
Best Horror Games On Itch.io – July 2026
Across a bounty of subgenres.![Haze Seas Accessories Tier List [Best Accessories to Equip]](/wp-content/uploads/2026/07/haze-seas-accessories-tier-list.jpg "Haze Seas Accessories Tier List [Best Accessories to Equip]")
Haze Seas Accessories Tier List [Best Accessories to Equip]
The accessories with the best stat buffs in Haze Seas.
![[Roblox] Evomon Shiny Hunting Guide – Including Prismatic and Pris Shinies!](/wp-content/uploads/2026/06/evomon-shiny-hunting-guide.jpg "[Roblox] Evomon Shiny Hunting Guide – Including Prismatic and Pris Shinies!")

Tesla’s Tower: The Wardenclyffe Mystery Walkthrough
Welcome to the Tesla’s Tower: The Wardenclyffe Mystery walkthrough on Gamezebo. Tesla’s Tower: The Wardenclyffe Mystery is a hidden object/adventure game created by Persha Studia. This walkthrough includes tips and tricks, helpful hints, and a strategy guide on how to complete Tesla’s Tower: The Wardenclyffe Mystery.
Share this


- Prefer Gamezebo on Google

Game Introduction – Tesla’s Tower: The Wardenclyffe Mystery
Welcome to the Tesla’s Tower: The Wardenclyffe Mystery walkthrough on Gamezebo. Tesla’s Tower: The Wardenclyffe Mystery is a hidden object/adventure game created by Persha Studia. This walkthrough includes tips and tricks, helpful hints, and a strategy guide on how to complete Tesla’s Tower: The Wardenclyffe Mystery.
General Tips
- There are no difficulty levels for this game
- The cursor changes into a hand when you can pick up an object for your inventory or if you can otherwise interact with it (like pulling a lever)
- A magnifying glass means you can zoom in on an object to inspect it more closely
- A revolving gear with a blue center means an object in the scene requires an action. Clicking on this object will give you a hint about what needs to be done
- The cursor changes into a little rocket arrow in places where you can exit to the next scene
- Your game journal can be found in the bottom right of the screen. The journal contains three tabs: story, goals and maps
- Refer to the story tab to remind yourself of codes and other important information to open locks or solve puzzles
- The goals tab gives you a list of all your current and completed goals with a little bit of information and an image of the location of the goal
- Maps for various areas can be found throughout the game and will appear under the maps tab. The map will have your current location highlighted. Uncompleted goals are indicated on the map with little buttons. The yellow pins show locations where you found journal entries. Clicking on a yellow pin will take you to the relevant journal entry.
- The ether sphere you find in the safe in the abandoned basement turns into your hint button. The hint button directs you to any object in the scene that requires and action that you can complete. If the hint button finds an action for you it will need to recharge before you can use it again. If there’s nothing left for you to do in the scene, the hint button will direct you to where you need to go. In this case you can keep using the button without recharging. The hint button can also be used to find objects in hidden object scenes (HOS)
- Hidden object scenes are indicated with sparkling symbols. HOS are random, so only items that can be found in every game are shown in this walkthrough. Yellow items on the objects list are items that can’t be seen in the current view. You will need to find drawers to open or objects to move aside etc. to find yellow items
- All mini games can be skipped as soon as the blue bar at the bottom of the game has filled up. Clicking the info button to the left of the blue bar gives you a basic explanation on how to play a mini game
Chapter 1: Repair the Time-Space Machine

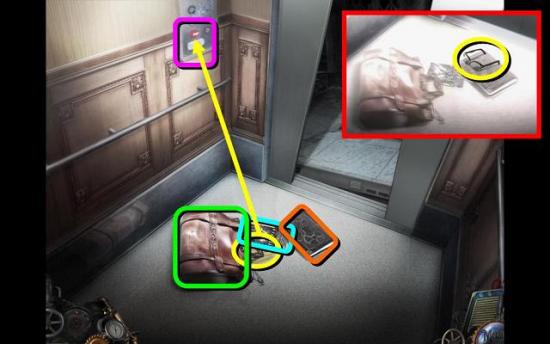
- Pick up Marie’s glasses
- Pick up the notebook (which becomes your game journal), the bag (which becomes your inventory) and the flyer, which has a map of the building on the back that will go into your journal
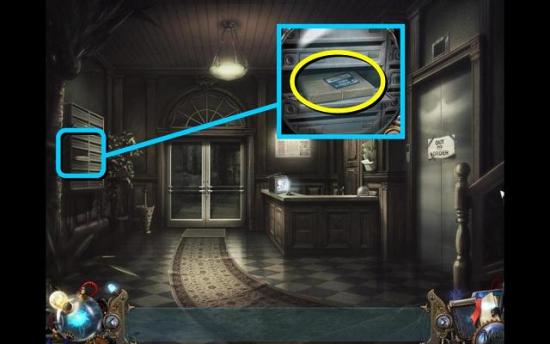
- Finally, pick up the RUBBER GLOVES
- Use the RUBBER GLOVES on the elevator controls. This opens the doors
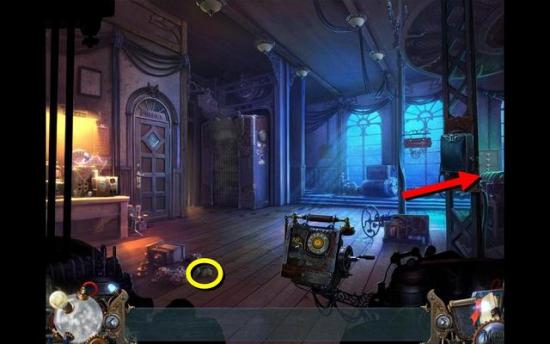
- Exit the elevator into the abandoned basement

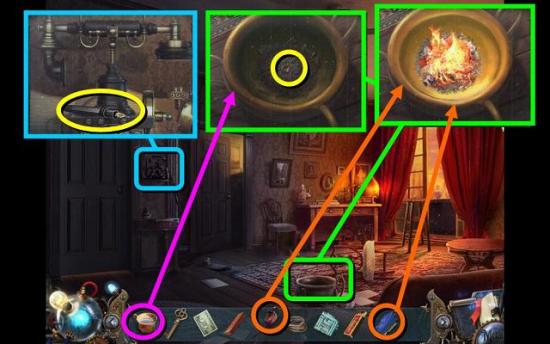
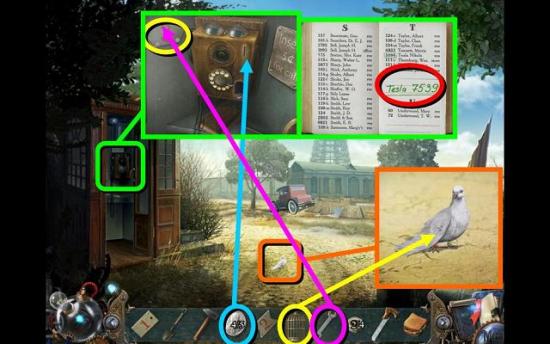
- Answer the phone
- After the dialog, open the safe in the right corner of the room
- Look inside the safe
- Pick up the ether sphere, which will be a direct link to Tesla and can be used as your hint button
- Try and take the blueprints, but they disintegrate
- Take the KNIFE
- Exit the safe and answer the phone again
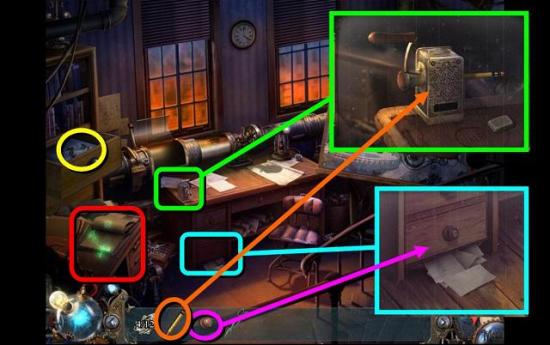
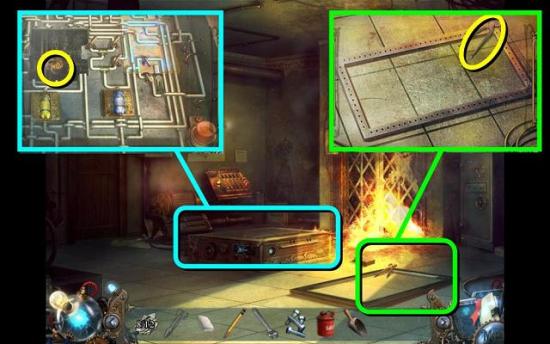
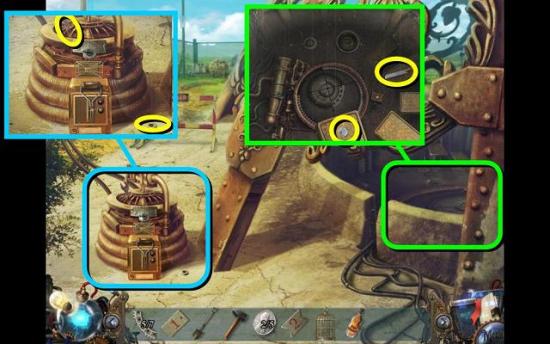
- Inspect the time-space machine in the middle of the room
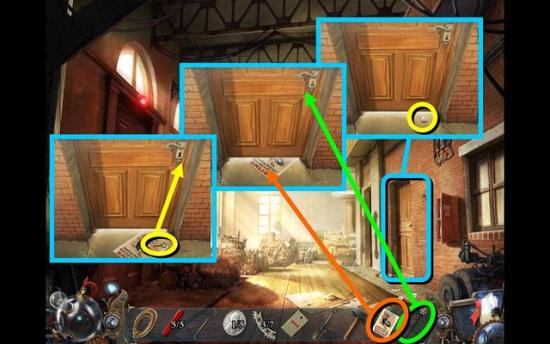
- Zoom in on the door on the left and use the KNIFE to cut through the wallpaper covering the gap
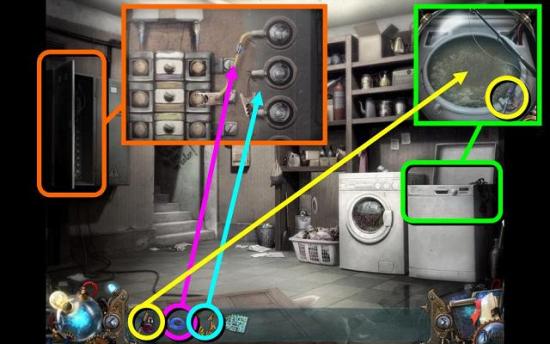
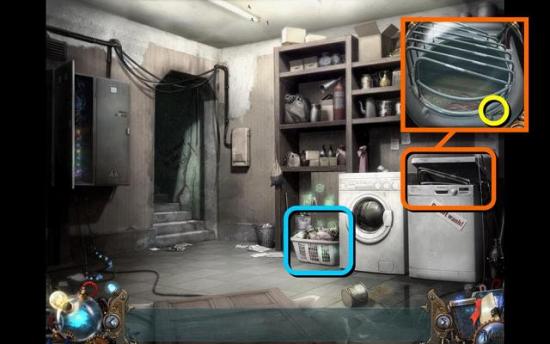
- Go through the door into the basement laundry room
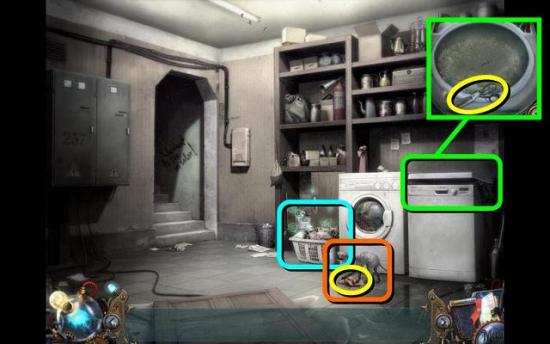
- Pet the cat and pick up the RAG
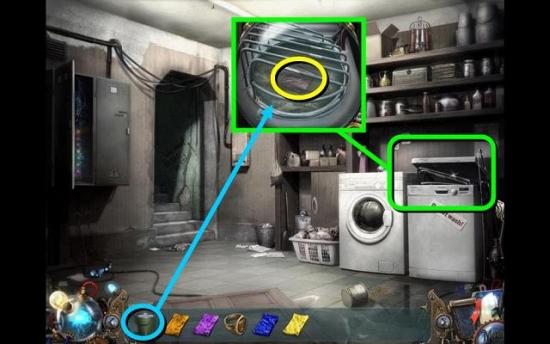
- Open the top loader washing machine and zoom in on it (green)
- Take the SCISSORS
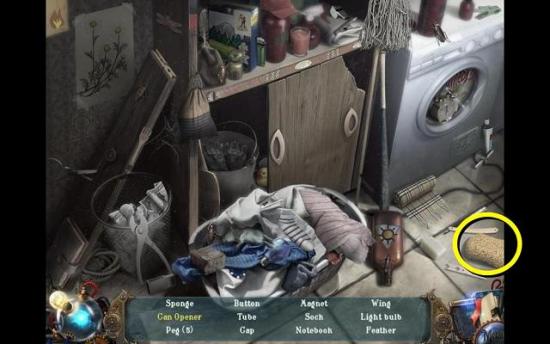
- Play the HOS in the laundry basket (blue)
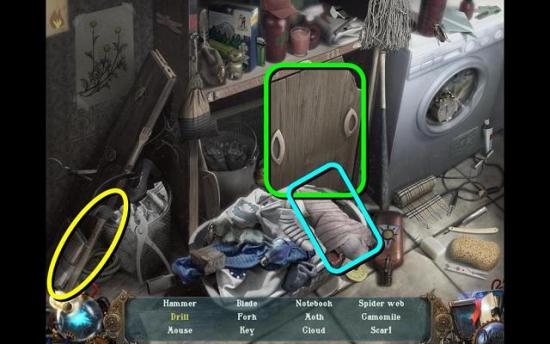
- There may be a drill under the red and white striped shirt in the laundry basket (blue). Other yellow items may be behind the sliding door (green). When you’re done you get a HAMMER (yellow)
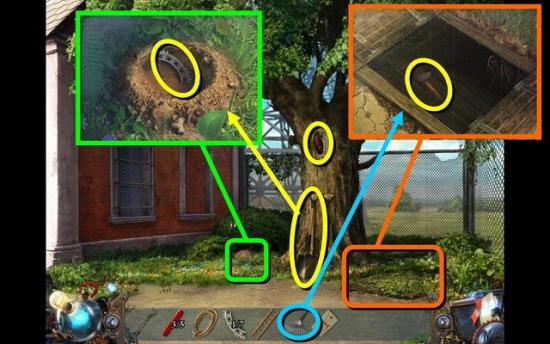
- Exit left into he apartment lobby
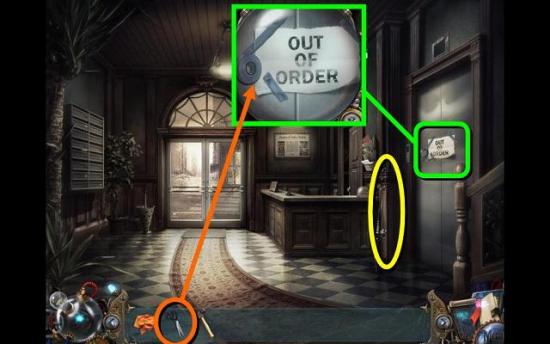
- Take the FISHING ROD
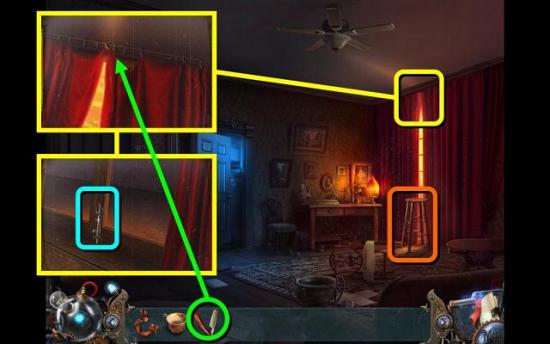
- Inspect the note on the elevator door and use the SCISSORS to take down the INSULATING TAPE
- Exit through the front door to the street
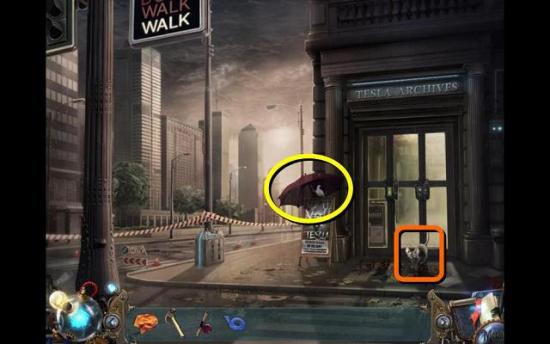
- Pet the cat again
- Pick up the UMBRELLA
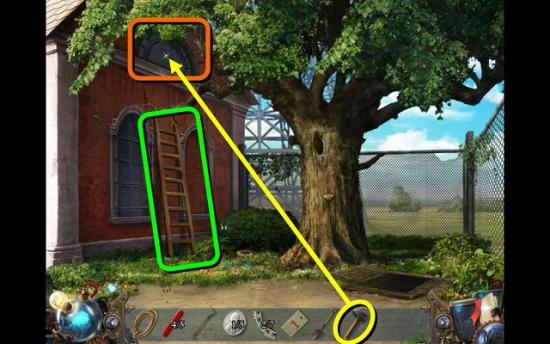
- Back out three screens until you’re back in the abandoned basement
- Put the UMBRELLA on the time-space machine
- Open the machine and look inside
- Use the RAG to clear away the cobwebs
- Go back into the laundry room and watch the scene (this scene is triggered by placing the umbrella)
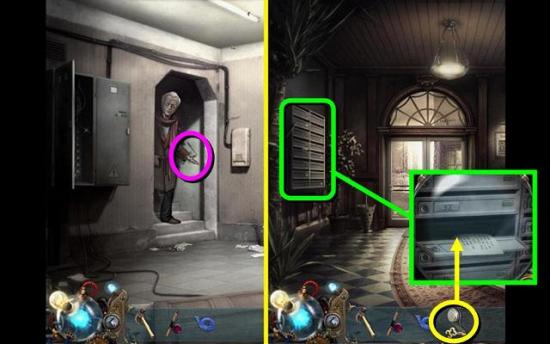
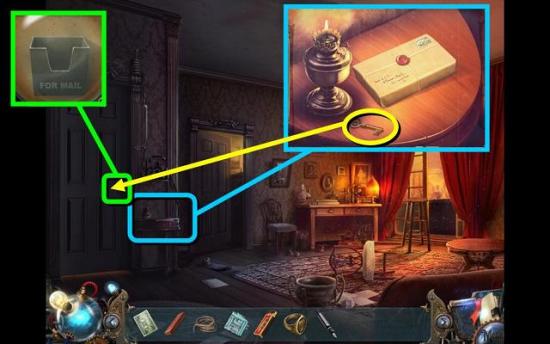
- Take the MAILBOX KEY from the janitor’s hand
- Follow the janitor into the lobby
- Inspect your mailbox and open it with the MAILBOX KEY
- Pick up the note inside it – it has the entrance code to the archives on it
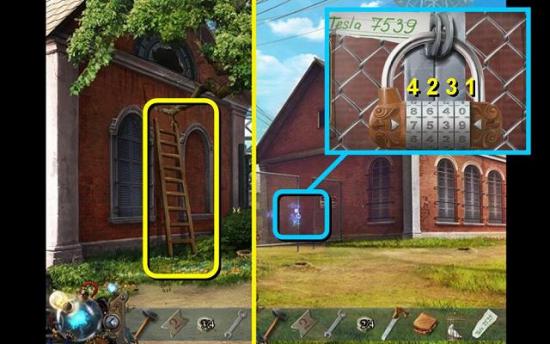
- Exit to the street again
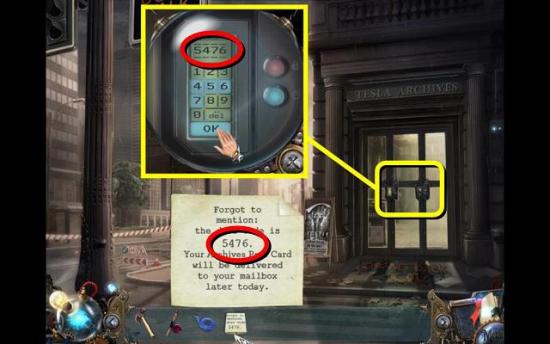
- Zoom in on the lock of the archives’ door
- Enter 5476 and hit OK
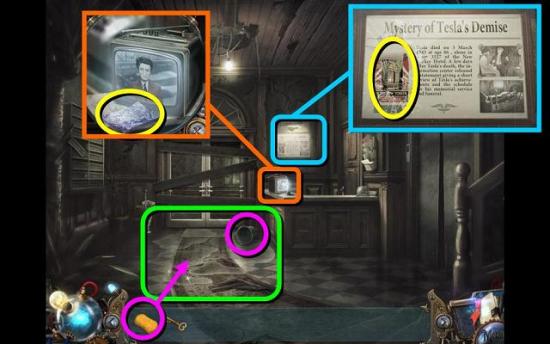
- Go into the archive hall
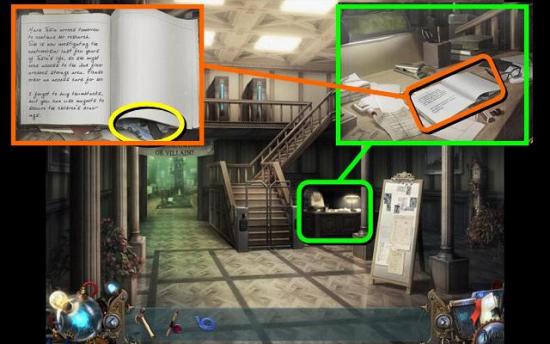
- Zoom in on the desk and then on the notebook
- Take the PICTURE from the notebook
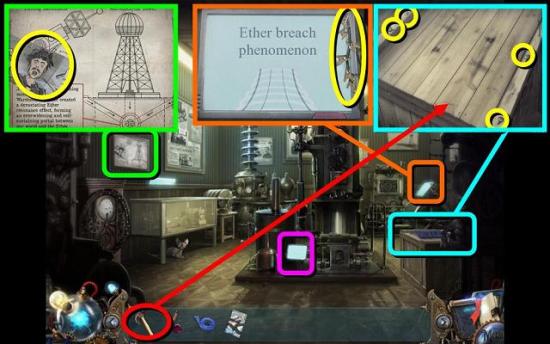
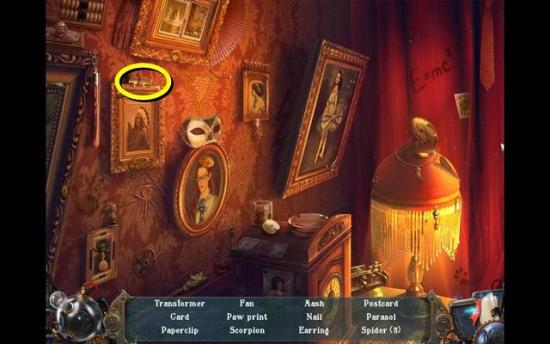
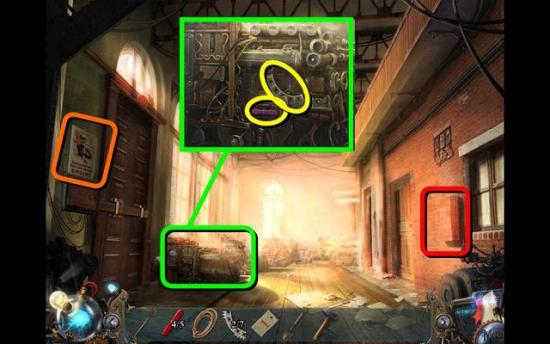
- Go through the doors in the back to the Tesla exhibition
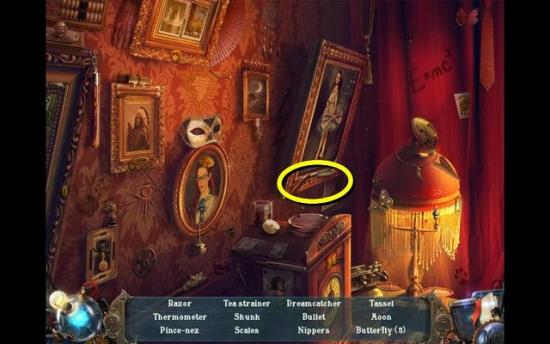
- Inspect the bottom picture on the wall (green) and take the second PICTURE
- There are two video exhibits you can watch to get more backstory
- The video in the back (orange) has some CLAMPS attached to it
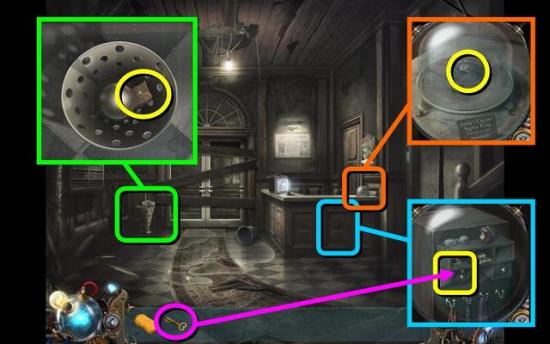
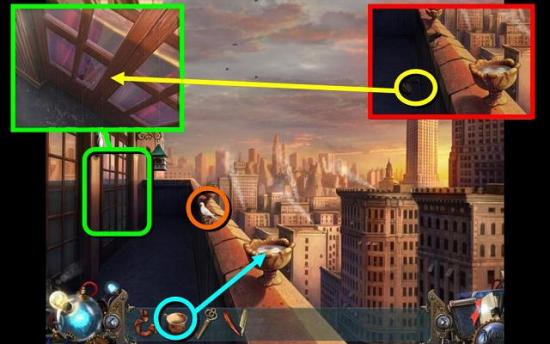
- Zoom in on the crate on the right (blue) and take the map of Tesla’s old lab from 1895
- Take out the nails with the HAMMER – there are four
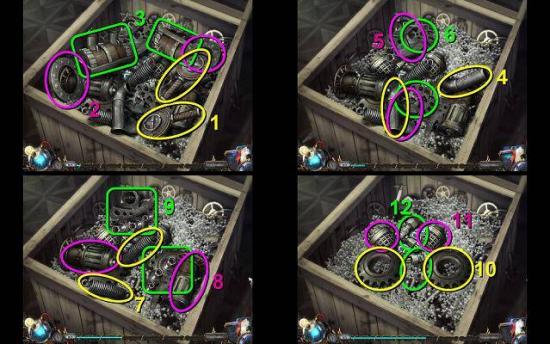
- Inside the crate is your first mini game. You need to remove all the machine parts inside the crate by finding pairs of identical ones. However, you can only remove the items lying on top
- When you’ve removed them all, wipe off the Styrofoam bubbles and pick up the ETHER CHARGED CIRCUIT BOARD
- Back out into the hall and zoom in on the notice board
- Put the two PICTURES on the board to trigger a new mini game
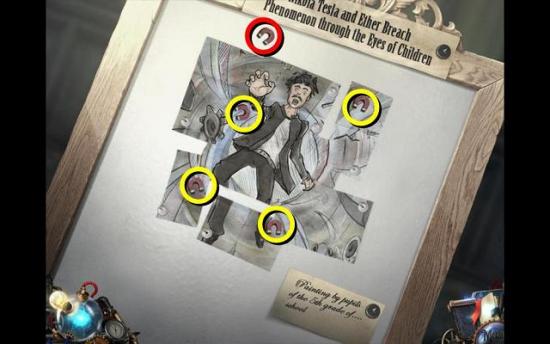
- You need to rotate the picture pieces until they make up one image. However, it’s not a jigsaw – some pieces overlap while there may be gaps in other places. When you rotate a piece and let it go, it will drop back into its original position. So you need to figure out where the magnets need to go to fix all the bits in place. Figure out a way to complete the picture using all but one magnet
- When you’re done you get this MAGNET for your inventory. It will be attached to the fishing rod
- Back out three screens to the laundry room
- Zoom in on the top loader again and use the FISHING ROD WITH MAGNET to fish out the SCREWDRIVER
- Open the electricity box
- Fix the broken wire with the INSULATING TAPE
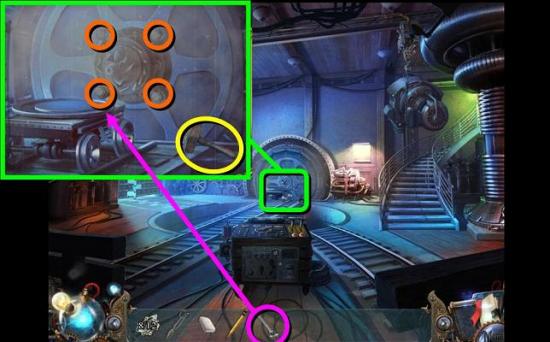
- Put the CLAMPS on the board to trigger a new game
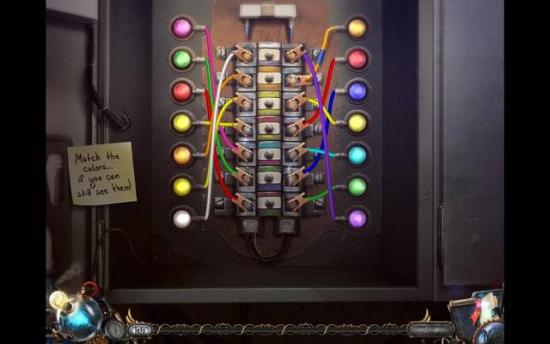
- To repair the circuit you need to connect all the clamps onto a bolt with a matching color. Pull out a clamp to see what color wire it has. Each pair of bolts has two color options and need to be connected with a clamp from either side. When a clamp has been connected to a bolt with the correct color, the light will go on. However, this does not necessarily mean it is the correct solution
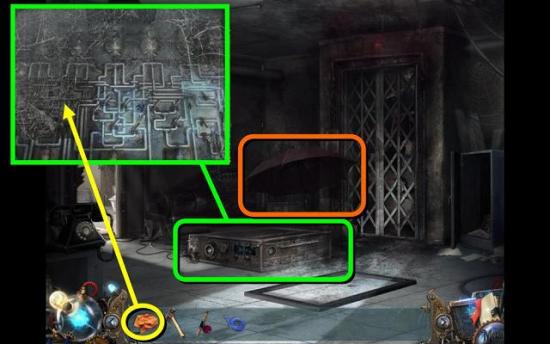
- Back out to the abandoned basement
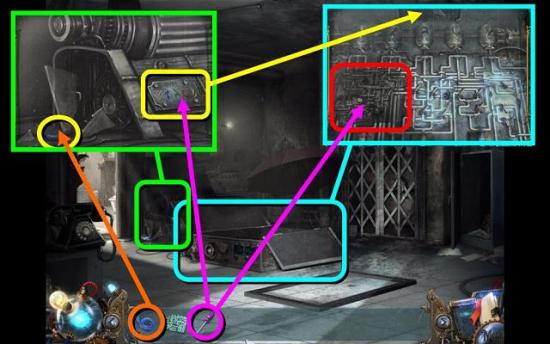
- Inspect the broken generator by the door (green)
- Fix the broken wire with the INSULATING TAPE
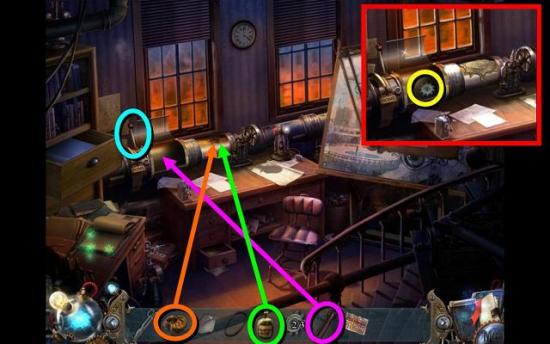
- Take off the ADDRESS TABLET with the SCREWDRIVER
- Zoom in on the time-space machine (blue)
- Put the ADDRESS TABLET in the slot at the top
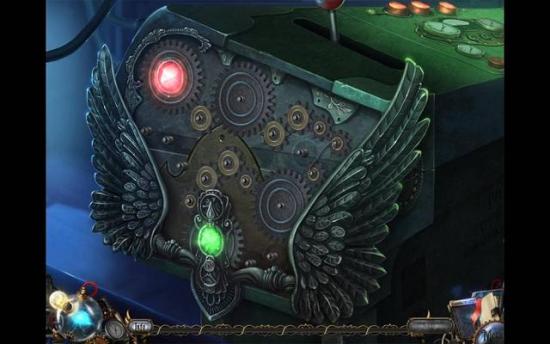
- Remove the old circuit board (red) with the SCREWDRIVER
- Put the ETHER CHARGED CIRCUIT BOARD on the device and fix it in place with the SCREWDRIVER
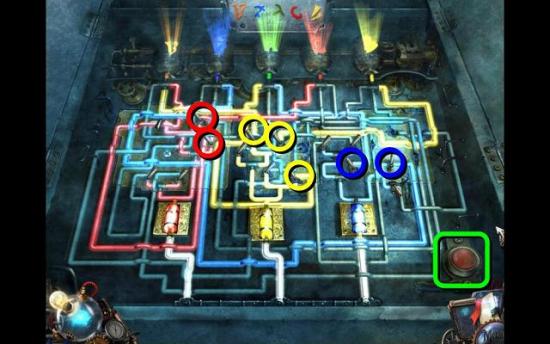
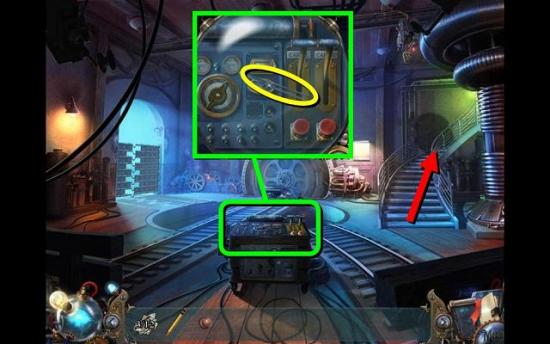
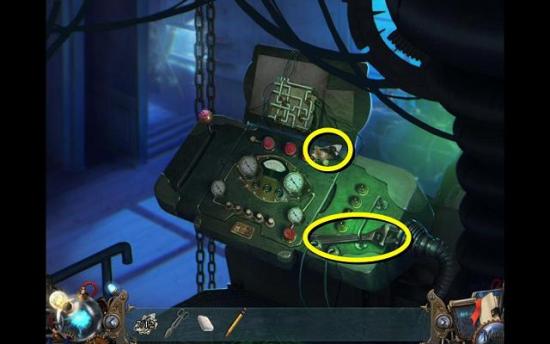
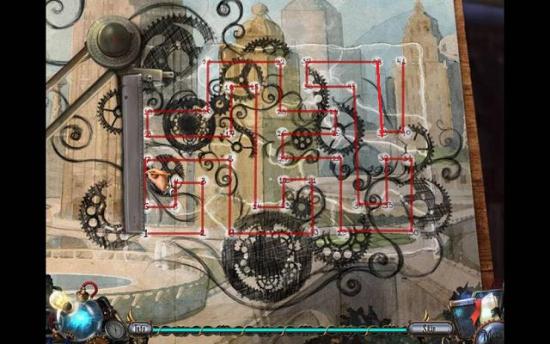
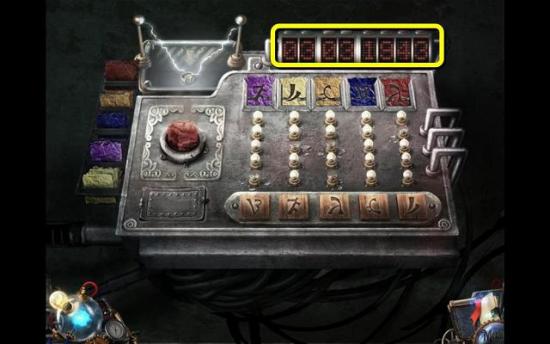
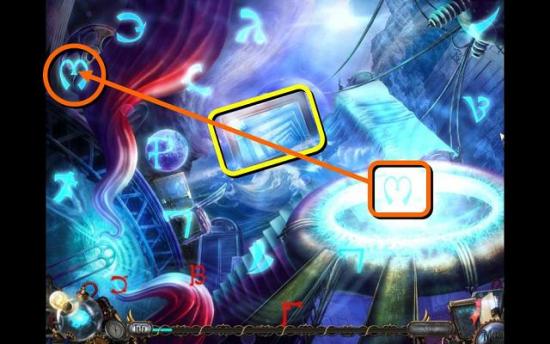
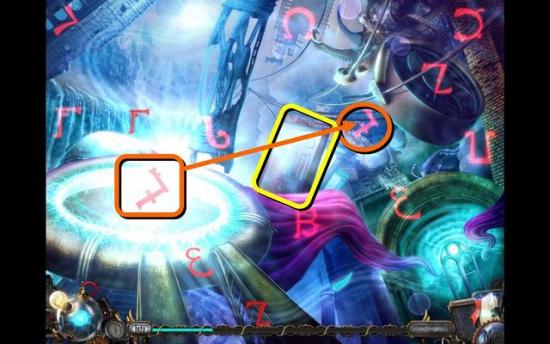
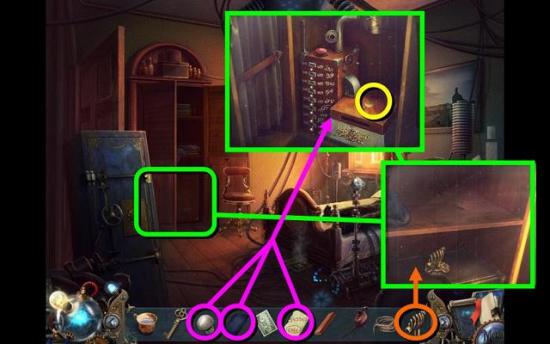
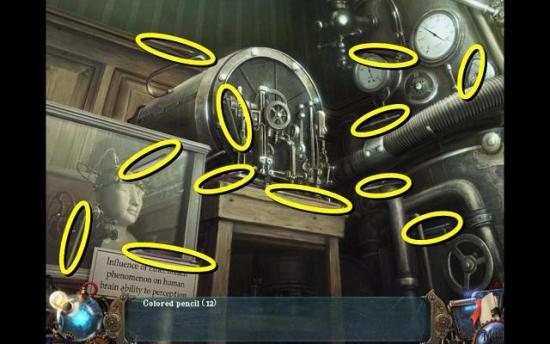
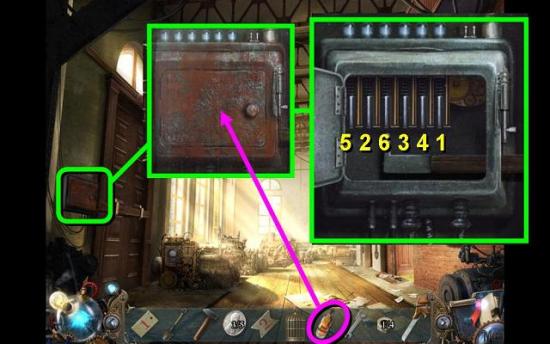
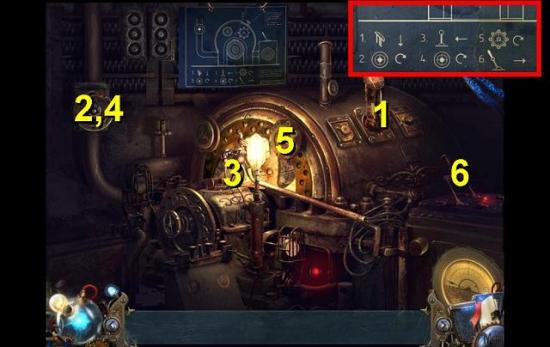
- Throughout the game you will get several versions of the following puzzle. You need to light up the symbols at the top according to the colors on the address tablet. To do this you first need to switch on the machine with the red button on the right. Then you need to flick the switches to guide the light to the symbols. You will need to mix colors to get orange, green or purple. Be systematic and look at the effect of one switch at a time – where does the light go if I flick this switch? The switches you need to flick are circled in the image
- Go through the portal to the next chapter
Chapter 2: Get the Blueprints from 1895
- Pick up the first TORN DRAWING PIECE (1/12)
- Exit right to the main room corner

- Knock over the rubbish bin and look at the contents
- Take the note and TORN DRAWING PIECE 2/12
- Open the scrunched up paper to find a FURNITURE KNOB
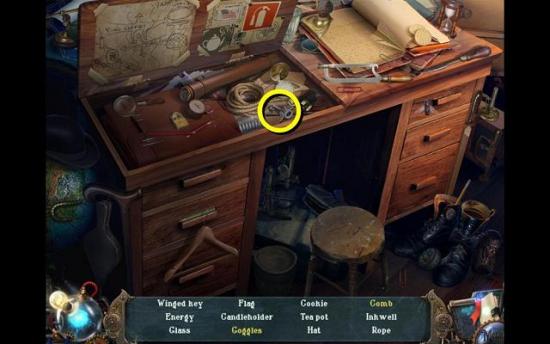
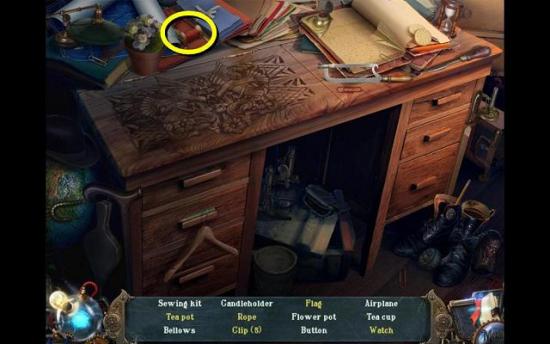
- On the filing cabinet on the left is a BLUNT PENCIL and another note
- Check the birdcage device in the back for another TORN DRAWING PIECE (3/12)
- Exit right to the laboratory hall
- Attempt to go up the stairs
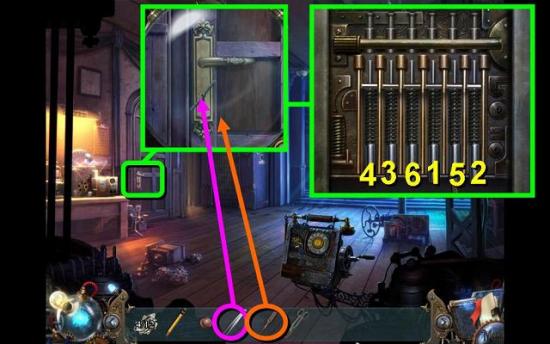
- Zoom in on the control panel and take the TWEEZERS
- Back out two screens to the main room and go left to the back door
- Inspect the generator and use the TWEEZERS to take out the LOCKPICK
- Take the TORN DRAWING PIECE (4/12)
- Zoom in on the chalkboard and take the SCISSORS
- Back out to the main room
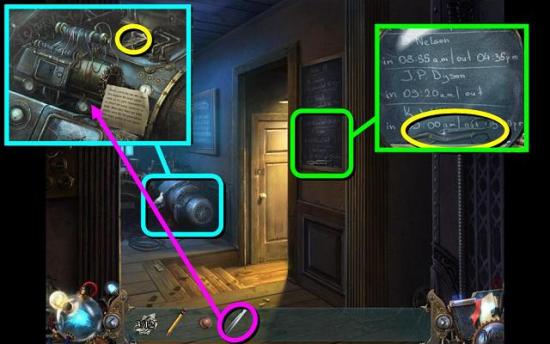
- Zoom in on the office door
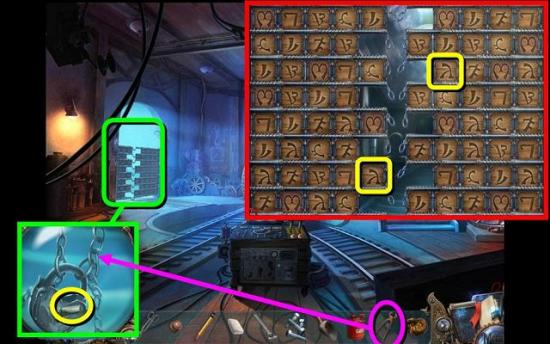
- Use the TWEEZERS to take the wire out of the lock and put the LOCKPICK in the lock
- To pick the lock you need to push the pins up in the right order. If you get the order right they stay up, if you get it wrong they reset and you have to start again. I found the controls for this quite finicky, but what works best is to click on the handle of the lockpick once and then you can move it back and forth and up and down without needing to hold the button down. The order is shown in the image
- Go through the door into Tesla’s office
- There is a pencil sharpener on the desk, use it to sharpen your BLUNT PENCIL into a SHARPENED PENCIL
- Also pick up the ERASER
- The top drawer in the cabinet on the left has another TORN DRAWING PIECE (5/12)
- Zoom in on the desk drawers
- Place the FURNITURE KNOB and open the drawer
- Inside the drawer are a note and TORN DRAWING PIECE 6/12
- Play the HOS on the desk on the left
- The yellow items are all inside the drawers or under the lid. When you’re done you get a WINGED KEY
- Back out to the main room
- Use the WINGED KEY on the locked box on the right
- Take the TORN DRAWING PIECE (7/12) and pull the lever (orange)
- A winged device with a hook comes down. Take the HOOK
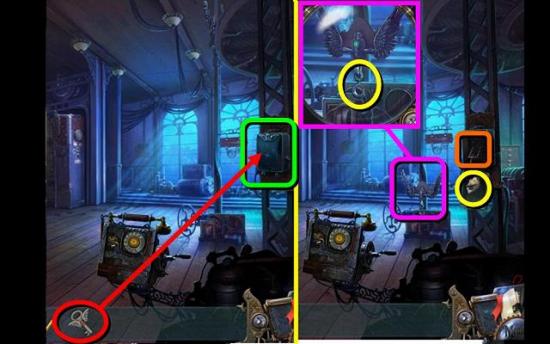
- Go right to the corner and right again to the laboratory hall
- Hit the red light in the back to make a chain come down
- Zoom in on the chain and put the HOOK on it
- Hit the red light again
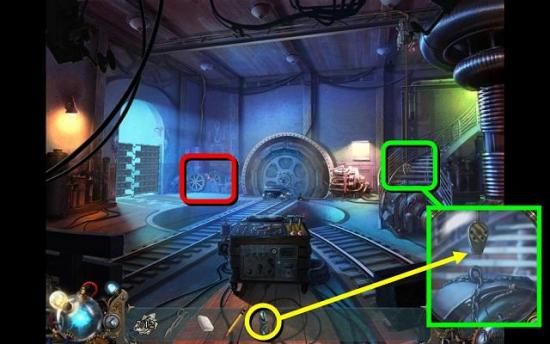
- Go up the stairs to the control room
- Take the WRENCH and TORN DRAWING PIECE 8/12
- Back out to the laboratory hall
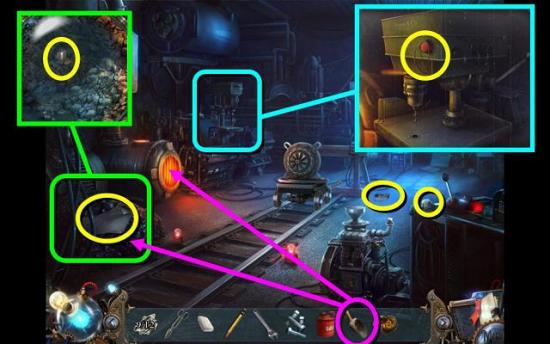
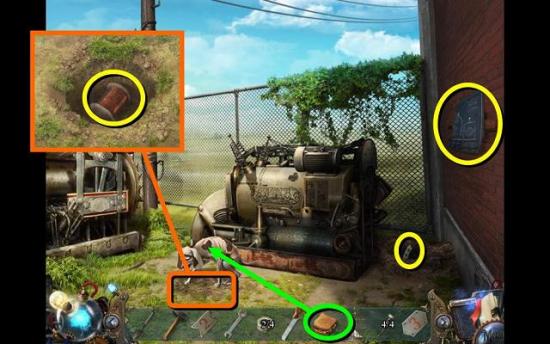
- Zoom in on the generator in the back and take the SLEDGEHAMMER
- Undo all the GENERATOR BOLTS with your WRENCH and move the broken cap onto the cart
- Back out to the main hall and play the new HOS in the back
- There may be some items inside the small chest on the sill (blue). When you’re done you get a DOOR KNOB
- Go left to the back room
- Zoom in on the door and place the DOOR KNOB
- Slide the knob to open the door
- Go through to the basement

- Pick up the SCOOP and the CAN OF FUEL (you really don’t want that near a fire)
- Zoom in on the sprinkler system and break the glass with the SLEDGEHAMMER
- Turn the wheel
- Inspect the frame on the floor and pick up the CUTTING PLIERS
- Open the time-space machine on the floor and zoom in
- Take the RUBBER CEMENT
- Go back to the main room and right to the laboratory hall
- Zoom in on the gate in the back
- Take TORN DRAWING PIECE 8/12
- Cut the chain with the CUTTING PLIERS
- This is a Mahjong type of game, but easier. You need to remove all the blocks by finding matching pairs. Only the blocks on the ends of each row can be removed. There are numerous ways of solving this – just pay attention to which blocks are left and how tricky they are to get to
- Go through to the assembly room
- Pick up TORN DRAWING PIECE 10/12
- Pick up the LITTLE KNOB beside the lever
- Take the ASBESTOS CLOTH from the pile of coal on the left
- Open the furnace
- Use the SCOOP to scoop coal into the furnace
- After two scoops you can zoom in on the coal and take a third scoop. You will get a SCOOP WITH COAL in your inventory
- Under the coal is a WOODEN BLOCK
- Put the last SCOOP WITH COAL in the furnace
- Zoom in on the drill beside the furnace and take the BELT
- Put the CAN OF FUEL on the small generator at the front (green)
- Pull the lever (orange) to remove the cart
- Where the cart was you can now find a RULER (yellow)
- Play the HOS in the back (blue)
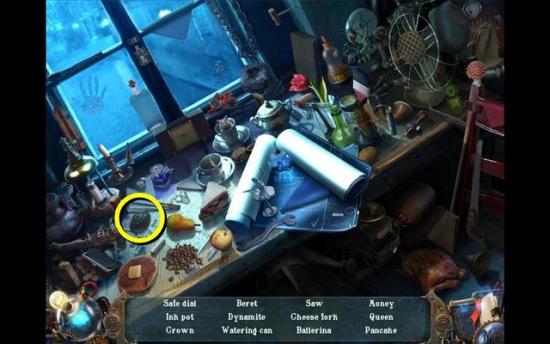
- Find the SAFE DIAL
- Back out to the laboratory hall
- If you haven’t already removed the broken generator cap, do so now (see above)
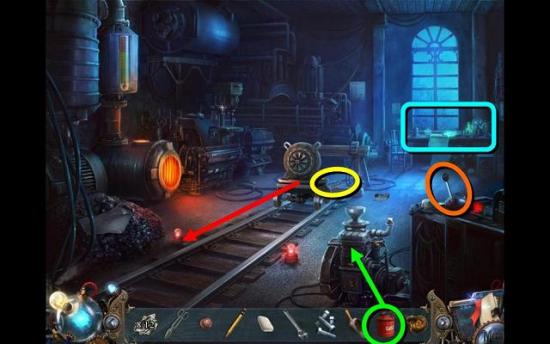
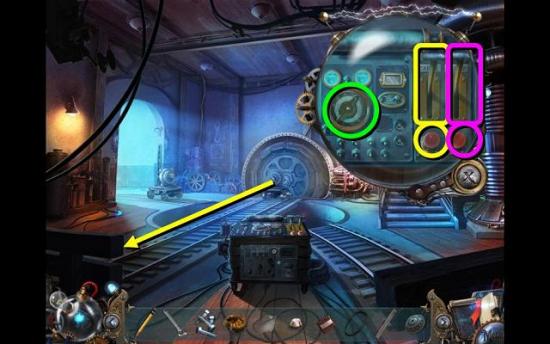
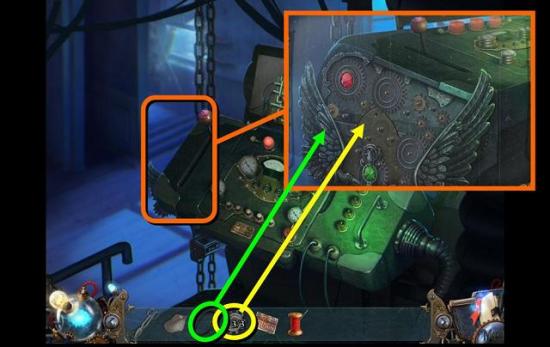
- Zoom in on the control station in the front
- Pull the lever saying “cart 1” down and hit the red button underneath it twice to move the broken generator cap away from the generator (yellow)
- Push the lever up again
- Turn the dial on the left (green) so the rails move toward the second cart
- Pull down the lever saying “cart 2” and hit the red button underneath it once (pink) so that the cart with the new cap moves onto the revolving raisl
- Turn the dial back
- Push the lever up again and hit the red button
- Zoom in on the generator cap and click on it to put it in place
- Put the GENERATOR BOLTS on it and fix them in place with the WRENCH
- Go back to the main room
- Zoom in on the electrical device on the left
- Take the bottle of RUBBER HARDENER
- Put the LITTLE KNOB on the device and use it to turn the device off
- Take TORN DRAWING PIECE 11/12
- Put the WOODEN BLOCK on the puzzle
- You need to swap the two square blocks on either side. There isn’t one specific solution for this puzzle, just keep sliding the blocks out of the way to make way for the square blocks. I tried to find one simple, clean solution by making a path that would allow both blocks to pass, but if there is one, I couldn’t find it. Just take it one step at a time
- Behind the puzzle is a piece of paper with a code
- There now is a new HOS in the back of the main room
- Find a GEAR (1/3)
- Go to the back room and into the basement
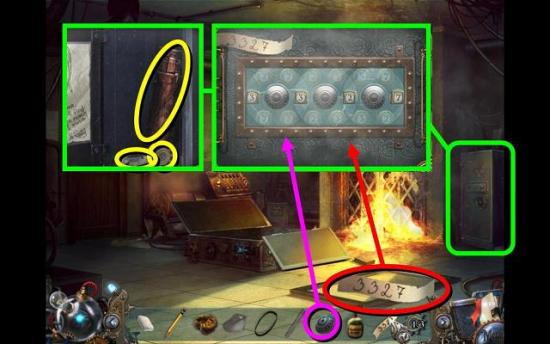
- Zoom in on the safe and place the SAFE DIAL
- Put the code you just found on the safe
- Turn the three dials to move the numbered blocks around until the four open blocks spell 3327. You actually need to turn the dials by clicking and dragging
- Take TORN DRAWING PIECE 11/12, the GEAR WITHOUT A HOLE and the CAPSULE WITH DOCUMENTS
- Exit and go back to the assembly room next to the laboratory hall
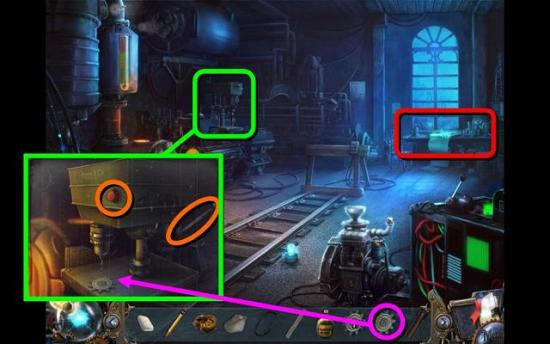
- Zoom in on the drill
- Place the GEAR WITHOUT A HOLE on the drill, switch it on by hitting the red button and pull the lever down
- You will get GEAR 2/3
- Play the new HOS
- Get the PAPER GLUE
- Go back to the main hall and into the office
- Put the TORN DRAWING PIECES on the drawing board
- Play the jigsaw. You can rotate pieces by right clicking
- Use the PAPER GLUE to glue the pieces down
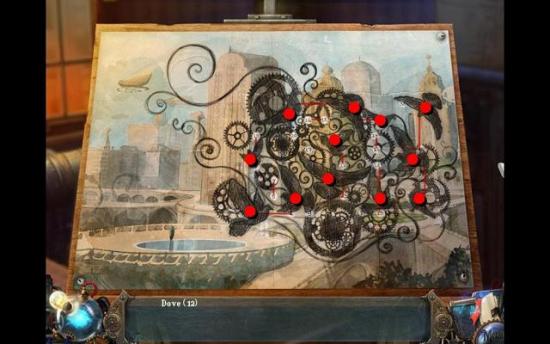
- Zoom back in on the board and find the 12 doves
- Put the RULER on the board, followed by the SHARPENED PENCIL
- Connect the dots by placing the ruler between them and then drawing a line along the ruler
- Put the CAPSULE WITH DOCUMENTS in the pneumatic pipe and close the lid
- Put the RUBBER CEMENT on the hole in the pipe and then put some RUBBER HARDENER on it
- Pull the lever
- After the capsule has been sent, open the lid again and find GEAR 3/3
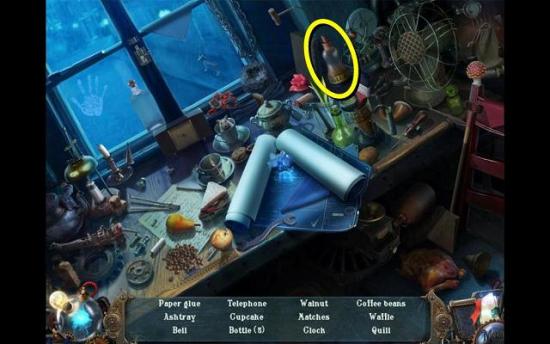
- Play the new HOS on the desk on the left
- Remember to open drawers and the lid to find the yellow items. Get a SEWING KIT when you’re done
- Exit to the main room and answer the phone
- Go back to the laboratory hall and go up the stairs
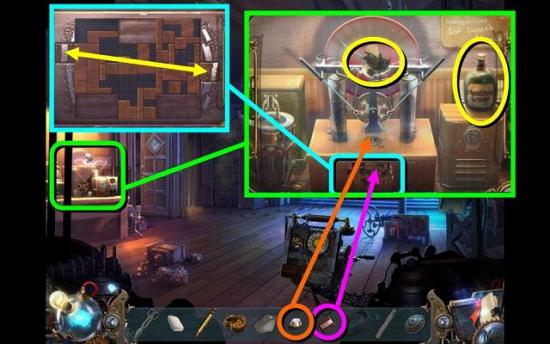
- Zoom in on the side of the panel and place the GEARS
- Connect the gears with the BELT
- For this mini game you need to move the small gears around until all gears are connected and the power goes to the green light at the bottom
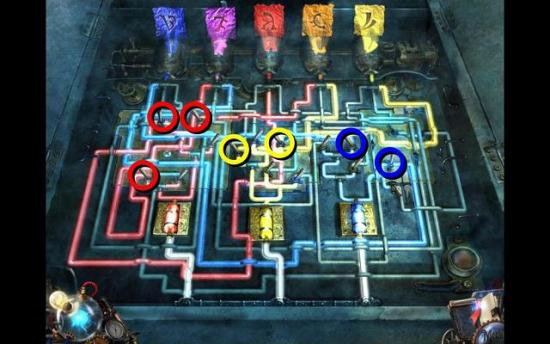
- Pull the lever on the control panel
- Put your drawing on the opened panel
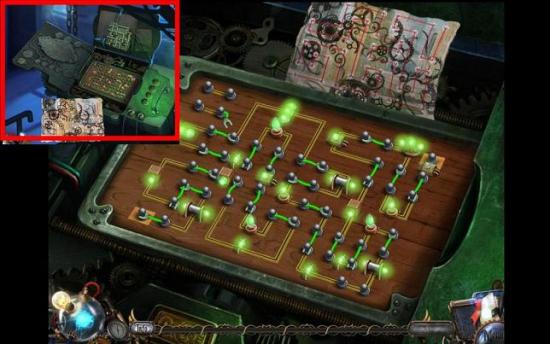
- Connect the little metal pins with the green wires according to the drawing
- Take the 2ND CIRCUIT BOARD
- Go back to the main room and down to the basement
- Zoom in on the frame on the floor and put the ASBESTOS CLOTH on it
- Use the SCISSORS to cut it to size
- Play the mini jigsaw. Again, right clicking rotates pieces. They have to fit precisely
- Use the SEWING KIT to sew the pieces together and fix them to the frame
- Click on the fire shield you just made
- Zoom in on the time-space machine and put the 2ND CIRCUIT BOARD on it
- Play the light puzzle again as before
- Go through the portal
Chapter 3: The Butterfly Effect
- Go into the laundry room
- Inspect the top loader and take the DRAWER KEY
- Play the HOS in the laundry basket
- Get a SPONGE
- Go into the lobby
- Click on the bucket to put it upright
- Use the SPONGE to mop up the water. Whenever the sponge is saturated, wring it out into the bucket. You will need to do this multiple times until all puddles are gone
- Pick up the BUCKET WITH WATER
- Watch the news on the TV and pick up the BLUE FOIL PACK
- Look at the picture over the desk
- Tear off the label, which contains the map to the New Yorker Hotel, and find the YELLOW FOIL PACK
- Inspect the umbrella stand, read the newspaper and take the ORANGE FOIL PACK
- Open the gate to the front desk
- Use the DRAWER KEY to open the left drawer
- Inside is the PURPLE FOIL PACK
- Inspect the glass dome on the desk and take Tesla’s SIGNET RING
- Back out into the laundry room
- Zoom in on the top loader again and fill it with the BUCKET WITH WATER
- Take the RED FOIL PACK

- Go to the basement
- Zoom in on the address generator against the back wall
- Put all your PACKS OF FOIL on the machine
- Put the SIGNET RING in the slot at the top
- Enter the date where you want to go at the top: 03/03/1943
- Now you need to figure out which foils go where. If a foil is in the right place, a symbol will be burned on it. I found the best way to do this was to fill the machine up with one color, then hit the red button. Take out all the foils, except the ones with symbols on them, and fill the empty slots with foils of another color. Occasionally a foil will burn up. Just hit the red button again when that happens. Keep doing this until you have all five
- You will get another ADDRESS PLATE
- Zoom in on the time-space machine and put your new ADDRESS PLATE on it
- Solve the puzzle as before
- Go through the portal
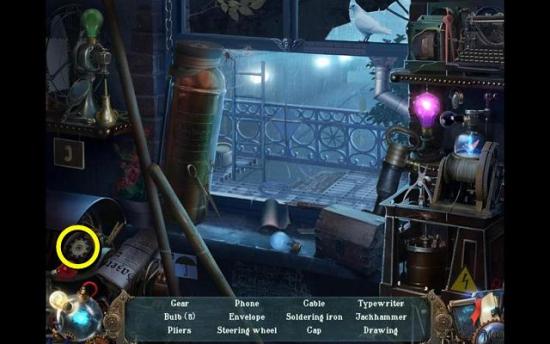
Chapter 4: The New Yorker Hotel, 1943
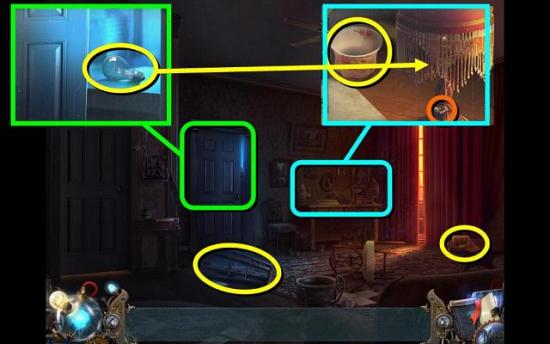
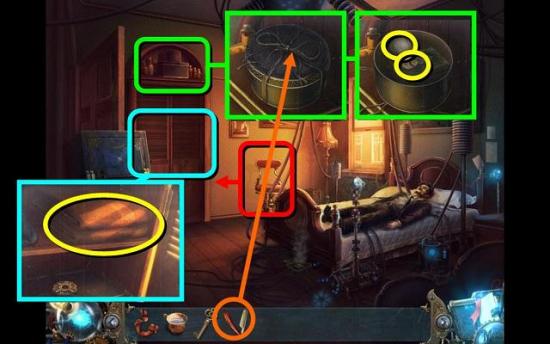
- Pick up the STOOL and the TOWEL
- Open the door to the back and pick up the LIGHT BULB
- Zoom in on the desk and pick up the EMPTY CUP
- Remove the lampshade and the broken bulb
- Put the LIGHT BULB on the lamp and put the shade back
- Flick the switch
- Play the HOS on the desk
- Get a RAZOR
- Put the STOOL down by the curtains
- Zoom in on the curtains and cut them with the RAZOR
- Pull the curtain aside
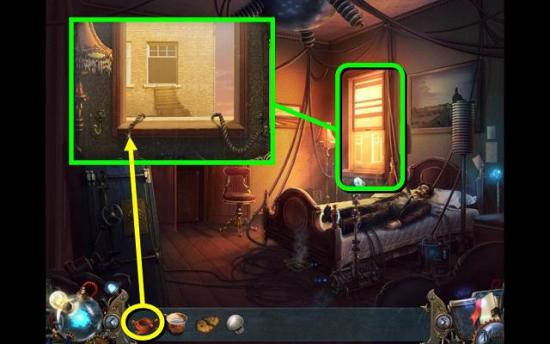
- Zoom in on the balcony door and undo the latch
- Push the door open and go to the balcony
- Say hello to your friend the dove again
- Pick up the PARAPET STONE it drops
- Fill the EMPTY CUP with water in the flowerpot
- Zoom in on the door on the left
- Break the glass with the PARAPET STONE and undo the latch
- Push the door open and go into the suite bedroom
- To get out of the Ether you need to remove all the floating symbols. Each time a symbol stops above the circle of light you need to find an identical symbol and click on it. Blue symbols can be found in the first screen, but if a red symbol comes up you will need to go through the frame to the second room
- Back in the room, move the chair to the left so you can reach the box on the shelf
- Cut the string with the RAZOR
- Take the X-RAY BULB and the CRUMBLED COOKIE
- Open the cupboard and take the two TOWELS. The towels will be tied together into THREE TIED TOWELS
- Click on the window
- Fix the rope bridge with the THREE TIED TOWELS
- Go through to the neighboring room
- Pick up the base of the broken STATUETTE
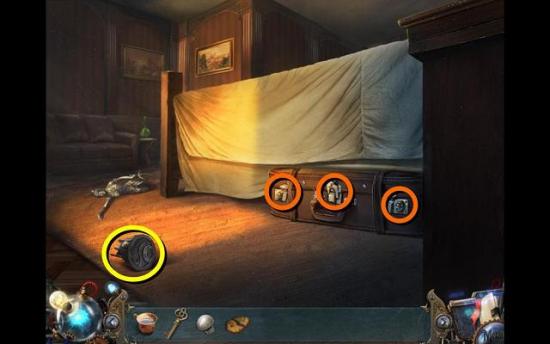
- Pull the suitcase out from under the bed
- Undo the three clasps and open the suitcase
- Play the HOS
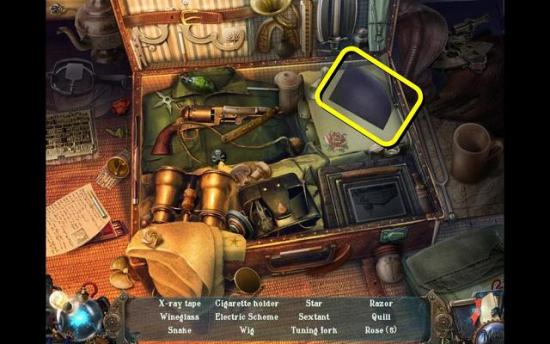
- Find some X-RAY TAPE
- Exit into the neighboring hotel room
- Inspect the capsule on the bed and find a POSTAL STAMP
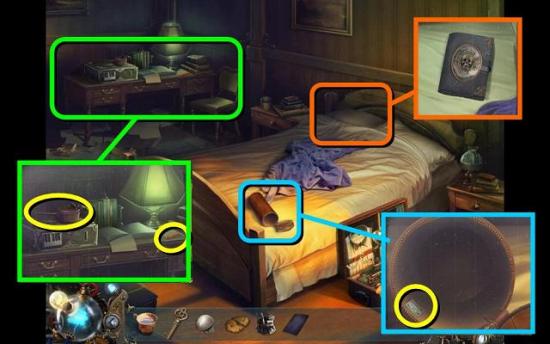
- Move the pillow on the bed and zoom in on the mattress
- Inspect the diary until you find a note saying “expel” and another note with a FAKE SAFE CODE
- Check the desk for SEALING WAX and a BURNING OIL LAMP
- Back out two screens to the balcony
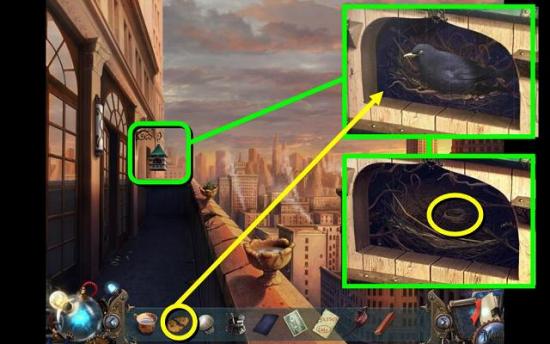
- Zoom in on the birdhouse
- Give the CRUMBLED COOKIE to the bird
- Zoom in on the birdhouse again and play a Mikado-style game. You need to remove the twigs one by one, starting with the one on top and working your way down
- In the nest is some STRING
- Back out to the hotel suite parlor
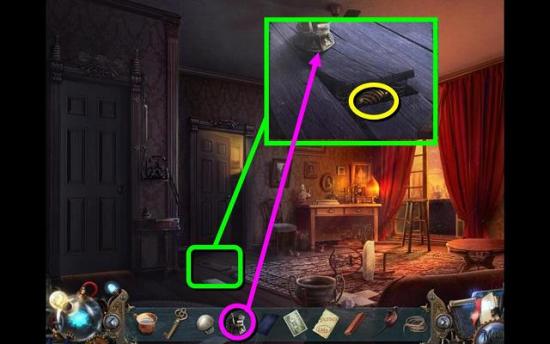
- Zoom in on the loose floor board and put the STATUETTE on it
- Pick up the LOCKER KEY
- Go back to the balcony and into the suite bedroom
- Zoom in on the cupboard again and put the LOCKER KEY on the locked box
- Inside the locked box is an X-ray machine
- Pick up the COIN
- Put the X-RAY LAMP in the socket and the X-RAY TAPE in the slot
- Put the FAKE SAFE CODE on the machine
- To turn on the lamp, you must only flick the switches that have a formula with an answer that is a multiple of 3. Then hit the red button
- Pick up the SAFE COMBINATION
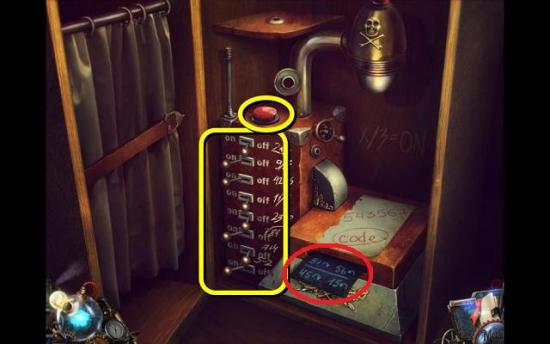
- Zoom in on the safe and put the SAFE COMBINATION on it
- To open the safe, turn the dial clockwise to 31, counterclockwise to 56, clockwise to 45 and counterclockwise to 15
- Inside the safe is the THIRD ETHER CHARGED CIRCUIT
- Go back through the window
- Zoom in on the suitcase for another HOS

- You get a BOX OF MATCHES
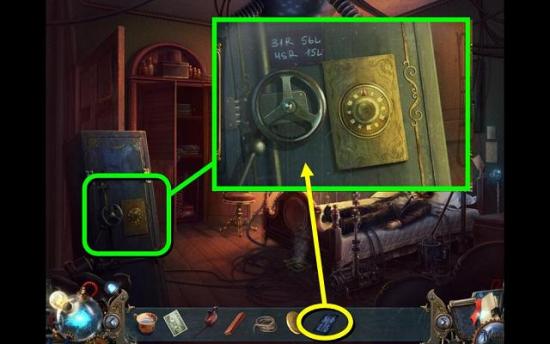
- Zoom in on the desk and put the COIN on the music box
- Put the COIN in the slot and repeat the melody it plays. For those of you who know a piano keyboard, it’s C#, B, Bb, F#, G#, E
- Inside the music box are TESLA’S BLUEPRINTS
- Back out three screens to the parlor
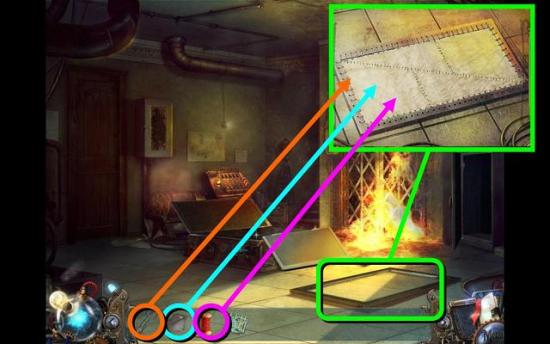
- Zoom in on the burner on the floor and light it with the BURNING OIL LAMP
- Burn TESLA’S BLUEPRINTS
- Put out the fire with the CUP FILLED WITH WATER
- Among the ashes is Tesla’s SIGNET RING
- Zoom in on the telephone and take the PEN
- Zoom in on the little writing table under the telephone
- Light the lamp with the BOX OF MATCHES
- Put the THIRD ETHER CHARGED CIRCUIT on the paper and wrap it
- Tie the STRING around it
- Heat the SEALING WAX and put it on the string
- Push the SIGNET RING in the wax
- Put the POSTAGE STAMP on the parcel and write the address on it with the PEN
- Pick up the MAIL PACKAGE
- Open the second door with the DOOR KEY
- Put the MAIL PACKAGE in the mailbox
- Play the new HOS on the desk
- Get a TRANSFORMER
- Go out and go to the bedroom
- Zoom in on the box under the bed and put the TRANSFORMER on it
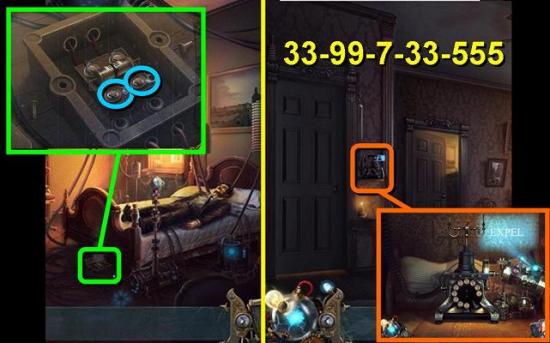
- Connect the two red wires
- Back out to the parlor and zoom in on the phone
- Click on the receiver
- Dial the word “expel” – 33 99 7 33 555
- Go through the portal
Chapter 5: Find the Wardenclyffe Address
- Go through the laundry room to the apartment lobby
- Check your mailbox
- Take the ARCHIVES PASS and the THIRD ETHER CHARGED CIRCUIT from the mailbox
- Also watch the TV if you like
- Exit through the front door to the street
- Enter the archives
- Go to the exhibit in the back
- Play the HOS
- Find the 12 COLORED PENCILS
- Back out to the archives hall
- Use the ARCHIVES PASS on the gates by the stairs
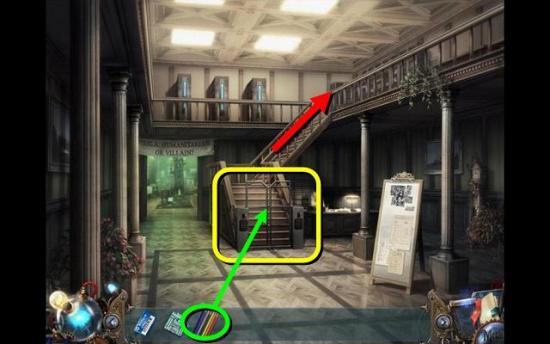
- Go up the stairs
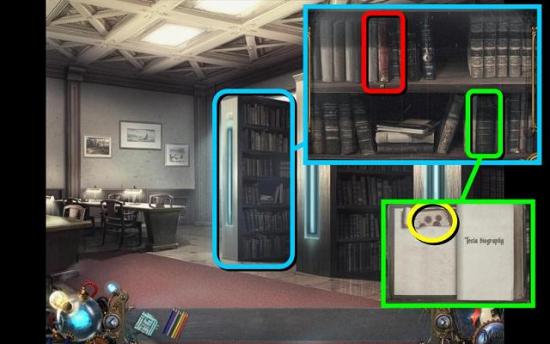
- Check the left bookcase
- Inspect the red book, which is called The Unknown Inventions of Tesla (red)
- Open Tesla Biography (green) and take the STENCIL from the inside cover
- Go back to The Unknown Inventions of Tesla and put the STENCIL on the symbols
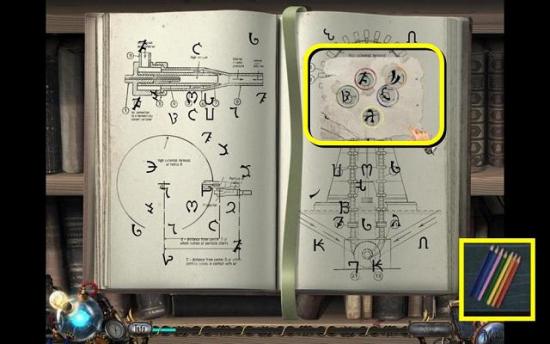
- Move the stencil around until you have symbols in all five holes
- Use the COLORED PENCILS on the holes
- Remove the stencil and tear out the WARDENCLYFFE ADDRESS
- Back all the way out to the basement
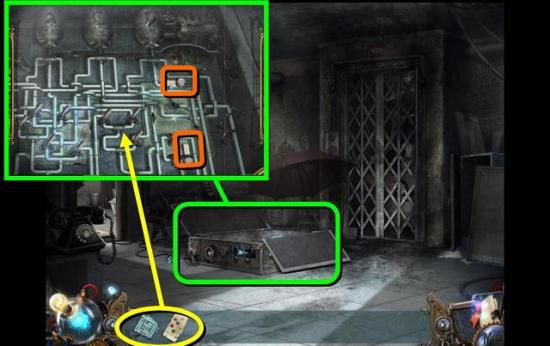
- Zoom in on the time-space machine
- Undo the two latches and remove the old circuit board
- Put the THIRD ETHER CHARGED CIRCUIT on the machine
- Put the WARDENCLYFFE ADDRESS on the machine
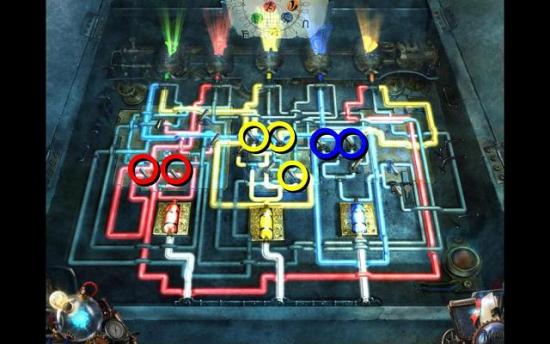
- So the puzzle as before
- Go through the portal
Chapter 6: Wardenclyffe Tower, 1918
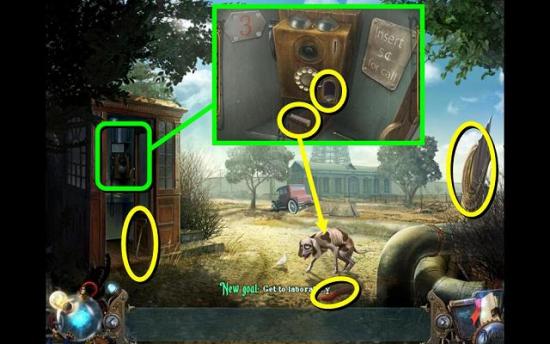
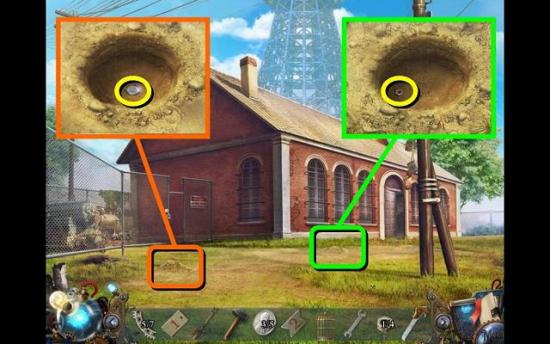
- Pick up the CROWBAR, ROPE and VALVE 1/5
- Zoom in on the phone booth and pick up the map, the FLAP that’s under the map and SMALL COIN 1/5
- Use the FLAP on the poor emaciated dog to scare the living daylights out of it
- Go on to Wardenclyffe Tower gates
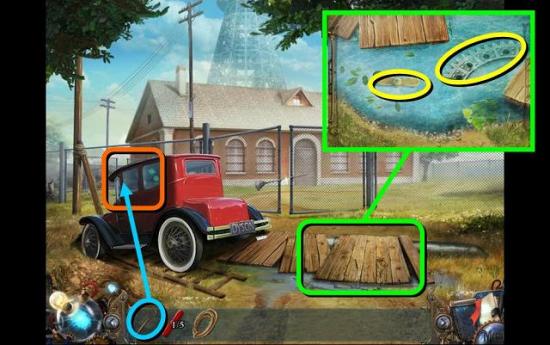
- Zoom in on the boards covering the puddle
- Move all the items until you find another VALVE (2/5) and HATCH PART 1/7
- Smash the car window with the CROWBAR
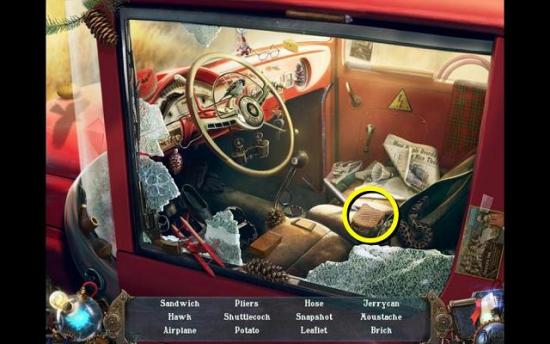
- Zoom in on the car for a HOS
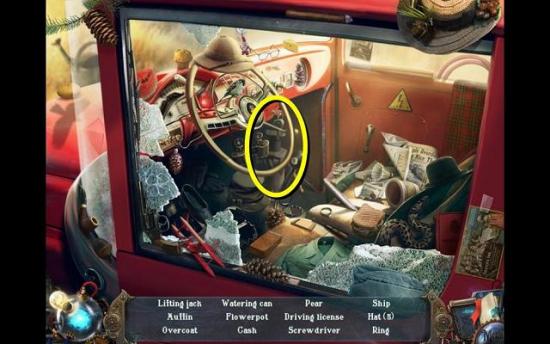
- Find the LIFTING JACK
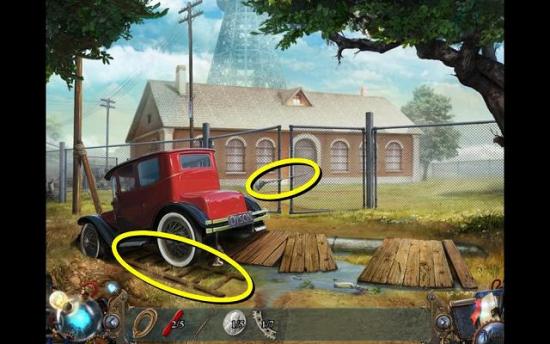
- Put the LIFTING JACK under the car and click it a few times to raise the car
- Take the LADDER
- Take the RAKE from the gate
- Open the gate and go through it to the tower front yard
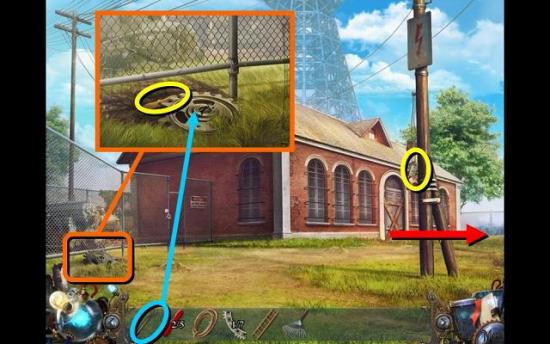
- Take NUMBER PLATE 1 from the telegraph pole
- Zoom in on the big cog by the fence and move it with the CROWBAR
- Under it is VALVE 3/5
- Go right to the tower backyard
- Take the SPADE
- Take VALVE 4/5 from the hole in the tree
- Zoom in on the hatch covered in leaves
- Remove the leaves with the RAKE
- Open the hatch and take the HAMMER
- Zoom in on the pile of dirt to the left of the tree and dig it up with the SPADE
- Find HATCH PART 2/7
- Put the LADDER against the wall
- Break the window with the HAMMER
- Go through the window into Wardenclyffe laboratory
- Zoom in on the machine on the left and take VALVE 5/5 and HATCH PART 3/7
- Take the POSTER off the wall
- Open the first aid box for a HOS
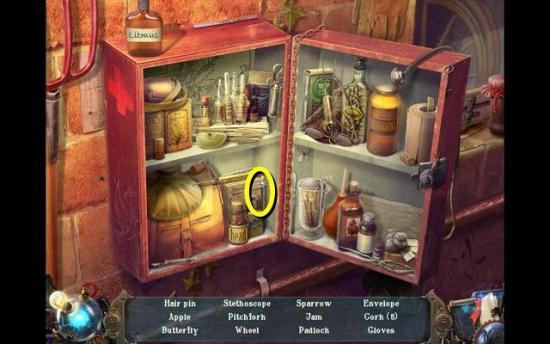
- Find a HAIR PIN
- Zoom in on the door on the right
- Pick up a SMALL COIN (2/5)
- Slide the POSTER under the door
- Use the HAIR PIN to knock the key out of the lock
- Pull the poster back and pick up the LABORATORY KEY
- Use the LABORATORY KEY to unlock the door
- Go through the door to the tower front square
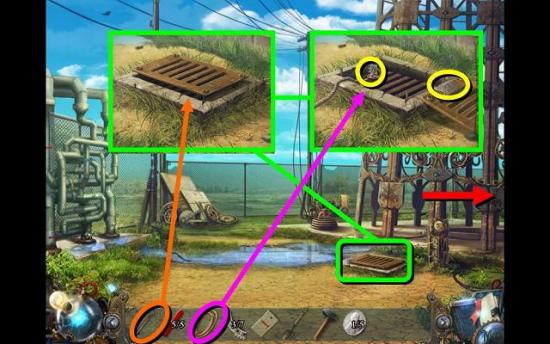
- Zoom in on the grate in the ground and lift it with the CROWBAR
- Use the ROPE to pull HATCH PART 4/7 out of the grate
- Pick up NUMBER PLATE 2
- Go right to the tower back square
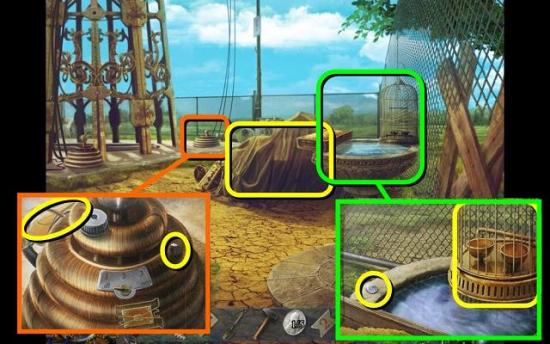
- Take the RUBBER TARPAULIN
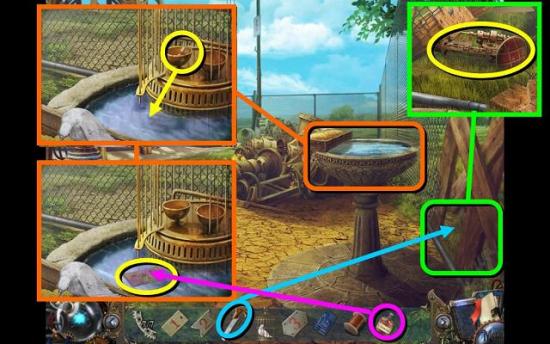
- Zoom in on the bird bath
- Take SMALL COIN 3/5, the DOVE CAGE and HATCH PART 5/7 (which is hidden behind the dove cage)
- Zoom in on the transmitter in the back and take the bottle of RUST REMOVER and NUT 1/4
- Go back one screen to the front square
- Put the RUBBER TARPAULIN over the water
- Put the five VALVES on the pipes on the left
- Turn the valves until all the leaks stop. The valves are paired, so you only need to turn one each of the red, green, yellow and dark blue valves (not the light blue or purple)
- Go through to the shaft entrance
- Zoom in on the transmitter and take the WRENCH and NUT 2/4
- Zoom in on the shaft and take the HACKSAW and SMALL COIN 4/5
- Back out two screens to the laboratory
- Zoom in on the door on the left
- Clean the lock with the RUST REMOVER
- Open the lock’s cover and pick the lock as you did earlier
- Go through the door – you’re back in the front yard
- There are two piles of dirt you can dig up with the SPADE, one contains NUT 3/4 and the other SMALL COIN 5/5
- Back out to the gate and zoom in on the car for another HOS
- Find a SANDWICH
- Back out to the first screen
- Zoom in on the dove and put it in the DOVE CAGE
- Click on the spaces around the dove to frighten it away until it moves into the cage. There numerous ways of solving this puzzle – you’ll figure it out
- Zoom in on the phone booth
- Put all COINS into the slot and get the GENERATOR AREA CODE: 7539
- Use the WRENCH to take NUMBER PLATE 3 from the wall of the booth
- You also get four BOLTS
- Go through to the front yard
- Quickly pop right to the back yard and retrieve your LADDER as you will need it again in a bit
- Go back to the front yard and zoom in on the gate
- Enter code 7539 by rotating the wheels in the order shown in the image
- Go through the gate
- Give the SANDWICH to the poor wee puppy
- Take the HATCH PART (6/7) from the hole on the right
- Dig up the dirt with the SPADE to find a COPPER WIRE REEL
- Take the PART OF SCHEME from the wall

- Hit the wall behind the scheme with the HAMMER to find HATCH PART 7/7
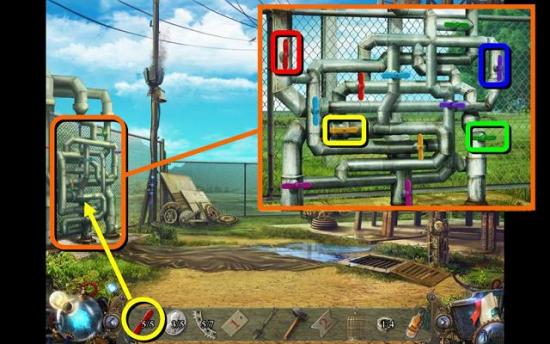
- Put the LADDER up against the electricity pole and zoom in on the top
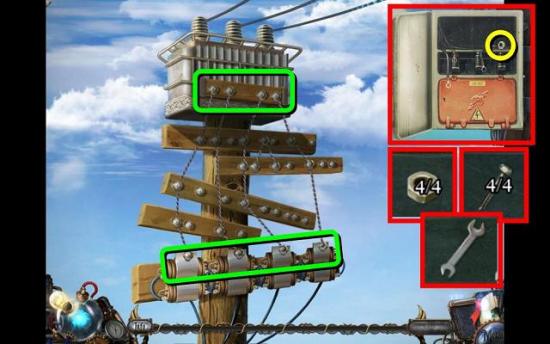
- Take NUT 4/4
- Put the BOLTS in the box, followed by the NUTS
- Fasten the nuts with the WRENCH
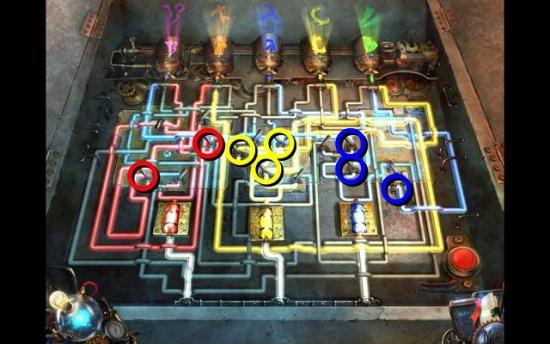
- Connect the pins at the bottom with the pins at the top without lines crossing or wires touching any exposed pins
- Back out and go into the laboratory
- Play the new HOS in the first aid box
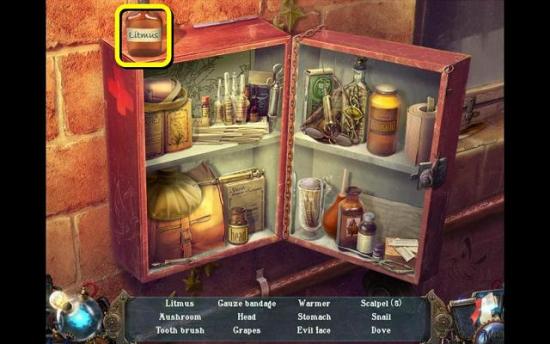
- Find LITMUS
- Go through the laboratory to the front square and then right to the tower back square
- Zoom in on the fence on the right
- Remove the boards with the HACKSAW
- Take the DEVICE PART
- Zoom in on the bird bath again and put down the CAGED DOVE
- Open the cage and take the EMPTY SCHEME
- Put the EMPTY SCHEME in the water and put some LITMUS on it
- Take the note with the scheme
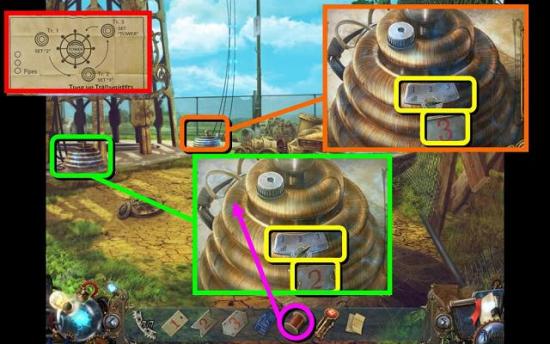
- Zoom in on the transmitter in the back, put NUMBER PLATE 3 on it and turn the dial to “tower”, according to the scheme you just found
- Zoom in on the transmitter in the front and fix it with the COPPER WIRE REEL
- Put NUMBER PLATE 2 on the transmitter and turn the dial to 3
- Back out to the front square and go through to the shaft entrance
- Zoom in on the transmitter, put NUMBER PLATE 1 on it and set the dial to 2
- Pull the lever
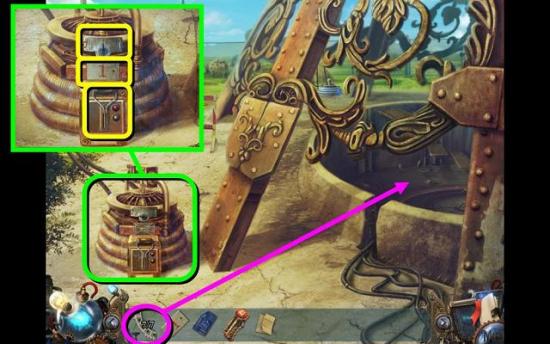
- Zoom in on the shaft
- Put the HATCH PARTS on the shaft

- Rotate the parts of the hatch until the lines light up. They will turn blue when they do. Rotate the discs in the order shown in the image
- Go down the shaft
- Put the PART OF SCHEME on the wall and the DEVICE PART in the hole
- Push the device part down
- Now activate the machine according to the scheme on the wall:
- Push the button
- Turn the left wheel once
- Pull the lever on the machine
- Turn the left wheel once
- Turn the right wheel once
- Pull the right lever
- Back out to the front square
- Find the floating symbols that match the ones at the bottom

- Back in the apartment building, exit to the street
- Watch the ending

More articles...
-
Best Horror Games On Itch.io – July 2026
Across a bounty of subgenres. -
Haze Seas Accessories Tier List [Best Accessories to Equip]
The accessories with the best stat buffs in Haze Seas.