- Wondering how to get Monopoly GO! free rolls? Well, you’ve come to the right place. In this guide, we provide you with a bunch of tips and tricks to get some free rolls for the hit new mobile game. We’ll …
Best Roblox Horror Games to Play Right Now – Updated Weekly
By Adele Wilson
Our Best Roblox Horror Games guide features the scariest and most creative experiences to play right now on the platform!The BEST Roblox Games of The Week – Games You Need To Play!
By Sho Roberts
Our feature shares our pick for the Best Roblox Games of the week! With our feature, we guarantee you'll find something new to play!All Grades in Type Soul – Each Race Explained
By Adele Wilson
Our All Grades in Type Soul guide lists every grade in the game for all races, including how to increase your grade quickly!
Tattoo City Walkthrough
Tattoo City is a simulation game developed by WonderHill, where you can create your very own tattoo parlor! You can hire employees, decorate your Tattoo Parlor and choose what kind of tattoo art you will offer to the clients in your shop. Gamezebo’s Tattoo City strategy guide and walkthrough will provide you with a quick start guide, tips and tricks, hints and cheats on how to win.
Tattoo City – Game Introduction
Tattoo City is a simulation game developed by WonderHill, where you can create your very own tattoo parlor! You can hire employees, decorate your tattoo parlor and choose what kind of tattoo art you will offer to the clients in your shop. Gamezebo’s Tattoo City strategy guide and walkthrough will provide you with a quick start guide, tips and tricks, hints and cheats on how to win.
Quick Start Guide
Getting started

- To play Tattoo City you can click on the link at the top of this page to find the application on Facebook.
- You must be a registered Facebook user to play Tattoo City.
- Once you are in the application be sure to “Like” the game, bookmark it, and give permissions along the top of the screen.
- You will immediately be taken through a brief and helpful tutorial where “Tina” will show you around. Here at Gamezebo you will find much more detailed instructions and tips to do your best at Tattoo City.
- Your Facebook friends that are already playing Tattoo City will be located at the bottom of your screen in the Neighbor area. Click on their image to visit them. You can also send a free gift to each neighbor once every 24 hours.
- NOTE – To zoom in and out of the scene click on the slider bar at the bottom left of the game screen.
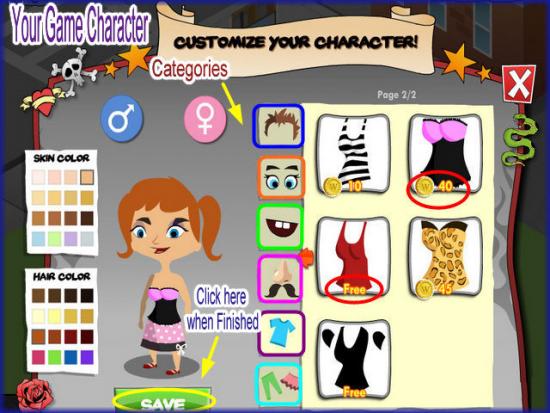
- First you will be asked to build your personal avatar which will be the parlor owner in the game. Choose things such as gender, skin, tone, hair color and style and clothing. Note that you can change your character’s appearance or clothing at any time by clicking on the face icon at the bottom of the screen.
- You are given 5510 Gold Coins, 7 Rubies, 24 Energy and 0 Ink when you start the game.
- Once you choose your Character’s appearance (be careful not to spend too much money on these items as many of the choices are free) you can begin to work in your Tattoo parlor.
How to earn Money in Tattoo City/Hiring Tattoo Artists
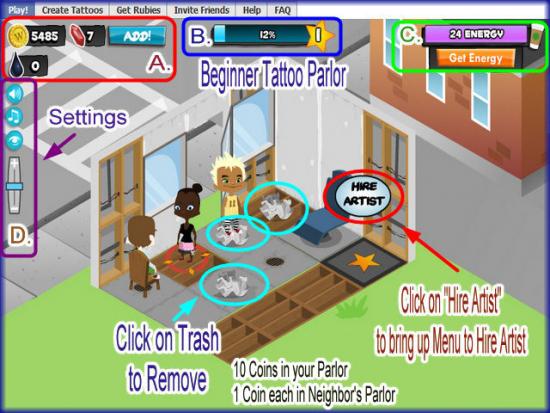
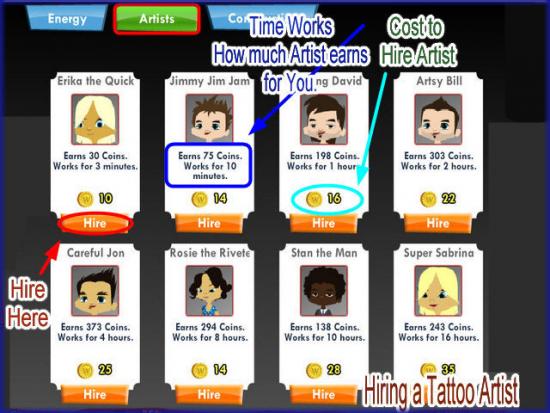
- To earn Money in Tattoo City you will need to hire Tattoo Artists to work for you and collect money from them before they finish their shifts and leave with all of your profits.
- In your shop you will be given 1 Tattoo Chair and 1 Waiting Chair.
- You will see a “Hire Artist” sign next to the Tattoo Chair. Click on that sign to bring up the Tattoo Artist hiring menu.
- Note in the Menu that Tattoo artists work for different amounts of time and for different amounts of money and they will earn you different amounts of money. As you advance in the game more artists will unlock.
- While your Artist is working you will see a countdown clock as they work on the client.
- Once the time you hired the artist for is all finished you will see a large coin above their head. Click on the Artist twice to collect the money then click on the coins and XP stars on the ground. If you wait too long the Artist will leave with all of your money. You must collect the money right away as they will not stay around for long.
- TIP – Try to have a waiting chair for each Artist Chair you have in your shop.
- If you click on the chair while a client is waiting you will be able to choose a Tattoo for them. Doing this will earn you Blue stars which if you click on them before they disappear you will earn at least 2 XP (Experience Points) which help you to level up faster. You can also earn drops of Ink which also disappear very fast. These drops of ink can be used to design your own Tattoos to be used in your Parlor.
- A. Currency and Ink Indicators – Here you can see the 2 types of currency in the game. Gold coins are the game’s basic currency and are used to purchase most items in the game. Rubies are used to purchase high end items that help you to advance along in the game faster such as more energy or items to make your Parlor look nicer. The drop icon indicates how much ink you have acquired in order to make your own Tattoos. (See designing your own Tattoos below for more information.)
- B. Level Indicator/XP Meter – Here you can see what level you are at and how many XP you have. Place cursor over the meter to see how many XP you need to reach the next level. XP is earned by clicking on Stars, hiring Tattoo Artists, and creating your own Tattoos. The more XP you can earn the faster you will level up and unlock items to purchase and use in your Parlor.
- C. Energy Meter/Purchase Energy/Energy Timer – Here you can see how much energy you have which is what you need for your Artists to work in your Parlor. To begin with you earn 1 Energy every 2 minutes and 30 seconds in the game. As you level up more time is added so you have a higher maximum and the amount of time you earn it will decrease as you level up. Click on the Coffee Cup in the upper right hand corner to purchase more energy. If you find Coffee Cups on the floor click on them for energy and you can purchase Energy with Rubies.
- D. Settings – Here you can control the game’s sound effect and music level, toggle the image quality and use the slide bar to zoom in and out of the scene.
Picking a Tattoo for your Clients/Tattoo Picker
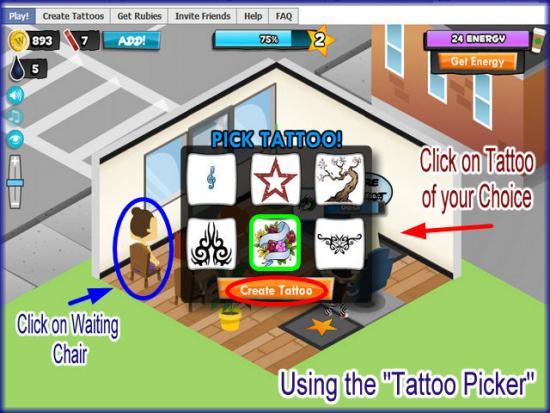
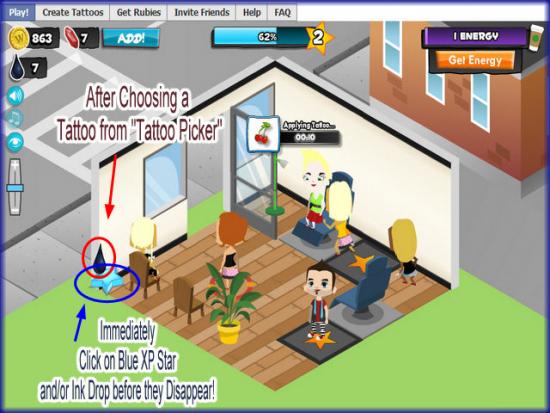
- When a client comes to sit in a waiting chair you can click on the chair and a menu such as the one in the image above will appear with random Tattoo designs.
- Click on one and you will earn either a blue star which if you click on it before it disappears will give you XP, or a drop of Ink which if also clicked on before it disappears will be added to the grand total at the top left of the screen and used to purchase Tattoos that you design yourself. (See Designing your own Tattoos Below)
- Once you design a Tattoo you and your Neighbors will see it in their Tattoo Picker.
- TIP – The Star and Oil disappear very fast so be sure to click on them right away.
Working Tattoo Artists
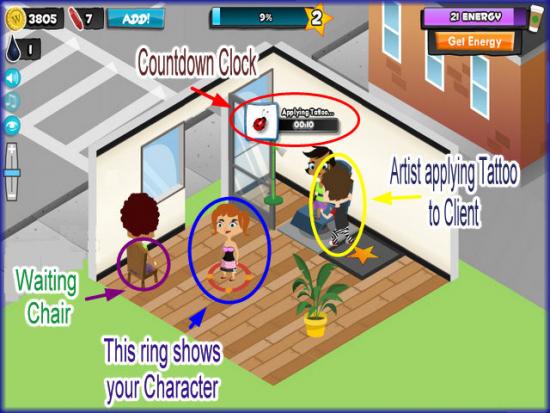
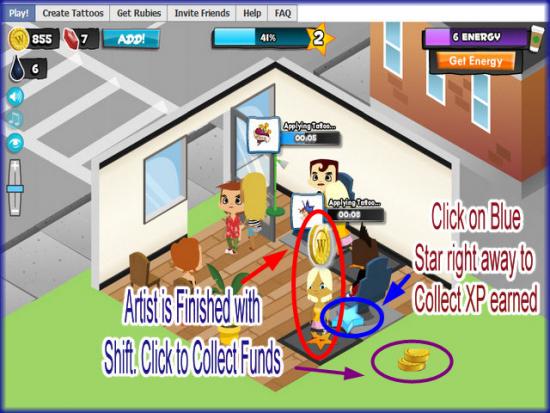
- Once you hire an Artist they will appear on the Star next to the Tattoo Chair.
- Once the client sits down a clock will appear above the artist as shown in image above.
- This will continue until the Artist has completed the shift you have hired them for.
- To see how much time is left you can place your cursor over the Artist at any time.
- When the Artist’s shift is over, you will see a coins with a “W” on it above the Artist’s head.
- Click on the Artist at least twice and collect your money.
- NOTE – If you do not collect the money on time you will lose the profits and the money you paid to hire the Artist.
- TIP – Make sure you choose the shift you hire for your Artist is a time you know you can get back to the game to collect. You do not have much time after the shift is over to collect the money. Set an alarm or a reminder so you do not miss collecting funds.
Decorating and Expanding your Tattoo Parlor
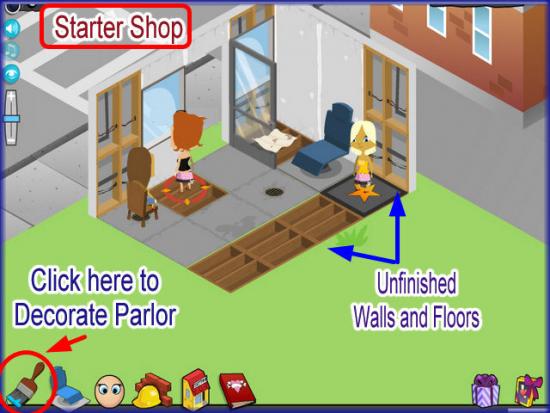
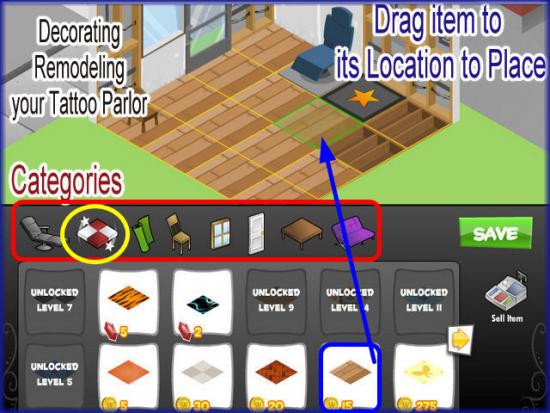
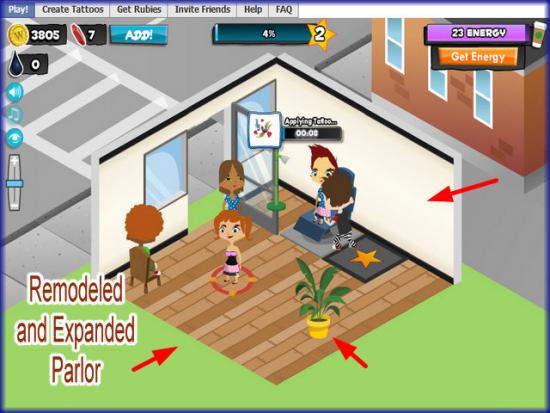
- You will notice right away that your Parlor has no flooring, no wallpaper and a plain door and 2 plain windows along with no decor.
- You can purchase these items by clicking on either the paintbrush icon at the bottom left or the Store icon at the bottom of the screen.
- Once in the store notice along the top all the different categories you can choose from.
- Click on the category and click and drag the item to the location you want it in the Parlor.
- NOTE – For Floor tiles you can only purchase them one at a time so click on the tile then hold down your left mouse button and drag it to its location. With wallpaper you will need to do the same thing but watch for the green panel at the bottom to make sure it is facing the correct location.
- You can rotate items buy clicking on them in the parlor with the store menu open. A red square with an arrow will appear. Click on it and rotate the item until it is where you want it.
- Place the items and the coins will deduct as soon as they lock into place.
- Be sure to click on “Save” on the lower right side of the store menu and your Parlor will look much nicer.
- Also be sure to expand your Parlor to make it larger. As you level up you can purchase more square footage for you Parlor. You will need to add wallpaper and tile as you expand or you can wait and expand a while before you decorate but the more you decorate the happier you customers will be.
- If you wish you can sell items in the store menu as well. Just drag the item to the cash register at the lower right and the coins will be credited to your total.
- Inventory – If you drag a new item over an old item the old item will go into your inventory. While in the store you will see a little number in the upper right corner of the item . This shows you how many of that item you have in inventory. You can keep it there or sell the item if you wish.
Building your own Tattoos for your Parlor/Custom Tattoo Creator
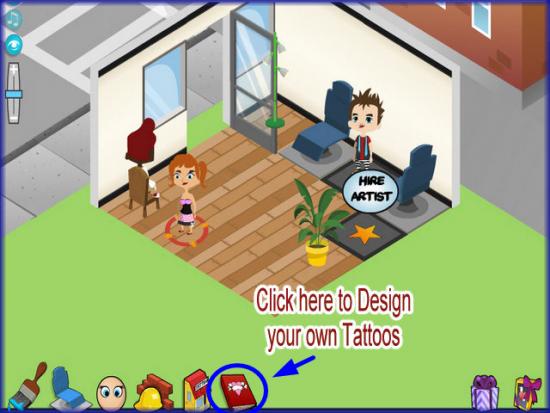
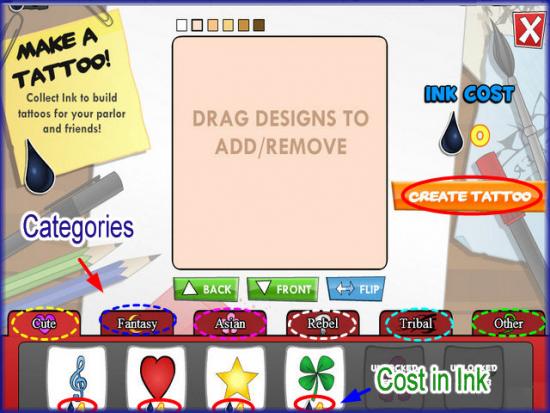
- Tattoo City has a fun feature called the “Custom Tattoo Creator” where you can build and design your own Tattoos for use in your Parlor and in your Neighbor’s Parlors.
- You start out with zero ink so you will need to be sure to click on the waiting chairs several times to collect several ink drops.
- Once you are in the menu note that there is a cost in Ink drops for each image you add to your Tattoo.
- Once you have at least 4 drops of ink click on the Tattoo book at the bottom center menu of the game screen.
- A few are unlocked as you begin the game and more will unlock once you reach level 3 and various other levels in the game.
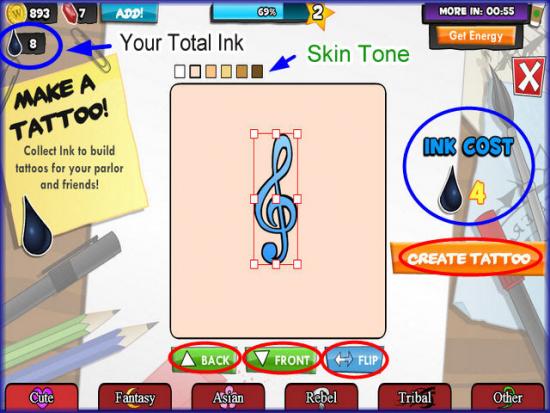
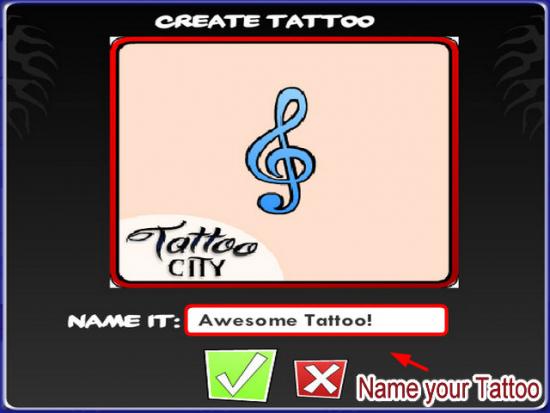
- Drag the design you want to the area in the center of the screen. NOTE that you can choose the skin tone in the upper left hand corner as well.
- Once you have the design where you want it you can add more details and you can flip the design and rotate it any way you want.
- Once your design is how you like it, click on save and then confirm and you can share this with a Facebook Profile indicator and a mention on the live feeds if you would like.
Cleaning up Trash in your Tattoo Parlor
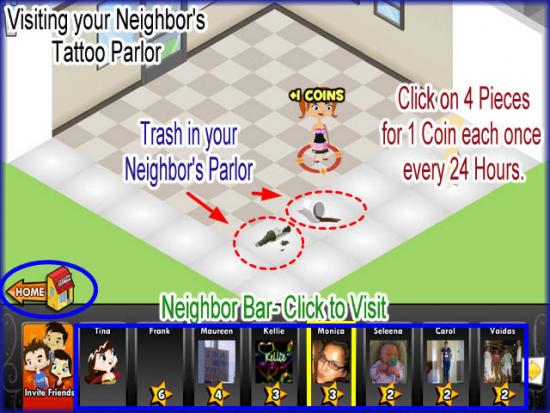
- You will notice when you first open your Parlor and at various times while your are playing that trash items will appear in your Parlor. Things such as paper, Styrofoam cups, and bottles will be seen on the floor.
- Click on these items and you will earn 10 coins for each item you clean up.
- Be sure to keep your Parlor clean or customers will walk out if it is too dirty.
Inviting Neighbors/Visiting Neighbors in Tattoo City
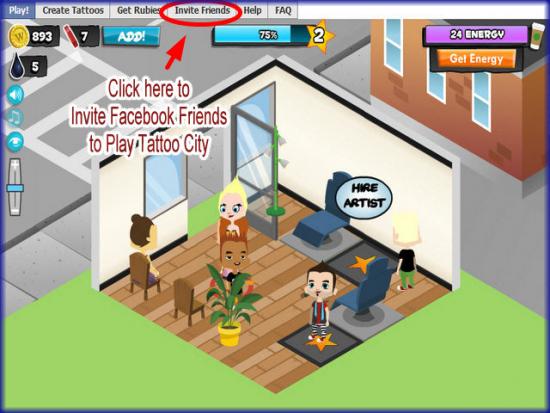
- If you would like to invite more friends to play along with you in Tattoo City you can click on the “Invite Friends” tab at the very top left corner above the game screen.
- Once you choose the people you wish to invite click on “Send” and then they will individually receive an invitation from you in the invitation area at Facebook.
- NOTE – Each person must accept your invitation before they appear on your Neighbor list.
- To visit your Neighbor click on their image.
- Once you are taken to your Neighbor’s Tattoo Parlor you will be allowed to clean 4 items from their parlor which will earn you 1 coin each once every 24 hours.
Sending and Receiving Gifts
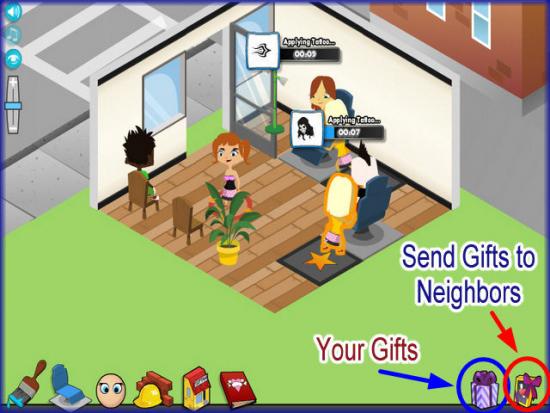
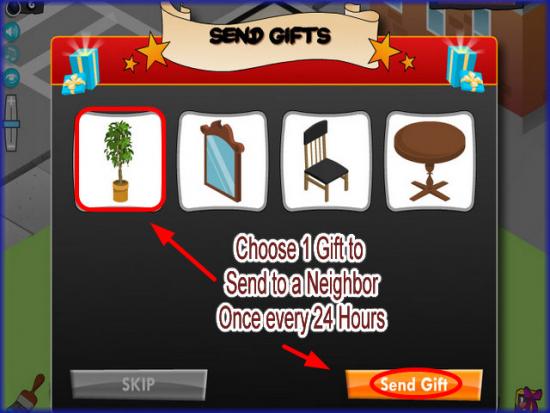
- You can also send your Neighbor a free gift once every 24 hours by clicking on the gift at the lower right corner of the game screen. When the menu appears choose an item to send to your Neighbor and odds are they will do the same for you.
- The gift icon at the bottom left is where any gifts sent to you will be found.
- You can send to one friend at a time or all of them at once.
- There may be a limit at first as to the maximum number of neighbors you can send to per day and this will increase as you level up.
- To get back home from your Neighbor’s Parlor click on the icon at the lower left of their screen.
- If a Neighbor sends a gift to you, you must accept it in the Facebook live feed gift page and and then find it in the gift box at the lower right corner of the screen.
Congratulations!
- You have completed the basic game play guide for Tattoo City from WonderHill Fine Games at Facebook. Be sure to check back often for game updates, Staff and user reviews, user tips, forum comments and much more here at Gamezebo!
More articles...
Monopoly GO! Free Rolls – Links For Free Dice
By Glen Fox
Wondering how to get Monopoly GO! free rolls? Well, you’ve come to the right place. In this guide, we provide you with a bunch of tips and tricks to get some free rolls for the hit new mobile game. We’ll …Best Roblox Horror Games to Play Right Now – Updated Weekly
By Adele Wilson
Our Best Roblox Horror Games guide features the scariest and most creative experiences to play right now on the platform!The BEST Roblox Games of The Week – Games You Need To Play!
By Sho Roberts
Our feature shares our pick for the Best Roblox Games of the week! With our feature, we guarantee you'll find something new to play!All Grades in Type Soul – Each Race Explained
By Adele Wilson
Our All Grades in Type Soul guide lists every grade in the game for all races, including how to increase your grade quickly!


