![Digimon UP Tier List [Supports, Buddies, and Partners]](/wp-content/uploads/2026/07/digimon-up-tier-list.jpg "Digimon UP Tier List [Supports, Buddies, and Partners]")
Digimon UP Tier List [Supports, Buddies, and Partners]
These Digimon will get you UP the leaderboard.

![Haze Seas Boss Drops [Chances, Locations, and How to Spawn]](/wp-content/uploads/2026/07/haze-seas-boss-drops.jpg "Haze Seas Boss Drops [Chances, Locations, and How to Spawn]")

Welcome to Gamezebo’s walkthrough for Tales of Monkey Island: Chapter 2 – The Siege of Spinner Cay.

a:1:i:0;a:2:s:13:”section_title”;s:72:”Tales of Monkey Island: Chapter 2 – The Siege of Spinner Cay Walkthrough”;s:12:”section_body”;s:33512:”
Welcome to Gamezebo’s walkthrough for Tales of Monkey Island: Chapter 2 – The Siege of Spinner Cay.
GENERAL TIPS
Controls
Saving and Loading
To save, press ESC to bring up the menu and then click Save & Load. Use the red arrows to scroll through to a blank saved game and then click the Save Game button. Saved games are given a location, date, time and description of what has happened in the adventure so far. To load, press ESC to bring up the menu and then click Save & Load. Use the red arrows to scroll through to a previously saved game and then click the Load Game button.
Inventory
Press the I key to bring up the inventory. Left click to select an item and it will be tagged onto the cursor. The item will glow green when it is moved over an object in the playing area that it can be used on. Some objects can also be combined by using them on another item in the inventory window. To combine objects, place an object in each of the circles at the left side of the inventory window and then press the plus sign between the circles to try and combine them. Objects can also be examined by selecting the magnifying glass at the top-left corner of the inventory window and then selecting the item.
ITEM LIST
101 Fish Jokes

Found by asking Tetra in the library at Spinner Cay for the 101 fish jokes book. It is examined in the inventory to find the special coupon.
Ancient Tool

Available at the start of the episode. After Guybrush has told LeChuck to use the Merfolk key on the left clamshell in the jungle on Spoon Isle, Guybrush can use the ancient tool on the right clamshell to open the altar.
Bowl of Hardened Pyrite

Available if the bowl of melted pyrite is kept in the inventory for too long. If this has happened, go to the bottom of the cliff and take the hardened pyrite, then return to the Vacaylian ruins and use the bowl of hardened pyrite on the ruins to get another bowl of melted pyrite.
Bowl of Melted Pyrite

After the hot tub controls have been used on Vacaylian ruins in the jungle on Spoon Isle, the pyrite parrot is used on the ruins to get the bowl of melted pyrite. It is used on the cliff face on Spoon Isle.
Bucket

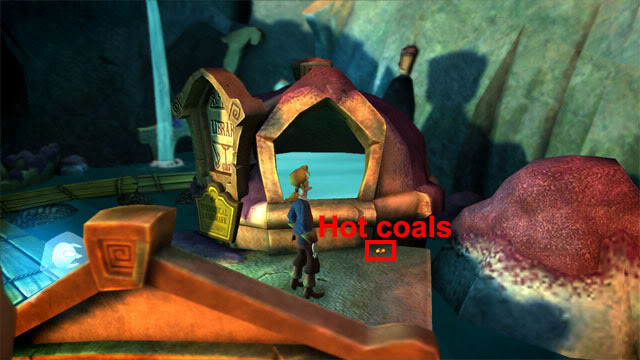
Found in front of Anemone’s bait and repair shop on Spinner Cay. After McGillicutty has started to attack Spinner Cay, the bucket is used to pick up the hot coals in front of the library.
Bucket o’ Coals

After McGillicutty has started to attack Spinner Cay, the bucket is used to pick up the hot coals in front of the library. It is used on the Vacaylian ruins in the jungle on Spoon Isle.
Elaine’s Ring

Found by talking to Elaine below the royal chamber on Spinner Cay. It is not used.
Eye of the Manatee

Available at the start of the episode. It is combined with the fish eye in the inventory to make the fish eye of the manatee.
Fake Turtle Artifact

After the bowl of melted pyrite has been used on the cliff in the jungle on Spoon Isle, the prying tool is used to take the fake turtle artifact from the broken Merfolk display at the bottom of the cliff. It is given to LeChuck.
Fish Eggs

Found by giving the fish eggs coupon to Anemone at the bait and repair shop on Spinner Cay. When Guybrush is standing near the fishing well in the jungle on Spoon Isle, the fish eggs can be combined with the hook in the inventory to attempt to catch a fish. The item is useless however as Guybrush cannot catch the fish from the well.
Fish Eggs Coupon

Found on top of the fishing well in the jungle on Spoon Isle. It is given to Anemone at the bait and repair shop on Spinner Cay to receive fish eggs.
Fish Eye

Found by selecting the statue below the royal chamber on Spinner Cay. It is combined with the eye of the manatee in the inventory to make the fish eye of the manatee.
Fish Eye of the Manatee

Made by combining the eye of the manatee and the fish eye in the inventory. It is combined with the paper in the inventory to reveal the name of a book, 101 Fish Jokes.
Glowy Bait

Found by giving the special coupon to Anemone in the bait and repair shop on Spinner Cay. When Guybrush is standing near the fishing well in the jungle on Spoon Isle, the glowy bait is combined with the hook in the inventory so that Guybrush can fish out the summoning fish artifact.
Hook

Found near the seagull on the Screaming Narwhal while Guybrush is fighting Morgan LeFlay. It is used on the cable at the top of the stairs on the Screaming Narwhal to slide down to the beam above the ship. When Guybrush is standing near the fishing well in the jungle on Spoon Isle, the hook is combined with the glowy bait in the inventory so that Guybrush can fish out the summoning fish artifact.
Hot Tub Controls

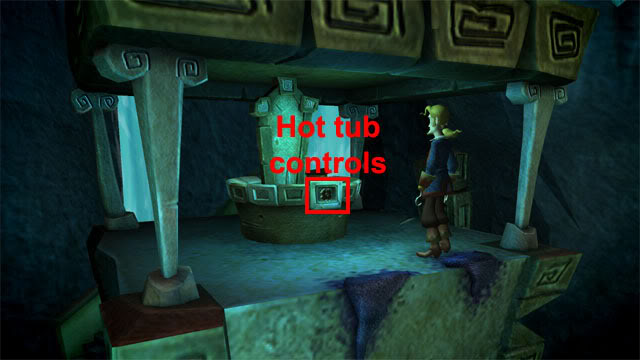
After McGillicutty has started attacking Spinner Cay, the hot tub controls are found at the front of the royal throne. It is used on the Vacaylian ruins in the jungle on Spoon Isle.
Locket

Available at the start of the episode. It is used on the manatee on Roe Island to receive the paper.
Oyster

Found by giving the oyster coupon to Anemone at the bait and repair shop on Spinner Cay. It is examined in the inventory to find the pearl.
Oyster Coupon

Found by the cliff in the jungle on Spoon Isle. It is given to Anemone in the bait and repair shop on Spinner Cay to receive a oyster.
Paper

Found by using the locket on the manatee on Roe Island. It is combined with the fish eye of the manatee in the inventory to reveal the name of a book, 101 Fish Jokes.
Pearl

Found by examining the oyster in the inventory. It is given to LeChuck in the jungle on Spoon Isle. When LeChuck asks Guybrush for help, Guybrush can tell him to use the pearl on the claw.
Prying Tool

After the altar has been opened at the top of the cliff in the jungle on Spoon Isle, the prying tool is found in the altar next to the turtle artifact. It is given to LeChuck so that he can remove the turtle artifact from the altar. After Guybrush falls down the cliff, the prying tool is found by the rock. After the bowl of melted pyrite has been used on the cliff in the jungle on Spoon Isle, the prying tool is used to take the fake turtle artifact from the broken Merfolk display at the bottom of the cliff.
Pyrite Parrot

Available at the start of the episode. After Guybrush has started the staring contest between the two arguing pirates on Spoon Isle and has then distracted the pirates by telling them to look at something, the pyrite parrot is used on the empty treasure chest. After the arguing pirates on Spoon Isle have carried off the treasure chest with the pyrite parrot in it, the pyrite parrot is found again by walking over to the left side of Brillig Island. After the hot tub controls have been used on Vacaylian ruins in the jungle on Spoon Isle, the pyrite parrot is used on the ruins to get the bowl of melted pyrite.
Special Coupon

Found by examining the 101 fish jokes book in the inventory. It is given to Anemone in the bait and repair shop to receive the glowy bait.
Summoning Ball Artifact

After sinking McGillicutty’s ship, the three summoning artifacts are given to the Merfolk leader in the royal chamber on Spinner Cay to receive the summoning ball artifact. It is thrown into the ocean at the end of the dock.
Summoning Fish Artifact
When Guybrush is standing near the fishing well in the jungle on Spoon Isle, the hook is combined with the glowy bait in the inventory so that Guybrush can fish out the summoning fish artifact. After sinking McGillicutty’s ship, the artifact is given to the Merfolk leader in the royal chamber on Spinner Cay.
Summoning Seahorse Artifact

After the arguing pirates on Spoon Isle have carried off the treasure chest with the pyrite parrot in it, the summoning seahorse artifact is found by walking over to the left side of Brillig Island. After sinking McGillicutty’s ship, the artifact is given to the Merfolk leader in the royal chamber on Spinner Cay.
Summoning Turtle Artifact

After Guybrush falls down the cliff on Spoon Isle, run east from the bottom of the cliff to take the summoning turtle artifact from LeChuck. After sinking McGillicutty’s ship, the artifact is given to the Merfolk leader in the royal chamber on Spinner Cay.
Transit Pass

Found by talking to Elaine about the raft ride by the docks. It is given to Anemone by the raft on Spinner Cay so that Guybrush can then use the raft to travel around the Jerkbait Islands.
WALKTHROUGH
The Screaming Narwhal
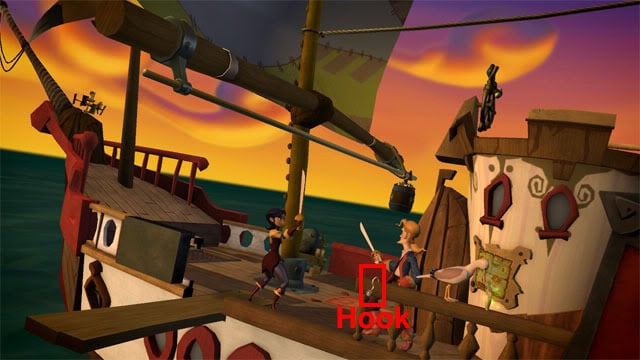
The chapter starts aboard the Screaming Narwhal. Pirate hunter Morgan LeFlay has boarded the ship to recover Guybrush’s possessed hand for the Marquis De Singe. Each time that Guybrush talks to LeFlay, they will move to a different area of the ship. Talk to LeFlay twice about any topic to move over to the seagull. Take the hook from the wooden railing:
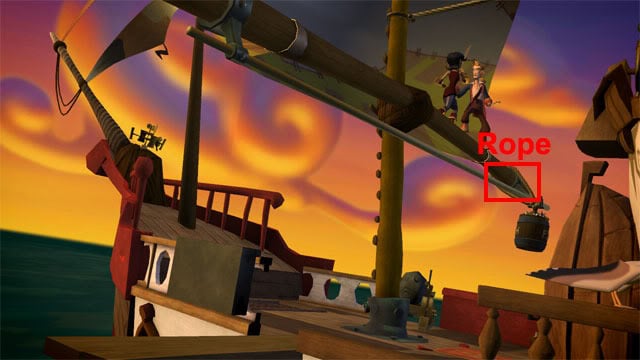
Talk to LeFlay again to move upstairs. Open the inventory by moving the cursor to the right side of the screen and selecting the tab or by pressing the I key on the keyboard. Select the hook and then close the inventory by clicking outside the inventory window or by pressing the I key. With the hook selected, click the cable above Guybrush to slide down to the beam above the ship. Select the rope below the beam and Guybrush will cut it with his sword:
Talk to LeFlay three times to return to the top of the stairs. Turn the wheel: Because Guybrush cut the rope holding the barrel of fish earlier on, it will slide down to the other end of the beam. Talk to LeFlay twice to return to the seagull. Click the seagull and it will fly up to the barrel of fish. The seagull wobbles the barrel and it drops onto the plank, launching LeFlay over the side of the ship. Walk east and look at the map on the wall:
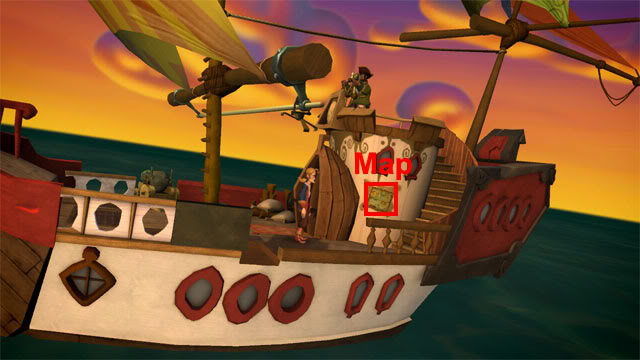
Select the Jerkbait Islands at the top-left corner of the map to travel to Spinner Cay.
Spinner Cay
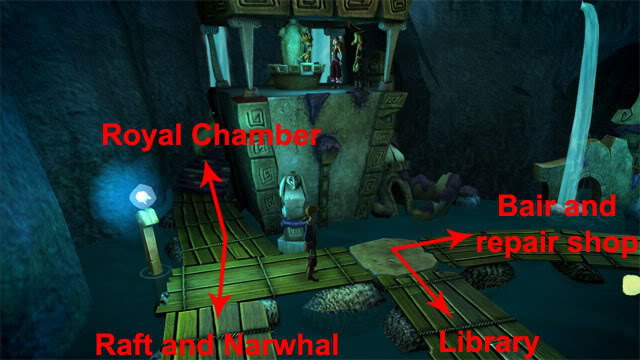
Walk east along the pier to meet a Vacaylian named Anemone. Select any topic and then either keep talking to Anemone or say "I gotta run." to end the conversation. Run north up the pier to see Elaine trying to settle an argument between McGillicutty and the leader of the Merfolk. Continue north up the stairs to the royal chamber.
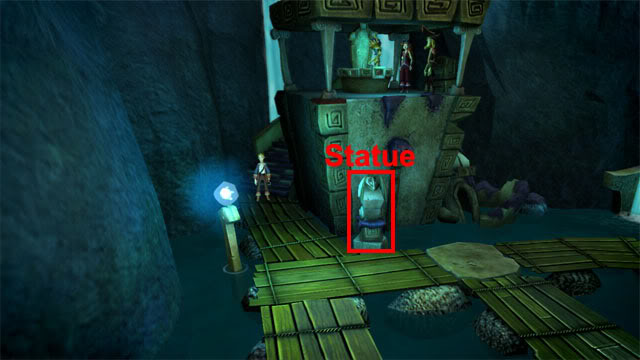
Talk to Elaine and say "That raft ride by the docks looks like fun!" to receive the transit pass. Say "Well, I gotta go.". Select any topic when Elaine says that they can’t leave, and she will say that the three summoning artifacts have to be found. Select any topic when she mentions that LeChuck is looking for one of the artifacts on Spoon Isle, then select three negative answers before the option for "…Fine." appears. Go downstairs and look at the statue to take a fish eye:
Run east and enter the cave to go upstairs to the bait and repair shop. Take the bucket in front of the shop:
Anemone will appear from the pool of water as Guybrush walks toward the shop. Talk to Anemone and say "I need my mast repaired.": Anemone disappears for a few seconds and puts a new mast on the Screaming Narwhal. Exit the conversation. Go downstairs and run back along the pier to see Anemone reappear by the raft. Give the transit pass to Anemone and then use the raft to view a map of the Jerkbait Islands:
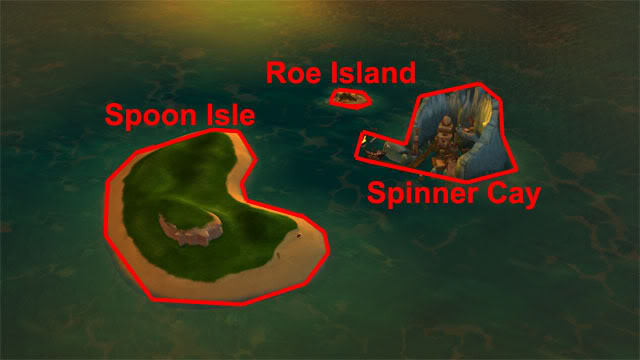
Select the smallest island on the map to travel to Roe Island.
Roe Island
Look at the manatee to see that there is a hole in the middle of it:
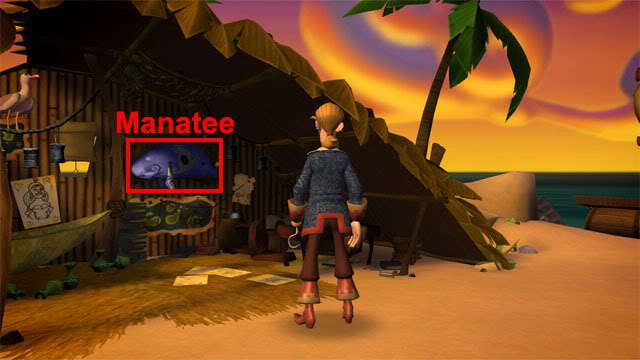
Use the locket on the manatee to take a blank piece of paper. Open the inventory and combine the eye of the manatee with the fish eye to make the fish eye of the manatee. To combine two items, place one item in the top circle at the left side of the inventory window and a second item in the bottom circle, then press the red plus button between the two buttons. Still keeping the inventory window open, combine the fish eye of the manatee with the paper to read the name of a book: 101 Fish Jokes. Go back to the raft and return to Spinner Cay.
Spinner Cay
Run north up the pier, go east at the first junction and south at the second junction to arrive at the library:
Walk in front of the library and Tetra will appear. Talk to Tetra and say "Ya know, I would like a book from the library.". When Tetra asks what book you would like, say "101 fish jokes!". Examine the 101 Fish Jokes book inventory by selecting the magnifying glass at the top-left corner of the inventory window and then selecting the book. Guybrush discovers a special coupon in the book. Return to the bait and repair shop and give the special coupon to Anemone to receive the glowy bait. Return to the raft.
Spoon Isle
Guybrush arrives on Spoon Isle near a group of arguing pirates. Talk to one of the pirates and say "What are you guys arguing about?": They can’t decide who should be in charge of hiding the Summoning Artifact. Say "Maybe there’s a fair way to settle your argument.". Say "How about a staring contest? First one to blink loses!".
While the two pirates are staring at each other, select the bottom topic to make the two pirates look around. Select the pyrite parrot from the inventory and use it on the empty treasure chest. The two pirates will carry the treasure chest with the parrot off to a different island. Run south and return to the raft.
Spinner Cay
Run south down pier and go up the plank to board the Screaming Narwhal. Look at the map on the wall and select Brillig Island at the top-right corner of the map.
Brillig Island
Guybrush will hear the squawk of the pyrite parrot that the two arguing pirates buried earlier on. Walk over to the left side of the island and Guybrush will automatically dig to find the treasure chest containing the pyrite pirate and the Summoning Artifact.
A cutscene is shown where the Marquis De Singe offers LeFlay quadruple the money if she brings Guybrush back to him alive. After the cutscene, use the rowboat to return to the Screaming Narhwhal. Select the Jerkbait Islands on the map. Return to the raft.
Spoon Isle
Run north to enter the jungle and then go east to the fishing well:
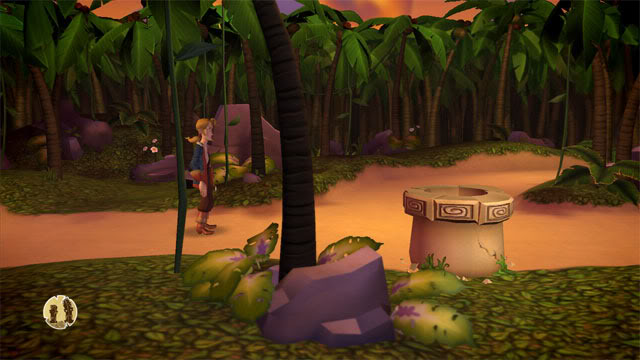
Don’t worry about taking the fish eggs coupon on the fishing well; the coupon can be given to Anemone at the bait and repair shop to receive some fish eggs, but the fish eggs are a useless item as no fish can be caught. Combine the hook with the glowy bait in the inventory and Guybrush will automatically fish the summoning fish artifact out of the fishing well.
Run west twice, north twice and then west to see LeChuck. He tells Guybrush that he needs help to retrieve the summoning artifact from the altar. Take the oyster coupon on the ground:
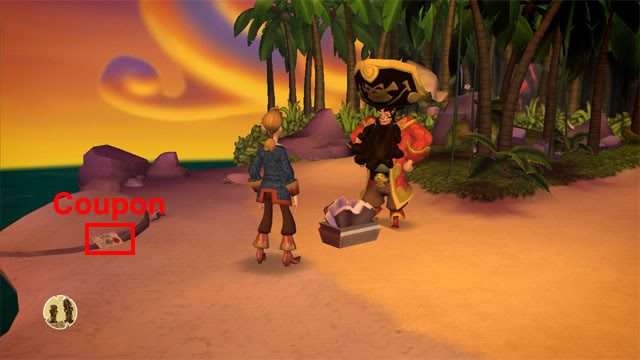
Select the image of the totem poles at the bottom-left corner of the screen to return to the jungle entrance. Run south to return to the raft.
Spinner Cay
Return to the Bait and Repair shop. Give the oyster coupon to Anemone to receive an oyster. Examine the oyster to find a pearl. Return to the raft.
Spoon Isle
Run north to enter the jungle. Run west, north twice and west to return to LeChuck. Give the pearl to LeChuck. Talk to LeChuck and say "So, how much longer do you think?": He asks Guybrush for some help. Say "What are you carrying with you?". You now need to tell LeChuck the correct items that need to be used. Say "Use", "pearl", "claw thingie" and LeChuck will make the Merfolk key.
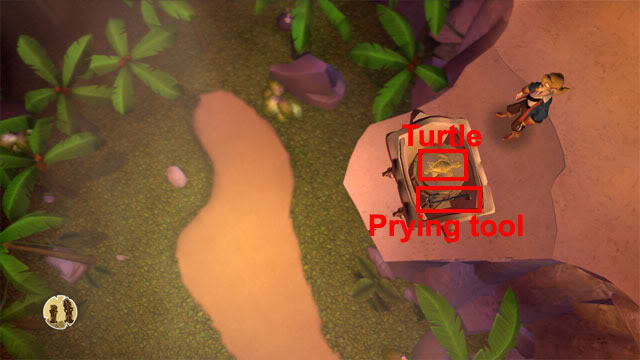
Talk to LeChuck again and say "You look like you are still struggling, need some more help?". Say "Use", "Merfolk key", "clamshell lock" and LeChuck will insert the key into the clamshell lock. Walk east and use the ancient tool in the other clamshell to open the altar. Walk west to the altar and take the prying tool below the turtle artifact:
Use the prying tool on the turtle artifact to attempt to remove it. Give the prying tool to LeChuck and he will remove the artifact. After Guybrush falls down the cliff, take the prying tool by the rock:
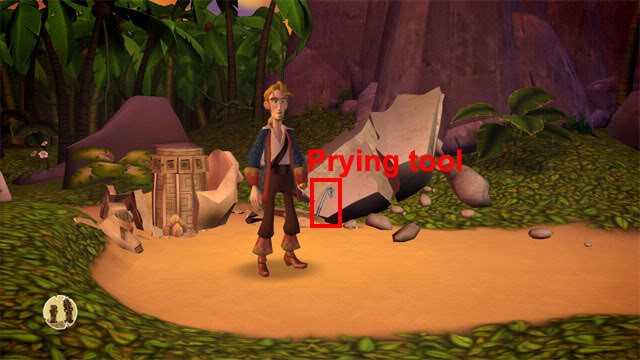
Run east to take the turtle artifact from LeChuck. Exit the jungle and return to the raft.
Spinner Cay
Guybrush steps off the raft and sees that Spinner Cay is under attack from McGillicutty. Go to the library and move the fallen statue to free Elaine. Use the bucket on the hot coals to pick them up:
Go upstairs to the royal chamber. Walk around to the other side of the throne and and turn the hot tub controls to take the controls:
Return to the raft.
Spoon Isle
Run north to enter the jungle. Go east and then north-east to see LeChuck being ambushed by the group of pirates. Run west to the Vacaylian ruins. Use the hot tub control and the bucket o’ coals on the ruins. Turn the hot tub controls to increase the heat. Use the pyrite parrot on the ruins to take the bowl of melted pyrite. Run west, north and west to the cliff. Use the melted pyrite on the cliff edge.
If you got to the cliff quickly enough and used the bowl of melted pyrite then you can skip this paragraph. The melted pyrite will turn into hardened pyrite if it has been kept in the inventory for too long. If you have the bowl of hardened pyrite, use it on the cliff edge and it will drop down to the bottom of the cliff. Enter the jungle.
Go south four times and west to the bottom of the cliff. Take the hardened pyrite on the ground at the bottom of the broken Merfolk display. Go east, north three times and east to the Vacaylian ruins. Use the bowl of hardened pyrite on the ruins to get another bowl of melted pyrite. Go west, north and west to return to the top of the cliff. Use the melted pyrite on the cliff edge.
Enter the jungle. Go south four times and west to the bottom of the cliff to see that the melted pyrite landed in the top of the broken Merfolk display. Use the prying tool on the artifact on top of Merfolk display to take the fake turtle artifact. Go east, north three times and east twice to return to LeChuck. Give the fake turtle artifact to LeChuck and the pirates will leave. Select any topic when LeChuck asks Guybrush what Elaine wanted him to do. Return to the jungle entrance and go south to return to the raft. Select the bottom two ships to find the weak point in the blockade:
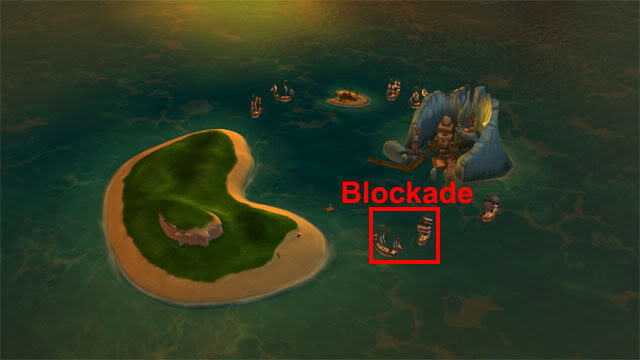
Blockade
Sail through the gap in the blockade to board the Screaming Narwhal.
Screaming Narwhal
Look at the map on the wall and select McGillicutty’s ship. Talk to McGillicutty and select the third speech option to insult him: He shoots a cannonball at the Screaming Narwhal and breaks the mast. Look at the map on the wall and select Brillig Island.
Brillig Island
Guybrush sees Hardtack and Trenchfoot searching for the treasure they were sure they left on the island. Talk to Hardtack or Trenchfoot and say "So… can’t find the treasure, huh?". Say "I think I see a bit of the chest poking out by the tree." and Trenchfoot will dig under the palm tree. Exit the conversation. Push the palm tree and it will fall over. Return to the rowboat and select the Jerkbait Islands.
Spinner Cay
Go to Anemone’s ship repair shop. Talk to Anemone and say "I found a tree you can use to repair my mast!". Exit the conversation and return to the Screaming Narwhal.
The Screaming Narwhal
Look at the map on the wall and select McGillicutty’s ship. Talk to McGillicutty and select the third option to insult him again. This time, the cannonball rebounds off the rubber tree mast and sinks McGillicutty’s ship. Look at the map on the wall and return to the Jerkbait Islands.
Spinner Cay
Guybrush returns to the royal chamber to talk to the Merfolk leader. Say "I need to find La Esponja Grande." to receive the summoning ball artifact. Go to the end of the dock near the no fishing sign and use the summoning ball artifact on the ocean. Select any topic when Winslow asks if Guybrush is ready to go to start following the sea creatures. When LeFlay boards the ship and threatens to kill Winslow, talk to LeFlay about all of the topics to complete the episode.
“;
