![Digimon UP Tier List [Supports, Buddies, and Partners]](/wp-content/uploads/2026/07/digimon-up-tier-list.jpg "Digimon UP Tier List [Supports, Buddies, and Partners]")
Digimon UP Tier List [Supports, Buddies, and Partners]
These Digimon will get you UP the leaderboard.


![Haze Seas Boss Drops [Chances, Locations, and How to Spawn]](/wp-content/uploads/2026/07/haze-seas-boss-drops.jpg "Haze Seas Boss Drops [Chances, Locations, and How to Spawn]")

Welcome to Gamezebo's walkthrough for Tales of Monkey Island: Chapter 1 – Launch of the Screaming Narwhal.GENERAL TIPS CONTROLS Hold down the left mouse button and then move the mouse in a direction to make Guybrush walk in that direction. In most areas you can also hold down the right mouse button while Guybrush is walking to make him run. Alternatively, the keyboard keys W, A, S and D can be used to make Guybrush walk, and the shift key can be held down at the same time to make him…

a:1:i:0;a:2:s:13:”section_title”;s:75:”Tales of Monkey Island: Ch. 1 – Launch of the Screaming Narwhal Walkthrough”;s:12:”section_body”;s:34836:”
Welcome to Gamezebo’s walkthrough for Tales of Monkey Island: Chapter 1 – Launch of the Screaming Narwhal.
GENERAL TIPS
CONTROLS
SAVING AND LOADING
To save, press ESC to bring up the menu and then click Save & Load. Use the red arrows to scroll through to a blank saved game and then click the Save Game button. Saved games are given a location, date, time and description of what has happened in the adventure so far. To load, press ESC to bring up the menu and then click Save & Load. Use the red arrows to scroll through to a previously saved game and then click the Load Game button.
INVENTORY
Press the I key to bring up the inventory. Left click to select an item and it will be tagged onto the cursor. The item will glow green when it is moved over an object in the playing area that it can be used on. Some objects can also be combined by using them on another item in the inventory window. To combine objects, place an object in each of the circles at the left side of the inventory window and then press the plus sign between the circles to try and combine them. Objects can also be examined by selecting the magnifying glass at the top-left corner of the inventory window and then selecting the item.
ITEM LIST
Action Figure

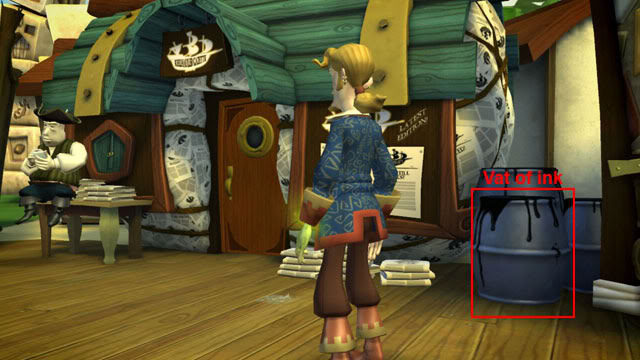
Found by telling D’oro to look at Dark Ninja Dave and then taking an action figure from the pile of dolls when he looks away. It is used on the vat of ink at the right side of the Keelhauler Gazette to make the ink-stained action figure.
Ancient Door Face

Found on the ground after the unbreakable bottle breaker has been used on the crystal nose on the ancient portal. It is shown to De Singe after Guybrush tells him that he has proof he is up to no good.
Ancient Scroll

Found by combining the unbreakable bottle with the unbreakable bottle breaker. It is combined with the eye of the manatee to make Hemlock’s map.
Ancient Tool

Found after Guybrush tricks De Singe into thinking he has entered the ancient portal. It is used on the clamshell near the giant statue in the jungle to make four idols appear. After selecting the correct order of icons on the idols, the ancient tool is then used on the clamshells next to the idols.
Ancient Weather Vane

Found on the ground outside the Voodoo Lady’s shack after Guybrush has talked to the Voodoo Lady. While following Hemlock’s map, the weather vane can be examined at locations marked with a cloud to point the correct exit to follow. It is used on the idols in the jungle to see which order the icons should be placed.
Breath Mints

Available at the start of the prologue. They are combined with the root beer to make the fizzy root beer. After the chuck roots have been used on the barrel of grog on LeChuck’s ship, the breath mints are used on the barrel of root grog to make the barrel of enchanted root grog.
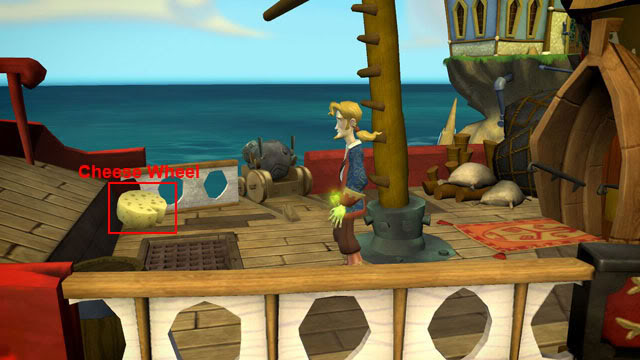
Cheese Wheel

Found on the lower deck of the Screaming Narwhal. It is used on the jail carvings below the windows of the jail at the right side of the courthouse to make the imprinted cheese wheel.
Chuck Roots

Found by using the cutlass on Chuck the Plant on LeChuck’s ship in the prologue. It is used on the barrel of grog on LeChuck’s ship to make the barrel of root grog.
Cutlass

Available at the start of the prologue. It is combined with the fizzy root beer to drop the fizzy root beer on the deck of Guybrush’s ship. It is used on Chuck the Plant on LeChuck’s ship to get Chuck roots. After the chuck roots and the breath mints have been used on the barrel of grog on LeChuck’s ship, the cutlass is used on the barrel of enchanted root grog to get the enchanted cutlass.
Deep Gut Map

Given by Davey Nipperkin after Guybrush gets him three news stories. It is looked at to find the way to Deep Gut’s shack in the jungle.
D’oro’s Map

Found when Guybrush asks D’oro if he can look at his map. It is used on the wishing well in the jungle. It is looked at to see directions to the X in the jungle.
Enchanted Cutlass

Found by using the cutlass on the barrel of enchanted root grog on LeChuck’s ship in the prologue. It is used on LeChuck.
Eye of the Manatee

Found by talking to Hemlock McGee about the ancient scroll. It is combined with the ancient scroll to make Hemlock’s map.
Fizzy Root Beer

Made by combining the breath mints with the root beer. It is combined with the cutlass to drop the fizzy root beer on the deck of Guybrush’s ship.
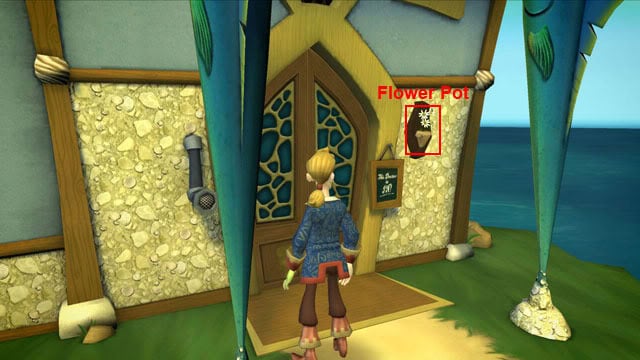
Flower Pot

Found outside the Marquis De Singe’s house. While following Hemlock’s map to the ancient portal, the flower pot is used on the wishing well. It is used on the enigmatic idol in the jungle to replace the nose.
Grogatini Sword

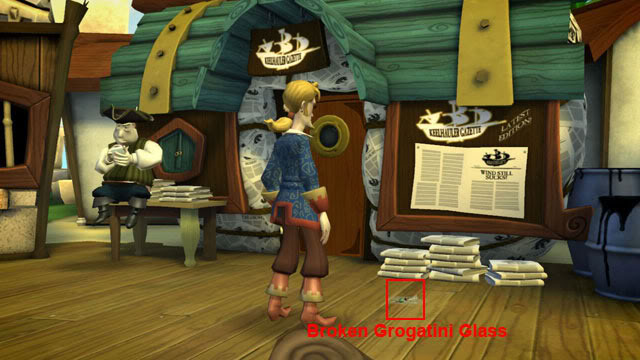
Found by looking at the broken grogatini glass on the floor outside the Keelhauler Gazette after Guybrush causes a fight in Club 41. It is combined with the ink-stained action figure to make the ninja action figure.
Hemlock’s Map

Made by combining the eye of the manatee with the ancient scroll. It is used on the altar in the jungle. It is looked at to see the way to the ancient portal.
Imprinted Cheese Wheel

Found by using the cheese wheel on the jail carvings below the windows of the jail at the right side of the courthouse. It is used on the strange idol in the jungle.
Ink-Stained Action Figure

Found by using the action figure on the vat of ink at the right side of the Keelhauler Gazette. It is combined with the grogatini sword to make the ninja action figure.
Lit Mini-Bomb

After Guybrush has created a fire near the Screaming Narwhal, the mini-bomb is used on the grease fire to make the lit mini-bomb. It is used on the frilly pink underwear on the washing line.
Locket

Given during the conversation with the Voodoo Lady. It is not used.
Membership Card

Found by looking at the socks on the washing line near the Screaming Narwhal. It is shown to the doorman after Guybrush knocks on the door to Club 41.
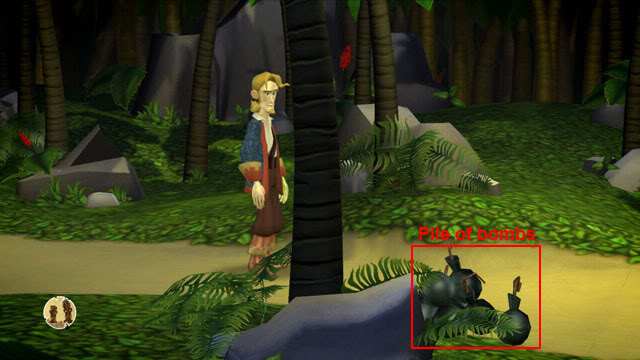
Mini-Bomb

Found on the ground one screen east of the wishing well in the jungle. After Guybrush has created a fire near the Screaming Narwhal, the mini-bomb is used on the grease fire to make the lit mini-bomb.
Monkey Coffin

Found on the top deck of Guybrush’s ship in the prologue. It is examined in the inventory to find the bottle of root beer.
Ninja Action Figure

Made by combining the grogatini sword with the ink-stained action figure. It is used on the X in the jungle after Guybrush has followed D’oro’s map.
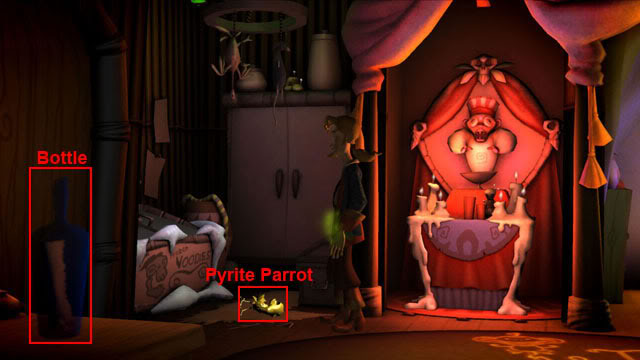
Pyrite Parrot

Found on the floor in the Voodoo Lady’s shack after Guybrush talks to the parrot. After the unbreakable bottle breaker has been used on the crystal nose on the ancient portal, the pyrite parrot is used on the nasal cavity on the ancient portal.
Root Beer

Found by examining the monkey coffin in the inventory. It is combined with the breath mints to make the fizzy root beer.
U Tube

Found by asking Crimpdigit for a free vowel tube. After Guybrush tells De Singe to look at King Louis near the messed up idol in the jungle, the U tube is used in the rifle.
Unbreakable Bottle

Found in the foreground at the bottom-left corner of the Voodoo Lady’s shack. After escaping from De Singe’s house, it is combined with the unbreakable bottle breaker to get the ancient scroll.
Unbreakable Bottle Breaker

Found outside Crimpdigit’s shop after Guybrush has used the cannon on the Screaming Narwhal to break his glass unicorns. After escaping from De Singe’s house, it is combined with the unbreakable bottle to get the ancient scroll. It is used on the crystal nose on the ancient portal.
WALKTHROUGH
Prologue
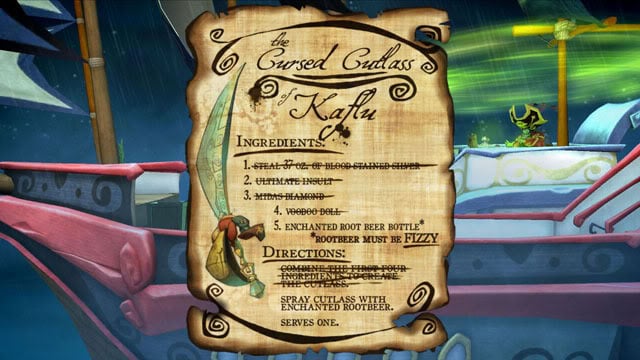
The game starts aboard Guybrush’s ship. Walk over to the mast on the left and select the voodoo recipe to see that the fizzy root beer is the remaining ingredient needed to make the cursed cutlass of Kaflu:
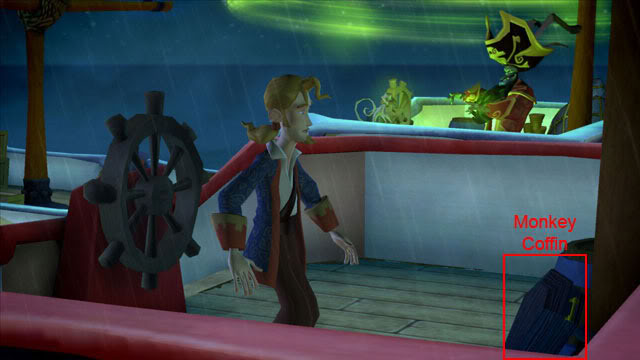
Remember that to walk you can either hold down the left mouse button and drag the mouse or use the keys W, A, S and D on the keyboard. Walk up the steps at the right side of the ship and take the monkey coffin on the floor near the barrel:
Move the mouse cursor to the right side of the screen and select the tab that appears to open the inventory. Select the magnifying glass at the top-left corner of the inventory window and then select the coffin to find a bottle of root beer. There are two circles at the left side of the inventory window. Put the cutlass in the top circle and the root beer in the bottom circle. Select the plus sign between the two circles to combine the two items:

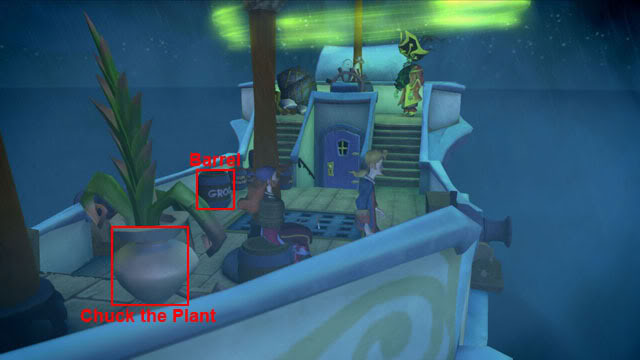
After combining the cutlass and the root beer, Guybrush notices that the root beer is currently flat. Put the breath mints in the top circle and the root beer in the bottom circle and then press the plus sign again to to make the fizzy root beer. Combine the cutlass with the fizzy root beer: Guybrush manages to drop the root beer all over the deck of his ship. Walk to the left side of the ship and talk to Elaine. Say "Throw me the rope!" to board LeChuck’s ship. Walk to the front of the ship and use the cutlass on Chuck the Plant to get Chuck roots:
Walk over to the barrel of grog and use the Chuck roots on the barrel. Use the breath mints on the barrel of root grog to make the enchanted root grog. Use the cutlass on the barrel of enchanted root grog. Use the enchanted cutlass on LeChuck. After a lengthy cut-scene, Guybrush arrives on Flotsam Island.
First News Story – Bar Fight
Davey Nipperkin introduces himself to Guybrush as the senior reporter of the Keelhauler Gazette on Flotsam Island. Select any topics when talking to him. He mentions the constant winds that blow inland, trapping everyone on the island, and that the only person who might know a way off the island is Deep Gut. He says that he will say where Deep Gut can be found if Guybrush can come up with some interesting local news.
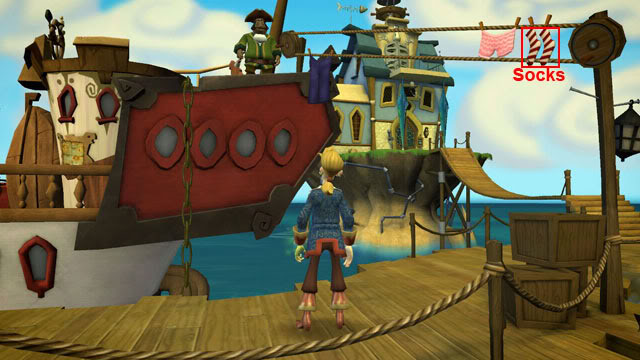
Walk to the other side of the town to meet Reginald Winslow, the Captain of the Screaming Narwhal. Say "See ya." to exit the conversation with Winslow. Select the socks on the washing line to find Winslow’s membership card to Club 41:
Walk back to Club 41 at the right side of the Keelkauler Gazette and knock on the door to show the membership card to the doorman. Guybrush is allowed inside the pub, and leaves a few seconds later after causing a fight.
Second News Story – Buried Treasure
Walk left to the Keelhauler Gazette and look at the broken grogatini glass on the floor to get the grogatini sword:
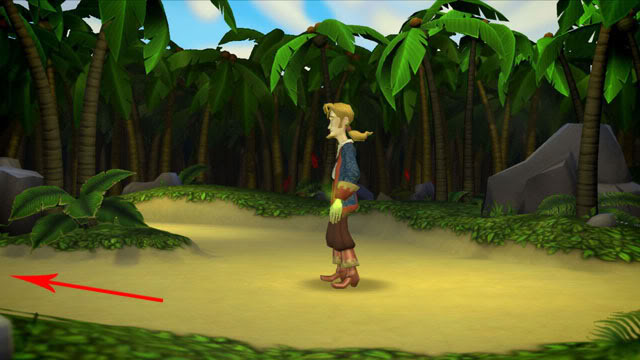
Run west to the glassblower’s house and talk to Crimpdigit. Say "What’s this Alphabet Sale all about?": He makes unbreakable tubes in the shapes of letters. Say "I think I’d like one of those free vowel tubes." to get a U tube. Run up the path between the two pillars at the right side of Crimpdigit’s house to enter the jungle. Run west and take the bottom path at the fork:
Talk to the pirate playing with the action figures and say "What kind of treasure do you hunt?". Say "What are Porcelain Power Pirates?". Say "How many Porcelain Power Pirates do you have left?": The only porcelain pirate he hasn’t found is Dark Ninja Dave. Say "Mind if I take a look at that map?" to get the map. Scroll down the list of topics and say "Look, it’s Dark Ninja Dave!". When D’oro turns around to look, select the pile of dolls to get an action figure. Exit the jungle to view a map of Flotsam Island. Select the dock. Run east one screen and use the action figure in the vat of ink at the right side of the Keelhauler Gazette:
Combine the grogatini sword with the ink-stained action figure in the inventory to make the ninja action figure. Return to the jungle entrance and run west along the bottom path to see D’oro. Examine the map from the inventory to see that the start point is a wishing well. Go north from D’oro to arrive in the wishing well area. Use D’oro’s map on the wishing well to start the treasure hunt. Examine the map again to see that each step on the way to the treasure is represented by an animal:
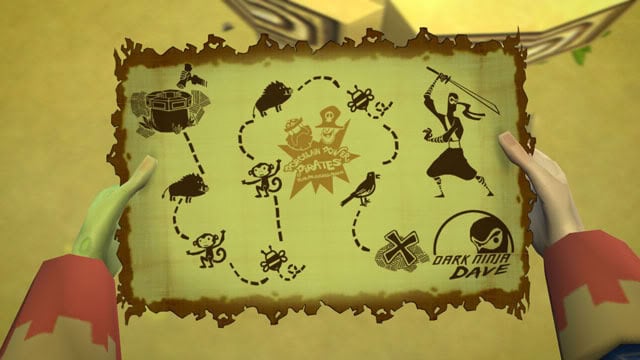
The first step on the map is represented by a warthog, the second step by a monkey and so on. When Guybrush starts walking down one of the paths, a noise of an animal is heard so that you can identify if you are going the correct way. The correct path from the wishing well is east twice, north, south twice, north and west. If the directions were followed correctly, Guybrush will arrive in an area with an X marks the spot.
Someone has already dug up the treasure, so use the ninja action figure on the X marks the spot to bury it. Run west to exit the jungle. Return to the jungle entrance and run west along the bottom path. Talk to D’oro and say "Good news! Your map isn’t a rip-off!". Guybrush leads D’oro to the buried treasure and Nipperkin writes down his second news story.
Third News Story – Seizing a Boat
Run west to view the island map. Return to the jungle entrance and run west along the bottom path to where D’oro used to be. Run north one screen to the wishing well and then east one screen. Take the pile of bombs on the ground:
Exit the jungle and return to the Screaming Narwhal. Try to climb up the plank to leave a smear of grease on the dock. Try climbing up the anchor chain on the ship. Winslow will throw a bucket of hot coals at Guybrush and one of the coals will catch fire on the grease smear. Use a mini-bomb on the grease fire. Use the lit mini-bomb on the frilly pink underwear on the washing line. Use the washing line to blast Winslow off his ship.
Meeting Deep Gut
Return to the jungle entrance. Run west along the bottom path to where D’oro used to be sitting. Examine the map in the inventory to see directions to Deep Gut’s shack along with the password "Deadline":

Run west once and north three times to arrive outside Deep Gut’s shack. Knock on the door and say the password "Deadline" to be invited inside. Talk to the Voodoo Lady about all topics: The Pox of LeChuck has infected Guybrush’s hand and the only cure is a legendary sea sponge known as Le Esponja Grande. Look at the parrot skeleton: It copies what Guybrush says to it. Walk over to the left side of the room and get the pyrite parrot on the floor and the interesting bottle on the desk in the foreground:
The voodoo lady says that the bottle is unbreakable and that it contains an ancient scroll. Exit the shack.
Breaking the Bottle
Take the ancient weather vane outside the shack that fell down when Guybrush shouted. Run east to return to the dock to see that the Pox of LeChuck is now hovering above the island. Run down the path and talk to Crimpdigit. Say "Know anything about unbreakable bottles?": Crimpdigit demonstrates how he opens the bottles using his unbreakable bottle breaker. Return to the Screaming Narwhal and jump on the anchor chain to board the ship. Winslow asks if he can be the first mate, so select any topic to agree. Run downstairs to the lower deck and take the cheese wheel:
Use the cannon to break Crimpdigit’s unicorns. Exit the ship and return to Crimpdigit’s shop to see that he has gone inside. Take the unbreakable bottle breaker. Combine the unbreakable bottle with the unbreakable bottle breaker: Guybrush’s hand won’t let him break it. Run west and cross over the bridge to the doctor’s house. Take the flower pot on the wall:
Knock on the door to be invited inside the house by the doctor, the Marquis De Singe. Talk about all topics with De Singe, who then decides the best course of action is to cut off Guybrush’s infected hand. He straps Guybrush into a chair and leaves him for a few minutes to fetch his guillotine. Guybrush now has to perform a series of actions from the chair in order to escape from De Singe. The A and D keys are used to rotate the chair left and right, and the W and S keys are used to lie back and sit up.
Face east, lean back and select the key to take it. Face north and use the key on the monkey cage. Face west and use the bell to make the monkey change the slide. Sit up and use the right pedal to make a banana drop down. Use the left pedal to shock the monkey and make a picture of Guybrush’s hand drop down. Face south and take the picture of Guybrush’s hand. Face west, lean back and use the picture on the box of other pictures.
Ring the bell to call the monkey. Sit up and use the right pedal to make a banana drop down. Press the left pedal and the key will stick to the monkey’s tail. Lean back and use the bell to call the monkey back over. Sit up and use the right pedal to get the key and escape from De Singe’s house. Combine the unbreakable bottle with the unbreakable bottle breaker in the inventory to get the ancient scroll from the bottle.
Tricking De Singe
Run east to the courthouse and talk to the crusty pirate, Hemlock McGee. Say "Can you help me with these crazy winds?". Say "What a coincidence, I’ve got an indecipherable ancient scroll too!". Select any topic to receive the eye of the manatee. Return to the jungle entrance. Combine the eye of the manatee with the ancient scroll in the inventory to read it: The directions start from an altar. Run west along the bottom path to return to where D’oro used to be and then run east to the altar:
Use Hemlock’s map on the altar to start following the map. As with before, the aim is to follow the steps on the map by listening to the sounds of the animals, only this time you can examine the weather vane in the inventory at steps marked with a cloud to identify the correct exit. Go south, west and north to the wishing well. Use the flower pot from on the wishing well to continue following the map. Run east and then west twice to the calendar area.
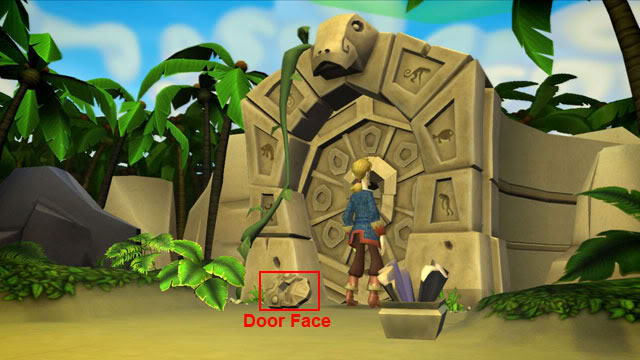
Walk anti-clockwise around the calendar until the screen shakes. Go north to the ancient portal to see De Singe walk out. Use the unbreakable bottle breaker on the crystal nose on the portal. Use the pyrite parrot on the nasal cavity. Take the weird door face on the ground:
Run east to the gap in the pillars to exit the jungle. Return to the dock. Cross over the bridge to De Singe’s house and say "I’ve got PROOF you’re up to no good!" to show De Singe the ancient door face. De Singe follows Guybrush back to the ancient portal.
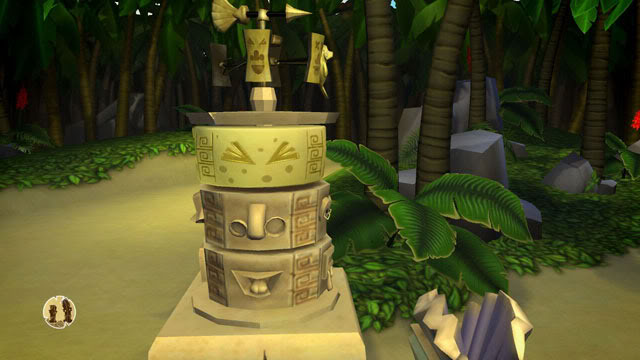
Summoning the Wind Gods
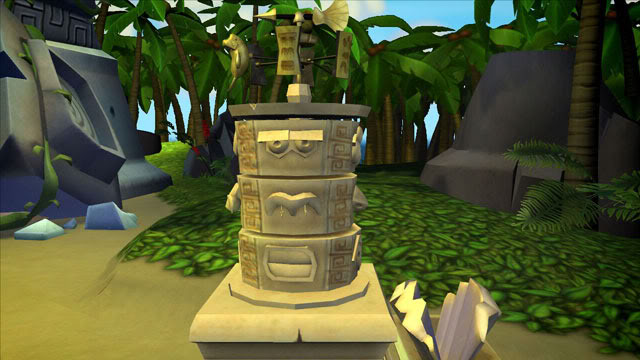
Use the ancient tool on the clamshell to make four idols rise in the jungle. Use the ancient weather vane on top of the mysterious idol in the statue area. Turn the wheels on the idol until they match the three icons on the weather vane:
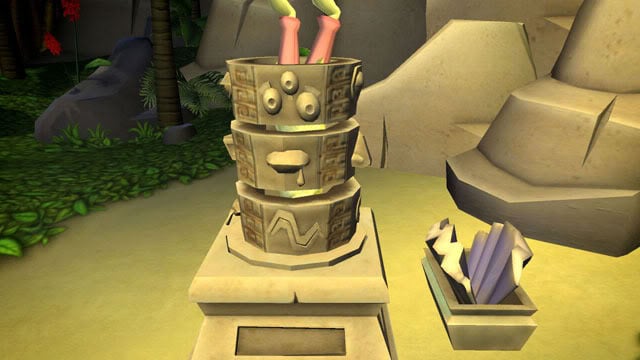
Use the ancient tool on the clamshell to summon the first wind god: De Singe appears and shoots Guybrush back to the jungle entrance. Run east to exit the jungle. Return to the jungle entrance and run west along the bottom path to where D’oro used to be. Run west, north, east and west to the second idol. Put the weather vane on the enigmatic idol, look at the idol and then spin the wheels to see that the idol is missing a nose. Use the flower pot on the idol to fix a nose onto it. Match the symbols on the wheels with the symbols on the weather vane:
Use the ancient tool on the clamshell to summon the second wind god. Exit the jungle and return to the dock. Go to the jail at the right side of the courthouse and use the cheese wheel on the jail carvings below the windows to get the imprinted cheese wheel. Return to the jungle. Go back to where D’oro used to be and then run west to the strange idol to see that a wheel is missing. Use the imprinted cheese wheel on the idol. Use the weather vane on the idol. Look at the idol and then spin the wheels so that it matches the symbols on the weather vane:
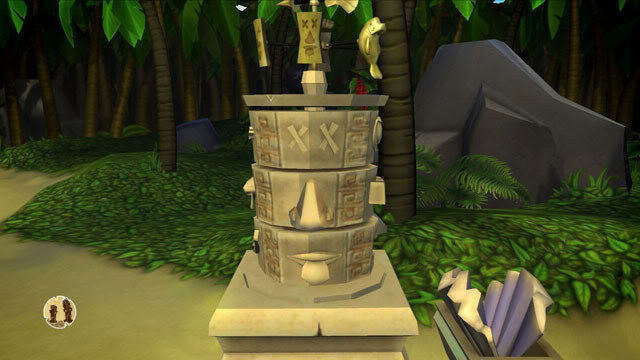
Use the ancient tool on the clamshell to summon the third wind god. Return to the jungle entrance. Run west along the bottom path to D’oro’s area and then run east twice to see De Singe again. Say "Look, it’s King Louis!". When De Singe turns around to look, use the U tube in the rifle. Look at the messed up idol. Spin the top wheel and listen to De Singe: He will scream in pain if it is the incorrect symbol or pleasure if it is the correct symbol. Do the same thing for the middle and bottom wheels and then use the ancient tool on the clamshell:
The Screaming Narwhal
Select any option when Winslow asks where to go to now: Guybrush’s hand doesn’t let him finish the sentence. Go upstairs and use the wheel to tilt the ship and move the tar barrel toward the cannon on the lower deck. Go downstairs and use the cannon to spill oil over the deck. Look at the map on the wall near the bottom of the stairs:
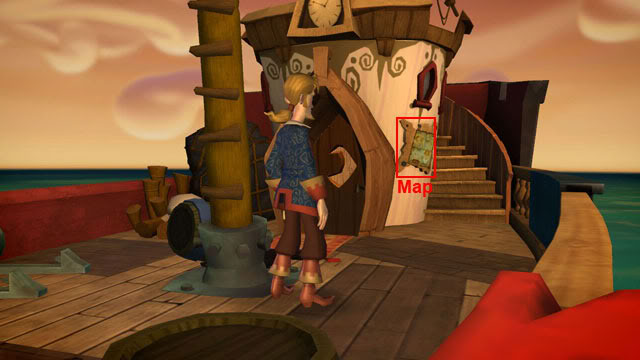
The hand will knock Guybrush over and he becomes stuck in the puddle of tar. Talk to Winslow to complete the episode.
“;
