- Wondering how to get Monopoly GO! free rolls? Well, you’ve come to the right place. In this guide, we provide you with a bunch of tips and tricks to get some free rolls for the hit new mobile game. We’ll …
Best Roblox Horror Games to Play Right Now – Updated Weekly
By Adele Wilson
Our Best Roblox Horror Games guide features the scariest and most creative experiences to play right now on the platform!The BEST Roblox Games of The Week – Games You Need To Play!
By Sho Roberts
Our feature shares our pick for the Best Roblox Games of the week! With our feature, we guarantee you'll find something new to play!All Grades in Type Soul – Each Race Explained
By Adele Wilson
Our All Grades in Type Soul guide lists every grade in the game for all races, including how to increase your grade quickly!
Surface: The Soaring City Walkthrough
Surface: The Soaring City is a hidden-object puzzle game that takes you on a whimsical journey of two brothers – one of which is the famous inventor “Jeremy Stevens,” who has invented a floating city and the ability for human beings to fly! As happy as this makes the human race, the evil “Thunder” will do whatever it takes to stop anyone else from dominating the sky. Help Jeremy’s brother rescue him while locating hidden objects and completing fun mini-games. Gamezebo’s strategy guide will provide you with detailed images, tips, hints, and information to help you play your best game.
Game Introduction – Surface: The Soaring City
Surface: The Soaring City is a hidden-object puzzle game that takes you on a whimsical journey of two brothers – one of which is the famous inventor “Jeremy Stevens,” who has invented a floating city and the ability for human beings to fly! As happy as this makes the human race, the evil “Thunder” will do whatever it takes to stop anyone else from dominating the sky. Help Jeremy’s brother rescue him while locating hidden objects and completing fun mini-games. Gamezebo’s strategy guide will provide you with detailed images, tips, hints, and information to help you play your best game.
General Tips
- Surface: The Soaring City may be found by clicking on “Buy Now” at the top of this page.
- There are eight chapters of regular game play and once you complete them there is a bonus chapter.
- From the main menu there are several game “Extras” for you such as concept art, sound clips, video clips and more.
- This guide will give you the solutions to the regular game play chapters only and is played in “Casual mode”
- This strategy guide is written to help you progress in the game with more detailed information than what is given in a general game tutorial. Images will be provided and key elements will be marked and/or color coded to help you understand them. You will be shown solutions to mini game puzzles and how to move from one location to the next. Note – There may be more than one way to complete this game in such that some steps can be taken in a different order. This walkthrough will show you how to get through the game from start to finish in a most efficient manner.
- Items in images will be marked with a letter or number and may also be color coded to help you keep your steps in sequence. Any key items to be placed in your inventory will be written in all capital letters. As you place items in your inventory, they will be shown along the bottom of the screen which activates by placing your cursor in that area which causes it to lift up from the bottom. Once the inventory menu lifts up you can use the arrows along the sides to scroll through your items.

Main Menu
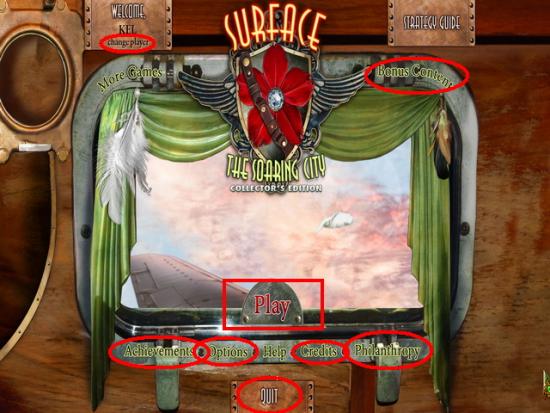
- The main menu screen is shown here and its features are circled.
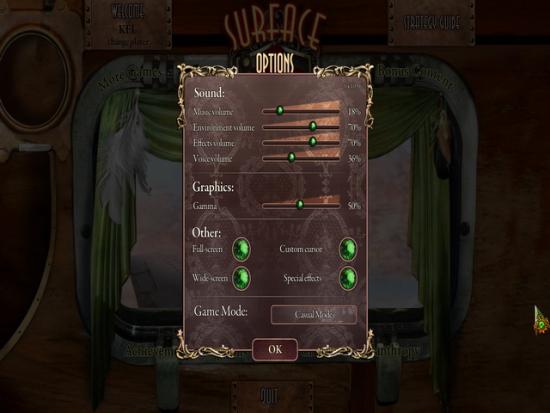
- “Options” – From the main menu click on the “Options” button where you can control the volume of game music, sound effects, and character speech by dragging the button from left to right where you will hear the sound volume as you adjust it.
- You may also set the game to play in full screen or windowed mode in this menu as well as choose a custom cursor and choose from the three difficulty modes.
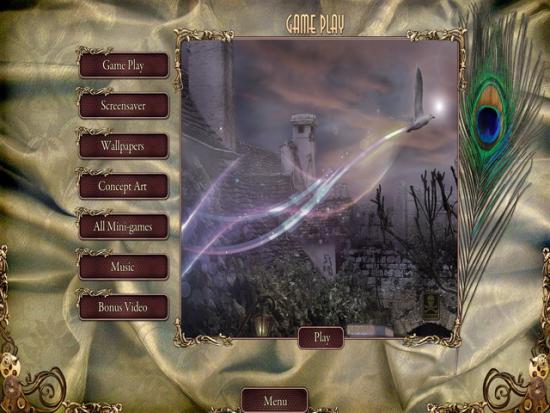
- “Extras” – Once you complete the game (Collector’s Edition) you will unlock many great extras in the game such as a bonus level, screen savers, concept art, videos, mini game puzzles, wallpapers, and music clips you can save to your computer.
Create and Choose User Profile
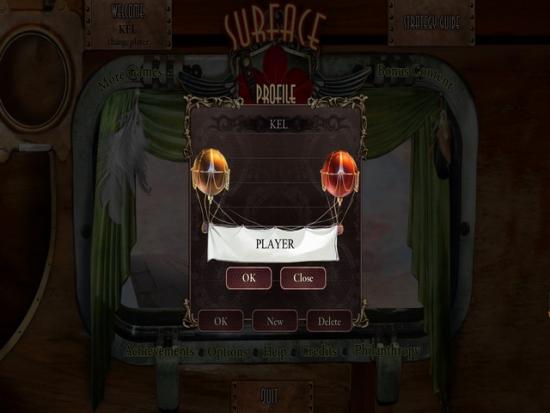
- Profile/Username – To begin enter a username of your choice with up to ten characters.
- The game will allow up to eight different profiles.
- The username/profile currently in use is located at the bottom left of the main menu when you load the game. Click on the username to go to the profile menu and create a new one or change it. Once you have the correct username simply click on the white “Play” button in the main menu to begin or continue where you left off.
- You have the option to play up to nine different games using different user profiles in different difficulty modes. Each time you exit the game it will be automatically saved and you will be brought back to that exact location and user profile when you resume game play.
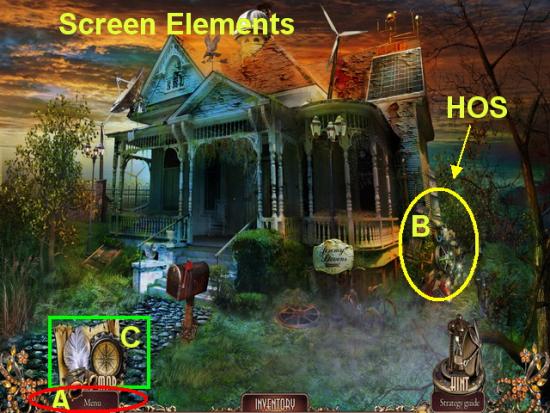
Screen Elements
- You will move your cursor around the screen looking for it to change as it passes over certain areas. You may be able to pick an item up, take a closer look, or read information about it.
(See “Cursors” below for more detailed information) - Click on an item and it will stick to your cursor, then click on the item you wish it to act upon.
- A. Main Menu – Click here when you are ready to return to the main menu to exit the game or change user profiles. Your game will save automatically when you return to the main menu.
- B. Sparkling or Twinkling Effects – Based on the difficulty level you have chosen you will see a slight twinkling effect on certain items which mean you should explore them. The cursor will change depending upon the type of action you need to take. (An area with several sparkling lines indicates a hidden object scene or HOS.)
- C. Game Map – Click here to access the game map. (See below for more information.)
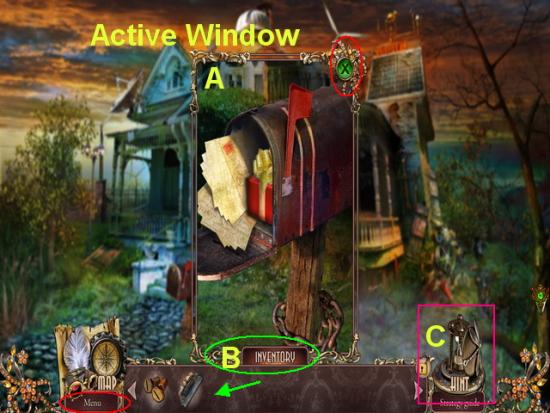
- A. Active Window – When you click on areas which show a magnifying glass cursor you will open another window which is active for a closer look. You will be able to click on items in this window and act upon them in some way.
- B. Inventory – This menu lifts up from the bottom of the screen when you place your cursor in the general area. Here any item you collect will be placed for future use. Once all the slots have filled up arrows will be used on each side allowing you to scroll through your entire inventory items. Click on an item and it will stick to your cursor. If you need to release it just click on any area outside the screen and it will return to its inventory slot.
- You may hover your cursor over an inventory item to see what it is called if needed.
- Once items have been used up they will disappear from your inventory. Some items may return to your inventory because they have multiple uses.
- C. Hint Button – Hints are provided for you if you get stuck and are located along the bottom right of the game screen. There is a timer that shows a sixty second countdown when a hint is used. You are locked out until this countdown is finished. The speed in which the number counts down depends on the difficulty mode you have chosen to play in. Casual mode refills a hint at sixty seconds, advanced mode refills at ninety seconds, and hardcore mode disables hints altogether.
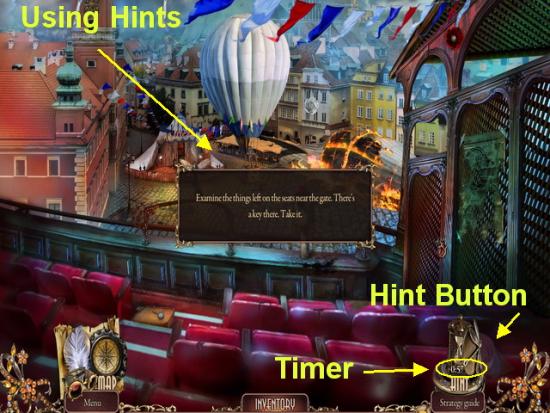
Types of Hints
- Note – There are two types of hints in the game. If you click on hint during the regular game play it will tell you the next possible step you should take in the game in the form of a text instruction at the center of the screen.
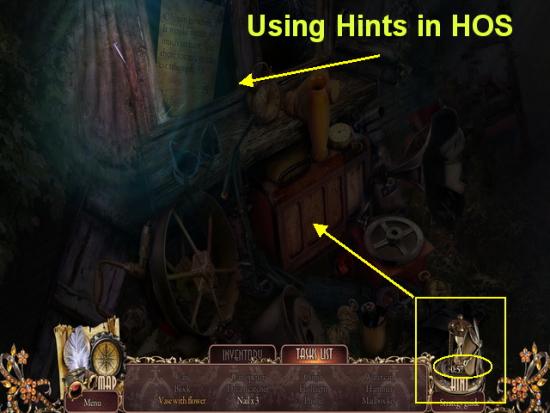
- If you choose hint while in an HOS it will show you where one of the items on the list are located by showing a brief circle of light around the item(s). If more than one item is required which need to be combined you will see both items circled as in the image above. Click on one and then the other to combine then click on it once its combine to eliminate it from the list.
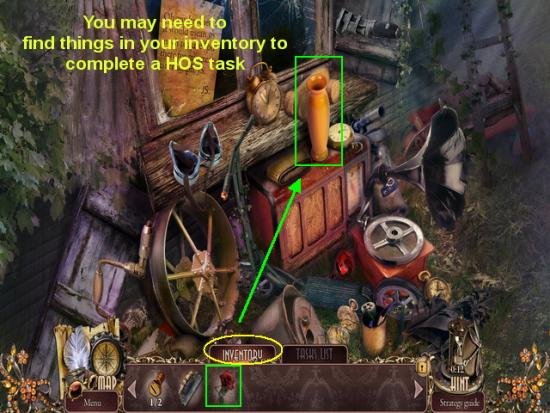
- Using inventory items in HOS – The items shown in the gold text may require you to use an item from your inventory to complete it. Along the top of the list you will see an “inventory” tab. Click on it then take the item and place it in the hidden object scene then click on the item to remove it from your list.
- In example above the task list is “Flower in vase” you will need to take the flower you collected in an earlier scene and place it in the vase then you may click on the combined item to clear it off your task list.
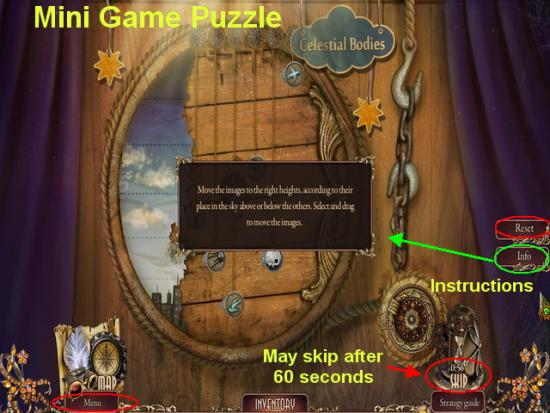
- Mini game instructions – As you play a mini game you can click on an “Info” button located on the left or right side of the screen for detailed instructions. In this guide you will be shown at least one possible solution for each mini game.
- Skipping Mini Games – You have the option to skip any mini game after a certain amount of time unless you are playing in “Hardcore” mode. This is available when the “Skip” button highlights and the speed in which is does so is determined by the difficulty mode you have chosen. Skipping a puzzle will simply allow you to progress without penalty. You must wait sixty seconds of any mini game before you can choose to skip it.
- Note – Skipping a mini game will keep you from completing one of the achievements in the achievements menu.
- Closing windows/Message screens – You can close a screen by either clicking on it or look for an “X” in the upper right hand corner to click on which will close the mini window. To escape mini game puzzle screens simply back out at the bottom by clicking on the down arrow when it appears.
Game Dialogue/Cut Scenes
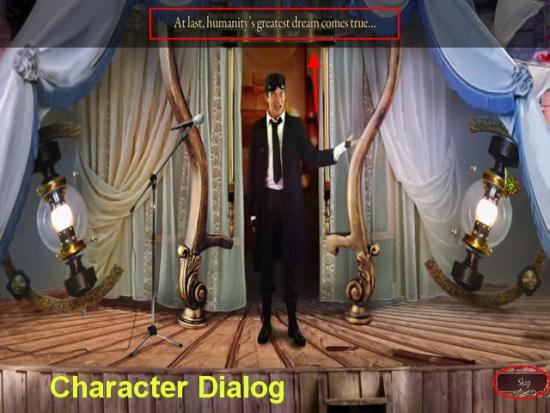
- At the beginning of the game and in between chapters you will see video that is critical to the storyline. Text appears along the top of the screen. You have the option to skip this if you wish by clicking on the button at the bottom right of the game screen.
- As you play there will be several characters in the game you will have speak to you. These are images of real actors imposed into the game. There is a dialogue menu that appears at the top of the screen as shown above and you will hear your character speak this dialogue. You have the option to click on the dialog box itself or along the bottom of the screen to advance to the next group of sentences, or you may click on the “Skip dialogue” button at the top right and it will skip all the dialogue in that particular sequence.
Difficulty /Game Modes
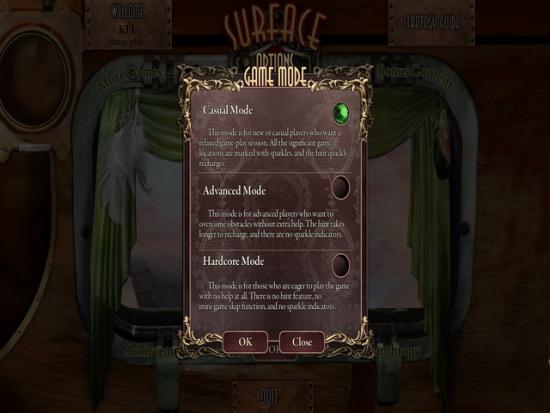
- You may choose between three difficulty modes in the game and you have the option to change your difficulty mode at any time during the game without having to start over. To change your mode go into the main menu and click on “Options” then on “Difficulty Mode”.
- Casual Mode – This is best for beginners or those that want a little help along the way. The “Skip” and “Hint” buttons recharge more quickly and active zones are highlighted with a sparkling effect.
- Advanced Mode – The “Hint” and “Skip” buttons recharge at a slower rate and the active zones do not have any sparkling effects to help you find them.
- Hardcore Mode – The sparkles, hints, and skip buttons do not exist at all in this most challenging mode.
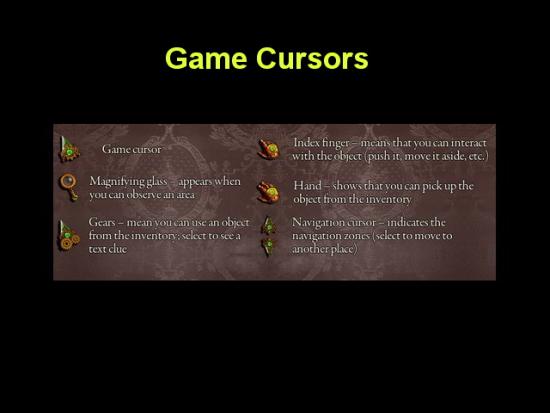
Cursors
- There are six different cursors used in the game and each one is very important in guiding your game play.
- Cursor Arrow – This cursor is simply a pointing arrow and can be changed to a custom cursor in the options menu if you would like to change it.
- Hand – When you place your cursor over an item and it changes to a hand you may click on an item and pick it up. The item will stick to your cursor and you can place it into your inventory or on another item to act upon it.
- Index Finger/Pointing finger – When you see the finger pointing at an object this means you can interact with it in some way.
- Magnifying Glass – When you see this icon click on the area to get a closer look. Usually this will open another window which is active and you can click to find even more items.
- Navigational Arrow – You will see these arrows whenever you can enter a location on the screen. You will also see a text description of the location you are heading. Once you see your cursor change to an arrow click on it and you will be taken to the new location.
- Gear Arrow – When you see gears on an arrow this means the area requires an item from your inventory will need to be placed here to combine the items. The combined item may turn into another inventory item or it may complete a puzzle to help you progress in the game.
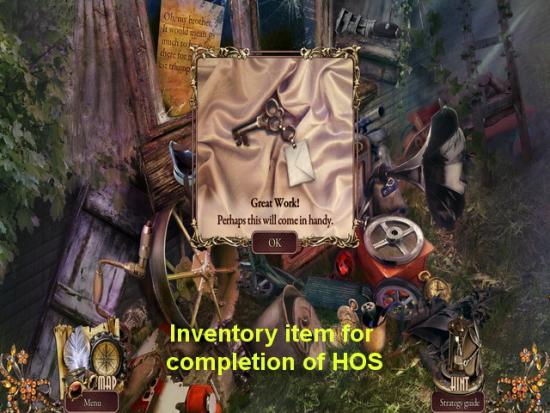
Reward for Completion of HOS
- Your main objective in the game is to find objects in various areas and in hidden object scenes and to use them with other objects to help you find clues, solve mini puzzle games and progress to the next chapter.
- When you find an object that is useful to you a summary screen (usually after the completion of a HOS) a summary will appear telling you that the item is found and will be placed in your inventory.
- Remember some items are parts of other items that will need to be assembled and some are parts for mini game puzzles and you may need to find more than one of an item before it can be used.
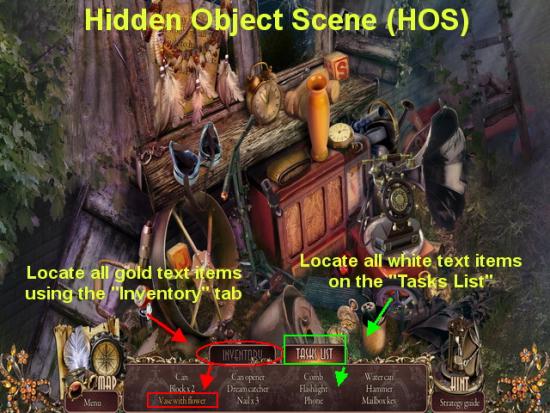
Hidden object scenes
- These are also known as “HOS” in the guide.
- When you see an area with a large number of flowing sparkles over them this is an area you click on to start a hidden object scene. Completion of these scenes will always result in an inventory item you need to complete a task. You may need to complete a task before an area will begin to sparkle and activate as a HOS.
- There is a task list located along the bottom of the screen along with an inventory tab so that you can toggle between the two menus. You must locate all the items on the task list. Those listed in white text you will locate outright. When you click on them they will disappear and the item will disappear from the list.
- Finding interactive items – The items listed in gold text require you to do something to them before you can eliminate them. For example you may notice your cursor changes to the arrow with gears on it when you hover over an item. This means you must find another item either in the HOS or from your inventory menu and combine them to form the needed item. (If you do not have the item in your inventory you may have to exit out of the HOS and find it) If your cursor changes to a hand this means you can pick up this item and place it with another in the scene. You must find the other item in the scene it interacts with and put them together to make the item needed. You may need to place a flower in a vase, cut an item, repair missing parts, or any other kind of action to build the item needed. Once you do this the item will be fully assembled and then you may click on it. All items once you find them will disappear from the picture and the list.
- You must find every item in the list to earn the inventory item at the end. This is an item you will need in the game to proceed in completing another puzzle.
- Note – If you leave a HOS you can come back to it and it will save your progress.
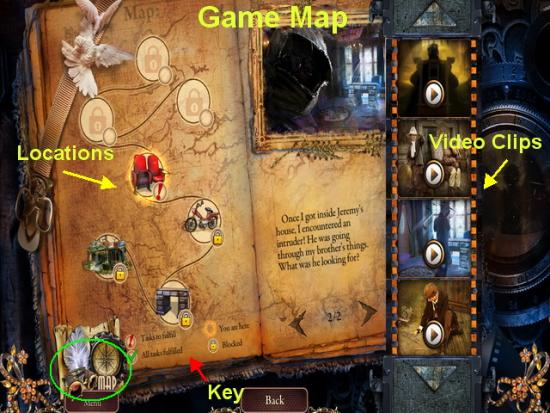
Game Map
- At the bottom left of the game screen you can click on the compass and binocular icon which will take you to the game map. The further along you progress the more helpful this map will become to you as it will allow you to move between locations faster.
- There is a key along the bottom of the map which will tell you where you are, if tasks are available for completion in this location, and if an area is locked or unlocked. Click on an area to move to it right away.
- Keep an eye on the task list and complete these as soon as possible.
- Video Clips – You also have the option here to replay any of the video clips or cut scenes you have seen in the game so far. Once you see one it is added to the map menu. Simply click on the arrow to play it. Note there is an arrow along the top and bottom that allows you to scroll through all the videos.
- You will also see key elements to the story shown in text which can give you clues.
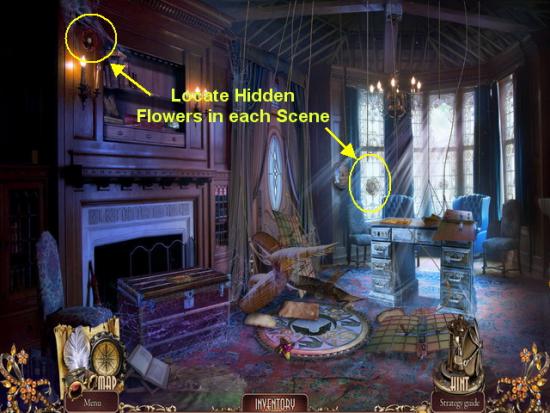
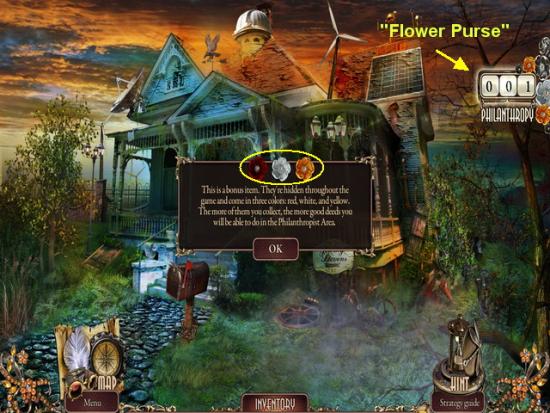
Philanthropy/Bonus Flowers
- As you enter each new scene in the game it is best to first search for hidden flowers located outright in the scene. There are potentially three flowers you may find and they are red, gold, and silver. These flowers can be hidden outright in a new scene or inside of a window that you open up for a closer look.
- Each time you find a flower a counter known as your “Flower Purse” will appear at the upper right corner of the game screen showing you how many you have found.
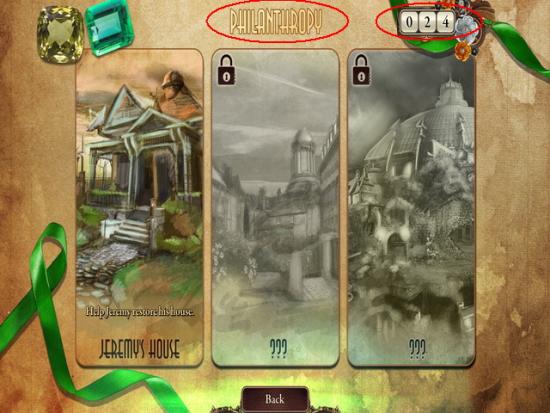
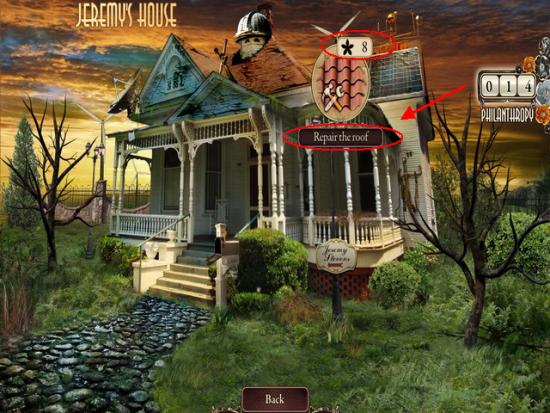
- Using your philanthropy flowers – Go to the main menu and along the bottom of the screen click on the “Philanthropy” button. Here you will be taken to the first screen that unlocks called “Repair Jeremy’s House” Here you will place your cursor around various areas until you see the option to spend the flowers appear. Click on the button to do a good deed and the house will repair. You will need at least thirty flowers to complete the first panel. When you complete the first panel the second will open and you must complete the second to open the third.
- Note – You will need to play into chapter two before you gather enough flowers to complete the first panel.
- You may enter the philanthropy area at any time to spend your flowers you do not have to wait until you have the required number to complete the entire scene.
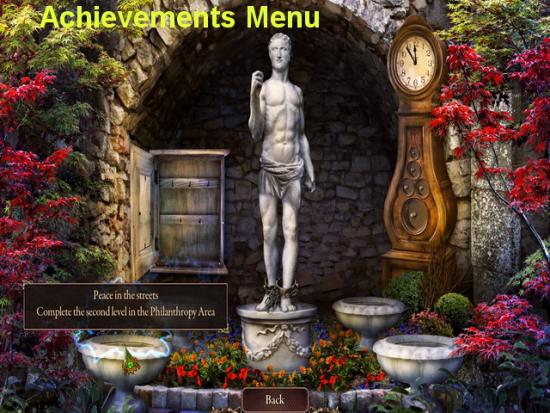
Achievements
- On the main menu there is a link to the achievements menu. You may hover your mouse over the various areas to see what kind of achievements you can earn. Each time you complete an achievement a message will briefly appear in the upper left corner of the game screen.
Chapter 1 – Jeremy’s House
- Here begins the step by step walkthrough of Surface: The Soaring City
- Introduction – You will see a cut scene showing the storyline and the history of the two brothers.
- There will be many cut scenes or short videos in the game. You may skip them if you wish but they are critical to understanding the story line.
- Note – All Philanthropy flowers will be shown circled in red when applicable.
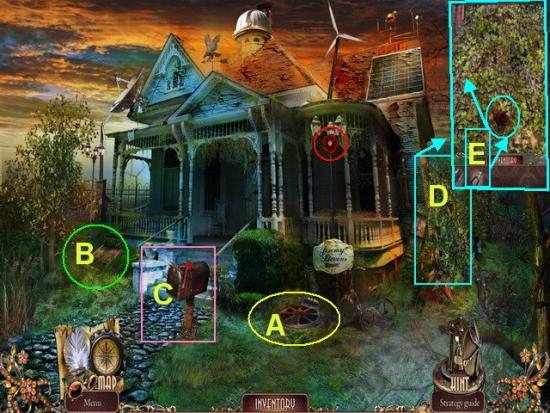
- You are now standing in front of Jeremy’s house that is in disrepair. (Be sure to check out the philanthropy section once you have at least thirty bonus flowers collected and you will be able to purchase the repair of his home.)
- A. Click on the DRAIN to zoom in. Take the HANDLE into inventory.
- B. Click on the TRAP DOOR to the far left of house to zoom in. Take the BOLT into inventory.
- C. Click on the MAILBOX to zoom in and take the PRUNERS into inventory.
- D. Click on the VINES on the right side of the house to zoom in. Take the PRUNERS from inventory and use them on the vines.
- E. Once the vines are cut away, cut the FLOWER and take into inventory.
- The area will now sparkle and is an activated HOS.
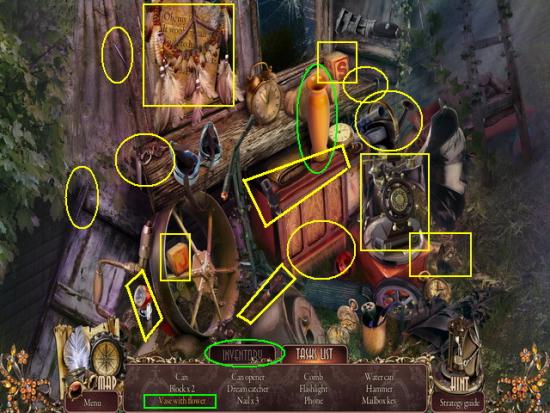
- Locate the hidden objects listed in white text shown circled in image above.
- Gold text item – Click on the INVENTORY TAB and take the FLOWER and place it into the VASE. Click on the “VASE WITH FLOWER” to remove it from list.
- When you complete the HOS take the MAILBOX KEY into inventory.
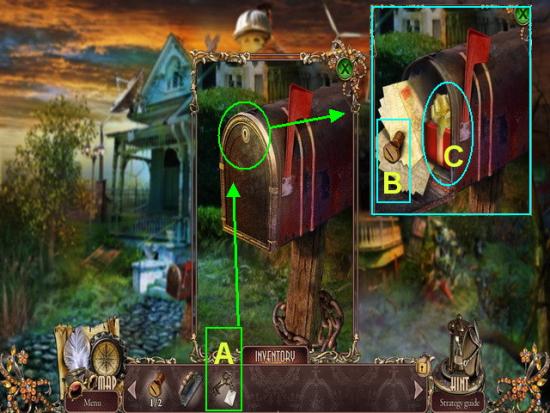
- A. Click on the MAILBOX to zoom in. Use the MAILBOX KEY in the slot and click on it once to turn it.
- B. Take the BOLT into inventory.
- C. Click on the GIFT to open it and place the SCREWDRIVER into inventory.
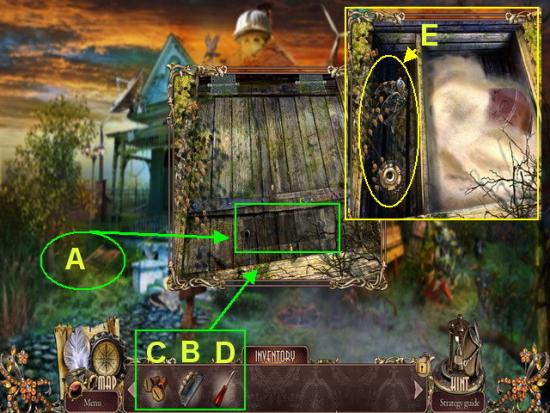
- A. Click on the TRAP DOOR again to zoom in.
- B. Take the HANDLE from inventory and place near bottom of door.
- C. Take 2 BOLTS from inventory and place on handle.
- D. Use the SCREWDRIVER to assemble the bolts into the handle.
- E. Open door and take the BIRD and GEAR into inventory.
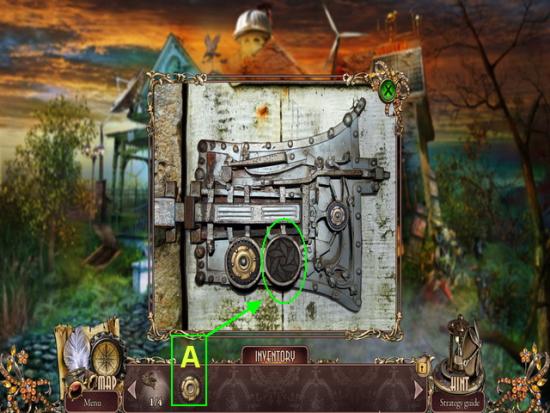
- A. Click on the FRONT DOOR to zoom in. Place the GEAR from inventory into the slot. The door is now unlocked and you may go inside.
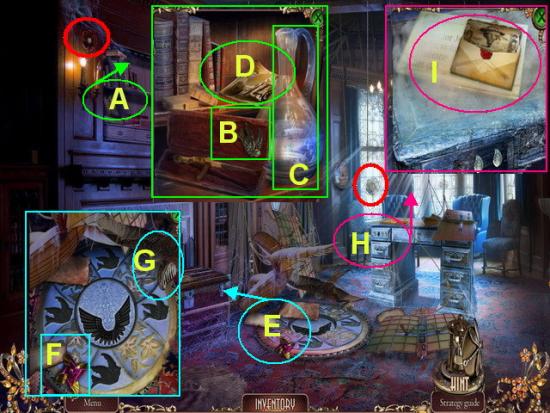
- A. Click on the SHELF to zoom in.
- B. Take the BIRD into inventory.
- C. Take the BOTTLE OF WATER into inventory.
- D. Click on PHOTO to zoom in.
- E. Click on the FLOOR to zoom in.
- F. Take the PINWHEEL into inventory.
- G. Take the LEAF DECORATION into inventory.
- H. Click on DRAWER to zoom in.
- I. Read the LETTER.
- Exit to front of house.
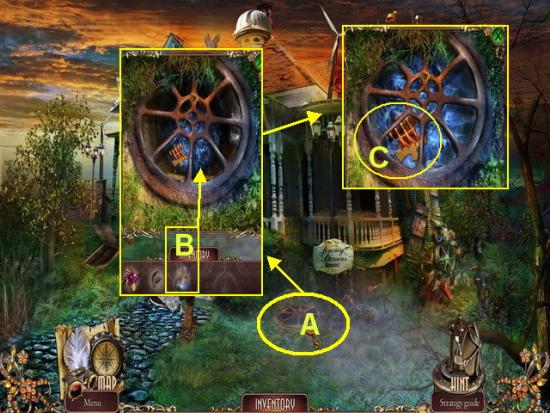
- A. Click on DRAIN to zoom in.
- B. Take BOTTLE OF WATER from inventory and pour into drain.
- C. When the water rises to the top take the WOODEN DETAIL into inventory.
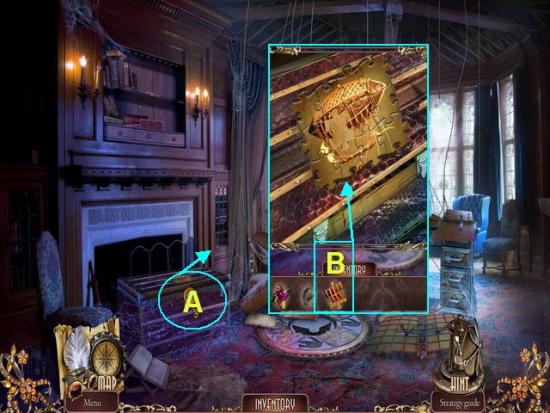
- A. Click on the CHEST to zoom in.
- B. Take the WOODEN DETAIL from inventory and add to activate mini game puzzle.
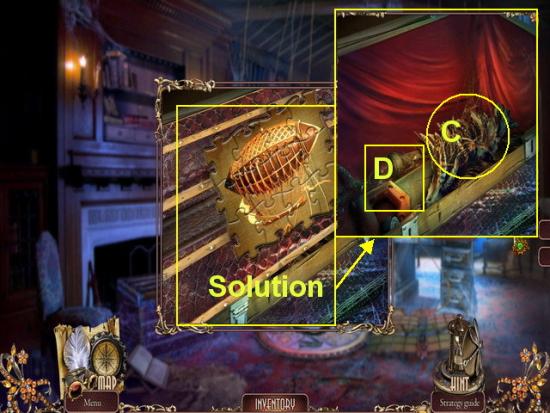
- Mini Game – You will at first see the puzzle assembled correctly then it will shuffle the pieces out of order. You will need to reassemble the puzzle.
- The solution is shown in the image above. Click on one puzzle piece to exchange it with another.
- Note – The pieces will move to a spot even if they don’t fit. Pay attention to the shape of the pieces to solve the puzzle.
- C. Take the DUSTER into inventory.
- D. Remove the SAW BLADE.
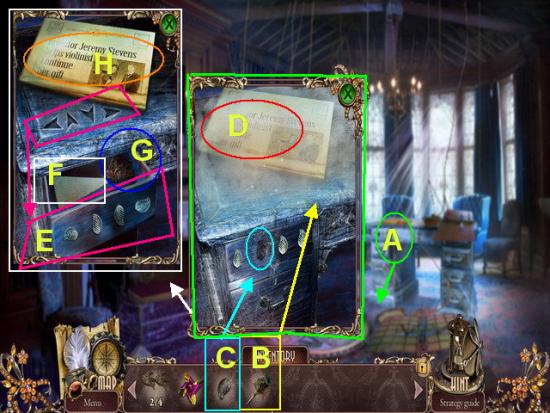
- A. Click on the DRAWER to zoom in.
- B. Use the DUSTER on the cobwebs.
- C. Place the LEAF DECORATION into the empty slot.
- D. Read the NEWSPAPER ARTICLE.
- E. Note the solution is shown etched into the desk.
- Solution – Click on the LEAF DECORATIONS from left to right until the leaves are facing as follows – LEAF 1 – LEFT, LEAF 2 – UP, LEAF 3 – DOWN, LEAF 4 – RIGHT.
- F. Take the SAW BLADE into inventory.
- G. Take the BIRD into inventory.
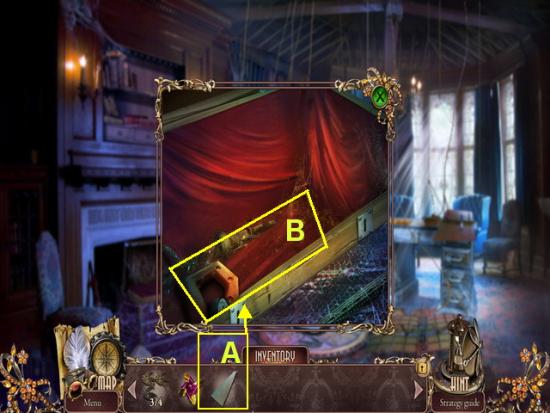
- A. Click on the SHELF to zoom in.
- B. Connect the SAW BLADE to SAW HANDLE and take SAW into inventory.
- Go outside house.
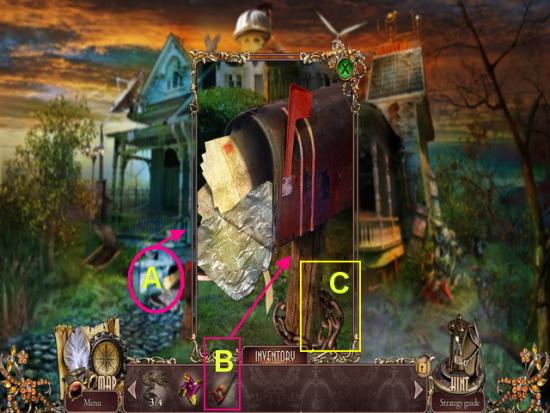
- A. Click on MAILBOX to zoom in.
- B. Take SAW from inventory and use on wood post to remove mailbox.
- C. Take CHAIN into inventory.
- Go back inside house.
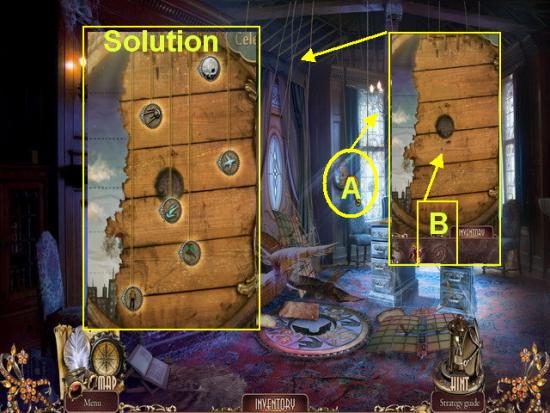
- A. Click on PANEL at far wall to zoom in.
- B. Take CHAIN from inventory and place on panel to activate a mini game.
- Solution – Shown above is the solution. You must click on the charms and pull them down in order as to which would be higher than the other.
- The charms will highlight once you have them correctly placed so click on them and hold your left mouse button down as you move them along the path of the chain.
- Solution from bottom to top – Man, Kite, Bird, Airplane, Satellite, and Moon.
- Exit through the door to the BACKYARD.
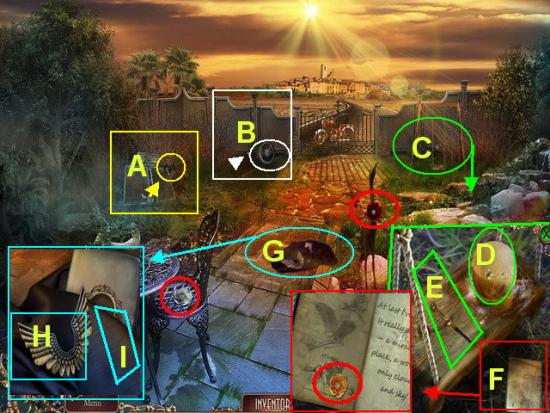
- Watch the brief cut scene video.
- A. Click on the SOLAR PANEL to zoom in and take the RUBBER BAND into inventory.
- B. Click on the WHEEL on back fence to zoom in and take it into inventory.
- C. Click on the SWING to zoom in.
- D. Take the WET SPONGE into inventory
- E. Take the LEFT COMPASS LEG into inventory.
- F. Click on BOOK to read it.
- G. Click on COAT to zoom in.
- H. Take the LITTLE WINGS into inventory.
- I. Click on the COAT to move it aside. Read text after clicking on WALLET.
- Go back inside house.
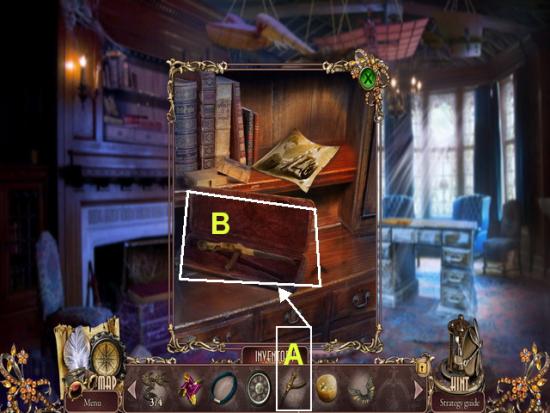
- A. Click on SHELF to zoom in.
- B. Take the LEFT COMPASS LEG from inventory and attach it to RIGHT COMPASS LEG. Once assembled take COMPASS into inventory.
- Go back outside.
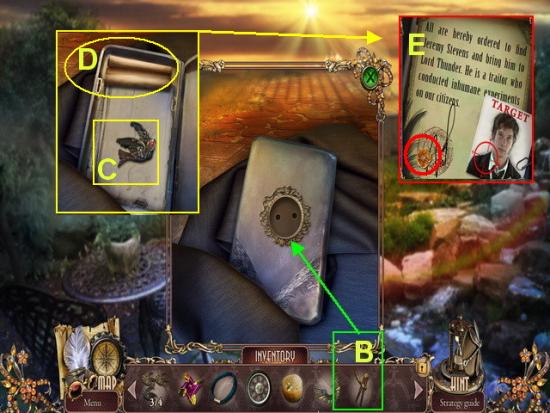
- A. Click on COAT to zoom in.
- B. Take COMPASS from inventory and use on two small holes to open wallet.
- C. Take the BIRD into inventory.
- D. Read the NOTE inside and take flower on note.
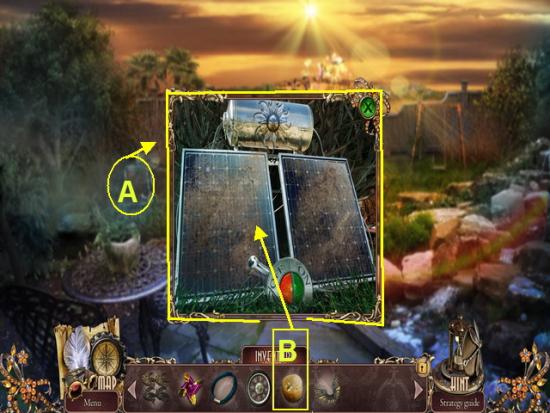
- A. Click on the SOLAR PANEL to zoom in.
- B. Take the WET SPONGE from inventory and use it to clean the solar panels.
- You can’t turn it on until you repair the cord.
- Go back inside house.
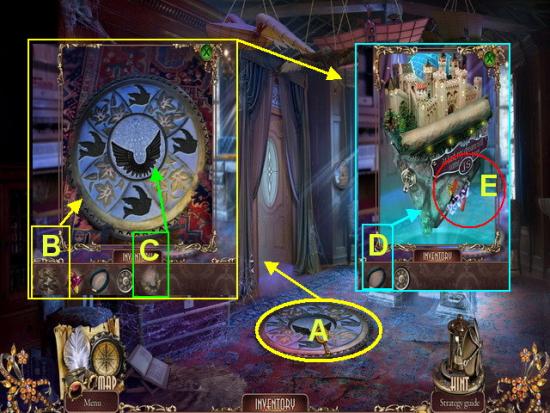
- A. Click on FLOOR panel to zoom in.
- B. Place the 4 BIRDS from inventory onto panel.
- C. Place the LITTLE WINGS from inventory onto center panel.
- D. When FLOATING ISLAND appears, take the RUBBER BAND from inventory and place on the CLAMPS.
- E. Take CLAMPS into inventory.
- Return to backyard.
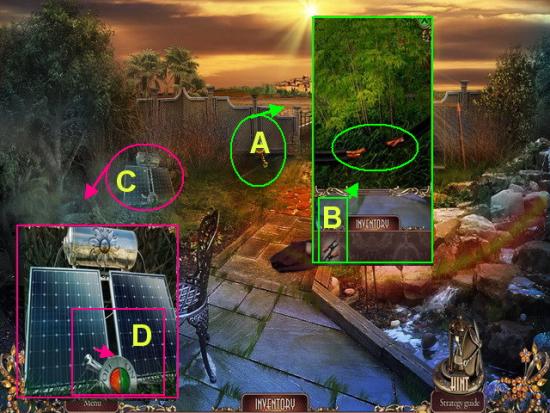
- A. Click on BACK FENCE PANEL (Where wheel was) to zoom in.
- B. Take CLAMPS from inventory and place on WIRES to connect them.
- C. Click on SOLAR PANEL to zoom in again.
- D. Turn SOLAR PANEL on and GATE will open.
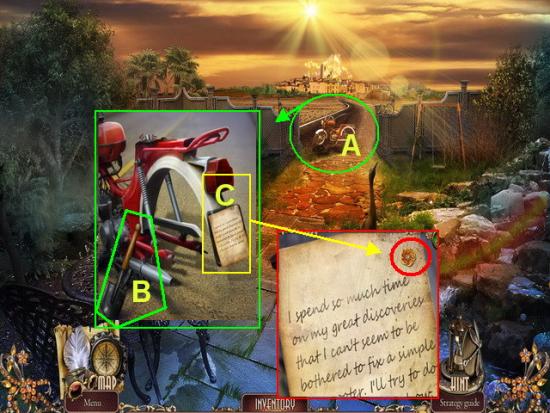
- A. Click on the MOTORCYCLE to zoom in.
- B. Take the SPADE into inventory.
- C. READ the note on bike and take the flower from the top of the note.
- Go back to the front of the house.
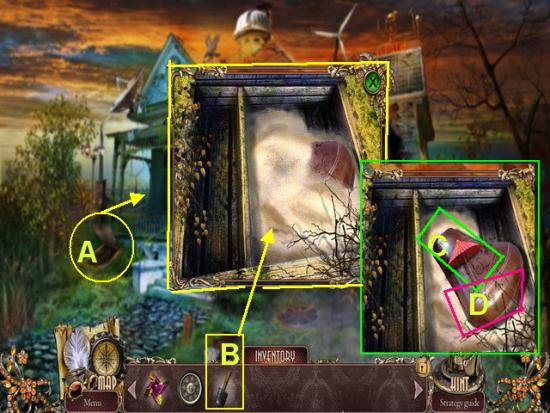
- A. Click on the TRAP DOOR to zoom in.
- B. Use the SPADE from inventory to dig away white sand.
- C. Take the COCKTAIL UMBRELLA into inventory.
- D. Take the SEAT into inventory.
- Return to the backyard.
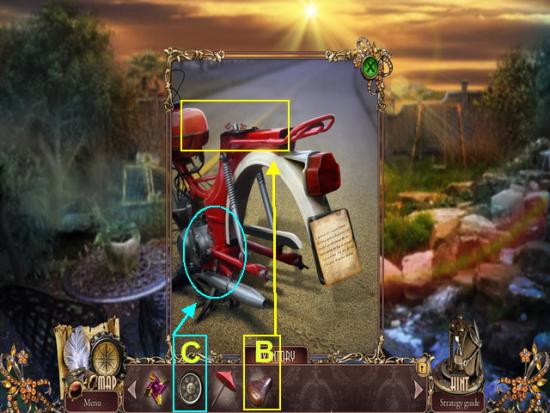
- A. Click on MOTORCYCLE to zoom in again.
- B. Take the SEAT from inventory and place on motorcycle.
- C. Take the WHEEL from inventory and place on motorcycle.
- The bike will now start and you will move on to the next scene.
- Watch the cut scene video.
- This is the end of Chapter one.
Chapter 2 – The Tribunes
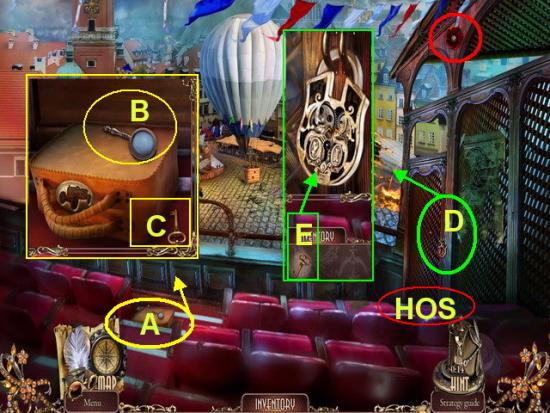
- A. Click on the bag to zoom in.
- B. Take the MAGNIFYING GLASS into inventory
- C. Take the KEY into inventory.
- D. Click on the LOCK at the far left. Take the KEY from inventory and place in lock clicking once to turn it.
- Click on the sparkling area for a HOS.
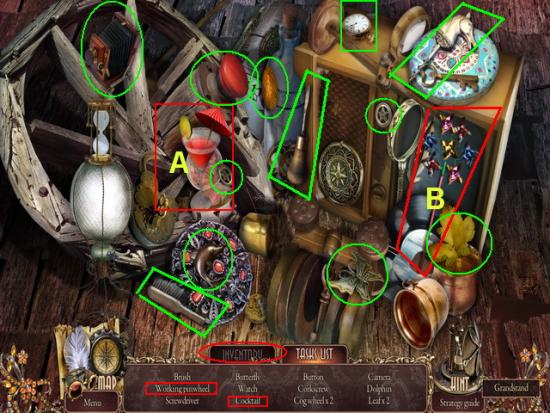
- Click on the “inventory tab”
- A. Place the COCKTAIL UMBRELLA into the drink then click on it to take it off the list.
- B. Take the PUMP from inventory and use it on the BALL. After you inflate it click on it to remove from list.
- Locate all other white text items on the tasks list.
- Once you find all items a BUTTON will be added to your inventory.
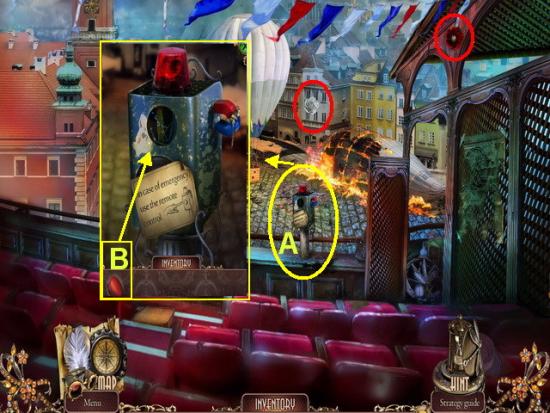
- A. Click on the device at center of scene to zoom in.
- B. Take BUTTON from inventory and place in empty slot. Click on the button to press it.
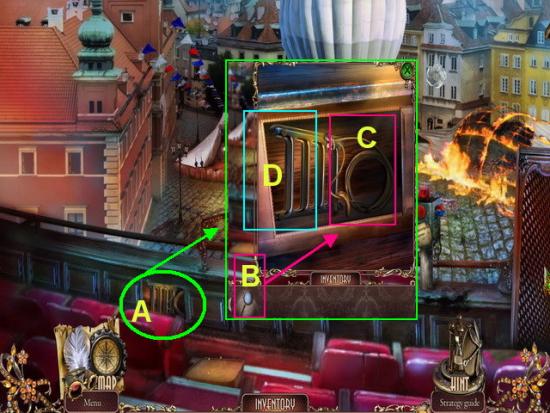
- A. Click on the OPEN PANEL to zoom in.
- B. Use the MAGNIFYING GLASS from inventory to burn the ROPE free.
- C. Take ROPE into inventory.
- D. Take LADDER into inventory.
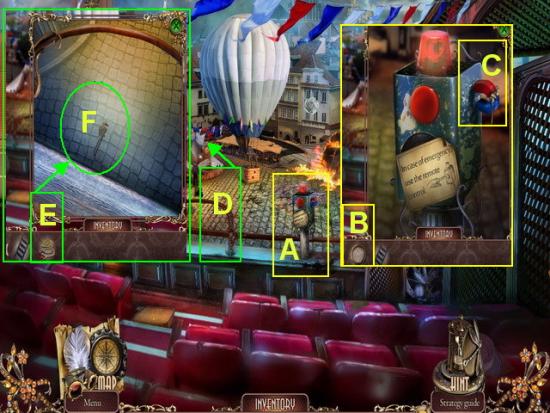
- A. Click on button device to zoom in.
- B. Take the ROPE from inventory and attach to MAGNET
- C. Take the MAGNET and ROPE into inventory.
- D. Click on the railing to the far left of scene to zoom in.
- E. Take the MAGNET and use it to gather the WRENCH.
- F. Take WRENCH into inventory.
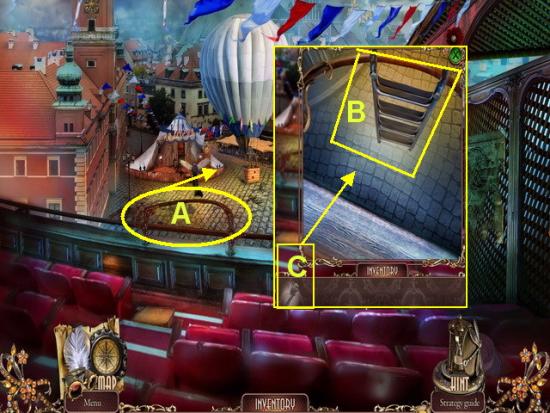
- A. Take the LADDER from inventory and place over railing.
- B. Use the WRENCH to tighten the bolts.
- The ladder will extend down and you may now move down.
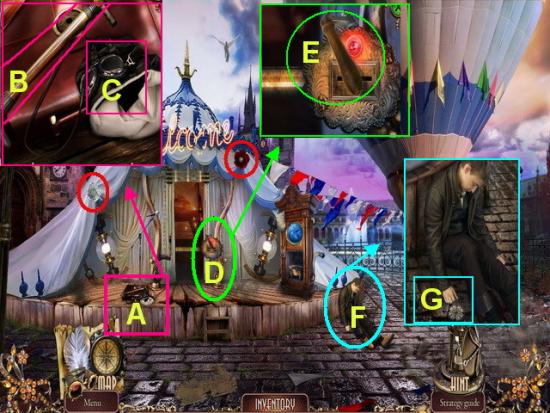
- Click on the white and red flowers shown circled in red above.
- A. Click on the BAG to zoom in.
- B. Take the PISTON PUMP into inventory.
- C. Take the HELMET into inventory.
- D. Click on the PANEL to zoom in.
- E. Take the CRANK into inventory.
- F. Zoom into the HURT MAN
- G. Take the COMPASS into inventory.
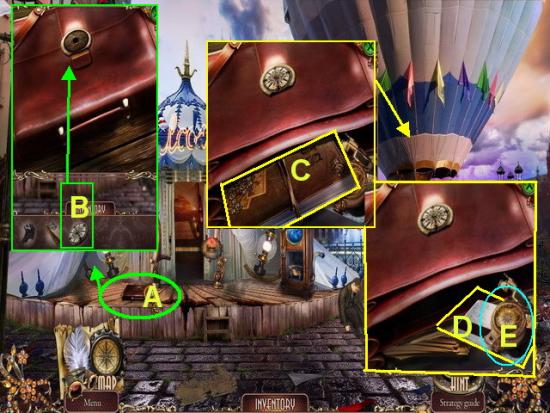
- A. Return to the BAG and zoom in.
- B. Use the COMPASS on the BAG LOCK.
- C. Take the BOOK into inventory. Watch the video cut scenes.
- D. Take JEREMY’S PASS into inventory.
- E. Take second COMPASS into inventory.
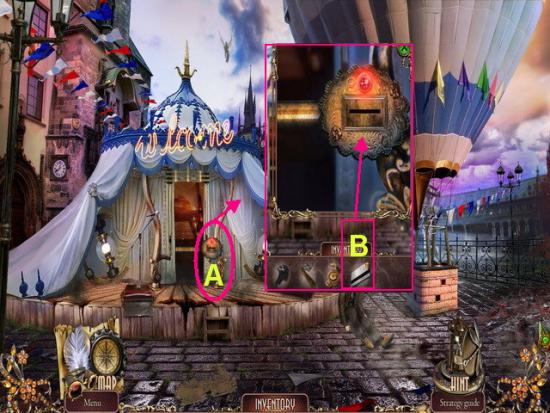
- A. Click on the LOCK PANEL to zoom in.
- B. Use JEREMY’S PASS in the slot.
- Go inside.
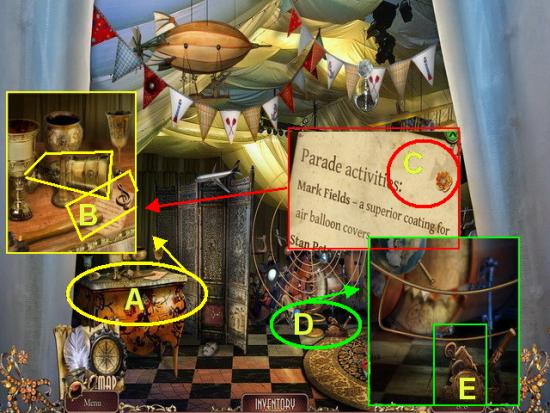
- A. Click on table to far left to zoom in.
- B. Click on the CUPS to turn them over. Take the KEY into inventory.
- C. Read the NOTE and take gold flower
- D. Click on PLANET SYSTEM and take the CAR EMBLEM into inventory.
- A. Click on the CHEST to zoom in.
- B. Place TREBLE CLEF KEY in keyhole to open in.
- Mini game will be triggered.
- Mini Game – Click on the TREBLE CLEF symbol to reset the puzzle. You will want to unlock the three locks by clicking on the lighted buttons in the order they present to you.
- Solutions are as follows to unlock each lock.
- Puzzle 1 – Press the GREEN, ORANGE and YELLOW buttons.
- Puzzle 2 – Press the RED, PURPLE, GREEN, and DARK BLUE buttons.
- Puzzle 3 – Press the RED, LIGHT BLUE, YELLOW, ORANGE, and GREEN buttons.
- When completed the panel will open.
- C. Take the BOBBER into inventory.
- D. Take the PIPE into inventory.
- E. Take the HANDKERCHIEF into inventory.
- Walk down twice back to the balcony at beginning of chapter.
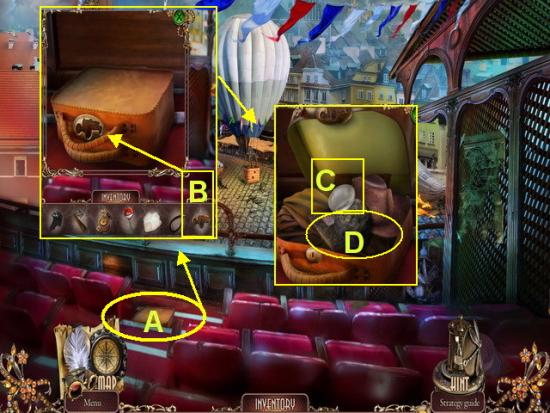
- A. Click on the BAG to zoom in.
- B. Take the CAR EMBLEM and place in the empty slot.
- C. Take the LENS into inventory.
- D. Take the MOON into inventory.
- Move forward twice back into building.
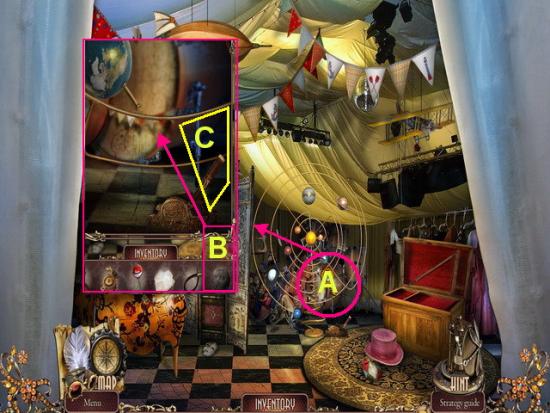
- A. Click on the PLANETARY SYSTEM to zoom in.
- B. Take the MOON from inventory and place under the Earth.
- C. Click on the LEVER to turn it on.
- Watch the animation as the scene turns into a HOS.
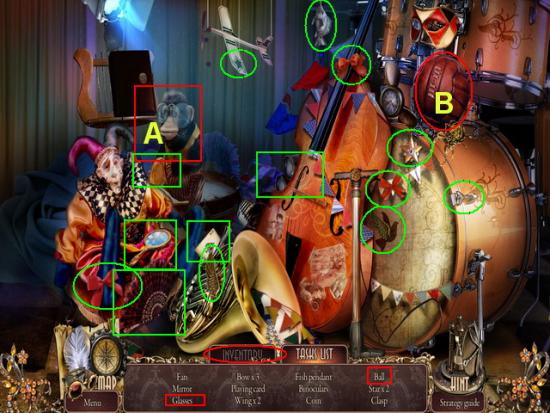
- Click on the INVENTORY TAB
- A. Take the LENS from inventory and place on the monkey’s GLASSES.
- B. Take the PISTON PUMP from inventory and use it to inflate the BALL.
- Locate all the hidden objects in white text shown circled above.
- Collect the COIN into inventory.
- Walk down once.
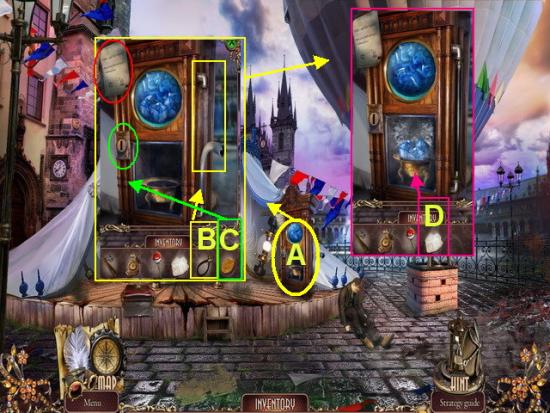
- A. Click on the ICE MACHINE to zoom in.
- B. Take the PIPE from inventory and add to side of machine.
- C. Insert the COIN into slot.
- D. Place HANDKERCHIEF from inventory under ICE.
- E. Take the ICE COMPRESS into inventory.
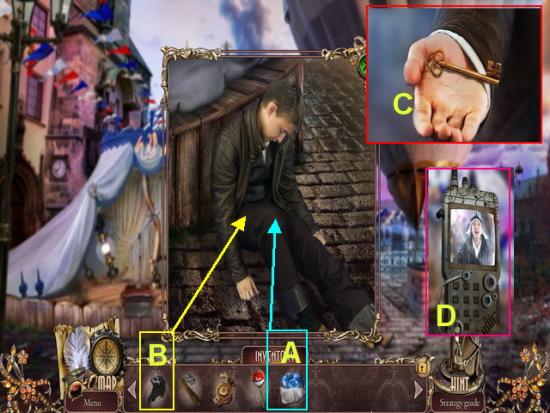
- A. Click on the HURT MAN to zoom in.
- B. Give the ICE COMPRESS to man.
- Watch cut scene video.
- C. Give HELMET to man.
- D. Take the WIND UP KEY into inventory.
- E. Take the RADIO into inventory.
- Go back inside moving forward once.
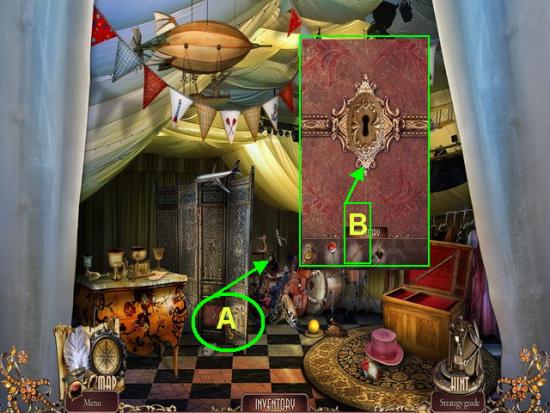
- A. Click on area at lower left of room to zoom in.
- B. Place KEY from inventory into keyhole and turn to open it.
- This will trigger a mini game puzzle.
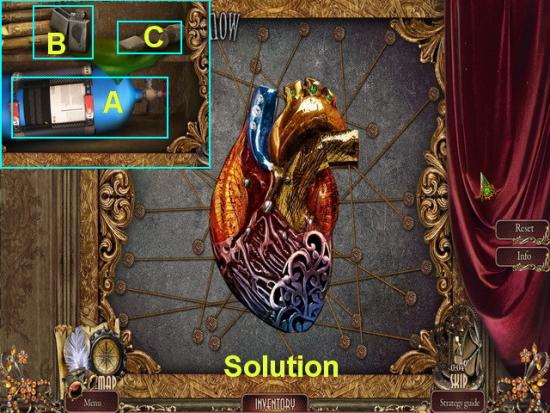
- Assemble the pieces until you see the solution above. Each piece is located along a string. Guide the piece down the string or up it until you find its location.
- When you correctly place a puzzle piece it will highlight and lock in place.
- A. Take the GAS CYLINDER into inventory.
- B. Take the LIGHTER into inventory.
- C. Take the TOP PART of HAMMER into inventory.
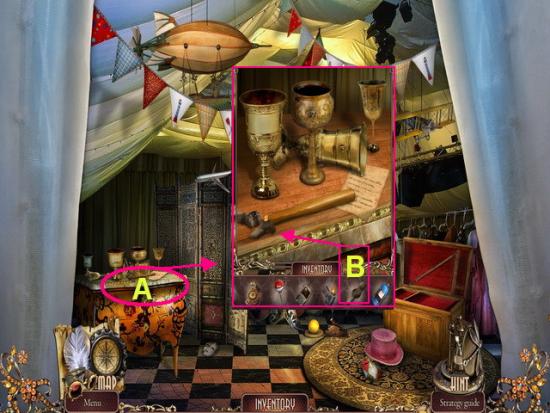
- A. Click on table at left side of room to zoom in again.
- B. Take the TOP of HAMMER and add it to the BROKEN HAMMER to repair it. Add HAMMER to inventory.
- Walk down once.
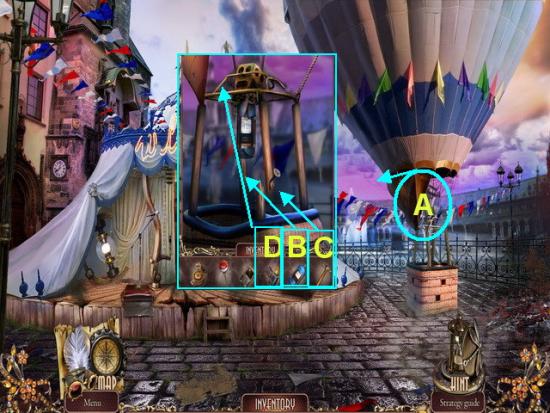
- A. Click on the BALLOON to zoom in.
- B. Take the GAS CYLINDER from inventory and place it in the slot.
- C. Repair the wooden post using your HAMMER from inventory.
- D. Use the LIGHTER from inventory to light a fire.
- You will now go up in the air.
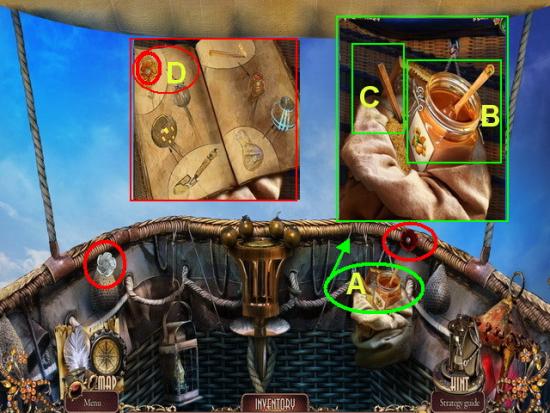
- A. Click on the SACK to zoom in.
- B. Take the NUT OIL into inventory.
- C. Take the TORCH into inventory.
- D. Read the NOTE and take the flower.
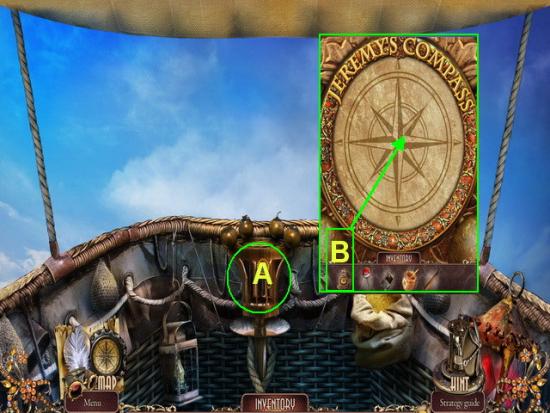
- A. Click on the HELM to zoom in.
- B. Take the COMPASS from inventory and place in empty slot to trigger a mini game puzzle.
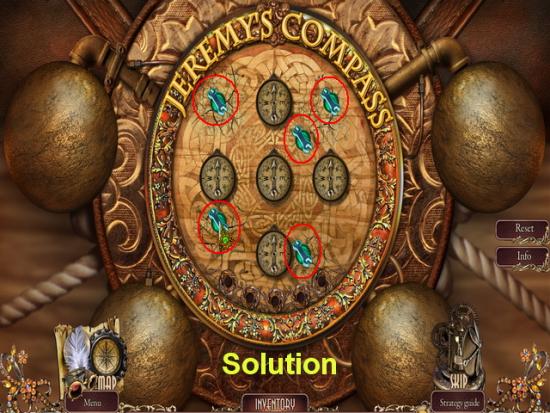
- Mini Game- The objective is to place the five blue magnets in such a way that every compass is pointing north or straight up.
- The solution is shown in the image above.
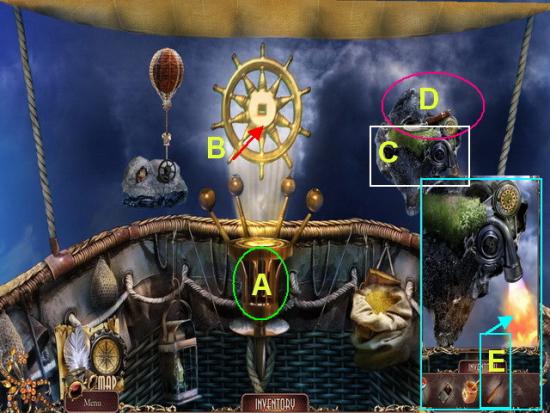
- A. Click on the HELM to zoom in.
- B. Click on the WHEEL once to turn it.
- C. Click on the ISLAND to zoom in.
- D. Take the SHOVEL into inventory.
- E. Take the TORCH from inventory and hold it in the flame. Take the LIT TORCH into inventory.
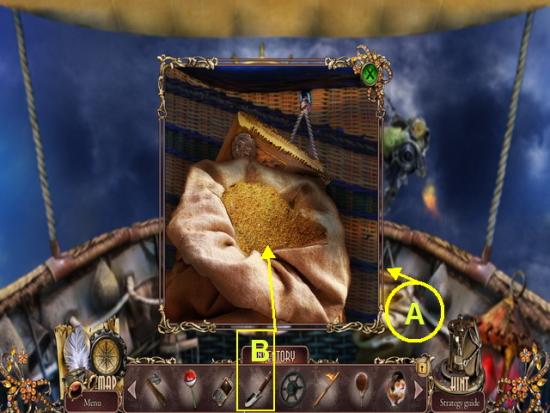
- A. Click on the SACK to zoom in.
- B. Take the SHOVEL and place in SAND. Take SCOOP OF SAND into inventory.
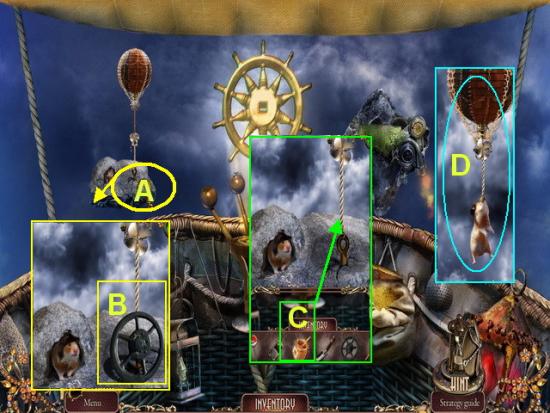
- A. Click on the LEFT ISLAND to zoom in.
- B. Take the VALVE into inventory.
- C. Use NUT OIL from inventory and place on ROPE.
- D. When HAMSTER comes out take him into inventory along with BALLOON.
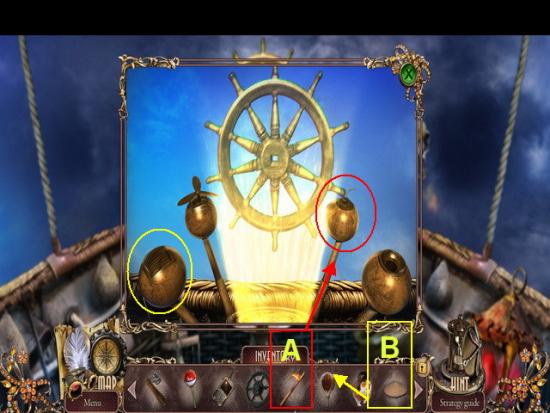
- Click on the HELM to zoom in.
- A. Use the LIT TORCH from inventory to activate the ORB.
- B. Take the SCOOP of SAND and place it in second orb.
- Click once to turn to wheel.
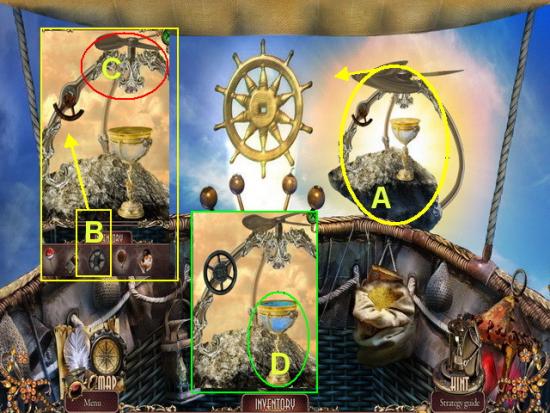
- A. Click on the ISLAND to zoom in.
- B. Take the VALVE from inventory and place it over the broken valve.
- C. Click on the VALVE and watch the water start to pour.
- D. Take CUP OF WATER into inventory.
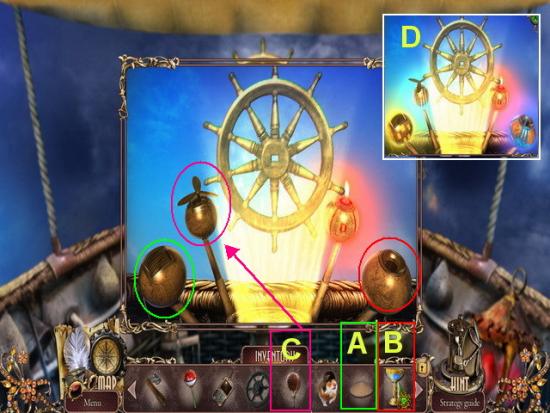
- Click on the HELM to zoom in again.
- A. Click on SAND and add to first orb circled in green.
- B. Take the CUP OF WATER and pour into the orb circled in red.
- C. Take the BALLOON from inventory and place on the final orb circled in pink.
- Watch the video cut scenes as the balloon progresses to the floating city.
- This is the end of chapter two.
Chapter 3 – Entering the Soaring City
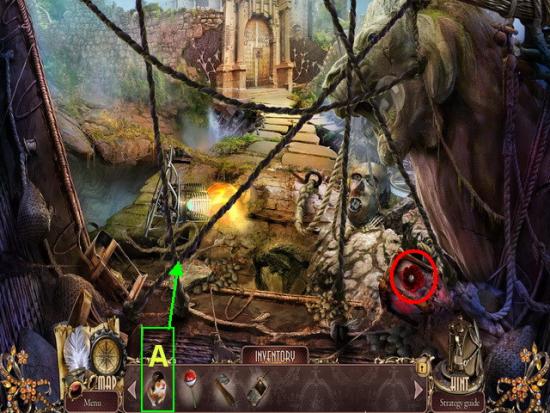
- Click on the red flower marked in red circle and add to philanthropy total.
- A. Take the HAMSTER from inventory and add to the ROPES and he will chew them all away for you.
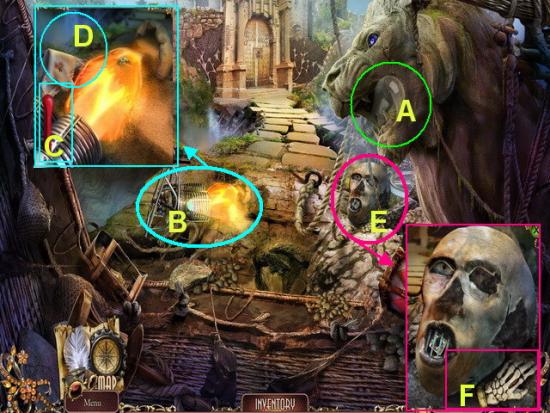
- A. Take the BULB from lion’s mouth at top right.
- B. Click on the FLAMES to zoom in.
- C. Click on the LEVER to turn on heat.
- D. Take the PIECE OF CLOTH into inventory.
- E. Click on the HEAD to zoom in.
- F. Take the SKELETON HAND into inventory.
- Move forward once to the “City Gates”
- Watch the cut scene videos.
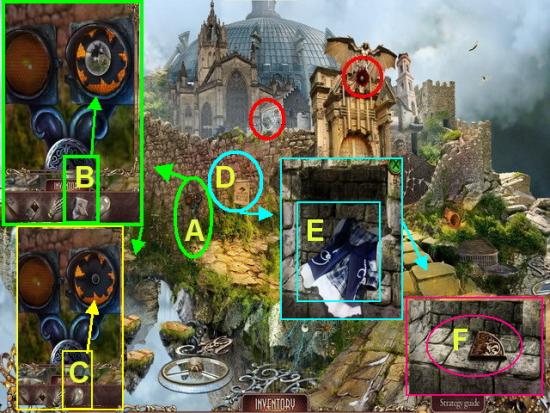
- Remove the flowers shown circled in red.
- A. Click on the LIGHTS to zoom in.
- B. Use the PIECE OF CLOTH from inventory to remove broken bulb.
- C. Take BULB from inventory and replace broken one.
- D. Click on the POSTER to zoom in. Click on poster and watch video.
- E. Take DOLL DRESS into inventory.
- F. Take PART OF AMULET into inventory.
- Go forward to the “Break in the wall” to the left of the scene.
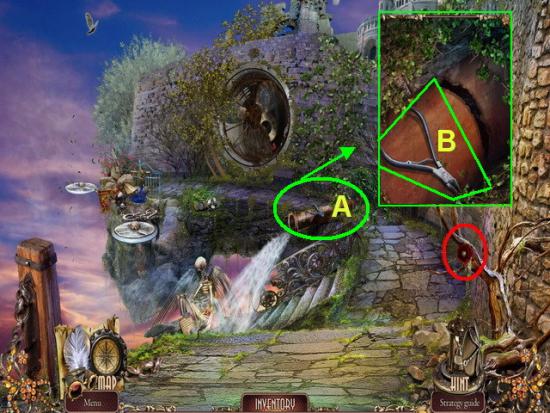
- Remove the red flower circled in red.
- A. Click on the PIPE to zoom in.
- B. Take the CUTTING PLIARS into inventory.
- Walk down one scene.
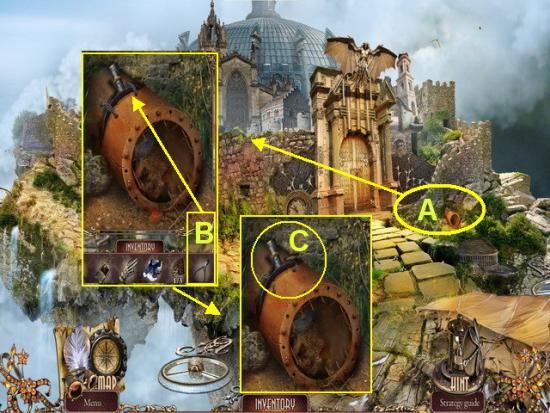
- A. Click on the PIPE to far right to zoom in.
- B. Use CUTTING PLIARS to clip away wires.
- C. Take PIPE BLOCKER into inventory.
- Return to the previous location.
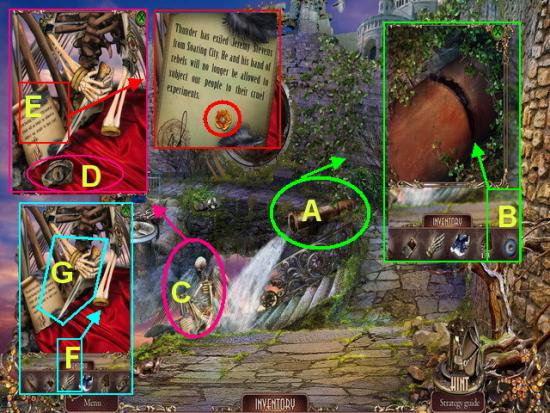
- A. Click on the PIPE again to zoom in.
- B. Take the PIPE BLOCKER and place it in the opening to block the water flow.
- C. Click on the SKELETON to zoom in.
- D. Take the STONE EYE into inventory.
- E. Click on the NOTE to open. Read it and take the flower into philanthropy inventory.
- F. Take the SKELETON HAND from inventory and place it in where the hand is missing.
- G. When the grip is released take the DAGGER into inventory.
- Return to previous scene.
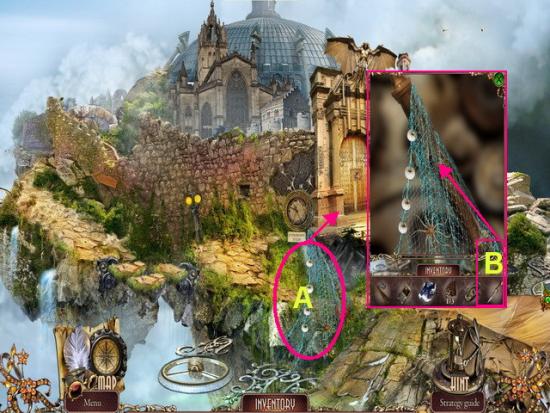
- A. Click on the NET to zoom in.
- B. Use the DAGGAR to cut the net away.
- Take the NET and STONE EAR into inventory.
- Note the clock that is now exposed. You will come back here later.
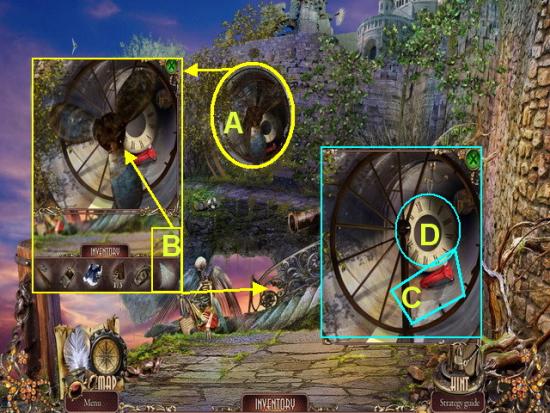
- A. Click on the PROPELLAR to zoom in.
- B. Take the NET from inventory and place it on the moving propeller and it will break apart.
- C. Take the EMERGENCY MALLET into inventory.
- D. Take the CLOCK FACE into inventory.
- Click on the now sparkling area to play the HOS.
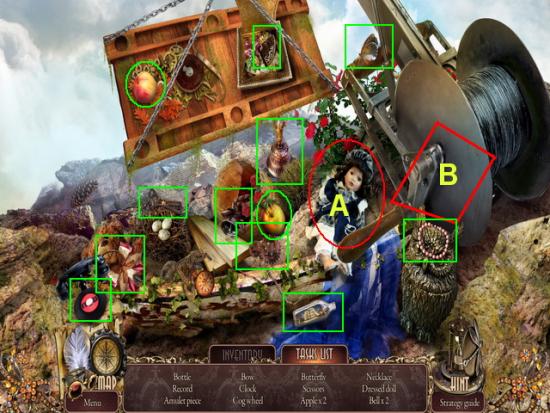
- Click on the inventory area first.
- A. Take the DOLL DRESS from inventory and place it on the doll.
- B. Take the CRANK from inventory and place it to the far right to bring the items closer to you.
- You may now proceed and locate the hidden objects on the task list shown circled above.
- When you locate all items take the PART OF AMULET into inventory.
- Return to previous scene.
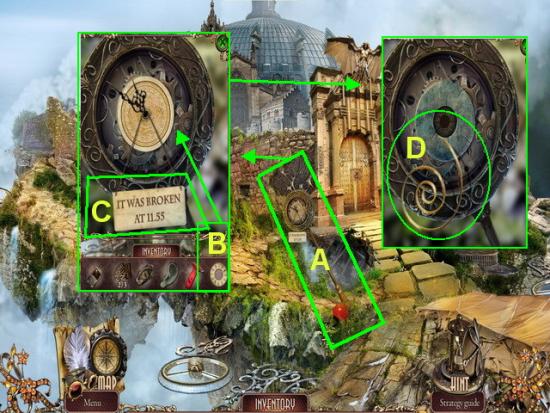
- A. Click on the CLOCK to zoom in.
- B. Take the CLOCK FACE from inventory and place it.
- C. Click on the hands to change the time to 11:55 and the face will fall off.
- D. Take the SPRING into inventory.
- Return to previous scene.
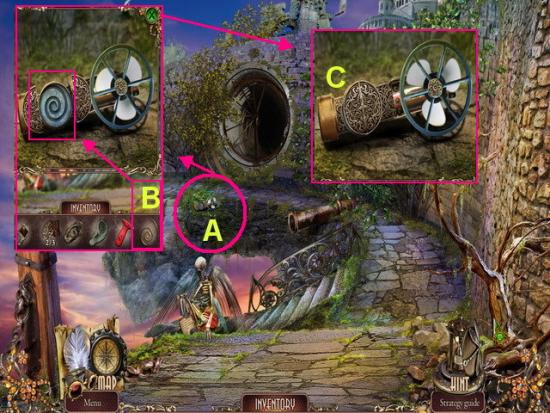
- A. Click on the MANUEL PROPELLER to zoom in.
- B. Take the SPRING from inventory and place in slot.
- C. Take the repaired MANUAL PROPELLER into inventory.
- Return to the very first scene by walking down twice.
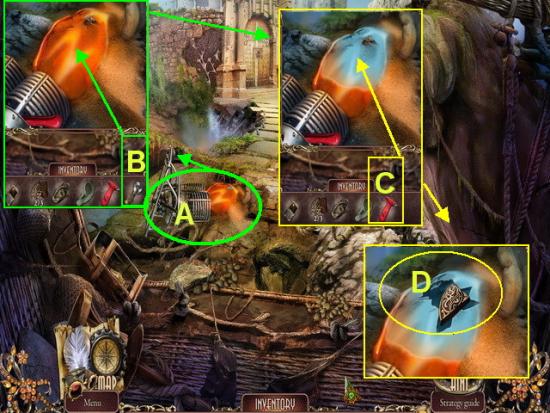
- A. Click on the LAMP to zoom in.
- B. Take the MANUAL PROPELLAR and use it on the flame.
- C. Take the EMERGENCY MALLET and use it on cooled areas.
- D. Take the AMULET PIECE into inventory. (Should be your final piece)
- Return to the castle and click on door.
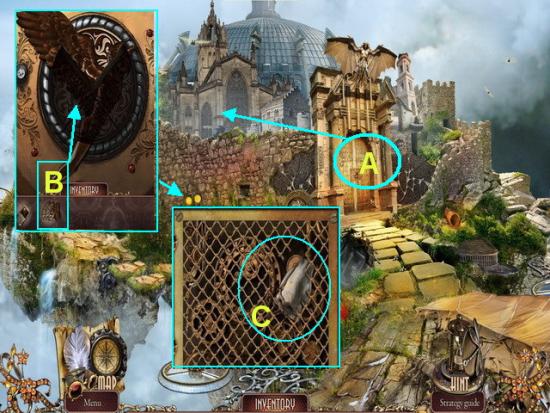
- A. Click on DOOR to zoom in.
- B. Take the AMULET PIECES and add to center of mini game board.
- C. Take the STONE NOSE into inventory.
- Go down one scene you will need to return here later to complete this puzzle.
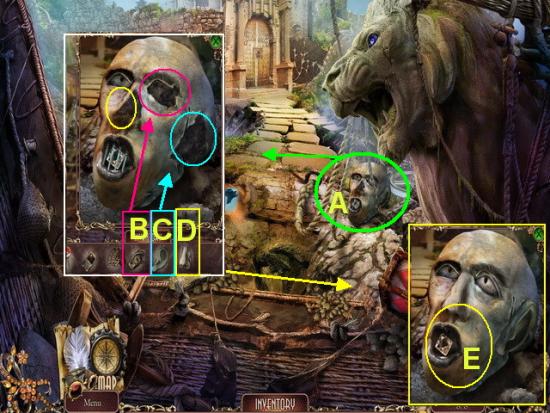
- A. Click on STONE FACE to zoom in.
- B. Take the STONE EYE and place it.
- C. Take the STONE EAR and place it.
- D. Take the STONE NOSE and place it.
- E. When the mouth opens up take the DIAMOND into inventory.
- Return to the front door of the castle and click to zoom in.
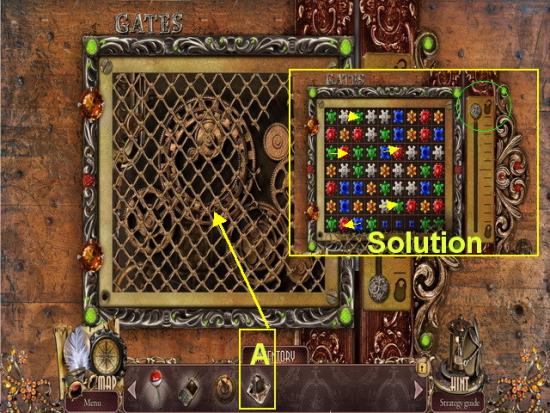
- A. Take the DIAMOND from inventory and throw it onto the grate which will destroy it. This will trigger a mini game puzzle.
- Mini game – Here you will need to click on the pieces and swap places so you have a match of three or more of the same color.
- As you make matches the meter to the right will fill up. Once it reaches the top the game is complete.
- Once you finish the castle door is now open.
- Go inside and watch the cut scene video.
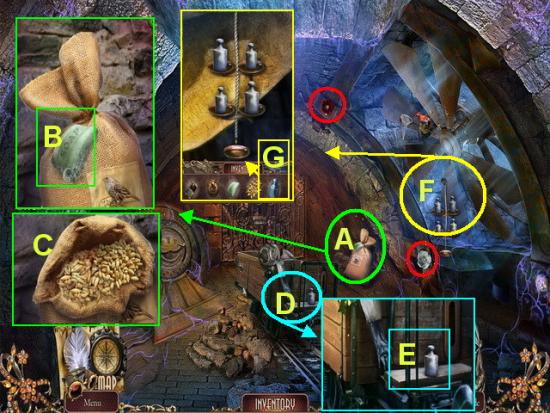
- Locate the flowers circled in red.
- A. Click on the SACK to zoom in.
- B. Take the SOAP into inventory.
- C. Click on the bag and take the GRAIN into inventory.
- D. Click on the front of the CART to zoom in.
- E. Take the WEIGHT into inventory.
- F. Click on the WEIGHTS to zoom in.
- G. Place the WEIGHT on the bottom tray to start the propeller.
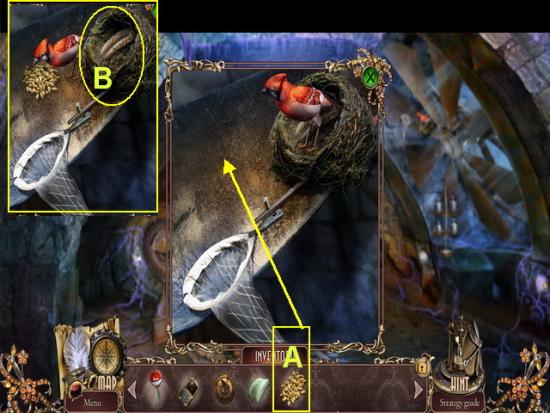
- Click on the BIRD NEST to zoom in.
- A. Take the GRAIN from inventory and place in front of bird.
- B. Take the BRASS FEATHER into inventory.
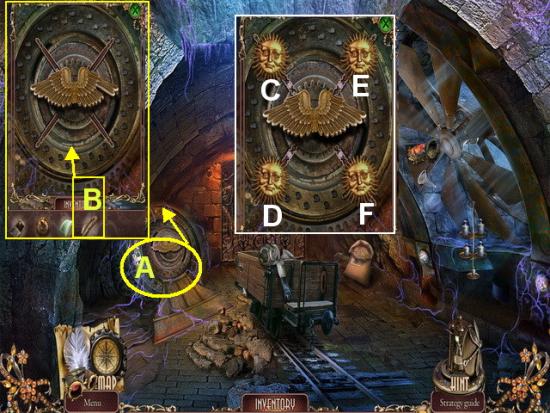
- A. Click on the ELECTRIC TRAPDOOR to zoom in.
- B. Take the BRASS FEATHER from inventory and place on the board to trigger a mini game puzzle.
- Mini Game – Your objective is to rotate the four suns so they are all upright at the same time. One will affect the movement of another.
- Each sun is labeled C, D, E, or F.
- SOLUTION – Click on E x 1, the D x 2, and F x 1.
- Go through the trapdoor to the next area.
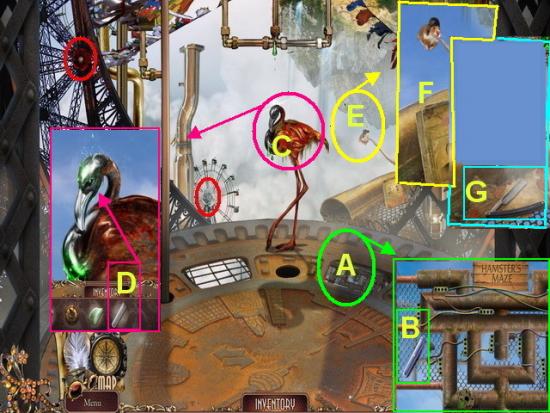
- Click on the flowers shown circled in red for philanthropy inventory.
- A. Click on the GRATE to zoom in.
- B. Take the TEST TUBE into inventory
- C. Click on the FLAMINGO STATUE to zoom in.
- D. Take the TEST TUBE from inventory and place it over the bird’s head and it will fill up with acid. The TEST TUBE WITH ACID will be added to your inventory.
- E. Click on the HAMSTER to zoom in.
- F. Click on the FILE FOLDER and watch the cut scene video that follows.
- G. Take the BLADE into inventory.
- Go forward once.
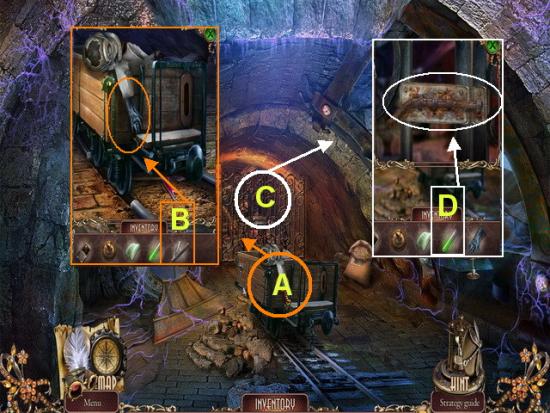
- A. Click on CART to zoom in.
- B. Take the BLADE from inventory and use it to cut the GLOVE. The GLOVE will be placed in your inventory now.
- C. Click on the DOOR LOCK to zoom in.
- D. Take the TEST TUBE with ACID and pour over lock.
- Click on the lock to open door.
- Go inside the “Underground Area”
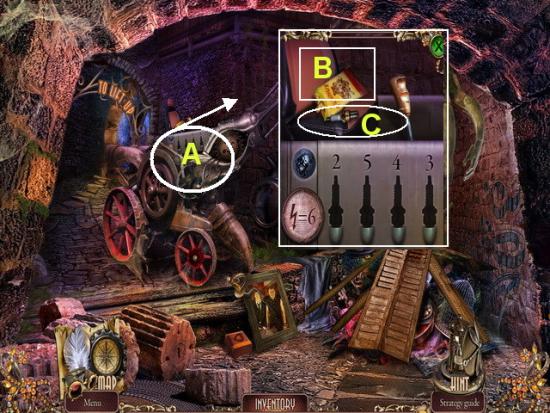
- Click on the flowers shown circled in red for philanthropy inventory.
- A. Click on the GRATE to zoom in.
- B. Take the NUTS into inventory.
- C. Take the SPARK PLUG into inventory.
- This is the end of Chapter 3.
Chapter 4 – The Elevator
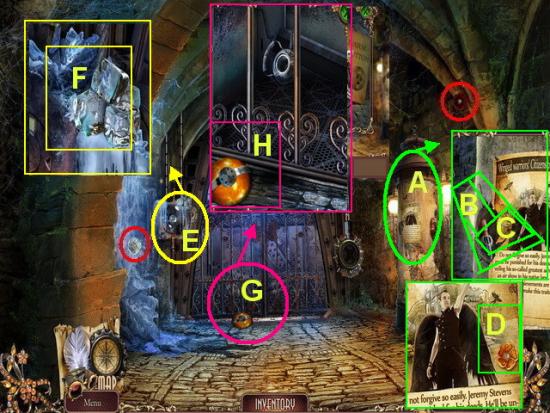
- A. Click on the COLUMN to zoom in.
- B. Take the EYE DROPPER into inventory.
- C. Take the RING into inventory.
- D. Click on the POSTER and take the gold flower into philanthropy inventory.
- E. Click on the wall MECHANISM to zoom in.
- F. Take the ICE into inventory.
- G. Click on the PANEL to zoom in.
- H. Take the ELEVATOR BUTTON into inventory.
- Go down once
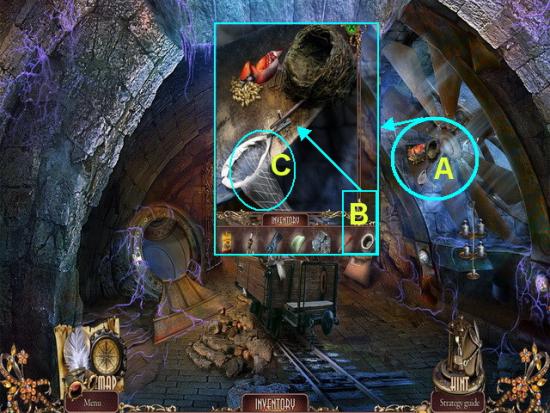
- A. Click on the BIRD NEST to zoom in.
- B. Take the NUT from inventory and repair the NET.
- C. Take the NET into inventory.
- Go through the electric trapdoor.
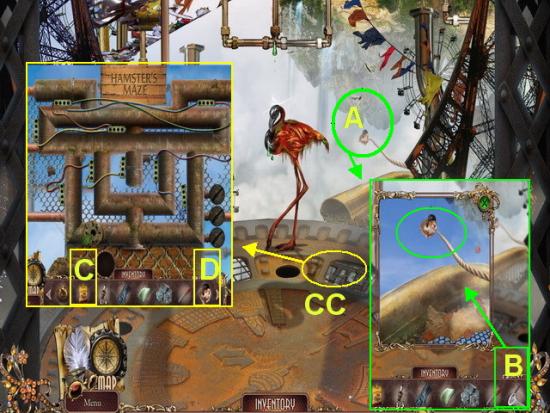
- A. Click on the HAMSTER to zoom in.
- B. Take the NET from inventory and use it to gather the HAMSTER into inventory.
- CC. Click on the GRATE to zoom in.
- C. Place the BAG OF NUTS onto the board.
- D. Place the HAMSTER onto the board.
- This will trigger a mini game puzzle.
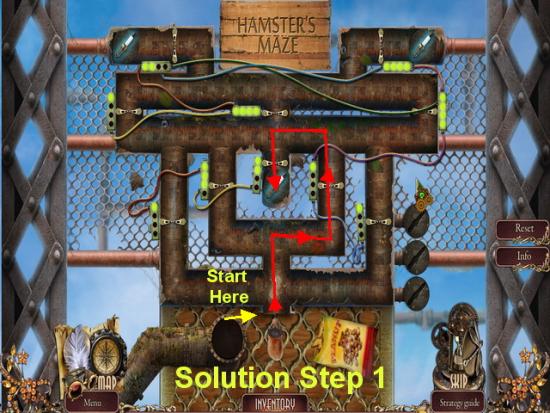
- Mini Game – The object of this puzzle is to move the hamster through the maze and collect the spark plugs.
- Each series of steps is listed and there is a color coded image to help you find your way.
- Solution part 1 – UP x 2, R, UP, L, and DOWN.
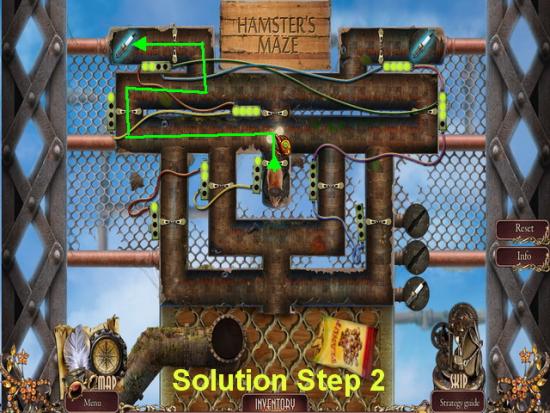
- Solution Part 2 – UP, Left x 3, UP, R, UP, and LEFT.
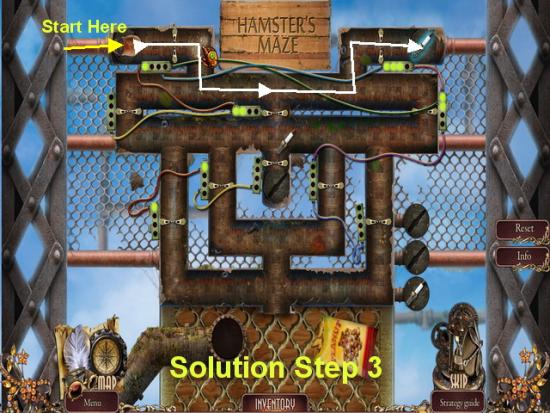
- Solution Part 3 – R, DOWN, R x 2, UP, and RIGHT.
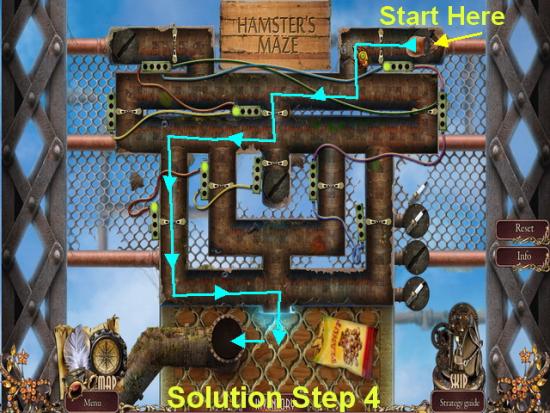
- Solution Part 4 – LEFT, DOWN, LEFT, DOWN, LEFT x 2, DOWN x 2, RIGHT, and DOWN.
- Once you complete the maze four SPARK PLUGS will be added to your inventory.
- Go down once then forward.
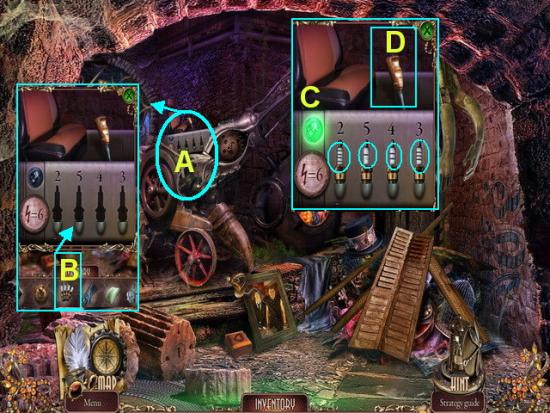
- A. Click on the GRATE to zoom in.
- B. Take the SPARK PLUGS from inventory and add.
- C. Mini Game Puzzle – Here you must place the spark plugs so that the number of rings added to the number above it each equal to six.
- Click on one plug then another to trade places.
- Solution is shown in image above
- First plug under the “2” should have 4 rings.
- Second plug under the “5” should have 1 ring.
- Third plug under the “4” should have 2 rings.
- Fourth plug under the “3” should have 3 rings.
- D. Click on the LEVER once the green light activates indicating they are correctly placed.
- The mechanism to the right will rise up and the scene will sparkle indicating a HOS.
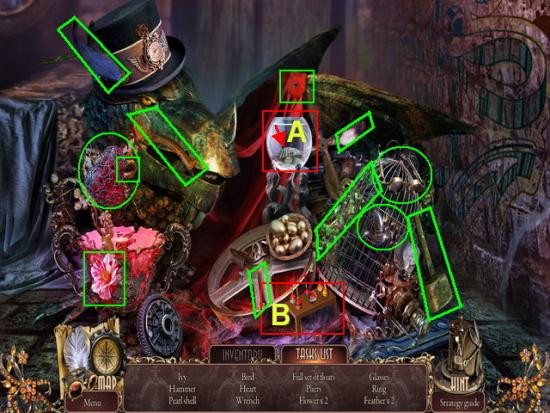
- Click on the “Inventory” tab.
- A. Take the GLOVE from inventory and use it to remove the fish from fish bowl. This will leave the PEARL SHELL in the bowl.
- B. Take the BOBBER from inventory and add it to the incomplete set. You now have a FULL SET OF FLOATS.
- You may now return to the “Tasks” tab and locate the items listed. The items above are shown circled in red and all other items are shown circled in green.
- Once you locate all the items PLIARS will be added to your inventory.
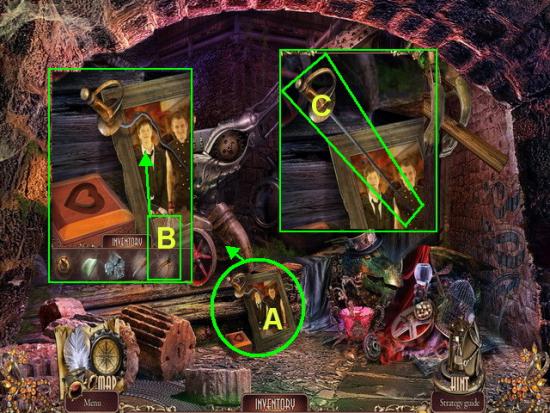
- A. Click on the PORTRAIT to zoom in.
- B. Take the PLIARS from inventory and use it to straighten out the RAPIER.
- C. Take the RAPIER into inventory once repaired.
- Return to the elevator door.
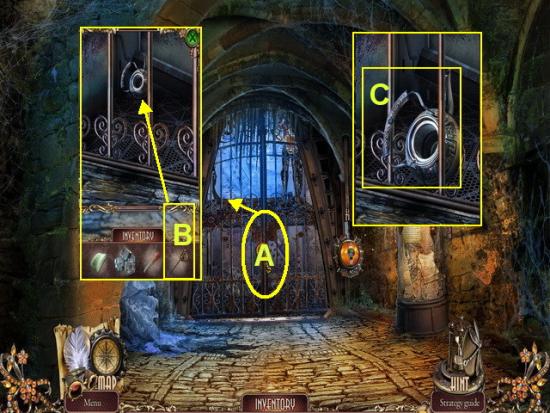
- A. Click on the ELEVATOR DOOR to zoom in.
- B. Take the RAPIER from inventory and use it to bring the KETTLE CLOSER.
- C. Take the KETTLE into inventory.
- Go back once.
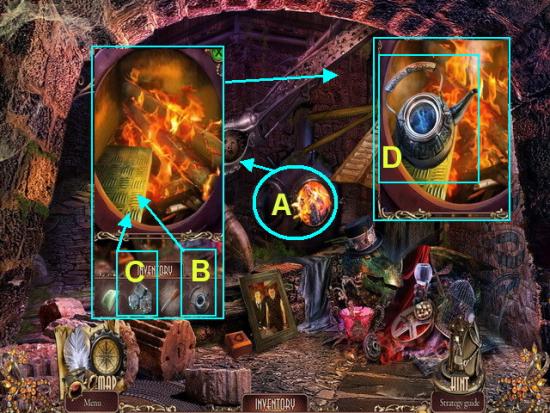
- A. Click on the OVEN to zoom in.
- B. Take the KETTLE from inventory and add it to the shelf.
- C. Take the ICE CUBES and add them to the KETTLE.
- D. Add the BOILING KETTLE OF WATER to your inventory.
- Go forward once.
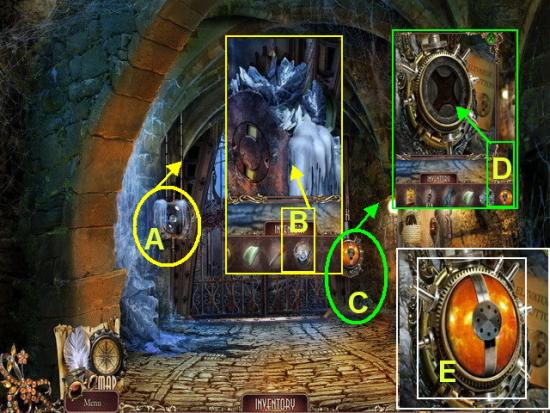
- A. Click on the FROZEN MECHANISM to zoom in.
- B. Take the BOILING KETTLE OF WATER and pour it over the ice to free the mechanism.
- C. Click on the ELEVATOR BUTTON SOCKET to zoom in.
- D. Place the ELEVATOR BUTTON from inventory into the socket.
- E. Click on the ELEVATOR BUTTON to push it.
- The door is now open.
- Click on the BOY to trigger a mini game puzzle.
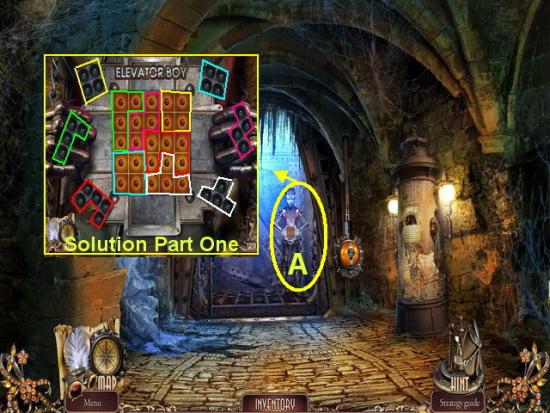
- This is a two part mini game puzzle.
- Part one – Here you must take the black tiles and place them on the grid so that it is entirely covered.
- In the image above the tiles are color coded and shown how they should be placed on the grid.
- Once you complete this a new game board will be exposed for part two of the puzzle.
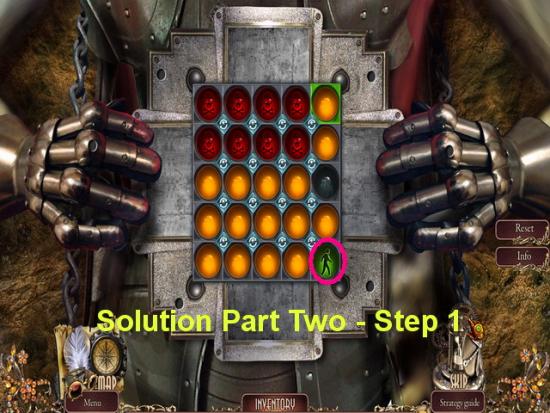
- Puzzle two – Part 1 – In this puzzle you must click on the center rotation buttons to rotate four positions on the board at a time. You can do this to maneuver the spheres around the board.
- Your objective is to get the green sphere out of the grid and will have to do this in steps.
- Solution – Manipulate the board until you get it to look just like the one in the image above.
- NOTE – You must not ever let a red ball sit directly next to the green or the entire board will reset and you will have to start over again.
- It is important to move the red spheres far away so that you don’t risk touching them with the green sphere.
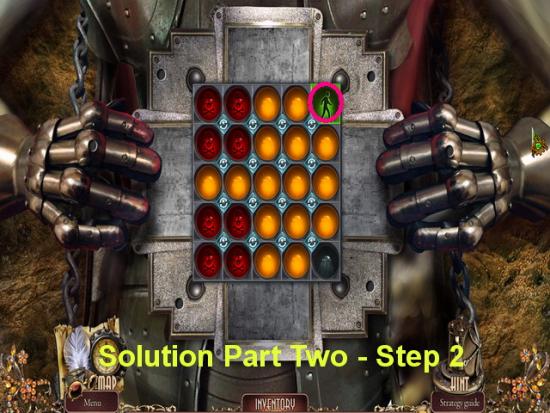
- Puzzle two – Part 2 – Starting out in the position of the last image move the spheres to this position. Once you have the green sphere in the upper right corner you will have successfully completed the puzzle.
- You may now proceed through the elevator.
- Watch the cut scene video.
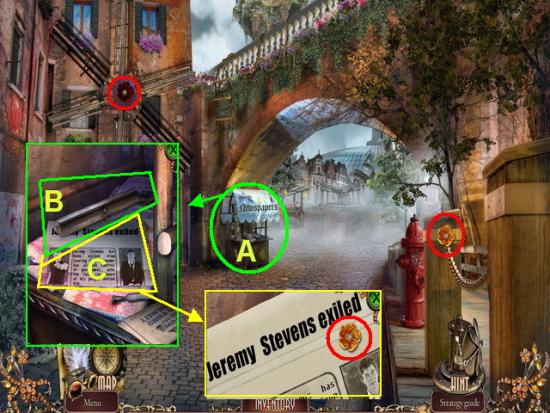
- Locate the flowers shown circled in red above.
- A. Click on the NEWSTAND to zoom in.
- B. Take the RAIL into inventory.
- C. Click on the NEWSPAPER to read it and zoom in. Take the gold flower into philanthropy inventory.
- Move forward once.
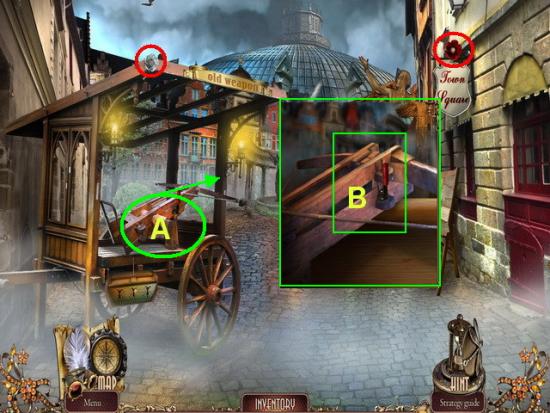
- A. Click on the CROSSBOW to zoom in.
- B. Take the LEVER into inventory.
- You will have to come back here later.
- Back up four times.
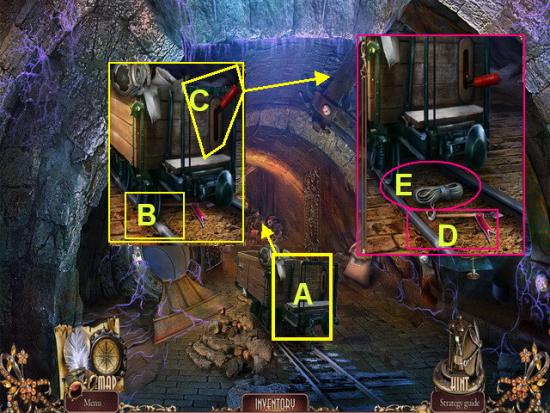
- A. Click on the CART to zoom in.
- B. Take the RAIL from inventory and place it on the track.
- C. Take the LEVER from inventory and place it in the slot. Click on it to move the cart.
- D. Take the ARROW into inventory.
- E. Take the ROPE WITH HOOK into inventory.
- Go forward four times.
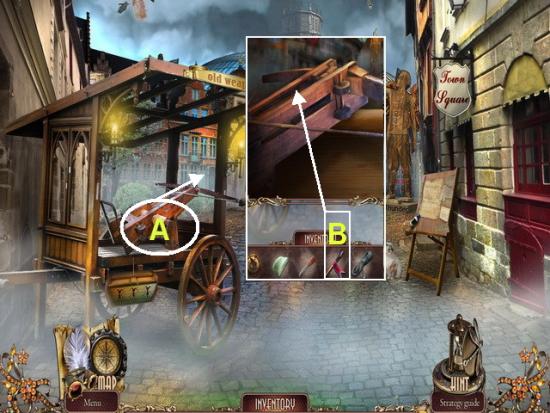
- A. Click on the CROSSBOW to zoom in.
- B. Take the ARROW from inventory and place on crossbow.
- You will have to come back here later to finish this.
- Back up once.
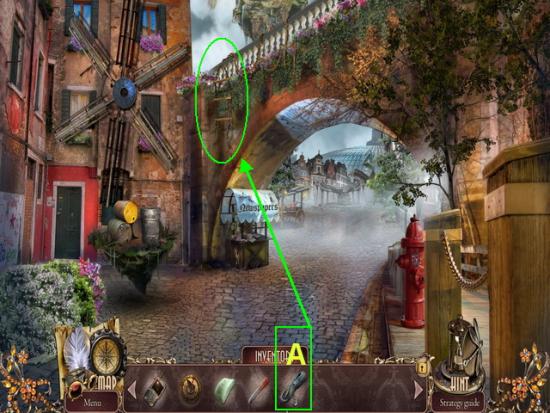
- A. Take the ROPE WITH HOOK and place it on the LADDER hanging off the bridge.
- You may now go over the bridge.
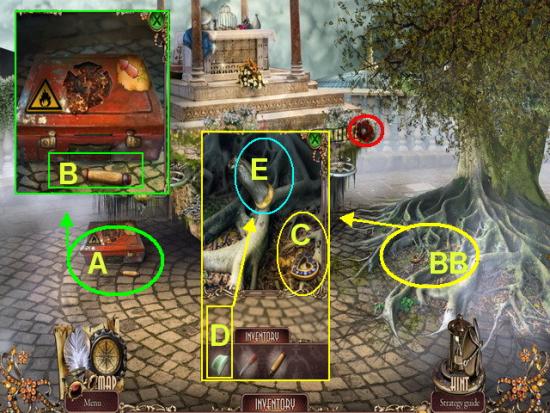
- Locate the flowers shown circled in red.
- A. Click on the SUITCASE to zoom in.
- B. Take the HANDLE into inventory.
- BB. Click on the ROOTS to zoom in.
- C. Take the HEART into inventory.
- D. Take the SOAP from inventory and use it on the RING.
- E. Take the RING into inventory once the soap loosens it.
- Return to the room with the furnace.
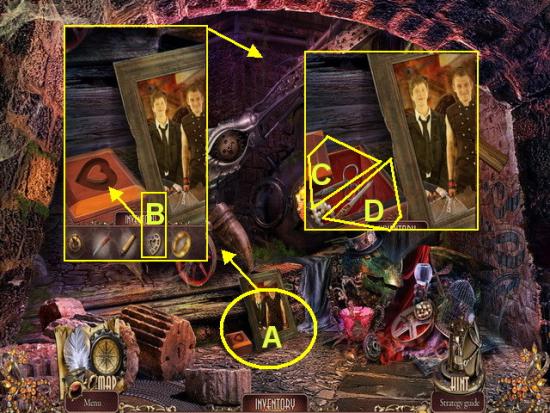
- A. Click on the PORTRAIT to zoom in.
- B. Take the HEART from inventory and place in the opening in box.
- C. Take the CUTICLE SCISSORS into inventory.
- D. Take the NAIL FILE into inventory.
- Go forward twice.
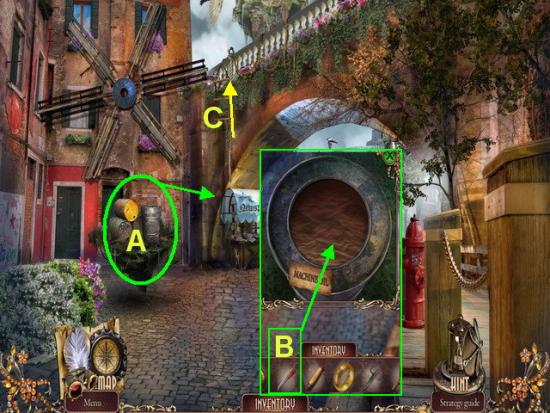
- A. Click on BARRELS to zoom in.
- B. Take the EYE DROPPER from inventory and place it in the MACHINE OIL.
- You now have an eye dropper with machine oil in your inventory.
- C. Go up the ladder to next location.
- Click on sparkling area for HOS
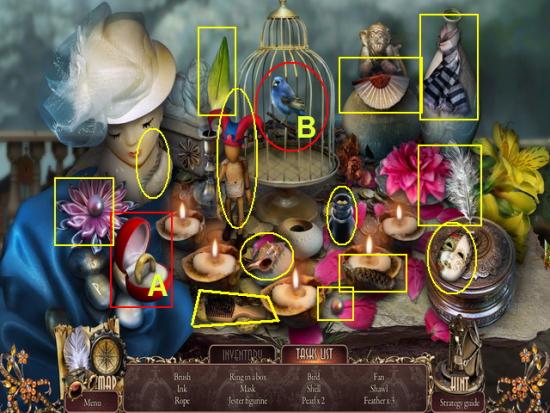
- Click on the “INVENTORY” tab first.
- A. Place the RING from inventory in the box.
- B. Use the NAIL file from inventory to file the BIRD CAGE. This will leave you access to the BIRD.
- You may now move to the “TASKS LIST” tab.
- Locate the hidden objects listed. They are shown circled in yellow above.
- Once you complete this HOS a JESTER PUPPET will be added to your inventory.
- Go down and forward once.
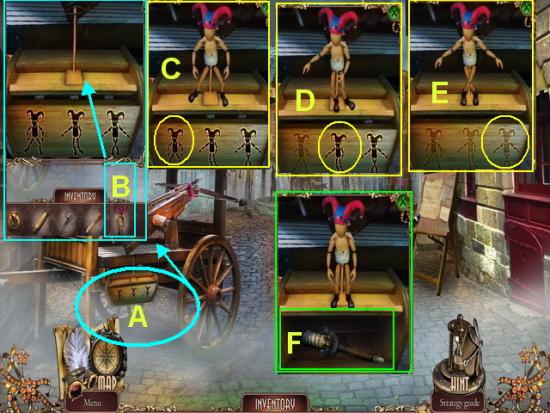
- A. Click on area under crossbow to zoom in.
- B. Take the JESTER PUPPET and add him to the stand. This will activate a mini game puzzle.
- Mini Game – Objective is to position the puppet exactly as the images on the box. You will do one at a time from left to right.
- Once you get it correct you will see the outlines fade out and can move to the next one.
- C., D., and E. – Click on the joints to move them. If you go too far just keep clicking and it will eventually go where you want it to.
- F. Take the TORCH into inventory when finished with puzzle.
- Go down twice to the furnace room.
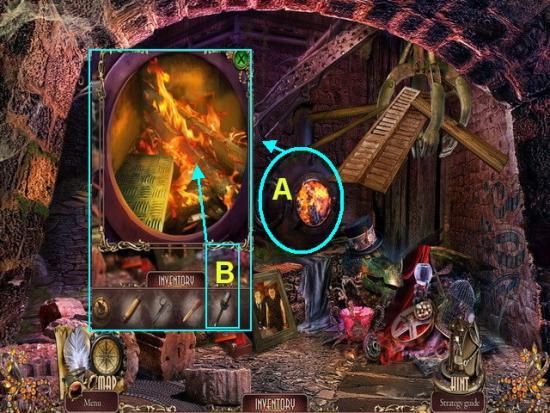
- A. Click on the FURNACE to zoom in.
- B. Take the TORCH from inventory and place it in furnace.
- A LIT TORCH will be added back into inventory.
- Go up once and up the ladder over the bridge.
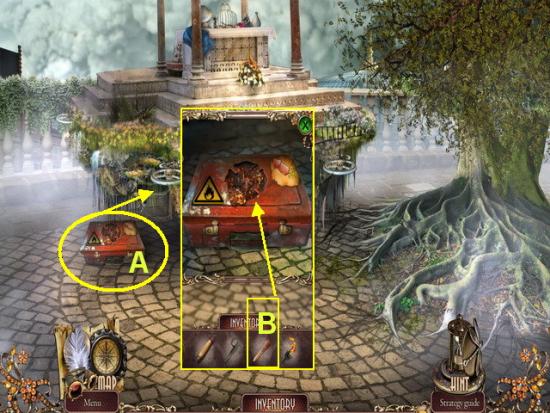
- A. Click on the SUITCASE to zoom in.
- B. Take the EYE DROPPER OF MECHANICAL OIL and add it to the empty slot to remove rust.
- Go down once.
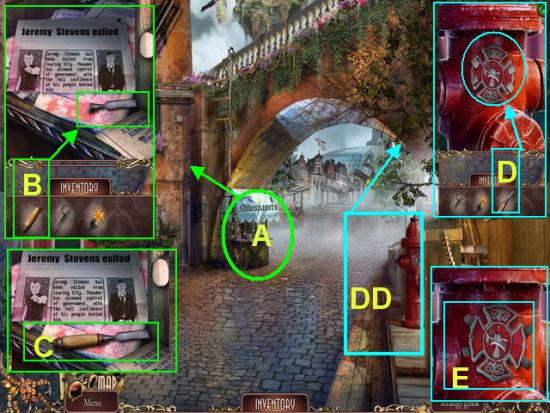
- A. Click on the NEWSPAPER STAND to zoom in.
- B. Take the CHISEL HANDLE from inventory and add to blade to repair it.
- C. Add CHISEL to inventory.
- DD. Click on FIRE HYDRANT to zoom in.
- D. Use the CHISEL from inventory to loosen the SEAL.
- E. Take the SEAL into inventory.
- Go back up the ladder over the bridge.
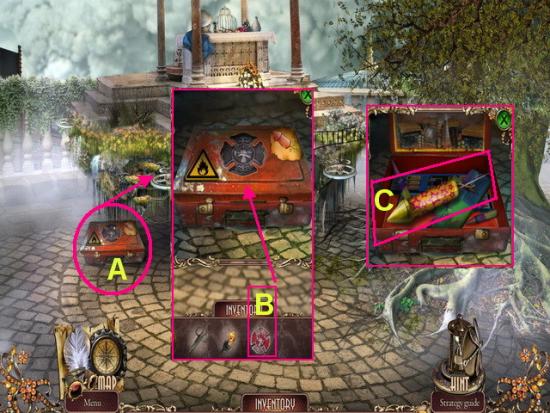
- A. Click on the SUITCASE to zoom in.
- B. Take the SEAL and place it in the indentation.
- C. Click on the lock to open the suitcase. Take the FIREWORK into inventory.
- Go down and forward once.
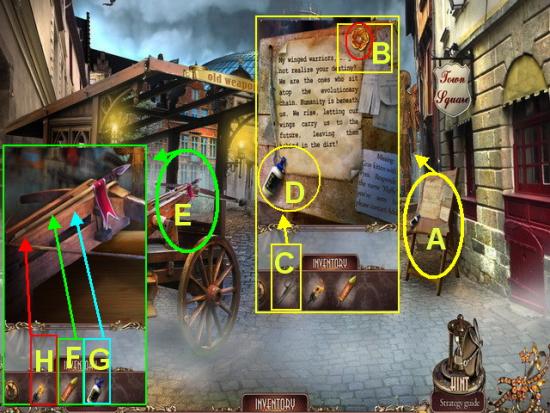
- A. Click on the BULLETIN BOARD to far right to zoom in.
- B. Click on the PAPER for a close up and remove the flower into philanthropy inventory.
- C. Take the CUTICLE SCISSORS and cut the STRING.
- D. Take the GLUE into inventory.
- E. Click on the CROSSBOW to zoom in.
- F. Take the FIREWORK and place on crossbow.
- G. Take the GLUE and apply it to firework to attach it.
- H. Take the LIT TORCH from inventory and light the firework.
- Watch the cut scene video and information that plays next.
- This is the end of Chapter 4.
Chapter 5 – The Trapped Brother
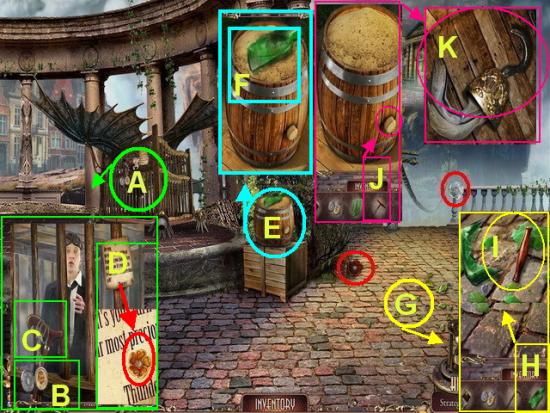
- Click on the flowers circled in red for philanthropy inventory.
- A. Click on the CAGE to zoom in. Watch the cut scene video with Jeremy.
- B. Take the LOCKET into inventory.
- C. Take the CANE into inventory.
- D. Click on the NOTE and read it. Take the gold flower into philanthropy inventory.
- E. Click on the BARREL to zoom in.
- F. Take the GREEN BOTTLE WITH CORKSCREW into inventory.
- G. Click on the SHATTERED GLASS AREA on the ground.
- H. Take the GREEN BOTTLE and shatter it on the ground.
- I. Take the CORKSCREW and the GLASS SHARD Into inventory.
- Click on the BARREL to zoom in again.
- J. Take the CORKSCREW from inventory and use it on the cork in barrel.
- Once the barrel empties of sand, click on the door to open it.
- Mini game – In this puzzle simply click on pairs of matching hangers to remove them.
- K. Take the HOOK into inventory.
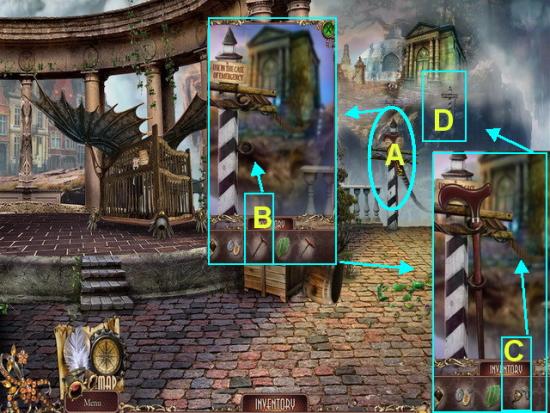
- A. Click on the ABYSS to the far right to zoom in. Remove the broken wood by clicking on it once.
- B. Take the CANE from inventory and Place in vertically in the holes.
- C. Take the HOOK from inventory and place on the rope.
- Click to start the video cut scene.
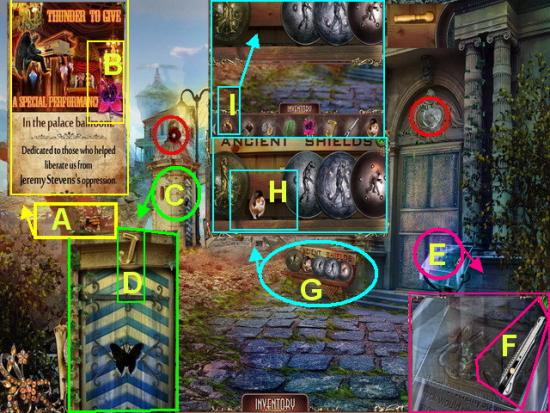
- Click on the red and white flowers shown circled in red.
- A. Click on the post to the far left to zoom in to the poster.
- B. Take the FLOWER into inventory.
- C. Click on the CENTER POST to zoom in.
- D. Take the LETTER “J” into inventory.
- E. Click on the GLASS DISPLAY CASE to the far right to zoom n.
- F. Take the UTILITY KNIFE into inventory.
- G. Click on the BENCH to zoom in.
- H. Take the HAMSTER into inventory.
- I. Take the SHIELD from inventory and place with the others to trigger a mini game puzzle.
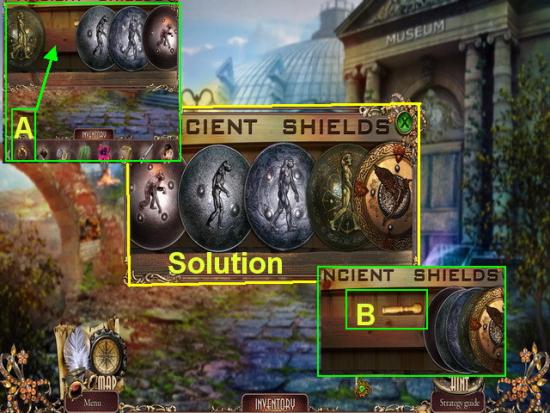
- A. Take the SHIELD and place it on the shelf with the others.
- MINI GAME – The objective here is to arrange the shields left to right in order of human evolutionary development.
- Solution – Shown in image above.
- A. Click on a shield then another to trade places.
- B. Take the PESTLE into inventory once puzzle is completed.
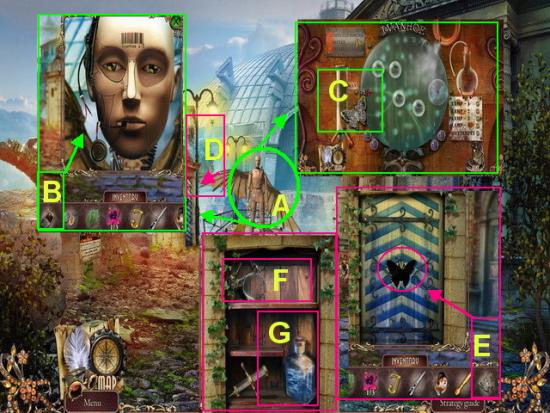
- A. Click on the ROBOT to zoom in.
- B. Take the RADIO from inventory and connect to the far left side over microphone. Listen to video cut scenes.
- C. Click on ROBOT again to zoom in. Take IVANHOE’S AMULET into inventory.
- D. Click on the center post next to robot again to zoom in.
- E. Take IVAHNOE’S AMULET and place in indentation to open cabinet.
- F. Take the JEWLER’S LENSE into inventory.
- G. Take the BOTTLE OF WATER into inventory.
- You will have to return here again later to get the final item.
- Click to the far left of scene and go forward once.
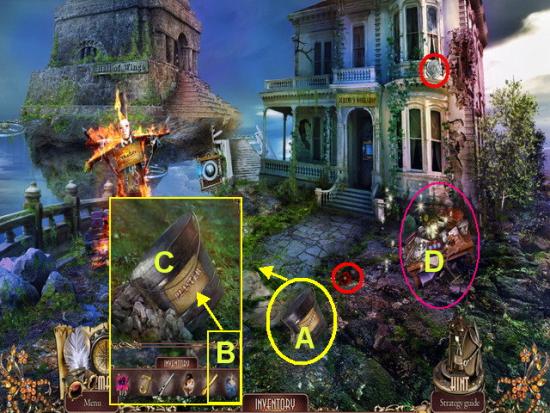
- You are now in front of Jeremy’s workshop. Click on the flowers shown circled in red for your philanthropy inventory.
- A. Click on the BUCKET OF PLASTER to zoom in.
- B. Take the BOTTLE OF WATER from inventory and add to bucket.
- C. Place the BUCKET OF PLASTER into inventory.
- D. Click on the sparkling area to the right for a HOS.
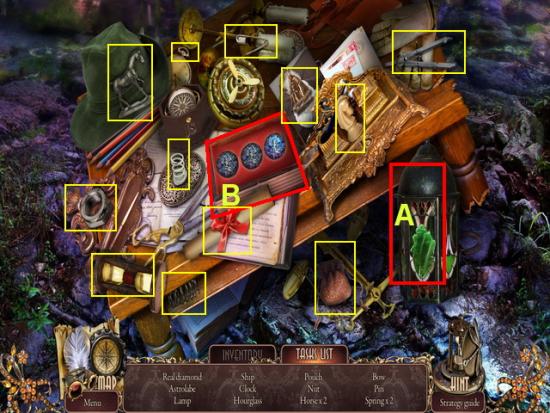
- Click on the inventory tab first.
- A. Take the SHARD OF GLASS from inventory and place on broken lantern.
- B. Take the JEWLER’S LENSE and place over diamonds. The real diamond will highlight.
- Click on the “Tasks” list now and proceed to find all hidden objects on the list shown circled in yellow in image above.
- You will be given a DIAMOND for inventory once you complete this HOS.
- Return to the original scene by moving down once.
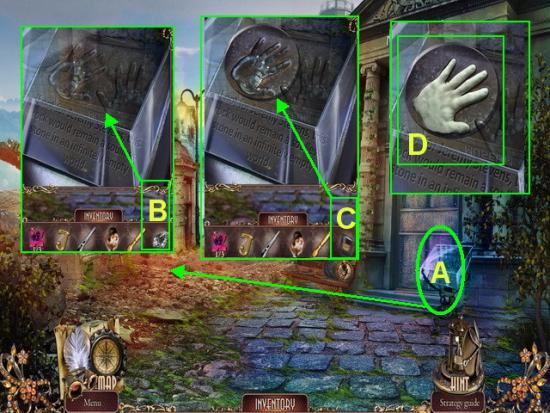
- A. Click on the glass display case to the far right to zoom in.
- B. Take the DIAMOND from inventory and use it on the glass to cut a hole.
- C. Take the PLASTER from inventory and pour into handprint.
- D. Take the HANDPRINT into inventory once dry.
- Go forward once back to Jeremy’s workshop.
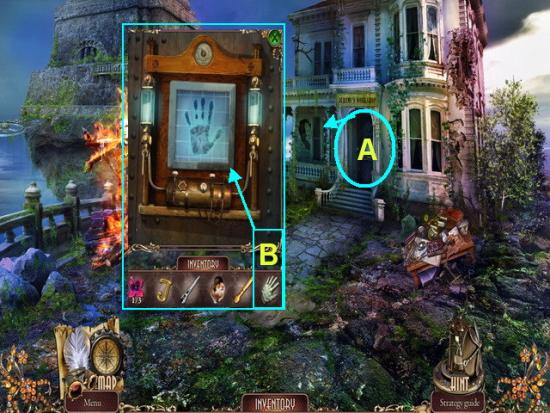
- A. Click on the FRONT DOOR to zoom into the lock panel.
- B. Take the HAND PRINT and place over the machine.
- You now may go inside the workshop so proceed inside.
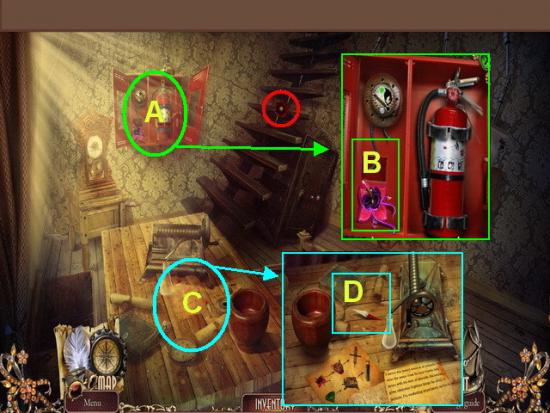
- Click on the flower shown circled in red for philanthropy inventory.
- A. Click on the FIRE HYDRANT CASE on far wall to zoom in.
- B. Take the FLOWER into inventory. You will have to return here again later.
- C. Click on the TABLE to zoom in.
- Read the note on table.
- D. Take the COMPASS HANDS into inventory. You will have to return here later once you find all needed items.
- Go down once.
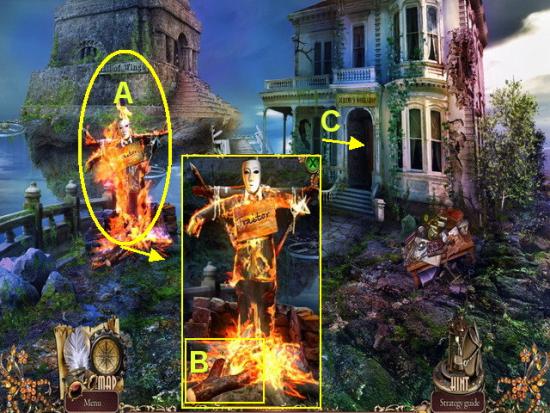
- A. Click on the BURNING EPITAPH to zoom in.
- B. Take the BURNING LOG at bottom left into inventory.
- C. Return inside the workshop.
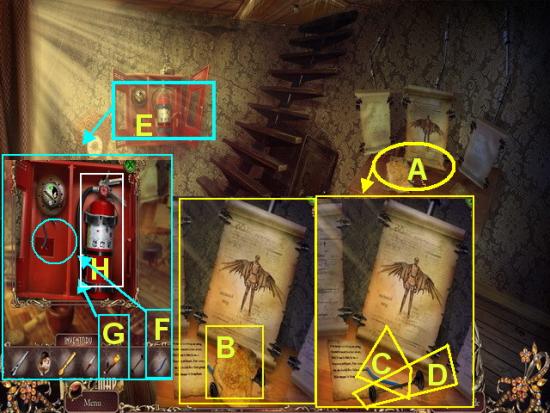
- A. Click on the work TABLE to the right of room to zoom in.
- B. Take the FLIGHT LOG and watch the video cut scenes that begin to play.
- C. Take the WIRE into inventory.
- D. Take the SYRINGE PLUNGER into inventory.
- Read the note.
- E. Click on the FIRE HYDRANT CASE to zoom in.
- F. Take the WIRE from inventory and repair the wire under sensor.
- G. Take the BURNING STICK from inventory and wave it under sensor.
- H. When FIRE EXTINGUISHER releases take it into inventory.
- Go back outside workshop.
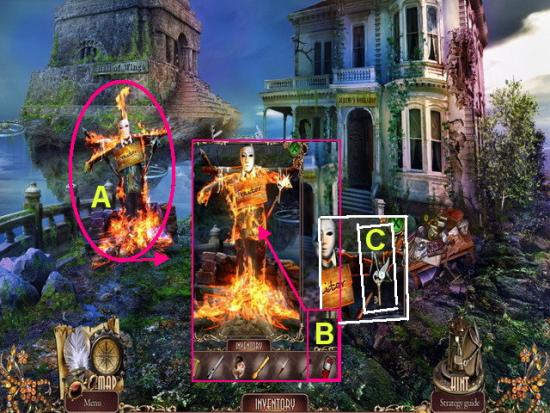
- A. Click on the BURNING EFFIGY again to zoom in.
- B. Take the FIRE EXTINGUISHER from inventory and use it on the fire.
- C. Take the KEY into inventory.
- Go back inside the workshop.
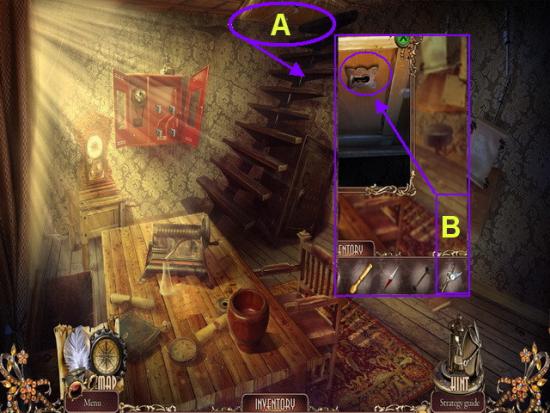
- A. Click on the DOOR at the top of the stairs to zoom in.
- B. Take the KEY from inventory and use it to unlock door.
- Go upstairs.
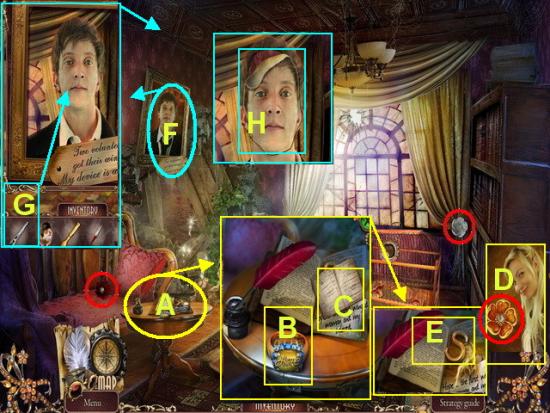
- Remove the two flowers shown circled in red to add to philanthropy inventory.
- A. Click on the COFFEE TABLE to zoom in.
- B. Take the RING into inventory.
- C. Take the JOURNAL and watch the cut scene video.
- D. Take the gold flower into your philanthropy inventory.
- E. Take the LETTER “S” into inventory.
- F. Click on JEREMY’S PORTRAIT on the wall.
- G. Take the UTILITY KNIFE and cut his face from the picture.
- H. Take the PICTURE into inventory.
- Go downstairs once.
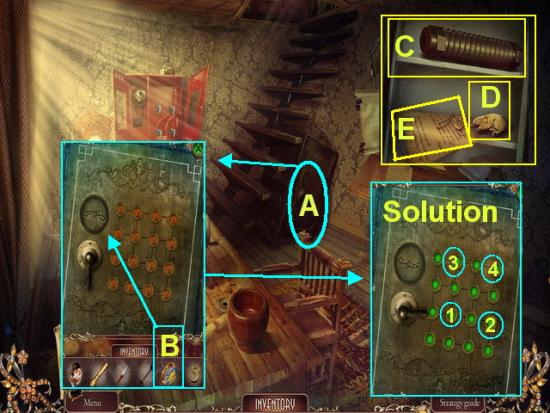
- A. Click on the SAFE to zoom in.
- B. Take the RING and add it to the indentation. This will trigger a mini game.
- Solution – The buttons you need to push are numbered in the image above press on them in the order 1 to 4 as shown in the image to open the safe.
- C. Take the GRINDER into inventory.
- D. Take the HAMSTER AMULET into inventory.
- E. Read the note.
- Go down once.
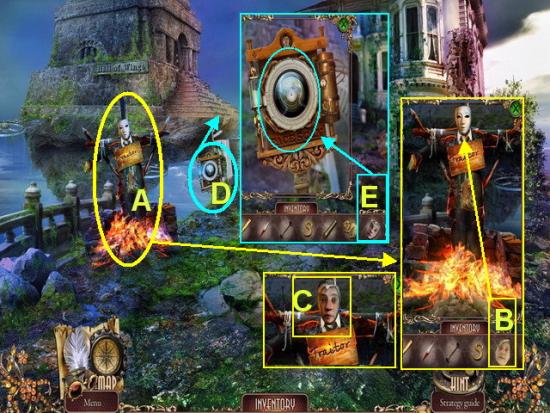
- A. Click on the BURNING EFFIGY again to zoom in.
- B. Take the PICTURE of Jeremy and add it to the MASK.
- C. Take the MASK into inventory.
- D. Click on the MACHINE to the right of effigy.
- E. Take JEREMY’S MASK and place it over the device. You may now go forward to the hall of wings.
- Go forward once.
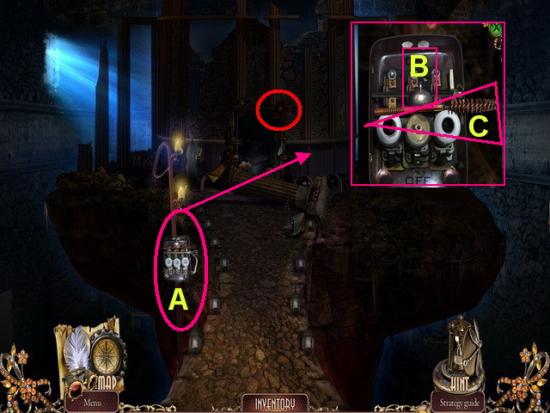
- Click on the flower circled in red to add to philanthropy inventory.
- A. Click on the MACHINE to zoom in.
- B. Take the ALARM BELL PIECE into inventory.
- C. Take the BRUSH into inventory.
- Go down twice back inside workshop and upstairs then click on the sparkling area for a HOS.
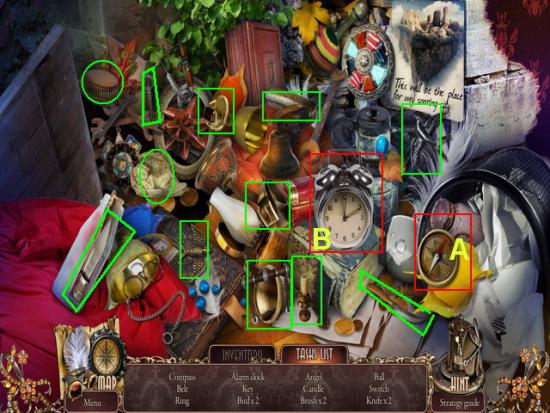
- Click on the “Inventory tab” first.
- A. Take the COMPASS HANDS from inventory and place on compass.
- B. Take the ALARM BELL and place it on top of clock.
- These items are shown labeled and circled in red.
- Click on the “Tasks” list next and locate all the hidden objects in the scene shown circled above.
- Once you complete this HOS a HANDLE will be added to your inventory.
- Go back into the workshop and go upstairs.
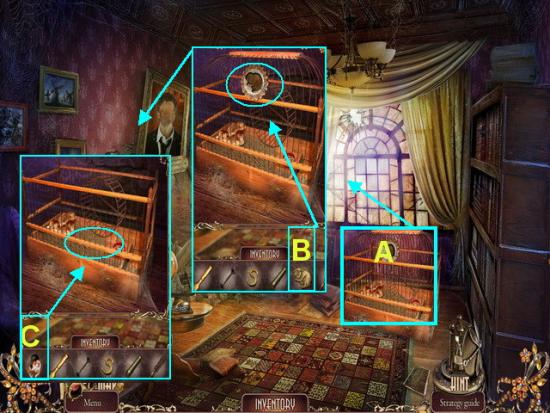
- A. Click on the HAMSTER CAGE to zoom in.
- B. Take the HAMSTER AMULET from inventory and place in the indentation.
- C. Take the HAMSTER and place inside the cage. When he works the wheel the cage will lift up.
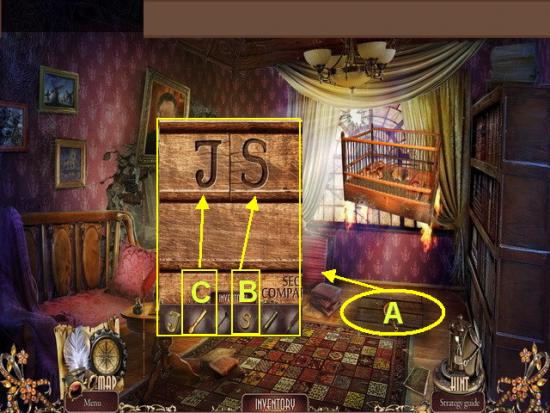
- Click on the FLOOR PANEL to zoom in.
- B. Take the letter “S” and add to indentation along the top.
- C. Take the letter “J” and add it to the indentation along the top.
- Once the panel opens a mini game is triggered.
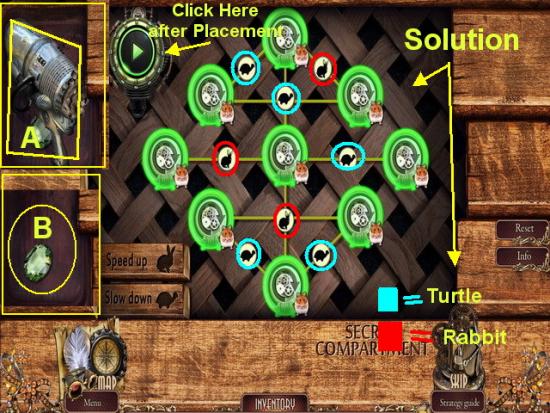
- Mini Game – The objective here is to place the turtles and rabbits strategically so that all the wheels will turn at the same speed and they will end the race together.
- Click on a rabbit or turtle and place it next to a wheel to slow it or speed it.
- Solution – The solution is shown in the image above. Place the rabbits in the areas circled in red and the turtles where they are circled in blue.
- You must next click on the button at the top left to see if you have done this correctly. If you have all the circles will turn green and a panel will open with rewards.
- A. Take the NET PISTOL into inventory.
- B. Take the EMERALD into inventory.
- Go down three times.
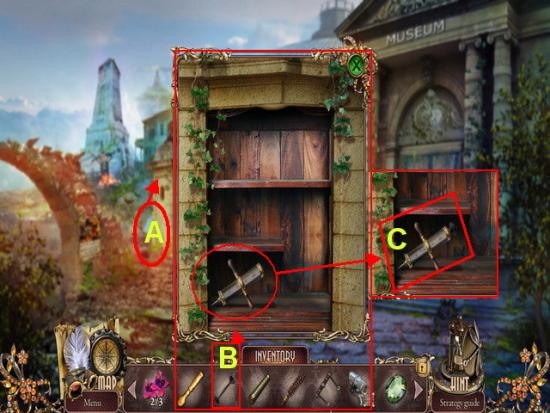
- A. Click on the center POST to zoom in.
- B. Take the SYRINGE PLUNGER from inventory and add to the SYRINGE>
- C. Take the completed SYRINGE into inventory.
- Return to the Hall of Wings.
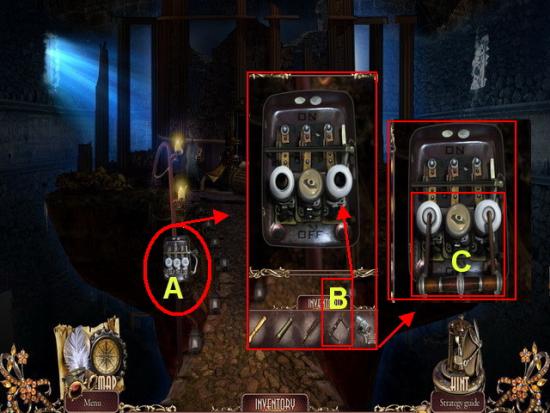
- A. Click on the MECHANISM to zoom in.
- B. Take the HANDLE from inventory and place in the empty slot.
- C. Click on the handle to activate it. The lights will now turn on.
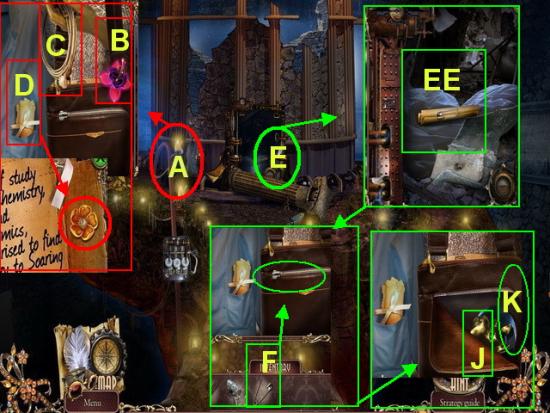
- A. Click on the panel to the far left to zoom in.
- B. Take the FLOWER into inventory.
- C. Take the ROPE into inventory.
- D. Click on the LETTER and read it. Take the gold flower into your philanthropy inventory.
- E. Click on the right panel to zoom in.
- EE. Take the SAFETY PIN and add to inventory.
- Click on the left panel again to zoom in.
- F. Take the SAFETY PIN from inventory and place it on the broken zipper.
- Click on the ZIPPER to open the case.
- J. Click on the COPPER DOG HEAD HANDLE and add to inventory.
- K. Click on the BLACK ELECTRICAL TAPE and add to inventory.
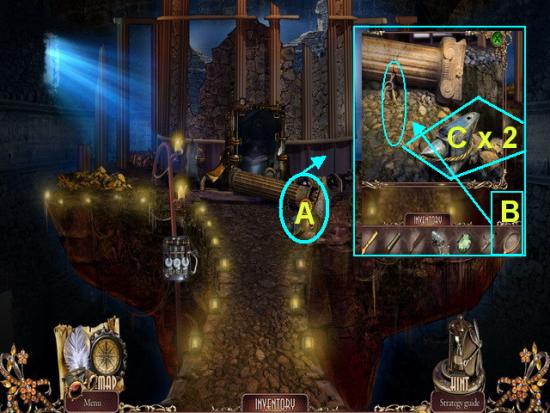
- A. Click on the area near the COLUMN to zoom in.
- B. Take the ROPE from inventory and tie to the ends to repair.
- C. Take the ANVIL and click on it twice to knock it over the abyss. Watch the column go over the edge which frees up the blockage.
- Return to Jeremy’s workshop and go inside.
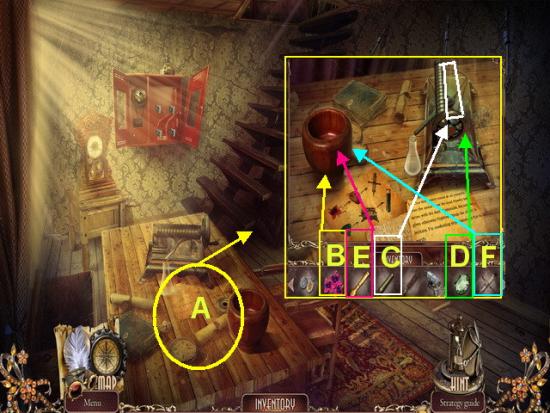
- A. Click on the TABLE to zoom in.
- B. Take the FLOWERS and add to the MORTAR.
- B. Take the GRINDER and add to machine.
- C. Take the EMERALD and add to the grinder. Click on the handle to start it and the ground emeralds will add to the flask. Click on the FLASK OF EMERALDS to add to your inventory.
- D. Add the PESTLE to the flowers in the mortar and watch them grind up to a liquid.
- E. Take the SYRINGE from inventory and use it to draw up the liquid. The SYRINGE will return to your inventory.
- Go down once back to robot.
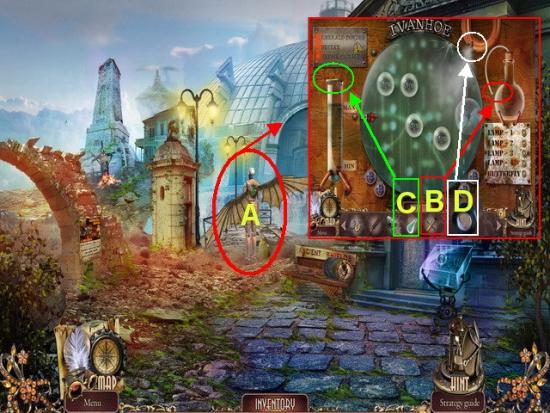
- A. Click on the ROBOT to zoom in.
- B. Take the SYRINGE and use it on the container to far right.
- C. Take the EMERALD FLASK and pour contents into tube at far left.
- D. Take the BLACK ELECTRICAL TAPE and repair the leak.
- The machine is now repaired and loaded and ready for a mini game.
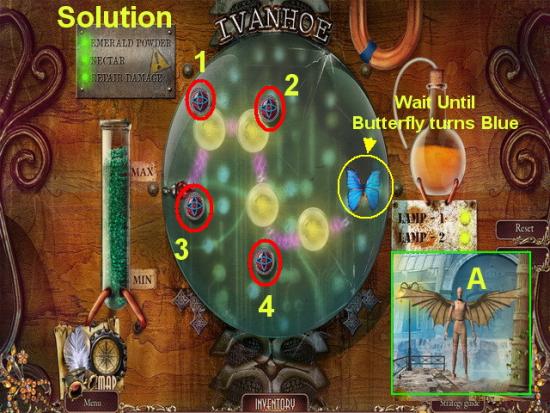
- Mini Game – The objective here is to place the four magnets in such a way as to cause the solution to hit the butterfly at the far right.
- Solution – The solution is shown in the image above. Click on a magnet to place it.
- Once all magnets are placed you should see the purple vapor touching all posts and ending at the butterfly. Wait for a while before the butterfly turns blue then you will be able to collect it into inventory.
- Once finished click on IVANHOE and watch the video cut scenes as Jeremy’s brother is flown to the palace by Ivanhoe.
- This is the end of chapter 5.
Chapter 6 – The Palace Entrance
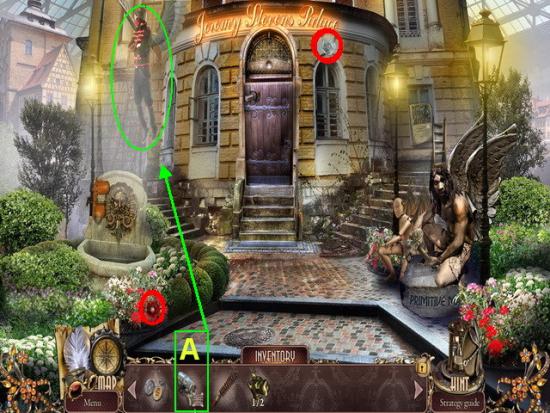
- Click on the two flowers circled in red for your philanthropy inventory.
- A. Take the NET GUN and aim it at the GUARD and click.
- Watch the cut scene videos.
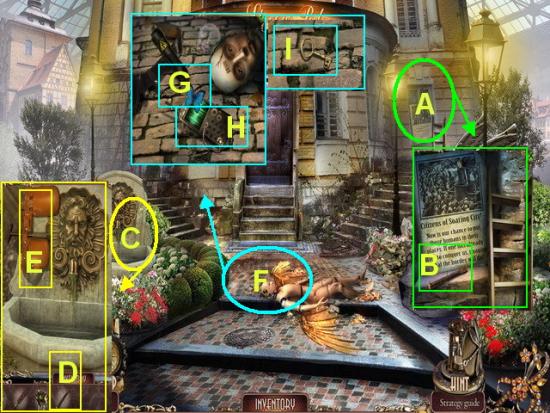
- A. Click on the WINDOW to the far right of scene to zoom in.
- B. Take the CHISEL BLADE into inventory.
- C. Click on the FOUNTAIN to zoom in.
- D. Take the CHISEL BLADE and add to SCULPTOR’S KIT
- E. Take the SCULPTOR’S KIT into inventory.
- F. Click on IVANHOE THE ROBOT to zoom in.
- G. Take the BUTTERFLY into inventory.
- H. Take the RADIO into inventory.
- I. Take the KEY into inventory.
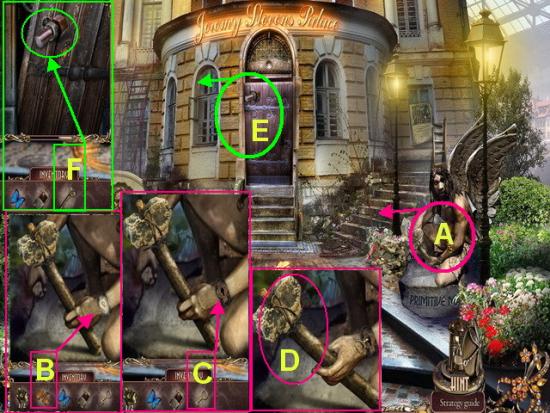
- A. Click on the STATUE to zoom in.
- B. Take the SCULPTOR’S KIT from inventory and use it on the STATUE.
- C. Take the KEY from inventory and use it on the arm of the statue.
- D. When the grip loosens take the ANCIENT HAMMER into inventory.
- E. Click on the FRONT DOOR to zoom in.
- F. Take the ANCIENT HAMMER from inventory and use on the BOLT. The door will now open.
- Go inside the ballroom.
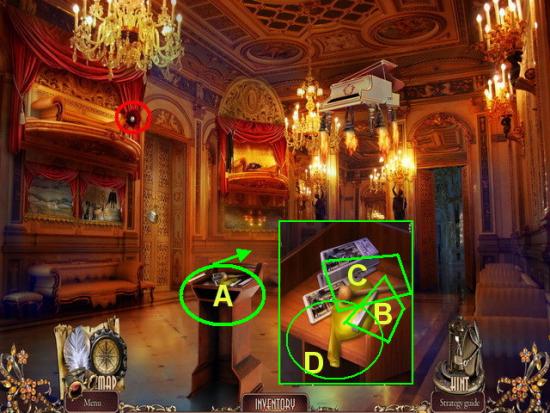
- A. Click on the PODIUM to zoom in.
- B. Take the PIANO KEY into inventory.
- C. Take the MALLETT into inventory.
- D. Take the BALLOON into inventory.
- Go forward once.
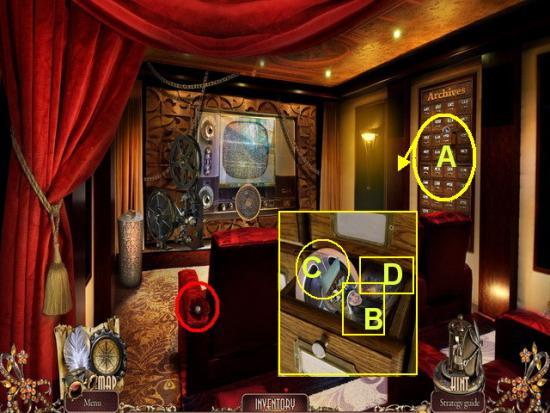
- A. Click on the ARCHIVES drawer to zoom in.
- B. Take the PICTURE slice into inventory.
- C. Take the FILM into inventory.
- D. Read the BOOK inside drawer.
- Go outside ballroom.
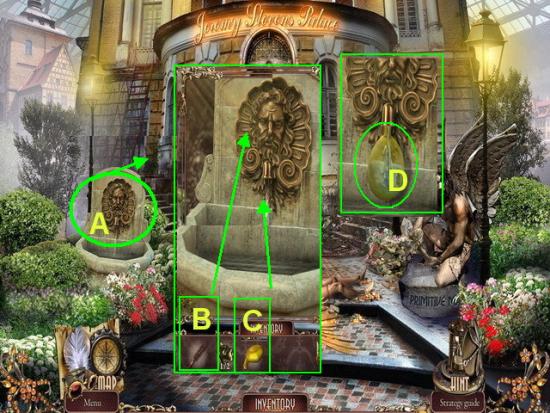
- A. Click on the FOUNTAIN to zoom in.
- B. Use the BRUSH from inventory to clean out the faucet.
- C. Place the BALLOON over the water.
- D. Take the WATER BALLOON into inventory.
- Go back inside ballroom.
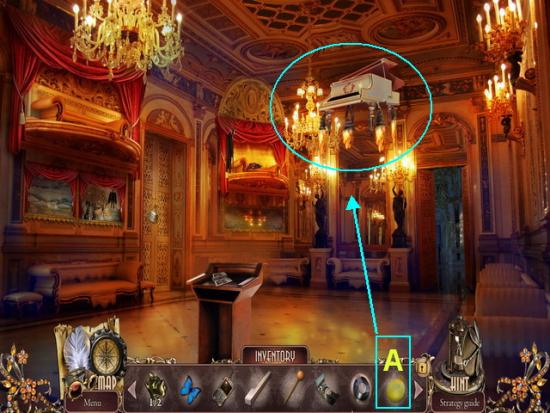
- A. Take the WATER BALLOON from inventory and throw it at the PIANO.
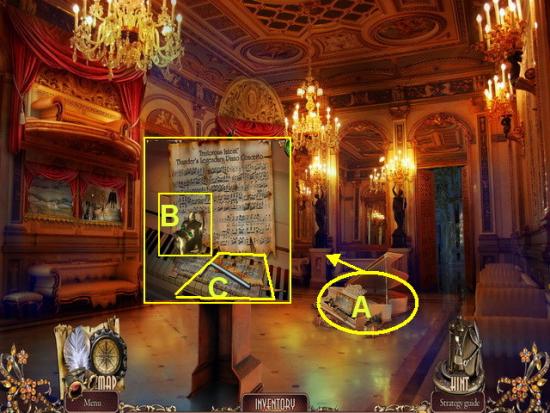
- A. Click on the PIANO to zoom in.
- B. Take the HEX KEY into inventory.
- C. Take the COPPER DOG HEAD TOPPER into inventory.
- Go forward once.
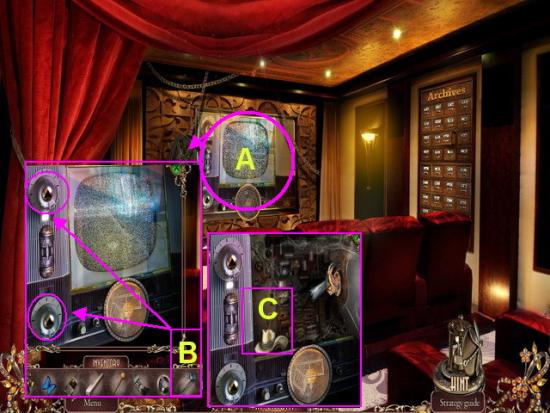
- Click on the flowers circled in red.
- A. Click on the TV to zoom in.
- B. Take the HEX WRENCH from inventory and use on the two holes.
- C. Take the HAT KEY from inventory.
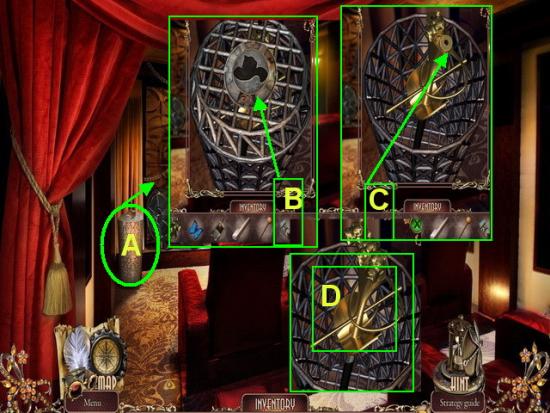
- A. Click on the WASTE BASKET to the left of TV to zoom in.
- B. Take the HAT KEY and place it in the indentation.
- C. Take the COPPER DOG HEADS and add to the top of the rapier.
- D. Take the RAPIER into inventory.
- Go down once.
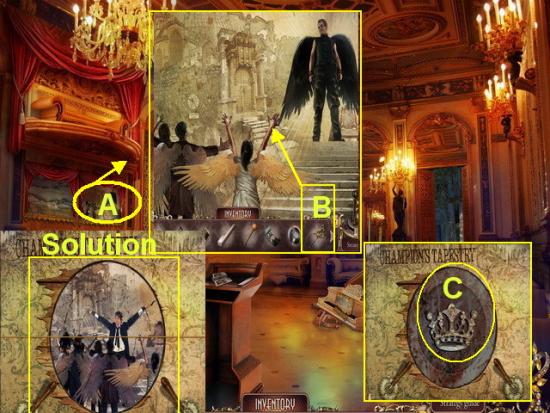
- A. Click on the TAPESTRY to the far left of scene to zoom in.
- B. Use the RAPIER from inventory and tear the tapestry away.
- This will trigger a mini game puzzle.
- Mini Game – Place the pieces in the correct position and use the handles along the left and right to rotate the image.
- Tip – It is best to align the part and then turn the handles. The part will lock in permanently once placed correctly.
- Solution is shown above.
- C. When panel opens take the CROWN into inventory.
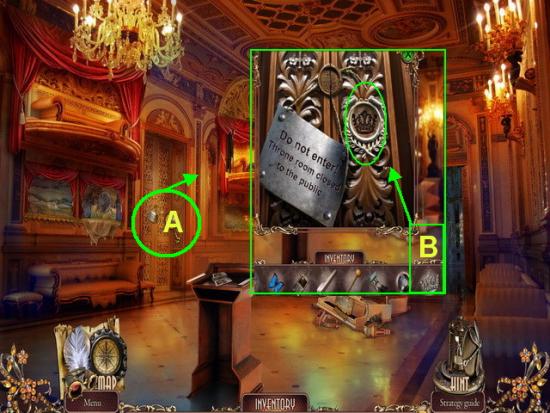
- A. Click on the THRONE HALL door to zoom in.
- B. Take the CROWN KEY from inventory and place in the indentation.
- Go inside thrown hall.
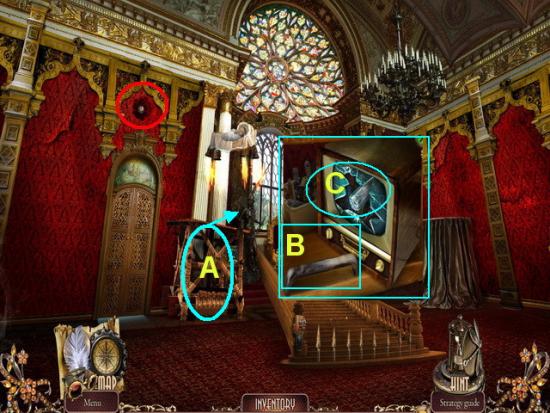
- A. Click on the SHELF to zoom in.
- B. Take the LADDER RUNG into inventory.
- C. Take the FUSE into inventory.
- Return to the TV room.
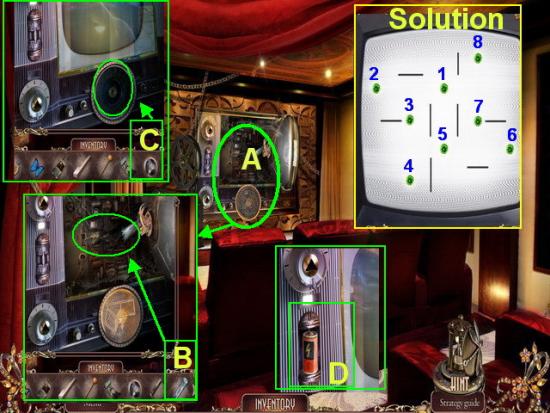
- A. Click on the TV to zoom in.
- B. Use the FUSE to replace the broken one.
- This will start a mini game puzzle.
- Mini Game Solution – The solution is shown in the image above. Click on the buttons as shown in the order listed – Note – Click on a button then click on it again before you click on the next one in the sequence. This will cause all the buttons to combine. Your goal is to cause all of them to disappear. If a green button doesn’t disappear you have missed a step and will need to reset puzzle.
- C. Take the FILM from inventory and place in the slot.
- Watch the video.
- D. Take the BATTERY into inventory.
- Go back outside ballroom.
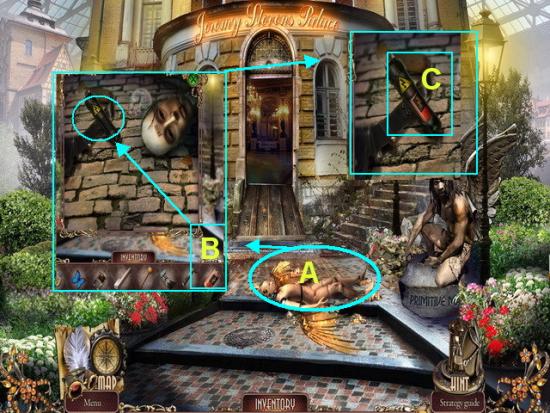
- A. Click on IVANHOE the ROBOT to zoom in.
- B. Take the BATTERY from inventory and place in the STUN GUN.
- C. Place the STUN GUN in inventory.
- Go back inside the throne room.
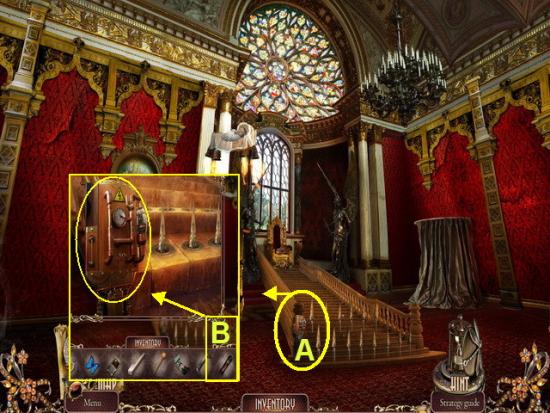
- A. Click on the CONTROLS that are next to the steps to zoom in.
- B. Use the STUN GUN to blow the controls out.
- You may now go up the stairs.
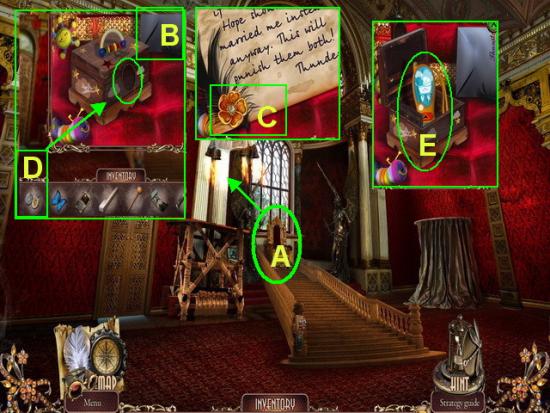
- A. Click on the THRONE to zoom in.
- B. Read the letter in the blue envelope.
- C. Take the gold flower for philanthropy inventory.
- D. Place the LOCKET into the indentation of the box to open it.
- E. Take the REMOTE for the baby bed into inventory.
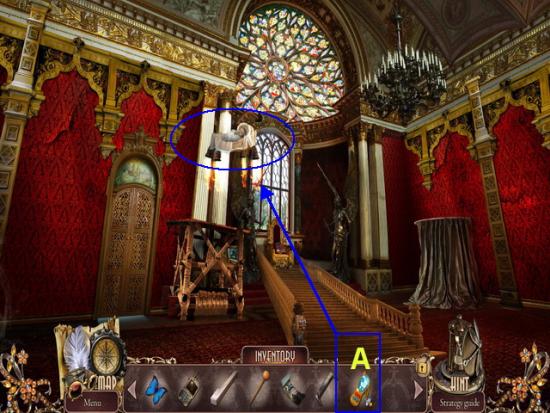
- A. Take the REMOTE and use it to bring the baby bed down to the floor.
- Go back to the area outside the ballroom.
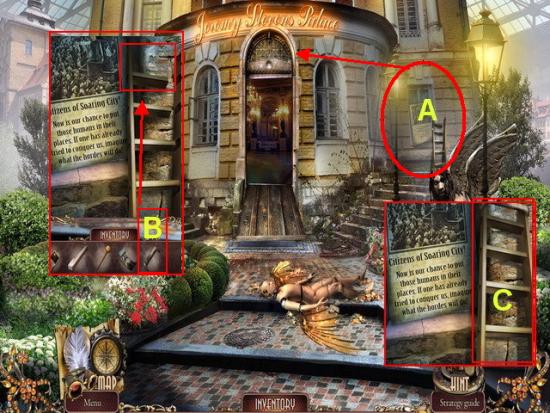
- A. Click on the WINDOW to the far right of scene to zoom in.
- B. Take the LADDER RUNG from inventory and add to the ladder.
- C. Take the repaired LADDER into inventory.
- Go inside ballroom.
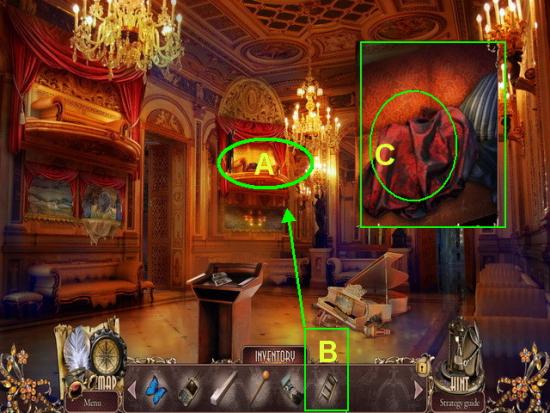
- A. Click on the BALCONY to zoom in.
- B. Use the LADDER in inventory and place under balcony.
- C. Take the DIAPER into inventory.
- Go inside the throne room.
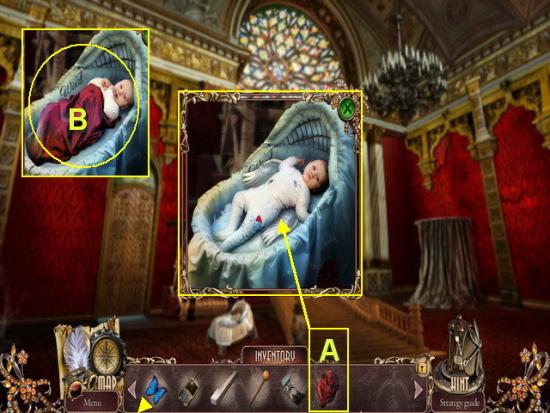
- A. Place the DIAPER on the baby.
- B. Take the BABY/WIND into inventory.
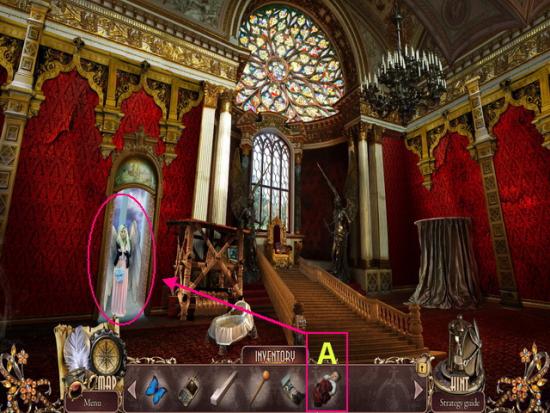
- A. Give the BABY to HOPE.
- Watch the video cut scenes.
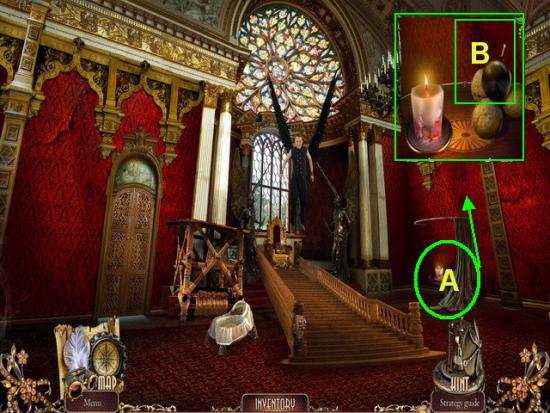
- A. Click on the TABLE to the far right of scene to zoom in.
- B. Click on the BOMB and take it into inventory.
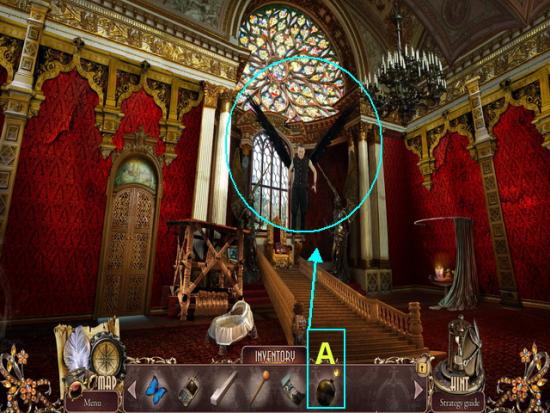
- A. Take the BOMB and throw it at THUNDER
- Watch video cut scenes.
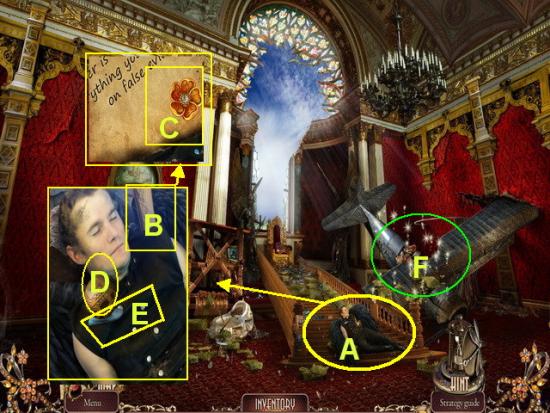
- A. Click on THUNDER to zoom in.
- B. Click on the paper at the upper right corner.
- C. Take the golden flower for philanthropy inventory.
- D. Take the CITY MEDALLION into inventory.
- E. Take the AIRPLANE WING into inventory.
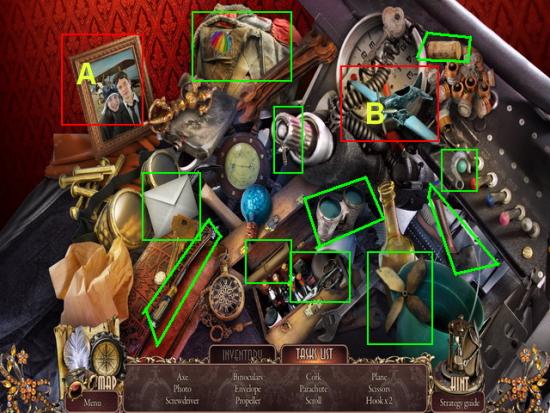
- F. Click on the sparkling area for a HOS.
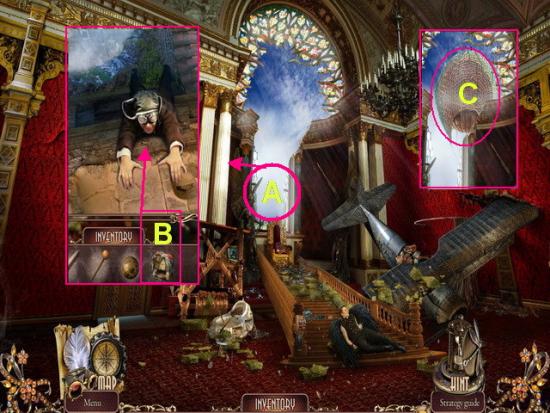
- Click on the “Inventory” tab first.
- A. Take the PHOTO HALF and add it to the photo frame.
- B. Take the AIRPLANE WING and add it to the airplane.
- Click on the “Tasks” list and locate all the hidden objects on the list shown circled above.
- You will be given a PARACHUTE into inventory once completed.
- A. Click on the WINDOW to zoom in.
- B. Give the PARACHUTE to CHESTER and he will drop to Earth.
- C. Click on the BALLOON he sends to you to move to the next location.
- Watch video cut scene.
- This is the end of Chapter six.
Chapter 7 – Back at the Soaring City
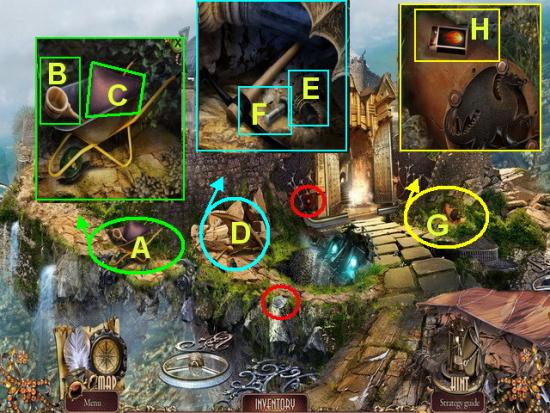
- Click on the flowers circled in red for philanthropy inventory.
- A. Click on the WHEELBARROW to zoom in.
- B. Take the SCOOP into inventory.
- C. Take the PILLOW into inventory.
- D. Click on the BROKEN COLUMN to zoom in.
- E. Take the JOYSTICK into inventory.
- F. Take the BOLT into inventory.
- G. Click on the DRAIN PIPE to zoom in.
- H. Take the MATCHES into inventory.
- Go forward at the far left of scene to the PRECIPICE.
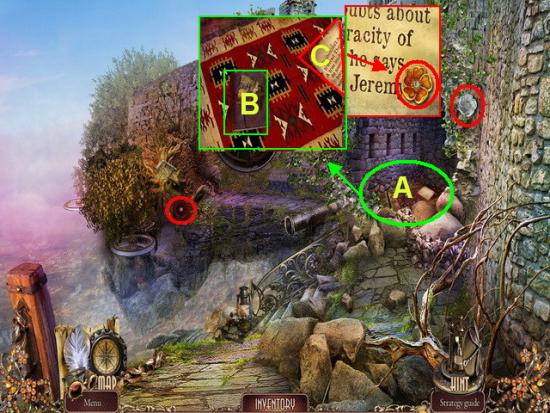
- Click on the flowers circled in red for philanthropy inventory.
- A. Click on the PILE in center of building to zoom in.
- B. Click on the BOOK and watch the video and cut scenes.
- C. Click on the NOTE to read and take the gold flower into philanthropy inventory.
- Go down once.
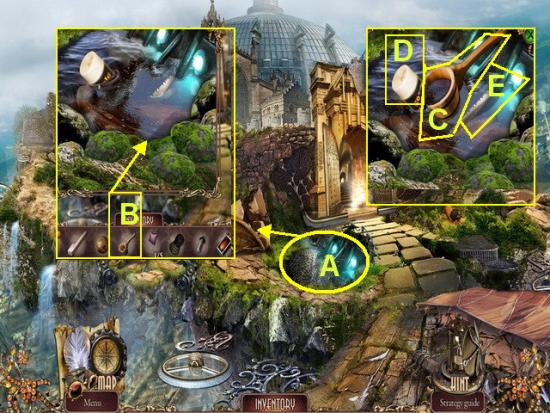
- A. Click on the glowing area in center of scene to zoom in.
- B. Take the SCOOP and place it into the OIL.
- C. Take the OIL into inventory.
- D. Take the SPRAY PAINT into inventory.
- E. Take the SAW BLADE into inventory.
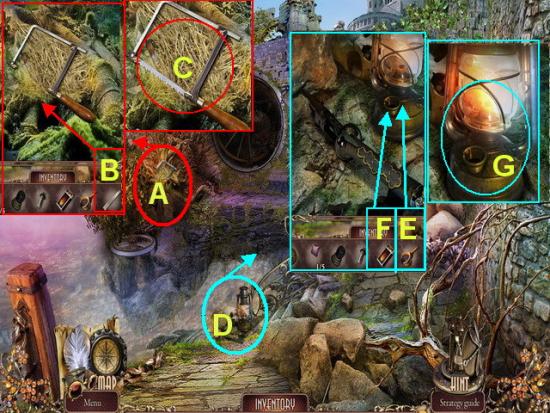
- A. Click on the DRY STRAW to zoom in.
- B. Take the SAW BLADE from inventory and place it on saw to repair it.
- C. Take the HACKSAW into inventory.
- D. Click on the LANTERN to zoom in.
- E. Take the SCOOP OF OIL and add to the LANTERN.
- F. Use the MATCHES to light the LANTERN.
- G. Place the LIGHTED LANTERN into inventory.
- Go down once.
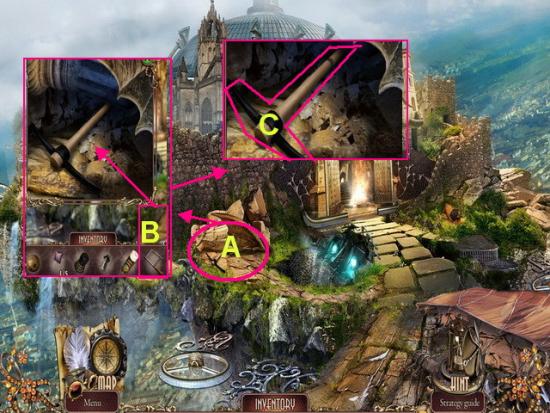
- A. Click on the BROKEN COLUMN at the center of the scene to zoom in.
- B. Use the HACKSAW to cut the pick axe free.
- C. Take the PICK AXE into inventory.
- Return to the precipice.
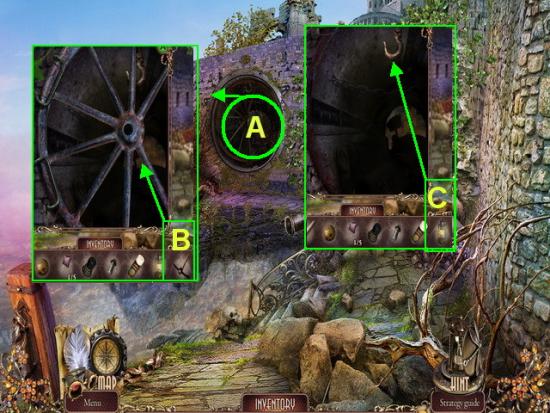
- A. Click on the DRAIN to zoom in.
- B. Take the PICK AXE from inventory and use it to remove the grate cover.
- C. Take the LIGHTED LANTERN and add it to the HOOK.
- This will start a sparkling effect. Click on it to start a HOS.
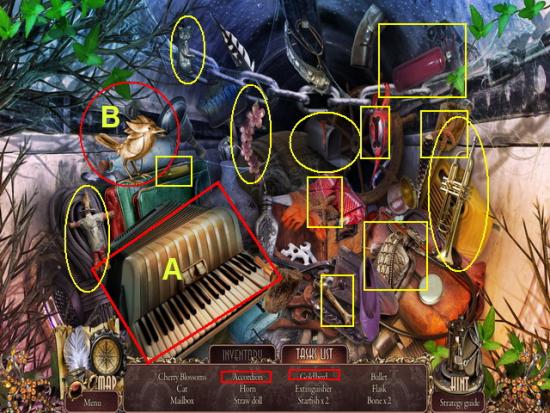
- Click on the “inventory” tab first.
- A. Take the ACCORDIAN KEY and add it to the accordion.
- B. Take the SPRAY PAINT and paint the bird gold.
- Click on the “Tasks” tab and find all the items listed in white text.
- The solution is shown circled above.
- Once you find all the items a CHERRY BLOSSOM INLAY will be added to your inventory.
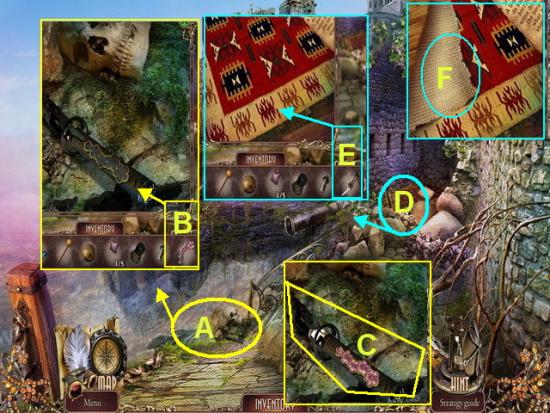
- A. Click on the SKULL to zoom in.
- B. Take the CHERRY BLOSSOM INLAY and use it on the KATANA.
- C. When it opens take the KATANA into inventory.
- D. Click on the TRAPDOOR area to zoom in.
- E. Take the KATANA and use it to cut the CARPET.
- F. Take the CARPET into inventory.
- Go down once.
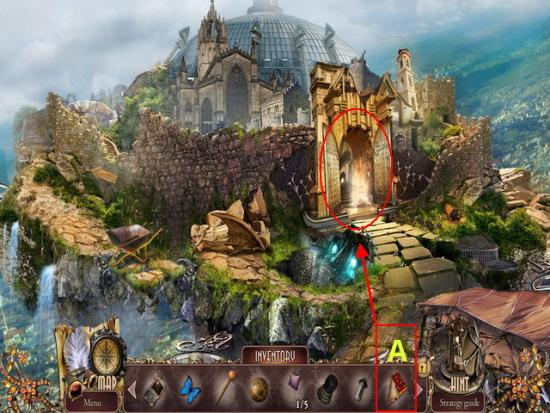
- A. Take the CARPET from inventory and place over the STEAM in the door entrance.
- The door is now open. Go through the door.
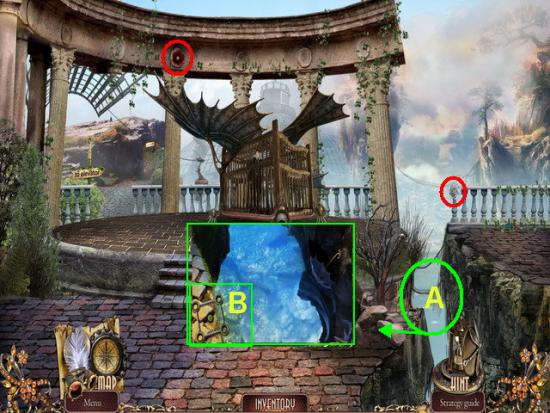
- Click on the flowers shown circled in red for philanthropy inventory.
- Click on the cage and watch video cut scene.
- A. Click on the ABYSS to zoom in.
- B. Take the RING DISK into inventory.
- Head to the left side and go forward once to the dome elevator.
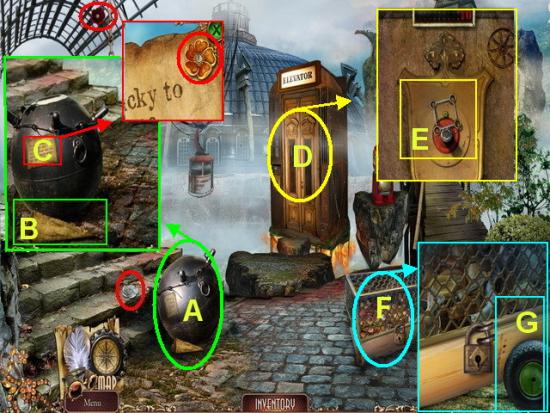
- A. Click on the CORE to zoom in.
- B. Take the PAPER BAG into inventory.
- C. Click on the NOTE and read it. Take the gold flower into your philanthropy inventory.
- D. Click on the ELEVATOR to zoom in.
- E. Take the RING DISK into inventory.
- F. Click on the CAGE to zoom in.
- G. Take the WHEEL into inventory.
- Go forward once.
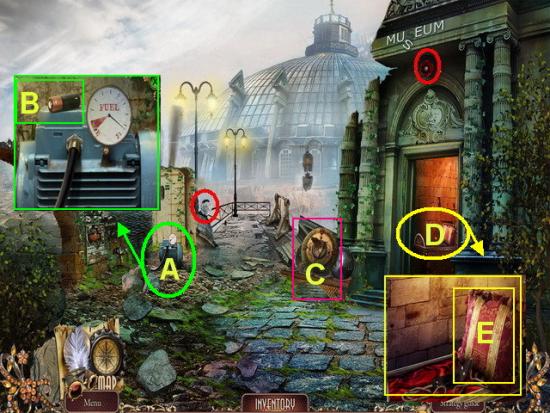
- Click on the two flowers circled in red for your philanthropy inventory.
- A. Click on the TANK to zoom in.
- B. Take the BATTERY into inventory.
- C. Take the SHIELD/PROTECTIVE ITEM that is sitting on the bench into inventory.
- D. Click on the CHAMBER to zoom in.
- E. Take the PILLOW/PROTECTIVE ITEM into inventory.
- Go down three times.
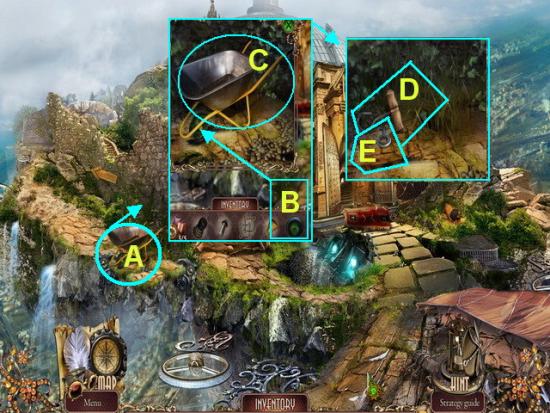
- A. Click on the WHEELBARROW to zoom in.
- B. Take the WHEEL from inventory and replace it on the wheelbarrow.
- C. Take the WHEELBARROW into inventory.
- D. Take the HOOK into inventory.
- E. Take the KEY into inventory.
- Go forward to the left into the precipice.
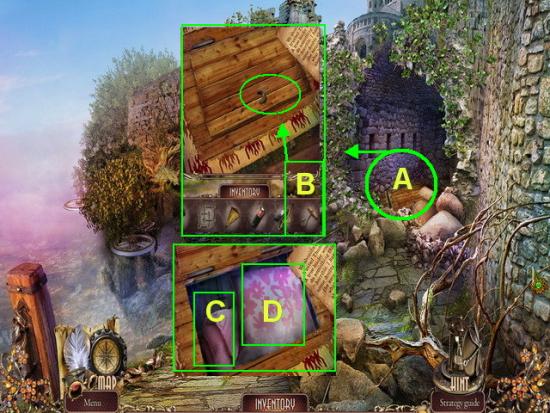
- A. Click on the TRAPDOOR to zoom in.
- B. Use the HOOK to open the door.
- C. Take the PILLOW into inventory.
- D. Take the BLANKET into inventory.
- Go down once then through the open doors then forward once.
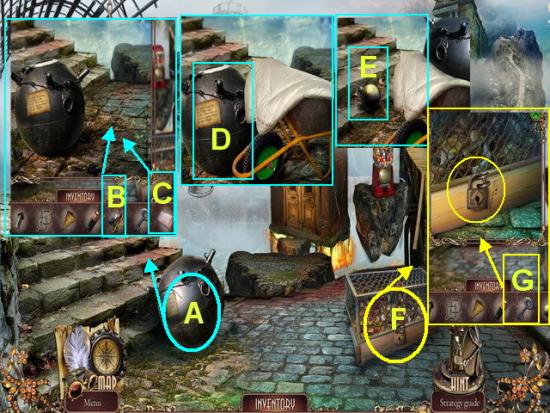
- A. Click on the CORE to zoom in.
- B. Take the WHEELBARROW from inventory and place it next to core.
- C. Take the BLANKET and place into the wheelbarrow.
- D. Place the CORE inside the WHEELBARROW.
- E. Take the MINE left behind into inventory.
- F. Click on the BOX to zoom in.
- G. Use the KEY on the lock. This will start a sparkling effect.
- Click here to play the HOS.
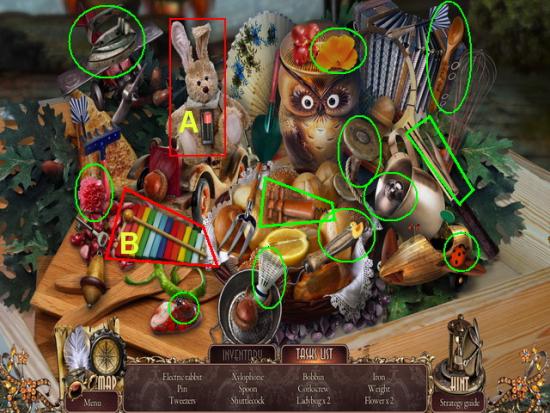
- Click on the “Inventory” tab first.
- A. Take the BATTERY and place it into the rabbit.
- B. Take the MALLETT from inventory and place on the XYLOPHONE.
- Click on the “Tasks” tab and locate all hidden objects listed.
- The hidden objects are shown circled above.
- Once you find all items a COIL will be placed in your inventory.
- Move forward once.
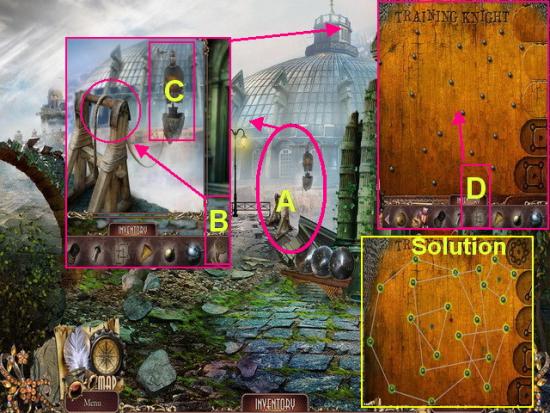
- A. Click on the ABYSS straight ahead to zoom in.
- B. Take the COIL from inventory and add it. Click on the handle once to start it.
- C. Click on the ARMOUR to zoom in and start a mini game puzzle.
- D. Place the TWO RING DISKS onto the puzzle board to activate the puzzle.
- Solution – The solution is shown above. You will need to take each ring disk and stretch it to fit every peg on the board.
- Note – The jewel in the center allows you to move the shape and click on the edges and drag while holding down your left mouse button to change the shape.
- This puzzle is very difficult. You must click on the center of the disk ring to get it to grab and move away to the board.
- Once you complete the puzzle protective ARMOUR will be added to your inventory.
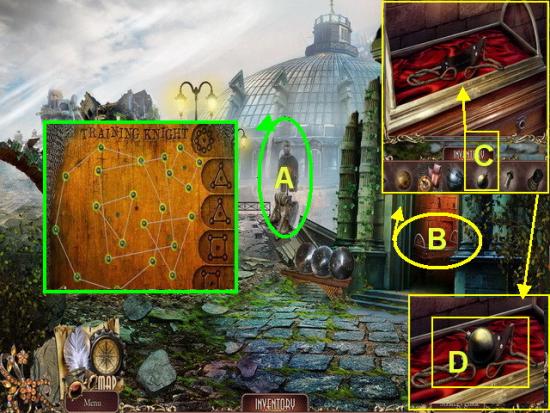
- A. Click on the ARMOUR and complete the mini game puzzle as shown above.
- B. Click on the CHAMBER to zoom in.
- C. Take the MINE from inventory and add to the SLING.
- D. Take BOMB and SLING into inventory.
- Return to the cage by walking down twice.
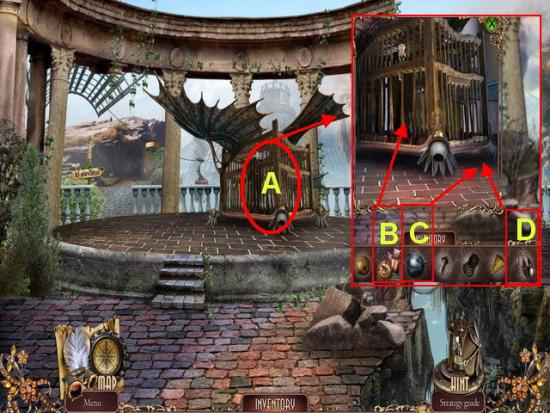
- A. Place all of the PROTECTIVE ITEMS in inventory in the CAGE with JEREMY.
- B. Place the MINE next to the cage.
- C. Throw the BOMB at the CAGE using the SLING.
- Watch the video cut scene.
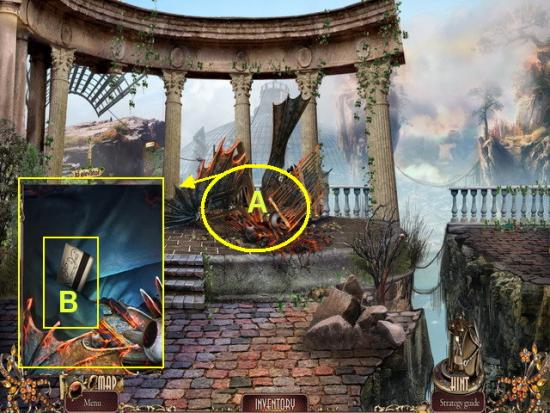
- A. Click on the WRECKAGE to zoom in.
- B. Take the ID CARD into inventory.
- Move forward once.
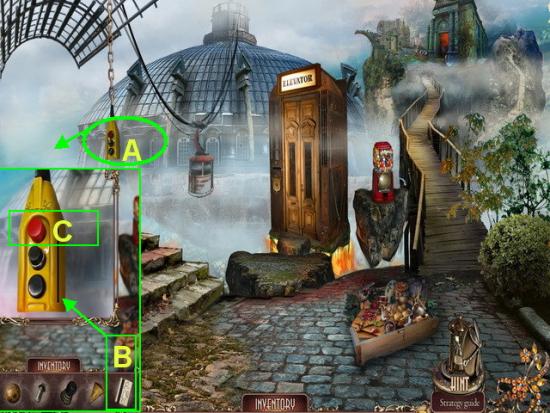
- A. Click on the ID CARD READER to zoom in.
- B. Take the ID CARD and run it through the slot in the reader.
- C. Click on the RED BUTTON to activate it.
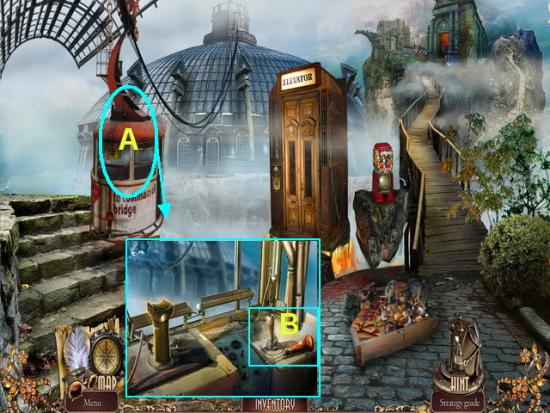
- A. When the LIFT moves forward, click on it to zoom in.
- B. Take the AWL into inventory.
- Move forward once.
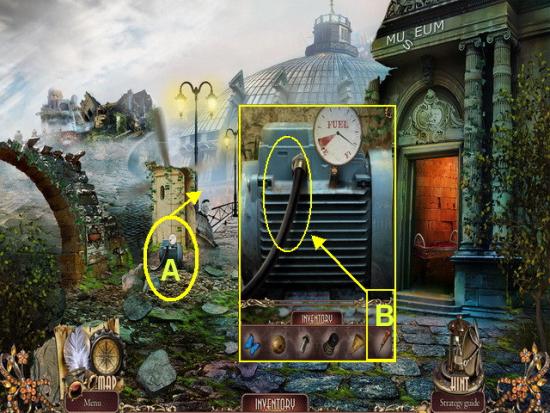
- A. Click on the ENGINE to zoom in.
- B. Take the AWL from inventory and use it to poke holes in the fuel line.
- Move forward.
- This is the end of Chapter 7.
Chapter 8 – Near Jeremy’s Tower
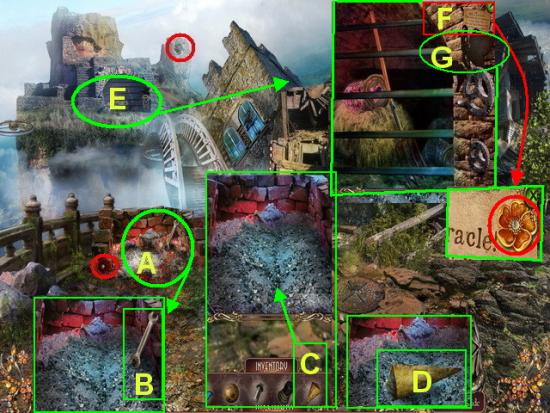
- Click on the flowers circled in red to add to philanthropy inventory.
- A. Click on the FIREPLACE to zoom in.
- B. Take the WRENCH into inventory.
- C. Take the PAPER BAG from inventory and add ASHES from fireplace.
- D. Take the ASHES into inventory.
- E. Click on the GRID at far left of scene to zoom in.
- F. Click on the NOTE and take the gold flower into philanthropy inventory.
- G. Take WEATHER VANE into inventory.
- Walk down four times.
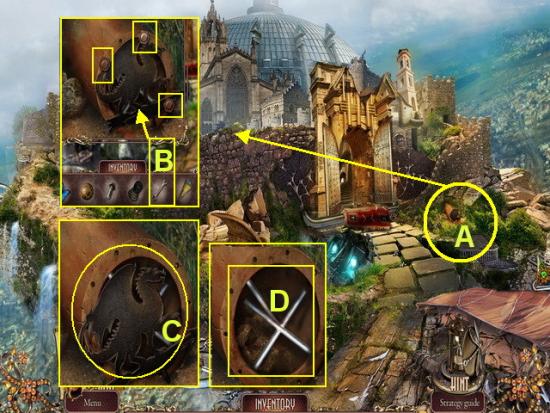
- A. Click on the PIPE to zoom in.
- B. Take the WRENCH from inventory and use on the screws.
- C. Take the WEATHER VANE into inventory.
- D. Take the CROSS KEY into inventory.
- Move forward four times.
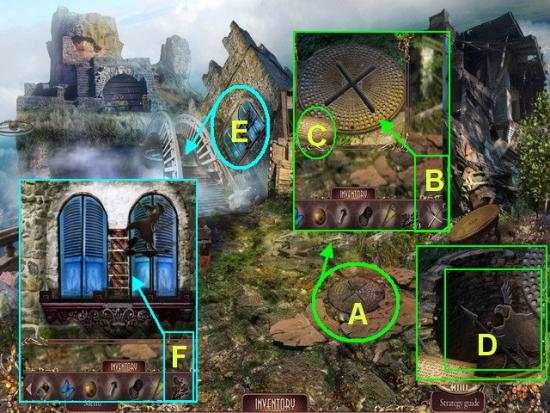
- A. Click on the MANHOLE COVER to zoom in.
- B. Take the CROSS KEY and use it to open the manhole cover.
- C. Read the NOTE by manhole cover.
- D. Take the WEATHER VANE into inventory.
- E. Click on the WINDOWS to zoom in.
- F. Place the WEATHER VANES on the window to trigger a puzzle.
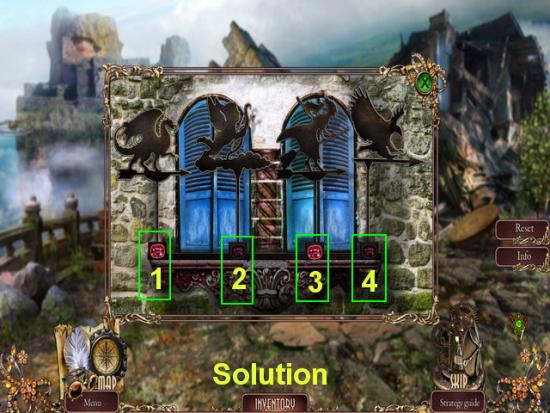
- Mini Game – The objective of this puzzle is to put the weather vanes so they are all on the same level. Clicking on one will make others move.
- Each vane is numbered one through four.
- Solution – The solution can be found by clicking on the numbers in the image above in this sequence – 3, 1, 4,2,4,1, and 2.
- You may now go through this entrance.
- Move forward once.
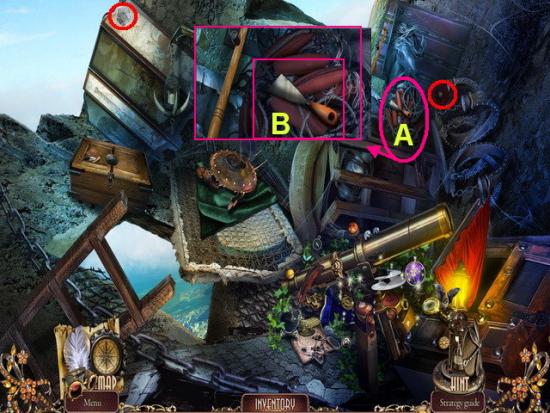
- Click on the flowers circled in red to add to your philanthropy inventory.
- A. Click on the FISHING TACKLE to zoom in.
- B. Take the PALETTE KNIFE into inventory.
- Walk down twice.
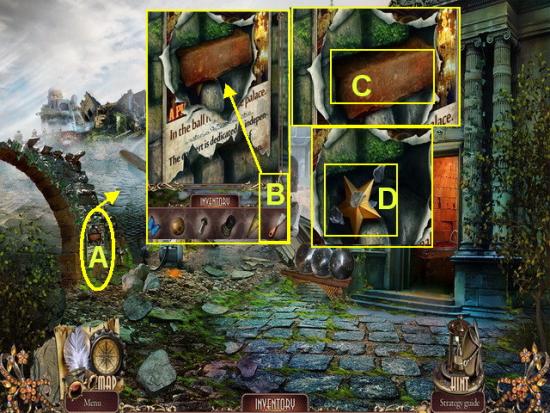
- A. Click on the POSTER to zoom in.
- B. Take the PALETTE KNIFE from inventory and use to loosen the BRICK.
- C. Take the BRICK into inventory.
- D. Take the STAR into inventory.
- Walk forward twice.
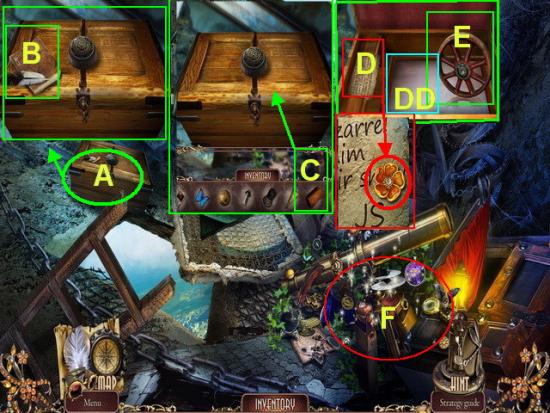
- A. Click on the CHEST to the far left to zoom in.
- B. Read the JOURNAL and then watch the video cut scenes.
- C. Take the BRICK from inventory and place on top of chest to unlock it and trigger a mini game.
- Mini Game – To complete this puzzle click on each button and scroll through the pictures until you see a tool. Once all images are of a tool the box will open.
- D. Read the NOTE and take the gold flower into philanthropy inventory.
- DD. Take the MIRROR into inventory.
- E. Take the VALVE WHEEL into inventory.
- F. Click on the sparkling area for a HOS.
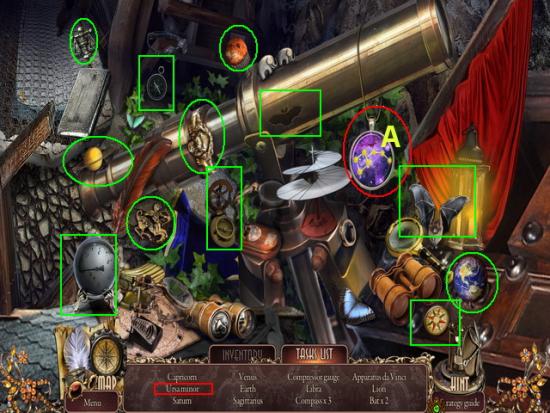
- Click on the “Inventory” tab first.
- A. Take the STAR from inventory and place on the constellation known as the “URSA MINOR”
- Click on the “Tasks” list tab and locate all the hidden objects on this list shown circled above.
- When you complete this HOS you will be given a COMPRESSOR GUAGE for your inventory.
- Walk down twice.
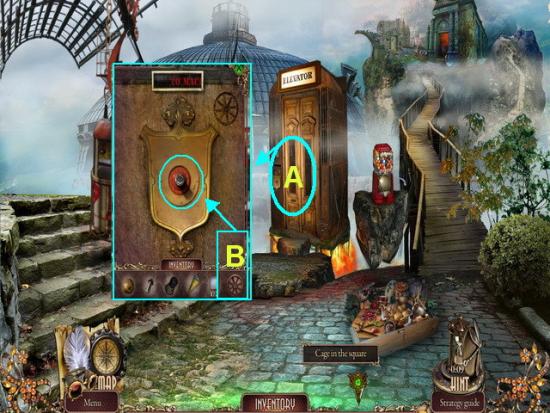
- A. Click on the ELEVATOR to zoom in.
- B. Take the VALVE WHEEL and place it on the peg.
- Click once to turn the valve.
- Go down.
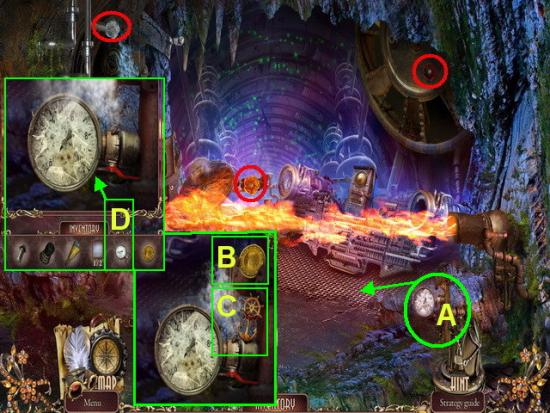
- Click on the flowers shown circled in red for philanthropy inventory. You will not be able to get to the gold flower until the flame is turned off.
- A. Click on the BROKEN COMPRESSOR to zoom in.
- B. Take COIN into inventory.
- C. Take the CAPTAIN’S BADGE into inventory.
- Walk down once.
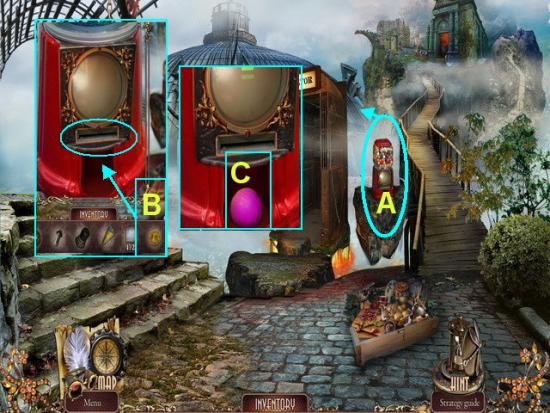
- A. Click on the VENDING MACHINE to zoom in.
- B. Take the COIN from inventory and place in machine.
- C. Take the GUM into inventory.
- Go back down elevator.
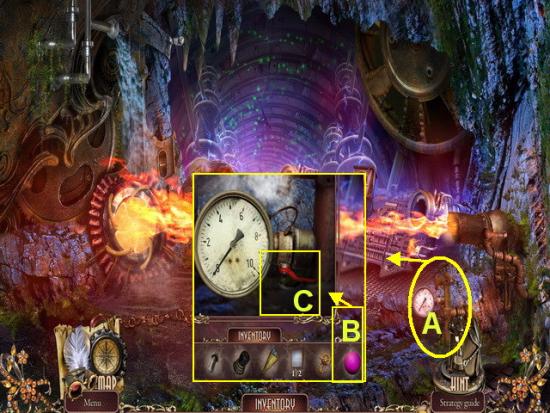
- A. Click on the COMPRESSOR to zoom in.
- B. Take the GUM and place it on the hole to stop the steam.
- C. Click on the LEVER to turn it on.
- You may now take the gold flower into philanthropy inventory.
- A. Click on CENTER PANEL to zoom in.
- B. Take the BAND into inventory.
- C. Read the NOTE on side of panel and take the gold flower into philanthropy inventory.
- Walk down once and move forward two times.
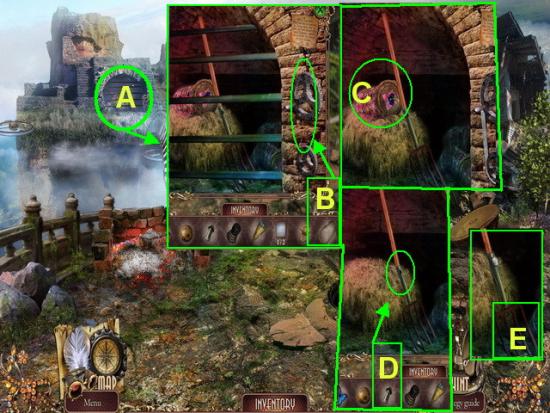
- A. Click on the GRID to the far left of scene to zoom in.
- B. Connect BELT to the wheel mechanism.
- C. When doors open take the JAR OF FLOWERS into inventory.
- D. Take the BOLT from inventory and place into the PITCHFORK.
- E. Take the PITCHFORK into inventory.
- Walk down four times then walk left.
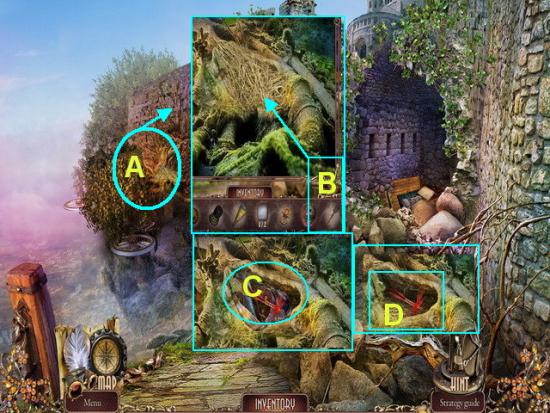
- A. Click on the HAY to zoom in.
- B. Use the PITCHFORK to remove the HAY.
- C. Take the CLAW into inventory.
- D. Take the HOOK into inventory.
- Walk down, go through the gate then move forward four times.
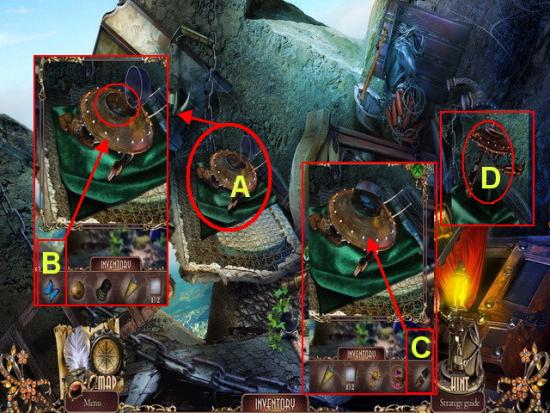
- A. Click on the ROBOT to zoom in.
- B. Take IVANHOE the BUTTERFLY and place him in the robot.
- C. Take the CLAW and add it to the ROBOT.
- D. Take the ROBOT into inventory.
- Walk down three times then go down the elevator.
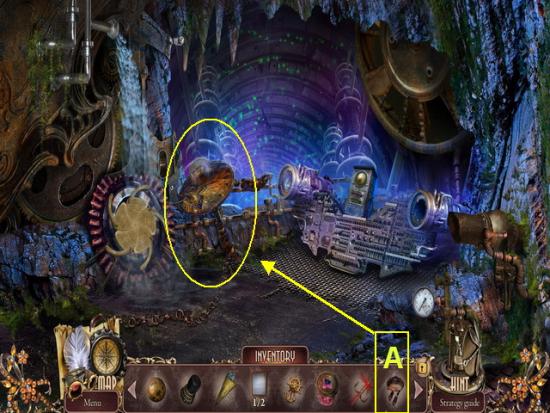
- A. Replace the OLD ROBOT with the new ROBOT.
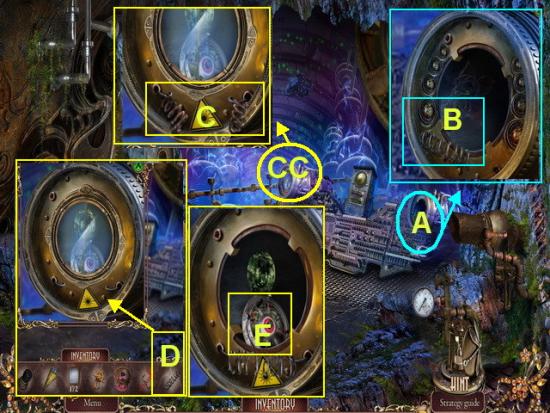
- A. Click on the RIGHT COMPARTMENT to zoom in.
- B. Remove the SPRING and place in inventory.
- CC. Click on the LEFT COMPARTMENT and zoom in.
- C. Remove the OLD SPRINGS from device.
- D. Place a NEW SPRING from inventory into the slot.
- E. When the panel opens take the REEL into inventory.
- Walk down and move forward three times.
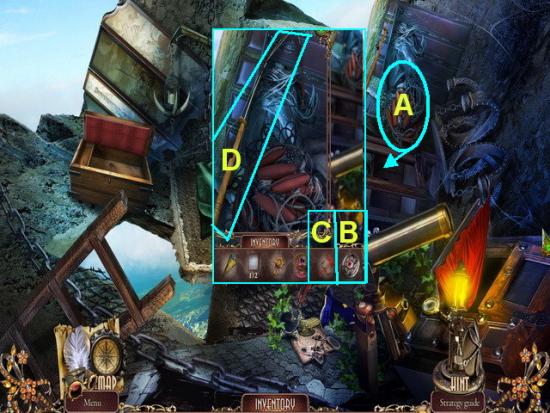
- A. Click on the FISHING GEAR to zoom in.
- B. Place the REEL on the rod.
- C. Place the HOOK on the rod.
- D. Take the FISHING POLE into inventory.
- Walk down four times.
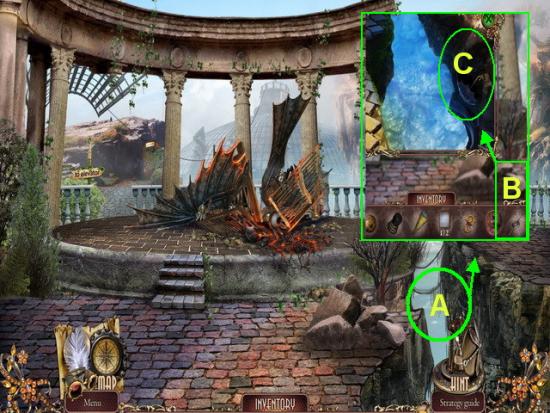
- A. Click on the ABYSS to zoom in.
- B. Take the FISHING POLE and use it to gather the UMBRELLA
- C. Take the UMBRELLA into inventory.
- Move forward once and go down elevator.
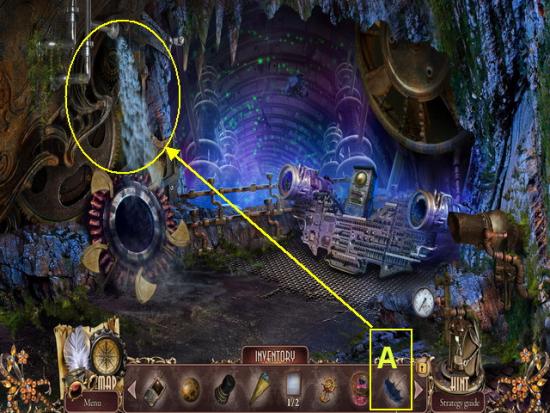
- A. Take the UMBRELLA and place it to the upper left side above the robot.
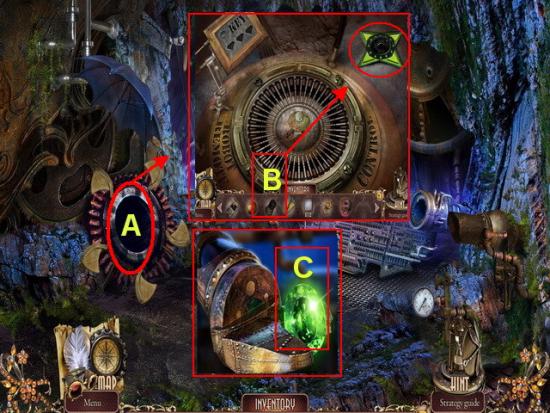
- A. Click on the CONTROL PANEL to zoom in.
- B. Place the JOYSTICK on the star. This will trigger a mini game puzzle.
- Mini Game – Follow the white tiles until you gather all the items located under the stars. Use the joystick by clicking around it to move around the board.
- Once you locate all of the items the robot will present you with an emerald.
- C. Take EMERALD into inventory.
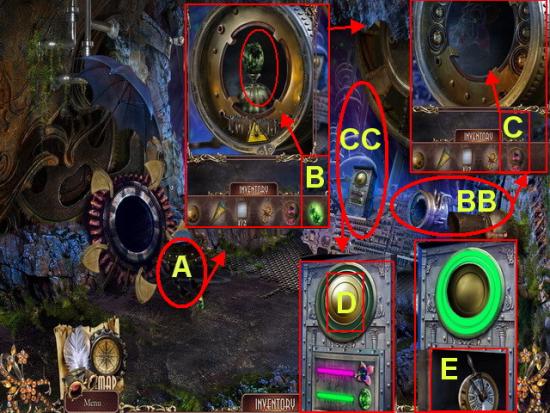
- A. Click on the LEFT PANEL to zoom in.
- B. Place the EMERALD into the mechanism.
- BB. Click on the RIGHT PANEL to zoom in.
- C. Place JAR OF FLOWERS into panel.
- CC. Click on CENTER PANEL to zoom in.
- D. Click on the GOLD BUTTON once to activate.
- E. Take the THROTTLE LEVER into inventory.
- Walk down once.
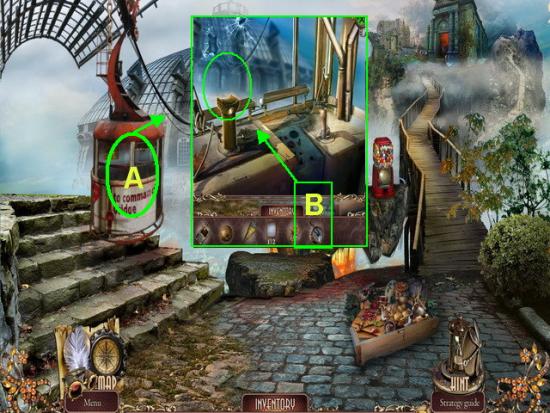
- A. Click on the LIFT to zoom in.
- B. Take the THROTTLE LEVER from inventory and place in the slot.
- Click on the lever to turn it once.
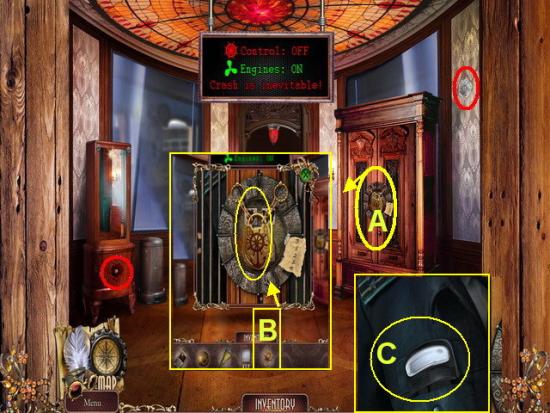
- Click on the flowers shown circled in red for your philanthropy inventory.
- A. Click on the CABINET to zoom in.
- B. Take the CAPTAIN’S BADGE and place it in the indentation.
- This will trigger a mini game puzzle.
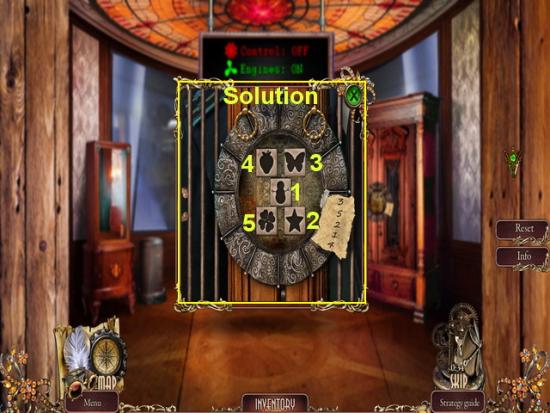
- Mini Game – To solve this puzzle push on the buttons in the sequence one through five as shown in the image above.
- C. (Previous Image) When the Cabinet opens take the PEDAL and place in inventory.
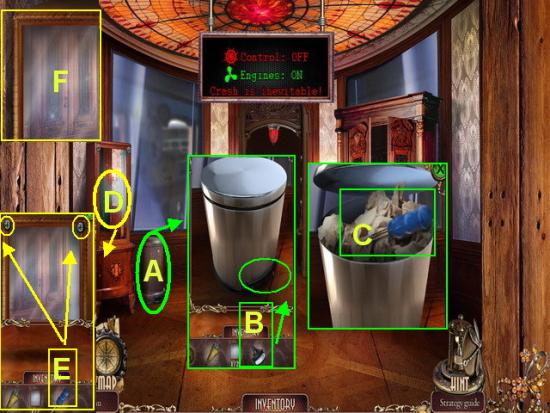
- A. Click on the TRASH CAN to zoom in.
- B. Place the PEDAL on the can to open.
- C. Take the SCREWDRIVER into inventory.
- D. Click on the MIRROR to zoom in.
- E. Use the SCREWDRIVER to remove the screws.
- F. Take the MIRROR into inventory.
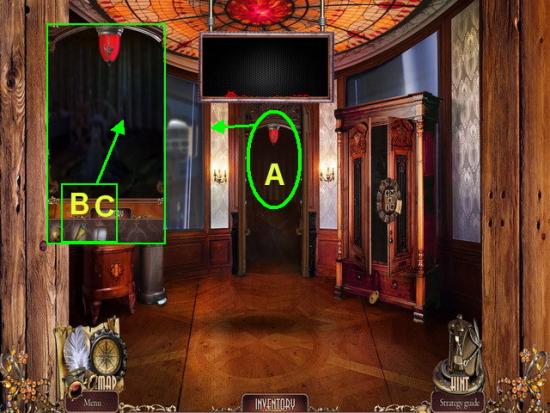
- A. Click on the SECURITY AREA to zoom in.
- B. Take the ASHES and place in the area.
- C. Take the MIRRORS and place in the area.
- You may now go inside.
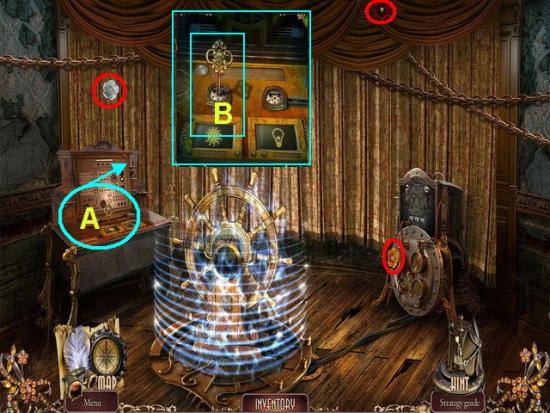
- A. Click on the CONTROL PANEL to zoom in.
- B. Click on the KEY once.
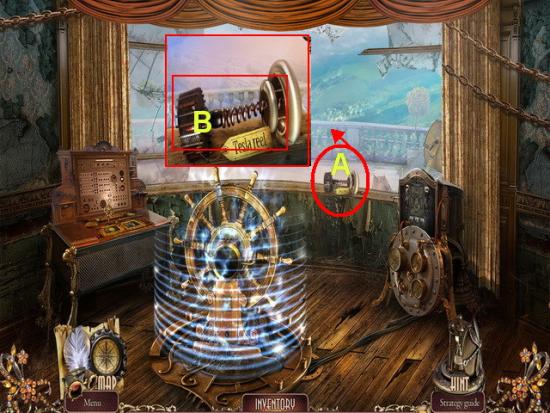
- A. Click on the DEVICE by window to zoom in.
- B. Take the TESLA COIL into inventory.
- C. Click on the machine to trigger a mini game puzzle.
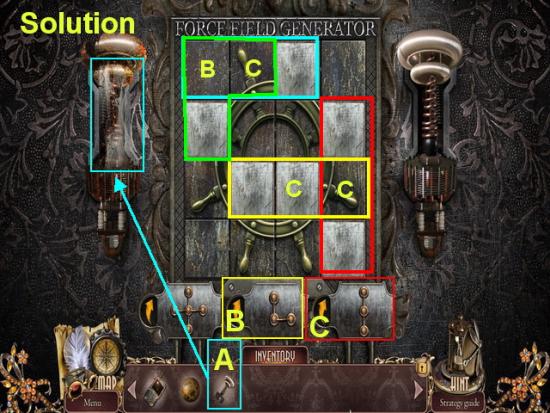
- A. Take the TESSLA COIL and add to the left side of the mechanism which will activate the puzzle.
- B. This is figure “B”
- C. This is figure “C”
- Mini Game – The objective of this puzzle is to remove all the solid tiles by placing shapes over them to reveal the image underneath.
- The yellow arrows to the left of each figure will rotate it by clicking on it.
- Solution – Using the image above
- 1. Take figure “C” and place it in the area marked in red first.
- 2. Take figure “C” and rotate it using the yellow arrow to the left of it and then place it in the area marked in yellow.
- 3. Take figure “C” again and place it in the area marked in light blue.
- 4. Take figure “B” and rotate it once using the yellow arrows then place it in the area shown marked in green on the grid.
- Note the letters on the grid represent the center of the shape you are to place and which figure should be used there.
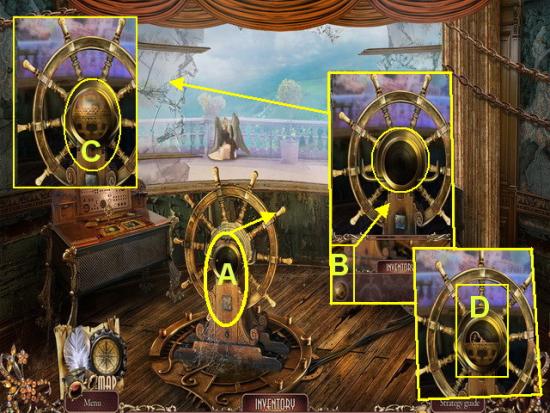
- A. Click on the STEERING WHEEL to zoom in.
- B. Place the CITY MEDALLIION in the center of wheel.
- C. Click on the medallion once to open it.
- D. Take the CITY KEY into inventory.
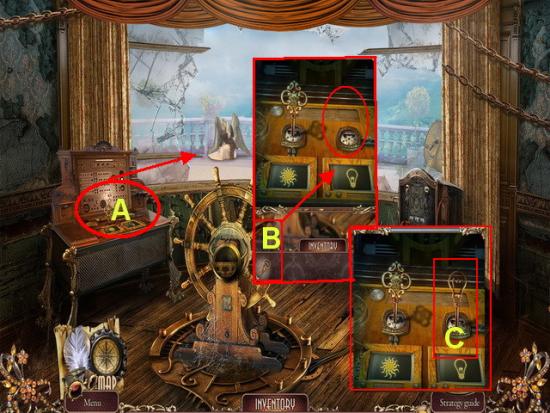
- A. Click on the CONTROL PANEL to zoom in.
- B. Take the KEY and add it to the second slot.
- C. Click on the KEY to turn it.
- Watch the video cut scenes and end of the storyline.
- You have now finished the game and may play a bonus chapter located in the bonus section of the main menu which is now unlocked.
Congratulations!
You have completed Gamezebo’s walkthrough for Surface: The Soaring City. Be sure to check back often for game updates, Staff and user reviews, user tips, forum comments and much more here at Gamezebo.
More articles...
Monopoly GO! Free Rolls – Links For Free Dice
By Glen Fox
Wondering how to get Monopoly GO! free rolls? Well, you’ve come to the right place. In this guide, we provide you with a bunch of tips and tricks to get some free rolls for the hit new mobile game. We’ll …Best Roblox Horror Games to Play Right Now – Updated Weekly
By Adele Wilson
Our Best Roblox Horror Games guide features the scariest and most creative experiences to play right now on the platform!The BEST Roblox Games of The Week – Games You Need To Play!
By Sho Roberts
Our feature shares our pick for the Best Roblox Games of the week! With our feature, we guarantee you'll find something new to play!All Grades in Type Soul – Each Race Explained
By Adele Wilson
Our All Grades in Type Soul guide lists every grade in the game for all races, including how to increase your grade quickly!


