
Best Horror Games On Itch.io – July 2026
Across a bounty of subgenres.![Haze Seas Accessories Tier List [Best Accessories to Equip]](/wp-content/uploads/2026/07/haze-seas-accessories-tier-list.jpg "Haze Seas Accessories Tier List [Best Accessories to Equip]")
Haze Seas Accessories Tier List [Best Accessories to Equip]
The accessories with the best stat buffs in Haze Seas.
![[Roblox] Evomon Shiny Hunting Guide – Including Prismatic and Pris Shinies!](/wp-content/uploads/2026/06/evomon-shiny-hunting-guide.jpg "[Roblox] Evomon Shiny Hunting Guide – Including Prismatic and Pris Shinies!")

Surface: Mystery of Another World Walkthrough
Welcome to the Surface: Mystery of Another World walkthrough on Gamezebo. Surface: Mystery of Another World is a Hidden Object/Adventure game played on PC created by Elephant Games. This walkthrough includes tips and tricks, helpful hints, and a strategy guide on how to complete Surface: Mystery of Another World.


- Prefer Gamezebo on Google

Game Introduction: Surface: Mystery of Another World
Welcome to the Surface: Mystery of Another World walkthrough on Gamezebo. Surface: Mystery of Another World is a Hidden Object/Adventure game played on PC created by Elephant Games. This walkthrough includes tips and tricks, helpful hints, and a strategy guide on how to complete Surface: Mystery of Another World.
General Information
- You can choose to play this game in Casual, Advanced or Hardcore Mode
– Casual Mode: all areas of interest are indicated with sparkles and hint and skip buttons recharge relatively fast
– Advanced Mode: you get no extra hints and hint and skip buttons recharge much slower
– Hardcore mode really is for hardcore players as it gives you no help whatsoever and games cannot be skipped - The Options Menu allows you to change sound volumes, screen size and your cursor. You can also switch between game modes during the game
- To go back to the main menu and exit the game you need to click the menu button twice
- At the start of the game you can choose to play a little tutorial, which shows you the various interactions:
– A magnifying glass cursor means you can zoom in on an object
– Gears mean you need to use an inventory item on an object
– A hand cursor means you can grab an object for your inventory
– A pointed finger means you can interact with something
– The cursor becomes an ornate arrow in places where you can move on to another scene - The journal in this game, which can be accessed at the bottom left of the screen, is very good. It keeps track of the storyline for you, like a journal should do, but it also allows you to replay certain videos by clicking film icons in the top right of a page. In this game there are no codes or sequences that need to be remembered
- By far the best thing of the journal is the interactive map on the left page of the journal. The map shows all locations in a chapter and you can quickly travel from one location to another simply by clicking where you want to go. The green emeralds show your current location and question marks indicate unexplored areas. However, you can’t go back to previous chapters
- There is an in-game strategy guide that can be accessed at the bottom right of the screen. You can quickly skip between chapters from the table of contents, but it also remembers where you were at your last visit. Click on the images to zoom in
- The hint button is very useful when you’re completely stuck, as it gives you a very direct description of the next step
- Hidden object scenes (HOS) are a little different once you’ve reached a certain part of the game: in the list of items there will be some items listed in blue, which are items that can only be found if you use an item from your inventory on an object in the scene. This may mean that the first time you encounter a certain HOS you won’t have the correct item yet, meaning you will have to come back to it later
- In Casual and Advanced modes puzzles can be skipped once the skip button has charged. All puzzles can be reset with the reset button
- There are several achievements you can get throughout the game, which you can access from the main menu. Click on the windows on the achievements page to see which achievements you still need to get
- The Collector’s Edition of this game features quite a lot of fun bonus material, which can be accessed from the main menu after you’ve completed the main game:
– There is a bonus chapter of normal gameplay
– Throughout the game you can find 60 bonus flowers hidden in various scenes. Finding these flowers will gain you achievements, some extra mini games and decorations for your main menu. The first few bonus flowers are mentioned in this walkthrough and circled in the images
– Several mini games can be replayed
– Other bonus content varies from concept art and wallpapers to the soundtrack and funny little videos
Chapter 1: Kidnapped
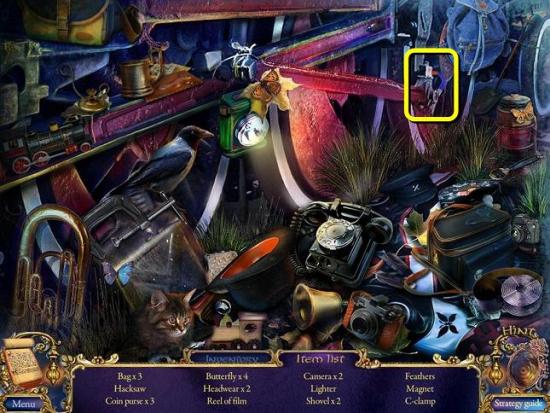
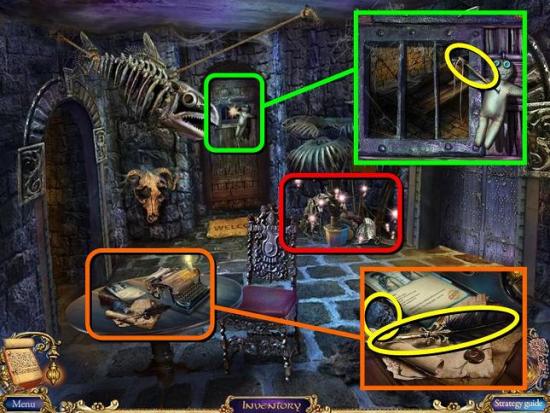
The Train

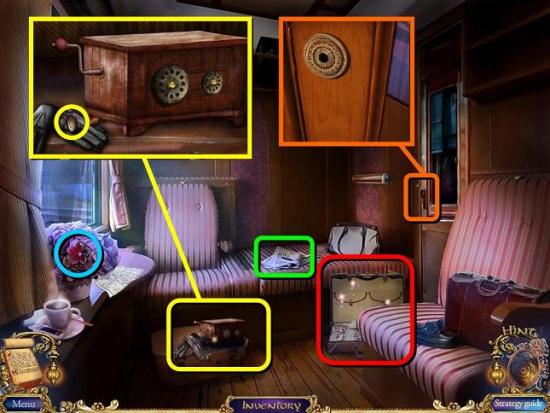
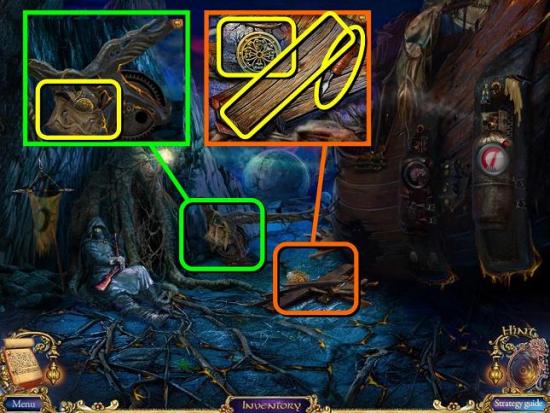
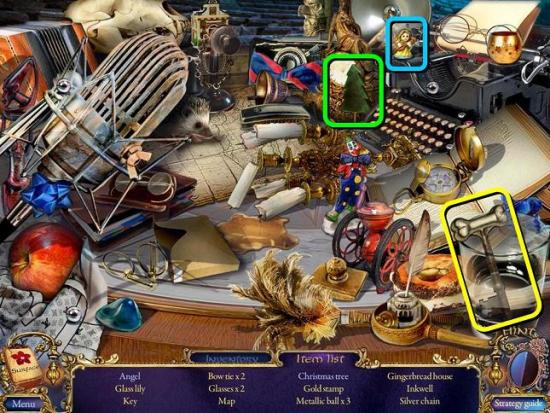
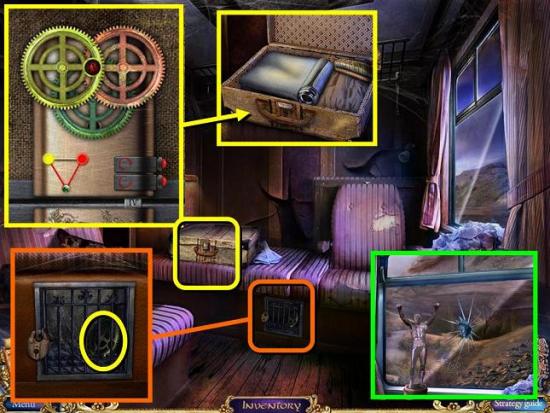
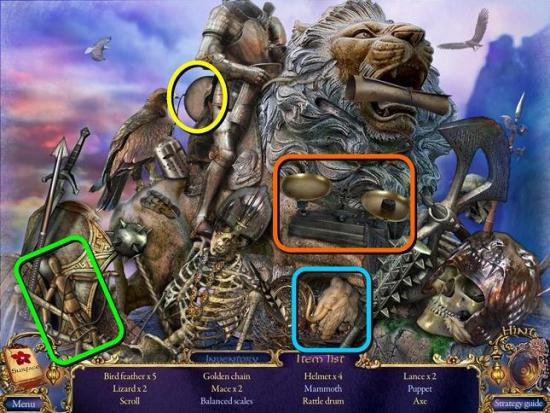
- Pick up the bonus flower (blue; 1/30; only the first four flowers are shown in this walkthrough so you know what to look for)
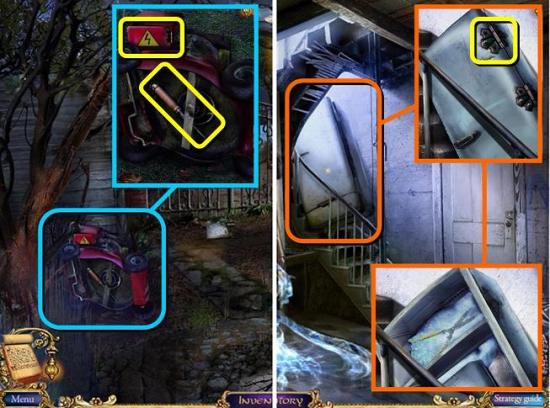
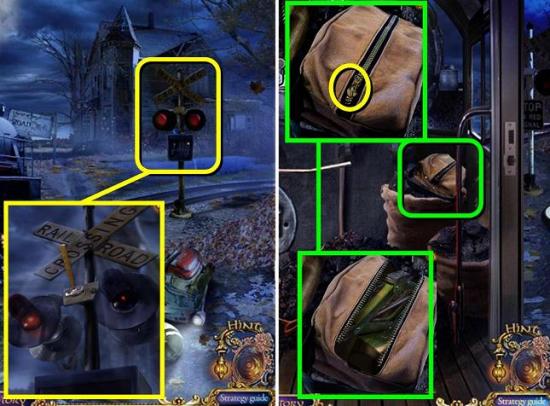
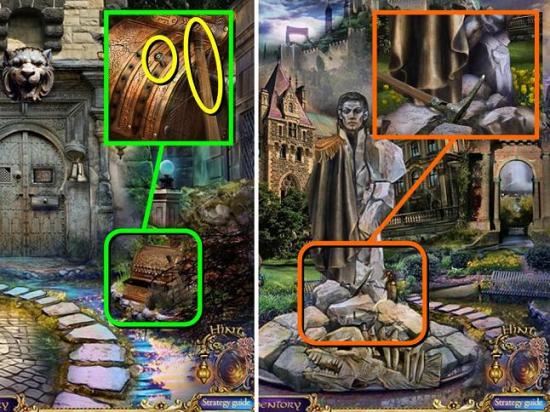
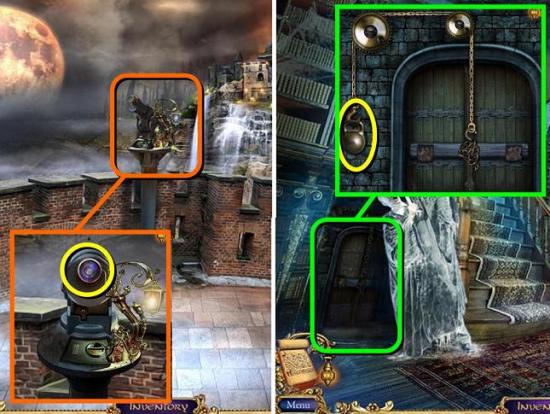
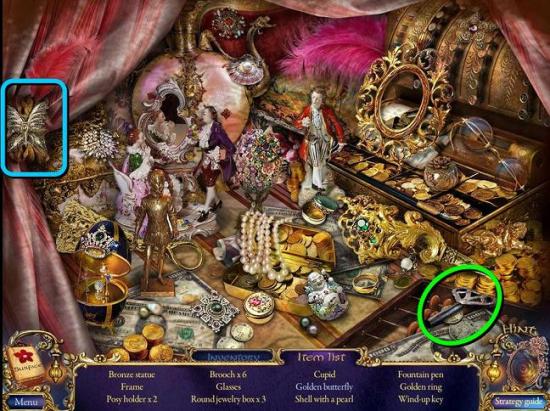
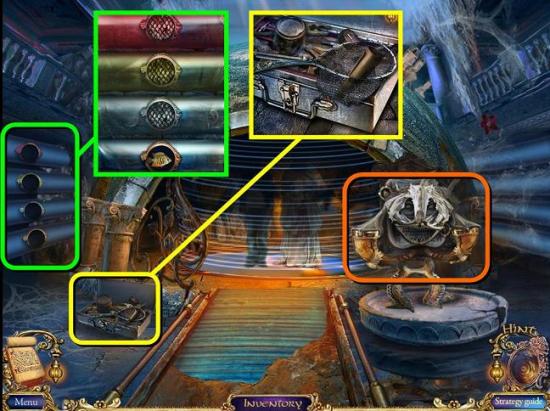
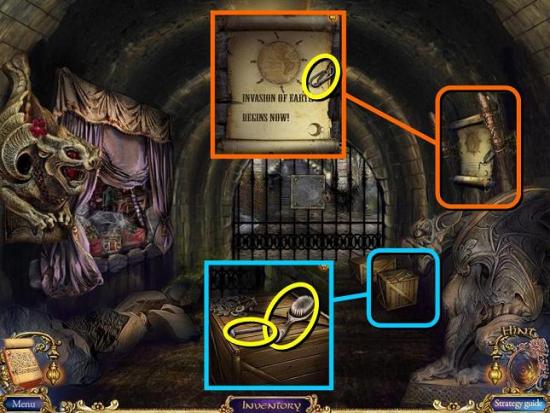
- Zoom in on the Jack-in-the-Box and pick up the SUITCASE BUTTON (yellow)
- Zoom in on the newspaper (green) and pick it up to go into your journal
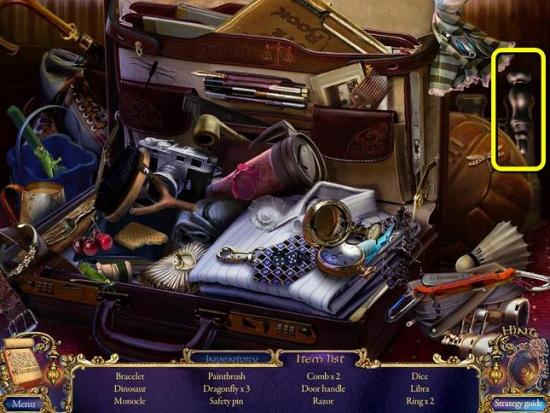
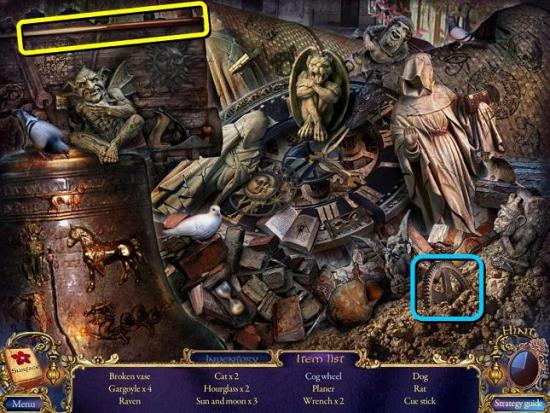
- Play the HOS in the suitcase (red) to find a DOOR HANDLE
- Zoom in on the door (orange), place the DOOR HANDLE and exit to the vestibule
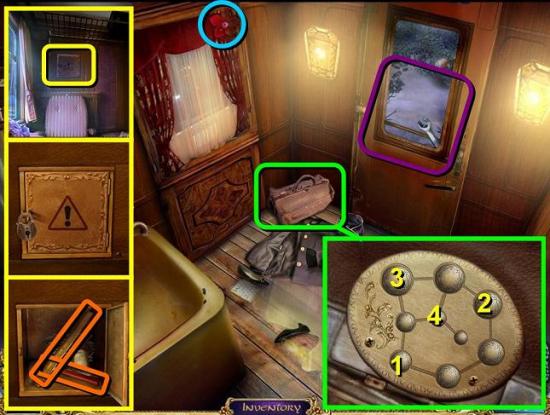
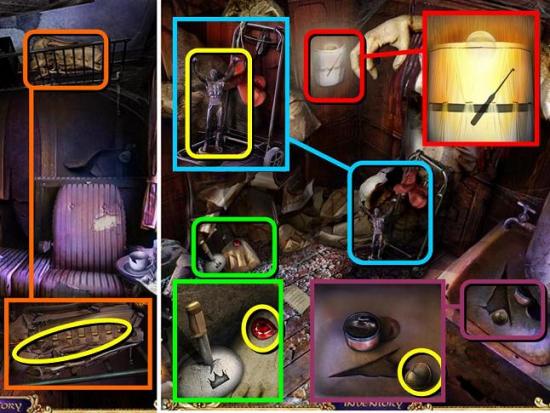
- Take the bonus flower (2/30) and read the note on the floor
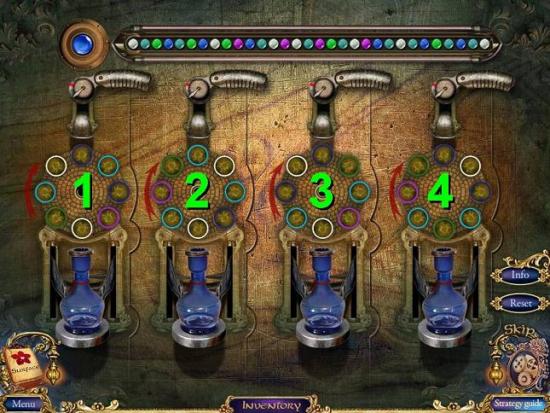
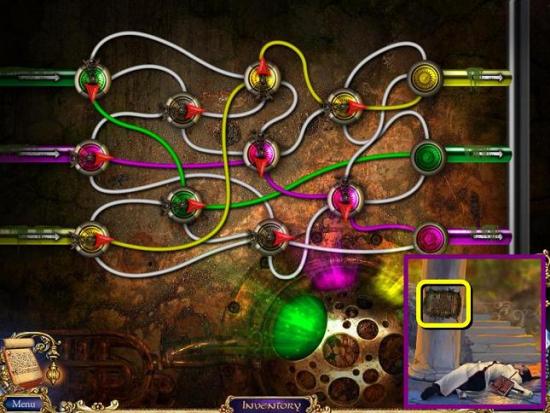
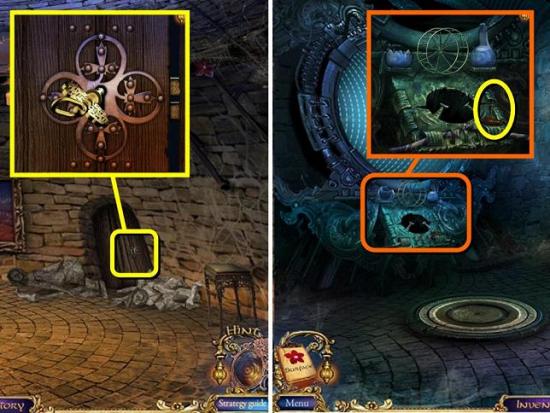
- Zoom in on the suitcase (green) and place the SUITCASE BUTTON in the empty spot
- All buttons need to be pushed in, but connected buttons affect each other. Push the buttons in the order shown in the screen shot and take the KEY from the suitcase when it’s open
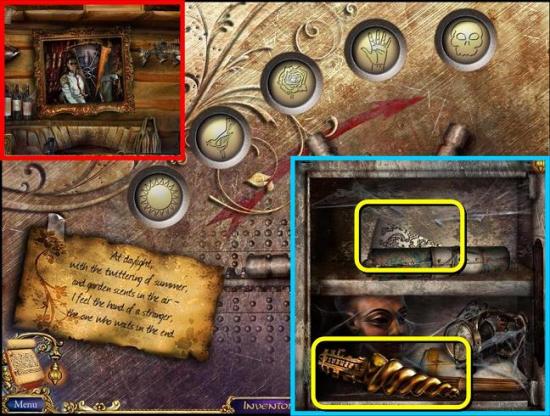
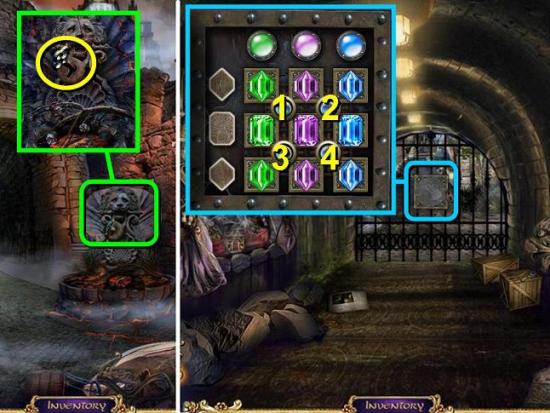
- Go back into the compartment, zoom in on the emergency supply cabinet and open it with the KEY (yellow)
- Take the HAMMER and the RULER (orange)
- Back in the vestibule, zoom in on the door (purple) and watch the scene. Then hit the glass with the HAMMER and take the WRENCH
- Exit the train
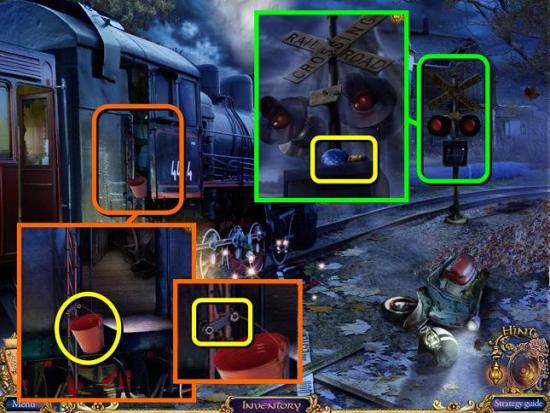
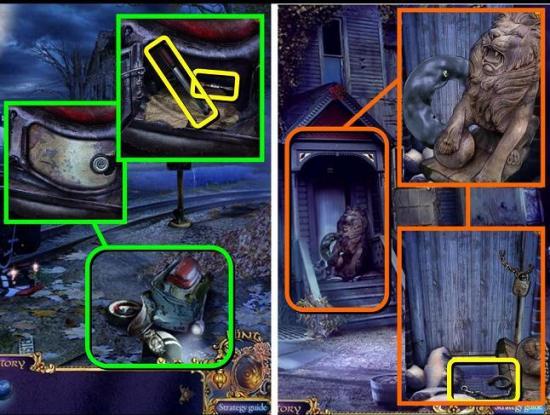
- Zoom in on the railroad sign and take the UV LIGHT (green)
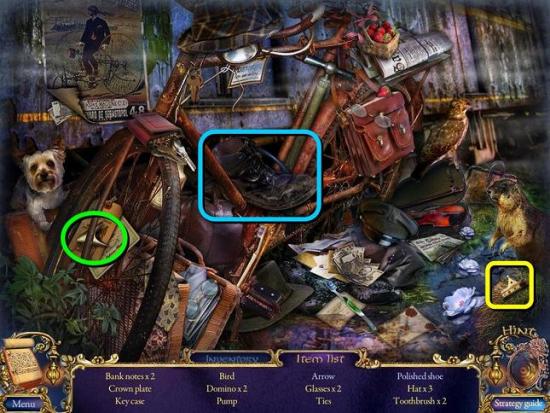
- Zoom in on the locomotive and take the BUCKET (orange)
- Then use the WRENCH on where the bucket was hanging to release the ladder
- Play the HOS to find a MAGNET
- Go up the ladder to the engine room
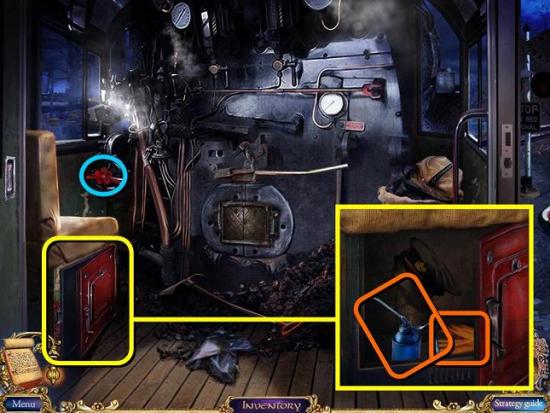
- Take the bonus flower (3/30)
- Zoom in on the compartment under the seat and take the OIL CAN and RUBBER GLOVES
- Go back outside and move on to the old house in the back

- Take the bonus flower (4/30)
- Zoom in on the electric panel on the left (orange) and open it
- Use your RUBBER GLOVES to take out the FUSE
- Zoom in on the drain in the ground (green) and use the MAGNET to find the KEYS TO THE SCOOTER
- Go back one screen, zoom in on the scooter and use the KEYS TO THE SCOOTER to open the compartment
- Take out the SCREWDRIVER and the PUMP
- Go back to the house, zoom in on the door and use the PUMP to inflate the tyre and move the statue
- Pick up the CHAIN
- Go back to the train compartment
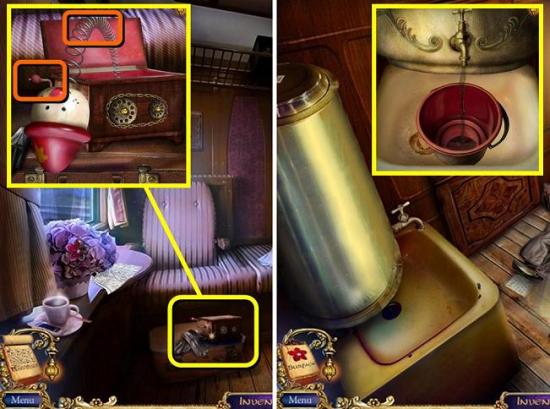
- Zoom in on the Jack-in-the-Box and put the CHAIN on the gears
- Turn the handle and take the SPRING from the puppet, then also take the HANDLE
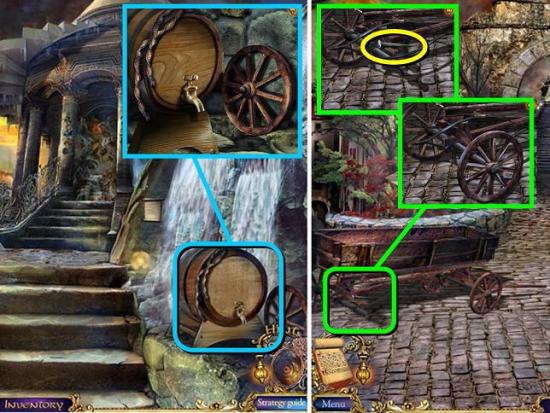
- Go to the train vestibule and zoom in on the sink and water container
- Place the BUCKET and turn the tap to get a BUCKET OF WATER
- Go back to the outside of the train and into the engine room
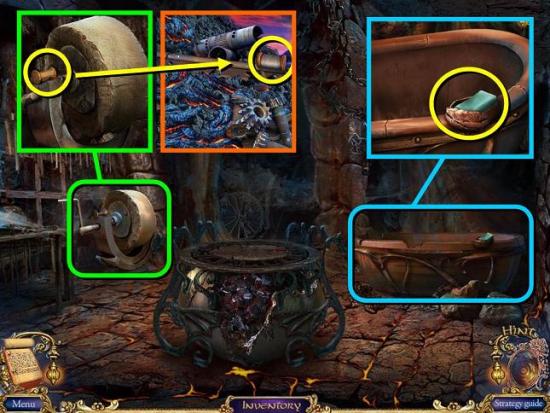
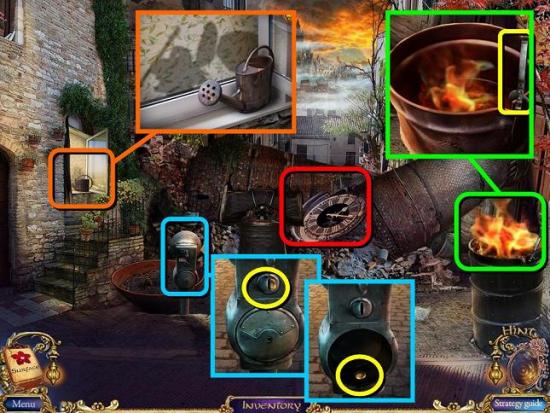
- Zoom in on the furnace
- Replace the broken spring on the right with your SPRING from the Jack-in-the-Box
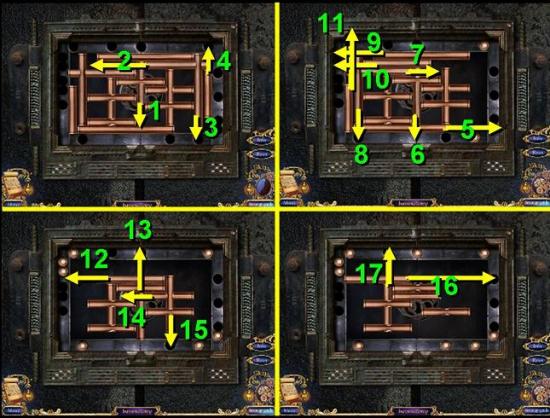
- Open the furnace by moving the copper bars to the holes around the edge. You can move bars by clicking on the arrows that appear when you click on one. Move the bars as shown in the screen shot above. After step 17 just move all the free bars to their holes
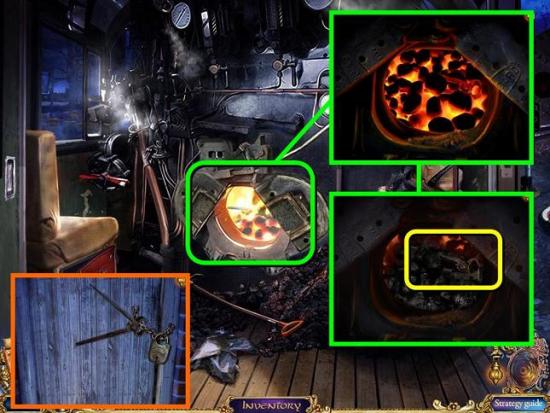
- Zoom in on the opened furnace and use the BUCKET OF WATER to cool down the coals
- Take out the NIPPERS
- Go back to the old house, zoom in on the door and use the NIPPERS to cut the chain on the lock
- Enter the house
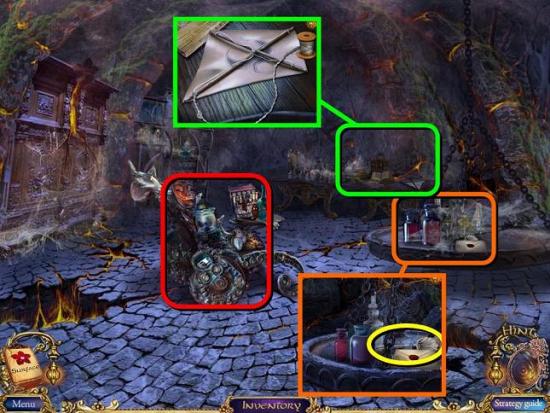
The Old House
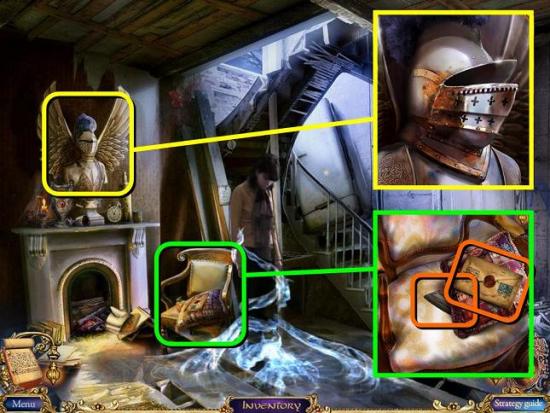
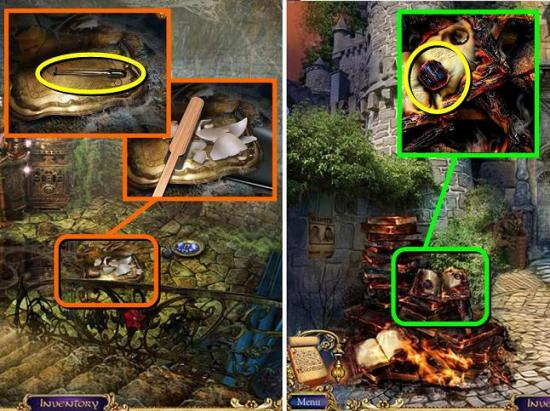
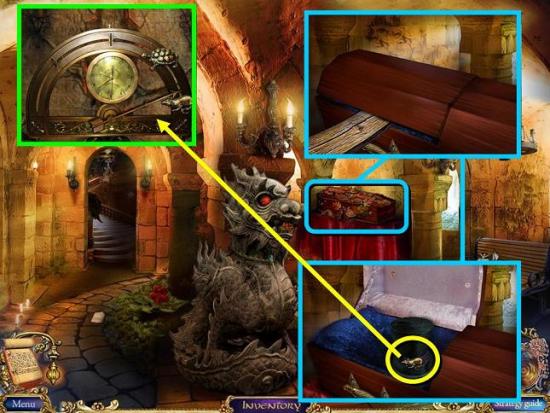
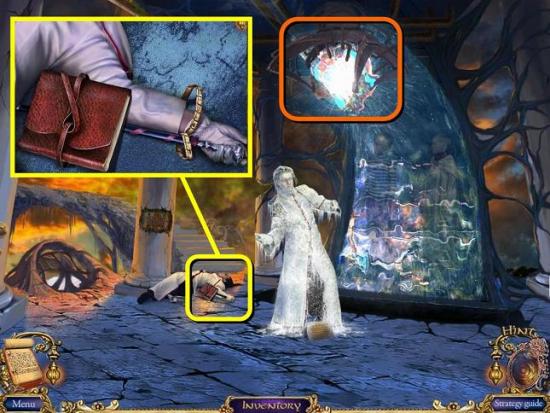
- Zoom in on the chair, take the envelope for your journal, move the cushion and take the MYSTERIOUS ELEMENT (1/3)
- Zoom in on the mantelpiece and use the OIL CAN to open the visor
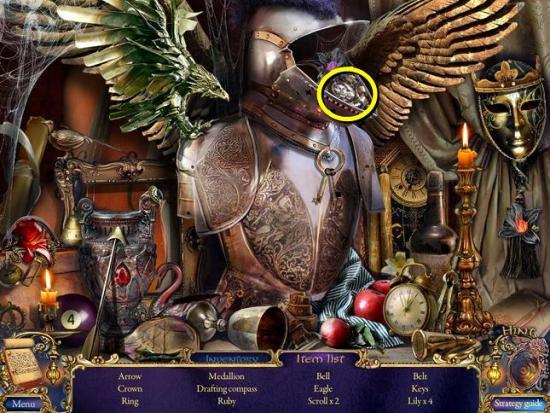
- Play the HOS that has appeared by the coat of arms to find a MEDALLION
- Back out to the front of the house and zoom in on the garden fence
- Use the MEDALLION to open the gate in the fence
- Go through the gate to the back yard
- Zoom in on the lawnmower, open the power compartment and place your FUSE
- Take the ICE PICK after it falls out
- Go back into the main room of the house
- Zoom in on the fridge that’s blocking the stairs and use the SCREWDRIVER to remove the door
- Use the ICE PICK to take some ICE and the GARDEN SHEARS
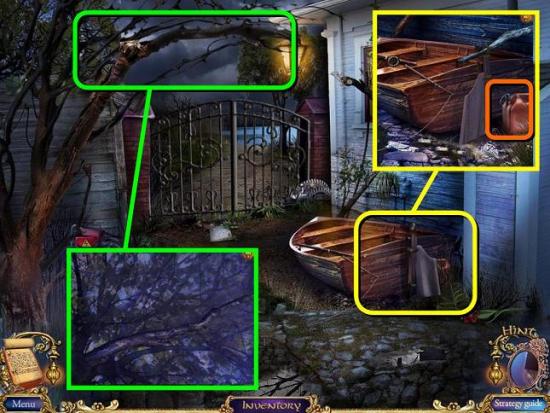
- Go back to the back yard and zoom in on the tree (green)
- Use the GARDEN SHEARS to cut the branch. Take the STICK after you cut it
- Zoom in on the row boat (yellow) and use the STICK to move the rudder
- Take the GASOLINE from behind the rudder
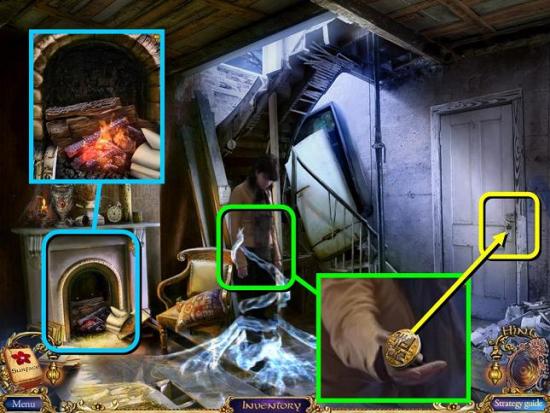
- Go back into the house, zoom in on the fireplace and use the GASOLINE to light the fire
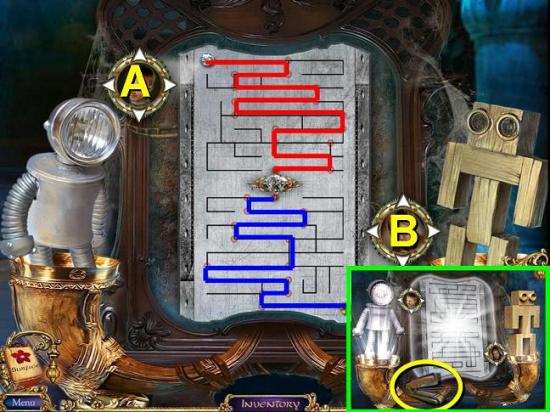
- Take the KNOB from Kira
- Zoom in on the bathroom door and place the KNOB
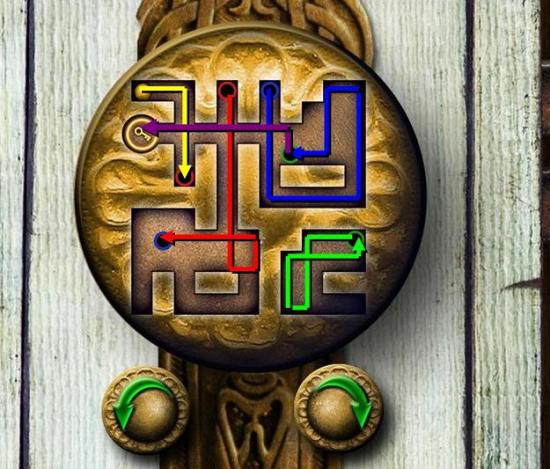
- To open the lock you need to move the little ball to the area with the lock by rotating the maze with the two arrows. The ball needs to go through the colored holes to different parts of the maze. The image above shows what route the ball needs to take. Or just click the arrows in the following order: (yellow) R, L / (red) R, R, R / (blue) R, R, R, R, R, L / (green) R, L, L, L, R / (orange) R
- Go into the bathroom
- Click on the little boy and watch the scene
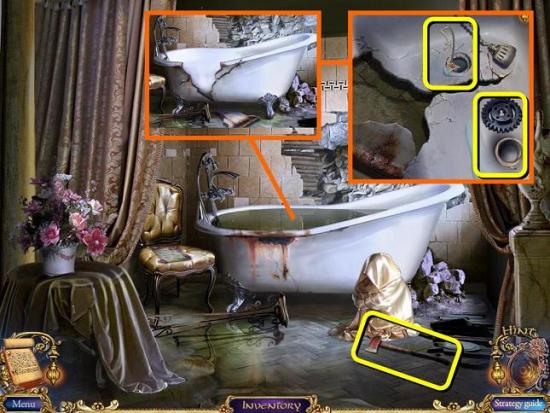
- After the scene, pick up the AXE and throw it at the bath
- Zoom in on the bath and take the TAPE and the COG WHEEL
- When you click on the medallion it slips down the drain
- Go outside and back to the back yard
- Zoom in on the gate mechanism and find BOBBY’S TOY
- Place the COG WHEEL to open the gate
- Go through the gate to the lakeshore
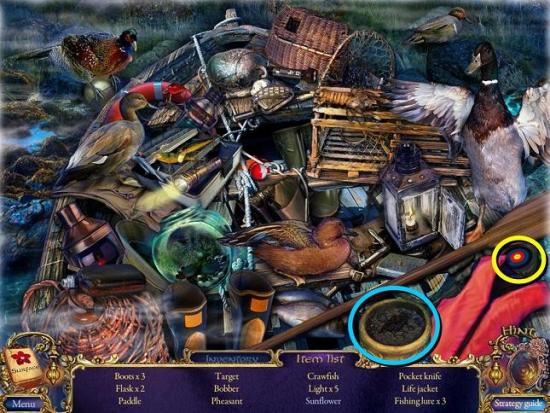
The Lakeshore

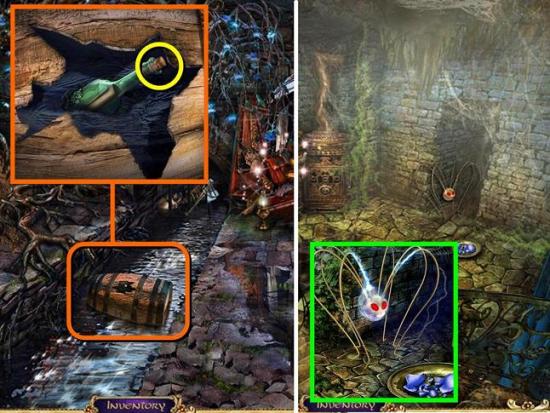
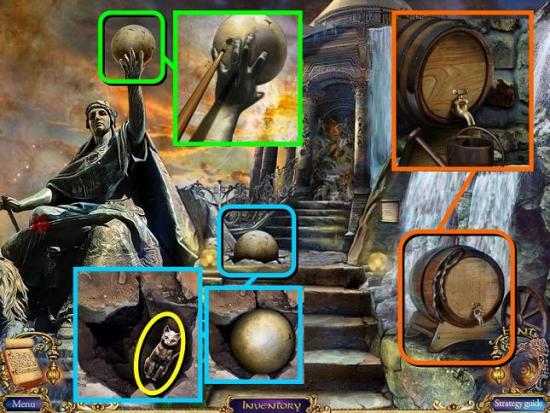
- Zoom in on the barrels with acid and take the IRON FIN (green)
- Zoom in on the pizza box on the steps and take the STONE (blue)
- Inside the pizza box is another MYSTERIOUS ELEMENT (2/3)
- Zoom in on the broken boardwalk and take the PLUNGER (orange)
- Go to the door of the fishing hut and use the RULER to undo the latch (red)
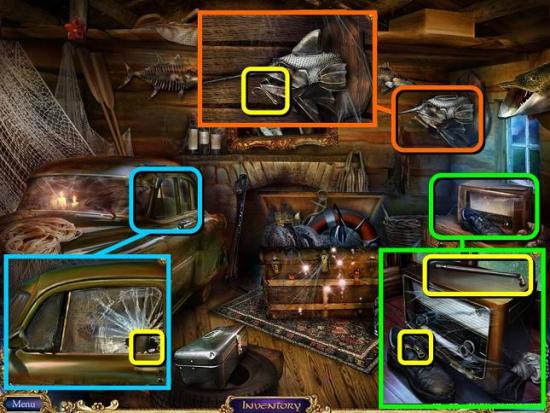
- Zoom in on the radio and take the ANTENNA and ZIPPER PULL (green)
- Zoom in on the fish on the wall, place the IRON FIN and take the HOOK (orange)
- Zoom in on the car door and smash the window with the STONE, then pull the button for the lock to unlock the door (blue)
- Go into the car

- Zoom in on the tool box and take the HAMMER (green)
- Zoom in on the chest and take the PAPER WITH VERSE (blue)
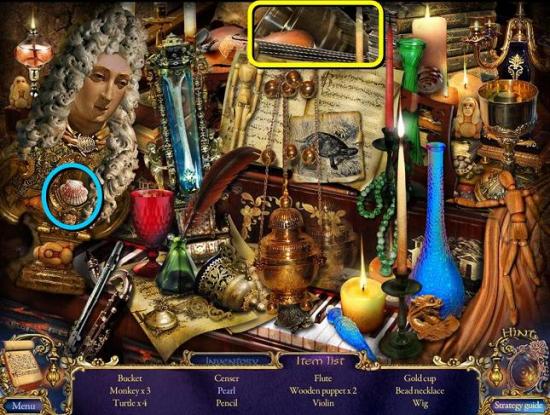
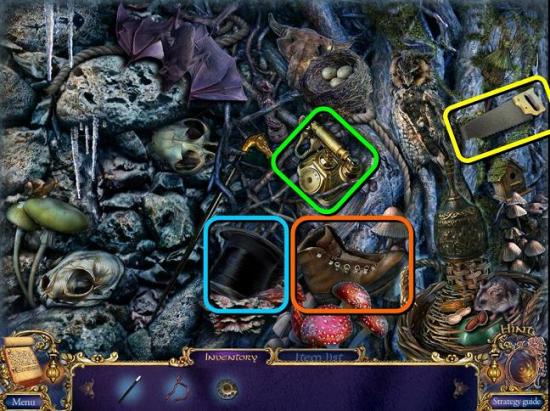
- Ho back to the hut and play the HOS in the chest
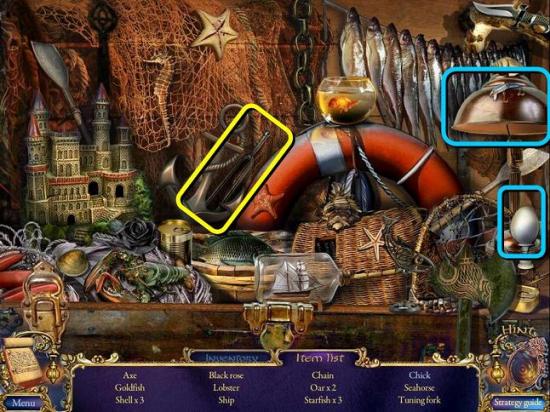
- From this point on the HOS are a little different: in the list of items there will be some items listed in blue, which are items that can only be found if you use an item from your inventory on an object in the scene. This may mean that the first time you encounter a certain HOS you won’t have the correct item yet, meaning you will have to come back to it later
- In this HOS, use the UV LIGHT on the lamp above the egg (blue) to find the chick
- When you’ve completed the HOS you will get a TUNING FORK (yellow)
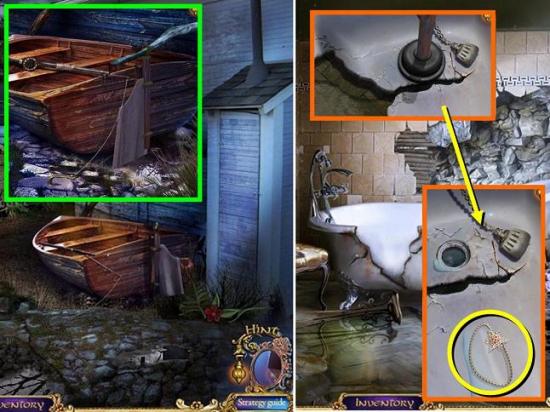
- Go back to the back yard, zoom in on the row boat and repair the fishing rod with the ANTENNA, TAPE and HOOK, then take the ROD
- Go back to the bathroom, zoom in on the bath and use the PLUNGER to get the MEDALLION from the drain
- Go back to the outside of the train, zoom in on the signpost and use the HAMMER to get some NAILS
- Go into the engine room, zoom in on the bag on the coals and place the ZIPPER PULL
- Inside the bag is a JACK
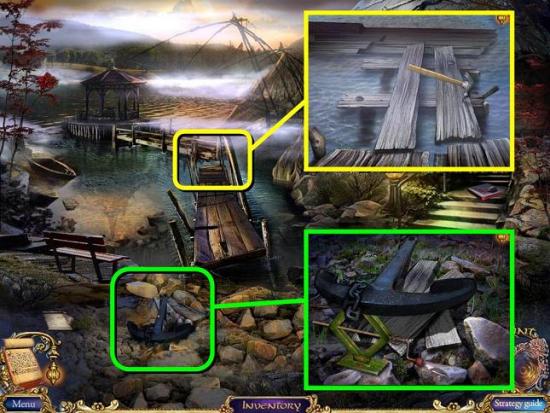
- Go back to the lakeshore and zoom in on the anchor
- Place the JACK and use the HANDLE from the Jack-in-the-Box to lift the anchor
- Under the anchor are wooden boards, which in this game are named PART OF BRIDGE
- Zoom in on the broken boardwalk and use the PART OF BRIDGE, NAILS and HAMMER to repair it
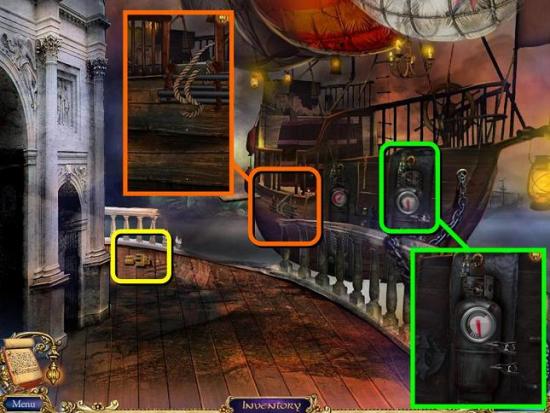
- Move on to the mysterious platform
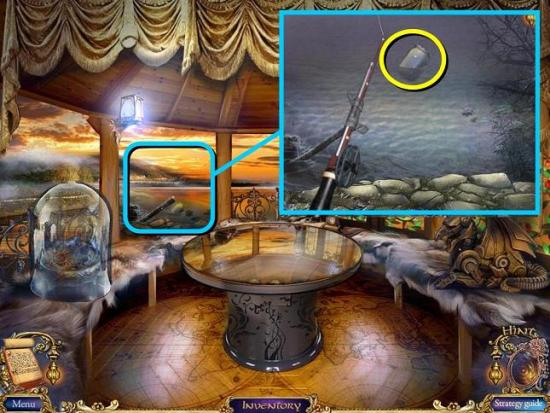
- Zoom in on the water in the back and use the ROD to get the JAR
- For now ignore everything else here and go back to the lakeshore
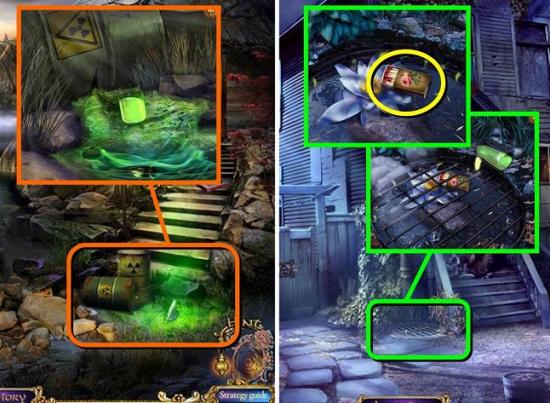
- Zoom in on the puddle of acid and use the JAR to get a JAR WITH ACID
- Go back to the front of the old house, zoom in on the storm drain and use the JAR WITH ACID to melt the grate so you can get the MATCHES
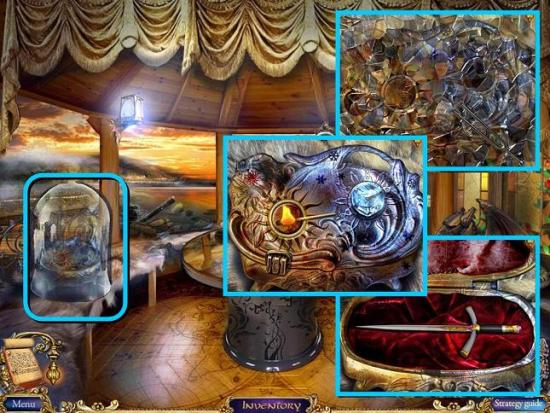
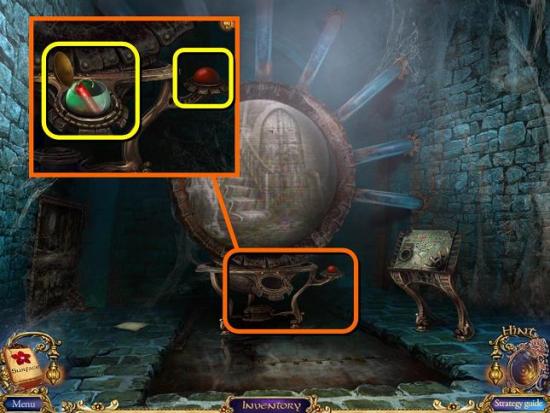
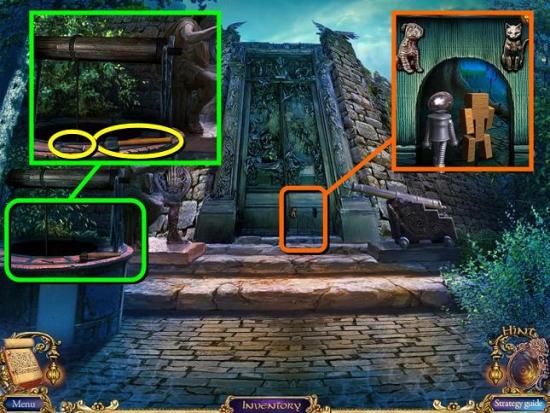
- Go back to the mysterious platform and zoom in on the glass dome on the left
- Use the TUNING FORK to shatter the glass
- Place the ICE on the right and the MATCHES on the left and then open the lid
- Take the ELEGANT KNIFE
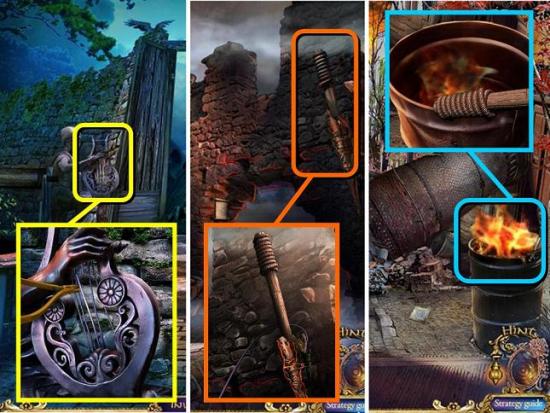
- Go back to the fishing hut, zoom in on the painting and cut it with the ELEGANT KNIFE
- Zoom in on the safe behind it and place the PAPER WITH VERSE to activate the puzzle
- You need to change the five symbols according to the verse on the paper (sun, bird, rose, hand, skull)
- Zoom in on the safe and take a scroll for your journal, the last MYSTERIOUS ELEMENT (3/3) and a HORN
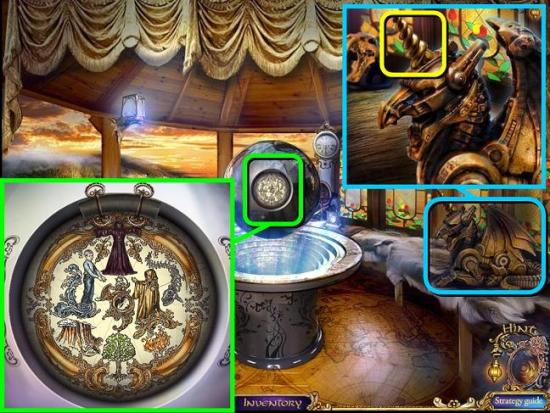
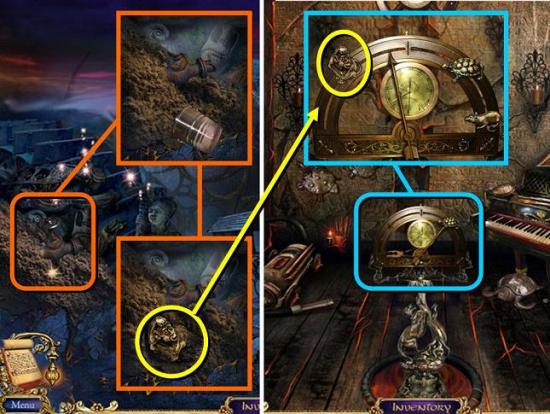
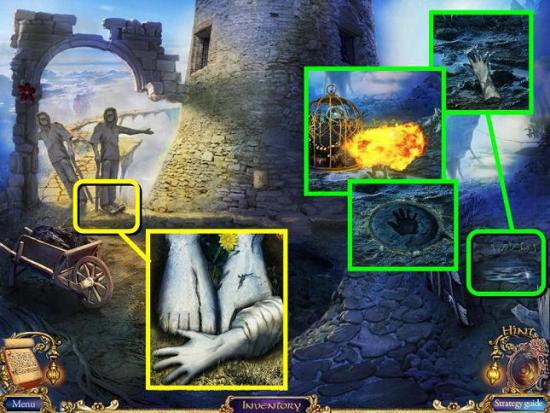
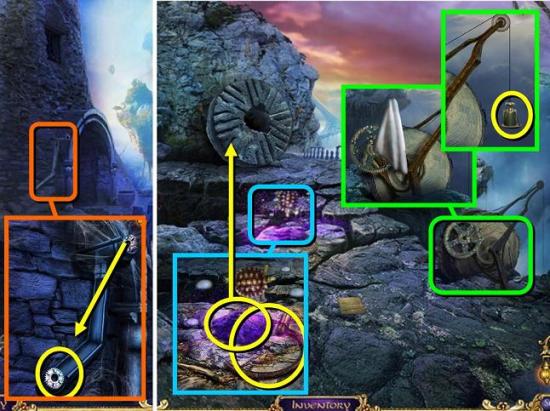
- Go back to the mysterious platform and zoom in on the dragon on the right
- Place the HORN on its head and then pull the head down
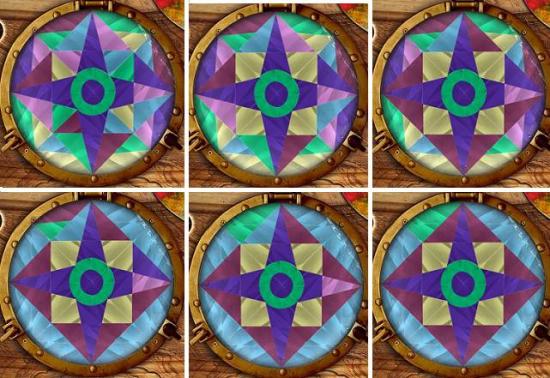
- Zoom in on the sphere that appears and place the MEDALLION and the MYSTERIOUS ELEMENTS to activate the puzzle
- Restore the image on the disk by clicking two wedges to move them
- Move on to the next chapter
Chapter 2: Captured
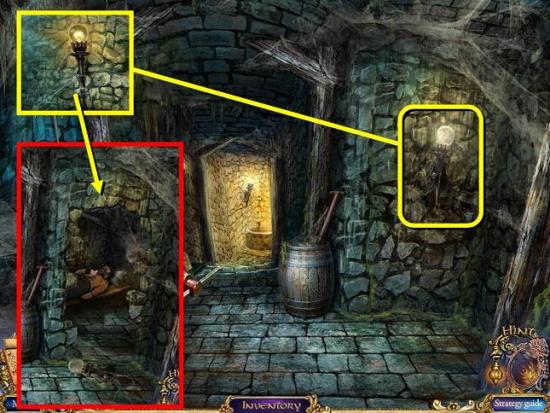
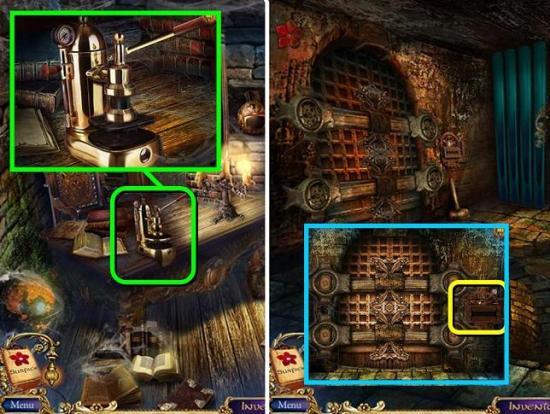
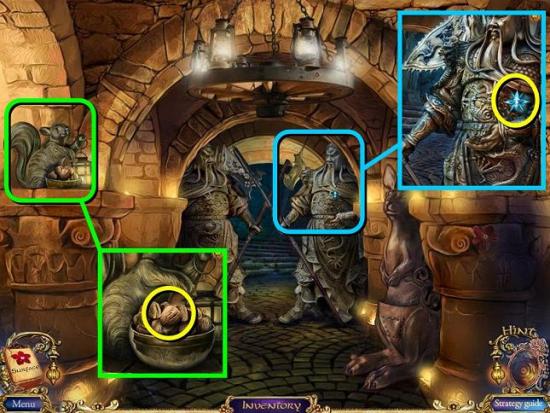
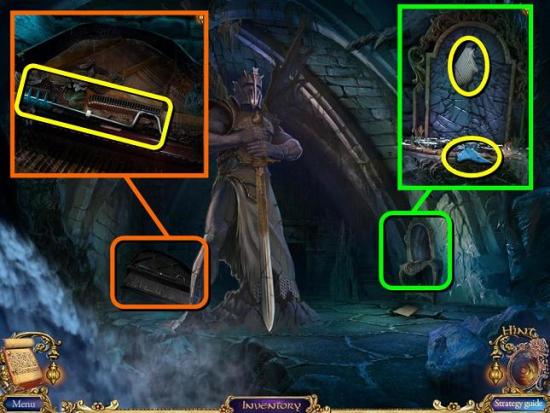
The Dungeons
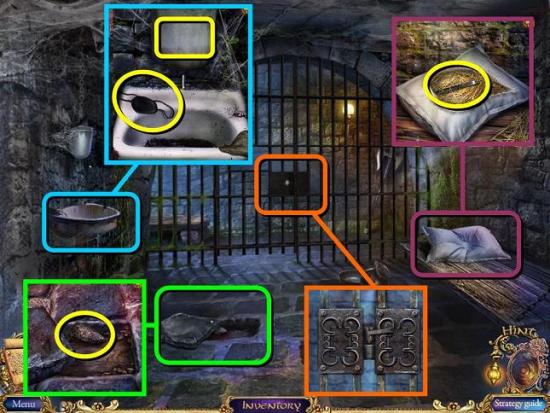
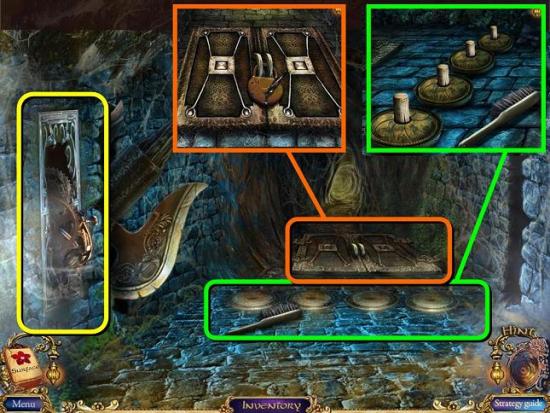
- Zoom in on the loose floor slab (green) and take the STONE
- Zoom in on the wash basin (blue) and take the EYE PATCH
- Use the STONE to break the reservoir and pick up the IRON ROD
- Zoom back in on the loose floor slab and sharpen the IRON ROD to get a SHANK
- Zoom in on the pillow (purple) and rip it with the SHANK. Then click on it to reveal a SAW
- Open the lock on the door with the SAW (orange) and exit to the guardroom
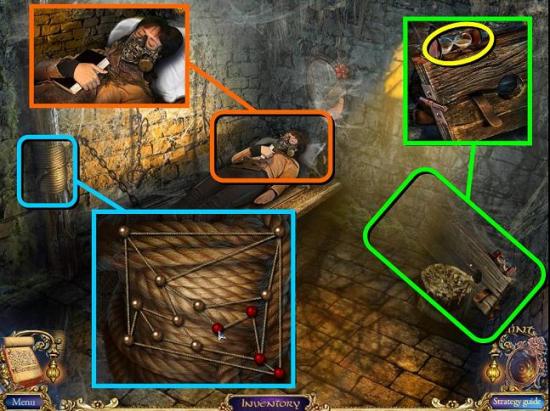
- Zoom in on the small table (orange) and take the PEN, the FLINT and a piece of paper for your journal
- Zoom in on the cell door in the back (green) and take the NEEDLE from the doll
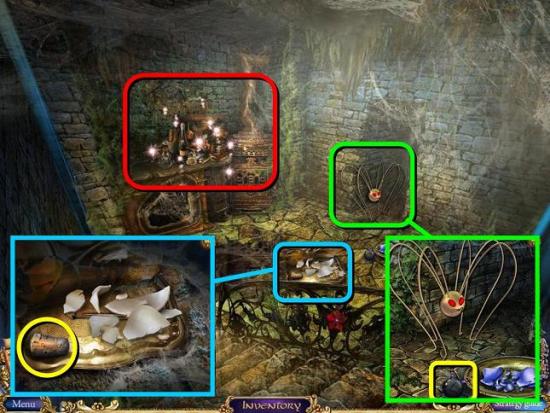
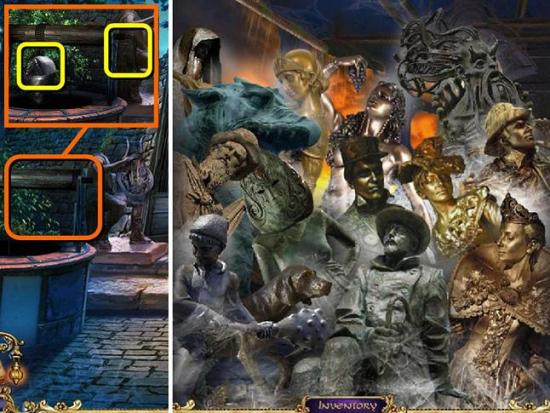
- Play the HOS in the right corner (red)
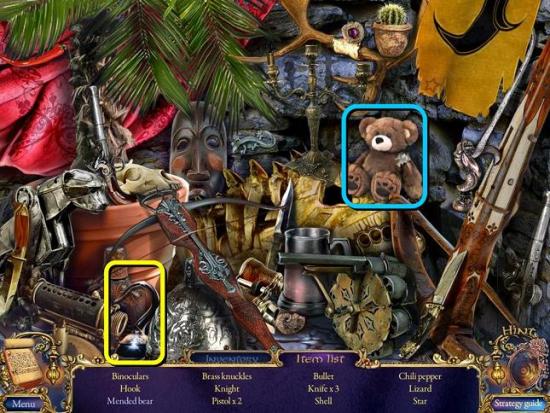
- You need to mend the Teddy bear with your NEEDLE to get the mended bear (blue). When you’re done you get a HOOK (yellow)
- Go left into the archive
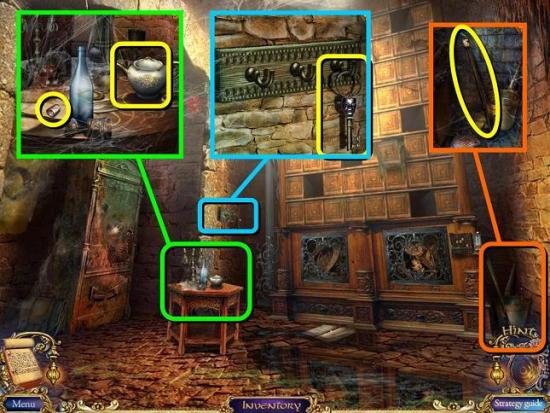
- Zoom in on the table (green) and get the CORK (1/4) and the TEA POT
- Take the MASK KEY from the key hooks on the wall (blue)
- Zoom in on the corner with the bucket on the right. Put the HOOK on the stick and then take the GAFF (orange)
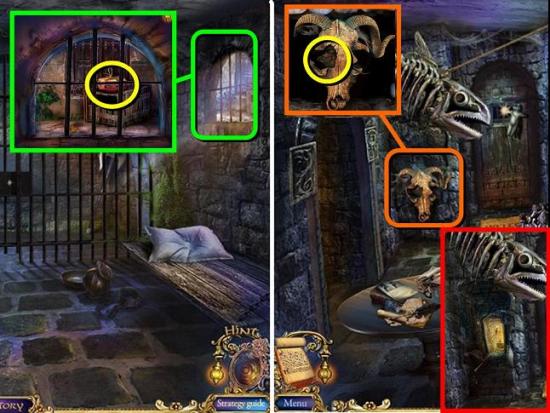
- Go back to your cell, zoom in on the window and use the GAFF to get the CHEESE (green)
- Go back to the guard room, zoom in on the skull on the wall and feed the rat some CHEESE (orange)
- Hit the button behind him to reveal a standard match-two memory puzzle. This is a random puzzle so no solution is shown
- Go into the secret passage that opens (red)
- Move the torch on the wall and discover another secret door!
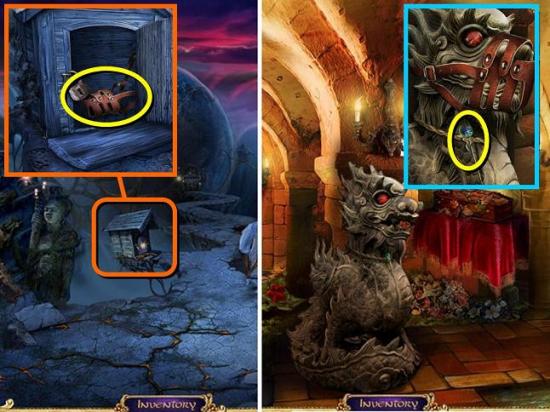
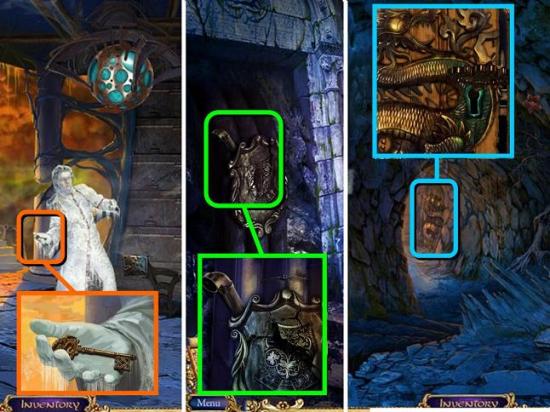
- Go into Kira’s cell
- Zoom in on Kira (orange) and unlock her mask with the MASK KEY. You will get the LOCK and she will give you her BLACK BOOK
- Underneath the book is a RUBY
- Zoom in on the stocks on the right (green) and take the HOURGLASS
- Zoom in on the rope on the left (blue) and untangle it by moving the pins until none of the strings cross. Strings will glow red when they’re not untangled
- Get a ROPE when you’re done
- Back out to the secret passage and zoom in on the well in the back
- Put the ROPE down the well
- Move into the sewer system
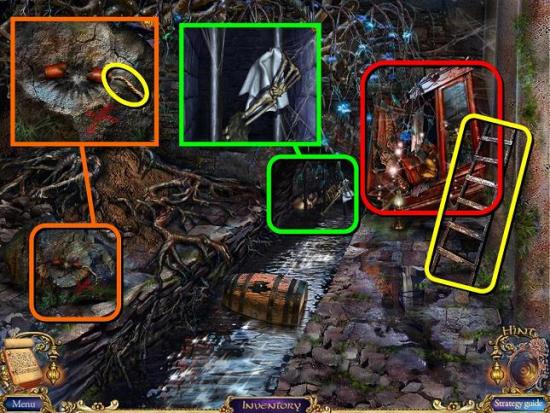
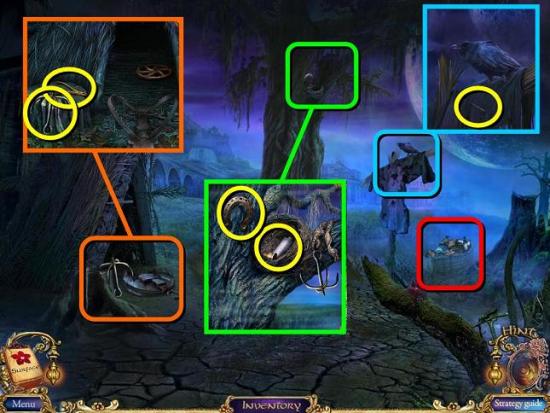
- Take the LADDER
- Zoom in on the stone marked X and take the WICK (orange)
- Zoom in on the skeleton behind the grate and take his HANDKERCHIEF (green)
- Play the HOS in the red cabinet
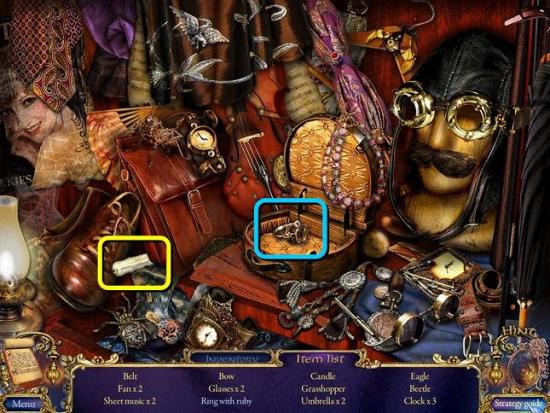
- To get the ring with ruby, put your RUBY on the ring (blue). When you’re done, get the CANDLE (yellow)
- Back out two screens to the guardroom
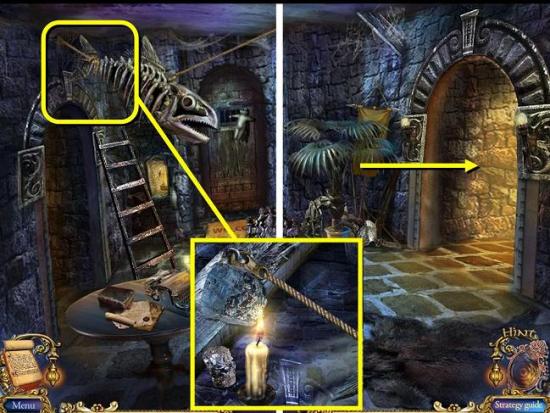
- Place the LADDER under the fish skeleton on the ceiling
- Place the CANDLE under the rope and light it with your FLINT
- Exit to the square
The Town of Agonia
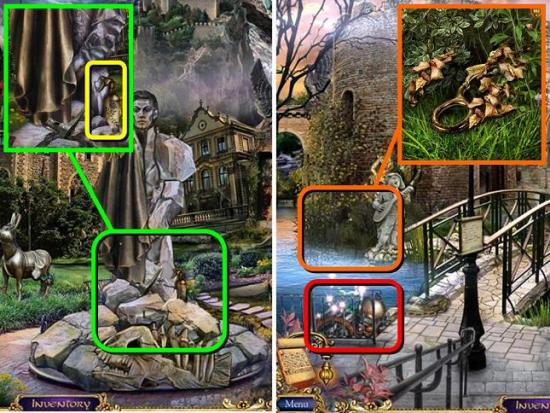
- Zoom in on the foot of the statue and pick up the WEED KILLER
- There are several othe things you can interact with here, but nothing you can actually do right now. So lets go right to the canal
- Take the papers from the wallet on the floor for your journal
- Zoom in on the ivy on the wall and use the WEED KILLER to take the SCISSORS HALF
- Play the HOS to the left at the front of the bridge
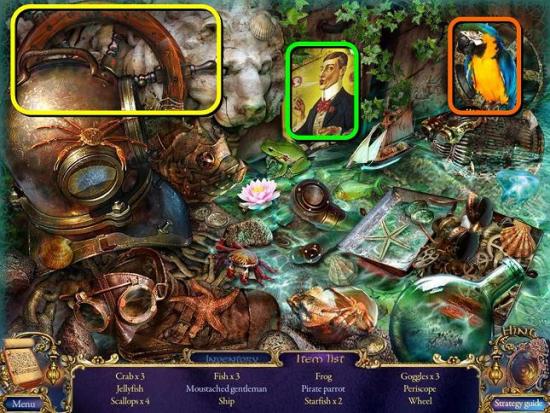
- To get the moustached gentleman, use your PEN to draw a moustache on the poster (green). To get the pirate parrot, give the parrot your EYE PATCH (orange). When you’re done you get a WHEEL (yellow)
- Move on to the city wall
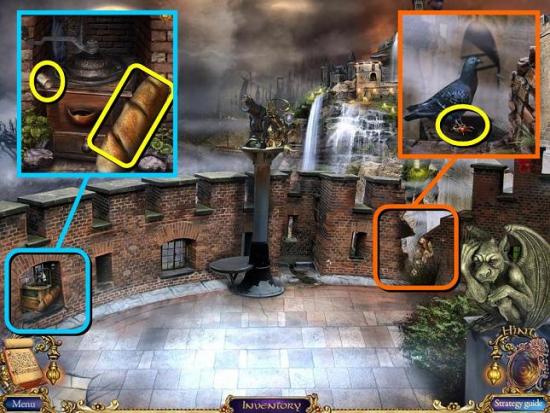
- Zoom in on the left of the rampart and take the CORK (2/4) and the BREAD
- On the crack in the rampart on the right is a pigeon. Give him the BREAD so you can take his RING
- Go back two screens to the square and move on to the street near the library
- There is an old cash register to the right. Take the BUTTON and the STICK
- Go back to the square, zoom in on the base of the statue and put the STICK on the head of the pickax. Then take the PICKAX
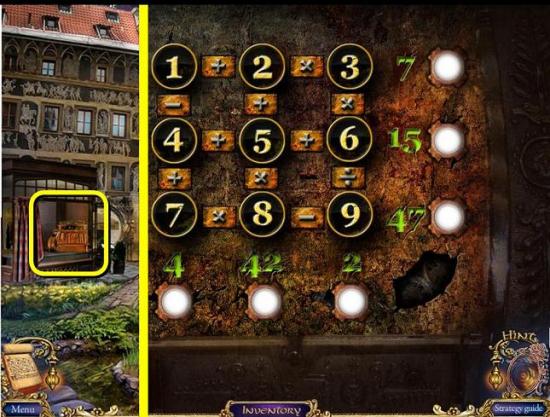
- Zoom in on the cash register on the left and place the BUTTON in the #6 spot
- You now need to place the math symbols between the numbers so the results of the formulas in each row and column are equal to the numbers around the outside
- The register opens up a new HOS. Unfortunately we don’t have the item needed for this one yet so we’re going to ignore it for now
- Go back into the guard room and go left into the archive storage
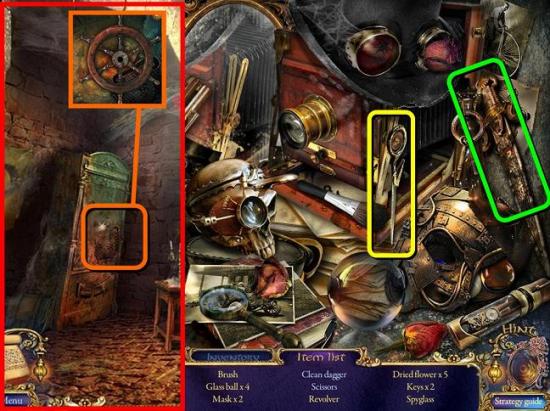
- Zoom in on the safe, place the WHEEL and turn it to open
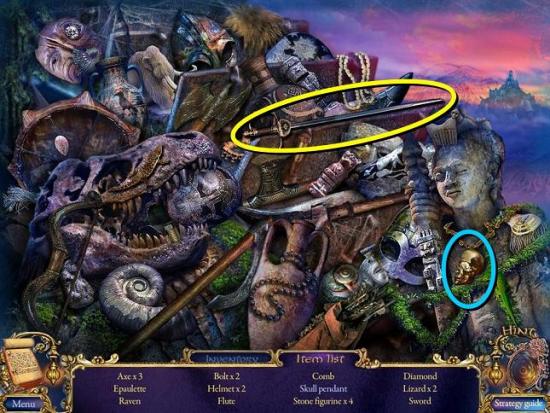
- Play the HOS inside. To get the clean dagger you need to clean the dagger with your HANDKERCHIEF (green). To get the scissors you need to place your SCISSOR HALF on the scissor half in the scene. When you’re done you get the SCISSORS (yellow)
- Go down the secret passage to the sewer and use the PICKAX on the rock marked X
- Take the DIAMOND
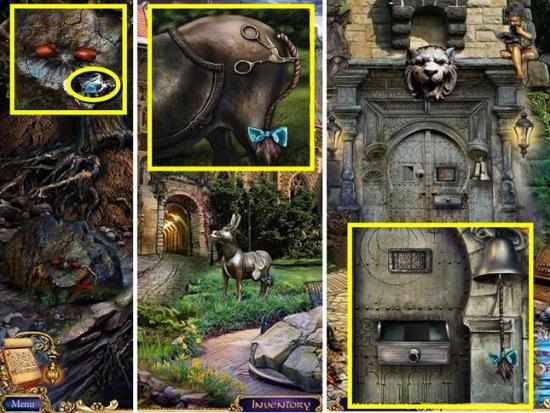
- Go back to the square, zoom in on the donkey and cut his tail with your SCISSORS to get a TAIL ROPE
- Go to the street outside the library and zoom in on the door
- Place the TAIL ROPE on the bell and ring the bell
- Put the BLACK BOOK in the drawer that opens
- Enter the library
The Library

- Zoom in on the grandfather clock and cut the glass with the DIAMOND
- Take the FLUTE and the CLOCK HANDS
- Next to the door to the tower you find the first of the REELS (1/3)
- You can go up to the librarian’s office now if you like, but there’s nothing to do there now
- Go back to the secret passage in the dungeon (use the interactive map if you like)

- Zoom in on the barrel and charm the snake with your FLUTE
- Take the SHOVEL
- Go down the well to the sewer system
- Zoom in on the base of the tree and dig with the SHOVEL
- Open the wooden chest and take the WEIGHT and the COIN
- Go back to the city walls to the right of the square and zoom in on the spyglass
- Put the COIN in the slot and watch the scene
- Then take the LENS
- Go back to the library main room and zoom in on the door on the left
- Place the WEIGHT on the hook by the door and go down to the library kitchen
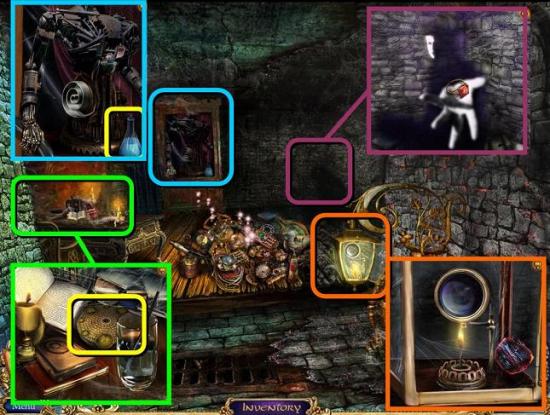
- Zoom in on the spiderbot and take his VESSEL
- Zoom in on the tray on the floor and take the CORK (3/4)
- Play the HOS in the cabinet
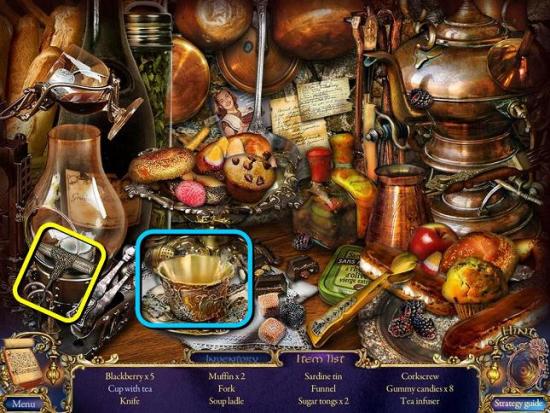
- To get the cup of tea, pour tea into the cup (blue) with your TEA POT. When you’re done you get a CORKSCREW (yellow)
- Go to the canal, zoom in on the strange device on the right and place the VESSEL in the slot
- You need to set the lights to the scheme on the left by clicking the little arrows and rotating the discs. I found the easiest way to do this was to focus on the yellow lights. Keep moving yellow lights to the discs, starting at the top disc and working your way down, always making sure there is one space between a red light and a yellow light
- When you’re done you can take out the vessel again, which is now a BULB WITH FLASH
- We need to make one more stop at the sewer system, so use your interactive map to jump back
- Zoom in on the barrel in the water and use your CORKSCREW to get the CORK (4/4) from the bottle. You also get a note for your journal
- Jump back to the library kitchen and give the BULB WITH FLASH to the spider so he goes to sleep
- Go into the corridor of three deaths
- We shall make quick work of the booby traps!
- Zoom in on the mechanism for the swinging axe in the wall and pour the sand from the HOURGLASS on it to jam the mechanism
- Zoom in on the holes in the ground and plug them with your CORKS
- Don’t forget to pick up the BROOM!
- Finally, zoom in on the trapdoor and lock it with your LOCK
- Now you can move on to the catacombs
The Catacombs
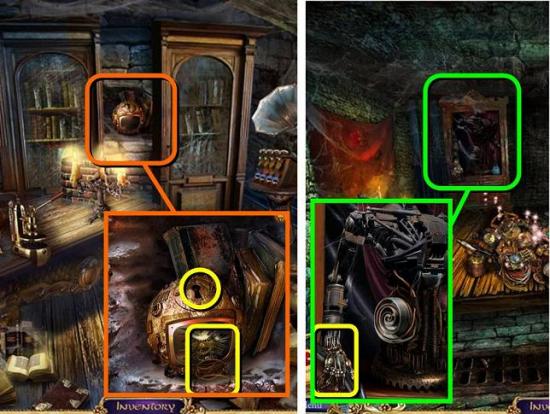
- Zoom in on the large doors on the left and pick up the HAMMER and the second one of the REELS (2/3)
- Zoom in on the pneumatic pipes and take out the top PNEUMO CAPSULE, which is blocking the flow
- You can’t really do anything in the library cellar right now
- Instead we’re going to jump back to Kira’s cell in the secret passage of the dungeons
- Zoom in on the stocks and hit the pin with the HAMMER
- Take the BELT
- Jump back to the library catacombs and zoom in on the steam by the back wall
- Fix the leak with the BELT and take the SCOOP
- Back out two scenes to the kitchen, zoom in on the tray on the floor and use the SCOOP and BROOM to sweep up the PIECES OF GLASS
- Pick up the TWEEZERS
- Back out two more scenes to the street outside the library, zoom in on the fire and use the TWEEZERS to get the COAL
- Go back to the library catacombs and now go into the library cellar
- Zoom in on the lamp, open it and light it with the COAL
- Replace the broken lens with your own LENS to magnify the light
- Zoom in on the desk and take the last one of the REELS (3/3)
- Zoom in on the cabinet with the robot in the back and take the SOLVENT and the LIGHTER
- Talk to the shadow figure in the back right corner and give him your RING
- When he leaves he drops a bar of GOLD
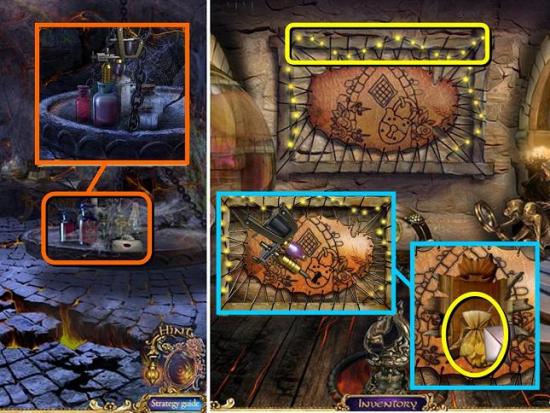
- Play the HOS in the pile of junk
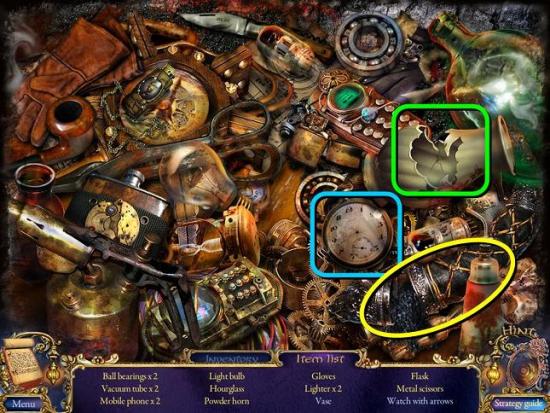
- To get the watch with arrows, place your CLOCK HANDS on the watch (blue). To get the vase, you need to repair the broken vase (green) with your PIECES OF GLASS. When you’re done you get a horn of POWDER (yellow)
- Jump back to the secret passage and zoom in on the work bench on the left
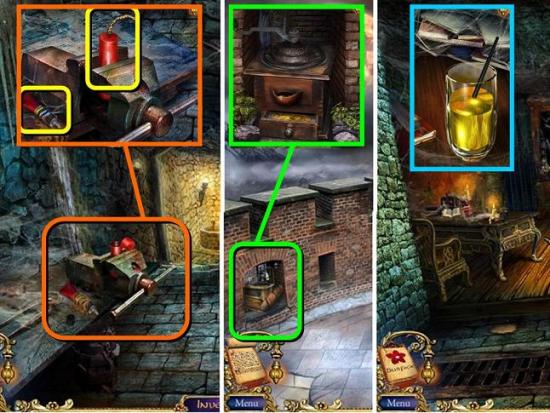
- Put the POWDER and the WICK in the empty capsule in the vice and take the DYNAMITE
- Use the SOLVENT to release the tube of GLUE
- Go to the city walls and zoom in on the coffee grinder on the left
- Put your GOLD in the grinder and turn the handle
- Take the GOLD POWDER
- Go to the library cellar, under the catacombs, and zoom in on the table
- Put the GOLD POWDER in the glass of water and take the GOLD PAINT
- Now we can finally play the HOS in the town square, so go to the square and zoom in on the cash register on the left. If you haven’t done the maths puzzle yet, see above for the solution
- To get the golden butterfly, paint the butterfly on the curtain with your GOLD PAINT. When you’re done you get a WIND-UP KEY
- Now go to the librarian’s office (up the steps from the main room) and zoom in on the device on the right
- Place your three REELS to activate the puzzle
- This one is tricky: you need to make the colored balls at the top drop down into slots with a corresponding color on the reels below. Pulling the handle at the top of a reel makes the next ball in line drop down into the top slot of that reel, making the reel rotate one slot to the right. Figure out the correct order in which to click the handles to make all the balls drop onto the reels. The order I found is: 1, 1, 1, 1, 4, 2, 2, 3, 3, 4, 4, 3, 3, 3, 3, 1, 4, 2, 4, 2, 2, 1, 2, 2, 2, 3, 1, 3, 4, 4, 1, 4
- A hidden compartment is revealed behind the bookcases
- Zoom in on the weird looking TV set and wind it up with your WIND-UP KEY (isn’t that cute – a wind-up TV!)
- Take the SPRING that comes out
- Go back to the library cellar and zoom in on the robot in the cabinet
- Give him the SPRING and click on his hand to get the MECHANICAL ARM
- Now you have to go all the way back to the archive storage in the dungeons. Best use your map
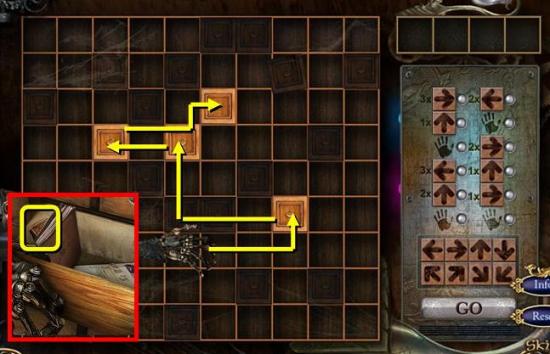
- Zoom in on the shelving unit in the archive and place the MECHANICAL ARM on the controls to activate the puzzle
- You need to pick up all four drawers in one run. However, you first need to set the controls for the path by placing the arrow blocks in the formula on the right. When you think you have the formula right, hit the go button to see if you’re right
- The arm will come down with a drawer
- Zoom in on it and take out some notes and a PASS
- Go back to the librarian’s office
- Zoom in on the hole punch on the desk, place the PASS and pull the lever
- Take out the PUNCHED PASS
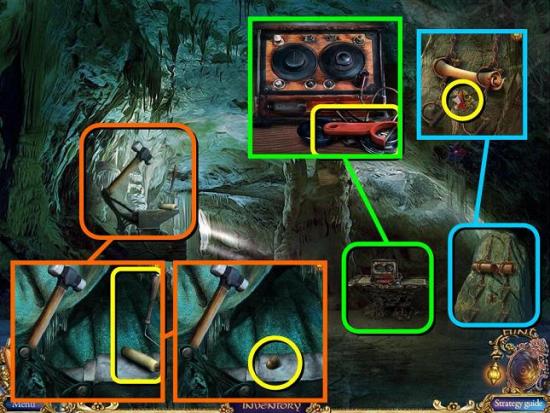
- Go to the catacombs, zoom in on the large door and put the PUNCHED PASS in the slot to the right
- Go into the control room
- Zoom in on the control panel, take the KNIFE and mend the leak with your GLUE
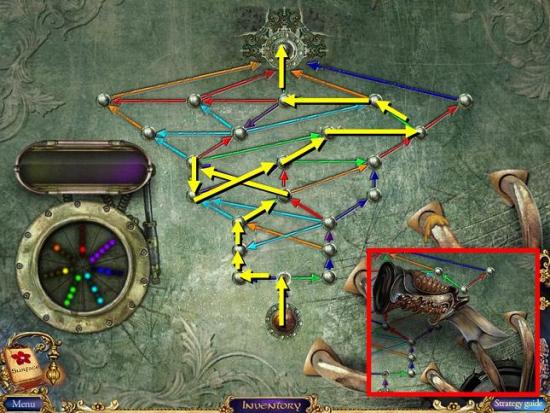
- You need to move the ball from the bottom to the top via the arrowed paths. You can only use a certain number of arrows of each color. The graph on the left shows how many colors you have left. You don’t have to use all colors
- When the path is set, the pneumatic system will open
- Place your PNEUMO CAPSULE and put the DYNAMITE in it
- Light the dynamite with your LIGHTER and hit the send button
- Back out to the library main room and go through the door to the tower roof
- Pick up EYA’S TOY
- Zoom in on the ship’s ladder and cut the ropes with your KNIFE
- Zoom in on the fuel tank on the right and take out the TANK
- We have to make one last trip before we can leave: go back to the library catacombs
- Zoom in on the fuel tank in the back, take out the old tank and place your TANK to refill it
- When it’s full you get a TANK WITH GAS
- Go back to the airship on the tower roof and replace the TANK WITH GAS
- Board the ship to fly away!
Chapter 3: The Perishing Lands
The Temple
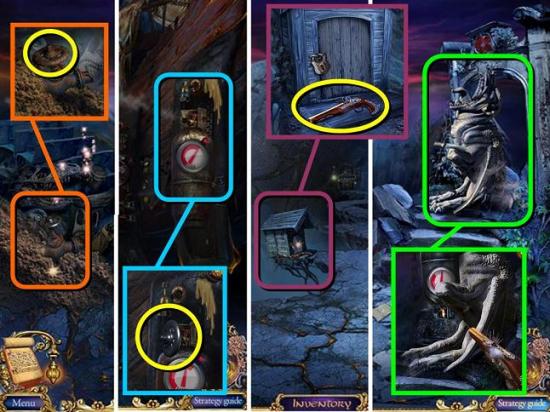
- Zoom in on the pile of wood and take the BOARD, the STONE and the CHISEL (orange)
- Zoom in on the bag and put the STONE in the bag to raise the barrier (green)
- Go to the temple entrance

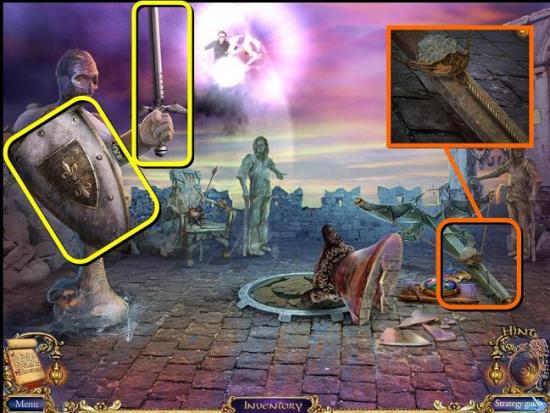
- Zoom in on the statue and take the RITUAL KNIFE (green)
- Zoom in on the temple and take the SKULL MEDALLION HALF (orange)
- Play the HOS behind the pile of sand (red)
- To get the skull pendant, place your SKULL MEDALLION HALF on its counterpart (blue). When you’re done you get a RAPIER (yellow)
- Go back one scene

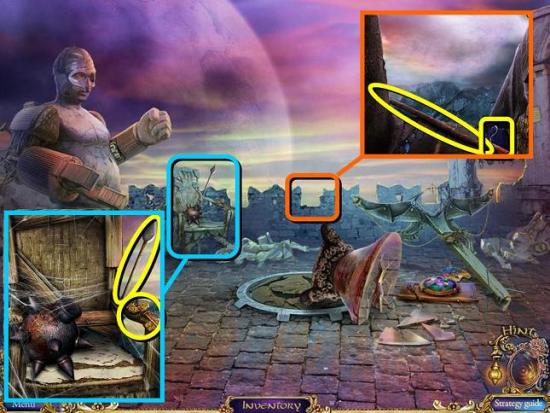
- Zoom in on the stone guard and Use the RITUAL KNIFE to cut a FLAG FRAGMENT
- Use the RAPIER to get the BULLET out of his gun
- Zoom in on the leaking fuel tank on the airship and mop up some fuel with your FLAG FRAGMENT to get an OILED FLAG FRAGMENT
- Go to the temple entrance
- Zoom in on the pile of sand and use the OILED FLAG FRAGMENT to take off the VALVE (orange)
- Once again go back to the crashed airship
- Zoom in on the fuel tank again and close it with the VALVE (blue)
- Take the TANK WITH GAS and go to the temple entrance
- Zoom in on the doghouse, put the BULLET in the musket and take the musket (purple)
- Zoom in on the statue and place the TANK WITH GAS (green)
- Shoot it with the MUSKET – awesome!
- Go behind the temple
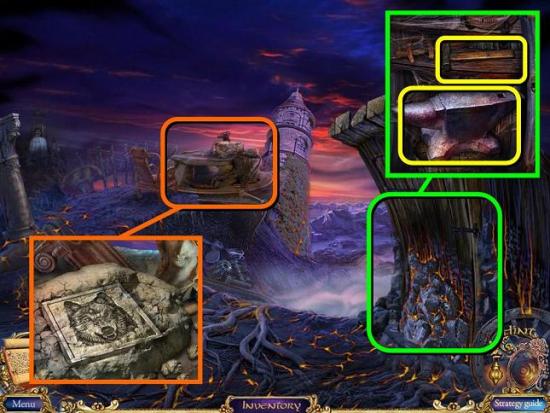
- Zoom in on the shed and take the ANVIL and the HAMMER
- Zoom in on the large stone table in the back and chisel it with your CHISEL and HAMMER
- Take the STONE TABLET
- Back out to the temple entrance and zoom in on the door
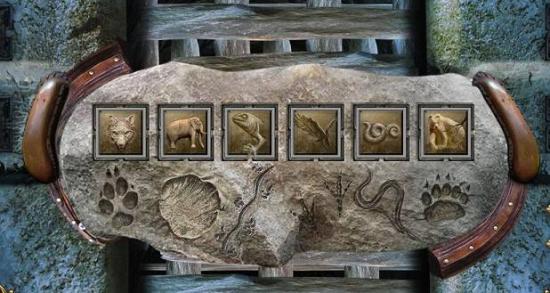
- Place the STONE TABLET to activate the puzzle
- Place the tablets so the animals are matched with their ‘footprints’
- Enter the temple
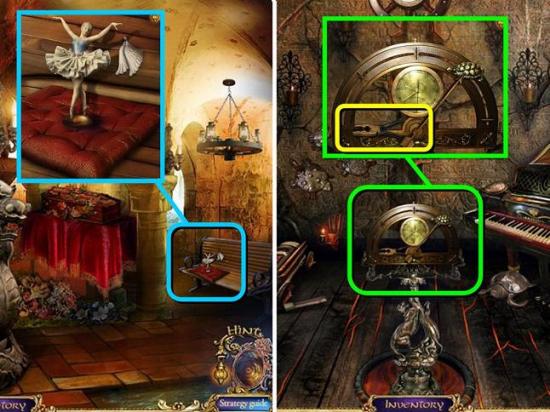
- Zoom in on the bench on the right and take the BALLERINA and the SMALL WINGS
- Go to the temple labyrinth in the back
- There is a HOS in the piano, but you can’t complete it yet
- Zoom in on the control panel and take the PLIERS
- Back out to the entrance and go right behind the temple
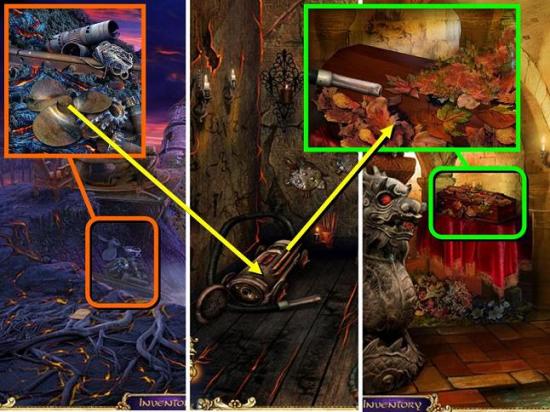
- Zoom in on the pile of rubble and use the PLIERS on the propeller and take the PROPELLER
- Go back to the temple labyrinth and zoom in on the leafblower
- Place the PROPELLER on the leafblower and take the LEAFBLOWER
- Go back one screen, zoom in on the coffin and use the LEAFBLOWER
- Open the coffin by wedging the BOARD under the lid and dropping the ANVIL on it
- Take the METAL RAT
- Go back to the labyrinth, zoom in on the control panel and place the METAL RAT – this is one freaky place!
Temple Labyrinth
- There is nothing to do on the landing of rat floor so go left into the forge
- Zoom in on the trough and take the SOAP
- Zoom in on the grindstone and take the EMPTY SPOOL
- Use your interactive map to jump to behind the temple
- Zoom in on the rubble and use the EMPTY SPOOL on the string to get a TWINE SPOOL
- Use the interactive map again to go back to the forge
- Back out to the landing and go right into the ritual room
- Zoom in on the table at the back and put the TWINE SPOOL on the KITE
- Zoom in on the hanging table and take the sealed envelope and the SCALLOP SPOON
- Go back to the rat landing and take the lift back to turtle floor
- Zoom in on the piano to play the HOS
- To get the pearl, use the SCALLOP SPOON on the scallop (blue). When you’re done you get a BUCKET (yellow)
- Back out to the temple entrance
- Zoom in on the pile of sand and scoop some sand with your BUCKET to get a BUCKET WITH SAND
- Pick up the METAL MONKEY and go back to the labyrinth with the piano
- Zoom in on the control panel and place the METAL MONKEY to go to monkey floor
- Go right to the entrance of the conference hall
- Zoom in on the squirrel and take a NUT
- Zoom in on the metal guard on the right and take the STAR
- Take the interactive map back to the ritual room and play the HOS in the middle
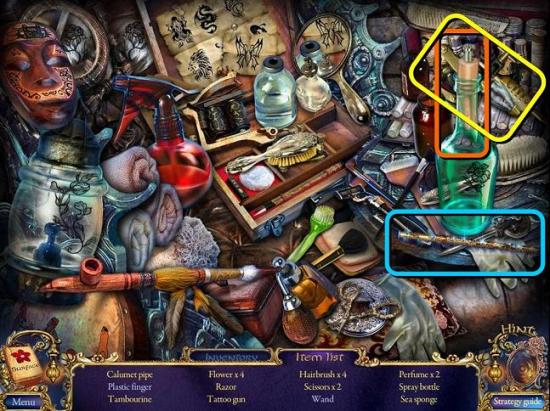
- To get the wand, place your STAR on the wand (blue). To get the plastic finger, rub the finger in the bottle with your SOAP (orange). When you’re done you get a TATTOO GUN (yellow)
- Zoom back in on the swinging table and fill your TATTOO GUN with ink to get a… TATTOO GUN WITH INK!
- Back out and take the lift back to monkey floor
- Zoom in on the hide on the wall and use your TATTOO GUN WITH INK on it
- Take the envelope and the SACK WITH MONEY from behind the hide
- Also take the CHRISTMAS LIGHTS from around the hide
- Go back into the entrance to the conference hall, zoom in on the guard and give him the SACK WITH MONEY
- Go into the conference hall
- Zoom in on the electricity generator in the back and use the KITE to catch lightning
- Play the HOS on the pedestal
- To get the Christmas tree, put the CHRISTMAS LIGHTS on the little tree (green). To get the angel, place the SMALL WINGS on the figurine (blue). When you’re done you get a SMALL KEY (yellow)
- Jump back to the temple entrance
- Zoom in on the dog house and open it with the SMALL KEY
- Open the door and take the MUZZLE
- Go into the temple, zoom in on the dragon statue and MUZZLE him
- Take the MONK’S NEEDLE
- Go into the labyrinth and go back to the landing of monkey floor
- Zoom in on the bubble on the left and pop it with the MONK’S NEEDLE
- Go into the monk’s chamber
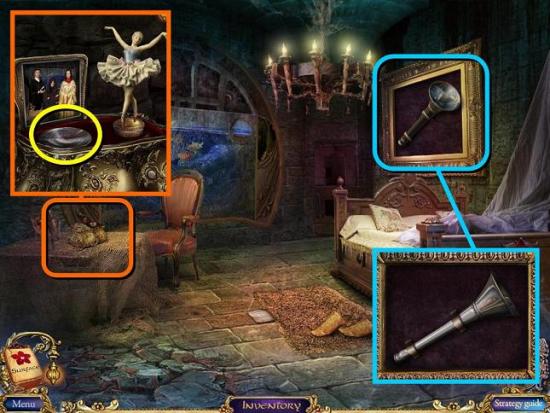
- Zoom in on the frame above the bed and take the PIPE
- Zoom in on the music box on the table and put the BALLERINA on it
- Take the notebook and find a HOLOGRAPHIC DISC underneath
- Back out to the landing and go right and on to the conference room
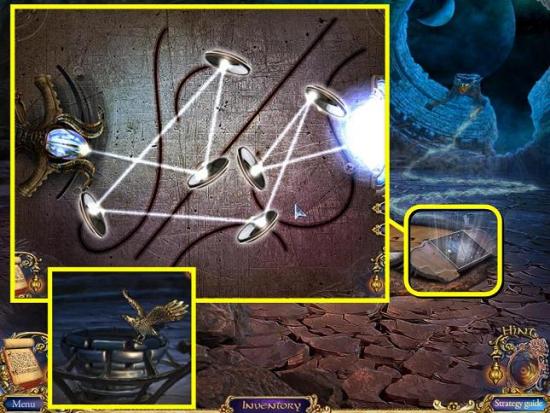
- Zoom in on the projector on the floor and place the HOLOGRAPHIC DISC
- To solve the puzzle, you need to move both the light and the mirrors so that the light hits all mirrors before going through the disc on the right
- Zoom in on the beamer and take the METAL BIRD
- Go back to the landing and place the METAL BIRD on the control panel to go to the roof
The Balloon
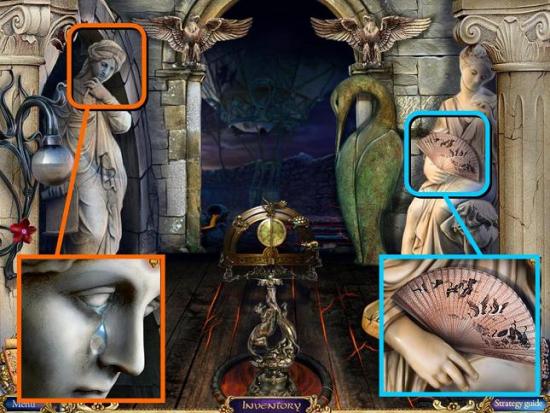
- Zoom in on the statue on the right and take the FAN
- Zoom in on the statue on the left and take the TEAR
- Go on to the landing strip

- Zoom in on the bench and take the BLUNT RAZOR
- Go to the basket of the balloon for a HOS
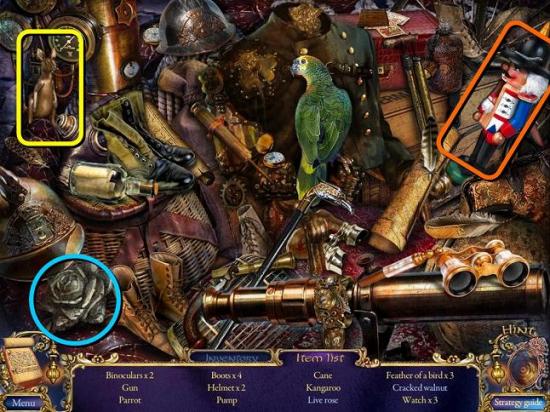
- Put the TEAR on the stone rose to get a live rose (blue). Put the NUT in the nutcracker and click on it a few times to get the cracked nut (orange). When you’re done you get a BABY KANGAROO STATUE (yellow)
- Jump back to the entrance to the conference room on monkey floor

- Zoom in on the kangaroo, place the BABY KANGAROO STATUE in its pouch and get the BOOMERANG
- Jump to the forge on rat floor
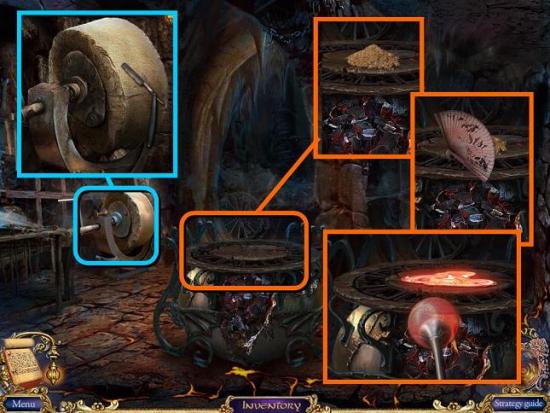
- Zoom in on the furnace and pour the sand from your BUCKET WITH SAND on top
- Fan the coals with your FAN
- Then use the PIPE to blow the glass and make a LAMPSHADE
- Zoom in on the grindstone and sharpen your BLUNT RAZOR to get a SHARP RAZOR
- Back out to the landing
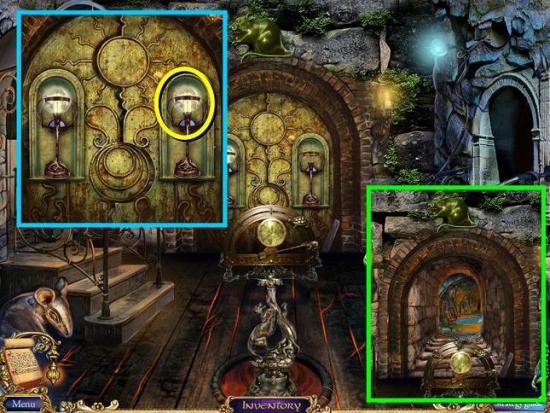
- Zoom in on the lamps on the back wall and place the LAMPSHADE on the lamp on the right
- Go on to the experiments room
- Zoom in on the open suitcase on the left and take the scroll and the NET
- Go to the monk’s chamber on monkey floor and zoom in on the fish tank (not shown)
- Place the NET to start the puzzle. You need to find pairs of fish with matching symbols. However, they have different symbols on each side so you may need to wait until they swim the other way. Click on two to compare
- When you’re done you get a RED FISH, a YELLOW FISH, a WHITE FISH and an ORANGE FISH
- Jump back to the experiments room and zoom in on the pipes on the left
- Release the fish in the pipes of matching color. From top to bottom: red, yellow, white, orange
- You can now play the puzzle on the right. This one is quite hard. First place BOBBY’S TOY and EYA’S TOY in the cups on the side. Then you need to move both boys to the center at the same time by clicking the arrows around their pictures. When you click on one, the other will move in the opposite direction and will keep moving until the first one stops. Using U=up, D=down, L=left and R=right, click the following arrows: BL, AD, AL, AD, BL, AD, AL, BU, AR, BU, AL, AD, BL, BU, AL
- After the video, zoom back in on the puzzle and take the LIVE TOYS and the STAPLER
- Jump all the way back to the crashed airship at the start
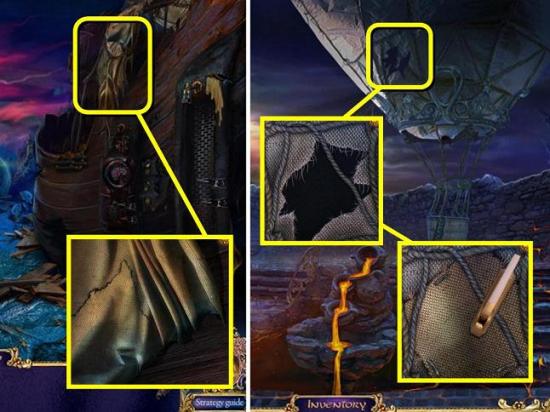
- Throw the BOOMERANG to knock down the ladder
- Look at the top of the ladder and use the SHARP RAZOR to cut a PATCH from the old balloon
- Go back to the landing strip and zoom in on the balloon
- Place the PATCH over the hole and fix it in place with the STAPLER
- Board the balloon to fly away
Chapter 4: The Spring of Life
The Lost City
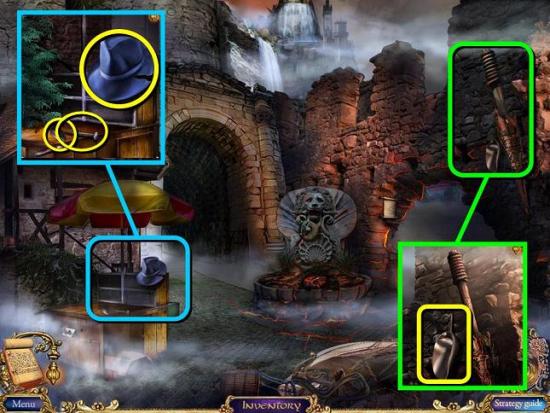
- Zoom in on the torch on the wall and take the SHOVEL
- Zoom in on the vending cart on the left and take the TORN HAT, NAIL (1/4) and SUNFLOWER SEED
- Go on to the arch
- Zoom in on the poster and take the PAPER CLIP
- Zoom in on the crates and take another NAIL (2/4) and the HAIRBRUSH
- There is a HOS here you can’t complete yet
- Go back one screen and zoom in on the lion fountain
- Take out the GRATING KEY with your PAPER CLIP
- Go back to the arch and open the panel on the gate with the GRATING KEY
- Reorder the gems according to the colors at the top and shapes on the left. You can turn blocks of four gems by clicking the arrow keys in their middle. The quickest way of doing this from the default position, with R being clockwise and L being counter clockwise is: 3L, 1L, 3L, 1R, 2L, 3R, 2L, 4L, 2R. NB: I found it easier to think of right and left as clockwise and counterclockwise, even though this means that R means you have to click the left button and vice versa. If you prefer to have R be the right key and L the left, reverse the Rs and Ls in the code
- Go on to the main street
- First go on to the entrance to the Spring of Life
- Zoom in on the barrel on the right and take the WHEEL and the ROPE
- Go back to the main street
- Zoom in on the broken cart and take the nail (3/4)
- Place the WHEEL on the cart
- Go left to the path to the lower city and watch the scene
- Zoom in on the barrel of fire and take the OPENER
- Zoom in on the parking meter
- When you try to take the coin it falls in, so open the meter with your OPENER
- Then take the COIN
- Zoom in on the window and take the EMPTY WATERING CAN
- Zoom in on the clock for a HOS
- To get the cog wheel you need to dig it out of the sand with your SHOVEL. When you’re done you get a CUE STICK
- Go back to the main street and on to the entrance to the Spring of Life
- Zoom in on the barrel and place your EMPTY WATERING CAN under it
- Turn the tap to get a FULL WATERING CAN
- Zoom in on the large ball in the statue’s hand
- Use your CUE STICK to knock down the ball
- Zoom in on where it lands, take the CANNONBALL and the CAT BADGE underneath it
- Go back to the main street and go right to the park of statues
- Zoom in on the well and take the HAMMER and NAIL (4/4)
- Zoom in on the bottom of the door and place the CAT BADGE
- Let the LIVE TOYS go through the door
- Pick up the LIVE TOYS again and go to the dried pond
- Zoom in on the shack on the left and take the NIPPERS
- Put the ROPE on the hook to get the GRAPNEL
- Throw the GRAPNEL at the nest in the tree and look up the tree
- Take the THIMBLE, the THREAD and the HORSESHOE
- Zoom in on the scarecrow and take out the NEEDLE with your THIMBLE
- Zoom in on the HOS
- For the sunflower you must put the SUNFLOWER SEED in the pot of earth and water it with your FULL WATERING CAN (blue). When you’re done you get a TARGET SIGN (yellow)
- Back out one screen to the park of statues
- Zoom in on the statue with the harp and take the STRING with your NIPPERS

- Back out one screen to the main street and zoom in on the horse’s left foot
- Put the HORSESHOE on its hoof and nail it down with the NAILS and HAMMER
- Take the lid off the sewer hatch and pick up the WELL HANDLE
- Go all the way back to the first screen: the arch entrance
- Zoom in on the torch on the wall and use the STRING to take down the TORCH
- Go back to the path to the lower city, to the left of the main street
- Zoom in on the barrel of fire and put the TORCH in it to get a BURNING TORCH
- Back out to the main street and go right to the park of statues

- Zoom in on the cannon, put the CANNONBALL in it and light it with your BURNING TORCH
- To fire the cannon, zoom back in on it and place the TARGET SIGN on the right
- This puzzle is quite hard: you need to aim the cannon to hit the target in the middle. You get five shots per round to hit the target. However, the target will start moving in increasingly difficult patterns after each hit. For the second and third round I recommend not moving the cannon, but to try and time your shot until the target moves past the point where the cannonball will strike. To shoot, place a cannonball in the cannon and then light it with the torch
- The cannon will fire and shoot the statue’s head into the well
- Zoom in on the well and place the WELL HANDLE on the crank
- Turn the handle to pull up the bucket and take the STATUE HEAD
- Go to the entrance to the Spring of Life, zoom in on the arch at the end and place the STATUE HEAD in its place on the right
- Now place all the heads on their matching statues. If a placement is correct, the head won’t move anymore
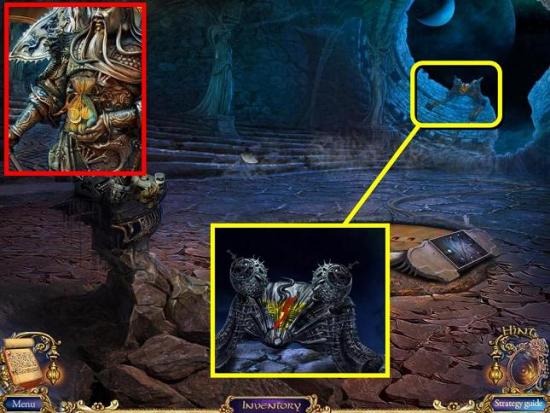
The Spring of Life
- Zoom in on Lord Toriar’s hand and take the DUNGEON KEY
- Go to the entrance to the top of the city
- Zoom in on the shield on the left and take the PIPE PIECE
- Back out to the spring and go into the entrance to the dungeon
- There is nothing to do in the entrance area right now, so zoom in on the back and open the lock with the DUNGEON KEY
- Go into the dungeon
- Zoom in on the vanity in the back and break the mirror with the PIPE PIECE
- Take the MIRROR SHARD, the newspaper for your journal and the ILLUSIONIST’S WAND behind it
- Zoom in on the piano and take the ICE DRILL
- Back out to the entrance to the dungeon
- Zoom in on the ring in the ice on the left and use the ICE DRILL to get the RING “MALE”
- Go to the entrance to the lower city (use your interactive map)
- Zoom in on the window on the left and cut the curtain with the MIRROR SHARD
- Take the KNITTING NEEDLE and the RING “FISH”
- Now we can finally do the HOS under the arch at the start of the chapter
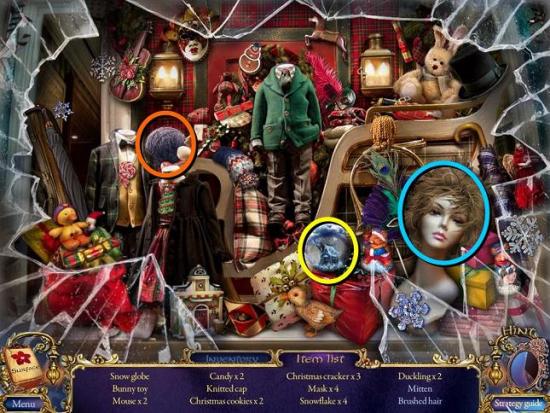
- To get the brushed hair, use your HAIRBRUSH on the wig on the right (blue). To get the mitten, use the KNITTING NEEDLE on the ball of yarn (orange). Get a SNOW GLOBE when you’re done (yellow)
- Jump back to the entrance to the top of the city
- Zoom in on the back and place the SNOW GLOBE in the empty space
- Go through the gate to the top of the city
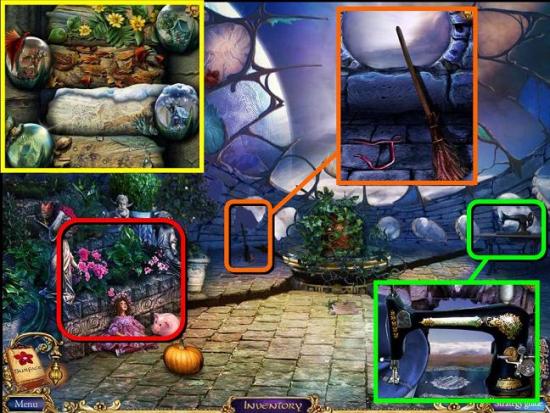
- Zoom in on the sewing machine on the right and place the NEEDLE, the THREAD and the TORN HAT
- Take the MENDED HAT
- Zoom in on the broom in the back and take the BROOM and the SHOELACE
- Play the HOS among the flowers
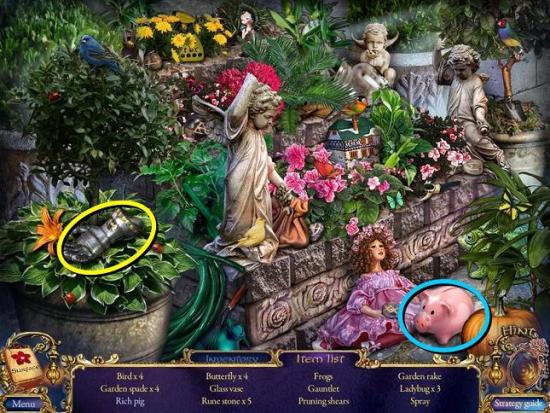
- Put the COIN in the piggybank to get the rich pig (blue). Get a GAUNTLET when you’re done (yellow)
- Jump to the dried pond, behind the garden of statues
- Zoom in on the scarecrow and place the MENDED HAT
- You get a FEATHER
- Zoom in on the shack and use the BROOM to spring the trap
- Take the VALVE
- Go to the arch entrance
- Zoom in on the lion fountain and use the GAUNTLET to pick up the DEAD SOIL
- Go back to the entrance to the top of the city
- Zoom in on the flesh eating plant and tickle it with your FEATHER
- Take the RING “SNAKE”
- Go to the top of the city
- Zoom in on the pedestal in the middle and use the DEAD SOIL to get rid of the ivy
- Take the THICK BOOK
- Go to the dungeon

- Zoom in on the statue and place your two rings (RING “MALE and RING “FISH”) on his empty fingers. Now rearrange the rings so the symbols on the rings match the symbols on the hands. Each of the symbols on his hands has two rings that go with it
- Grab the SWORD
- Go back to the Spring of Life
- Zoom in on the object next to Lord Toriar and place the THICK book on the right and the SWORD on the left
- Zoom in on the water and put the LIVE TOYS in the water
- After the video, zoom in on the broken column and take the TELEPHONE ROTOR
- Then place the VALVE and turn it
- You need to make the green, purple and yellow currents go from left to right. However, each valve in the middle can only let one current through
- Go to the entrance to the dungeon
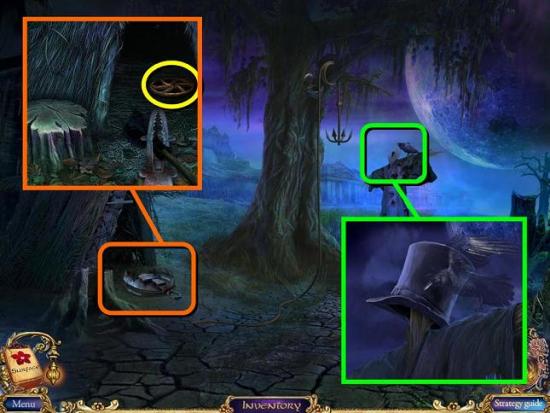
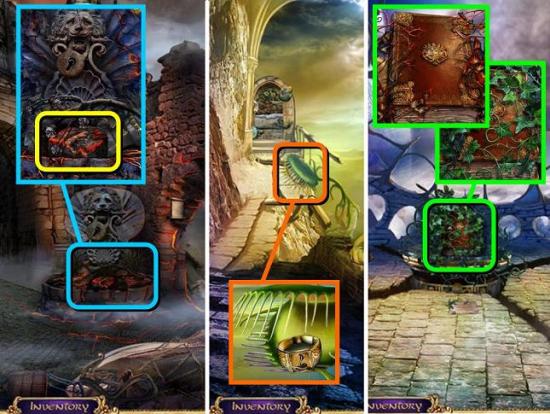
- Now you can finally play the HOS by the wine bottle
- To get the shoe, put the SHOELACE in the shoe (orange). To get the telephone, put the TELEPHONE ROTOR on it (green). To get the rabbit, use the ILLUSIONIST’S WAND on the top hat (blue). Get a SAW when you finish (yellow)
- Go back to the spring
- Zoom in on Sid’s hand and take his diary
- Use the SAW on the chain and pick up his CANE
Stick the CANE in the spring and watch the ending unfold!
Bonus Chapter (Collector’s Edition Only)
Defeating Sid
- Zoom in on the bag on the luggage rack and take the HEADLESS ARROW
- Go left into the vestibule
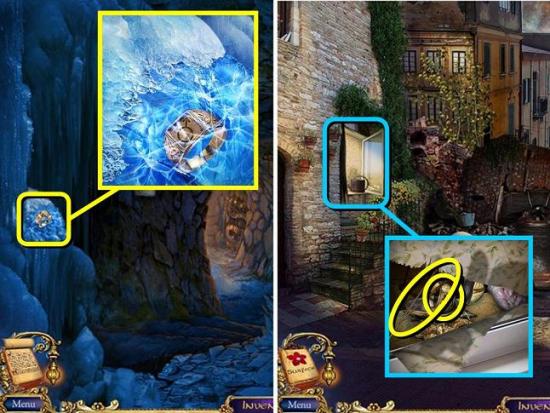
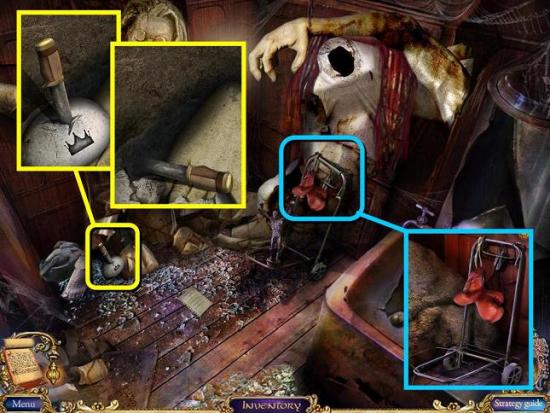
- Zoom in on the rubble on the left and take the RUBY
- Zoom in on the sink and take the BENT COIN
- There is a LOCK PICK behind the lampshade
- Zoom in on the luggage trolley and take the STATUETTE
- Go back to the compartment
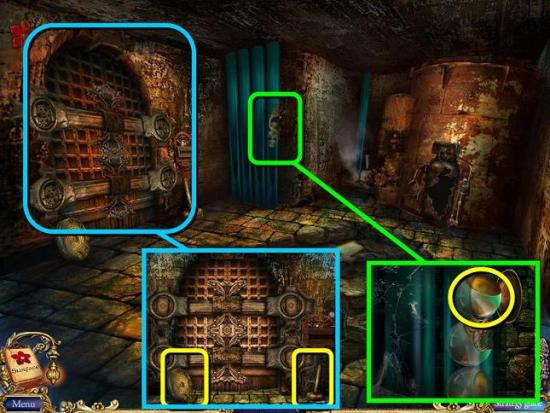
- Zoom in on the little air vent under the seat
- Unlock it with the LOCK PICK and take out the WHEEL WITH CODE
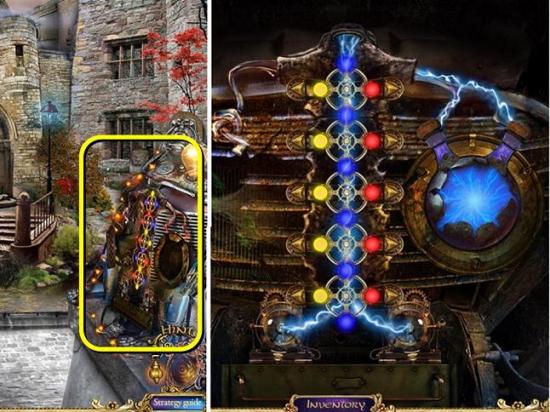
- Zoom in on the suitcase on the seat and place the WHEEL WITH CODE
- For this puzzle you need to line up the holes in the three rotating wheels to reveal four red buttons underneath them. You need to find and click on all four buttons. The wheels turn in pairs, and you can select which pairs to turn by clicking the connections on the triangular diagram. From the default position, execute the following steps:
1. Red/green 3x clockwise – click I
2. Red/green 2x clockwise
3. Yellow/red 1x counter clockwise – click II
4. Yellow/red 2x counter clockwise
5. Yellow/green 4x either direction – click III
6. Red/green 2x counter clockwise
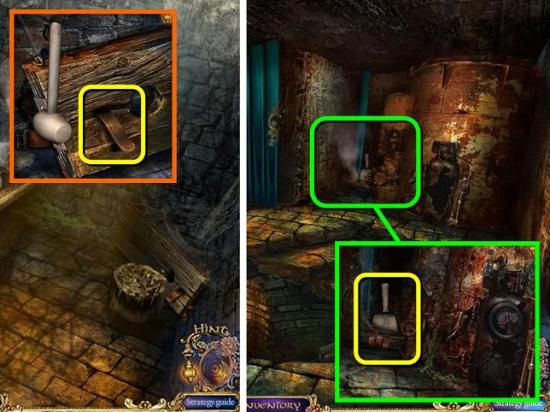
7. Yellow/red 4x either direction – click IV - Zoom in on the opened suitcase and take out the TOWEL, CANTEEN and CLEAN BRUSH
- Go back to the vestibule
- Zoom in on the sink and put the CLEAN BRUSH in the shoe polish to get a BRUSH WITH CREAM (not shown)
- Go back into the compartment
- Zoom in on the window and smash it with the STATUETTE
- Go through the window
- Play the HOS on the left
- To get the polished shoe, use your brush with cream on the shoe. To get the arrow, combine your HEADLESS ARROW with the arrowhead. On completion, get a CROWN PLATE
- Go back into the train and to the vestibule
- Zoom in on the knife in the stone
- Put the CROWN PLATE in the indentation, then take the LITTLE KNIFE
- Use the LITTLE KNIFE to take the BOXING GLOVES from the luggage trolley
- Go back outside

- Inspect the CRYSTAL SPHERE in the water and take it
- Zoom in on the statue of the hands and place your RUBY
- Use the BOXING GLOVES to take the SNOWFLAKE
- Zoom in on the bridge and freeze it with the SNOWFLAKE
- Cross the bridge to the tower entrance
- Go into the tower
- Zoom in on the painting and take the PICKAX
- Back out and zoom in on the wheelbarrow with coal
- Take a piece of COAL with your PICKAX
- Go back into the tower and give your COAL to the fire salamander on the right
- Take the SALAMANDER and go back out
- Zoom in on the statues and take the LORD’S HAND
- Zoom in on the mud on the right
- Make a print of the LORD’S HAND in the mud and bake it with the SALAMANDER’s breath
- Take the PALM PRINT and go into the tower
- Zoom in on the door on the left and place the PALM PRINT
- Click it to open the door and go to the top of the tower
- Play Sid’s riddle/puzzle
- You need to make the shapes shown on the left by coloring the mosaic pieces. Use the dropper to select a color and the brush to paint pieces. Use the scissors to return a piece to its original color. Connecting pieces of the same color will change color together each time you paint them, so don’t give a piece the same color as its neighbor if you don’t want them to have the same color in the end. There are numerous ways of doing this, but the image above shows one solution
- Now for some action! While Sid is shooting at you, take the shield and the sword from the statue on the left
- Protect yourself with the shield and zoom in on the crossbow
- Cut the rope with the SWORD
Getting Home
- Zoom in on the throne and take the SPEAR and the LORD’S KEY
- Zoom in on the eaves and take the CANE and the POUCH
- Go to the ground floor and zoom in on the door on the right
- Open it with the LORD’S KEY
- Go to the tower basement
- Zoom in on the strange dimension sucker thing and take the CORKSCREW
- Back out of the tower
- Zoom in on the drainpipe by the door and use the SPEAR to take out the GEAR (1/3)
- Go into the path to the entrance of the cave that’s been revealed
- Zoom in on the poor little hovering turtle and take the SICKLE
- Put the purple FLYING POWDER in the POUCH
- Zoom in on the pulley on the right and take the SOUP LADLE
- Dry the handle of the pulley with your TOWEL and pull it up
- Take the WEIGHT
- Zoom in on the giant millstone and put the FLYING POWDER on it
- Go into Sid’s cave
- Zoom in on the shackles on the wall and take the scroll and the PUZZLE PIECE
- Zoom in on the tape recorder and pick up the POTATO PEELER
- Zoom in on the anvil and take the ROLLER
- Put the BENT COIN on the anvil and hit it with the hammer
- Take the COIN
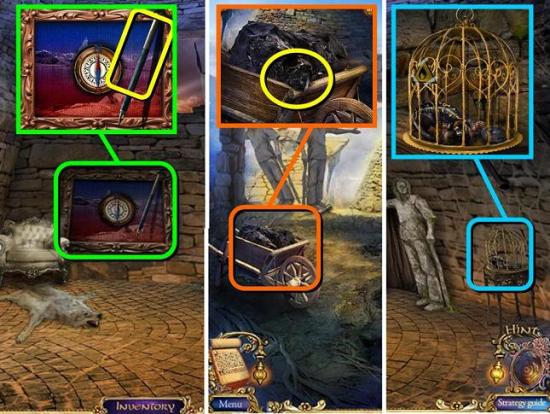
- Back out to the front of the tower and zoom in on the rune on the wall
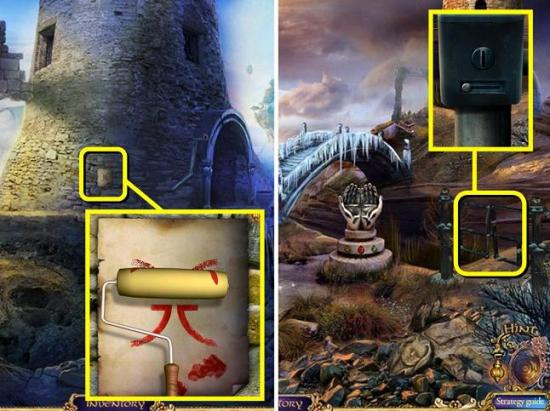
- Take the rune print off the paper with your ROLLER to get a ROLLER WITH RUNE
- Back out to the outside of the train
- Zoom in on the fence on the right and put your now-straight COIN in the slot
- Go to the clearing

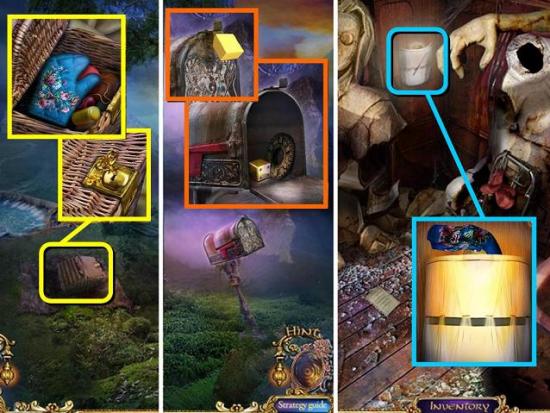
- Zoom in on the mailbox and take the ARCHEOLOGIST’S BRUSH
- Zoom in on the pool of icy liquid
- Put down your CANTEEN and use the SOUP LADLE to scoop the liquid into it
- Pick up the CANTEEN WITH ICY LIQUID
- Go to the entrance to the cave

- Zoom in on the rubble in the top left and use your ARCHEOLOGIST’S BRUSH to find a STICK
- Go to the top of the tower
- Zoom in on the throne and put the STICK on the mace head to get a MACE
- Go to the tower basement
- Pour the ICY LIQUID on the rusty fire grate
- Use the MACE to break the grate and pick up the LOG and the NIPPERS
- Go back to the top of the tower
- Zoom in on the statue and use the NIPPERS to get the GEAR (2/3) from under his arm
- Go back to the clearing
- Zoom in on the base of the stairs to the tree house and place the LOG to repair the stairs
- Go into the tree house
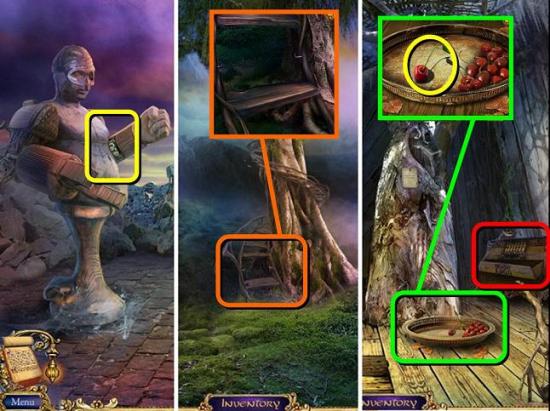
- Zoom in on the tray and take a CHERRY
- Zoom in on the cabinet on the right for another mini puzzle
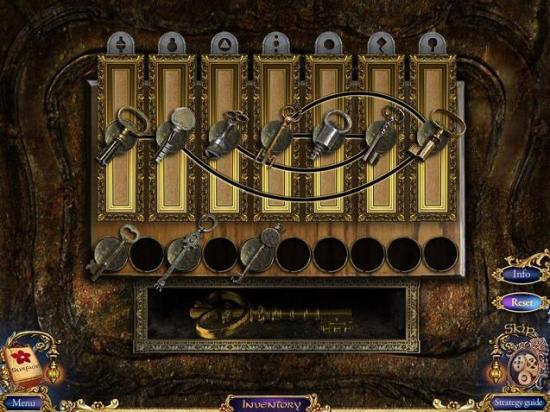
- Find the keys that match the shapes of the keyholes shown above and click on them to put them in the opening on the left. Each time you put in another key, the previous keys get pushed further down the line. So take note of the route the keys will take and put in the last one first etc
- Take the APPLE KEY
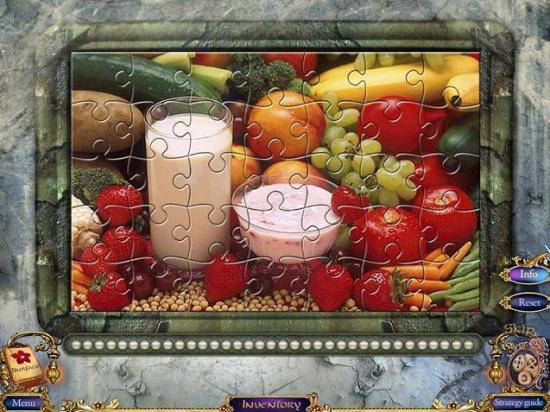
- Zoom in on the fridge, place the puzzle piece and then do a standard jigsaw puzzle
- Click on the fridge again for a HOS
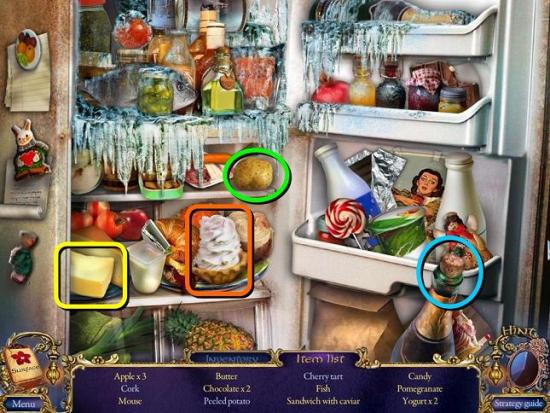
- To get the cherry tart, put the cherry on the tart (orange). Peel the potato (green) with your PEELER and use the CORKSCREW on the wine bottle (blue). When you’re done you get BUTTER (yellow)
- Back out to the clearing
- zoom in on the picnic basket and open it with the APPLE KEY
- Take the OVEN MITT and the CLOWN’S NOSE
- Zoom in on the mailbox and put BUTTER on the rusty lock
- Take the DIE and the GEAR (3/3)
- Back out to the outside of the train and go into the vestibule
- Zoom in on the lamp and take out the BULB with the OVEN MITT
- Go to the tower basement
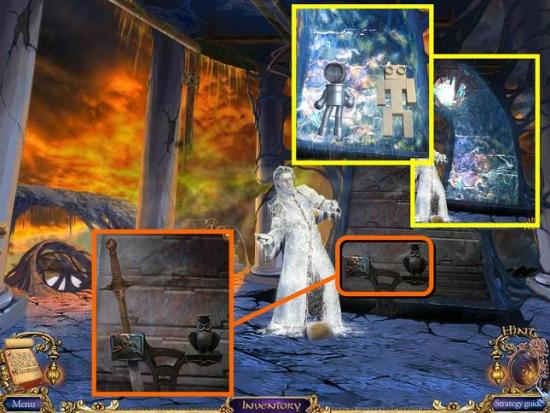
- Play the HOS inside the big skull
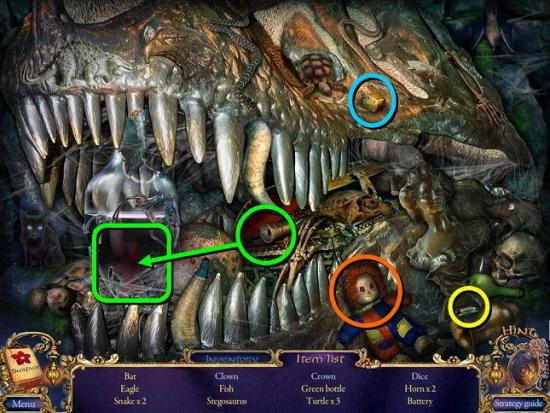
- Give the CLOWN’S NOSE to the little clown doll (orange). Put your DIE next to the other (blue) and put the BULB in the light so you can take the crown from the bottle (green). When you’re done you get a BATTERY (yellow)
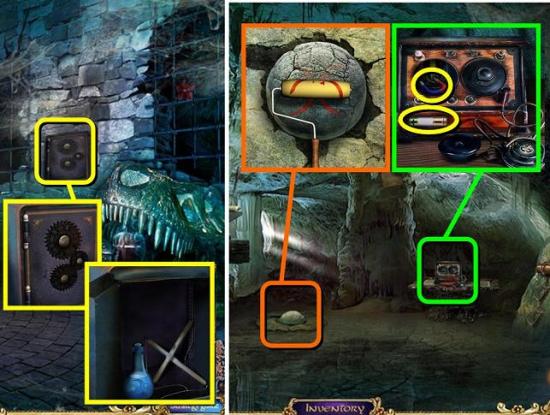
- Zoom in on the safe in the wall and place your three GEARS to open it
- Take out the WATER and the MARIONETTE CONTROL
- Go back to the cave
- Zoom in on the tape recorder and put in your BATTERY
- Take the MAGNET out of the compartment that opens
- Zoom in on the rune on the ground and put your ROLLER WITH RUNE on it
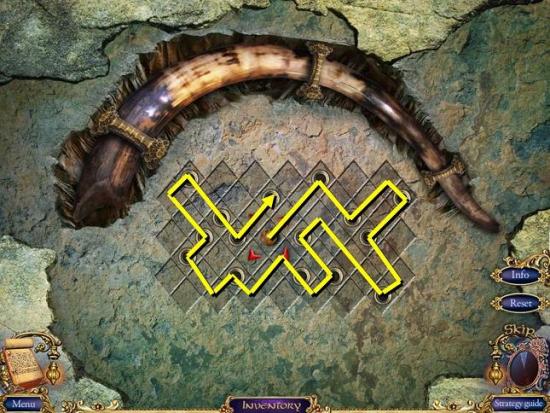
- For this puzzle you need to make the ball roll across the board, hitting all holes. The ball can only cross a square once
- When you’re done take the TUSK
- Back out to the entrance as you can now finally do the HOS by the lion statue
- To get the mammoth, place the TUSK on the little mammoth figurine (blue). Put the MARIONETTE CONTROL on the wooden puppet (green) and the WEIGHT on the scales (orange). Get the RATTLE DRUM when you finish (yellow)
- Go back to the ground floor of the tower

- Zoom in on the painting and tweak the compass with your BATTERY
- Take the ROPE
- Back out to the tower entrance and zoom in on the wet soil
- Use the RATTLE DRUM to make it rain
- Then use the SICKLE to get the GRAIN
- Go to the tree house
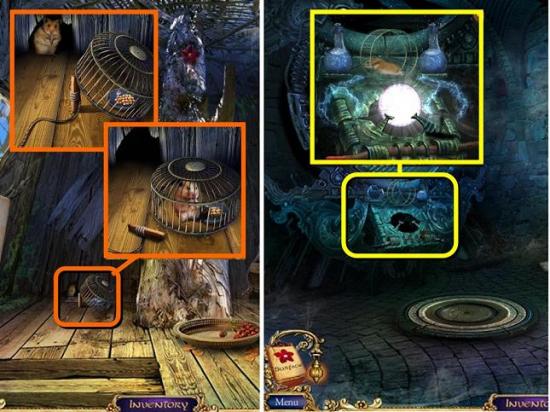
- Zoom in on the trap
- Put the ROPE on it and the GRAIN in the bowl to trap the HAMSTER
- Finally, return to the tower basement and zoom in on the dimension portal
- Put the CRYSTAL SPHERE, WATER and CANE on the device, if you haven’t already done so
- Put the HAMSTER in the wheel
- Goodbye!

More articles...
-
Best Horror Games On Itch.io – July 2026
Across a bounty of subgenres. -
Haze Seas Accessories Tier List [Best Accessories to Equip]
The accessories with the best stat buffs in Haze Seas.