
Grow A Garden 2 Base Price List
What's the most valuable crop?![Evomon Best Starter [Leafbun, Blazpup, or Bubble?]](/wp-content/uploads/2026/06/evomon-best-starter.jpg "Evomon Best Starter [Leafbun, Blazpup, or Bubble?]")
Evomon Best Starter [Leafbun, Blazpup, or Bubble?]
Grass-type, Fire-type, or Water-type?![Evomon Tier List [META and BEST Evomon]](/wp-content/uploads/2026/06/evomon-tier-list.jpg "Evomon Tier List [META and BEST Evomon]")
Evomon Tier List [META and BEST Evomon]
The Evomon dream team.
![[Roblox] Evomon Shiny Hunting Guide – Including Prismatic and Pris Shinies!](/wp-content/uploads/2026/06/evomon-shiny-hunting-guide.jpg "[Roblox] Evomon Shiny Hunting Guide – Including Prismatic and Pris Shinies!")
Strange Cases: The Tarot Card Mystery Walkthrough
Welcome to Gamezebo's walkthrough for Strange Cases: The Tarot Card Mystery. GENERAL OVERVIEW The game has nine chapters each of varying size and requirements. Each chapter has at least one mini game. You can move from room to room by toggling the pictures of photographs at the bottom left of the screen. Some will be locked and you can only access them once you unlock them. There are hints available in the game at the top left of the screen marked by a white butt…


- Prefer Gamezebo on Google

a:1:i:0;a:2:s:13:”section_title”;s:49:”Strange Cases: The Tarot Card Mystery Walkthrough”;s:12:”section_body”;s:72155:”
Welcome to Gamezebo’s walkthrough for Strange Cases: The Tarot Card Mystery.

GENERAL OVERVIEW
- The game has nine chapters each of varying size and requirements.
- Each chapter has at least one mini game.
- You can move from room to room by toggling the pictures of photographs at the bottom left of the screen. Some will be locked and you can only access them once you unlock them.
- There are hints available in the game at the top left of the screen marked by a white butterfly You can get hints to find missing items, or to show you where to go next in the scene.
- You have no set number of hints but must wait for it to recharge before you can use it again. There is a green bar under the butterfly when it is full, you can access another hint.
- Each time you play the game there are different hidden objects to find.
- When you exit the game make sure you are at the very beginning of a chapter because it does NOT save where you left off. It will take you back to the beginning of the chapter you are working on and can actually give you different objects to search for than you may have the first time.
- If you click randomly around a search screen quickly you will incur a "Cursor Penalty" and the cursor will spin in circles for a few moments.
- The game does not have a time limit.
- In almost every search screen one or two items will be put into inventory for future use in another scene. The briefcase at the bottom left of the screen is where your items will be stored. Click on the briefcase to access the items.
KEY GAME ELEMENTS
Tarot Cards
Blue Tarot Cards

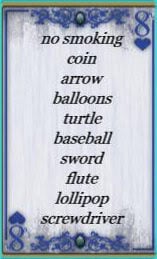
- Blue Tarot Cards will give you a list of items to find in a scene.
Green Tarot Cards
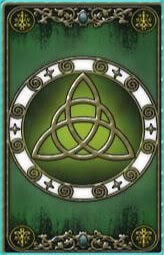

- Green Tarot cards will give you silhouettes of items to find in a given scene.
Red Tarot Cards


- Red Tarot cards require you find fragmented images in a scene and there are usually 3 to 4 items per red card.
Eye Symbol on a Tarot Card

- If you see this symbol on a card it means it is hidden in the scene somewhere and you must search for it or use items in the scene to access it.
Tarot Card Information
- There is at least one tarot card in each scene and they are either hidden in the scene or inside of something in the scene.
- Once you click on a Tarot card it will move to the left side of the screen and turn over showing you what items you need to find.
- As you move along in levels there will be more Tarot cards to a scene.
- NOTE – You can only click on items in a scene while its card is showing face up.
- You can toggle between Tarot cards by simply clicking on them. If you get stuck finding items and you have more tarot cards, toggle to another one and work on it first.
Cursors
Gears

- When you hover your mouse and find gears this means an action must be performed in this area such as using an inventory item in this location.
Magnifying Glass

- A magnifying glass means you must click on the area to get a closer look. Sometimes you can find hidden objects in these areas.
Moving Arrow

- A moving arrow indicates you can move from one location to another by clicking when the arrow is initiated.
Important Elements
Inventory Briefcase

- This is located at the lower left of the screen. When you click on it you can see what is inside it.

- Red – Hints – Click here to find hidden objects or to find next location.
- Yellow – Click here to change locations throughout the game.
- Green – Inventory Case – Click here to see what items you have in inventory and to access them to use in the scene.
Mini Games

- Each mini game opens into a screen like the one shown above.
- A. Click here for mini game instructions.
- B. Click here to exit the mini game and re-enter later.
- C. Click here to skip the puzzle. NOTE – Once you click this you can not go back. There is no penalty for skipping mini games.
- All of the mini games offer you the option to skip them.
- Several of the mini games have multiple solutions. At least one example solution will be provided in the walkthrough if possible.
WALKTHROUGH
CHAPTER ONE
Outside Warehouse

- The game begins here outside of a warehouse.
- Click on the red button where you will activate a mini game.
- Once completed click on the warehouse door and enter.
Mini Game – Circuit Board Puzzle

- Click on the components and they will turn in 4 different directions.
- You must connect the electricity from red area to red area. (See image)
- A light will come on if there is electricity in a component.
- You do NOT have to use every component in this puzzle.
- There are multiple solutions and one is shown above.
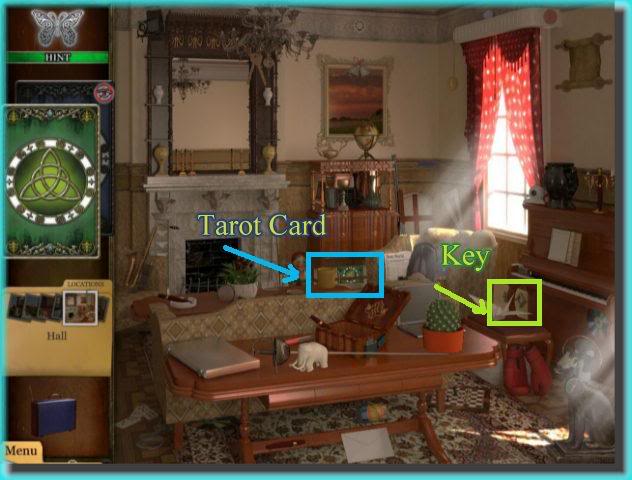
Inside Warehouse

- Always locate the Tarot cards first in any new scene.
- There are 2 cards in plain sight and one hidden in the locker.
- You will frequently have to go to other scenes to find items to use on current scenes.
- The Tarot cards are circled above.
- The blue card will ask you to click on a key.
- Click on the key and it will go into your inventory.
- The red card will ask you to find pieces of a roll of tape. They are circled above in yellow.
- You will have to come back later to open locker.
- Use the key from the blue card by clicking on the inventory, then the key and dragging it to the door circled in green.
Inside Office

- There is a green tarot card in sight and a blue one hidden in the vent which you can not access yet.
- Click on the green card and find all items on it.
- Click on boat key at back left wall and it will move into inventory for later use.
- Go back to the area outside the Warehouse when finished.
Outside Warehouse

- Notice the boat lights are now on.
- Click on the boat to change scenes.
Boat’s Deck

- Click on the lid over the boat’s engine.
- You will see it needs engine oil.
- You will have to come back to this scene later.
- Click on the door to enter boat.
Inside Boat
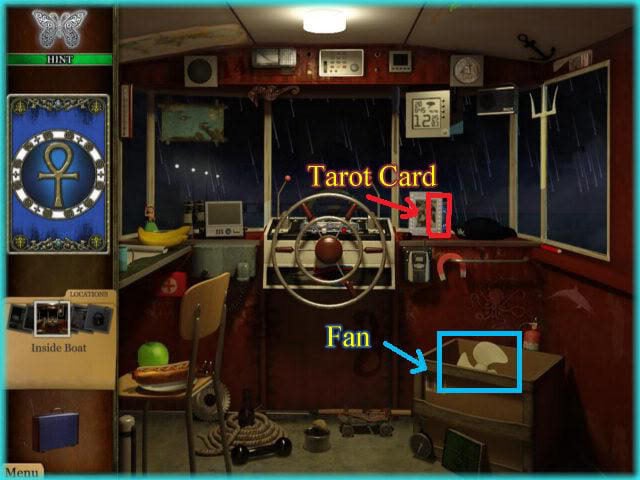
- Click on the blue tarot card which is located on the right side of steering wheel behind a silver picture frame.
- Find all of the items listed on the card.
- Click on the fan in crate to lower right.
- Take a closer look at steering wheel area.
- You have a key in your inventory drag it here and you will find you can’t turn the boat on as it is out of engine oil. You will have to return later.
- If you are asked to find the roller skate it is moving back and forth as the boat rocks.
- Wait for it to appear and click on it if it is on your blue card list.
- Return to Office.
Office

- Use the items in your inventory to complete this scene.
- Use the blue tape on the broken wire to the far right.
- Place the fan blade as shown in image above in green.
- Click on the switch on right side of wall. It will turn on and a blue tarot card will drop from above onto the desk.
- Click on blue card and find all items on list.
- Click on locker key on far right side of the wall inside frame.
- Go back to warehouse.
Warehouse

- Take the locker key from inventory and drag it to locker.
- Click on blue card inside locker and find all items listed on it.
- Click on flashlight shown above and then enter through the door circled above.
Storeroom

- When you enter this scene it will be dark.
- Click on your inventory and remove the flashlight which will allow you to see a small area of scene.
- Focus the light on the right side of scene.
- Click on the tarot card in scene and find all items on card.
- You will be asked to find engine oil which is shown circled above.
- Return to boat.
Boat

- Click on the engine lid to get a closer view.
Add Engine Oil

- Open inventory drag the oil and place it inside opening.
- Click on door in scene.
Inside Boat

- Click on the radio to the right of steering wheel to open a mini game.
- Click on the steering wheel to get a closer view.
- You inserted the key earlier so now simply click to start the boat and move to next location.
Ping Mini Game

- The object of this game is to enter the code in correctly.
- As the little short and long blips of light scroll from left to right they will pass through a square.
- Once they are inside the square they will become larger. As soon as they do click on the ping button shown above.
- They will turn green if you are correct.
- The long symbols require you to hold the right mouse button in until they have finished passing through the square.
- Once you see the last bit of green pass through release the button.
- If you make a mistake you will have to begin from the start again.
- Once you complete this puzzle it is the end of chapter one.
CHAPTER TWO
Outside Trailer


- Click on the tarot card on door and find all the items listed on it.
- Click on the chest shown above and you will see inside.
- Click on the crowbar it will go into your inventory.
- The dog will not let you access all the items you need so you will have to find something to distract him.
- Once you have the crowbar, use it on the boarded windows in the scene.
Inside Trailer
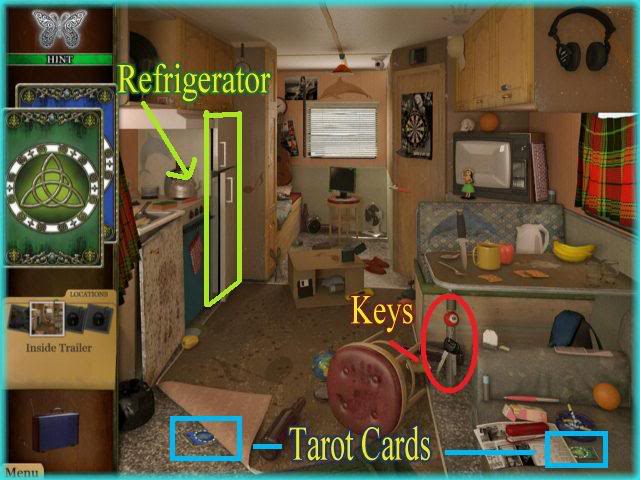

- Click on blue tarot card at lower left of scene and find all items on it.
- Click on green tarot card at lower right of scene and find all items on it.
- Click on the refrigerator to see inside.
- Click on the meat in fridge and it will go into inventory.
- Click on the keys on right side of scene.
- Exit trailer.
Outside Trailer

- Drag meat from inventory and give to the dog. He will leave scene.
- Click on backyard to move to next scene.
Backyard
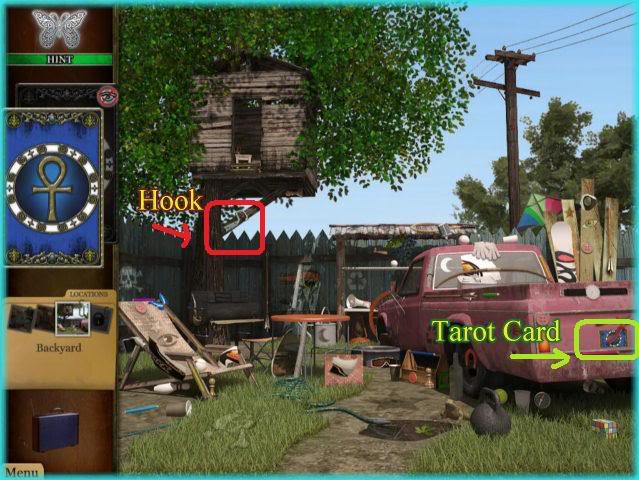

- Click on the blue tarot card and find all items on it.
- Click on the hook located under tree and circled above.
- Drag the keys to the pickup in the scene.
- You can click on the door and close it after you find the red card.

- The door will open remove the red tarot card and find all the items required.
- Helmet fragments circled in red, and pole in yellow.
- Drag the hook to the top of tree house to bring the ladder down.
- Click on tree house to enter.
Inside Tree house


- Click on the paper on table and it will give you coordinates to find the combination to the lock on the chest.
- You will be given a vertical and horizontal coordinate.
- Use the mouse to turn the dial. Left for negative and right for positive numbers.
- If you are correct you will see the scenes below. If you are incorrect you may see different scenes.
First Digit of Combination

- Here you find the light house which has 3 stripes.
- Therefore the first number is "3"
Second Digit of Combination

- There is a 4 located on the house in ivy.
- therefore "4" is the second number.
Third Digit of Combination

- The last digit is 9.
- Therefore 9 is the final number in the combination.
Enter the Combination

- Enter the numbers 3, 4, 9 on the lock.
- You will have to scroll through the numbers and the numbers must be centered as shown in image above.
- Click on chest when it opens.
Inside the Chest

- Click on the paper inside chest.
- It will give new coordinates.
- Click on telescope and enter coordinates.
Final View

- Enter the coordinates and you will see this final scene.
- Click on it to end chapter 2.
CHAPTER THREE
Circus

- Click on the green Tarot card located under the sign and circled above in green.
- Find all of the silhouetted images on card.
- Click on the bullets circled above in yellow toward the front of the screen and they will go into your inventory.
- The blue Tarot card is hidden in the green and yellow tent but you will have to access it later.
- There are 2 mini games in this chapter. They are highlighted in the picture and clicking on these areas will take you to the mini games.
- There is access to the warehouse by clicking on the right side of the green and yellow tent. You will need to access this area before you can play both mini games.
Shooting Gallery Mini Game


- The object of this game is to shoot all of the ducks NOT carrying a white peace flag.
- Every time you are successful, a light will come on in the left hand panel. Once they reach the top you have won the game.
- Use your mouse to aim and the red viewfinder should be centered over the duck. Click to shoot.
- There will be clouds and other obstructions while the ducks move faster and faster.
- Once you complete the game a handle will lower down as your prize click on this and it will go into your inventory.
- Your next location is the warehouse which you can find by clicking to the right of the green and white tent.
Turning on the Lights

- It will be very dark when you first arrive so you must find the lights.
- The handle is in your inventory click on it and drag it to the electric box and it will snap into place.
- Click on it and the lights will go on.
Outside the Warehouse

- Now that the lights are on you can explore this area of the warehouse.
- There are 2 tarot cards in this scene circled in red above.
- The red card will ask you to find pieces of a stick and multiple coins. These are circled above in blue and green.
- Be sure to click on the joystick in the torn up area of the wall toward the right.
- After you have finished this scene the joystick will be in your inventory. Go back to the Circus and play the Grabber mini game.
Grabber Mini Game


- The object of this game is to grab the stuffed bear that has the blue tarot card in its hands.
- You will need to take the joystick out of inventory and place it between the two white arrows on the machine. This is how you will move the claw back and forth.
- Next you will need to take all of the coins in inventory and drag them to the coin slot area. This will give you unlimited tries at grabbing for the doll and removing others that are in the way.
- Use the white arrows by clicking on them to place the claw directly over the animal you wish you remove and then hit the white round button to activate it.
- The claw will then drop the animal down the chute.
- It is best to remove all of the other animals first before grabbing the bear.
Circus

- Once you are back at the circus the blue tarot card you just retrieved will be flipped. Find all of the items on the list.
- The screwdriver is required in the next scene and it is circled in the image above it will go into your inventory.
- Once you are finished you will go back to the outside of the warehouse.
Outside of Warehouse

- Here you will access the screwdriver from your inventory and drag it to the grate circled in image above.
- This will give you access to inside the warehouse.
- Click on the area after vent is removed.
Inside Warehouse


- Click on the blue tarot card circled above and find all of the items on the list.
- Click on the tall cabinet for closer access and click on key in center of garment which will go into your inventory.
Chest


- Use the key from inventory to open the chest.
- Here you will find a green tarot card and a crowbar. Click on crowbar and it will go into inventory.
- Find all of the silhouetted items on the card.
- There is a grate on the floor. Use the crowbar on the grate to open it.
- Once inside you will see wooden statue with a small piece of paper attached. Click on it and read the message and this will end chapter 3.
CHAPTER FOUR
Mansion/Hall

- Here you find the hall and the entry to the many rooms you will need to investigate.
- See circled rooms above. Study, Attic, Basement.
- There is also a puzzle on the floor which you will solve after you investigate all of the rooms above.
- The rooms can be searched in any order.
Attic

- This room has 3 tarot cards (one of each color) which are circled in yellow.
- As you find each card search for the items each card requests.
- The key is located back left wall circled in blue.
- There are many mirrors to find and here you will find the round mirror circled above in red.
- You will also be searching for multiple puzzle pieces for a future mini game. The puzzle piece is circled above in green.

- Here are the red card items solutions.
- They are color coded by the outer edges of the card.
- You can toggle from one picture to the next by clicking on the bottom of the red card.
- You will be asked to find, a drum, pair of shoes and square mirror which will go into your inventory when completed.
- Shoes are circled in red, mirror in blue and drum in green.
- After you are finished move to another room to search.
Study
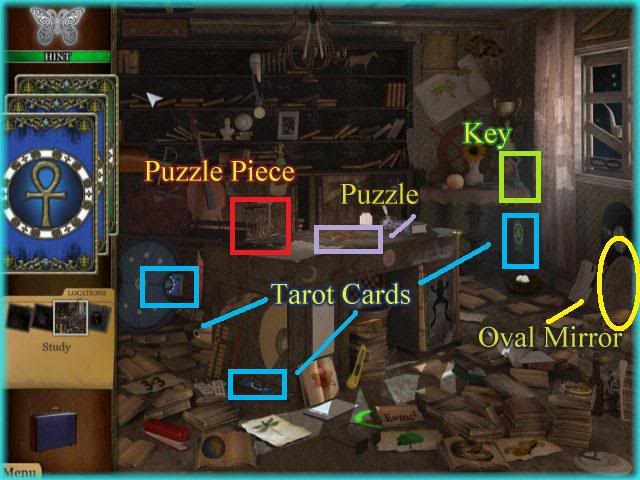
- In this room there are 2 blue tarot and one green.
- Locate the cards circled above in blue and find the items listed on them.
- The puzzle piece is circled in red.
- The Oval mirror is circled in yellow.
- The key is circled in green.
- There is a puzzle located on the desk circled in purple.
Basement

- The tarot cards are circled in blue. Click on them and find all items required. (See red next image)
- The key is circled in green.
- Puzzle Piece is circled in red.

- Here are the solutions for the red tarot card.
- You will be asked to find a harp, tambourine, and hexagon shaped mirror.
- The cards are color coded on their outer edges. The pieces of the same color are circled to help you locate them.
- Harp is circled in blue, tambourine in green, and mirror in red.
- Now you should have 3 keys in your inventory as well as all the puzzle pieces.
Chest in Basement

- Here you are required to open the chest using the correct key for each lock.
- The answer is above and color coded.
Inside Chest

- Once you open the chest you will find a jewel encrusted disc and a puzzle piece.
- Click on both and they will go into your inventory for later use.
- After you finish go to the study.
Study

- Click on the puzzle on desk to activate the jigsaw puzzle style mini game.
Puzzle Mini Game Solution

- Drag and place the puzzle pieces from inventory onto the board.
- If placed correctly the piece will lock in place.
- Assemble the pieces until they look like the image in the solution above.
Slider Puzzle Solution

- After you finish the jigsaw puzzle this puzzle appears from underneath.
- Slide the items out of the way until you can move the block circled in green out of the exit circled in red.
- The blocks are in the correct position to allow the green block out.
- There are possibly multiple solutions to this puzzle.
Disc 2

- After completing the 2 puzzles the chest will open.
- Click on the second disc inside to add to inventory.
- Go to the Attic.
Attic

- You must now place the mirrors in the correct location as seen in image above.
- When you see the gears click the mirror in place.
- You can move them if you make a mistake.
- Once you have them all in the right place, the light will shine and bounce off of them in such a way it looks like a star design.
- Once finished return to the Hallway.
Hallway

- Open inventory and place the 2 discs inside the puzzle area on the floor in front of stairs
- Area will open up and you will see another puzzle to complete.
- See the image above for the solution
- Click on the rings to move them.
- Once you solve it the puzzle will raise up and a small piece of paper will be in the top portion.
- Click on the paper to read it.
- This is the end of Chapter 4.
CHAPTER FIVE
Mansion

- This is the front of the Mansion simply click on the left side to go to the garden.
Garden

- Here you will find a red tarot card circled above in white.
- There are four items in fragments you must find.
- These items have been color coded.
- Lawnmower -green, violin – blue, Bicycle – red, and ladder – yellow. (See image above for solutions)
- After you find all of the ladder pieces it will go into your inventory for later use.
Placing the ladder

- Take ladder from inventory and place it as shown in image above.
- Enter in through window.
Bedroom

- Click on the blue tarot card circled above and find all of the items required.
- The handle is circled above. It will go into your inventory.
- Take the handle from inventory and drag it to the door as marked.
- Click on the door to exit room.
House Foyer

- Here you can access the kitchen, bedroom and hall as indicated in image above.
- You may access rooms in any order.
Study
- Here there is a green tarot card circled above in blue.
- Find all of the items requested on card.
- The kitchen key is circled above in green. Click and it will go into inventory.
- Proceed to Kitchen next.
Kitchen

- Once in the kitchen there is a blue tarot card that is hidden in the left sided cabinet.
- Use the key on the cabinet and click on card inside finding all items on it.
- Click on the horn circled in blue and it will go into inventory for a mini game.
- When finished exit back to Study.
Gargoyle Horn Puzzle

- Go back into the study and click on the area over fireplace to access puzzle.
- Take the horn from inventory and place it on the Gargoyle at far left that has one missing and it will snap into place.
- Now you must get all of the horns to line up.
- Clicking on one effects the movements of another horn and you must figure out this pattern.
- Click on the center Gargoyle first as his horns will move together and from that point on will move independently.
- There are multiple solutions for this puzzle.
- As an example, the horns have been labeled A through F.
- Click on C, then D, then you can click on the first 2, A and B, then the last 2, E and F, then horn C and E.
- NOTE- This may not work for your puzzle as they vary.
- Random clicking can easily land you with a solved puzzle as it looks much harder than it is.
- After you solve the puzzle a blue card appears. Click on it and find all of the items required. There is a jewelry box key located at the top right above the fireplace. (No image available) Be sure to click on those keys for your inventory.
- Go to the Bedroom when you are finished.
Bedroom


- Use the keys in inventory to unlock the jewelry box on dresser.
- Click on green card inside box and find all of the silhouetted items on card.
- Click on the powder near center of bed and it will go into inventory.
- Go to the study.
- Click on the safe and a close up view of keypad appears.
- Drag powder to keypad and the second row of keys will highlight with fingerprints.
- Now you know which 3 numbers are in the combination.
- You can try random combinations until you hit it or you can use "5-4-6" as seen above.
- Once the safe opens you will see a black and white photograph and will be able to read more of the storyline.
- This is the end of Chapter 5.
CHAPTER SIX
Front of Lighthouse


- There is a green Tarot card circled above click on it and find all of the silhouetted items requested.
- Click on gas can circled in red above which will go into your inventory.
- Click on area in green to access a closer look.
- You may or may not have hidden objects in the closer look picture.
- Click on the front door to enter the lighthouse.
First floor of Lighthouse

- There isn’t much to do here yet.
- You can access either the basement or lantern room as shown in image above.
- You can also access the crack in the floor by clicking on it. There is a blue tarot card there but you can’t get to it yet.
- Go to the basement first.
Basement

- Here you have a blue and red tarot card highlighted in blue.
- Click on all of the items on the blue card that are requested.
- The crowbar is circled in red and will go into your inventory.
Red Card Solutions

- There are 3 images on the red cards and there are 4 potential cards so I have listed all of them here. Remember you will only have 3.
- The cards are color coded to help you find the answers.
- Computer chip – Red, Shirt – Yellow, Cloth – Blue, Stacking Doll – Yellow.
- Go back to first floor and then access the lantern room.
Lantern Room


- Here there are 2 tarot cards green and red which are circled above in red.
- Click on the green card and find all of the required items
- The tweezers are highlighted in yellow and will go into your inventory when completed.
- The red card solutions are in the second image and these cards are also color coded for the answers.
- There are 3 items to find out of a potential 4 so all 4 are listed here.
- Stick -Red, Sandwich- Green, Backpack – Blue, and Camera – Yellow.
- Go back to the first floor of the lighthouse.
First Floor of Lighthouse
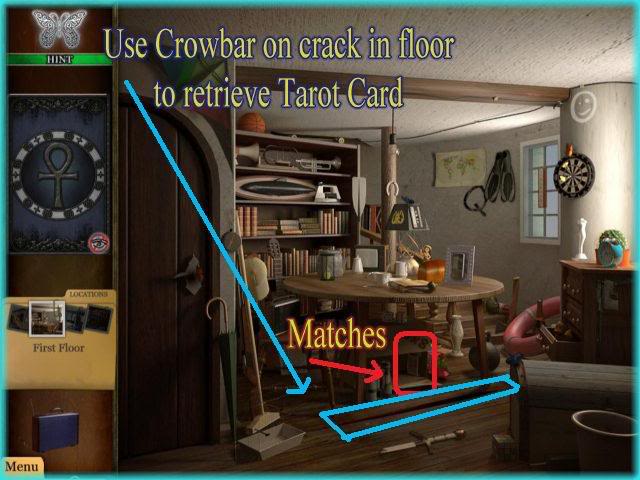

- Here you will use your crowbar to access the blue tarot card in the crack in the floor.
- Click on the card and find all of the items required.
- Click on the matches and they will go into inventory merging with old cloth, stick and fuel and will emerge in your inventory as a burning torch.
- Go back to basement.
Basement


- Once here use the crowbar in inventory on the door.
- You will next access another mini game.
- The goal of the mini game is to use the torch to figure out which bricks to touch to open wall.
- You can randomly touch the torch to various spots in the wall without penalty.
- The solution is listed in the image above circled in yellow.
- Once you pass the torch over these 4 areas, the puzzle is solved and you have completed chapter six.
CHAPTER SEVEN
Emily’s Dream

- Emily is now dreaming and sees the Mansion as it was in earlier times.
- Click on the door at the top of the stairs to the study.
Jigsaw Puzzle


- Click on the puzzle on the desk to access it.
- Click and drag pieces to the proper location and they will lock into place if correct.
- See the solution to puzzle in image above
- Once completed you will be back at the tree house.
Tree House


- Click on the paper highlighted in blue.
- Here you will see coordinates you must follow.
- Set the coordinates like you did in earlier chapters.
- The left dial must go all the way to the left and the right dial must be set all the way to the right for V -90, H 90.
- Once you see the image above click on it and you will be taken there.
Hallway

- Click on the crystal hanging from the ceiling and you will be taken to the next scene immediately.
- This is the end of chapter seven.
CHAPTER EIGHT
Jail Cell

- You find there is a nail file in your inventory.
- Click and drag the nail file to the lock in the door and it will trigger a mini game.
Nail File Mini Game Puzzle

- Here you must move the file in the correct directions to open the door.
- The solution is listed in the image above.
- Forward is toward you and back is away from you.
- Solution is Forward, left, back, left, right.
- Once you open the door you will be let right outside the cell.
Outside Jail Cell


- Click on the door to exit.
- Once in the second location note there is an electronic lock on the doorknob.
- You remember there were strange markings in the jail cell so you will need to go back to the cell to study them and find the combination for the electronic lock.
Inside Jail Cell/Wall Symbols Puzzle


- Here you will need to study the symbols on the wall and crack the code.
- The pairs of letters under the seat are the keys to solving the puzzle.
- Take the pairs and plot them on the grid as seen in the image above.
- GE – lands on triangle – 3 sides to a triangle so first number is 3, TM intersects to four small tick marks therefore the second digit is "4". SE intersects and lands on "2" so third digit is "2"’ and EM lands on "0" so last digit is "0"
- The numbers show the answer is "3-4-2-0"
- Go back to the electronic door lock.
- Enter in the numbers "3-4-2-0" and door will open.
Storeroom

- There is a blue and green tarot card in this scene circled in red. Click on them and find all of the required objects including the laxative and wire cutters circled in image above.
- Exit back to corridor.
Corridor

- Use the wire cutters in your inventory to clip the TV wire near top of door.
Sneaky Escape

- One of the guards will leave to fix the TV.
- Place the laxative in your inventory inside the other guards drink and exit out of the door as shown in image above.
- This is the end of chapter eight.
CHAPTER NINE
First floor of lighthouse 
- Click on the green tarot card and find all of the items required in the scene.
- Click on the green crystal and it will go into inventory.
- Go to the Basement.
Basement

- Click on the green tarot card circled above and find all of the items required in the scene.
- Click on the red crystal and it will go into inventory.
- Click on the cave entrance.
Cave Entrance

- Here you will find a door with 2 empty slots for the crystals.
- Place the crystals in just as the image above shows and the door will illuminate.
- Once it is all lit up click on the door see how the story ends.

You did it! Congratulations!
“;

More articles...
-
Grow A Garden 2 Base Price List
What's the most valuable crop? -
Evomon Best Starter [Leafbun, Blazpup, or Bubble?]
Grass-type, Fire-type, or Water-type? -
Evomon Tier List [META and BEST Evomon]
The Evomon dream team.