![Digimon UP Tier List [Supports, Buddies, and Partners]](/wp-content/uploads/2026/07/digimon-up-tier-list.jpg "Digimon UP Tier List [Supports, Buddies, and Partners]")
Digimon UP Tier List [Supports, Buddies, and Partners]
These Digimon will get you UP the leaderboard.


![Haze Seas Boss Drops [Chances, Locations, and How to Spawn]](/wp-content/uploads/2026/07/haze-seas-boss-drops.jpg "Haze Seas Boss Drops [Chances, Locations, and How to Spawn]")

Welcome to the Strange Cases: The Lighthouse Mystery walkthrough on Gamezebo. Strange Cases: The Lighthouse Mystery is a Hidden Object/Adventure game played on PC created by Sulus Games and available at Big Fish Games. This walkthrough includes tips and tricks, helpful hints, and a strategy guide for how to complete Strange Cases: The Lighthouse Mystery.
Welcome to the Strange Cases: The Lighthouse Mystery walkthrough on Gamezebo. Strange Cases: The Lighthouse Mystery is a Hidden Object/Adventure game played on PC created by Sulus Games and available at Big Fish Games. This walkthrough includes tips and tricks, helpful hints, and a strategy guide for how to complete Strange Cases: The Lighthouse Mystery.

In the opening cutscene Agent Ellery wakes from a dream to phone call from her boss, Chief Cooper. He asks her to head over to Tom’s apartment building to investigate his murder. How eerie! That’s exactly what she’d been dreaming about. Your task is to solve Tom’s murder and uncover the mystery behind it.
Chapter 1 – Tom’s Apartment Building
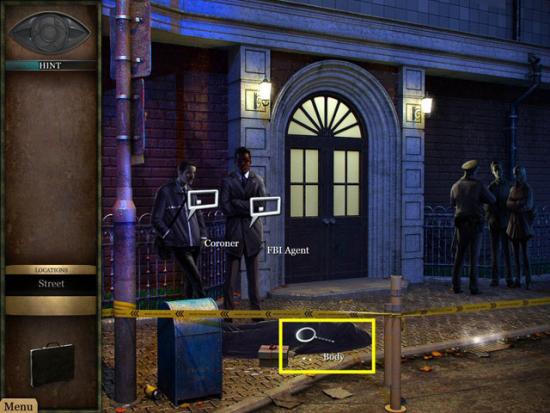
Street
You begin on the street, in front of Tom’s Apartment Building. Talk to the Detectives on the scene, then click on Tom’s body. Click on the box lying next to Tom’s body. When you’re finished, head inside the apartment building.
Apartment 904
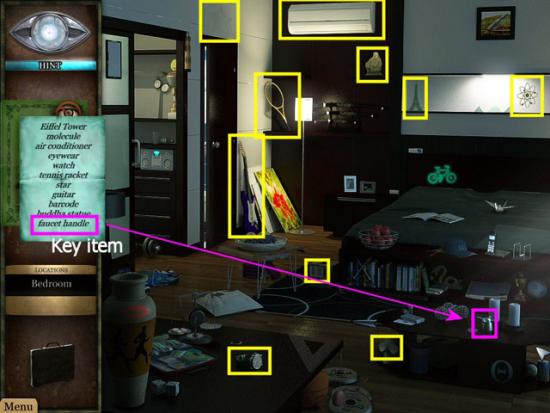
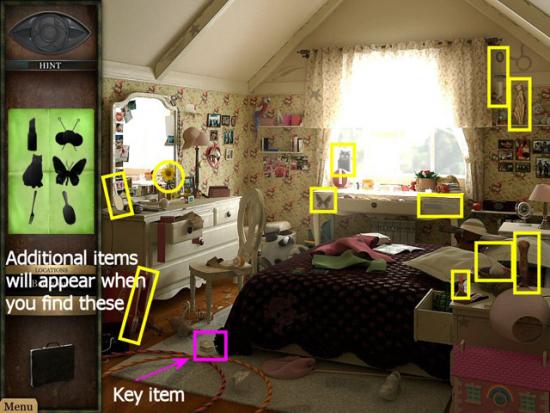
Bedroom
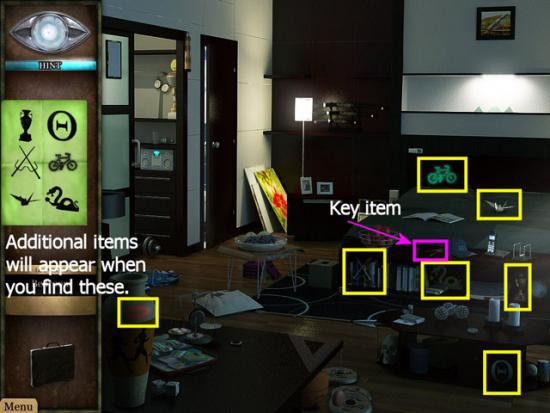
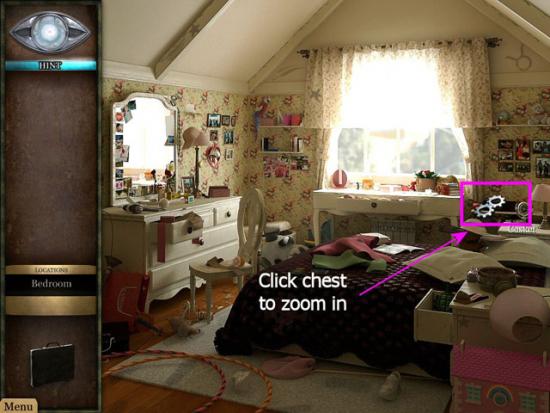
After you enter Apartment 904, investigate the Living Room then proceed directly to the Bedroom. Click on the Card for your first object list.

Collect all the objects (yellow) and key item (magenta).
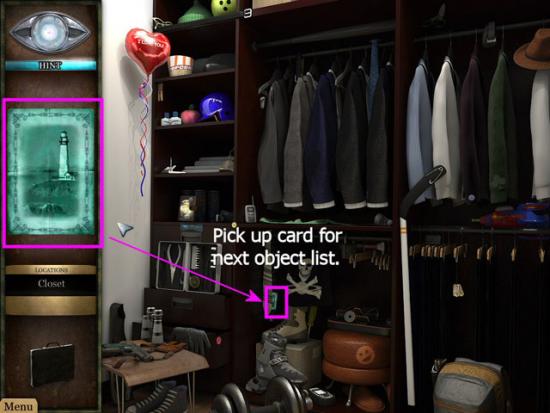
Closet
Enter the Closet (Note: If you like, you can investigate the Bathroom first. Just skip down to that section then return here to complete this area). Pick up the Card for your next object list.
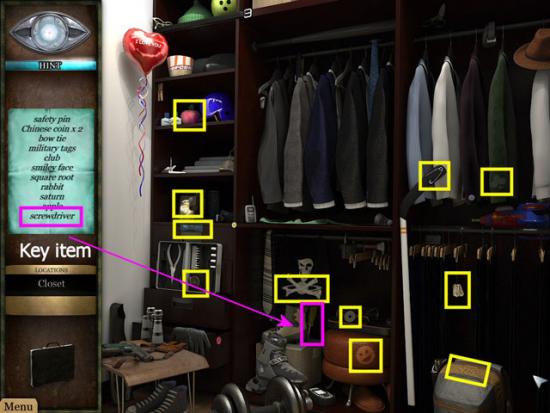
Collect all the objects (yellow) and key item (magenta). Return to the Bedroom and enter the Bathroom.
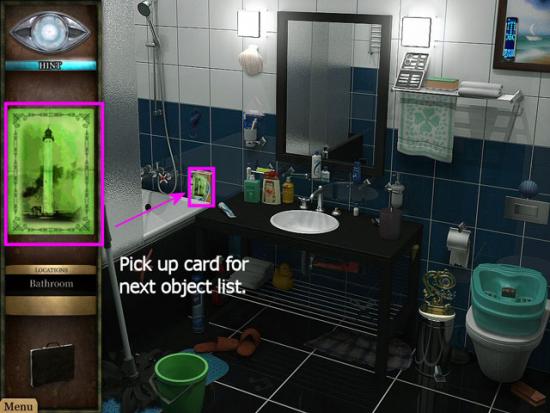
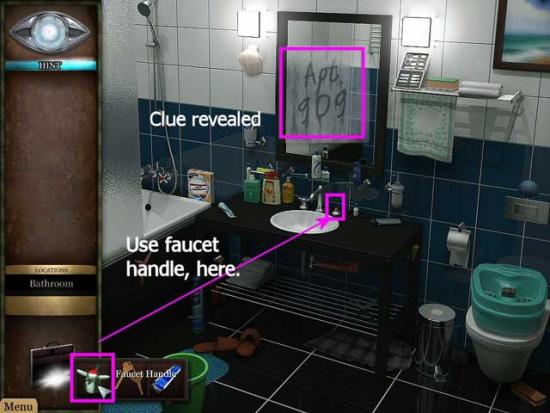
Pick up the Card for your next object list.
Collect all the objects (yellow) and key item (magenta).
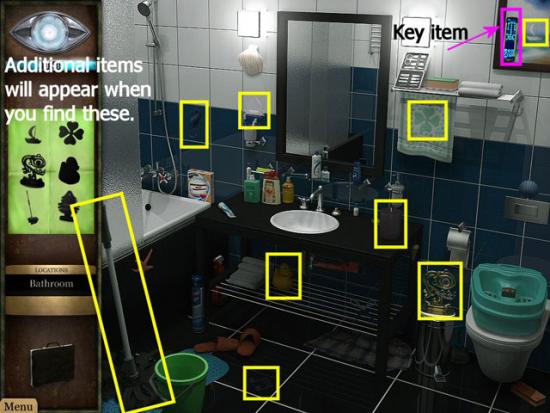
Use the Faucet Handle (click on the Briefcase to open your inventory) on the Faucet. A clue is revealed in the mirror.
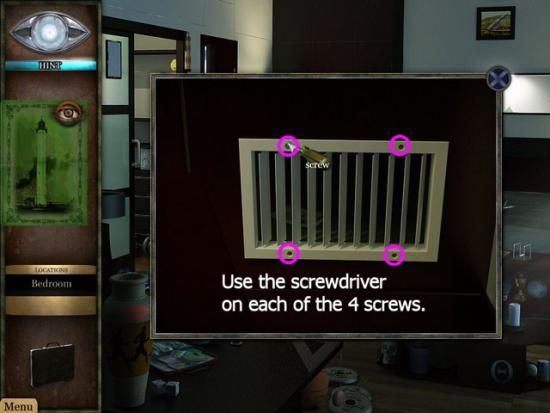
Return to the Bedroom, move to the Bedside and click on the Vent Cover. Use the Screwdriver (click on the Briefcase to open your inventory) on the Vent Cover.
Pick up the Card for your next object list.
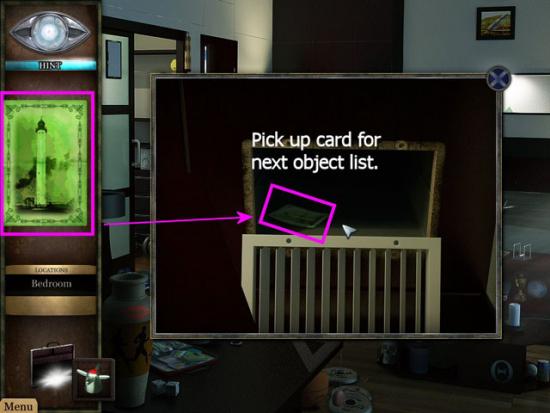
Collect all the objects (yellow) and key item (magenta). Leave the Apartment and head down the Hallway to Apartment 909.
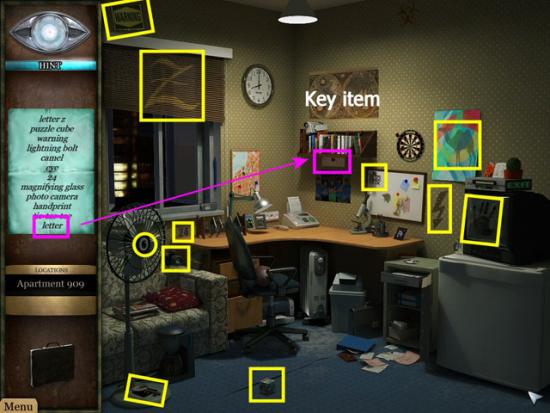
Apartment 909
Use the Keys on the Door. As soon as you turn on the lights, you startle a thief who quickly exits out the window. Pick up the Card for your next object list.
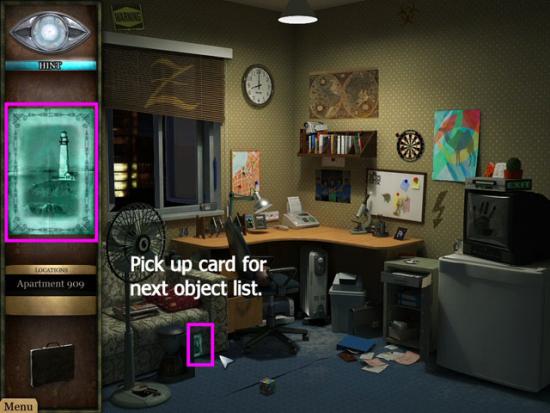
Collect all the objects (yellow) and key item (magenta).
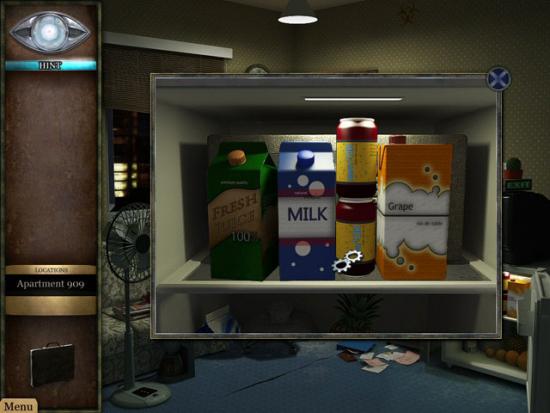
Click on the Refrigerator, twice. Click on each item to move them out of the way. You reveal a Safe, hidden behind everything in the Refrigerator, but you can’t do anything since you don’t have the code. Return to the Hallway and head to Apartment 901 to talk to Tom’s neighbor.
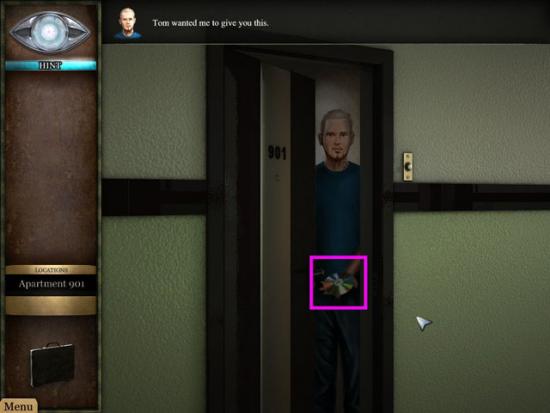
Apartment 901
Ring the Doorbell and give the Letter to Tom’s neighbor. He’ll return in a few moments; take the CD Tom left for you.
Apartment 904
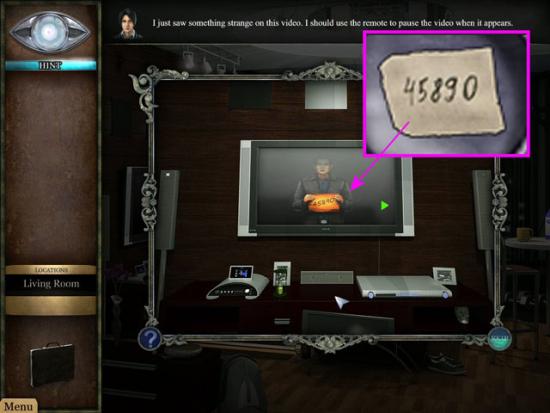
Return to Tom’s apartment (Apartment 904) and click on the DVD Player in the Living Room. Open the DVD Player and insert the DVD. Click on the TV, use the Remote and click on the TV to bring up the controls. Note: click on the Pause button to stop the video. Watch the video, then click on the Pause Button when you see the inserted frame. You now have the code for the Safe in Apartment 909. Return to Apartment 909, click on the Safe and enter the Code. Watch the cutscene for more information that will lead you to your next location.
Agent Ellery talks to Tom’s girlfriend, Sarah and finds out he’d been working on something that involved the Ryde Corporation. Sarah gives you more clues and you’ll begin the next part of your investigation.
Garage
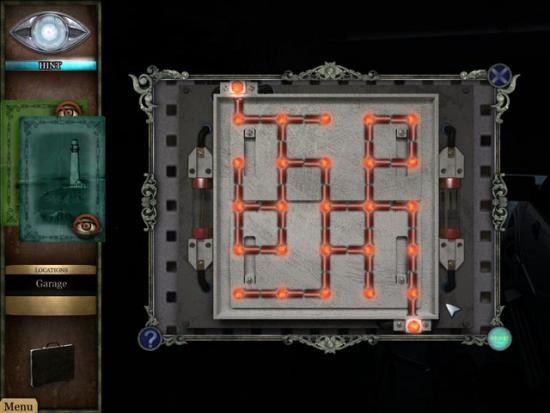
Click forward to enter the Yard, then enter the Garage. Click on the blinking red light to start a puzzle to turn on the Garage lights. The following screenshot shows one possible solution. N. B. You MUST connect all parts of the puzzle to complete it; there are T, elbow, straight and end pieces. Click on each one to rotate it into the correct position.
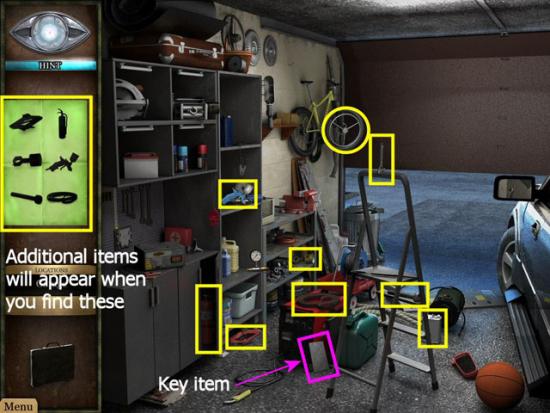
Pick up the Card for your next object list.
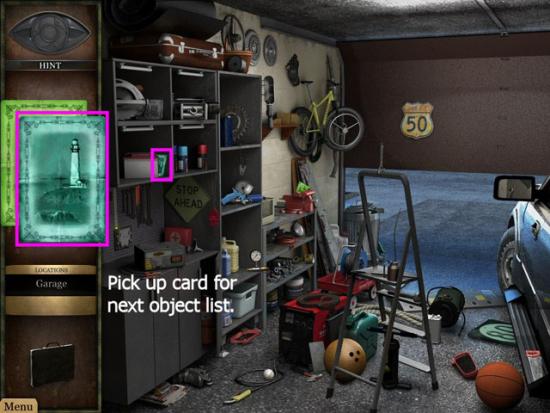
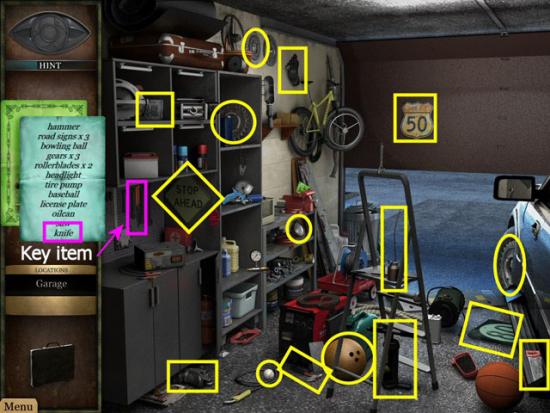
Collect all the objects (yellow) and key item (magenta). Exit Garage and head to the Backyard.
Backyard
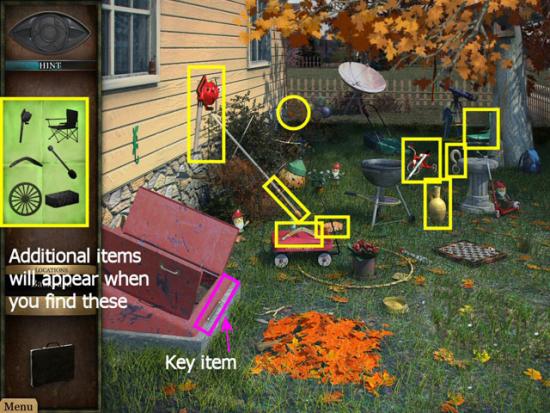
Pick up the Card for your next object list.
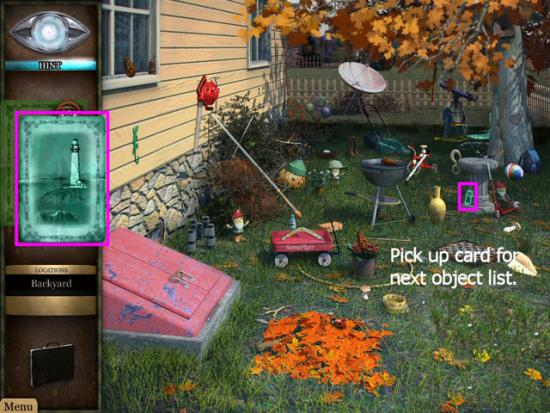
Collect all the objects (yellow) and key item (magenta). Use the Crowbar on the Cellar door, then enter the Cellar.

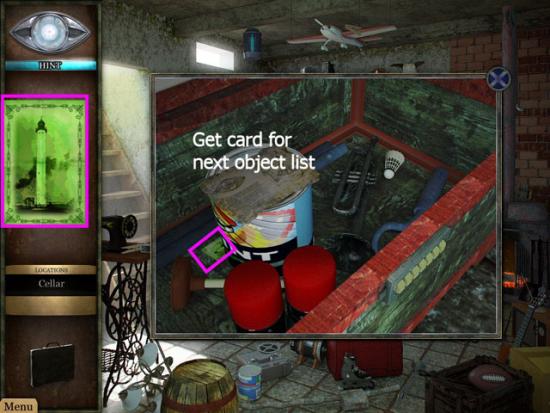
Cellar
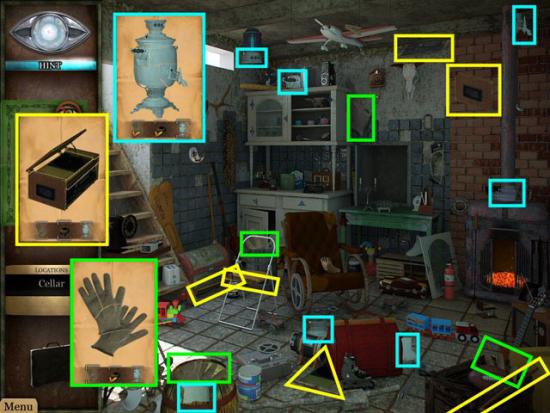
Click on the dumbwaiter, then use the Knife to cut the Rope. Pick up the Card for you next object list.
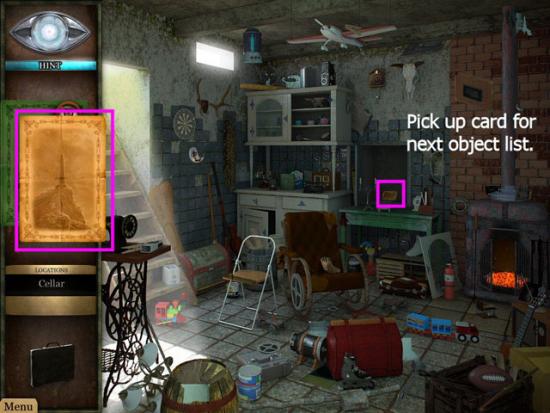
Collect all pieces of the objects and key item (magenta).
Backyard
Return to the Backyard and click on the Dogrose. Use the Gloves to pick up the Card for your next object list.
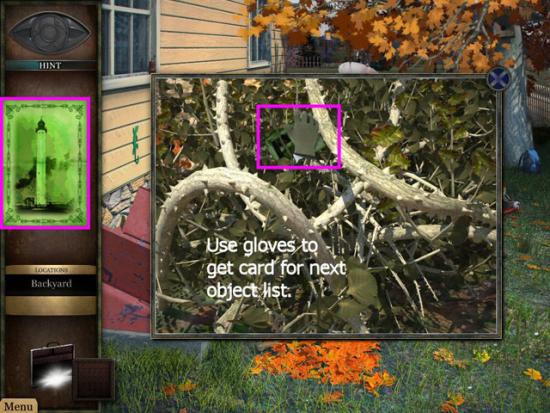
Collect all the objects (yellow) and key item (magenta).
Garage
Return to the Garage and click on the Vise. Use the Handle on the Vise and pick up the Card for your next object list.
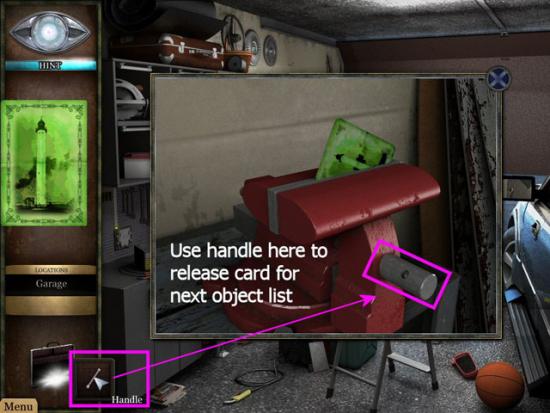
Collect all the objects (yellow) and key item (magenta). Return to the Yard, then enter the Bedroom, inside the House.
Bedroom
Pick up the Card for your next object list.
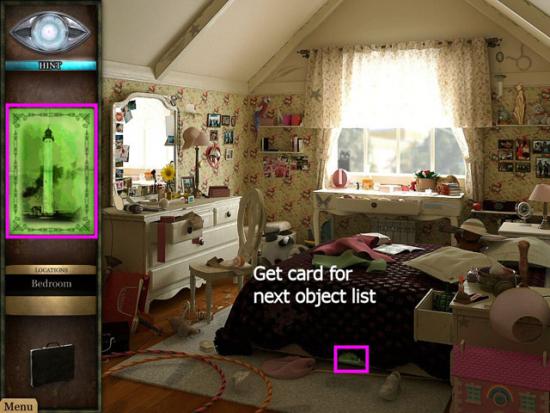
Collect all the objects (yellow) and key item (magenta).
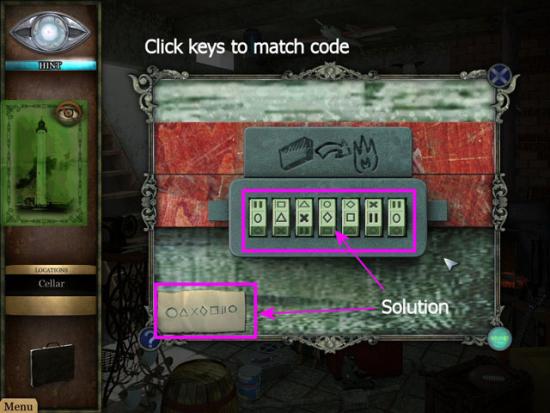
Cellar
Return to the Cellar and click on the Stove. Use the Plate on the Stove to get the Code for the Chest. Click on the Chest, then use the Key in the empty slot. Enter the Code by clicking on each wheel. Here is one solution (yours may be different).
Pick up the Card for your next object list.
Collect all the objects (yellow) and key item (magenta).
Bedroom
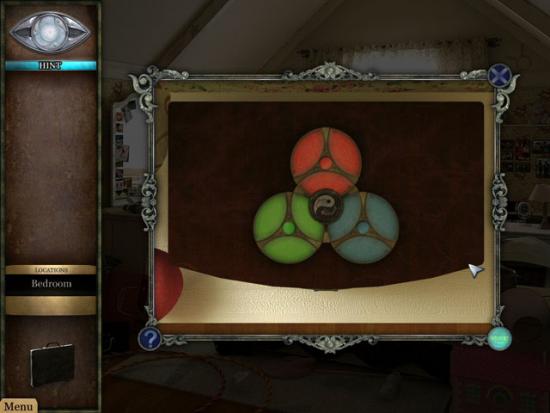
Return to the Bedroom and click on the Chest.
Place the Yang symbol in the empty spot. Click on the center of each circle to rotate it until all the colors are in the correct spot. My recommendation is to complete one circle, then move the other 3 circles to rotate the colors into position. You will need to move your first circle, again, to get the colors in the correct order to solve it. It should take around 12 to 16 moves, depending how many times you try and miss. Here is one solution. If you wish, you can Skip the puzzle after about 20 seconds. Click on the Chest, again, and collect the keys.
Garage
Return to the Garage and use the keys on the car door. Click on the car door to view the GPS.
The GPS shows the last place Tom went, just before he was killed. Investigate the cabin for more clues to the mystery.
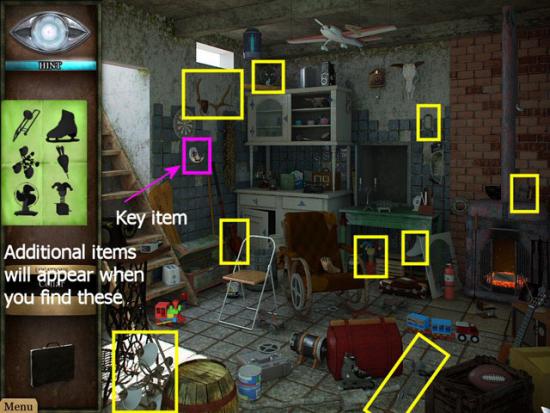
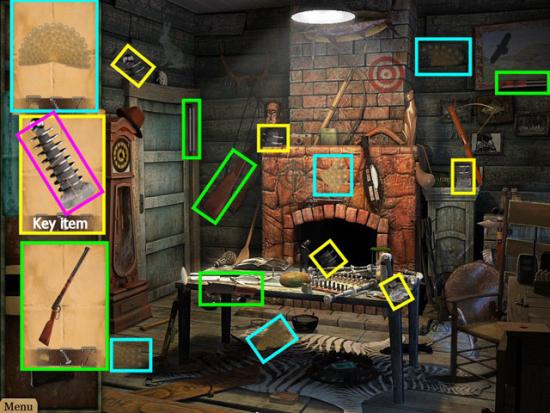
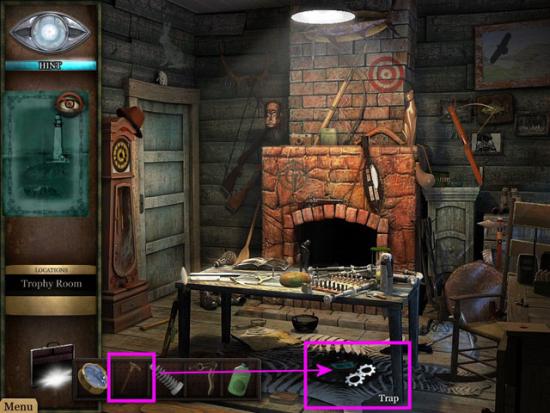
Trophy Room
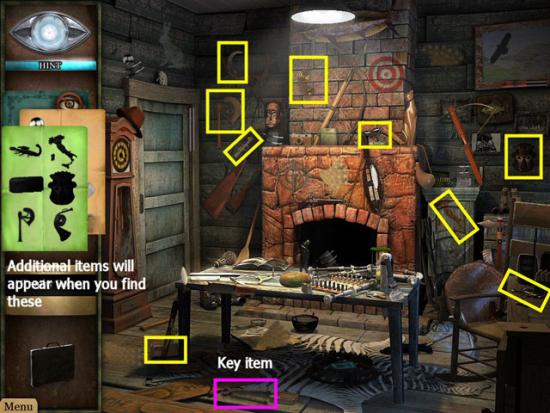
Head into the Trophy Room, from the Hall. Pick up the Card (magenta) for the next object list. If you like, you can pick up the other card (yellow) and switch between them to find all the objects (you can’t get the third card, yet).
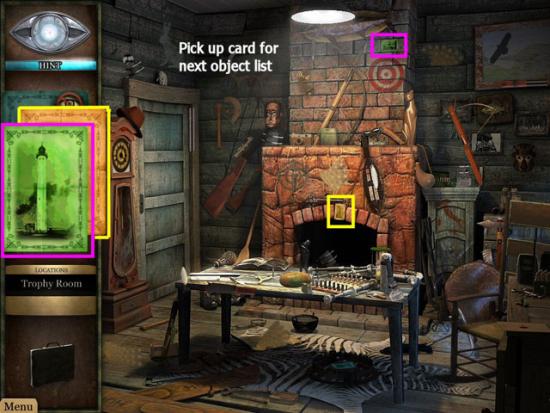
Collect all the objects (yellow) and key items (magenta) and read the newspaper (blue). Return to the Hall and enter the Laboratory.
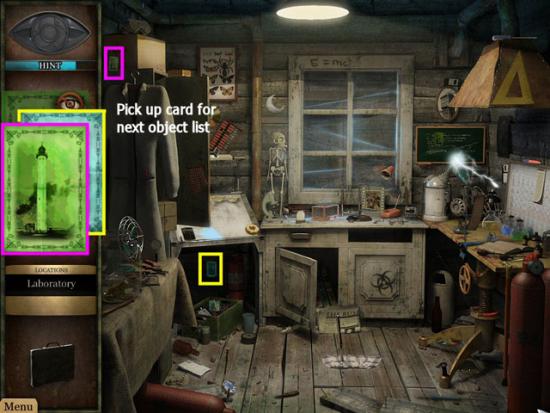
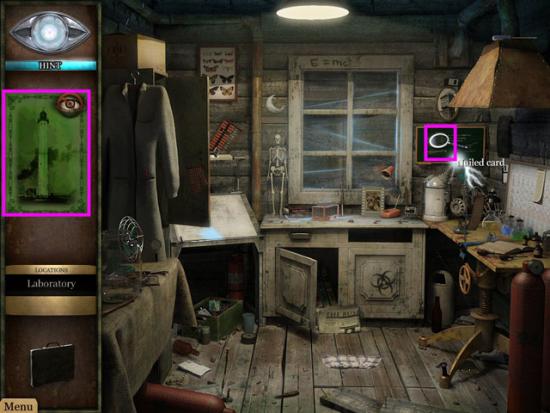
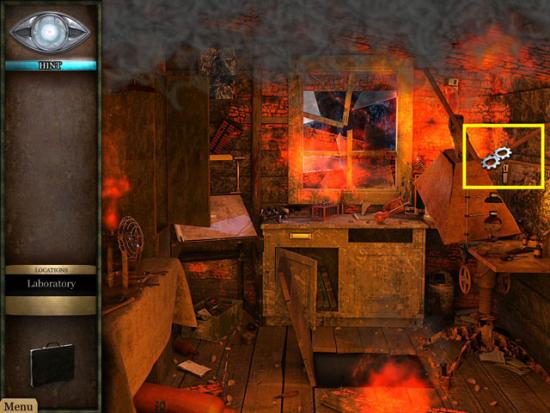
Laboratory
Pick up the Card (magenta) for the next object list. If you like, you can pick up the other card (yellow) and switch between them to find all the objects (you can’t get the third card, yet).
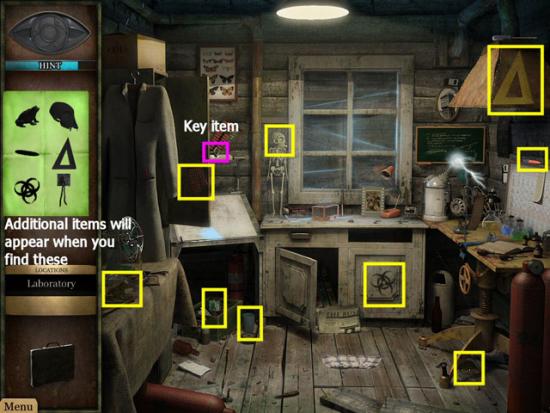
Collect all the objects (yellow) and key items (magenta).
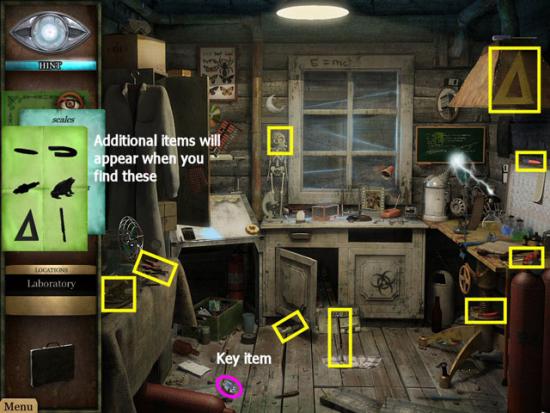
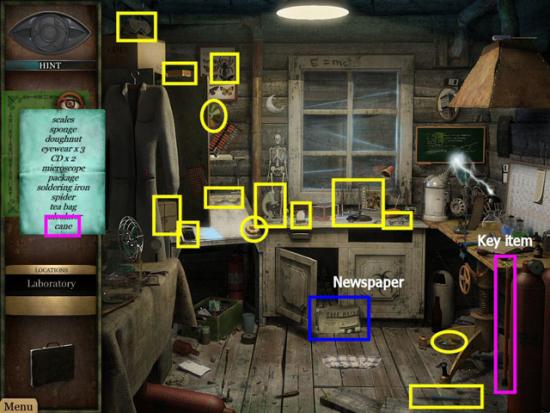
Click on the last card. Use the pincers to pull the nails out and collect the card for your next object list.
Collect all the objects (yellow) and key item (magenta).
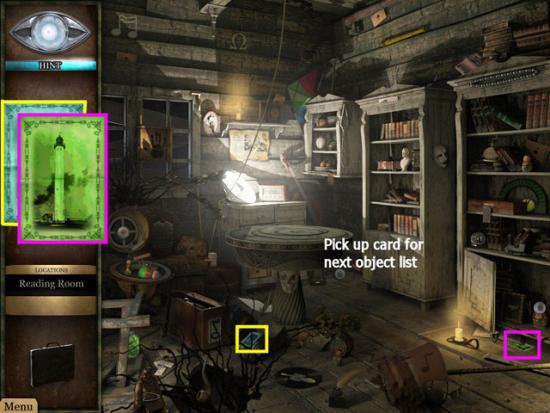
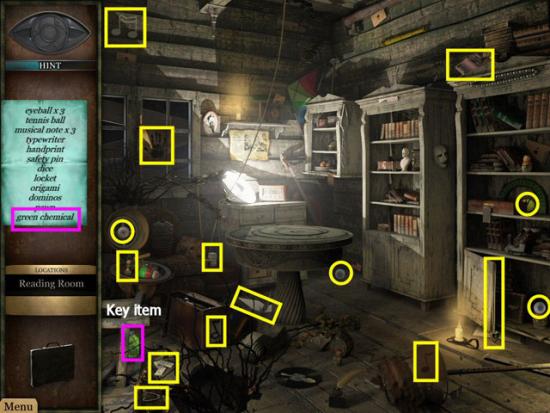
Reading Room
Return to the Hall and click on the door to the Reading Room. Use the Key; open the door and enter the Reading Room.
Pick up the Card (magenta) for the next object list. If you like, you can pick up the other card (yellow) and switch between them to find all the objects.
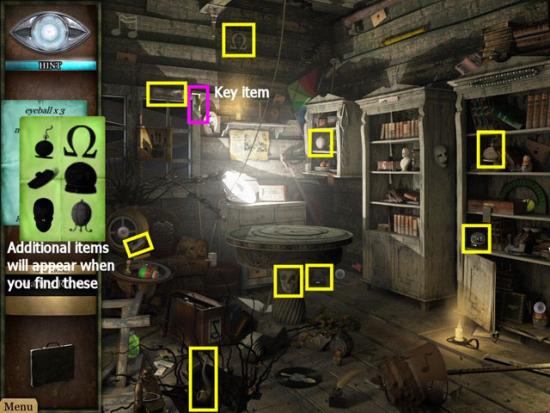
Collect all the objects (yellow) and key items (magenta).
Trophy Room
Return to the Trophy Room and use the Cane on the Bear Trap. Pick up the Card for the next object list.
Collect all the objects (yellow) and key item (magenta). Use the Handle on the Basement Door; enter the Basement.

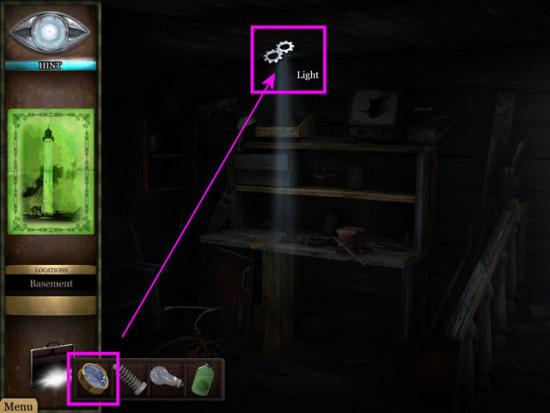
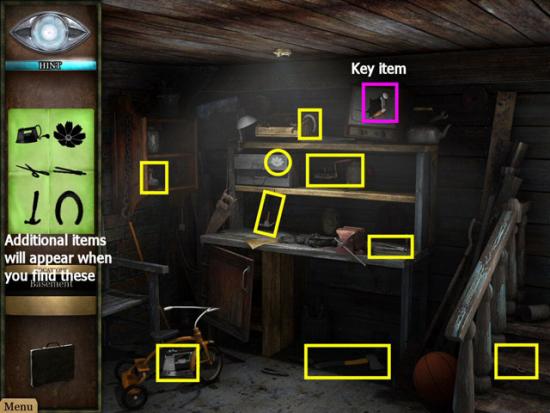
Basement
Use the Lens on the Light. Look at the Blueprint.
Pick up the Card for the next object list.
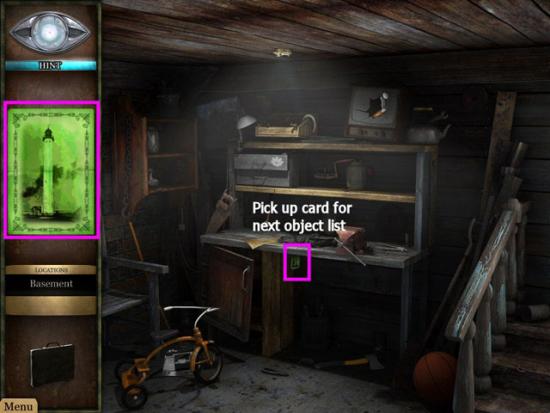
Collect all the objects (yellow) and key item (magenta). Return to the Trophy Room, then back to the Hall.
Hall
Click on the Red Crystal. Use the Wrench on the Red Crystal; collect the Red Crystal. Return to the Lab
Laboratory
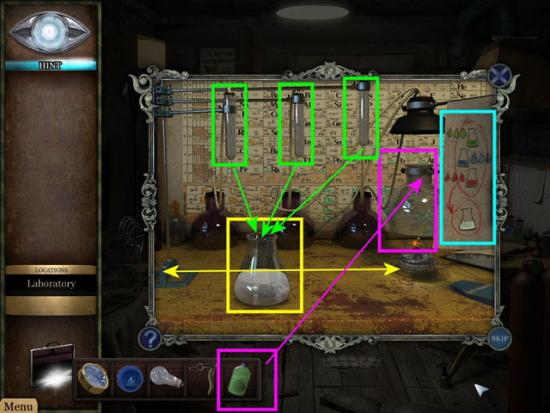
Use the Tesla Coil on the Electric Current; collect the Blue Crystal. Click on the Chemistry setup; use the Green Solvent on the Beaker (magenta) sitting on the flame. Move the Beaker, in front (yellow), to the left and right. You need to catch 3 drops of Green, 3 drops of Red and 3 drops of Blue liquid (cyan), in any order. Note: you must catch 3 drops of one color before moving on to the next. The drops fall from the Test Tubes (Green) in random order. If you make a mistake, you can start over. Return to the Trophy Room.
Trophy Room
Use the Solvent on the Rosin, sitting on the table; collect the Green Crystal. Return to the Reading Room.
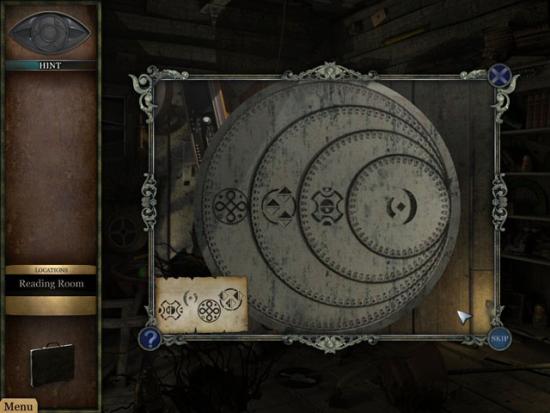
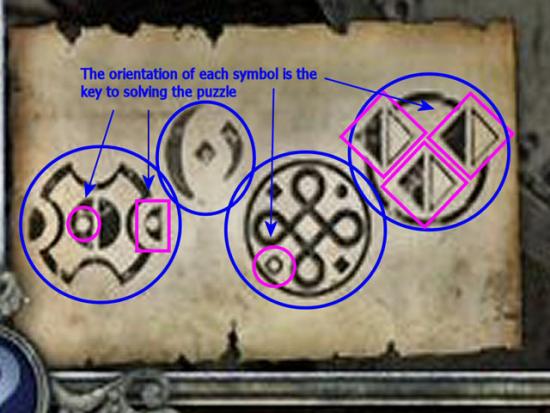
Reading Room
Click on the Disc Table. Click and drag the discs to rotate them so they match the picture on the Blueprint. Note: You can’t solve it by trying to line them up in a row. Look at the Blueprint and each symbol’s orientation. Each symbol must be facing the way it’s shown on the Blueprint. The location of the discs and symbols don’t matter as long as each symbol is facing in the correct direction. See the next 2 screenshots. As soon as you solve the puzzle, the bookcase opens. Enter the Hidden Storeroom.
Hidden Storeroom
The Storeroom is dark, but there are 4 blinking, red lights. You only have one Lightbulb, so you’ll have to put it in each socket, one at a time.
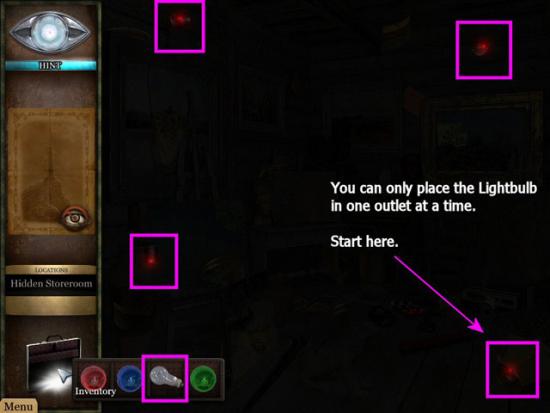
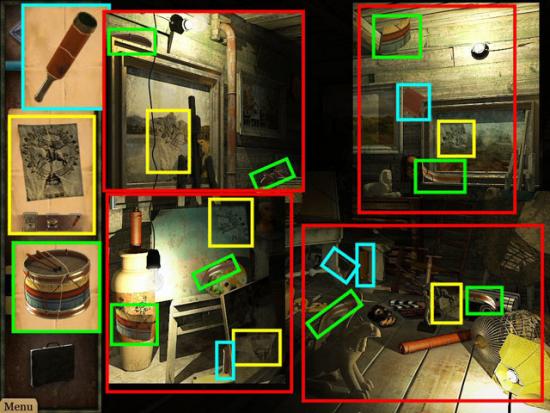
Pick up the Card for the next object list.
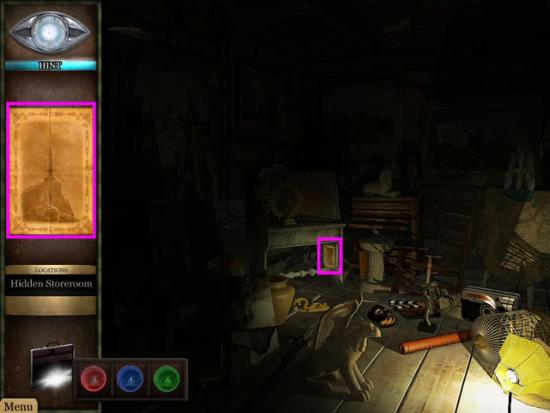
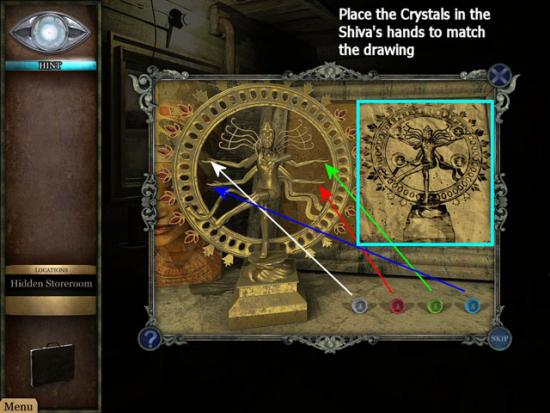
Collect all the pieces you can see, then move the Lightbulb to each of the other sockets to find the rest of the pieces. When you’ve found everything, make sure the Lightbulb is in the top left socket. Click on the Shiva statue to start the next puzzle.
Move the Crystals and the Drawing to the places indicated.
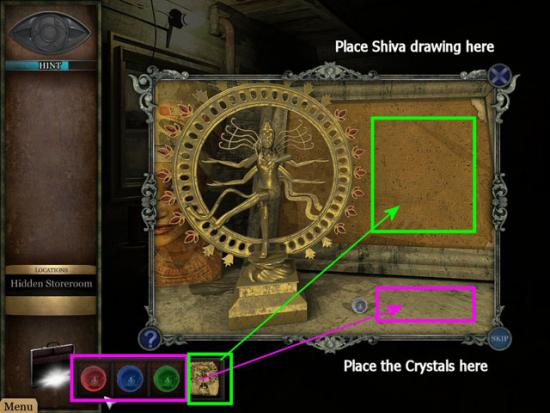
Place the Crystals in the Shiva’s hands, to match the drawing. Return to the Laboratory and click on the Hatch Door.
After Agent Ellery enters the Hatch, she runs into the Scientist that was mentioned in the file she found. She learns that the founder of the Ryde Corporation is trying to use a mysterious artifact to create world domination. They’re captured and the cabin is set afire. She comes to, with the Hall in flames and the Scientist gone.
Hall
Use the Fire Extinguisher to put out the flames and enter the Laboratory.
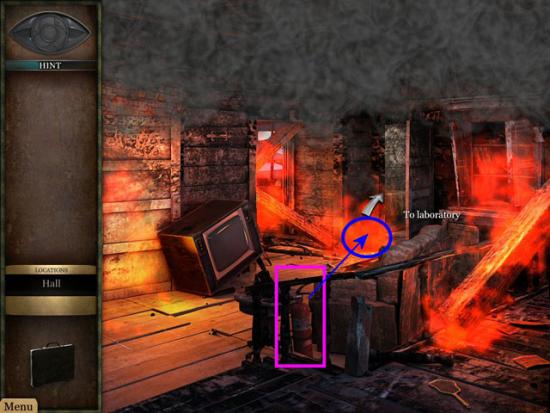
Click on the leaking Pipe to put out the flames in the Laboratory and enter the Underground Lab, through the Trap Door.
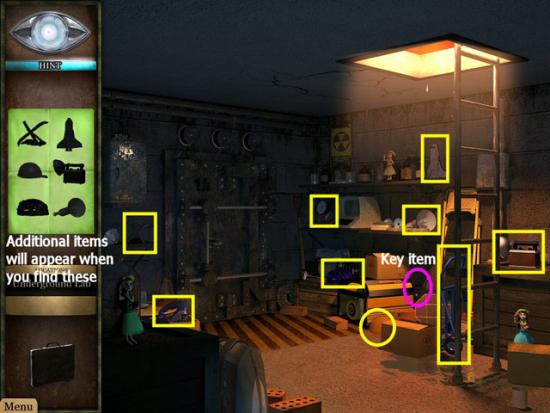
Underground Lab
Pick up the Card for the next object list.

Collect all the objects (yellow) and key item (magenta). Use the Handle on the door and enter the Fallout Shelter
Fallout Shelter
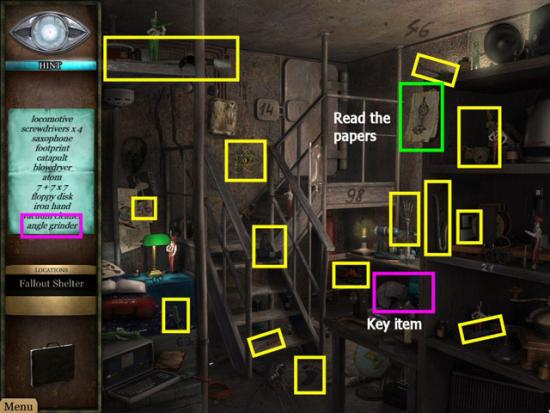
Pick up the Card for the next object list.
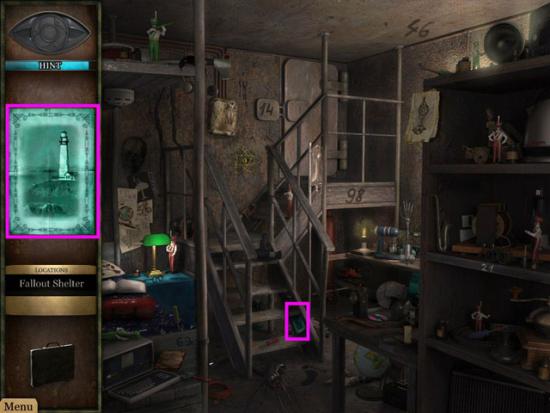
Collect all the objects (yellow) and key item (magenta). Read bout the Anti-Hypnotic device (green). Use the Angle Grinder to open the door to the Surveillance Room then go inside.
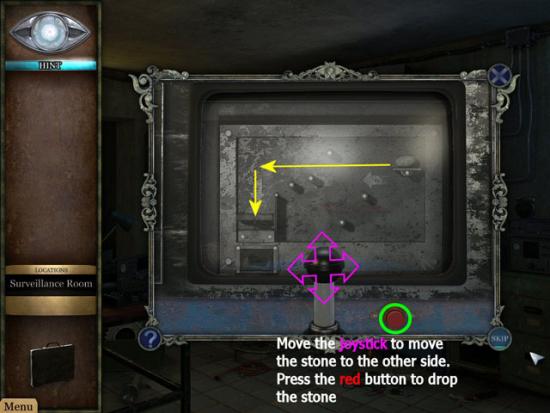
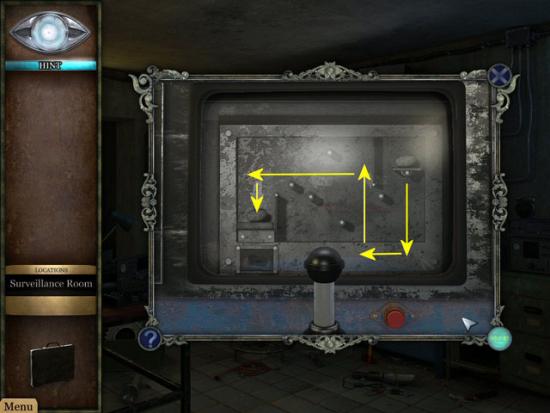
Surveillance Room
Click on the active monitor (on the left) and remove the tape from the VCR. Click on the middle monitor to start a mini-game. The object is to move the stone, from the left to the right, using the joystick (click and hold then move it forward, backward, left or right) to raise, lower and move the platform left or right. Once you reach the left side, press the red button to drop the stone. You will play it twice. The second time you play, you must avoid 2 moving objects. Once you drop the second stone, you’ll see something open and drop to the bottom, in the next room. Continue on to the Storeroom
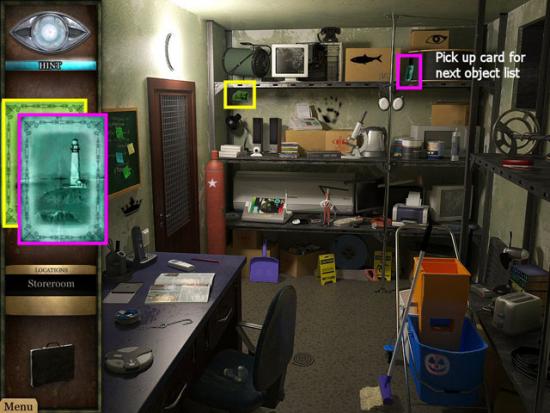
Storeroom
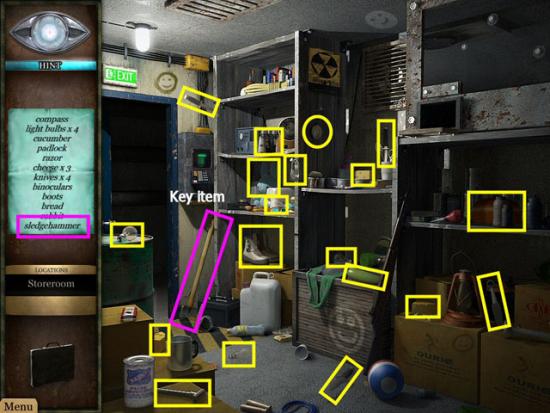
Pick up the Card for the next object list.
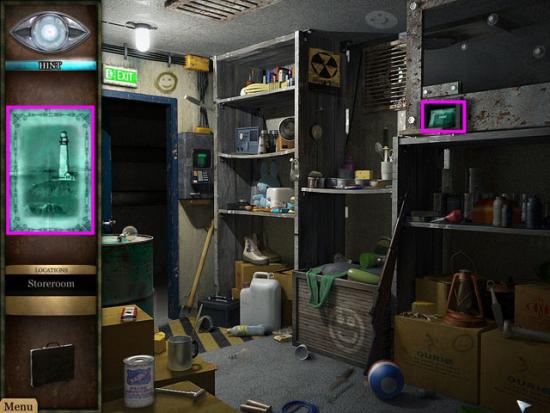
Collect all the objects (yellow) and key item (magenta). Click on the Security Panel
You must answer 5 questions, correctly. If you miss one, you have to start over. Click on the monitor to begin. Once you get all 5 correct, go through the door to the Generator Room.
If you’d rather not back-track to the individual rooms, here are all the questions and answers:
Generator Room
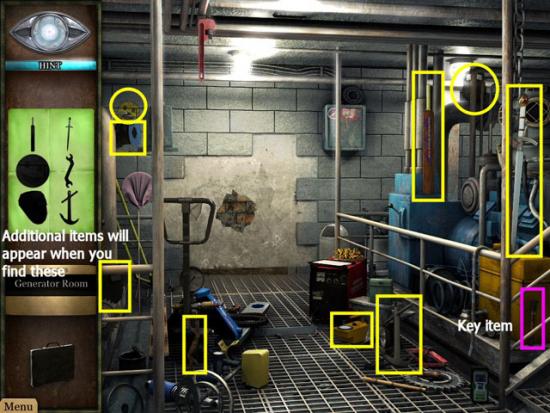
Pick up the Card for the next object list.
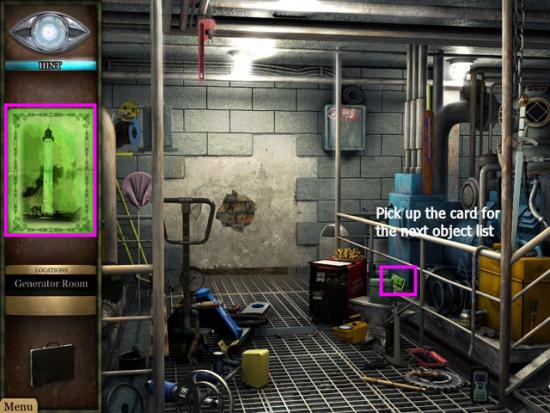
Collect all the objects (yellow) and key item (magenta). Use the Sledge Hammer on the wall, then head through the hole to the Canal.
Canal
Use the Handle on the Lever and pull it to open the gate. Time to escape.
Agent Ellery heads off to Ryde Corporation to see what she can find out about the device the Scientist told her about. To get inside, she dons a disguise.
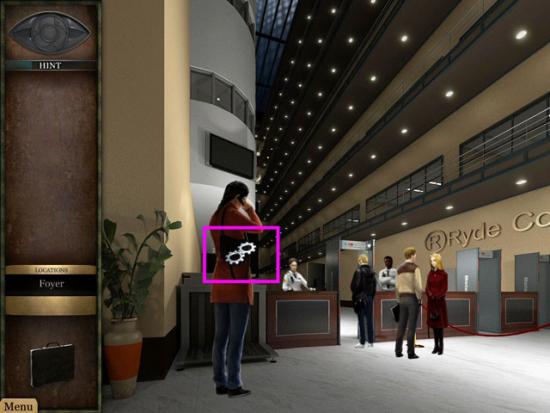
Foyer
Click on the woman’s handbag to start a short mini-game.
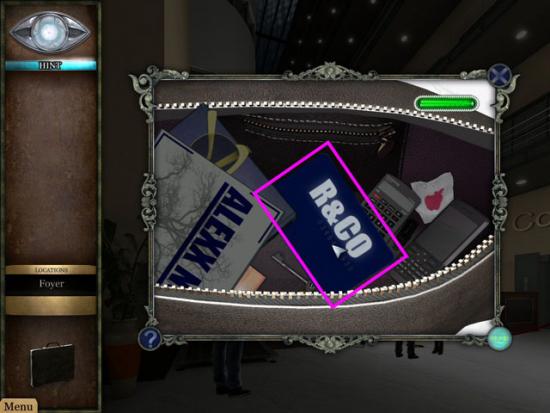
You need to move items out of the way to retrieve an Access Pass so you can get inside. There are only 3 items, but you need to click and hold, and move them VERY SLOWLY, to the left. If you move anything too quickly, the handbag will shake (you’re trying to be as unobtrusive as possible…like a pickpocket) and you’ll have to start again. Move the CD, sunglasses and book to uncover the Access Pass. Collect it then head to the Waiting Room.
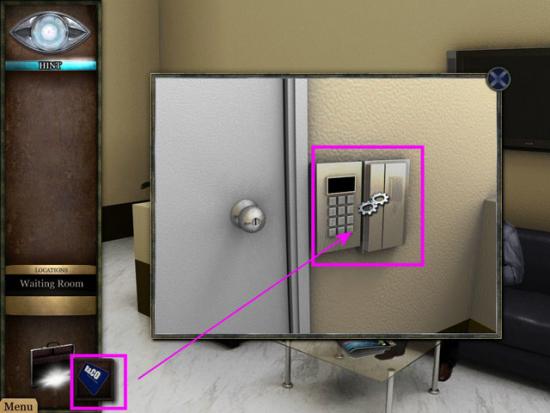
Waiting Room
Click on the Protection Lock and use the Access Pass. Continue into Corridor C-8.
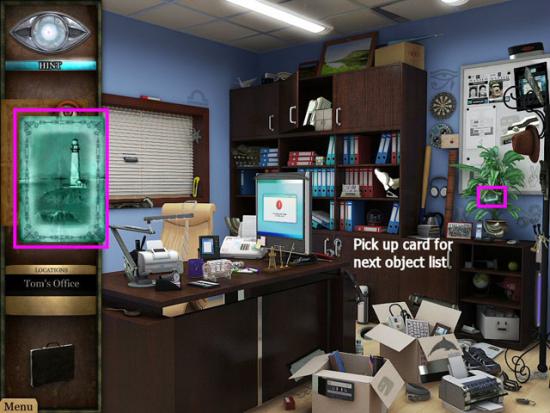
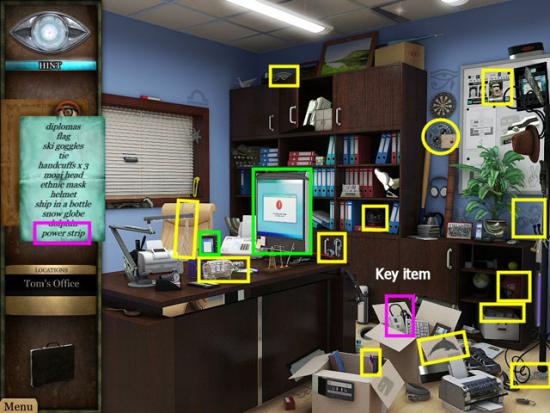
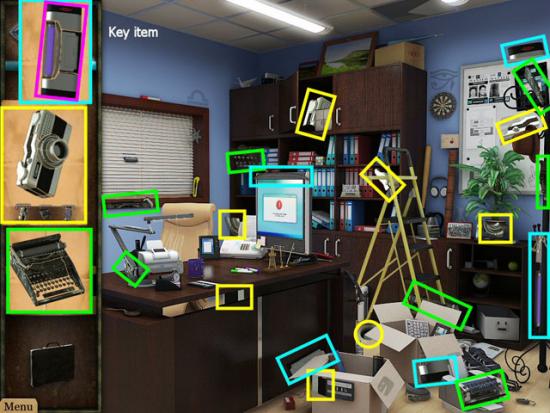
Tom’s Office
Listen to the employees discussing Tom and Ryde Corporation, then enter Tom’s Office. Pick up the card for your next object list.
Collect all the objects (yellow) and key item (magenta). Note Tom’s Photo Maker and Workstation (green). Exit Tom’s Office and continue down Corridor D-10. Note the locked Storeroom, on the right, then enter the Cafe.
Cafe
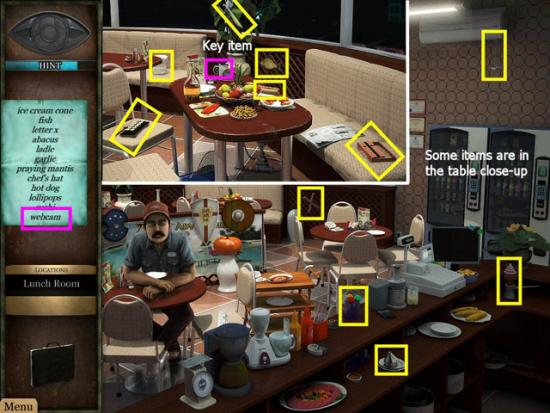
Pick up the Card for the next object list.
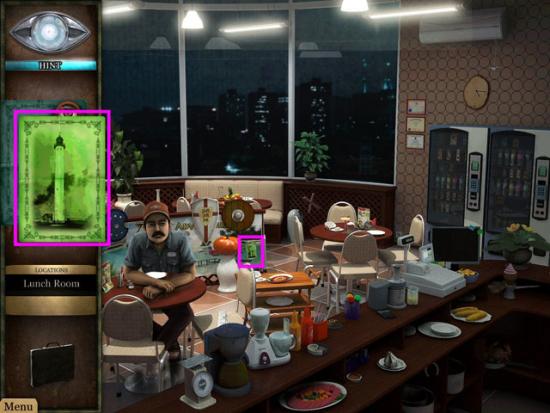
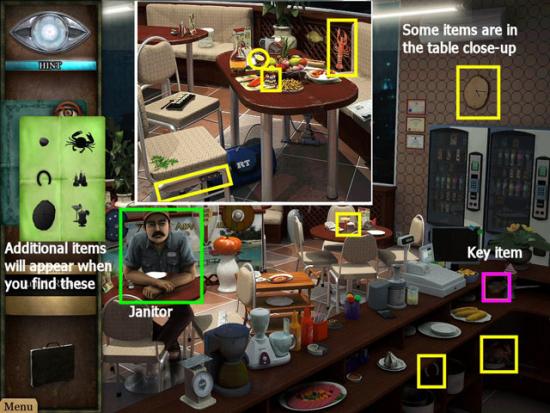
Collect all the objects (yellow) and key item (magenta). Some items will be in the close-up of the table, at the back. Use the cups (magenta; Key item) on Tom’s friend, the Janitor (green), to start a “3-Card Monte” type mini-game.
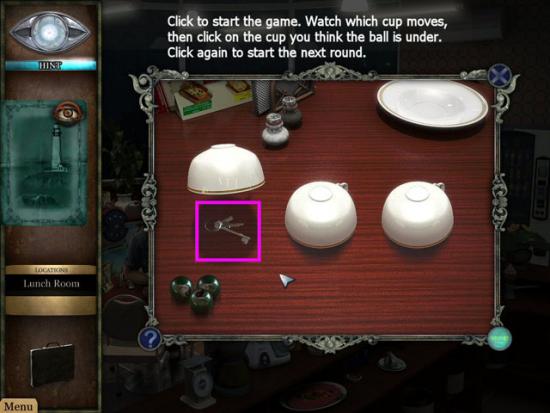
You will play three rounds of a game more commonly known as “3-Card Monte.” You’ll be shown which cup the ball starts under, watch that cup while it’s moved around several times, then click on the cup you think the ball is under. The game is different each time you play, so you need to watch as the cups are moved around. Collect the Keys after you complete the game.
Click on the Vending Machine, on the right. Use the Power Strip on the Outlet (magenta), press the red button (green) then pick up the Card (yellow) for the next object list.
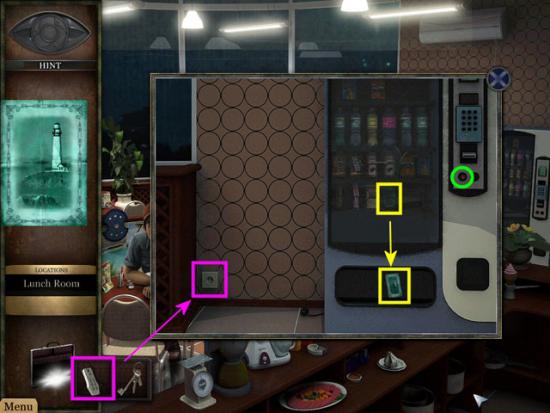
Collect all the objects (yellow) and key item (magenta). Some items will be in the close-up of the table, at the back. Exit the Cafe and return to Corridor D-10
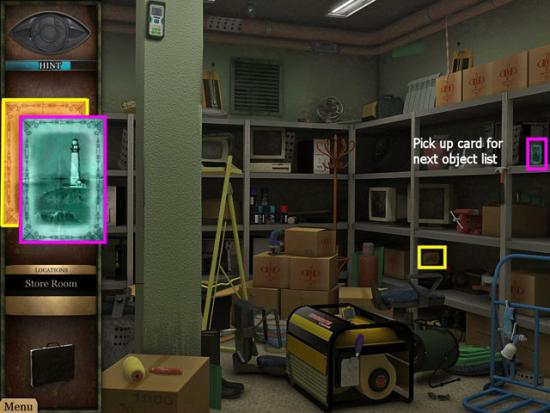
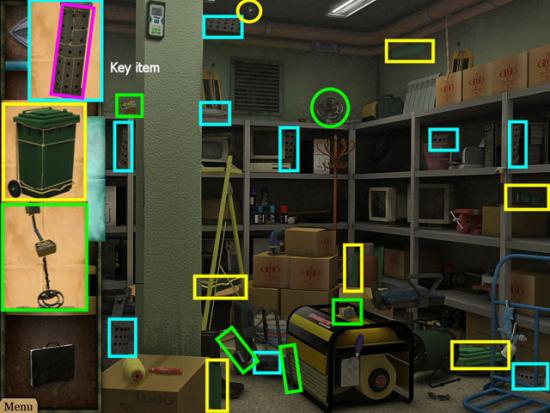
Storeroom
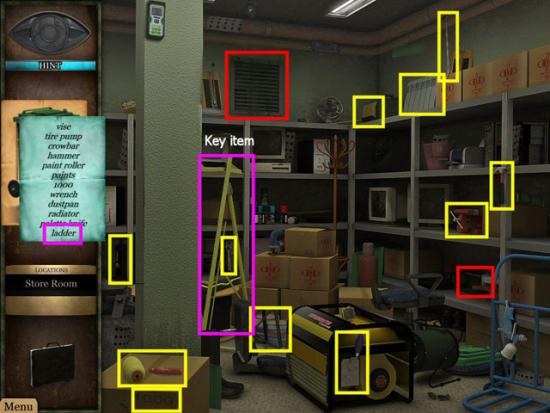
Use the Keys and enter the Storeroom. Pick up the card (magenta) for the next object list. You can pick up the other card (yellow), also, and switch between them to find everything.
Collect all the objects (yellow), pieces and key items (magenta). Note the Vent and the Music Box (red). Return to Tom’s Office.
Tom’s Office
Use the Ladder on the loose Ceiling Tile. Pick up the card for the next object list.
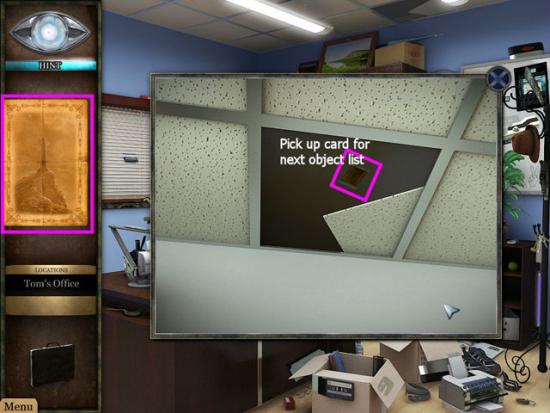
ect all the pieces and key item (magenta). Return to the Storeroom.
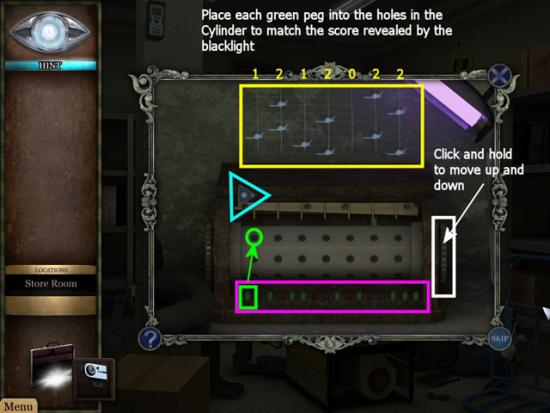
Storeroom
If any of the pegs are incorrect, the music will sound discordant and you can move the incorrect pegs and try again. When you’ve placed all the pegs correctly, the music will play, the back of the Music Box will open and you’ll collect the Set of Tom’s Photos. Note: Pegs that are in the correct holes cannot be moved. After you collect the Photos, return to Tom’s Office.
Tom’s Office
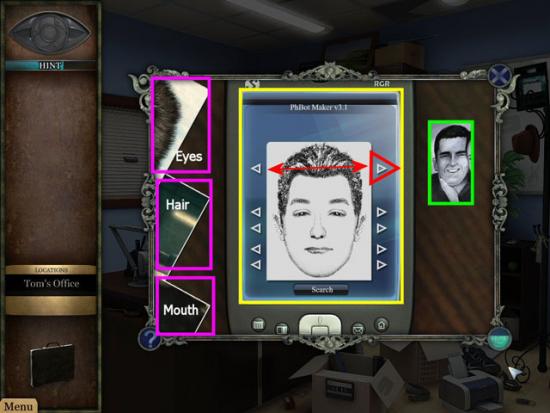
Use the Set of Tom’s Photos on Tom’s Photo Maker. Click on each of the 3 photos of Tom (magenta) to view his Eyes, Hair and Mouth. Use the arrows (red), on either side of the display (yellow) to change each feature until you get a correct photo of Tom. I’ve also provided a photo of Tom, from Chapter 1, so you can see his whole face (green). When you’re satisfied, click the Search button (cyan); pick up the Photo of Tom from the printer.
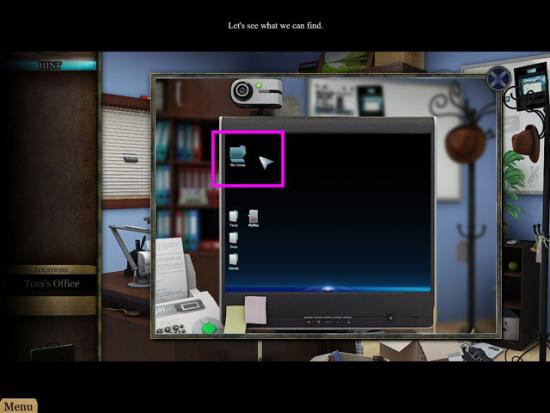
Use the Webcam and Photo of Tom on the Workstation then click on My Computer to view a Map and the location of the Anti-Hypnotic Device. Exit Tom’s Office and return to the Storeroom.
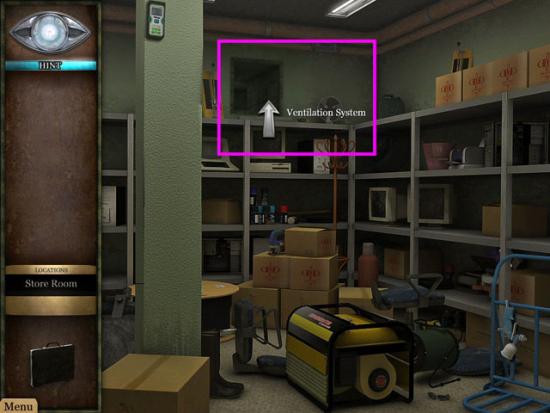
Ventilation System
Enter the Vent on top of the shelves.
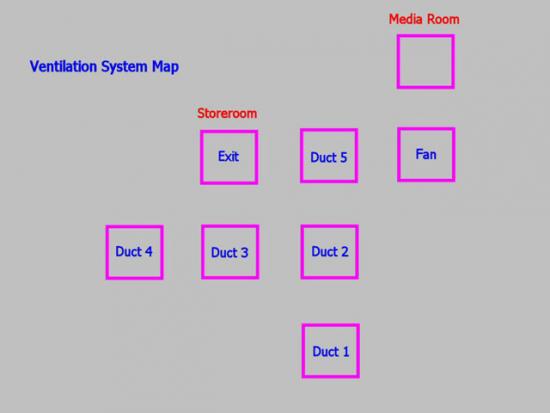
See the next screenshot for a complete Map of the Ventilation System.
Storeroom
Move forward twice, then left once to the Exit. Push out the Grate and enter the Storeroom. Pick up the Card (magenta) for the next object list. If you like, you can pick up the other card (yellow) and switch between them to find all the objects.
Collect all the objects (yellow) and key items (magenta). Return to the Ventilation System, go back twice, left once and forward once to Duct 4.


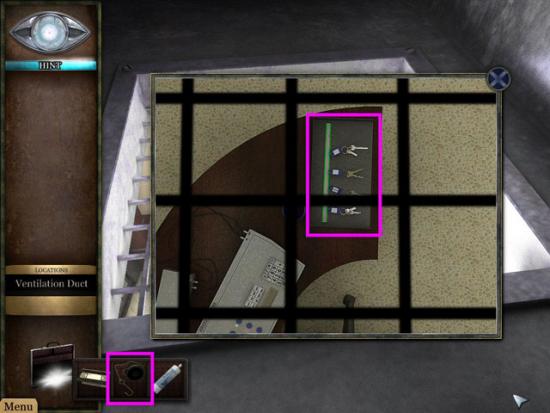
Ventilation Duct 4 Grate
Use the Hook and Fishing Line on the Keys. Return to the Exit (back twice, forward once and left once: Storeroom) and use the Keys on the Door.
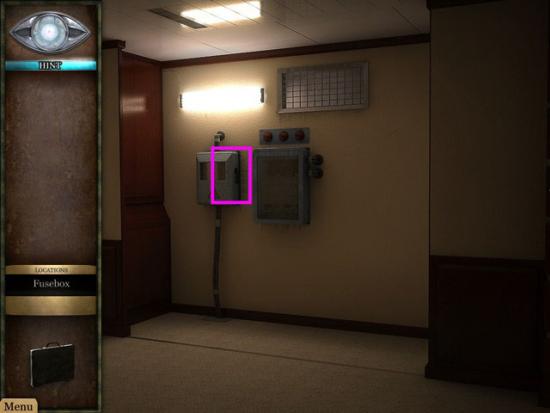
Fusebox
Exit into Passage 1, go left at Passage 2 then right to the Fusebox. Click on the Fusebox to turn off the Fan. Exit the Fusebox area and go forward to the Restricted Area.
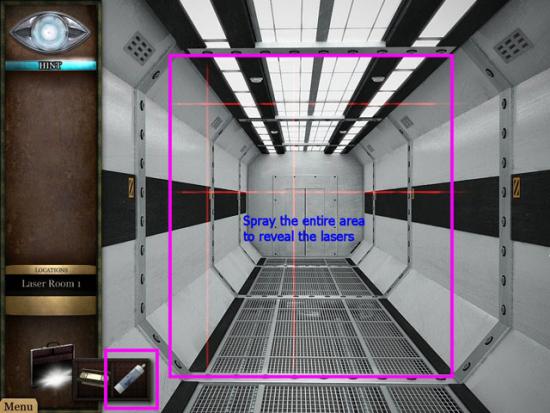
Restricted Area 1
Use the Spray to reveal the Lasers. Click and hold on the Spray and go over the area. Continue on and repeat this 2 more times.
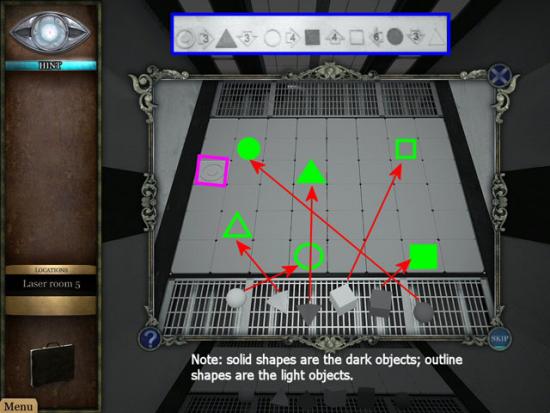
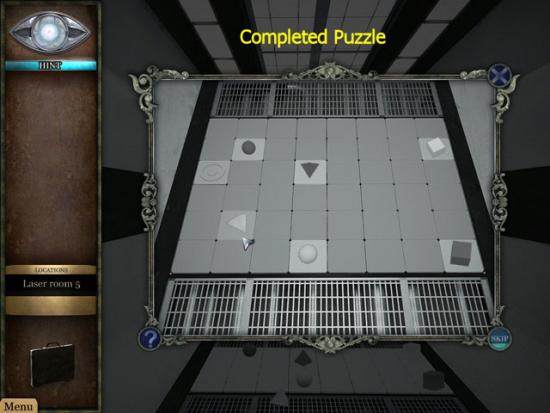
Laser Room 5
Continue forward to Laser Room 5. Take a look at the Symbols (blue) over the door, then click on the Floor for the next puzzle. Starting at the White Button (magenta), place each object according to the diagram of the Symbols. From the White Button, count over 3 spaces and place the Triangle. From the Triangle, count down 3 spaces and place the White Sphere. Continue following the diagram and place the remaining Symbols. Your puzzle may be different. Continue into the Depository.
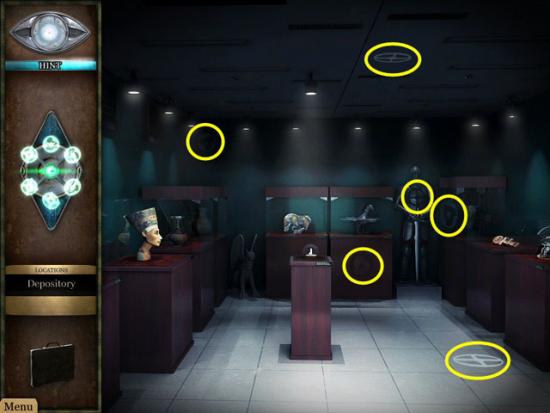
Depository
Click on the Center Pedestal and collect the Anti-Hypnotic Talisman. Retrace your steps to the Storeroom (go back 8 times) then enter the Vent and head to the Fan (go back once, right once then forward once). Click on the Grate and enter the Media Room.
Media Room
Use the Tape on the VCR. Enter the Conference Ballroom.

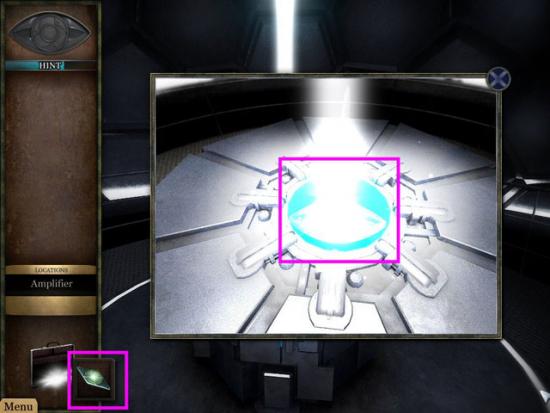
Mrs. Ryde is beginning her speech in the Conference Ballroom, when she’s interrupted by the her video confession of the murder of Tom. When Agent Ellery confronts her, Mrs. Ryde presses a remote control and activates the Amplifier. It’s now a race for Agent Ellery to use the Anti-Hypnotic Talisman to destroy Mrs. Ryde’s evil plans.
The Dome
Walk toward the Amplifier and use the Anti-Hypnotic Talisman on the Beam.
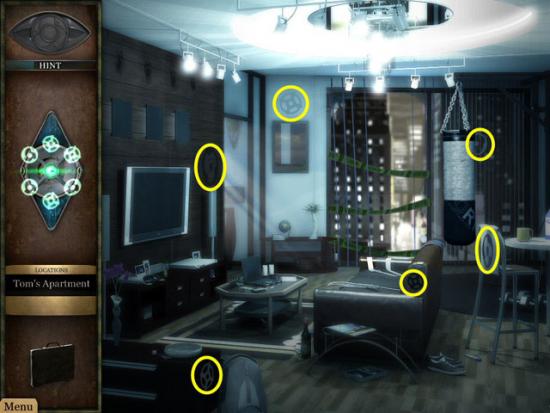
Tom’s Living Room
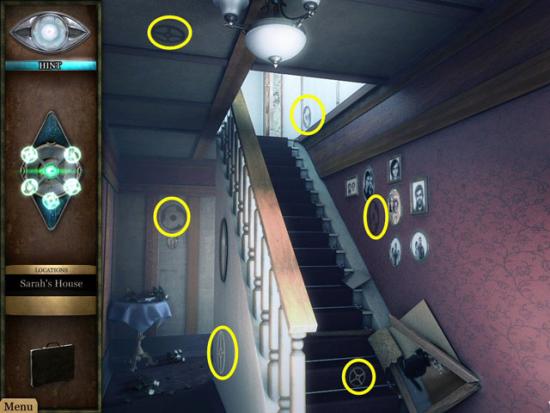
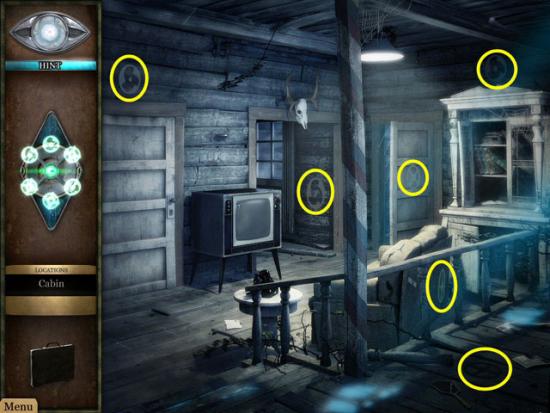
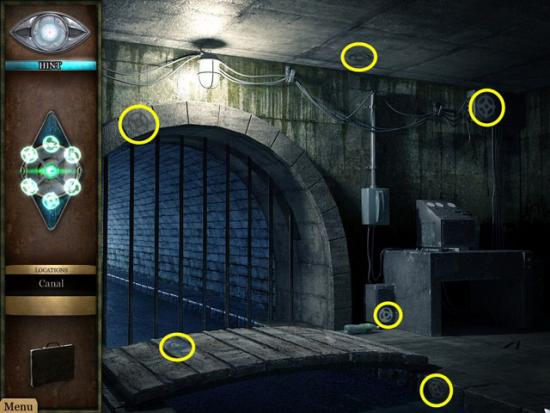
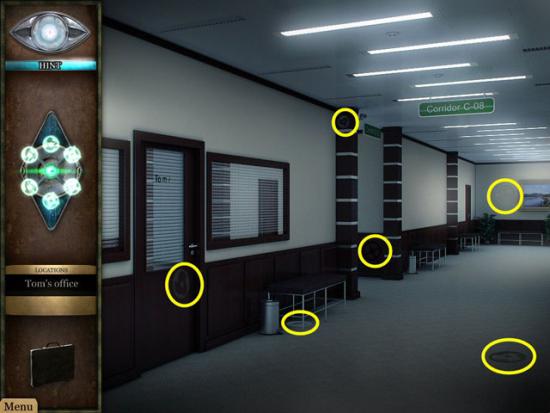
You awake, in Tom’s Apartment. Collect all 6 Symbols (yellow) in the room. Follow the light to the 6 next areas and collect the Symbols at each place.
Sarah’s House
The Cabin
The Canal
Tom’s Office
The Depository
Click on the Snow Globe, on the center pedestal after you collect the 6 Symbols.
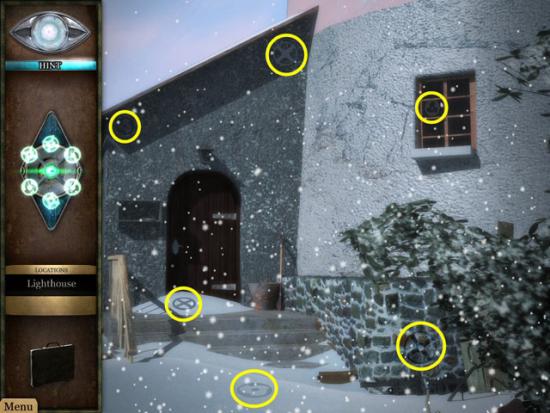
The Lighthouse
After you collect the last of the 6 Symbols, you’ll receive the Charged Talisman; enter the Lighthouse.
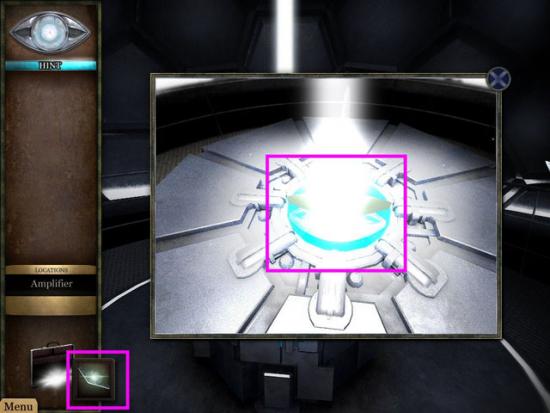
The Dome
Use the Charged Talisman on the Beam
Finale
After putting the Charged Talisman into the Beam, the Dome starts to collapse. Agent Ellery escapes outside and is confronted by Mrs. Ryde…watch the ending movie.
Congratulations! You’ve completed Strange Cases: The Lighthouse Mystery.
