- Wondering how to get Monopoly GO! free rolls? Well, you’ve come to the right place. In this guide, we provide you with a bunch of tips and tricks to get some free rolls for the hit new mobile game. We’ll …
Best Roblox Horror Games to Play Right Now – Updated Weekly
By Adele Wilson
Our Best Roblox Horror Games guide features the scariest and most creative experiences to play right now on the platform!The BEST Roblox Games of The Week – Games You Need To Play!
By Sho Roberts
Our feature shares our pick for the Best Roblox Games of the week! With our feature, we guarantee you'll find something new to play!All Grades in Type Soul – Each Race Explained
By Adele Wilson
Our All Grades in Type Soul guide lists every grade in the game for all races, including how to increase your grade quickly!
Steve the Sheriff Tips Walkthrough
Check out our strategy guide for Steve the Sheriff. This game combines hidden object, find the differences, and inventory tasks as Steve tracks down a thief who stole the town’s Neptune Statue. GENERAL TIPS If the magnifying glass cursor is spinning, that means you will need to use an inventory item in that location. (The instructions say the magnifying glass will change color—it also spins.) Any time you see a cigar, click on it, and you will get an extra hint. If the cigar is in a …
a:1:i:0;a:2:s:13:”section_title”;s:22:”Steve the Sheriff Tips”;s:12:”section_body”;s:34151:”Check out our strategy guide for Steve the Sheriff. This game
combines hidden object, find the differences, and inventory tasks as
Steve tracks down a thief who stole the town’s Neptune Statue.
GENERAL TIPS
- If the magnifying glass cursor is spinning, that means you
will need to use an inventory item in that location. (The instructions
say the magnifying glass will change color—it also spins.) - Any
time you see a cigar, click on it, and you will get an extra hint. If
the cigar is in a Find the Differences scene, it will not count as one
of the differences. - The magnifying glass must be centered exactly on small items or the click won’t register.
- “Lamp” is used throughout the game to mean light bulb.
- If
you hover your cursor over any item on the Find List, you will see its
silhouette in the large magnifying glass at the bottom of the list. - A
few rooms, like the Santa Maria Pub, have too many objects that fit the
same clue. In that case, it’s bottles. There are at least 3 bottles in
the scene that won’t be accepted for the Find List. That’s just an
error. If you click on something that fits the clue and it’s not
accepted, just move on to the next one. This only happens in a couple
of scenes—we note them in the strategy guide for that location. - Inventory
items are stored in the drawer at the bottom of the Find List. You can
take these out and use them in the scene later. - Evidence
items are stored in the CASE at the bottom of the Find List. You can
click on this anytime to look at the evidence you’ve gathered so far,
but you won’t be able to use these items in a scene. - To
use an inventory item, first click on the knob on the side of the
drawer below the Find List. Then click on the item you want to use. It
will attach to your cursor. Now move your cursor to the location where
you want to use the item. Make sure you get to the exact location where
the magnifying glass is spinning—otherwise the inventory item won’t
work correctly. Once the glass is spinning in the right area, click the
mouse again and the inventory item will be used. - Minigames
are triggered by specific actions or objects, so they may occur in a
slightly different order for one player than another. - If
you use the “solve later” button in a minigame, you will return to the
previous scene, but you will still have to finish the minigame before
you can move onto the next location. - You can use the
“skip” button to skip any minigame you don’t like without penalty—you
just won’t get the minigame points bonus at the end of the round. The
minigame will be automatically solved and you will get any clues that
it reveals. - You can’t skip the Find the Differences, as they’re considered part of the main game.
- If you forget the goal for any minigame, you can click on HELP and see them again.
- When
you’re using the Find List, be alert for items that may be only
partially revealed, like only being able to see the fingertips of a
glove. The game does this a lot. The items are still clearly
recognizable, you just have to be alert to them. Almost all items are
their normal proportional sizes, which helps. - Most of the
Find the Differences puzzles use differences that fool the brain but
don’t strain the eye. For example, two similar brown hats might have
their positions swapped in the two views. Or a bottle might be standing
up in one view and lying down in the other. - The Find the
Differences puzzles usually represent the location before and after the
crime spree. So always look for things like broken windows or doors. - In
most minigames, once you have a piece in the right place it will
slightly change color and click into place and you won’t be able to
move it again. - The “repeat the pattern” minigames are
pretty slow, so you’ll have time to write down each new addition,
making it easy to enter your reply. Allow the displayed sequence to
disappear completely before you start your reply or your first clicks
won’t register and you’ll have to start all over. - Some
players have reported a minor glitch where the game will not accept
multiple clicks in the same position, for example when rotating jigsaw
pieces or trying to open the inventory drawer to get a second inventory
item. Just click somewhere else and then try again.
WALKTHROUGH (SPOILER ALERT!!!)
Location 1: The Sheriff’s House
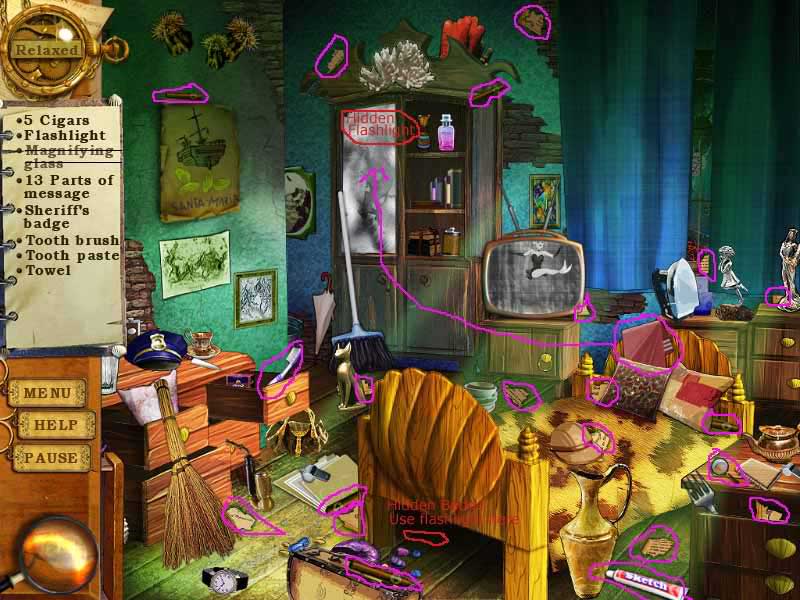
The Sheriff’s House Hidden Objects (see picture)

The Sheriff’s House Inventory Tasks:
- Use the towel to clean the dirty glass on the Armoire on the back left of the scene.
- Once it’s clean, take the flashlight you can now see on the top shelf. It will go into inventory.
- Take the flashlight from inventory and look under the bed. You will find the Sheriff’s Badge there.
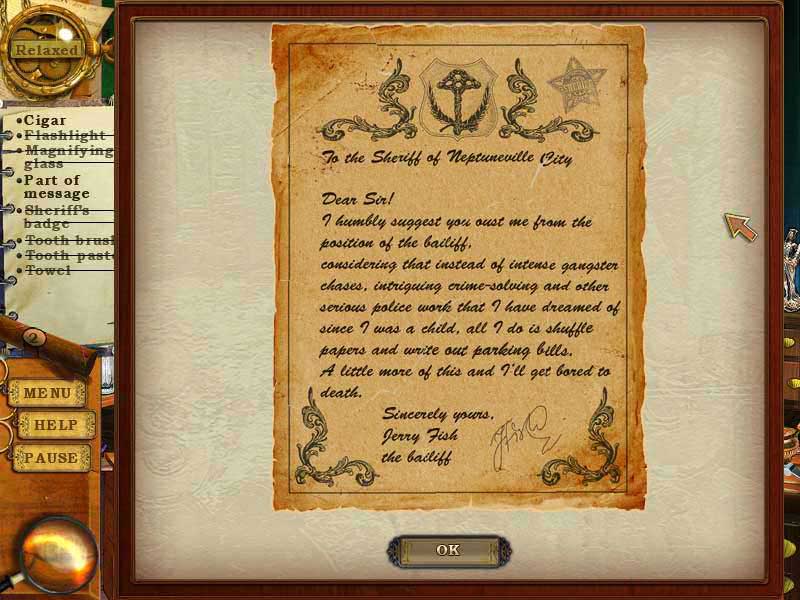
The Sheriff’s House Assemble Note jigsaw puzzle Minigame (see picture)
Location 2: Police Station
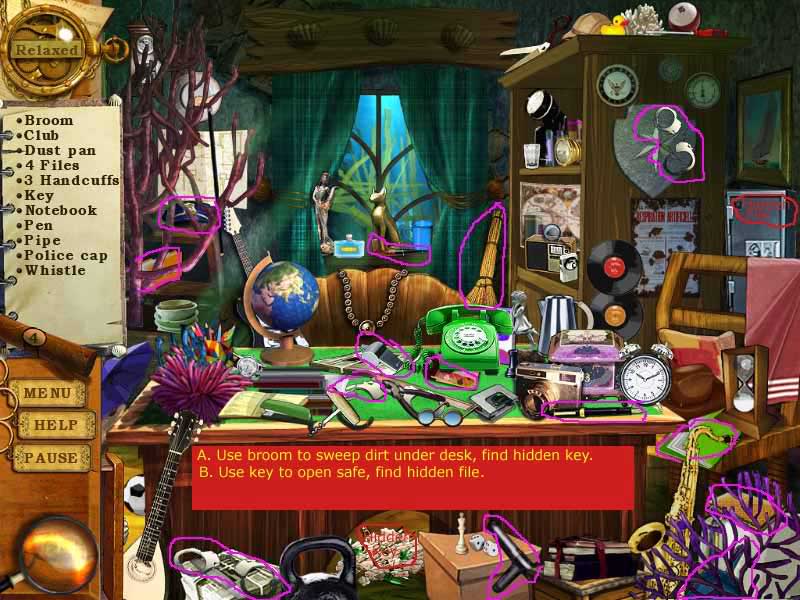
Police Station Office Hidden Objects (see picture)
Police Station Office Inventory Tasks:
- Take the broom from the back wall and sweep under the desk, revealing the key.
- Use the key on the safe on the right wall, revealing the 4th file.
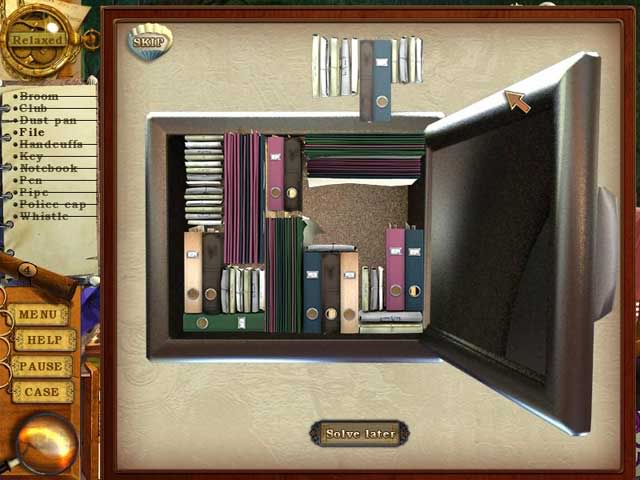
Police Station Office files in safe Minigame (see picture)
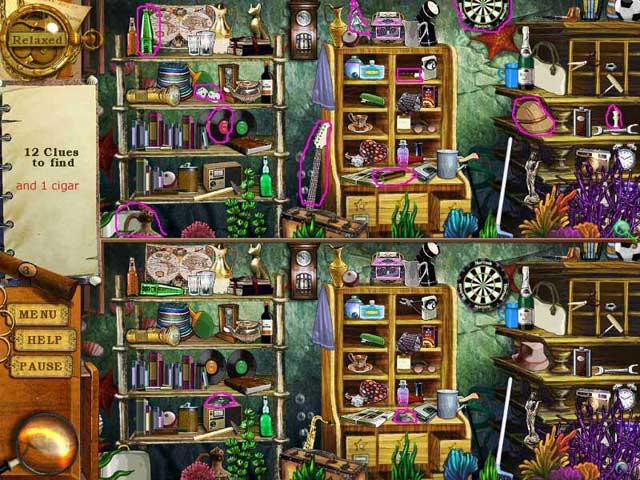
Police Station Evidence Room Find the Differences (see picture)
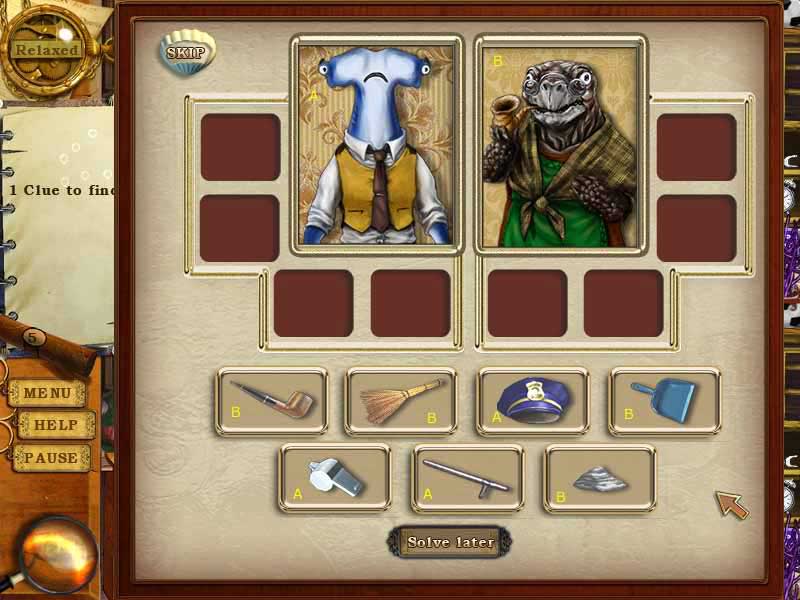
Police Station Evidence Room Suspect Match Minigame (see picture)
Location 3: Town Hall
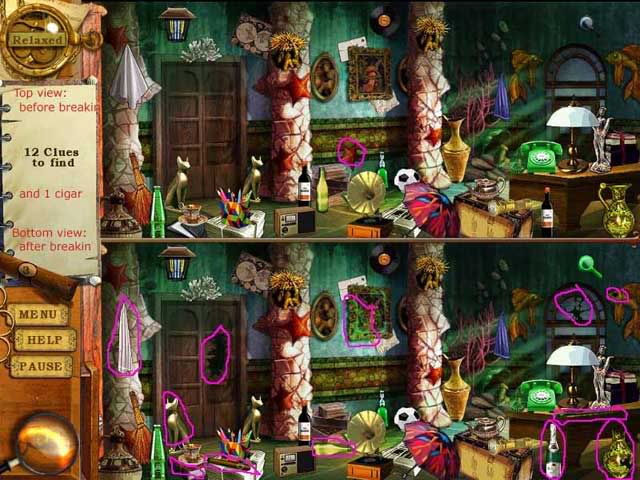
Town Hall Find the Differences (see picture)
top view before break in, bottom view after break in
Town Hall Office Hidden Objects (see picture)
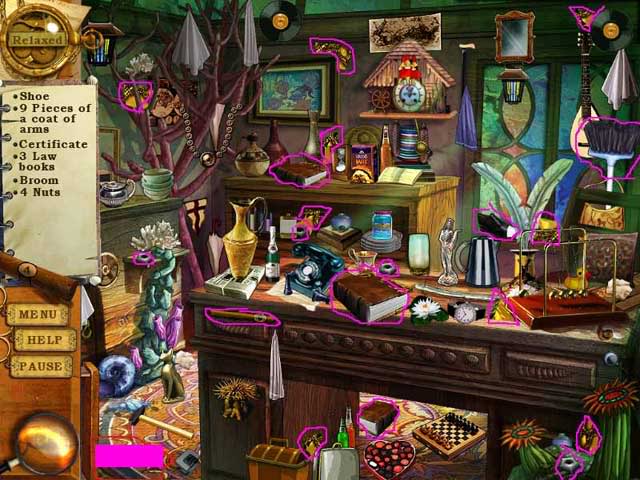
Town Hall Office Inventory Tasks:
- Use the broom from the righthand side on the lower left section of the carpet to reveal the hidden certificate.
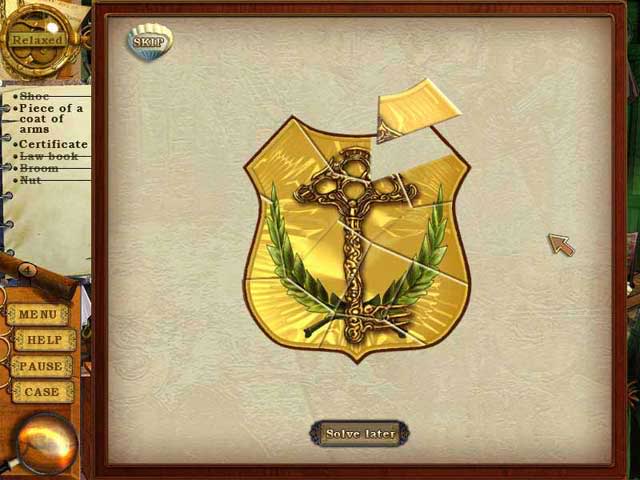
Town Hall Office Town Seal jigsaw Minigame (see picture)
Location 4: Car Service
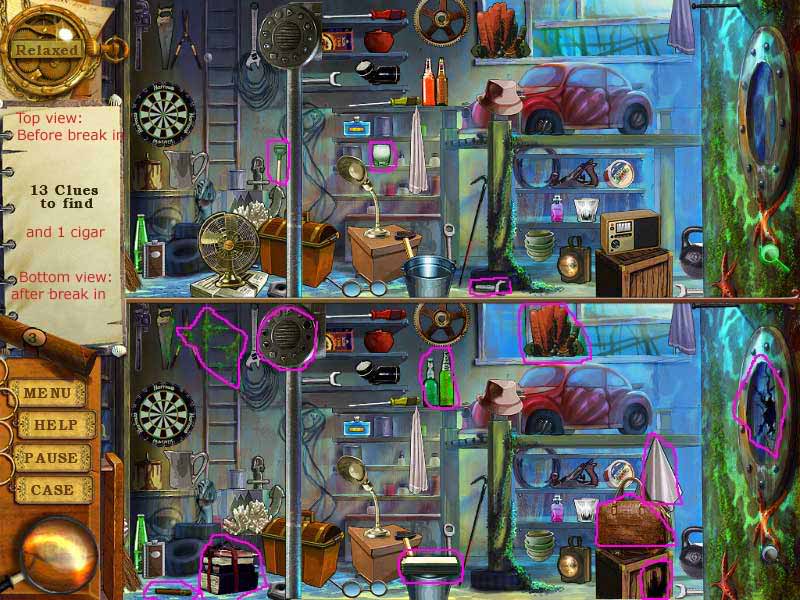
Car Service Garage Find the Differences
top view is before the break in, bottom view is after the break in
Car Service Storeroom Hidden Objects (see picture)
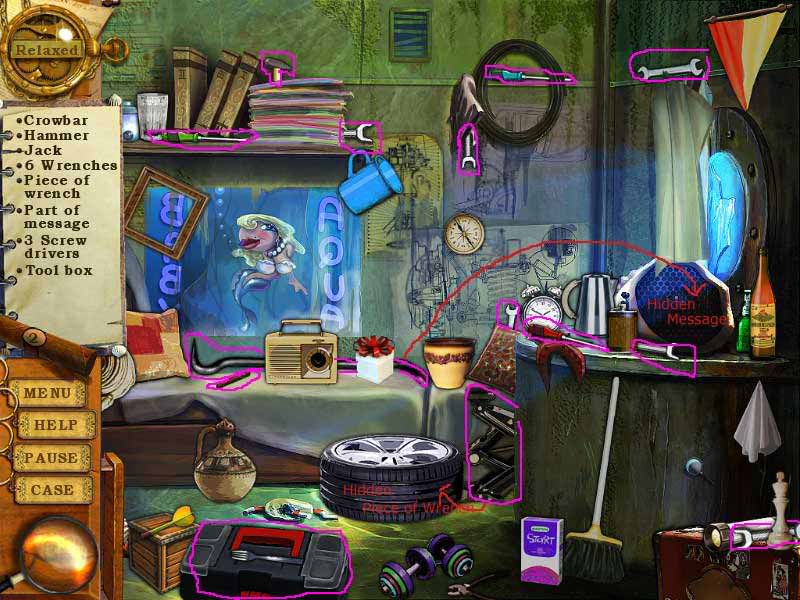
Car Service Storeroom Inventory Tasks:
- Use the crowbar to take the grill off the part on the far right to reveal the hidden piece of the message.
- Use the jack to lift the stack of tires to see the piece of wrench underneath.
Car Service Storeroom Toolbox Minigame 4A (see picture)
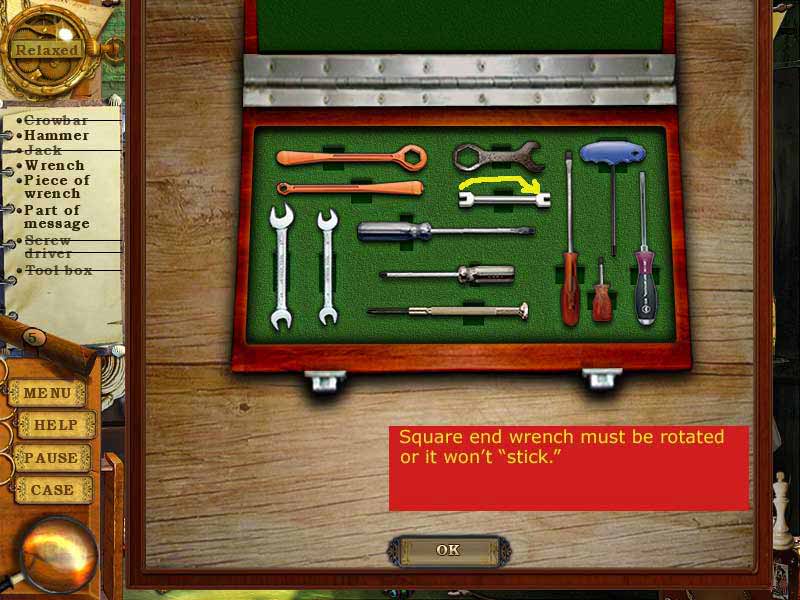
Car Service Storeroom Vent Cover Minigame 4B (see picture)
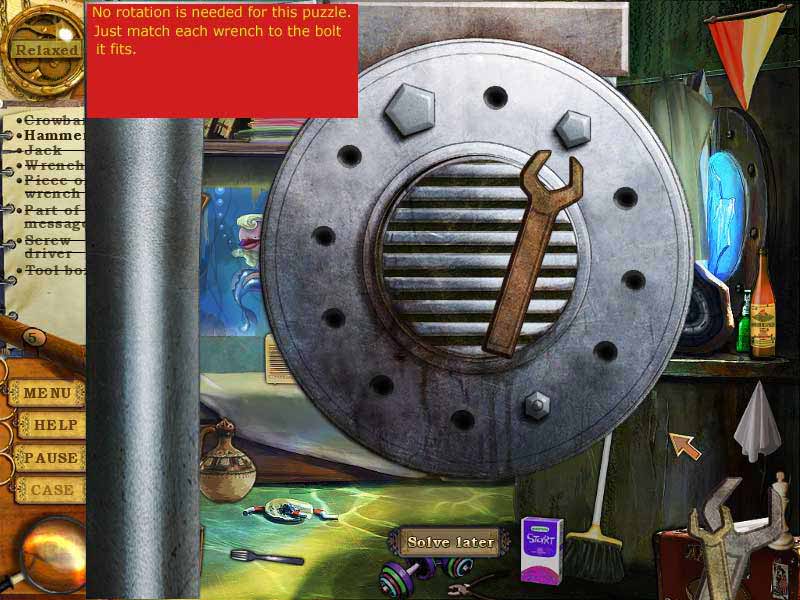
Location 5: Publishing House
Publishing House Office Hidden Objects (see picture)
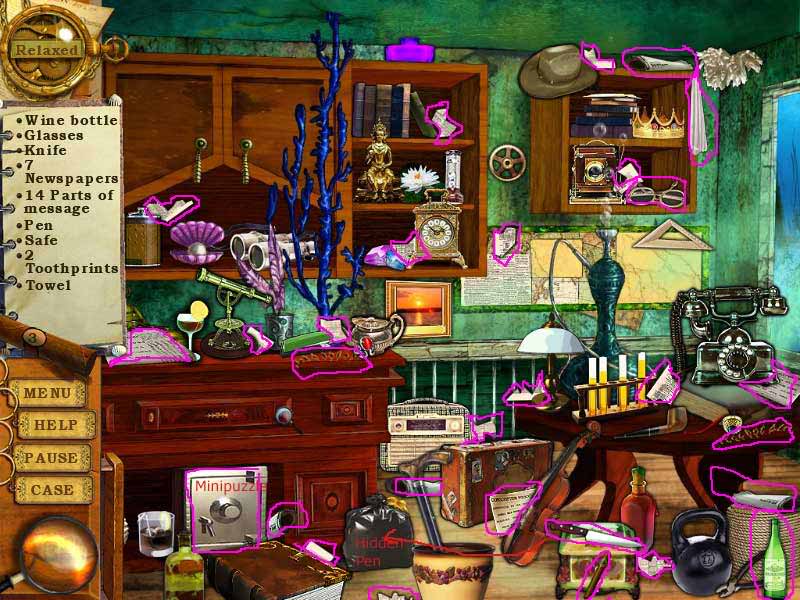
Publishing House Office Inventory Tasks:
- Use the knife to cut open the trash bag and find the hidden pen.
Publishing House Office Safe Minigame:
- This is a “repeat the pattern” minigame, which can be
random. To start the game, click on any of the picture keys. It’s
fairly slow, so you should have time to write down each symbol on one
line, just adding the next one to the line below it. That makes it easy
to enter. For example, we had the pattern: Grass; grass; grass; grass;
fish; fish; water;water - Make sure you wait for the displayed
sequence to completely disappear before you start entering your turn,
or the game won’t register your first symbols and you’ll have to start
all over.
Publishing House Printing Press Find the Differences (see picture)
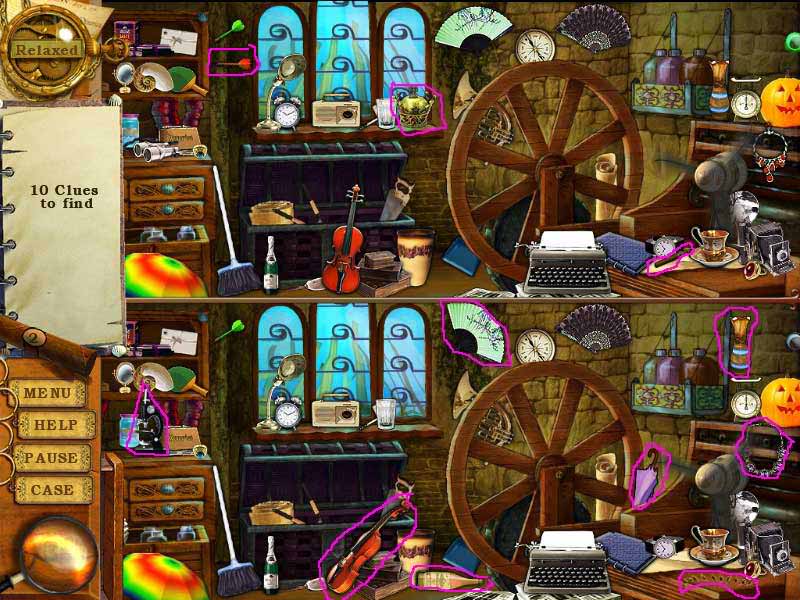
Location 6: Santa Maria Pub
Santa Maria Pub Hidden Objects (see picture)
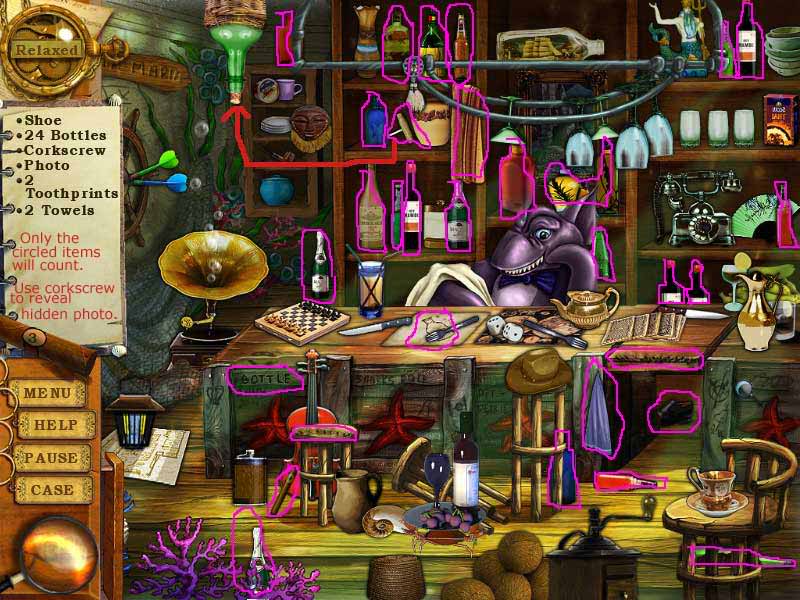
- The find list asks you to find 24 bottles, but there are
several bottles in the scene that will NOT count, including the one on
the tray and the ship in a bottle. Also, a set of 3 salad dressing
bottles will count as 1 item. See the picture—only the circled items
will count. - The same problem occurs with the towels—the towel that the bartender is holding does not count.
Santa Maria Pub Inventory Tasks:
- Use the corkscrew to take the cork out of the hanging lamp bottle and reveal the photo.
Santa Maria Pub Bottle Match Minigame 6A (see picture)
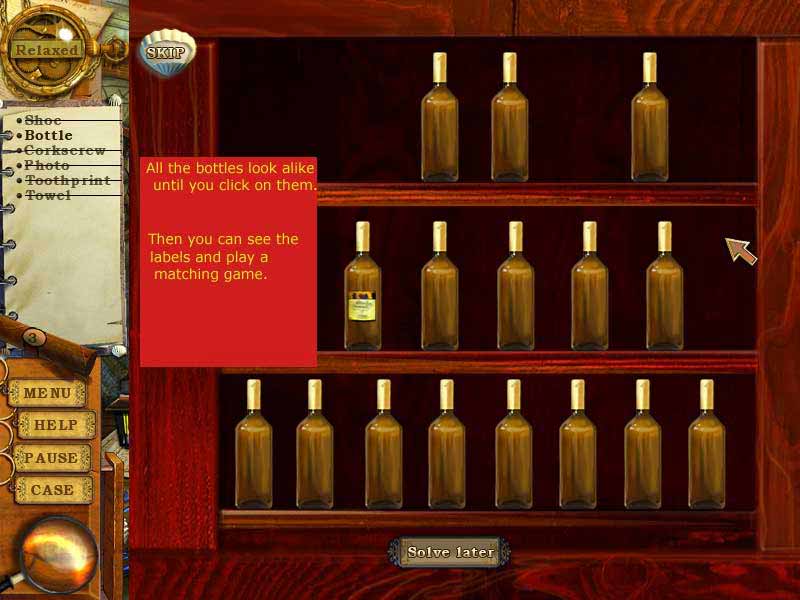
- Click on each bottle to reveal its label. Match labels in pairs to remove the bottles.
Santa Maria Pub Compare Teethmarks Minigame 6B (see picture)
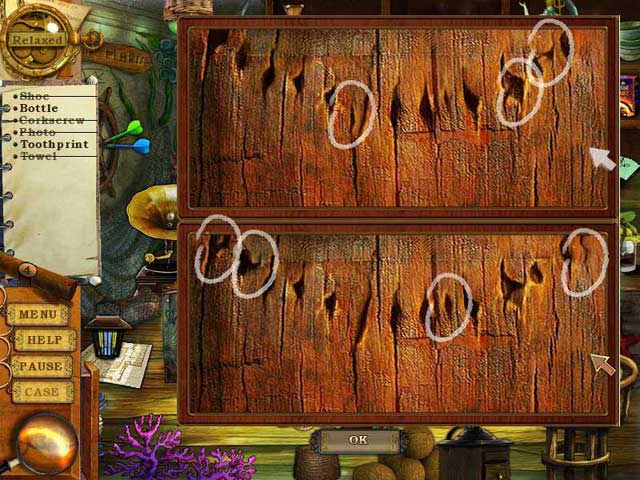
Santa Maria Kitchen Find the Differences (see picture)
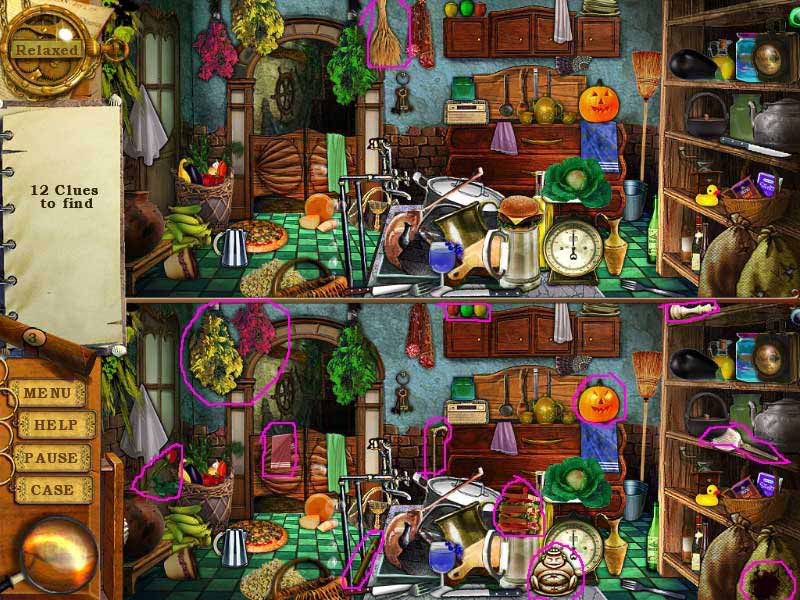
Location 7: Chinese Shop
Chinese Shop Find the Differences
top view: before the break in, bottom view: after the break in
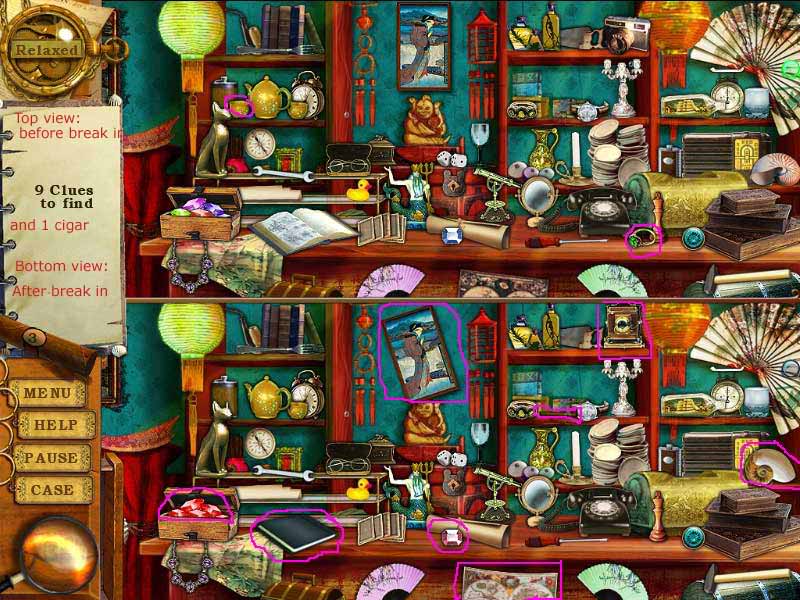
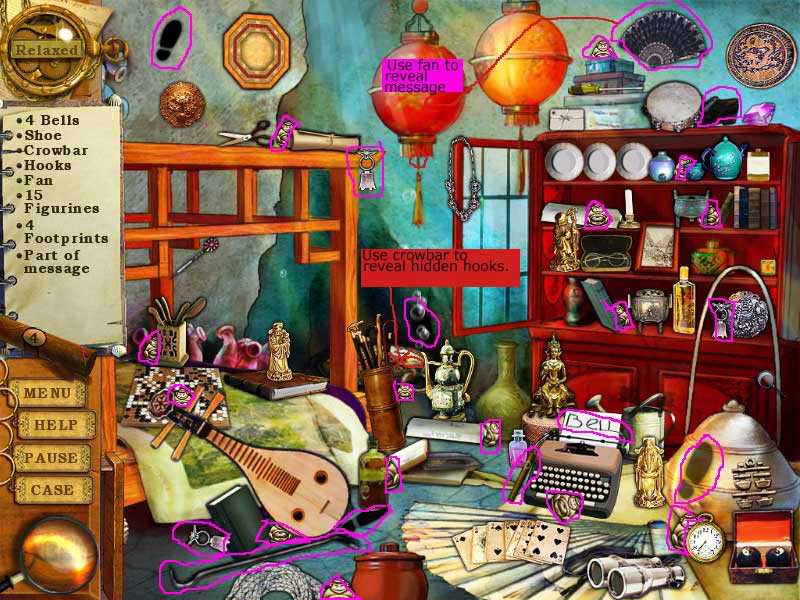
Chinese Shop Inventory Tasks
- Use crowbar (on floor near bed) on porcelain container near tunnel to reveal hidden hooks.
- Use fan from wall (upper right) on red hanging lantern to reveal hidden message.
Chinese Shop Bedroom Hidden Objects (see picture)
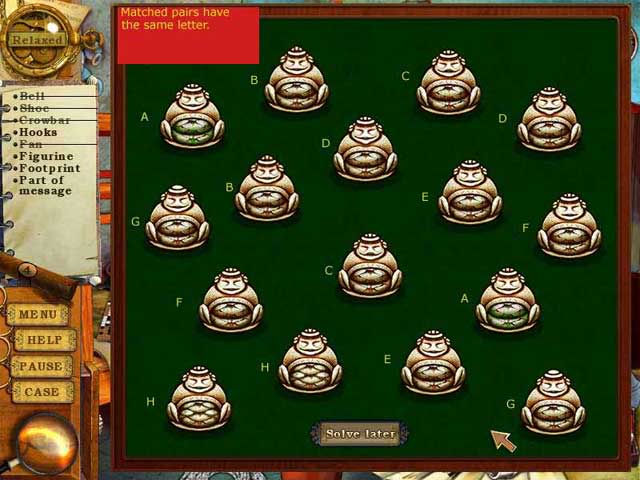
Chinese Shop Bedroom Figurine Match Minigame (see picture)
Location 8: Boiler House
Boiler Room Find the Differences (see picture)
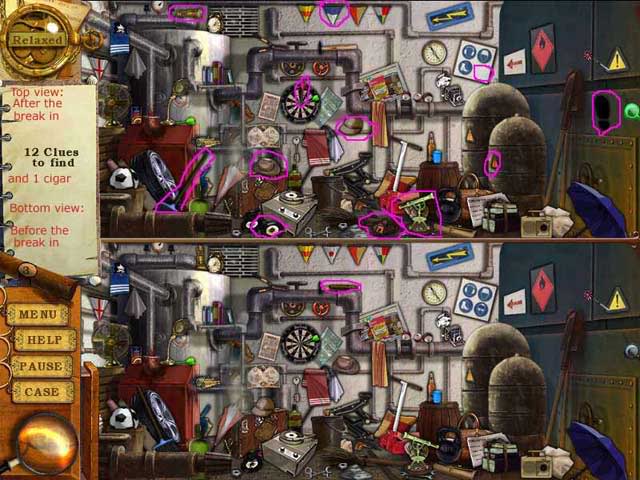
- This burglar is amusing: he/she tries on hats, play darts,
listens to records, trips over a few things…I wonder what they were
looking for?
Boiler House Stoker’s Room Hidden Objects 8A (see picture)
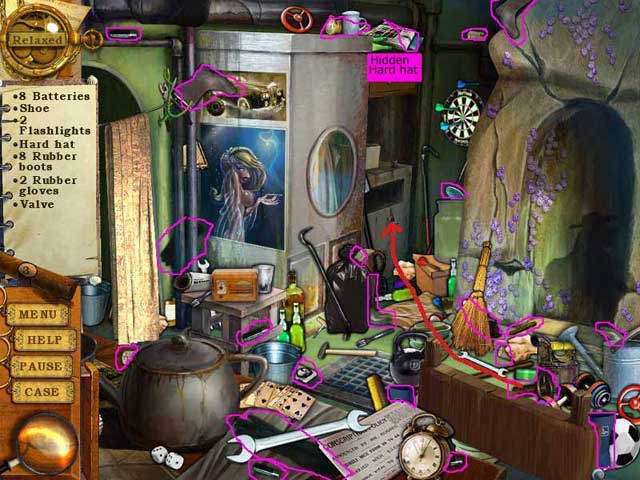
Boiler House Stoker’s Room Inventory Tasks 8A:
- Attach the valve to the grey machine box. (Make sure the
magnifying glass is spinning before you click, or the valve won’t
attach.) This will cause the upper cabinet door to open revealing the
hard hat.
Boiler House Tunnel Room Lamps Hidden Object 8B (see picture)
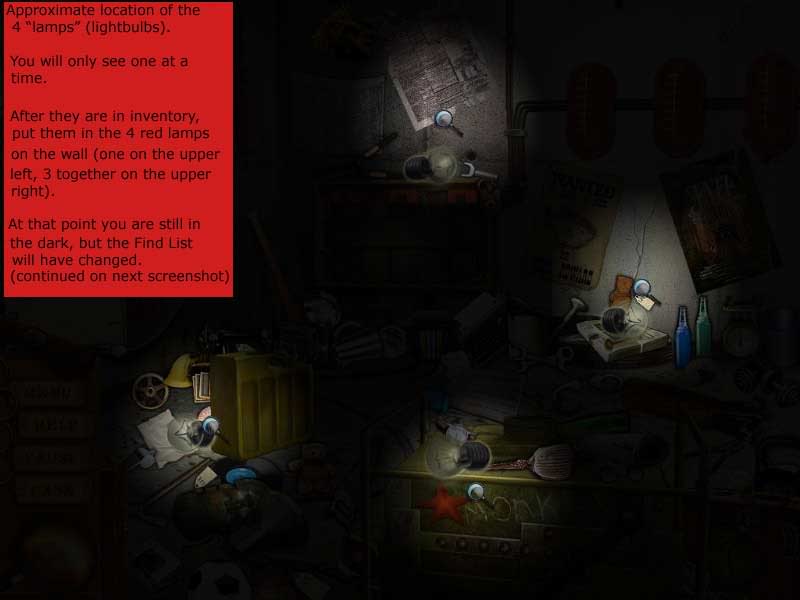
- You will get 3 different Find Lists for the same room.
- First, you need to find 4 “lamps” (lightbulbs).
- Our
screenshot is a composite picture so you can see the approximate
location of all 4 lightbulbs. In the game you will only see one at a
time. - As you click on each bulb, it will go into the inventory drawer.
Boiler House Tunnel Room Lamps Inventory Task 8B:
- Take the 4 lightbulbs out of the inventory drawer and put
one in each of the 4 red lamps on the walls of the room. There is one
lamp on the upper left wall, and 3 together on the upper right wall
Boiler House Tunnel Room Generator Hidden Object 8C (see picture)
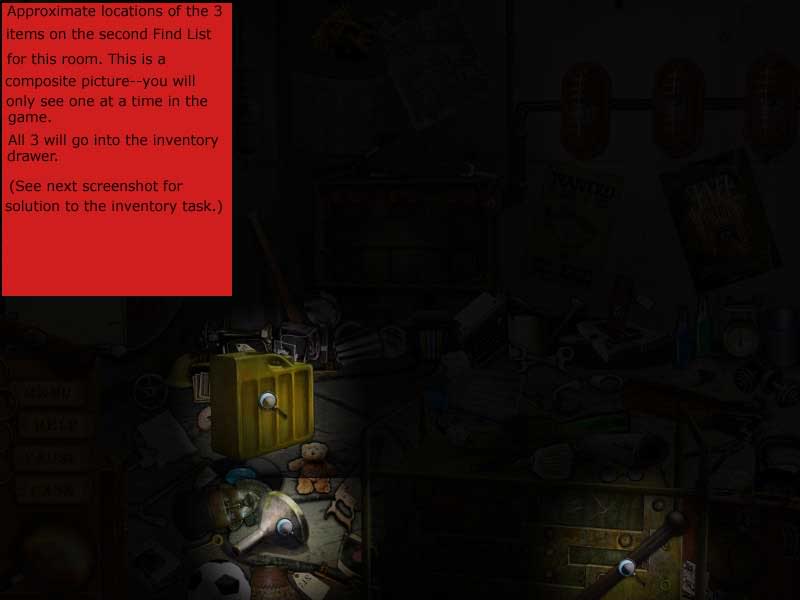
- Again, this is a composite picture. You will only see one at a time.
- All 3 items will go into inventory.
- The “can” is a yellow-green gas can.
Boiler House Tunnel Room Generator Inventory Task 8C:
- Put the lever in the left side of the switch box on the righthand wall.
- Put the funnel in the top of the generator (It says “MONKEY” on the front.)
- Touch the gas can to the funnel to fuel the generator. The lights will come on!
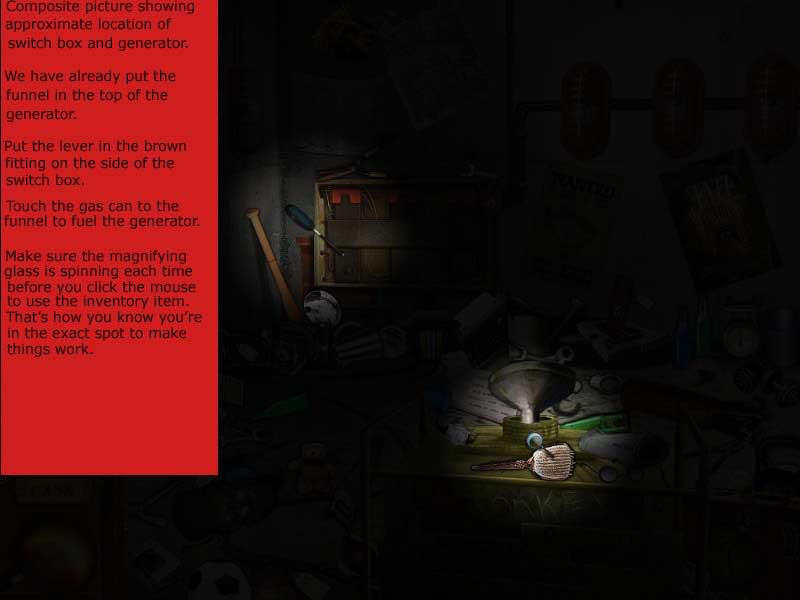
Boiler House Tunnel Room with Lights On Hidden Object 8D (see picture)
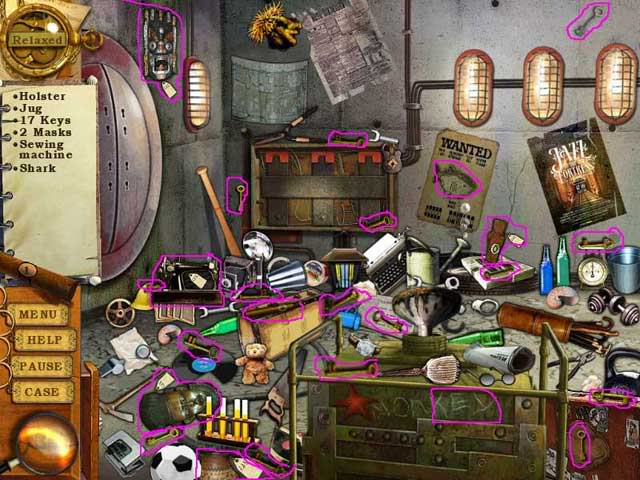
Boiler House Tunnel Room Match Keys Minigame (see picture):
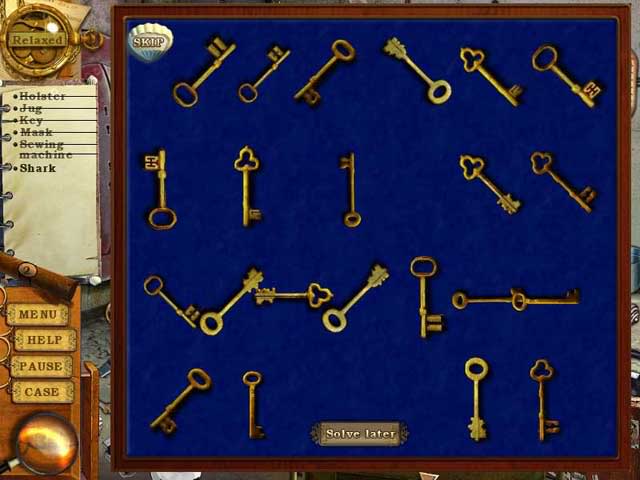
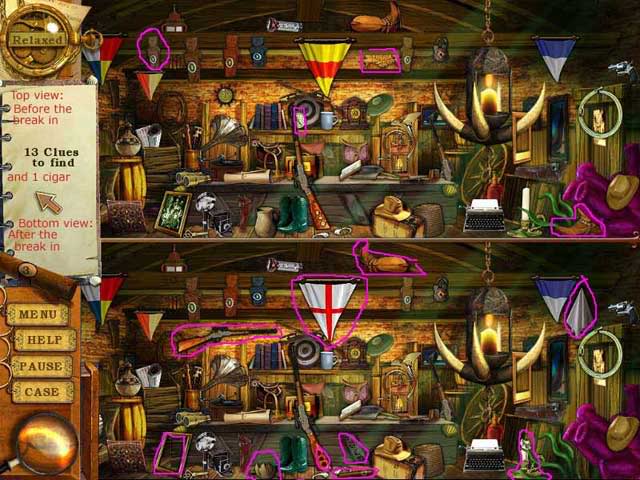
Location 9: Museum
Museum Cowboy Hall Find the Differences 9A (see picture)
Museum Indian Hall Find the Differences 9B (see picture)
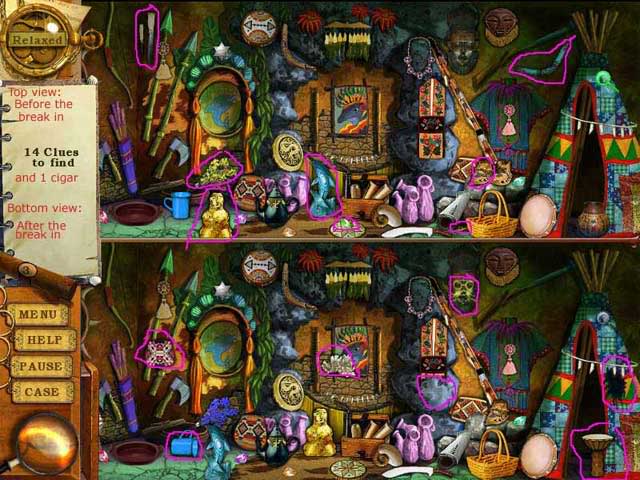
Museum Anthropology Hall Hidden Objects (see picture)
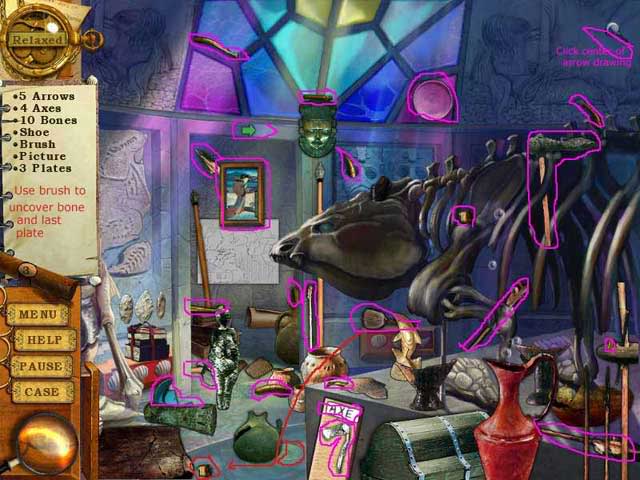
- Note that you must click the center of the arrow drawing on the upper right wall or it won’t be accepted.
Museum Anthropology Hall Inventory Tasks:
- Use brush to clear sand away from last piece of bone and hidden plate.
Museum Anthropology Hall Portrait Minigame 9A (see picture)
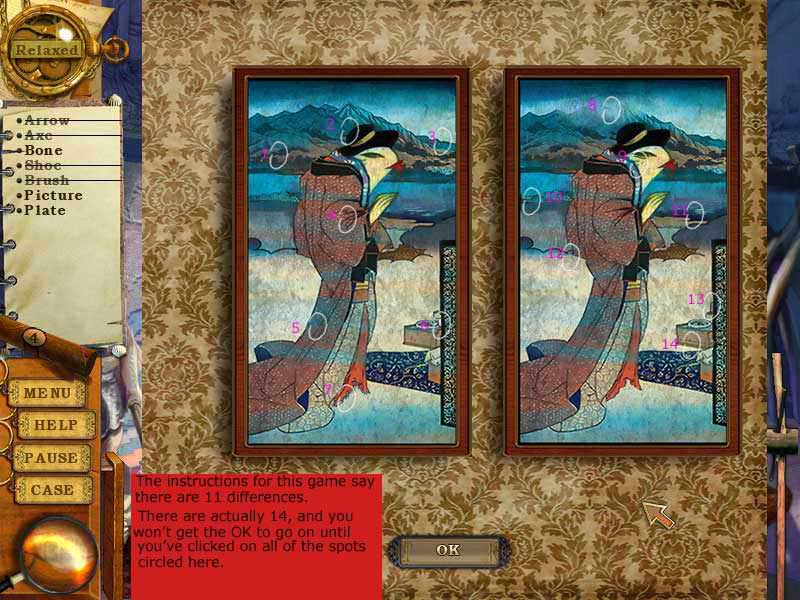
- The instructions for this minigame say there are 11
differences. There are actually 14. Keep looking until you find all 14
or you won’t get the OK to continue.
Museum Anthropology Hall Skeleton Minigame 9B (see picture)
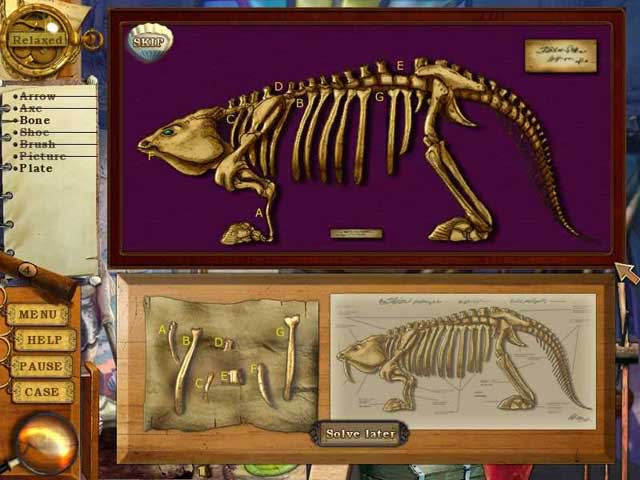
Location 10: Jellyfish Residence
Jellyfish Dining Room Find the Differences (see picture)
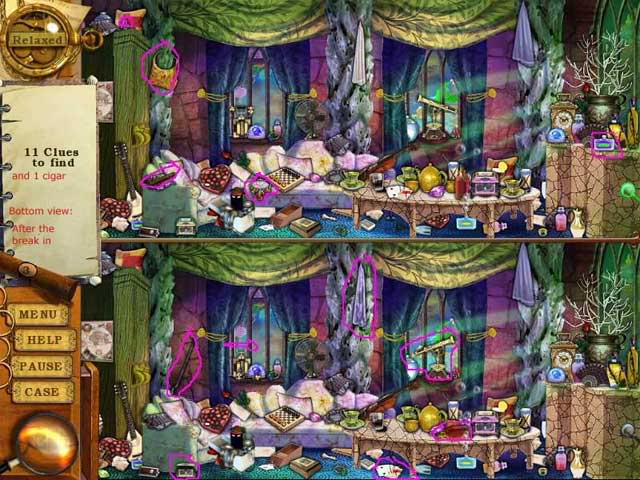
Jellyfish Bedroom Hidden Object 10A (see picture)
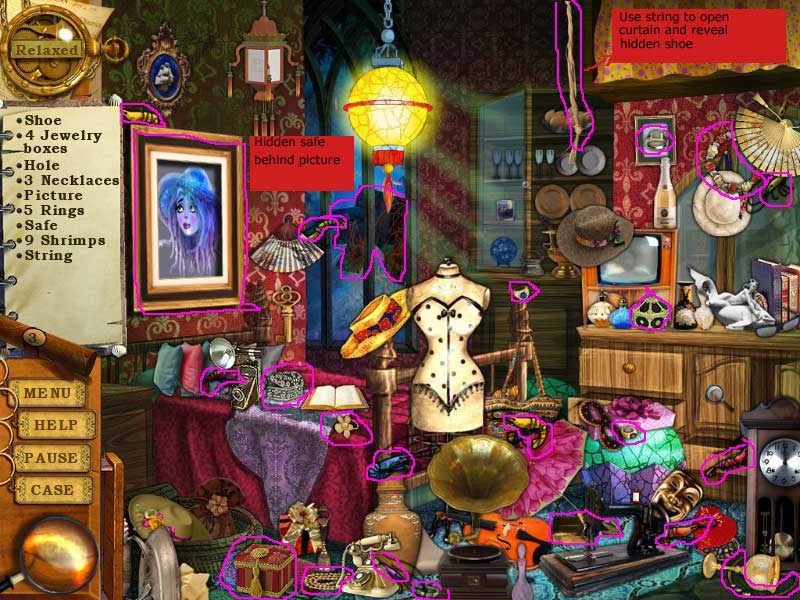
Jellyfish Bedroom Inventory Tasks:
- Use string to open curtain at top right and reveal hidden shoe.
- Remove picture on left wall to reveal hidden safe.
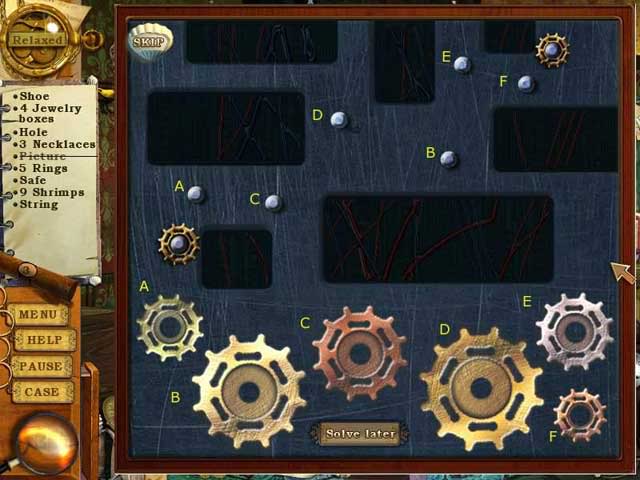
Jellyfish Bedroom Gears Minigame (see picture)
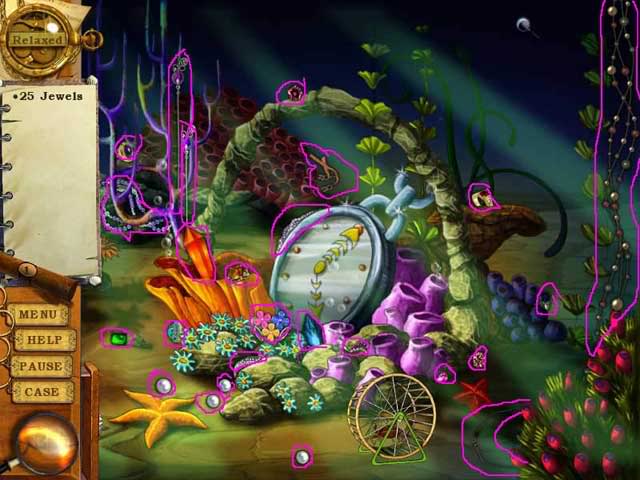
Jellyfish Aquarium Hidden Object 10B: (see picture)
Location 11: Artist’s House
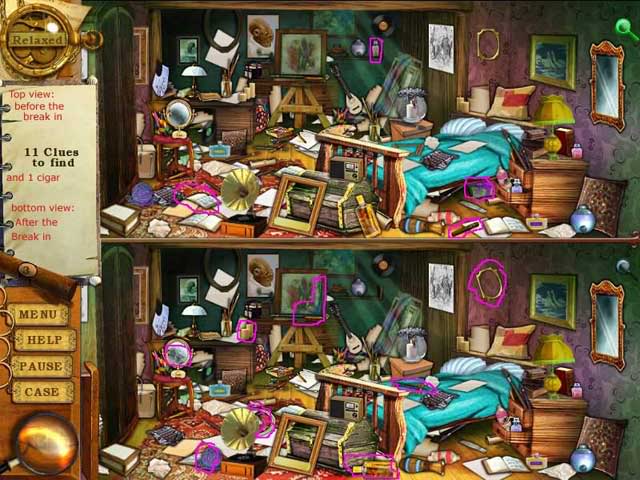
Artist’s House Find the Differences (see picture)
Artist’s House Studio Hidden Object (see picture)
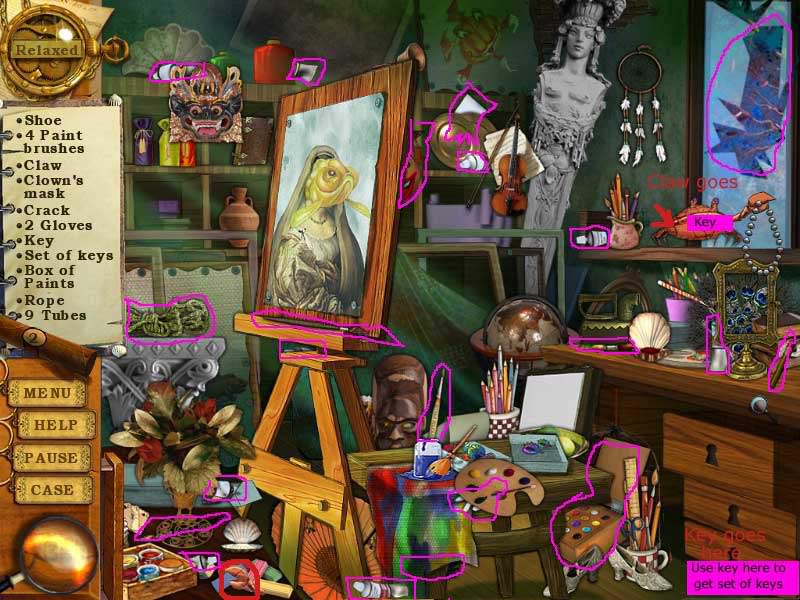
Artist’s House Studio Inventory Tasks:
- Give claw from floor by easel back to crab on desk. Hidden key is in his mouth.
- Use key from the crab to open locked drawer in desk to reveal set of keys.
Artist’s House Studio Paint Tubes Minigame
- This is a “repeat the pattern” minigame, which can be
random. To start the game, click on any of the paintbrushes. It’s
fairly slow, so you should have time to write down each symbol on one
line, just adding the next one to the line below it. That makes it easy
to enter. - Make sure you wait for the displayed sequence to
completely disappear before you start entering your turn, or the game
won’t register your first clicks and you’ll have to start all over.
Location 12: Hotel
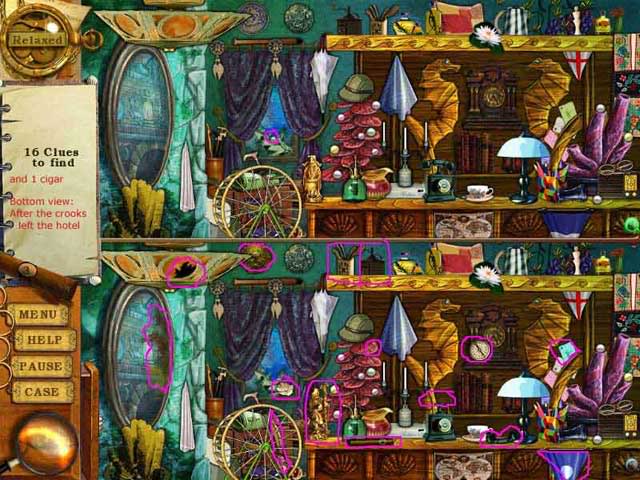
Hotel Lobby Find the Differences (see picture)
Hotel Reception Hidden Object 12A (see picture)
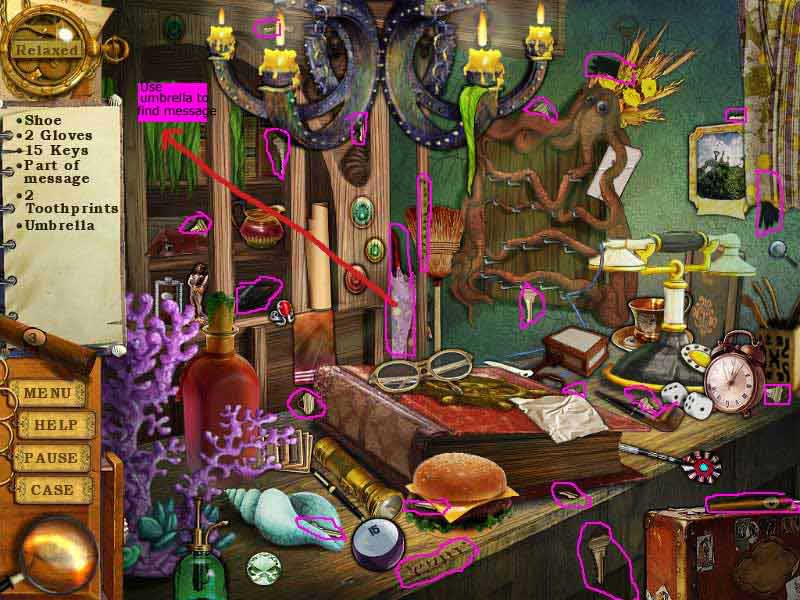
Hotel Reception Inventory Tasks:
- Use umbrella to move seaweed on shelf to reveal hidden part of message.
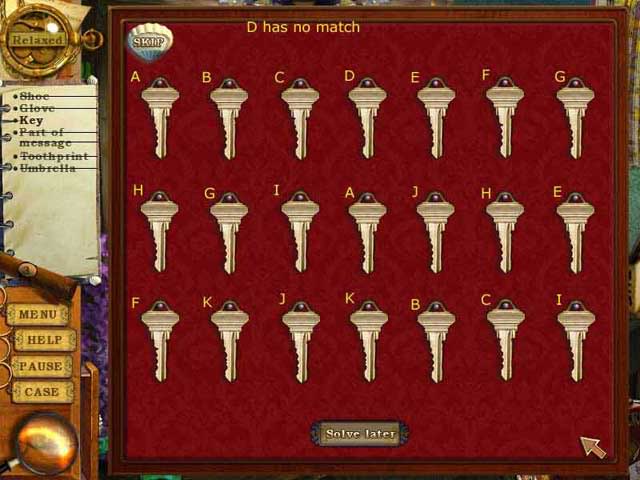
Hotel Reception Match Keys Minigame 12A (see picture)
Hotel Room Hidden Object 12B (see picture)
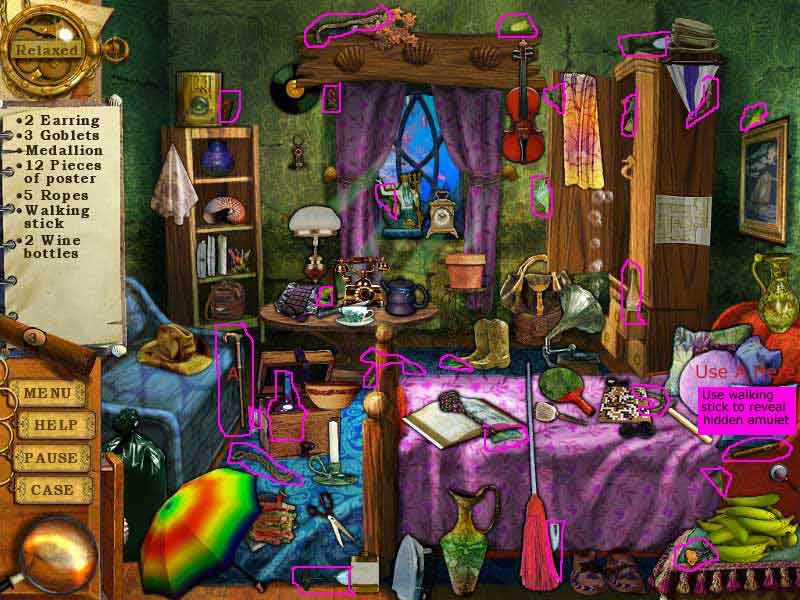
Hotel Room Inventory Tasks:
- Use the walking stick from the couch to hit the pillows on the bed and reveal the hidden amulet.
Hotel Room Carnival Jigsaw Minigame 12B (see picture)
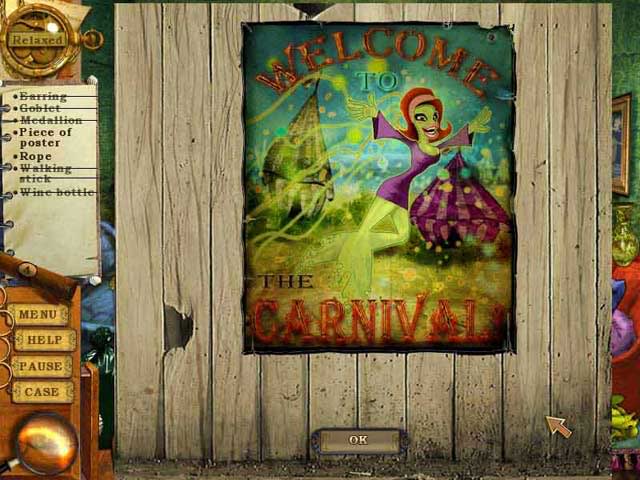
Location 13: Entertainment Park
Entertainment Park Cashier’s Office Find the Differences (see picture)
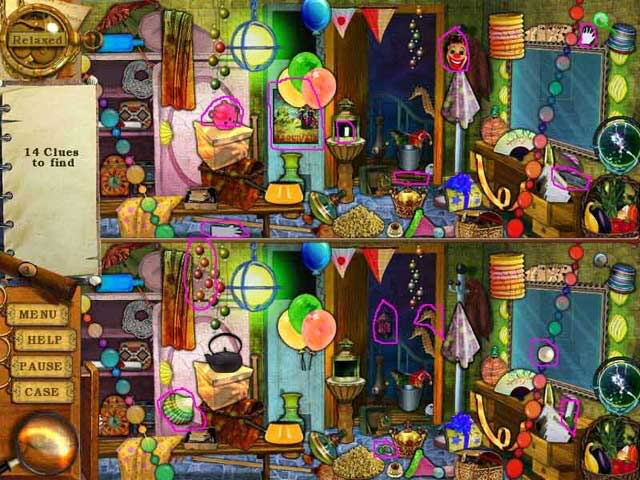
Entertainment Park Shooting Gallery Hidden Object 13A: (see picture)
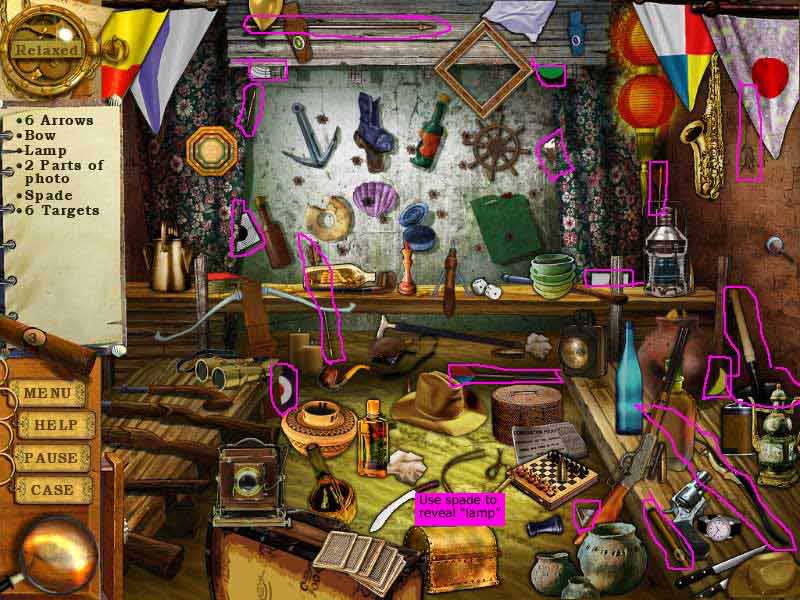
Entertainment Park Shooting Gallery Inventory Tasks 13A:
- Use spade to dig up lightbulb
Entertainment Park Chamber of Horrors Hidden Object 13B (see picture)
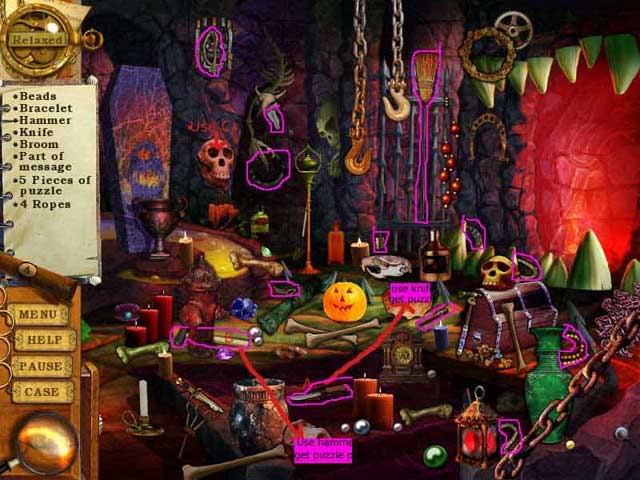
Entertainment Park Chamber of Horrors Inventory Tasks 13B:
- Use knife to break open shell and reveal puzzle piece.
- Use hammer to break skull on ground and reveal puzzle piece.
- Use broom to clean skull on wall and reveal puzzle piece.
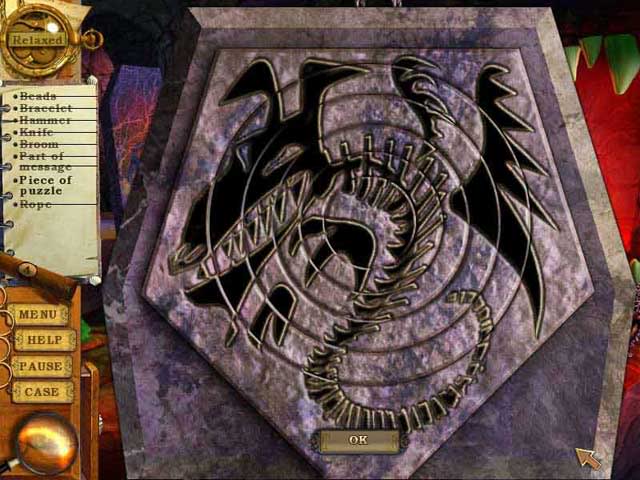
Entertainment Park Chamber of Horrors Rotation Minigame (see picture)
Location 14: The Ship
The Ship, The Breach Hidden Object 14A (see picture)
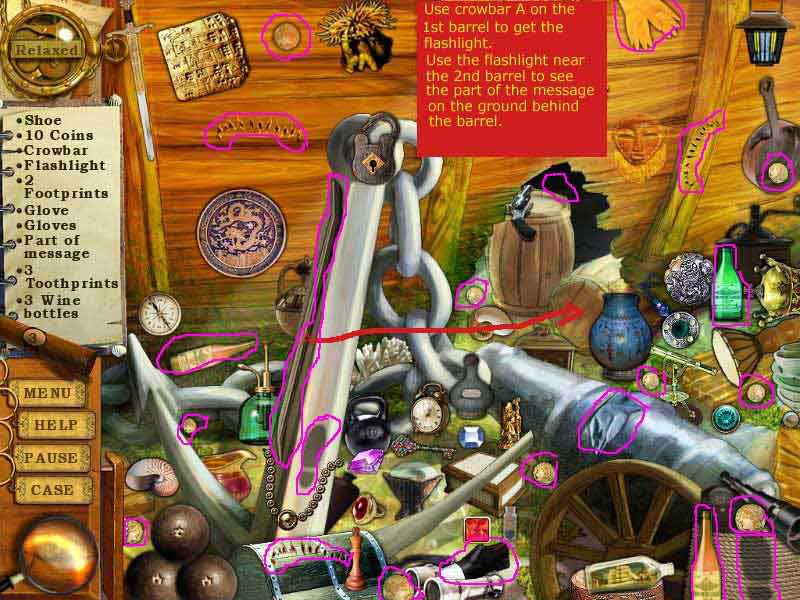
The Ship, The Breach Inventory Tasks 14A:
- Use crowbar on barrel that is lying down to reveal hidden flashlight.
- Use flashlight near 2nd barrel to reveal hidden part of message (on ground behind barrels)
The Ship, Crew’s Quarters Find the Differences 14A (see picture)

The Ship, The Hold Find the Differences 14B (see picture)
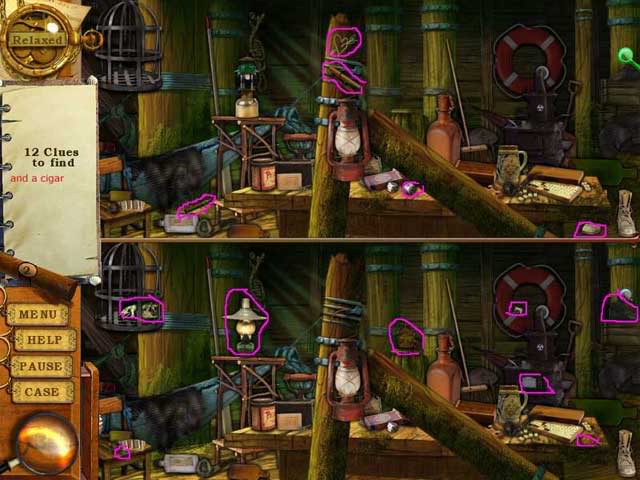
The Ship, The Treasury Hidden Object 14B (see picture)
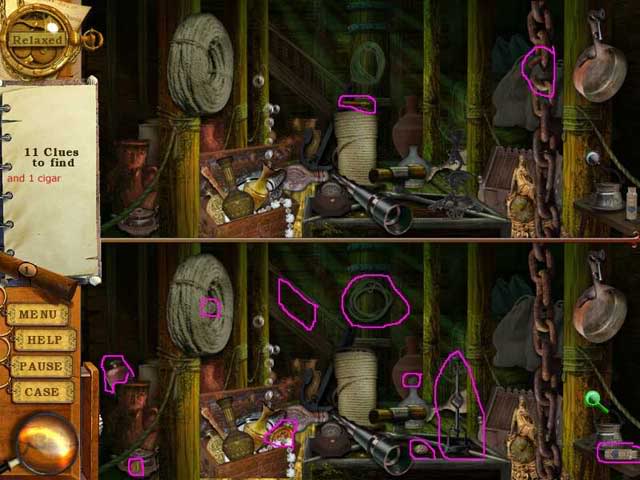
The Ship, The Treasury Inventory Tasks 14B:
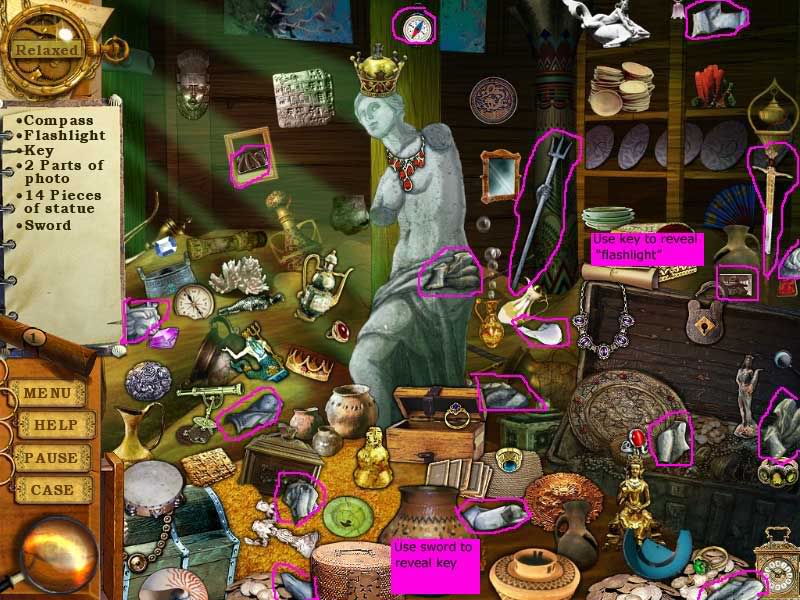
- Use the sword from the right side on the ceramic pot in front to reveal the hidden key.
- Use the key on the small gold chest by the shelves to reveal the hidden streetlamp (called a “flashlight” in the Find List)
The Ship, The Treasury Octopus Minigame (see picture)
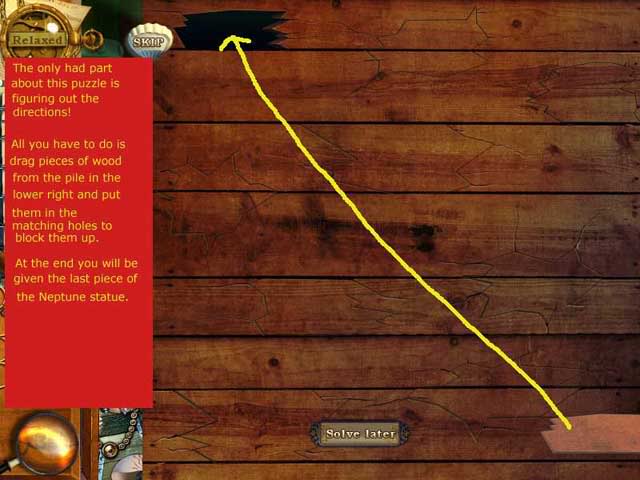
- The only hard part about this puzzle is figuring out the
directions! All you have to do is drag the pieces of wood from the
lower right corner to the matching holes. Pieces will “stick” if they
are placed correctly.
Location 15: Crime Scene at the Town Square
Crime Scene Crooks’ Note Jigsaw Minigame 15A (see picture)
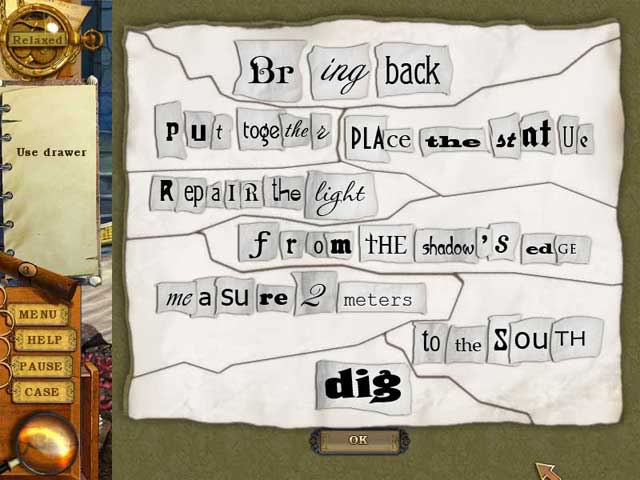
Crime Scene Neptune Statue Minigame 15B (see picture)
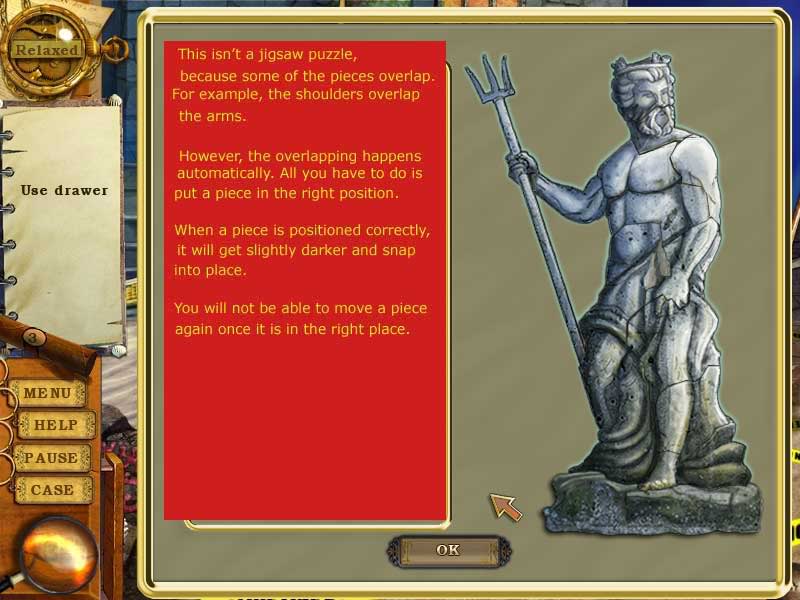
- This isn’t exactly a jigsaw puzzle, because some pieces overlap.
- When you have a piece in the correct position it will lock into place and you won’t be able to move it again.
Crime Scene, Prepare Light, Inventory Tasks 15A:
- After you’ve put together the crooks’ note, you’re ready to repair the damage to the Town Square.
- Begin by placing the Neptune statue from inventory on the pedestal. Then do minigame 15B to assemble it.
- Next put the streetlamp from inventory onto the top of the pole. The light will go on automatically.
Crime Scene Hidden Object (see picture)
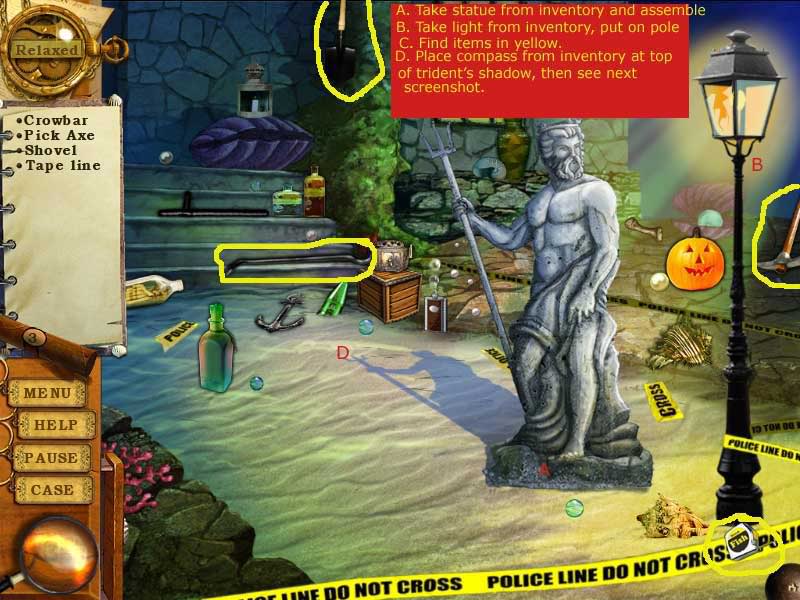
Crime Scene, Find the Town Key Inventory Tasks 15B (see picture):
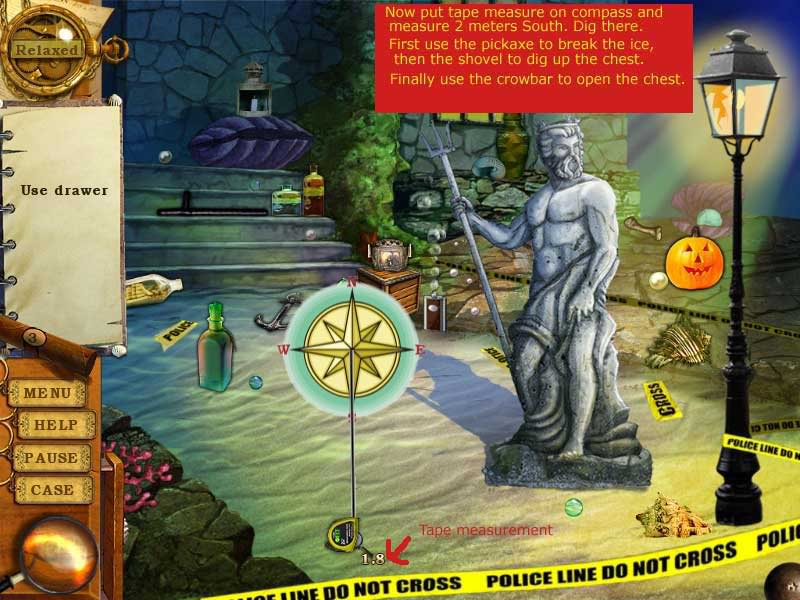
- Begin by placing the compass from inventory at the top of the shadow of the trident. Then measure South 2.0 meters.
- You must have the measuring line going directly south.
- Next use the pickaxe to break the ice at that spot.
- Use the shovel to dig up a chest.
- Use the crowbar to break open the chest and reveal the hidden Town Key.
- Click on the key to pick it up and complete the game.
“;
More articles...
Monopoly GO! Free Rolls – Links For Free Dice
By Glen Fox
Wondering how to get Monopoly GO! free rolls? Well, you’ve come to the right place. In this guide, we provide you with a bunch of tips and tricks to get some free rolls for the hit new mobile game. We’ll …Best Roblox Horror Games to Play Right Now – Updated Weekly
By Adele Wilson
Our Best Roblox Horror Games guide features the scariest and most creative experiences to play right now on the platform!The BEST Roblox Games of The Week – Games You Need To Play!
By Sho Roberts
Our feature shares our pick for the Best Roblox Games of the week! With our feature, we guarantee you'll find something new to play!All Grades in Type Soul – Each Race Explained
By Adele Wilson
Our All Grades in Type Soul guide lists every grade in the game for all races, including how to increase your grade quickly!


