- Wondering how to get Monopoly GO! free rolls? Well, you’ve come to the right place. In this guide, we provide you with a bunch of tips and tricks to get some free rolls for the hit new mobile game. We’ll …
Best Roblox Horror Games to Play Right Now – Updated Weekly
By Adele Wilson
Our Best Roblox Horror Games guide features the scariest and most creative experiences to play right now on the platform!The BEST Roblox Games of The Week – Games You Need To Play!
By Sho Roberts
Our feature shares our pick for the Best Roblox Games of the week! With our feature, we guarantee you'll find something new to play!All Grades in Type Soul – Each Race Explained
By Adele Wilson
Our All Grades in Type Soul guide lists every grade in the game for all races, including how to increase your grade quickly!
Star Crossed Love Walkthrough
Welcome the Star Crossed Love walkthrough on Gamezebo. Star Crossed Love is a hidden object adventure game played on the PC created by GameHouse. This walkthrough includes tips and tricks, helpful hints, and a strategy guide to how to complete Star Crossed Love.
Star Crossed Love – Game Introduction
Welcome the Star Crossed Love walkthrough on Gamezebo. Star Crossed Love is a hidden object adventure game played on the PC created by GameHouse. This walkthrough includes tips and tricks, helpful hints, and a strategy guide to how to complete Star Crossed Love.
General Tips
- Throughout the course of the game, a to-do list is available on the lefthand side of the screen. This will offer clues as to what you should do next and what your current goals are.
- Also located on the left side of the screen is a purse: this contains inventory items that are to be held and used elsewhere.
- On the right side of the screen can be found the Keepsake Box and the Diary. The Keepsake Box keeps tracks of momentos you’ve recovered from your previous lives, while the Diary keeps track of the story and goals of the game.
- Hints are unlimited and will replenish over time. It should be noted that hints will not appear or replenish in areas where it cannot be used, or it would be a waste to do so. In other words, hints are only available in areas where there are still tasks left to do or items left to be found.
- Puzzles throughout the game can be skipped after a certain amount of time has passed.
Chapter 1: The Locket
Apartment
- Click on the light switch located above the TV on the right to turn on the lights.
- Take a closer look at the laptop on the table, then click the “Smartmail” icon to access your email. But wait, not so fast! You’ll have to answer some security questions, first.
- Click on the diary (a green arrow will point you to it) sitting in front of the TV. This will be your in-game journal.
- Pick up the clipboard lying to the right of the laptop on the table to officially acquire your to-do list. You can check items and goals off as you go.
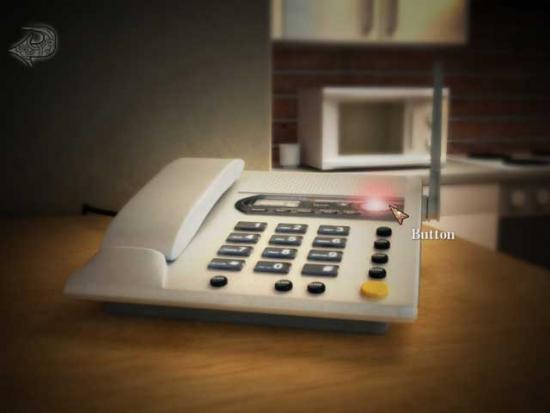
? Who is your best friend?- Take a closer look at the phone: it’s located between the bedroom and the kitchen. Click on the red button to play back your messages. Your best friend, Sarah Jones, called.

? What is your favorite building in New York?- Click on the large red curtain on the left side of the room for a close-up: open it. Find the objects shown at the bottom of the screen: you can use the telescope for a closer view around the city. The solution is shown below:
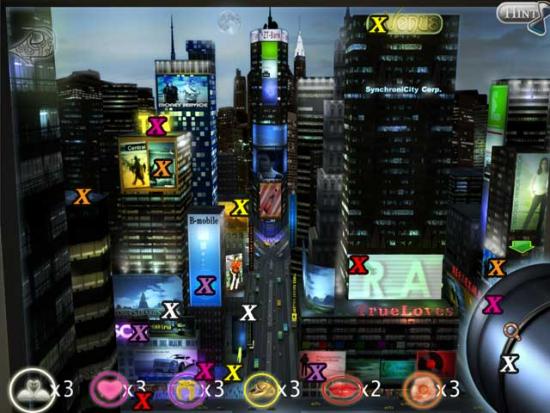
Successfully finding all the objects will jog your memory: your favorite building is the Flatiron Building.
? What is your favorite TV show?- The TV needs a remote to turn on. Click on the cushions on the couch to move them and discover the remote.
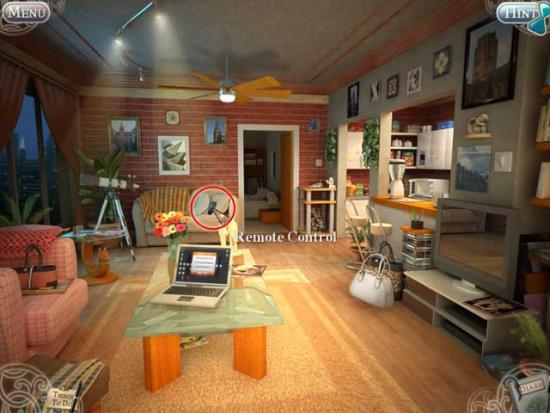
Use the remote on the TV to turn it on. Press the power button, as well as the “7” and “8” to flip it to the correct channel and discover your favorite TV show is Heart Felt.
? What is your favorite restaurant?- Take a closer look at the microwave in the kitchen. Push the “close” and “10 sec” buttons. Press the “stop” button with two seconds remaining, then “open” the microwave to unveil food from your favorite restaurant: Wong’s.
- Return to the laptop computer. Fill in the security questions, then click “submit” to read your email.
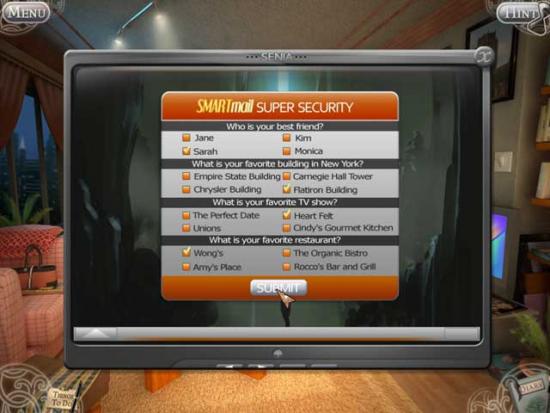
- After reading a mysterious email, pick up the white purse located in front of the TV to proceed on your way.
Street Curb
- Pick up the two hubcaps, the leaflet, and the license plate circled in the screenshot below. Place the hubcaps in their correct locations over the tires, the license plate in the missing slot on the back of the taxi, and the leaflet will go into your diary.
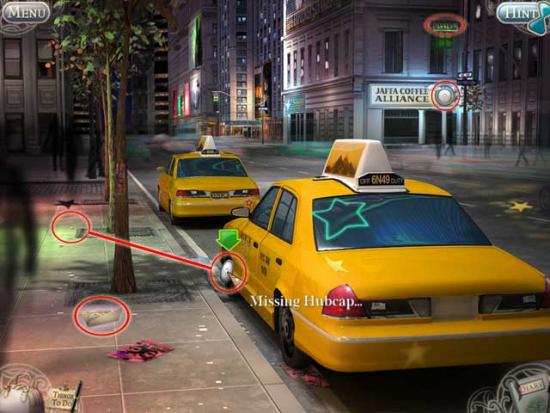
- To please the superstitious taxi driver, connect the stars hidden throughout the area so that they create a large star. The solution is shown below:
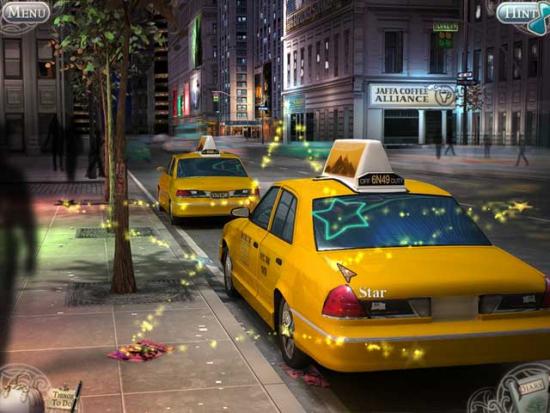
- Enter the taxi and you’ll be transported to the museum.
Museum
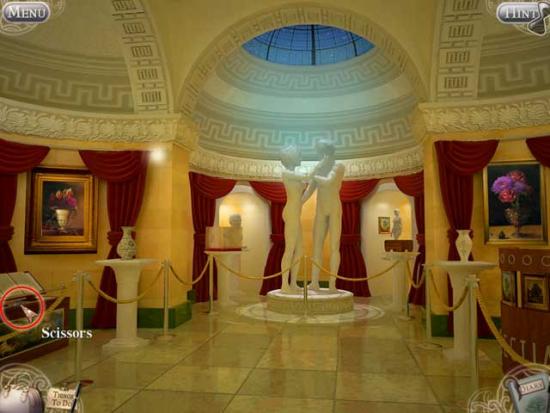
- Enter the museum. Pick up the scissors located on the left and exit back to the entrance.
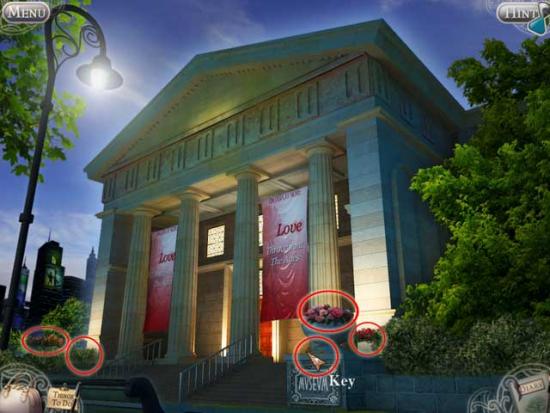
- Use the scissors to cut Begonias, Tulips, Roses, and then the bush covering the Other Flowers. Once you’ve gathered one of each, the scissors will disappear. Pick up the Key located beneath the begonias and re-enter the museum.
- Place the flowers inside their correct vases according to the paintings behind them. The solution is shown below:
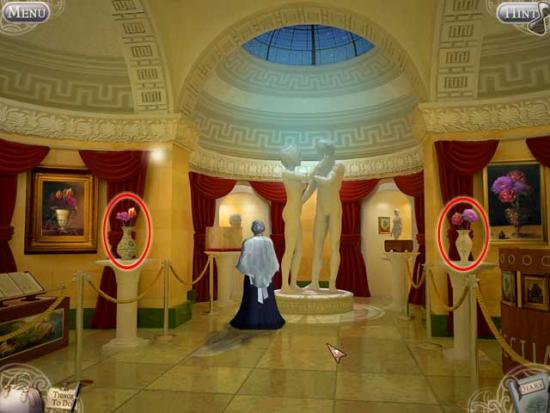
- Proceed towards the statue to talk with the old woman.
- Use the Key on the ring collection on the left to enter a puzzle.
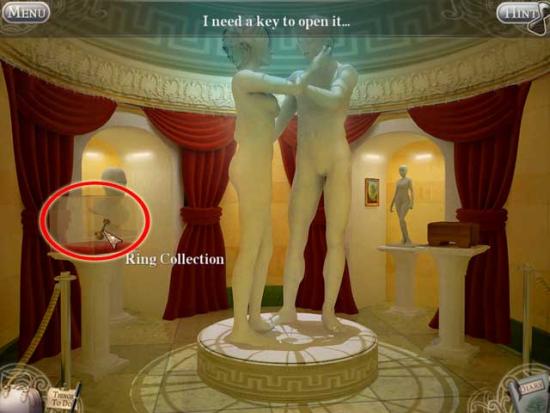
- Pair the rings to their proper matches: the solution is shown below.
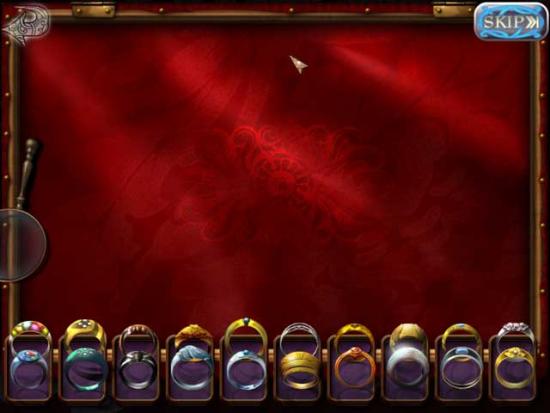
- Pick up the cog that falls on the floor upon solving the puzzle to add it to your inventory. Take a closer look at the music box on the right.
- Use the Cog on the empty slot to fix the music box. Click on the crank on the right to play the melody, then press the buttons to repeat it back. Do this until all the pictures appear at the top, then retrieve the Key and add it to your inventory.
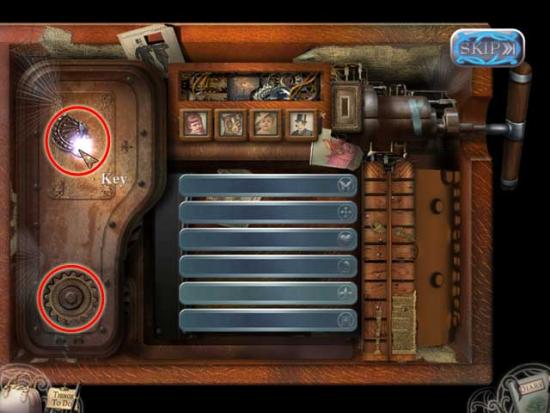
- Upon completing the puzzle, more objects will fall to the floor. Pick up the letter to read it in your diary, then use the Key on the Keepsake Box to acquire it (it will appear next to the diary in the lower right). Open it to reveal the Locket.
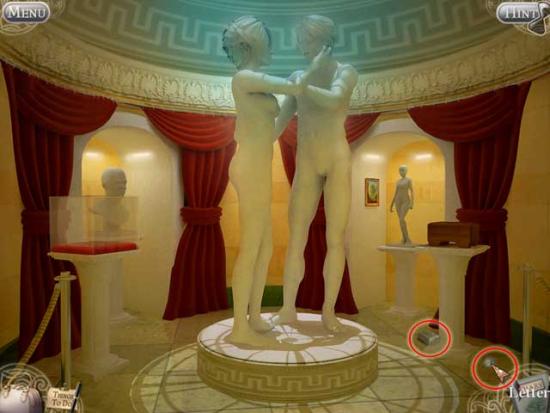
Chapter 2: The Woman’s Watch
Abandoned Station
- Proceed towards the ticket counter in the distance.
- Find the missing letters of the station sign and place them back in their proper locations. The solution and locations are shown below:
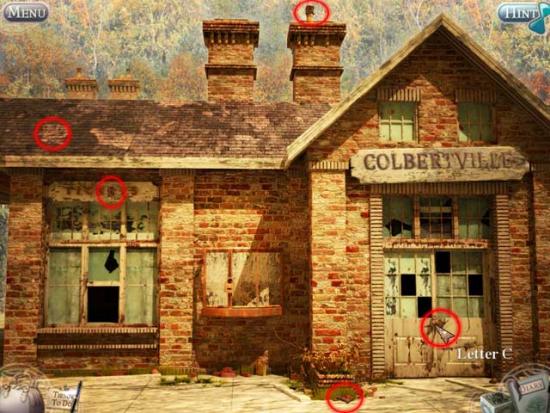
- Go back to the train tracks. Pick up the Sledgehammer and all the Statue Pieces scattered throughout the area. Their locations are shown below.
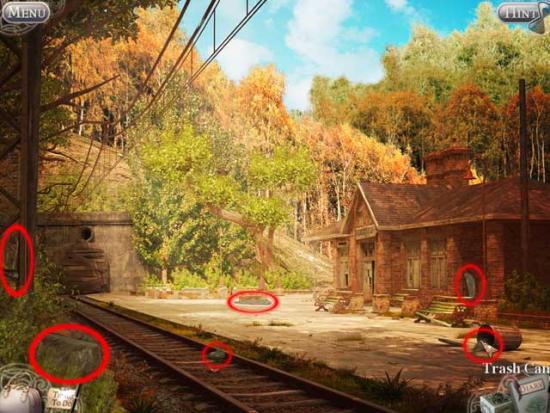
- Click on the statue base in the distance for a closer look.
- Use the Sledgehammer on the large rock on the left to split it. Pick up the Chisel circled below to carve the largest bit of debris into an additional statue piece.
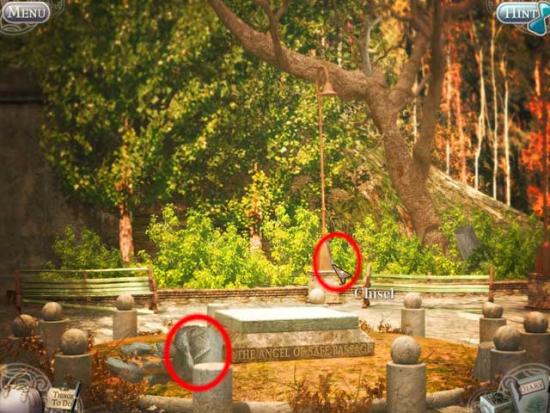
- Pick up all the statue pieces in the surrounding area. Their locations are shown below.

- Reassemble the angel statue, starting from the bottom and working your way up. The solution is shown below:
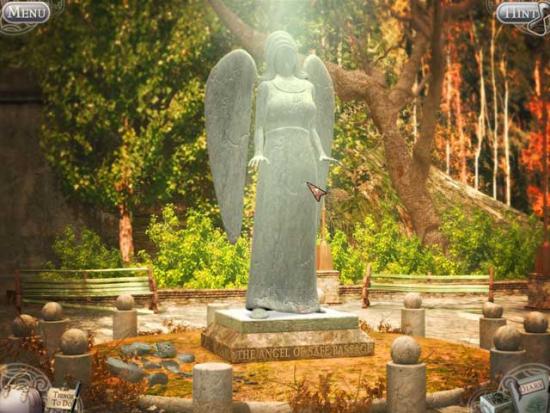
- A Time Capsule will appear. Open it to reveal a letter that will place itself within your diary, as well as a Woman’s Watch for your Keepsake Box.
Chapter 3: The Glasses
Train Platform
- Pick up the Silver Dollar in the train’s light, then proceed to the ticket counter.
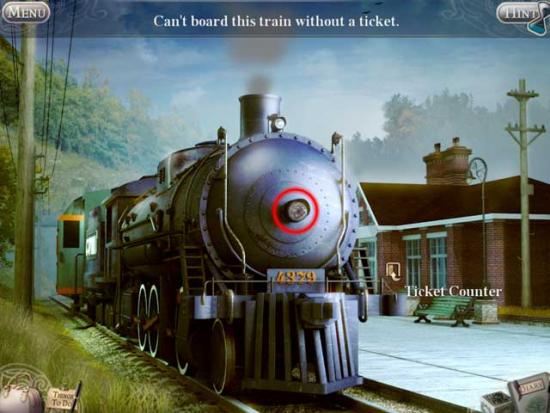
- Give the silver dollar to the man at the ticket counter. He’ll unlock the map case. Click on it to enter a puzzle.
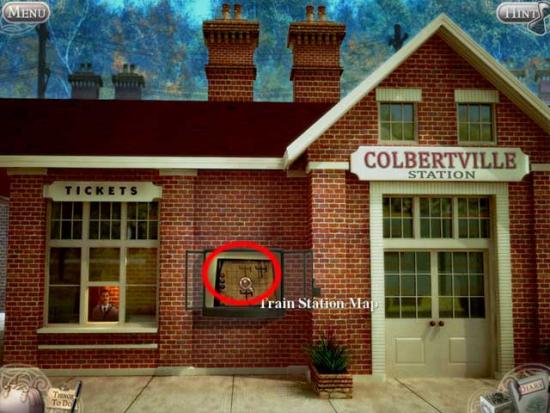
- Arrange the tracks so that each of the colored dots meets up with their destination. The solution is shown below:
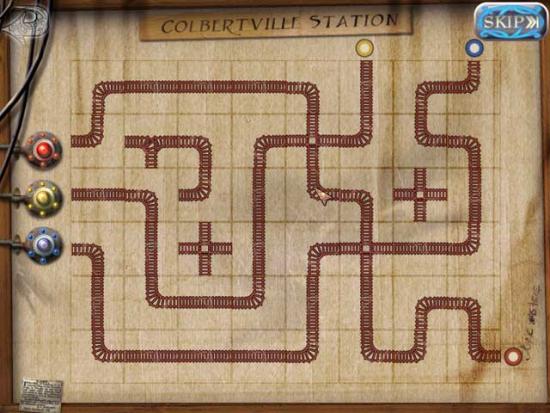
- Pick up your Ticket from the man at the counter, then go back to the train. Use the ticket on the train to board.
Inside the Train
- Proceed forward once. Click on the chessboard on the left to enter a puzzle.
- Capture all the knights. You can move vertically, horizontally, or diagonally, but you cannot overlap a previous path. The solution is shown below:
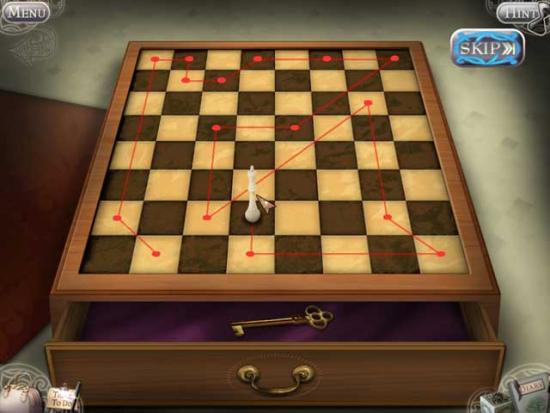
- Pick up the Key that appears to add it to your inventory.
- Proceed to the Kitchen Car.
- Click on the heavy red curtains to open them and let in the light. Click until all the curtains are open. Several orbs will appear on the floor. Click on each one to add them to your inventory.
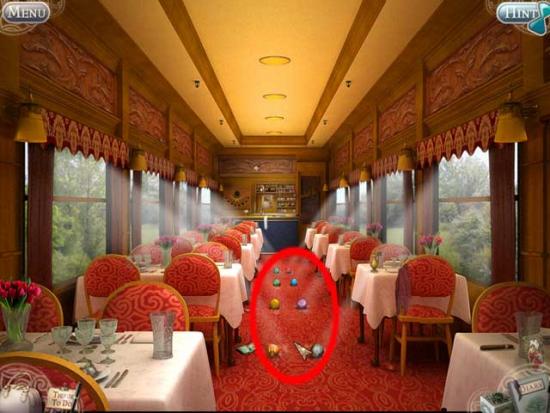
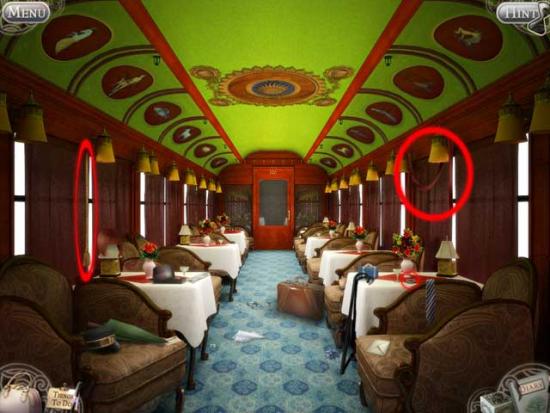
- Go back to the first train car. Pick up the Lion’s Tail, Nose Ring, and Red Sash and add them to your inventory.
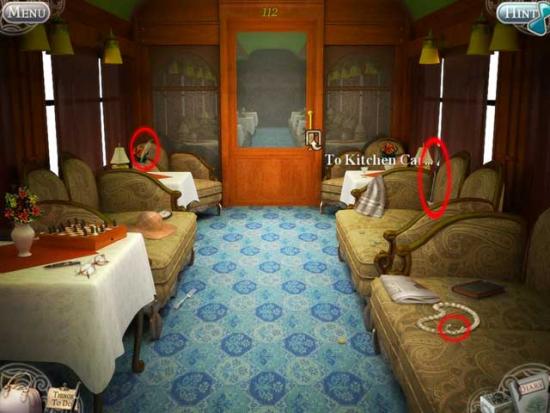
- Proceed forward to the chess board area. Pick up the Scorpion Tail, the Arrow, and the Wheat and add them to your inventory. Proceed forward to the kitchen car.
- Pick up the Fish Head, the Crab Claw, the Jar, and the Wheat to add them to your inventory. Proceed to the back of the car.

- Click on the Counterweight, Scales, Rams, and Capricorn Antlers to add them to your inventory. Then 1)Use the Jar on the faucet. Turn on the water to fill it, then add it back to your inventory and turn the faucet off. Next 2)Use the Arrow on the sharpening rock to sharpen the tip.
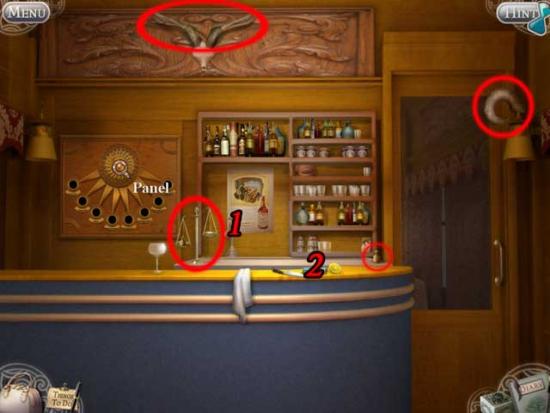
- Click on the Panel for a closer view.
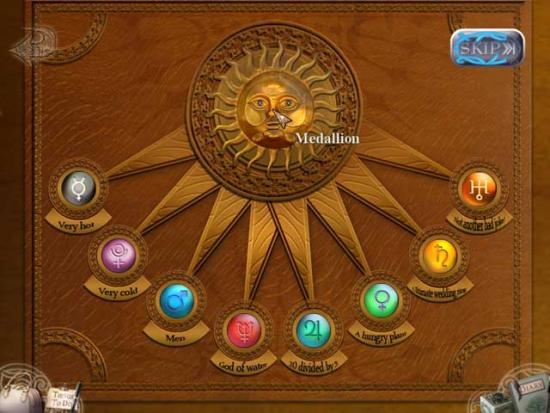
- Using the clues given below each slot, place each of the 8 orbs in their proper locations. The solution is shown below. Once finished, pick up the Medallion and add it to your inventory.
- Return to the first car.
- Click on each of the zodiac symbols at the top of the train car, then place the missing item(s) in their correct locations to complete them. The solutions are shown and named below:
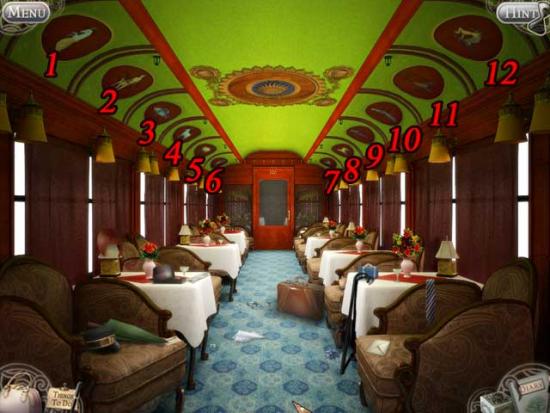
? 1. Capricorn Horns
? 2. Jar of Water
? 3. Fish Head
? 4. Rams
? 5. Nose Ring
? 6. Red Sash
? 7. Crab Claw
? 8. Lion Tail
? 9. Scales and Counterweight
? 10. Wheat (x2)
? 11. Scorpion Tail
? 12. (Sharpened) Arrow
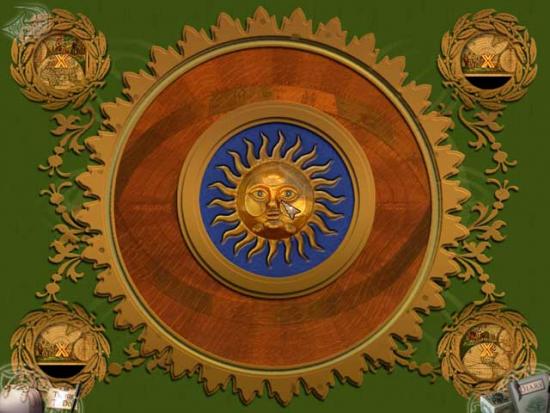
- Once you’ve placed all the items correctly, click on the sun dial at the top of the ceiling for a closer look.
- Move the maps in each of the 4 corners so that the “X” appears, then place the Sun Medallion in the slot that appears.
- Another time capsule will appear. Click on the letter to add it to your diary and on the Glasses to add them to your Keepsake Box.
Chapter 4: The Ring
Cathedral
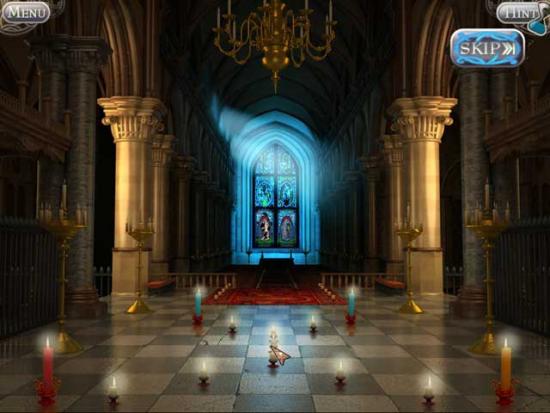
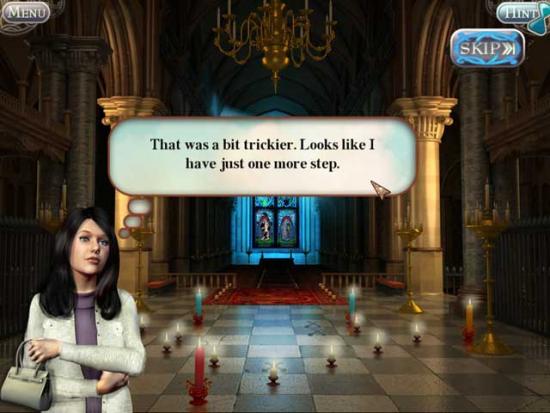
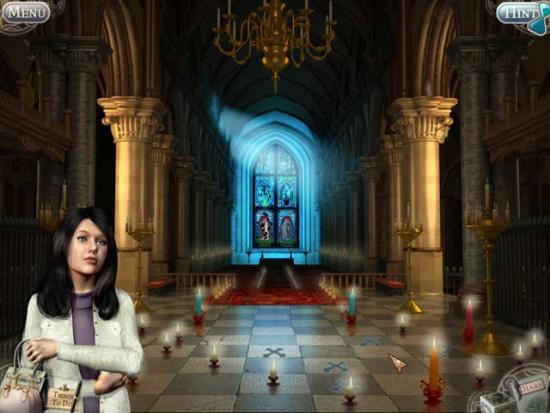
- Arrange the candles on the floor so that they’re all lit: only the red candle will burn constantly on its own. The solutions are shown below:
- Pick up the stained glass pieces hidden throughout the area: their locations are shown below:
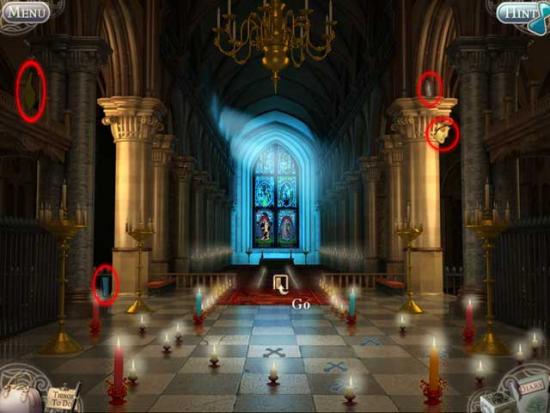
- Proceed forward into the next area. Pick up the stained glass pieces hidden here: their locations are shown below:
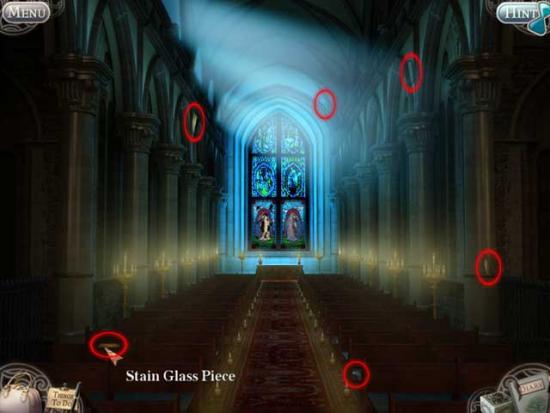
- Take a closer look at the stained glass window at the back of the church. Place the extra pieces from your inventory around the frame, then place them into their proper locations on the actual window. You can rotate them before placing them. The completed window is shown below:
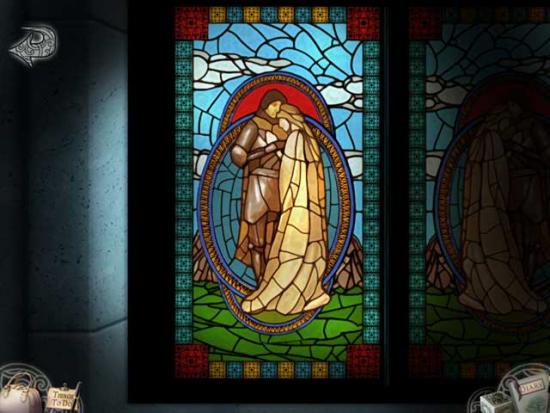
- You’ll be transported back through time!
Wedding Chapel
- Click on each of the four tablets at the tops of the pillars to enter puzzles.
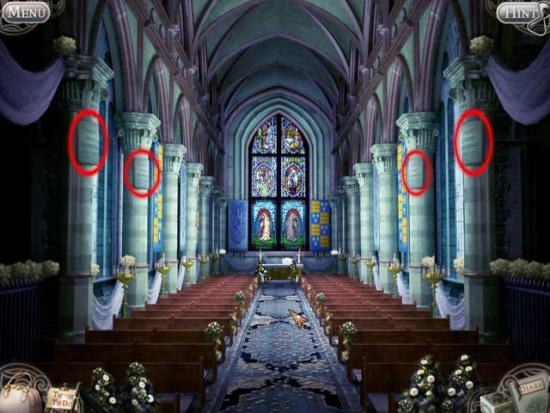
- Rearrange the letters so that the correct words are visible. The four solutions are shown below:
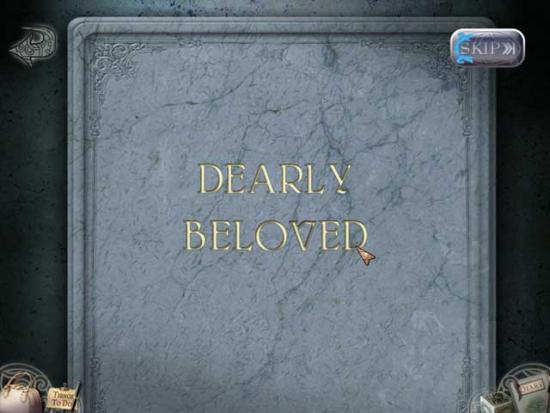

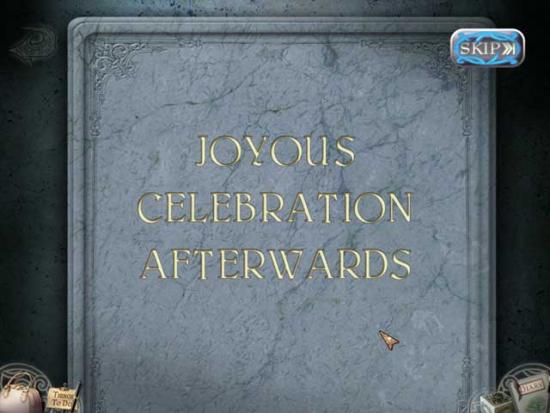
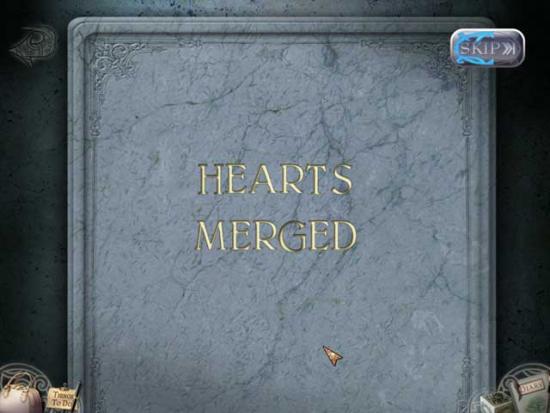
- A new time capsule will appear. Open it and click on the letter inside to add it to your diary, then on the Ring to add it to your Keepsake Box.
Chapter 5: The Baton
Concert Hall
- Proceed forward towards the stage.
- Take a closer look at the piano to activate a mini-game.
? Play 3 notes that add up to 30, Solution: 13, 19, 8
? Play 3 notes that add up to 40, Solution: 25, 9, 6
? Play 4 notes that add up to 56, Solution: 24, 17, 9, 6
? Play 4 notes that add up to 59, Solution: 32, 8, 13, 6
- For the next segment of the puzzle, a pattern will be played and you’ll have to figure out the following note(s). The solutions are as follows:
1. Pattern: 32, 39…
Solution: 24
2. Pattern: 17, 43, 43, 9, 9, 9…
Solution: 25, 25, 25, 25
3. Pattern: 17, 43, 24, 8, 9…
Solution: 25, 34, 6
4. Pattern: 13, 1, 39, 32, 6, 25, 34, 9, 8…
Solution: 43, 24, 17
- Once you’ve completed the puzzle, pick up the Clarinet Bell, the Cello Bow, the Violin Bow, and the Gears circled and shown below:
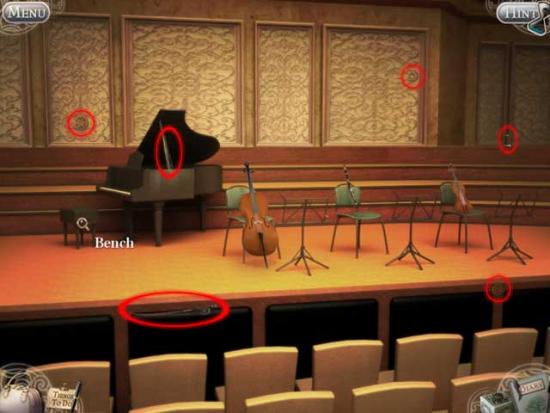
- You can take a closer look at the bench, but you’re not ready to solve the puzzle there. Instead, exit to the full view of the concert hall and collect the remaining gears and the rosin circled and shown below:
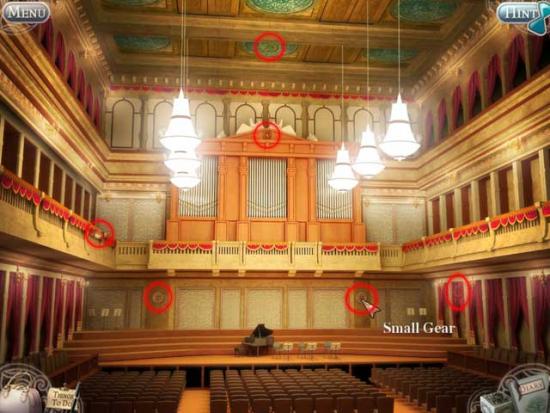
- Return to the stage.
- Use the Cello Bow, Violin Bow, and Clarinet Bell on their respective instruments. Next, use the Rosin on the Violin and Cello. Then, click on the piano Bench for a closer view.
- Solve the puzzle by placing the gears in their correct locations so that all of them spin and the arrows spin in the proper direction. The solution is shown below:
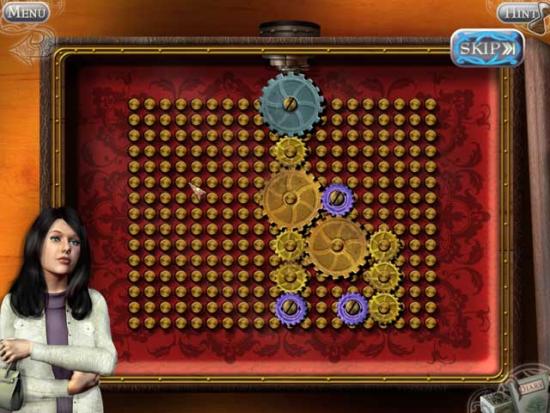
- Upon completing the puzzle, the Bench will open. Collect all the various pieces of Sheet Music and exit to the stage.
- Place each of the Music Sheets with their correct instrument. Done correctly, you’ll once again travel back in time.
- In this next puzzle, you’ll be presented with a crowd of noble women. Click on each one: a particular intrument will appear over their heads. Match them in pairs to keep them standing for an ovation. It’s easiest to work up from the back to the front. An example is shown below:
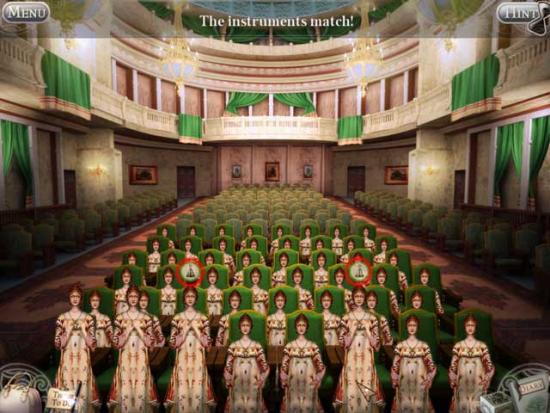
- A complete standing ovation will reward you with another time capsule. Click on it to open it. Click on the letter to add it to your diary and click on the Baton to add it to your Keepsake Box.
Chapter 6: The Goblet
Mountain Village
- Proceed forward to the Fountain, then up the left street.
Weststraße
- Take a closer look at the coffee shop on the right. Zoom in on the “Cups on Table” to enter a puzzle.
- Fill all the coffee cups and place them on their matching plates. A simple method should be recognized:
? 2 small cups combined (or 1 full small cup)= ½ a medium cup
? 2 medium cups combined (or 1 full medium cup)= ½ a large cup
Use this way of measuring to complete the puzzle successfully. The solution is shown below. Your reward will be the Coffee Beans.
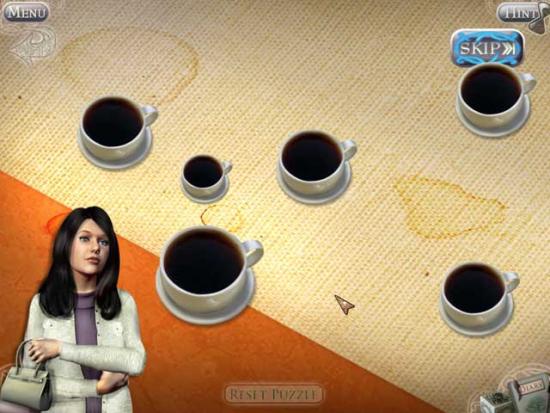
- Before proceeding further, pick up the Crystal Ball on top of the building in the distance, and the Extension Chord on the left to add them to your inventory.
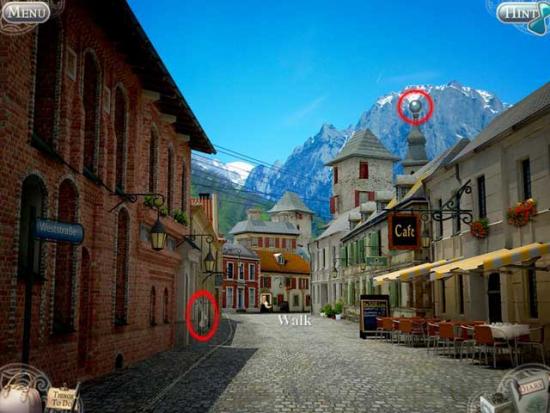
- Backtrack to the Fountain.
Oststraße
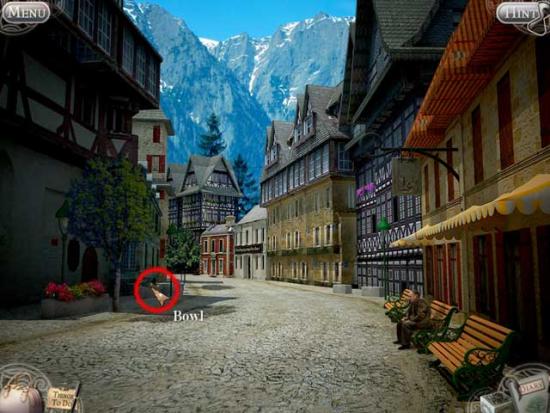
- Walk up the street until you encounter a Sad Man sitting on a bench. Pick up the Bowl lying nearby and add it to your inventory.
- Go back to the market area to the Fountain.
Mountain Village
- Place the Dirty Bowl in the Fountain to clean it and add it back to your inventory. Proceed back to the market.
- Use the Bowl on the Bronze Stand and you’ll be rewarded with the Silver Coin.
- Go back up past the Fountain and take the path on the left.
Weststraße
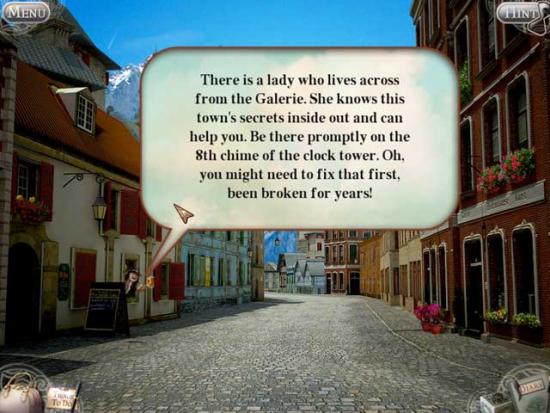
- Proceed up the street until you encounter a man hanging out of the pub window. Give him the Silver Coin and he’ll give you some useful information regarding an old woman and the village clock tower.
- Proceed up the road towards the clock tower.
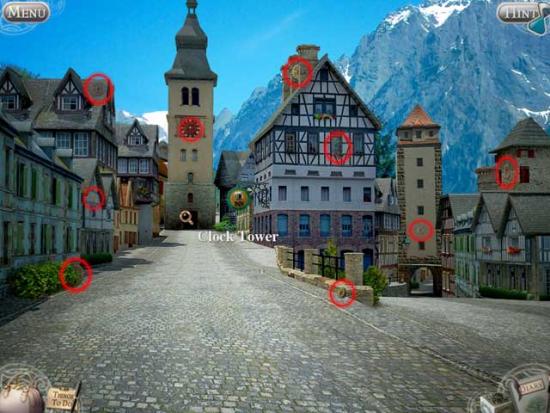
- Pick up the 9 gears hidden throughout the immediate area. Their locations are shown below:
- Click on the clock tower to enter a puzzle.
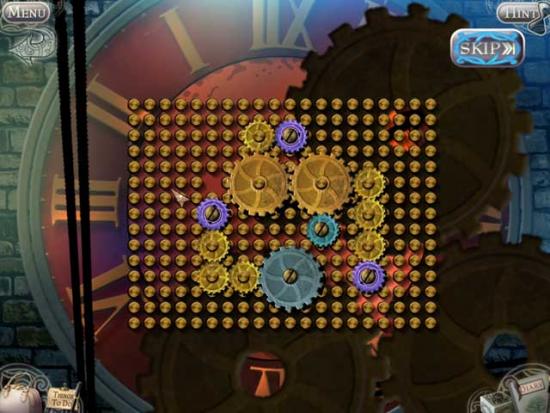
- Place the 9 gears that you’ve found in their correct locations so that all the gears are turning in their proper directions. The solution is shown below:
- Once you’ve completed the puzzle, quickly make your way to the Galerie by the 8th clock chime. The quickest route is past the Inn, down the street on the right.
Oststraße
- Wait outside the Galerie until the Old Lady appears on the 8th chime, then click on her to talk with her.
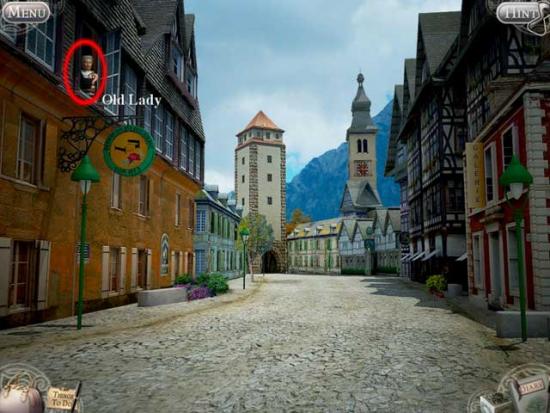
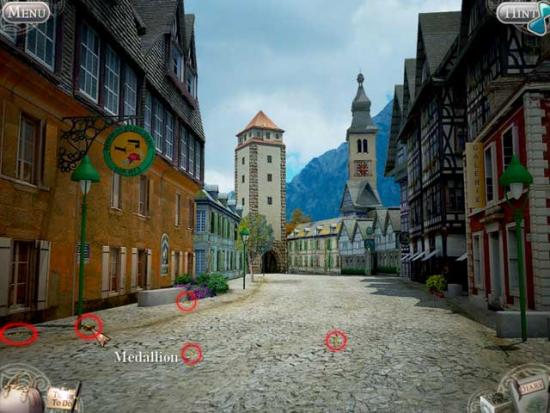
- After talking with her, the Old Lady will throw the Amulet from her window. Pick up all the pieces (their locations shown below) to add them to your inventory, then return to the market area before the Fountain.
Mountain Village
- Offer the Amulet to the jewelry stand. You’ll be given the Gold Coin in return.
- Proceed past the Fountain and up the street on the right.
Oststraße
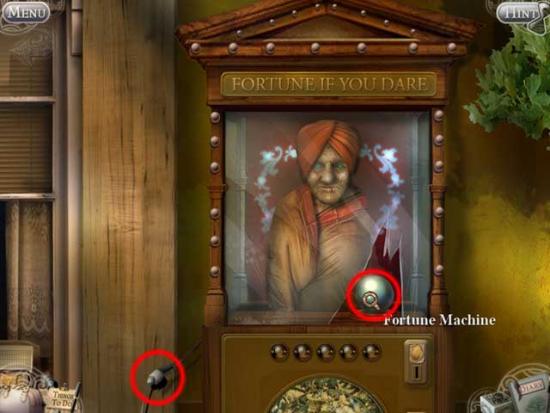
- Take a closer look at the Fortune Machine on the right.
- Use the Extension Chord and the Crystal Ball on their correct locations, shown below, then click on the machine for a closer view.
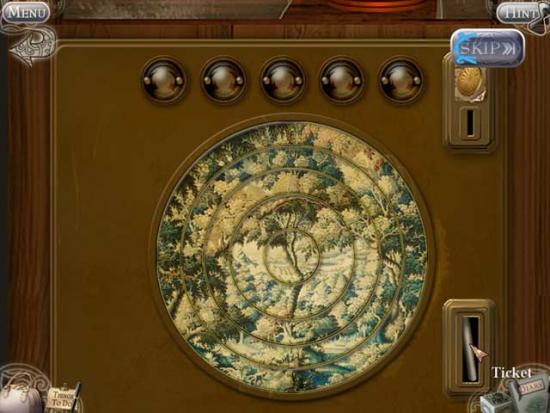
- Use the Gold Coin on the coin slot to activate the machine. Use the dials at the top to rotate the rings below and restore the picture. The solution is shown below. Once you’ve done this successfully, collect your fortune ticket from the slot on the bottom right.
- Proceed up the street until you encounter the Sad Man sitting on the bench. Give him the Lucky Fortune and he’ll return the favor by giving you the Rose, and giving you a tip to visit the Chocolate Store. Backtrack to the area with the fortune machine.
- Use the Rose on the Chocolate Store. The shop owner will offer to give you a Box of Chocolates in exchange for a bag of Coffee Beans. Use the Coffee Beans on the shop to acquire the Chocolates and add them to your inventory.
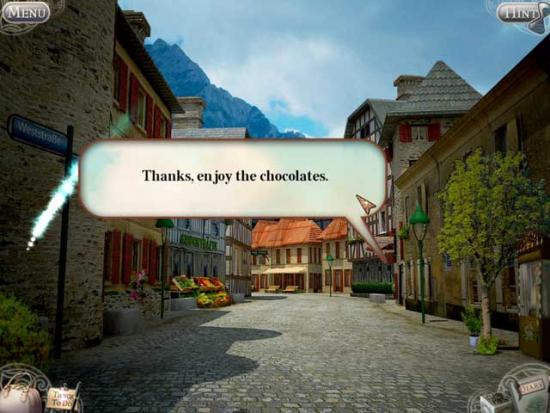
- Proceed up the street to the Galerie, then once more. You should find yourself where the clock tower and the Inn are located.
Weststraße
- Use the Chocolate Box on the Inn. The innkeeper will thank you by giving you the Pocket Watch.
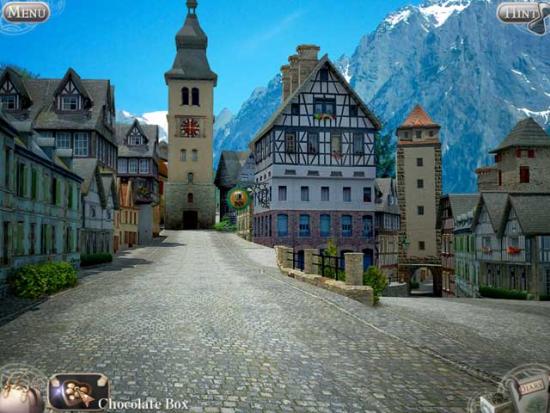
- Proceed back to the market area prior to the Fountain.
Mountain Village
- Use the Pocket Watch on the Clock Stand, and you’ll be rewarded with the Bill Note. Use the Bill Note on the Shell Stand to obtain the Shell and add it to your inventory.
- Go forward to the Fountain.
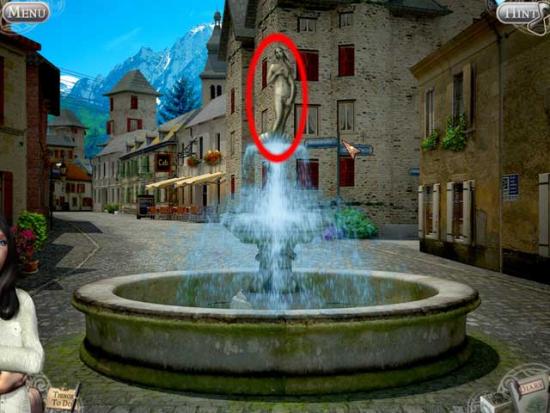
- Use the Shell on the fountain figure of Aphrodite, and you’ll find yourself transported to the past.
Olde Market
- Pick up the 4 Horseshoes, the Graspers, the Hammer, the Stirrups, the Goblet, and the Basket all shown and circled below:

- Use the Basket on the Food Stand to trade it for the Potatoes and add them to your inventory.
- Use the Potatoes on the Beer Stand as payment, then give the Goblet to the Beer Stand to acquire the Full Goblet (of beer).
- The fountain has stopped working now, revealing the Gold and Silver coins. Click on them to add them to your inventory.
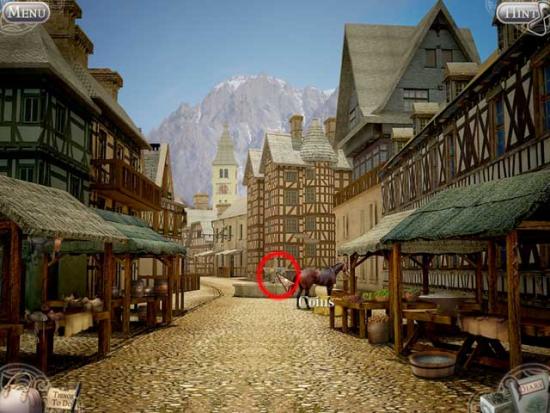
- Click on the Saddle Stand. They’ll ask you to make a reasonable offer, and so begins the heckling. Give them the following offers in the following order to secure the Saddle and add it to your inventory:
? Silver (Coin), Silver (Coin), Silver (Coin), Silver and Gold (Coins), Gold and Silver Coins and Beer.
- Place one of the Horseshoes from your inventory on the Anvil on the right. Use the Hammer on it to heat it. Next, use the Graspers to cool it in the Water below and add the Shiny Horseshoe to your inventory. Repeat this process for each of the 4 Horseshoes.
- Use the Saddle, the 4 Horseshoes, and lastly the Stirrups on the horse in the distance to reveal another time capsule.
<SL61.jpg>
- Open the time capsule. Click on the letter inside to add it to your diary, then click on the Goblet to add it to your Keepsake Box.
Chapter 7: The Shoe
Castle Entrance
- You’ll find yourself in front of a castle, with remnants of a catapult located to the left. Pick up the two Catapult Parts in the immediate area. Their locations are shown below:
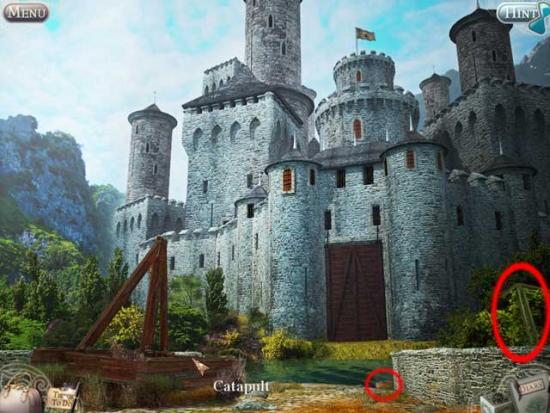
- Once you’ve collected these parts, proceed down to the field.
Field
- Collect the catapult parts scattered throughout the field. Their locations are shown below:
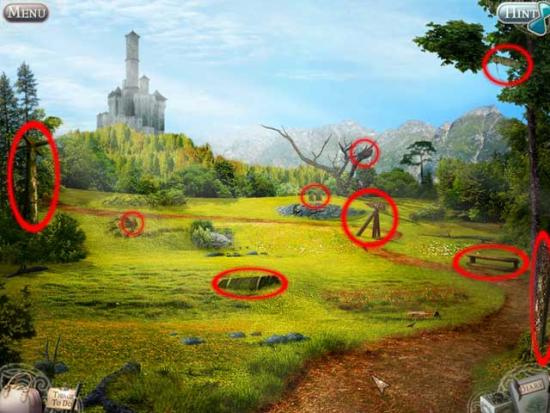
- Return to the castle entrance.
Castle Entrance
- Reassemble the catapult by placing the pieces in their correct locations in the correct order. The order and completed catapult are shown below:
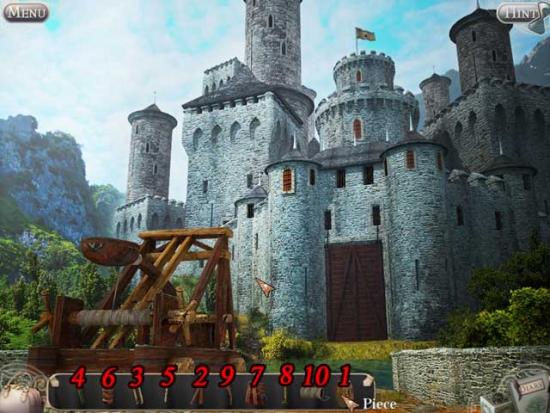
- Return to the field.
Field
- Pick up the Boulder and the Knife to add them to your inventory, then proceed back to the catapult.
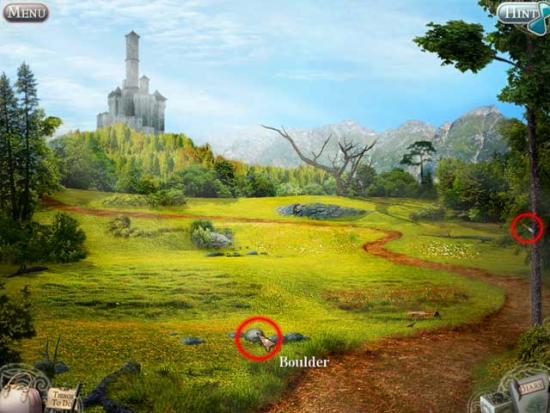
Castle Entrance
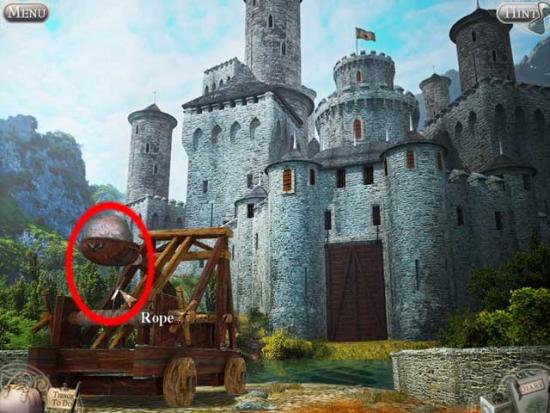
- Place the Boulder in the catapult, then use the Knife on the rope to activate it, breaking open the window.
- Return to the field.
Field
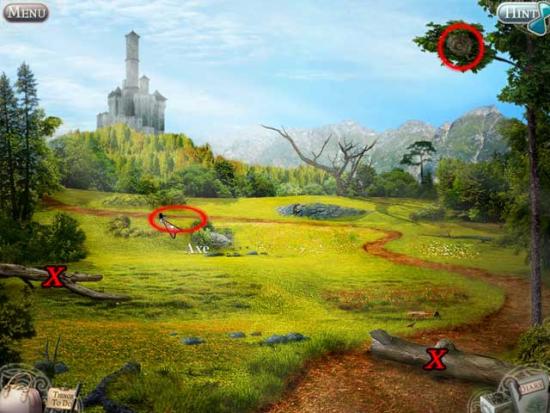
- Pick up the Axe and the Vine Rope circled below to add them to your inventory. Use the Axe on the pieces of wood marked with an “X” to chop them up, then collect the resulting wood piles to add them to your inventory. Once you’ve collected everything, return to the castle entrance.
Castle Entrance
- Take the Raft from your inventory and place it in the water moat, then click forward to step onto it.
Castle Wall
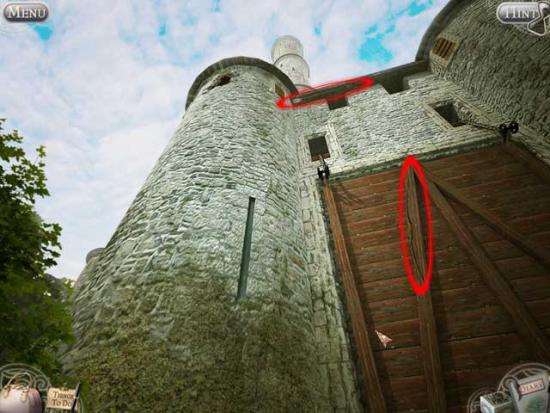
- Pick up the Bow and the Arrow to add them to your inventory, then exit back to the castle entrance.
Castle Entrance
- Click on the Used Rope on the catapult to add it to your Bow and Arrow.
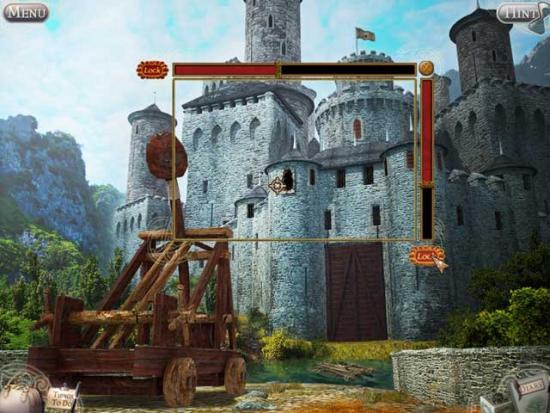
- Use the Bow and Arrow with Rope on the Window. A special window will appear, and a cursor will bounce around. Wait until the cursor lands over the window, then press either one of the “Lock” buttons. Then, align the cursor with the window again and press the other Lock button to shoot the arrow successfully into the window.
- Cross over onto the raft.
Castle Wall
- Click on the rope to climb it.
Castle Tower
- Pick up the 4 butterfly nets scattered throughout the room.
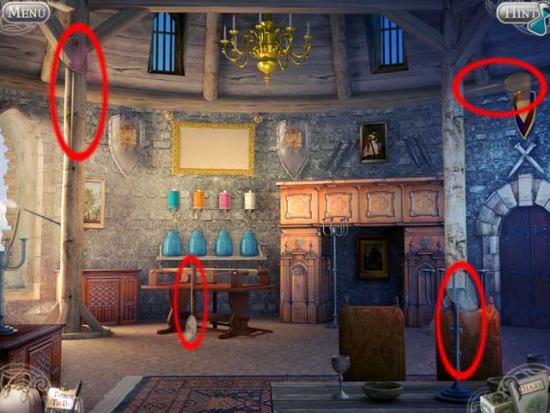
- Exit the tower and proceed back to the field.
Field
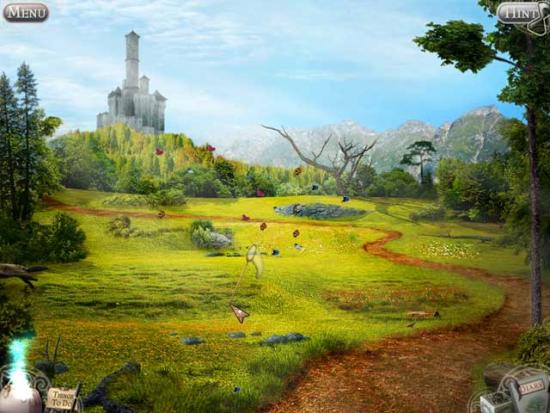
Castle Tower
- Use the colored nets full of butterflies on the jars under the thread of the same color. The butterflies will restore the tapestry, and you’ll travel back in time.
Olde Castle Tower
- Pick up the 5 colored gems hidden throughout the room. Their locations are shown below:
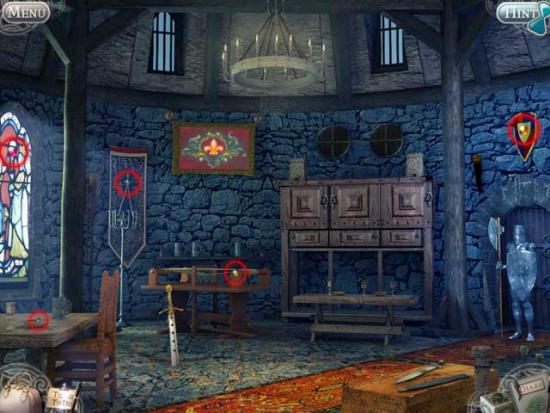
- Take a closer look at the slotted sword in the middle of the room. Place the gems in their proper locations. The solution is shown below:
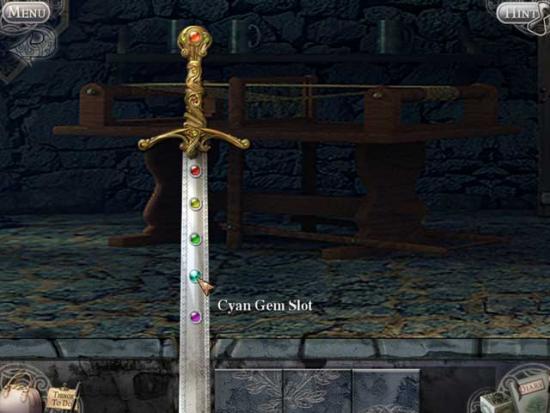
- Slide the tiles at the bottom of the sword so that the picture on them is restored. The solution is shown below:
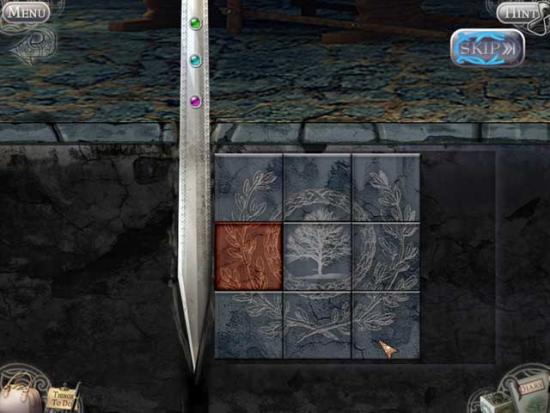
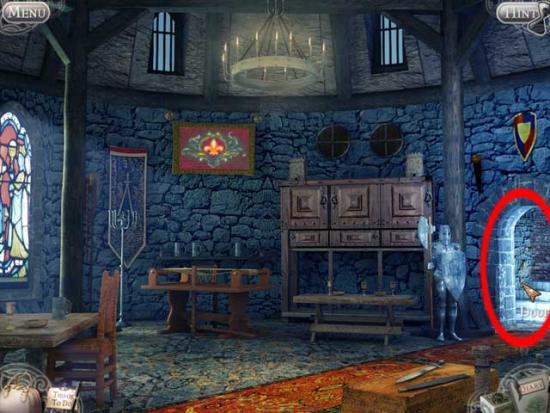
- Click on the sword to then add it to your inventory. Use the sword on the guard knight’s shield to open the door on the right and exit the room.
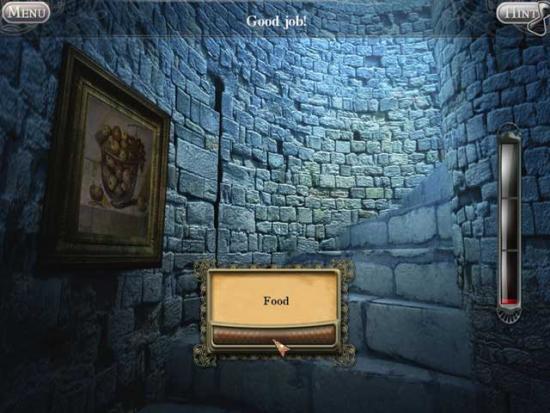
- Ascend the tower stairs. As you go, you’ll encounter paintings. If the image matches the word category written at the bottom of the screen, click “accept”, otherwise keep going until you find a match. The pace will grow steadily faster, and you’ll reach the top of the tower once the meter is filled. An example is shown below:
- At the top of the tower, click on the time capsule that appears. Click on the letter inside to add it to your diary, then click on the Shoe to add it to your Keepsake Box.
Chapter 8: The Compass
Gondola Canal
- Pick up the Paddle to add it to your inventory.
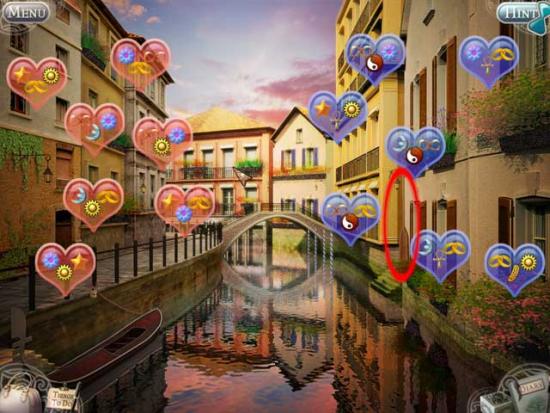
- Click on the floating hearts. Match the red ones with the blue ones: each must have at least two symbols in common. The solution is shown below:
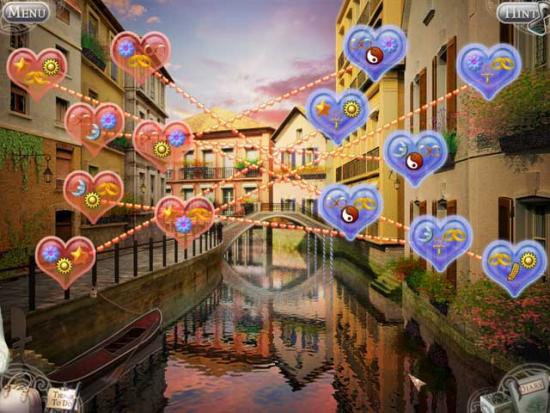
- Pick up the Key that appears upon solving the puzzle.
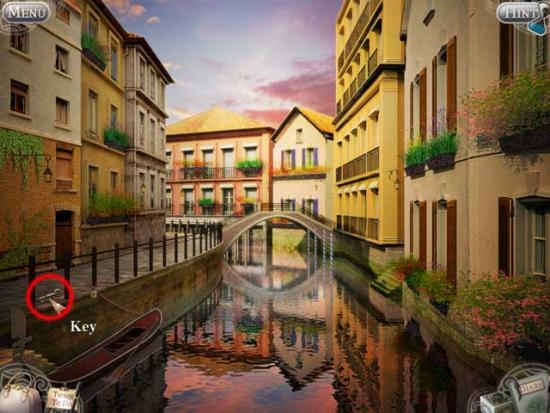
- Click on the Gondola for a closer view. Use the Key on the padlock restraining the gondola, then use the Paddle on the gondola. Click on the gondola to transport yourself to the next location.
Docks
- Click on the Bulletin Board on the right side of the screen for a closer view.
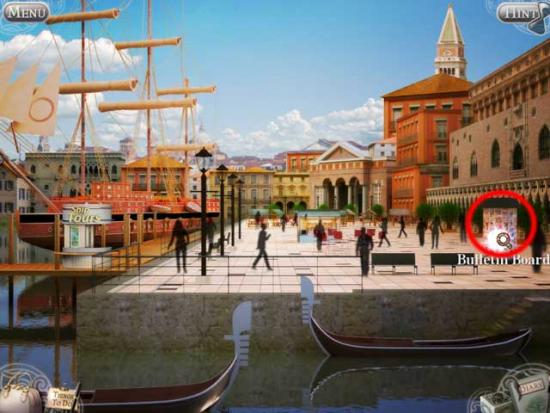
- Layer all the love notes so that they can all be read at the same time. The solution is shown below:
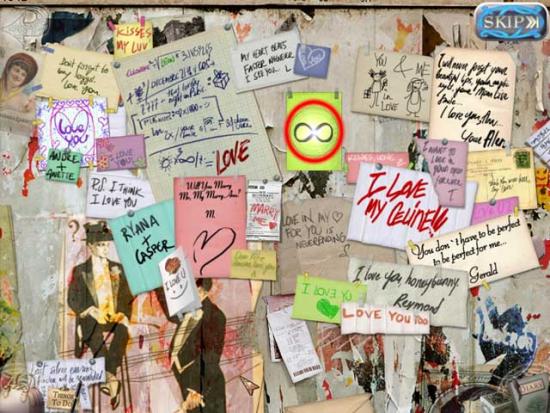
- Click on the Infinity symbol to add it to your inventory.
- Use the Infinity symbol on the ring on the ship’s sails on the left side of the screen to trigger a flashback.
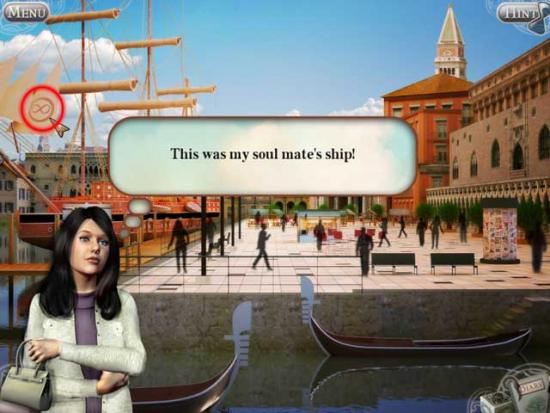
Ancient Docks
- Pick up the two Keys circled below, then take a closer look at the Treasure Chest marked with an “X”.
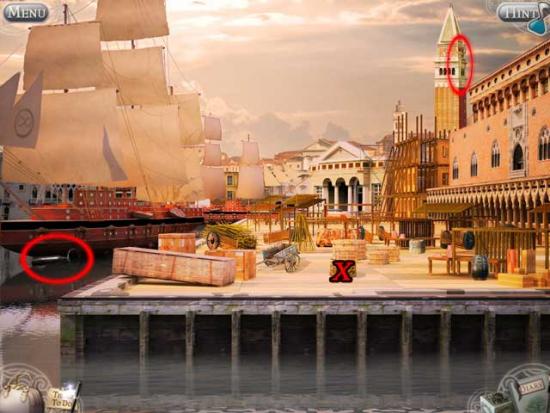
- Pick up the other two Keys in this area, then click on the Treasure Chest again for a closer view.
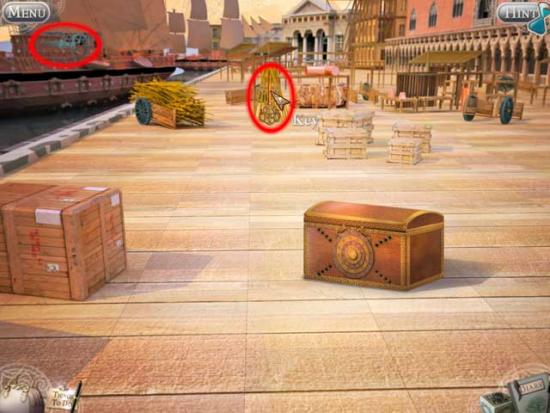
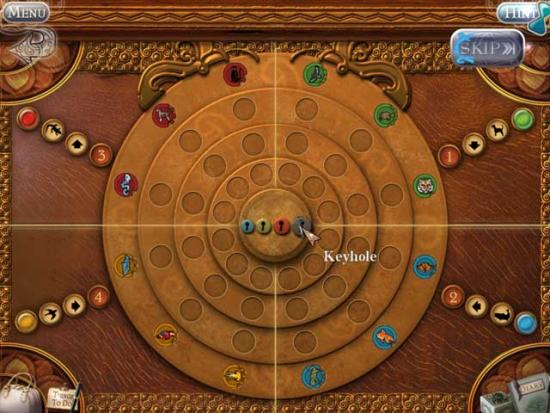
- Move the various pieces into their correct slots based on the prominent key slot and the clues on the outer edges of the ring. The 4 seperate solutions are shown below:
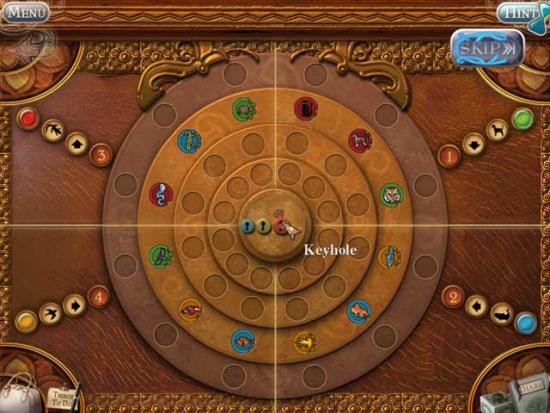
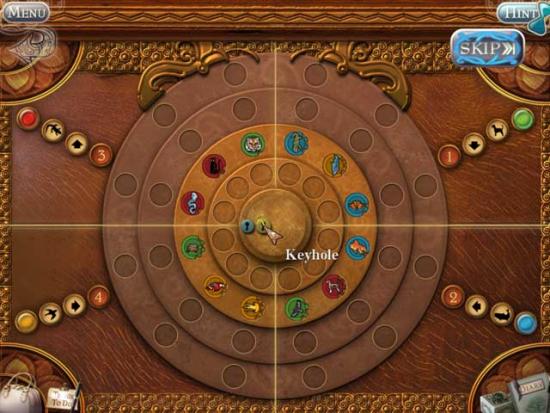
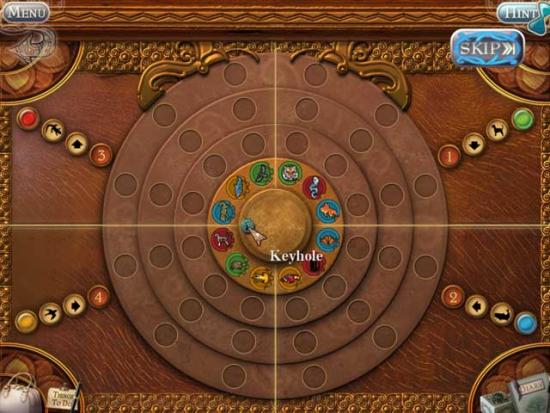
- Click on the time capsule that appears inside the opened chest, then open it. Click on the letter to add it to your diary, then click on the Compass to add it to your Keepsake Box.
Chapter 9: The Candle
Apartment
- Click on the laptop sitting on the table, then click on the “Smartmail” icon to read an email sent by your soulmate. Take a closer look at the statue located just behind the laptop.
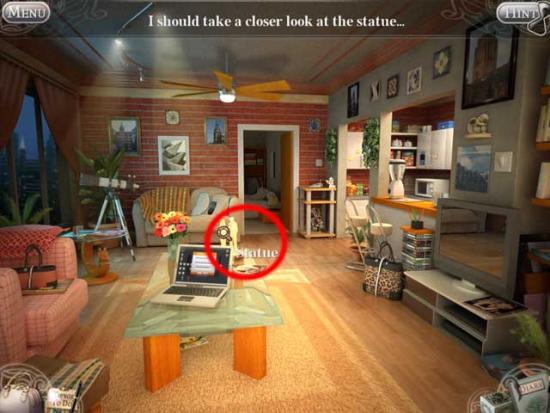
- In the close-up, click on the Plaque to remove it, then click on the Puzzle to enter it.
- Arrange the sliding letters so that they spell out the word “Eternal”. Upon doing this successfully, a secret compartment will appear with one final time capsule.
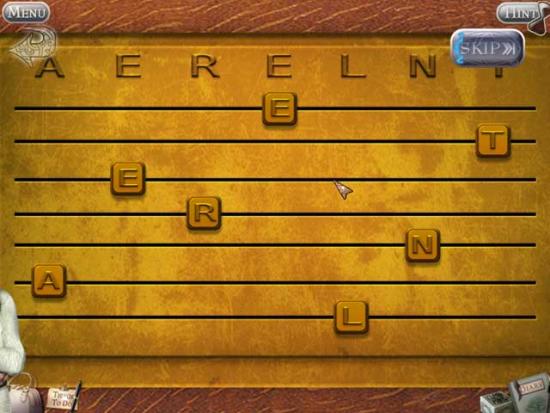
- Open the time capsule. Add the letter to your diary, make sure you read it! Then add the Candle to your Keepsake Box.
- Click on the Window of the left side of the room to look outside.
- Place the 9 Keepsake items in their proper city locations. They will reveal the location of your soulmate. The solution is shown below:
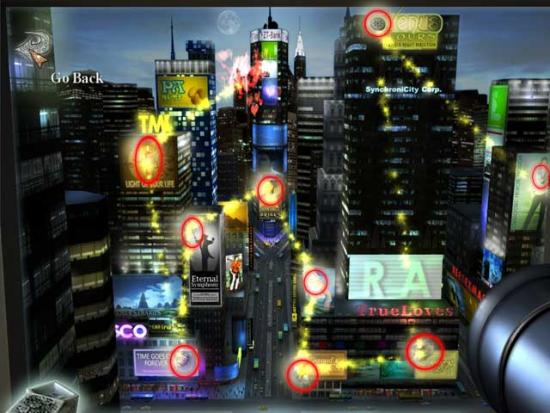
- Now sit back, relax, and enjoy the romantic conclusion.
Congratulations, you’ve completed Star Crossed Love!
More articles...
Monopoly GO! Free Rolls – Links For Free Dice
By Glen Fox
Wondering how to get Monopoly GO! free rolls? Well, you’ve come to the right place. In this guide, we provide you with a bunch of tips and tricks to get some free rolls for the hit new mobile game. We’ll …Best Roblox Horror Games to Play Right Now – Updated Weekly
By Adele Wilson
Our Best Roblox Horror Games guide features the scariest and most creative experiences to play right now on the platform!The BEST Roblox Games of The Week – Games You Need To Play!
By Sho Roberts
Our feature shares our pick for the Best Roblox Games of the week! With our feature, we guarantee you'll find something new to play!All Grades in Type Soul – Each Race Explained
By Adele Wilson
Our All Grades in Type Soul guide lists every grade in the game for all races, including how to increase your grade quickly!


