
Best Horror Games On Itch.io – July 2026
Across a bounty of subgenres.![Haze Seas Accessories Tier List [Best Accessories to Equip]](/wp-content/uploads/2026/07/haze-seas-accessories-tier-list.jpg "Haze Seas Accessories Tier List [Best Accessories to Equip]")
Haze Seas Accessories Tier List [Best Accessories to Equip]
The accessories with the best stat buffs in Haze Seas.
![[Roblox] Evomon Shiny Hunting Guide – Including Prismatic and Pris Shinies!](/wp-content/uploads/2026/06/evomon-shiny-hunting-guide.jpg "[Roblox] Evomon Shiny Hunting Guide – Including Prismatic and Pris Shinies!")

Special Enquiry Detail: Engaged to Kill Walkthrough
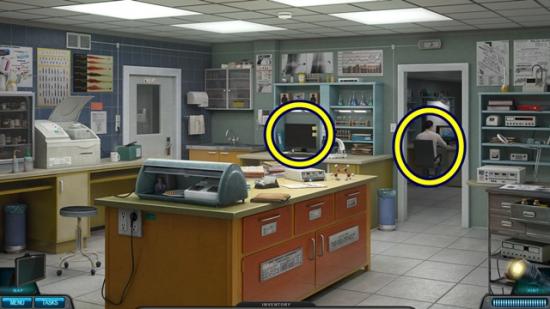
Welcome to the Special Enquiry Detail: Engaged to Kill walkthrough on Gamezebo. Special Enquiry Detail: Engaged to Kill is a hidden object/adventure game created by Floodlight Games. This walkthrough includes tips and tricks, helpful hints, and a strategy guide on how to complete Special Enquiry Detail: Engaged to Kill.
Share this


- Prefer Gamezebo on Google

Game Introduction – Special Enquiry Detail: Engaged to Kill
Welcome to the Special Enquiry Detail: Engaged to Kill walkthrough on Gamezebo. Special Enquiry Detail: Engaged to Kill is a hidden object/adventure game created by Floodlight Games. This walkthrough includes tips and tricks, helpful hints, and a strategy guide on how to complete Special Enquiry Detail: Engaged to Kill.
How to Use this Walkthrough (Please read)
- This walkthrough is meant to be used as a guide to assist in solving mini-puzzles and acquiring all items in order to complete the game. You may explore locations in the order you wish, this walkthrough is written to take the most direct route to the game’s finish.
- Inventory objects will be written in bold. The walkthrough will state, “Use the inventory item on the blah blah,” because it assumes you have the item. If you don’t have the item, on your keyboard, press CTRL+F (at the same time). In the text box, type the name of the item you are looking for and press ENTER. This will scan this page for the appearance of that word.
- This is a task-based game. Often you will need to visit a room or examine an area before other tasks can be triggered. For example, you need to visit a room however there is nothing you can do at the moment because the room is dark. This triggers a need for a lamp. In the next room, the only active area is a lamp. Once you click on it and learn you need to fix it, you must close the window and a hidden object hunt is triggered.
Gameplay and Tips
- This is a hidden object adventure game. You will move from location to location solving hidden object hunts, mini-puzzles and picking up items to use in order to proceed in the game.
- This walkthrough will indicate all areas to explore in order to finish the game. It will not indicate where to click to simply get comments from the characters.
- For explanation on gameplay, click Help from the main screen or from the Menu button during the game.
- Sparkles indicate areas of interest.
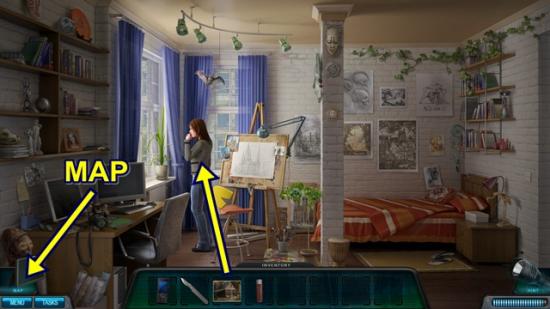
- The Tasks button at the bottom left of the screen lets you know what you need to do.
- Move your cursor over every aspect of a scene and watch for it to change, it’s the only way to find everything.
- The Menu button at the bottom left of the screen gives access to the options and help screens and will bring you back to the main screen.
- Hidden object hunts will provide a list of items to find in the scene. Once you have found all the hidden objects, an item is added to your inventory.
- Items collected throughout the game go into your inventory, located at the bottom of your screen.
- Closing a window – To close the zoom-in windows, click anywhere outside the window. Tip: If you can zoom in on the area again, you likely haven’t found everything you needed to find.
- Click the question mark at the top of a mini-puzzle scene to get help on how to solve the puzzle.
- Mini-puzzles can be skipped once the Skip button fills. The Skip button is located at the top of the puzzle window.
- Hint system – Hints are available via the flashlight at the bottom right of the screen.
- Hints used in the hidden object scenes highlight an item.
- Hints used during the adventure mode will point out something to do in the scene, tell you there is nothing left to do in the scene or instruct you as to where to go next.
- The map appears at the bottom left of the screen. It allows you to move to different areas of the game. Each area has several scenes within it. When the map icon flashes, click on it to move to a different location.
Chapter 1: A Model Abduction

- Click through the dialogue. Talk to Mr. Templeton. Click through the dialogue.
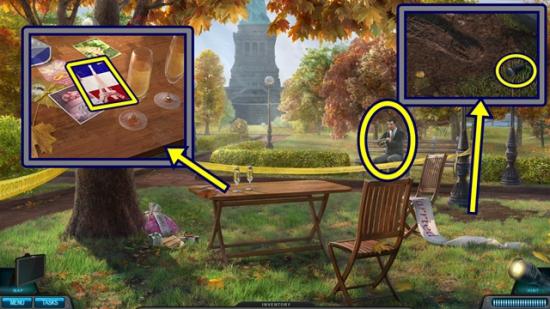
- Click on the table. Open the card with the Eiffel Tower on it and take the key.
- Click on the ground in front of the lamppost. Take the film canister. Click anywhere outside the window to close it.
- Give the film canister to Mr. Templeton. Click through the dialogue.
- Move forward.

- Take the bottle of water.
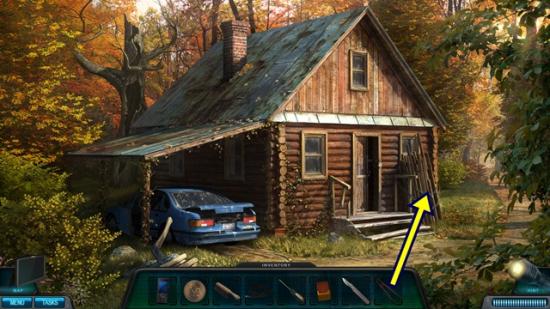
- Click on the doors. Click through the dialogue. After the dialogue, click on the crates. A mini-puzzle starts. This is a Tower of Hanoi puzzle. Move the crates so they are stacked in front of the post so you can take the hard hat.
- When you click on the top crate (the smallest), note the silhouettes that appear on the left. These show where you can place the crate. Crates can only be placed directly on the ground or on top of a larger crate. A big crate cannot be placed on a smaller crate.
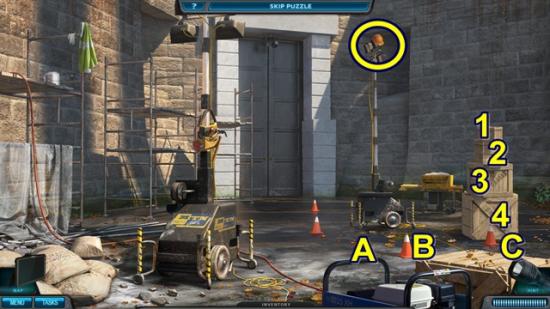
- Using the screenshot above as a guide, assume the positions are labelled A-B-C and the crates are numbered 1-4, with 1 being the smallest and 4 being the largest. Move the crates in the following order: 1B, 2A, 1A, 3B, 1C, 2B, 1B, 4A, 1A, 2C, 1C, 3A, 1B, 2A and 1A.
- When you are finished, take the hard hat.
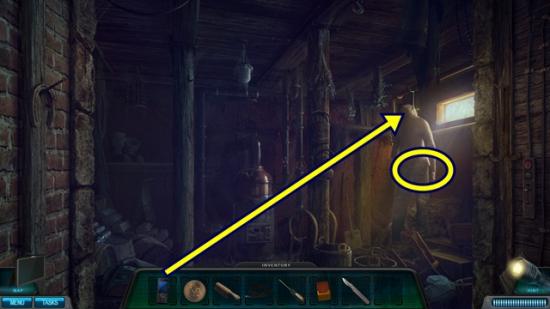
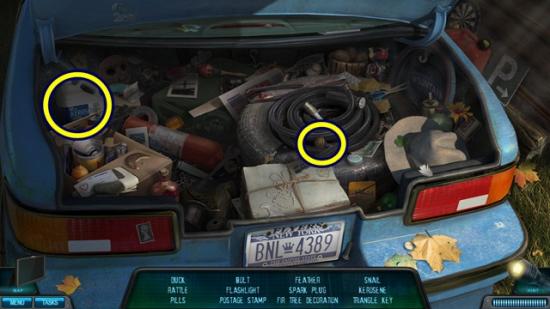
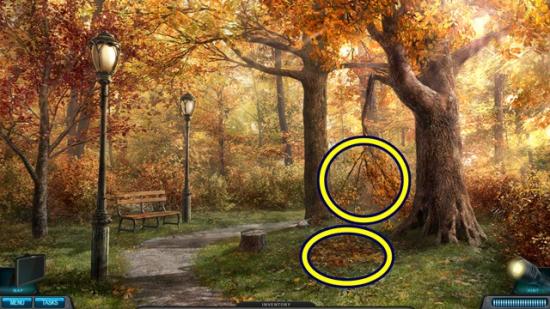
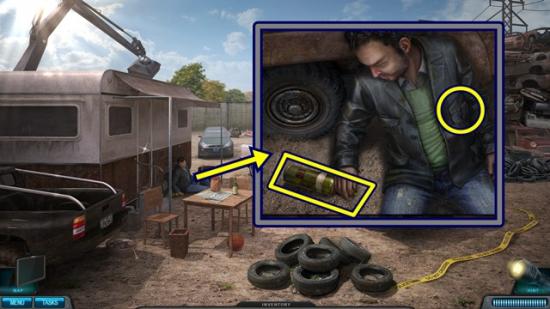
- Click on the sewer. Take the wire cutters.
- Move down.
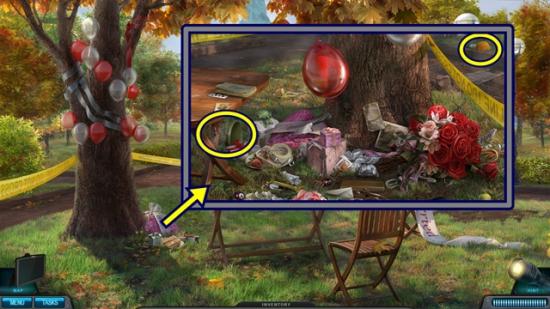
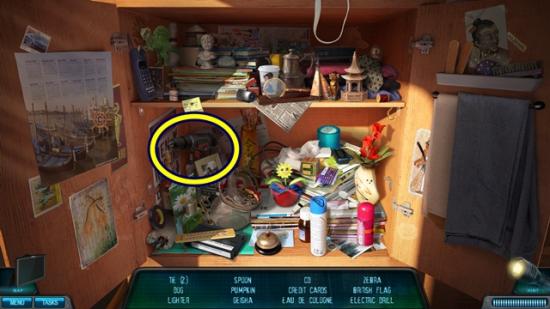
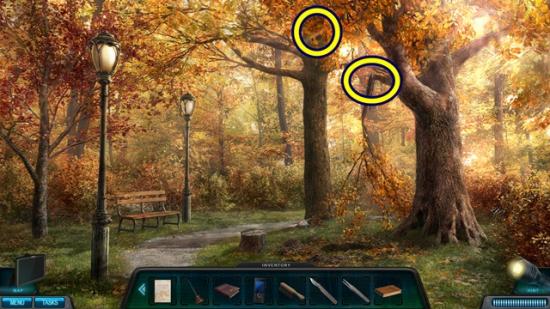
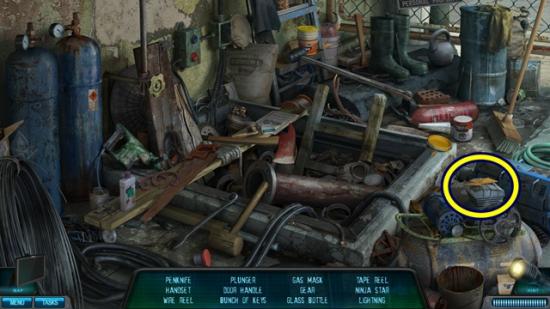
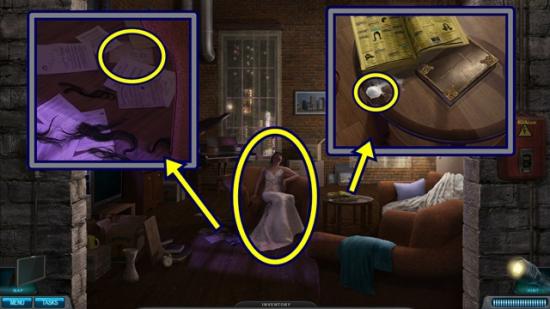
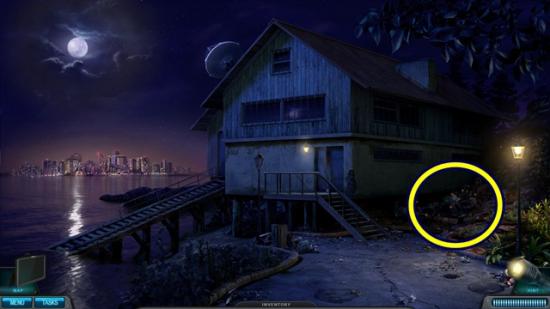
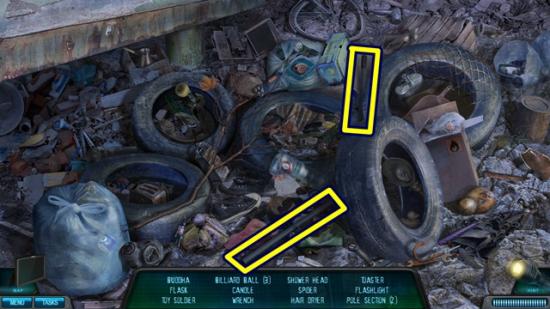
- Click on the junk in front of the tree to start a hidden object hunt.
- Find all the objects. Once you have found all the items, a hard hat and bucket are added to your inventory.
- Move forward and go through the doors.
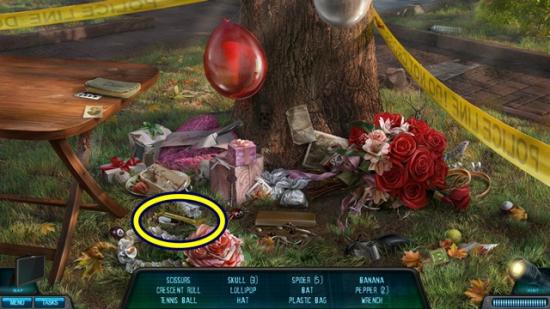
- Click through the dialogue. Take the sledge hammer. Take note of the dress.
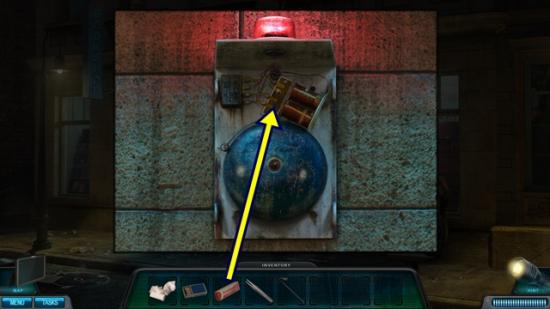
- Use the key to open the large red dumpster. Click through the dialogue. After the dialogue, click on the bomb. A mini-puzzle starts. Using the wire cutters, cut the wires to defuse the bomb. Note the flashing light above the timer. Follow its wire through the tangled wires to the top of the bomb and cut the wire there. If the light turns green, you cut it correctly. As you cut wires, the timer speeds up. If you don’t cut the wires in time, you have to start from the beginning.
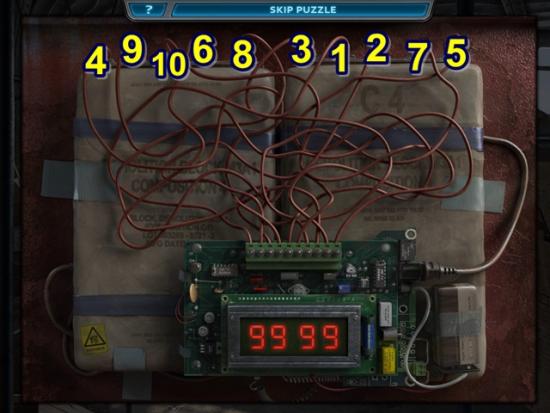
- This puzzle is random so a complete solution cannot be given. To make things easier, assume the lights are labelled 1-10. The screenshot above shows what wire matches each light.
- When you are finished, click through the dialogue. Look inside the red dumpster.
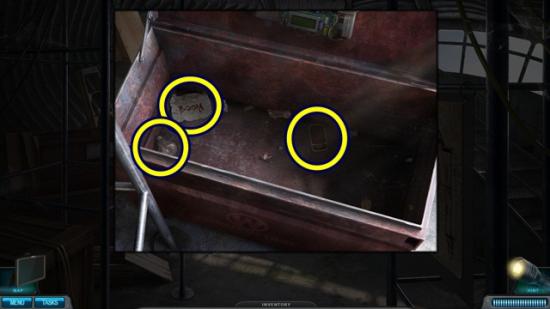
- Read the note. Take the light bulb and cell phone.
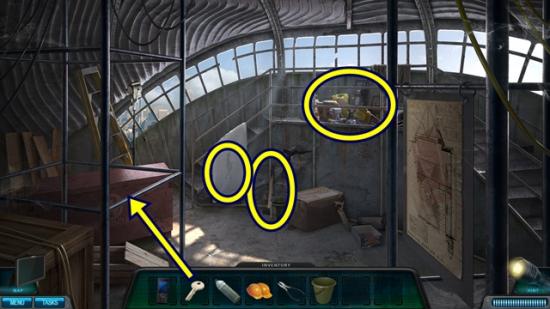
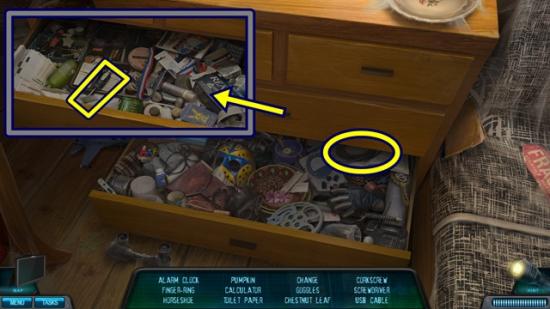
- Click on the scaffold to start a hidden object hunt.
- Find all the objects. Once you have found all the items, a bag of plaster and metal strips are added to your inventory.
- Return to Mr. Templeton (move down two scenes).
- Give the cell phone to Mr. Templeton. Click through the dialogue.
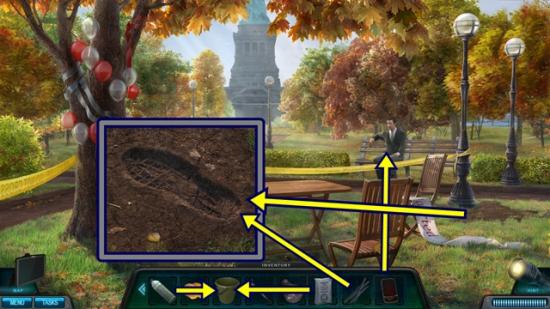
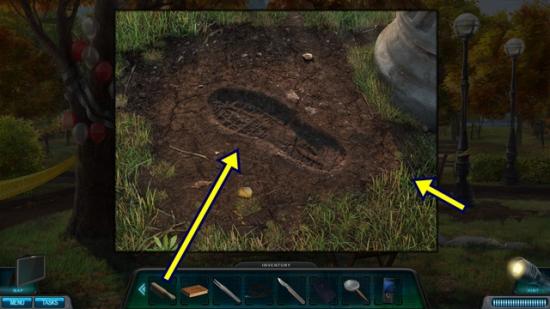
- Click on the ground in front of the lamppost. Surround the footprint with the metal strips.
- Open your inventory and take the bottle of water and add it to the bucket, then add the bag of plaster to the bucket to get the bucket of mixed plaster. Pour the bucket of mixed plaster onto the footprint. Take the plaster cast.
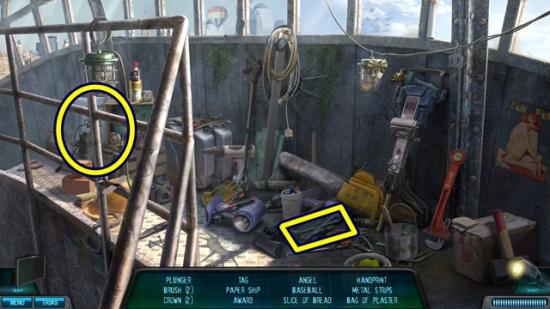
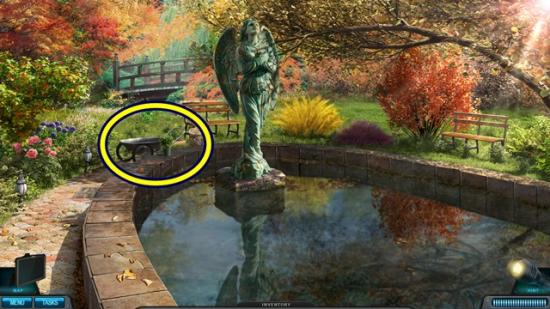
- Click through the dialogue. Move forward and enter the statue. Click on the scaffold to start a hidden object hunt.

- Find all the objects. Once you have found all the items, silicon spray and a manhole key are added to your inventory.
- Move down two scenes.
- Click on the junk in front of the tree to start a hidden object hunt.
- Find all the objects. Once you have found all the items, a wrench is added to your inventory.
- Move forward.
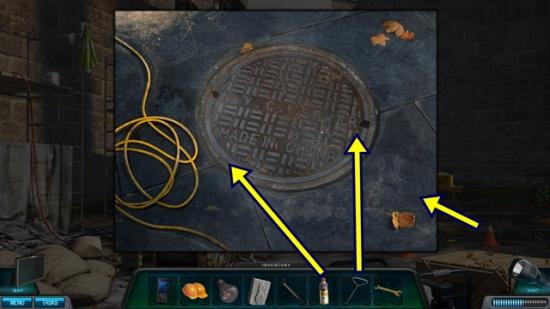
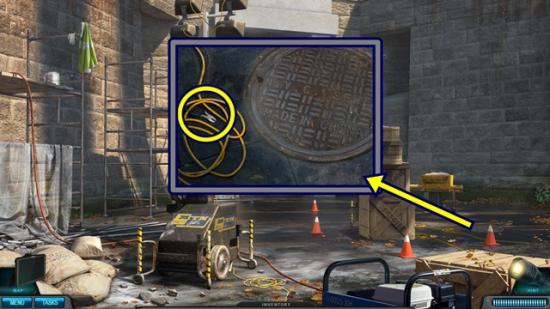
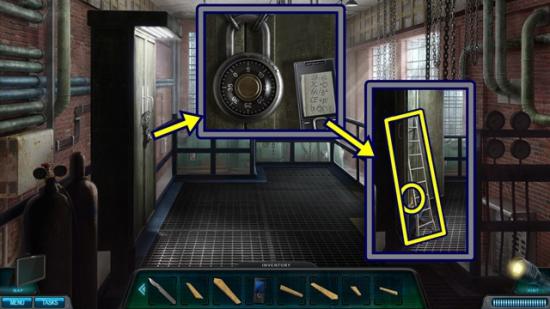
- Click on the sewer. Use the silicon spray on the edges of the manhole cover. Click and drag the spray around the edges. Continue until the can is empty, then use the manhole key to lift the manhole cover.
- Climb down into the sewer.
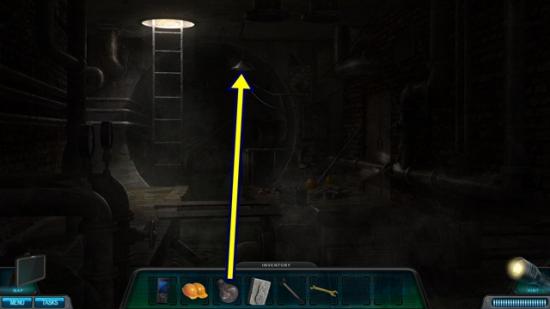
- Click on the lamp. Add the light bulb. Screw in the light bulb by clicking and dragging in the arrow’s direction.
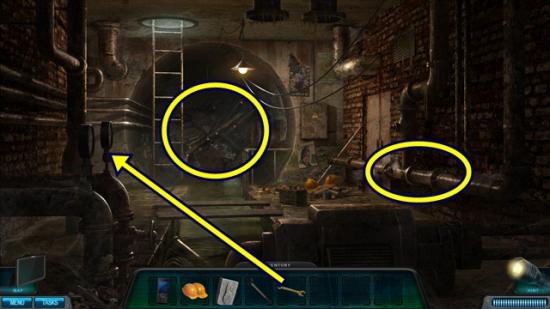
- Use the wrench to take the pressure gauge.
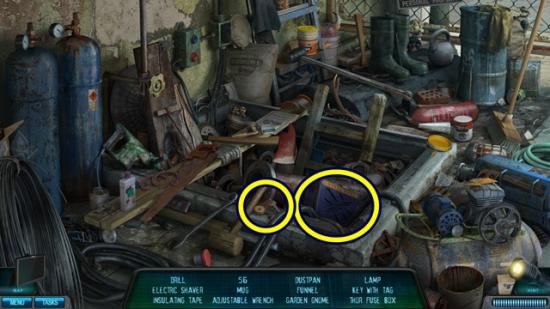
- Click on the debris to start a hidden object hunt.
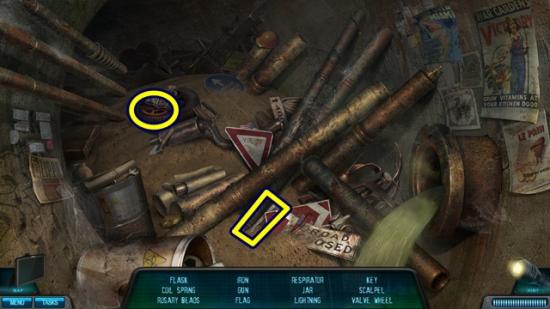
- Find all the objects. Once you have found all the items, a valve wheel and a scalpel are added to your inventory.
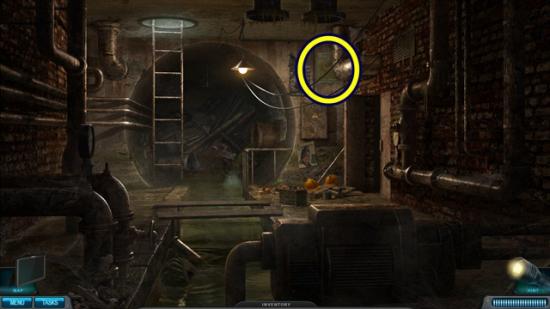
- Click on the pipes on the right.
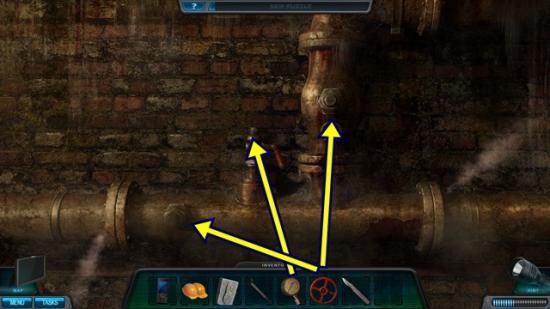
- Add the pressure gauge, then add the valve wheel to the either the top or bottom position. A mini-puzzle starts. Turn the valve wheel (click and drag) to close the steam from the bottom pipe. Click on the centre of the wheel and click and drag it to change its position. Turn the wheel until the steam from the top pipe turns off.

- Use the sledge hammer to break the pipe blocking the door (put the tip of the sledge hammer on the pipe) (three clicks). Click on the door. Use the tip of the scalpel between the door and the frame. Go through the door.
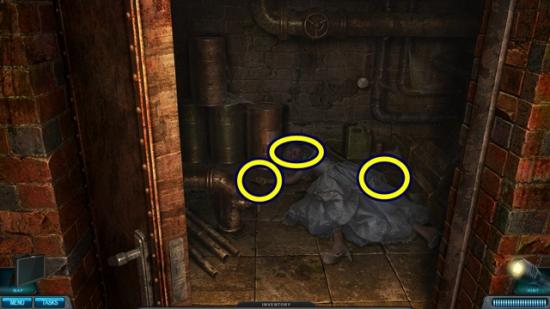
- Click through the dialogue. Click on the victim’s face. Click on the various areas and click through the dialogue.
- Click on the victim’s left hand. Note the missing engagement ring.
- Click on the victim’s right hand. Take the hair sample.
- Leave, go up the ladder and go down one scene.
- Talk to Mr. Templeton. Click through the dialogue.
Chapter 2: Darkness in the Woods
- Click through the dialogue. Talk to Will Sheng. Click through the dialogue.
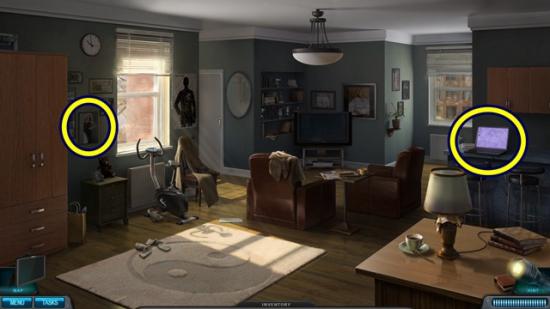
- Click on the computer.
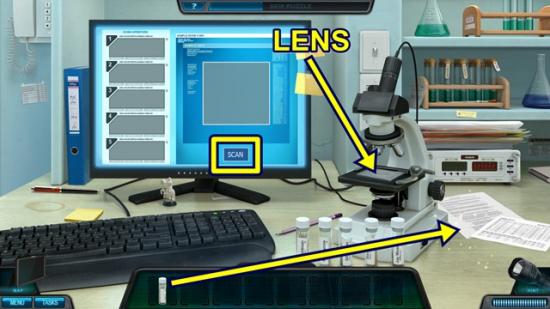
- Add the hair sample to the right of the microscope. A mini-puzzle starts. Analyze the hair samples. Take the hair sample you just placed (now known as the unknown sample) and put it on the microscope lens and click Scan on the computer screen. Now do the same for the other five samples (it doesn’t matter what order).
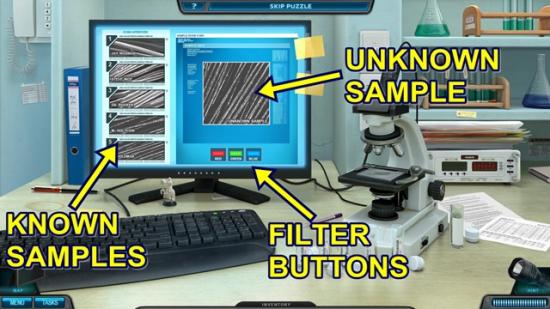
- Once they are all scanned, it’s time to analyze the samples. Start by clicking on the red filter button. The unknown sample lightened. Remove the samples that didn’t lighten (to remove, click on them and select Delete). Then click on the green filter button. The unknown sample lightened. Remove the samples that didn’t lighten. Then click on the blue filter button. The unknown sample darkened. Remove the samples that didn’t darken. You will be left with one, Gil Booker.
- If you make a mistake, you have to start over by adding the samples to the microscope and scanning them.
- Once you are finished, click through the dialogue.
- From the map, go to Jacinta’s place.
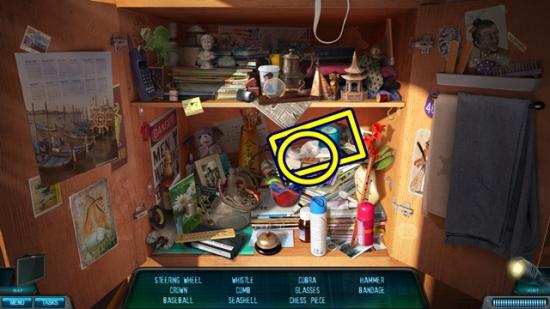
- Click through the dialogue. Look under the bed to start a hidden object hunt.
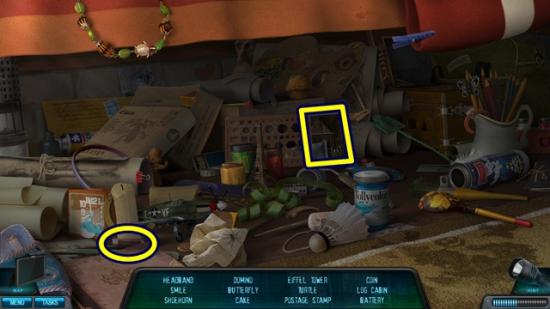
- Find all the objects. Once you have found all the items, a log cabin and a battery are added to your inventory.
- Give the log cabin to Mrs. Pollard. Click through the dialogue.
- Click on the map at the bottom left of the screen. Go to Booker’s cabin.
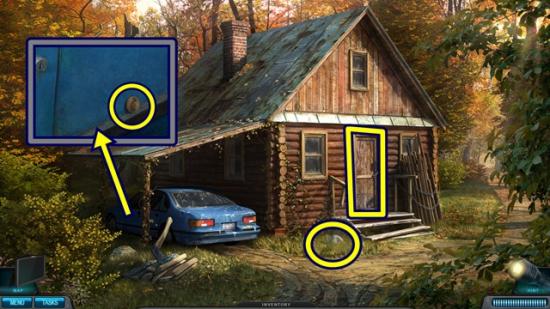
- Click on the car door (not the trunk). Take the dollar coin. Click anywhere outside the window to close it.
- Click on the rock. Turn over the rock and use the dollar coin to remove the lid. Take the cabin key. Take back the dollar coin.
- Click on the cabin door. Use the cabin key to unlock the lock. Enter the cabin.
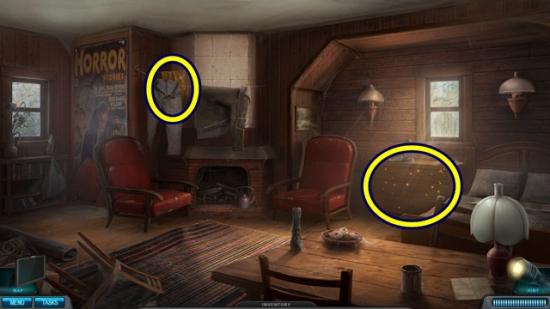
- Take the towel. Click on the dresser to start a hidden object hunt.
- Find all the objects. Once you have found all the items, car keys are added to your inventory.
- Leave the cabin.
- Click on the car door. Unlock the door with the car keys, then pull the handle.
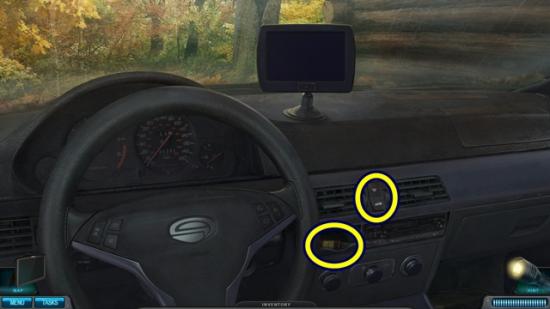
- Take the mentholated oil. Press the trunk release button.
- Leave the car.
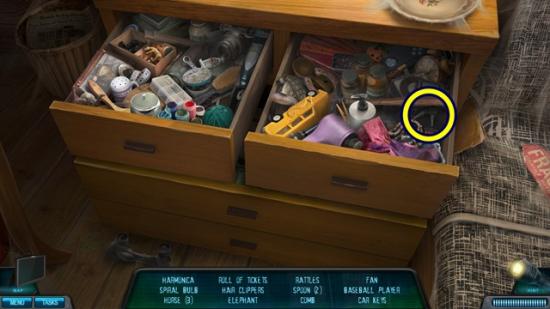
- Click on the trunk to start a hidden object hunt.
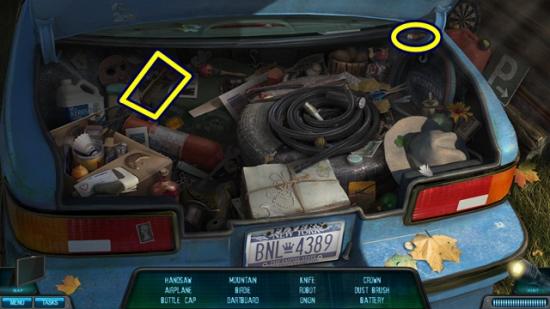
- Find all the objects. Once you have found all the items, a battery and a dust brush are added to your inventory.
- Go back into the car.
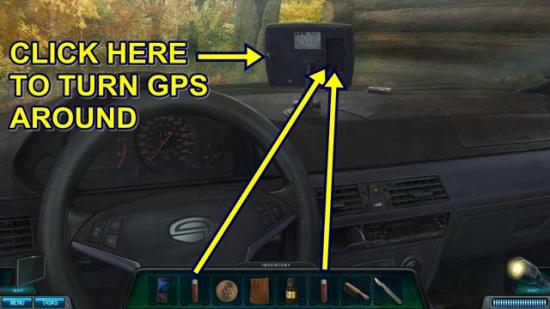
- Turn the GPS around. Use the scalpel to remove the battery cover. Add the two batteries. Turn the GPS around. Press the power button and click View Last Journey. Click through the dialogue.
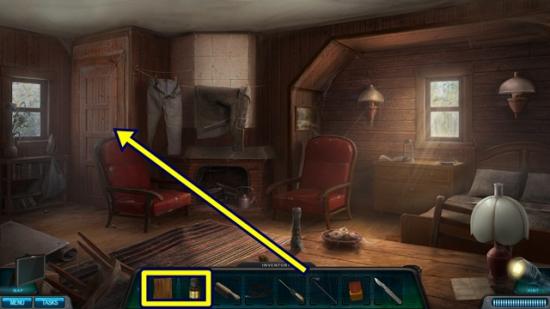
- Get out of the car and go into the cabin.
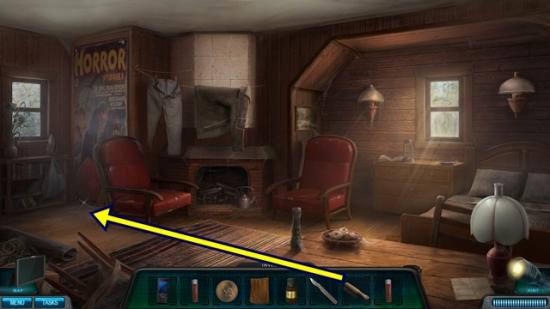
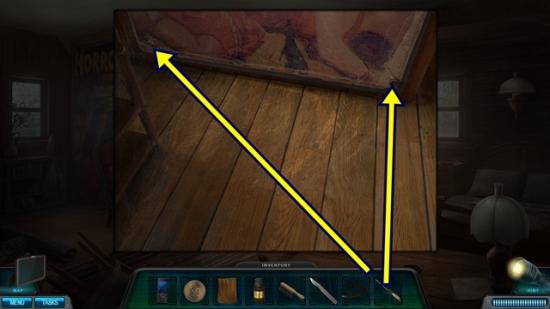
- Click on the floor in front of the poster. Use the dust brush to sweep away the dust. To sweep, click and drag the brush back and forth across the floor until the dialogue starts. Click through the dialogue. Click anywhere outside the window to close it.
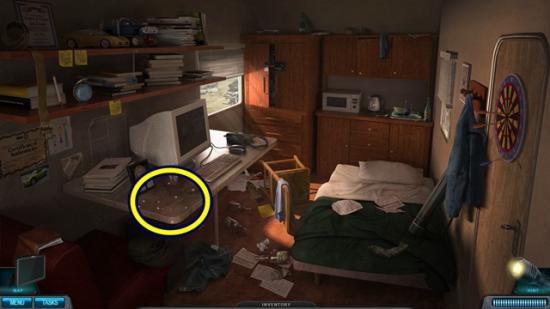
- Click on the dresser to start a hidden object hunt.
- Find all the objects. Once you have found all the items, a screwdriver and a USB cable are added to your inventory.
- Click on the floor in front of the poster.
- Use the screwdriver to remove the screws. To remove the screws, click and drag the screwdriver in a circle in the direction shown.
- When you are finished, click on the top of the poster and remove the two screws.
- Click through the dialogue, then leave the cabin.
- Click on the trunk to start a hidden object hunt.

- Find all the objects. Once you have found all the items, a crowbar and square key are added to your inventory.
- Go back inside the cabin.
- Use the crowbar to open the door. From your inventory, combine the mentholated oil and the towel. Put the mentholated towel on the door. Enter the cellar.
- Take the bolt cutters. Leave and go outside.
- Click on the poles. Use the bolt cutters to cut the padlock and centre of the bottom chain. Move the poles.
- Return to the cellar.
- Click on the body’s head. Use Lamonte’s phone to take a picture of the face.
- Click on the body’s back pocket. Move the watch to reveal the tattoo. Take the item from the pocket.
- Click through the dialogue.
Chapter 3: The Killer’s Message
- Click through the dialogue. Talk to Mrs. Pollard. Click through the dialogue.
- Look under the bed to start a hidden object hunt.
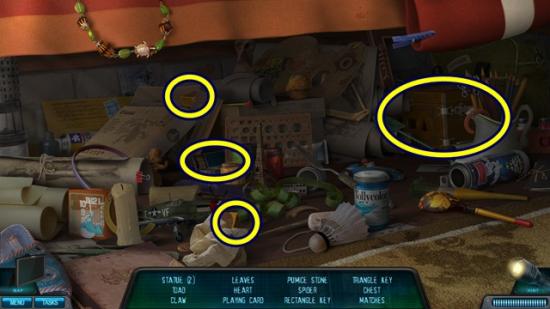
- Find all the objects. Once you have found all the items, a triangle key, rectangle key, key chest and matches are added to your inventory.
- Put the key chest on the bed.
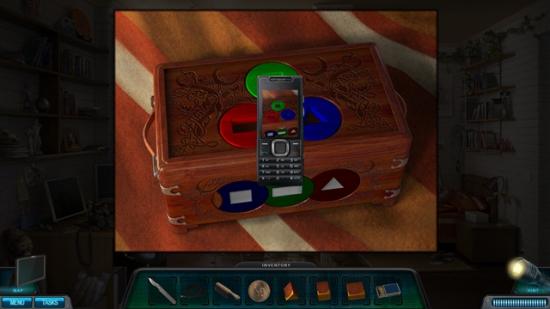
- Use Lamonte’s phone to take a picture of the design. A mini-puzzle starts. Put the three shape keys (triangle, square, and rectangle) into their appropriate slot (i.e., triangle key in the triangle slot, etc.).
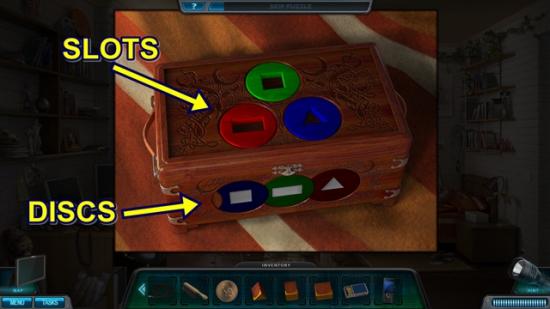
- To begin, click on the triangle key until the square in the blue disc turns blue. Then take the square key (click and drag) and put it in the blue disc’s slot. Turn the blue disc. Drag the square key back to its slot.
- Click on the square key until the rectangle in the green disc turns green. Then take the rectangle key (click and drag) and put it in the green disc’s slot. Turn the green disc. Drag the rectangle key back to its slot.
- Click on the rectangle key until the triangle in the red disc turns red. Then take the triangle key (click and drag) and put it in the red disc’s slot. Turn the red disc.
- When the chest opens, take the Bible. Click through the dialogue. Take the star key.
- Show the star key to Mrs. Pollard. Click through the dialogue. Show the Bible to Mrs. Pollard. Click through the dialogue.
- Click on the map. Click through the dialogue. Return to the Booker’s cabin.
- Enter the cabin and go down into the cellar. You need to visit this room to trigger further actions. Leave.
- Click on the kerosene lamp to learn you need to fix it. Click anywhere outside the window to close it.
- Click on the dresser to start a hidden object hunt.
- Find all the objects. Once you have found all the items, lamp parts are added to your inventory.
- Go outside and look in the trunk to start a hidden object hunt.
- Find all the objects. Once you have found all the items, a triangle key and kerosene are added to your inventory.
- Go back into the cabin.
- Click on the kerosene lamp.
- A mini-puzzle starts. Fix the kerosene lamp. Remove the cap and fill the lamp with kerosene. Replace the cap. Add the remaining lamp parts. Place the candle, then the wick, then the round disc-type thing. Light the lamp with the matches before placing the glass piece.
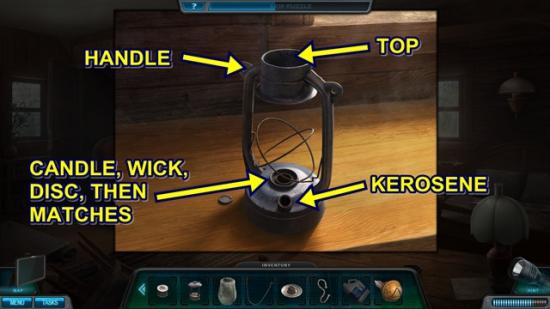
- The final solution looks like this:
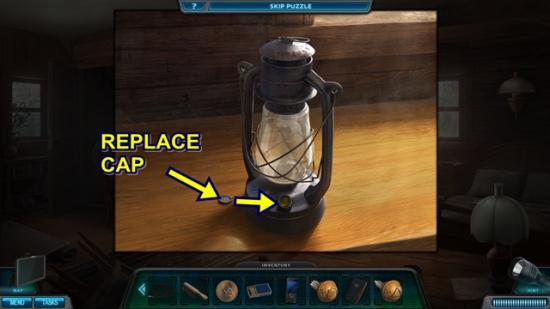
- When you are finished, the window closes. Take the kerosene lamp.
- Go down to the cellar.
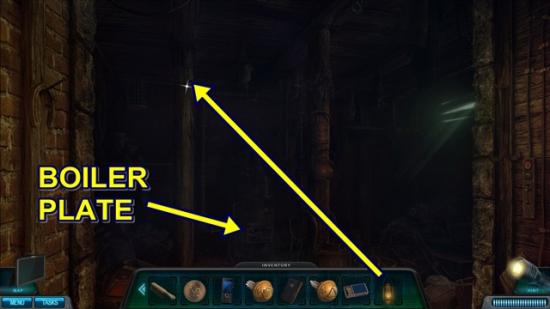
- Hang the kerosene lamp on the hook. Click through the dialogue. Click on the boiler plate.
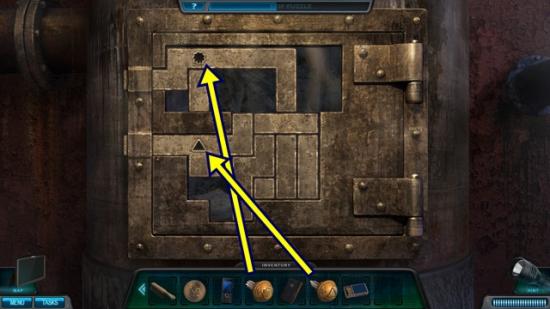
- Add the triangle key and the star key. A mini-puzzle starts. Open the boiler plate door by sliding the metal slides out of the latches.
- The final solution looks like this:

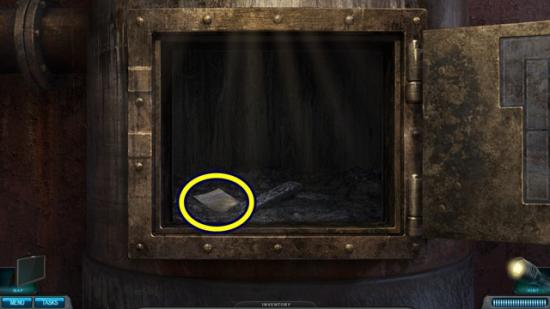
- When the plate opens, take the wedding invite. Click through the dialogue.
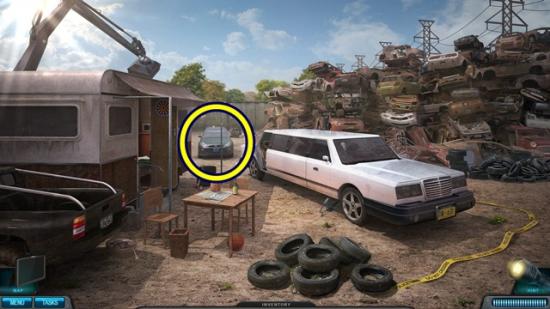
- Click on the map and go to the junkyard.
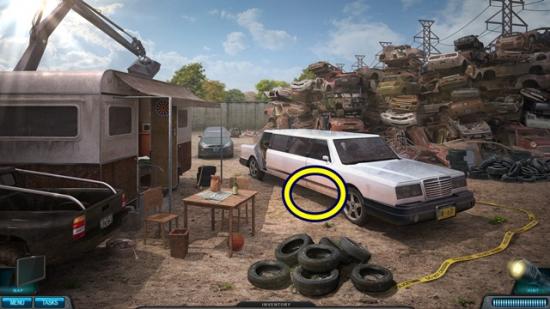
- Click under the car to get new tasks. Click anywhere outside the window to close it.
- Enter the trailer.
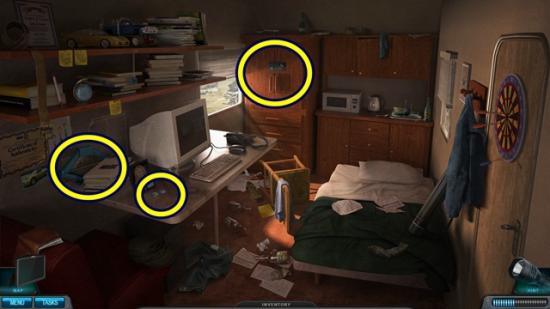
- Take the car jack and the coin. Click on the locker.
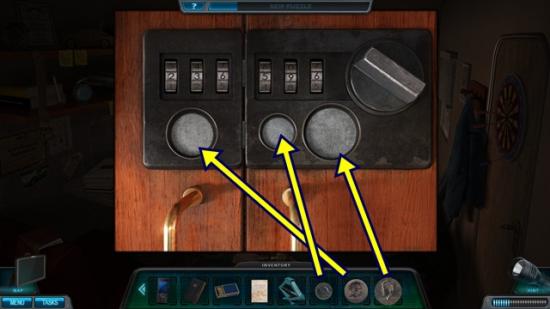
- Add the three coins. A mini-puzzle starts. Use the last two digits of the year on each coin to open the combination. The combination is 799402. Click on the dials to change the numbers.
- Once the locker is open, look in the locker to start a hidden object hunt.
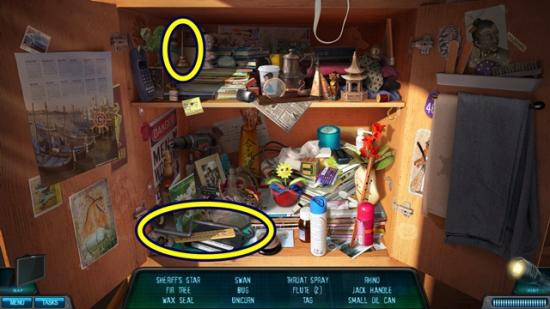
- Find all the objects. Once you have found all the items, a jack handle and small oil can are added to your inventory.
- Leave the trailer.

- Click under the car. Add the car jack, then put the jack handle on the end. Use the small oil can to oil the inner part of the car jack. Turn the handle to lift the car. To turn the handle, click on the handle, then click and drag your cursor in a circle in the direction of the arrow.
- Once the car has been lifted, take the second Bible from under the wheel. Note: I couldn’t see a book, I clicked where I saw a sparkle and that happened to be the book.
- Click through the dialogue. Watch the cutscene.
- Click on the car. A mini-puzzle starts. Corner the man. Click on a character (a green circle will appear around them) and click anywhere on the board to move them there. As the character runs, the man will run. As the man is running, click on the characters and direct them where to move in order to corner the man. This puzzle is extremely random and requires fast clicking so no step-by-step solution is possible.
- Once you’ve caught him, talk to Todd Mason. Click through the dialogue. Jay Wozniak’s business card is added to your inventory.
- From your inventory, combine Lamonte’s phone with Jay Wozniak’s business card so you can call him. Click through the dialogue.
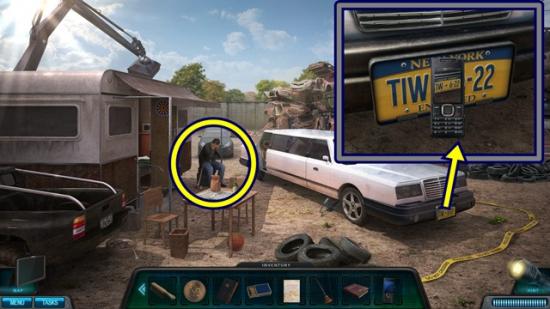
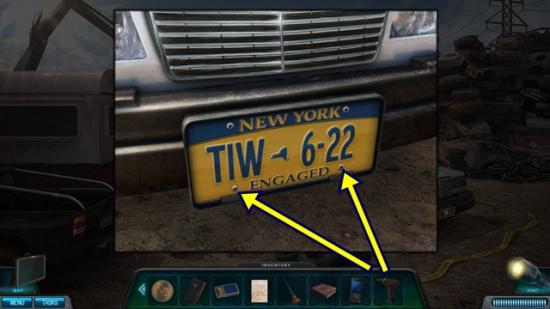
- Click on the licence plate.
- Take a picture of the licence plate with Lamonte’s phone. Click anywhere outside the window to close it.
- Enter the trailer.
- Click on the locker to start a hidden object hunt.
- Find all the objects. Once you have found all the items, an electric drill is added to your inventory.
- Leave the trailer.
- Click on the licence plate. Use the electric drill to remove the rivets. Take the cog. Click through the dialogue.
- Click on the map and go to Will Sheng’s lab.
- Click through the dialogue.
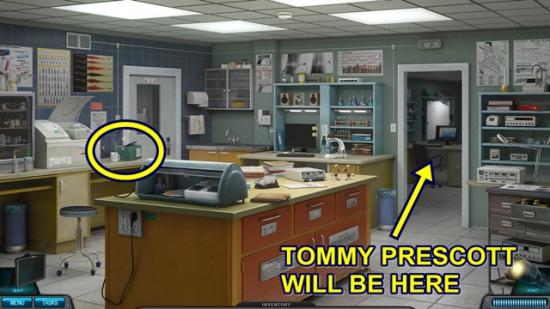
- Click on the evidence box to start a hidden object hunt.
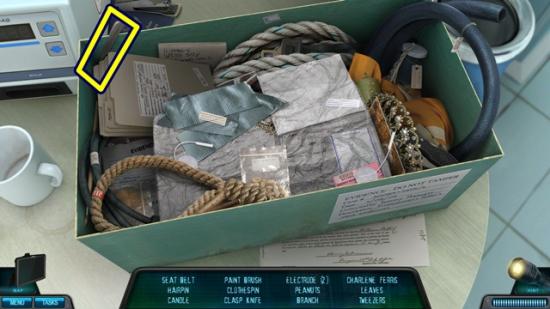
- Find all the objects. Once you have found all the items, tweezers are added to your inventory.
- Talk to Tommy Prescott (sitting at the desk). Click through the dialogue.
- Click on the map and go to Central Park.
- Click on the broken branch. Click through the dialogue. Click on the leaves on the ground. Use the dust brush to sweep away the leaves. To sweep away the leaves, click and drag the brush across the leaves to move them. Continue until the brush is no longer part of your cursor. When you are finished, click anywhere outside the window to close it.
- Move up the path.
- Click on the wheelbarrow to start a hidden object hunt.
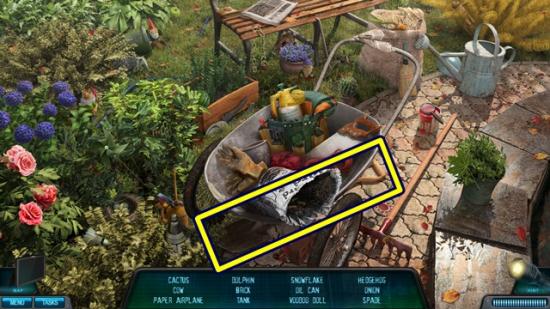
- Find all the objects. Once you have found all the items, a spade is added to your inventory.
- Move down.
- Click on the patch on the ground. Use the spade to lift the soil, then take the cog.
- Move up the path.
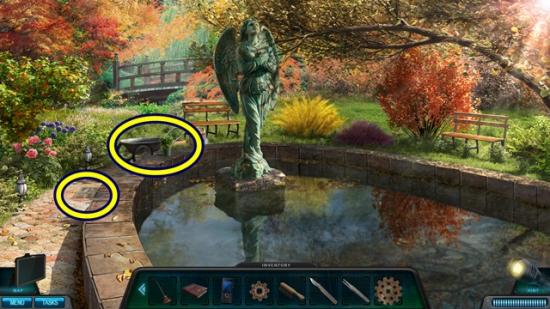
- Click on the fountain grate. Remove the cover. Click anywhere outside the window to close it.
- Click on the wheelbarrow to start a hidden object hunt.
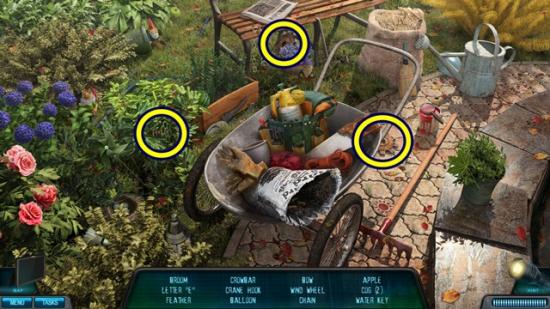
- Find all the objects. Once you have found all the items, two cogs and a water key are added to your inventory.
- Click on the fountain grate. A mini-puzzle starts. Arrange the four cogs so they all fit together. Once they are properly placed, they are locked in place. The screenshot below shows their proper position.
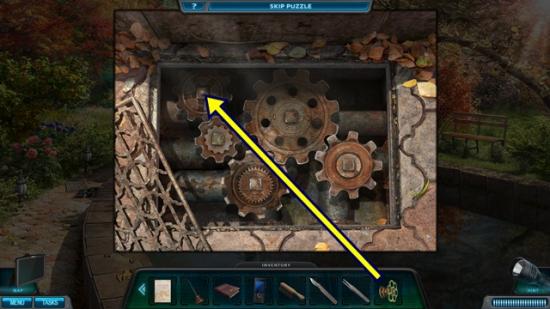
- Add the water key, then turn it.
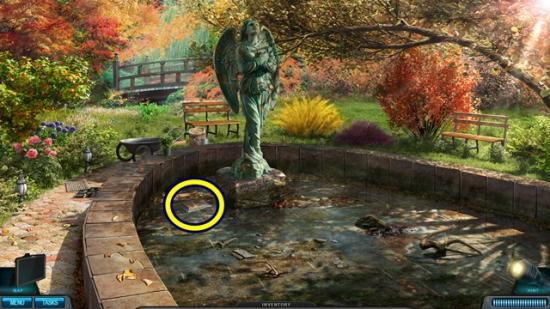
- Take the third Bible. Click through the dialogue.
- Move down.
- Click on the top of the broken branch. Click through the dialogue. Click on the top of the tree on which the woman was killed. Click through the dialogue.
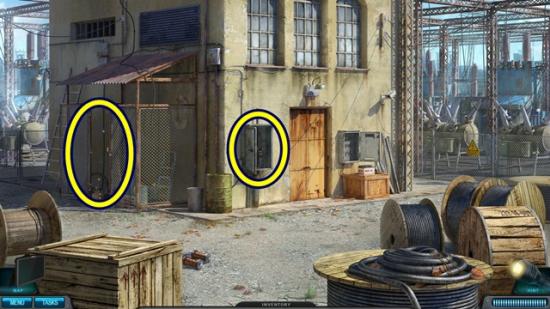
- Click on the map and go to the power station.
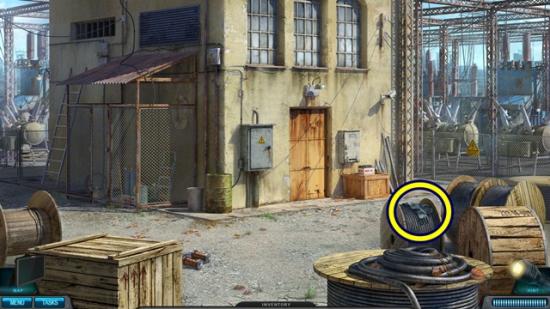
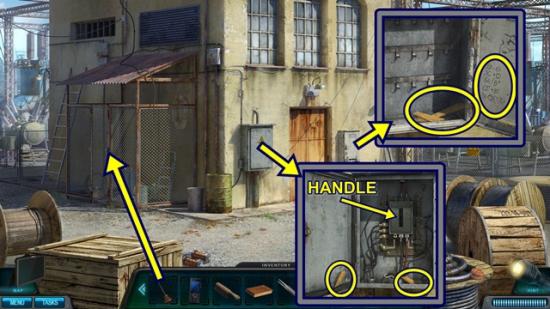
- Take the rubber gloves. Enter the power station.
- Talk to David Goldman. Click through the dialogue.
- Click on the back of the shelf. Use the rubber gloves to remove the pin from the handle. To take the power handle, click and drag back and forth to loosen it.
- Leave the power station.
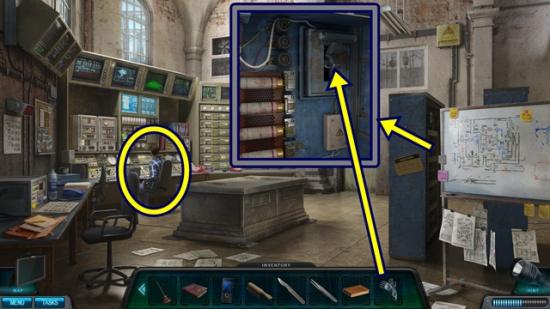
- Click on the cupboard. Open the cupboard and take the three metal pieces. Use Lamonte’s phone to take a picture of the formula.
- Click on the electrical panel. Take the three metal pieces. Put the power handle in the slot and pull it down to turn off the power.
- Use the small oil can to oil the hinges on the fence. Click on the fenced in area to start a hidden object hunt.
- Find all the objects. Once you have found all the items, a thor fuse box and a key with tag are added to your inventory.
- Click on the electrical panel and pull the handle up.
- Enter the power station.
- Use the key with tag on the door. Go through the door.
- If there is no light, go outside of the power station and click on the electrical panel and pull the handle to the top position.
- Click on the locker. The puzzle will only start if you have taken a picture of the formulas you saw in the cupboard. A mini-puzzle starts. Open the combination using the formulas as a clue for the combination. If you don’t want to solve complex mathematical problems, you can open the lock using trial and error. Move the dial counter-clockwise, stopping at each number until a pin releases. Then move the dial clockwise, stopping at each number until a pin releases. Then move counter-clockwise, etc.
- To open the lock, move the dial counter-clockwise to 20, then clockwise to 26, then counter-clockwise to 16, then clockwise to 33, then counter-clockwise to 35.
- Take the stepladder and the metal piece.
- Move down.

- Put the thor fuse box on the table. Take a picture of the fuse box using Lamonte’s phone. Add all the metal pieces (you should have seven).
- Move down.
- Click on the electrical panel and move the handle down to turn off the power.
- Click on the fenced in area to start a hidden object hunt.
- Find all the objects. Once you have found all the items, lightning is added to your inventory.
- Go back into the power station.
- Click on the table. Add the lightning. Open the box and take the fourth Bible. Click through the dialogue.
- Click on the map and go to Central Park.
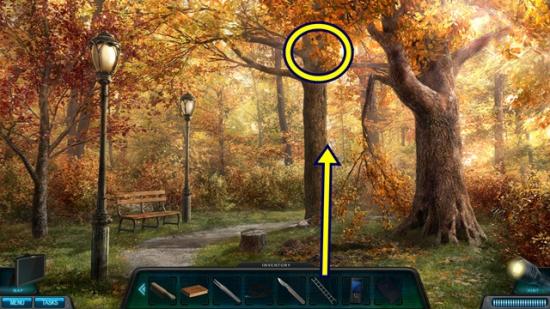
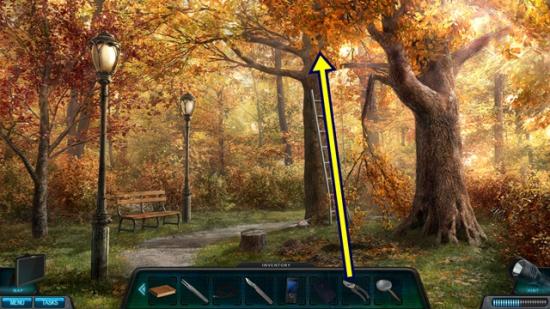
- Put the stepladder against the tree. Click on the top of the tree. Click anywhere outside the window to close it.
- Move forward up the path.
- Click on the wheelbarrow to start a hidden object hunt.

- Find all the objects. Once you have found all the items, a magnifying glass and pruning shears are added to your inventory.
- Move down.
- Click on the top of the tree. Cut away the leaves with the pruning shears. Use Lamonte’s phone to take a picture of the mercury thermometer. Then move the thermometer so you can take the scrap of material.
- Click on the map and go to the junkyard.
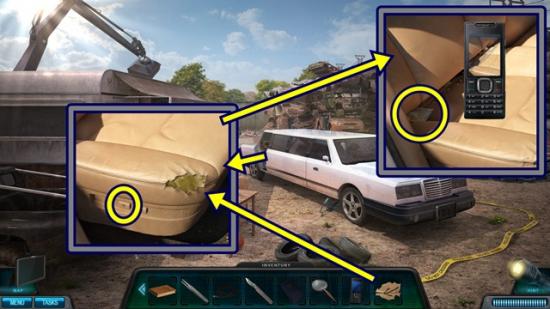
- Click on the backseat of the limo. Add the scrap of material. Push the back button. Use Lamonte’s phone to take a picture of the rose. Take the bag of soil. Click through the dialogue.
- Click on the map and go to Liberty Island.
- Click on the ground in front of the lamppost. Use the dust brush to brush away the dirt (click and drag the brush back and forth). Use Lamonte’s phone to take a picture of the champagne bottle.
- Move forward and go down the sewer.
- Click on the poster to trigger a new task. Click anywhere outside the window to close it.
- Climb up the ladder and move forward.
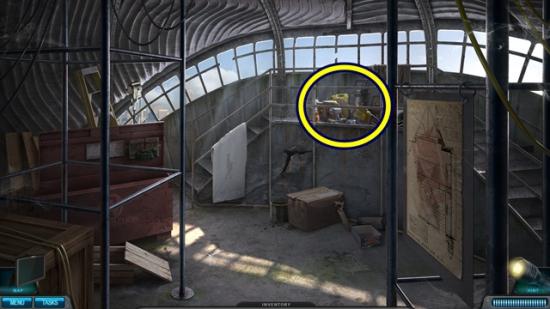
- Click on the scaffold to start a hidden object hunt.
- Find all the objects. Once you have found all the items, a handy grabber and a rusty old file are added to your inventory.
- Leave and go back down into the sewer.
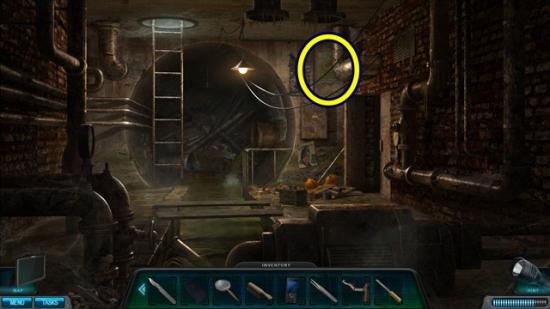
- Click on the poster.
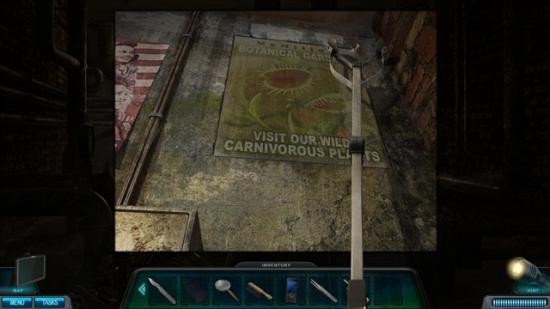
- Use the handy grabber to remove the pegs holding up the poster. Grab a peg and click and drag up and down to release the peg. Do this to both pegs.
- When the poster falls, take the fifth Bible. Click through the dialogue.
Chapter 4: The Forensic Tale
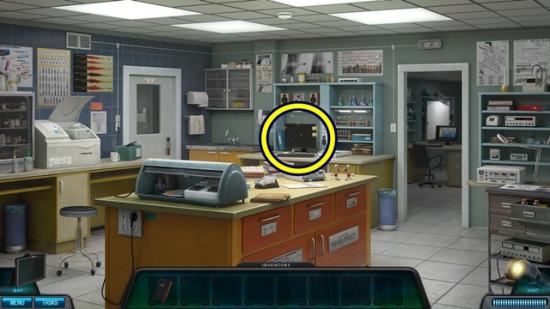
- Click through the dialogue. Click on the computer.
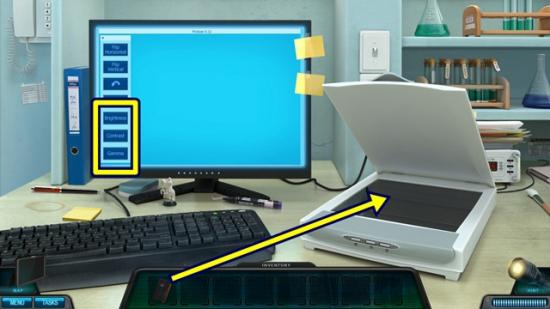
- A mini-puzzle starts. Lift the scanner lid and add the fifth Bible. Use the computer settings to read the ink spot. The only buttons you will need to use are Brightness, Contrast and Gamma. Use the sliders to adjust the colours on the screen.
- When you are finished, dialogue will start. Click through the dialogue.
- Click on the map and go to the bookshop.
- Enter the bookshop.
- Click on the back shelf to start a hidden object hunt.
- Find all the objects. No items are added to your inventory.
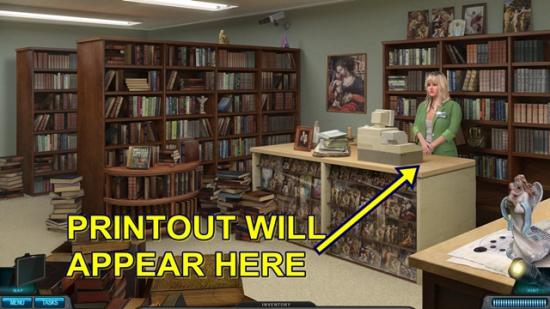
- Talk to Tallulah Minton. Click through the dialogue. Give her the fifth Bible. Click through the dialogue. Give her the USB cable. Click through the dialogue. Take the printout that appears on the counter. Click through the dialogue.
- Click on the map and return to Will Sheng’s lab.
- Click on the inventory box to start a hidden object hunt.
- Find all the objects. Once you have found all the items, photos are added to your inventory.
- Click on the computer.
- Take the eraser and marker.
- Click on the desk in the other room.
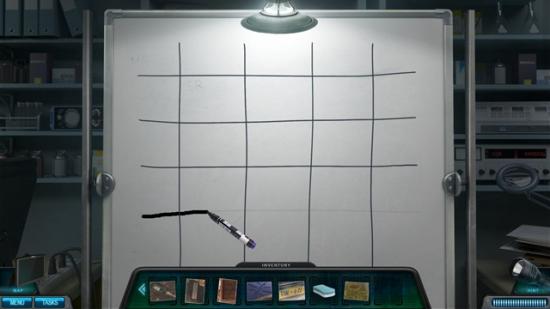
- Use the marker to draw lines on the board. Follow the outline, start from one end and click and drag the marker to the other. If done correctly, a dark line will appear. If you make a mistake, use the eraser (click and drag) to remove the mark and start again.
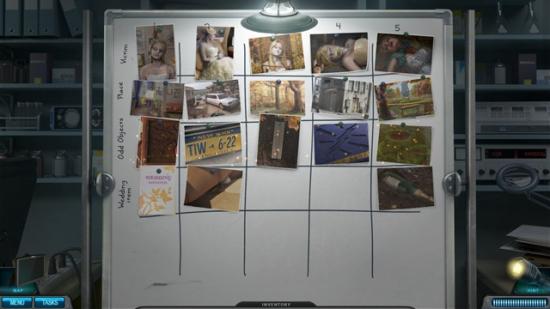
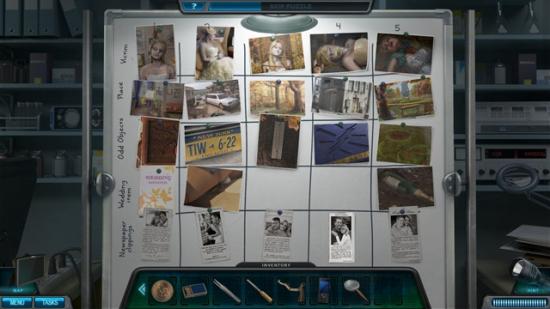
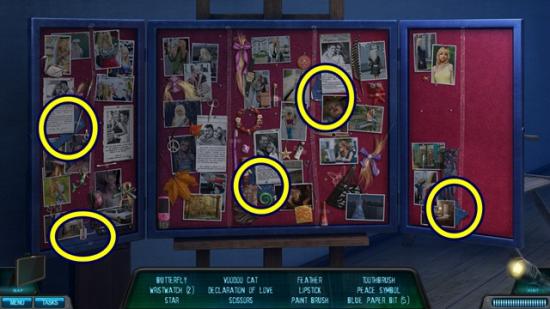
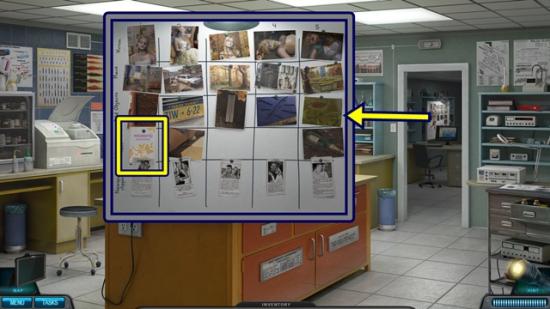
- Once you are finished, a mini-puzzle starts. Take all the photos from your inventory and arrange them on the board according to the description for each row. Each column’s photos should be related.
- Solution:
- When you are finished, click on the photos. Click through the dialogue.
- Click on the inventory box to start a hidden object hunt.
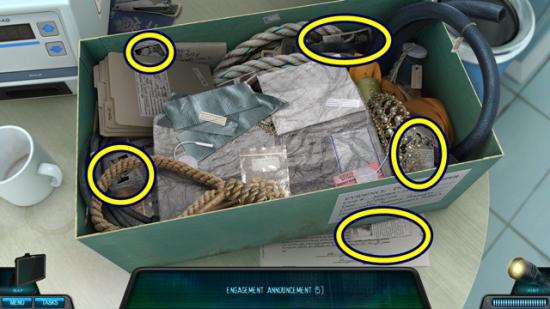
- Find all the objects. Once you have found all the items, five announcements are added to your inventory.
- Click on the desk in the other room. Add the five announcements to the appropriate column.
- Solution:
- Click through the dialogue.
- Click on the map and go to the junkyard.
- Click on Mason. Take the whiskey bottle. Open the top right pocket and take the hut key. Click anywhere outside the window to close it.
- Unlock the trailer with the hut key. Enter the trailer.

- Put the whiskey bottle in the sink to get the bottle of water. Click on the locker to start a hidden object hunt.
- Find all the objects. Once you have found all the items, a hammer and bandage are added to your inventory.
- Leave the trailer.
- Click on Mason. Pour the bottle of water on his head. Watch the cutscene.
- Click on Mason again.

- Take the bloody knife. Watch the cutscene.
- Click on the backseat of the limo.

- Use the scalpel to cut open the seat. Click through the dialogue. Take Wosniak’s phone.
- Go back in the trailer.
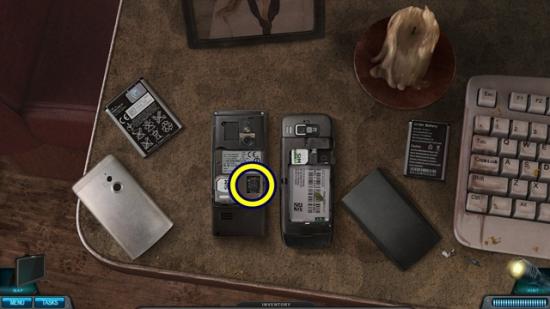
- Click on the edge of the desk. Place Wosniak’s phone on the desk. Slide off the cover (slide upward) and remove the battery. Place Lamonte’s phone on the desk. Slide off the cover and remove the battery.
- Use the tweezers to remove the bug (click and drag back and forth). Click through the dialogue.
- Click on the map and go to Turino’s apartment.
- Enter the building.
- Take the Turino photo from off the wall. Click on the laptop.
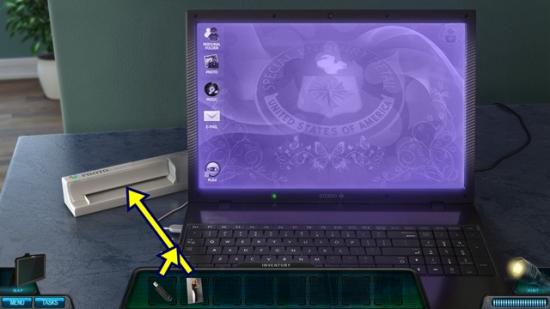
- Add the flash drive to the left side of the laptop and run the Turino photo through the scanner. A mini-puzzle starts. Create the fake engagement.
- Click on the PicEd icon. Click and drag Lamonte’s photo (the .jpg) to the editor. Click the Cut icon and draw a continuous line around Lamonte, staying as close as possible to him.
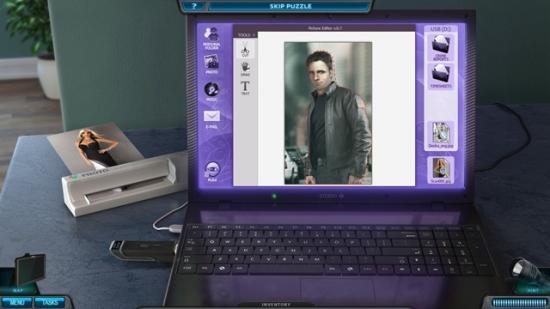
- Click the Drag icon and drag his picture over to the right side.
- Click and drag Turino’s photo onto the editor. Click Drag and drag Lamonte’s cut photo onto Turino’s photo.
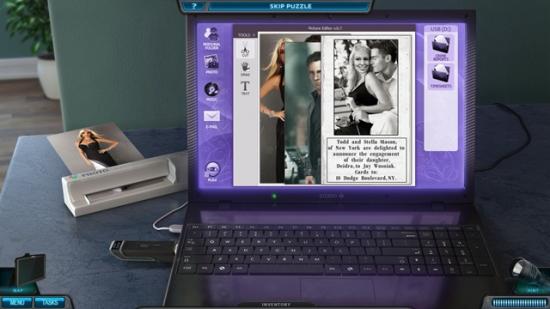
- Click on the Deirdra’s engagement announcement. Cut around the text, staying as close to the text as possible.
- Click and drag the text to Turino and Lamonte’s picture. Click on parts of the text to change the names and address.
- When you are finished, click on the picture to make the email appear. Click in the To field to type in the address. Click in the text field to add text. Click Send.
- Watch the cutscene.
- Enter the surveillance van.
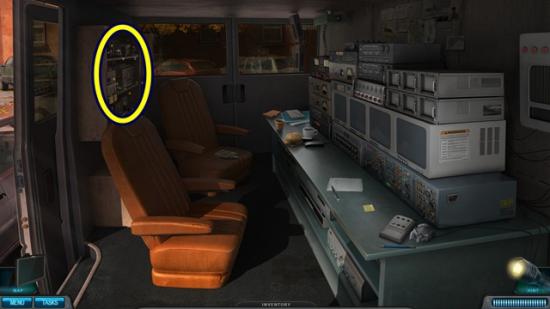
- Click on the back shelf to start a hidden object hunt.
- Find all the objects. Once you have found all the items, four small cameras are added to your inventory.
- Leave the van and enter Turino’s apartment.

- Click through the dialogue.
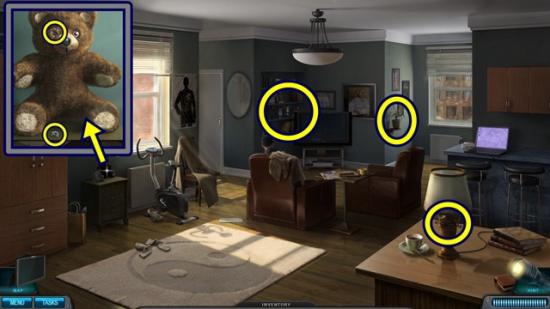
- Click on the teddy bear. Remove the eye with the scalpel and add a small camera.
- Click on the bookshelf. Place a small camera under the books.
- Click on the plant. Place a small camera in the plant.
- Click on the lamp. Remove the old cloth and place a small camera on the lamp.
- Go back to the van.
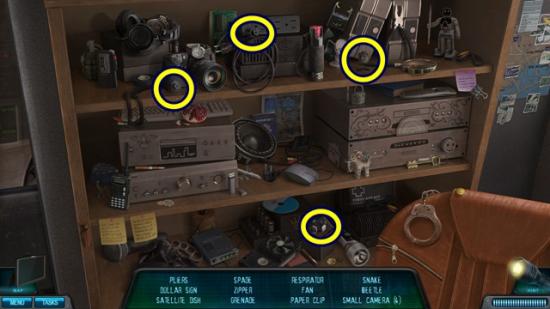
- Click on the back shelf to start a hidden object hunt.
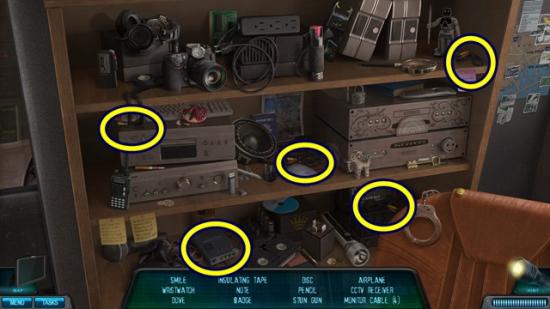
- Find all the objects. Once you have found all the items, four monitor cables and a CCTV receiver are added to your inventory.
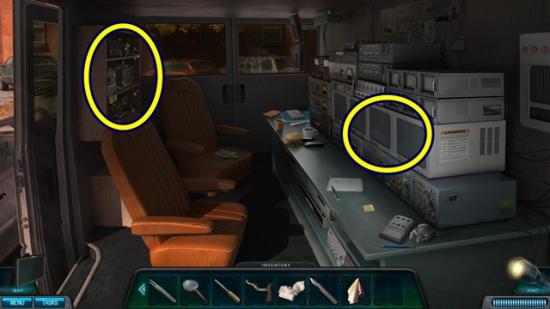
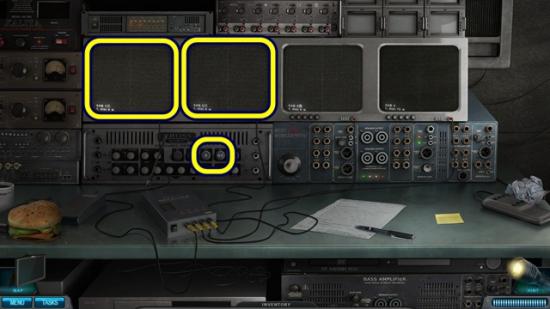
- Click on the monitors.
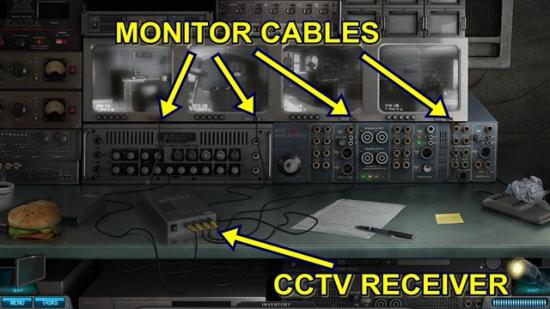
- Put the CCTV receiver on the counter and add the four monitor cables to the four monitors. Watch the cutscene.
- Return to Turino’s apartment.
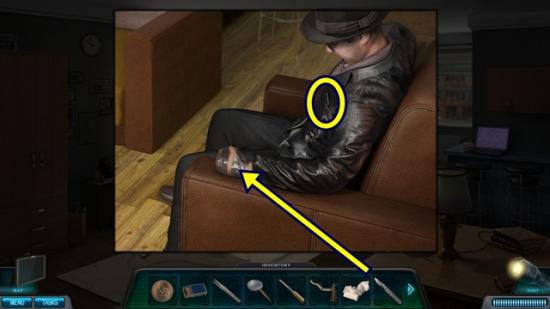
- Click on the body. Take the licence from the jacket pocket. Use the scalpel on the hand. Click through the dialogue.
- Click on the body again. Use the magnifying glass on the hand. Use the scalpel to take the tape with fingerprint. Click through the dialogue.
- Give the tape with fingerprint to Prescott. Click through the dialogue.
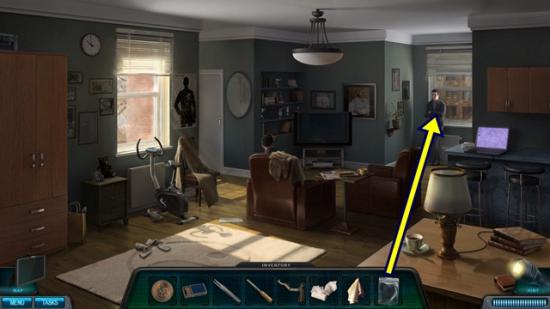
- Return to the surveillance van.
- Click on the monitors. Press the Play button, then the Rewind button, then Play, then Rewind. Eventually, sparkles will appear over the two monitors on the left. Click on the two monitors and click through the dialogue.
- Return to Turino’s apartment.
- Click on the teddy bear. Take the small camera from its eye. Pick up the crumpled piece of newspaper for a clue. Click through the dialogue.
- Click on the bookshelf and take the small camera. Click on the plant and take the small camera. Click on the lamp and take the small camera.
- Click on the map and return to Jacinta’s place.
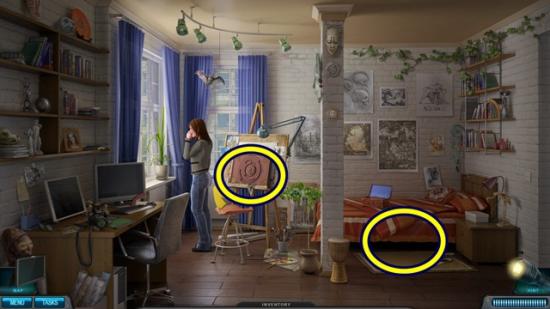
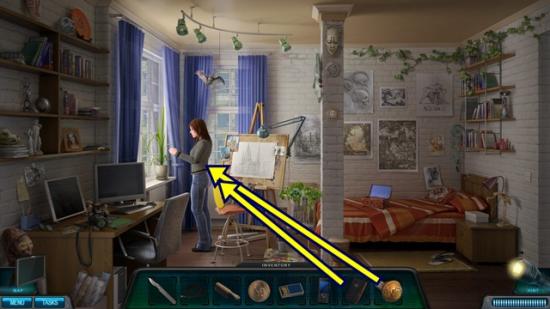
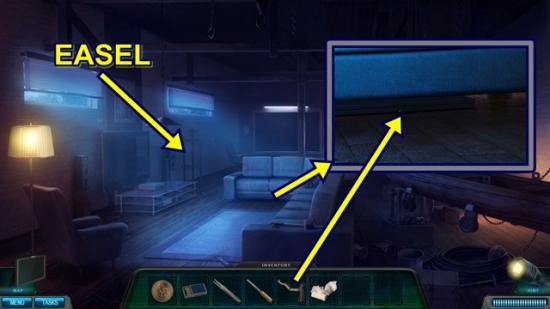
- Click on the easel. Click through the dialogue. Click anywhere outside the window to close it.
- Look under the bed to start a hidden object hunt.
- Find all the objects. Once you have found all the items, three puzzle pieces are added to your inventory.
- Take the two puzzle pieces. Click on the easel. A mini-puzzle starts. Add the five puzzle pieces to the slots.
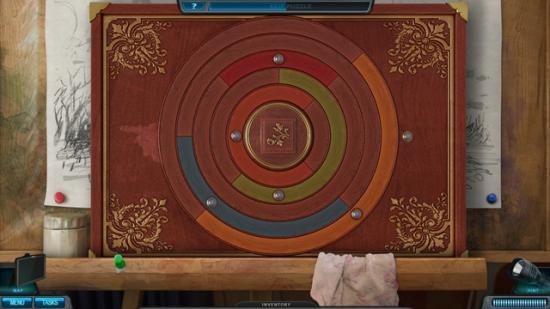
- Once you have added the puzzle pieces, line up the dots. Take note of what each ring moves. Assuming the rings are labelled 1-5, from the inside ring to the outside ring:
- Ring 1 moves 1, 4.
- Ring 2 moves 1, 2.
- Ring 3 moves 1, 3.
- Ring 4 moves 4.
- Ring 5 moves 1, 2, 3, 4, 5.
- To solve the puzzle, line up ring 5, then 3, then 2, then 1 then 4.
- When you are finished, take the wedding rings. Click through the dialogue.
- Give the wedding rings to Mrs. Pollard. Click through the dialogue.
Chapter 5: Narrowing the Hunt
- Click through the dialogue. Knock on the door. Click through the dialogue.
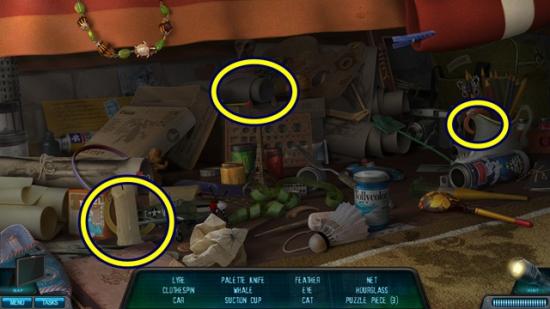
- Click on the garbage to start a hidden object hunt.
- Find all the objects. Once you have found all the items, a lock pick is added to your inventory.
- Try the lock pick on the door. Click on the lamp closest to the house. Open the latch and use the old cloth to unscrew the light bulb (click and drag in a circle in the arrow’s direction).
- Put the light bulb in the dark lamp beside the door. Use the lock pick on the door. A mini-puzzle starts. Get all the pins in the up position. Click on a pin to change its position (if it was up, it will go down, etc.). Each pin moves itself and at least one other pin; hover your cursor over a pin and the pins that light up are the pins it will move.
- As there is no reset button, a step-by-step solution to this puzzle is not possible.
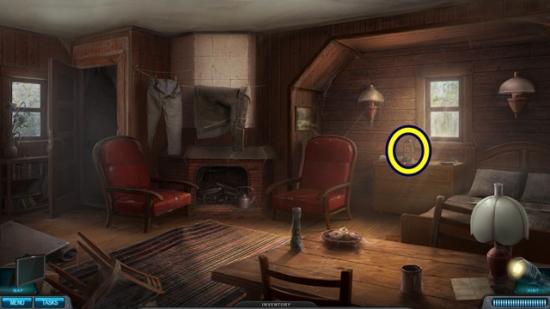
- Once the pins are lifted, enter Sheng’s home.
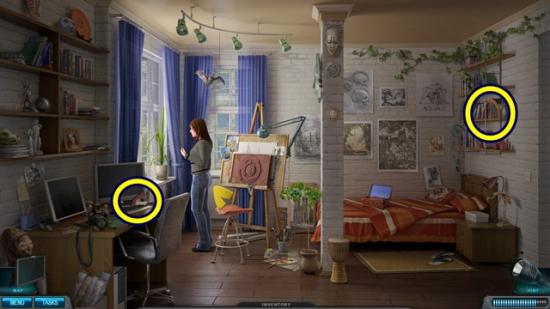
- Look under the couch. Use the handy grabber and pull out the display stand.
- Put the display stand on the easel. Click on the easel.
- Open the padlock using the rusty old file. Open the display. Find all the objects. Nothing is added to your inventory. Click through the dialogue.
- Click on the map and return to the bookshop.
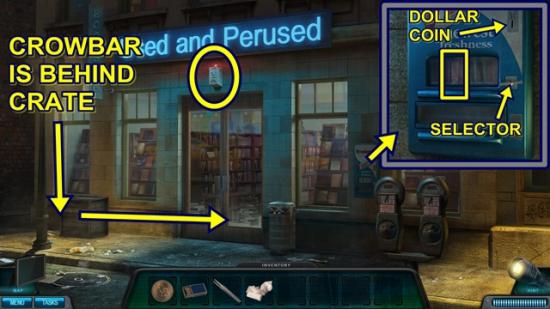
- Click on the vending machine. Turn the dial so the selector is under the gum, then add the dollar coin. Take the pack of gum.
- Click on the drag the crate so it’s in front of the door. Take the crowbar it revealed.
- Click on the alarm above the door. If you can’t click on the alarm, move the crate so it’s in front of the door and you can step up on it.
- Use the crowbar to remove the cover.
- Add the pack of gum.
- Use the crowbar to open the door. Enter the bookshop.

- Click on the bookshelf to start a hidden object hunt.
- Find all the objects. Once you have found all the items, a small jar and princess are added to your inventory.
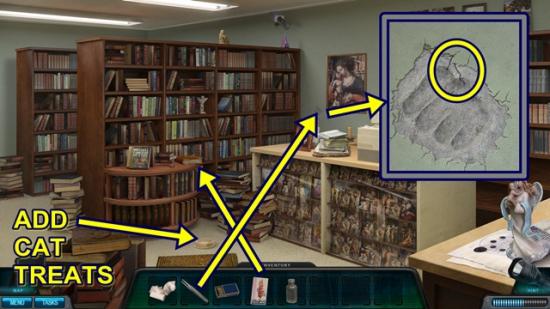
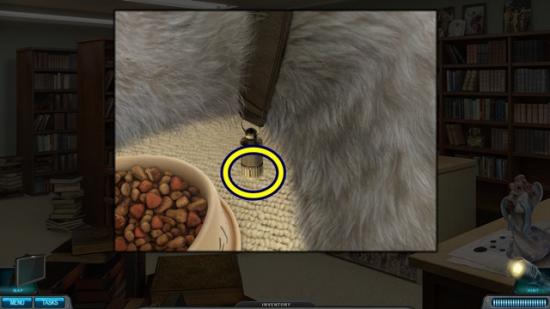
- Click on the book on the table. Slide the princess card into the slot and open the book. Take the cat treats. Click through the dialogue.
- Put the cat treats in the bowl.
- Click on the dent on the wall. Use the tweezers to examine the black fibre. Click through the dialogue.
- Click on the cat when it appears. Unscrew the cap on its collar (click and drag) and take the address.
- Click on the map and go to the warehouse.
- Click on the elevator call buttons. Remove the screw. Click anywhere outside the window to close it.
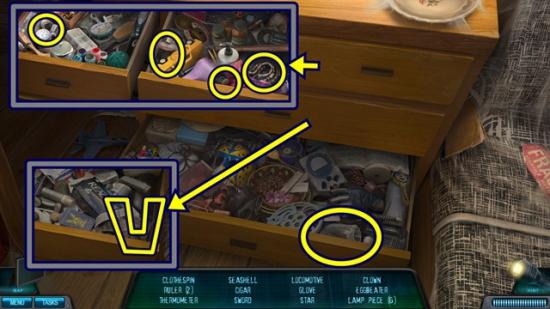
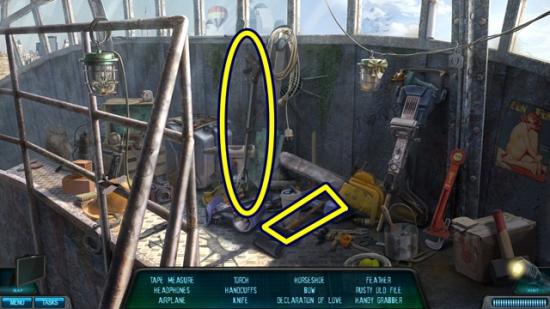
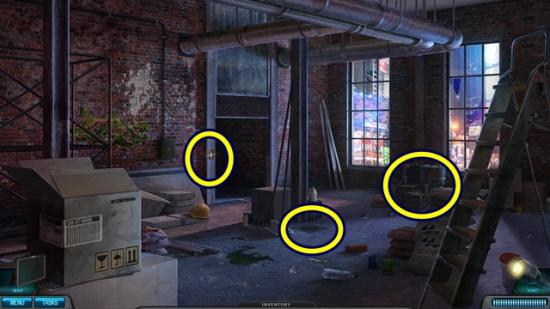
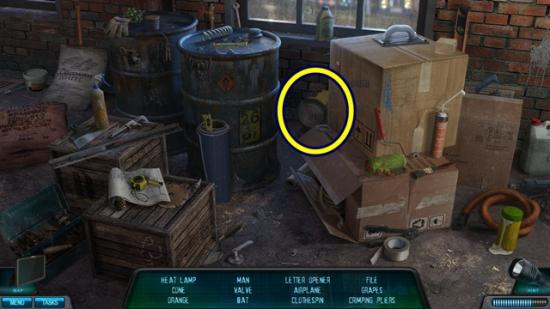
- Click on the barrels to start a hidden object hunt.

- Find all the objects. Once you have found all the items, three pieces of wire and an axe are added to your inventory.
- Click on the grate on the floor. Strike a match for some light (drop the match down the grate). Use the tweezers to get the two pieces of wire.
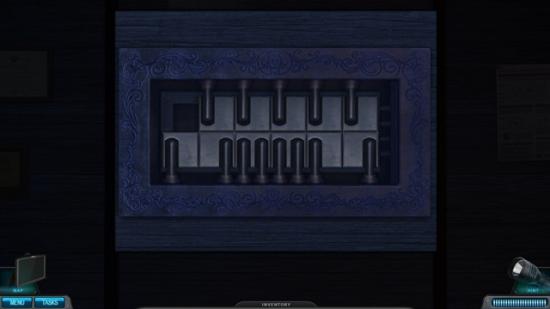
- Click on the elevator call buttons. Add the pieces of wire to the electrodes. Note the wires’ positions and where the electrodes are. The screenshot below shows how to add them.
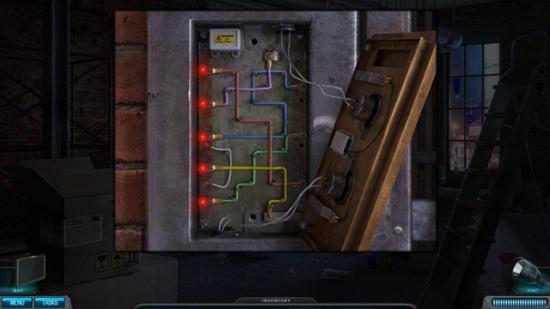
- When you are finished, replace the cover and press the Down button.
- Get on the elevator.
- Click on Tallulah. Click through the dialogue. Continue clicking on her until the call for paramedics. Click through the dialogue.
- Click on the hair on the floor beside the chair. Read the note.
- Click on the table beside the chair. Use the small jar to get the jar of lye.
- Click on the Bible. Click through the dialogue.
- Click on the yellow pages. Click through the dialogue.
- Watch the cutscene.
- A mini-puzzle starts. This is the same chase puzzle as in the junkyard.
- Watch the cutscene.
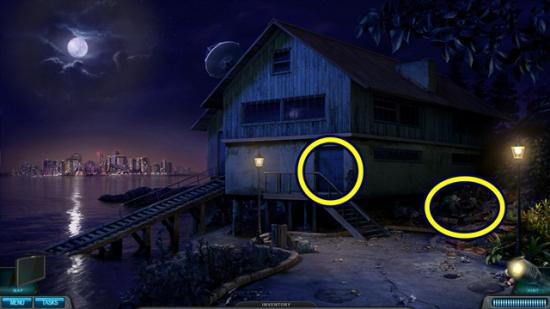
- Click on the map and return to the old lifeboat station.
- Enter the house.
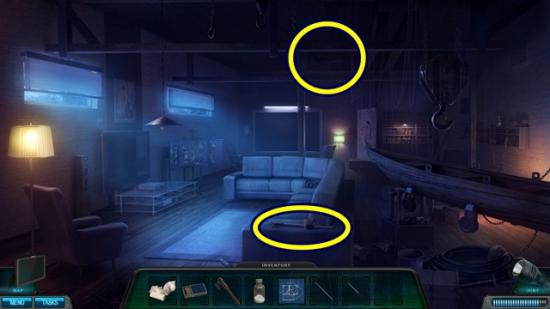
- Click on the easel to start a hidden object hunt.
- Find all the objects. Once you have found all the items, blueprints are added to your inventory.
- Click on the hatch on the ceiling. Click through the dialogue. Click anywhere outside the window to close it.
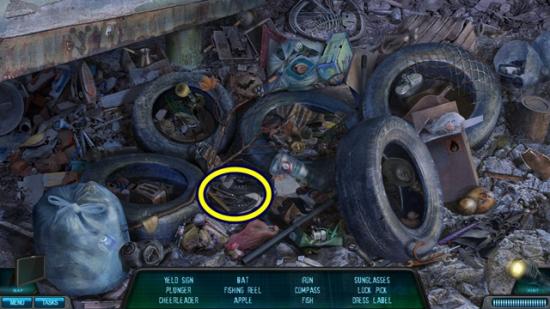
- Go outside.
- Click on the garbage to start a hidden object hunt.
- Find all the objects. Once you have found all the items, two pole sections are added to your inventory.
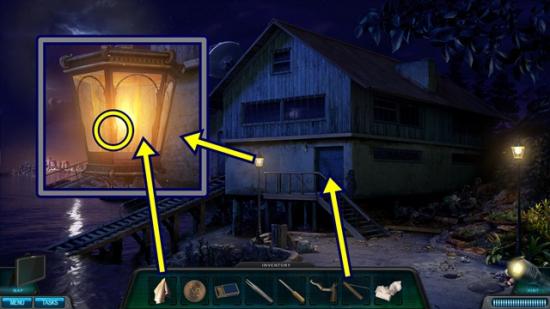
- Go back in the house.
- Take the pole section. Open your inventory and combine the three pole sections to make the pole. Click on the hatch on the ceiling. Use the pole to open the hatch. Climb the ladder.
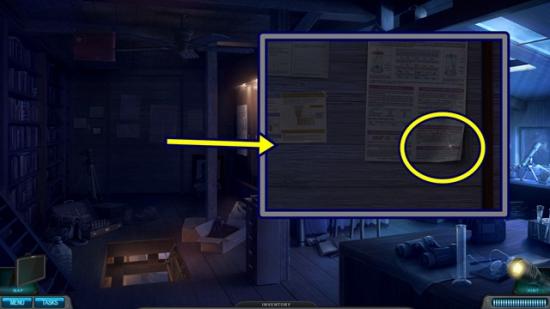
- Click on the back wall. Lift the corner of the poster to reveal the panel. Click on the panel. A mini-puzzle starts. Rearrange the tiles so the pins fit in the slots.
- Solution:
- Take the photo of Rebecca. Click on the timer. Watch the cutscene.
- Click on the debris. Pick up the brick and smash the frame with it. Take the photo. Click through the dialogue.
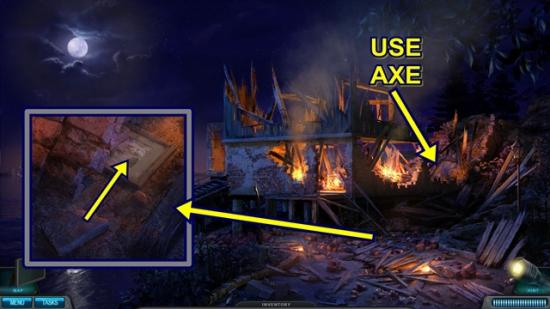
- Click on the door hatch. Break it open with the axe (five-six clicks). Enter the cellar.
- Click on the Will Sheng’s head. Click through the dialogue. Click on the Will Sheng’s legs. Click through the dialogue. Click anywhere outside the window to close it.
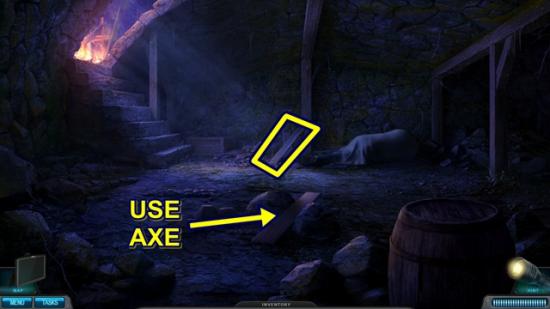
- Take the wooden plank. Use the axe to get the second wooden plank. Click on the Will Sheng’s legs again. Add the two wooden planks to his leg, then add the bandage.
- Click on the Will Sheng’s head. Click through the dialogue. Watch the cutscene.
- Return to the Will Sheng’s lab.
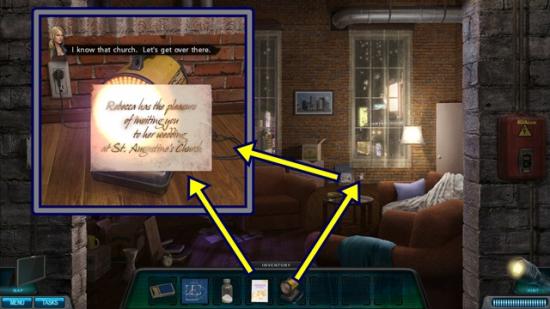
- Click on the desk in the other room. Take the wedding invite.
- Click on the map and return to the warehouse.
- Click on the barrels to start a hidden object hunt.
- Find all the objects. Once you have found all the items, a heat lamp is added to your inventory.
- Get on the elevator.
- Plug the heat lamp into the wall (use the point of the cursor on the outlet).
- Put the wedding invite in front of the lamp and move it around until the letters appear and dialogue starts.
Chapter 6: The Fair Damsel
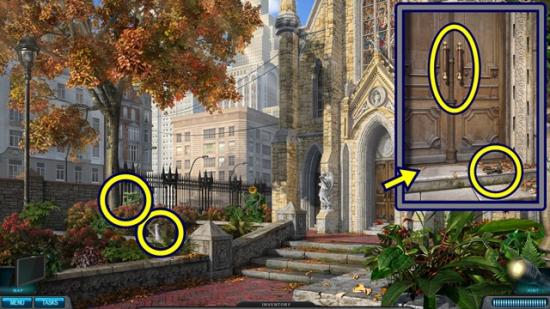
- Take the watering can. Click on the door. Examine the gloves. Try to open the door. Click anywhere outside the window to close it.
- Click on the moving bushes. Talk to the gardener. Click through the dialogue.
- Click on the door.
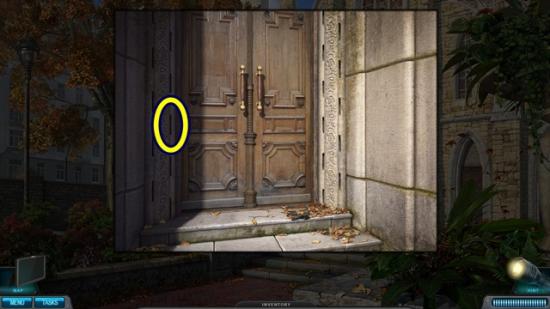
- Click on the latch the gardener mentioned. Enter the church.
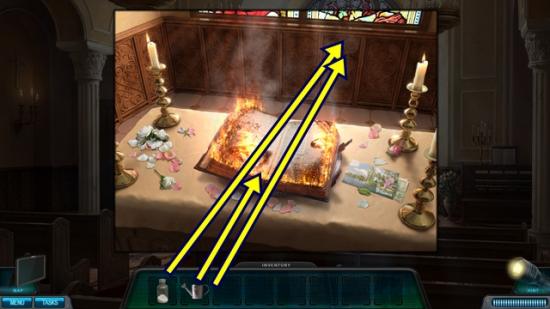
- Click on the altar. Put out the fire with the watering can.
- Use the jar of lye on the fish symbol, then pour water on it using the watering can. Take the fish symbol.
- Watch the cutscene.
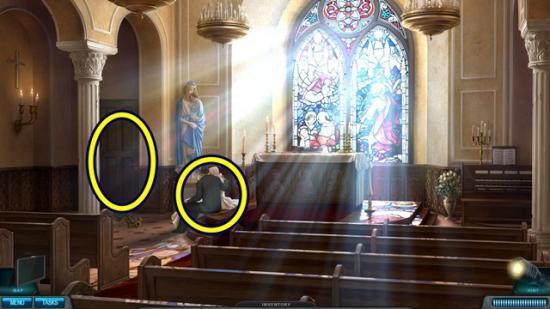
- Talk to the minister and Rebecca. Click through the dialogue.
- Go through the door.
- Click on the door. Click anywhere outside the window to close it.
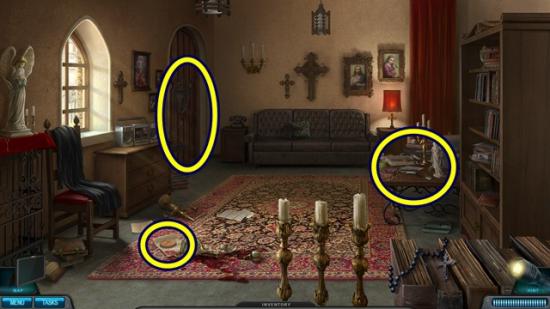
- Take the cross symbol. Click on the table to start a hidden object hunt.
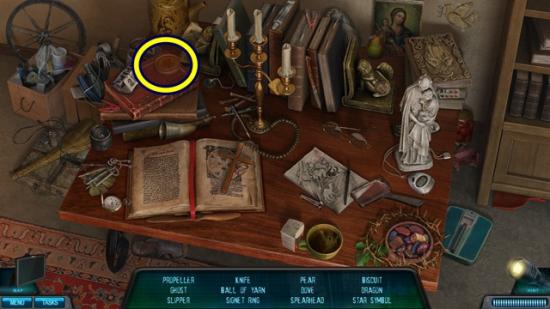
- Find all the objects. Once you have found all the items, the star symbol is added to your inventory.
- Click on the door.
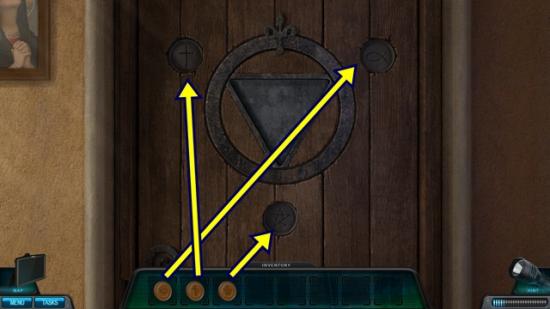
- Add the star symbol, fish symbol and the cross symbol. A mini-puzzle starts. Watch the centre ring move and point to the symbols. Then click on the rings to match the sequence. If you make a mistake, you will have to start again. You will have to do this four times.
- When you are finished, go through the door.
- Watch the cutscene.

Comments are closed.
More articles...
-
Best Horror Games On Itch.io – July 2026
Across a bounty of subgenres. -
Haze Seas Accessories Tier List [Best Accessories to Equip]
The accessories with the best stat buffs in Haze Seas.