
Best Horror Games On Itch.io – July 2026
Across a bounty of subgenres.![Haze Seas Accessories Tier List [Best Accessories to Equip]](/wp-content/uploads/2026/07/haze-seas-accessories-tier-list.jpg "Haze Seas Accessories Tier List [Best Accessories to Equip]")
Haze Seas Accessories Tier List [Best Accessories to Equip]
The accessories with the best stat buffs in Haze Seas.
![[Roblox] Evomon Shiny Hunting Guide – Including Prismatic and Pris Shinies!](/wp-content/uploads/2026/06/evomon-shiny-hunting-guide.jpg "[Roblox] Evomon Shiny Hunting Guide – Including Prismatic and Pris Shinies!")

Sonya Walkthrough
Welcome to the Sonya walkthrough on Gamezebo. Sonya is a hidden object/adventure game played on the PC created by Specialbit Studios. This walkthrough includes tips and tricks, helpful hints, and a strategy guide to how to complete Sonya.
Share this


- Prefer Gamezebo on Google

Sonya – Game Introduction
Welcome to the Sonya walkthrough on Gamezebo. Sonya is a hidden object/adventure game played on the PC created by Specialbit Studios. This walkthrough includes tips and tricks, helpful hints, and a strategy guide to how to complete Sonya.
How to Use this Walkthrough (Please read)
- This walkthrough is meant to be used as a guide to assist in solving mini-puzzles and acquiring all items in order to complete the game. You may explore locations in the order you wish, this walkthrough is written to take the most direct route to the game’s finish.
- Play the tutorial!!!! This walkthrough will assume you have and won’t explain anything explained in the tutorial.
- Inventory objects will be written in bold. The walkthrough will state, “Use the inventory item on the blah blah,” because it assumes you have the item. If you don’t have the item, on your keyboard, press CTRL+F (at the same time). In the text box, type the name of the item you are looking for and press ENTER. This will scan this page for the appearance of that word.
Gameplay and Tips
- This is a hidden object adventure game. You will move from location to location solving hidden object hunts, mini-puzzles and picking up items to use in order to proceed in the game.
- The Menu button at the top left of the screen will bring you back to the main screen.
- The Tasks button at the top right of the screen will show you the tasks you need to complete.
- Items collected throughout the game go into your inventory, located at the bottom of your screen. It is hidden from view until you hover over it with your mouse.
- You will sometimes have to combine inventory items. To do so, click on one inventory item, then the other to combine them (it is explained in the tutorial). A green plus sign [+] indicates inventory items that need to be combined with other items.
- Closing a window – To close the zoom-in windows, click the Close button or anywhere outside of the window.
- Mini-puzzles can be skipped by using the Hint button.
- Hint system – Hints are available in the bottom right-hand of the screen. Using a hint in the adventure part of the game will guide you as to where to go next.
- Hints used in the hidden object scenes act in one of two ways. If you only have one object left to find, click the Hint button and that item will be highlighted. If there are two or more items to be found, click the Hint button, then click an item in the list and that item will be highlighted in the scene.
- Hidden object hunts provide either a list of items to find or pictures of fragments to find. Click on items in the scene to cross them off the list. Once you have found all the hidden objects or fragments, an item is added to your inventory.
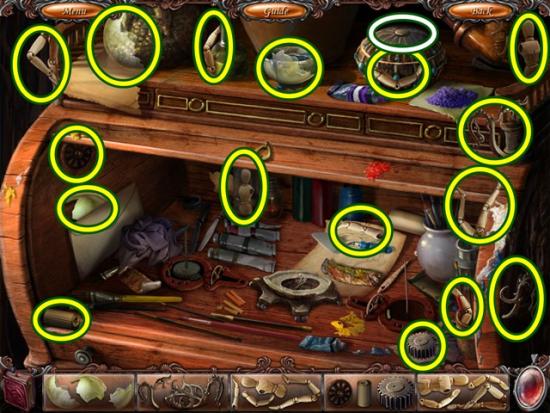
- Hidden objects screenshots will only highlight (yellow circles) the items added to your inventory.
- Achievements – This game has achievements. From the Main Menu screen, click the Achievements button and look them over. Note most are achieved by progressing through the game. The last page of achievements contains the ones you can actually earn (ex: not using Hint, not skipping puzzles, etc.).
Navigation
- There is no map in this game. The name of each room appears when you hover your cursor over the entryway to the next scene. This walkthrough will use that naming convention and will state, “return to the blah blah” and will not explain the route to take.
Walkthrough – Chapter 1
- When you start to play the game, the tutorial is offered to you. Even if you play a lot of these types of games, play the tutorial!!! If there is anything out of the ordinary in this game, it will be explained via the tutorial. The remainder of the walkthrough will be written assuming you have played the walkthrough.
- Click Yes to play the tutorial. The tutorial explains the hand cursor and has you pick up the vase with water. Take the vase with water from your inventory and pour it over the door handle.
- Note: clicking Skip on the tutorial dialogue boxes does not skip the tutorial, it simply closes the dialogue box. There is an achievement for not using hints. If you want to get the No Hints achievement, don’t click the Hint and click Skip instead.

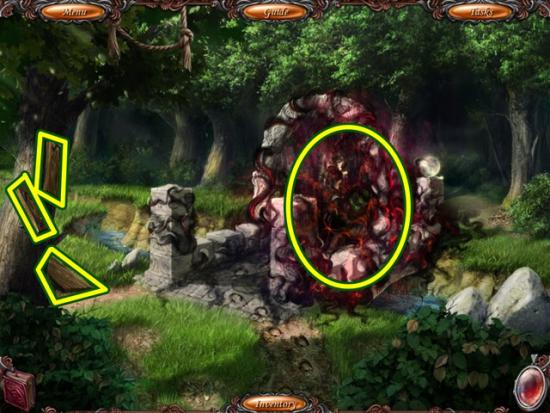
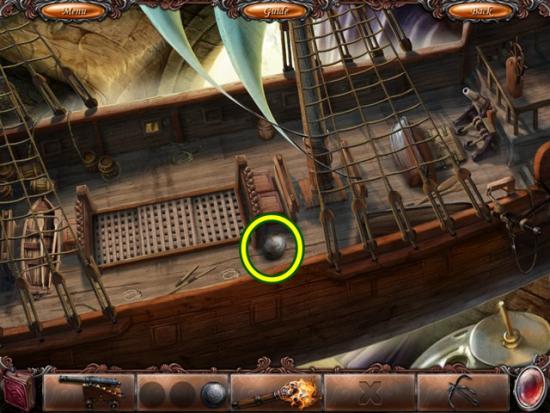
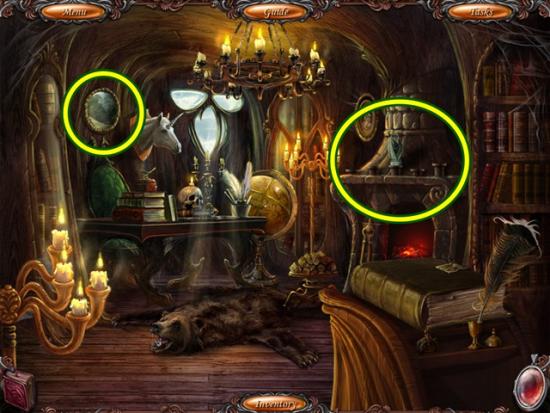
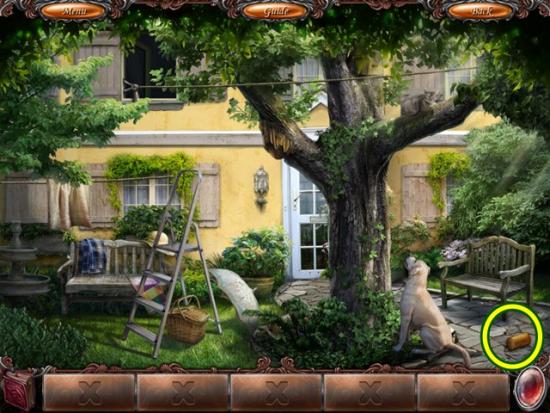
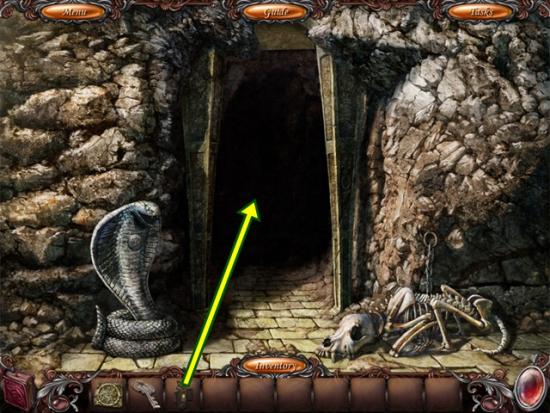
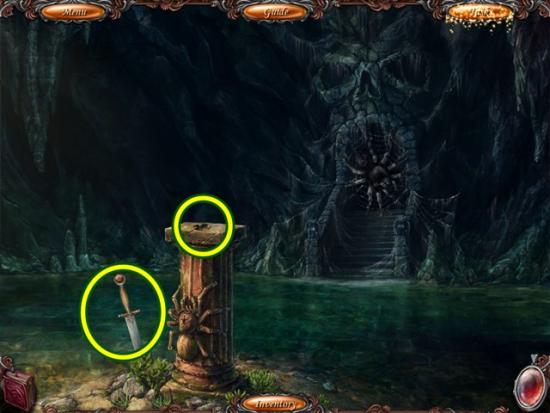
- Take the unloaded revolver. Go south to explore Sonya’s room.
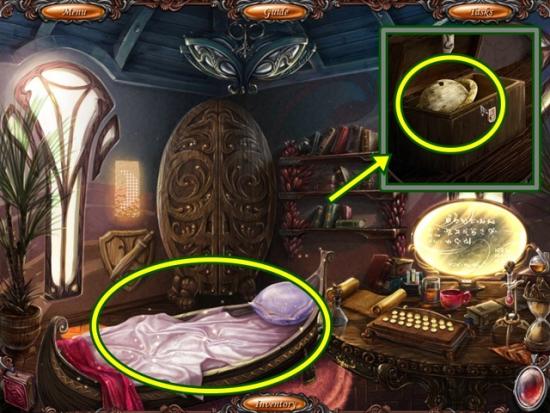
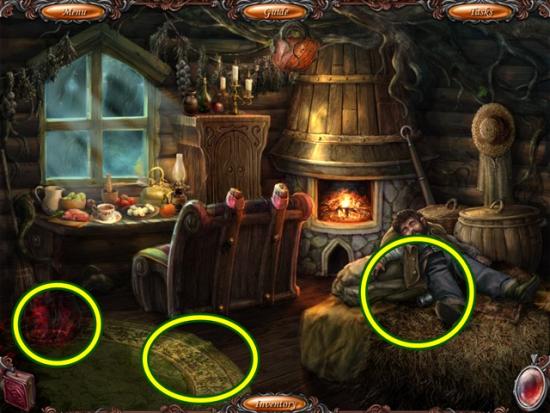
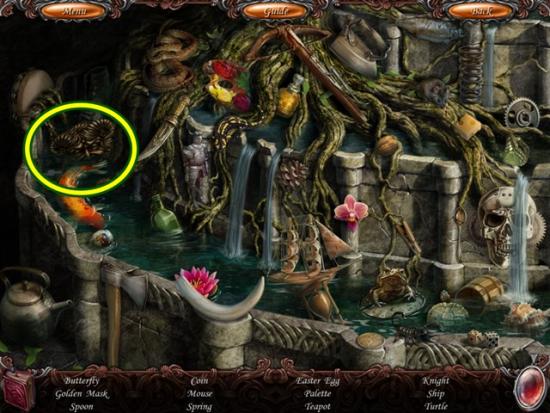
- Click on the wall shelf. Open the chest and take the Jupiter model. Click on the bed to start a hidden object scene.
- Find all the objects. Bullets are added to your inventory.
- The tutorial explains how to combine inventory items. From the inventory, take the unloaded revolver and combine it with the bullets to make the revolver. Go south to the door.
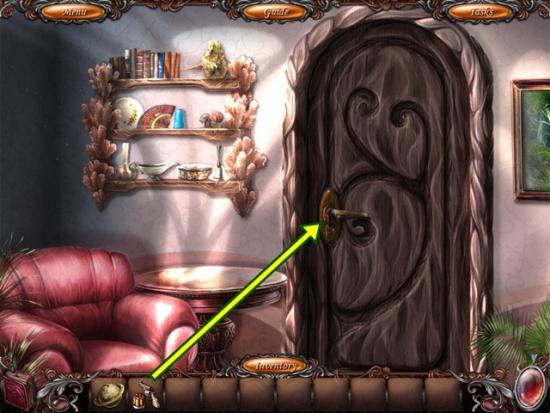
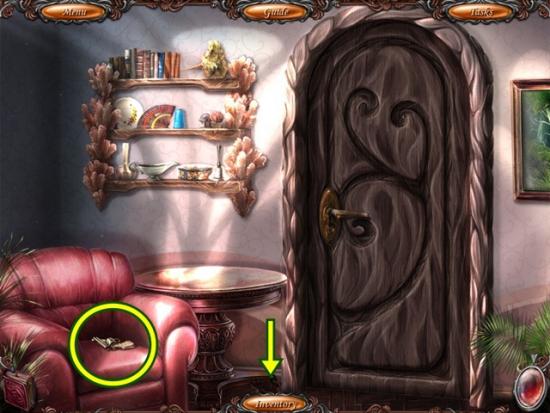
- Use the revolver to shoot the door handle. Go south to Sonya’s room.
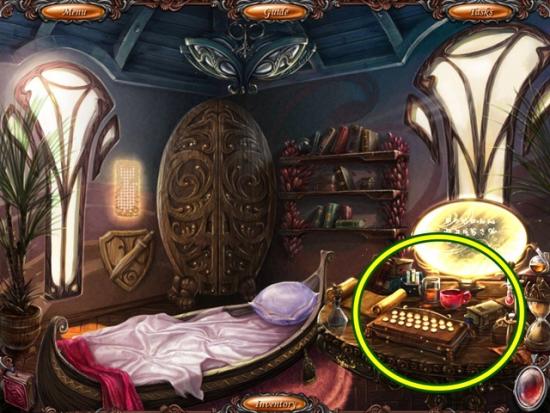
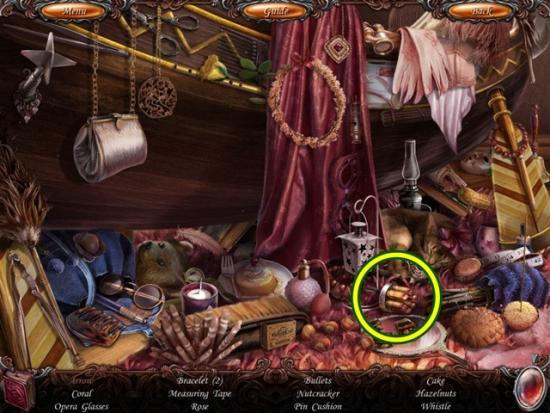
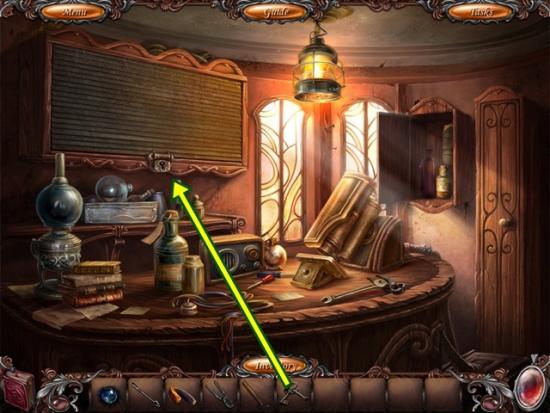
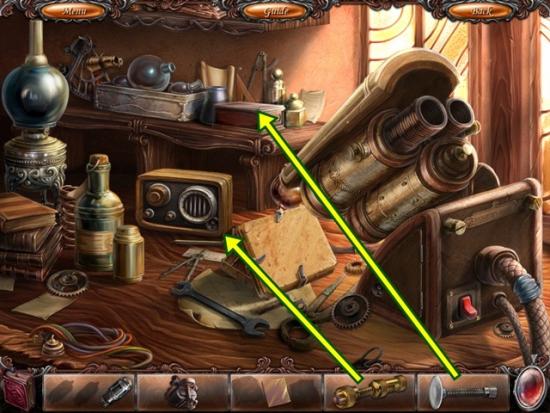
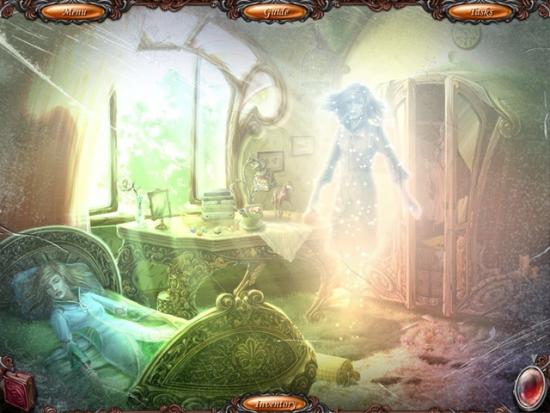
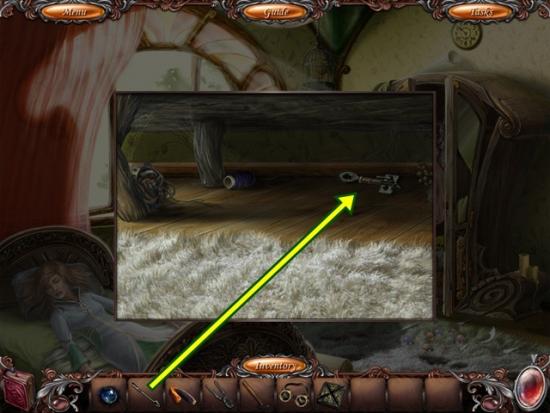
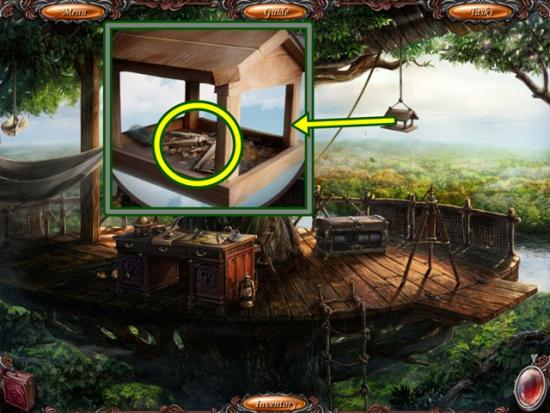
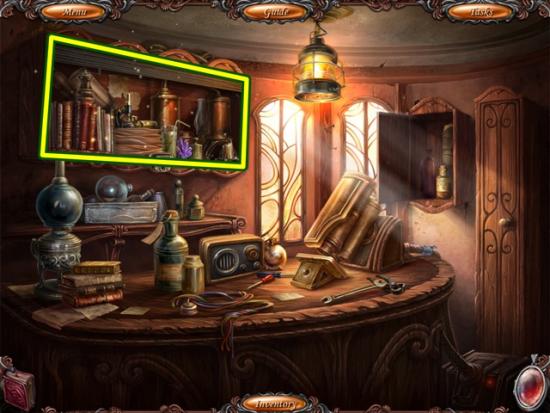
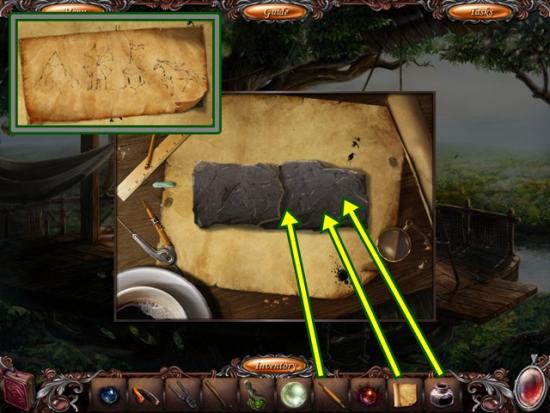
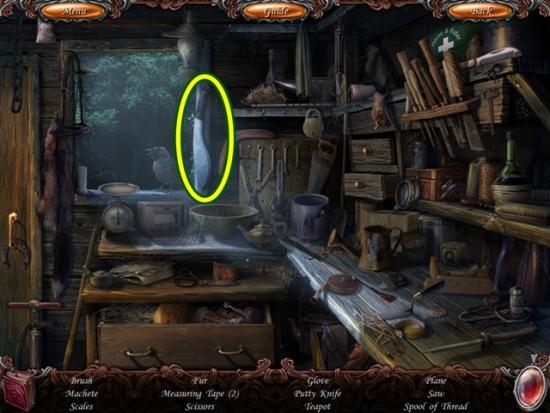
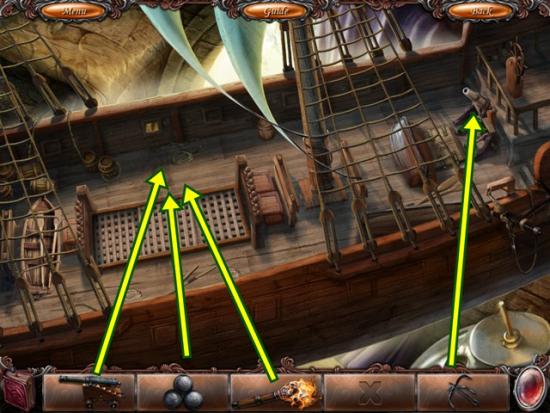
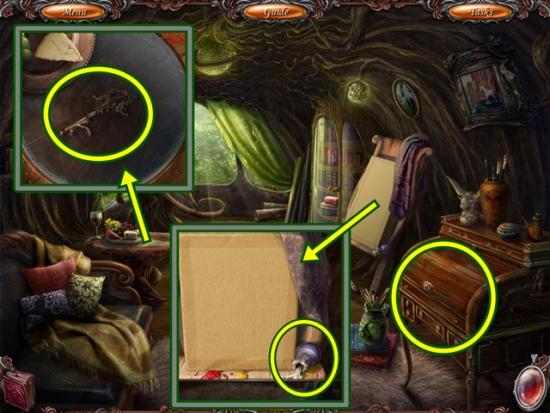
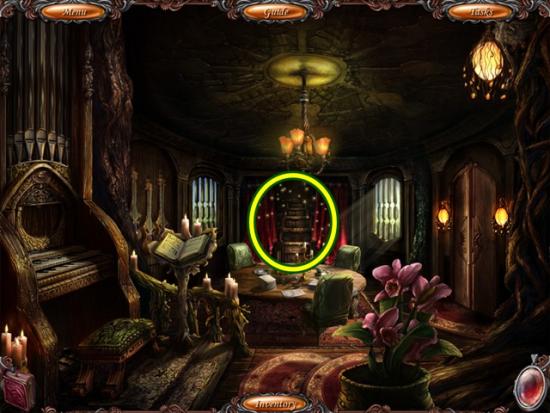
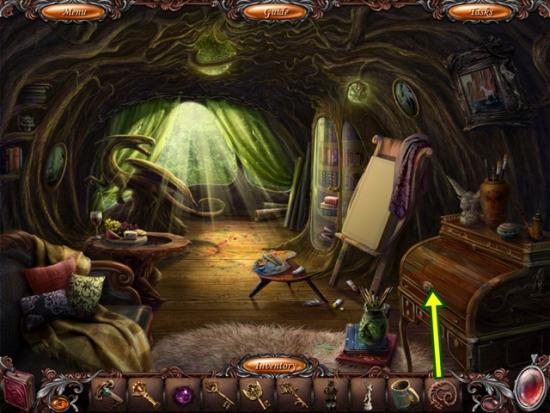
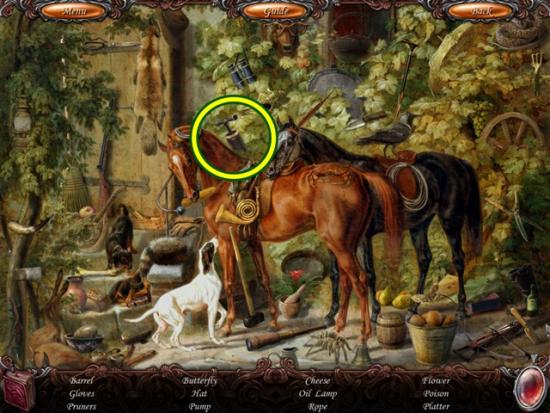
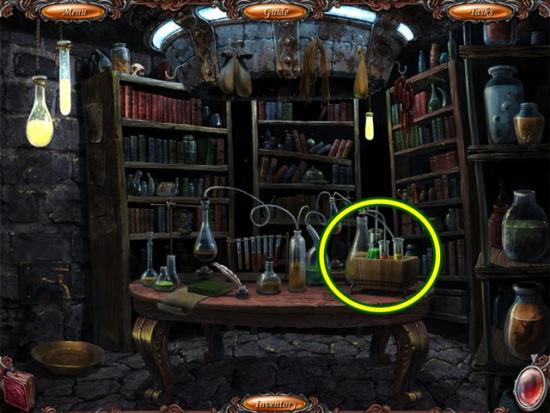
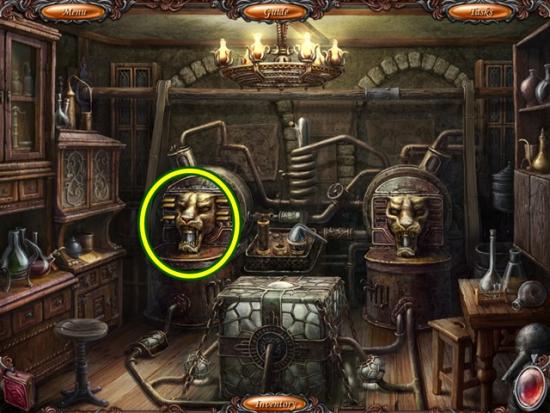
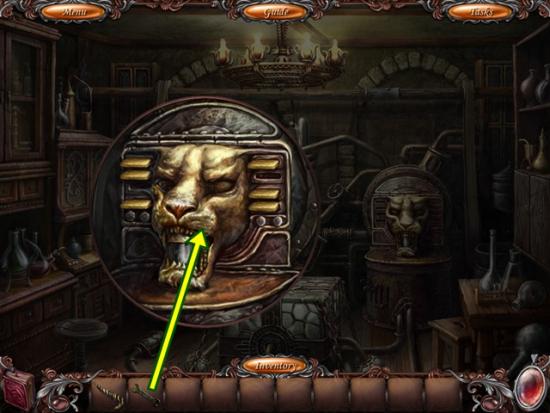
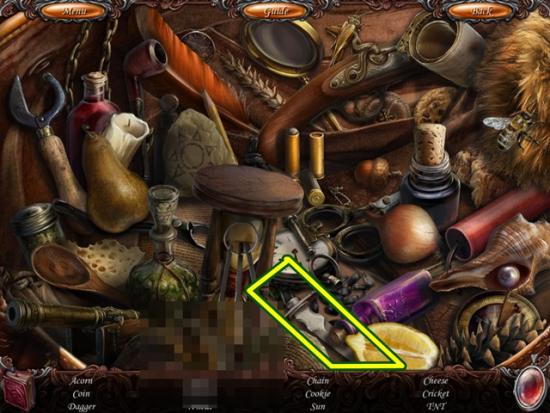
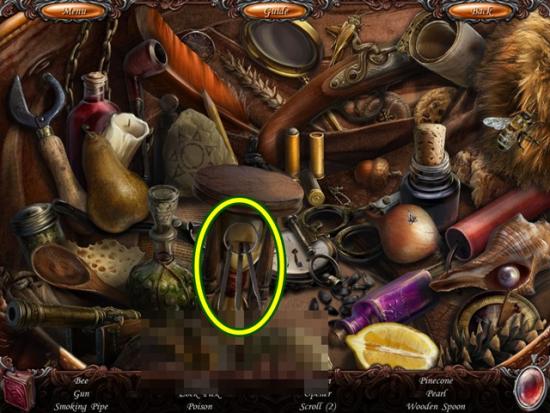
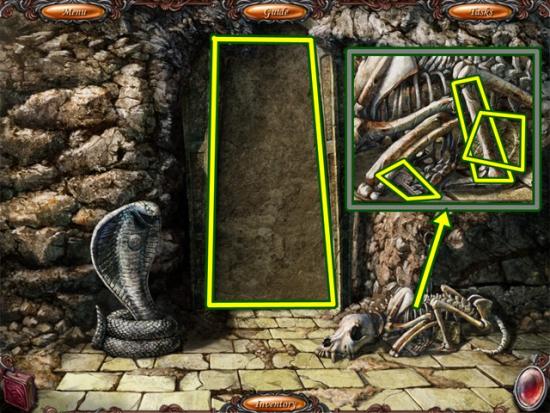
- Click on the desk to start a hidden object scene.
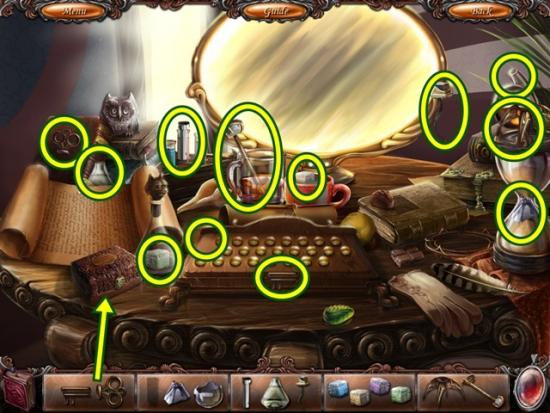
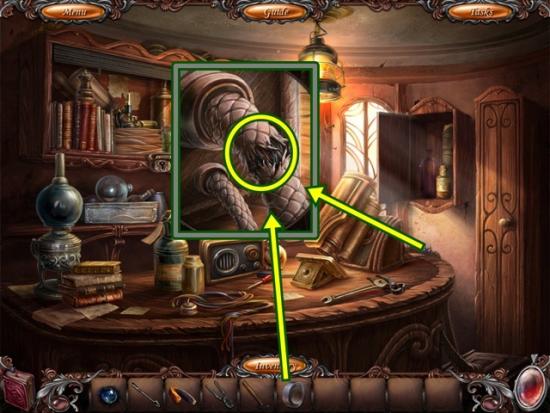
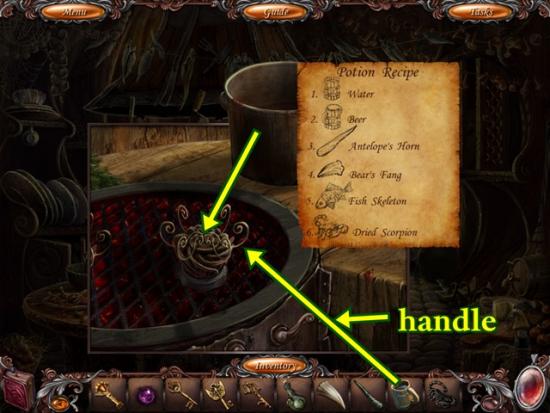
- Find all the object fragments. Move the wooden item in the middle of the desk (white outline) to get a reagent piece. Use the completed key to open the small box and take the remaining two pieces.
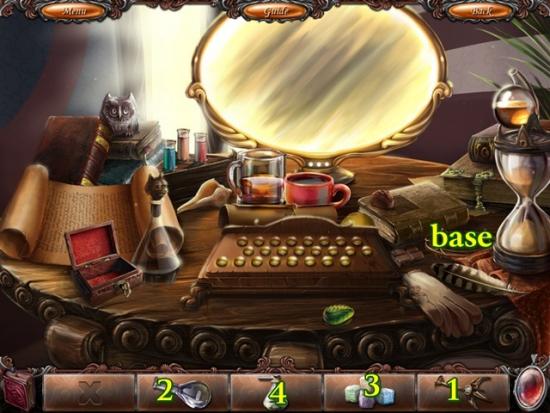
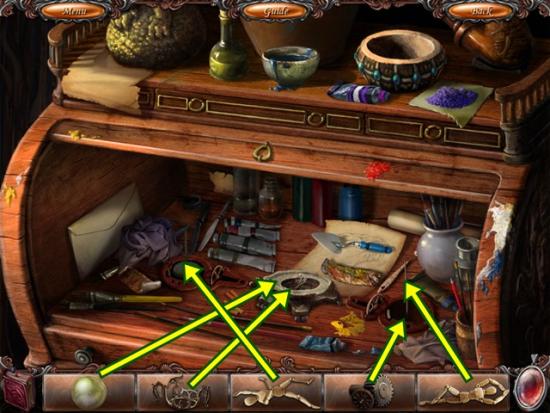
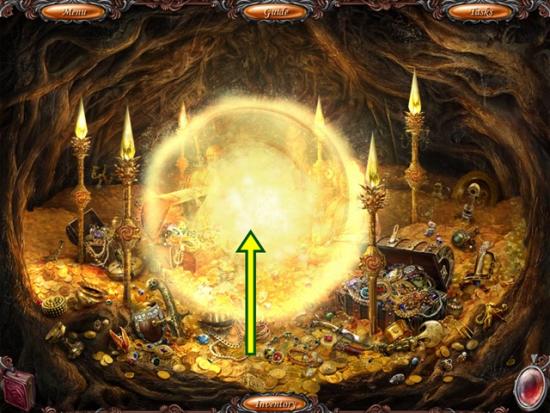
- Once you have all the items, put the flask holder (1) on the base (yellow circle), then add the flask (2), put the reagent (3) in the flask and then light it with the lighter (4). Take the flask which is now an explosive.
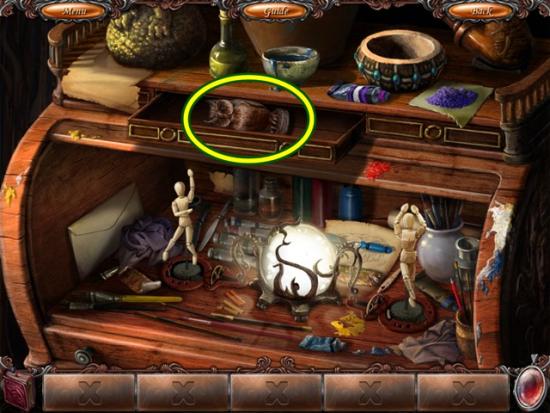
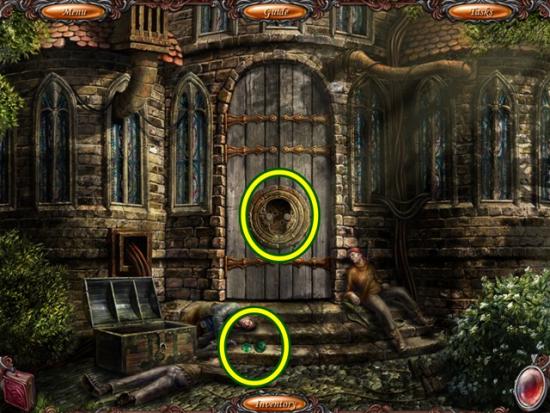
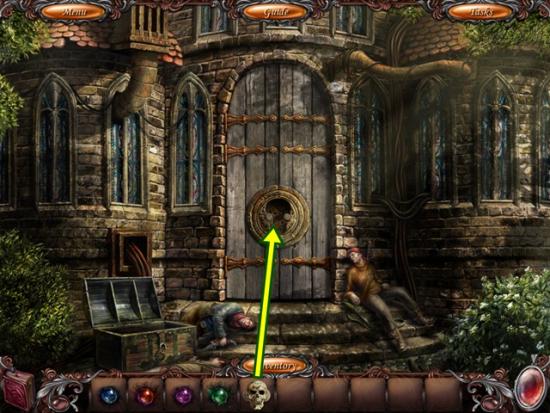
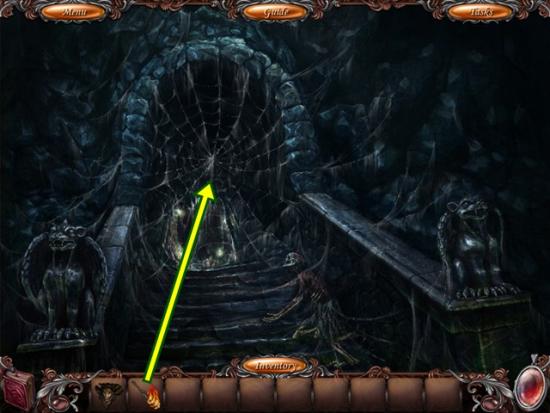
- Go south to the door.

- Put the explosive on the door handle. Shoot at it with the revolver. Go through the door to the hallway.
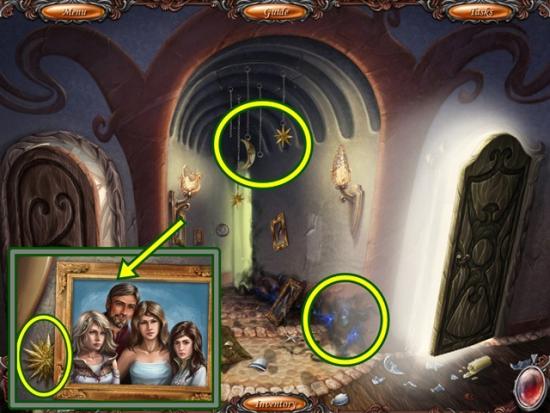
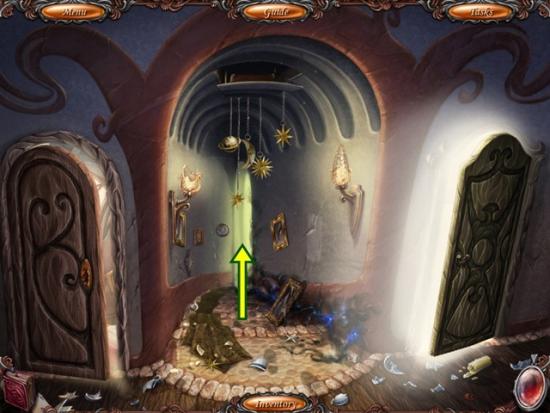
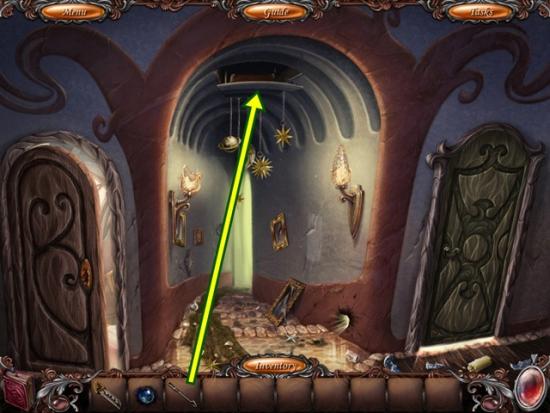
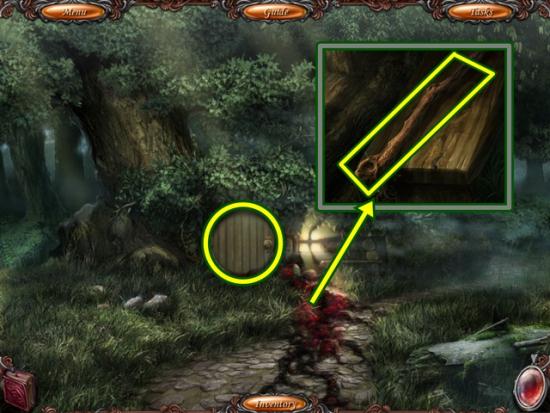
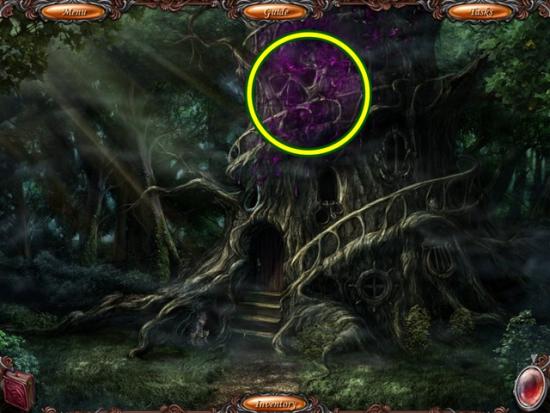
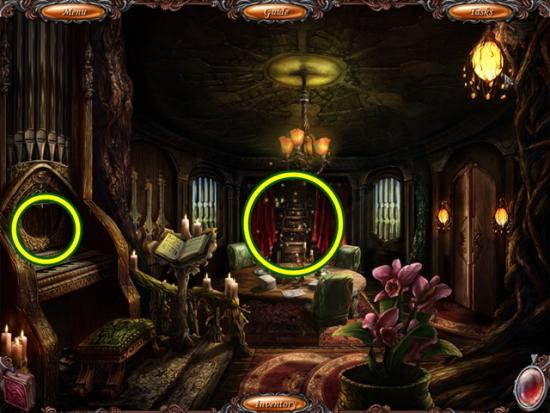
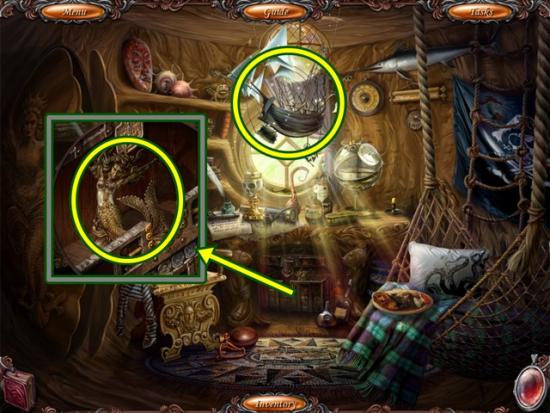
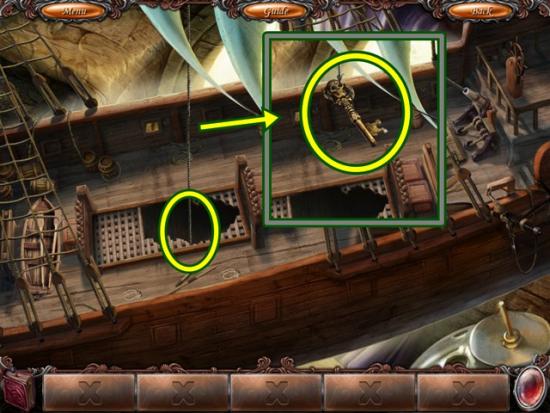
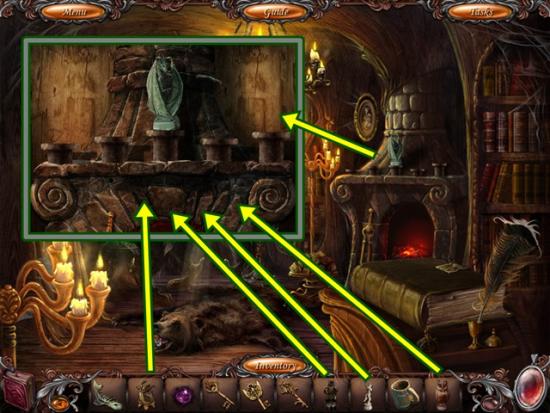
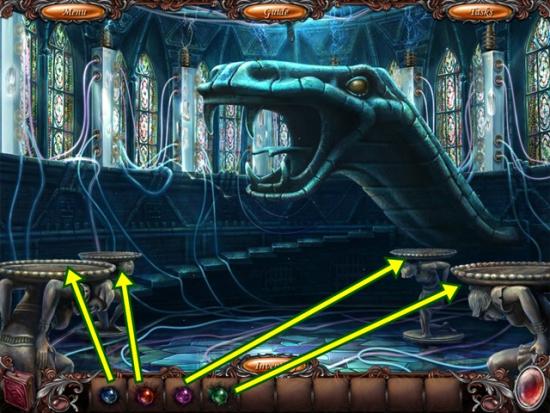
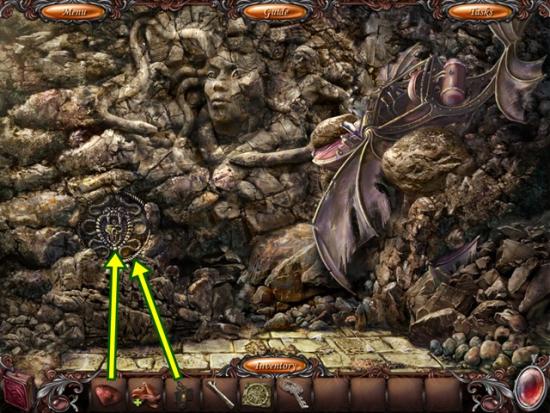
- Click on the picture on the wall. Take the star model. Click anywhere outside of the window to close it. Click on the blue glowing area on the floor and examine it. Click anywhere outside of the window to close it. Click on the moon and stars hanging from the ceiling.
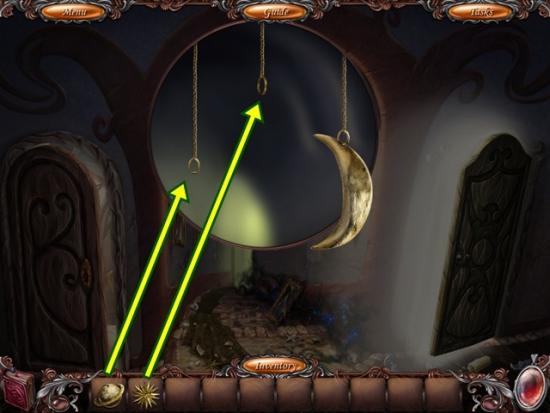
- Place the Jupiter model and star model on the hooks.
- A mini-game starts. To solve this game, repeat the pattern to light up the models. Watch the models light up, once they are done, click on each model in the same order. Do this three times. If you make a smogake, you will be shown the pattern again.
- Go forward down the hall to the living room.
- Click on the overturned table. Take the electric card key. Return to Sonya’s room.
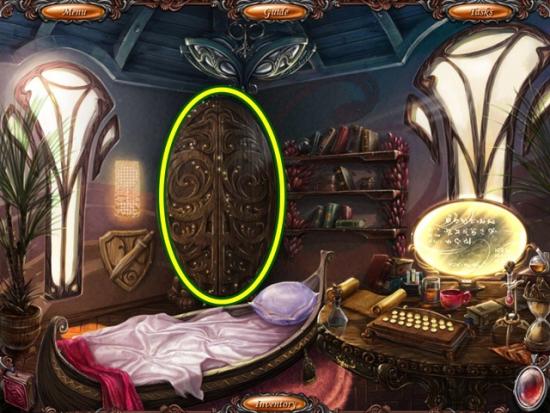
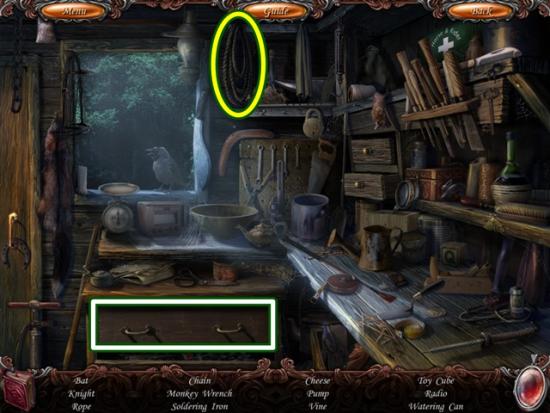
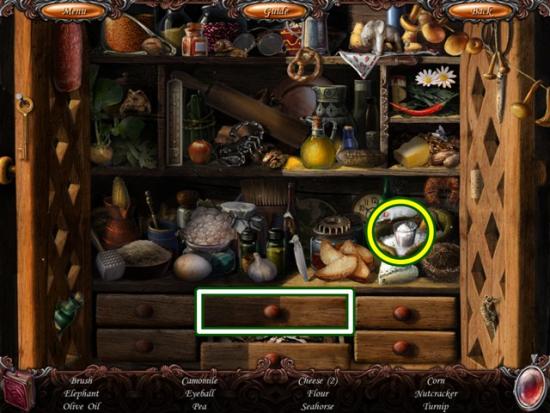
- Click on the wooden wardrobe to start a hidden object scene.
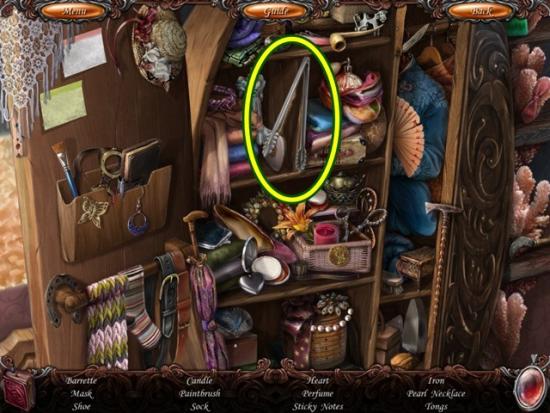
- Find all the objects. Tongs are added to your inventory. Return to the hallway.
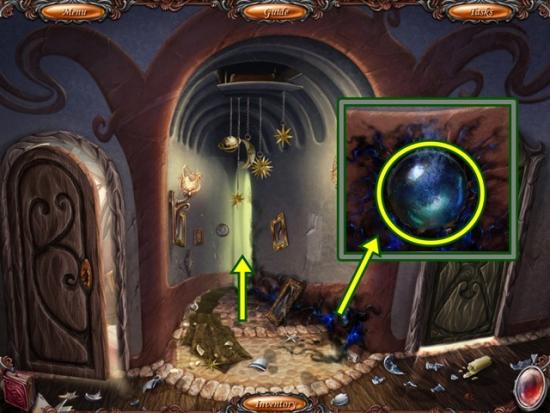
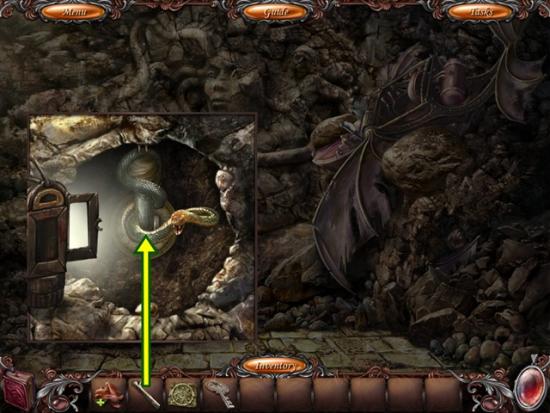
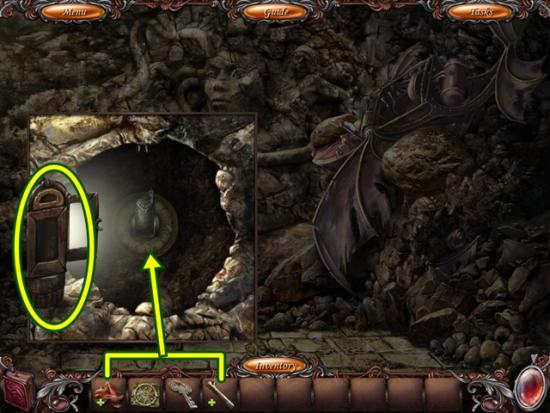
- Click on the blue glowing area on the floor. Use the tongs to remove the blue orb. Go forward to the living room.
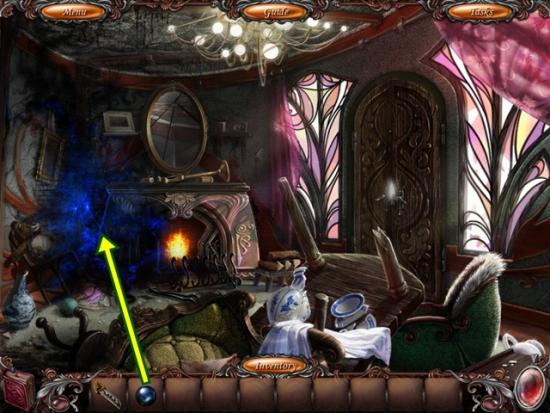
- Use the blue orb on the blue smoke to clear the room.
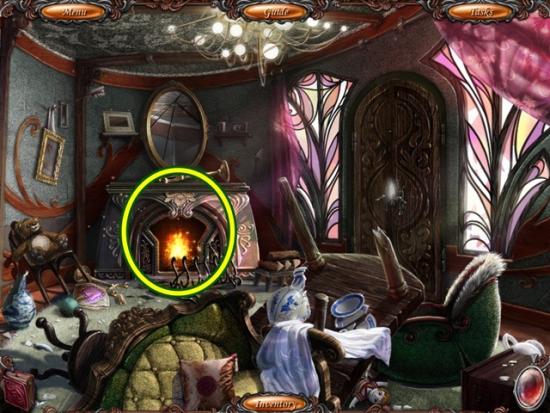
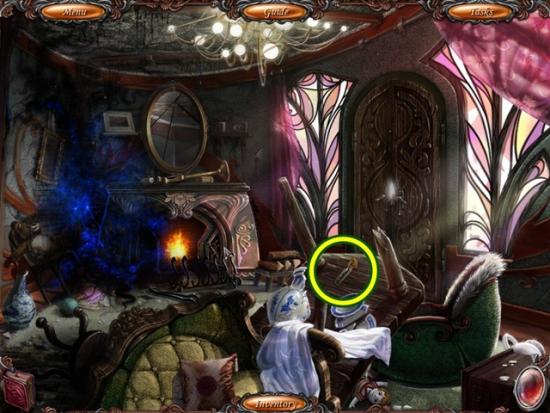
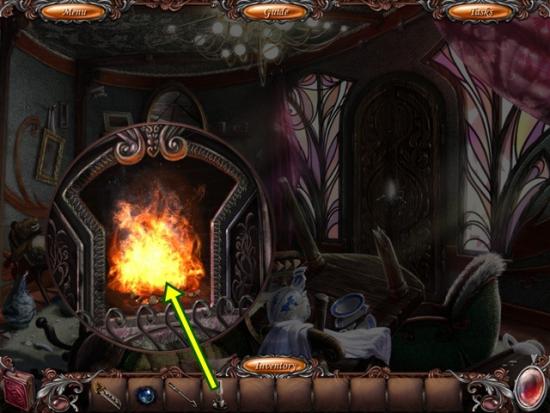
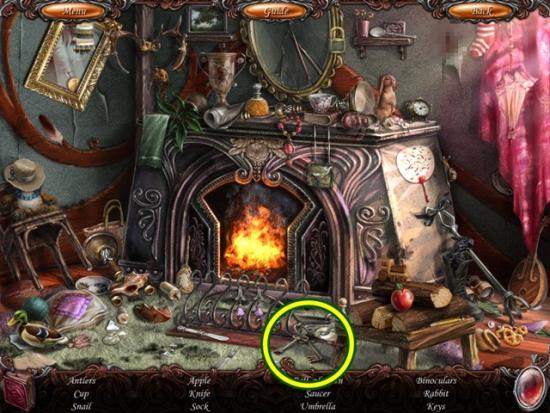
- Click on the fireplace to start a hidden object scene.
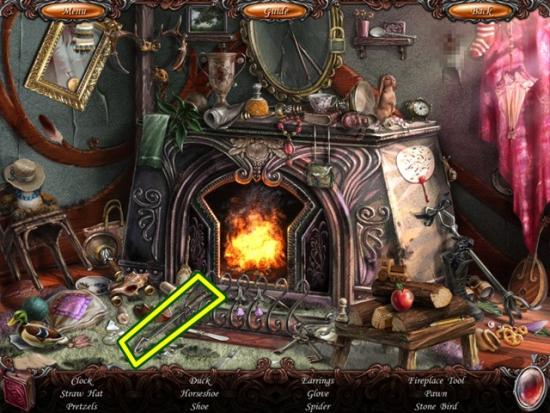
- Find all the objects. A fireplace tool is added to your inventory. Click on the fireplace to examine it. Click anywhere outside of the window to close it. Return to the hallway.
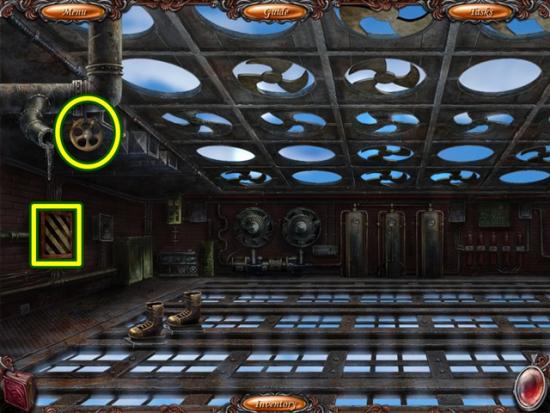
- Use the fireplace tool to pull the attic stairs down. Climb the ladder. Click anywhere outside of the window to close it. Go back into Sonya’s bedroom.
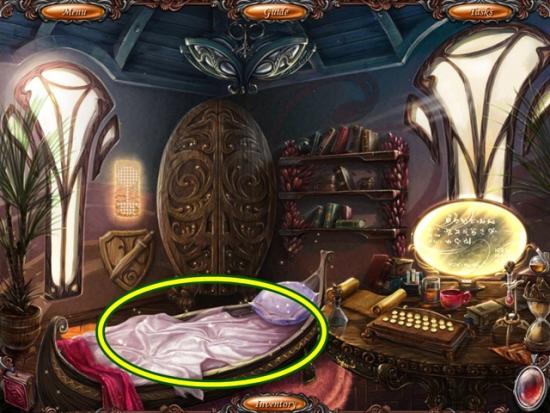
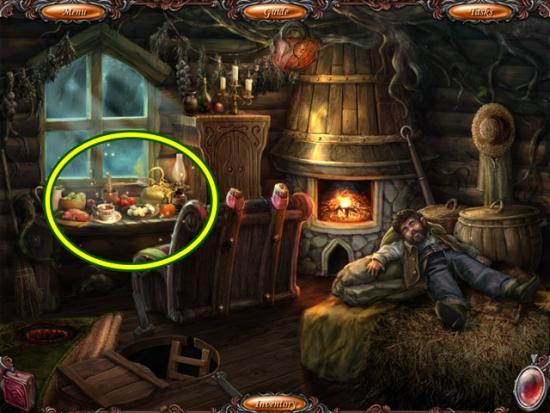
- Click on the bed to start a hidden object scene.
- Find all the objects. An unlit lamp is added to your inventory. Return to the living room.
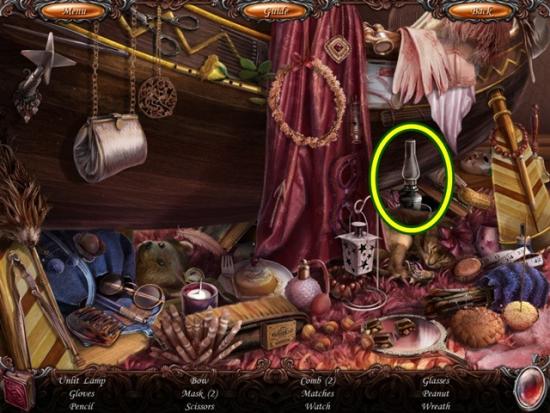
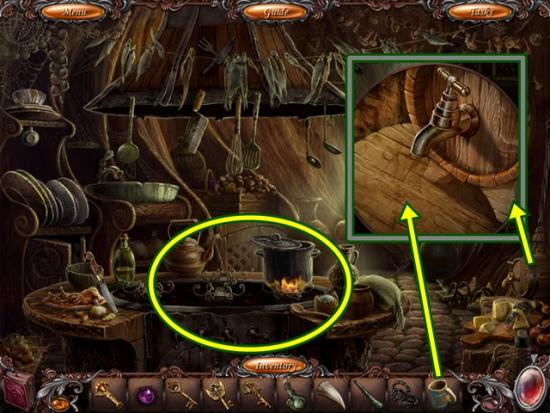
- Click on the fireplace. Place the unlit lamp in the fire to get the lit lamp. Return to the hallway.
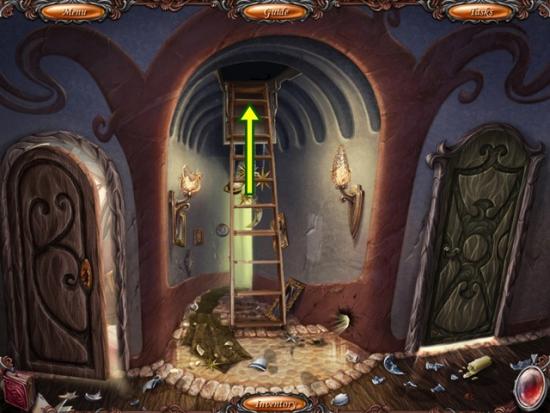
- Climb the ladder.
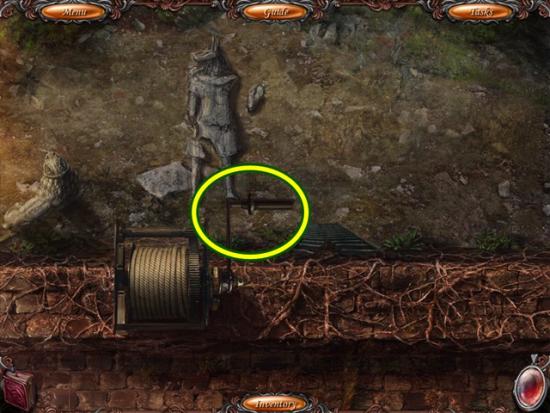
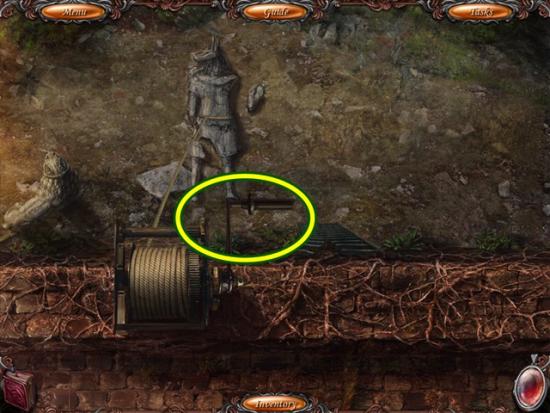
- Place the lit lamp on the floor. Take the magnet and the valve. Return to the living room.
- Use the fireplace tool to smash the door. Go through the door.
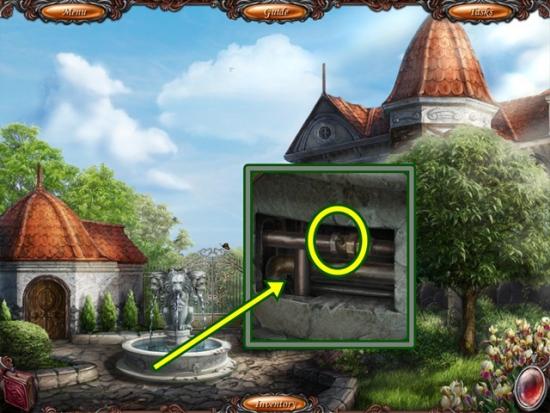
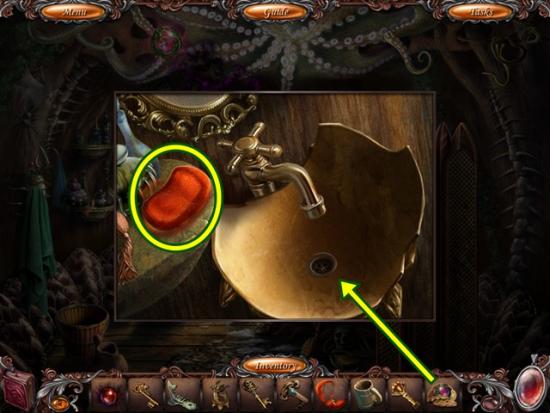
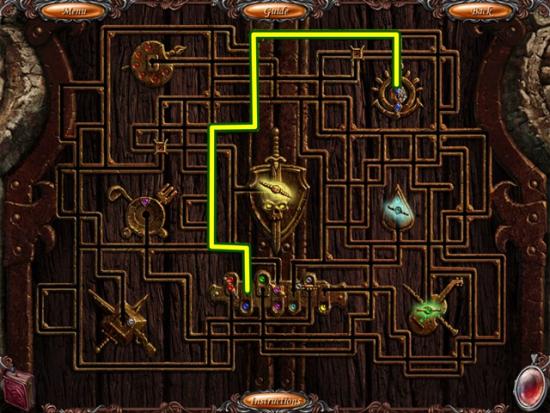
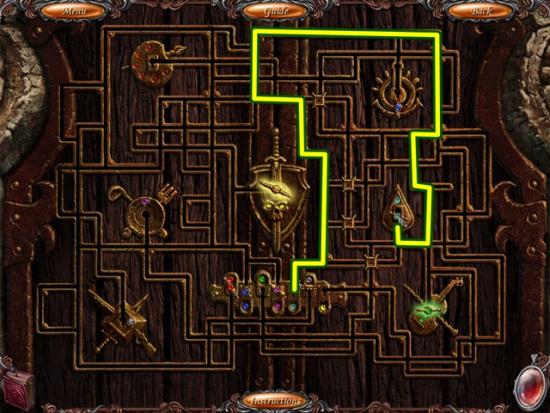
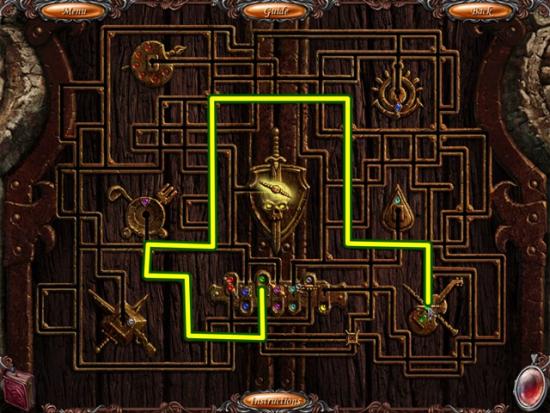
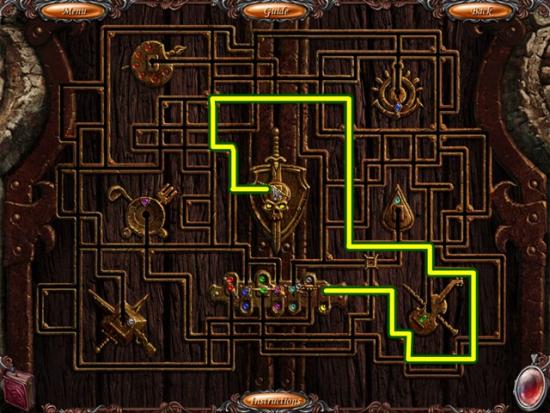
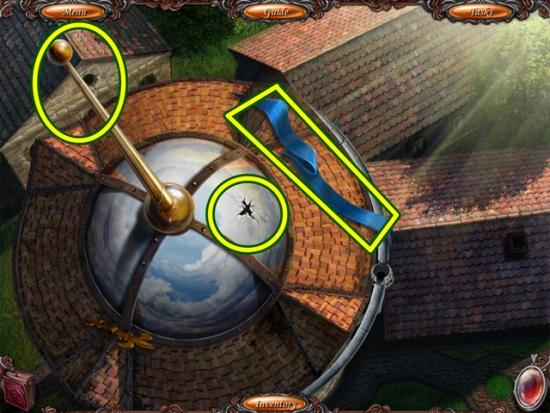
- Click on the fountain. Remove the panel. Add the valve.
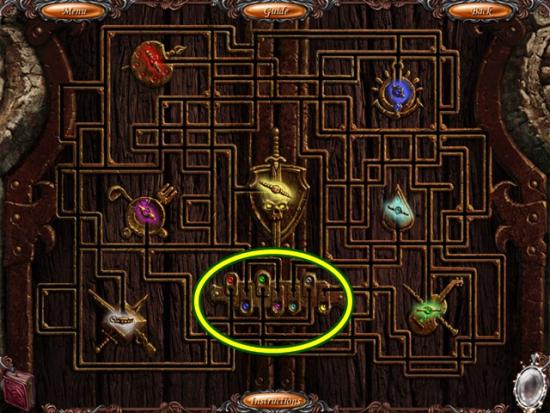
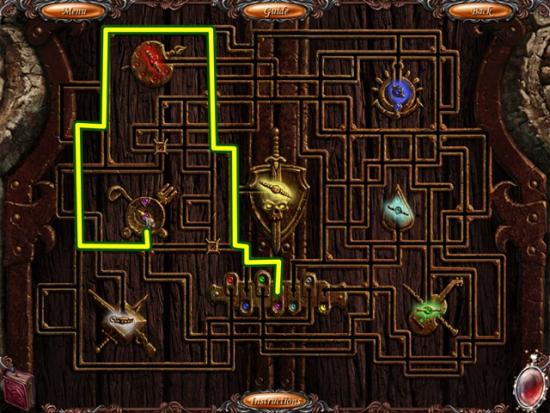
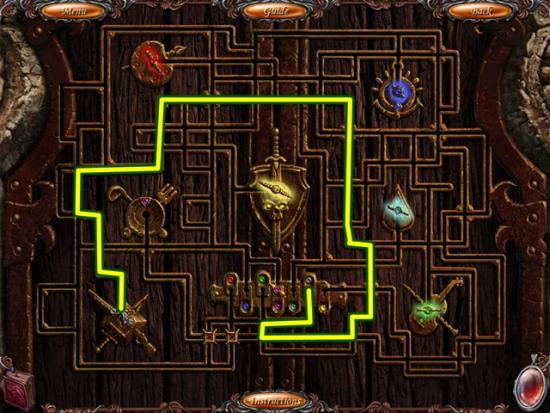
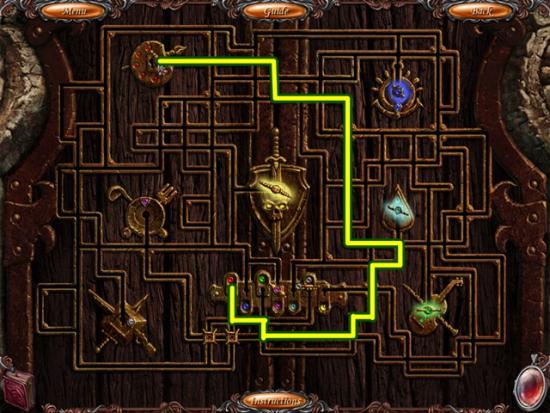
- A mini-game starts. Rearrange the pipes so the water moves through all the pipes. Left-click to turn the pipes clockwise, right-click to turn the pipes counter-clockwise. A pipe with three brass rings at the end is an end piece. Start with the pipe flow on the left.
- Solution:
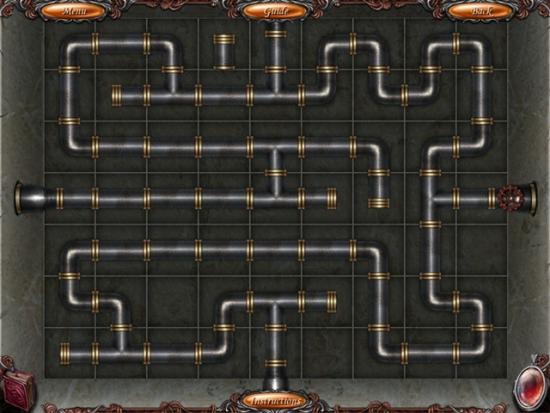
- Note: Only one piece is not used.
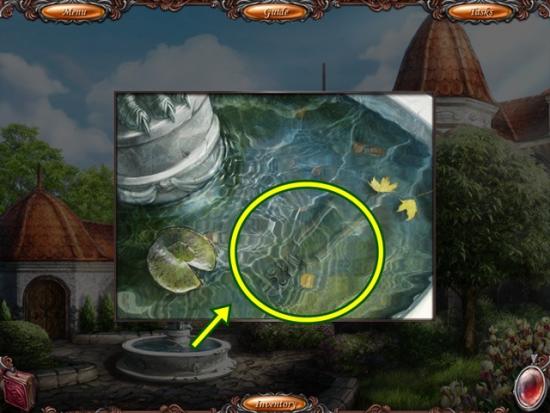
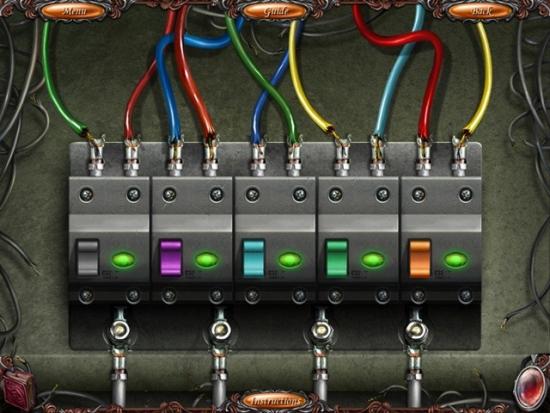
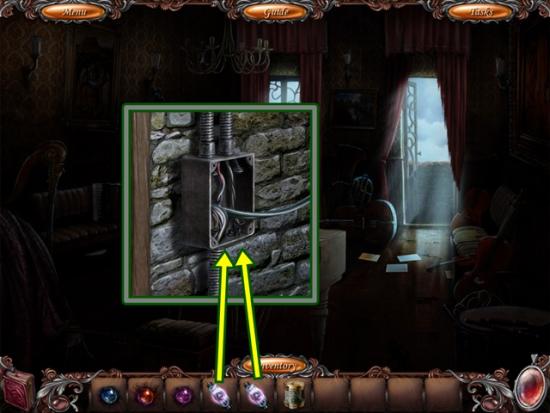
- Click on the fountain. Take the wire cutter.
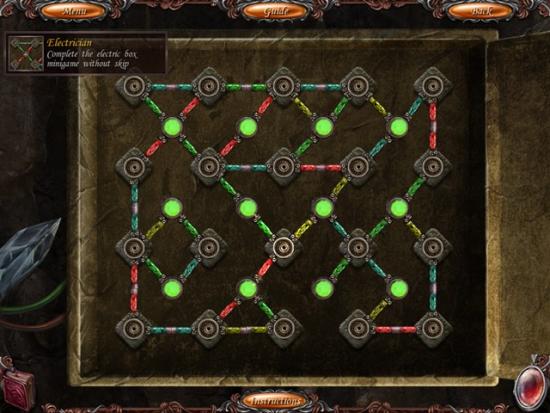
- Click on the electrical box. Cut the wires with the wire cutter. Remove the cover and examine the fuses.
- A mini-game starts. Four of the five switches require two wires that combined create its (the switch’s) colour. To place a wire, click on a wire to select it, then click again to release it. When a switch has an incorrect wire combination, a red light appears. When a switch has the correct wire combination, a green light appears.
- The orange switch requires the red and yellow wires, the green switch requires the light blue and yellow wires, the light blue switch requires the blue and green wires, the purple switch requires the red and blue wires and the grey switch gets the last two wires.
- Solution:
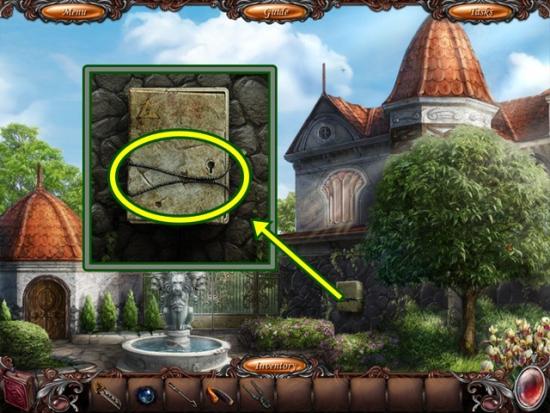
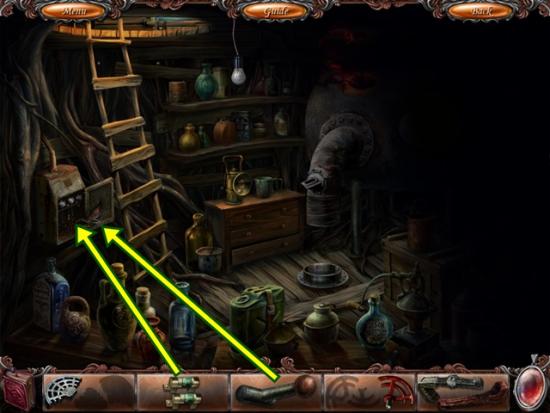
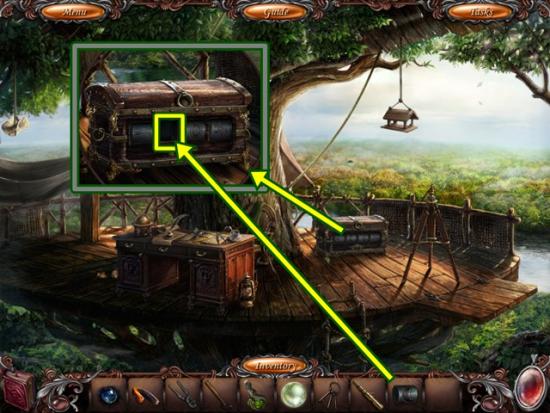
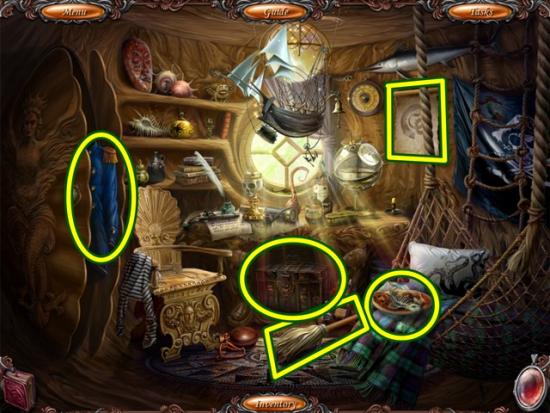
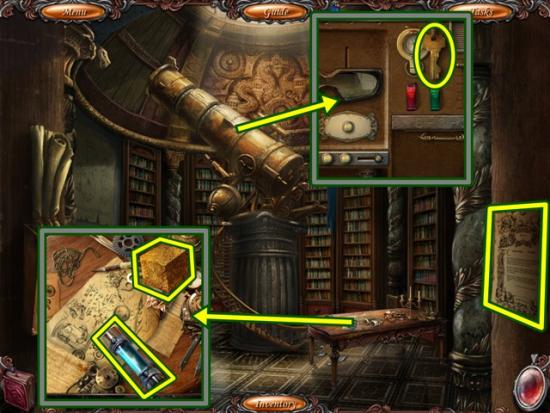
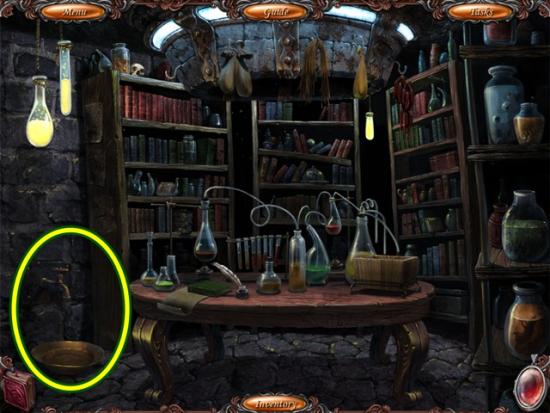
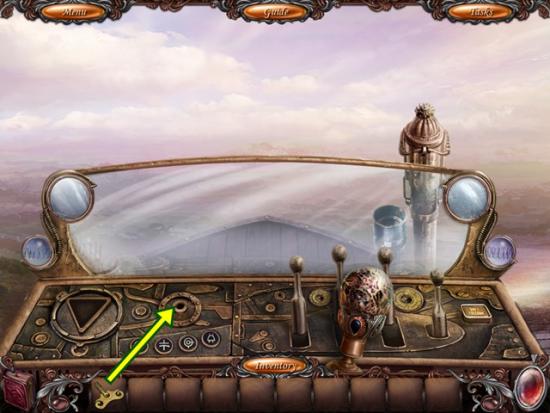
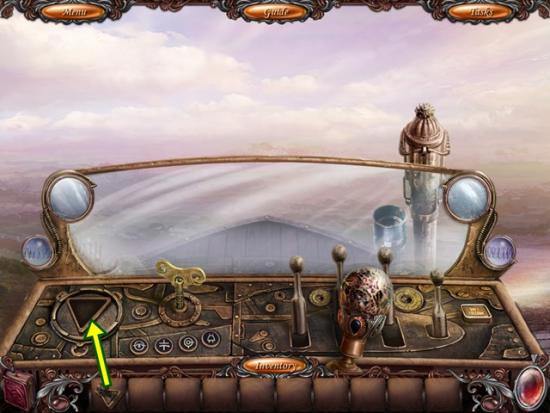
- Click on the workroom door (on the left). Use the electric card key to unlock the door. Enter the workroom.
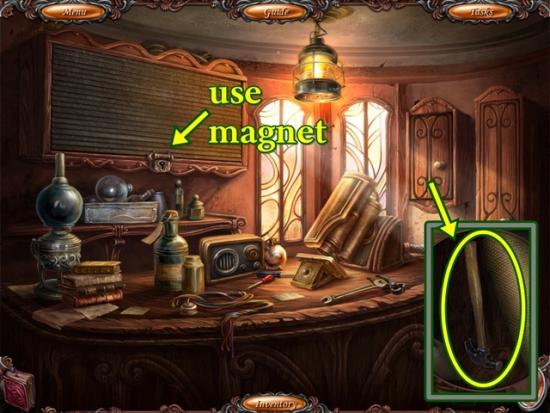
- Open the small wall cabinet. Look inside. Take the claw hammer. Click on the locked wall cabinet. Use the magnet to remove the broken key. Return to the living room.
- Click on the fireplace to start a hidden object scene.
- Find all the objects. Keys are added to your inventory. Return to the workroom.
- Click on the locked cabinet. Unlock it with the keys. Click on the cabinet to start a hidden object scene.
- Find all the objects. Electrical tape is added to your inventory.
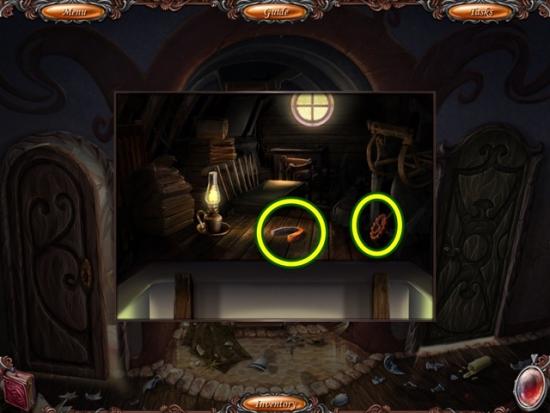
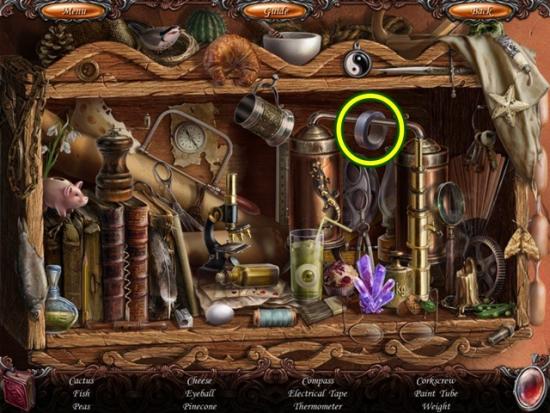
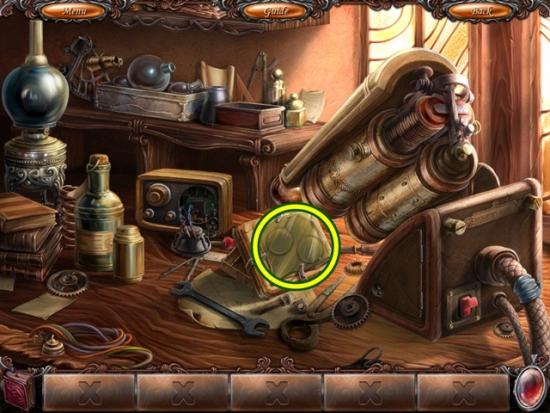
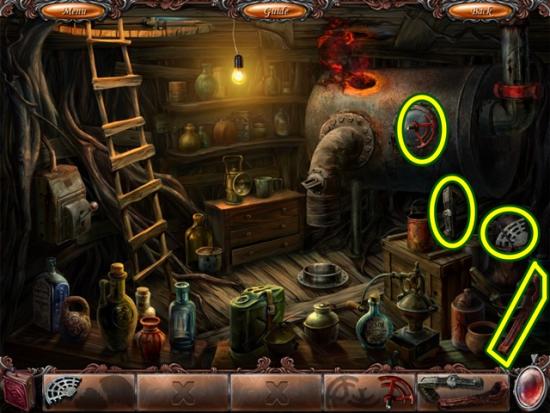
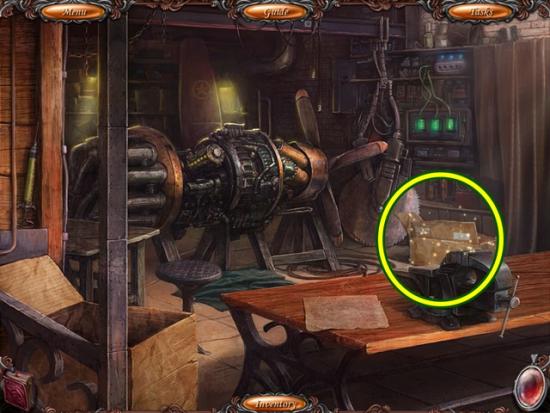
- Click on the hose. Repair it with the electrical tape. Click on the table to start a hidden object scene.
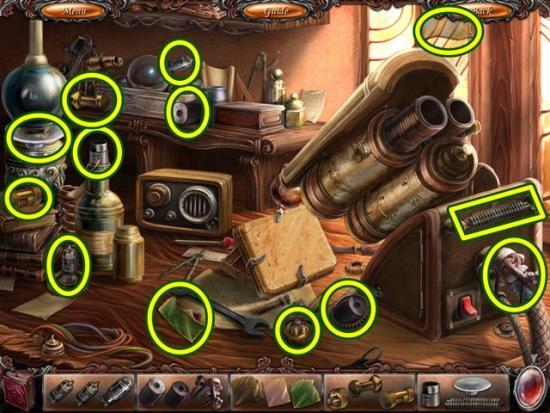
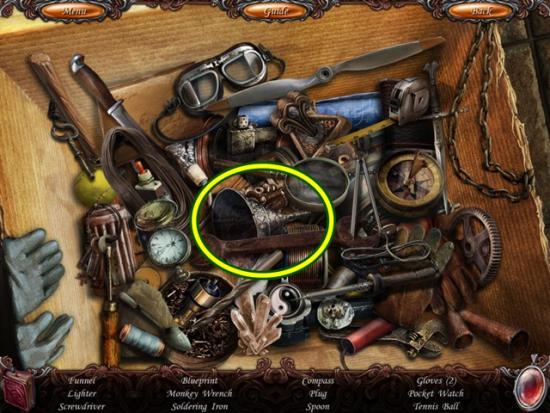
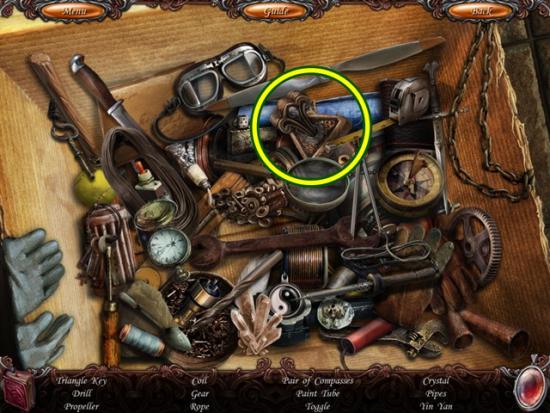
- Find all the object fragments. Without using any tools, you can find 13 of the 15 fragments.
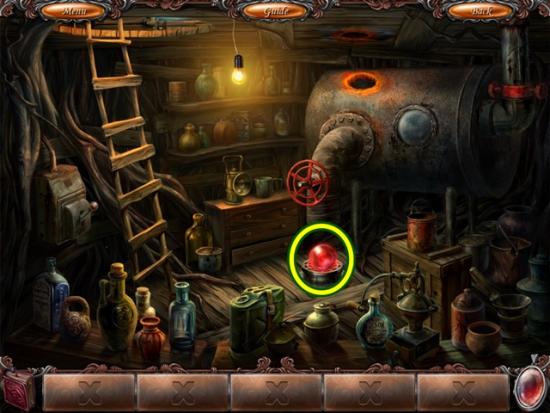
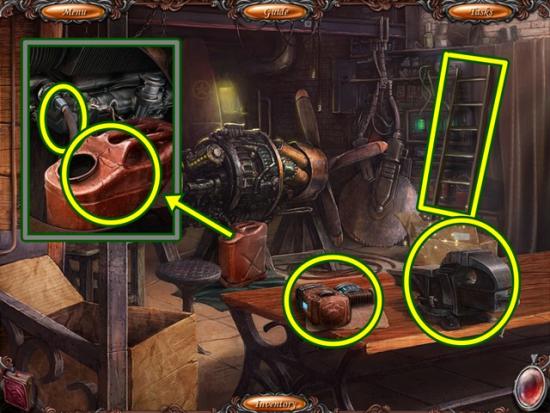
- Use the screwdriver to open the radio. Take the fragment. Use the suction cup on the glass topped box and take the fragment.
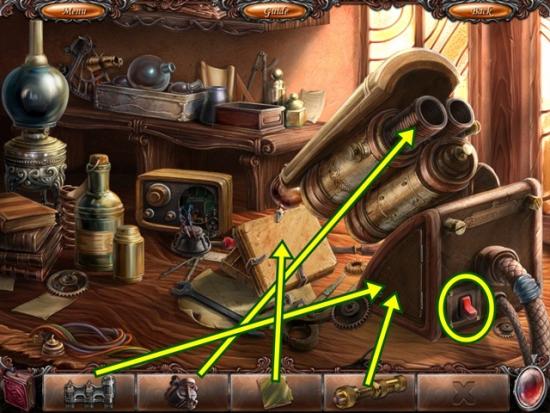
- Place the laser part on the laser. Use the screwdriver to open the laser’s side panel and place the lamp transistor. Put the glass on the holder in front of the laser. Flip the power switch.
- Take the glass lenses. Return to Sonya’s room.
- Click on the wooden wardrobe to start a hidden object scene.

- Find all the objects. Goggle frames are added to your inventory. Return to the hallway.
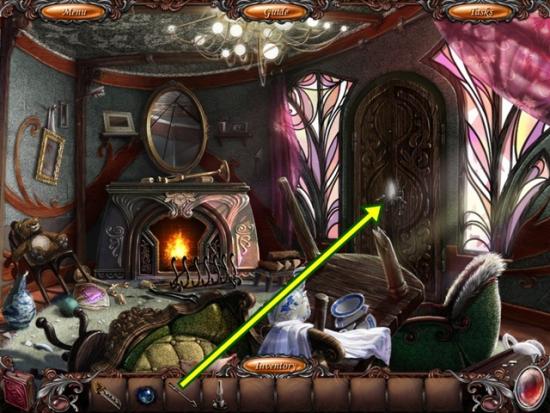
- Combine the goggle frames and glass lenses to make protective glasses. Use the protective glasses on Lily’s bedroom door and enter the room.
- Click anywhere. Watch the cutscene.

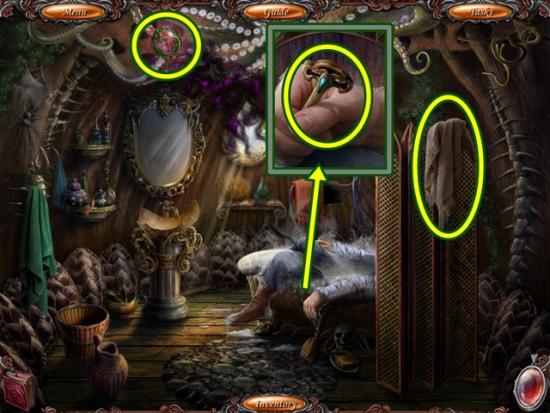
- Click on Lily. Take the gate’s lock part from her hand. Click on the wardrobe.
- Use the fireplace tool to pull the key toward you. Take the key. Return to the courtyard with the fountain.
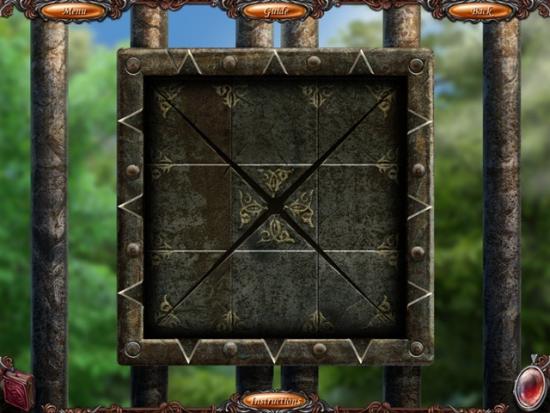
- Click on the gate. Place the gate’s lock part in the empty slot.
- A mini-game starts. Complete the design. Use the left and right arrows to move its rows left or right and use the up and down arrows to move its column up or down.
- I can’t give you a step by step solution as there is no reset button and this puzzle is randomly generated.
- To solve this, I positioned the top row, then the bottom row, using the middle room to move pieces back and forth.
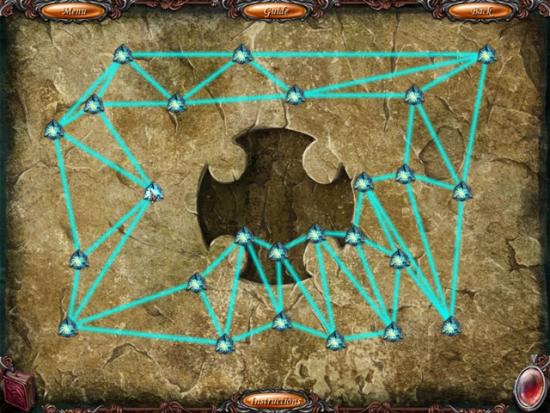
- Solution:
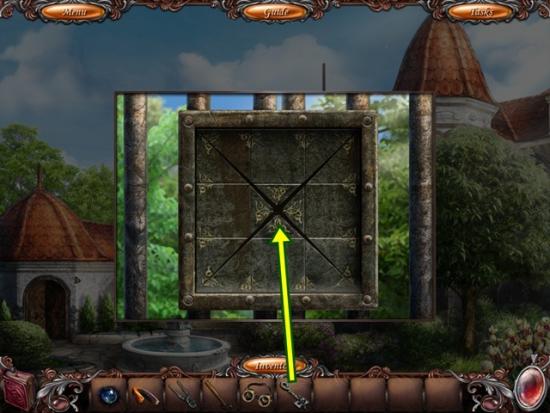
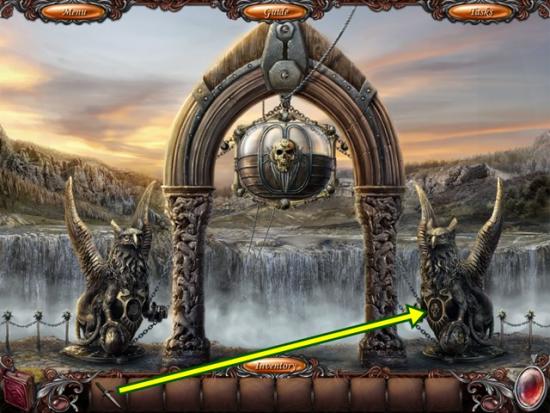
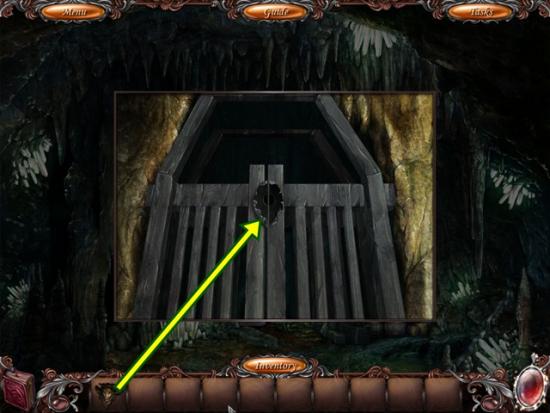
- Use the key to unlock the gate. Go through the gate.
Chapter 2
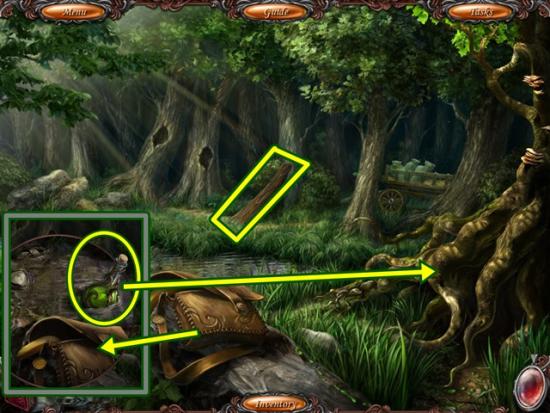
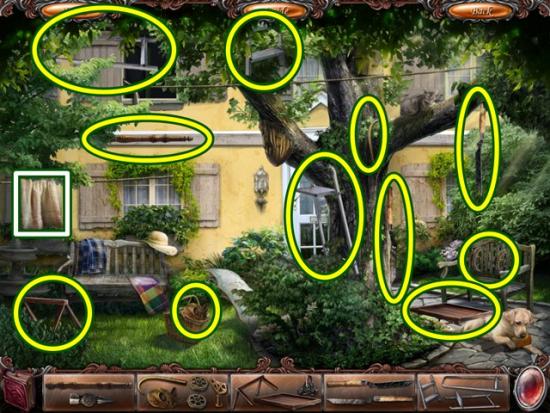
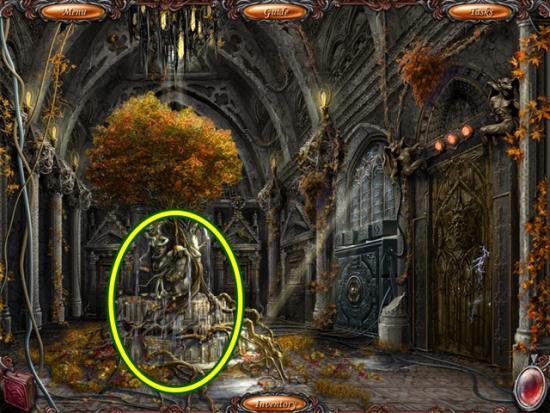
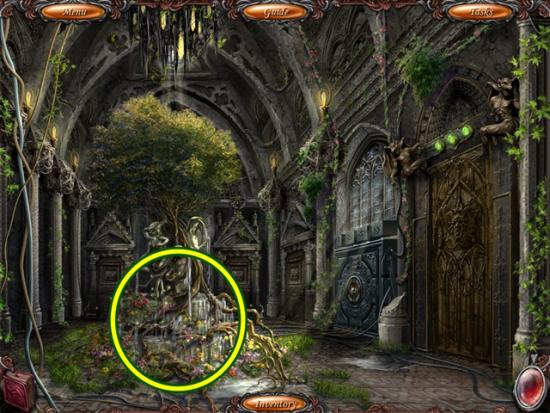
- Take the long board. Click on the satchel and take the green potion. Pour the green potion on the tree roots.

- A mini-game starts. The potion bottle appears at the top of the screen and you control it with your cursor. Move the potion bottle back and forth, noting its colour changes. When it’s above roots of a matching colour, click to drop some liquid. Do this to all 11 roots. When there are only a few roots left, they take longer to appear. Be patient.
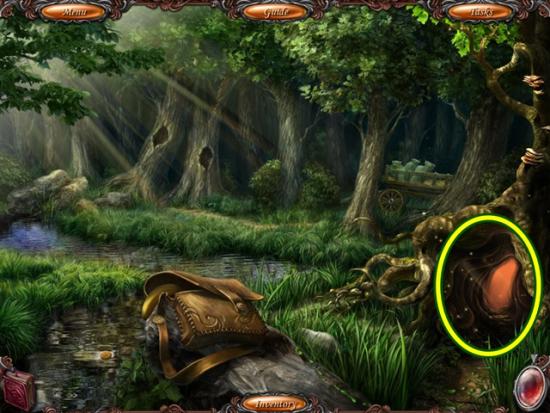
- Click on the tree to start a hidden object scene.
- Find all the objects. A tree symbol is added to your inventory.
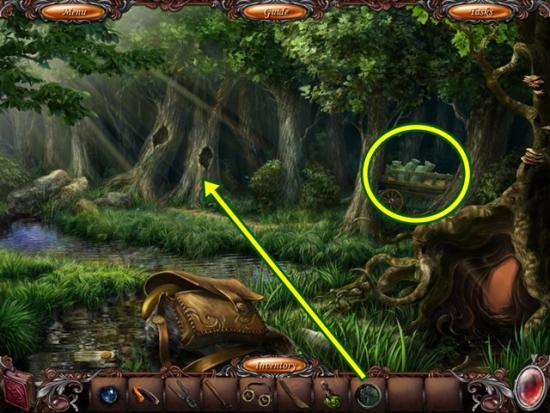
- Click on the trees on the other side of the creek. Add the tree symbol to the right tree. Click anywhere outside of the window to close it. Click on the cart to start a hidden object scene.
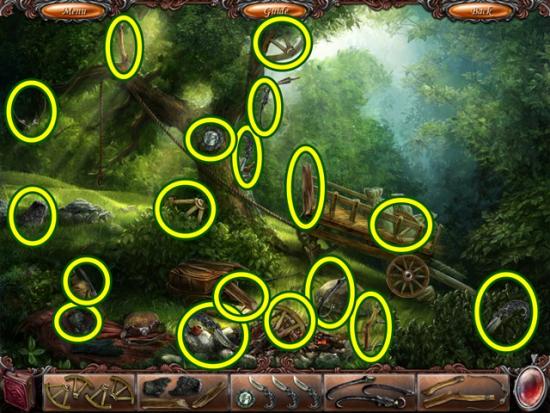
- Find all the object fragments.

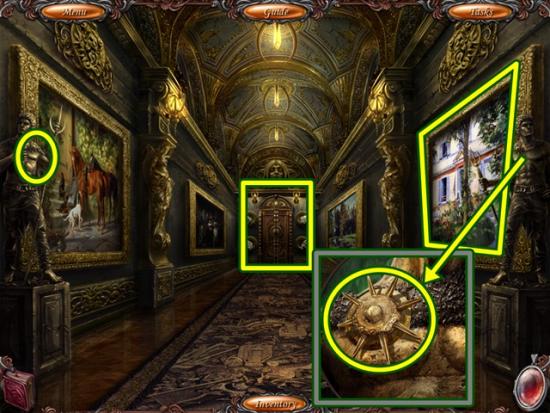
- Add the hook to the end of the rope. Place the wheel on the cart. Use the hammer to remove the stone blocking the cart’s wheel.
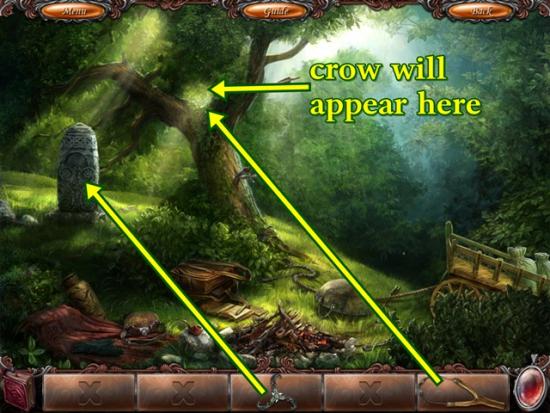
- Add the valve-handle to the monument, then turn the handle. Try to take the item that appears. Use the slingshot on the crow. Take the flower symbol.
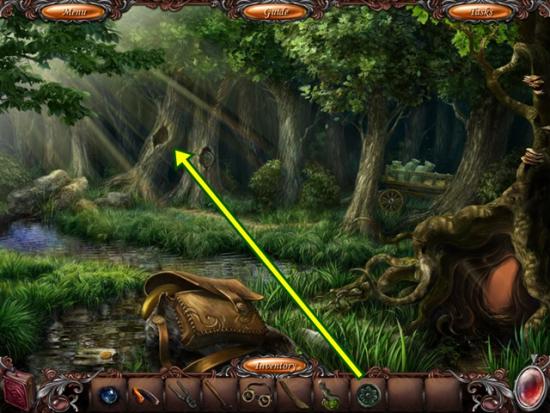
- Click on the trees on the other side of the creek. Add the flower symbol to the left tree. Go through the newly opened path.
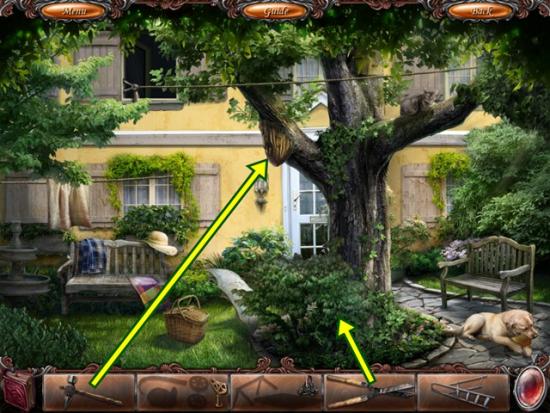
- Click on the red glowing area. Take the long board. Use the claw hammer to remove the two boards from the tree. Two short boards and nails are added to your inventory.

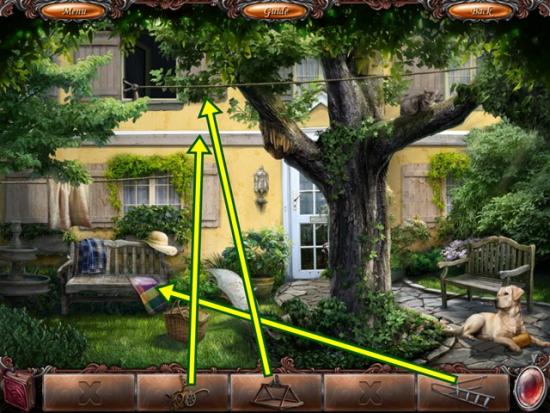
- Build a bridge to cross the creek. First, place the two long boards over the stones, then add the two short boards. Add the nails, then drive them in with the claw hammer. Cross the newly formed bridge.
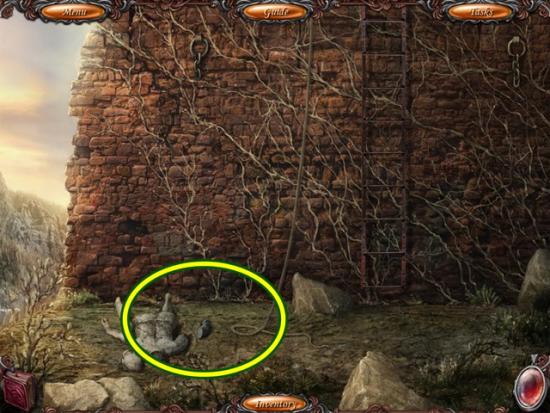
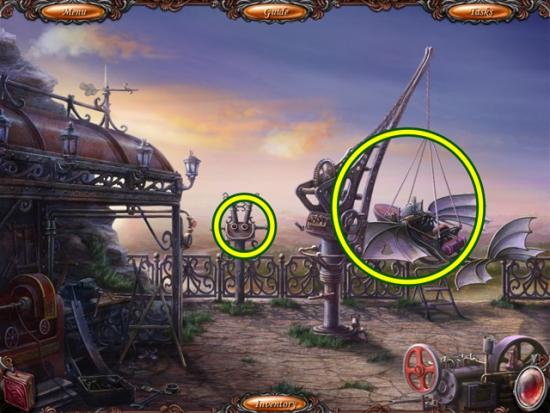
- Click on the path leading to the small door. Take the cane. Open the door. Use the protective glasses on the door.
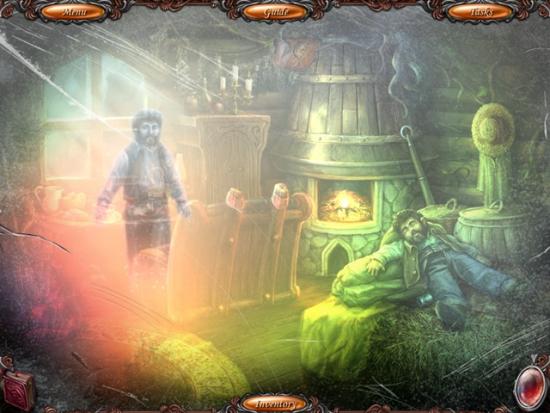
- Click anywhere. Watch the cutscene.
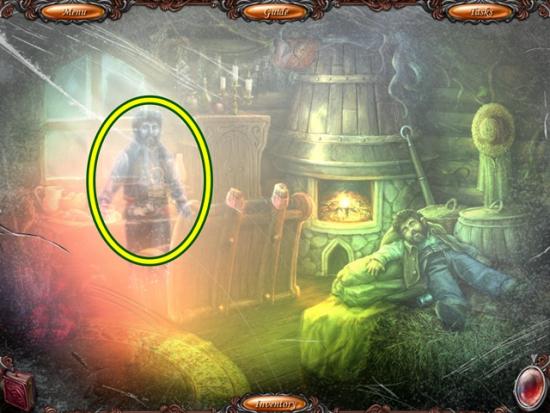
- Click on the apparition to make it go away.
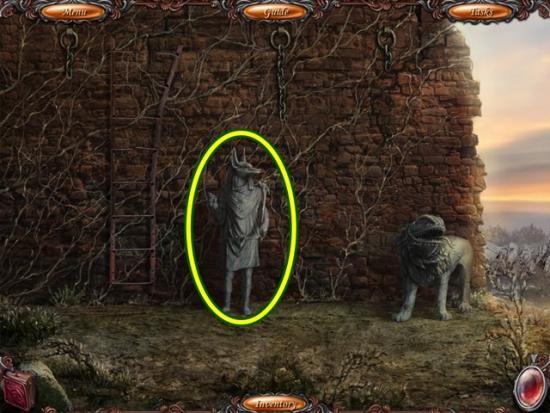
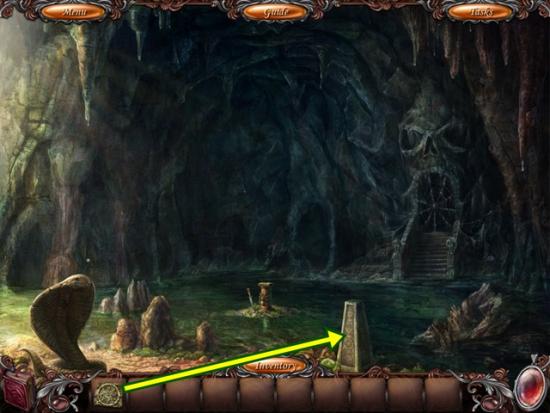
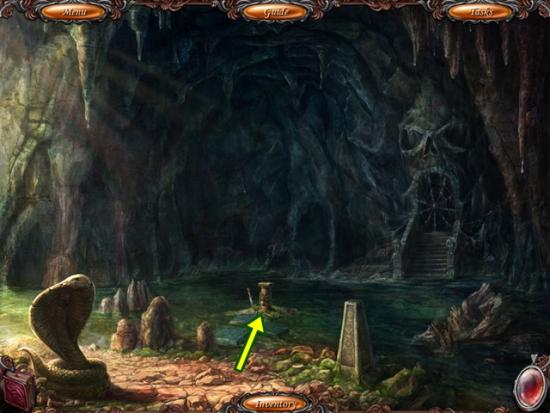
- Click on the red glowing area on the floor. Click on the man. Take the chest digit. Click on the rug. Click on the locked hatch. Leave the room and go northeast up the path.
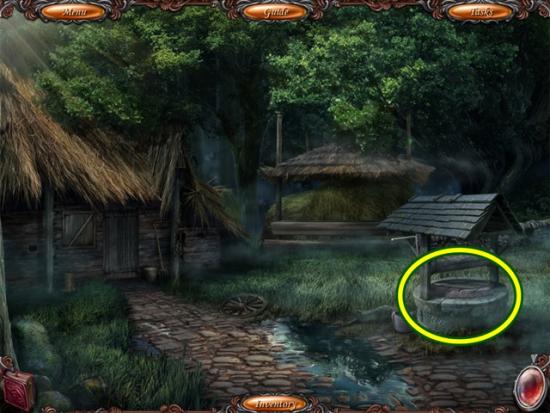
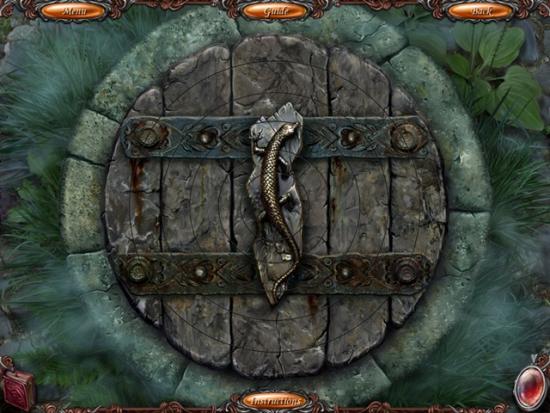
- Click on the well to start a mini-game. Rotate the discs to complete the design. Left-click to rotate the discs clockwise, right-click to rotate the discs counter-clockwise. Each disc only moves itself so start from the inner most disc and match it to the centre disc and continue outwards.
Solution:
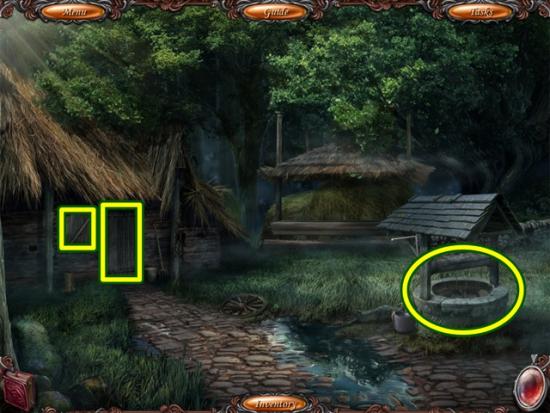
- Look inside the well. Look down the well. Click anywhere outside of the window to close it. Click on the hut’s window. Lift the latch. Click on the hut’s door to start a hidden object scene.
- Find all the objects. Open the drawer to find an object. Note, if you are asked to find “vine,” it’s misspelled and should read “wine.” Rope is added to your inventory.
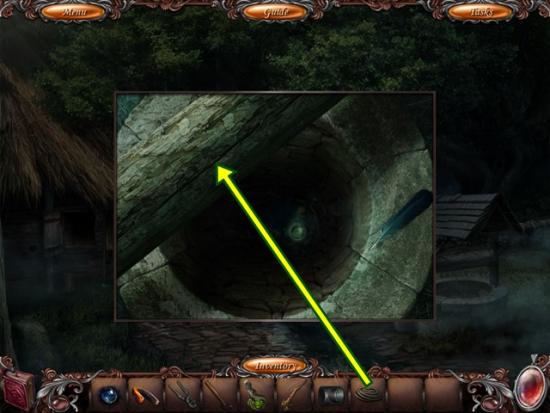
- Click on the well. Add the rope and climb down the well (click twice).
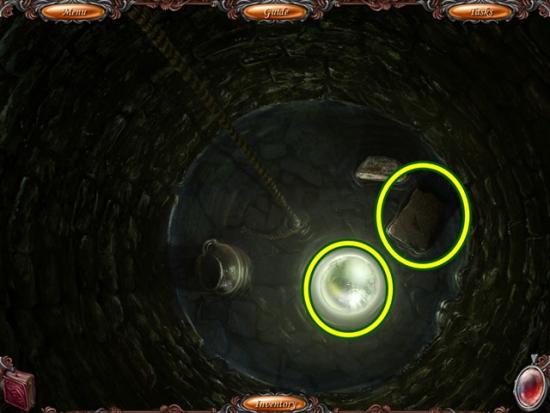
- Take the bridge sphere and the stone plate part. Leave the well (click south then north). Return to the bridge (south twice).
- Use the cane to pull down the rope ladder. Climb the ladder.
- Click on the birdhouse. Take the keys. Climb down the ladder. Return to the man’s tree house.
- Unlock the hatch on the floor with the keys. Try to climb down the hatch. Click on the table to start a hidden object scene.
- Find all the objects. A rolling pin is added to your inventory. Go south three times.
- Click on the tree to start a hidden object scene.
- Find all the objects. A ladder is added to your inventory. Return to the workroom (south back to the fountain and then enter the workroom).
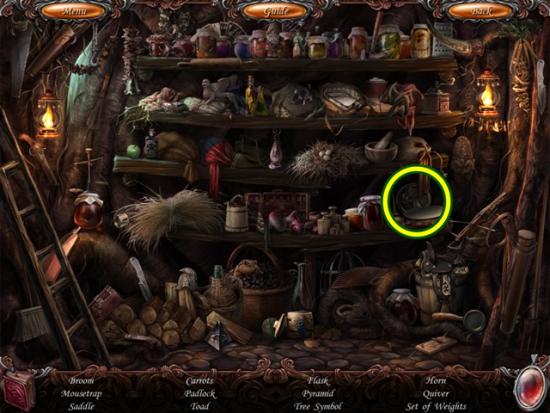
- Click on the wall cabinet to start a hidden object scene.
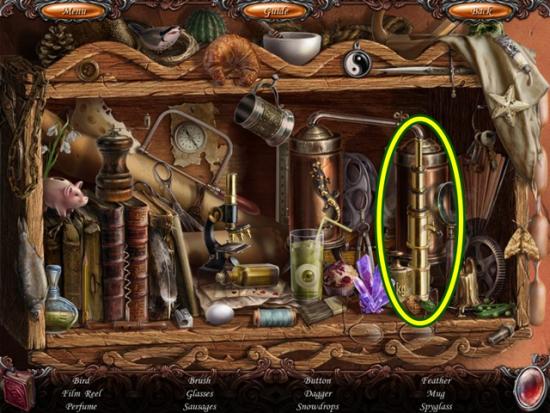
- Find all the objects. Note, if you have to find snowdrops, they are little white flowers. A spyglass is added to your inventory. Return to the man’s tree house.
- Put the ladder down the hatch and climb down into the cellar.
- Find all the object fragments possible.
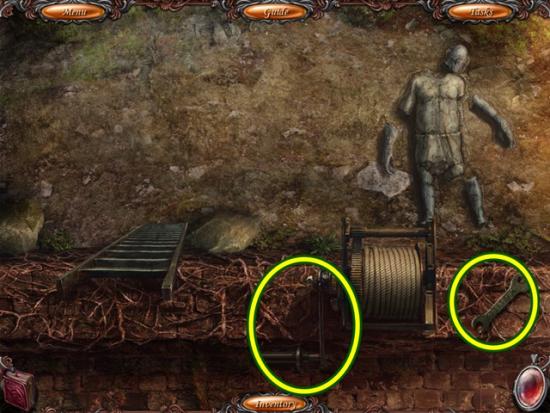
- Put the fuses in the fuse box, then add the switch handle. Pull the handle.
- Find the remaining object fragments.

- Loosen the bolts with the wrench. Put the filter on the slot on the floor. Put the valve on the large pipe. Turn the valve.
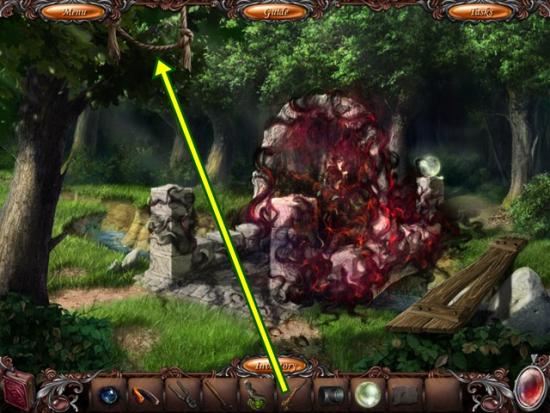
- Take the red orb. Return to the bridge.
- Use the red orb on the red smog.
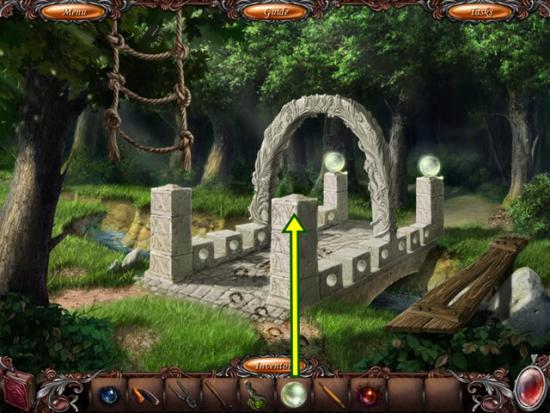
- Add the bridge sphere to the pillar. Climb the rope ladder.
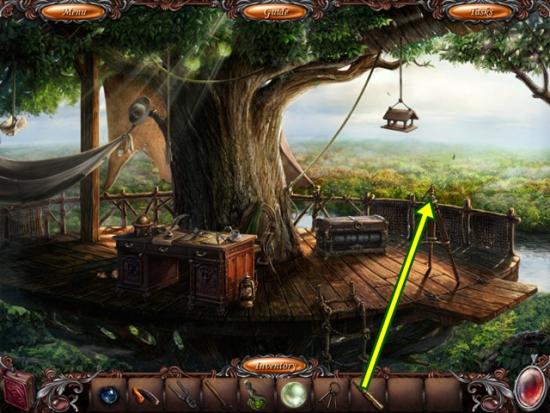
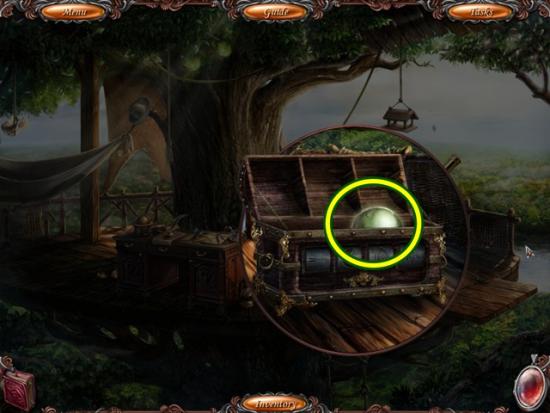
- Place the spyglass on the stand. Look through the spyglass.
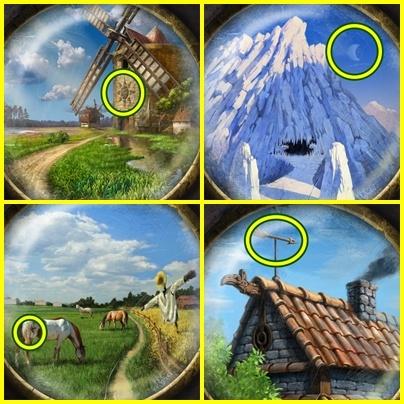
- Take note of the symbols. Click on the sun symbol on the windmill. Move the view using the right arrow. Click on the moon symbol above the mountaintop. Move the view right again. Click on the star symbol on the horse. Move right again. Click on the arrow above the house. Click south to exit the spyglass view.
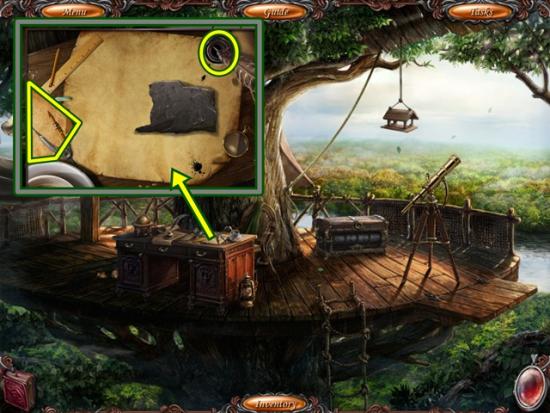
- Click on the desk. Take the sheet of paper and the ink.
- Place the stone plate part beside its mate. Poor ink over the stone plates. Add the sheet of paper. Then flatten it with the rolling pin.
- Click on the piece of paper. Note the images correlate to the images seen through the spyglass. From left to right, mountaintop (moon), windmill (sun), house (arrow) and horse (star). Click anywhere outside of the window to close it.
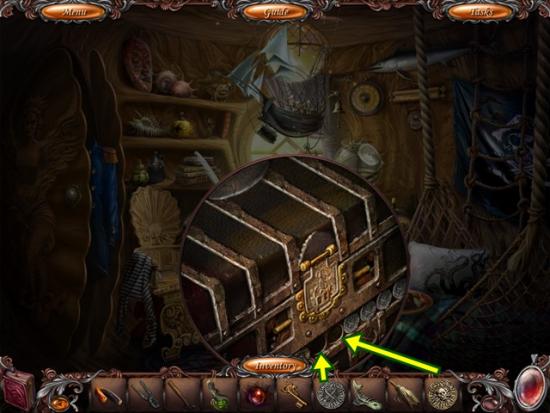
- Click on the chest. Add the chest digit. Click on the chest.
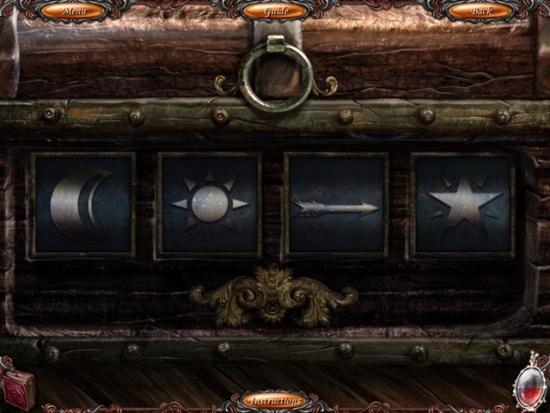
- The combination to open the chest is moon – sun – arrow – star, as seen in the paper on the desk and from the spyglass (see instructions above).
- Click on the chest and take the bridge sphere. Climb down the rope ladder.
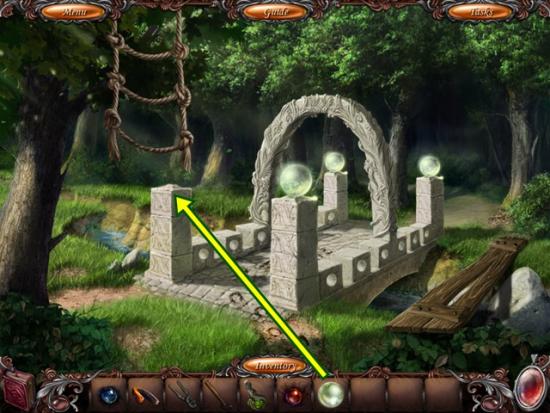
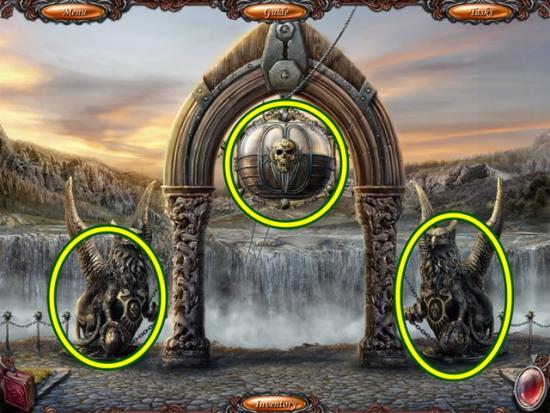
- Place the bridge sphere on the pedestal. If you haven’t already done so, use the red orb on the bridge to clear the red smog and place both bridge spheres on the pedestals. Click on the bridge.
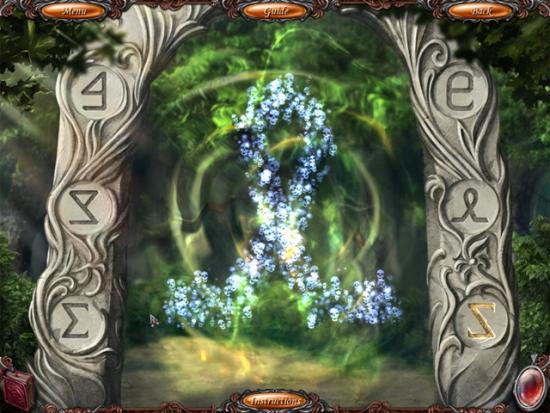
- A mini-game starts. Under the arch, you will be shown a symbol. Use your mouse to draw the image. For reference, it is the symbol flashing on the archway.
- To begin recreating the symbol, start from the shimmering area. Whenever you make a smogake, you get to start over. To draw, click and drag your mouse and when you are done, release the button. Place a finger (or fingers) on your screen so you know how high to draw or how far left or right to draw.
- Repeat for all six images. If you make a smogake, you start over from that image, you don’t start over from the beginning.
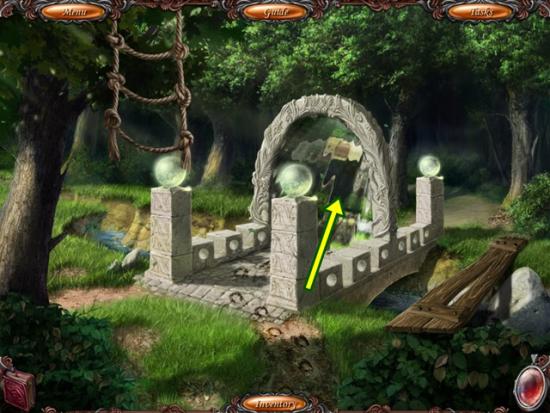
- Go through the portal.
Chapter 3
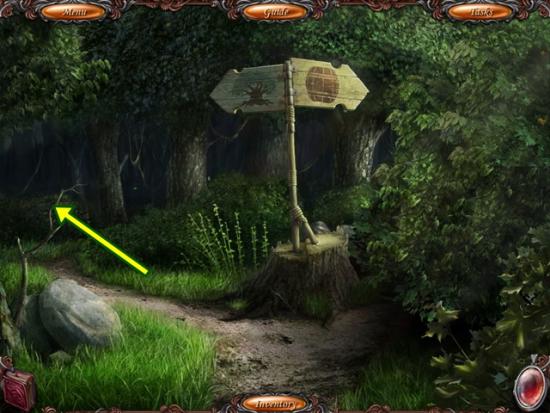
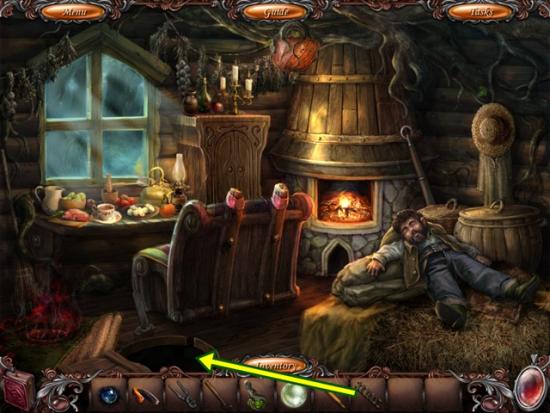
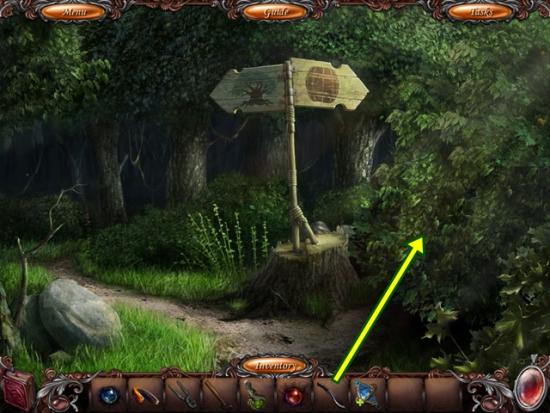
- Take the path to the west.
- Click the smog to reveal a hungry wolf. Click anywhere outside of the window to close it. Go south twice to the bridge portal and take the northeast path. Enter the man’s tree house.
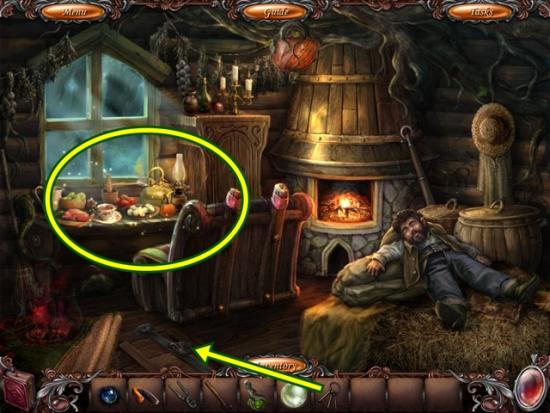
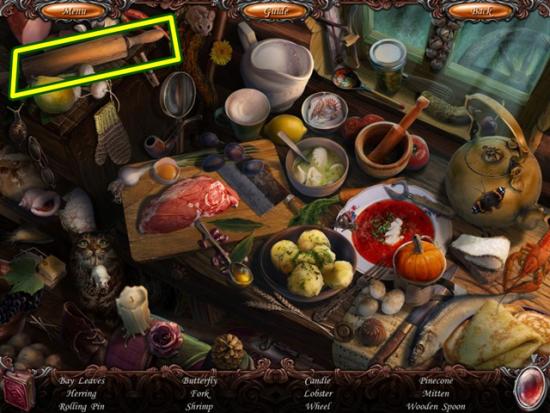
- Click on the table to start a hidden object scene.
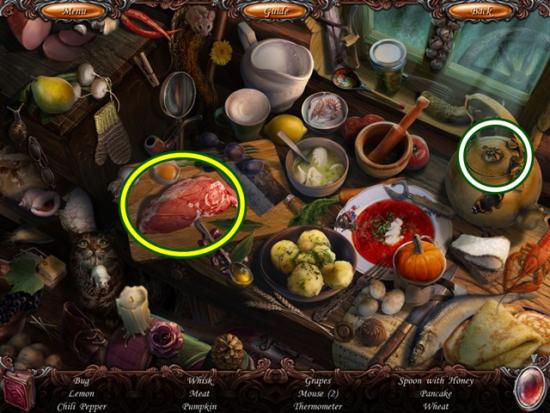
- Find all the objects. Remove the teapot lid to get the bug. Meat is added to your inventory. Leave the house and go north.
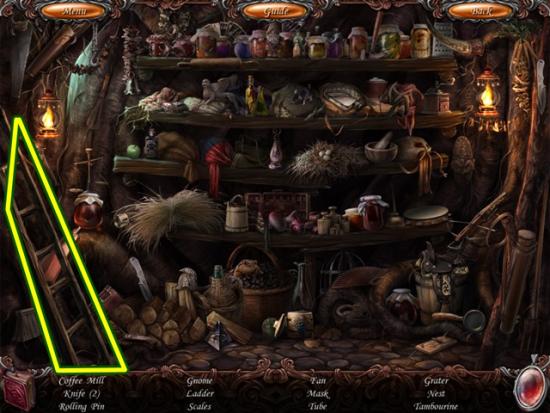
- Click on the door to start a hidden object scene.
- Find all the objects. A machete is added to your inventory. Return to the scene with the wolf.
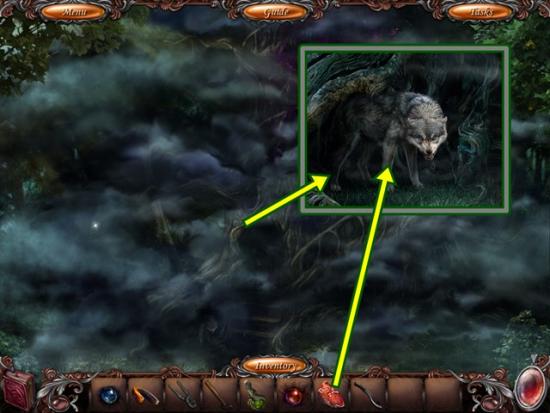
- Click the smog. Give the meat to the wolf. After it eats the meat, take the wolf’s crystal. Click on the wolf again to learn it is sad. Click anywhere outside of the window to close it. Go south one scene.
- Use the machete to clear away the underbrush (three clicks). Go down the newly opened path.
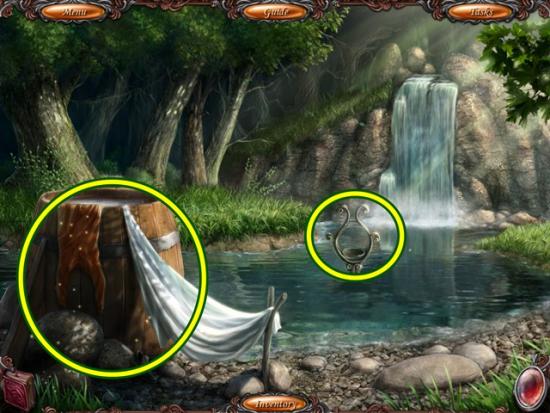
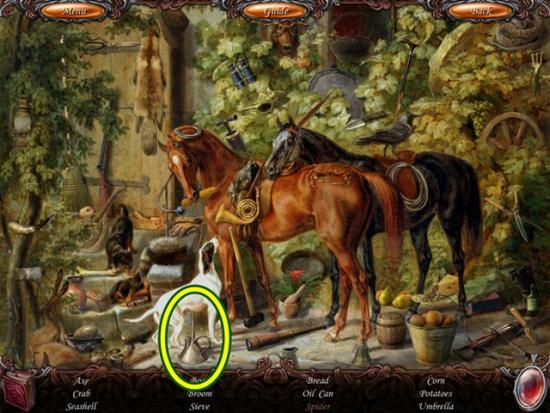
- Click on the stand in the water. Click on the barrel to start a hidden object scene.
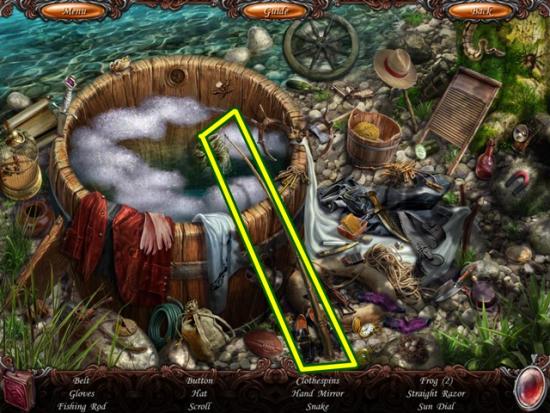
- Find all the objects. A fishing rod is added to your inventory.
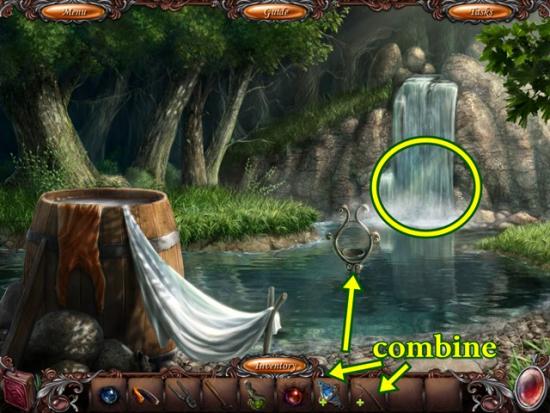
- Combine the fishing rod and wolf’s crystal to form the rod with crystal. Use the rod with crystal on the base in the water. Go into the waterfall.

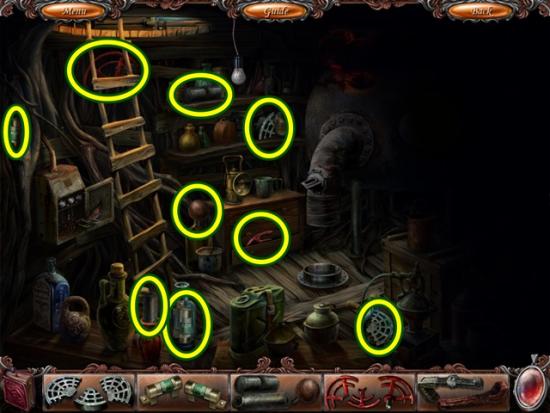
- Find all the fragmented objects.

- Put the millstones on the base, then add the herbal sedatives. Click on the millstones to grind the herbal sedatives. Replace the handle.
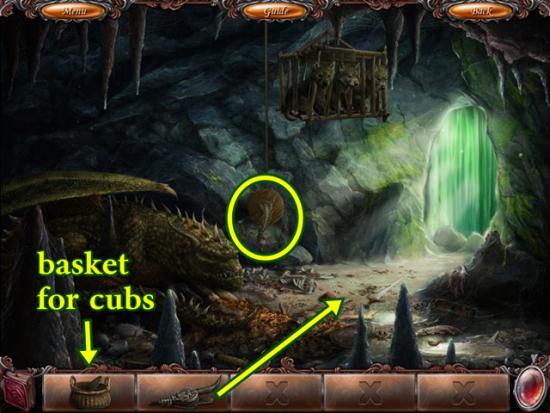
- Place the bellows in front of the herbal sedative powder. Turn the handle to lower the cage. Open the cage and put the little cubs in the basket. The wolf’s cubs are added to your inventory. Return to the wolf.
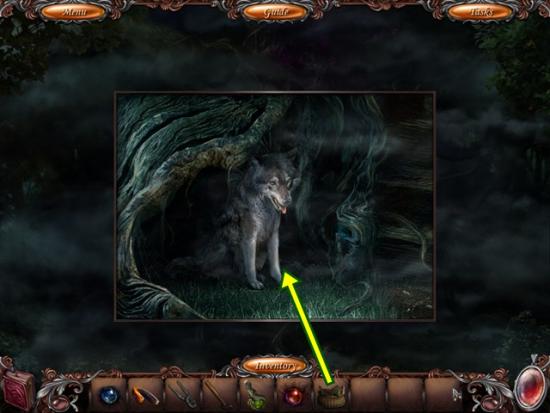
- Click on the smog. Give the wolf’s cubs to the wolf.
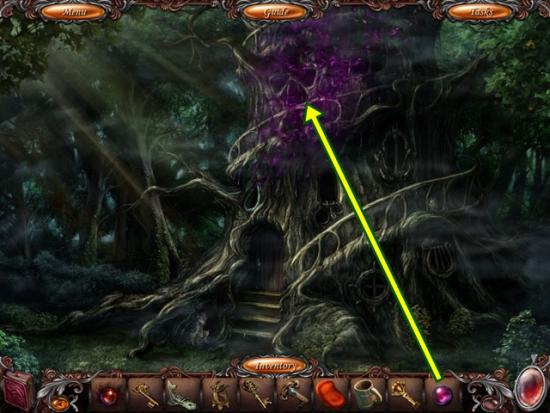
- Click on the violet smog.
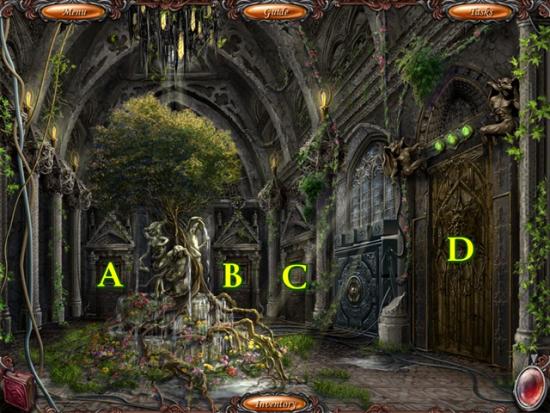
- The large tree has five windows, each leading into a different room.
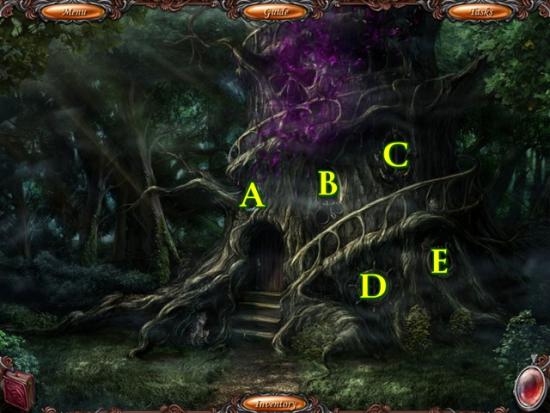
- Using the screenshot above, window A is the bathroom, window B is the kitchen, window C is the hunter’s room, window D is the sailor’s room and window E is the musician’s room. The door is locked.
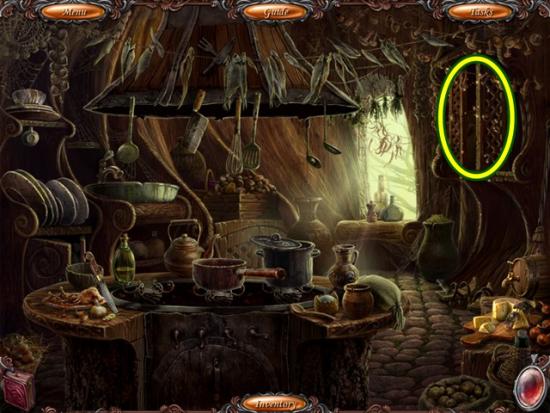
- Enter the musician’s room.

- Click on the music stand and read the note. Click on the organ.
- A mini-game starts.
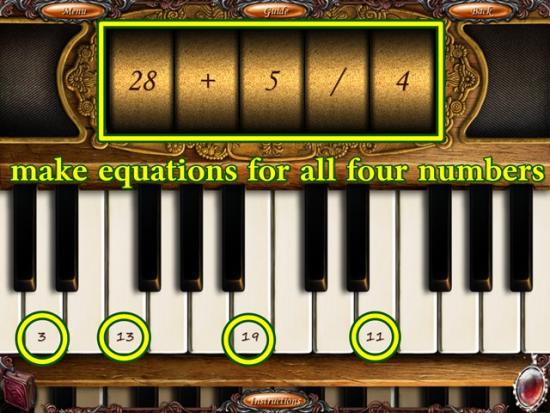
- Rearrange the dials above the keyboard to create a math equation that equals each numbered key. Left-click on a dial to rotate it downwards, right-click to rotate it upwards. The numbers are different for each game so a full solution cannot be provided.
- Example of a solution:
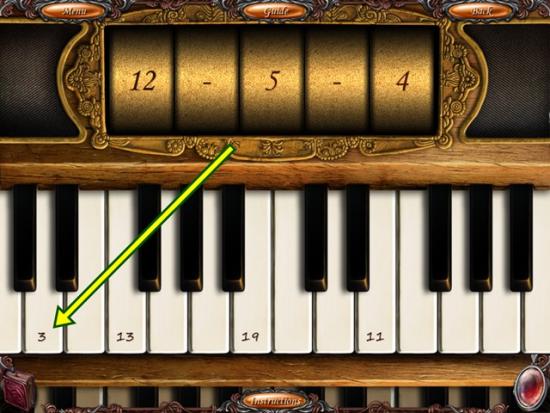
- Once you have a mathematical combination, click on that key. If the equation is correct, the key will stay down. Create an equation for all four numbers.
- Click on the organ again. Take the music key. Click on the back shelf to start a hidden object scene.

- Find all the objects. A silver coin is added to your inventory. Leave the room (click south) and enter the sailor’s room.
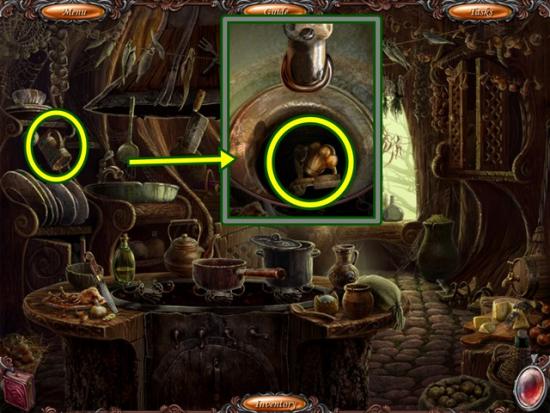
- Take the fish skeleton and mop. Click on the scroll hanging on the wall. Pull the handle to learn about making a dragon mould. Click on the hanging jacket. Take the golden coin. Click on the chest on the floor.
- Add the silver coin (from the hidden object scene in the musician’s room) and the golden coin (from the blue jacket in this room).
- A mini-game starts.
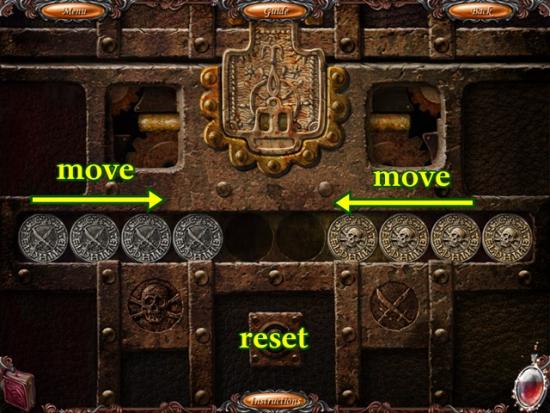
- Move the coins so the coins with skulls are on the left and the coins with swords are on the right. Coins can only move in the direction they are to go (ex: skull coins can only move towards the left, sword coins can only move towards the right). A coin can only move one space. It can jump over an opposite coin if there is an empty space beside it. A coin cannot jump over two or more opposite coins. If you are stuck, click the Reset button in the middle.
- Solution:
- Using the screenshot above, assume the positions are identified A through J. Press Reset to start from the beginning and click on the following positions: G – D – C – E – F – E – H – I – G – D – B – E – D – C – F – A – B – D – H – J – I – G – F – E – F – H – C – D – F – G – E – F
- Click on the open chest. Take the mermaid statuette. Click on the hanging ship to start a hidden object scene.
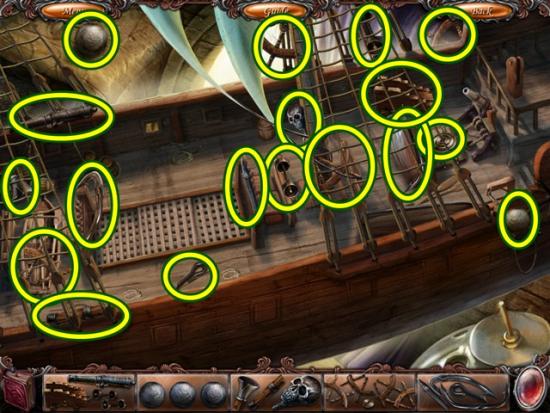
- Find all the object fragments.
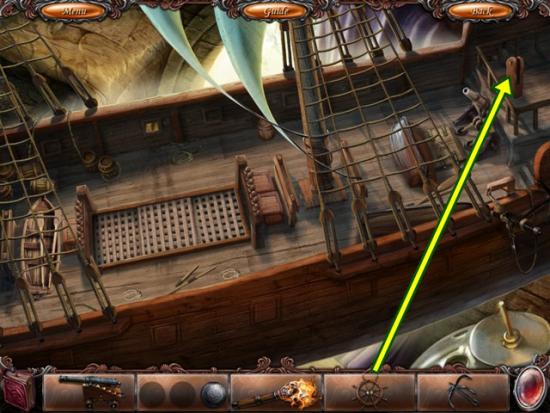
- Place the wheel.
- Turn the wheel to get the last cannonball.
- Position the cannon, then add the cannonballs. Use the torch to light the cannon. Add the hook to the other cannon. Click on it to launch the hook.
- Click on the rope. When it rises, take the sailor’s key. Leave the room (south) and enter the bathroom.
- Take the towel. Click on the body in the bathtub. Take the water key. Click on the orb. Use the mop (from the sailor’s room) on the tentacle holding the orb. Once it lowers, use the towel to take the wrapped dirty orb. Click on the sink.
- Take the soap. Put the wrapped dirty orb in the sink. Turn the water on and take the purple orb. Leave the room (south).
- Use the purple orb to clear the violet smog. Enter the kitchen.
- Take the mug. Click on the sink. Remove the stopper. Use the magnet to get the cook’s key. Leave the room and enter the hunter’s room.
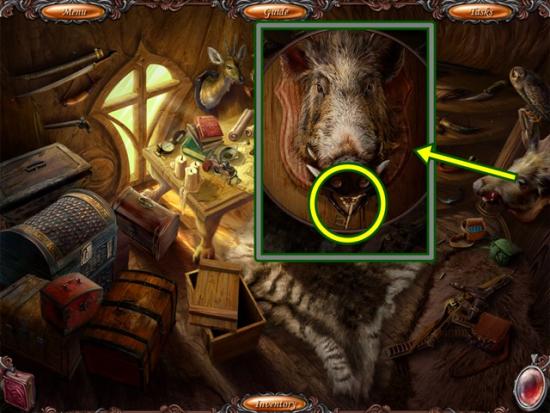
- Click on the boar’s head (right). Click on its mouth and take the hunter’s key. Leave the room. Enter the leader’s room (top left window).
- Click on the wall mirror to knock it down. Click on the newly exposed area.
- A min-game starts. It’s a match two puzzle. Click on two tiles. If they match, they will turn blue. Continue until all tiles are blue. Once you’ve finished, click on the area again and take the leader’s key.
- Click on the mantle. You need to find the missing statuettes. Click anywhere outside of the window to close it. Leave the room.
- Enter the artist’s room (top right window).
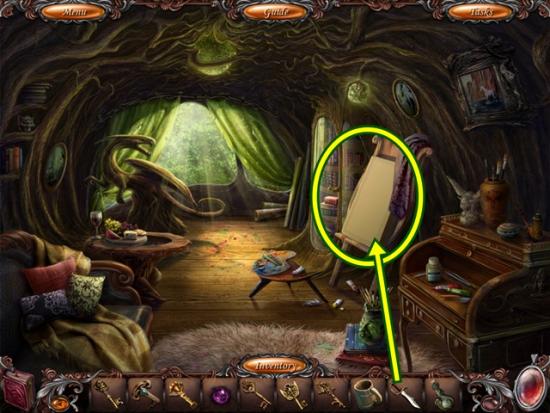
- Click on the small round table. Use the claw hammer to break the glass (three clicks). Take the artist’s key. Click the roll-top desk. Click on the handle. You need a dragon-shaped key. Click on the easel. Take the glue. Click anywhere outside of the window to close it. Leave the room and return to the hunter’s room.
- If you haven’t already done so, click the boar’s head (right), click its mouth and take the hunter’s key. Click on the chests to start a hidden object scene.
- Find all the objects. Lift the lids of two chests to find more items. A bear statuette is added to your inventory. Leave the room. Enter the musician’s room.
- Click on the back shelf to start a hidden object scene.
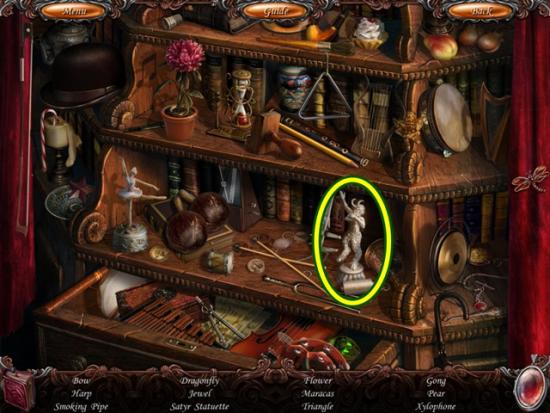
- Find all the objects. A satyr statuette is added to your inventory. Leave the room and enter the bathroom.
- Click on the sink. Fill the mug with water. Take the mug with water. Click anywhere outside of the window to close it. Leave the room and enter the kitchen.
- Click on the cupboard to start a hidden object scene.
- Find all the objects. Open the top middle drawer to find more objects. Flour is added to your inventory.
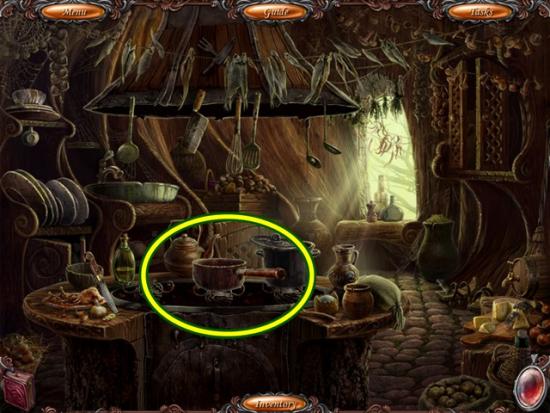
- Click on the stove.
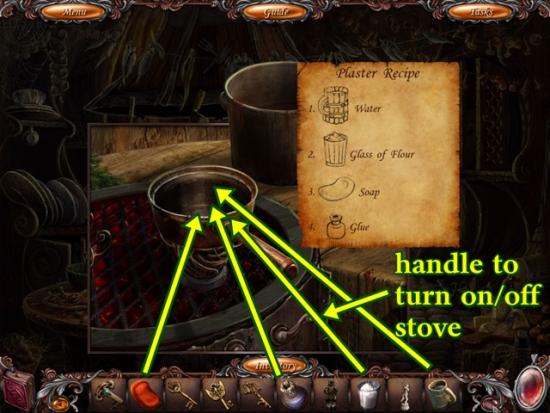
- Follow the recipe. First add the mug with water to the pot, then turn on the stove (pull the handle). Now add the flour, soap and glue. Turn off the fire. Take the plaster. Go to the sailor’s room.
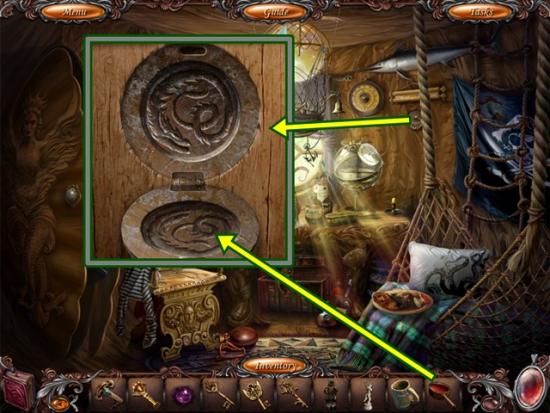
- If you haven’t already, click the scroll on the wall and pull the handle. Pour the plaster into the bottom portion of the dragon mould, then close it. Open the mould and take the dragon key. Go to the artist’s room.
- Click on the roll-top desk. Use the dragon key to unlock the desk. Click on the desk to start a hidden object scene.
- Find all the object fragments. Lift the lid off the bowl on top of the desk to get the last fragment.
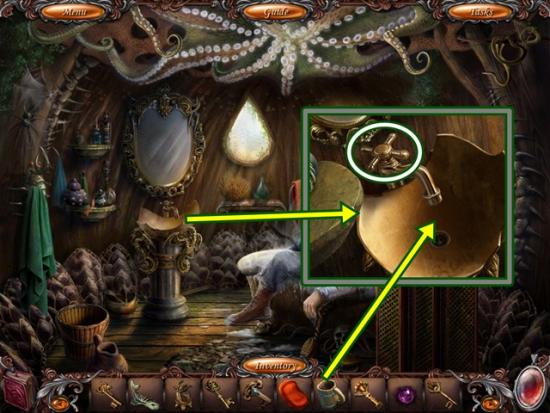
- On the base, add the bulb bowl holder, then add the bulb bowl. To the left of the bulb, add the left puppet. On the right of the bulb, add the right gear and then the right puppet.
- Take the owl statuette. Go to the leader’s room.
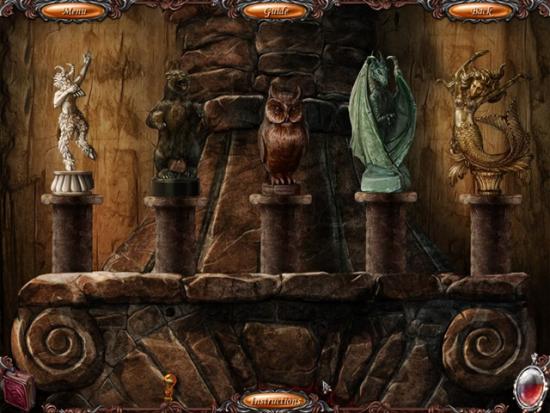
- Click on the mantle. Add the owl statuette, mermaid statuette, satyr statuette and bear statuette.
- A mini-game starts. Rearrange the statuettes so all their stands are at the same level. Click on two statuettes to swap their positions. Start by swapping the positions of the highest and lowest statuettes and work from there.
- Solution:
- Go through the secret passageway that appears.
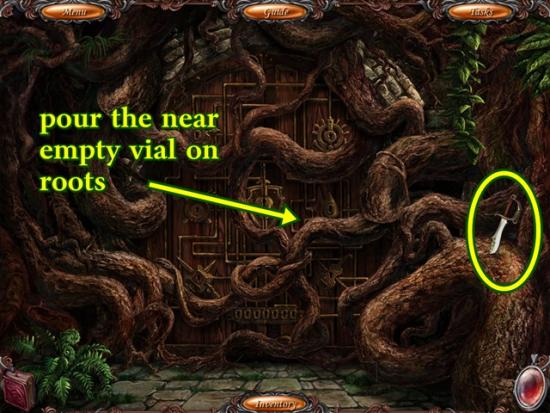
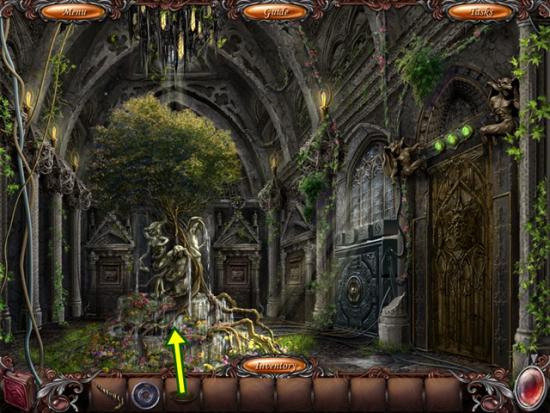
- Take the knife. Pour the near empty vial on the roots. Leave and go to the artist’s room.
- Click on the easel. Tear the canvas with the knife. Take the small key. Go to the leader’s room.
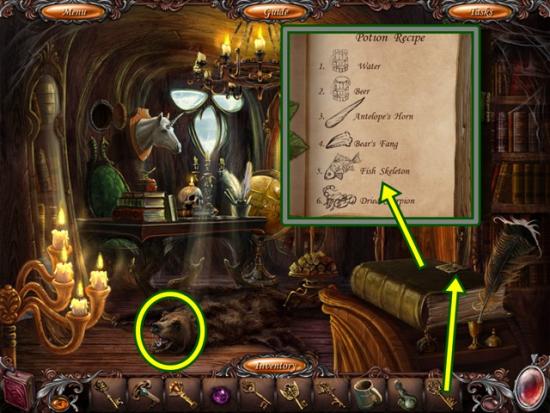
- Click on the large book. Unlock the book with the small key. Learn the potion recipe. Click anywhere outside of the window to close it. Click on the bear rug. Use the wire cutter to take a bear’s fang. Go to the hunter’s room.
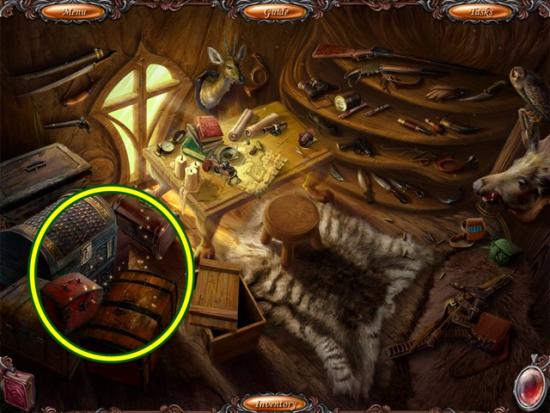
- Click on the chests to start a hidden object scene.

- Find all the objects. Open the chests to find more items. A hand saw is added to your inventory.
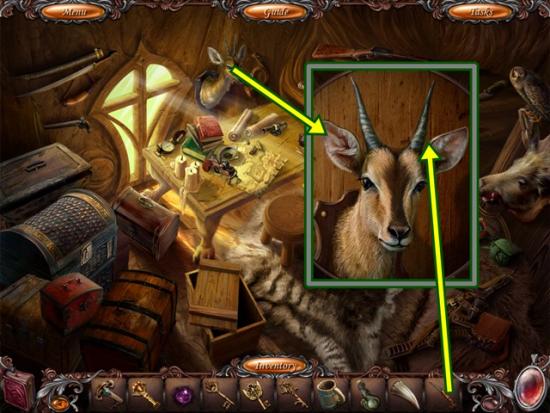
- Click on the antelope head. Use the hand saw to take the antelope’s horn. Go to the bathroom.
- Click on the sink. Fill the mug with water to get the mug with water. Go to the kitchen.
- Click on the cupboard to start a hidden object scene.
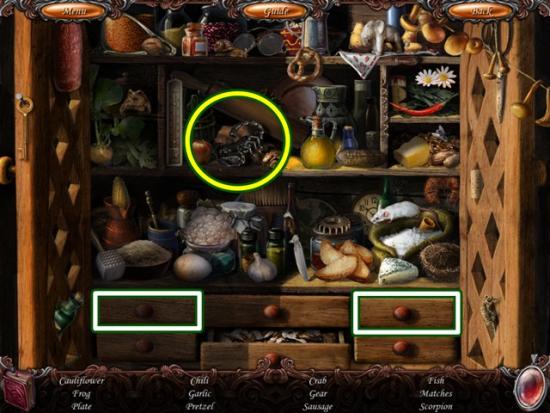
- Find all the objects. Open the drawers to find more objects. A scorpion is added to your inventory.
- Click on the stove.
- Put the pot on the burner. Add the mug with water, then turn on the burner. Click anywhere outside of the window to close it.
- Click on the barrel. Place the mug, turn the tap and fill the mug with beer. Click on the stove again.
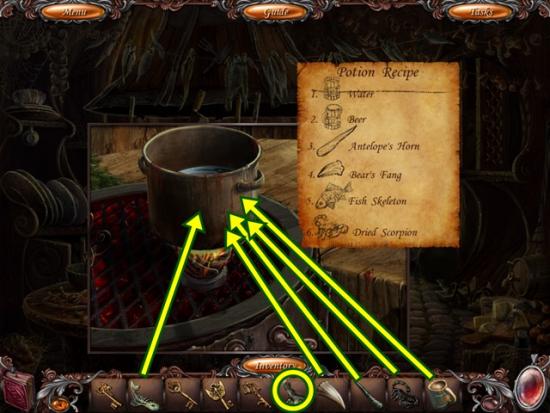
- If you haven’t already done so, turn on the burner. Follow the recipe. In the pot, add the beer, antelope’s horn, bear’s fang, fish skeleton and scorpion. Turn off the burner. Scoop up the potion with the empty vial to get the magic potion. Go back to the leader’s room and go through the secret passage to the doorway.
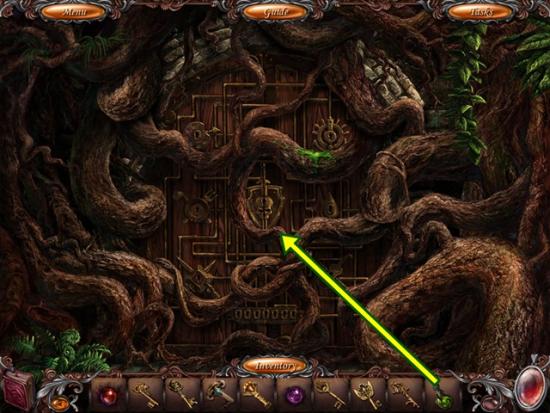
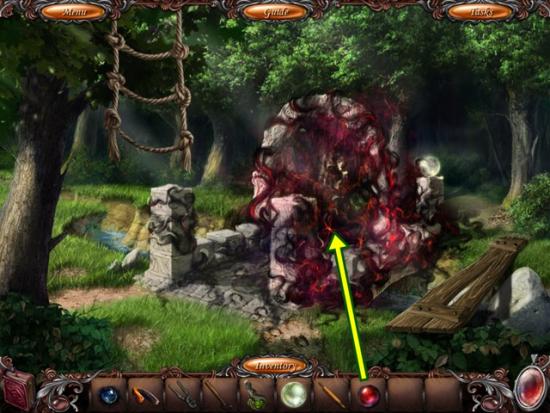
- Pour the magic potion on the roots.

- You need all seven keys to open this door. The symbols match the keys. Clockwise from top left, add the artist’s key, the sailor’s key, the water key, the music key, the hunter’s key, the cook’s key and in the centre, add the leader’s key. It doesn’t matter what order you add the keys.
- A mini-game starts. Lead each key to its matching keyhole (match the colour). To move a key, click on it and drag it along the path, avoiding obstacles. It’s ok if you let go of a key, it will stay where you leave it (it won’t return to its original position).
- Solutions:
- Cook’s key (purple gem)
- Hunter’s key (white gem)
- Artist’s key (red gem)
- Sailor’s key (blue gem)
- Water key (light blue gem)
- Music key (green gem)
- Leader’s key (yellow gem)
- Go towards the door. Watch the cutscene.
Chapter 4
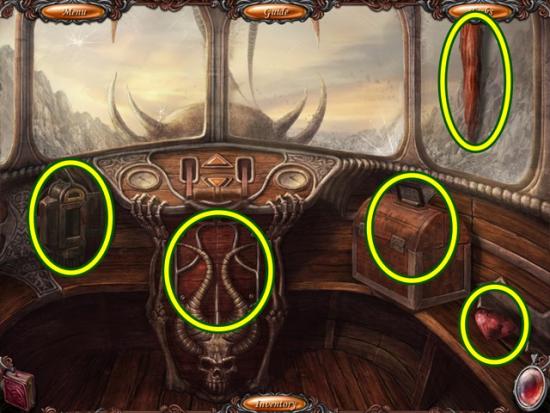
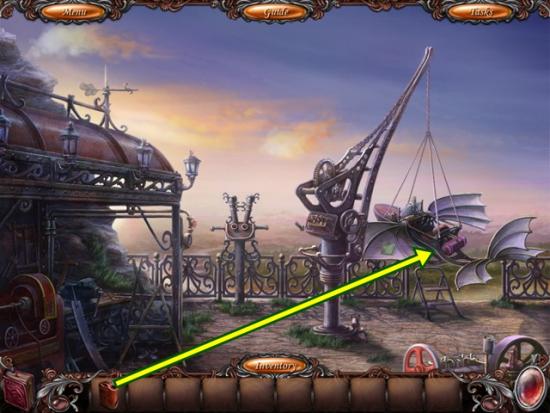
- Take the flag and the spire. Click on the crack. Use the spire to crack the glass (two clicks). Place the spire across the opening. Attach the flag to the spire. Lower yourself down the broken window.
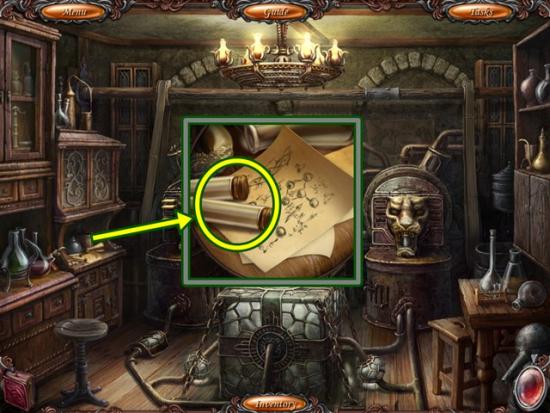
- Read the poster on the wall (right). Click on the table. Take the golden cube and the fuse. Click on the telescope. Take the key. Click anywhere outside of the window to close it.
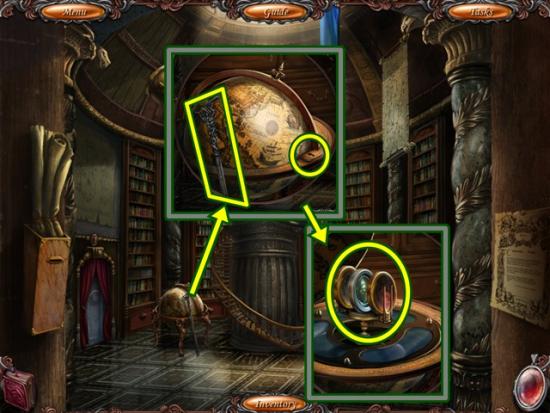
- Click on the globe. Take the metal cane. Unlock the globe with the key. Take the lenses. Go south.
- A mini-game starts. Click on the bars in the proper sequence. Begin by clicking on all the bars. Once a bar remains lowered, that is your starting point. With the first bar lowered, press another bar (to keep track, go clockwise). If it’s incorrect, all bars will go back to their original position. Press the first bar to lower it and continue in that fashion until the second bar stays lowered. Continue until all bars are lowered. The solution is different for each game.

- Combine the metal cane and the magnet to form the cane with magnet. Use the cane with magnet to reach the special skates. Place the special skates on the rails. Move west (put the cursor on the far left of the scene and click).
- Take the valve. Click on the panel. Remove the cover. Add the fuse. Go back to the right of the scene and go up the stairs.
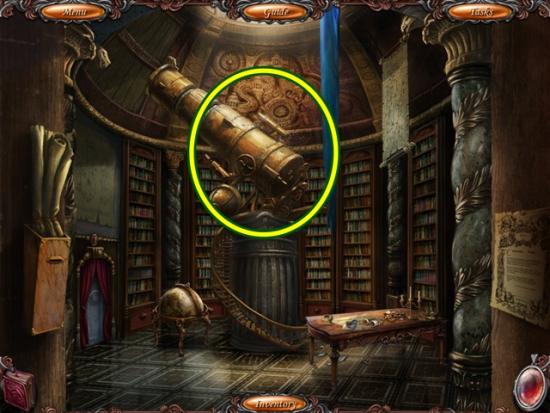
- Click on the telescope.
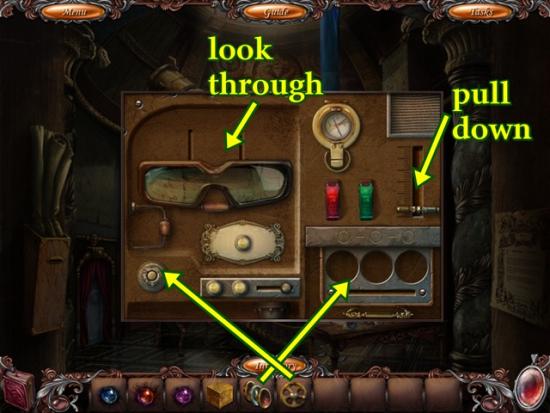
- Add the valve, then pull the lever and add the lenses. Turn the valve. Look through the glasses.
- A mini-game starts. Recreate the constellation based on the image provided. Drag and drop the stars. When a star is positioned properly, it can no longer be moved. As the stars are positioned, the constellation’s outline becomes more clear. Don’t worry about the different sizes of the stars.
- Solutions:
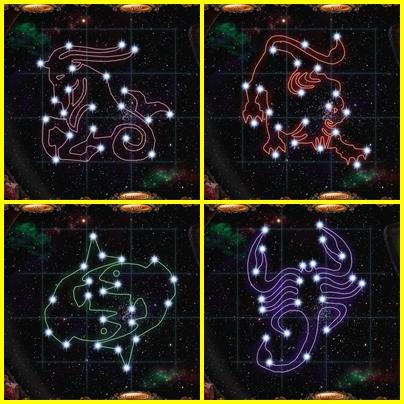
- Click on the door. Click on the constellations you saw in the telescope. Open the door and go through the doorway.
- Click on the door at the end of the hall. Click on the right statue. Click on the clasp. Take the golden pyramid. Click on the statue on the left. Click on the clasp and learn you need oil. Click anywhere outside of the window to close it. Click on the painting (right) to start a hidden object scene.
- Find all the objects fragments. Move the towel to get another fragment.
- Cut away the leaves with the pruners. Take the fragment that appears. Smash the beehive with the hammer and take the fragment.
- Position the ladder (click it on the clothesline to set it). Put the platform on the clothesline. Put the mechanical mouse on the platform. It will automatically move and the cat will chase it.
- Take the golden cylinder.

- Click on the painting (left) to start a hidden object scene.
- Find all the objects. An oilcan is added to your inventory.
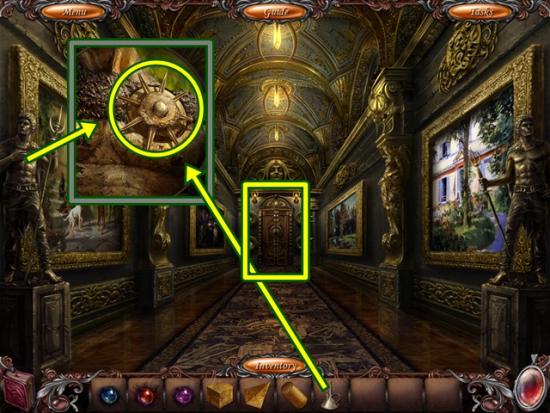
- Click on the left statue. Click on the clasp. Use the oil can. Take the golden sphere. Click on the door at the end of the hall.
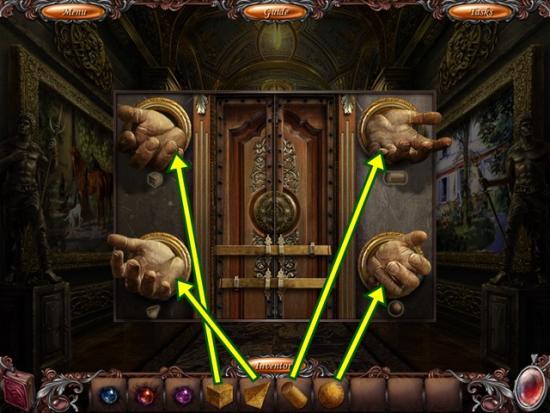
- In each hand, place the golden item that matches the symbol. Go through the doorway.
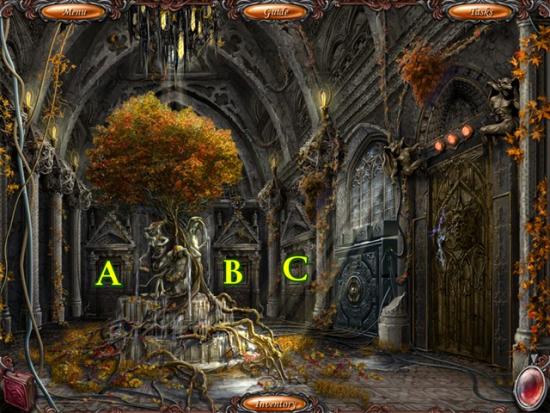
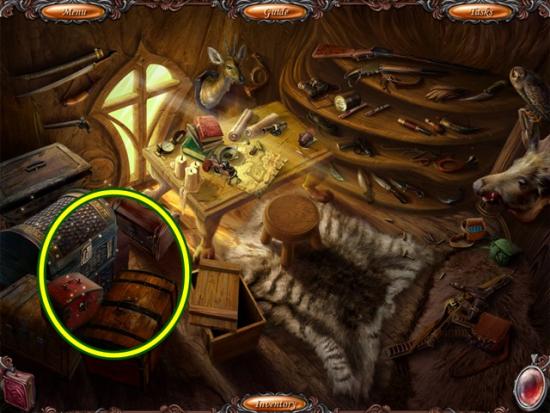
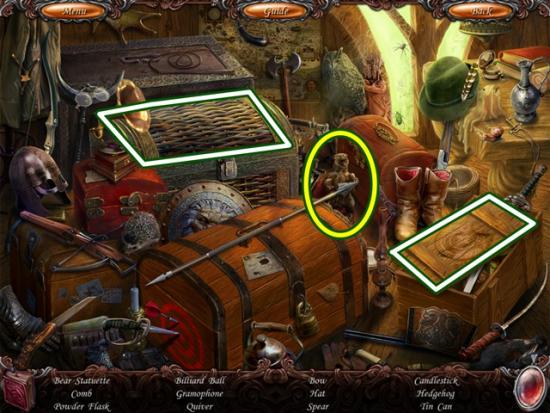
- There are three doors off this room. In the screenshot above, they are named A, B and C. Enter room A.
- Pull the cloth off the mirror. Take the transistor. Leave the room and enter room B.

- Pull the cloth off the mirror. Take the transistor. Leave the room and enter room C.
- Pull the cloth off the mirror. Leave the room.
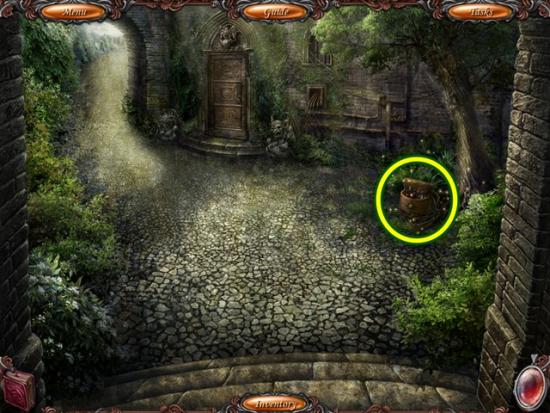
- Click on the fountain to start a hidden object scene.
- Find all the objects. A golden mask is added to your inventory. Enter room A.
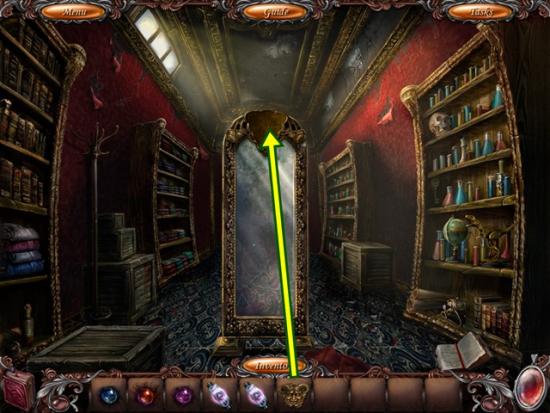
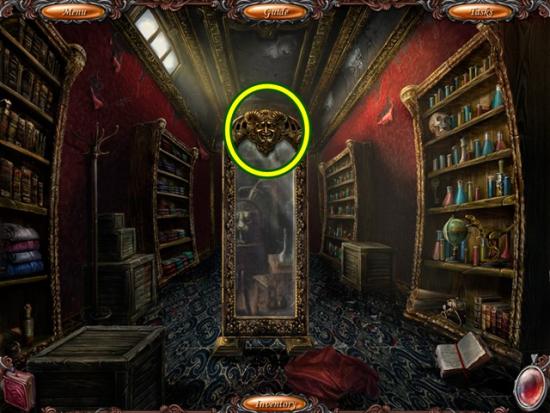
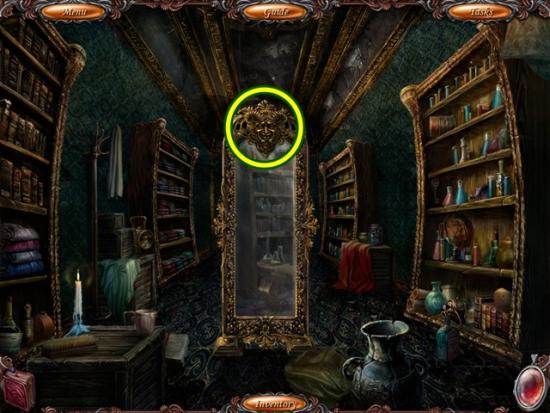
- Put the golden mask on the mirror inlay. Enter the mirror.
- Click on the cabinet on the left. Take the empty bulbs and look at the potion recipe. Leave the room.
- Take the golden mask from the mirror and return to the long hallway.
- Click on the painting (left) to start a hidden object scene.
- Find all the objects. A pump is added to your inventory. Go to room B.
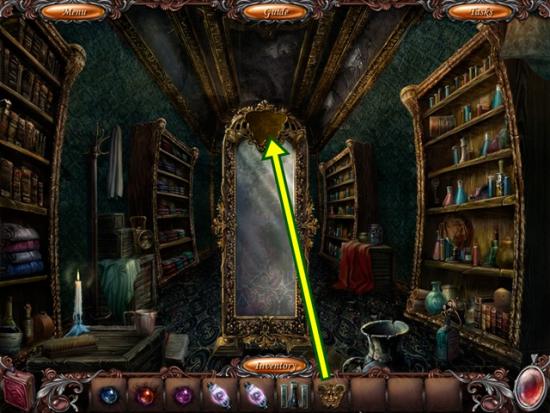
- Put the golden mask on the mirror inlay. Enter the mirror.
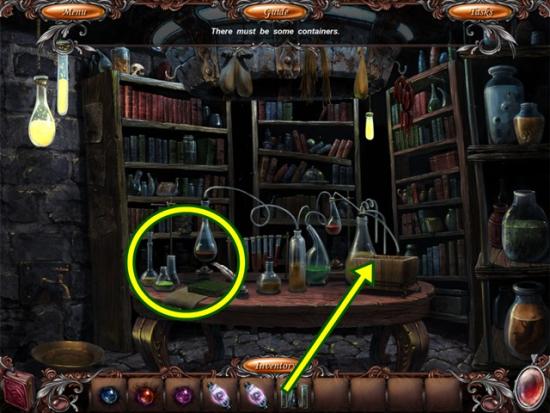
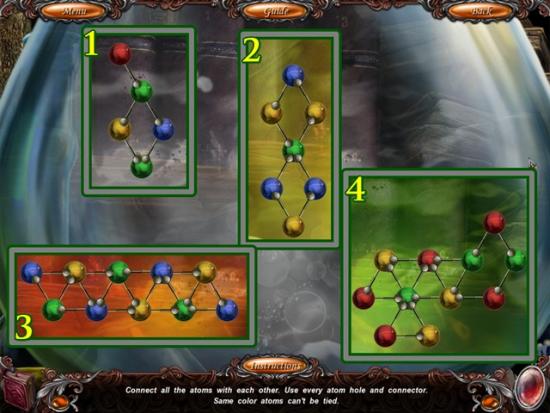
- Click on the right side of the table. Add the empty bulbs to the box. Click on the left side of the table.
- A mini-game starts. Connect all the atoms so all holes and connectors are filled/attached. Look carefully at each atom. Look at the coloured part for a white indent. That’s a hole. That means a connector must go in it. Some atoms have more than one hole and some have none. Same coloured atoms cannot connect to each other.
- Solutions:
- Click on the right side of the table. Take the restoring potion components. Leave the room.
- Take the golden mask. Enter room A and put the golden mask on the mirror’s inlay. Enter the mirror.
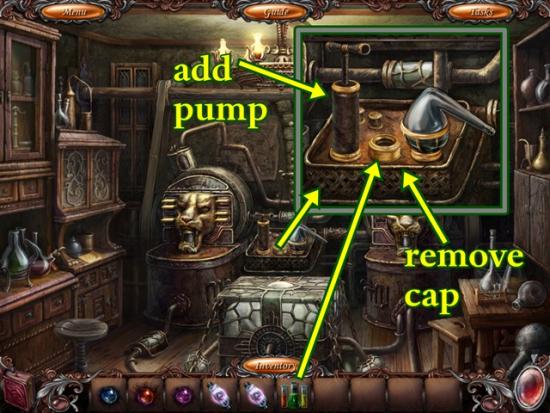
- Click on the device between the two heads. Add the pump. Remove the cap and pour the restoring potion components in. Push down the pump handle. Wait for the machine to stop.
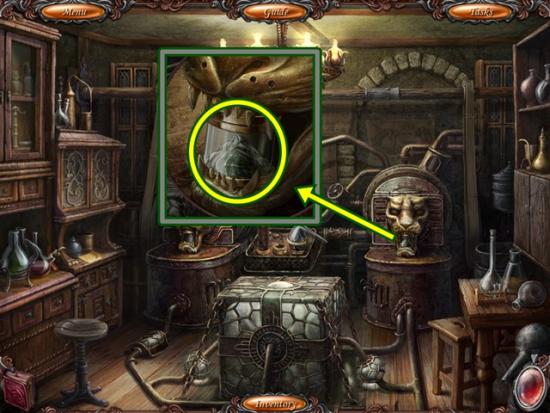
- Click on the lion face on the right. Take the restoring potion. Leave the room. Take the golden mask. Go to room C.
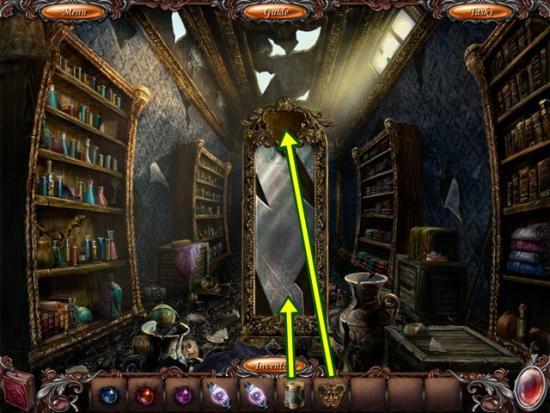
- If you haven’t done so already, remove the cloth from the mirror. Put the restoring potion on the broken mirror. Put the golden mask on the mirror’s inlay. Enter the mirror.
- Click on the doorway. Add the two transistors.
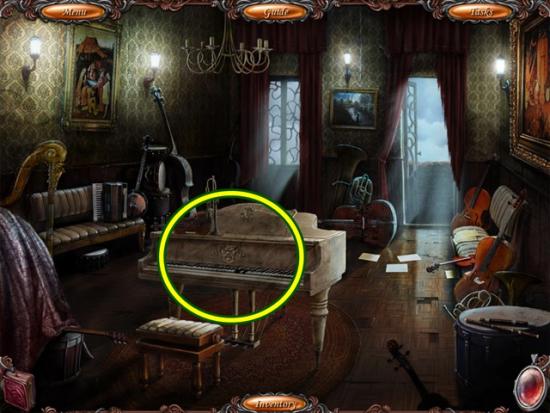
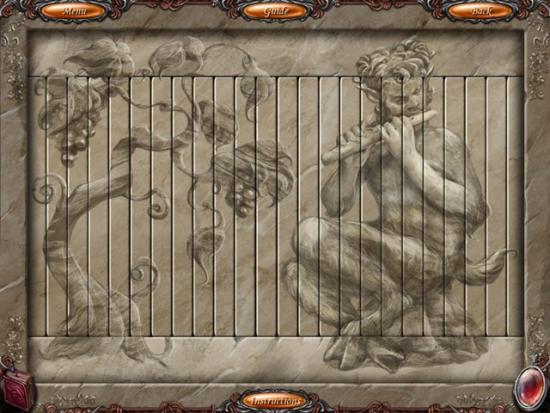
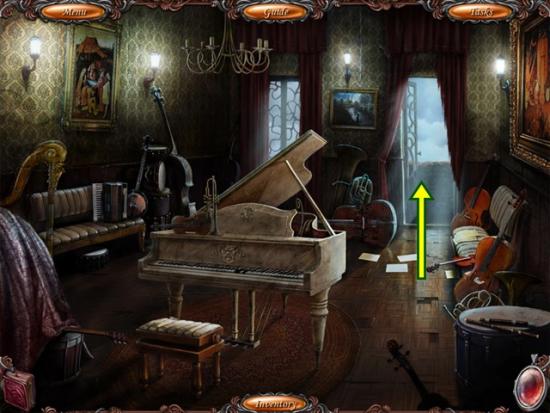
- Click on the piano.
- A mini-game starts. Rearrange the slats to recreate the design. Click on two slats to swap their positions.
- Solution:
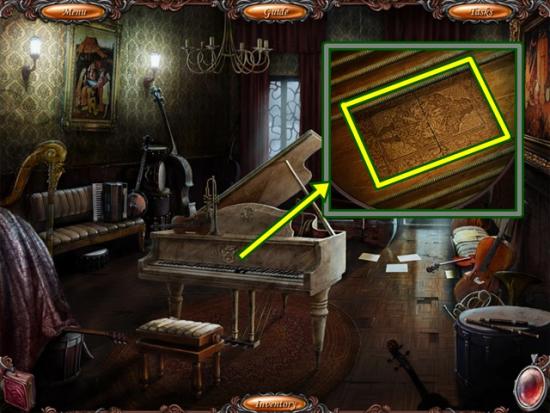
- Click on the piano. Open the panel. Take the mask key. Return to the room with the fountain. (south twice).
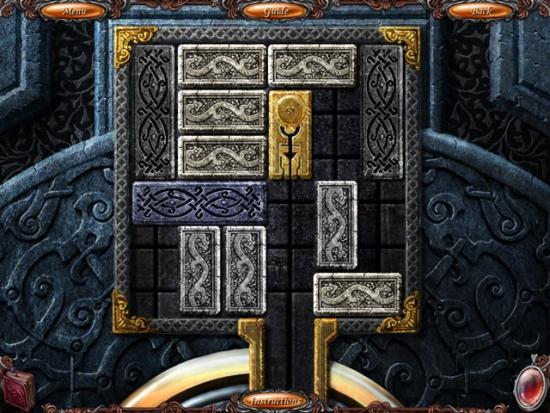
- Click on the side panel. Insert the mask key.
- A mini-game starts. Slide the blocks out of the way to allow the golden block through the passage. Horizontal blocks can move left and right and vertical blocks can move up and down. Because there’s no reset button, a step-by-step solution isn’t possible. Here is how the screen should finally look:
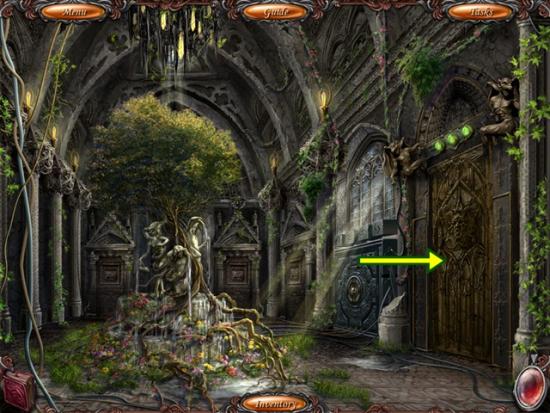
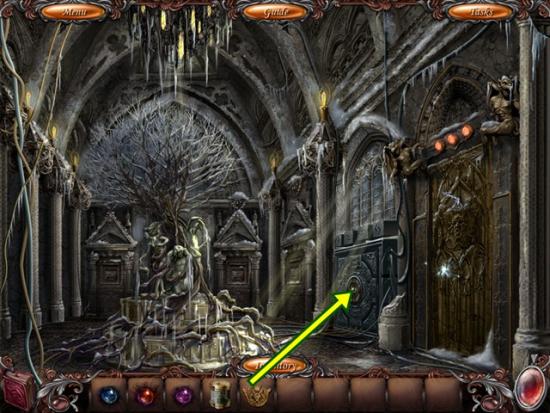
- Go through the large wooden door.
- Click on the broken green orb. Use the restoring potion on it. Take the loaded green orb. Click on the door. You need some parts. Click anywhere outside of the window to close it. Return to the fountain.
- Click on the fountain to start a hidden object scene.
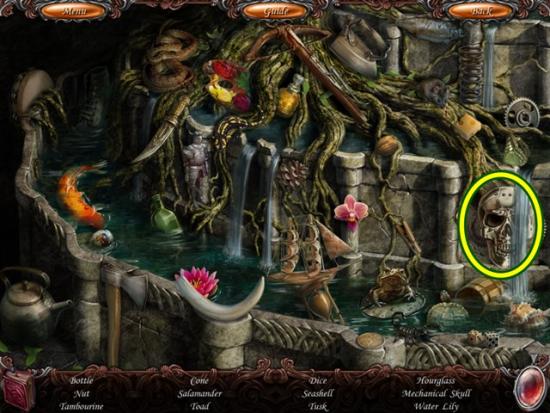
- Find all the objects. If you have to find a “cone,” it’s a pinecone. A mechanical skull is added to your inventory. Go back through the large wooden door.
- Click on the door. Add the mechanical skull. Enter the temple.
- Watch the cutscene. Place the loaded orbs on the four pedestals (don’t worry about what colour goes where).
- Watch the cutscene.
This is the end of the regular game.
Bonus Chapter
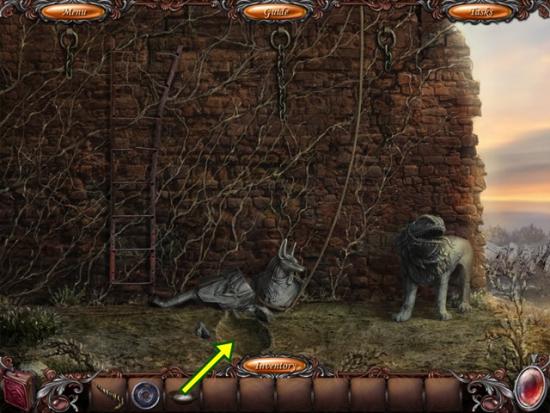
- Click on the wires. Take the horn. Take the path to the north.
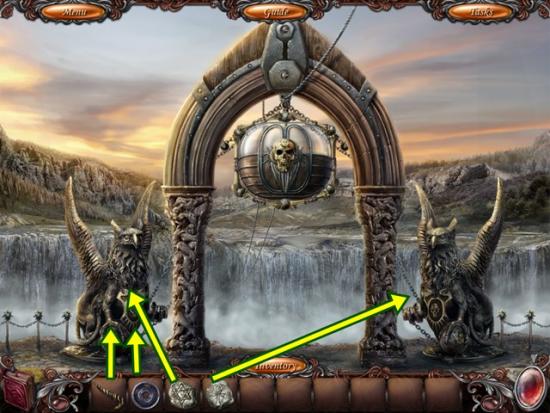
- Click on the griffins to learn you need a key. Click on the carriage. Go east.
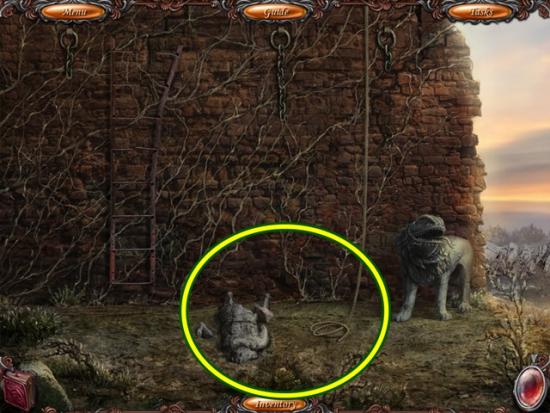
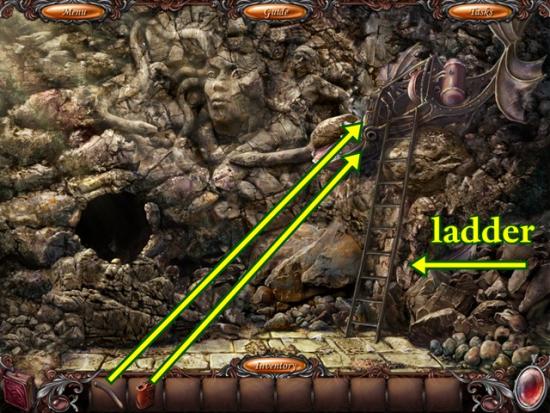
- Click on the statue to knock it over. Go up the ladder.
- Take the wrench. Turn the winch handle. Climb down the ladder.
- Attach the rope to the statue. Climb up the ladder. Turn the winch handle. Climb down the ladder. Go south and go west.
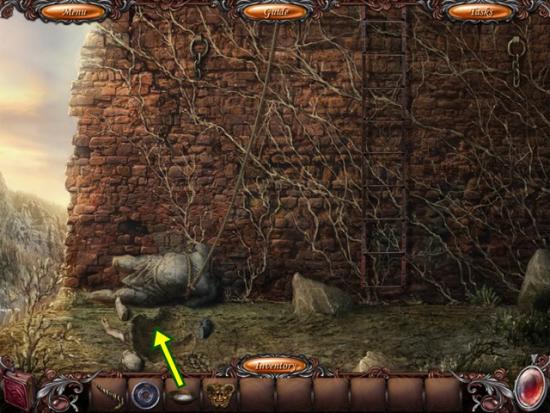
- Click on the left statue to knock it over. Return to the castle (south twice, then go through the door).
- There are four doors. According to the screenshot above, they will be named A, B, C and D. Go through doors A, B and C to find and take the golden mask. Leave whatever room and enter room A. Put the golden mask in the mirror’s inlay and go through the mirror.
- Click on the lion’s head on the left.
- Use the wrench to remove the bolts, then remove the panel. Take the gear. Leave the room and take the golden mask. Leave and go to room B. Add the golden mask to the mirror’s inlay and go through the mirror.
- Turn on the faucet and take the plaster. Leave the room and take the golden mask. Leave and go to room C. Add the golden mask to the mirror’s inlay and go through the mirror.
- Go onto the balcony.
- Turn the winch handle. Leave the balcony and the room. Take the golden mask. Leave the room. Go through door D, go up the path and go west.
- Tie the rope to the statue. Go south then east.
- Click on the indent. Pour the plaster onto the indent. Click anywhere outside of the window to close it. Return to the fountain and enter room C. Put the golden mask back in the inlay, if necessary. Go through the mirror and onto the balcony.
- Turn the winch handle. Return to that statue (west of the griffin statues).
- Click on the indent. Pour the plaster onto the indent. Click anywhere outside of the window to close it. Return to the fountain.
- Click on the fountain. Fill the empty bowl with water to get the bowl with water. Return to the statue to the east of the griffins.

- Click on the plaster. Pour the bowl with water onto the plaster, then take the star symbol. Go to the other statue.

- Click on the plaster. Pour the bowl with water onto the plaster, then take the ankh symbol. Go south.
- Click on the statue on the left. Add the star symbol. When the panel opens, add the gear, then the horn. Turn the horn/handle.
- Click on the statue on the right. Add the ankh symbol. The panel gets stuck. Click anywhere outside of the window to close it. Go south.
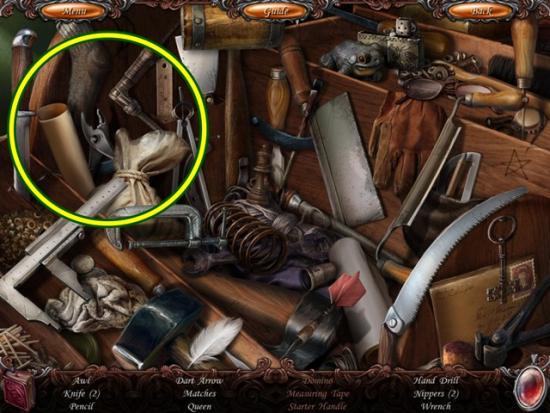
- Click on the bag to start a hidden object scene.
- Find all the objects. A dagger is added to your inventory. Go up the path.
- Click on the right griffin. Use the dagger to lower the panel. Turn the handle. Click on the carriage that lowered.
- A mini-game starts. Move the gears from the left to the centre stand. The gears must be stacked from biggest to smallest. A big gear cannot go over a small gear. Tip: always move the smallest gear to the centre position, then the second smallest gear to the other position (either left or right), then move the smaller gear on top of it.
- Once you are done, climb onto the carriage.
- Take the red gem, lantern and cloth. Click on the panel. Leave the carriage and go south.
- Click on the bag to start a hidden object scene.
- Find all the objects. A lock pick is added to your inventory. Go back to the carriage.

- Click on the toolbox. Use the lock pick to open it. Click on the toolbox to start a hidden object scene.
- Find all the objects. A starter handle is added to your inventory.
- Click on the panel. Add the starter handle. Turn the handle twice, then pull the lever. When the carriage stops, go south.
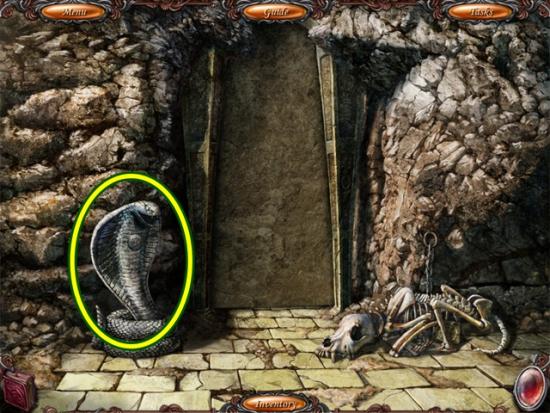
- Click on the cobra statue. Press the fire button.
- Light the lantern from the fire coming out of the cobra’s mouth to get the fired lantern. Click the button to stop the fire. Click anywhere outside of the window to close it.
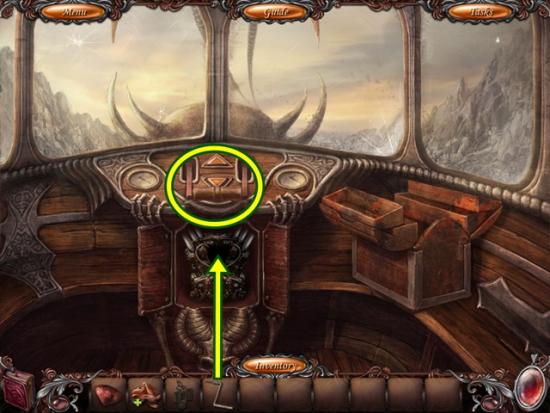
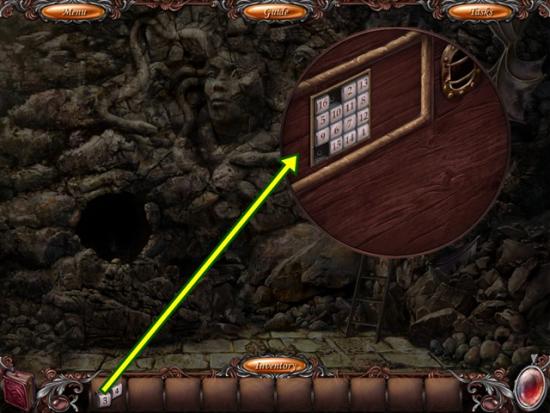
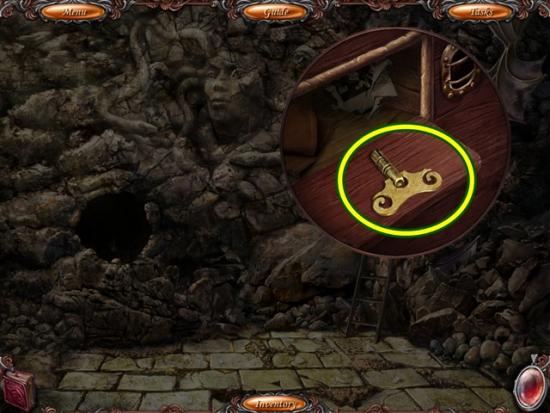
- Click on the animal skeleton. Take the bone, stone plate and key. Click the centre wall to learn it’s blocking your way. Go east.
- Click on the skull inlay. Add the red gem. When it opens, add the fired lantern.
- Hit the snake with the bone. Pull the lever twice (it must break).
- Combine the bone with the cloth to get the bone with cloth. Attach it to the broken lever. Pull the lever. Take the fired lantern. Go south.
- Use the fired lantern on the dark doorway. Look inside. Open the panel with the key. Click on the exposed area.
- A mini-game starts. Arrange the fuses so the lamps turn green. Note the entry points (holes) on each lamp. Only same coloured wires can touch each other. Select two lamps to swap their positions. Each wire must connect with another.
- Solution:
- Enter the doorway.
- Click on the obelisk. Add the stone plate.
- A mini-game starts. Rotate the tiles so the chain flows in a continuous line. Also, line up the cracks in the tiles.
- Solution:

- Move towards the spider pedestal.
- Take the sword. Click on the spider pedestal. Take the cross. Click anywhere outside of the window to close it. Go south.
- Click on the snake statue. Add the cross. Take the snake crystal from its mouth. Go south and go east.
- Click on the aircraft. Use the sword to take the aircraft wing. Go south and go through the door. Go to the spider pedestal.
- Click on the pedestal. Add the snake crystal.
- A mini-game starts. Rearrange the lasers so none cross each other.
- Solution:
- Solving this mini-game drives away the spider.
- Put the aircraft wing on the stone. Go to the web.
- Click on the left griffin. Take the goat mask. Click on the skeleton. Take the torch base. Return to the carriage (south four times).
- Click on the toolbox to start a hidden object scene.

- Find all the objects. An oiled rag is added to your inventory. Go south.
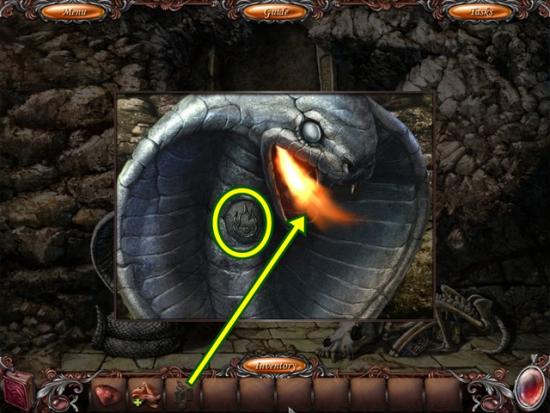
- Combine the torch base and the oiled rag to form the torch. Click on the cobra statue and press the flame button. Light the torch to get the burning torch. Enter the cave and go towards the cobwebs.
- Burn the cobwebs with the burning torch. Enter the room.
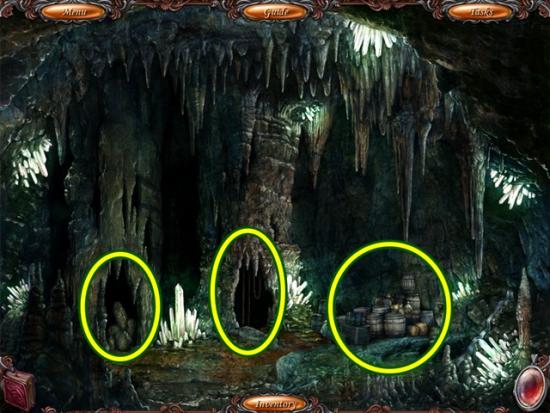
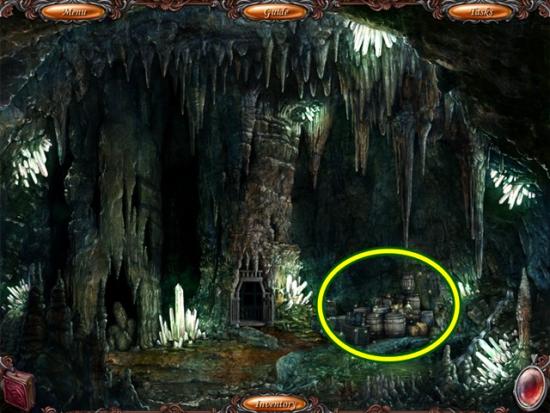
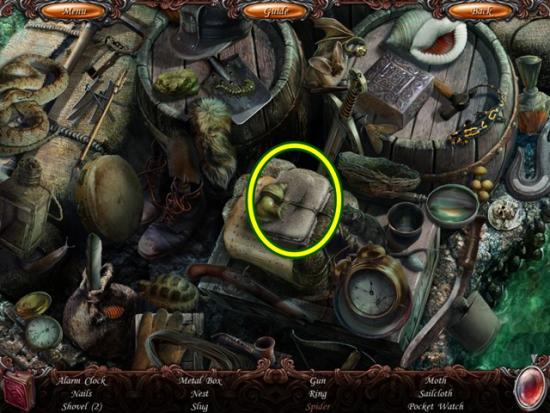
- Click the two openings. Once you’ve done this, click the barrels to start a hidden object scene.
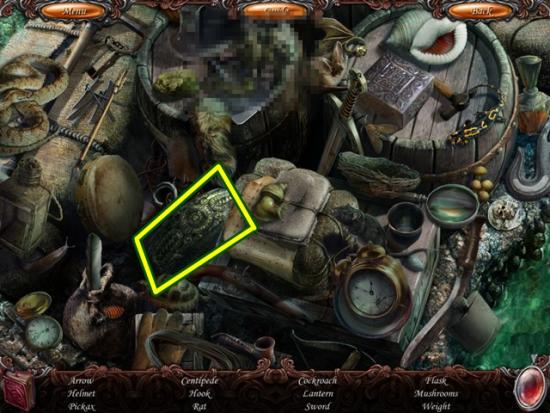
- Find all the objects. A weight is added to your inventory.
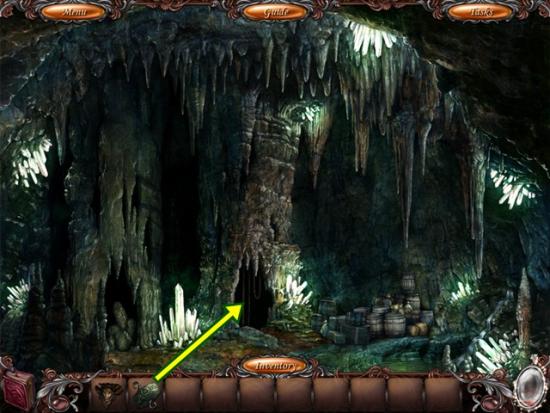
- Click on the central opening. Add the weight. Click on the elevator that appears.
- Add the goat mask. Enter the elevator.
- Click on the aircraft. Click anywhere outside of the window to close it. Click on the viewer. Click once to the right to see your house. Go south. Go west into the room.
- Take the staple and the ladder. Click on the gas can and take the hose and the empty can. Click on the bed to start a hidden object scene.
- Find all the objects. A funnel is added to your inventory. Go south twice.
- Click on the barrels to start a hidden object scene.
- Find all the objects. Sailcloth is added to your inventory. Go back up the elevator.
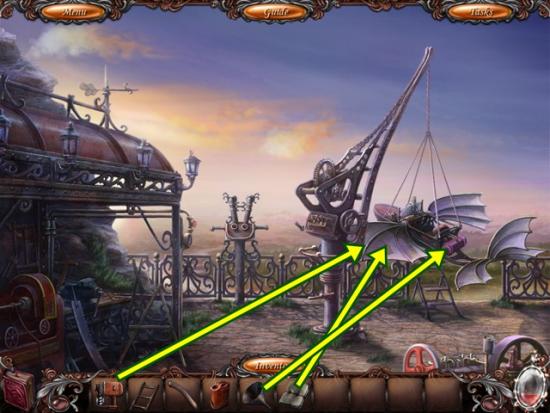
- Click on the wing. Add the sailcloth and attach it with the staple. Click on the back of the aircraft. Remove the cap and add the funnel. Click anywhere outside of the window to close it. Go south five times, then go east.
- Put the ladder against the aircraft. Click on the ship. Remove the gas cap. Put the hose in the hole and fill the empty can. Take the fuel. Return to the other ship.
- Click on the back of the aircraft. If you haven’t already done so, remove the gas cap and add the funnel. Fill the tank with fuel. Click on the aircraft.

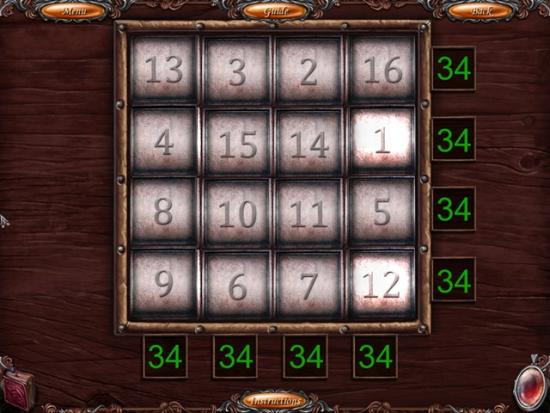
- Take the buttons. Go south six times, then go east.
- Click on the aircraft. Add the buttons.
- A mini-game starts. Rearrange the buttons so each row and column’s numbers add up to 34.
- Solution:
- Click on the aircraft and take the ignition key. Return to the other aircraft. Click on the aircraft.
- Add the ignition key and turn it. Go south and enter the room.
- Click on the box to start a hidden object scene.
- Find all the objects. A triangle key is added to your inventory. Go back to the aircraft
- Add the triangle key. Click on it and click on the wires.
- A mini-game starts. Reconnect the wires. The wires at the top have a coloured piece of tape. The wires connected at the bottom have a coloured piece of tape (except the green). Start from the bottom and trace your mouse along a connected wire and take note of its tape colour. Then click it and its matching wire at the top to connect them.
- Solution:
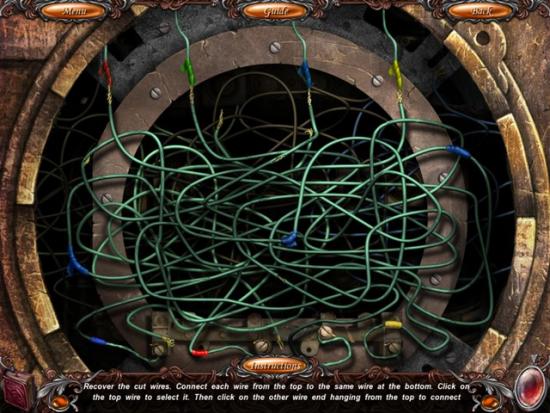
- Turn the ignition key.
- Watch the cutscene.
The end!

More articles...
-
Best Horror Games On Itch.io – July 2026
Across a bounty of subgenres. -
Haze Seas Accessories Tier List [Best Accessories to Equip]
The accessories with the best stat buffs in Haze Seas.