
Best Horror Games On Itch.io – July 2026
Across a bounty of subgenres.
Grow A Garden 2 Base Price List
What's the most valuable crop?![Evomon Best Starter [Leafbun, Blazpup, or Bubble?]](/wp-content/uploads/2026/06/evomon-best-starter.jpg "Evomon Best Starter [Leafbun, Blazpup, or Bubble?]")
Evomon Best Starter [Leafbun, Blazpup, or Bubble?]
Grass-type, Fire-type, or Water-type?
![[Roblox] Evomon Shiny Hunting Guide – Including Prismatic and Pris Shinies!](/wp-content/uploads/2026/06/evomon-shiny-hunting-guide.jpg "[Roblox] Evomon Shiny Hunting Guide – Including Prismatic and Pris Shinies!")
Snark Busters 2: All Revved Up Walkthrough
Welcome to the Snark Busters 2: All Revved Up! walkthrough on Gamezebo. Snark Busters 2: All Revved Up! is a hidden object/adventure game played on the PC created by Alawar. This walkthrough includes tips and tricks, helpful hints, and a strategy guide to how to complete Snark Busters 2: All Revved Up!


- Prefer Gamezebo on Google

Snark Buster 2: All Revved Up! – Game Introduction
Welcome to the Snark Busters 2: All Revved Up! walkthrough on Gamezebo. Snark Busters 2: All Revved Up! is a hidden object/adventure game played on the PC created by Alawar. This walkthrough includes tips and tricks, helpful hints, and a strategy guide to how to complete Snark Busters 2: All Revved Up!
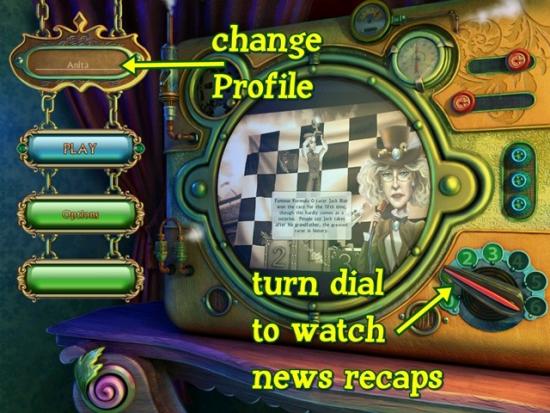
Main Menu

- Options allows you to adjust the volume to the sound and music. You can also change the full screen mode, the custom cursor or enable/disable gameplay hints.
- When you begin playing, you have to create a Profile (i.e., enter a name). If you want to create a new profile, click on the current Profile’s name (top left corner). Most games display text that reads, “to switch users” or something to that effect but this game doesn’t.
- Turn the dial (bottom right) to watch a news video pertaining to its corresponding chapter. You can only watch news recaps of chapters you’ve already reached/passed.
Gameplay and Tips
- This is a hidden object adventure game. In each scene, you must find object pieces. Once all the pieces are collected to form the object, it is used to perform an action.
- Collecting objects – The objects to find are displayed at the bottom of the screen. The object is broken into pieces. Scour the scene and click on object pieces when you see them. They will be added to the picture. Pieces coloured in red are not immediately visible.
- Hover your mouse over every aspect of the scene and watch for your cursor to change. When it changes into a hand or magnifying glass, click on the area to perform an action and take the object piece.
- Using objects – Objects are used wherever the cursor has spinning gears. To use an item, click on the item from the inventory and move it to the action zone.
- Areas of interest – For areas that require an action or further investigation, the cursor turns into a magnifying glass. To close the area, click the X at the top right of the window. Most games allow you to click anywhere outside the window but this game sometimes doesn’t.
- Hint system: If you are stuck, click the Question Mark icon and it will highlight an object or what to do next. It regenerates after 30 seconds or so.
- There is no timer or point system.
How to Use this Walkthrough
- All inventory objects in this walkthrough will appear in bold.
- Small windows will appear showing close-ups of items. Once you get the item or information you need, close it. The walkthrough will not include that instruction.
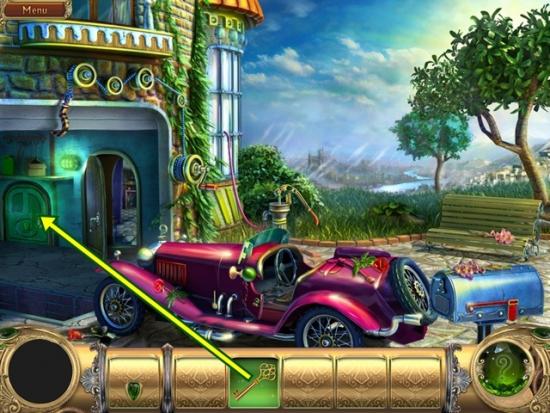
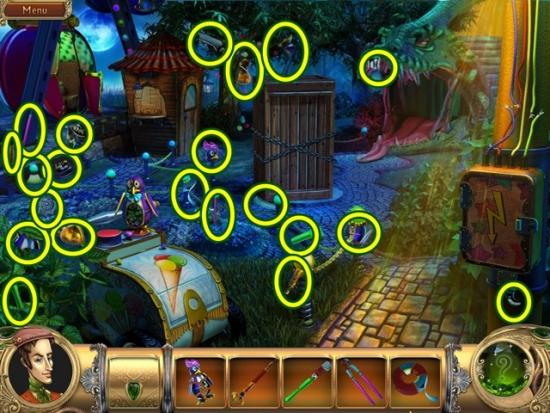
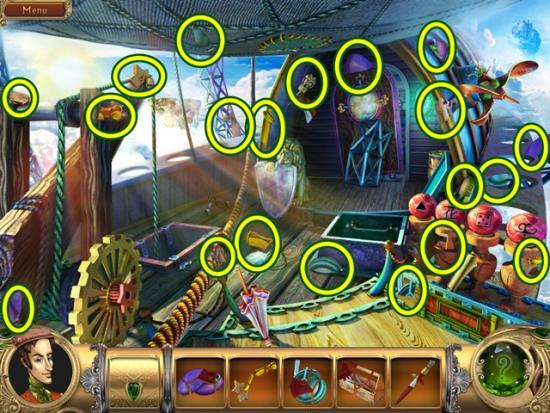
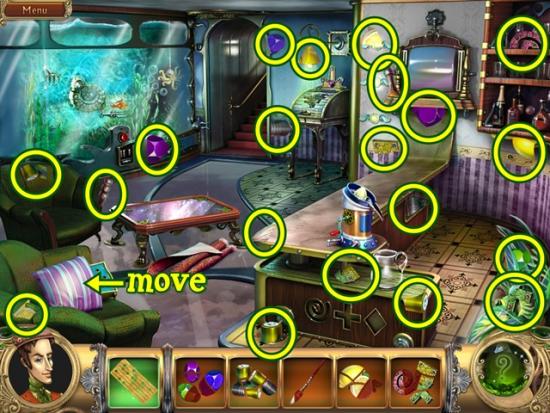
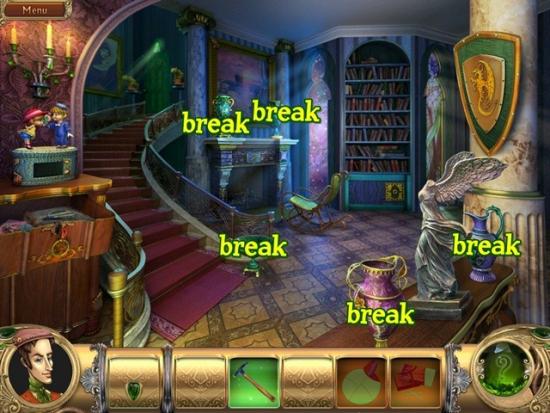
Walkthrough – Chapter One (Tutorial)
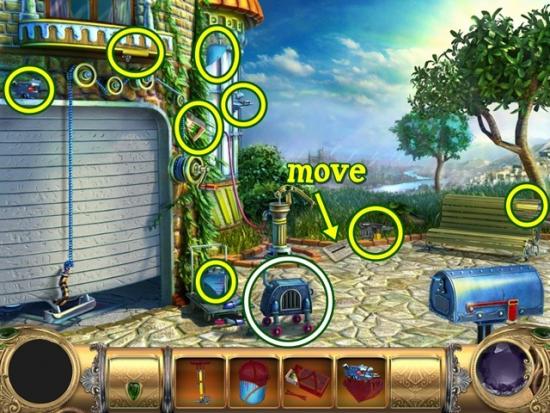
- The first level of the game acts as a tutorial. Do not skip it! Follow the tutorial and find all the object pieces. Once prompted, move the newspaper to take the object piece. Click on the robot dog.
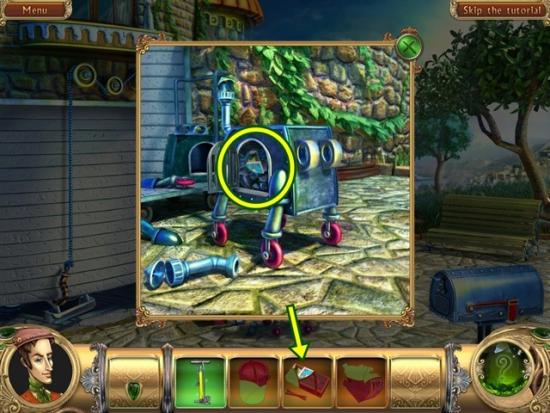
- Open the grate on the centre of its body. Note the inventory items at the bottom of the screen. When the grate is closed, all the pieces are red. Once you open the grate, the available piece is displayed in colour. Take the object piece. Close the window.
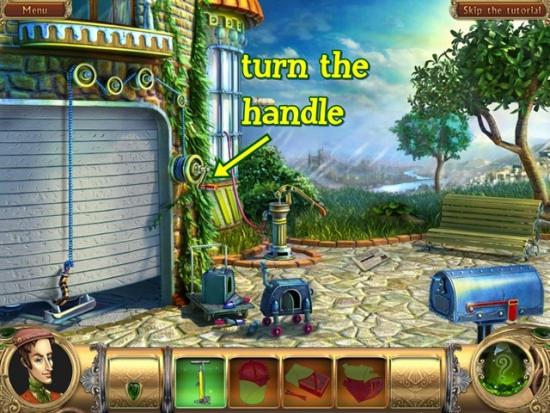
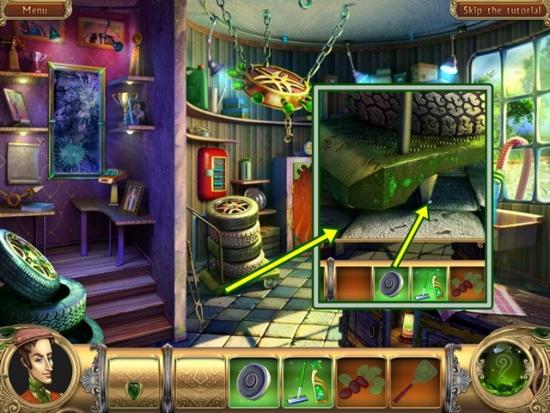
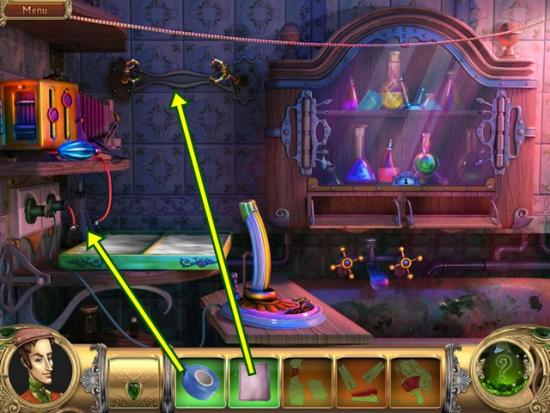
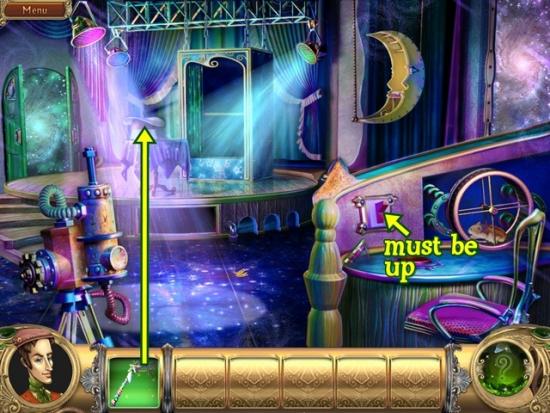
- Turn the handle to raise the garage door.
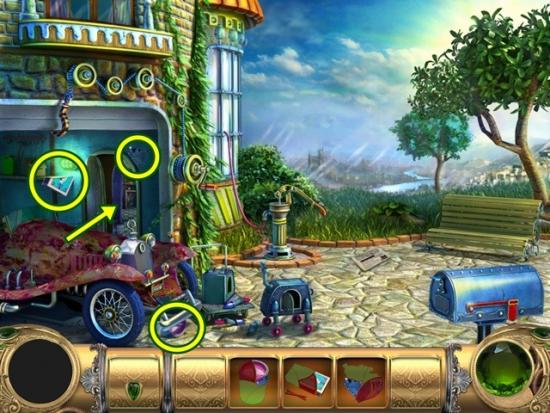
- Follow the prompts by using the pump on the car. Find all the object pieces, then go through the door.

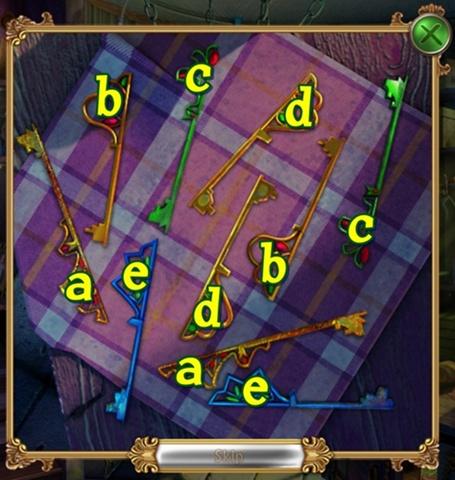
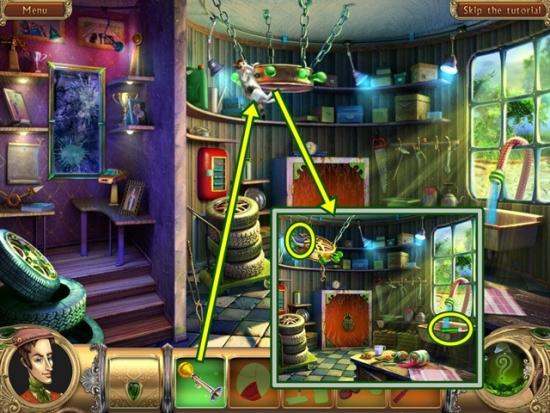
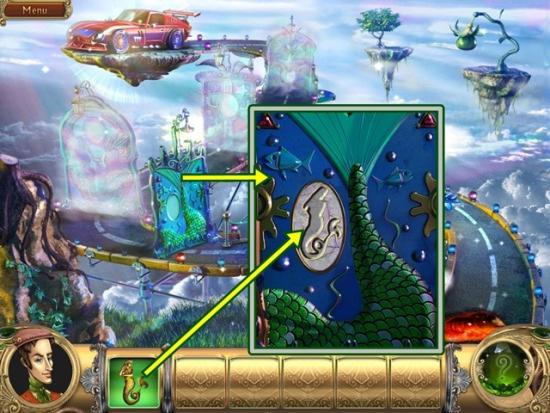
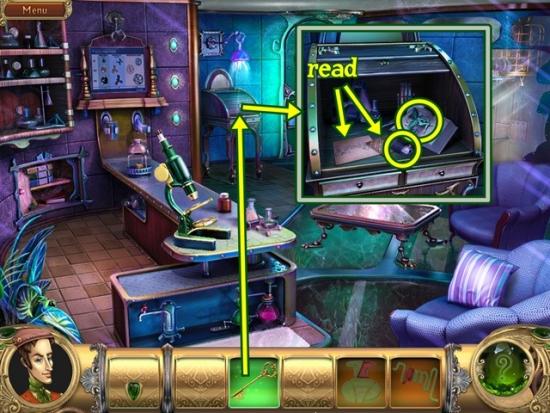
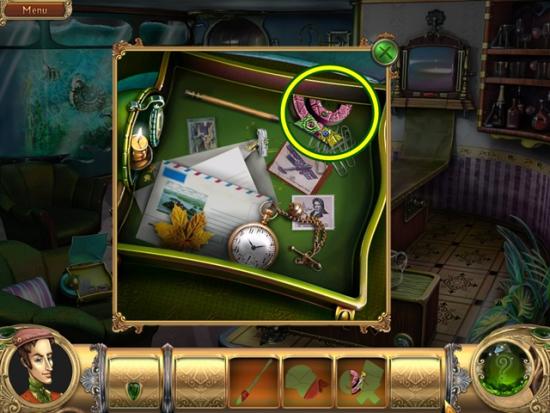
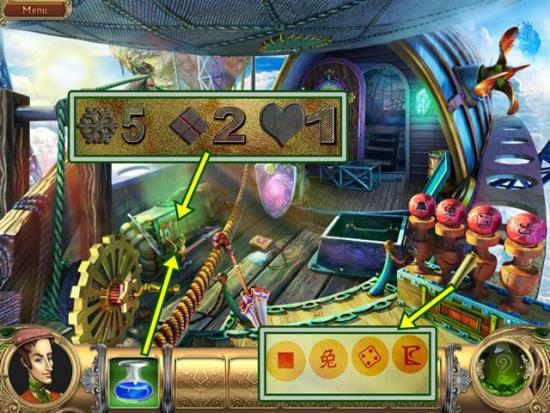
- Find all the object pieces. Put the chain on the hanging ceiling lamp to take the last key part. When you have all the key parts, click on the key parts on the table (white circle).
- Add the key parts. Mini-puzzle: Reassemble the keys. Click on one key part and then click on its identical match. Solution:
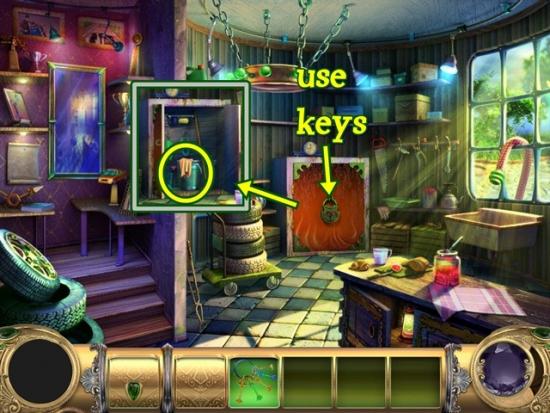
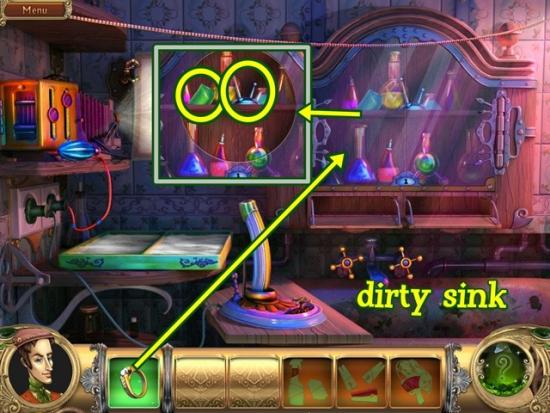
- Open the cabinet with the keys. Take the bucket. Leave the scene (go south).
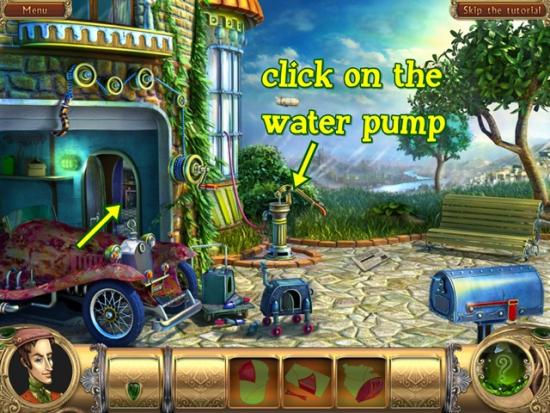
- Click on the water pump. Go through the door.
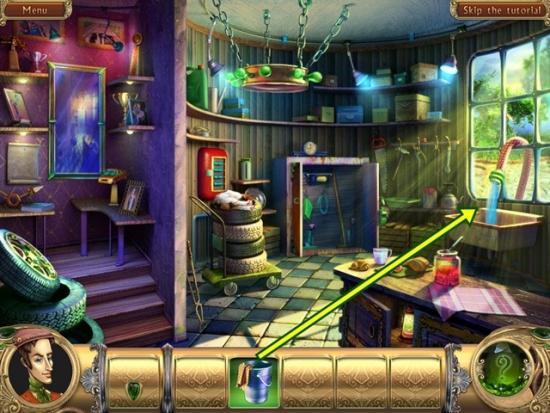
- Fill the bucket with water. Leave the scene (go south).
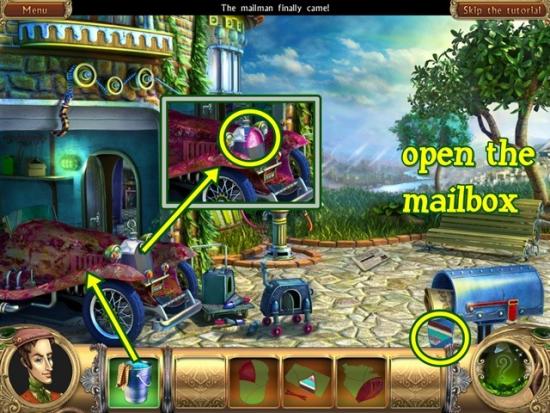
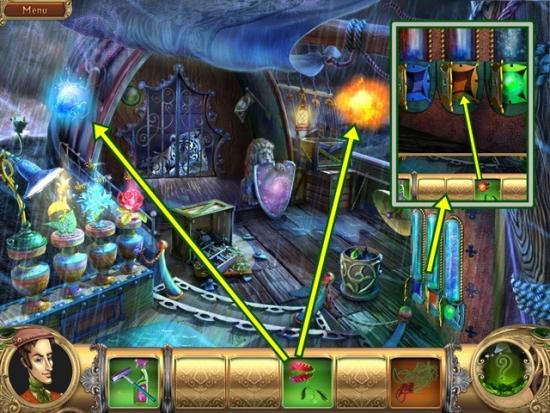
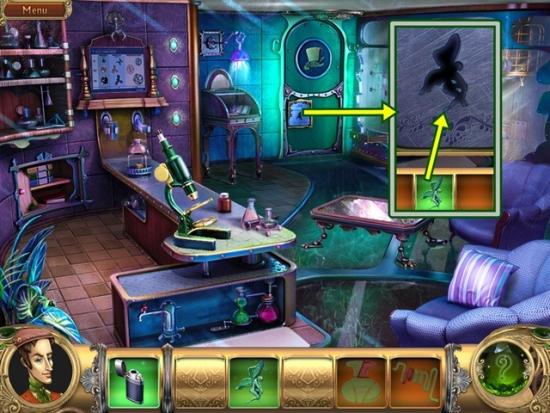
- Open the mailbox. Take the object piece and read the newspaper article. Clean the car using the bucket with water. Find the object piece that appears on the car’s grill (front). Use the paint on the car. Chief Bow appears. Click to move through the dialogue.
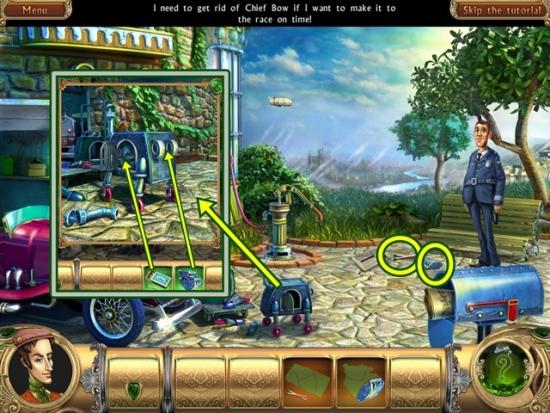
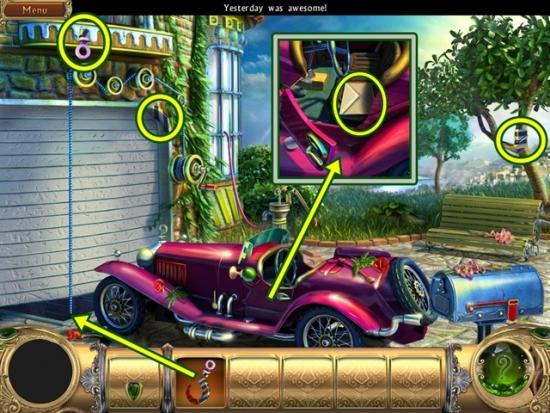
- Take the two object pieces that now appear. Once the matches and dog’s head are completed, click on the robot dog. Use the matches to light the inside of the dog and place the dog’s head. It will then go after Chief Bow. Click on the car to drive away.
- Watch the video.
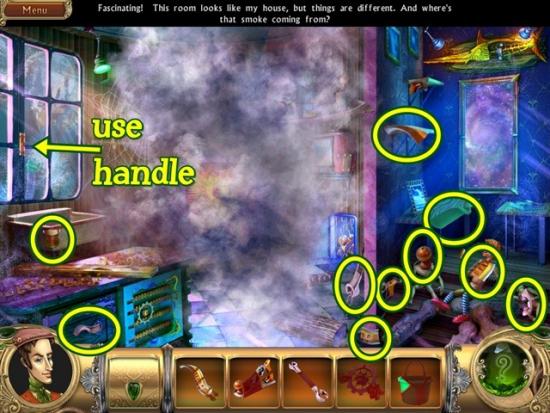
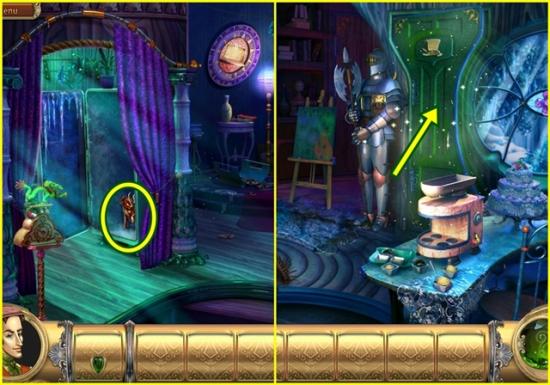
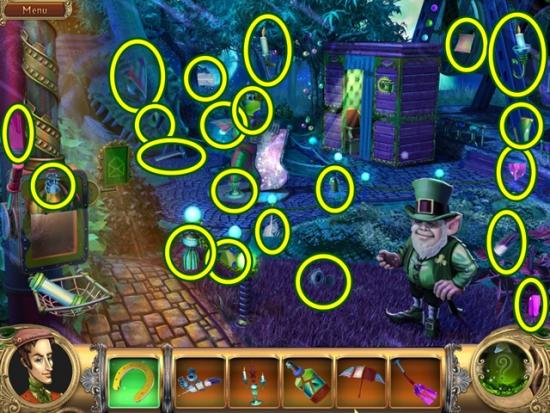
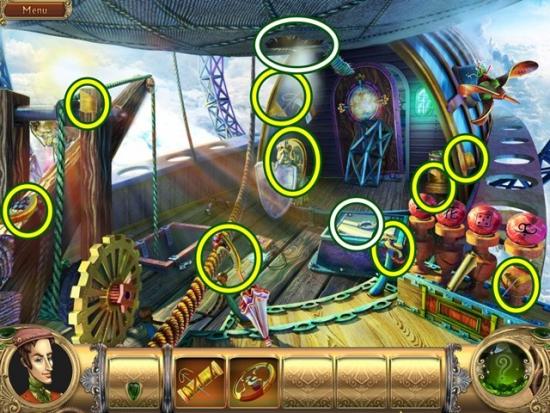
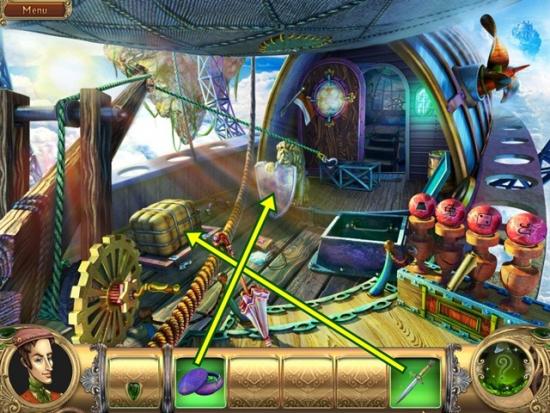
Chapter One
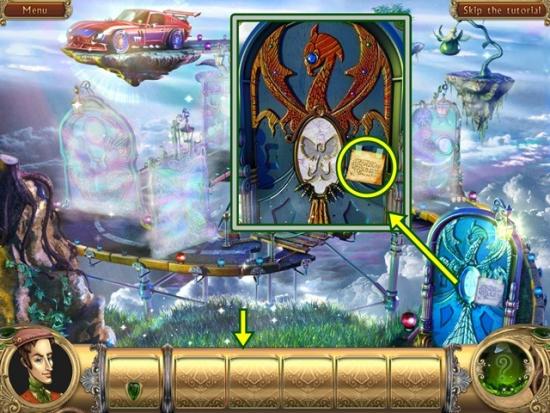
- Find all the object pieces. Open the car door and look inside. Click on the envelope to start a video. After the video, take the key and the object piece to complete the hook. Read the letter. Click on each piece of paper to zoom into it and then click on it again to replace it. This letter explains the plot and goal of the game. When you are finished reading the letter, close the window.
- Put the hook on the end of the rope to open the garage door.
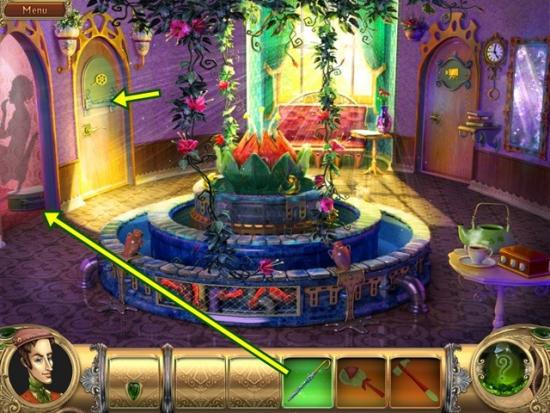
- Click on the green door, then unlock it with the key. Enter the doorway.
- Click on the door at the bottom right. Read the note. Leave the scene (south), then enter the house.
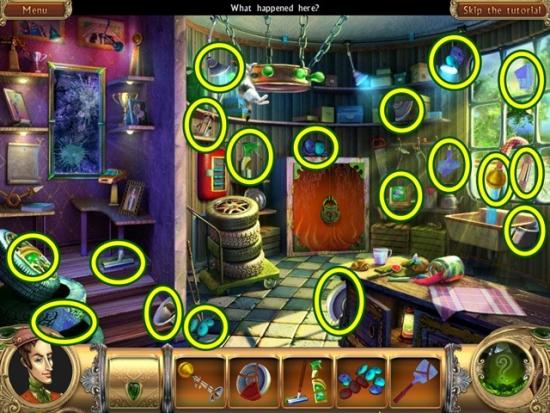
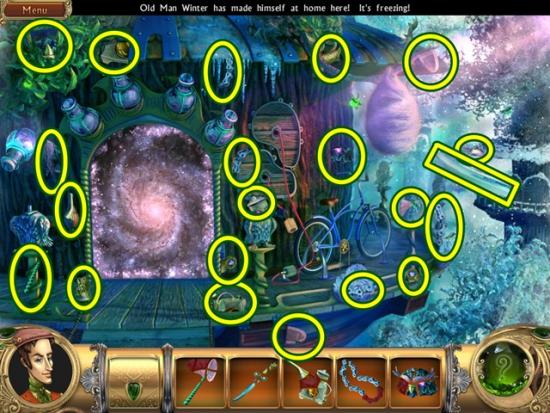
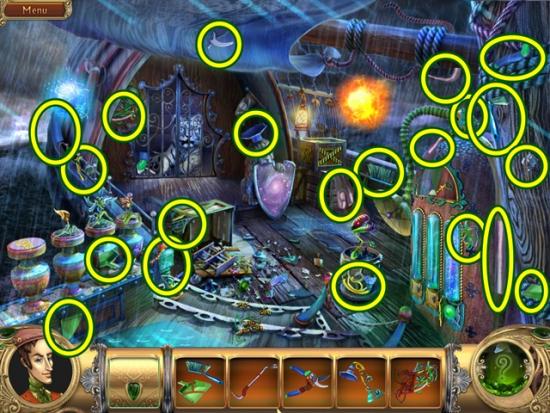
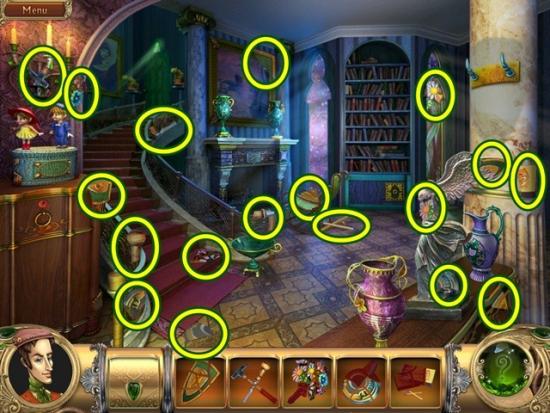
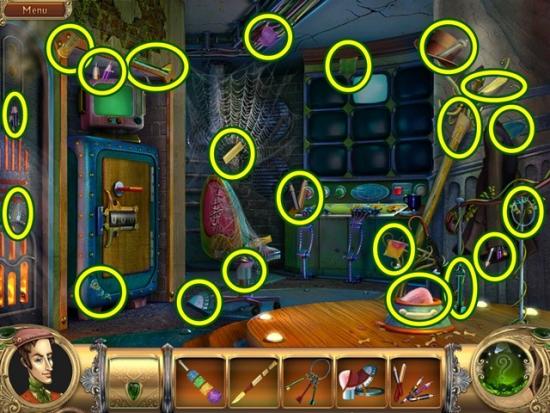
- Find all the object pieces.
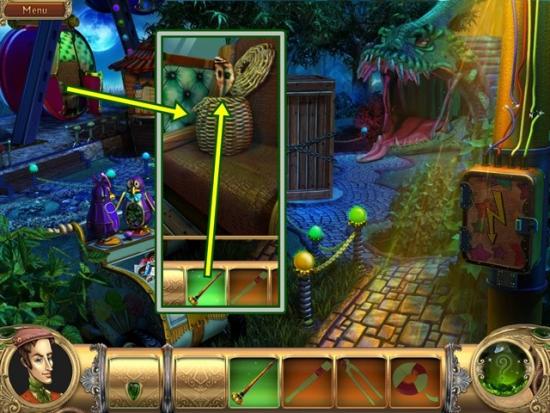
- Once completed, use the bicycle horn on Sam the cat to scare him away. Take the two object pieces that appear.
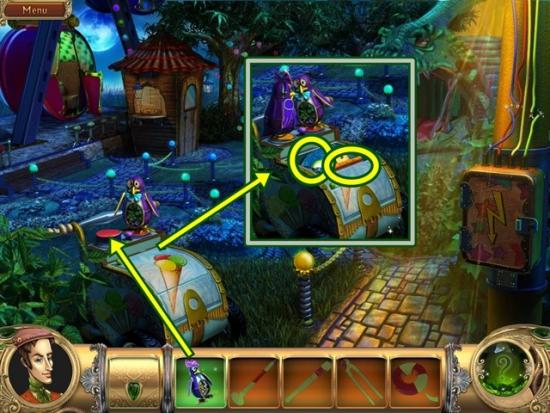
- Click on the broken cart. Place the wheel. Close the window. Move the cart and take the object piece to complete the abacus beads.
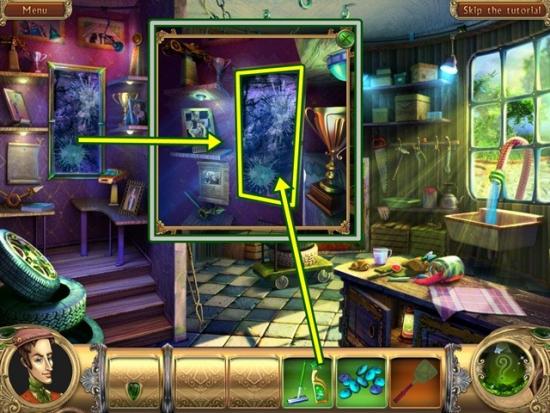
- Click on the dirty mirror. Clean it with the cleaning supplies. Once it’s clean, click on it to go through the mirror.
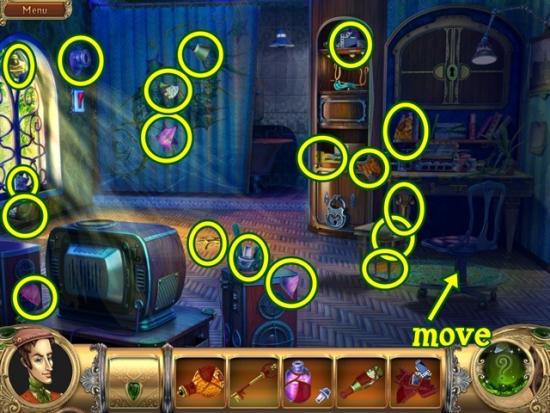
- Find all the object pieces. Once you’ve completed the handle, click on the window. Use the handle to open the window.
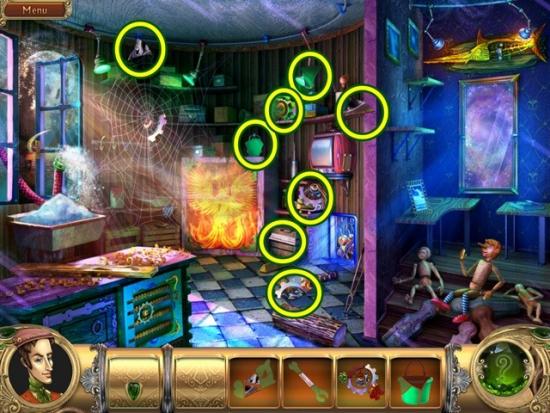
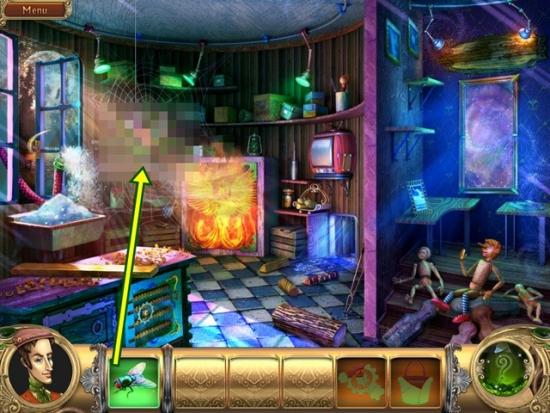
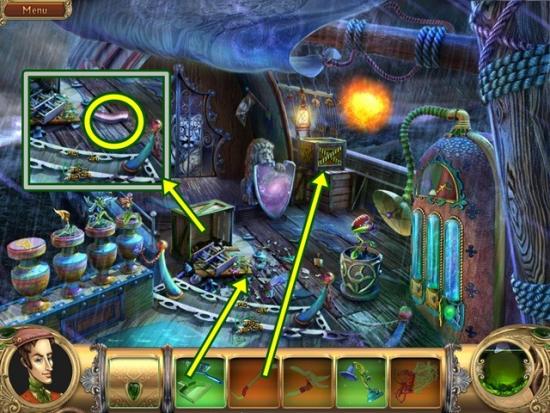
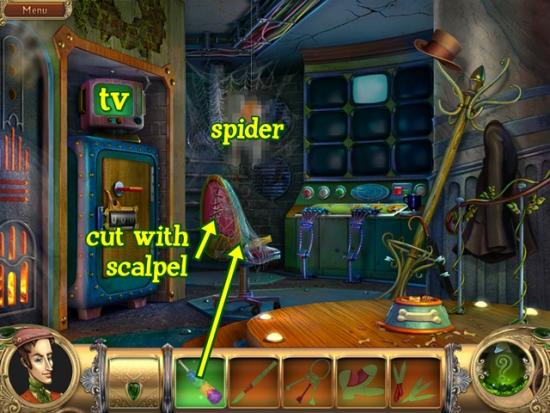
- Take the object pieces that now appear. When you try to take the object in the centre of the web, a big gross spider appears blocking the item.
- Please note in the screenshot above, I blurred the spider.
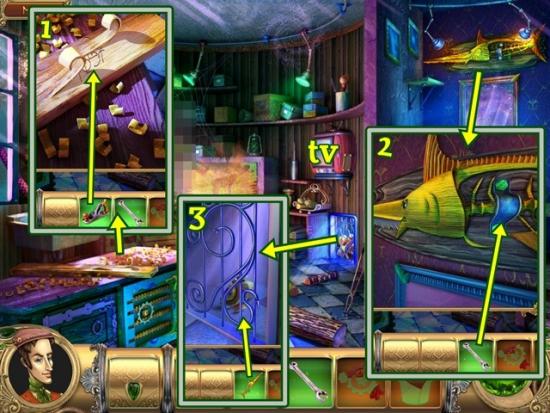
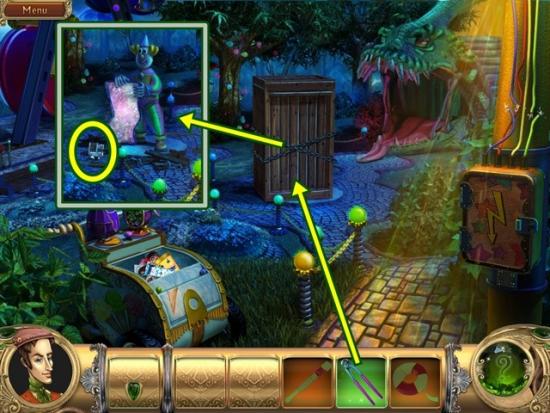
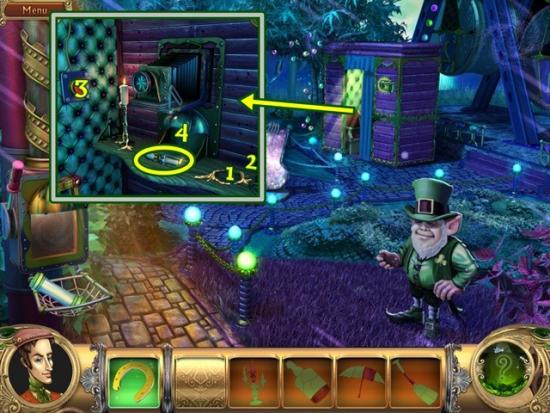
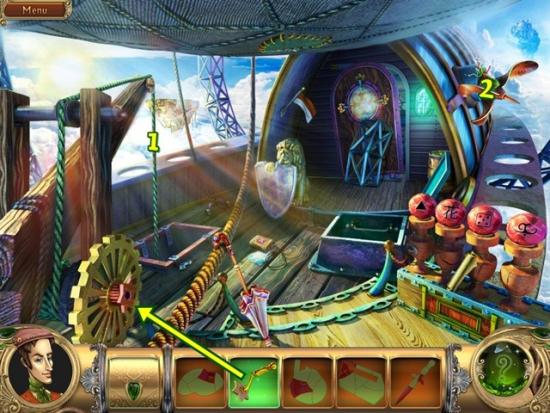
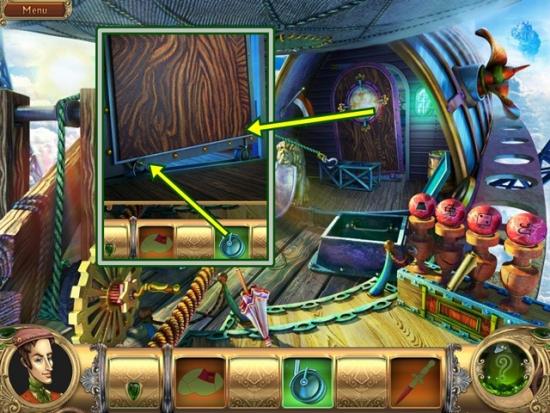
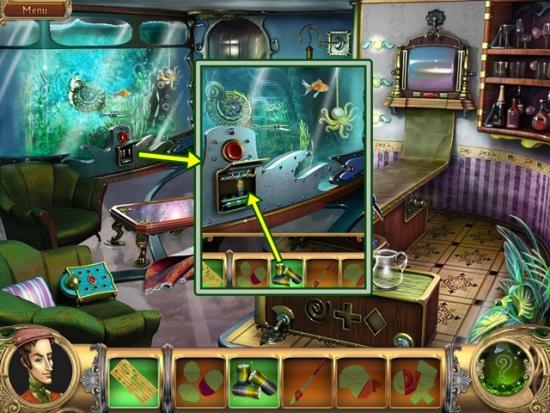
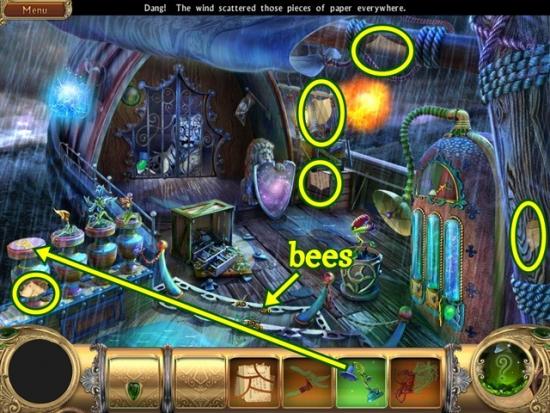
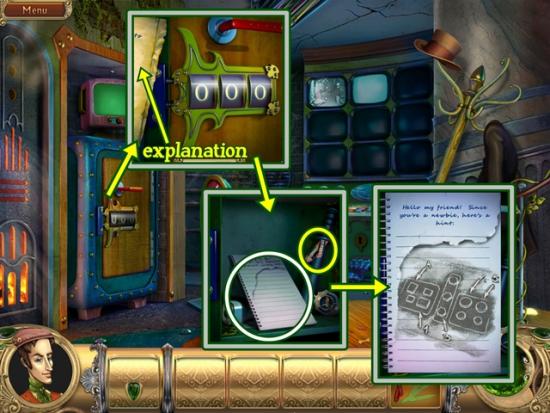
- Click on the tv to watch a news recap. Click on the block of wood. Use the plane on the wood (1) to reveal a code. The code is unique to each game. There is no need to write it down as it will appear when you need to use it.
- Click on the sawfish above the mirror. Use the wrench to loosen the bolts (2). The sawfish is added to your inventory. Click on the grate. Saw the grate with the sawfish (3) and take the gears piece. Close the window.
- Go out the mirror.
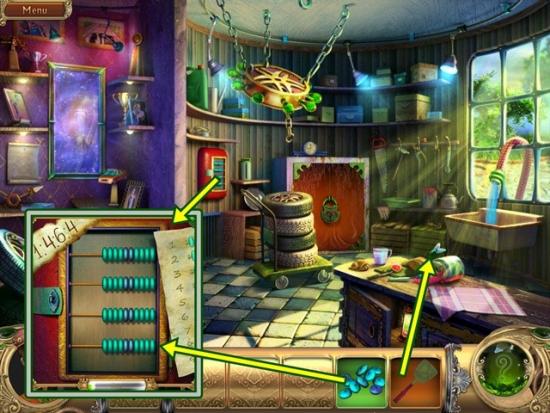
- Click on the abacus puzzle on the wall. Place the abacus beads on the abacus. If the code doesn’t appear in the top left corner, go back through the mirror and use the plane on the block of wood. You cannot solve this puzzle until you’ve received the code. Don’t try guessing. The code is unique to each game. For your game, do not use the code in this walkthrough.
- Click on the sheet of paper on the right hand side to see a diagram on how to arrange the beads. Click to push it back to the side. Arrange the beads so they represent the code. Displaying dark and light beads is a trick; each bead is a count of 1, regardless of colour.
- Once you’ve correctly aligned the beads, take the last piece of the flyswatter. Use the flyswatter on the fly (it’s added to your inventory). Go back through the mirror.
- Please note in the screenshot above, I blurred the spider.
- Give the fly to the disgusting spider so it goes away.
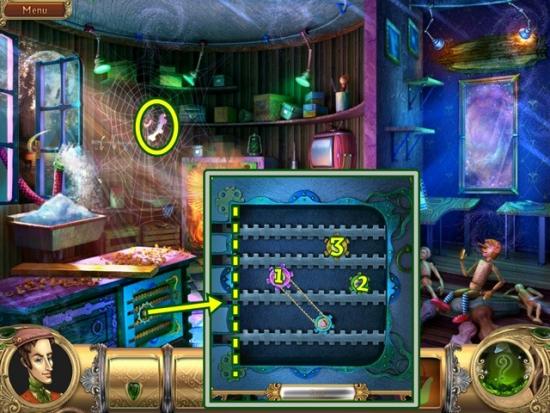
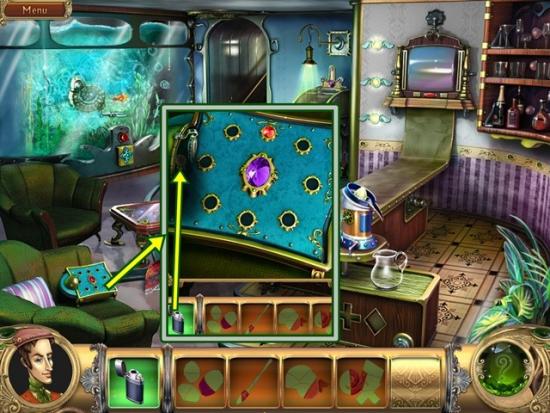
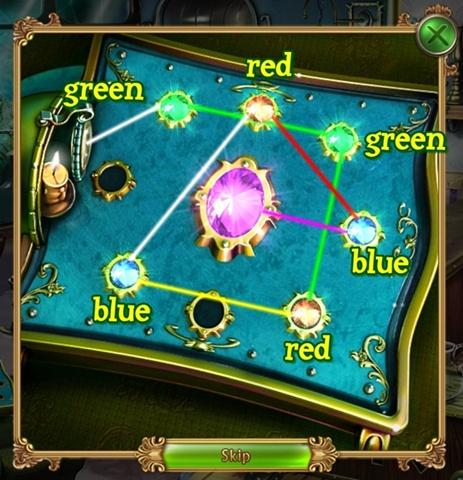
- Take the last gears piece. Click on the gears on the side of the table. Add the gears. Mini-puzzle: Use the gears to move the lock pins so they are all on the right side of the red line (highlighted by a yellow dotted line in screenshot above).
- The two small gears operate one lock pin while the two big gears operate two lock pins.
- Click on a gear to make two buttons appear. These buttons allow you to move the gear clockwise or counter-clockwise.
- First click on the pink gear (1). It operates the second and fourth lock pin. Turn it clockwise about five times.
- Click on the small green gear (2) and turn it counter-clockwise twice (until its lock pin is on the right of the red line).
- Click on the top gold gear (3) and turn it clockwise a couple of times until its lock pin is on the right of the red line. As long as the second lock pin was moved far enough to the right, this is all you need to do.
- When the panel opens, take the last bucket piece.
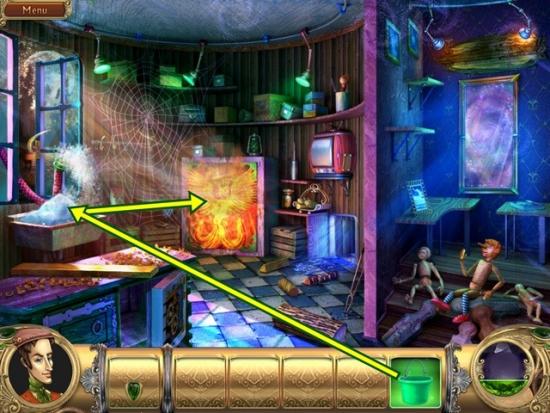
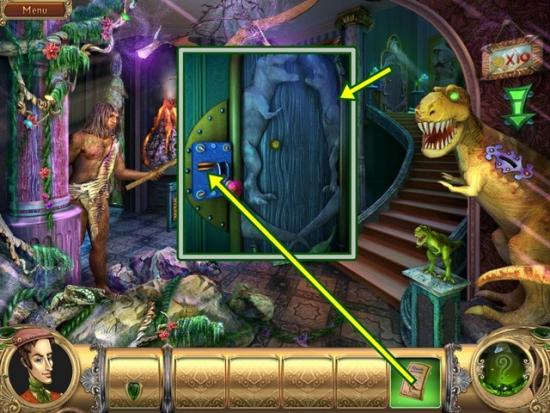
- Fill the bucket with snow from the sink. Use the bucket with snow on the burning phoenix. Take the phoenix. Go through the mirror, south to leave the house and go through the small green door (in the garage).
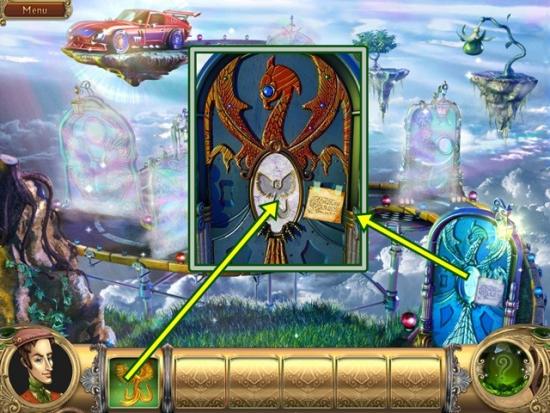
- Click on the door at the bottom right. If you haven’t already, read the note. Place the phoenix in the slot. Go through the door.
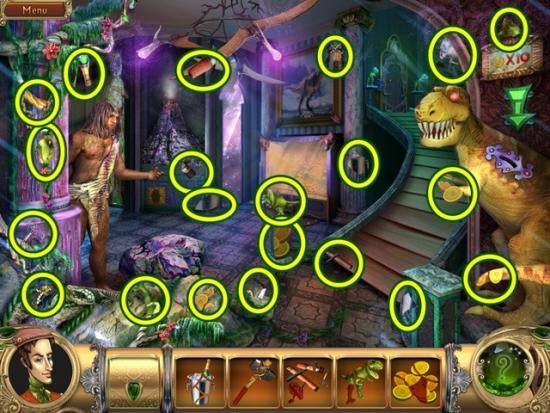
Chapter Two
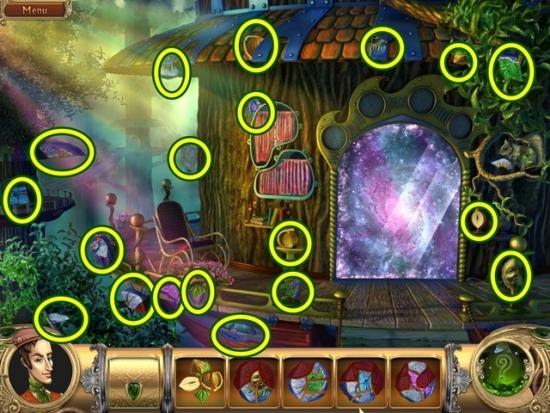
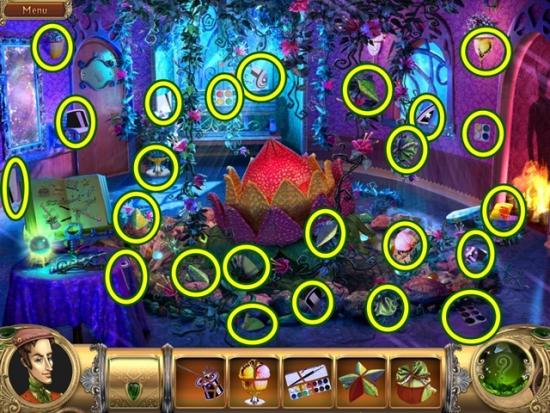
- Find all the object pieces.
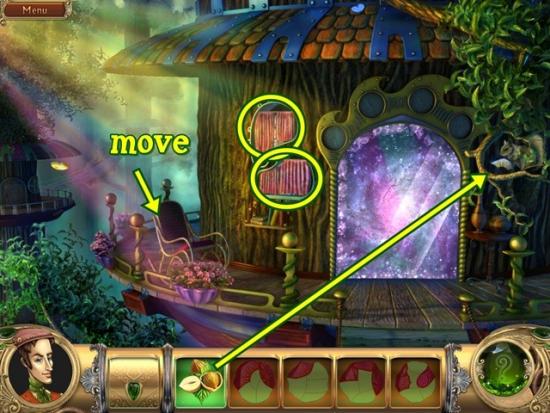
- Give the nuts to the squirrel so he lets go of the sun piece. Take it from where it falls. Click on the two curtained areas and take the object pieces that appear. Click on the rocking chair and take the object piece that appears. Go through the mirror.
- Find all the object pieces.

- Use the knife on the hornet’s nest (1). Take the last oiler piece. Click on the bike chain. Use the oiler on the rusty gear (2). Take the last chain piece that appears, then put the completed chain on the gear. Take the two object pieces that appear (3 and 4). Put the completed owl’s head on top of the owl statue (5). Take the last butterfly net piece.

- Use the butterfly net to catch the four fireflies. Put each firefly in a jar above the door. Go through the mirror.

- Take the four newly exposed object pieces.
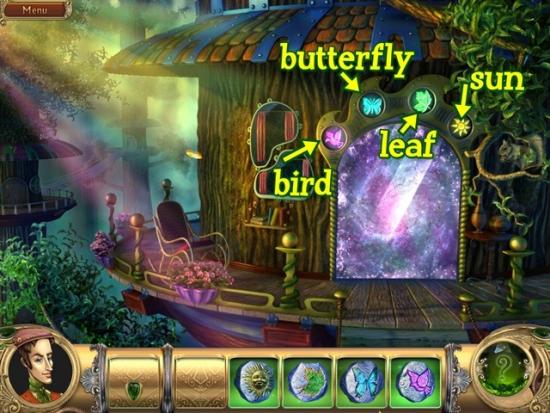
- Place the sun, leaf, butterfly and bird stones in the matching slot above the door. Enter the newly opened doorway.
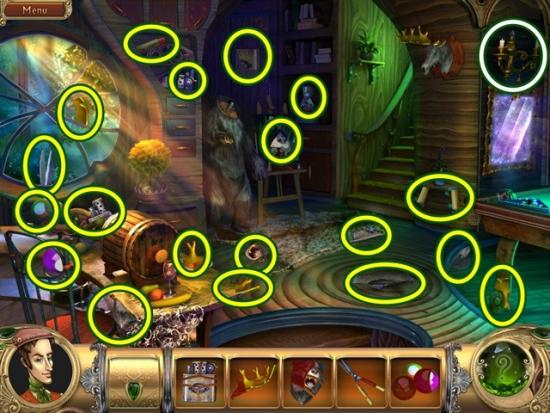
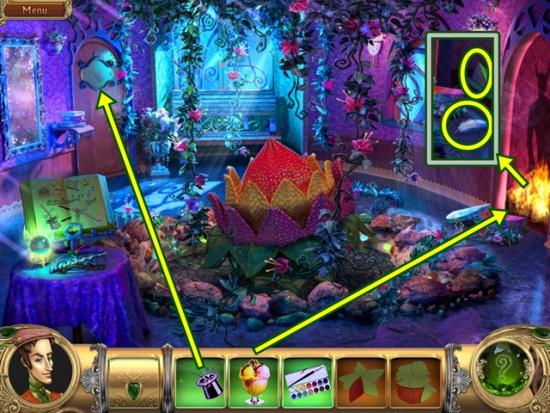
- Find all the object pieces. Use the lighter to light the candles on the wall (top right, white circle).
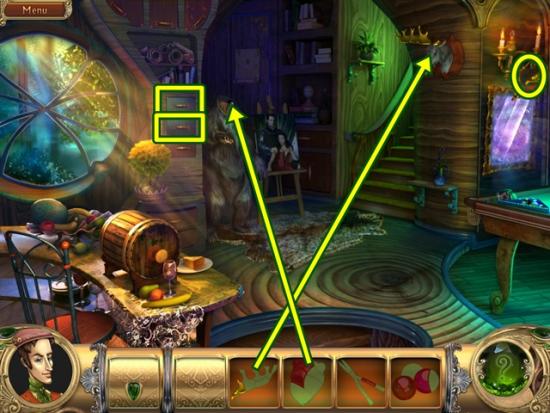
- Take the last antler piece. Put the completed antler on the moose head. When the moose head falls, take the newly revealed object piece. Open the top two panels to take the object pieces. Once the bear’s head is complete, place it on top of the bear’s body. Take the newly revealed object piece.
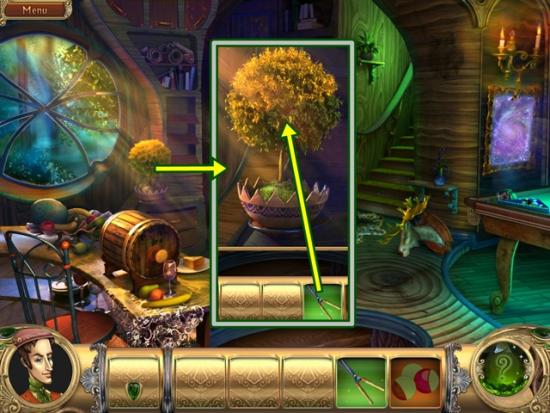
- Click on the small tree. Prune it with the pruning shears. Take the object piece that appears. Close the window. Go through the mirror.
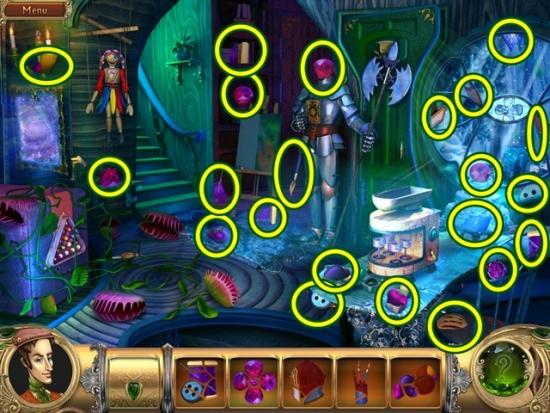
- Find all the object pieces.
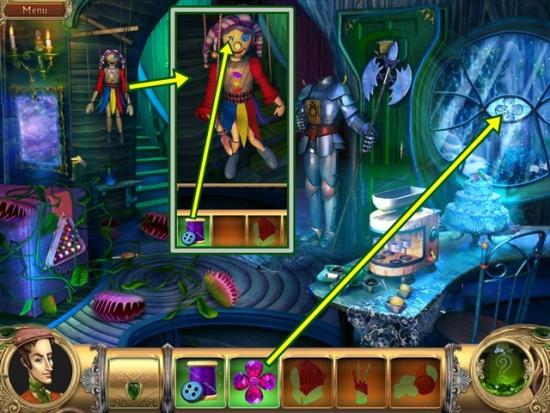
- Click on the marionette. Use the mending kit to repair its eye. Once it’s done dancing, take the object piece from its hand. Put the flower in the slot on the window pane.
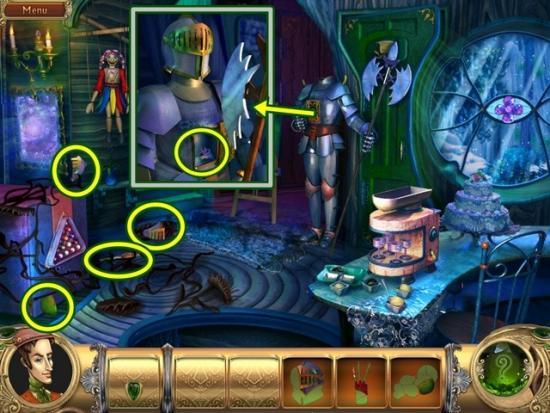
- With the Venus Flytraps dead, take the newly revealed object pieces. Click on the suit of armour. Put the helmet where its head should be, then take the newly revealed object piece. Close the window.
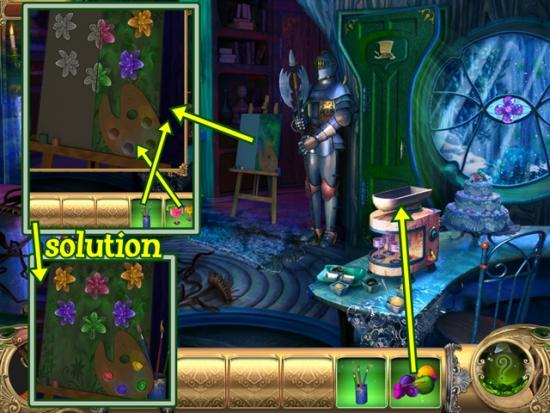
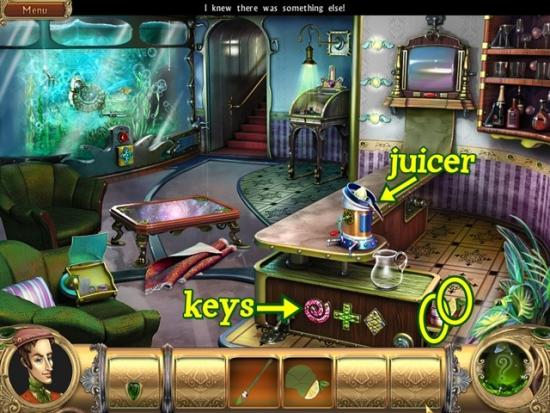
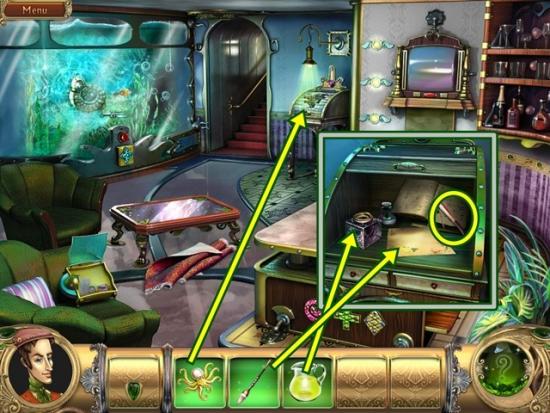
- Put the fruits in the juicer, then take the paints that appear. Click on the canvas. Put the paints on the palette, then place the paintbrushes. Mini-puzzle: Finish the painting so the left side mirrors the right side. Take a paintbrush and dip it in a colour and paint a flower. You don’t have to combine colours or clean the brush between each colour. Once completed, close the window.
- Go up the stairs.
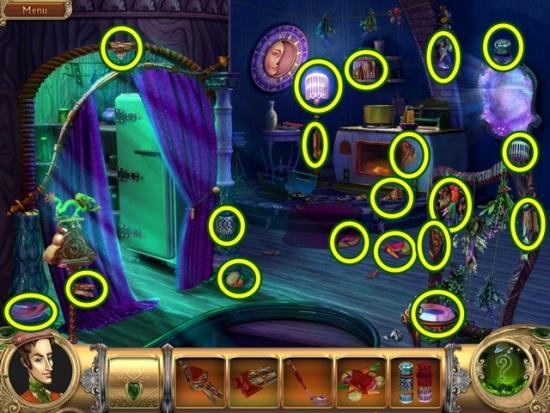
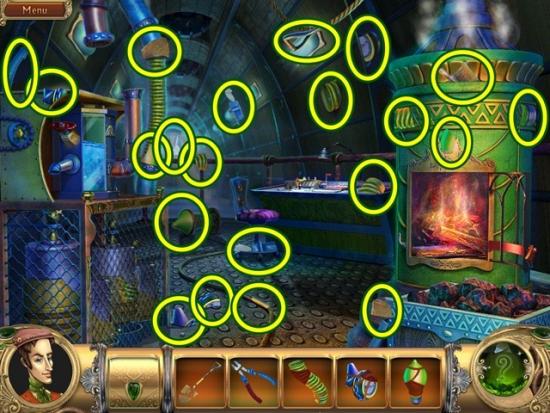
- Find all the object pieces.
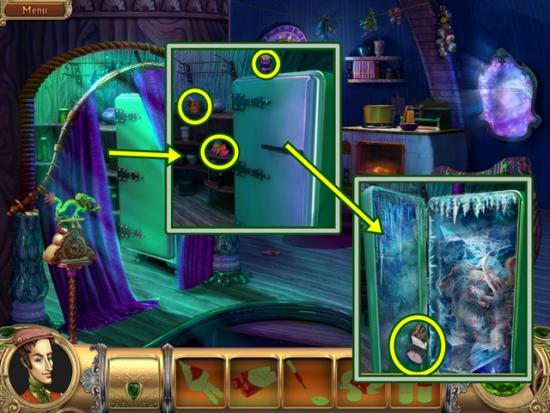
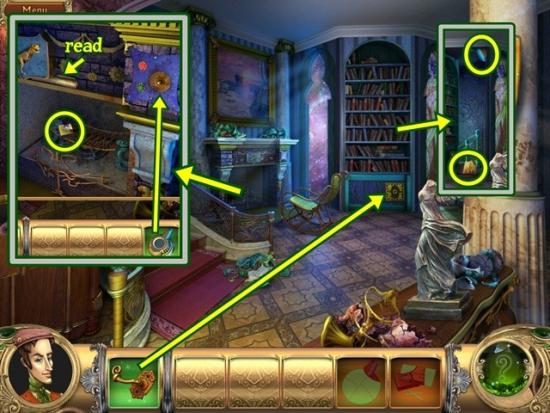
- Click on the refrigerator. Find all the object pieces. Open the refrigerator and take the object piece. Close the window.
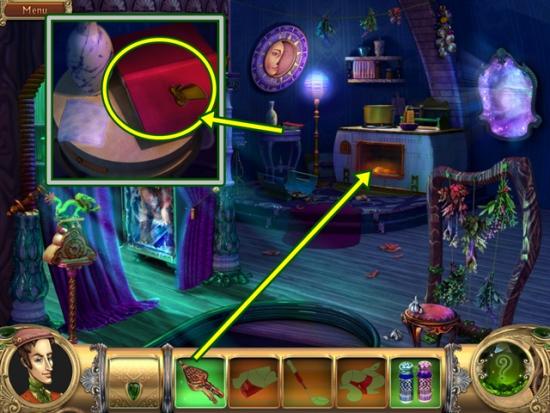
- Click on the small table near the oven. Click on the book. Take the object piece and read about the snark. Close the window.
- Use the bellows to stoke the fire. Take the last firewood piece. Put the firewood in the oven. Go through the mirror.
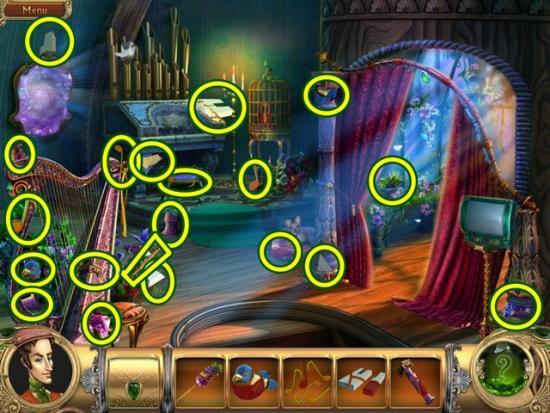
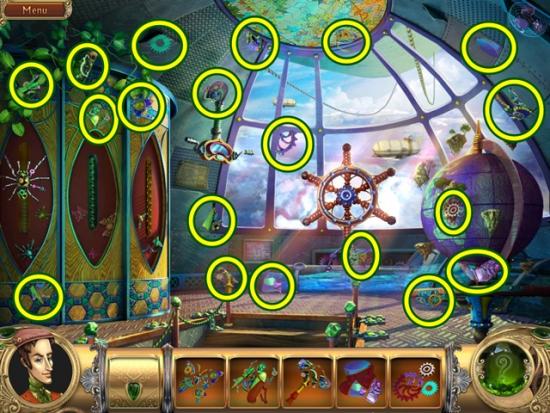
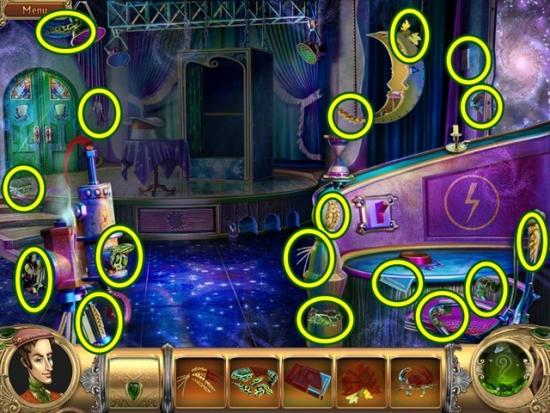
- Find all the object pieces.

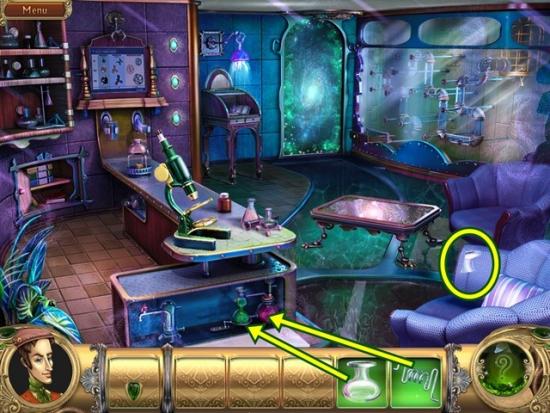
- Click on the tv to watch a news recap. Click on the organ. Clean the area with the feather duster and then take the two object pieces.
- Click on the birdcage.
- Mini-puzzle: Rearrange the flowers so they appear in the order shown. You cannot start this puzzle until you complete the flower painting puzzle.
- To move a flower, slide it along a rail. There is one empty position. A flower can only be moved into an empty position beside it. This puzzle is randomly generated and different with each play. Start with correctly positioning the flowers from left to right (or right to left).
- Once complete, the cage will open. Take the object piece. Place the completed toy bird in the cage. This moves the dove and you can take the object piece.
- Click on the organ again.
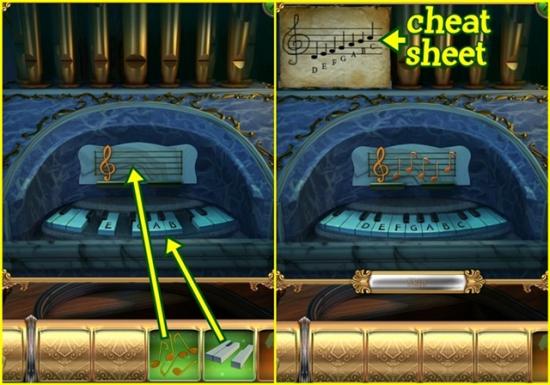
- Place the organ keys and notes. Mini-puzzle: Play the melody according to the sheet music. The notes are on a cheat sheet in the top left corner. Press the corresponding organ key. When you hit a correct key, the note on the sheet music turns green. If you make a mistake you can start over. You can take your time between notes, there’s no rush. This puzzle is random and unique to each game.
- Once you’ve played the melody, take the object piece. Close the window.
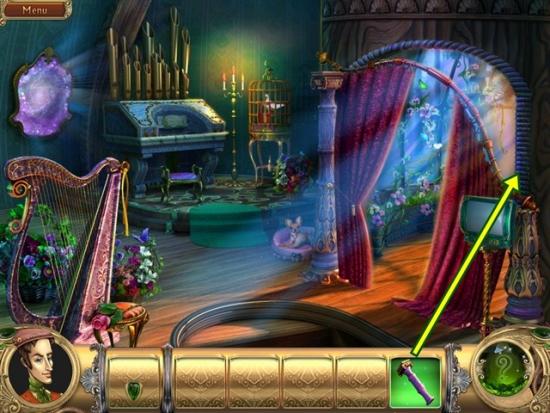
- Place the column, then go through the window.
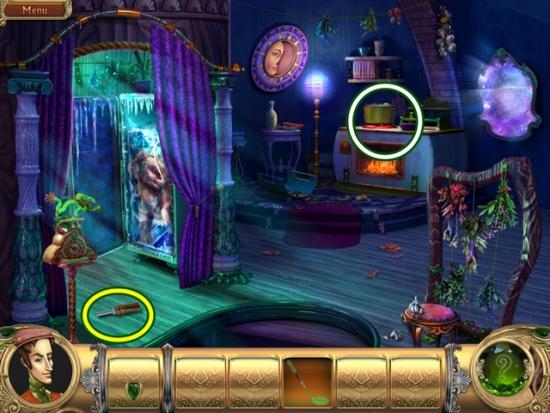
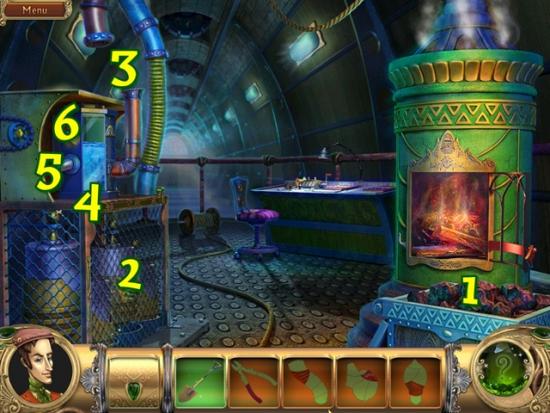
- Take the last ladle piece. If you haven’t already done so, use the bellows on the fire, take the object piece that appears, then place the firewood in the oven. Click on the pot on the stove (white circle).
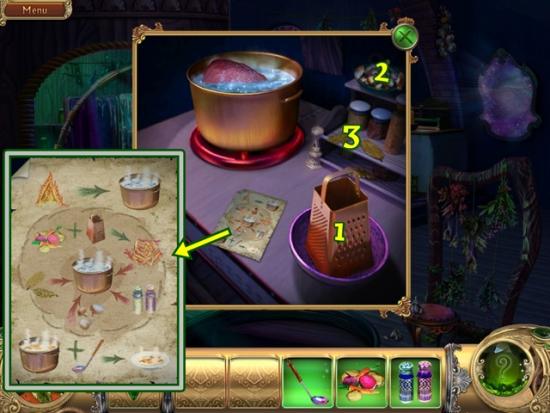
- Click on the piece of paper to see the recipe. You must first have used the bellows and firewood (see the steps above). Add the vegetables to the grater (1). Put the grated vegetables in the pot. Add salt & pepper to the pot, then the mushrooms (2), then the leaves (3). Stir the pot with the ladle.
- After it explodes, pick the corkscrew up off the floor. Go downstairs and go through the mirror.
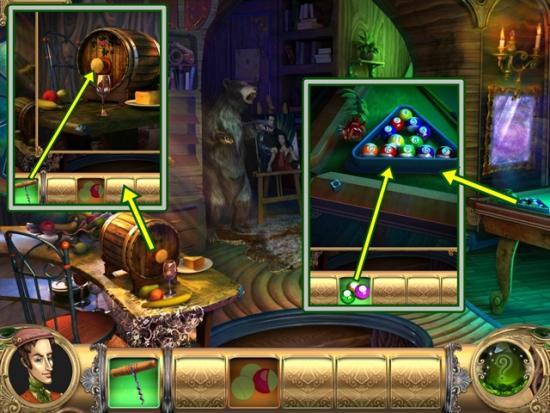
- Click on the casket. Uncork the casket with the corkscrew. After the wine is poured, take the last billiard ball piece. Close the window. Click on the pool table. Add the billiard balls. Go through the window.
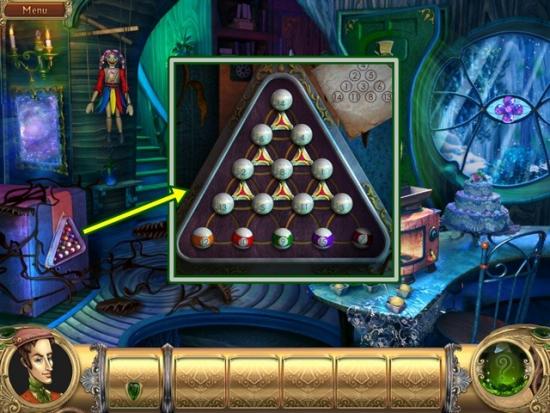
- Click on the triangular panel. Mini-puzzle: Rearrange the billiard balls so they are all in the positions indicated by the paper in the top right corner. You cannot start this puzzle until you have placed the billiard balls on the pool table.
- This puzzle is randomly generated and unique to each game so a step-by-step guide cannot be given.
- Click the button in between each ball “triangle” to rotate them clockwise. I started at the top and worked my way down. For the bottom row, I arranged the right side and then lined up the left side. Get used to how the balls line up and arrange and rearrange them until they fall into place.
- Once you are finished, take the crescent moon. Close the window. Go upstairs.
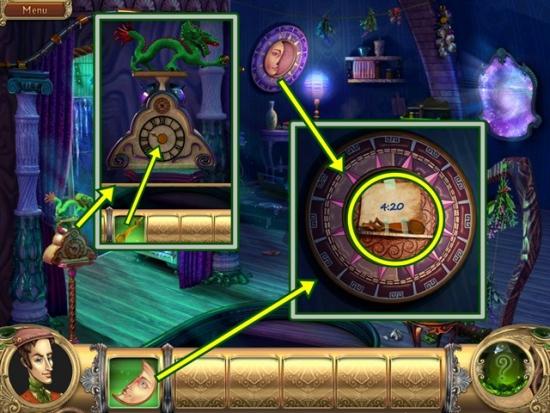
- Click on the blue disc on the wall. Place the crescent moon in the slot and when it turns over, take note of the time and take the minute hand. Close the window.
- Click on the clock. Place the minute hand and arrange the time according to the time that was with the minute hand. Please note each game is different, set the time according to your game’s information, not what is written in this walkthrough. The time doesn’t have to be exact like on a real clock. For example in my game, the time was 4:20. I placed both hands directly over the number 4 and that was sufficient (on a real clock, the hour hand would be slightly past the number 4).
- Once complete, the dragon will breathe fire and melt the ice in the refrigerator.
- Take the mammoth. Go downstairs and go through the green door.
- Click on the door. Place the mammoth in the slot. Go through the door.
Chapter Three
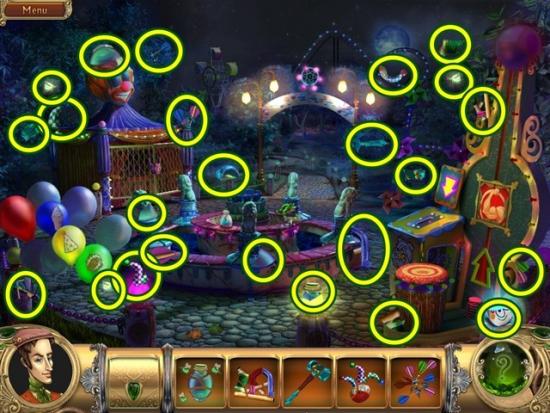
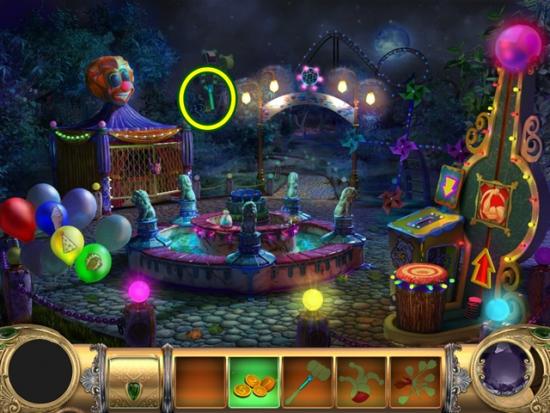
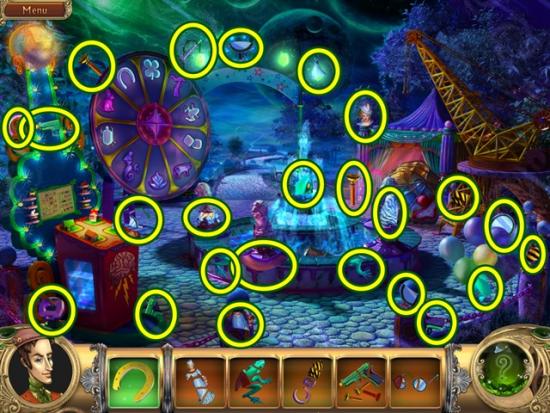
- Find all the object pieces.
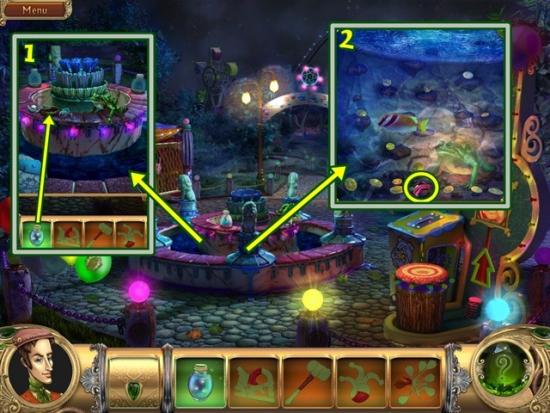
- Click on the fountain. Put the jar of fireflies on the fountain (1). The frog will eat the jar and leap away. Click on the fountain again. Take the object piece (2). Do not close the window!
- Use the magnet to collect all the coins. Mini-puzzle: Position the magnet over a coin(s). Once there are no fish in the way, click to release the magnet. It will lower, collect the coin(s) and rise up. You can move the magnet back and forth as it rises and lowers. Do this to avoid hitting fish.
- Continue until you have collected all the coin. If the magnet hits a fish, the coin(s) will get knocked off however they’ll be in a higher position than they were which makes them easier to retrieve.
- Once you are finished, leave the scene by going through the archway.
- Find all the object pieces.
- Place the penguin on the stand with the other penguin. Take the two object pieces that appear.
- Click on the carriage. Use the recorder to charm the snake. Take the object piece that appears. Close the window.
- Use the tongs to cut the chains on the large crate. The crate reveals the mirror and an object piece. Make sure to pick it up to complete the glass cutter.
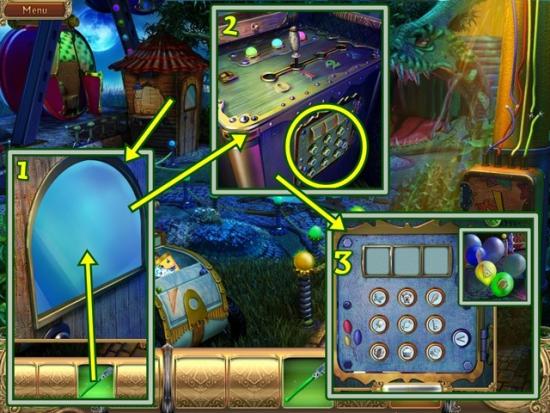
- Click on the ticket booth. Cut the door’s window with the glass cutter (1). Enter the door. Click the side panel (2). Mini-puzzle: Enter the right combination (3). All the buttons have a symbol on them. The combination can be found on the balloons in the first scene of this chapter. Close the window and return to the first scene if you need to.
- After you enter the right combination and the panel opens, take the ignition key.
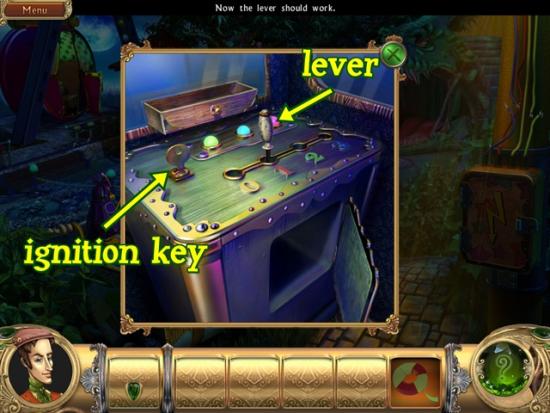
- Use the ignition key in the slot on the top of the panel.
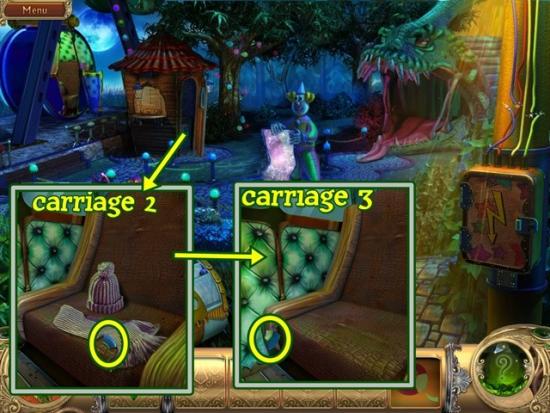
- Move the lever to the 2 position. Enter the carriage. Take the object piece. Close the window. Go back into the ticket booth and move the lever into the 3 position. Enter the carriage. Take the object piece. Close the window.
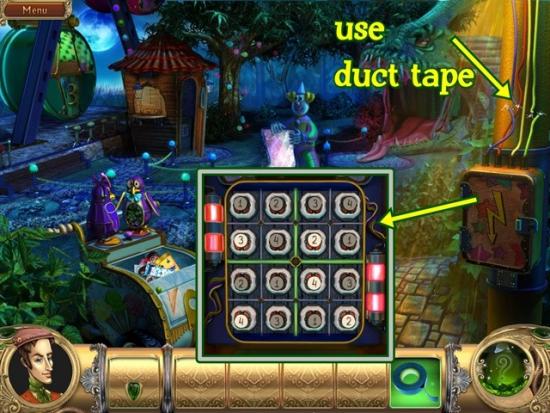
- the duct tape on the exposed wires. This causes the fuse box to pop open. Click on it. Take the fuses from the bottom and place them so each row and column contains the numbers 1 through 4 without any duplicate numbers.
- Once complete, go south.
- Take the last hammer piece.
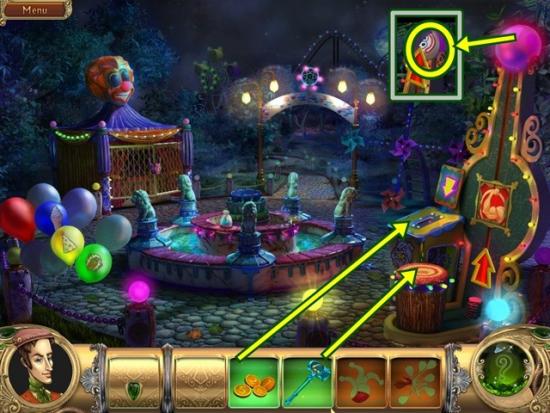
- Use the coins in the strongman machine, then use the hammer on the target. Take the object piece.
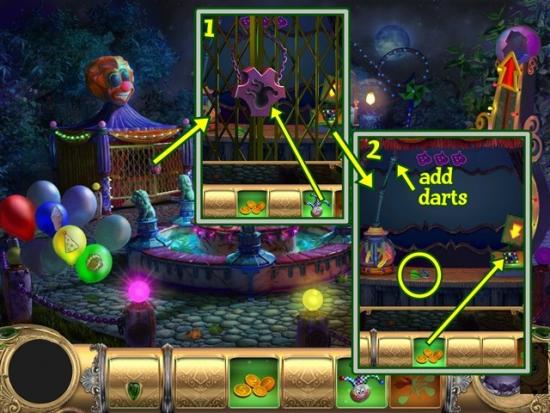
- Click on the caged booth. Use the joker to open the padlock (1). Take the last darts piece. Add the darts to the shooter and put a coin in the slot (2). Mini-puzzle: Pop three clown head balloons using the darts. The clown head balloons continuously move back and forth.
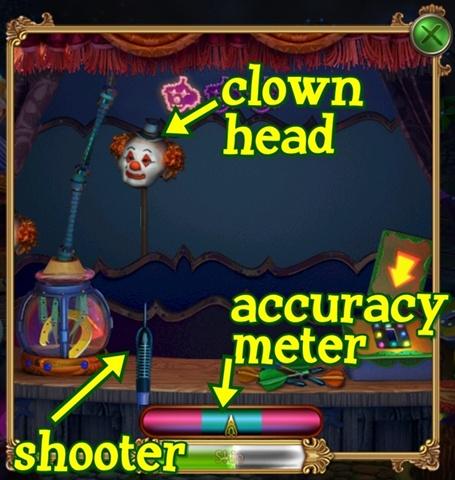
- When one is directly above the shooter (blue stick at the bottom), click your mouse to aim. Everything freezes and an accuracy meter appears. When the needle is in the blue centre area, click again to shoot the dart.
- Once you are finished, take the horseshoe. Close the window.
- Go through the gateway and go into the mirror.
- Find all the object pieces. Enter the photo booth.
- Take the last candelabra piece. Place the completed candelabra on the desk (1). Take the last glue piece that appears behind the candelabra (2). Click the large red button to take your photo (3). Take the photo when it appears (4). Close the window.
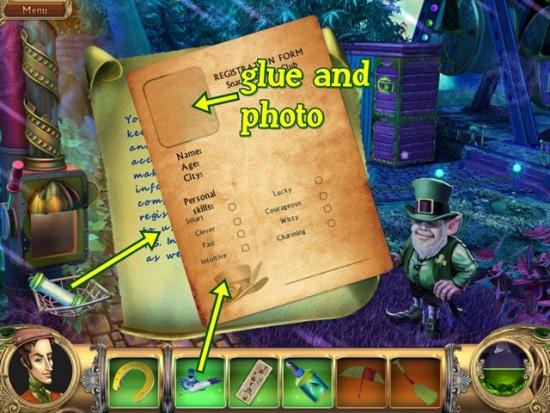
- Click on the pneudo-mail to read the letter. Click on the letter to reveal the form. Use the ink and feather to complete the form. Put the glue on the form where the photo is to go, then add the photo. Click on the pneudo-mail tube to send the letter, then take the object piece when it appears.
- Go south down the path.
- Find all the object pieces.
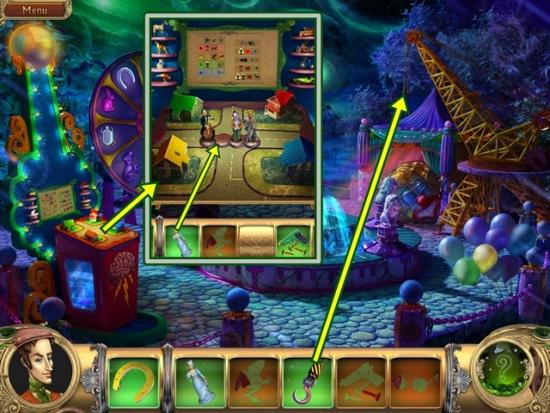
- Put the hook on the crane. Take the last gun piece that appears. Click the game on the far left (white circle). Place the lady figurine in the empty slot.
- Mini-puzzle: Position the four people, animal and vehicle figurines in their appropriate house according to the diagram.
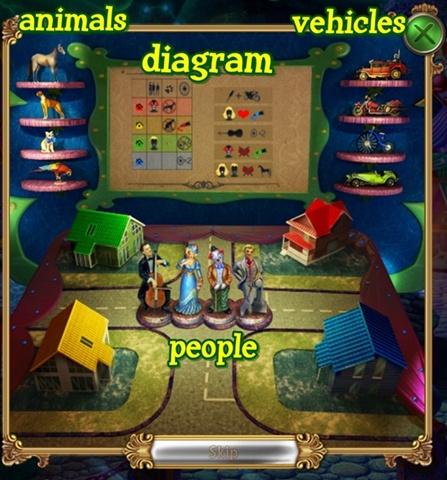
- Use the left diagram first and place the figurines. The two definites are:
o Red house – clown figurine
o Green house – gentleman figurine
o Yellow house – red vehicle (either car or motorcycle)
- Now examine the right diagram and place the figurines based on logic and deduction. The second clue states the lady figurine loves a blue vehicle. The lady figurine’s house isn’t red (clown), green (gentleman) or yellow (red vehicle) so she’s in the blue house. Based on deduction, this places the cellist in the yellow house. The third clue states the cellist loves a two wheeled vehicle so he drives a red motorcycle (yellow house has a red vehicle). The fourth clue states the clown hates green vehicles so he drives the red car (only vehicle left). By deduction, the gentleman has the green car.
o Red house – clown – red car
o Green house – gentleman – green car
o Yellow house – cellist – red motorcycle
o Blue house – lady – blue bicycle
- According to the top clue, the parrot loves the motorcycle so it belongs to the cellist. Neither the lady nor the gentleman has the horse so it belongs to the clown.
o Red house – clown – red car – horse
o Green house – gentleman – green car
o Yellow house – cellist – red motorcycle – parrot
o Blue house – lady – blue bicycle
- The clues don’t give any indication as to where to place the dog and cat so I gave the dog to the gentleman and the cat to the lady and that solved the puzzle.
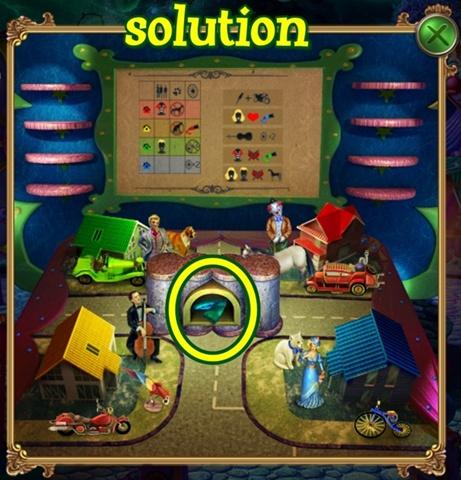
- Take the object piece that appears in the centre. Close the window.
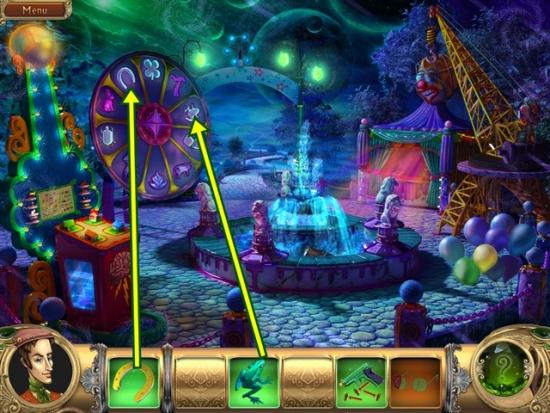
- On the large wheel, place the horseshoe and the frog. Go north.
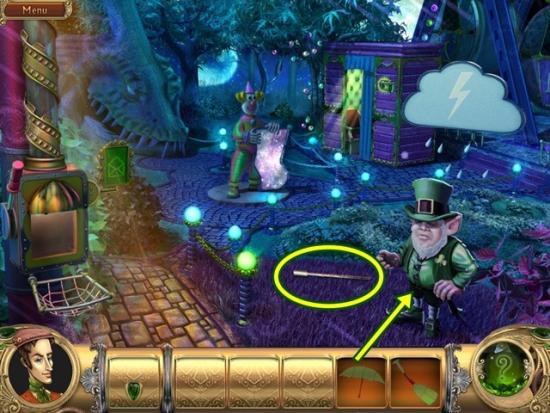
- Take the last umbrella piece. Give the umbrella to the leprechaun.
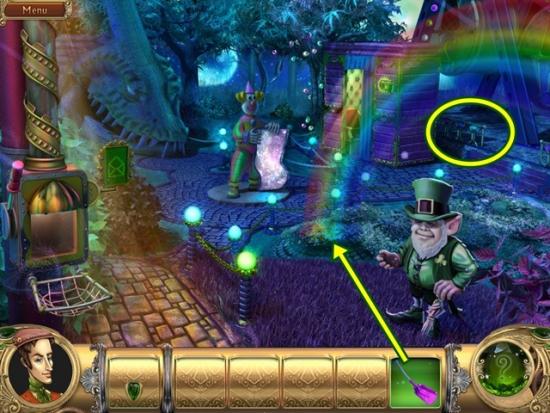
- Take the last spade piece that appears after the cloud leaves. Use the spade to dig up the area the rainbow is pointing to. Take the shamrock. Go south down the path.
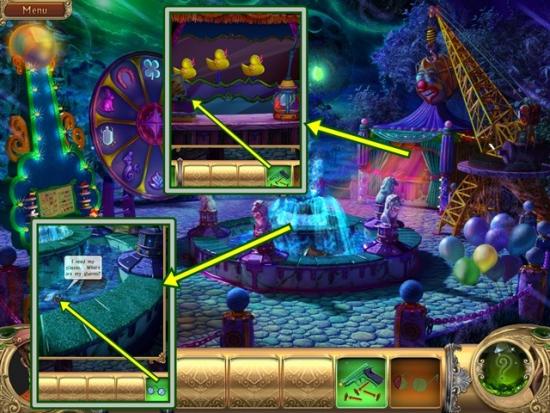
- Click on the booth. Add the gun.
- Mini-puzzle: Shoot all the ducks. Your cursor turns into a reticle. Wait for a duck to appear, target it, then click to shoot. Once you are finished, take the last glasses piece. Close the window.
- Click on the fountain. Give the piranha the glasses.
- Mini-puzzle: Arrange the small discs in the same combination as what appears in the top left. Each game has a unique combination so solve the puzzle using the combination that appears in the top left corner of your game, not what the walkthrough shows.
- To move a disc, click on it to select, move your mouse to where you want it to go, then click to release. Move the top disc under the symbol that appears at the top of the combination, the next disc represents the next symbol, etc.

- Once you are finished, take the scarab. Close the window.
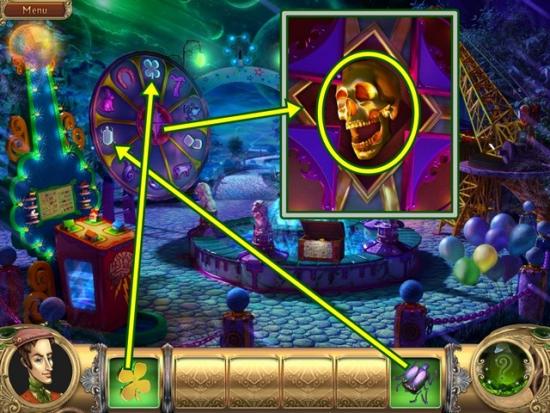
- Add the scarab and the shamrock to the large wheel. The centre opens; click on it. Take the skull. Close the window.
- Go north and through the mirror. Go into the snake’s mouth.
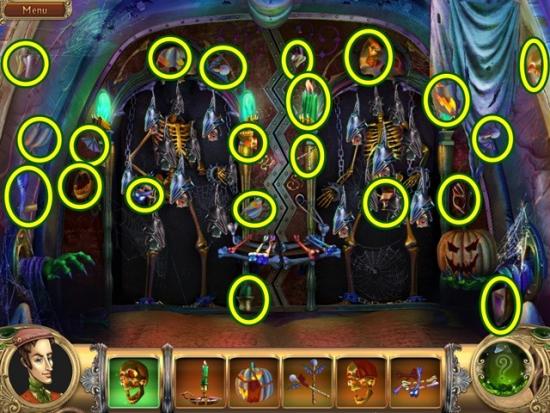
- Find all the object pieces.
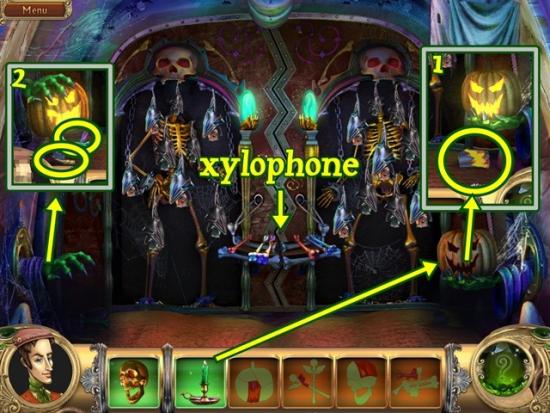
- Put the candle in the jack-o-lantern. Take the last jack-o-lantern piece (1). Add the completed jack-o-lantern to the hand on the left (2) and take the last mallets piece and last bones piece. Put the bones on the xylophone and then use the mallets to play the xylophone.
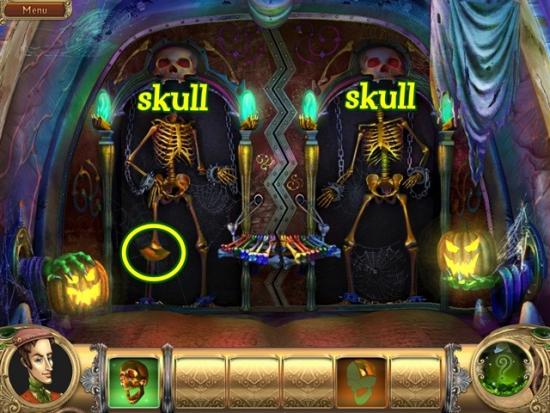
- Take the last skull piece. Put the two skulls on top of the skeletons. Enter the area that appears.
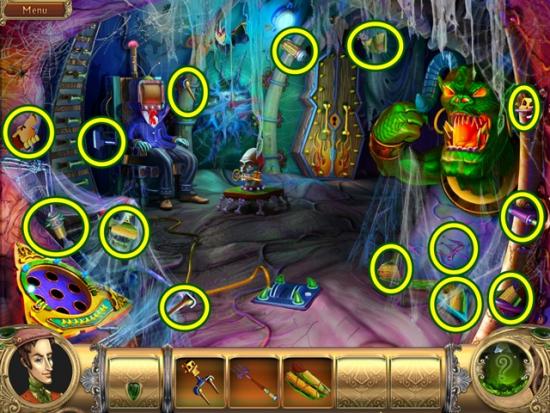
- Find all the object pieces.
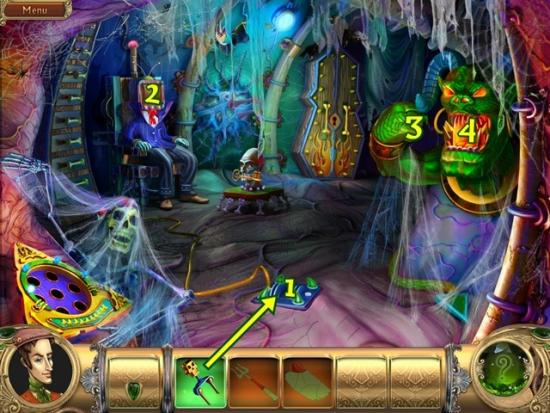
- Put the switch in the slot on the floor (1). Pull the lever to power the tv. Take the last trident piece that appears on the tv (2). Put the completed trident on the demon (3). Take the last corn piece that comes out of its mouth. Put the bowl of corn in the demon’s mouth (4) and then take the bowl of popcorn.
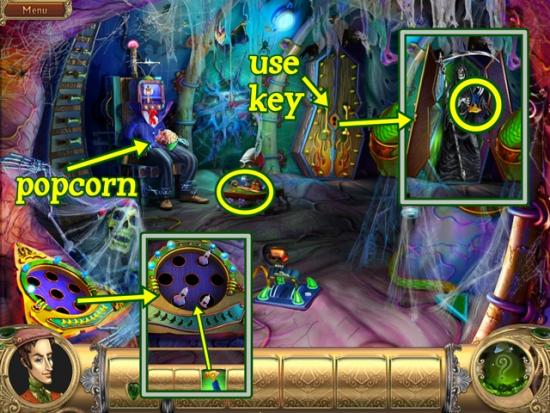
- Put the popcorn on the tv body’s lap. Take the key that falls out of the head’s mouth. Watch a news recap on the tv. Open the casket with the key. Click on the ghost, then take the toy hammer. Click on the whack-a-mole game (bottom left). Put the toy hammer on the game.
- Mini-puzzle: Use the hammer to whack the ghosts. There’s a slight delay between “whacks.” Continue to whack the ghosts until you’ve whacked 10. Take the dice that appears. Close the window. Go south, go through the mirror and go south again.
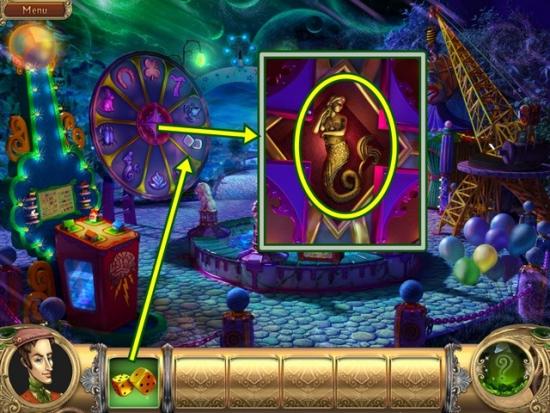
- Put the dice on the large wheel. When the centre opens, click on it. Take the mermaid figurine. Close the window. Go north, go through the mirror and go back into the snake mouth.
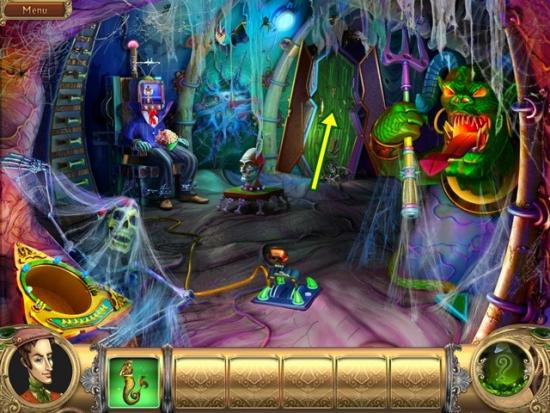
- Click on the green door.
- Click on the door. Place the mermaid figurine in the slot. Go through the door.
Chapter Four

- Find all the object pieces. Watch a news recap on the tv. Use the key to unlock the door. Leave the room.
- Find all the object pieces. Repair the ripped sail (white circle) with the completed needle and thread. Take the last valve handle piece. Put the completed valve handle on the hatch. When it opens, go down the hatch.
- Find all the object pieces.
- Use the spade to shovel coal (1) into the stove. Take the last wire cutters piece that appears. Use the wire cutters on the wire fence (2). Take the last hose piece. Replace the missing hose. Take the last pressure valve piece that appears (4). Place the pressure valve (5). Finally, turn the red valve.
- Leave the scene (south).
- Find all the object pieces.
- Put the handle on the wheel. Take the last toolbox piece that appears. Click on the hook (1) so it attaches to the scaffold in front of the door. Click the handle to move the scaffold and take the last wheel piece. Use the toolbox on the propeller. Take the knife piece that appears.
- Click on the door. Place the wheel. Go through the door.
- Find all the object pieces.
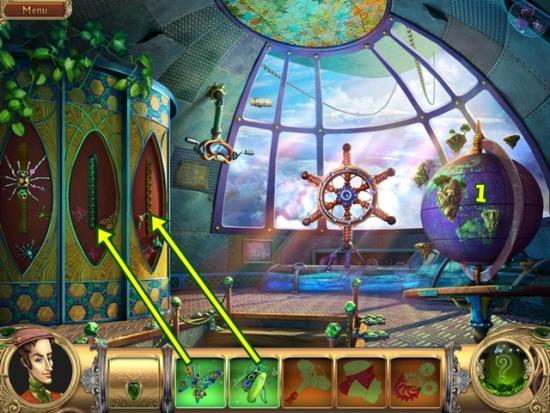
- Click on the globe (1). Take the last mechanical bug piece that falls. Place the mechanical butterfly and mechanical bug on the panel.
- When the panel opens, take the object piece. Click on the panel (far left) to move it. Take the last winding key piece.
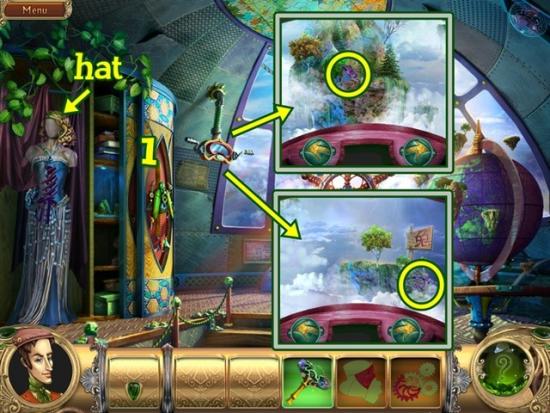
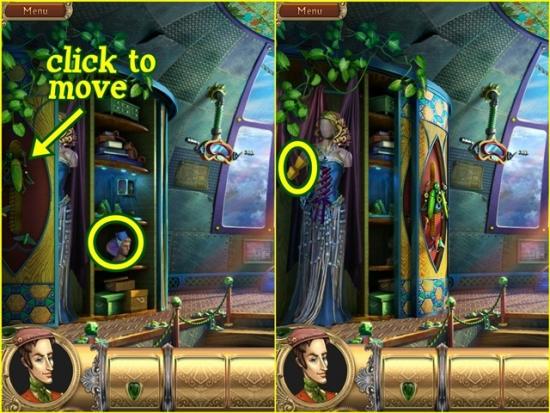
- Click on the periscope. Scan the area for object pieces. Use the arrow buttons to move the viewer left to right. You only need two pieces. Make sure you see the symbol. Once you are finished, you will have the completed hat and another gear piece. Close the window. Put the hat on the mannequin. Click on the right panel (1).
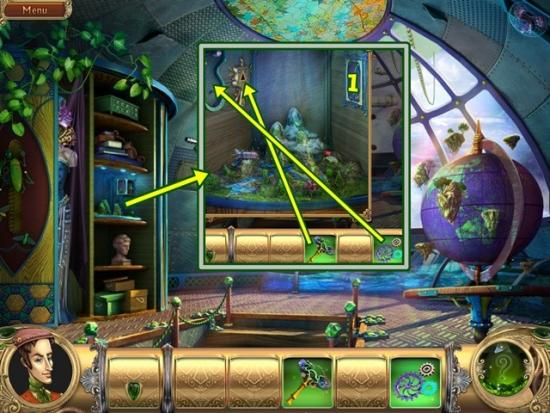
- Click on the middle area. Place the gears then the winding key. Watch the zeppelin fly. Once it’s finished and the secret cache opens. Click on the captain’s log and take the punch card. Read about the steering code. Close the window.
- Leave the scene by going south twice.
- Find all the object pieces. Move the pillow and take the object piece.
- Click the panel on the window. Put the batteries in the slots.
- Mini-puzzle: Cut the octopus’ chain. Use the directional arrow buttons to move the nautilus with the scissors so it can cut the octopus’ chain. Avoid the goldfish.
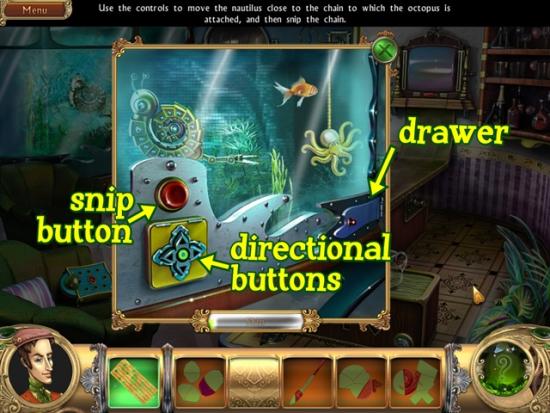
- Once you’ve got the scissors around the chain, click the large red button. When the octopus falls, click on the drawer and take the octopus. Close the window.
- Go through the mirror (table).

- Find all the object pieces. Move the small panel (left) and take the object piece.
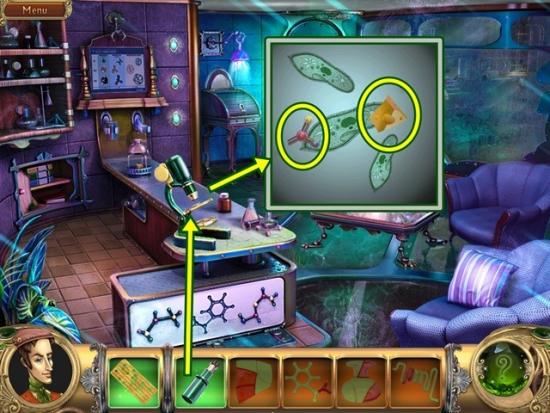
- Put the microscope lens on the microscope. Click on the microscope. Take the two object pieces. Close the window.
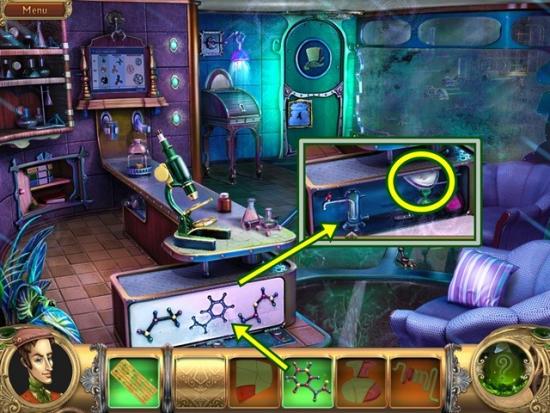
- Put the molecule in the slot. Take the object piece. Go through the mirror, out the door and down the hatch.
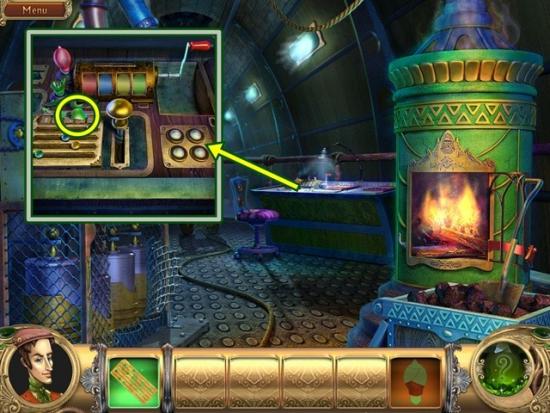
- Click on the desk. Take the last light bulb piece. Replace the broken light bulb with the new light bulb. Click on the gold knob in the centre.
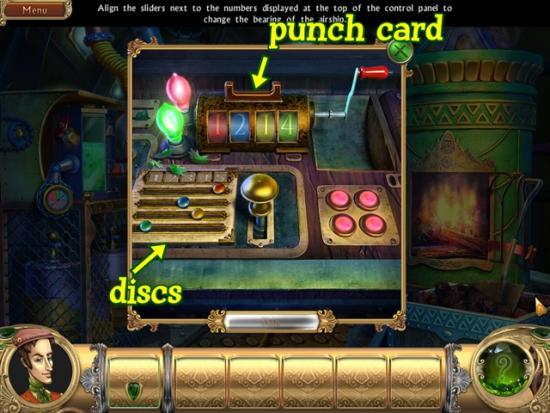
- Put the punch card in the slot. A code then appears. The code is unique to each game. Solve the puzzle using the code given in your game, not the code that appears in this walkthrough.
- Mini-puzzle: Arrange the discs so they recreate the code. Match the colour of the slide to the colour of the number. For my puzzle, I had 1 (red), 2 (blue), 1 (yellow), 4 (green) so I moved the red disc under the 1 position, the blue disc was moved under the 2 position and so forth.
- Remember your code is unique to your game. Follow these instructions but replace my code with the one you were given. If you do not have a code, there are steps you have not yet done. Explore the area or go back further in this walkthrough.
- Once you are finished, leave the scene (go south).
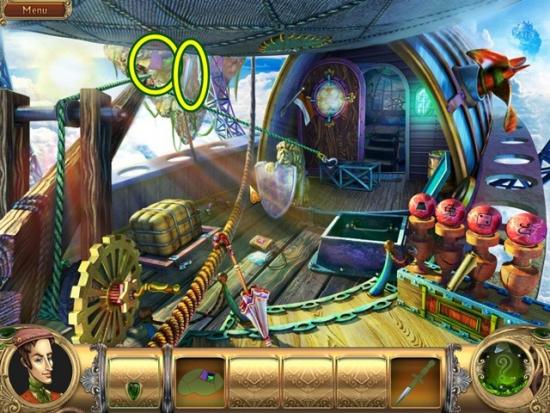
- Take the two object pieces.
- Cut open the parcel with the knife. Take the cloth. Use the cleaning solution on the dirty mirror, then use the cloth to wipe it. Go through the mirror.
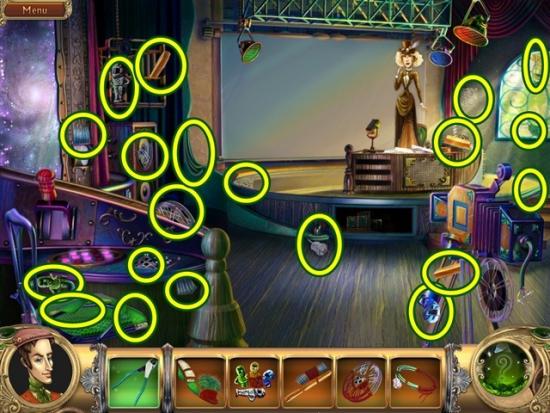
- Find all the object pieces.
- Use the broom and dustpan to sweep up the broken glass. Take the object piece that appears. Use the crowbar to open the crate.
- Find all the object pieces. Put the lamp on the pedestal. This moves the bees. Take the object piece they were blocking.
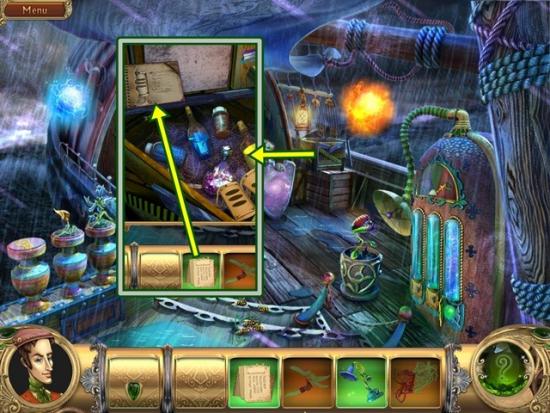
- Click on the crate. Place the manual page in the book.
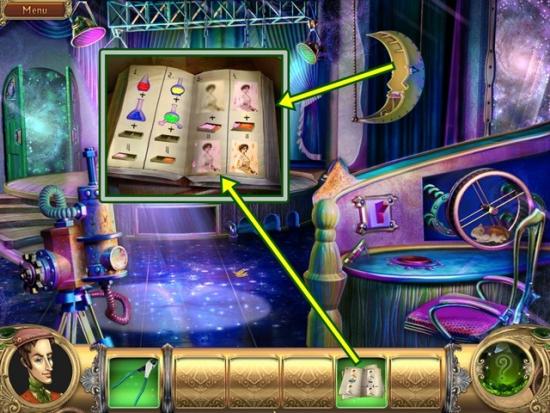
- Mini-puzzle: Match each bottle to its proper label. Click on the manual to get a description and diagram of each bottle and label. Click on a page to turn it, to go back a page, click on the arrow on the left-facing page. Click off the book to close it. To solve this puzzle, you will have to use logic and deduction (like the earlier figurine puzzle).
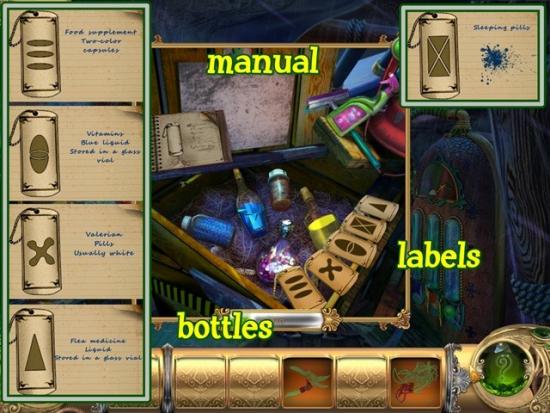
- The food supplement is a two-coloured capsule. There is only one bottle that contains two-coloured capsules. To assign the label, click on the bottle of white and pink pills, then click on its label. Click off the bottle to place it back down.
- The vitamins are in a vial made of blue liquid. There is only one bottle of blue liquid. Assign the label to it. Click off the bottle to place it back down.
- The valerian is a bottle of white pills. There is only one bottle of white pills Assign the label.
- The flea medicine is in a glass bottle filled with liquid. There is only one glass bottle left. Assign the label.
- The sleeping pills are given the last remaining label.
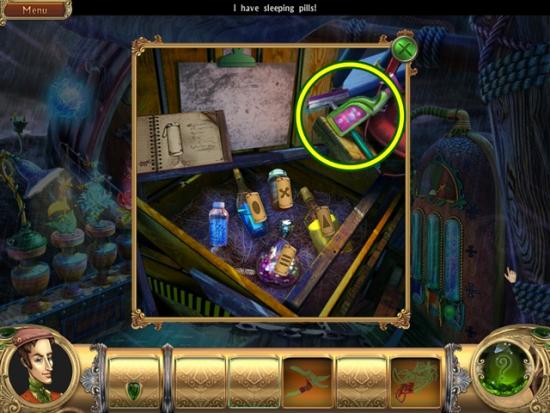
- The sleeping pills are added to your inventory. Take the cleaning supplies. Close the window.
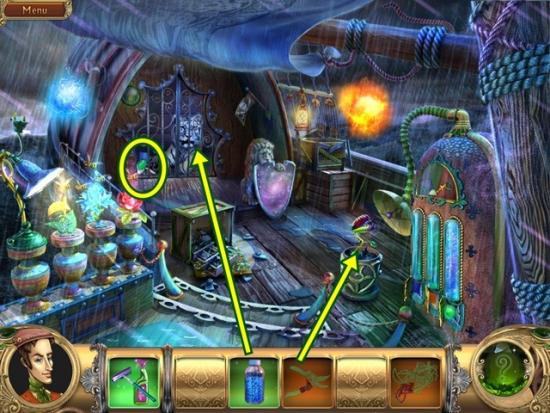
- Give the sleeping pills to the tiger. After the tiger falls asleep, take the last pruning shears piece. Use the pruning shears to cut the Venus flytrap. The Venus flytrap is added to your inventory.
- Use the Venus flytrap to trap the orange power ball. Click on the machine (right). Open the two closed doors. Put the orange power ball in the orange box. Close the window. Use the Venus flytrap to trap the blue power ball. Click on the machine. Put the blue power ball in the blue box.
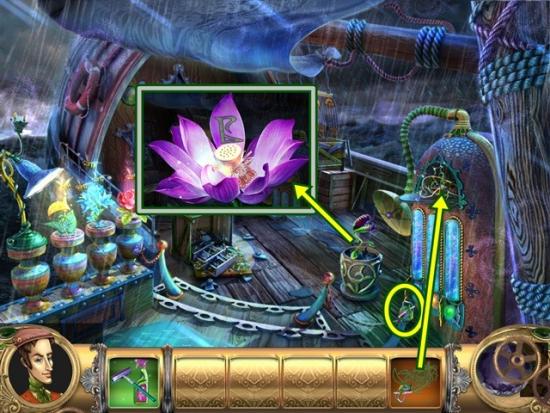
- Take the last wires piece. Put the wires in the opening on the machine. When the machine turns the Venus flytrap into a Lotus blossom, click on it. Take note of the symbol.
- Go through the mirror, go south and go through the mirror (table).
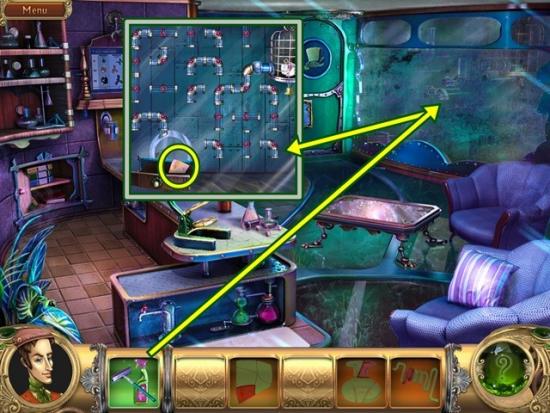
- Use the cleaning supplies on the dirty window. Click on the window. Take the piece of cheese. Put the completed cheese back in the drawer.
- Mini-puzzle: Rotate the tubes to create an unblocked path for the mouse to get to the cheese. Left-click on a tube to rotate it clockwise, right-click to rotate it counter-clockwise. Start from the end of the maze and work towards the start.
- Solution:
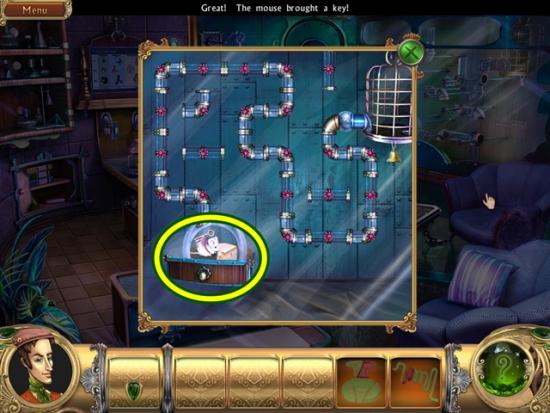
- When the mouse gets to the cheese, open the drawer and take the key. Close the window.
- Click on the roll desk. Use the key to open it. Take the green fairy and the lighter. Read the note on neutralizing poisonous vapours and the paper with the diagram. Close the window.
- Click on the door. Place the green fairy in the slot.
- Mini-puzzle: Place a coloured marble in its matching coloured hole. Click to move the partition to manipulate the coloured marble into its hole. You only need to get a blue marble into the blue hole, green marble into the green hole and the yellow marble into the yellow hole. Ignore the red marbles. The marbles will continue coming for as long as you play the puzzle.
- Once you get the right coloured marble into its proper hole, block the path to that hole. A wrong coloured marble will knock out the matching marble and you’ll have to place it again.
- You cannot move the partitions that are reddish in colour.
- Once you are finished, take the last glass pipe piece (on the floor). Go through the mirror (table).
- Click on the mechanism on the chair. Use the lighter to light the candle. Take the last gems piece that appears. Place the completed gems on the mechanism.
- Mini-puzzle: Arrange the gems so a violet ray passes through the centre gem. See screenshot below for solution.
- Take the last keys piece. Close the window.
- Put the keys in the slots on the panel. When the slot opens, take the two object pieces. Put the lemons in the juicer. Take the pitcher of lemon juice.
- Click on the roll desk. Place the octopus in the slot. Take the last feather piece. Pour the lemon juice into the inkwell, then dip the feather in it. Use the feather on the paper and read the note. Close the window. Go through the mirror (table).
- Take the last flask piece. Put the completed flask and glass pipe on the panel. The neutralizing agent is added to your inventory. Go through the mirror (table) and go up the stairs.
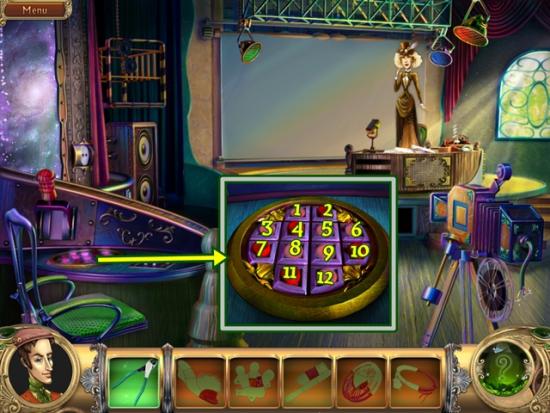
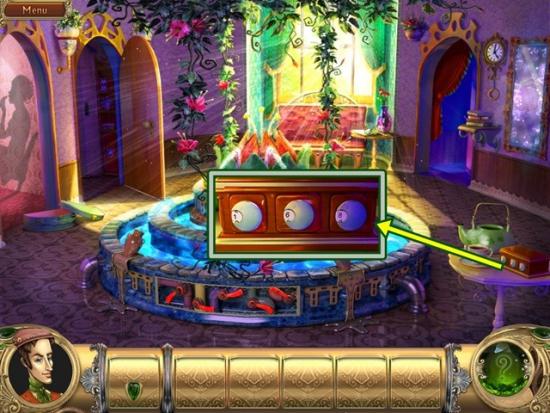
- Click on the scroll in front of the pedestals. Arrange the balls on the pedestals so they display the code as it appears on the scroll. If you don’t see a code, you haven’t performed all the actions you need to. According to the captain’s log, three places to find the code are through the periscope, on the note you used lemon juice to read and on the Lotus flower.
- Use the code in your game, do not use the code from this walkthrough. Each game is different.
- Once you’ve positioned the balls according to the code, another code is shown to you. Take note of it. Click off the combination to close it.
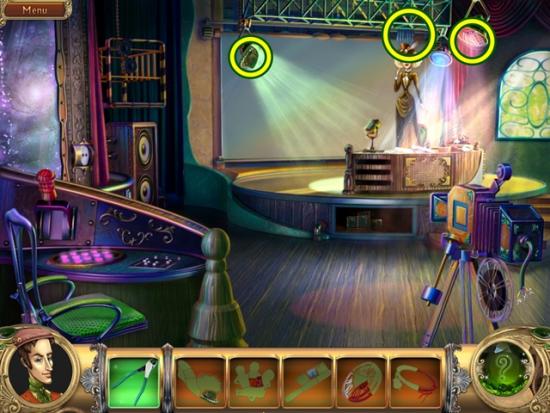
- Use the neutralizing agent on the package. Click on the package.
- Mini-puzzle: Place the pegs according to the combination you just received after properly positioning the balls. Again, this combination is different each game. Do not use the same numbers from this walkthrough, use what was given to you in your game.
- Your combination consists of three numbers aligned with three symbols. Go to your first symbol’s column and place the peg in the number that symbol is matched with.
- Once you are finished, take the griffin figurine. Close the window.
- Go south, go through the mirror (table) and go out the door.
- Click on the door. Place the griffin figurine in the slot. Go through the door.
Chapter Five
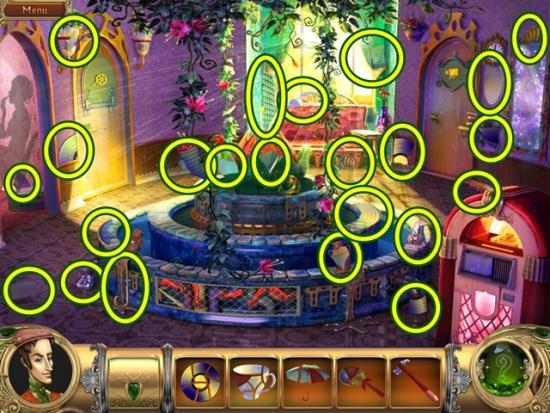
- Find all the object pieces.
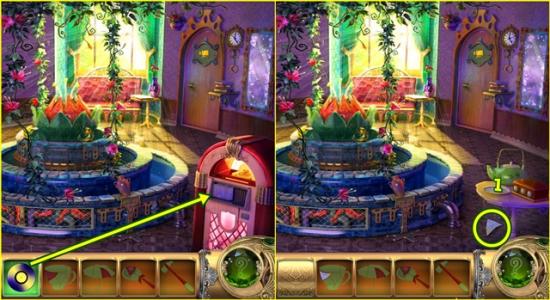
- Put the record in the jukebox. After the jukebox moves, take the last cup piece. Put the completed cup on the saucer. After the tea is poured, take the last umbrella piece.
- Use the umbrella to take the suitcase. Open the suitcase. Move the items around to get two object pieces. Close the window. Go through the door on the left.
- Find all the object pieces. Move the chair and take the object piece.
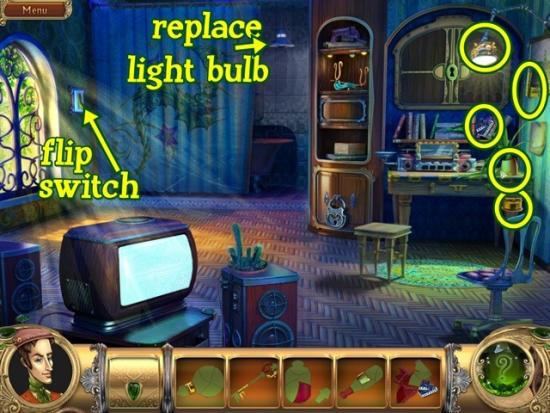
- Flip the light switch. Find all the object pieces. Once the light bulb is complete, replace the ceiling bulb. Flip the switch. Go into the new area behind the curtain.
- Find all the object pieces. Open the panel and take the object piece.
- Use the duct tape to repair the wires. Hang the photographic paper. Go south twice, then go through the mirror.
- Find all the object pieces.
- Put the ice cream on the fire. Take the feather and last star piece.
- Click on the door on the left. Put the hat in the slot. Go through the doorway.
- Find all the object pieces.

- Press the big red button (white circle). Take the last wheat piece that appears. Place the wheat in front of the hamster holes. Take the hamster.
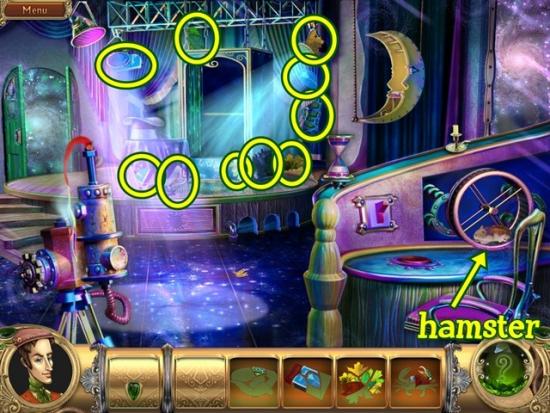
- Put the hamster in the wheel. Find all the object pieces.
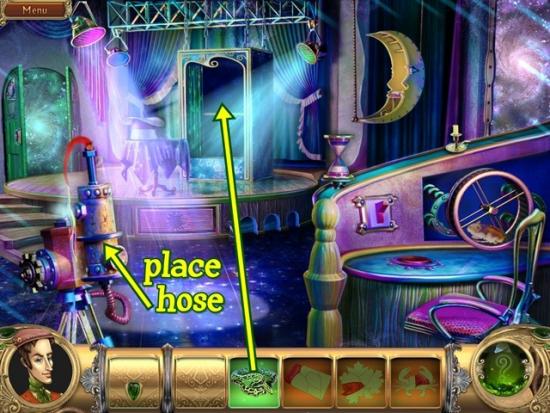
- Put the snake in the magician’s box. Take the hose. Put the hose on the balloon blowing machine. Take the hammer. Take the last crab piece that appears above the door on the left.
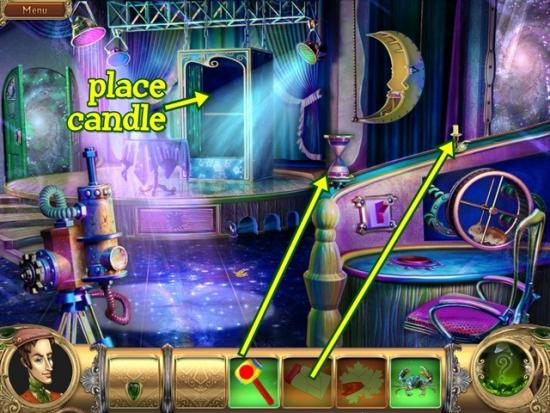
- Break the hourglass with the hammer. Take the last matches piece. Light the candle with the matches. The candle is added to your inventory. Put the candle in the magician’s box. Take the sun.
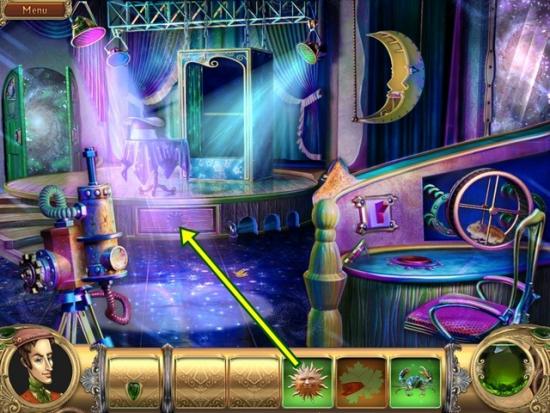
- Put the sun in the panel on the stage. Take the last leaves piece. Put the leaves in the magician’s box. Take the book pages. Put the crab in the magician’s box. Take the wire cutters.
- Click on the moon. Put the book pages on the book. You now have the instructions to develop photographs. Go through the mirror on the right.
- Find all the object pieces.
- Click on the puzzle on the panel. Mini-puzzle: All the buttons must be pressed in (light pink). Pressing a button creates the opposite effect for it (i.e., if it’s pressed in, it will pop out and vice versa). Its surrounding buttons will have the opposite effect as well.
- Unlike other puzzles in this game, leaving this puzzle and returning to it resets it.
- There are many possible solutions to this puzzle. Because this puzzle resets by virtue of leaving it and returning to it, I can provide a step-by-step solution. The screenshot above has numbered the buttons 1-12. From the beginning, press the following combination: 9-8-1-4-8-3-12.
- Find all the object pieces. Click on the desk.
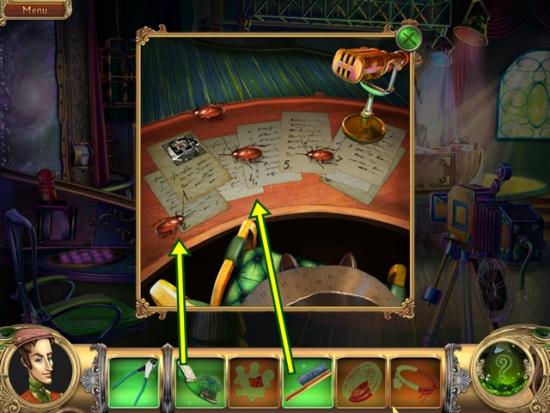
- Use the shoe to kill the cockroaches (there are four). Sweep them away using the brush. Take the last film reel piece.
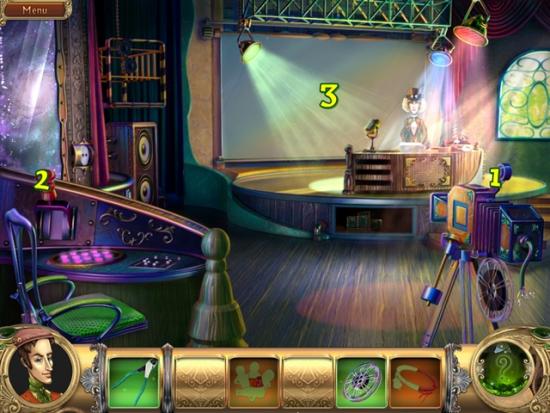
- Put the film reel on the camera (1). Pull the lever (2). It moves the backdrop (3). Take the last figurines piece and a wire with a plug piece. Go south.
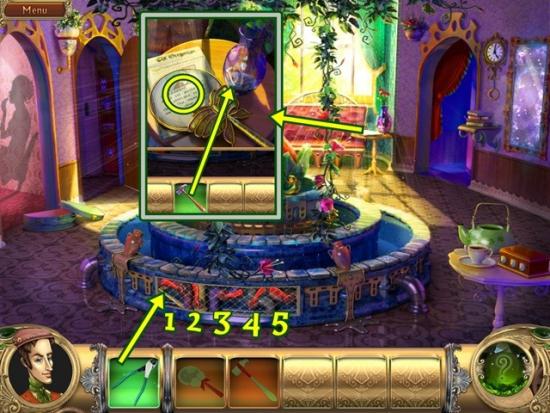
- Use the wire cutters on the fence. Take the last magnifying glass piece that appears. You now have to press the red levers to start the fountain. This is done through trial and error. Start pressing levers until you learn which to press first. Then press it and start pressing the other levers until you discover which lever needs to be pressed second. I’m not sure if all games are the same, if they are, counting the red levers as 1-5 from left to right, press 2-4-1.
- Click on the end table. Use the magnifying glass on the letter. Take the last hammer piece and read the full letter. Break the vase with the hammer and take the ring. Close the window. Go through the mirror.
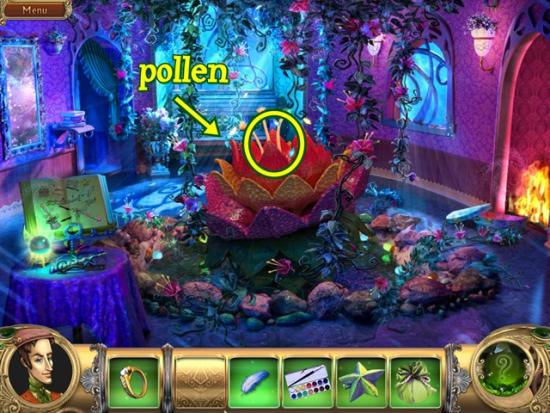
- Take the last empty bag piece. Use the empty bag to gather pollen from atop the flower. Go through the mirror and go through the door on the left.

- Go behind the curtained area. If you cannot, flip the light switch so it’s in the “up” position.
- Use the ring to cut the glass. Take the last cleaning supplies piece and the aerial. Clean the dirty sink with the cleaning supplies. Take the last clothespin piece that appears. Leave the room.
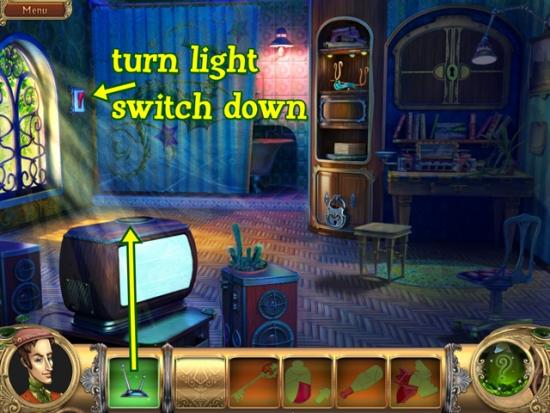
- Put the aerial on the tv. Take the last key piece and watch the news recap. Turn the light switch to the “down” position.
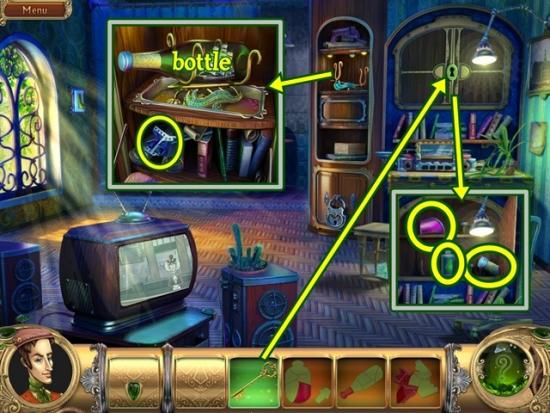
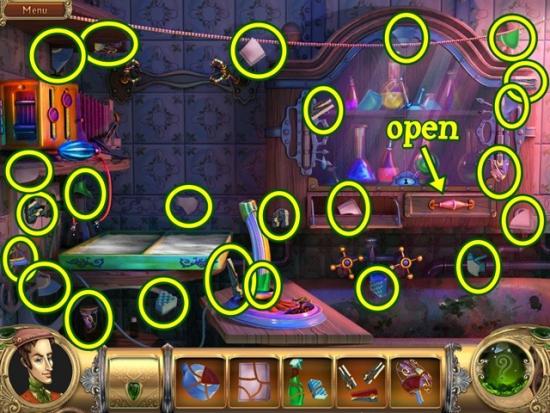
- Unlock the upper cabinet with the key. Take the last ship in a bottle and acid pieces. Take the glue.
- Click on the upper shelf. Place the completed ship in a bottle. It lowers and a panel opens. Take the pieces of film piece. Close the window.
- Use the acid on the lock on the bottom cabinet. Open the cabinet and take the last pieces of film piece.
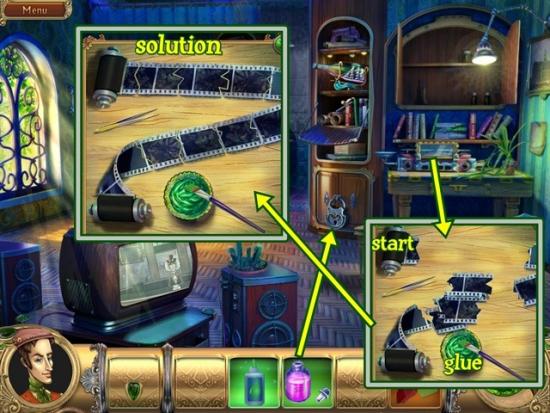
- Click on the desk. Add the pieces of film and the glue. Mini-puzzle: Reassemble the pieces of film. Spread out all the pieces. Start at the piece at the top left. Match the edges. When a piece is in the right place, it will be locked. When you are finished, use the glue to attach the pieces. Once you are finished, take the film. Close the window. Turn the light switch to the “up” position and go behind the curtain.
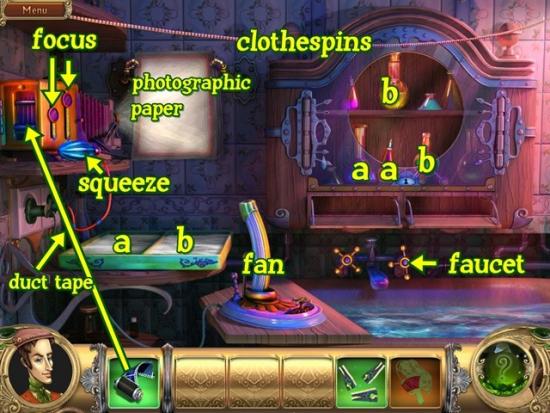
- If you haven’t already done so, use the duct tape to repair the wires. Hang the photographic paper.
- From the medicine cabinet, take the blue and red bottles (marked with an “a”) and pour them into the left tray (a). Take the green and yellow bottles (marked with a “b”) and pour them into the right tray (b).
- Add the film to the camera. Use the two slider tiles on the side of the camera to focus the camera. Pull the left tile almost all the way to the bottom and pull the right tile to the centre. When they are in the correct position, they will be outlined in bright green. To take a picture, squeeze the blue bulb. You can keep taking pictures until you get the right focus.
- Once you’ve successfully take the photo, take it and the undeveloped photo is added to your inventory. Take it and add it to the left tray of the developing solution. When it’s done, take the undeveloped photo. Take it again from your inventory and add it to the right tray of the developing solution. Take the photo covered with chemicals.
- Turn on the faucet to fill the sink with water. Add the photo covered with chemicals and the wet photo is added to your inventory.
- Put the clothespins on the clothesline. Add the wet photo to the clothesline. Take the last fan piece that falls into the sink. Add the fan to the base. Take note of the photo and the placement of the figures.
- Go south twice, then go through the door on the right.
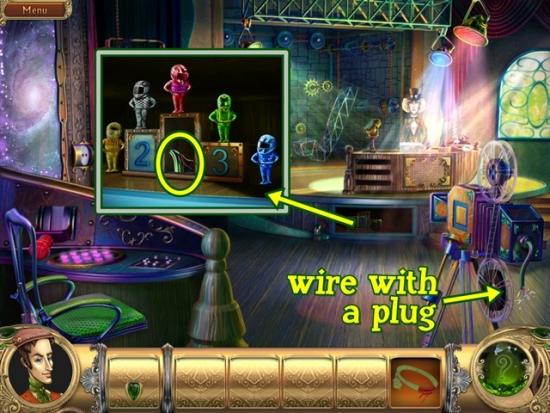
- Click on the area under the stage. Add the figurines. Arrange them in the position according to the photo you just developed. Take the last wire with a plug piece. Close the window. Add the wire with a plug to the camera. The screen behind Jessica lowers and a video plays. Take note of the number shown.
- Go south.
- Click on the box on the right end table. Mini-puzzle: Open the box. The combination appeared in the video you just watched after fixing the movie camera. Click on the dials to turn them. Enter the combination. Each game has a different combination.
- Take the ribbons. Close the window. Go through the mirror.
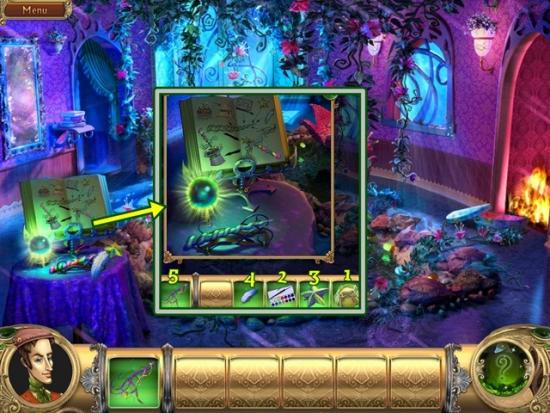
- Click on the left side table. Follow the instructions to create the magic wand. To the wand, first add pollen, then the paints, then the star, then the feather, then the ribbons. Take the magic wand.
- Go through the door on the left.
- Ensure the light switch is in the “up” position. Use the magic wand on the hat. Take the rabbit figurine. Go through the door on the left.
- Click on the door. Place the rabbit figurine in the slot. Go through the door.
Chapter Six
- Find all the object pieces.
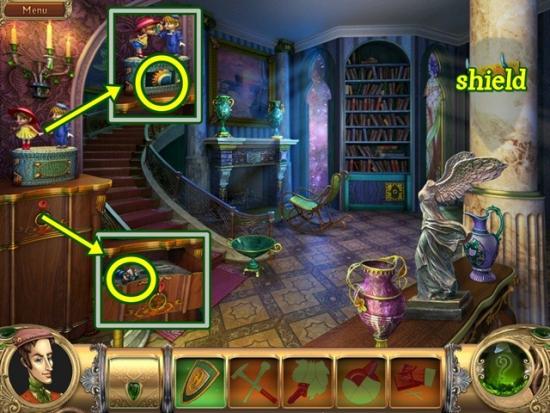
- Hang the shield on the column. Take the last tools piece that falls. Use the tools to break the drawer’s lock. Take the last bouquet piece. Give the bouquet to the boy figurine. Take the fireplace knob piece.
- Break all the vases in the room with the hammer. One has a piece of paper and another has a matches pieces. Click on the piece of paper revealed and take note of the number.
- Leave the room by the door to the left of the bookshelf.
- Find all the object pieces.

- Click on the volcano. Use the champagne to cool the object piece down, then take the last stone hammer piece. Give the stone hammer to the caveman. After he smashes the rock, take the last fishing rod piece. Click on the terrarium. Use the fishing rod to get the handle. Leave through the doorway.
- Click on the square tile below the bookshelf. Attach the handle. The bookshelf opens to reveal a doorway. Take the object pieces. Click on the fireplace. Take the last matches piece. Click on the scroll and take note of the dinosaur’s pose. Add the fireplace knob and turn it to turn on the gas. Light a fire using the matches. Go through the doorway to the left of the bookshelf.

- Take the last t-rex piece. Place the t-rex on the pedestal on the right side of stairs. Take the last coin piece that appears. Put the coin in the slot on the dinosaur. Take the ticket from its mouth.
- Click on the doorway at the top of the staircase. Insert the ticket in the slot. Go through the doorway.
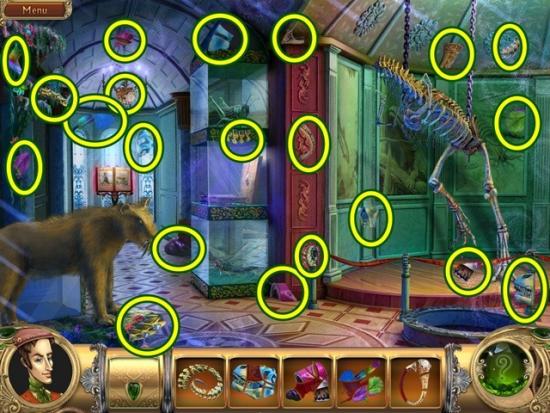
- Find all the object pieces.
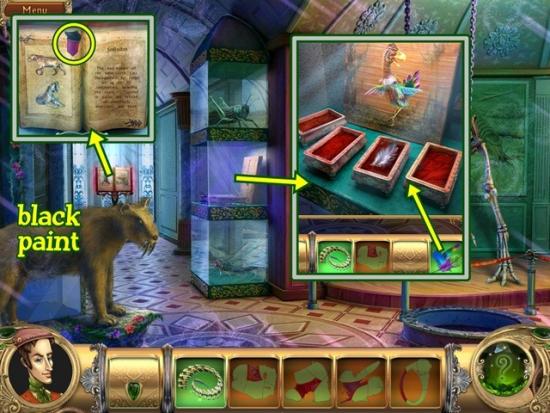
- Click on the book. Turn the page (small red arrow). Take the last black paint piece. Close the window. Paint the saber-toothed tiger with the black paint. When it lies down, take the last feathers piece. Click on the glass displays middle shelf. Add the feathers. Take the last dinosaur skull piece. Close the window.
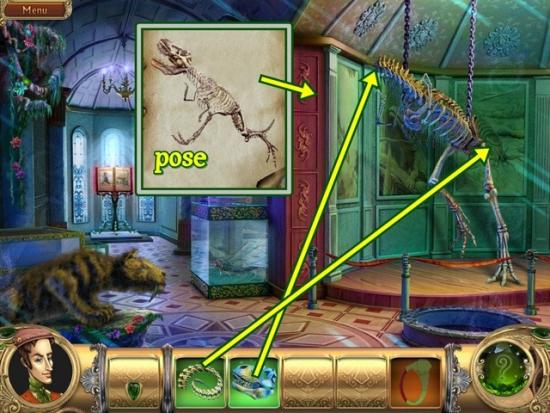
- Add the dinosaur skull and dinosaur tail to the dinosaur skeleton. Pose the dinosaur according to drawing on the scroll in the fireplace. If you haven’t already seen it, return to the first scene of this chapter (south, then through the doorway) and click on the fireplace and click on the scroll. Take note of the pose.
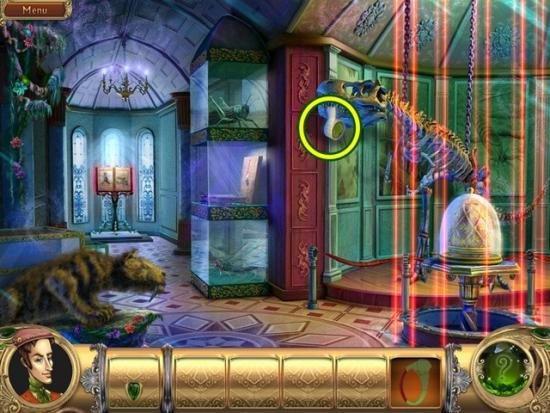
- Take the sticky tape from the dinosaur’s mouth. Go south, go through the doorway and then go down the stairs (where the bookshelf was).
- Find all the object pieces. Be warned – when you take the object piece off the web, a large spider appears.
- Please note in the screenshot above, I blurred the spider.
- Click on the spider and take note of the number given (text at the top of your screen).
- Use the feather duster on the chair. Take the last scalpel piece. Watch a news recap on the tv. Cut the back of the chair with the scalpel. Take the last key ring piece.

- Click on the panel. Use the key ring in the locks. Take the last make-up piece. Use the make-up on the dirty cup, then use the sticky tape to get the fingerprint. Put the fingerprint on the red fingerprint scanner. Close the window.
- Take note of the working monitors.
- Click on the safe. Click on the note and read it to learn how to get the combination. If you haven’t already, go back to the first room of this chapter and use the hammer to smash all the vases. One will have a piece of paper with a number written on it. Click on the spider to learn the number it knows and take note of the monitors that are powered on. The combination is unique to each game so you will have to perform these steps before being able to open the safe.
- Please note: In my game, the spider had a “3” on its back however the text at the top read “9.” The “3” was used in my combination, not the 9.
- Click on the note again to put it away. If you have already performed the above steps to learn the combination, click on the numbered dials and enter the combination, then click on the red lever to open the safe.
- When the safe opens, click on it to look inside. Take the last pencils piece. Click on the notepad (white circle). Use the pencils on the notepad and take note of the diagram. Close the window.
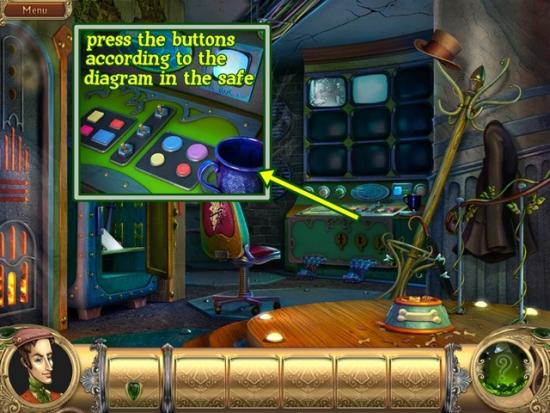
- Click on the panel. Click on the buttons in the order shown in the diagram found in the safe. If you make a mistake you can start over again. Once you are finished, go south, go through the doorway to the left of the bookshelf, then go up the stairs.
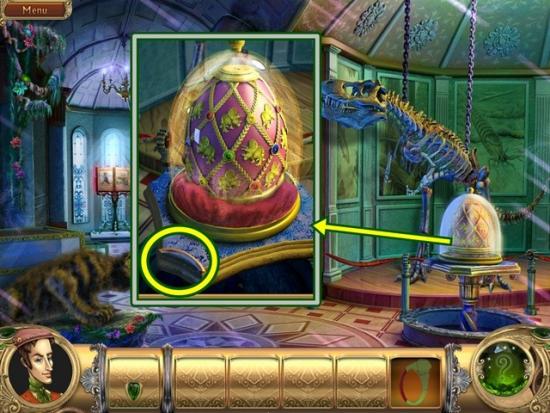
- Click on the egg. Take the last ring piece. Use the ring to cut the glass. Take the egg. Close the window. Go south and go through the doorway.
- Click on the fireplace. If you haven’t already, take the last matches piece. Add the fireplace knob and turn it to turn on the gas. Light a fire using the matches.
- Put the egg in the fire. The dinosaur figurine is added to your inventory. Close the window.
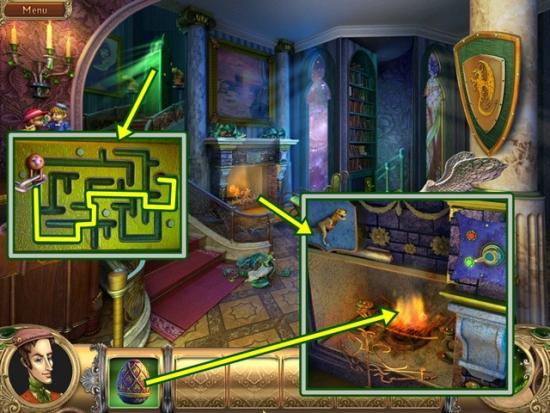
- Click on the door at the top of the stairs. Mini-puzzle: Drag the lock to the end of the maze.
- Go through the doorway.

- Click on the door. Place the dinosaur figurine in the slot. Go through the door.
- Watch the video.
The end!

More articles...
-
Best Horror Games On Itch.io – July 2026
Across a bounty of subgenres. -
Grow A Garden 2 Base Price List
What's the most valuable crop? -
Evomon Best Starter [Leafbun, Blazpup, or Bubble?]
Grass-type, Fire-type, or Water-type?