
Grow A Garden 2 Base Price List
What's the most valuable crop?![Evomon Best Starter [Leafbun, Blazpup, or Bubble?]](/wp-content/uploads/2026/06/evomon-best-starter.jpg "Evomon Best Starter [Leafbun, Blazpup, or Bubble?]")
Evomon Best Starter [Leafbun, Blazpup, or Bubble?]
Grass-type, Fire-type, or Water-type?![Evomon Tier List [META and BEST Evomon]](/wp-content/uploads/2026/06/evomon-tier-list.jpg "Evomon Tier List [META and BEST Evomon]")
Evomon Tier List [META and BEST Evomon]
The Evomon dream team.
![[Roblox] Evomon Shiny Hunting Guide – Including Prismatic and Pris Shinies!](/wp-content/uploads/2026/06/evomon-shiny-hunting-guide.jpg "[Roblox] Evomon Shiny Hunting Guide – Including Prismatic and Pris Shinies!")
Slingo Mystery Walkthrough
Welcome to Gamezebo's strategy guide for Slingo Mystery: Who's Gold. The game offers a combination of Hidden Object Adventure and Slingo mini-games in a contemporary mystery about the search for a missing Will. This Strategy Guide is divided into two sections: General Tips (no spoilers) Detailed Walkthrough GENERAL TIPS There is no timer. If you make too many incorrect clicks in a row, the cursor will dance away for a moment. There are 30 locations. Each one is …


- Prefer Gamezebo on Google

a:1:i:0;a:2:s:13:”section_title”;s:26:”Slingo Mystery Walkthrough”;s:12:”section_body”;s:102060:”
Welcome to Gamezebo’s strategy guide for Slingo Mystery: Who’s Gold. The game offers a combination of Hidden Object Adventure and Slingo mini-games in a contemporary mystery about the search for a missing Will.
This Strategy Guide is divided into two sections:
- There is no timer.
- If you make too many incorrect clicks in a row, the cursor will dance away for a moment.
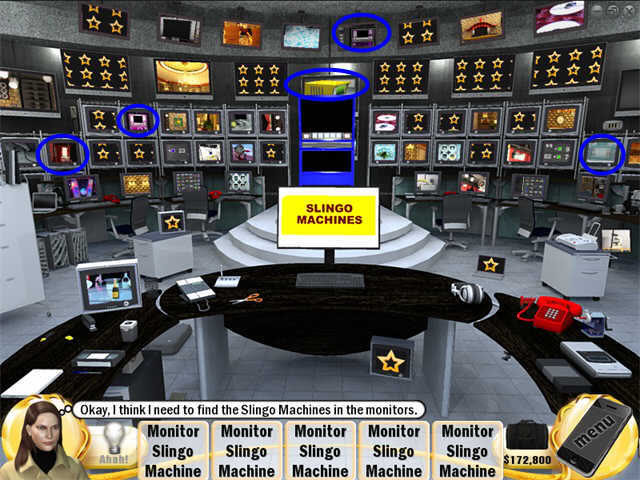
- There are 30 locations. Each one is a combination of Hidden Object and inventory tasks. There is a Slingo Machine in every 3rd location.
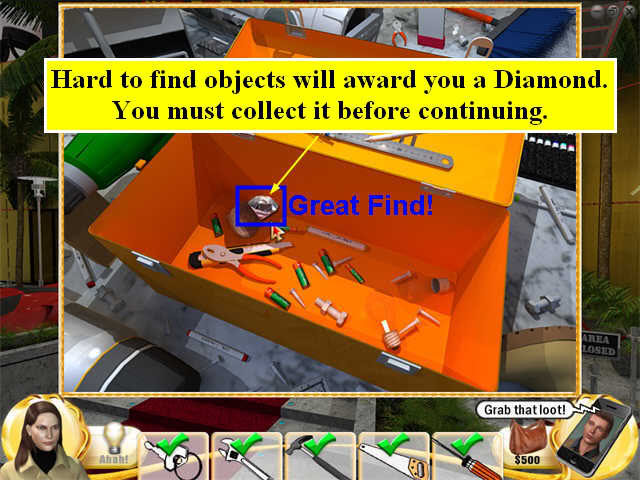
- You can click on the Aha! Button when it is fully yellow to receive one hint for a Hidden Object. It recharges fairly slowly.
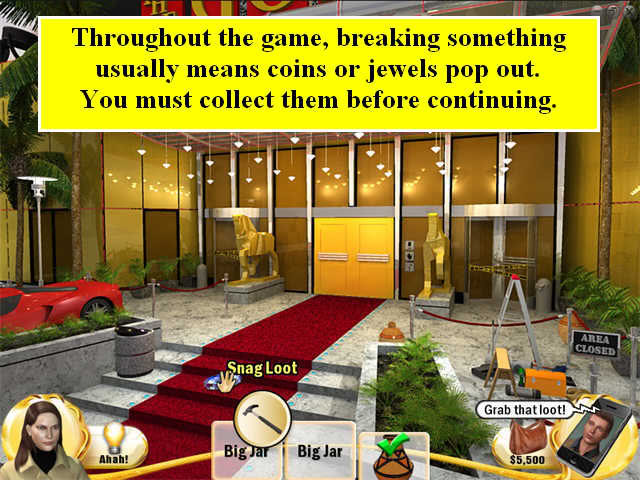
- Hard to find items may award you a Great Find bonus item, like a diamond. You must collect all of this "Loot" before you can continue.

- You can also find loot when you break something like a vase during the game. Again, you must collect the Loot before continuing.
- Inventory items will combine automatically when necessary.
- You will only be able to use one item from inventory at a time, so there’s no confusion about what you’re supposed to work with.
- You cannot skip the Slingo mini-games.
- Every time you complete a Slingo game in the main story, it will unlock in the bonus features so you can play it as much as you like there.
- You will only play in one location at a time. Whenever you can go through a door, do so-it’s time for the next location.
- The game will automatically save every time you exit.
- You can click on the cellphone in the lower right to get a choice of navigation options. You will be able to return to the main menu or change the difficulty level.
- There are two difficulty levels Normal/Easy and Hard. In Easy mode, the cursor will change to a hand every time you touch something you can click on. The cursor will change to a magnifying glass if there is an area you can zoom in on. In Hard mode, the cursor does not change. The other difference is that in Easy mode, the cursor will give you text clues about where to position inventory objects. This helps you click in exactly the right spot.
- You can switch back and forth between Easy and Hard mode whenever you like, even in the middle of a scene.
- If you like Adventure games, I recommend playing in Hard mode, and then switching to Easy mode if you are completely stuck and need a hint. The Aha! Button is useful, but it doesn’t recharge often enough to get you through most locations.
- You will have to read all the dialog for the game or you won’t understand what your next objectives are.
- The Find List is sometimes more of a task list. It may list the name of an item you have to find, or show a picture of it. It may have a picture of a zoom scene, and then you have to click on the item in regular mode to zoom in. It may just have a ?-in these cases, you need to read the dialog to figure out what problem you’re trying to solve.
- You can tell what Chapter you’re in by going to Bonus Features on the main menu and choosing Chapters. The chapter pictures unlock when you start a chapter, not when you complete it, so you can tell where you are by looking at the last one that’s unlocked.
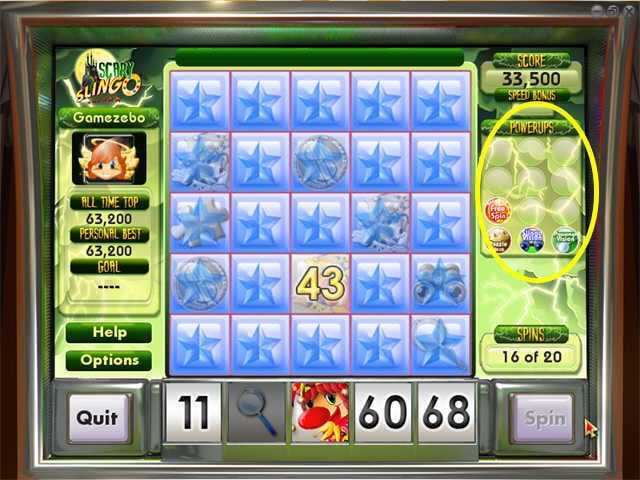
General Tips for Slingo
- Start by clicking SPIN.
- Match the numbers will roll up at the very bottom of the screen to a number in the column above them.
- You get some bonus points for being quick.
- When you match a number, that square colors in.
- When you get 5 squares in a row colored in, that’s a SLINGO. It doesn’t end the game, but you do get bonus points for it.
- You can get a regular SLINGO horizontally, vertically, or diagonally.
- Some machines also have a "bouncing SLINGO" powerup. This lets you make a SLINGO that wraps around the board’s edge.
- The spin row can be number or special items.
- Special items include coins and jokers.
- A regular joker is a wild card that can match any number in its column.
- A super joker is a wild card that can match any number on the board.
- If you get a super joker, all the numbers on the board will light up to tell you you can play any of them. However, before you do, look to see if you will later be able to match a number with the regular spin result for that column.
- For example, if you get a number in column 1 that would match, don’t use the superjoker to match that number. Do the superjoker on a different number first, then you’ll be able to do your regular match.
- Some squares have powerups underneath them. Power ups include SIingovision, Powervision, Nudge, Free Spin, Devil Protection, Bouncing Slingos, and multipliers that increase your score.
- Most powerups start automatically and last for 5 turns.
- Slingovision lights up numbers you can match. This helps you get the speed bonus.
- Powervision lets you see what powerups lie underneath numbers. This is helpful when you have jokers and you’re deciding which square to match to the joker.
- Some machines have a colored pattern on some of the squares. When you match the entire pattern, you get a bonus. The earlier in the game you complete the pattern, the higher the bonus.
- You will get a bonus for completing the full card, but it’s not required.
- Spins are free until the last 3. Then you have to pay points. If you have a free spin powerup, you will have a choice of whether to use it or not.
- Since spins become increasingly expensive, if you only have one free spin powerup, save it for the most expensive spin.
- You can have more than one multiplier going at once.
- If you make more than one SLINGO with one move, you get bonus points. Some people like to leave the corner squares unmatched for as long as possible for just this reason, because it makes it easier to get double or triple SLINGO.
- If you’ve made 10 SLINGOs in a game, you will have the option to cash out instead of continuing. If you are trying to earn a special prize that requires a certain point score and you’ve made that many points already, you may want to just cash out and collect your prize.
- You can play without much thinking, but to get the top scores, you’ll need to use some strategy.
- On each spin, your only choices will come if you have jokers. If you have no jokers, just match the numbers as quickly as you can.
- If you do have jokers, consider: what will get a double or triple SLINGO? What will fill in the pattern? What will set up a potential double or triple SLINGO for the future? What powerups can I get (if you have powervision turned on)? Do I have bouncing Slingos or multipliers about to run out?
- Some squares also have a puzzle piece hidden under them. In this game, you just get bonus points for finding the puzzle piece, but you can’t do anything else with them.
- During the main game, you will need to meet the goal for the machine in order to get the prize. The goal will be listed in the left column.
- If you don’t make the goal, you can just try again.
- Once you have played a Slingo Machine in the main game, it will be unlocked in the "Bonus Features on the Main Menu. However, it no longer keeps track of the goals, you just play each one for points.
- You will have many different things to do in one location: multiple Find Lists, multiple inventory tasks, perhaps a Slingo game. I’ve marked the different tasks in different colors. "Cyan" is neon blue.
- Remember that you can switch back and forth from Hard to Easy mode at any time, even in the middle of a scene, just by clicking on the cell phone in the lower right corner. If you’re stuck trying to find the exact pixel location to click, switch to Easy Mode.
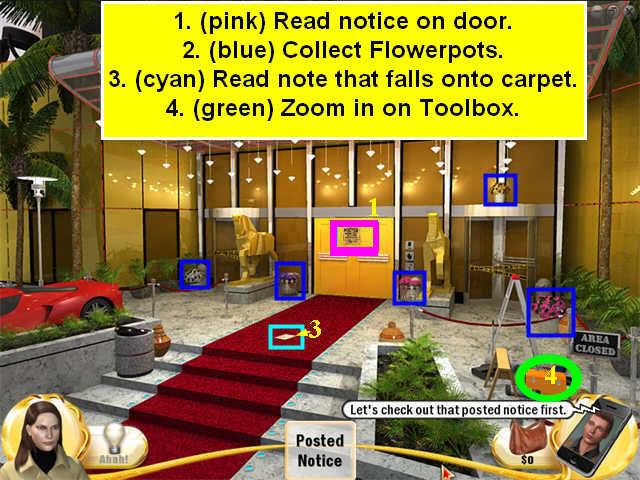
- Read the Posted Notice on the front door.
- Collect the 5 flowerpots.
- A note will fall out on to the carpet. Read it.
- Zoom in on the toolbox.
- Collect the items in the zoom scene. Note that for some, you can only see a tiny part of the object. This is typical of the game.
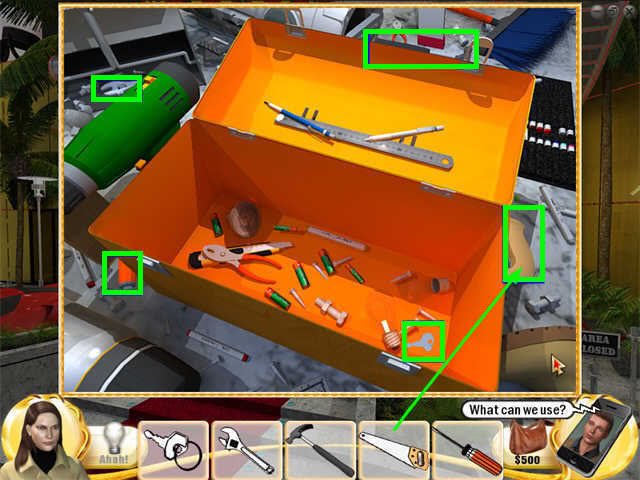
- Break the 3 big jars.
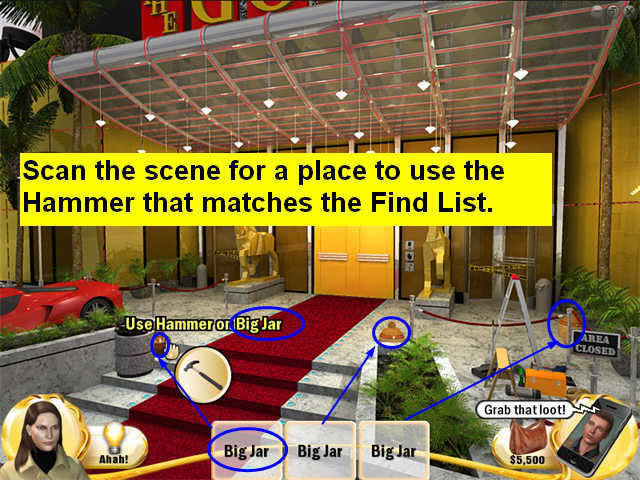
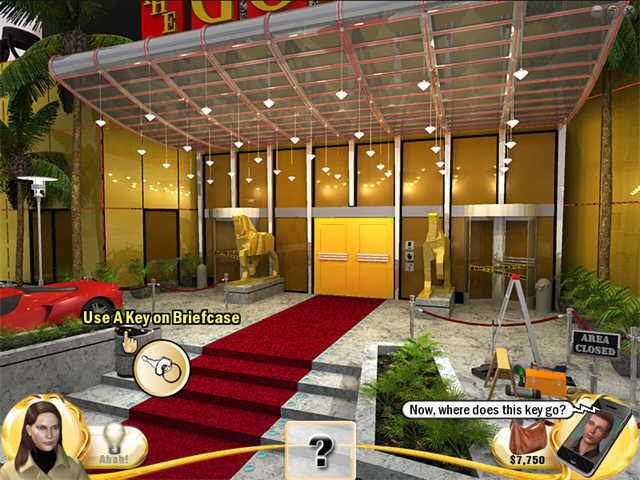
- Pick up the loot and the keys.
- Use the keys to open the briefcase.
- Read the note to Abel.
- Collect the other items. The key is under the paper in the lower right.
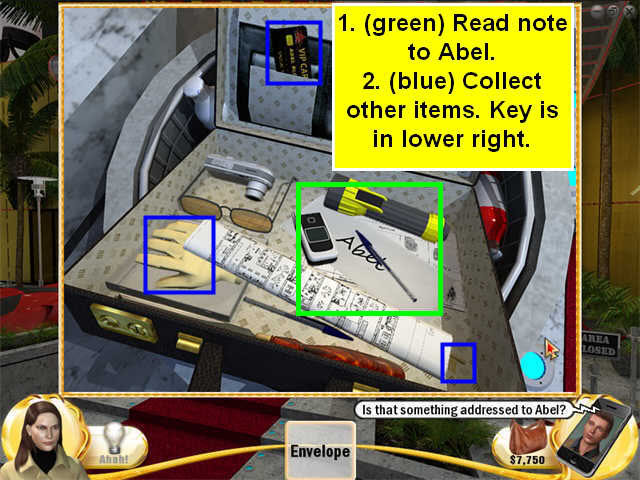
- Now you have a key card, a glove with a handprint on it, and a regular key.
- Click on the big doors to zoom in.
- Use the card on the card reader, the glove on the hand reader, and the key on the key slot.
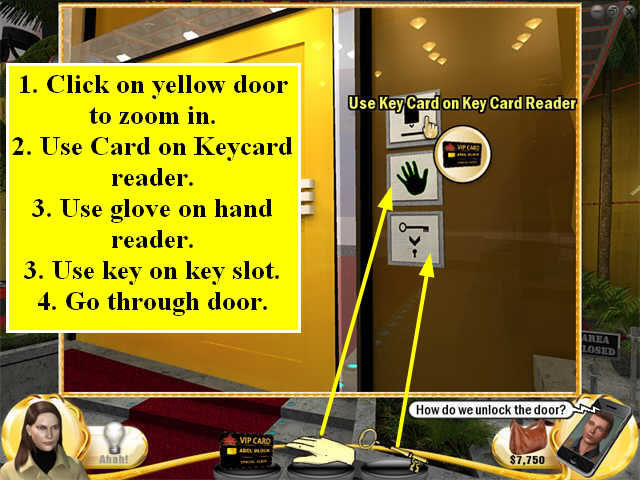
- Go through the doors.
- There is a large hotel luggage cart on the left side of the room. Click on it to zoom in.
- Collect the items on the Find List. The baseball bat is white. The camera is silver, and is near the black and white ball.

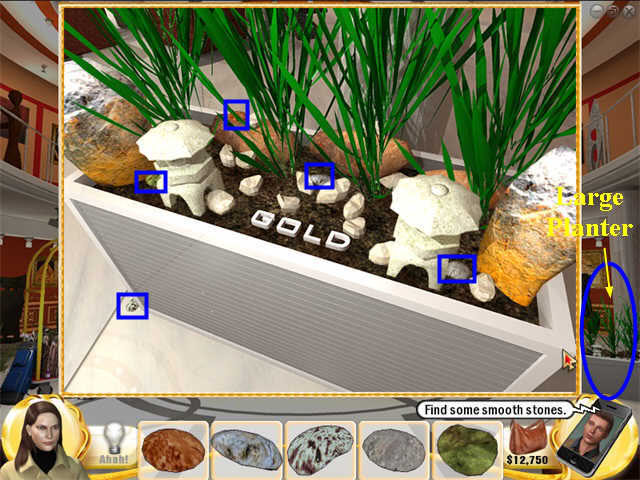
- There is a large white planter on the right side of the scene. Click on it to zoom in.
- Collect the 5 smooth rocks shown on the Find List.
- Now you have a slingshot and rocks. Click on each of the 5 security cameras.
- Break the vases from the Find List and collect the loot.
- Move the paintings shown in the Find List.
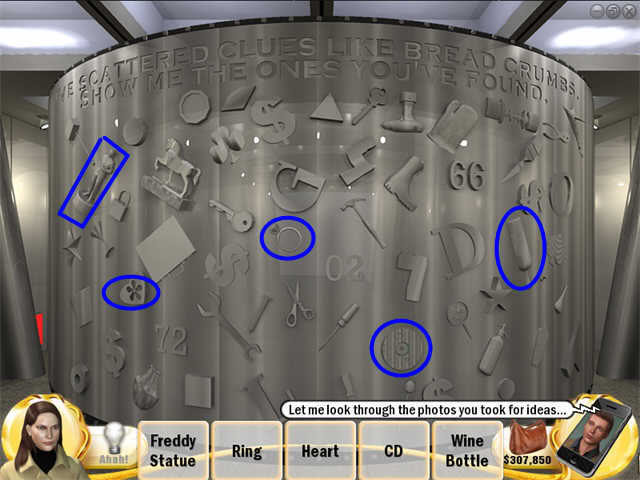
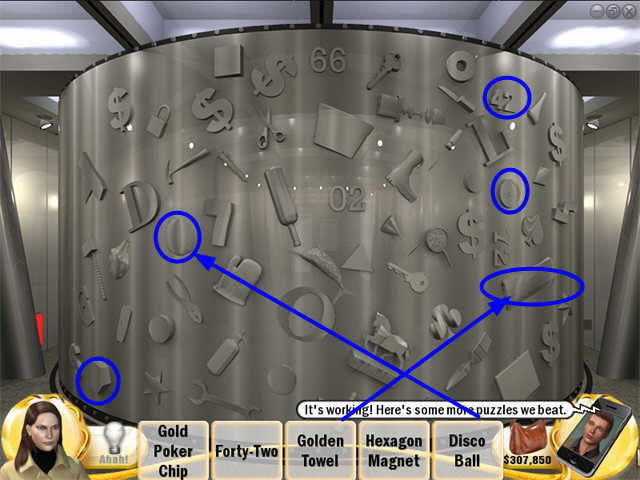
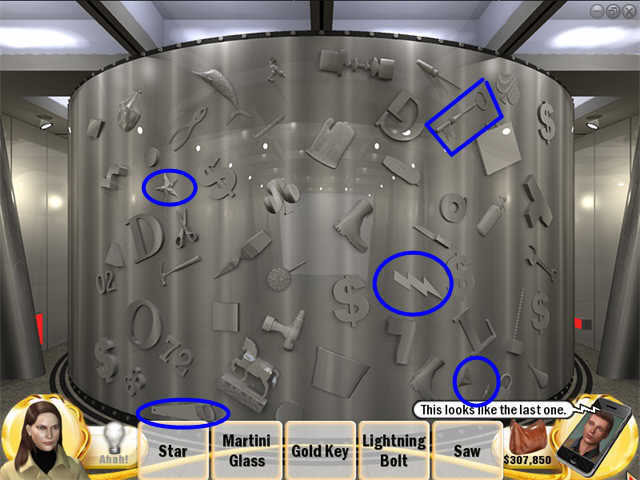
- Click on the giant gold statue of Freddy.

- The statue will fall over and break. Collect the note from its head.

- The note tells you to go to The Slingo Room.
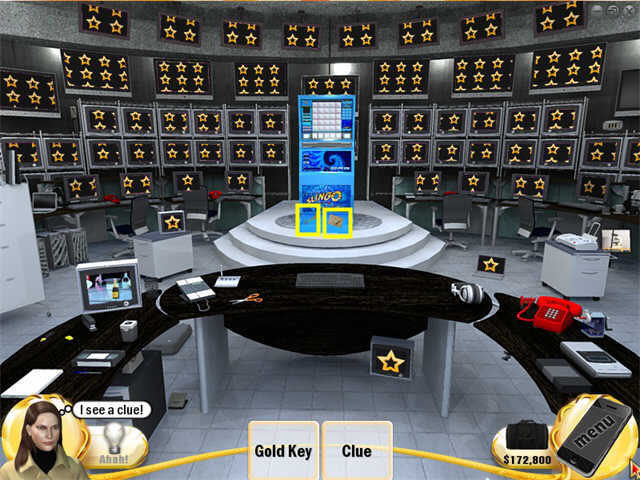
- You can see a Slingo machine through the glass doors, but no power.
- Click on the stars, then try the power switch. No luck yet.
- Click on the lightning bolts.
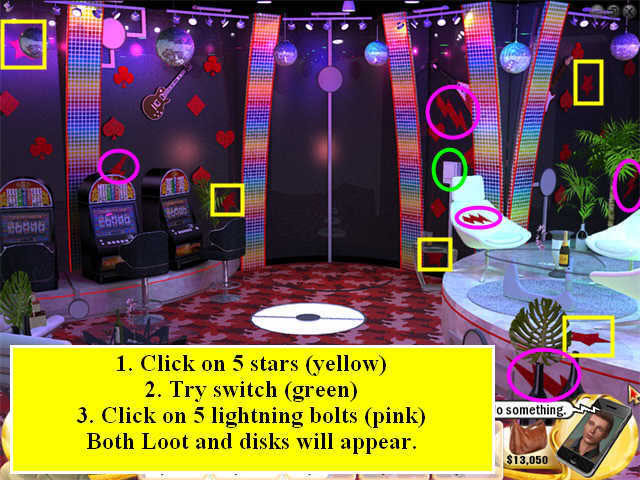
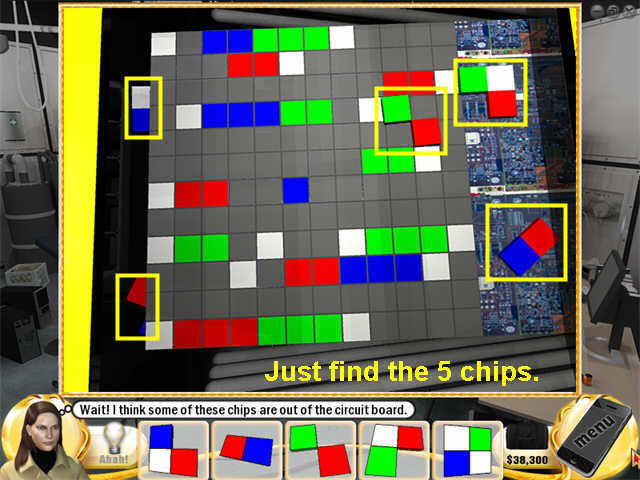
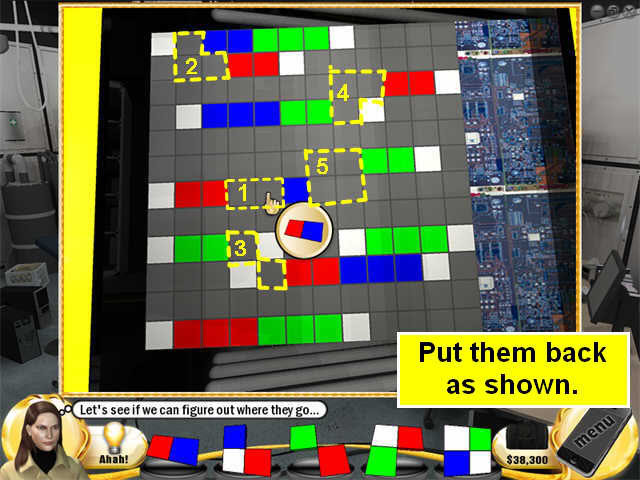
- Several things will fall into the scene. Some are loot, but 5 of them are round grey disks which will turn out to be part of the electrical system. Collect everything.
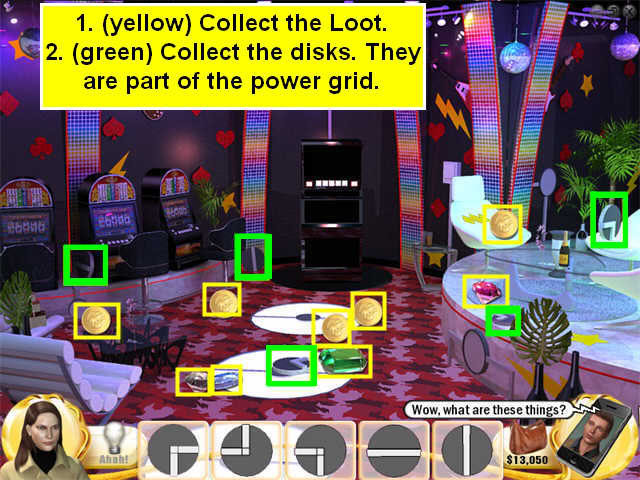
- Now you need to place the disks so that they complete the electrical circuits to the switch. You do this by looking at the lines on the disk and matching them to the existing power grid.
- Once you have all 5 in place, try the switch again, .The power will come on and the Slingo Machine will light up.
- Click on the Slingo machine to play it. You must win the challenge so it may take a few tries.
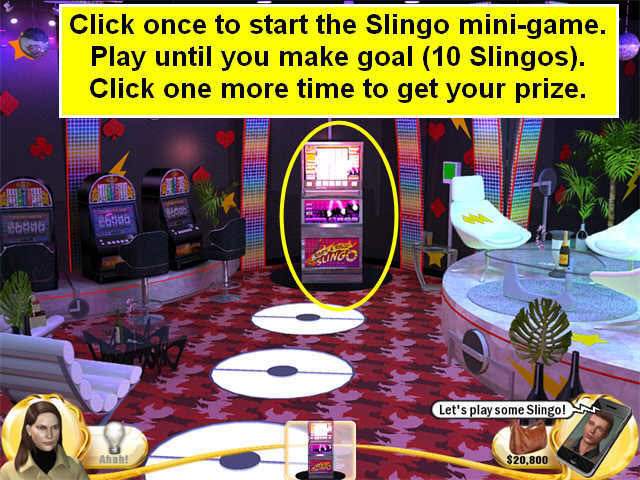
- When you win, there will be a prize in the hopper for the machine. It’s a box. Collect it. Maggie’s wedding ring is inside.
- At this point Gloria, Freddy’s current wife, will catch you, and have her assistant Abel lock Maggie in the Lost and Found room while they call the police.
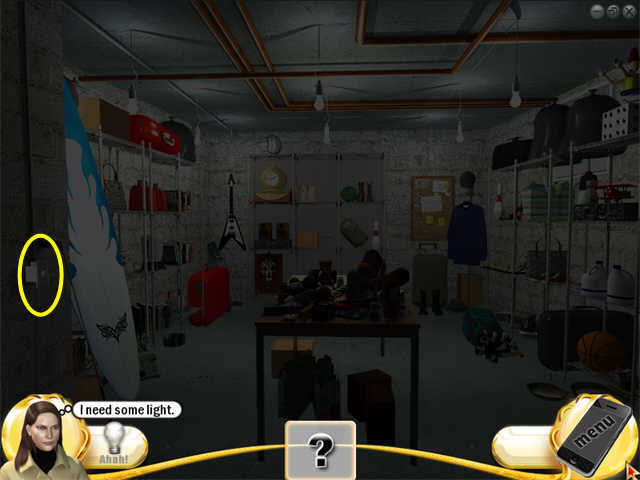
- It’s dark! Turn on the light.
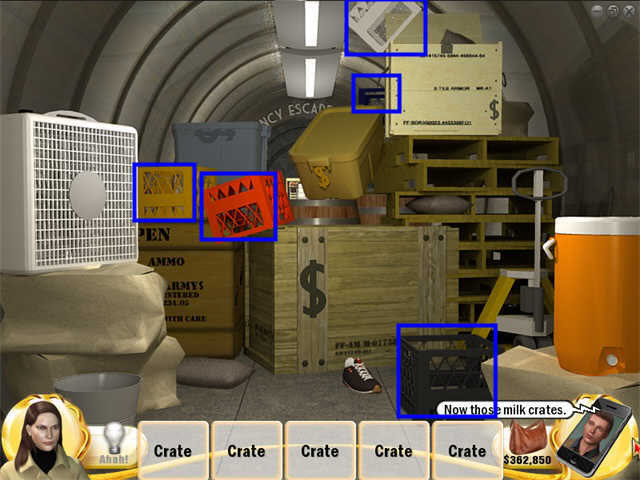
- Move the cardboard boxes.
- Check 5 suitcases (only the ones that match the Find List pictures will count). One of these will become your new Loot Bag.
- Some loot will fall out. Collect it all.
- Zoom in on the Bulletin Board.
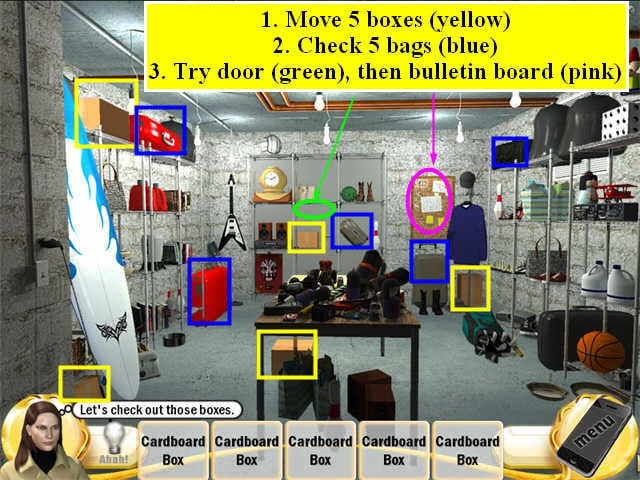
- There is a key on the lower right on the Bulletin Board. Collect it.
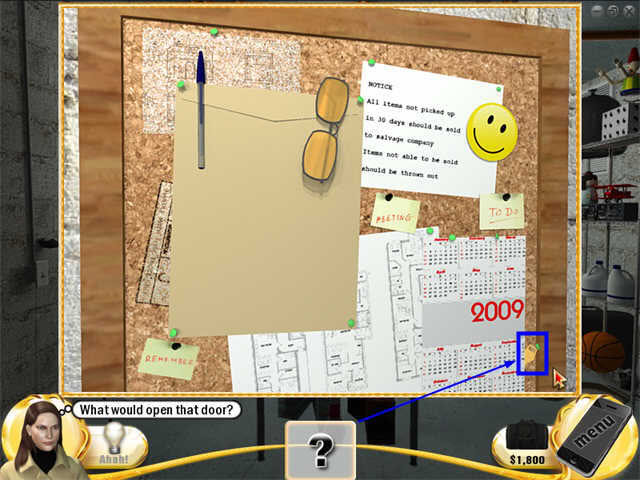
- Use the key on the door. It will open, but the exit is blocked with wooden crates.
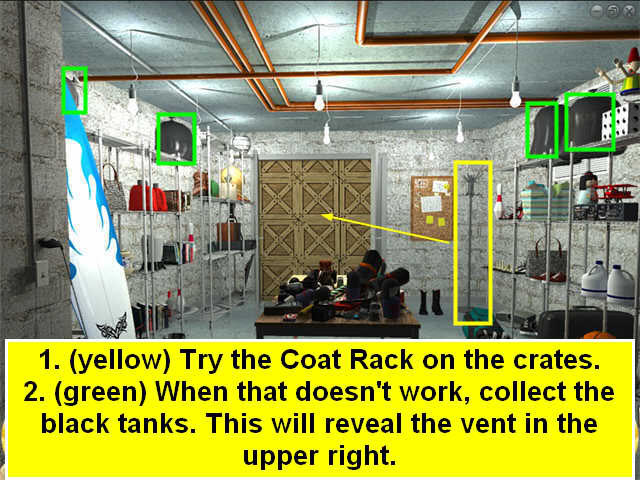
- Collect the clothes on the Find List. This will reveal the Coat Rack.
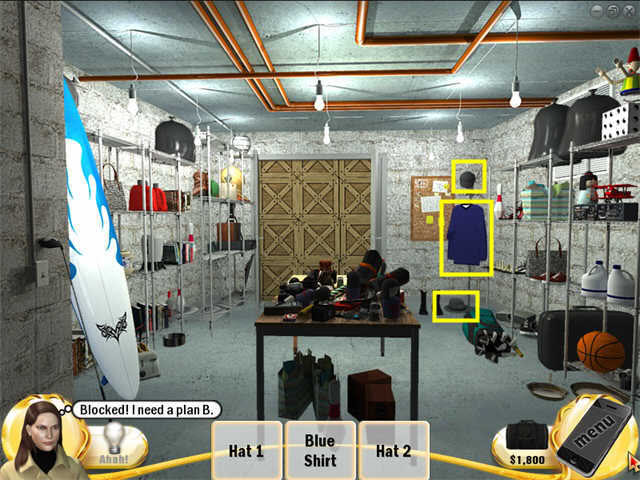
- Try the Coat Rack on the crates. That doesn’t work either.
- Collect the black tanks shown on the Find List. One is hidden behind the Surfboard.
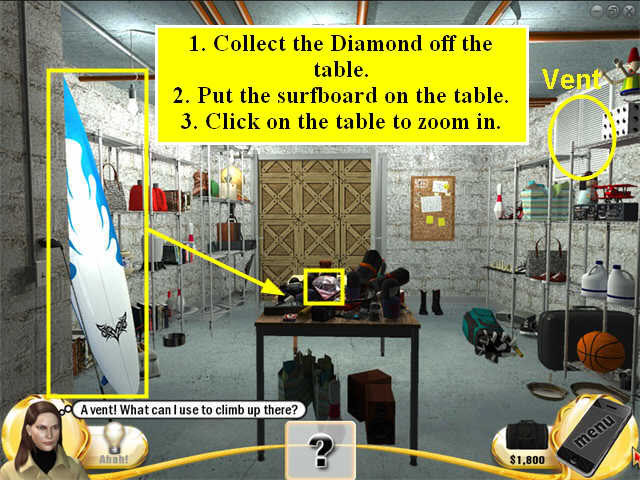
- This will reveal a vent on the upper right. Now you just need to figure out how to get up there.
- Collect the Great Find diamond off the table.
- Put the Surfboard on the table.
- You need something to remove the screws on the vent.
- Click on the table to zoom in.
- Collect the items on the Find List.
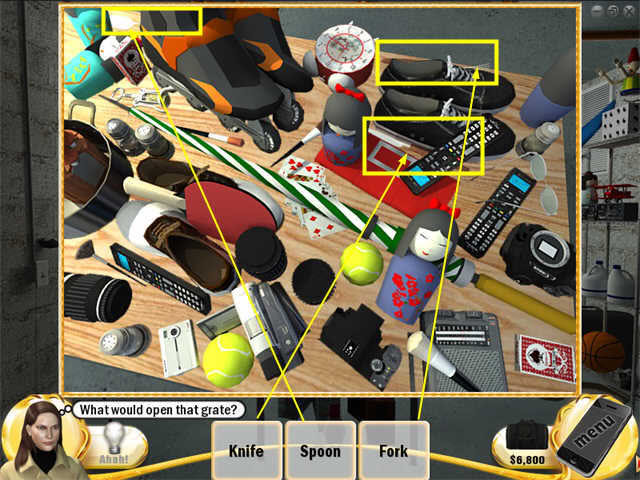
- You have to pick up the Loot before you can close the Zoom scene.
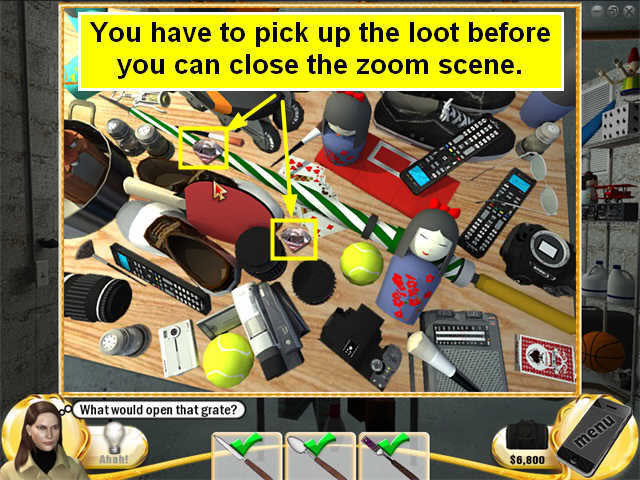
- Use the knife on the vent cover.
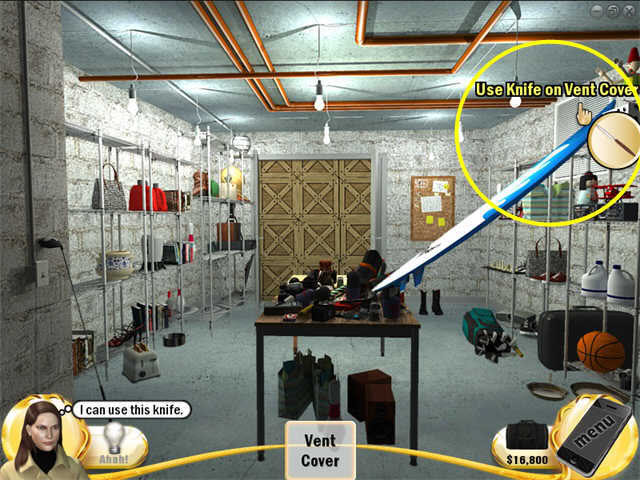
- Exit through the vent.
- You come out in the Casino Workshop. There are laser alarms everywhere.
- There is a keypad on the back left wall, but you need the code. Just look around the room and find five numbers. You can click on them in any order.
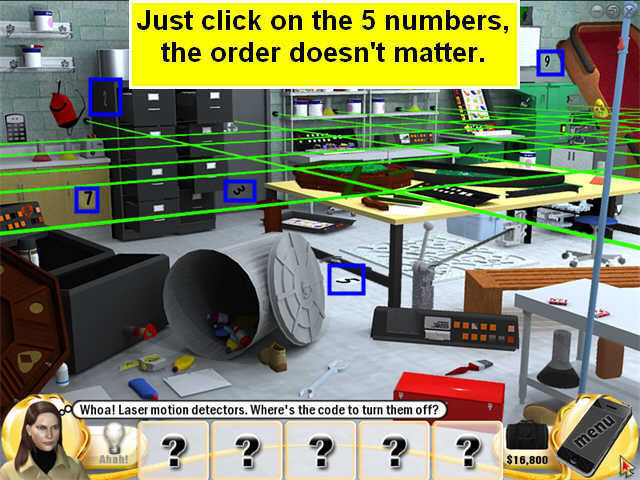
- There is a long blue pipe on the right side of the scene. Pick it up and use it on the keypad.
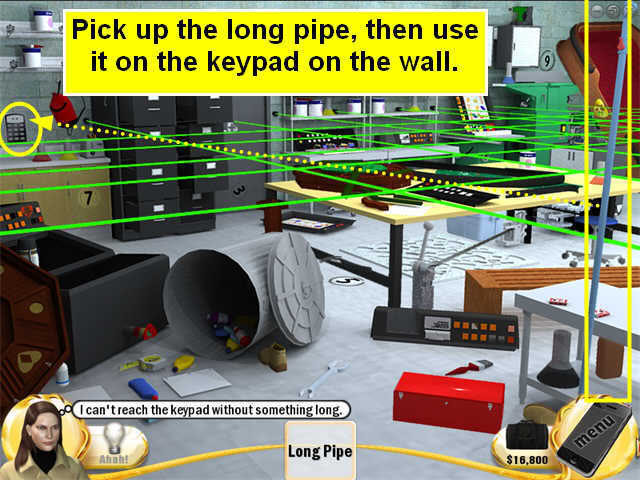
- Now use the numbers on the keypad.
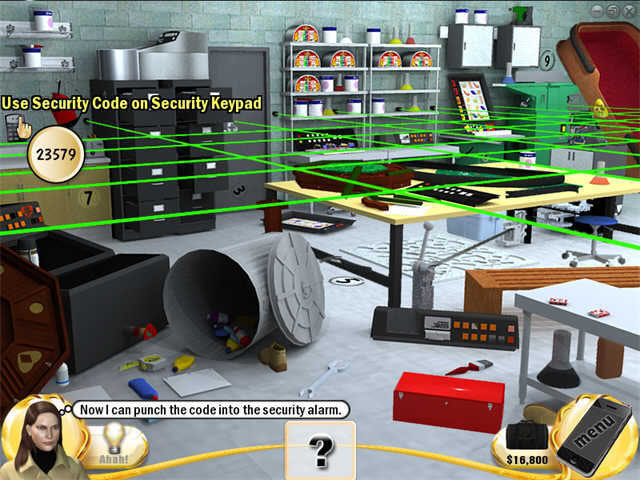
- The lasers are off!
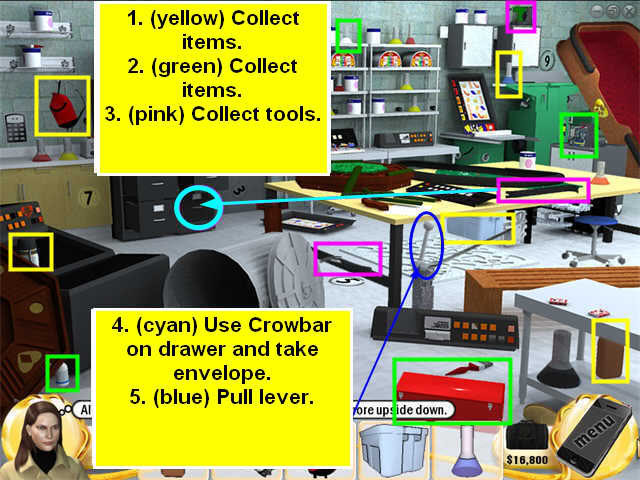
- Now you have to do three Find Lists, one right after the other. The last one is a set of tools.
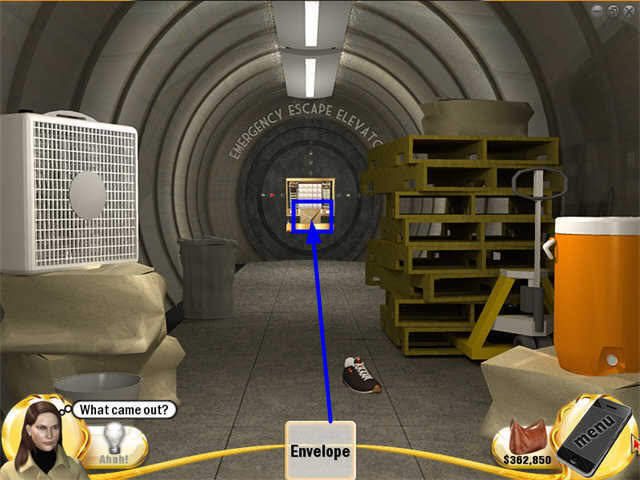
- Use the crowbar to pry open the locked drawer on the bottom right of the filing cabinet. Take the envelope.
- Now pull the white lever under the table. The table will slide back.
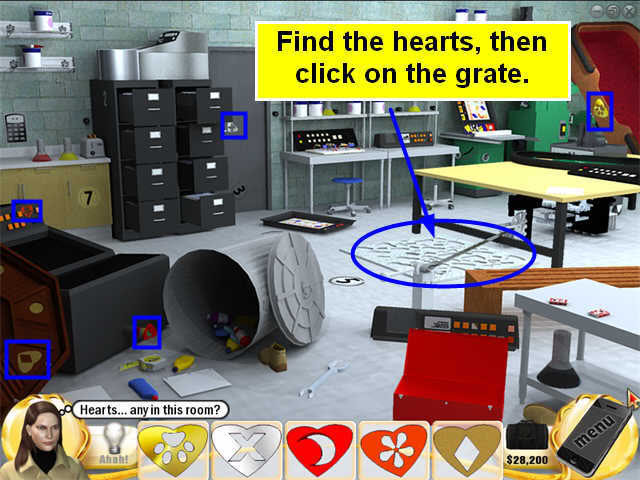
- Find the 5 hears on the Find List, then zoom in on the grate.
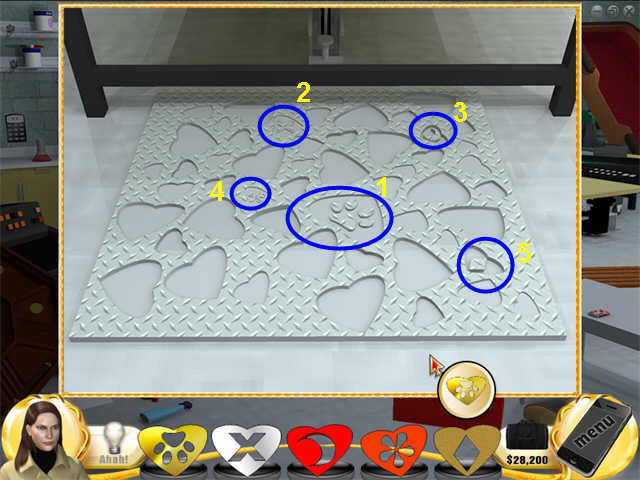
- Place the hearts as shown.
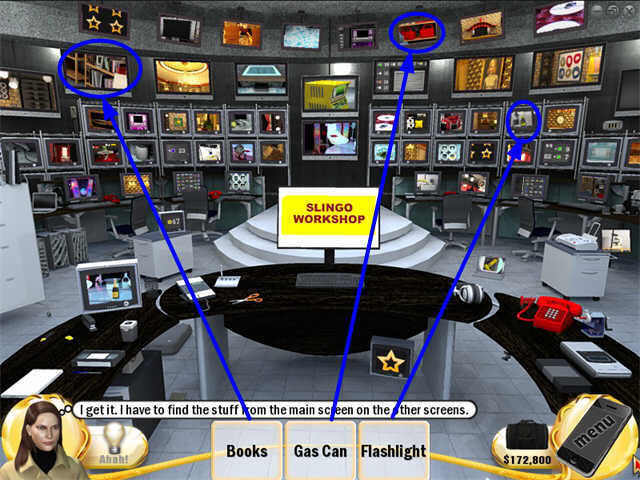
- Go through to the secret Slingo workshop.
- So Freddy kept a secret Slingo workshop. He also kept a photo of Maggie here.
- Collect the items on the Find List.
- Zoom in on the cabinet.
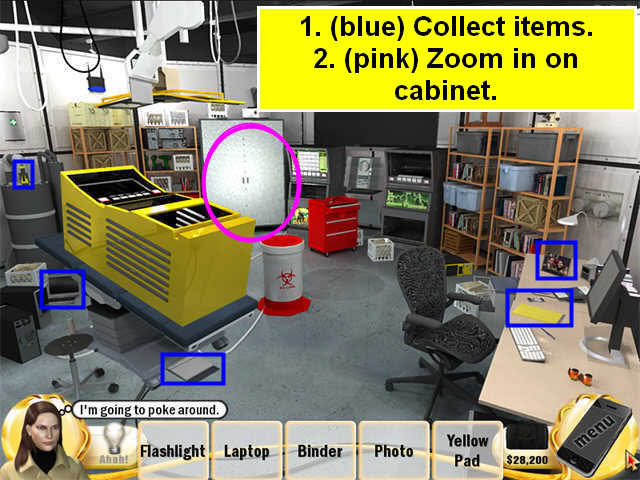
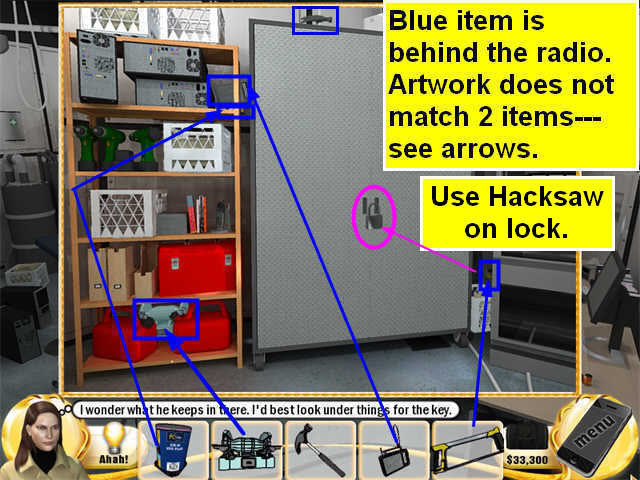
- Look around for the key by collecting the items on the Find List.
- Two of the items don’t look like their drawings (one is still in a case). See the screenshot.
- You don’t find a key, but you do find a hacksaw. Use it on the cabinet lock.
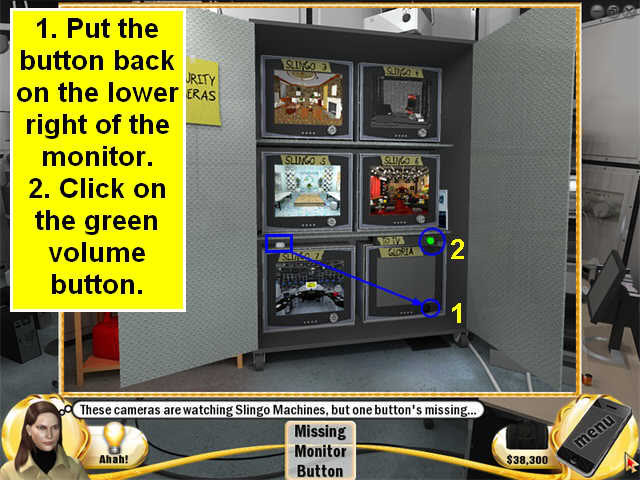
- The button has come off of one monitor and is lying on top of the monitor on its left. Pick it up and put it back.
- Now adjust the volume by clicking on the green button.
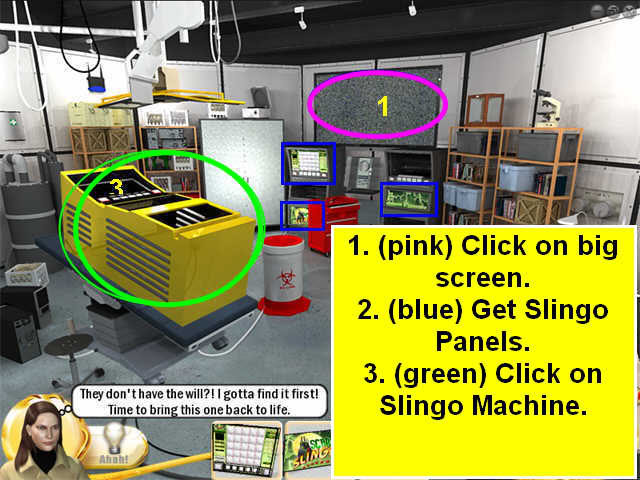
- Click on the Big Screen. Gloria hasn’t found Freddy’s will yet!
- Collect the Slingo panels.
- Click on the Slingo machine to start repairs.
- You will get a zoom scene of the Slingo Machine control board.
- First just collect the 5 pieces from the Find List.
- Now decide where each piece goes on the board. You have to match the colors. See the screenshot for the solution.
- Put the panels on the machine, then click the green lever to raise it up.
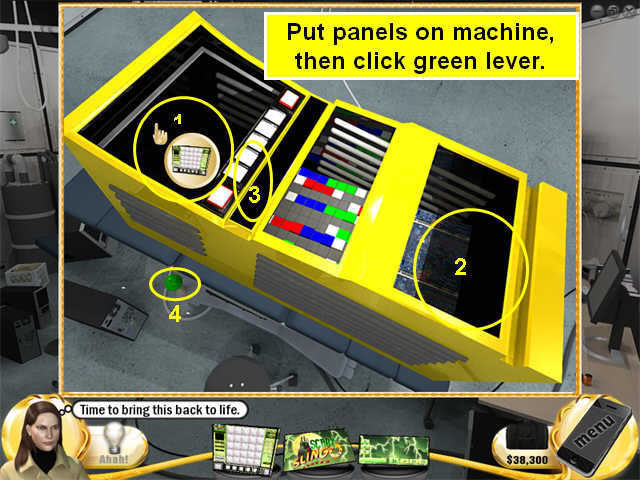
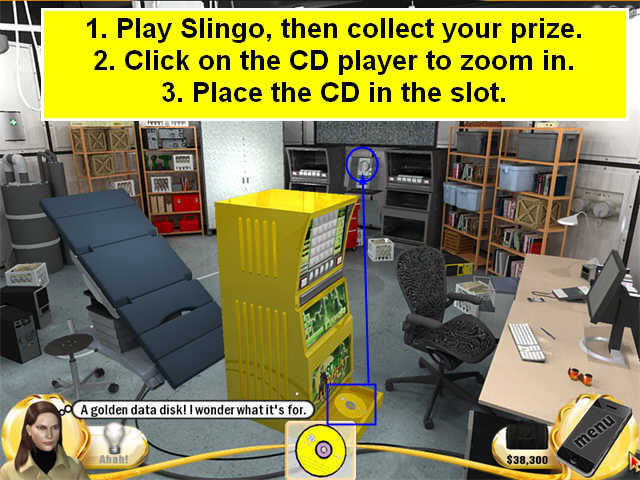
- Click on the machine to play, and play until you win the prize.
- Your prize is a "golden data disk." Collect it.
- Click on the DVD slot on the back wall to zoom in.
- Place the disk in the slot.
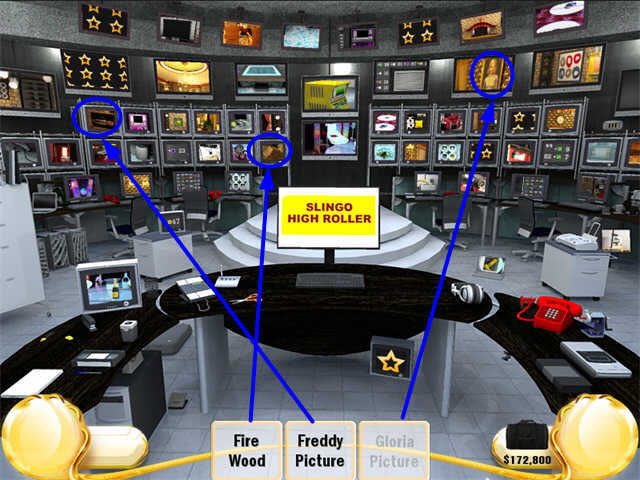
- Time to go to the High Roller room!
- There’s a special express elevator to the High Roller room. However, it’s out of order.
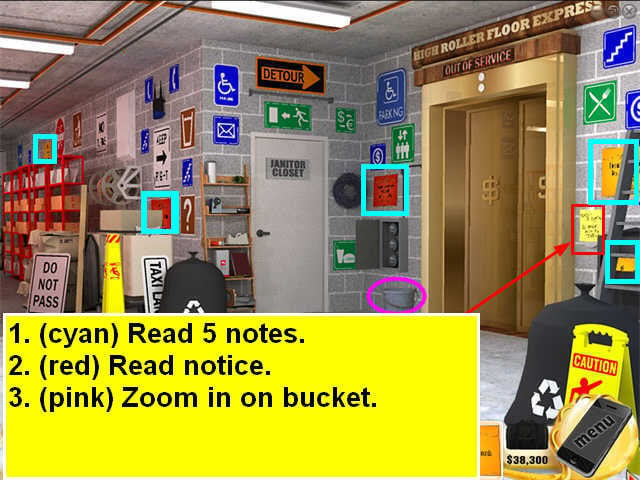
- Read the 5 notes that match the Find List.
- Read the posted note next to the elevator.
- Zoom in on the bucket.
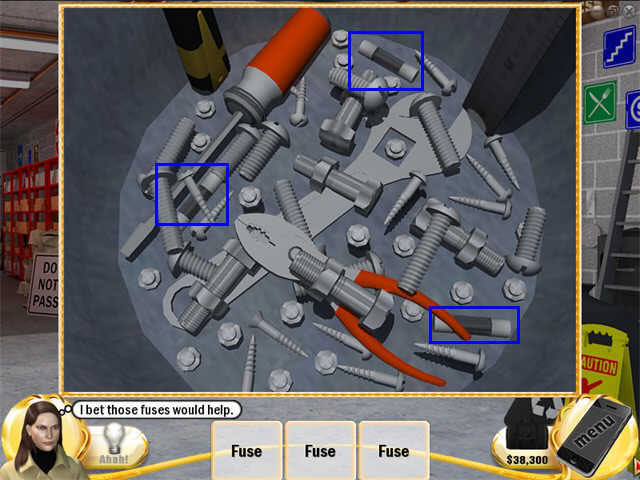
- Look in the bucket and you will find some fuses. Maybe they will help get the elevator working.
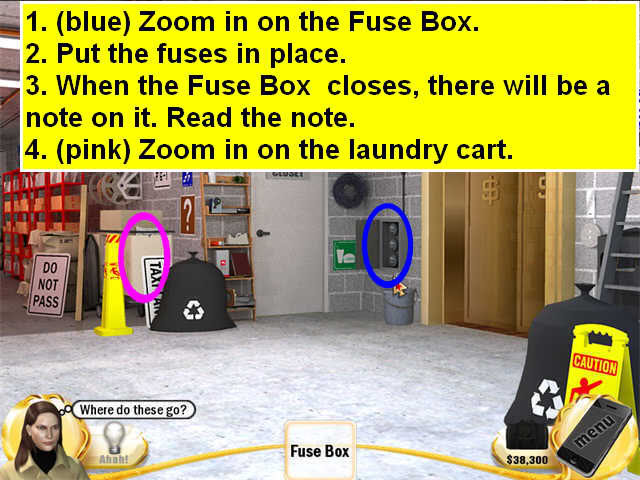
- Zoom in on the Fuse Box. Put the fuses in places.
- When the Fuse Box closes, there will be a note on it. Read it.
- Zoom in on the laundry cart.
- Now you have to basically look at every single thing in the cart.
- Not all items look like their pictures on the Find List. See marked arrows.
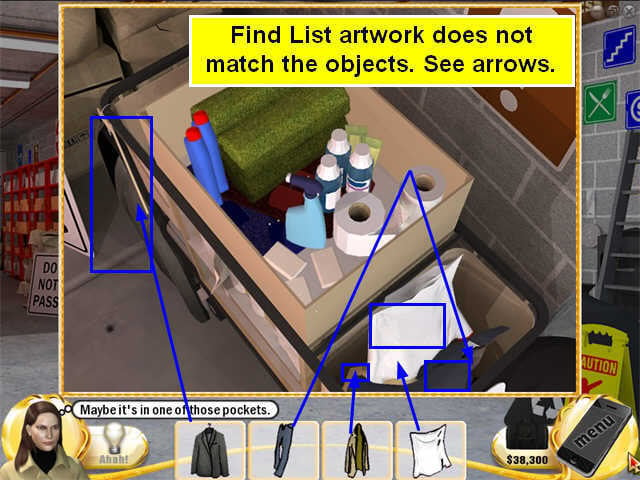
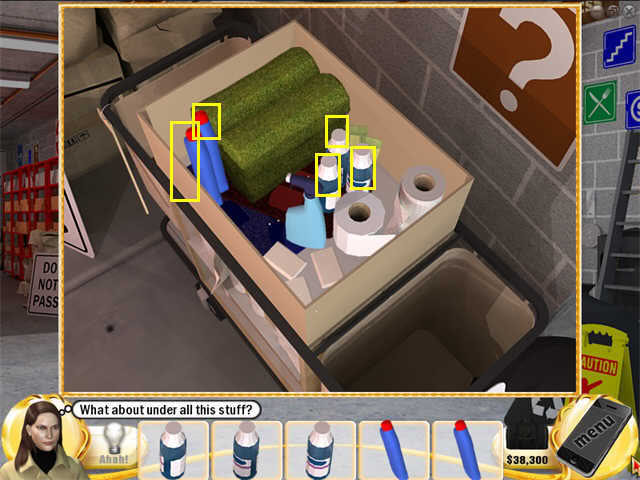
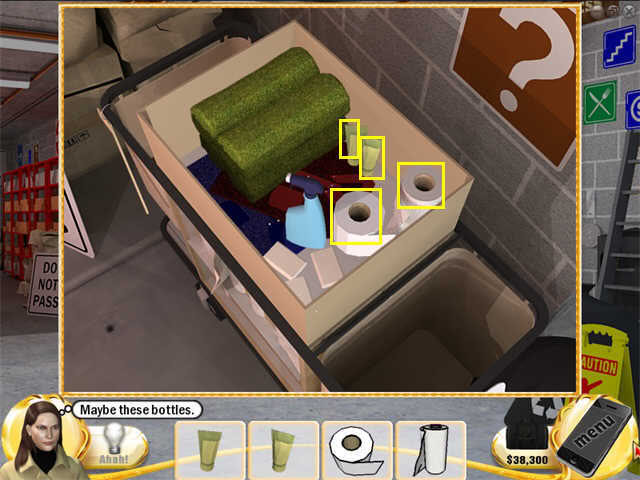
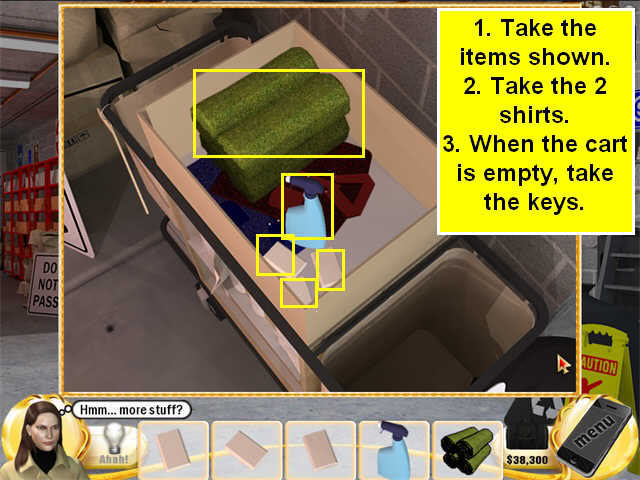
- Lastly pick up the two shirts.
- When you have finally removed everything, you will see the key to the janitor’s closet. Collect it.
- Use the key on the Janitor’s Closet.
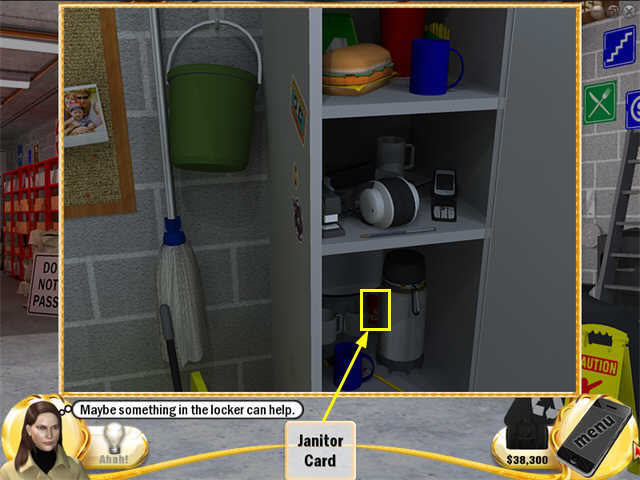
- Click on the locker to zoom in.
- Collect the pages with number on them.
- Use the numbers on the combination lock.

- Collect the Janitor Card. It is on the bottom shelf behind the thermos.
- Use the card on the card reader on the wall to the right of the Elevator.
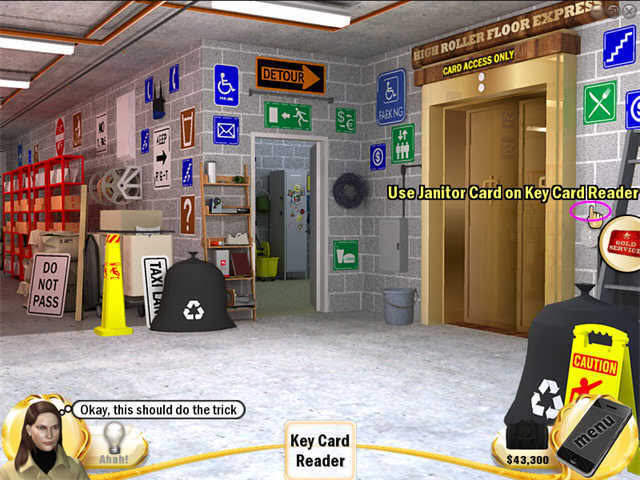
- Take the Elevator up to the High Roller rooms.
- Search the jackets on the Find List for clues.
- A note will fall to the ground. Read it.
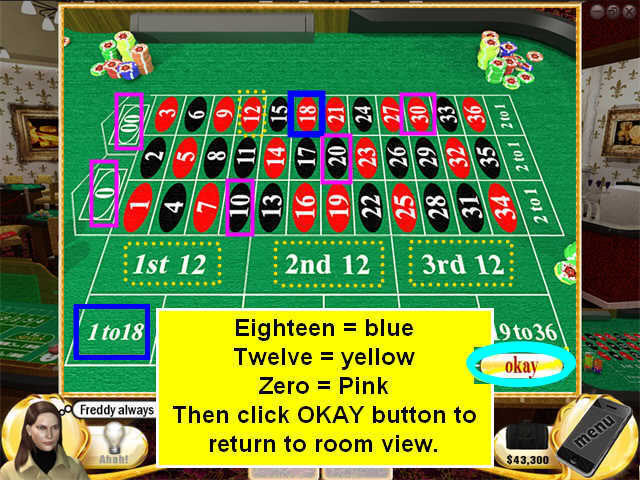
- Zoom in on the Roulette Table on the lower right.

- Now Maggie will click the numbers on the roulette table that match Freddy’s favorite bets.
- After the last set, an "OKAY" button will appear in the lower right corner. You have to click it to finish the zoom scene.
- See the screenshot for the solution.
- Now zoom in on the Blackjack Table towards the back of the scene.
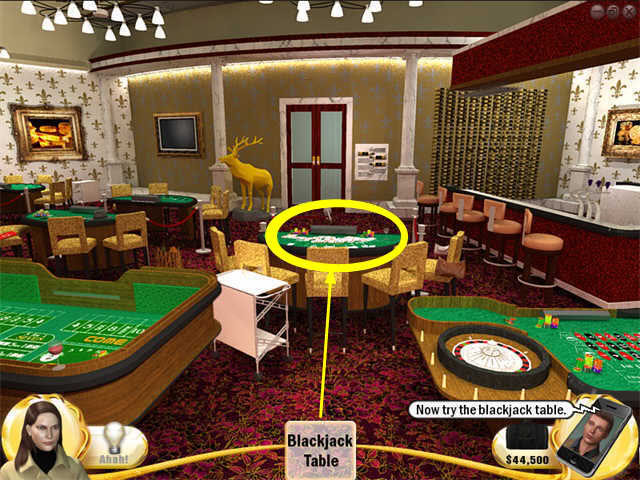
- Collect all the cards with gold stars. Freddy has a thing about stars.

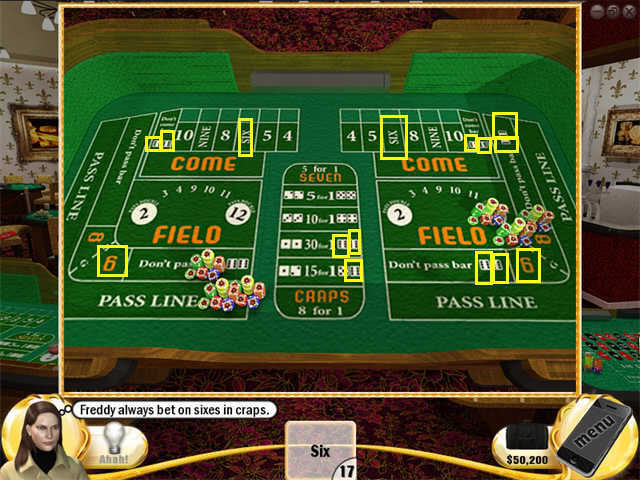
- Now click on the Craps Table on the left.
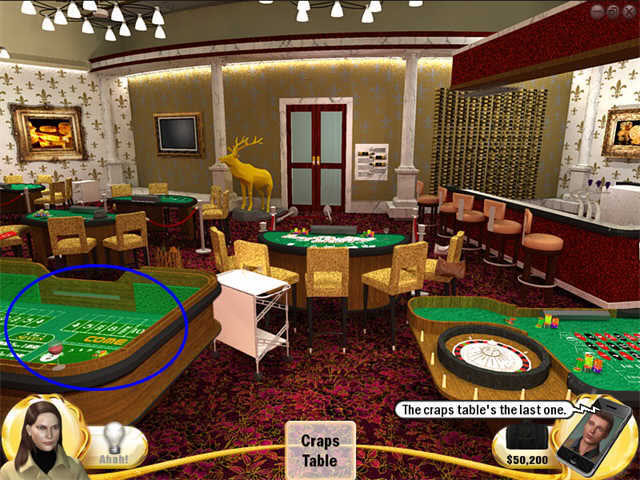
- Again, you have to click on sets of numbers that Freddy liked to bet.
- When Maggie says Freddy liked to bet sixes, you will have to click both things with the number 6 and any die that has 6 spots showing.
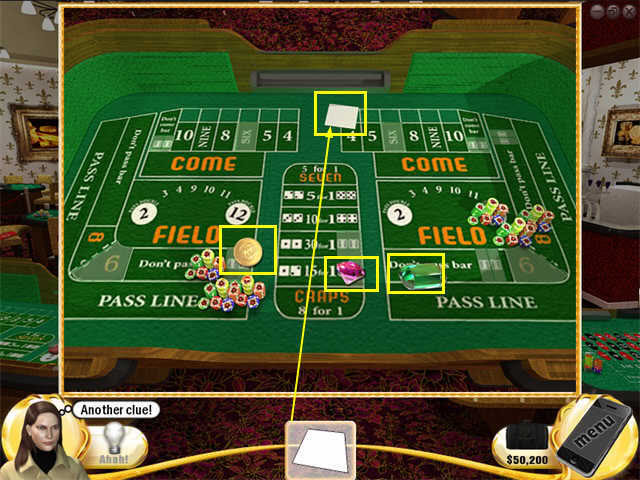
- Collect the loot and a note. It says "P E N D R."
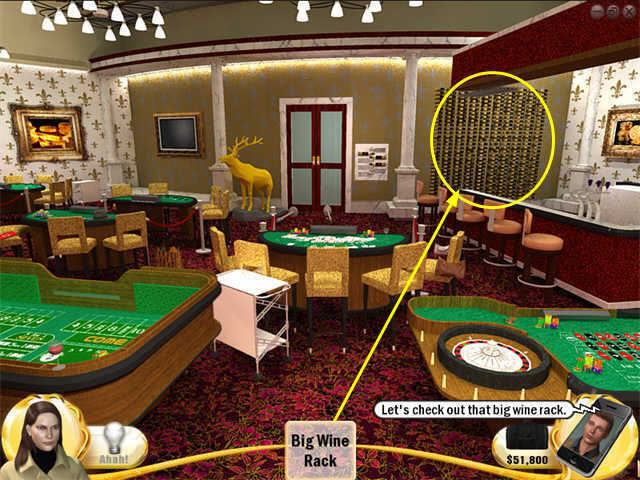
- Click on the big wine rack in the back right.
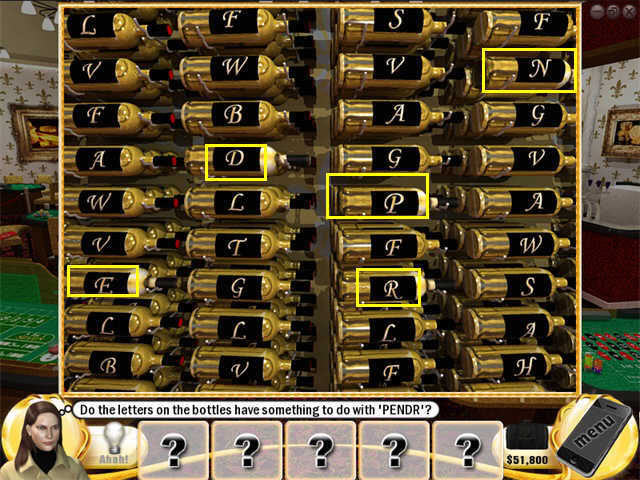
- Collect the bottles labeled P, E, N, D, R
- Click on the small wine rack next to the door.
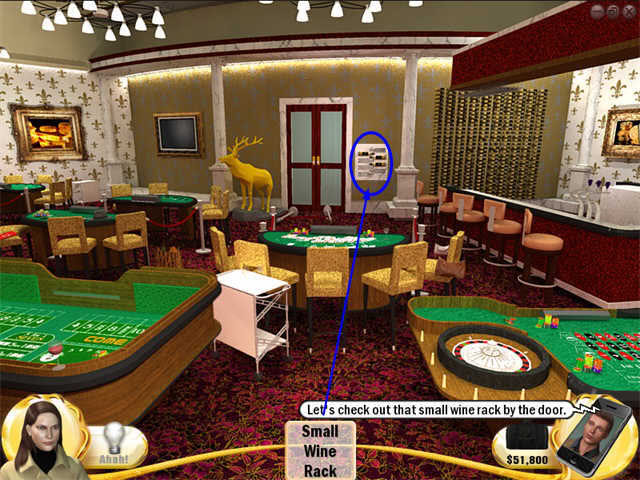
- Put the bottles in place in two columns in order: P, E, N, D, R, skipping any bottles that are already there.
- See the screenshot for the solution.
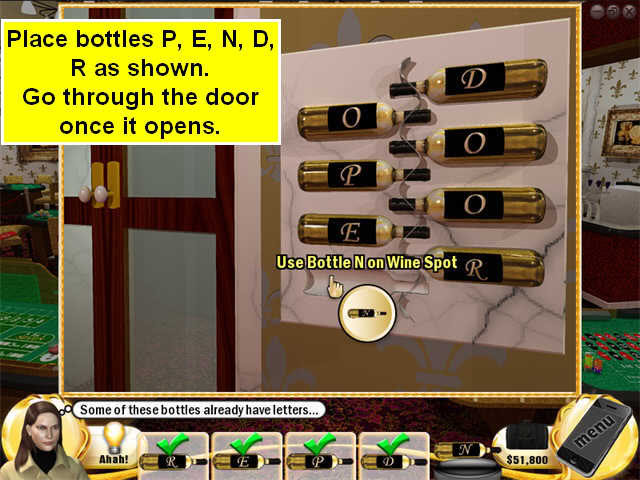
- The door will open. Go through.
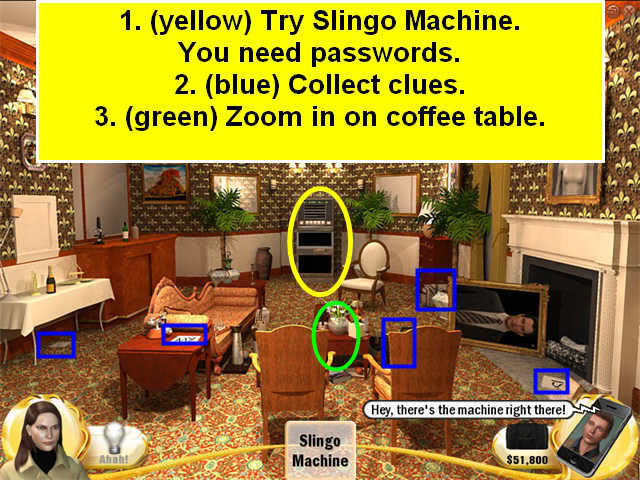
- So the high rollers had their own Slingo room!
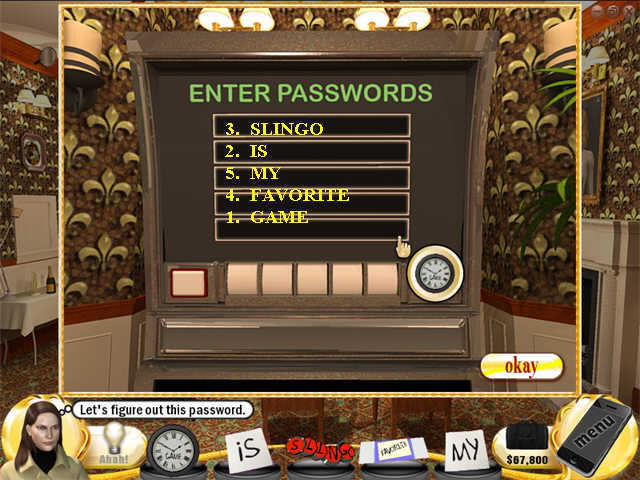
- Try the Slingo Machine. You need passwords.
- Search the room for clues.
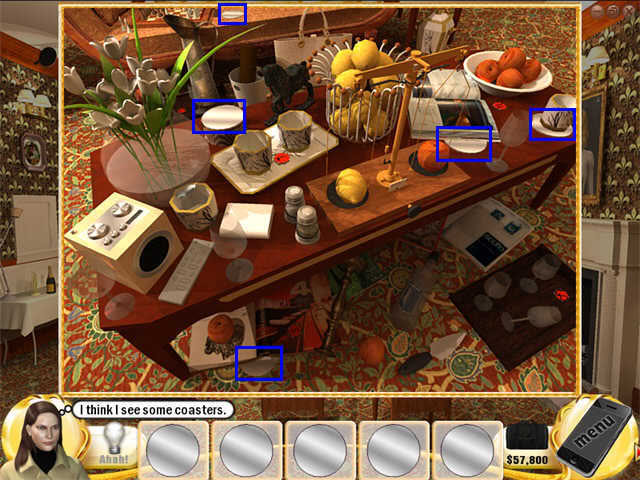
- Zoom in on the coffee table.
- Collect the coasters.
- Put the coasters into the "coaster slots" around the room.
- Turn on the desk lamp on the left side table. Beams of light will shoot around the room, spotlighting the clock on the wall.
- Zoom in on the clock.
- The word GAME is stuck to it-collect it.
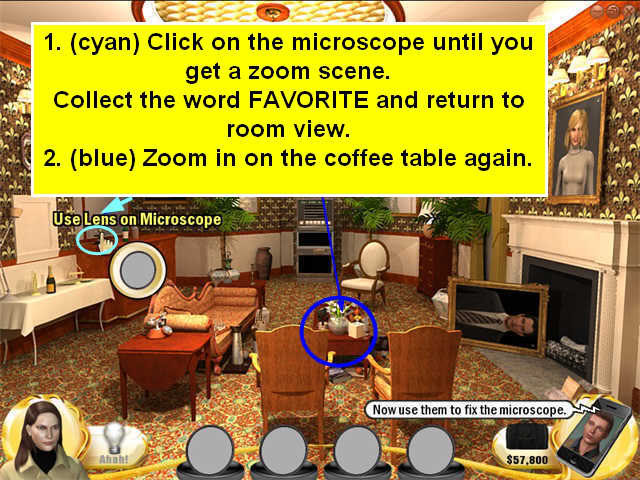
- Try the microscope on the other left table.
- There’s something there, but it’s too blurry to read.
- Zoom in on the chandelier.
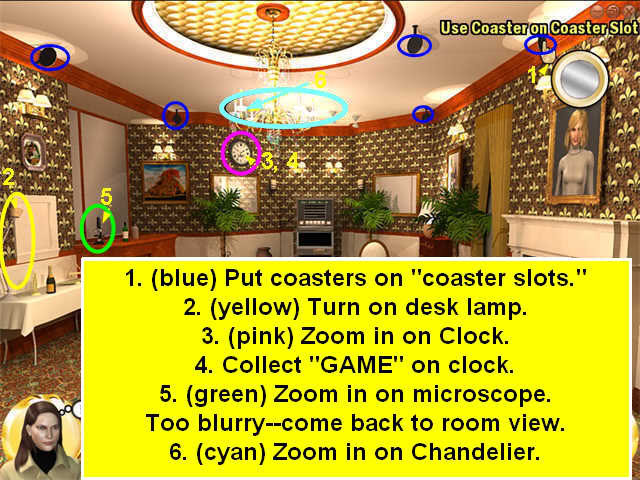
- Collect the microscope lenses.
- Now you have to put the lenses into the microscope. This will take multiple clicks, but eventually you’ll get a zoom scene.
- There’s another word there-collect it.
- Return to room view.
- Zoom in on the coffee table again.
- Collect the red poker chips.
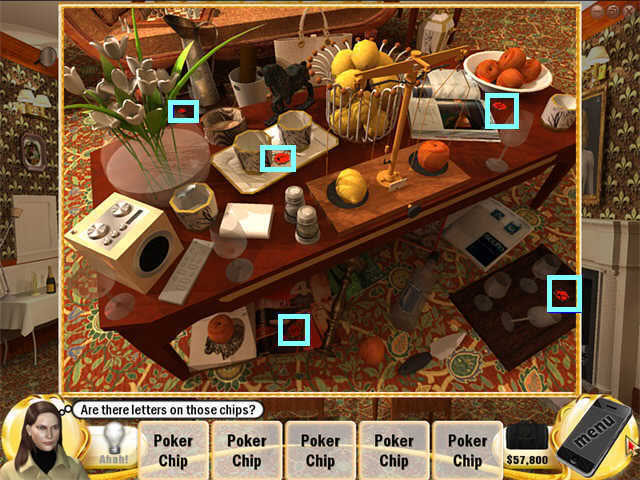
- Return to room view.
- Click on the Slingo Machine.
- Now enter the passwords so they say "Slingo is my favorite game."
- See the screenshot for the solution.
- Go through to the area with the High Roller Cages.
- You’re standing in the payout area in front of the High Roller Cages.
- The place has been trashed.
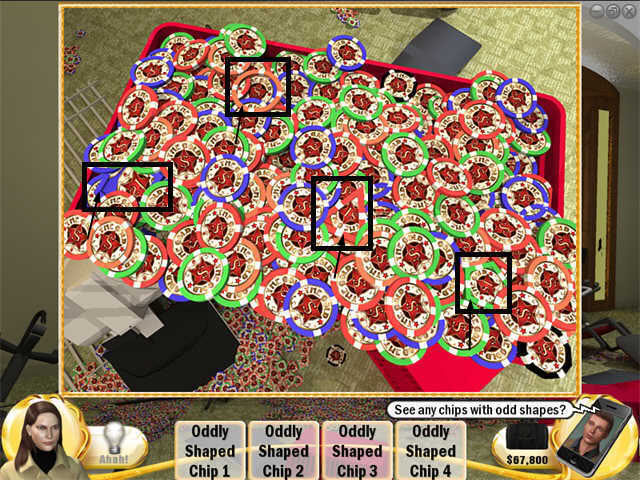
- Start by looking in the big basket of chips.
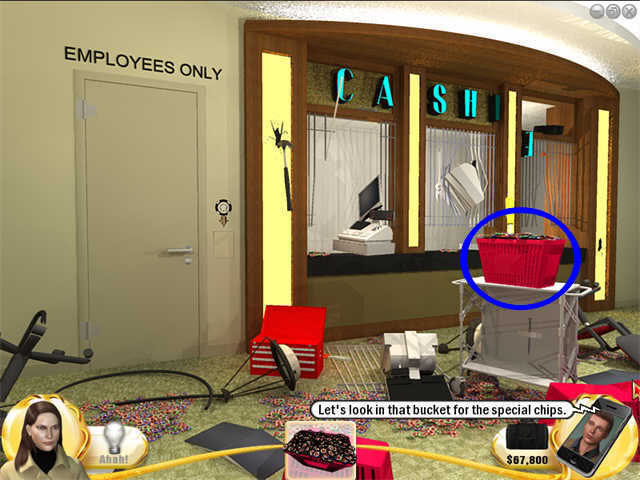
- There are four strangely shaped chips: a square, a triangle, a hollow circle, and a pentagon.
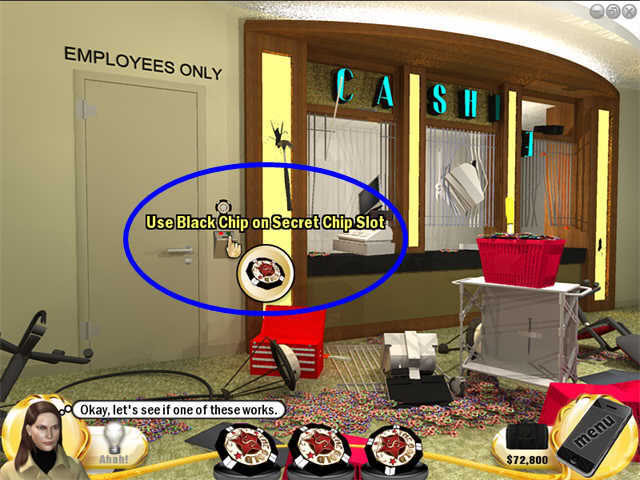
- Zoom in on the cash register in the leftmost teller window (under the CA).
- There is a chip slot. Put your chips in it.

- When the register drawer opens, take the key.
- Try the key on the door. It doesn’t work. There’s a chip reader next to the door–you need a chip as well.
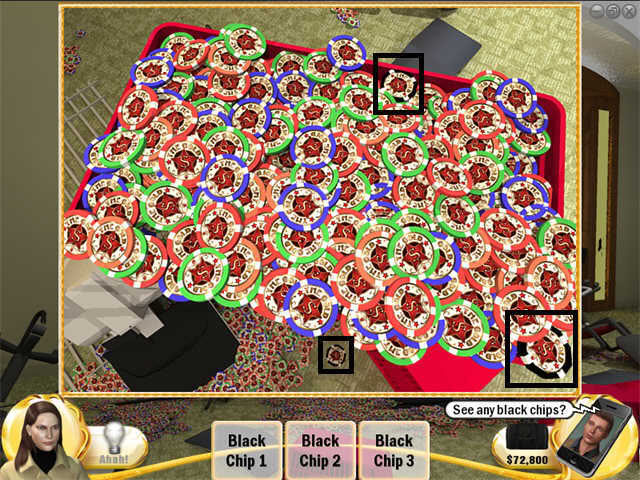
- Zoom in on the chip basket again.

- This time collect the 3 black chips.
- Use the chips on the chip reader next to the door.
- It unlocks, but it’s jammed.
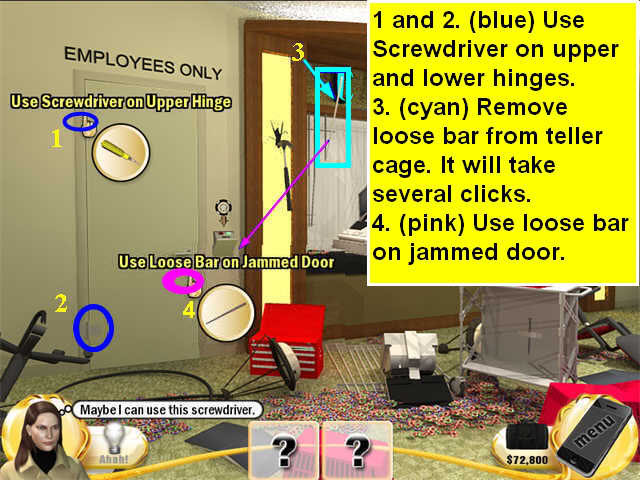
- Collect some tools.
- Use the screwdriver on the upper and lower hinges of the door.
- There is a loose bar in the left most teller cage. It will take several clicks, but you can break it away.
- Use the loose bar on the jammed door.
- The door is ready to open, but Kyle tells you it’s booby trapped. How does he know? If you watch the movie at the very end of the game, you’ll find out, until then, just go with it.
- Collect the items on the Find List. The extension cord is hard to see, but it’s hanging in the far right teller window.
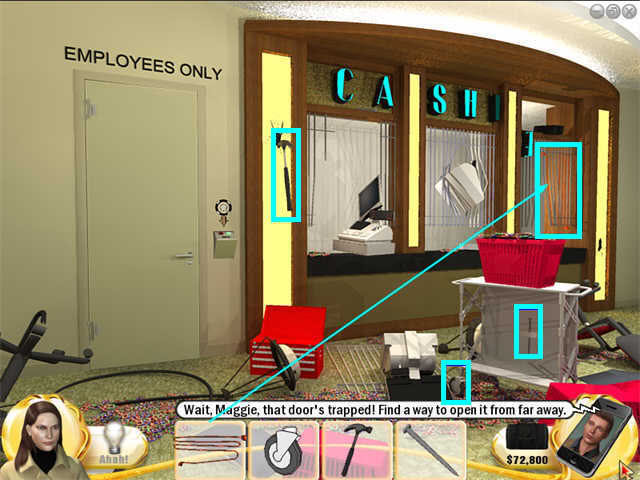
- The items will automatically combine in inventory.
- Click on the extension cord to pull the handle.
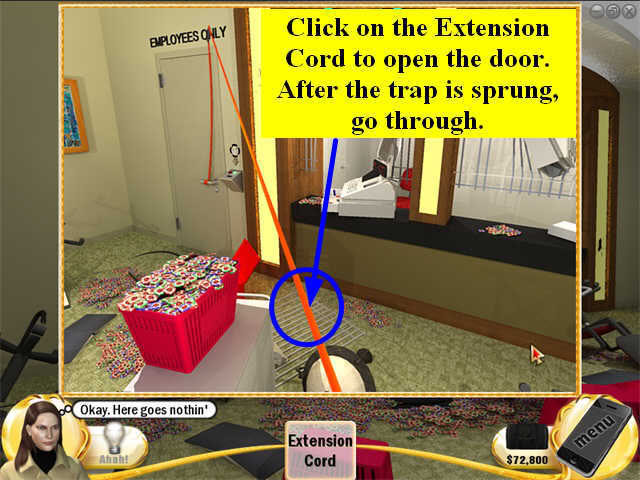
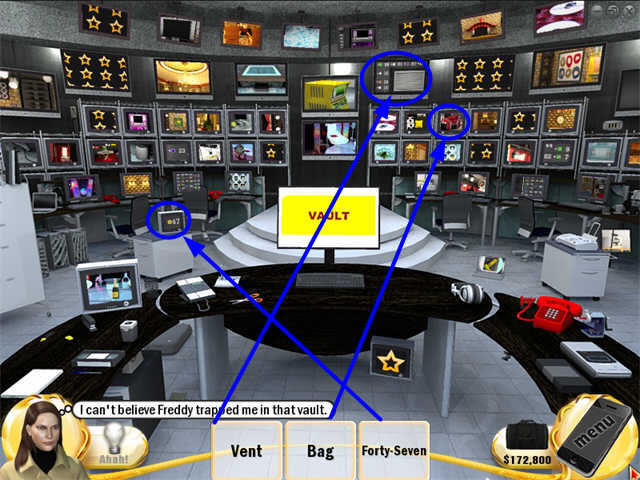
- When the door is open, go through into the High Roller Cage.
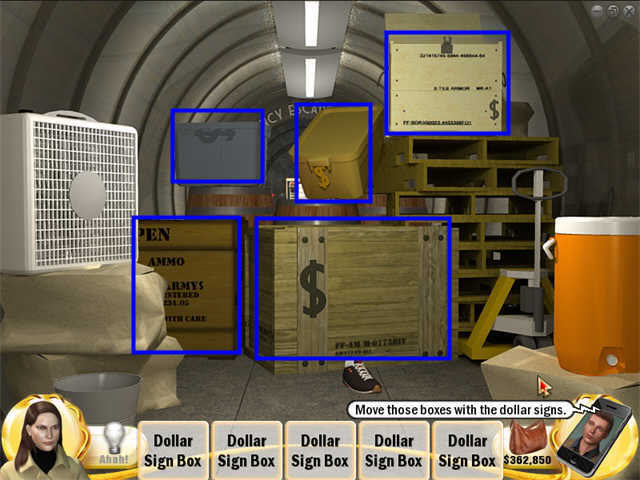
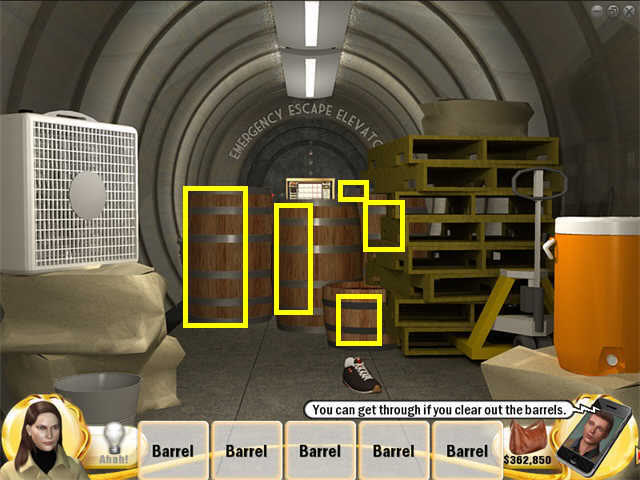
- This should be the place where they key the money to pay the high rollers, but it’s got a bunch of gold bars just stacked on the floor and a couple of desks. You need to perform several actions in sequence to get into the vault. None of this really makes sense, just go with it.
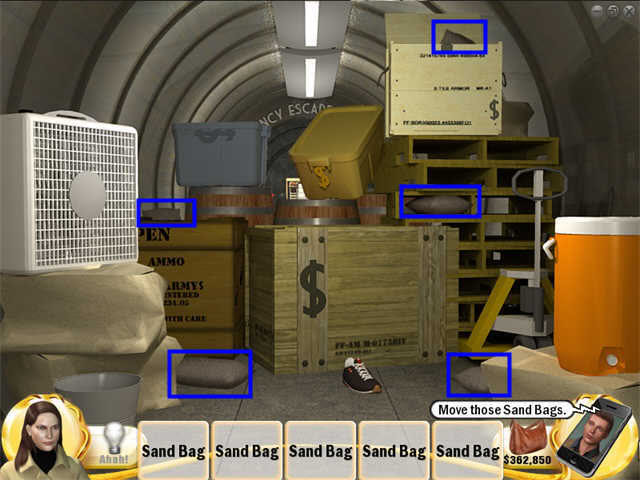
- Collect the items from the Find List. The mallet is wooden, on the right side.
- Smash the barrels and collect the loot.
- Press on the strange shapes on the wall.
- Click on the diamonds that are not the regular color. One is a slightly darker brown and one is gray. See screenshot.
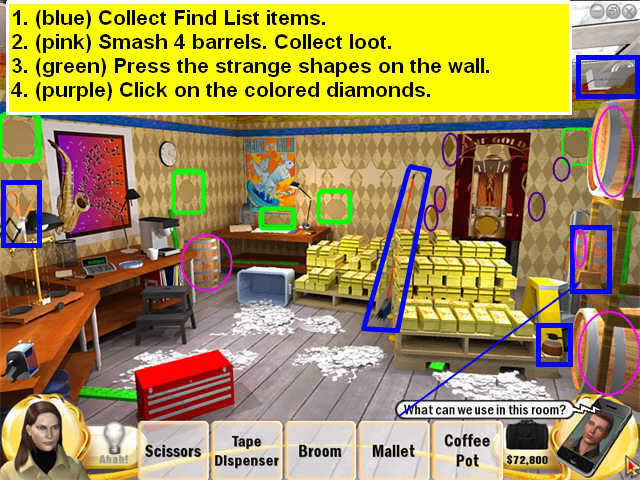
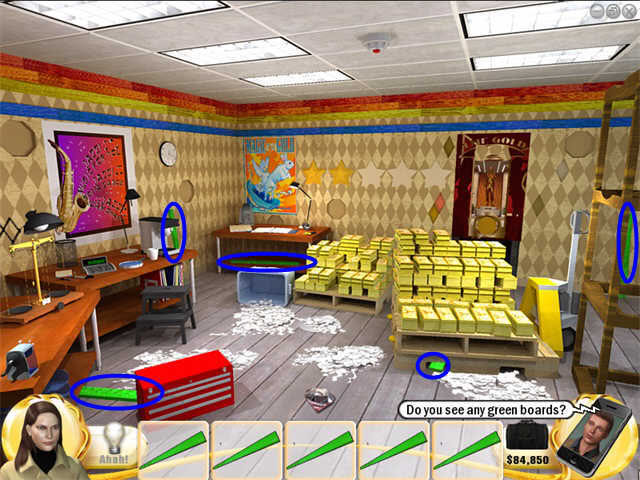
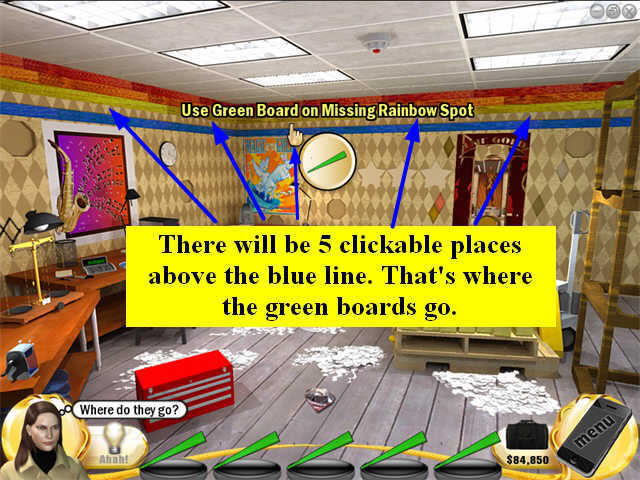
- Collect the 5 green boards.
- There will be 5 clickable places above the blue line that runs around the room. That’s where the green boards go.
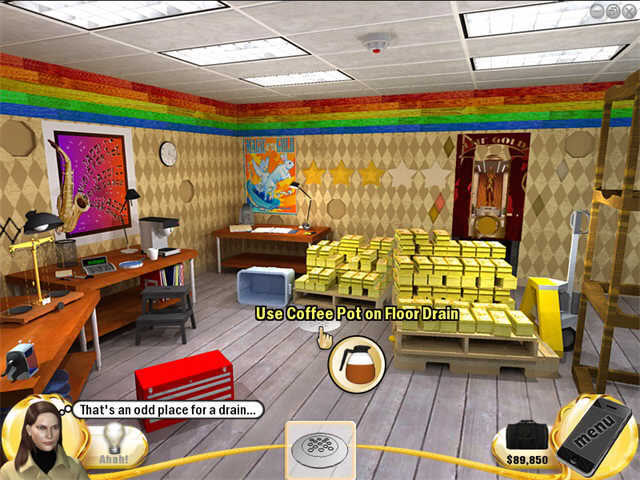
- Sweep up the mess on the floor.
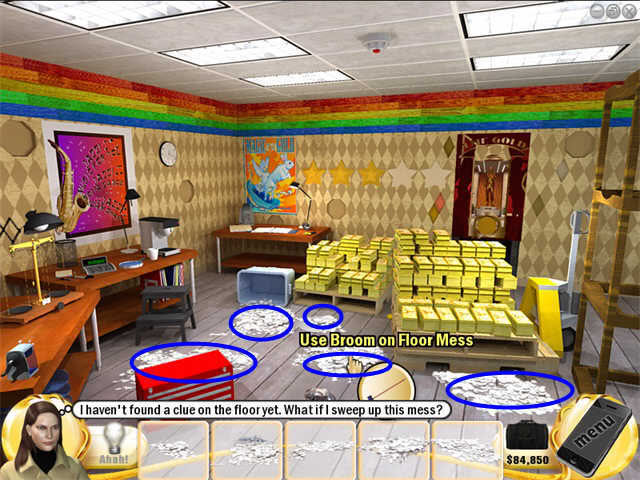
- This reveals a drain in the floor. Use the coffee pot on it.
- Zoom in on the magic poster on the back wall.
- Use the scissors to cut out 3 letters.

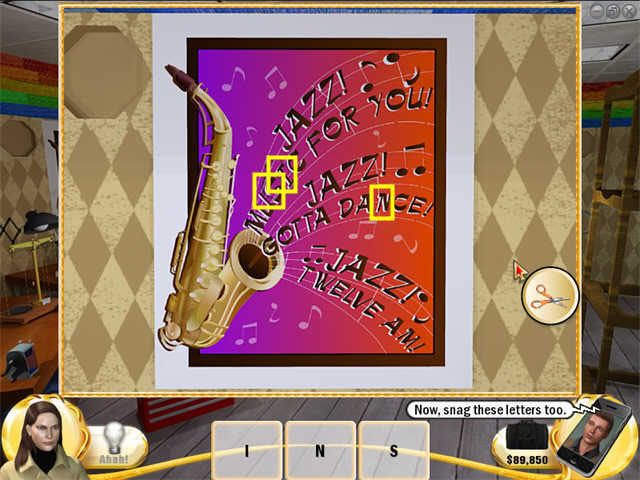
- Then zoom in on the music poster on the left wall.
- Again, remove some letters.
- Now zoom in on the remaining poster on the back right.
- Put back the letters you cut from the other posters so they spell CASINO.
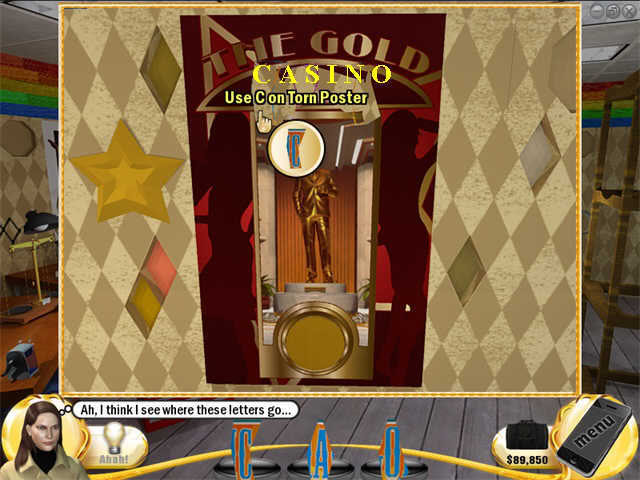
- This will reveal a chip slot at the bottom of the poster. Put the gold chip there.

- This will open the entrance to the High Roller Vault. Go on through.
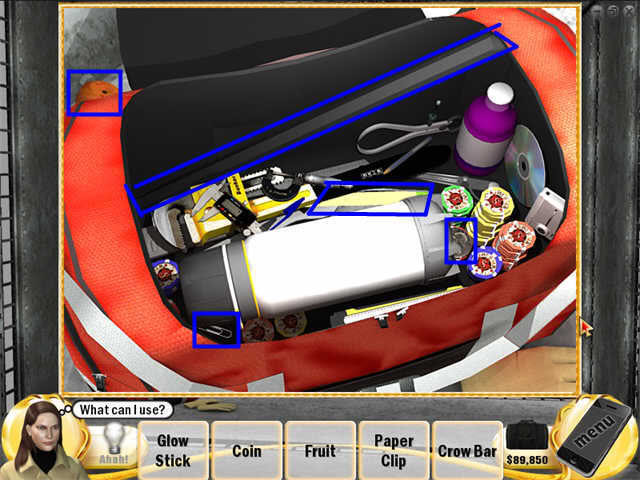
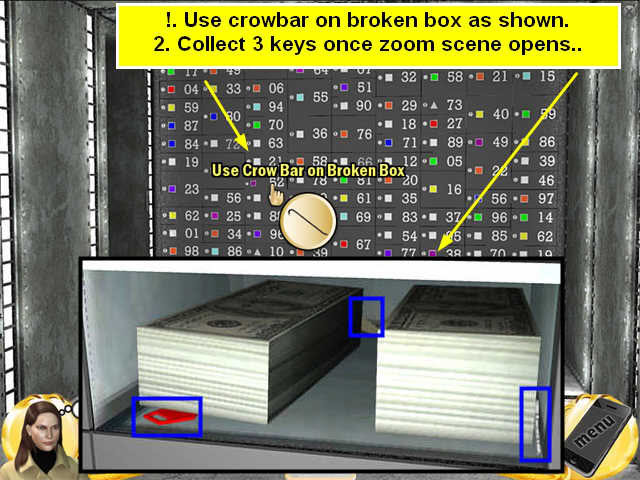
- There is a loot bag in the lower left. Zoom in on it.
- Collect the items on the Find List.
- One of the boxes is broken. Use the crowbar to open it.
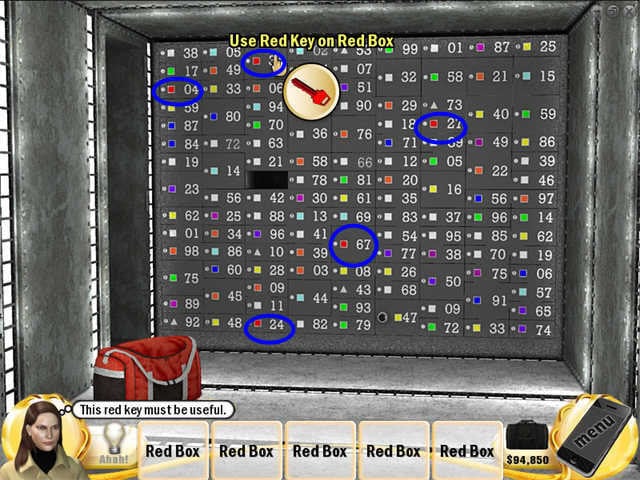
- Collect the 3 keys.
- The red key opens boxes with red. The triangle key opens boxes with triangles.
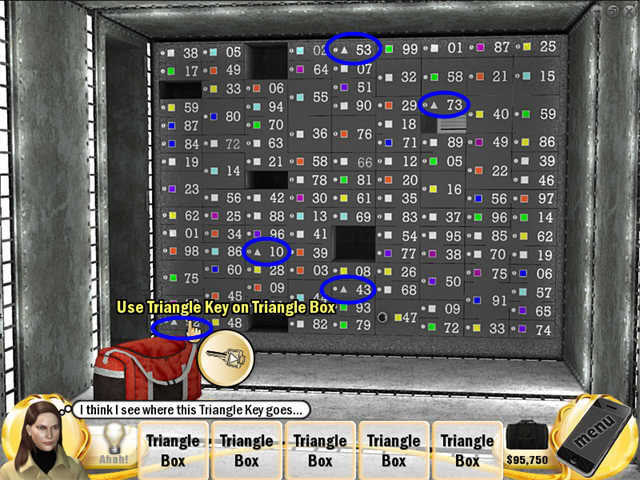
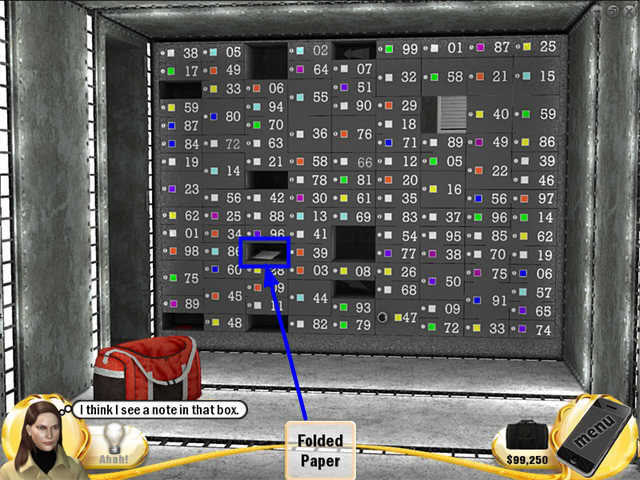
- This reveals a folded piece of paper in one of the boxes. Read it.
- Now use the last key with the boxes that have the numbers on the paper.
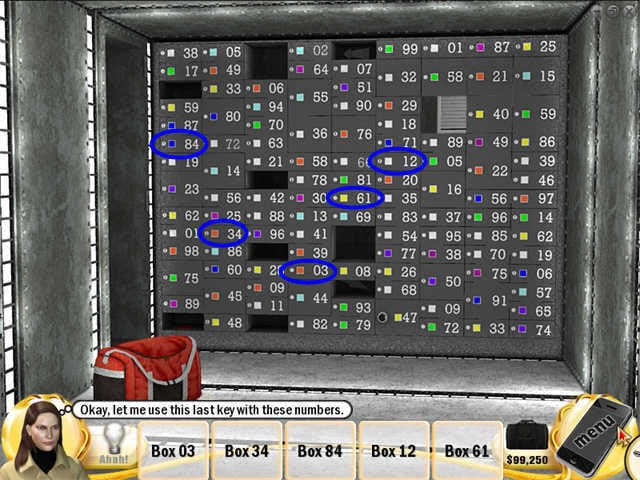
- This reveals another note. Take it and read it.
- Now just click on the boxes that match the 3 numbers on that last note.
- Click on the only box that has a combination lock and it will open.
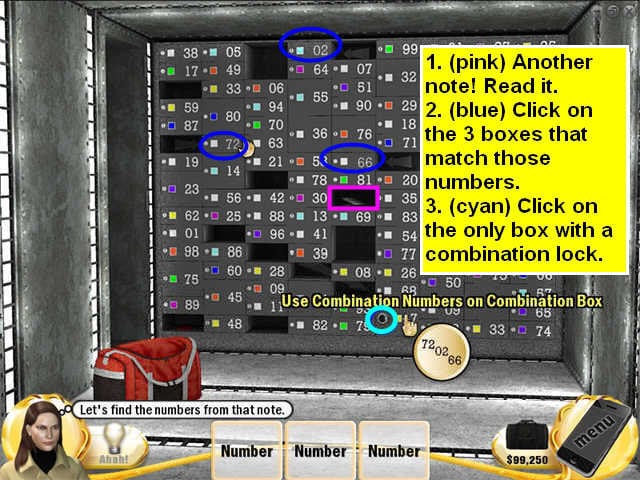
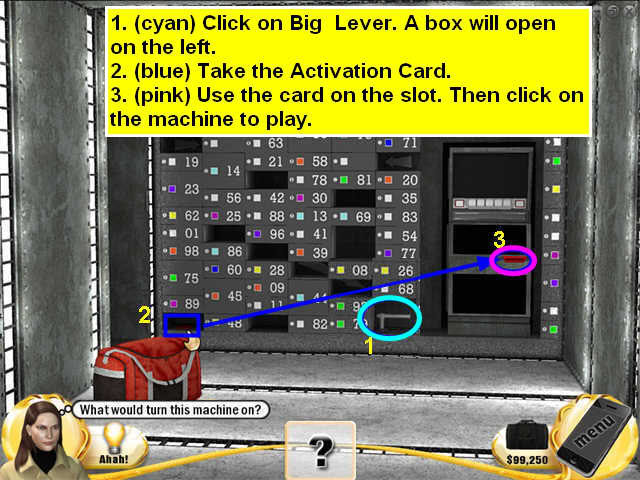
- Inside that box is a lever. Click on it.
- Another box will open on the far left, revealing an Activation Card.
- Take the card and use it in the slot on the Slingo machine.
- Click on the machine to play.
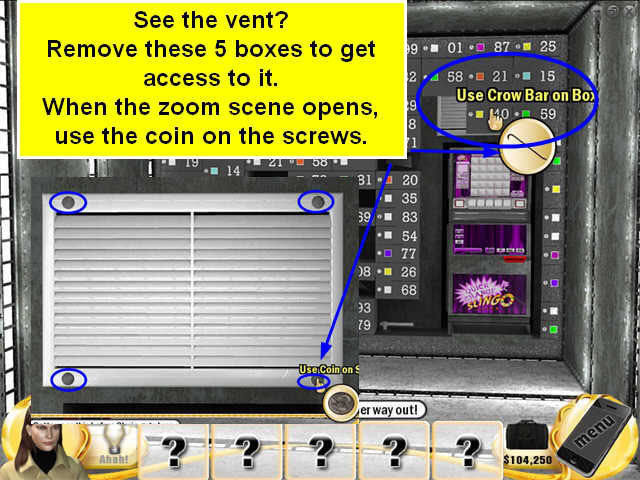
- Now use the crowbar on the 5 boxes covering the vent, just above the Slingo machine.
- When the vent is revealed, zoom in on it.
- Use the coin from inventory to remove the 4 screws from the vent.
- Go through the vent.
- You will come out in the Spa.
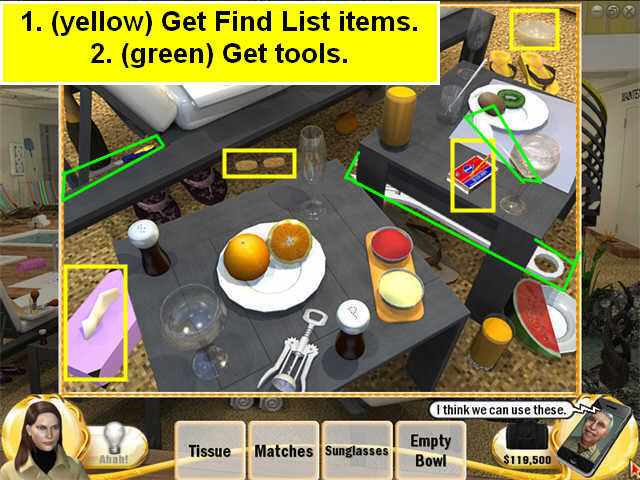
- Start by collecting the items on the Find List.
- Zoom in on the grate.
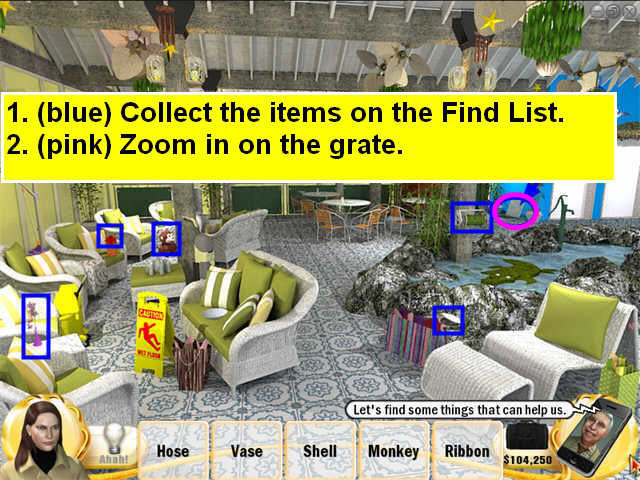
- There is a faucet in the upper left of the zoom scene. Click on it to attach the hose.

- Collect the items on the next Find List.
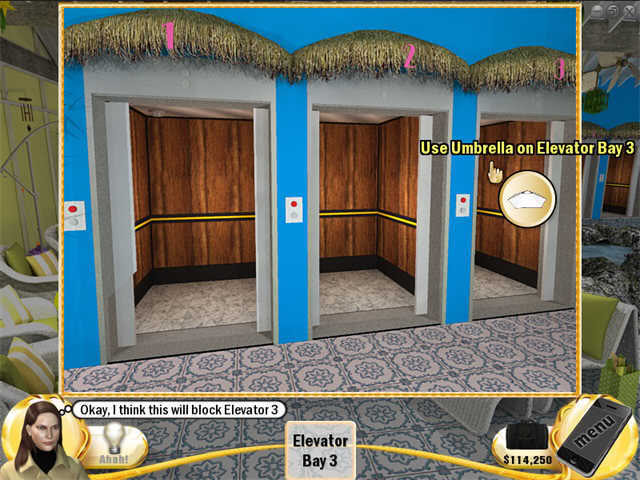
- Zoom in on the Elevator.
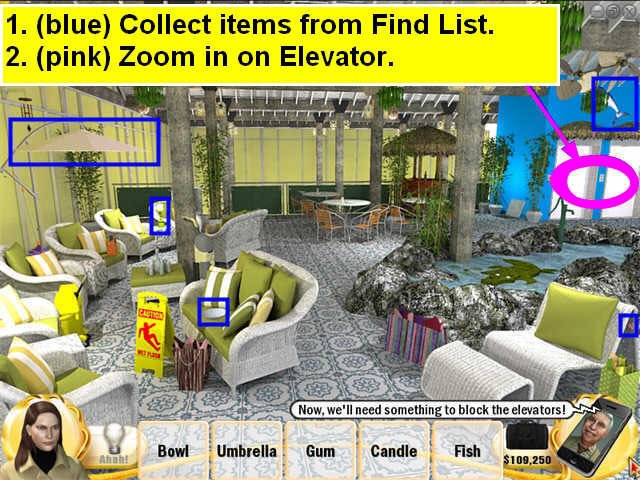
- Call all 3 elevators to the spa floor.
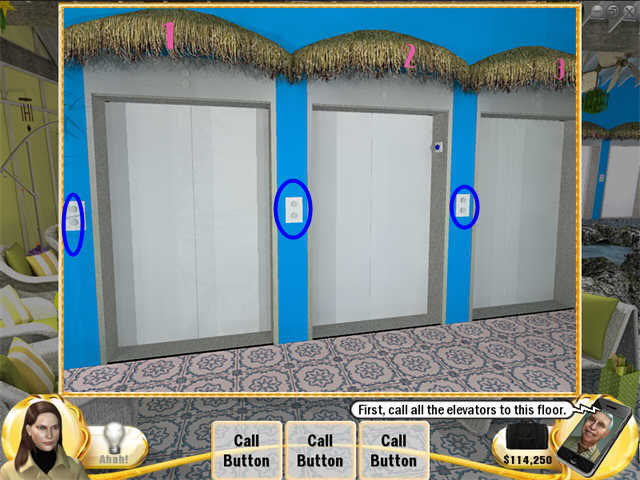
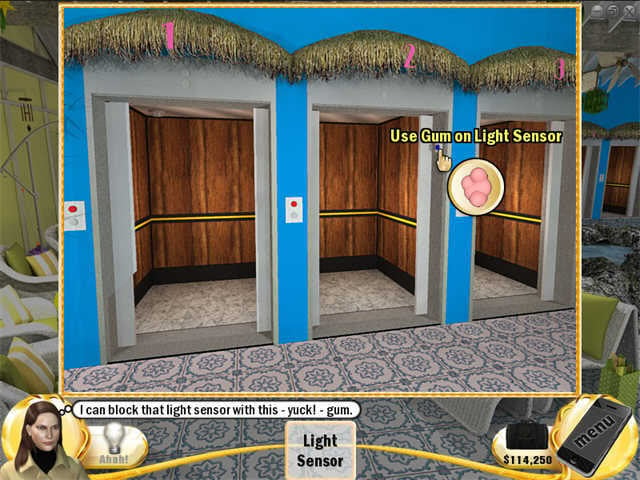
- Now you must block each of the three elevators.
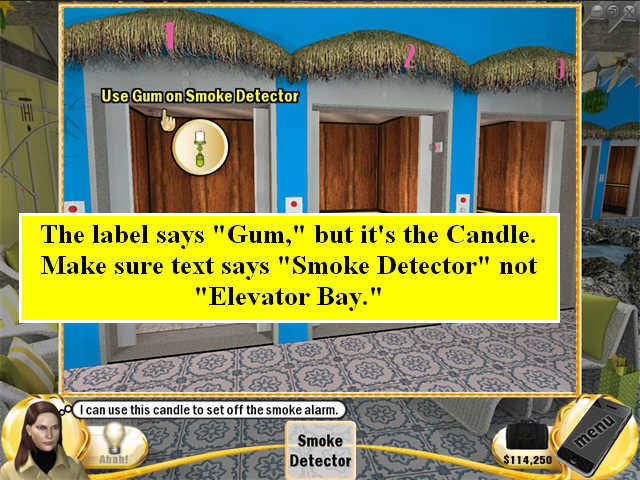
- You will chewing gum to block the sensor on the middle elevator.
- You will use a candle to set up the smoke alarm in the left elevator.
- You will use the umbrella to block the right elevator.
- That will keep anyone else from using the elevators for awhile.
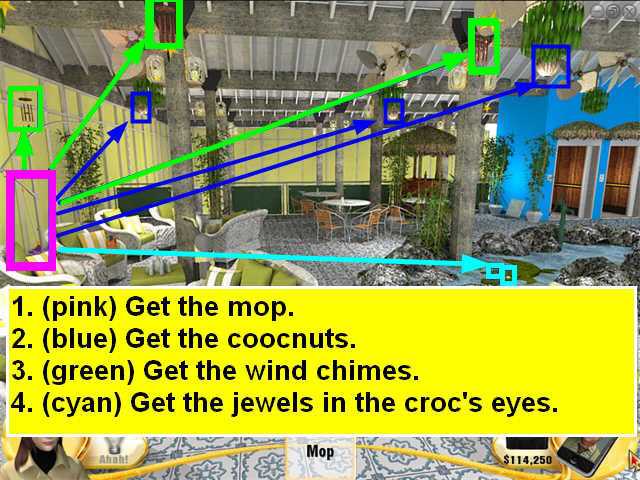
- Get the mop.
- Use the mop to get the coconuts, wind chimes, and the jewels from the crocodile’s eyes.
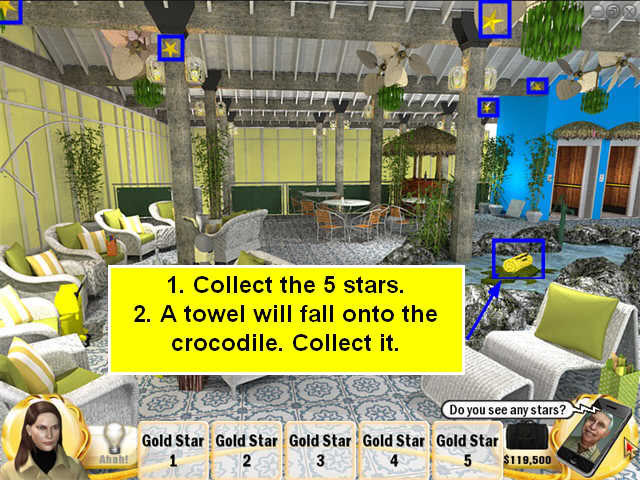
- Collect the 5 stars.
- A towel will fall onto the crocodile. Collect it.
- Go through to the Beautiful People Spa.
- This is the public spa area. Start by zooming in on the small tables on the left.
- Collect the items from two Find Lists.
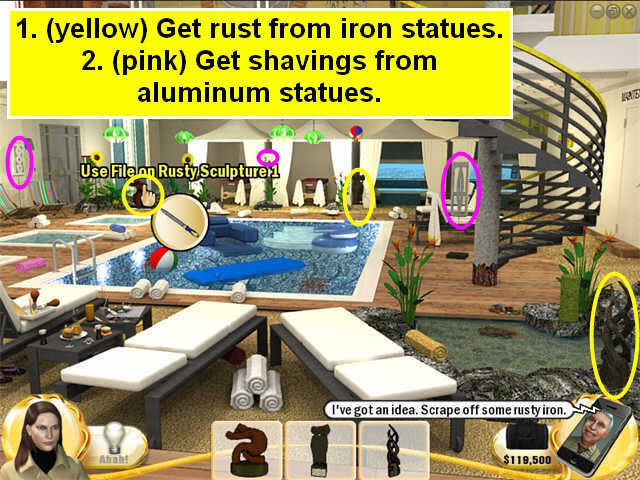
- Collect the rust from the iron statues.
- Collect shavings from the aluminum statues.
- Now zoom in on the big post at the bottom of the stairs.
- You need to do several things in sequence.
- Start by using the big wrench to remove the bolt. This leaves a hole.
- Put the thermite you made from the rust and the aluminum into the hole.
- Put the tissues into the hole.
- Light the tissues, not the thermite.
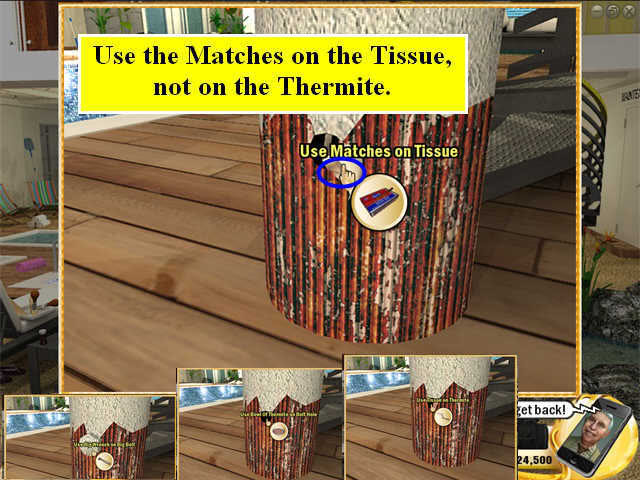
- This will blow up the stairs so Gloria can’t get to you.
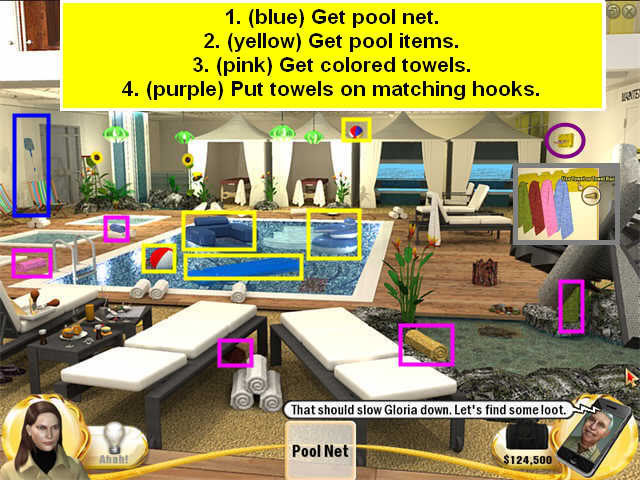
- Get the pool net from the far left wall.
- Use the pool net to get the pool items. The white object in the pool isn’t a pool item-it’s permanent steps. The 5th pool item is the beach ball that’s up high.
- Collect the colored towels.
- Zoom in on the hooks on the right wall.
- Put each towel on its matching color hook.
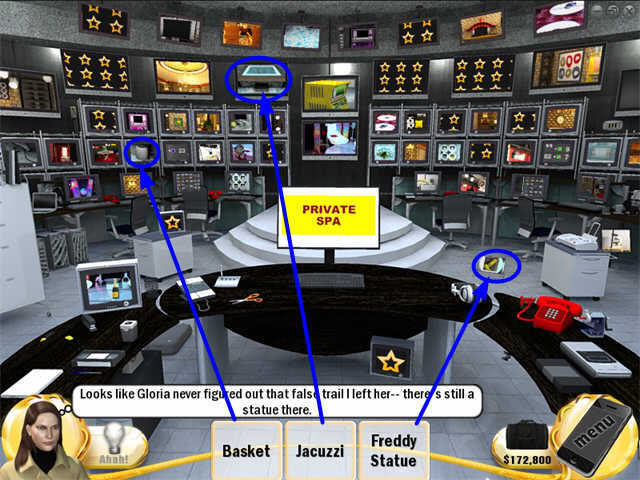
- Go through to the Private Spa room.
- Collect the colored towels.
- A business card falls out on top of the Jacuzzi. Read it.
- Get the remote from under the bench on the right.
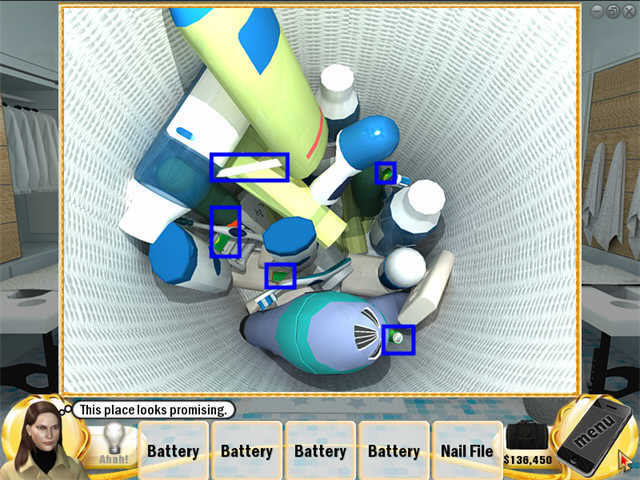
- Zoom in on the white basket next to that bench.
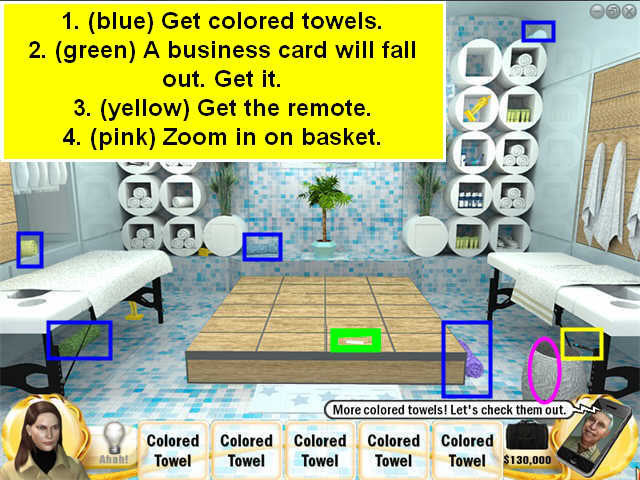
- Get the batteries and the nail file.
- Use the remote on the Jacuzzi and the top will pull back.
- Click on the 5 star tiles.
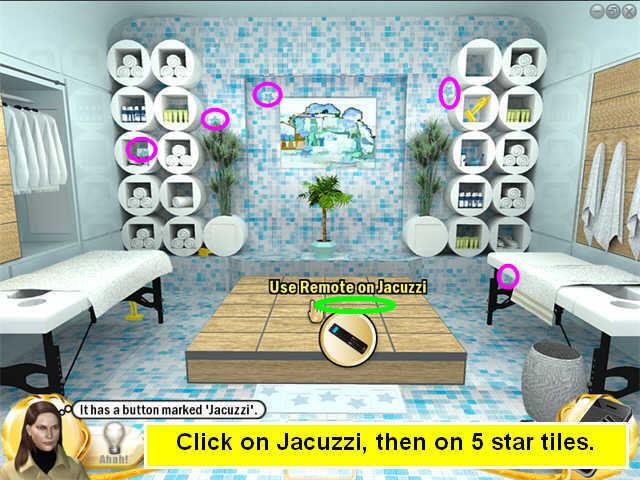
- Zoom in on the star panel at the base of the Jacuzzi.
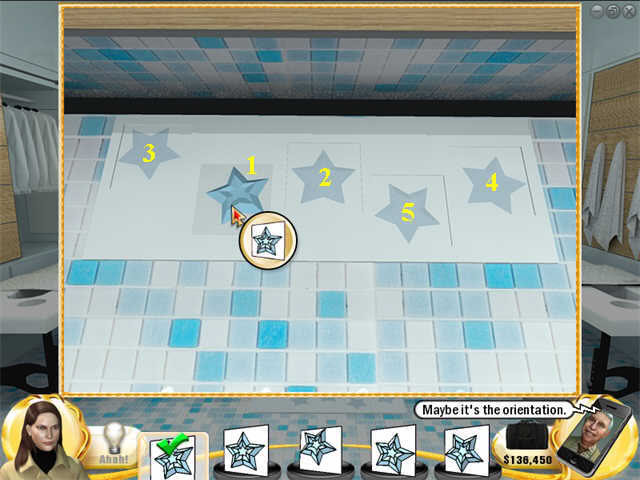
- After you do this, you will be able to play the Slingo Machine.
- Your prize will come out of the tray in front of the Jacuzzi. Collect it.
- Now collect the 5 gold statues and put one back in the tray to fool Gloria.
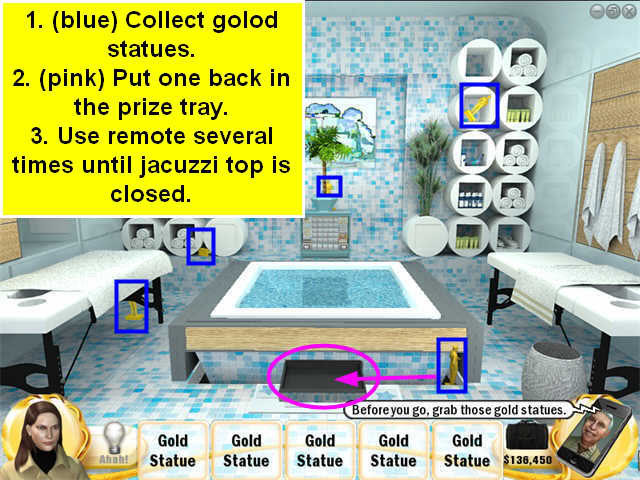
- Now use the remote until everything is back the way it was with the Jacuzzi top closed.
- Take the 5 robes out of the closet on the right.
- This will reveal a secret door.
- Click to open it, then go through.
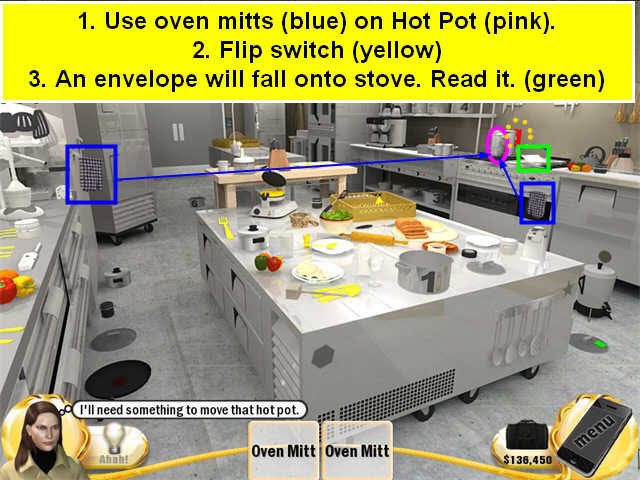
- You will come out in the kitchen.
- Start by picking up the two oven mitts.
- Use them to move the hot pot on the stove.
- Now click the red switch on the wall.
- An envelope will fall onto the stove. Read it.
- Get the tools that match the Find List.
- Smash the 3 white jars and 3 black jars.
- Collect the colored magnets.
- Place the magnets on the matching shapes.

- A drawer will open on the left side of the center island.
- Collect the note and the gold martini glass.
- Collect the numbers from around the room.
- Use the numbers on the keypad on the right of the door.
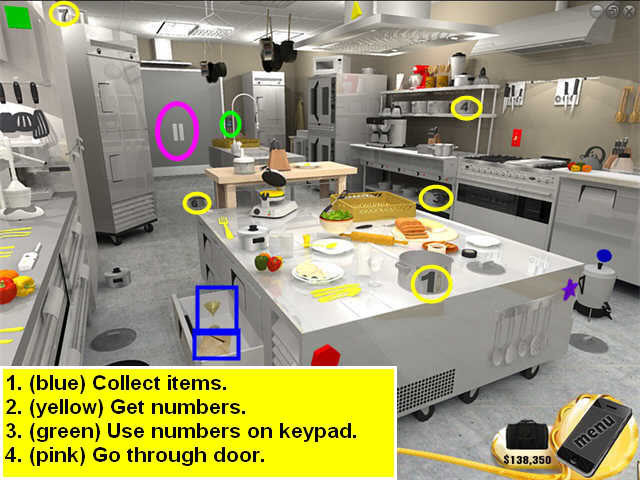
- Go through into the restaurant.
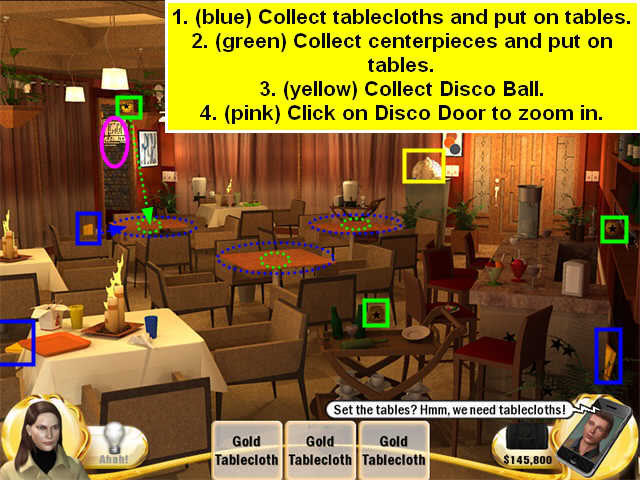
- You are now in FEAST, the restaurant.
- Get the items from the Find List.
- Use them to knock out the security cameras.
- Collect the food items Maggie wants.
- Look at the unusual bottles.
- A note will fall onto a chair by the bar on the right. Read it.
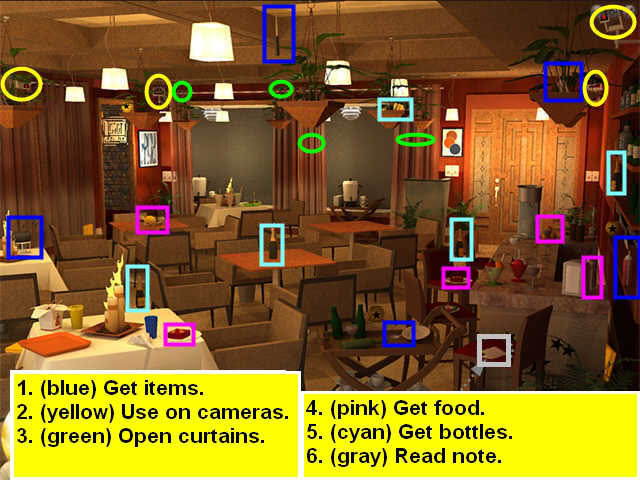
- Get the three gold tablecloths and put them on the uncovered tables.
- Get the three star centerpieces and put them on the tables with the gold cloths.
- A disco ball will appear by the podium on the right. Collect it.
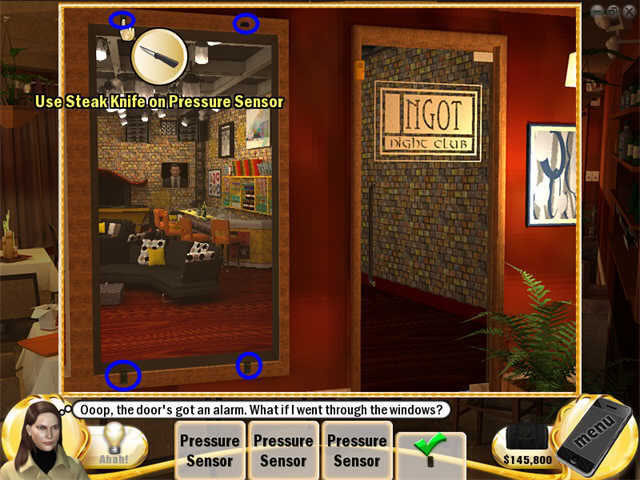
- Zoom in on the door to the Ingot night club.
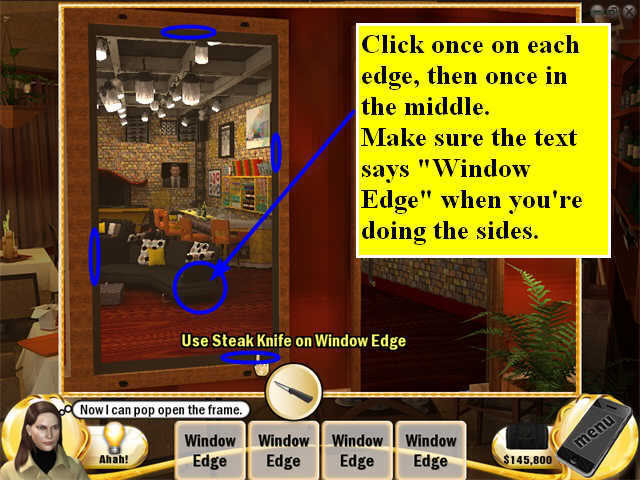
- Use the steak knife to remove the 4 pressure sensors.
- Use the knife once on each edge, then click once in the middle to pop out the window.
- Make sure the text says "window edge" when you’re doing the sides if you’re in Easy mode.
- Go through to INGOT.
- Collect the items on the Find List. The only one you really need is the ladder.
- Once you have the ladder, you will be able to hang the Disco Ball from the ceiling. Look for the gold mounting plate.
- Turn on all the spotlights.
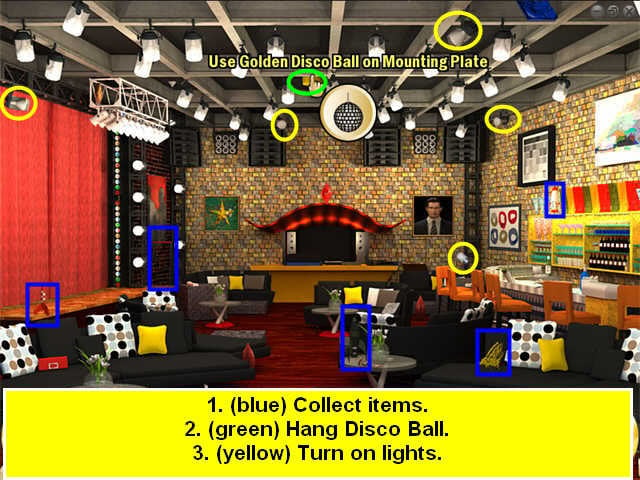
- Now click on all the places where the reflection is making gold spots.
- An envelope will fall down onto the couch on the left. Read it.
- Zoom in on the bar.
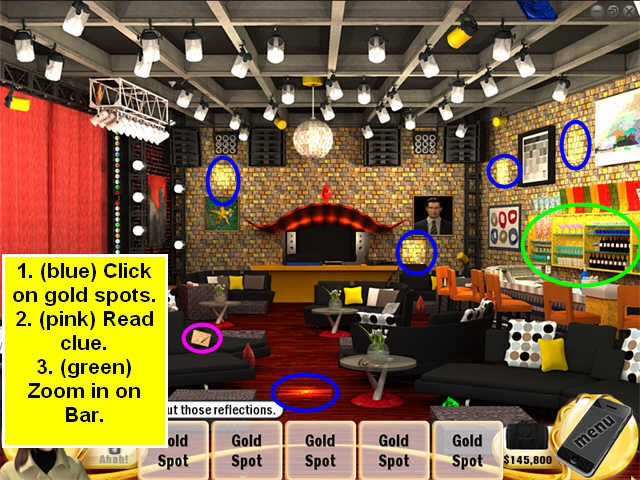
- Collect the items for Freddy’s favorite drink.
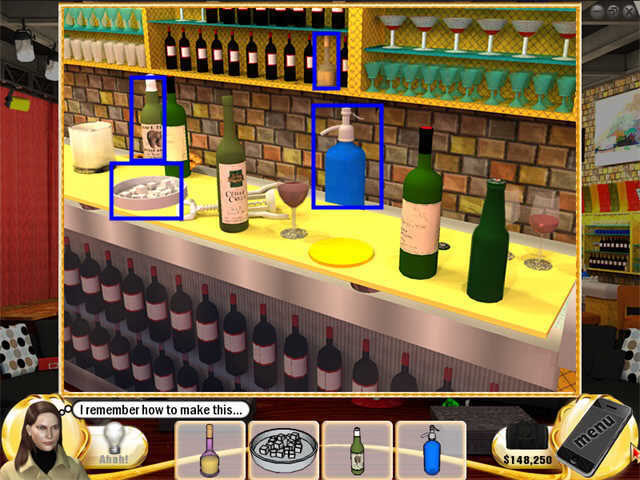
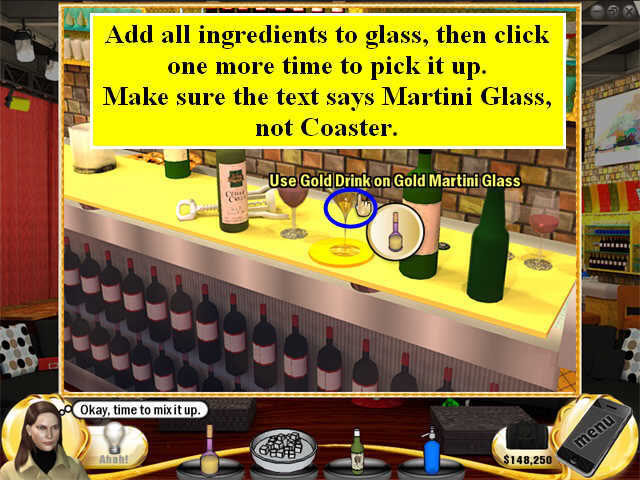
- Put the gold martini glass on the gold coaster.
- Add all the ingredients to the glass.
- Make sure the text says "glass" not "coaster" when you try to add things.
- Click one more time to pick it up.
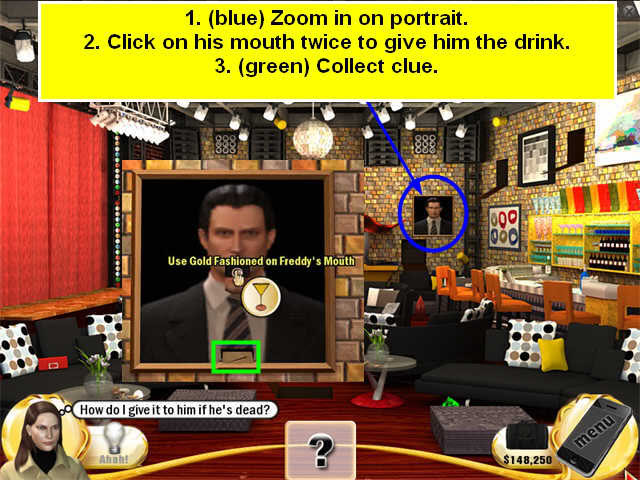
- Zoom in on Freddy’s portrait.
- Click on his mouth twice to give him the drink.
- An envelope will appear at the base of his tie. Collect it.
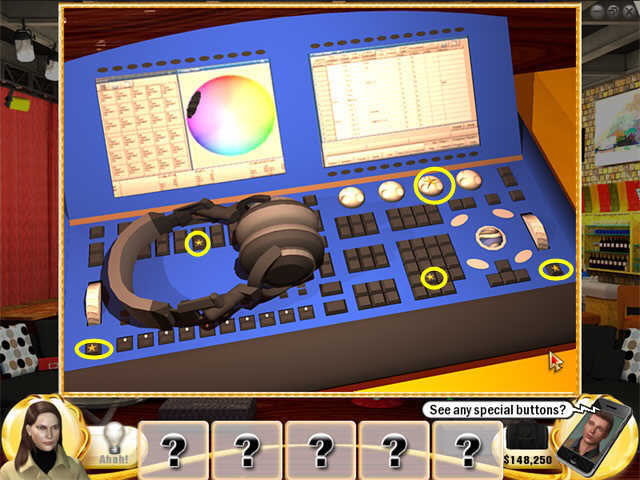
- Zoom in on the DJ station in the back of the room.
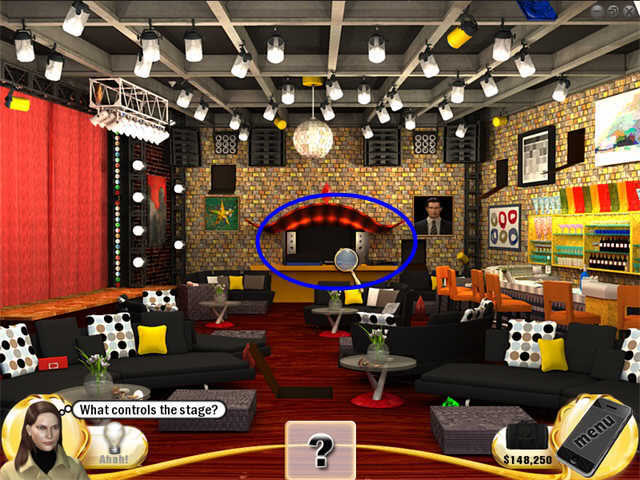
- Click on the 5 buttons that have stars.
- The stage curtains will open.
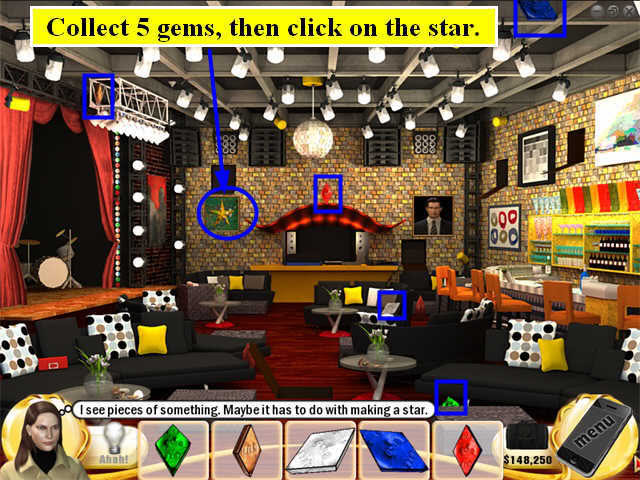
- Collect the 5 gems, then click on the star and place them.
- Go through to the Garden Room.
- Kyle tells you there is a secret entrance to Security here.
- Collect the tools on the Find List.
- Check the gold flowerpots.
- Check the paintings.
- Tap on the mirror.
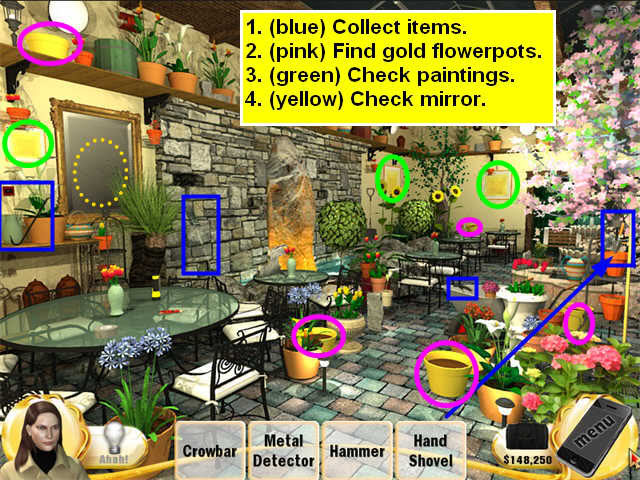
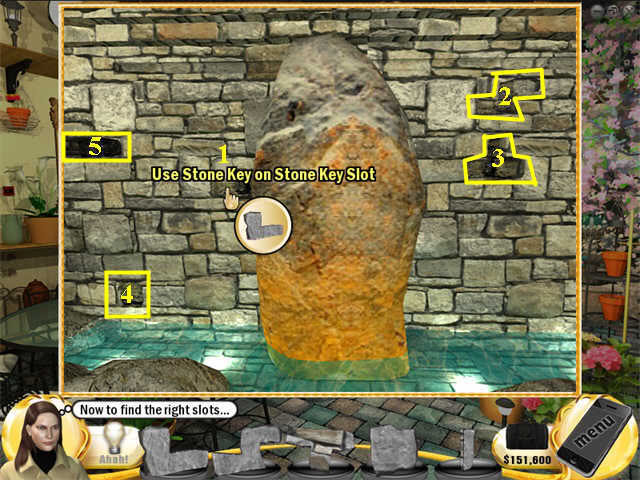
- Collect 5 odd stones.
- Zoom in on the Monolith.
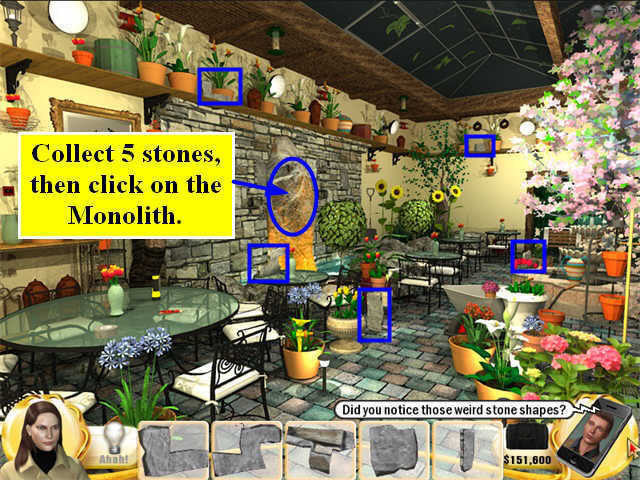
- Place the 5 stones in the matching indentations. See the screenshot for solution.
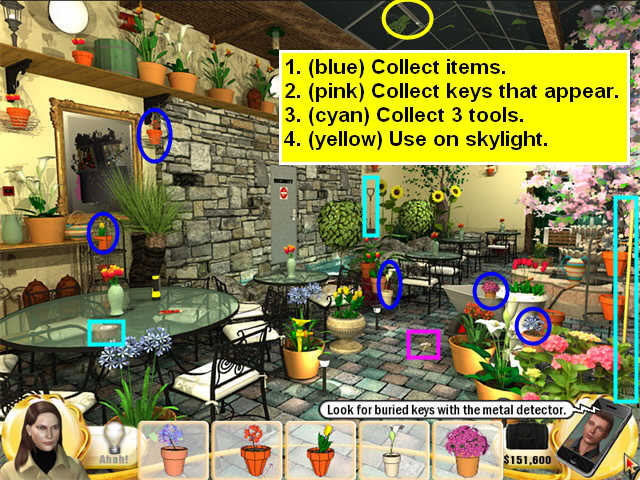
- Pick up the flowerpots that match the Find List.
- Some keys will fall on the floor. Collect them.
- Collect the tools.
- The tools will automatically combine in inventory to make a long pole.
- Use the pole on the skylight.
- You will get a zoom scene. Open the window latches.
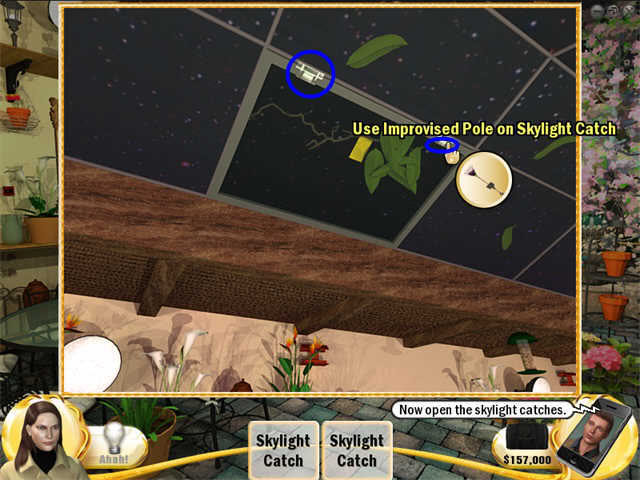
- A yellow ID card will fall down. Pick it up.
- Zoom in on the door that was revealed when the monolith moved.
- Use the key on the lock.
- Use the card on the card slot.
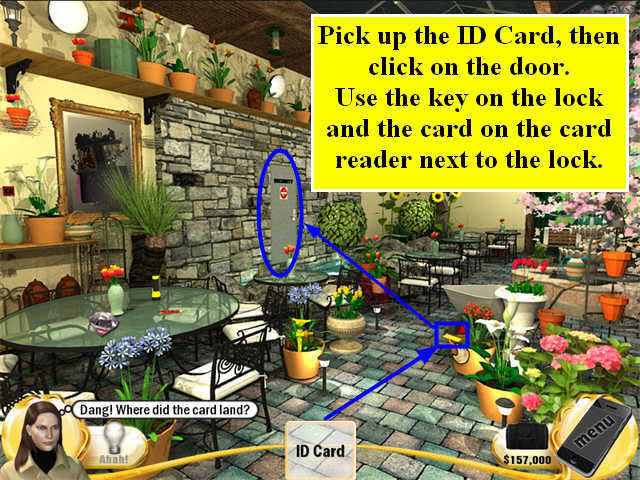
- Go through into security.
- Collect the items on the Find List.
- Open the two lockers.
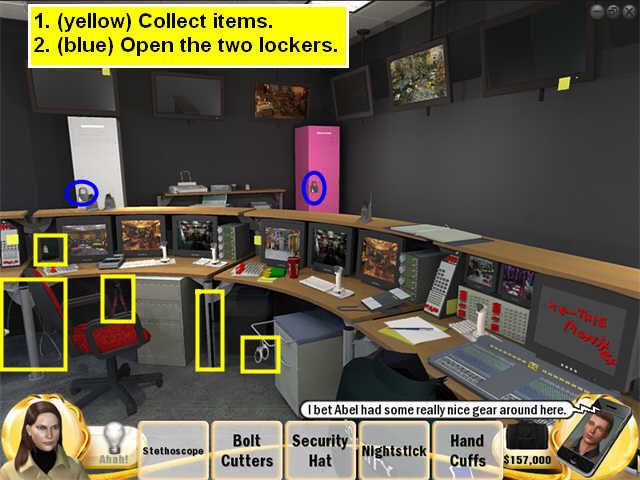
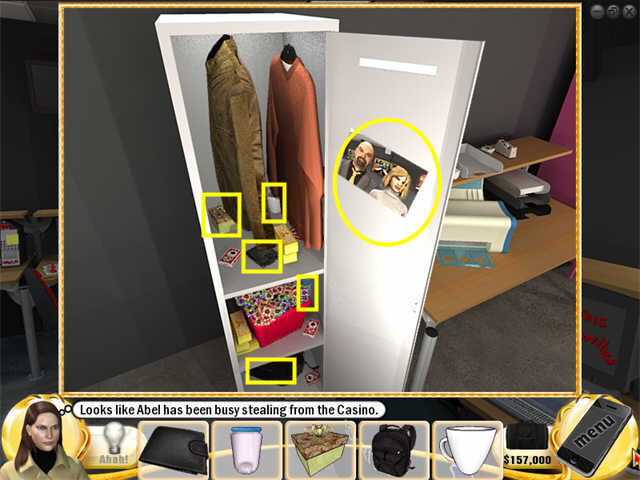
- Look inside Abel’s locker, the gray one, first.
- Collect the items.
- Look at the photo.
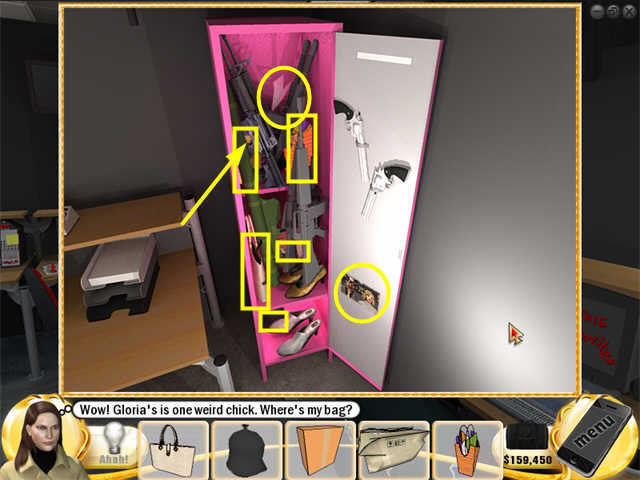
- Look inside Gloria’s locker next.
- Remember the bag she took away from you when she caught you and put you in the Lost and Found? You’ll find it now, which means you’ll get the ring back.
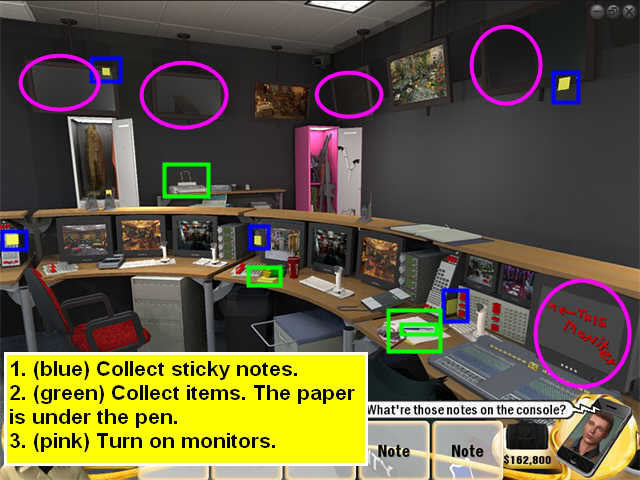
- Read the sticky notes.
- Collect the items on the Find List. The paper is under the pen.
- Turn on any monitors that are off.
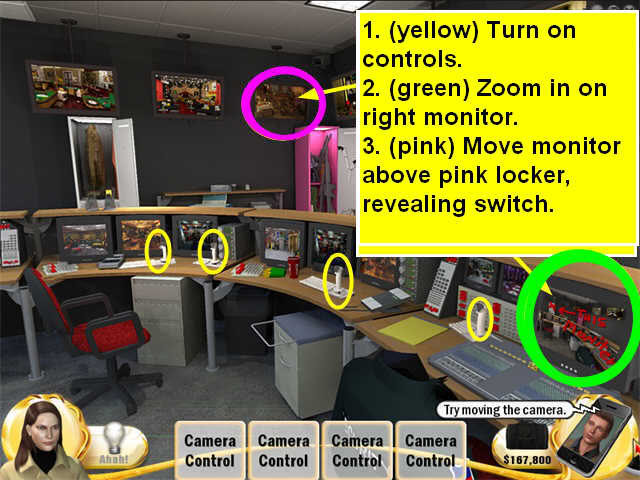
- Turn on the monitor controls.
- What’s written on the rightmost monitor? Click on it to zoom in.
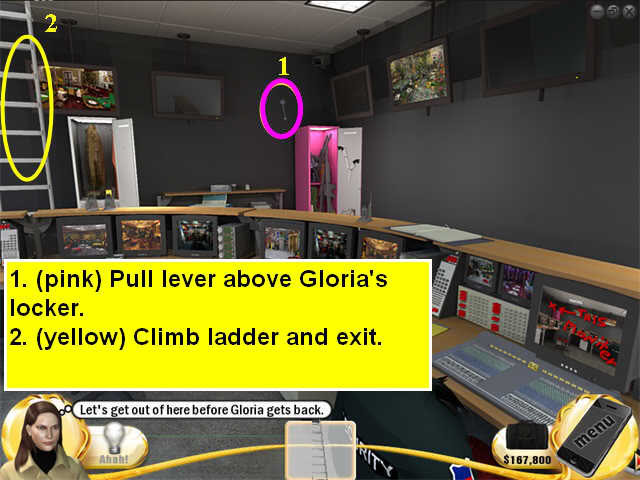
- Move the monitor over the pink locker, revealing a switch.
- Click on the switch and go up the ladder.
- Get the yardstick and use it on the security camera.
- When that doesn’t work, get the hat.
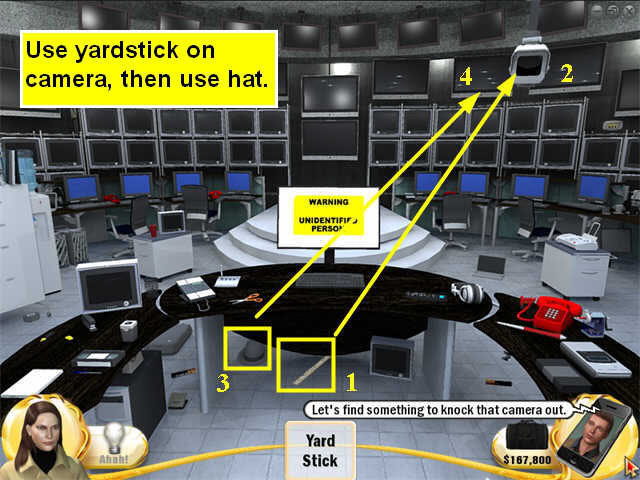
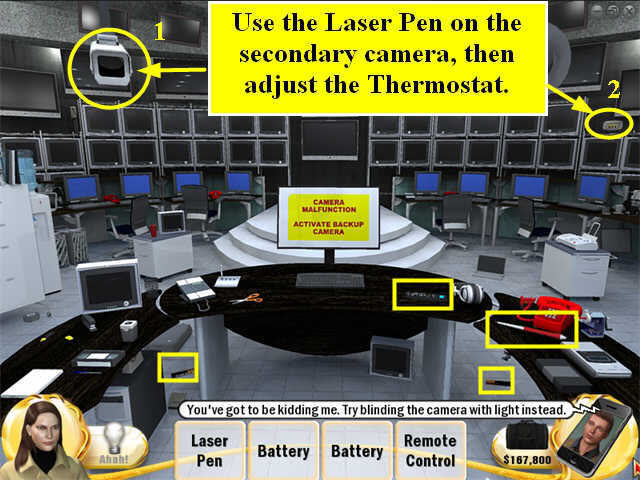
- A secondary camera turns on!
- Collect more items, then use the laser pen on the camera.
- Now adjust the thermostat on the right wall.
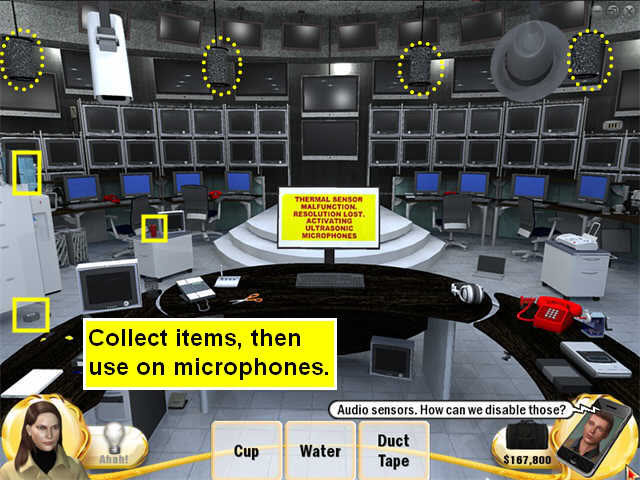
- Audio sensors will appear.
- Collect the items, then use them to disable the sensors.
- Finally, push the CANCEL button on the main screen.
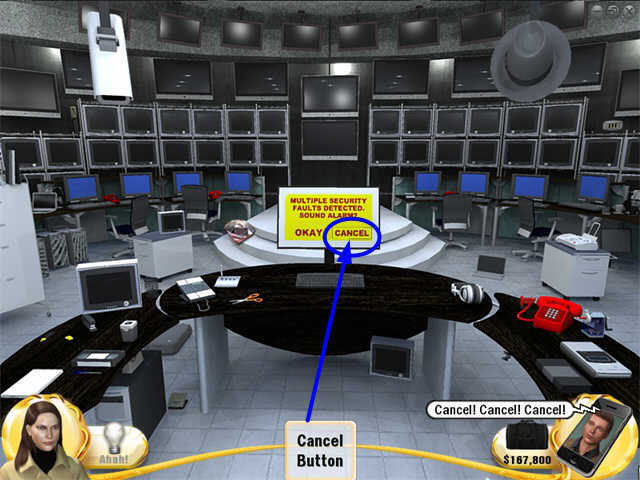
- Do you remember all the rooms you had to go through to get this far? The computer does! It will now display the name of a room, one at a time, on the main screen where you pressed the cancel button.
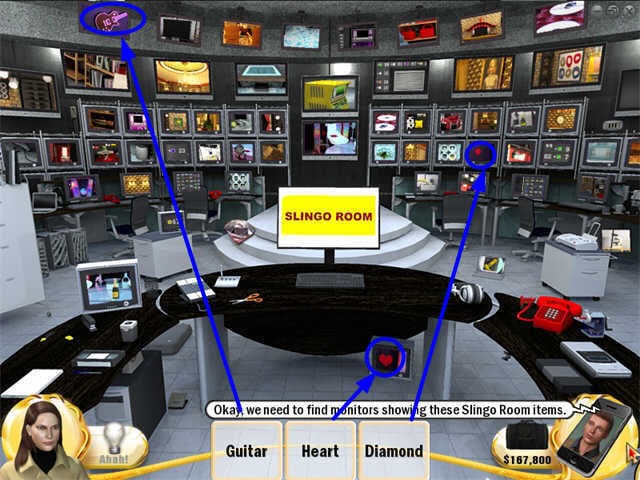
- The Find List will name three items from that room.
- You have to find the monitors showing those items.

- At last a Slingo Machine will appear. Play it.
- There will be two prizes in the prize tray: a gold key and a note.
- Gloria will catch you again. You agree to give her everything you have in exchange for your ring and your freedom. She lets you go outside the Casino.
- However, you decide you need to know what’s in the Will.
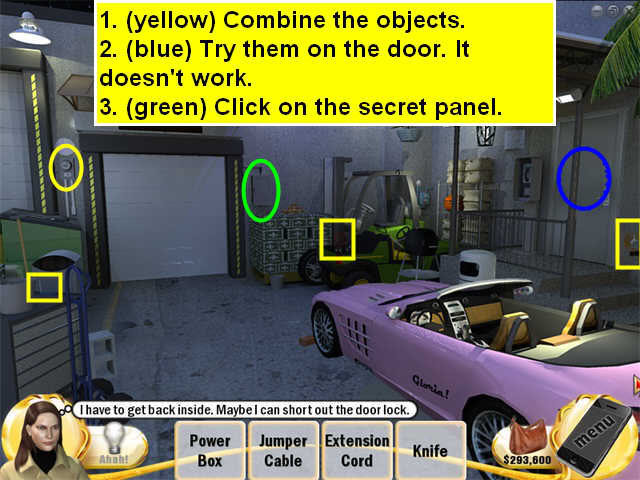
- You are now going to try a sequence of things to get in, first through the regular door on the right, and then through the VIP entrance on the back wall.
- Collect the items on the Find List. They will automatically combine in inventory.
- Try to short out the door on the right. It doesn’t work.
- Click on the secret panel on the back wall.
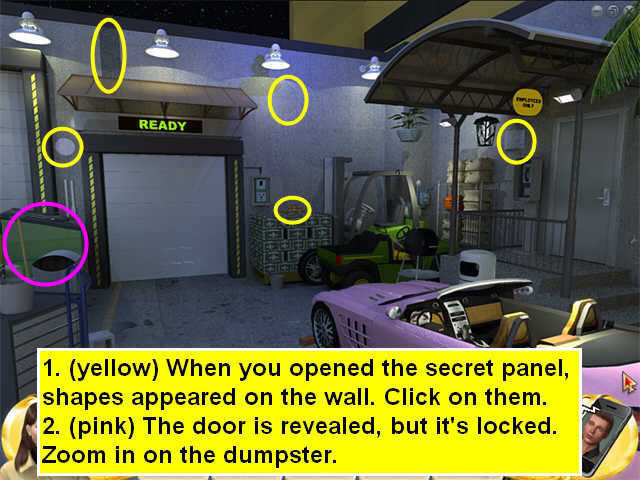
- When you open the secret panel, shapes will appear on the wall.
- Click on them.
- The light panel over the big door now says READY.
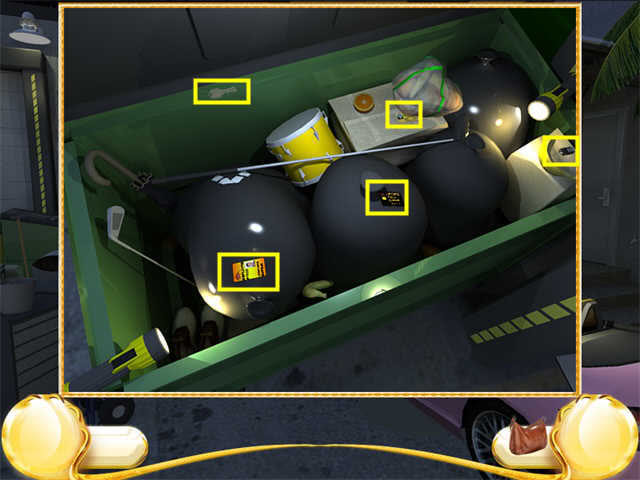
- Zoom in on the dumpster.
- This is quite a dumpster! You’re going to find a credit card, an ID card, a key, and some other items.
- Try everything on the VIP door. The light will change to VIP ONLY, but you still won’t be able to get in.
- Collect the tools on the Find List.
- Try them on the door. Doesn’t work.
- Try them on the Secret Panel. That doesn’t work either.
- Zoom in on the car.
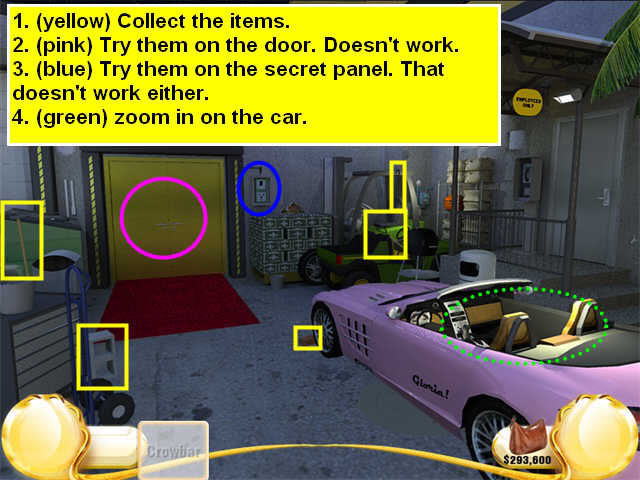
- First search for keys. They will fall down onto the passenger seat.
- When you find the keys, use them on the ignition.
- Use the brick on the gas pedal.
- Move the handbrake and the gearshift.

- The car will crash into the door.
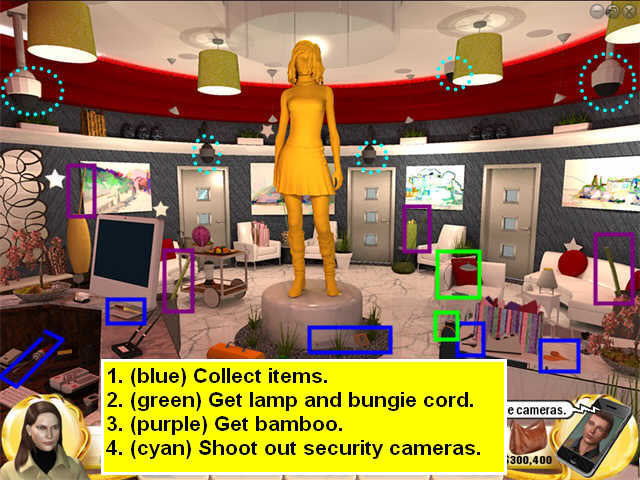
- Go through into the VIP Lobby.
- More security cameras!
- Collect the items on the Find List.
- Take the stem part of the desk lamp.
- Take a piece of the bungee cord.
- Collect the bamboo from around the room.
- These items will combine automatically in your inventory to make a bow with bamboo arrows.
- Click on each of the security cameras to shoot them with the bamboo arrows.
- Check the gift bags.
- Get the clues.
- A note will fall on the ground in front of Gloria’s statue, but it’s blank.
- Collect the items to reveal invisible ink. Read the note.
- Click on the stars. One of them is on the side of a white chair, pretty hard to see.
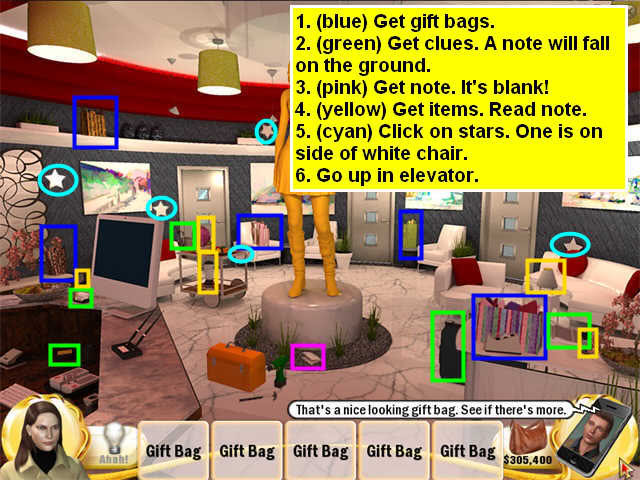
- An elevator will come down on top of Gloria’s statue.
- Go up in the elevator.
- Now you are in Freddy’s vault. The first thing you have to do is click on sets of symbols that match the rooms you were in.
- Now you have to turn off the alarm system.
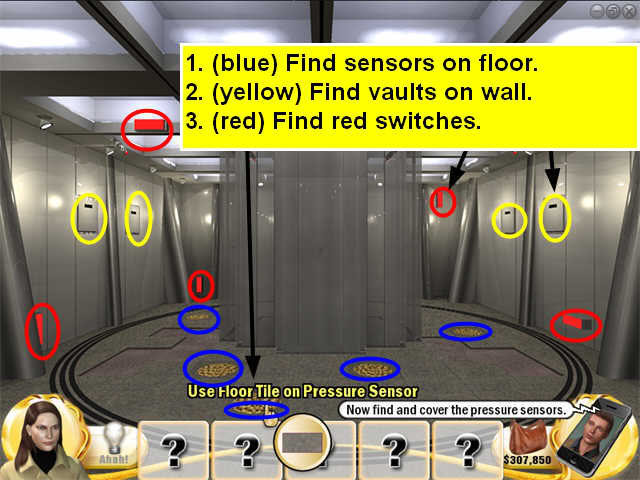
- Collect the floor tiles as marked.
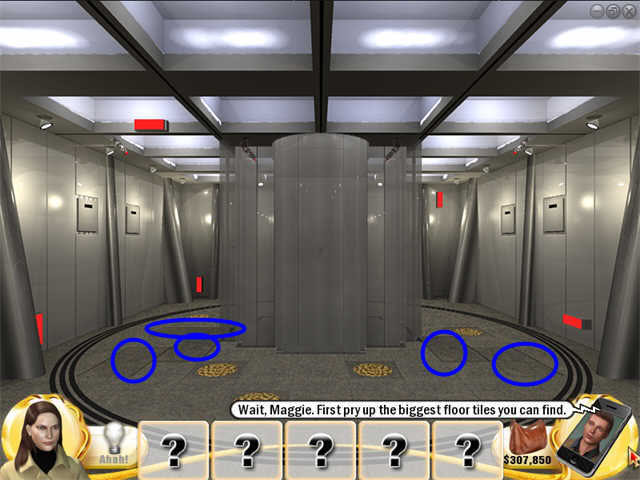
- Put the tiles on the tan pressure sensors on the floor.
- Click on the vaults on the wall.
- Turn off the 5 lights.
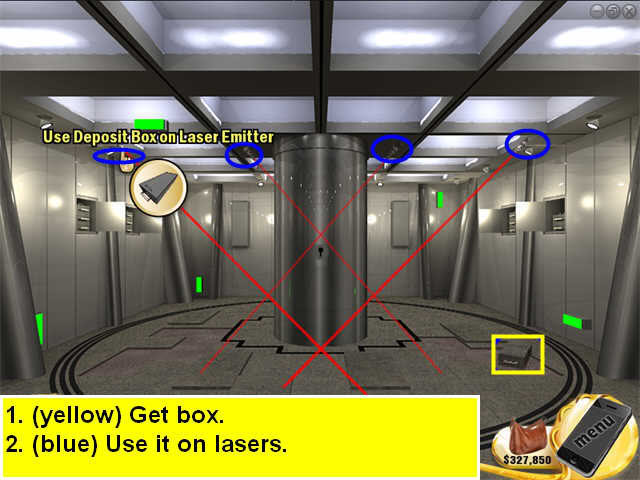
- One of the safety deposit boxes fell out of a vault. Pick it up, then use it on each of the laser emitters.
- A Slingo Machine will appear. Play it.
- Your prize is: The Will! Only it’s in code.
- Go on to Freddy’s lobby.
- How can you get inside to the inner office?
- Take the paintings down. There are big switches on the wall behind them.
- Click on the switches-that just drops down a security gate.
- Click on the stars. Another security gate!
- Zoom in on the desk.
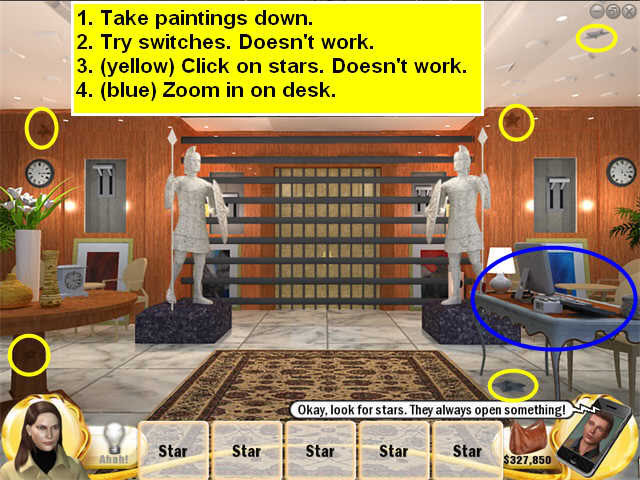
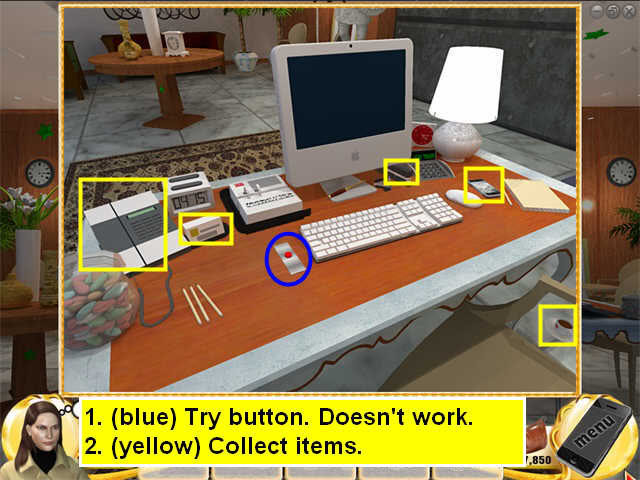
- Push the red button. Doesn’t work.
- Collect the items. You’re looking for a clue.
- Looks like the time is the code.
- Click on all the clocks in the room. Each will automatically reset to the code time.
- Zoom in on the desk again.
- The button has turned green. Click on it.
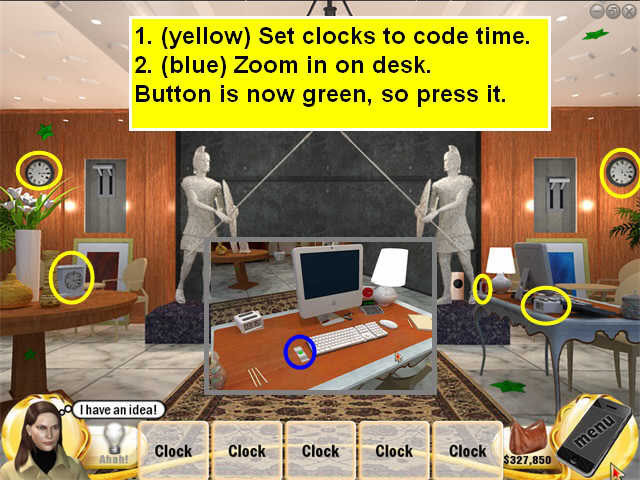
- Go through to Freddy’s office.
.
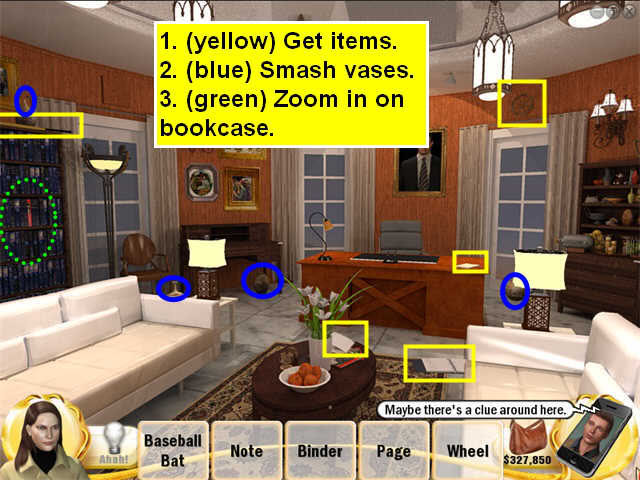
- Collect the items on the Find List.
- Smash the vases and collect the loot.
- Zoom in on the bookcase on the left side of the room.
- Click on all the red books.
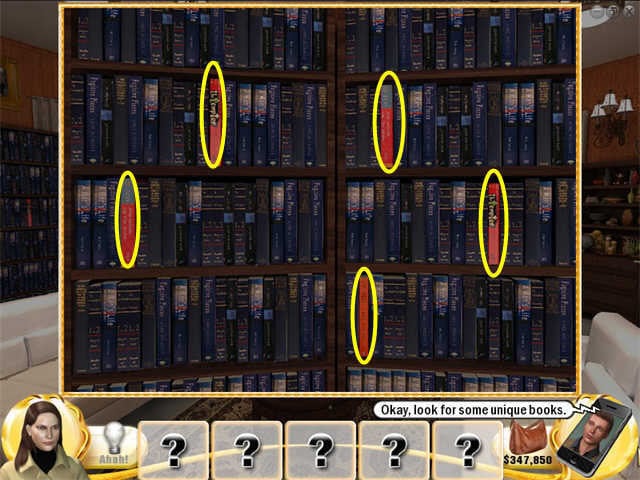
- A secret compartment will open in the wall. There is a note there. Read it.
- Zoom in on the shelves on the right side of the room.
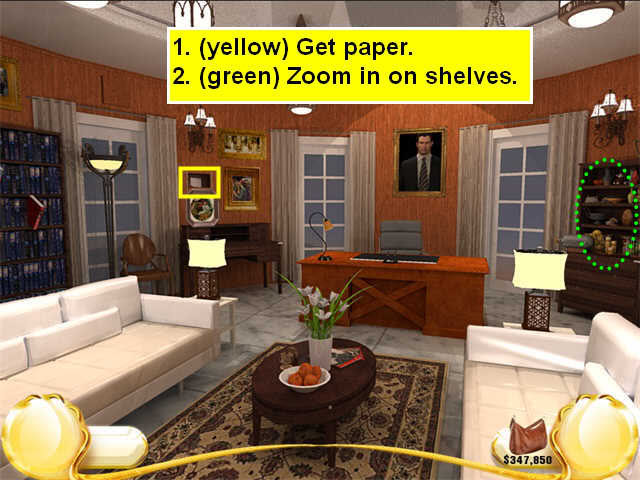
- Collect the toys.
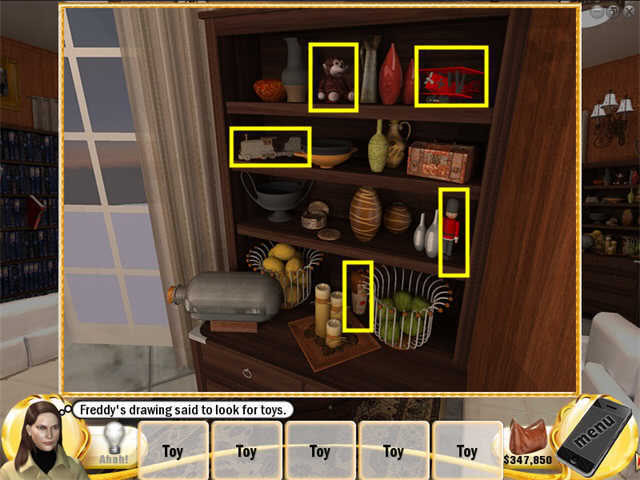
- Another secret compartment will open, with another note. Read it.
- Now zoom in on the small desk just under the secret compartments.
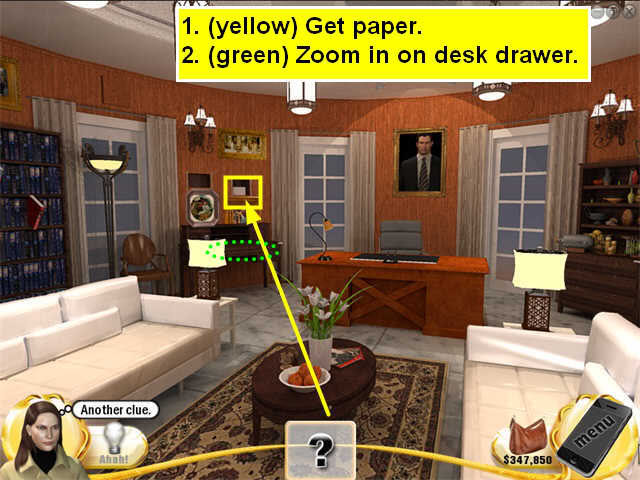
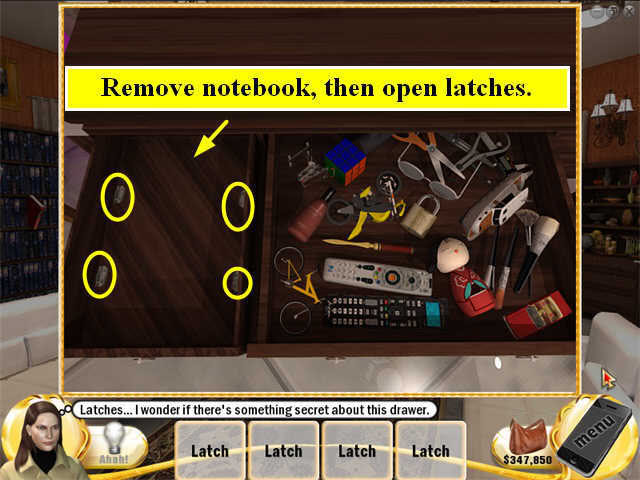
- Take out the notebook.
- Open the latches.
- On the left side of the drawer are silhouettes of transportation vehicles.
- Collect the vehicles from the right side of the drawer, then match them to their silhouettes.
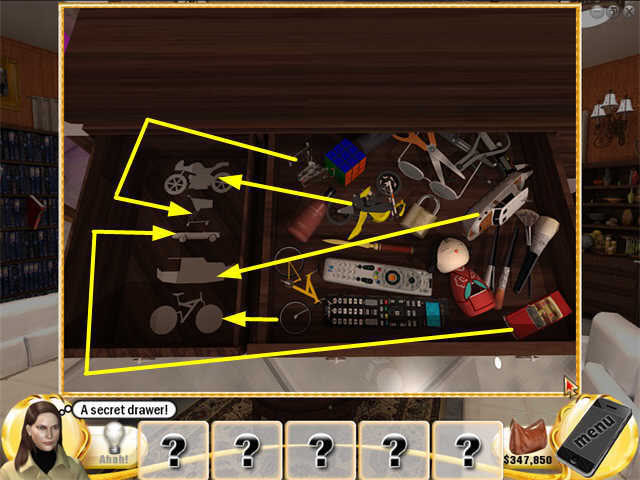
- Another secret compartment will open.
- Take the note and read it.
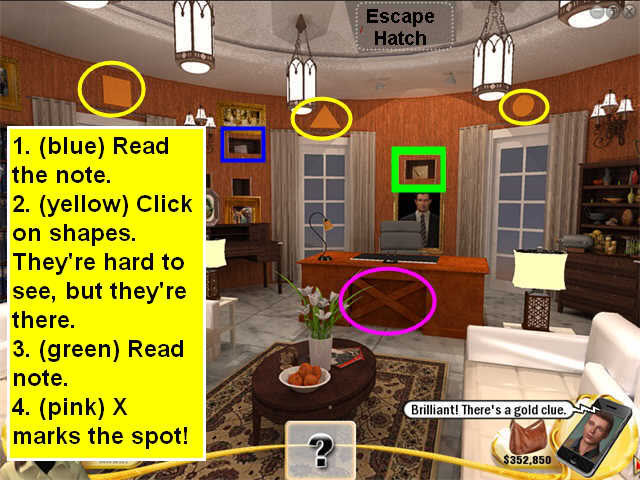
- Click on the three shapes along the top of the wall. They’re hard to see, but they’re there. See the screenshot for exact position.
- Freddy’s painting will move.
- Collect the paper there.
- Now hit the X on the front of the desk to break it open and reveal the safe.
- Finally, go up through the escape hatch in the ceiling.
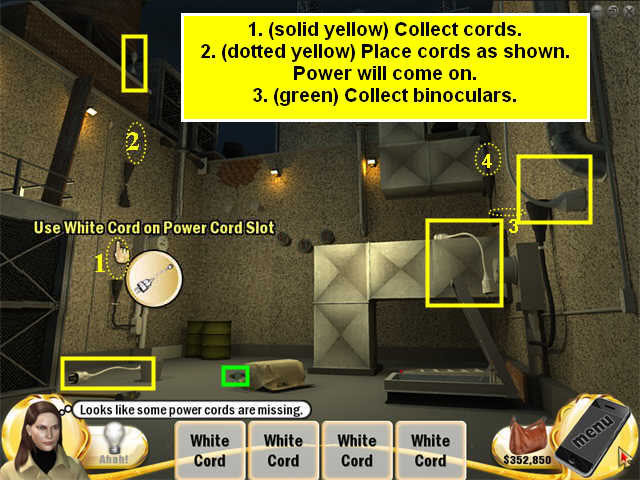
- First let’s get some light.
- Collect the white power cords, and use them to complete the power grid.
- The lights will come on.
- Pick up the binoculars from the floor.
- Look at the Slingo Machine with the binoculars. How can you get up there?
- Collect the tools on the Find List.
- Place the ladder by the big vent pipe.
- Place the two wooden boards horizontally as shown in the screenshot.
- Use the sledge hammer to break through the bricks at the top of the wall.
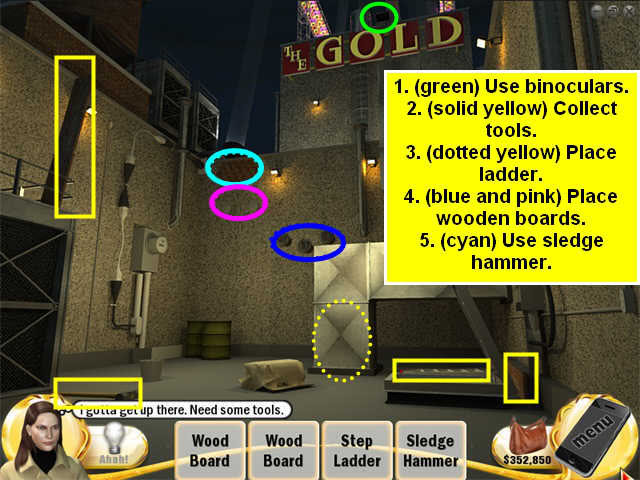
- This gets you up to the next level, but not all the way to the top yet.
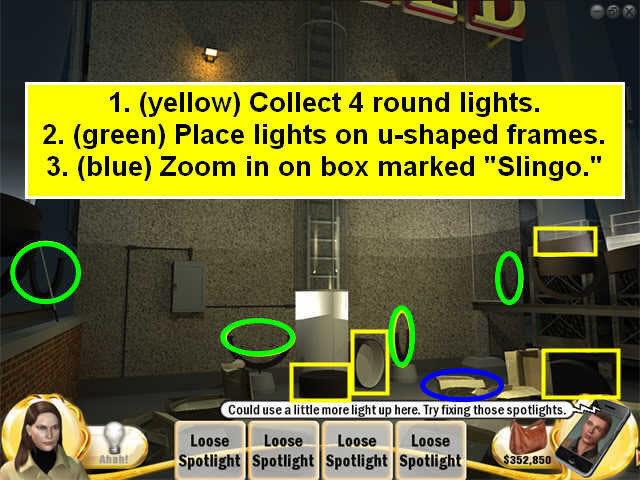
- Collect the round lights.
- Put the lights in the U-shaped frames. More light.
- Zoom in on the box marked "SLINGO."
- Take the Slingo CDs out of the box.
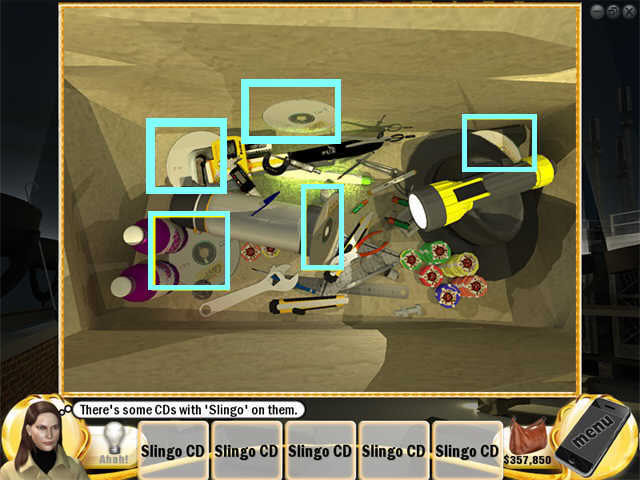
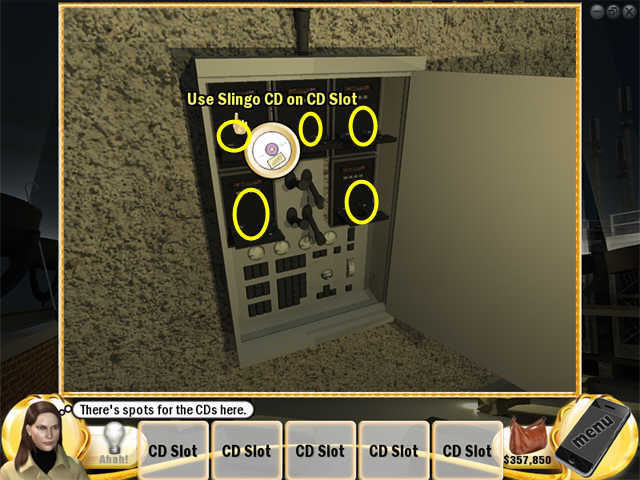
- Put the CDs in the control unit on the wall. That will open the doors below the ladder.

- Take the hook from the left side of the scene and use it to pull down the ladder in the middle.
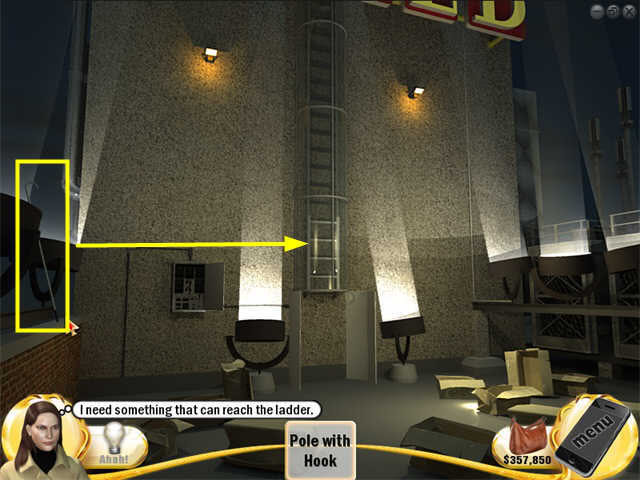
- Climb the ladder to get access to the Slingo machine.
- Play Slingo.
- Your prize is the decoder.
- Listen to the will.
- Transition to the sub basement.
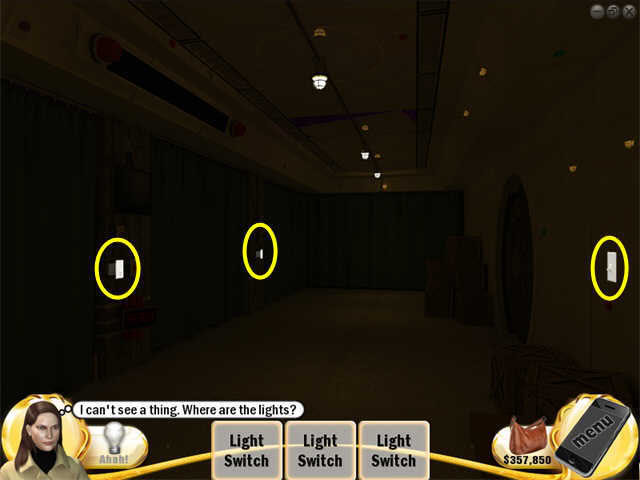
- Turn on the lights.
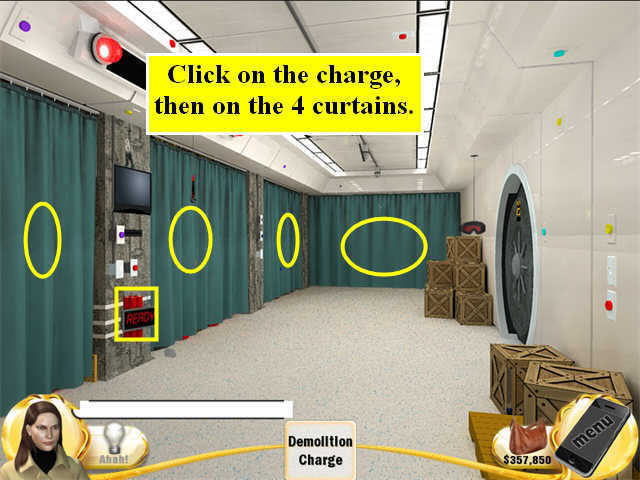
- Click on the charge, then on the curtains.
- Uh oh. A ticking bomb!
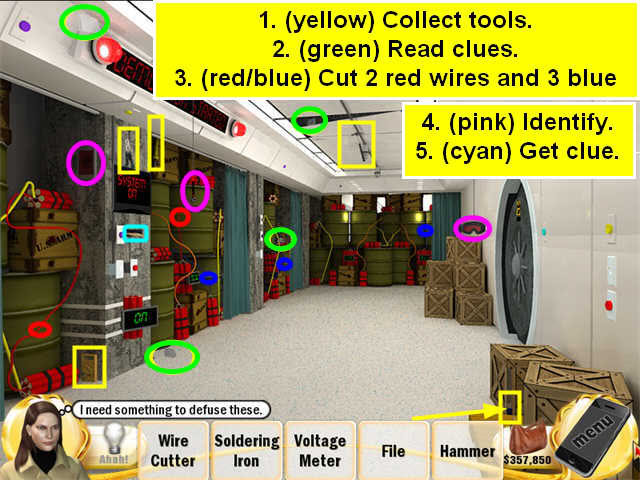
- Collect the tools.
- Read the clues.
- Cut 2 red wires and 3 blue ones. Countdown stopped!
- Use the identity verifiers.
- Take the clue that appears.
- At this point Maggie loses her mind. There is no other explanation. She just finished disabling the bomb, and she decides to start it up again.
- Press the red buttons.
- Zoom in on the hatch.
- Enter 1, 2, 3 on the keypad.
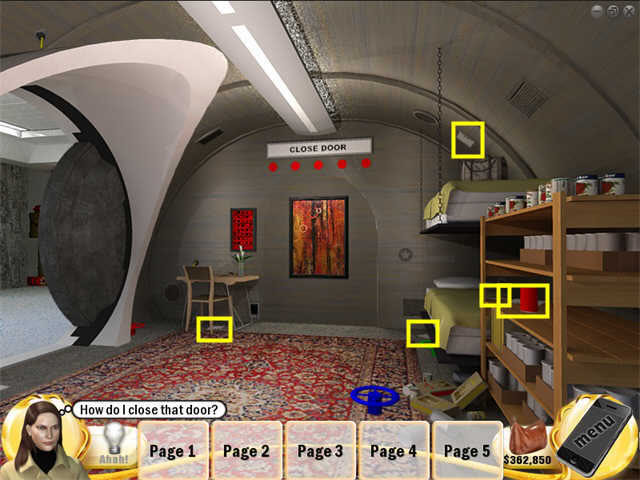
- Go through into the bomb shelter.
- There are five pages of instructions scattered around the bomb shelter. I don’t know if that’s convenient or inconvenient. Collect them.
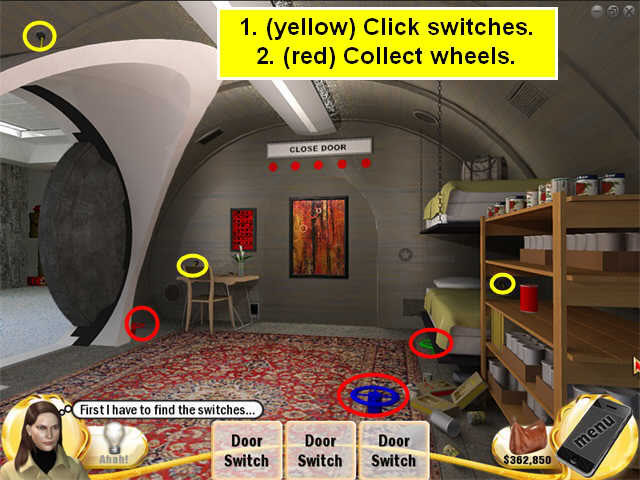
- Flip the switches.
- Pick up the wheels.
- Put the wheels on the big door.
- Click them to push them in.
- Turn on the fan on the wall below the desk.
- Open the vents.
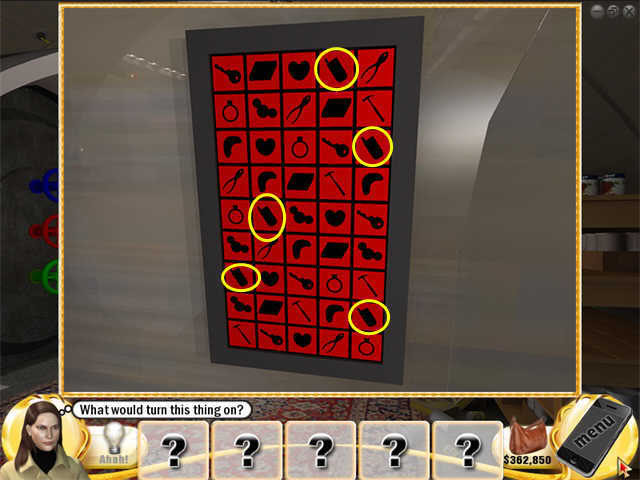
- Click on the red control panel above the desk to start the cellphone relay.
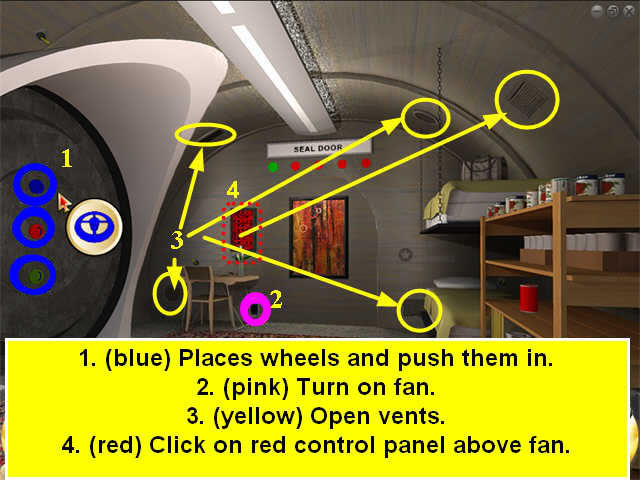
- Click on all the cellphone silhouettes to turn it on.
- Now you can talk to Kyle.
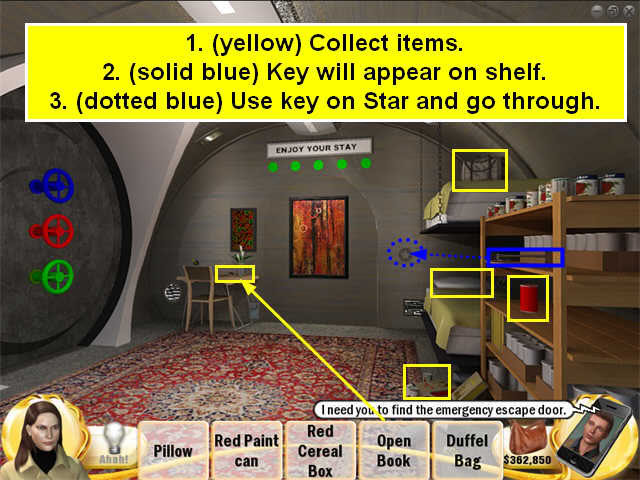
- Collect the items on the Find List.
- A huge key will appear on the shelf. Get it.
- Use the key on the star symbol on the wall.
- Go through the door.
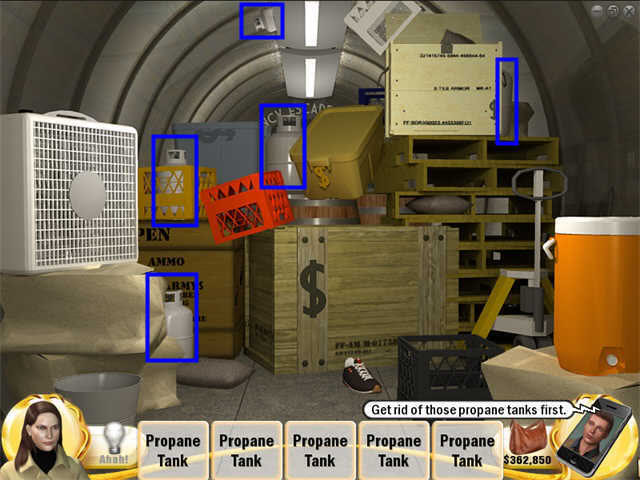
- Now you just have to keep moving things out of the way, based on the Find List.
- One more Slingo Machine. Play it.
- Once the elevator is available, use it!
- Watch the ending.
“;

More articles...
-
Grow A Garden 2 Base Price List
What's the most valuable crop? -
Evomon Best Starter [Leafbun, Blazpup, or Bubble?]
Grass-type, Fire-type, or Water-type? -
Evomon Tier List [META and BEST Evomon]
The Evomon dream team.