
Best Horror Games On Itch.io – July 2026
Across a bounty of subgenres.
Grow A Garden 2 Base Price List
What's the most valuable crop?![Evomon Types Guide [Strengths, Weaknesses, Resistance]](/wp-content/uploads/2026/06/evomon-types.jpg "Evomon Types Guide [Strengths, Weaknesses, Resistance]")
Evomon Types Guide [Strengths, Weaknesses, Resistance]
Your companion guide during battles.
![[Roblox] Evomon Shiny Hunting Guide – Including Prismatic and Pris Shinies!](/wp-content/uploads/2026/06/evomon-shiny-hunting-guide.jpg "[Roblox] Evomon Shiny Hunting Guide – Including Prismatic and Pris Shinies!")
Slingo Mystery 2: The Golden Escape Walkthrough
Welcome to the Slingo Mystery 2: The Golden Escape walkthrough on Gamezebo. Slingo Mystery 2: The Golden Escape is a hidden object adventure game played on the PC created by Funkitron. This walkthrough includes tips and tricks, helpful hints, and a strategy guide for how to complete Slingo Mystery 2: The Golden Escape.
Share this


- Prefer Gamezebo on Google

Slingo Mystery 2: The Golden Escape – Game Introduction
Welcome to the Slingo Mystery 2: The Golden Escape walkthrough on Gamezebo. Slingo Mystery 2: The Golden Escape is a hidden object adventure game played on the PC created by Funkitron. This walkthrough includes tips and tricks, helpful hints, and a strategy guide for how to complete Slingo Mystery 2: The Golden Escape.
General Tips
- Adjustable difficulty is available for this game. You can either select it from the start when you create your user file, or you can choose to make it easier or more difficult at any time by simply clicking the “options” menu during gameplay.
- Hints are unlimited, but will take a while to recharge after use. Click the light bulb on the lower left hand corner during the game to use a hint. When a hint can be used, the light will be lit and an “Ahah!” will appear beneath it.
- Puzzles cannot be skipped.
- Throughout the game, you will encounter Slingo machines. Depending on which Slingo machine you’re playing at, the rules and power-ups differ slightly. Simply click on “help” or the power-ups themselves to view the details of what they do and to devise strategies for each individual machine.
- Inventory items are a feature of this game, however they occur automatically: you will never have to manually select an item except in a few choice circumstances. Items are usually assigned to the cursor automatically for you.
- From the game’s main menu, you can choose to replay chapters you’ve already completed, visit the Game Room, or play more Slingo. You can choose the Slingo machine of your preference from any point in the game and compete for a high score with other Slingo Mystery 2 players.
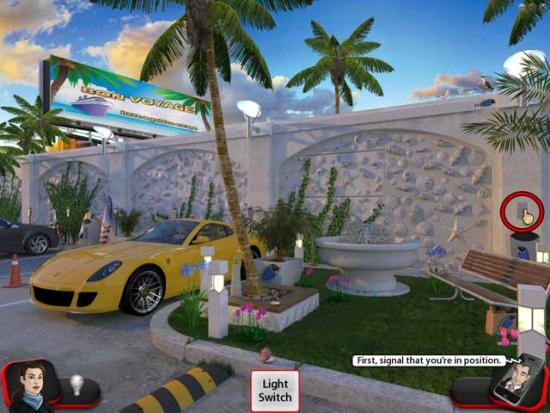
Chapter 1: Parking
- Click the light switch to signal you’re in position.

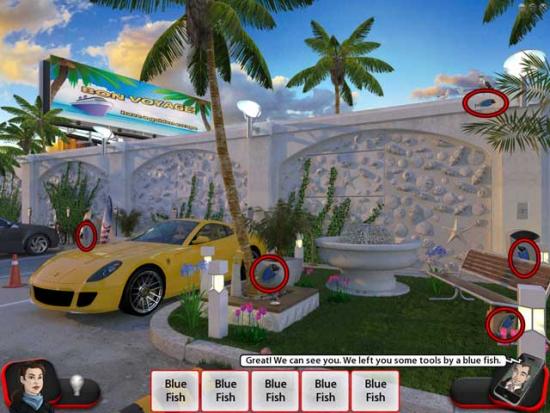
- Find the five blue fish, then click on the Bag that appears on the lawn on the right.
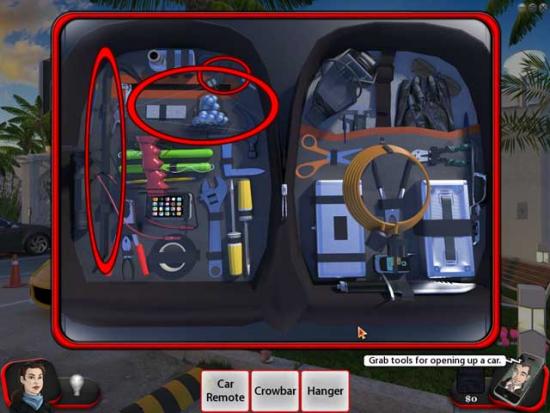
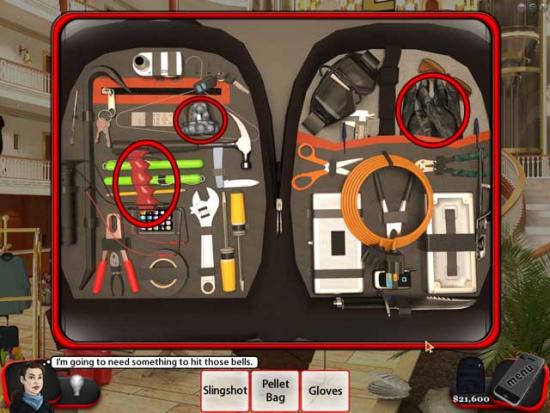
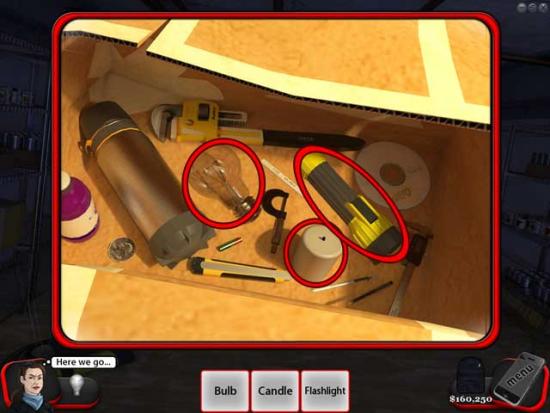
- Grab tools for opening a car. Their locations are shown below:
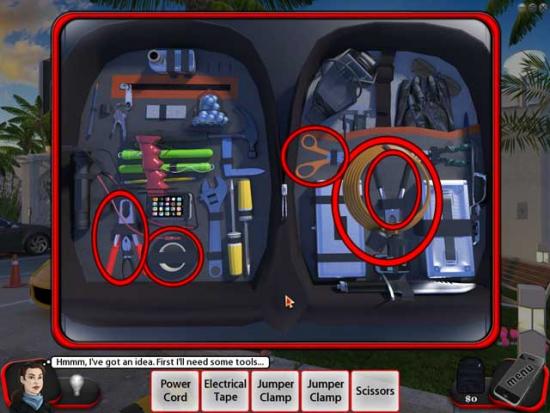
- Use the car remote on Freddy’s Car, then try to open the trunk at the front: it’s electrified. Return to the bag and collect the right tools. Their locations are shown below:
- Use the wires/supplies on the front and rear wheels of Freddy’s car, then on the fountain on the grass. Use the car remote on Freddy’s car: now you can gain access to the trunk.
- Salvage the items listed at the bottom of the screen. Their locations are shown below:
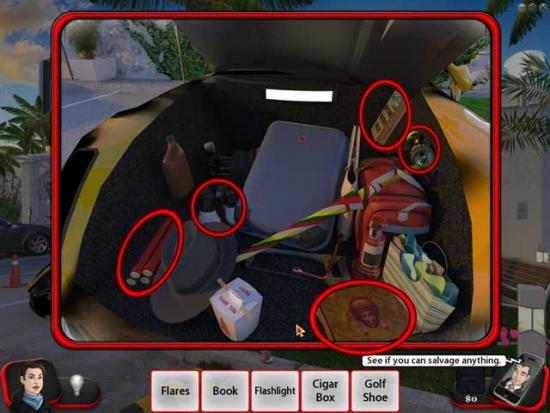
- Take a look at the clue that appears near the bottom of the screen. It mentions something about starfish…
- Click on the starfish on the white wall in the correct order to reveal a secret door: the correct solution is shown below:
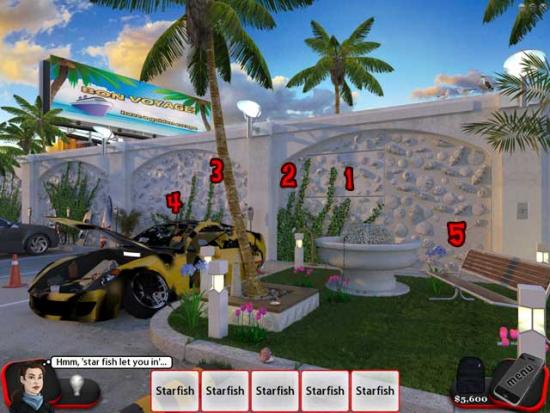
- Proceed through the secret doorway to complete the chapter.
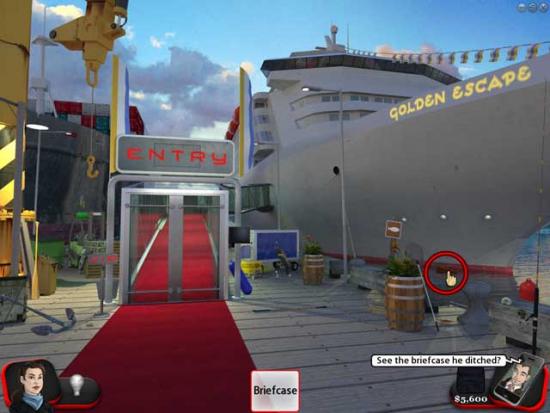
Chapter 2: Dock
- Take a look at the briefcase floating in the water.
- Find the items listed at the bottom of the screen. Their locations are shown below.
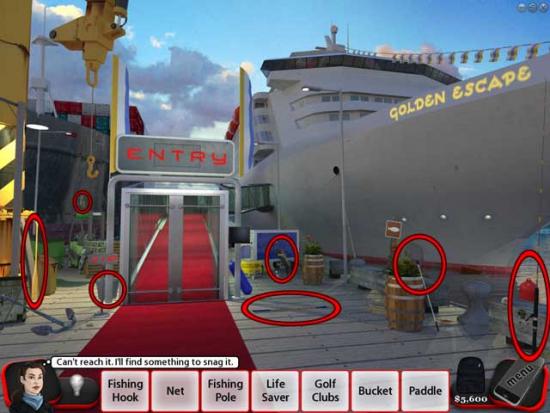
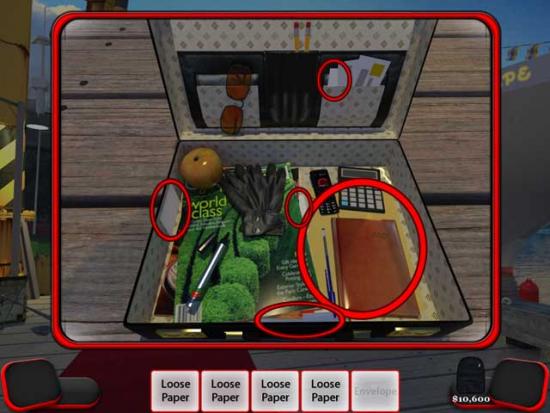
- Select the fishing pole to pull the briefcase from the water, then take a closer look inside.
- Collect the items listed at the bottom of the screen. Their locations are shown below.
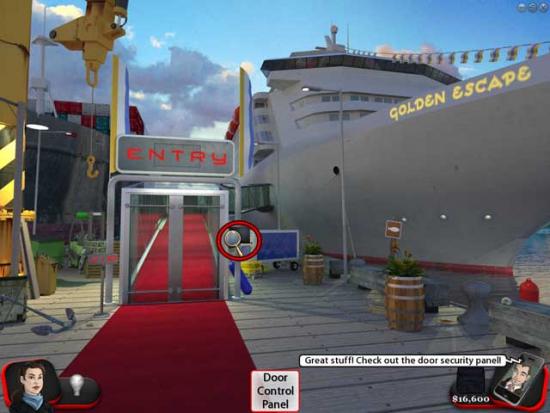
- Take a closer look at the door control panel.
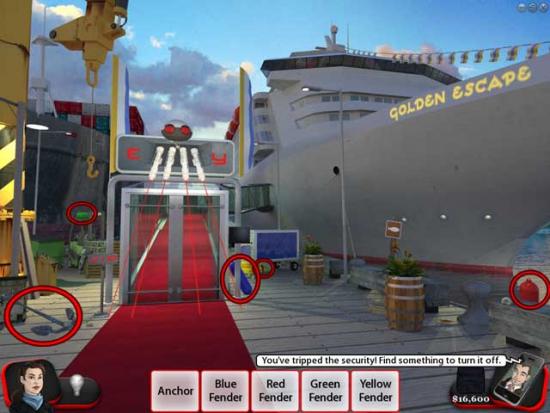
- The security system will be tripped. Find the items listed at the bottom of the screen: they should be able to help you turn it off.
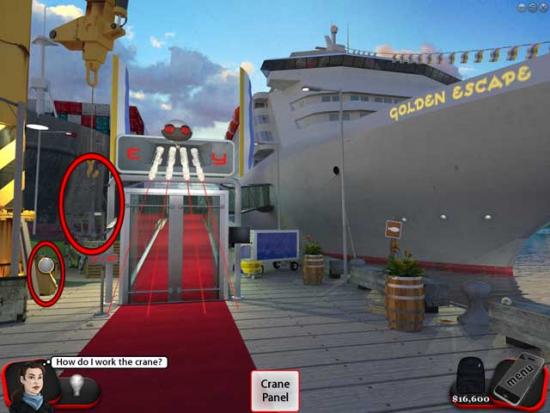
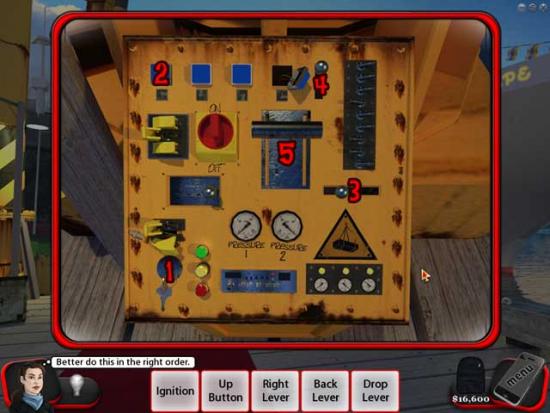
- Use the anchor on the hook, then take a closer look at the crane control panel.
- Press the buttons in the correct order to operate the crane. The solution is shown below.
- Now look at the door control panel again. Pick out the correct shapes. Their locations are shown below.
- Proceed through the entry gate and onto the ship.
Chapter 3: Atrium
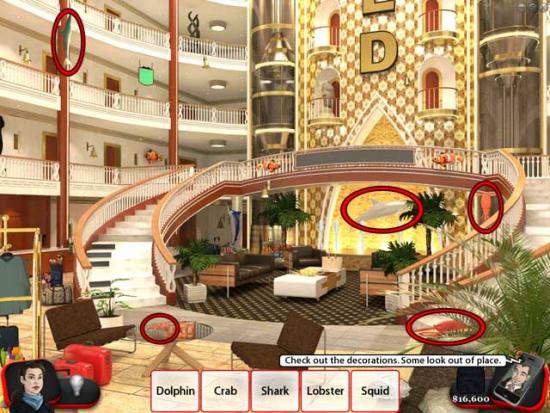
- Find the out-of-place decorations. Their locations are shown below.
- Take a closer look at the sign hanging beneath the balcony.
- Enter your bag. Find the items listed at the bottom of the screen. Their locations are shown below.
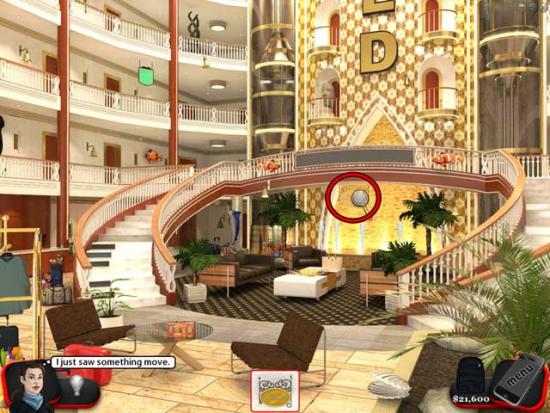
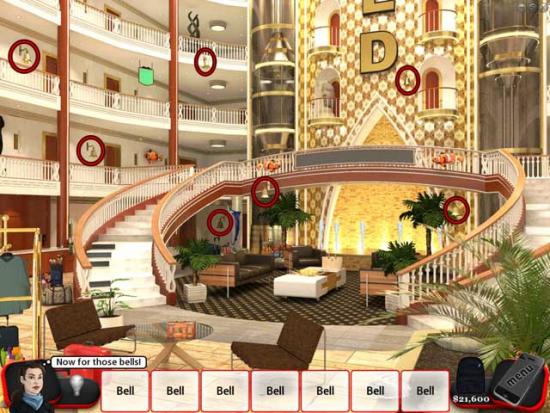
- Shoot the bells hidden throughout the area. Their locations are shown below.
- Take a closer look at the reception desk on the far left on the ground floor.
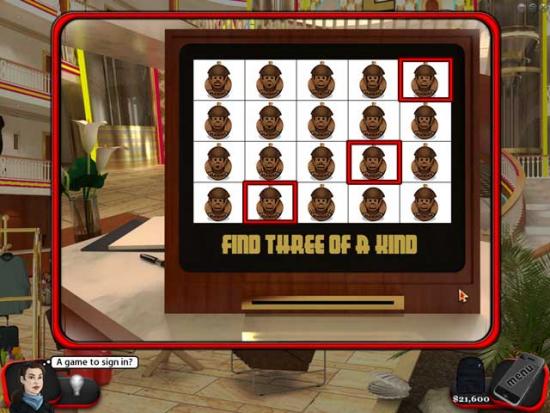
- Find three of a kind. The solution is shown below.
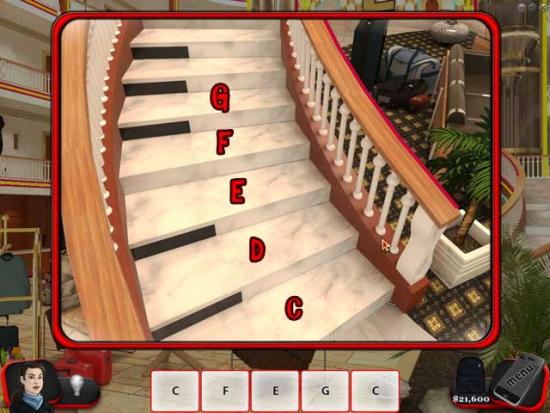
- Pick up the clue that appears from the slot, then take a closer look at the stairs on the left: the bottom steps look like piano keys.
- Click on the steps in the correct order as dictated by the notes listed at the bottom of the screen. The key/solution is shown below:
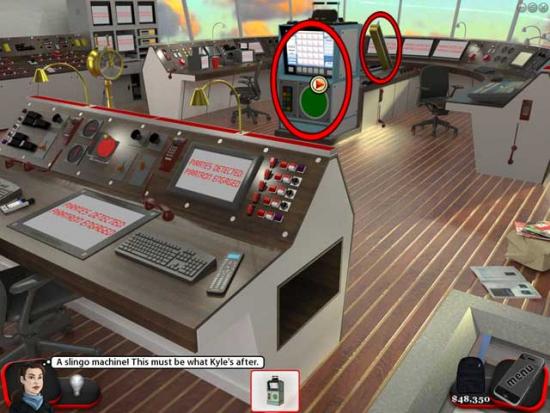
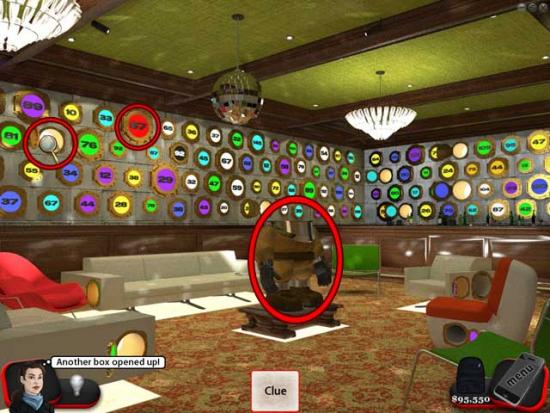
- A Slingo machine will appear in the middle of the room beneath the balcony. Click on it to play.
- Score 25,000 points to win the next clue. Once completed, take a closer look at the Slingo machine again, specifically the tray. Pick up the golden box inside to complete the chapter.
Chapter 4: Cabin
- Find the items listed at the bottom of the screen. Their locations are shown below.
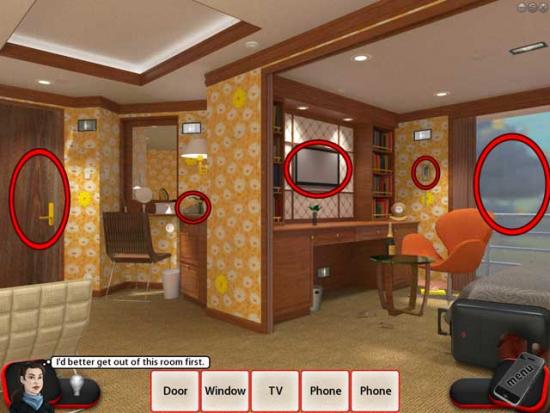
- Click on the note that appears near the door.
- Find the items listed at the bottom of the screen. Their locations are shown below.
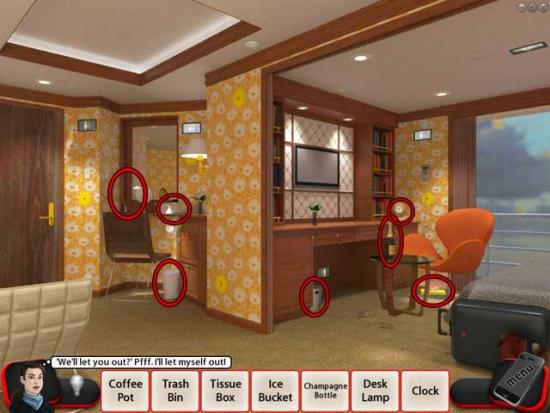
- Click on the welcome pamphlet that appears for a closer look.
- Find the yellow flowers hidden throughout the room. Their locations are shown below.
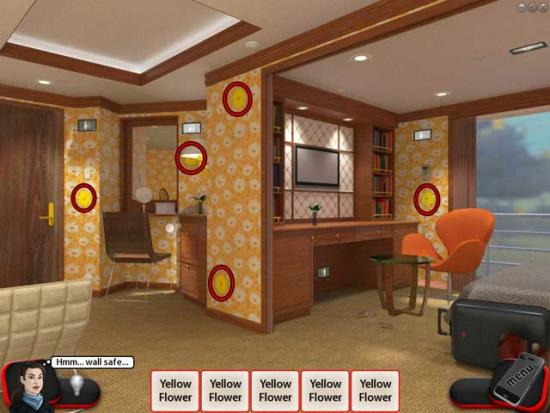
- Click on the wall safe that appears near the door.

- Input the code according to the bottom of the screen (*1234, unlock lever below the digital number display) to open the safe. You must do this within an allotted amount of time, or you will have to try again. Unlock it successfully to earn your job bag back.
- Gas will start to seep into the room. Find the five wall vents and click on them to help air out the room.
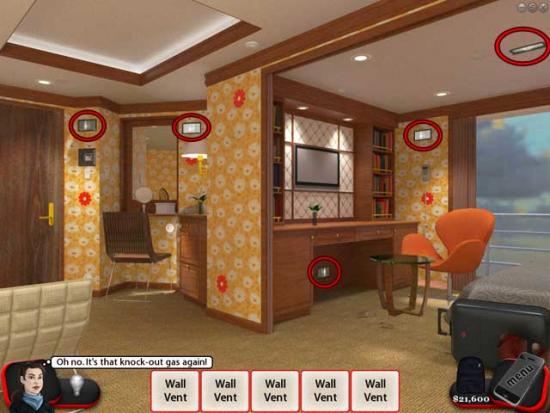
- Gas is still getting through. Find the items listed at the bottom of the screen. Their locations are shown below.
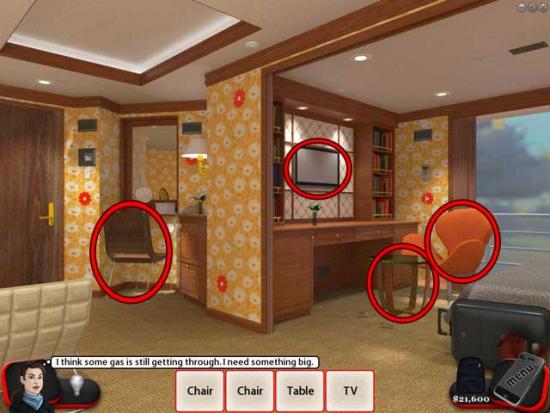
- Use the objects on the window on the far right until it breaks open, then pick up the safety note that falls onto the floor for a closer look.
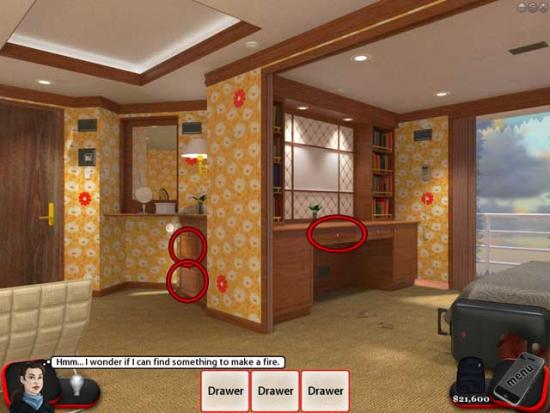
- Open the three drawers.
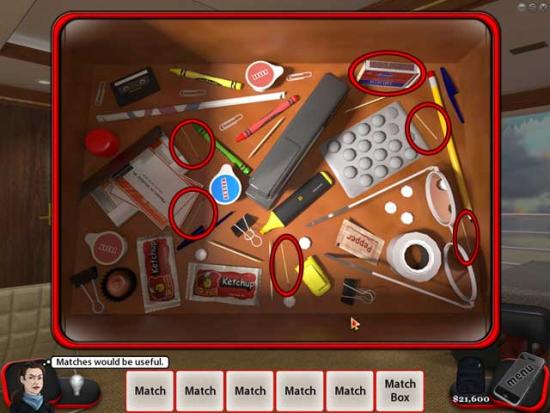
- Find the items listed at the bottom of the screen. Their locations are shown below.
- Use the matches on each of the room’s smoke detectors. Their locations are shown below.
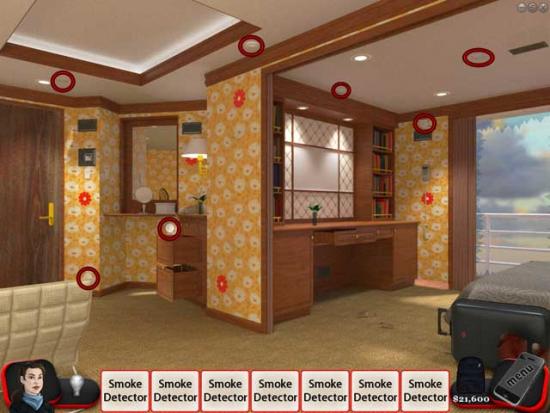
- The door is now open. Click on the doorway to exit and begin the next chapter.
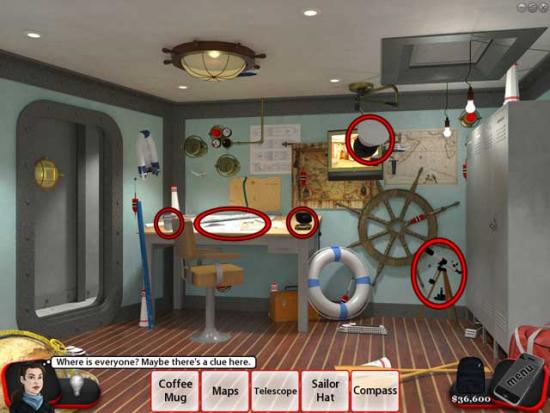
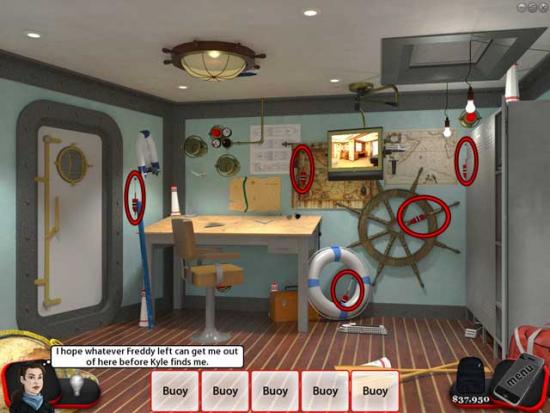
Chapter 5: Navigation
- Find the items listed at the bottom of the screen. Their locations are shown below.
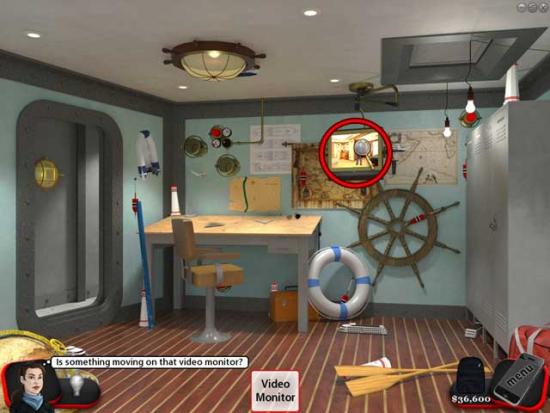
- Take a closer look at the note that falls on the floor, then look at the video monitor.
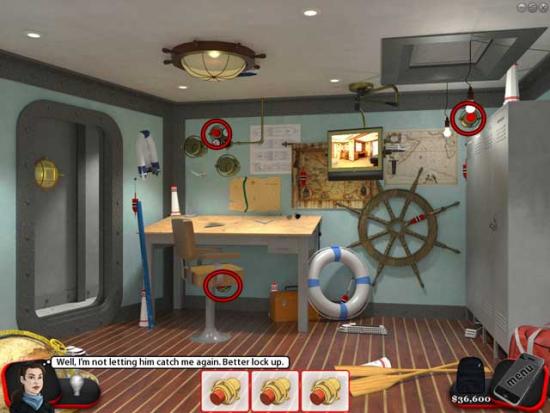
- Find the locking mechanisms. Their locations are shown below:
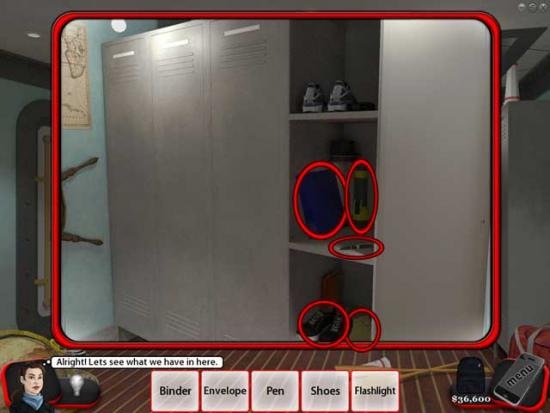
- Take a closer look at the locker on the right.
- Use the crowbar to break open the lock and gain access to the locker.
- Find the items listed at the bottom of the screen. Their locations are shown below.
- Take a closer look at the note that appears on the bottom shelf of the locker.
- Find the five buoys. Their locations are shown below.
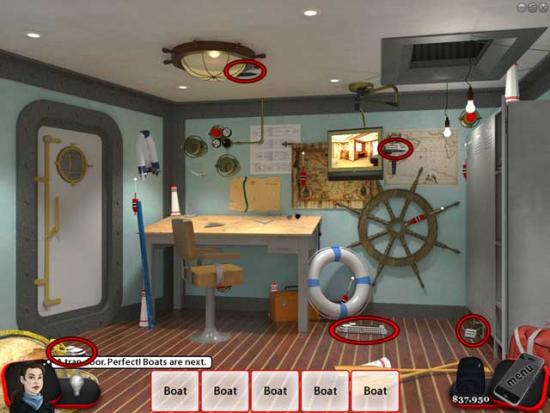
- Find the five boats. Their locations are shown below.
- Find the five lighthouses. Their locations are shown below.
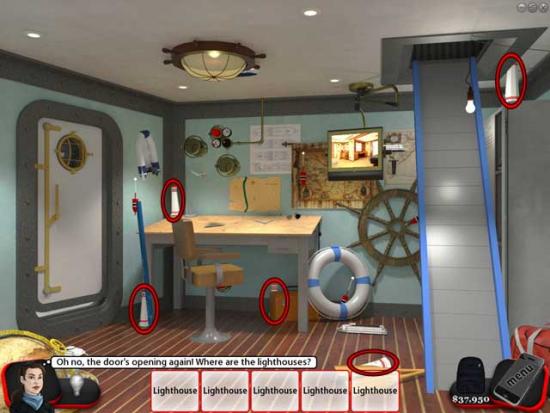
- Proceed up the ladder and to the next chapter.
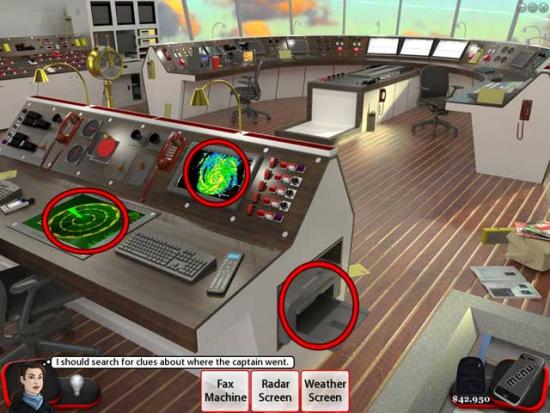
Chapter 6: Bridge
- Find the items listed at the bottom of the screen. Their locations are shown below.
- Find five envelopes. Their locations are shown below.
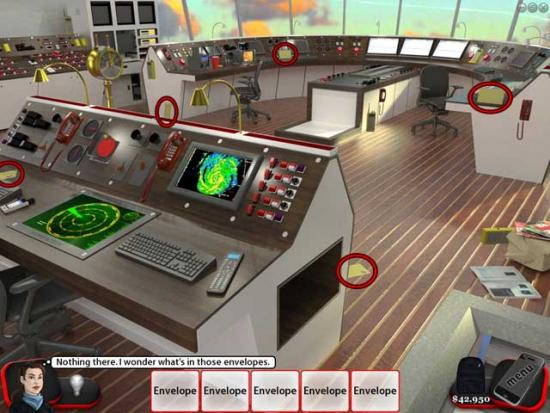
- Take a closer look at the clue that appears in the middle of the floor.
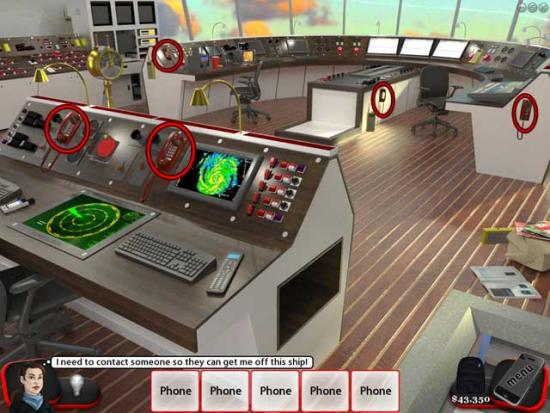
- Find five phones. Their locations are shown below.
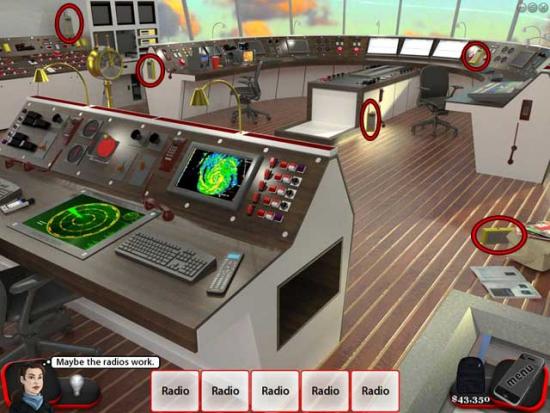
- Find five radios. Their locations are shown below.
- Click on the emergency beacon, then on the control station.
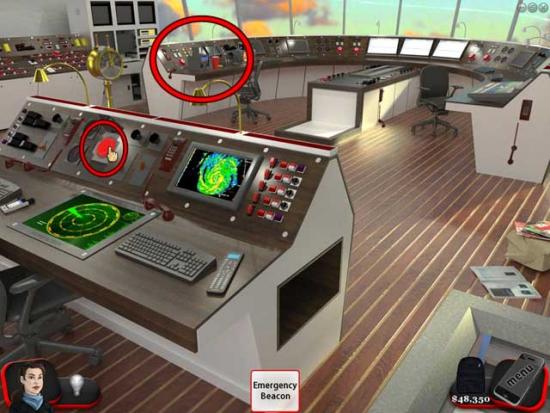
- Click on the green button, then five blue buttons, then the red button located on the control panel.
- Click the lever that appears, triggering the appearance of a Slingo machine. Click to play.
- Complete 10 Slingos to win a clue. Once completed successfully, collect the clue that appears inside the prize tray to complete the chapter.
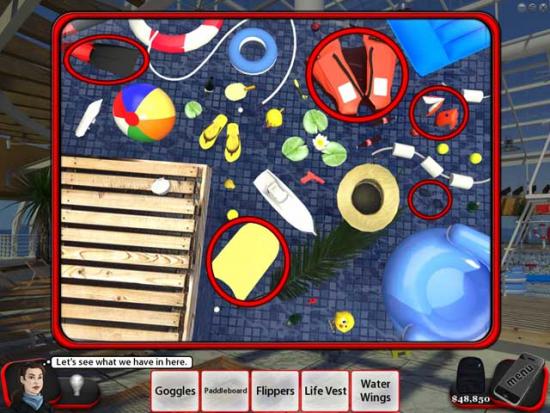
Chapter 7: Pool
- Find the items listed at the bottom of the screen. Their locations are shown below.
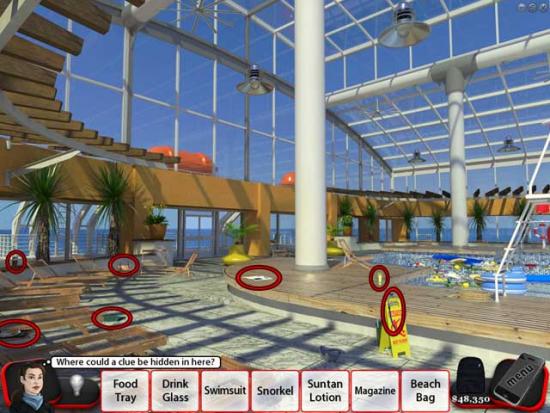
- Check under the chairs. Their locations are shown below.
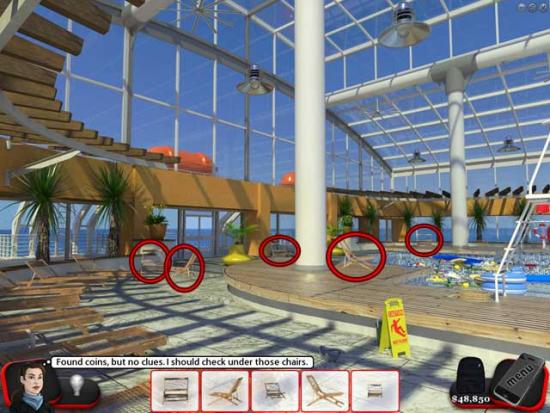
- Pick up the clue that appears on the floor in the distance near the door.
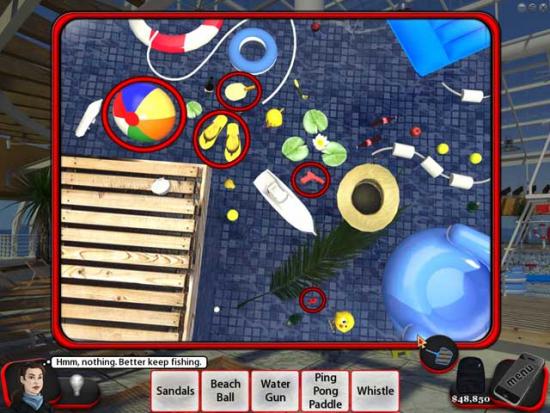
- Take a closer look at the pool.
- Pick up the net so you can fish objects out of the water.
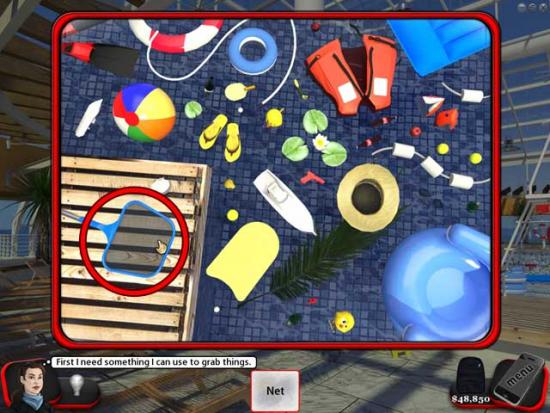
- Find the items listed at the bottom of the screen. Their locations are shown below.
- Pick up the clue that appears on the crate on the left.
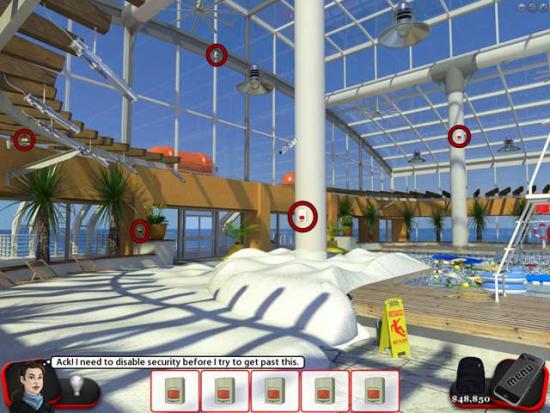
- Click on the door: foam will appear everywhere.
- Find five security sensors. Their locations are shown below.
- Find the items listed at the bottom of the screen. Their locations are shown below.
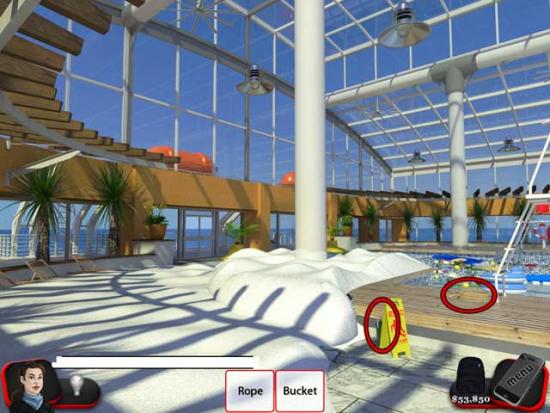
- Use the rope on the ceiling fan.

Chapter 8: Deck
- Head for the door at the far end of the deck. Unfortunately, Piratron appears again.
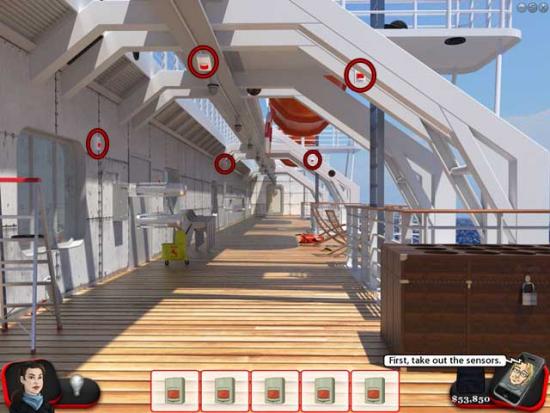
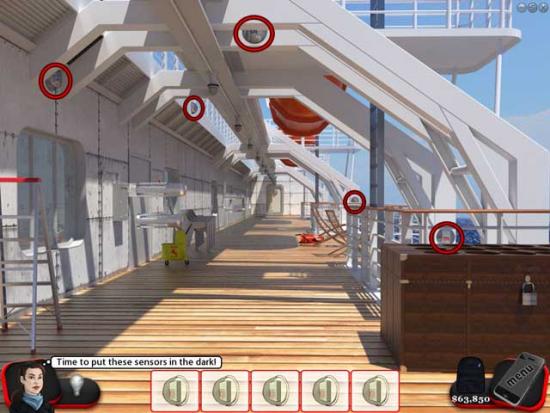
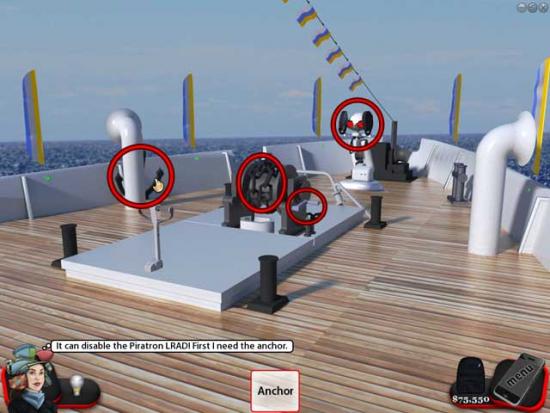
- Find five sensors. Their locations are shown below.
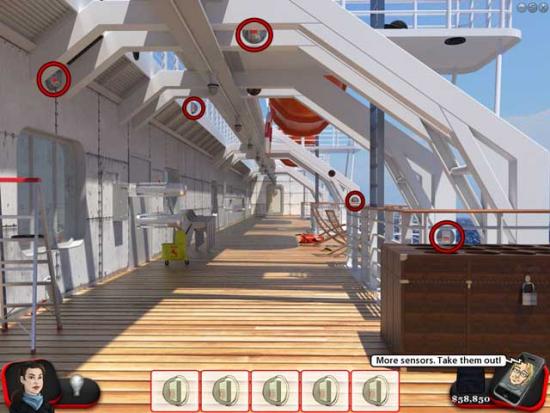
- Find five shielded sensors and use the slingshot on them. Their locations are shown below.
- Find the items listed at the bottom of the screen. Their locations are shown below.
- Pick up the clue that appears.
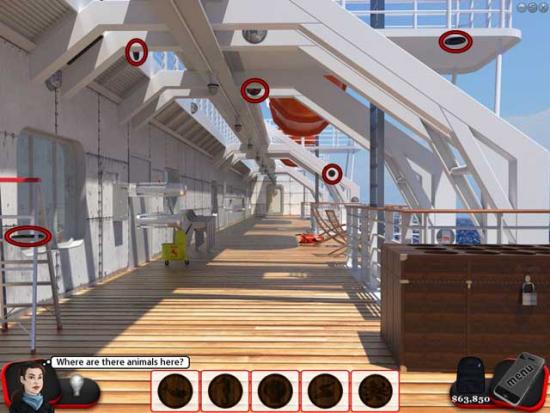
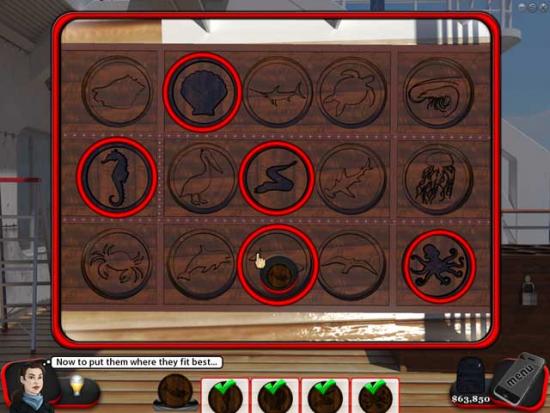
- Pick up the animal dials. Their locations are shown below.
- Take a closer look at the large trunk on the right.
- Place the animal dials in their proper locations where they fit best. The solution is shown below.
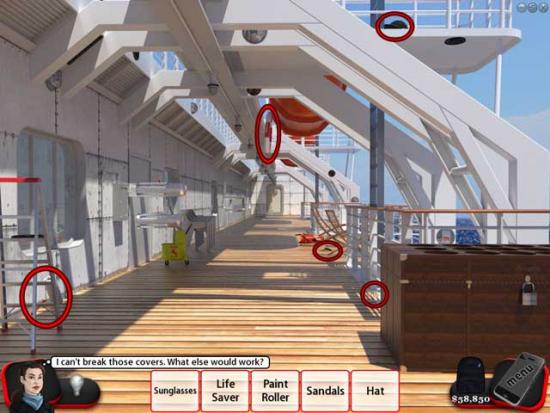
- Find the items listed at the bottom of the screen. Their locations are shown below.
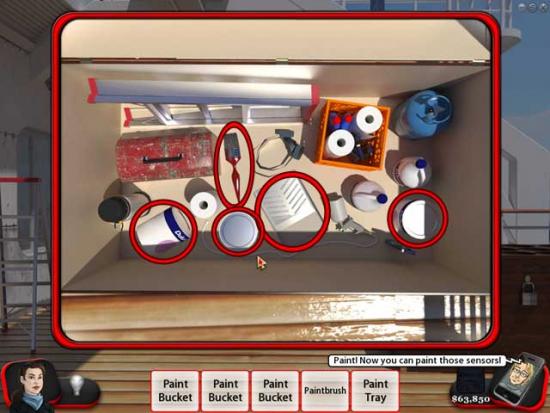
- Paint over the sensors. Their locations are shown below.
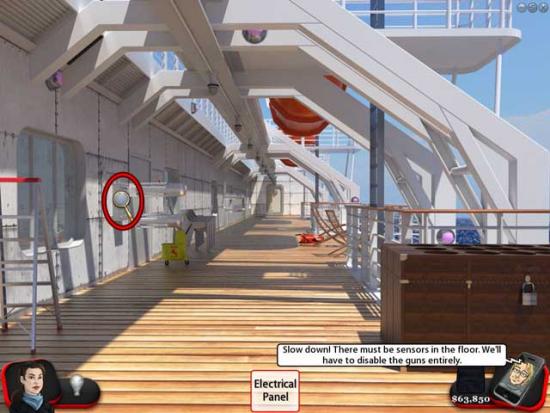
- Try and head towards the door again: no luck.
- Click on the electrical panel on the left for a closer view.
- Find the items needed from your job bag to access the electrical panel. Their locations are shown below.
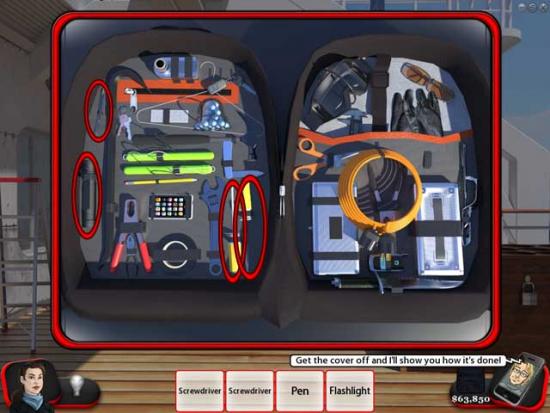
- Use the screwdriver to remove the screws from the panel, then click on it to remove it.
- Follow the instructions by clipping the red and blue wires, then using the electrical tape to connect each to the other. The finished solution is shown below.
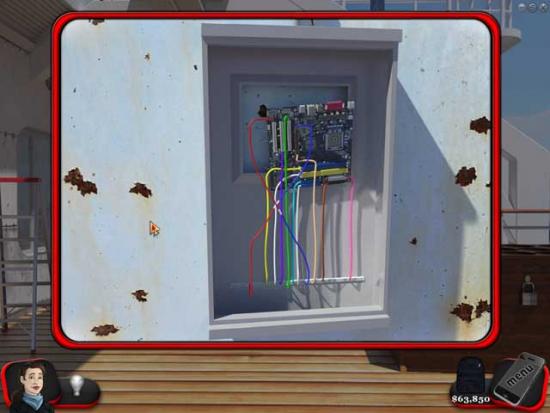
- Proceed through the door on the far end of the deck to complete the chapter.
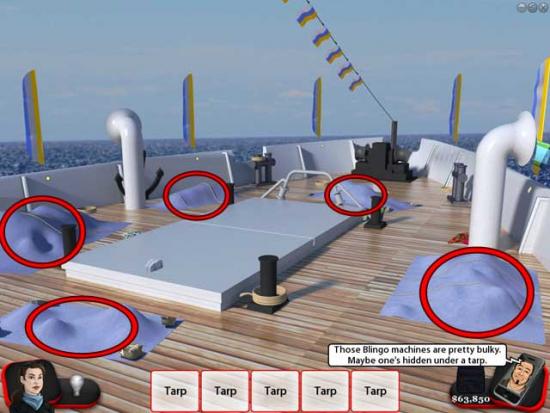
Chapter 9: Bow
- Remove the five blue tarps on the deck.
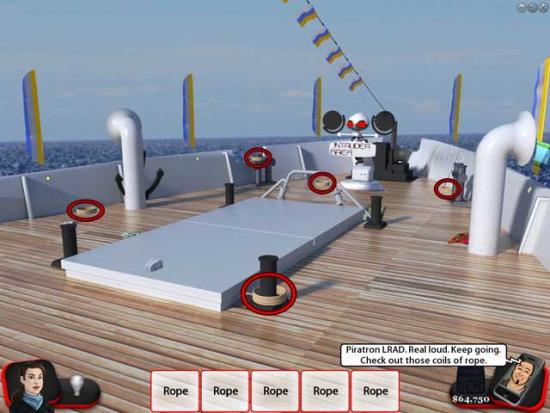
- Pick up five ropes. Their locations are shown below.
- Click on the five flags in the correct order. The solution is shown below.
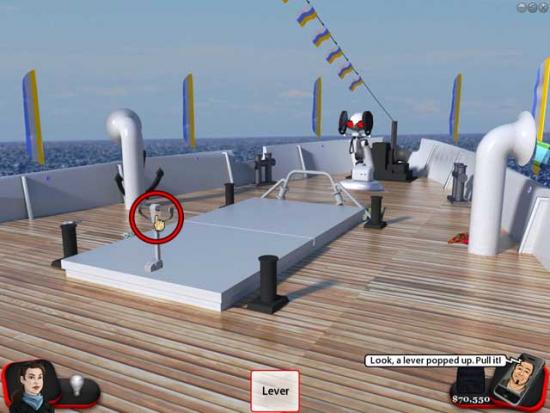
- Click on the lever that appears.
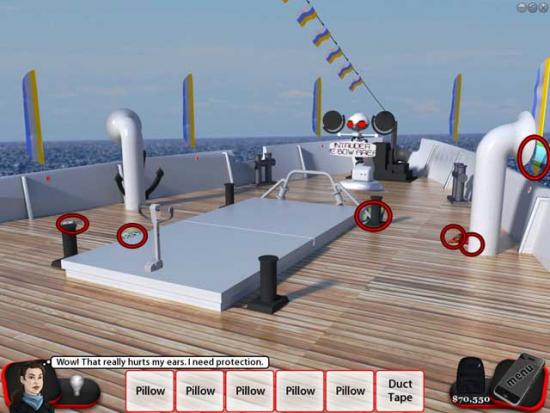
- Find the items listed at the bottom of the screen. Their locations are shown below.
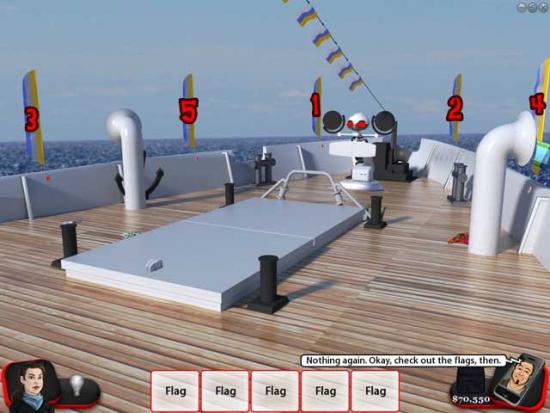
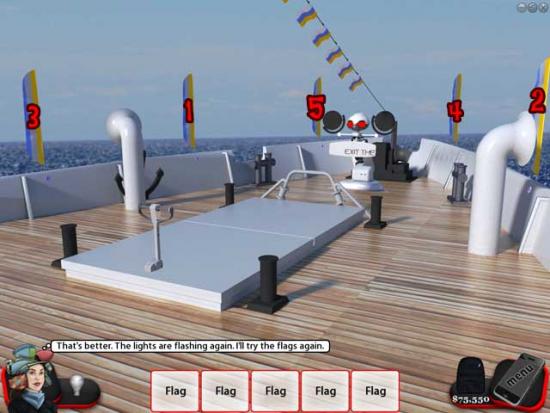
- Click on the five flags in the correct order. The solution is shown below.
- Pick up the anchor, then attach it to the chain and use it on the LRAD. Click the switch/lever on the side of the chain to destroy it.
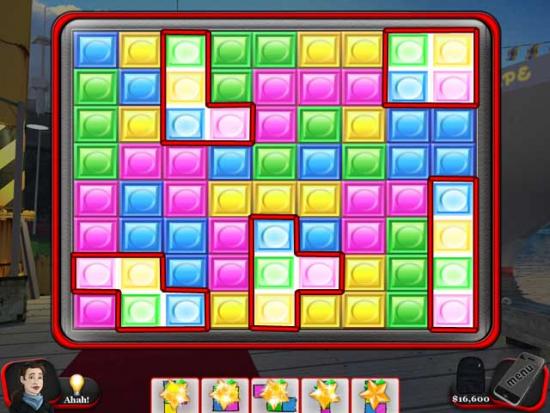
- Click the lever on the deck to trigger the appearance of a Slingo machine, then click to play.
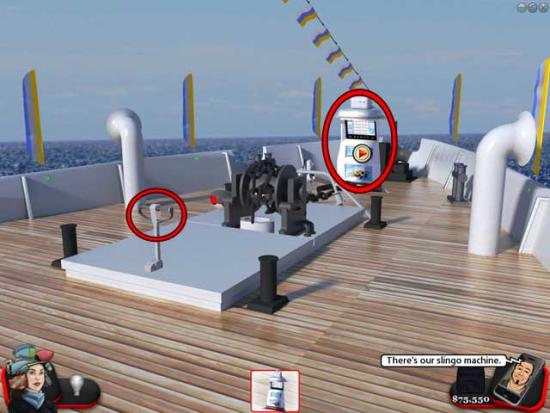
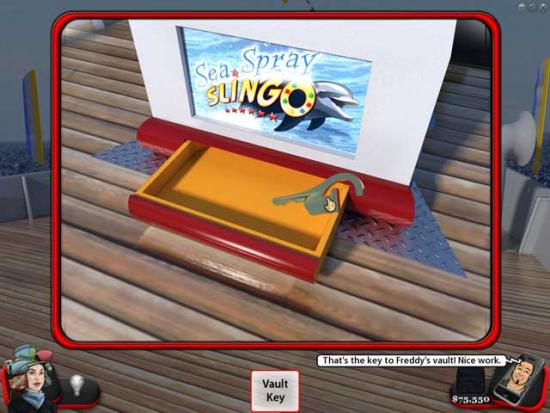
- Match all the yellow squares on the Slingo machine to win a prize. Once done successfully, click on the prize tray to collect the Vault Key and complete the chapter.
Chapter 10: Outside Casino
- Click on the doors: instead of opening, the security system will appear.
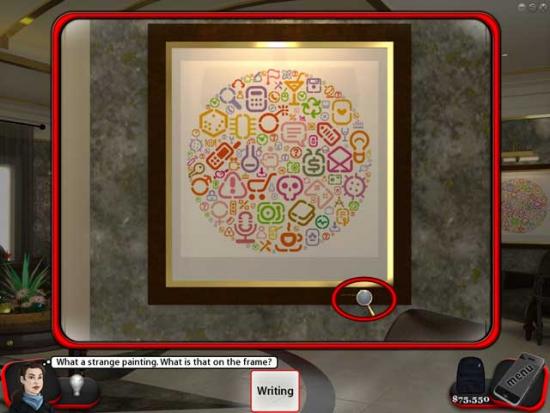
- Click on the painting on the right for a closer view.
- Take a closer look at the writing on the bottom right corner of the frame.
- Find the items listed at the bottom of the screen. Their locations are shown below.
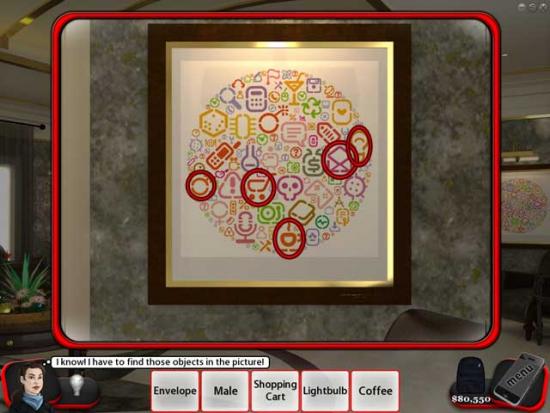
- Pick up the clue that appears on the floor.
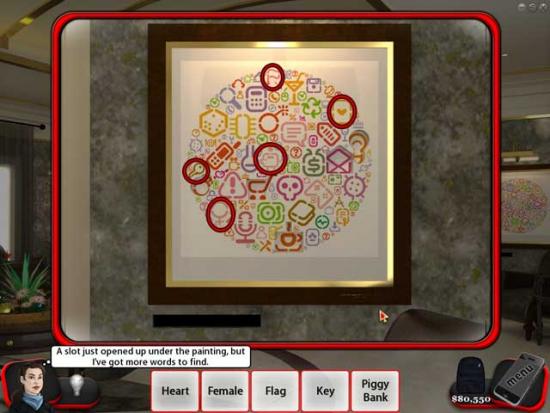
- Take a closer look at the painting to the left of the doors.
- Find the items listed at the bottom of the screen. Their locations are shown below.
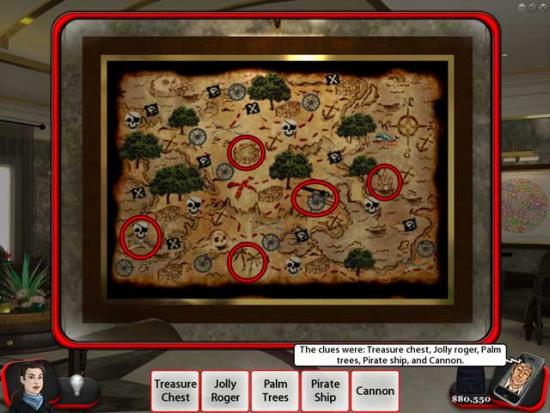
- A new painting will appear to the left of the painting you were just at. Click on it for a closer view.
- Find the items listed at the bottom of the screen. Their locations are shown below.
- Enter the casino.
Chapter 11: Casino
- Take a closer look at the cashier cages on the right.
- Try using tools like the scissors on the cages: it will trigger the security system.
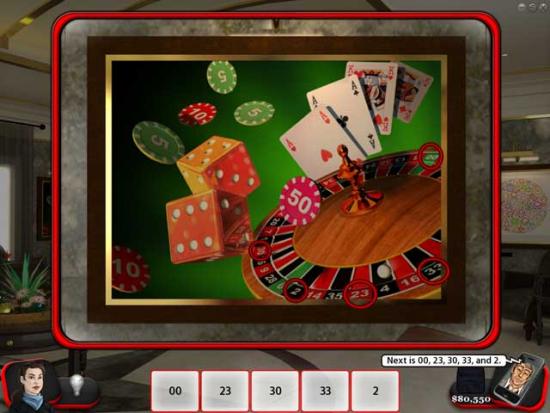
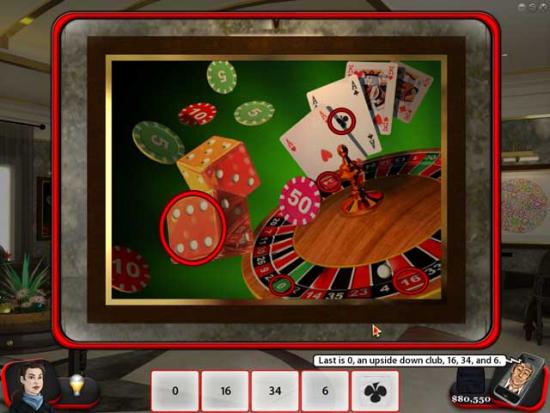
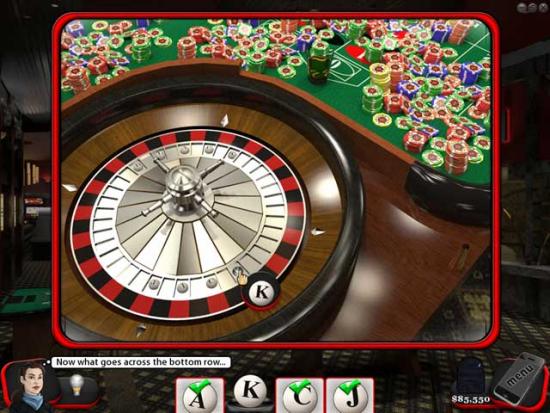
- Take a closer look at the roulette table closest to the bottom of the screen.
- Find 9 lettered balls, then arrange them so they spell two words “Black Jack”. The locations and solution are shown below.

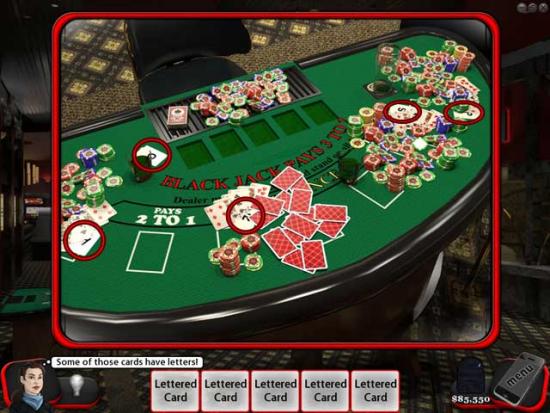
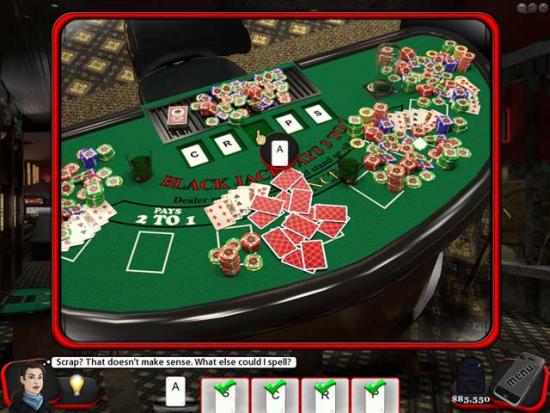
- Take a closer look at the Black Jack tables at the far end of the row.
- Find the lettered cards, then arrange them so they spell “Craps”. The locations and solution are shown below.
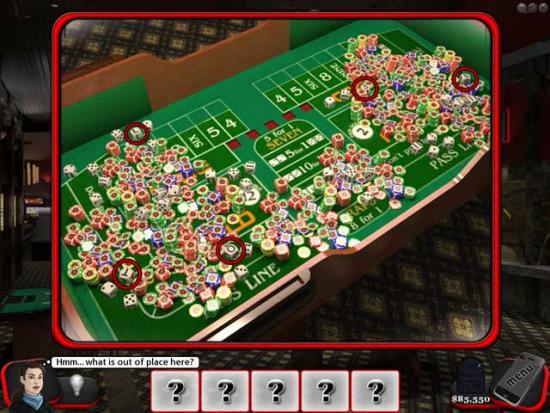
- Take a closer look at the craps table in the middle of the room.
- Find five lettered die, then arrange them so they spell “slots”. The locations are solution are shown below.
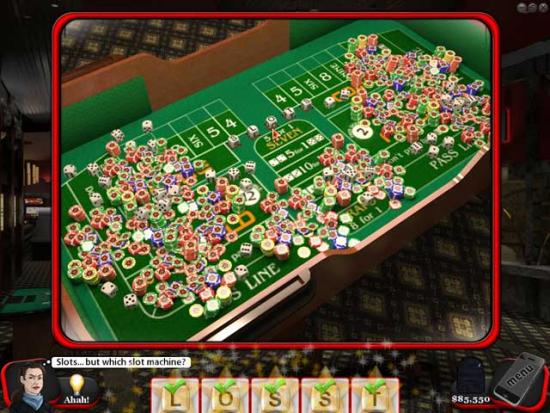
- Take a closer look at the slot machine that appears on the far side of the room.
- Click the lever, then collect the lettered coins that appear. Arrange them so they spell “Vault”.

- Click on the secret vault entrance that appears near the cashier cages to complete the chapter.
Chapter 12: Vault
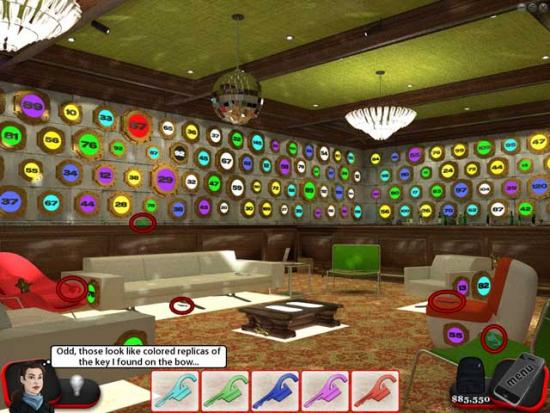
- Pick up the colored vault key replicas. Their locations are shown below.
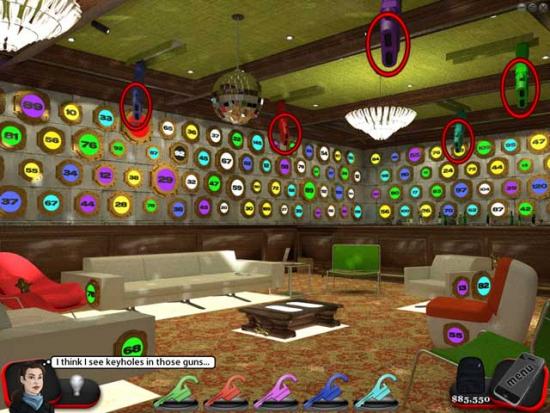
- Use the vault key on one of the yellow boxes on the left: the security system will be triggered.
- Use the keys on the guns of the corresponding color to disarm them.
- Find five miniature statues. Their locations are shown below.
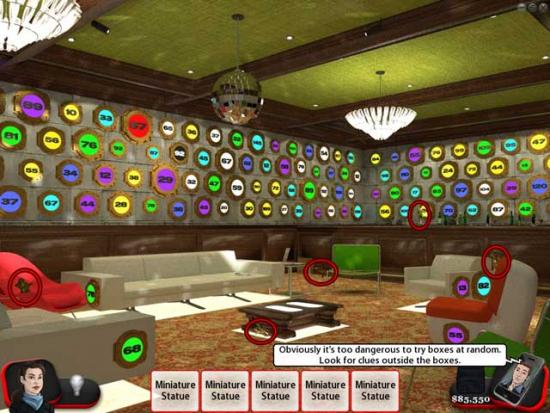
- Pick up the clue that appears on the floor.
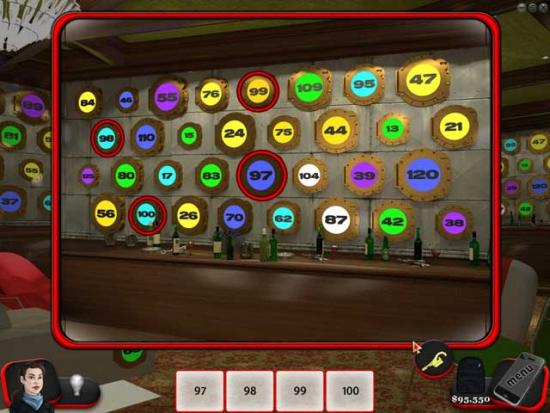
- Take a closer look at the bar on the right side of the room.
- Find and open the boxes numbered 97-100 and pick up the objects inside. Their locations are shown below.
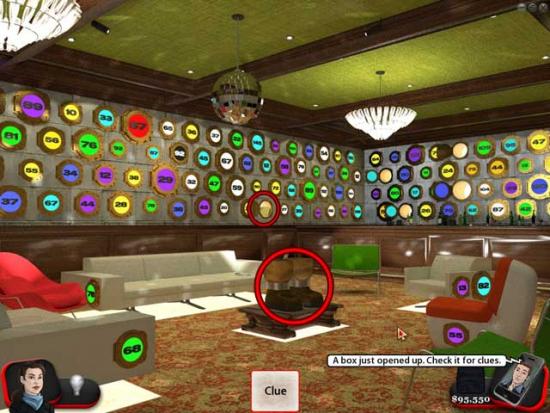
- Place the body pieces on the table, then collect the clue that appears.
- Use the vault key on the five furniture boxes to open them and collect the statue parts inside. Their locations are shown below.
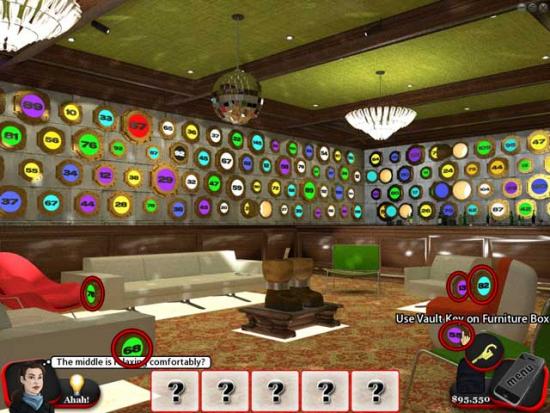
- Place the body pieces into their correct locations and collect the next clue that appears. Then, open the red box and collect the head inside, placing it on top of the rest of the statue.
- Pick up the power chord that appears and use it on the statue head to trigger a Slingo machine.
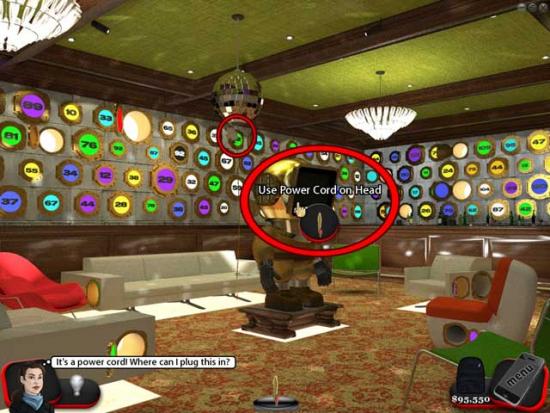
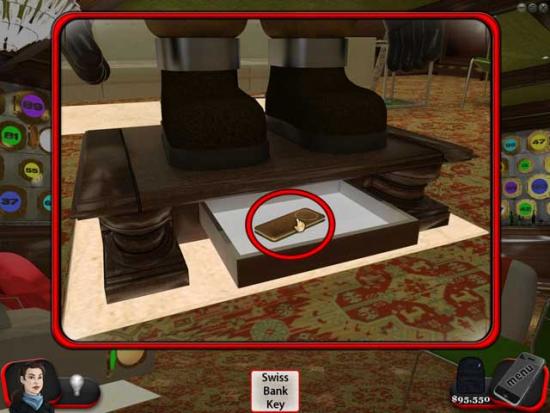
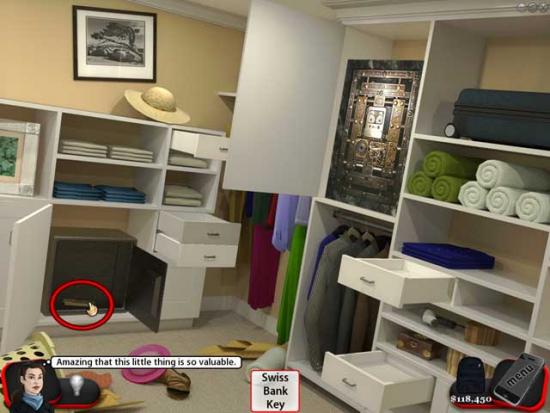
- Click on the Slingo machine to play. Score 25,000 points for a prize. Once completed successfully, click on the prize tray and collect the Swiss bank key to complete the chapter.
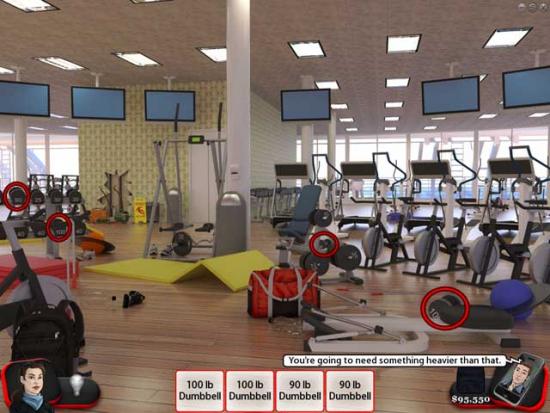
Chapter 13: Fitness Room
- Click on the door on the other side of the room: it’s locked.
- Collect five 45lb plates. Their locations are shown below.
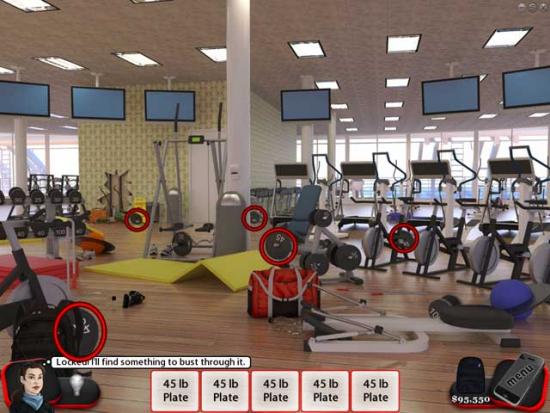
- Use the plates on the door: it still won’t open.
- Find the items listed at the bottom of the screen. Their locations are shown below.
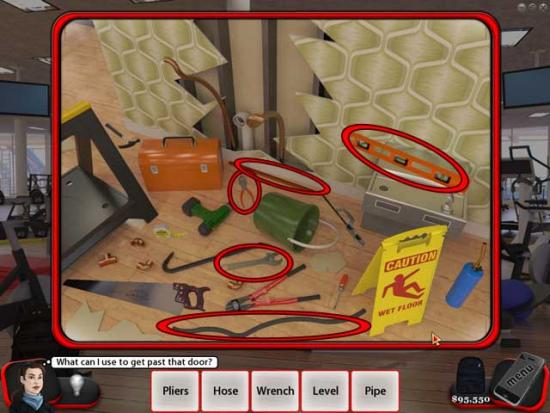
- Take a closer look at the plumbing to the left of the door. You can find it easily by looking for the hole in the wall.
- Find the items listed at the bottom of the screen. Their locations are shown below.
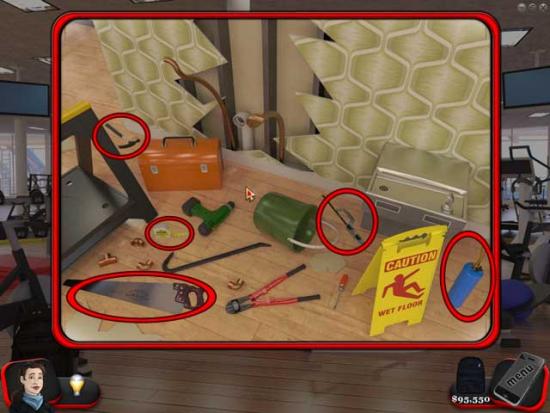
- Use the blowtorch on the floor, then smash the weights against them until it bursts open.
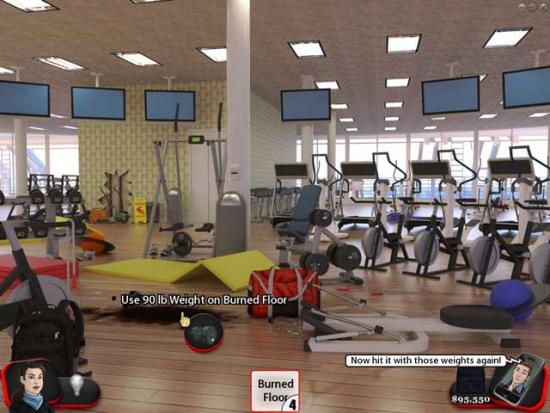
- Once the hole in the floor is open, enter to complete the chapter.
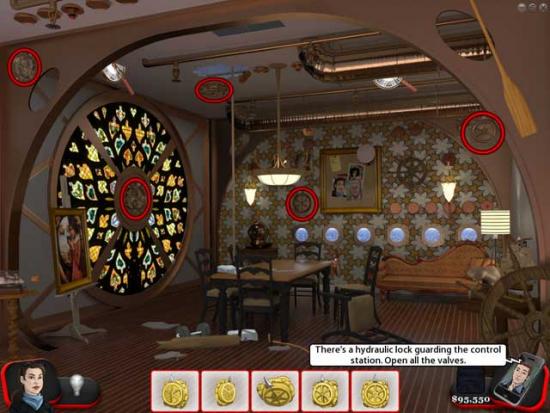
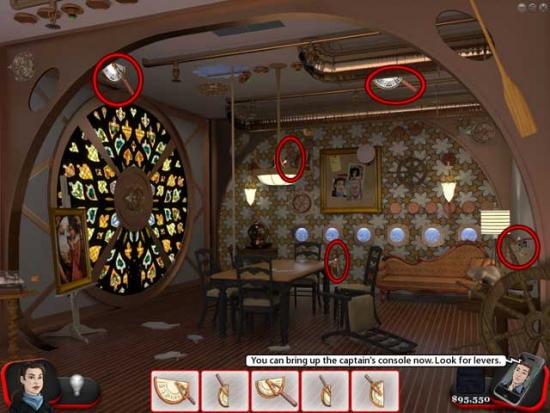
Chapter 14: Captain’s Quarters
- Open five hydraulic valves. Their locations are shown below.
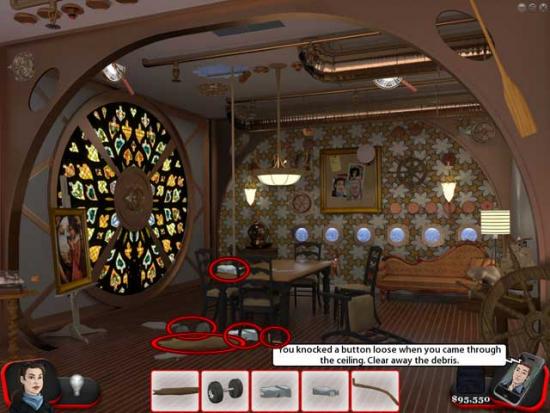
- Clear away the debris. The locations are shown below.
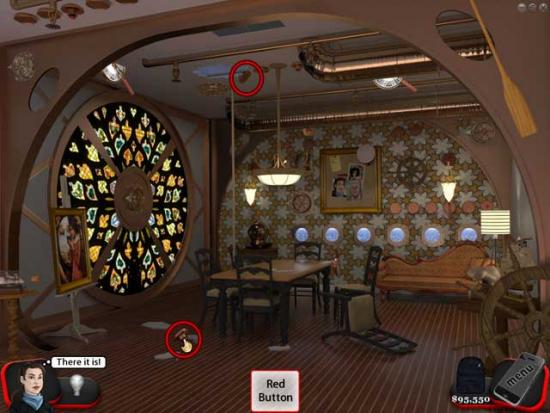
- Pick up the red button and use it on the red button slot.
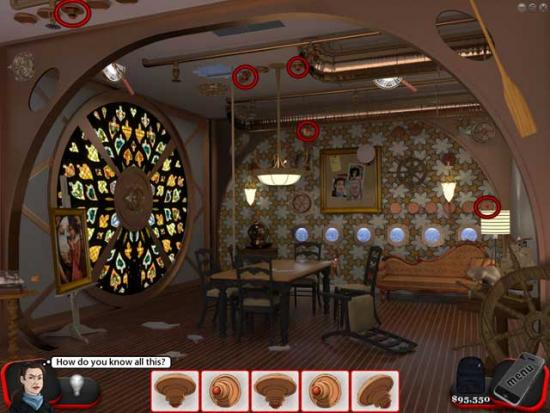
- Press five red buttons. Their locations are shown below.
- Click five levers. Their locations are shown below.
- Take a closer look at the computer console that appears in the middle of the room and click the “Off” setting.
- Take a closer look at the picture board.
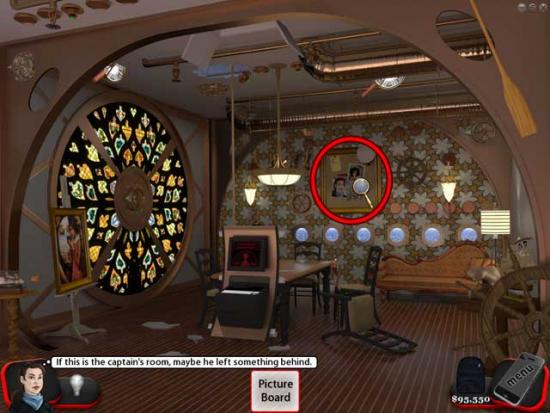
- Pick up the hat and the pictures on the board.
- Look at the computer console again for a closer look. Input “CaptnK” and then “Enter”.
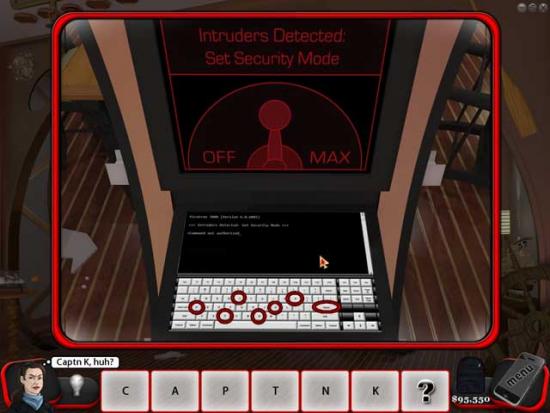
- An exit will appear. Click on it to complete the chapter.
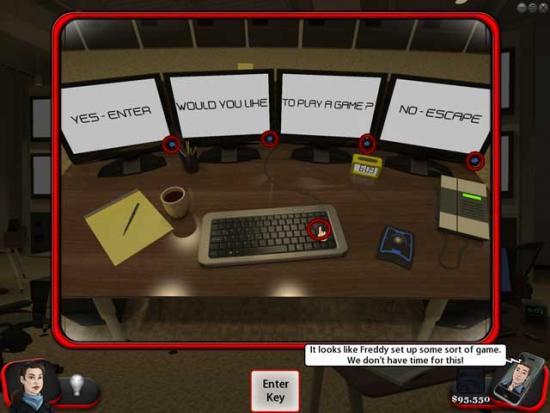
Chapter 15: Computer Room
- Take a closer look at the computer terminal on the left.
- Click the power buttons on the monitors to turn them on, then click the Enter key.
- The large monitors in the room will turn on and a color pattern will flash. Repeat the pattern correctly within the allotted amount of time. The complete pattern is as follows: Light Blue- Green- Blue- Yellow- Pink- Red.
- A Slingo machine will appear. Click on it to play.
- Score 50,000 points to gain access to the Piratron. Once completed successfully, pick up the note that appears in the bottom tray.
- Pick out the pictures that have “$” signs. The solutions are shown below.
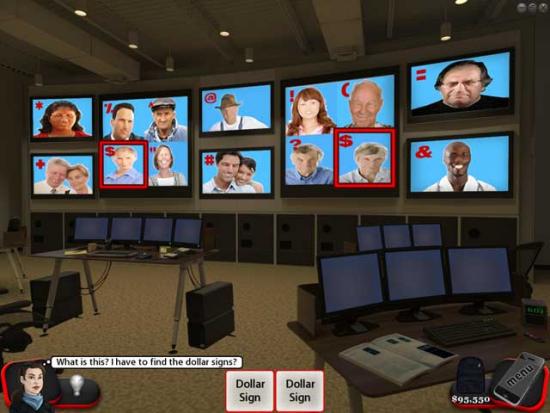

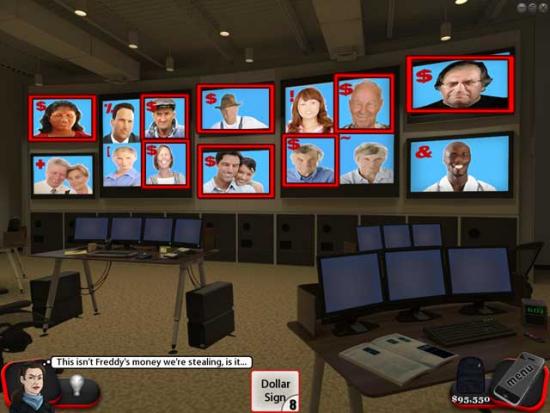
- Take a closer look at the computer terminal on the left again.
- Click “Max” on any of the monitors to completed the chapter.

Chapter 16: Outside Mona’s Hideout
- Find the items listed at the bottom of the screen. Their locations are shown below.
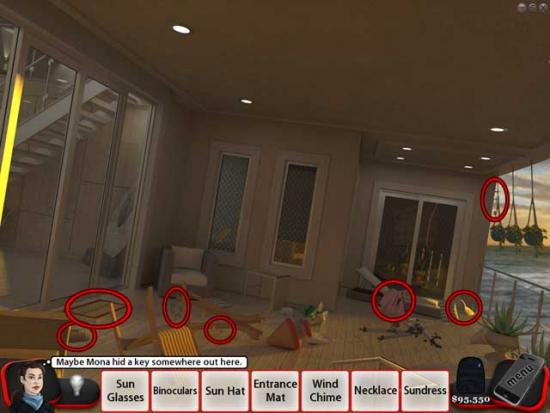
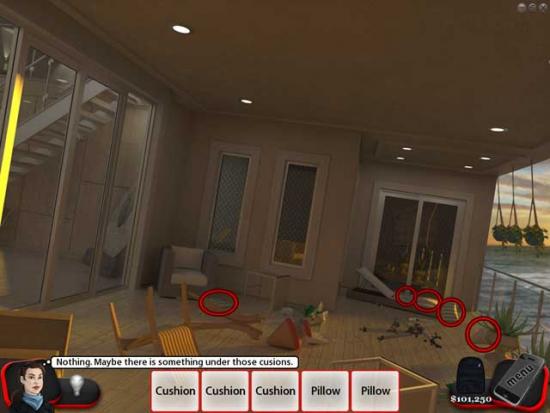
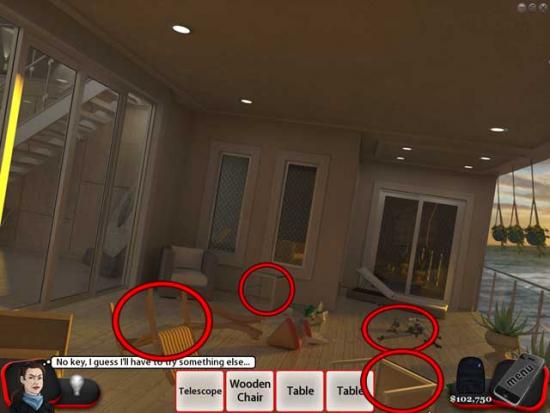
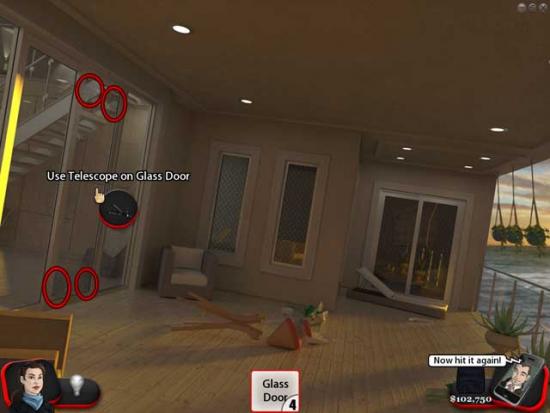
- Use the telescope on the glass door on the left: it doesn’t work.
- Use the hammer and screwdriver in each of the door’s four corners, then use the telescope on the door again to break it.
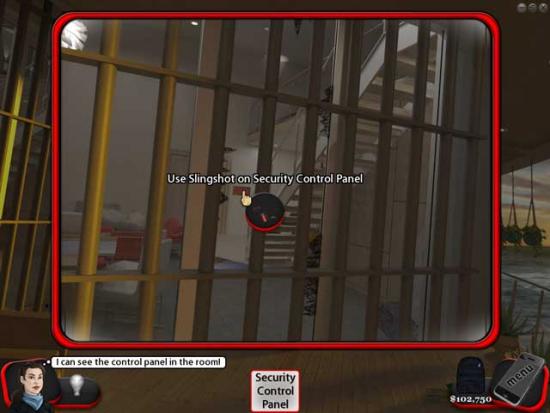
- Security bars will appear. Take a closer look at the broken door on the left, through the security bars.
- Use the slingshot on the security control panel to remove the bars and enter the hideout.
Chapter 17: Mona’s Hideout
- Find the five painting pieces scattered throughout the room. Their locations are shown below.
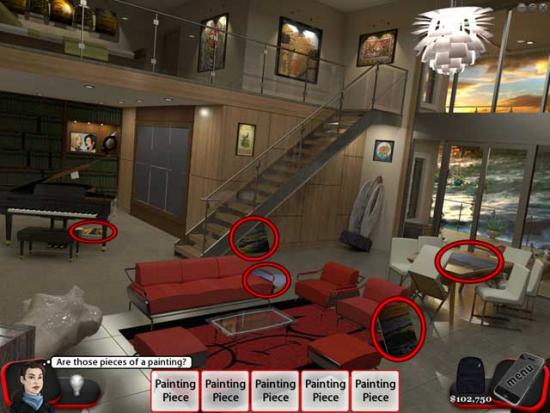
- Place the painting pieces on the slots in the wall.
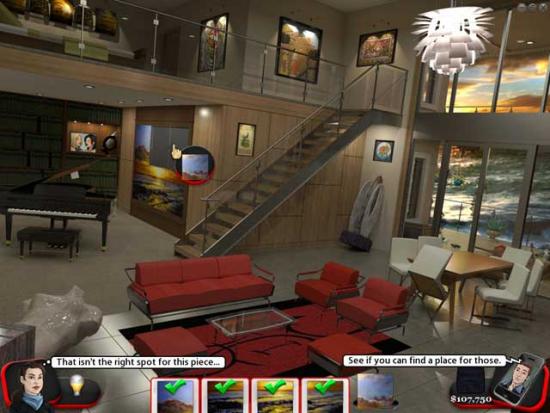
- Check the remaining five paintings to search for the last piece.

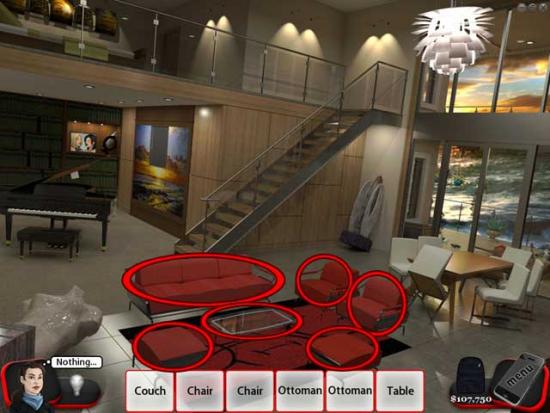
- Find the items listed at the bottom of the screen. Their locations are shown below.
- Collect the books that appear on the floor, then take a closer look at the bookcase at the back of the room.
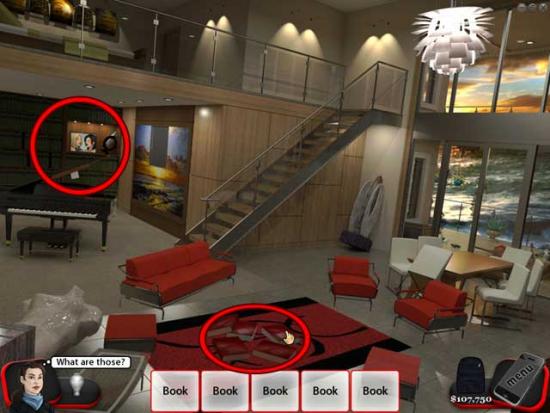
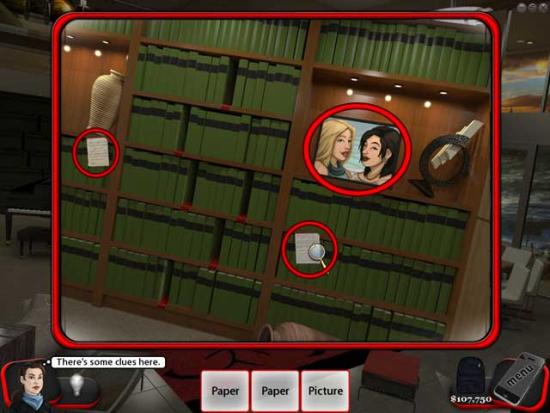
- Take a closer look at the papers and the picture.
- Place the books back in their slots in the bookcase.
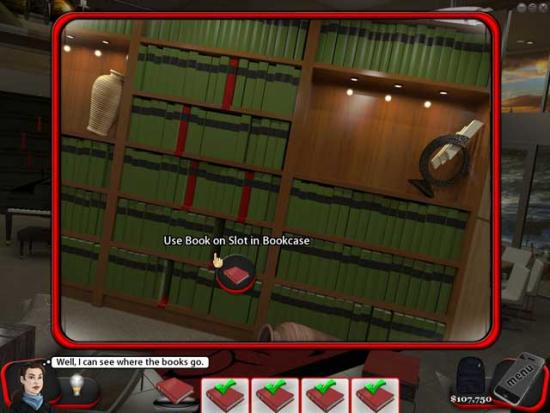
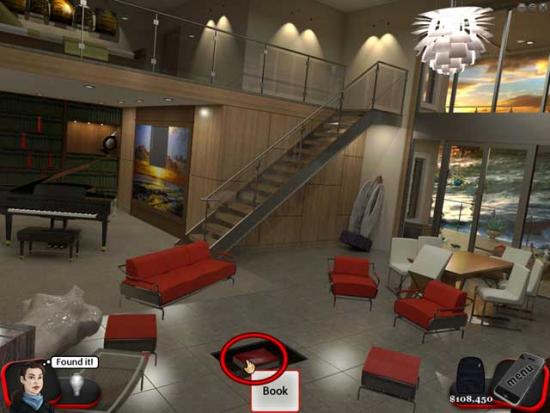
- One book is missing. Click on the rug back in the main area and collect the book hidden beneath, then return to the bookcase.
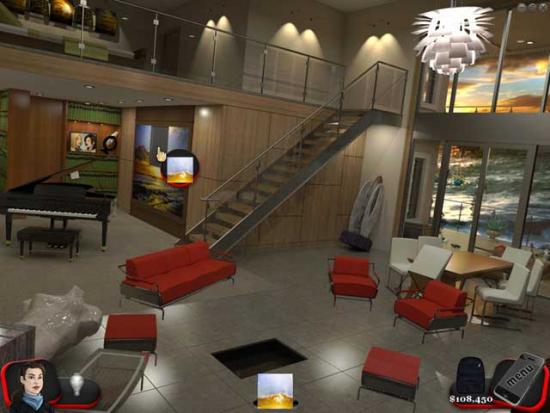
- Place the last book in the last slot and collect the final painting piece that appears.
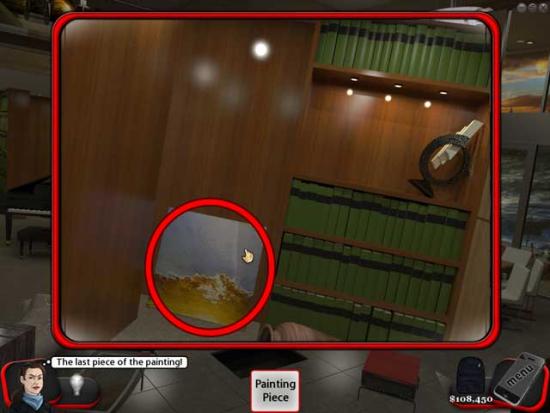
- Place the final piece in the painting to restore it, revealing a secret room, and complete the chapter.
Chapter 18: Mona’s Closet
- Click on the large cabinet door on the left to reveal a safe.
- Click on five drawers to open them. Their locations are shown below.
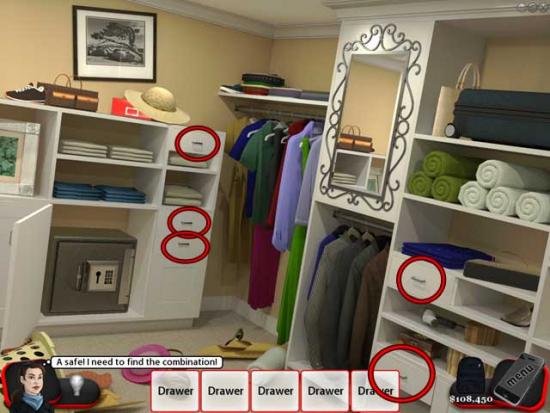
- Collect the two papers and two photos inside the drawer.
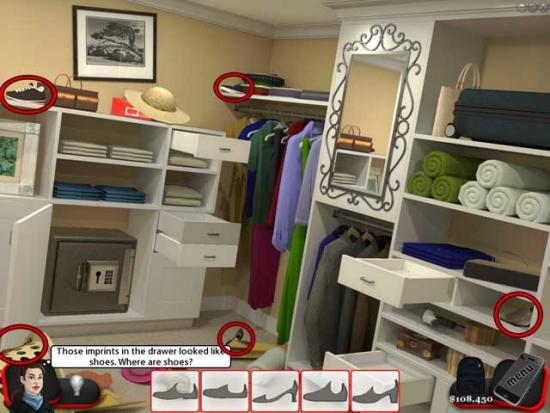
- Find five shoes hidden throughout the room. Their locations are shown below.
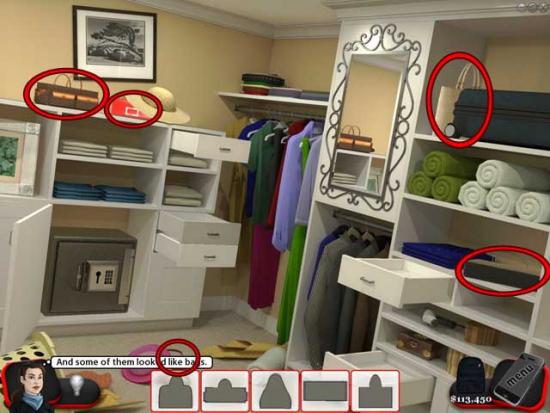
- Find five handbags hidden throughout the room. Their locations are shown below.
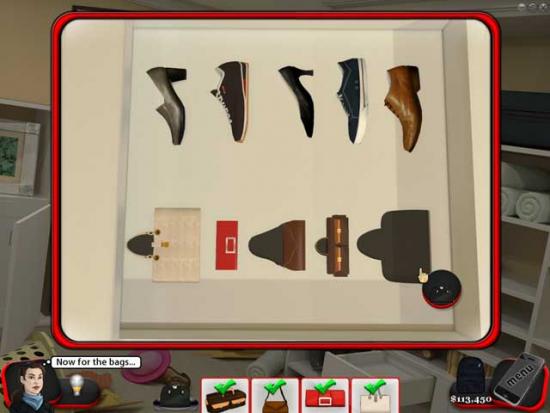
- Place the bags and shoes in their correct slots. The solutions are shown below.
- Take a closer look at the second safe that appears.
- Use the screwdriver the turn the screws and spell out “Slingo”.
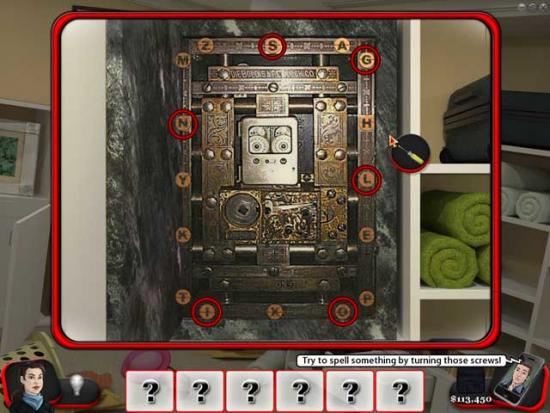
- A Slingo machine will appear. Click on it to play.
- The goal of this game is to get a full card. Once completed successfully, check the prize tray and collect the key.
- Use the key on the first safe to unlock it and recover the Swiss bank key.
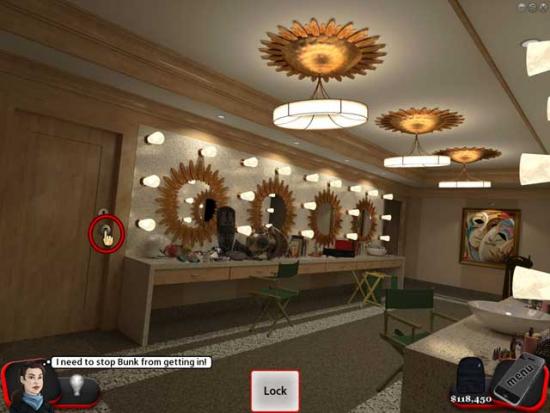
Chapter 19: Performers’ Room
- Click on the lock on the door to lock it.
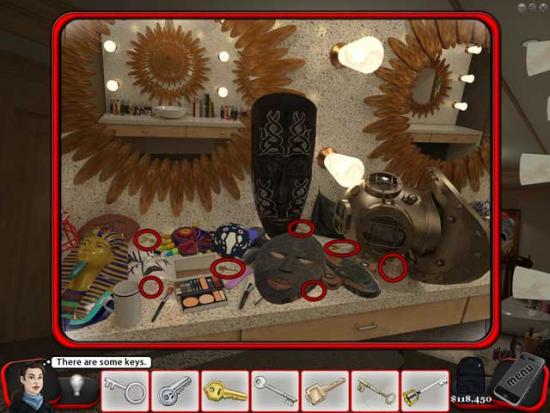
- Take a closer look at the masks lying on the dressing counter on the left.
- Find seven keys. Their locations are shown below.
- Use the second to last key (second on the right) on the deadbolt to lock it.
- Click on the door on the far end of the room: it’s locked.
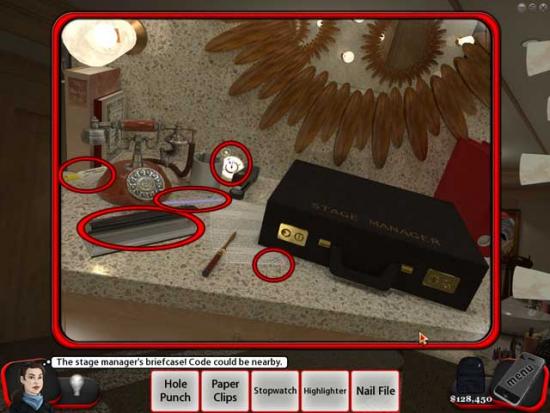
- Take a closer look at the briefcase.

- Find the items listed at the bottom of the screen. Their locations are shown below.
- Use the first key to unlock the briefcase.
- Find the items listed at the bottom of the screen. Their locations are shown below.
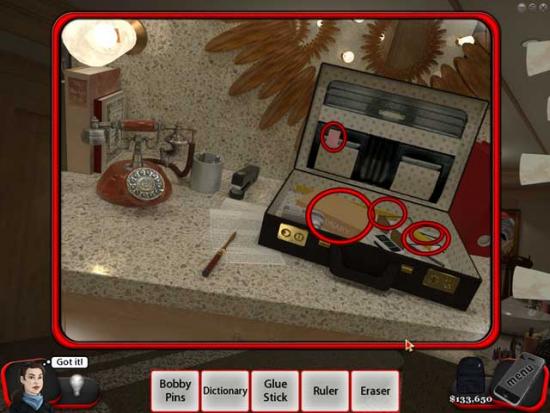
- Collect the paper at the bottom of the briefcase: it has a code on it.
- Find the items listed at the bottom of the screen. Their locations are shown below.
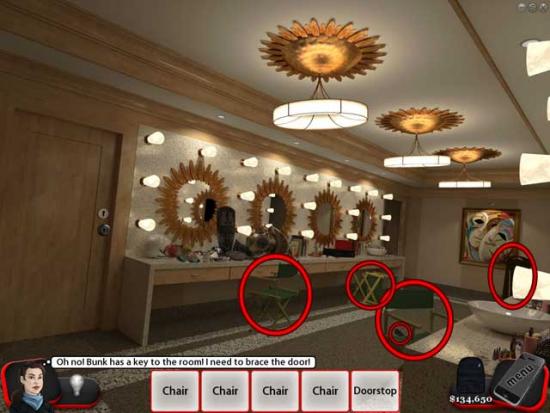
- Place the chairs and doorstop against the door on the left, then take a closer look at the door control panel.
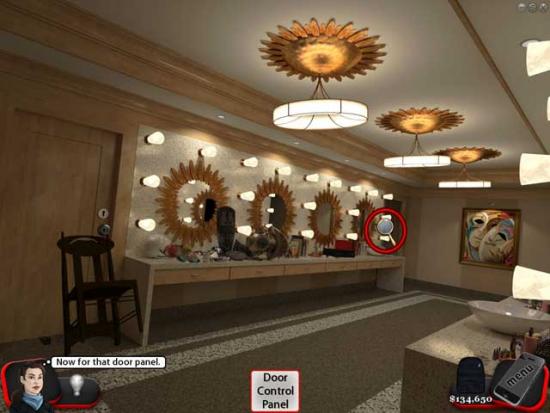
- Input the code “7-4-9-2-1” then click “unlock” to open the door and exit to the next room.
Chapter 20: Backstage
- Click on the door to close it, then take a look at the door control panel just to the right of the door. Input the code “7-4-9-2-1” then click “lock”.
- Try exiting via the door on the right: no luck!
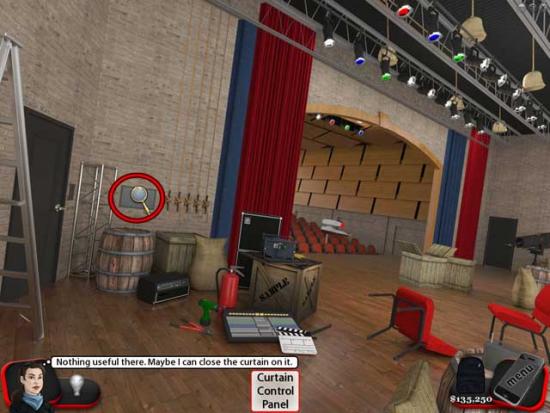
- Find the items listed at the bottom of the screen. Their locations are shown below.

- Take a closer look at the curtain control panel.
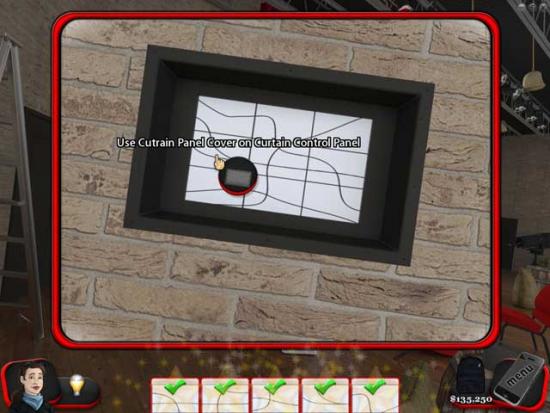
- Use the screwdriver on each of the six screws to remove the panel. Next, place each of the puzzle pieces into their proper locations, then return the panel to its original location.
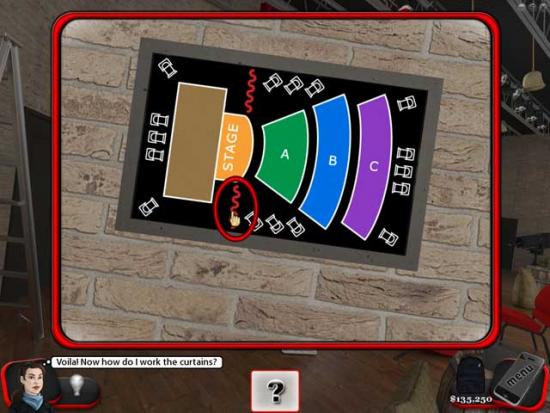
- Click on the red squiggled line to close the curtains.
- Use the knife to cut each of the five ropes.
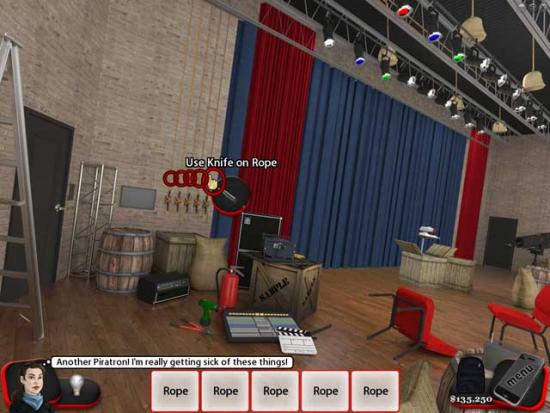
- Click on the door on the right. You can now exit the room safely.
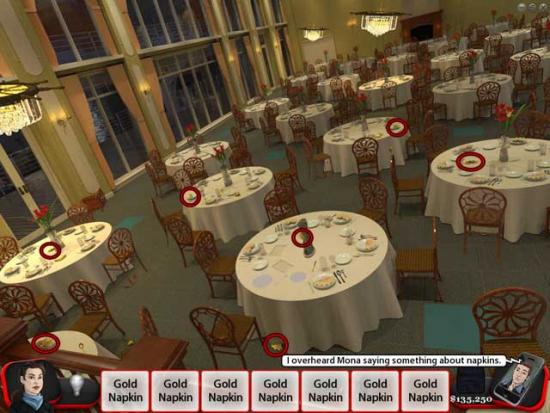
Chapter 21: Ballroom
- Find the seven golden napkins hidden throughout the room. Their locations are shown below.
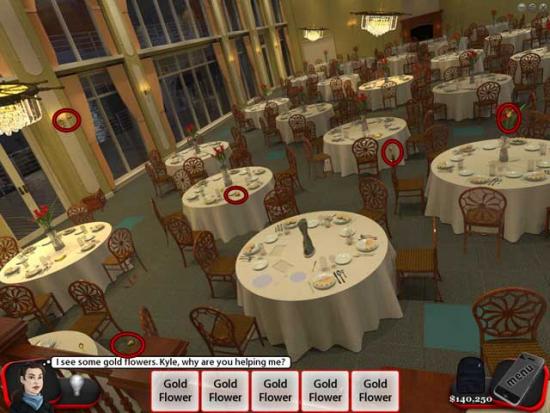
- Find the five golden flowers. Their locations are shown below.
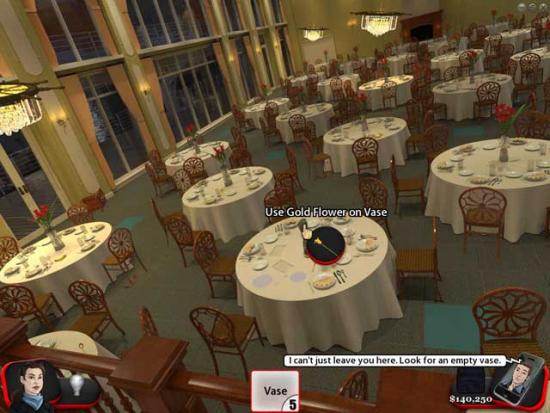
- Place all the golden flowers into the correct vase. Its location is shown below.
- Take a closer look at the clue that appears.
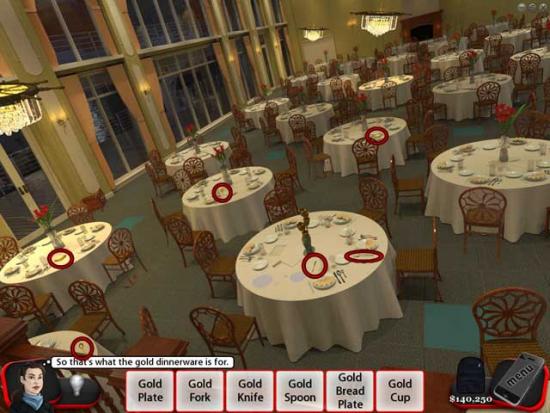
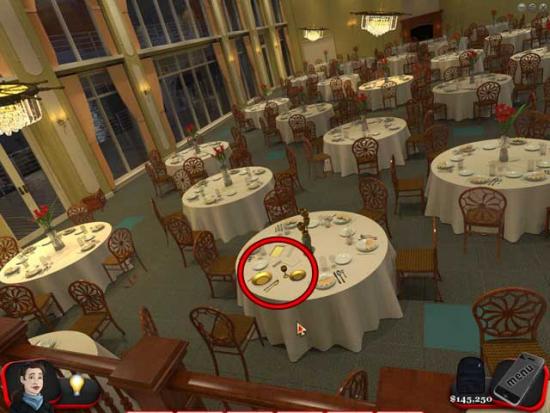
- Find six pieces of gold dinnerware. Their locations are shown below.
- Place the dinnerware into its proper locations. The solution is shown below.
- Take a closer look at the clue that appears.
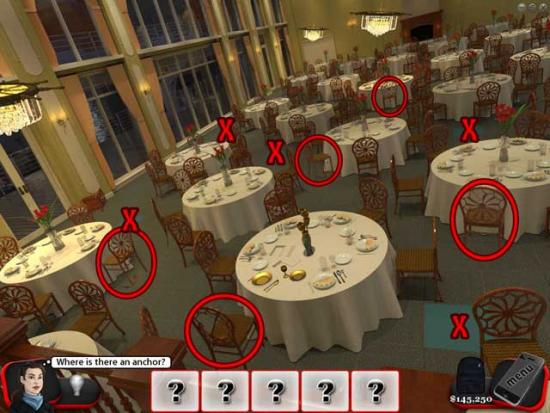
- Pick up the five anchor chairs and place them into the locations marked with an “X”. Their locations are shown below.
- Click on the Slingo machine that appears to play.
- Get 19 Slingos to win the prize. Done successfully, check the prize tray and collect the key inside to finish the chapter.
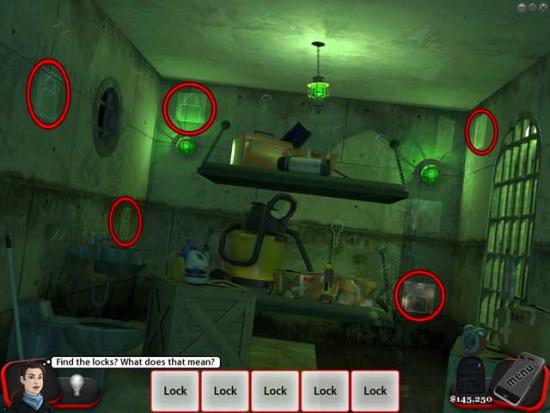
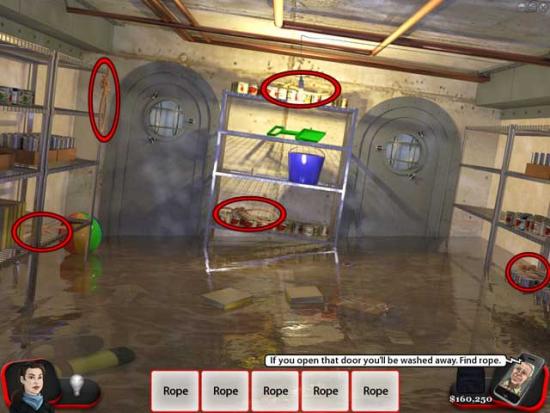
Chapter 22: Jail
- Find the items listed at the bottom of the screen. Their locations are shown below.
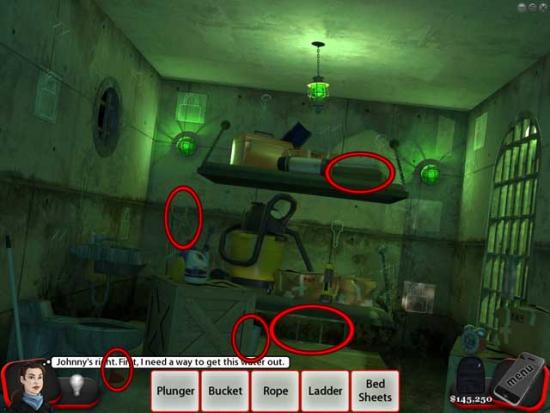
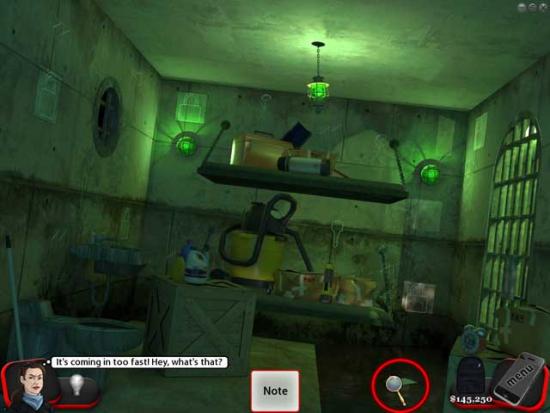
- Use the bucket on the water on the left and reveal the note.
- Find and click the five locks in the room. Their locations are shown below.
- Clear off the objects obstructing the beds. Their locations are shown below.
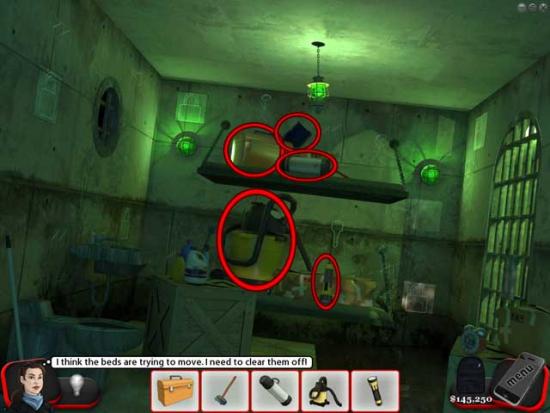
- Clear the remaining four boxes off the beds.
- Click the five locks again.
- Find five objects to fill the slots. Their locations are shown below.
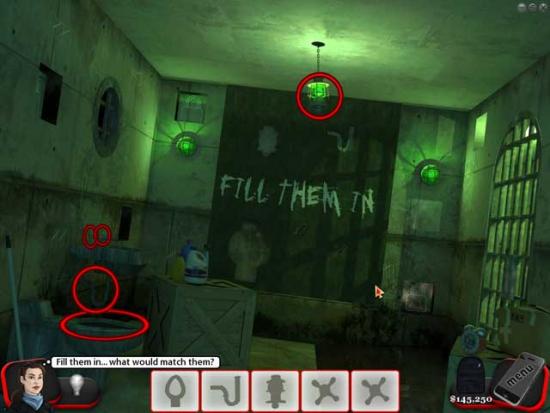
- Place the items in their correct slots, then collect the keys that appear.
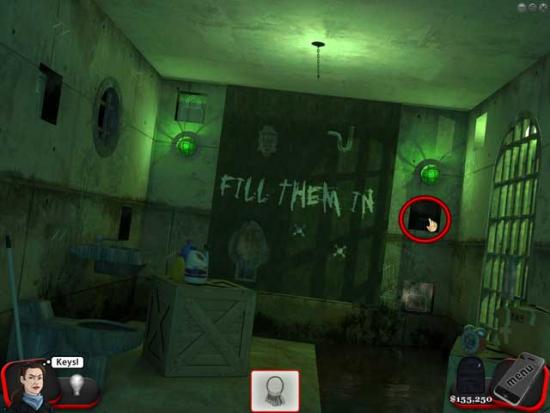
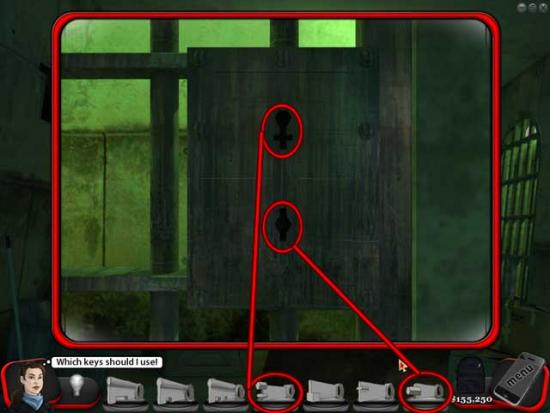
- Take a closer look at the cell door on the right.
- Select the correct keys for each slot. The solutions are shown below.
- Exit the cell to complete the chapter.
Chapter 23: Storage
- Clear the five large box crates floating in the middle of the room.
- Click on and look through the porthole on both of the steel doors.
- Find and click on the two arrows on the floor.
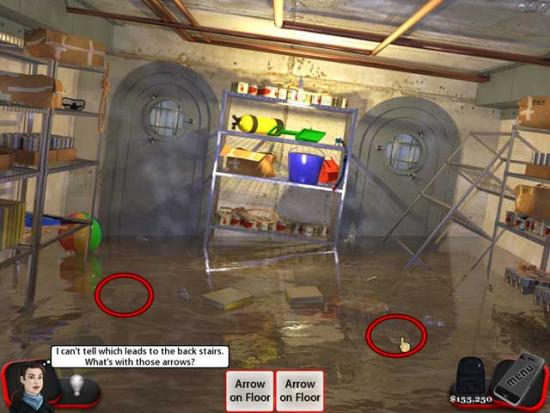
- Find the items listed at the bottom of the screen. Their locations are shown below.
- Use the goggles on each of the floor arrows to see which goes in what direction.
- Click on the toppled shelf on the right and the power will go out.
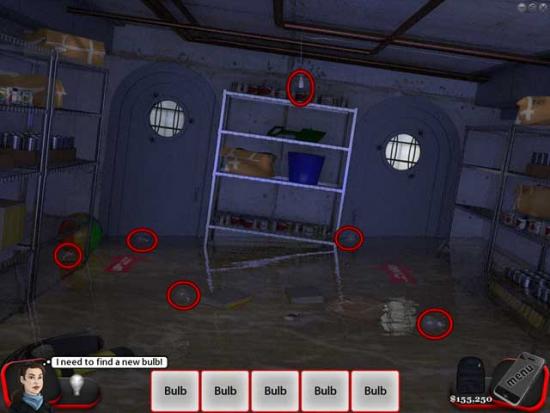
- Click on the burnt out bulb, then collect five new ones. Their locations are shown below.
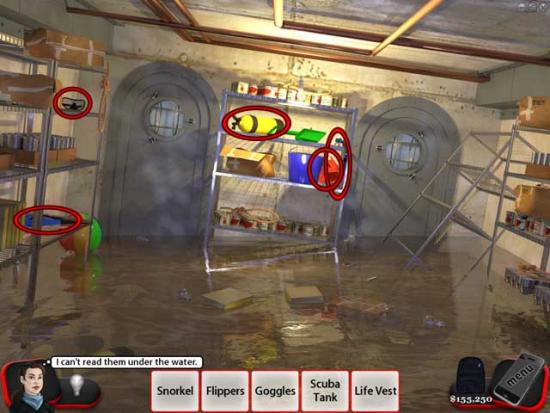
- Clear the five cardboard boxes off the shelves.
- Find the items listed at the bottom of the screen. Their locations are shown below.
- Use the bulb on the light socket to restore light to the room.
- Find five ropes. Their locations are shown below.
- Use the rope on each of the three shelves, then click on the door on the right to open it.
- Exit through the door on the right to finish the chapter.
Chapter 24: Fortune Slingo Room
- Take a closer look at the door panel on the right.
- Click the appropriate buttons to open the door. Their locations are shown below.
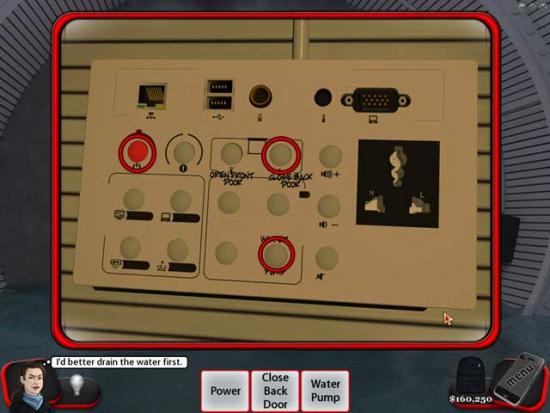
- After that’s done, press the “open front door” button.
- Enter the Fortune Slingo room.
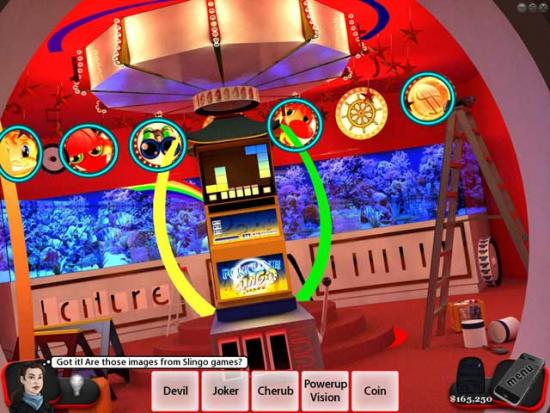
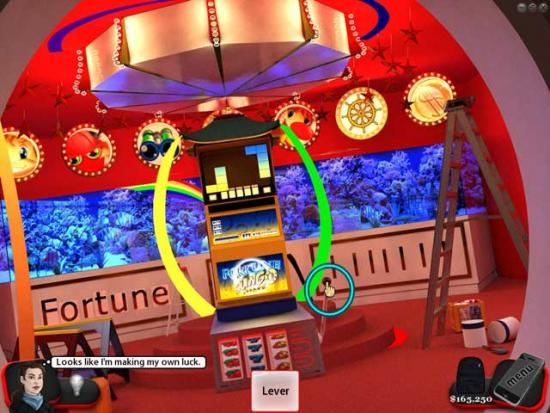
- Take a closer look at the Slingo machine: it’s missing some pieces.
- Find the items listed at the bottom of the screen. Their locations are shown below.
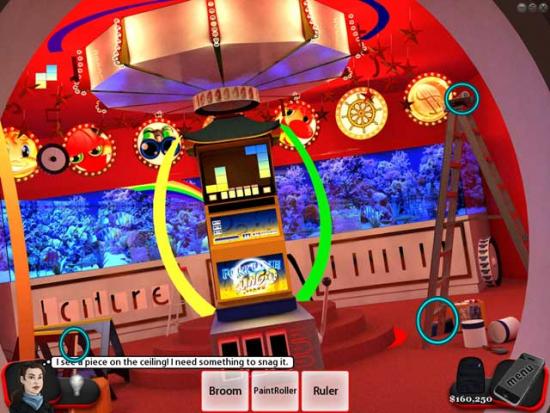
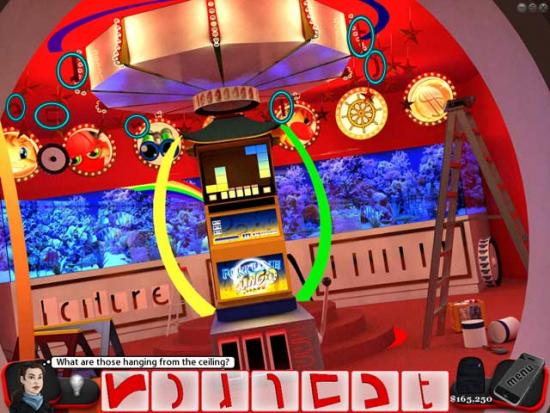
- Use the broom on the Slingo machine piece.

- Find the items listed at the bottom of the screen. Their locations are shown below.
- Pick up the Slingo machine piece that appears on the floor.
- Find the items listed at the bottom of the screen. Their locations are shown below.
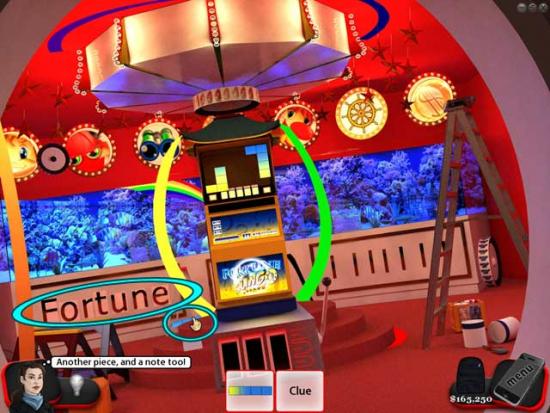
- Arrange the pieces on the panel on the lower left so it spells “Fortune”, then pick up the Slingo machine piece that appears.
- Find the missing slot machine reels. Their locations are shown below.
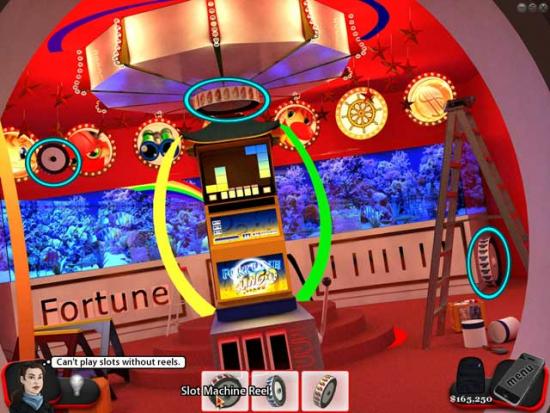
- Place the reels in their correct slots below the Slingo machine and click the lever. Collect the Slingo machine piece and the clue that appear.
- Find the items listed at the bottom of the screen. Their locations are shown below.
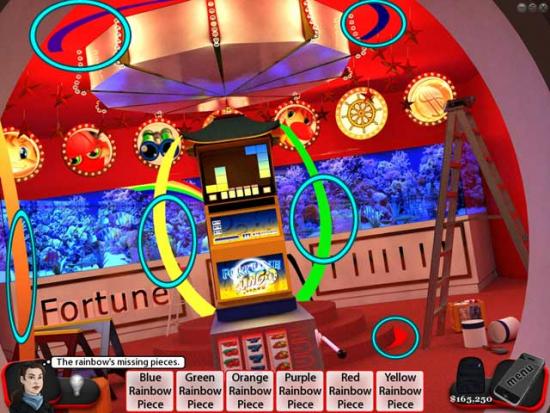
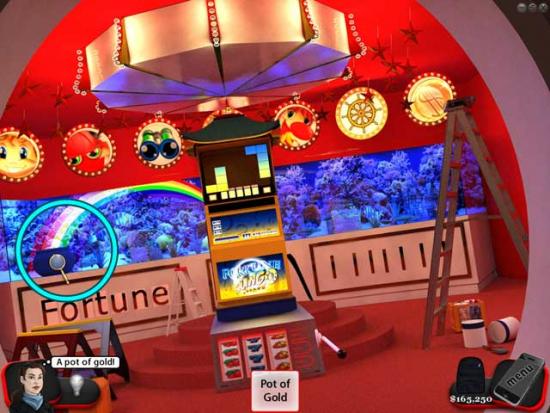
- Place the rainbow pieces back in their correct locations and order, then click on the pot of gold that appears beneath it for a closer look and collect the last Slingo machine piece hidden inside.
- Use the Slingo machine pieces on the machine screen to restore it, then pick up the glass panel and place it on top of the screen.
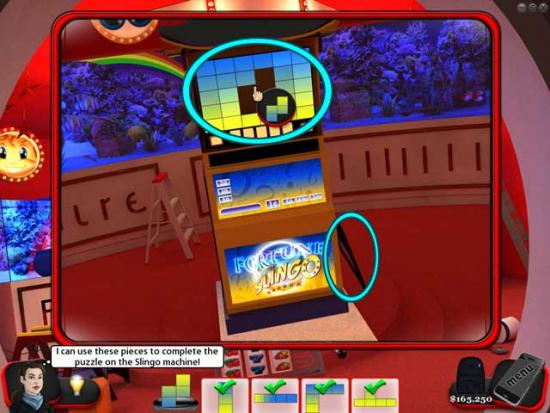
- Click the Slingo machine to play.
- Score 700,000 total points to win this time around. Once you’ve won, check the prize slot for the next clue and to complete the chapter.
Chapter 25: Stern
- Find the control panel, followed by the manual releases and click them. Their locations are shown below.
- Find the items listed at the bottom of the screen. Their locations are shown below.
- Take a closer look at the shark cage on the left.
- Press the control buttons listed at the bottom of the screen, then click on the cage again.
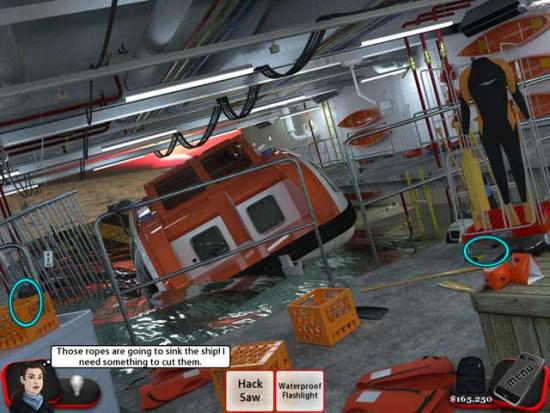
- Use the hacksaw on the ropes to cut them.
- Click on the electric shark repellant to scare the shark away.

- Find the five security cameras and place them back into their ceiling outlets marked with an “X”. Their locations are shown below.
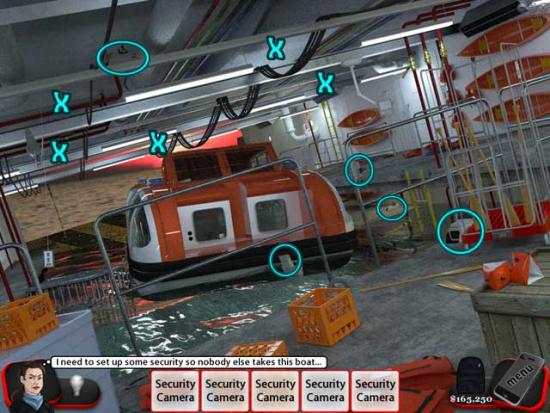
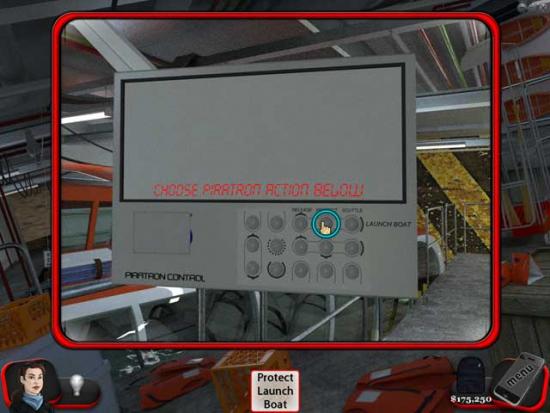
- Click on the Piratron panel for a closer look.
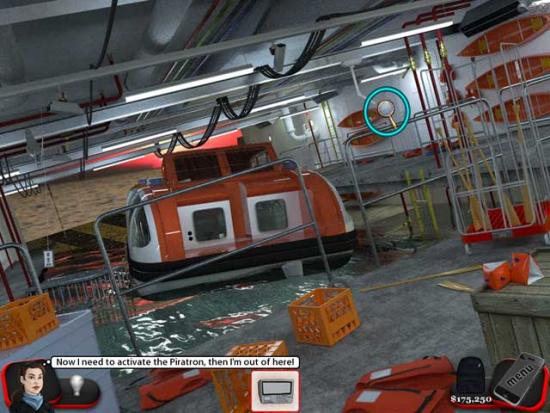
- Press the “Protect Launch Boat” button to complete the chapter.
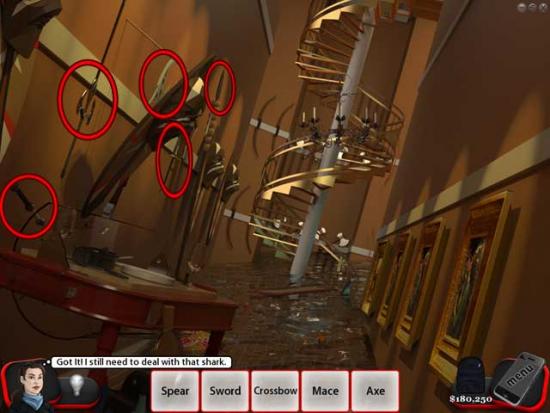
Chapter 26: Outside Piratron Control
- Click the two levers to try and open the door.
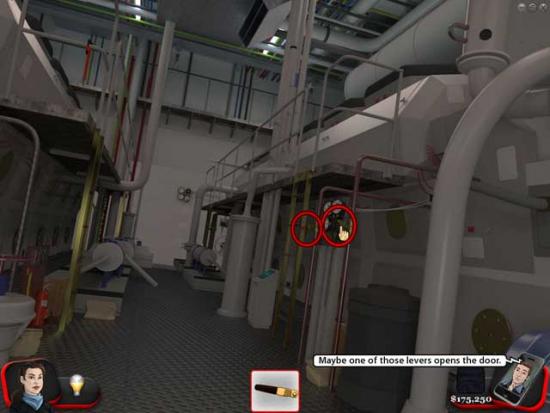
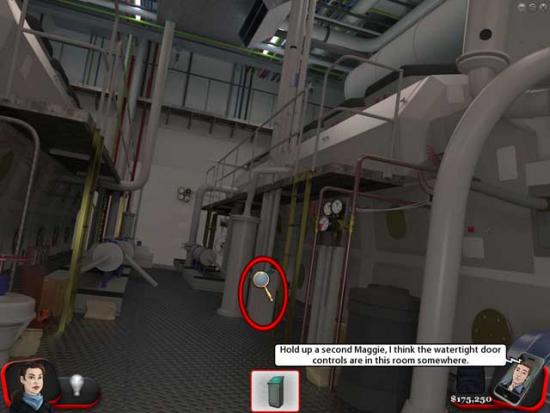
- Find the items listed at the bottom of the screen. Their locations are shown below.
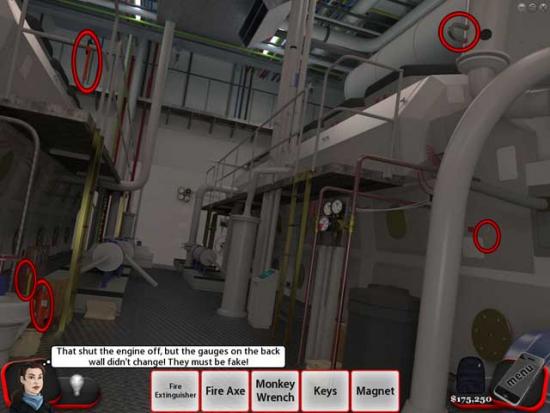
- Take a closer look at the watertight door control panel.
- Click on each of the doors to open them. One of the doors is obstructed, marked with a red box with an X through it.
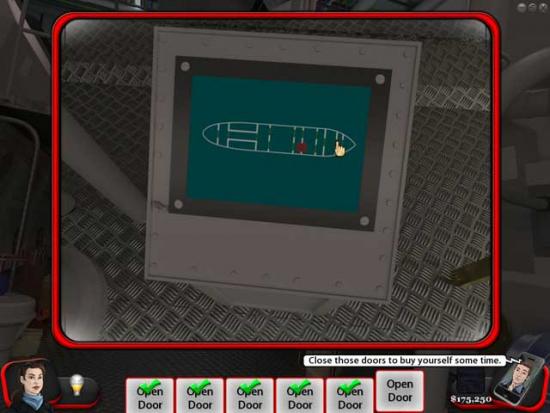
- Click the two levers once again, then return to the control panel and open the final door, which is no longer obstructed.
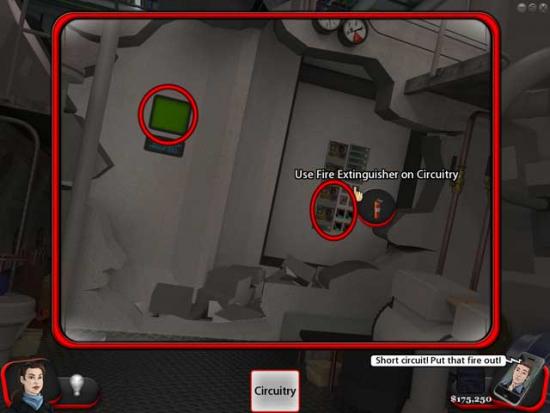
- Use the fire axe on the back wall, then take a closer look.
- Click on the hand print scanner, then use the fire extinguisher to put out the circuitry fire.
- Take a closer look at the hydraulic controls on the back wall.
- Click the levers for a total of 90 PSI. The correct levers are circled below.
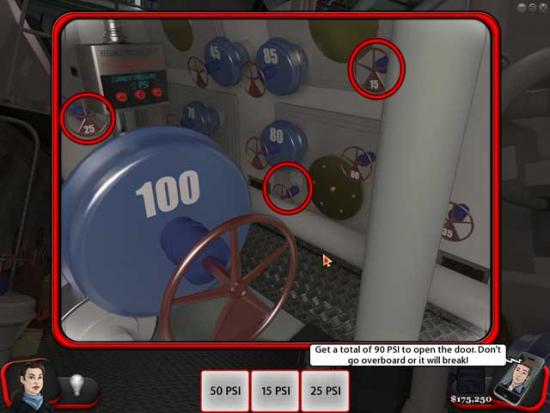
- Enter the Piratron Control Room that appears.
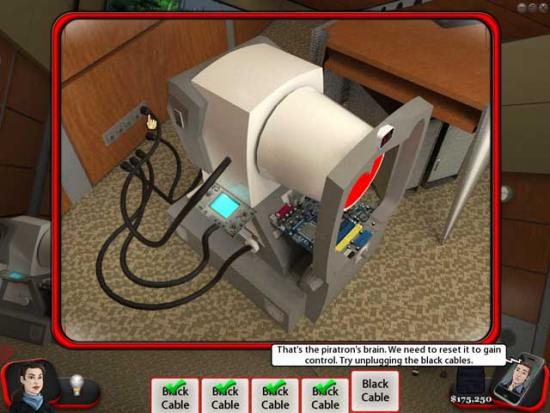
Chapter 27: Piratron Control
- Click on each of the locations listed at the bottom of the screen until you’ve gone through each and every one of them.
- Click on the machine on the left for a closer view.
- Unplug each of the five black cables.
- Take a closer look at the wires entering the wall on the lower right.
- Use the screwdriver to remove each of the screws on the panel, then click on it with the crowbar to remove it.
- Click on the thick black cable to unplug it, then plug it back in.

- A new Slingo machine has appeared. Click on it to play.
- Acquire a handsome 800,000 points in a single game of Slingo to win the prize. Click on the prize drawer at the bottom of the machine to acquire the needed password: “Escape”.
- Take a closer look at the keyboard on the right.
- Type the password “Escape” in on the keyboard to successfully complete the chapter.
Chapter 28: Outside Owner’s Room
- Pick up the envelope floating in the water.
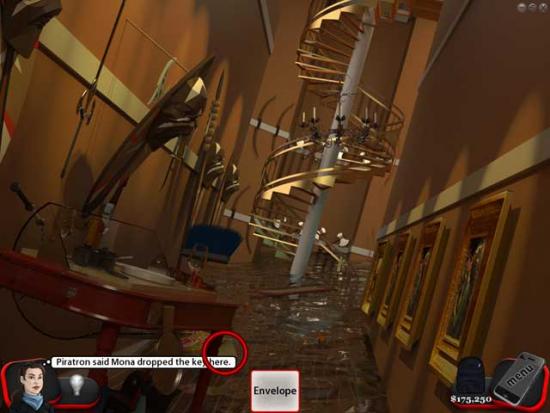
- No luck yet! Take a closer look at the serving station on the left.
- Find the items listed at the bottom of the screen. Their locations are shown below.
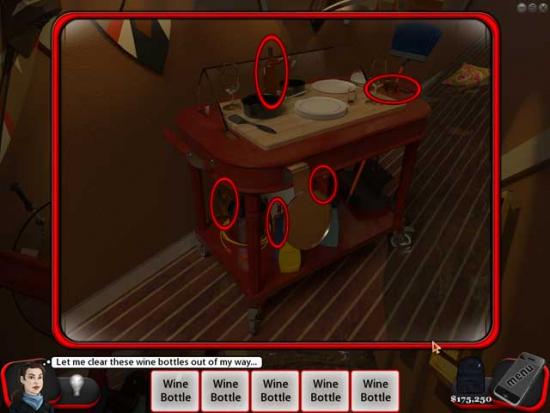
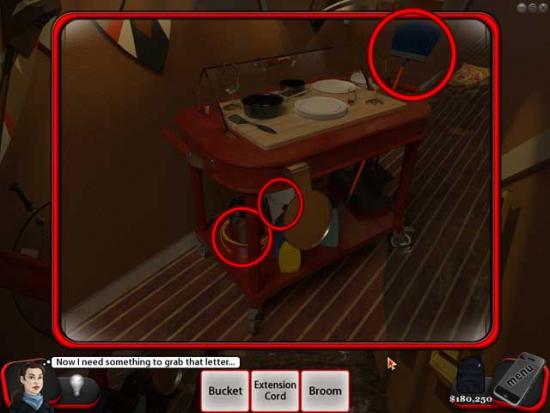
- Use the bucket to retrieve the envelope.
- Find the items listed at the bottom of the screen. Their locations are shown below.
- Use the crossbow on the chandelier to knock it down.

- Use the broom on the chandelier to clear the glass, then proceed up the stairs.
- Use the crossbow on the control panel and proceed up the stairs.

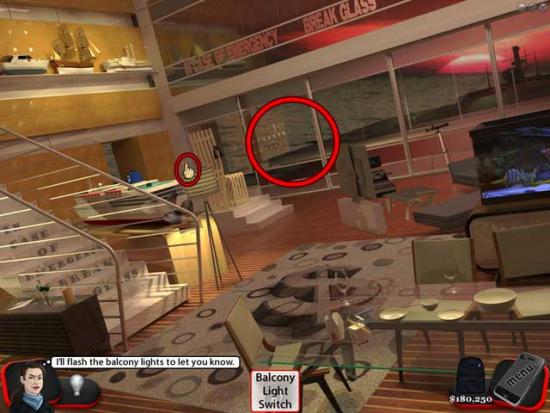
Chapter 29: Owner’s Room
- First, turn on the lights. Next, click the light switch to signal the FBI agent, then click on the balcony door to open it.
- Take a closer look at the Superfly that crashes through the door.
- Click on it to assess the damage, then collect the three missing pieces, as well as the boat propeller to fix it.
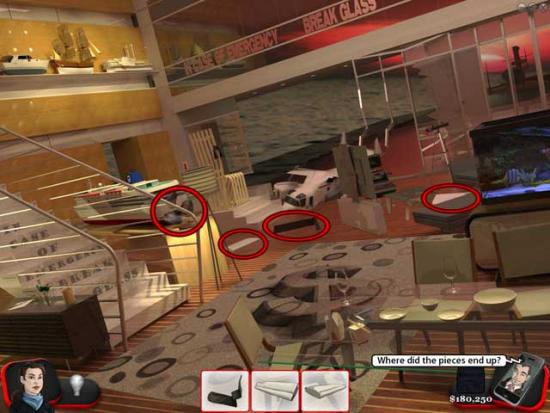
- Find six chopsticks. Their locations are shown below.
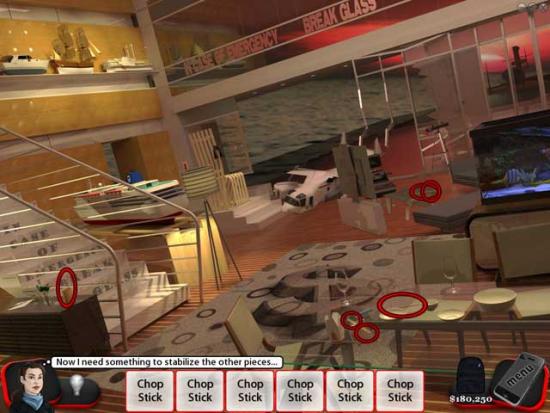
- Use the materials on the Superfly, then use the pen and paper to write a note.
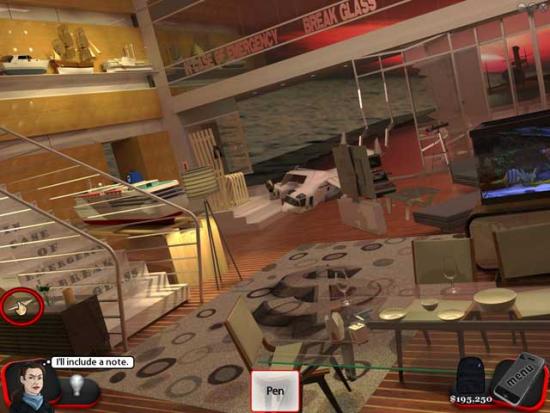
- Attach the note and the Swiss bank key to the Superfly and then use the repaired Superfly on the balcony to send it off.
- Notice the “In case of emergency break glass” message on the stairs or above the door. Use the hammer on 11 glass items. Their locations are shown below.

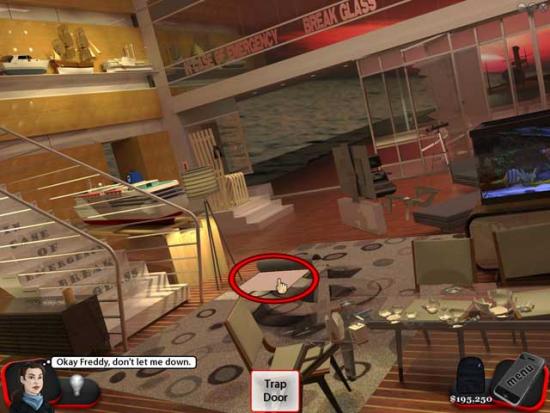
- Pick up the clue that appears, then click on the rug. Use the knife on the rug to reveal a trap door. Click on it to complete the chapter.
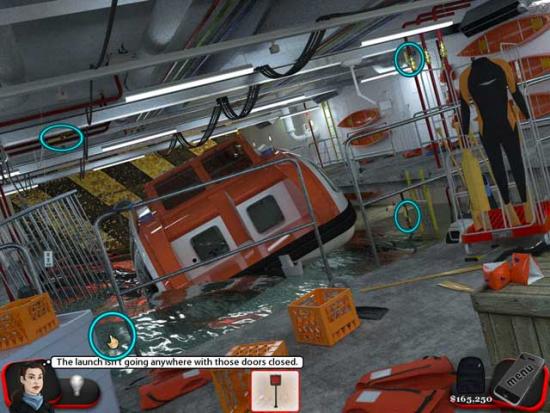
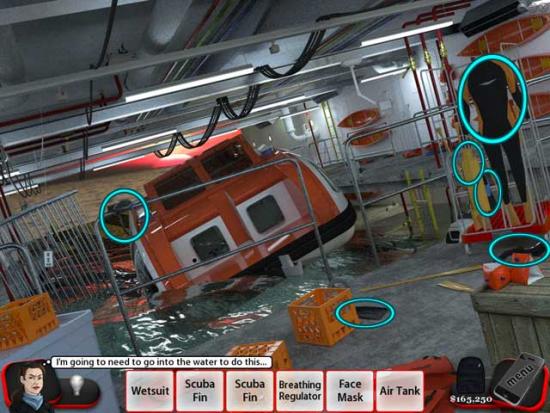
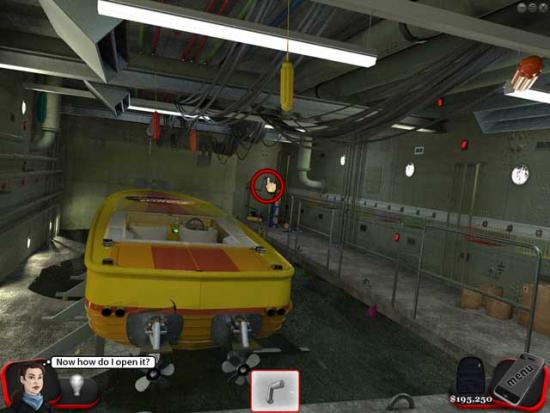
Chapter 30: Escape Boat
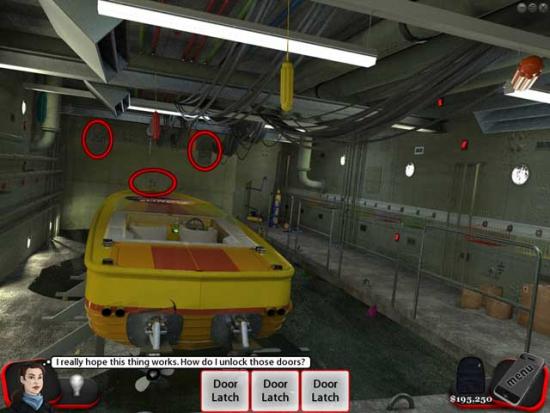
- Click on the three door latches. Their locations are shown below.
- Click on the lever to fill the room with water.
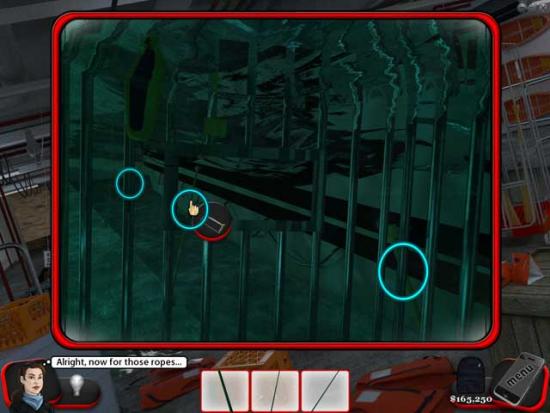
- Find and click on five switches. Their locations are shown below.
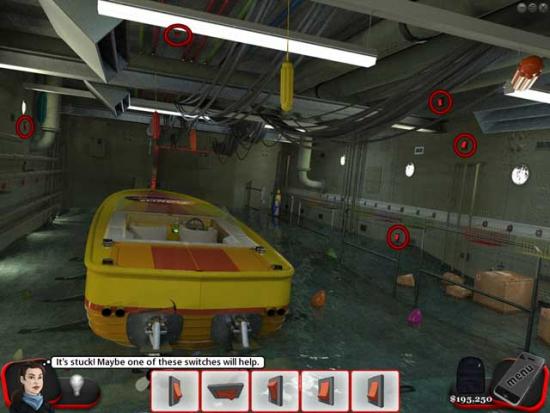
- A Slingo machine will appear. Click on it to play.
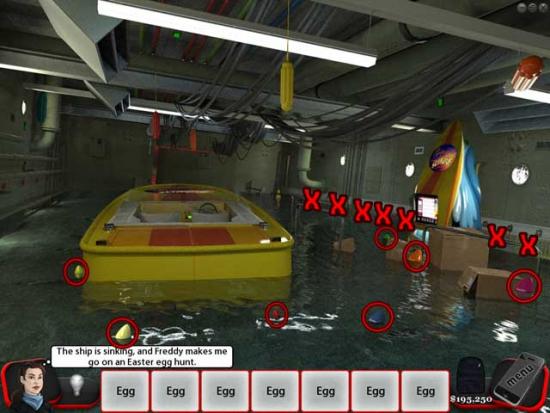
- Get 1 bouncing Slingo to complete the game successfully. Upon successful completion, your reward will be another clue. Pick it up for a closer look.
- Collect the seven eggs floating in the water, then place them in the baskets (marked with an X) of the corresponding color. Their locations are shown below.
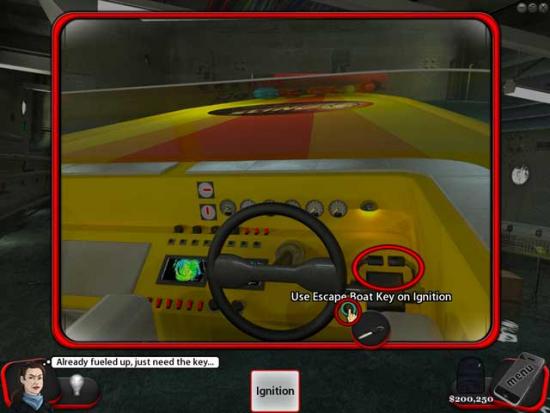
- Pick up the key. Its location is shown below.
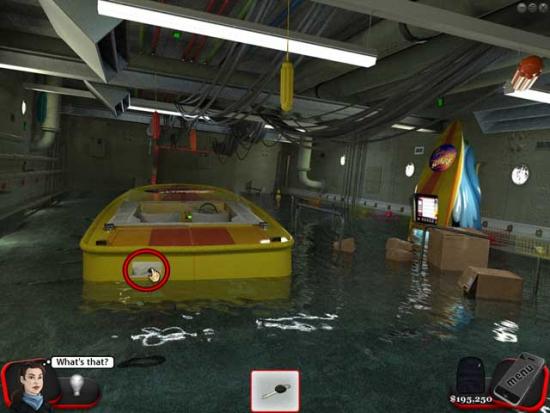
- Use the crowbar on the doors in front of the boat. They still won’t budge.
- Find five fenders and place them on the front of the boat. Their locations are shown below.
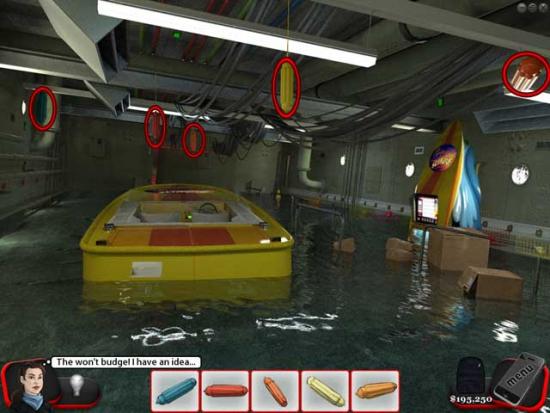
- Use the escape boat key on the ignition, then click the throttle.
Congratulations! You’ve completed the game! To be continued…

More articles...
-
Best Horror Games On Itch.io – July 2026
Across a bounty of subgenres. -
Grow A Garden 2 Base Price List
What's the most valuable crop? -
Evomon Types Guide [Strengths, Weaknesses, Resistance]
Your companion guide during battles.