- Wondering how to get Monopoly GO! free rolls? Well, you’ve come to the right place. In this guide, we provide you with a bunch of tips and tricks to get some free rolls for the hit new mobile game. We’ll …
Best Roblox Horror Games to Play Right Now – Updated Weekly
By Adele Wilson
Our Best Roblox Horror Games guide features the scariest and most creative experiences to play right now on the platform!The BEST Roblox Games of The Week – Games You Need To Play!
By Sho Roberts
Our feature shares our pick for the Best Roblox Games of the week! With our feature, we guarantee you'll find something new to play!All Grades in Type Soul – Each Race Explained
By Adele Wilson
Our All Grades in Type Soul guide lists every grade in the game for all races, including how to increase your grade quickly!
Silent Nights: The Pianist Walkthrough
Welcome to the Silent Nights: The Pianist walkthrough on Gamezebo. Silent Nights: The Pianist is a hidden object game created by Dark Blue Games. This walkthrough includes tips and tricks, helpful hints and a strategy guide on how to complete Silent Nights: The Pianist.
Game Introduction – Silent Nights: The Pianist
Welcome to the Silent Nights: The Pianist walkthrough on Gamezebo. Silent Nights: The Pianist is a hidden object game created by Dark Blue Games. This walkthrough includes tips and tricks, helpful hints and a strategy guide on how to complete Silent Nights: The Pianist.
General Tips
This hidden object game requires visiting several locations and using inventory items to advance play.
- Play is mostly linear although there are some options for the order in which to explore locations.
- Begin play by selecting a mode:
- Casual – Hint and Skip button recharge faster. Active zones are highlighted by sparkles.
- Challenge – Hint and Skip buttons recharge slower. There are fewer sparkles.
- Playing modes cannot be changed during the game. Create a new profile and restart play a different mode.
- Hidden object scenes contain items listed in red lettering. These items require an extra step to find.
- Collector’s Edition Extras includes a bonus story, wallpapers, concept art and music.
- Options include added brightness for scenes as well as widescreen correction, sound volume control and custom cursor selection.
- Always move the cursor around a scene. Watch the cursor to see if it changes into a hand, gears or magnifying glass.
Walkthrough Tips
- CAPITALIZED inventory items are meant to make it easier to find where this guide may differ from your own play. Inventory items are highlighted in blue with a white border in the screenshots.
- An interactive tutorial is available to help familiarize players with the game icons.
- If you don’t have an item referenced in this guide, click and hold the “Ctrl” key and then press the “F” key. This opens a Find area in your web browser. Type in the name of the object as it appears in this guide to find where else it’s referenced.
- To minimize back and forth moves, all available inventory items in a scene are picked up when first encountered.
Chapter 1: The Inn

Inn Courtyard
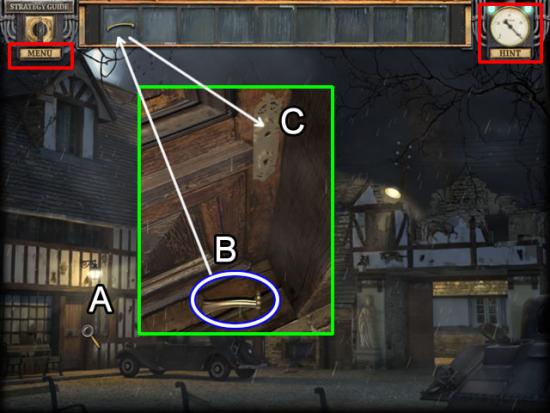
- Note the Menu tab for exiting the game or changing options. The hint meter on the right refills after each use. There is also an in-game strategy guide available at the top of the screen.
- Zoom in on the door (A).
- Pick up the HANDLE for inventory (B). Drag the handle to the doorframe (C) to open the door.
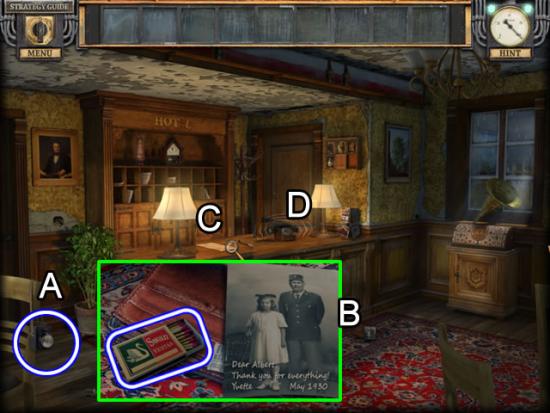
Inn Lobby
- Pick up the FLASHLIGHT (A).
- Look closer at the picture on the floor (B). Take the MATCHES and examine the picture.
- Read the note on the desk (C).
- Answer the ringing telephone (D).
- Exit the lobby.
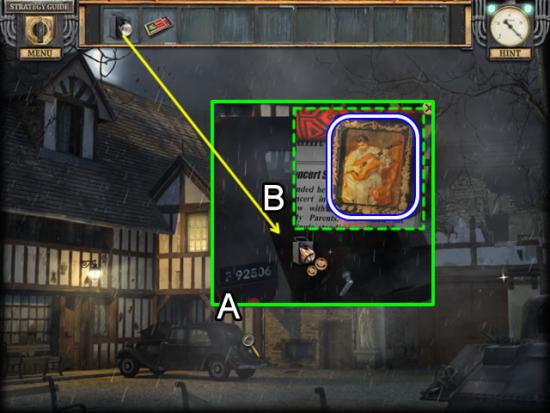
Inn Courtyard
- Inspect the car (A). Click to open the trunk.
- Use the FLASHLIGHT to illuminate the contents (B). Take the PORTRAIT and read the paper.
- Return to the lobby.
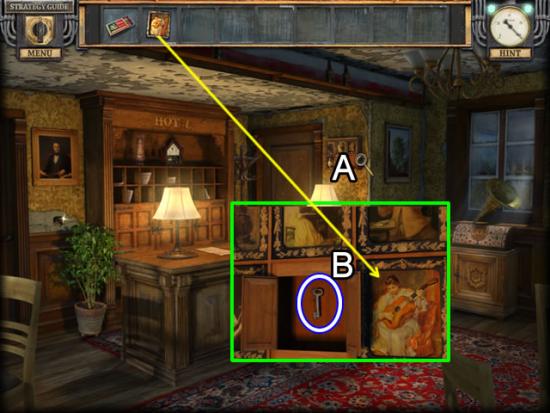
Inn Lobby
- Zoom in on the portrait collection (A).
- Place the PORTRAIT in the missing space (B). Take the KEY from the secret compartment.
- Play the hidden object scene.
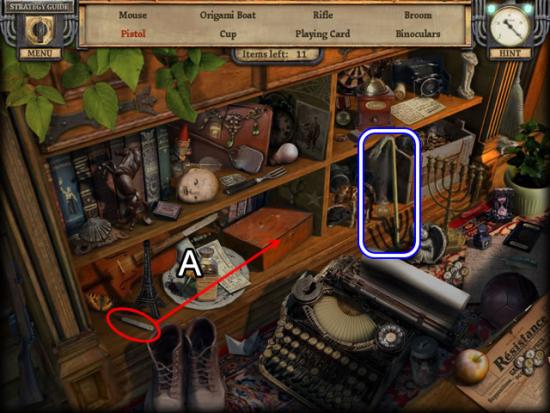
- Insert the lock pick in the box keyhole (A) to find the Pistol.
- Find the rest of the listed objects. The CROWBAR goes to inventory.
- Exit the inn.
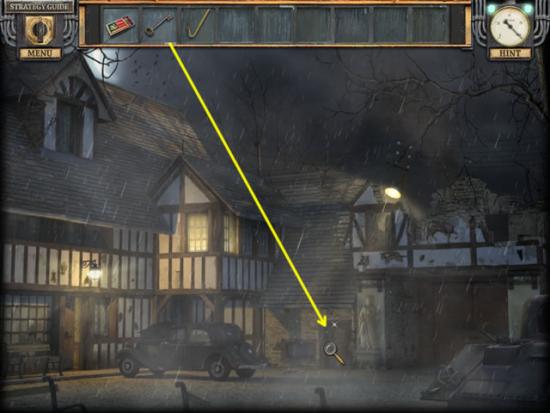
Inn Courtyard
- Use the KEY to open the cellar door.
Cellar
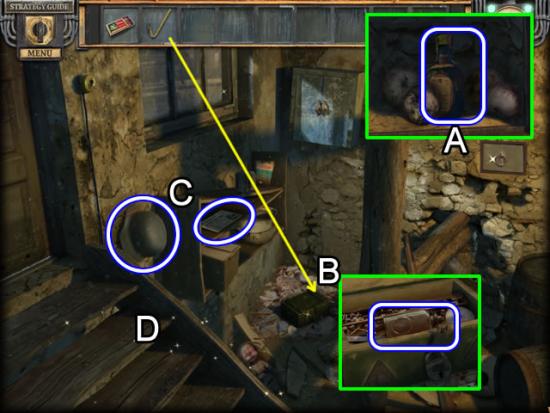
- Open the compartment (A). Take the WHISKEY.
- Pry open the box with the CROWBAR (B). Take the RUST REMOVER.
- Zoom in and pick up the NEWSPAPER on the shelf (C). Take the HELMET hanging on the wall.
- Play the hidden object scene on the stairs (D).
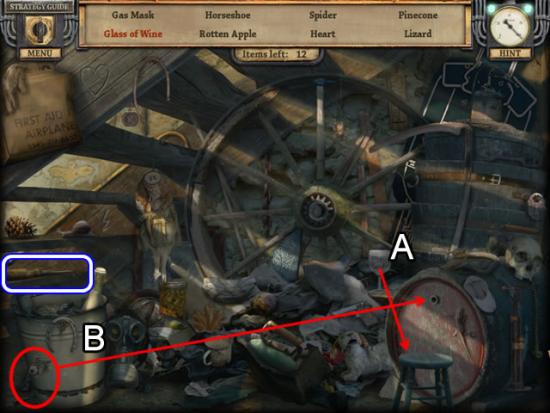
- Put the empty glass on the stool (A). Insert the spigot in the wine barrel (B). Take the Glass of Wine.
- Find the rest of the listed objects.
- The SCREWDRIVER goes to inventory.
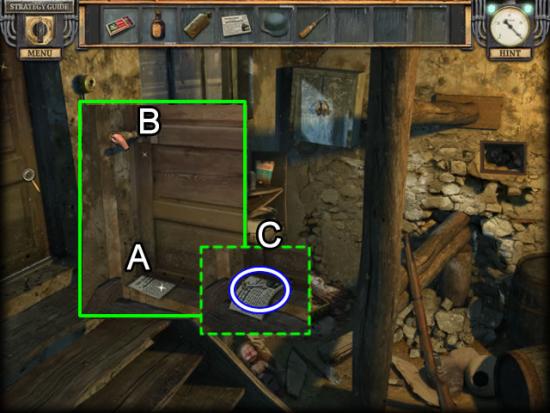
- Zoom in on the door.
- Place the NEWSPAPER under the door (A). Use the SCREWDRIVER to push the cellar key out of the lock (B).
- Drag the newspaper back (C). Take the CELLAR KEY. Insert it in the lock to escape.
Inn Courtyard
- Look at the lock on the exit gate.
- Use the RUST REMOVE to loosen the screw. Remove it with the SCREWDRIVER and remove the lock plate.
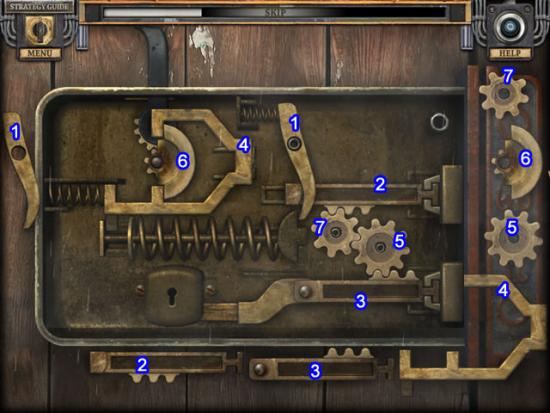
- Click the center of the lock to open a puzzle.
- The goal is to place the pieces in the correct location to open the lock.
- Solution:
- Go through the gates to the crossroads.
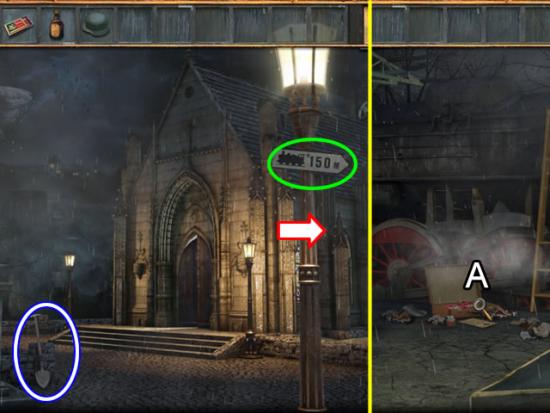
- Pick up the SPADE leaning against the statue.
- Head right to the train station.
Train Station
- Look at the suitcase (A). Read the piece of paper in the suitcase.
- Play the hidden object scene in the suitcase.
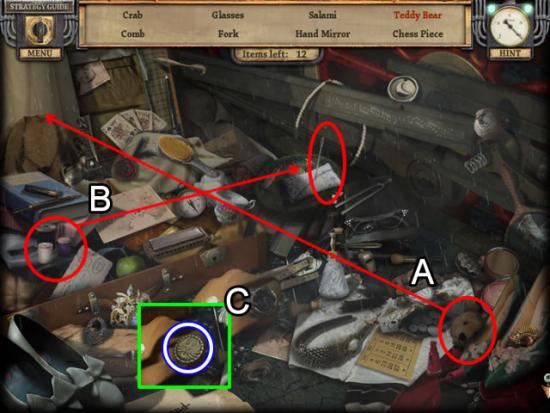
- Put the head on the bear (A). Drag the thread to the needle (B). Use the needle and thread to attach the head to the Teddy Bear.
- Find the rest of the listed objects. The PHOENIX MEDAL shows up after the Black Rose (C) item is picked up.
- Return to the crossroads.
- Enter the church.
Chapter 2: The Church
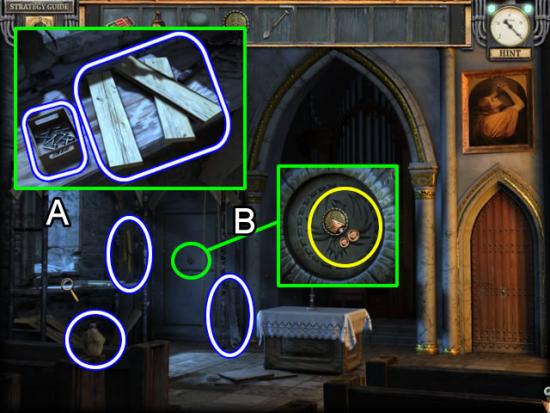
The Chancel
- Pick the EMPTY CANTEEN, RAG and SAW.
- Zoom in on the work area (A). Use the SAW to shorten the WOOD STRIPS. Take the NAILS.
- Inspect the door lock (B). Insert the PHOENIX MEDAL in the slot to open the door.
Crypt
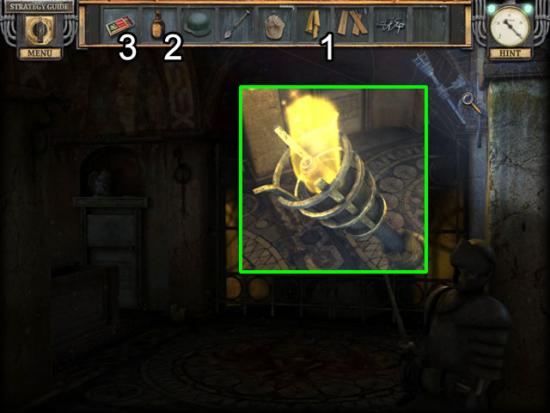
- Zoom in on the torch.
- Stuff the RAG in the torch. Pour the WHISKEY on the rag. Light the torch with the MATCHES.
- Play the hidden object scene.
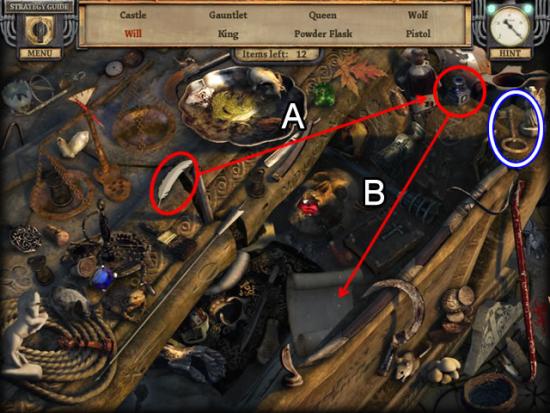
- Dip the feather in the bottle of ink (A). Drag the quill to the paper (B) to write the Will.
- Find the rest of the listed objects.
- The Key goes to inventory as a CRYPT GATE KEY.
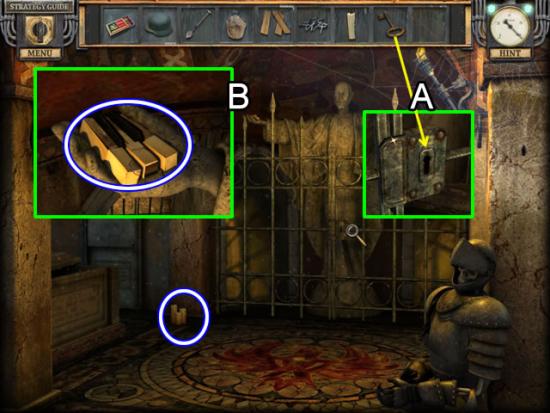
- Pick up a CANDLE from the floor.
- Look at the gate lock (A). Use the CRYPT GATE KEY to open the lock.
- Examine the statue’s hand (B). Take the ORGAN KEYS.
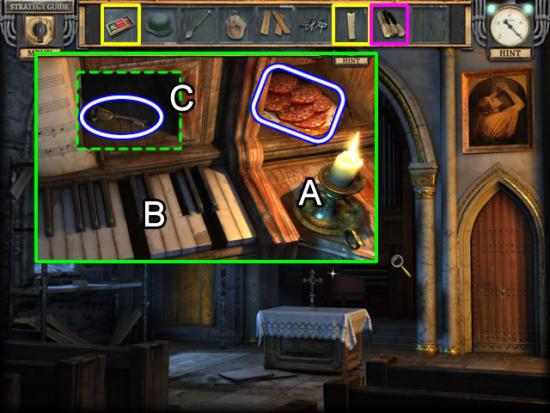
The Chancel
- Zoom in on the organ.
- Insert the CANDLE in the candleholder (A). Use the MATCHES to light the candle.
- Take the SANDWICH.
- Place the ORGAN KEYS on the keyboard (B) to open a puzzle.
- Play the three rounds of a repeat-the-sequence puzzle.
- Take the BELL-SHAPED KEY from the compartment (C).
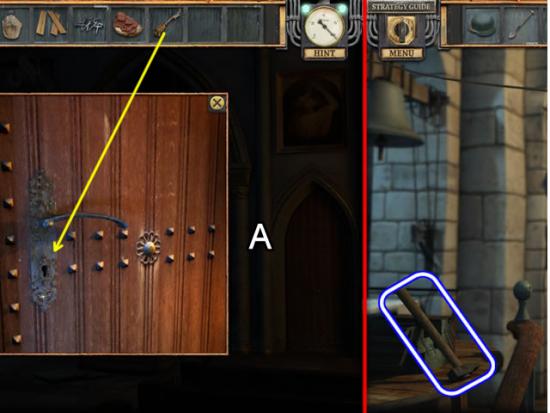
- Use the BELL SHAPED KEY to unlock the door to the bell tower (A).
Bell Tower
- Take the HAMMER
- Exit the church.
- Go left.
Church Alley
- Play the hidden object scene by the tank.
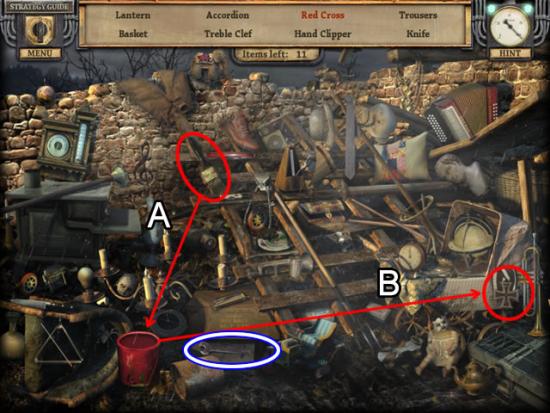
- Dip the brush in the can of red paint (A). Use the paintbrush to paint a Red Cross (B).
- Find the rest of the listed objects.
- The WRENCH goes to inventory.
- Go back and to the right to return to the train station.
Train Station
- Give the SANDWICH to the dog so it runs off.
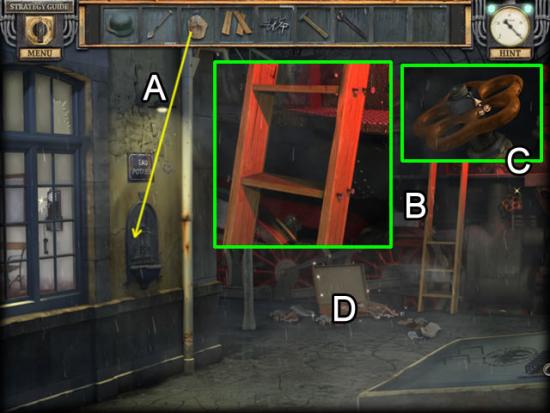
- Fill the EMPTY CANTEEN from the water fountain (A). A FULL CANTEEN returns to inventory.
- Examine the broken ladder (B). Add the WOOD STRIPS and NAILS. HAMMER them to the frame. Take the repaired LADDER.
- Use the WRENCH to remove the bolt from the VALVE (C).
- Play the hidden object scene.
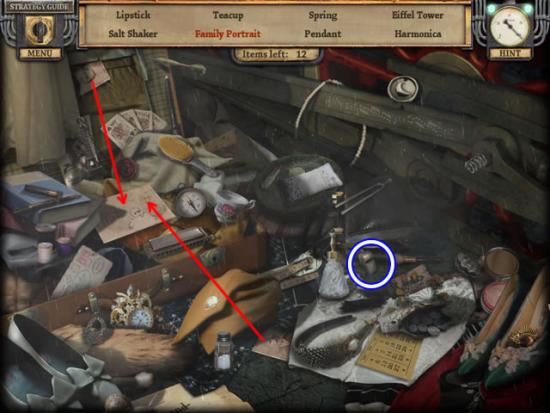
- Add the two missing pictures to the Family Portrait.
- Find the rest of the listed objects.
- The WHISTLE goes to inventory.
- Return to the bell tower.
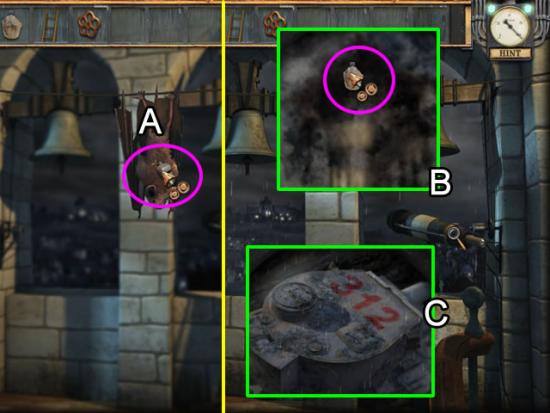
Bell Tower
- Use the WHISTLE to scare the bat (A).
- Look closer at the telescope. Use the CANTEEN WITH WATER to clean the lens (B).
- Click three times to see the scenes. Note the numbers on the tank turret (C).
- Go down three times to return to the inn.
Chapter 3: Back at the Inn
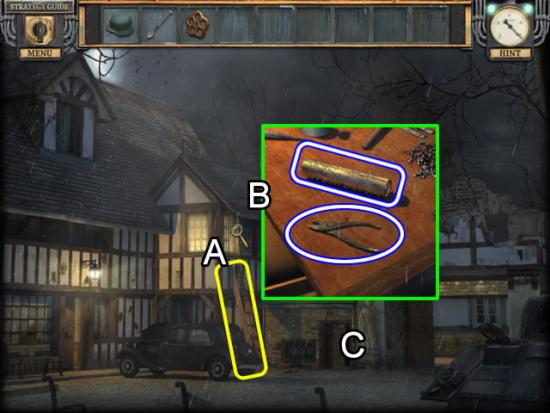
Inn Courtyard
- Lean the LADDER against the side of the inn (A).
- Peer through the window (B). Take the MUSIC BOX CYLINDER and PLIERS.
- Enter the cellar (C).
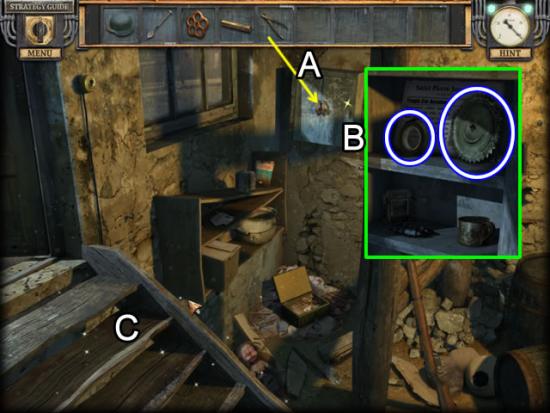
Cellar
- Use the PLIERS to remove the wire from the cabinet (A).
- Take the ELECTRICAL TAPE and GEAR (B).
- Play the hidden object scene on the steps (C).
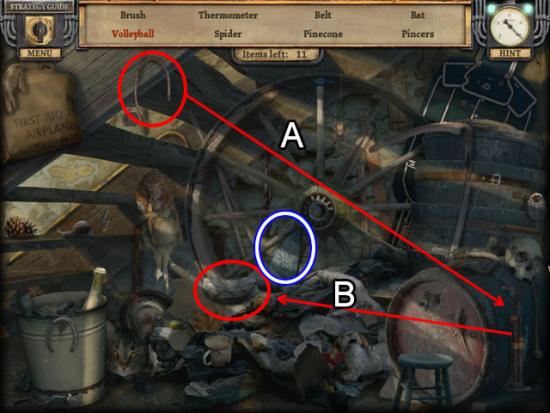
- Attach the hose to the air pump (A). Use the pump to inflate the Volleyball (B).
- Find the rest of the listed objects.
- The STONE PLATE PIECE goes to inventory.
- Return to the inn lobby.
- Play the hidden object scene.
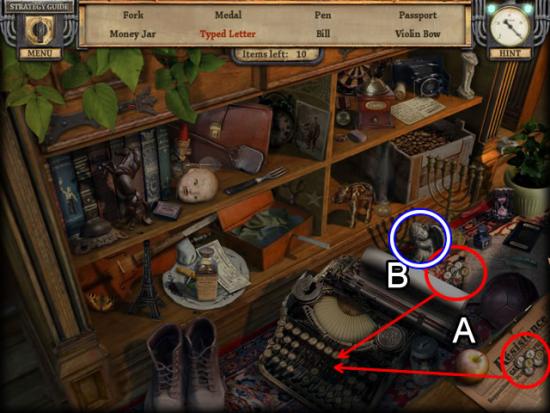
Inn Lobby
- Place both sets of keys on the typewriter (A). Take the Typed Letter from the typewriter (B).
- Find the rest of the listed objects.
- The ANGEL STATUE goes to inventory.
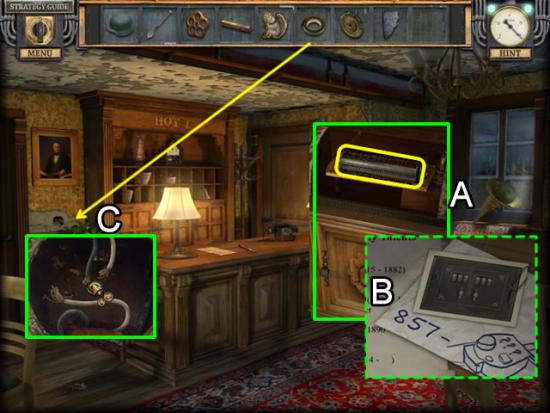
- Zoom in on the music box (A). Insert the MUSIC BOX CYLINDER.
- Inspect the papers in the compartment (B). Note the clue for the safe combination.
- Use the ELECTRICAL TAPE to repair the wires (C).
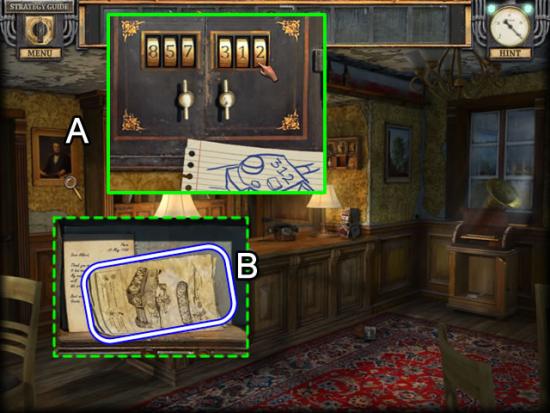
- Look at the portrait (A). Slide the latch to reveal the safe.
- Use the two parts of the combination to open the safe (B).
- Take the TANK MANUAL (B). Read the note.
- Return to the crypt area in the church.
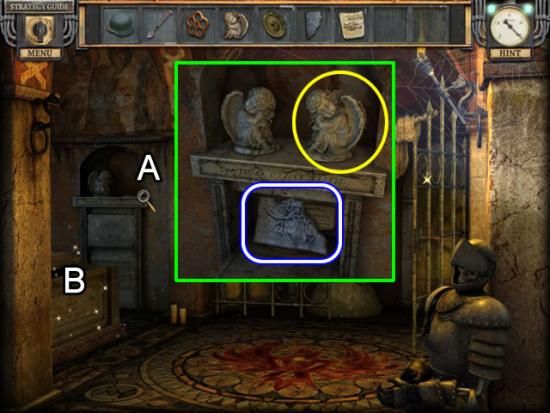
Crypt
- Zoom in on the alcove (A). Place the ANGEL STATUE on the pedestal. Take the STONE PLATE PIECE and read the information in the compartment.
- Play the hidden object scene.
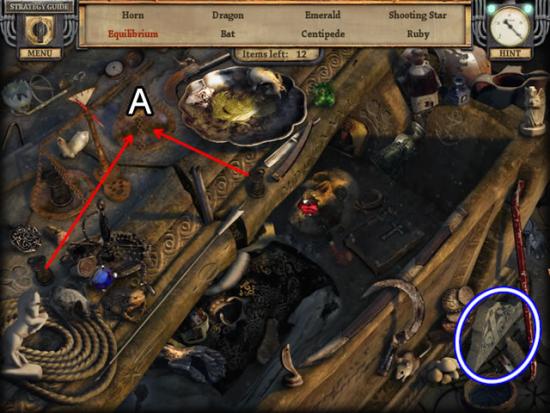
- Place both weights in the right scale pan (A) to achieve Equilibrium.
- Find the rest of the listed objects.
- The STONE PLATE PIECE goes to inventory.
- Exit the church.
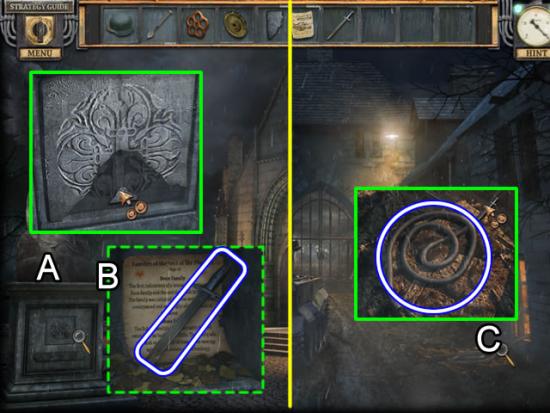
Crossroads
- Examine the base of the statue (A).
- Place the three STONE PLATE PIECES in the inset.
- Take the BAYONET from the compartment. Read the document.
- Head to the left.
Church Alley
- Look at the side of the church (C).
- Use the BAYONET to cut off the RUBBER TUBING.
- Enter the tank.
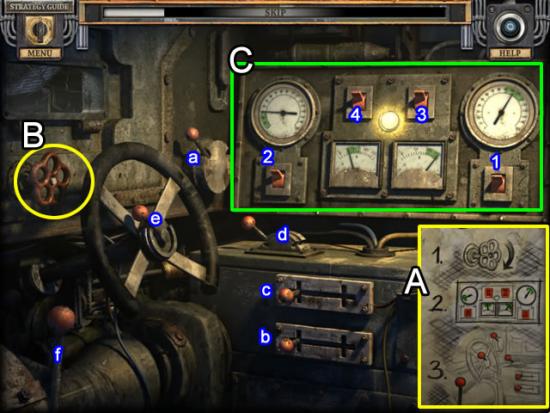
- Place the TANK MANUAL on the side (A) to start a puzzle.
- Follow the instructions to move the tank.
- Put the VALVE on the stem (B) and turn to open the fuel lines.
- Use the switches to adjust the fuel (C). Flip each switch to stop the needle when it is in the green area. Missing a green area restarts all of the switches. The needles move at different speeds.
- The best strategy is to flip the switches on the fastest moving needles first. The above inset shows the best order in which to flip the switches.
- Next move the levers in the correct sequence to drive the tank. The lowercase letters indicate the order.
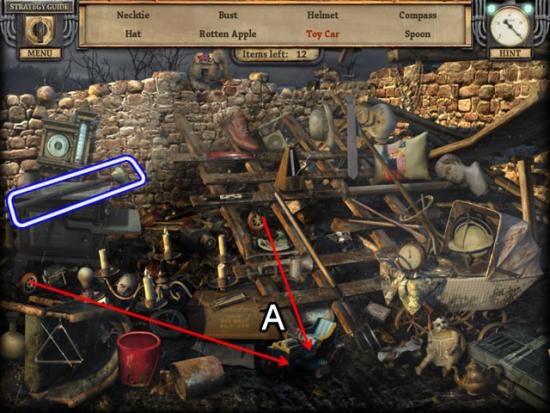
- Play the hidden object scene.
- Put both wheels on the Toy Car.
- Find the rest of the objects.
- The AXLE goes to inventory.
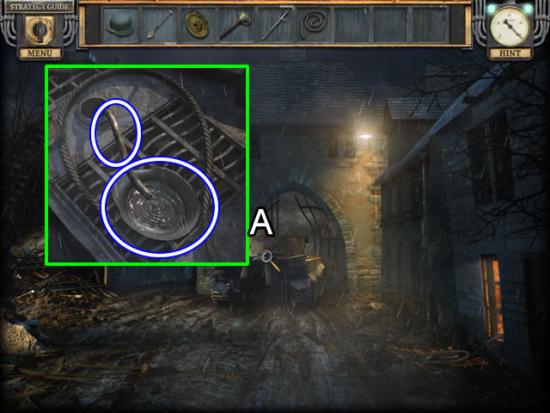
- Zoom in on the back of the tank (A).
- Put the HELMET on the grill. Insert the RUBBER TUBING into the gas tank to siphon off a HELMET FULL OF GASOLINE. Take the RUBBER TUBING as well.
Chapter 4: The Mill Area
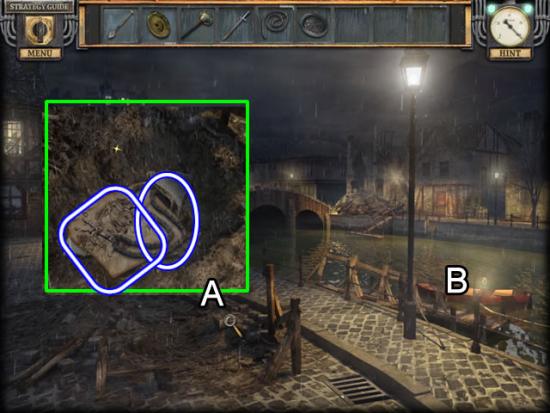
Waterfront
- Use the SPADE to unearth (A) the CHAIN and BOAT MANUAL.
- Examine the boat (B).
- Add the AXLE, CHAIN and GEAR to open a puzzle.
- The goal is to place the parts in the correct locations to assemble the engine. Clicking the engine gives clues to which part is needed.
- Solution:
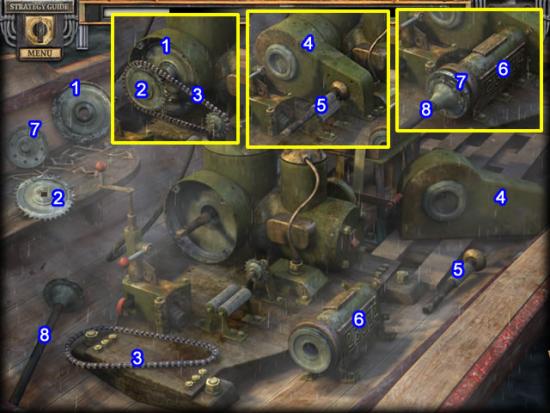
- Match the numbered parts to the insets.
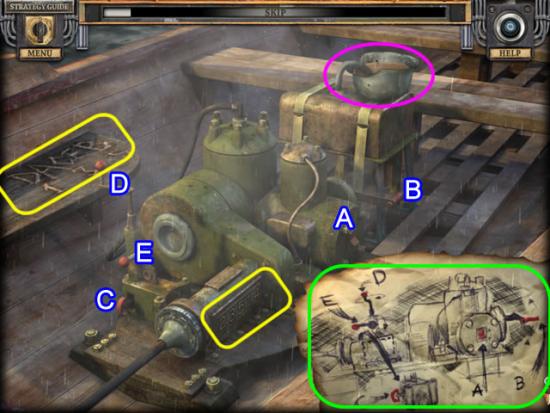
- Fill the tank with the HELMET FULL OF GASOLINE and the RUBBER TUBING (pink).
- Add the BOAT MANUAL to open a puzzle.
- The goal is to use the clue on the bench and the serial number on the engine (yellow) to flip the switches shown on the manual in the correct order.
- The screenshot shows the switches on the engine that correspond to the drawing.
- The serial number on the engine is 23514. This is the order to flip the switches. The clue on the seat shows D = 1, C = 3 and B = 5. This means either A or E = 2 and A or E = 4. Assign either letter to these numbers as there is a 50% chance of being right. Flip the switches quickly.
- Solution: Flip the switches in this order A-C-B-D-E.
Outside the Mill
- Play the hidden object scene.
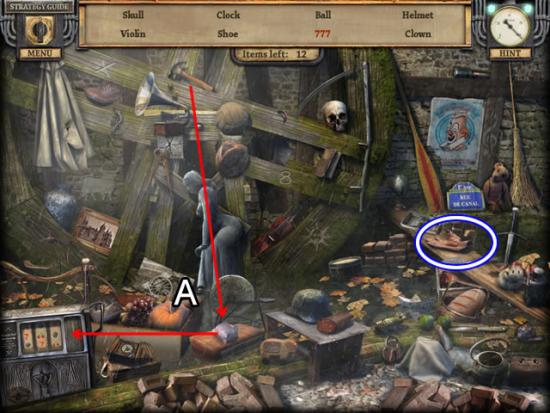
- Use the hammer to break the piggy bank. Take the coin and insert it in the slot machine to get 777.
- Find the rest of the listed objects. The GLOVE goes to inventory.
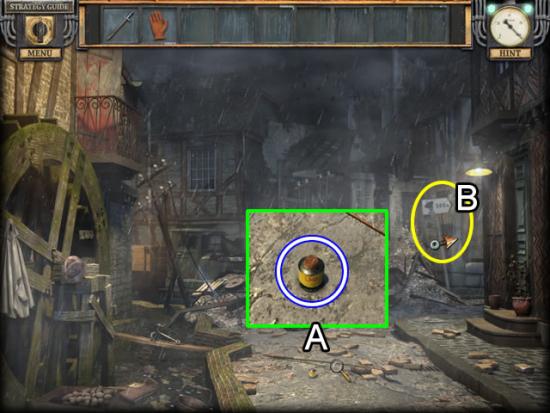
- Look closer at the fishing rod (A). Take the GLUE.
- Follow the radar sign to the right (B).
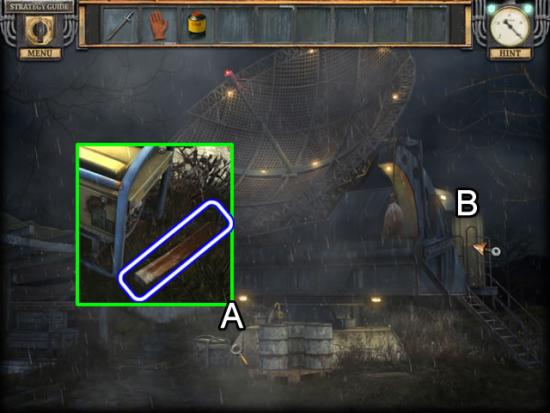
Radar Area
- Inspect the generator (A). Take the CHAIR LEG.
- Enter the work trailer (B).
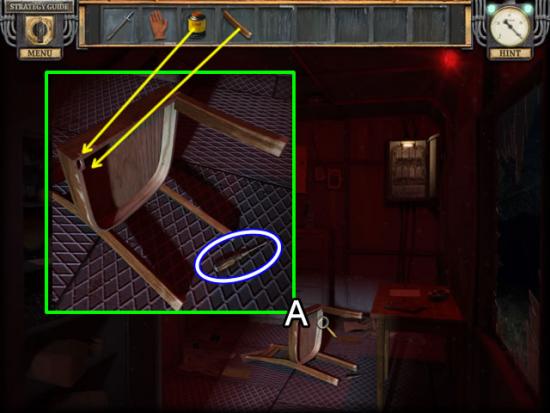
Work Trailer
- Zoom in on the chair (A).
- Use the GLUE on the hole. Attach the CHAIR LEG. Take the CHAIR and the SCREWDRIVER.
- Go down twice to return to the area outside of the mill
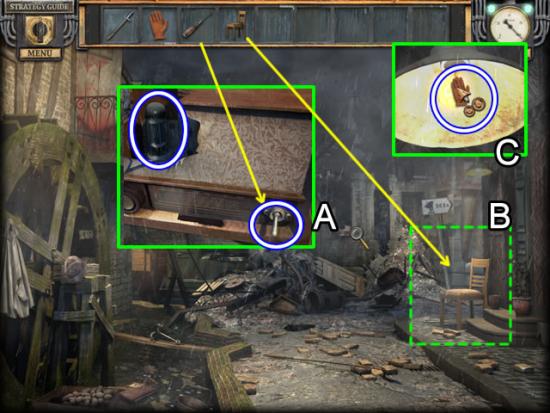
Outside the Mill
- Inspect the radio (A).
- Use the SCREWDRIVER to remove the plate covering the SWITCH. Take the VACUUM TUBE.
- Put the CHAIR on the sidewalk beneath the lamp (B). Use the GLOVE to remove the LIGHT BULB from the lamp (C).
- Return to the work trailer.
Work Trailer
- Zoom in on the electrical panel.
- Insert the LIGHT BULB and SWITCH in the empty slots to start a puzzle.
- The goal is to flip the switches in the correct order to light the bulbs.
- This appears to be a trial and error puzzle. The wires cannot be traced from the switches to the bulbs. Flipping an incorrect switch resets all the switches.
- Solution:
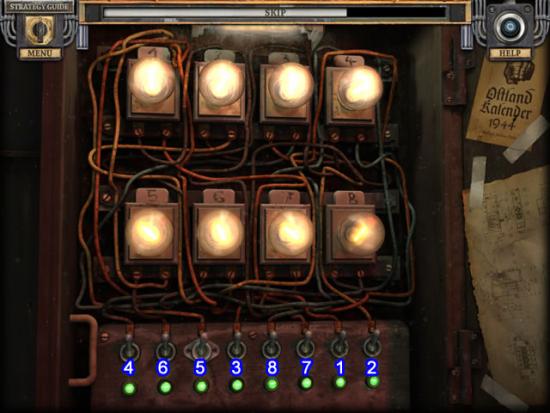
- Finding the correct order lights the work area.
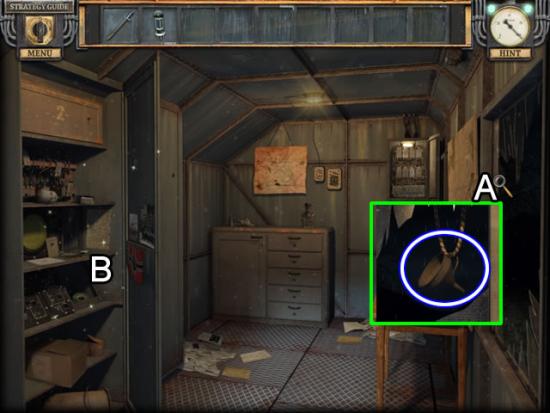
- Examine the window (A). Take the FUNNEL.
- Play the hidden object scene (B).
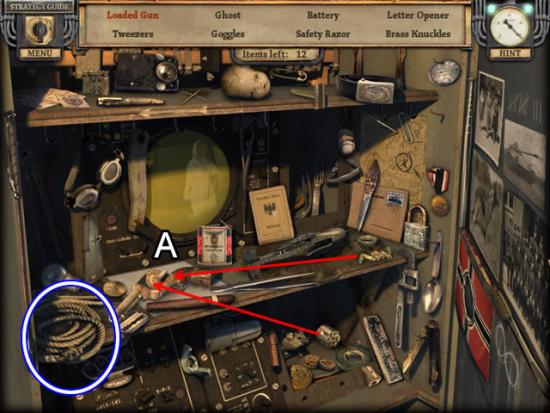
- Add the cylinder and bullets to the pistol to get a Loaded Gun (A).
- Find the rest of the listed objects. The ROPE goes to inventory.
- Return to the area outside of the mill.
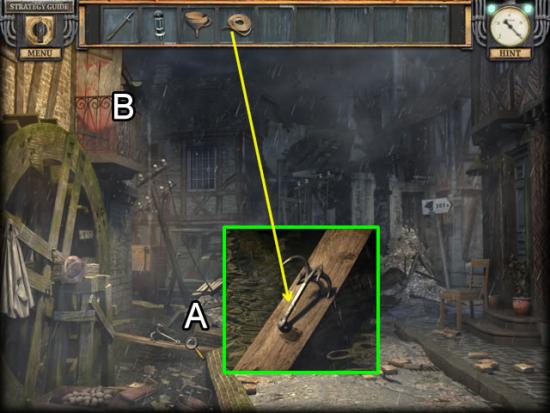
Outside the Mill
- Look closer at the hook (A). Attach the ROPE to the hook. Take the GRAPPLING HOOK.
- Attach the GRAPPLING HOOK to the balcony railing (B).
- Enter the upper floor of the mill.
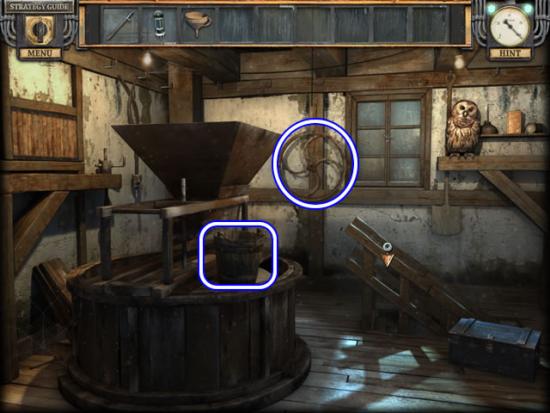
Mill – 2nd Floor
- Pick up the BUCKET and WELL WHEEL.
- Go down the steps.
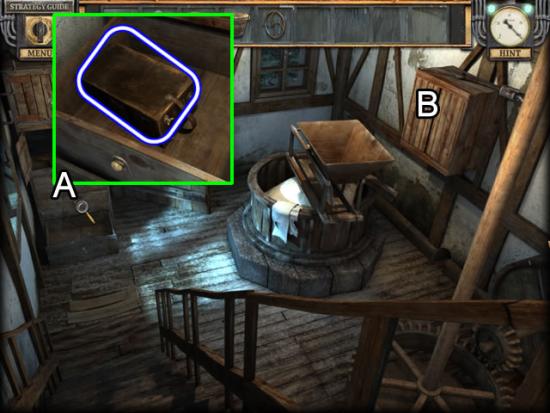
Mill – 1st Floor
- Examine the cabinet drawers (A).
- Pry open the middle drawer with the BAYONET. Take the DETONATOR.
- Open the cabinet doors (B).
- Play the hidden object scene in the cabinet.
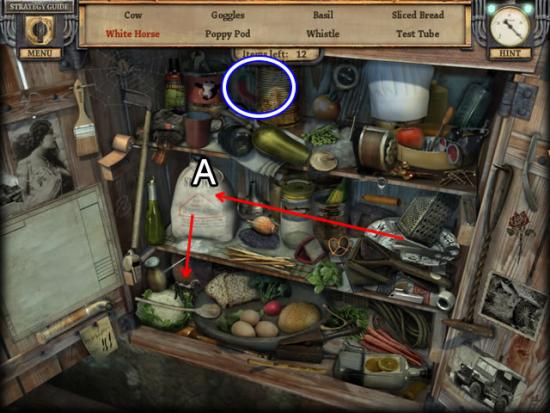
- Use the scissors to cut the string on the sack of flour. Dump the flour on the horse. Take the White Horse.
- Find the rest of the listed objects.
- The MAGNET goes to inventory.
- Go through the door to the back of the mill.
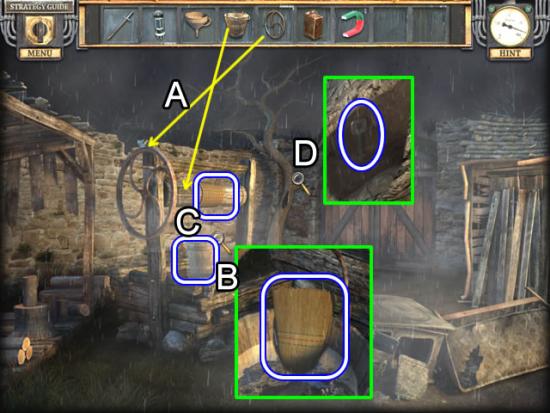
Back of Mill
- Attach the WELL WHEEL to the windlass and the BUCKET to the rope on the well (A).
- Look in the bucket (B). Take the SHORT BROOM.
- Take the BUCKET FULL OF WATER and the ROPE from the windlass.
- Look in the hollow (D). Use the MAGNET to retrieve the FOOTLOCKER KEY.
- Return to the second floor of the mill.
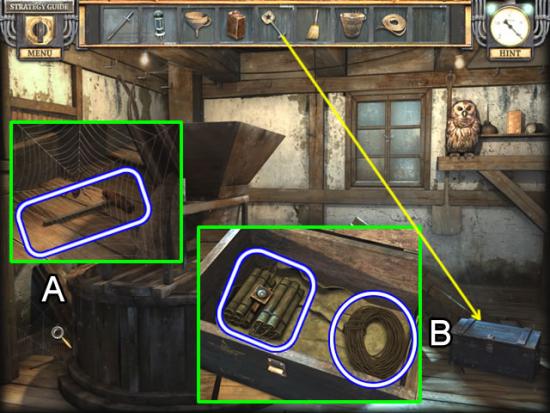
Mill – 2nd Floor
- Zoom in on the spider web (A). Use the SHORT BROOM to remove the web. Take the DETONATOR LEVER.
- Open the case (B) with the FOOTLOCKER KEY. Take the DYNAMITE and FUSE.
Back of Mill
- Examine the back gate.
- Place the DYNAMITE and FUSE on the gate to trigger a puzzle.
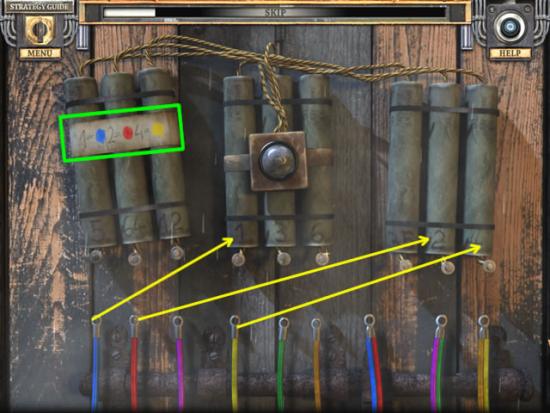
- The goal is to attach the wires to the correct piece of dynamite.
- This is a two-part puzzle. Use the code (green) as the basis for both puzzles. Each color has a number value associated with it. Blue = 1, Red = 2 and Yellow = 4. Attach these three wires to the sticks with the same number on their base.
- Part One.
- Use the three primary colors to create new colors. The value of the new color will equal the sum of the two colors used to create it. Match the value of the new color to the number on the dynamite. Example:
- Blue (1) + Red (2) = Purple (3). Attach the purple wire to the dynamite stick with the number 3 on it.
- For reference, Blue + Yellow = Green; Yellow + Red = Orange. Solve these two color numbers using the above example.
- Part Two.
- Do not attempt summing numbers for the combination wires. The first number on the dynamite stick equates to the number obtained in part one. The second equals the color number of the second wire. Example:
- Stick numbered 12 means a blue wire (value of 1) and a red wire (value of 2).
- Solution:
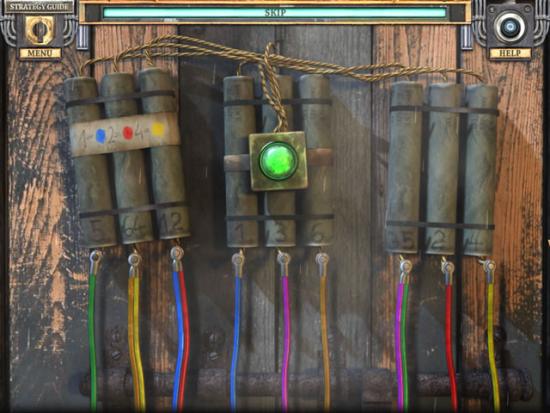
- Blue = 1, Red = 2, Purple = 3, Yellow = 4, Green = 5, Orange = 6.
- The second stick (64) is the orange (6) and yellow (4) combination. See the above screenshot for the other combination placements.
- The green light indicates all wires are properly connected.
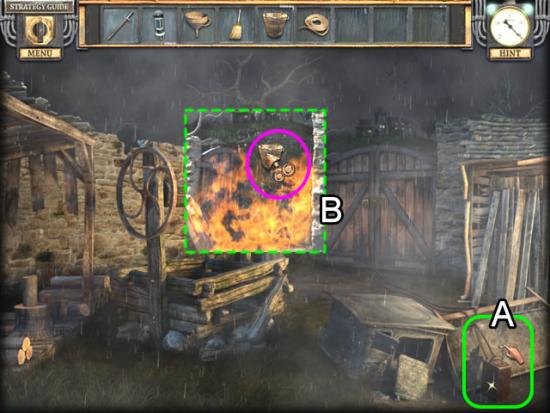
- Place the DETONATOR and attach the DETONATOR LEVER (A).
- Press the lever to set off the dynamite (B).
- Use the BUCKET FULL OF WATER to put out the flames.
Mansion Gates
- Play the hidden object scene in the leaves.
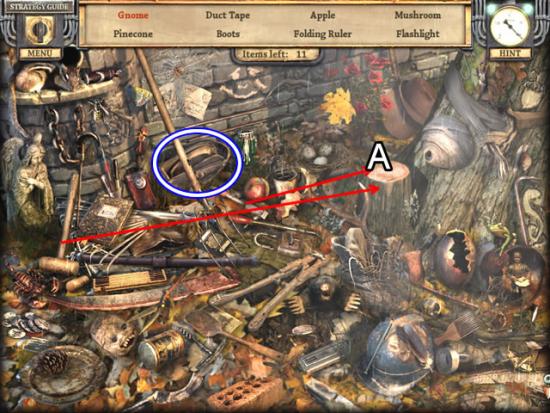
- Place the chisel on the stump (A). Use the mallet on the chisel to carve a Gnome.
- Find the rest of the listed objects.
- The PULLEY goes to inventory.
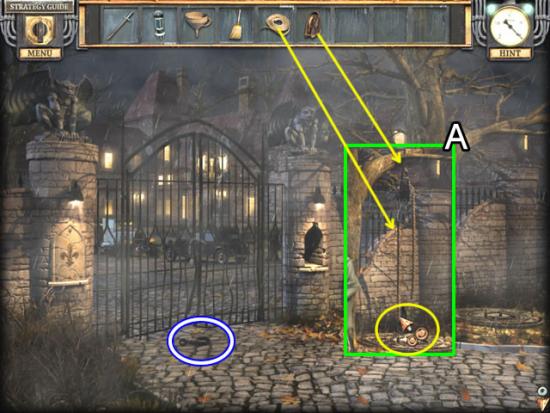
- Pick up the HOOK.
- Place the PULLEY on the tree branch (A). Attach the ROPE to the pulley. Add the HOOK to the bottom of the rope to lift the manhole cover.
- Enter the sewer
Sewer Entrance
- Look closer at the cheese wheel.
- Use the BAYONET to slice of a hunk of CHEESE.
- Return to the first floor of the mill (down four).
Mill – 1st Floor
- Play the hidden object scene.
- The LIGHTER goes to inventory.
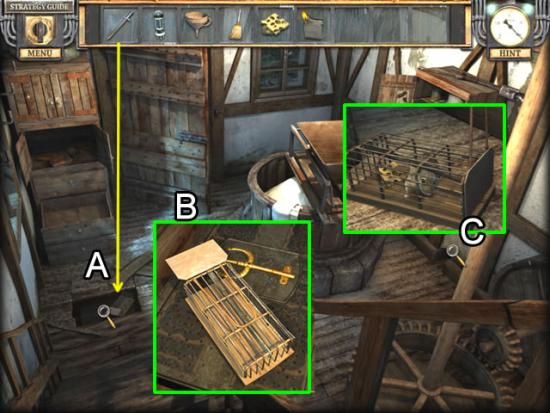
- Use the BAYONET to pry up the floorboards (A).
- Peer inside (B). Take the MOUSETRAP.
- Look closer at the mouse hole (C).
- Place the MOUSETRAP on the floor. Add the CHEESE. Take the MOUSE.
Mill – 2nd Floor
- Distract the owl with the MOUSE.
- Zoom in on the shelf. Take the OIL CAN.
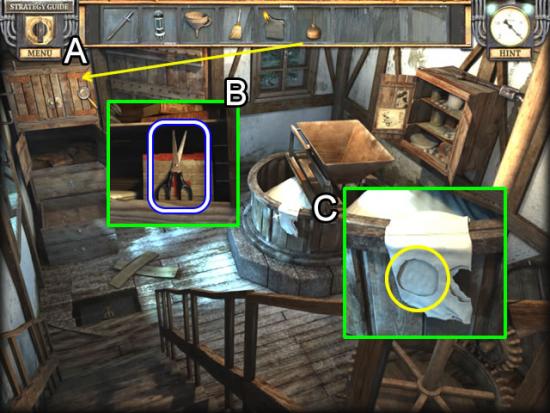
Mill – 1st Floor
- Use the OIL CAN on the rusty cabinet door hinges (A)
- Take the SCISSORS (B).
- Look at the flour vat (C). Take the SACK WITH HOLES. Use the SCISSORS to cut out a TEXTILE PATCH from the remaining bag.
- Return to the sewer system
Chapter 5: The Underground Rooms
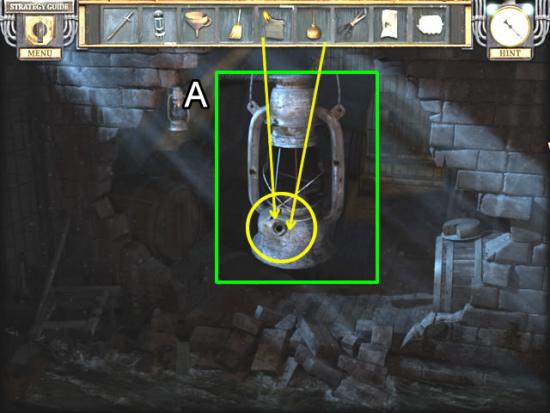
Sewer Entrance
- Examine the lantern (A).
- Pour the contents of the OIL CAN in the hole. Use the LIGHTER to light the oil.
- Play the hidden object scene.
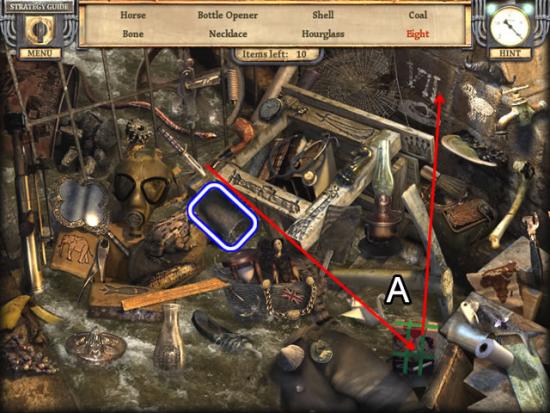
- Cut the tape off the chalk box with the knife (A). Draw an extra chalk line to get an Eight.
- Find the rest of the listed objects.
- The SLEDGEHAMMER goes to inventory.
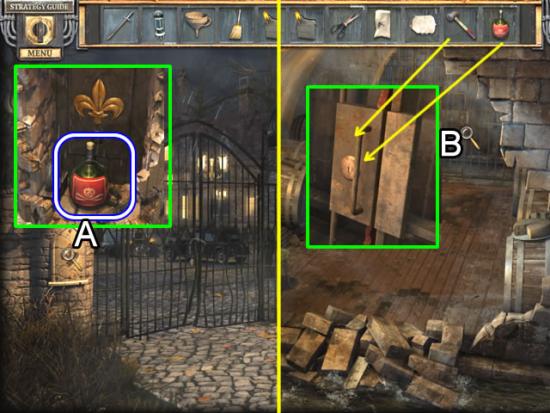
Mansion Gates
- Use the SLEDGEHAMMER to break the rock on the gate column (A).
- Take the ACID from the nook.
- Go back to the wine cellar in the sewer system.
- Zoom in on the barred gate (B). Use the ACID to weaken the lock. Remove it with the SLEDGEHAMMER.
- Enter the dungeon.
Dungeon
- Play the hidden object scene.
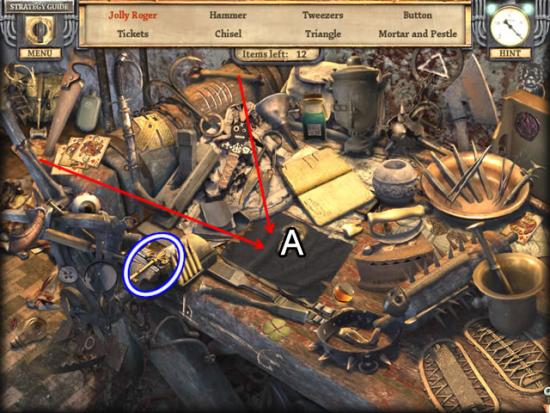
- Drag the two bones to the flag. Take the Jolly Roger.
- Find the rest of the listed objects.
- The FLEUR-DE-LIS KEY goes to inventory.
Mansion Gates
- Look again at the nook in the gate column.
- Use the FLEUR-DE-LIS KEY to open the compartment. Take the ROUND KEY.
- Play the hidden object scene.
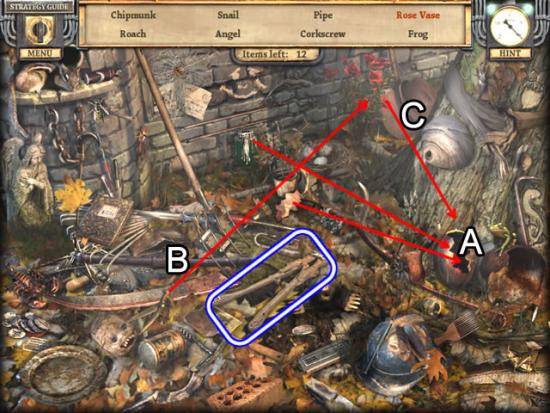
- Apply the glue to the broken vase (A) and then add the vase chip.
- Use the pruners (B) to cut the roses. Put the roses (C) in the vase. Take the Rose Vase.
- Find the rest of the listed objects.
- The BOLT CUTTERS go to inventory.
- Return to the sewer system. Go to the dungeon.
Dungeon
- Play the hidden object scene.
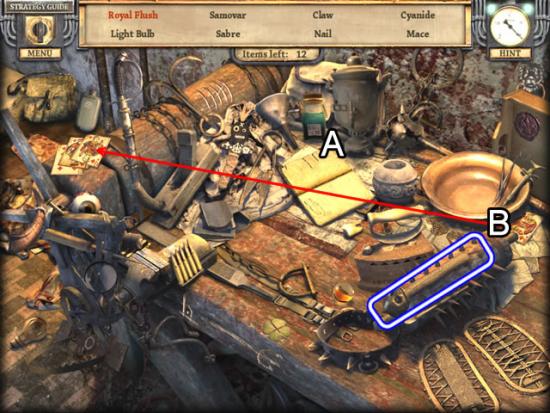
- Turn the page in the book (A) to find a red playing card. Put it with the other red cards. Drag the red playing card (B) to the hand of cards. Take the Royal Flush.
- Find the rest of the listed objects.
- The SKULL HANDLE goes to inventory.
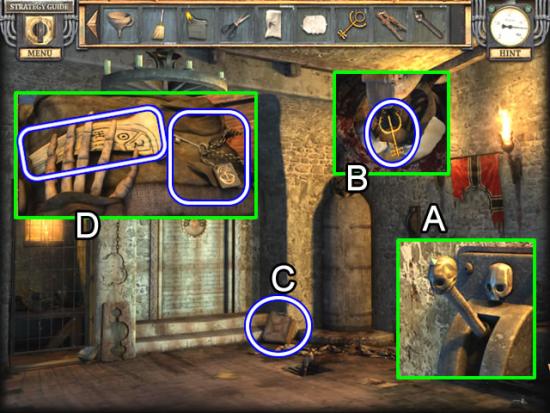
- Insert the SKULL HANDLE in the lever (A).
- Pull the handle to open the iron maiden (B). Take the TRIDENT KEY from the occupant.
- Pick up the EMPTY GAS CAN (C).
- Use the BOLT CUTTERS to remove the chain on the cell door (C).
- Take the CODE PAPER PIECE and the KEY WITH RADAR SYMBOL from the forgotten inmate.
Mill – 1st Floor
- Look at the chest in the floorboard-hiding place.
- Use the TRIDENT KEY to open the lock.
- Read the document. Take the WINGS OF PHOENIX.
- Head for the radar area.
Work Trailer
- Play the hidden object scene.
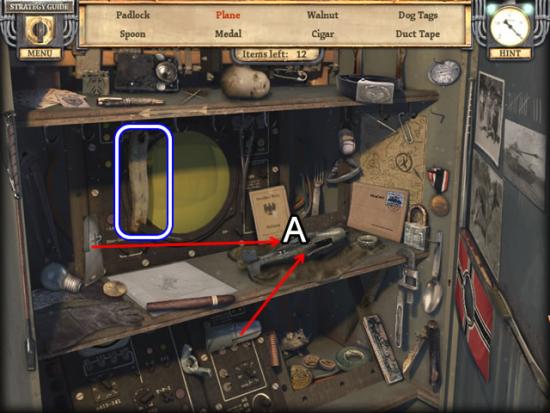
- Attach the two wings to the fuselage (A). Take the Plane.
- Find the rest of the listed objects.
- The GAS PUMP LEVER goes to inventory.
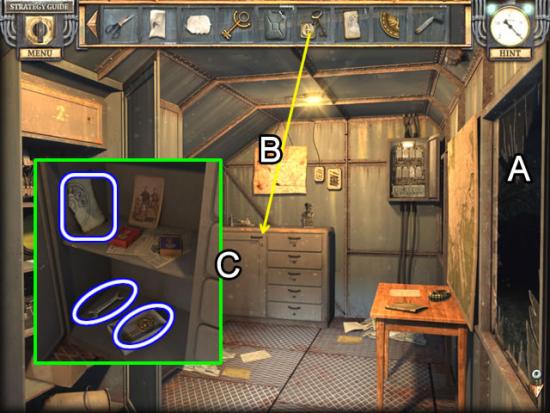
- If you have not already done so, check the window (A) to find the FUNNEL.
- Open the cabinet with the KEY WITH RADAR SYMBOL (B).
- Take the CODE PAPER PIECE, WRENCH and TERRA KEY.
Radar Area
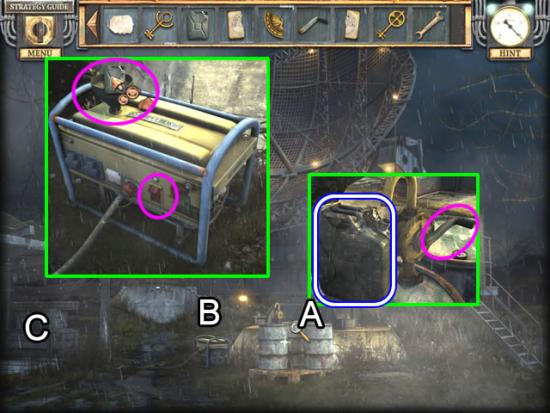
- Zoom in on the fuel barrels (A).
- Put the EMPTY GAS CAN under the spout. Attach the GAS PUMP LEVER. Take the FULL GAS CAN.
- Examine the generator (B). Insert the FUNNEL in the top. Fill the generator from the FULL GAS CAN. Flip the red switch to start it up.
- Head into the now lit shed (C).
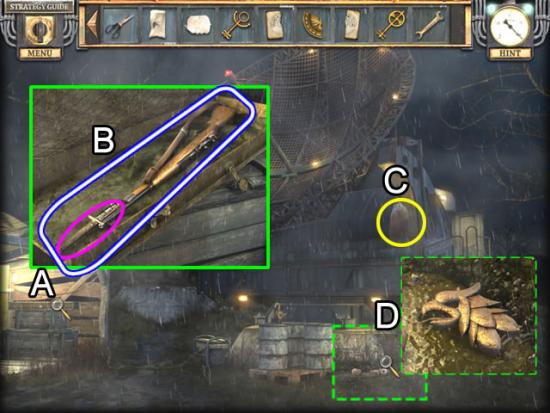
- Use the BAYONET to pry off the lock on the footlocker (A).
- Attach the BAYONET to the end of the rifle (B). Take the RIFLE WITH BAYONET.
- Look at the dangling sack (C). Rip the sack open using the RIFLE WITH BAYONET.
- Examine the sack contents on the ground (D). Take the PHOENIX HEAD.
Outside the Mill
- Look at the old truck.
- Use the WRENCH to remove the BATTERY.
- Head back to the dungeon (left, down, forward twice, down, forward).
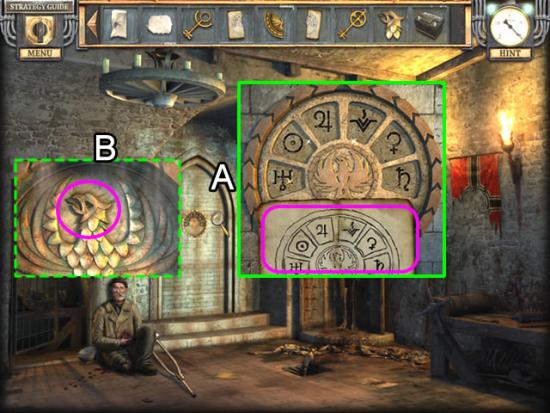
Dungeon
- Zoom in on the symbol lock (A).
- Add the two CODE PAPER PIECES (pink). Click the symbols until they match the code.
- Insert the PHOENIX HEAD in the inset behind the lock (B) to open the door.
Chapter 6: The Mansion
Sitting Room
Play the hidden object scene.
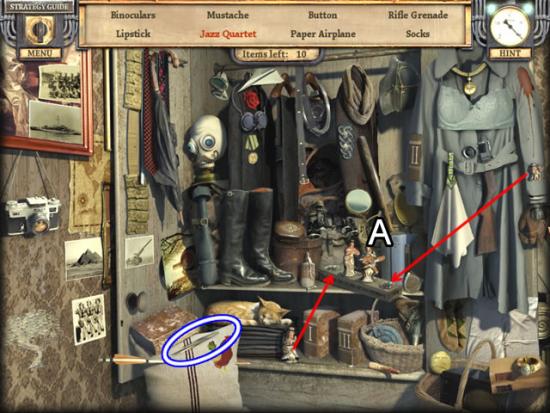
Move the two musician figurines to the stand (A). Take the Jazz Quartet.
Find the rest of the listed objects.
The TWEEZERS go to inventory.
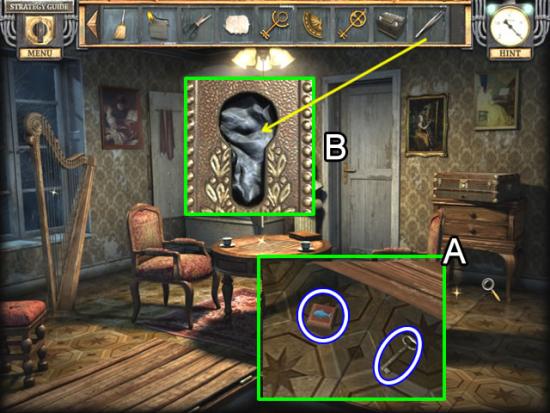
Look under the small bureau (A).
Pick up the BOARD GAME TILE and DOOR KEY.
Examine the door lock (B).
Use the TWEEZERS to remove the obstruction. Insert the DOOR KEY.
Exit the room to a hallway. Enter the first door on the left.
Kitchen
Play the hidden object scene.
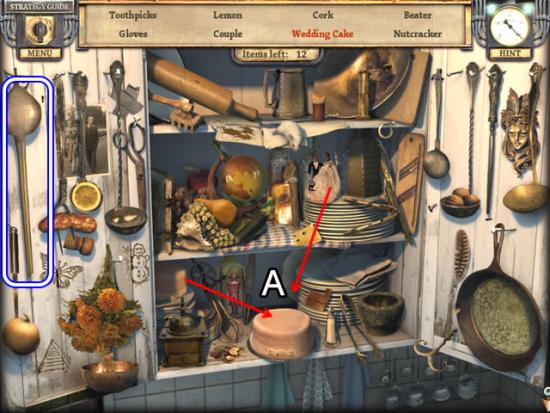
Put the next layer on the cake (A). Add the bride and groom on the top. Take the Wedding Cake.
Find the rest of the listed objects.
The EMPTY WINE THIEF goes to inventory.
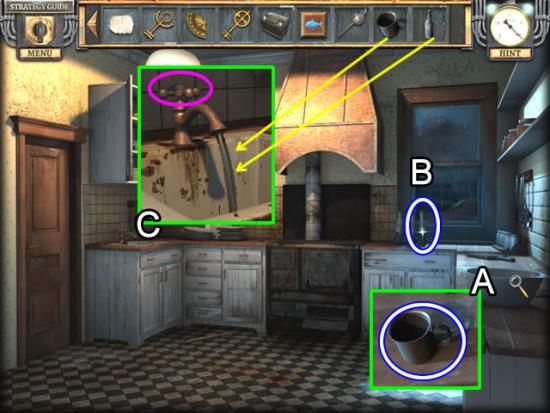
Look closer at the work surface by the bowl (A).
Pick up the EMPTY MUG.
Take a DIRTY BOTTLE from the counter (B).
Zoom in on the sink (C). Click the tap to turn on the water. Place the EMPTY MUG under the spigot. A FULL MUG returns to inventory.
Put the DIRTY BOTTLE in the water. A CLEAN BOTTLE returns to inventory.
Return to the sewer system entry to the wine cellar (down four times).
Sewer Entrance
Play the hidden object scene
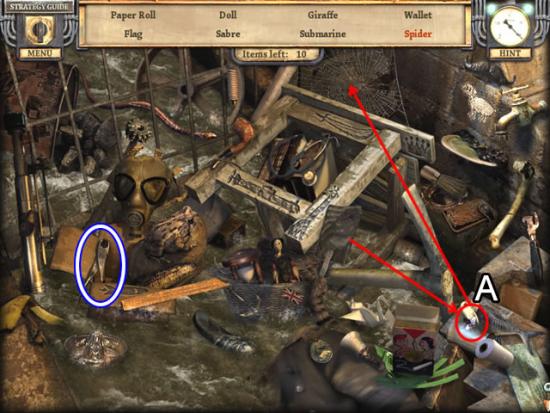
Use the flyswatter to zap the fly (A). Put the fly on the web to attract the Spider.
Find the rest of the listed objects.
The PLIERS go to inventory.
Return to the sitting room.
Sitting Room
Inspect the harp.
Use the PLIERS to remove the HARP STRING.
Kitchen
Look at the broken handle on the floor.
Add the SHORT BROOM to the end of the handle. Attach the two pieces with the HARP STRING.
Take the LONG BROOM.
Exit the kitchen.
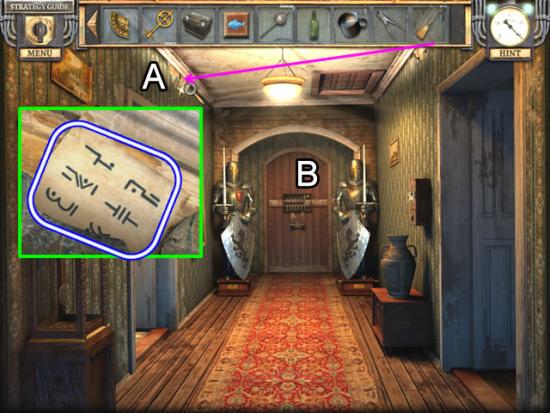
Hallway
Inspect the rip in the wallpaper (A).
Use the LONG BROOM to retrieve the CODE PAPER .
Zoom in on the door at the end of the hall (B).
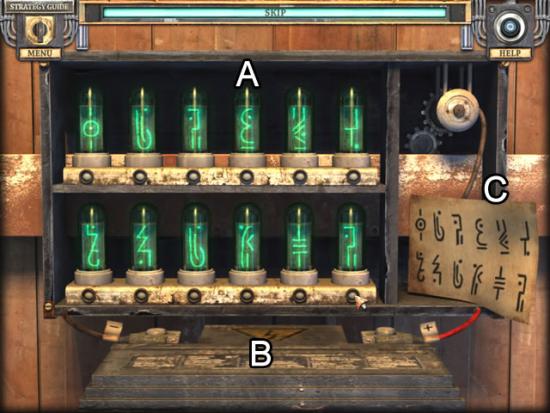
Insert the VACUUM TUBE (A) and BATTERY (B) to light up the tubes. Add the CODE PAPER (C) to open a puzzle.
The goal is to match the symbol on each tube to the code paper as shown above.
The tubes begin as a limited number of amber symbols. As matches are made, more tubes become available. Click the tube when the symbols match. The tube turns green.
Strategy tip: When a tube first becomes available the symbol is more likely to occur. Focus on the new tubes. Clicking a tube, even incorrectly, restarts the cycle. This comes in handy if too many tubes are open with too few matches.
Completing the puzzle opens the door.
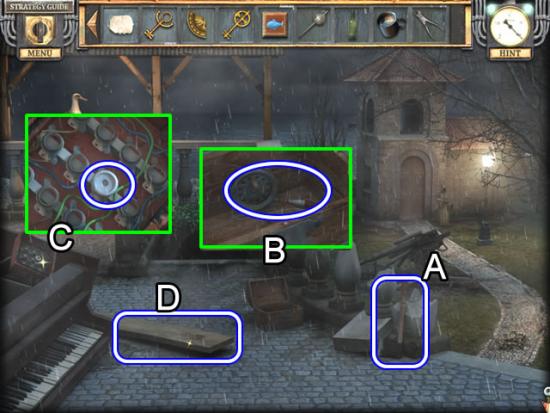
Back Terrace
Pick up the AXE (A).
Look in the box (B). Take the FISHING TACKLE.
Examine the fuse box (C). Take the white FUSE.
Pick up the LONG BOARD (D).
Hallway
Inspect the fuse box on the right wall.
Insert the FUSE in the empty slot.
Click the dial to the “1” position to open the door on the right.
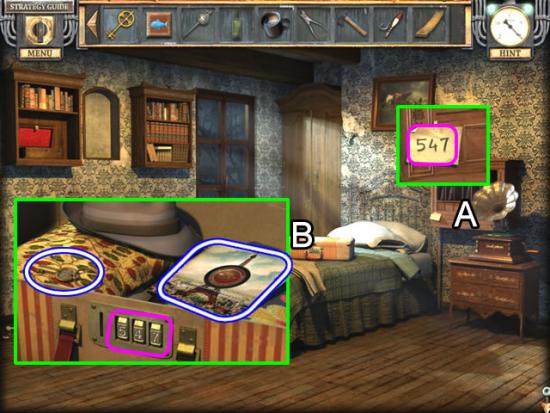
Bedroom
Zoom in on the gramophone (A). Note the taped note with “547” on it.
Inspect the suitcase (B). Click the number lock until the numbers are “547”.
Take the CHEST KEY and the RECORD.
Go down twice.
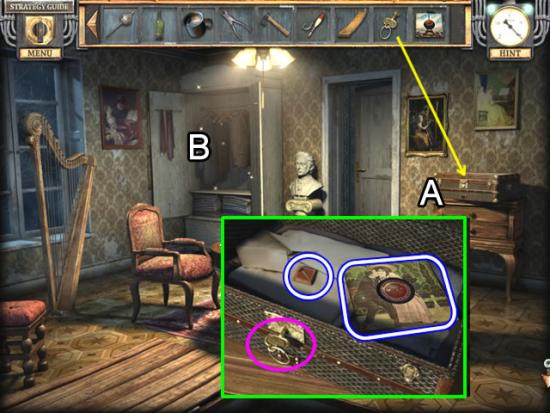
Sitting Room
Examine the suitcase on the table (A).
Use the CHEST KEY to unlock the case. Take the RECORD and BOARD GAME TILE.
Play the hidden object scene (B).
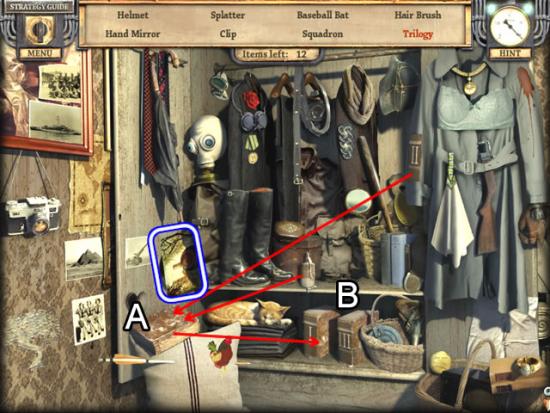
Apply glue to the book’s binding and affix the spine label (A). Add the book to the other two (B) to form a Trilogy.
Find the rest of the listed objects.
The RECORD goes to inventory.
Return to the bedroom.
Bedroom
Zoom in on the gramophone.
Insert the three RECORDS in the empty slots to trigger a puzzle.
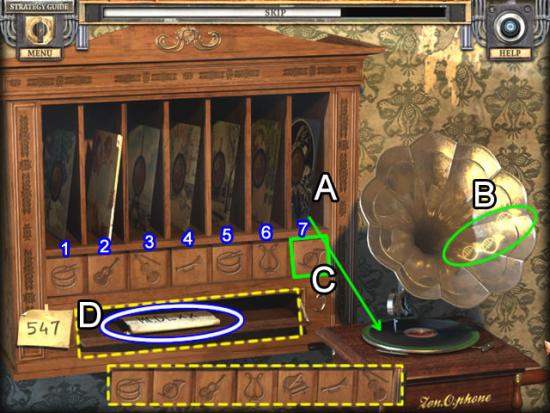
The goal is to match the records with the musical instrument they play to open a secret compartment.
Take a record (A) and place it on the turntable. Listen to or watch (B) the instrument it plays. Click through the instrument symbols on the bottom panel (C) until it matches. Clicking some panel instruments affect other panels.
2 affects 2 and 5
4 affects 1, 4 and 7
6 affects 3 and 6
The best strategy is to solve 4 first, 6 second and 3 third. The rest can be solved in any order, as they don’t affect other panels.
Completing the game opens the panel (D). Take ROMAN NUMERAL CODE.
The dashed inset above shows the solution.
Return to the wine cellar (down 4)
Chapter 7: Opening the Gate
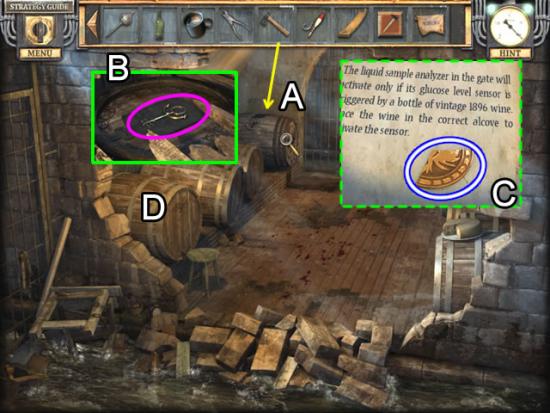
Wine Cellar
Use the AXE to widen the opening in the barrel (A).
Insert the ROUND KEY in the compartment lock (B).
Read the document about another ingredient needed to open the gate (C). Take the WING OF PHOENIX.
Look closer at the first barrel (D).
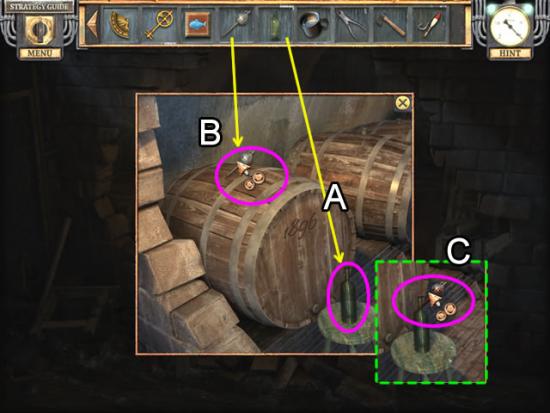
Place the CLEAN BOTTLE on the stool (A).
Insert the EMPTY WINE THIEF in the top of the barrel (B). The FULL WINE THIEF automatically goes to inventory.
Empty the full wine thief into the clean bottle. Take the BOTTLE OF WINE.
Return to the back of the mill (down twice).
Back of Mill
Use the AXE to make FIREWOOD on the chopping stump on the left.
Go to the area in front of the mill (down three times).
Outside of Mill
Play the hidden object scene.
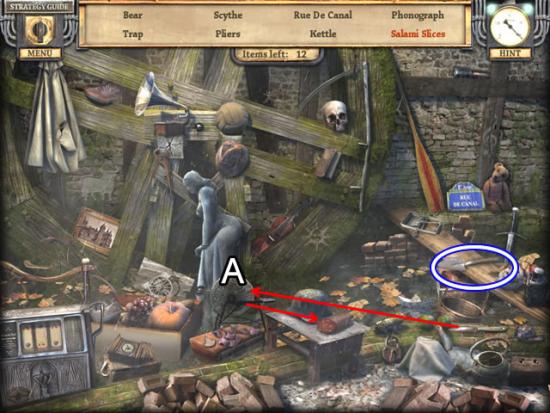
Use the grindstone to sharpen the knife (A). Cut off some Sliced Salami.
Find the rest of the listed objects.
The HAND SPADE goes to inventory.
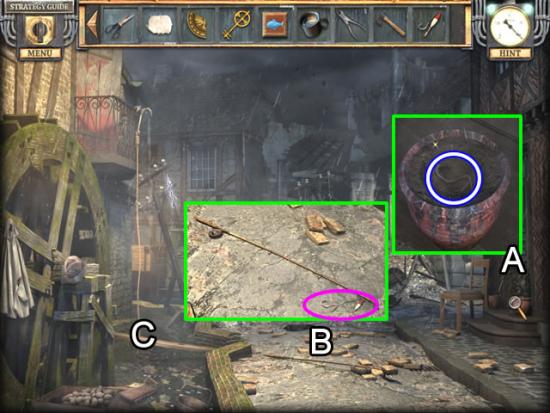
Zoom in on the pot by the door (A).
Use the SCISSORS to cut the DRY BRANCHES.
Dig up the WORM with the HAND SPADE.
Look at the fishing pole (B). Attach the FISHING TACKLE and the WORM (pink). Take the FISHING ROD.
Look at the fishing hole in the stream (C). Use the FISHING ROD to catch a FISH.
Return to the mansion’s back terrace (left, down, forward twice, down, forward four times).
Back Terrace
Feed the FISH to the gull.
Pick up the SEWING MACHINE BELT the gull drops.
Bedroom
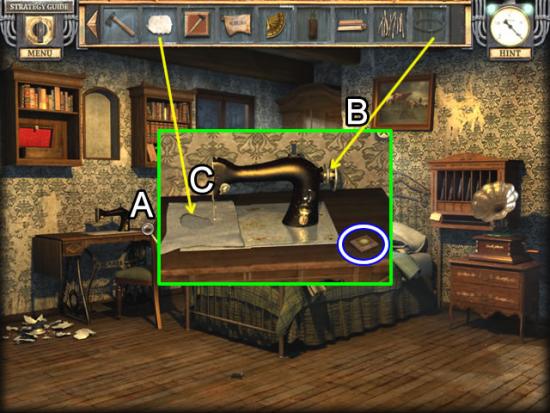
Zoom in on the sewing machine (A).
Pick up the GAME BOARD TILE.
Attach the SEWING MACHINE BELT to the wheel (B).
Place the SACK WITH HOLES on the table. Sew the TEXTILE PATCH over the hole (C). Take the EMPTY SACK.
Return to the mill.
Mill – 1st Floor
Dip the EMPTY SACK into the flour vat.
Take the SACK FULL OF FLOUR.
Return to the mansion’s kitchen.
Kitchen
Play the hidden object scene.
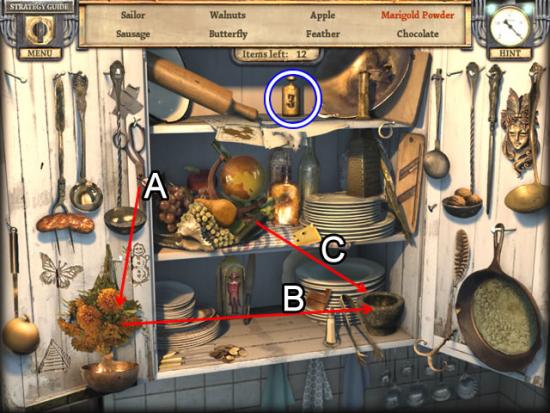
Use the scissors to cut the marigolds (A). Place the cut blossoms in the mortar (B).Grind the Marigold Powder with the pestle (C).
Find the rest of the listed objects.
The MEASURE WEIGHT (hidden behind the tankard) goes to inventory.
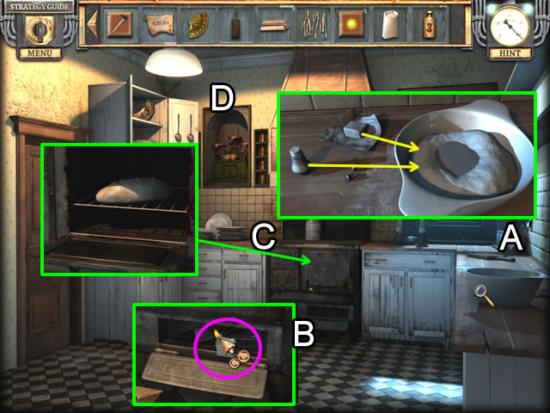
Zoom in on the work area around the bowl (A).
Add the SACK FULL OF FLOUR, FULL MUG and the Yeast and contents of the Salt Shaker to the bowl.
Knead the DOUGH twice.
Look closer at the bottom of the over (B).
Put the FIREWOOD and DRY BRANCHES in the compartment. Ignite them with the LIGHTER.
Open the oven door (C). Place the DOUGH on the rack. Close the door. The oven door automatically opens when the BREAD is ready.
Look at the scale in the niche (D).
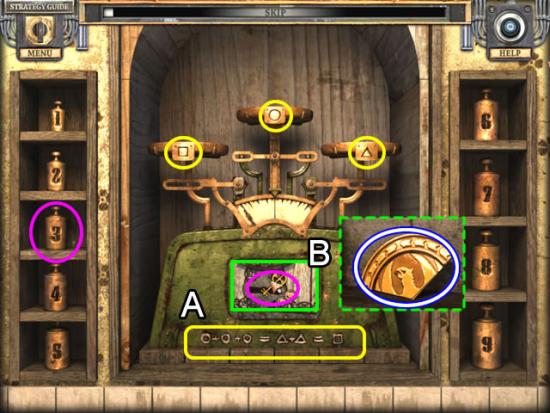
Place the MEASURE WEIGHT to start a puzzle.
The goal is to find the right weight combinations to open the middle compartment.
Use the legend at the bottom of the scale (A) and the same symbols on the scale pans to figure out the correct combination.
Three units of weight in the circle pan are the same as two units in the triangle pan, which is the same as one unit in the square pan.
Use the TERRA KEY to open the inner compartment door (B). Get the HEAD OF PHOENIX.
Solution: square is 6, circle is 2 and triangle is 3.
Sitting Room
Zoom in on the board game on the table.
Add the three BOARD GAME TILES to start a puzzle.
The goal is to swap the tiles to find the two related items that equal the third. For example a beehive plus a bear equals a honeycomb.
Solution:
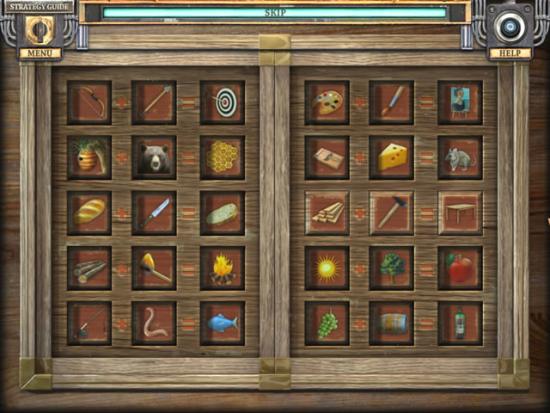
The board opens to reveal a book inside.
Place the HEAD OF PHOENIX and the two WINGS OF PHOENIX in the inlay to open the book.
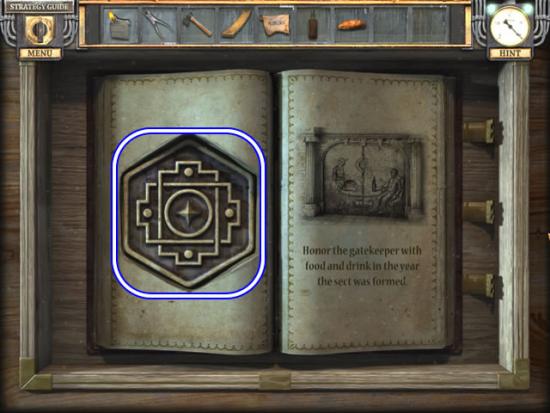
Read the instructions in the book for opening the gate.
Take the STAR EMBLEM.
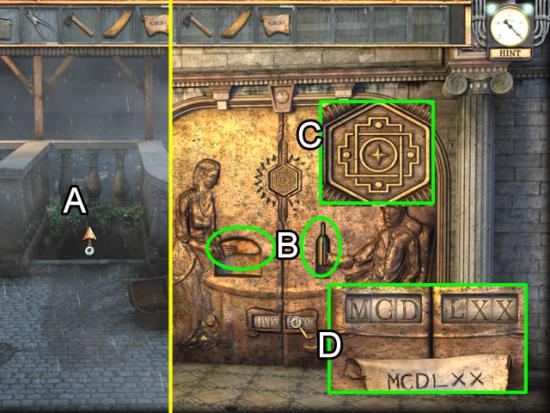
Back Terrace
Go down the steps to the gate.
Gate
Place the BREAD and BOTTLE OF WINE in the insets.
Zoom in on the star slot (C). Insert the STAR EMBLEM.
Look at the date on the bottom of the doors (D).
Put the ROMAN NUMERAL CODE on the plate. Click the dials until they match the numbers on the code.
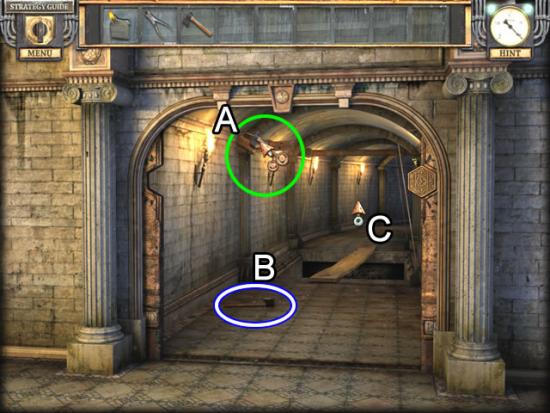
Tunnel Entrance
Throw the AXE at the weak part of the beam (A).
Pick up the fallen AXE (B).
Put the LONG BOARD across the gap (C) and go forward.
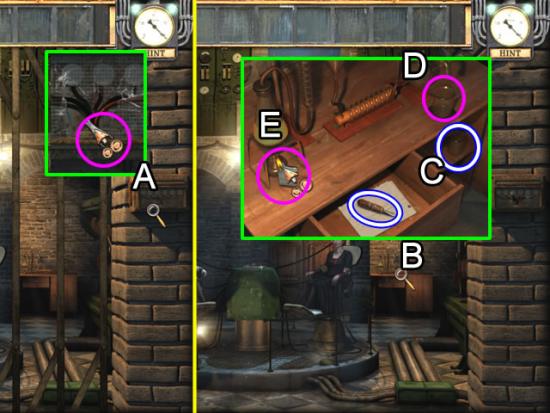
Secret Chamber
Zoom in on the control panel (A).
Use the AXE to smash the glass. Cut the wires with the PLIERS.
Go to the desk (B).
Open the drawers (C). Take the SCREWDRIVER and EMPTY BEAKER for inventory.
Place the EMPTY BEAKER on the desk (D).
Use the LIGHTER to ignite the burner under the solution (E). Take the BEAKER FULL OF ACID after the heated solution has been transferred.
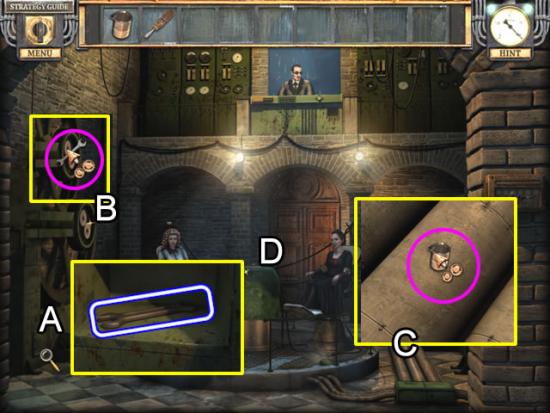
Open the compartment door (A) and take the WRENCH.
Throw the WRENCH in the gears (B) to stop them.
Pour the BEAKER FULL OF ACID on the pipes (C).
Zoom in on the mechanism (D). Use the SCREWDRIVER to open the panel and start a puzzle.
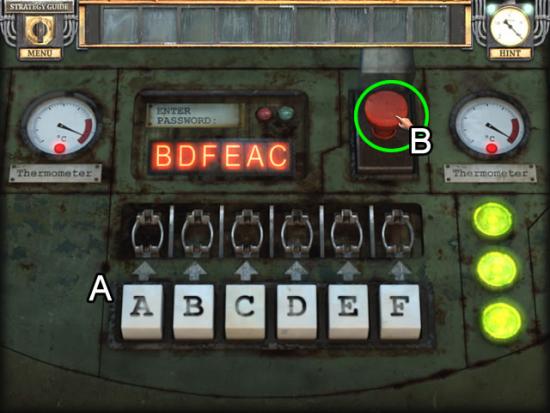
This is a very fast repeat-the-sequence game.
There are three rounds. When a blue light flashes above a letter, press the letter. There is very little time to input all of the letters.
The best strategy is to watch the sequence, copy down the letters and then try to hit the letters as the short circuits light up. If you fall behind or input the wrong letter, you must try that sequence again. It will not restart from the beginning, just that particular sequence.
The green light on the right illuminates when a sequence is correct. When all three are lit, the cover over the red button opens (B).
Press the button.
Solution: Round 1: D-B-A-E; Round 2: F-A-C-E-B; Round 3: B-D-F-E-A-C.
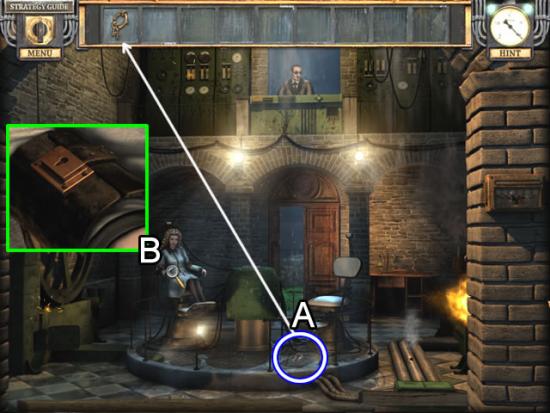
Pick up the KEY BUNCH the countess drops (A) for inventory.
Zoom in on Yvette’s arm (B). Use the KEY BUNCH to release her.
Watch the final cut scene.
Congratulations! You have finished playing Silent Nights: The Pianist Collector’s Edition. Click the Extras tab on the main menu to access new material and a bonus chapter.
Bonus Play
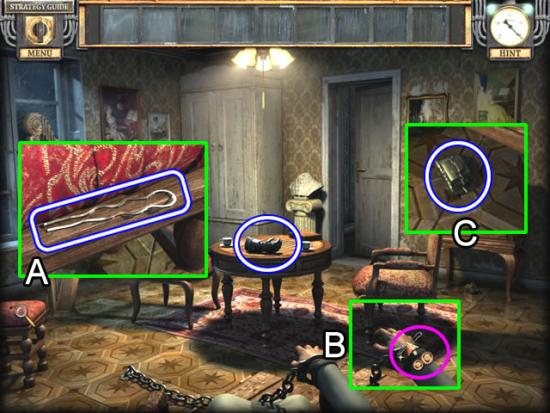
Sitting Room
Take the HAIRPIN from the chair on the left (A).
Use the hairpin to unlock the handcuffs (B).
Pick up the GAUNTLET from the table and the MODEL TANK from under the table (C).
Hallway
Pick up the HAMMER on the floor by the kitchen door.
Continue through the door at the end of the hall.
Back Terrace
Play the hidden object scene
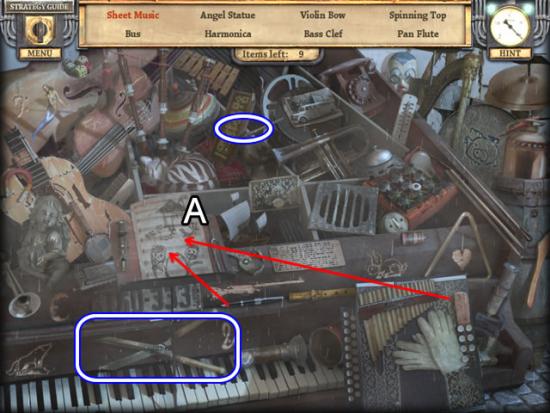
Use the eraser to remove the drawings on the paper (A). Draw the notes for the Sheet Music with the pen.
Find the rest of the listed objects.
The GARDEN PRUNER goes to inventory.
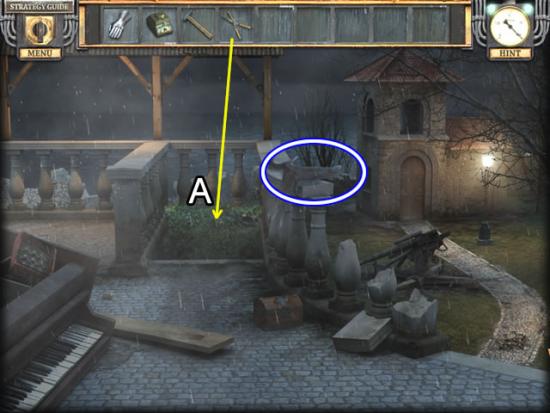
Use the GARDEN PRUNER to remove the foliage covering the underground entrance (A).
Pick up the HALF ANTLER.
Go down the steps to the gate.
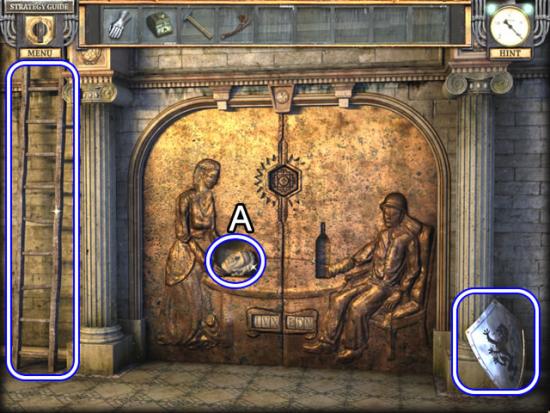
Gate
Zoom in to take the STATUE HEAD (A).
Pick up the LADDER and SHIELD.
Go down three times to the sitting room.
Sitting Room
Place the STATUE HEAD on the broken bust. Take the LYRE MEDAL from the compartment.
Play the hidden object scene.
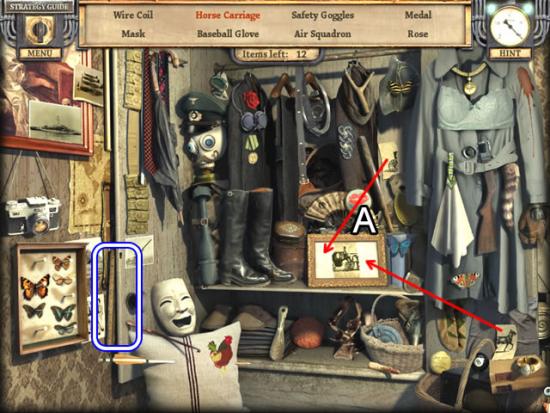
Add the two picture scraps to complete the Horse Carriage picture (A).
Find the rest of the listed objects.
The RULER goes to inventory.
Hallway
Zoom in on the door on the right.
Use the RULER to slip the latch.
Bedroom
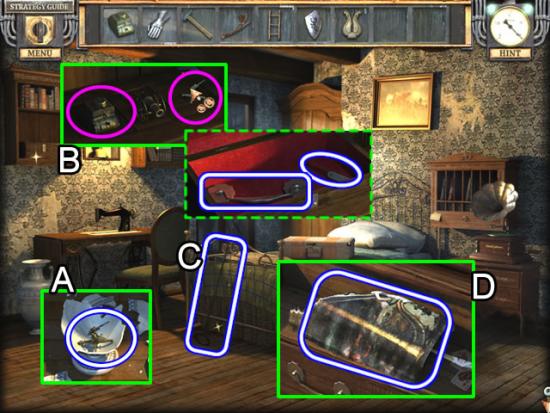
Use the HAMMER to smash the vase (A). Take the MODEL ANTI-AIRCRAFT GUN.
Inspect the box on the shelf (B). Place the MODEL TANK and MODEL ANTI-AIRCRAFT GUN on the lid to open the box. Take the DRAWER HANDLE and LOCK PICK from the box.
Pick up the GAFF HOOK propped against the bedstead (C).
Use the DRAWER HANDLE to open the cabinet drawer (D). Take the HALF OF A PAINTING.
Hallway
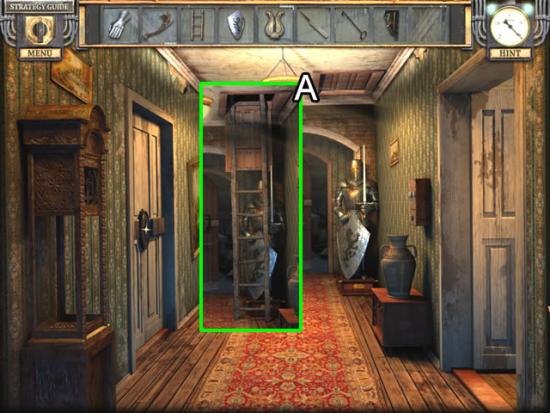
Use the GAFF HOOK to pull down the attic access door (A). Attach the LADDER.
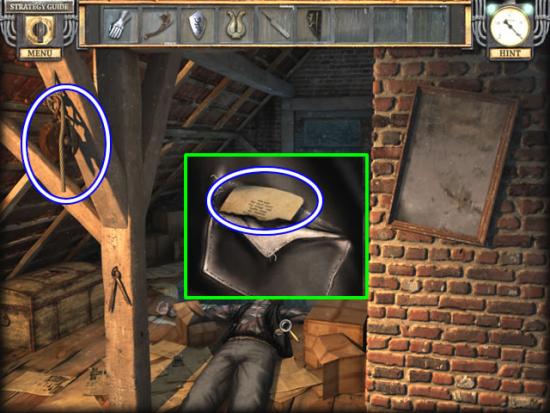
Attic
Take the PULLEY from the post.
Look closer at the body. Pluck the MICRO CODE PAPER from the pocket.
Sitting Room
Add the HALF OF A PAINTING to the picture to the right of the door. Take the GUITAR MEDAL.
Play the hidden object scene.
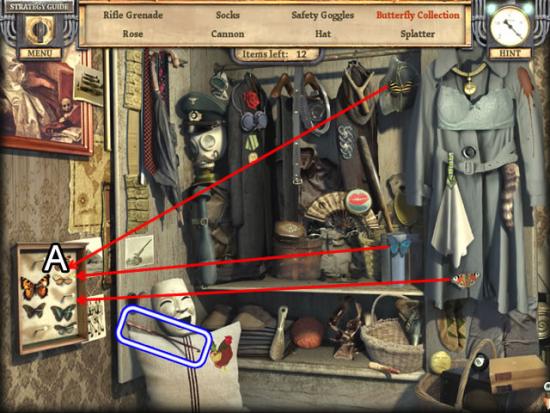
Add the three butterflies to the Butterfly Collection (A).
Find the rest of the listed objects.
The CROCHET HOOK goes to inventory.
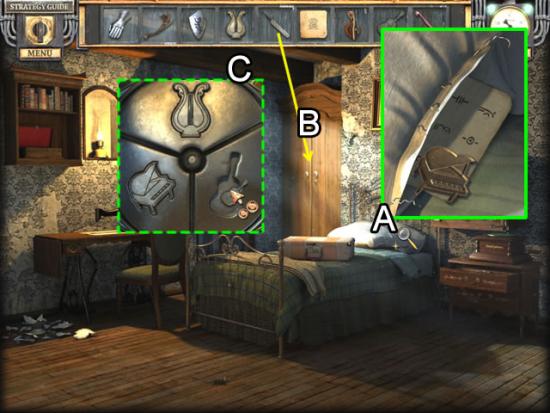
Bedroom
Use the CROCHET HOOK to remove the stitches on the pillow (A). Take the CODE PAPER and PIANO MEDAL.
Use the LOCK PICK to open the outer wardrobe door (B).
Insert the PIANO, LYRE and GUITAR MEDALS to open the inner lock.
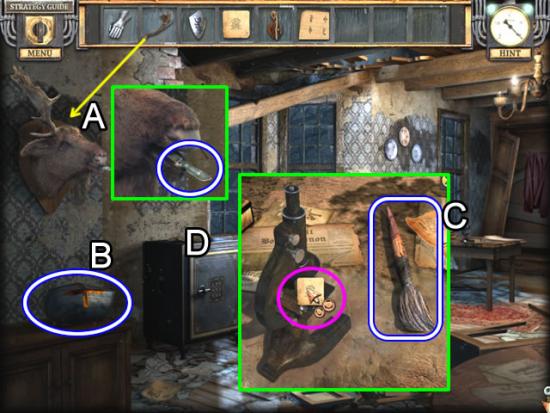
Office
Attach the HALF ANTLER to the moose (A). Take the SCALPEL from its mouth.
Pick up the HELMET from the table (B).
Zoom in on the desk (C).
Put the MICRO CODE PAPER under the microscope (pink) to get the SAFE CODE PAPER. Take the BRUSH next to the microscope.
Examine the safe (D). Put the SAFE CODE PAPER on the safe door to open a puzzle.
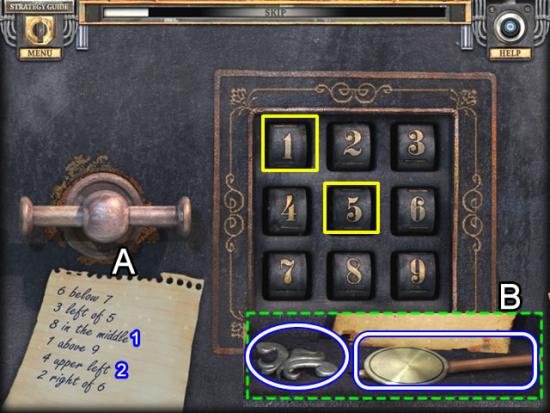
Use the clues on the sheet (A) to solve the safe combination.
Start with the two most explicit clues (1 and 2) to enter the first two numbers: four in the upper left and eight in the middle. Work around the positions of these two numbers to place the others. Two of the clues are trial and error. Refer to the solution below if needed.
Read the note inside the safe (B). Take the FLEUR-DE-LIS MEDAL and PENDULUM.
Solution: Row 1: 435; Row 2: 781; Row 3: 629.
Back Terrace
Insert the FLEUR-DE-LIS MEDAL in the lid of the box.
Take the SCREWDRIVER.
Play the hidden object scene.
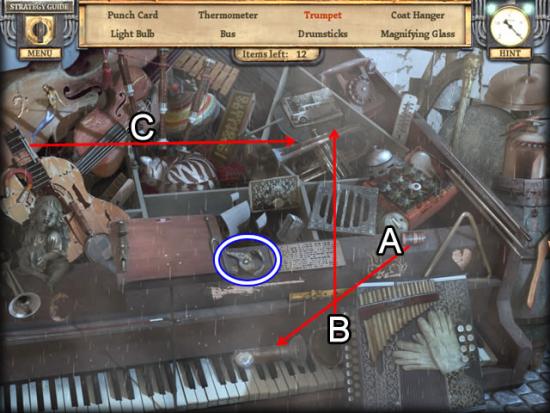
Put the battery in the flashlight (A). It lights up to show a trumpet valve inside the can (B). Add that valve to the trumpet. Drag the other valve (C) to the Trumpet.
Find the rest of the listed objects.
The PINCERS go to inventory.
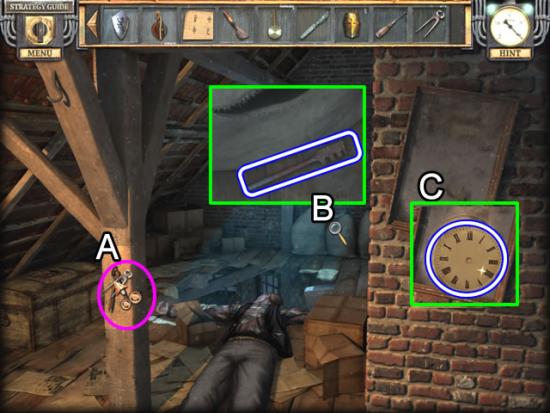
Attic
Use the PINCERS to remove the nail holding the CLOCK HANDS (A).
Zoom in on the sacks (B). Slit open the bag with the SCALPEL and take the GLASS CUTTER.
BRUSH off the grime on the glass in the frame. Use the GLASS CUTTER to free the CLOCK FACE.
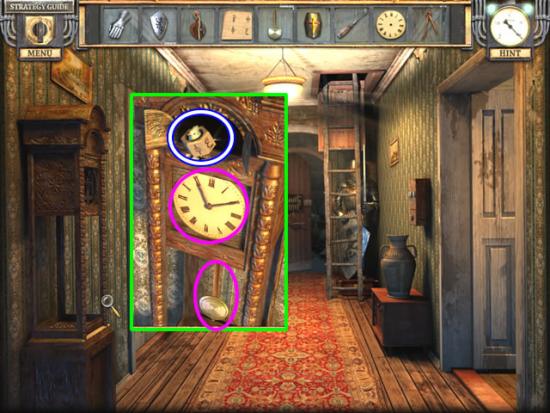
Hallway
Examine the clock.
Place the PENDULUM, CLOCK FACE and CLOCK HANDS in the case.
Take the PUZZLE PART.
Attic
Zoom in on the chest.
Insert the PUZZLE PART in the vacant spot. Place the CODE PAPER on the chest to open a puzzle.
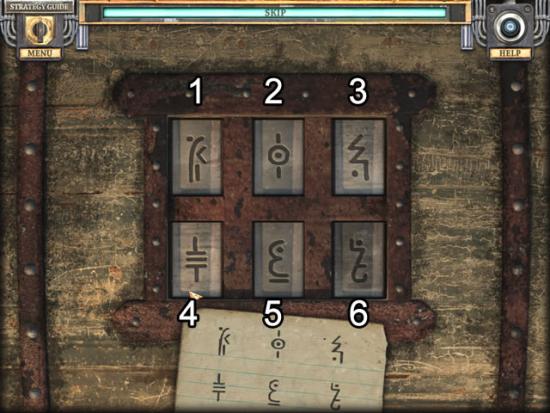
The goal is to rotate the symbols on the lock until they match those on the code sheet.
Turning some symbols affects others.
Solution: Click 5 first and solve for it. Click 6 second and get its symbol. Click 3 third and solve for it. Solve 2 fourth and then solve 1 and 6.
Take the SWORD.
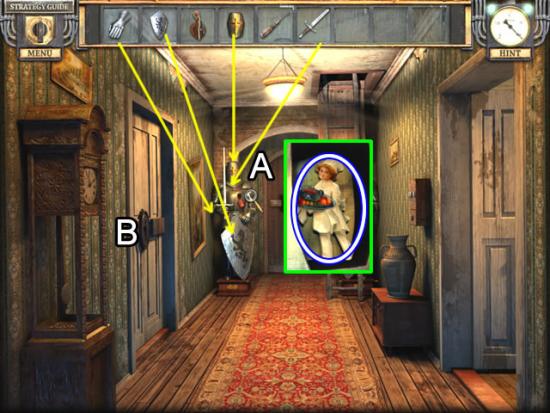
Hallway
Place the GAUNTLET, SHIELD, HELMET and SWORD on the suit of armor.
Take the KITCHEN BOY MEDAL from the secret compartment (A).
Insert the KITCHEN BOY MEDAL in the slot on the kitchen door (B).
Kitchen
Play the hidden object scene
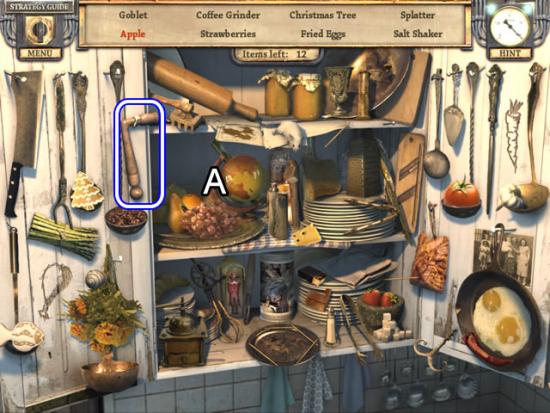
Move the pieces of fruit away (A) until the Apple is uncovered.
Find the rest of the listed objects.
The DOOR HANDLE goes to inventory.
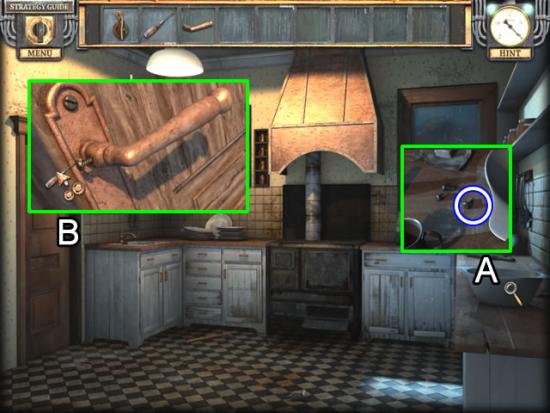
Look at the work surface next to the bowl (A). Pick up a SCREW.
Examine the door (B). Put the DOOR HANDLE on the plate. Insert the SCREW in the door handle. Secure the handle to the door with the SCREWDRIVER.
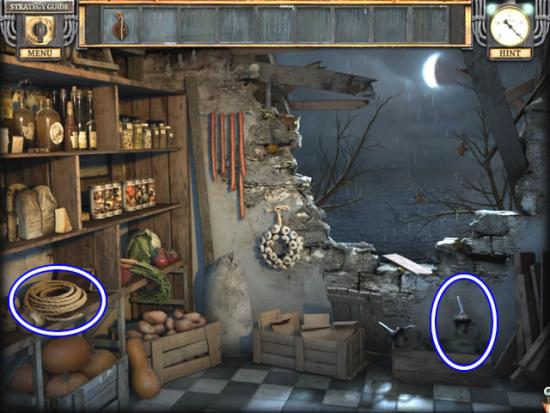
Pantry
Pick up the ROPE and OIL FLASK.
Return to the bedroom. Go through the wardrobe door to the office.
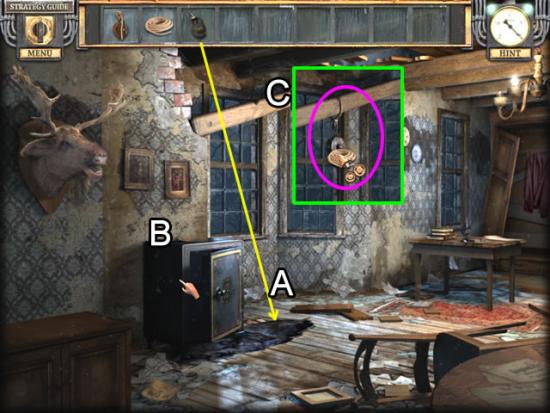
Office
Pour the contents of the OIL FLASK on the rotten boards (A).
Slide the safe over the oil slick (B).
Hook the PULLEY to the beam. Attach the ROPE to lift and drop the safe through the floor.
Garage
Play the hidden object scene.
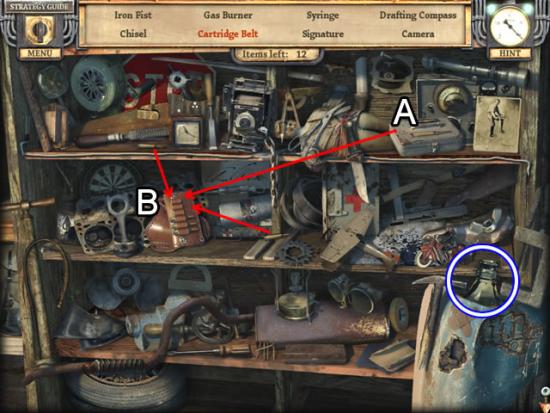
Open the tin box (A). Put the cartridge in the belt (B). Add the other two cartridges to the Cartridge Belt.
Find the rest of the listed objects.
Take the EMPTY BOTTLE.
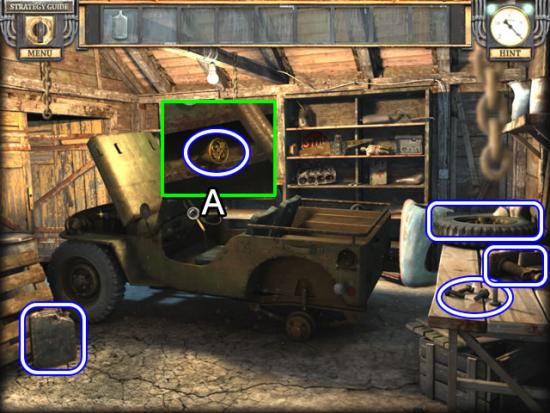
Garage
Pick up the FULL GAS CAN, WHEEL NUTS, CAR WHEEL and CAR JACK.
Examine the dashboard (A). Take the SIGNET RING.
Bedroom
Zoom in on the dresser beside the bed.
Insert the SIGNET RING in the chest inset.
Take the CAR KEY.
Kitchen
Play the hidden object scene.
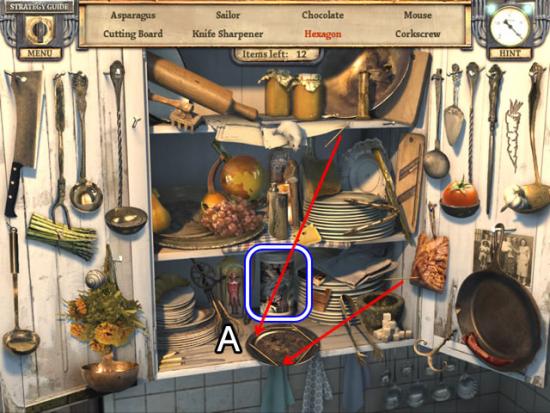
Place the two toothpicks to finish forming the Hexagon.
Find the rest of the listed objects.
The CAN OF FOOD goes to inventory.
Pantry
Inspect the row of cans on the shelf.
Add the CAN OF FOOD to open a puzzle.
The goal is to arrange the cans to form a picture.
Begin by selecting the cans that are up side down. Click once to flip the can.
Try matching scene details and swapping two cans until the picture is complete.
Solution:
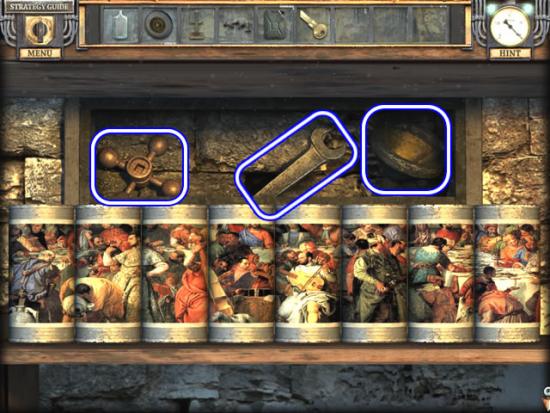
Take the VALVE, WRENCH and FUNNEL.
Kitchen
Inspect the sink.
Place the VALVE on the tap to turn on the water.
Place the EMPTY BOTTLE under the water to get a BOTTLE OF WATER.
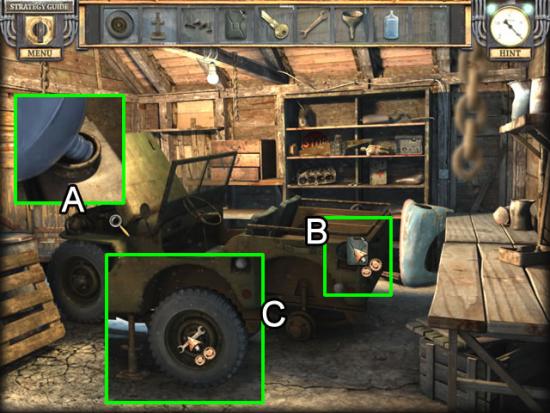
Garage
Look under the hood (A). Fill the radiator with the BOTTLE OF WATER.
Place the FUNNEL in the gas tank (B) and fill the tank with the FULL GAS CAN.
Zoom in on the axle (C). Life the Jeep with the CAR JACK. Place the CAR WHEEL and WHEEL NUTS. Tighten the wheel nuts with the WRENCH. Lower the jack.
Play the hidden object scene.
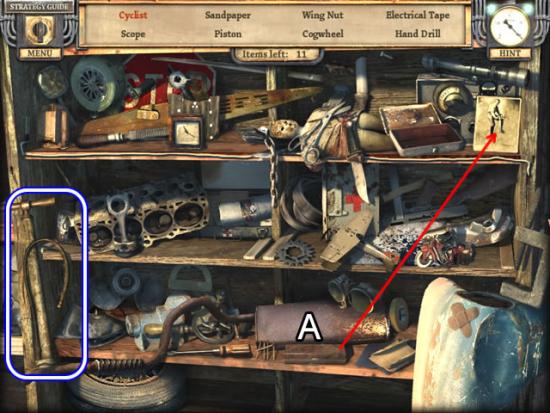
Open the box (A). Take the pen and draw the bicycle on the Cyclist picture.
Find the rest of the listed objects.
The PUMP goes to inventory.
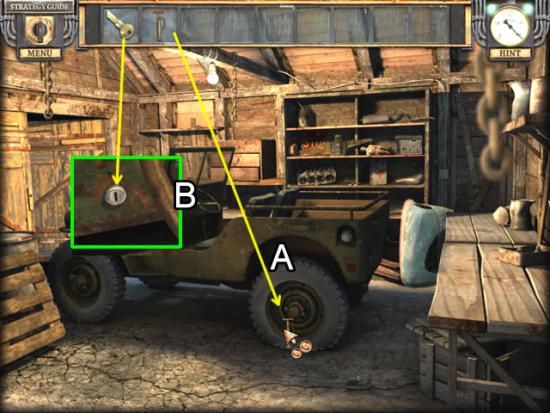
Inflate the flat tire with the PUMP (A).
Insert the CAR KEY in the ignition on the dashboard (B). Click to start the engine.
Watch the final cut scene.
Congratulations! You have finished the Bonus Play for Silent Nights: The Pianist Collector’s Edition.
More articles...
Monopoly GO! Free Rolls – Links For Free Dice
By Glen Fox
Wondering how to get Monopoly GO! free rolls? Well, you’ve come to the right place. In this guide, we provide you with a bunch of tips and tricks to get some free rolls for the hit new mobile game. We’ll …Best Roblox Horror Games to Play Right Now – Updated Weekly
By Adele Wilson
Our Best Roblox Horror Games guide features the scariest and most creative experiences to play right now on the platform!The BEST Roblox Games of The Week – Games You Need To Play!
By Sho Roberts
Our feature shares our pick for the Best Roblox Games of the week! With our feature, we guarantee you'll find something new to play!All Grades in Type Soul – Each Race Explained
By Adele Wilson
Our All Grades in Type Soul guide lists every grade in the game for all races, including how to increase your grade quickly!


