- Wondering how to get Monopoly GO! free rolls? Well, you’ve come to the right place. In this guide, we provide you with a bunch of tips and tricks to get some free rolls for the hit new mobile game. We’ll …
Best Roblox Horror Games to Play Right Now – Updated Weekly
By Adele Wilson
Our Best Roblox Horror Games guide features the scariest and most creative experiences to play right now on the platform!The BEST Roblox Games of The Week – Games You Need To Play!
By Sho Roberts
Our feature shares our pick for the Best Roblox Games of the week! With our feature, we guarantee you'll find something new to play!All Grades in Type Soul – Each Race Explained
By Adele Wilson
Our All Grades in Type Soul guide lists every grade in the game for all races, including how to increase your grade quickly!
Shiver: Vanishing Hitchhiker Walkthrough
Welcome to the Shiver: The Vanishing Hitchhiker Collector’s Edition walkthrough on Gamezebo. Shiver: The Vanishing Hitchhiker Collector’s Edition is a Hidden Object Game played on the PC created by Artogon for Big Fish Games. This walkthrough includes tips and tricks, helpful hints and a strategy guide on how to complete Shiver: The Vanishing Hitchhiker Collector’s Edition.
Shiver: The Vanishing Hitchhiker – Game Introduction
Welcome to the Shiver: The Vanishing Hitchhiker Collector’s Edition walkthrough on Gamezebo. Shiver: The Vanishing Hitchhiker Collector’s Edition is a Hidden Object Game played on the PC created by Artogon for Big Fish Games. This walkthrough includes tips and tricks, helpful hints and a strategy guide on how to complete Shiver: The Vanishing Hitchhiker Collector’s Edition.
General Tips
This hidden object game requires visiting several locations and using inventory items to advance play.
- Play is generally non-linear but some areas or tasks must be completed to open another area.
- CAPITALIZED inventory items are meant to make it easier to find where this guide may deviate from your own play.
- There are no penalties for multiple clicks in a scene.
- Always move the cursor around a scene. Watch the cursor to see if it changes into a hand or an eye.
Main Menu:
- Profiles – Click the “Not you? Click here” link to create or delete player profiles.
- Start Adventure – Begin or resume a game.
- Options – Change music and sound effects volume. You may select or deselect full screen and wide screen correction play. You may also select a Difficulty level:
- Casual – Hint and Skip buttons recharge faster. There is less time before illuminating the next collectable item of location area.
- Advanced – Hint and Skip buttons take longer to recharge. Most helpful aids are unavailable.
- Videos – Review cut scenes.
- Exit – Quite the game.
- Extras – Concept art, wallpapers and walkthrough.
Screen Navigation:
- Tasks – A list of objectives. They need not be completed in order.
- Hint/Skip Bar – Clicking will show a random item from an itemized list. Hints are not limited and the bar refills quickly. The bar turns into a Skip bar for puzzles.
- Photos – Review snapshots of scenes.
- Menu – Change your options, resume the game or return to the main menu.
- Strategy Guide – Game assistance.
- Diary – Clicking an object can add clues or information. The diary automatically opens when new information is added.
- Inventory/Item List – A scrollable list of icons showing available items or a list of hidden items to be collected.
- Flashlight – Use to help illuminate dark scenes.
- Camera – Flashes when you can capture a secret image.
Symbol Meanings:
- Eye – Zoom in on interactive area.
- Hand – Interact with an object: pick up an item, open a door, move an object.
- Glint – Hidden object areas.
Walkthrough
A short clip explains the background and introduces the story line for play.
Click “Yes” when asked if you would like to receive some help during the game. This will show you how to interact with objects and characters.
For this walkthrough, only inventory items are shown in hidden object scenes. They are highlighted in white with a blue border.
With the exception of a hidden object area, most inventory items are not collected from a scene until they are needed.
Assumptions:
- You know to click through the conversations with characters.
- After you have gone back and forth between locations more than once, you don’t need to be told how many times to go up or down.
- Just as in the movies, you will always enter a darkened door or window.
VH01a
- Key information/navigation tabs are shown above (refer to the General Hints area of the guide for an explanation).
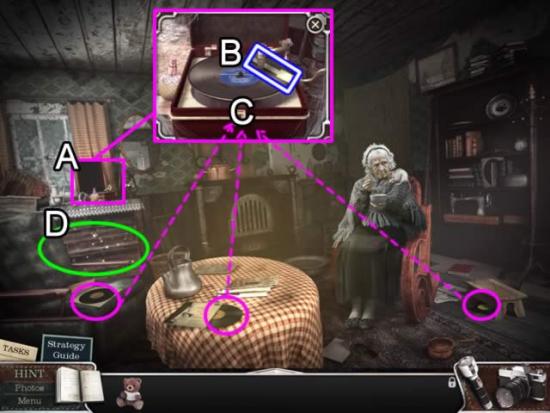
- The first task is “Visit the house on the right and ask about the girl”. Click forward once and then right (A).
- Press the doorbell (B) and speak with the old woman. She invites you in.

- Access the record player (A). Collect the PIANO KEY (B).
- Place the records on the player (C). There is no specific order for placement and only two records are needed before the lady is happy with the selection.
- Open the hidden object area (D).
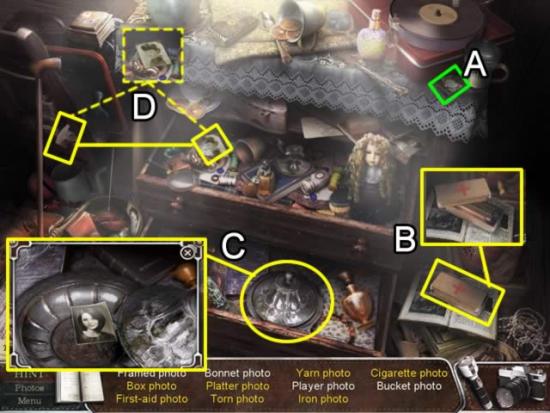
- Items listed in white are visible in the scene, i.e. Player photo (A).
- Items listed in yellow must be opened (B), accessed (C) or assembled (D) to retrieve the object.
- Collect all the items listed to get the PHOTO. Place it on the woman. Collect the MAILBOX KEY.
- Exit the house.
Chapter 1: Exploring the House
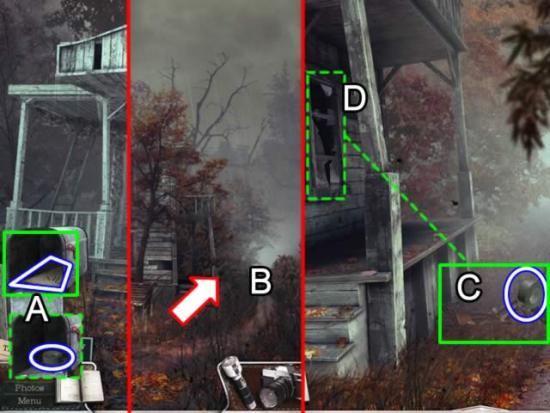
- Place the MAILBOX KEY on the mailbox to open it (A). Collect the OLD NEWSPAPER. Underneath it is the STICKY TAPE. Return to the house.
- Give the OLD NEWSPAPER to the woman.
- Exit the house. Go forward once into the town.
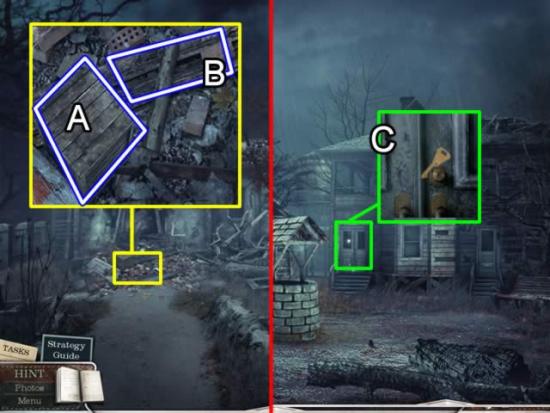
- Take the path on the side of the smoking house (B).
- Use the STICKY TAPE to repair the broken chair (C).
- Use the CHAIR to break more of the window glass (D).
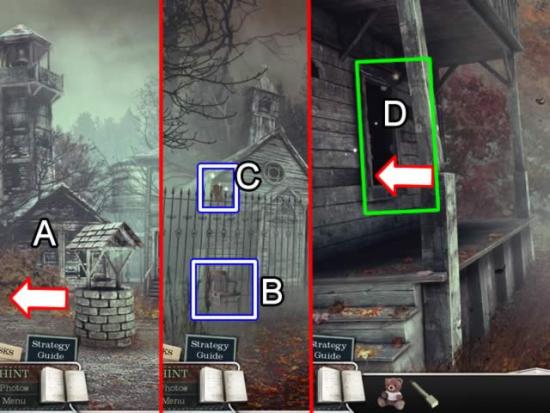
- Return to the street in front of the house. Go left (A).
- Place the CHAIR at the base of the fence (B) in front of the church. Get the GLOVE (C).
- Return to the side of the house. Use the GLOVE to remove the last shards of glass in the window (D). Enter the house.
- Approach the door on the back wall. Fall through to the basement.
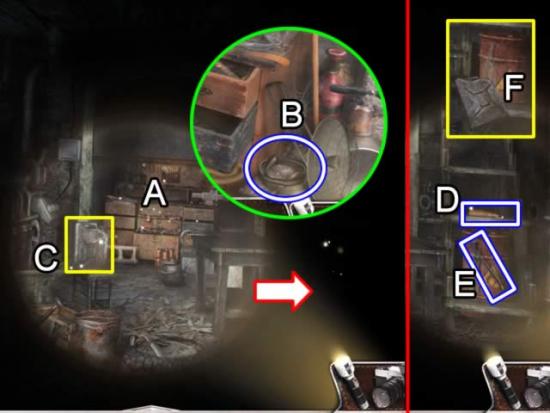
- Use the flashlight to illuminate the areas. Access workbench hidden object area (A).
- Find all the listed hidden objects. Collect the DRIVE BELT (B).
- Pick up the EMPTY CAN (C).
- Move to the right.
- Get the DOLL ARM (D) and the CROWBAR (E).
- The fuel begins to flow from the barrel. Fill the EMPTY CAN (F) to get a CAN WITH FUEL.
- Move back to the far left to the generator.
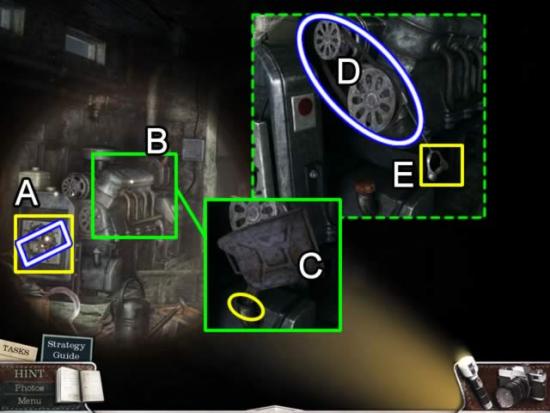
- Get the PLIERS (A).
- Zoom in on the engine area (B). Add fuel through the spout with the CAN WITH FUEL (C).
- Put the DRIVE BELT between the wheels (D). Pull the starter cord (E) three times to start the generator. The lights come on.
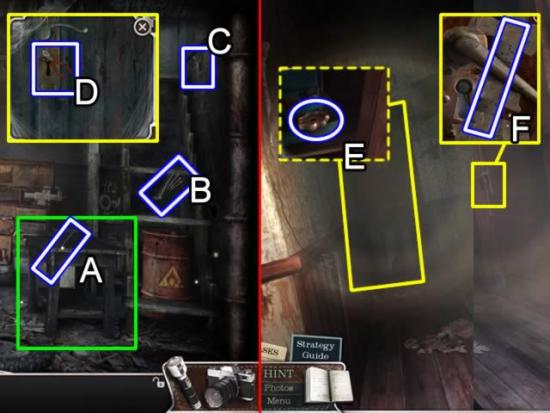
- Use the CROWBAR to dissemble the table (A).
- Pick up the table PLANKS and place them on the empty stair risers (B). Work from bottom to top.
- Grab the BASEMENT KEY at the top of the stairs (C). Place it in the lock and click to open the door.
- Use the PLIERS (D) to remove the broken key from the lock.
- Enter the kitchen area. Pick up the map from the kitchen table. Information is added to the diary.
- Go up the stairs on the left. At the top of the stairs, inspect the photographs on the wall and the note on the door.
- Turn left and go forward to the end of the hall.
- Use the flashlight to see the closet door (E). Open the doors and get the VALVE.
- Access the keyhole on the door on the right (F). Remove the tape securing the RULER.
- Go left to reach the top of the landing. Descend the stairs to the kitchen.
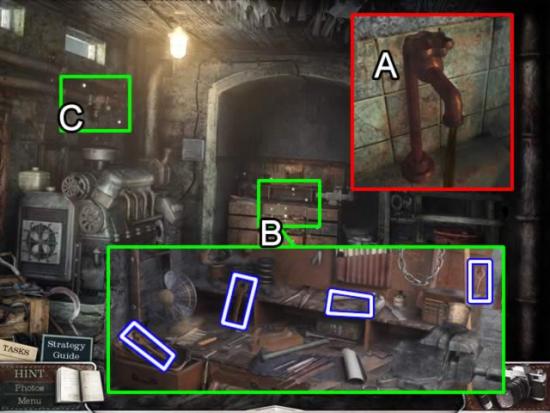
- Place the VALVE on the spigot for the kitchen sink (A). Click to turn on the water.
- Enter the basement and access the hidden object area on the workbench (B).
- Collect the listed items, including the four wrenches shown above. One WRENCH is added to inventory.
- Use the WRENCH to turn on the water (C).
- Returning to the kitchen, note that clear water is now running from the tap.
- Continue through the double doors into the music room.
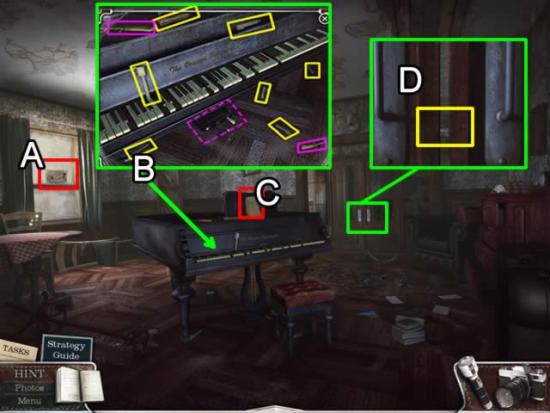
- Examine the drawing affixed to the window (A). The information is added to the diary.
- Zoom in on the piano. Place the two pedals (pink) in the foot pedal area (dotted pink). Place the piano keys (yellow) back on the keyboard. Match the cutout of the key to an opening in the keyboard. Add the PIANO KEY to fill in the last slot.
- Examine the note on the sheet music stand (C).
- Access the door on the right. Use the RULER to slip the latch. Enter the room.
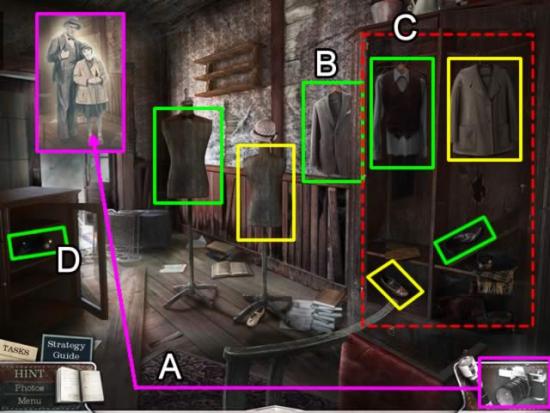
- The Camera flashes when you enter the room. Click it to take a picture (A). It is added to the diary and the Photo log.
- Begin assembling the clothing for the mannequins. Place the coat (B) on the male mannequin.
- Open the wardrobe doors (C). Place the two green outlined objects on the male. Place the two yellow outlined objects on the child.
- Open the cabinet door on the left (D). Place the object on the male.
- Exit through the door at the rear of the room.
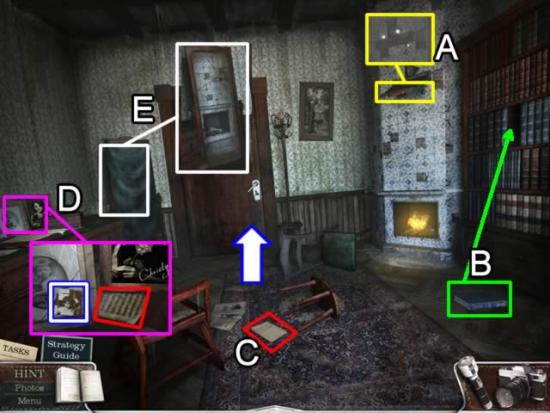
- Open the damper (A) to clear the smoke from the room.
- Place the book back on the shelf (B). Note that there is still one book missing.
- Read the note on the floor (C).
- Access the desk (D). Read the note and collect the TORN PHOTO.
- Remove the sheet covering the mirror (E).
- Exit the room. You are back at the end of the hallway on the second floor. The door that was locked from the inside is now open. You can access this room via the mannequin room door or the stairs from the kitchen.
- Return to the kitchen.
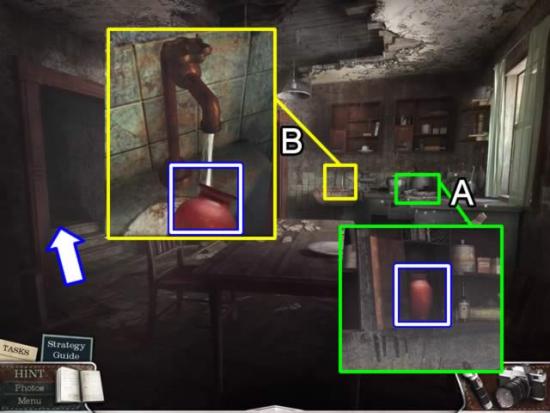
- Access the hidden object area by the cabinets (A). Open the storage door and collect the VASE.
- Fill the VASE WITH WATER from the kitchen tap (B).
- Return to the second floor landing.
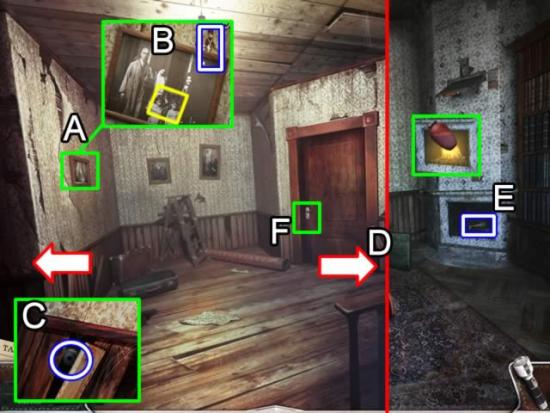
- Zoom in on the picture (A). Patch the picture with the TORN PHOTO (yellow). The picture tilts. Pick up the TOY SOLDIER (B).
- Go left.
- Grab the EYE (C) and return to the center of the landing.
- Go right (D) and enter the room at the end.
- Use the VASE WITH WATER to extinguish the fire in the fireplace. Pick up the KEY (E).
- Return to the landing.
- Use the KEY to open the nursery door (F).
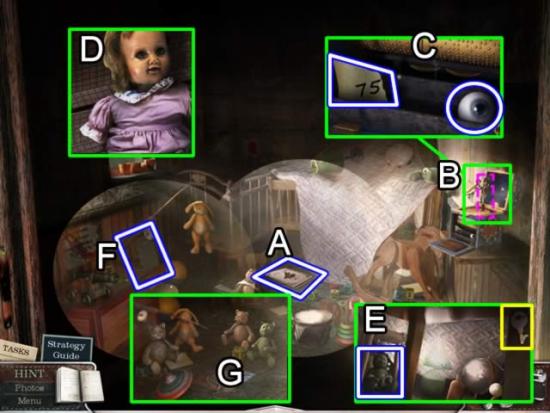
- Turn on the Flashlight. Use the Camera to take a picture for the diary.
- Use the Flashlight to find the hidden objects. The EMPTY MUSIC BOOK (A) is added to inventory.
- Place the TOY SOLDIER on the music box (B). Pick up the EYE (C). The information on the note half is added to the diary.
- Place both EYES in the doll’s empty eye sockets (D). You cannot attach her arm yet.
- Use the key under the bed (E) to unlock the handcuffs on the BEAR.
- Pick up the BOOK (F).
- Place the BEAR and click each stuffed animal to arrange them according to the picture (G).
- Return to the music room.
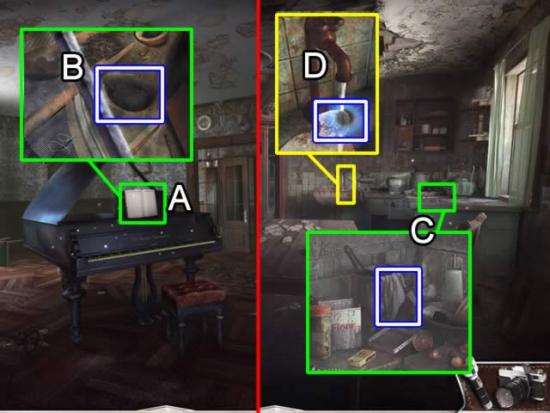
- Place the EMPTY MUSIC BOOK on the piano (A). Click the music to raise the piano top and open the hidden object area.
- Collect the listed objects. A HAT (B) is added to inventory.
- Return to the kitchen.
- Access the hidden object area on the counter (C). The TOWEL goes to inventory.
- Click the water faucet on the sink. Place the TOWEL under the water (D). A WET TOWEL is added to inventory.
- Return to the music room.
- Clean the inside of the piano by placing the WET TOWEL on the grime. Click and hold the mouse button. Move the towel around the inside of the piano.
- Watch the clip. Pick up the SHEET MUSIC (A).
- Exit through the glass doors into the mannequin room.
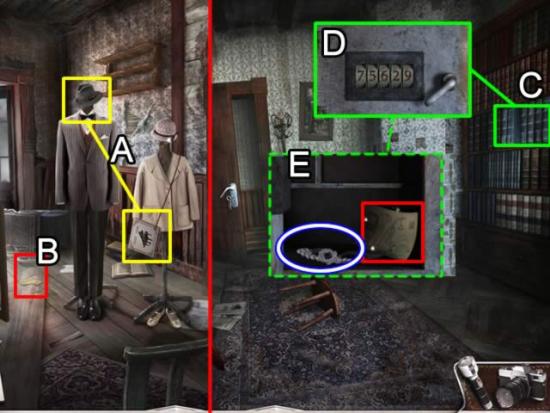
- Place the HAT and SHEET MUSIC on the mannequins (A).
- A piece of paper falls to the floor (B). It is the second half of the safe combination and is recorded in the diary.
- Exit through the rear door to the second floor room.
- Place the BOOK in the bookshelf (C). Swap the books until they are in the correct numerical ascending order.
- The books slide away revealing the safe (D). Click the tumblers until they match the code from the diary (7-5-6-2-9). Open the safe (E).
- Look at the drawing (red). Collect the NECKLACE.
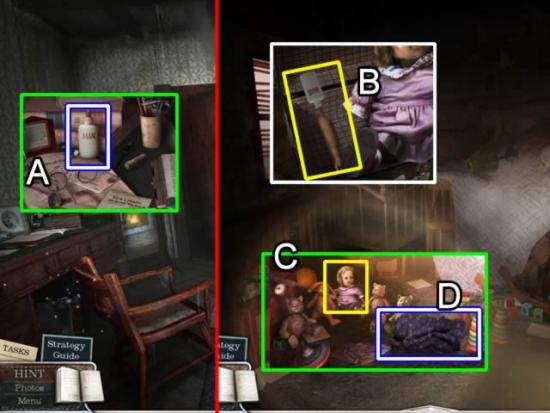
- Zoom in on the hidden object area on the desk. Find all the objects listed. The GLUE is added to inventory.
- Return to the nursery.
- Place glue on the end of the doll’s arm (B) and affix it to the doll.
- Add the doll to the toy circle to complete the picture (C). Watch the vision. Pick up the DRESS (D).
- Return to the mannequin room. Place the DRESS and NECKLACE on the child mannequin. Watch the vision. Exit the back doors onto the street.
- Return to the woman’s house (click down, then right and then forward).
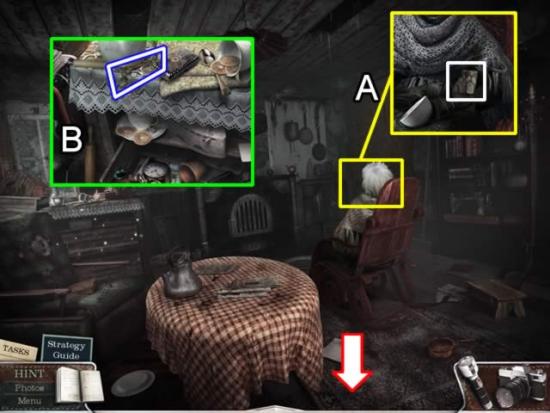
- Take the part of the torn photo (A) for the diary.
- Collect all the objects in the hidden object area by the bureau. The Key turns into a HOSPITAL KEY with a complete photo attached.
- Exit the house and return to the town square.
Chapter 2: The Hospital
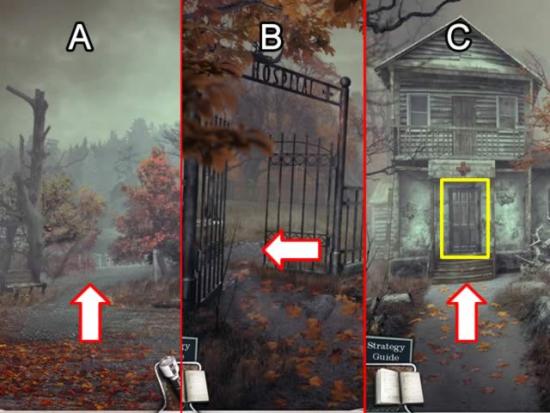
- Go forward past the well.
- Go up between between the trees (A). Turn left into the hospital grounds (B) and forward (C) to the door.
- Use the HOSPITAL KEY to open the door.
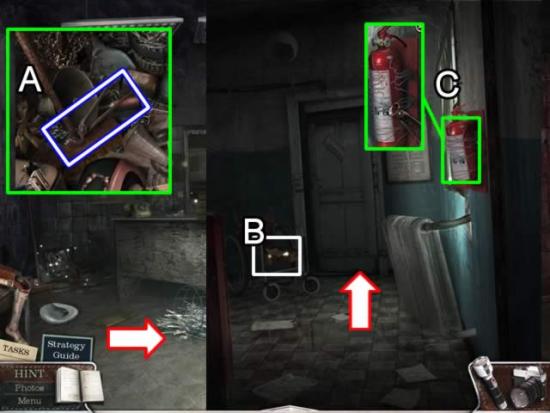
- Find the items listed for the hidden object area. The WIRE CUTTERS go to inventory (A).
- Turn right and go down the hall. Go up the stairs.
- In the hallway, pick up the drawing (B) on the wheel chair.
- Use the WIRE CUTTERS to remove the FIRE EXTINGUISHER (C).
- Enter the door at the end of the hall.
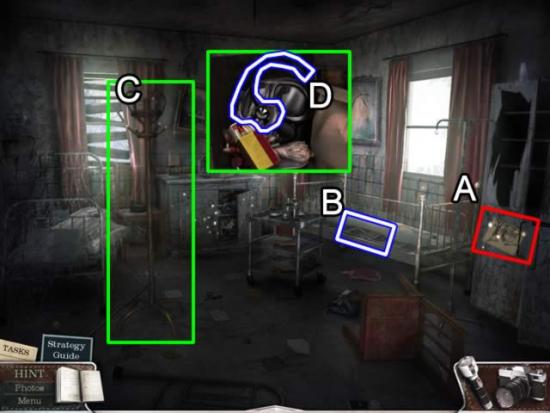
- Take the drawing (A) on the cabinet door.
- Click the mattress to lift it. Grab the WINCH HANDLE (B).
- Take the CLOTHES RACK (C).
- Access the hidden object area by clicking on the small cabinet door. Collect all the listed items. The STETHOSCOPE (D) goes to inventory.
- Exit the room. Go down the stairs to the first floor. Continue down to the basement (glowing red area on the left).
- Enter the morgue.
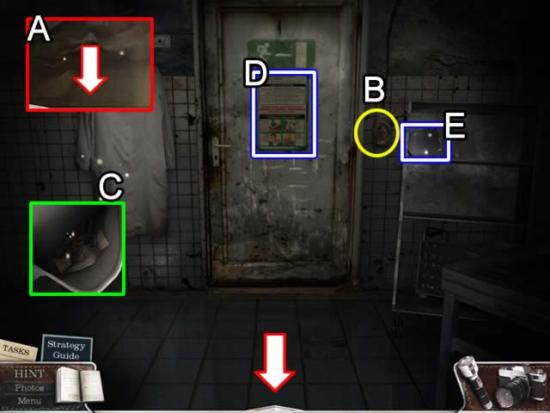
- Turn on the Flashlight and point it at the bottom of the screen (A). Click once to access the back of the morgue.
- Press the switch (B) to turn on the lights.
- Click the lab coat (C). Extract a ZIPPER LOCK and a drawing.
- Take the POSTER (D) off the door.
- Collect the X-RAY PHOTO PART (1 of 4) from the cart (E).
- Click down to return to the main part of the morgue.
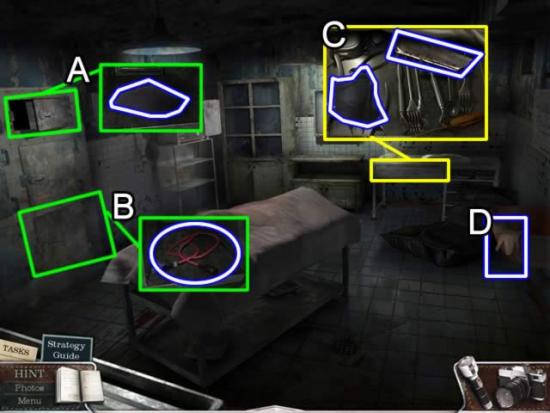
- Open the small door (A). Collect the X-RAY PHOTO PART (2 of 4).
- Open the larger door (B). Get the POWER CABLE.
- Access the area on the back wall (C). Get the X-RAY PHOTO PART (3 of 4) and the BONE SAW.
- Pick up the SURGEON’S GLOVE (D).
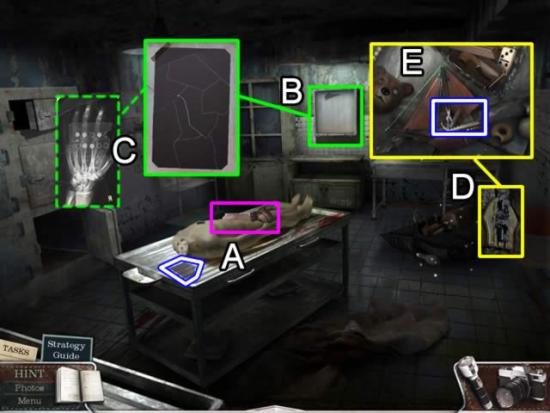
- Lift the sheet off the table (A).
- Get the X-RAY PHOTO PART (4 of 4).
- Use the BONE SAW on the mannequin. Pick up the MANNEQUIN TORSO.
- Place the X-RAY PHOTO PARTS on the light box (B). Fit the pieces together. Left-click to select a piece. Click again to rotate it. The top of the x-ray is lighter than the bottom. Work with the colors and shapes. A correctly placed piece is lock into position. See the above screenshot for the solution.
- Attach the POWER CORD to the light box to illuminate the x-ray (C). A copy is added to the diary.
- Use the ZIPPER LOCK (D) to open the body bag and access a hidden object area.
- Collect all the items listed. The POCKET KNIFE goes to inventory.
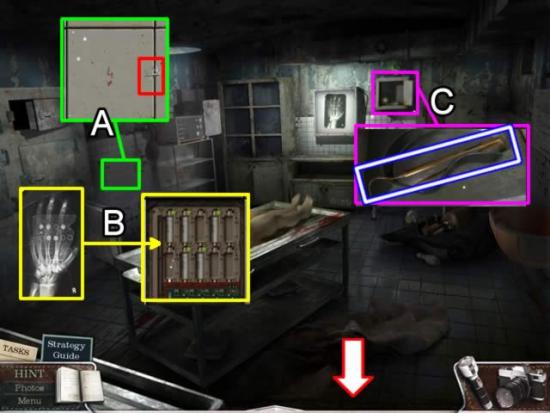
- Zoom in on the tile wall (A). Use the POCKET KNIFE to gain access to the fuse compartment.
- Put on the SURGEON’S GLOVE to avoid a nasty shock. Use the x-ray as a pattern to place the fuses (B). Closed circles indicate a fuse. The solution is shown above.
- This opens a door on the back wall (C). Collect the DENTAL HOOK.
- Click down to go to the morgue’s door.
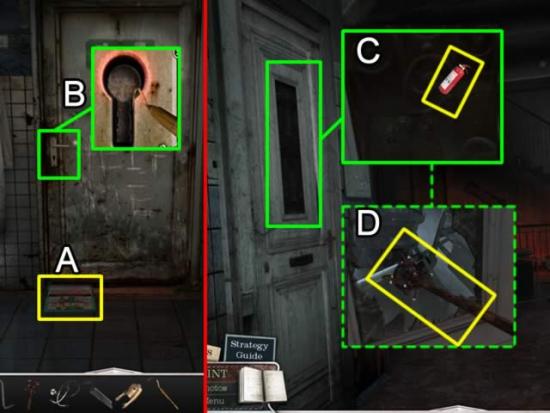
- Slide the POSTER under the door (A).
- Use the DENTAL HOOK to push the key out of the hole (B).
- Slide the poster with the MORGUE KEY back. Open the door.
- Go up one level.
- Click the sign next to the door. Note that this is the Resuscitation Ward (this is important only as a reference for this guide.)
- Access the door glass. Use the FIRE EXTINGUISHER (C) to break the glass.
- Clear the entryway with the CLOTHES RACK (D).
- Enter the room.
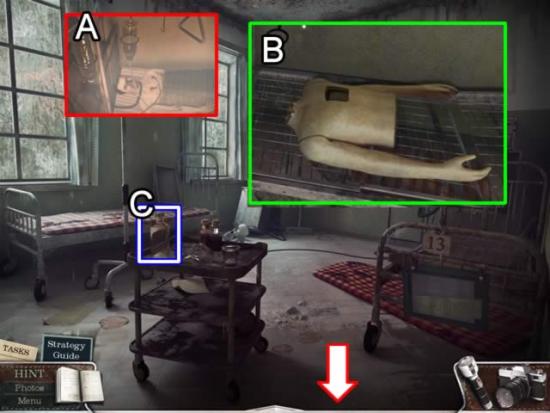
- Access the bed area. Take a picture (A) of the completed scene.
- Begin recreating the scene by placing the MANNEQUIN TORSO (B) on the cot.
- Pick up the EMPTY BOTTLE (C) and exit the room.
- Go upstairs and enter the room at the top of the stairs.
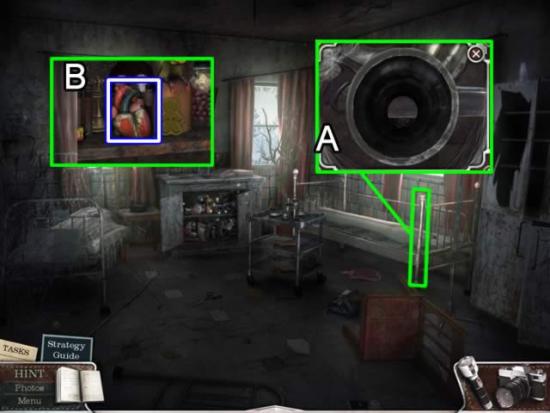
- Access the bed post. Take the knob off the post. Use the BONE SAW to saw through the post (A).
- Pluck the KEY out of the shortened post.
- Zoom in on the hidden object area in the small cabinet. Find all the objects listed. The Heart is added to inventory as a MANNEQUIN HEART.
- Exit the room.
- Use the KEY to unlock the doctor’s office door.
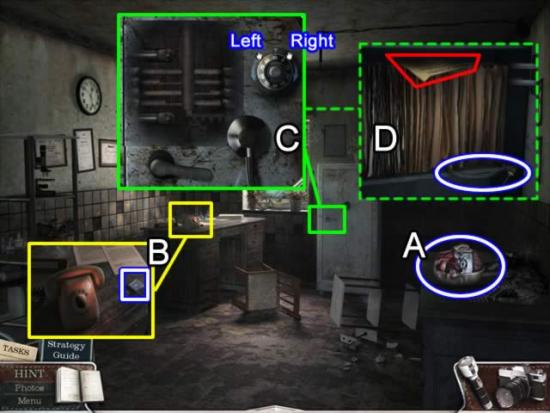
- Pick up the MANNEQUIN’S HEAD (A).
- Answer the ringing telephone. Replace the handset on the phone and pick up BUTTON 9 (B).
- Place the STETHOSCOPE on the door of the safe (C). Click on either side of the dial to move the lock bar right or left through the tumblers. If you make a mistake the lock will reset.
- Take the clue (red) for the diary. Collect the DROPPER HOSE.
- Exit the hospital.
- Return to the water well in the square.
- Place the WINCH HANDLE on the rope bar. Click to raise the bucket.
- Place the EMPTY BOTTLE in the bucket of water. The bottle with water automatically combines with the DROPPING HOSE to form a DROPPING BOTTLE in inventory.
- Return to the hospital.
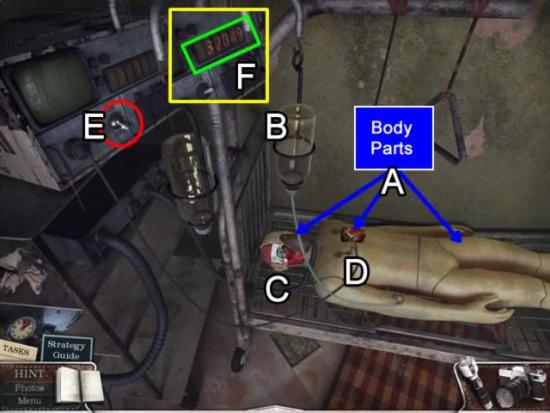
- Go down to the morgue and get the MANNEQUIN LEGS.
- Return to the Resuscitation Ward.
- Attach the MANNEQUIN HEAD and LEGS to the TORSO. Place the HEART in the chest cavity (A).
- Put the DROPPING BOTTLE in its holder (B). The tube automatically attaches to the arm.
- Place the oxygen mask (C) on the face.
- Attach the monitor leads to the chest (D).
- Flip the switch (E).
- The mannequin doesn’t make it. The time of death (F) is recorded in the diary.
- Return to the reception area.
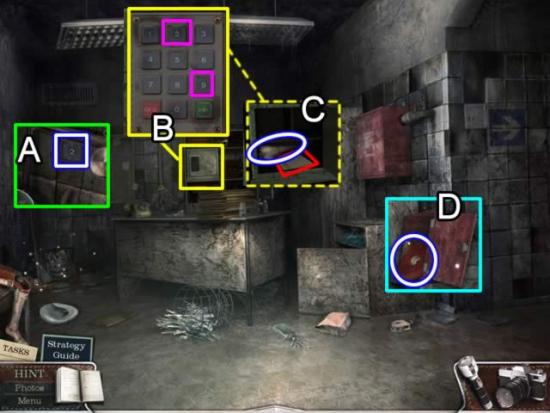
- Collect all the items in the hidden object area. The Two goes to inventory as BUTTON 2.
- Access the safe behind the desk.
- Place BUTTON 2 and BUTTON 9 in the panel.
- The access code is in the diary; it is the time of death for the mannequin. Press 3-2-0-4-9 and the ENT key.
- Read the note and collect the BONE (C).
- Pick up the FIRE HOSE from the fallen box (D).
- Exit the hospital and return to the town square.
Chapter 3: Investigating the Island
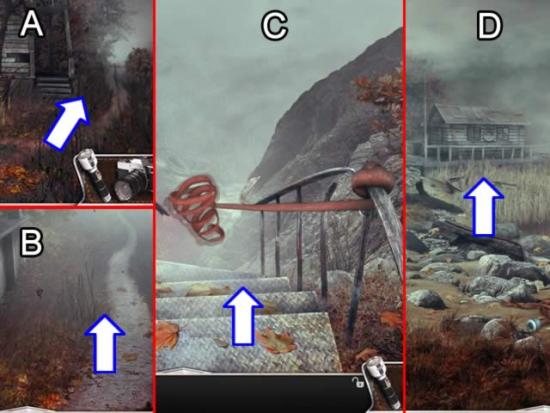
- Go to the side of the house (A) and continue along the path (B).
- At the top of the stairs (C), attach the FIRE HOSE. Climb down.
- Cross to the house (D).
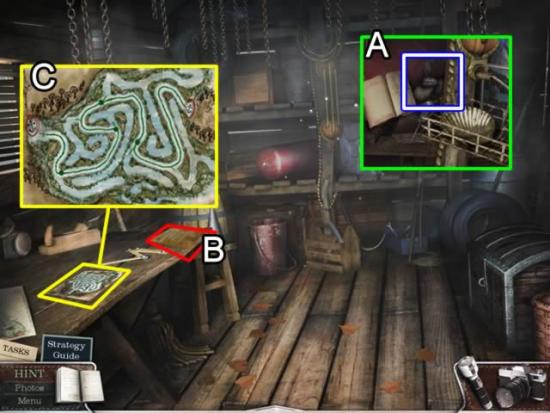
- Access the hidden object area at the rear of the house. Find all the items listed. The PROPELLER (A) goes to inventory.
- Read the note to Mr. Kern (B).
- Pick up the map to open a minigame (C). Use the green pencil to trace a path through the maze. The green blots are reset points. If you touch the side of the maze, your progress is erased to the last reset point. The completed MAP is added to inventory.
- Return to the beach.
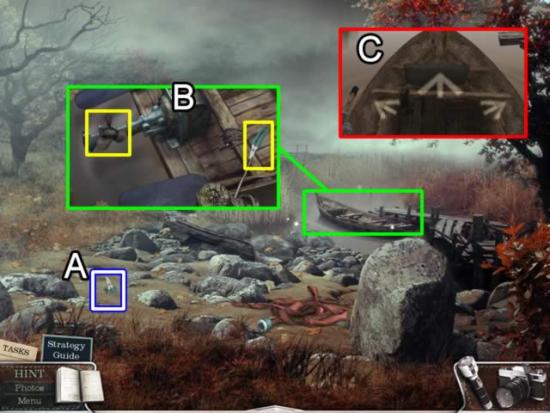
- Pick up the GARDEN SHEARS (A).
- Access the boat (B). Place the PROPELLER on the motor. Use the GARDEN SHEARS to cut the rope.
- Click the boat to begin a minigame. Navigation arrows appear to let you know what options you have to navigate obstacles on the way to the island. When you hit an obstacle, the boat will back off and give you another try.
- Watch the scene as you crash land on the island.
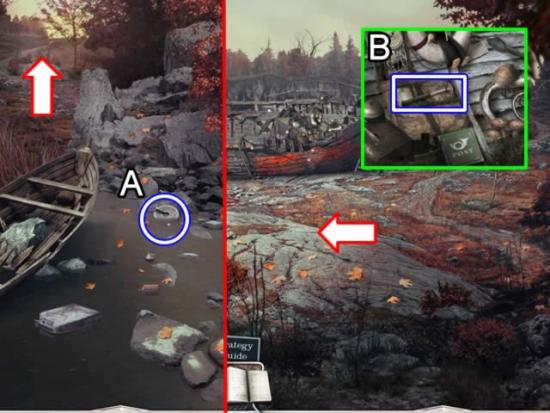
- Pick up the WEIGHT (A) and continue up the path.
- Take a picture at the clearing showing there is something underground.
- Access the hidden object area on the old wreck . Find all the listed items. Collect the HAMMER (B).
- Move left.
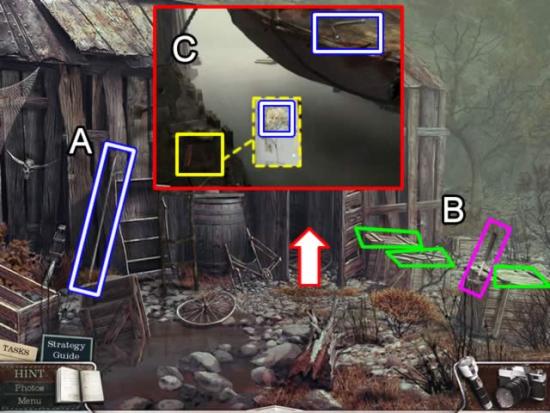
- At the dock area, turn right and head to the old boathouse.
- Grab the FIRE HOOK (A).
- Use the HAMMER to open the three crates (B). Collect a second WEIGHT, FLY WHEEL and a note for the diary.
- Enter the boat house (C).
- Pick up the WRENCH from the deck of the boat. Pick up the book. Click through the pages until you find the WHITE FLOWER (1 OF 4).
- Exit the boathouse.
- Return to the dock.
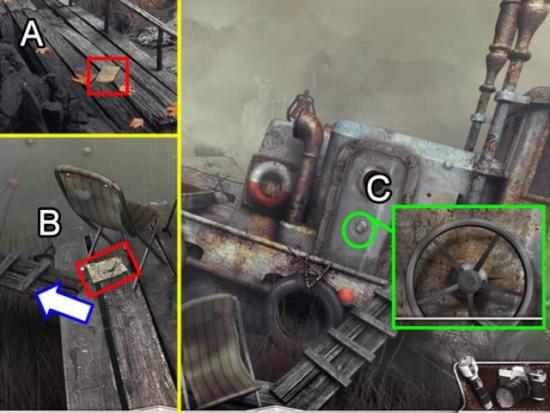
- Pick up the note at the start of the dock (A).
- Pick up the drawing at the end of dock (B). Watch the sequence.
- Use the gangplank on the left to enter the tug boat.
- Place the FLY WHEEL on the door to the cabin (C).
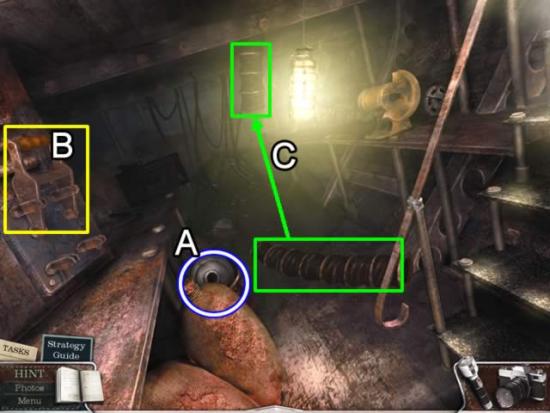
- Pick up the third WEIGHT (A).
- Click the switch (B) to shut off the power.
- Use the Flashlight to see to connect the two tubes.
- Exit the boat.
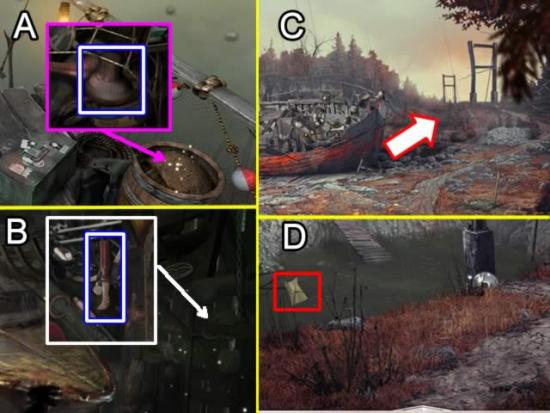
- Access the hidden object area in the barrel at the end of the gangplank (A). Get a TURNING KNOB.
- Return to the boathouse.
- Access the hidden object area in the corner. Get a KNIFE.
- Go back to the ship wreck (C). Go up the hill.
- At the washed out bridge (D). Get the radio instructions.
- Return to the end of the dock
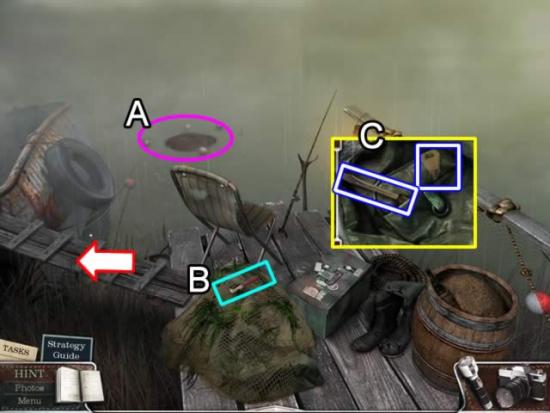
- Use the FIRE HOOK to retrieve the floating object (A).
- Use the KNIFE to open the bag (B).
- Get the SCREWDRIVER and KEY from the pocket (C).
- Open the tackle box and get the STAR KEY.
- Board the boat.
- Use the KEY to open the first-aid box located to the right of the door. Pick up the STICKY TAPE and enter the cabin.
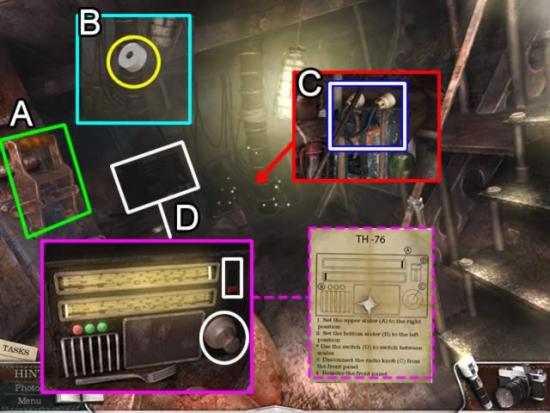
- Make sure the power switch (A) is in the down position (OFF).
- Use the Flashlight to see while sealing the two pipes with the STICKY TAPE (B).
- Flip the switch to turn the power on and drain the water.
- Access the hidden object area below the pipes. Get the POWER CABLE (C).
- Zoom in on the radio (D).
- Follow the directions from the diary to remove the face plate. Attach the TURNING KNOB. Put the switch in the top position and click the knob to move the top slider. Click the switch to the down position to adjust the lower slider (see the inset above). Use the fork to remove the panel. Pick up a MAGNET.
- Return to the boathouse.
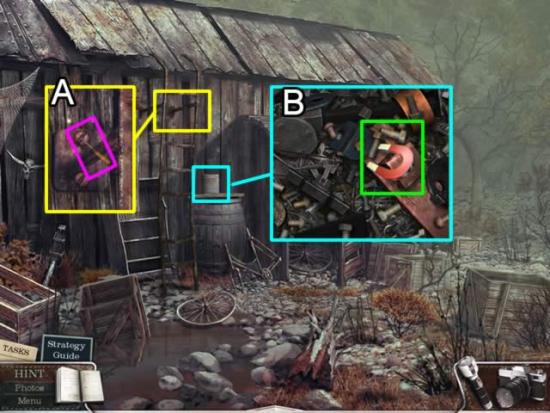
- Use the SCREW DRIVER to remove the ladder screws (A). The LADDER goes to inventory.
- Click the can of bolts. They fall into the barrel (B).
- Move the MAGNET slowly around the bolts. A correct bolt will vibrate. Click to add it to inventory. Collect 15 bolts.
- Return to the boat.
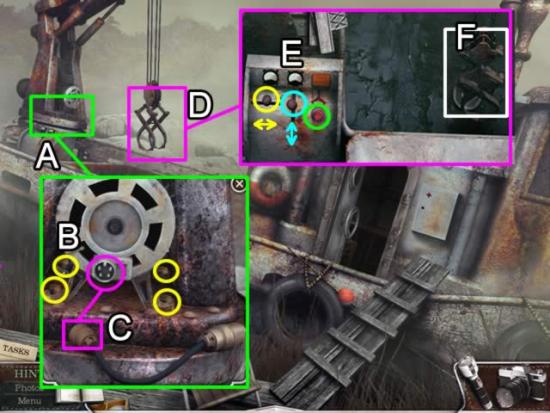
- Access the motor area (A).
- Place four BOLTS in the indicated holes (B).
- Use the WRENCH to tighten each one.
- Attach the POWER CABLE (C) to start the engine running.
- Click the crane to begin a minigame (D).
- Use the controls (E) to move the grabber (F) and remove the objects covering the weight. Press the red button to lower the grabber and pick up an object. It will automatically move the item to the side and release it. Add the WEIGHT to inventory.
- Return to the washed out bridge.
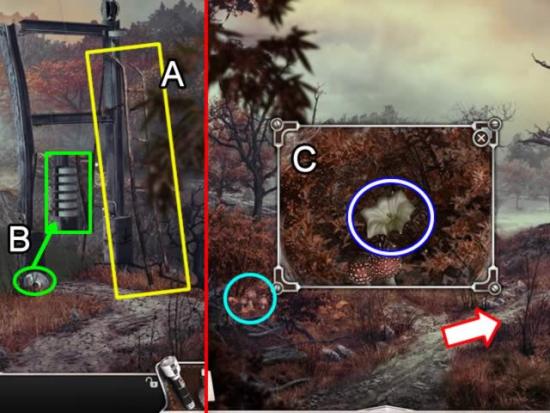
- Place the LADDER against the bridge support (A).
- Place the four WEIGHTS from inventory on the counter weight (B). Add the weight in the grassy area. The bridge rises.
- Cross the bridge.
- Access the mushroom by the side of the path. Remove the leaves and pluck the second WHITE FLOWER (C).
- Continue up the hill toward the tree.
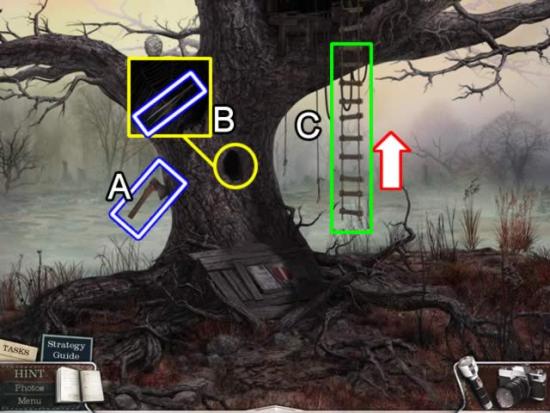
- Take the RUSTY AXE (A) from the side of the tree.
- Access the hollow area to get the TWEEZERS (B).
- Pull the three ropes at the back of the tree (C). A rope ladder descends.
- Go up to the tree house.
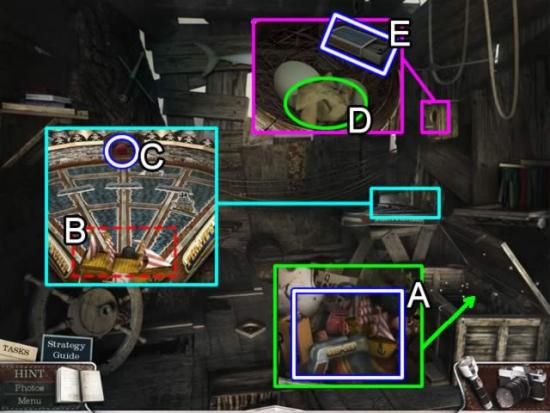
- Open the chest to access a hidden object area. Get a SHIP GUN for inventory.
- Access the pirate ship minigame. Use the SHIP GUN (B) to shoot the pirate ships. Use the red target indicator to line up your shots. Each successful sinking reduces the number of pirate heads along the top of the game. Shooting a mermaid or dolphin adds back a head. Sink ten ships to win a CLOWNISH NOSE (C).
- Click the bird house. Take the note (D). Move the eggs aside and collect the MATCH BOX (E) behind them.
- Return to the wrecked ship.
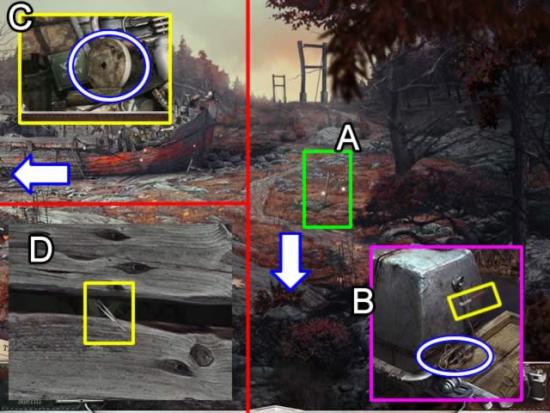
- If you have not already done so, collect the SHAFT (A).
- Continue down to the rocky beach. Zoom in on the boat’s outboard motor (B). Use the KNIFE to cut the CORD.
- Return to the hidden object area on the wrecked ship. Get the GRINDING WHEEL (C).
- Go to the docks. At the end of the dock, stop and use the TWEEZERS to get the tile from between the boards (D).
- Enter the tug boat’s cabin.
- Place the GRINDING WHEEL on the grinder. It starts turning. Put the RUSTY AXE on the whetstone. A SHARPENED AXE is returned to inventory.
- Return to the tree house.
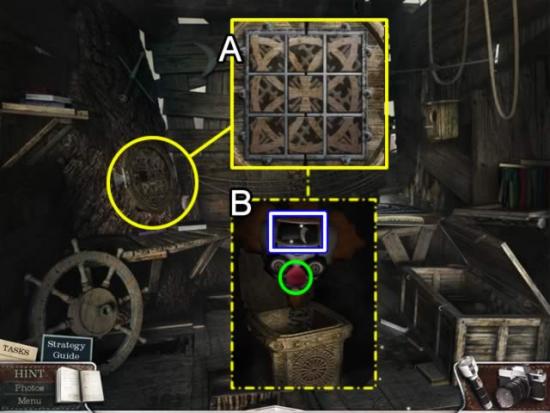
- Access the minigame on the left wall.
- Place the TILE in the empty slot. Swap the tiles to form an interlocking circle/star pattern with the cross at the center (A).
- Zoom in on the opening. Click the jack-in-a-box (B). Place the CLOWNISH NOSE and receive a CRESCENT KEY.
- Exit the tree house.
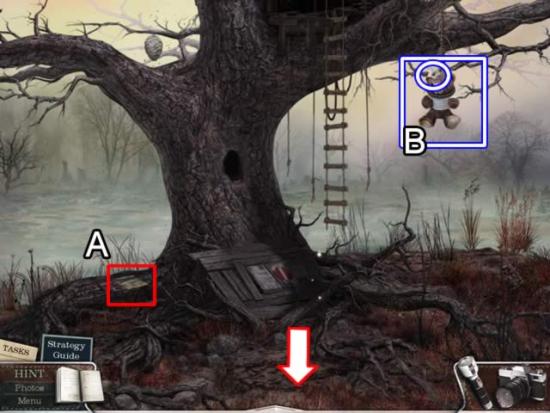
- Pick up the drawing on the ground (A). After the cut scene, retrieve the BEAR and WHITE FLOWER (B).
- Go down once to the start of the path. Head toward the bog.
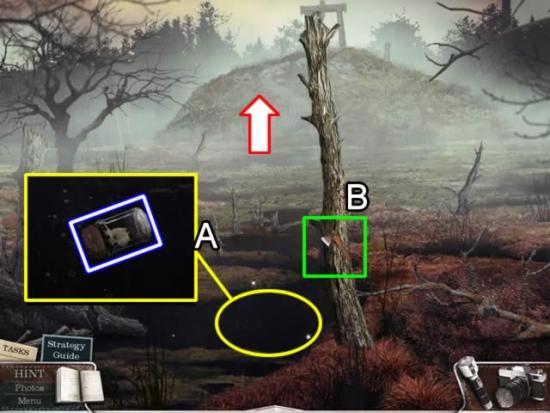
- Take a picture of the vision.
- Access the dark pool. Retrieve the last WHITE FLOWER from the bottle (A).
- Use the SHARPENED AXE to cut down the dead tree (B).
- Cross the tree bridge and head up the hill.
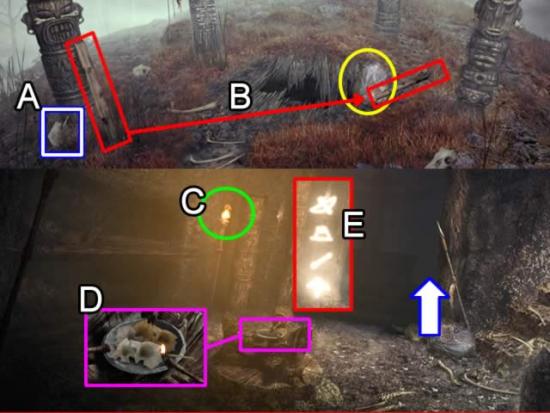
- Pass through the stone pillars guarding the burial ground.
- Pick up the spade head (A) at the base of the totem. It combines with the SHAFT to form a SPADE.
- Use the log leaning against the totem as a lever on the rock (B) to widen the hole.
- Descend into the burial tomb.
- Use the Flashlight to find the torch. Light it from the MATCH BOX (C).
- Access the incense burner.
- Place the WHITE FLOWERS in the bowl. Light them with a match from the MATCH BOX (D).
- The smoke reveals symbols on the totem (E).
- Enter the next chamber.
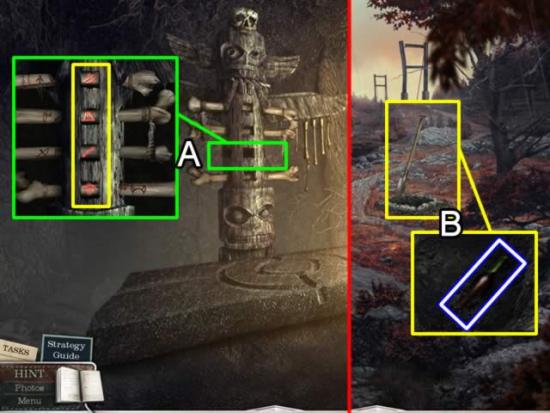
- Light the torch at the entrance.
- Place the BONE from the hospital in the slot in the totem (A).
- Slide the bones back and forth until the icons match the order of the symbols revealed in the previous chamber. Refer to the diary if necessary.
- Return to the soil area near the ship wreck.
- Use the SPADE to unearth a bottle of RED WINE (B).
- Return to the burial grounds and enter the second chamber.
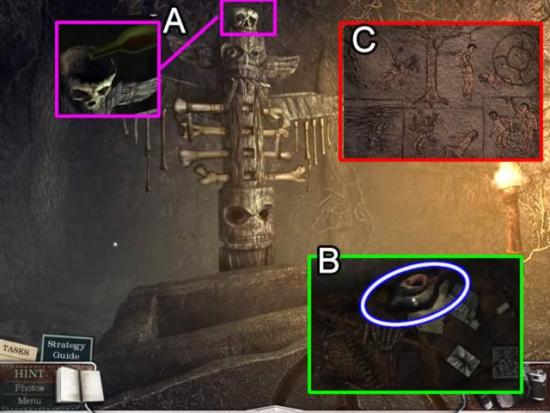
- Pour the RED WINE into the skull at the top of the totem (A).
- The lid for the sarcophagus opens.
- Pick up the note and the OIL CAN (B).
- Examine the drawing on the side of the chamber.
- Return to the first chamber.
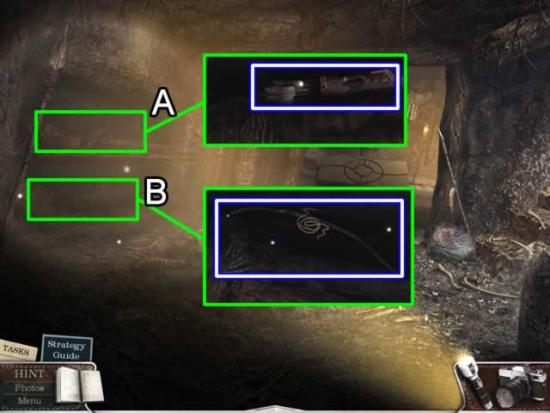
- Get the QUIVER from the remains (A).
- Combine the CORD with the old bow from the second body (B). These items combine in inventory as a BOW.
- Return to the tree.
Chapter 4: Returning to the Town
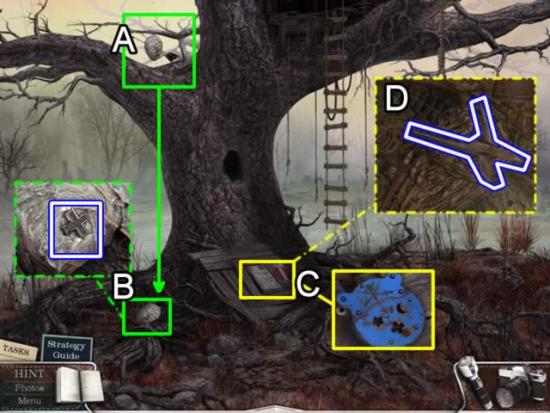
- Place the BOW on the hornet’s nest (A) to start a minigame.
- Try to put two arrows through the nest. I found that trying to place the red cross-hairs on the lower right side of the nest had the best effect. The nest falls to the ground.
- Take the CROSS KEY from the nest (B).
- Use the STAR, CROSS and CRESCENT KEYS to open the lock on the cellar door (C). This activates a hidden object area.
- Collect all the objects listed. The SHEARS go to inventory.
- Return to the rocky beach.
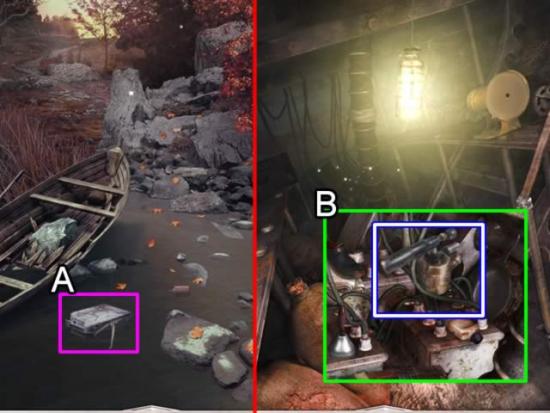
- Use the SHEARS to snip away a portion of the CAN.
- Return to the tug boat. Enter the cabin.
- Access the hidden object area at the back. Collect all the objects. A (blow) TORCH goes to inventory.
- Go to the boathouse.
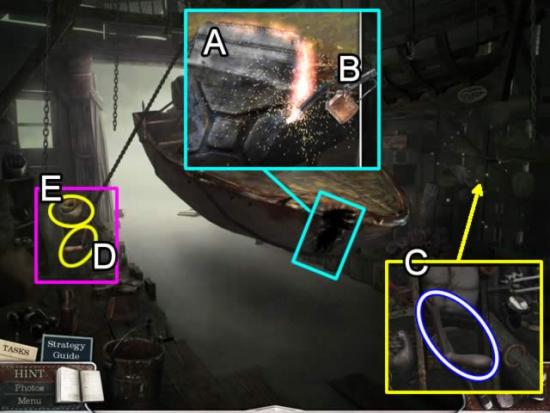
- Place the CAN on the hole in the boat (A). It molds to the hole. Use the TORCH (B) to solder the metal to the boat.
- A hidden object area becomes available. Find the items listed. A CRANK is added to inventory (C).
- Place the CRANK on the winch (D). Use the OIL CAN to get rid of the rust (E). Click the winch to lower the boat into the water.
- Click the boat to begin the navigation minigame. Repeat the process of avoiding obstacles as when coming to the island.
- Dock at the landing.
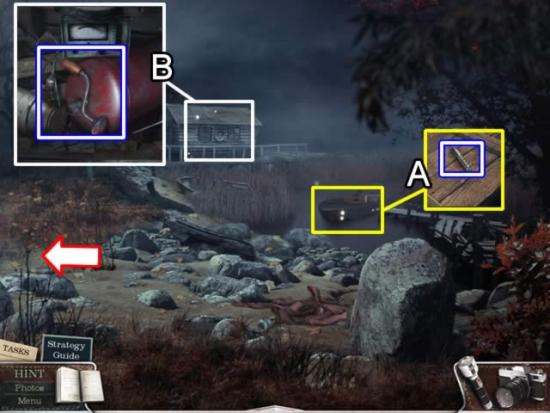
- Once on shore, click the boat. Get the DRILL BIT (A) and head for the cabin.
- Access the hidden object area in the cabin. Collect the HAND DRILL. The drill bit is automatically added to the drill in inventory.
- Exit the cabin. Go left.
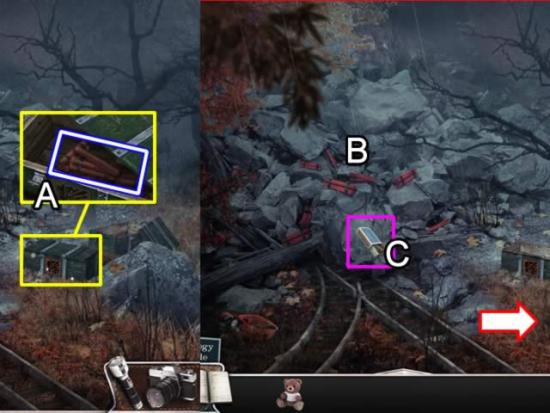
- Take a picture of the vision.
- Use the HAND DRILL to remove the top of the dynamite box. Pick up the DYNAMITE (A).
- Place the DYNAMITE on the rock slide (B).
- Use a match from the MATCH BOX to light the fuse (C). Exit stage right.
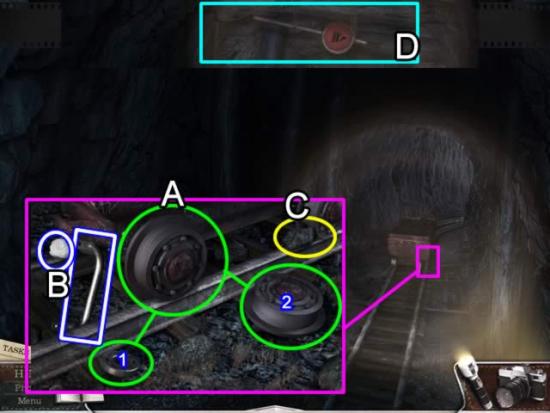
- Enter the mine. Use the Flashlight to locate the disabled cart.
- Replace the wheel (A) by placing the bearing (1) and then the wheel (2) on the axle.
- Collect the two inventory items (B): a RUNG and the first WHITE STONE.
- Remove the other stone (C) blocking the front wheel. Click the cart to move it toward the entrance.
- Now you can reach the SHAFT (D).
- Exit the mine.
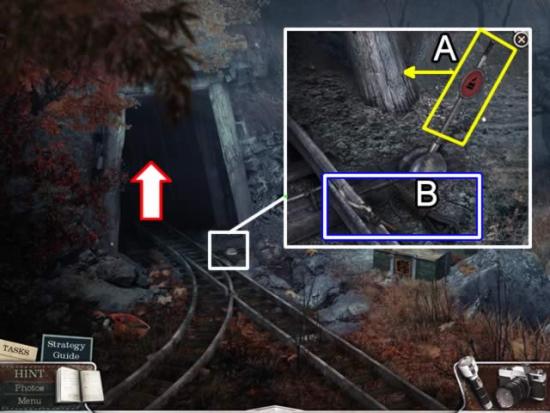
- Place the SHAFT in the switching box (A). Click it to move it forward and open the tracks.
- Collect the GRAPPLING HOOK (B).
- Re-enter the mine.
- Go forward once.
- Point the Flashlight up to see the top of the well. Click the GRAPPLING HOOK. It attaches to the top of the well.
- Climb up the rope and return to civilization at the town square.
- Go left toward the church.
Chapter 5: The Graveyard
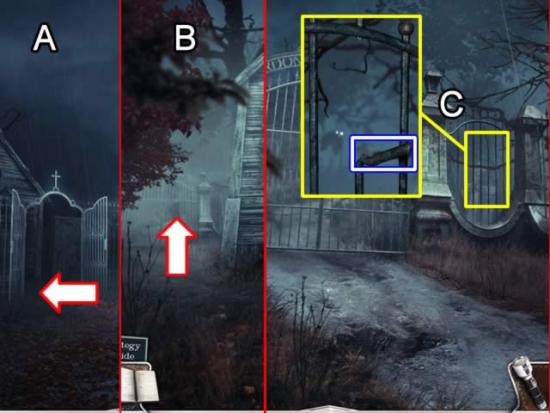
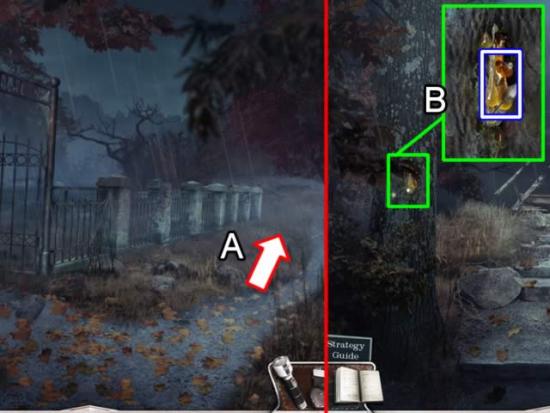
- Enter the gate to the church (A).
- Go to the left of the church toward the cemetery gate (B).
- At the gate, zoom in on the ornamental decoration to the right of the gate (C). Click three times to break off the broken ROD and add it to inventory.
- Click the main gates and enter the cemetery grounds.
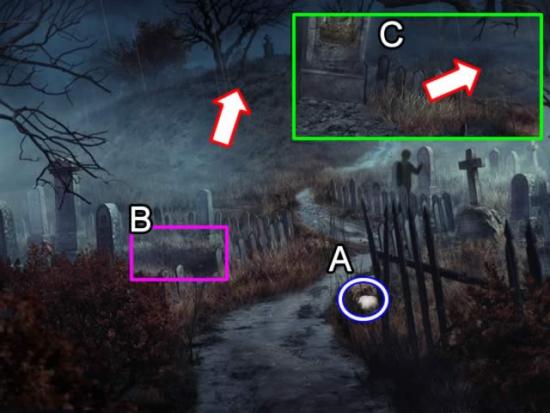
- Take a picture to capture the image.
- Pick up the second WHITE STONE (A).
- Access the open grave (B). Collect the second RUNG.
- Head up the hill and discover Christy’s grave (C).
- Go right. Get the WIRE from the wicket gate.
- Return to the church.
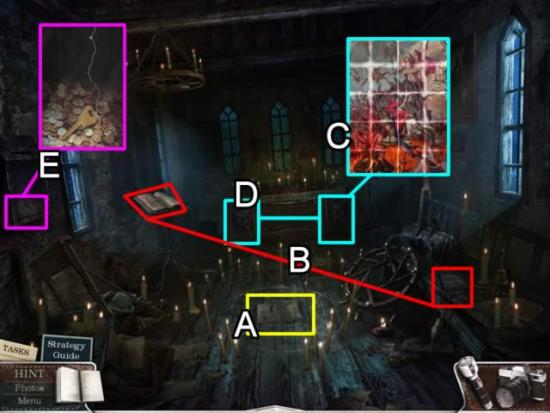
- Pick up the drawing (A) and access both books (B) to store information in the diary.
- Access the minigame in panel (C) in the altar. Swap the tiles to form a picture. Use the image in panel (D) as a guideline. You can close out of the minigame to look at the illustration without losing game progress.
- Use the WIRE to retrieve the HOUSE KEY in the donation box (E).
- Exit the church.
- On the right side of the church is a shed. Use the ROD to break the lock on the shed.
- Access a hidden object area. Although it isn’t among the list of items to find, you’ll receive a CLAPPER.
- Go up to the hospital.
- Get the CRATE (A) and remove the rubble from the LADDER (B).
- Return to the house.
- Use the HOUSE KEY (C) to open the door.
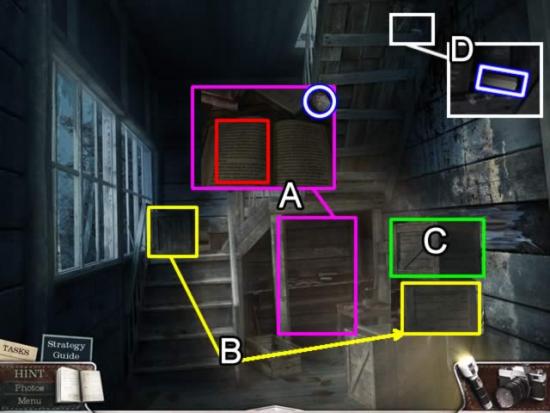
- Use the Flashlight to see into the alcove (A). Collect the information in the book and the third WHITE STONE.
- Get the crate from the stair landing (B) and place it on the first crate. Place the CRATE (C) on top of it.
- Get the CHALK from under the stairs (D).
- Go upstairs.
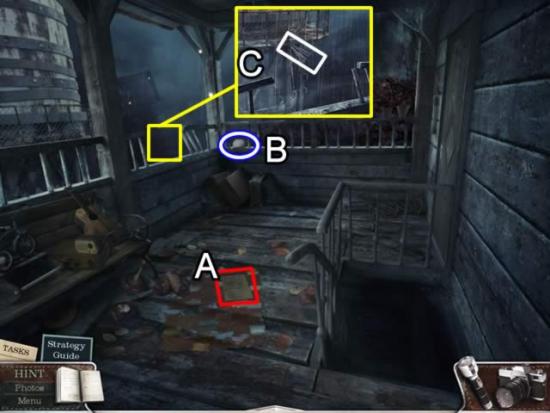
- Pick up the note (A).
- Collect the fourth WHITE STONE (B).
- Place the LADDER on the ledge to access the tower (C).
- Cross to the tower.
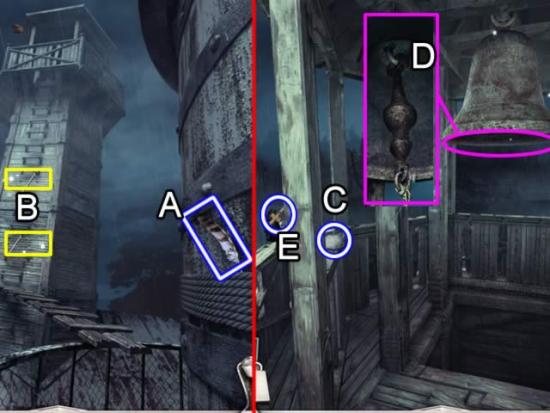
- Pick up the FEATHER (A).
- Place the two RUNGS (B) to gain access to the bell tower.
- Get the fifth WHITE STONE (C).
- Place the CLAPPER in the bell (D). Click to ring the bell.
- The bird flies away leaving the CROSS (E).
- Return to the house.
- Access the hidden object area. Collect all the items. Although a SCOOP is not on the list, it is added to inventory.
- Exit the house.
- Go up to the hospital. Note that there is a path that continues past the hospital. This is a new location. Continue on this path (A).
- Use the SCOOP to collect the TAR from the tree (B).
- Return to the church.
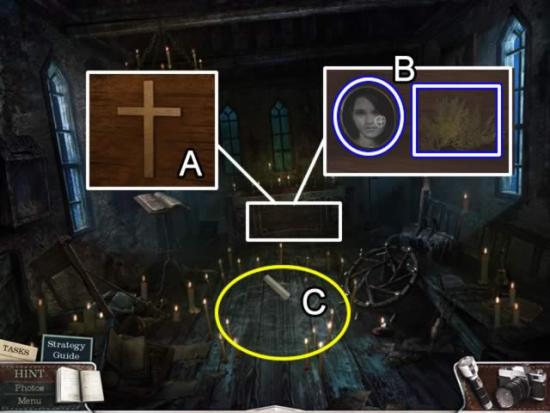
- Place the CROSS in the slot in the center panel of the altar (A). Click to open the alcove.
- Collect the GRAVE PLATE and JUNIPER (B).
- Use the CHALK to draw the design on the floor (C).
- Return to Christy’s grave.
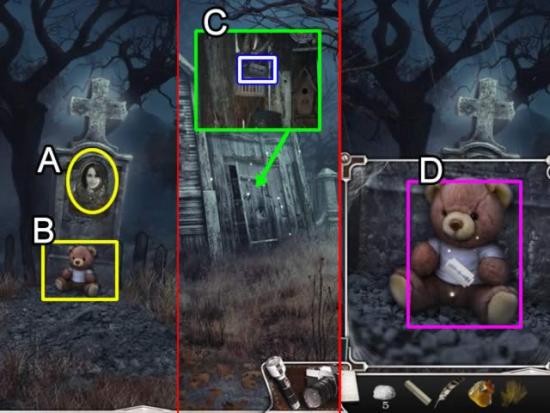
- Place the GRAVE PLATE in the empty niche (A).
- Take a picture of the image. Observe there is something inside the bear.
- Put the BEAR at the bottom of the grave marker (B).
- Return to the church.
- Play the hidden object scene in the shed at the side of the church. Get a RAZOR (C).
- Return to Christy’s grave.
- Use the RAZOR (D) to recover a MYSTERIOUS OBJECT hidden inside the bear.
- Return to the church.
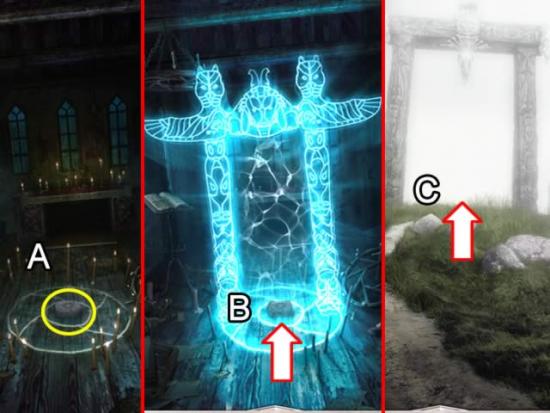
- Place the MYSTERIOUS OBJECT in the center of the design on the floor of the church (A).
- Enter the portal that appears (B).
- Continue through the stone arches on the hill (C).
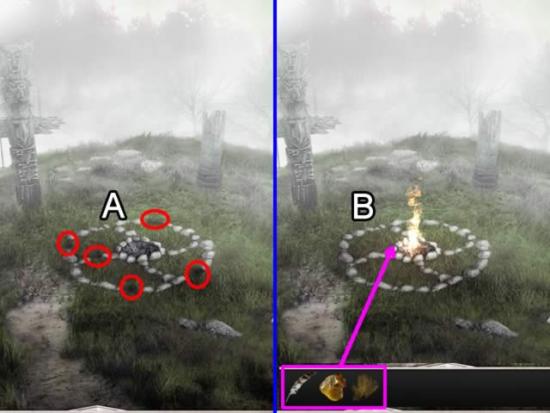
- Complete the ritual circle by placing the five WHITE STONES in the openings (A).
- A fire appears in the center of the circle.
- Place the FEATHER, TAR and JUNIPER in the flames to complete the ritual.
- Watch the ending of the story.
Congratulations! You have completed playing Shiver: The Vanishing Hitchhiker.
Collector’s Edition Bonus Chapter
Once you have completed normal play, click “Start Adventure”. Select the option for extra play.
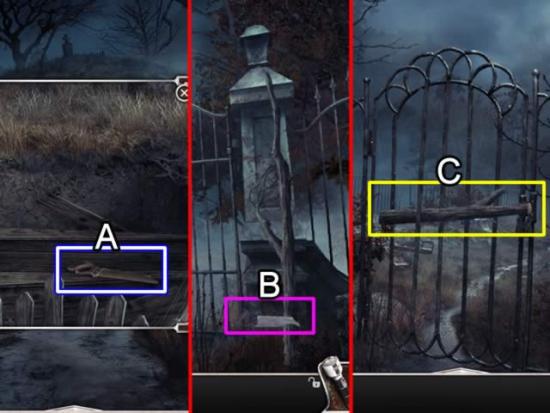
- Remove the boards on the coffin lid and exit the coffin.
- Pick up the WOOD SAW (A).
- Go to the cemetery gate. Use the WOOD SAW on the dead tree to the right of the gates (B). Collect the LOG.
- Go back to the cemetery, up the hill past Christy’s grave and down the path to the wicket gate.
- Use the LOG to open the gate (C).
- Enter the playground
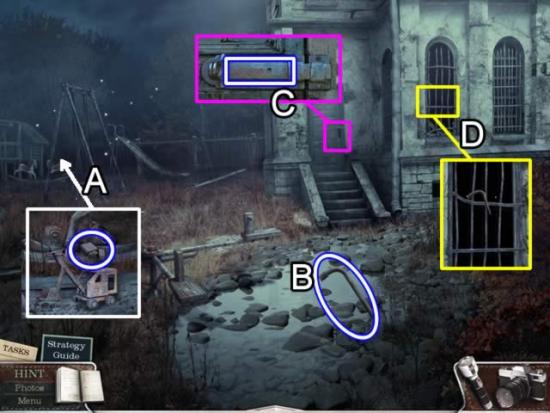
- Get a LIGHTER from the hidden object area at the back of the playground (A).
- Pick up the STEEL PIPE by the puddle of water (B).
- Get the BAR from the door latch (C).
- Gain entrance to the building by using the STEEL PIPE to bend back the bars on the window (D).
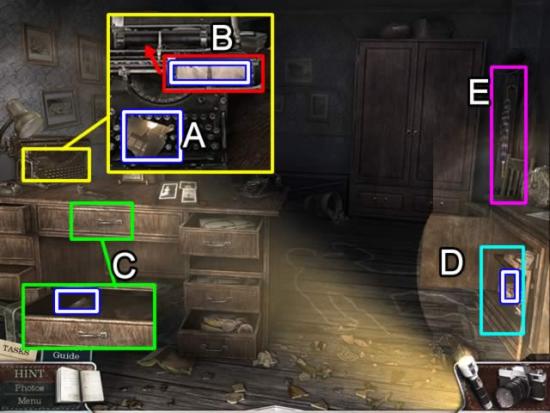
- Use the Flashlight to explore the office.
- Explore the desk area. Find a frame with photo pieces missing.
- Access the typewriter. Take the PHOTO PIECE (1/6) (A). Click the typewriter roller. Take the piece of PAPER (B).
- Open the desk drawer (C). Pick up the PHOTO PIECE (2/6).
- Open the small cabinet on the right (D). Take the PHOTO PIECE (3/6).
- Grab the UMBRELLA (E) against the back wall.
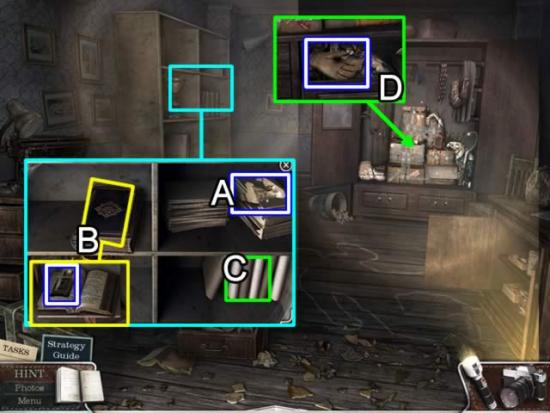
- Zoom in on the book case on the left.
- Pick up the PHOTO PIECE (4/6) on the top shelf (A).
- Open the book (B). Take the WHISKEY.
- Click the folders on the bottom shelf (C). Read the file on John Rossi.
- Open the wardrobe doors in the back of the room to reveal a hidden object area. The GLOVE goes to inventory.
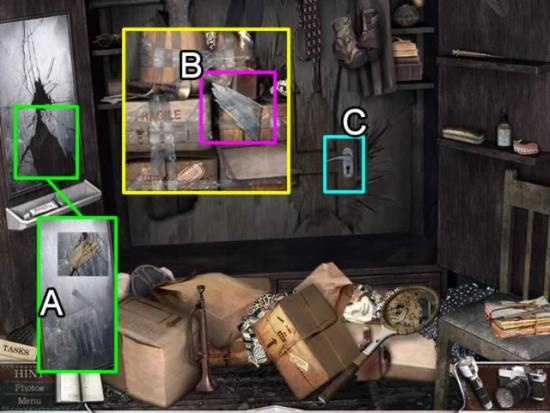
- Use the BAR to break the mirror and the GLOVE to remove a shard of glass (A).
- Use the shard to cut through the strapping tape holding the boxes together (B).
- A secret door is revealed (C). Remove the boards around the door to enter the next room.
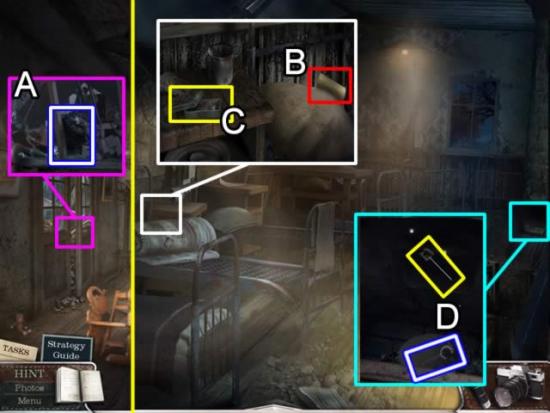
- Use the Flashlight to explore the room. Discover that this was once an orphanage.
- Pick up the CHIMNEY BRUSH by the doors on the left (A).
- Go up the stairs. Enter the first door on the right.
- Zoom in on the night stand. Take the note (B). Open the box (C) and get the PHOTO PIECE (5/6).
- Use the CHIMNEY BRUSH on the clogged chimney (D). Pick up the KEY that drops down.
- Exit the room. Continue down the hallway.
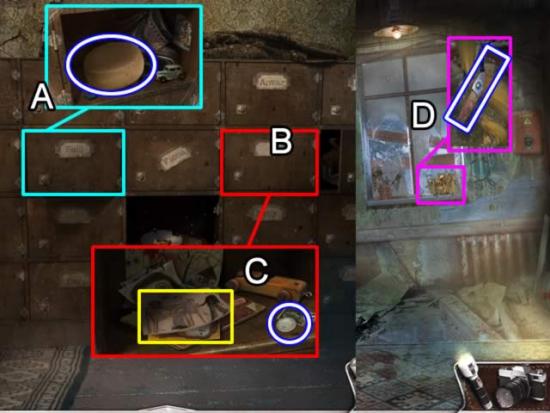
- Click the row of lockers.
- Open the locker labeled “Paul”. Get the SPONGE (A) .
- Two over from Paul’s locker is a locker with a blank tag. Use the KEY to open this locker (B). Pick up the drawing and the COIN (C).
- On the window ledge next to the lockers is a plant. Take the BROKEN SCISSORS (D).
- Use the COIN to undo the screws on the top hinge holding the door up. Add the loosened DOOR to inventory.
- Enter the classroom.
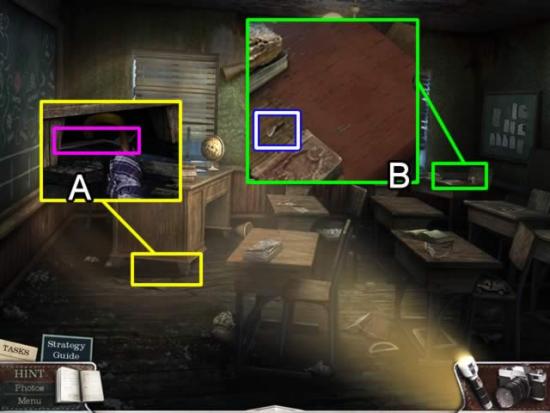
- Zoom in on the area in front of the teacher’s desk. Attempt to use the UMBRELLA to retrieve a fork (A). Bad luck, the fork falls through the hole in the floor.
- Click the desk in the back by the window.
- Take a picture of the image. Take the PIN (B).
- Exit the room. Return to the top of the stairs.
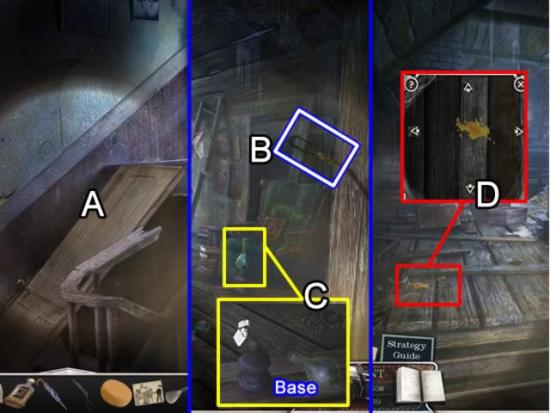
- Use the DOOR to bridge the missing steps (A).
- Go up to the attic.
- Pick up the other half of the broken scissors (B). They form SCISSORS in inventory.
- Access the lamp (C). Pick up the PHOTO PIECE (6/6) next to the lamp. Take off the lamp chimney. Pour the WHISKEY into the base. Use the LIGHTER to light the wick. Replace the lamp chimney.
- Click the paint splotch on the floor to start a minigame (D). Use the arrows to navigate through an unseen maze. Click the DRY PAINT at the end. My moves were: right, up, right, up, right, right, up.
- Return to the main floor.
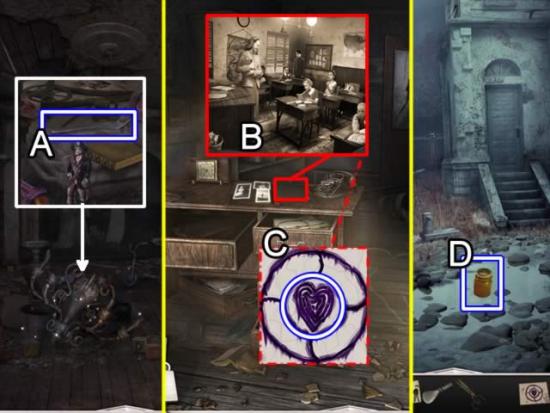
- Add the FORK (A) to inventory from the hidden object area on the chandelier.
- Continue into the office.
- Access the desk area. Place the PHOTO PIECES in the frame to start a minigame. This is a jig-saw type game. Left-click to select and rotate pieces. Correctly joined pieces lock together. The solution is shown above (B).
- The photo flips over showing the familiar pattern with a heart in the middle (C). Add this HEART drawing to inventory.
- Return to the playground.
- Place the DRY PAINT in the puddle (D). Retrieve a JAR OF PAINT.
- Return to the sleeping quarters.
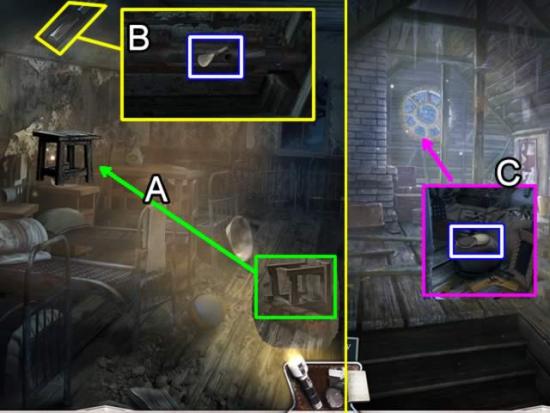
- Move the table (A) to the top of the nightstand so you can reach the window.
- Place the PIN in the window slide (B). It still cannot be opened.
- Go to the attic.
- Play the hidden object scene. Get MAKEUP CREAM (C).
- Return to the sleeping quarters. Apply the MAKEUP CREAM to the window slide. It opens. Collect the SCROLL.
- Return to the attic.
- Access the glowing lamp. Place the SCROLL on the lamp. Symbols appear. Click the SCRIPT to add it to inventory.
- Return to the classroom.
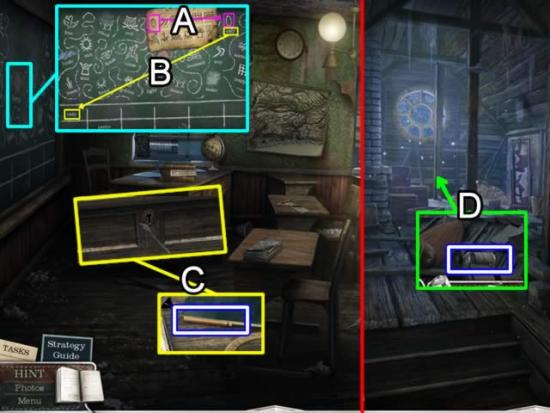
- Place the SCRIPT on the chalkboard to open a minigame. Match the symbol on the script to its symbol on the chalkboard (A). Click the word under the symbol on the chalkboard and place it in a square in the grid below (B). The order of the symbol corresponds to its order on the grid. The solution is: ONLY-WAY-FREE-SOUL-TRAPPED-ANCIENT; CURSE-PIERCE-EVIL-HEART-GOLDEN-KNIFE.
- Use the FORK to open the lock on the desk to access a hidden object area. Collect the PENCIL.
- Go to the attic.
- The paint Solvent from the hidden object items (D) combines with the SPONGE for a WET SPONGE.
- Return to the classroom.
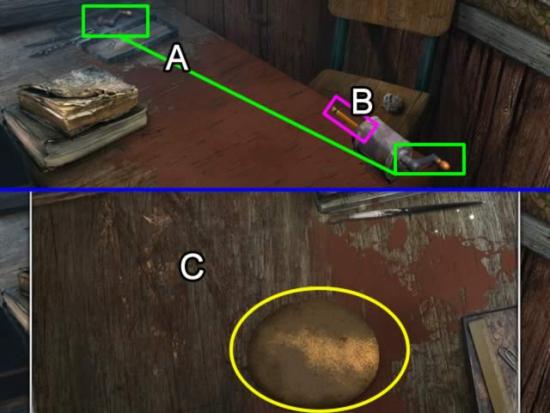
- Drag the crank to the pencil sharpener (A). Place the PENCIL in the sharpener (B). Click to get a sharpened PENCIL.
- Click and hold the WET SPONGE and wipe it across the desk to remove the paint (C).
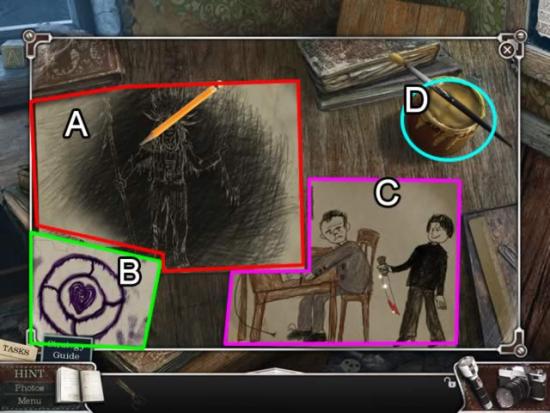
- Place the PAPER on the desk. Use the PENCIL to trace the outline of the shaman (A).
- Add the HEART (B), DRAWING (C) and JAR OF PAINT (D) to the desk area.
- Use the paint brush sitting atop the paint jar to color the knife in the drawing gold.
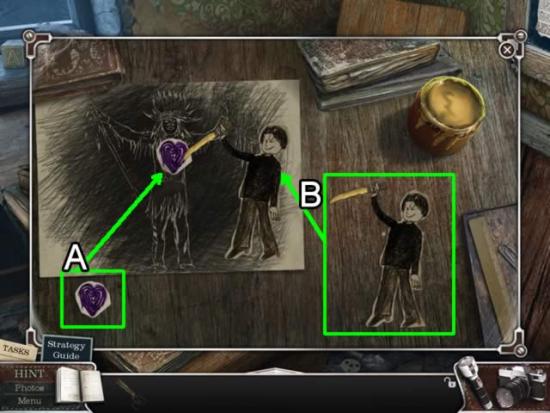
- Use the SCISSORS to cut out the HEART (A) and the boy (B). They move onto the Shaman drawing.
- Watch the final sequence.
Congratulations! You have completed the bonus chapter of Shiver: The Vanishing Hitchhiker Collector’s Edition.
More articles...
Monopoly GO! Free Rolls – Links For Free Dice
By Glen Fox
Wondering how to get Monopoly GO! free rolls? Well, you’ve come to the right place. In this guide, we provide you with a bunch of tips and tricks to get some free rolls for the hit new mobile game. We’ll …Best Roblox Horror Games to Play Right Now – Updated Weekly
By Adele Wilson
Our Best Roblox Horror Games guide features the scariest and most creative experiences to play right now on the platform!The BEST Roblox Games of The Week – Games You Need To Play!
By Sho Roberts
Our feature shares our pick for the Best Roblox Games of the week! With our feature, we guarantee you'll find something new to play!All Grades in Type Soul – Each Race Explained
By Adele Wilson
Our All Grades in Type Soul guide lists every grade in the game for all races, including how to increase your grade quickly!


