![Digimon UP Tier List [Supports, Buddies, and Partners]](/wp-content/uploads/2026/07/digimon-up-tier-list.jpg "Digimon UP Tier List [Supports, Buddies, and Partners]")
Digimon UP Tier List [Supports, Buddies, and Partners]
These Digimon will get you UP the leaderboard.


![Haze Seas Boss Drops [Chances, Locations, and How to Spawn]](/wp-content/uploads/2026/07/haze-seas-boss-drops.jpg "Haze Seas Boss Drops [Chances, Locations, and How to Spawn]")

Welcome to the Shiver: Poltergeist walkthrough on Gamezebo. Shiver: Poltergeist is a Hidden Object Game played on the PC created by Artogon. This walkthrough includes tips and tricks, helpful hints and a strategy guide on how to complete Shiver: Poltergeist.
Welcome to the Shiver: Poltergeist walkthrough on Gamezebo. Shiver: Poltergeist is a Hidden Object Game played on the PC created by Artogon. This walkthrough includes tips and tricks, helpful hints and a strategy guide on how to complete Shiver: Poltergeist.
This hidden object game requires visiting several locations and using inventory items to advance play.
Play is mostly linear although there are some options for the order in which to explore locations.
Begin play by selecting a mode compatible to your style of play. The mode can be changed at any time through the Options menu.
Hidden object scenes contain items listed in yellow lettering. These items require an extra step to find.
Always move the cursor around a scene. Watch the cursor to see if it changes into a hand or an eye to indicate interact areas.
CAPITALIZED inventory items are meant to make it easier to find where this guide may deviate from your own play. Inventory items are highlighted in blue with a white border in the screenshots.
If you don’t have an item referenced in this guide, click and hold the “Ctrl” key and then press the “F” key. This opens a Find area in your web browser. Type in the name of the object as it appears in this guide to find where else it’s referenced.
To minimize back and forth moves, most available inventory items in a scene are picked up when first encountered.

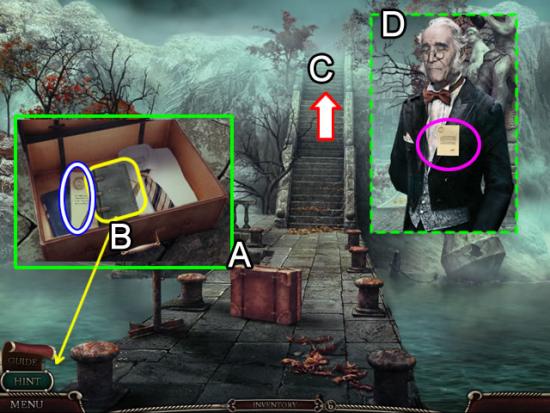
Examine the contents of the suitcase (A).
The Diary (B) is added as a reference tool. Review it for strategy hints, tasks and other helpful information.
Take the PAPERS.
Go up the stairs (C).
Give the PAPERS to the butler (D).
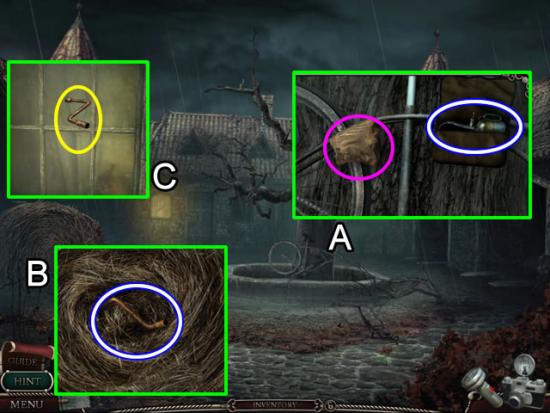
Go forward to the fountain area.
Take the path on the left side of the mansion.
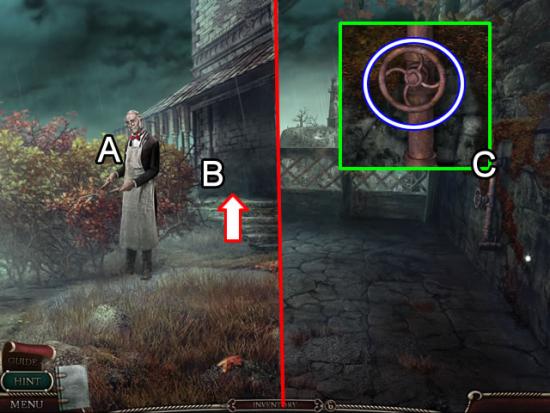
Have a conversation with the butler (A).
Go up the steps (B) to the porch.
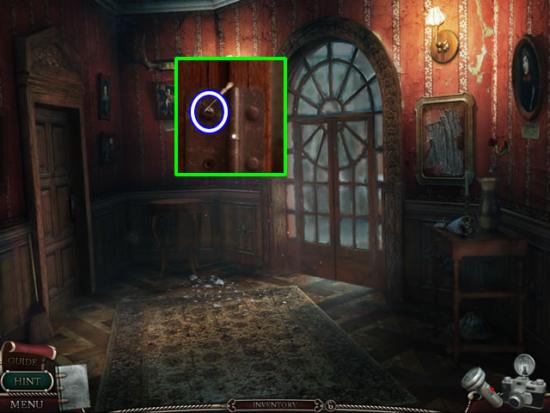
Zoom in on the pipes (C). Take the VALVE.
Return to the fountain.

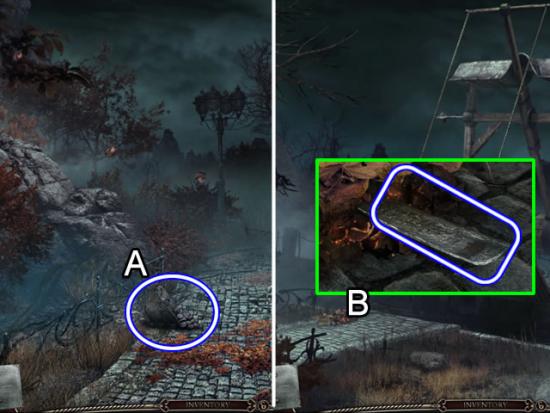
Inspect the base of the fountain (A).
Place the VALVE on the spigot. Turn to drain the water.
Pick up the MANOR KEY.
Approach the front door (B).
Insert the MANOR KEY in the door.

Pick up the CARPET in the entryway.
Note the door to the cloakroom is locked.
Go forward to the main hall.
Main Hall
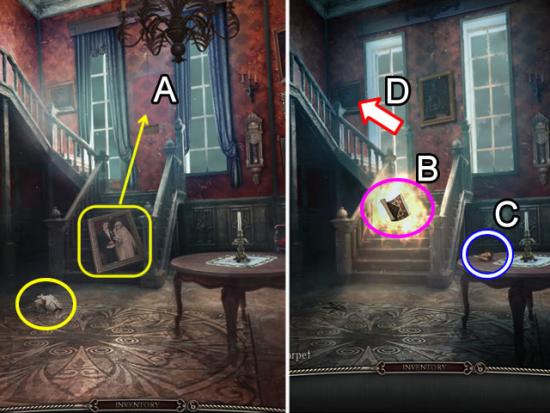
Pick up the paper for the diary.
Hang the portrait in the empty space on the wall (A).
Use the CARPET to put out the fire (B).
Pick up the TORN PORTRAIT piece from the table (C).
Go up the stairs (D).
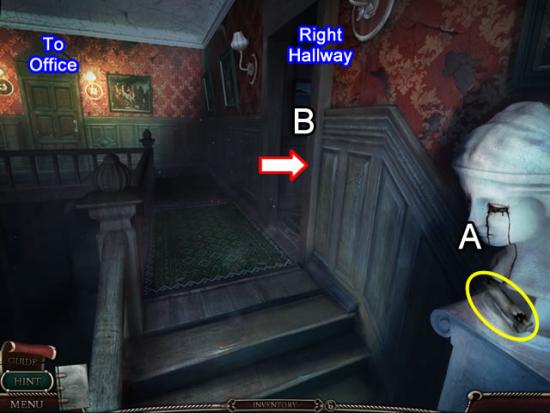
Landing
Read the note (A).
Enter the right hallway (B).
Play the hidden object scene in the hallway.
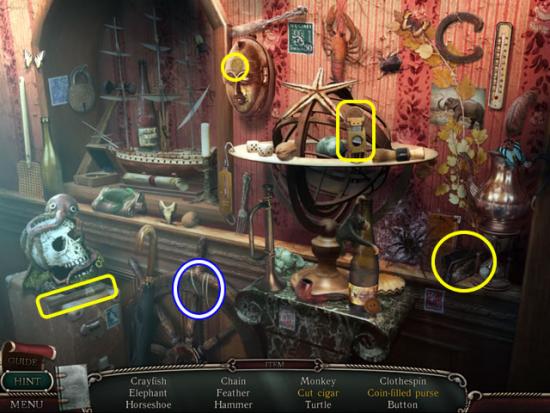
Use the cigar cutter to cut the cigar.
Put the coin in the purse. Take the coin-filled purse.
Find the rest of the listed objects.
The Chain goes to inventory as a NECKLACE CHAIN.
Go forward to the end of the hall.
End of Hallway
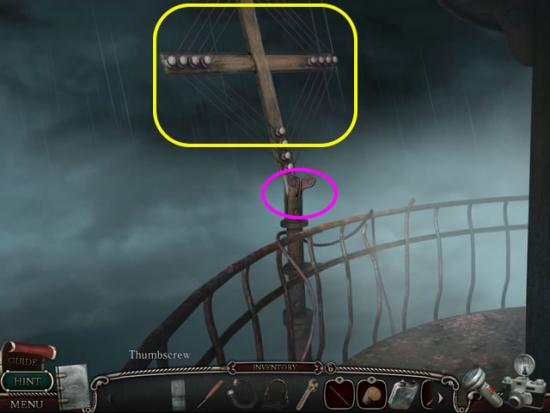
Inspect the lighthouse replica (A). Take the DISCHARGED FLASHLIGHT.
Go through the left door (B) to the foyer.
Foyer
Knock over the vase (C). Move the shard around to uncover the CLOAKROOM KEY.
Return to the entryway.
Entryway
Use the CLOAKROOM KEY to unlock the door.
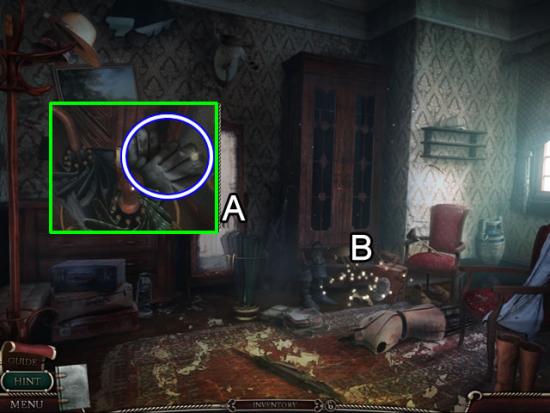
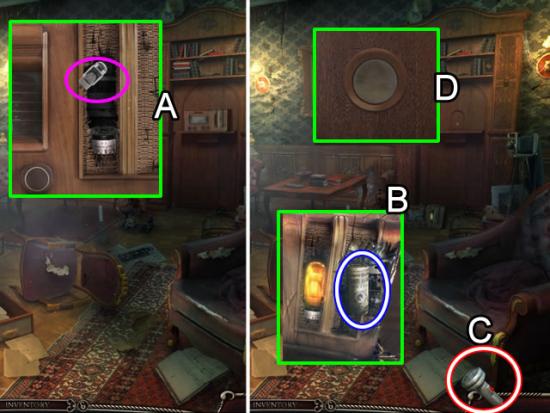
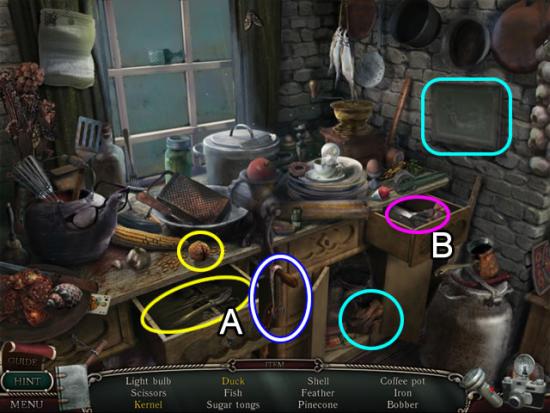
Cloakroom
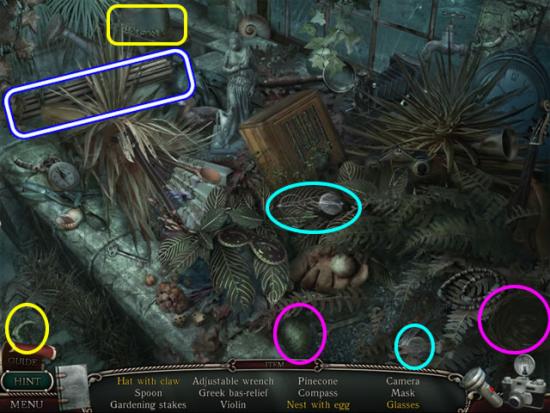
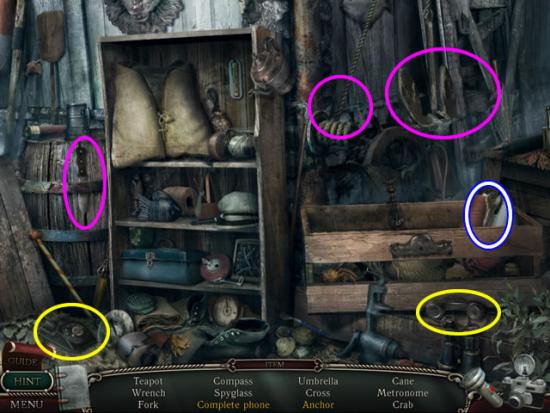
Look closer at the umbrella stand (A). Take the GLOVES.
Play the hidden object scene (B).
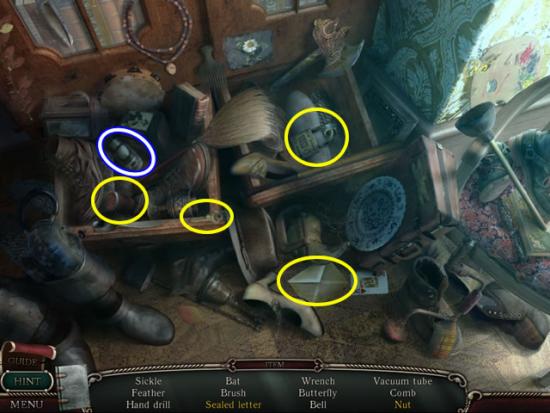
Place the seal on the envelope. Take the Sealed letter.
Unlock the padlock with the key. Take the Nut.
Find the rest of the listed objects.
The VACUUM TUBE goes to inventory.
Go back to the second floor landing.
Go forward to the office.
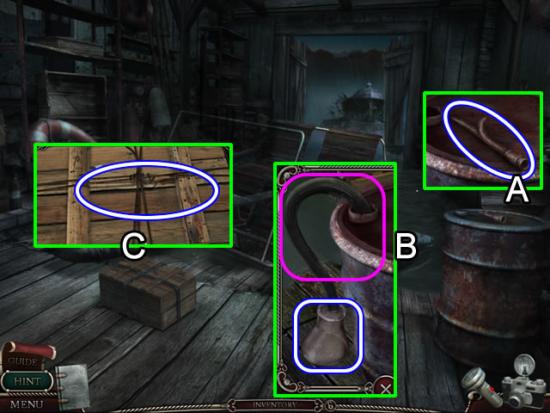
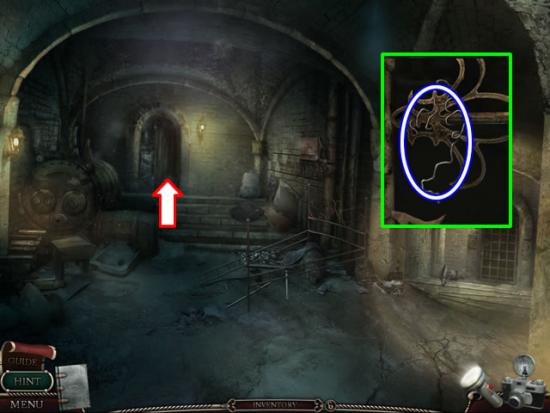
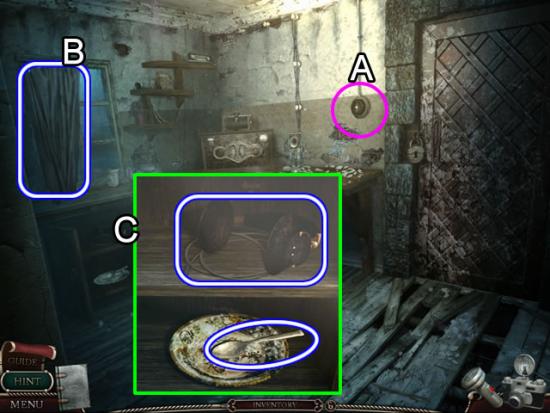
Office
Zoom in on the radio on the back shelf (A).
Insert the VACUUM TUBE.
Look closer at the fallen radio (B). Take the BATTERY.
The DISCHARGED FLASHLIGHT and BATTERY combine to form a flashlight tool (C) permanently available on the game screen.
Inspect the panel (D). Press the button to open a door.
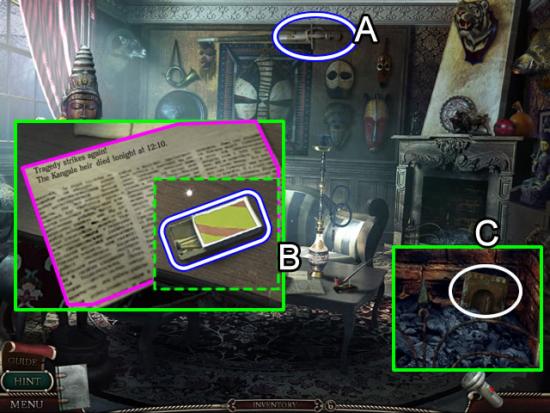
Secret Room
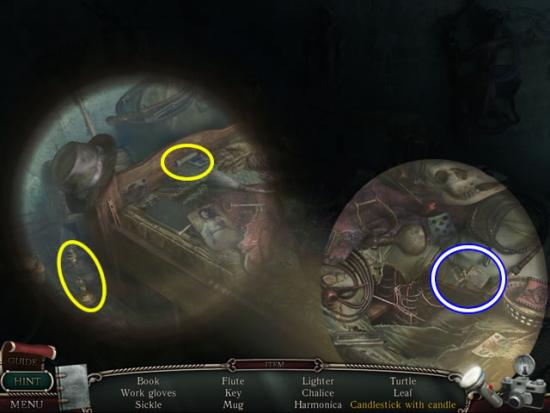
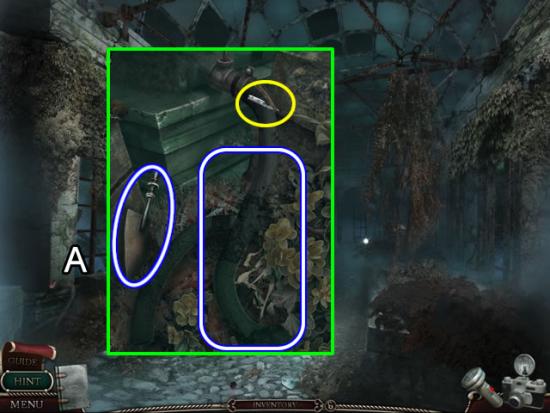
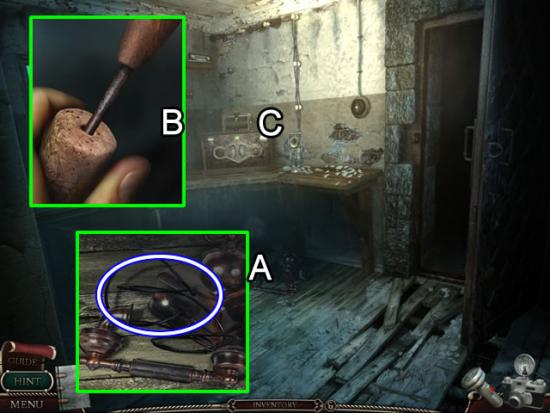
Take the BROKEN SABER (A) from the scabbard.
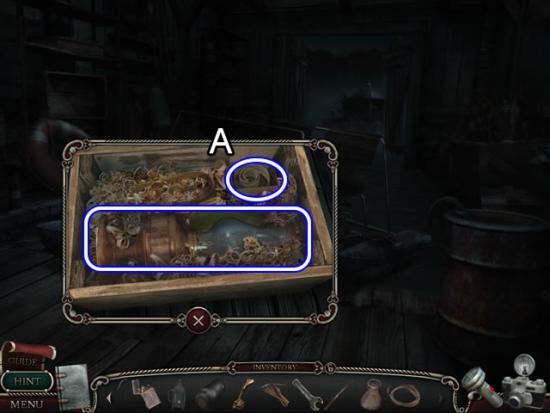
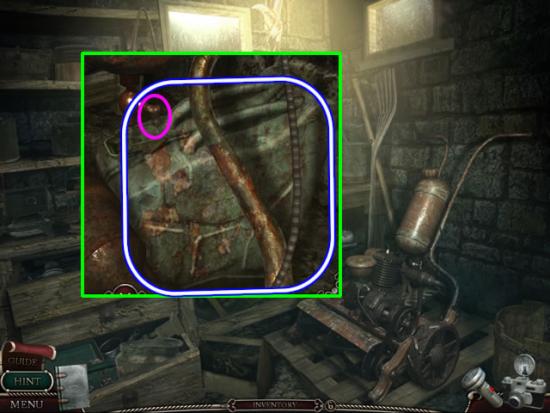
Look closer at the table (B). Pick up the clipping. Take the MATCHBOX that was under the clipping.
Examine the fireplace (C). Attempt to take the box.
Back out of the secret room and office to the landing.
Enter the right hallway and the first door on the right.
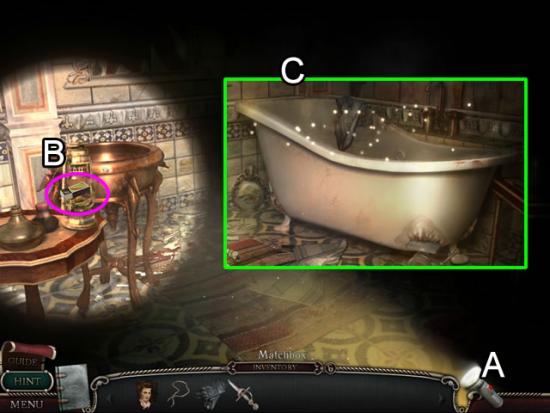
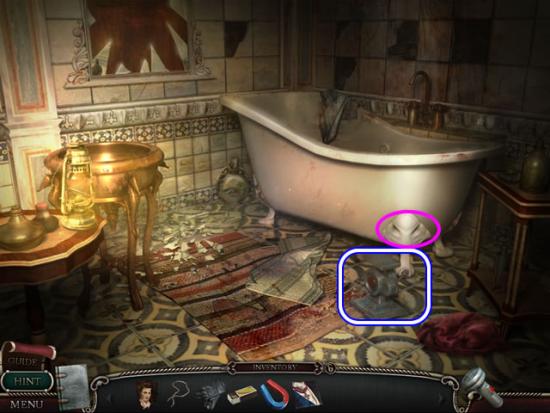
Bathroom
Turn on the flashlight (A) and find the lantern (B).
Use the MATCHBOX to light the lantern.
Zoom in on the bathtub (C). Pull the plug to drain the tub and reveal a hidden object scene.
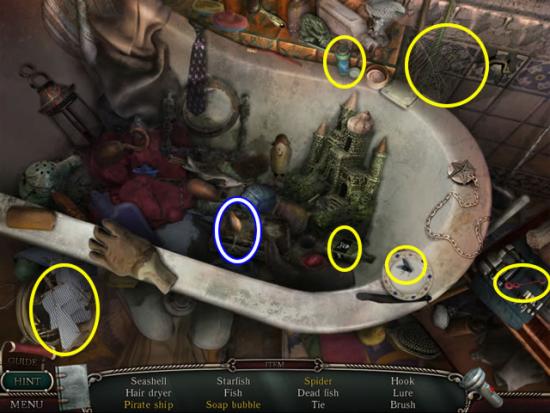
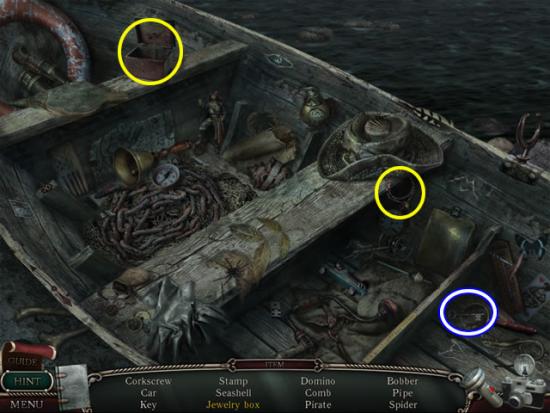
Put the Jolly Roger on the ship. Take the Pirate ship.
Dip the pink stick in the bubble solution. Pop the Soap Bubble.
Put the fly on the spider web. Take the Spider.
Find the rest of the listed objects.
The LURE goes to inventory.
Exit the bathroom. Go to the end of the hallway.
Use the BROKEN SABER to pry off the boards securing the door on the right.
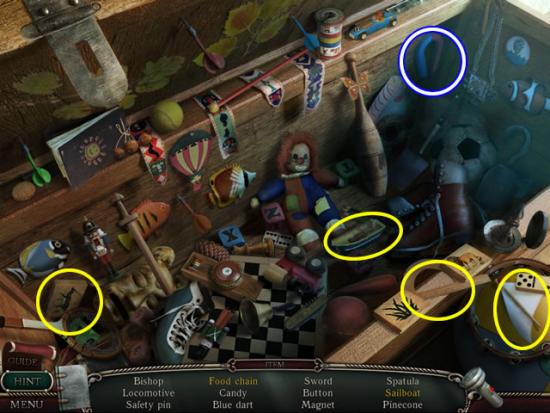
Boy’s Room
Play the hidden object scene.
Place the gazelle block between the lion and grass blocks to complete the Food chain.
Insert the sail on the boat. Take the Sailboat.
Find the rest of the listed objects.
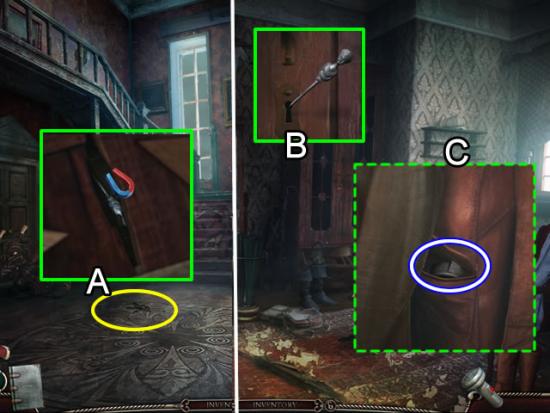
The MAGNET goes to inventory.
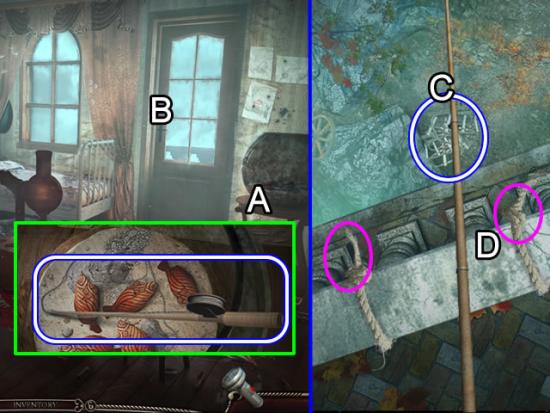
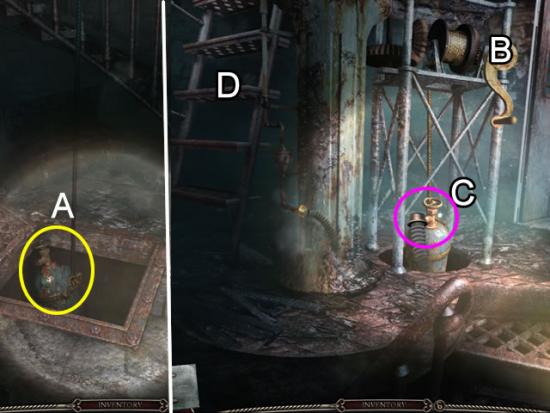
Examine the aquarium (A).
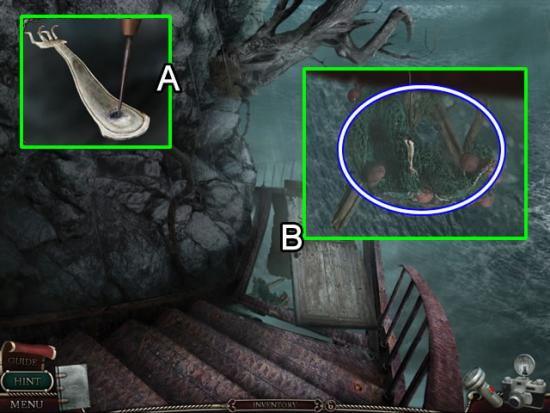
Pick up the INCOMPLETE FISHING ROD. It automatically combines with the LURE. A FISHING ROD goes to inventory.
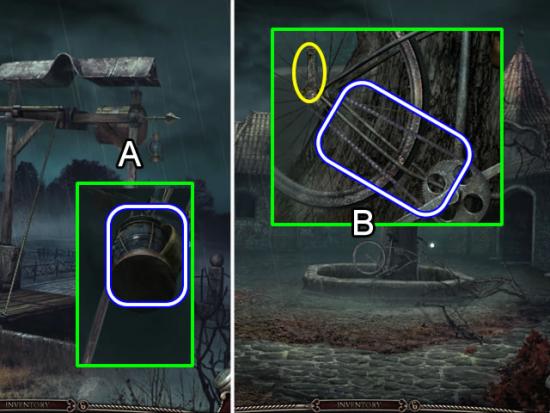
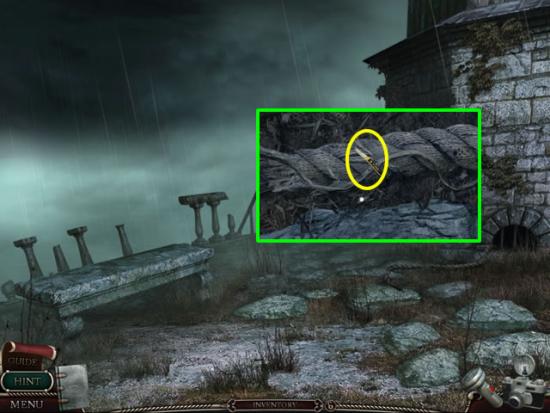
Go through the door (B) to the balcony.
Use the FISHING ROD to retrieve the ROPE LADDER (C).
Attach the ladder to the two rope ends (D).
Descend the ladder.
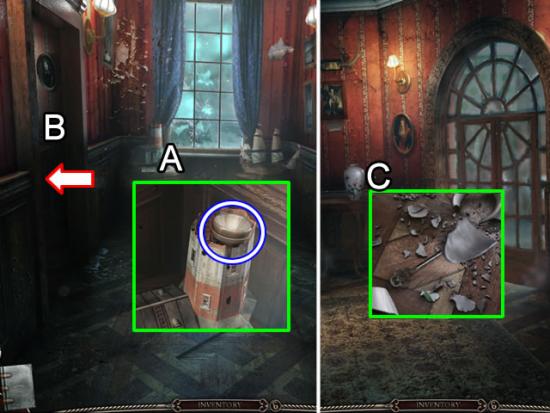
Go forward to the tower.
Tower Entrance
Place the metal hooked bar in the door grating.
Pick up the BATHTUB LEG that was uncovered.
Return to the Boy’s room.
Go across the hall to the foyer.
Foyer
Inspect the mirror (A).
Use the BATHTUB LEG to shatter the glass.
Take the PANEL PIECE.
Go down the hallway to the bathroom.
Bathroom
Attach the BATHTUB LEG to the tub.
Take the JACK.
Go downstairs to the main hall.
Main Hall
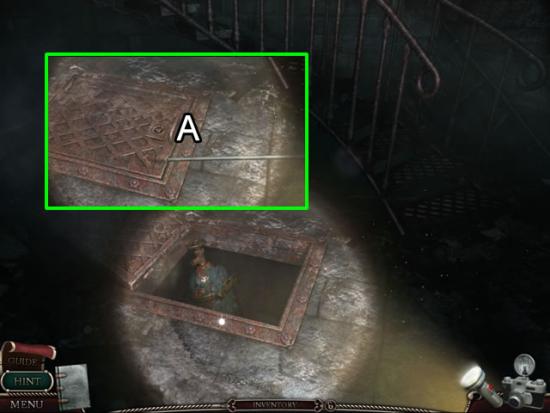
Peer into the hole in the floor (A).
Use the MAGNET to retrieve the HAIRPIN.
Continue forward to the entryway.
Enter the cloakroom.
Cloakroom
Use the HAIRPIN to pick the lock on the cabinet (B).
Examine the coats in the cabinet. Take the ELECTRICAL tape from the pocket (C).
Go back upstairs.
Go straight into the office.
Office
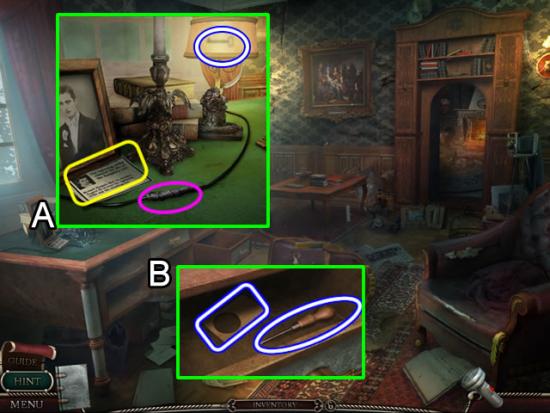
Zoom in on the desktop (A).
Repair the wiring with the ELECTRICAL TAPE.
Pick up the clipping.
Take the KEY hidden in the lampshade.
Examine the center desk drawer (B).
Insert the KEY in the lock.
Take the FRAME and SCREWDRIVER.

Inspect the panel (A).
Add the PANEL PIECE to start a puzzle.
Swap the pieces to form the picture shown above.
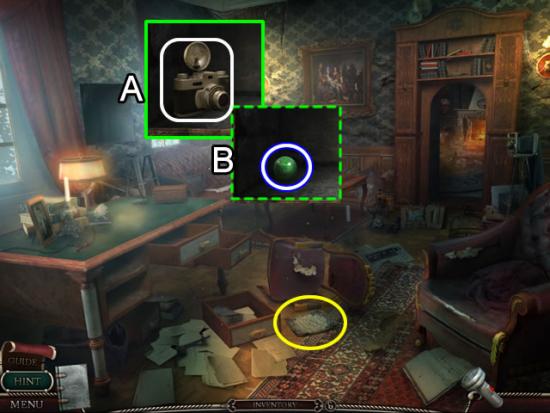
Look in the compartment (A).
Take the camera. It joins the flashlight for use in the game.
Look again in the compartment (B).
Take the MARBLE.
Pick up the document from the floor.
Exit the office.
Go down to the end of the hallway.
Go left into the foyer.
Foyer
Look at the hinge on the glass door.
Use the SCREWDRIVER to remove the SCREW.
Enter the bedroom.
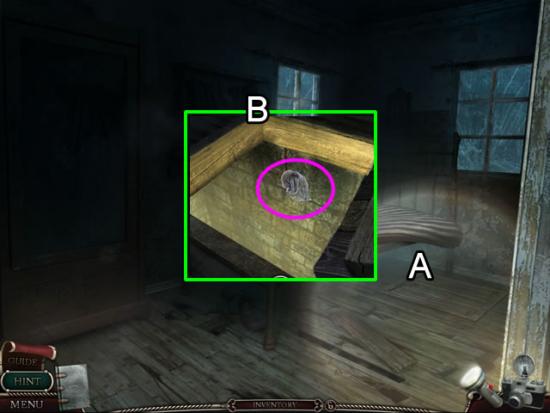
Bedroom
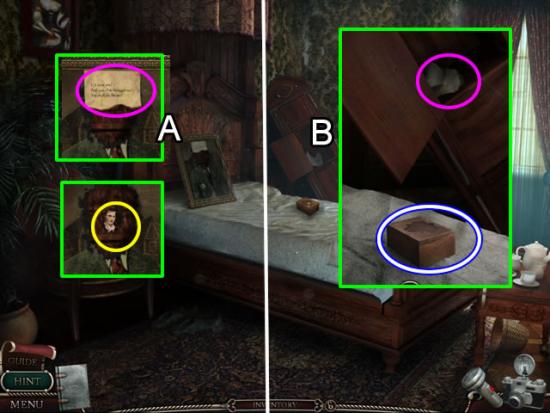
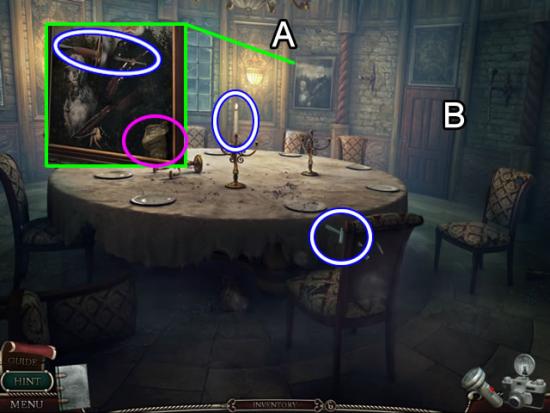
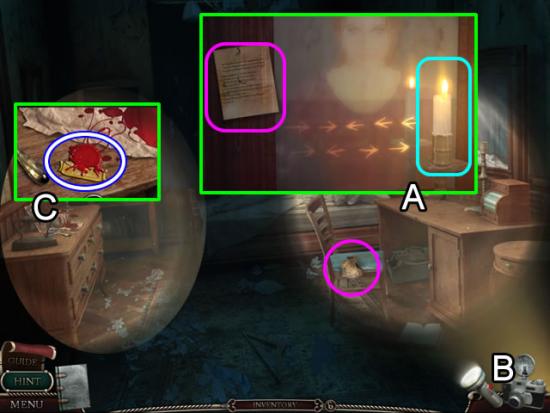
Inspect the portrait on the bed (A).
Take the note.
Put the TORN PORTRAIT piece in the vacant spot.
Look closer at the fallen cabinet (B).
Take the paper.
Pick up the PUZZLE BOX on the bed. Note that the box has an eye on the frame in inventory. An eye indicates that the item is itself an interactive area that needs an additional part
Exit the bedroom.
Cross the hall to the Boy’s room. Go out the window.
Pick up the piece of paper at the foot of the ladder.
Go toward the tower.
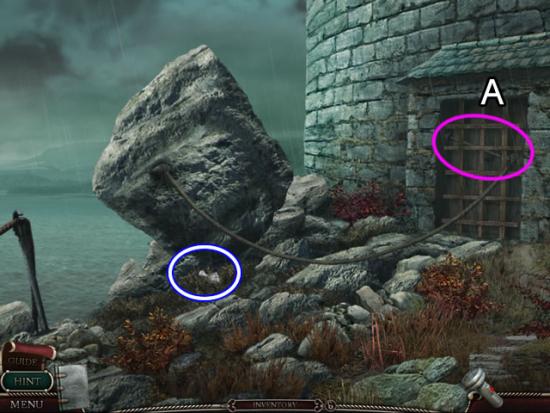
Tower Entrance
Place the JACK under the boulder.
Click the handle to leverage the boulder over the cliff, which also pull off the door grate.
Enter the library.
Library
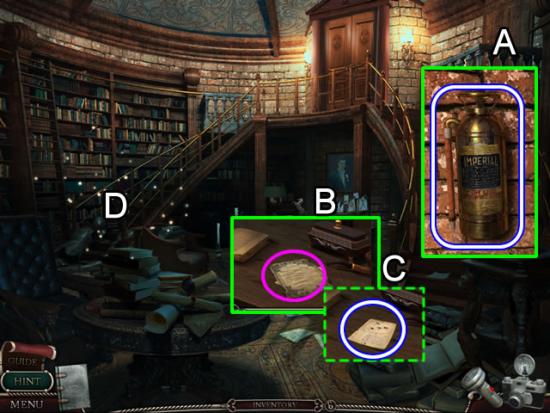
Look closer at the top right door (A). Take the FIRE EXTINGUISHER.
Examine the desk (B). Take the paper.
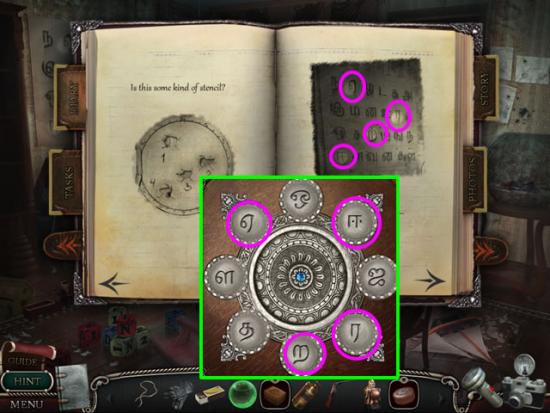
Look again at the desk (C). Take the STENCIL that was under the paper. The STENCIL and FRAME combine to add a SLIDE in inventory. Look closer at the top right door (A). Take the FIRE EXTINGUISHER.
Examine the desk (B). Take the paper.
Look again at the desk (C). Take the STENCIL that was under the paper. The STENCIL and FRAME combine to add a SLIDE in inventory.
Play the hidden object scene (D).
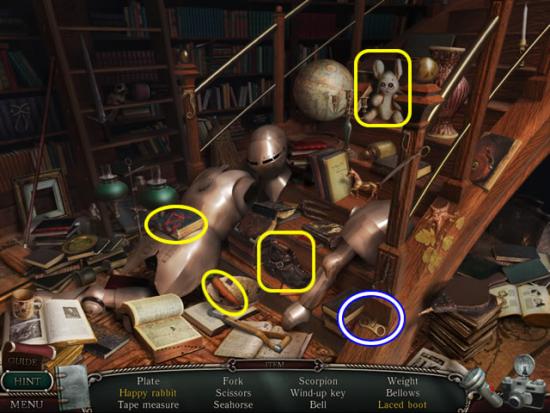
Give the carrot to the rabbit to make it happy.
Use the laces on the boot.
Find the rest of the listed objects.
The WIND-UP KEY goes to inventory.
Return to the Boy’s room.
Boy’s Room
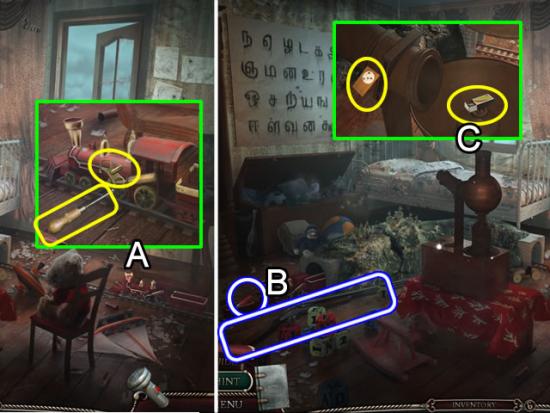
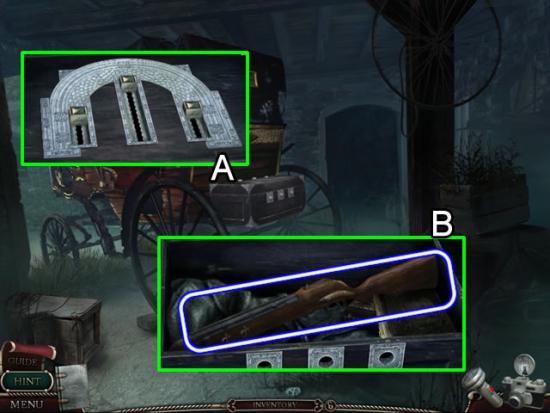
Zoom in on the train (A).
Insert the SCREW in the wheel. Affix the wheel with the SCREWDRIVER.
Use the WIND-UP KEY to set the train running. It talks two laps around the track.
Take the CARTRIDGE the train pushes out of the tunnel (B). Pick up the HUNTING RIFLE lying next to the tracks. Both items combine as a LOADED RIFLE in inventory.
Inspect the projector (C). Light the wick with the MATCHBOX. Insert the SLIDE. The code projected on the wall is added to the diary.
Cross the hall to the foyer.
Foyer
Use the LOADED RIFLE to blow the door open.
The empty HUNTING RIFLE returns to inventory.
Girl’s Room
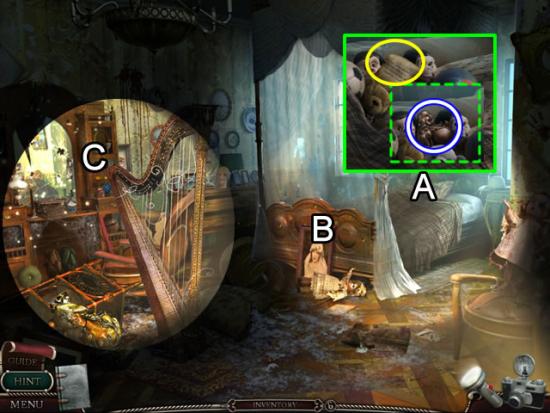
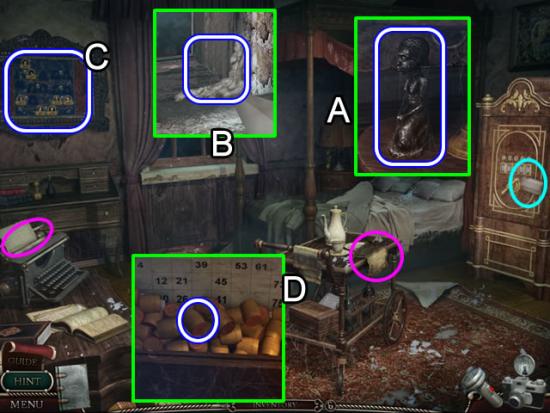
Examine the bed (A).
Turn down the blanket. Take the note.
Pick up the FIGURINE the note was covering.
Look at the portrait (B).
Play the hidden object scene by the dresser (C).
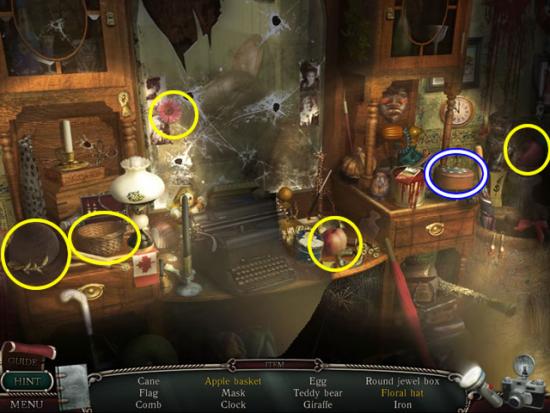
Put the apples in the basket. Pick up the Apple basket.
Attach the flower to the hat for a floral hat.
Find the rest of the listed objects.
The JEWEL BOX goes to inventory with an eye frame.
Refer to the diary for the code from the projector.
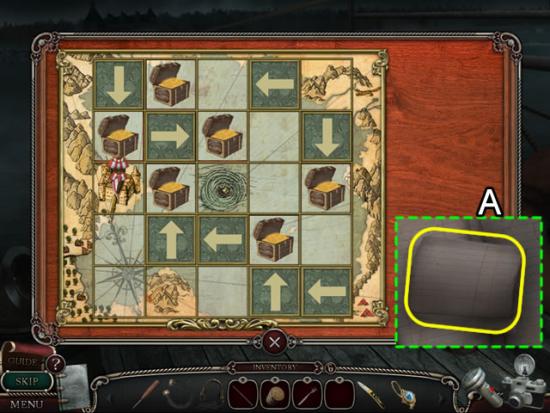
Match the symbols with the numbers on the holes to determine the order.
Take the JEWEL BOX from inventory. Click the symbols in the order indicated.
Take the BEADS from the open jewel box.
Go back down the hallway to the landing. Enter the office. Go through to the secret room.
Secret Room
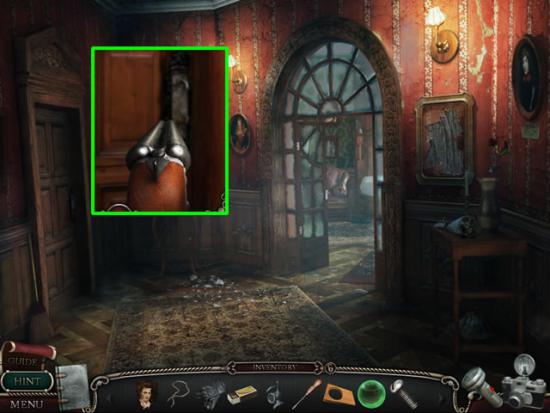
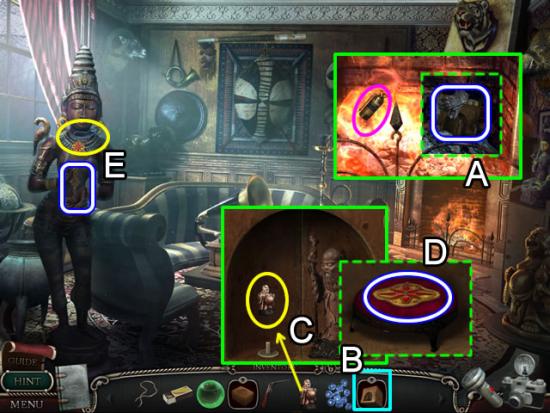
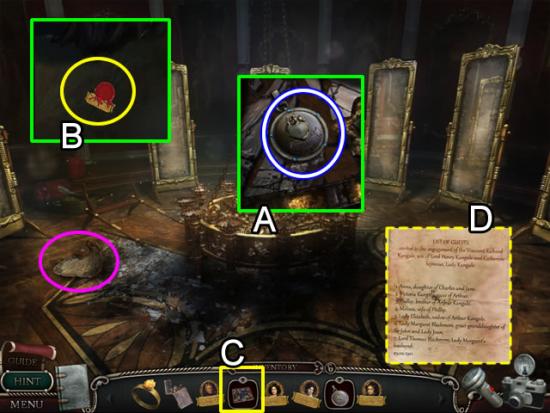
Use the FIRE EXTINGUISHER to put out the flames in the fireplace (A). Take the ORIENTAL BOX from the ashes with the GLOVES.
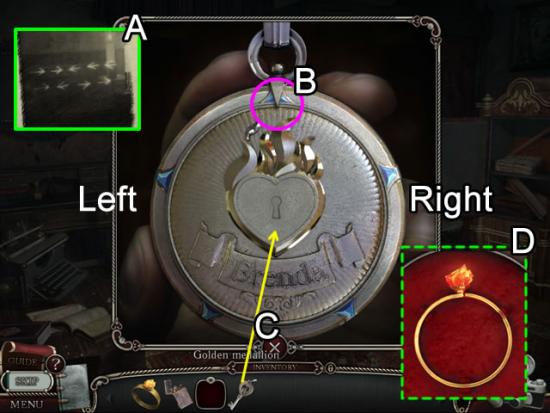
Click the eye on the inventory frame for the ORIENTAL BOX to expand it (B). Place the FIGURINE in the empty slot (C). Take the AMULET from the box (D).
The NECKLACE CHAIN, BEADS and AMULET combine to form a NECKLACE.
Drape the NECKLACE on the statue (E). Pick up the HOUR HAND.
Go downstairs to the main hall.
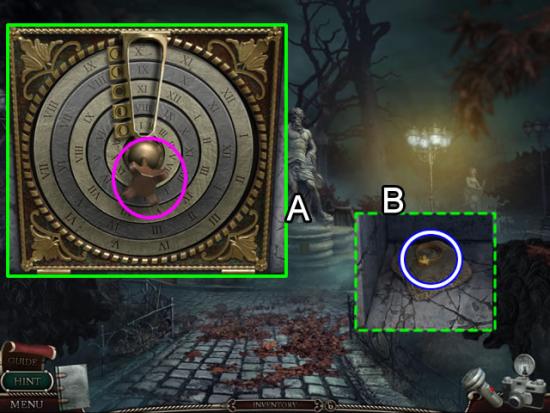
Main Hall
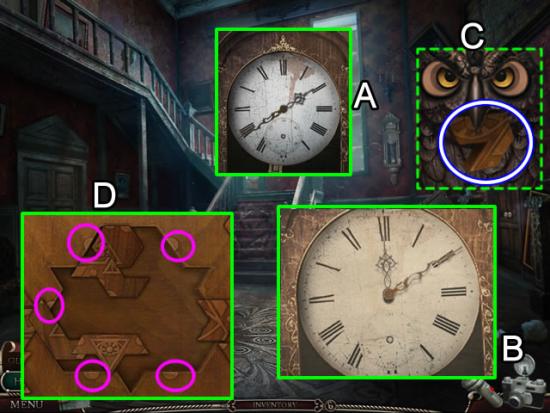
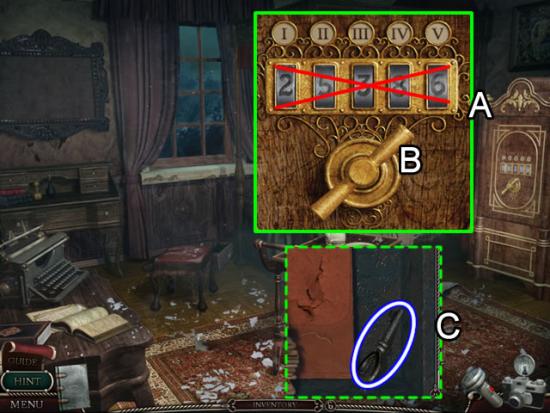
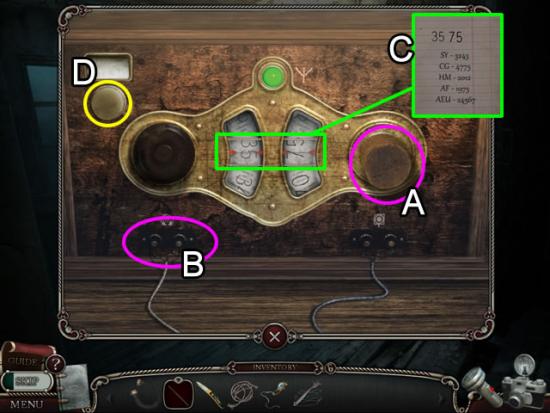
Zoom in on the clock (A).
Attach the HOUR HAND.
The camera (B) is flashing and moving indicating that this would be a great time to take a picture. The photo shows the time at which the clock should be set.
Position the hands to 12:10. Take the PUZZLE PIECE from the owl (C).
Open the PUZZLE BOX in inventory. Add the PUZZLE PIECE to start a puzzle (D).
The goal is to place the shapes to form a pattern.
A good strategy is to match the pieces with the circles on the outside. From there match patterns and colors. The pieces do not lock into place when correcting positioned.
Solution:

Take the letter and MARBLE from the open box.
Library
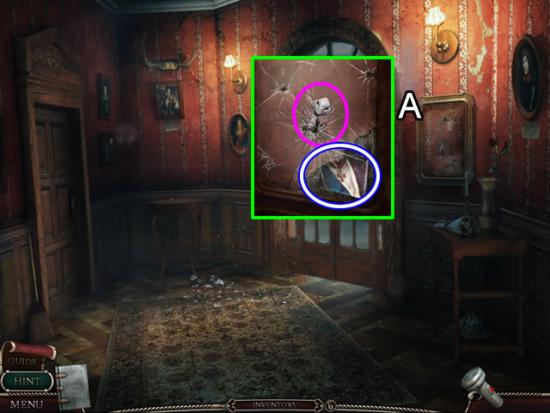
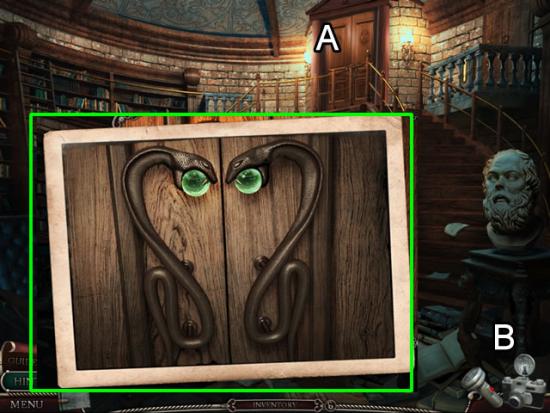
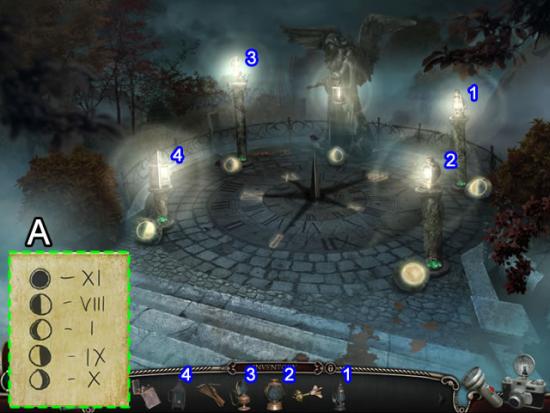
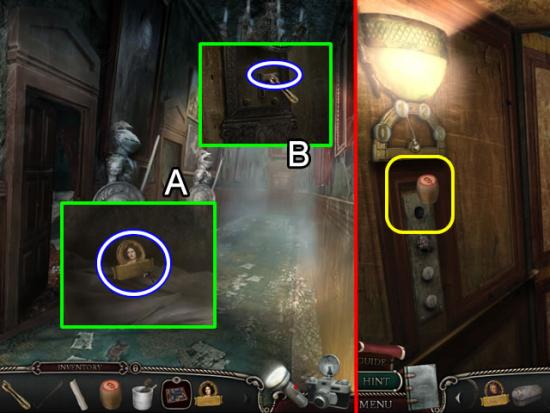
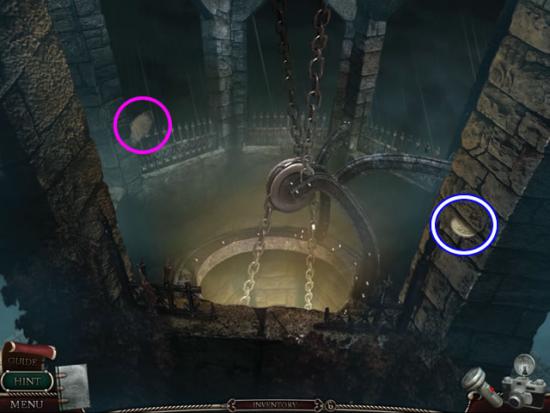
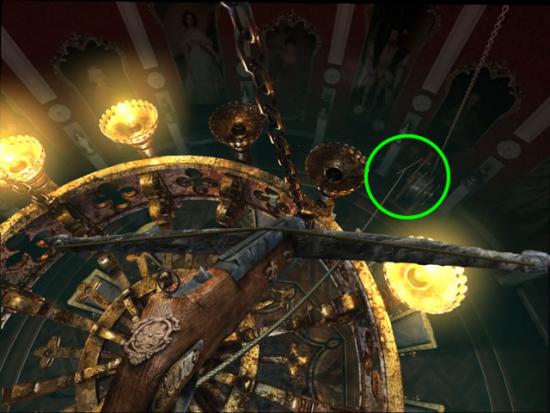
Zoom in on the double doors at the top of the staircase (A).
The camera gets agitated. Click the camera (B) to get a snapshot of how to open the door.
Place the two MARBLES in the snake’s mouths as shown.
Hall of Mirrors
Attempt to pick up the necklace on the floor.
Fountain
Awaken to find that someone (or something) has picked your inventory pocket. The MATCHBOX and HUNTING RIFLE are gone.
Follow the poltergeist down the path to the left.
Left Side Yard
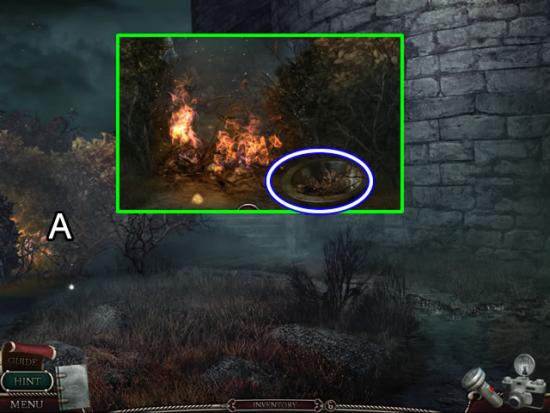
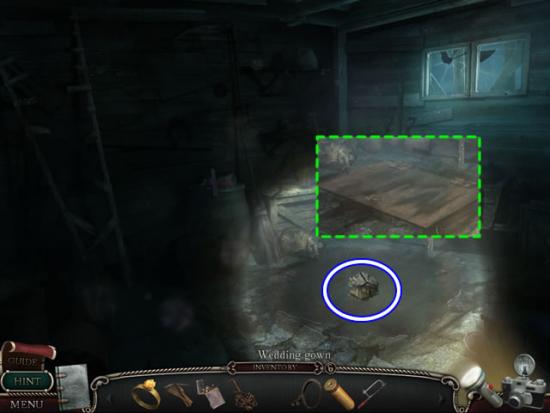
Inspect the burning brush (A).
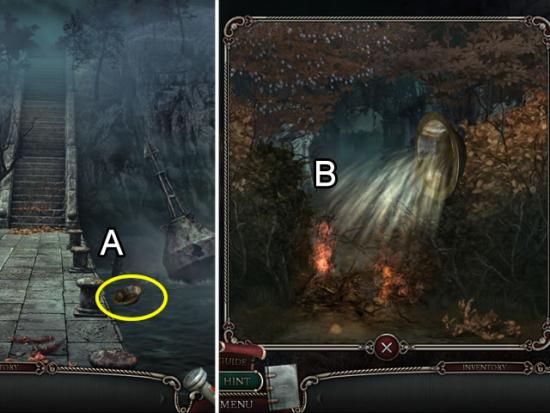
Pick up the BASIN.
Go back to the pier (down three times).
Pier
Dip the BASIN in the water (A). Take the BASIN OF WATER.
Left Side Yard
Throw the BASIN OF WATER on the flames (B).
Remove the burned brush and start down the path.
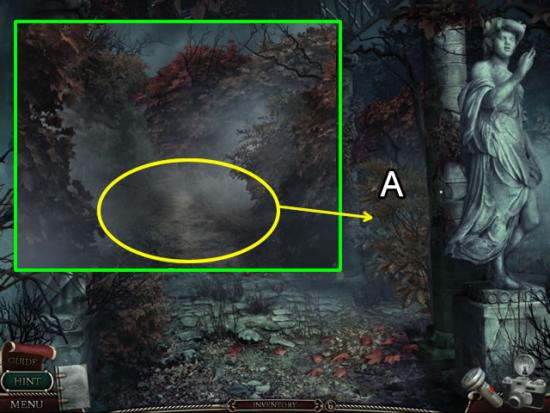
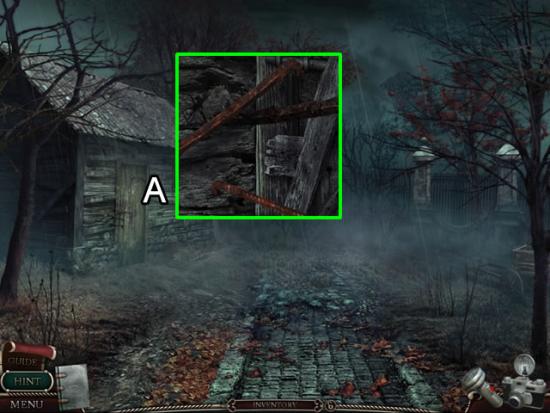
Side Yard Path
Note the camera movement.
Take a photo of the path. The glowing area (A) shows in the photo only.
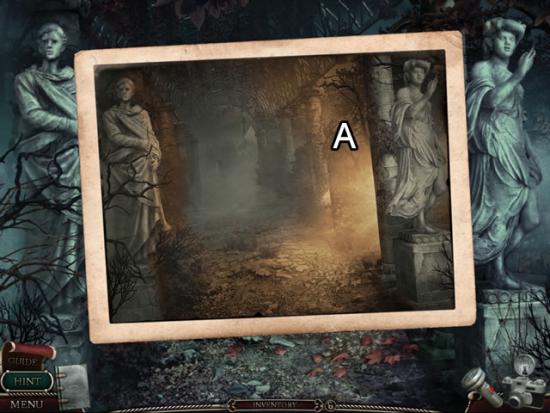
Continue to the end of the path.
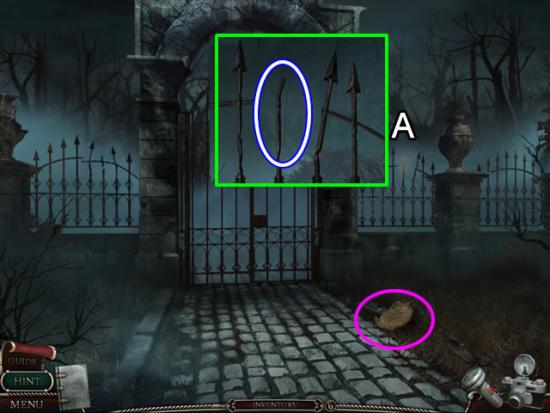
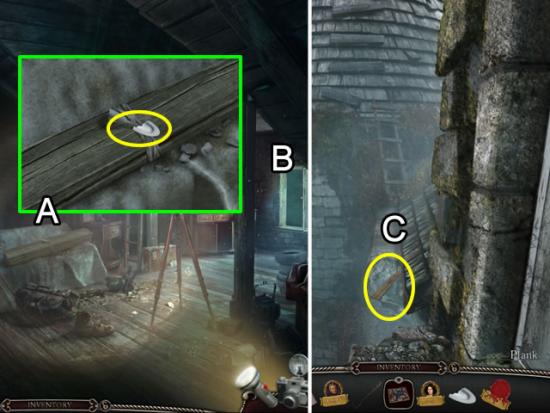
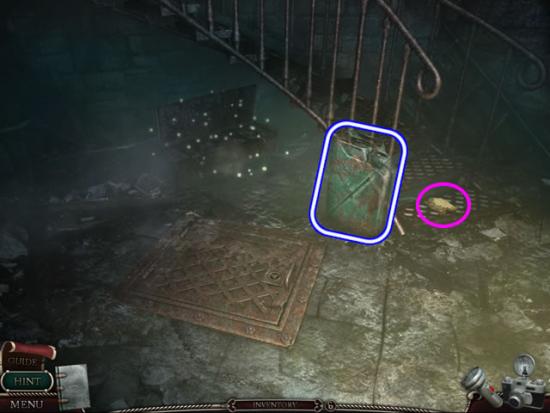
Pick up the SHAFT that falls to the ground in front of the double gates.
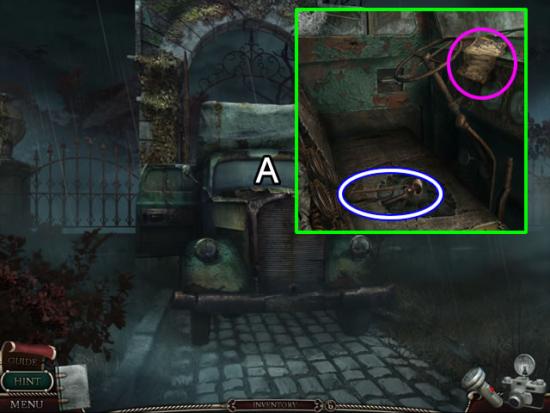
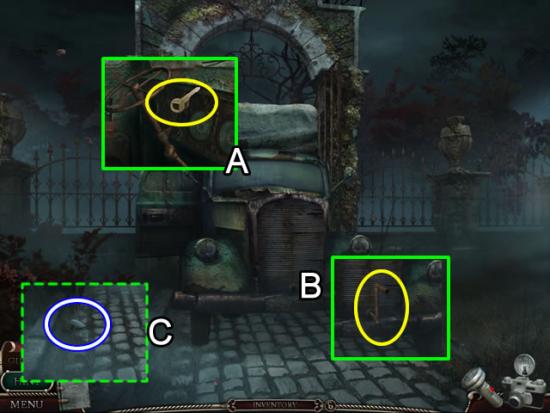
Approach the truck (A).
Look inside the cab. Take the diary page and BOLT CUTTERS.
Return to the double gates.
Stable Yard
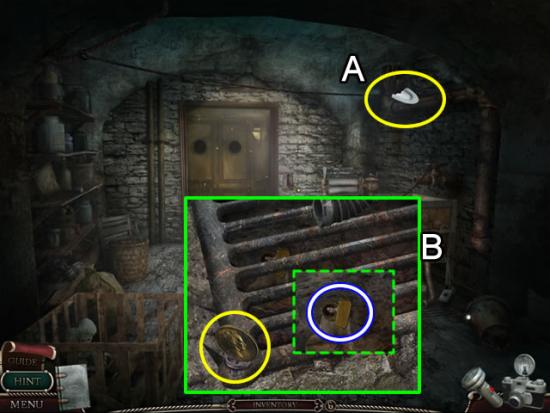
Zoom in on the bicycle (A). Open the pouch and take the OIL CAN. Take the diary page.
Examine the hay bale (B). Dig through the hay to find the CRANK SHAFT.
Look closer at the illuminated window (C). Use the CRANKSHAFT to break the glass.
Groomsman’s Room
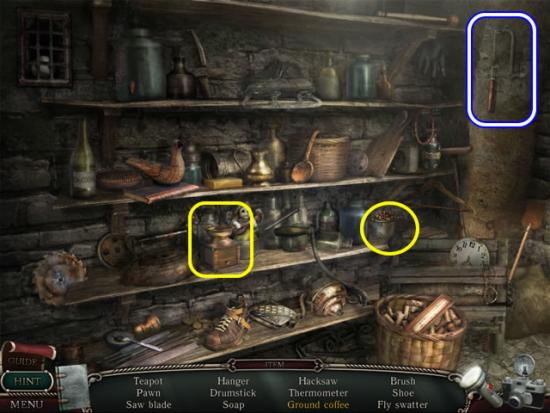
Play the hidden object scene.
Place the candle in the holder. Take the candlestick with candle.
Find the rest of the listed objects.
The LIGHTER goes to inventory.
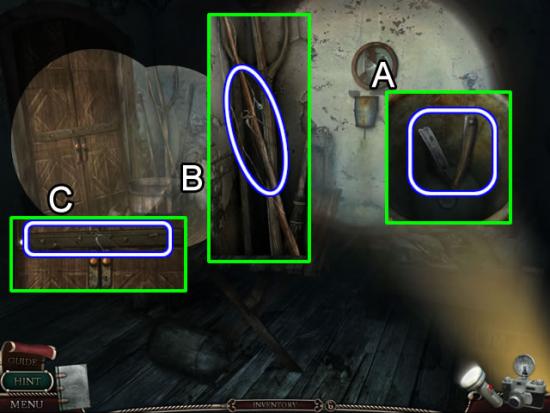
Look in the holder below the mirror (A). Take the DULL BLADE.
Inspect the barrel (B). Use the BOLT CUTTERS to get the FISHING LINE.
Examine the barred door (C). Remove the NAILS with the BOLT CUTTERS.
Barn
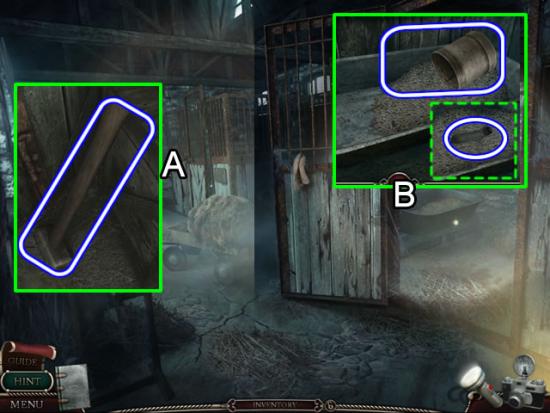
Look inside the far stall (A). Take the HAMMER.
Inspect the feed trough (B). Fill the CAN OF OATS and uncover a CORKED BOTTLE.
Exit the building
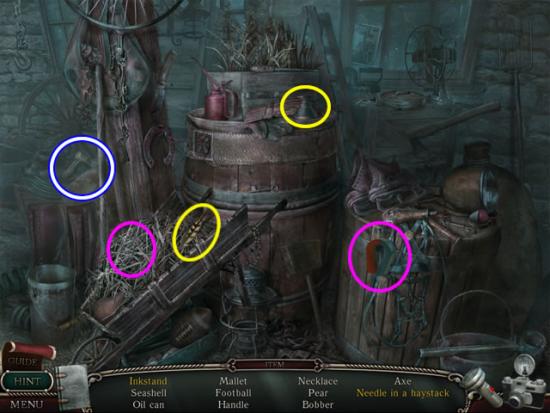
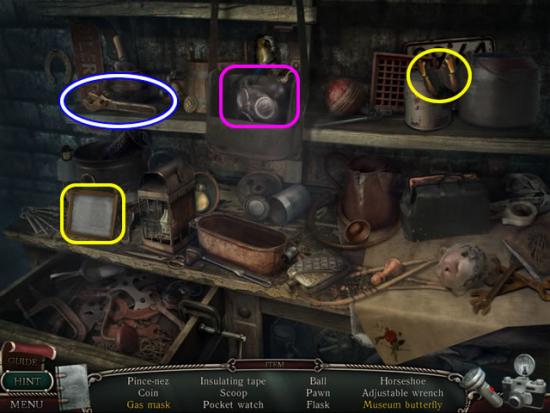
Carriage House
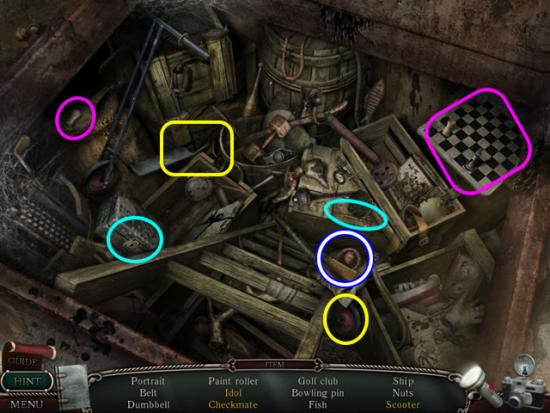
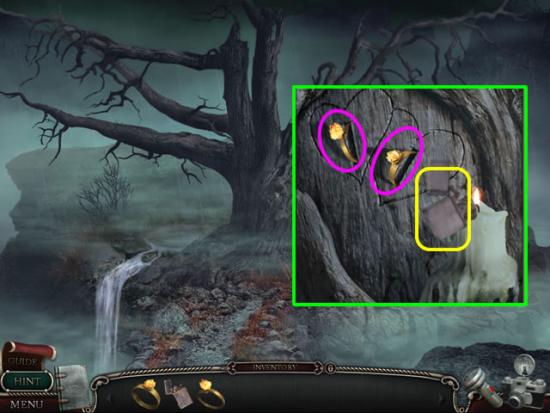
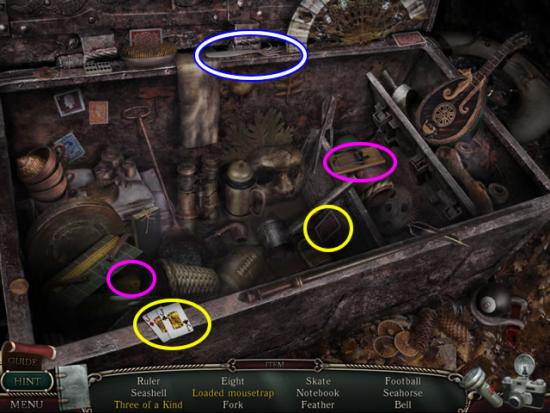
Play the hidden object scene.
Put the feather in the bottle of ink (yellow) to get an inkstand.
Drag the magnet to the hay to find a needle in a haystack.
Find the rest of the listed objects.
The HANDLE goes to inventory.
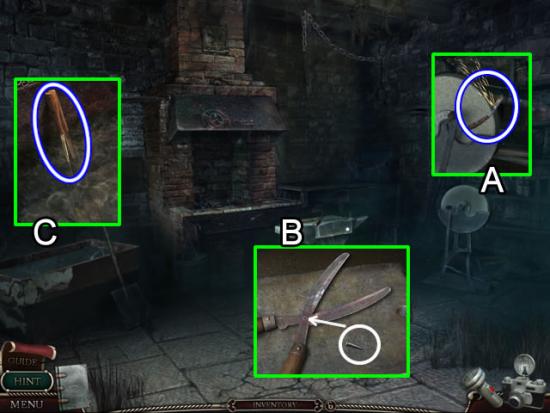
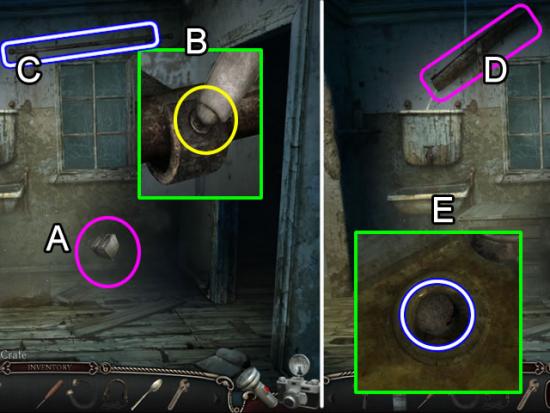
Blacksmith’s Forge
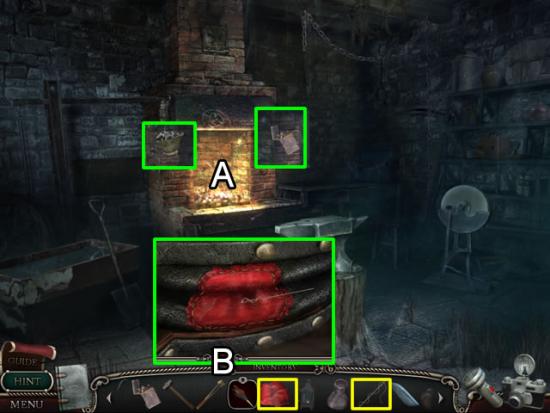
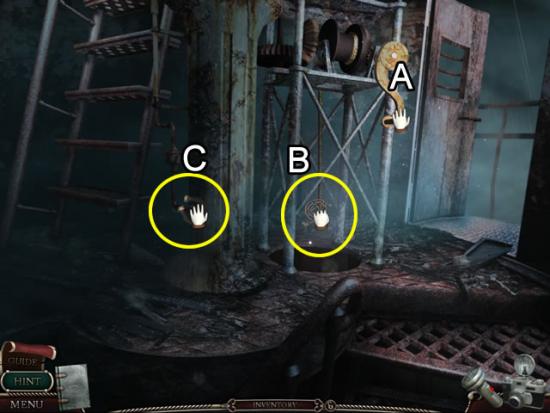
Sharpen the DULL BLADE on the grindstone. Take the BLADE.
Look at the anvil (B). Insert the pin in the hole in the shears. Use the HAMMER to mend the SHEARS.
Take the TONGS out of the water trough (C).
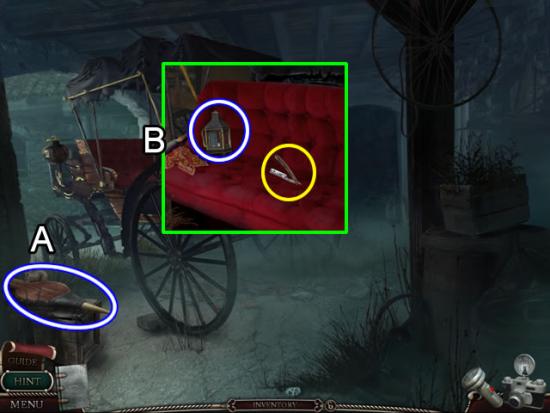
Carriage House
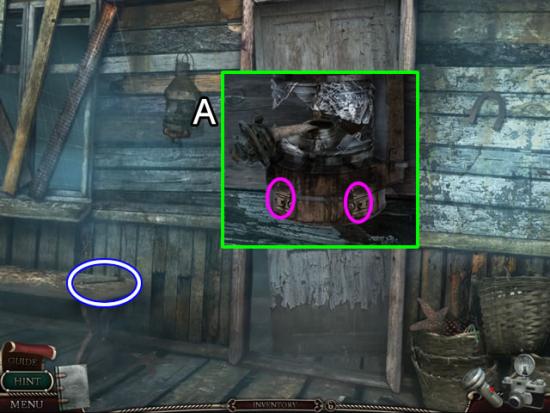
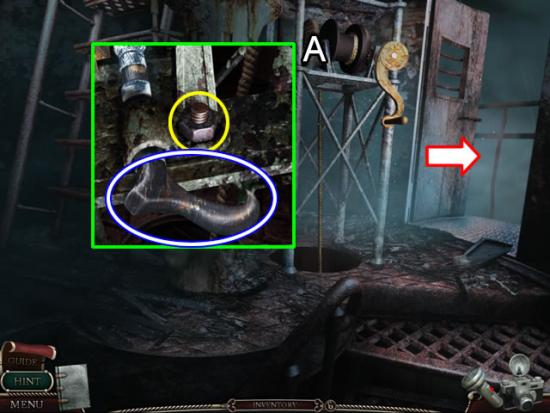
Pick up the BELLOWS (A).
Look inside the carriage (B). Pick up the LANTERN. Use the BLADE to cut the seat and get a patch of LEATHER.
Groomsman’s Room
Attach the HANDLE to the cabinet door.
Take the corkscrew to uncork the bottle. A CORK and BOTTLE are returned to inventory.
Return to the path and head back to the mansion.
Stop at the bushes that glowed in the photo.
Side Yard Path
Examine the bushes (A).
Use the SHEARS to cut remove them. Discover a hidden path.
Lightening Tree
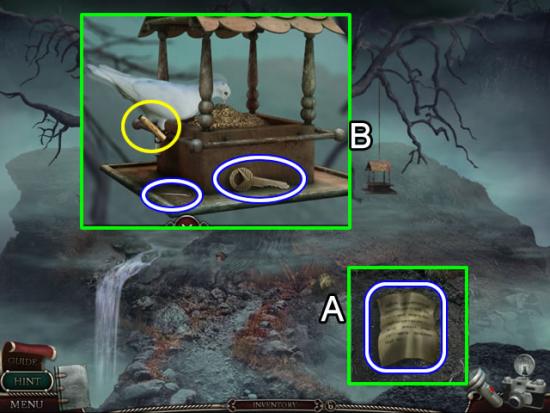
Pick up the NOTE by the side of the path (A).
Zoom in on the bird feeder (B). Pick up the IGNITION KEY.
Fill the feeder from the CAN OF OATS to attract the carrier pigeon.
Place the NOTE on the pigeon’s leg (yellow). Pick up the NEEDLE that falls out.
The NEEDLE and FISHING LINE combine for a NEEDLE AND THREAD in inventory.
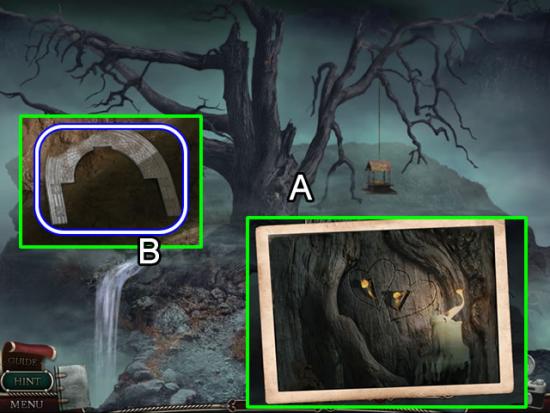
Look at the scarred area in the tree bark (A).
Take a photo of the area.
Zoom in on the waterfall (B). Take the STRANGE PLATE.
Return to the truck.
Truck
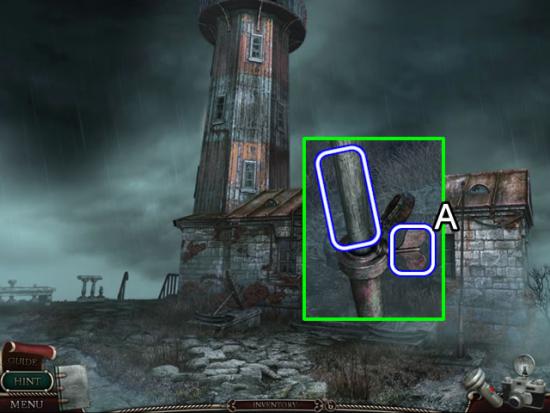
Put the IGNITION KEY in the starter (A).
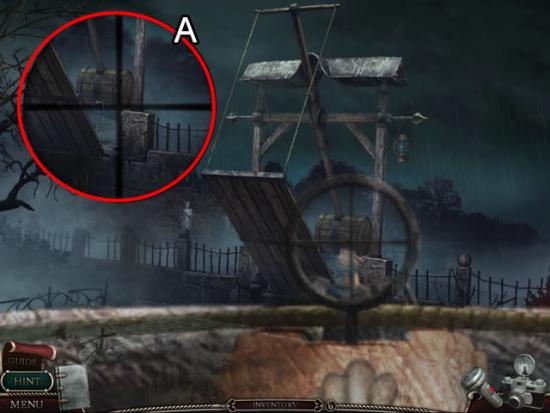
Insert the CRANK STARTER in the front grill (B). Hold the left mouse button down on the starter. Rotate the starter with the mouse until the truck starts.
Pick up the MIRROR (C) after the truck backs out.
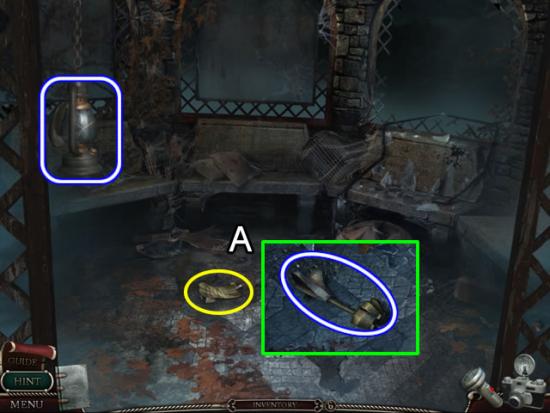
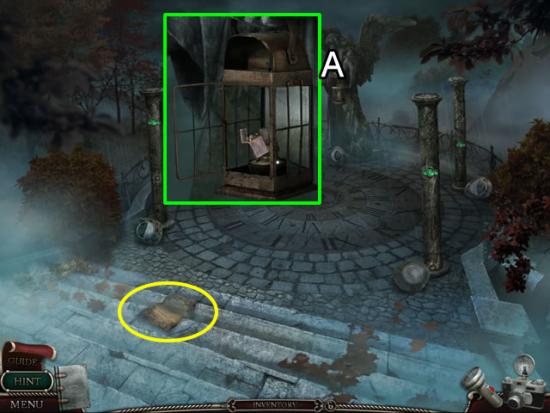
The Statue
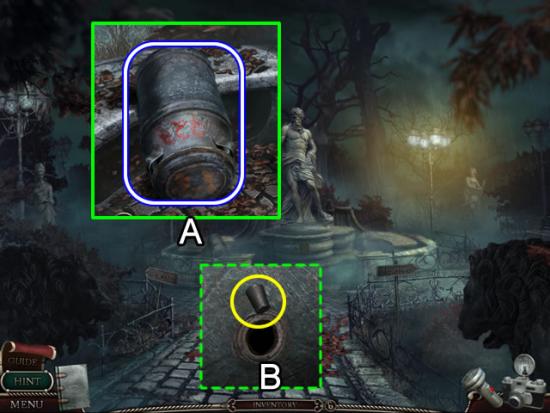
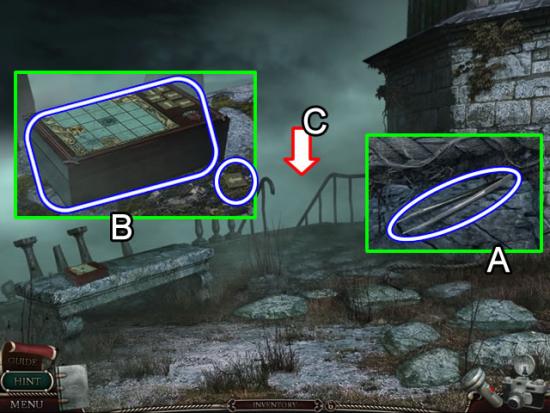
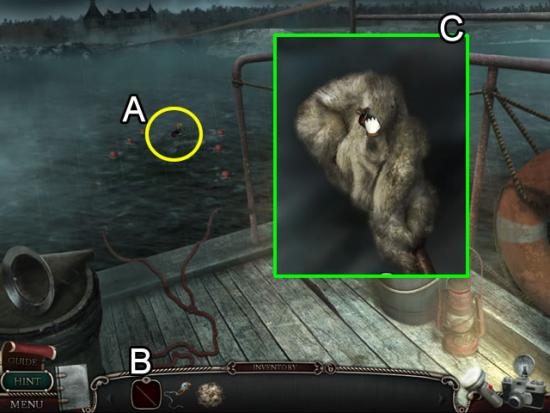
Pick up the HOLE RIDDLED BARREL on the bench to the left of the statue (A).
Click the eye on the inventory frame. Insert the CORK to mend the BARREL (B).
Go right toward the lake.
Path to Lake
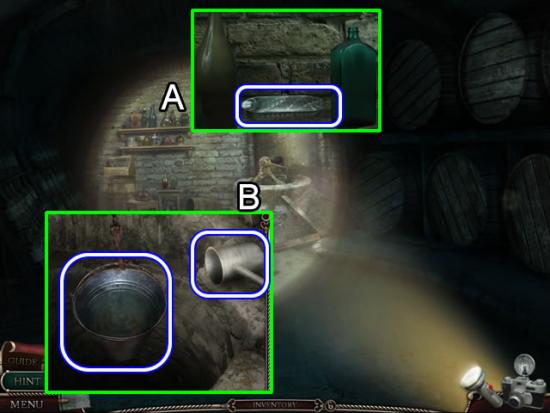
Stop and pick up the BUCKET OF COAL (A).
Continue to the end of the path.
Inspect the burning leaves (B). Take the IRON bar.
Return to the statue.
Take the path to the greenhouse.
Pick up the diary page on the path outside the greenhouse.
Greenhouse
Play the hidden object scene.
Place the claw on the hat (yellow). Take the hat with claw.
Put the egg in the nest (pink). Take the nest with egg.
Add the lens to repair the glasses (aqua).
Find the rest of the listed objects.
The GARDEN STAKES combine with the NAILS to form BOLTS.
Zoom in on the water tap (A).
Pick up the SCOOP.
Use the BLADE to cut off the HOSE.
Return to the stables.
Carriage House
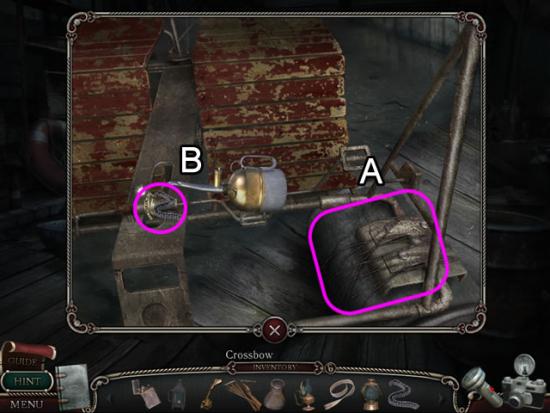
Inspect the box on the back of the carriage (A).
Insert the STRANGE PLATE in the slot to open the box.
Take the BROKEN CROSSBOW from the box.
Go into the blacksmith’s forge.
Blacksmith’s Forge
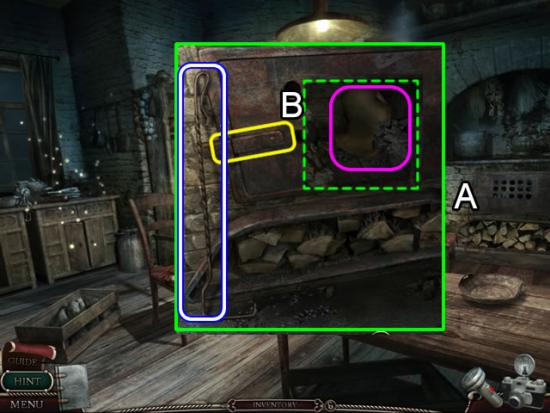
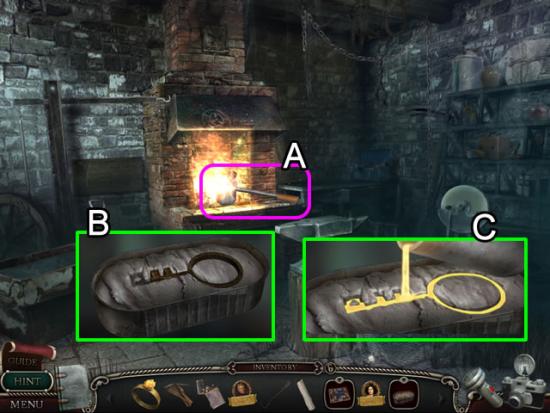
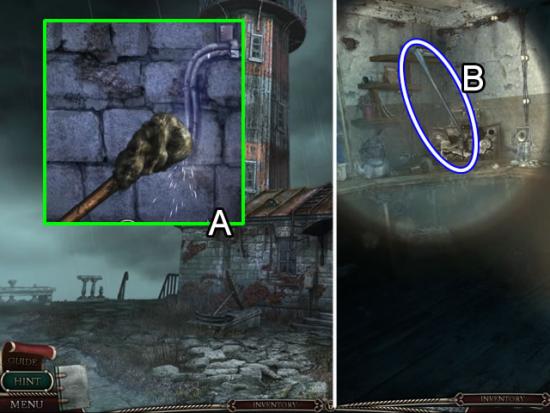
Pour the BUCKET OF COAL in the furnace. Use the LIGHTER to start the fire (A).
Click the BELLOWS in inventory (B). Use the NEEDLE AND THREAD to attach the LEATHER patch to the bellows.
Use the BELLOWS to stoke the fire.
Put the IRON bar in the flames.
Retrieve the hot bar with the TONGS and place it on the anvil.
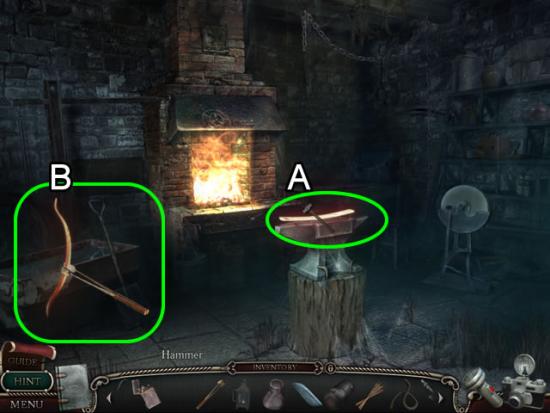
Pound the bar several times with the HAMMER to bend it into a bow shape.
Dip the hot BOW into the water trough with the TONGS.
The cooled BOW combines with the BROKEN CROSSBOW and BOLTS to form a CROSSBOW.
Return to the path. Go down and take a left in the bushes to get to the lightening tree.
Lightening Tree
Use the SCOOP to uncover a container in the loose dirt at the base of the tree.
Take the diary page.
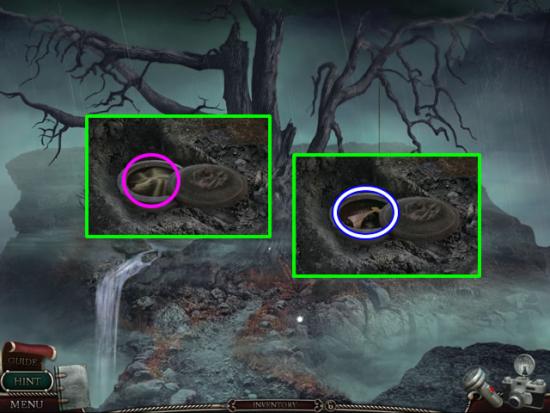
Get the KEY HALF.
Return to the top of the path. Go to the statue and head right to the lake.
Path to Lake
Boathouse Exterior
Boathouse
Lake Path Bridge
Stable Yard
Boathouse
Gazebo
Greenhouse
Statue
Shed

Basement
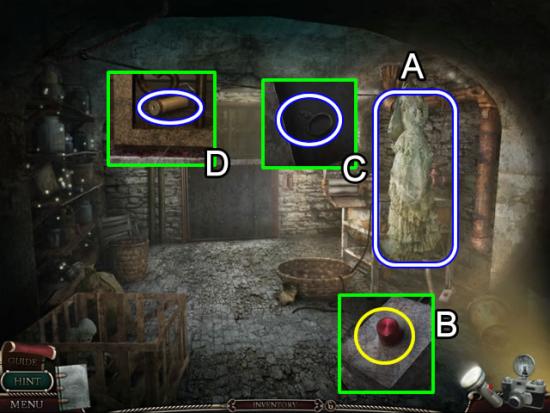
Laundry Room
Shed
Basement
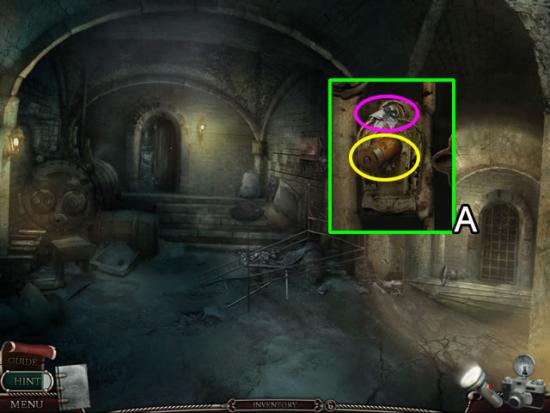
Wine Cellar
Basement
Laundry Room
Kitchen
Dining Room
Bedroom
Hallway
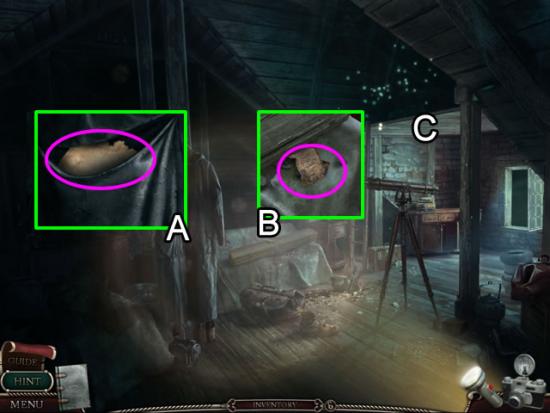
Attic
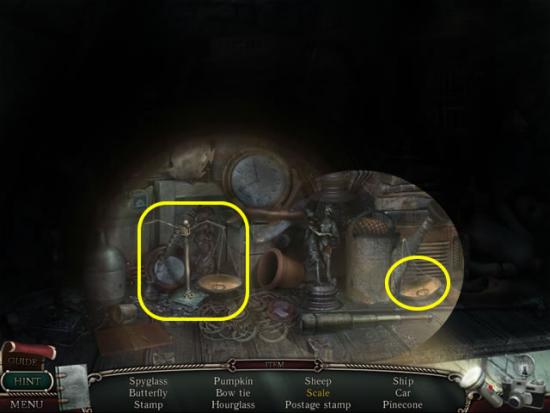
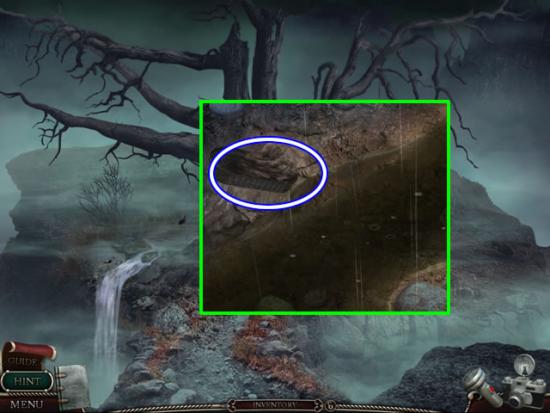
Lightening Tree
Blacksmith’s Shop
Dining Room
Hallway
Second Bedroom
Attic
Tower Top
Laundry Room
Tower Top
Hall of Mirrors
Bedroom
Lightening Tree
Congratulations! You have finished playing the main story of Shiver: Poltergeist. Select “Extra Play” from the main menu to play the bonus chapter.
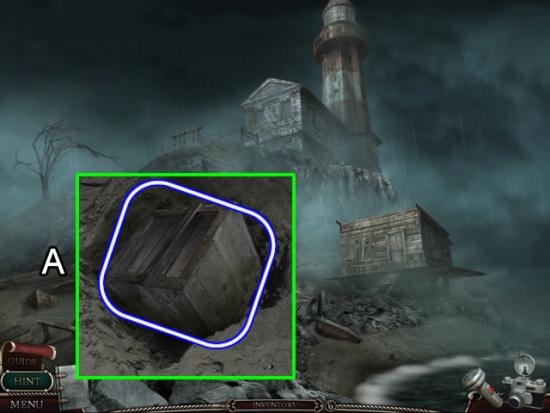
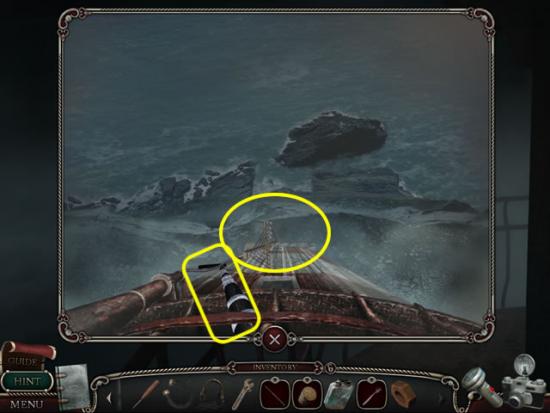
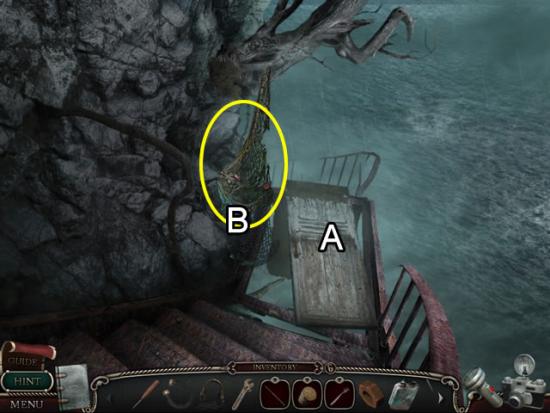
Beach
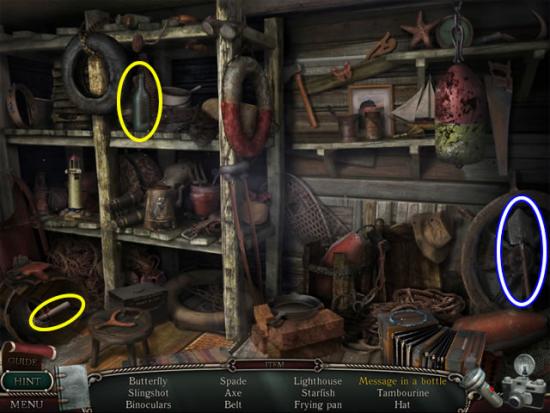
Shack
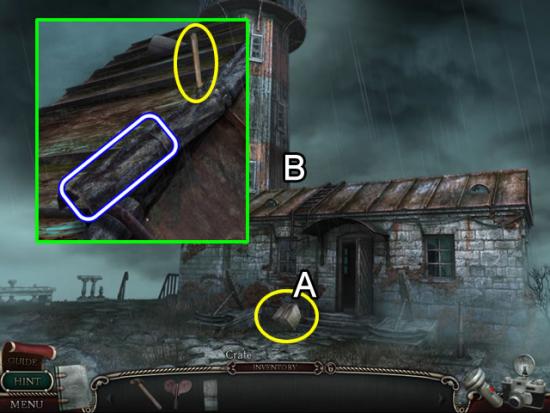
Lighthouse Exterior
Shack
Beach
Lighthouse Exterior
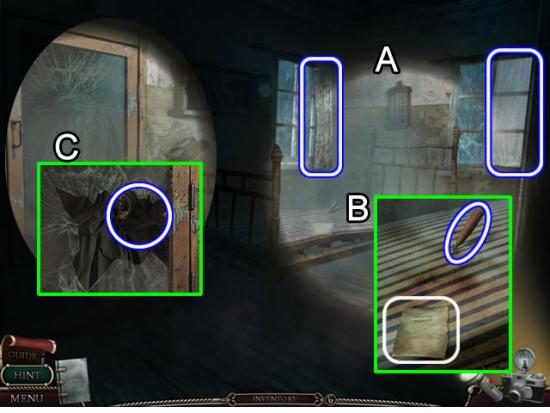
Bedroom
Kitchen
Bedroom
Workshop
Sink Area
Beach
Kitchen
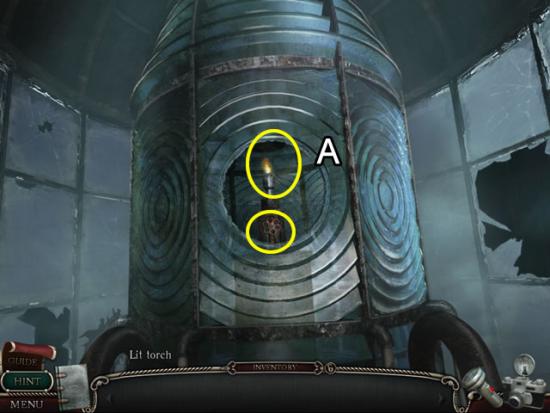
Lighthouse Tower
Top of Lighthouse
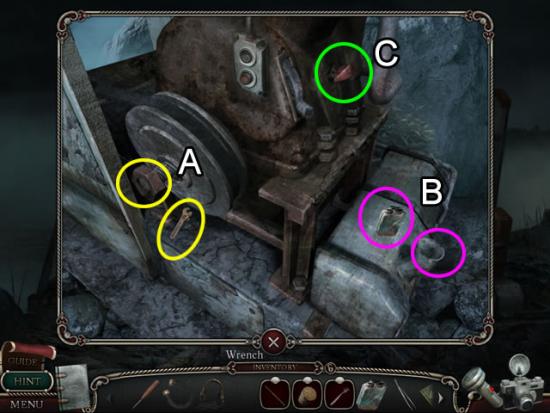
Workshop
Left Side of Lighthouse
Ferry Landing
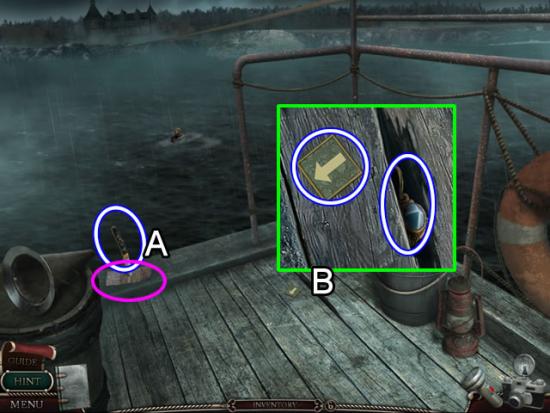
Ferry
Kitchen
Bedroom
Ferry
Lighthouse
Kitchen
Lighthouse Tower
Top of Lighthouse
Congratulations! You have finished the bonus chapter for Shiver: Poltergeist.
