
Grow A Garden 2 Base Price List
What's the most valuable crop?![Evomon Best Starter [Leafbun, Blazpup, or Bubble?]](/wp-content/uploads/2026/06/evomon-best-starter.jpg "Evomon Best Starter [Leafbun, Blazpup, or Bubble?]")
Evomon Best Starter [Leafbun, Blazpup, or Bubble?]
Grass-type, Fire-type, or Water-type?![Evomon Tier List [META and BEST Evomon]](/wp-content/uploads/2026/06/evomon-tier-list.jpg "Evomon Tier List [META and BEST Evomon]")
Evomon Tier List [META and BEST Evomon]
The Evomon dream team.
![[Roblox] Evomon Shiny Hunting Guide – Including Prismatic and Pris Shinies!](/wp-content/uploads/2026/06/evomon-shiny-hunting-guide.jpg "[Roblox] Evomon Shiny Hunting Guide – Including Prismatic and Pris Shinies!")
Sherlock Holmes – The Secret of the Silver Earring Tips Walkthrough
Welcome to Part 1 of Gamezebo's strategy guide for Sherlock Holmes: The Silver Earring from Frogwares Games. In this large file point and click adventure game, Holmes and Watson investigate a series of murders. Part 1 covers day 1, 2, and 3 of the adventure. Part 2 will cover day 4 and 5. This guide is divided into sections:General TipsDay 1 Walkthroughs…..Day 1 Quiz SolutionDay 2 Walkthroughs…..Number Board Puzzle Solution…..Automaton Puzzle Solution…..Noah's Ark Puzzle Soluti…


- Prefer Gamezebo on Google

a:1:i:0;a:2:s:13:”section_title”;s:55:”Sherlock Holmes – The Secret of the Silver Earring Tips”;s:12:”section_body”;s:135341:”Welcome to Part 1 of Gamezebo’s strategy guide for Sherlock Holmes: The Silver Earring from Frogwares Games. In this large file point and click adventure game, Holmes and Watson investigate a series of murders. Part 1 covers day 1, 2, and 3 of the adventure. Part 2 will cover day 4 and 5.
This guide is divided into sections:
- General Tips
- Day 1 Walkthroughs
- …..Day 1 Quiz Solution
- Day 2 Walkthroughs
- …..Number Board Puzzle Solution
- …..Automaton Puzzle Solution
- …..Noah’s Ark Puzzle Solution
- …..Day 2 Quiz Solution
- Day 3 Walkthroughs
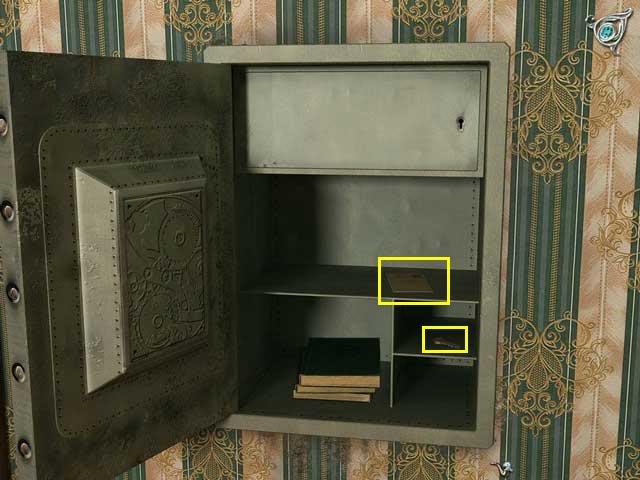
- …..Bromsby’s Office Safe Puzzle
- …..Getting Holmes into the Office at Night Solution
- …..Getting Holmes into the Theater at Night Solution
- …..Day 3 Quiz Solution
- Day 4 Walkthroughs
- …..Abbey Forest Maze Solution
- …..Day 4 Quiz Solution
- Day 5 Walkthroughs
- …..Day 5 Quiz Solution
There are no spoilers in this section. General tips will cover
- Main Menu Options, including Save
- Navigation and Cursor Controls
- Using your Inventory
- Talking to Characters
- Using Your Journal
- Answering the Quizzes
After the general tips, you will find the spoiler section with a detailed walkthrough for each day.
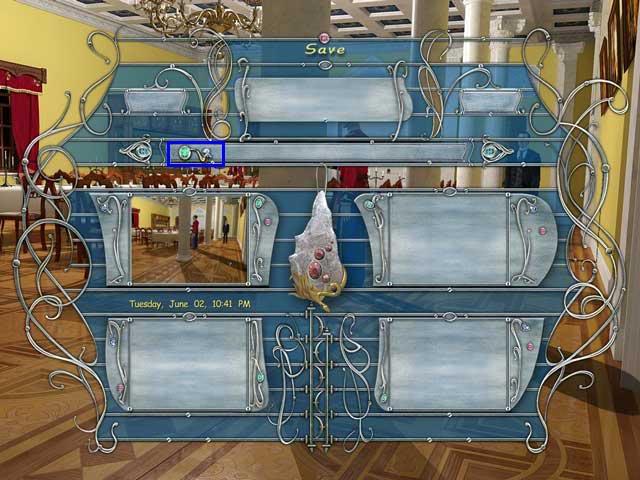
Main Menu Options, including Save
- You can get back to the Main Menu at any time by pressing ESCape.
- There is no autosave, so make a save file before you quit the game.
- You can’t name save files, but you do see a thumbnail of where you saved.
- The control with a green jewel in the center of it lets you scroll through your save files.

Navigation and Cursor Controls
- Character navigation is very awkward. Sometimes you can just click anywhere and your character will walk in that direction.
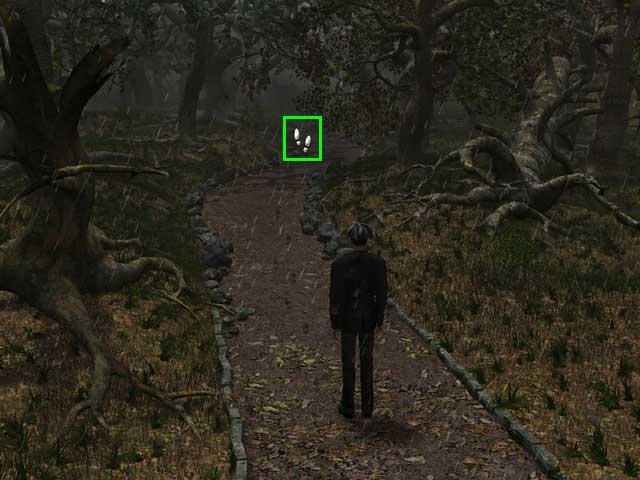
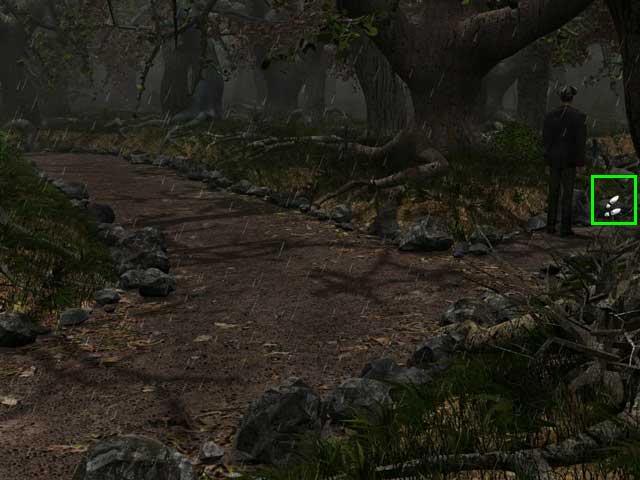
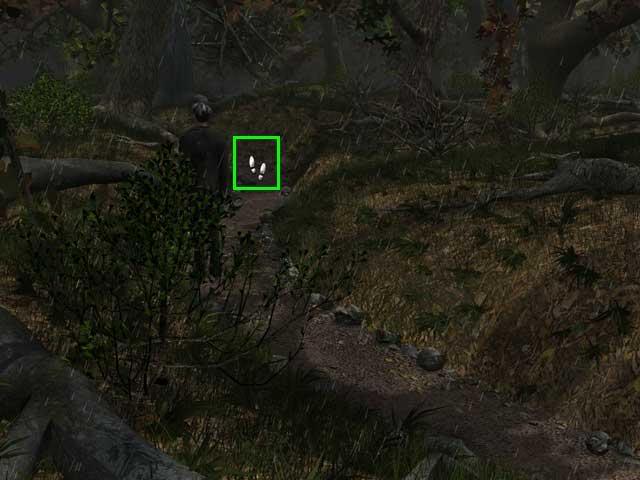
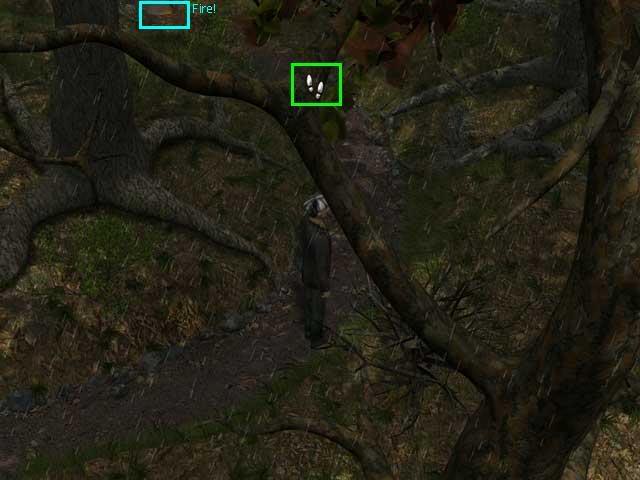
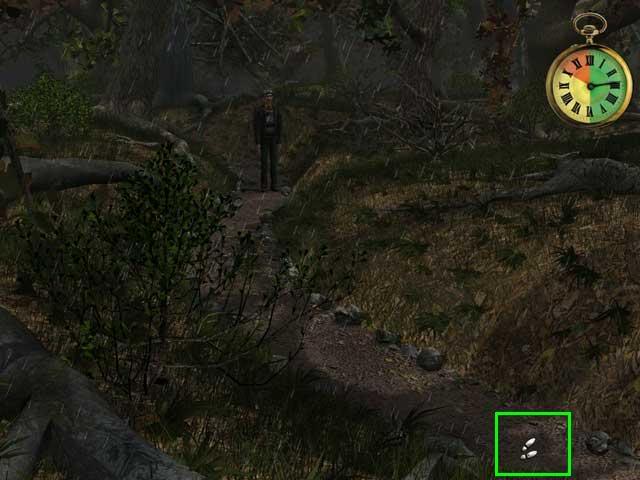
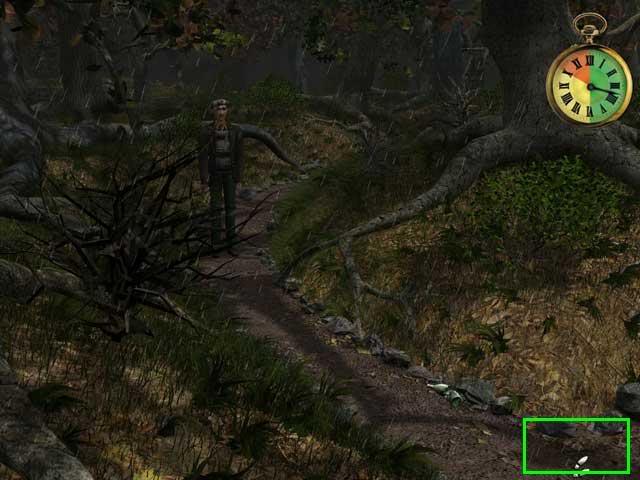
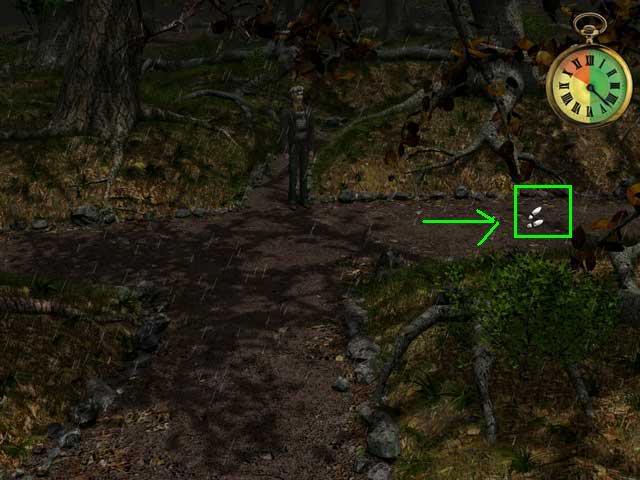
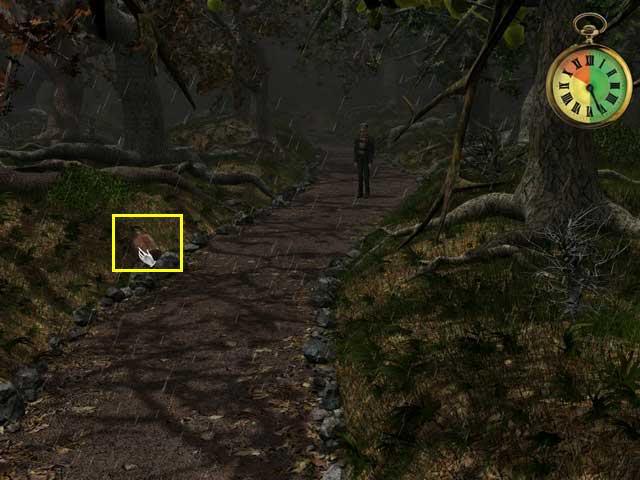
- But if the view is going to change, you must click on the exact hot spot needed. These will be marked by tiny footprints as your cursor passes over the spot. However, the footprints aren’t necessarily pointing in the direction your character will go when you click on the spot.
- Hotspot footprints may also appear on tables, sofas, and other pieces of furniture.
- If you have the inventory bar open, it may be covering up a hotspot you need to exit the scene. Right click to close the inventory bar again.
- If you doubleclick on a hotspot, Holmes might start running. Or not. The game is very inconsistent in this.
- Sometimes clicking on a hotspot just causes Holmes to turn. Try looking for a different hotspot.
- If you have used the magnifying glass to zoom in on the scene, you will need to close the magnified view by clicking on the blue art deco arrow in the top right corner.
- Whenever Holmes says a door is closed, he means locked. Either you can’t get in at all at this time, or you need a key.
- If you are playing as Holmes, the cursor will be a pipe. If you are playing as Watson, the cursor will be a quill and paper.
- The cursor will change to a hand if there is something you can pick up, or a place where you can use an inventory item.
- Right click to open the inventory bar.
- Click on an object in inventory to see additional options, like READ or UNPACK.
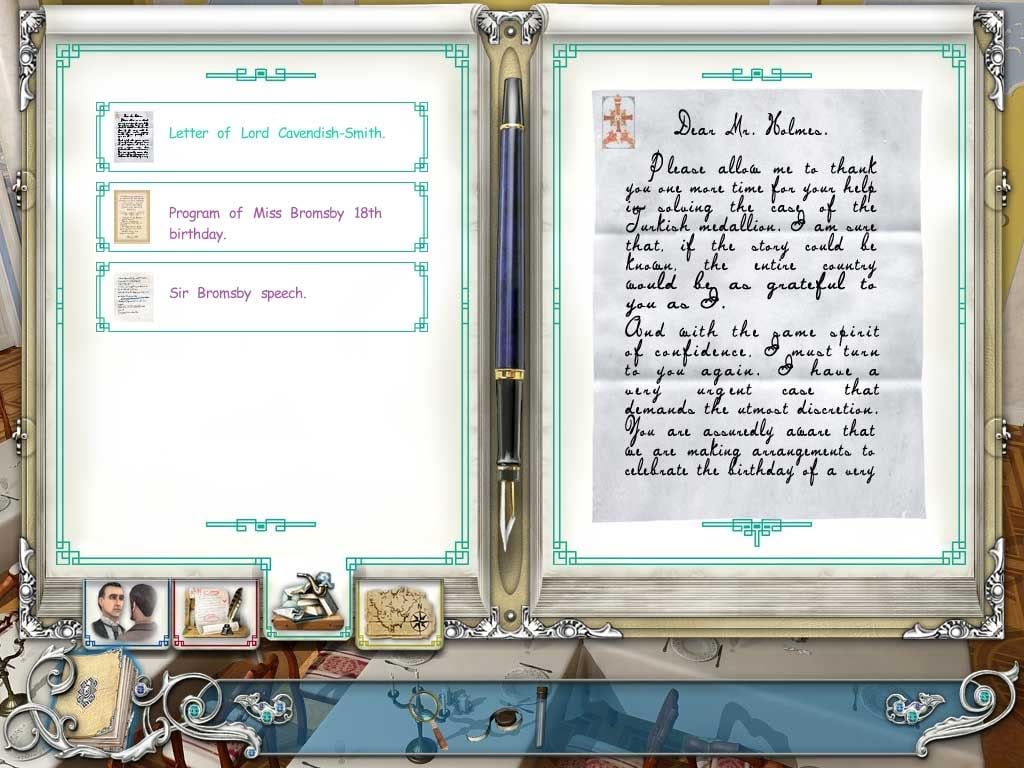
- The READ command on the inventory bar doesn’t actually read the document. Instead it gives you a brief two line note about the document and then copies it to your journal. Then you have to use the documents tab in the journal to see the document index, then select the document before you can finally read it.
- You must read all documents before completing a day.
- Your inventory tools are a test tube, a magnifying glass, and a measuring tape. Just click on them to use them.
- If Holmes says "I need something," he usually means he wants one of his tools from inventory, the magnifying glass, tape measure, or test tube. But he might also mean he needs one of the inventory objects you picked up, like a knife.
- Holmes likes to measure footprints and any smudges.
- Most items will stay in inventory until Holmes analyzes them back at Baker Street. At that point the item disappears from inventory but there will be a new evidence report in the journal about it.
- This is pretty simple in this game. Just click on a character and you will see a list of topics. You must talk to them about all topics shown.
- If you want to talk about something in inventory, right click to open the inventory bar, click on the object to select it, then hover it over the character.
- If Holmes says "I need to use one of my little hints" he means you should ask about a clue from inventory.
- You can review previous conversations by checking your journal. Sometimes this is the only way to find out the name of the person you were talking to!
- To get to the journal, right click to open the inventory bar, then left click on the book on the far left.
- To close the journal after you are done with it, left click on the book icon again.
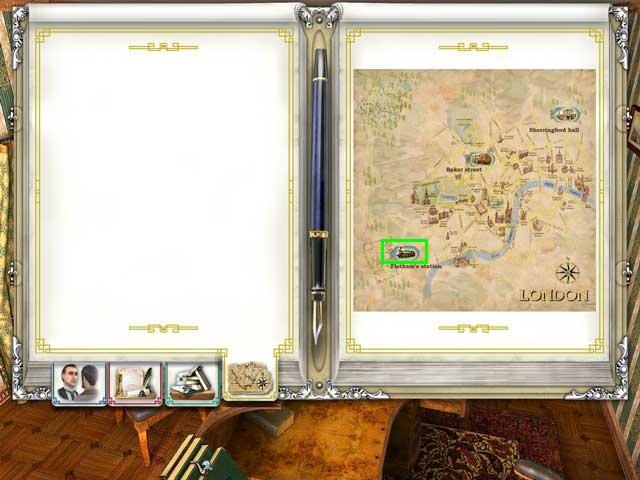
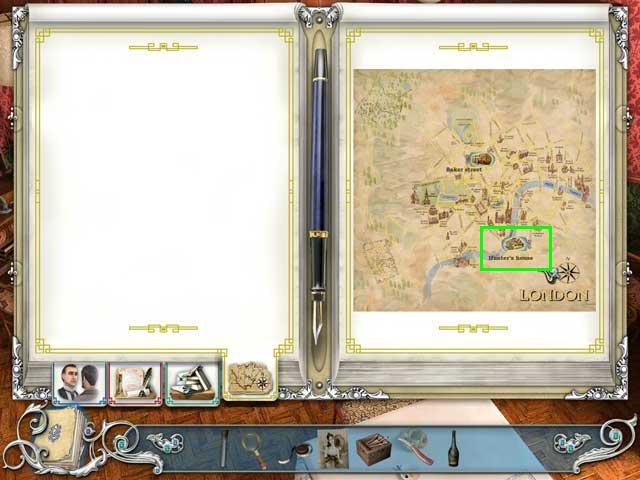
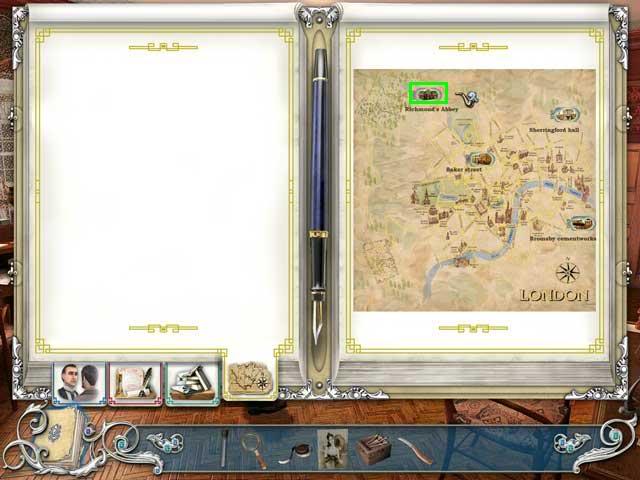
- The journal has four tabs: Conversation Log, Document Log, Evidence Log, and Map.
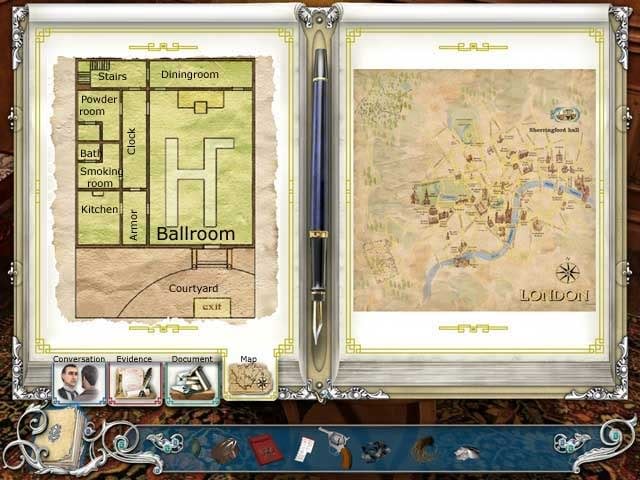
- You can move up or down in the index to each log by clicking on the stylized arrows at the top and bottom of the index page.
- Clicking on an item in the index on the left will make its details appear on the right.
- The map has two parts. The left side is a floor plan of the building you are in, if there is one. The right side is a map showing the city locations you can visit. New locations will be added to the map over the course of a day.
- There is a quiz at the end of each day that shows how each clue fits into the mystery.
- Use the down arrow on the right page to scroll through the questions.
- First click YES or NO to answer the question. Then justify your answer by choosing evidence from the logs on the left.
- To use the evidence to justify the answer, select the log, then click on the item on the index list on the left. Then immediately click on the answer box on the right page.
- Check the color of the frame under the question. This tells you where the answer is in your journal. Red is a conversation. Green is evidence. Blue is a document.
- If you need to review the notes about an item, click on it on the left page, then click on the NOTES tab. Click on the QUIZ tab to return to the quiz.
- After you’ve entered the evidence in the boxes on the right, click on the down arrow on the right to scroll to the next question.
- When you are done answering the quiz, just click on the book icon to close the journal. Holmes will tell you whether you were right or wrong.
- You must get all answers right to proceed to the next chapter.
SPOILERS BELOW!!!!
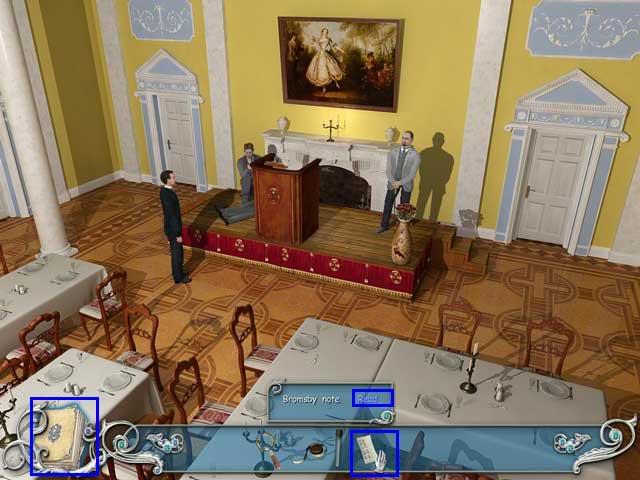
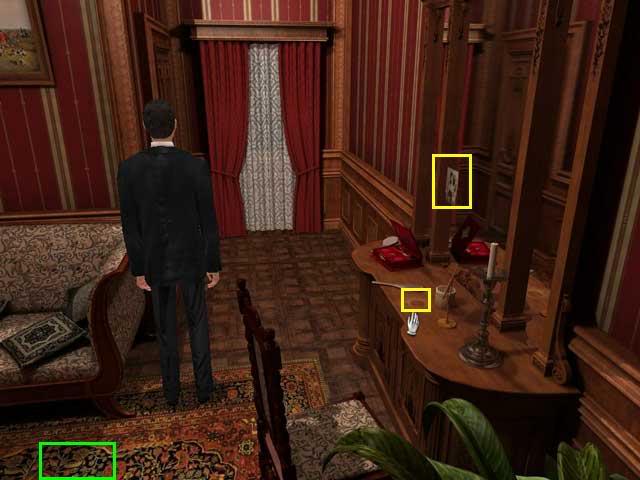
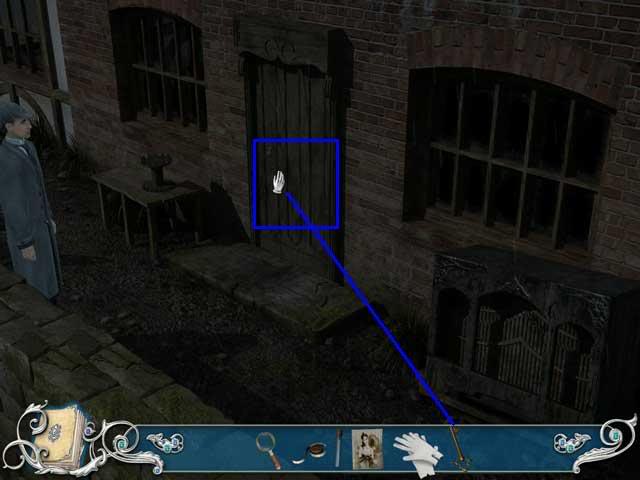
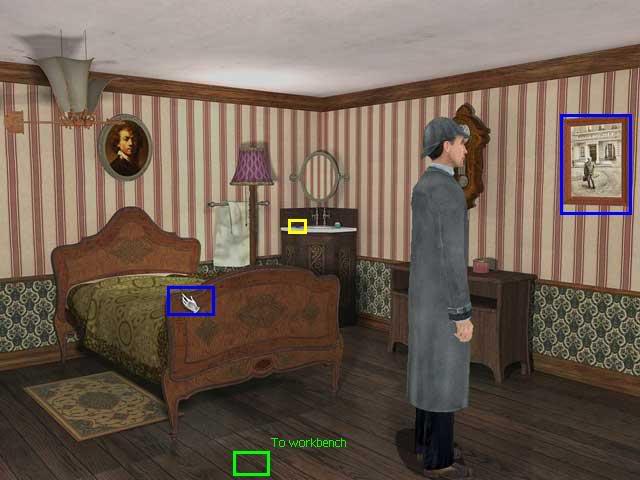
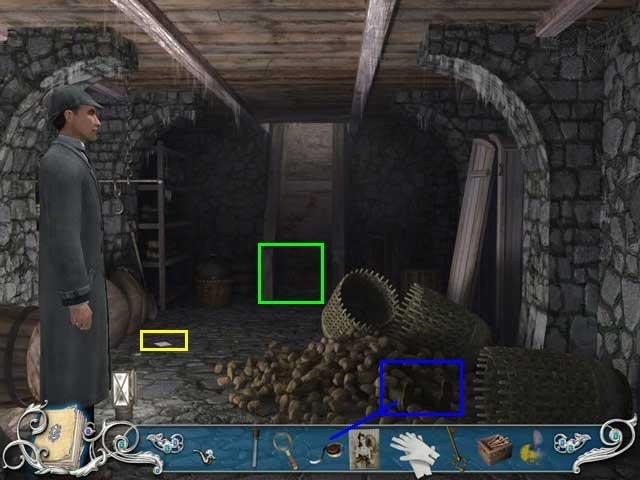
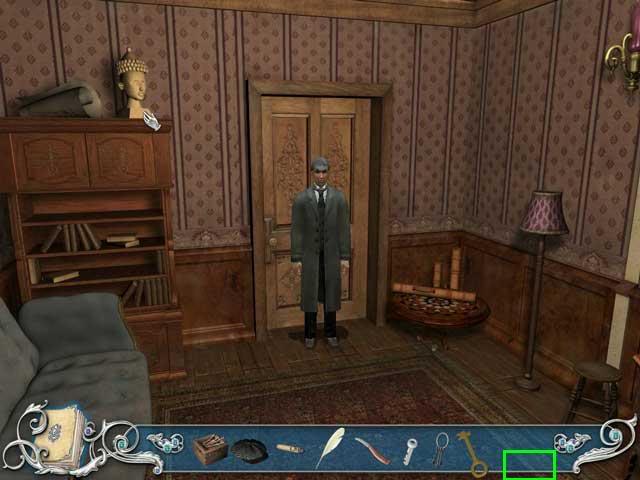
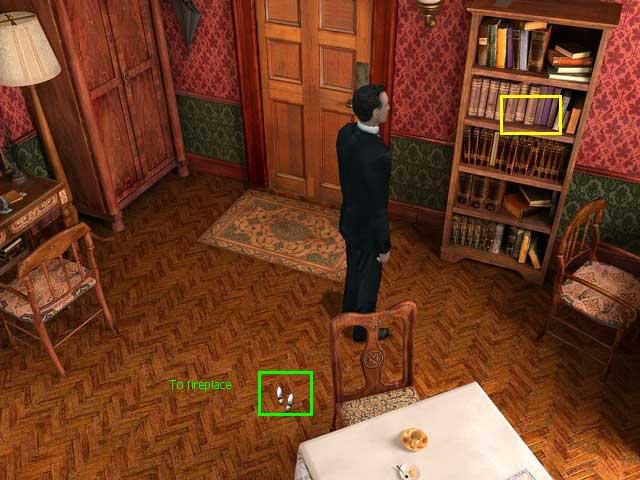
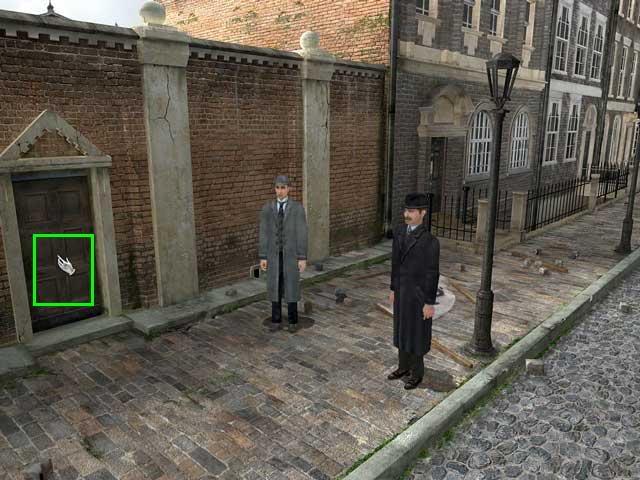
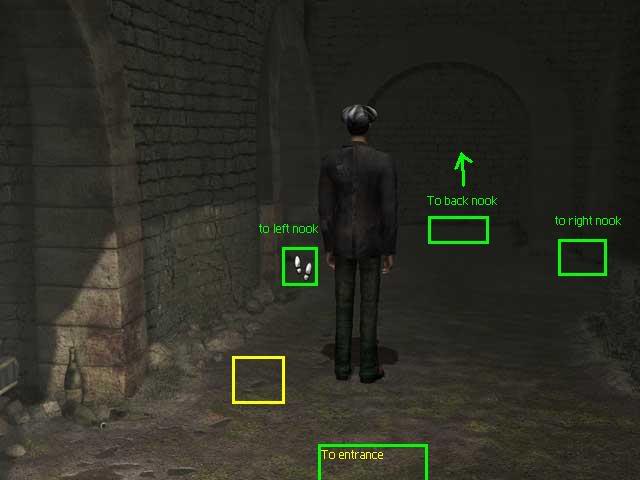
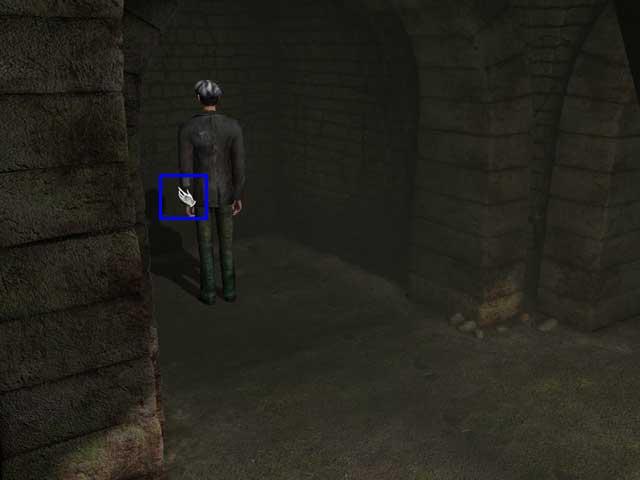
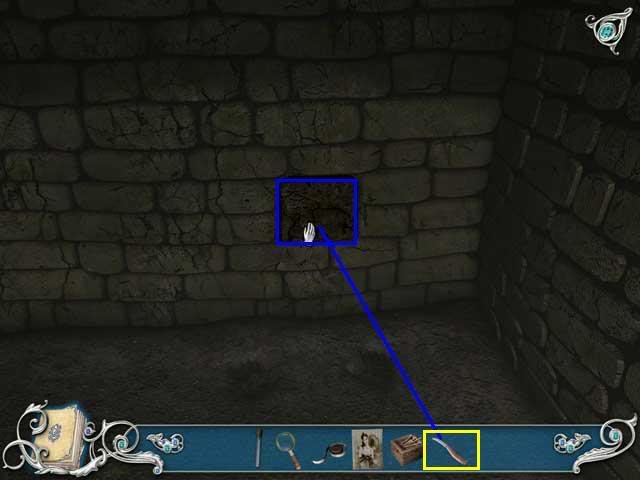
In the screenshots, items marked in yellow are things you can put into inventory.
Items marked in blue are places where you can interact with the scene.
Locations marked in green are hotspots where you can cause Holmes to turn or exit.
There are many rooms at Sherringford Hall and you may search them in any order.
When you have finished at the Hall, you can return to Baker Street.
- Ballroom: Day 1
- Hall with Armor: Day 1
- Hall with Clock: Day 1
- Hall with Staircase: Day 1
- Men’s Bathroom: Day 1
- Smoking Room: Day 1
- Powder Room: Day 1
- Sherrington Hall Kitchen: Day 1
- Sherrington Hall Grounds: Day 1
- Baker Street, Day 1
- Day 1 Quiz Answers
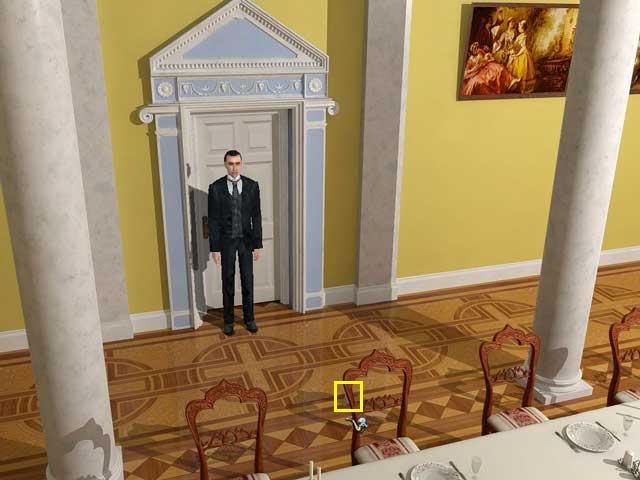
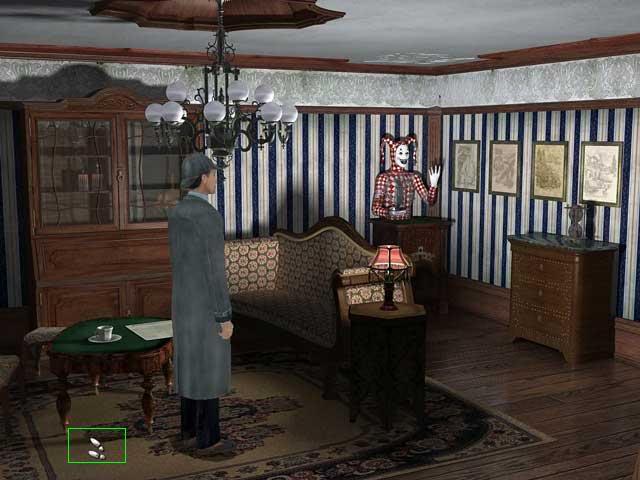
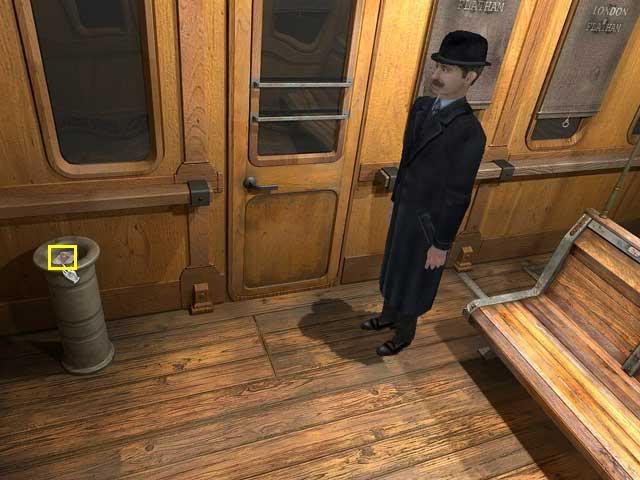
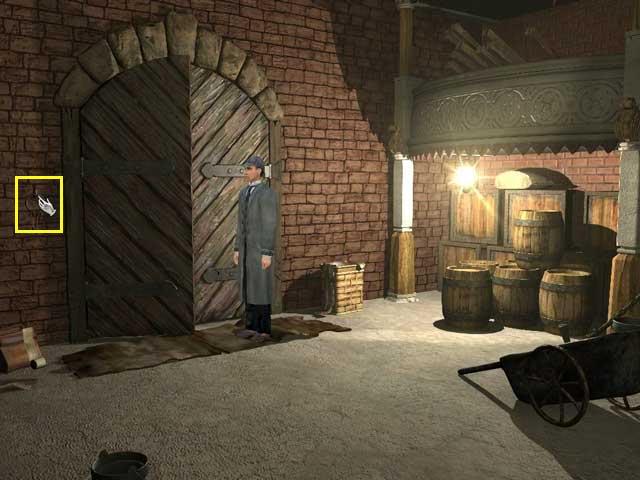
Sherringford Hall, Day 1
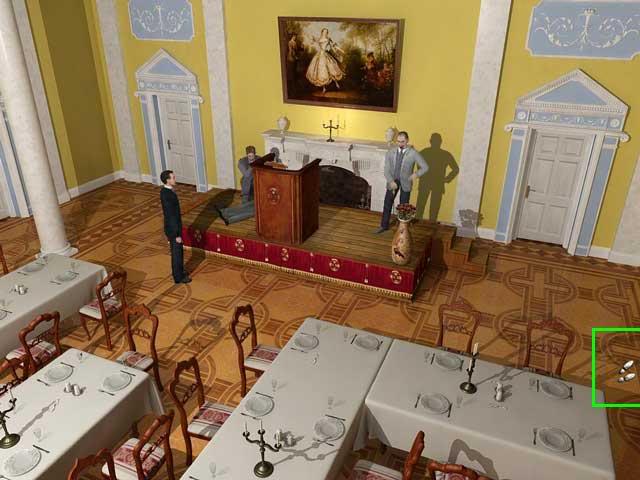
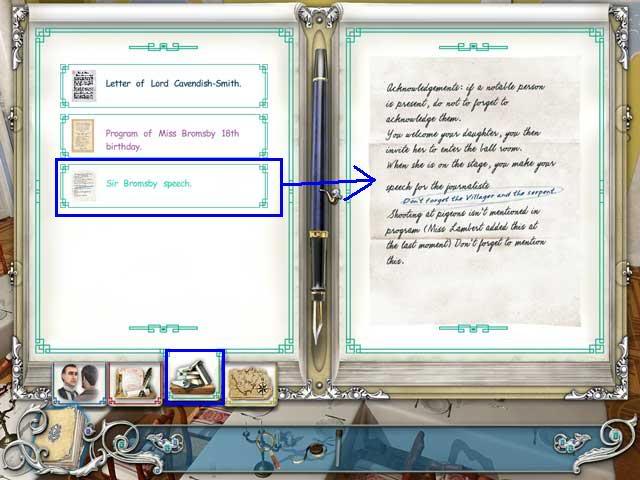
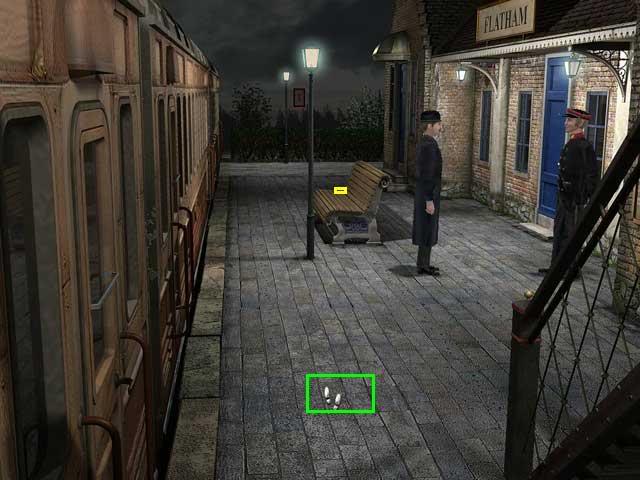
To start there are 5 people in the Ballroom, and you need to talk to all of them. 2 are on the speaker’s stage. 2 military men are guests. And a servant is sweeping.
Actions
First visit
Talk to the 2 people on the stage, the 2 military men, and the servant.
Locate the notes from the speech by the stage.

Hover over the notes in inventory, then click on READ to copy them to the journal.

Now you can open the journal and read them in the Document Log.
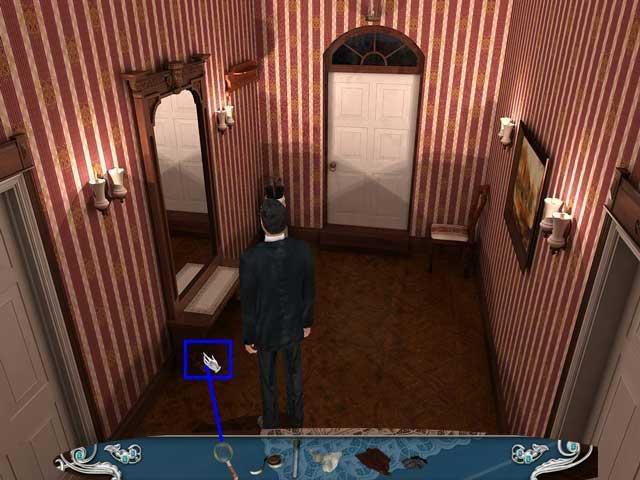
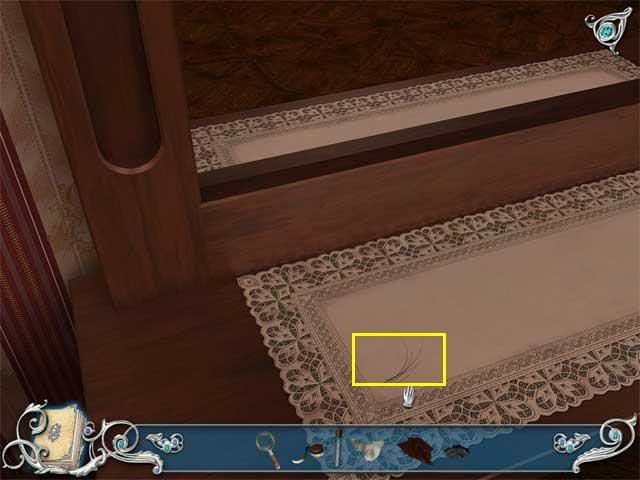
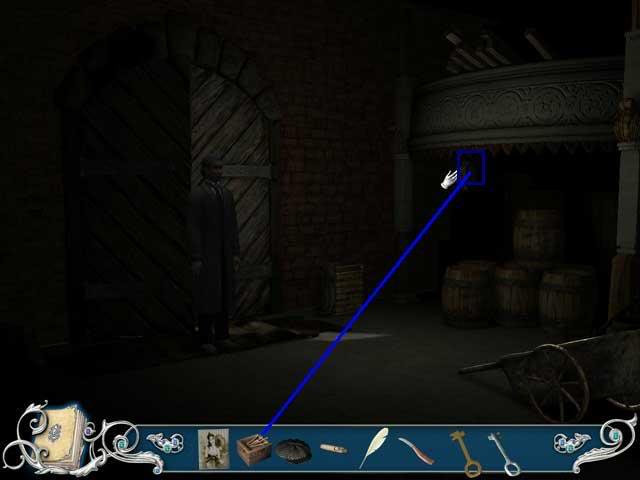
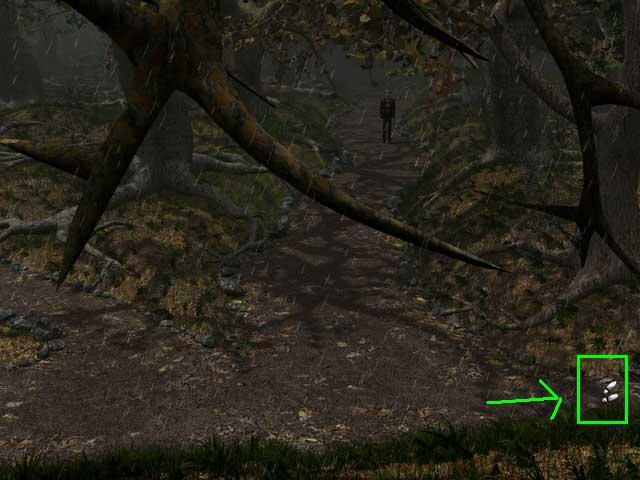
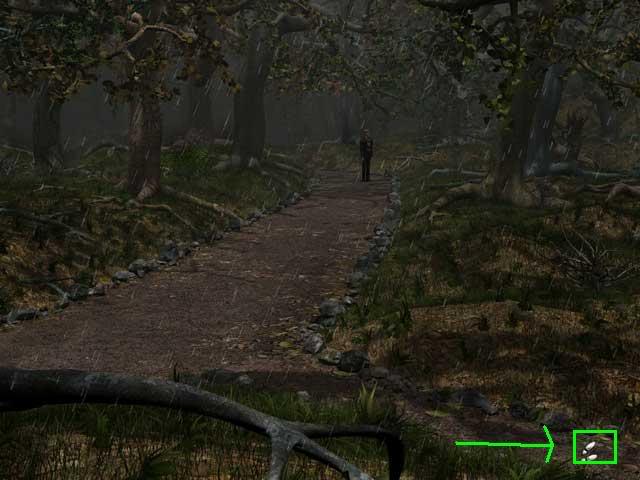
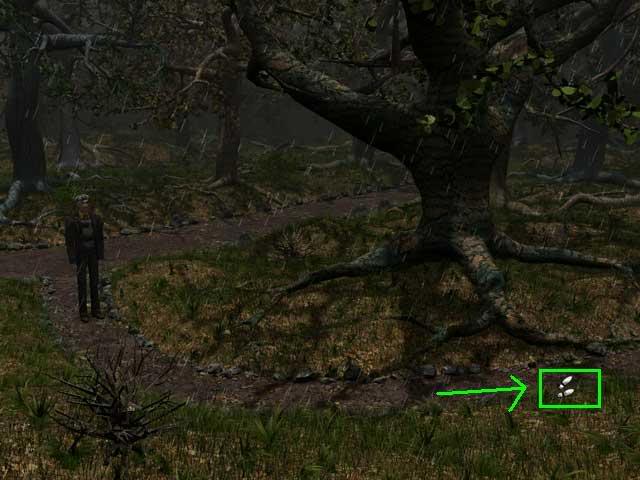
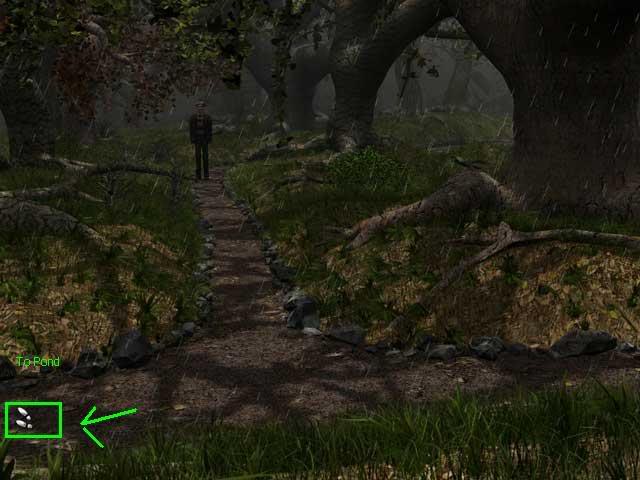
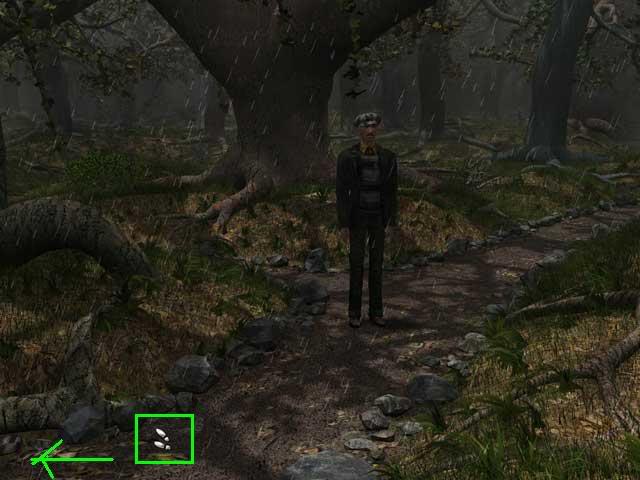
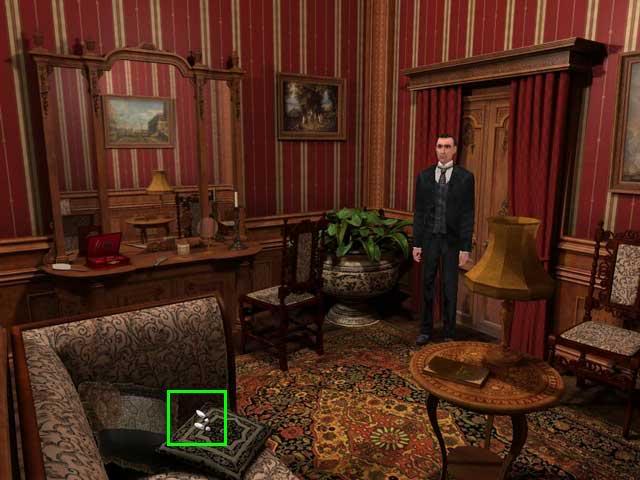
Locate the bit of cloth on the chair by the back door. This is a very small fragment of white.
Now you can search the outer rooms.
Second visit
After you have been to all the outer rooms, come back to the Ballroom and talk to everyone again. One of the people you met in the dining room will now be at the bar with the Colonel. You may need to go out to the dining room and come back in a 3rd time before the Barman appears at the bar. You also need to talk to him.
Evidence
You need 2 pieces of evidence. One is a document on the floor by the stage.
The other is a tiny piece of cloth on one of the chairs by the door that leads to the Hall with Armor.
After you collect the document, make sure you read it and any other documents in your journal.
There are no people here.
Actions
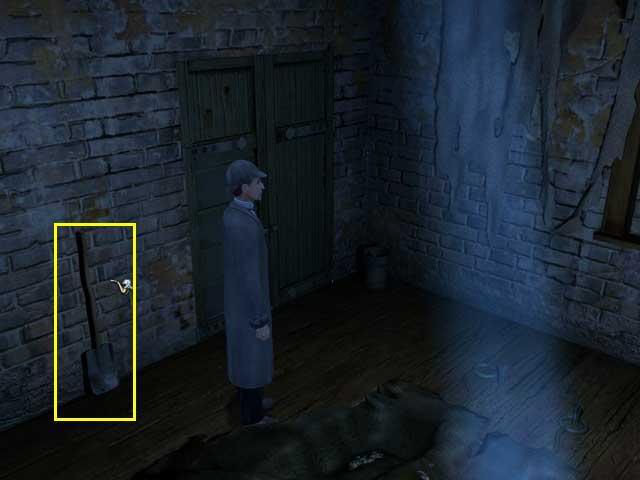
Look behind the Armor. You will find a Black Sheet.
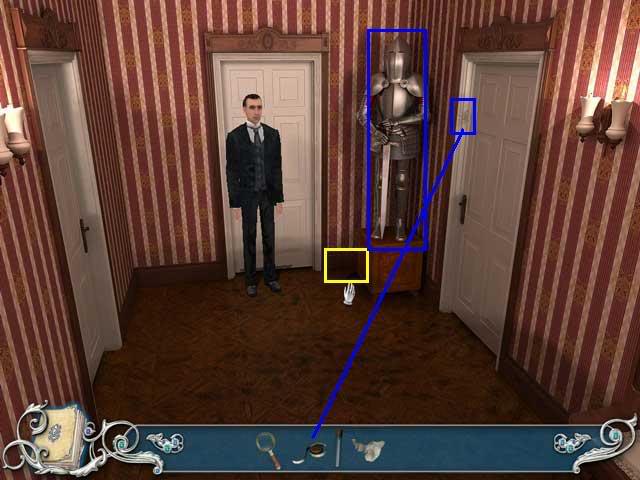
Check the smudges on the door by the Armor. You will need to use the tape measure.
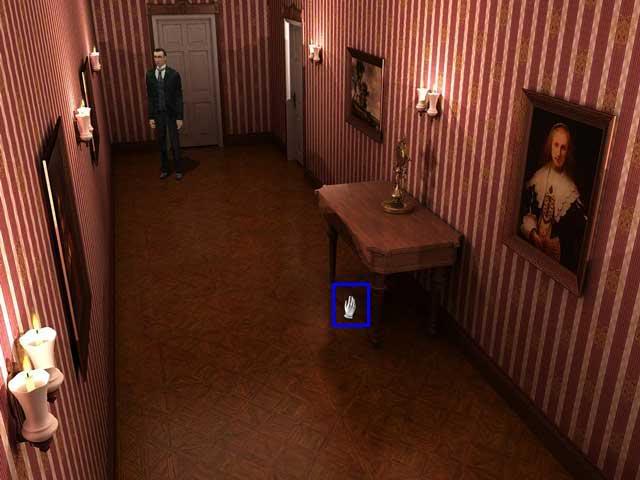
In the far side of this hall there is a table by a mirror.
Search it for a Black Hair.
Evidence
Black Sheet
Smudge measurements
Black Hair from table
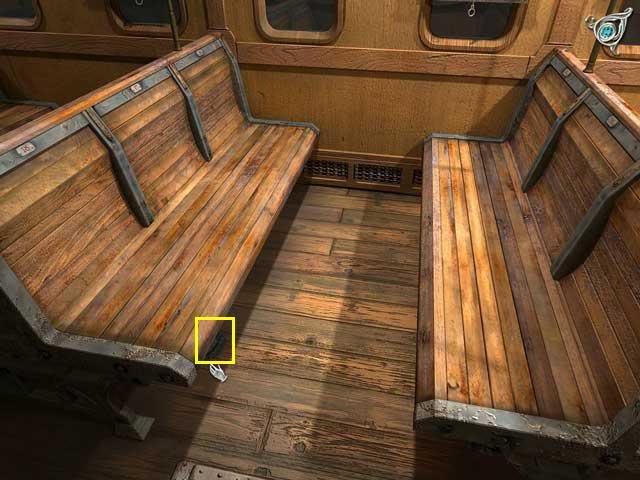
You will hear the clock ticking whenever you enter this hall.
People
There are no people here.
Actions
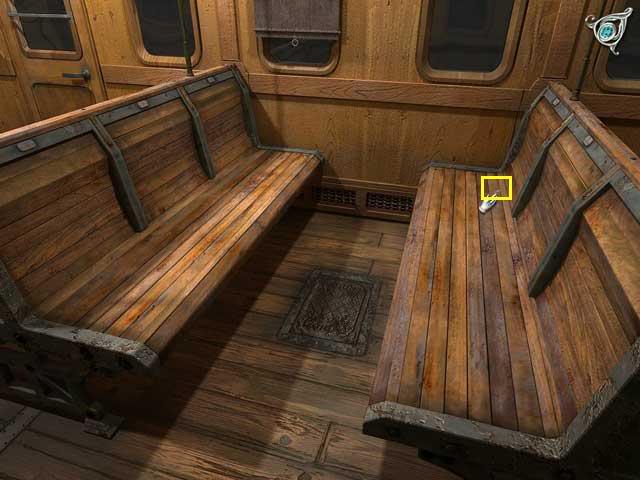
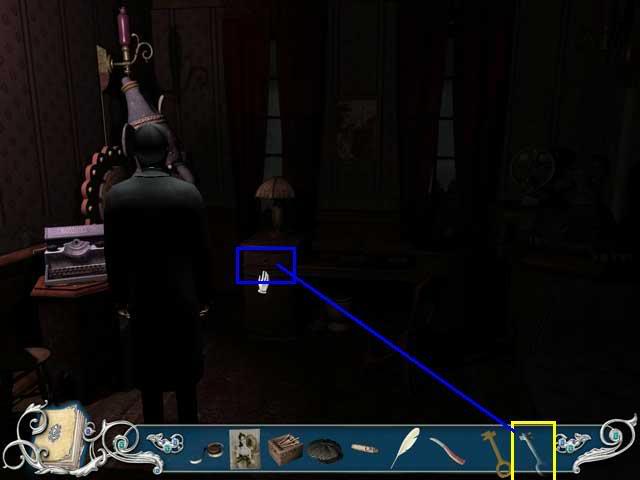
You need to look carefully-there are 3 items to collect here.
There is a red purse on the floor by the door to the ballroom.
Next to the purse on the floor there is some Dust. You will need to pick it up in the test tube.
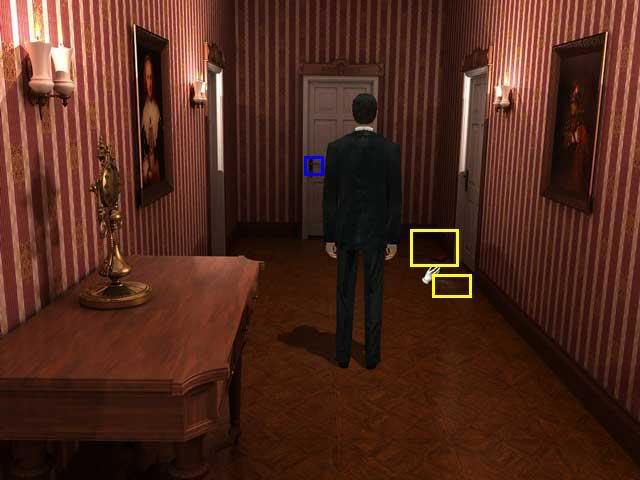
Keep looking by the table. Use the magnifying glass and pick up a Small Box.
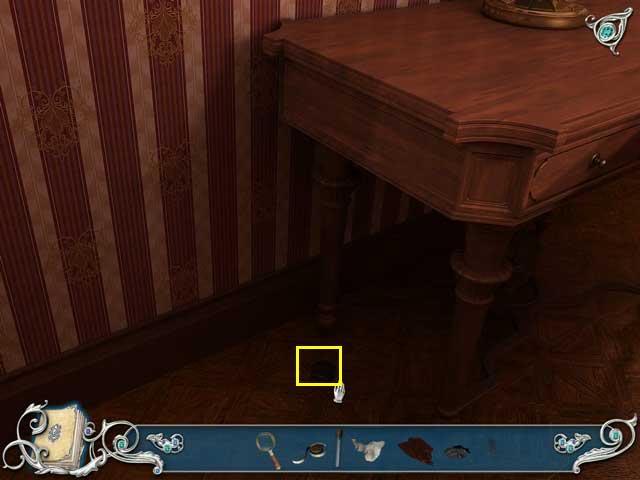
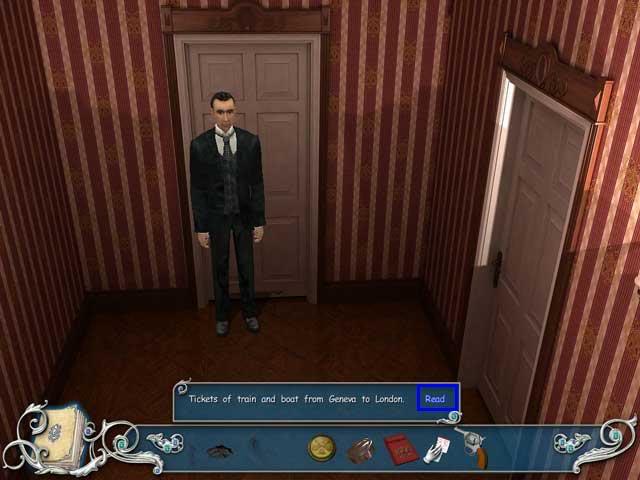
Now unpack the Red Handbag in inventory. You will need to read the Passport and the Train Ticket in your journal.
Evidence
White powder from floor
Small box
Passport
Train Ticket
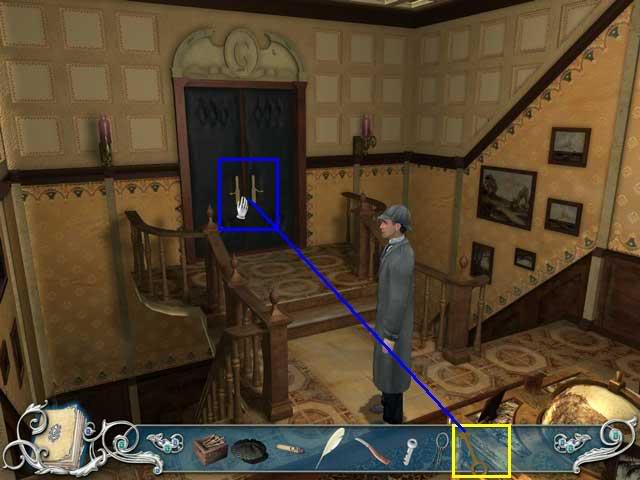
Hall with Staircase, Day 1People
Mary the maid.
Actions
Talk to Mary.
Look under the staircase.
You will find a cabinet with blue tablecloths. Just notice them, they don’t go into inventory.
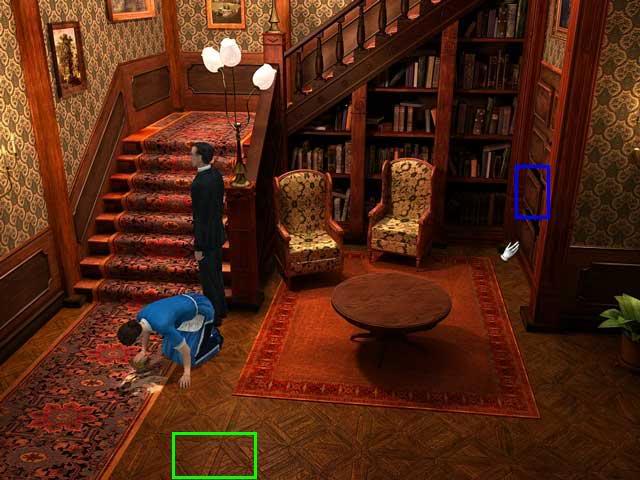
You will not be able to go up the staircase until Day 2, so don’t worry about it yet.
Evidence
Log entry about blue tablecloths
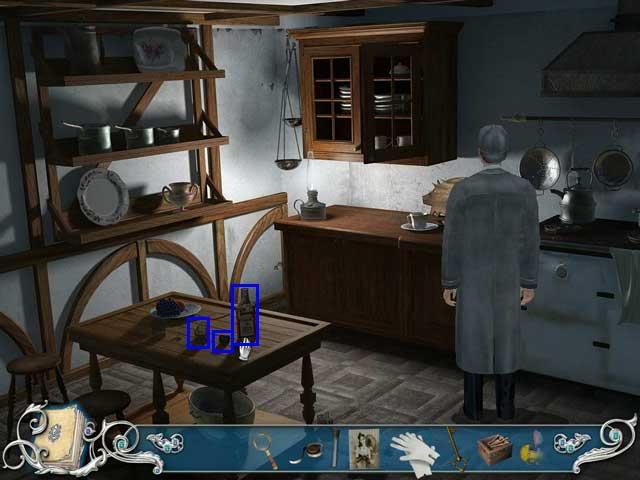
Sheraton Hall Kitchen, Day 1People
Carl the cook
Actions
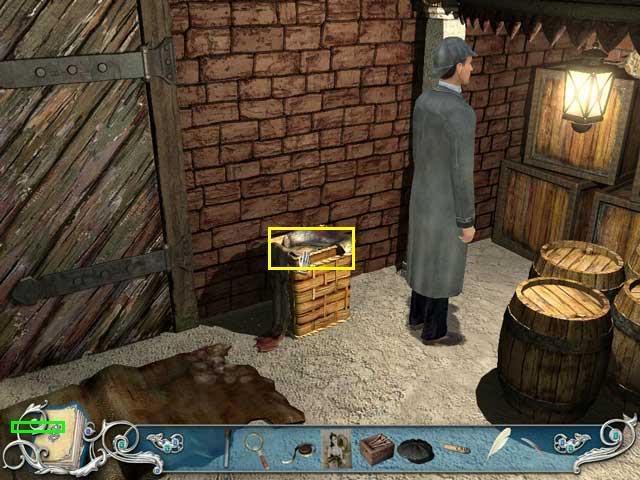
You have to notice several things in here, particularly that the lid of the well/bin is very heavy. You will find a Uniform Button under the table.
Use the hotspot on the table to get over to the bookshelf.
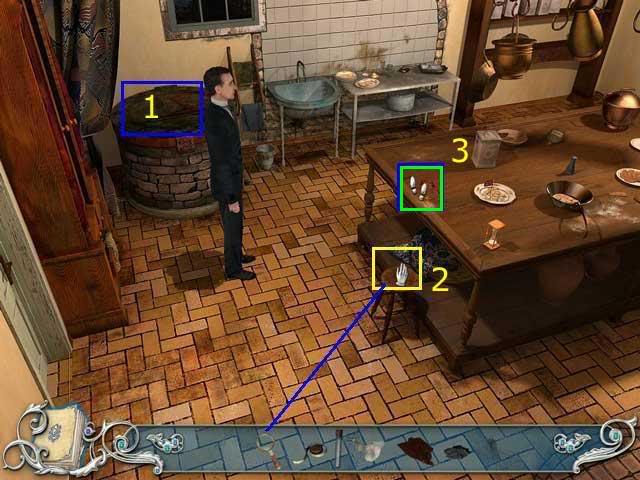
After you notice the books look across the table all the way to the right and you will see the top of Carl’s hat. Put your cursor where you see his thumbnail and click on it. The scene will shift so you can talk to him.
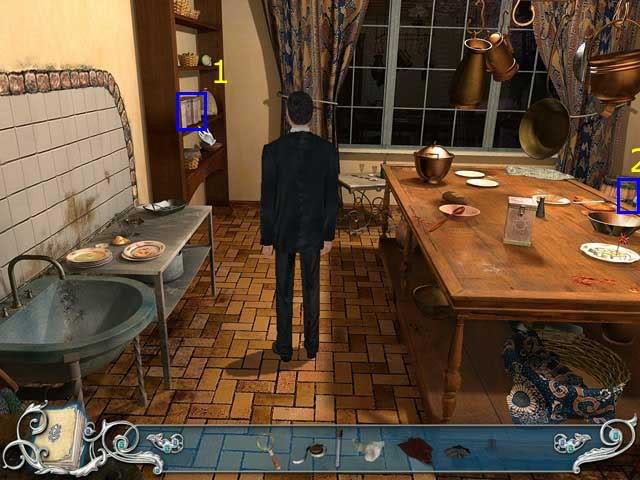
Evidence
Uniform Button
Lavinia Bromsby
Lt. Herrington
Mr. Grimble
Actions
First visit
Pick up and read the Guest List from the table.

Talk to all the people.
You have to ask Lavinia Bromsby about the gun you found in the red handbag. If you haven’t found the handbag yet, it’s in another room. If you have the handbag but haven’t found the gun, you need to select the handbag in inventory, then click on UNPACK.
Some people will go back to the Ballroom. You will automatically go back with them.
Second visit
Try talking to Mr. Grimble again.
Then talk to Lavinia.
Evidence
Guest List
You will find footprints on the floor. Measure them with the tape measure.
Use the magnifying glass on the table to find some Flaky Ash.
Evidence
Footprints
Flaky Ash
Search the sink with the magnifying glass. You will notice some scissors, but cannot pick them up.
Pick up the Red Hairs.
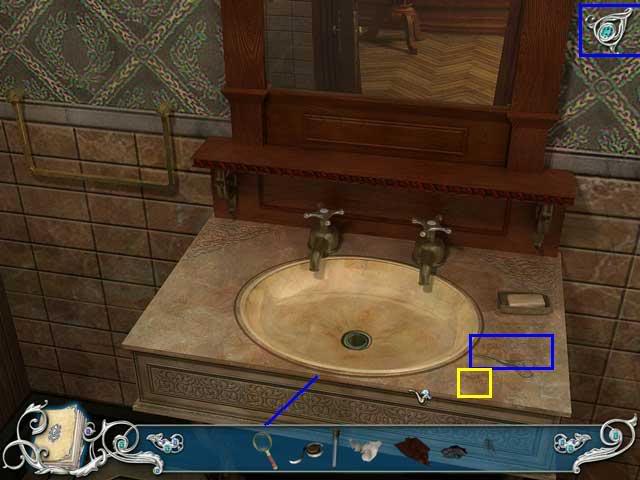
Evidence
Red Hairs
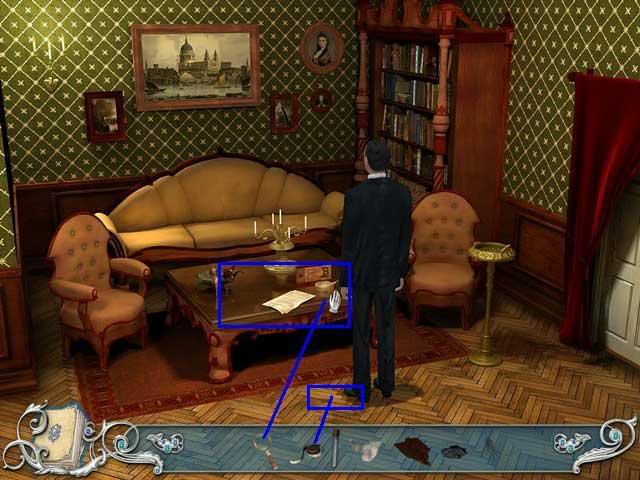
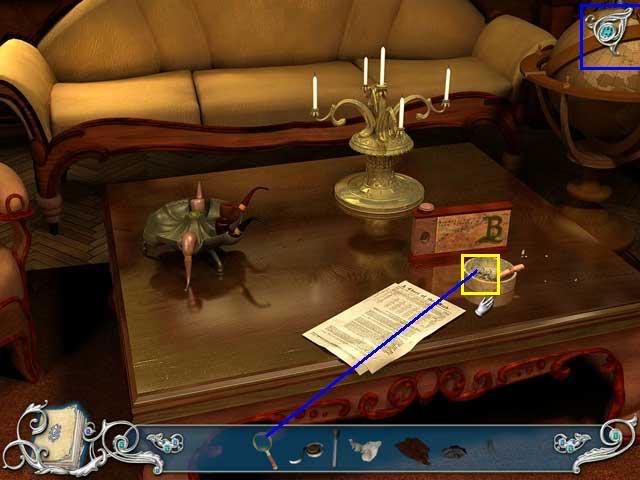
Actions:
Notice the book on the table and take the Calling Card.
Click on the hot spot by the sofa.

Examine the dressing table. Use the test tube to pick up the White Powder.
Take the photograph from the mirror.

Evidence
Frenchman’s calling card
Photograph of a young woman
White powder
Sherrington Hall Grounds, Day 1
When you have finished doing everything inside as Holmes, you will automatically be transferred to Watson’s point of view outside in the grounds. Or you can go there anytime by clicking on the map in the journal.
People
Lamb, a servant
Miss Lambert
3 drunken footmen
Satherwaite, a guest
Miss Roundtree and Sue, sitting on a bench
Actions:
Have Watson talk to all of them.
After Holmes is finished with everything inside the house, he will come outside.
Search for evidence.
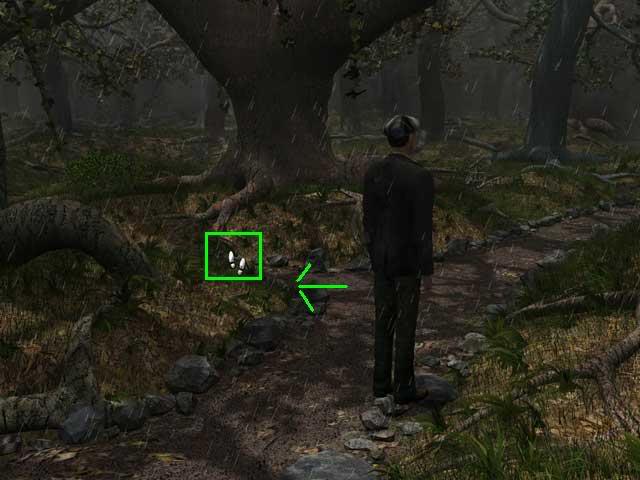
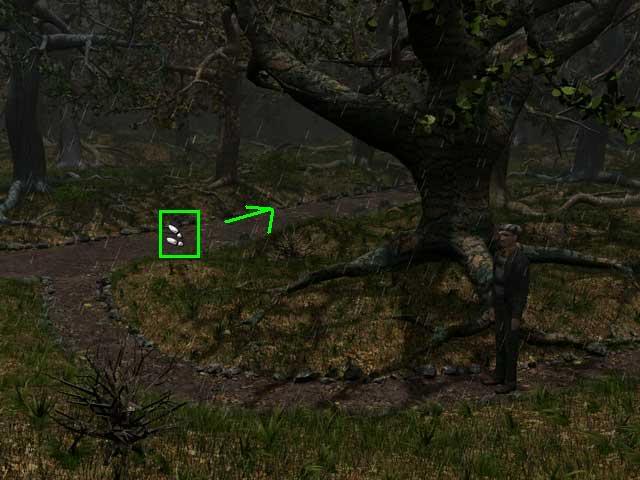
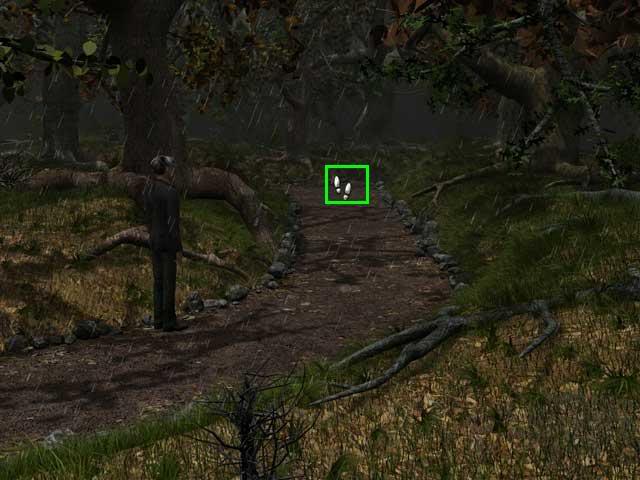
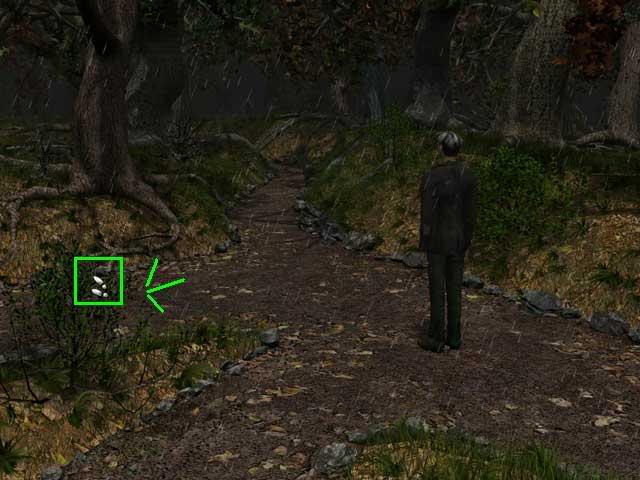
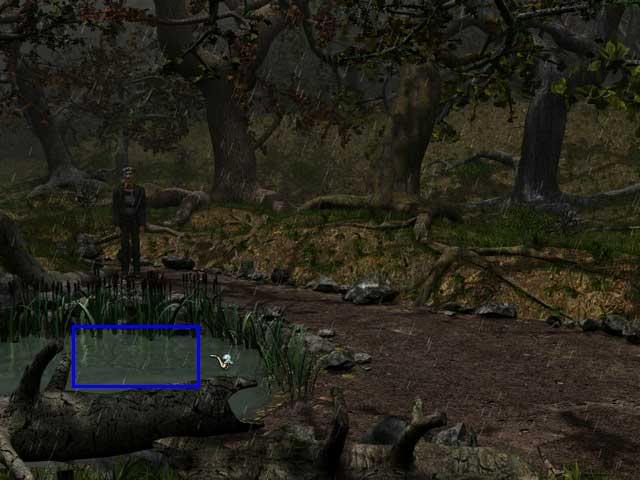
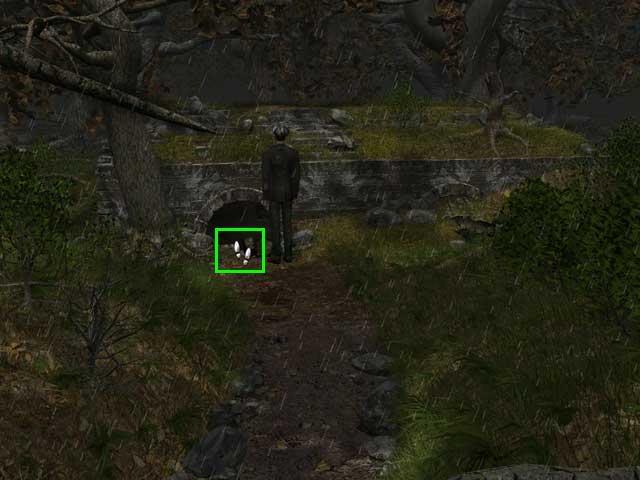
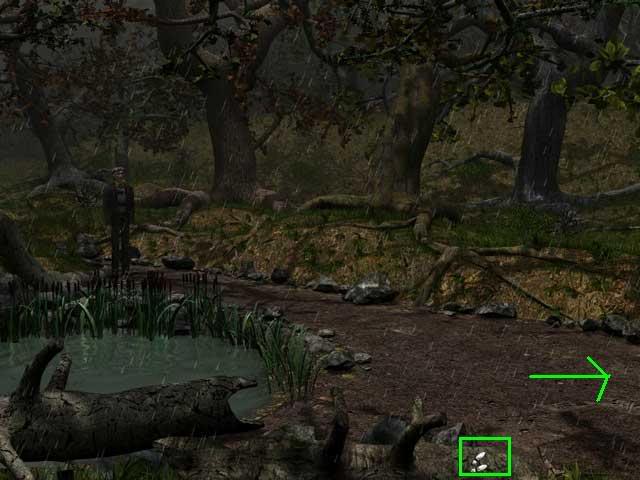
Holmes, not Watson, will find a cigarette butt on the ground near where you first met Lamb. Use the magnifying glass to zoom in.
Pick up the cigarette. There is a footprint near it. Use the tape measure on it.

Once Holmes has found both items, Inspector Lestrade will arrive for a cutscene dialogue with Holmes.
Baker Street won’t appear on your map until you’ve done everything at the Hall, including having Holmes search the grounds for evidence. Once it appears, click on it to go there.
Evidence
Cigarette butt
footprint
People:
Just Holmes and Watson
Actions:
Holmes gives Watson a reading assignment. You must take the book from the bookshelf, then open the journal to the page for each assignment. There will be 3 books altogether.
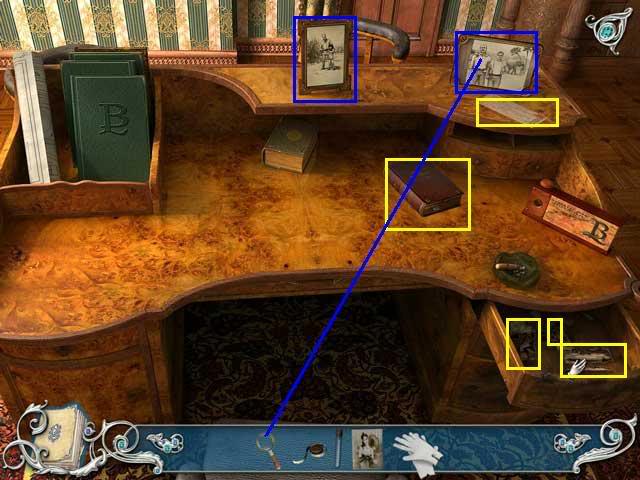
Holmes himself will analyze the evidence. Click on the right side of the desk to see his lab.
When you click on a clue in inventory Holmes will tell you what to do with it. However, it won’t count unless you do it in this specific order:
White cloth
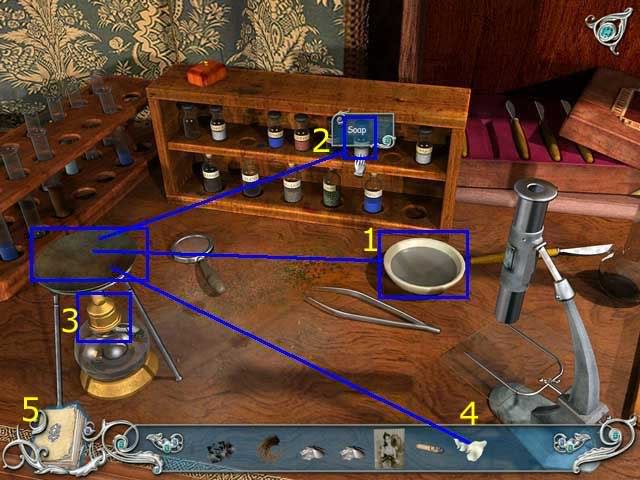
Click on white cloth to find out what to do.
Put dish of water on burner.
Put soap in burner.
Click to turn burner on and heat soap until yellow.
Put white cloth in soap solution. It will return to inventory.
Put dish of water on burner.
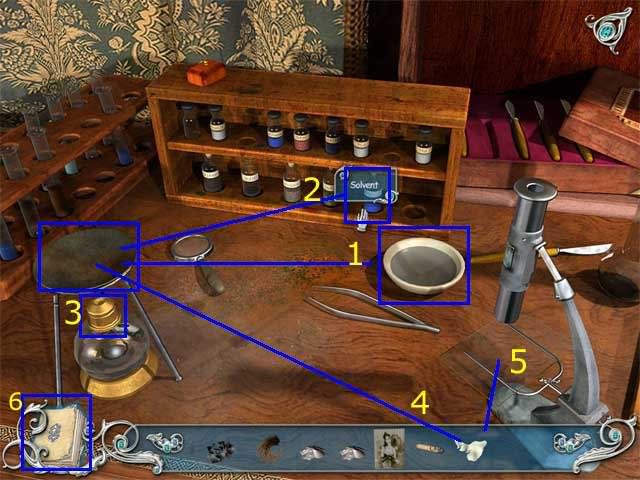
Put solvent in burner.
Click to turn burner on.
Put white cloth in solvent solution. It will return to inventory.
Click on the white cloth in inventory and put it on the microscope slide. Holmes will make a comment.
Click on the journal evidence log to learn more. Remember ot use the arrow to scroll down through the index.
Dark powder.
Place dark powder on burner.
Turn on flame.
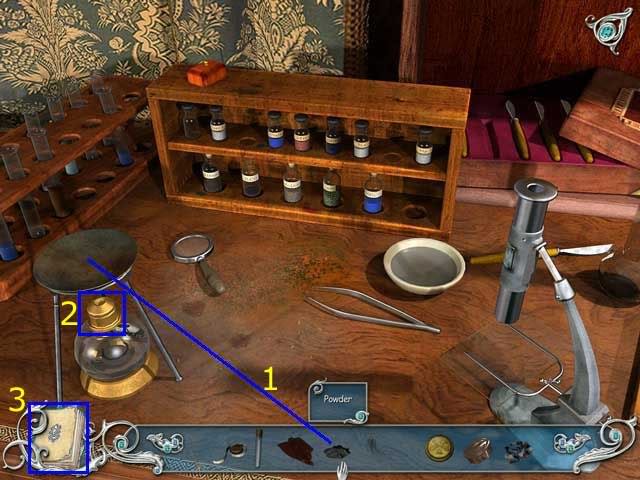
Check journal.
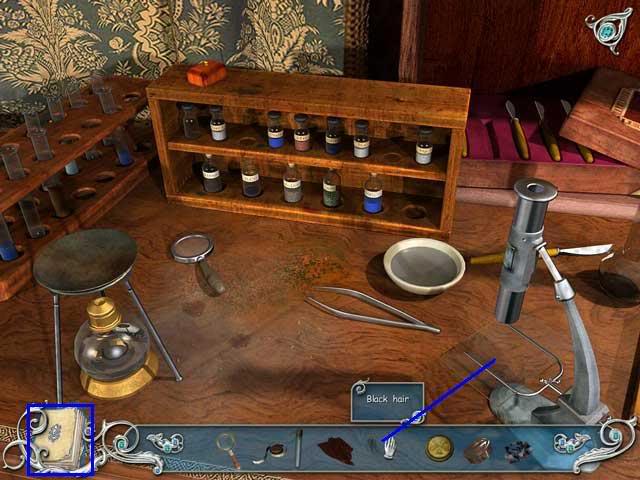
Black hair
Place black hair on microscope, then read journal. A man’s hair.
Red hair
Place red hair on microscope, then read journal. A woman’s hair. But…we found it the men’s bathroom sink!
Small box and white powders
Use magnifying glass on the box in inventory. You will find white powder.
Put all 3 white powders from inventory onto the microscope slide at the same time.
They are all the same.
Click on the white powder on the microscope slide to put it back into inventory.
Click on it again in inventory, and Holmes suggests heating it. Put the white powder on the burner, then click the flame. No effect. It returns to inventory.
Now Holmes suggests mixing it with water.
Put the dish of water onto the burner.
Put the white powder into the dish.
It makes a paste.
When you finish analyzing all the evidence, you will be returned to the room to start the Day 1 quiz.
You will find a screenshot example of how to answer the quiz under the first question.
Q. Weapon? A. Yes, 2nd conversation with Col. Patterson
First choose the down arrow to scroll to the quiz question.
Click Yes.
Click on the Conversation Log tab and look on the left index. If you see the conversation you want, click on it.
Then click again on the answer box on the right page.
Now scroll down to the next question.
Q. Murderer went upstairs? A. No, conversation with Mary.
Q. English cigarettes? A. No, because of cigarette butt evidence and the book about tobacco (document).
Q. ide door open after the shot? A. No, conversation with Satterwaite.
Q. Miss Lambert chose the tablecloths? A. No, conversations with Miss Lambert and with Carl the cook.
Q. Murderer’s height? A. Yes, powdery residue evidence and ballistics book.
Q. Bad eyesight besides the Colonel? A. Yes, several. Conversation with Miss Lambert, Guest List (document).
Today you will go back and forth between
Watson, Holmes, Lestrade
Actions
Talk to Lestrade.
Open your journal and reading all of Lestrade’s notes.
Open the journal and click on the map to go to Sherringford Hall
Second Visit
You will end the day with the Quiz for Day 2.
There are many rooms in this location and you may search them in any order. Rooms you do not need today will be "closed."
- Ballroom: Day 2
- Hall with Staircase: Day 2
- Sherringford Hall Kitchen: Day 2
- Smoking Room: Day 2
- Powder Room: Day 2
Grimble, Lestrade, Watson, and eventually Lavinia
Actions
Talk to Grimble.
Lestrade and Watson will then engage him in conversation while you explore the other rooms. Only the rooms you need will be open to you.
When you return, Lavinia will be here. Talk to her.
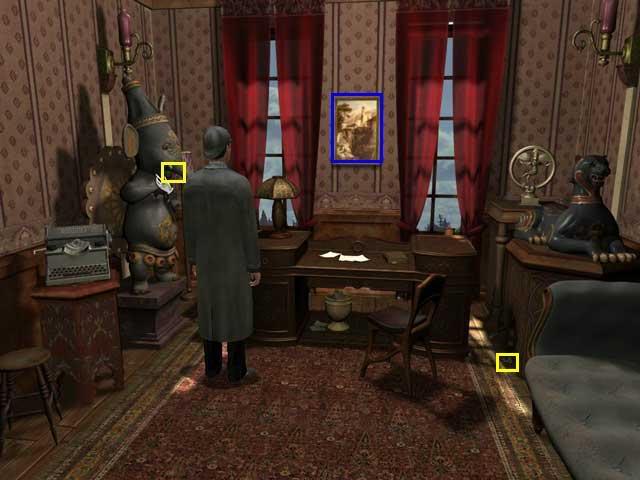
Sherringford Hall Kitchen Day 2People
Carl the cook
White Gloves

Pick up Lavinia’s purse.
Unpack it and read two documents.
Evidence
Passport
Train Ticket
Hall with Staircase, Day 2People
Mary
Actions
Talk to Mary, then go upstairs.
Holmes, Watson, Grimble, Lestrade
Actions
Notice everything. You will pick up several documents and examine a number of pictures, some of them with the magnifying glass.
Specifically examine the picture of Bromsby and Grimble with the magnifying glass, the picture of Lavinia, and the picture of Bromsby in front of the abyss that is hanging on the wall.
Read the page from the book on French art and 3 burned documents from the drawer in the desk.
Once you have found everything at the Hall, the map will open and you can now choose Flatham Station.
Evidence
3 photographs
Page on French art
3 burned documents
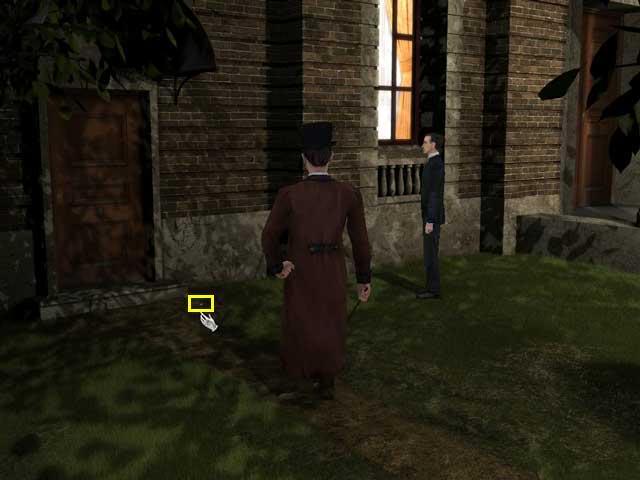
Flatham Day 2Flatham Station Day 2People
Constable
Fowlett’s House, Day 2
This is a cottage in Flatham owned by Bromsby’s attorney, Fowlett. It has several rooms. You have a lot of choice in where you go, but there is also a lot of back and forth, as you will find that you need things from other rooms to complete tasks where you are. You will need to get an item from the bedroom to use in the livingroom, and then that will get you a clue to a puzzle that’s back in the bedroom.
Fowlett’s House, Grounds: Day 2People
Neighbor. He will give you a key to the front door.
Constable. You must talk to him before using the key.
Actions
First Visit
Talk to the neighbor. He will give you a key to the front door.
Talk to the Constable. You will not be able to use the key until you talk to him.
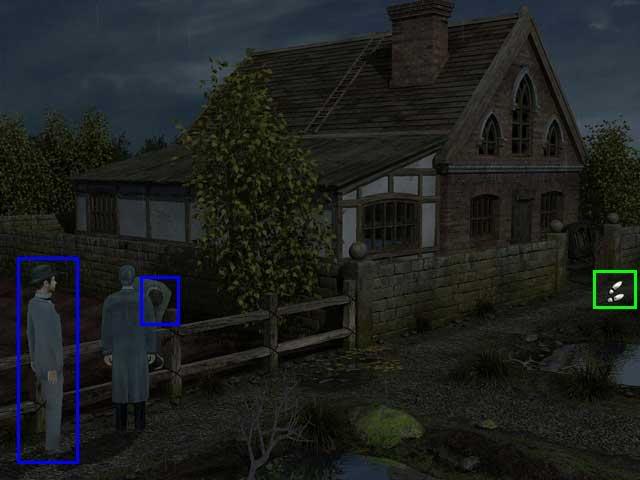
Use the key on the front door
and go into the living room.
After you have been into the house once, you will need to come back outside and talk to Watson. He will give you a small doorkey to use inside the house. You will still have to use the big key to get back in.
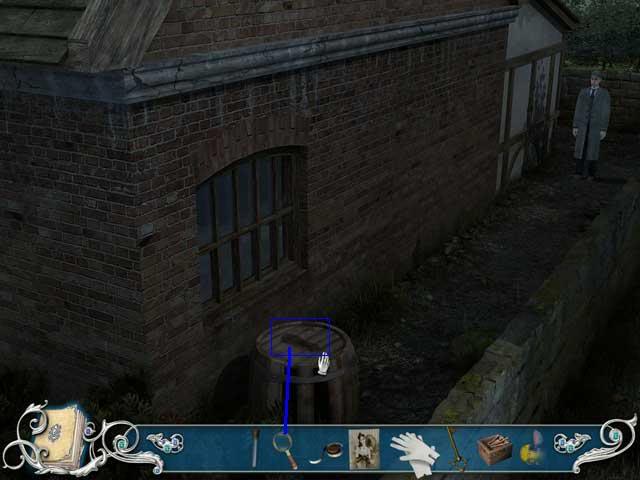
On your third time in this location, it is time to search the grounds around the house.
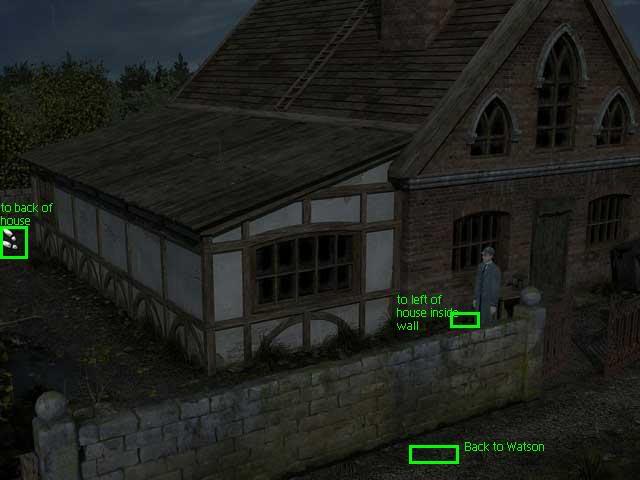
I thought the hotspots here were hard to use. Sometimes Holmes just turned instead of walking. The first one you need is to the left of the scene.
This will change your point of view. Now you can see the left side of the House with Holmes in front inside the fence.
There is a hotspot all the way to the back of the house at the left corner. That’s the one you need.
At the back of the house, measure the footprint on the barrel by the bedroom window.
Return to Watson and talk to everyone there one more time.
Then return to Baker Street.
Evidence:
Footprint from back of house.
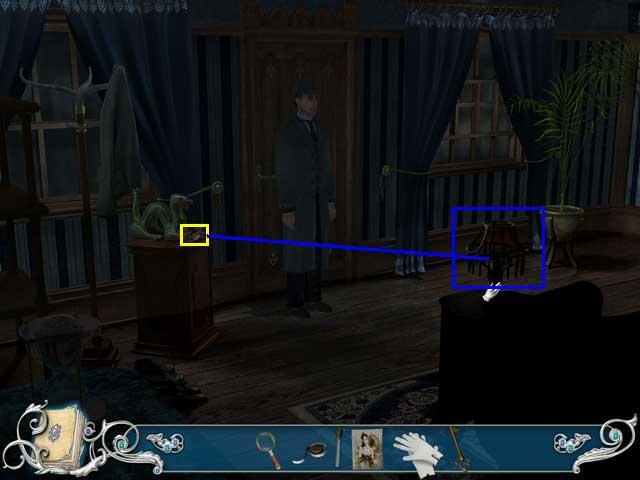
Actions:
Get matchbox from dragon on left of door. Use it to light lamp.
Look at the shoes on the floor.
Measure the footprint with the tape measure.
Move to the other side of the room.
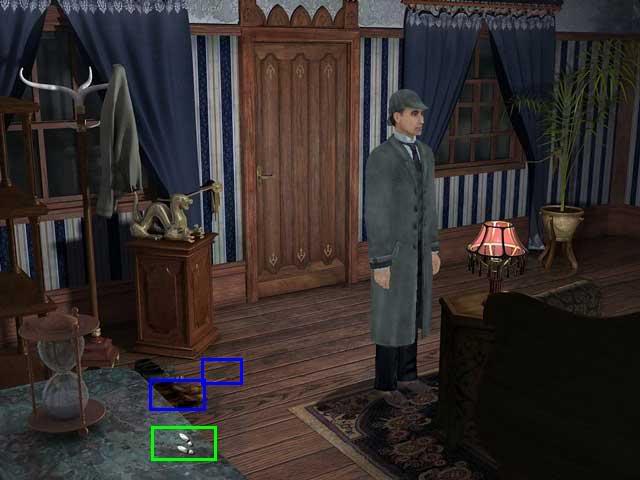
Pick up the child’s toy from under the table.
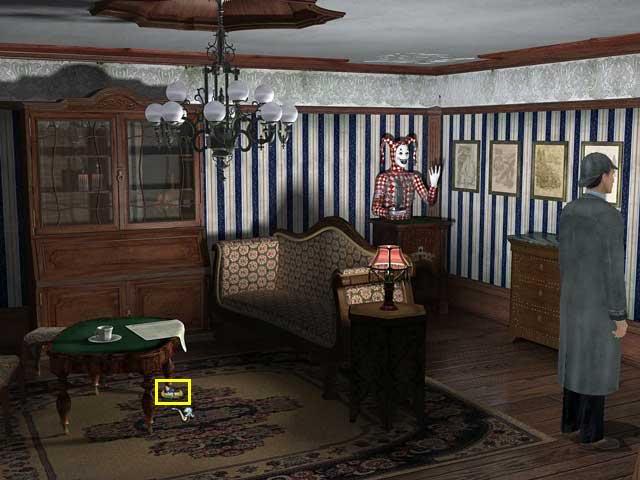
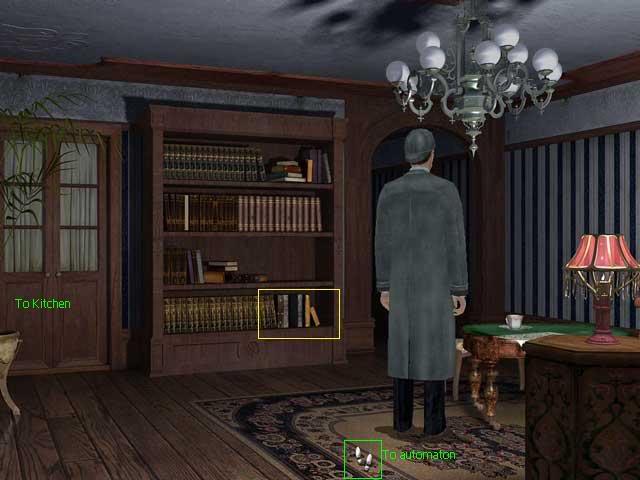
Notice the Joker, It needs a token.
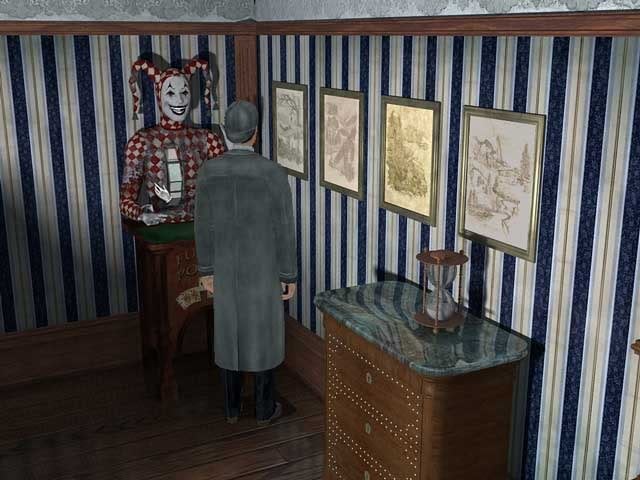
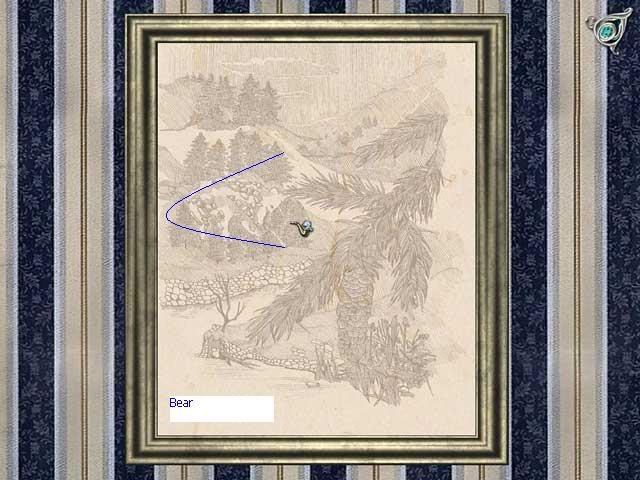
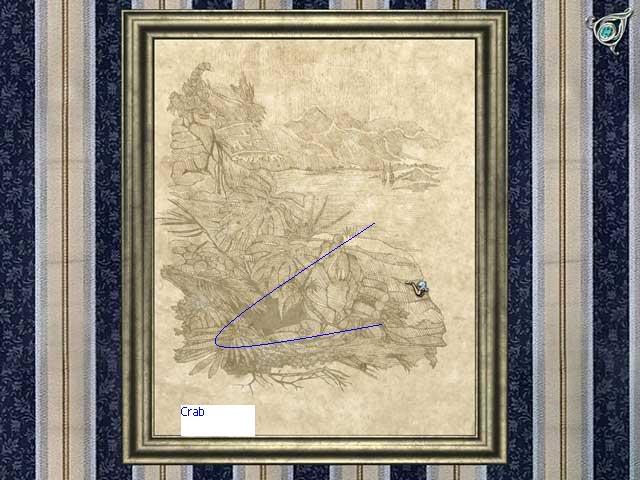
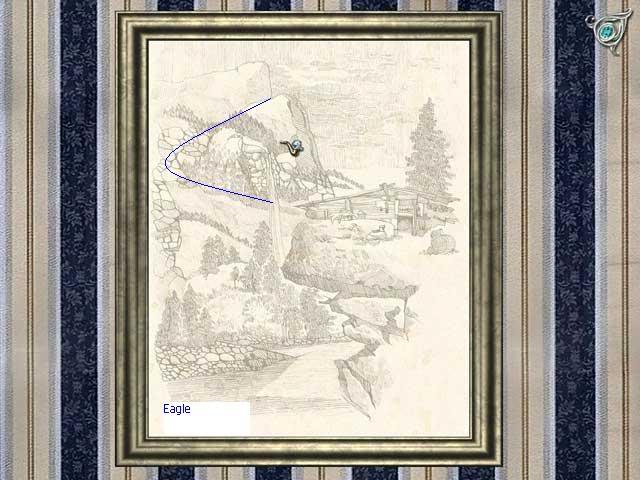
Find hidden pictures in 4 paintings on wall (see screenshots).
They are: Deer, Bear, Crab, Eagle.

Go back by the table where you found the child’s toy.
On the carpet over towards the left side of the table is another hot spot.
Click on it and Holmes will turn and face a bookcase against a wall.
Pick up a notebook from the bottom shelf of the bookcase.
Holmes will say "This merits a closer look." That means it’s in your journal.
Open the journal to the Document Log and scroll down to the "Poetry" entry.
Read the whole poem. You will need to click the bottom arrow on the right.
At some point you must enter the kitchen through the doors on the left of the bookcase.
After you return from the kitchen, Holmes will be on the far left side of the bookcase and you will be able to see the entrance to the hallway on the far right side.
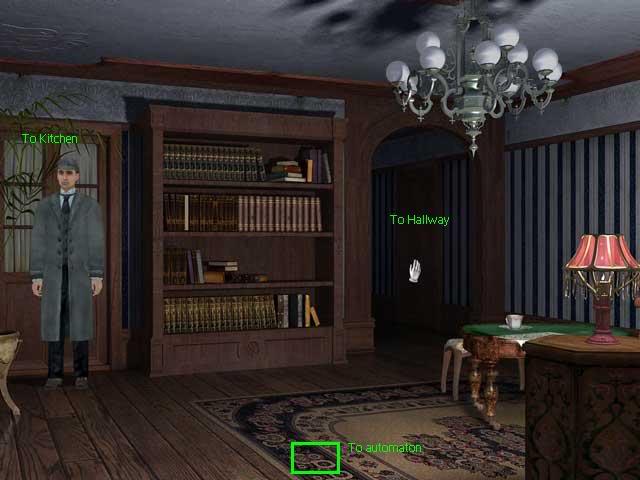
After you come back from the bedroom and have the counter/token, go back and do the
Put the coin you got from the bedroom in the coinslot and click on the upright hand on the right.
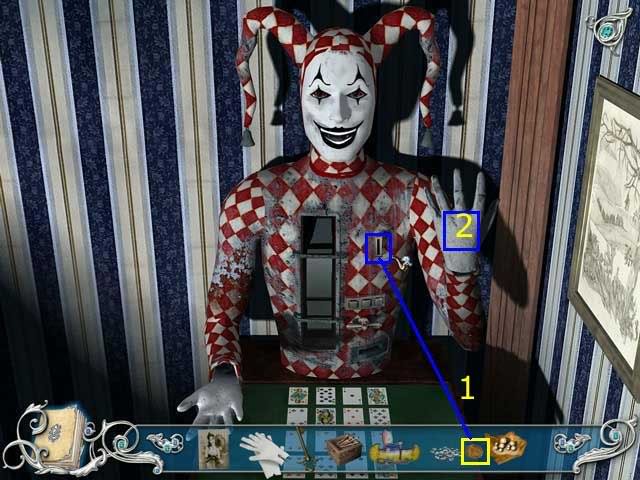
The automaton will deal out cards for you to pick from on the top left, and show you a "logical sequence" that you must match in the 3 card slots on its chest.
You must get all the answers right, or you have to start over at the beginning.
The first one was easy-the 4th ace. Click on the ace from your cards in the upper left of the screen, then click on the automaton’s hand on the table. Finally, pull the automaton’s other hand to submit your answer.
I thought the second one was not a good puzzle. The 3 cards on the automaton’s chest also appear in your set of cards. None of them are diamonds and they are next to the 4 of diamonds, so you’re supposed to pick that one. But it’s not very logical.
OK, if you thought that one was weird, this next one is even worse. I’ve seen people give four completely different explanations for why the answer is the answer! I’m not even going to try and come up with a logical reason, I’ll just tell you the answer is the 4 of clubs. I did it by trial and error.
After you win the game, the automaton will give you a piece of paper from the slot below the coin slot. Click on it in inventory and choose READ. Then look in your journal to read it.
Return to the Bedroom to the Noah’s Ark puzzle in the workbench view.
Evidence
The child’s toy from under the table
The poem from the bookcase
Fowlett’s House, Kitchen, Day 2
Actions:
Collect the flaky ash from the ashtray by the stove.
Examine the items on the table. You must notice the gin bottle, the cork, and the broken glass.
Evidence
Use the magnifying glass and collect the ash from the ashtray.
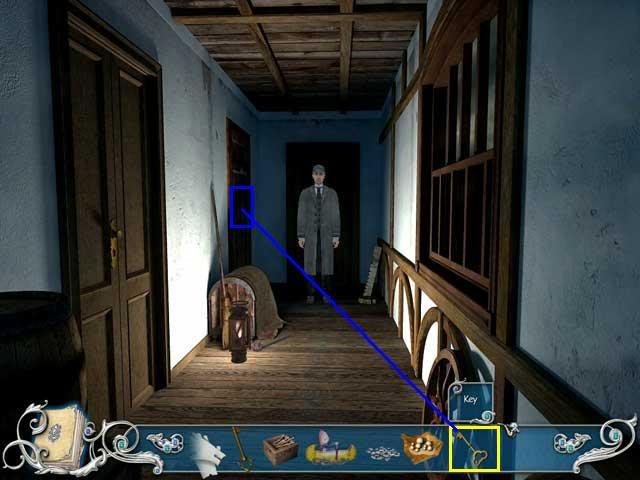
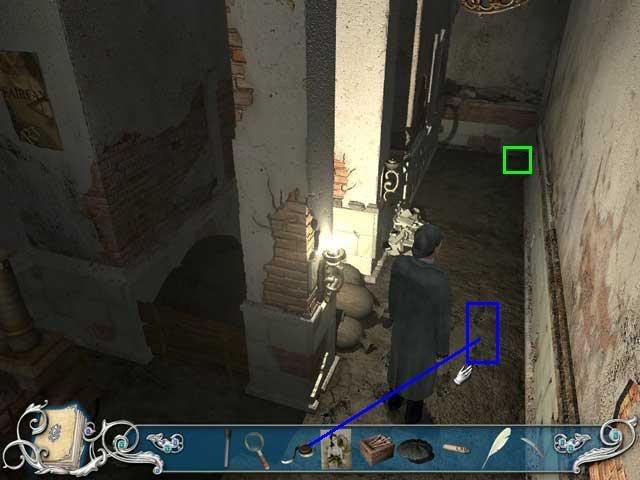
Fowlett’s House, Hallway, Day 2
The entrance is on the far right side of the bookcase in the living room. It’s hard to see unless Holmes has just come out of the kitchen. Otherwise he usually blocks the spot.
Actions
First Visit:
Once you are in the hallway, use the matches to light the lamp.
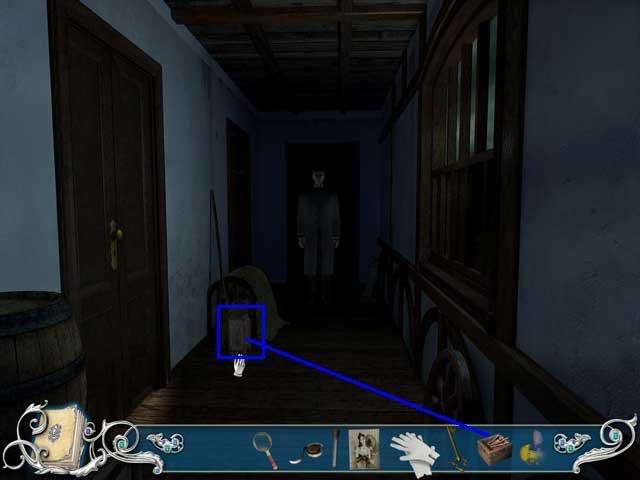
Enter the bedroom first, because the basement door is locked.

Second Visit
Later after you get the key from Watson, you can unlock the basement door.
Fowlett’s House, Bedroom, Day 2
Actions:
First Visit
Start by examining the automatic shoeshine machine.
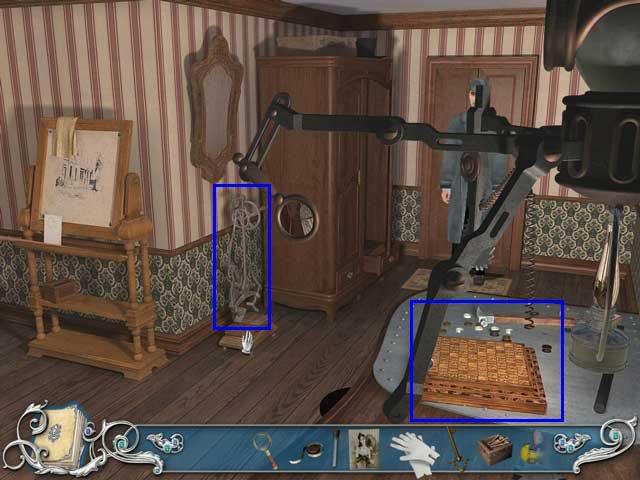
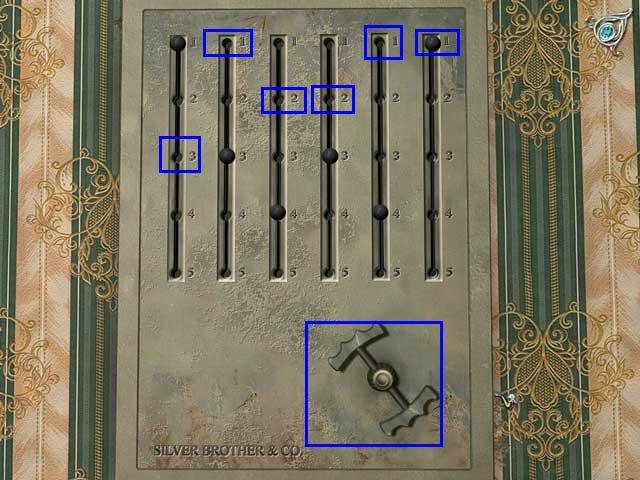
Then turn to the table and do the number tile puzzle.
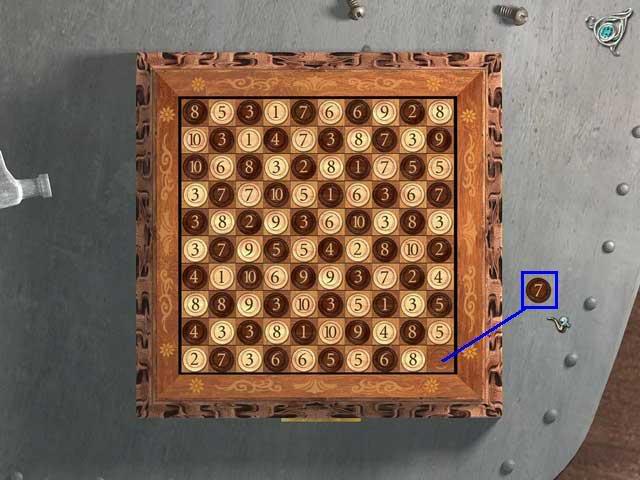
Click on the number tile puzzle on the table. Each row and each column must add up to the code number, 55, from the burnt paper in Bromsby’s desk.
Tiles must alternate dark/light.
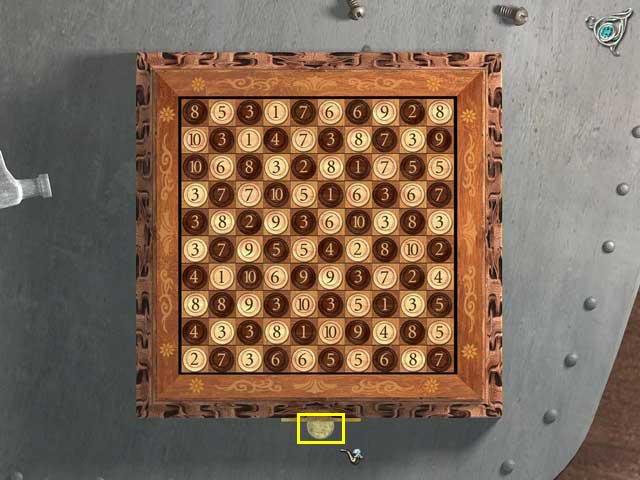
When you finish, a counter/token will pop out of the lower center of the board.
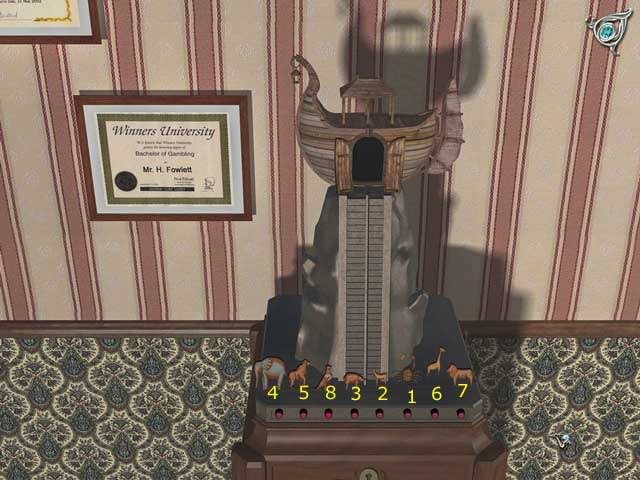
Here is the solution:

Now you have the token for the automaton in the living room, but there is more to do here first.
Examine the machine above the workbench, the screwdriver by the windowsill, and the certificates on the wall.
Make sure you look at the certificate on the left side so you find out Fowlett has been to South America.
Look at the safe and the Noah’s Ark on top of it, but you can’t do anything with them yet.
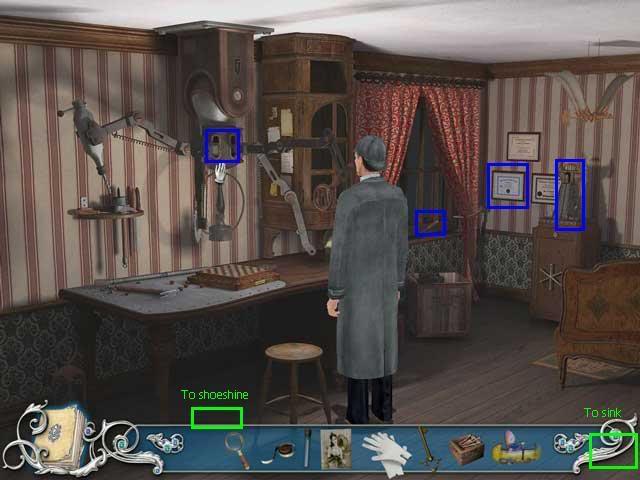
Click on the hotspot in the lower right part of the screen to turn and look at the other side of the room. This is the only way to get Holmes to examine the bed.
Look at the bed and notice the pillow is missing.
Look at the picture on the wall.
Take the Greasy Substance from the left side of the sink.
Now you can go back to the Automaton in the living room. There is a hotspot on the floor below the bed to go back to the workbench, and another one below the stool to go back to the shoeshine. Continue through the door to the Living Room
When you come back, you have the Noah’s Ark clue from the automaton. Make sure you’ve read it in your journal.
You also need to have looked at the 4 paintings on the wall next to the automaton-they go with the poem.
This one is logical! Read the poem, and remember the 4 hidden animals. Then click on the animals in this order: Crab, Deer, Bear, Elephant, Gorilla, Giraffe, Lion, Eagle.
If you do it wrong, Noah will come to the door of the Ark and bow.
If you do it right, the safe below the shelf will open and you will see lots of papers.
Collect everything.
Now right click on the "piece of paper" in inventory, which is really a whole bunch of papers, and then read them in your journal.
After you have read everything, closed the journal, and closed the zoom scene, Watson will tell you that Murray has found a key in the garden.
Go all the way back outside to talk to Watson. I guess he was yelling through the window!
Evidence
Greasy Substance from left side of the sink.
Picture of Fowlett
Documents from safe
Fowlett’s House, Basement, Day 2
You need a key to open this door. Watson will give it to you outside the house after you have solved the number board puzzle, the automaton puzzle, the Noah’s ark puzzle, and read all the papers from the safe.
Actions:
After you unlock the door with the key, there will be a cut scene.
Measure the dead man’s feet with the tape measure.
Pick up the card from the floor. Click on READ in inventory, then examine it in the journal, along with the frenchman’s visiting card.
Click on the stairs to go out, and you will find Holmes outside the house.
Evidence
Fowlett’s feet are size 6
Antique dealer’s card matches "frenchman’s" visiting card.
Q. Fowlett had a Visitor? A. Yes, conversation with Murray the neighbor
First choose the down arrow to scroll to the quiz question.
Click Yes.
Click on the Conversation Log tab and look on the left index. If you see the conversation you want, click on it.
Then click again on the answer box on the right page.
Now scroll down to the next question
Q. All guests in the ballroom? A. Yes, Lestrade’s document Development of the Crime.
Q. Relationship with daughter good? A. No, Grimble conversation from October 15.
Q. Fowlett knew about problems with Grimble? A. Yes, letter of November 12, 1896.
Q. Anything missing from house? A. Yes, pillow (evidence).
Q. Someone came in from outside? A. Yes, footprint from outside (evidence) and window shut with screwdriver (evidence).
Today you will go back and forth between
At the beginning of the day, just Holmes and Watson.
Late in the day Lt. Herrington will arrive.
Actions:
First visit
You will wake up at Baker Street. Begin Analyzing the evidence collected yesterday.
Use the magnifying glass in inventory, not the one on the table, to look at the wooden toy.

Read about it in the journal.
Put the greasy balls on the microscope slide.
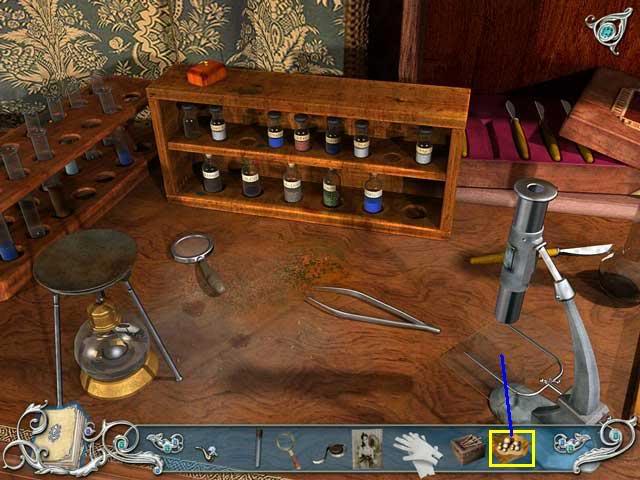
Use the magnifying glass in inventory on the white gloves in inventory. Read in the journal.
Watson will tell you about his visit to the Flatham Station and you will see it as a flashback.
Second visit, after flashback, still morning
When the flashback ends, you will be back in Baker St.
After a cut scene, open the journal and click on Sherringford Hall on the map.
You will finally return to Baker Street at the end of the day.
Lt. Herrington will arrive. Talk to him.
The Baker Street Irregulars will arrive. Back to the cementworks!
Very late at night you will return from the cementworks. Time for the Day 3 Quiz.
When you get back to Baker Street, first right click to open the inventory bar, then quickly read the passport. Then you’ll be ready to start the Quiz.
Flatham Station, Day 3 (flashback to Day 2)
You are playing as Watson.
People
Stationmaster
Actions:
There are two hotspots in the first scene. Click on the one on the right to go to the bench area.
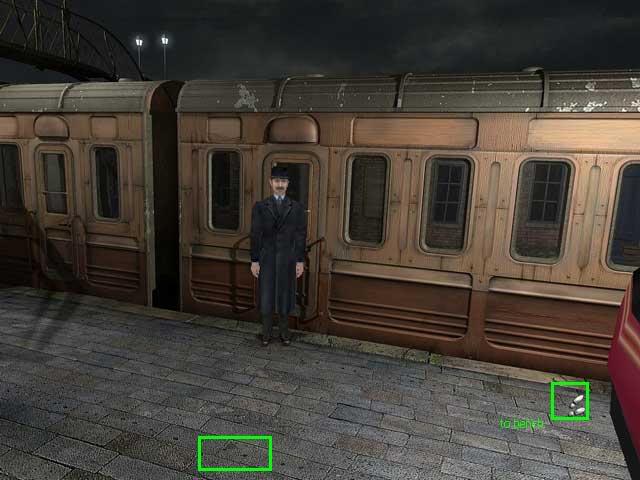
Talk to the stationmaster.
Search the bench and you will find a white feather.
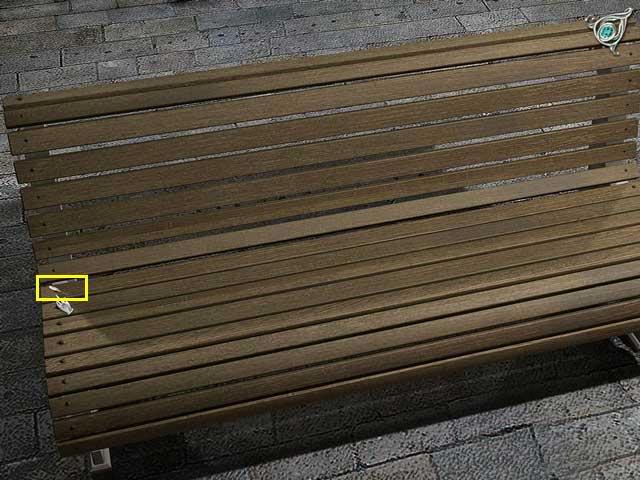
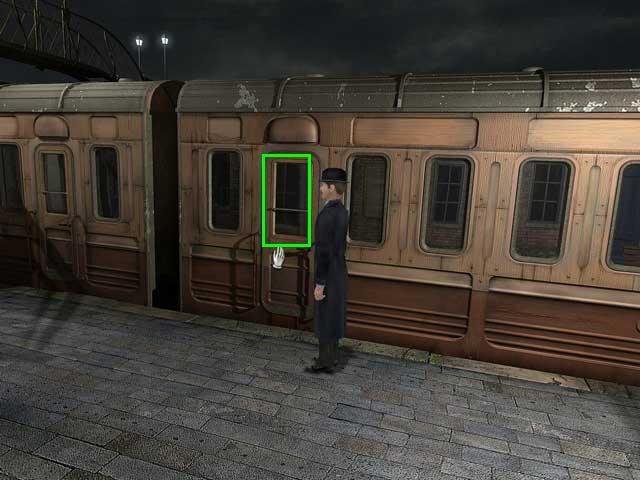
Now you need to go inside the train car. I kept overshooting the hotspots here, but eventually you’ll end up with Watson standing in front of the cars and he can go in.
Evidence
White feather from bench
Inside the train car, Day 3 (flashback to Day 2)
When Watson first enters the car, he can go to the right of the scene, where there’s just an empty ashtray at the front of the train car.
Come back and click on the hotspot on the first bench. This will let you walk towards the back of the car past 3 sets of benches.
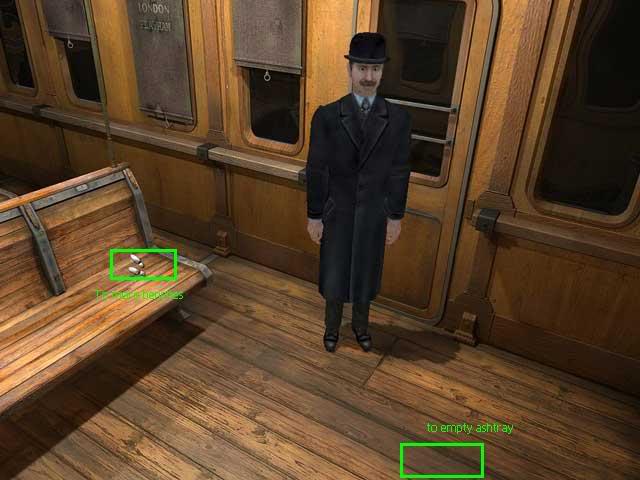
Search each bench.
You will find a white feather in the back on the right side of the first set of benches
You will find a cap under the left side of the middle set of benches.
Keep going to the back of the car, and you will find a cigarette butt in the ashtray by the back wall.
As soon as you have picked up all 3 clues, the flashback will end and you will automatically go back to Baker St. on Day 3.
Evidence
White feather
Cap
Cigarette butt
There are only three important locations today, and you need to visit them in this order:
Sue, the maid
Mrs. Lambert
Actions:
After talking to the people, exit through the door on the right. Just keep walking down the hallways until you come to the hall with staircase.
Hallway with staircase, Day 3People
Mary
Talk to Mary, then go up the staircase to the office.
Livia
Lt. Herrington
Lestrade
Actions:
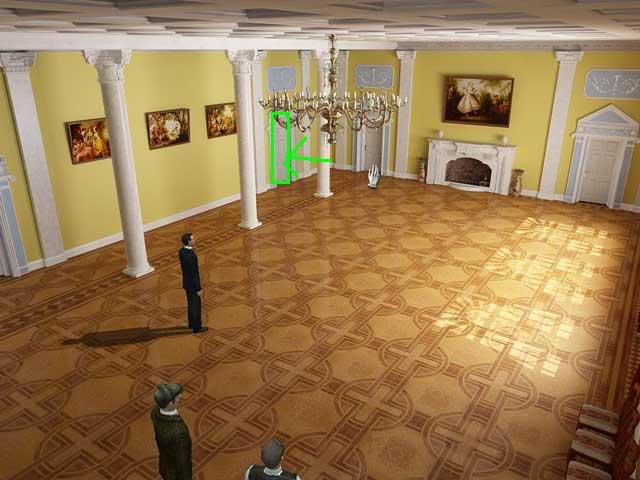
Click on the large picture to get to the safe.
Safe Puzzle in Bromsby’s Office
Read the last line out loud, saying the number of each digit. You will say
"Three ones, two twos, one one."
The code is 3 1 2 2 1 1.
Set the code to that, and you will hear a click.
Click on the safe handle to open it.
Take out the key and the letter.
Talk to everyone again.
Holmes now says he’s going to the Fairfax Theatre, but when you open the map in the journal the only choice is the Bromsby Cementworks, so go there. It turns out Bromsby bought the old theatre because it was next to the cementworks and it’s now used as a warehouse there.
Evidence
Key
Letter
Wire Transfer records
Bromsby Cementworks, Day 3Cementworks, Grounds, Day 3People
Day Guard
Actions
First visit, daytime
Talk to the guard. He will give you the keys to Grimble’s offices.
Go to the building on the right and use the key on the door.
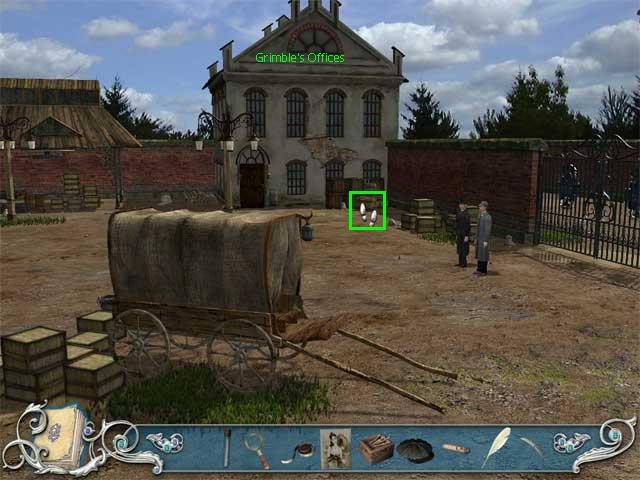
Later that night Holmes and Watson will return here.
First click on the ladder to the left of the gate. Click near the top of the wall to put the ladder there. Then click one more time to go over the ladder.
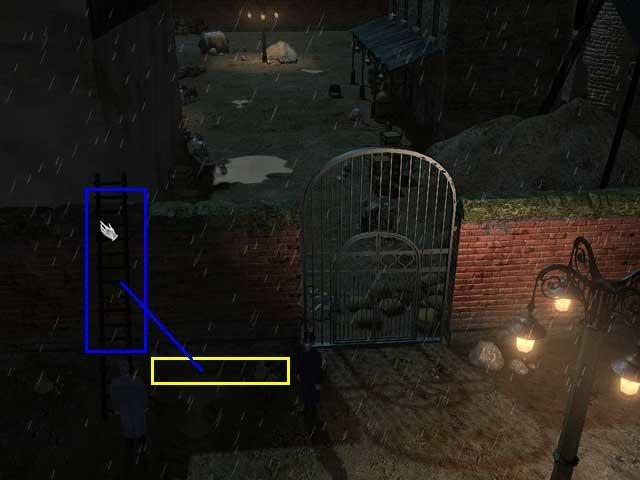
Getting Holmes into Grimble’s Office at Night Puzzle
Once you are in the yard, Holmes will have to make his way across to Grimble’s Office Building without being seen by either the guard, Marty, or his dog. Watson will stay hidden by the gate. This is a really, really annoying sequence. Make sure you save now, because you’re going to need to try it three or four times to get through.
Begin by following along behind Marty, but not too close.
As soon as the scene changes, look for a hotspot near the wheelbarrow that is close to the long center building. However, and this is the tricky part, you actually want to click about an inch lower than the wheelbarrow. Then wait in that spot.
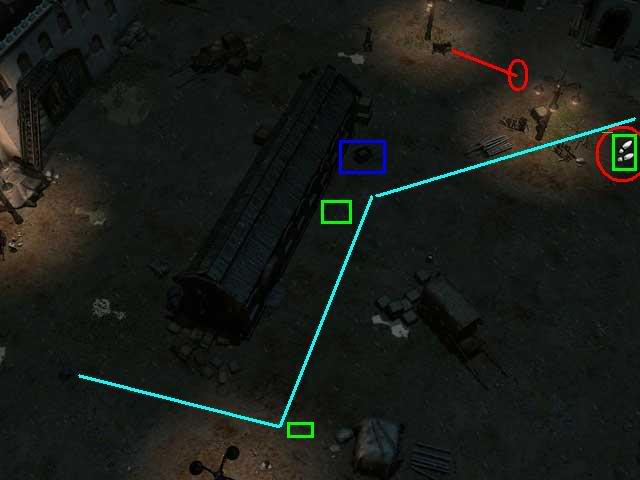
As soon as the dog gets just to the left of the righthand lamppost (see red circle on the screenshot), find the footprints hotspot in front of the office building, and double click it so Holmes runs.
If you get to the door of the office building without being spotted, you can use the key and go in, then on up to the bridge room.
If you are spotted, let the scene play out to end of game. Then load your saved position and try again.
Did I mention that I hate this part of the game?
The agony isn’t over yet, though! When you do get successfully through to the office building, you’re going to go inside, and then come out with the key to warehouse, which is the old theatre building all the over on the left.
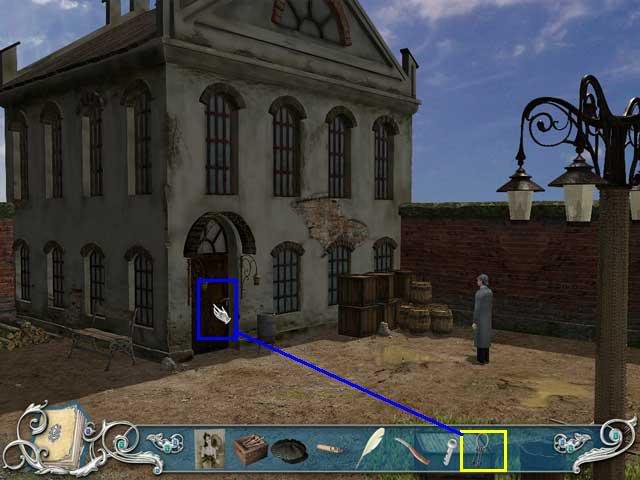
Getting Holmes into the Theater at Night Puzzle
Now you have to get past Marty and the dog AGAIN. So again, save, because again it’s going to take several tries.
The easiest way seems to be to click on the left side of the scene right in front of the office building, wait for the point of view to change, then click just below the dark grainy splotch that is just to the right above the wagon. See the screenshot.
The tricky thing is that sometimes the dog will see you here, ending the game, and sometimes not. I could never figure out why, it may just be random.
Anyway, you’re on the right spot. Wait for Marty to come all the way around and start to walk up past the left side of the wagon. While you’re waiting, right click to open inventory, and find the warehouse key.
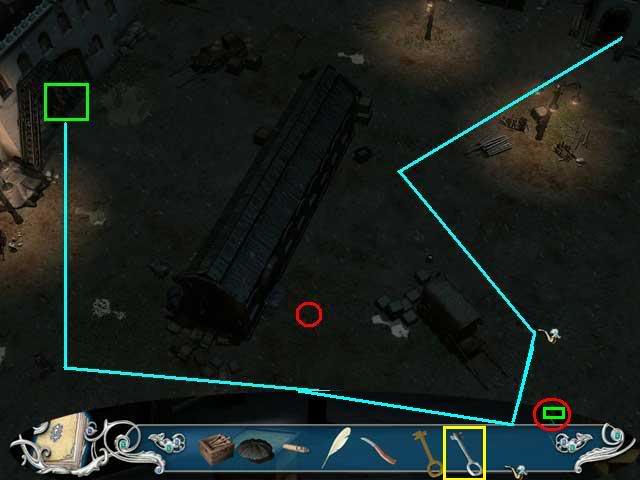
As soon as Marty’s in the right spot (red on the screenshot), double click to go down, then grab the warehouse key and double click on the theatre. Holmes should run over there at the bottom of the scene while Marty is making his way up across the the top.
The point of view will shift twice. The instant you see the door into the theatre, click the key on it near the bottom of the door.
If you’re lucky, the door will open, Holmes will say, "Come, Watson," and you’re in the theatre.
If you’re unlucky, Marty will catch you, it will be end of game again, and again you’ll have to reload.
Cementworks, Grimble’s Office Building, Day 3
Watson will stay downstairs while Holmes goes upstairs.
From now on this room will just be used to travel through.
There are two rooms upstairs, and you will go back and forth between them several times.
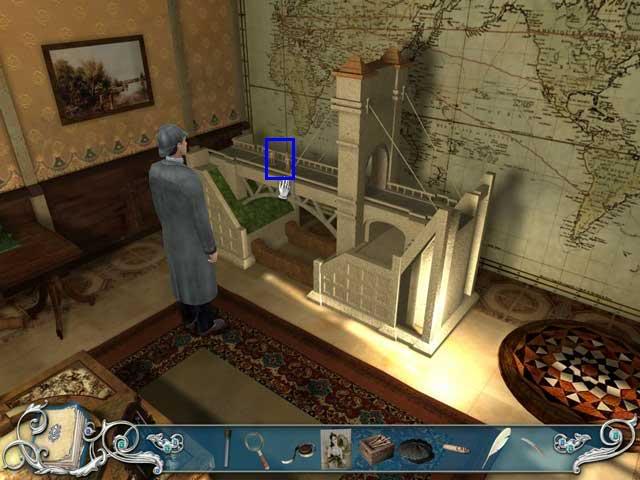
Cementworks, Bridge Room, Day 3
Actions:
First visit: daytime
Notice the bridge model. Walk right up to it and notice the small statuettes on top.
Notice the pictures on the wall.
Pick up the key under the table on the left.
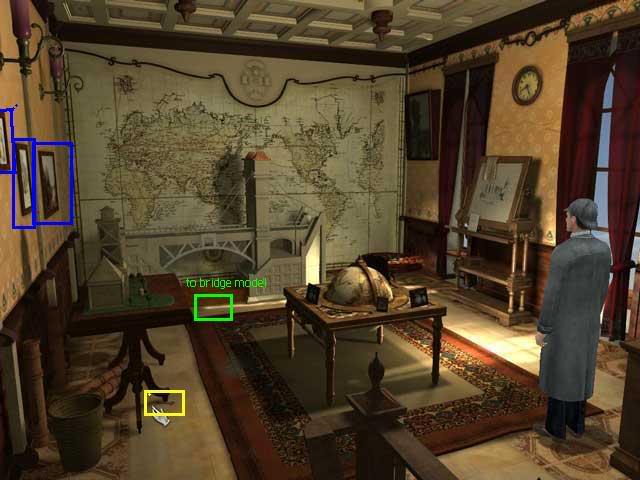
Use the key to open the double doors to Grimble’s inner office.
Second visit: daytime
When you return, put the statuette on the bridge.
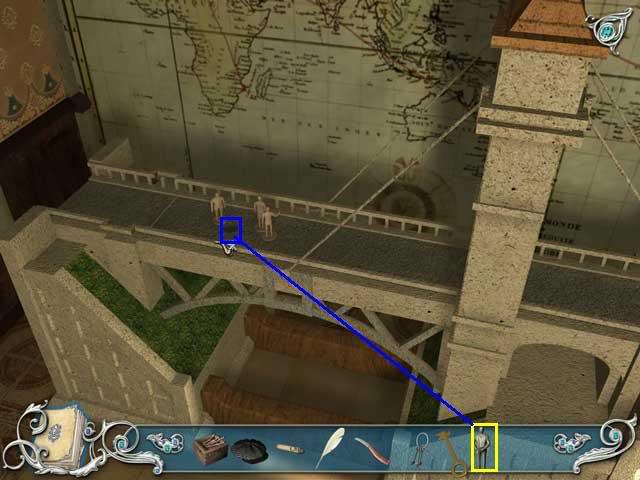
A small key will fall down. Pick it up.
Now you have a new key, and there was still a locked drawer in Grimble’s desk, so back to the inner office.
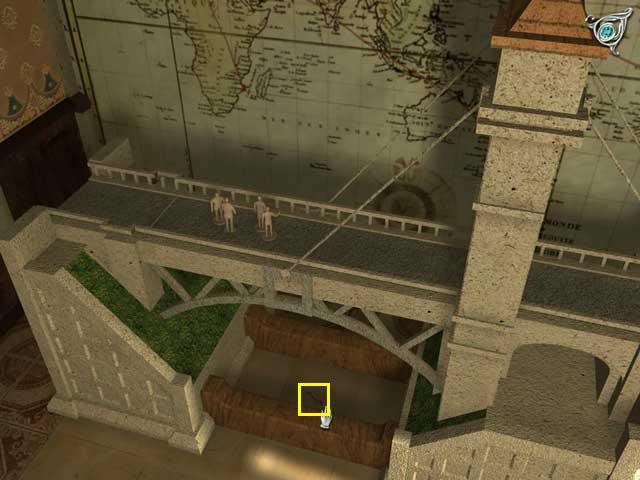
Holmes will return at night. First he will just go through the bridge room into the inner office, which is conveniently unlocked this time.
When Holmes returns from the office with the statuette, all you need to do is put the statuette onto the bridge, pick up the key that falls, and go back into the inner office.
When Holmes finally comes out with the warehouse key, just go on downstairs and out of the building.
Grimble’s Inner Office, Day 3Actions
First Visit: Daytime
Look at the statue on top of the bookcase, then go forward further into the room.
Go to the elephant statue on the left. Click on its trunk, then take the statue from its mouth.
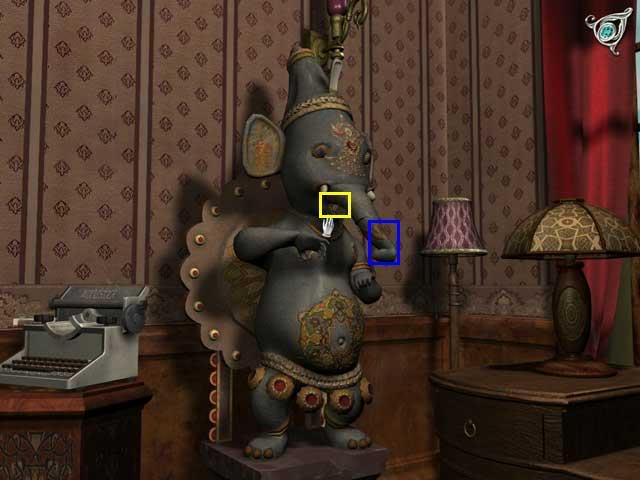
Click on the painting on the wall behind the desk. It will open showing a safe. Use the small key you took from Bromsby’s safe.
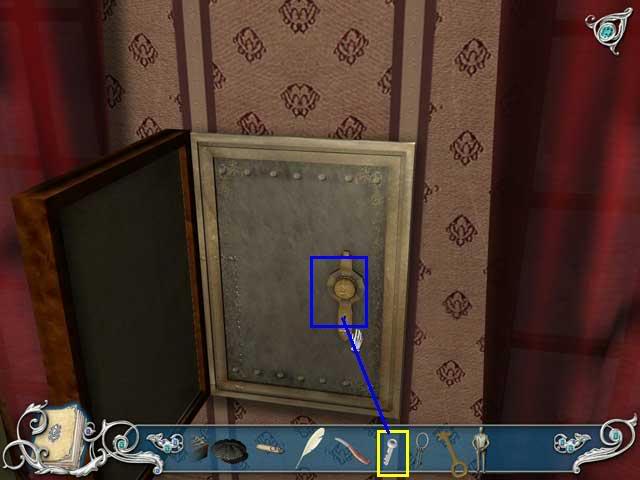
It will open. Take out all papers and read them in the journal.
Pick up the letter from under the tiger table. You will have to position the cursor very carefully so it turns into a hand and you can pick it up. Read it in the journal.
Return to the bridge room to use the statuette there.
When you return, use the key on the drawer. Examine everything in it, but you won’t be able to keep anything.
Once you close the zoom scene, Watson will tell you someone is coming. Holmes will put everything back and you will return automatically to Baker Street.
Later that night, Holmes will return. Go to the elephant statute, click on the trunk, and again take the statuette from its mouth. Back to the bridge room to the get drawer key.
When you return with the drawer key, open the drawer, and take out everything there.
Read the document in your journal. Then back to the bridge room and on out of the building.
Fairfield Theater, Day 3
This building has several rooms to explore. Again, you will often need to take something from one room to use in another, so you will visit each room several times.
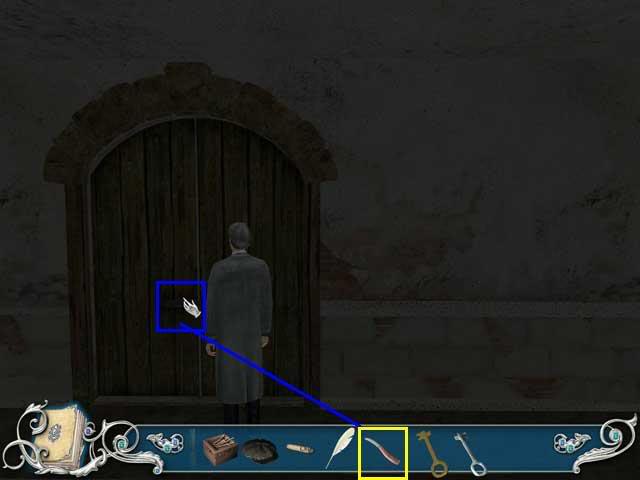
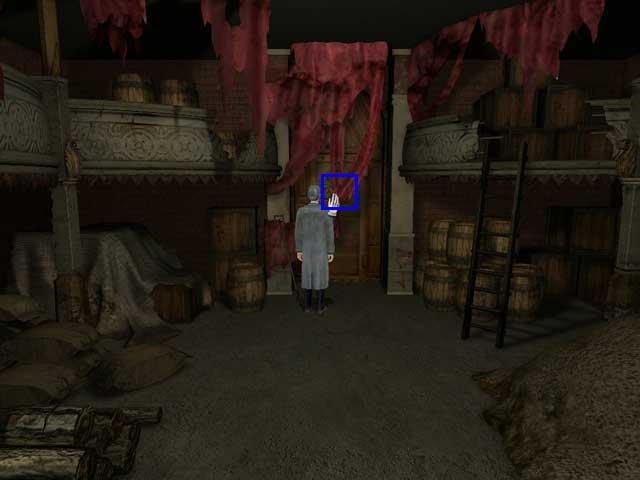
Fairfax Theater/Converted Warehouse, Entryway, Day 3
Actions:
It’s dark! Use your matches to light the lamp just to the right of the bricks on the post.
Head towards the right, and you will see some footprints. Use the tape measure to measure them.
Head on down the corridor, then to the right.
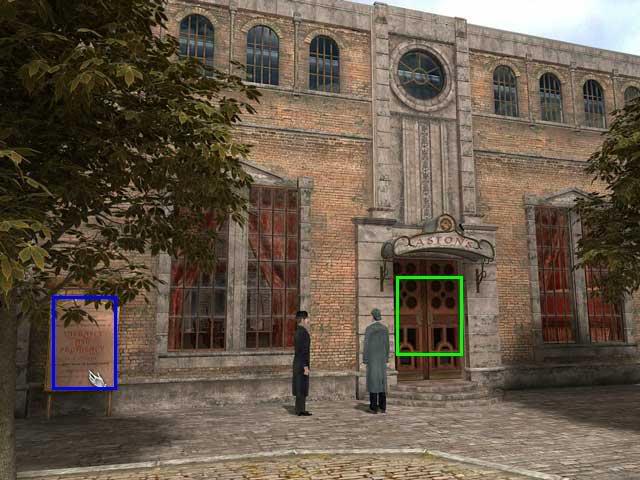
You will come to a locked double door. Use the knife from inventory to open the door to the main room.
Fairfax Theatre, main room, Day 3Actions
First visit
Dark again! Again, use the matches to light a lamp.
Examine a carpet roll and take some hairs for evidence.
Go to the left of the door and you will find keys hanging on the wall.
Now go all the way to the back of the room and you will find a locked door.
Use the keys from the wall to enter the room with the sun on the door.
When you come back here later, you will find white cloth on the floor underneath where the keys were.
Put this in inventory, then use the knife on it to make a mask. Return to the room with the tarp.
You will come into the room a third time looking for tools. You will find a pole next to the door
into the room with the sun on the door on your way back to the room with the tarp.
Fairfax Theatre, Room with sun on door, Day 3
Actions:
First visit
Walk to the far side of the room.
Use the magnifying glass to examine the white powder on the floor. Quicklime!
Walk through the door on the right into the room with the tarp.
On later visits you will just be passing through between the room with the tarp and the main room.
Fairfax Theatre, Room with tarp, Day 3
Actions:
First visit
Walk to the left side of the room. Examine the rings with the ropes holding down the tarp. You will be able to cut one of them with the knife in your inventory.
More quicklime! Go back through the Room with sun on door to the main warehouse room. But take a quick look at what’s under the tarp as you’re going.
When you return with the mask, take the shovel from the left side of the door. You may have to click on a hotspot on the right side of the room to get Holmes to turn so you can get to the shovel.
Try the shovel on the body-it falls into the pit.
Go back into the main room to look for something else.
When you return with the pole, use it on the body.
You will find a passport and a bottle of liquor.
Call Watson. You will have a discussion, then a cutscene, and then end up back at Baker Street.
Evidence
Passport
Bottle of liquor
Q. Grimble have the only set of keys? A. Yes, conversation with Goblet at the cementworks (Conversation)
First choose the down arrow to scroll to the quiz question.
Click Yes.
Click on the Conversation Log tab and look on the left index. If you see the conversation you want, click on it.
Then click again on the answer box on the right page.
Now scroll down to the next question
Q. Captain Lowrie? A. Yes, "About Captain Lowrie" document and photograph of the Abyss.
Q. Wyatt Colins is honest? A. No, conversation with Mary, Audience text document.
Q. Can Grimble be Bromsby’s heir without a will? A. Yes, document Cabinet, Lloyd, Lloyd, and Masters.
Q. Man found at the theater from abroad? A. Yes, passport.
Congratulations! You’ve just finished the game.
Today you will go back and forth between
Holmes, Watson, and Lestrade
Action
After a cut scene, Lestrade will give you 3 documents. Read these.
Open the journal, and see that Hunter’s House is now on the map. Hunter was the bartender at the party.
Click on the map to go there.
Baker Street, Day 4, Second Visit
Holmes returns from visiting Hunter’s House. Even though Watson isn’t there, Holmes keeps talking as if he is.
Right click on your inventory bar and click on the bottle of liquor you found by the body in the theater.
Holmes says, "I must have a book that speaks about this Abbey."
Go over to the bookcase and get the book. Read it in the journal.
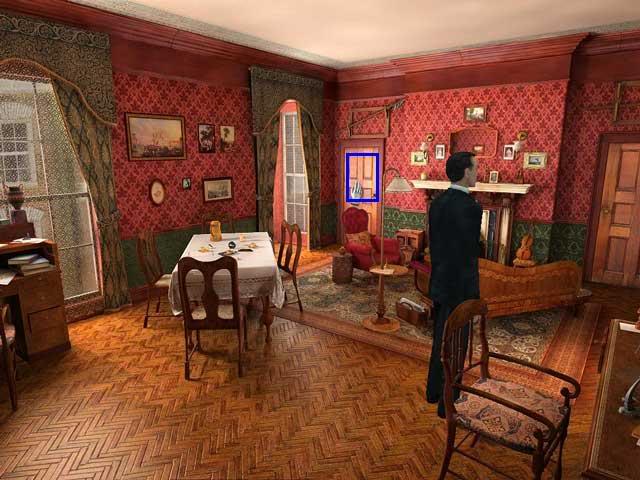
Then click on the hotspot just to the left of the chair so Holmes will turn and face the fireplace.
Click on the door on the left of the fireplace. Holmes will disguise himself.
Open the journal and click on the Abbey to go there.
Baker Street, Day 4, Third Visit, on returning from the Abbey
Holmes will instantly change out of his disguise and the map will open so you can join Watson at Sherringford Hall.
Baker Street, Day 4, Fourth Visit, on returning from Sherringford Hall
Time for the Day 4 Quiz.
•· Hunter’s House, Bedroom, Day 4Hunter’s House, Grounds, Day 4People
Appleby
Actions
Enter from the street.
Talk to Appleby about the case.
Enter the bedroom.
Hunter’s House, Grounds, Second Visit
After Holmes is done in the house, he comes back out to the grounds.
You will now get an aerial view.
Talk to Appleby again.
Click on the hotspot in the bottom center of the scene to go into the greenhouse area.
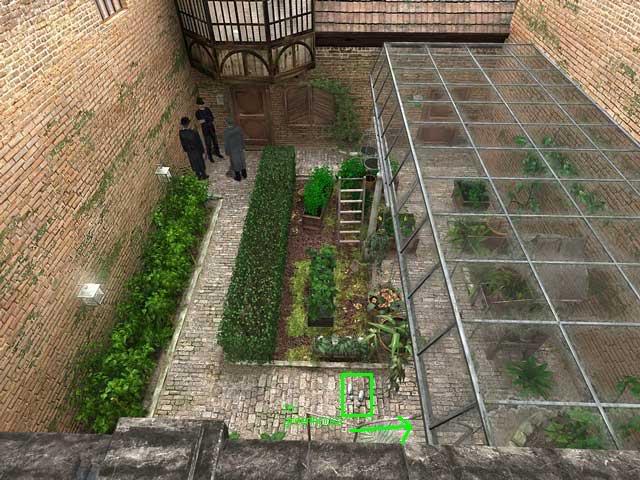
Examine the plants on the right. They are not from England.
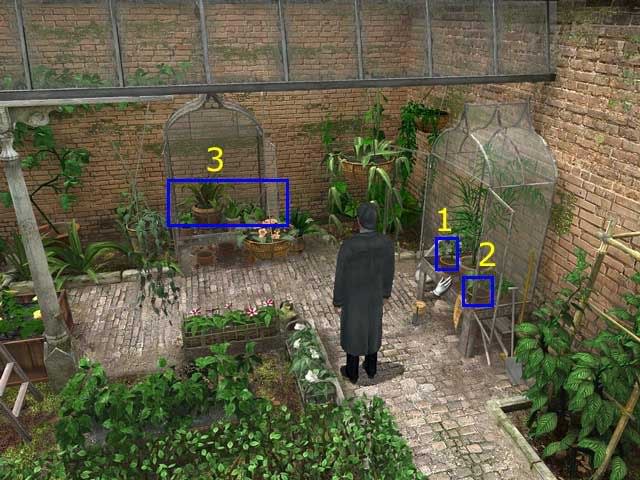
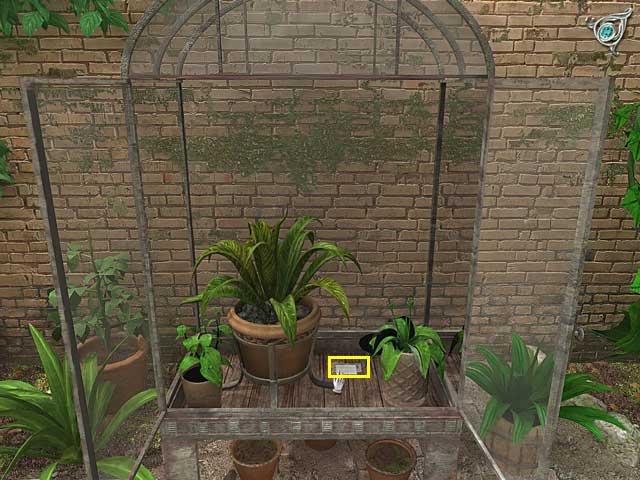
Now go over to the plants in the front. Pick up the pot marked on the screen shot, and then the flower behind it.
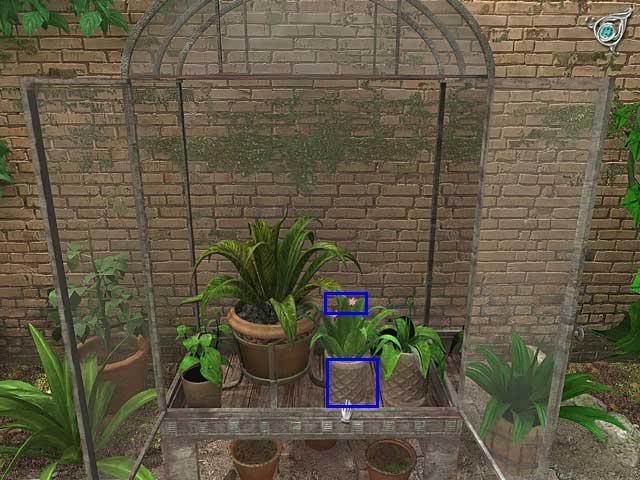
You will now be able to pick up a pawn ticket and some money.
Holmes will give the ticket to Watson and ask him to pick up the pawned item and meet Holmes at Sherringford Hall that evening.
Holmes then says "Let us return to Baker Street."
Right click on the inventory bar and READ the pawn ticket, then read it in the journal.
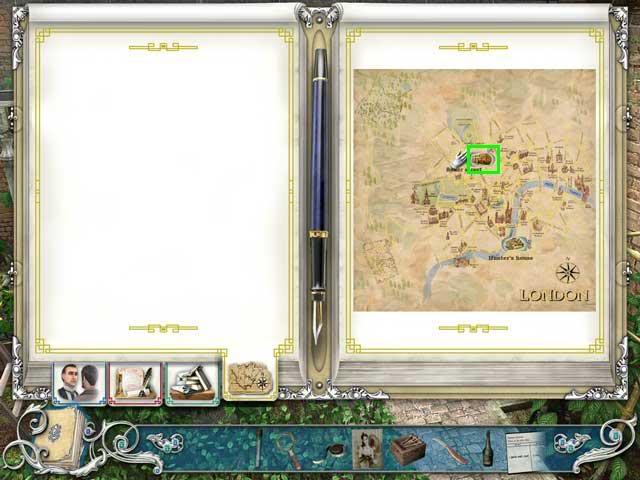
You must open the journal to the map tab and click on Baker Street on the map to return there.
Hunter’s House, Bedroom, Day 4Actions
Examine the bloodstain on the floor.
Go to the cabinet and notice both the finished sketches and the blank canvas.
Use the hotspot on the floor near the center of the window to go closer to it.
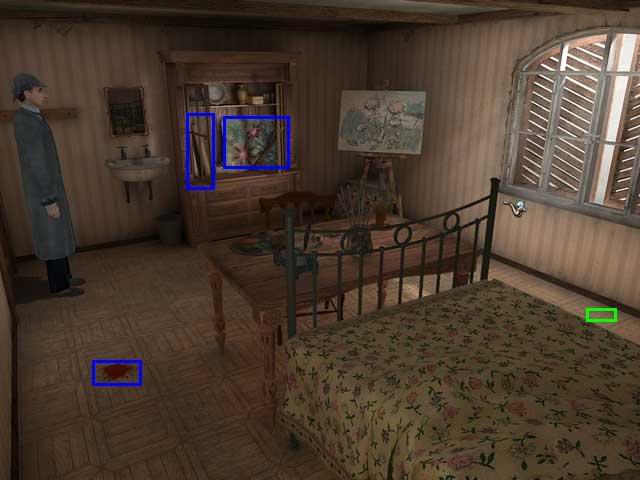
Use the tape measure to measure the partial footprint on the windowsill.
Return using the hotspot by the lower left corner of the bed.
Go back through the door to the grounds.
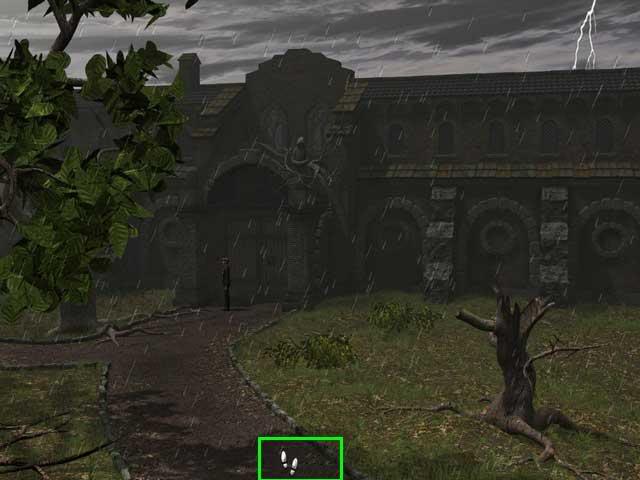
Click on the hotspot by the abbey to move closer.
Click on the small grate to knock on the door. The grate will open.
Talk to the monk.
Click on either hotspot at the bottom of the screen to turn around.
If you’re going to follow the walkthrough all the way, you may want to save here. If you click on different hotspots then I use, you may get different camera angles. Also just walk unless I tell you to run.
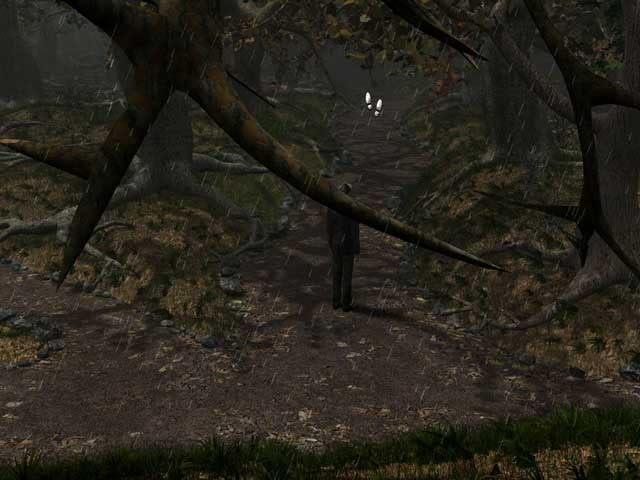
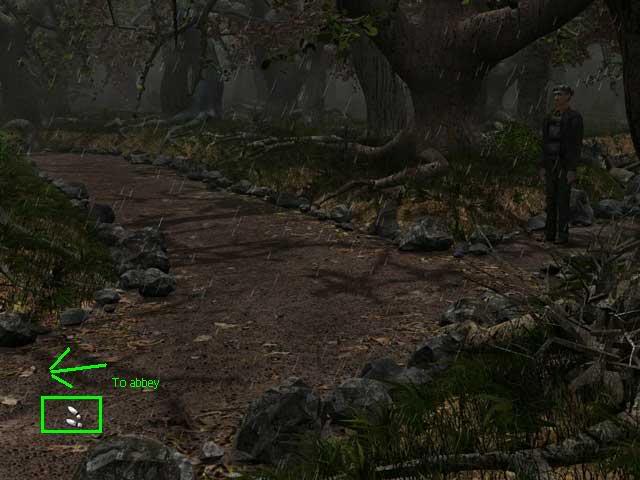
After you talk to the monk in the Abbey, you’re going to go on a walk through the woods. This part is a maze. I really liked it, though, because the first part is NOT timed, so you can spend all the time you want exploring and learning your way around. Only when you get to the part where you smell smoke does the timer start.
Also, unlike the guard dogs at the cementworks, there’s no randomness here. You just need to learn the maze, and run through it quickly.
There is one confusing part-the point of view keeps changing. So a place that might have looked like a right turn now looks like straight ahead. But the maze itself isn’t too complicated and you’ll learn it OK.
Getting through the Maze in the Woods Puzzle
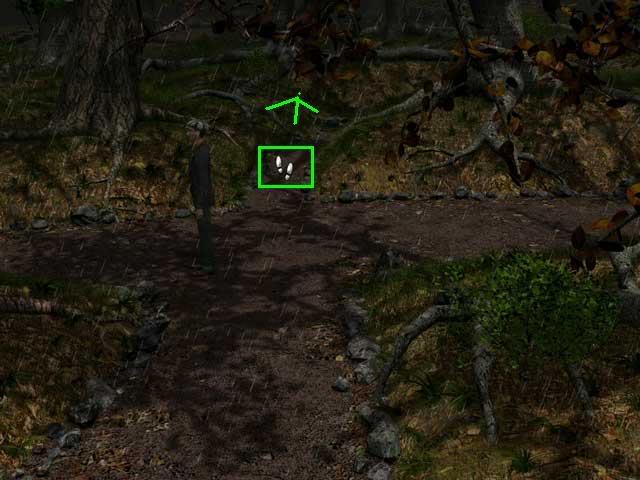
It’s tricky, and you’ll probably have to do it several times, but the good news is that unlike the guard dog problem, here you’ll be able to see that you’re getting better at it. Here are the basic steps.
- Move away from the Abbey to your left to go into the woods. Continue up the path.
- At the first crossroads, don’t take the left path. Yours might look right or straight ahead depending on the point of view, but it won’t look left. If Holmes doesn’t move when you click the footprints, try clicking a little bit closer to him.
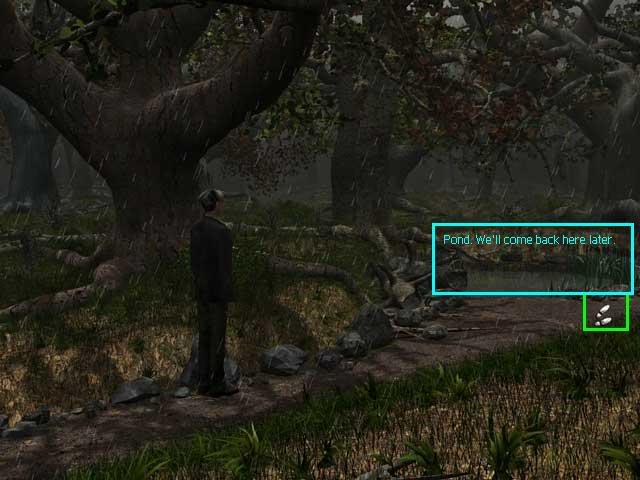
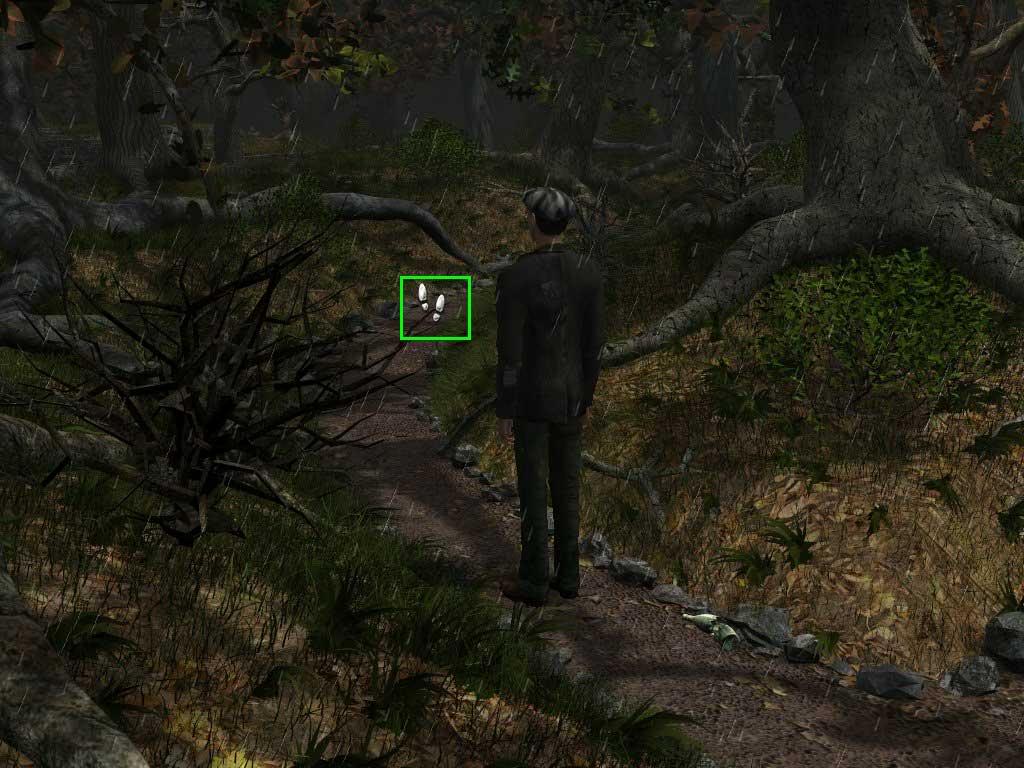
- Keep going straight past the pond.
Again, if Holmes won’t move, click a little closer to him. Don’t doubleclick.
- When you come to a fork, take the lefthand path. That is, don’t turn right. This is a very small path in front of a big tree. After you turn, Holmes will say "What can it be?" Your point of view may jump around as you move up this path, but it’s the same path.

- When you come to the next crossroads, take the righthand path.

- Eventually you come to a crossroads with 3 paths meeting. Holmes will say "Is it near there?" Take the center path. Again the point of view will shift as you step onto the path.
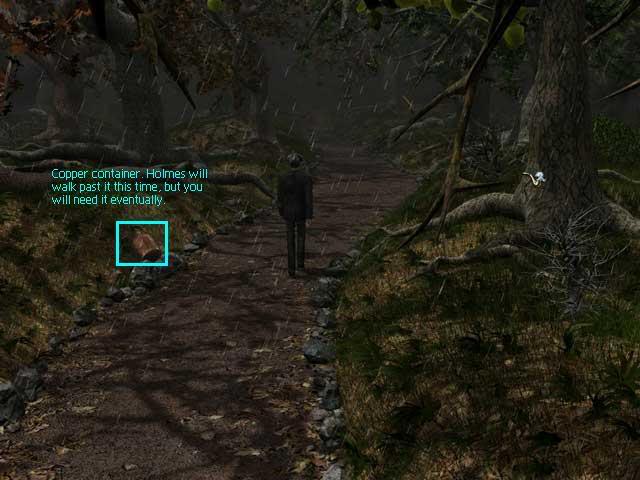
- You will see a copper container along the path on the left side. You can’t pick it up yet, but you need to remember where it is.
- You will come to a 4 way crossroads. Holmes will try to keep going straight through but you want him to turn right..
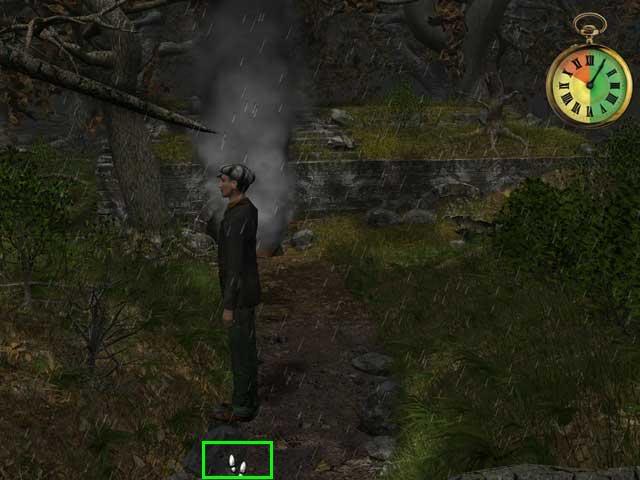
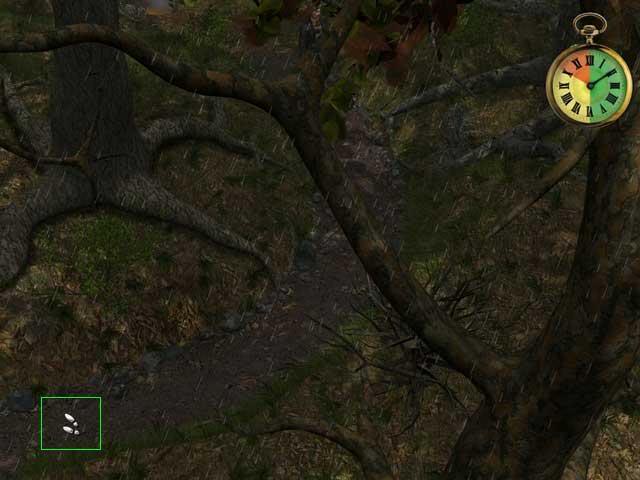
- Around a bend in the path you will smell smoke. SAVE HERE!!! The timer starts soon. If you notice the fire towards the top left of the screen you’ll be able to figure out where to click if Holmes stops or needs to turn.
- Keep going until you see the tramp’s shelter at the ruins. It’s on fire!
- Turn around and run back to the pail. From now on run! The timer shows you how much time you have left. You’ll need to be at the pond by the half-way mark or you won’t make it, so keep running! It may take a few tries before you learn exactly where the hotspots are. Remember you can practice during the untimed phase before the timer starts if you kept a saved game. Here’s the path from the ruins back to the 4 way crossroads.
- Back at the 4 way crossroads. You need to make Holmes go to the right side of the screen.
- Weirdly this part of the path doesn’t reorient to Holmes’ point of view, so the pail is still on the left side of the screen. Pick up the pail.
- Keep running towards the pond. Remember to double click on the hotspots to get Holmes to run.
- When you come to the crossroads, turn right. Holmes tends to stop right at the turn and the screen view shifts-just keep him headed to the right.

- Continue running down the path. Now the hotspots are on the left.

- Now you need to make Holmes turn to the right side of the screen again to step onto the little path. Depending on exactly where you click, the point of view may do a strange jump and then reorient itself, but Holmes will stay on the path. Keep him running!
- At the next crossroads, go to the left. You’re almost to the pond! Again the game makes you take two screens to complete this turn.
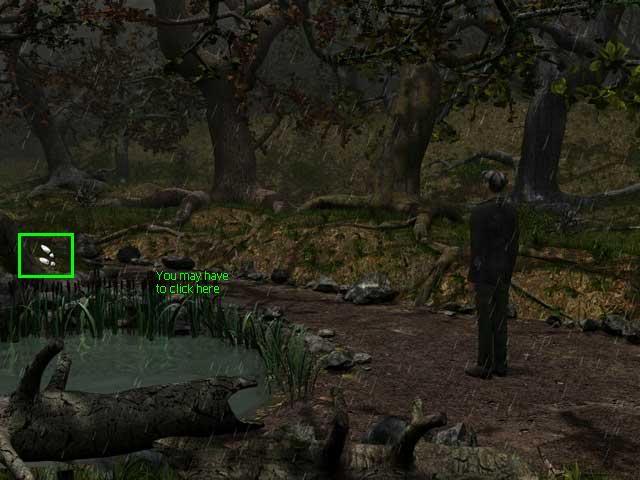
- Finally, the pond! You will need to right click to open the inventory bar, select the pail, then click it on the lower right front corner of the pond. Holmes will go to that spot and fill the pail. Close the inventory bar again or you won’t find all the hotspots running back. At this point you need to still have about half the time left, or you won’t make it back.
- Click the pail on the pond, then run back to the fire (repeat steps 3 to 10 above).
- Around the bend to the fire. Put the pail on the fire, and you’re done!
Click on the Tramp’s Shelter to go in.
Abbey Grounds, Day 4, Second Visit after exiting the Tramp’s Shelter.
Now just head back to the pond (steps 10 to 19 in the puzzle), and then back to the abbey.
When you get all the way back to the abbey, click on the hotspot at the bottom of the scene and the journal map will open. Return to Baker Street to remove your disguise.
Actions
One of the good things about this game is that Holmes is smart enough to hold onto things that might be useful more than once, like a box of matches and a knife.
Use the matches on the candle on the right.
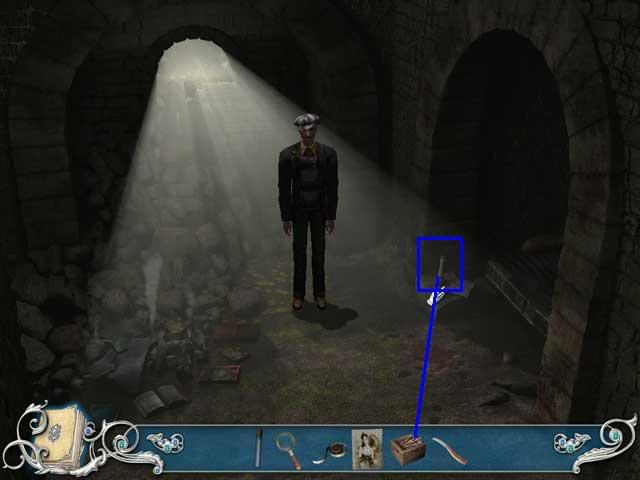
Now that you have light, look around the room. Examine the burned papers on the left and the mattress on the right. Use the magnifying glass from inventory on the red stain on the floor near the candle. Look at the liquor bottles.
Then use the hotspot to move down scene.
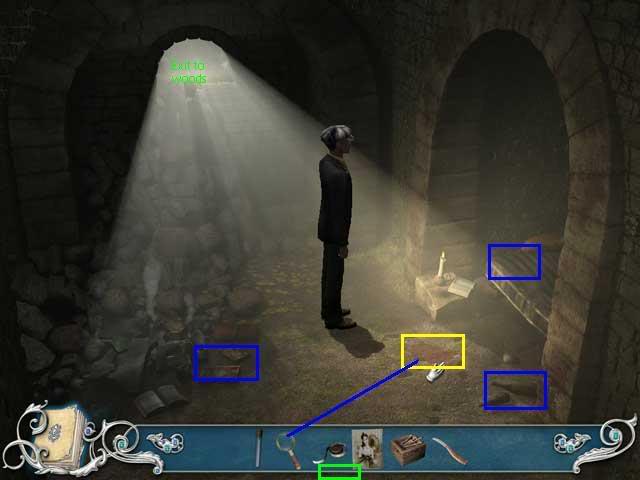
Use the tape measure on the footprints on the floor.
Then go all the way to the back nook.
When you get close to the back wall, you will be able to use the hand cursor to open a zoom screen. Use the knife on the dark brick and take out the letter there. Click on READ in inventory to move it to your journal, then read it.
Use the hand cursor on the light at the top of the entrance to the tramp’s shelter to leave it and return to the Abbey grounds.
Grimble, Watson, Holmes, Lestrade
Actions
First watch the cutscene.
Then exit to the hallway and cross it to the Powderroom.
Lavinia, Lt. Herrington
Actions
Click on the hotspot on the sofa to move into the back part of the room.
Speak with both Lavinia and Lt. Herrington.
After the Lieutenant leaves, select the photo of the young woman from inventory and show it to Lavinia.
You will then view a cutscene and be automatically returned to Baker Street.
Q. Thugs related to the case? A. Yes, Wung Jei document
First choose the down arrow to scroll to the quiz question.
Click Yes.
Click on the Conversation Log tab and look on the left index. If you see the conversation you want, click on it.
Then click again on the answer box on the right page.
Now scroll down to the next question
Q. Skilled with weapons? A. Yes, Appleby conversation at Hunter’s house..
Q. Tramps hang out in woods near Abbey? A. Yes, conversation with Brother at Abbey.
Q. Handwriting the same as other documents? A. Yes, W threat document and WC threat document.
Q. Work abroad? A. Yes, Kaldissia letter from Mycroft.
Today you will go back and forth between
Holmes, Watson, and Lestrade
Action
Watch a cut scene, then you will be automatically taken to the Aston Theater.
Baker Street, Day 5, Second Visit
After visiting the Aston Theater, you will be back at Baker street.
Holmes will give Watson a table of shoe sizes. You will also receive a newspaper clipping from Mycroft.
The journal will open for the Quiz, but first read the two new documents.
Then go to the Quiz for Day 5.
For some reason in this location the point of view changes all the time, even in the middle of a conversation.
Also, there is an error in the game in how they refer to rooms. They start out by talking about Doris’ room as the dressing room, but then in the evidence they call the Office/Costume room "the dressing room." In order to be consistent with the game, we will call them Doris’ Room and Costume/Dressing room.
- Aston Theater Grounds, Day 5
- Aston Theater Lobby, Day 5
- Aston Theater Doris’ Room, Day 5
- Aston Theater Hallway, Day 5
- Aston Theater Backstage, Day 5
- Aston Theater Locked Room, Day 5
- Aston Theater Costume/Dressing Room, Day 5
Action
Read the theater poster.
Enter the theater lobby.
Aston Theater Lobby, Day 5People
Kirby (sweeping)
Aston (by the dressing room door)
Small (on stage)
Wilcox and Sullivan, in front of the stage.
Action
Talk to the man sweeping.
After you finish, you will have to click on a hotspot in the upper right corner of the scene to get to a view of the room where you can see at least some of the people on stage.
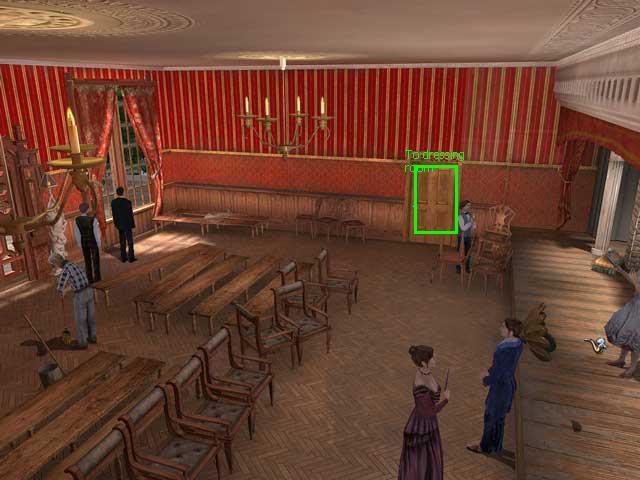
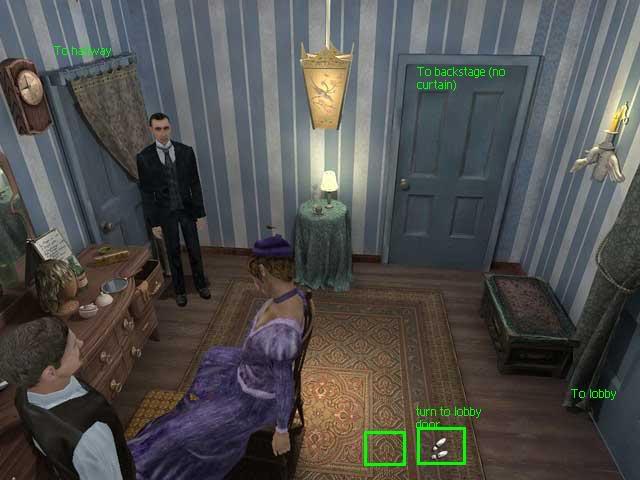
Talk to everyone in the room. When you finish, enter the door to Doris’ room.
Aston Theater Lobby, Day 5, Second Visit
After you have been to the outer rooms, including backstage, come back here and get a set of keys from Aston
Go back through Doris’ room to the backstage area by using the door without a curtain.
Aston Theater Lobby, Day 5,Third Visit
You have been to the locked room and need to get all 3 earrings. Click on the silver earring in inventory and show it to Miss Small (on stage).
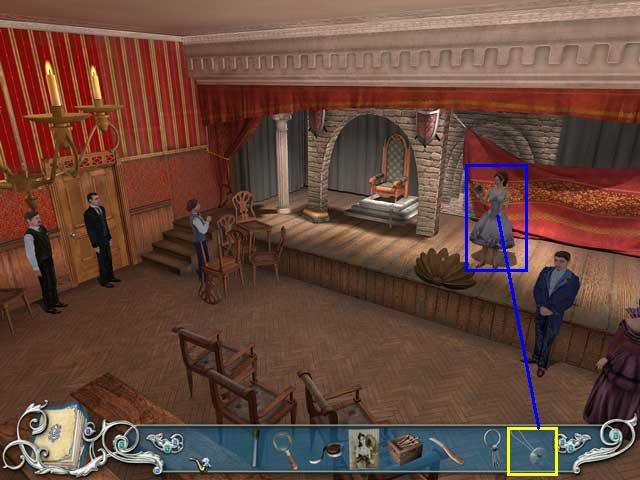
She will give you both of the other earrings. Check your inventory to make sure you have all 3, then head back to the locked room.
Aston Theater Doris’ Room, Day 5
People
Doris
Actions
Talk to Doris, then exit to the hallway through the door on the right of the mirror.
Aston Theater Doris’ Room, Day 5, Second Visit
After you are done in the outer rooms, come back through here. This time use the door that leads backstage. That is the only door without a curtain.
Aston Theater Doris’ Room, Day 5,Third Visit
This time, use the hotspot on the carpet to turn towards the lobby door, then go back to the lobby.
Aston Theater Doris’ Room, Day 5, Fourth Visit
You have been to the locked room, and now you need to get the earring from Doris. You try to wake her up, but she just says "I do not know where your wig is!" and falls back asleep.
Leave her alone and go back to the lobby.
Aston Theater Hallway, Day 5People
At first just Holmes and Watson, but Richards will come out and join them after you knock on his door.
Actions:
Click on the hotspot at the lower center of the scene, and Holmes will step forward to the end of the hallway.
Knock on the door.
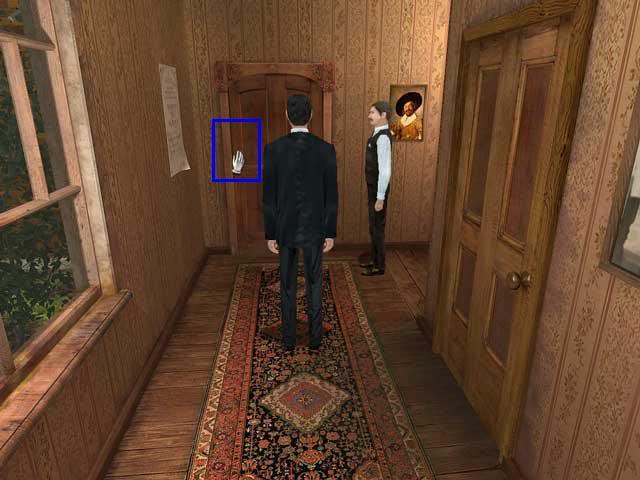
Richards will come out. Talk to him.
After you have exhausted all the topics, click on the silver earrings in inventory and show it to Richards.
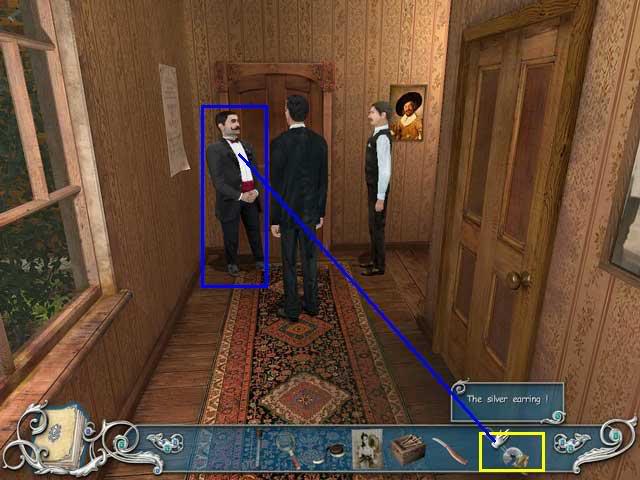
Turn around and walk back up the hall to the last door on the left.
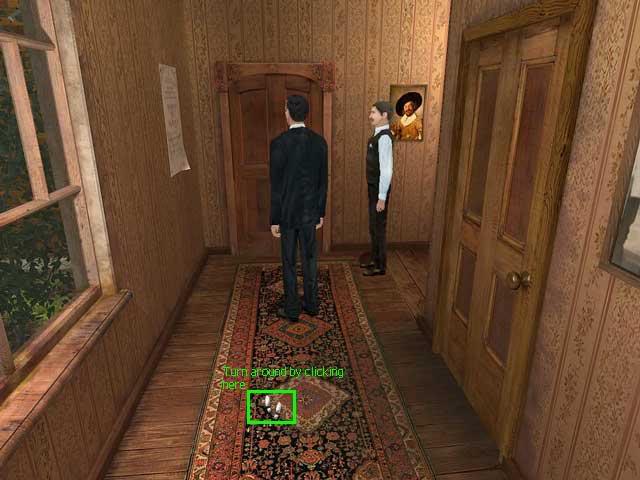
I found that there were not enough hotspots here to make Holmes walk to the end of the hall, but once you get the hand cursor on the door you can click it and he’ll go there. Go into the costume room.
Aston Theater Hallway, Day 5, Second Visit
After you are done in the costume room, come back out, then go back into Doris’ room.
Aston Theater Costume/Dressing Room, Day 5
Your cursor will be the quill because you are playing as Watson here.
There are many different things to look at in the room.
Actions
You can do these in any order. I started with the items on the table.
Pick up the list of costumes, and use the READ in inventory.
Look at the open book.
Pick up the book from the stack of books in the center. Read it in the journal. This entry is quite long, so you will have to page down twice.
Then click on the hotspot on the carpet to see the far side of the room.
Check the closet-one costume is missing.
There are two hotspots right next to each other on the carpet here. One makes Watson walk over to Holmes and the other shifts the view of the scene so you can see the door.
When you can see the door, click on it and go back to the Hallway.
Aston Theater, Backstage, Day 5People
Poole
Actions
Talk to Poole.
Return to Doris’ room.
Aston Theater Backstage, Day 5, Second Visit and Third Visit
After you get the keys from Aston, walk past Poole all the way to the end of the backstage area.
Maybe I missed a hotspot, but I found this next scene really awkward. Right click to open the inventory bar and click on the ring of keys that Aston just gave you. Right click again to close the inventory bar. Now move the cursor until it turns into a hand on the door. Left click to use the keys and open the door.
Now Holmes will talk to Watson, and then climb the stairs to the locked room.
On the third visit, you do the same thing to get to the locked room for the second time.
Aston Theater, Locked Room, Day 5Actions
First move the clay pot and the small box aside so you can look at the medium size wooden box.
Use your magnifying glass on it.
Now you see a zoom screen of the front of the box. Fit the silver earring from inventory into the space on the left side of the waves.
Now return to Doris’ room.
Aston Theater Locked Room, Day 5, Second Visit
Now that you have all 3 earrings, fit them into the lock.
The box will open. Take out the handwritten note and the photo and examine the other items.
You will automatically be taken to the grounds for the theater, and then to Baker Street.
Evidence
Handwritten note
Photo
Q. Two sets of keys? A. Yes, Aston conversation
First choose the down arrow to scroll to the quiz question.
Click Yes.
Click on the Conversation Log tab and look on the left index. If you see the conversation you want, click on it.
Then click again on the answer box on the right page.
Now scroll down to the next question
Q. Red wig missing? A. Yes, Sullivan conversation at theater.
Q. Costume room be connected to the case? Yes, fake uniform button from Sherringford Hall kitchen (evidence) and missing costume from costume room (evidence).
Q. Writing on latest note match anything else? A. Yes, French visiting card (document) and antiques dealer card (document)
Optional Quiz Answers Day 5
You know my methods, Watson-what is the solution?
This second quiz is optional. Once you’re done, just close the journal. You will be told if you have the right answers or not, and given the option to continue.
Q. Sir Bromsby? A. Herrington
Q. Fowlett? A. Collins
Q. Johansson? Q. Jeffries
Q. Davenport? A. Jeffries
Q. Jeffries? A. Nobody
Q. Hunter? A. Herrington
Now watch the end movie!
“;

More articles...
-
Grow A Garden 2 Base Price List
What's the most valuable crop? -
Evomon Best Starter [Leafbun, Blazpup, or Bubble?]
Grass-type, Fire-type, or Water-type? -
Evomon Tier List [META and BEST Evomon]
The Evomon dream team.