- Wondering how to get Monopoly GO! free rolls? Well, you’ve come to the right place. In this guide, we provide you with a bunch of tips and tricks to get some free rolls for the hit new mobile game. We’ll …
Best Roblox Horror Games to Play Right Now – Updated Weekly
By Adele Wilson
Our Best Roblox Horror Games guide features the scariest and most creative experiences to play right now on the platform!The BEST Roblox Games of The Week – Games You Need To Play!
By Sho Roberts
Our feature shares our pick for the Best Roblox Games of the week! With our feature, we guarantee you'll find something new to play!All Grades in Type Soul – Each Race Explained
By Adele Wilson
Our All Grades in Type Soul guide lists every grade in the game for all races, including how to increase your grade quickly!
Sherlock Holmes and the Hound of the Baskervilles Walkthrough
Welcome to the Sherlock Holmes and the Hound of the Baskervilles walkthrough on Gamezebo. Sherlock Holmes and the Hound of the Baskervilles is an interactive, hidden object, adventure game played on PC, created by Frogwares and available at Big Fish Games. This walkthrough includes tips and tricks, helpful hints, and a strategy guide for how to complete Sherlock Holmes and the Hound of the Baskervilles.
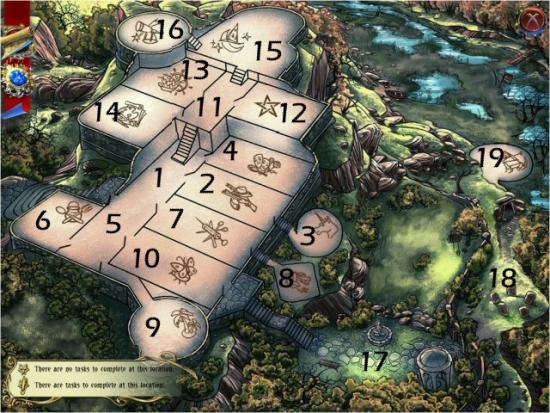
SHerlock Holmes and the Hound of the Baskervilles – Game Introduction
Welcome to the Sherlock Holmes and the Hound of the Baskervilles walkthrough on Gamezebo. Sherlock Holmes and the Hound of the Baskervilles is an interactive, hidden object, adventure game played on PC, created by Frogwares and available at Big Fish Games. This walkthrough includes tips and tricks, helpful hints, and a strategy guide for how to complete Sherlock Holmes and the Hound of the Baskervilles.
General Information
- Enter your profile name (up to 13 characters – letters and numbers, only) and click OK. Click on “Change Profile” (lower right) to switch, add or delete profiles.
- Click on Options to adjust Resolution, Gamma (brightness), Music, Effects and Voice levels, turn Full Screen and Custom Cursors on and off and to access the Credits.
- Click on Honors to see any of the 32 achievements (the list is located at the end of this guide) you’ve collected. Mouseover them for a description of the requirements.
- Extra Content is locked until you complete the regular (7 levels) and bonus (3 levels) games.
- Once you click play, you can choose which difficulty mode you’d like to play: Easy (Tutorial option, additional Hints and Help, quick Hint/Skip recharge and easy puzzles/object searches) or Hard (no Tutorial, limited Hints and Help, slower Hint/Skip recharge and hard puzzles/object searches).
- The Hint button is located in the center of the Medallion at the lower right. Hints recharge in 25 seconds in Easy mode and 40 seconds in Hard mode. The Skip button is available during most puzzles and charges in 150 seconds (2 and one half minutes) in Easy mode and seconds in Hard mode.
- There are 5 slots (around the Hint button) for the Strength (manipulate or break heavy objects), Perception (see into dark places), Speed (accelerate time), Materialization (create items from two-dimensional objects) and Telekinesis (reach distant objects) abilities, which you’ll acquire as you play. These are always available and don’t need to recharge.
- The interactive Map is located at the lower left (once you collect the Baskerville Book) and you can use it to jump to available locations rather than clicking through to different areas.
- The Inventory is located at the bottom of the screen. Click on the right or left arrows to scroll to additional items.
Gameplay and Guide Tips
- This guide assumes you’ve read the General Information, used the in-game Tutorial and/or Help features or otherwise familiarized yourself with the gameplay. This guide was written playing the game in Hard mode. Where appropriate, differences between the Easy and Hard modes will be shown or discussed.
- When you unlock a new Baskerville location, you’ll enter it, automatically. Use the Map, or click to exit, if you wish to explore a different area, first.
- Throughout this walkthrough, Interactive Items (Doors, Puzzles, Object Searches, etc.) are indicated in White, Coat of Arms Pieces in Yellow, Inventory Items in Green and Crystal Eyes in Blue.
- When finding new abilities, completing a Coat of Arms or performing other tasks, you’ll be given the opportunity to go directly to the location indicated. Click No if you wish to complete other tasks, first. This may help avoid backtracking.
- Object Searches are random and only the Inventory Item will be shown.
- Important: you may need to click on puzzles that you don’t have all the pieces for. This is the only way to initiate certain game triggers. If you don’t, you won’t be able to progress.
- Within the various rooms, you travel between the Past and Present by clicking on the Wolf’s Head, after it’s activated. You can also access the Past (Blue Wolf’s Head) and Present (Yellow Wolf’s Head) from the Map.
- Make use of the interactive Map, often. Rather than backtracking, simply click on any area with a Wolf’s Head (with or without an exclamation point) to go directly to that location. An Exclamation Point indicates new or incomplete tasks.
Walkthrough
Click Play, choose your difficulty mode and watch the opening movies.
Main Game Map
Portrait Gallery
2: Rodger’s Room
3: Secret Garden
4: Luisa’s Room
5: Hall
6: Kitchen
7: James’ Room
8: Laboratory
9: Winter Garden
10: Lily’s Room
11: Second Floor
12: Henry’s Room
13: Edward’s Room
14: Elizabeth’s Room
15: Charles’ Room
16: Observatory
17: Garden
18: Moor
19: Mine

Rodger Baskerville
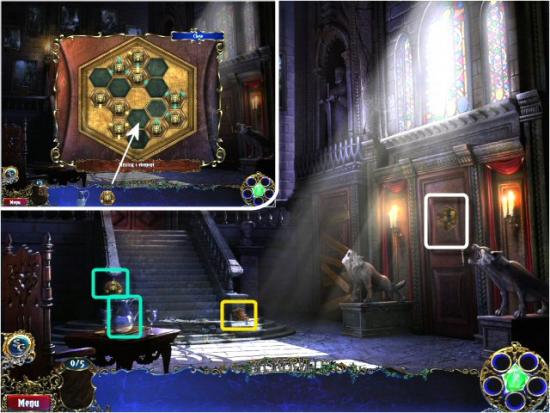
Collect the Pitcher of Water, Rodger’s Door Lock Piece and Coat of Arms Piece and then click on Rodger’s Door. Use the Door Lock piece in the Puzzle.
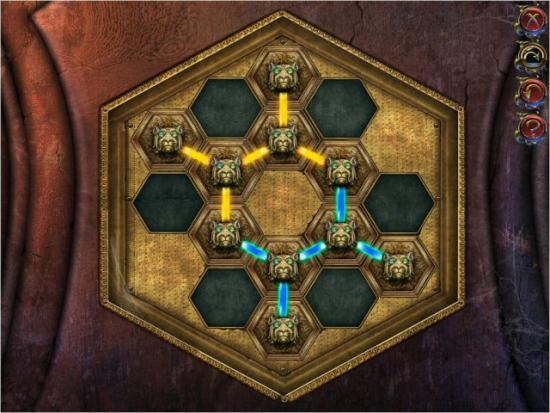
Arrange the pieces so there’s a continuous connection. Click and drag the pieces to move them and match the yellow and blue connections. There is no difference in this puzzle between the Easy and Hard modes.
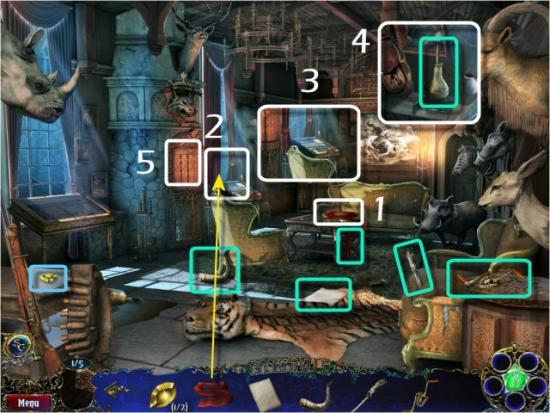
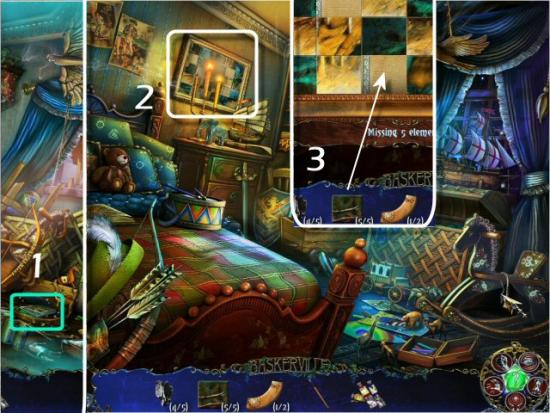
Collect the Baskerville Book (1 – Interactive Map), Curtain Tie, Crystal Eye, Horn, Paper, Knife and Crossbow Part. Use the Curtain Tie on the Drapes (2), click on the Display Case (3), find all the items in the list (4 – Inventory Item: Oiler – located just to the left of the Display Case, in the search scene) and then click on the Grate (5).
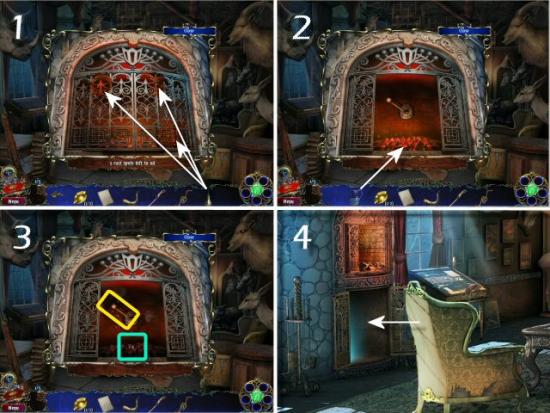
Use the Oiler in the spots indicated (1), use the Pitcher of Water on the Coals (2), collect the Coal, click on the Lever (3) and then enter the Secret Garden (4).
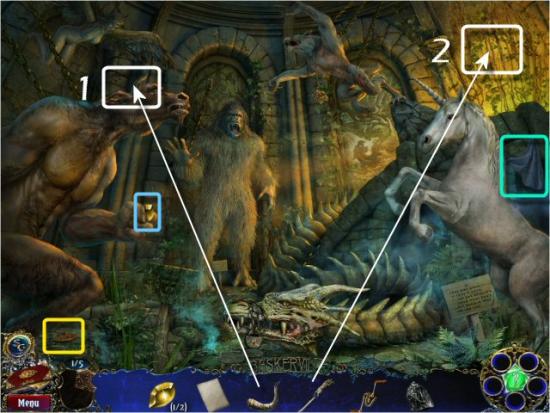
Collect the Coat of Arms Piece and Cloth, use the Horn on the Minotaur (1), collect the Crystal Eye (click No, when asked if you want to change locations) and then use the Knife on the Ivy (2 – click 2 times).
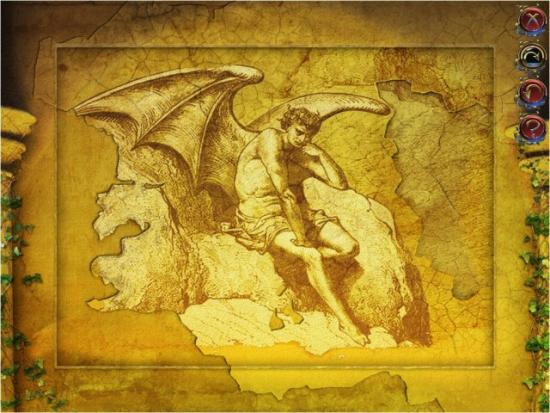
Reconstruct the Image by clicking on each square until complete.
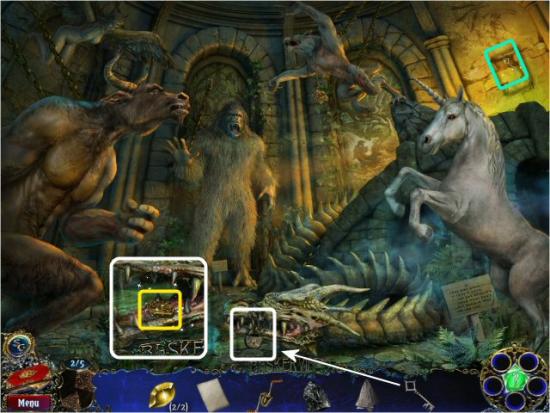
Collect the Key, use the Key on the Dragon, collect the Coat of Arms Piece and then return to Rodger’s room.
Use the Cloth on the Whiskey (1), click on the Wolf’s Head (2), use the Crystal Eyes (3) and then enter the Past.
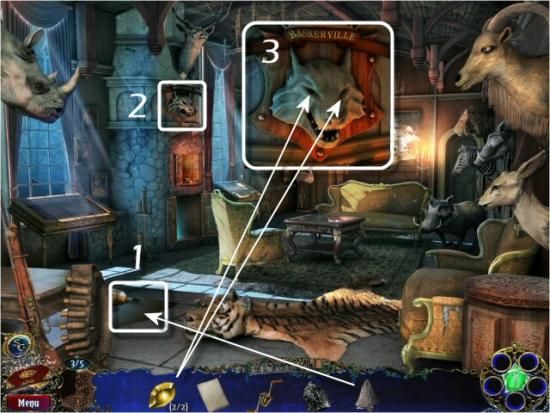
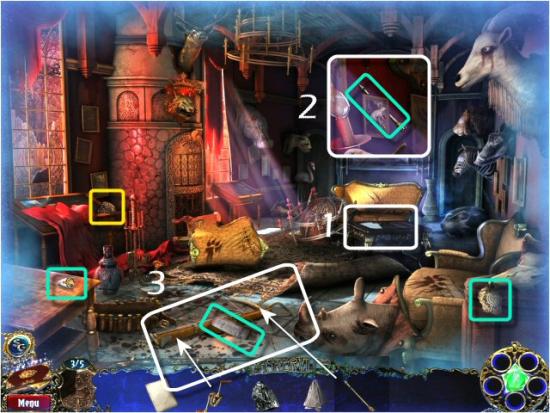
Collect the Second Floor Key Piece, Coat of Arms Piece, Newspaper and Scheme Piece and then click on the Table (1). Find all the items in the list (2 – Inventory Item: Arrow, located at the upper left, between the Slingshot and Small Bird), use the Crossbow Piece and Golden Arrow on the Crossbow (3), collect the Crossbow and then enter the Present.
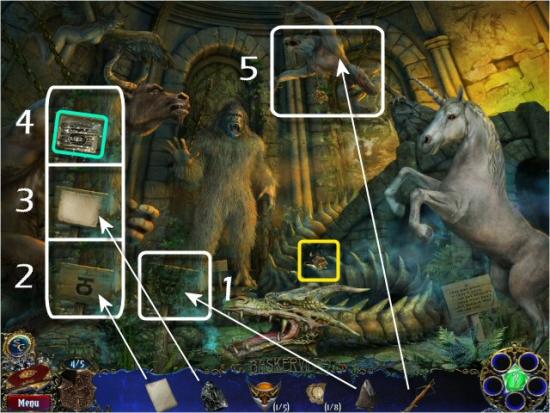
Enter the Secret Garden, use the Cloth on the Sign (1), use the Paper on the Image (2), use the Coal on the Paper (3), and then collect the Strange Sign (4). Use the Crossbow on the Werewolf (5), collect the Coat of Arms Piece (click Yes, when asked if you want to change locations), and then return to the Portrait Gallery.
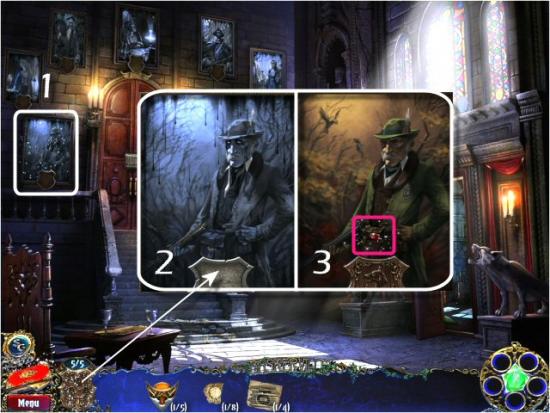
Click on Rodger Baskerville’s Portrait (1), use the Coat of Arms (2) and collect the Strength Medallion (3).
Luisa Baskerville
Click on the Strength Ability, use it on Luisa Baskerville’s Door (1 – click 2 times) and then enter Rodger’s room (2). Enter the Past, use the Strength Ability on the Vases (3 and 4 – on the left and right sides of the room), collect the Gear and the Painting Part and then return to the Portrait Gallery and click on Luisa’s Door (5).
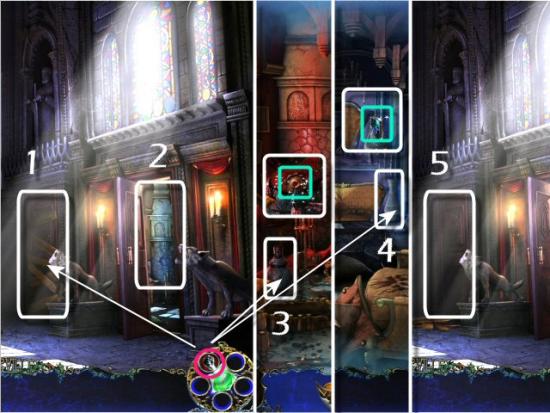
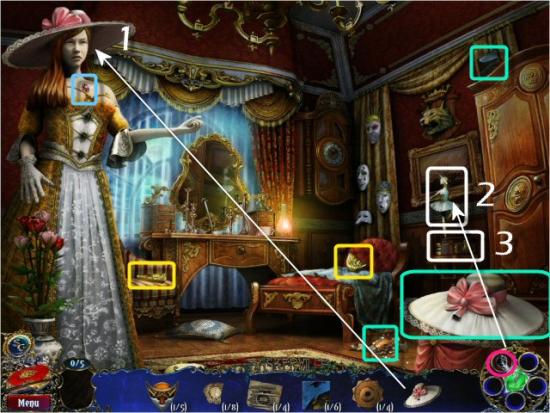
Collect the 2 Coat of Arms Pieces, the Hat and the Painting Part. Use the Hat on the Mannequin (1), collect the Crystal Eye, click on the Strength Ability, use it on the Ballerina (2), collect the Gear and then click on the Little Box (3).
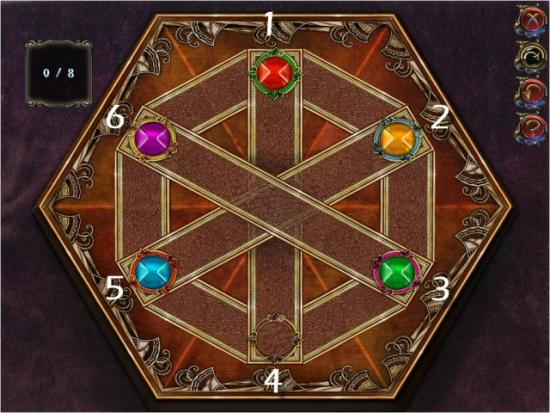
Move the Gems to their matching colored slots. In Easy mode you are given 10 moves, in Hard mode you only have 8 moves. Click on the Gems in this order (8 moves – this will work in Easy mode, also): 1, 2, 5, 4, 3, 6, 1 and 4.
Click on the following for a video solution.
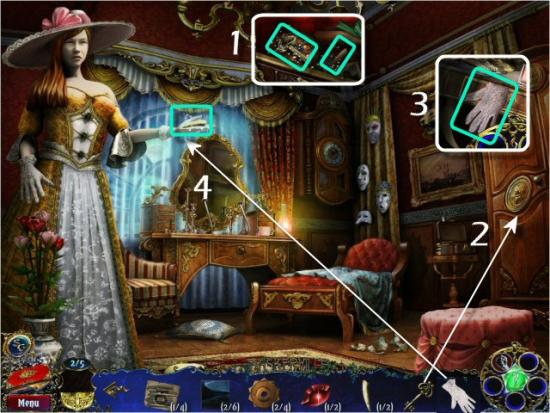
Collect the Fang and the Little Key (1), use the Little Key on the Wardrobe (2), click on the Open Doors and then find all the objects in the list (3 – Inventory Item: Glove, located at the lower right of the scene). Use the Glove on the Mannequin’s Hand (4), collect the Fang and then return to Rodger’s room (click Yes, when asked if you want to change locations).
Use the Fangs on the Tiger (1 – click 2 times), collect the Crystal Eye, return to Luisa’s room (click Yes, when asked if you want to change locations), click on the Wolf’s Head (2), use the Crystal Eyes and then enter the Past.
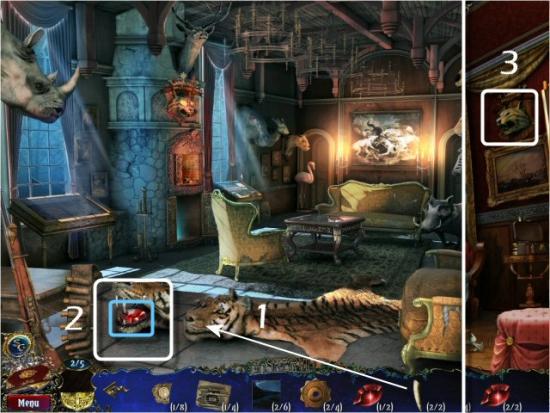
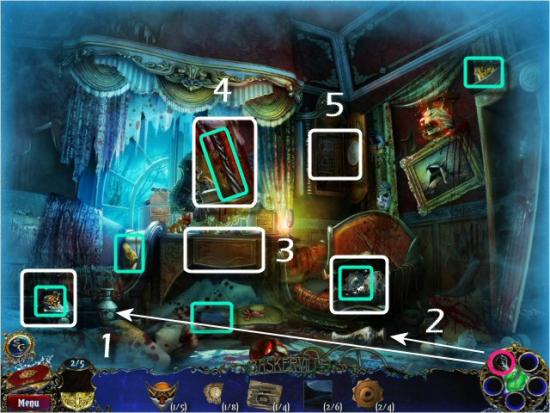
Use the Strength Ability on the 2 Vases (1 and 2), collect the 2 Coat of Arms Pieces, the Painting Piece, James’ Door Lock Part, the Second Floor Key Part and the Gear and then click on Vanity Drawer (3). Find all the objects in the list (4 – Inventory Item: Black Candle, located at the upper middle, just under the Mask). Click on the Clock (5), close it, return to the Present and then click on the Wardrobe.
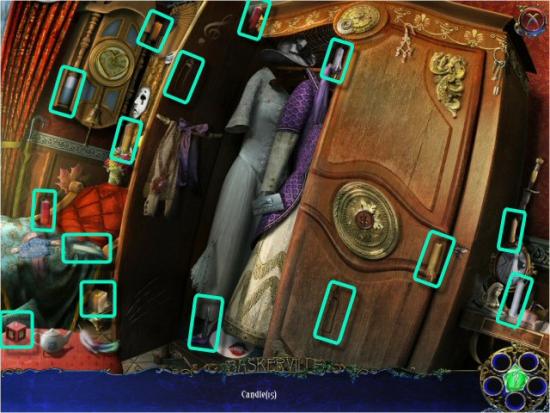
Find the 15 Candles. Inventory Item: Black Candle
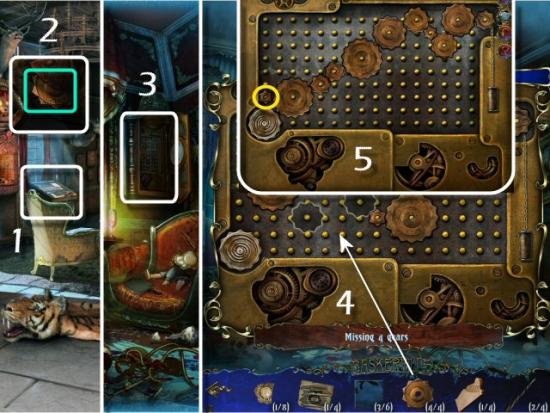
Return to Rodger’s room, click on the Display Case (1), find all the items in the list (2 – Inventory Item: Gear, located at the lower left, just to the left of the Boar’s Head), return to Luisa’s room, enter the Past, click on the Clock (3) and use the Gears (4 – click anywhere, 4 times).
Arrange the Gears so they connect from the Moving Gear, at the lower left, to the Stationary Gear at the upper right. There is no difference in this puzzle between the Easy and Hard modes. You only need to use 9 out of the 10 Gears to get all of them to rotate. One of the smallest Gears can be ignored (5 – yellow), if you like.
Collect the Handle (1), return to the Present, use the Handle on the Vanity Drawer (2), collect the Coat of Arms Piece (3) and then return to the Portrait Gallery (click Yes, when asked if you want to change locations). Click on Luisa Baskerville’s Portrait (4), use the Coat of Arms (5) and collect the Perception Medallion (6).
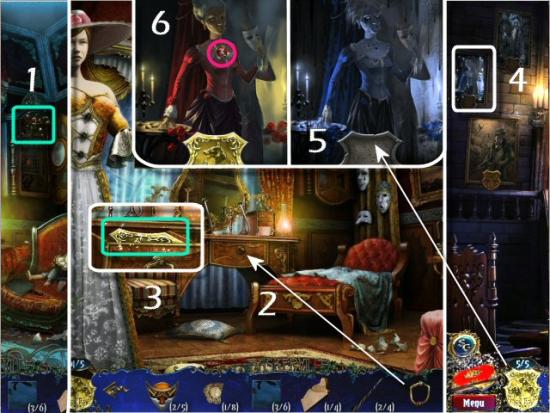
James Baskerville
Use the Perception Ability in the Dark Area (1), collect the Kitchen Key (2), enter the Hall, use the Perception Ability in the Dark Area (3), collect the James’ Door Lock Part (4) and then use the Kitchen Key on the Door (5).
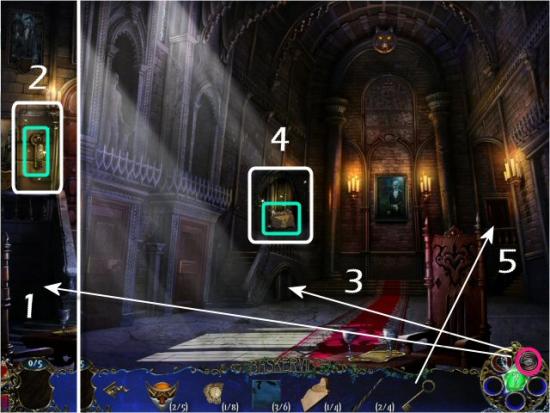
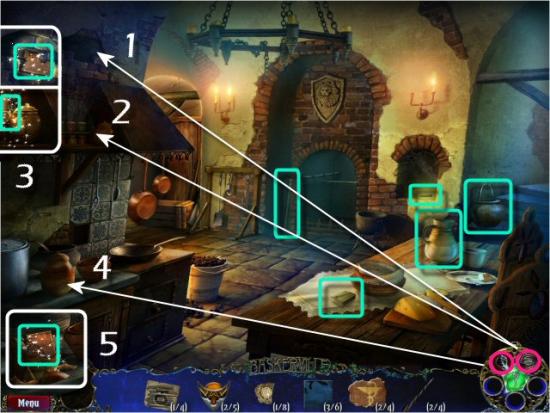
Use the Perception Ability in the Dark Areas (1 and 2), collect the James’ Door Lock Part and the Cabinet Lock Part (3), use the Strength Ability on the Pot (4), collect the James’ Door Lock Part (5), collect the Matches, Jug, Cauldron, Black Candle and Poker and then return to the Hall.
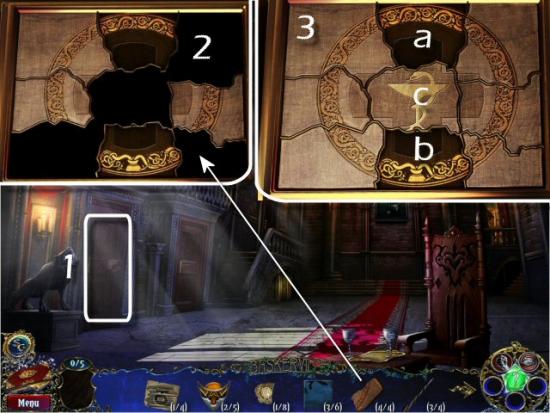
Return to the Hall, click on James’ Door (1), use the Door Lock Pieces (2 – click anywhere, 4 times).
Depress all 9 parts of the Image (3). Clicking on a section will change its state (either Raised or Depressed) and those of the adjacent (touching on the left, right, top and/or bottom) sections. The image is misleading. It should be viewed as if it were a perfect 3 by 3 square, rather than 9 irregular sections. The areas that appear to touch near the “corners” aren’t changed. The solution is to press the top middle (a), bottom middle (b) and center sections (c), in that order. There are other solutions, but this is the quickest.
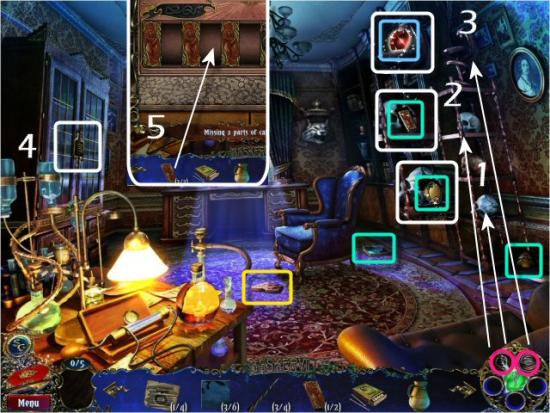
Use the Strength Ability on the 2 Skulls (1 and 2), use the Perception Ability in the Dark Area (3) and collect the Crystal Eye, collect the Painting Piece, the Second Floor Lock Part, the Circular Key Part and the Cabinet Lock Part. Click on the Cabinet (4) and then use the Cabinet Lock Parts (5 – click anywhere, 2 times).
Switch the places of all the Lions (red) and Snakes (black) to the opposite ends. Snakes can only move left to the next empty space, or over one Lion to the next empty space to the left. Lions can only move right to the next empty space, or over one Snake to the next empty space to the right. Once a piece is moved, it can’t be moved back. Click the Reset button if you want to start over. The key is to make sure none of the same blocks are next to each other, until you’re near the end of the solution. There are 2 solutions (they are the same in both Easy and Hard modes):
Solution 1 is to click on 7, 5, 4, 6, 8, 9, 7, 5, 3, 2, 4, 6, 8, 10, 11, 9, 7, 5, 3, 1, 2, 4, 6, 8, 10, 9, 7, 5, 3, 4, 6, 8, 7, 5 and 6
Solution 2 is to click on 5, 7, 8, 6, 4, 3, 5, 7, 9, 10, 8, 6, 4, 2, 1, 3, 5, 7, 9, 11, 10, 8, 6, 4, 2, 3, 5, 7, 9, 8, 6, 4, 5, 7 and 6
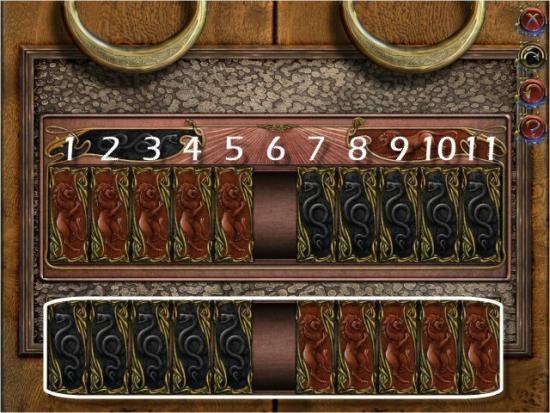
Click on the following for a video solution. Solution 1 is shown.
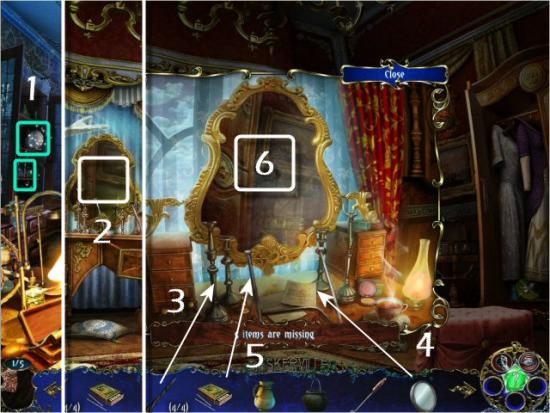
Collect the Black Candle and Small Mirror (1), return to Luisa’s room, click on the Mirror (2), use the Black Candles (3 – click anywhere, 4 times), Small Mirror (4) and Matches (5 – click anywhere, 4 times) and then click on the Mirror (6).
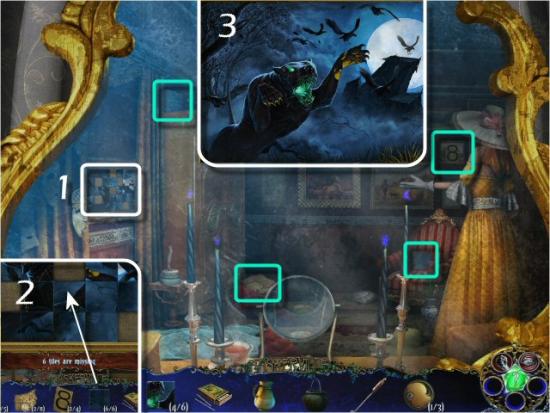
Collect the 2 Painting Parts, the Scheme Piece and the Strange Sign. Click on the Painting (1), use the Painting Parts (2 – click anywhere, 6 times) and then restore the Image (3). Click on each tile to rotate them into the correct positions.
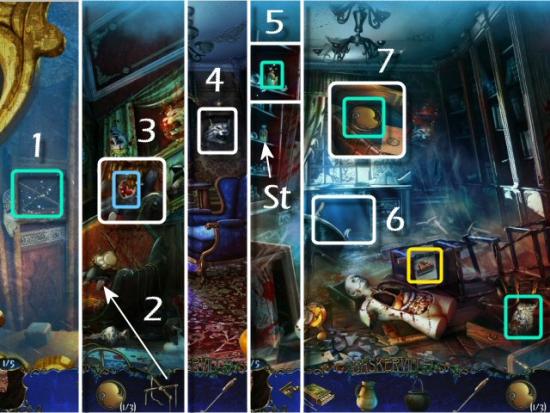
Collect the Marionette Rulers (1), return to Luisa’s room and then enter the Past. Use the Marionette Rulers on the Marionette (2), collect the Crystal Eye (3) and then return to James’ room (click Yes, when asked if you want to change locations). Click on the Wolf’s Head (4), use the Crystal Eyes and then enter the Past. Use the Strength Ability (St) on the Bottle, collect the Circular Key Part (5), collect the Coat of Arms Part, the Scheme Piece and then click underneath the Desk (6). Find all the objects in the list (7 – Inventory Item: Circular Key Part, located in the drawer on the floor, just to the left of the Envelope in the scene) and then return to the Present.
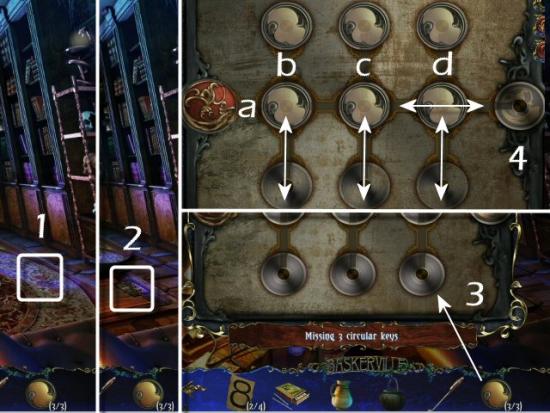
Click on the Carpet (1), click on the Hidden Door (2) and then use the Circular Key Parts (3 – click anywhere, 3 times). Move the Red Piece all the way to the right (4) to unlock the Hidden Door. Click and drag the center row, left or right and the 3 vertical rows up and down until you move the Red Piece all the way to the right. The solution is (the puzzle is the same in both Easy and Hard modes):
aR, bD, aL, bU, aR, cD, aL, cU, aR, dD, aL, dU, and aR (R=right, L=left, D=down, U=up).
Click on the following for the video solution
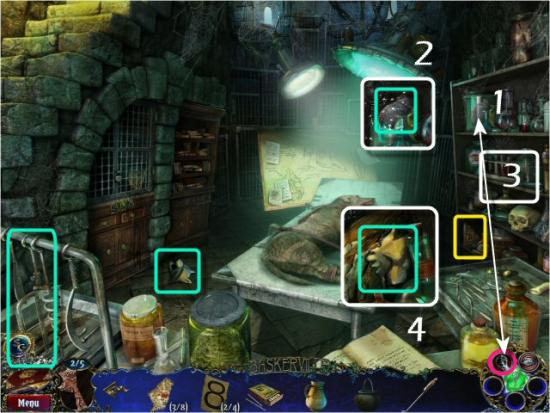
Enter the Laboratory, use the Strength Ability on the Jar (1), collect the Lung (2), the Saw, the Fountain Part, the Coat of Arms Piece and then click on the Shelves (3). Find all the objects in the list (4 – Inventory Item: Fountain Part, located to the left, on the second shelf) and then return to the Hall.
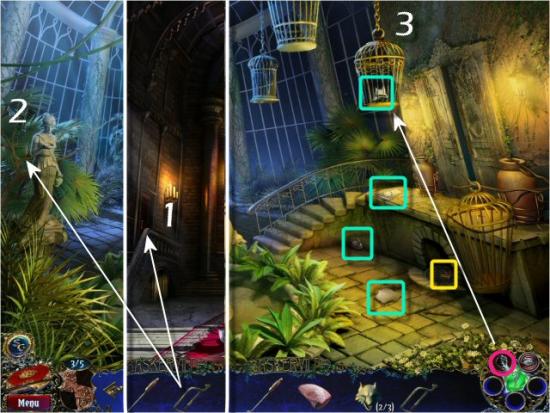
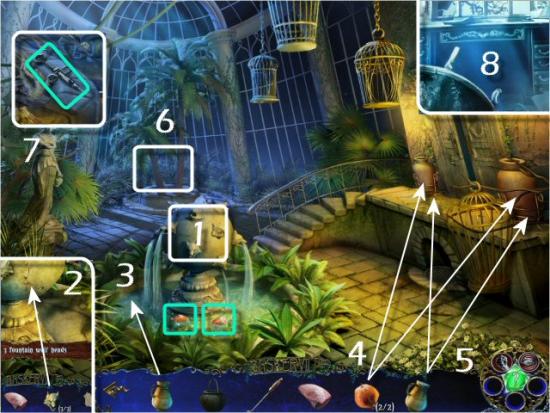
Use the Saw on the Winter Garden Door (1), use the Saw on the Plant (2), use the Strength Ability on the Cage (3), collect the Fountain Piece, the Molding Part, the Coat of Arms Piece, the Second Floor Key Part and the Scheme Piece.
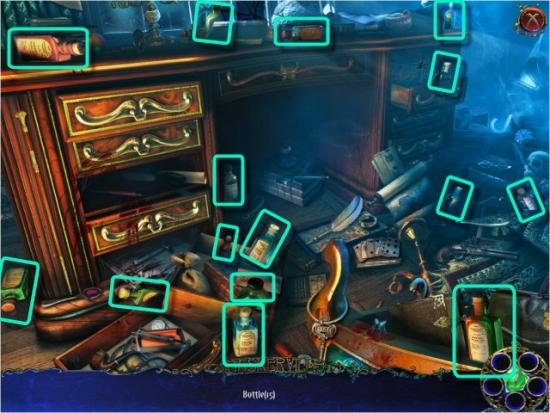
Click on the Fountain (1), use the Fountain Parts (2 – click anywhere, 3 times), collect the Seeds, use the Jug on the Water (3), use the Seeds and the Jug of Water on the Pots (4 and 5), and then click on the Palm Trees (6). Find all the objects in the list (7 – Inventory Item: Syringe, located at the lower right on the Stone Border), return to James’ Room, enter the Past and then click on the Desk (8).
Find 15 Bottles
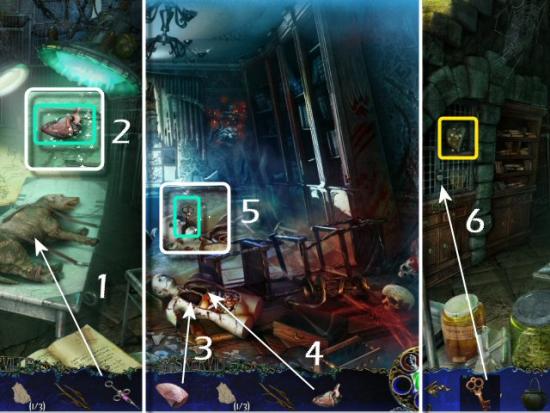
Return to the Present, enter the Laboratory, use the Syringe on the Frankendog (1) and then collect the Heart (2). Return to James’ room, enter the Past, use the Lung and Heart on the Anatomical Model (3 and 4) and then collect the Key (5). Return to the Present, enter the Laboratory, use the Key on the Lock (6), collect the Coat of Arms Piece and then return to the Portrait Gallery (click Yes, when asked if you want to change locations).
Lily Baskerville
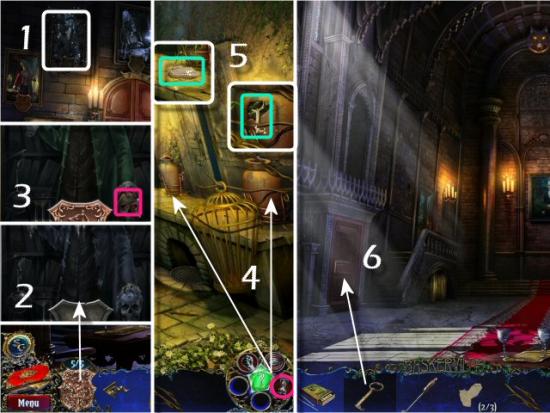
Click on James’ Baskerville’s Portrait (1), use the Coat of Arms (2), collect the Speed Ability (3) and then return to the Winter Garden (click Yes, when asked if you want to change locations). Use the Speed Ability on the Pots (4), collect the Molding Part and Lily’s Room Key (5), return to the Hall and then use the Key on Lily’s Door (6).
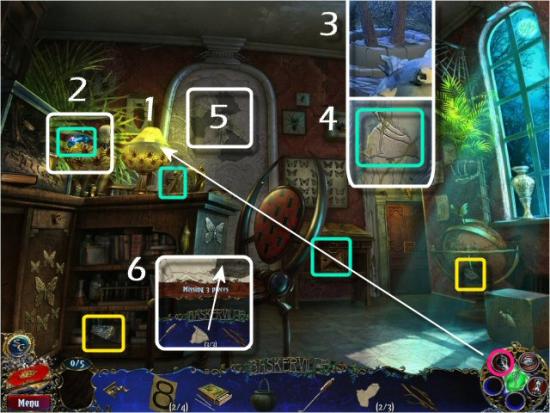
Use the Strength Ability on the Lamp (1), collect the Crystal Eye (2), the 2 Coat of Arms Pieces, the 2 Tetravex Pieces and then return to the Winter Garden and click on the Palm Trees (3). Find all the objects in the list (4 – Inventory Item: Molding Piece, located at the top of the Column on the left), return to Lily’s Room, click on the Destroyed Molding (5) and use the Molding Pieces (6 – click anywhere, 3 times).
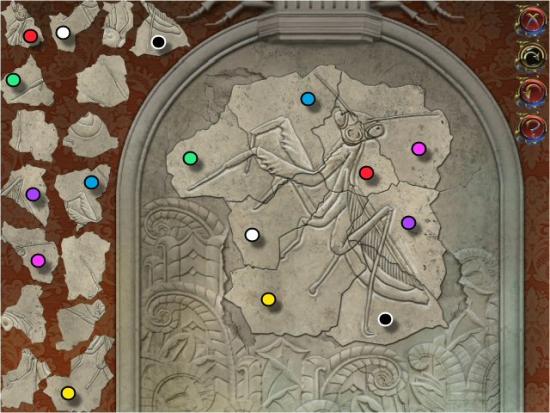
Restore the Molding. Click on the correct pieces (you will only use 8 of the 16 pieces) to move them to the Molding. They’ll automatically be placed into position. Follow the color legend on the screenshot.
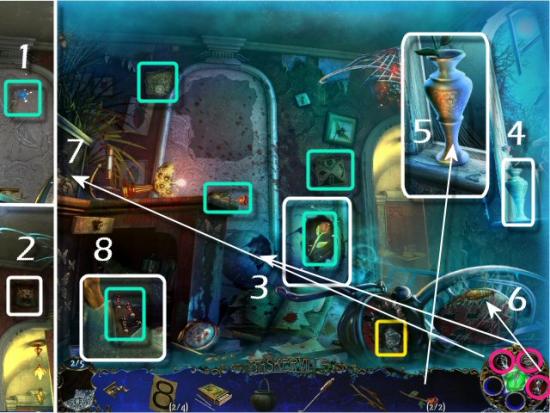
Collect the Crystal Eye (1), click on the Wolf’s Head (2), use the Crystal Eyes and then enter the Past. Use the Perception Ability on the Broken Globe (3), collect the 2 Flowers, the Scheme Piece, the Tetravex Piece and the Coat of Arms Piece. Click on the Vase (4), use the Flowers (5 – click anywhere, 2 times), use the Speed Ability on the Chrysalis (6), use the Strength Ability on the Terrarium (7) and then click on it. Find all the objects in the list (8 – Inventory Item: Termites, inside the broken terrarium, just to the left of the Watch) and then return to the Present.
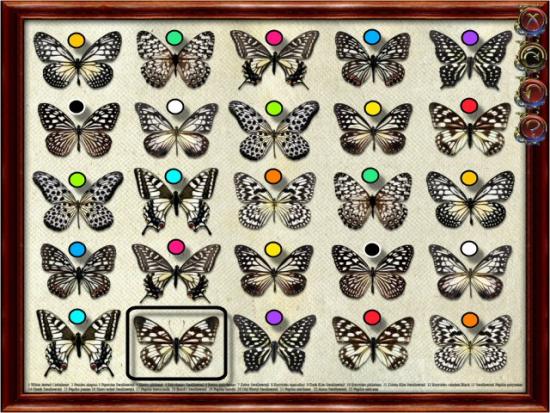
Use the Termites on the Wooden Box (1), use the Speed Ability (2) and then collect the Butterfly Net (3). Use the Butterfly Net on the Butterfly (4), return to the Past, use the Butterfly Net on the 2 Butterflies (5) and the Second Floor Key Part (6), return to the Present, click on the Butterfly Collection and then use the Butterflies (click anywhere, 3 times).
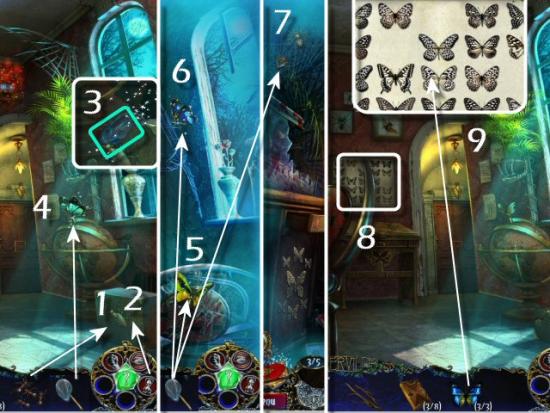
Find the unique Butterfly. Click on matching pairs to eliminate them.
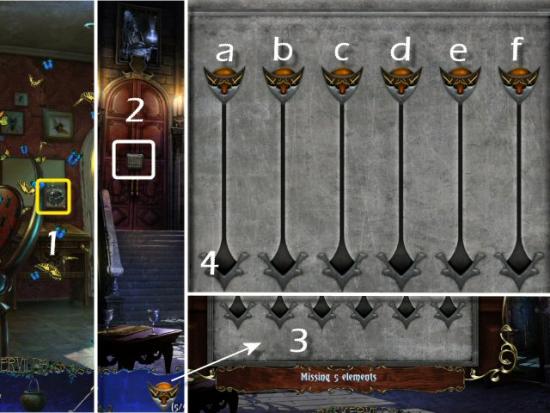
Collect the Coat of Arms Piece (1), return to the Portrait Gallery, click on the Door (2), use the Second Floor Key Parts (3 – click anywhere, 5 times). Unlock the Door by moving all the Sliders to the bottom. Clicking on a Slider moves it and 2 others to the bottom. If you get confused, simply click on the Reset button to start over, or click on the last Slider you moved to undo. Simply click on Slider a (moves a, b and d to the bottom) and Slider f (moves c, e and f to the bottom) to solve (4).
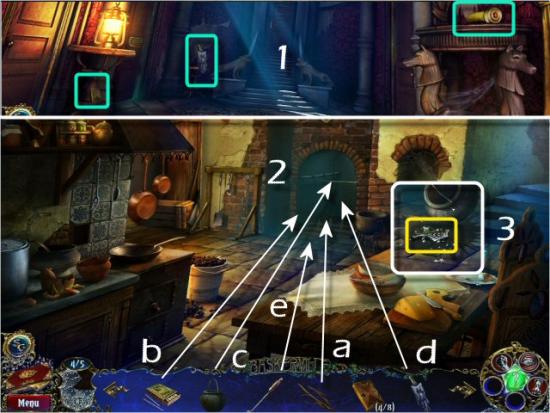
Collect the Tetravex Piece, Wax Mold and Lens (1) and then return to the Kitchen. Use the Twigs, the Matches, the Cauldron, the Wax Mold and the Poker, in that order, in the Fireplace (2 – a, b, c, d and e). Collect the Coat of Arms Piece (3) and then return to the Portrait Gallery (click Yes, when asked if you want to change locations).
Edward Baskerville
Click on Lily Baskerville’s Portrait (1), use the Coat of Arms (2), collect the Materialization Ability (3) and then return to the Second Floor (click Yes, when asked if you want to change locations). Use the Materialization Ability on the Painting (4), collect Henry’s Room Key (5), use it on the Door to Henry’s Room (6).
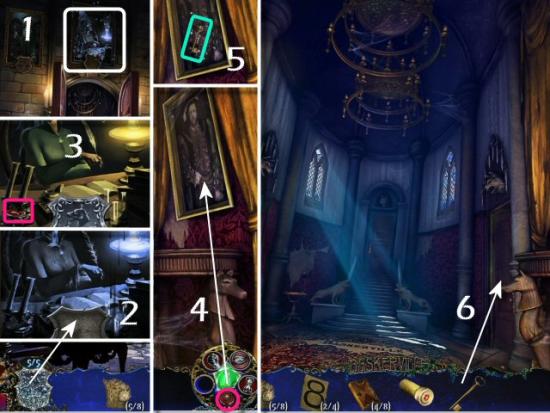
Collect the 2 Coat of Arms Pieces, the Strange Sign and Cube and then click on the Small Dresser (white).
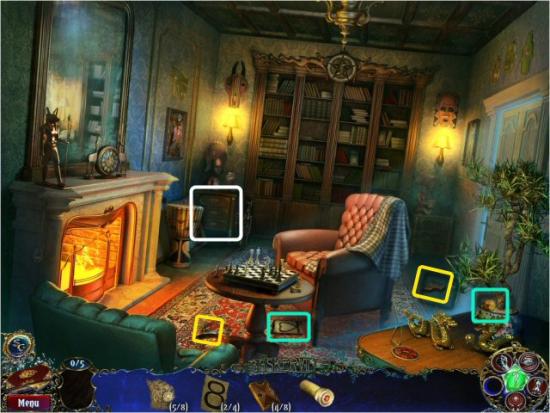
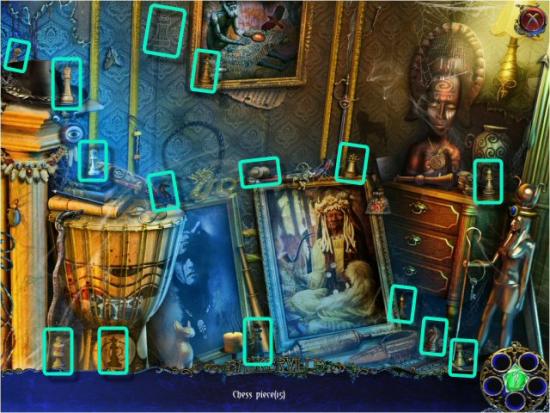
Find 15 Chess Pieces
Use the Chess Piece on the Chessboard (1). Move the Chess Pieces to the Slots so they drop into the Drawer. You’ll play 3 rounds with 1, 2 and 3 Chess Pieces, respectively. Move the Chess Pieces by clicking on one of the Arrows to move the Rows and Columns in the direction of the Arrow you click. Note that the Rows and Columns will only move until the Arrows touch the side of the Board. Legend: r = red, g = green, b = blue and p = purple
- Board 1 Solution: r, g1, b2, p and g2 (2)
- Board 2 Solution: b2, r1, g2, p1, g2, r1, p1, b1 and r1 (3)
- Board 3 Solution: p2, g, r3, r2, r1, b, p2, p1, g and r1 (4)
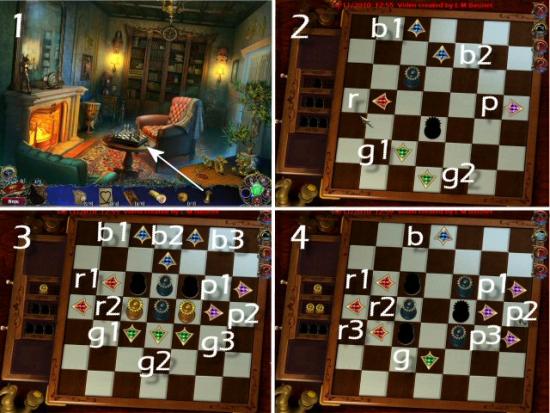
Click on the following for a video solution for all 3 Boards
Collect the Strange Sign (1), return to the Second Floor, click on Edward’s Door (2) and use the Strange Signs (3 – click anywhere, 4 times).
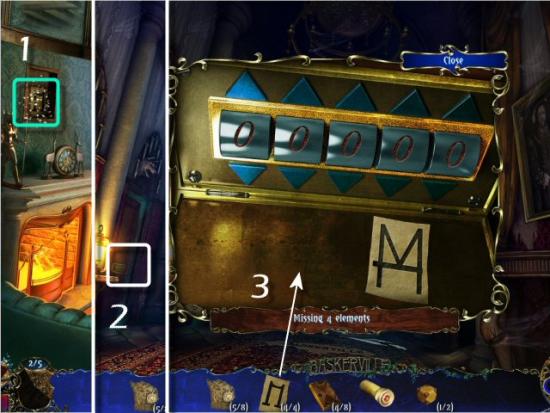
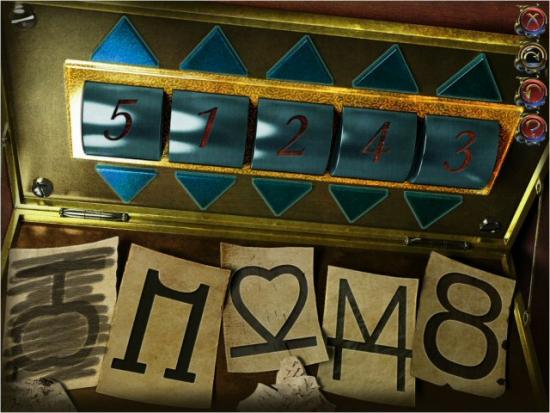
Decipher the Signs and unlock Edward’s Door. The solution to this puzzle is recognizing what the Strange Signs depict. The first clue is that you need to input 5 numbers. Each Sign is actually a number with its mirror image. Use the Arrows, at the top and bottom, to enter the Code: 5 1 2 4 3
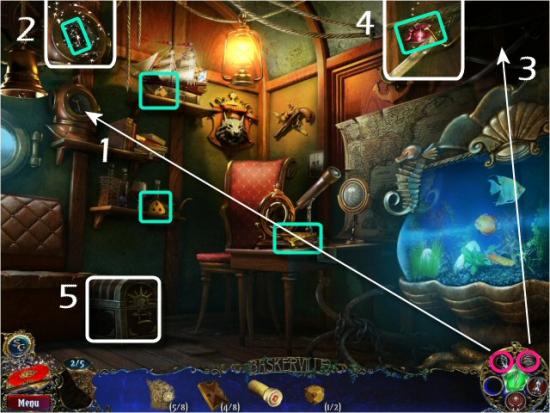
Use the Strength Ability on the Diving Helmet (1), collect Elizabeth’s Room Key (2), use the Perception Ability on the Dark Area (3) and collect the Crystal Eye (4). Collect the Cube, the Wood Piece and the Pentagram Part and then click on the Chest (5).
Use the Cubes (1 – click anywhere, 2 times) and unlock the Chest by moving the Cubes to the Green Spaces. Each Cube must be moved the number of times shown on its face. You’ll play 3 rounds; simply click and drag a Cube to the location you want it moved. Note that a Cube can push another (Board 2) and that the number of moves left will be shown, after you move a Cube, on its Face. L = Left, R = Right, U = Up and D = Down
- Board 1 Solution: 1L, 2D 2R, 3L, 3D and 3D (2)
- Board 2 Solution: 1L, 2D and 2R (3)
- Board 3 Solution: 1R, 2D, 2D, 3R, 3U, 3L, 4R, 4U, 4U and 4L (4)
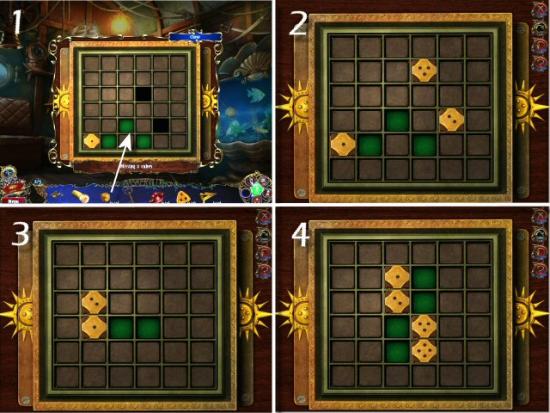
Click on the following for a video solution for all 3 Dice Boards. There is no difference between the Easy and Hard modes.
Collect the Crystal Eye, click on the Wolf’s Head (1), use the Crystal Eyes and then enter the Past. Use the Perception Ability on the Dark Area (2 – Pc), collect the 2 Coat of Arms Pieces, the Scheme Piece, Charles’ Door Lock Part and the Wood Piece and then return to the Present and the Second Floor Hall.
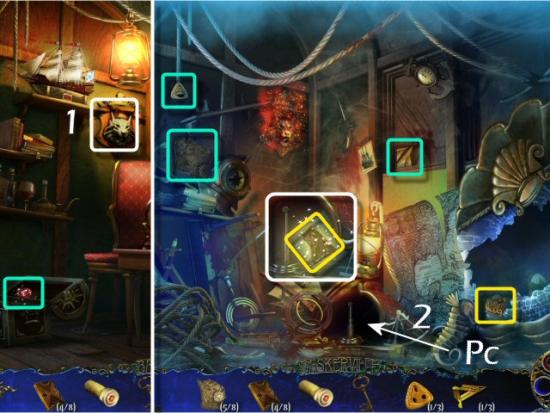
Use Elizabeth’s Door Key (1), use the Materialization Ability on the Pentagram Drawing (2), collect the Pentagram Piece (3) and then click on the Bust (4). Find all the objects in the list (5 – Inventory Item: Sponge, located at the lower middle to the left of the Bust), collect the Wood Piece, the Paint Brush and the Coat of Arms Piece (click Yes, when asked if you want to change locations) and then return to the Portrait Gallery.
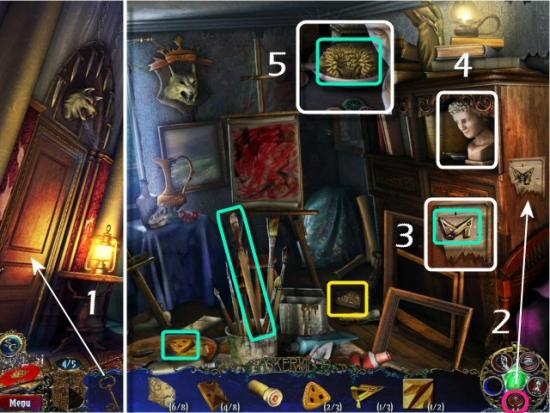
Elizabeth Baskerville
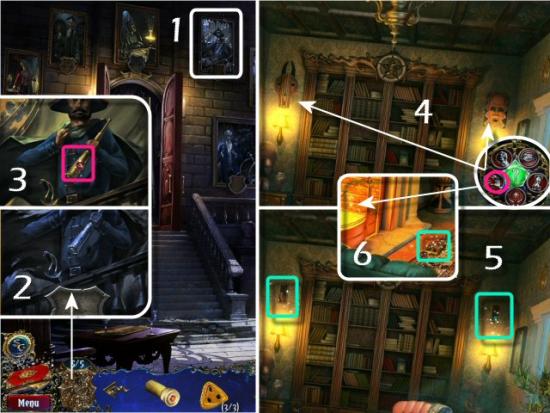
Click on Edward Baskerville’s Portrait (1), use the Coat of Arms (2), collect the Telekinesis Ability (3) and then return to Henry’s room (click Yes, when asked if you want to change locations). Use the Telekinesis Ability on the 2 Masks (4) and collect the Crystal Eye and the Coat of Arms Piece (5). Use the Telekinesis Ability on the Fireplace (6), collect the Tetravex and then return to Elizabeth’s Room.
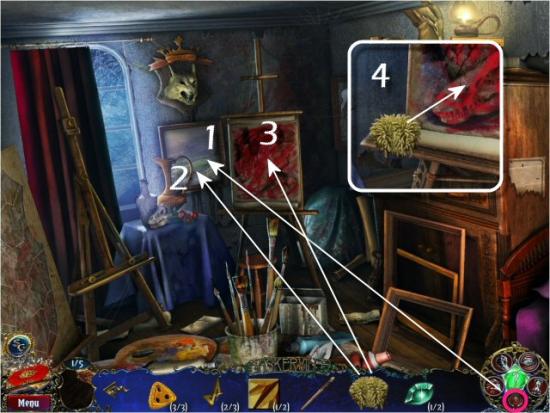
Use the Materialization Ability on the Seascape (1), use the Sponge on the Water (2) and then use the Wet Sponge on the Damaged Painting (3). Clean the Painting with the Wet Sponge. Click on the Sponge and then click and drag it all over the Painting until it’s clean (4).
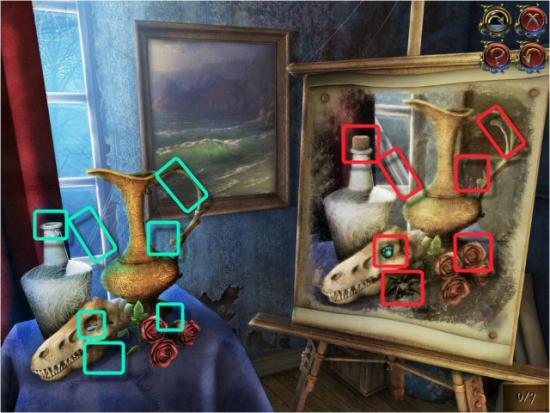
Find the 7 differences between the Painting and the Still Life.
click on the Wolf’s Head (1), use the Crystal Eyes and then enter the Past. Use the Perception Ability on the Dark Area (2), use the Materialization Ability on the Unfinished Painting (3), collect the 3 Coat of Arms Pieces, the Scheme Piece and the Palette. Return to the Present and click on the Bust (4).
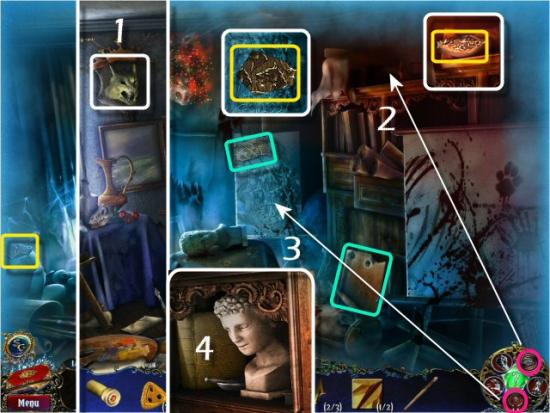
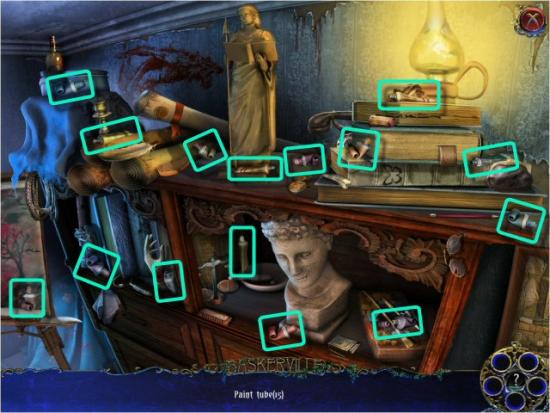
Find 15 Paint Tubes
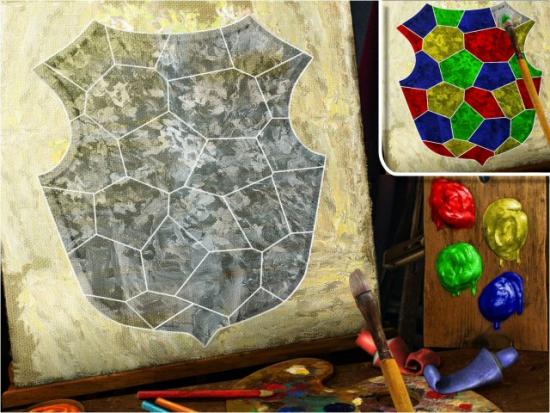
Click on the Unfinished Painting, use the Brush, Palette and Paints (click anywhere; you must use the Palette before the Paints) on the Painting. Finish the Painting. Click on the Brush, click on one of the Paint Colors and then click on the Canvas. You must use the colors so that each section has a different color and no color is adjacent to itself. The easiest solution is to use 2 alternating colors in each row. For example, you can use Red and Yellow in the bottom row, Blue and Green in the next and then repeat as you work your way to the top. There are several different correct solutions.
Click on the following for a video solution
Charles Baskerville
Collect the Coat of Arms Piece (1 – click Yes, when asked if you want to change locations) and return to the Portrait Gallery. Click on Elizabeth Baskerville’s Portrait (2), use the Coat of Arms (3) and then collect Charles’ Door Key Part (4). Return to Edward’s Room, enter the Past, click on the Net (5) and use the Wood Pieces (6 – click anywhere, 3 times).
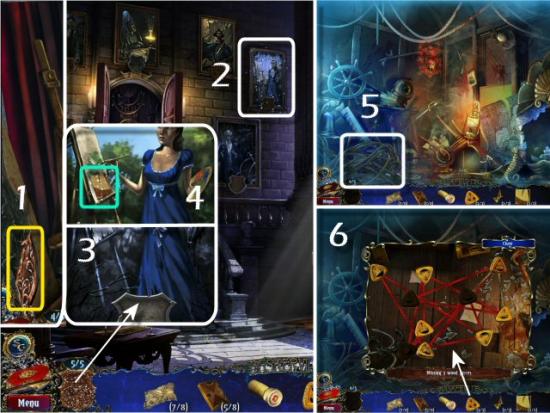
Untangle the Ropes by clicking and dragging the Wood Pieces to different locations so that none of the Ropes cross another. If you get confused, click on the Reset button. Please note this puzzle will begin differently each time you play, including each time you click the Reset button. There are quite a few beginning configurations, so you can click several times until you find one you like.
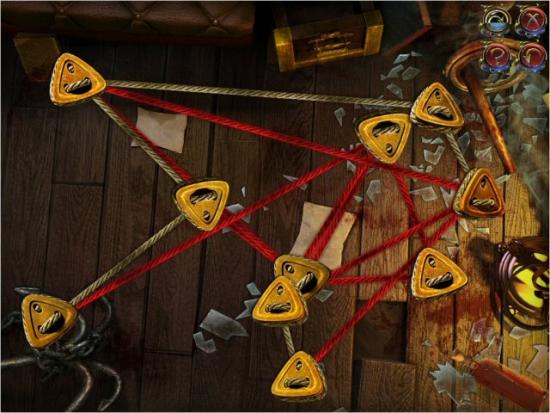
Click on the following for a video example
Click on the Anchor (1), Find all the items in the list (2 – Inventory Item: Pentagram Part, located just below the Ship’s Wheel), return to Henry’s Room, click on the Pentagram (3), use the Pentagram Parts (4 – click anywhere, 3 times), collect the Tetravex (5) and then click on the Drum (6). Find all the items in the list (7 – Inventory Item: Stair Board, located at the lower right, just to the right of the Egyptian Statue) and then return to the Second Floor.
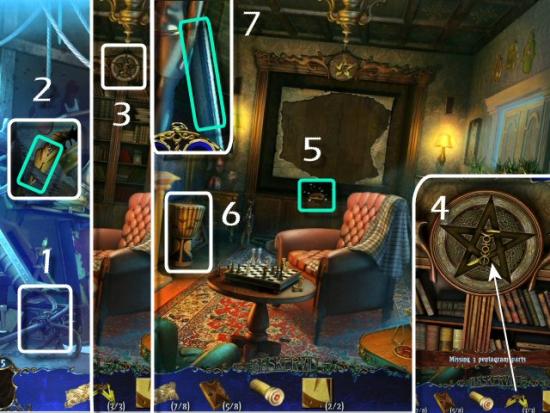
Click on Charles’ Door (1) and use the Door Lock Pieces (2 – click anywhere, 2 times).
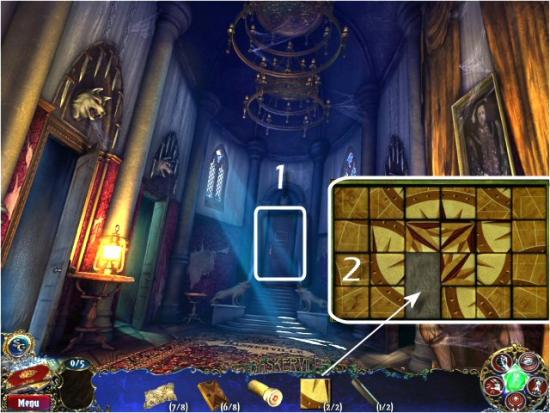
Restore the Image by clicking on Squares to rotate them into position. Each Square you click rotates clockwise and rotates the squares adjacent (top, bottom, left and/or right) to it – 4, 6 or 9 Squares, depending on which one you click.
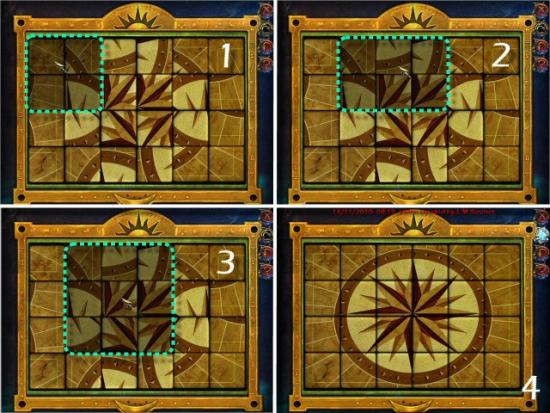
If you get confused, click the Reset button to start over from the beginning – this puzzle always begins with the same configuration and there is only one solution. The instructions in the Strategy Guide are your best choice if you wish to “solve” this puzzle without figuring it out for yourself – there are 90 steps. Click on the following for a video solution, based on the instructions in the in-game Strategy Guide.
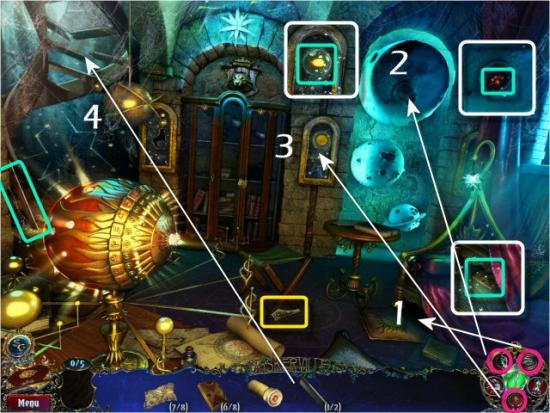
Use the Perception Ability under the Bed (1), collect the Tetravex, use the Strength Ability on the Stone Planet (2), collect the Crystal Eye, use the Materialization Ability on the Picture of the Sun (3) and collect the planet Mars. Collect the Stair Board and Coat of Arms Piece and then use the Stair Boards (4 – click 2 times) on the Broken Stairs.
Collect the planet Saturn and the Padlock Key, use the Perception Ability below the Telescope (1), collect the Crystal Eye (click Yes, when asked if you want to change locations), and then return to Charles’ Room. Use the Padlock Key on the Book Case (2), click on the lower shelves, Find all the items in the list (3 – Inventory Item: Telescope Viewfinder, located at the lower right, just above the Item List and to the left of the Telescope), click on the Wolf’s Head (4), use the Crystal Eyes and enter the Past.
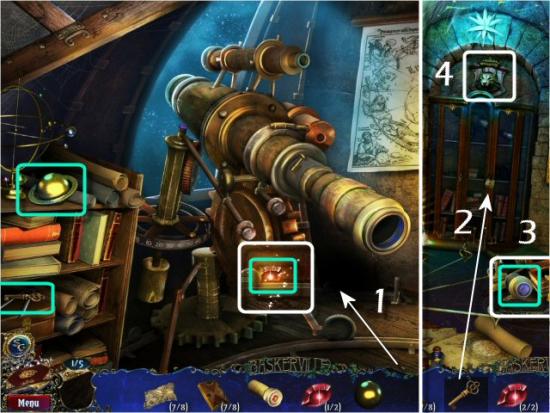
Use the Perception Ability on the Dark Area (1), collect the 3 Coat of Arms Pieces and the Jar, use the Materialization Ability on the Diagram (2), collect the Telescope Focuser and then click on the bottom Planet in the Arch (3). Find all the items in the list (4 – Inventory Item: Ocular, located just below the Telephone), return to the Present and up to the Observatory.
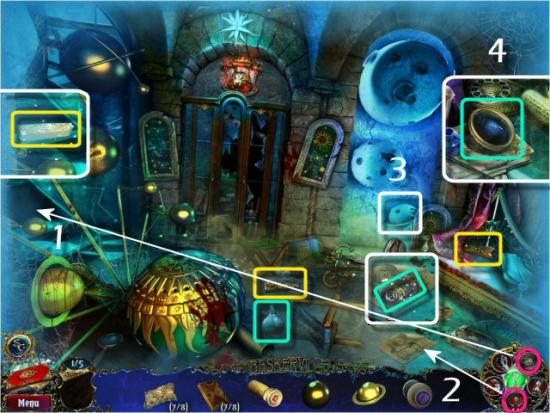
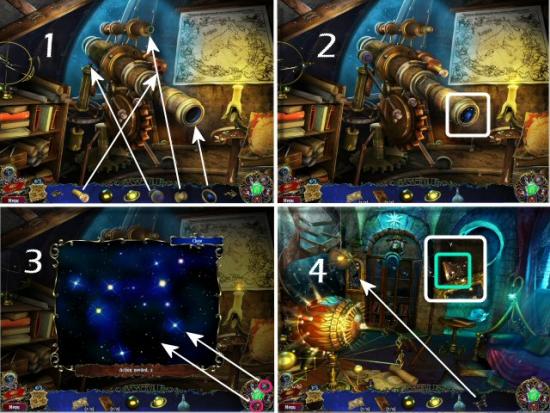
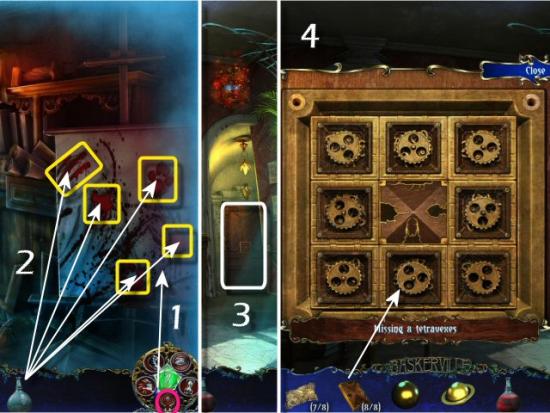
Use the Lens, Ocular, Viewfinder and Focuser on the Telescope (1), click on the Ocular (2), use the Perception and Materialization Abilities, in that order (3 – click anywhere) and then return to Charles’ Room. Use the Dog Shape (4), collect the Tetravex and then return to the Past in Elizabeth’s Room.
Use the Materialization Ability on the Blood, use the Jar on each of the 5 Blood Stains (you must click on each one), and then return to Lily’s Room. Click on the Garden Door (3) and use the Tetravexes (4 – click anywhere, 8 times)
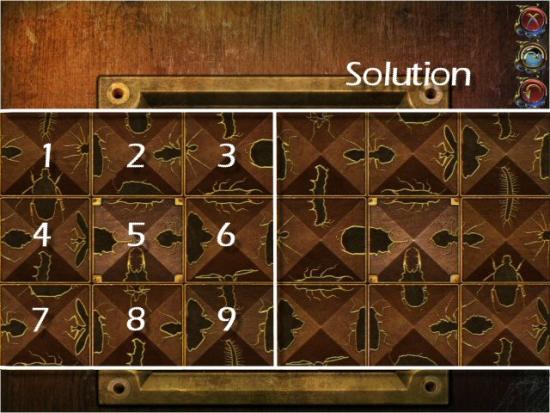
Restore the image to unlock the Door. Click on a Tile and then click on another to place the first and pick up the next. Note that when you click on the next tile, you’ll automatically pick it up unless you place the Tile in an Empty Space. The solution is: click on 1, 6, 7, 2, 8, 1, 4, 9, 3 and 4. Tile 5 is stationary and doesn’t move.
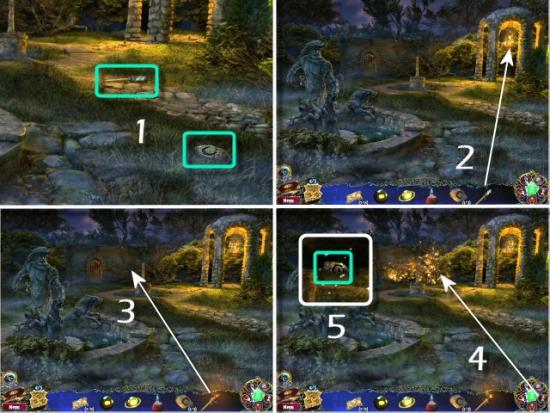
Collect the Stone and the Torch (1), use the Torch on the Brazier (2), use the Lit Torch on the Dry Twigs (3), use the Speed Ability on the Fire (4) and collect the Stone (5).
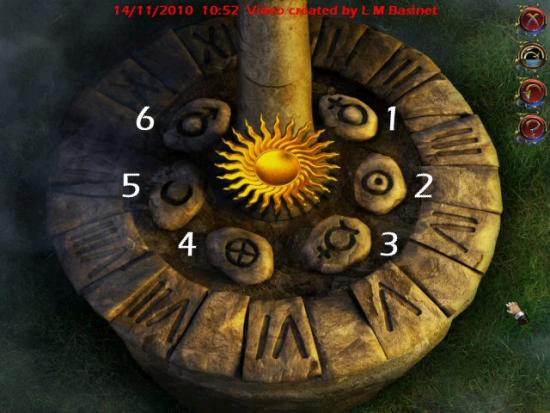
Click on the Archway (1), find all the items in the list (2 – Inventory Item: Stone, located at the lower right just to the left of the Brick Column), click on the Sundial (3) and use the Stones (4 – click anywhere, 3 times).
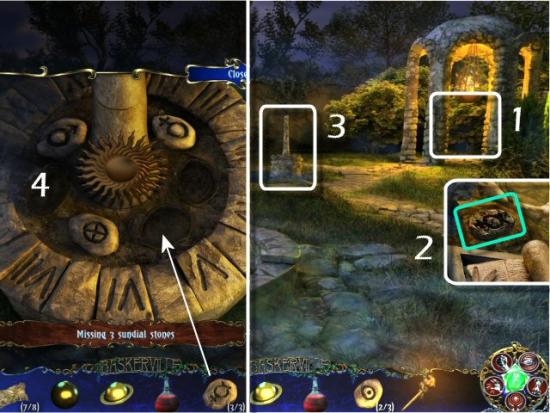
Repeat the sequences of lit Stones. You’ll play 5 rounds that are always the same (this minigame is the same in Easy and Hard modes). The solutions are:
- Round 1: 6, 3 and 4
- Round 2: 2, 1, 4 and 6
- Round 3: 5, 4, 1, 3 and 6
- Round 4: 5, 2, 4, 1, 6 and 3
- Round 5: 3, 4, 5, 1, 2 and 6
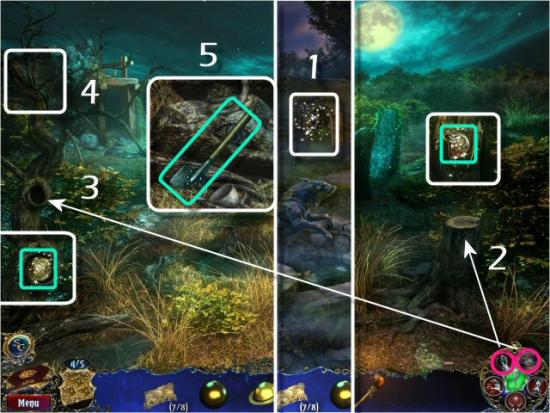
Enter the Moor (1), use the Strength Ability on the Stump (2) and the Perception Ability on the Dark Hollow (3), collect the 2 Metal Plaques and then click on the Top of the Tree (4). Find all the items in the list (5 – Inventory Item: Shovel, located at the middle left, just below the Snake) and then return to the Garden.
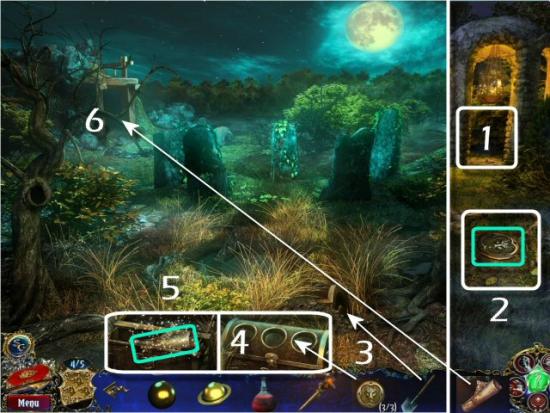
Click on the Archway (1), find all the items in the list (2 – Inventory Item: Metal Plaque, located on the ground just to the left of the Compass) and then return to the Moor. Use the Shovel on the Buried Chest (3), use the Metal Plaques (4 – click anywhere on the Chest, 3 times), collect the Map of the Mine (5) and then use it on the Mine Entrance (6).
Guide Sherlock Holmes to the Mine’s Exit. Note the arrows at the intersections. You won’t always stop at an intersection; it may send you around a corner or in the opposite direction. Some intersections will not allow travel in all directions.
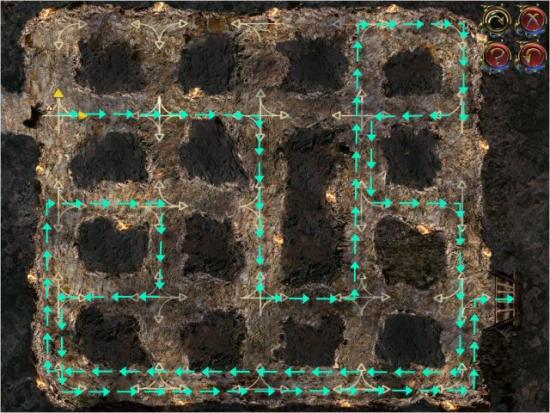
Click on the following for a video solution.
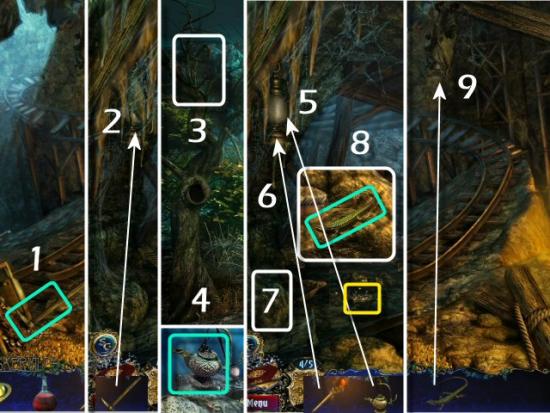
Collect the Pickaxe (1), use it on the Lantern (2), return to the Moor, click on the top of the Tree (3), find all the items in the list (4 – Inventory Item: Oil, located at the upper left, just to the right of the Wagon Wheel) and then return to the Mine. Use the Oil (5) and then the Torch (6), in that order, on the Lantern.
Click on the Ground below the Lantern (7) and find all the items in the list (8 – Inventory Item: Lizard, located at the lower left, just to the right of the Brush). Use the Lizard on the Bat (9), collect the Coat of Arms Piece and then return to the Portrait Gallery (click Yes, when asked if you want to change locations).
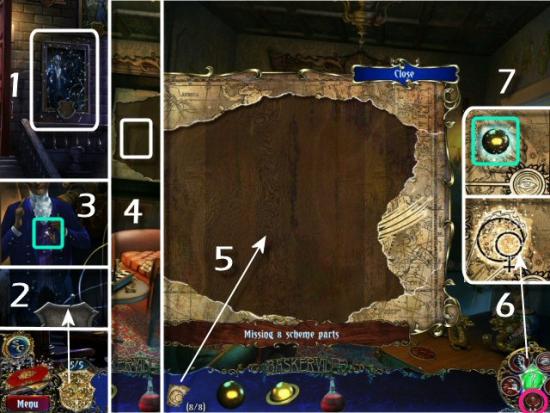
Click on Charles Baskerville’s Portrait (1), use the Coat of Arms (2), collect the Scheme Piece (3) and then return to Henry’s Room (click Yes, when asked if you want to change locations). Click on the Ceremonial Scheme (4), use the Scheme Pieces (5 – click anywhere, 8 times), use the Materialization Ability on the Venus Drawing (6), collect the Planet Venus (7) and then return to Charles’ Room.
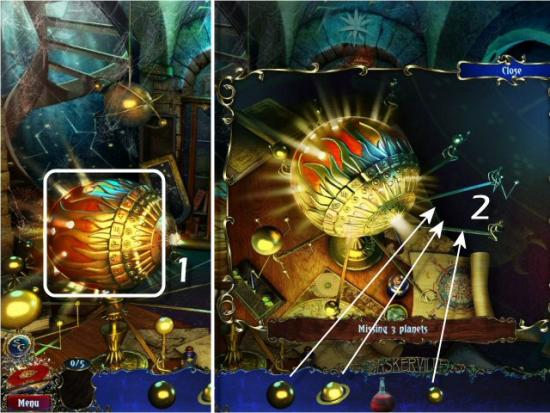
Click on the Solar System (1) and use the Planets (2 – click anywhere), in any order.
Illuminate all the Lights. Click on a Space and then choose one of the other 2 Spaces on a direct path. Continue in this manner until all the Lights are illuminated. If you end up with no moves left, click the Reset button to restart from the beginning. There are 8 solutions, depending on which point you start with. Here are 2 of them:
- Solution 1: click 1 then 6, 8 then 3, 4 then 1, 5 then 8, 2 then 5, 7 then 4, 2 then 7 and click 2 to complete.
- Solution 2: click 7 then 4, 6 then 1, 2 then 7, 3 then 6, 8 then 3, 5 then 2, 8 then 5 and click 8 to complete.
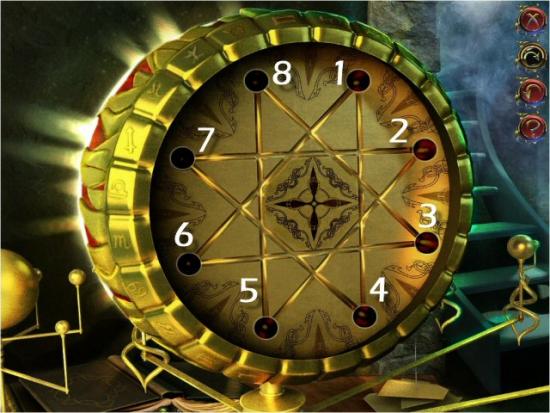
Click on the following for a video solution. Solution 2 is shown.
Collect the Meteorite (1), return to the Moor (click Yes, when asked if you want to change locations) and click on the Ritual Place (2). Use the Meteorite and Jar of Blood, in that order, in the center (3) and then use each of the Abilities on the corresponding Stone (4).
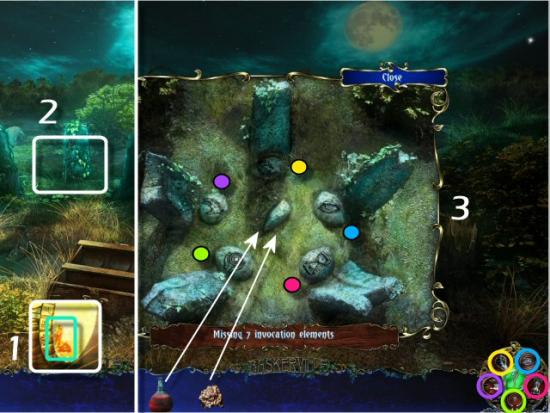
Watch the ending movie. Congratulations! You’ve completed Sherlock Holmes and The Hound of The Baskervilles.
Collector’s Edition Extra Gameplay
Bonus Game Map
20: Outbuildings
21: Wood Shed
22: Mary’s Room
23: Oliver’s Room
24: Abyss
25: Hugo’s Secret Place
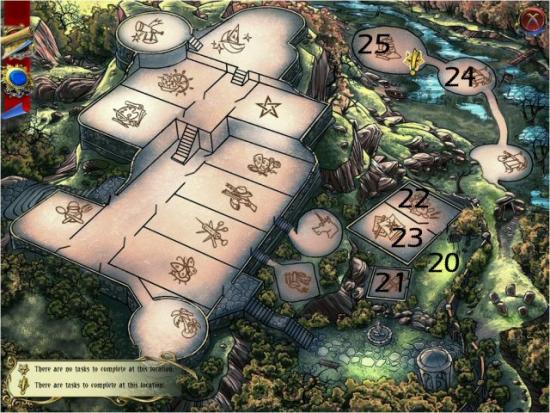
Mary Baskerville
Head right to the Outbuildings (1), collect the Nut, the Shovel, the Coat of Arms Piece and the Watering Can. Click on the Ladder (2), find all the items in the list (3 – Inventory Item: Cement Powder, located in the Wheelbarrow), return to the Garden, use the Watering Can on the Water (4) and then return to the Outbuildings.
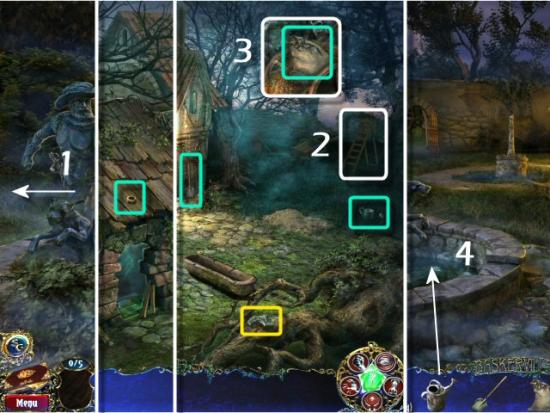
Use the Shovel on the Sand (1), use the Sand, Cement, Watering Can and Shovel, in that order, on the Trough (2), collect the Cement Mortar (3), use the Cement Mortar (4) and Speed Ability (5), in that order, on the Damaged Entrance and then enter the Woodshed.
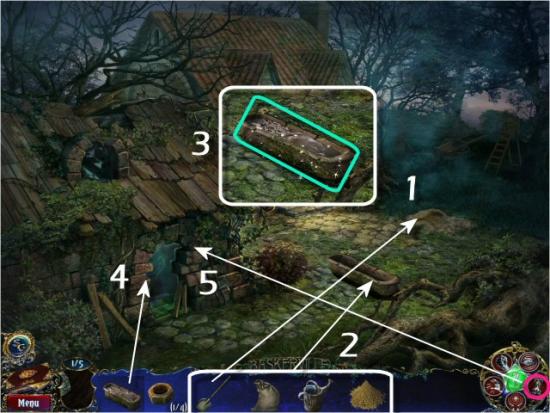
Collect the Scraper, Rope and Toy Horse Rocker, use the Scraper on the Mossy Area (1), collect the Nut (2), use the Rope on the Anvil (3) and then use the Strength Ability on the Rope (4). Collect the Coat of Arms Piece and Mary’s Room Key (5), use the Perception Ability on the Dark Area (6) and then collect the Handle (7). Use the Handle (8) and the Strength Ability (9), in that order, on the Vise, collect the Nut (10) and then return outside.
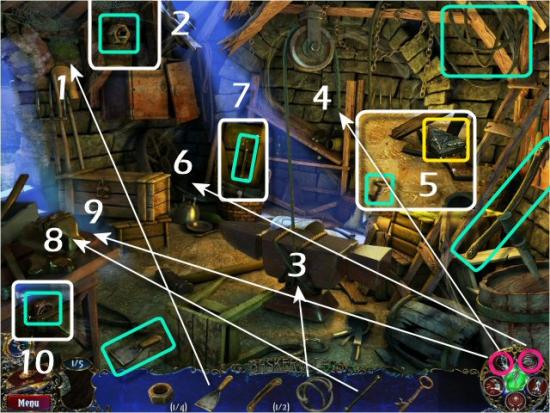
Use the Key on the Door (1), Use the Materialization Ability on the Picture of a Nut (2), collect the Book, Stamp, Nut, Marble and Rosary and then return to the Woodshed. Click on the Toolbox (3) and use the Nuts (4 – click anywhere, 4 times).
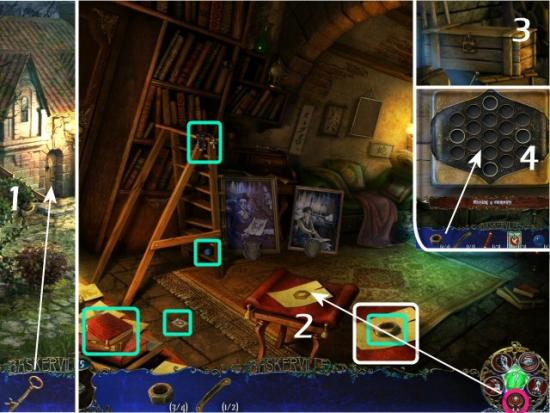
Rearrange the order of the Nuts to unlock the Toolbox. You’ll play 3 rounds and click in the center of a group to rotate them clockwise (you can’t right click) and move the Nuts into the positions shown at the bottom of each screen.
Easy Mode
Click on the following for a video solution for all 3 rounds in Easy Mode.
Hard Mode
Click on the following for a video solution for all 3 rounds in Hard Mode.
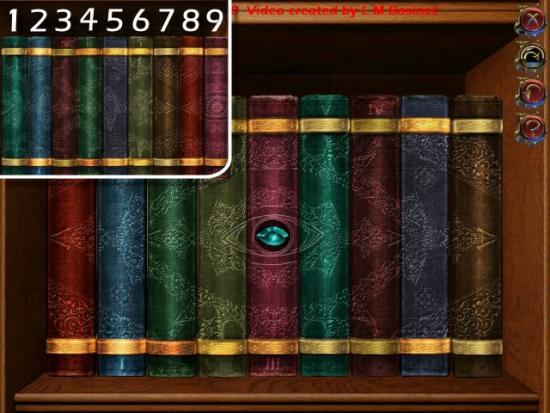
Collect the Crystal Eye and the Book (1), return to Mary’s Room, click on the Book Shelf (2) and then return outside. Click on the Ladder (3), find all the items in the list (4 – Inventory Item: Book, located just underneath the handle of the Wheelbarrow) return to Mary’s Room, click on the Book Shelf, again, and then use the Books (5 – click anywhere, 3 times).
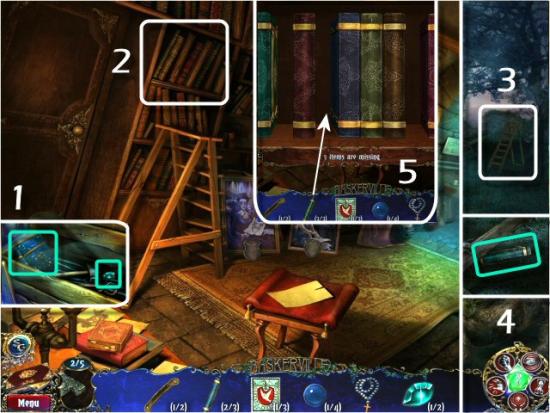
Rearrange the Books to form an image. Click on one book and then click on another to switch their places. One solution is: click on 8 then 1, 3 then 7, 4 then 3, 6 then 4, 9 then 5, 8 then 6 and 9 then 8.
Click on the Wolf’s Head (1), use the Crystal Eyes and then enter the Past. Use the Perception Ability on the top of the Bookshelf (2), use the Strength Ability on the Brass Head (3) and the Skull (4), collect the Elephant Head, Marble, Stamp, 2 Pieces of Woman’s Portrait, 2 Coat of Arms Pieces and then click on the Flowers (5). Find all the items in the list (6 – Inventory Item: Letter Opener, located at the upper left on top of the Desk) and then return to the Present.
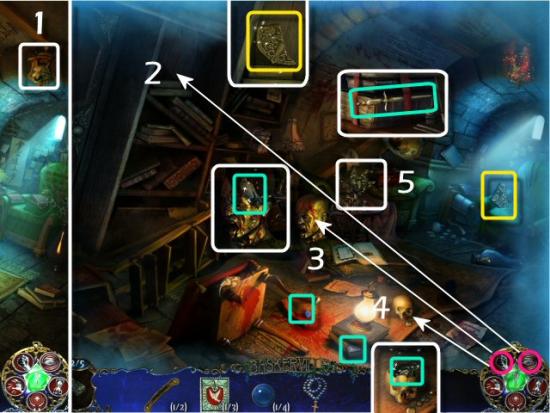
Click on the Corner (1), find all the items in the list (2 – Inventory Item: Stamp, located at the upper middle of the scene), return to the Past, click on the Stamp Album (3) and then use the Stamps (4 – click anywhere, 3 times).
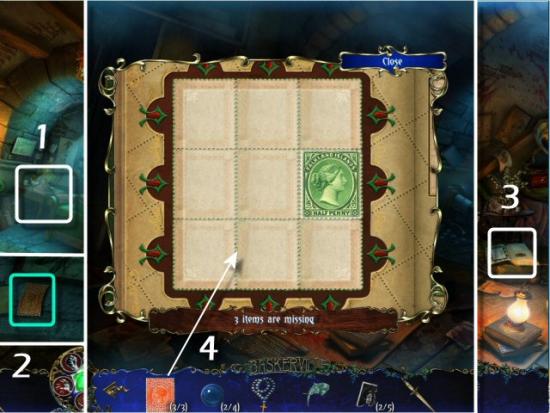
Rearrange the Stamps. Move the Stamps by clicking on the arrows at the sides, top and bottom. You must move the stamps to the correct positions using no more than the indicated number of moves. You’ll play 3 rounds. There is no difference between the Easy and Hard modes. The solutions are:
Page 1: Click 3 twice, click 5, click D and click E
Page 2: click B, click 6 and click F
Page 3: click 5, click B, click 3, click B and click 2.
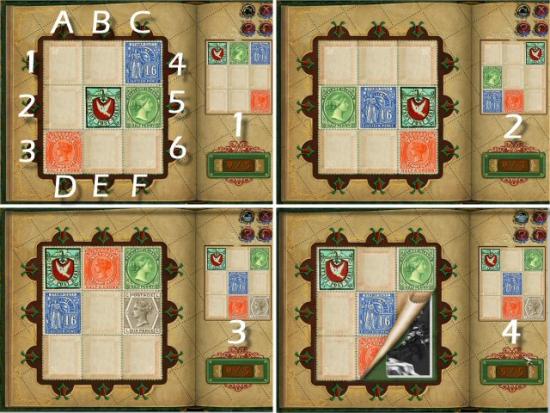
Click on the following for a video solution for all 3 Stamp Pages.
Return to the Present, use the Letter Opener on the Calligraphy Scroll (1), collect the Coat of Arms Piece, click on Mary Baskerville’s Portrait (2), use the Coat of Arms (3), collect Oliver’s Door Key (4) and then use the Key on Oliver’s Door (5).
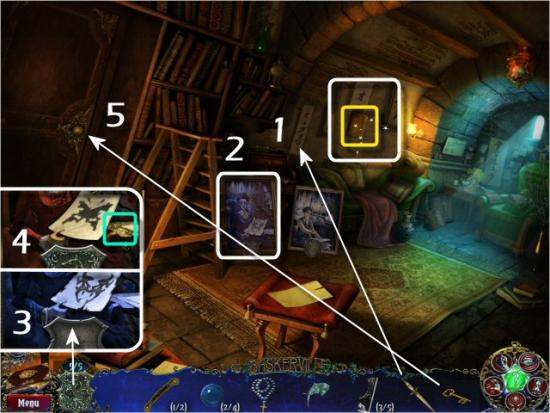
Oliver Baskerville
use the Materialization Ability on the small Drawing (1), collect 2 Toy Soldiers, Piece of Woman’s Portrait, Crystal Eye, Marble and 2 Coat of Arms Pieces. Use the Elephant Head on the Body (2), collect the Toy Box Key (3), use Key on the Toy Box (4). Collect the Toy Soldier and the Drawing Part and then click on the Display Shelf (5).
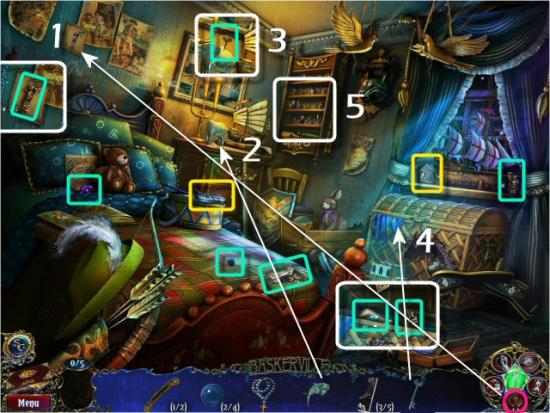
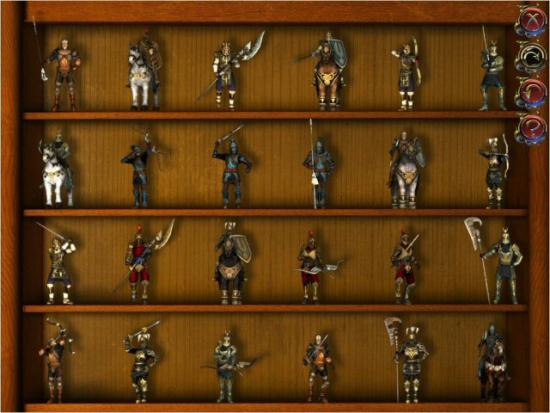
Use the Toy Soldiers (click anywhere, 3 times). Arrange the rows of Toy Soldiers by similar groups. Click on one and then click on another to switch their places. Click on the Empty Space to place the Toy Soldier you just exchanged, or click on another to drop one and pick up another. The order doesn’t matter, but each row should be grouped by Bows and Crossbows, Axes and Lances, Swords and then Horses.
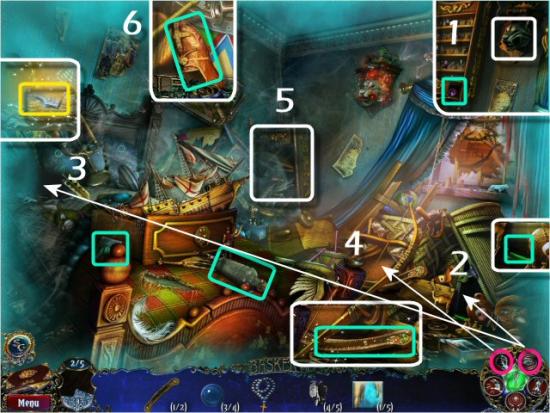
Collect the Crystal Eye click on the Wolf’s Head (1), use the Crystal Eyes and enter the Past. Use the Perception Ability on the Dark Areas (2 and 3), use the Strength Ability on the Rocking Horse (4), collect the Coat of Arms Piece, the 2 Drawing Parts, the Holy Water and the Toy Horse Rocker. Click on the Dresser (5), find all the items in the list (6 – Inventory Item: Dirty Shoe, located at the lower middle, just above the item list) and then go to the Mine (click Yes, when asked if you want to change locations).
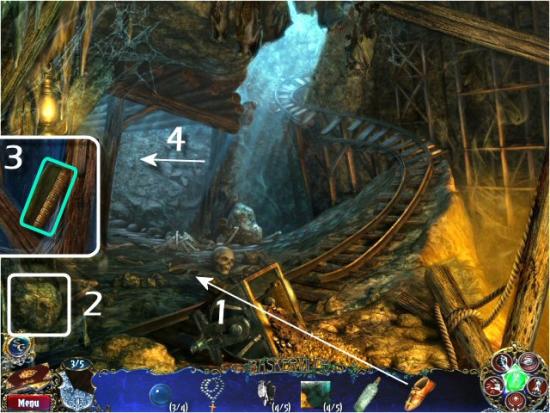
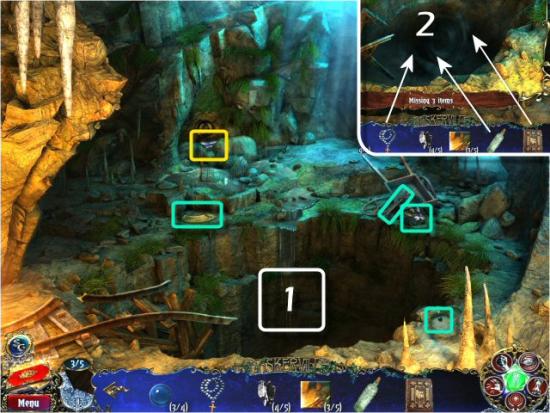
Use the Dirty Shoe on the Shoe Print (1), click on the Ground below the Lantern (2), Find all the items in the list (3 – Inventory Item: Bible, located on the right, just to the left of the Spear) and then enter the Abyss (4).
Collect the Metal Circle, the Brush, the Paints and the Marble and then click on the Chasm (1). Use the Rosary, Holy Water and Bible (2 – click anywhere), collect the Coat of Arms Piece and then return to Oliver’s Room
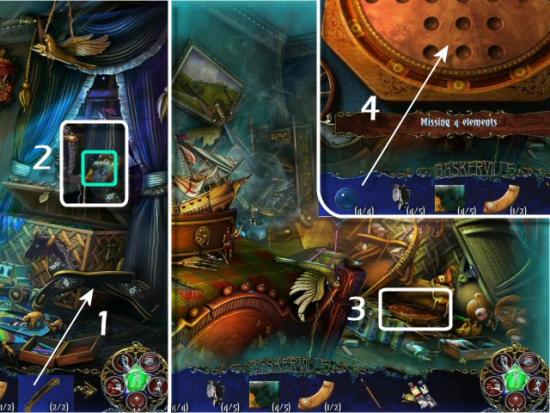
Use the Toy Horse Rockers on the Rocking Horse (1), collect the Drawing Part, return to the Past, click on the Marbles Plate (2) and then use the Marbles (3 – click anywhere, 4 times).
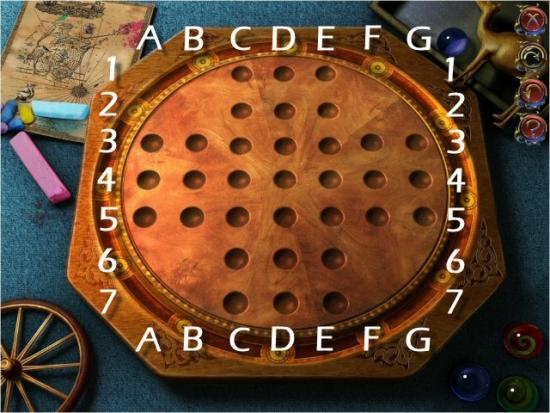
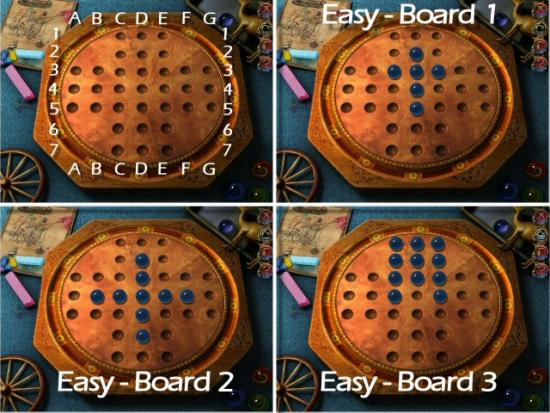
Eliminate all but 1 Marble. Click and drag a Marble, over another Marble, to the next Empty Space. The Marble you jumped over will be eliminated. You must jump another Marble and you can only move vertically or horizontally. Continue until there’s only 1 Marble left. You’ll play 3 rounds. Note that the individual puzzle boards all have more than one correct solution. Use the following screenshot as a guide for moving the Marbles.
Easy Mode
- Board 1: move D3 to F3, D3 to D3, C3 to E3, F3 to D3 and D3 to D1
- Board 2: move E4 to G4, C4 to E4, D2 to D4, D4 to F4, G4 to E4, D6 to D4, E4 to C4 and C4 to A4
- Board 3: move D3 to F3, E1 to E3, E4 to E2, C1 to E1, E1 to E3, F3 to D3, D2 to D4, D4 to B4, C2 to C4 and C4 to A4
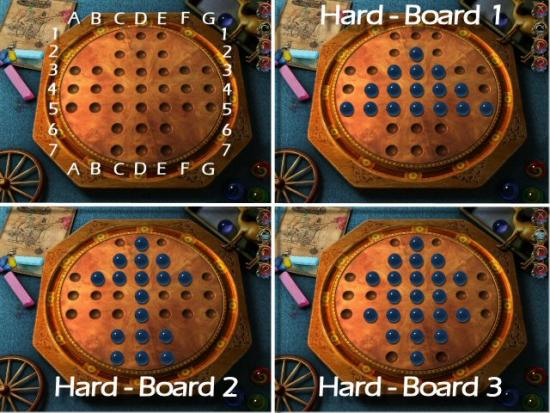
Click on the following for a video solution for all 3 rounds in Easy Mode.
Hard Mode
- Board 1: move D3 to F3, E5 to E3, F3 to D3, C3 to E3, D5 to D3, D3 to F3, G5 to E5, F3 to F5, F5 to D5, A5 to C5, D5 to B5, B5 to B3, B4 to D3 and D2 to D4
- Board 2: move E3 to E1, E1 to C1, C3 to E3, B3 to D3, E7 E5, E5 to C5, D7 to D5, D4 to D6, D2 to D4, F3 to D3, D3 to D5, D5 to B5, C7 to C5, B5 to D5 and D6 to D4
- Board 3: move F5 to F7, E7 to C7, C5 to E5, C7 to C5, B5 to D5, E3 to E1, E1 to C1, C3 to E3, C1 to C3, B3 to D3, D4 to F4, D2 to D4, C4 to E4, D6 to D4, F5 to D5, D5 to D3, F4 to D4, D4 to D2, F3 to D3 and D2 to D4
Click on the following for a video solution for all 3 rounds in Hard Mode.
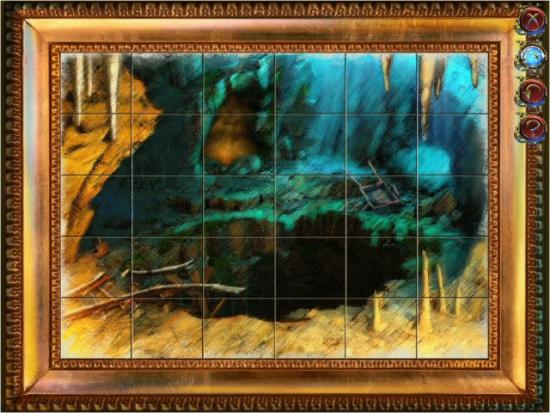
Collect the Drawing Part (1), return to the Present and click on the Drawing (2). Use the Drawing Parts (3 – click anywhere, 5 times).
Restore the image. Click on one square and then click on another. When you click on the second Square, you automatically place the first and pick up the next. Click on the Empty Space to place the Square you just exchanged, or click on another Square to drop one and pick up another.
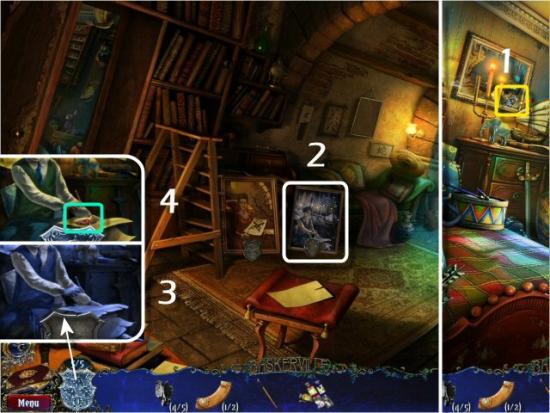
Collect the Coat of Arms Piece (1) and return to Mary’s Room (click Yes, when asked if you want to change locations). Click on Oliver Baskerville’s Portrait (2), use the Coat of Arms (3) and then collect the Big Metal Circle (4 – click No, when asked if you want to change locations).
Hugo Baskerville
Enter the Past, click on the Flowers (1), find all the items in the list (2 – Inventory Item: Piece of Woman’s Portrait, located at the middle right, on the desk), and then return to the Present. Click on the Incomplete Portrait (3), use the Pieces of Woman’s Portrait (4 – click anywhere, 5 times), click on the Incomplete Portrait, again (5) and use the Brush and Paints (6 – click anywhere).
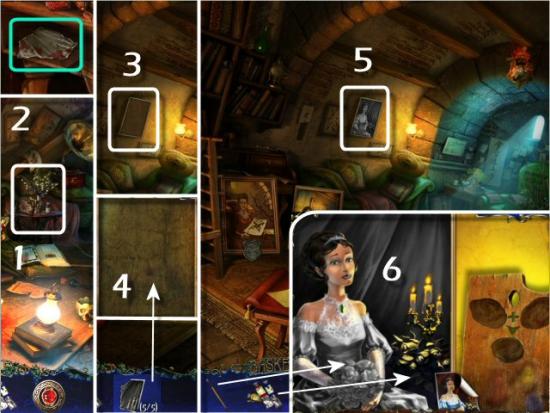
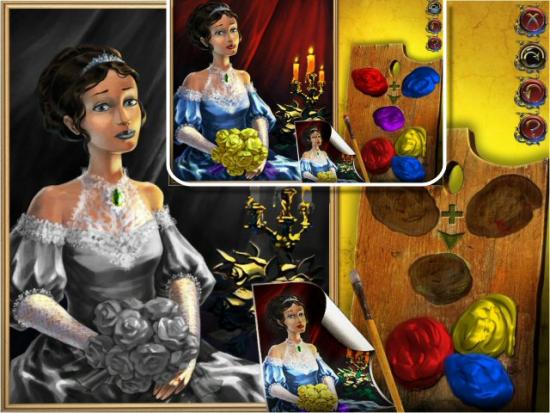
Complete the Portrait. Click on the Brush, click on one of the Paint Colors and then click on the appropriate area of the Canvas. You’ll also need to mix colors to make Green (Blue and Yellow), Purple (Blue and Red) and Orange (Yellow and Red). To mix the colors, click on the first color and place it in the first Empty Space on the Palette, click on the second color and place it in the second Empty Space on the Palette and then click on the new color. Follow the photo for correct placement of all the colors.
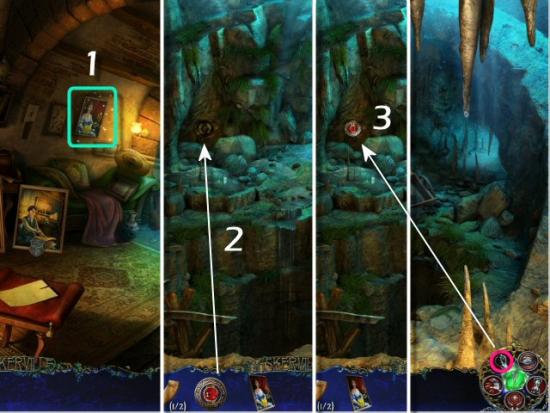
Collect the Portrait of Hugo’s Wife (1), Return to the Abyss, use the Big Metal Circle in the Round Hole (2), and use the Strength Ability on the Round Handle (3).
Use the Perception Ability on the Dark Area (1), collect the Crystal Eye and Piece of Tubing and then click on the Chair (2). Find all the items in the list (3 – Inventory Item: Crystal Eye, located at the left on the top shelf), click on the Wolf’s Head (4), use the Crystal Eyes and then enter the Past.
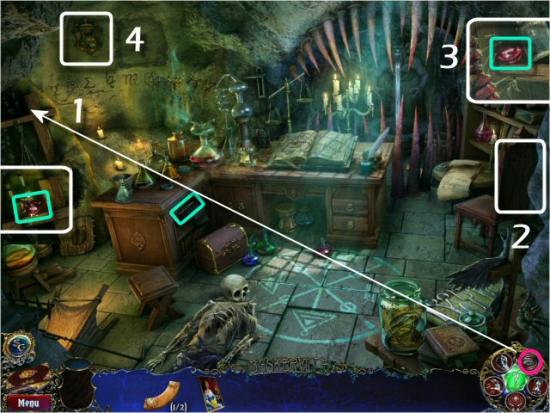
Use the Telekinesis Ability on the Weight (1), collect the Poison and then click on the Desk (2). Find all the items in the list (3 – Inventory Item: Bag of Herbs, located at the top of the Desk, just to the left of the Scale), use the Bag of Herbs on the Mortar (4), collect the Colored Powder and then return to the Present.
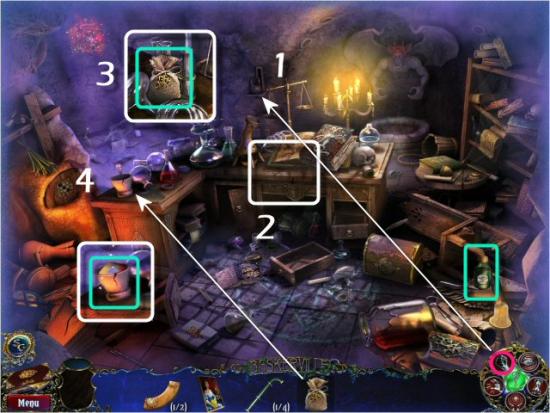
Use the Poison on the Insects (1), the Materialization Ability on the Alchemist Symbol (2), and the Weight on the Scale (3), collect the 2 Alchemist’s Stones, the Piece of Tubing and the Metal Circle Piece. Click on the Chair (4), find all the items in the list (5 – Inventory Item: Alchemist Stone, located at the lower left) and then return to the Past.
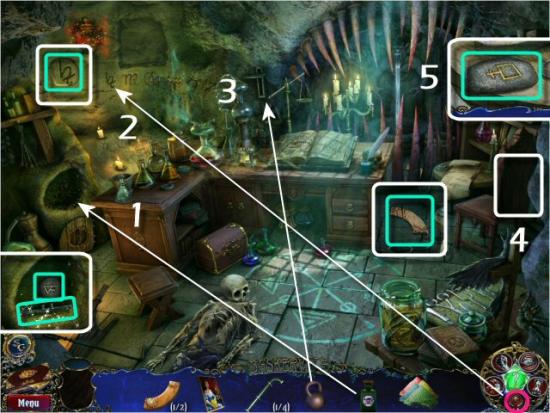
Click on the Chest (1) and use the Metal Pieces (2 – click anywhere, 2 times).
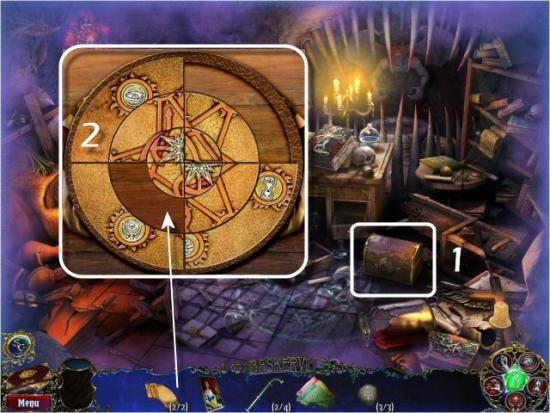
Restore the image. Click and drag the pieces until the image is complete.
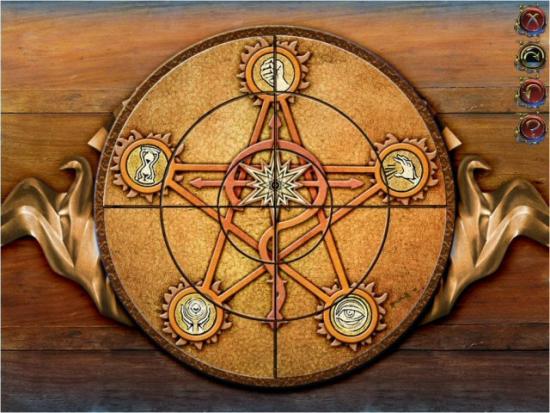
Collect the Piece of Tubing, click on the Closed Niche (1) and use the Alchemist’s Stones (2 – click anywhere, 3 times).
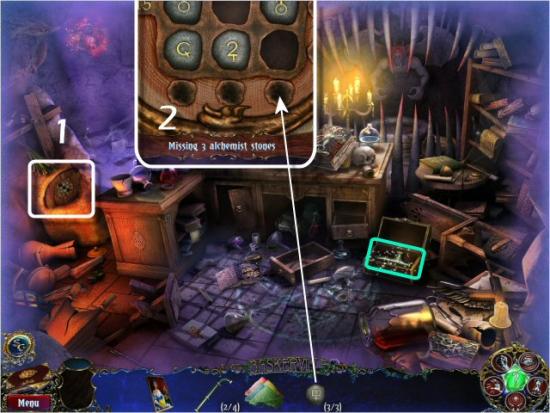
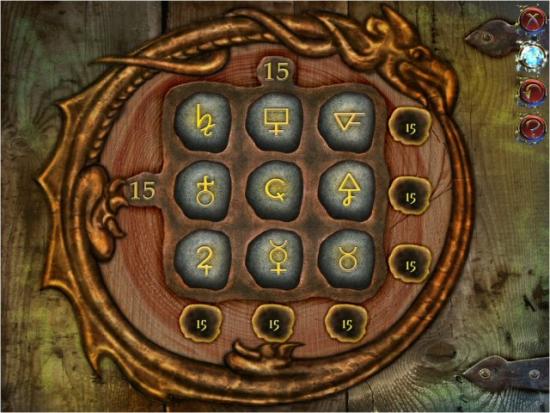
Solve the Equations. Rearrange the Stones so that all the Columns and Rows add up to 15. This is supposed to be a Magic Square and all the numbers (1 through 9), arranged correctly, should form a square where each row and column adds up to 15. Unfortunately, the values for the Symbols appear to change as you move them around and you’ll need to solve this by trial and error. Simply rearrange the Stones as if they were numbers, to complete the Equations. Again, this is completely random and every puzzle will be different.
Collect the Piece of Tubing (1), return to the Present, click on the Alembic (2) and then use the Colored Powder and the Pieces of Tubing (click where indicated).
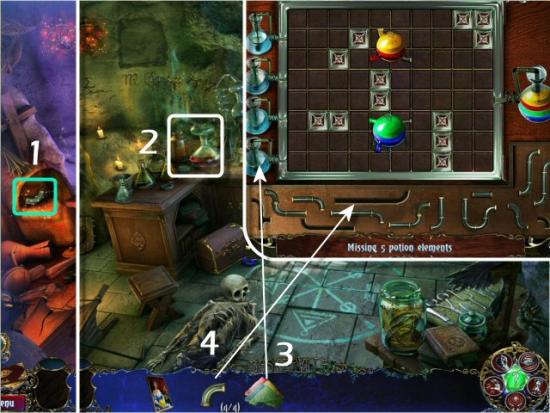
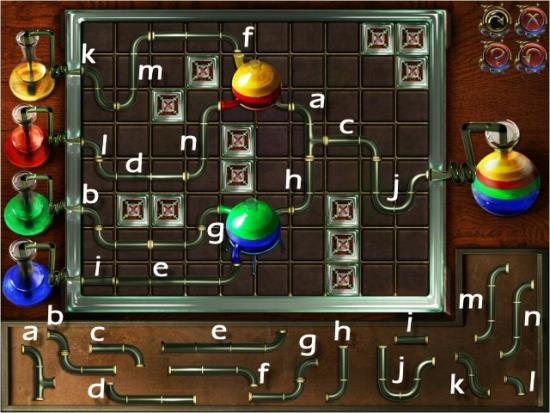
Click on a Piece of Tubing and place it on the Diagram. The object is to connect the 4 Flasks of Colored Powder, the 2 Flasks in the Center and the Large Flask at the right with the correct placement of all the Pieces of Tubing.
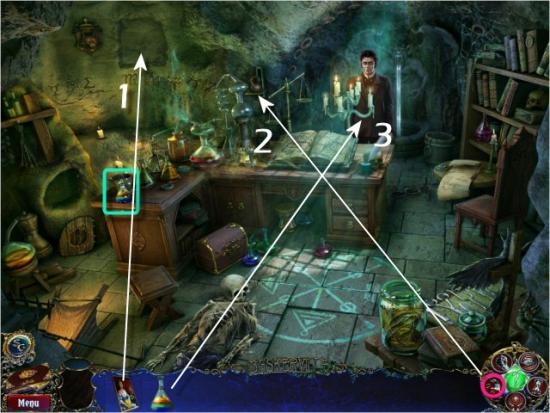
Collect the Potion, use the Portrait of Hugo’s Wife on the Wall (1), use the Telekinesis Ability on the Weight (2) and then use the Potion on Hugo (3).
Watch the ending movie. Congratulations! You’ve completed the Sherlock Holmes and the Hound of the Baskerville’s Bonus Game.
You can now access the Extra Content:
- Book of Mysteries (10 additional minigames)
- Multimedia (movies and soundtracks)
- Wallpapers
- Minigames (all 32 puzzles from the regular and bonus games)
- Hidden Objects (all 24 object search scenes from the regular and bonus games)
More articles...
Monopoly GO! Free Rolls – Links For Free Dice
By Glen Fox
Wondering how to get Monopoly GO! free rolls? Well, you’ve come to the right place. In this guide, we provide you with a bunch of tips and tricks to get some free rolls for the hit new mobile game. We’ll …Best Roblox Horror Games to Play Right Now – Updated Weekly
By Adele Wilson
Our Best Roblox Horror Games guide features the scariest and most creative experiences to play right now on the platform!The BEST Roblox Games of The Week – Games You Need To Play!
By Sho Roberts
Our feature shares our pick for the Best Roblox Games of the week! With our feature, we guarantee you'll find something new to play!All Grades in Type Soul – Each Race Explained
By Adele Wilson
Our All Grades in Type Soul guide lists every grade in the game for all races, including how to increase your grade quickly!


