- Wondering how to get Monopoly GO! free rolls? Well, you’ve come to the right place. In this guide, we provide you with a bunch of tips and tricks to get some free rolls for the hit new mobile game. We’ll …
Best Roblox Horror Games to Play Right Now – Updated Weekly
By Adele Wilson
Our Best Roblox Horror Games guide features the scariest and most creative experiences to play right now on the platform!The BEST Roblox Games of The Week – Games You Need To Play!
By Sho Roberts
Our feature shares our pick for the Best Roblox Games of the week! With our feature, we guarantee you'll find something new to play!Type Soul Clan Rarity Guide – All Legendary And Common Clans Listed!
By Nathan Ball
Wondering what your odds of rolling a particular Clan are? Wonder no more, with my handy Type Soul Clan Rarity guide.
Shattered Minds: Encore Walkthrough
Welcome to the Shattered Minds: Encore walkthrough on Gamezebo. Shattered Minds: Encore is a hidden object/adventure game created by Vast Studios. This walkthrough includes tips and tricks, helpful hints, and a strategy guide on how to complete Shattered Minds: Encore.
Game Introduction – Shattered Minds: Encore
Welcome to the Shattered Minds: Encore walkthrough on Gamezebo. Shattered Minds: Encore is a hidden object/adventure game created by Vast Studios. This walkthrough includes tips and tricks, helpful hints, and a strategy guide on how to complete Shattered Minds: Encore.
How to Use This Walkthrough (Important)
- This walkthrough is meant to be used as a guide to assist in solving mini-puzzles and acquiring all items in order to complete the game. You may explore locations in the order you wish; this walkthrough is written to take the most direct route to the game’s finish.
- Inventory objects will be written in bold and highlighted in yellow in the screenshots. The walkthrough will state, “Use the inventory item on the blah blah,” because it assumes you have the item. If you don’t have the item, on your keyboard, press CTRL+F (at the same time). In the text box, type the name of the item you are looking for and press ENTER. This will scan this page for the appearance of that word.
- Play the tutorial! It will explain gameplay elements. The tutorial is available in Casual mode only.
- Often you need to perform an action (i.e., place or collect an inventory item) in order for the game to progress. Before assuming the game has a glitch, go through your inventory and see if you can place any of your items anywhere or look for an item to pick up, switch to flip, etc.
Gameplay and Tips
- This is a hidden object adventure game. You will move from location to location solving hidden object hunts, mini-puzzles and picking up items to use in order to proceed in the game.
- The Menu button at the bottom left of the screen gives access to the options screen and can bring you back to the main menu.
- There are three difficulty settings. You cannot switch settings mid-game.
- In Casual mode, sparkles indicate areas of interest and the Hint and Skip meters fill quicker. Hidden object hunts are indicated by floating card symbols. Casual mode has a tutorial.
- In Advanced mode, sparkles indicate areas of interest and the Hint and Skip meters fill quicker. Hidden object hunts are indicated by floating card symbols. Advanced mode does not have a tutorial.
- In Extreme mode, there are no sparkles, Hint or Skip meters. Expert mode does not have a tutorial.
- Move your cursor over every aspect of a scene and watch for it to change, it’s the only way to find everything, especially if playing in Extreme mode.
- Items collected throughout the game go into your inventory, located at the bottom of your screen.
- Hidden object scenes provide a list of items to find. Items written in white are available immediately. Items written in yellow require an action to reveal them. Items written in green require two objects to create them. When you have found everything from the list, an item will be added to your inventory. In this walkthrough, the inventory item will be indicated by a yellow highlight, items found by an action or combining items will be indicated with green highlights and all other items will be indicated by white highlights.
- The journal is located in the bottom left corner. It records your progress and contains clues to solve puzzles. The journal will sparkle when new clues have been added. Items collected that are added to your journal will be highlighted in white in the screenshots.
- The map is in the journal. When looking at the map, click on the area where you are located to zoom in. This will show you your location and any objectives to complete.
- Closing a window – To close the zoom-in windows, click Close. Tip: If you can zoom in on the area again, you likely haven’t found everything you needed to find.
- Mini-puzzles can be skipped once the Skip button fills (Casual and Advanced modes only). The Skip button is located at the bottom right of the puzzle window.
- If you leave a puzzle, it will reset.
- Hints are available in the bottom right of the screen.
- Hints used in the hidden object scenes highlight an item.
- Hints used during the adventure mode will point out what to focus on in the scene or that there is nothing to do in that scene.
Level One
- Upon launching the game, you will have to enter your name. Then from the main menu, click Play.
- Watch the cutscene. Click through the dialogue. If you are playing in Casual mode, you will be offered the tutorial. Play the tutorial as all gameplay elements are explained.

- Click on the journal at the bottom left corner. Take note of the badge number (1374). Click on the X to close the journal.
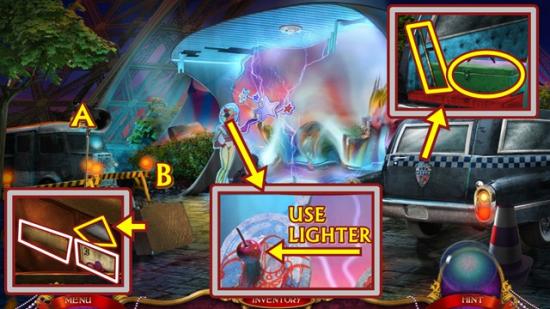
- Click on the briefcase. Enter the badge number (1374). Open the latch. Take the lighter. Take the note and card to add clues to your journal.
- Click on the back of the car. Move the insignia, then open the door. Take the baton. Open the chest and take the jack.
- Click on the cardboard cut-out. Use the lighter on the candy apple, then take the apple.
- Turn on the spotlight (A). Throw the apple at the birds (B). Click on the area (B) to start a hidden object hunt.
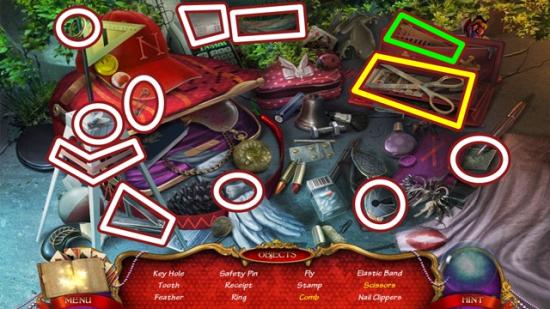
- Find all the objects. Open the wallet to get the scissors and comb. Scissors are added to your inventory.
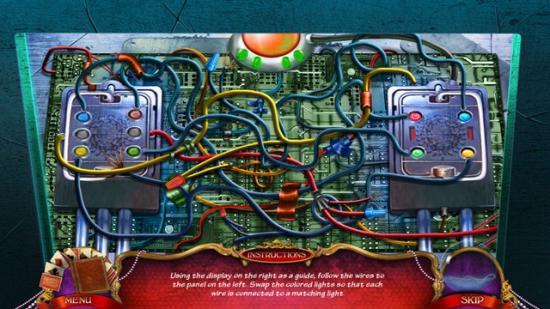
- Click on the box in front of the kneeling lieutenant. Use the scissors to cut the ribbon, then open the panel and click on the circuit board. A mini-puzzle starts. Starting with the right panel, select a wire connected to a coloured light and trace its path to the left panel. Make the light on the left match the light on the right. Click on two lights to swap their colours. If you are correct, a light at the top of the panel will turn green.
- Solution:
- Click through the dialogue. Move forward to the Unisphere Globe.
- Click on the Lestrange.
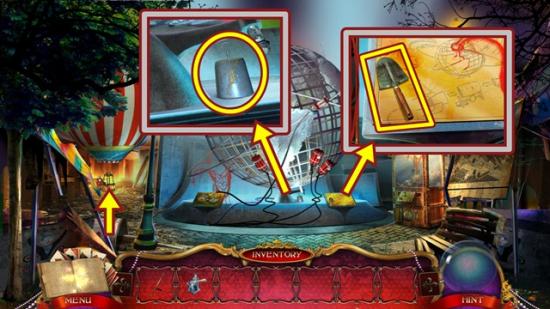
- When he leaves, click on the right panel. Note the diagram. Take the garden spade. Click anywhere outside the window to close it.
- Click on the base of the globe. Take the weight. Click anywhere outside the window to close it.
- Move forward to the exhibition (towards the balloon).
- Click through the dialogue.
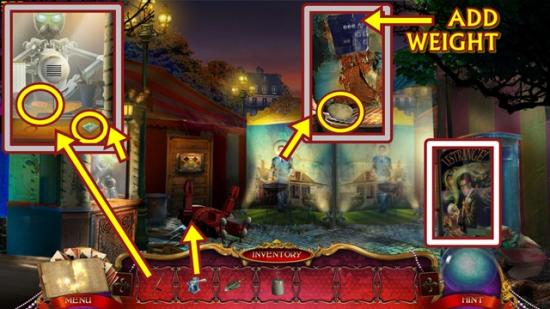
- Take the poster on the right to add to your journal.
- Click on the ticket machine on the left. Use the baton to smash the glass. Take the ticket and the sodium button.
- Click on the left panel. Open the chest panel and add the weight. Take the potato. Click anywhere outside the window to close it.
- Use the jack on the robot. When the robot stands, take the rocket tail from where it was lying. Click on the robot. Click on the red button. A mini-puzzle starts. Use the rotate buttons to move the sparkplugs into their matching coloured slots. The yellow sparkplugs move into the bottom row, the orange sparkplugs belong in the middle row and the blue in the top row. There are many ways to solve this puzzle; the screenshot below shows one possible solution.
- Solution:
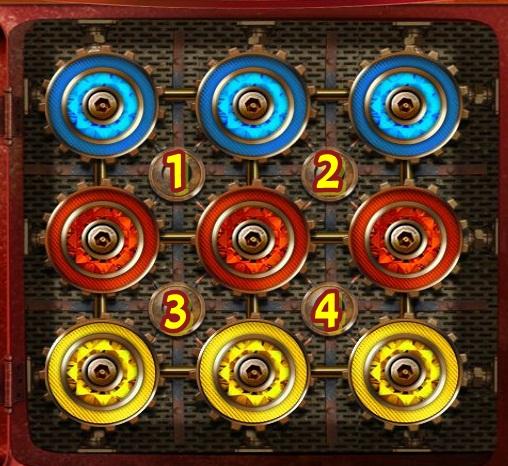
- Use the screenshot above as a guide. If you have moved any sparkplugs, click anywhere outside the window to close it, then go back into the puzzle. Press the following buttons in this order: 3-3-2-1-1-1-4-4-2-4-4-4.
- Move right to Home of Tomorrow.
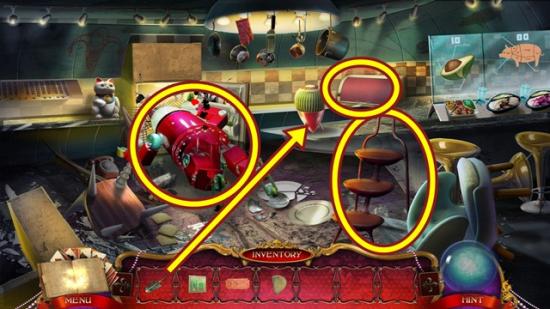
- Take the step ladder. Click on the cactus. Use the garden spade to remove the cactus, then take the rocket cone. Click on the bread box. Lift the cover and take the defaced flyer.
- Click on the robot in the fridge to start a hidden object hunt.
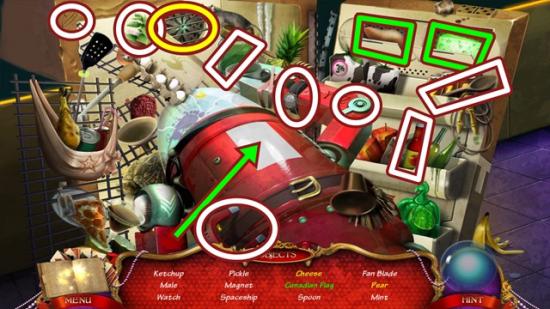
- Find all the objects. Open the door panels and take the cheese and pear. Put the maple leaf on the white part of the robot, then take the Canadian flag. A fan blade is added to your inventory.
- Move down two scenes to the Unisphere Globe.
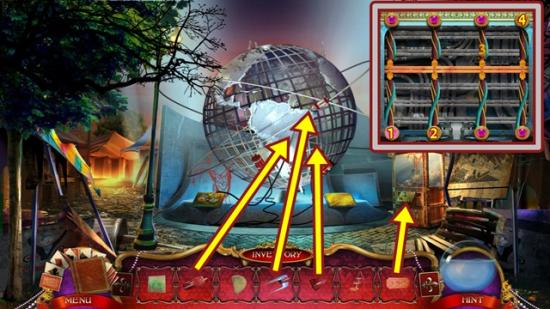
- Click on the toy machine. Add the ticket. Click on the circuit board. A mini-puzzle starts. Align the golden tabs on each vertical cable with the horizontal golden bar. Click on the purple gems at the top and bottom of each vertical cable to move the tabs. Moving a cable may move other cables. To solve the puzzle, use the screenshot above as a guide.
- Assuming the cables are labelled 1-4 from left to right, starting from the beginning (leave the puzzle and return to it, if necessary) move cable 1 down one position, move cable 2 down two positions, then move cable 4 up three positions.
- When you finish the puzzle, you will be looking at the toy machine. Press the arrow pointing to the right two times to move the grabber above the rocket body. Press the red button to lower the grabber. The rocket body is added to your inventory.
- Click on the cradle. Add the rocket tail, rocket body and rocket cone. Watch the cutscene.
- Click on the left display. A mini-puzzle starts. Move the mirrors to guide the light beam to the receiver at the bottom left. Press the rotating arrow button to reset the puzzle.
- Solution:
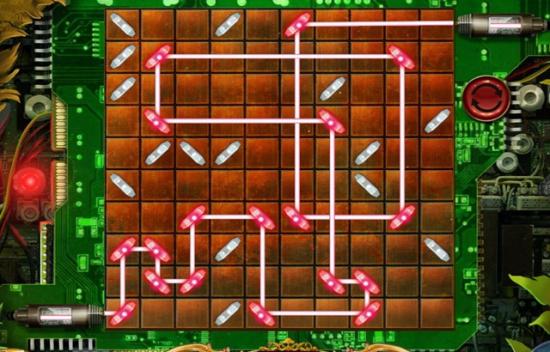
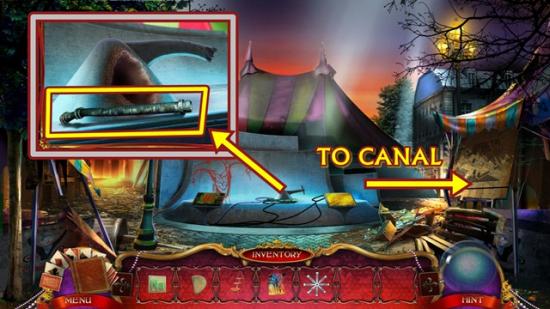
- Click on the area where the Unisphere Globe was. Take the bent steel pipe.
- Move right to the canal. Click through the dialogue. Watch the cutscene.
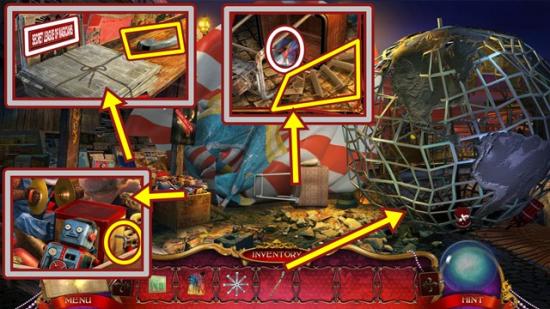
- Click on the newspaper stand. Take the freezer handle. Click on the newspaper headline to add it to your journal. Click anywhere outside the window to close it. Click on the hot air balloon basket. Take the postcard as a clue. Take the rope ladder. Click anywhere outside the window to close it.
- Click on the toy box. Click on the jack-in-the-box handle, then take the cat puppet.
- Use the bent steel pipe to move the Unisphere Globe.
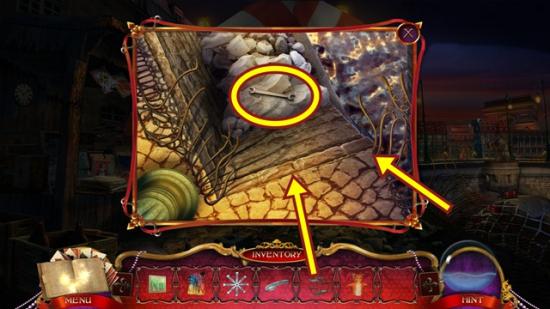
- Click on the edge of the canal. Add the rope ladder and take the wrench. Move down the rope ladder to the riverside.
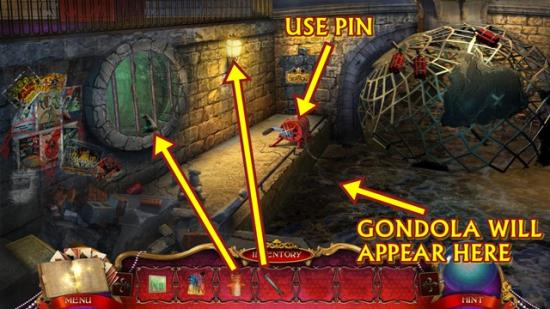
- Click on the rat. Scare it with the cat puppet. Take the mercury button.
- Click on the lantern. Use the wrench to open the lantern and get the pin. Open the lantern door and take the candle.
- Click on the winch. Add the pin to raise the gondola. When the gondola appears, remove the cloth covering it. Click on the gondola. Take the screwdriver. Remove the oar and cloth and take the file.
- Move down two scenes, then go forward and into the Home of Tomorrow.
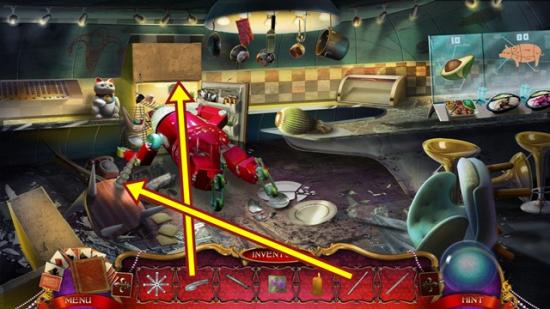
- Click on the freezer and add the freezer handle. Open the freezer. Remove the icicles and take the ice block.
- Click on the overturned chair. Use the screwdriver to remove the two screws to get the chair leg.
- Move down.
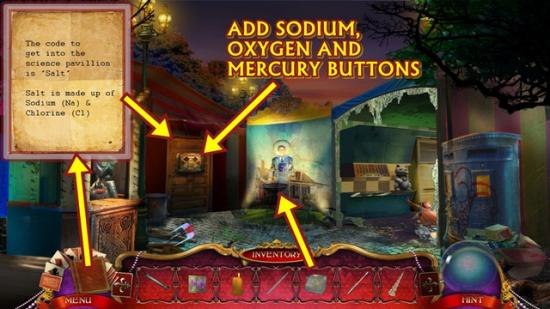
- Click on the barbecue. Add the ice block, then take the oxygen button.
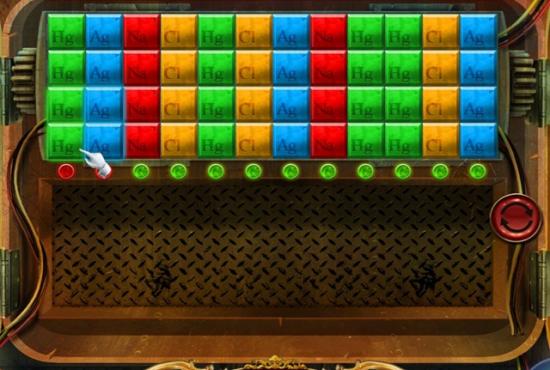
- Click on the door. Add the mercury button, oxygen button and the sodium button. A mini-puzzle starts. Press the correct buttons according to the note you found in the briefcase (clue is in your journal).
- Press Na and Cl. Another mini-puzzle starts. Place the blocks from the bottom into the area on the top.
- Solution:
- Enter the Future Travel Show.
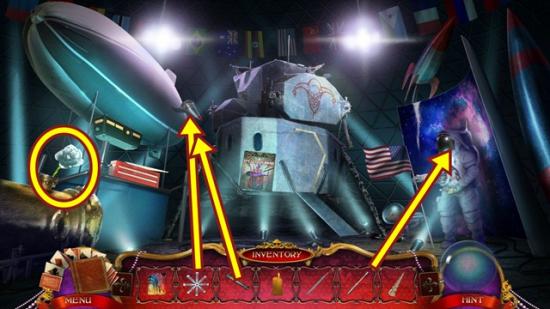
- Take the white rose. Click on the astronaut’s head. Remove the screw with the screwdriver. Lift the visor. Take the defaced flyer.
- Click on the zeppelin. Add the fan blade, then secure it with the wrench.
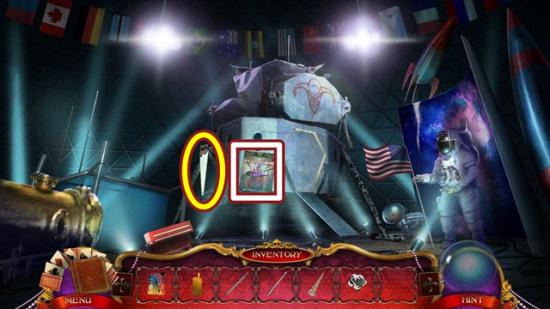
- Take the saw. Take the poster as a clue.
- Move down and enter the Home of Tomorrow.
- Click on the robot in the fridge to start a hidden object hunt.
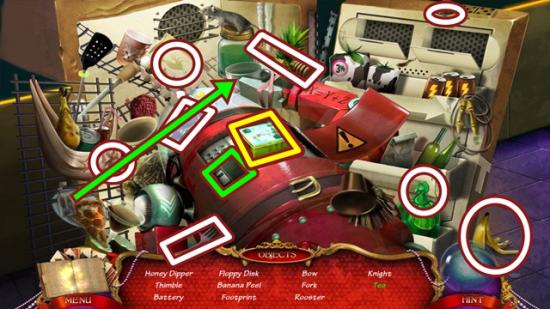
- Find all the objects. Open the robot’s panel and take the battery and floppy disk. Put the tea bag in the cup and take the tea. A battery is added to your inventory.
- Move all the way down to the fair entrance (first scene).
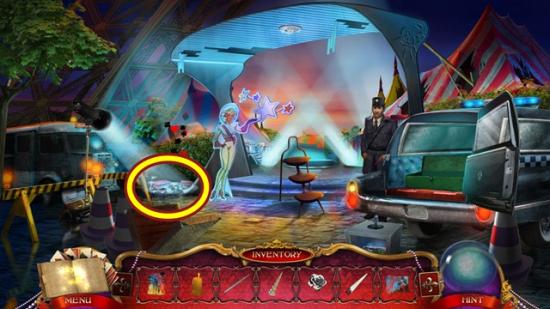
- Click on the area where the spotlight is shining to start a hidden object hunt.
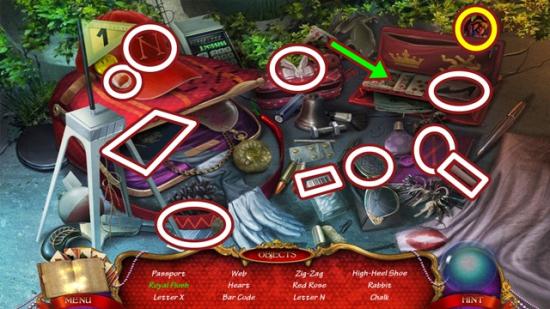
- Find all the objects. Add the queen of diamonds to the other cards and take the royal flush. A red rose is added to your inventory.
- Move forward, then go right towards the canal and move down to the riverside.
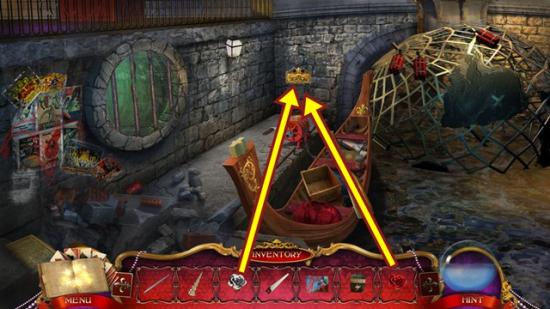
- Click on the placard. Add the white rose and the red rose. A mini-puzzle starts. Move the stones out of the slots so the blue lights go off. Unlike other games like this, the stones can move up and down and left and right, as long as the spot is empty. There are many possible solutions for this puzzle however the screenshots below will show one possible solution.
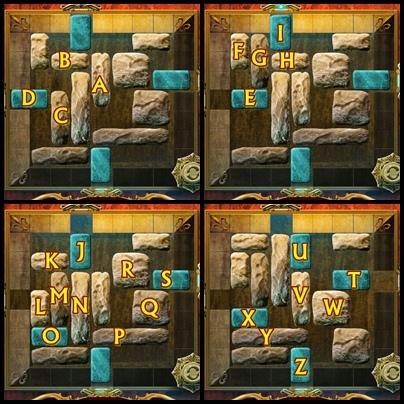
- Using the screenshot above as a guide, move A all the way down, move B all the way right, move C all the way up, move D all the way right, move E all the way down, move F all the way down, move G all the way down, move H all the way left, move I all the way down, move J all the way right, move K all the way up, move L all the way up, move M all the way up, move N up (but don’t move it into the slot), move O all the way up, move P all the way left, move Q all the way down, move R all the way down, move S one spot left, move T all the way up, move U all the way right, move V all the way up, move W all the way up, move X all the way right, move Y all the way up, move Z up.
- When you are finished, enter the secret location.
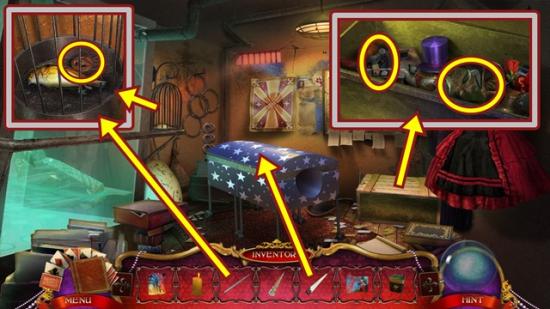
- Click on the birdcage. Use the file to cut the bars and take the valve.
- Click on the crate. Remove the lid and take the mask piece and doll arm.
- Use the saw on the magician’s box. Click on the magician’s box to start a hidden object hunt.
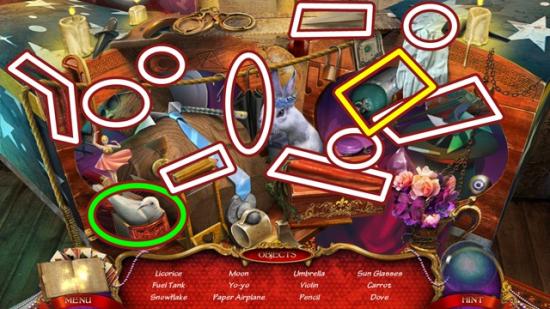
- Find all the objects. Open the jewelry box drawer and take the dove. A fuel tank is added to your inventory.
- Move down two scenes to the canal.
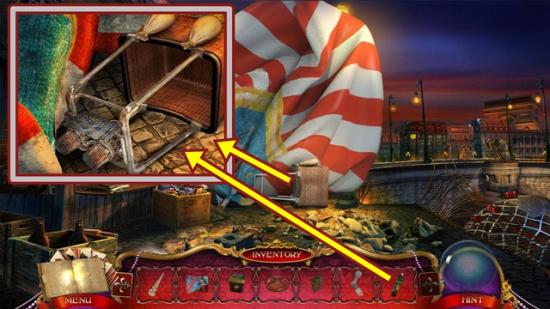
- Click on the hot air balloon basket. Add the fuel tank. A mini-puzzle starts. Turn the valve handles to ignite the three pilot lights on the right. Use the screenshot below as a guide to solve the puzzle.
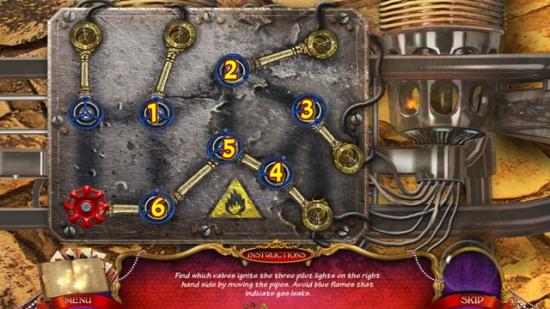
- Press the valve handles in the order shown on the screenshot above.
- When you are finished, the hot air balloon floats away. Move forward to the bridge access.
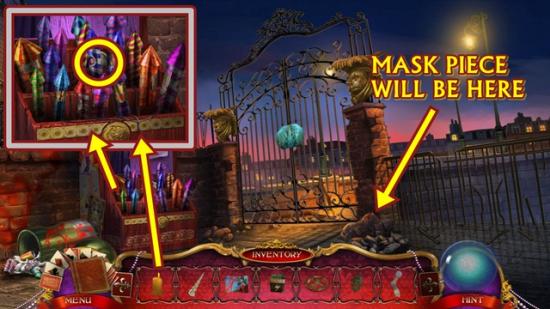
- Click on the fireworks. Use the candle to light the fuse. After the fireworks go off, click on the debris on the ground to take the mask piece. Click on the display and take the lucky coin.
- Move down two scenes, then move forward and go into the Home of Tomorrow.
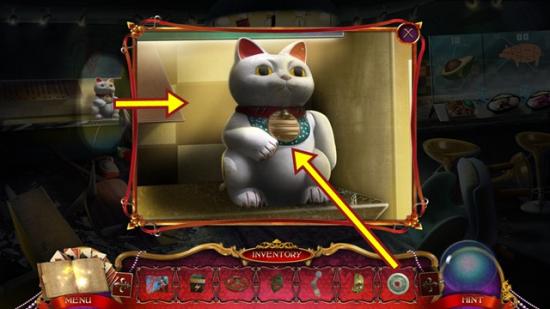
- Click on the lucky cat. Add the lucky coin, then take the fortune cookie.
- Leave and enter the future travel show.
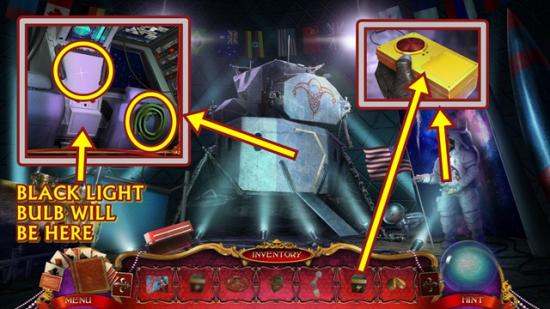
- Click on the astronaut. Open the cover, add the battery, then close the cover and press the red button.
- Click on the spaceship. Take the hose. Open the panel and click on the circuit board. A mini-puzzle starts. Click on the switches to turn on the lights in order from left to right. Each switch is connected by a wire to a light bulb. You can solve the puzzle by starting from the far left light bulb and follow its wire up to the switch or you can solve it through trial and error. Click on the switches until one light stays on. That light becomes #1. Then click another switch. If it’s not correct, the lights will turn off. Click on light #1 and click on other switches until two stay on. Continue until all the lights stay on.
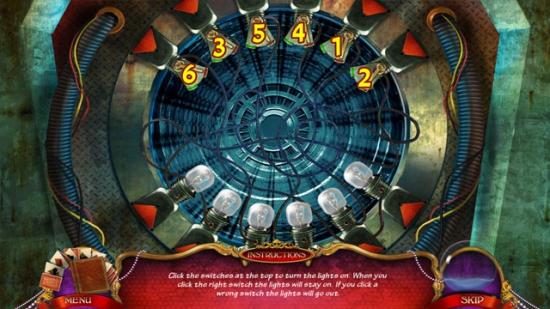
- Click on the switches in the order shown in the screenshot above.
- When you are finished, the lower panel opens. Take the black light bulb.
- Move all the way down to the fair entrance.
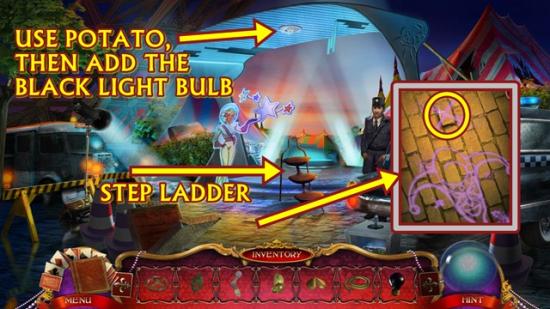
- Put the step ladder on the steps. Click on the light socket. Use the potato to remove the broken light bulb, then add the black light bulb.
- Click on the drawing on the ground. Click on the X and take the harp relief.
- Move forward and go right to the canal.
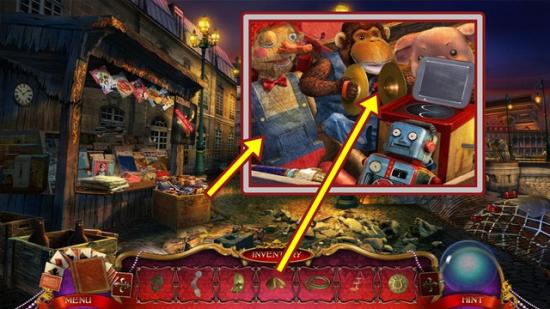
- Click on the toy box. Put the fortune cookie between the cymbals, then take the horn relief.
- Go over the edge of the canal to the riverside, then forward into the secret location.
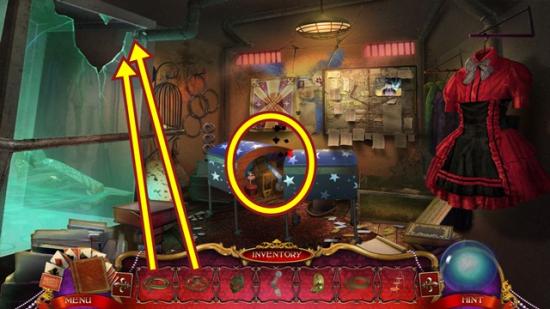
- Click on the pipe. Add the valve, then add the hose (click off the pipe to add the hose). Turn the valve handle. When the water rises, take the wooden carving that floats up.
- Click on the magician’s box to start a hidden object hunt.
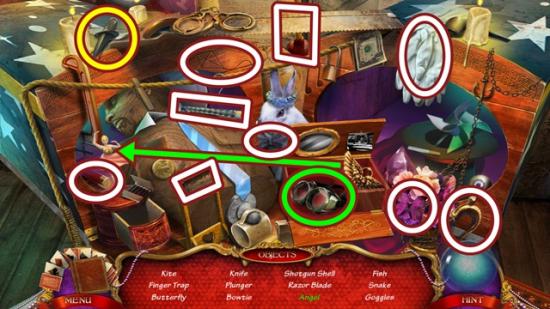
- Find all the objects. Open the box and take the goggles. Put the wings on the dancer and take the angel. A knife is added to your inventory.
- Move down to the riverside.
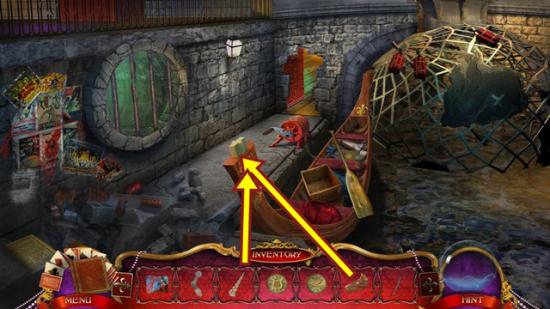
- Put the wooden carving on the front of the gondola, then add the chair leg. Take the cornucopia relief from the carving’s mouth.
- Move down to the canal.
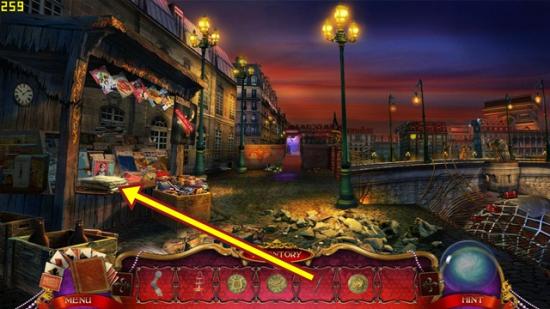
- Click on the newspaper stand. Cut the twine with the knife. Lift the newspapers (two clicks) and take the defaced flyer.
- Return to the secret location.
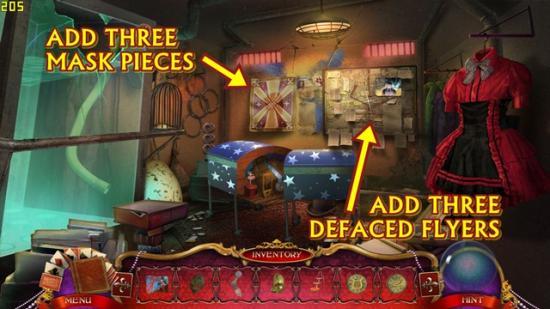
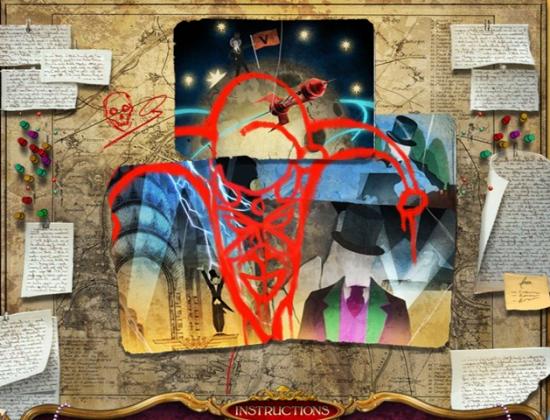
- Click on the bulletin board on the right. Add the three defaced flyers. A mini-puzzle starts. Rearrange the flyers to complete the joker drawing. Drag the flyers to move them. When a flyer is in the correct position, it locks.
- Solution:
- Click on the poster on the left. Add the three mask pieces. Take the bow relief.
- Return to the canal and move forward to the bridge access.
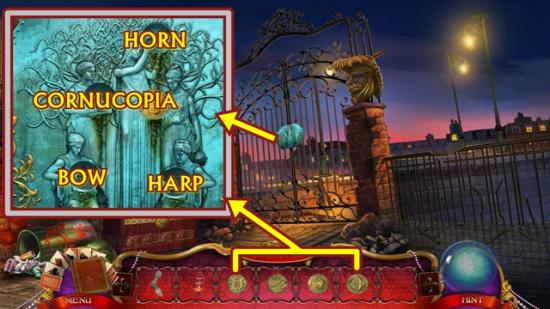
- Click on the gate. Add the cornucopia, bow, horn and harp reliefs to their appropriate slots. A mini-puzzle starts. Swap the tiles to recreate the image. To rotate a tile, select it and click the blue rotate button at the top left. When a piece is correctly positioned, it will lock in place and be surrounded by a purple light.
- Solution:
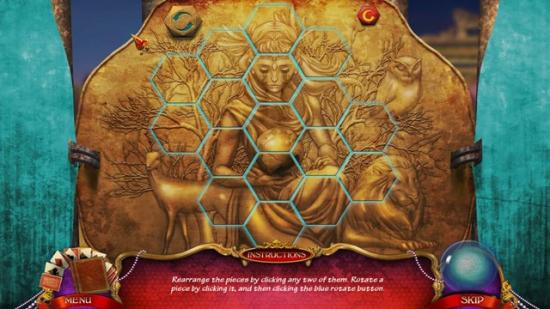
- When you are finished, go through the gate.
Level Two
- Watch the cutscene.
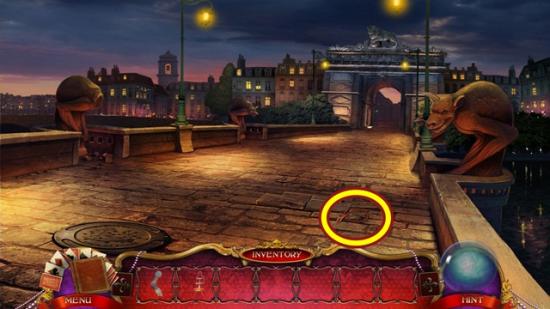
- Click on the loose stones. Take the wire clamps. Click anywhere outside the window to close it.
- Move forward.
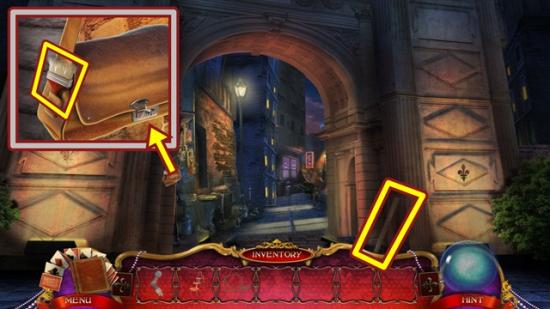
- Take the wooden pole. Click on the bag and take the brush. Click anywhere outside the window to close it.
- Move forward to Market Street South.
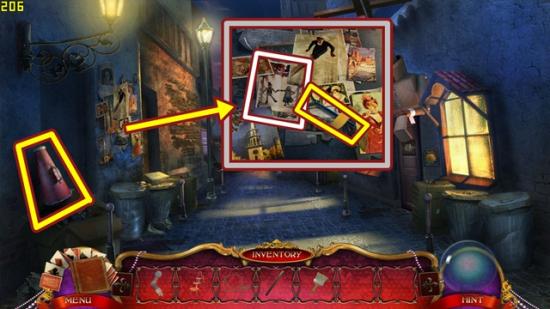
- Take the megaphone. Click on the posters and take the hex key. Take the puppet dance poster to add as a clue in your journal.
- Move forward to Market Street North.
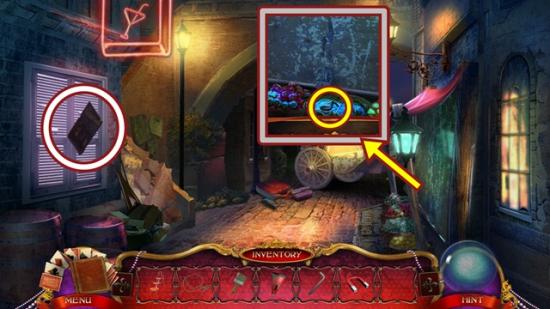
- Click on the left window and take the poster to add as a clue in your journal.
- Click on the right window under the awning. Take the music note. Click anywhere outside the window to close it.
- Move down.
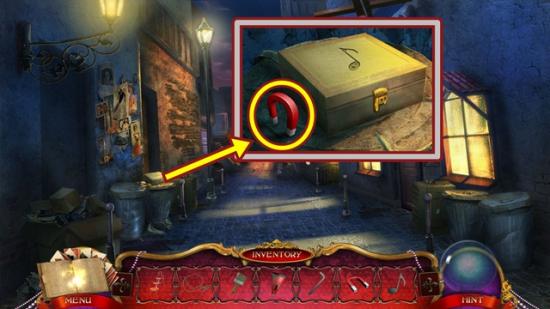
- Click on the garbage cans. Take the magnet. Add the music note, then take the sharp card.
- Move forward.
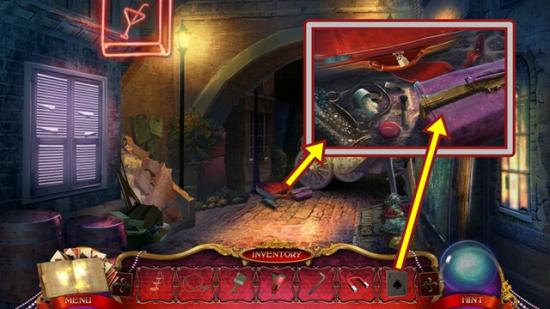
- Click on the suitcases. Use the sharp card to cut open the purple bag. Take the crowbar.
- Move down three scenes to the archway.
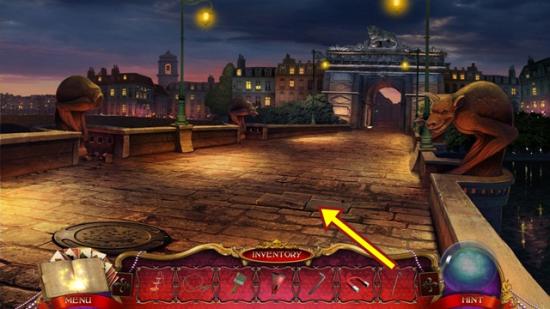
- Click on the loose stones. Use the crowbar on the loose stone, then take the hairpin and the brick (1/3).
- Move forward.
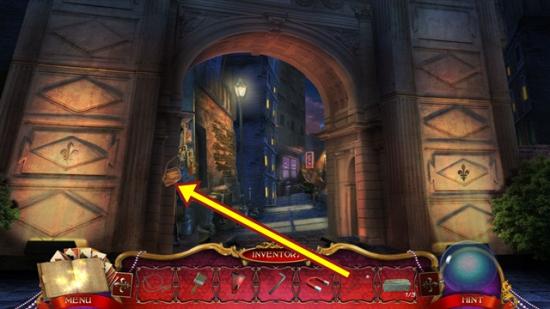
- Click on the bag. Use the hairpin on the lock, then take the clockwork flower.
- Move forward two scenes to Market Street North.
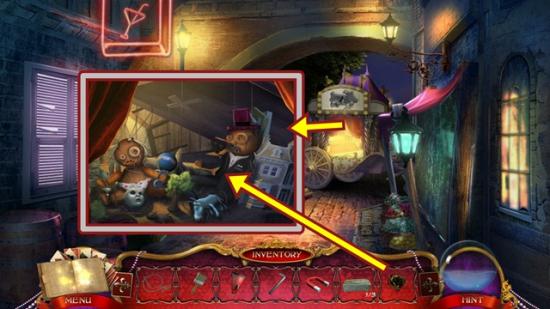
- Click on the carriage. Give the clockwork flower to the male puppet. Take the tiny top hat.
- Move down.
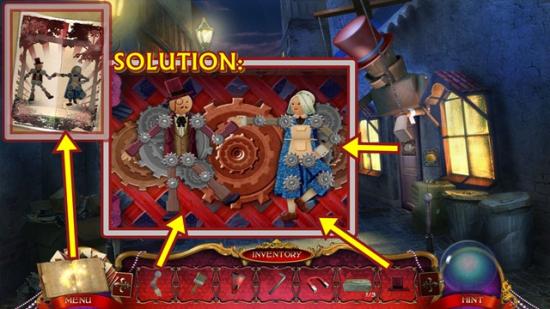
- Click on the door. Add the doll arm and the tiny top hat. A mini-puzzle starts. Arrange the dolls so they match the positioning of the dolls in the poster in your journal. Click on the gears to move the limbs. If you have difficulty moving the female doll’s left leg, move the right leg so it’s farther away from the left leg, then move the left leg. The solution is in the screenshot above.
- Enter the ventriloquist’s toy shop.
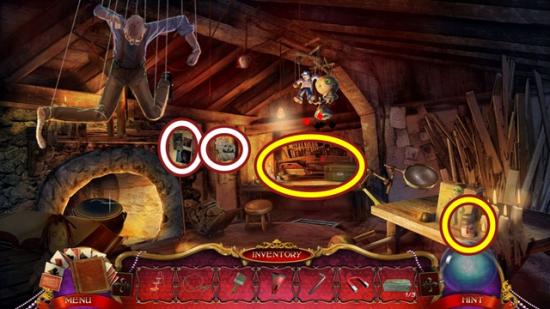
- Take the photos and newspaper article as clues to add in your journal. Click on the voodoo doll. Take the glue.
- Click on the desk to start a hidden object hunt.
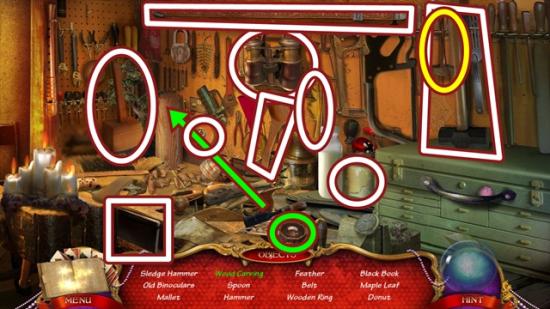
- Find all the objects. Open the box and take the wooden ring. Use the chisel on the log, then take the wood carving. A hammer is added to your inventory.
- Leave and move forward.
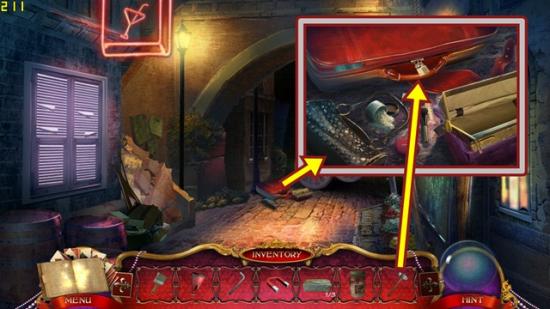
- Click on the suitcases. Click on the large suitcase to expose the lock. Smash the lock with the hammer. Take the tesla coil.
- Return to the ventriloquist’s toy shop.
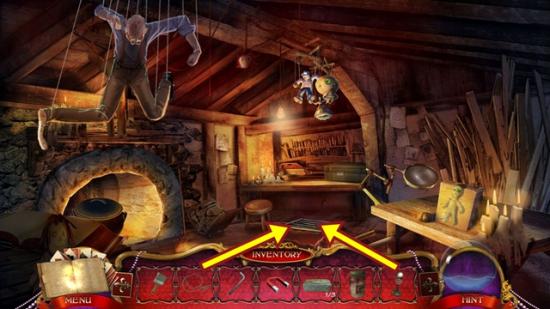
- Lift the carpet. Click on the grate. Add the tesla coil and then the wire clamps. Go down into the doll dungeon.
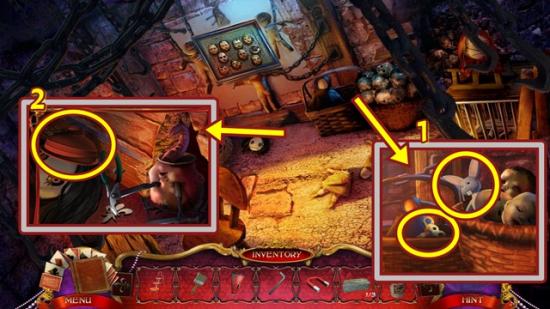
- Click on the basket of doll heads. Take the wind-up key and the rabbit toy.
- Click on the doll head mechanical puppet. Take the plunger head. Click anywhere outside the window to close it.
- Move down.
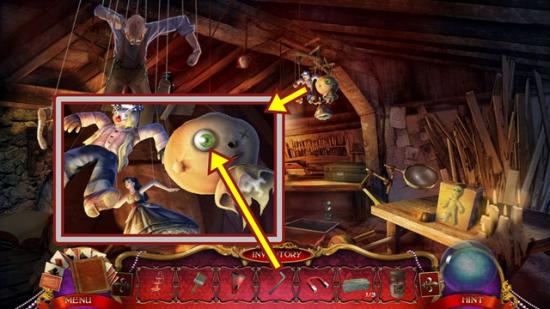
- Click on the hanging puppets. Insert the wind-up key to get the doll eye (1/2).
- Move down.
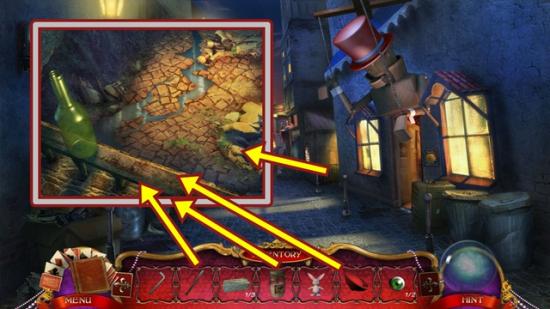
- Click on the balcony. Try to take the bottle. Add the wooden pole, then place the plunger head on it, then put glue on the plunger. Sharp glass is added to your inventory.
- Return to the ventriloquist’s toy shop.
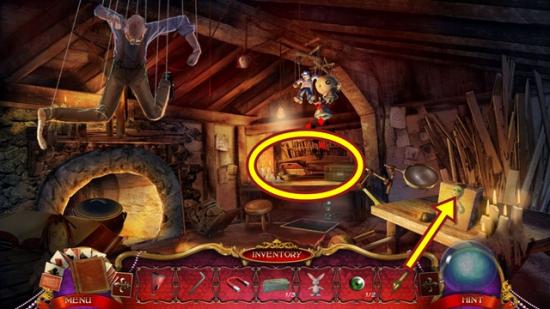
- Click on the voodoo doll. Use the sharp glass to take the doll eye (2/2). Click on the desk to start a hidden object hunt.
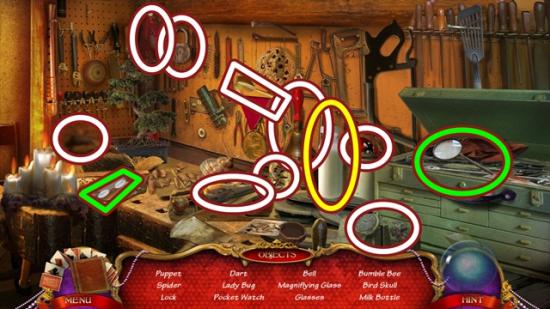
- Find all the objects. Open the tool chest and take the magnifying glass. Open the glasses case and take the glasses. A milk bottle is added to your inventory.
- Go down into the doll dungeon.
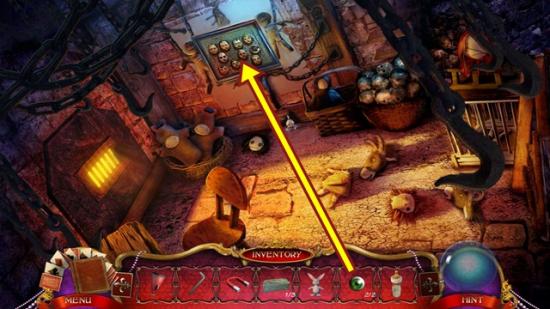
- Click on the wall display. Add the two doll eyes. A mini-puzzle starts. Watch all the dolls’ eyes to see where they are all looking, then click on that doll head. Continue until all the dolls’ eyes are closed. If you make a mistake, you must restart. The puzzle will be different when you restart, hence a step-by-step solution cannot be given.
- When you are finished, click on the newly opened area to start a hidden object hunt.
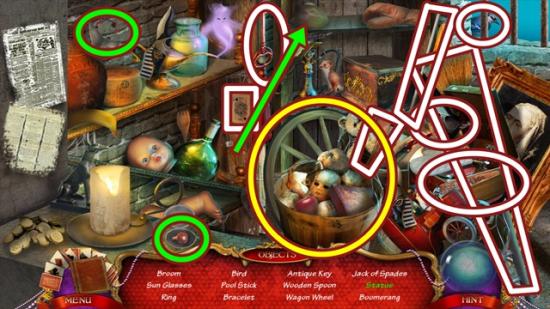
- Find all the objects. Tear the poster to take the bracelet. Open the locket to take the ring. Use the chisel on the clay to make the statue. A cart wheel is added to your inventory.
- Move down two scenes.
- Click on the carriage. Give the baby the milk bottle. Take the baby rattle. Add the cart wheel to the carriage.
- Move forward to the park entrance.
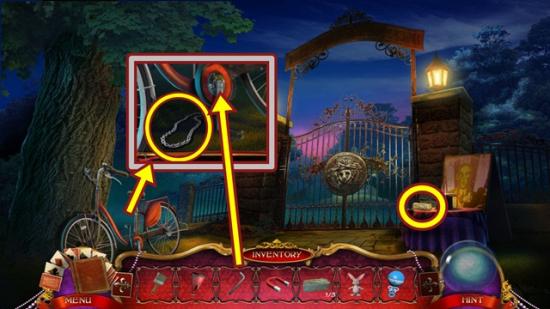
- Click on the bicycle. Take the bike chain. Use the hex key to take the pedal crank.
- Click on the table. Take the brick (2/3). Click anywhere outside the window to close it.
- Return to the doll dungeon.
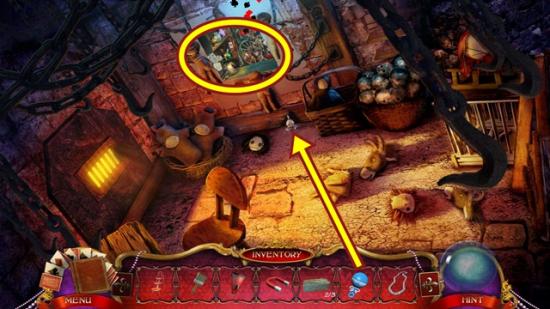
- Click on the mechanical puppet. Give it the baby rattle, then take the fleur-de-Lys.
- Click on the insert to start a hidden object hunt.
- Find all the objects. Open the chest to take the skull. Move the doll head and take the cupcake. Put the pieces together create the Egyptian mask. An oven mitt is added to your inventory.
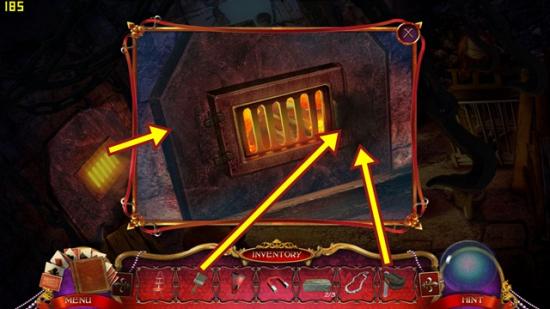
- Click on the oven hatch. Sweep the soot away with the brush, then add the pedal crank to open the hatch. Use the oven mitt to take the gargoyle head.
- Move down.
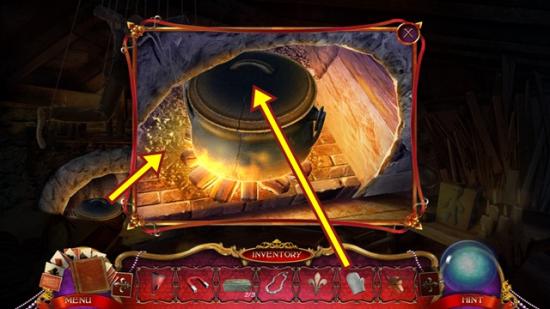
- Click on the pot. Use the oven mitt to lift the lid, then take the magic wand.
- Move down two scenes.
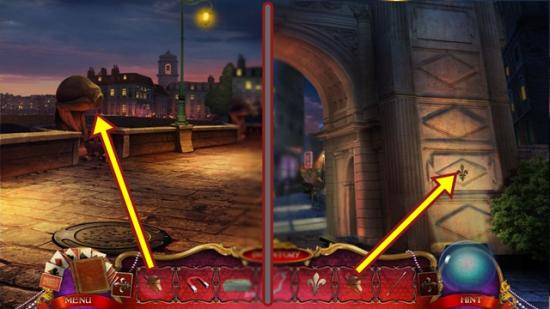
- Click on the inset on the right. Add the fleur-de-Lys. Take the emerald eye (1/2).
- Move down.
- Click on the broken gargoyle on the left. Add the gargoyle head, then take the emerald eye (2/2).
- Move forward all the way to the park entrance.
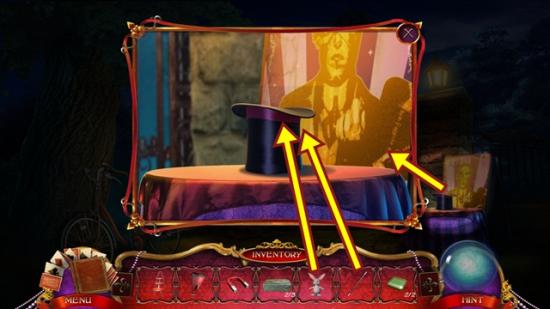
- Click on the table. Put the toy rabbit in the hat, then use the magic wand on it. Take the vendor key.
- Move down.
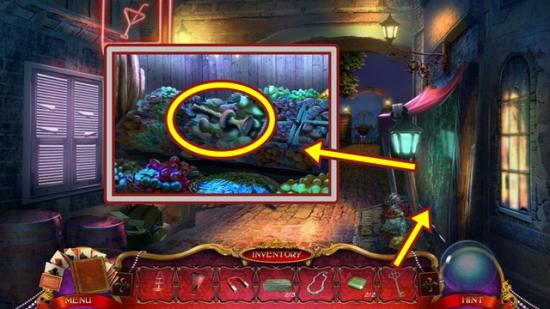
- Click on the right window. Unlock the lock with the vendor key. Take the snake charmer’s flute.
- Move forward.
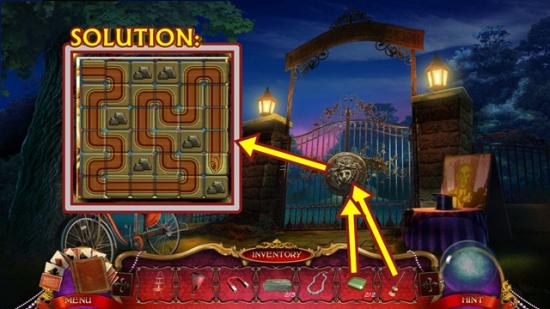
- Click on the gate. Use the snake charmer’s flute, then add the two emerald eyes. A mini-puzzle starts. Use the arrows to move the snake so it passes over every tile. Use the rotating arrows button to reset to start over. The solution is in the screenshot above.
- Go through the gates into the park.
Level Three
- Click through the dialogue.
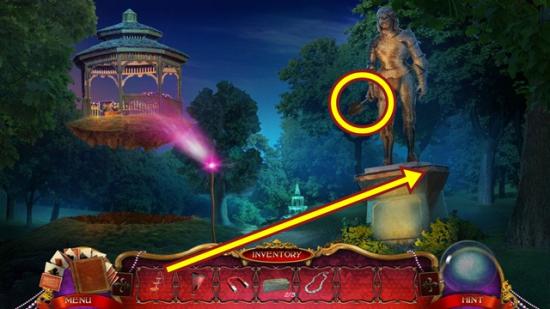
- Put the step ladder to the right of the statue. Click on the statue and take the shovel. Click anywhere outside the window to close it.
- Move forward to the fountain.
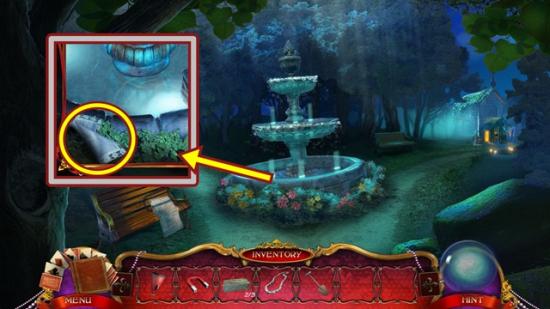
- Click on the fountain. Take the handkerchief. Click anywhere outside the window to close it.
- Take the path to the right to the tomb.
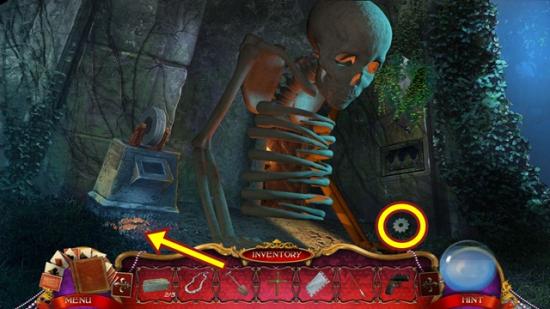
- Take the cog (1/5). Use the shovel on the loose dirt and take the chisel.
- Move down two scenes to the park.
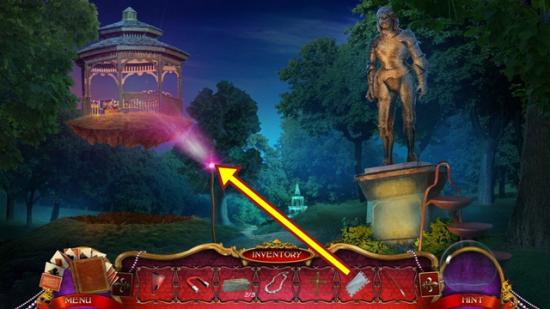
- Put the handkerchief on the lamppost. Click on the lamppost to get the staff. Click on the gazebo to start a hidden object hunt.
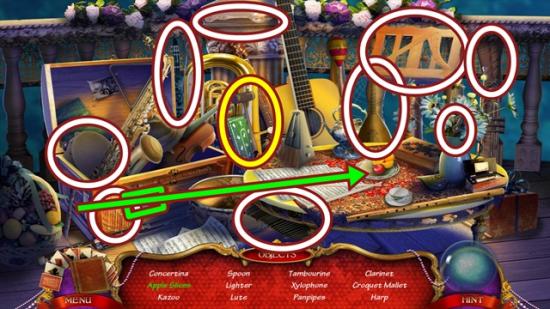
- Find all the objects. Open the panel and take the lighter. Use the knife on the apple, then take the apple slices. A croquet mallet is added to your inventory.
- Move forward to the fountain.
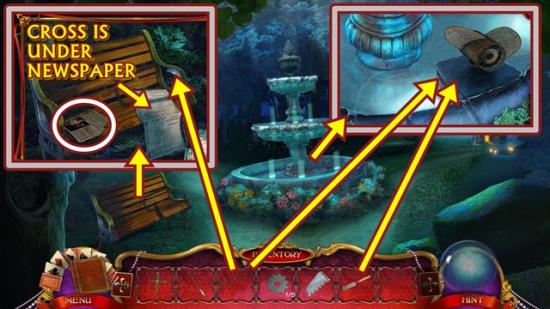
- Click on the fountain. Put the chisel in the ice, then hit it with the croquet mallet and take the propeller.
- Click on the bench. Take the article to add as a clue in your journal. Move the newspaper. Take the cross. Use the croquet mallet on the bench arm to get the dull moon.
- Take the right path to the tomb.
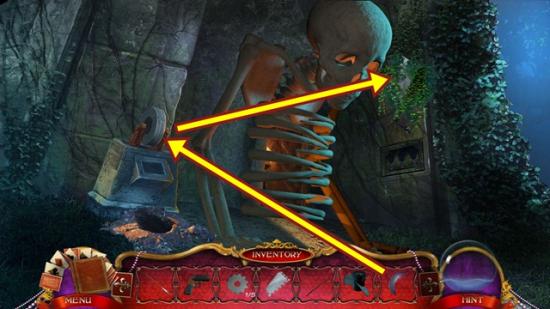
- Use the dull moon on the grindstone to get the sharp moon.
- Click on the ivy above the panel on the right. Use the sharp moon to cut the growth, then take the rudder.
- Move down, then take the left path to the dock.
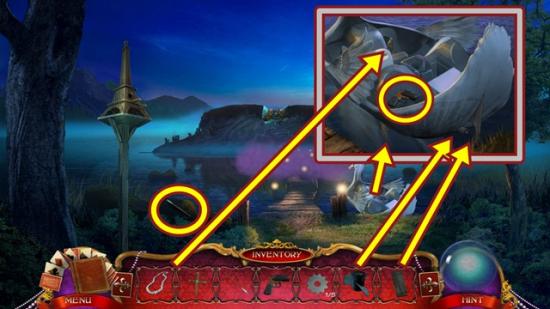
- Take the dock brush. Click on the swan boat. Take the flare gun. Add the bike chain, propeller and the rudder.
- Get on the boat and go to the island entrance.
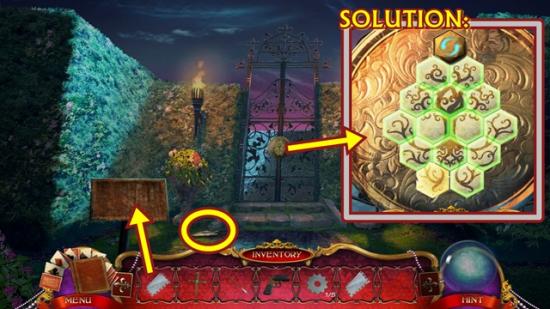
- Take the gardening gloves.
- Click on the stand. Use the handkerchief to clear away the dirt, then take the cog (2/5).
- Click on the gate. A mini-puzzle starts. Swap the tiles to recreate the image. To rotate a tile, select it and click the blue rotate button at the top. When a piece is correctly positioned, it will lock in place and be surrounded by a green light. The solution is in the screenshot above.
- Go through the gate to the secret maze.
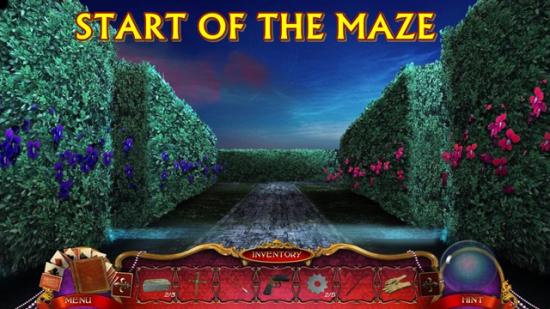
- This scene is the start of the maze. To get to various parts of the maze, this walkthrough will always begin at the start of the maze.
- Move forward, then right, then left, then left again.
- Click on the body. Click on the suit or armour. Take the tuning fork.
- Return to the start of the maze by moving down four times.
- From the start of the maze, move forward, then right, then left.
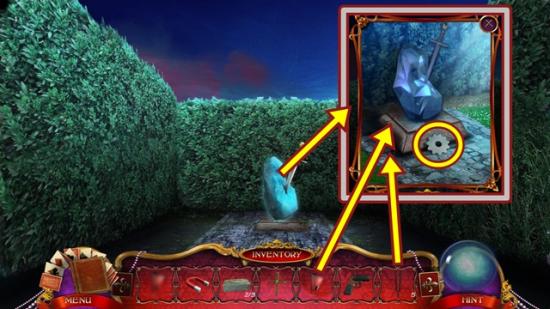
- Click on the crystal. Take the cog (3/5). Put the megaphone on the crystal, then add the tuning fork. After the crystal shatters, take the sword (grab it by the handle).
- Move down all the way until you get to the park.
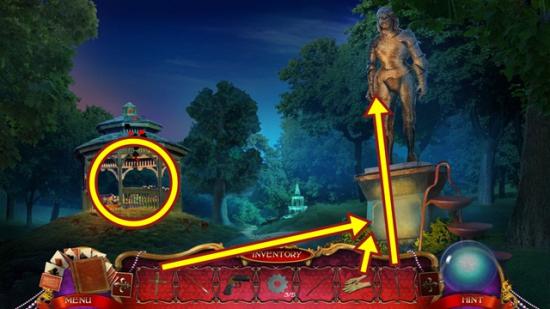
- Click on the base of the statue. Use the gardening gloves to move the bush, then take the shears. Click anywhere outside the window to close it.
- Click on the statue and add the sword. Click on the base of the statue and add the cross. Click on the panel and take the diamond skull.
- Click on the gazebo to start a hidden object hunt.
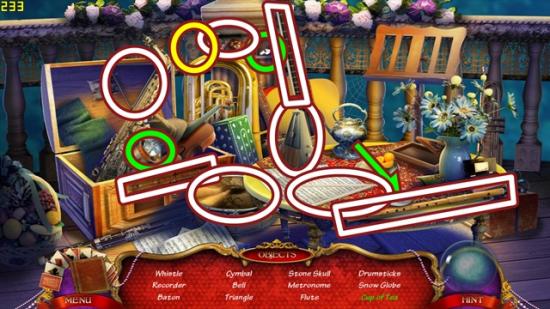
- Find all the objects. Open the stone panel and take the whistle. Lift the cover off the saxophone and take the snow globe. Use the tea pot on the tea cup and take the cup of tea. A stone skull is added to your inventory.
- Return to the start of the maze (move forward, take the left path, take the boat to the island entrance, then go through the gate).
- From the start of the maze, move forward, then move right, then left, then left again.
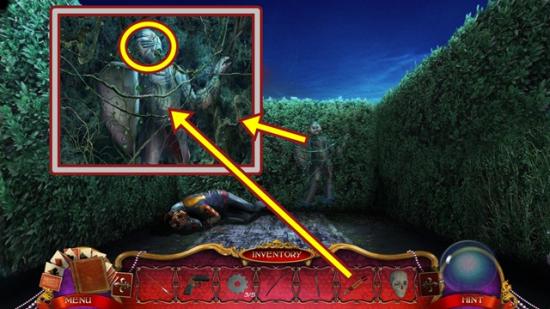
- Click on the suit of armour. Cut the vines with the shears. Lift the visor and take the onyx skull.
- Move all the way down to the fountain, then take the right path to the tomb.
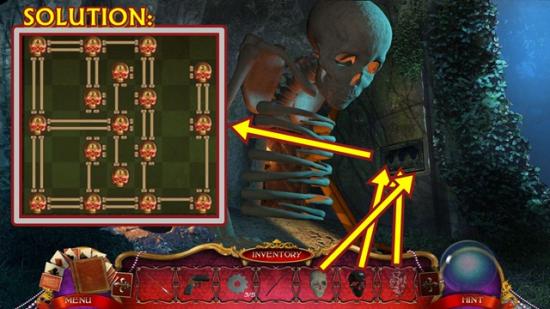
- Click on the panel on the right. From left to right, add the onyx skull, diamond skull and stone skull. A mini-puzzle starts. Connect the skulls by connecting the bone ends. Each skull has a number on it that indicates the amount of connecting bones it requires. When the skull’s eyes glow red, it has the required number of connections. Click on a bone end to connect it to another bone end. Connections cannot cross each other. The solution is in the screenshot above.
- Go through the door into the skeleton tunnel.
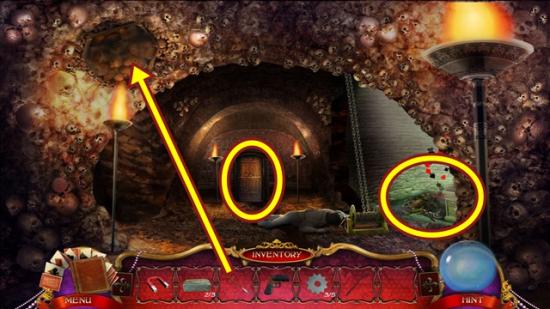
- Click on the body. Click on the skulls on the left part of the ceiling. Clear the webs with the dock brush. After the skulls fall, take the cog (4/5).
- Click on the door. Click on the door again to take the door. Take the toy fish from the shelf. Take the posters to add as a clue in your journal.
- Click on the area on the right to start a hidden object hunt.
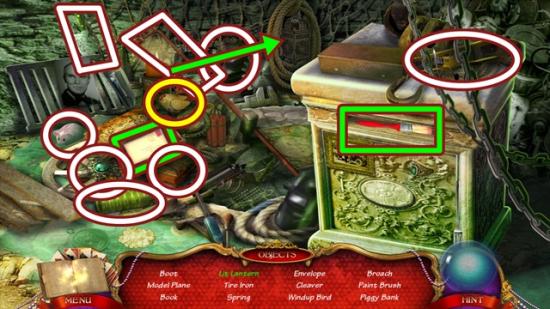
- Find all the objects. Open the chest and take the envelope. Open the panel on the pedestal and take the paint brush. Use the candle on the lantern, then take the lit lantern. A wind up bird is added to your inventory.
- Return to the dock (move down two scenes, then take the path on the left).
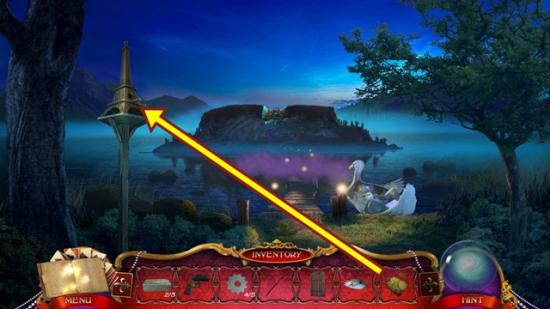
- Click on the Eiffel Tower birdhouse. Add the wind up bird, then take the cog (5/5).
- Return to the skeleton tunnel.
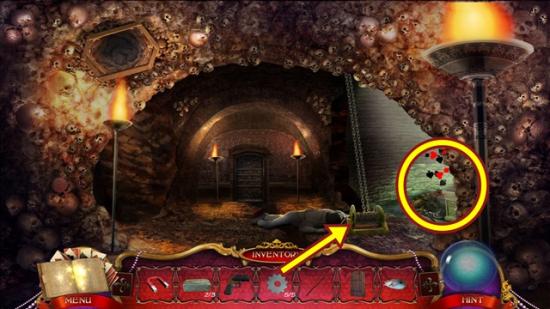
- Click on the winch. Add the five cogs. Click on the area on the right to start a hidden object hunt.
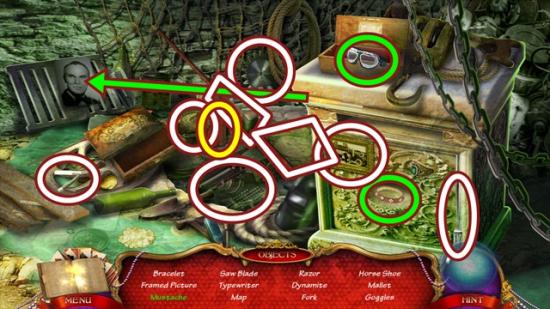
- Find all the objects. Remove the panel from the pedestal and take the bracelet. Open the chest and take the goggles. Use the pen on the photo (click on the centre of the photo) and take the moustache. A firecracker is added to your inventory.
- Go into the newly opened area.
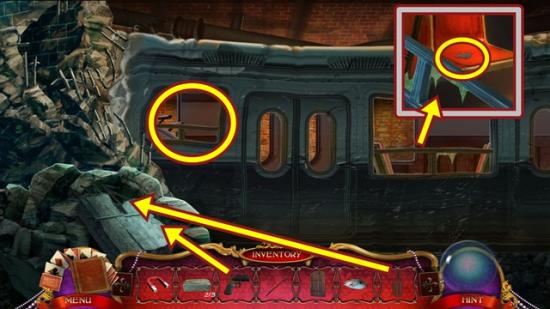
- Click through the dialogue. Click on the right window and take the rabbit emblem.
- Click on the debris at the left. Add the firecracker. Shoot the debris with the flare gun. Click on the debris and take the turtle emblem.
- Click on the left window. Add the turtle and rabbit emblems. A mini-puzzle starts. Rearrange the turtles and rabbits so the rabbits are on the red slots and the turtles are on the green slots. Use the three rotating buttons to move the turtles and rabbits. Use the rotating arrows button to reset the puzzle.
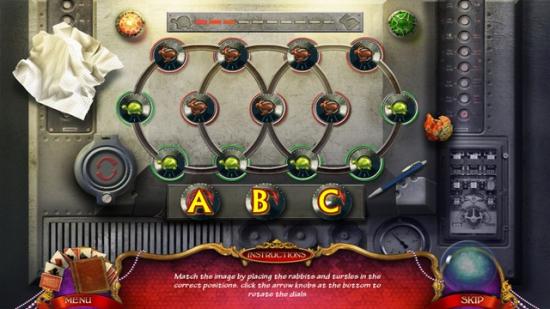
- Use the screenshot above as a guide. Assuming the buttons are labelled A-C, from the beginning, press B once, press C three times, press A five times, then press C five times.
When the train moves, lay the door down and go forward
Level Four
- Move right to the back alley.
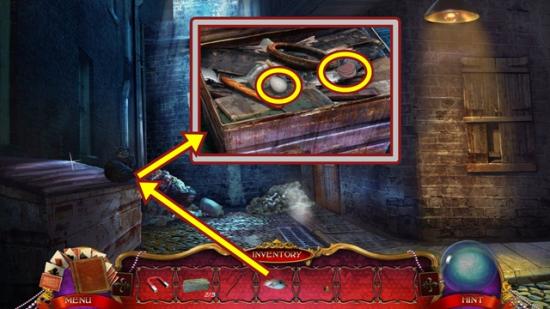
- Click on the cat. Give the toy fish to the cat. When the cat leaves, open the dumpster lid. Take the egg and the razor teeth.
- Move down to the tunnel exit.
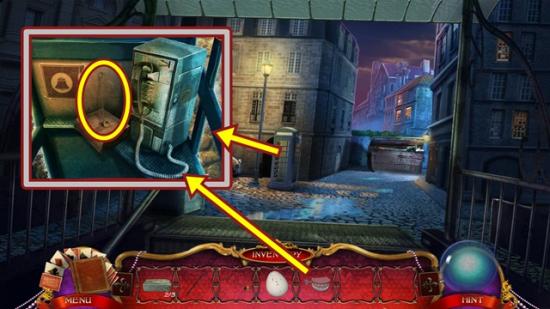
- Click on the phone booth. Take the snuffer. Use the razor teeth on the phone cord, then take the phone cord. Click anywhere outside the window to close it.
- Move right to the back alley.
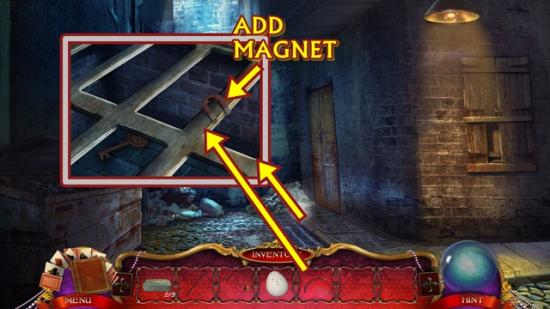
- Click on the grate. Add the magnet and the phone cord to get the news key.
- Move down to the tunnel exit.
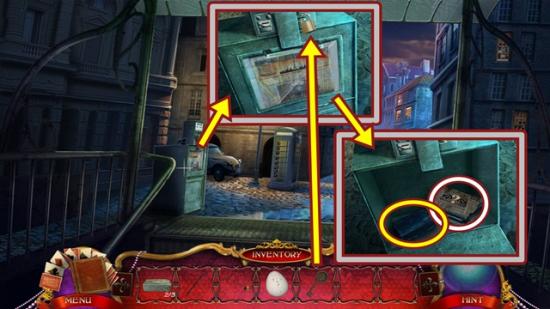
- Click on the newspaper box. Open the lock with the news key. Open the newspaper box. Take the brick (3/3) and the article to add as a clue to your journal.
- Move right to the back alley.
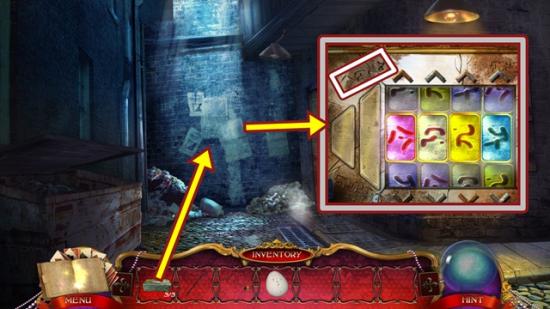
- Click on the back wall. Add the three bricks. A mini-puzzle starts. Use the arrows to adjust the symbols to match a set of symbols etched into the wall. There is only one series with four symbols, found at the top left of the puzzle area. The solutions is in the screenshot above.
- Go through the opening into the workshop and go up the ladder into the living space.
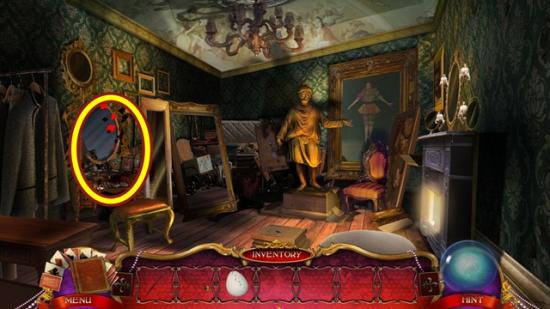
- Click on the table to start a hidden object hunt.
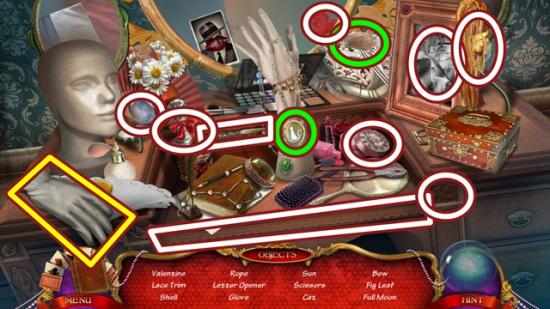
- Find all the objects. Open the box and take the shell. Open the locket and take the cat. A glove is added to your inventory.
- Click on the statue and add the glove. Take the coin.
- Move down three scenes to the exit tunnel.
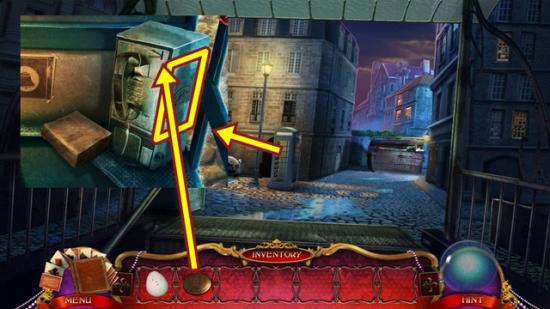
- Click on the phone booth. Put the coin in the slot. When the side panel opens, take the bulb.
- Return to the workshop (right, then forward).
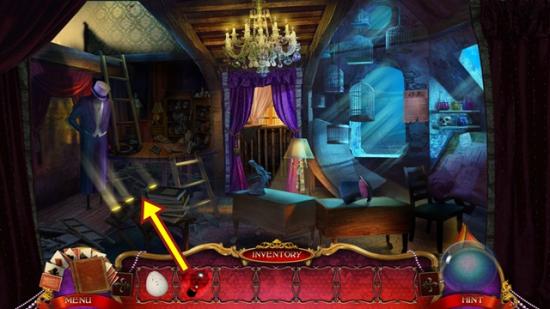
- Put the bulb in the light panel.
- Click on the table to start a hidden object hunt.
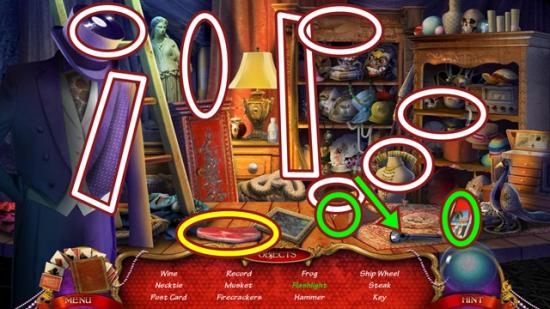
- Find all the objects. Tear the photo and take the postcard. Lift the rug and take the key. Put the batteries in the flashlight, then take the flashlight. Meat is added to your inventory.
- Move forward into the storage room.
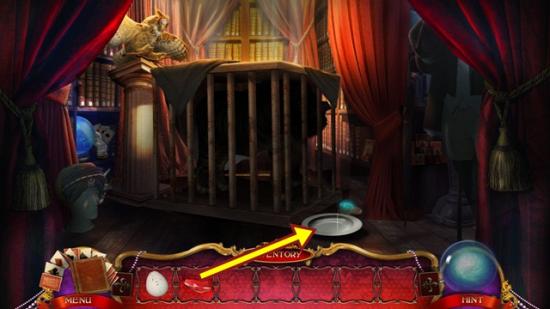
- Put the meat in the dish. Take the rune tablet (1/3).
- Move down to the workshop.
- Click on the table to start a hidden object hunt.
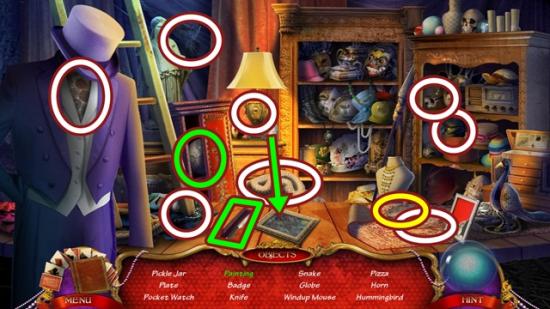
- Find all the objects. Open the tall chest and take the globe. Lift the panel on the table and take the knife. Use the cleaner on the frame, then take the painting. A mouse figure is added to your inventory.
- Move forward into the storage room.
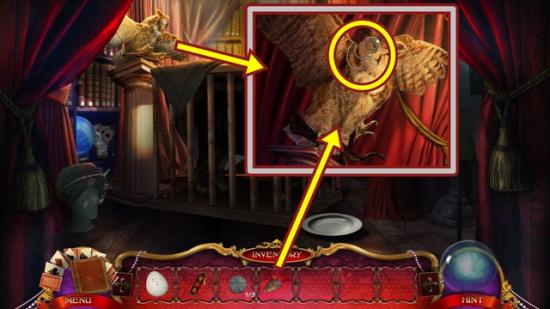
- Click on the owl. Add the mouse figure. Take the monocle.
- Move down, then go up the ladder to the living space.
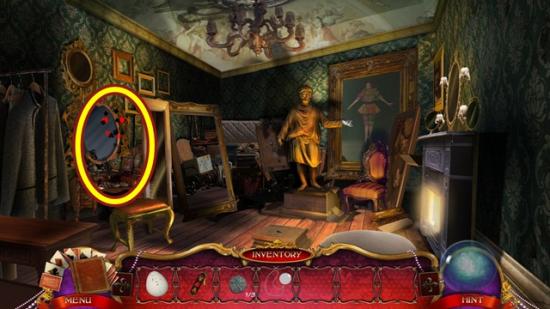
- Click on the table to start a hidden object hunt.
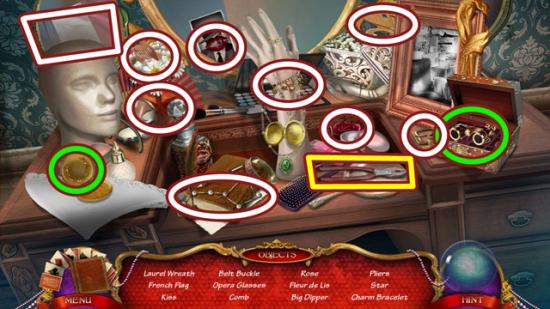
- Find all the objects. Open the box and take the opera glasses. Open the compact and take the laurel wreath. Wire cutters are added to your inventory.
- Move down to the workshop.
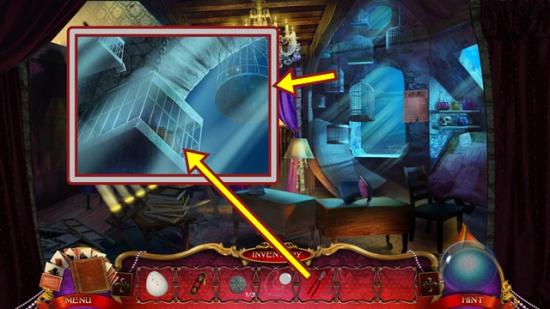
- Click on the hanging cages. Use the wire cutters on the lowers cage. Add the egg. The crystal ball is added to your inventory.
- Go up the ladder.
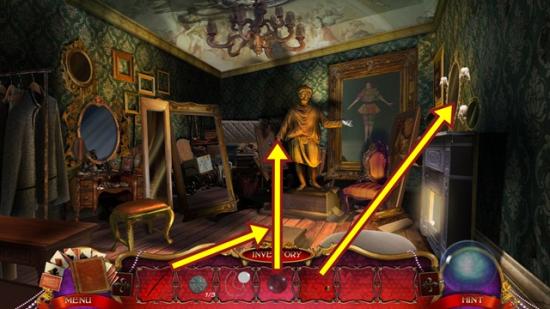
- Click on the mirror. Use the snuffer to put out all the candles.
- Put the staff on the wooden pedestal, then add the crystal ball.
- Click on the door that appears. A mini-puzzle starts. Match the outer symbols to the inner symbols. Click on an outer symbol to move it clockwise two spaces. Click on the centre button to rotate the outer ring. Press the rotating arrow button on the right to reset the puzzle.
- When you are finished, go through the door into the sanctum.
- Click through the dialogue.
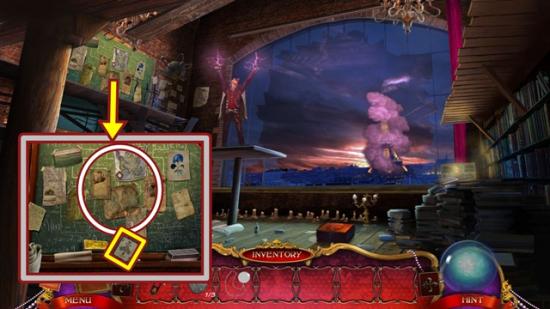
- Click on the posters on the left wall. Remove the posters. Take the card. Use the monocle on the wall. Click on the wall several times until the symbol is added to your journal.
- Return to the storage room by moving down two scenes, then moving forward.
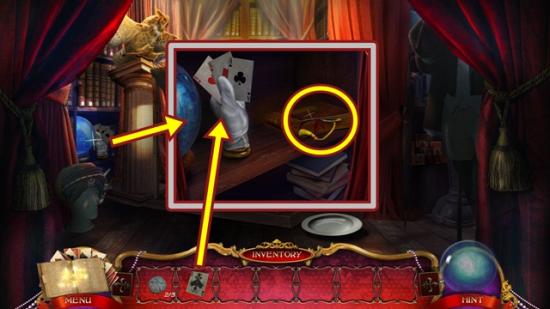
- Click on the shelf. Add the card to the other cards, then take the rune tablet (2/3).
- Open the book and take the magic bookmark.
- Return to the sanctum (move down, then climb the ladder and go through the door).
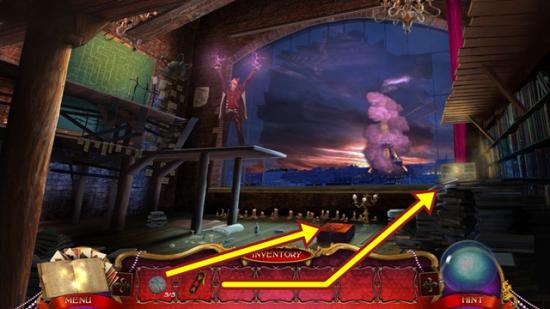
- Click on the stack of books. Remove the first book. Use the magic bookmark, then take the rune tablet (3/3).
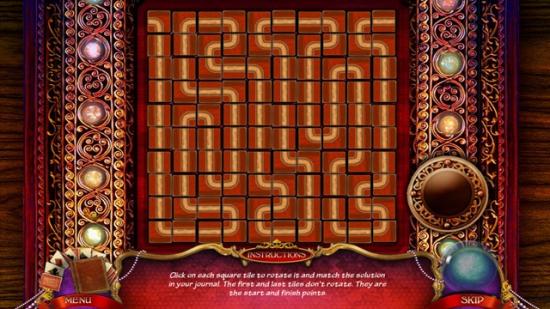
- Click on the box. Add the three rune tablets. A mini-puzzle starts. Rotate the tiles to match the clue in your journal.
- Solution:
- Click through the dialogue, then watch the cutscene.
- Click through the dialogue.
Congratulations! You have completed Gamezebo’s walkthrough for Shattered Minds: Encore. Be sure to check back often for game updates, staff and user reviews, user tips, forums comments and much more here at Gamezebo!
More articles...
Monopoly GO! Free Rolls – Links For Free Dice
By Glen Fox
Wondering how to get Monopoly GO! free rolls? Well, you’ve come to the right place. In this guide, we provide you with a bunch of tips and tricks to get some free rolls for the hit new mobile game. We’ll …Best Roblox Horror Games to Play Right Now – Updated Weekly
By Adele Wilson
Our Best Roblox Horror Games guide features the scariest and most creative experiences to play right now on the platform!The BEST Roblox Games of The Week – Games You Need To Play!
By Sho Roberts
Our feature shares our pick for the Best Roblox Games of the week! With our feature, we guarantee you'll find something new to play!Type Soul Clan Rarity Guide – All Legendary And Common Clans Listed!
By Nathan Ball
Wondering what your odds of rolling a particular Clan are? Wonder no more, with my handy Type Soul Clan Rarity guide.


