
Best Horror Games On Itch.io – July 2026
Across a bounty of subgenres.![Haze Seas Accessories Tier List [Best Accessories to Equip]](/wp-content/uploads/2026/07/haze-seas-accessories-tier-list.jpg "Haze Seas Accessories Tier List [Best Accessories to Equip]")
Haze Seas Accessories Tier List [Best Accessories to Equip]
The accessories with the best stat buffs in Haze Seas.
![[Roblox] Evomon Shiny Hunting Guide – Including Prismatic and Pris Shinies!](/wp-content/uploads/2026/06/evomon-shiny-hunting-guide.jpg "[Roblox] Evomon Shiny Hunting Guide – Including Prismatic and Pris Shinies!")

Shadow Wolf Mysteries: Bane of the Family Walkthrough
Welcome to the Shadow Wolf Mysteries: Bane of the Family Collector’s Edition walkthrough on Gamezebo. Shadow Wolf Mysteries: Bane of the Family Collector’s Edition is a Hidden Object Game played on the PC created by ERS Game Studios. This walkthrough includes tips and tricks, helpful hints and a strategy guide on how to complete Shadow Wolf Mysteries: Bane of the Family Collector’s Edition.


- Prefer Gamezebo on Google

Shadow Wolf Mysteries: Bane of the Family – Game Introduction
Welcome to the Shadow Wolf Mysteries: Bane of the Family Collector’s Edition walkthrough on Gamezebo. Shadow Wolf Mysteries: Bane of the Family Collector’s Edition is a Hidden Object Game played on the PC created by ERS Game Studios. This walkthrough includes tips and tricks, helpful hints and a strategy guide on how to complete Shadow Wolf Mysteries: Bane of the Family Collector’s Edition.
General Tips
This hidden object game requires visiting several locations and using inventory items to advance play.
- Play is mostly linear although there are some options for the order in which to explore locations.
- Begin play by selecting a mode:
- Regular – Hint and Skip button recharge faster. Active zones are highlighted by sparkles.
- Expert – Hint and Skip buttons recharge slower. Active zones are not indicated.
- Hard – Hint and Skip buttons recharge slower. Active zones are not indicated. The black bar tips are disabled.
- Modes can only be changed by creating a new profile.
- Hidden object scenes contain items listed in orange lettering. These items require an extra step to find.
- The Notes tab glows when new information is added. Entries continue the storyline and add hints for solving puzzles.
- Always move the cursor around a scene. Watch the cursor to see if it changes into a hand or magnifying glass.
Walkthrough Tips
- CAPITALIZED inventory items are meant to make it easier to find where this guide may differ from your own play. Inventory items are highlighted in blue with a white border in the screenshots.
- If you don’t have an item referenced in this guide, click and hold the “Ctrl” key and then press the “F” key. This opens a Find area in your web browser. Type in the name of the object as it appears in this guide to find where else it’s referenced.
- To minimize back and forth moves, most available inventory items in a scene are picked up when first encountered.
Chapter 1: Finding the Count
Estate Entrance
- Click the wolf attacking the carriage to activate the scene.
- Receive the MEDALLION from the woman.
- Pick up the KNIFE on the path.
- Inspect the mailbox. Use the KNIFE to open the package. Take the IDOL. Read the note.
- Go forward to the side entrance.

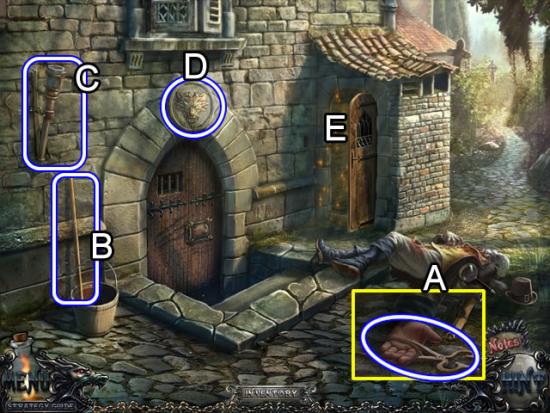
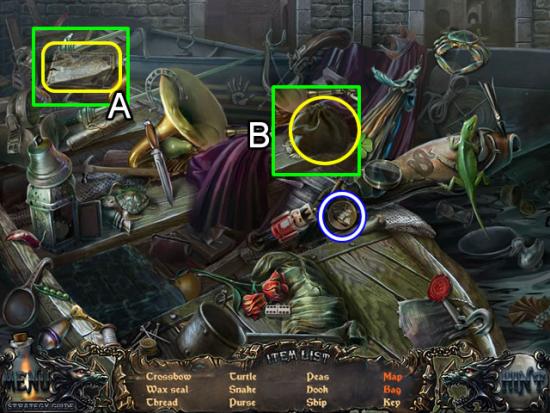
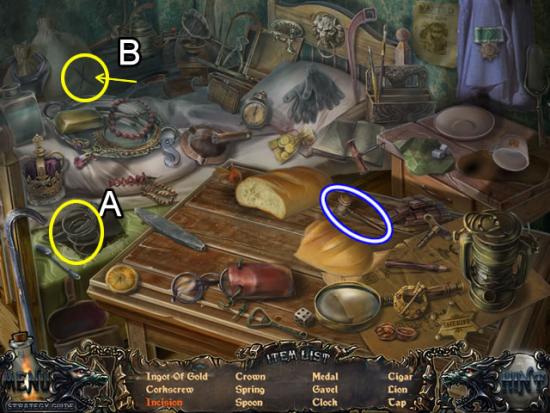
Side Entrance
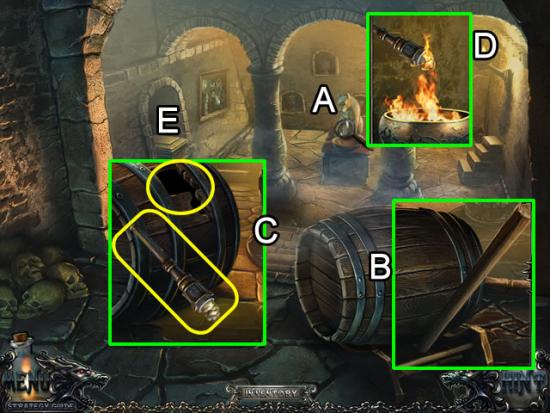
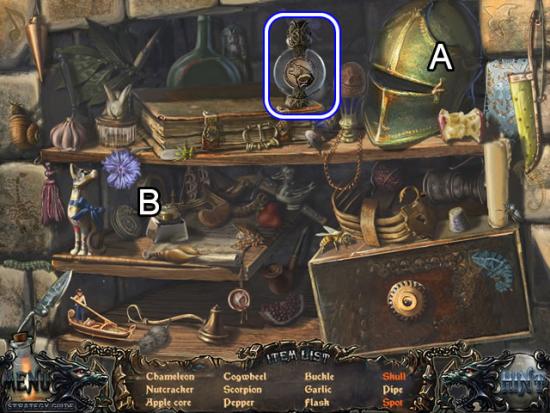
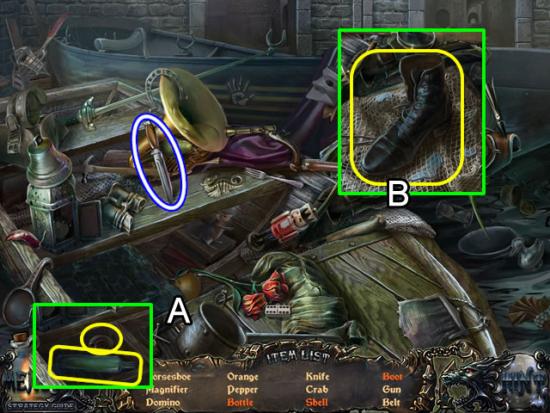
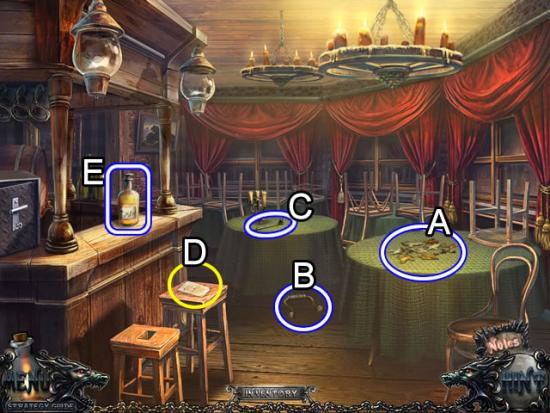
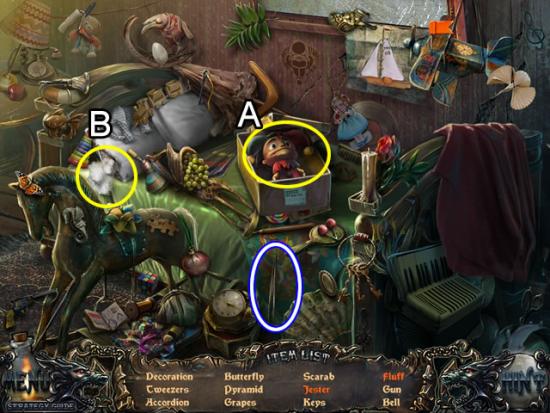
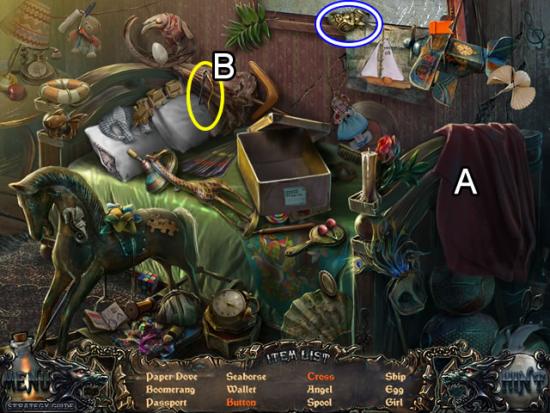
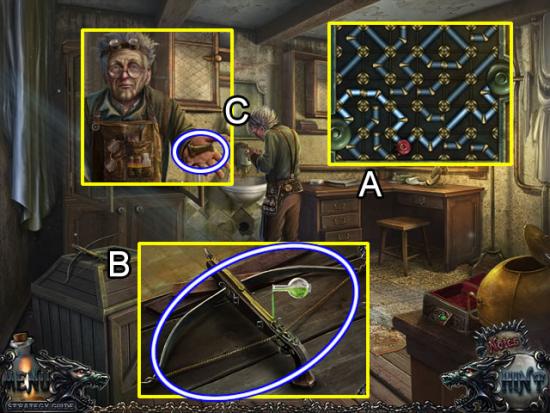
- Look closer at the man on the ground (A). Take the PINCERS from his hand. Read the note.
- Pick up the STICK from the bucket (B).
- Get the TORCH from the wall (C).
- Unscrew the WOLF HEAD above the door (D).
- Play the hidden object scene (E).
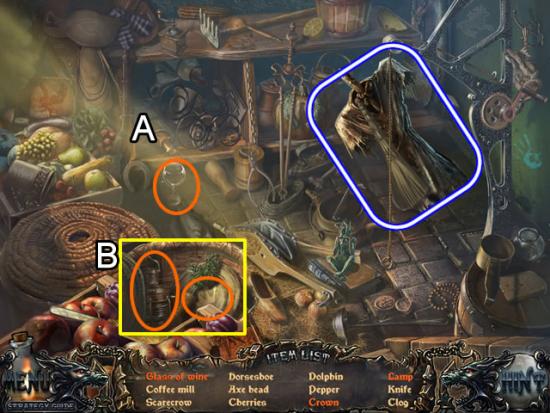
- Click the bottle of wine to pour a Glass of Wine (A).
- Lift the lid on the basket (B). Pick up the Lamp and Crown.
- Find the listed objects. The SCARECROW is added to inventory.
- Go forward to the cemetery.
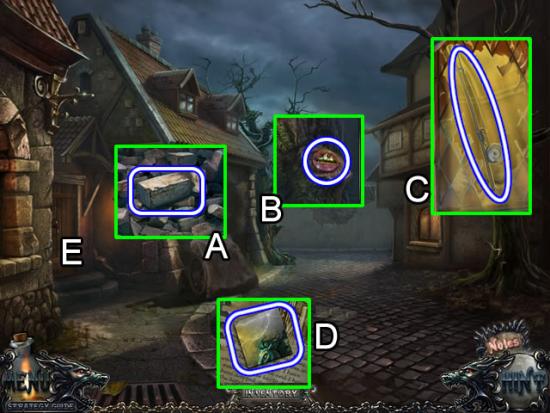
Cemetery
- Click the wolf to activate the scene.
- Zoom in on the collapsing mausoleum. Use the PINCERS to remove the wires holding the STEPLADDER.
Estate Entrance
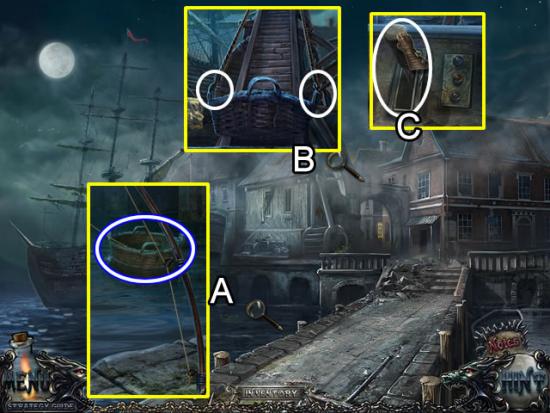
- Inspect the small door on the back of the carriage.
- Place the STEPLADDER against the carriage to reach the door.
- Play the hidden object scene.
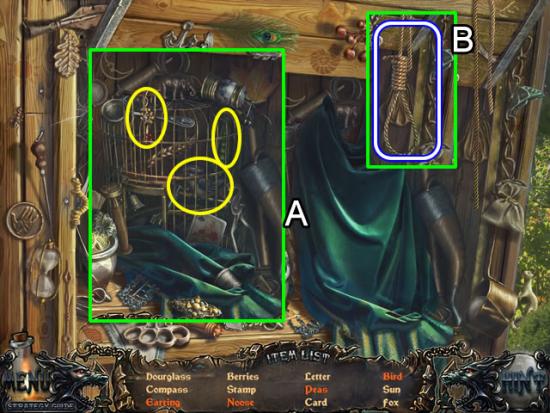
- Remove the green cover to reveal a birdcage. Take the Earring, Bird and Peas.
- Click the dangling rope (B). It forms a Noose.
- Find the remaining objects. The NOOSE is retained in inventory.
Cemetery
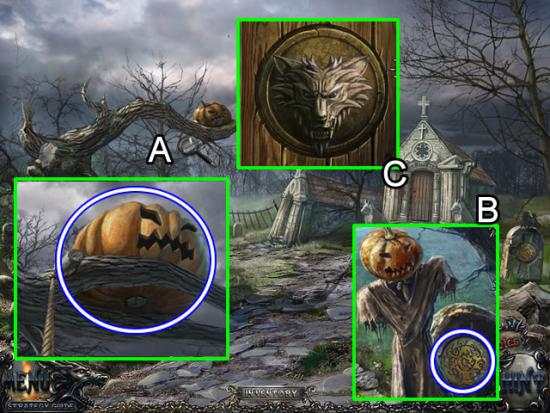
- Use the NOOSE to pull down the branch holding the PUMPKIN.
- Look at the tombstone (B). Place the SCARECROW in the ground. Add the PUMPKIN to the top. Take the SYMBOL.
- Zoom in on the door of the mausoleum (C). Insert the WOLF HEAD in the slot to open the door.
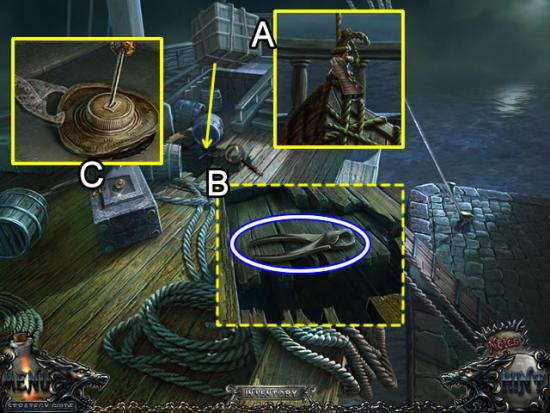
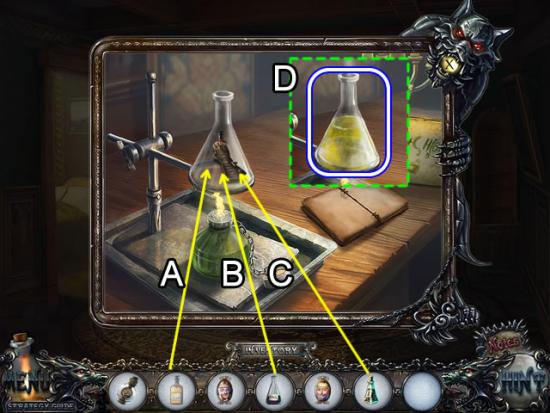
Mausoleum
- Click the wolf statue to activate the scene (A). Take the note from its mouth.
- Use the STICK to dislodge the barrel (B). It rolls down the steps.
- Remove the broken parts on the barrel (C). Dip the TORCH in the spilled contents. Take the TORCH WITH OIL and place it in the burning wall sconce (D). The BURNING TORCH is added to inventory.
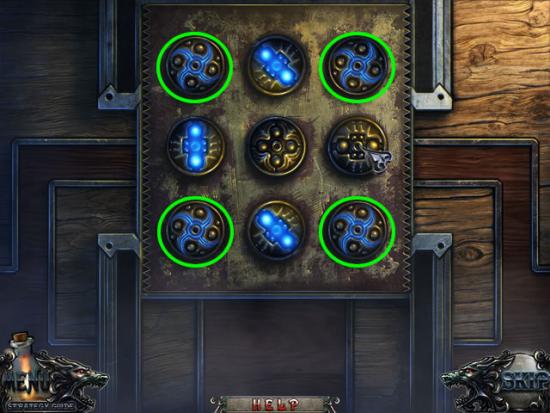
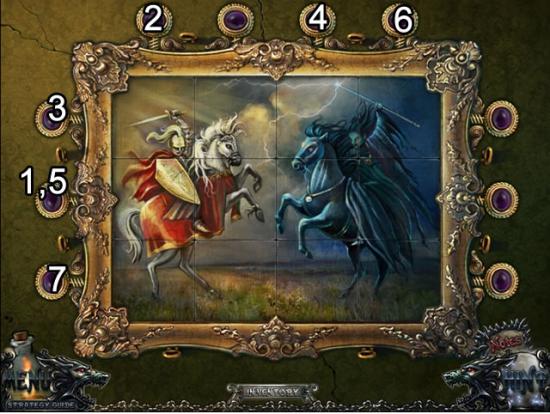
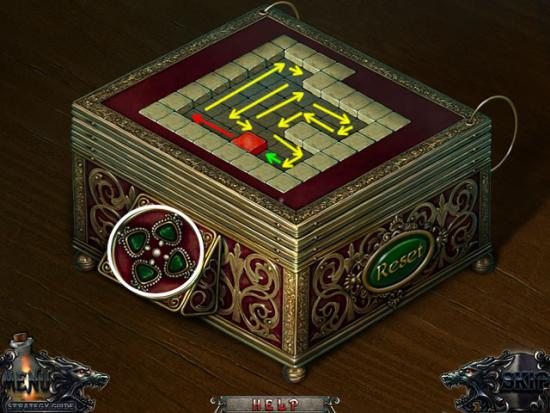
- Remove the coffin from the wall (E). Insert the SYMBOL in the empty slot to open a puzzle.
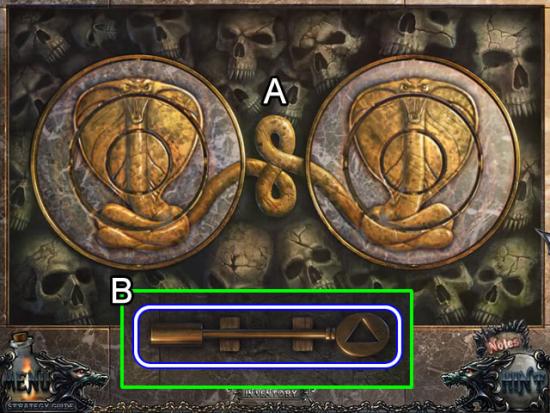
- Flip the disks until the snakes are a mirror image of each other (A).
- Take the SCREWDRIVER from the compartment (B).
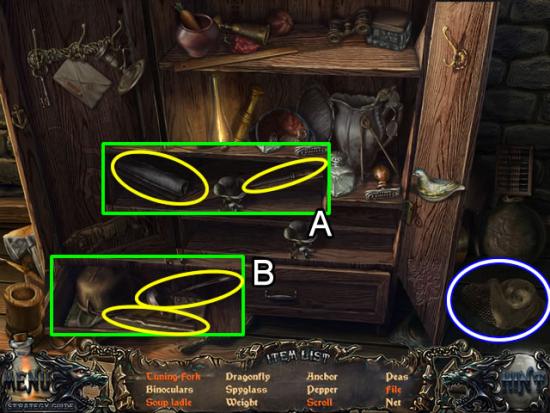
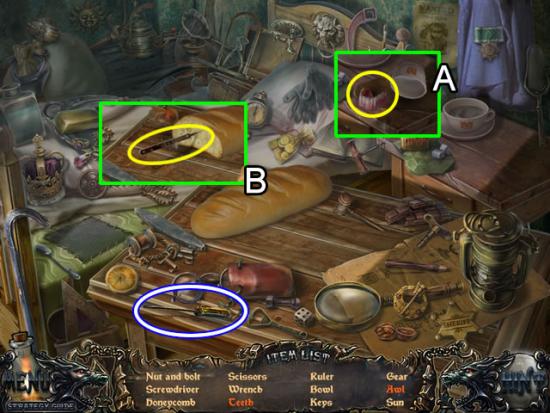
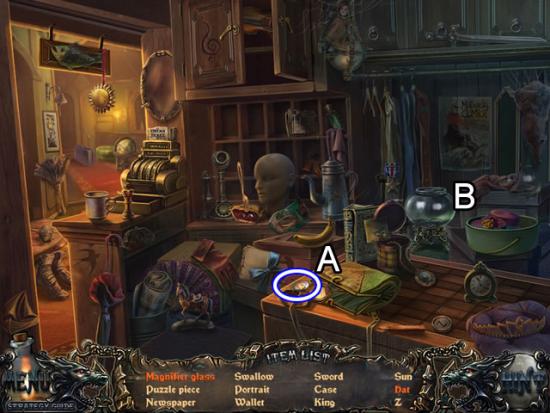
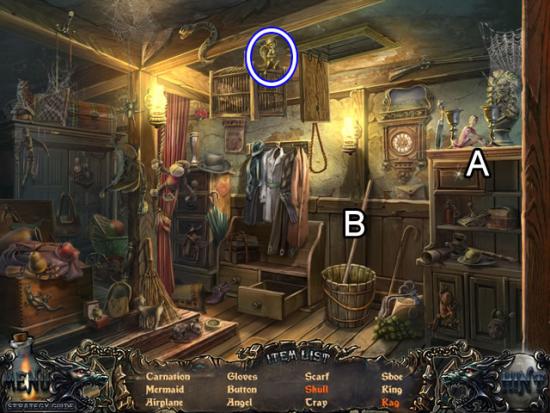
Side Entrance
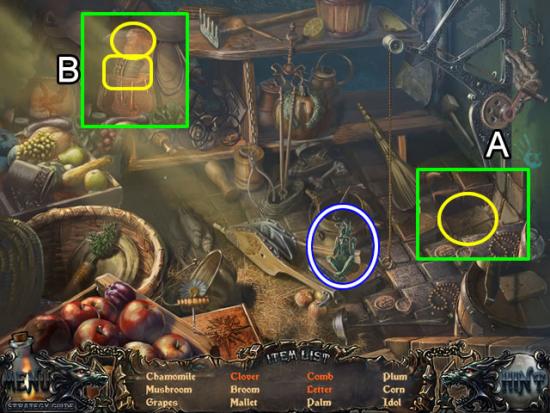
- Play the hidden object scene.
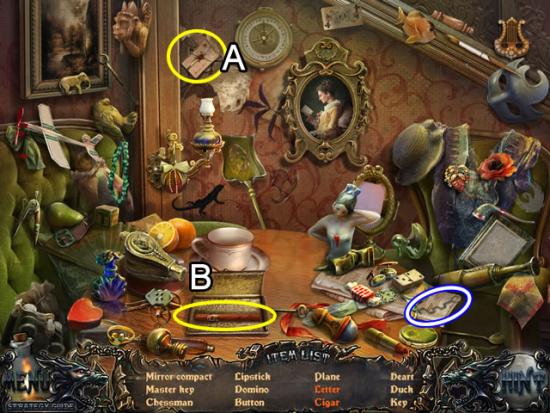
- Click the lever to raise the bricks on the floor (A). Take the Letter from the secret compartment.
- Lift the flap on the pouch (B). Get the Comb and Clover (the clover is a faint outline right above the comb).
- Find the rest of the listed objects. The IDOL is retained in inventory.
- Examine the door lock.
- Use the SCREWDRIVER to remove the three remaining screws. Remove the plate. Drag the red disk until its notch is even with the lock mechanism to open the door.
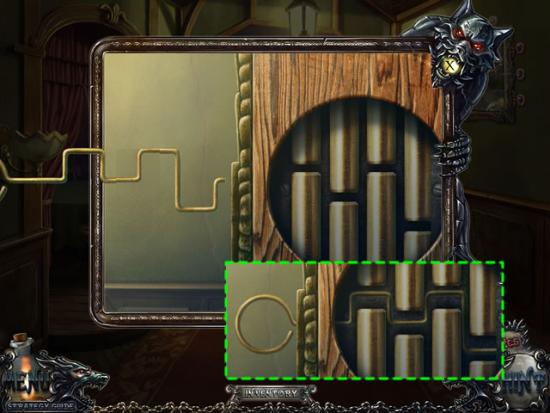
Skull Tunnel
- Zoom in on the animal head on the side of the wall. Use the BURNING TORCH to light the tunnel.
- Look in the recess on the right. Remove the debris to uncover a COG WHEEL.
- Zoom in on the panel inset in the wall on the left to open a puzzle.
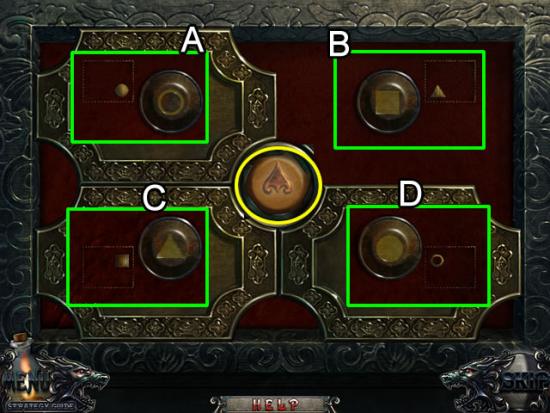
- Slide the plates to see the buttons and drawings under them. The drawings show the position of each symbol. Match the buttons to the drawing position.
- Solution: The drawing beneath plate (A) shows that a solid circle should be in the lower right corner. The drawing beneath plate (B) shows that a triangle goes in the lower left corner. The drawing beneath plate (C) shows a square in the upper right area. The drawing beneath plate (D) shows an open circle in the upper left position. The above screenshot shows the correct button symbols.
- Press the center button to open a hidden object area.
- Open the helmet (A) to find the Skull.
- Spill the bottle of ink (B) to form a Spot.
- Find the rest of the objects. The EMPTY FLASK is added to inventory.
- Go forward to the end of the tunnel.
Tunnel End
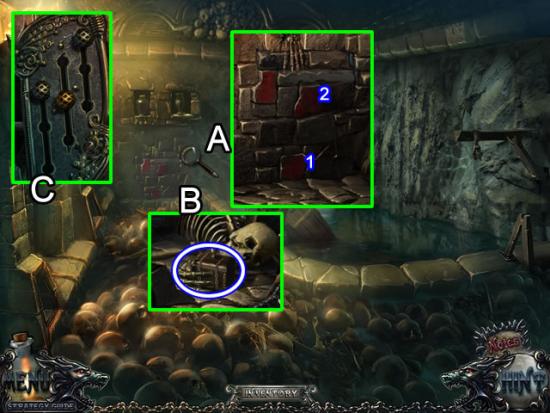
- Look at the bricks on the far wall (A). Click the bricks so all three are pushed out simultaneously.
- Solution: Click the bottom brick first and then the middle brick.
- Take the CASKET from the skeleton’s hand (B).
- Look closer at the door latch on the left (C). Slide the three buttons to the holes with the scratch marks. See the above inset for the solution.
Count’s Chambers
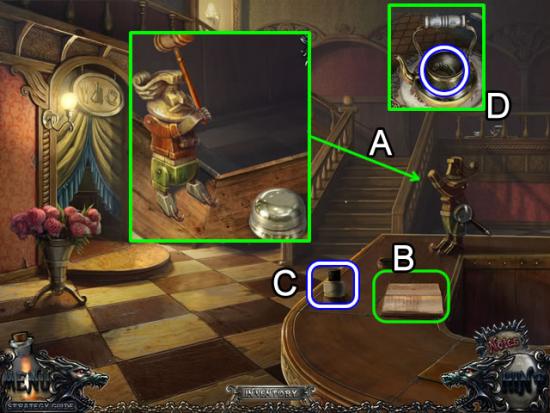
- Give the MEDALLION to the count (A).
- Look closer at the dresser (B). Place the two IDOLS in the empty slots to start a puzzle. Look at the position of the legs to figure out the hand positions.
- Solution: From left – Eyes, ears and mouth.
- Take the PIN and DRAGON PART from the case (C).
- Pick up the DRAGON PART on the barrel (D).
- Inspect the knight on the left (E). Place the CASKET on the anvil. Click the arm to smash the casket with the hammer. Take the HOOK.
- Go down twice.
Chapter 2: Off to the Harbor
Skull Tunnel
- Insert the two DRAGON PARTS in the inset in the left wall. Take the ROPE COIL and note.
- Go forward.
Tunnel End
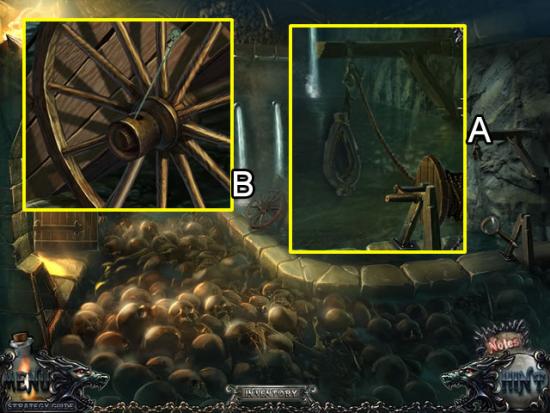
- Zoom in on the crane (A). Attach the ROPE COIL to the mechanism. Place the HOOK at the end of the rope. Click the handle to raise the YOKE.
- Look closer at the cart wheel (B). Use the PIN to push the peg out of the hub. Take the WHEEL.
Skull Tunnel
- Play the hidden object scene.
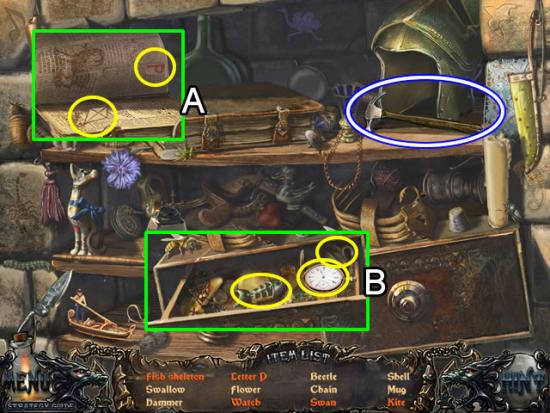
- Open the book (A). Pick up the Letter P and the Kite.
- Open the drawer (B). Get the Swan, Watch and Fish Skeleton.
- Find the rest of the listed objects. The HAMMER is added to inventory.
- Go down twice.
Estate Entrance
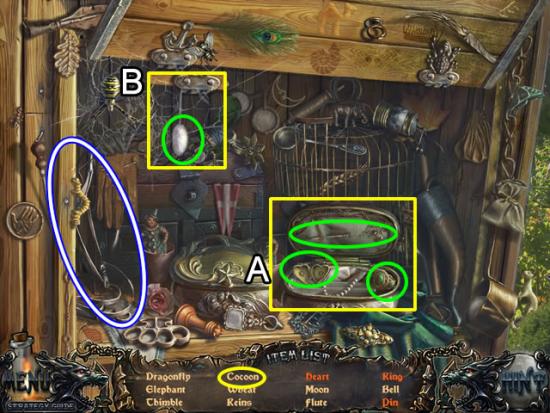
- Play the hidden object scene at the back of the carriage.
- Open the jewelry box (A) to find the Heart, Ring and Pin.
- The Cocoon is not listed in orange but requires an extra step to create it. Click the spider (B). The fly goes to the web and the spider spins the Cocoon around it.
- Find the rest of the listed objects. The REINS are added to inventory.
- Go forward to the left of the carriage.
Field
- Put the WHEEL on the carriage.
- Put the YOKE and REINS on the horse. Attach the end of the reins to the carriage.
- Speak to Louise. Exit the carriage.
The Harbor
- Play the hidden object scene.
- Click the reel on the fishing rod to get the Lure.
- Click the piece of paper (B) to make a Boat.
- Find the rest of the hidden objects. The GAFF is added to inventory.
- Head up the hill to the lighthouse.
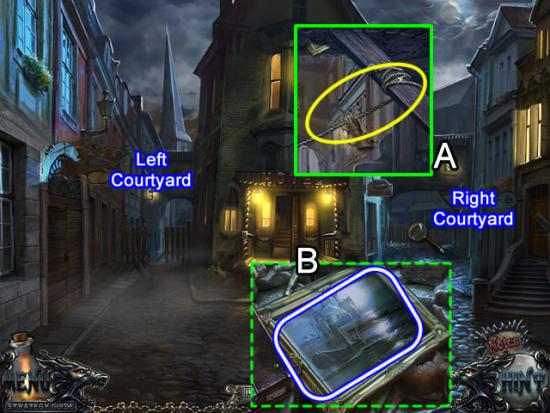
Lighthouse Exterior
- Look closer at the wooden basket dangling from the side of the lighthouse.
- Use the GAFF to break the boards apart and get a SABER.
The Harbor
- Zoom in on the gangway.
- Use the SABER to cut the rope.
- Board the ship.
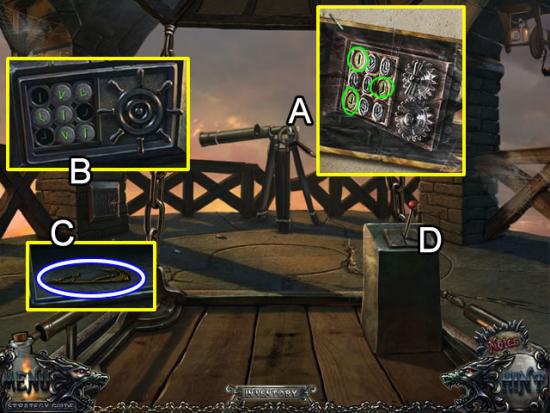
Main Deck
- Click the wolf to activate the scene.
- Take the RIBBON from the wheel.
- Open the hatch next to the wolf and go below deck.
Cargo Hold
- Speak with the captain. Accept the CAPTAIN’S KEY.
- Click down to return to the upper deck.
Main Deck
- Use the CAPTAIN’S KEY to open the door on the left.
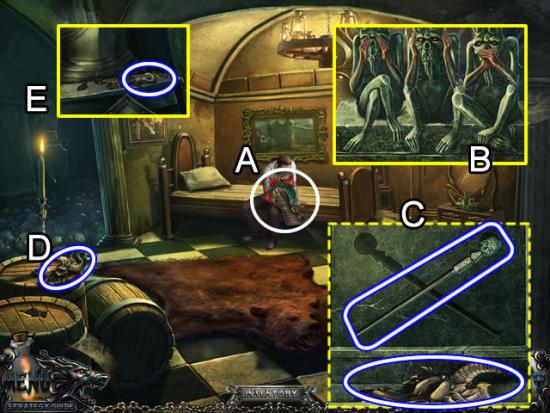
Captain’s Cabin
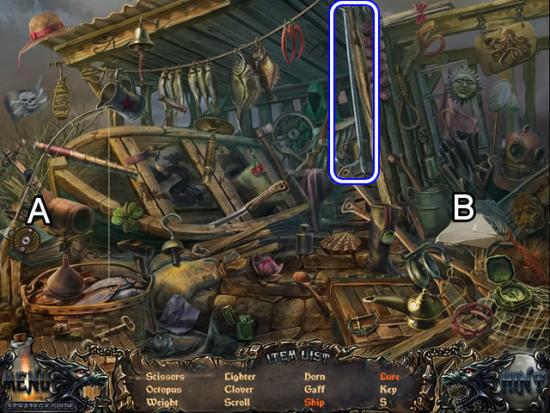
- Zoom in on the display case on the right wall. Use the RIBBON to remove the clamps from the HARPOON.
- Pick up the box of MATCHES from the chair.
- Look at the left drawers on the desk to open a slider puzzle.
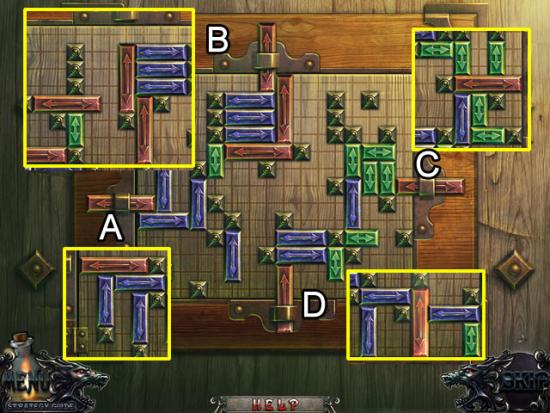
- The goal is to slide the red bars in the loops into the board grid.
- The insets above show the final moves for each bar starting from bar (A) and going around the board to bar (D).
- Take the LEVER from the compartment.
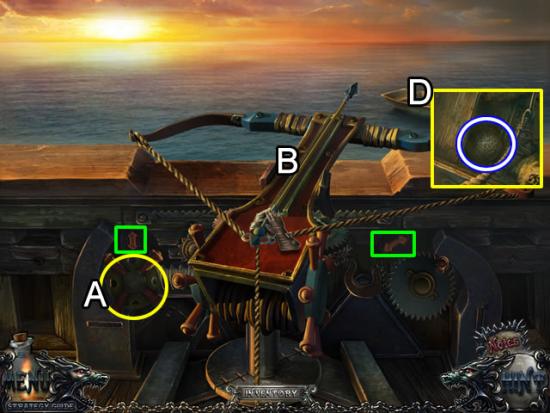
Main Deck
- Zoom in on the ballista.
- Place the LEVER (A) and the HARPOON (B) on the device.
- Use the horizontal and vertical arrows (green) to hit the dinghy (D). Take the CANNON BALL.
- Exit the ship.
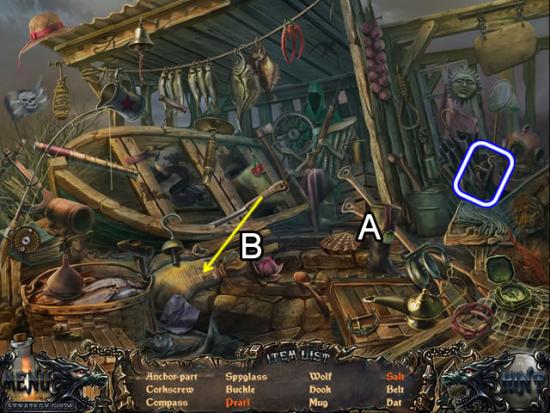
The Harbor
- Play the hidden object scene.
- Open the clam (A) to find the Pearl.
- Slit the sack with the knife (B) to spill Salt.
- Find the rest of the hidden objects. The ANCHOR PART is added to inventory.
- Head up the hill to the lighthouse.
Lighthouse Exterior
- Pick up the BOARDS on the left.
- Zoom in on the cannon. Insert the CANNON BALL in the barrel. Click to aim the cannon at the lighthouse door. Use the MATCHES to light the fuse.
Lighthouse Interior
- Look at the man’s hand. Take the BUTTON.
- Lift the loose floor board. Get the COG WHEEL.
- Play the hidden object scene.
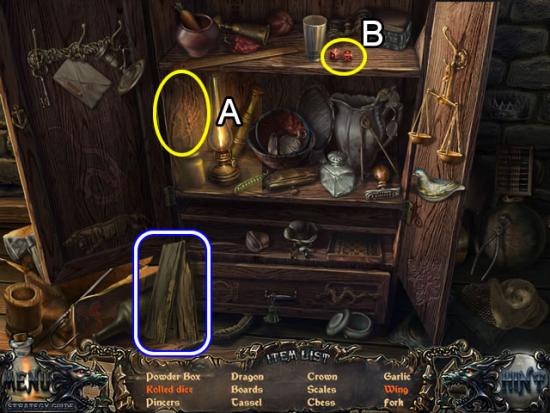
- Click the lamp (A) to illuminate the Wing.
- Click the dice (B). Pick up the Rolled Dice.
- Find the rest of the listed objects. The BOARDS are added to inventory.
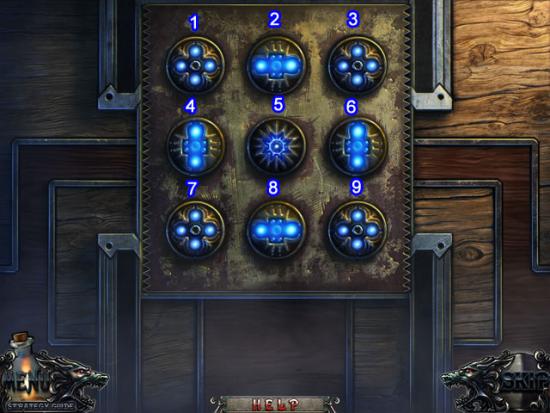
- Look closer at the panel on the back right wall. Place the BUTTON in the empty slot to open a puzzle.

- Round One. Press the button sequence to illuminate all the lights simultaneously. Button 1 illuminates 1, 2 and 4. Button 5 illuminates 2, 4, 5, 6 and 8. Button 9 illuminates 6, 8 and 9. All the other buttons only illuminate themselves. Pressing one of the three combination buttons will turn off an already lit button.
- Solution: 1, 5, 9, 2, 3, 4, 6, 7, 8.
- Round Two. The goal is same. The combination sequences make it more difficult.
- Sequences: 1 – 1,2,4; 2 – 1,2,3; 3 – 2,3,6; 4 – 1,4,7; 5 – 5; 6 – 3,6,9; 7 – 4,7,8; 8 – 7,8,9; 9 – 6,8,9.
- Solution: 5, 4, 6, 3, 7, 9, 1, 2, 8.
- Round Three. The goal is the same but you can determine the combinations.
- Spinning the four dials (green) rotates the dials around them 1/4 turn. Position these slower buttons to point at the dials you want to light up, the click them. The outside dials cannot turn on lights. The solution will vary depending on how each button is positioned. The above screenshot shows the last move. Clicking the middle outside button will light it and the adjoining middle button.
- Take the LIGHTHOUSE KEY.
- Zoom in on the wheels on the back wall. Take the LEVER. The wheels turn, lowering a platform. Insert the LEVER in the slot in the box on the platform to go to the top of the lighthouse.
Top of the Lighthouse
- Click the pulley lever in the upper right corner. Open the case and take the code.
- Pick up the BOARD.
- Click the lever on the platform to return to the ground floor.
Lighthouse Exterior
- Look on the right side of the lighthouse.
- Use the LIGHTHOUSE KEY to open the lock.
- Click the tumblers on the chest until they match the code: 8-5-6. Take the SPYGLASS.
Lighthouse Interior
- Play the hidden object scene.
- Click the shelf. Take the Scroll and File.
- Open the drawer (B). Pick up the Tuning Fork and Soup Ladle.
- Find the rest of the listed objects. The Net is added to inventory as a FISH NET.
Top of the Lighthouse
- Place the SPYGLASS on the stand (A). It comes into focus. Click it to get a second view. The information is stored in the Notes.
- Zoom in on the safe (B). Look at the last entry in the Notes. There are three symbols that are a different color. Click those same three symbols on the safe (see above inset).
- Take the ANCHOR PART from the safe (C).
- Go back to the ground floor (D) and return to the harbor.
Harbor
- Inspect the winch overlooking the harbor.
- Put the FISH NET on the winch. Click the lever to retrieve some NAILS.
- Board the ship.
Captain’s Cabin
- Look at the chest on the left side of the cabin.
- Put both ANCHOR PARTS in the inset. Take the COG WHEEL.
Cargo Hold
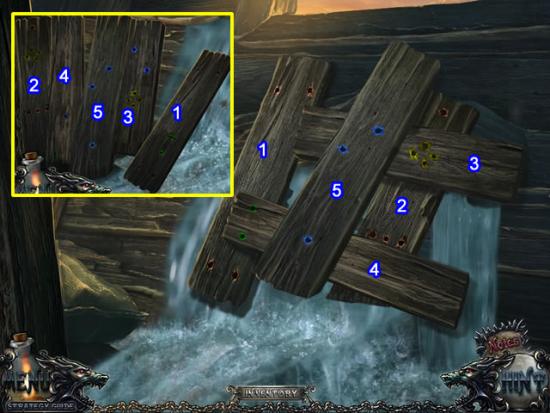
- Zoom in on the water pouring into the hold.
- Place the BOARDS from inventory on the area to start a puzzle.
- Place the boards based on the number and color of the holes. See the above screenshot for the placement.
- Add the NAILS and HAMMER them in place.
- Go to the steering mechanism.
- Place the three COG WHEELS in the slots (order doesn’t matter).
Chapter 3: Chasing the Ship
The Wharf
- Click the wolf to activate the scene.
- Play the hidden object scene.
- Open the scroll (A) to reveal a Map.
- Remove the cloth (B) to find the Bag.
- Find the rest of the listed objects. The Ship is retained in inventory as a DISK (1/3).
- Go forward.
Town Entrance
- Click the wolf to activate the scene.
- Remove the cover from the brick pile (A). Take a BRICK.
- Look at the tree (B). Take the DISK (2/3).
- Zoom in on the lit window (C). Use the BRICK to break the glass and take the FISHING ROD.
- Inspect the notes on the cobble stones (D). Some information is added to Notes. Take the PUZZLE PIECE (1/3).
- Open the door (E) to play a hidden object scene.
- Knock over the cup (A) to find the Teeth.
- Break the bread open and take the File.
- Find the rest of the hidden objects. The SCREWDRIVER is added to inventory.
- Head left toward the ship
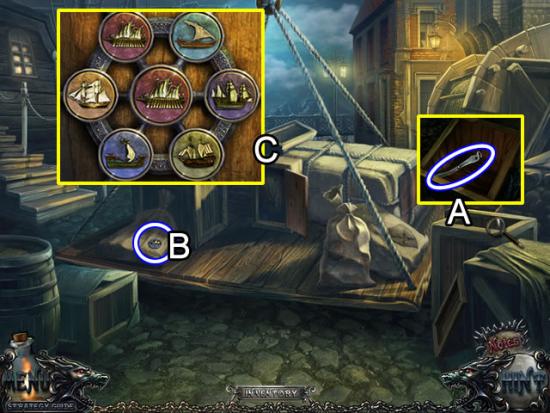
Cargo Platform
- Inspect the crate on the right (A). Take the PART OF TONGS.
- Pick up the DISK (3/3) from the sack (B).
- Open the door on the cabinet (C). Place the three DISKS in the empty slot to start a puzzle.
- This is a memory puzzle. Pair the image of the ship in the center with its match on the outside ring. Receive a LEVER.
Wharf
- Play the hidden object scene.
- Use the pot (A) to scoop out the water. Get the Shell and Bottle.
- Open the net (B) and take the Boot.
- Find the rest of the listed objects. The KNIFE is saved in inventory.
- Use the FISHING ROD to retrieve the BASKET floating in the water (A).
- Look at the crane (B). Attach the BASKET to the hooks and ride to the top.
- Insert the LEVER in the slot. Pull to lift the pallet and free the way to the ship.
Shipboard
- Use the KNIFE to cut the rope on the crate (A).
- Look at the hole in the deck caused by the falling crate (B). Attach the PART OF TONGS to the missing piece. Take the PINCERS.
- Inspect the safe lock (C). Use the PINCERS and SCREWDRIVER to open the safe and start a puzzle.
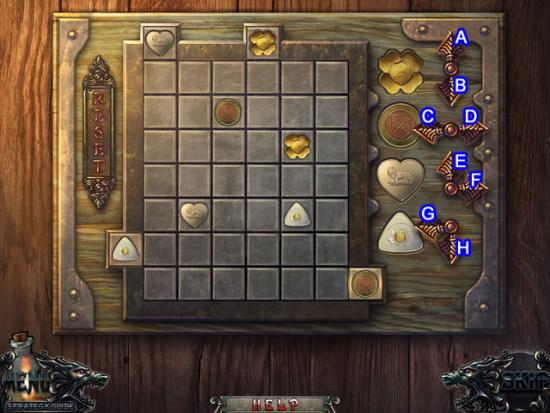
- The goal is to put each pawn in its slot on the side of the board. Use the pawns to push other pawns into position.
- Begin with the heart and triangle. Use the triangle to position the heart. Refer to the letters on the arrows above.
- Solution: G x 3; E x 5; H, G.
- Next use the circle to position the clover in the correct column. Then use the clover to push the coin down to its row.
- Solution: D x 3; A; C; A; C; B x 5; D x 3; A x 6.
- Take the HANDLE. The flier for the hotel is added to the Notes.
Dock
- Look at the logs.
- Place the HANDLE on the blade. Take the SAW.
Town Entrance
- Play the hidden object scene.
- Click the patch (A) to uncover the Spring.
- Use the knife (B) to create an Incision in the sack.
- Find the rest of the listed objects. The GAVEL is added to inventory.
- Use the SAW to cut down the tree at the end of the street.
Chapter 4: Exploring the Hotel
Hotel Approach
- Click the wolf to activate the scene
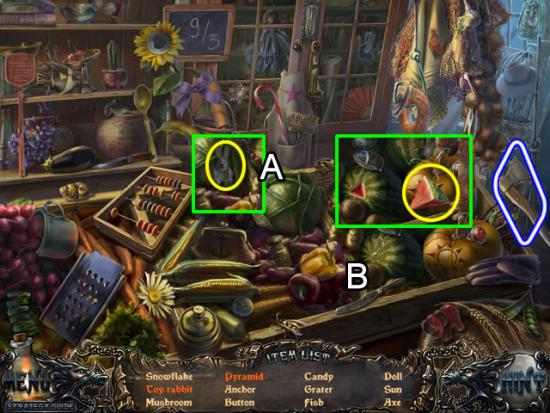
- Play the hidden object scene.
- Remove a cabbage leaf to reveal a Toy Rabbit.
- Use the knife (B) to cut a Pyramid shaped melon piece.
- Find the rest of the listed objects. The AXE is retained in inventory.
- Approach the fence on the left side of the hotel. Use the AXE to cut through the fence.
Left Courtyard
- Click the wolf to activate the scene.
- Open the purse lying on the path. Take the HOTEL KEY.
- Play the hidden object scene.
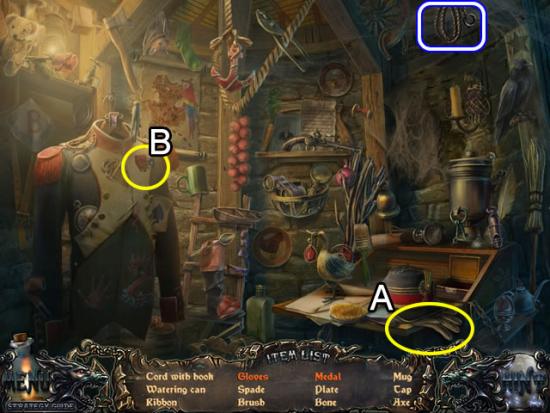
- Move the cap to get the Gloves (A).
- Click the ribbon (B) to reveal a Medal.
- Find the rest of the listed objects. The CORD WITH HOOK is added to inventory.
Hotel Entrance
- Insert the HOTEL KEY in the door lock. Click the lever to open.
Lobby
- Play the hidden object scene.
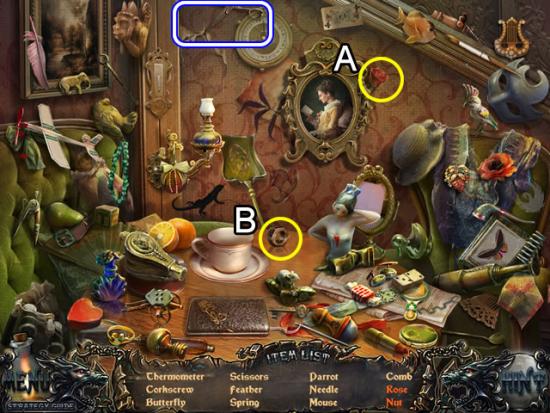
- Move the painting (A) to find the Rose.
- Move the cup (B) to see the Nut.
- Find the rest of the listed objects. The SCISSORS are retained in inventory.
- Go left.
Left Hallway
- Play the hidden object scene in the coat check.
- Click the cloth in the cabinet to form a Turban on the mannequin’s head.
- Remove the cloth hanging on the right to find the Belt.
- Find the rest of the listed objects. Although it is not a listed item, a PART OF BELL is added to inventory.
- Go left.
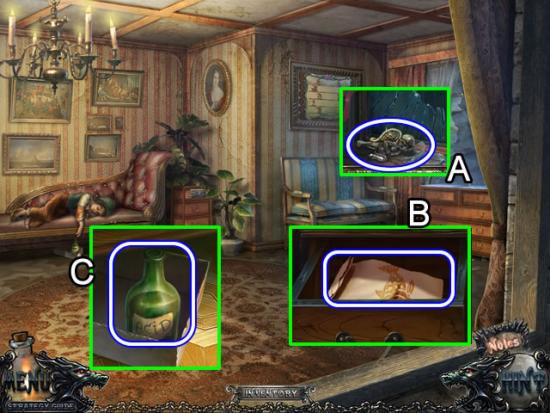
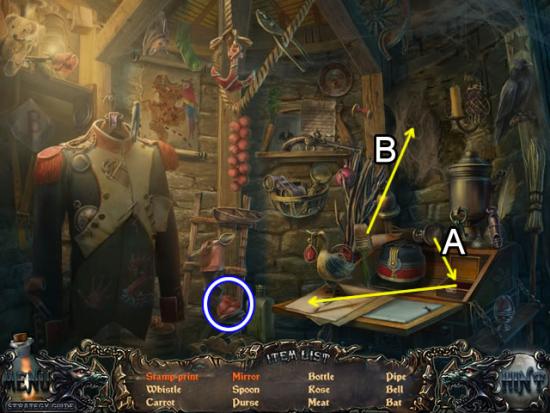
Restaurant
- Zoom in on the pieces of a puzzle (A). Click to combine them into one PUZZLE PIECE (2/3).
- Pick up the HANDLE on the floor (B).
- Look a closer look at the table (C). Take the candle SNUFFER.
- Pick up the note on the stool (D).
- Take the bottle of ALCOHOL (E).
Lobby
- Play the hidden object scene.
- Rip the wall paper (A) to find the Letter.
- Open the case (B) and take the Cigar.
- Find the rest of the listed objects. The MASTER KEY is retained in inventory.
Chapter 5: Restoring Disappearing Ink
Lobby
- Zoom in on the bell ringer (A). Place the GAVEL in his hands. Add the PART OF BELL below him.
- Speak to the desk clerk. Examine the guest register (B).
- Take the GLUE (C).
- Look at the tea service (D). Use the GLUE on the teapot. Attach the HANDLE. Pour the contents into the cup. Take the PORTRAIT (1/3).
Second Floor Landing
- Inspect the suitcase. Take the PUZZLE PIECE (3/3) from the right corner.
Left Hallway
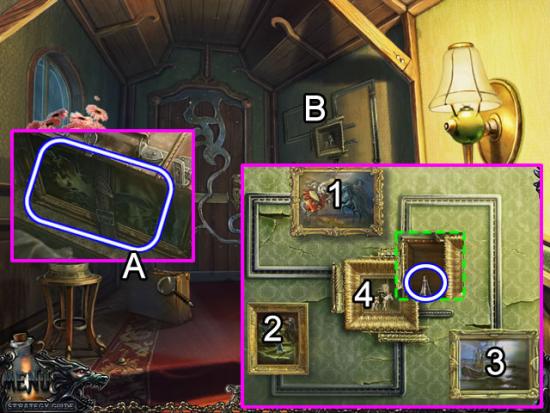
- Look at the painting on the right wall.
- Place the three PUZZLE PIECES in the frame to start a puzzle.
- The goal is to create a picture by flipping the panels.
- The above screenshot shows the sequence to press the buttons.
- Take the PICTURE.
- Zoom in on the lock on the door at the end of the hallway.
- Place the MASTER KEY on the lock. Bend the sections of the key to conform to the lock tumblers.
- Finding the right combination of bends will automatically insert the key and unlock the door.
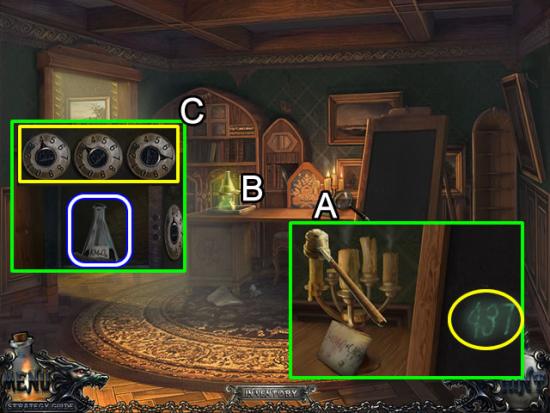
Scientist’s Study
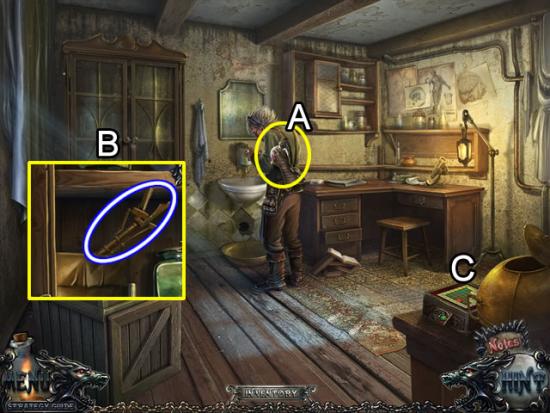
- Look closer at the right side of the desk (A). Use the SNUFFER to put out the candles and reveal a code.
- Inspect the beaker on the left side of the desk (B). Note the recipe in the notebook.
- Open the cabinet doors (C). Set the dials to 4-3-7. Take the PERMANGANATE ACID.
- Exit the hotel.
Left Courtyard
- Examine the baby buggy. Turn the bear over. Slit the stitches with the SCISSORS. Take the PORTRAIT (2/3).
Right Courtyard
- Use the ROPE WITH HOOK to tear down the beam (A).
- Enter the courtyard.
- Move the pieces of debris and take the PAINTING (1/2).
Second Floor Landing
- Look at the suitcase. Use the same combination on the lock as for the safe in the scientist’s study: 4-3-7. Remove the straps. Take the PAINTING (2/2).
- Inspect the right wall (B). Place the two PAINTINGS and the PICTURE on the slots. Click each one to send it along a track. Click the center painting to reveal a secret nook. Take the IODINE.
Scientist’s Study
- Zoom in on the beaker on the desk.
- Add the ALCOHOL, PERMANGANATE ACID and IODINE to the beaker.
- Take the REVEALING REAGENT (D).
Left Hallway
- Play the hidden object scene.
- Open the purse (A) to find the Magnifying Glass.
- Take the lid off of the hat box (B) and take the Hat.
- Find the rest of the listed objects. The PORTRAIT (3/3) goes to inventory.
Lobby
- Look again at the guest register (A).
- Pour the REVEALING REAGENT on the register to reveal the invisible writing.
- Take the second floor KEY from the desk clerk (B).
Chapter 6: Finding Room 23
Second Floor Landing
- Look at the vase on the table. Remove the flowers. Take the VASE WITH WATER.
- Pick up the piece of PARQUET leaning against the right wall.
- Insert the KEY in the lock. Click to unlock the door. Click the lever to open the door.
Second Floor Hallway
- Take the TOWEL from the door knob.
- Get the COOKIE from the table between the first two doors.
- Look at the second painting. Place the three PORTRAITS in the painting to start a puzzle.
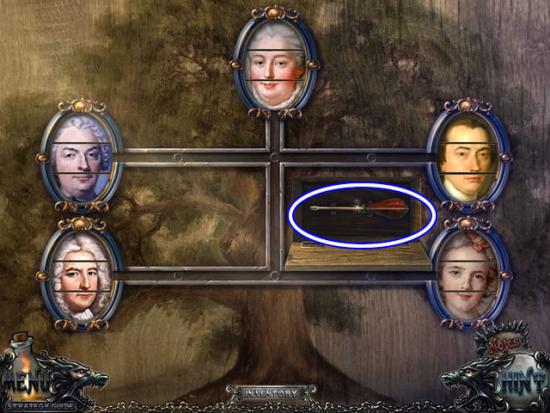
- The goal is to place the correct features with each face.
- Use the rails to slide the parts of each face. Solve by matching face and hair color. The position of the face on the tree is not important. See above for one solution. Take the SCREWDRIVER.
- Look at the door handle of the last door on the right. Use the SCREWDRIVER to remove the plate and access the door mechanism.
Child’s Bedroom
- Play the hidden object scene.
- Take the lid off of the box (A). Take the Jester.
- Touch the pillow (B) to expose the Fluff.
- Find the rest of the listed objects. The TWEEZERS are added to inventory.
- Look closer at the painting (A). Use the TOWEL to remove the paint. The equation is added to the Notes for future reference. Take the ALLEN KEY with the blue tag hanging on the frame.
- Lift up the carpet (B). Put the PARQUET piece in the empty slot. Click the boards in the following order: 3, 2, 1, 1, 2, 3 (see above inset for the numbering).
- Examine the wardrobe (C). Take the WRENCH.
Second Floor Hallway
- Look at the middle door.
- Take the lampshade off the lamp. Pour the contents of the VASE WITH WATER into the lamp globe. Use the TWEEZERS to extract the CLOSET KEY.
- Use the CLOSET KEY to open the door.
- Play the hidden object scene.
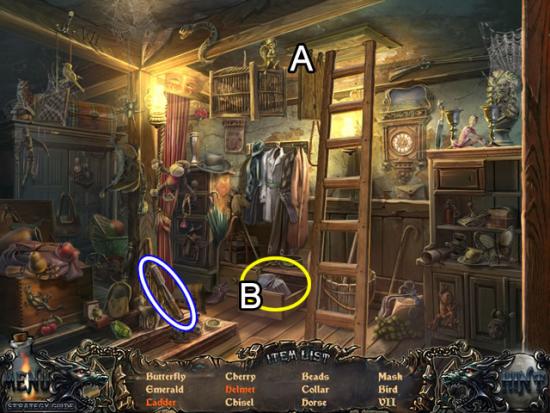
- Open the trap door (A) for the Ladder to descend.
- Open the drawer (B) and take the Helmet.
- Find the rest of the listed objects. The CHISEL is added to inventory.
Child’s Bedroom
- Zoom in on the window. Use the CHISEL to open it.
Window Ledge
- Take the UMBRELLA and ALLEN KEY with the red tag from the ledge outside of the window.
- Click down to return to the bedroom.
- Look inside the wardrobe. Look closer to open a puzzle.
- The goal is to rotate the keys so the key color and the circle color match.
- Use the diamonds between the circles to rotate groups of four. There are many ways to solve this puzzle. Here is one set of solutions:
- Solution Left: A, A, D, D, B, B.
- Solution Right: F, F, E, G, E, E, G, E, E.
- Insert the ALLEN KEY with the red tag in the left slot. Insert the ALLEN KEY with the blue tag in the right to open a secret compartment (dashed yellow). Take the WEIGHTS.
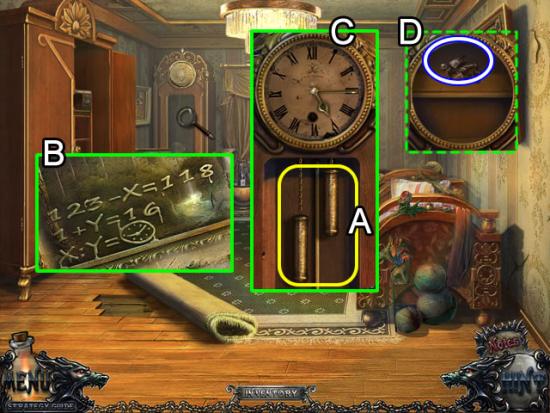
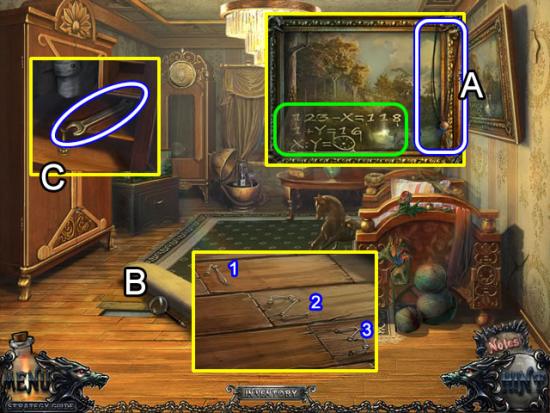
- Zoom in on the grandfather clock.
- Place the WEIGHTS on the chains (A) to open the clock face.
- Refer to the Notes page where the equation from the painting was noted. Solve the equation to figure out the time at which to set the hands. “X” equals the hour and “Y” equals the minute. For a lesson in algebra, see below. Otherwise: X = 5; Y=15.
- Drag the hour hand to 5 and the minute hand to 3 (C). The clock face springs open (D). Take the KNIGHT.
- Algebra lesson:
- 123 – X = 118. Solve for X
- 123 = 118 + X (change from negative to positive when changing sides of the equal sign)
- 123 – 118 = X (change from positive to negative when changing sides of the equal sign)
- 5 = X
- 1 + Y = 16. Solve for Y.
- Y = 16 – 1
- Y = 15.
- Go out the window.
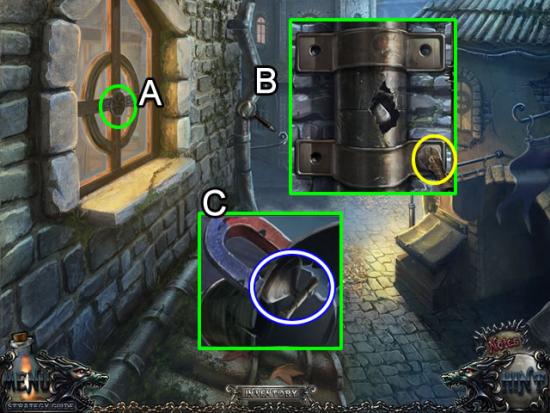
Window Ledge
- Look at the design on the window (A). Note that it takes a seal to open.
- Examine the drain pipe (B). Use the WRENCH to remove the four bolts. The pipe splits. Look closer at the open end.
- Use the MAGNET to get the DIRTY STAMP (C).
Second Floor Hallway
- Zoom in on the cabinet between the first and second door.
- Place the DIRTY STAMP beside the brush. Use the brush to get a CLEAN STAMP.
Window Ledge
- Place the CLEAN STAMP in the middle of the window design.
Chapter 7: Locating the Potions
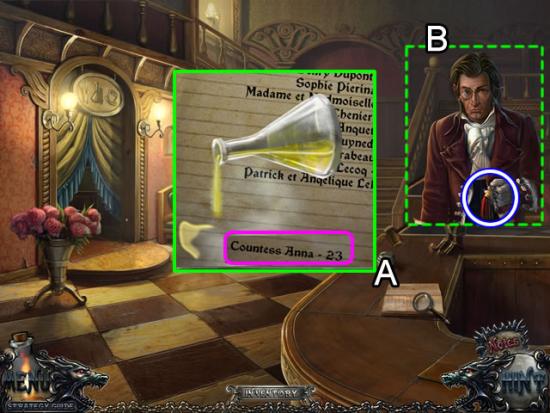
Room 23
- Talk to the countess to activate the scene.
- Take the ANGEL (1/3) from the window sill (A).
- Open the top left dresser drawer (B). Take the FISH FOOD.
- Pull the box from under the lounge (C). Take the ACID.
Child’s Bedroom
- Look at the fish tank.
- Feed the FISH FOOD to the fish.
- Take the ARCHER and RED EARRING.
Room 23
- Zoom in on the panel on the right wall.
- Place the KNIGHT and ARCHER on the board to begin a game.
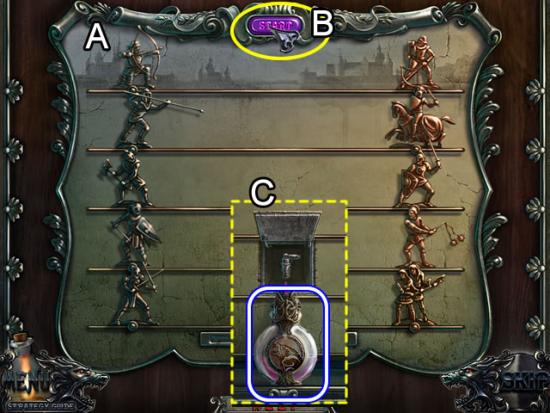
- The goal is to place the fighters on the left so they defeat the fighters on the right.
- Swap the fighters on the left two at a time until they look like they are in the correct position (A). Click the Start button to watch the battle (B). A green flag on the left means the fighter is in the correct position. The above screenshot shows the correct solution.
- When all flags on the left are green, a compartment in the middle of the board opens (C). Place the EMPTY FLASK under the spout. Click to fill the flask with ELIXIR.
Child’s Bedroom
- Play the hidden object scene.
- Move the cloth (A) to reveal a Button.
- Click the needle and thread (B) to stitch a Cross on the pillow.
- Find the rest of the listed objects. The ANGEL (2/3) is added to inventory.
Second Floor Hallway
- Play the hidden object scene.
- Open the drawer to find the Skull.
- Click the mop handle (B) to reverse it and find the Rag.
- Find the rest of the listed objects. The ANGEL (3/3) is added to inventory.
Left Hallway
- Remove the cover from the bird cage.
- Give the bird the COOKIE. Take the BLUE EARRING.
Scientist’s Study
- Look left into the bedroom.
- Place the three ANGELS on the bed post.
- Open the compartment. Take the KEY.
Room 23
- Inspect the small dresser.
- Place the RED EARRING and BLUE EARRING in the snake’s eyes.
- Take the TEARS and SKULL from the drawer.
- Exit the hotel.
Chapter 8: Using the Laboratory
Street to Hotel
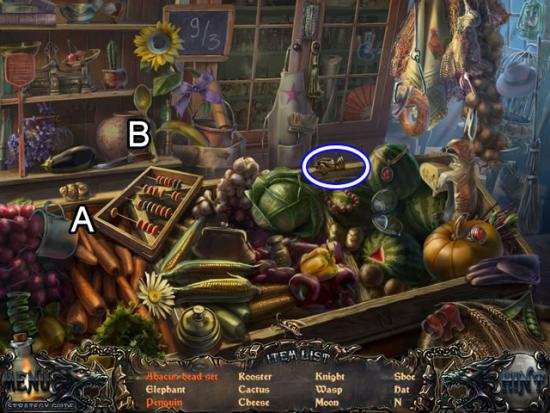
- Play the hidden object scene.
- Click the bead (A) to get the Abacus Bead Set.
- Use the knife (B) to carve a Penguin in the eggplant.
- Find the rest of the objects. The KNIGHT is retained in inventory.
- Cross the street to the laboratory.
Laboratory
- Zoom in on the sign. Use the ACID to remove the chains.
- Insert the KEY in the lock.
- Give the ELIXIR to the scientist.
- Open the cabinet (B). Take the SNAKE CATCHER.
- Look at the box on the table (C) to open a puzzle.
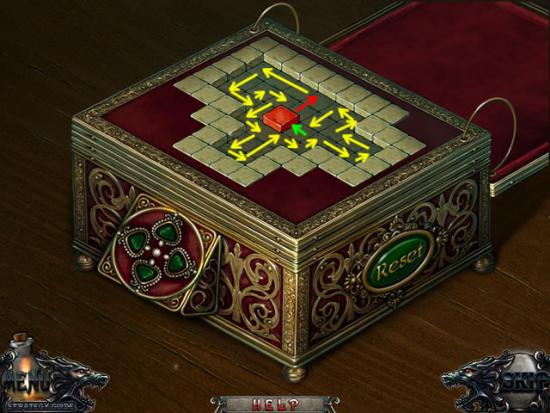
- The goal is to use the arrows (white) to move the red square around the board to cover all the squares without crossing lines and returning to the original position. There are three rounds.
- Round One. The solution is shown above. Follow the arrows as shown around the outside of the grid and work back toward the start. The red arrow indicates the first move. The green arrow is the last move.
- Round Two. Follow a similar strategy as the first round. See the above for a solution. The red arrow indicates the first move. The green arrow is the last move.
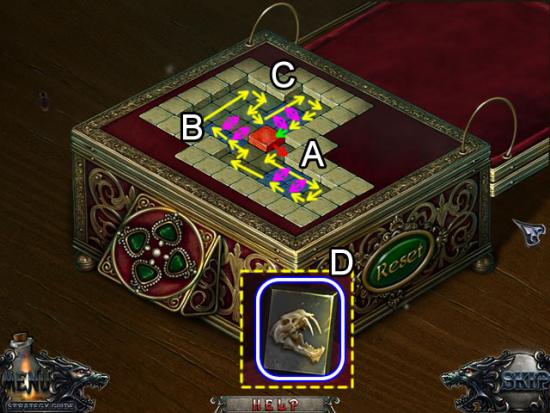
- Round Three. The blue tiles mean they must be crossed twice. Use a back and forth motion to do this (pink).
- For the first set of blue tiles (A), go through the blue tiles on the right once. Make the turn at the bottom. Use the back and forth move on the second set and first sets on the way up the grid.
- For the second two blue tiles (B), use the back and forth movement before going on to the next tile.
- For last set of blue tiles (C), use the same strategy as for the first double set (A).
- Take the TIGER SKULL (D).
- Return to the hotel.
Scientist’s Study
- Look in the bedroom off the study.
- Inspect the trap door on the floor. Place the SKULL and TIGER SKULL in the empty slots to start a puzzle.
- The goal is to match the skulls and tracks to the correct animal.
- Swap any two tiles under each animal. When a correct match is made, the tiles turn pink. See above for the solution.
- Use the SNAKE CATCHER to retrieve a SNAKE.
Laboratory
- Zoom in on the desk (A). Place the SNAKE and TEARS in the puzzle board.
- The goal is to form a closed circuit with the pipes to connect the snake, elixir and tears.
- The best strategy is to start with the elixir (red) and work toward both ends. The pipes turn blue when a connection is made. Make sure there are no open connections. See the above inset for one solution. Take the GREEN ELIXIR.
- Look at the crossbow (B). Pour the GREEN ELIXIR onto the bow. Take the CROSSBOW.
- Take the ROOK KEY from the scientist (C).
Chapter 9: Creating the Elixir
Left Courtyard
- Play the hidden object scene.
- The stamp (A) goes to the ink pad and then the paper to make a Stamp Print.
- Use the brush to remove the cobwebs hiding the Mirror.
- Find the rest of the hidden objects. The MEAT is added to inventory.
- Zoom in on the city gates.
- Place the KNIGHT and the ROOK KEY in the slots to open a puzzle.
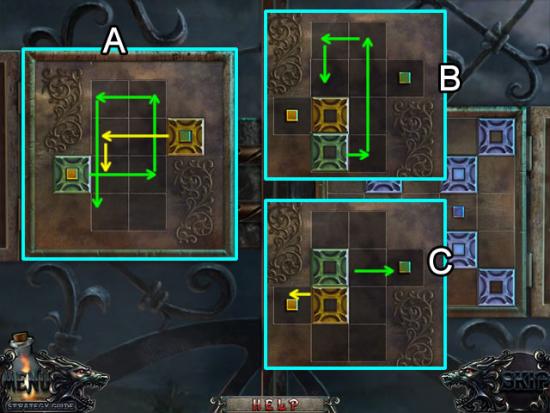
- The goal for both puzzles to is get the colored tile over the same colored peg.
- Puzzle 1. Move the green tile as indicated by the arrows (A). Next move the yellow tile as indicated. The result is shown in (B). Now move the green tile according to the arrows. Both are now in position (C) to move into their colored pegs.
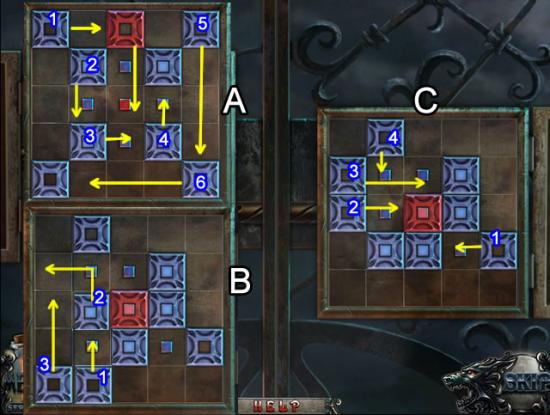
- Puzzle 2. Look at inset (A) above. Move tile 1 one square right. Move tile 2 one square down. Move tile 3 one square right. Move tile 4 one square up. Move tile 5 three squares down. Move tile 6 three squares left.
- The results are shown in inset (B). Move tile 1 one square up. Move tile 2 one square up and one square left. Move tile 3 two squares up.
- The Results are shown in inset (C). Move tile 1 one square left. Move tile 2 one square right. Move tile 3 two squares right. Move tile 4 one square down.
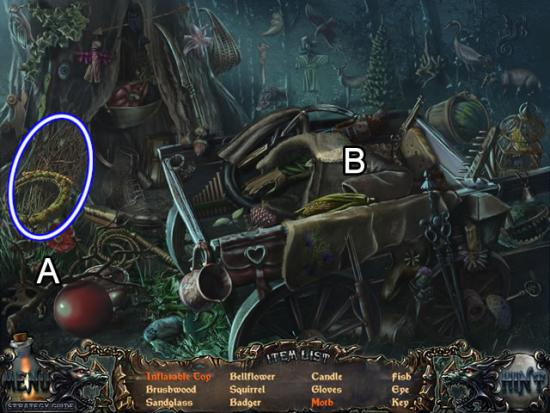
Trail to Cabin
- Play the hidden object scene.
- Remove the branch holding the Inflatable Toy down (A).
- Lift the coat sleeve (B) to find the Moth.
- Find the rest of the listed objects. The BRUSHWOOD is added to inventory.
- Look at the hole. Cover the hole with the BRUSHWOOD. Put the MEAT on top of the brush to lure the wolf.
- Look again in the hole. Take the WOLF WOOL.
Cabin Exterior
- Use the CROSSBOW on the wolf.
- Pick up the KNIFE on the stump.
- Look in the tree to open a puzzle.
- The goal is to rotate the circle halves to form the solid colored circles in the same order as the center colors.
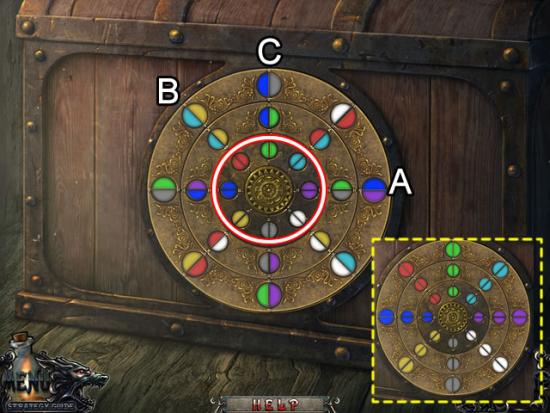
- To get the large aqua circle in the correct position follow these steps: Click the blue/purple circle (A). This flips the two ends. Next click the aqua/yellow circle (B) to swap the positions of the yellow and aqua colors. Now click the blue/gray circle (C) to swap the aqua and white half circles. The solid aqua circle in now correctly positioned.
- Work the rings and continue swapping colors. The solution is shown in the inset. Take the MEDALLION.
- Head to the right.
Wood Yard
- Look at the log holder on the right. Click to take the MACE.
- Use the KNIFE to cut the rope holding the logs.
- Play the hidden object scene.
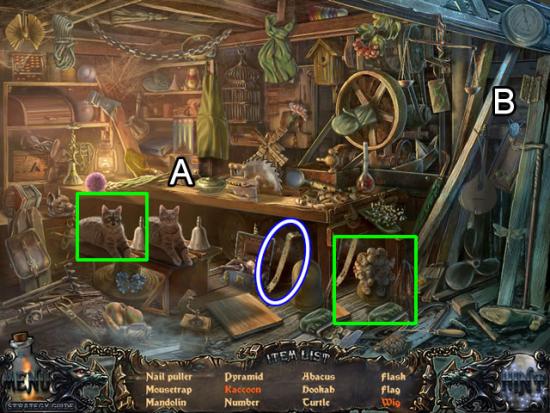
- Use the paintbrush to paint the cat into a Raccoon (A)
- Click the board to blow the wood shavings onto the mannequin head for a Wig.
- Find the rest of the listed objects. The NAIL PULLER is added to inventory.
Cabin – Main Room
- Use the NAIL PULLER to remove the boards from the window.
- Play the hidden object scene
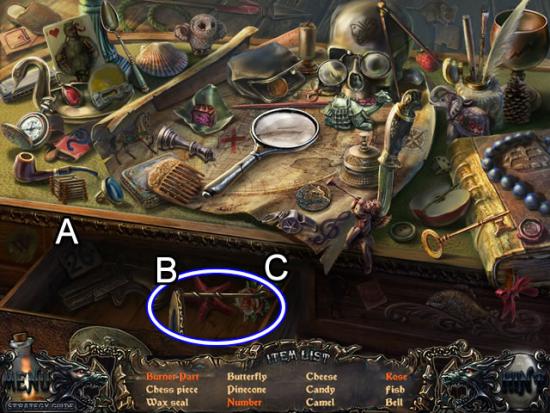
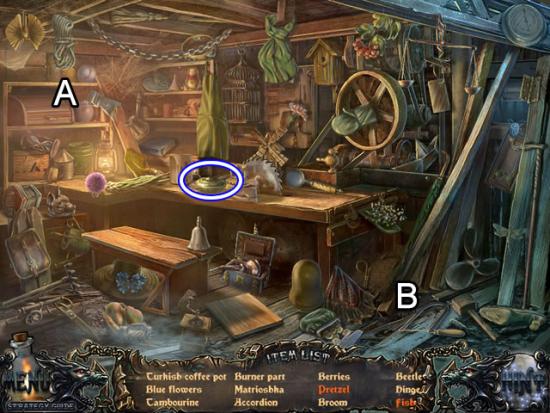
- Open the drawer to find the Number (A), BURNER PART (B) and Rose (C).
- Find the rest of the hidden objects.
Cabin – Lab
- Take the SCOOP-NET leaning against the chair.
Wood Yard
- Look closer at the window. Use the SCOOP-NET to capture the SPIDER.
- Play the hidden object scene.
- Open the bread box (A) to find the Pretzel.
- Pick up the saw (B) to create a Fish from the piece of wood.
- Find the rest of the objects. The BURNER PART is added to inventory.
Trail to Cabin
- Zoom in on the box on the left side of the trail.
- Use the MACE to smash to box. Take the MEDALLION.
- Play the hidden object scene.
- Use the brush (A) to Polish the Shoe.
- Combine the leaf sprig (A) with the pinecone to form a Bee.
- Find the remaining objects. The BURNER PART is added to inventory.
Cabin – Main Room
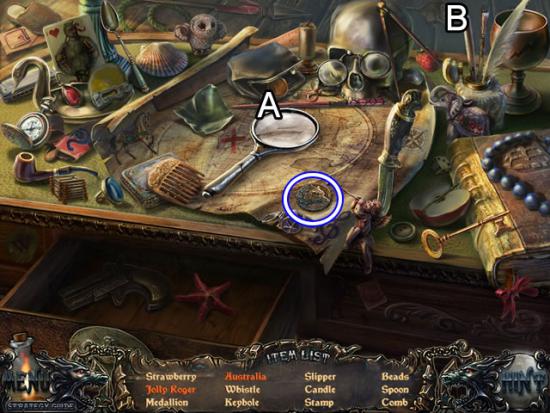
- Play the hidden object scene.
- Use the magnifying glass (A) to find Australia.
- Click the stick (B) to unfurl the Jolly Roger.
- Find the rest of the objects. The MEDALLION is added to inventory.
- Look at the box above the fireplace.
- Insert the three MEDALLIONS in the slots. Rotate them until the ears on the medallions match those on the box. Click the medallions to swap places with each other to get the correct ear match. Take the TUBE WITH BLOOD.
Cabin – Lab
- Zoom in on the right side of the desk.
- Place the SPIDER, TUBE WITH BLOOD and WOLF WOOL in the empty slots on the board to start a puzzle.
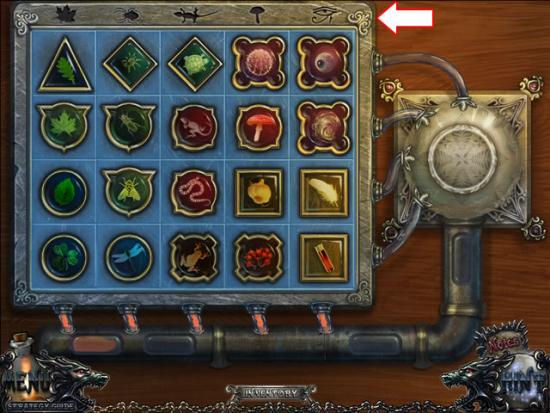
- The goal is to align the items under the correct icon along the top.
- Select a set of images. Click two to swap them. It is easiest to work from left to right.
- Take the ELIXIR.
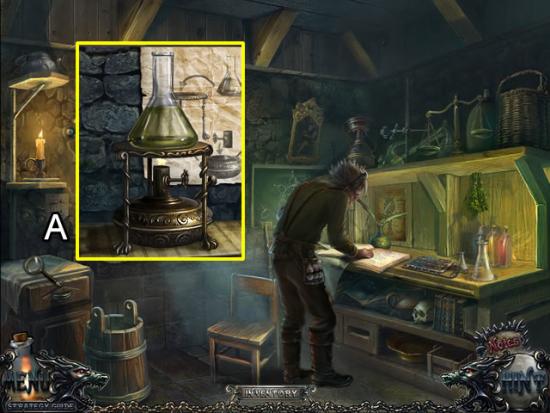
- Look at the work table on the left (A).
- Use the diagram on the wall to assemble the BURNER PARTS. Place the ELIXIR on top of the burner.
Congratulations! You have completed playing Shadow Wolf Mysteries: Bane of the Family Collector’s Edition. Bonus game play is now available from the Extras tab on the main menu.
Collector’s Edition Bonus Play
Estate Entrance
- Go right
Side Entrance
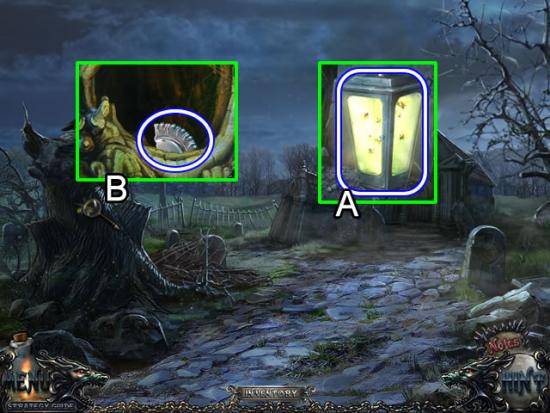
- Take the LANTERN hanging above the door.
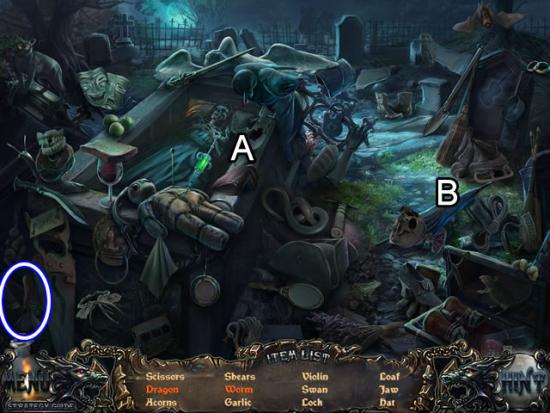
Cemetery
- Play the hidden object scene.
- Click the glove (A) to find the Worm.
- Open the umbrella (B) to see the Dragon.
- Find the rest of the objects. The SHEARS are added to inventory.
- Inspect the tombstone (A).
- Place the LANTERN among the fireflies to capture them and get a LIT LANTERN.
- Look at the tree hollow (B).
- Place the LIT LANTERN in the hollow. Take the SILVER PLATE PART.
Estate Entrance
- Inspect the drain pipe on the side of the mansion.
- Use the SHEARS to free the bat. Take the GLOVE
Cemetery
- Approach the tombstone on the right to find the entrance to the underground tunnel.
Tunnel Entrance
- Pick up the MATCHBOX from the floor (A).
- Use the GLOVE to open the door on the right (B).
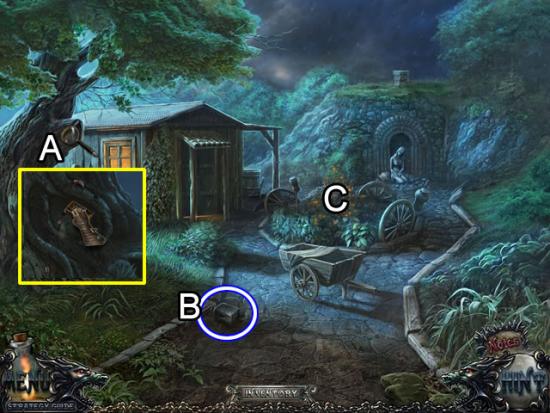
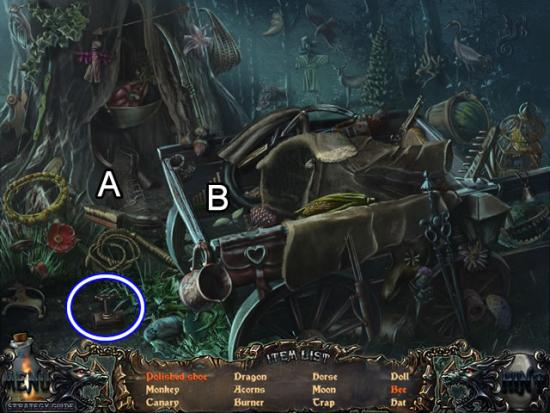
Cabin Garden
- Look at the tree on the left (A).
- Use the MATCHBOX on the bark beetles to take a MATCHBOX WITH A BUG.
- Pick up the HAMMER HEAD on the walk (B).
- Play the hidden object scene (C).
- Use the matches to light the candle (A) and attract a Moth.
- Lift the leaf (B) to uncover the Hedgehog.
- Find the rest of the listed objects. The PUZZLE PIECE is added to inventory.
Cabin
- Play the hidden object scene.
- Pick up the four photo parts (yellow) to reconstruct the Photo.
- Click the tutu (B) to complete the Ballerina.
- Find the rest of the hidden objects. The SKULL MEDALLION is added to inventory.
- Inspect the book to open a puzzle.

- The goal is to use the directional arrows (green) to program the maid to fetch the objects and give them to the owner.
- Solution: Move the maid (A) to the key (B). Go down and get the tea (C). Use the key in the lock (D) to get the paper (E). Go down to the owner (F). Press the Start button (G) to watch the progress.
- Take the VALVE.
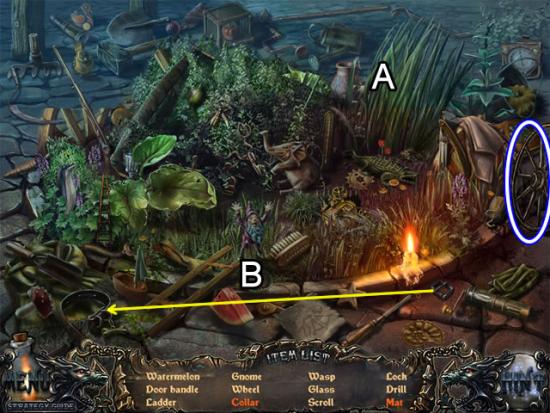
Cabin Garden
- Play the hidden object scene.
- Click the reeds (A) to weave a Mat.
- Put the buckle on the strap (B) to create a Collar.
- Find the rest of the objects. The WHEEL is retained in inventory.
Tunnel Entrance
- Put the HAMMER HEAD on the stick to form a HAMMER.
- Put the MATCHBOX WITH A BUG on the tree roots. Take the CHAIN.
- Look at the door on the left. Insert the PUZZLE PIECE to open a puzzle.
- The goal is to navigate the ball through the arrow interchanges to the exit point (red).
- The arrows dictate if a ball stops short of an interchange and shows the possible moves or funnels down a connecting path. Please look at the above screenshot for an explanation.
- The ball begins at position (A). Clicking the right arrow moves the ball forward to position (B), just short of the next interchange and shows the possible directions. Note that going up is not an option as there is no up arrow in the interchange. Clicking down will move the ball down and connect to the up arrow that sweeps right. The ball ends up in intersection (C) with three direction options.
- The key to solving this puzzle is to approach the exit point from the bottom row.
- Solution: R, D, L, D, D, R, R, R, R.
- Receive the ALUMINUM BALL. Go through the door.
The Maze
- Pick up the SILVER PLATE PART (A).
- Inspect the pipes (B). Put the VALVE on the tap to drain the pool.
- Look closer at the pool at the base of the statue (C). Take the PISTOL.
- Look at the statue’s head (D). Pluck a ROSE.
Cemetery
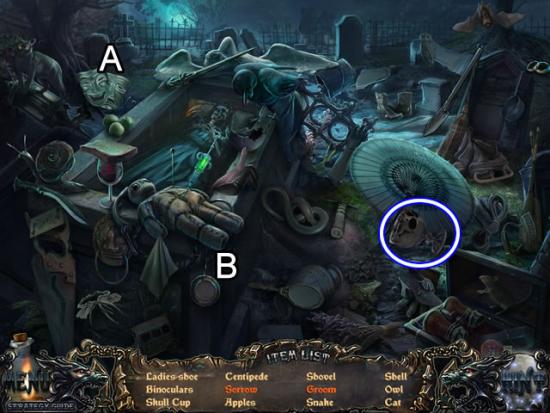
- Play the hidden object scene.
- Click the masks (A) to find Sorrow.
- Open the locket (B). Take the picture of the Groom.
- Find the rest of the listed objects. The SKULL CUP is retained in inventory.
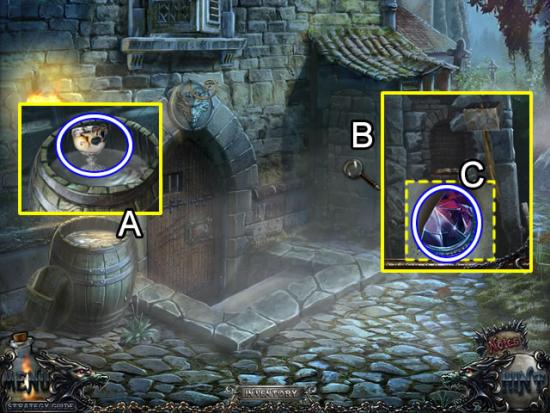
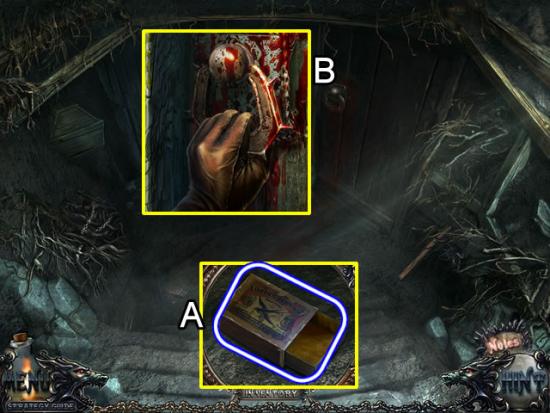
Side Entrance
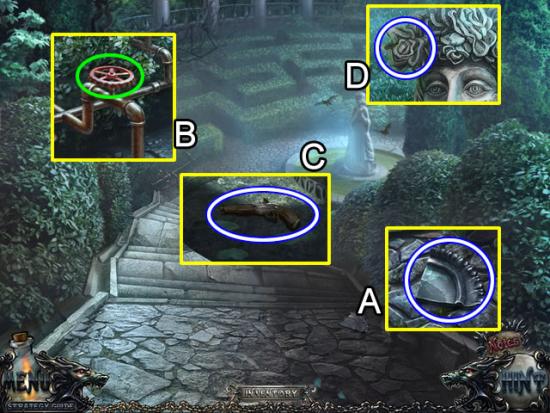
- Remove the cover from the barrel (A). Dip the SKULL CUP in the water. Take the SKULL CUP WITH WATER.
- Look at the brick wall (B). Use the HAMMER to smash the bricks. Take the AMULET.
Estate Entrance
- Zoom in on the fire. Douse the flames with the SKULL CUP WITH WATER.
- Take the SILVER PLATE PART from the ashes.
Cabin Garden
- Inspect the statue at the rear of the garden.
- Place the ROSE in her hand.
Skull Tunnel Entrance
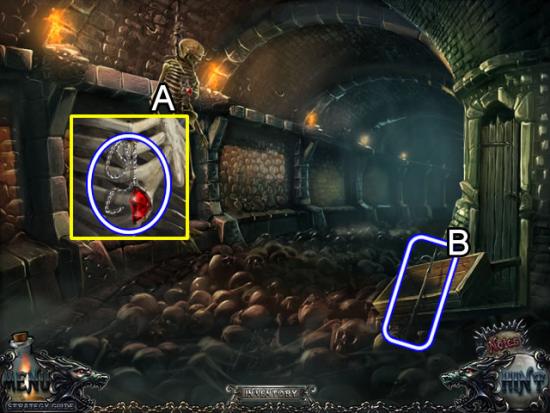
- Zoom in on the skeleton (A). Take the AMULET PART.
- Look at the broken cart (B). Take the HOOK.
- Go forward.
End of Skull Tunnel
- Use the HOOK to retrieve the WHEEL from the water.
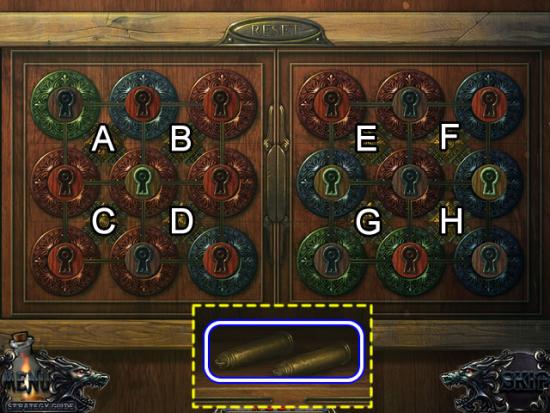
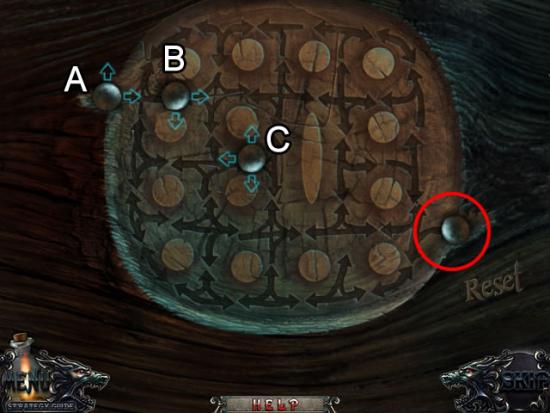
- Look at the safe on the right. Insert the SKULL MEDALLION in the empty slot to start a puzzle.
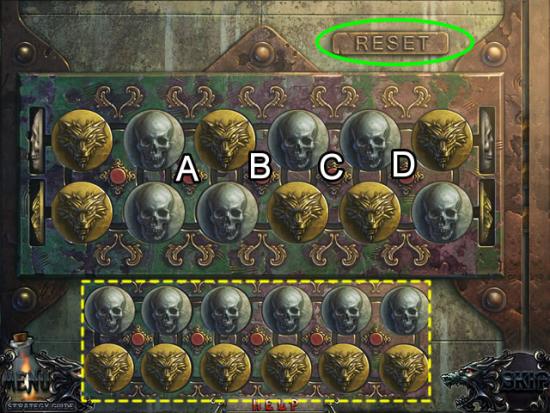
- The goal is to rotate the skulls so all the silver skulls are on top and the gold are on the bottom (see dashed inset).
- The Reset button comes in handy. For every rotation, the skull at the end of the top row goes to the first position in the row. Big Hint: Don’t press the first button.
- Solution: A, A, B, B, C, D, D.
- Take the BULLET FORM.
Skull Tunnel Entrance
- Zoom in on the cart again. Place the two WHEELS on the cart to clear the entrance to the chamber.
Wolf Chamber
- Click the countess to activate the scene.
- Click on the latches on the right side of the gate to remove the pins.
- Examine the wolf’s head. Place the AMULET and AMULET PART in the inset.
Cabin
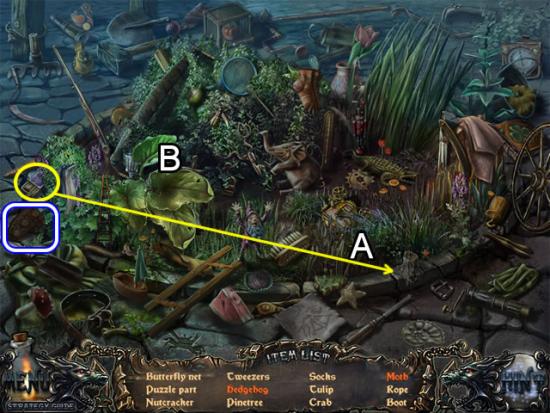
- Play the hidden object scene.
- Knit (A) a Collar.
- Open the box (B) to find the Dancer.
- Find the rest of the listed objects. The BRAID is added to inventory.

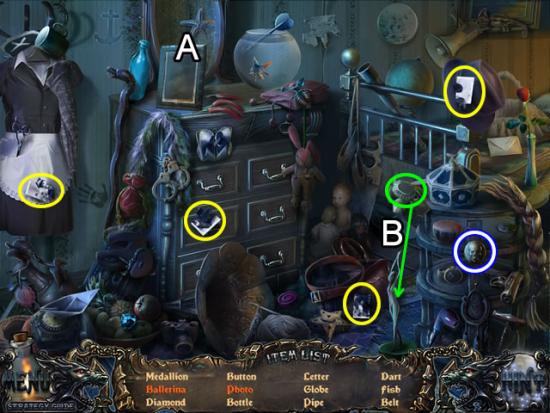
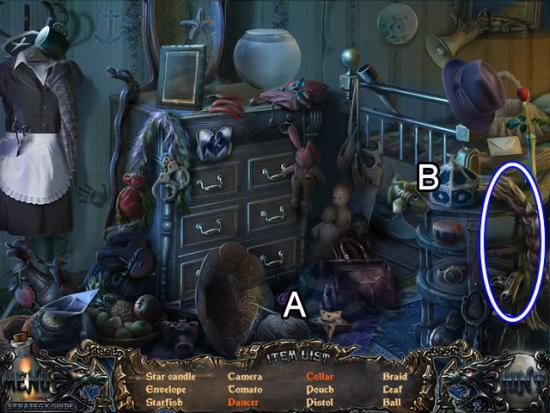
- Open the cabinet doors (A).
- Put the CHAIN on the broken SCALES. Pick up the REAGENT and BULLET FORM PART.
- Place the ALUMINUM BALL in place of the missing bed post ball (B).
- Take the SILVER PLATE PART from behind the picture (C).
Wolf Chamber
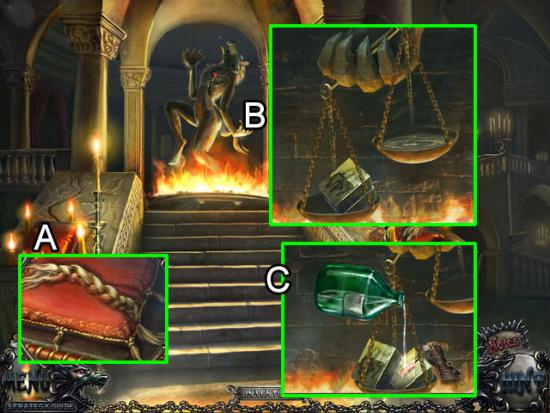
- Place the BRAID on the pillow on the left (A).
- Place the SCALES in the wolf’s hand (B). Put the four SILVER PLATE PARTS in the right scale. Put the two BULLET FORM PARTS in the left.
- Open the bullet form. Pour the REAGENT on the hot bullet (C). Place the PISTOL over the silver bullet.
Congratulations! You have finished playing the bonus chapter of Shadow Wolf Mysteries: Bane of the Family Collector’s Edition. Additional material is now available from the Extras tab on the main menu.

More articles...
-
Best Horror Games On Itch.io – July 2026
Across a bounty of subgenres. -
Haze Seas Accessories Tier List [Best Accessories to Equip]
The accessories with the best stat buffs in Haze Seas.