![All VV Ultimatum Titles [How to Get]](/wp-content/uploads/2026/06/vv-ultimatum-titles.jpg "All VV Ultimatum Titles [How to Get]")
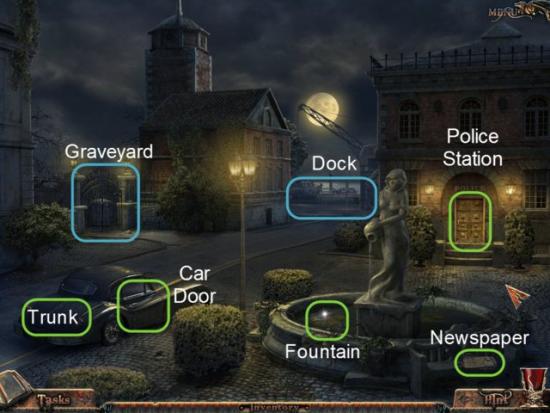
All VV Ultimatum Titles [How to Get]
Do titles provide buffs?


Welcome to the Shades of Death: Royal Blood walkthrough on Gamezebo. Shades of Death: Royal Blood is a hidden object game played on the PC and created by Vogat Interactive. This walkthrough includes tips and tricks, helpful hints, and a strategy guide on how to complete the Shades of Death: Royal Blood.
Welcome to the Shades of Death: Royal Blood walkthrough on Gamezebo. Shades of Death: Royal Blood is a hidden object game played on the PC and created by Vogat Interactive. This walkthrough includes tips and tricks, helpful hints, and a strategy guide on how to complete the Shades of Death: Royal Blood.
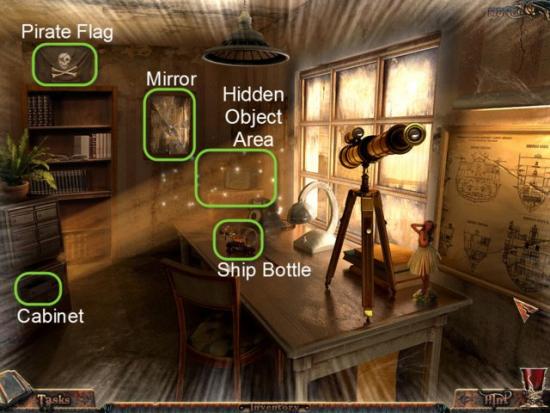
• There are two Game Modes available, Casual Mode and Advanced Mode.
• Casual Mode features faster refilling Hint Button and Skip Option; Active Areas will also sparkle.
• Advanced Mode features slower filling Hint and Skip; Active areas will not sparkle.
• In Casual Mode the Hint Meter takes approximately 30 seconds to refill. You have unlimited Hints.
• In Casual Mode the Skip Option will take approximately 1 minute to fill.
• Gear Mouse Icon represents areas that can be interacted with an Item.
• Magnifying Glass Mouse Icon represents areas that you can examine.
• Hidden Objects will vary slightly each time you play.
• There is only 3 Chapters.
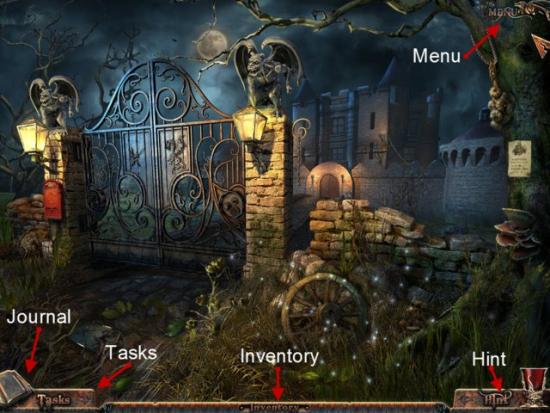
Interface

Menu – The Menu allows you access to the main functions.
Hint – Hint Meter is unlimited. Use as often as you like. Once the Glass refills, the Hint option is available once more.
Journal – Contains Hints, Story Details, and Important Information.
Tasks – This will show your current objectives or goals.
Inventory – Contains your current items collected.
Skip Puzzle -The Skip Button is used to skip any Mini-Game.
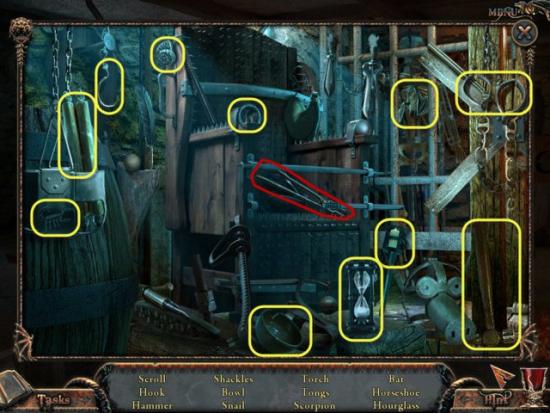
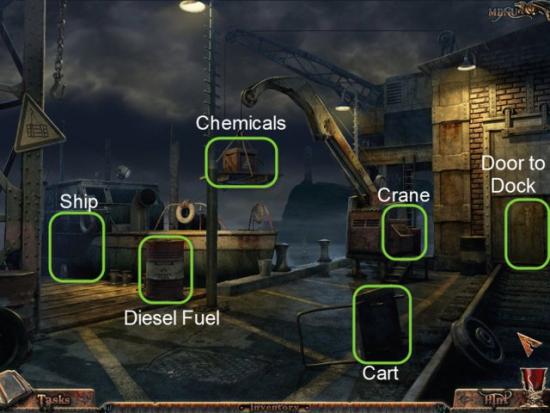
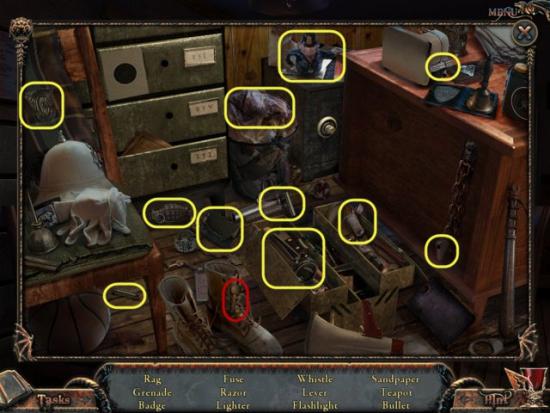
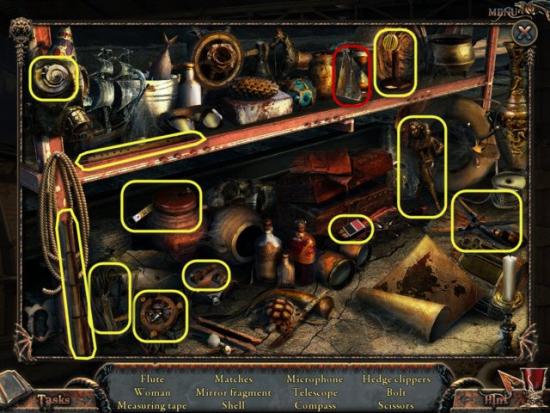
• Hidden Objects are highlighted in Yellow.
• Items are highlighted in Red.
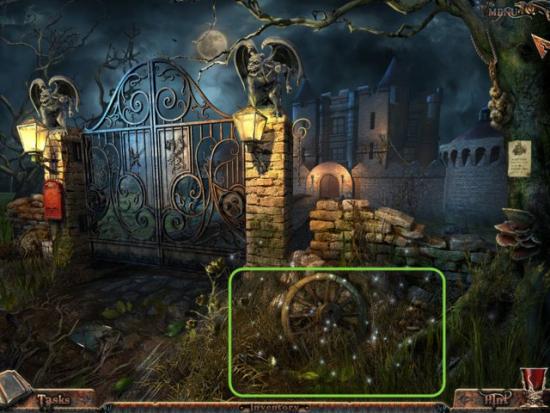
• Interactive Areas are highlighted in Green.
• Locations are highlighted in Blue.
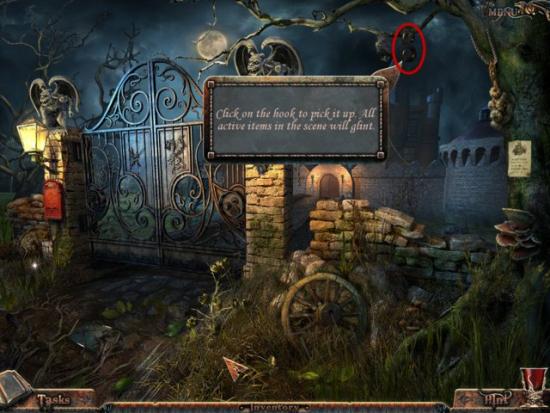
Gather the Hook highlighted in Red.
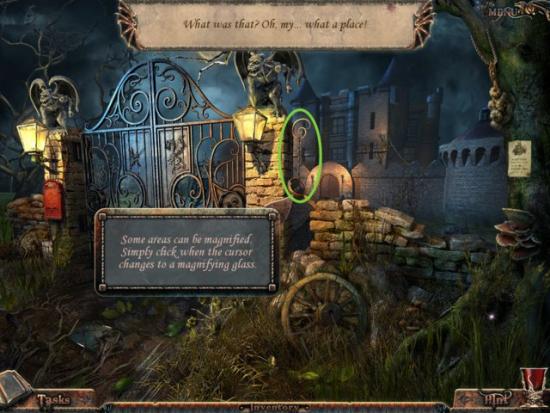
Examine the Chain highlighted in Green.
Examine the Area highlighted in Green.
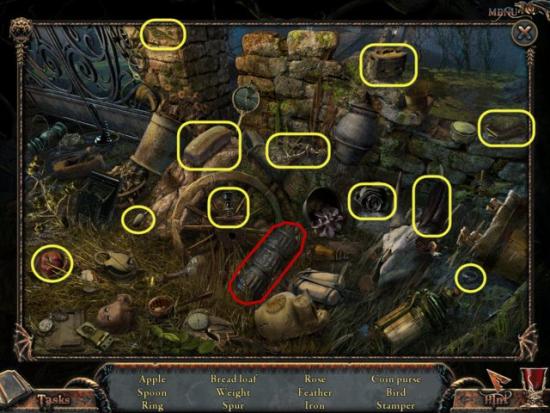
Gather the Weight highlighted in Red.
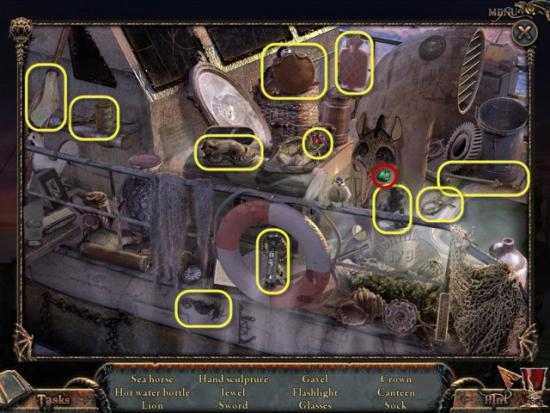
Gather the Hidden Objects highlighted in Yellow.
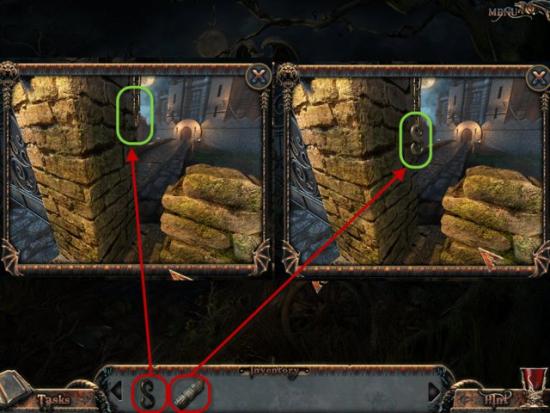
Examine the Chain once again.
Place the Hook on the Chain.
Next place the Weight on the Hook.
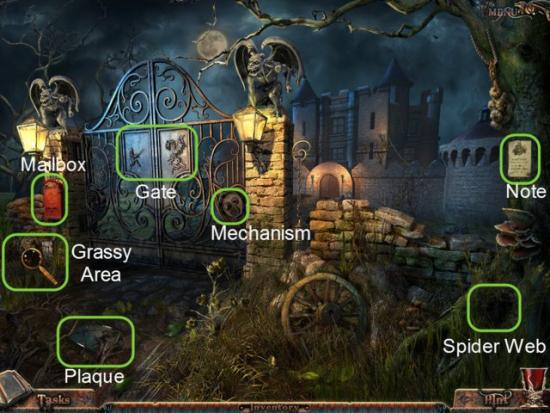
Examine the Note and Plaque highlighted in Green.
Next examine the Grassy Area highlighted in Green.
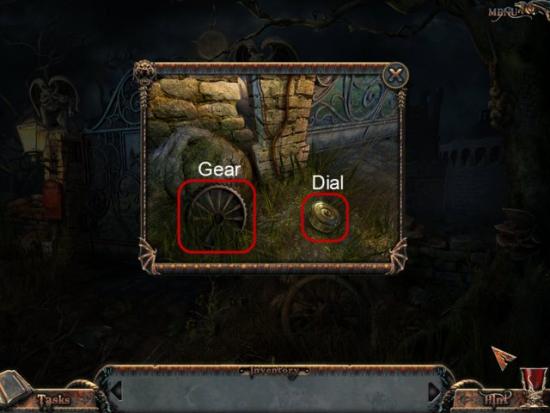
Gather the first Dial and Gear highlighted in Red.
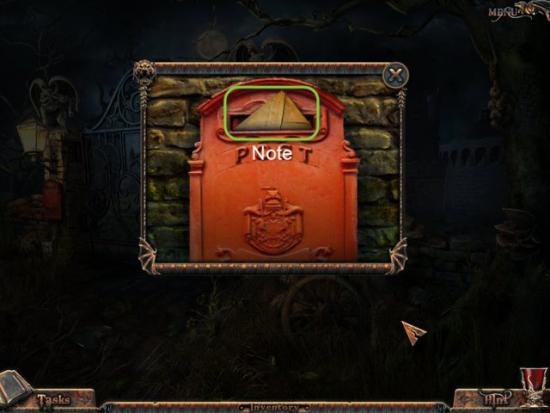
Examine the Mailbox.
Read the Note highlighted in Green.
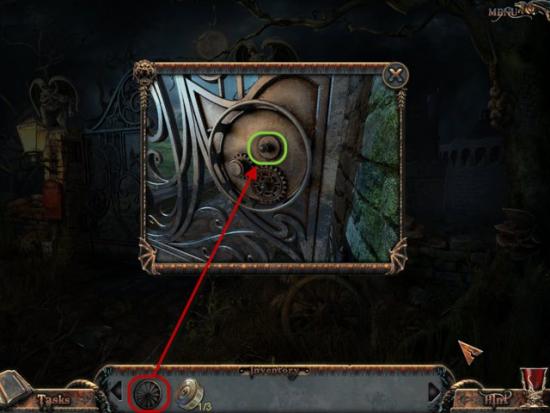
Examine the Gate Mechanism.
Place the Gear highlighted in Red into the Mechanism highlighted in Green.
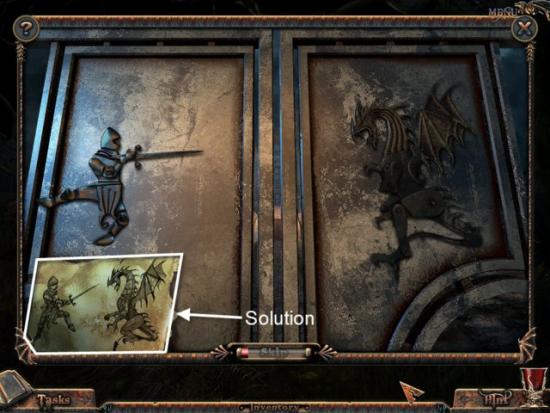
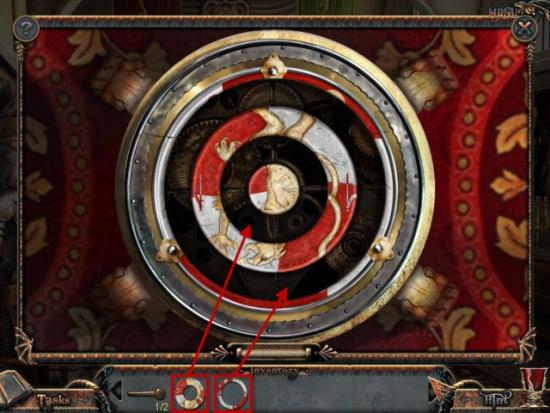
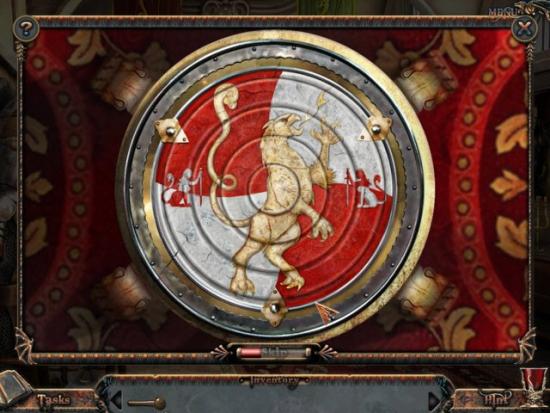
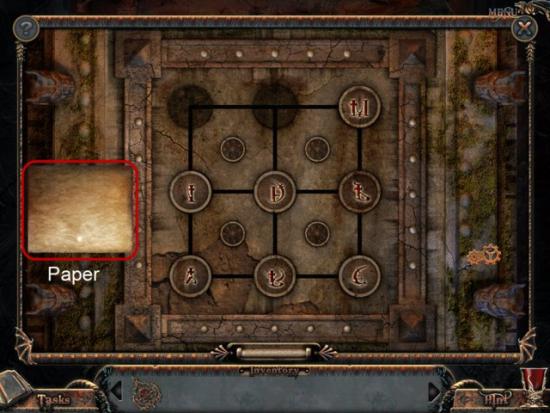
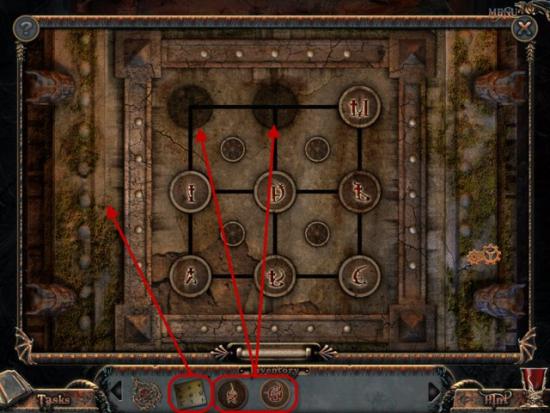
To solve this Mini-Game you must rearrange the Knight and Dragon to match the formation shown on the Plaque.
Click on each section to move the piece.
Pieces will move into one of a few different positions and then cycle through them again.
Once the Knight and Dragon are in the correct positions, the Gate will open.
Enter through the Gate.
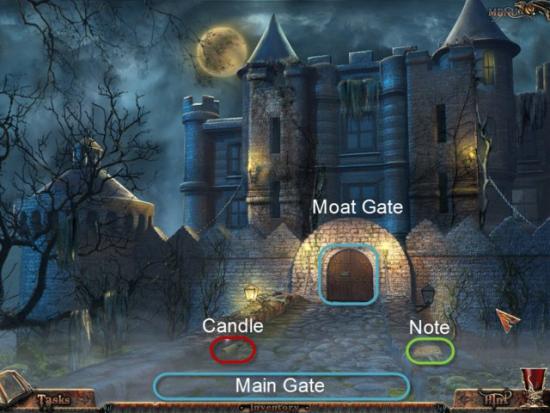
Gather the Candle highlighted in Red.
Examine the Note highlighted in Green.
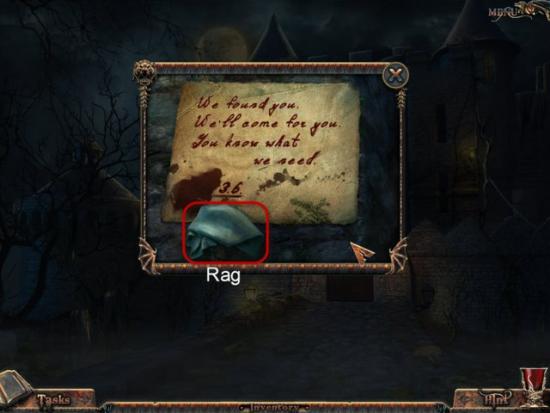
Gather the Rag highlighted in Red.
Make note of the two numbers at the bottom of the Note.
Head toward the Moat Gate.
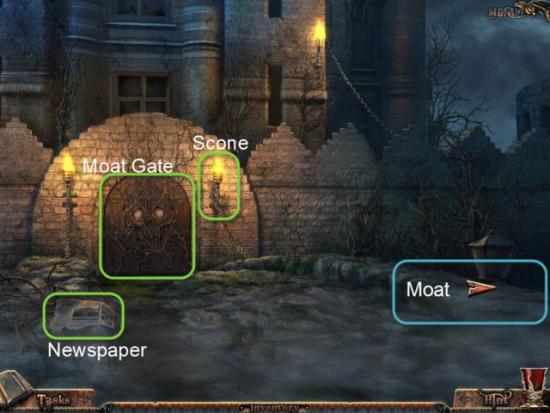
Examine the Newspaper highlighted in Green.
Examine the Scones highlighted in Green.
Place the Candle, highlighted in Red, on the Scone, highlighted in Green.
Receive a Lit Candle.
Head to the Moat.
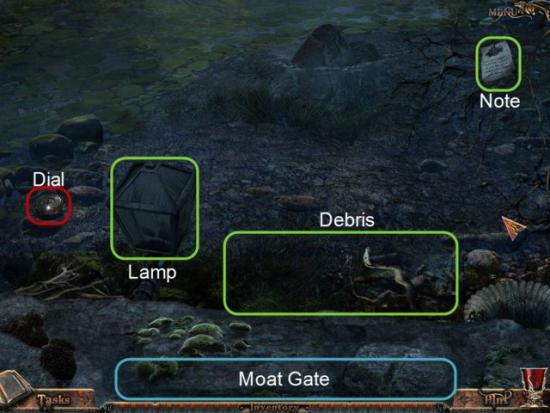
Gather the second Dial highlighted in Red.
Examine the Note highlighted in Green.
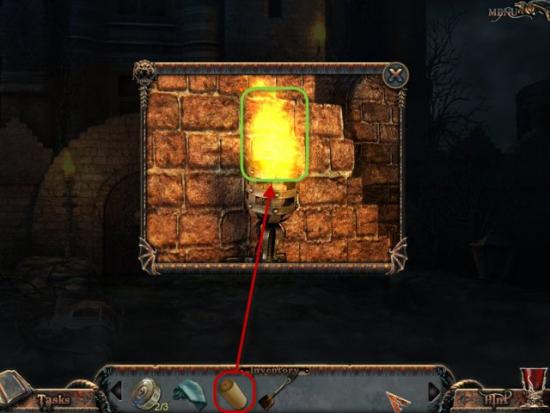
Next examine the Lamp highlighted in Green.
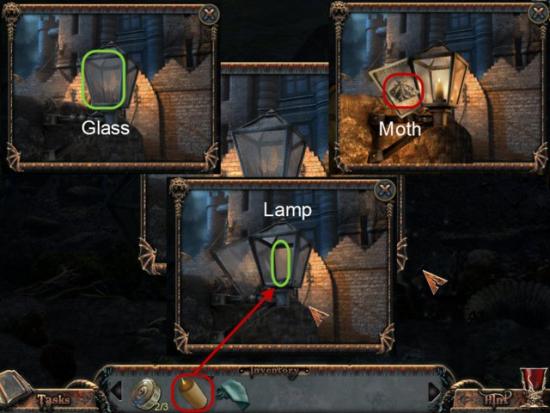
Open the Glass highlighted in Green.
Place the Lit Candle, highlighted in Red, into the Lamp.
Finally gather the Moth highlighted in Red.
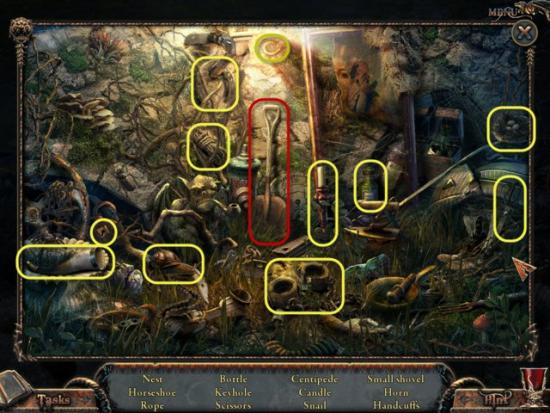
Examine the Debris.
Gather the Shovel highlighted in Red.
Gather the Hidden Objects highlighted in Yellow.
Return to the Moat Gate.
Examine the Moat Gate.
Return to the Main Gate.
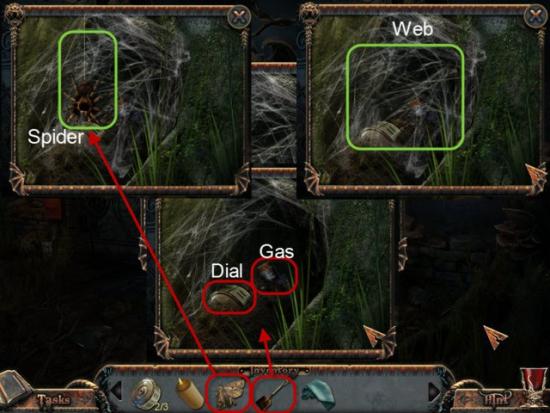
Examine the Spider Web.
Feed the Moth, highlighted in Red, to the Spider, highlighted in Green.
Next remove the Spiderweb.
Now use the Shovel, highlighted in Red, on the mound of Dirt, twice.
Finally gather the third Dial and the Bottle of Gas highlighted in Red.
Return to the Moat Gate.
Examine the Moat Gate once again.
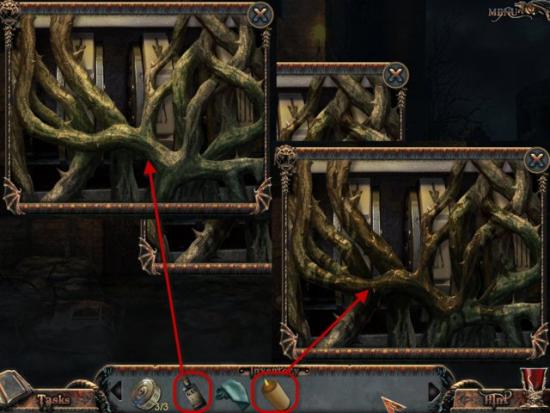
Use the Bottle of Gas, highlighted in Red, on the Dried Branches.
Next use the Candle, highlighted in Red. and light afire the Branches.
Examine the Moat Gate one more time.
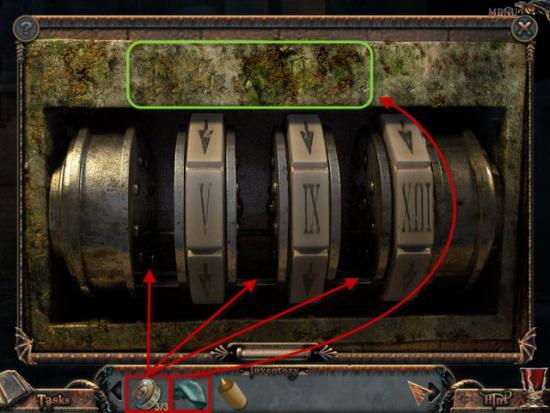
Place the three Dials, highlighted in Red, in the three empty slots.
Next use the Cloth, highlighted in Red, and clean the Stone above the tiles, highlighted in Green.
Notice the last two Numbers are missing.
The last two Numbers are on the Note you examined earlier.
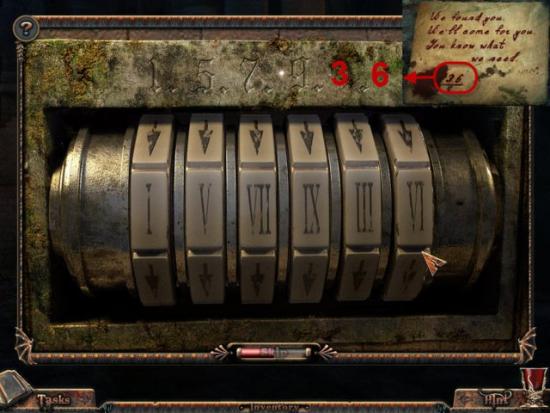
Click to turn each Dial till the Roman Numeral matches the Number above the Dial.
Once set all Dials to correct position the Moat Gate will open.
Enter the Castle.
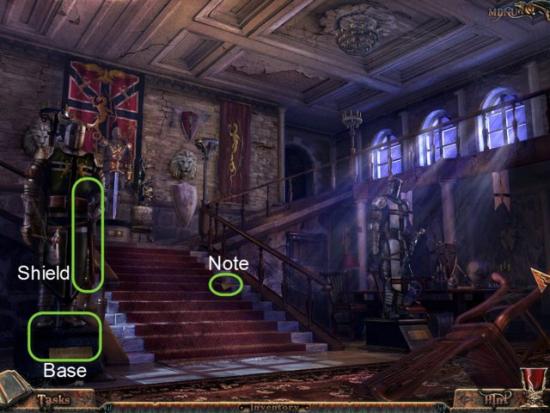
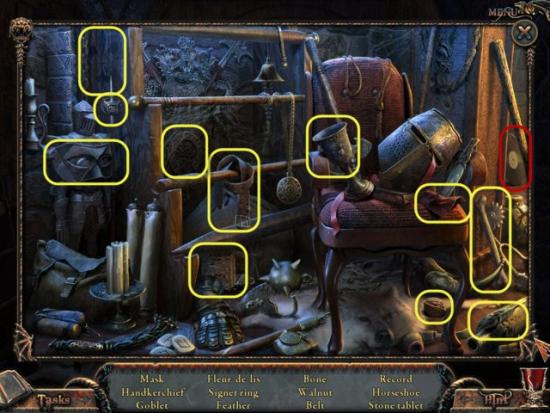
Examine the Note on the Steps, highlighted in Green.
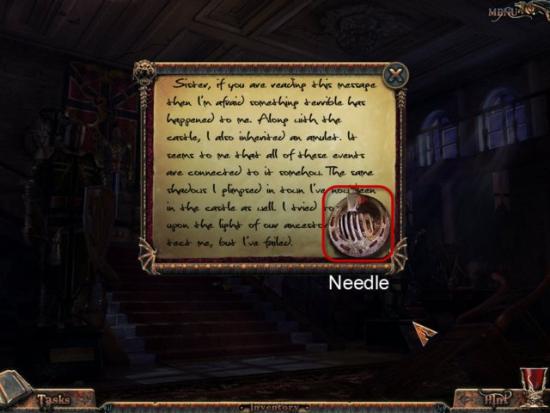
Gather the Needle highlighted in Red.
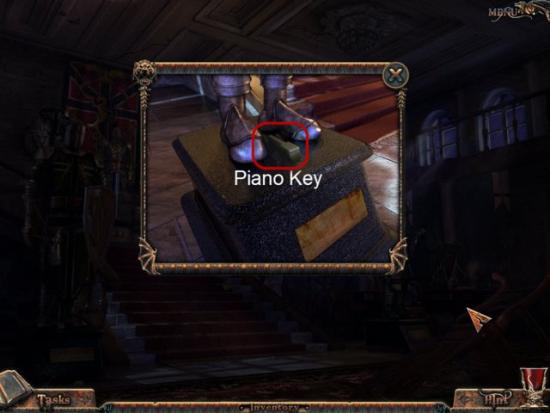
Examine the Suit of Armor Base highlighted in Green.
Gather the Piano Key highlighted in Red.
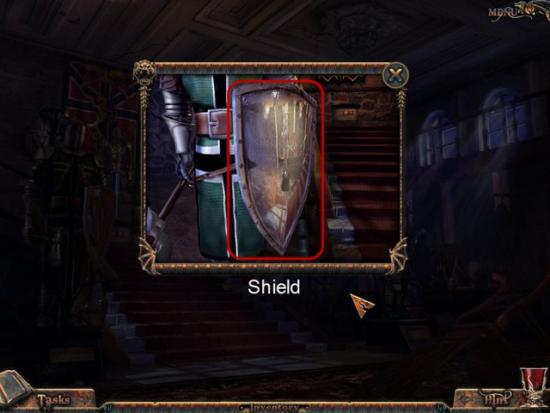
Examine the Knights Shield.
Gather the Shield highlighted in Red.
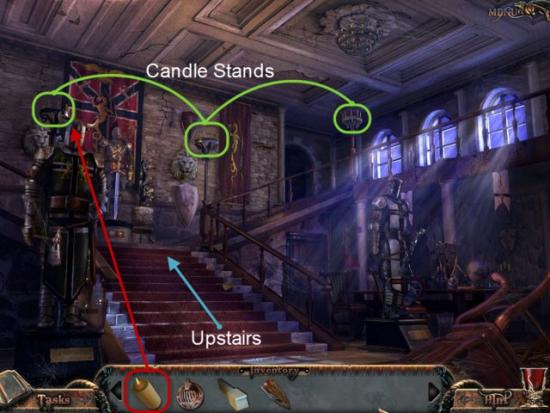
Use the Candle, highlighted in Red, on the three Candle Stands, highlighted in Green.
Climb the Stairs.
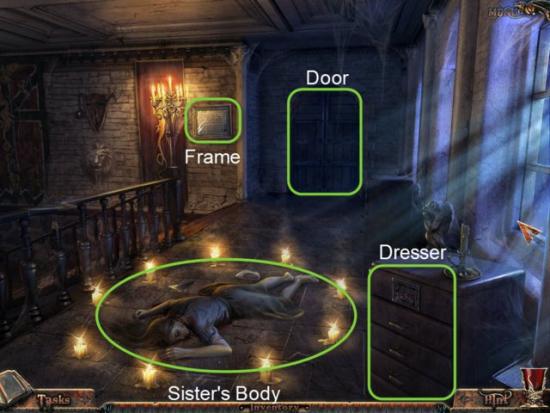
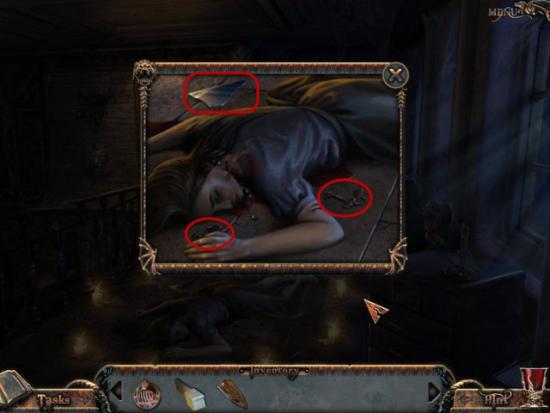
Examine your Sisters dead body.
Gather the Key, first Canvas Piece, and first Mirror Shard highlighted in Red.
Examine the Frame at top of Stairs highlighted in Green.
Examine the Door highlighted in Green.
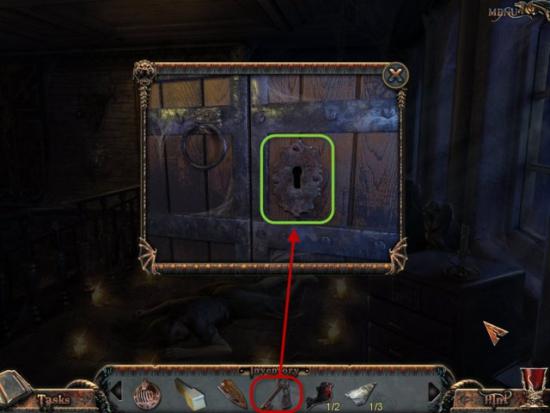
Use the Key, highlighted in Red, on the Lock, highlighted in Green.
Enter the Hallway.
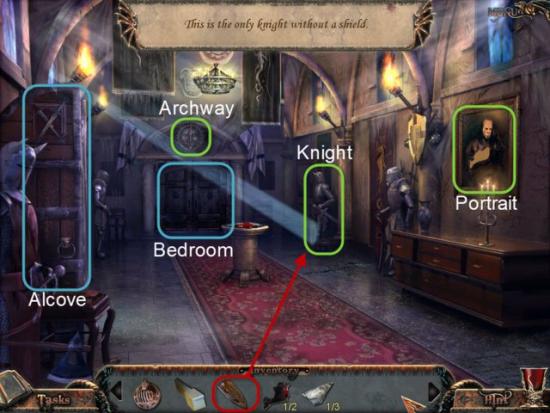
Give the Shield, highlighted in Red, to the Knight, highlighted in Green.
Examine the Archway to the Bedroom highlighted in Green.
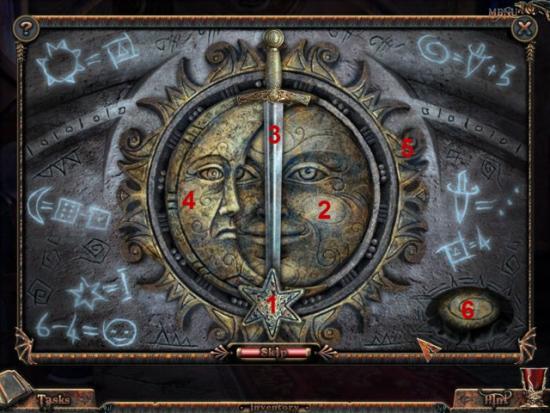
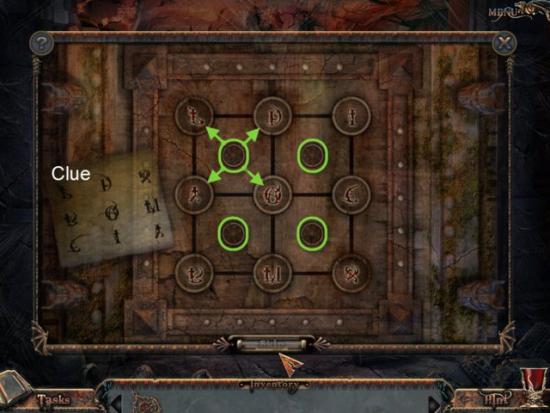
To solve this Mini-Game use the Clues written around the edges to find the order in which to move each Piece of the Puzzle.
Click on each Piece to move it.
Solution:
• Click to move the Star.
• Click to move the Sun Face.
• Click to move the Dagger.
• Click to move the Sun Rays.
• Click to move the Moon.
• Finally, click on the Swirling Icon Button highlighted in Green to solve the Puzzle.
This will open the Bedroom Door.
Move left to the Alcove highlighted in Blue.
Examine the Note on the Back Wall highlighted in Green.
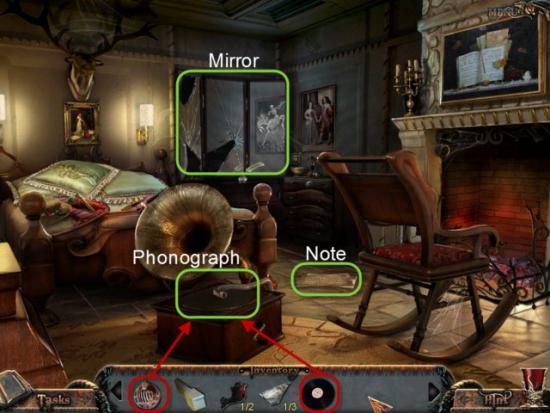
Examine the Hidden Objects Area.
Gather the Record highlighted in Red.
Gather the Hidden Objects highlighted in Yellow.
Return to the Hallway and enter the Bedroom.
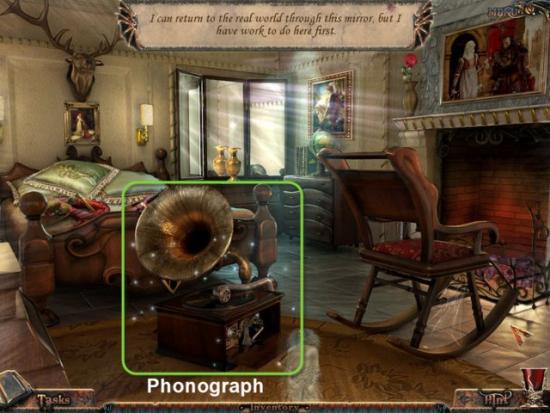
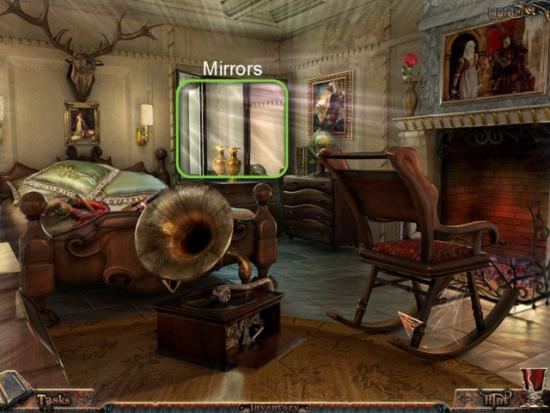
Examine the Mirror and Note highlighted in Green.
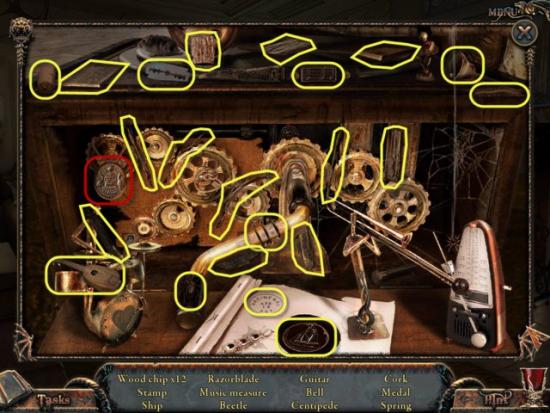
Use the Needle and Record, highlighted in Red, on the Phonograph, highlighted in Green.
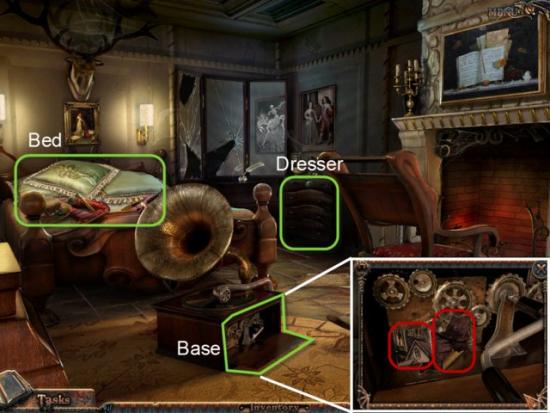
Examine the Base of the Phonograph.
Gather the second Canvas Piece and the Puzzle Piece highlighted in Red.
Examine the Dresser.
Place the Puzzle Piece into the empty spot.
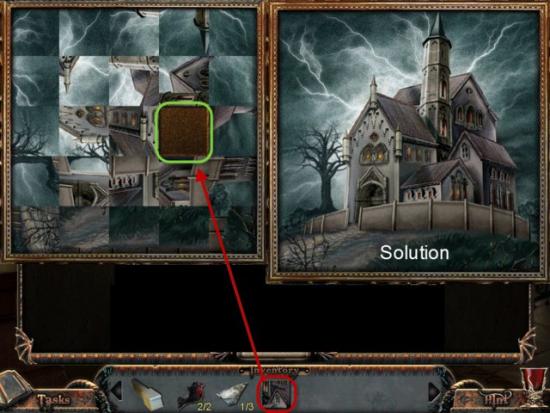
To Solve this Mini-Game rotate the Squares to form the Image.
Click on each Square to rotate it.
Once Image is completed the Dresser will open.
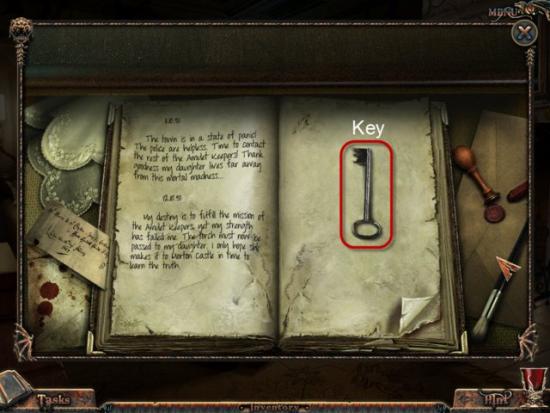
Click the Journal to turn the Page.
Gather the Key highlighted in Red.
Return to the Hallway.
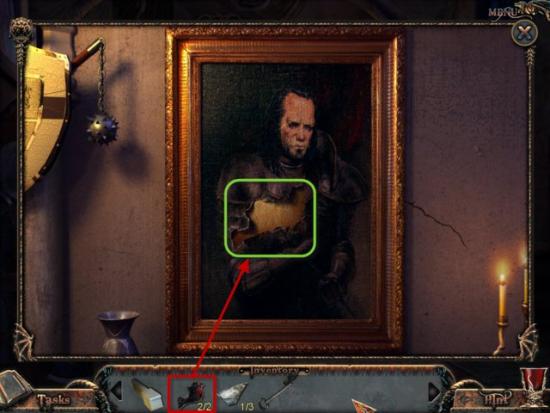
Examine the Portrait.
Place the two Canvas Pieces, highlighted in Red, onto the Canvas, highlighted in Green.
Return to the Bedroom.

Examine the Bed.
Gather the Arrow Slider highlighted in Red.
Gather the Hidden Objects highlighted in Yellow.
Leave the Bedroom and return to the top of the Stairs where your Sister’s Body is laying.
Examine the Dresser highlighted in Green.
Place the Slide Arrow, highlighted in Red, into the Puzzle Board.
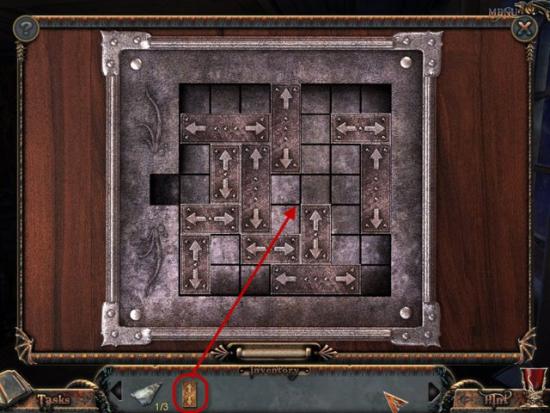
This Mini-Game is a simple Traffic Jam Puzzle.
Click on the tiles to slide them around to open a path for the Golden Slide Arrow to reach the Exit, highlighted in Green.
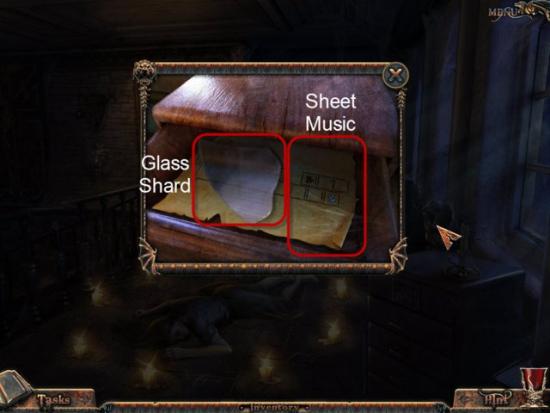
Gather the second Glass Shard and Music Sheet highlighted in Red.
Return to the Alcove.
Examine the Piano.
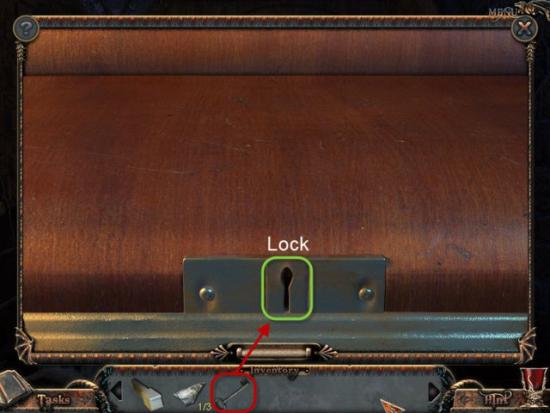
Use the Key highlighted in Red, on the Piano Lock, highlighted in Green.
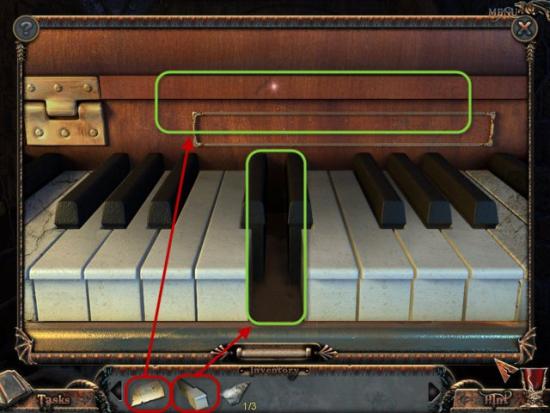
Place the Sheet Music and Piano Key, highlighted in Red, in the corresponding spots, highlighted in Green.
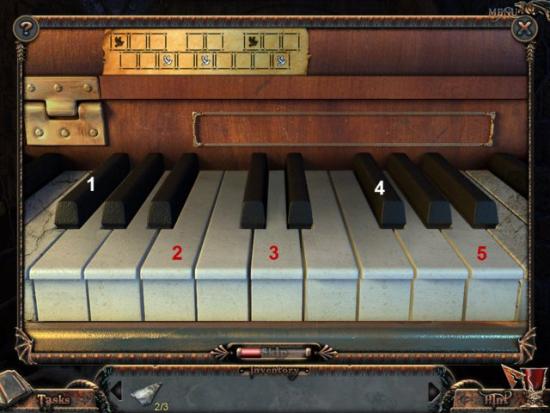
To solve this Mini-Game press the Keys noted in the Sheet Music.
Solution: Press the numbered Keys in numerical order to solve this Mini-Game.
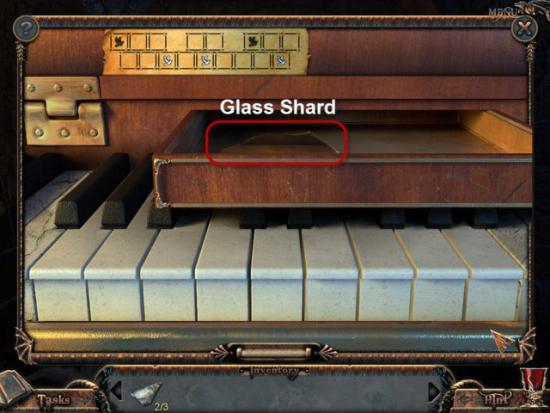
Gather the third Glass Shard.
Return to the Bedroom.
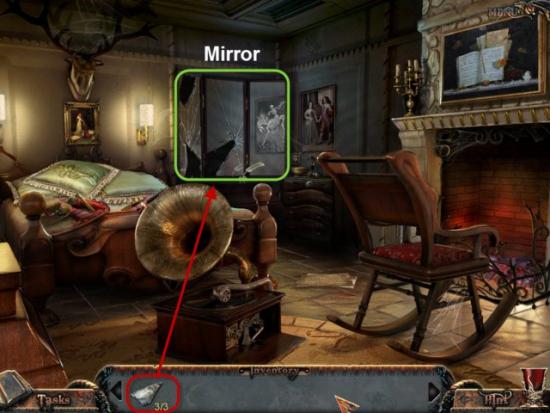
Place the three Glass Shards, highlighted in Red, into the Mirror, highlighted in Green.
Enter the Mirror.
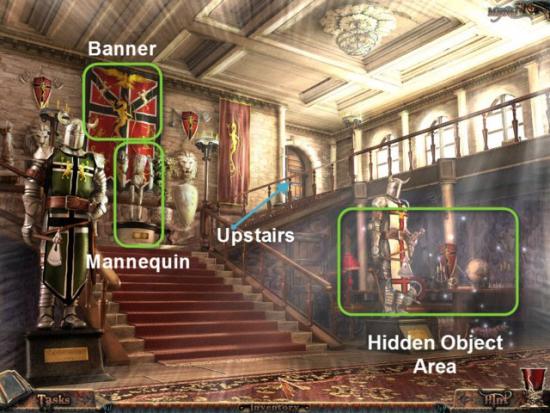
Examine the Banner highlighted in Green.
Next, examine the Area next to the Staircase.
Gather the Lock-pick highlighted in Red.
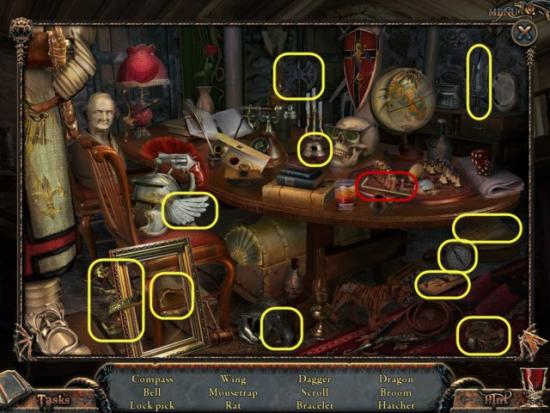
Gather the Hidden Objects highlighted in Yellow.
Examine the Mannequin.
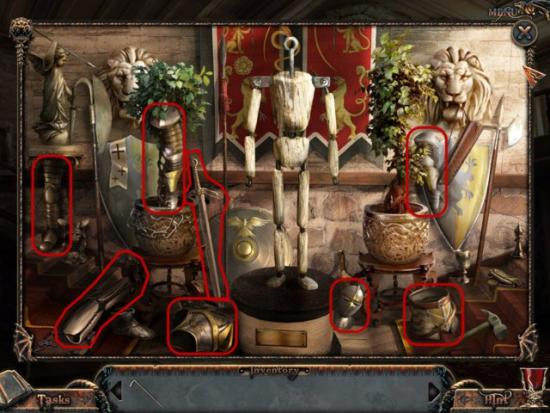
Gather all the Pieces, highlighted in Red, of the Knights Armor.
Replace each of the Pieces back on the Mannequin.
Exit and head Upstairs.
Head Upstairs
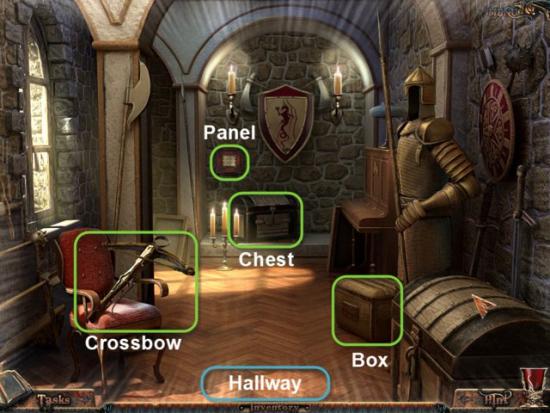
Move to the Alcove.
Examine the Box highlighted in Green.
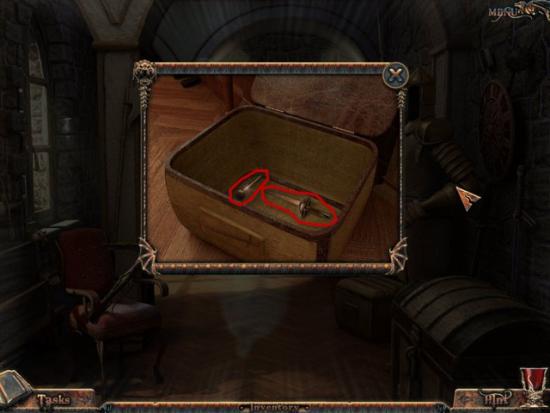
Open the Box and gather the Lever and Sword highlighted in Red.
Return to the Hallway.
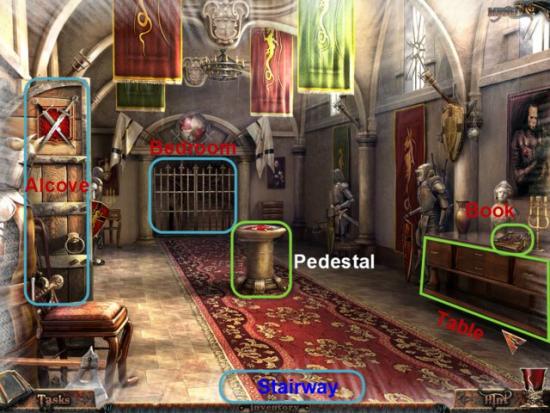
Examine the Book highlighted in Green.
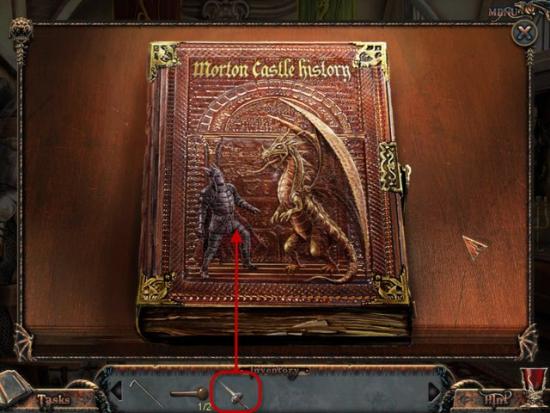
Place the Sword, highlighted in Red, on the Knight on the Cover of the Book.
Click to turn the Page.
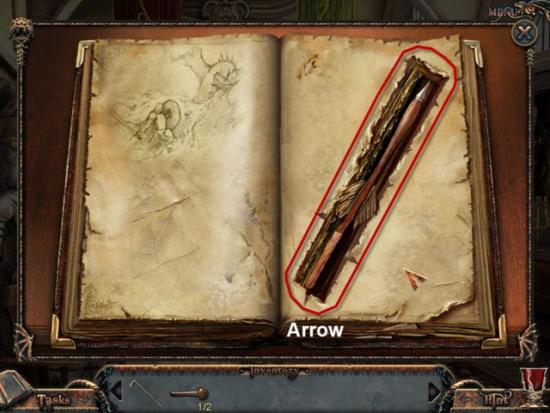
Gather the Arrow highlighted in Red.
Return to the Alcove.
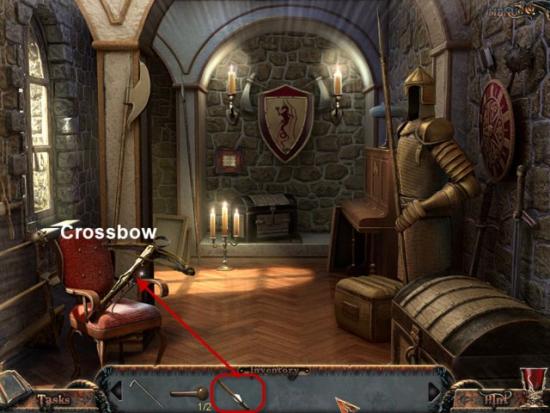
Place the Arrow, highlighted in Red, into the Crossbow.
Click the Crossbow to fire it.
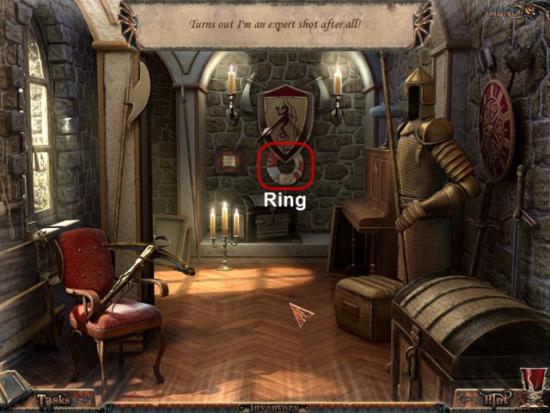
Gather the Ring, highlighted in Red, that fell down.
Return to the Hallway.
Examine the Table highlighted in Green.
Gather the Lion highlighted in Red.
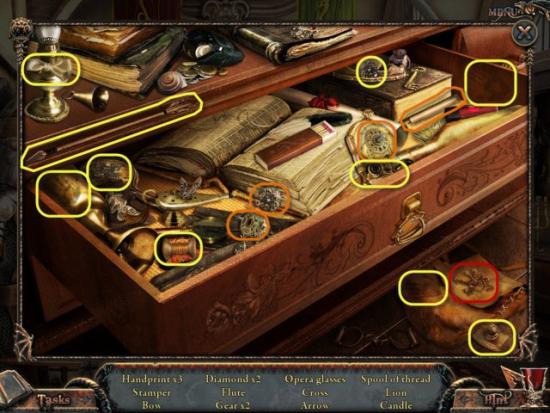
Gather the Hidden Objects highlighted in Yellow and Orange.
Return to the Alcove.
Examine the Chest.
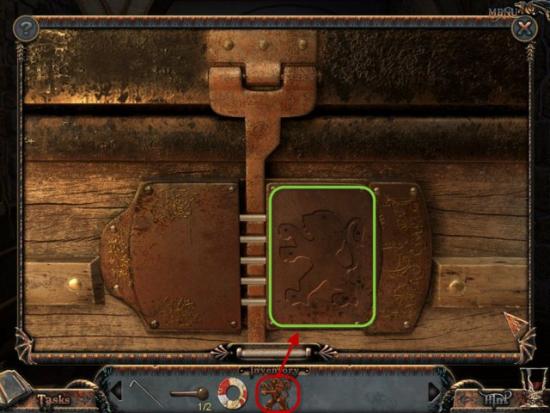
Place the Lion, highlighted in Red, into the Depression, highlighted in Green.
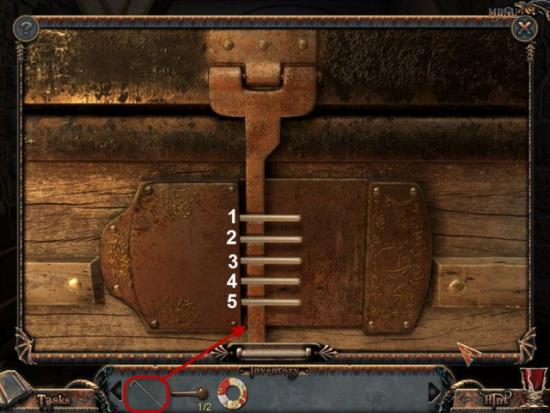
Next use the Lock-pick on the Lock.
To solve this Mini-Game, use the Lock-pick and click on each Pin to push them in.
If you push a Pin in an incorrect order, all Pins will reset.
Solution: Push the Pins in following order, 3-1-4-2-5, to open the Chest.
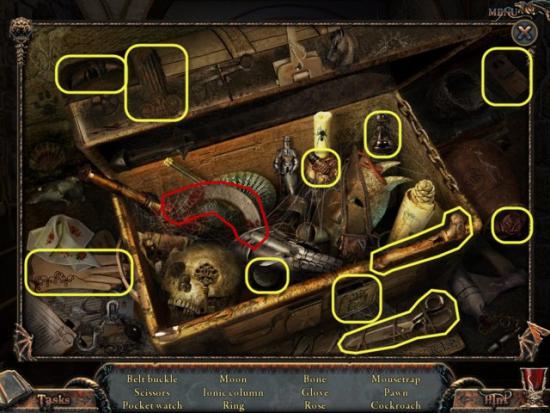
Examine the Chest again.
Gather the Ring highlighted in Red.
Gather the Hidden Objects highlighted in Yellow.
Return to the Hallway once again.
Examine the Pedestal.
Place the two Rings, highlighted in Red, into the Pedestal.
To solve this Mini-Game, click to rotate each Ring to form the completed Image.
The Bedroom is now open.
Enter the Bedroom.
Examine the Phonograph highlighted in Green.
Gather the Medallion highlighted in Red.
Gather the Hidden Objects highlighted in Yellow.
Return downstairs to the Entrance.
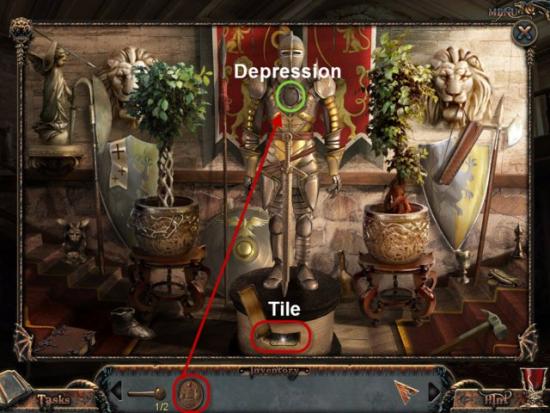
Examine the Knight on the Staircase under the Banner.
Place the Medallion, highlighted in Red, into the Depression, highlighted in Green.
A Slot opens in the Knights Base.
Gather the Tile.
Return Upstairs to the Alcove.
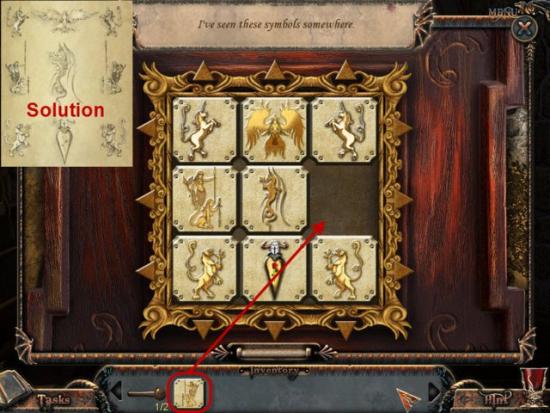
Examine the Plaque.
Place the Tile, highlighted in Red, into the Plaque.
To solve this Mini-Game use the Arrows around the edge of the Board to move the tiles around the Board till all the symbols are back in the correct order.
This will open the Trapdoor.
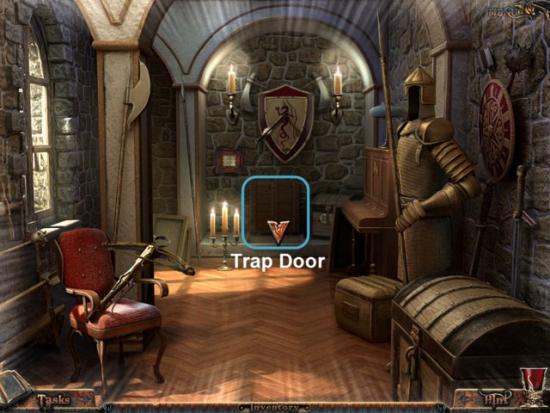
Enter the Trapdoor.
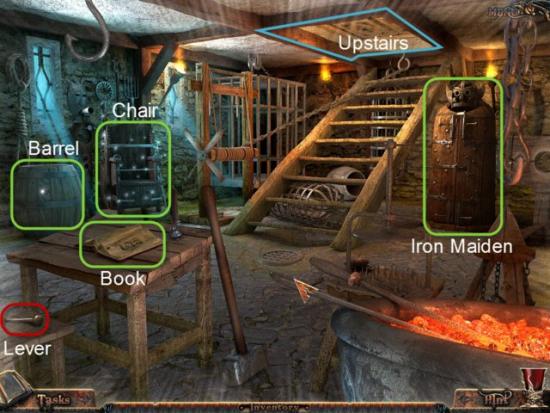
Gather the Lever highlighted in Red.
Examine the Book highlighted in Green.
Examine the Chair highlighted in Green.
Gather the Tongs highlighted in Red.
Gather the Hidden Objects highlighted in Yellow.
Return Upstairs to the Bedroom.
Use the Tongs, highlighted in Red, to gather the Key, highlighted in Green.
Receive Tong/Key.
Return to the Cellar.
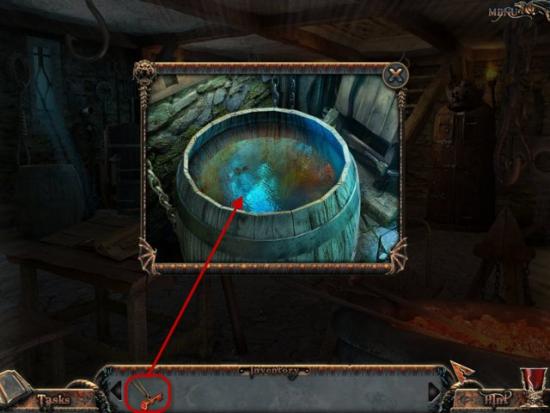
Examine the Barrel.
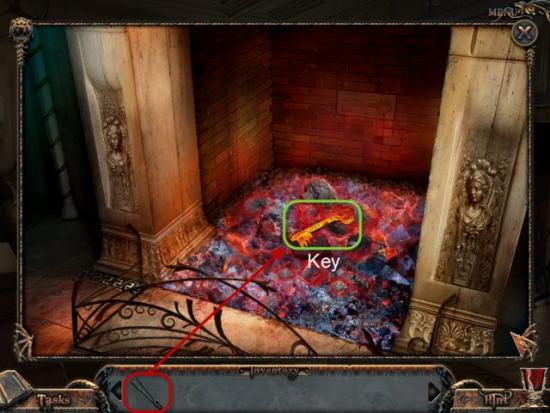
Place the Tong/Key into the Water.
Receive the Key.
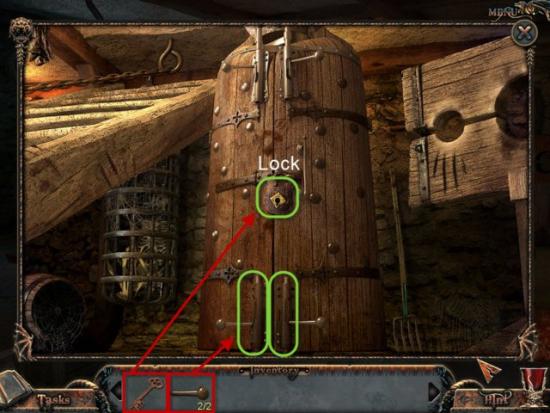
Examine the Iron Maiden.
Place the two Levers, highlighted in Red, onto the Iron Maiden, highlighted in Green.
Next use the Key on the Lock to open the Iron Maiden.
Receive the first piece of the Amulet.
Return upstairs and exit through the Mirrors.
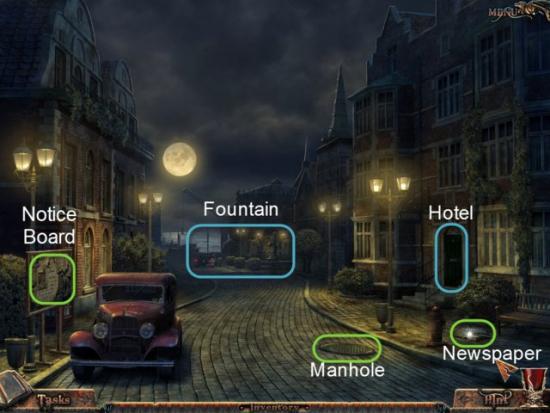
Examine the Notice Board high in Green.
Examine the Newspaper highlighted in Green.
Enter the Hotel.
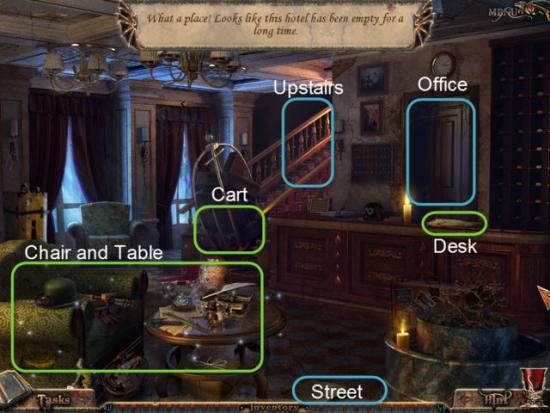
Examine the Desk highlighted in Green.
Examine the Office.
Examine the Cart.
Examine the Chair and Table.
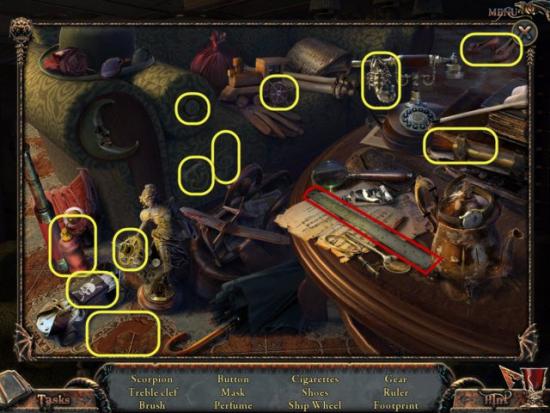
Gather the Ruler highlighted in Red.
Gather the Hidden Objects highlighted in Yellow.
Leave the Hotel.
Head down the Street toward the Fountain.
Examine the Newspaper highlighted in Green.
Examine the Car Door.
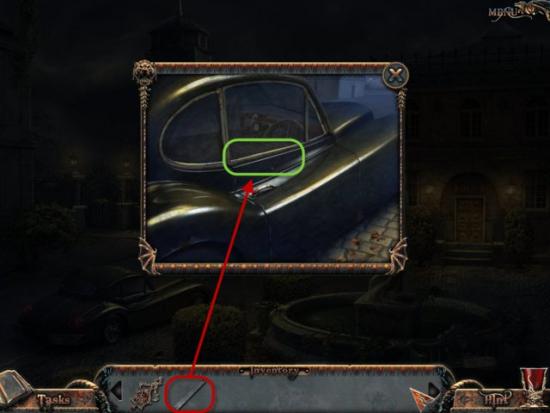
Use the Ruler, highlighted in Red, on the Car Door.
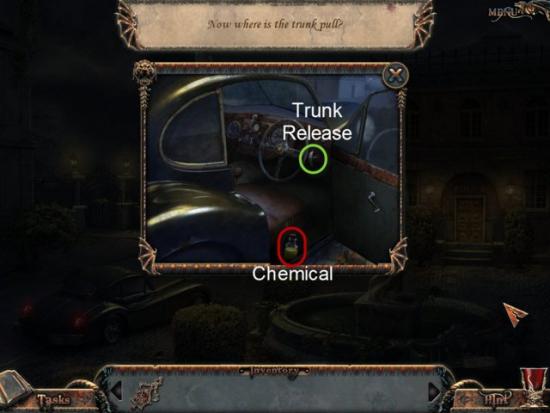
Gather the Chemical, highlighted in Red, and pull the Trunk Release, highlighted in Green.
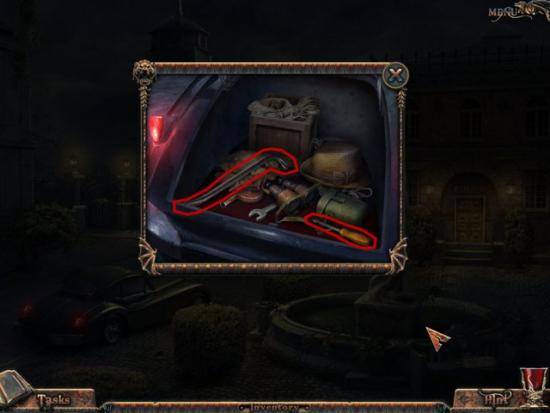
Examine the Trunk of the Car.
Click to open the Trunk.
Gather the Screwdriver and Crowbar highlighted in Red.
Head to the Dock.
Examine the Cart highlighted in Green.
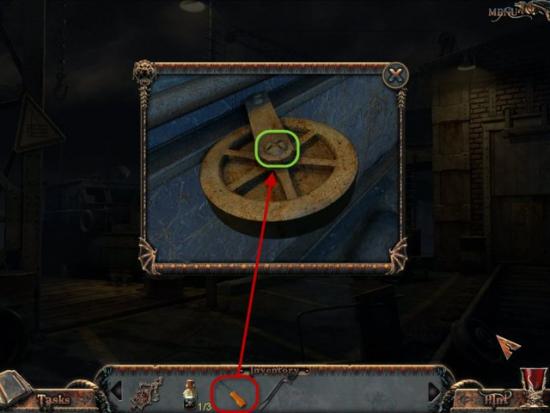
Use the Screwdriver, highlighted in Red, on the Screw, highlighted in Green.
Receive the Wheel.
Return to the Hotel.
Examine the Cart.
Place the Wheel, highlighted in Red, on the Cart, highlighted in Green.
Now go Upstairs.
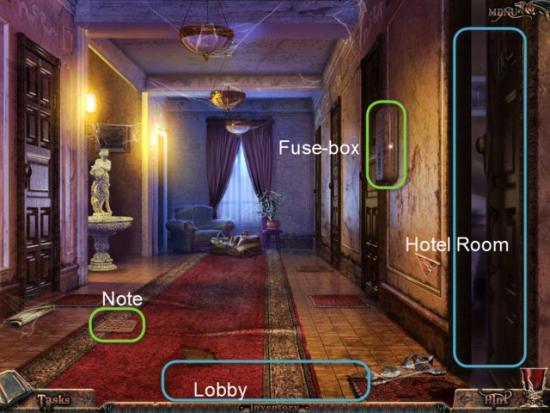
Examine the Note highlighted in Green.
Enter the Hotel Room on the right.
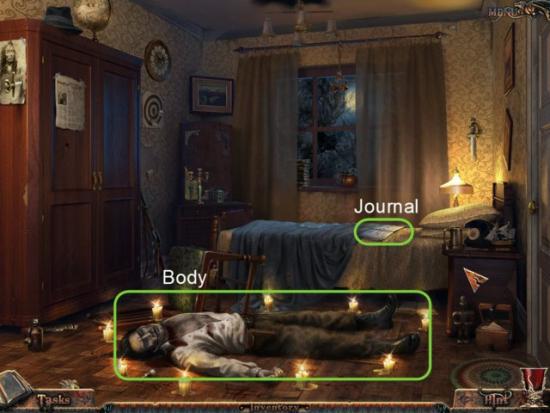
Examine the Journal on the Bed highlighted in Green.
Next examine the Dead Body.
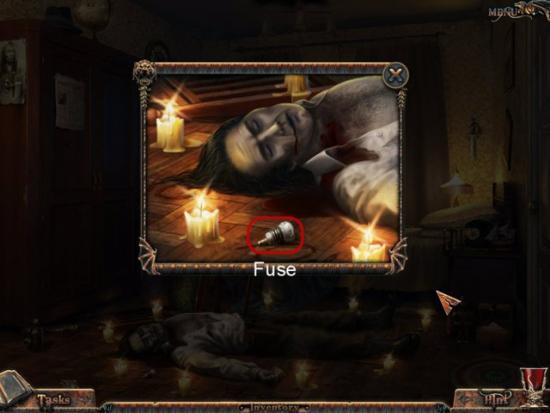
Gather the Fuse highlighted in Red.
Return to the Hallway.
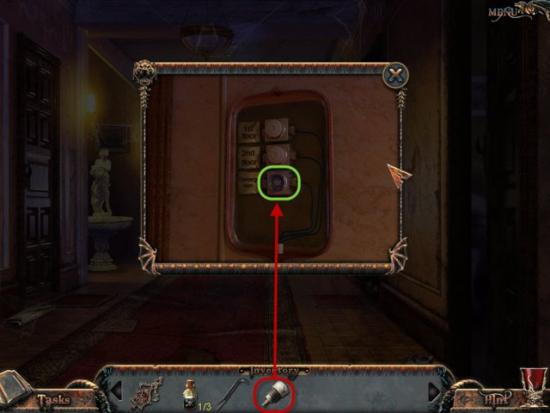
Examine the Fuse-box.
Open the Fuse-box.
Place the Fuse, highlighted in Red, into the Fuse-box, highlighted in Green.
Return to Hotel Lobby.
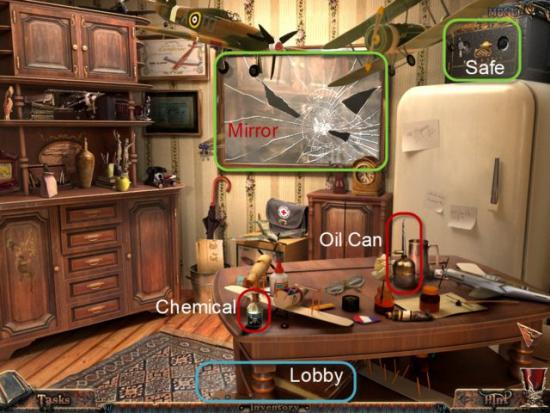
Enter the Office.
Gather the Chemical and Oil Can, highlighted in Red.
Examine the Safe highlighted in Green.
Examine the Mirror.
Exit the Hotel.
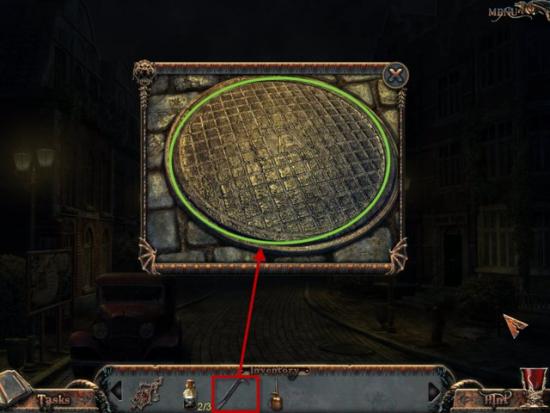
Examine the Man Hole Cover.
Use the Crowbar, highlighted in Red, on the Man Hole Cover, highlighted in Green.

Use the Oil Can, highlighted in Red, on the Handle, highlighted in Green.
Click to turn the Handle.
Return to the Fountain.

Examine the Fountain.
Gather the Key and Shard, highlighted in Red.
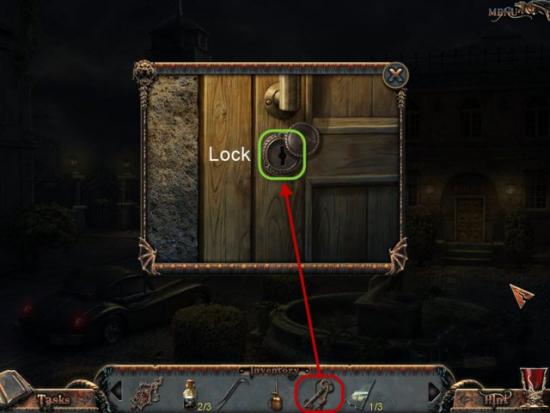
Examine the Police Station.
Use the Key, highlighted in Red, on the Lock, highlighted in Green.
Enter the Police Station.
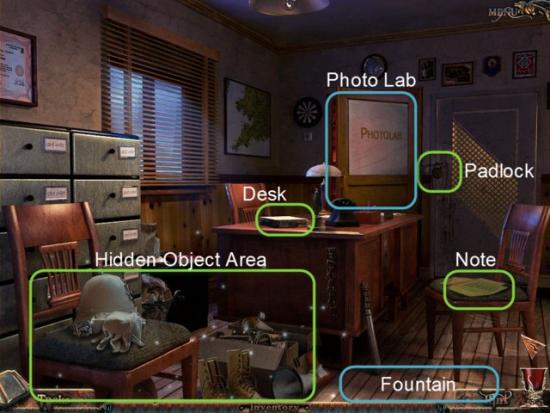
Examine the Padlock highlighted in Green.
Examine the Note.
Examine the Desk.
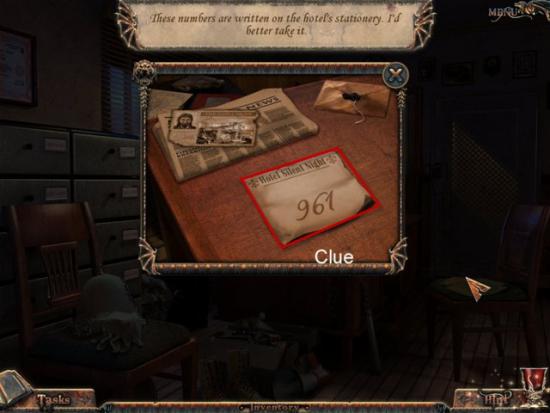
Gather the Clue highlighted in Red.
Examine the Area next to the Desk.
Gather the Lever highlighted in Red.
Gather the Hidden Objects highlighted in Yellow.
Leave Police Station.
Return to the Docks.
Examine the Crane.
Place the Lever, highlighted in Red, into the Panel, highlighted in Green.
Click to pull the Lever.

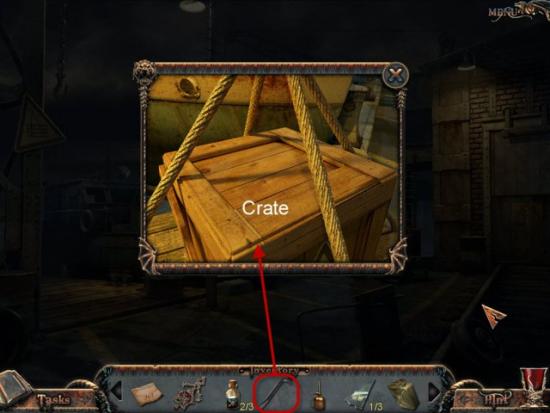
Examine the Crate.
Use the Crowbar, highlighted in Red, to open the Crate, highlighted in Green.
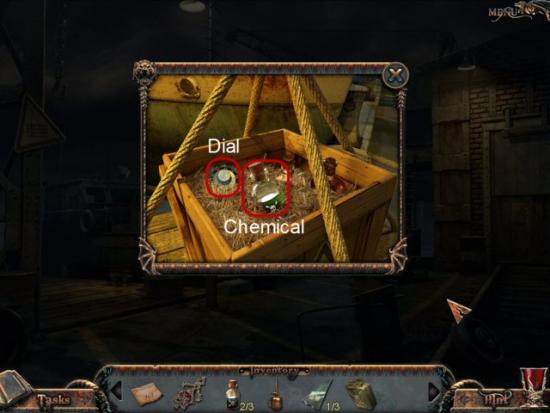
Gather the Chemical and Dial highlighted in Red.
Return to the Police Station.
Enter the Photo Lab.
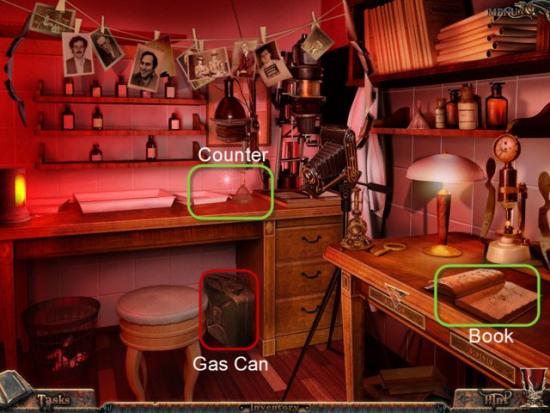
Gather the Gas Can highlighted in Red.
Examine the Book highlighted in Green.
Next, examine the Counter.
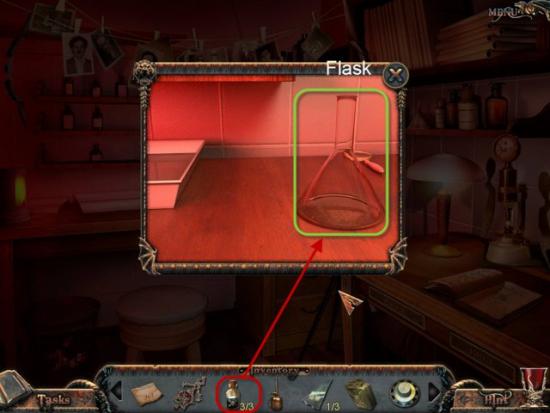
Place the three Chemicals, highlighted in Red, on the Flask, highlighted in Green.
Take the Flask.
Exit the Photo Lab.
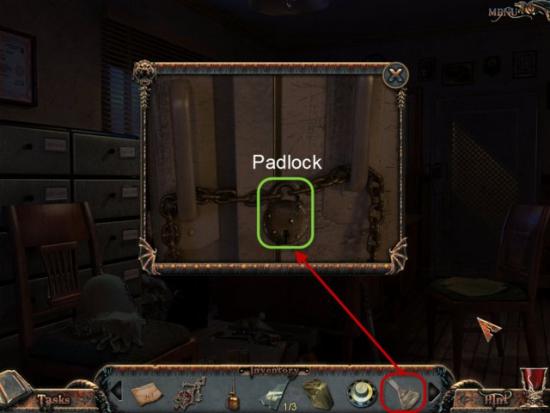
Examine the Padlock.
Use the Flask of Acid, highlighted in Red, on the Padlock, highlighted in Green.
Enter the Evidence Room.
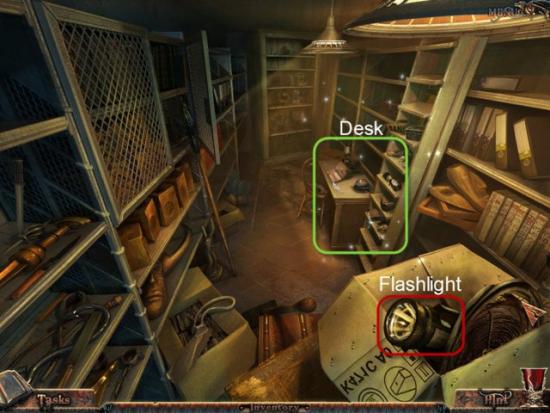
Gather the Flashlight highlighted in Red.
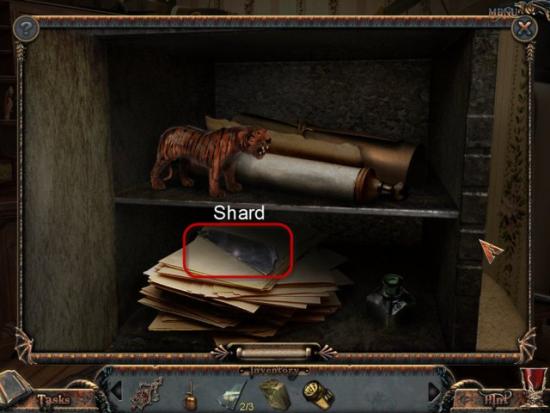
Examine the Desk highlighted in Green.
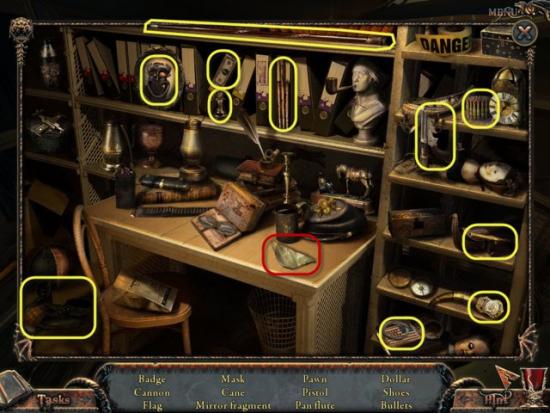
Gather the second Shard highlighted in Red.
Gather the Hidden Objects highlighted in Yellow.
Leave the Evidence Room and return to the Hotel Office.
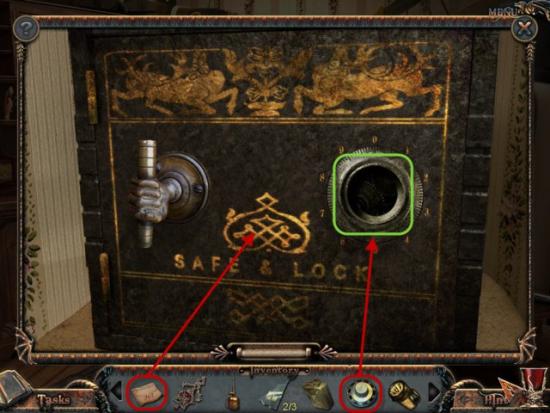
Examine the Safe.
Place the Dial, highlighted in Red, on the Safe, highlighted in Green.
Next, use the Code on the Safe.
To open the Safe:
• Turn the Dial to the Right to 9.
• Turn the Dial to the Left to 6.
• Turn the Dial to the Right to 1.
Gather the third Shard highlighted in Red.
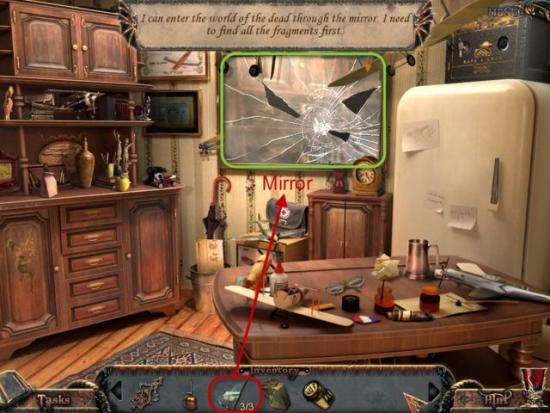
Place the three Shards into the Mirror.
Enter the Mirror.
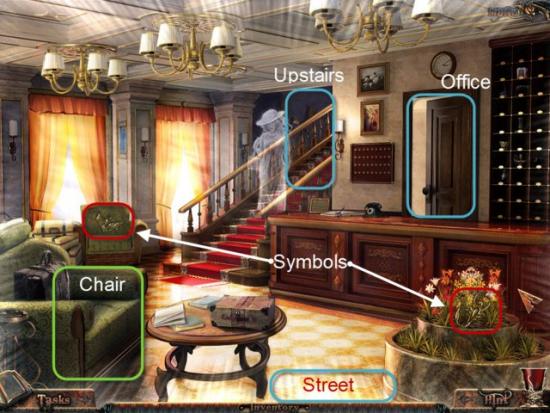
Gather the two Symbols highlighted in Red.
Enter the Office.
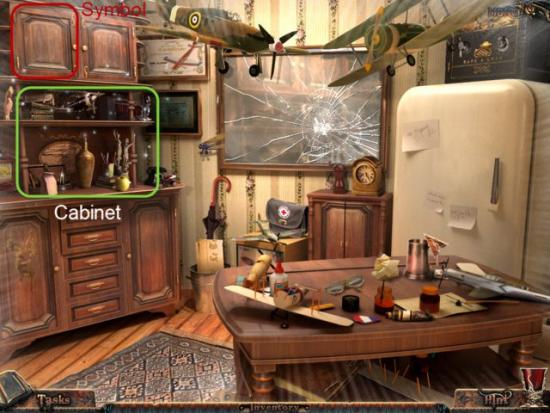
Gather the Symbol highlighted in Red.
Examine the Cabinet highlighted in Green.
Gather the Holy Water highlighted in Red.
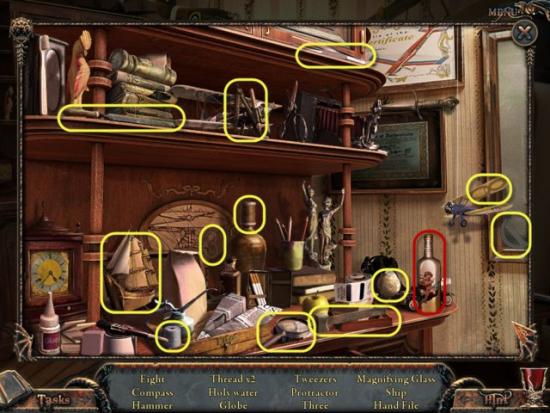
Gather the Hidden Objects highlighted in Yellow.
Exit the Office.
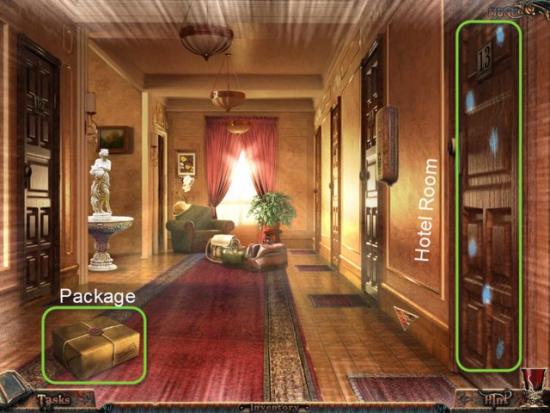
Head Upstairs.
Examine the Package highlighted in Green.
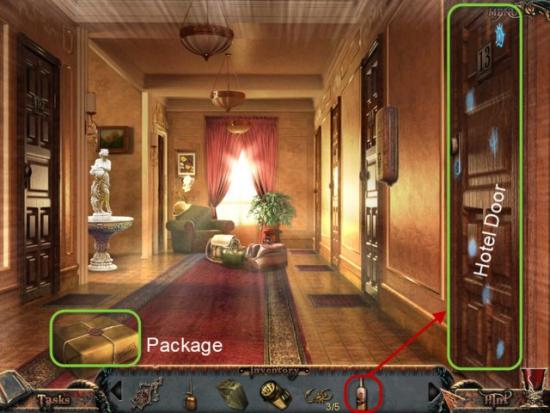
Use the Holy Water, highlighted in Red, on the Hotel Room Door.
Enter the Room.
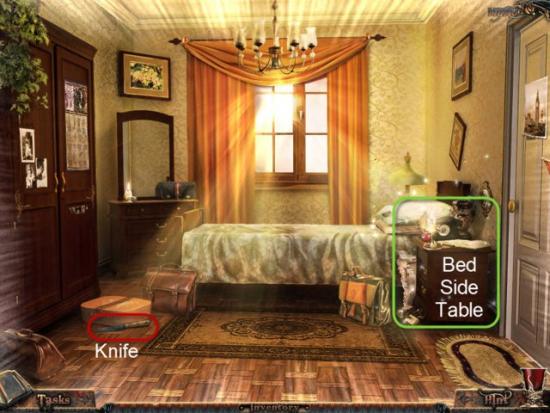
Gather the Knife highlighted in Red.
Examine the Bed Side Table highlighted in Green.
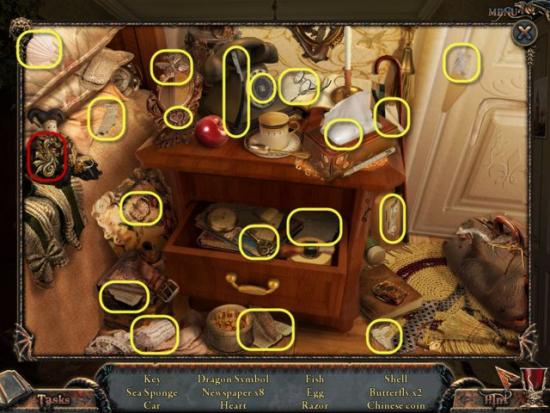
Gather the Symbol highlighted in Red.
Gather the Hidden Objects highlighted in Yellow.
Exit back to the Hallway.
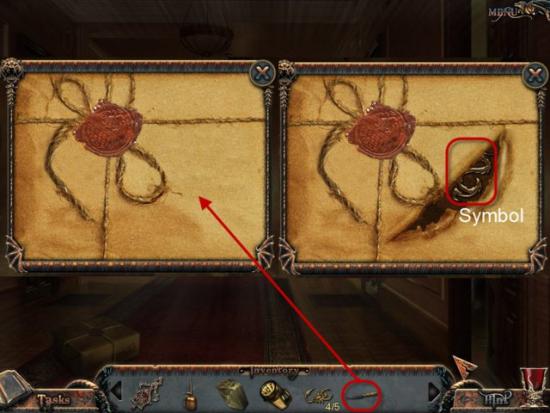
Examine the Package.
Use the Knife highlighted in Red on the Package.
Gather the Symbol highlighted in Red.
Return to the Lobby.
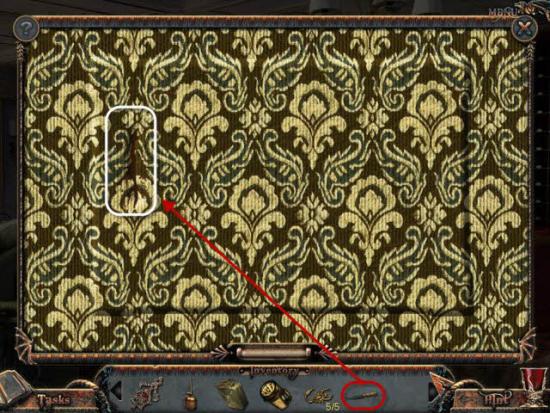
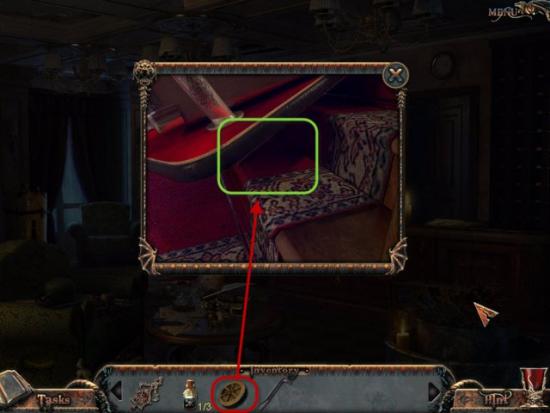
Examine the Chair.
Use the Knife, highlighted in Red, on the Chair, highlighted in White.

Place the five Symbols, high in Red, into the Box.
This is a Lights On/Off Puzzle.
Each Symbol is interconnected with several other Symbols.
When you click an Symbol on or off it will turn all interconnected Symbols to their opposite status.
Your goal is to turn on all Symbols at same time.
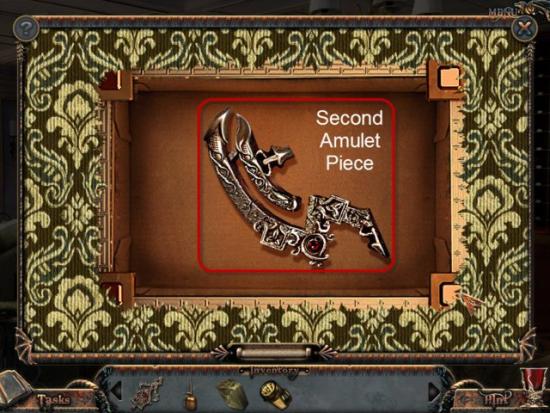
Gather the second Amulet Piece highlighted in Red.
Enter the Office.
Enter the Mirror.
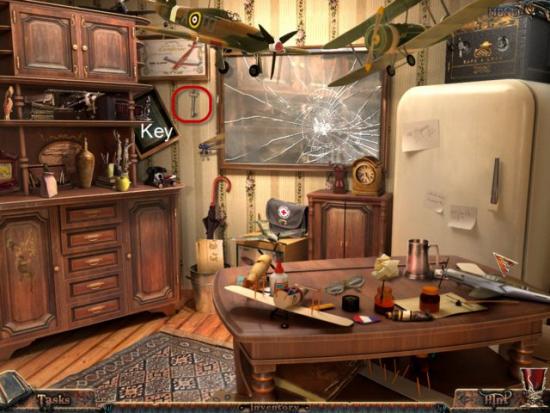
Gather the Key highlighted in Red.
Go to the Docks.
Examine the Dock Door.
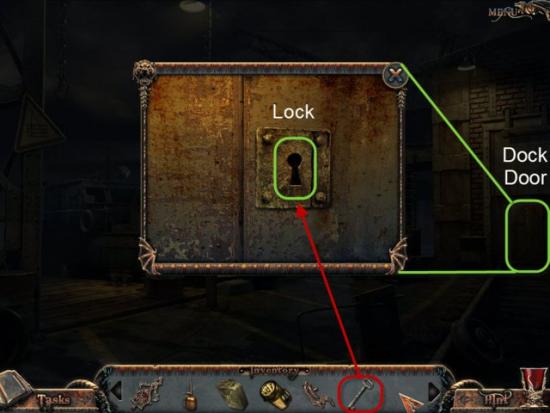
Use the Key, highlighted in Red, on the Dock Door.
Enter the Dock Door.
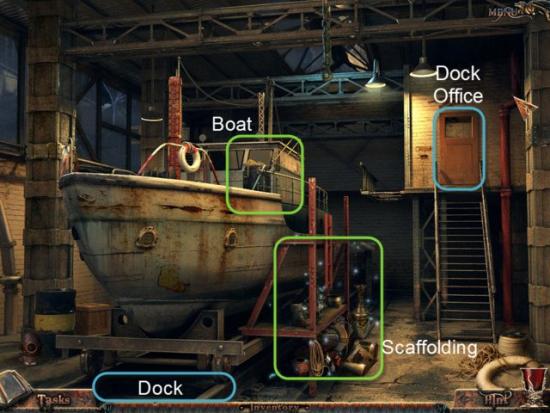
Exam the Scaffolding highlighted in Green.
Gather the Shard highlighted in Red.
Gather the Hidden Objects highlighted in Yellow.
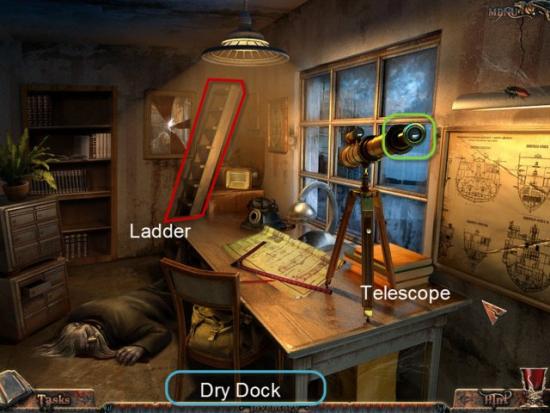
Climb the Stairs to the Dock Office.
Take the Ladder highlighted in Red.
Examine the Telescope highlighted in Green.
Exit back to the Dry Dock.
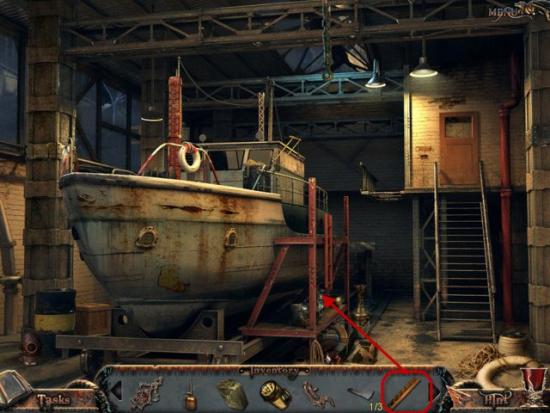
Use the Ladder, highlighted in Red, on the Boat.
Examine the Boat.
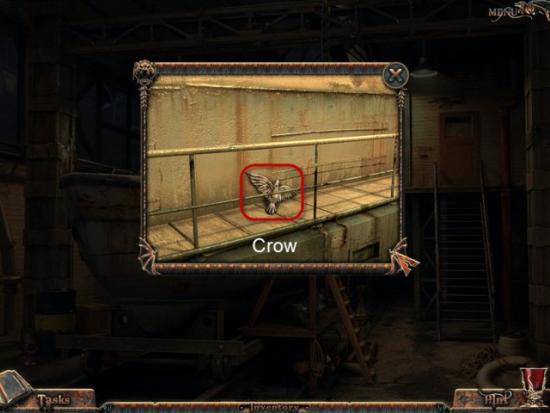
Gather the Crow highlighted in Red.
Exit the Dock and go to the Graveyard.
Examine the Newspaper highlighted in Green.
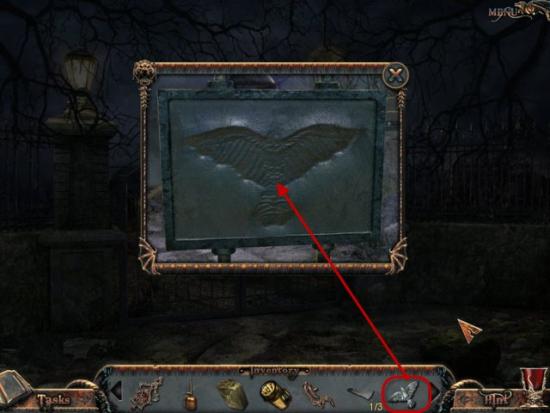
Examine the Gate.
Place the Crow, highlighted in Red, into the Gate.
Enter the Cemetery.
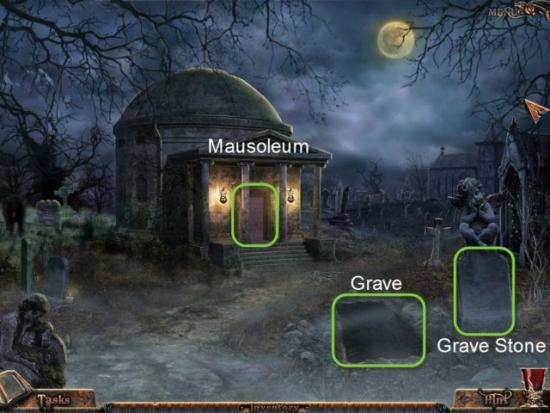
Examine the Gravestone.

Use the Flashlight, highlighted in Red, on the Gravestone.
Make note of the Dates.
Next, examine the the Grave.
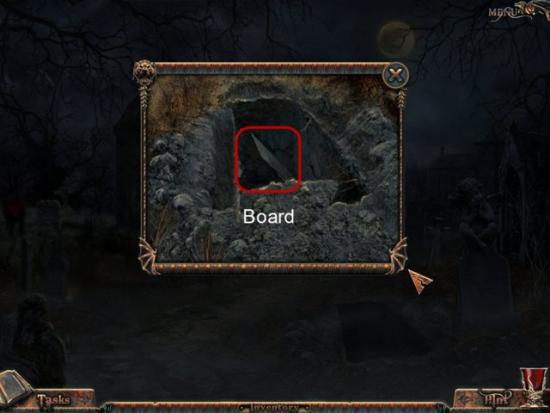
Gather the Board highlighted in Red.
Examine the Mausoleum.

To unlock the Door you need to enter the Age from the Gravestone.
Click to turn the Dials till the correct Age is entered.
Solution:
• Set the Left Dial to 6.
• Set Right Dial to 8.
Leave the Graveyard and return to the Docks.
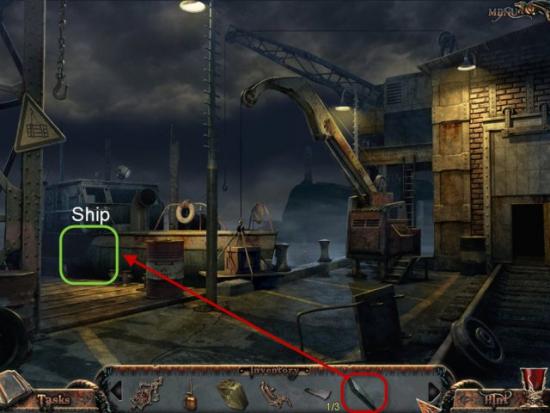
Place the Board, highlighted in Red, on the Ship, highlighted in Green.
Climb aboard the Ship.
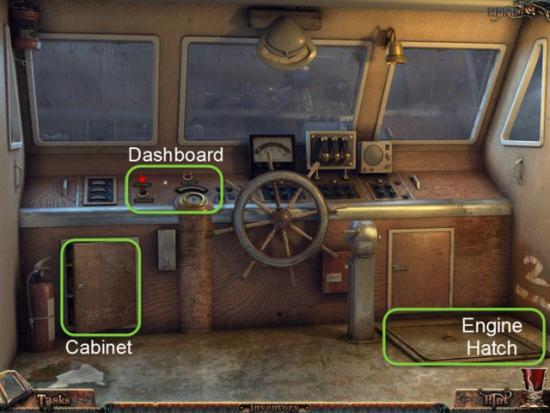
Examine the Cabinet highlighted in Green.
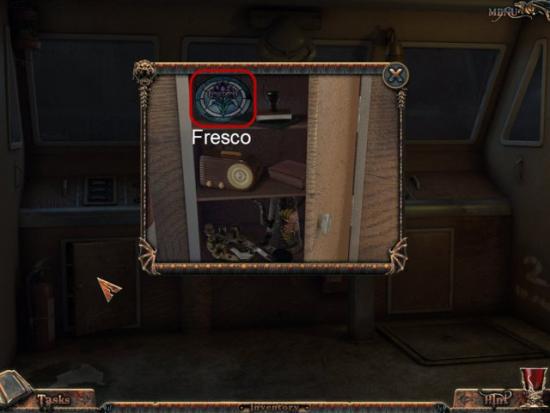
Gather the Fresco highlighted in Red.

Examine the Dashboard.
Click to turn on the Searchlight highlighted in Green.
Return to the Dock.
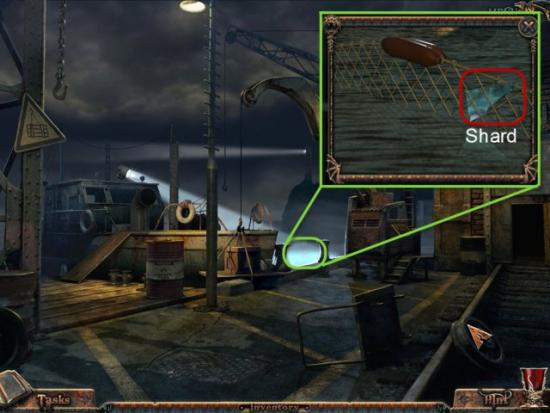
Examine the Area highlighted by the Searchlight.
Gather the Shard highlighted in Red.
Return to the Graveyard.
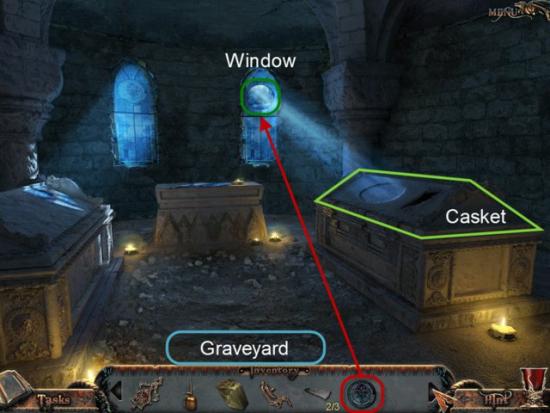
Enter the Mausoleum.
Place the Fresco, highlighted in Red, into the Window, highlighted in Green.
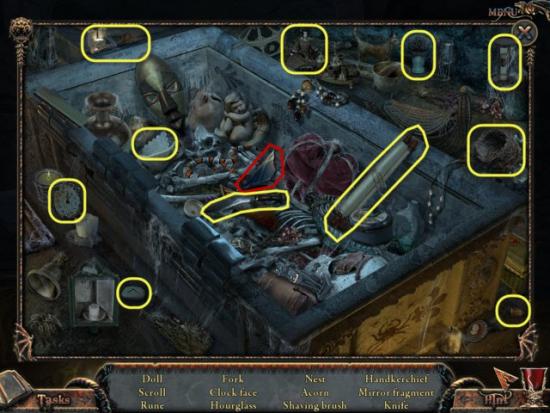
Examine the Casket.
Gather the Shard highlighted in Red.
Gather the Hidden Objects highlighted in Yellow.
Return to the Dock.
Enter the Dry Dock Office.
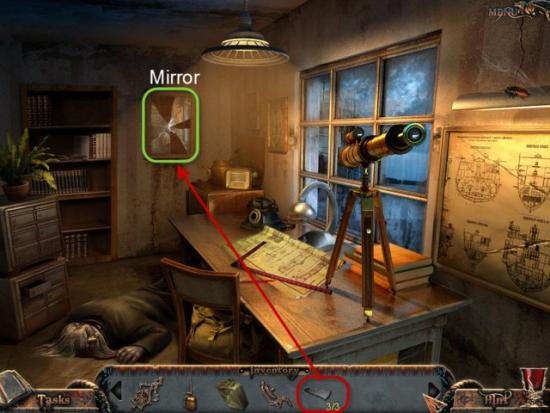
Place the three Shards, highlighted in Red, into the Mirror, highlighted in Green.
Enter the Mirror.
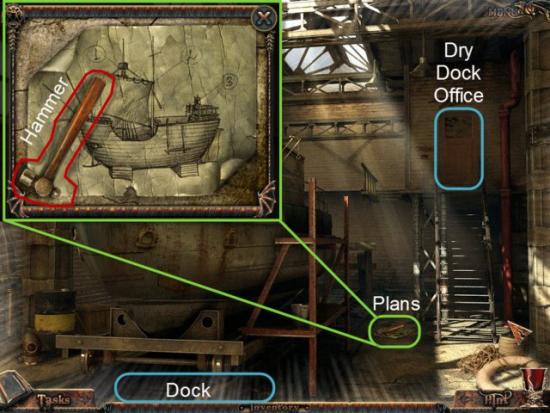
Examine the Plans highlighted in Green.
Gather the Hammer highlighted in Red.
Return to the Dry Dock Office.
Examine the Bottle Ship highlighted in Green.
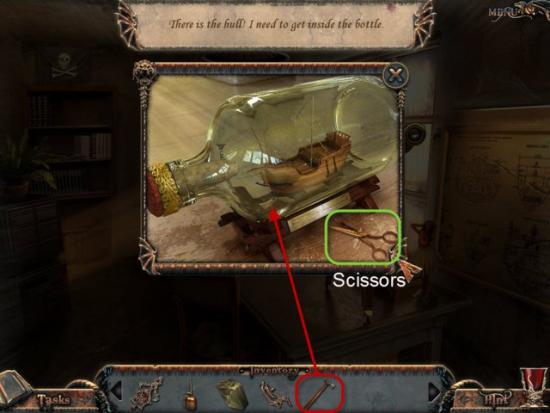
Take the Scissors highlighted in Red.
Use the Hammer on the Bottle.
Examine the Ship.

Examine the Cabinet.
Gather the Ship Mast highlighted in Red.
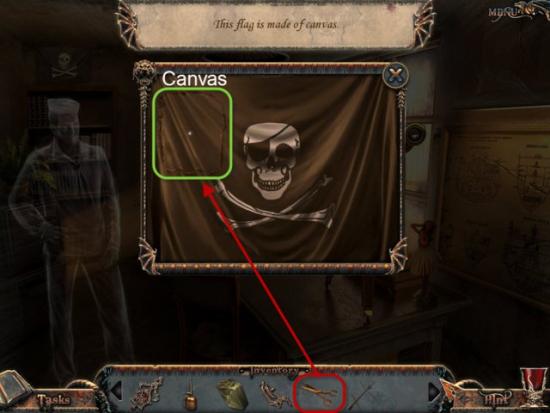
Examine the Pirate Flag.
Use the Scissors, highlighted in Red, on the Flag, highlighted in Green.
Take the Canvas.
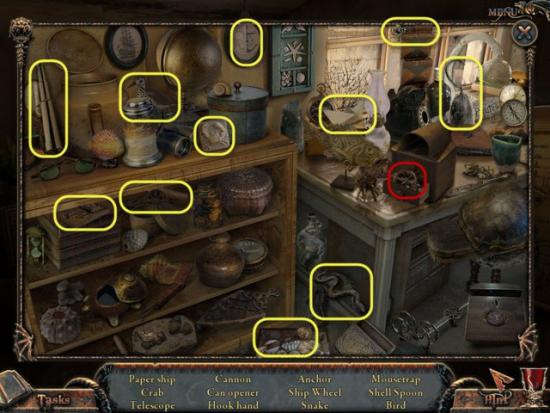
Examine the Hidden Object Area in the Corner.
Gather the Ship Wheel highlighted in Red.
Gather the Hidden Objects highlighted in Yellow.
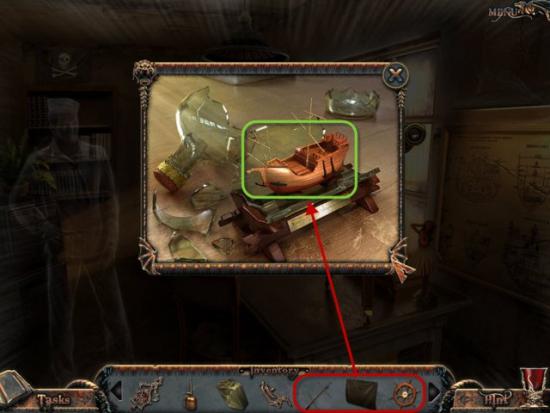
Examine the Bottle Ship once again.
Place the Sail, Mast, and Ship Wheel, highlighted in Red, onto the Model Ship.
Receive the third and final Amulet piece.
Exit through the Mirror.
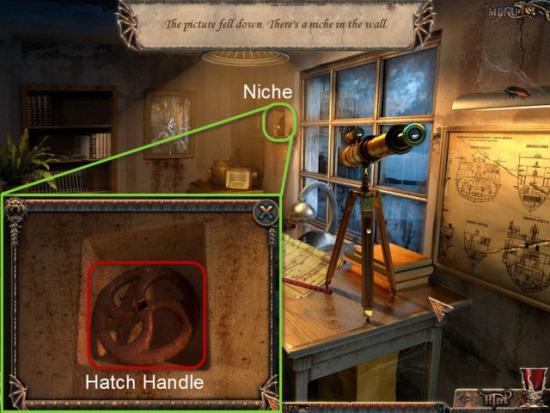
Examine the Niche in the Wall.
Gather the Hatch Handle.
Return to the Dock.
Board the Ship.
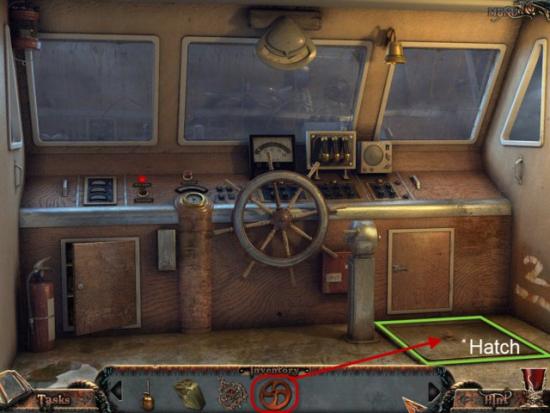
Use the Hatch Handle, highlighted in Red, in the Hatch, highlighted in Green.
Go Below Deck.
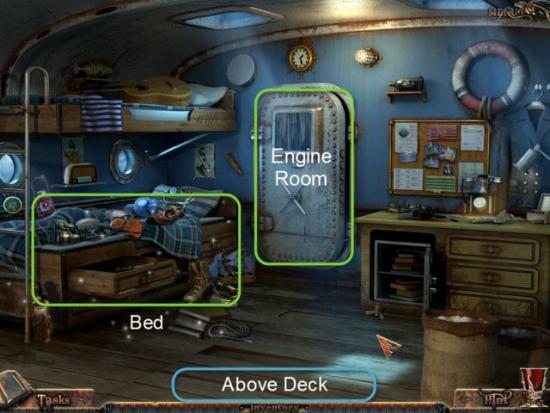
Examine the Bed highlighted in Green.
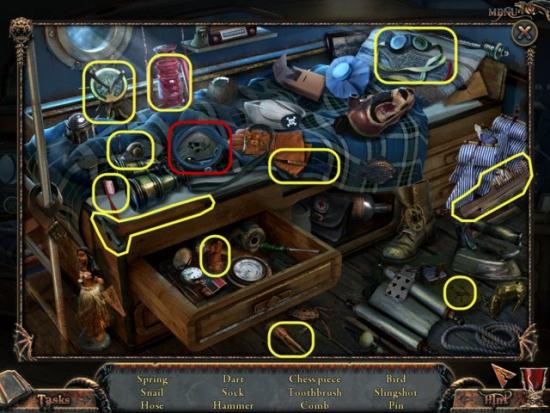
Gather the Hose highlighted in Red.
Gather the Hidden Objects highlighted in Yellow.
Return to the Dock.
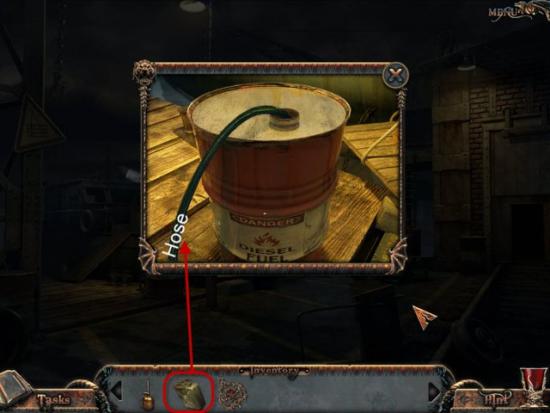
Examine the Diesel Barrel.
Use the Hose on the Barrel.
Next use the Gas Can on the Barrel.
Return to the Ship.
Head Down Below and enter the Engine Room.
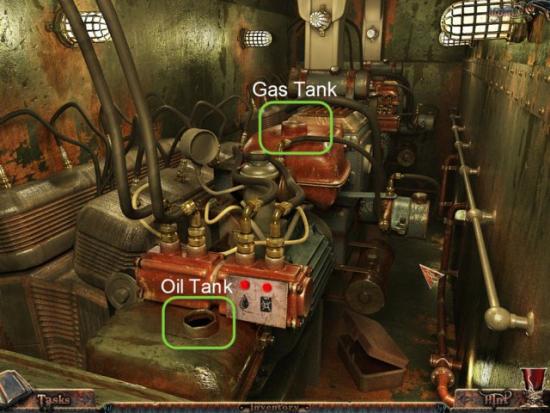
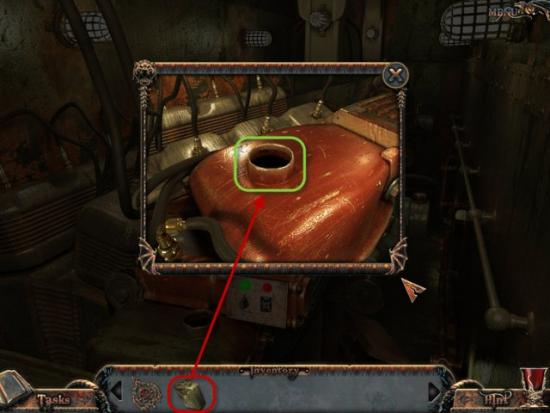
Examine the Oil Tank highlighted in Green.

Use the Oil Can, highlighted in Red, on the Oil Tank.
Exit and examine the Gas Tank.
Use the Gas Can, highlighted in Red, on the Gas Tank.
Return above Deck to the Wheel House.
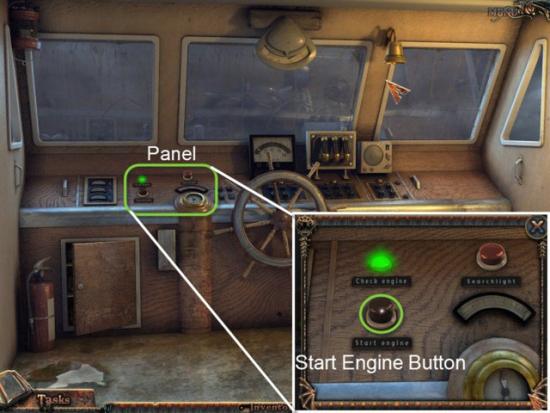
Examine the Panel.
Click the Start Engine Button, highlighted in Green.
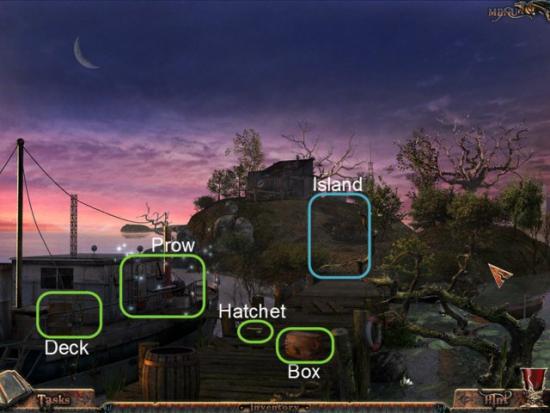
Examine the Box highlighted in Green..
Examine the Boat Deck .
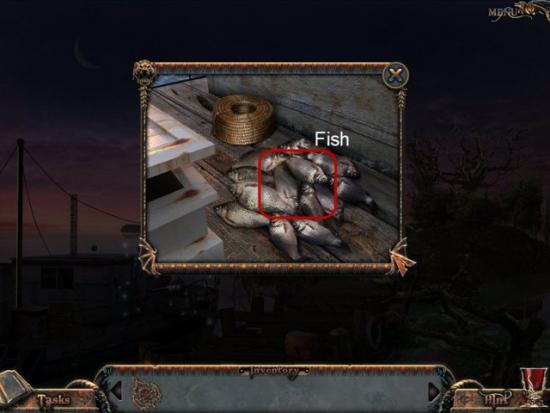
Gather the Fish highlighted in Red.
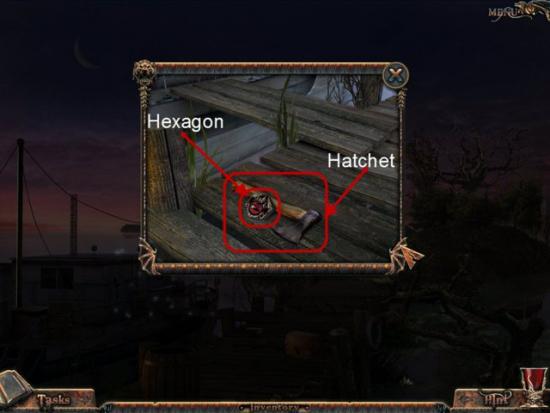
Examine the Hatchet laying on the Dock.
Gather the Hexagon and Hatchet highlighted in Red.
Examine the Boat Prow.
Gather the Gem highlighted in Red.
Gather the Hidden Objects highlighted in Yellow.
Head to the Island.
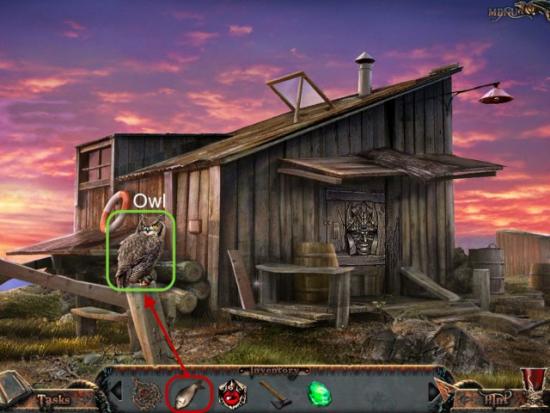
Give the Fish, highlighted in Red, to the Owl, highlighted in Green.
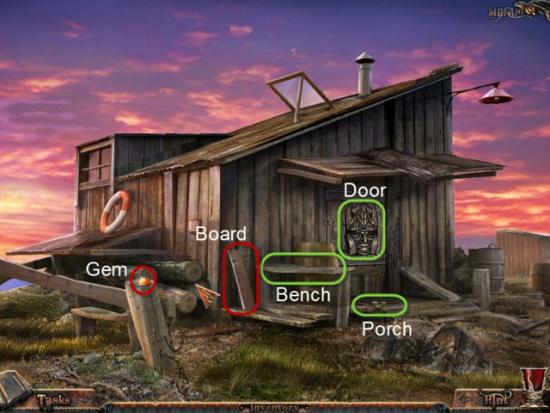
Gather the Orange Gem and Board highlighted in Red.
Examine the Porch.
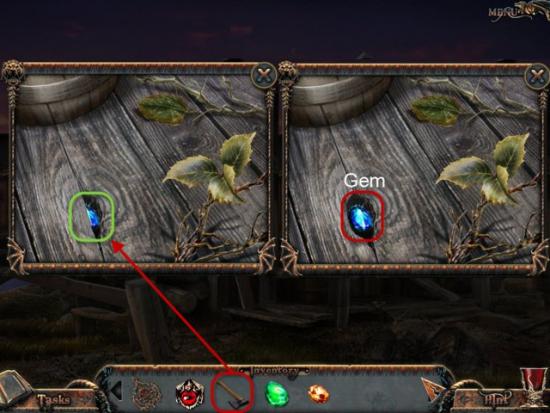
Use the Hatchet, highlighted in Red, on the Porch, highlighted in Green.
Gather the Blue Gem.
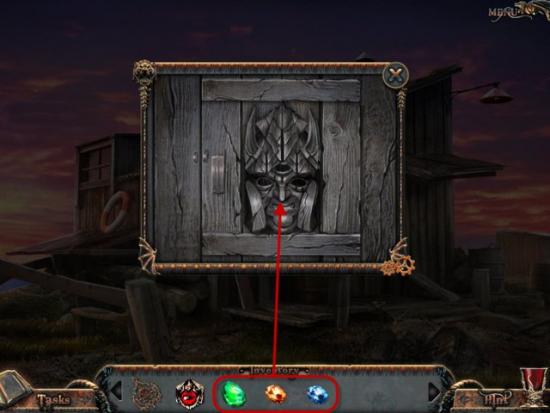
Examine the Shed Door.
Place the three Gems highlighted in Red, into the Face on the Door.
Enter the Shed.
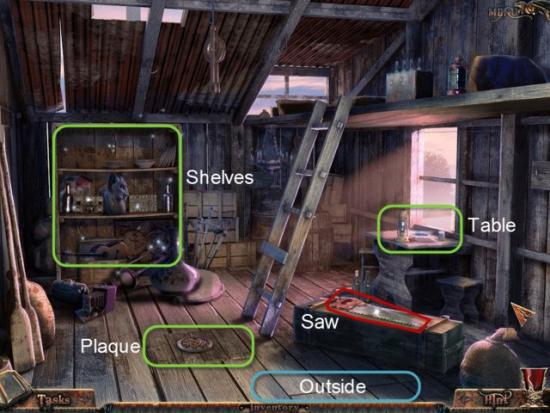
Gather the Saw highlighted in Red.
Examine the Table, highlighted in Green.
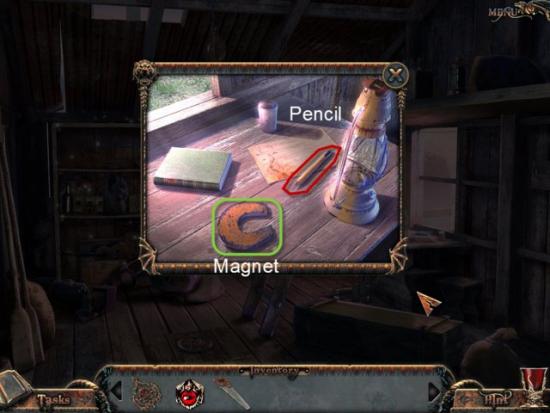
Gather the Pencil highlighted in Red.
Examine the Magnet.
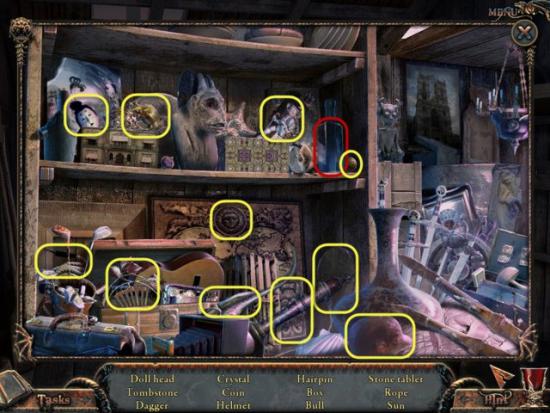
Examine the Shelves.
Gather the Crystal highlighted in Red.
Gather the Hidden Objects highlighted in Yellow.
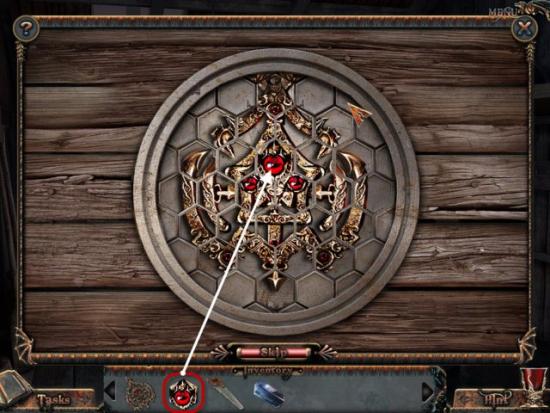
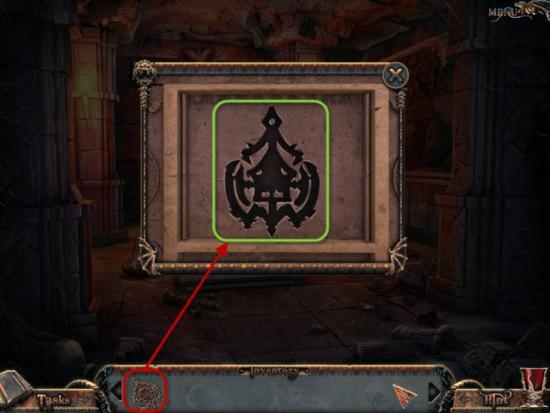
Examine the Plaque.
Place the Hexagon into the Puzzle.
To solve this Puzzle, click to rotate the pieces till the completed image is formed.
Click on each piece will rotate the piece.
See Image for Solution.
Return Outside Shed.
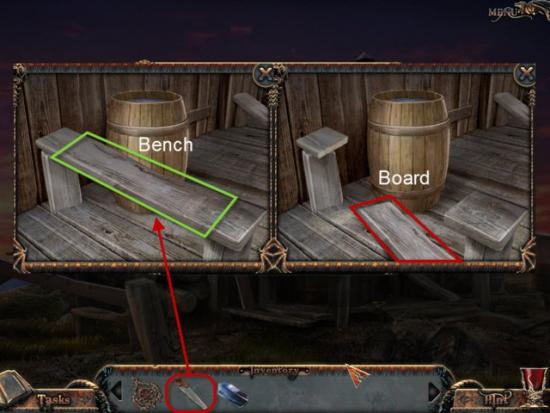
Examine the Bench.
Use the Saw, highlighted in Red, in the Bench, highlighted in Green.
Gather the Board.
Re-enter the Shed.
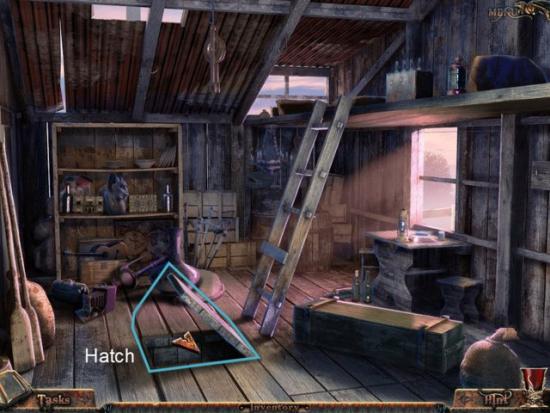
Enter the Hatch in the Floor.

Examine the Rope Bridge.
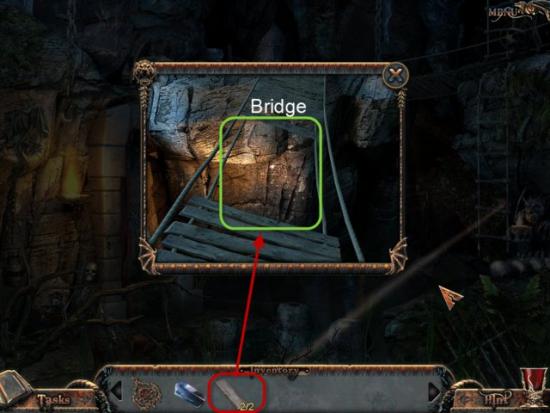
Place the two Boards, highlighted in Red, onto the Bridge, highlighted in Green.
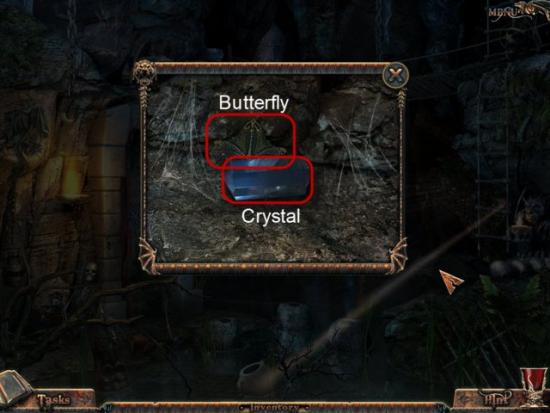
Examine the Crystal.
Gather the Crystal and Butterfly highlighted in Red.
Return to the Dock.
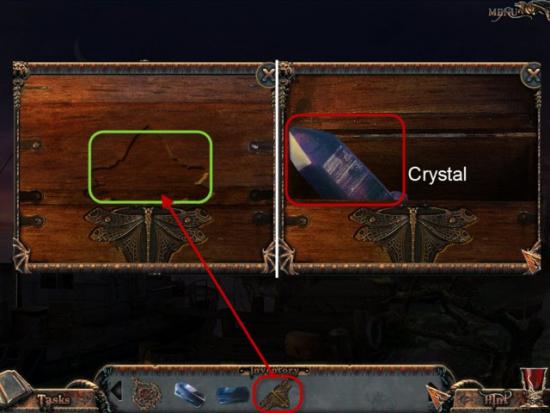
Examine the Box.
Place the Butterfly, highlighted in Red, onto the Box, highlighted in Green.
Gather the Crystal highlighted in Red.
Return to the Shed and down the Hatch.

Place the three Crystal in the correct order so that the Beam of Light hits the Door.
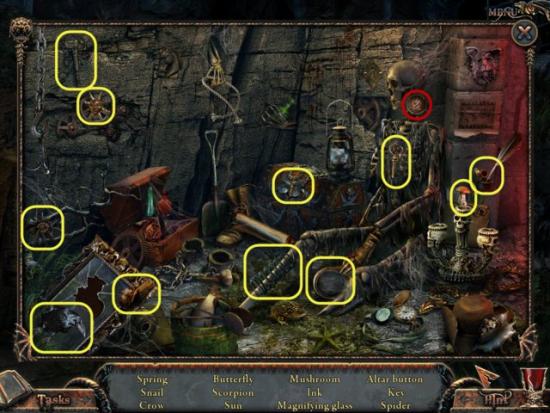
Examine the Skeleton.
Gather the Altar Button highlighted in Red.
Gather the Hidden Objects highlighted in Yellow.
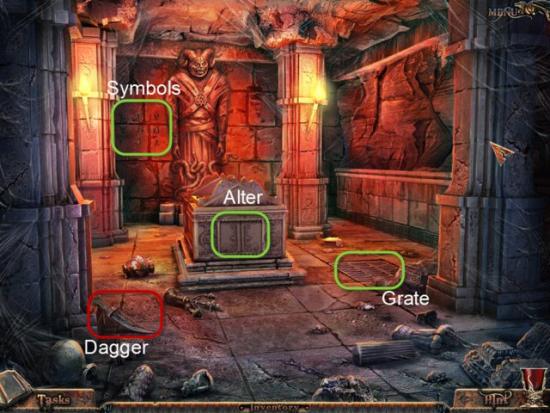
Enter the Alter Room.
Take the Dagger highlighted in Red.
Examine the Grate highlighted in Green.
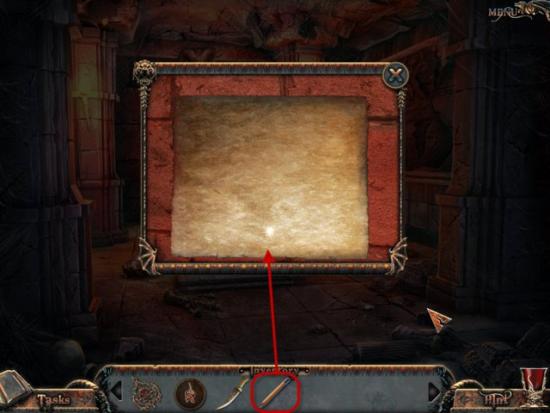
Examine the Alter.
Gather the Paper highlighted in Red.
Exit the Mini-Game.

Examine the Symbols.
Place the Paper on the Symbols.
Next use the Pencil on the Paper, three times.
Take the Paper with the Symbols on it.
Return to the Dock.

Examine the Deck.
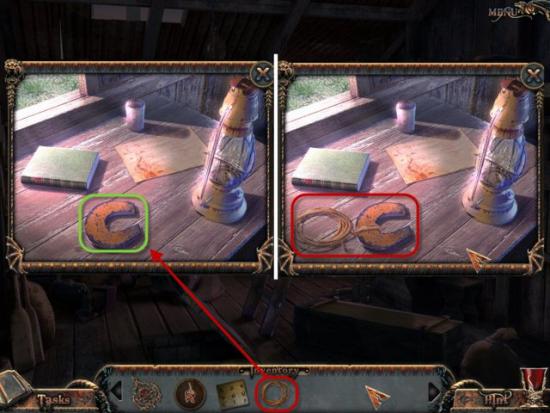
Use the Dagger, highlighted in Red, on the Rope, highlighted in Green.
Gather the Rope.
Return to the Shed.
Examine the Table.
Use the Rope, highlighted in Red, on the Magnet, highlighted in Green.
Take the Magnet.
Return to the Altar Room.
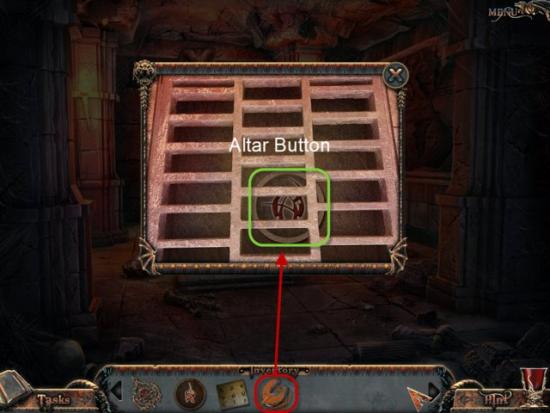
Examine the Grate.
Use the Magnet, highlighted in Red, to retrieve the Altar Button, highlighted in Green.
Examine the Altar.
Place the two Altar Buttons, highlighted in Red, into the Puzzle.
Place the Paper clue onto the Puzzle.
To solve this Mini-Game you must rearrange the Symbols to match the layout of that on the Paper clue.
Click on the four Buttons, highlighted in Green, to rotate the four surrounding symbols.
Rotate the Symbols until you have matched the Paper clue.
Remember if you get stuck, you can always use the Skip Button.
Examine the Altar once more.
Place the Amulet, highlighted in Red, onto the Altar, highlighted in Green.
Congratulations you have completed the game.
