- Wondering how to get Monopoly GO! free rolls? Well, you’ve come to the right place. In this guide, we provide you with a bunch of tips and tricks to get some free rolls for the hit new mobile game. We’ll …
Best Roblox Horror Games to Play Right Now – Updated Weekly
By Adele Wilson
Our Best Roblox Horror Games guide features the scariest and most creative experiences to play right now on the platform!The BEST Roblox Games of The Week – Games You Need To Play!
By Sho Roberts
Our feature shares our pick for the Best Roblox Games of the week! With our feature, we guarantee you'll find something new to play!All Grades in Type Soul – Each Race Explained
By Adele Wilson
Our All Grades in Type Soul guide lists every grade in the game for all races, including how to increase your grade quickly!
Secrets of the Seas: Flying Dutchman Walkthrough
Secrets of the Seas: The Flying Dutchman takes you to the high seas for some amazing adventure. Find hidden objects, locate items to combine and use for game play and unlock thrilling mini games. Help solve the secret of the seas! Gamezebo’s Secrets of the Seas: The Flying Dutchman walkthrough will provide you with detailed images, tips, and latest information on how to play your best game.
Game Introduction – Secrets of the Seas: The Flying Dutchman
Secrets of the Seas: The Flying Dutchman takes you to the high seas for some amazing adventure. Find hidden objects, locate items to combine and use for game play and unlock thrilling mini games. Help solve the secret of the seas! Gamezebo’s Secrets of the Seas: The Flying Dutchman walkthrough will provide you with detailed images, tips, and latest information on how to play your best game.
Getting Started
- Secrets of the Seas: Flying Dutchman can be purchased by clicking on the “Play Now” link at the top of this page.
- Once prompted, enter your user name. Each game will be saved under a different user name and you can save up to six different games. When you exit the game through the menu options it will save your progress at the point of your exit. If you do not properly exit the game by going through the menu options you may lose any progress you have made in the chapter and will have to start over at the beginning of the last chapter you completed losing any previous work.
- Be sure to check out the Gamezebo forums for this game where you can discuss and share tips and hints with other players.
- If you have purchased the “Collector’s Edition” you will have access to bonus material such as wallpapers and screensavers, game music, and an integrated user guide.
Game Tips/General Information

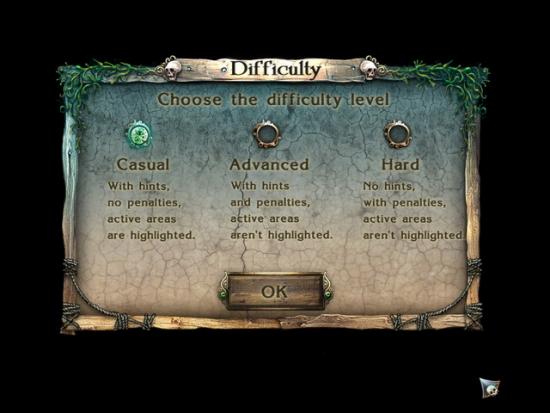
- Game Difficulty Modes: There are three difficulty modes in the game which are casual, advanced and hard.
- Casual mode – Unlimited rechargeable hints and all active areas have sparkling indicators.
- Advanced mode – Has hints but no active areas have sparking indicators.
- Hard mode – Has no hints and no sparkling indicators.
- You must choose your mode at the beginning of the game and you cannot change modes once you begin. If you want to play another mode you will need to start a new game with a new user name.
- Click on “Options” in the main menu to adjust the volume of game music and sound effects as well as adjust the cursor and change the screen dimensions.
- The game has eight chapters which consist of hidden object and interactive scenes requiring you to locate items and use them in other locations to combine or interact to solve a puzzle. There are occasionally mini game puzzles of varying difficulty found which will reward you with items for your inventory when completed. Hidden object scenes are found sprinkled throughout the interactive scenes in the game.
- Hidden object scenes are found by looking for the blue sparkling areas in a scene and clicking on it. Sometimes you will see objects such as ghostlike skulls or symbols coming from the area.
- Inventory Area – Your inventory is located along the bottom of the screen. Place your cursor there to cause it to lift up. You will be notified before anything is placed into your inventory area and will click on “Ok” to confirm. To use an item open inventory then click on it and it will stick to your cursor. Click on the item you wish to use it on and this will affect change on it.
Cursors
- There are several types of cursors in the game and you will need to know what each type does.
- Arrow – This is the general pointing cursor. Click on items to choose them while in a hidden object scene or to locate items you need to move from one scene to the next.
- Animated Hand – When a cursor changes to a hand the item under it can be picked up and placed into inventory.
- Magnifying Glass- When you see this cursor click on the item to take a closer look or a look behind something.
- You can use custom cursors by clicking on the options area from the main menu.
Hidden Object Scenes
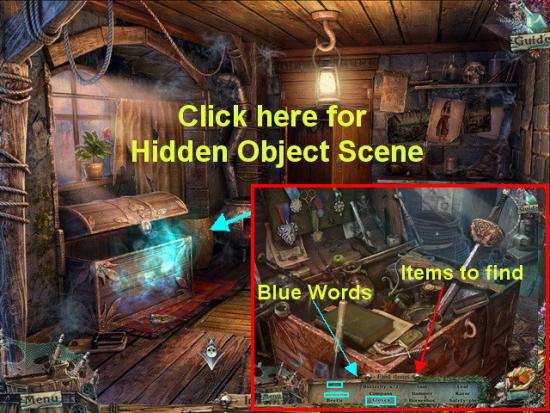
- When see a blue sparkling effect over an area click on it as this is a hidden object scene.
- A. Inventory List – Once in a scene note that the inventory list is along the bottom. You will need to find all the items in this list.
- B. Blue highlighted words – These items will require an additional step to solve them. Look for unusual things in the scene as well as hand cursors as they provide hints.
- Click on an object in the scene which is on the list and a line will draw through it.
- Once all items are found a final item will be requested of you to locate. Locate this item and it will be added to your inventory to use in the game.
Using Hints
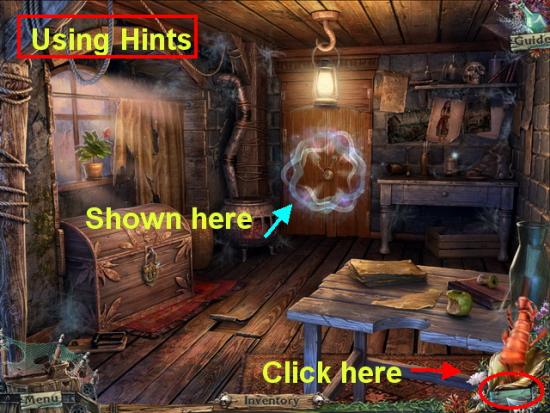
- Hints are used in casual and advanced mode. They are unlimited and do not give you a penalty but you must wait for them to recharge in between uses.
- While in a hidden object scene or during regular game play the hint button will appear at the lower right corner of the game screen once you complete the first half of chapter one.
- When you are stuck you can click on the word “Hint” and a glowing set of rings will rotate around the object in a hidden object screen or on a location if in the general game setting.
- Wait for the hint button to recharge before using it again. When the word “Hint” is showing the button is fully recharged and ready for use.
Walkthrough
- This walkthrough will take you through the eight chapters of the game explaining in detail how to proceed in the game from start to finish.
- The hidden object scenes will show the answers circled for you and a description of how to solve the blue lettered areas.
- Items in the adventure screen will be marked with a letter or number then a description will be given of how to proceed when you click on that particular item shown.
Chapter 1 – Shipwreck
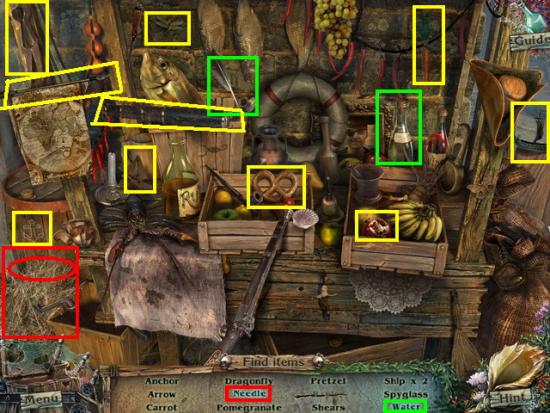
- The game will begin with an immediate hidden object scene which is a tutorial.
- Locate the hidden objects in the scene.
- Blue Words:
- “Needle” – Click on the hay at the lower left of the scene shown circled in red. When you see the needle click on it.
- “Water” – Note the bottle to far right has no label on it. Click on the quill pen shown circled in green above. It will write “H20” on the bottle. Now you can click on it to collect “Water”
- Once you find all items you will be asked to find a “Winch” which is circled in blue and will add to your inventory once found.
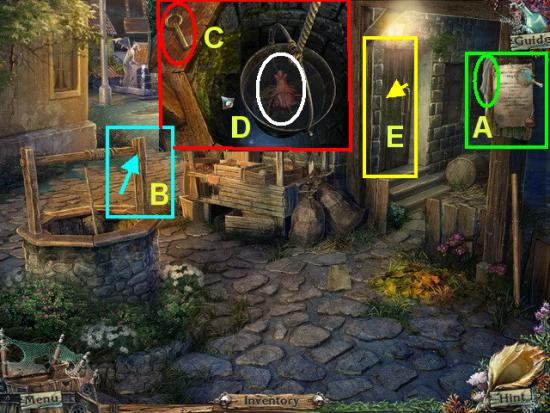
- A. Click on the note and take the cloth at upper left into your inventory.
- B. Take the winch from inventory and place it on the upper right side of the well until it locks into place. Click on the handle to turn it.
- C. Once you see the contents of the well bucket which is a shrimp click on it and it will go to the lower right corner of the game screen under your hint screen. Click here from now on if you need a hint in the game.
- D. Open the panel for the well again and take the cloth from inventory and use it to clear away debris at upper left corner of scene. When key is revealed click on it and place in your inventory.
- E. Click on the door to the back right of the scene and when panel opens take the key from inventory and use on the key hole. You can now enter this area. Click here for a new scene.
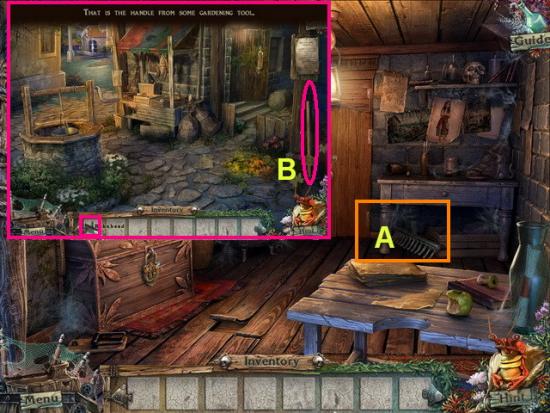
- A. Go inside the room and take the rake head from under the table.
- B. Exit outside and take the handle along the far right of the scene. These will combine to form a rake.
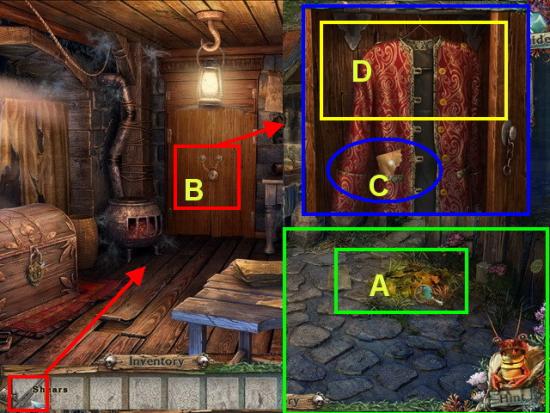
- A. Take the rake from inventory and use it on the pile of leaves. Take the pair of garden shears and add to inventory.
- Go back inside building.
- B. Take the shears from inventory and use it on the chains around closet door knobs.
- C. Once inside click on the jacket and when the panel opens take the note inside the pocket into inventory.
- D. Click on the jacket and it to inventory as well.
- E. Take the note on the table and add the note from inventory to it. Read the note.
- Watch the short video clip of ghost.
- Exit the scene.
- F. When outside place the jacket from inventory across puddle at far left of scene. Now you can walk over this area.
- Exit scene to far left.
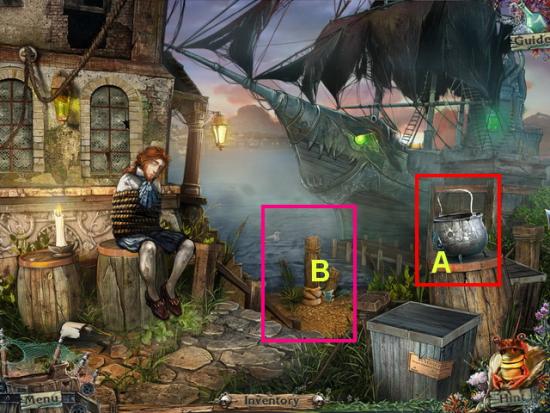
- Go forward for two scenes until you see the man tied up.
- A. Click on the kettle and take it into inventory.
- B. Click on the area in the center and when the panel opens take the shard of glass into inventory.
- Exit out one scene.
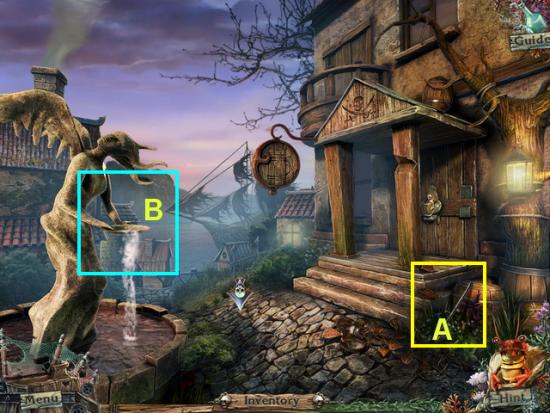
- A. Click on the crowbar and take it into inventory.
- B. Take the kettle from inventory and place it on the water. When it fills up with water it will add back into your inventory.
- Go down one scene.
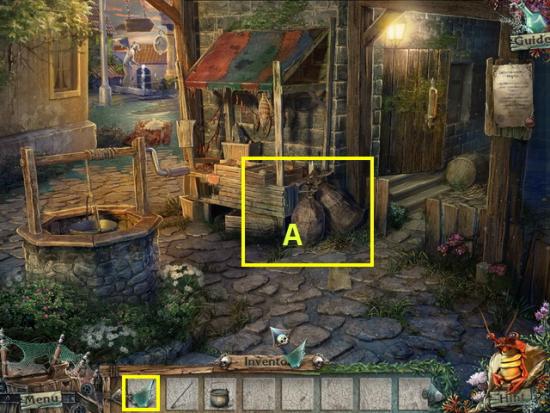
- A. Click on the sacks and when panel opens take the glass shard from inventory and use it on the bags. Take the gem into inventory.
- Exit into building.
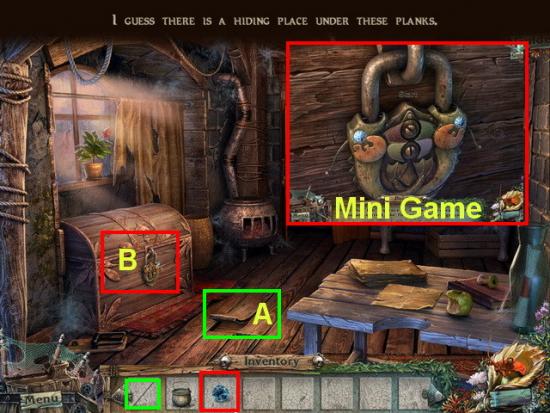
- A. Use the crowbar from inventory on the loose floor board. Take the wire piece into inventory.
- B. Click on the padlock on chest. When panel opens take the blue gem from inventory and place it in the empty slot.
- This will trigger a mini game.
- Your goal is to follow the patterns in a type of “Simon” game. There are four light colors. As you see them flash click on the panels to duplicate the patterns. Each time you get one correct another will add on a little longer than the one before.
- If you mess up the game starts over or you can hit the restart button anytime to start over.
- Once you complete the mini game the chest will become a hidden object scene and will glow blue.
- Click on the chest and enter hidden object scene.
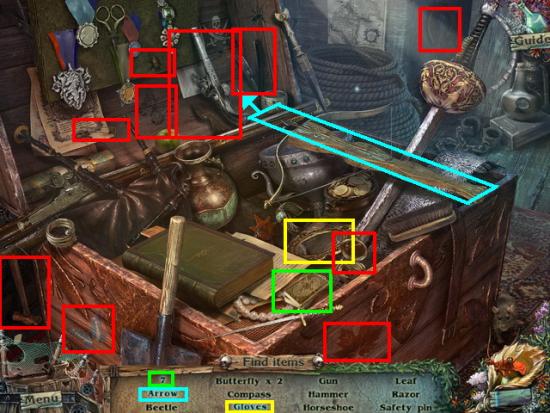
- There are three blue items in this scene.
- 7 – Click on the cards shown circled in green. When you see the cards change click on the 7.
- Arrow – Click on the bow and when the arrow shoots out click on the arrow. This is shown in light blue.
- Gloves – Click on the mirror in center front of chest. When it moves click on the gloves.
- Locate all other items shown circled in red.
- When finished you will be asked to locate a shovel. Once you do it will be added to your inventory.
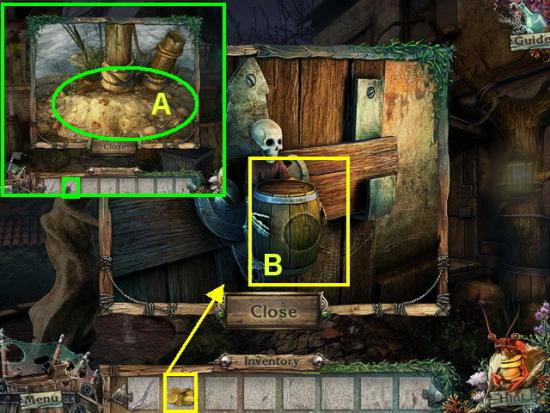
- A. Go back to the final scene near the ship where Michael is tied up. Open the panel and use the shovel from inventory to dig up the gold. Place gold in inventory.
- Go back one scene and click on the door to the right. When panel opens take the gold from inventory and place on door lock.
- You may now enter this area.
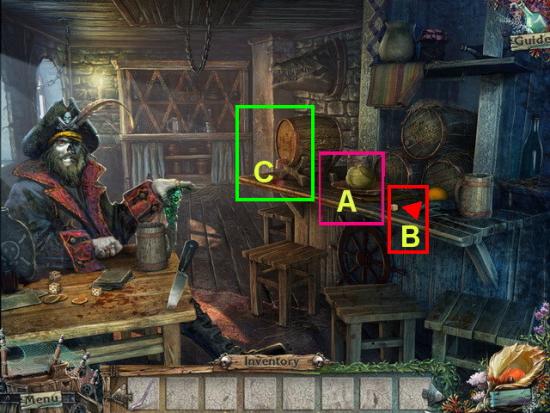
- A. Go inside and talk to ghost pirate. Take the cabbage into inventory.
- B. Take the die off of the counter and place in inventory.
- C. Click on the barrel area when panel opens find the paint brush and add to inventory.
- Return to the room with stove and chest.
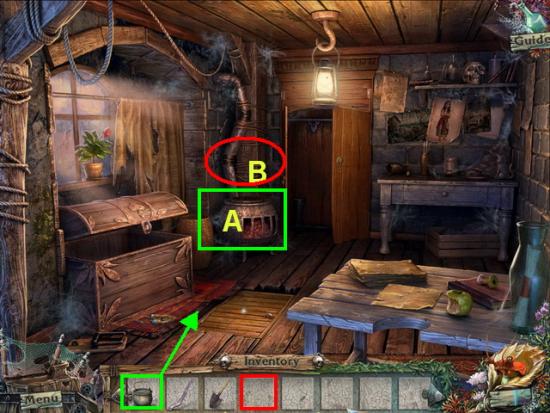
- A. Take the kettle of water from inventory and place on top of the stove.
- B. Take the cabbage from inventory and add to boiling water in kettle. Now you have soup in your inventory.
- Go back to Michael give him the soup to eat. He will explain what has happened then give you a metal ring for your inventory.
- Return to the room where the soup was made.
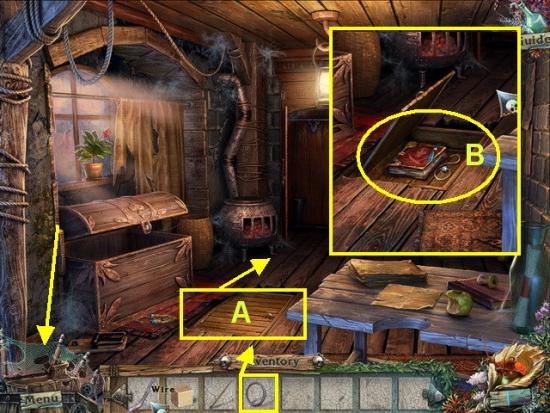
- A. Take the ring from inventory and use it on the handle of the panel in the floor. Lift up by the ring to open the panel.
- B. Remove the book from hidden space. This will move to the lower left side of the screen and you now have a diary in the game. You can click on this at any time to read documents in the game.
- Take the necklace into your inventory.
- Bring the necklace to the pirate ghost in the pub. He will give you a mug for inventory.
- Place the mug under the barrel and it will fill up with paint. Put back in your inventory.
- Return to the room where you got the necklace and right outside you will see a glowing area.
- Click on the glowing area for a hidden object scene.
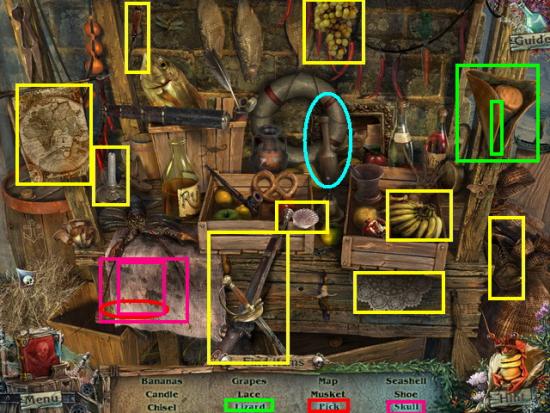
- Locate the hidden objects in the scene circled in yellow.
- Locate the blue text items –
- Lizard – Remove the hat at far upper right. When lizard starts to climb up the pole click on him. This is shown in green.
- Skull – Click on the towel at lower left. When skull is revealed click on it. This is shown circled in pink.
- Pick – The pick is found right next to the skull under the towel shown circled in red.
- Once you finish finding all items you will be asked to find a pestle which is shown circled in blue. This will add to your inventory.
- Return to the room where the book and necklace were found.
- Return to the room and click on the back right of the scene.
- When panel opens add paint in mug to scene.
- Next add brush to scene and dip in paint.
- Add white die to scene and paint dots on it.
- This will trigger a hidden object scene on chest. Click to complete.
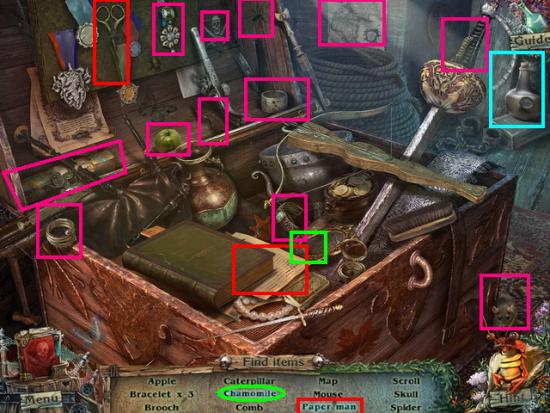
- Locate hidden objects in scene shown circled in dark pink.
- Blue text items –
- Chamomile – Click on mirror the flower is under book and circled in bright green.
- Paper man – Click on scissors then on paper under book to make paper man shown circled in red.
- Once all items are located you will be asked to find a bottle of booze which is shown above circled in bright blue.
- The booze will be added to your inventory.
- Return to the pub.
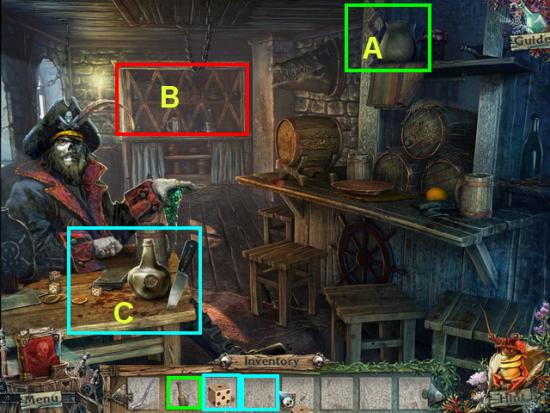
- A. Click on the pot in the upper right side of shelf. Use the pestle from inventory to mix and you will now have oil in your inventory.
- B. Click on the back shelf. Take oil from inventory and use it on grating. Take the die and add it to inventory.
- C. Give the booze from inventory and the two die to the pirate.
- He is now going to let you play a mini game.
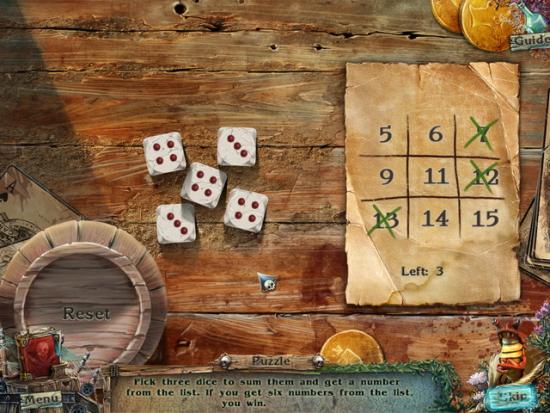
- Mini Game – You will be asked to pick three die to equal one of the totals of the nine numbers on the grid to the right.
- Keep choosing until you fill up the grid with green “X’s”
- Try to do the higher numbers first when possible.
- Each game is randomly generated so there is no way to give answers to this mini game.
- Once you complete it the pirate will let you on his crew.
- Follow the Pirate out the door.
- Go all the way back to where Michael was tied up and click on the ship to board it.
- Note – You will need to repair the necklace in the next chapter.
- This is the end of Chapter one.
Chapter 2 – The Flying Dutchman
- Note – At the end of Chapter 1 you acquired a broken necklace from the Pirate. You will now have to repair this necklace. Over the next few chapters look for pearls hidden in the interactional scenes. There are no pearls in the hidden object scenes. There are twelve to locate and they will appear along the left side of your game screen at all times. Click on the necklace to read a small snippet about the necklace.
- You are now on the ship and have many obstacles to overcome.
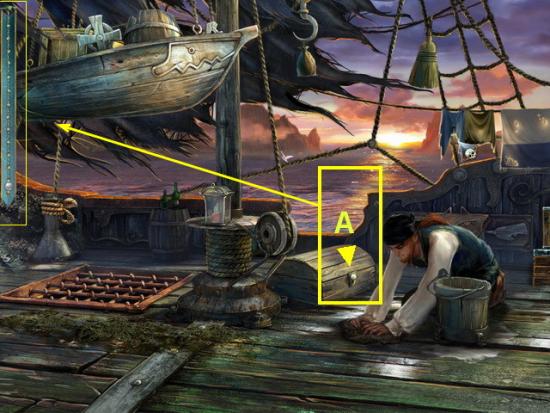
- A. Click on the pearl on the front of the chest.
- Note the area along the left of the screen. The necklace will remain here throughout the game until you complete it. Each time you find a new pearl it will add on to the left of the screen.
- Exit to the right.
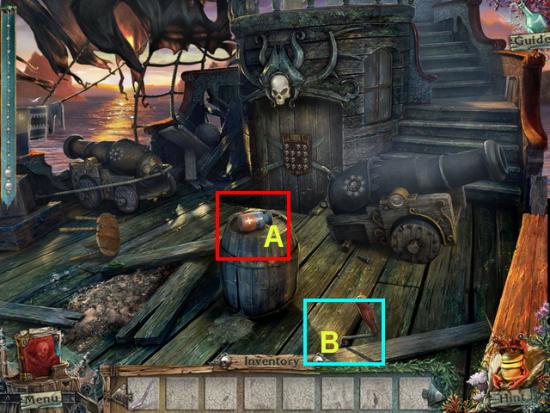
- A. Take the discharged battery and place in inventory.
- B. Take the winch and place in inventory.
- Return to the previous scene.
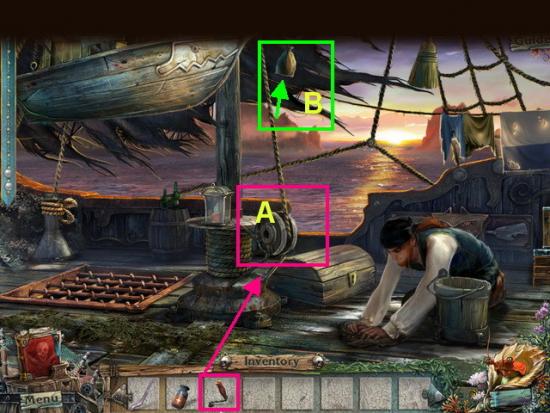
- A. Place the winch from inventory into the wheel slot. Click on the handle and lower the rope.
- B. When the empty pouch is lowered, click on it and add to inventory for later use.
- Exit once to the left.
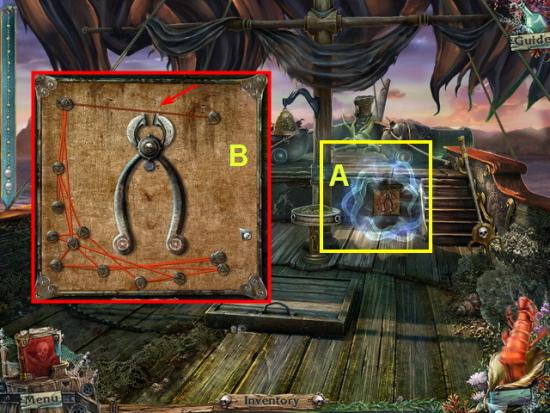
- A. Click on the panel at back right of scene. This will trigger a mini game.
- Click on the round pegs and drag the string away to the left of scene until they look like the image above. Then slowly move strings one by one until they fade out. String fades out when it is not crossing any other string. Your goal is to make sure none are crossing at all.
- B. Once the string puzzle is finished click on the nail puller and place into your inventory for later use.
- Exit back to the scene where you got the discharged battery and winch. Two scenes to the right.
- You will now see a blue glowing area. Click on it to trigger a hidden object scene.
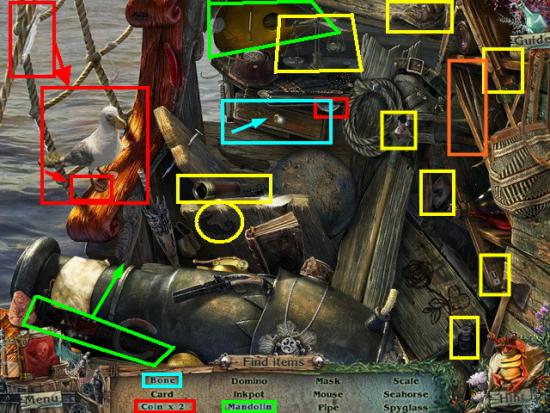
- You have three blue items to locate in this scene.
- First item is circled in green and is a mandolin. Click at bottom left on the handle and place it at top center on the other half of mandolin. When put together click on it.
- The second item is a bone which is circled in blue above. Click on the closed drawer. When it opens click on the bone.
- The final item is 2 coins. The first coin is near the drawer. The second coin requires that you click on the fish at the upper left corner and feed it to the seagull under it. When the bird takes the fish it will drop the coin near its foot. Click on it when you see it drop.
- Locate all the other items shown circled in yellow.
- When you find all items you will be asked to locate tweezers. Which are shown circled in orange.
- Add tweezers to your inventory.
- Exit two scenes to the left.
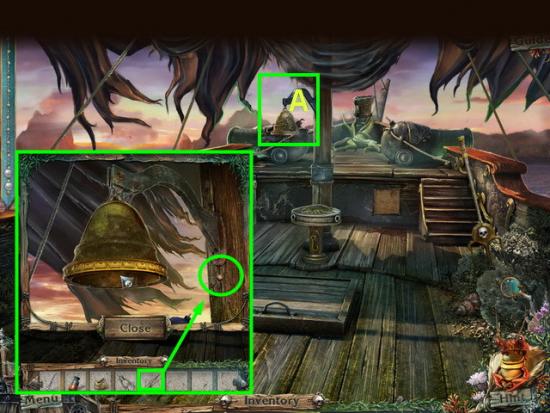
- A. Click on the bell at top center of scene. When panel opens focus on the bullet lodged in the wood near bottom right.
- Take the tweezers from inventory and remove the bullet which is now in your inventory.
- You will need to collect the other two bullets next.
- Exit one scene to the right.
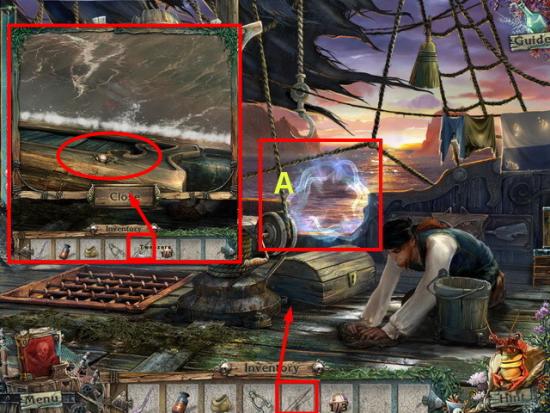
- A. Click on the water area past the man near center of scene. A panel will open showing a bullet lodged in the side of the boat.
- Use the tweezers to remove the bullet and add to inventory.
- Exit one more scene to the right.
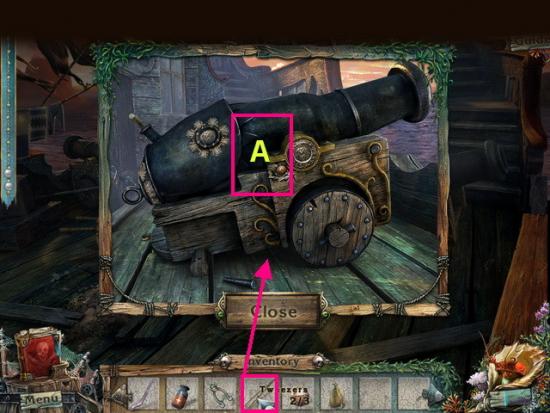
- Click on the cannon device at far right.
- A. Look for the bullet lodged in cannon. Use the tweezers to remove it into your inventory.
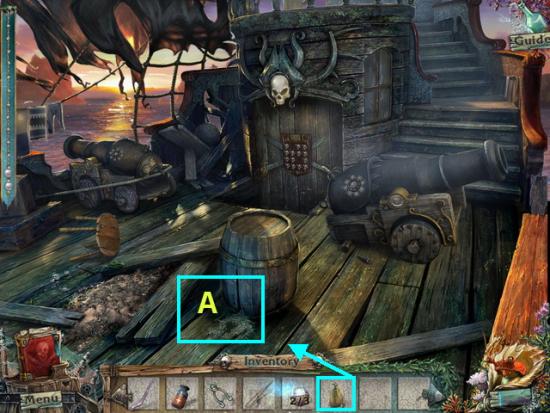
- Go to the front of the scene near barrel and take the empty pouch from inventory and place it on the pile of gunpowder.
- A. The empty pouch will fill up from gunpowder and will go back into inventory as a pouch full of gunpowder.
- Exit two scenes to the left and click on the barrel at far left.
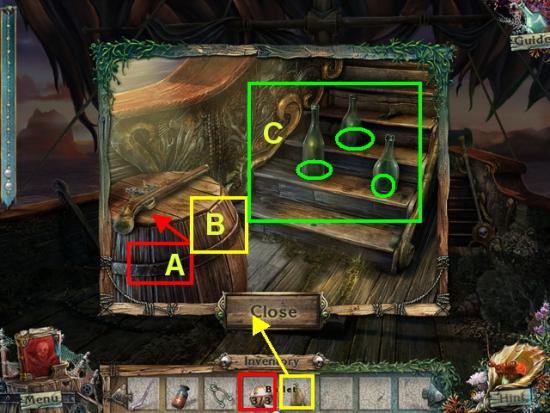
- A. Take the bullets from inventory and add them to the gun by clicking on the bullets then the gun. Wait until they load.
- B. Click the bag of gunpowder and add it to gun in the same manner as bullets.
- C. Click on each green bottle to shoot it. Each bottle has an item inside. Collect a skull game piece, a semicircle, and a key.
- Return to the screen with the man on it one to the right.
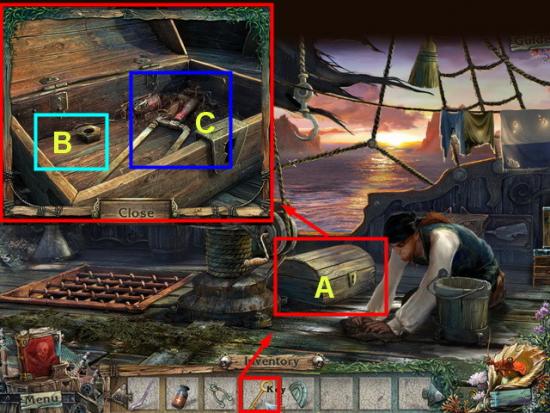
- A. Click on the chest by the man. When panel opens use key to unlock it.
- B. Remove the nut into inventory.
- C. Remove the hacksaw into inventory.
- Return to the scene with cannon one to the right.
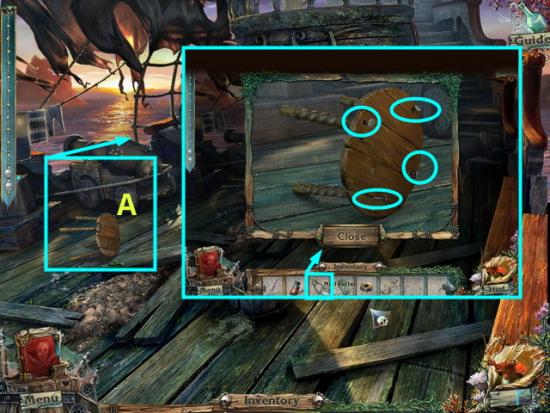
- A. Click on the stool to the left of scene.
- When panel opens use the nail puller to remove four nails clicking on each one to remove it.
- Once removed four chair legs will be added to your inventory.
- Exit two scenes to the left.
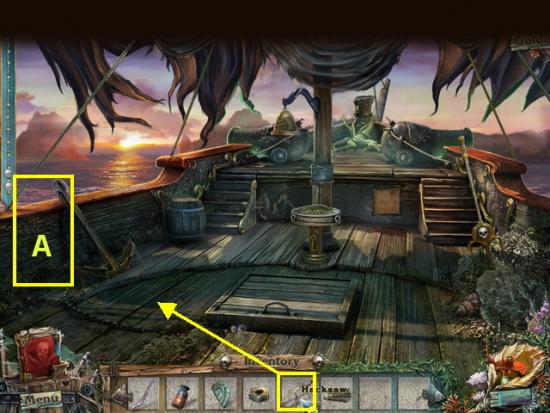
- A. Click on the anchor to the far left of scene. Use the hacksaw from inventory to cut the chain on the anchor.
- A length of chain will be added to your inventory.
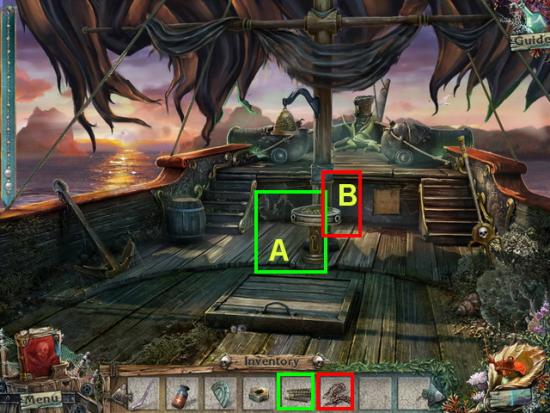
- Focus on the door hatch and post to the right.
- A. Add four chair legs to post.
- B. Add the chain to post and door.
- Click on the panel and the door will open.
- You may now go down into this area.
- Enter into the lower area and when you see the glowing blue area click for a hidden object scene.
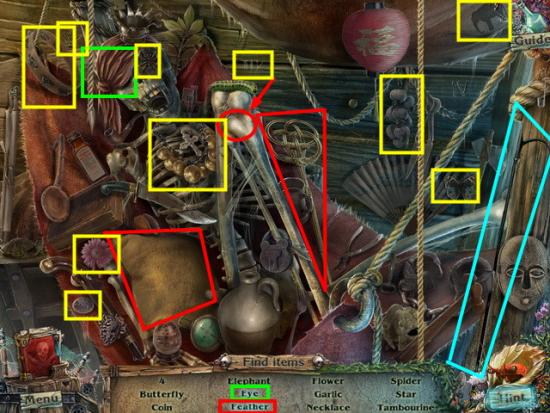
- There are two blue items in this scene.
- Eye – Click on the bandana over the skeleton’s eye and when it removes click on the eye underneath. This is shown circled in bright green.
- Feather – Take the rug beater and use it on the dirty pillow. When you do this a feather will fly out and land on the top of the bone. This is shown circled in red above.
- Locate all the other hidden objects in the scene shown circled in yellow.
- Once you find all items locate the long hook shown circled in light blue.
- A long hook will be added to your inventory.
- Exit scene and return to scene with the man cleaning.
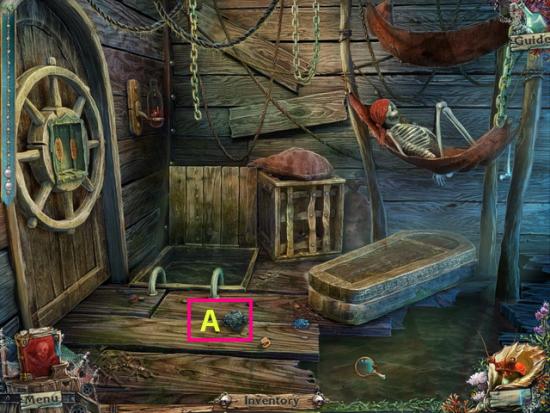
- A. Take the rock into your inventory.
- Go back up to the scene where the man is cleaning.
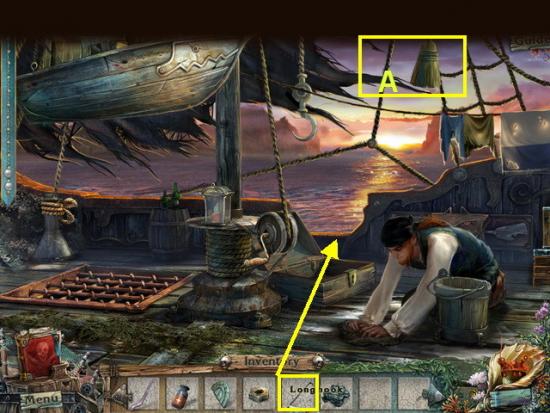
- A. Take the long hook from inventory and use it on the broom at top right of scene.
- The broom will move into your inventory.
- Move one scene to the right where the cannon is located.
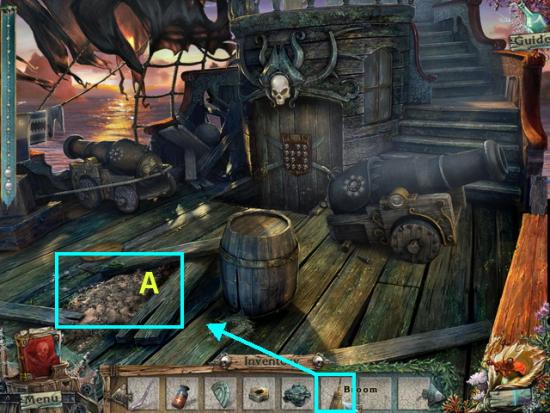
- A. Click on the brush in front center of scene.
- When panel opens use the broom in inventory to clear it away.
- Take the skull into inventory. You should now have two skulls in inventory.
- Return one scene to the left.
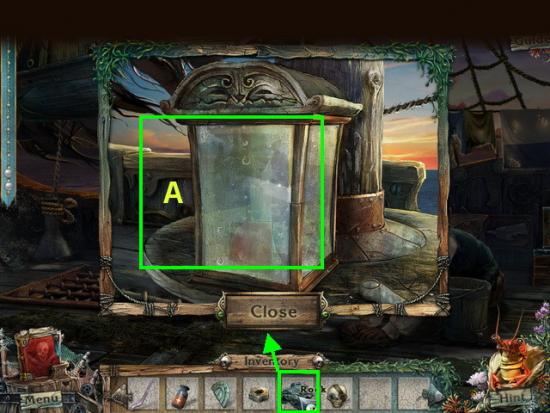
- Click on the candle holder at center of scene near man.
- A. Take the rock from inventory and break the glass.
- Remove the game piece inside and place in inventory.
- Go back down through hatch at far left of boat.
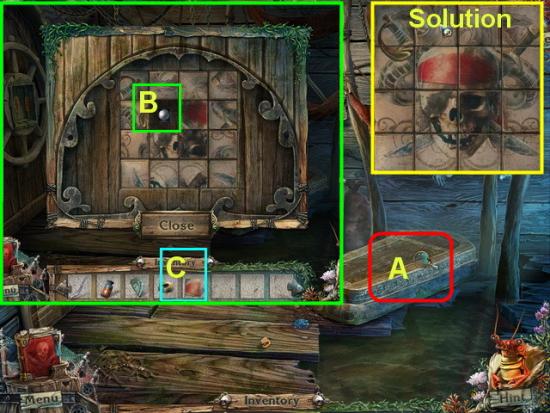
- A. Click on the coffin and a mini game puzzle will appear.
- B. Take the pearl from the empty space.
- C. Take the tile from inventory and place it on the game board.
- Solution – Click on the tiles to rotate them until you complete the image. Solution shown above.
- Once you complete the puzzle the coffin will open.
- Take the dagger into inventory and read the note.
- You will need to find the hat for the spirit to be freed.
- Go up to the scene where the man is scrubbing. At the far left take the dagger from inventory and use it on the rope. A section of rope will add to inventory.
- You will now see bright blue lights. Click on it for a hidden object scene.
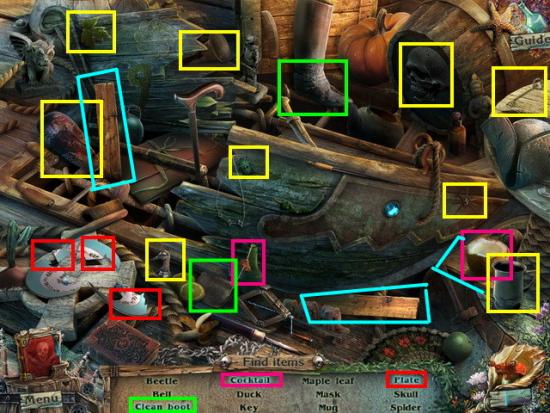
- There are three blue text items in this scene.
- Clean boot – Take the cloth and wipe the boot shown circled in green.
- Cocktail – Click the tiny umbrella and place it in the coconut shown circled in dark pink.
- Plate – Click on three broken pieces to repair the plate shown circled in red.
- Locate the hidden objects in the scene shown circled in yellow.
- When all the items are located you will be asked to find three planks.
- All three planks are shown circled in bright blue. These three planks are added to your inventory.
- Return to the room with the coffin.
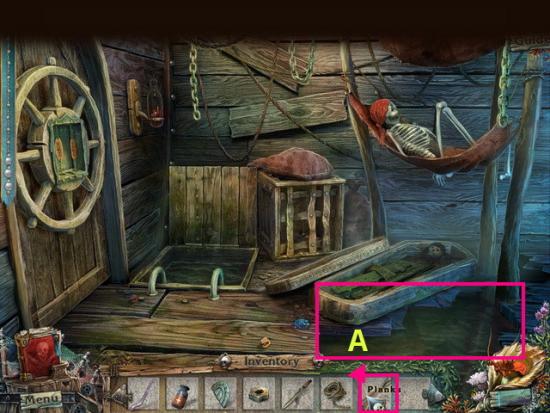
- A. Place the planks over the water to lower right to make a path to next room.
- Now you can walk across to the next location.
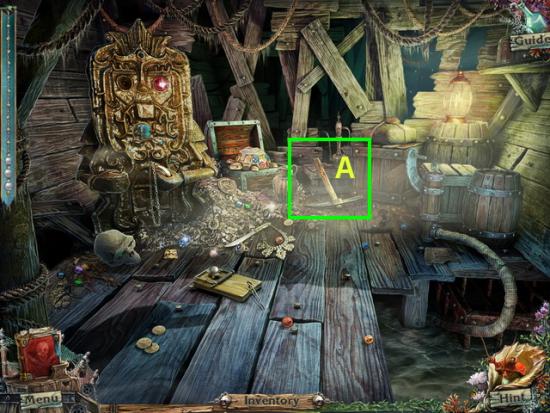
- A. Take the pick into inventory.
- Return to upper level and move to the left until you see open hatch.
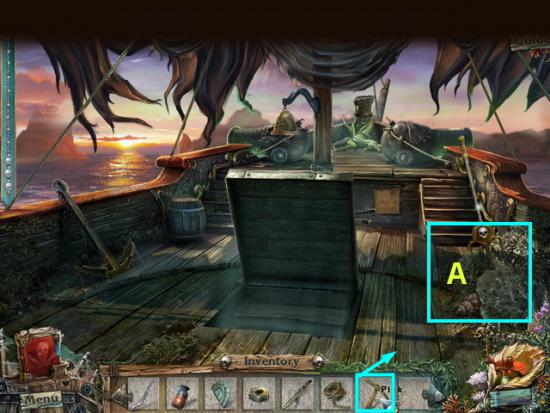
- A. Take the pick from inventory and clear away debris.
- Take the trident into inventory.
- Return to the treasure room below.
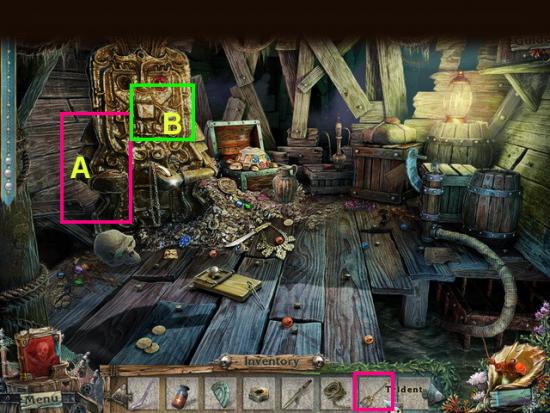
- A. Place the trident in the statue’s hand.
- When the mouth opens take the matches into inventory.
- Return to the candle next to the man cleaning above.
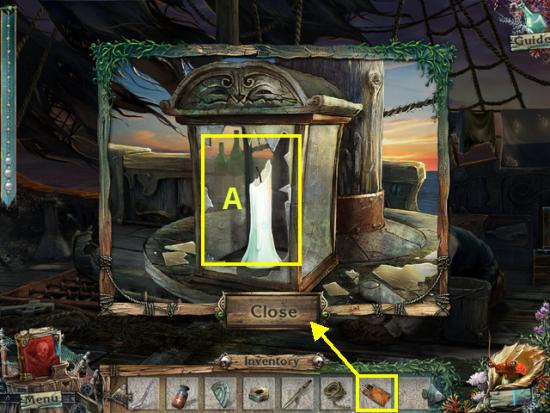
- A. Light the candle with the matches.
- Take the lit candle into inventory.
- Return to the coffin room below.
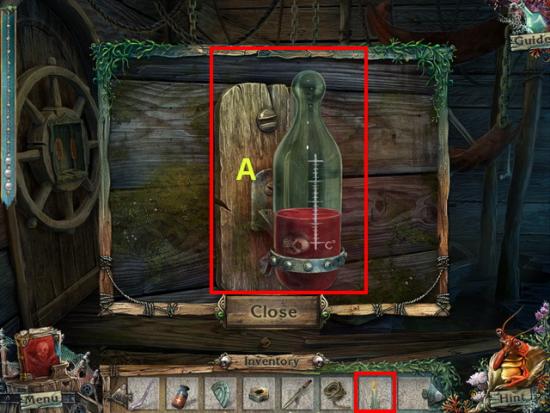
- A. Use the lit candle on the thermometer.
- Once it boils over take the skull piece into inventory.
- Return to the upper deck scene on far right with cannon and click on door.
- Once mini game opens click on the top panel where there is a randomly generated panel.
- Click the skulls until the colors match the blue and red patterns. It does not matter which side of the eye only the colors matter.
- Once they all match you will open the door and will be able to go into the captain’s quarters below.
- Go inside Captain’s quarters. Take the item on the lower left side of table and watch short video. He will order you outside of cabin.
- When you leave you will see an area glowing blue. Click on it to trigger a hidden object scene.
- This is the end of Chapter 2.
Chapter 3 – The Captain’s Mirror
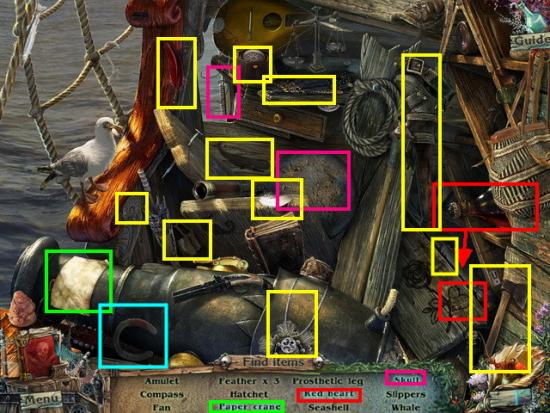
- There are three blue text items in this scene.
- Paper crane – Circled in green click on the piece of paper two times to build crane.
- Red heart – Click on the bottle of red wine at far right and it will spill into heart. Shown circled in red.
- Skull – Take the scrub brush to the globe and clean it. Shown circled in pink.
- Locate all other hidden objects circled in yellow.
- When all items are located you will be asked to find a magnet shown circled in blue.
- The magnet is then added to your inventory.
- Go into the lower room where coffin is and click on crate. Use the magnet from inventory to retrieve the clapper into inventory.
- Exit to the area to far left of top deck and click on the bell. Place the clapper from inventory on to the bell. Ring the bell three times until debris falls off of bell. Note the symbols on the bell and the order of them.
- Exit back to the downstairs room with coffin. Place the medallions on the door in the order of symbols shown on bell by clicking on the arrows. (Fish, Seahorse, Beetle, and Octopus) Once finished the door will open.
- Go inside the new location.
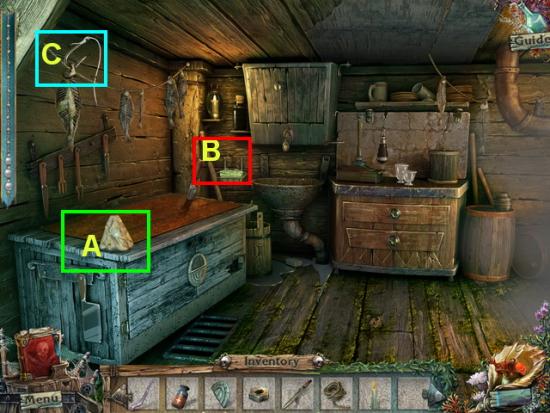
- A. Take the cheese into inventory.
- B. Take the soap into inventory.
- C. Take the fish hook and line into inventory.
- D. Take the semicircle piece from inventory and place on lock under table. When it opens you will see a snake inside and he is hungry.
- Exit to the jewel room.
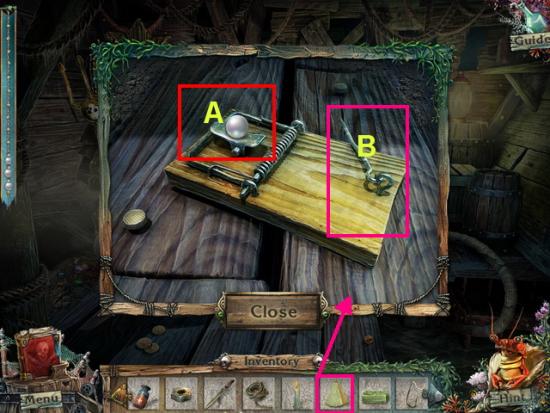
- Click on the mousetrap and open panel.
- A. Take the pearl and place in necklace inventory.
- B. Place cheese on the mouse trap.
- A mouse will come along. Click on the mouse and add to inventory.
- Return to the snake pen.
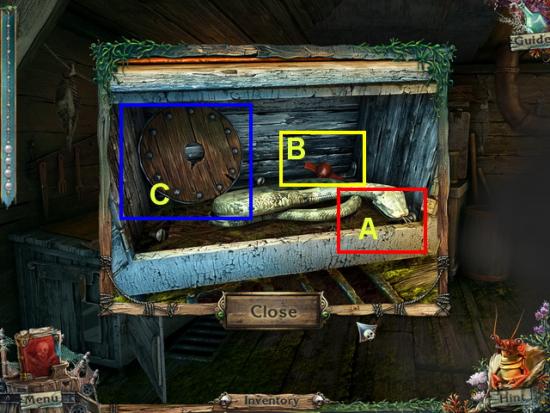
- A. Give the mouse to the snake. He will eat it and go to sleep.
- B. Take the valve and place in your inventory.
- C. Take the wheel and place in inventory.
- Click on the sink area to the right of snake pen.
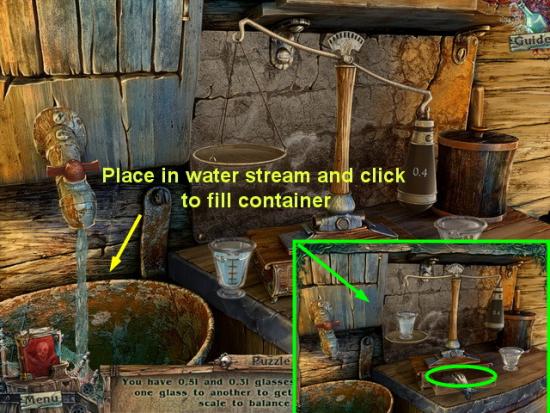
- A. Take the valve from inventory and place along the top of the faucet to repair it. Now the water will run.
- You will be taken to a mini game. The objective is to have .4 ounces of water in the flask to balance with the weight shown on the other side of the scale. You will have to do this with flasks that can hold either .5 or .3 ounces of fluid and pouring fluid or adding fluid to get the desired amount.
- Solution – Take the .5 flask and fill It up with water in the sink. Click on the flowing water to do this.
- Pour from the .5 into the .3 container until it is full. Hold the .2 left in the .5 container and take the .3 you just filled up and throw it out in the sink.
- Pour the .2 of water that is in the .5 container back into the .3 container (This leaves .1 space)
- Fill up the .5 container again and pour water from it into the .3 container until it is filled. This will take away .1 leaving you with the .4 you need.
- Place the container with .4 fluid on the scale.
- Once balanced a panel at the bottom of the scale will open. Take the piece of mirror inside and place in your inventory.
- Exit to the room on your right and you will see it is filled up with smoke. Get out quickly. Head to the treasure room.
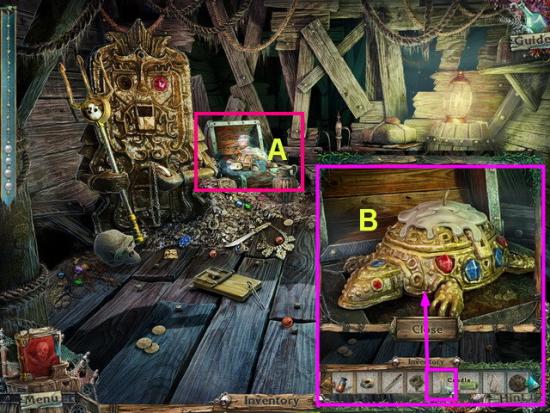
- A. Click on the treasure chest and you will see a jeweled turtle in the panel.
- B. Take the lit candle from inventory and use it on the turtle. You will now have wax in your inventory for later use.
- Exit out of the scene and head to the center scene where man is scrubbing the deck and you will see an area glowing blue again.
- Click on the area for a hidden object scene.
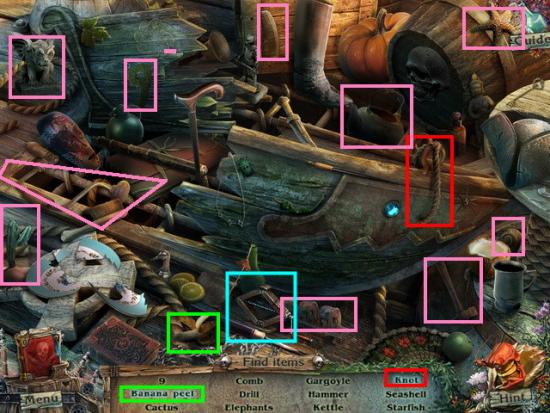
- There are two blue text items in this scene.
- Knot – Click on the rope shown circled in red twice to form the knot.
- Banana Peel – Click on the banana twice to peel it and then click on the peel. This is shown circled in bright green above.
- Locate all remaining hidden objects shown circled in pink above.
- Once you find all of these items find the jack which is shown circled in light blue above.
- Once finished the jack will be placed in your inventory.
- Exit and go to the cannon area and click on cannon to open panel.
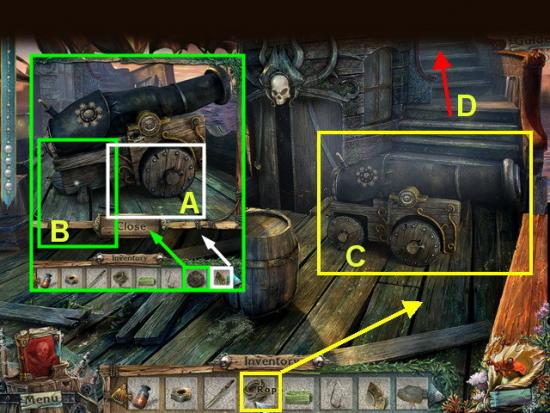
- A. Click on the jack in inventory and place it under the cannon to lift it up.
- B. Take the wheel from inventory and place it in the empty slot.
- C. Once the cannon is finished it is blocking the stair entrance and you will need to move it. Click on the rope from inventory and then on the cannon and it will be moved out of the way.
- D. Proceed up the stairs to a new location.
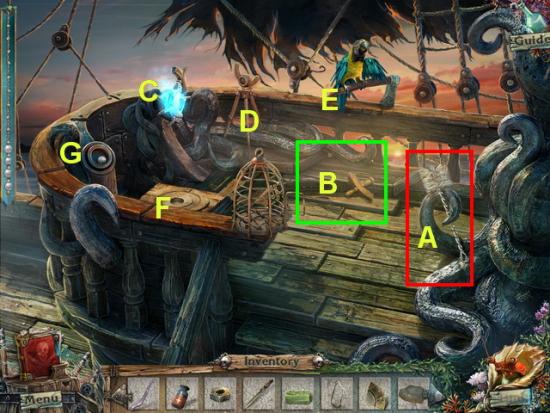
- Go upstairs and you are now at the top of the ship near the steering wheel.
- A. Click on the brush and take it into inventory.
- B. Click on the piece of ship wheel and take into your inventory.
- C. through G. Click on each of these items and examine them for future tasks. None can be finished at this time.
- Exit to the lower level and move two times to the left until you are at the area with the panel that opens from floor. Behind it you will see a chimney. Click on the chimney for a closer look.
- Take the brush from inventory and push it through the chimney by clicking on it four times. Once you do this the smoke will clear from the storeroom downstairs and you can now enter it again.
- Go to the storeroom below.
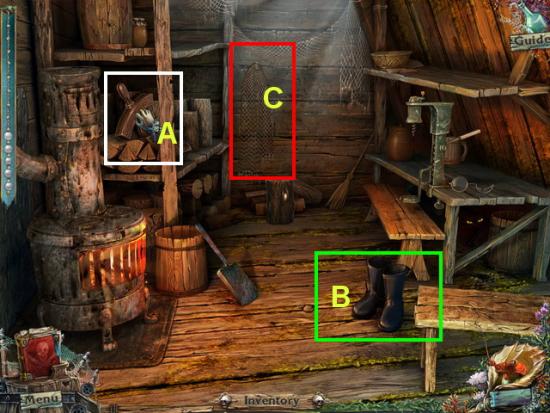
- A. Click on the piece of ship steering wheel and place in your inventory.
- B. Click on the boots and they will fall over. A piece of the ship map will fall out. Click on this piece and place into inventory for later use.
- C. Click on the fishing net against the back wall and add to inventory.
- There are a few other things to click on but you won’t be able to use them now.
- Exit to the area where the man is scrubbing the deck. Click on the water area just past him. There is a huge fish swimming around outside the boat.
- Take the fishing net from inventory and place it in the water.
- A large fish is now in your inventory.
- Return to the area with the parrot at top of ship.
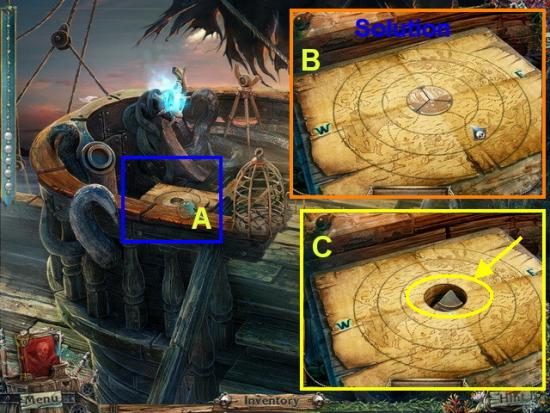
- A. Click on the puzzle map at lower left side of scene. When panel opens there is a mini game puzzle.
- B. Click on the rings to rotate them. One ring sometimes controls other and the puzzle can be solved many ways. Turn the rings until you get the image shown above.
- C. Once you complete the puzzle a panel will open in the center. Take the piece of mirror and add it to your inventory for later use.
- Exit to the kitchen area with the sink below.
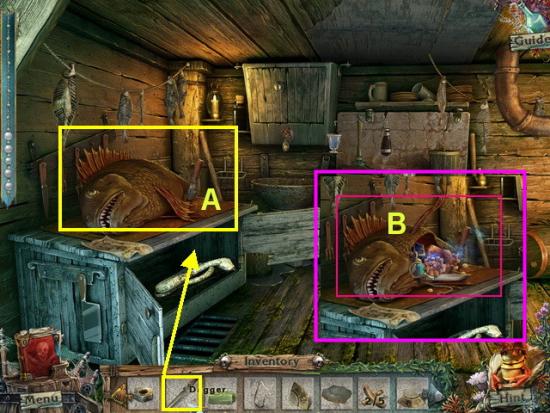
- A. Take the fish from inventory and place it on the table. Take the dagger from inventory and use it on the fish.
- Gold and treasures will spill out of the fish. It will also start to glow blue.
- B. Click on the fish for a hidden object scene.
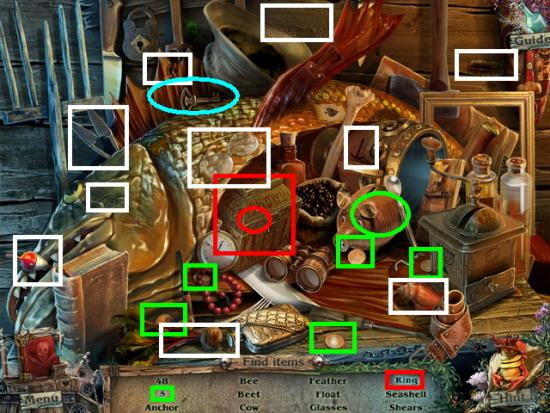
- There are two blue text items in this scene.
- Ring – Click on the box in the center of the scene and when it opens click on the ring inside. This is shown circled in red.
- “5” – This is shown circled in green above. You will need to click on the coins in the scene and place them in the piggy bank. Each time you do a number will appear on the side of the bank. When you place the final coin click on the “5”
- Locate the other hidden items in the scene shown circled in white.
- Once you locate all items you will be asked to locate a key. The key is shown circled in blue above.
- Return to the treasure room and click on the chest for the jeweled turtle once again. Use the key from inventory to open the turtle. Take the mirror piece into inventory.
- Return to the Captain’s Quarters and go inside.
- This is the end of Chapter three.
Chapter 4 – Break the Spell
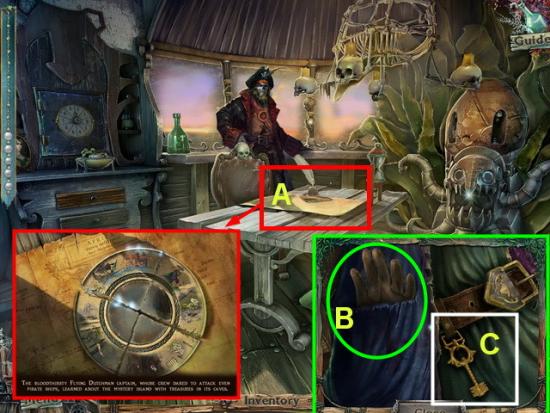
- A. Click on the panel on the table in front of the Captain. When it opens, take the mirror pieces from your inventory and place on the table. You will have to click at least four times to complete this.
- Read the text and watch the short video clip.
- Now the captain will pick up the mirror and look into it. He is deeply distracted so you can click on him.
- B. Take the gloves and add to your inventory.
- C. Take the wax from your inventory and place on the key to make a key mold.
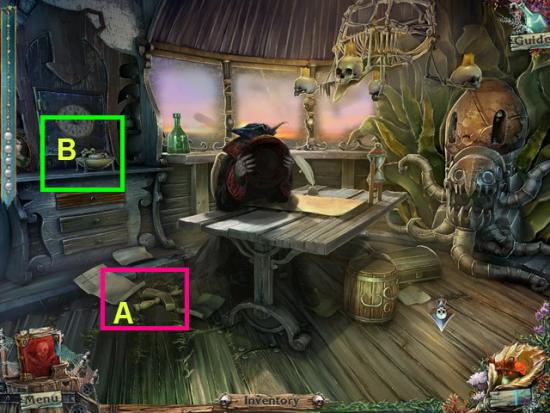
- A. Click on the piece of ship steering wheel and add to your inventory.
- B. Click on the bowl of fruit at back left of scene. Take the worm into inventory.
- Return to the ship steering wheel area.
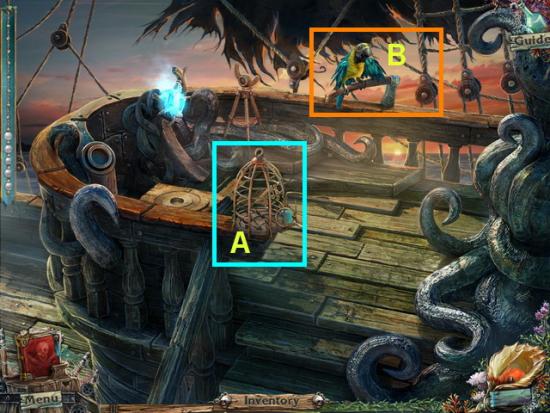
- A. Place the worm in your inventory into the empty bird cage. The bird will fly over to get it.
- B. Once bird is inside cage the hatchet is free. Take the hatchet into inventory.
- Return to the storage room where the furnace is.
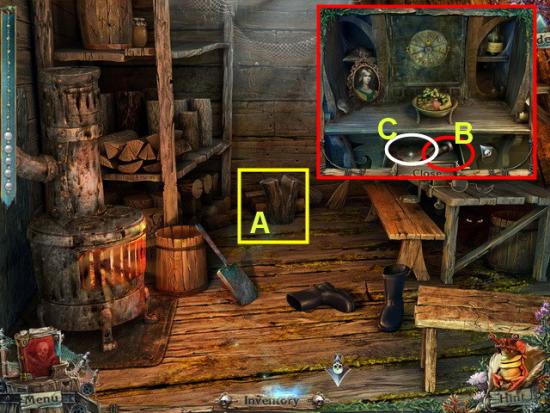
- A. Take the hatchet from inventory and use it to split the log. Take the handle out and place in inventory.
- B. Return to the Captain’s Quarters and take the handle from your inventory and place on the drawer. Take the brand out of the drawer and place in inventory.
- C. Click on the letter inside drawer and read.
- Return to the storage room and place the brand into the furnace. It will return to your inventory as a hot brand.
- Exit and return to treasure room.
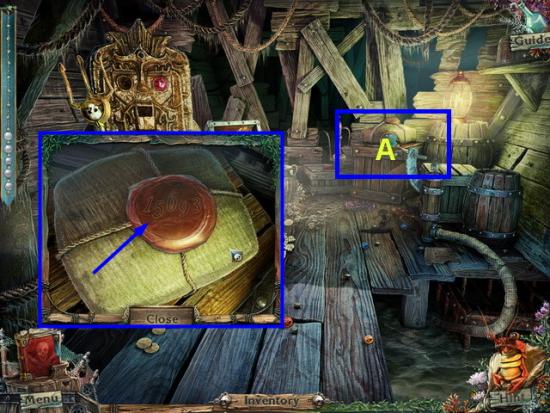
- A. Click on the package area in back of room and place the hot brand on the wax area. The numbers “15093” will appear on the wax. Take note of these numbers.
- Return to the Captain’s Quarters. Click on the large clock face. Enter in the numbers 15093 one at a time and watch the panel briefly light up. Once you enter all numbers the door will open. Take the pump lever and place in inventory.
- Return to the room with the coffin and you will see a blue glowing area. Click here to start a hidden object scene.
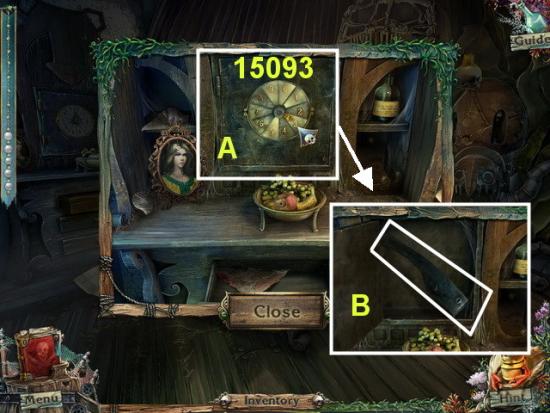
- There is one two blue text item in this scene.
- Domino – Click on the ceramic jug at front center of scene. Take the domino out of jug. This is shown circled in green.
- Locate the other hidden objects in the scene. These are shown circled in white.
- Once you locate all items you will be asked to locate a wrench and this will be a blue text item.
- Click on the rope next to the skeleton’s face and it will pull causing the wrench attached to the other side along the right side of scene to come down still attached to the rope. This is shown circled in bright blue.
- The wrench is now in your inventory.
- Exit back to the treasure room and click on the pump device.
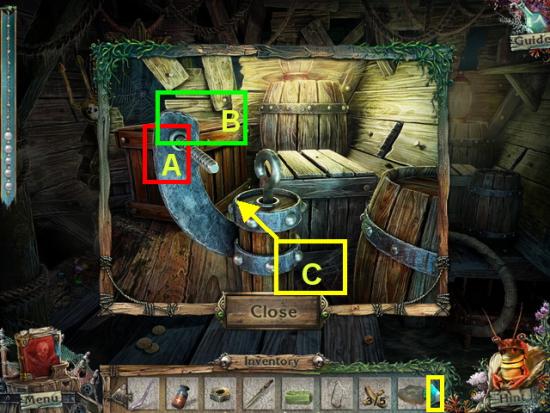
- Click on the pump device in the treasure room.
- A. Take the nut from inventory and place on the screw.
- B. Take the Pump lever from inventory and place on the open area.
- C. Use the wrench from inventory to tighten and the water will begin to pump out.
- The water is now draining out of the room and you can access it from the area right next to the coffin by climbing down there.
- Go to new locations.
- Climb down to prison area.
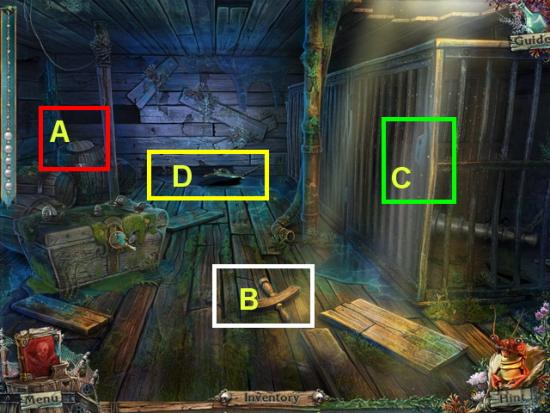
- A. Click on the box at back left and when panel opens use your dagger from inventory to open it. Take the pearl and add to necklace and take the key into inventory.
- B. Click on the piece of ship wheel and add to inventory.
- C. Click on the electric fish to open panel. Take the uncharged battery out of inventory and place it on the water. It will go back into inventory as a charged battery.
- D. Use the key from inventory to open the cell and go inside. Click on the bottom to open a panel.
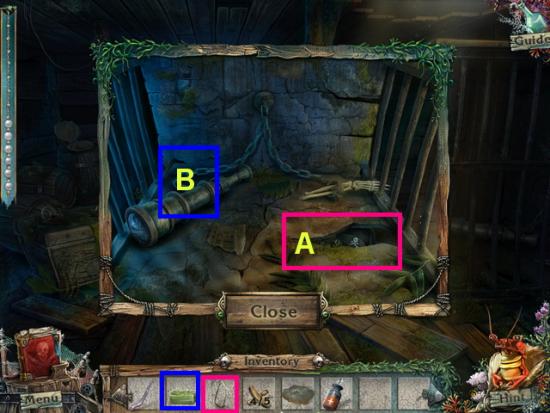
- A. Take the fishing hook and wire from inventory and use on the crack. Take the hat and place in your inventory.
- B. Take the soap from your inventory and use it on the glass to free it. You now have a spyglass in your inventory.
- Return to the area with the coffin.
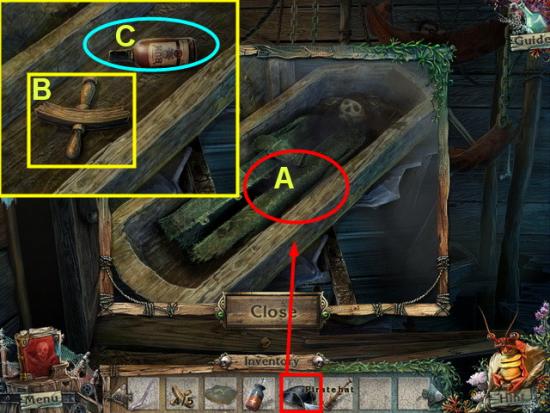
- A. Take the pirate hat from inventory and place it in the coffin. Watch the video clip.
- B. Take the ship piece and add to inventory.
- C. Take the bottle of rum and add to inventory.
- Return to the Captain’s Quarters.
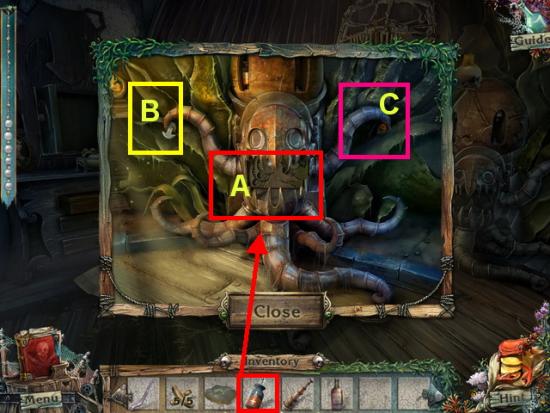
- Click on the scary looking machine to far right side of scene. Panel will open.
- A. Take the charged battery from inventory and place in mouth of machine.
- B. When it releases take the anchor into inventory.
- C. When it releases take the gem into inventory.
- Return to the treasure room.
- Take the gem from inventory and add it to the eye area of the gem monster. It will release a compass to you. Place the compass in your inventory.
- Return to the prison room.
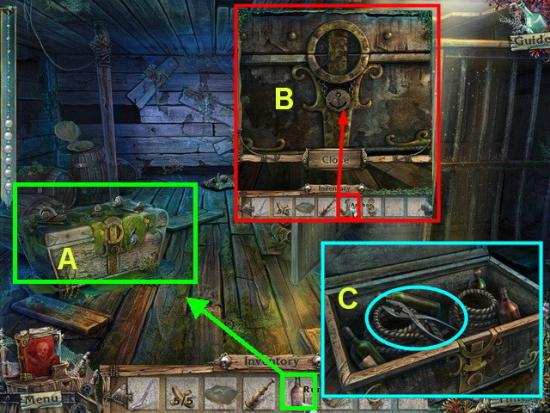
- A. Take the rum from inventory and spill it on top of the trunk to kill all of the poisonous snails. Once gone you can try to open.
- B. Click on the anchor from inventory and use on the lock.
- C. When the chest opens there is a pair of pliers for later use.
- Return to the storeroom. Use the pliers on the contraption to the right. Take the lens from glasses and place in inventory.
- Return to the kitchen area and click on the fish that is now glowing blue for a hidden object scene.
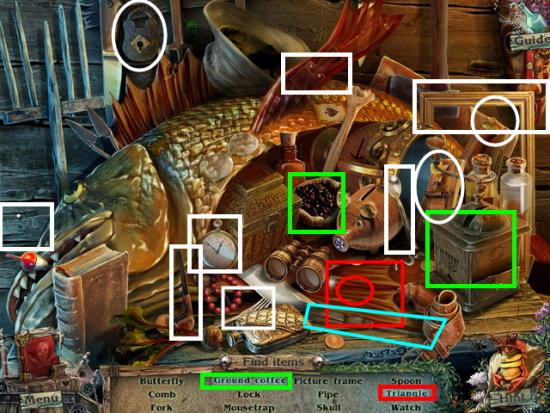
- There are two blue text items in this scene.
- Coffee Grinds – Click on bag of coffee beans then on coffee grinder. When the grinds come out click on them. This is shown circled in green.
- Triangle – Click on the fabric area along the bottom to pull it back. The triangle is etched into the wood. This area is circled in red.
- Locate the remainder of hidden objects in the scene shown circled in white above.
- When you find all of the hidden objects in the scene you will be asked to find a screwdriver which is shown circle in blue above.
- The screwdriver is now in your inventory.
- Return to the captain’s Quarters.
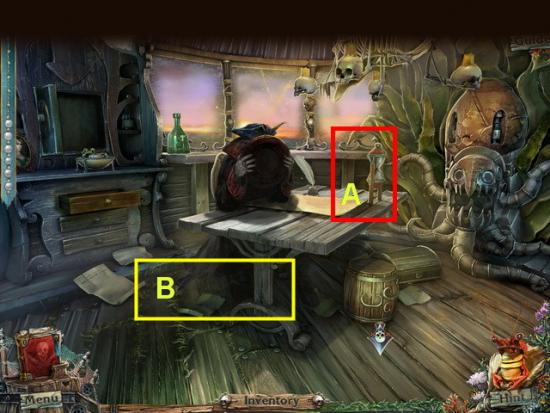
- A. Take the hourglass and use the screwdriver on it from inventory to open it.
- B. Take the hourglass and form a circle of sand around the pirate to make him leave.
- Collect the medallion into your inventory.
- Return to the top of the ship where the steering wheel is located.
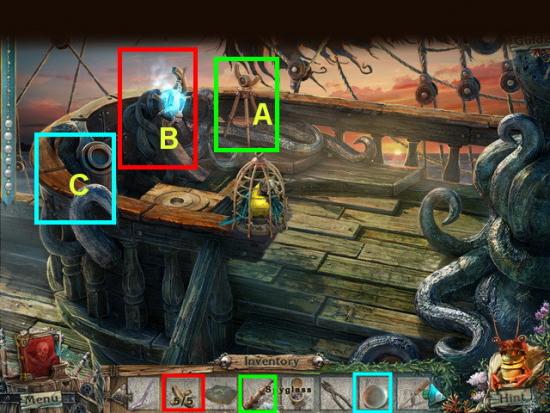
- A. Click on the tripod and when the panel opens place the spyglass. Next place the lens from inventory in place. This will trigger a very simple mini game. All you must do is click on the lens button twice and then on the arrow that points to the right to lock it in. Do this will all three images.
- B. Take the medallion from inventory and place in the center of the ship’s steering wheel. Next place the five pieces from inventory onto the wheel and watch them lock into place.
- C. Place the compass from your inventory in the slot provided.
- Watch the video clip.
- This is the end of Chapter 4.
Chapter 5 – Mysterious Island
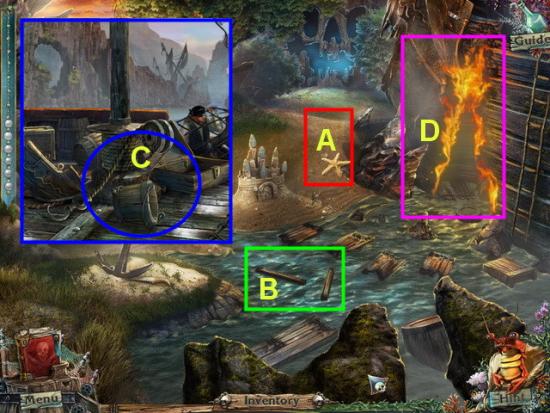
- You are now able to go on and off the ship.
- You are at a scene alongside the ship which is on fire.
- A. Collect the starfish into inventory.
- B. Collect the wooden beams into inventory.
- C. Go back on to the ship to the main deck and collect the empty bucket into inventory.
- Return to the previous scene and place the bucket into the water and it will return to inventory full of water.
- Take the bucket full of water and toss it on the fire to put it out.
- The area will now glow blue and turn to a hidden object scene.
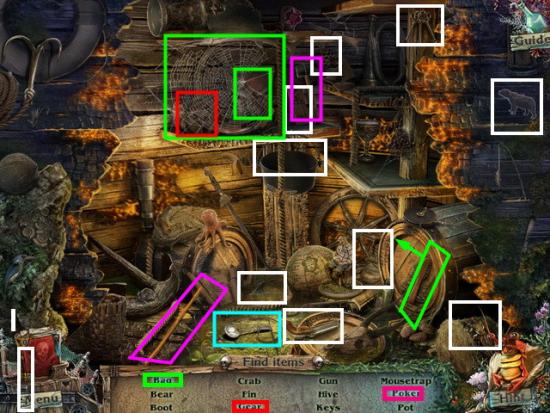
- There are three blue text items in this scene.
- Gear and Bag – Take the brush and clear away the cobwebs. You will find the bag and the gear underneath. These items are marked with green and red above.
- Poker – Take the hammer circled in dark pink and strike the metal rod by clicking on it four times. It will change into a poker.
- Locate the other hidden objects in the scene circled in white.
- Once you locate all items you will be asked to locate a spoon which is shown circled in light blue.
- Add the spoon to your inventory.
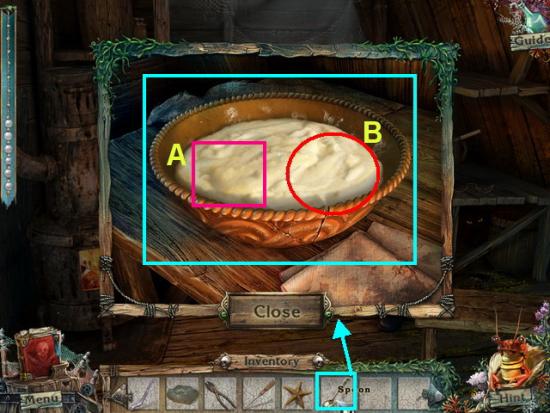
- Go back on the ship and return to the storage room.
- Near the top right you will see a bowl of porridge. Click on the bowl to open the panel.
- Take the spoon from inventory and click on the bowl three times to empty it.
- A. Take the eye jewel into inventory.
- B. Take the pearl and add to the necklace.
- Return to the deck where you see the man.
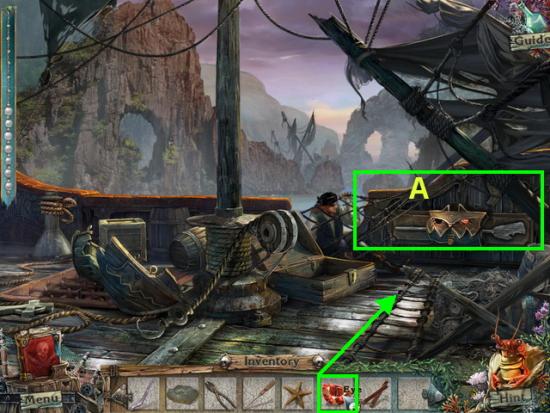
- A. Click on the jewel puzzle to the right of the man. Place the eye gem in the empty socket.
- B. Take the oar and place in your inventory.
- Go back to the area right outside the ship.
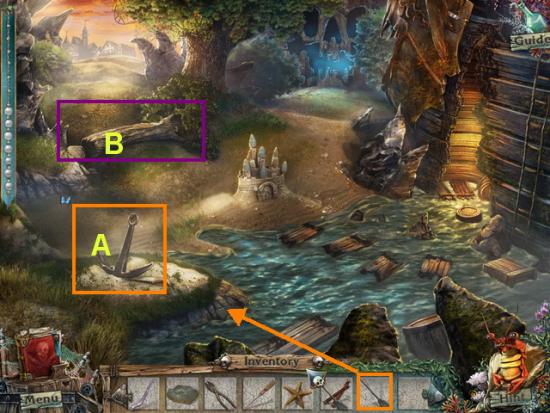
- A. Take the oar from inventory and use on the anchor as a lever.
- When it lifts up take the saw into your inventory.
- B. Take the saw from inventory and use it on the logs. Once you cut the logs you can reach a new location.
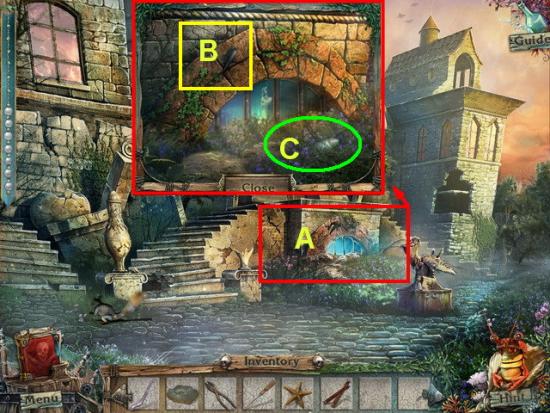
- A. Click on the basement window of the building. Watch the brief video that shows the woman trapped below.
- B. Click on the dowel and add to inventory.
- C. Click on the shell and add to inventory.
- Go to the right once and click on the blue glowing area to start a hidden object scene.
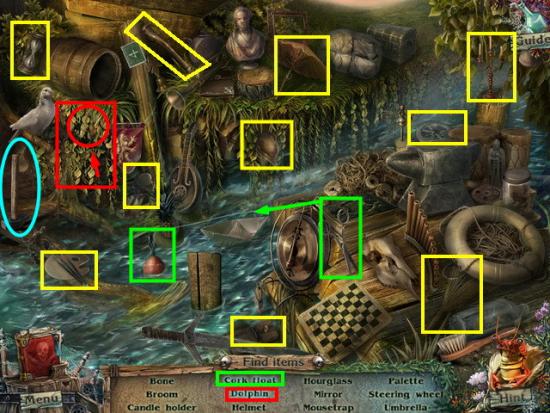
- There are two blue text items in this scene.
- Float cork – Click on the scissors shown circled in green and cut the fishing line. When the cork floats free click on it.
- Dolphin – Click on the brush area to remove it at the far left of scene. When you see the image of the dolphin click on it. This is shown circled in red.
- Locate the remaining hidden objects shown circled in yellow.
- Once you locate all the items you will need to find a hammer which is shown circled in light blue.
- The hammer is now in your inventory.
- Exit two scenes to the left.
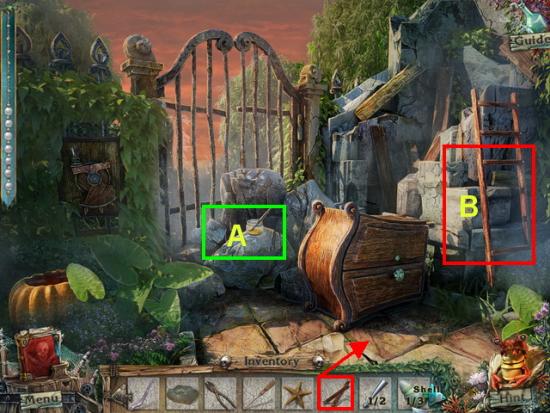
- A. Collect the glue into inventory.
- B. Take the two boards from inventory and repair the ladder.
- Take the ladder into your inventory.
- Return to the area with the groundhog two scenes to the right.
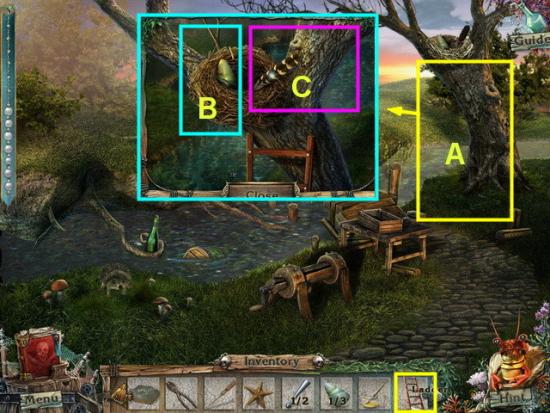
- A. Take the ladder from inventory and place against the tree. Click on the nest.
- B. Take the feather from nest and place in inventory.
- C. Take the shell from the nest and place in inventory.
- Exit one scene to the left.
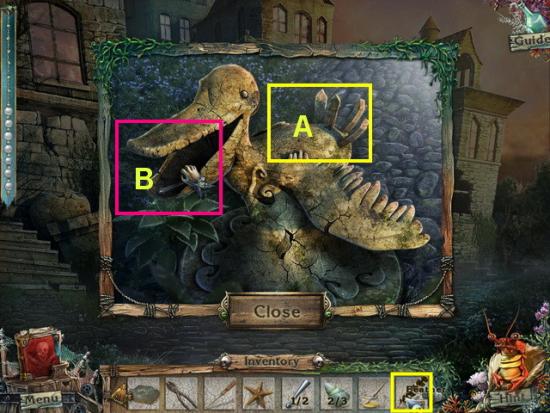
- A. Click on the statue at the right of scene. Take the feather from inventory and place it on the stone tail of the bird and it will change to stone. The bird will now open its mouth with something inside.
- B. Take the dowel from the bird’s mouth and place in inventory.
- Return to the area where the ground hog is.
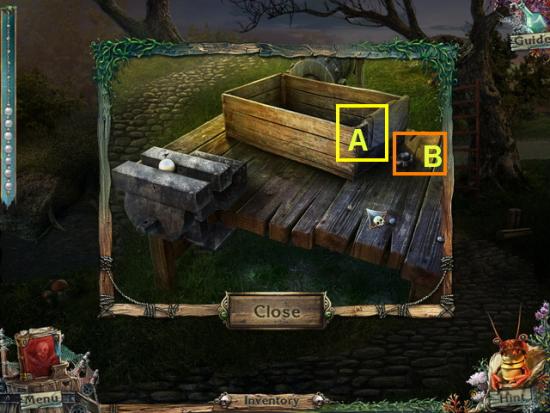
- A. Click on the cloth to move it back.
- B. Click on the half piece of handle and add to inventory.
- Return to the area with the statues.
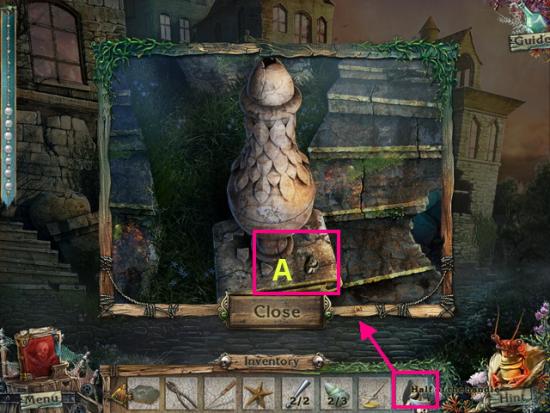
- Click on the left statue to open the panel.
- A. Take the half piece of handle from inventory and add to the piece at base of statue to repair it.
- Take the entire handle into inventory.
- Return to area in front of mansion gate.
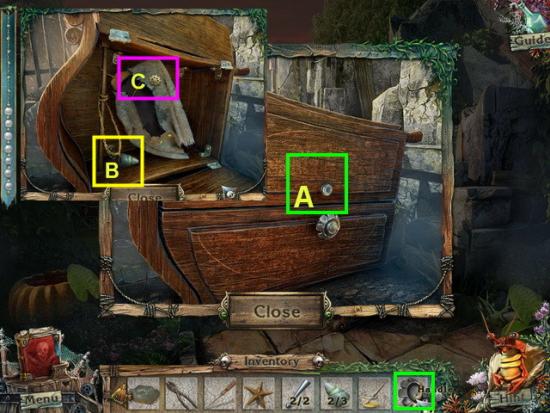
- A. Take the handle from inventory and place it on the wardrobe and click to open it.
- B. Take the shell into inventory.
- C. Take the gear into inventory.
- Click on the puzzle box at upper left of scene.
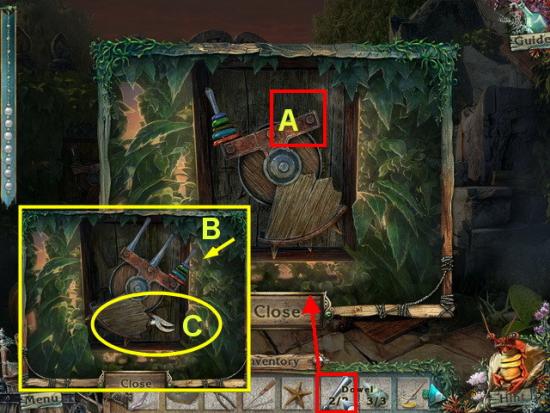
- A. Take the two dowels from inventory and add to the puzzle to trigger it.
- The goal of the puzzle is to move all the rings from the left side of the puzzle to the right in the same order.
- You can only put a ring on top of another ring if it is smaller.
- Click on the piece to move it and click to place it. Use the center, right and left to solve it.
- B. Solution shown in image above.
- Once you complete the puzzle a panel will open at the bottom.
- C. Collect the pruning shears into inventory.
- Return to the first scene next to the ship.
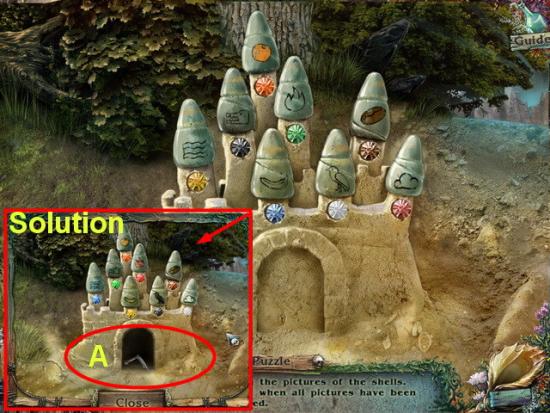
- Click on the sandcastle to open the panel.
- Add the three shells to the puzzle to trigger it.
- Click on the jewels under each image to swap places with another.
- If the jewel is correctly placed it will colorize the image above it.
- The solution is shown in image above.
- Once you complete the puzzle the bottom will open and a crab leg will appear at the bottom.
- A. Add crab leg to inventory.
- The area where there was a fire is now glowing blue. Click on it for a hidden object scene.
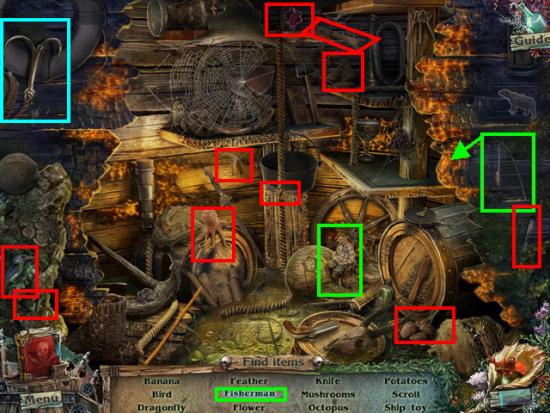
- There is one blue text item in this scene.
- Fisherman – Click on the fishing pole and add to fisherman statue in center of scene shown circled in bright green.
- Locate the other hidden items in the scene shown circled in red.
- Once you locate all hidden items you will be asked to find a grappling hook which is shown circled in light blue.
- The grappling hook is now in your inventory.
- Return to the area with the groundhog and trees.
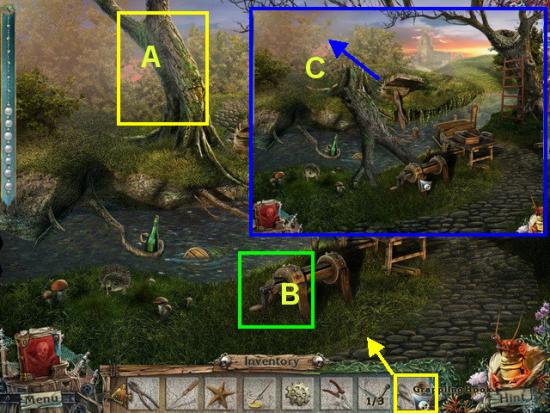
- A. Take the grappling hook and use it on the tree to the far left of scene. You should see a rope connect.
- B. Take the winch and add it to the box. Click on the handle a few times to crank it and the tree will break in half.
- C. You can now go to the new location behind the tree.
- Follow the area straight back.
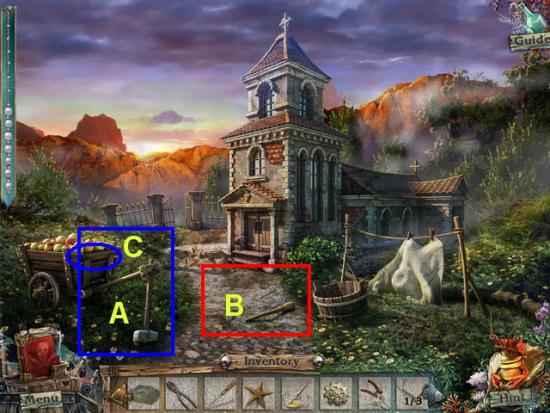
- A. Click on the sledgehammer holding up the apple cart and it will fall. Take the sledgehammer into inventory.
- B. Take the torch into inventory.
- C. Take the crab leg into inventory.
- Return to the area in front of mansion.
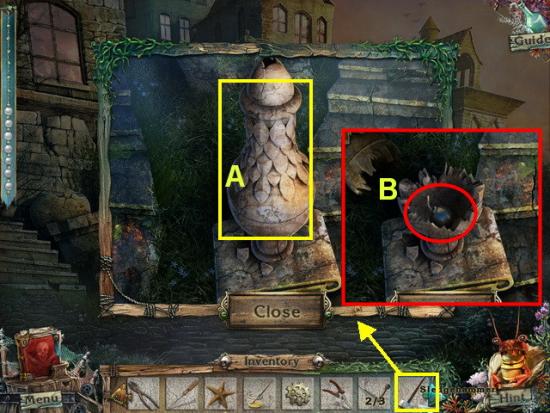
- A. Click on the statue on the far left of the scene. Take the sledgehammer and hit the statue.
- B. Take the bomb from inside the statue and add it to inventory.
- Return to the ship’s storeroom.
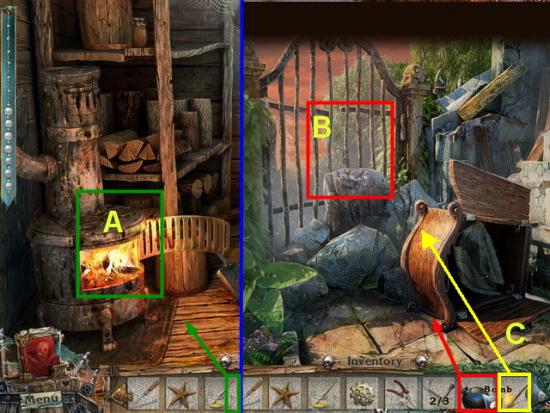
- A. Take the torch from inventory and place it in the furnace to light it and it will return to inventory.
- Return to the area outside the gate of the mansion.
- B. Take the bomb from inventory and place it on top of the rock. Use the lit torch to light it and watch it blow the fence wide open.
- You can now enter through this area to the garden location.
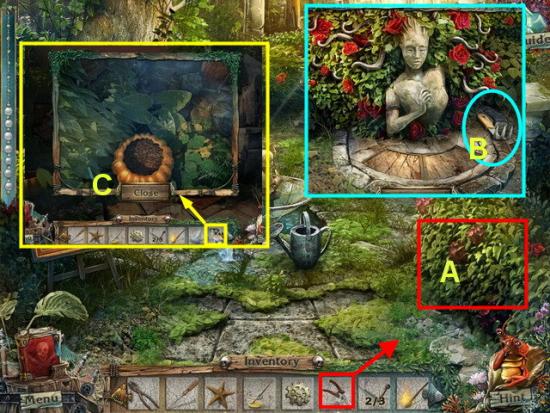
- A. When you enter the garden take the pruning shears to the far left and clear away the brush. Take the scrubber into inventory.
- B. Click on the rosebushes to back left of scene. Take the rake into inventory.
- C. Exit the garden and right outside click on the pumpkin to open the panel. Use the rake to move the soil and take the pearl and add to the necklace.
- Return to the church area.
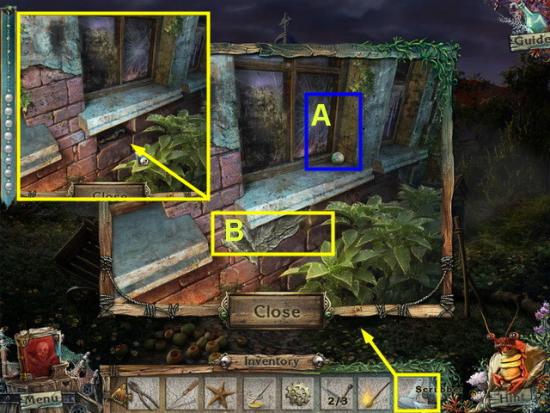
- A. Click on the window at the side of church. When panel opens take the pearl and add to the necklace.
- B. Click on the scrubber in inventory and use on the grout to clear it away. Take the crab leg into inventory.
- Return to the pond and you will see the area glowing blue. Click on it for a hidden object scene.
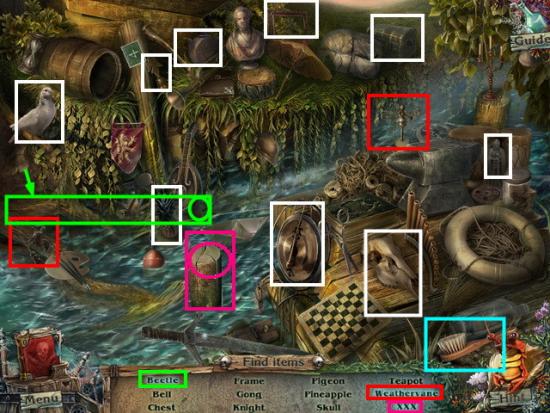
- There are three blue text items in this scene.
- Beetle – Click on the branch at the far left and when it lifts up click on the beetle. This is shown circled in green.
- Weathervane – This is in two pieces one to the far left and one to the right shown circled in red. Combine the two pieces.
- XXX – Click on the log and this will reveal the “XXX” This is shown circled in pink.
- Locate all the other hidden objects shown circled in white.
- Once you locate all hidden items you will be asked to find a brush shown circled in light blue.
- The brush is now in your inventory.
- Return to the church window scene.
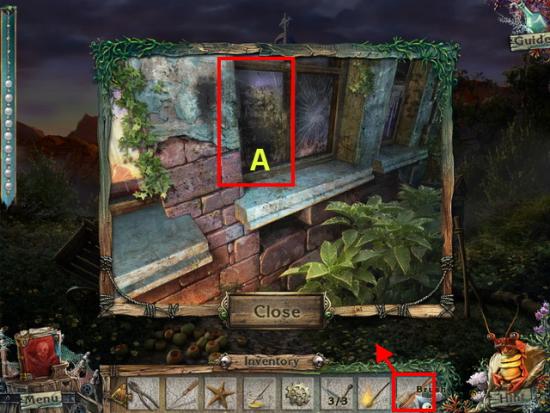
- A. Take the brush from inventory and clear the window.
- Click on the window a couple of times and add the image to your diary.
- You will see it again when you need it to solve a puzzle.
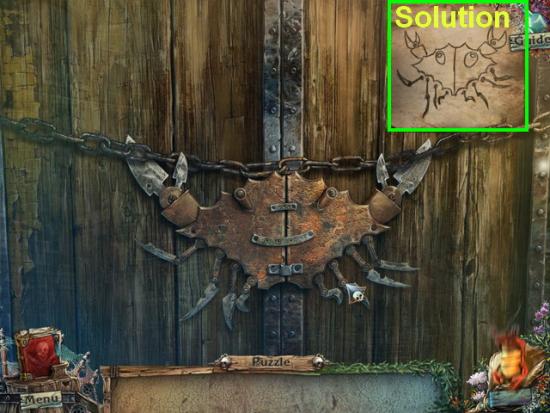
- Click on the door in front of the mansion.
- The solution is shown in the upper right corner of the scene.
- Click on one of two leg joints and move the legs so they match the picture completely.
- Once they match the door will unlock and now you can go inside.
- Go inside building.
- This is the end of Chapter 5.
Chapter 6 – The Mansion
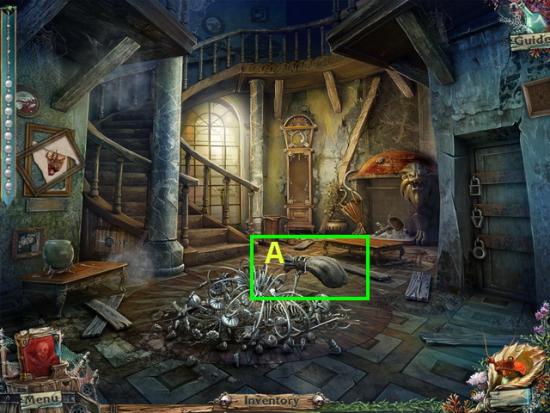
- A. Once inside the building place the empty sack into inventory.
- Go up the stairs.
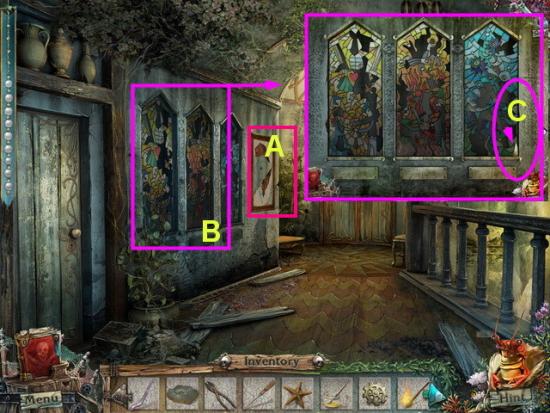
- A. Click on the picture and take into inventory.
- B. Click on the set of stain glass windows. Take the fang into inventory.
- The area at the ceiling will glow blue click on it for a hidden object scene.
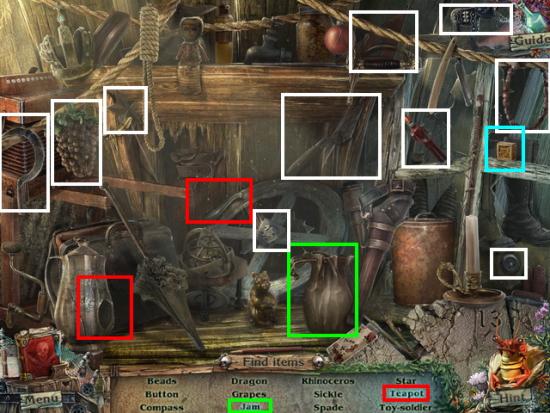
- There are two blue text items in this scene.
- Jam – Click on the bag to lower it and then on the jar of jam. Shown circled in green.
- Teapot – Locate the nose of the teapot and put it together shown circled in red.
- Locate the other hidden items in the scene shown circled in white.
- Once you locate all items you will be asked to locate a square locket.
- Take the locket into inventory.
- Return to the garden.
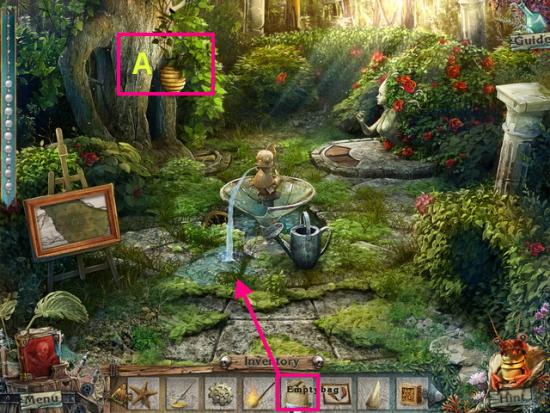
- A. Take the empty bag from inventory and place it over beehive. The bag will go back into your inventory with hive in it.
- The area above the tree will now glow blue. Click on it for another hidden object scene.
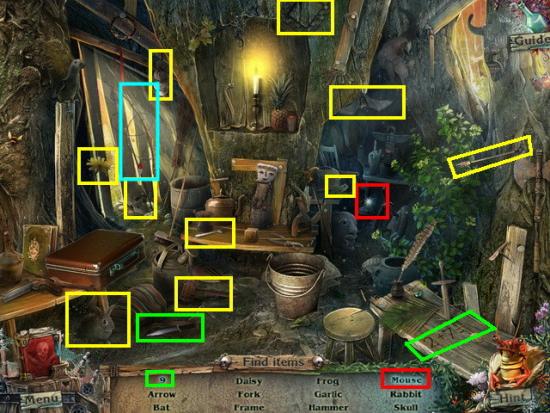
- There are two blue text items in this scene.
- 9 – Click on the knife and bring it to the equation carved into wood at far right. The number 9 will carve into wood. Click on it. This is shown circled in green.
- Mouse – Click on the boot and the toe will remove. The mouse is inside shown circled in red.
- Locate the other hidden objects shown circled in yellow.
- When you find all items you will be asked to locate a fishing pole shown circled in blue above.
- Fishing pole is now in your inventory.
- Return to the church.
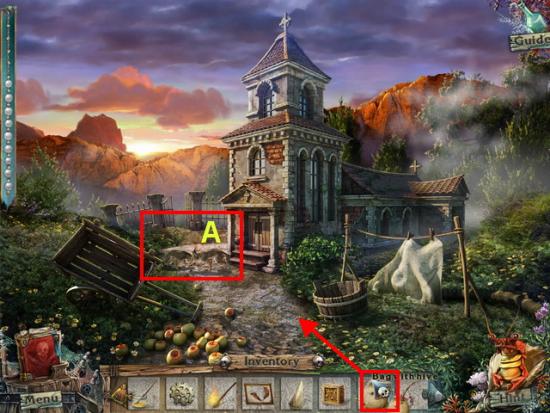
- A. Take the bag with the bee hive and open it on the fighting wolves.
- They will now leave the path and you can walk to the grave yard scene.
- Return to the pond with the hedgehog.
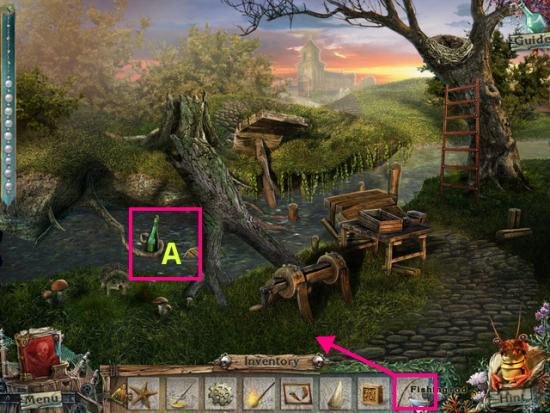
- A. Take the fishing rod from inventory and use it on the sealed bottle in water.
- The sealed bottle is now in your inventory.
- Return to the church and head down the path to graveyard area.
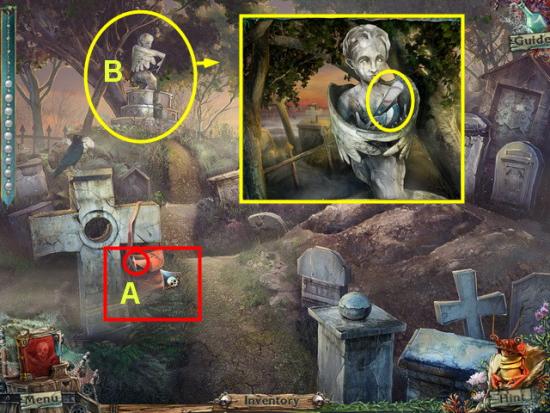
- A. Click on the bag hanging on tombstone and it will open revealing a pencil. Click on the pencil and add to inventory.
- B. Click on the statue in back of scene to open panel. Click on the fan piece and add to inventory.
- Return to the garden.
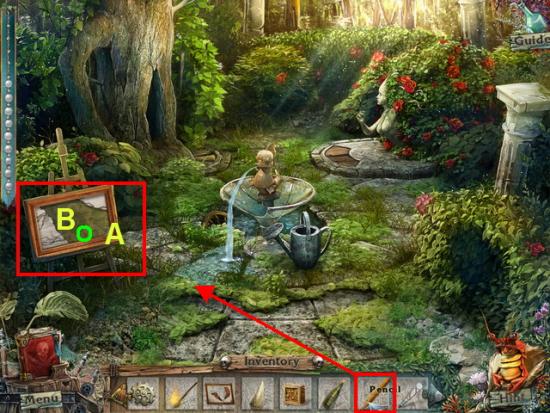
- A. Take the pencil from inventory and place on the unfinished painting. Collect the piece of painting into inventory.
- Collect the pearl and place on the necklace.
- Return to the mansion.
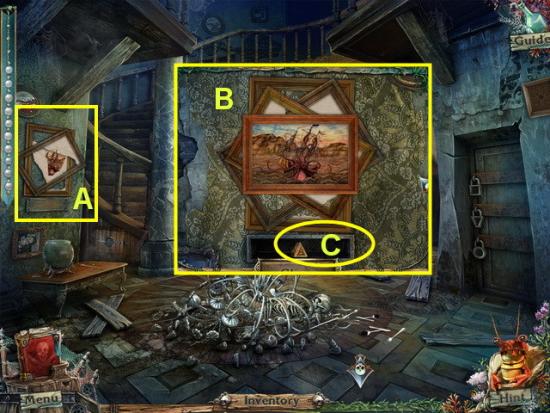
- A. Click on the portrait to open the panel and then take both pictures from your inventory and place there to trigger a mini game.
- B. Turn the frames of the pictures to assemble the portrait.
- Solution is shown above.
- C. When the puzzle is finished you can collect the triangle locket into inventory.
- Return to the ship storeroom.
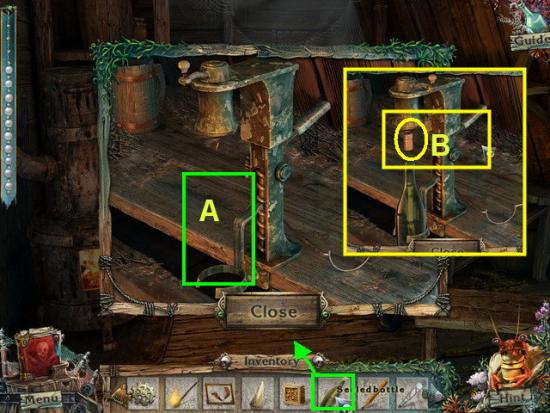
- A. Take the sealed bottle from inventory and place in the bottle opener.
- Click on the handle four times or until the cork comes out.
- B. Take the cork into inventory and read the note inside bottle.
- Return to the garden.
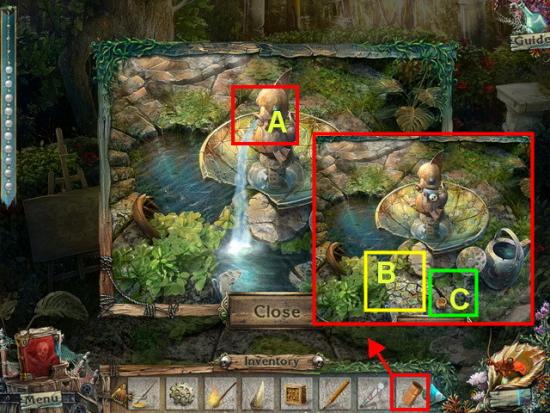
- A. Click on the duck fountain in center of scene. Take the cork from inventory and place in the duck’s mouth to stop water flow.
- B. Collect the fragments of stained glass into inventory.
- C. Collect the round locket into inventory.
- Return to the mansion.
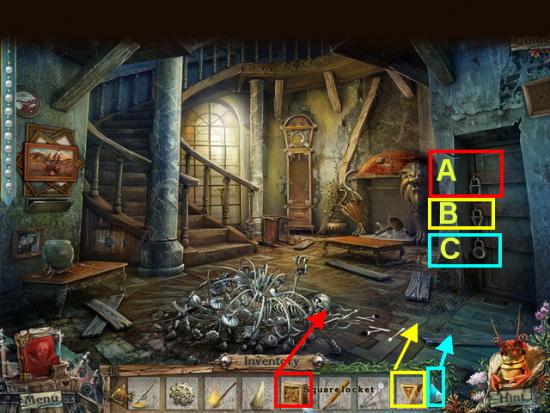
- A. Place square locket into lock.
- B. Place triangle locket into lock.
- C. Place round locket into lock.
- When door unlocks you can now access the basement.
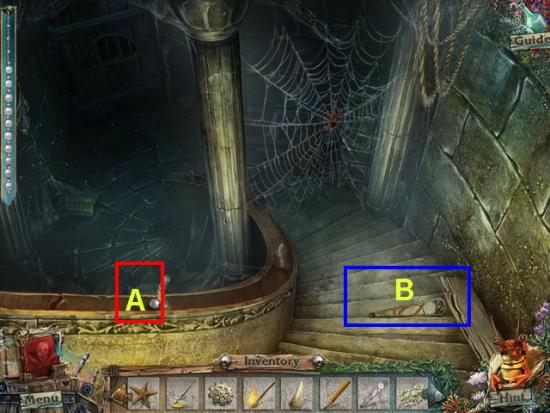
- A. Remove the pearl and add to the necklace.
- B. Take the fan piece into inventory.
- Exit scene and go back upstairs in mansion.
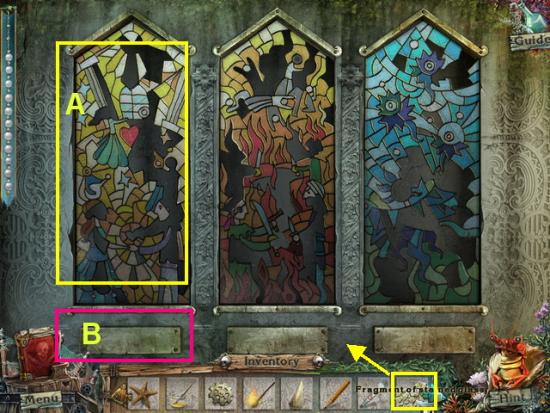
- Click on the stain glass window to open panel.
- A. Take the stained glass pieces from inventory and place on the first window.
- B. When panel opens take the pendulum into inventory.
- When you exit scene click on the door at back with the fan on it.
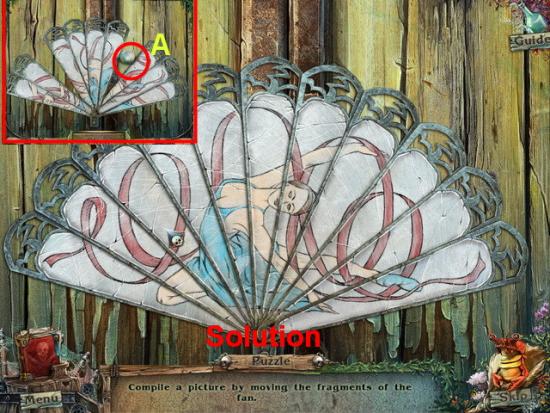
- A. Click on the fan and remove the pearl and add to necklace.
- Take the fan pieces from inventory and add to puzzle to trigger it.
- Click on the fan pieces until you have the solution shown above.
- Once completed the ceiling area will again glow blue. Click on it for another hidden object scene.
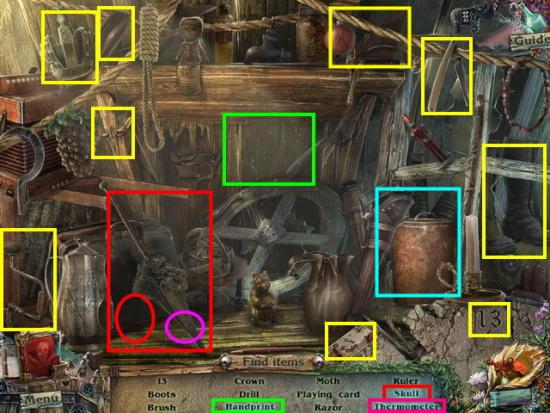
- There are three blue text items in this scene.
- Handprint – Click on the blank area in center panel to make a handprint shown circled in green.
- Skull and Thermometer – Click on the umbrella and when it opens you will see the thermometer and the skull inside. Both circled in red and pink.
- Locate the other hidden objects in the scene shown circled in yellow.
- Once you find all items you will be asked to locate a can of oil shown circled in blue.
- Once finished go inside the door that had the fan on it. You will see a ghost like object walking around.
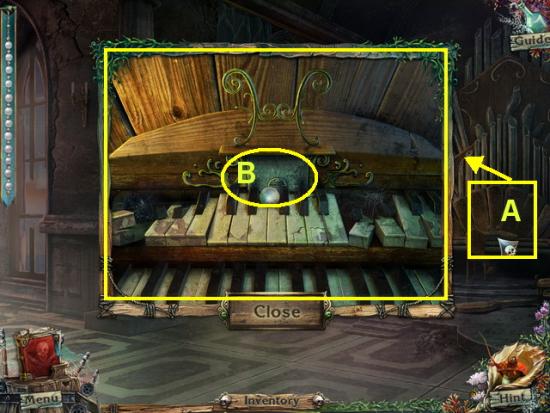
- A. Click on the center of the pipe organ to open the panel.
- B. Take the pearl and place on the necklace.
- Exit the scene and go downstairs to main room of mansion.
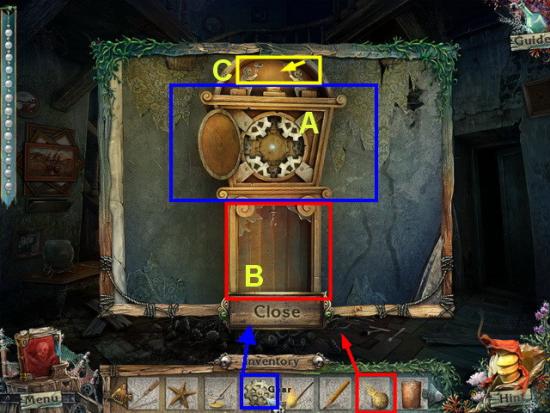
- Click on the clock in the center of the room.
- Click on the clock face to open it.
- A. Click on the gear in inventory and add it to clock face.
- B. Click on the pendulum in inventory and add it to clock.
- C. When the seed crystal appears take it into inventory.
- Return to the basement stairs.
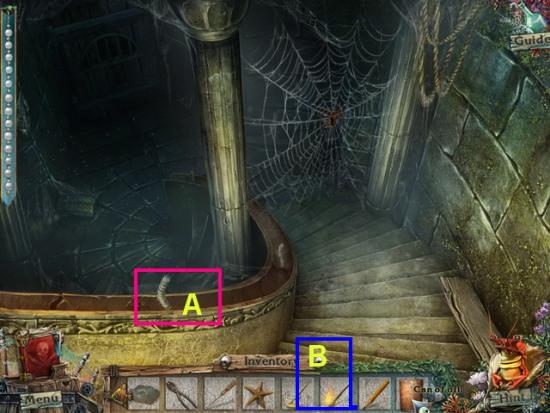
- A. Take the can of oil from inventory and add to the area along stair rail.
- B. Take the torch from inventory and light the fuses so the area lights up.
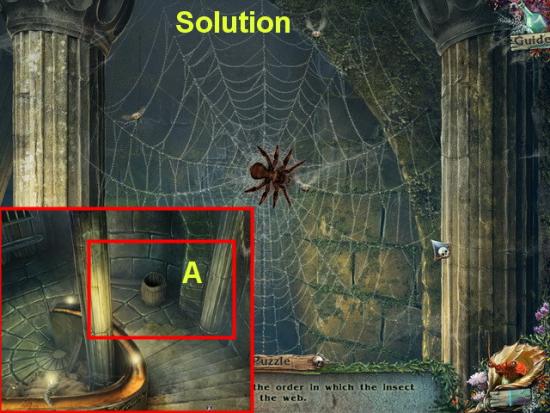
- Click on the web to start the mini game.
- This game has five phases which are always different so no solution can be shown here.
- Simply watch the order the flies land on the web and click on them in that order.
- Once finished the web will disappear.
- A. Click on the barrel with no bottom and add to inventory.
- Return to the area with the hedgehog.
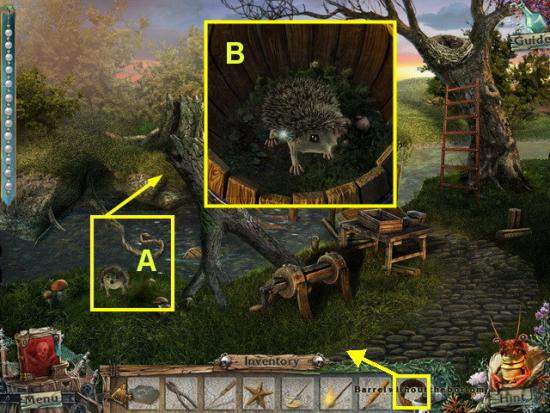
- A. Take the barrel with no bottom and place it over the hedgehog to trap him in.
- B. Take a needle directly from the hedgehog and add to inventory.
- Return to the garden area.
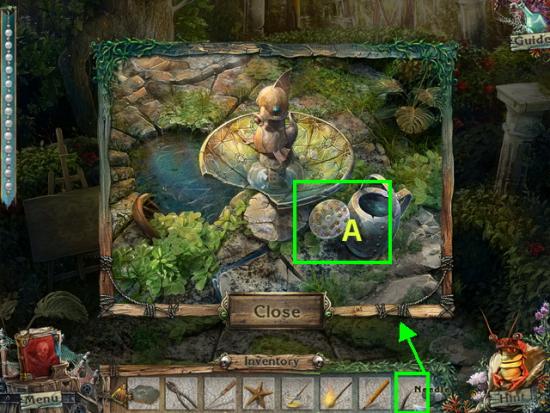
- A. Take the needle from inventory and use on the clogged water can spout.
- A full water can is now in your inventory.
- Return to the pumpkin.
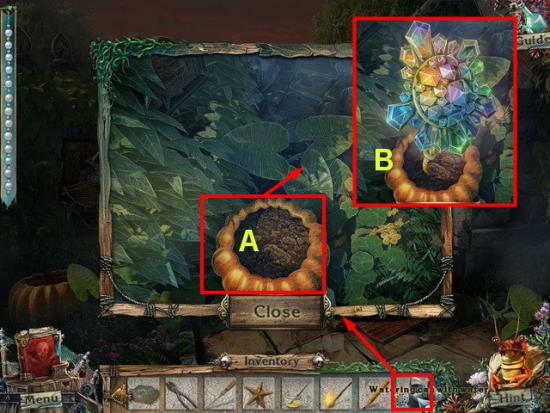
- A. Add the seed crystal to the pumpkin and water it with the can of water from inventory.
- B. Take the fragments of stained glass into inventory.
- Return to the mansion and go upstairs.
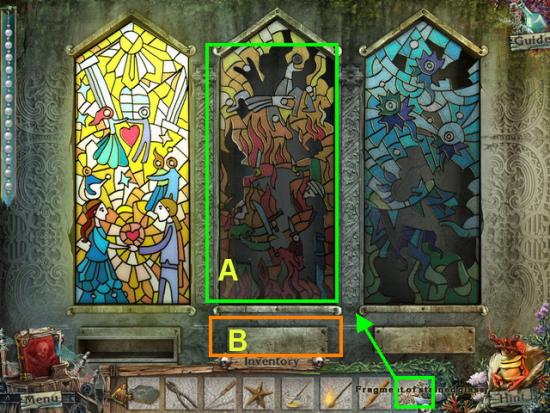
- A. Take the stained glass pieces from inventory and place on the middle window.
- B. Collect the vice handle from the bottom area and place in inventory.
- Return to the area with the hedgehog.
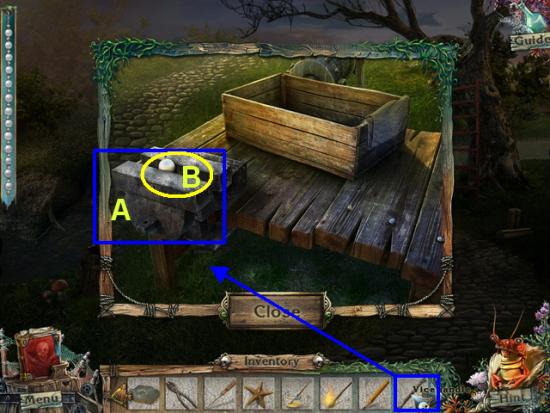
- A. Take the vice handle from inventory and place on the vice. Click on the handle multiple times to release the pearl.
- B. Take the pearl and place with necklace.
- You have now completed the necklace and a string of beads has been added to your inventory.
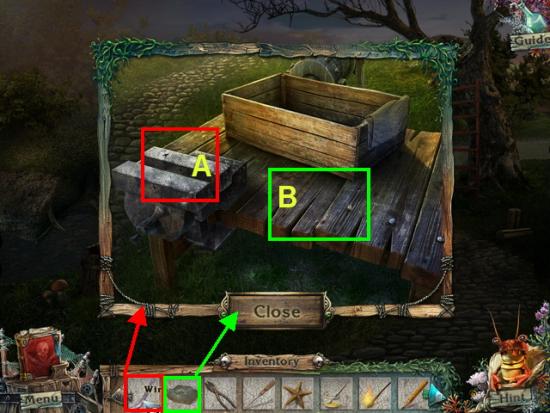
- A. Take the wire from inventory and place it in the vice and click on the handle to tighten it.
- B. Take the wax mold from inventory and place on table.
- C. Take the pliers from inventory and use it on the wire in the vice grip and it will form into the shape of the key.
- Place the lock pick into inventory.
- This is the end of Chapter 6.
Chapter 7 – The Girl
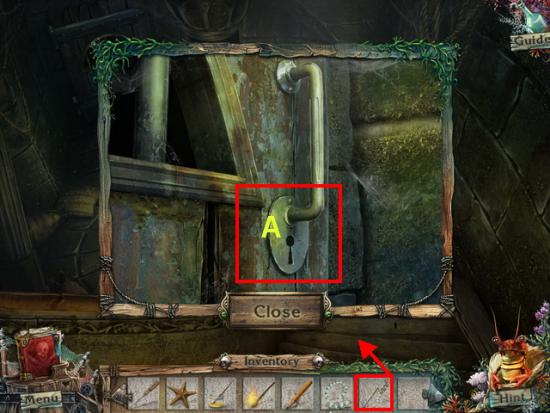
- Go to the mansion and take the door to the right downstairs and click on the door at the bottom of the stairs.
- A. Take the lock pick from inventory and use on the door knob.
- Go inside.
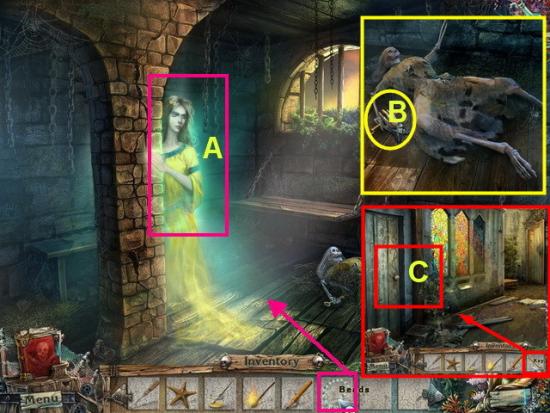
- A. Click on the girl and watch the video. Give the girl the pearl necklace in your inventory and watch the next video play.
- B. Click on the girl’s decomposed body and take the door key from her hand.
- C. Go upstairs then go upstairs again to the door by the stained glass windows. Take the key from inventory and use it to get inside the bedroom.
- Click on the blue glowing area that appears over the bed for a hidden object scene.
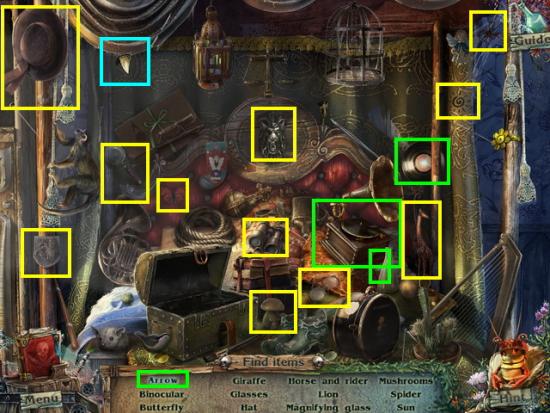
- There is one blue text item in this scene.
- Arrow – Click on the record and add to the gramophone. When it begins to play an arrow will come out the front. Click on the arrow.
- Locate all the other hidden objects shown circled in yellow.
- Once you locate all items you will be asked to find a fang which is shown circled in blue.
- The fang is added to your inventory.
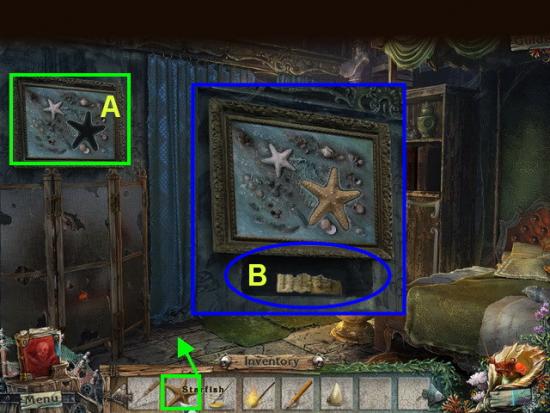
- A. Take the starfish from your inventory and place in the empty slot.
- B. When the panel opens click on the piece of sheet music that appears.
- Go downstairs to the main room of the mansion.
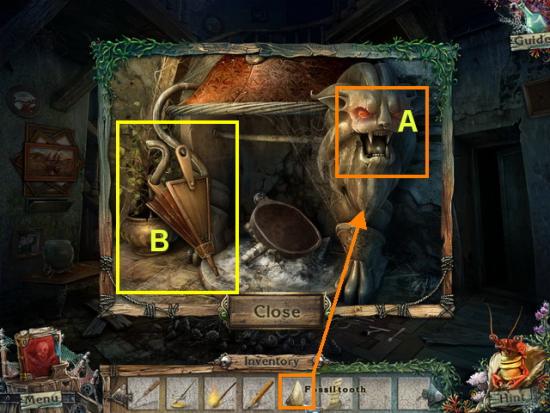
- A. Click on the fireplace area directly left of the door. Place the two fangs in inventory in the statues mouth.
- B. Take the bellows into your inventory.
- Go back upstairs to the bedroom.
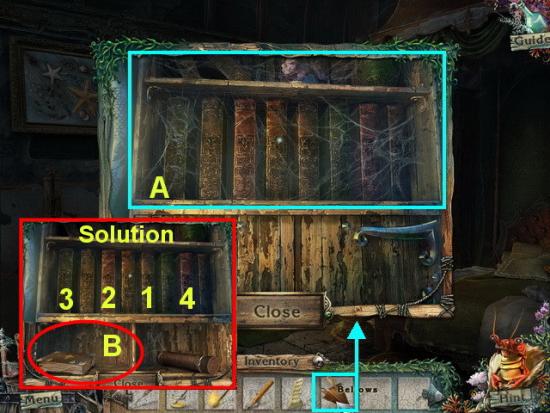
- A. Click on the bookcase and take the bellows from inventory and use it to clear away the spider webs.
- Click on the books to trigger a mini game.
- Your goal is to get all books to move forward as clicking on one can affect others.
- The solution is to click on the books in this order considering they are numbered 1 to 8 from left to right.
- Book 5
- Book 3
- Book 1
- Book 7
- Look at image above and click in the order shown as well.
- Return to the church and click on the door.
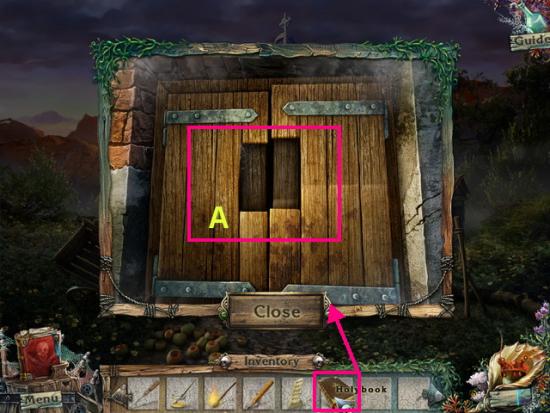
- A. Take the holy book from inventory and place it in the indentation of door.
- The door is now open and you may enter.
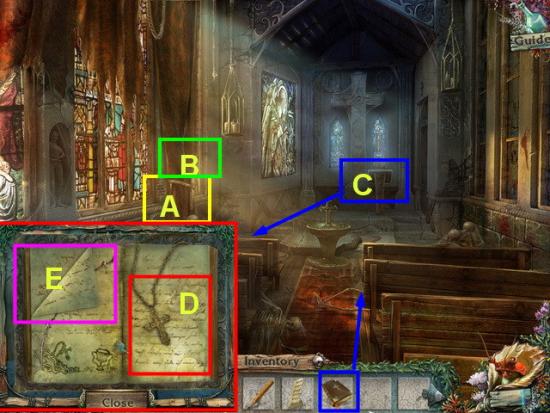
- A. Take the cord from around curtains and add to inventory.
- B. Take the clothespin and add to inventory.
- C. Click on the podium to open panel.
- D. Click on the cross necklace and take into inventory.
- E. Click on the left page and read it.
- Go outside the church once.
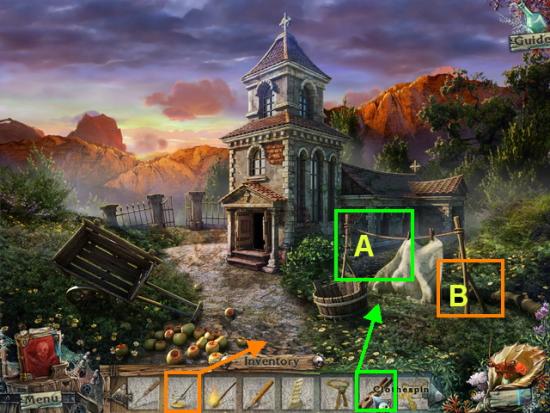
- A. Take the clothespin from inventory and use it on the sheet.
- B. Take the glue from inventory and use it on the hose under the sheets.
- The water is now restored and works in the fountain in the church.
- Go back to the bedroom in the mansion.
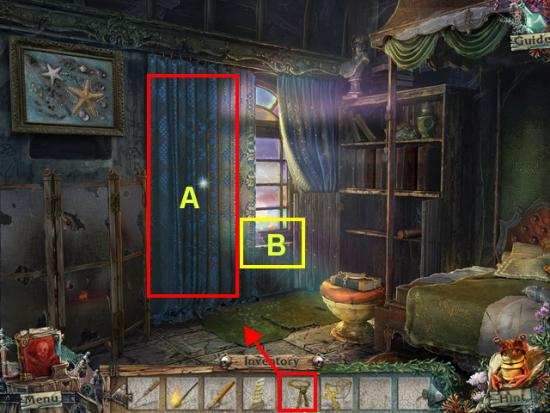
- A. Use the cord in inventory to tie up curtain.
- B. Collect the stain glass pieces into your inventory.
- Click on the blue glowing area over the bed for a hidden object scene.
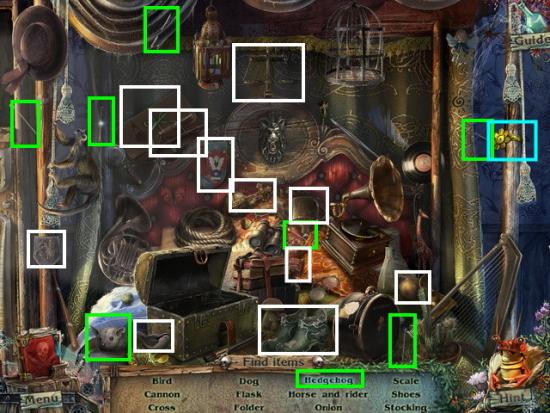
- There is one blue text item in this scene.
- Hedgehog – Collect all of the pins in the scene and add to the hedgehog at lower left bottom of scene. There are six pins to collect. Once you have them all stuck in the hedgehog pin cushion click on it.
- Locate all the hidden objects in the scene shown circled in white.
- After you find all hidden items you will be asked to find a bracelet shown circled in blue above.
- The bracelet is now in your inventory.
- Exit the room once.
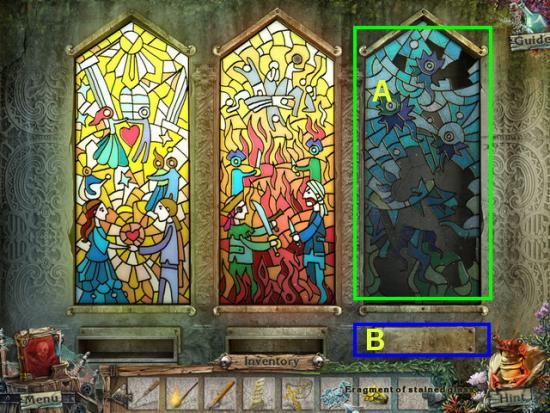
- A. Take the stain glass pieces from inventory and place on the third window.
- B. When the panel opens take the final fragment of sheet music into inventory.
- Exit into the ballroom across the hall and click on the organ.
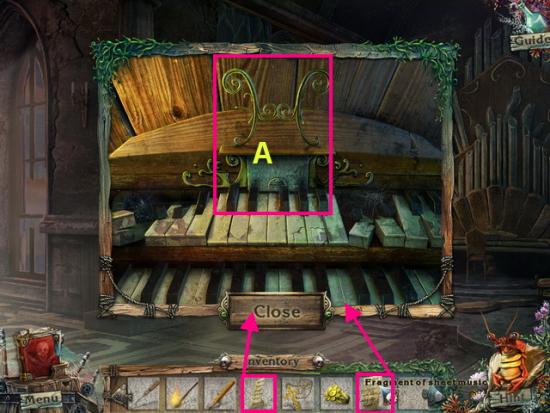
- A. Take the two pieces of sheet music and place on top of organ.
- This will trigger a mini game.
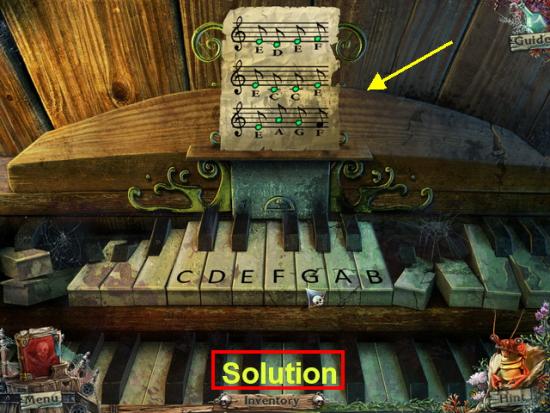
- Click on the notes as written on the music and if you are correct the note will highlight in green. If it doesn’t you will have to start over.
- Once you complete the music the ballroom to the left will open up. Watch the ghost figures dancing and the short video over the garden.
- Click on the area outside the far window.
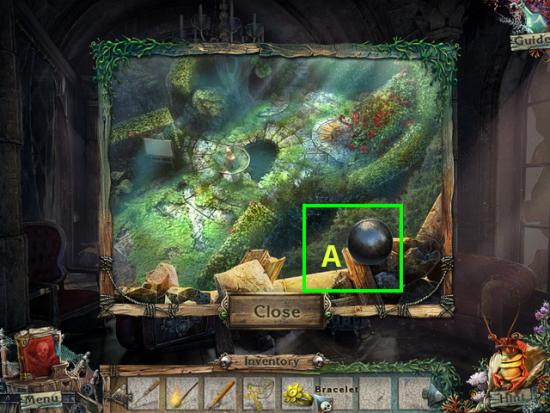
- A. Click on the cannonball and take into your inventory.
- Click on the paper on the sofa to the far left and read it.
- Click on the heater to the left of sofa.
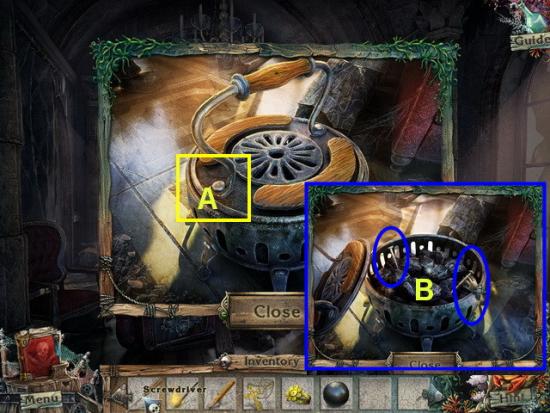
- A. Remove the large bolts at top of heater.
- B. Take the two screws inside into inventory.
- Go back up to the bedroom.
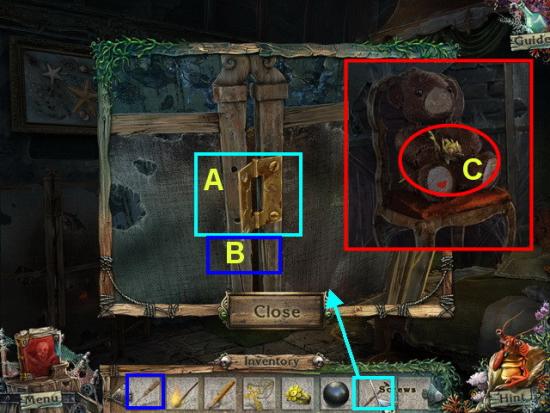
- Click on the panel to far left of scene and zoom in on the hinge panel.
- A. Take the screws from inventory and place on the hinge.
- B. Take the screwdriver from inventory and use on the hinge screws and it will move out of the way.
- C. Take the flower from teddy bear and place in inventory.
- Return to the garden area.
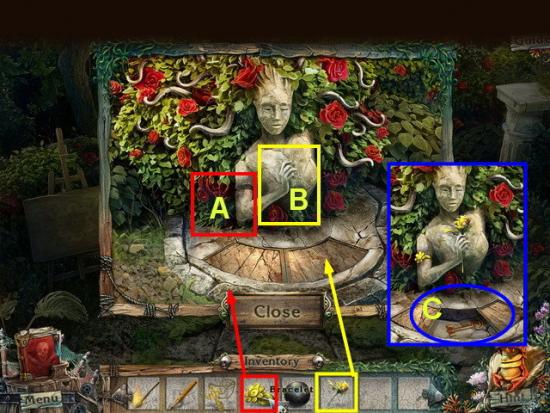
- Click on the rose panel at back left of garden.
- A. Take the bracelet from inventory and place on statue.
- B. Take the flower from inventory and place in statue’s hand.
- C. When the panel opens take the key into your inventory.
- Click on the blue glowing area from the tree to trigger a hidden object scene.
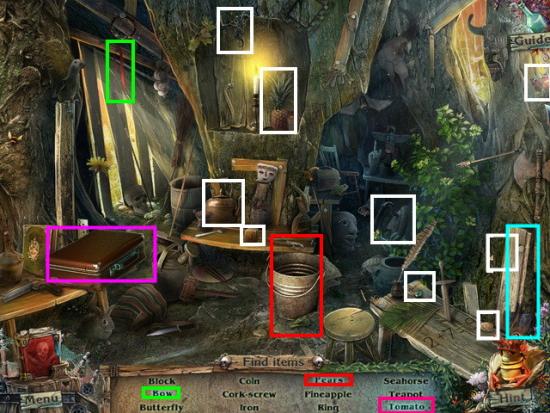
- There are three blue text items in this scene.
- Bow – Click on the red ribbon shown circled in green twice to make a bow.
- Tomato – Click on the suitcase at far left and when it opens click on the tomato inside. This is shown circled in pink.
- Pears – Click on the pail at front center to knock it over. Click on the pears inside. This is shown circled in red.
- Locate all hidden objects in the scene shown circled in white.
- Once you locate all items you will be asked to find a shovel shown circled in blue.
- The shovel is now in your inventory.
- This is the end of Chapter 7.
Chapter 8 – Save the Souls
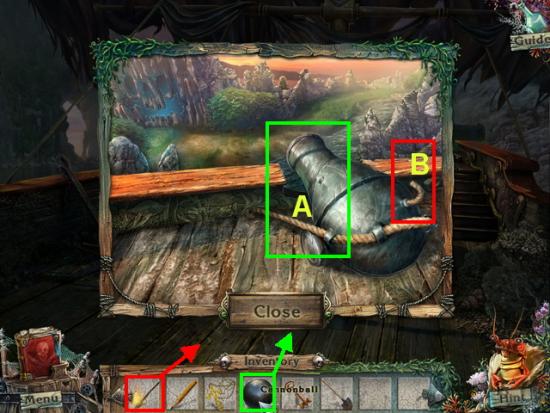
- Go back to the ship and head to the left twice.
- A. Click on the cannon to open the panel and take the cannonball and place into the cannon.
- B. Take the torch from inventory and use it to light the fuse.
- When the cannon goes off you now have access to the skull caves.
- Exit the boat then head off to the right to the cave.
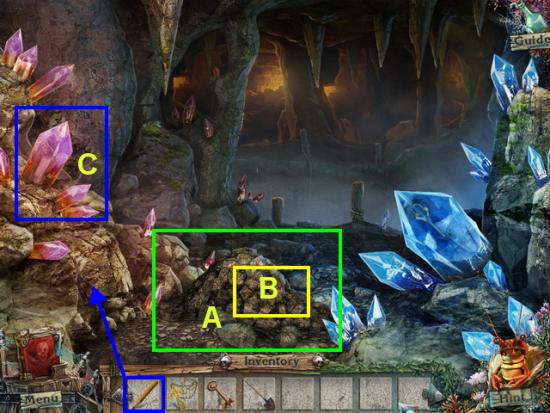
- A. Click on the mound of rocks and remove it.
- B. Take the half piece of locket and add to inventory.
- C. Click on the crystals to the left and when the panel opens take the pencil from your inventory and trace it over and add info to your diary.
- Head to the graveyard.
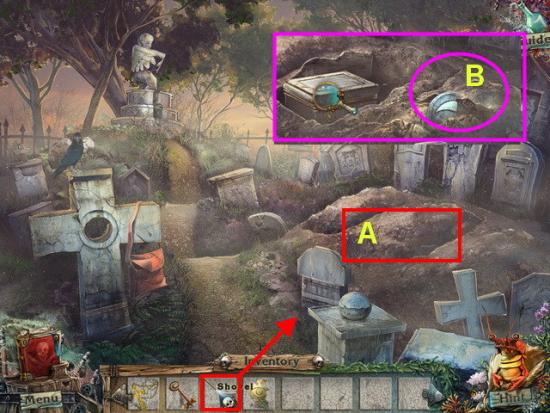
- A. Take the shovel from inventory and use it to dig up grave area to the left.
- B. Click on the moon piece in ground and add to inventory.
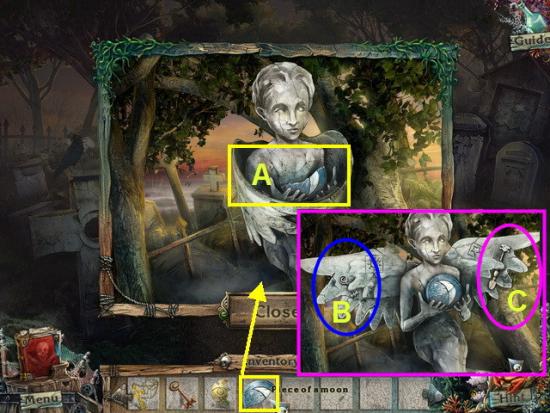
- A. Click on the statue to far left open the panel.
- B. Take the silver key into inventory.
- C. Take the glass cutter into inventory.
- Return to the skull cave.
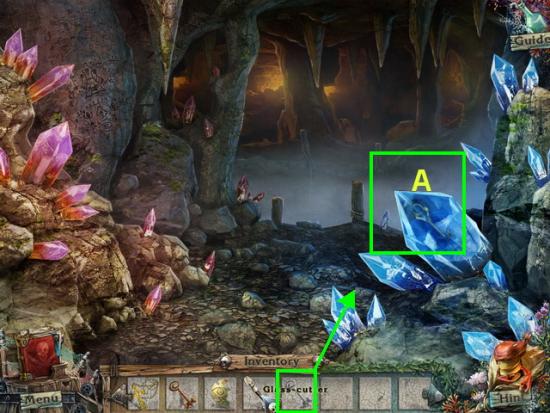
- A. Take the glass cutter from inventory and use on the blue crystal to far left.
- Place the exotic key into your inventory.
- Return to the ballroom in the mansion.
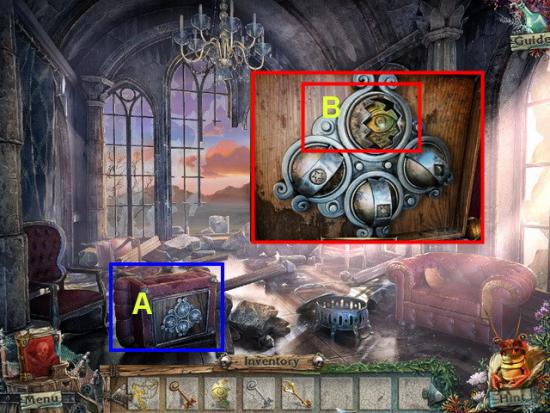
- A. Click on the puzzle on underside of chair to trigger a mini game puzzle.
- The object of the puzzle is to click on the blue bands and the spheres until you get the pattern seen in the upper left corner. Keep clicking on them until you get the shapes needed.
- To do this click on the blue bars and on the spheres until you have the shape outlining the correct image.
- B. Once you complete the puzzle click on the half of locket piece and add to inventory.
- Go back to bedroom and click on area next to bed.
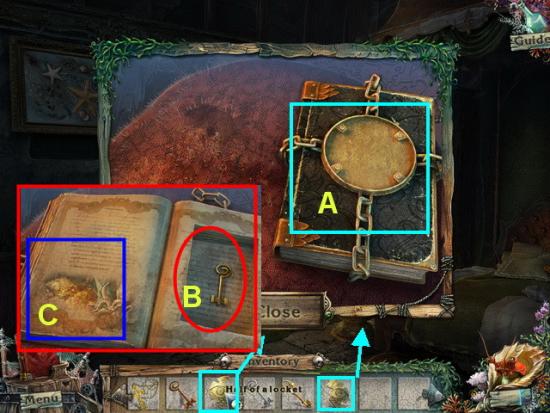
- A. Take the two pieces of locket from inventory and place in the circle area of book.
- B. When the book opens take the golden key into inventory
- C. Click on the left side of book and read the pages.
- Return to cemetery.
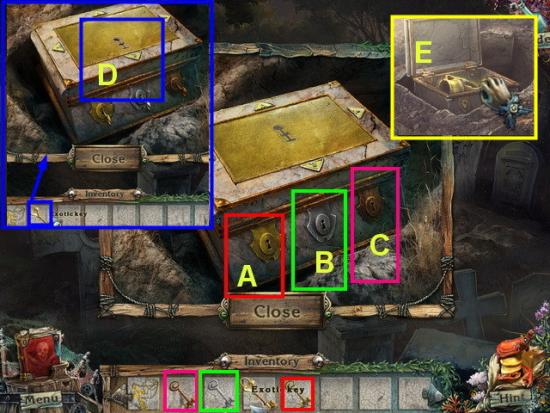
- Take the box from the ground and open the panel.
- A. Place the gold key from inventory into lock.
- B. Place the silver key from inventory into lock.
- C. Place the bronze key from inventory into lock.
- This will trigger a mini game puzzle.
- 1. Click the arrows and turn the keys in this pattern
- 2. Bottom arrow down
- 3. Turn silver key once
- 4. Bottom arrow key twice
- 5. Turn the bronze key once
- 6. Click the right arrow once.
- D. When keyhole opens up place the exotic key inside and click to turn.
- E. Take the holy cup from the box into inventory
- Return to the church.
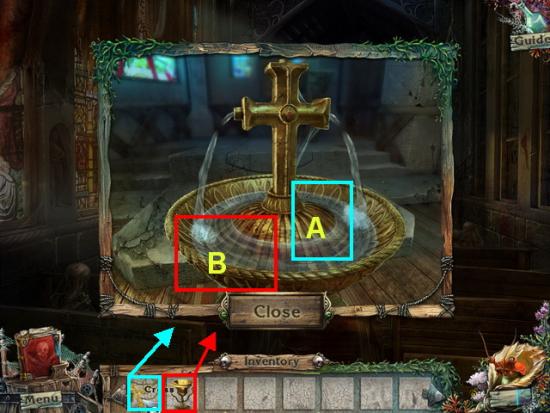
- A. Take the cross from inventory and place into the water.
- B. Take the holy cup and place into water and fill it up. It will return to your inventory filled.
- Return to the room where the girl is.
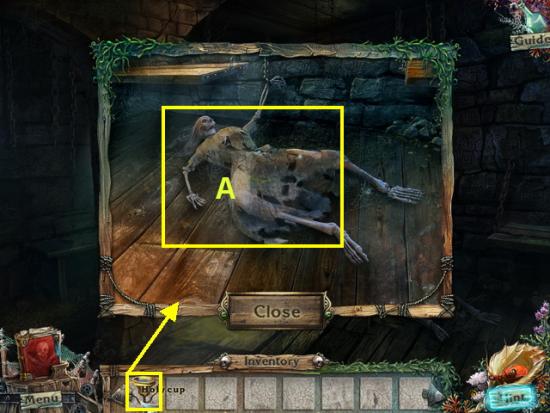
- A. Take the cup of holy water and place on the girl’s decomposed body.
- Watch the video play out and the storyline resolve.
Congratulations!
You have completed Gamezebo’s walkthrough for “Secrets of the Sea – The Flying Dutchman” by Taba Games. Be sure to check back often for game updates, Staff and user reviews, user tips, forum comments and much more here at Gamezebo!
More articles...
Monopoly GO! Free Rolls – Links For Free Dice
By Glen Fox
Wondering how to get Monopoly GO! free rolls? Well, you’ve come to the right place. In this guide, we provide you with a bunch of tips and tricks to get some free rolls for the hit new mobile game. We’ll …Best Roblox Horror Games to Play Right Now – Updated Weekly
By Adele Wilson
Our Best Roblox Horror Games guide features the scariest and most creative experiences to play right now on the platform!The BEST Roblox Games of The Week – Games You Need To Play!
By Sho Roberts
Our feature shares our pick for the Best Roblox Games of the week! With our feature, we guarantee you'll find something new to play!All Grades in Type Soul – Each Race Explained
By Adele Wilson
Our All Grades in Type Soul guide lists every grade in the game for all races, including how to increase your grade quickly!


