- Wondering how to get Monopoly GO! free rolls? Well, you’ve come to the right place. In this guide, we provide you with a bunch of tips and tricks to get some free rolls for the hit new mobile game. We’ll …
Best Roblox Horror Games to Play Right Now – Updated Weekly
By Adele Wilson
Our Best Roblox Horror Games guide features the scariest and most creative experiences to play right now on the platform!The BEST Roblox Games of The Week – Games You Need To Play!
By Sho Roberts
Our feature shares our pick for the Best Roblox Games of the week! With our feature, we guarantee you'll find something new to play!Type Soul Clan Rarity Guide – All Legendary And Common Clans Listed!
By Nathan Ball
Wondering what your odds of rolling a particular Clan are? Wonder no more, with my handy Type Soul Clan Rarity guide.
Secrets of the Dark: Temple of Night Walkthrough
Welcome to the Secrets of the Dark – Temple of the Night walkthrough on Gamezebo. Secrets of the Dark – Temple of the Night is a Hidden Object Game played on the PC created by [company name]. This walkthrough includes tips and tricks, helpful hints and a strategy guide on how to complete Secrets of the Dark – Temple of the Night.
Secrets of the Dark – Temple of the Night Game Introduction
Welcome to the Secrets of the Dark – Temple of the Night walkthrough on Gamezebo. Secrets of the Dark – Temple of the Night is a Hidden Object Game played on the PC created by [company name]. This walkthrough includes tips and tricks, helpful hints and a strategy guide on how to complete Secrets of the Dark – Temple of the Night.
General Tips
- Play is mostly non-linear although some tasks must be completed to open hidden object scenes or to advance play. This walkthrough attempts to take the most direct route so certain areas may not be explored even though they are available.
- CAPITALIZED inventory items are meant to make it easier to find where this guide may deviate from your own play.
- Play takes place in two dimensions: regular and demon realm. Switching between the dimensions requires “Changing Illumination” by clicking a light source. The source glows orange.
- Moving to different locations can only be done in the dimension in which they were discovered.
- This is not a timed game. However, your cumulative time is kept for a High Score statistic. Skipping puzzles adds an additional 30 minutes to your time.
Main Menu:
- Play – Begin or resume a game. The first time you play you must select a difficulty level:
- Regular – Hint and Skip buttons recharge faster. Hidden object areas are illuminated.
- Advanced – Hint and Skip buttons take longer to recharge. Most helpful aids are unavailable.
- Options – Change music and sound effects volume. You may select or deselect full screen and a custom cursor.
- Help – Describes how to interact with the game.
- High Scores – Time it took to complete the game by profile name.
- Exit – Quit the game.
- Extras – Bonus Adventure 1 (available after completing game), Bonus Adventure 2 (available after completing Bonus Adventure 1), minigames replay, strategy guide and wallpapers. Most of these extras are only available after completing the game.
- Profiles – Click the “Not you? Click Here” link to create, delete or switch player profiles.
Screen Navigation:
- Menu – Change your options, resume the game or return to the main menu.
- Hint/Skip Bar – Clicking will show a random item from an itemized list. Hints are not limited and the bar refills quickly. The bar turns into a Skip bar for puzzles.
- Journal – Clicking an object can add clues or information. The diary glows when new information is added. You can also replay cut scenes.
- Inventory/Item List – A scrollable list of icons showing available items or a list of hidden items to be collected or placed.
- Strategy Guide – A built in guide if you need help.
Symbol Meanings:
- Magnifying Glass – Zoom in on interactive area.
- Hand – Interact with an object: pick up an item, open a door or move an object.
- Sparkles – Hidden object areas.
Walkthrough
A short clip explains the background and introduces the story line for play.
If you are not familiar with hidden object games, click “Yes” when asked if you would like interactive help. This will show you how to interact with objects and characters.
The objects for hidden object scenes are randomly generated. That is why only inventory items are shown. They are highlighted in white with a blue border. Objects in yellow type indicate two items must be combined to form the object. Move your cursor around until the cursor turns into a hand to find the objects to combine.
With the exception of a hidden object area, most inventory items are not collected from a scene until they are needed.
Assumptions:
- After you have gone back and forth between locations more than once, you don’t need to be told how many times to go up or down.
- You will always explore a secret area as soon as you break the lock.
Chapter 1: The Hotel – Beginning the Search

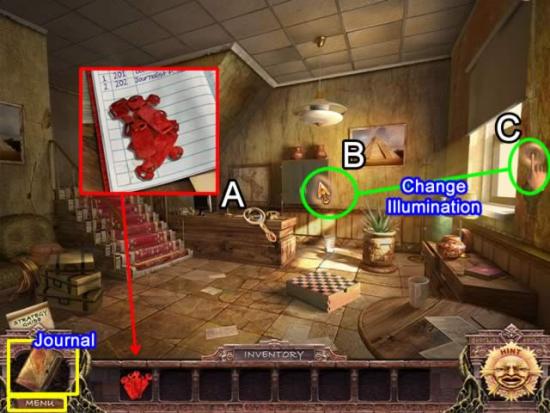
- Enter the Saguaro Hotel on the left.
- Zoom in on the desk area (A). Pick up the KEY TAGS for inventory.
- The cursor has an orange glow indicating no more can be done in this dimension. Click the curtain cord (C) to change illumination.
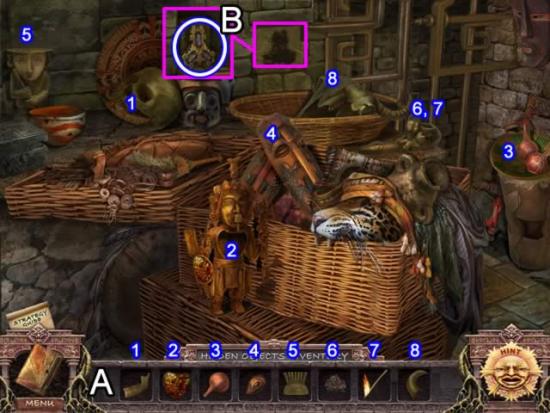
- Zoom in on the interactive area on the left.
- Match each object in the inventory tray with its related object in the scene. Note the tobacco (6) must be placed in the pipe before the fire (7).
- Correctly placing all the objects reveals a hidden nook containing a SAPPHIRE KEY (B).
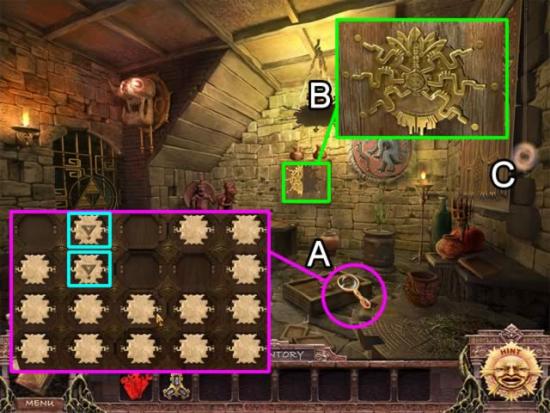
- Examine the box on the floor (A). Place the SAPPHIRE KEY in the slot to open a symbol-matching puzzle.
- The goal is to remember where the hidden symbols are located and match each pair. Incorrectly guessing switches the selected symbols. Correctly finding all the symbols opens the box. Take the HALF OF SUN.
- Zoom in on the sun emblem on the back wall (B). Place the other HALF OF SUN in the slot to open the cabinet.
- Click the illumination cord (C).
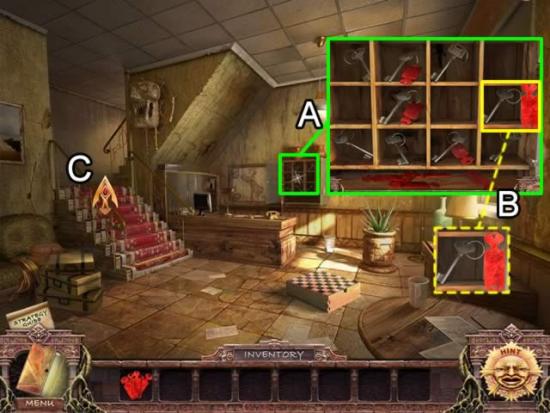
- Inspect the key cabinet on the back wall (A).
- Place the KEY TAGS on the key slots to start a puzzle.
- The goal is to match the shape of the key tag head with the head of key (B). Correctly matched tags will attach themselves to the key. Solving the puzzle adds ROOM 202 KEY to inventory.
- Go up the stairs (C).
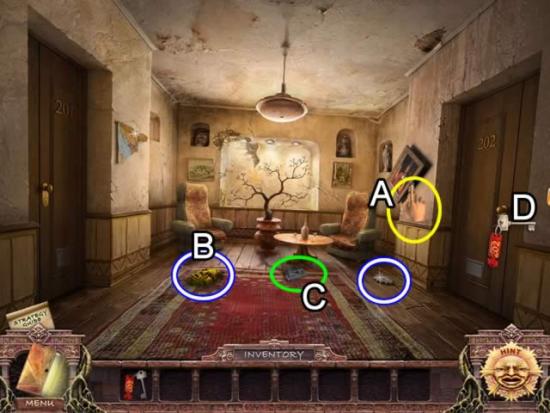
- Click the picture on the wall (A). It swings aside and a GEAR falls to the floor.
- Pick up the MASK (B). Click the video tape (C) to watch the scene.
- Use the ROOM 202 KEY to access the room (D).
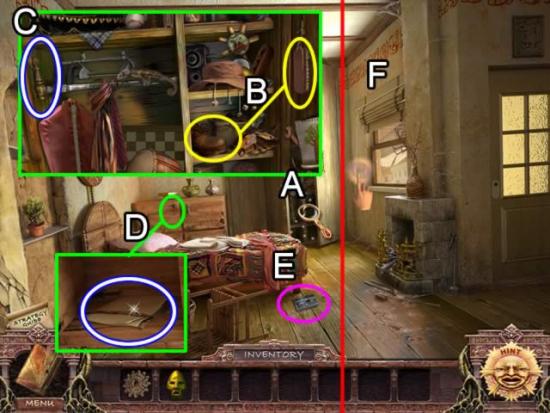
- Play the hidden object scene in the closet (A). An item listed in yellow indicates you must combined objects. If your list includes a “Clean Shoe”, move the cursor over the brush until it turns into a hand. Drag the brush to the shoe. Click to watch the brush shine the shoe.
- After all items are collected an additional item is listed. Take the HANDLE (C) to complete the scene.
- Zoom in on the dresser drawer (D). Place the HANDLE on the drawer. Retrieve the ROMAN SHADE from the drawer.
- Pick up the video tape (E) for another clue.
- Place the ROMAN SHADE on the window (F).
- Click the cord to switch dimensions.
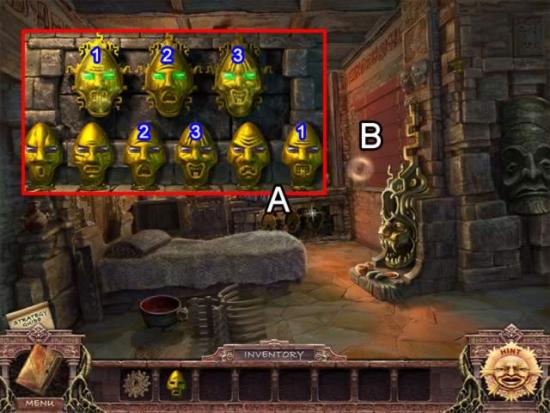
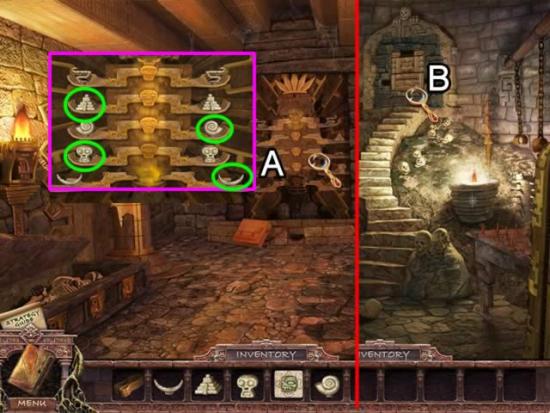
- Access the game on the back wall (A). Place the MASK on the empty stand.
- The goal is to place three of the masks in the slots so the light in their eyes turns green. Yellow indicates a correct selection in the wrong place. Red means it does not belong. The solution is shown above. Retrieve the STONE PYRAMID.
- Click the cord to change dimensions.
- Return to the lobby. Click the cord to switch dimensions.
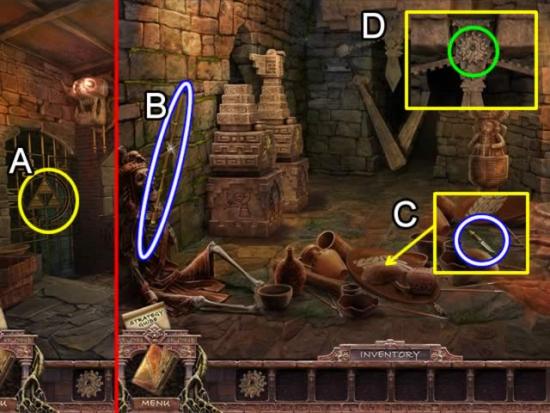
- Place the STONE PYRAMID in the lock slot on the gate (A).
- Enter the passage.
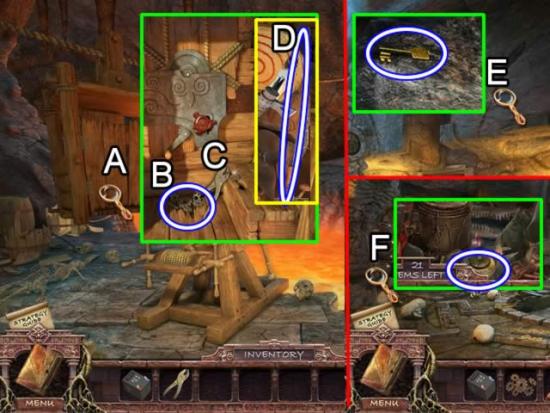
- Take the SPEAR from the skeleton (B). Move pieces in the pile (C) to uncover a KNIFE.
- Zoom in on the mechanism above the doorway (D). Place the GEAR in the center to open the gateway.
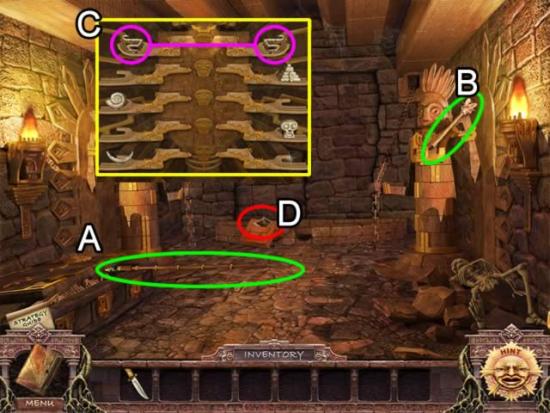
- Use the SPEAR to pry open the tomb (A). Take the MACE from the remains.
- Place the MACE in hand of the warrior guard on the right (B). The stone wall opens revealing a statue.
- Inspect the statue (C). Note the two matching symbols in the top pair of hands. Each of the lower hands is missing its mate.
- Examine the photograph on top of the satchel (D). Note the similarity between the circled statue and that on the bottom hand of the statue. Read the information added to the journal.
- Click down twice to return to the demon realm lobby. Click the cord to change realms.
- Go up the stairs.
- Use the knife to open the door on the left, room 201.
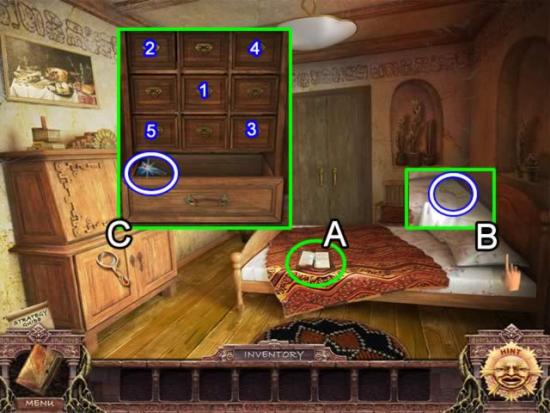
- Read the diary pages on the bed (A). The information is added to the game journal.
- Click the pillow three times to move it off the bed (B). Take the ESCRITOIRE KEY that was hidden beneath it.
- Use the ESCRITOIRE KEY to unlock the lower doors of the escritoire (C). Zoom in on the small drawers to open a puzzle.
- The goal is to find the combination that will keep all of the small drawers open simultaneously to gain access to the larger bottom drawer. The correct sequence is shown above. Take the hospital ACCESS CARD.
- Return to the lobby and exit the hotel. Cross the street to the hospital.
- Swipe the ACCESS CARD through the card reader to open the hospital doors.
Chapter 2: The Hospital – Initial Examination
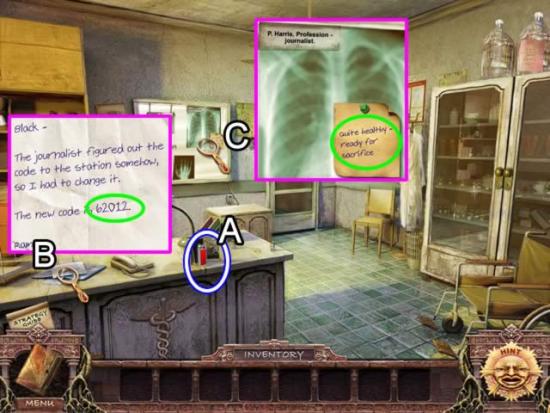
- Take the LIGHTER (A).
- Read the note on the desk. Note the code for the sheriff’s office is 62012. Click the note to add the information to the journal.
- Check out the x-ray screen (C). Take the note about Peter for the journal.
- Retrace your steps to the hotel.
- Go up the stairs to room 202.
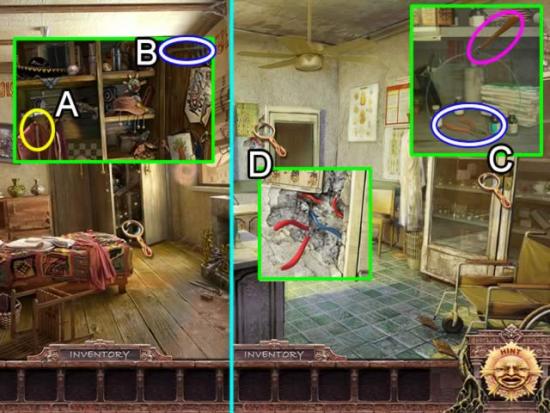
- Play the hidden object scene. If your list contains a “Jacket” in yellow text, click the zipper on the garment bag (A) to open it and see the jacket. Take the GLASS CUTTER (B).
- Return to the hospital.
- Use the GLASS CUTTER to open a hole in the cabinet (C) door. Take the WIRE CUTTERS.
- Inspect the wires by the door (D). Use the WIRE CUTTERS to clip both wires and open the door.
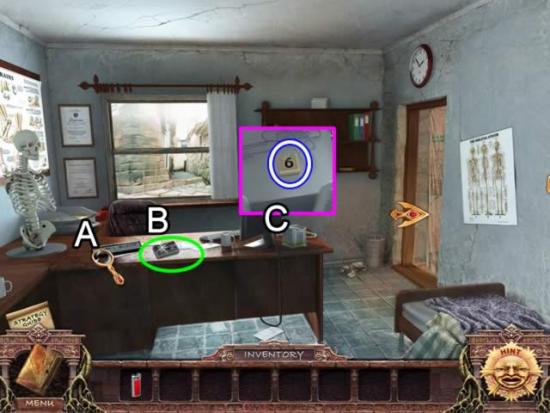
- Note the doctor’s name (A) on her nameplate .
- Watch the video (B).
- Take the BUTTON from the note paper holder (C).
- Enter the patient room on the right.
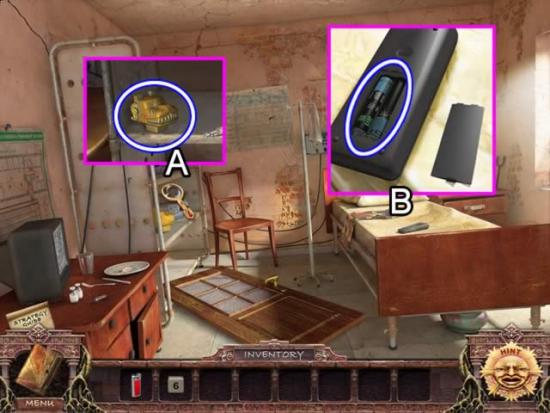
- Zoom in on the shelves (A). Take the ESCRITOIRE PART.
- Examine the remote control on the bed (B). Remove the back of the control and take the BATTERIES.
- Exit the hospital.
- Once in the street, go forward to go further into town.
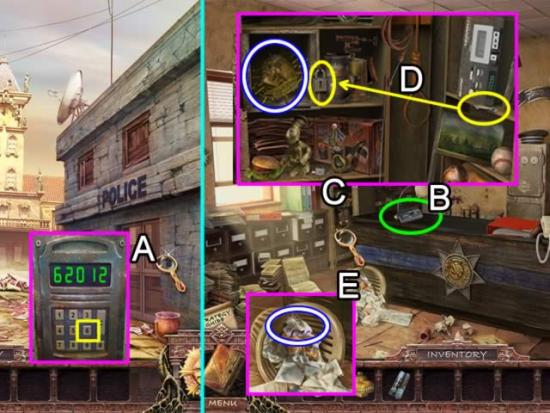
- Access the keypad outside of the police department (A).
- Place the BUTTON in the empty space. Click the keys to input the numbers found on the note in the hospital (6-2-0-1-2).
- View the video tape on the desk (B).
- Play the hidden object scene in the locker (C). Take the key and place it in the lock to open the safe (D). Take the SKULL.
- Examine the contents of the waste paper basket (E). Take the MAP PIECE.
- Return to the hotel. Go to the second floor hallway.
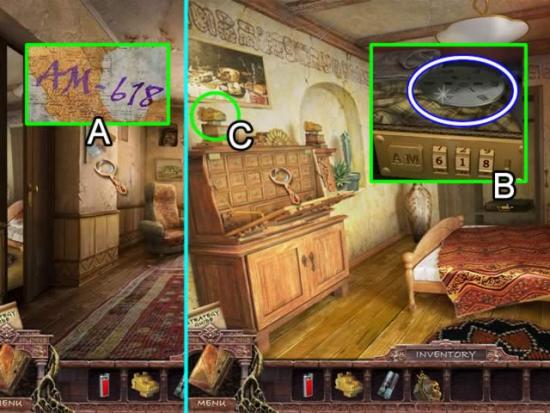
- Inspect the torn map (A). Place the MAP PIECE to discover a code.
- Enter room 201.
- Open the closet doors to reveal an attaché case in the closet (B). Zoom in on the lock. Enter the digits 6-1-8 to open the case. Take the DISC FOR MECHANISM.
- Place the ESCRITOIRE PART on the peg atop the escritoire (C) to open the upper part.
- Zoom in to play an expanded version of the open-all-the-drawers puzzle. See the following screenshot for one sequence solution.
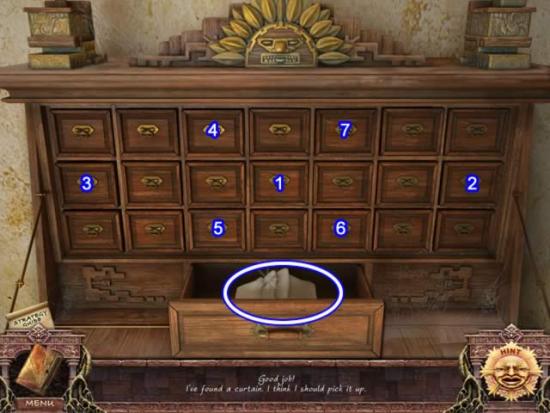
- Take the CURTAIN from the bottom drawer.
- Cross the hall to room 202.
- Use the LIGHTER to light a fire in the fireplace.
- Click the cord to change the illumination.
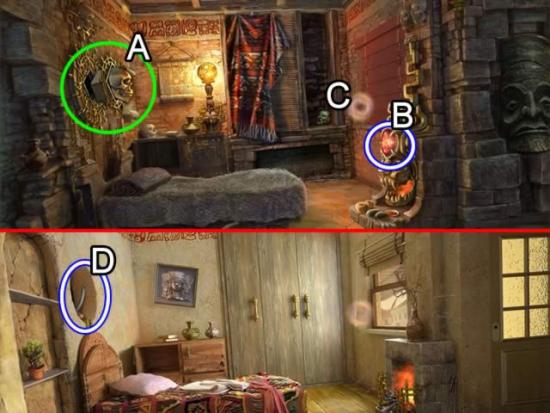
- Place the SKULL in the slot in the center of the stone sun (A).
- Pluck the RUBY from its mount in the fireplace (B).
- Click the cord to change the illumination (C).
- Take the CRANK HANDLE (D) from the recess above the bed.
- Return to the police station reception area.
Chapter 3: The Police Station
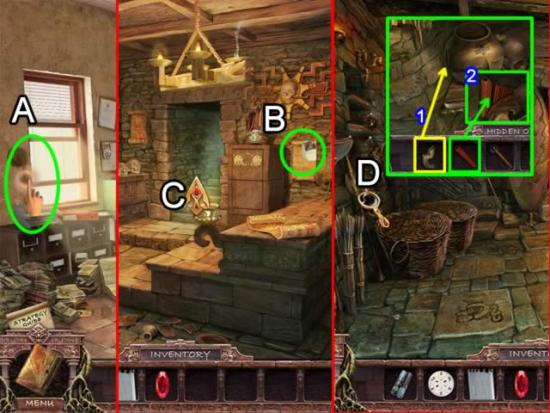
- Place the CRANK HANDLE in the slot by the window (A). Close the blinds.
- Check out the photo on the back wall (B). The information is saved in the journal.
- Go up the stairs (C).
- Access the replace-the-object scene on the left (D). Put the HANDLE (1) on the jar. The jar breaks revealing a pan flute (2). Insert the Flute Pipe in the gap. Continue replacing objects. Receive a BELT DRIVE.
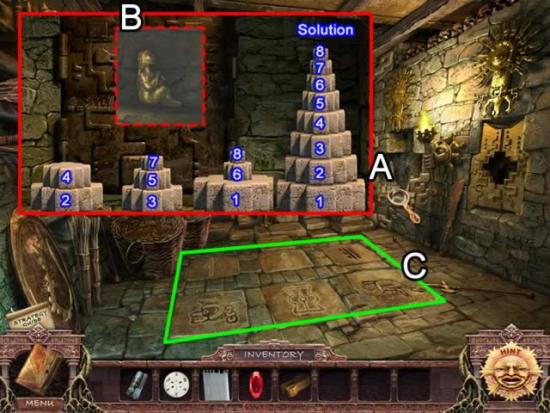
- Access the alcove on the right (A) to open a puzzle.
- The goal is to move the three piles of stones onto the empty pedestal on the right in ascending size order. Clicking a stone shows possible moves. The inset shows the eventual solution and the corresponding numerical position when beginning the puzzle.
- Here is one way to begin:
- Move 7 to the open pedestal.
- Move 8 to 7.
- Move 6 to 4.
- Move 8 to 5.
- Move 7 to 6.
- Move 1 to the pedestal.
View the solution video for additional help.
- Completing the puzzle opens the doors. Pick up the GOLDEN IDOL (B) from the recess.
- Note the pattern on the floor (C).
- Go downstairs. Open the blinds.
- Go to the doctor’s office in the hospital.
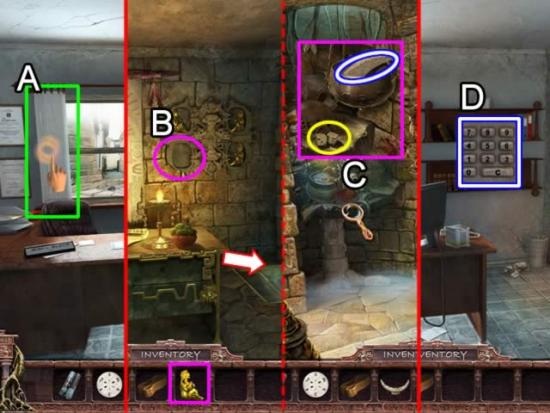
- Hang the CURTAIN on the window (A). Click the cord to change illumination.
- Zoom in on the back wall (B). Place the GOLDEN IDOL in the empty slot.
- Go down the stairs on the right.
- Play the hidden object scene (C). To get the yellow “Five”, click the dice. They flip in the air and combine for five. Get the HORN.
- Go back to the office.
- Click the cord to change illumination.
- Pick up the KEYBOARD from the top shelf (D).
- Return to the police department reception area.
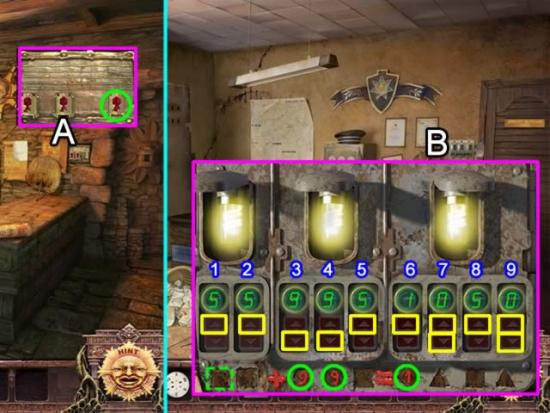
- Close the blinds to change illumination.
- Access the panel on the right side of the room (A). Insert the RUBY in the third slot.
- Open the blinds.
- Zoom in on the panel again (B) to open a puzzle.
- The goal is to use the clues given to determine the correct code. Note the mathematical equation along the bottom of the panel and the shapes. The first two numbers are unknown. Here is how to solve the puzzle:
- Begin pressing the up arrow for the first number (1) until the light coil comes on. It is a “5”. The symbol at the bottom is a square. The second light (2) also has a square at the bottom so it also must be a “5”. Press the up arrow until a “5” appears in the display. The bulb lights up.
- The values for lights 3 and 4 are given on the bottom panel. Press the down arrow once for each light. Note the symbol for light 5 is a square. Since a square represents the number 5, press the up arrow 5 times. The second bulb lights up.
- The equation on the bottom of the panel states that the values for bulb 1 plus the values for bulb 2 equal the code for bulb 3: 55 + 995 = 1050. To get a “0” for positions 7 and 9, press the up arrow once, then the down arrow.
When the code is correctly entered, the door to the Sheriff’s office opens.
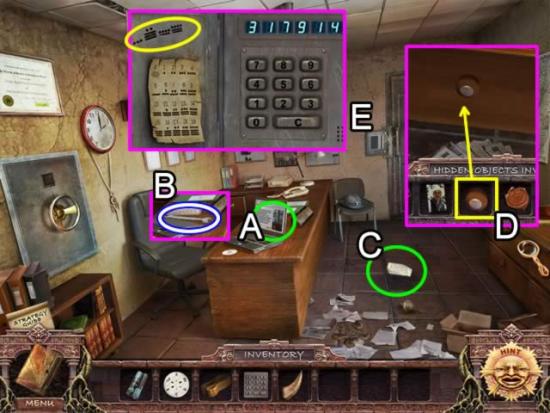
- Look at the screen on the labtop (A). Exiting the closeup saves the information in the journal and closes the laptop cover. Pick up the WRENCH that is now revealed (B).
- Read the note on the floor (C).
- Play the replace-the-object scene (D). Placing the “Knob” on the drawer opens the drawer to show more places to put objects. Receive a FINGERPRINT BRUSH.
- Use the WRENCH to remove the bolts on the access panel (E). Insert the KEYBOARD. Match the symbols to the number sheet to determine the code. The solution is 3-17-9-14. The door to the evidence room opens.
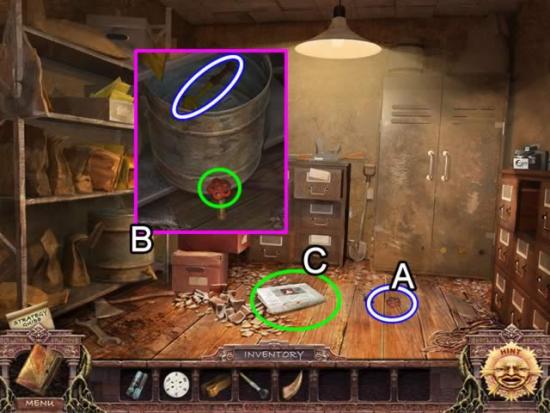
- Pick up the VALVE (A).
- Inspect the bucket on the shelf (B). Place the VALVE on the tap to drain the liquid. Get the KNIFE SWITCH.
- Return to the reception area.
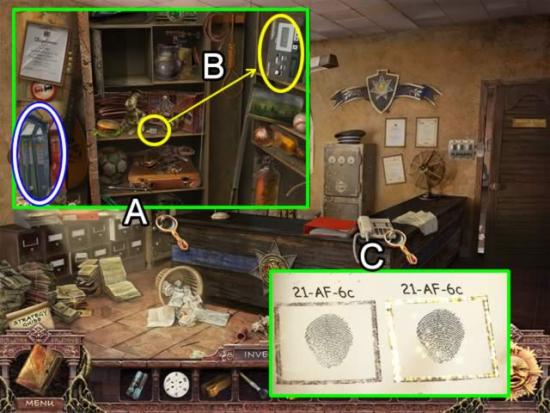
- Play the hidden object scene in the locker (A). To get the “Casette Tape”, pick up the eject button on the shelf and place it on the side of the tape recorder (B). Click the button to open the recorder lid and collect the tape. Get the HACKSAW.
- Examine the telephone (C). Use the FINGERPRINT BRUSH to highlight the prints on the telephone. This opens a match-the-print game. Look at the print on the booking page and find its match on the telephone. Pick up the print and place it in the empty slot on the page. Correctly matching all the prints adds a FINGER PRINT to inventory. See the next screenshot for the solution.
- Enter the Sheriff’s office.
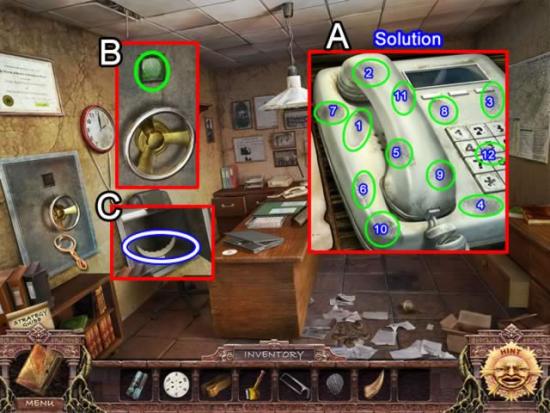
- The print and corresponding booking page is shown in the solution (A).
- Zoom in on the safe. Place the FINGER PRINT on the scanning box (B) to open the safe.
- Pick up the MOON SYMBOL (C).
- Exit the police station. Cross the street to the museum.
- Use the HACKSAW to saw through the chains on the door.
Chapter 4: The Museum and Hospital
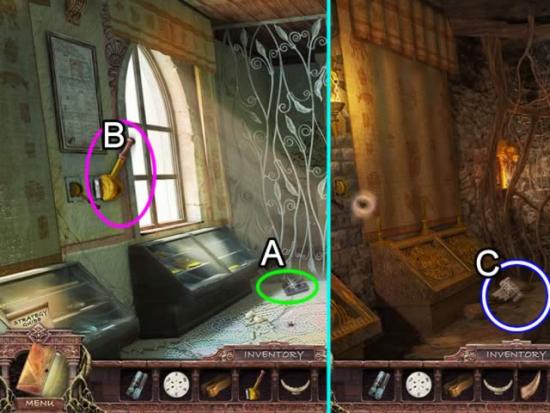
- View the video (A).
- Place the KNIFE SWITCH in the slot (B). Click to change the illumination.
- Pick up the STONE EAGLE (C). Click to change the illumination.
- Return to the hotel lobby. Change the illumination.
- Go to the basement.
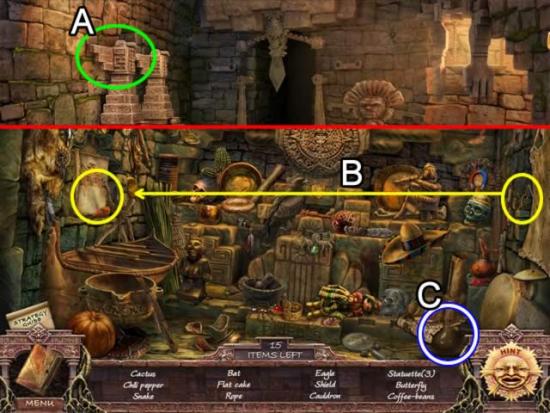
- Place the STONE EAGLE on the pillar (A) to open the secret room.
- Play the hidden object scene. To get the yellow “Sun” item, take the needle and thread and place them on the half-finished needlework sun. After the stitching is complete, take the sun. Pick up the BEAKER (C).
- Return to the lobby.
- Place the HORN in the skull.
- Change the illumination.
- Get the PLATE from the mounth of the skull.
- Go to the doctor’s office in the hospital.
- Close the blinds. Go down the stairs through the opening on the right.
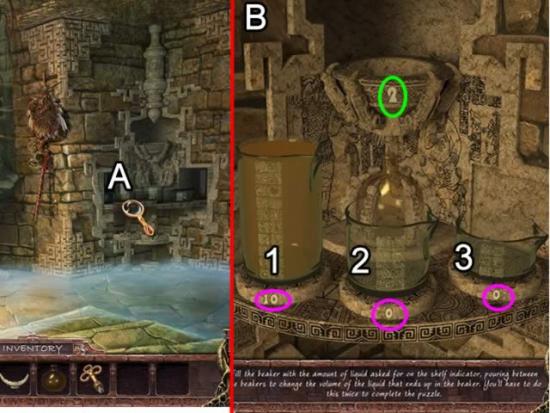
- Zoom in on the chemistry set in the right corner (A).
- Place the BEAKER in the center claw to open a puzzle.
- The goal is to spread the liquid among the three measuring cups until one cup has the amount specified on the bowl (green). The number at the base of each cup (pink) indicates how much liquid the cup is currently holding. The lines on the cups show how much each can hold: Cup 1 – 10; Cup 2 – 5; Cup 3 – 3. The puzzle must be completed twice.
- Solution 1. The amount in Cup 1 should be 2.
- Pour 1 into 2. Cup 1 now measures 5.
- Pour 1 into 3. Cup 1 now measures 2.
- Solution 2. The amount in Cup 1 should be 4.
- Pour 1 into 3. Cup 1 now measures 7.
- Pour 3 into 2. Cup 3 is now empty and Cup 2 contains 3.
- Pour 1 into 3. Cup 1 now measures 4.
- Obtain a beaker full of ANTI-RUST LIQUID.
- Exit the room to return to the office.
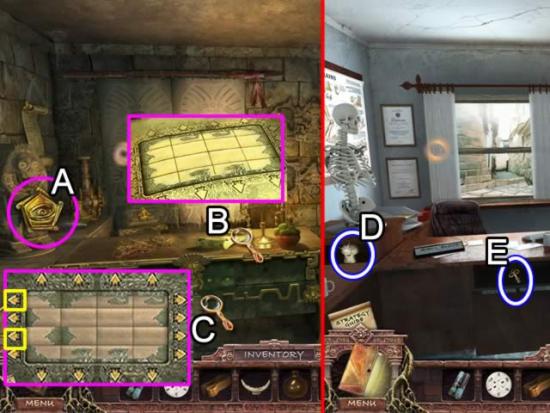
- Place the PLATE in the statue (A).
- Study the document on the desk (B). This is the solution to the puzzle on the front of the desk.
- Access the puzzle (C).
- The goal is to use the arrows to recreate the desk document. This is an easy puzzle to solve. Click the first arrow once. Click the third arrow once. Done.
- Open the blinds to change the illumination. Take the SKULL (D) and the TRIANGULAR KEY (E).
- Return to the police department. Go through the Sheriff’s office into the evidence room.
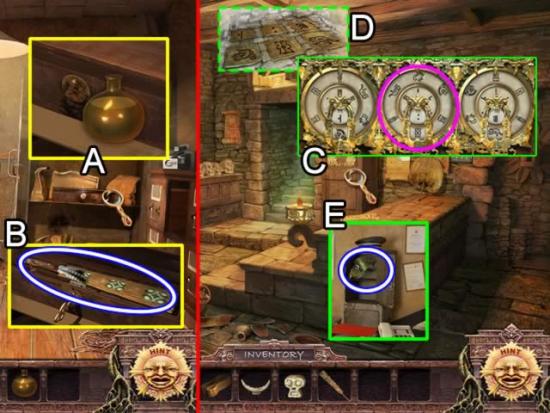
- Open the doors on the locker at the back of the room.
- Examine the box on the shelf (A). Pour the ANTI-RUST LIQUID on the lock. Insert the TRIANGULAR KEY. Take the OBSIDIAN SWORD (B).
- Return to the reception area.
- Close the blinds to change illumination.
- Zoom in on the dials by the door (C). Place the DISC FOR MECHANISM in the center circle (C). Refer to the journal entry (D) to click each disc to the correct position.
- Open the blinds to change illumination.
- Take the GOLDEN HELMET from the open safe (E).
- Go to the museum. Close the blinds to change illumination.
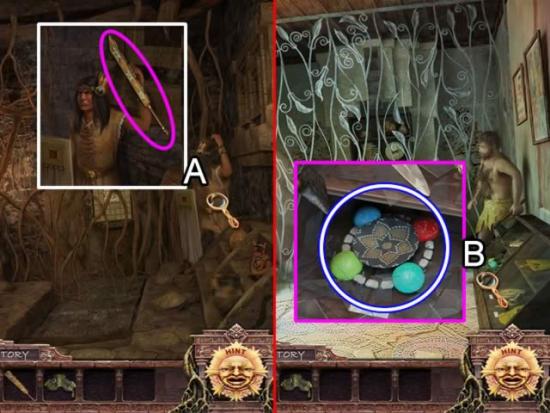
- Access the display (A). Place the OBSIDIAN SWORD in the hand of the statue. The arm falls down.
- Click the blinds to change the illumination.
- The sword broke the display glass (B). Take the GLASS BEADS.
- Return to the doctor’s office in the hospital.
- Close the blinds and go down the stairs.
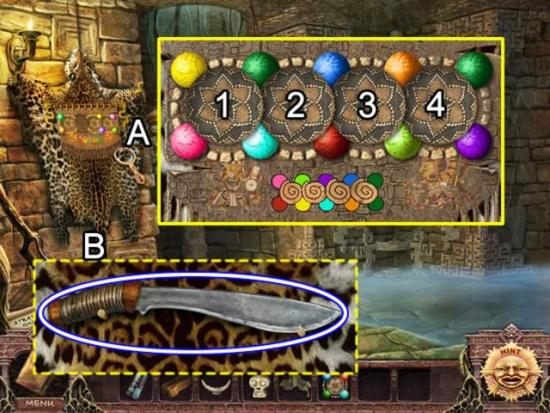
- Click the puzzle on the animal hide (A). Insert the GLASS BEADS in the second slot to start the puzzle.
- The goal is to rotate the beads so they match the indicated pattern. One solution is to start at the far right. Most beads will fall into the pattern. Manipulate the second disk to finish.
- Solution: 2-3-4-3-1-3-2-2-2.
- Collect the MACHETE (B).
- Return to the office. Change the illumination.
- Return to the museum.
- Change the illumination.
- Use the MACHETE to cut through the vines and uncover a puzzle on the back wall.
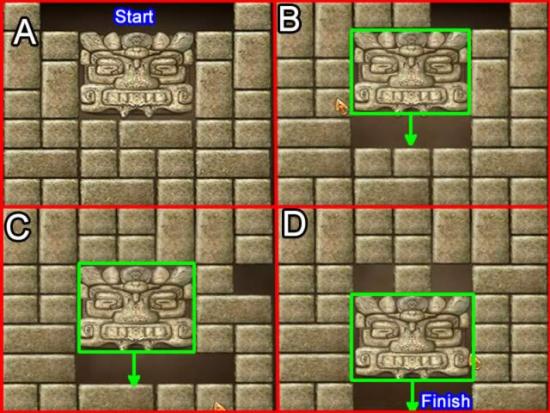
- This is a slider puzzle with each block capable of moving horizontally and vertically.
- The goal is to clear the blocks under the head and slide it out through the bottom of the screen. The above screenshot shows one solution.
- The completed puzzle falls to the floor and shatters.
- Click the blinds to change the illumination.
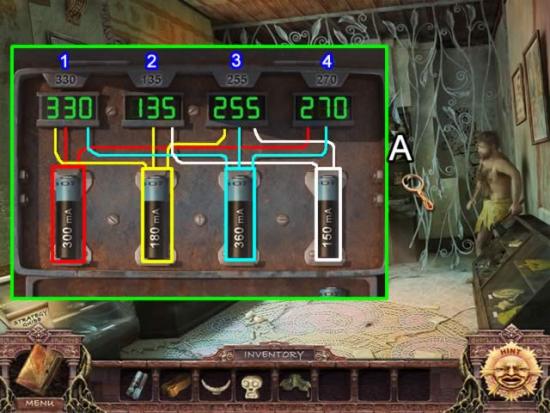
- Zoom in on the control panel (A). Place the BATTERIES in the empty slots to start a puzzle.
- The goal is to place the batteries in the slots so the voltage equals the number above the LED readout.
- The amount of current is split evenly among the wires connected to it. For example, the battery in the second slot (yellow) supplies current to 1, 2 and 3. Placing the 180 volt battery adds 60 volts to the counters for 1, 2 and 3. The colored lines show where the current for each battery is going.
- Solution: Place the following batteries in order in the slots: 300, 180, 360 and 150.
- The door on the back wall opens.
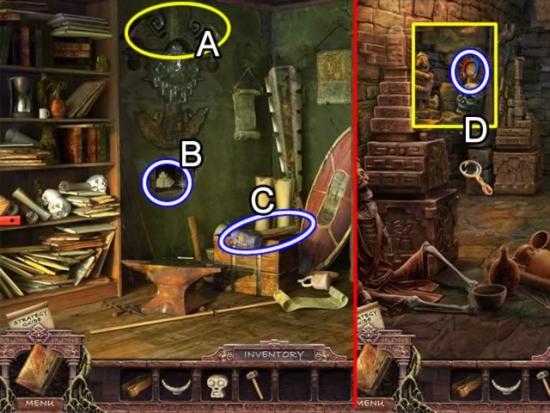
- Put the GOLDEN HELMET on the deity (A). It rises up revealing a nook.
- Take the PYRAMID SYMBOL from the nook (B).
- Pick up the HAMMER (C).
- Return to the hotel.
- Close the shades to change the illumination.
- Go downstairs.
- Play the hidden object scene (D). Get a MAGNET.
- Return to the lobby. Open the blinds to change the illumination.
- Retrace your steps to the back room in the museum.
- Open the left storage cabinet door. A SCREWDRIVER drops and falls in a crack in the floor.
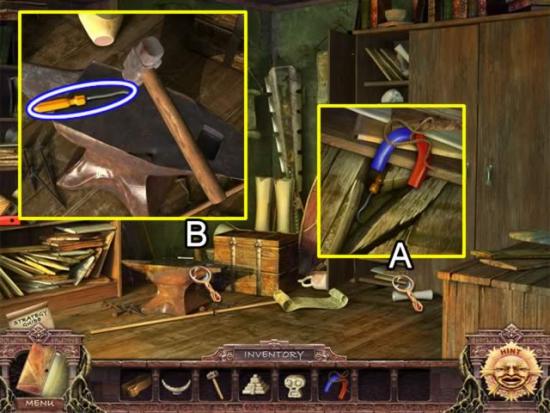
- Zoom in on the floor crevice (A). Use the MAGNET to retrieve the bent screwdriver.
- Access the anvil (B). Place the broken screwdriver on the anvil. Use the HAMMER to pound the SCREWDRIVER back into shape.
- Go to the hospital.
- Go through the doctor’s office into the patient’s room.
- Use the SCREWDRIVER to free the BALCONY HANDLE from the door on the floor.
- Go to the hotel to room 202.
- Place the BALCONY HANDLE on the door next to the fireplace.
Chapter 5: Night Moves
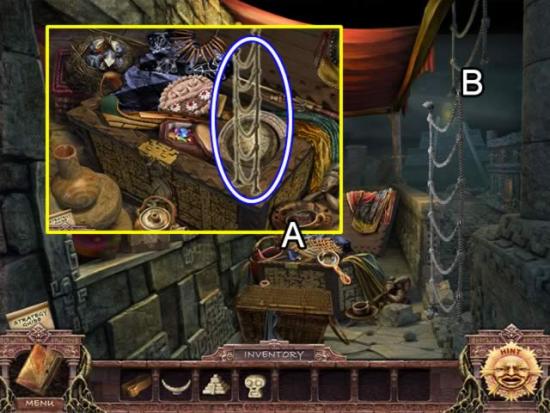
- Play the replace-the-object scene (A). Use the Knife to cut the string and open the cake box. Place the Eggs in the nest. When the birds hatch, give them the Worm. Receive a ROPE LADDER.
- Attach the ROPE LADDER to the broken rope (B).
- Climb down the rope.
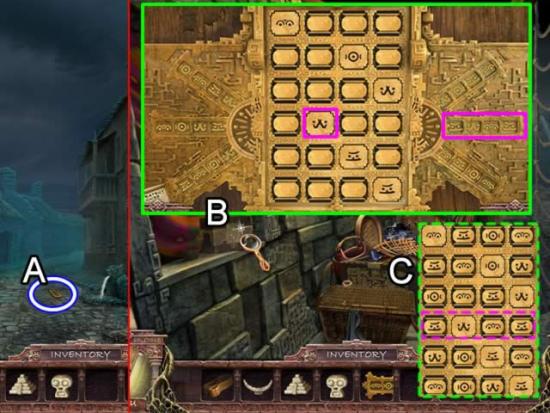
- Retrieve the PLATE WITH PASSWORD in the middle of the street (A).
- Return to the balcony.
- Inspect the lock on the box (B). Place the PLATE WITH PASSWORD in the empty slot to activate the puzzle.
- The goal is to change the symbols in the center to match the correct strip radiating from the center. Use the given symbols as a key. Note that there is only one strip whose second symbol is the same as the one in the fourth row (pink). Click through the symbols on each tab until the row matches that strip. Continue to do this until the puzzle solved (C).
- Take the SHELL SYMBOL from the box.
- Go back down the ladder.
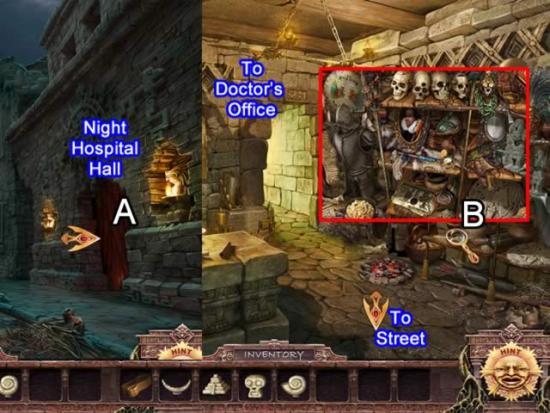
- Cross the street and enter the night hospital hall door (A).
- Play the replace-the-object scene (B). Put the Frying Pan on the coals. Put the Corn in the pan to get popcorn. Get the PLATE WITH HIEROGLYPHIC.
- Click down to return to the street.
- Cross the street and enter the hotel lobby.
- Go down the stairs and forward to the last chamber.
- Approach the back wall (A). Place the PYRAMID, SHELL, SKULL and MOON SYMBOLS as shown.
- Go up the stairs.
- Examine the door at the top of the stairs (B).
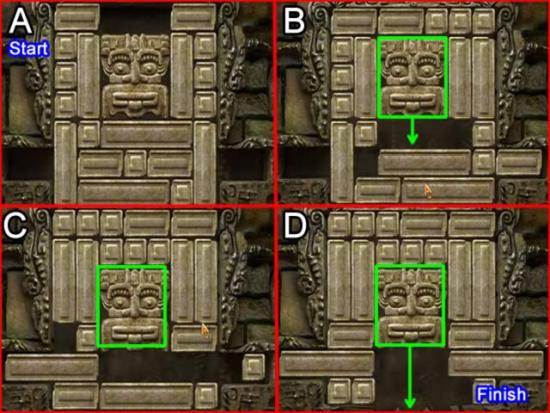
- It’s another slider puzzle!
- Each block can be moved horizontally and vertically.
- The goal is to clear the blocks under the head and slide it out through the bottom of the screen. The above screenshot shows one solution. View the video for extra help.
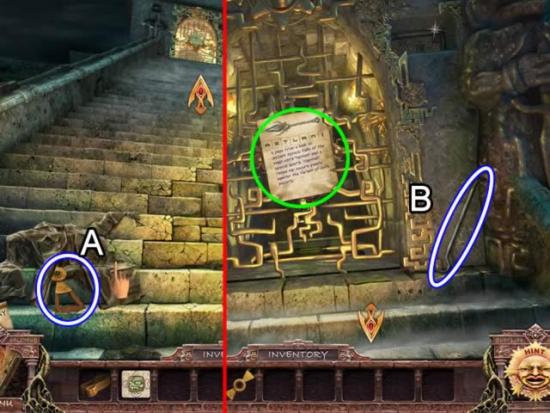
- Climb the stairs.
- Click the coat on the steps (A). Pick up the TWO-HANDED LEVER.
- Continue climbing.
- Pick up the CROWBAR and read the note on the door (B).
- Go down twice to the torture area.
- Inspect the sarcophagus on the right. Use the CROWBAR to pry it open. Receive a PLATE WITH HIEROGLYPHIC.
- Go back up to the top.
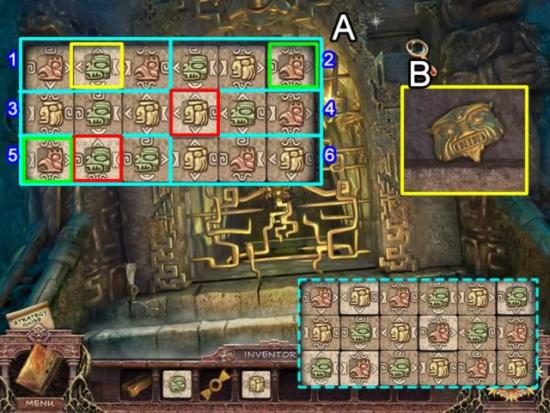
- Zoom in on the upper right corner of the arch (A). Place the two PLATE WITH HIEROGLYPHIC pieces in the empty slots to start a puzzle.
- The goal is to rearrange the five moveable plates so the “table has a completed look”. To figure out what this means, look at the table as six three-plate grids. The numbers outside the table represent the three plates next to them. In each grid the first and last color must match.
- Do the easy grids first:
- Grid 2. The first piece is locked. It is green so the third piece must also be green. Swap this plate with the green second plate in grid 5.
- Grid 4. The last plate is red so the first plate must also be red. For now, swap the yellow plate with the first red plate in grid 5.
- Grid 1. There is only one moveable yellow plate. There is no place in the table to place the yellow plate in a first or third position. By default the yellow plate goes here. If you followed the previous step, the yellow plate is now the first plate in grid 5. Swap the yellow plate in grid 5 with the green plate in grid 1.
The pattern on the outside of each plate may also be a determining factor but I couldn’t see any logic to it. If the table doesn’t slide back after you’ve put the plates as instructed, switch the red and green pieces. See the dashed inset for the solution.
- Once solved, the plate table slides away revealing a GOLDEN HEAD (B).
- Place the GOLDEN HEAD in its outline in the center of the gate. Take the ANCIENT MAGIC MACE on the back wall.
- Go down six times to reach the street. Go forward.
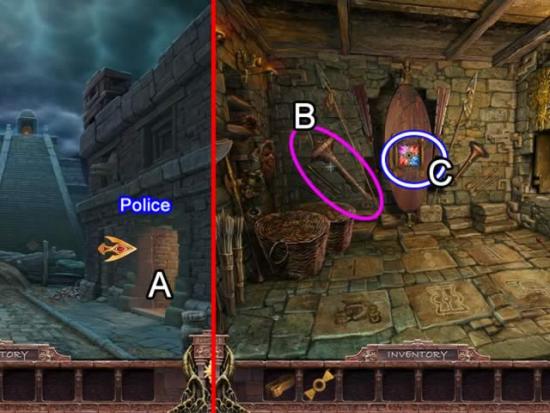
- There are two entries. The entry on the left is for the museum and the right is for the police.
- Enter the police station (A). Go up the stairs.
- Place the ANCIENT MAGIC MACE in the inset on the back wall (B). The shield rotates. Take the CRYSTAL from the shield (C).
- Exit the police station.
- Cross the street to the museum.
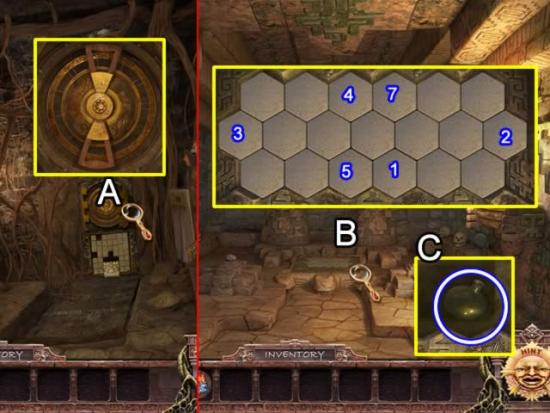
- Place the TWO-HANDLED LEVER in the mechanism on the back wall (A).
- Enter the next room.
- Inspect the tiles on the floor (B) to trigger a puzzle.
- The goal is to flip the tiles so all are turned up. One solution sequence is shown above.
- Collect the BEAKER (C).
- Exit the museum. Return to the hospital. Go forward to the doctor’s office then down the stairs on the right.
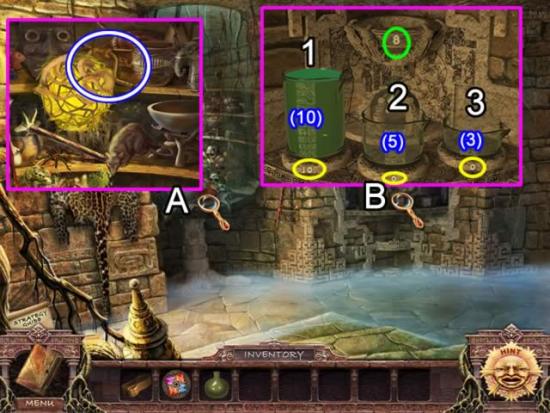
- Play the hidden object scene (A). Collect a DRILL.
- Zoom in on the chemistry set in the right corner (B).
- Place the BEAKER in the center of the claw to open a puzzle.
- The goal is to spread the liquid among the three measuring cups until one cup has the amount specified on the bowl (green). The number at the base of each cup (yellow) indicates how much liquid the cup is currently holding. The number in parenthesis indicates how much each cup can hold. The puzzle must be completed twice. Which cup contains the indicated amount doesn’t matter.
- Solution 1. Amount required: 8.
- Pour 1 into 2. Cup 1 now measures 5.
- Pour 2 into 3.
- Pour 3 into 1. Cup 1 now measures 8.
- Solution 2. Amount required: 1.
- Pour 1 into 3. Cup 3 now measures 3.
- Pour 3 into 2. Cup 3 is now empty and Cup 2 contains 3.
- Pour 1 into 3. Cup 3 now measures 3.
- Pour 3 into 2. Cup 3 now measures 1.
- Obtain a beaker full of GROWING ESSENCE.
- Exit the hospital. Go across the street to the hotel.
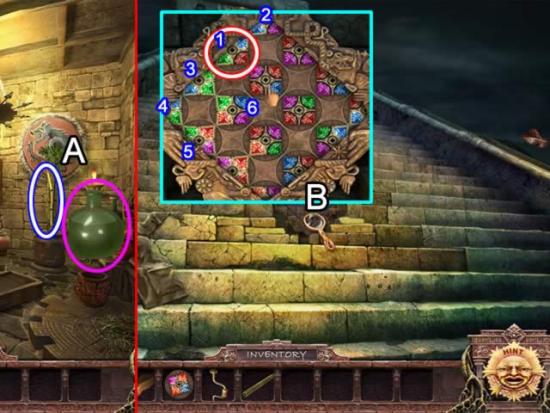
- Pour the GROWING ESSENCE on the cactus in the lobby (A). Take the CANE.
- Go down the stairs and continue through the rooms until you reach the stairs.
- Zoom in on the puzzle on the steps (B). Place the CRYSTAL in the empty spot to start the puzzle.
- The goal is to rotate the gems until each gem points to one of the same color. The best approach is to click all the crystals to see which colors each contains. Only two crystals contain all four colors.
- The inset above shows the first six moves. The first crystal, circled in red and white, is a key crystal. It is one of the two crystals that contain all four colors. Crystal 2 has no green. Crystal 3 has only green and blue. Click crystal 1 until its green point is toward crystal 3. Click crystal 2 until its only blue point matches with crystal 1. The way the blue and green points on crystal 3 are positioned, the point toward crystal 4 will be blue. The only decision is what color will point outward toward the board: blue or green. In this instance it is green.
- Continue around the board working from the set crystals shown above. View the video if you would like to see the entire puzzle solution.
- SPOILER ALERT! The next screen shot shows the solution. Don’t peek if you want to work it out for yourself.
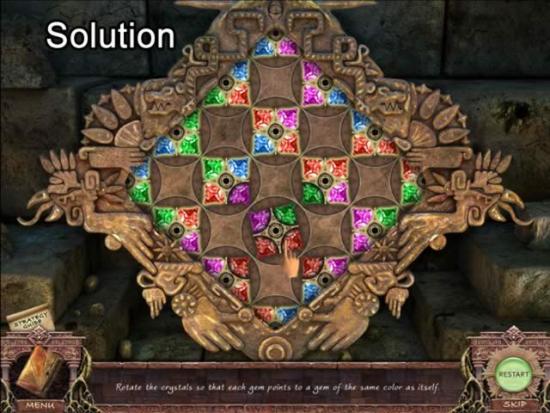
- Once the puzzle has been solved, go through the entrance in the stairs.
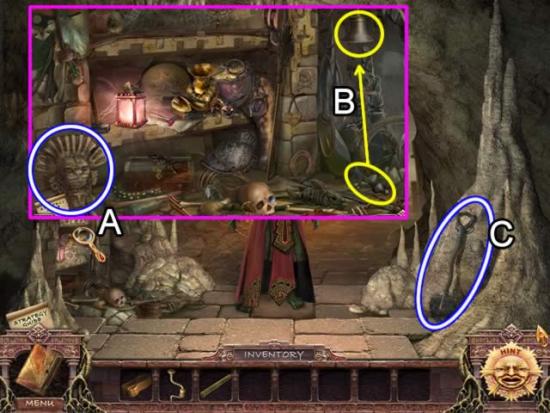
- Play the hidden object scene on the left (A). Pick up the bell clapper and place it inside the bell (B) to get the Bell Toll item. Get the STONE STATUE.
- Pick up the SPADE (C).
- Go down four times until you come to the first basement room.
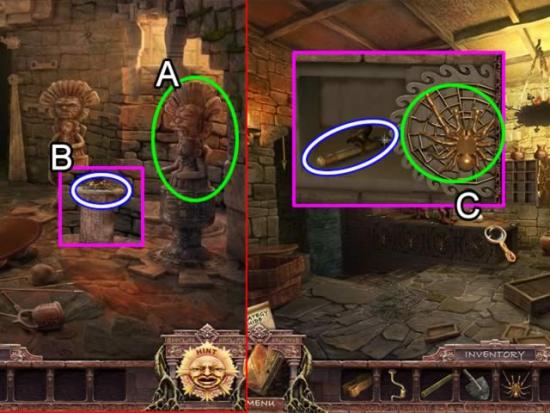
- Place the STONE STATUE on the empty pedestal (A). Take the GOLDEN SPIDER from the column that rises up (B).
- Go to the lobby.
- Zoom in on the desk (C). Place the GOLDEN SPIDER in the spider impression. Take the VICE HANDLE from the hidden compartment.
- Exit the hotel. Go across the street to the hospital.
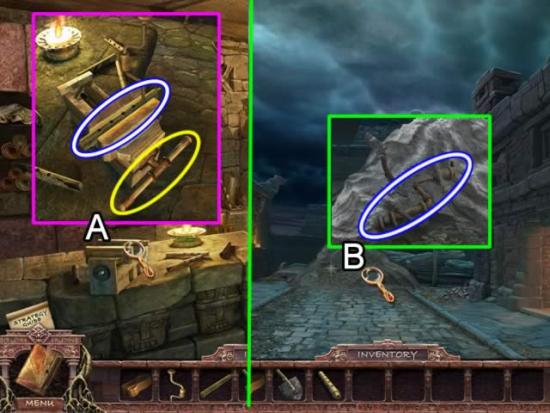
- Click the vice on the table (A). Attach the VICE HANDLE. Place the CANE in the vice grip. Use the DRILL to drill holes in the cane. Pick up the finished REED PIPE.
- Exit to the street. Go forward once.
- Zoom in on the dirt pile (B). Use the SPADE to uncover a WINCH.
- Return to the hotel. Go forward to the tunnel entrance in the stairs.
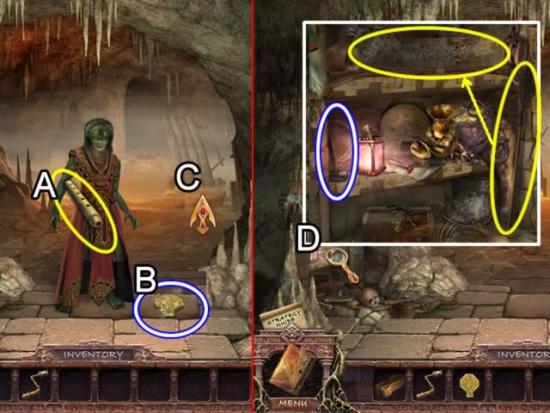
- Use the REED PIPE on the snake woman (A). Pick up the SNAKE AMULET (B). Go forward into the cave (C) and meet the wolf.
- Return to the cave entrance.
- Play the hidden object scene on the left (C). Use the broom to sweep away the dust on the board to reveal Santa Maria. Take the BIG HAMMER.
- Descend to the torture area to visit the guillotine.
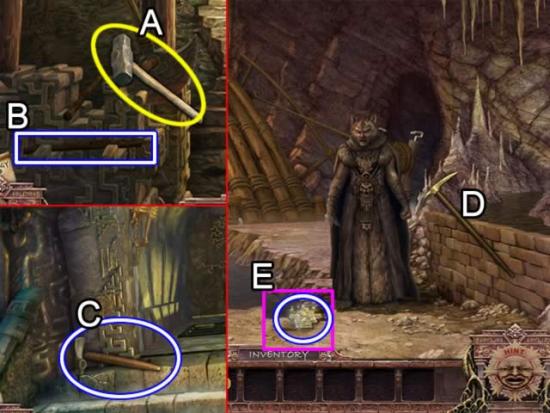
- Use the BIG HAMMER on the guillotine wedge (A). Pick up the SHORT POLE the blade cut (B).
- Climb the stairs all the way to the top.
- Place the SHORT POLE on the pickaxe head. Pick up the PICKAXE (C).
- Return to the cave entrance. Go forward to the wolf man.
- Use the PICKAXE on the brick dam (D).
- Pick up the WOLF AMULET (E).
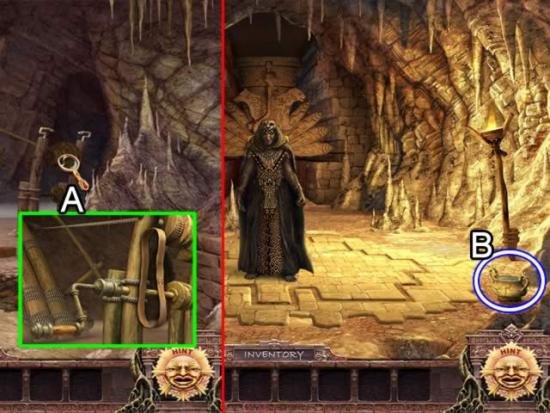
- Zoom in on the bridge (A). Place the WINCH and DRIVE BELT on the apparatus.
- Cross the bridge.
- Meet the jaguar man. Pick up the CUP WITH WATER (B).
- Exit the cave.
- Return to the torture area.
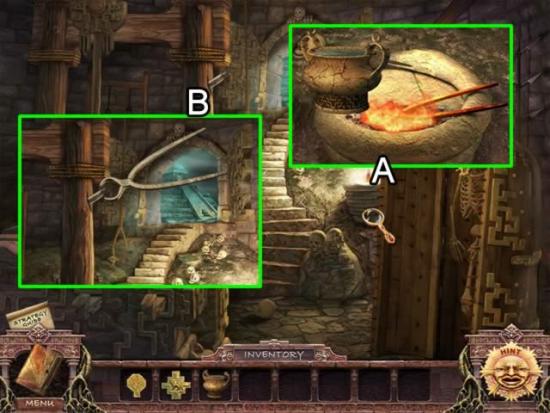
- Open the fire bowl (A). Pour the CUP WITH WATER on the fire to douse the flames. Pick up the TORTURE PINCERS.
- Apply the TORTURE PINCERS to extract the embedded CHISEL (B).
- Return to the jaguar man.
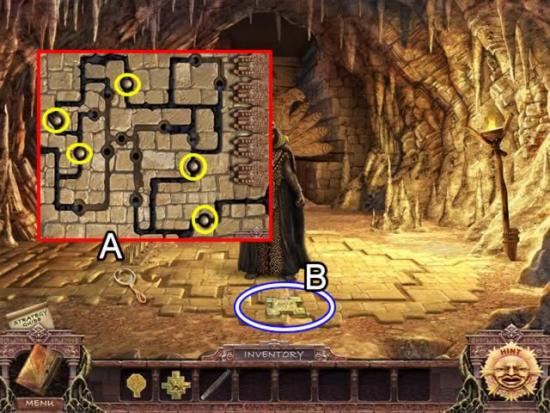
- Zoom in on the puzzle on the left (A).
- Use the CHISEL to break the stone holding the oil back.
- Place the five balls to form a path to the fire. See the inset above for the solution.
- Exit and go to the hospital.
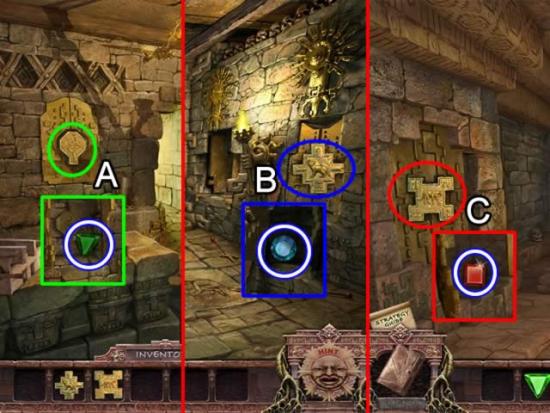
- Place the SNAKE AMULET in the outline (A). Pick up the GREEN GEM.
- Go to the police department. Go up the stairs.
- Place the WOLF AMULET in the outline (B). Pick up the BLUE GEM.
- Go to the back room of the museum.
- Place the JAGUAR AMULET in the outline (C). Pick up the RED GEM.
- Return to the cave where you met the jaguar man.
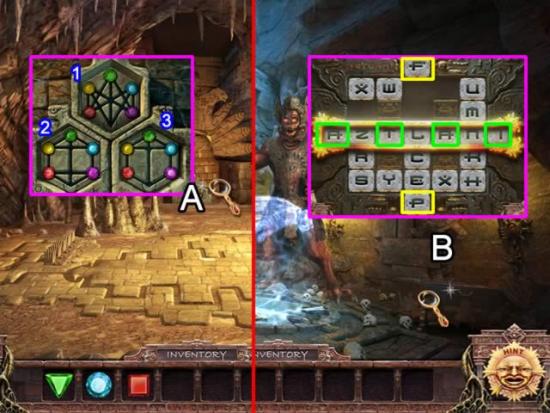
- Zoom in on the locked entrance (A). Insert the RED, BLUE and GREEN GEMS in the slots to start the puzzle.
- The goal is to solve all three puzzles by placing the gems in their color coded slots. Here are solutions. There may be better ones. View the videos for extra help. Click the colors indicated:
Puzzle 1: Red, green, pink, red, yellow, blue, red, yellow.
- Puzzle 2: Green, pink, yellow, blue, green, pink, red, pink
- Puzzle 3: Pink, red, green, pink, red, green, blue, yellow, red.
- Enter the inner chamber.
- Open the puzzle area on the right (B).
- This is a slider puzzle. The goal is to spell A-Z-T-L-A-N-I in the center box. To solve it, place the letters not in the slide columns first: A, T, A, I (green). The two boxes at the top and bottom (yellow) are good to store two of the three letters in a slide column until they are needed.
- After completing the puzzle, take the sword AZTLANI.
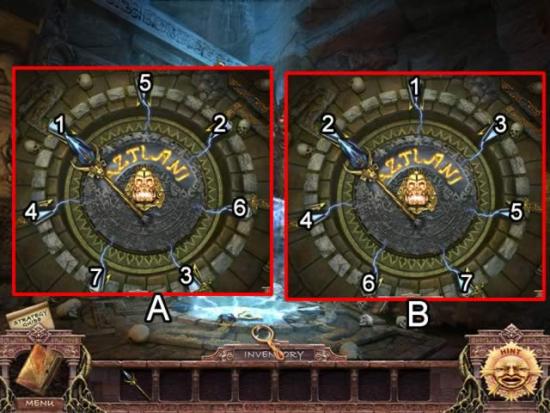
- Zoom in on the puzzle at the front. There are two iterations of this puzzle. Use the AZTLANI sword to click the crystals in a specific order to eliminate the letters.
- The first puzzle solution is shown in (A) above. As soon as it is finished, letters flash on the screen indicating the order for the next sequence. They are shown in (B) above.
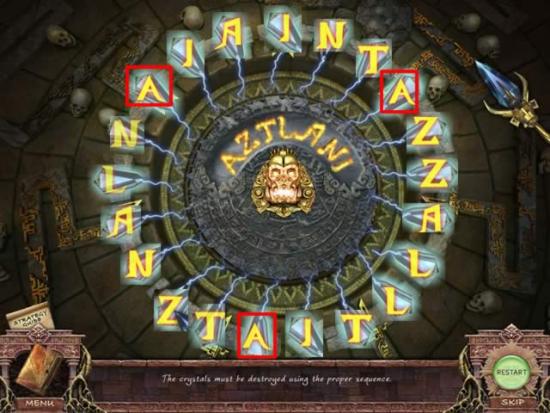
- The last regeneration requires selecting three of each letter. Note the difference between the two “A” letters. Be sure and select those in the red boxes first.
- Watch the final cut scene.
Congratulations! You have finished playing Secrets of the Dark – Temple of the Night Collector’s Edition. There are two bonus games available. Click “Extras” from the main menu and select the first bonus adventure game. You may now replay any puzzle encountered during the game.
Bonus Adventure: Book of the Dead
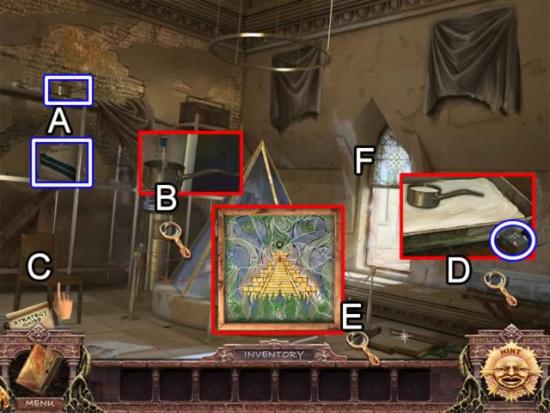
- Pick up the POT and DRY-GLUE MIX from the shelves (A).
- Zoom in on the water cooler (B). Fill the POT WITH WATER.
- Knock over the chair (C). Click the CHAIR LEG to break it off.
- Access the tray (D). Add the DRY-GLUE MIX, POT WITH WATER then stir the mixture with the CHAIR LEG. Dip the pot into the mixture to get a POT WITH GLUE. Pick up the DEAD BATTERY by the tray.
- Click the picture frame on the floor.
- Pour the POT WITH GLUE on the broken frame to repair it. Place the broken shards of stained glass in the frame. Work from the edges inward. Each piece will automatically rotate to the correct position when placed over the frame. The assembled puzzle is shown above(E).
- Attach the STAINED-GLASS WINDOW to the window frame (F).
- Click to change the illumination.

- Pick up the RITUAL KNIFE (A).
- Play the hidden object scene on the left (B). Get the RED SKULL.
- Access the puzzle (C). Place the RED SKULL in its slot to start the game. The disks rotate at different speeds and direction. Each is tied to another disk. All rotate clock wise except as noted:
- A and B rotate counterclock wise.
- B and C.
- C and D
- D and A. A rotates counterclock wise.
- Here is one solution: A(3), C(2), D, A, B(2), A(2), C(6), D(4).
- Go through the opening.
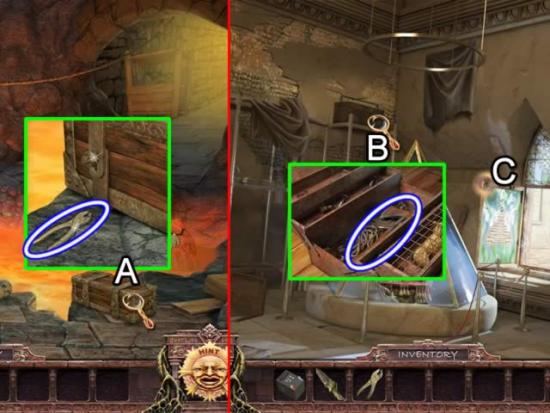
- Zoom in on the chest (A). Pick up the PLIERS.
- Return to the skull room.
- Click to change the illumination.
- Examine the toolbox on the top shelf (B). Use the RITUAL KNIFE to cut the rope. Take the AXE.
- Change the illumination (C).
- Return to the cable car area.
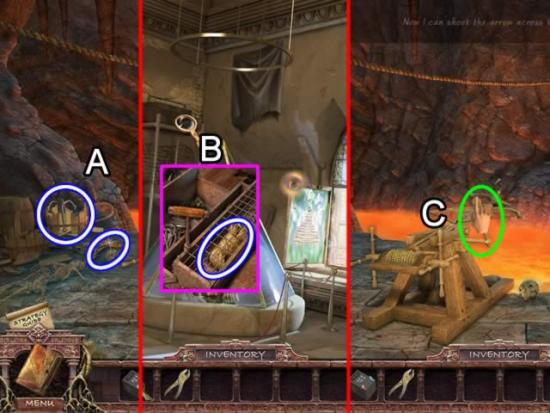
- Use the AXE to break open the barrel. Pick up the GRAPNEL and TRIANGLE-HEAD SCREWDRIVER (A).
- Return the the toolbox (B). Use the and TRIANGLE-HEAD SCREWDRIVER to free the ROPE.
- Return to the cable car area.
- Place the ROPE and GRAPNEL on the mechanism (C). Click the handle to send the grapnel across the chasm. Click the wheel handle to bring the cable car to this side of the chasm.
- Inspect the cable car (A).
- Pick up the GEARS (B). Use the PLIERS on the bench (C) to open a hidden object scene (D). Get the RAMROD.
- Return to the skull room.
- Look at the crack in the ceiling (E). Use the RAMROD to retrieve a FIGURED KEY.
- Play the hidden object scene on the left (F). Get an OLIVE OIL LAMP.
- Return to the cable car.
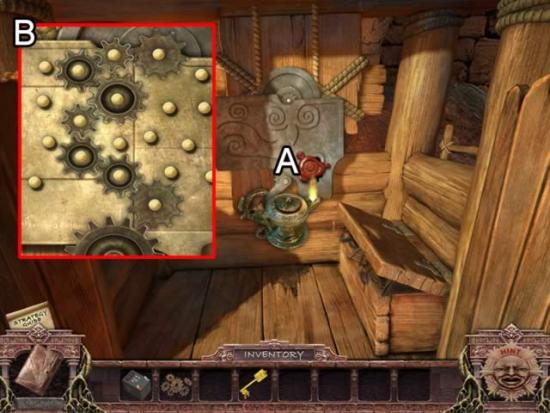
- Use the OLIVE OIL LAMP to melt the wax seal on the lock (A).
- Insert the FIGUERED KEY into the key hole.
- Zoom in to open the gear puzzle. Place all of the GEARS on the pegs so all are rotating. Start at the bottom and work your way up. See the solution (B) if necessary.
- Click the handle to cross the chasm.
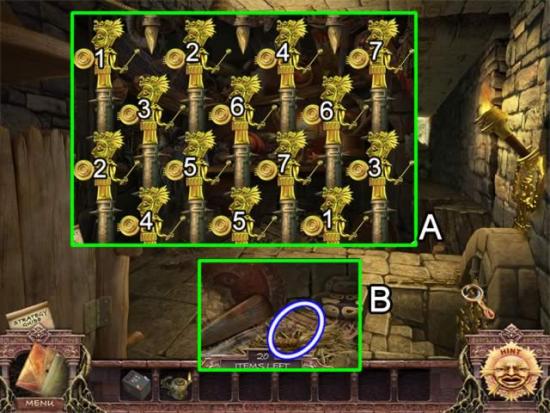
- Zoom in on the stone (A) to open a game.
- The goal is to find pairs by matching musical notes or sounds. See the inset for the solution.
- Completing the game opens a hidden object scene in the same spot. Collect the CORK SCREW (B)
- Go forward.
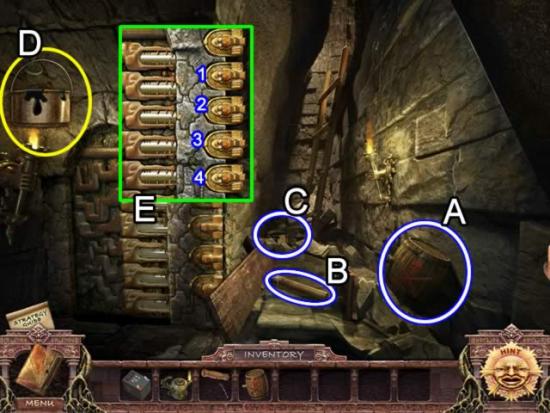
- Use the OLIVE OIL LAMP to light the two torches.
- Pick up the POWDER KEY (A).
- Click the boards to remove them and reveal a CROSS BAR (B).
- Click the rubble by the ladder (C) to find a POT WITH TAR. Hang the pot on the hook (D) to get MOLTEN TAR.
- Zoom in on the door to play a lock puzle (E). Click the stones on the left to remove the retaining bars. The correct order is shown in the inset.
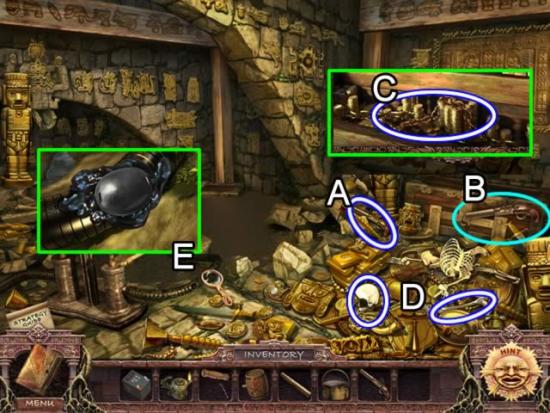
- Click the skeleton to remove it from the chest.
- Pick up the BLUNDERBUSS (A) and use it to blow the lock off of the chest (B).
- Inspect the chest. Take the GOLDEN CHAIN (C).
- Pick up the CANNON BONE and the EYE PATCH from the skull (D).
- Zoom in on the hose (E). Pour the MOLTEN TAR on the hole. Add the EYE PATCH to seal the hole.
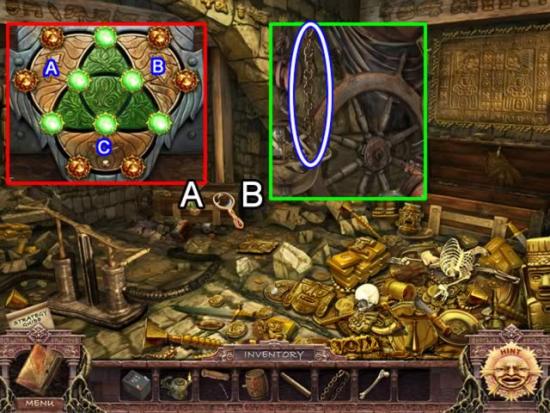
- Examine the chest lock (A). The goal is to rotate the three circles to align all the green gems in the center. One solution is: A, C, B(2), A(4), C, B(5).
- Play the hidden object scene when the chest opens (B). Take the GOLDEN CHAIN.
- Exit the room.
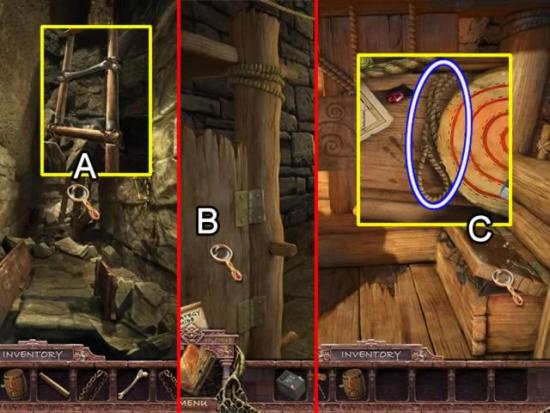
- Inspect the broken ladder (A). Place the CANNON BONE and CROSSBAR in the empty slots. Attach them to the ladder with the two GOLDEN CHAINS.
- Climb the ladder.
- Open the door to the cable car (B).
- Play the hidden object scene (C). Get the LASSO.
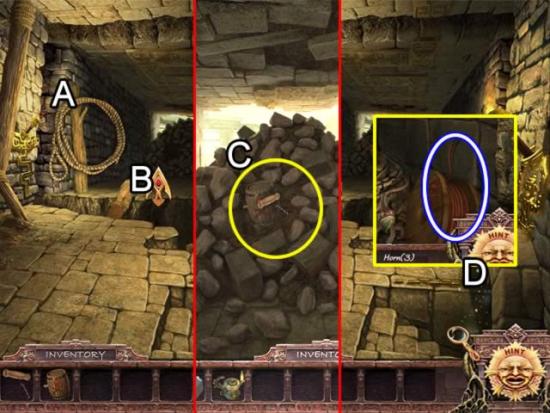
- Place the LASSO on the log (A) to make it fall across the chasm (B).
- Place the POWDER KEG on the rock pile (C). Use the CORKSCREW to drill a hole in the keg.
- Return to this side.
- Play the hidden object scene by the steps (D). Get the SAFETY FUSE.
- Place the SAFETY FUSE on the powder keg. Light the fuse with the OLIVE OIL LAMP.
- Go forward after the debris from the blast clears.
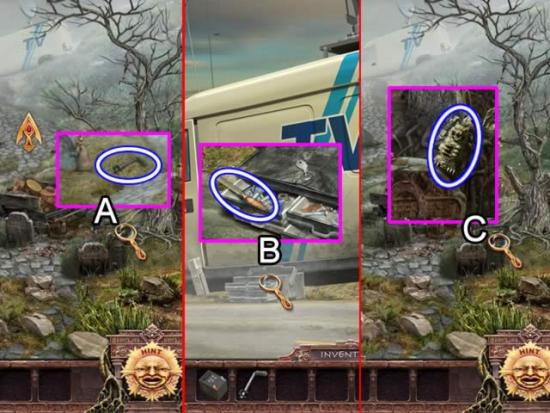
- Play the hidden object scene (A). Get the JACK HANDLE.
- Go up the stone path to the van
- Inspect the tool box (B). Take the FILE.
- Return to the tree.
- Play a hidden object scene (C). Get the WOLF IDOL.
- Return to the chasm. Climb down the ladder. Go into the treasure room.
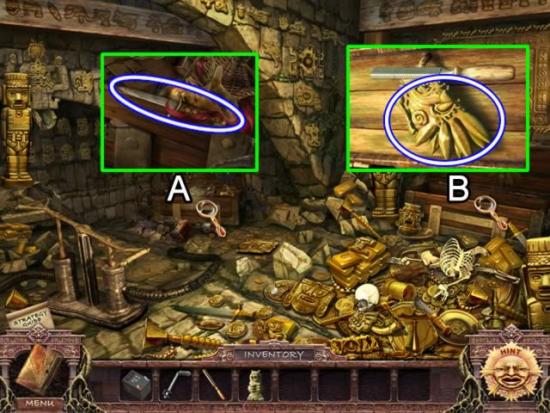
- Play the hidden object scene in the chest (A). Get the DAGGER.
- Look at the chest on the right (B). Use the FILE to get the CRYPT KEY.
- Return to the van.
- Use the dagger to pick the lock on the toolbox. Take the MONKEY WRENCH.
- Return and ride the cable car.
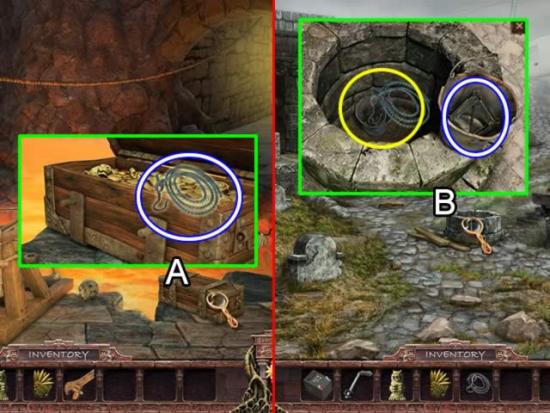
- Access the chest (A)
- Use the MONKEY WRENCH to remove the bolts on the chest. Take the TOW-LINE.
- Return to the well (B).
- Throw the TOW-LINE into the well (yellow) to pull up the bucket. Take the BROKEN SCISSOR JACK.
- Go to the van.
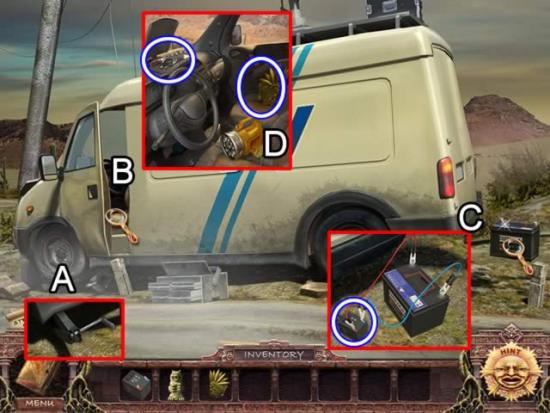
- Zoom in on the front tire (A). Place the BROKEN SCISSOR JACK under the van. Attach the JACK HANDLE.
- Examine the cab (B). Take the JUMPER CABLES and CRYPT KEY.
- Check out the battery at the back of the van (C). Attach the JUMPER CABLES to the large battery. Place the DEAD BATTERY by the ends of the cables. They attach themselves and detatch when the CHARGED BATTERY is ready.
- Reenter the cab. Place the CHARGED BATTERY in the flashlight to get a PORTABLE LANTERN.
- Go down the hill.
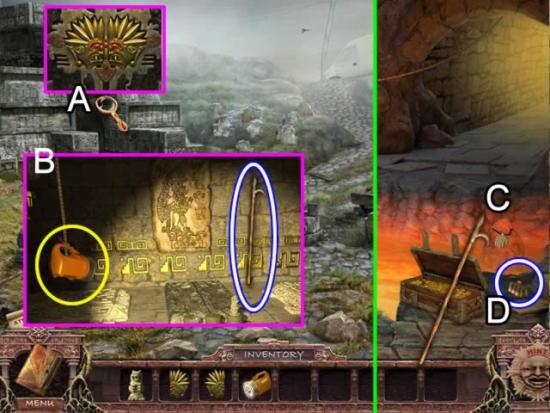
- Zoom in on the crypt (A). Place the CRYPT KEYS in their slots.
- Enter the crypt (B). Place the PORTABLE LANTERN on the end of the rope. Take the LONG HOOK.
- Board the cable car for a return crossing.
- Use the LONG HOOK to reach the pendant in the middle of the lava river (C). Pick up the HAND PENDANT (D).
- Return to the skull room.
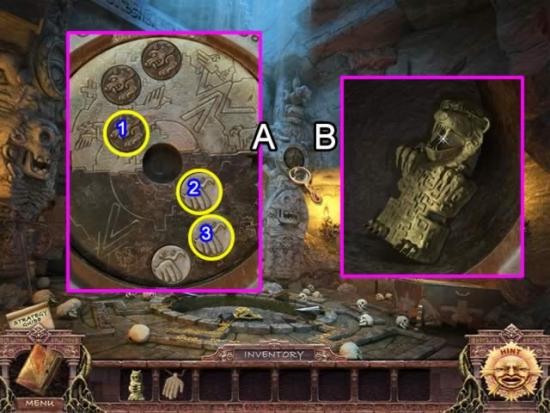
- Zoom in on the column. Place the HAND PENDANT in the slot to start a puzzle.
- The goal is to reverse the positions of the wolves and eagles. This can be played like checkers. Each disk can only go forward and must have an empty slot to land in. Here are the first three moves: Move wolf (1) to the empty slot. Jump the wolf with eagle (2). Move eagle (3) where eagle (2) was. Now the wolf (1) can jump eagle (2). See the video for the complete game.
- Collect the JAGUAR IDOL (B).
- Return to the crypt.
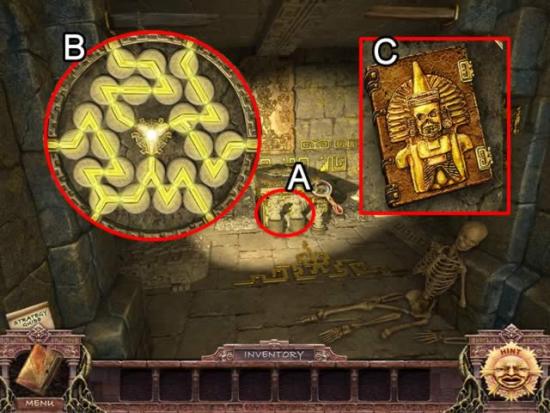
- Place the WOLF and JAGUAR IDOLS on the platforms (A). Zoom in on the table that rises up to start a puzzle.
- The goal is to from paths from the center crystal to the six perimeter crystals. Click the tiles to rotate them. The solution is shown above (B).
- Correctly solving the puzzle reveals the BOOK OF THE DEAD (C).
- Return to the skull room.
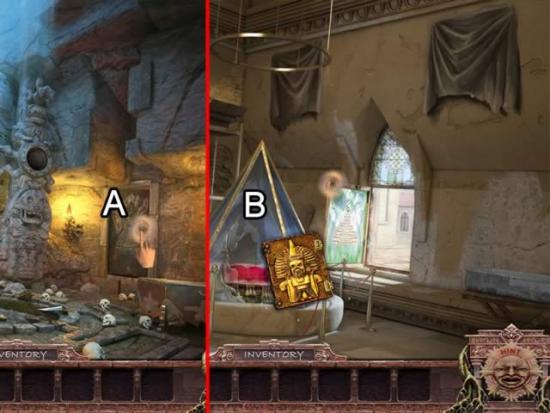
- Click the light source to change the illumination (A).
- Place the BOOK OF THE DEAD on the book stand (B).
- Watch the final cut scene.
Congratulations! You have finished the Bonus Adventure: Book of the Dead. You can now access the second bonus adventure: The Magic Crystals.
Bonus Adventure: The Magic Crystals
Complete the first Bonus Adventure. Click “Extras” from the main menu and select the second Bonus Adventure.
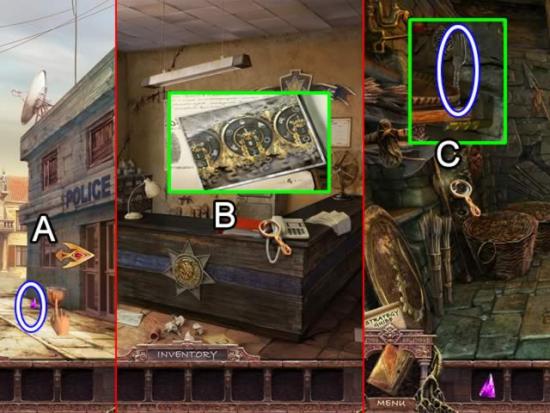
- Click the pot (A).
- Pick up the PINK CRYSTAL.
- Enter the Police station.
- Zoom in on the binder (B). Click three times to obtain the photo sticking out from the pages. The information is added to the journal.
- Close the blinds to change the illumination.
- Go up the stairs.
- Play the hidden object scene (C). Collect the FORK.
- Go back down stairs. Open the blinds to change the illumination.
- Exit the building. Go across the street to the museum.
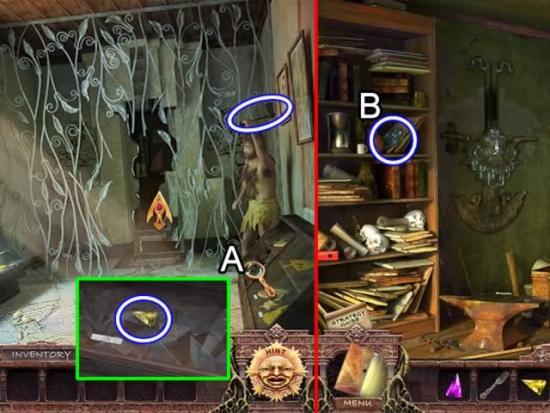
- Zoom in on the display case (A). Pick up the YELLOW CRYSTAL.
- Take the HAMMER from the hand of the display in the corner.
- Enter the back room.
- Pick up the DISK from the bookshelves (B).
- Return to the display room. Click the blinds the change illumination.
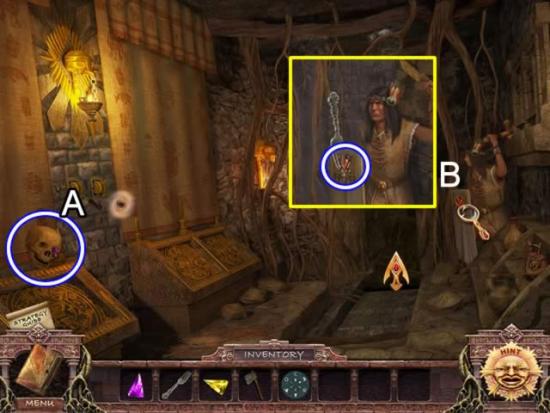
- Pick up the SKULL WITH CRYSTAL on the left (A).
- Inspect the display (B). Use the FORK to pry the RED CRYSTAL from the shield.
- Enter the back room.
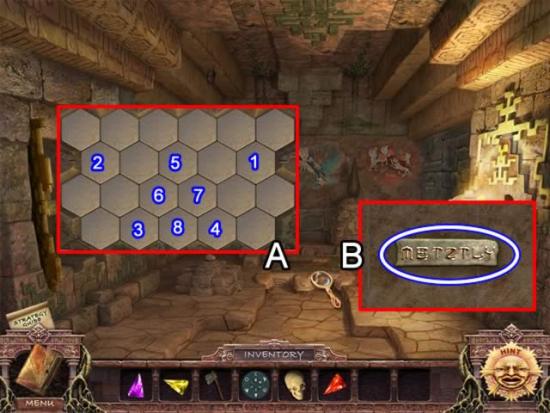
- Zoom in on the floor puzzle (A).
- The goal is to flip all the tiles right side up. One solution is shown in the inset.
- Pick up the PLATE WITH SPELL from the nook.
- Return to the display room. Click the blinds to change illumination.
- Return to the back room.
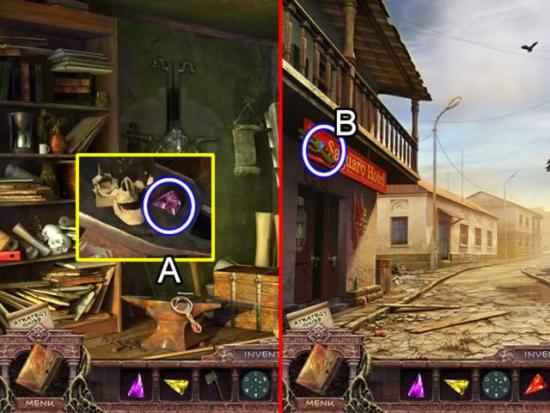
- Click the anvil (A). Place the SKULL WITH CRYSTAL on the anvil. Use the HAMMER to smash the skull. Take the PINK CRYSTAL.
- Exit the museum. Click down to go to the hotel and hospital area.
- Click the cactus on the hotel’s sign (B). Take the BLUE CRYSTAL.
- Enter the hospital.
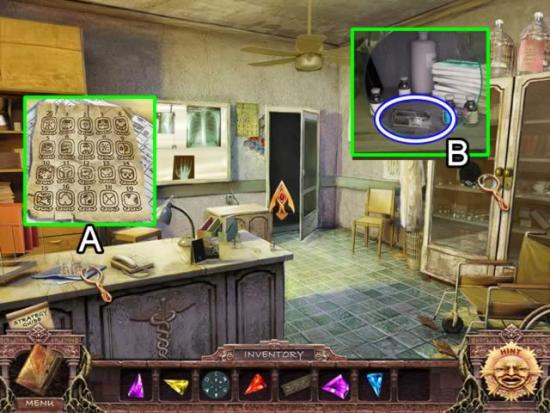
- Pick up the PAPER WITH CODE from the desk (A).
- Zoom in on the supply cabinet (B). Take what looks like a razor but is referred to as a SCALPEL.
- Enter the doctor’s office.
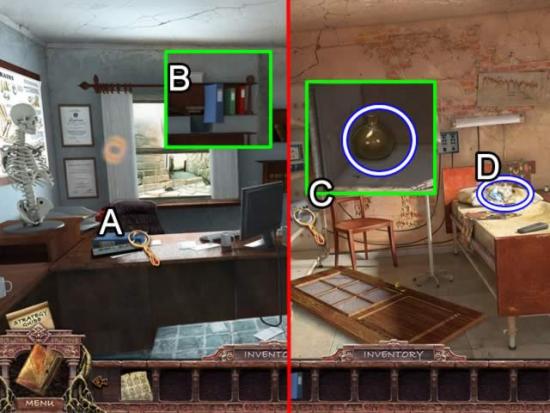
- Pick up the FOLDER from the desk (A).
- Place it with the other folders on the shelf on the right side of the room (B).
- Enter the patient room on the right.
- Zoom in on the shelf (C). Take the BEAKER.
- Use the SCALPEL to slash the pillow (D). Take the BLUE CRYSTAL.
- Return to the doctor’s office.
- Close the blinds to change the illumination.
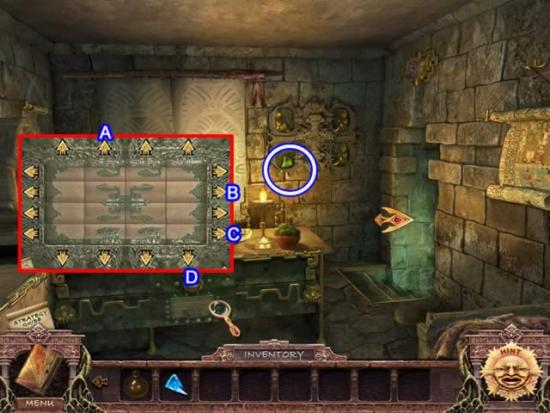
- Get the GREEN CRYSTAL from the back wall.
- Zoom in on the front of the desk to open a puzzle.
- This puzzle is much easier to solve once you know what the eventual pattern is. Study the inset above to attempt to solve it on your own. Note that only four of the arrows are needed. Try to line up the images on top and bottom and side to side so only one click is needed to put them in position.
- Solution: A-C-A-B-D-B-A-C.
- Go down the stairs on the right.
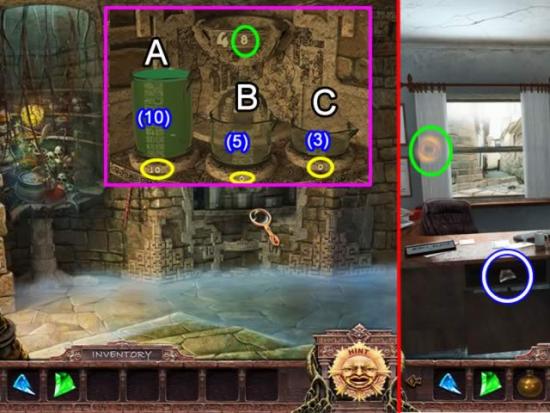
- Zoom in on the chemistry set in the right corner.
- Place the BEAKER in the center of the claw to open a puzzle.
- The goal is to spread the liquid among the three measuring cups until one cup has the amount specified on the bowl (green). The number at the base of each cup (yellow) indicates how much liquid the cup is currently holding. The number in parenthesis indicates how much each cup can hold. The puzzle must be completed twice. Which cup contains the indicated amount doesn’t matter.
- Solution 1. Amount required: 4.
- Pour A into B.
- Pour B into C.
- Pour B into A.
- Pour C into B.
- Pour A into C. Cup A now measures 4.
- Solution 2. Amount required: 6
- Pour A into B.
- Pour B into C.
- Pour C into A.
- Pour B into C.
- Pour A into B.
- Pour B into C.
- Pour C into A. Cup A now measures 6.
- Take the beaker full of ALKALI.
- Go upstairs. Click the cord to change illumination.
- Pick up the WHITE CRYSTAL from the desk.
- Go to the hotel.
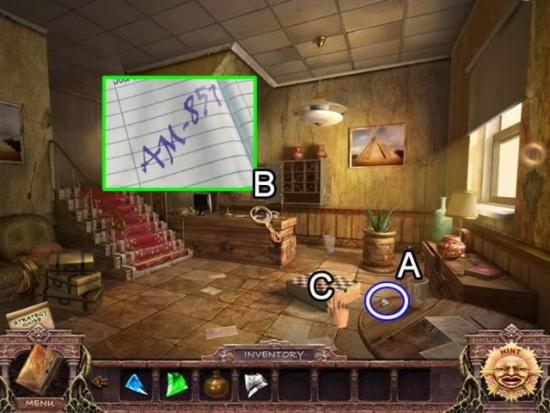
- Click the glass (A). Pick up the WHITE CRYSTAL.
- Examine the guest register on the desk (B). See the code AM-857 written there.
- Click the chessboard to open it (C).
- Close the binds to change illumination.
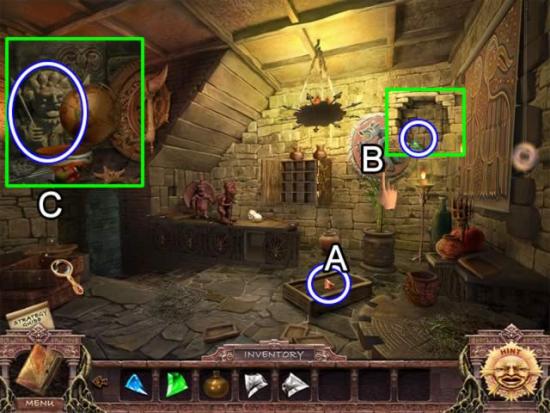
- Pick up the RED CRYSTAL on the box (A).
- Click the coyote painting (B). Take the GREEN CRYSTAL that was hidden behind it.
- Play the hidden object scene (C). Get the STONE FIGURE.
- Go into the next chamber.
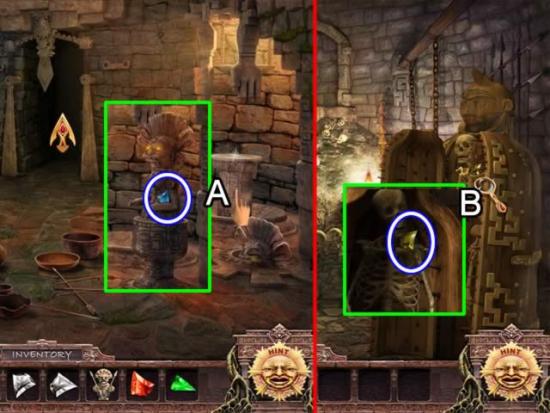
- Click the stand (A). Retrieve the BLUE CRYSTAL from the statue.
- Continue through the next chamber and exit in the torture area.
- Access the skeleton (B). Take the YELLOW CRYSTAL.
- Retrace your steps to the first room.
- Click the blinds to change illumination.
- Go up the stairs to the second floor hallway.
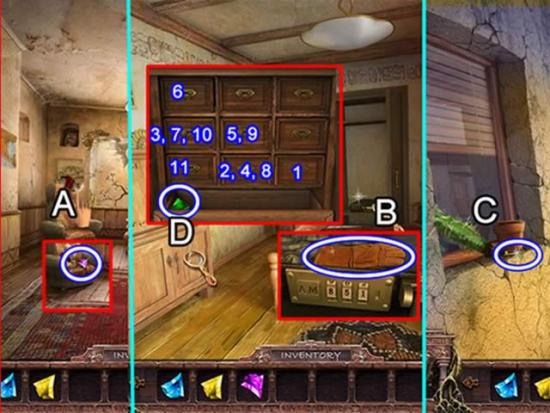
- Click the bear on the back of the chair (A). Pick up the PINK CRYSTAL.
- Enter room 201.
- Zoom in on the brief case (B). Enter the code from the guest register in the lock 8-5-7. Pick up the GLOVES.
- Cross the hall to room 202. Go out on the balcony.
- Use the GLOVE to remove the cactus from the pot (C). Take the ESCRITOIRE KEY.
- Return to room 201.
- Open the lower doors (D). Play the open the drawer puzzle. The inset shows a possible sequence. Take the GREEN CRYSTAL.
- Exit the hotel. Go up the street to the police department.
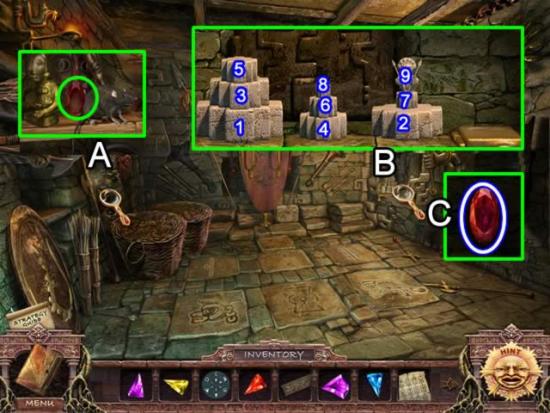
- Draw the blinds to change illumination.
- Go up the stairs.
- Play the hidden object scene on the left (A). Get the RUBY.
- Zoom in on the stones on the right (B) to open a game.
- Place the STONE FIGURE on the stones to start the game.
- The goal is to stack the stones on the gold pedestal in ascending order from largest to smallest. The stone idol is placed on top. Watch the video for a demonstration of how to solve this puzzle.
- Take the RUBY.
- Return down the stairs. Open the blinds.
- Exit the police station. Return to the hotel.
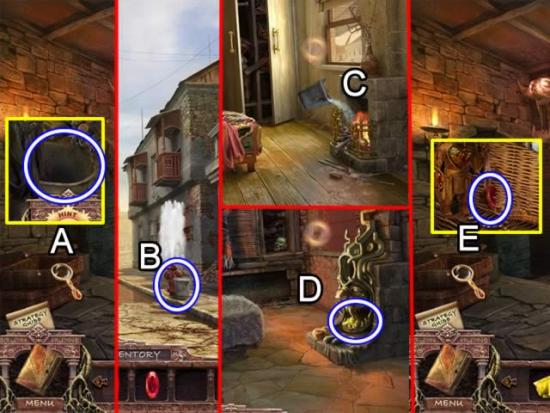
- Close the blinds to change illumination.
- Play the hidden object scene by the baskets (A). Get the EMPTY BUCKET.
- Open the blinds to change illumination. Exit the hotel.
- Place the EMPTY BUCKET by the fire hydrant. Click the hydrant to start the water flowing. Pick up the BUCKET WITH WATER.
- Return to the hotel. Go up the stairs to room 202.
- Throw the BUCKET WITH WATER on the fire in the fireplace (C). Close the blinds. Take the YELLOW CRYSTAL (D). Open the blinds.
- Return to the lobby. Close the blinds.
- Play the hidden object scene near the baskets (E). Take the RUBY.
- Open the blinds. Return to the police station.
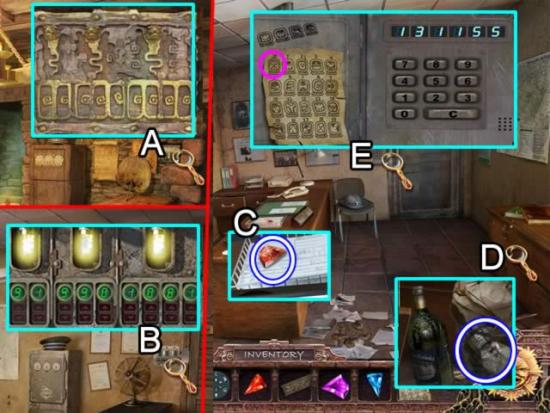
- Close the blinds.
- Zoom in on the mechanism on the right (A). Insert the three RUBIES in the slots.
- Open the blinds.
- Zoom in on the control panel (B). The directions say to use the “hint on the screen”. I could find no such hint. I referred to the in-game strategy guide for the number: 91-990-1081.
- Enter the sheriff’s office.
- Take the RED CRYSTAL from the in-box on the desk (C).
- Play the hidden object scene by the cabinet (D). Take the LIGHT BULB.
- Inspect the door lock (E). Place the PAPER WITH CODE on the left side of the door. Note the value of the first symbol is 20 (pink). Match the four symbls on the panel door with the paper. Enter the code 13-1-15-5.
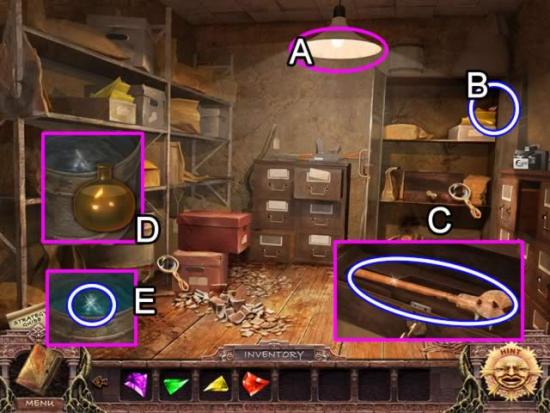
- Place the LIGHT BULB in the lamp (A).
- Click to open the doors to the storage cabinet. Pick up the PINK CRYSTAL (B) and the MACE from the metal box (C).
- Inspect the barrel. Pour the beaker with ALKALI into the barrel (D). Take the WHITE CRYSTAL from the neutralized water (E).
- Return to the sheriff’s office.
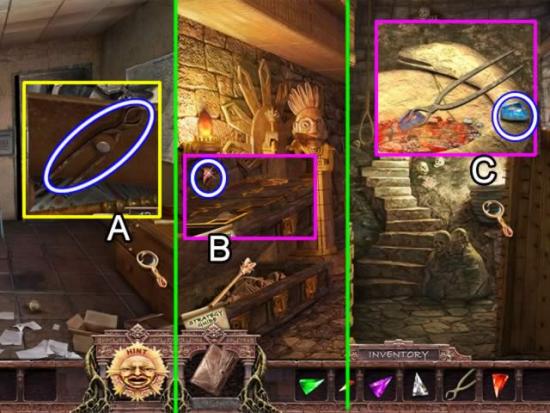
- Play the hidden object scene by the cabinet (A). Take the TONGS.
- Return to the hotel.
- Close the blinds.
- Go to the skeleton in the coffin (B). Place the MACE on the bones. Collect the RED CRYSTAL when the coffin lid closes.
- Go to the torture area.
- Access the coals (C). Use the TONGS to extract the BLUE CRYSTAL.
- Return to the lobby. Open the blinds.
- Return to the police department.
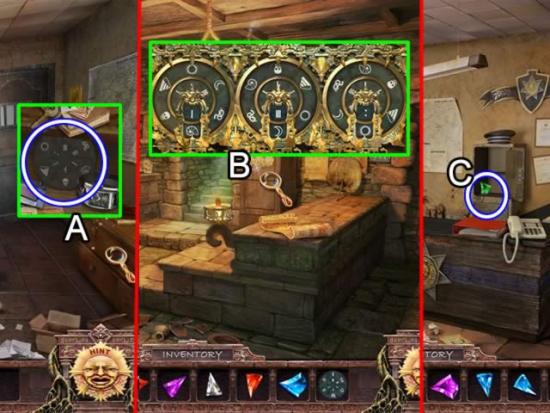
- Play the hidden object scene in the sheriff’s office (A). Get a DISK.
- Return to the entry area. Close the blinds.
- Focus in on the dial mechanism (B). Refer to the photo added to the journal that was picked up during early play for the correct combination. Open the blinds.
- Take the GREEN CRYSTAL.
- Close the blinds. Go up the stairs.
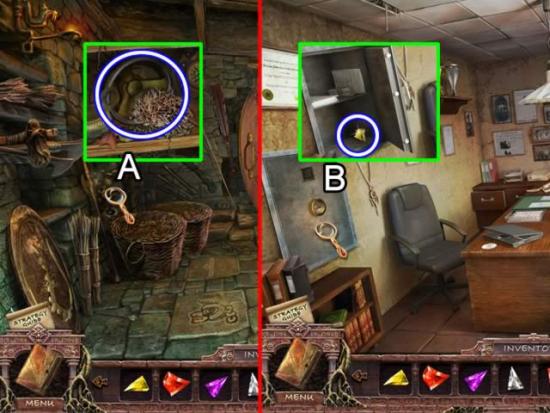
- Play the hidden object scene (A). Collect the SAFE HANDLE.
- Return down the stairs. Open the blinds.
- Enter the sheriff’s office.
- Zoom in on the safe (B). Place the SAFE HANDLE on the door. Take the YELLOW CRYSTAL from the safe.
- Exit the police department. Go up the street to city hall.
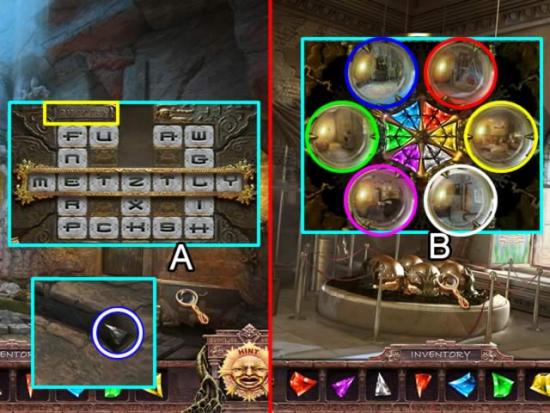
- Close the window.
- Zoom in on the box (A). Place the PLATE WITH PASSWORD in the groove on top (yellow). Slide the tiles until the letters align to M-E-T-Z-T-L-Y. It is easiest to solve by placing the four letters not in the sliding columns first (M, T, T and Y). Use the top slot to hold a tile to make sliding easier.
- Take the WHITE CRYSTAL under the puzzle.
- Open the window.
- Click the center circle to raise the globes (B). Access the globes. Place CRYSTALS in their associated colored globe.
- Watch the closing cut scene.
Congratulations! You have completed playing the second Bonus Adventure of Secrets of the Dark Temple: Temple of Night Collector’s Edition.
More articles...
Monopoly GO! Free Rolls – Links For Free Dice
By Glen Fox
Wondering how to get Monopoly GO! free rolls? Well, you’ve come to the right place. In this guide, we provide you with a bunch of tips and tricks to get some free rolls for the hit new mobile game. We’ll …Best Roblox Horror Games to Play Right Now – Updated Weekly
By Adele Wilson
Our Best Roblox Horror Games guide features the scariest and most creative experiences to play right now on the platform!The BEST Roblox Games of The Week – Games You Need To Play!
By Sho Roberts
Our feature shares our pick for the Best Roblox Games of the week! With our feature, we guarantee you'll find something new to play!Type Soul Clan Rarity Guide – All Legendary And Common Clans Listed!
By Nathan Ball
Wondering what your odds of rolling a particular Clan are? Wonder no more, with my handy Type Soul Clan Rarity guide.


