
Grow A Garden 2 Base Price List
What's the most valuable crop?![Evomon Best Starter [Leafbun, Blazpup, or Bubble?]](/wp-content/uploads/2026/06/evomon-best-starter.jpg "Evomon Best Starter [Leafbun, Blazpup, or Bubble?]")
Evomon Best Starter [Leafbun, Blazpup, or Bubble?]
Grass-type, Fire-type, or Water-type?![Evomon Tier List [META and BEST Evomon]](/wp-content/uploads/2026/06/evomon-tier-list.jpg "Evomon Tier List [META and BEST Evomon]")
Evomon Tier List [META and BEST Evomon]
The Evomon dream team.
![[Roblox] Evomon Shiny Hunting Guide – Including Prismatic and Pris Shinies!](/wp-content/uploads/2026/06/evomon-shiny-hunting-guide.jpg "[Roblox] Evomon Shiny Hunting Guide – Including Prismatic and Pris Shinies!")
Secret Mission: The Forgotten Island Walkthrough
Check out the official Gamezebo strategy guide for Secret Mission: The Forgotten Island.


- Prefer Gamezebo on Google

General Information
Main Menu
- The Play button starts the game with the currently selected profile. You have the option to play on easy mode (tutorial option, additional help and hints, quick hint recharge) or on hard mode (no tutorial option, limited help and hints, slow hint recharge).
- The Puzzles button displays all mini-games and hidden object locations that have been unlocked while playing the game.
- The Options button displays a window where there are toggle options for window mode and custom cursor. There are sliding options to change the resolution, gamma level, music volume and effects volume. Press the Accept button to accept the changes (which will apply after the game has been restarted), the Exit button to return to the main menu or the Credits button to view the list of people that were involved in making this game.
- The Help button displays three pages which explain the various controls and types of locations that are featured in the game.
- The Exit button quits the game if Yes is selected or returns to the main menu if No is selected.
- The Change Profile button at the bottom-right corner of the main menu displays the profile window. Select the Create button to make a new profile, the Delete button to remove a profile from the list or the OK button to return to the main menu with the currently selected profile.
Normal Locations
- The standard cursor is the arrow. Move the cursor around the screen until it changes. A blue name tag at the right side of the cursor shows an object that can be examined for a short description. The cursor will change to an eye over objects that can be examined more closely, a hand over objects that can be added to the inventory and a wrench over objects where an inventory item needs to be used.
- Single left click on an area when a cursor is shown to perform an action.
- On easy mode, sparkles indicate an area which is hidden from view. Sparkles do not appear on hard mode.
- When the area has been completed, directional arrows can be selected to exit the area.
- The Map button can be selected at the bottom-left corner of the screen to view the current position and other locations in the game. The locations are marked with a blank circle if there are no tasks to complete, an exclamation mark if there are tasks to complete or a green tick if the location has been completed.
- The Game Menu button can be selected at the bottom-left corner of the screen to return to the game menu. From here you can select the Play button to return to the game.
- After the broken beacon and the blue quartz has been found at the landing site, the beacon can be selected for a hint on which area should be examined next. On easy mode it takes 40 seconds for the beacon to refill. On hard mode it takes 3 minutes for the beacon to refill.
- The green window at the bottom of the screen is the inventory. Items that are collected are added here, and items from the inventory can be used on objects in the game when the wrench cursor appears.
- The piece of paper at the bottom-right corner of the screen displays the current tasks that need to be completed.
Hidden Object Locations
- On easy mode, hidden object locations are found by examining blue sparkling areas. On hard mode, there are no sparkling areas so the hidden object locations must be searched for.
- The aim in these locations is to find all of the objects that are displayed in the list. It is not possible to give the exact locations for many of the hidden objects as the list is random each time that the game is played. Some hidden objects on the list are not random and will appear in the same place each time that the game is played. These objects will be shown with a red border on the images in this guide.
- On easy mode, two pieces of blue quartz can be found in every hidden object location. On hard mode, only one piece of quartz can be found. If the hint beacon is empty, finding the quartz instantly refills the hint beacon. If the hint beacon is full, another hint is added to the beacon.
- The hint beacon can be selected at the bottom-left corner of the screen to reveal the location of a hidden object. On easy mode it takes 40 seconds for the beacon to refill. On hard mode it takes 3 minutes for the beacon to refill.
- Clicking too quickly causes the mouse cursor to move randomly for 3 seconds.
- After finding all of the hidden objects, a new object will be added to the inventory.
Mini-Games
- There are 15 mini-games in the main adventure which must be solved in order to make further progress with the game.
- The four buttons at the top-right corner of the window give help on the mini-game, skip the mini-game (after 2 minutes on easy mode or 6 minutes on hard mode), reset the mini-game or back away from the mini-game.
- Completing a mini-game causes a new object or exit to appear.
Some of the mini-games are more difficult on hard mode while some are the same on both difficulties.
Walkthrough – Crystal 1 – Soul of the Island
Landing Site
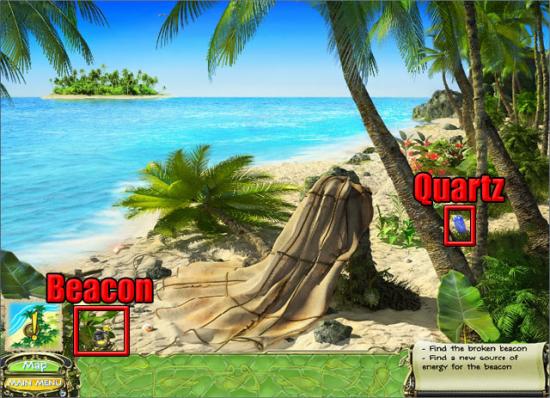
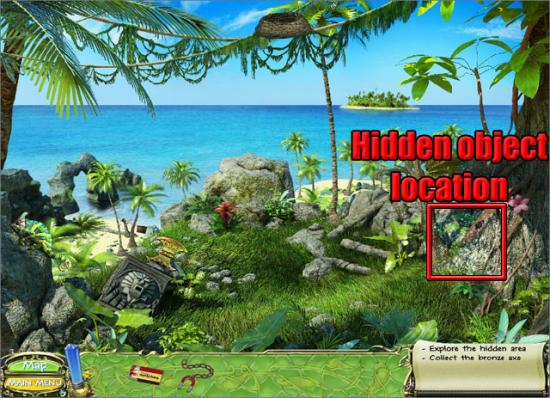
The game starts on the beach at the landing site. Take the broken beacon and the quartz:

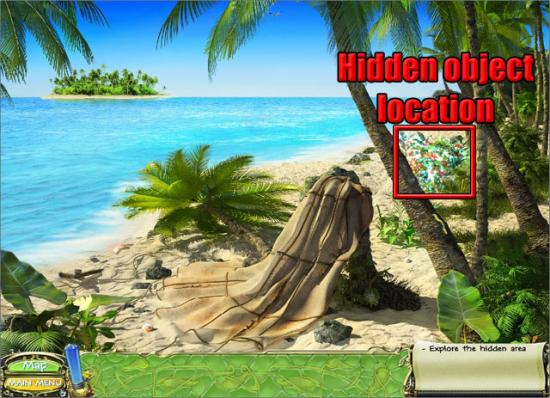
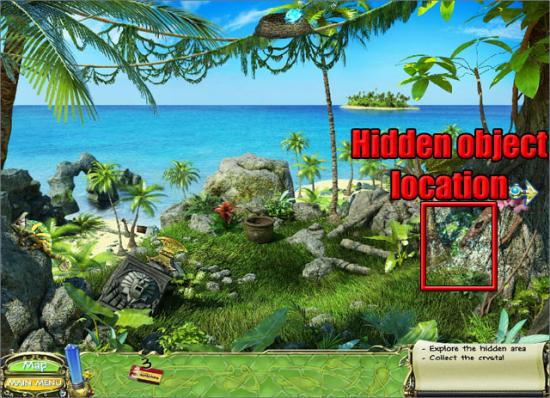
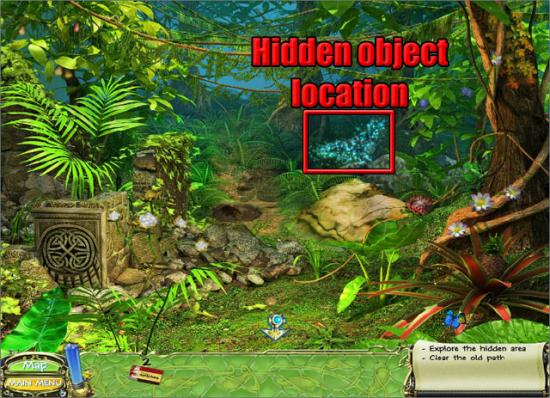
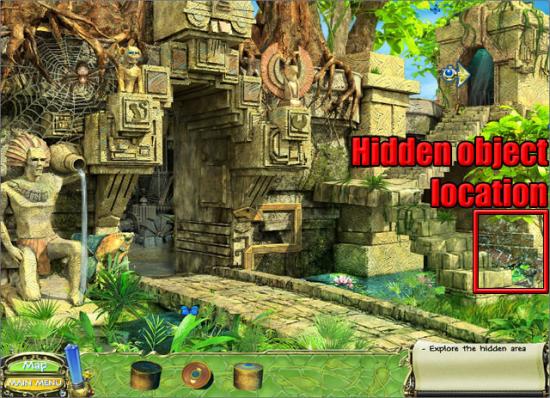
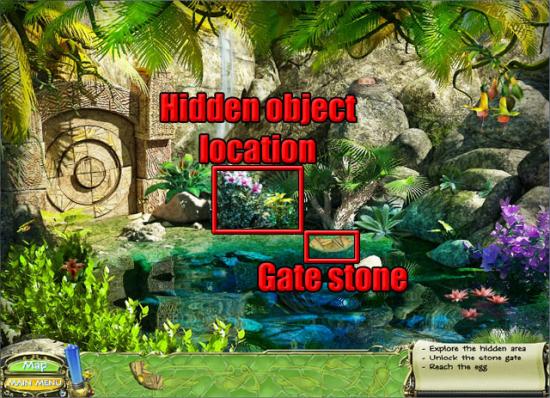
The completed beacon will now appear at the bottom-left corner of the screen and can be selected to reveal hints. Examine the hidden object location:
Select the quartz and the rope with hook:
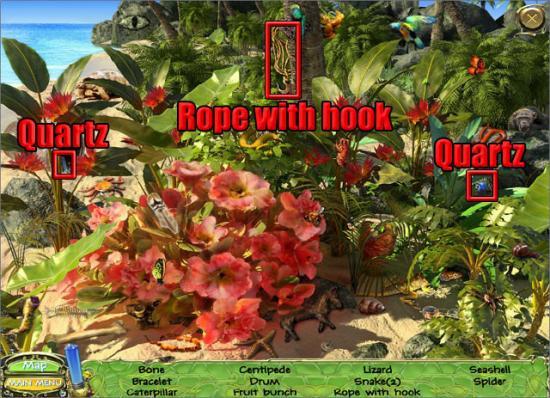
Find the remaining hidden objects on the list to take the rope with hook. Move left to the beach.
Beach
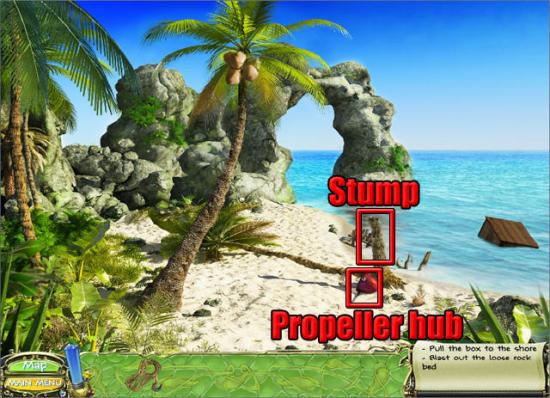
Take the propeller hub and it will be added to the inventory. Select the propeller hub in the inventory the use it on the stump:
Examine the hidden object location:
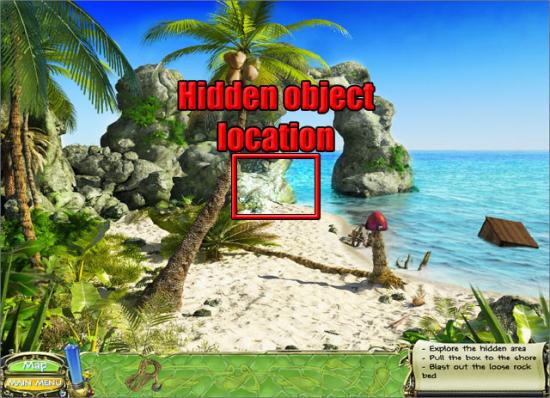
Select the quartz and the propeller blade:
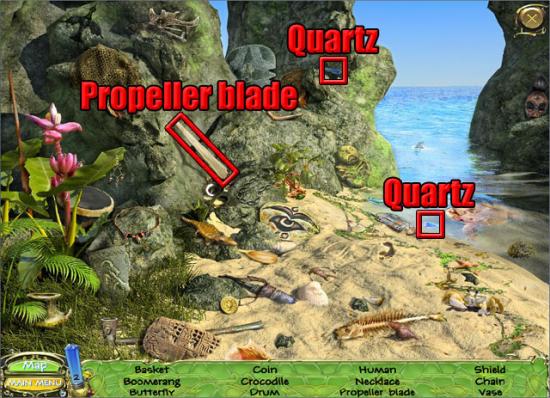
Find the remaining hidden objects on the list to take the propeller blade. Use the rope with hook on the propeller hub. Use the propeller blade on the propeller hub to pull the box onto the beach. Select the box to see a mini-game. The aim is to rotate the screws until the top lock matches the bottom lock. There are three levels of this mini-game to complete.
Easy – Level 1:
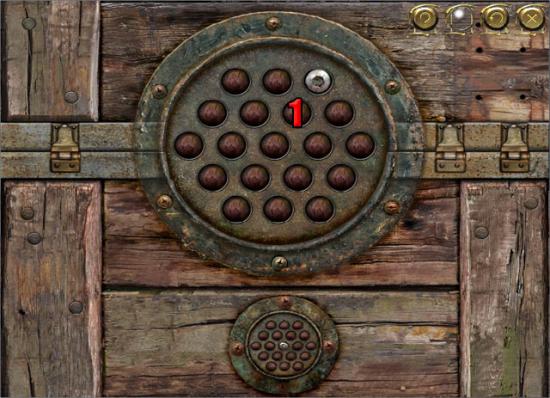
Press screw 1 three times.
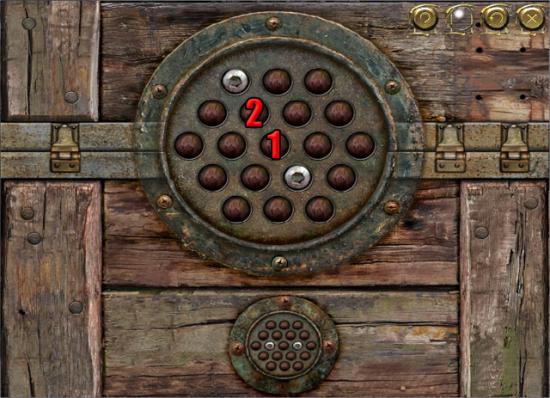
Easy – Level 2:
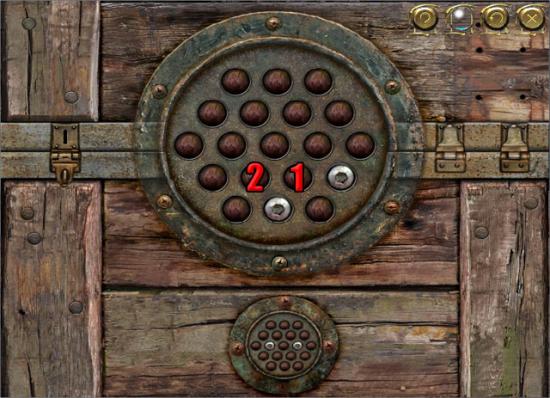
Press screw 1 twice.
Press screw 2 once.
Press screw 1 once.
Easy – Level 3:
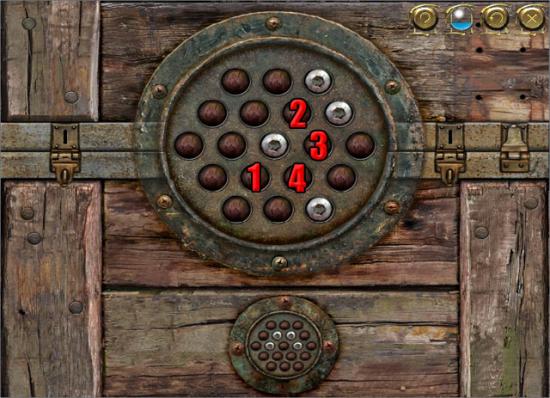
Press screw 1 once.
Press screw 2 three times.
Press screw 3 five times.
Press screw 4 twice.
Hard – Level 1:
Press screw 1 once.
Press screw 2 twice.
Hard – Level 2:
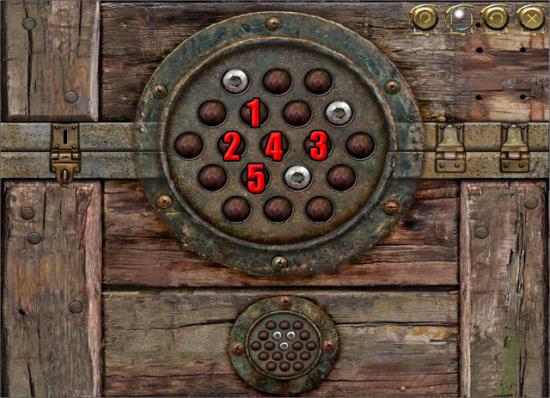
Press screw 1 once.
Press screw 2 twice.
Press screw 3 once.
Press screw 4 once.
Press screw 3 three times.
Press screw 5 four times.
Hard – Level 3:
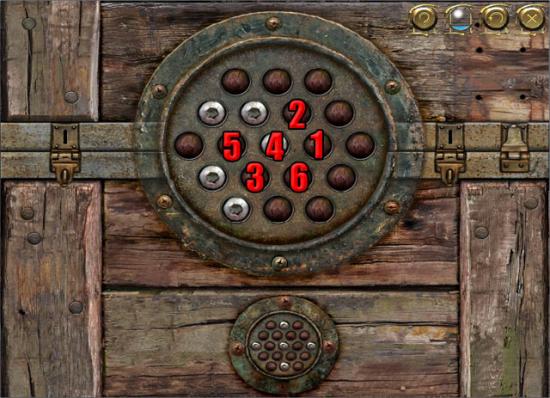
Press screw 1 three times.
Press screw 2 five times.
Press screw 3 five times.
Press screw 4 twice.
Press screw 5 once.
Press screw 6 four times.
Press screw 3 four times.
Press screw 4 five times.
Press screw 3 once.
Take the dynamite and matches from the box:
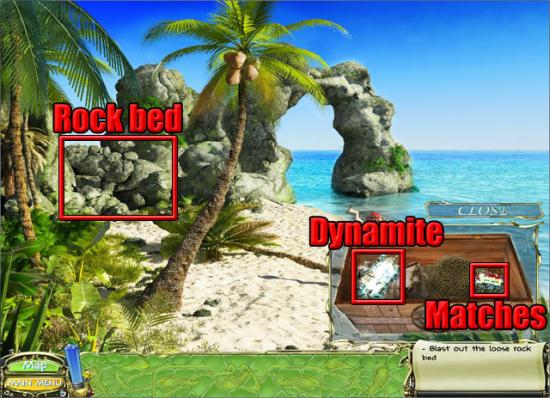
Use the dynamite on the rock bed. Use the matches on the dynamite and the rock bed will explode. Move forward to the chasm.
Chasm
Examine the hidden object location:
Select the quartz and the burner:
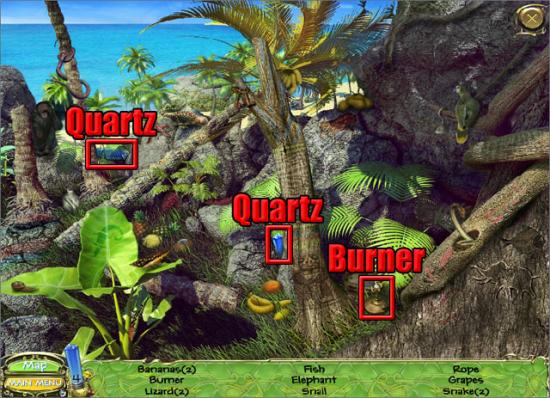
Find the remaining hidden objects on the list to take the burner. Select the map button at the bottom-left corner of the screen to view the game map. Travel to the landing site.
Landing Site
Examine the hidden object location:
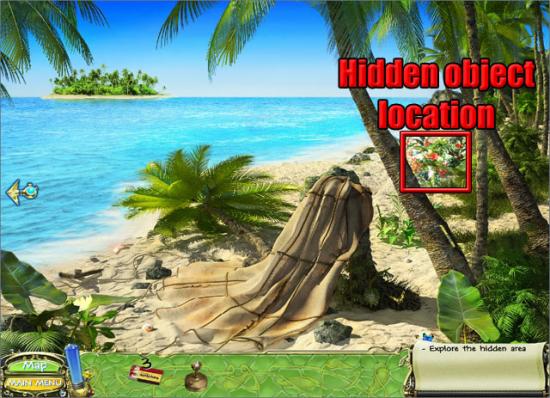
Select the quartz and the parachute:

Find the remaining hidden objects on the list to take the rag. Select the map and travel to the chasm.
Chasm
Use the rag on the old basket:
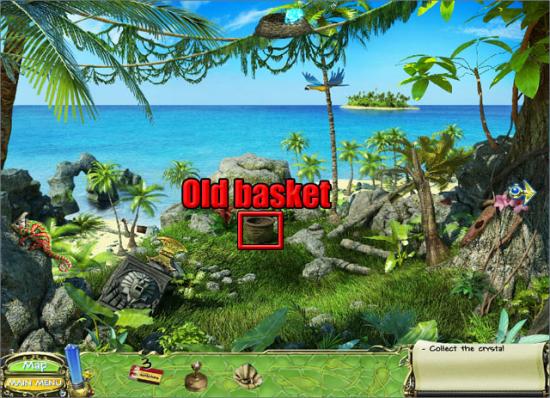
Use the burner and the matches on the old basket and it will float away. Take the soul of the island that drops to the grass:
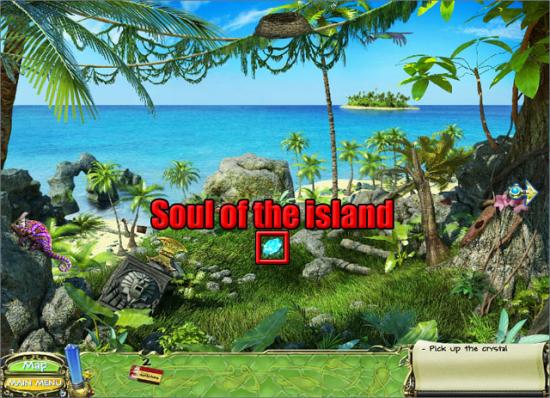
After the cutscene, move right to the crystal tree.
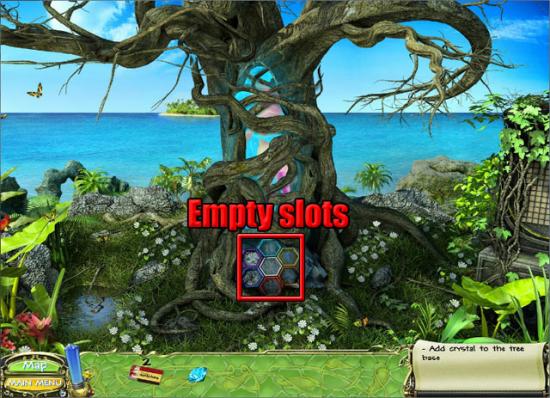
Crystal Tree
Use the soul of the island on the empty slot at the base of the tree:
Crystal 2 – Love of the Island
Crystal Tree
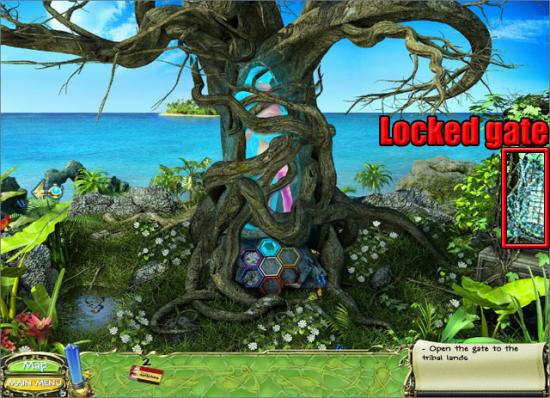
After the soul of the island has been put into one of the empty slots on the tree, Noah Hawkwood appears and asks you to find the other crystals. Examine the locked gate at the right side of the area to start the coin mini-game:
The aim is to find the golden coin within four tries. Start by selecting one of the normal coins to see how many spaces you are away from the golden coin. The number on the normal coin shows how many spaces away you are from the golden coin but it does not tell you which direction you need to go in, so that needs to be figured out by trial and error. The solution to this mini-game is random every time it is played. An example of how the mini-game may be solved is shown below:
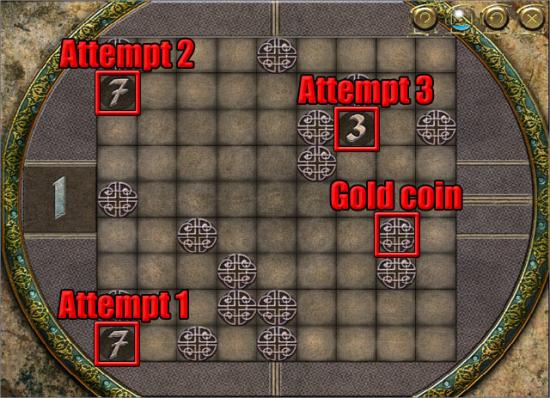
In this example, I started with the bottom-left coin to reveal the number 7. Moving up seven spaces to the second coin also revealed the number 7. Moving right seven spaces to the third coin revealed the number 3. The only possible coin within three spaces was the gold coin shown in the image. After completing the mini-game, move right to the jungle pathway.
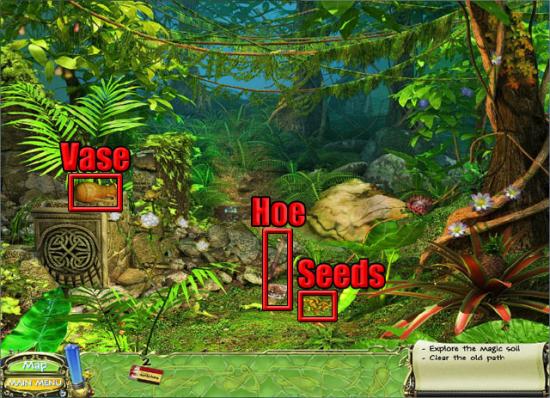
Jungle Pathway
Take the ancient vase, the hoe and the golden seeds:
Move back to the crystal tree.
Crystal Tree
Use the ancient vase on the puddle to get the vase with water:

Move right to the jungle pathway.
Jungle Pathway
Use the hoe on the magic soil:
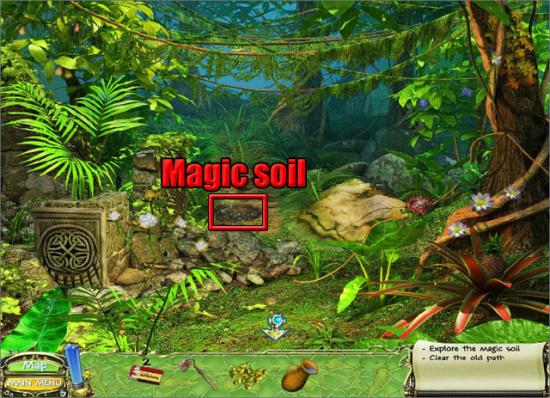
Use the golden seeds on the loose soil to plant the seeds. Use the vase with water on the planted seeds. Use the hoe on the watered seeds and the plant will grow. Take the love of the island:
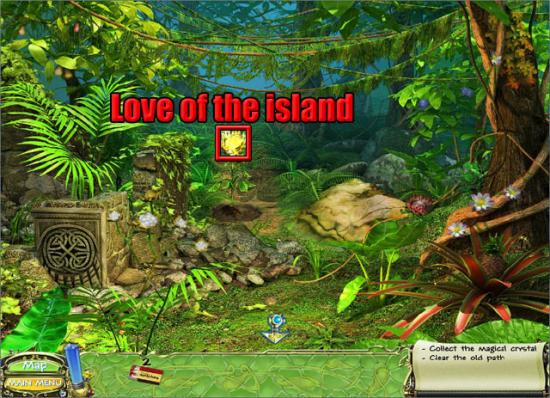
After the cutscene, move back to the crystal tree.
Crystal Tree
Use the love of the island on the empty slot at the base of the tree.
Crystal 3 – Danger of the Island
Crystal Tree
Select the map and travel to the jungle pathway.
Jungle Pathway
Examine the hidden object location:
Select the quartz and the machete:
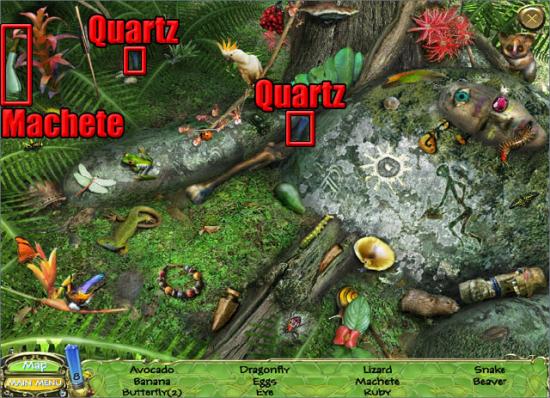
Find the remaining hidden objects on the list to take the machete. Use the machete on the old jungle path:
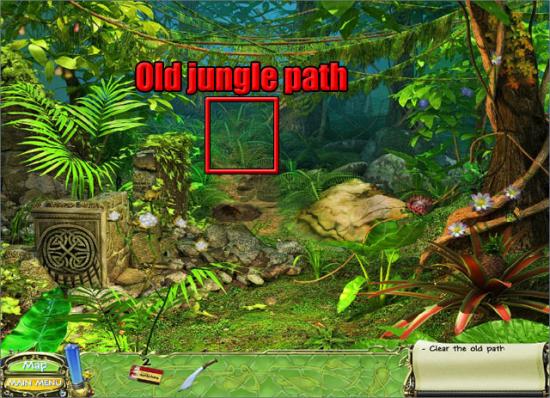
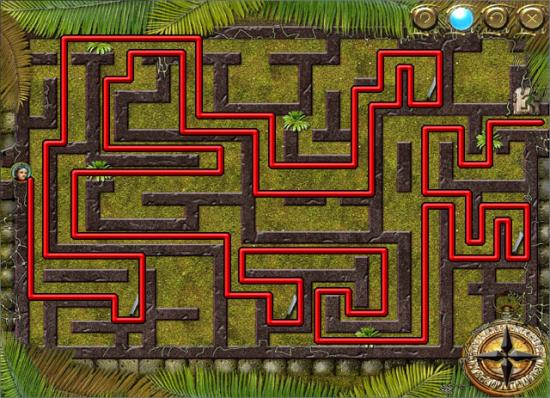
In the jungle path mini-game, drag the character token through the maze to collect the machetes so that the bushes can be cut down. Follow the path shown below to complete the mini-game.
Easy:
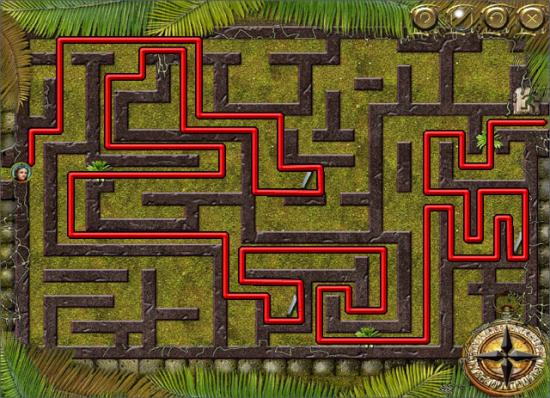
Hard:
Ancient Furnace
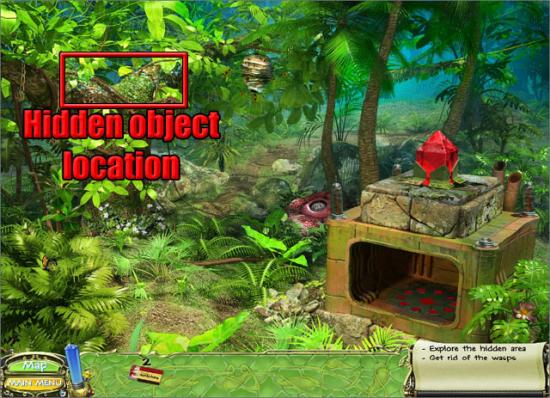
Examine the hidden object location in the tree:
Select the quartz and the ancient shears:
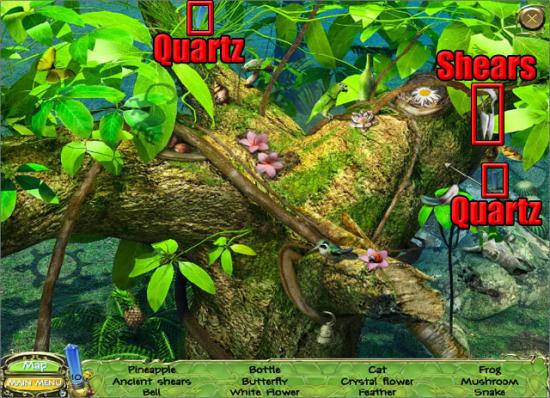
Find the remaining hidden objects on the list to take the ancient shears. Move back to the jungle pathway.
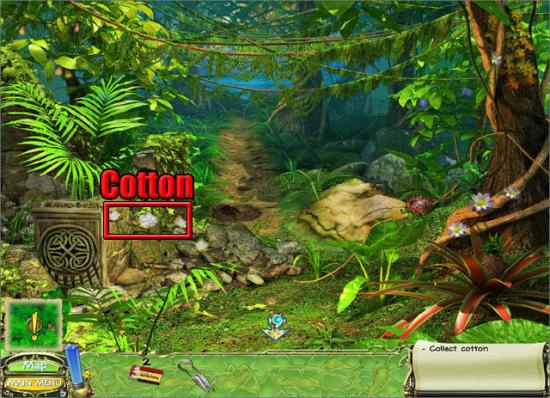
Jungle Pathway
Use the ancient shears on the three pieces of cotton:
Move forward to the ancient furnace.
Ancient Furnace
Use the cotton and the matches on the wasps’ nest:
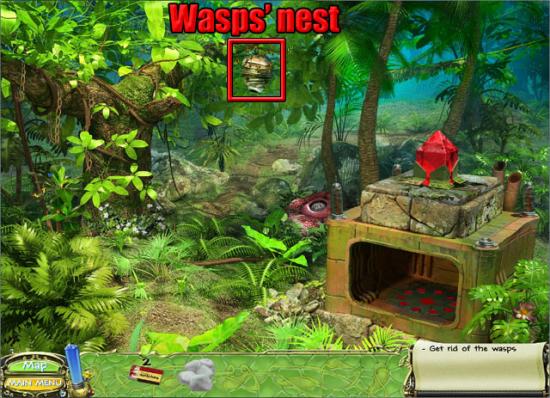
The wasps will fly away and the path to the river will be cleared. Move forward to the river.
River
Take the magnet on the grass:
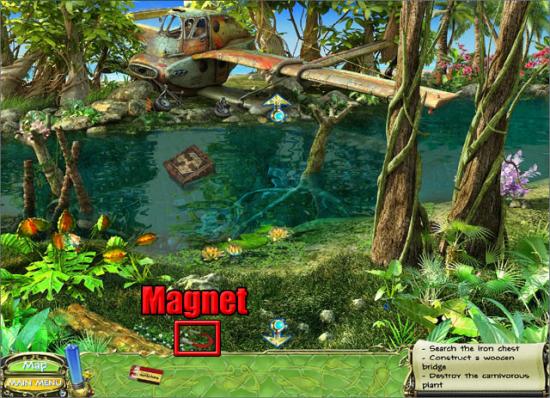
Move back to the ancient furnace.
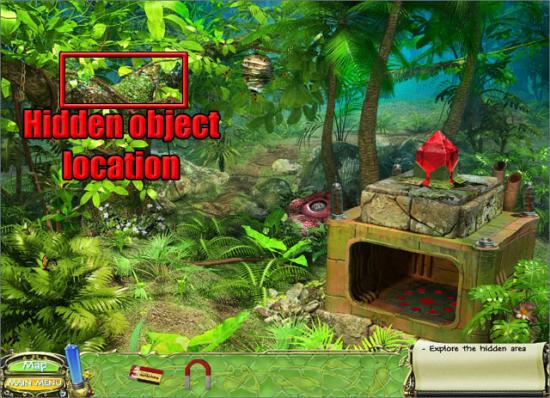
Ancient Furnace
Examine the hidden object location in the tree:
Select the quartz and the chain:
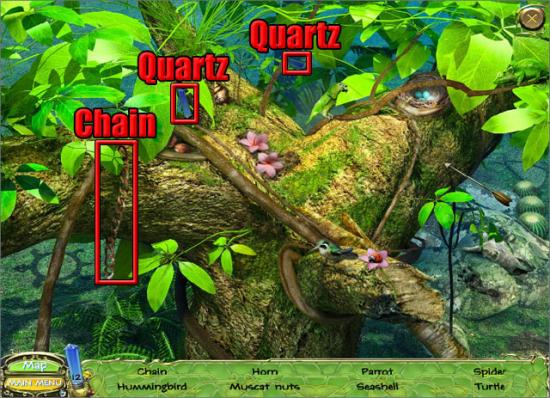
Find the remaining hidden objects on the list to take the chain. Select the map and travel to the chasm.
Chasm
Examine the hidden object location:
Select the quartz and the axe handle:
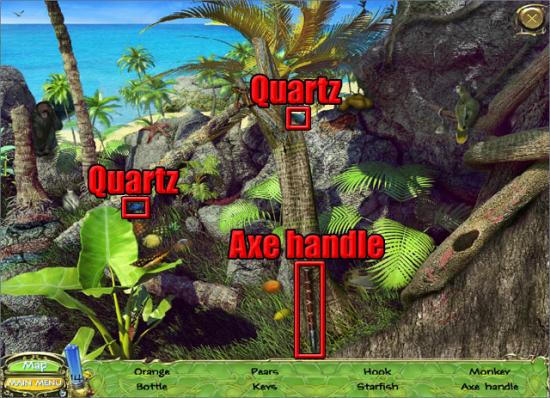
Find the remaining hidden objects on the list to take the axe handle. Use the axe handle on the axe blade to make the bronze axe:
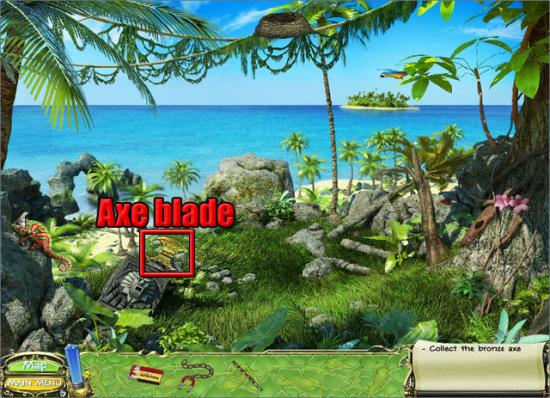
Take the bronze axe. Select the map and travel to the river.
River
Use the chain with magnet on the iron chest in the water:
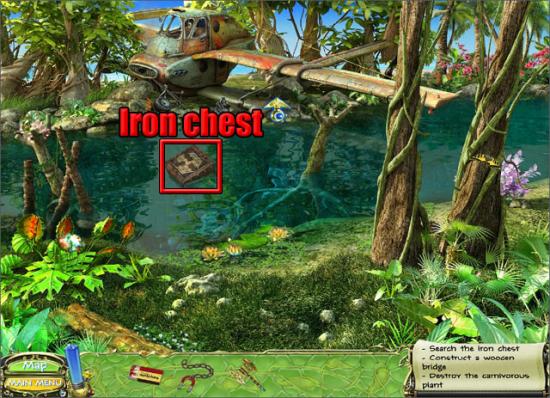
Select the chest to start the tile hexagon mini-game. The aim is to arrange the tiles so that there are no unmatched connections. Put the tiles in the following positions to complete the mini-game:
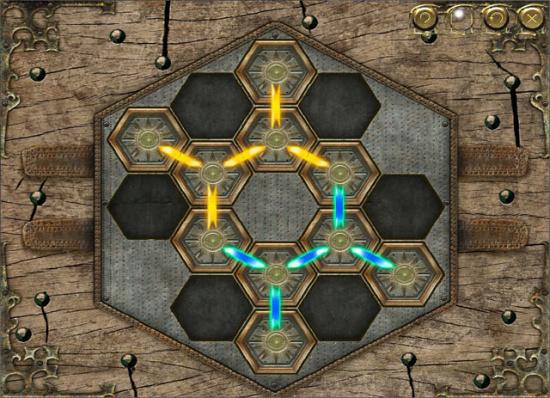
Take the rope from the chest:
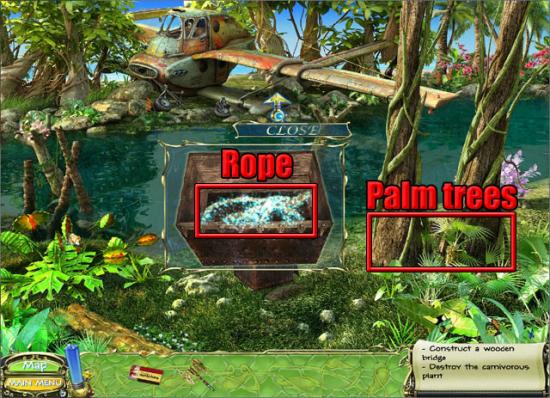
Use the bronze axe on the palm trees twice to make two fallen logs. Use the rope on the fallen logs to make a bridge over the river. Move forward to the luggage space of the plane.
Luggage Space
Examine the hidden object location:
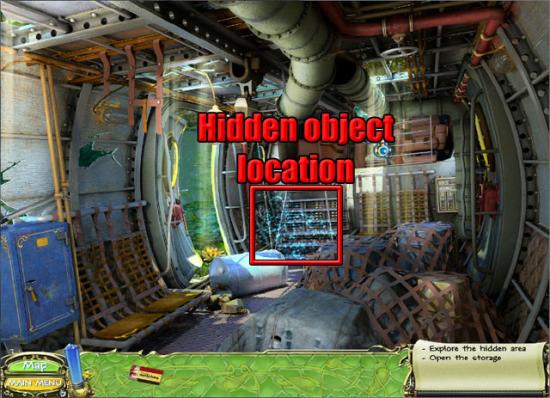
Select the quartz and the screwdriver:
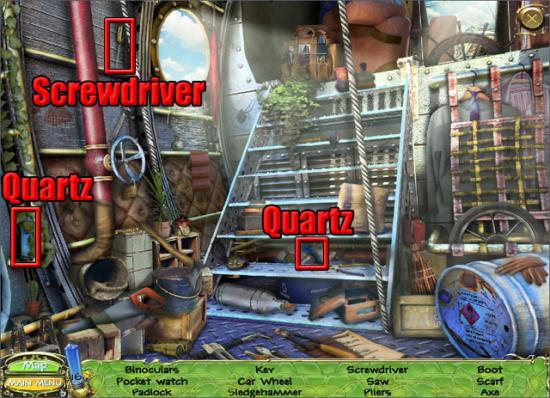
Find the remaining hidden objects on the list to take the screwdriver. Move forward the cockpit.
Cockpit
Take the wires and use them on the radio:
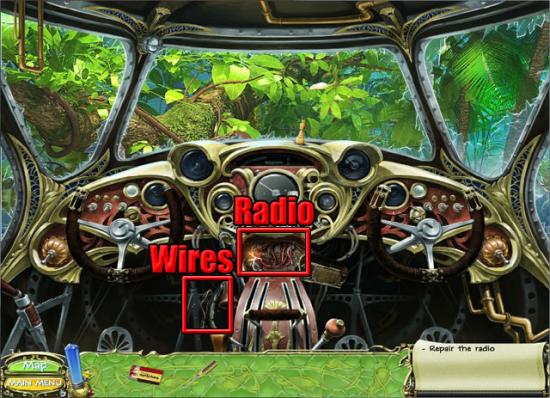
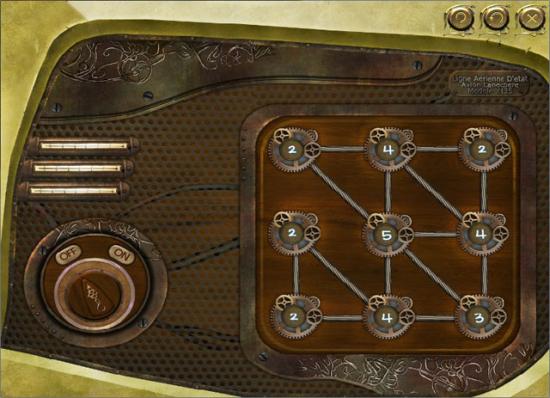
Use the screwdriver on the radio to see the radio gear mini-game. The aim is to connect the correct number of wires to each radio gear and then press the on/off dial to turn on the radio. Connect the wires to the following gears and then press the switch:
Take the storage key:
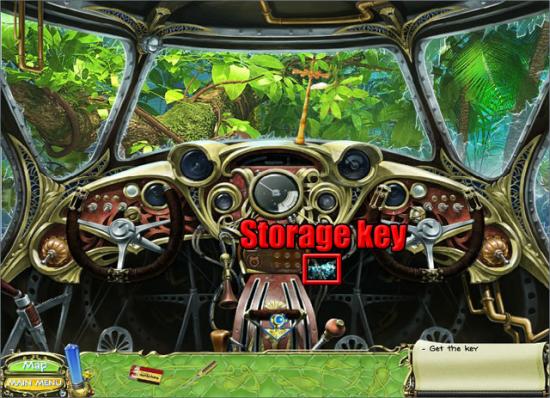
Move back to the luggage space.
Luggage Space
Use the storage key on the crate:
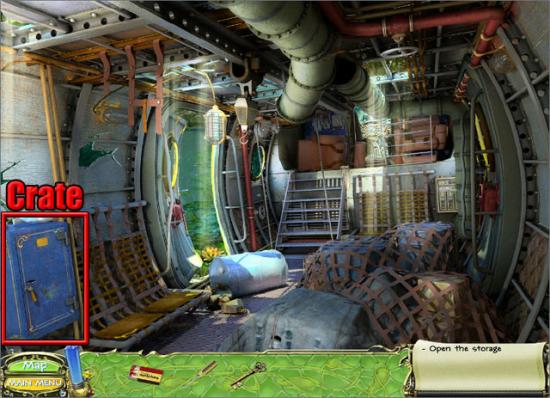
Take the poison from the crate. Move left to the river.
River
Use the poison on the carnivorous plant:
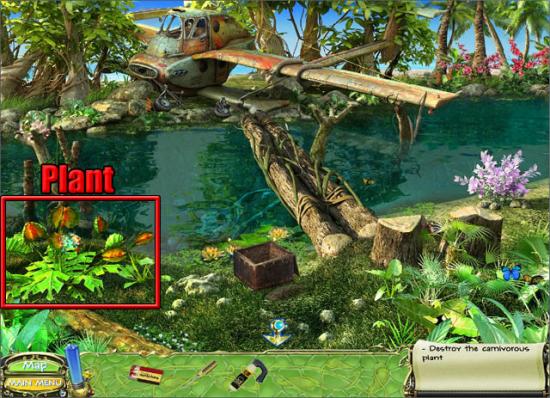
Take the danger of the island:
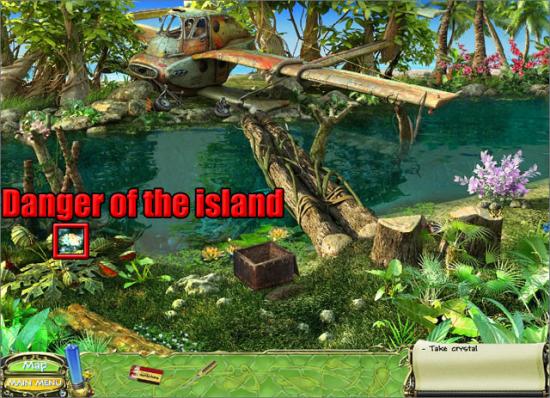
After the cutscene, select the map and travel to the crystal tree.
Crystal Tree
Use the danger of the island on the empty slot at the base of the tree.
Crystal 4 – Fate of the Island
Crystal Tree
Select the map and travel to the bridge.
Bridge
Take the spear and the clay mold:
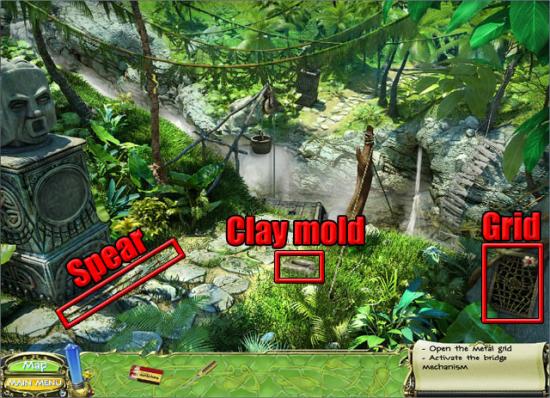
Use the screwdriver on the metal grid. Examine the metal grid to see the chips mini-game. The aim is to move the chips to holes which have the same colour. There are three levels of this mini-game to complete.
Level 1:
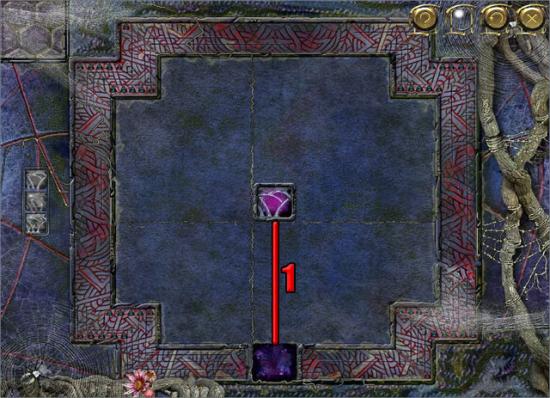
Level 2:
Level 3:
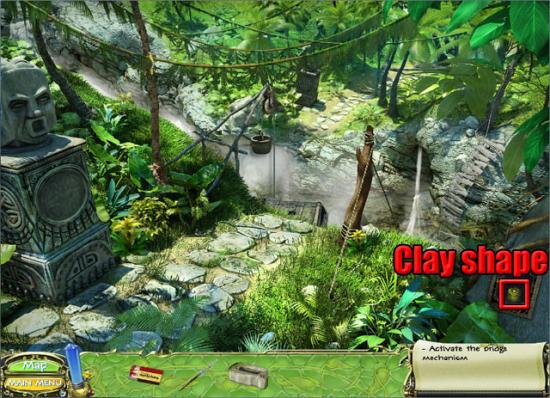
After completing the mini-game, take the clay shape:
Select the map and travel to the jungle pathway.
Jungle Pathway
Use the spear on the metal sign to take it:
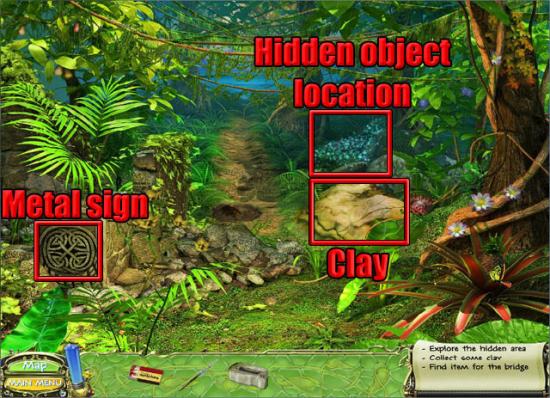
Examine the hidden object location. Select the quartz and the shovel:
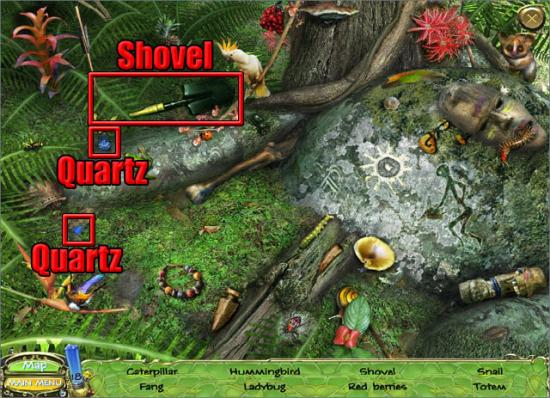
Find the remaining hidden objects on the list to take the shovel. Use the shovel on the clay to take the golden clay. Move forward to the ancient furnace.
Ancient Furnace
Use the clay mold in the furnace. Use the golden clay in the furnace: The oven needs to be repaired. Select the map and travel to the luggage space.
Luggage Space
Examine the hidden object location:
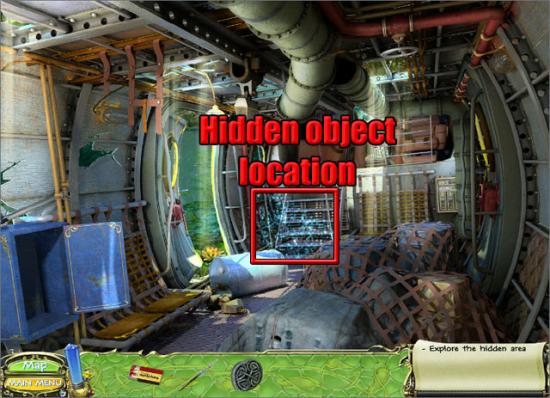
Select the quartz and the furnace lamp:
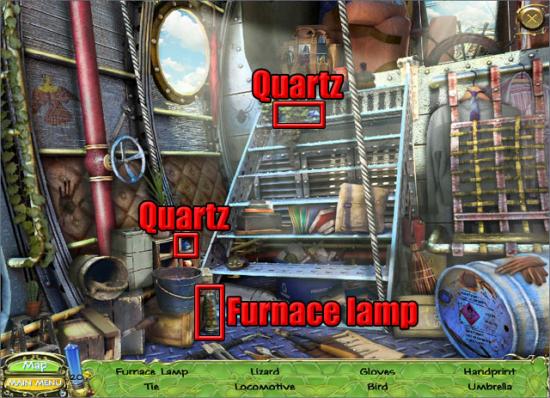
Find the remaining hidden objects on the list to take the furnace lamp. Select the map and travel to the ancient furnace.
Ancient Furnace
Use the furnace lamp on the missing lamp slot on the furnace:
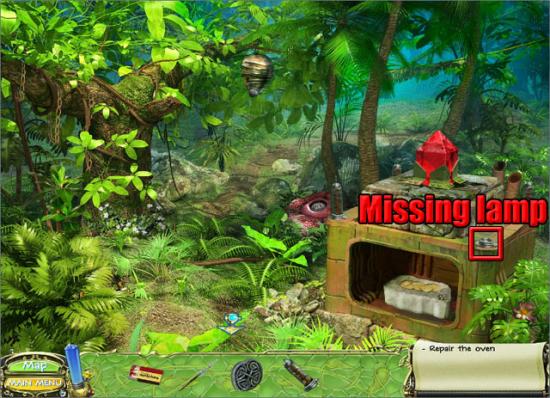
Take the clay shape from the furnace. Select the map and travel to the beach.
Beach
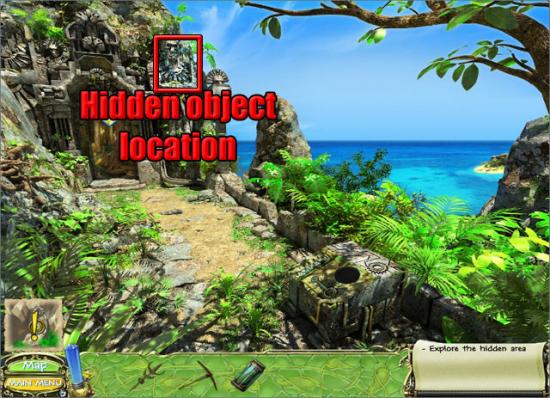
Use the spear on the coconuts in the tree and one of them will fall into the hidden object location:
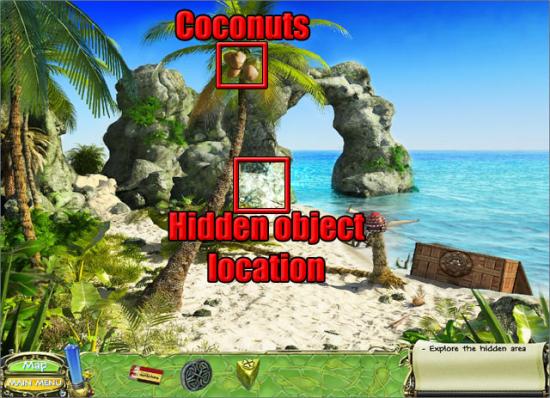
Examine the hidden object location. Select the quartz and the coconut:
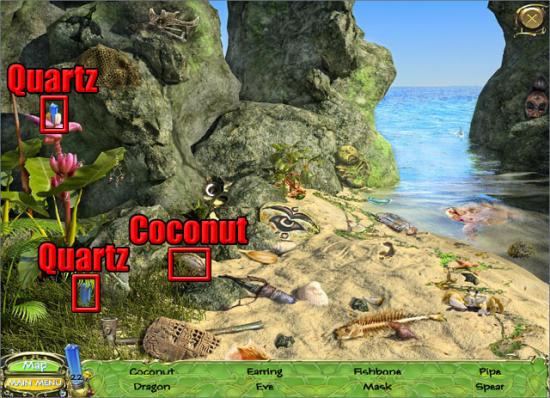
Find the remaining hidden objects on the list to take the coconut. Select the map and travel to the bridge.
Bridge
Use the coconut on the scale:
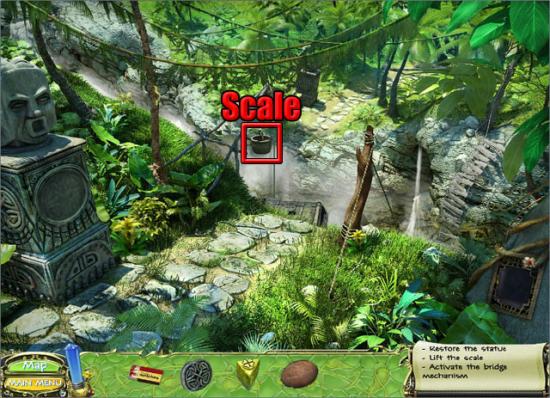
Take the two clay shapes. Use the metal sign on the sign place:
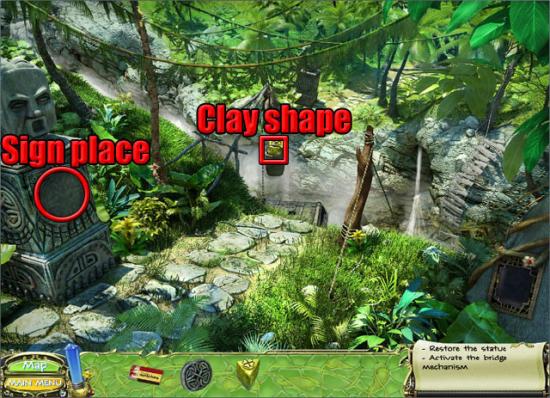
Take the clay shape from the statue. You should now have four clay shapes in the inventory. The shape of the statue’s mouth will be the same shape as one of the clay shapes. Put the relevant clay shape into the mouth of the statue and then click the head to rotate it. Do the same thing for the remaining three clay shapes and the bridge mechanism will be activated. Move forward to the temple entrance.
Temple Entrance
Take the ape statue and the sign stone:
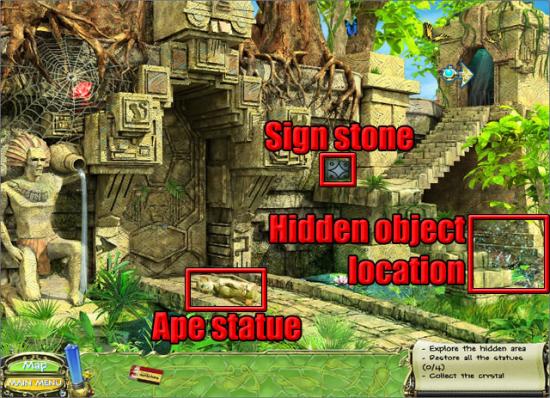
Examine the hidden object location. Select the quartz and the spider:
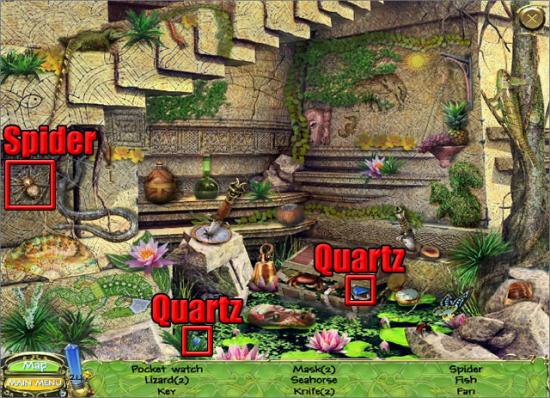
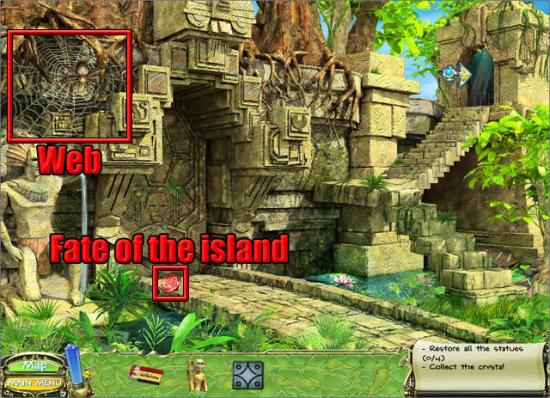
Find the remaining hidden objects on the list to take the spider. Use the spider on the web and take the fate of the island:
After the cutscene, select the map and travel to the crystal tree.
Crystal Tree
Use the fate of the island on the empty slot at the base of the tree.
Crystal 5 – Regret of the Island
Crystal Tree
Select the map and travel to the outpost.
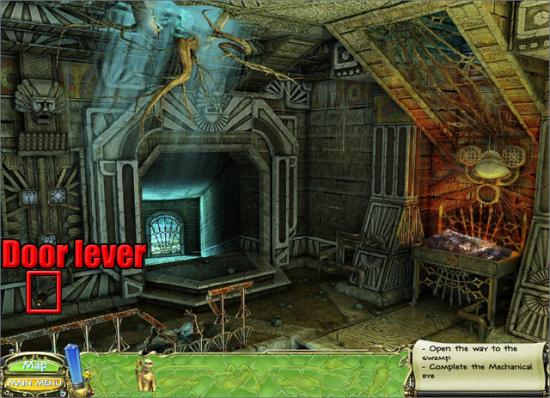
Outpost
The following hotspots are available:
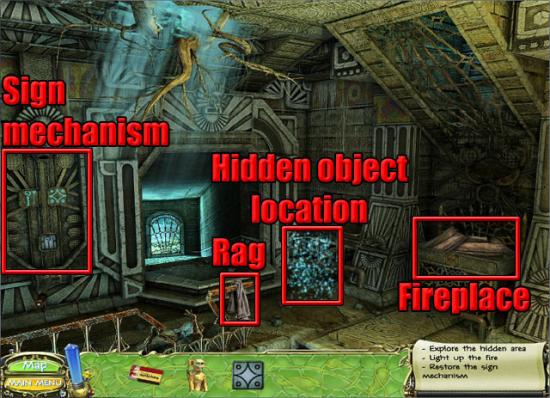
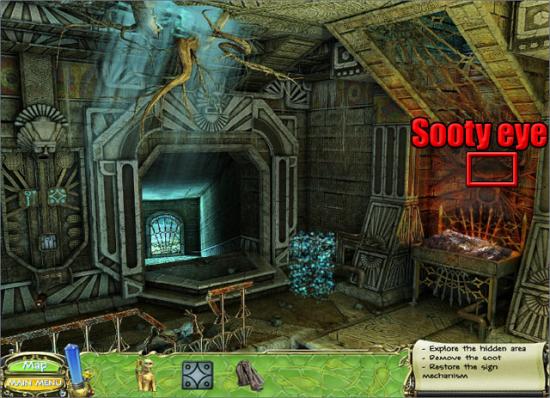
Take the rag. Use the matches on the fireplace to light it. Use the rag on the sooty eye above the fireplace three times to reveal the mechanical eye:
Examine the hidden object location. Select the quartz and the sign stone:
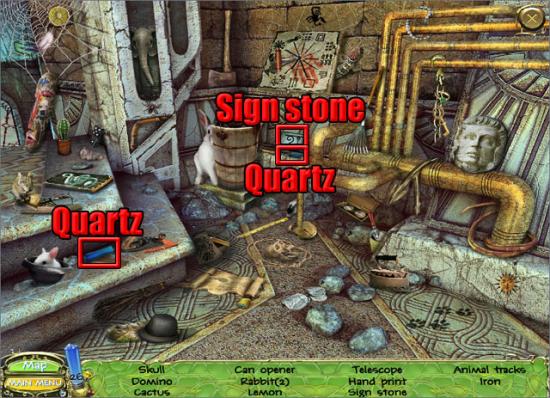
Find the remaining hidden objects on the list to take the sign stone. Use both sign stones on the empty slots on the sign mechanism. Select the top of the sign mechanism to play the secret code mini-game.
The aim in the mini-game is to find the correct order of colours within eight attempts. Select a slot to see a disc with six colours, then select a colour to place it in the holder. Once four colours are in the holder, three statue heads will be shown below the holder. The white statue head means that the colour is in the correct slot in the holder, the grey statue head means that the correct colour is in the holder but in the wrong slot, and the black statue head means that the colour should not be used in the holder. The solution to this mini-game is random every time it is played. An example of how the mini-game may be solved is shown below:
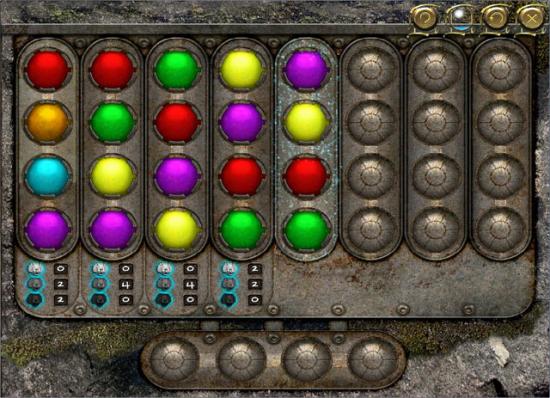
In this example, the first column shows that two colours are in the correct slots and two colours should not be used. The second column uses a different selection of colours, and this shows that all four of these colours should be used, but are in the wrong slots. Switching the colours around in the third column again shows that all four colours are in the wrong slots. The fourth column shows that two of the colours are in the correct slots while the remaining two colours need to be switched. The fifth column switches the top two colours to solve the mini-game.
After the mini-game has been completed, select the door lever:
Move forward to the swamp altar.
Swamp Altar
Take the bird statue:
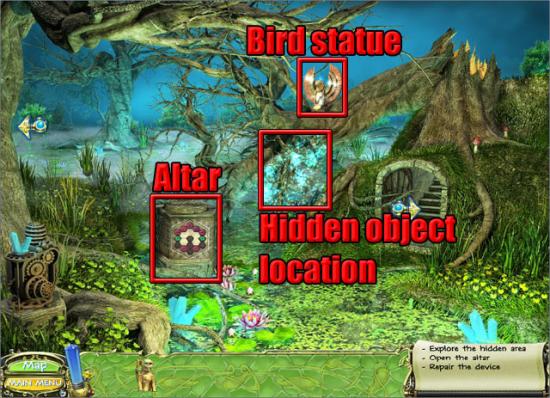
Examine the hidden object location. Select the quartz and the mechanical piece:

Find the remaining hidden objects on the list to take the mechanical piece. Use the mechanical piece on the altar to play the tiles mini-game. The aim is to arrange the tiles so that the number of tiles surrounding it equals the number of triangles on the tile. Put the tiles in the following positions:
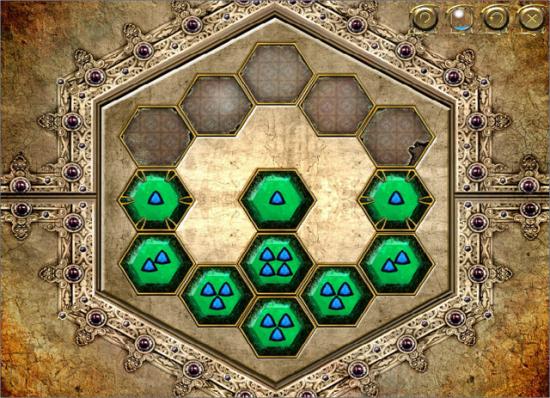
Take the lever and use it on the device:
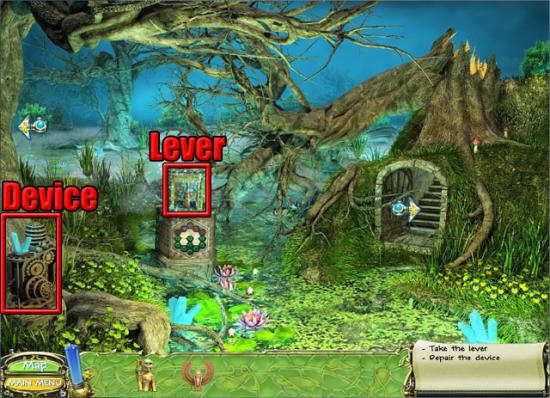
Take the golden flower on top of the device. Move left to the swamp.
Swamp
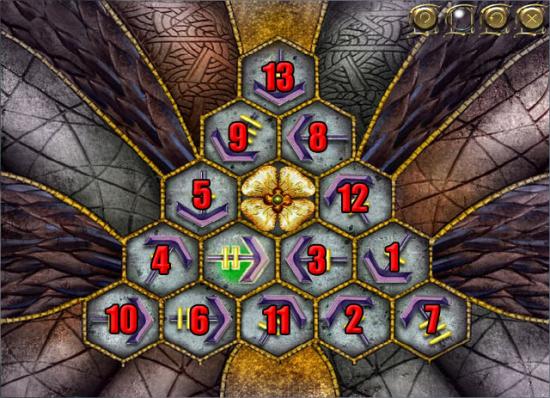
Use the golden flower on the mechanical flower to play the golden flower mini-game:

The aim in the mini-game is to press the correct tiles to find the correct path to the golden flower. Select the tiles in the following order:
After completing the mini-game, take the regret of the island:

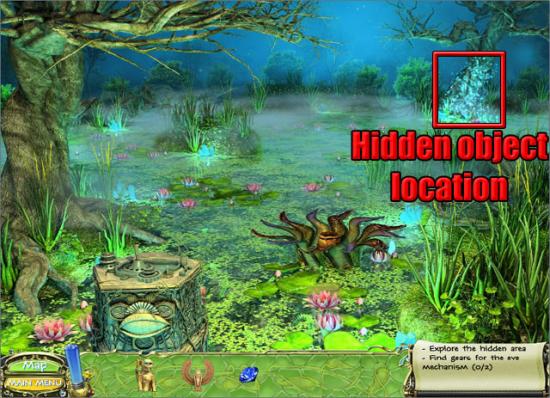
After the cutscene, examine the hidden object location:
Select the quartz and the fish:
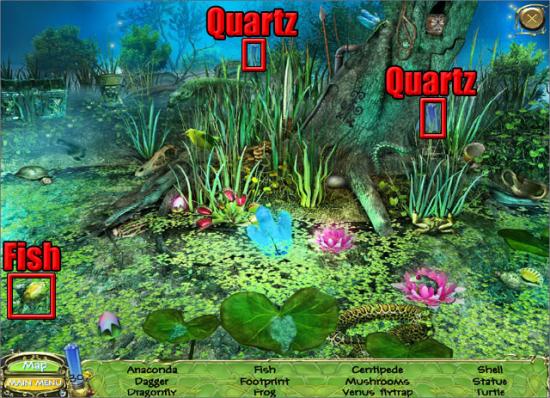
Find the remaining hidden objects on the list to take the fish statue. Select the map and travel to the crystal tree.
Crystal Tree
Use the regret of the island on the empty slot at the base of the tree.
Crystal 6 – Sin of the Island
Crystal Tree
Select the map and travel to the swamp altar.
Swamp Altar
Examine the hidden object location:
Select the quartz and the snake statue:
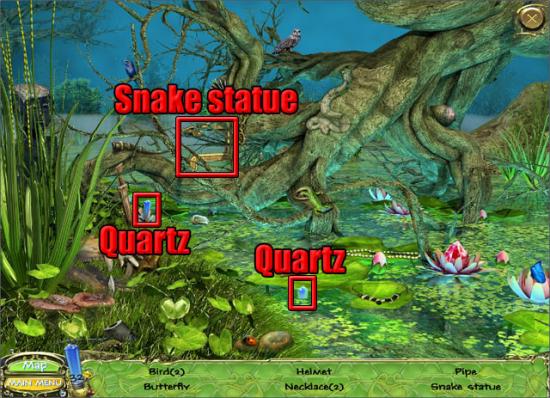
Find the remaining hidden objects on the list to take the snake statue. Select the map and travel to the temple entrance.
Temple Entrance
Put the four statues in the correct slots:
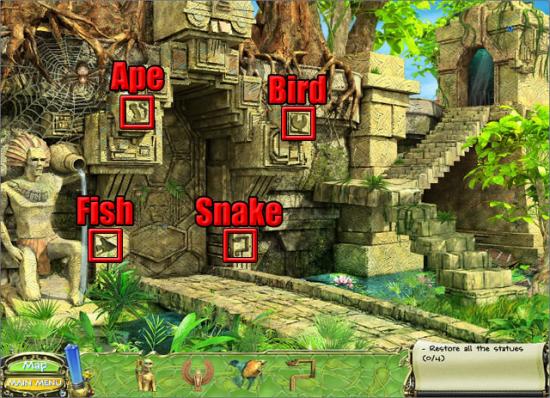
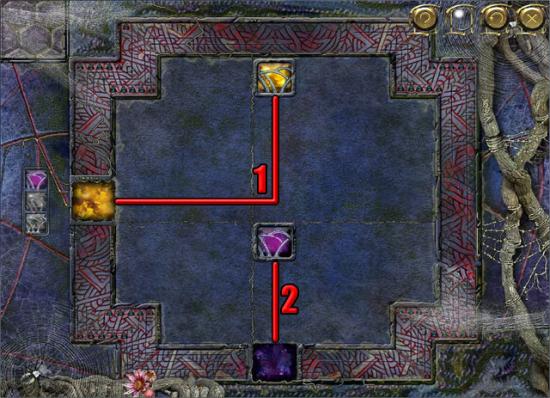
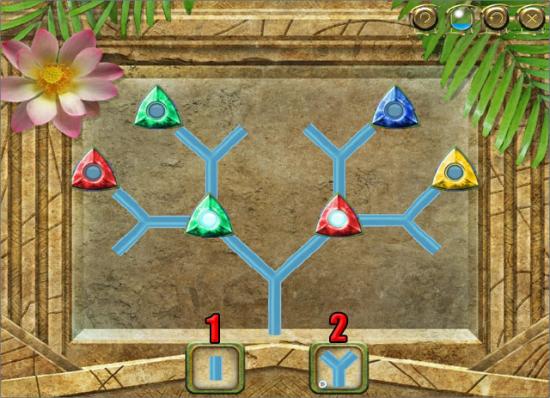
Select the temple gate to play the crystal mini-game. The aim is to select button 1 (line) or button 2 (branch) so that the line connects with all of the crystals. There are three levels of this mini-game to complete.
Level 1:
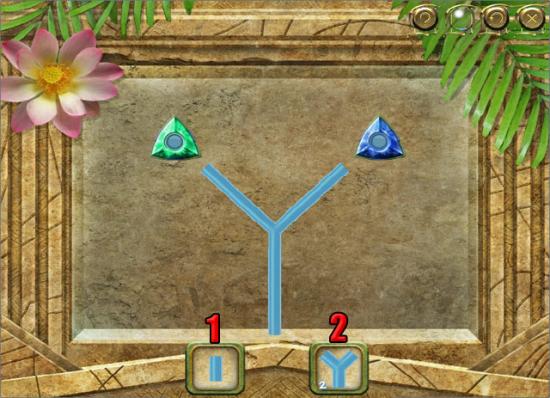
Press button 1 three times
Press button 2 once.
Press button 1 four times.
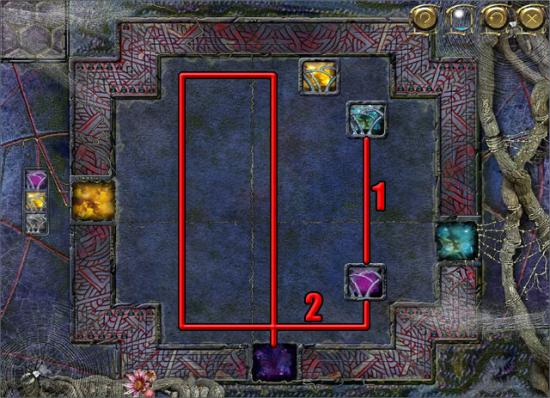
Level 2:
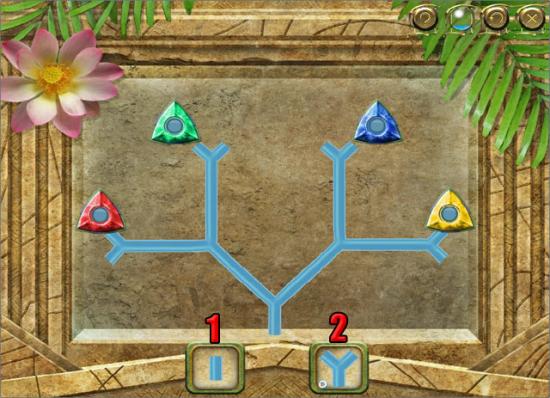
Press button 2 once.
Press button 1 twice.
Press button 2 once.
Press button 1 twice.
Press button 2 once.
Press button 1 once.
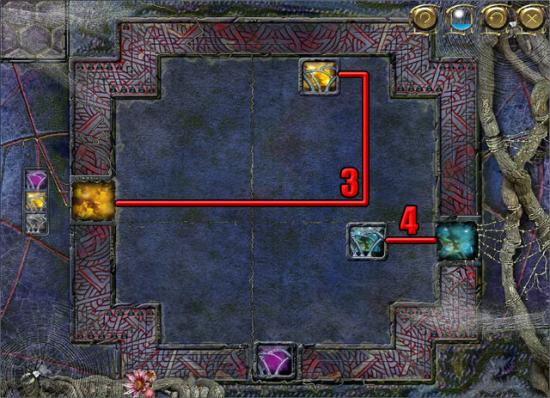
Level 3:
Press button 1 once.
Press button 2 once.
Press button 1 twice.
Press button 2 once.
Press button 1 once.
Press button 2 once.
Press button 1 twice.
After completing the mini-game, move forward to enter the temple dynamo.
Temple Dynamo
Take the metal rod and use it on the metal rod place:
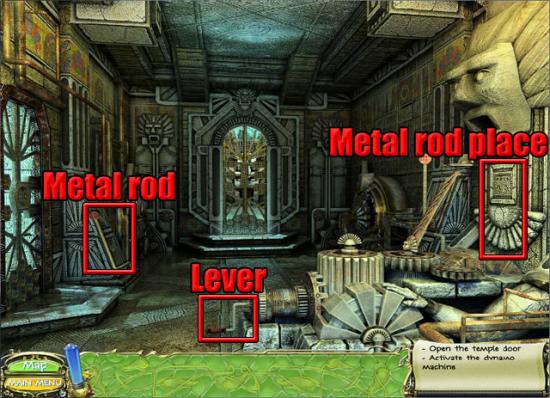
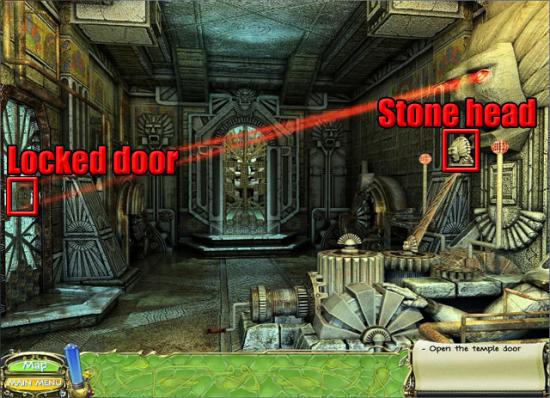
Select the lever and two red beams will focus on the locked door. Take the stone head and use it on the locked door to unlock the door:
Select the unlocked door and take the watchful eye:
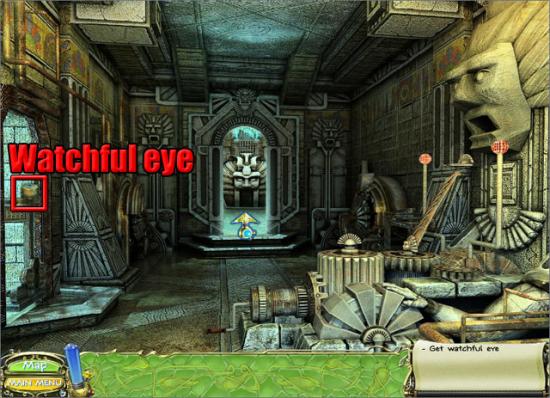
Move forward to the temple hall.
Temple Hall
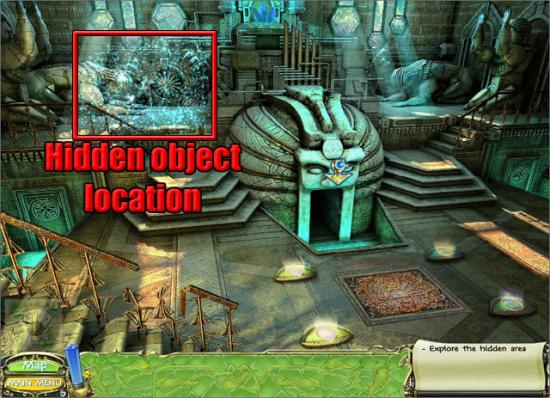
Examine the hidden object location:
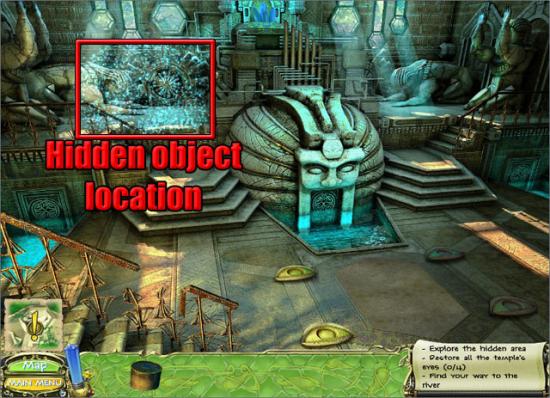
Select the quartz and the cogwheel:
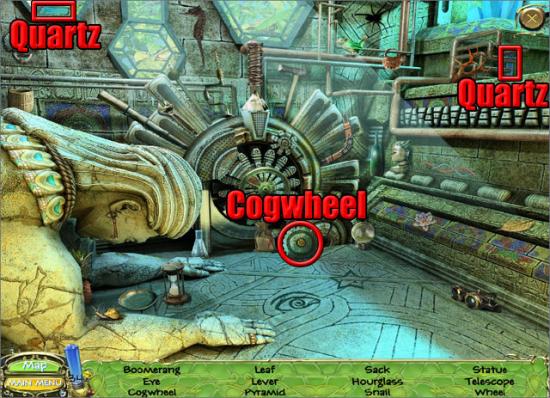
Find the remaining hidden objects on the list to take the cogwheel. Select the map and travel to the swamp.
Swamp
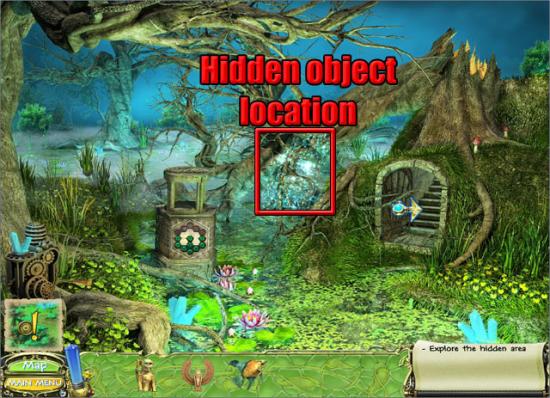
Examine the hidden object location:
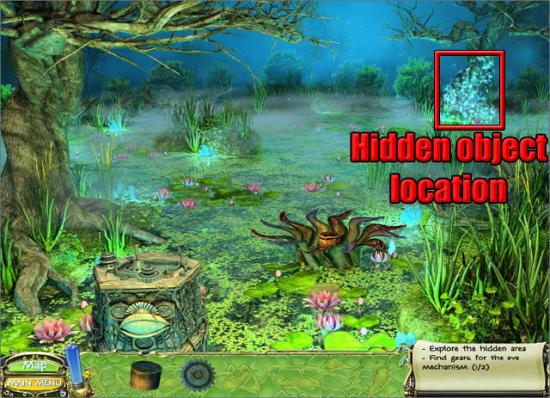
Select the quartz and the gear:
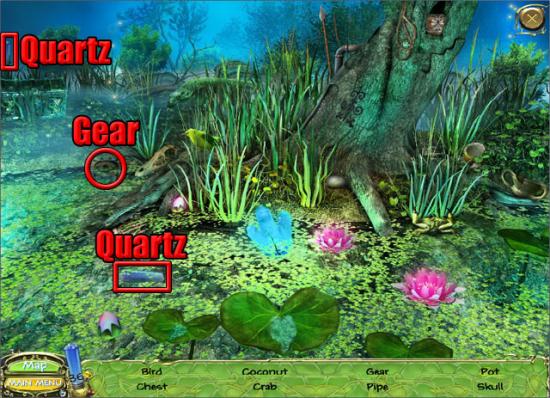
Find the remaining hidden objects on the list to take the cogwheel. Use both of the cogwheels on the eye mechanism:
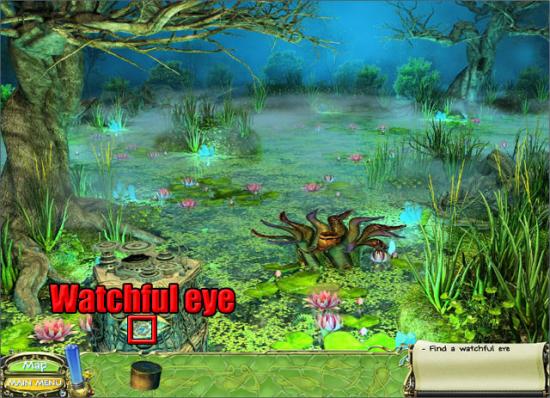
Take the watchful eye from the eye mechanism. Select the map and travel to the outpost.
Outpost
Examine the hidden object location:
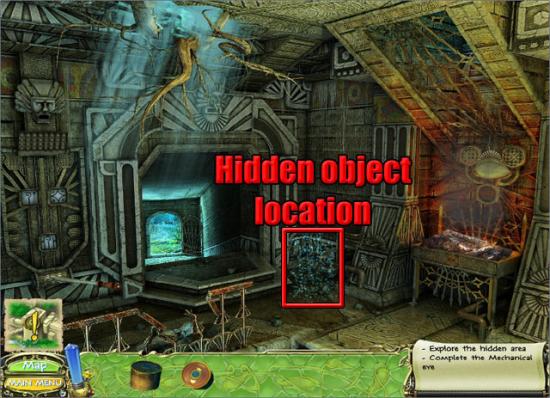
Select the quartz and the ancient symbol:
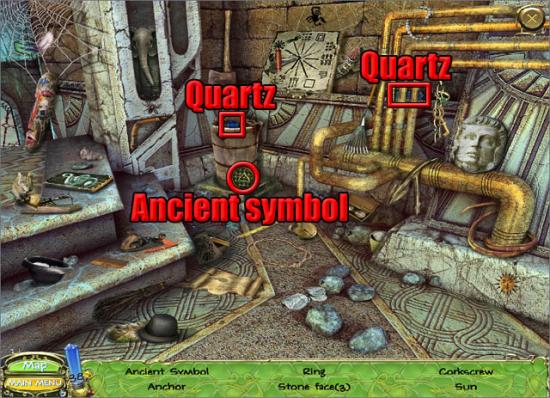
Find the remaining hidden objects on the list to take the ancient symbol. Use the ancient symbol on the mechanical eye:
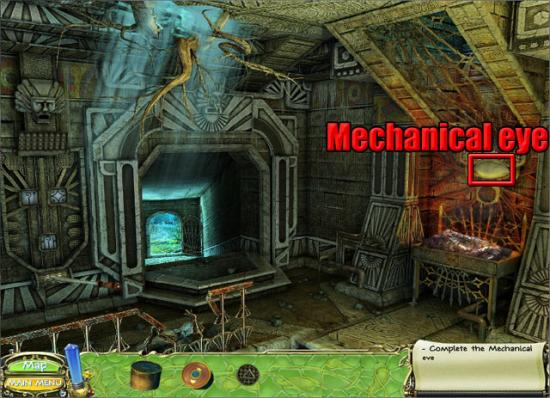
Take the watchful eye from the mechanical eye. Select the map and travel to the temple entrance.
Temple Entrance
Examine the hidden object location:
Select the quartz and the watchful eye:
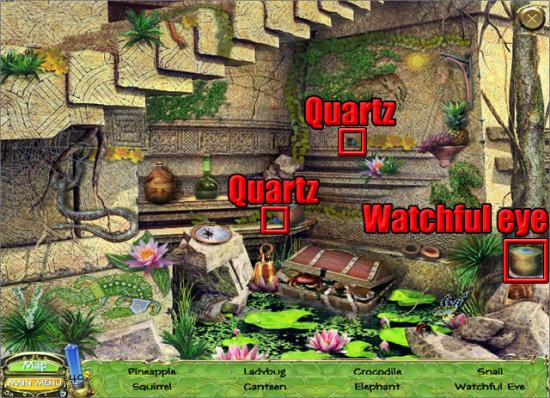
Find the remaining hidden objects on the list to take the watchful eye. Select the map and travel to the temple hall.
Temple Hall
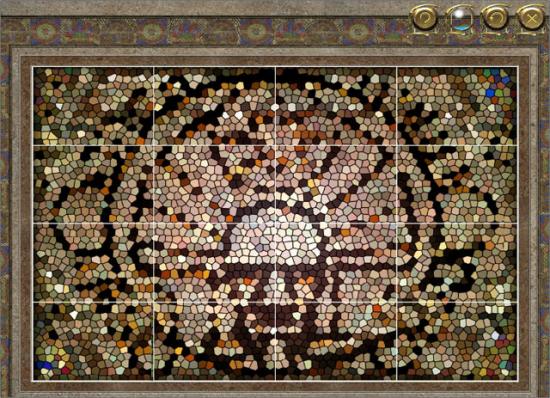
Use the four watchful eyes on the four empty eyes on the floor to play the mosaic mini-game. Switch the tiles to make the mosaic shown below:
After completing the mini-game, examine the hidden object location:
Select the quartz and the gate stone:
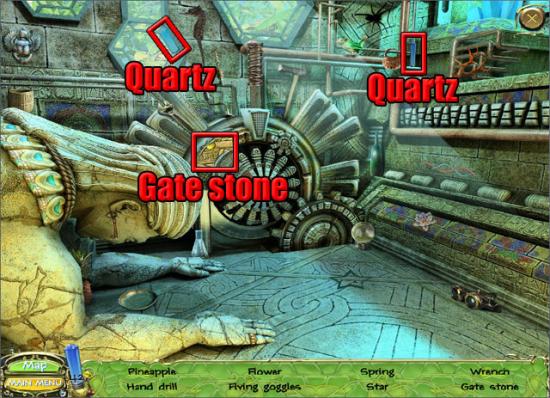
Find the remaining hidden objects on the list to take the gate stone. Move forward to the gates.
Gates
Take the gate stone. Examine the hidden object location:
Select the quartz and the flame crystal:
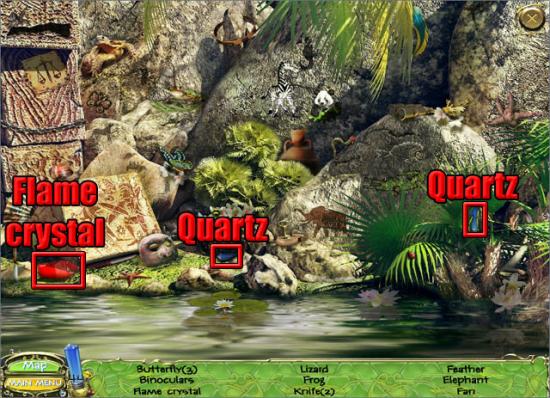
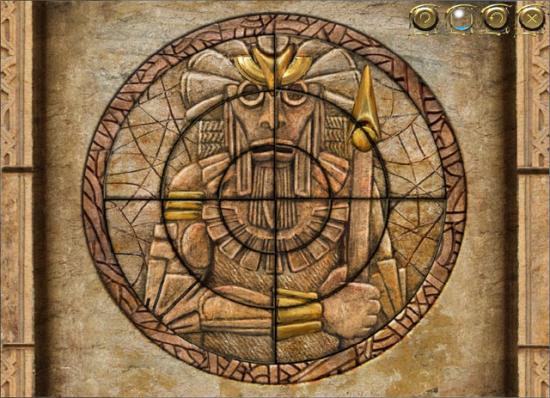
Find the remaining hidden objects on the list to take the flame crystal. Use the two gate stones on the locked gate. Examine the locked gate to play the disc puzzle mini-game. Drag the sections of the mini-game to make the image shown below:
Move forward to the ancient stairs.
Ancient Stairs
Use the flame crystal on the broken detail:
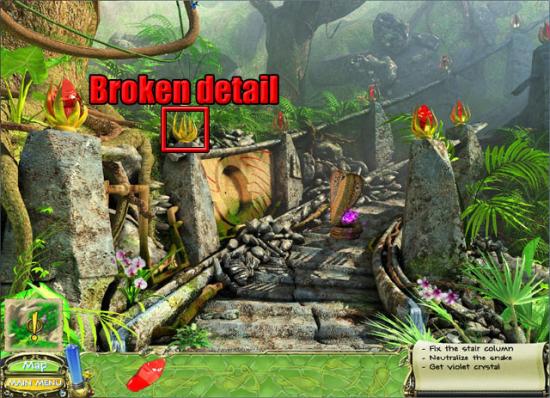
Examine the hidden object location:

Select the quartz and the slingshot:
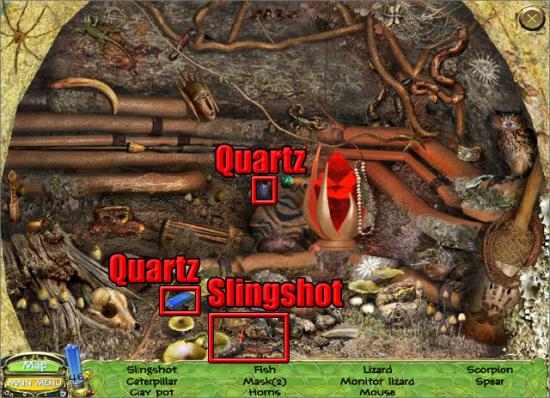
Find the remaining hidden objects on the list to take the slingshot. Move back to the gates.
Gates
Use the slingshot on the egg:
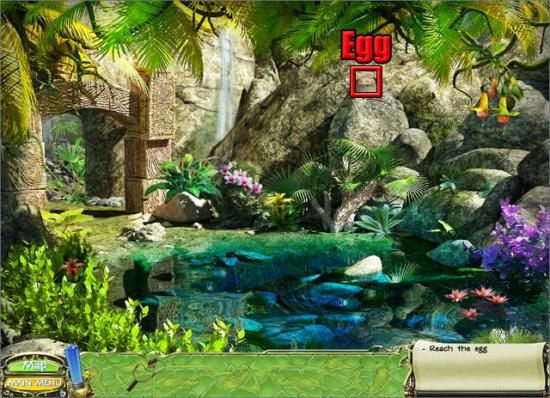
The egg will fall into the hidden object location. Examine the hidden object location:
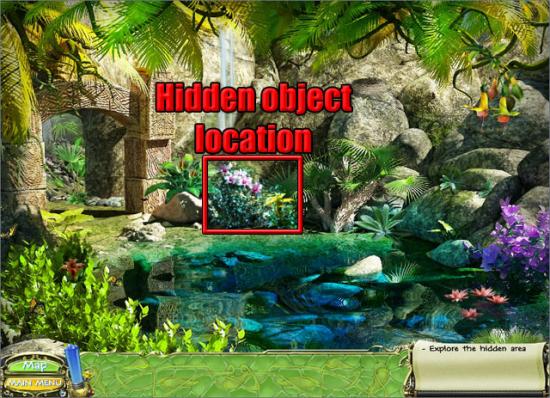
Select the quartz and the egg:
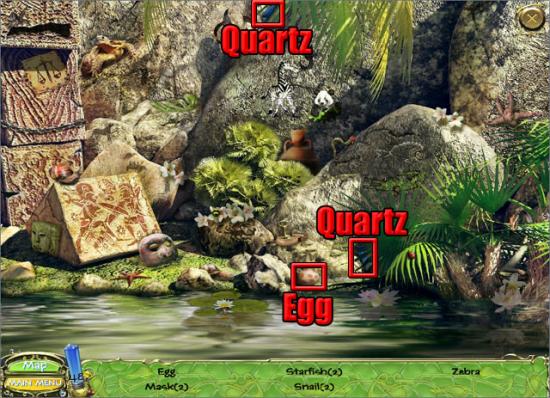
Find the remaining hidden objects on the list to take the egg. Move forward to the ancient stairs.
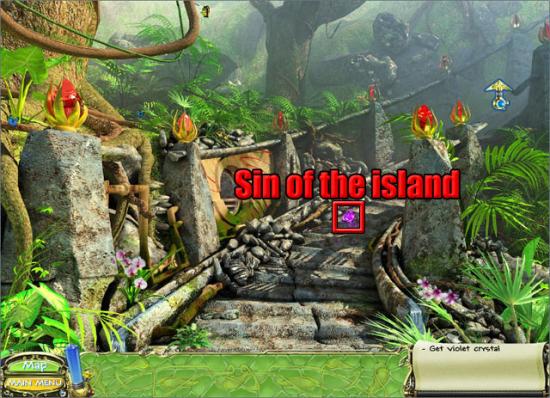
Ancient Stairs
Give the egg to the snake and it will disappear. Take the sin of the island:
Examine the hidden object location:
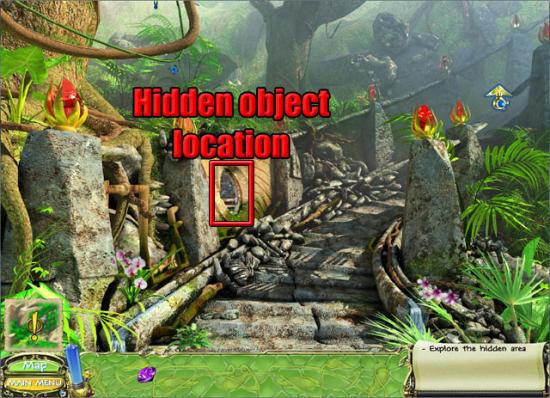
Select the quartz and the wooden disc:
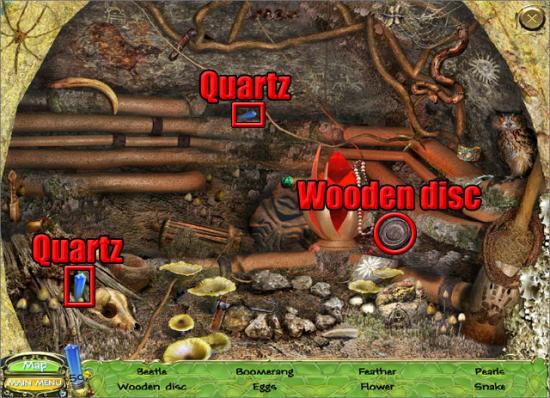
Find the remaining hidden objects on the list to take the blank disc. Select the map and travel to the crystal tree.
Crystal Tree
Use the sin of the island on the empty slot at the base of the tree.
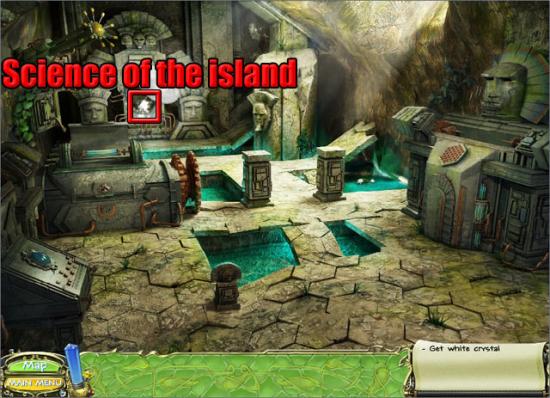
Crystal 7 – Science of the Island
Crystal Tree
Select the map and travel to the mountain pass.
Mountain Pass
Examine the hidden object location:
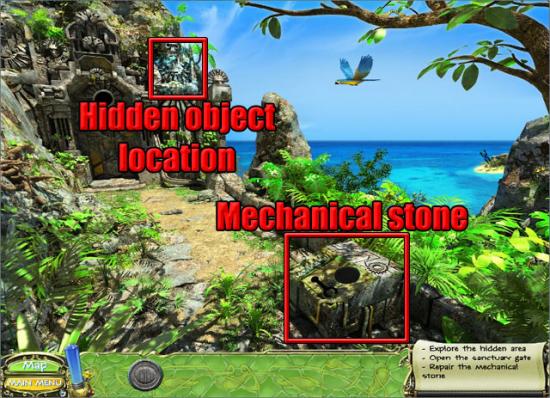
Select the quartz and the manipulator:
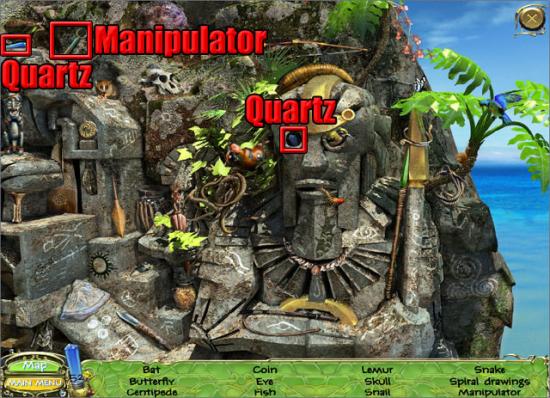
Find the remaining hidden objects on the list to take the manipulator. Use the blank disc and the manipulator on the empty places on the mechanical stone to play the mechanical arm mini-game. The aim is to manipulate the mechanical arm to place the small disk onto the large one. There are two levels of this mini-game to complete.
Level 1:
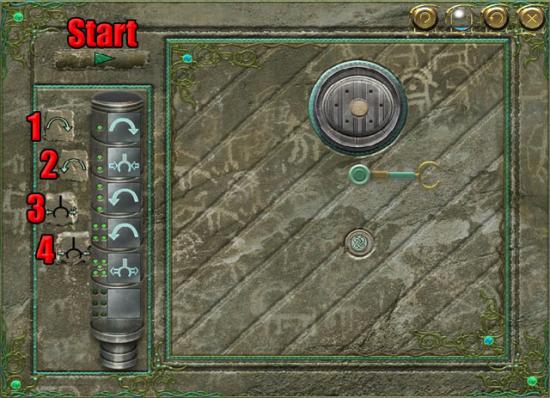
Press button 1 once.
Press button 4 once.
Press button 2 twice.
Press button 3 once.
Press the start button.
Level 2:
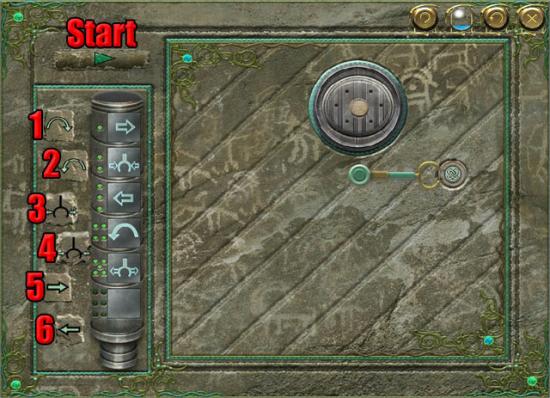
Press button 5 once.
Press button 4 once.
Press button 6 once.
Press button 2 once.
Press button 3 once.
Press the start button.
After completing the mini-game, take the engraved disk from the mechanical stone and use it on the empty place on the door:
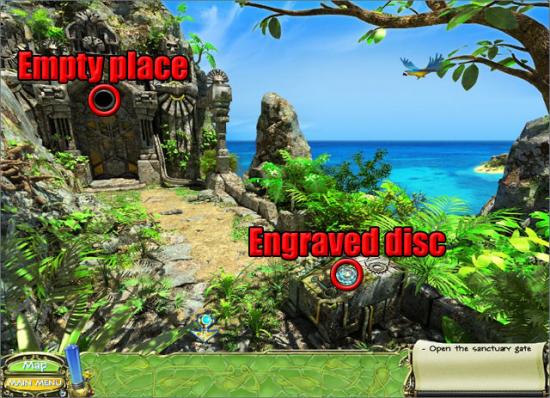
Move forward to the cavern entrance.
Cavern Entrance
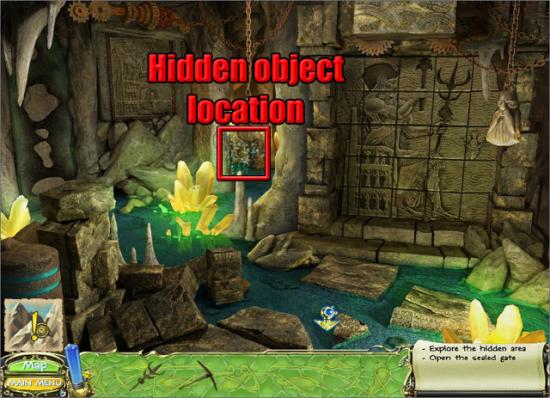
Take the high priest trident. Examine the hidden object location:
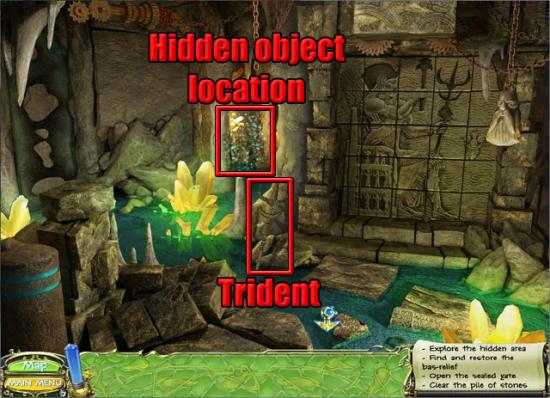
Select the quartz and the pickaxe:
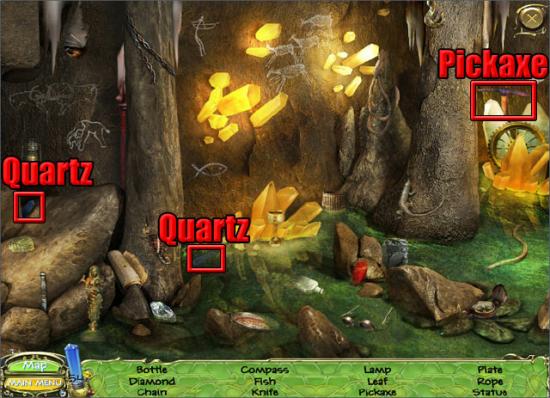
Find the remaining hidden objects on the list to take the pickaxe. Use the pickaxe on the pile of stones:
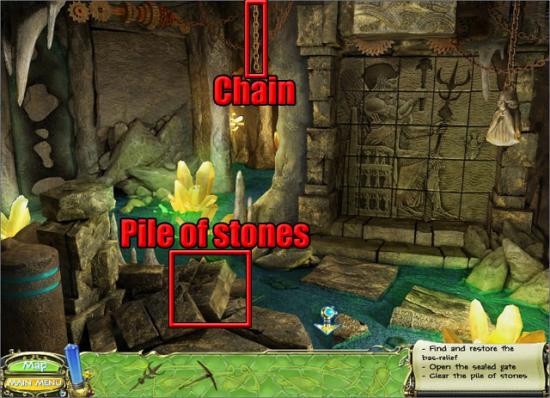
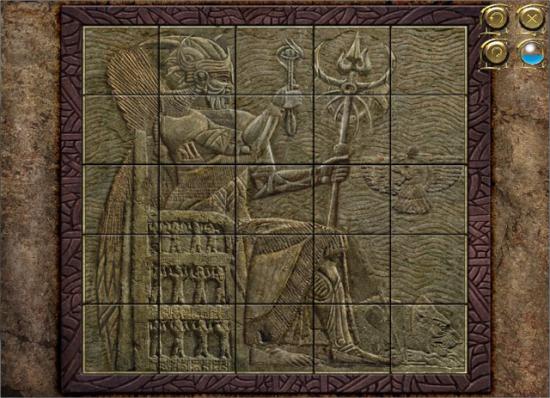
Take the counterweight on the pile of stones. Use the counterweight on the chain to reveal the bas-relief on the left wall. Examine the bas-relief to play the tile swap mini-game. Swap the tiles to make the image shown below:
After completing the mini-game, examine the hidden object location:
Select the quartz and the battery:
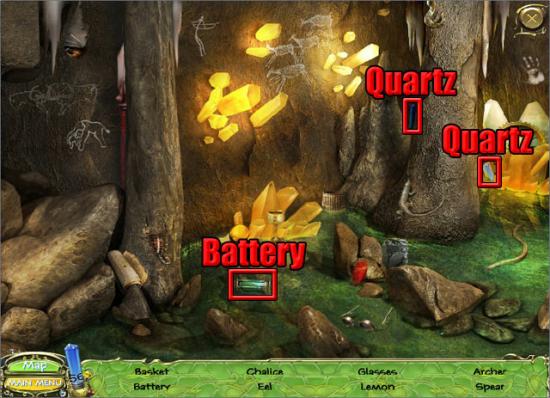
Find the remaining hidden objects on the list to take the battery. Move back to the mountain pass.
Mountain Pass
Examine the hidden object location:
Select the quartz and the scepter:
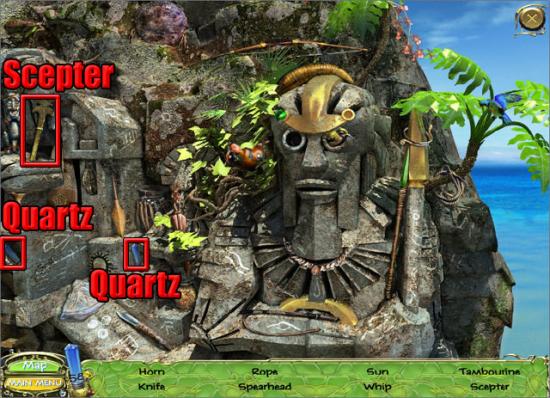
Find the remaining hidden objects on the list to take the warrior’s scepter. Move back to the ancient stairs.
Ancient Stairs
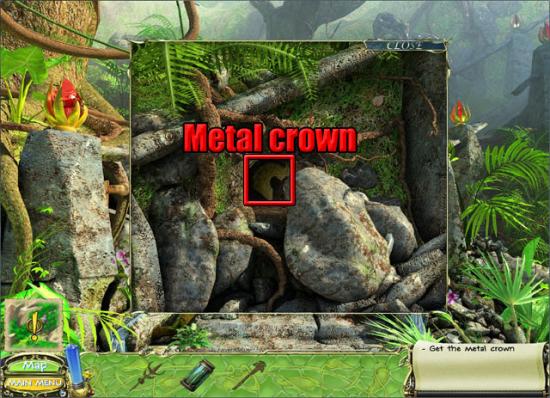
Use the pickaxe on the stones:

Take the metal crown:
Move forward twice to the cavern entrance.
Cavern Entrance
Use the high priest trident, the warrior’s scepter and the metal crown on the sealed gate:
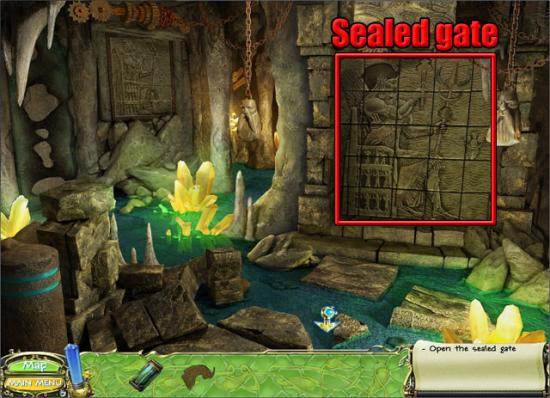
Move forward to the cavern room.
Cavern Room
Select the sign mechanism.
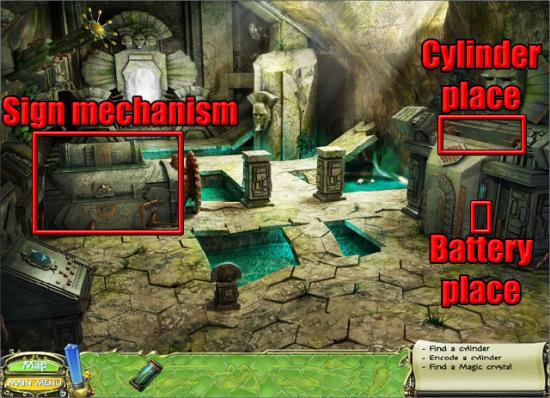
Take the rusty cylinder from the lid of the sign mechanism. Use the battery on the battery place of the strange machinery. Use the rusty cylinder on the cylinder place. Select the cylinder to play the hexahedron tiles mini-game. The aim is to press the tiles in the correct order so that all of the tiles go down. There are three levels in this mini-game.
Level 1:
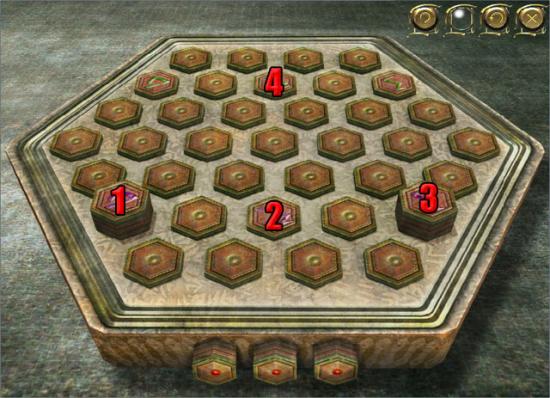
Level 2:
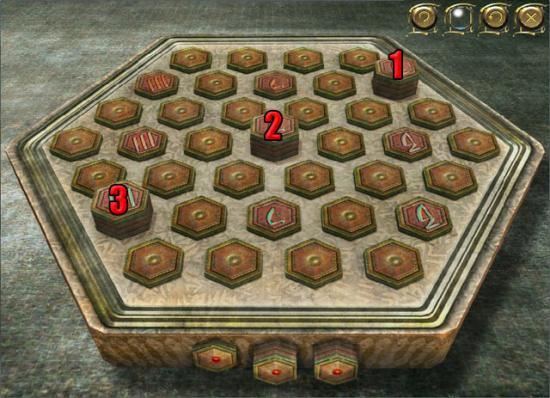
Level 3:
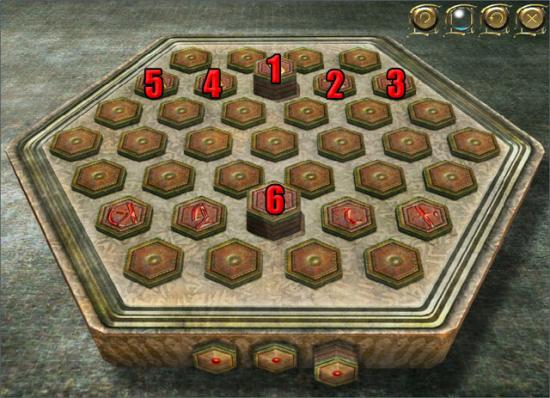
Follow these instructions to complete level 3:
Press button 1.
Press button 2.
Press button 1.
Press button 3.
Press button 1.
Press button 4.
Press button 1.
Press button 5.
Press button 6.
After completing the mini-game, take the encoded cylinder and use it on the encoded cylinder place:
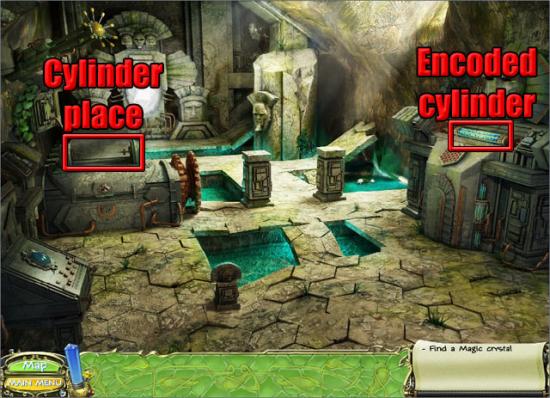
Select the sign mechanism to reveal the final crystal. Take the science of the island:
Select the map and travel to the crystal tree.
Crystal Tree
Use the science of the island on the empty slot at the base of the tree to complete the game.
CONGRATULATIONS! YOU HAVE COMPLETED SECRET MISSION: THE FORGOTTEN ISLAND!

More articles...
-
Grow A Garden 2 Base Price List
What's the most valuable crop? -
Evomon Best Starter [Leafbun, Blazpup, or Bubble?]
Grass-type, Fire-type, or Water-type? -
Evomon Tier List [META and BEST Evomon]
The Evomon dream team.