
Best Horror Games On Itch.io – July 2026
Across a bounty of subgenres.![Haze Seas Accessories Tier List [Best Accessories to Equip]](/wp-content/uploads/2026/07/haze-seas-accessories-tier-list.jpg "Haze Seas Accessories Tier List [Best Accessories to Equip]")
Haze Seas Accessories Tier List [Best Accessories to Equip]
The accessories with the best stat buffs in Haze Seas.
![[Roblox] Evomon Shiny Hunting Guide – Including Prismatic and Pris Shinies!](/wp-content/uploads/2026/06/evomon-shiny-hunting-guide.jpg "[Roblox] Evomon Shiny Hunting Guide – Including Prismatic and Pris Shinies!")

Sarah Maribu and the Lost World Walkthrough
Check out the official Gamezebo strategy guide for Sarah Maribu and the Lost World.
Share this


- Prefer Gamezebo on Google

General Tips
Main Menu
- Options – Options allows you to adjust the sound and music volume, as well as to play in full screen and keep the custom cursor.
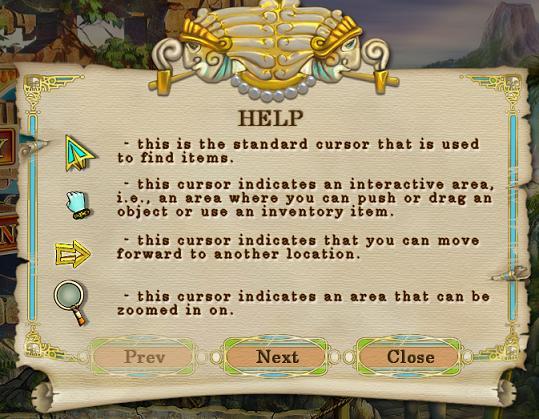
- Help

- Page one identifies the different types of cursors available. It shows the custom cursor, the directional cursor, the interactive cursor and the investigate cursor.
- Page two identifies the purpose of the game.
Game Play
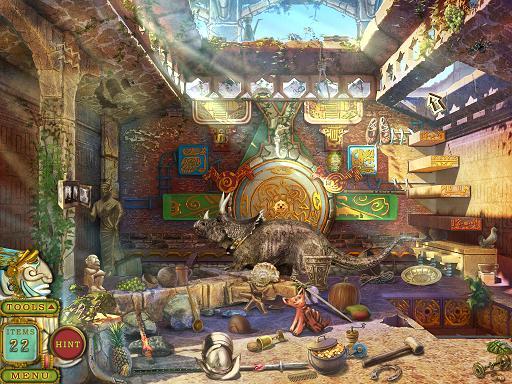
- This is mainly a hidden object game with some adventure elements. It is linear; you have to finish it level by level.
- You do not need to pay attention to the story to complete the game.
- When you start playing, take the tutorial.
- There is no timer.
- There are no trophies.
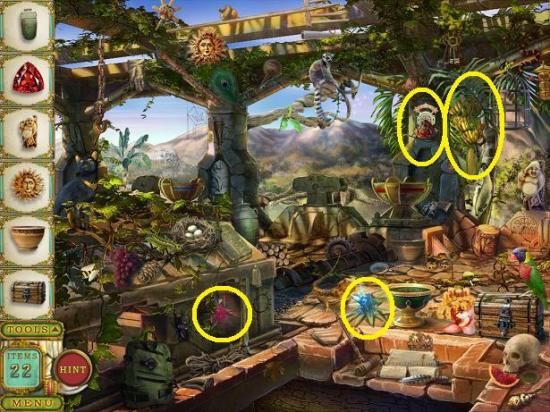
- Sparkling areas are investigative areas.
- Hidden object
- A few times, I had to click an item twice for it to register.
- You are given pictures of all the items you need to find.
- Hint
- Will either point you to the item you need to find or to an investigative area you need to complete.
- Unlimited hints. Takes about 30 seconds to regenerate.
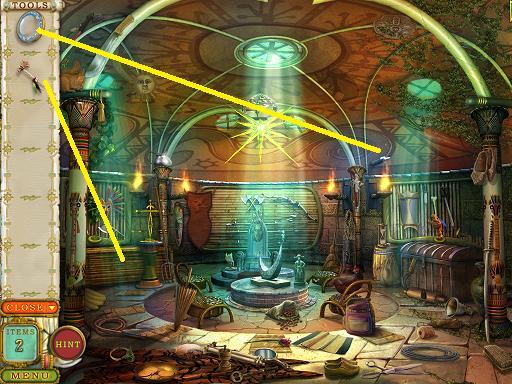
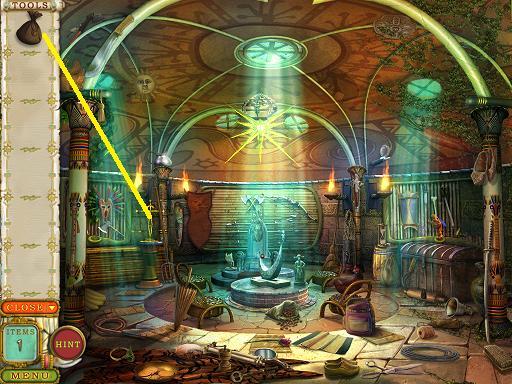
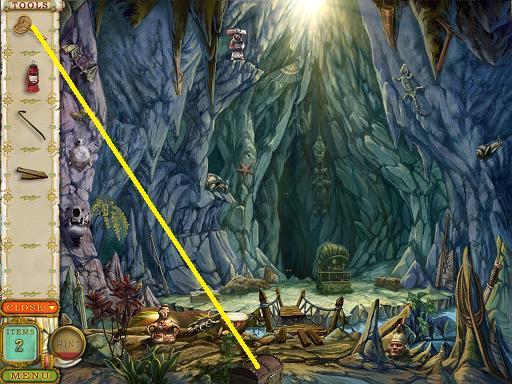
- Tools
- Tools is your inventory list.
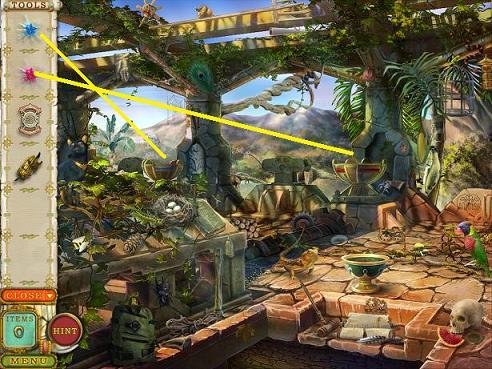
- Found items may be added to Tools to be used later in the game (to either find more items or to advance the game).
- Clicking on an investigative area will tell you what item from Tools is needed.
- Tip: I would find all the hidden object items, then I would complete the investigative areas.
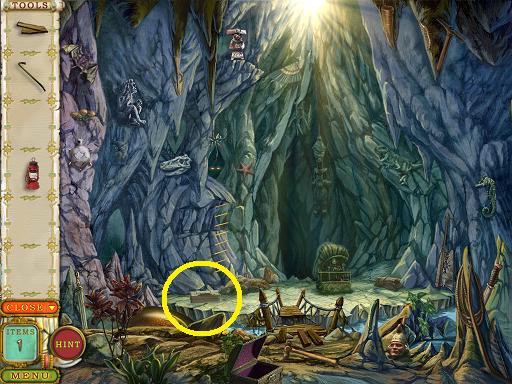
Walkthrough – Intro
- The hidden object list will be different every time you play. The screenshots will label the Tool items to find.
- It does not matter in what order you click on items. If you click on an investigative area and you do not yet have the Tool to perform an action, you can click the X and return to it later.
- When I write, “use item,” or “place item,” it means click to open Tools and get the item from there. Tool items appear italicized in bold.
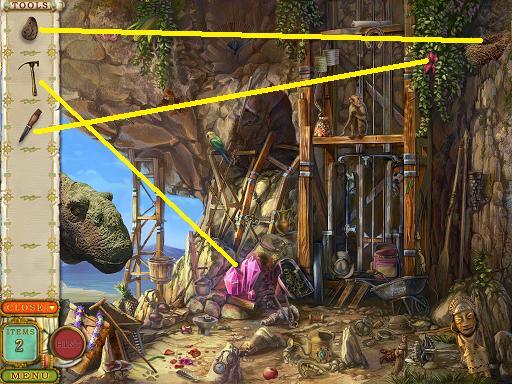
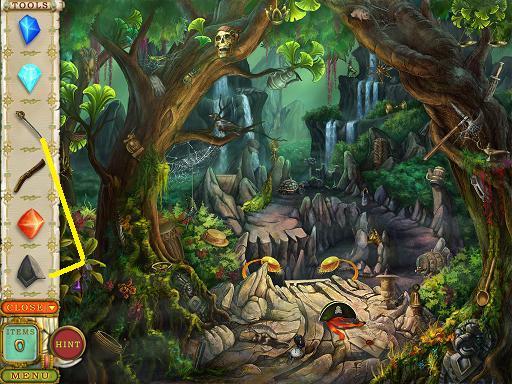
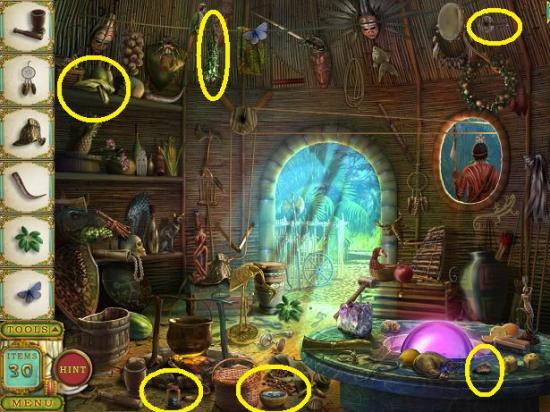
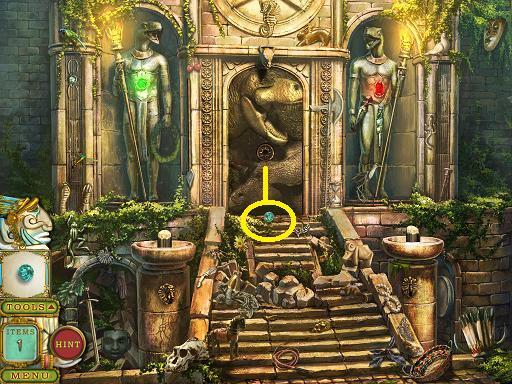
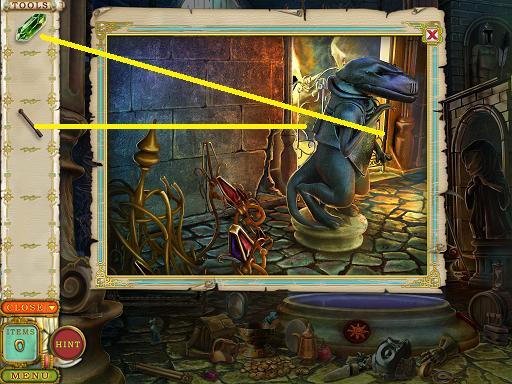
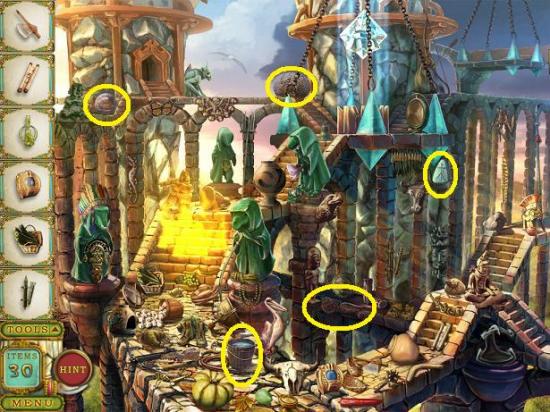
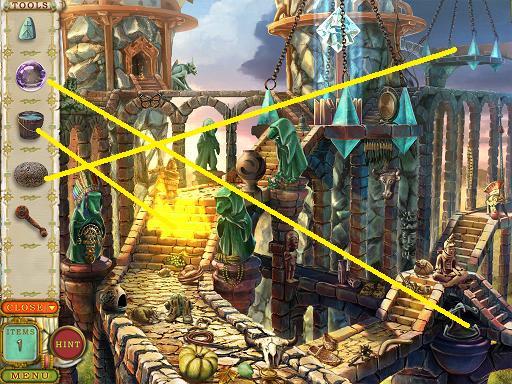
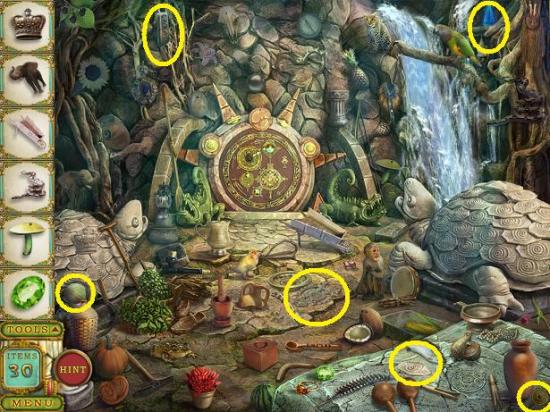
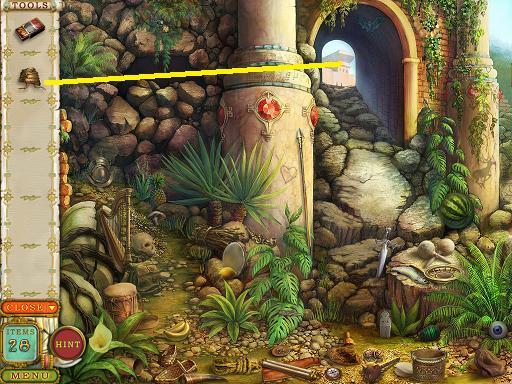
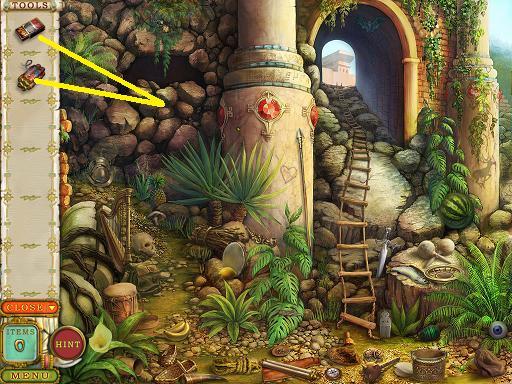
Level 1
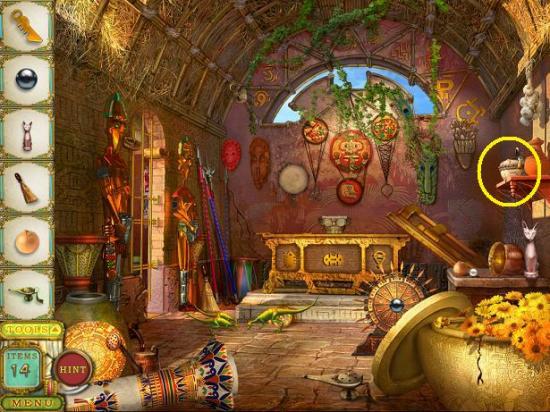
- After the tutorial, find the rest of the items.
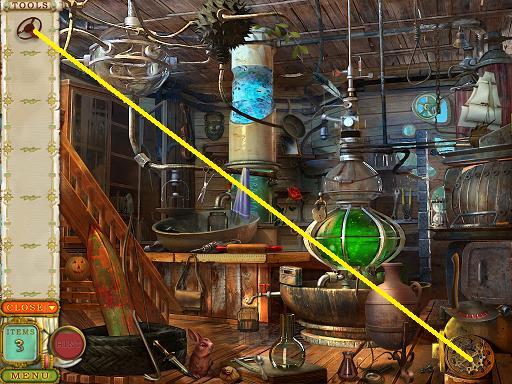
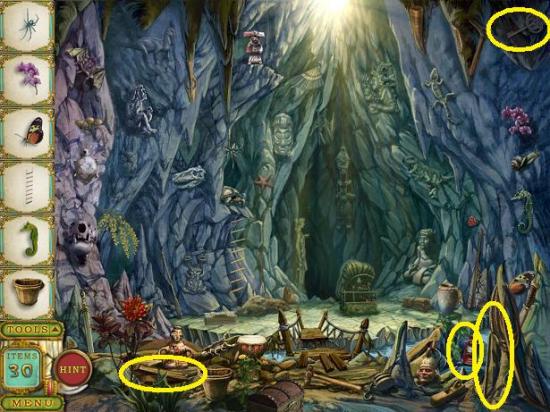
- Click the pot (right) to get the gold key part.
- Click the little dinosaurs to make them run away.
- Once you’ve found all the items, click the door.
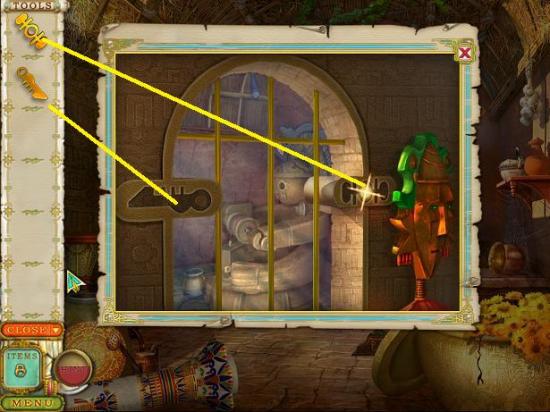
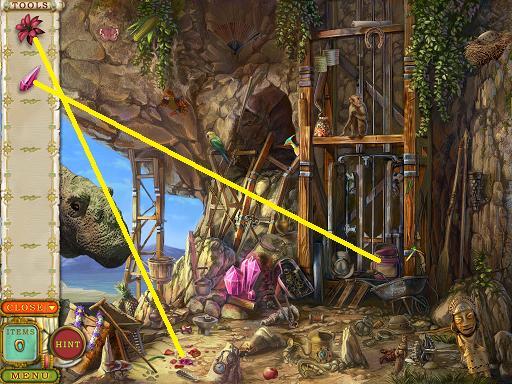
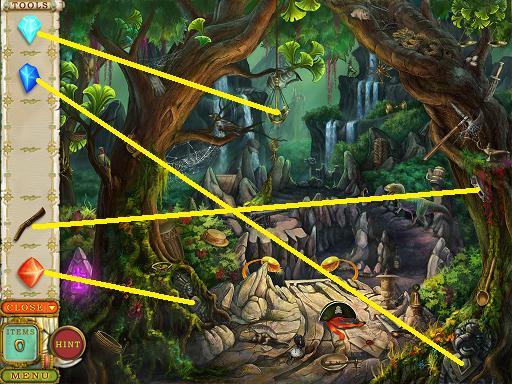
- Click Tools and use the two gate keys to open the gate.
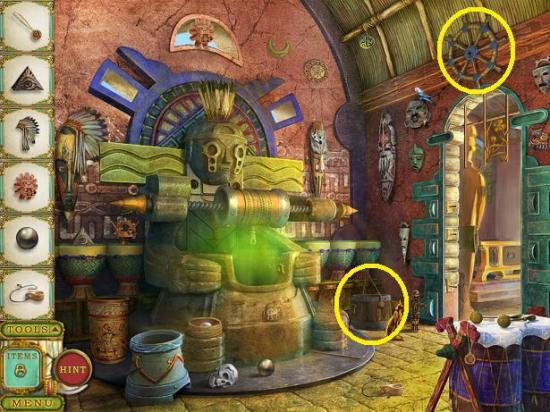
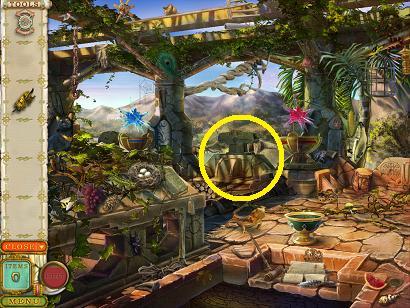
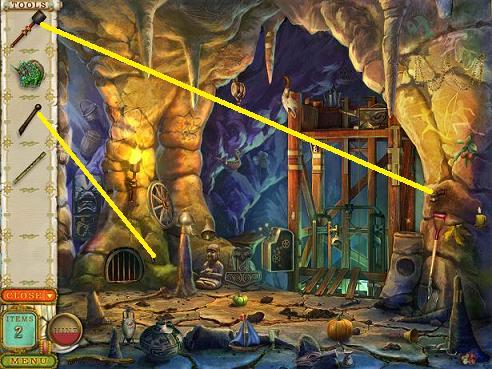
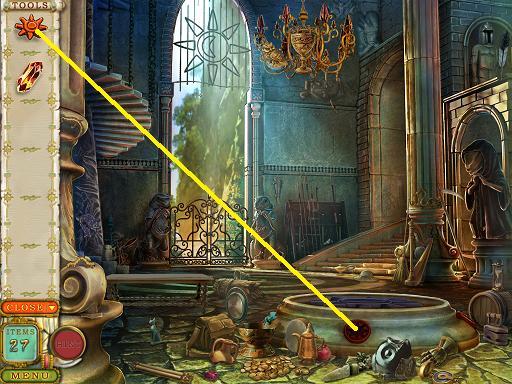
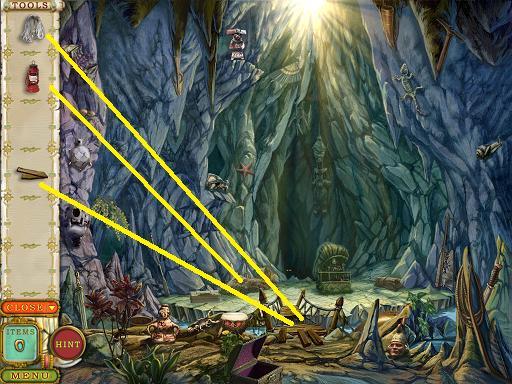
- Find all the items, and then click on the large statue/well in the middle of the room.
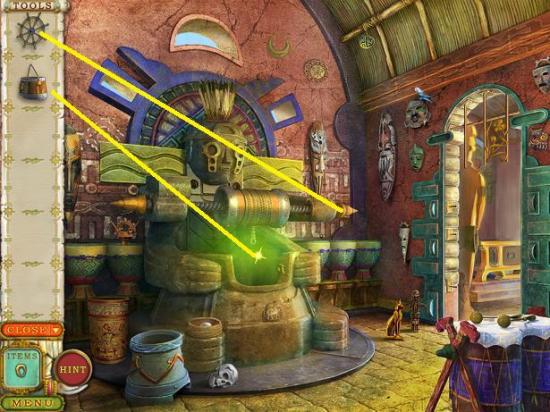
- Click Tools and put the bucket in the middle of the well and put the wooden well’s wheel on the right-side of the well.
- Click the wheel to lower it. Go down the well.
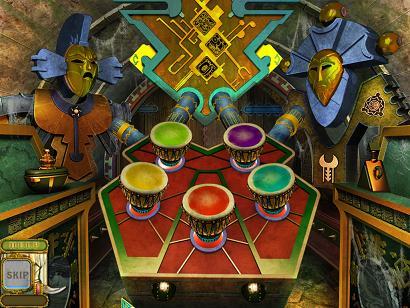
- Solve a mini-puzzle. Mimic the drum pattern three times.
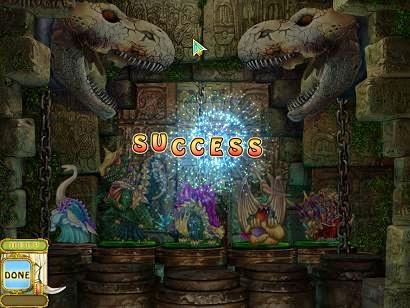
Level complete!
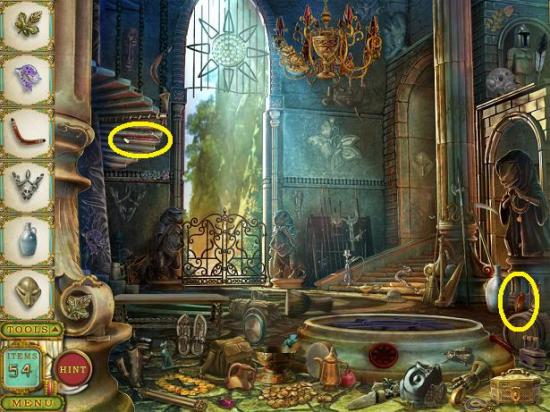
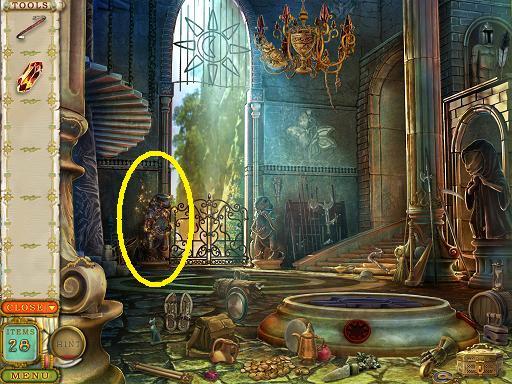
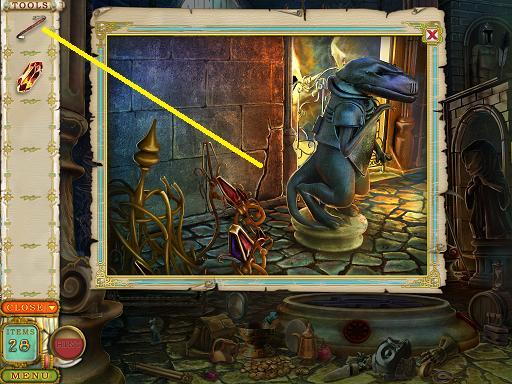
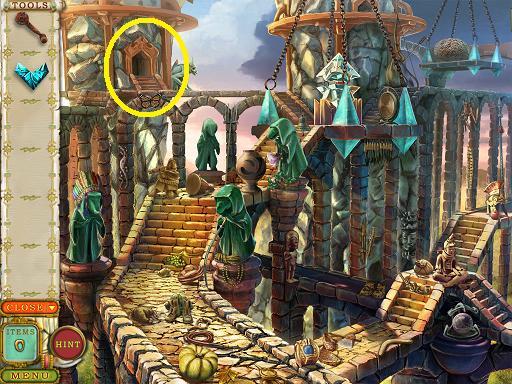
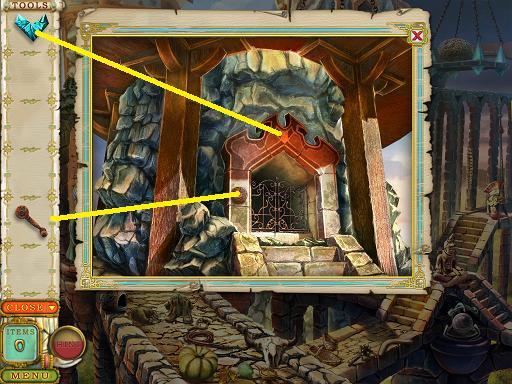
Level 2
- Find all the items.
- Click Tools and put the gate part on the empty tile. Place the dino statuette on the new part of the ground.
- Go down the new area.

- i-puzzle. The statuettes are of different weights and you must place them on the correct base. When a statuette is in the right position, its base will light up. There seems to be no logic as to what statuette weighs what so just place a statuette and if it lights up, leave it there. If not, click and drag it to another base. Continue until all the bases light up.
- Go up the newly formed steps.
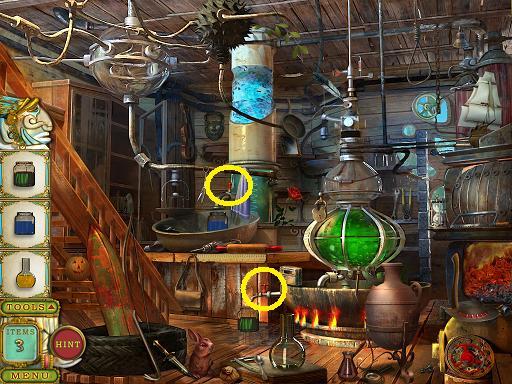
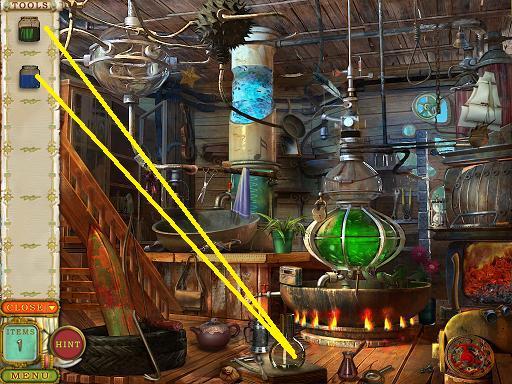
- Find all the items.
- Click Tools and place the red crystal above the red bowl and the blue crystal above the blue bowl.
- Click the mechanism in the middle.
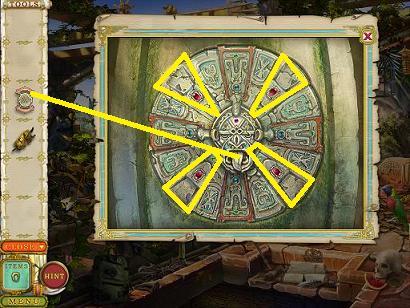
- Click all the tiles with the red rubies (the hand symbol will appear if you hold your cursor at the bottom of the tile). Then put the mechanism part in the open mouth.
- Head down the hole (bottom of the screen).
- From Tools, place the bananas in front of the dinosaur. Go through the newly opened area.
Level complete!
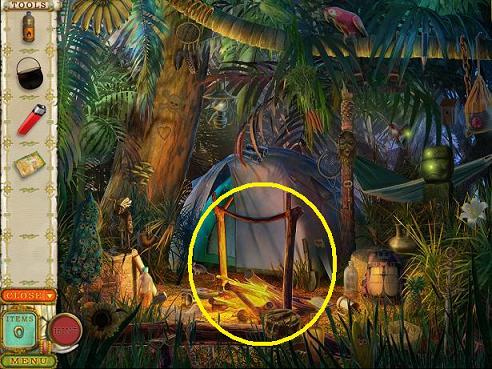
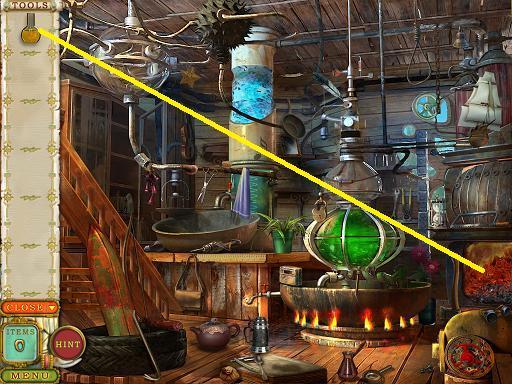
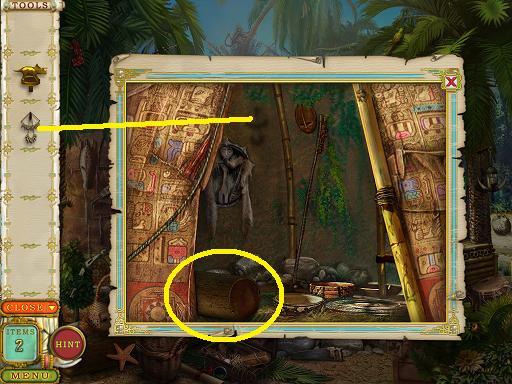
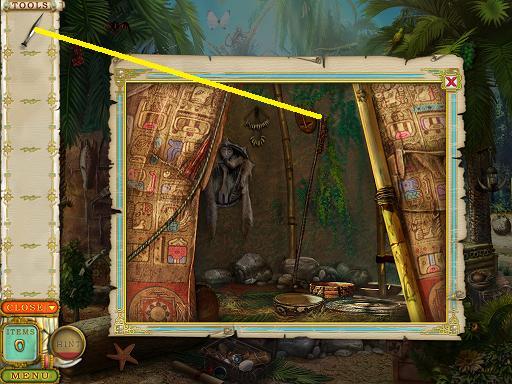
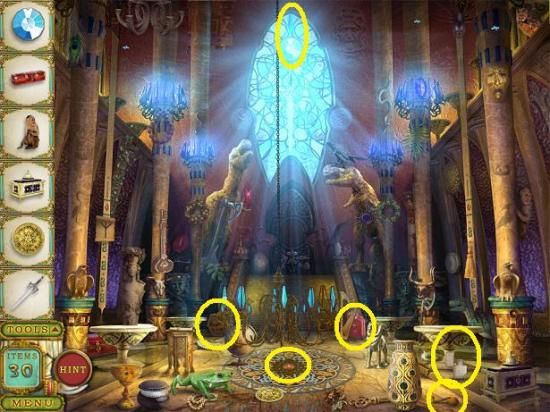
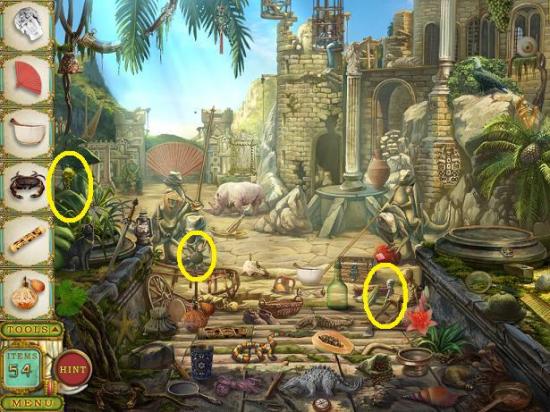
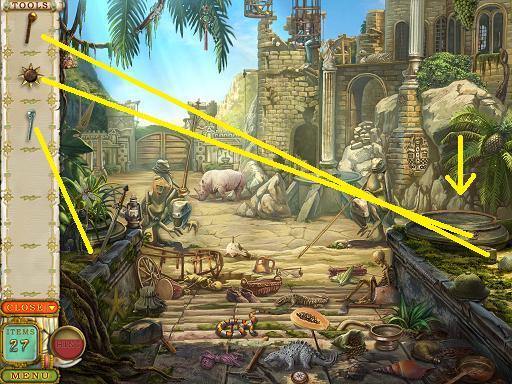
Level 3
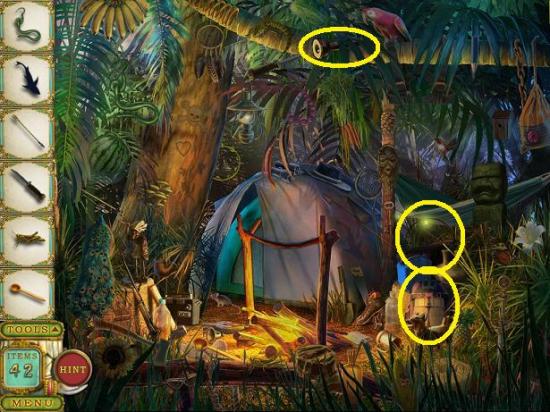
- Find all the items.
- Click the backpack and take the lighter,.
- Click the entrance to the tent.
- Click Tools and use the flashlight (anywhere on the screen).
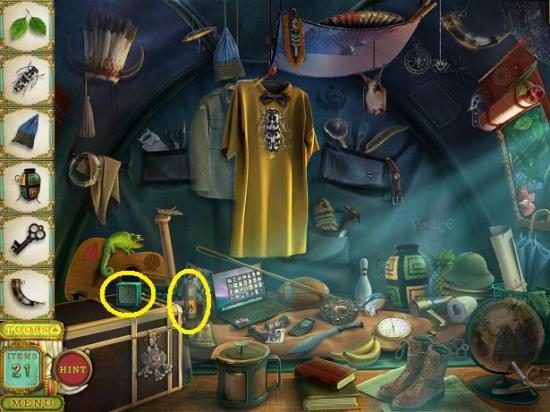
- Find all the items.
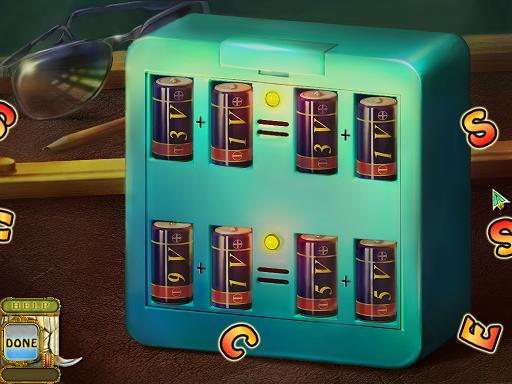
- Click on the blue clock to start a mini-puzzle. Place the batteries into the slots. A pair’s voltage must equal the same as the pair beside it.
- Solution: 9+1 = 5+5 and 3+1 = 3+1
- Click the chest to open it. Take the soup packet.
- Click the bottom of the screen to leave the tent.
- From Tools, put the following items (in this order) on the fire:
- benzine
- lighter
- pot of water
- soup
Level complete!
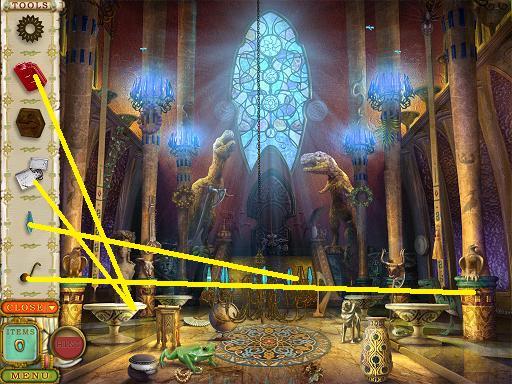
Level 4
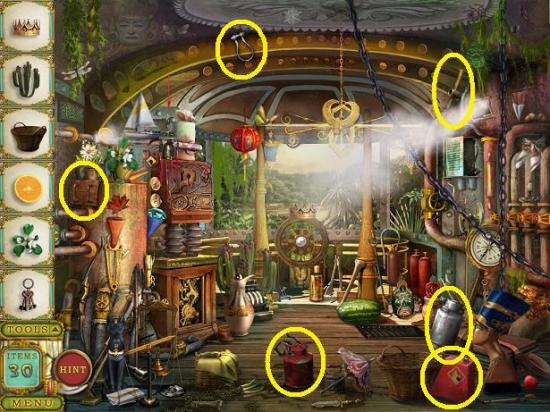
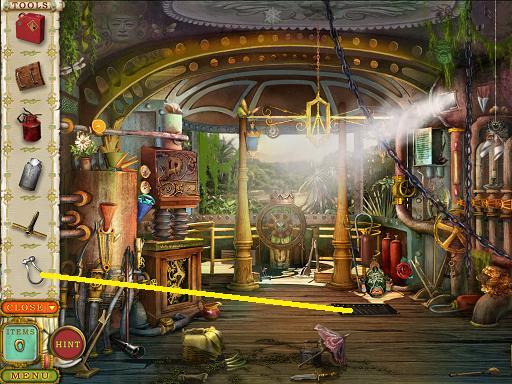
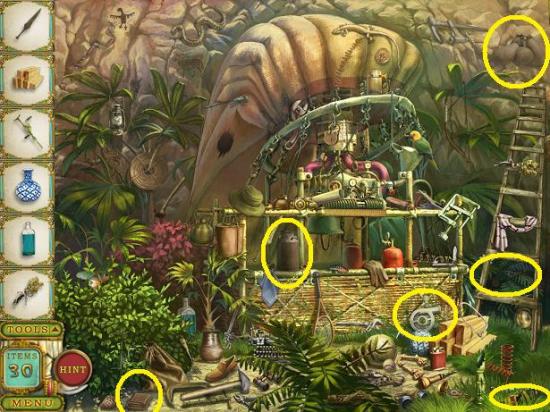
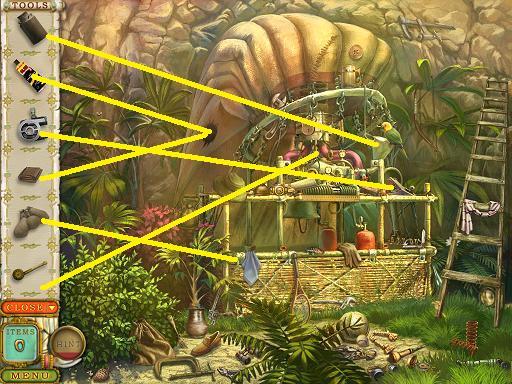
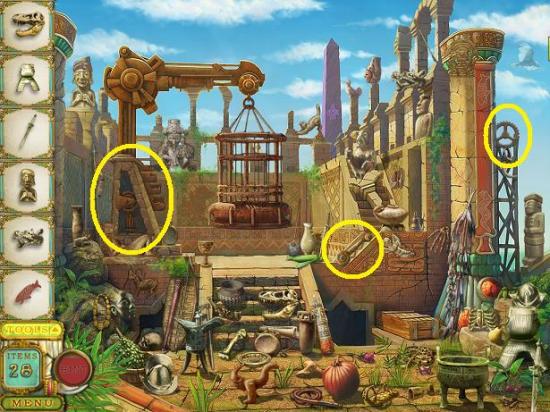
- Find all the items.
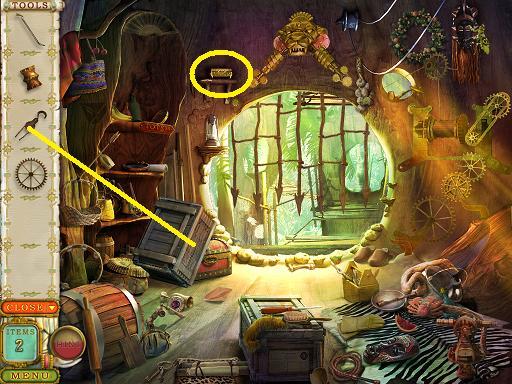
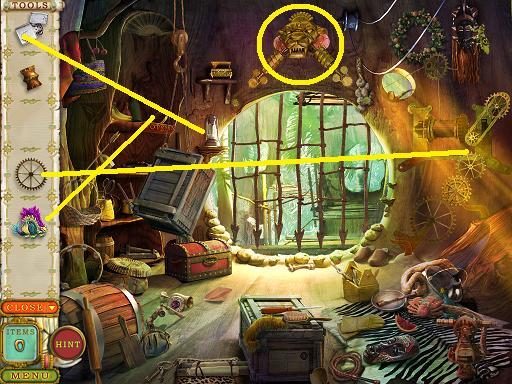
- From Tools, put the torch in the holder on the right of the elevator. Then put the lever in the slot by the grate. Click the lever.
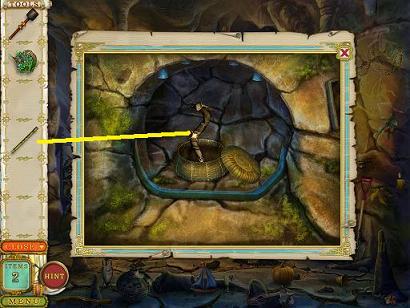
- Use the flute on the snake. When the snake is asleep, click the lid of the basket and take the scroll.
- Place the dino statuette on the ledge beside the elevator. Take the pinion (gear) that appears below it.
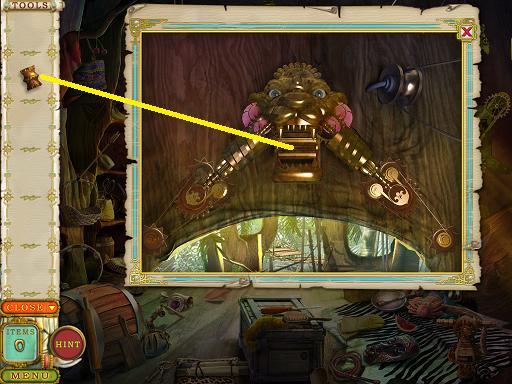
- Place the pinion (gear) on the controls beside the elevator, then click the scroll on the controls.
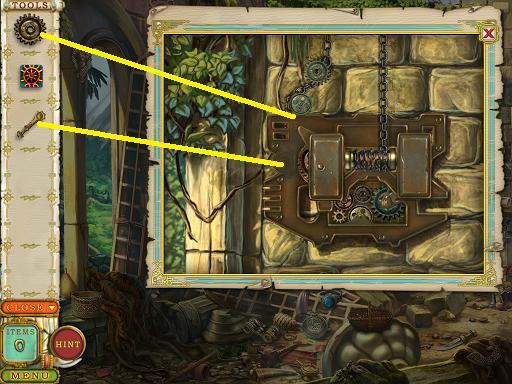
- Mini-puzzle. Place the gears in the right position.
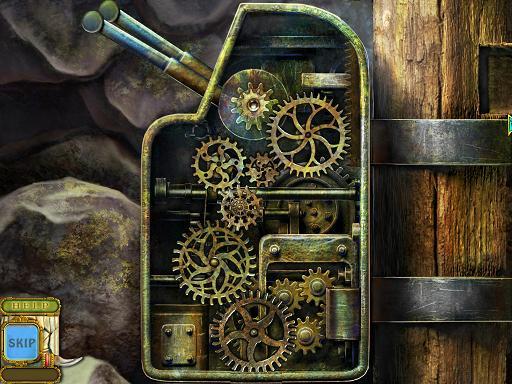
Level complete!
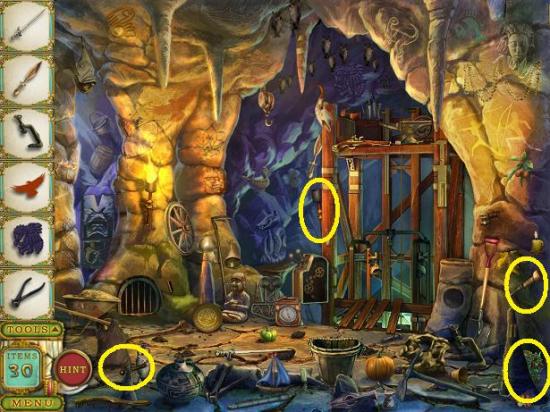
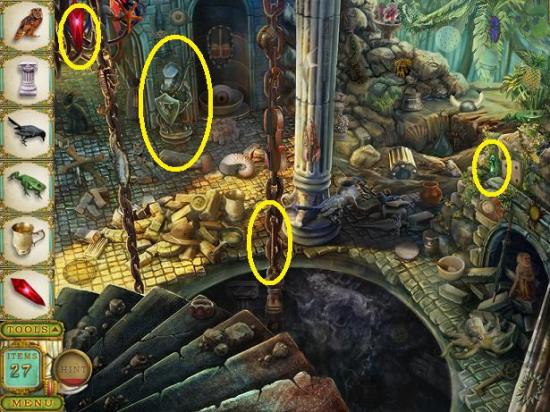
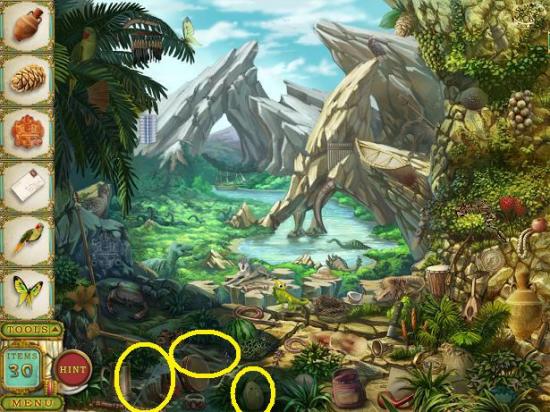
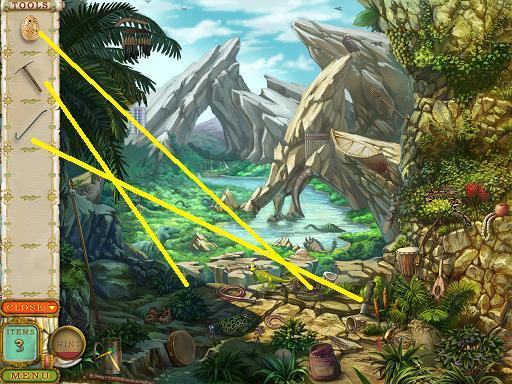
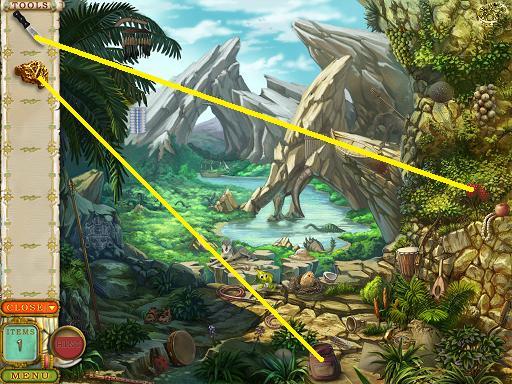
Level 5
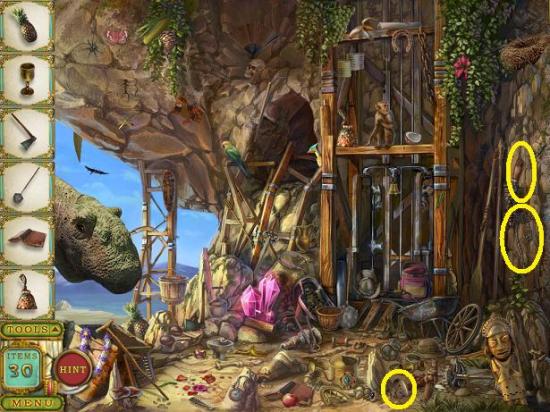
- Find all the items.
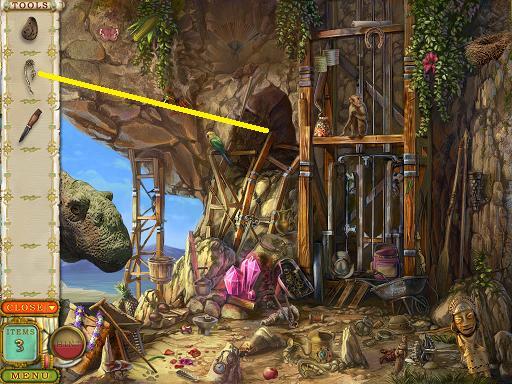
- From Tools, use the rope on the cave. Enter the cave.
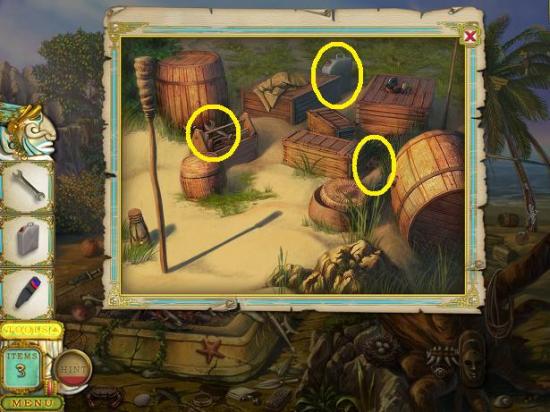
- Mini-puzzle. The pick is behind the dinosaurs. You have to switch the dinosaurs from one side. They can only move one space or fly above one dinosaur in the opposite direction.
- Follow the screenshot below, name the dinosaurs 123 and ABC, move them in this order (keeping track of who is who): 3AB321ABC321BC1
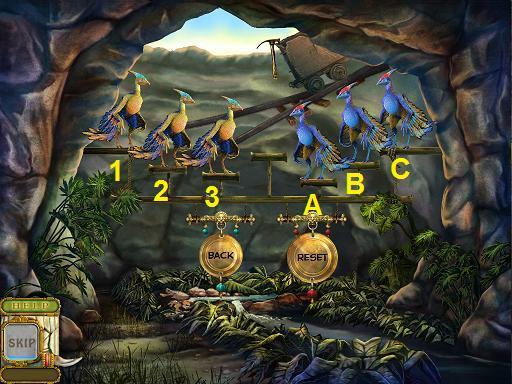
- The pick will fall and be added to Tools.
- Use the knife to cut the red flower. Pick up the flower from where it fell. Use the pick on the rubies. Pick up the ruby from where it fell.
- Put the ruby in your backpack and then place the flower in front of the dinosaur.
Level complete!
Level 6
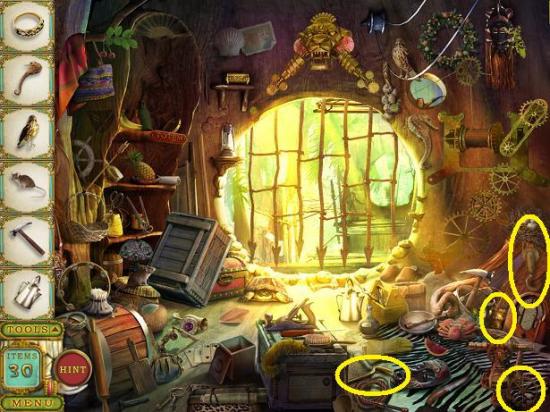
- Find all the items.
- From Tools, place the handle on the grate. Click the open grate.
- Mini-puzzle. You have to rotate the pipes so the steam can travel from one end to the other.
- Tip: All pipes are used. Start at the end and work your way backward.
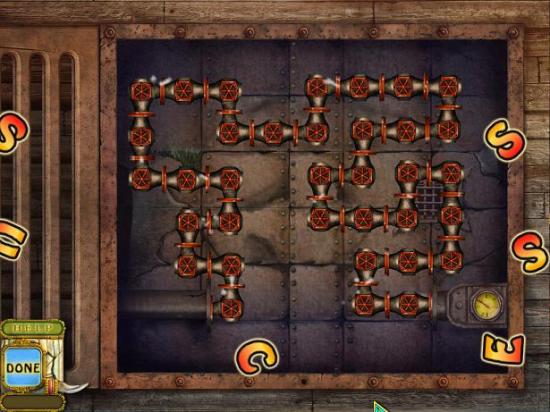
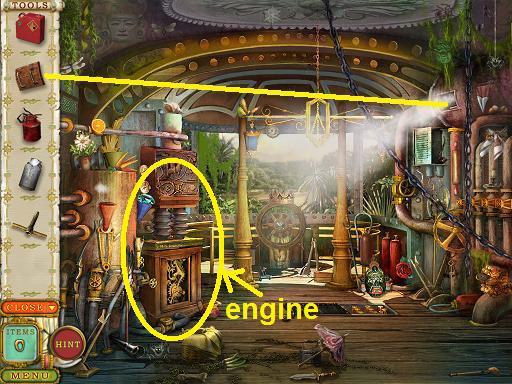
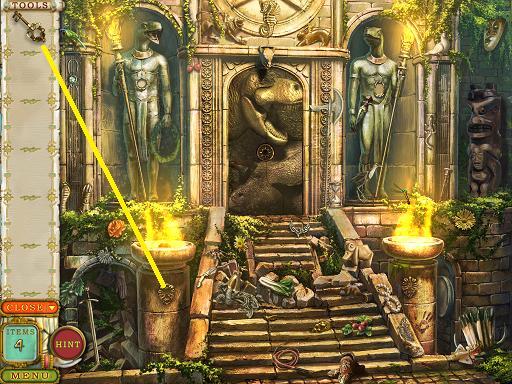
- Put the shutter on the leak, then click the engine.
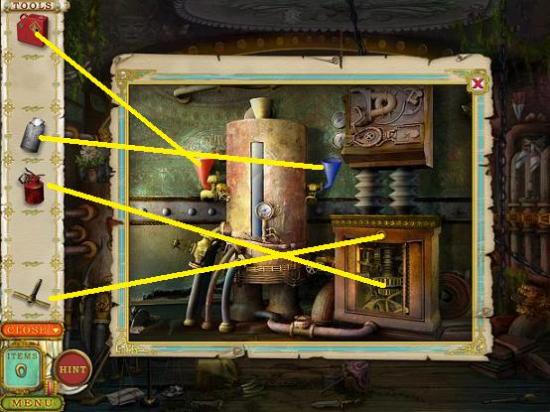
- Add the fuel can to the red funnel and the water can to the blue funnel, then the oil can on the valves and put the key in the slot.
Level complete!
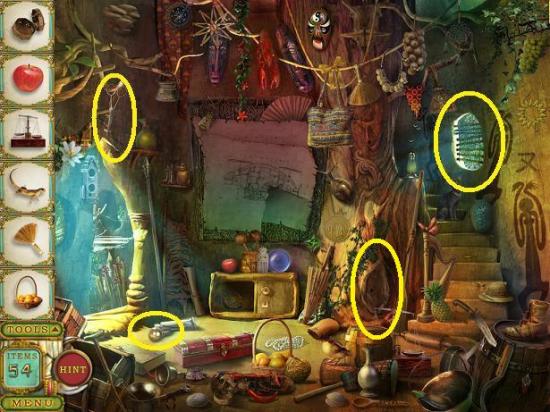
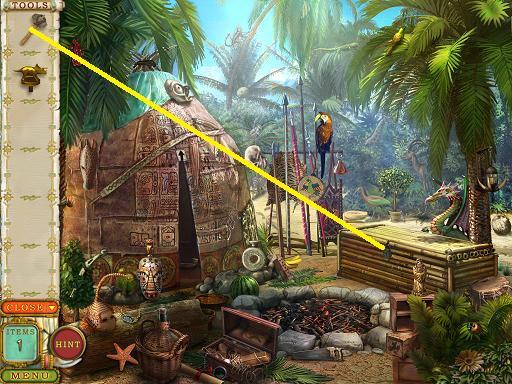
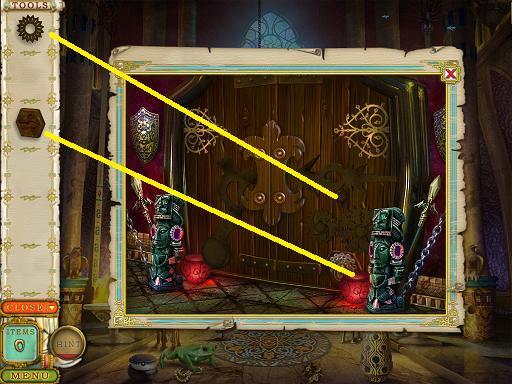
Level 7
- Find all the items.
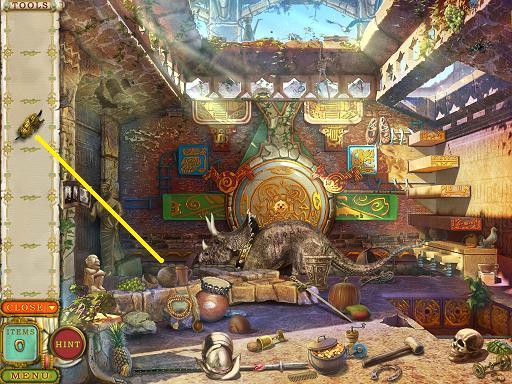
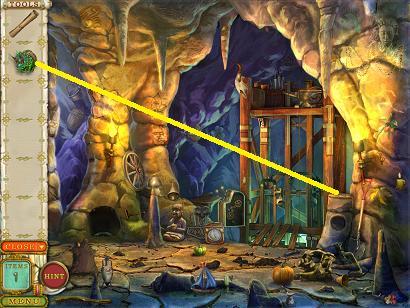
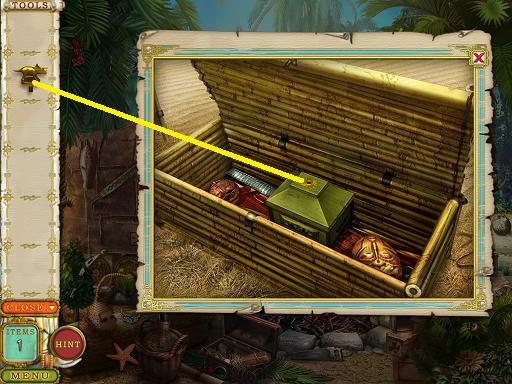
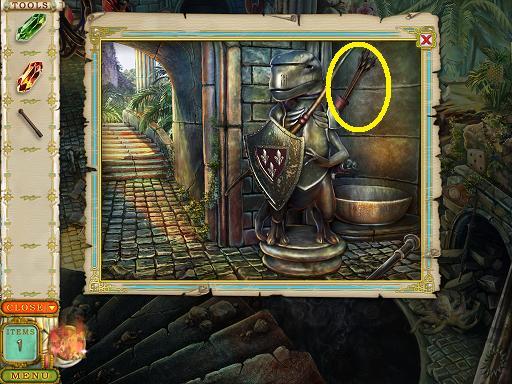
- Click the gold box on the ledge. Click to open it, then take the dino statuette.
- From Tools, use the hook to lift the box. Use the crowbar on the newly exposed chest. Click to open the chest and then take the lighter.
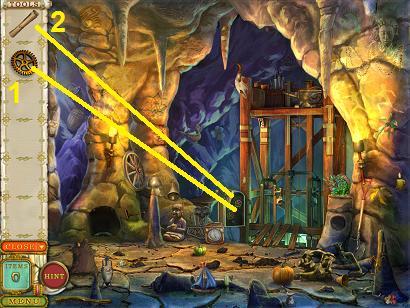
- Place the dino statuette on the base on the shelf (above the totem sign), then place the pinion (gear) on the controls beside the gate and then use the lighter to light the lantern.
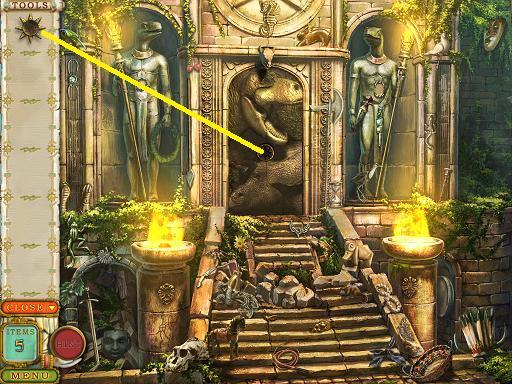
- Click the statue above the gate.
- Put the key in the statue’s mouth.
Level complete!
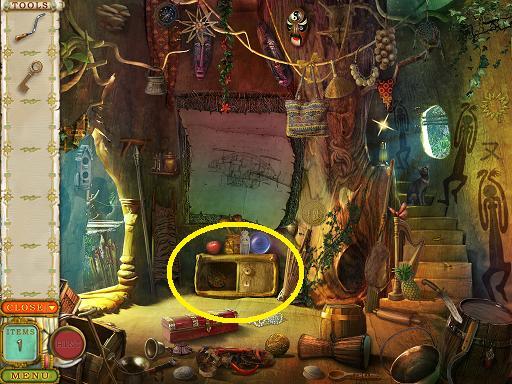
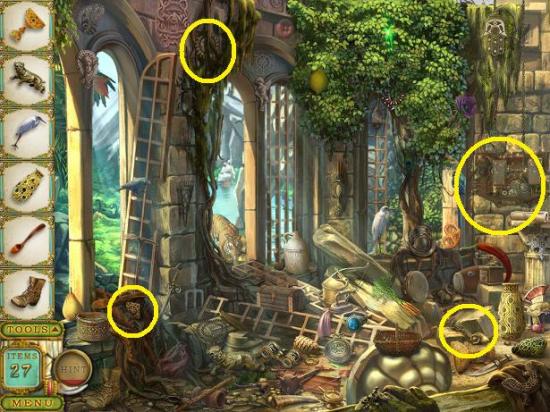
Level 8
- Find all the items.
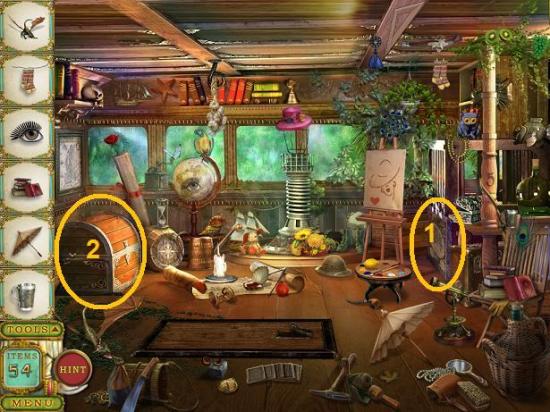
- Click the window (circled). From Tools, use the scissors to cut the latches to get the gramophone handle.
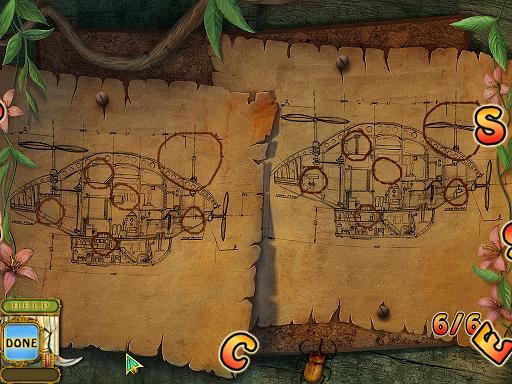
- Then take the door knob and place it on the small area by the stairs (circled). Take the blueprint fragment.
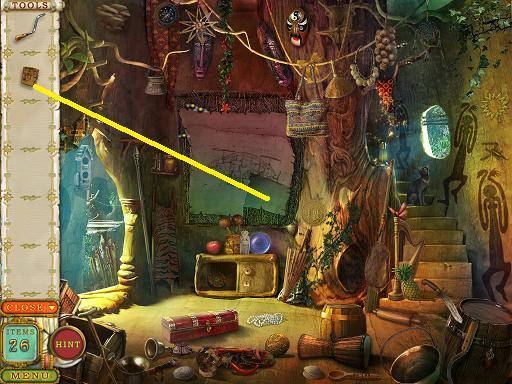
- Put the blueprint fragment and replace it on the wall.
- Mini-puzzle. Find six differences.
- Go up the stairs.
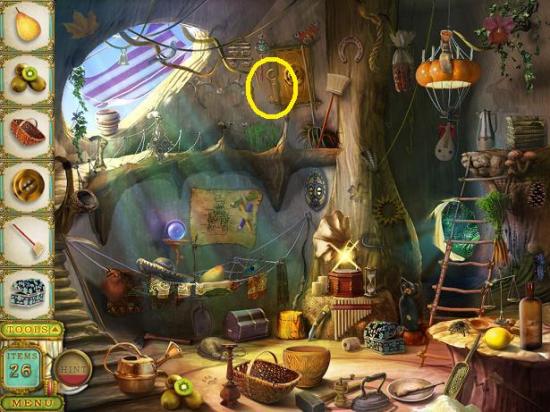
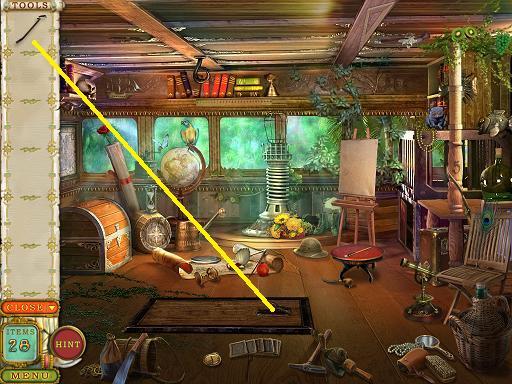
- Find all the items, then go down the stairs.
- Click the small table. Put the key in the lock. Take the record.
- Go back up the stairs.
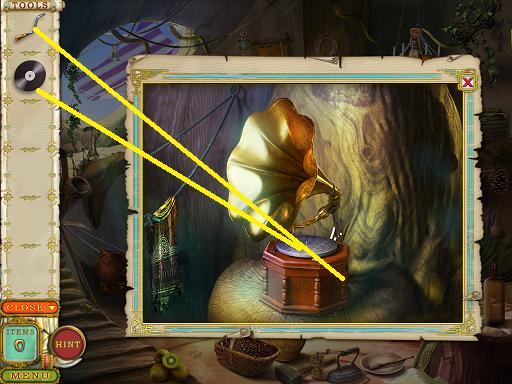
- Click the gramophone. Put the record on the gramophone, and then place the gramophone handle in the slot. Click the handle.
Level complete!
Level 9
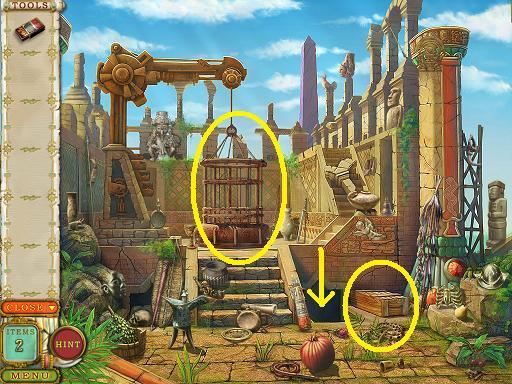
- Find all the items.
- Click the panel on the far right to open the door, then click again. Take the key.
- Use the key on the chest, then click again to open it. Click to take the crowbar.
- Use the crowbar on the hatch on the floor. Go down the stairs.
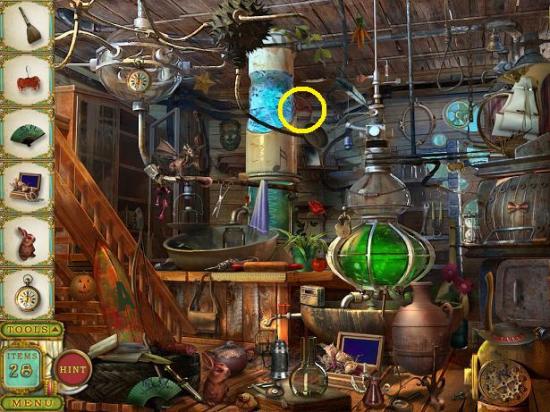
- Find all the items.
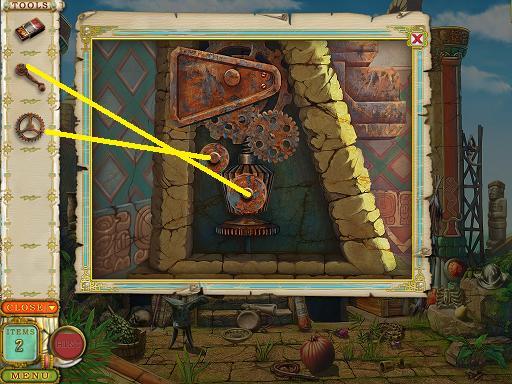
- Take the valve and put it on the mechanism in the bottom right of the screen.
- Click the lever attached to the spout attached to the tub with the boiling green liquid. Take the flask with liquid fuel.
- Click the lever attached to the spout attached to the tub with the boiling blue liquid. Take the flask with liquid fuel.
- Put the two flasks with liquid fuel into the empty flask.
- Put the new flask with liquid fuel into the furnace.
Level complete!
Level 10

- Find all the items.
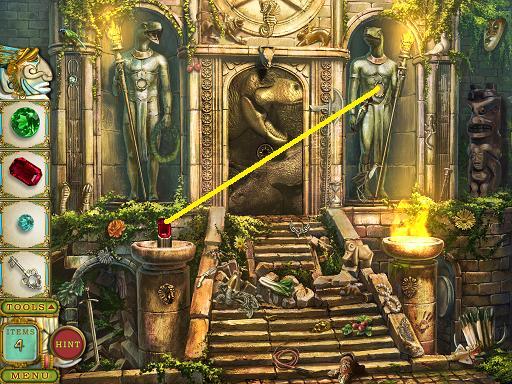
- Use the sabre to cut the bushes. Then put the idol part on the statue. The crown lowers.
- Place the red crystal on the middle statue and put the blue crystal on the right statue. Put the cyan crystal on the crown.
- Put the lever on the slot on the tree. Click the lever.
Level complete!
Level 11
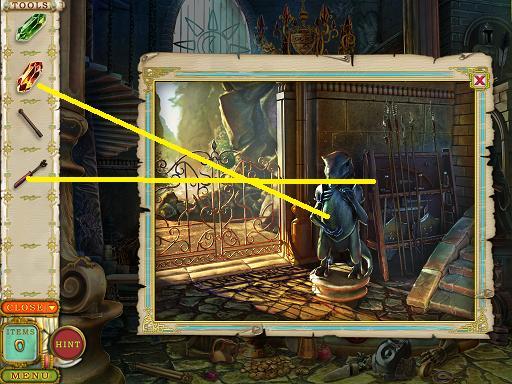
- Find all the items.
- Use the pot of water on the fire. Take the dino statuette. Then use the knife to cut the rope to the tent entrance. Click the entrance.
- Click the log. Take the hammer. Put the necklace of teeth on the missing area.
- Use the hammer on the trunk, then click to open it.
- Put the dino statuette on the box. Click to open the box. Take the spearhead.
- Click the tent entrance. From Tools, place the spearhead on the spear.
Level complete!
Level 12
- Find all the items.
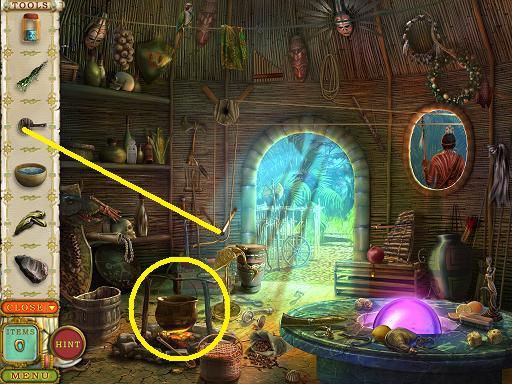
- From Tools, add to the fire (in the following order):
- herbs
- basin of water
- jar of potion ingredients
- flint
- rag
- Put the handle on the wall. Click it.
Level complete!
Level 13

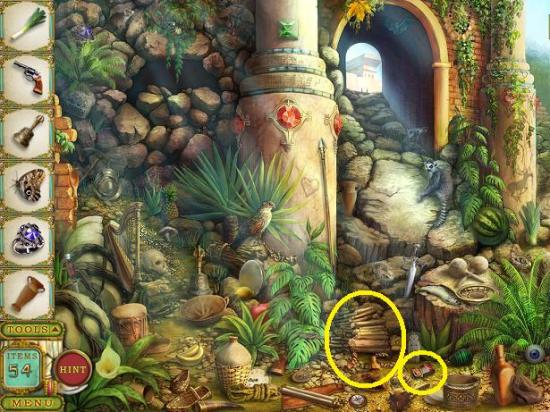
- Find all the items.
- Click the shield on the back wall to move it. Take the skull key.
- Use the skull key on the far right wall (above the trunk). Take the hatchet. Then use the key on the trunk below it. Click to open the trunk and then take the lens.
- Use the hatchet on the trunk on the left. Take the bag of coins.
- Put the lens above the fire (above the hourglass).
- Put the bag of coins on the gold statue.
- Mini-puzzle. Click and drag coins to the empty scale to make it balance.
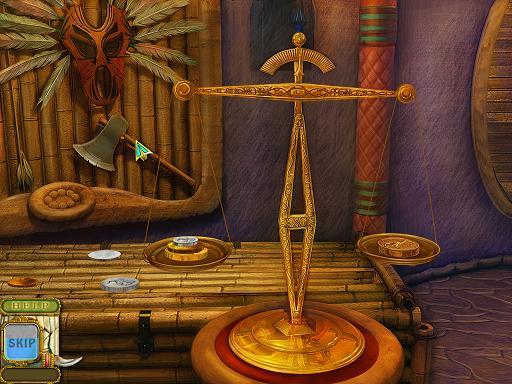
- The mechanism in the middle of the room opens. Take the ruby and put it in your backpack.
Level complete!
Level 14
- Find all the items.
- Use se the medallion on the door. The left statue’s mouth opens revealing a golden key. Take it.
- Use the golden key on the left altar.
- Take the ruby and place it on the chest of the right statue. Its mouth opens to reveal a silver key. Take it and use it on the right altar. Take the emerald and place it on the chest of the left statue.
- Take the diamond that fell and put it in the centre hole on the door.
Level complete!
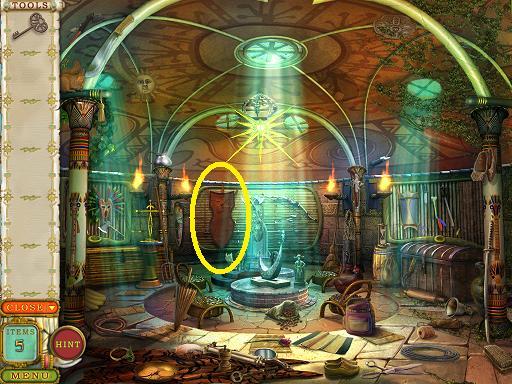
Level 15
- Find all the items.
- Click the left statue.
- Use the crowbar on the crack on the wall. Take the medallion. Close the area.
- Put the medallion in the slot on the altar. Go down the hole.
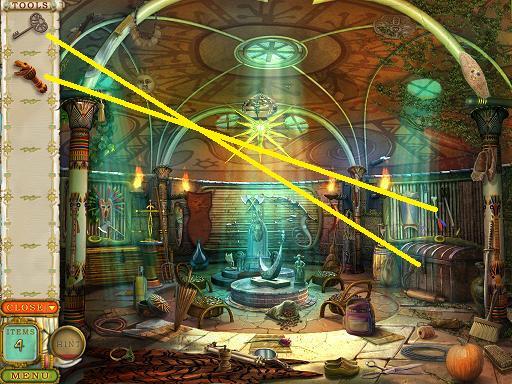
- Find all the items, and then click the statue (circled).
- Take the quiver.
- Go back up the stairs.
- Click the right statue.
- Put the red crystal in the statue’s hands, then put the quiver on the stand behind it.
- Click the left statue.
- Put the green crystal in its hands, then put the lever on the gate behind it. Click the lever.
- Go outside.
Level complete!
Level 16
- Find all the items.
- Use the fuel can on any lamp, then use the lighter to light the lamp.
- Place the crystal on the chandelier, and then place the lever on the column on the right. Click to activate it.
- Click the centre door.
- Put the pinion on the door and place the door fragment on top of the red vase.
Level complete!
Level 17
- Find all the items.
- Use the bucket on the fire on the steps, and then put the sphere into the open mouth. Place the stone on the chandelier at the top right. This causes the crystal to drop.
- Click the newly fallen crystal.

- Place the artefact with rune on the large blue crystal. It opens. Take the crystal.
- Click the doorway above the stairs.
- Place the crystal in the slot above the door. Place the lever in the slot, then click it.
Level complete!
Level 18
- Find all the items.
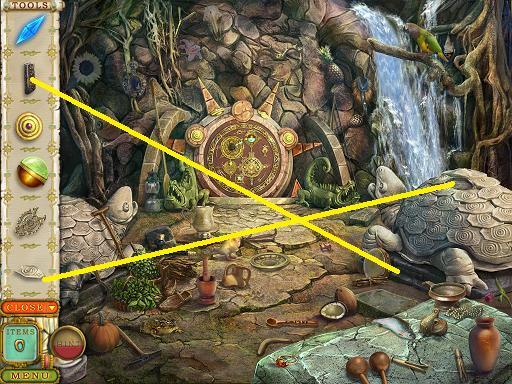
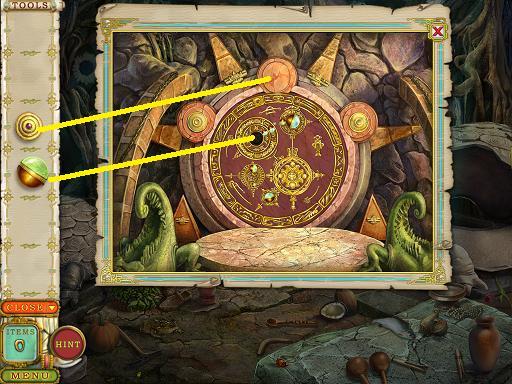
- From Tools, put the tortoiseshell part on the right turtle statue. A slot appears. Place the lever in the slot and click it to open the turtle.
- Click the area inside the turtle statue.
- Place the blue crystal and the pinion.
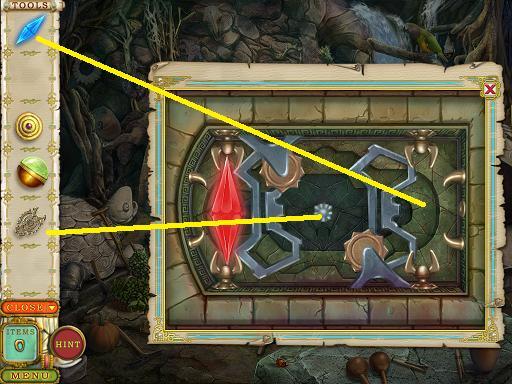
- Click the portal in the middle of the screen.
- Place the portal part in the empty circle, then place the sphere in the empty slot on the door.
- Click the portal door.
- Mini-puzzle. You have to line up the spheres so their rays fall on the large circle at the bottom right of the pattern. Each sphere is on its own “orbit.” Click an “orbit” to move the sphere. A ray will flash when it is in the correct position.
- Click the portal.
Level complete!
Level 19
- Find all the items.
- Put the egg in the nest. Use the pick on the rocks, then take the gold nugget. Use the crowbar to free the knife.
- Put the gold nugget in the backpack and use the knife on the berries.
- Feed the berries to the cute little yellow dinosaur.
Level complete!
Level 20
- Find all the items.
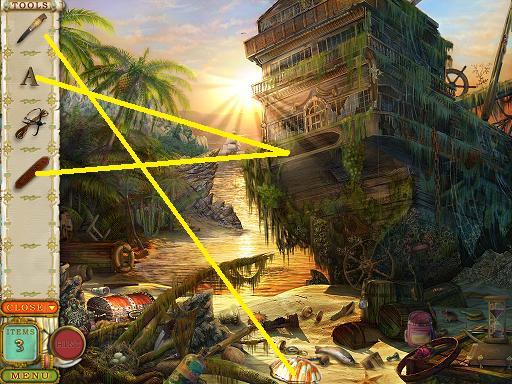
- Use the knife on the oyster, then take the key.
- Place the nameplate on the ship. Then place the A on it.
- Mini-puzzle. Re-arrange the letters to spell the name of the ship. The answer is CATALINA.
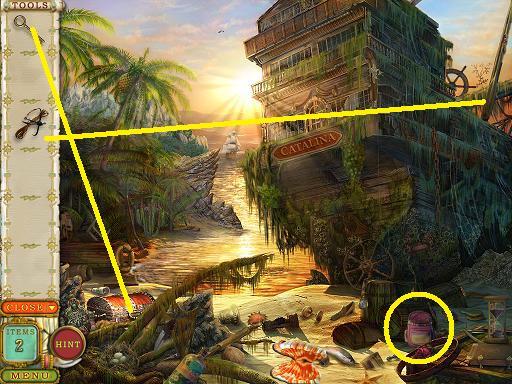
- Use the key on the trunk. Take the golden helmet, and then put it in your backpack.
- Use the rope with a hook on the far end of the ship.
Level complete!
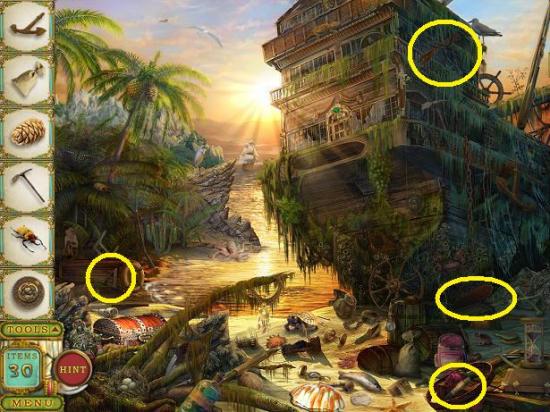
Level 21
- Find all the items.
- Use the key on the small chest. Take the book.
- Mini-puzzle. Reassemble the torn pieces of the map.
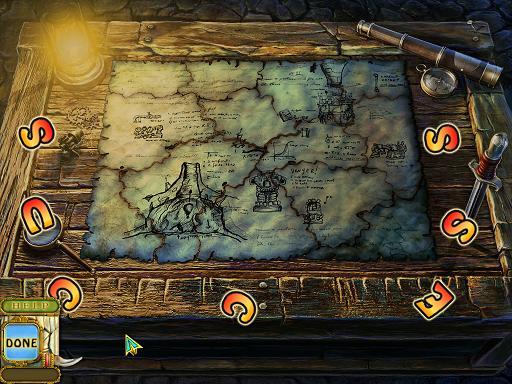
- Click on the small wooden box. Use the crowbar and then take the rope.
- Use the planks, then the rope on the bridge. Then place the lantern on the small rock on the other side.
Level complete!
Level 22
- Find all the items.
- Use the glue and then the patch on the hole in the balloon.
- Put the air heater part on the right side of the balloon.
- Use the can of water on the funnel where the bird is.
- Place the ballast on the edge of the basket.
- Use the lever on the middle of the machine, and then click to activate it.
Level complete!
Level 23
- Find all the items.
- From Tools, use the rope ladder on the entrance. Go up the ladder.
- Find all the items.
- Click the mechanical area (circled).
- Place the pinion where the missing gear is, then use the handle. Click the handle.
- Click the lowered cage. Click to open it, and then take the crowbar.
- Click the wooden box. Use the crowbar to open it. Take the dynamite. Go down the stairs.
- Put the dynamite just below the hole on the wall, then use matches to light the dynamite.
Level complete!
Level 24
- Find all the items.
- Use the golden lever on the right altar. Add the medallion.
- Use the silver lever on the left altar. The cage lowers but breaks.
- Head down the hole.
- Find all the items.
- Click the mechanism on the far right wall (circled).
- Place the pinion and the lever on the mechanism, then click the lever.
- You are returned to the main level and Michael’s cage has lowered.
- Click the cage.
- Place the button in the middle slot.
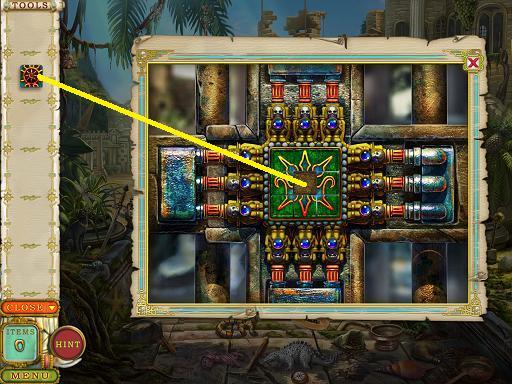
- Mini-puzzle. You have to recreate the symbol. You can only move adjacent pieces. Place the middle piece first. Now try to properly position at least two more tiles (the corner tiles are easiest to determine their proper position). Once you’ve gotten everything you can into the proper position, you’ll have to move the rest. It only takes about two clicks to move a tile into its proper location. To move the remaining pieces into their proper location, move a piece and if you displace a piece in its proper position, move it back using it and another tile.
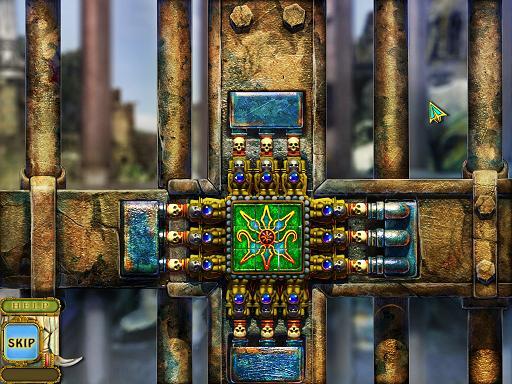
- Now you have to press the blue buttons in a certain order. Use trial and error. I clicked all three buttons and then pressed the middle tile. If that didn’t unlock it, I pressed the first two and tested, then the next two, then the outer two, then I pressed the buttons and tested them individually.
- Tip: No solution can be given as the combination is different each time.
Level complete!
Level 25
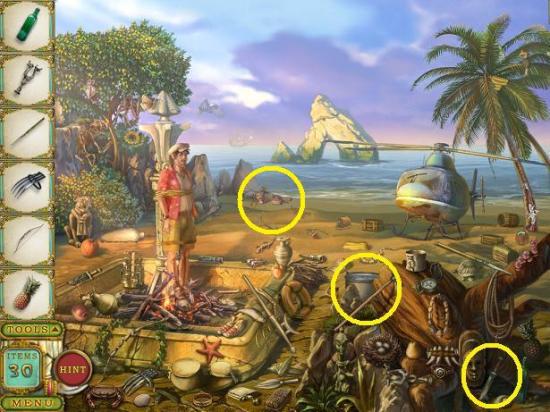
- Find all the items.
- Click the rocks by the water (circled).
- Take the wrench (in the toolbox), starter and the fuel can.
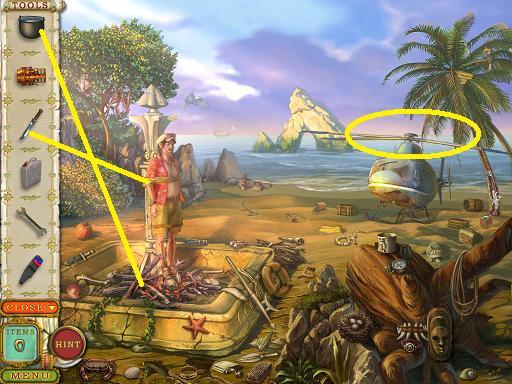
- Use the pot of water on the fire, then use the knife on the rope to free Uncle John.
- Click the helicopter blades.
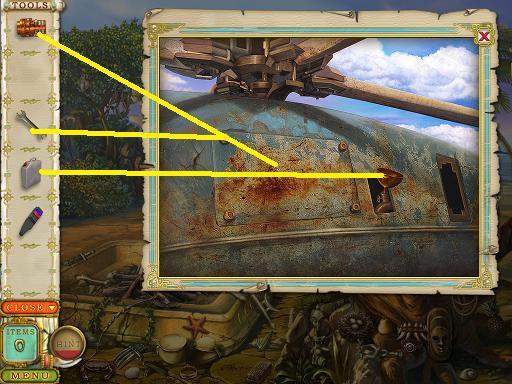
- Use the fuel can on the funnel and the wrench to open the panel. Place the engine part on the panel.
- Click the helicopter.
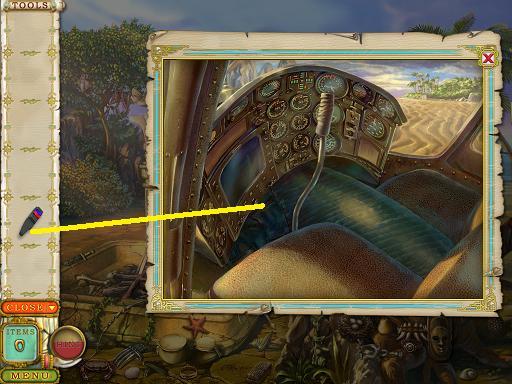
- Put the starter on the panel. Click it.
- The helicopter won’t start. They take the hot air balloon.
Level complete!
Congratulations, you’ve finished the game!

More articles...
-
Best Horror Games On Itch.io – July 2026
Across a bounty of subgenres. -
Haze Seas Accessories Tier List [Best Accessories to Equip]
The accessories with the best stat buffs in Haze Seas.