- Wondering how to get Monopoly GO! free rolls? Well, you’ve come to the right place. In this guide, we provide you with a bunch of tips and tricks to get some free rolls for the hit new mobile game. We’ll …
Best Roblox Horror Games to Play Right Now – Updated Weekly
By Adele Wilson
Our Best Roblox Horror Games guide features the scariest and most creative experiences to play right now on the platform!The BEST Roblox Games of The Week – Games You Need To Play!
By Sho Roberts
Our feature shares our pick for the Best Roblox Games of the week! With our feature, we guarantee you'll find something new to play!Type Soul Clan Rarity Guide – All Legendary And Common Clans Listed!
By Nathan Ball
Wondering what your odds of rolling a particular Clan are? Wonder no more, with my handy Type Soul Clan Rarity guide.
Samantha Swift and the Golden Touch Tips Walkthrough
Check out our walkthrough for Samantha Swift and the Golden Touch, which contains almost 200 screenshots! GENERAL TIPS There are no time limits in this game, so take as long as you like. Click on lightning bolts hidden in the scenes to get extra hints. There’s typically one lightning bolt per scene. In the walkthrough, lightning bolts are circled in yellow. Click on an item in your list to see its silhouette in your scanner. Random clicking will cause the scanner to break down. You won…
a:1:i:0;a:2:s:13:”section_title”;s:40:”Samantha Swift and the Golden Touch Tips”;s:12:”section_body”;s:91178:”
Check out our walkthrough for Samantha Swift and the Golden Touch, which contains almost 200 screenshots!
GENERAL TIPS
- There are no time limits in this game, so take as long as you like.
- Click on lightning bolts hidden in the scenes to get extra hints. There’s typically one lightning bolt per scene. In the walkthrough, lightning bolts are circled in yellow.
- Click on an item in your list to see its silhouette in your scanner.
- Random clicking will cause the scanner to break down. You won’t be able to use it for a few seconds.
- In the hidden object searches, there will always be two screens of items to find. You won’t see the second batch of items until you’ve found everything on the first list.
- Tools: When you find certain items, they will be added to your inventory. This means that you can use these items elsewhere to help solve puzzles. (Such as using a key to unlock a treasure chest.)
- You can hold up to 10 items at a time in your inventory. If you inventory is full but you still have items that you need to pick up, try using some of the items from your inventory to solve puzzles.
- Hidden Items: Items highlighted in blue on your list are hidden. You won’t be able to see these items unless you use other items from your inventory to solve a puzzle to reveal them.
- Secret Items: The secret item will be the last item you find in each scene. It’s often hidden, but not always.
- You can customize the color and background wallpaper of your PDA. To do this, click on MENU, then Customize (the yellow button). Click on the arrows next to “Change color” and “Change skin” to see what options you have.
- Museum: Click on MENU, then “Museum” to visit Samantha’s museum and see all of the artifacts you’ve collected so far.
WALKTHROUGH
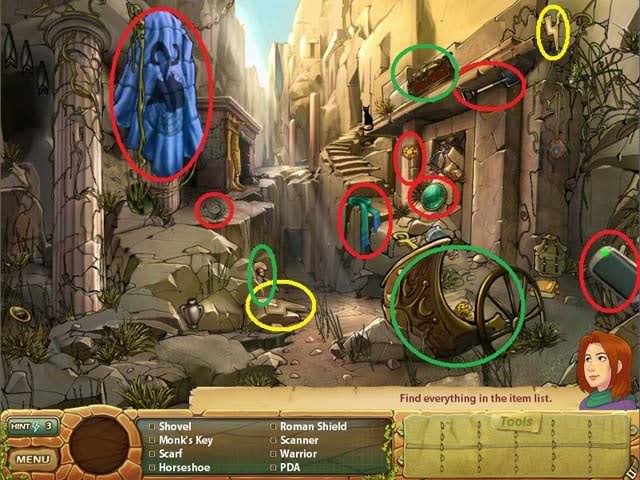
- Tools and special items are highlighted in red. Lightning bolts are highlighted in yellow. Artifacts for the museum are highlighted in green.
- Items aren’t always in the same place, so items might be in slightly different spots than on the screenshots.
- In a few rare cases, I’ve used both red and yellow to show the locations of hidden items in order to keep things clearer.
STAGE 1: Mending a Broken Heart
Find Samantha’s Things
Find all of the items on the list. Tools, museum items and lightning bolts are highlighted.
- Tools to find: Monk’s Key, Horseshoe, Shovel, Scarf, Parachute
- Museum Items to Find: Warrior, Roman Shield, Chariot

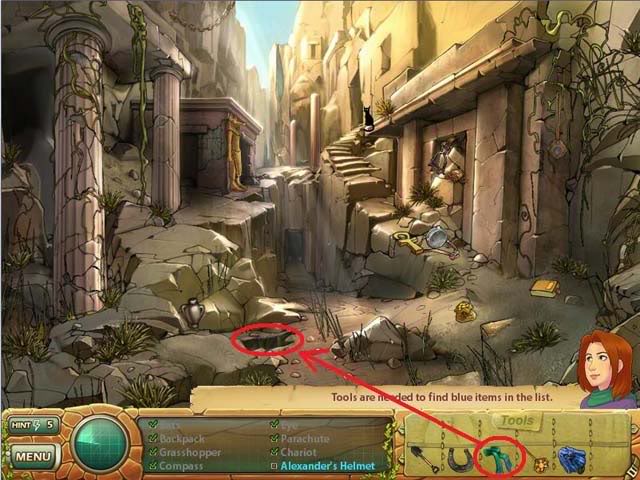
Hidden Item: Alexander’s Helmet
- Use the scarf on the hole in the ground to retrieve the helmet.
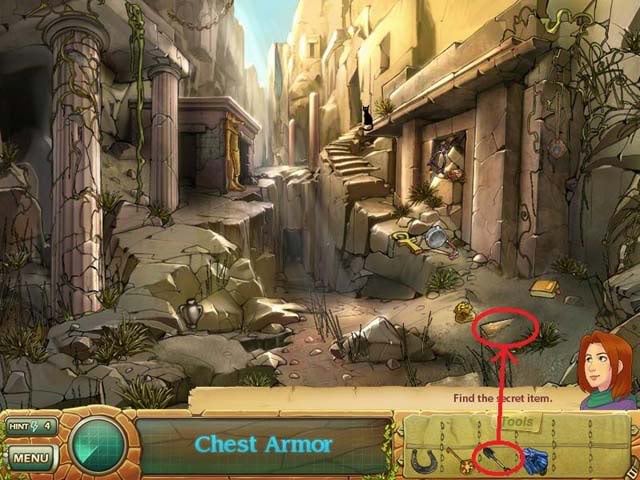
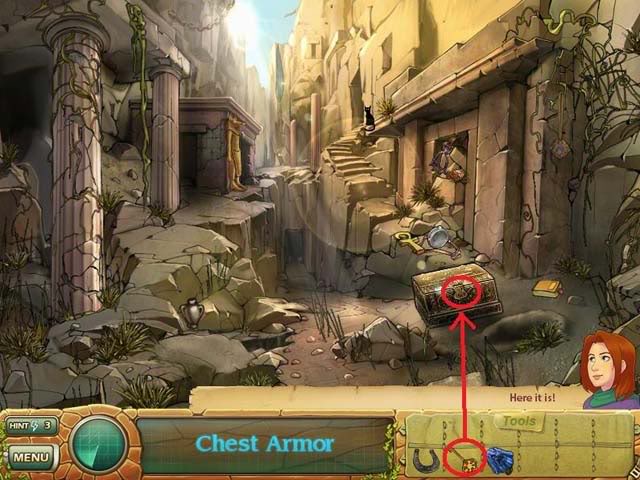
Secret Item: Chest Armor
- Use the shovel to dig up the chest, then use the monk’s key to unlock it.
Click on the glowing door to walk to the next area.
Antichamber
Find all of the items on the list.
- Tools to find: Bust 1, Bust 2, Sun Disc, Pry Bar
- When you click on the dove for the first time, it flies to the other side of the room. Click on it again to cross it off the list.
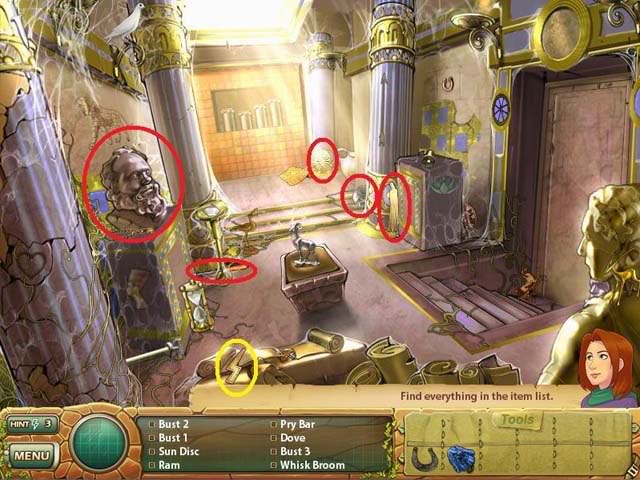
Hidden Item: Chest
- Use the horseshoe on the second horseshoe on the wall.
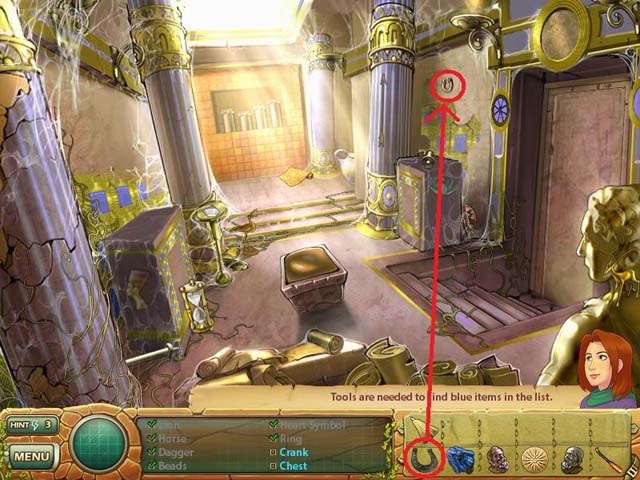
Hidden Item: Crank
- Use the prying tool on the loose step.
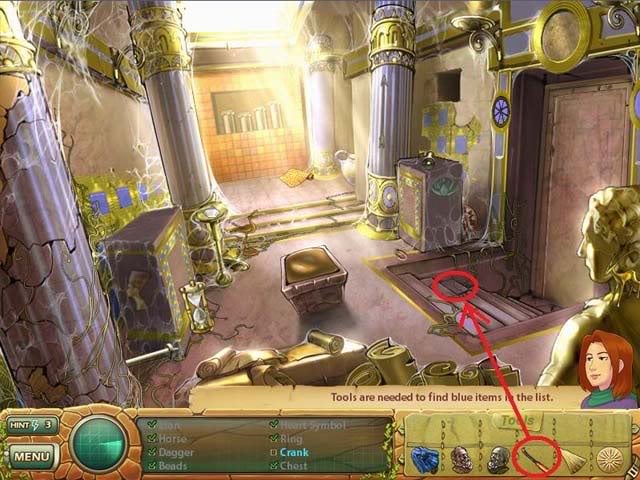
Get the door open
- Use the sun disc on the circle above the door.
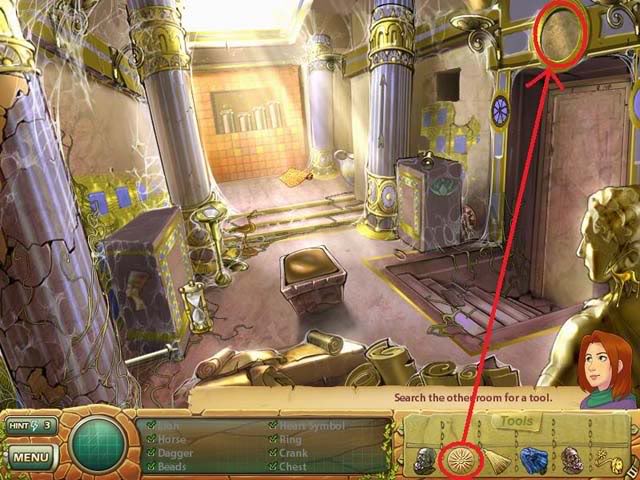
- Click on the open door to walk through to the next area.
Map Room
Find all of the items on the list.
- Tool items to find: Bust 6, Chariot Axle
- Museum items: Winged Lion
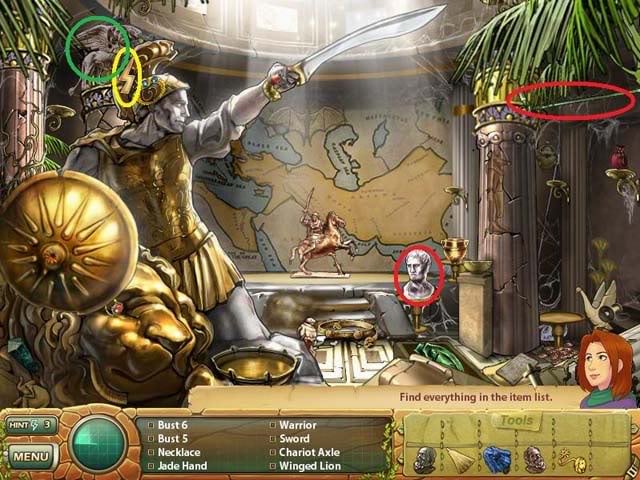
Hidden Item: Mask
- Use the whisk broom on the dust on the stairs.
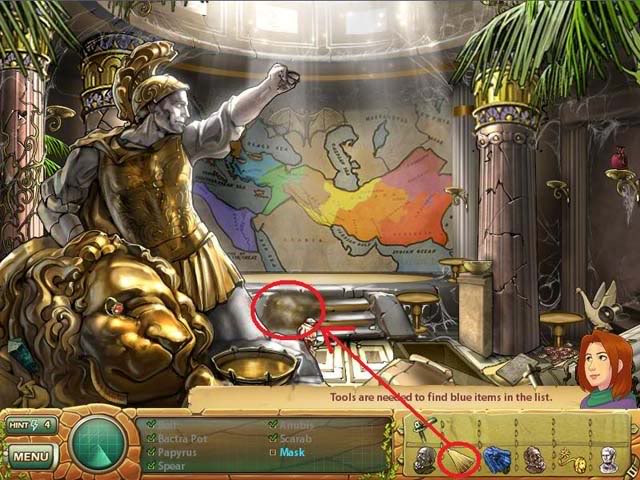
Secret Item: Olympias Head
- The Olympas head will automatically appear in the basin below the statue.
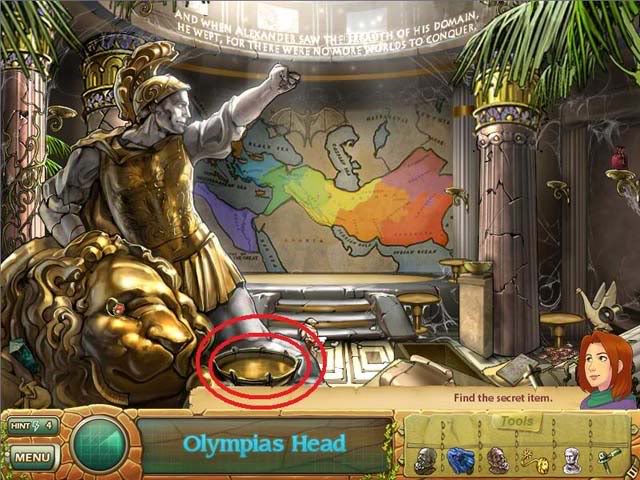
Click in the upper left corner of the screen to exit this room.
Antichamber
Secret Item: Roxana Head
- Use the chariot axle on the altar.
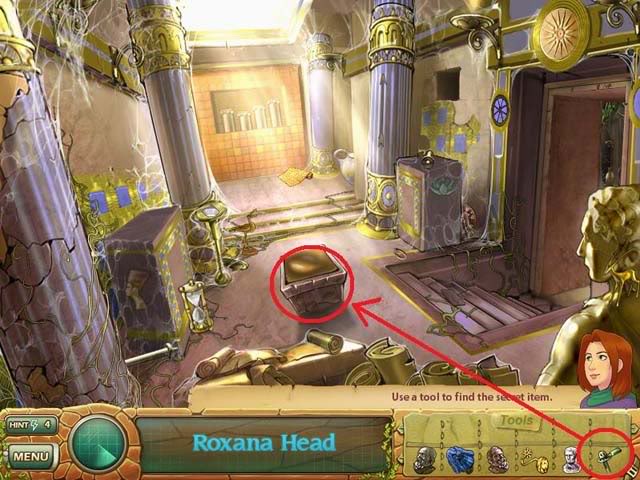
Antichamber – Busts Puzzle
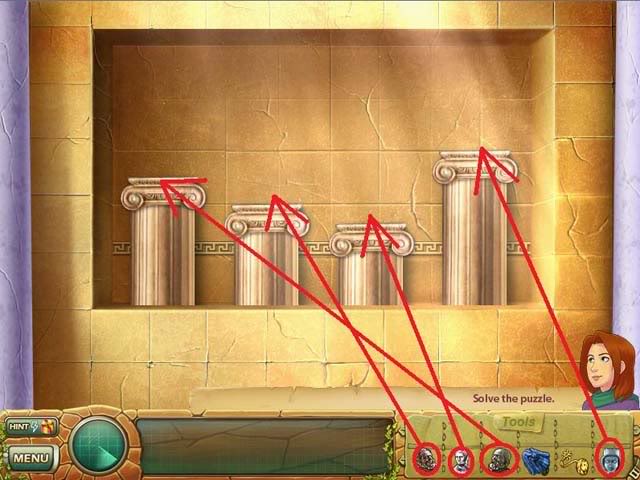
- Click on the back wall of the room to zoom in on a puzzle.
- The goal is to place the four busts in your inventory on the pedestals in the correct order. When you’ve placed a bust correctly, it will change color and lock into place.
- Place the busts in the following order, Left to Right: Bust #2, Bust #1, Bust #6, Roxana Head
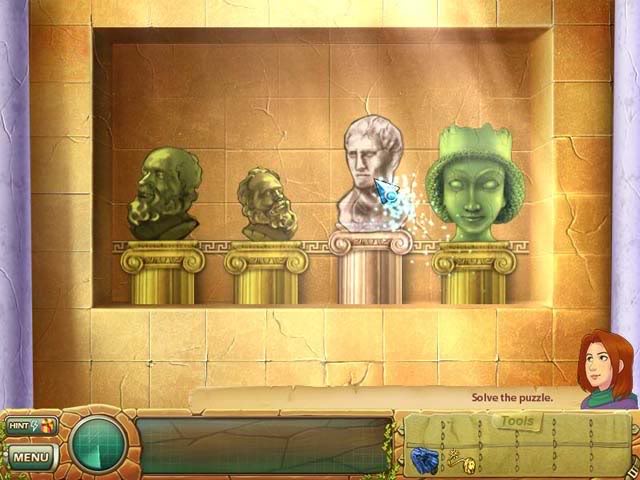
After the wall opens, walk through to the next area.
Golden Globe Room
Find the two ball parts
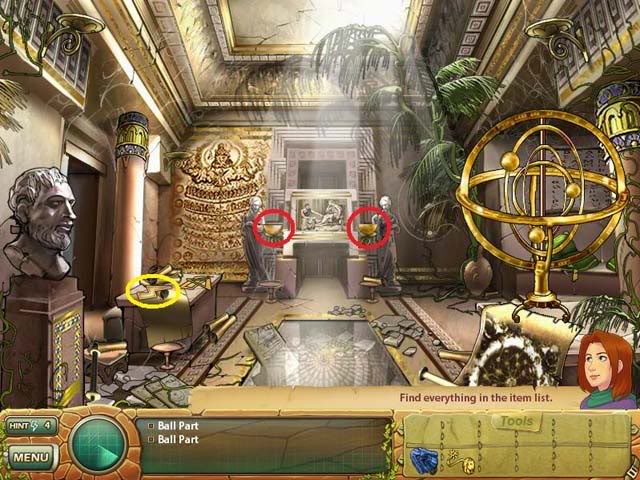
Hidden Item: Key
- Place the two ball halves onto the globe-like contraption. The key will appear on the floor in the area circled in red on the screenshot below.
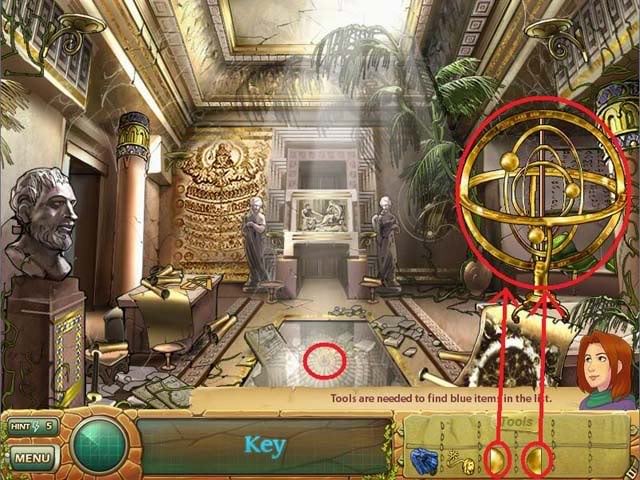
Use the key on the door’s keyhole to advance to the next room.
Sarcophagus Room
Find all the items on the list.
Museum items: Crown
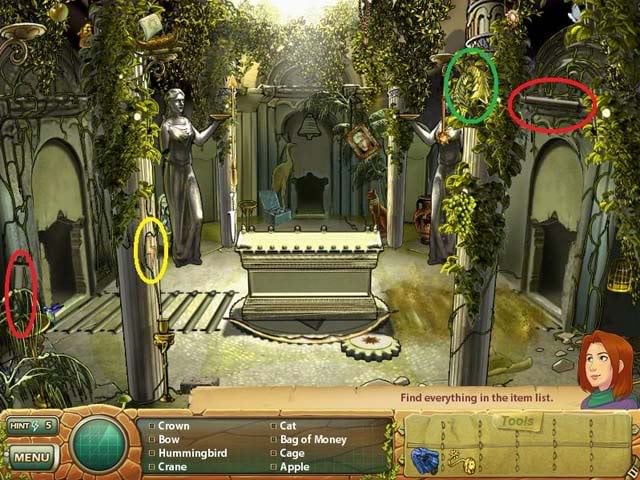
After you’ve found all the items, Samantha says you need to find more tools by searching the other rooms. Click on the glowing yellow area at the bottom of the screen to exit.
Golden Globe Room
Find the two scroll spools here.
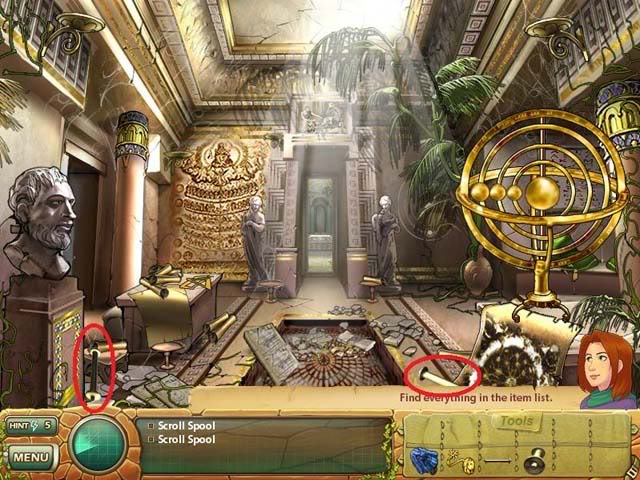
Click the glowing yellow area to the left to go back to the Antichamber.
Antichamber
Find the two scroll spools here.
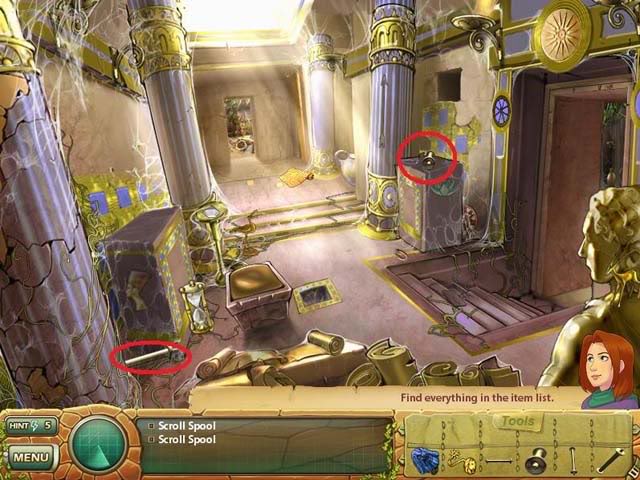
Click on the glowing yellow exit to the right to head back to the Map Room.
Map Room
Find the two scroll spools here.
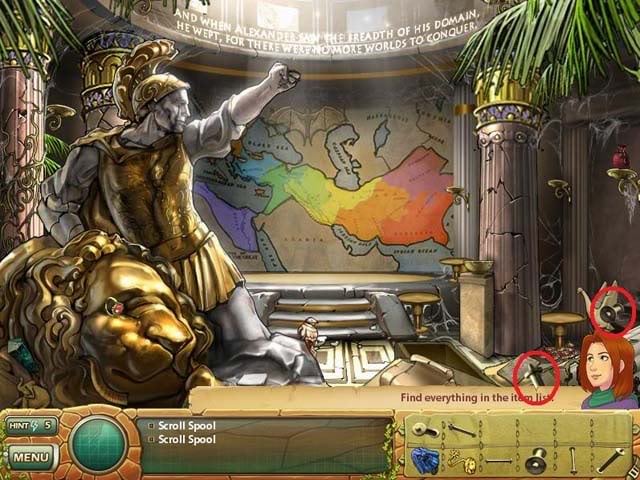
Follow the glowing yellow exits until you arrive back at the Sarcophagus Room.
Sarcophagus Room
Hidden Items: Side Carving 1, Side Carving 2, Swift Symbol
- Place the eight scroll spools in the grooved area to the left of the sarcophagus.
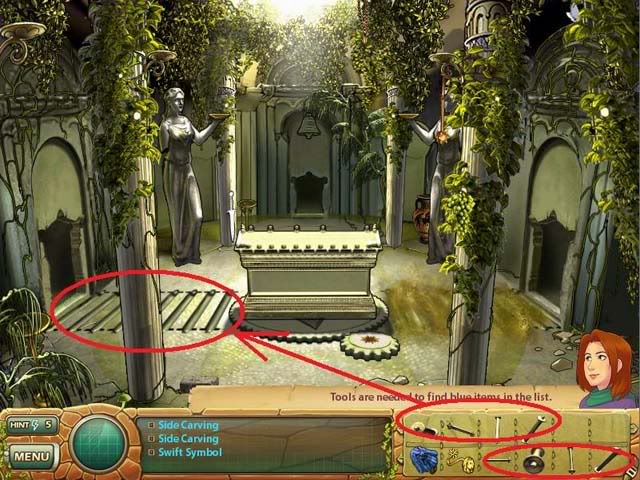
The sarcophagus will slide to reveal the Swift Symbol and one of the side carvings.. Grab them both.
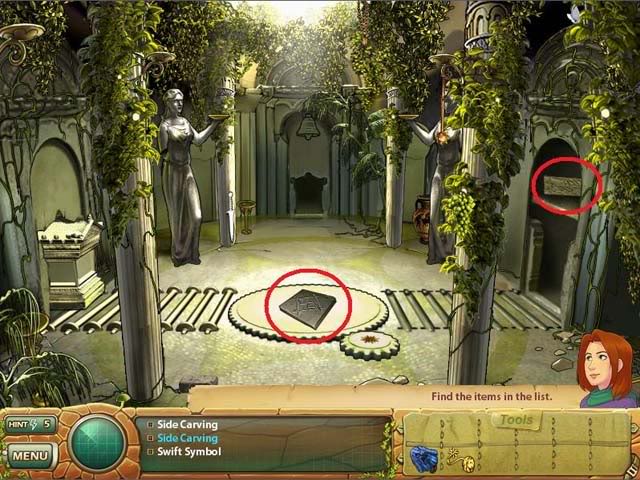
Click on the scroll spools to pick them back up, then lay them down in the grooves to the right of the sarcophagus.
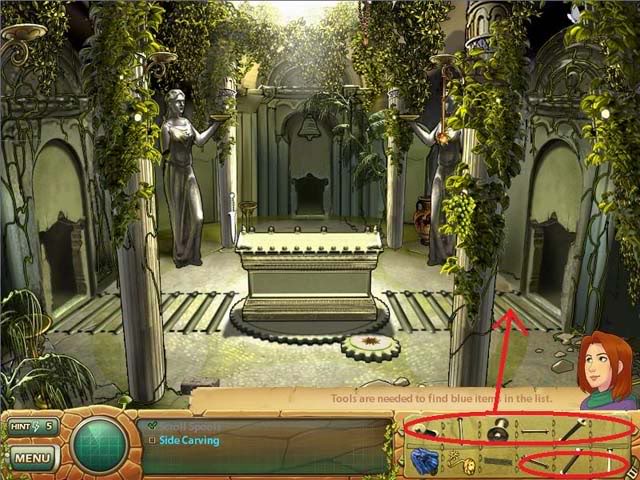
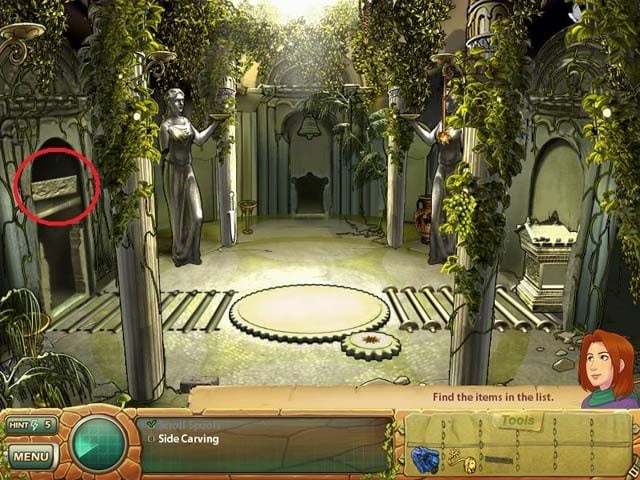
Secret Item: Scroll of Wealth
- Place the crank on the gear near the sarcophagus, and place the first side panel onto the sarcophagus.
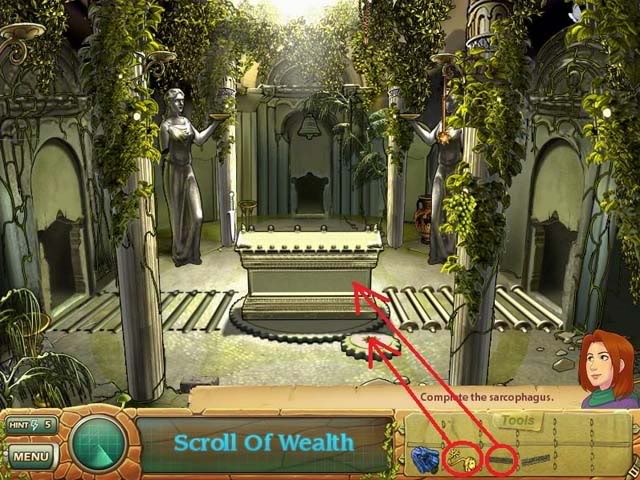
Click the crank four times to rotate the sarcophagus, then place the second side panel onto it.
Entrance
Find a way to light the room.
First, click on the flint to add it to the inventory.
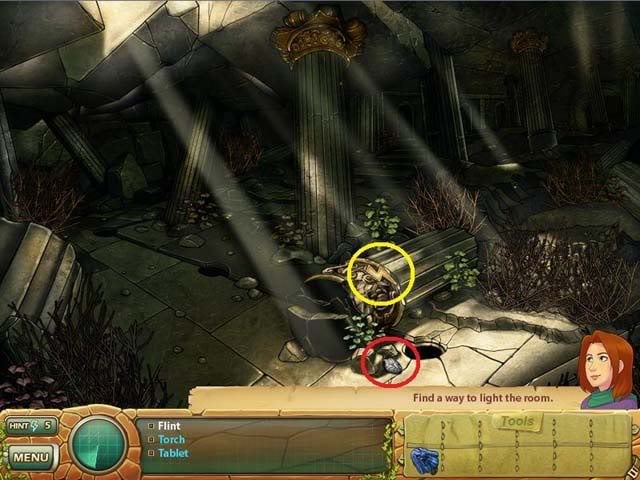
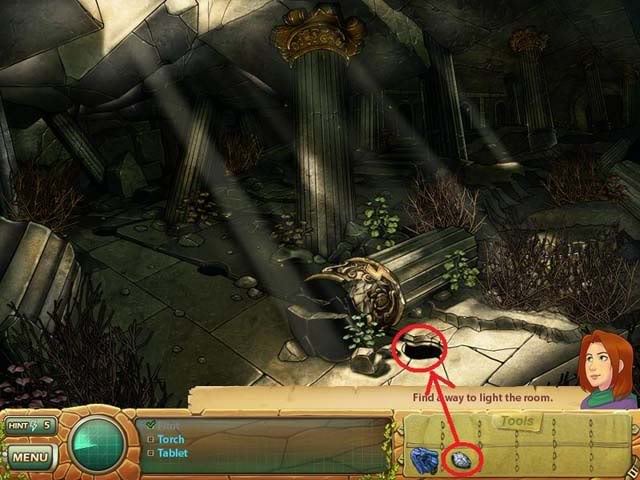
Use the flint on the hole on the floor to light the room.
Finally, grab the torch on the floor.
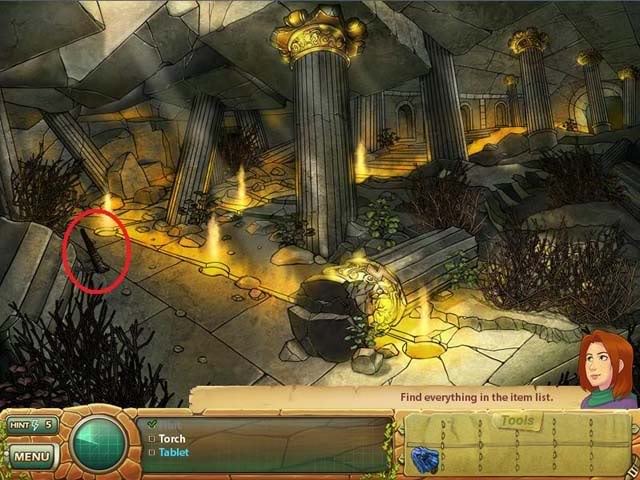
Hidden Item: Tablet
Use the torch on the fire to light it, then use the lit torch on the underbrush to burn it away.
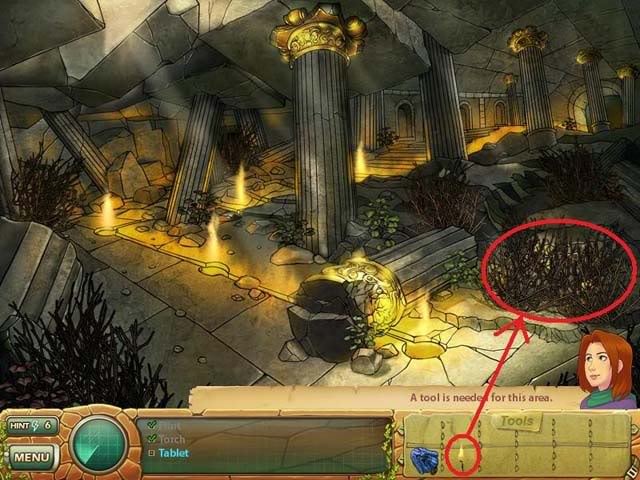
Click on the exit that appears to travel to the next room.
Mural Room
Take the torch and drop it into the room to cast some light. (Don’t forget to grab the lightning bolt sitting on the statue too.)
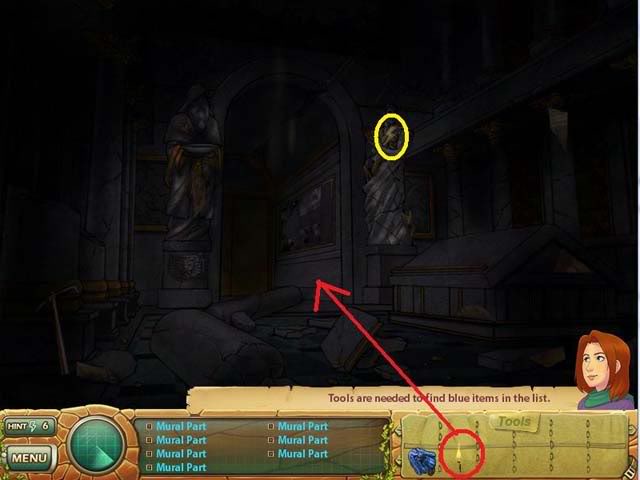
Collect the seven mural parts.
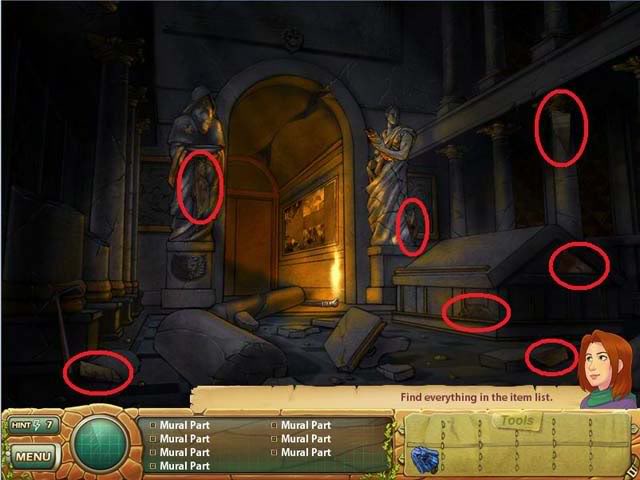
Click on the incomplete mural at the back of the room (the arrow will turn green) to play a mini-game.
Mural Room – Mini-Game
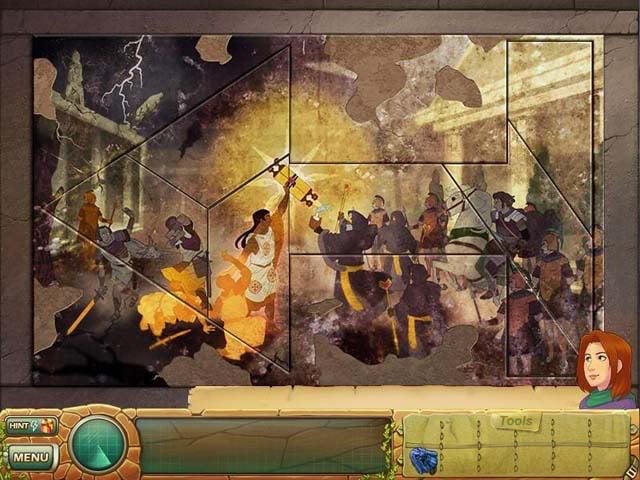
Place the pieces to fit the mural back together. To rotate a piece, click the green arrows, hold down your mouse button, and drag the mouse left or right. Click on the piece itself to drag it to another part of the mural. When you’ve found the right spot for a piece, it will lock into place.
Dock
Find all of the items on the list
Tools to find: Fishing net x 2, Coil of Rope, Pulley, Spear x 2, Mast, Scythe, Axe
Museum item: Sphinx
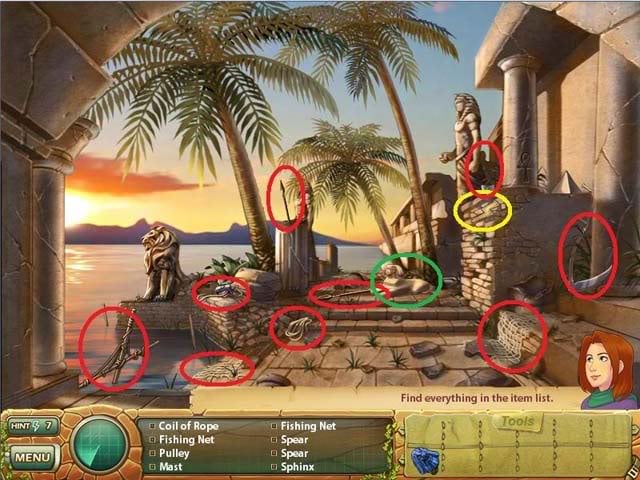
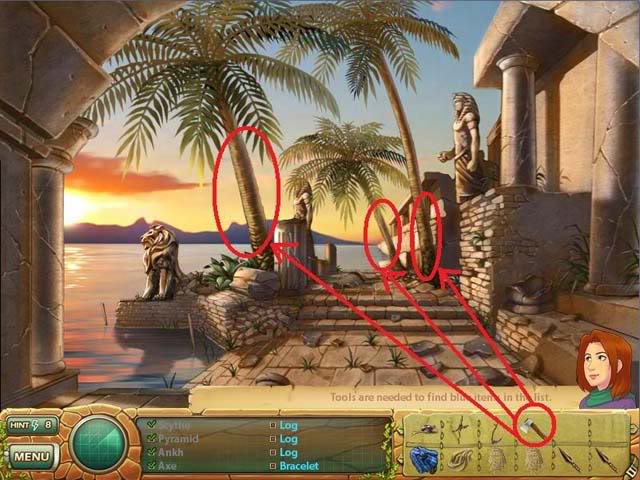
Hidden Items: Log x 3, Bracelet
- Use the axe on the three palm trees to get three logs.
- The bracelet will appear after you’ve chopped the trees down.
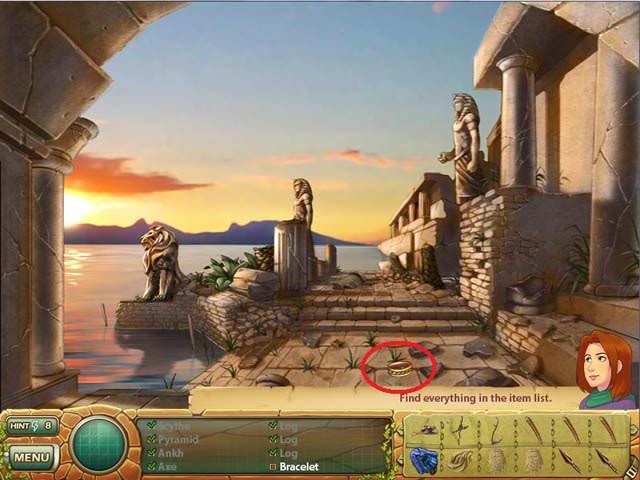
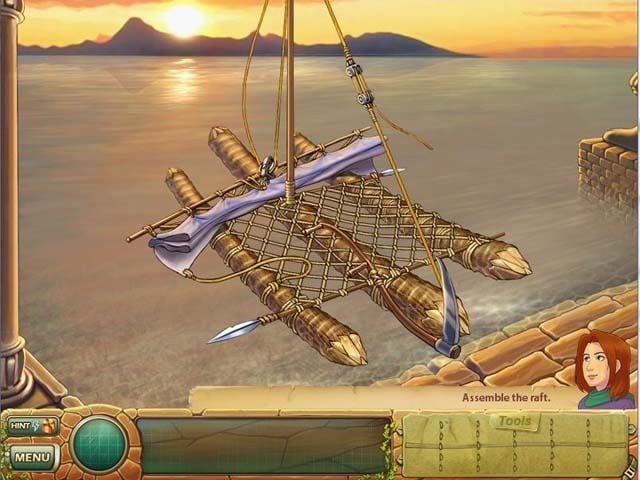
Click on the dock (the cursor will turn green) to assemble the raft.
Assembling the raft
- Start by placing the three logs on the water.
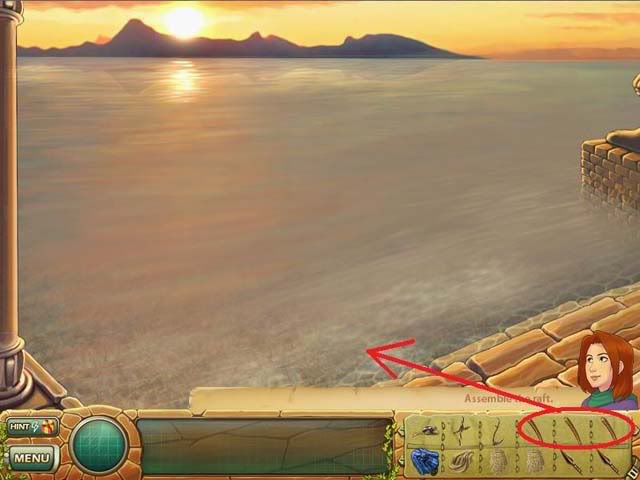
- Place the two spears on top of the logs, followed by the two fishing nets.
- Next, place the mast, then the scythe, then the coil of rope.
- Next, place the pulley, and finally place the parachute to function as a sail. When you’re finished it will look like the screenshot below:
From the dock, click on the lower right side of the screen to return to the library.
Mural Room
Find the items on the list.
Tools to find: Pick Axe, Mirror Plate, Metal Plaque
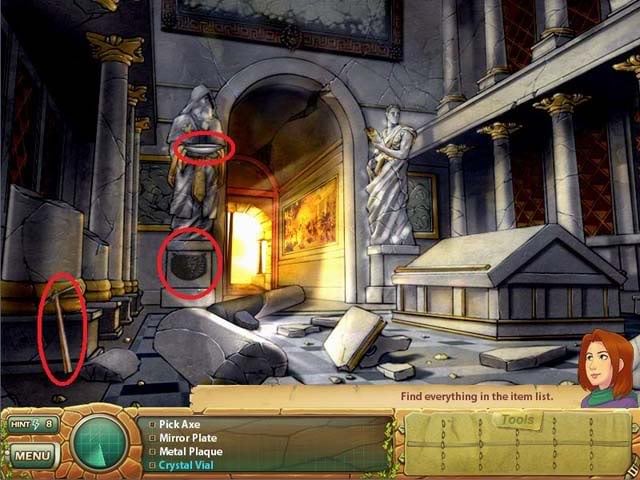
Hidden Item: Crystal Vial
- Use the Pick Axe on the stone column near the entrance.
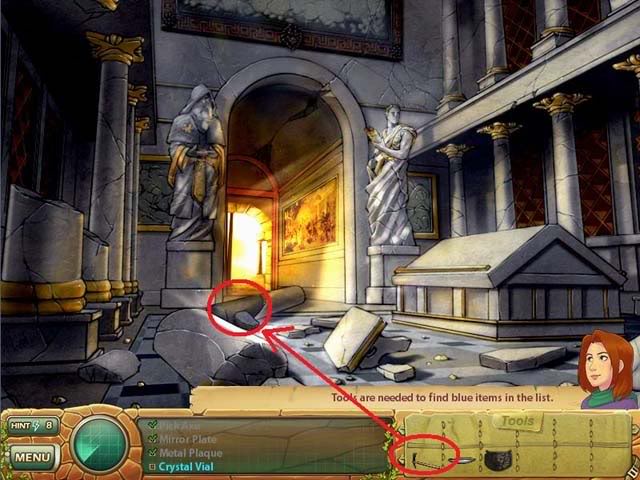
Return to the dock to complete the raft.
Dock
It is now dark outside. You’ll see what looks like a white illuminated area on the right wall of the library. Click on it to take the map.
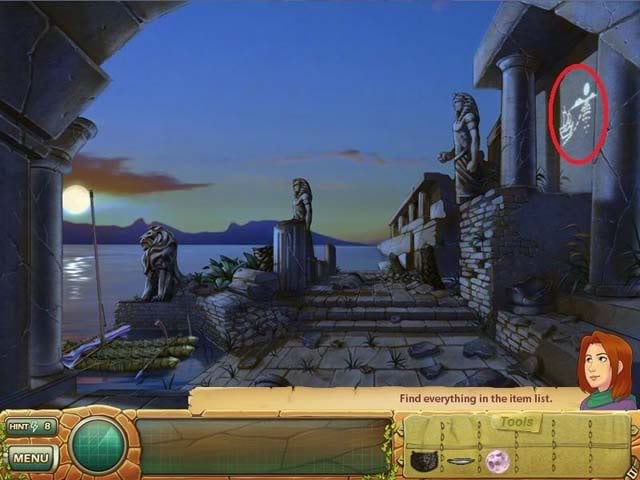
Next, click on the raft to finish building it.
Finishing the Raft
- Use the metal plate on the scythe to complete the rudder. Next, add the mirror plate to the raft, followed by the crystal vial.
- Click on the sail to raise it, and the raft will launch.
Rosetta Dock
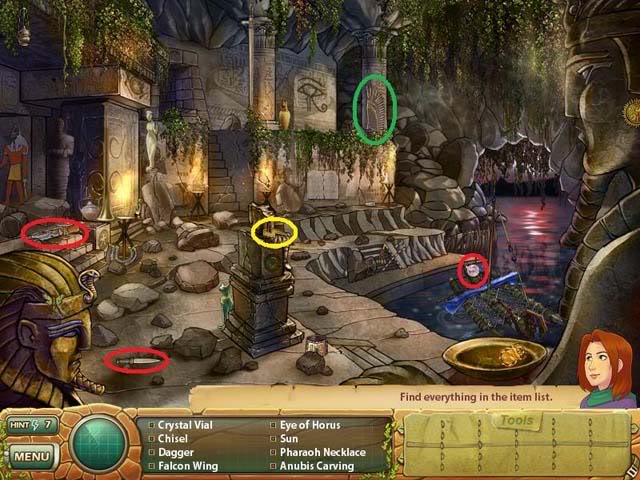
Find all the items on the list.
Tools to find: Crystal Vial, Chisel, Dagger
Museum item: Falcon Wing
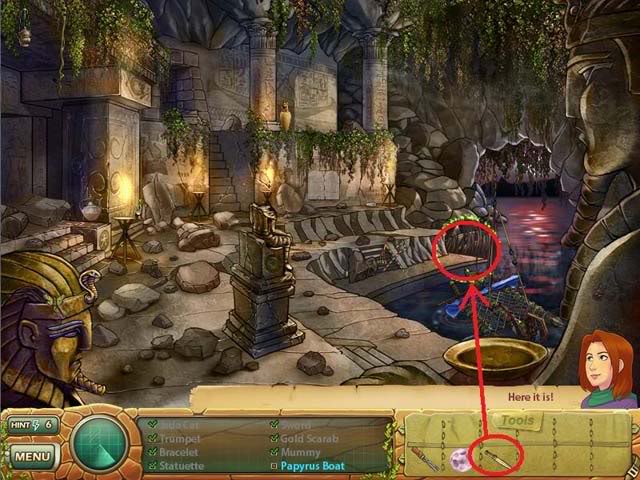
Hidden Item: Papyrus Boat
- Use the dagger on the reeds near the water.
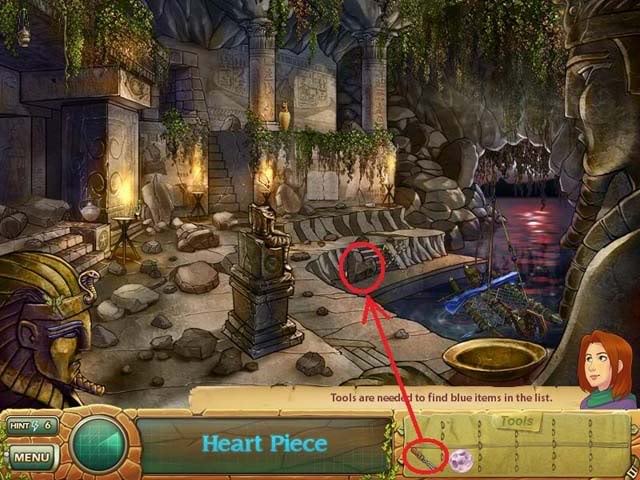
Secret Item: Heart Piece
- Use the chisel on the boulder near the water.
Statue Room
Find all the items on the list.
Tools to find: Heart Piece x 5
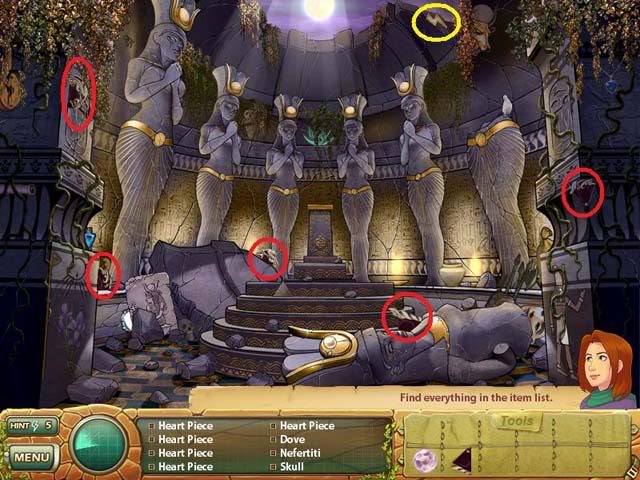
Click on the pedestal in the center of the room (the cursor will turn green) to zoom in.
Mini-Game: Assemble the Golden Heart of Midas
Place the heart pieces to reassemble the heart. This is similar to the mural mini-game, but you don’t have to rotate the pieces this time.
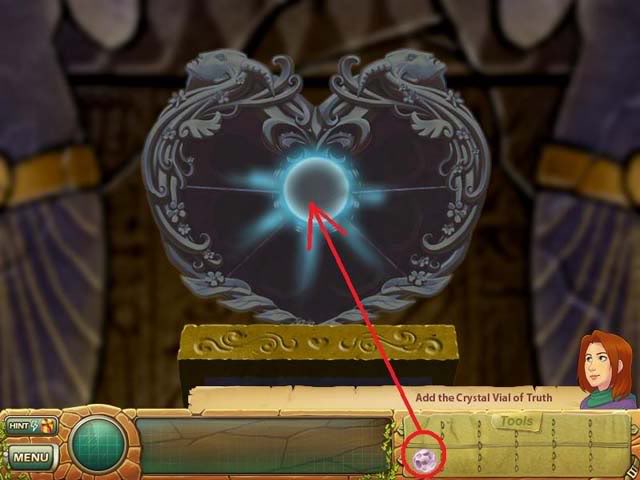
When finished, add the crystal vial of truth to the center.
STAGE 2: FINDING BEAUTY
Entrance
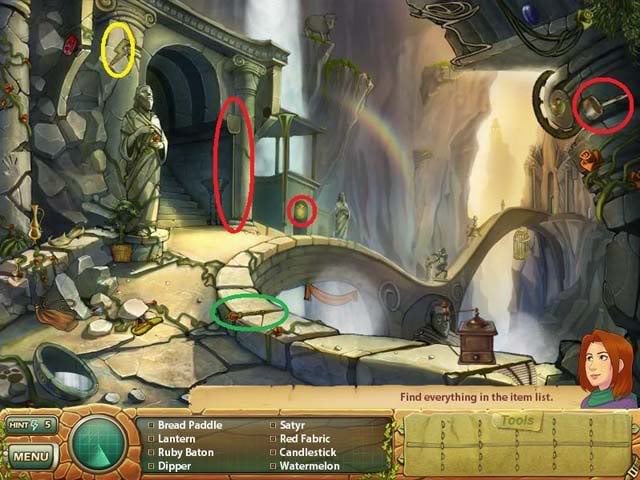
Find the items on the list.
Tools to find: Lantern, Dipper
Museum item: Ruby Baton
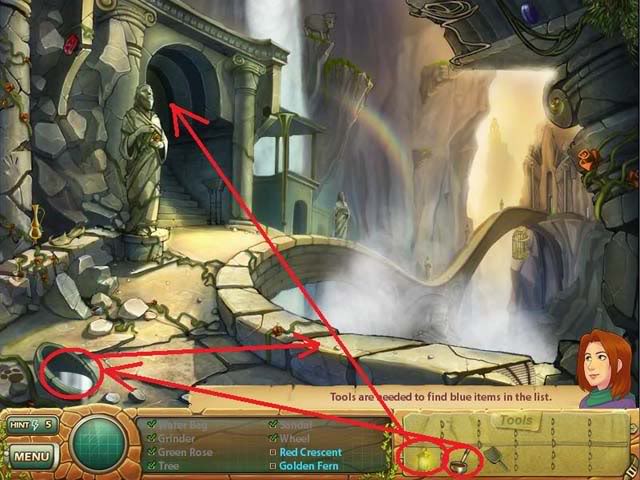
Hidden Items: Red Crescent, Golden Fern
- Use the lantern on the dark staircase to illuminate the wall. The red crescent appears on the wall for you to take.
- Use the dipper in the basin of water to fill it with water, then use the dipper with water on the stone ledge to cause the golden fern to sprout.
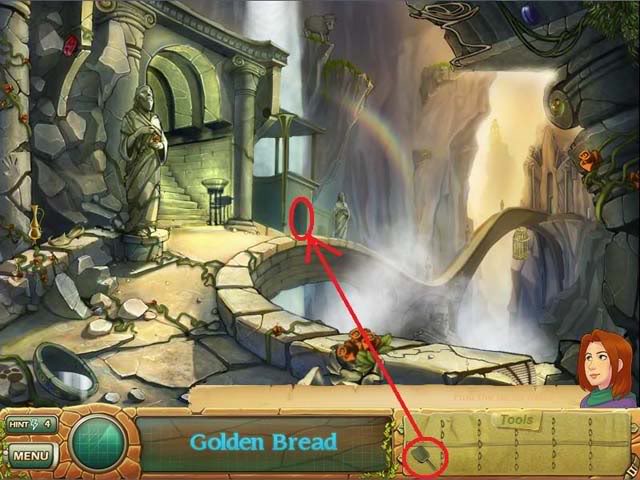
Secret Item: Golden Bread
- Use the bread paddle on the small opening in the structure to retrieve the bread.
Water Room
Find the items on the list.
Tools to find: Hook, Pliers, Hoe
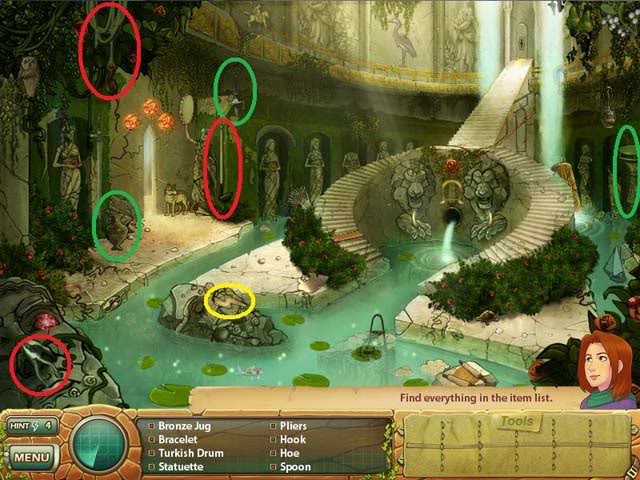
Hidden Items: Jewel Box, Golden Goblet, Beads
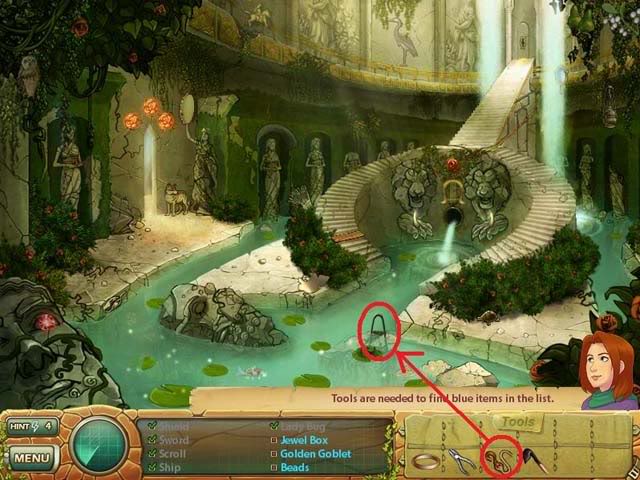
- Use the hook on the wire jutting out of the water to expose the beads.
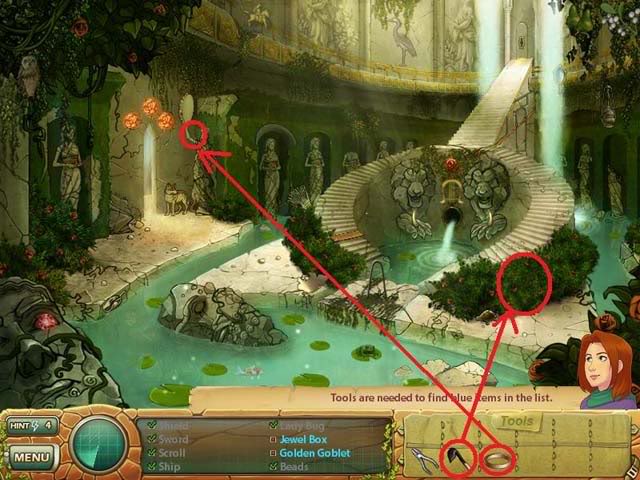
- Use the hoe on the center of the bushes to reveal the jewel box.
- Put the bracelet onto the statue near the door to reveal the golden goblet.
Secret Item: Key
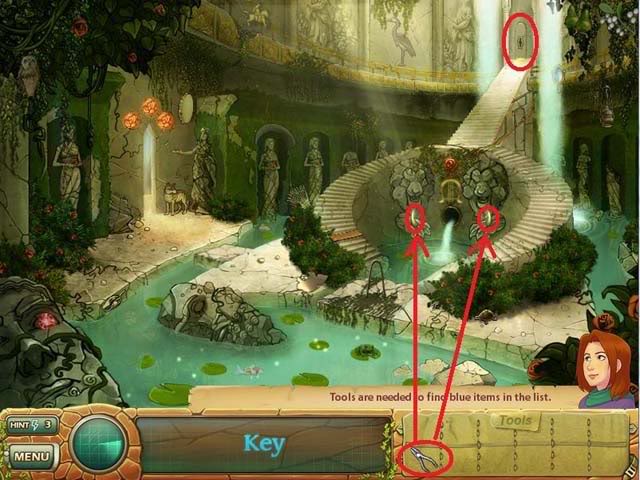
- Use the pliers on either of the thorns in the lions’ paws on either side of the fountain to get the key.
- Use the key on the keyhole at the top of the stairs to exit the room.
Midas’ Tomb
Find the items on the list.
Tools to find: Yellow Roses, Purple Roses, Green Roses, Blue Roses, Tiara x 4
Museum item: Oil Lamp
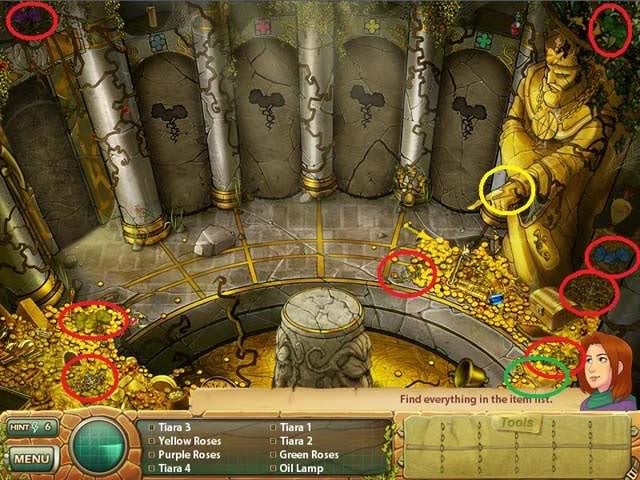
Hidden Items: Gold Roses x 4
- Place the four colored roses into the indents in the wall corresponding to the color of the flower above each indent. (See screenshot.)
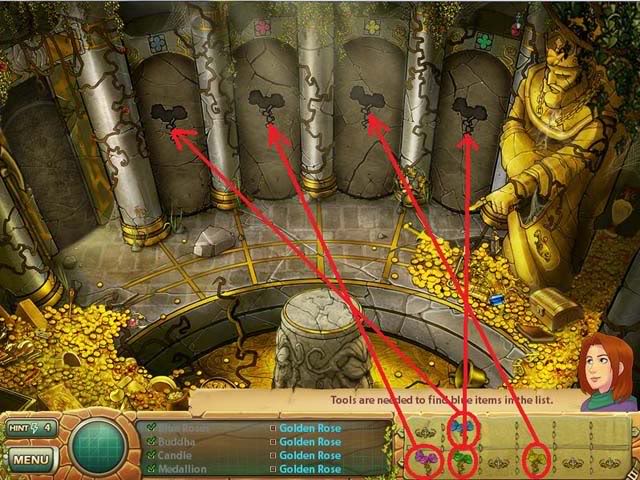
- Four statues will appear. Take the four gold roses that appear in the hands of each statue. You’ll receive the Golden Bouquet.
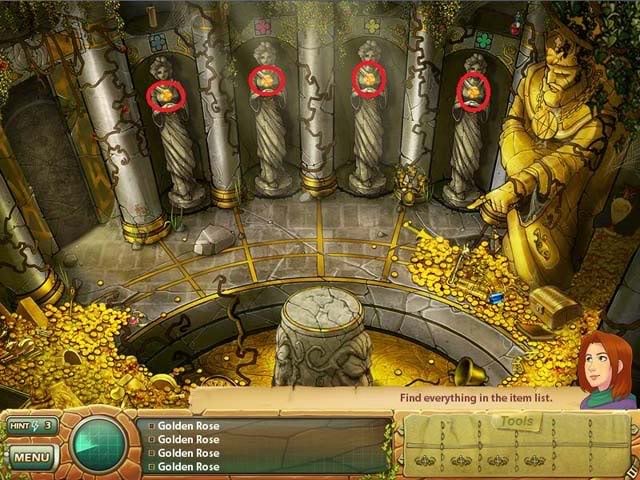
- Place a tiara on each statue’s head to exit the room.
Turkish Baths
Find all the items on the list.
Tools to find: Bag of Coins, Goblet, Jade Ball
Museum item: Helmet
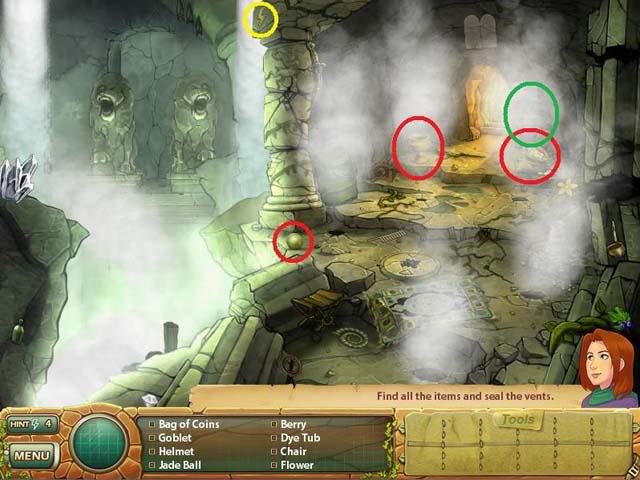
Hidden Items: Skull, Gold Plate, Gold Fork, Jewel
- Use the bag of coins, goblet and jade ball to plug up the three steam holes. This will reveal the skull, gold plate and jewels to take.
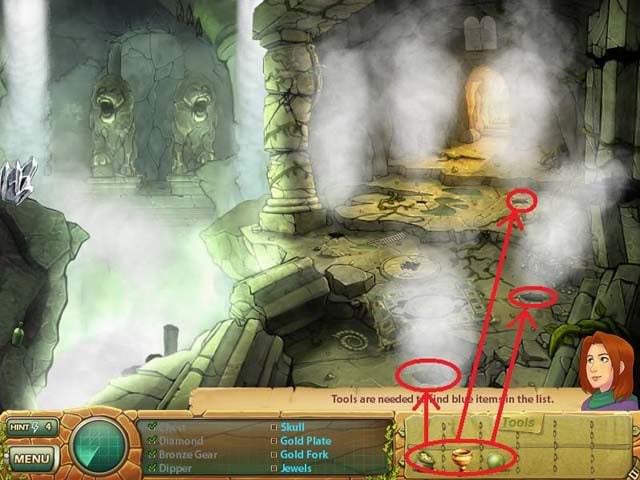
- Use the jewels and skull on the remaining two steam holes to reveal the gold fork to take, and reveal the location of the wheel crank
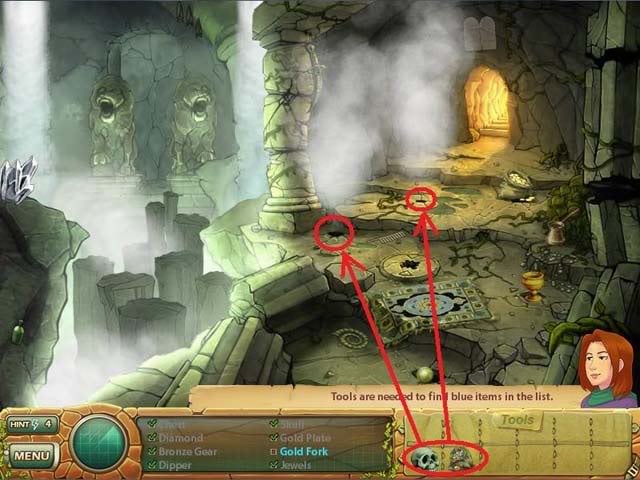
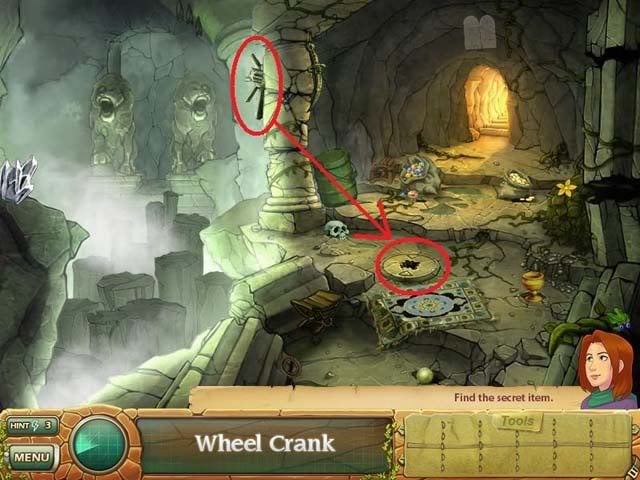
Secret Item: Wheel Crank
- The wheel crank will be revealed when you plug up the last steam hole. Take it, then use the crank on the gear on the ground to reveal the exit to the room.
Untying the Knots
Puzzle 1:
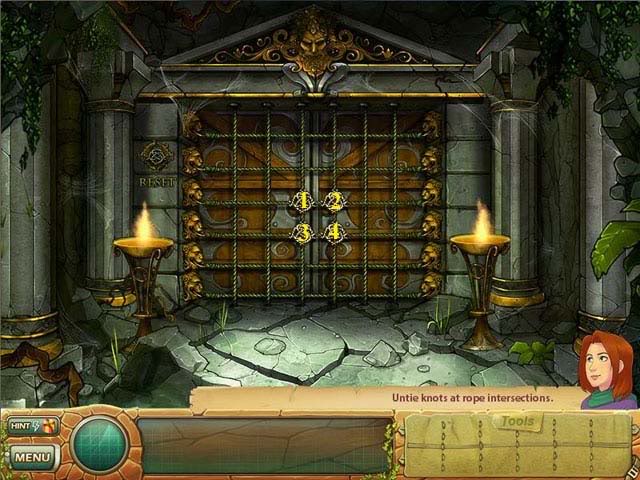
Click the knots in the following order: 4, 1, 2, 3
Puzzle 2:
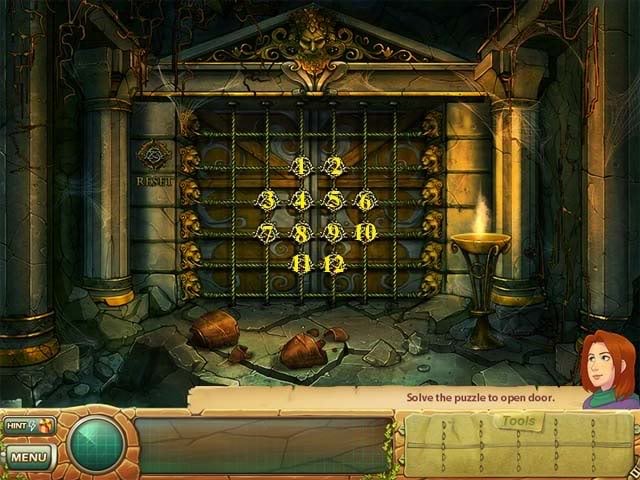
Click on the knots in the following order: 1, 7, 6, 12
Puzzle 3:
There are two ways to solve the last puzzle. The first way is by untying the knots.
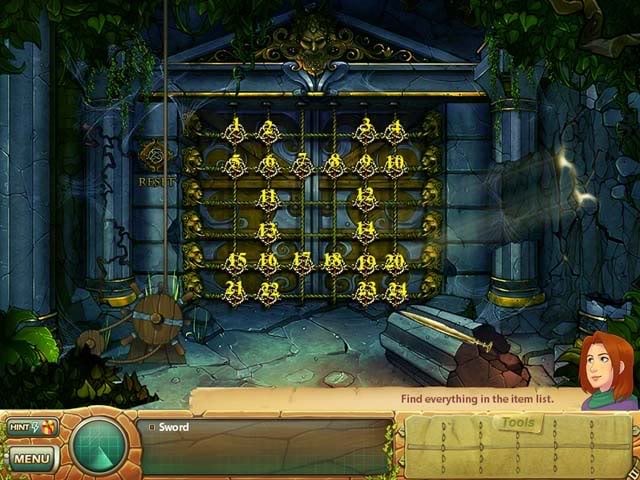
- Click on the knots in the following order: 1, 4, 21, 24, 7, 13, 18, 12
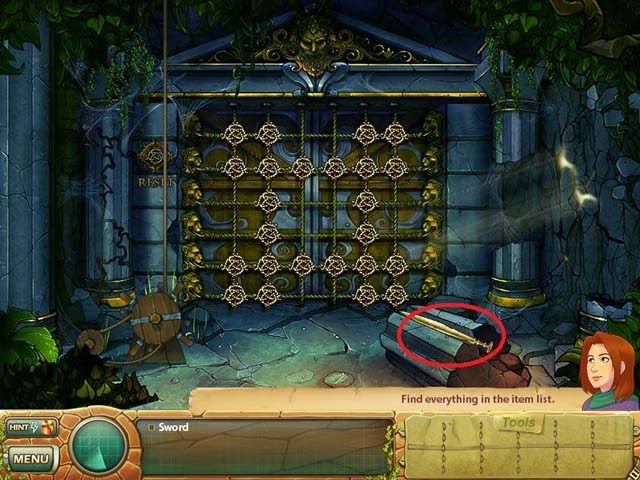
- Or, if you know your ancient history you’ll remember that Alexander the Great used a different method to solve the riddle of the Gordian Knot – he pulled out his sword and simply chopped his way through! Pick up the sword on the ground (it will appear as you approach the third puzzle) and use it on the knots to take a short cut through the door.
Back Room
Find the items on the list.
Tools to find: Staff
Special items: Swift Symbol, Stuffed Toy
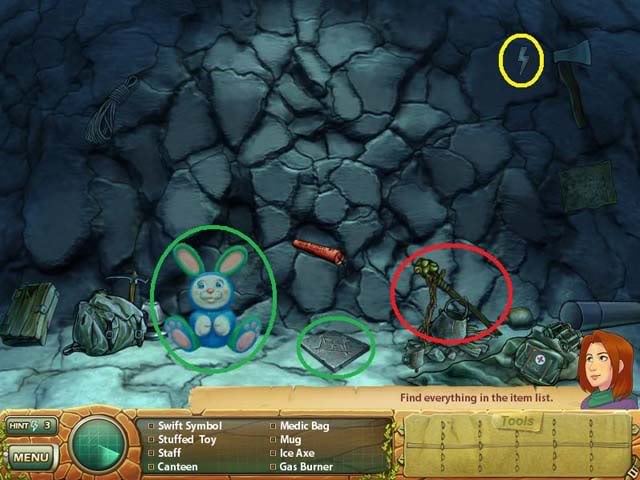
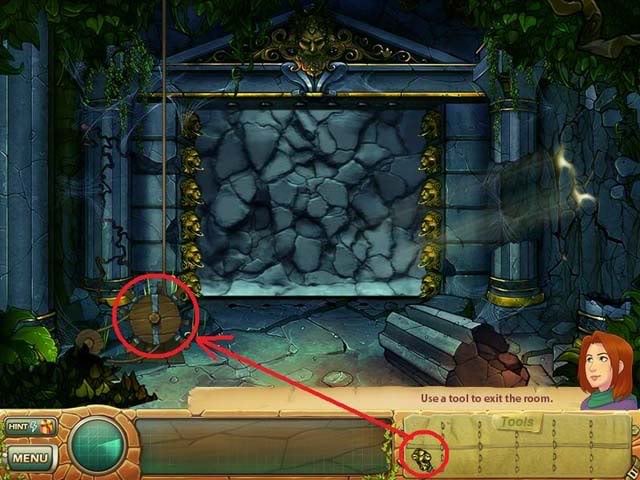
Exit the room, then use the staff on the turning wheel to expose an exit.
Statue of Zeus
Find the items on the list.
Tools to find: Water Bowl, Grain, Tongs
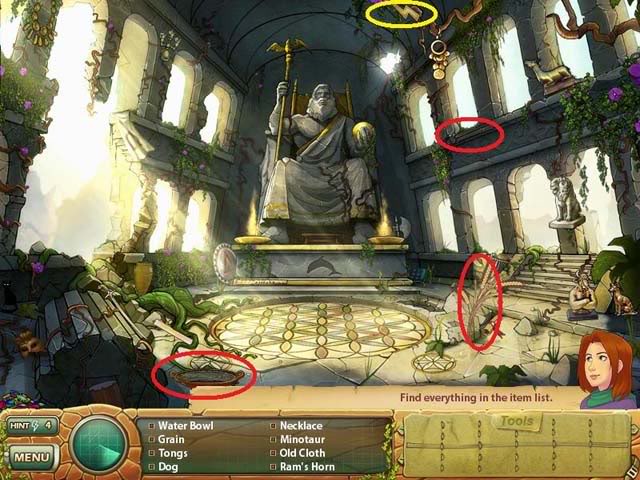
Hidden Items: Dove, Amethyst, Emerald
- Set the grain down on the floor in front of the statue. A flock of doves will swoop down to feed. Eventually they’ll all fly away except the white one, which you can click on.
- Use the water bowl on one of the fires in front of the statue, and use the tongs on the other fire, to retrieve the amethyst and emerald.
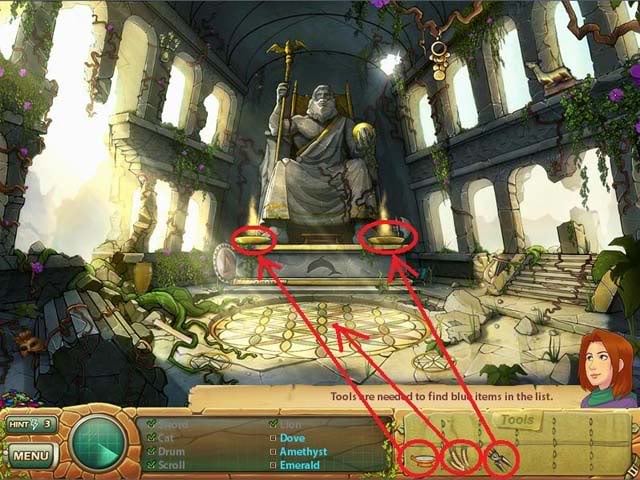
Secret Item: Vial of Beauty
- Click on the floor in front of the statue to zoom in and play a mini-game.
Mini-Game: Flower Petals
- The goal is to rotate the petals until you make four flowers in each corner. Each flower must correspond to the color of the flower in the symbol next to it. (So, upper left = red, upper right = blue, lower left = green, lower right = yellow).
- You can rotate the petals by pressing the yellow circles. In the screenshot below I’ve numbered each circle.
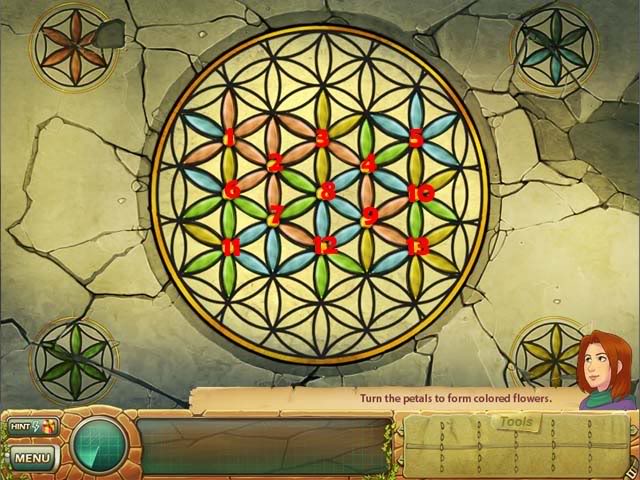
- For the solution, press the circles in the following order:
- Blue: Rotate #10 five times. Rotate #4 three times.
- Red: Rotate #1 two times. Rotate #6 one time. Rotate #1 five times. Rotate #2 one time.
- Green: Rotate #7 one time. Rotate #11 one time. Rotate #7 one time. Rotate #11 three times. Rotate #7 one time.
- Yellow: Rotate #9 one time. Rotate #8 four times. Rotate #13 one time. Rotate #9 three times. Rotate #13 four times. Rotate #3 three times. Rotate #8 four times. Rotate #9 three times.
Retrieve the Vial of Beauty from the floor.
STAGE 3: FULFILLING THE BASICS: SUSTENANCE
Waterfall
Find all the items on the list.
Tools to find: Hand Saw, Catnip, Shovel, Panther Tooth
Museum items: African Art
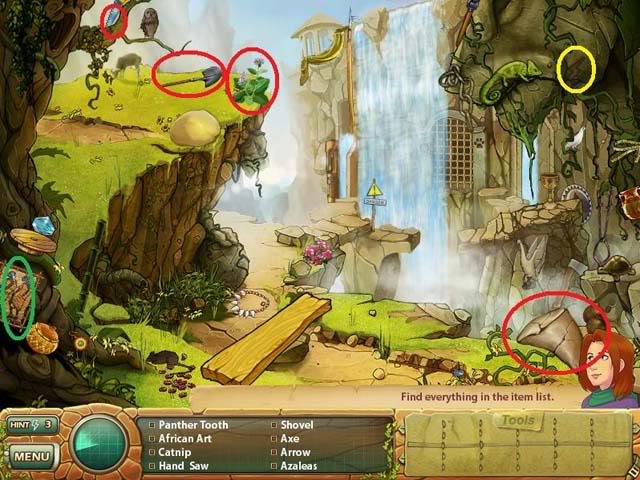
Secret Item: Panther Stamp
- Use the catnip on the mouth of the panther statue.
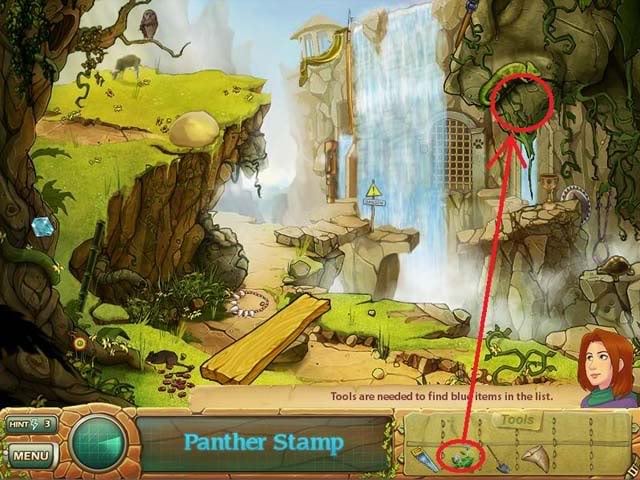
Waterfall – Fixing the path
- Use the Panther Tooth on the edge of the plank of wood.
- Next, use the shovel on the boulder on the cliff.
- Finally, use the panther stamp on the paw print near the door.
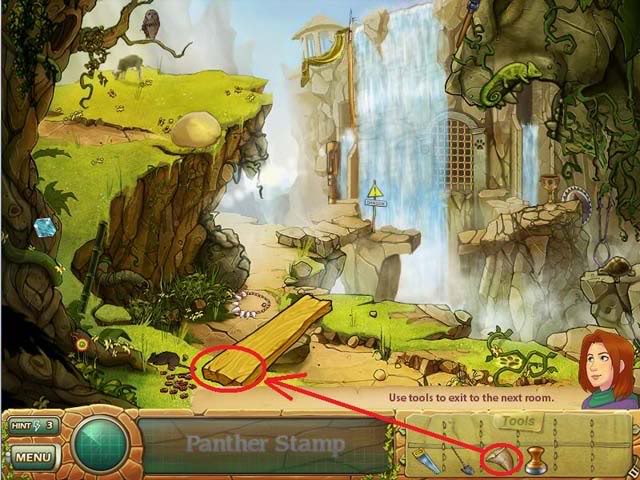
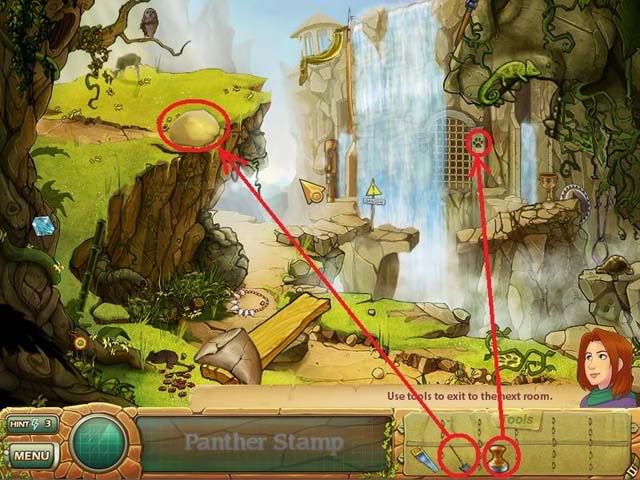
Exit the area.
Elephant Room
Find all the items on the list.
Tools to find: Ring 1, Ring 2
Museum items: Gold Tusk
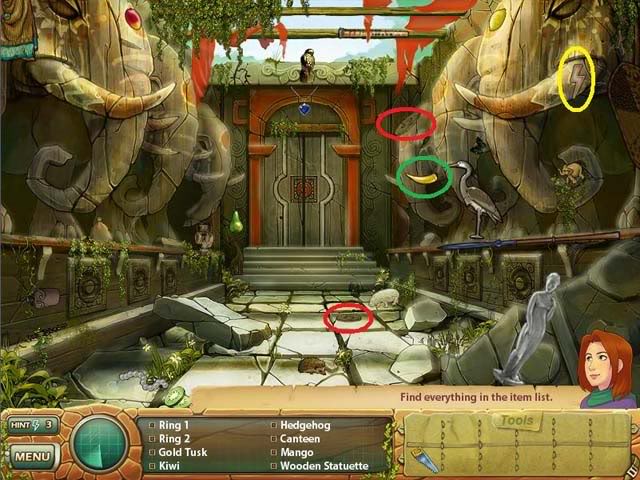
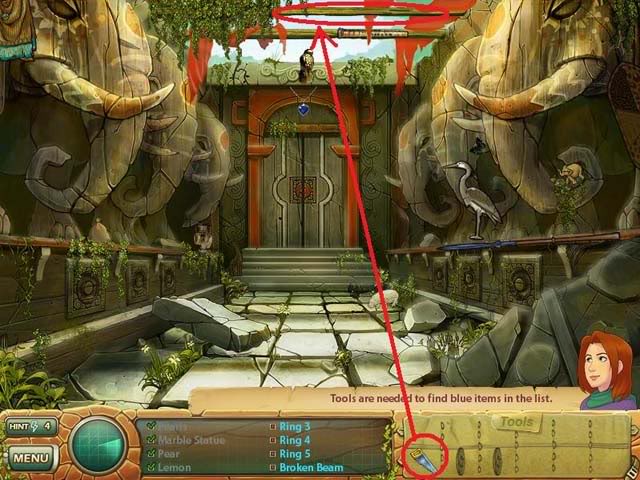
Hidden Items: Ring 3, Ring 4, Ring 5, Broken Beam
- Use the hand saw on the top beam along the top of the screen. The broken beam and three rings will fall to the ground.
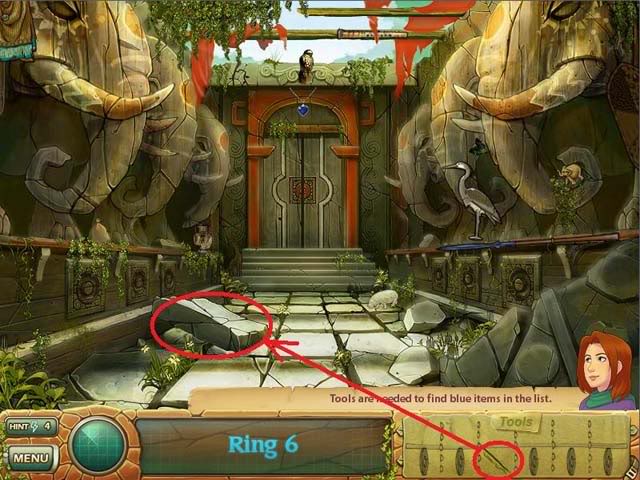
Secret Item: Ring 6
- Use the broken beam on the slab of rock on the ground.
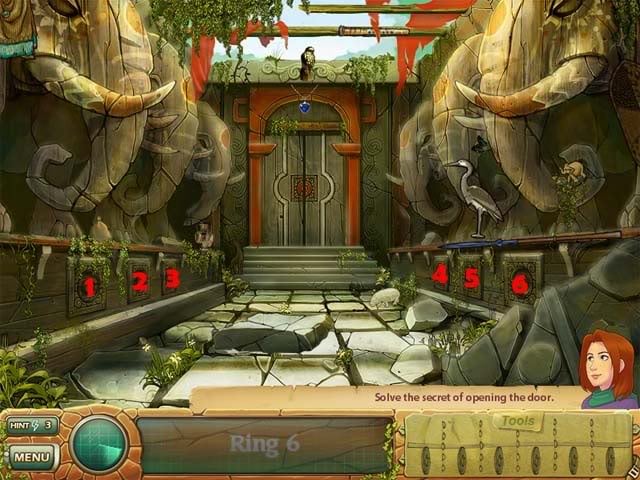
Opening the door
- Fit each of the six rings into the ring-shaped indentations in front of the elephant statues along either side of the pathway.
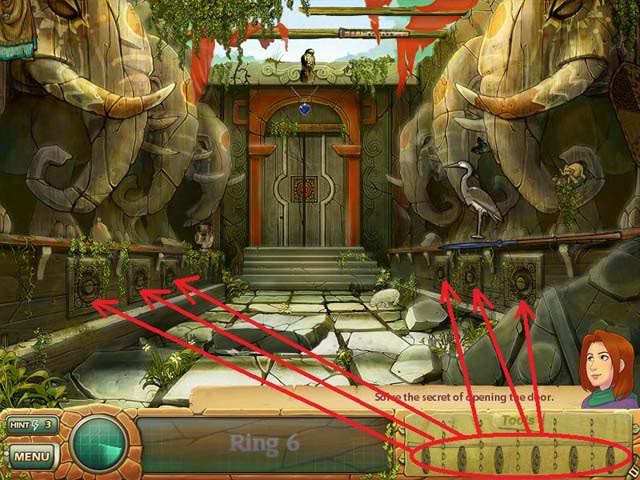
- Now, when you press each ring, statue behind it’s eye lights up. Match the colors on either side.
- Press the rings in the following order based on the numbering in the screenshot below: 3 and 6; 2 and 4; 1 and 5.
Palace
Find all the items on the list.
Tools to find: Knife
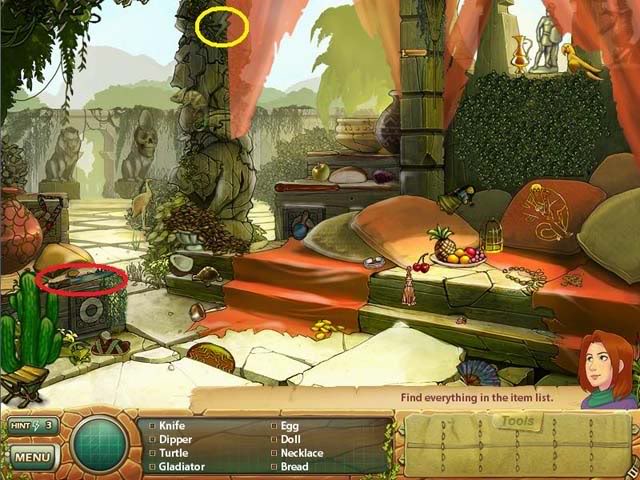
Hidden Item: Eagle Board
- Use the knife on the vines behind the cushions.
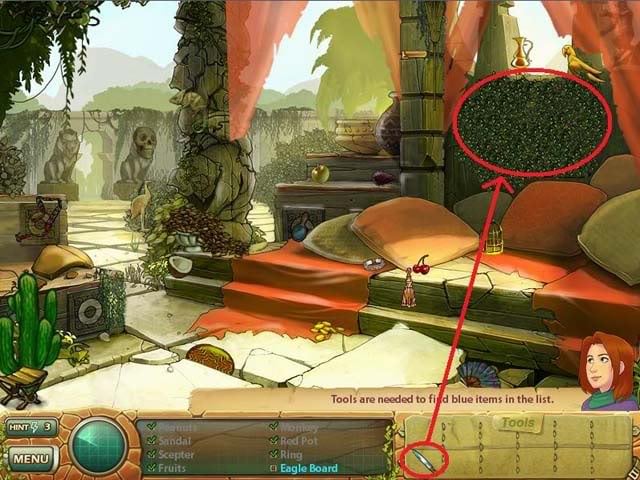
Secret Item: Sheba’s Scroll
- Zoom in on the area behind the Eagle Board for a mini-game.
Palace – Mini-Game
- The goal is to slide the pieces around until you find all the keys. The screenshot below is your starting position:
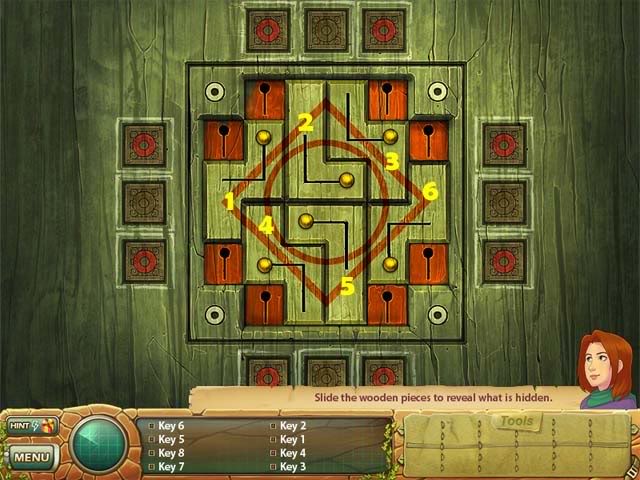
- Move the pieces in the following order: slide piece #6 down. Grab the Key 1. Slide piece #1 up. Grab key 3. Slide piece #4 to the left. Grab key 4. Slide piece #5 to the left. Grab Key 6 and Key 8. Slide piece #6 to the left.
- At this point, your screen will look like this:
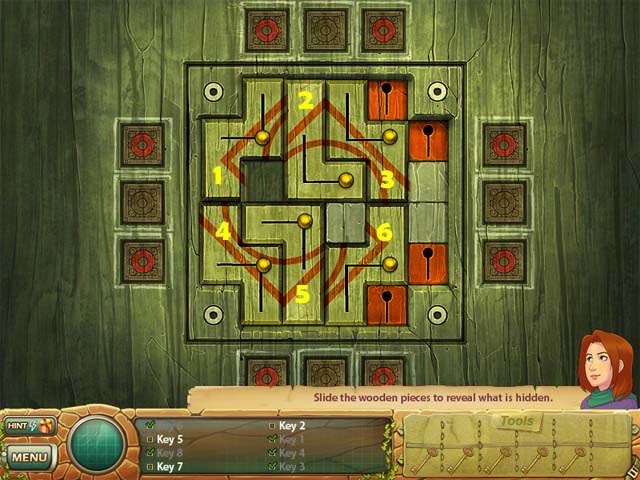
- Use four of the keys from your inventory on each of the red keyholes to unlock them.
- Slide piece #3 to the right, and pick up Key 2. Slide piece #2 to the right and pick up Key 5 and Key 7. Slide piece #1 to the right, and use two keys on the two red keyholes that get uncovered.
- Slide piece #1 back to the left. Slide piece #6 to the right. Slide piece #5 to the right (you might have to click it a few times before it moves right). Slide piece #4 to the right to reveal the final two keyholes. Use your two remaining keys on the keyholes to finish the puzzle. Click on Sheba’s Scroll.
Jerusalem – Courtyard
Find all the items on the list.
Tools to find: Diamond Top, Star of David, Brush, Seal
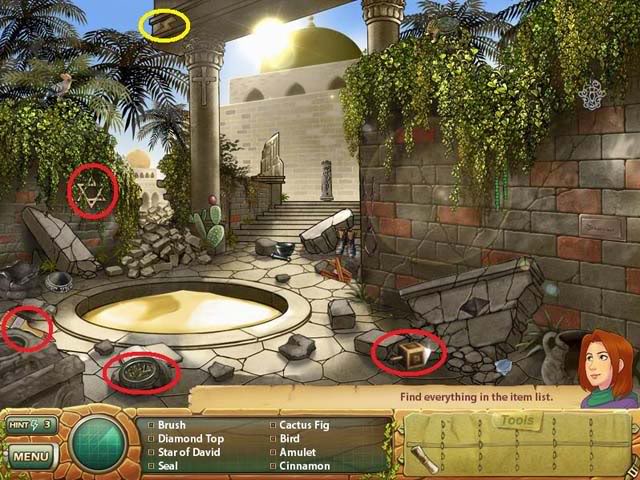
Hidden Items:
- Use the diamond top on the crumbling rock to get the horn.
- Use the brush on the pool of sand to get the camel statue.
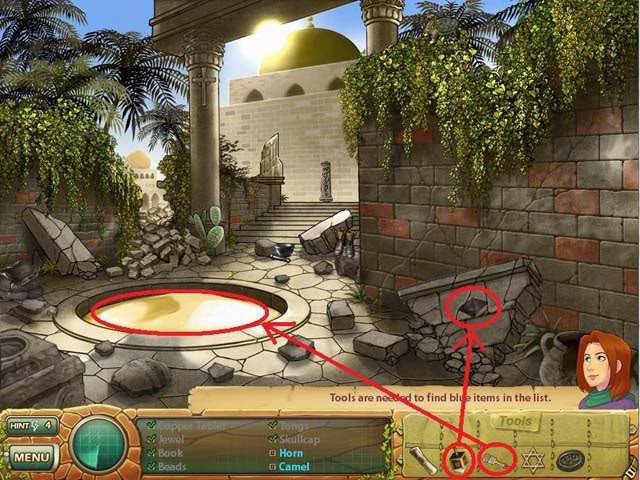
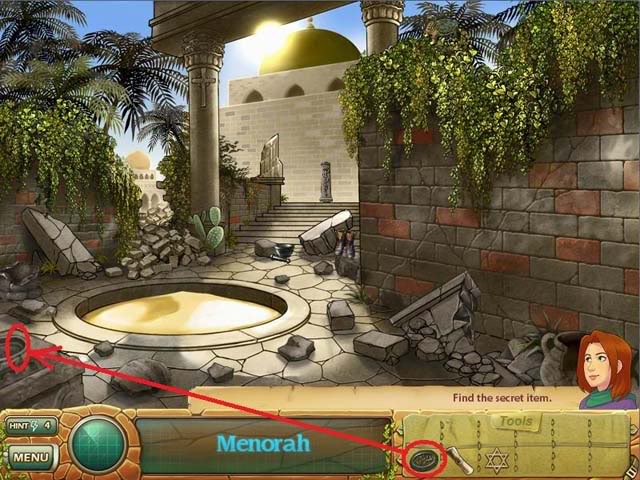
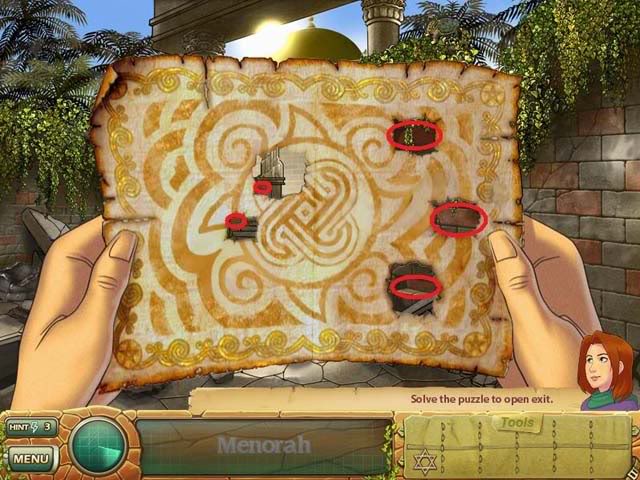
Secret Item: Menorah
- Use the seal on the stone indent in the lower left corner.
Finding the exit:
- Click on the scroll in your inventory to hold it up. Through the holes in the scroll you can see five red bricks. Click on each of them to reveal the exit.
Underground Passage
Find all the items on the list.
Tools to find:
Museum Items: Decorative Jar, Headdress
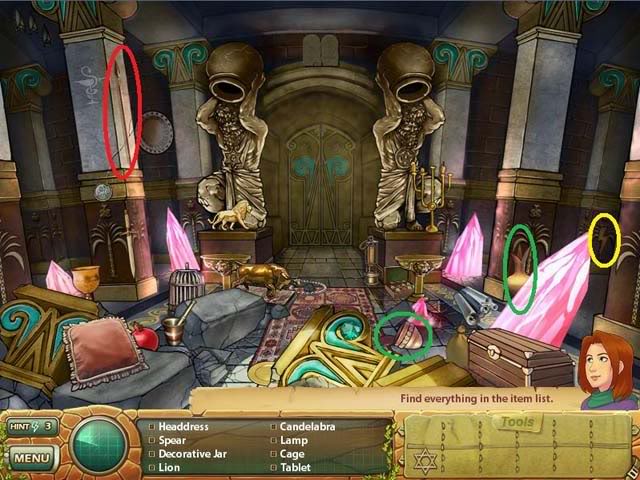
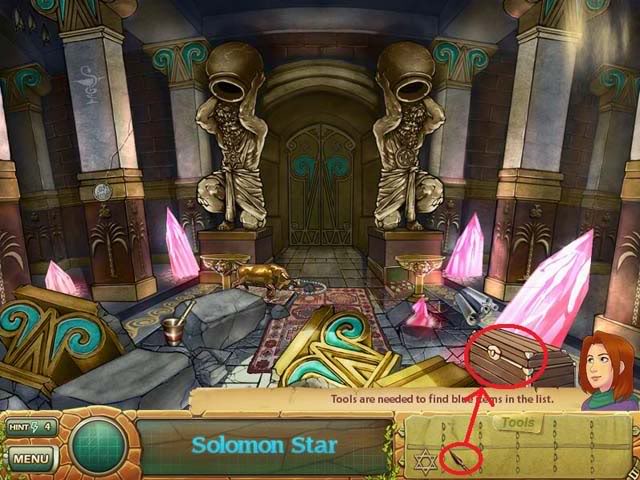
Hidden Item: Solomon Star
- Use the spear on the chest to pry it open.
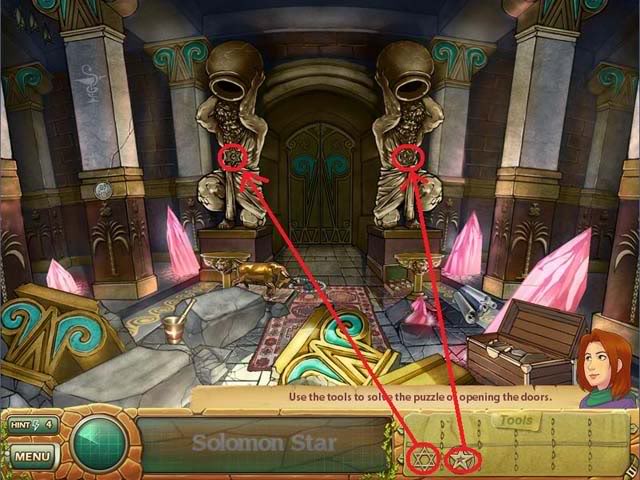
Opening the door
- Use the Star of David and the Solomon Star on the indentations in the statues on either side of the door.
Pink Crystal Room
Find all the items on the list.
Tools to find: Crystal Skull, Gold Earring
Museum Item: Scepter
Special Item: Swift Symbol
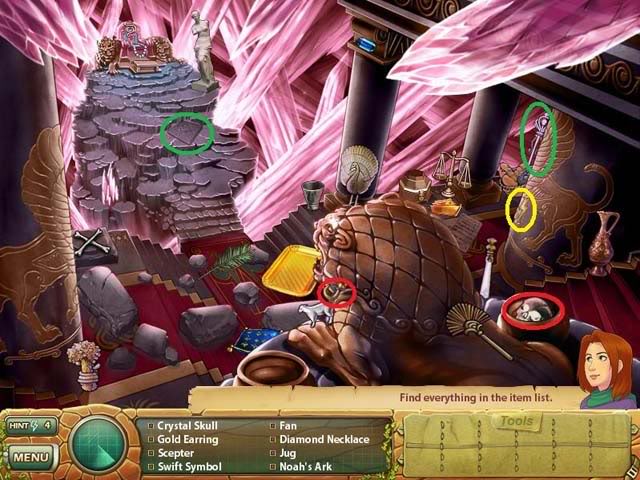
Hidden Items: Trumpet, Crystal Ball, Crystal Bowl, Golden Apple
- Use the gold earring on the jewelry box to get the crystal ball.
- Place the crystal skull on the bones to get the crystal bowl and trumpet.
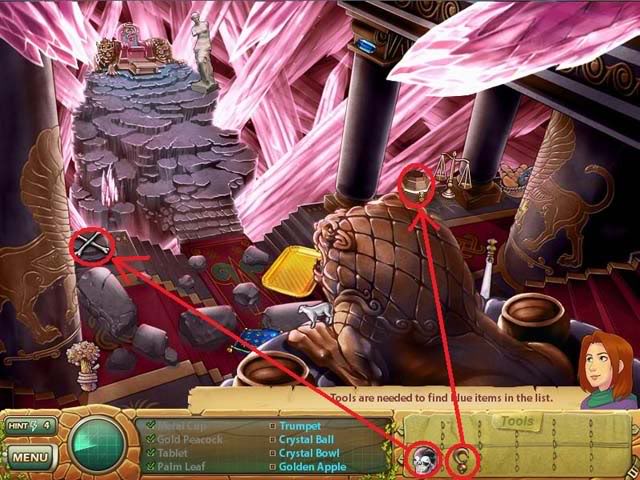
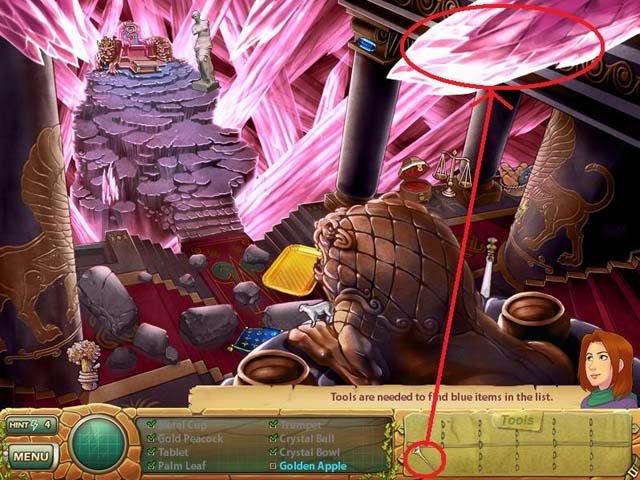
- Finally, use the trumpet on the large pink crystal to get the golden apple.
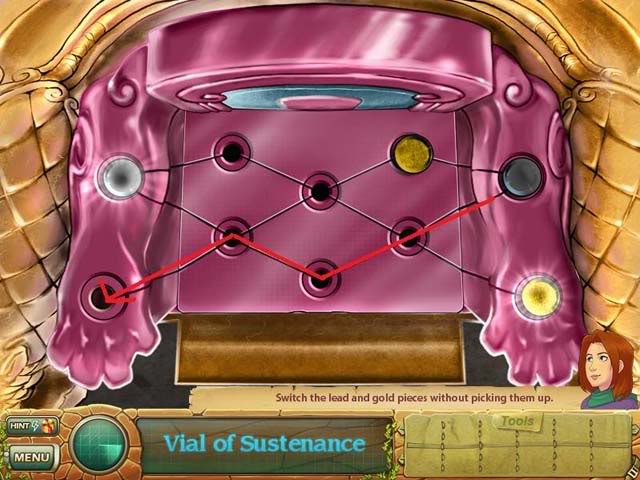
Secret Item: Vial of Sustenance
- Click on the throne at the back of the room to zoom in and play a mini-game.
Mini-Game: Lead Into Gold
- Slide the bottom lead piece three spaces diagonally upwards:
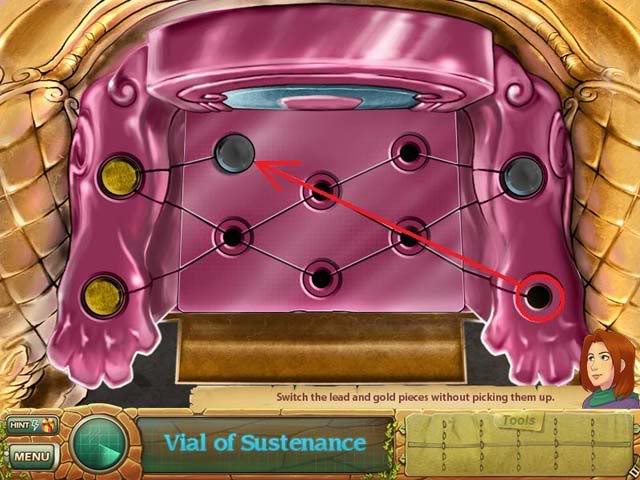
- Now slide the top gold piece into the lower right corner where the lead piece used to be. Slide the first lead piece into the place where the first gold piece used to be.

- Slide the bottom gold piece up three spaces until it’s next to the top lead piece. Slide the top lead piece out and move it down into the lower left corner. Slide the gold piece into the remaining spot where the lead piece used to be.
Casablanca Bar
Find all the items on the list.
Tools to find: Sheet Music, Milk Shake, Trombone
Special Items: Spy Bug, Sudoku Book
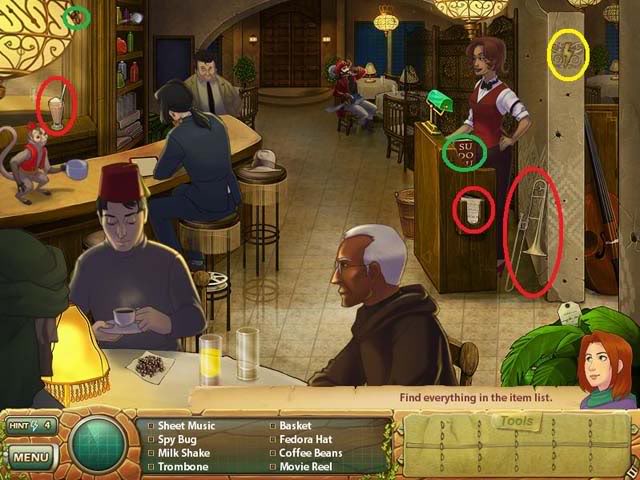
Hidden Items: Briefcase, Stack of Cash, Gold Coin, Bracelet
- Given the milk shake to the man who wants something tasty to get the briefcase.
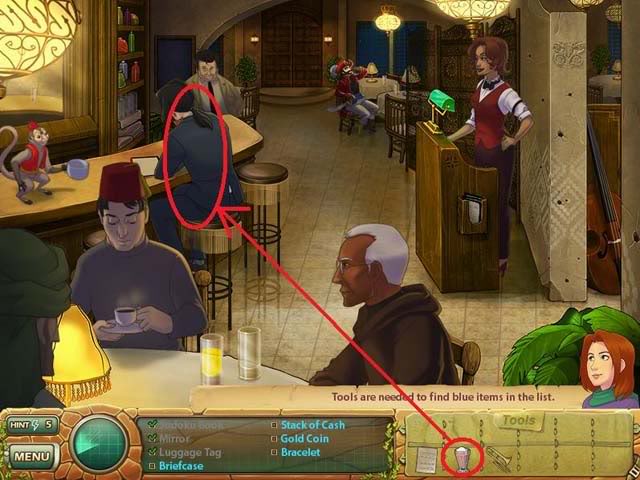
Exit the room to the right.
Casablanca – Billiard Room
Find all the items on the list.
Tools to find: Roulette Ball, Number 22, Bow, Glass of Water, Diamond Ring, Dates
Museum Item: Crystal Wand
Special Item: Heart
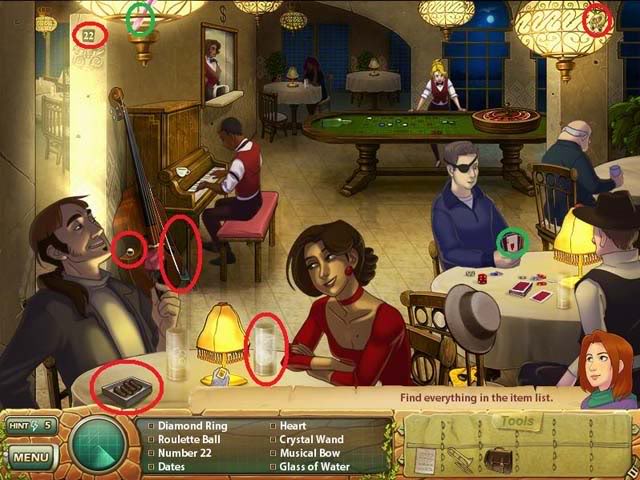
Hidden Items: Hotel Key, Gold Wasps, Swift Symbol, Pendant, Chip Stack, Passport
- Give the briefcase to the bald man to get the gold wasps (cufflinks).
- Use the bow on the upright bass to get the hotel key.
- Use the trombone behind the piano to get the pendant.
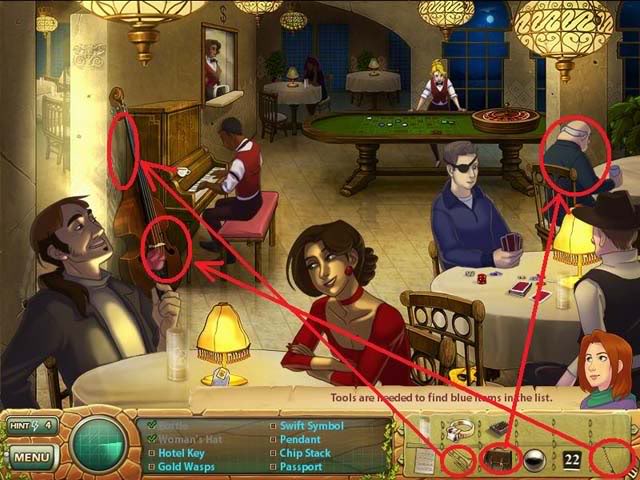
- Put the sheet music on the piano in front of the player to get the Swift symbol.
- Use the number 22 on the roulette table, and put the roulette ball on the roulette wheel. (We’ll have to finish this puzzle later.)
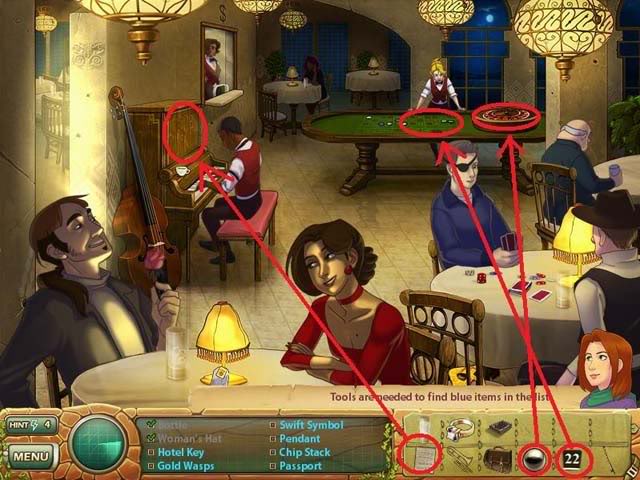
- Go back left into the other room.
Casablanca Bar (revisited)
Hidden Items: Stack of Cash, Gold Coin, Bracelet
- Give the glass of water to the man in the lower left corner to get the gold coin.
- Give the hotel key to the man in the tan jacket at the bar to get the stack of cash.
- Give the dates to the monkey on the bar to get the bracelet.
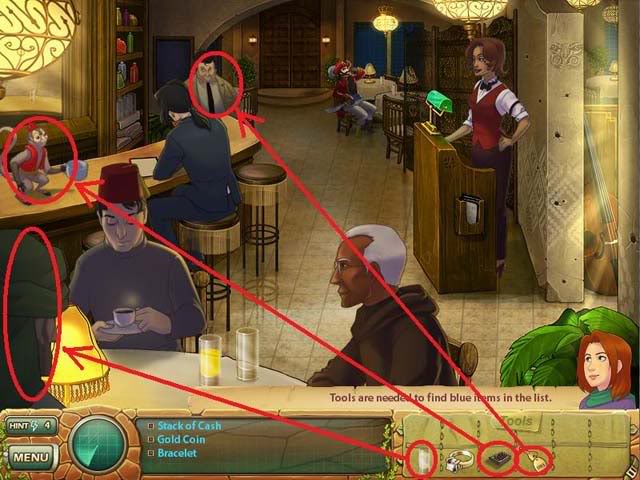
Secret Item: Old Document
- Give the stack of cash to the bartender to get the old document.
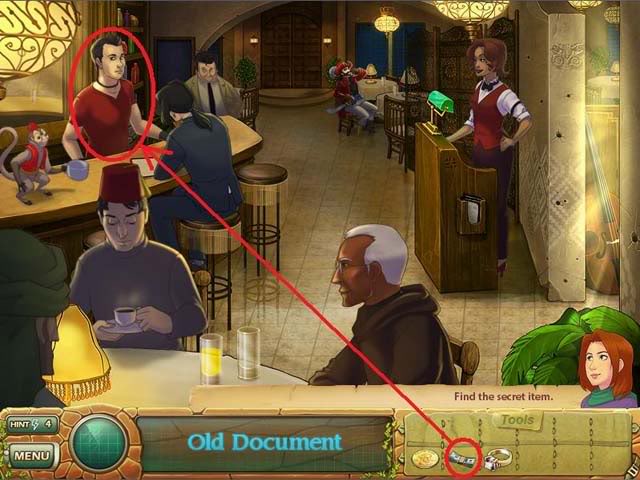
Go back to the billiard room.
Casablanca – Billiard Room (revisited)
Hidden Items: Chip Stack, Passport
- Give the gold coin to the casino worker to get the stack of chips. Then use the stack of chips on the roulette table to get the passport.
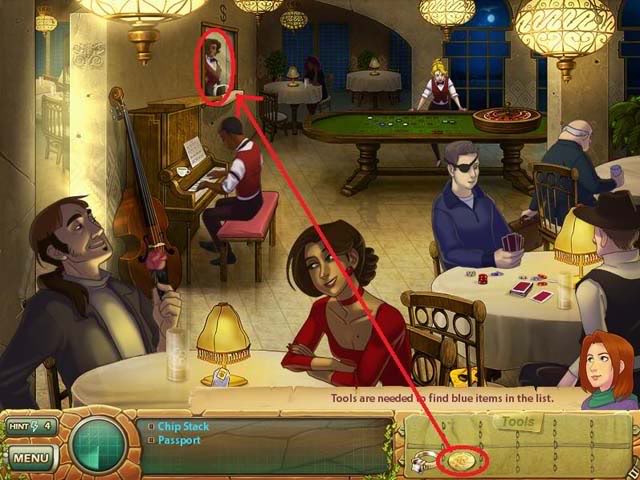
Secret Item: Plane Ticket
- Give the diamond ring to the man holding the rose to get the plane ticket.
- Go back to the entrance room and talk to the lady at the desk. Give her your plane ticket. A pilot will appear by the doorway. Give him the passport and exit.
STAGE 4: BUILDING STABILITY
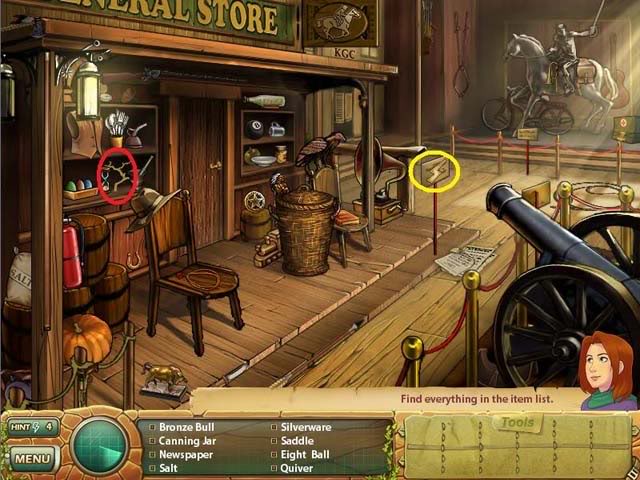
General Store
Find all the items on the list.
Secret Item: Golden Branch
Saloon
Find all the items on the list.
Tools to find: Knife
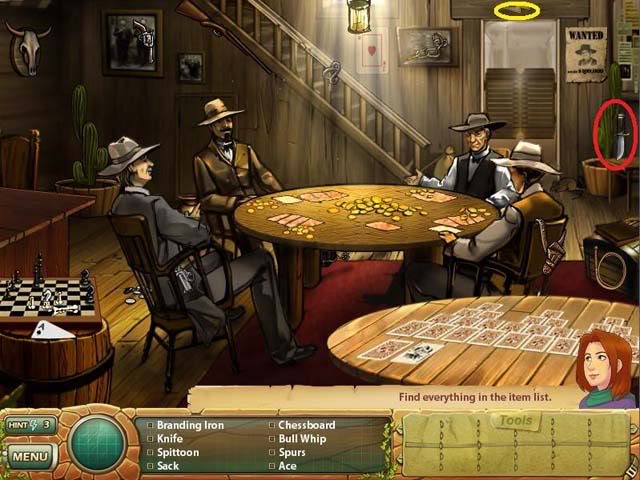
- Click on the poker-table to zoom in and have a chat with Adam on your PDA.
- Next, click on the solitaire table to zoom in for a mini-game.
Mini-Game: Solitaire
- Win a game of solitaire. The card you’ve drawn is in the lower left. Click on cards on the table that are either 1 card lower or higher than the card you drew. When there are no more moves left, click on the pile of face-down cards to draw another card. The Joker is a wild card that can be substituted for a card of any value.
- When you win the game, you’ll receive the three keys.
Saloon
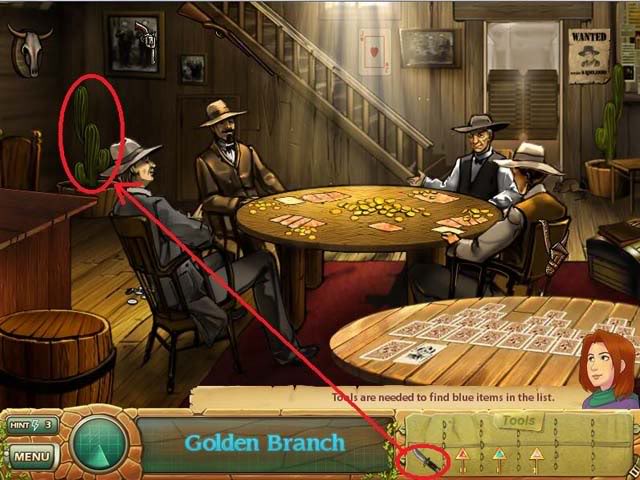
Secret Item: Golden Branch
- Use the knife on the cactus to get the second golden branch.
Exit the saloon.
Mine Entrance – repairing the generator
Tools to find: Fan Belt, Funnel, Fuel, Starter Cord
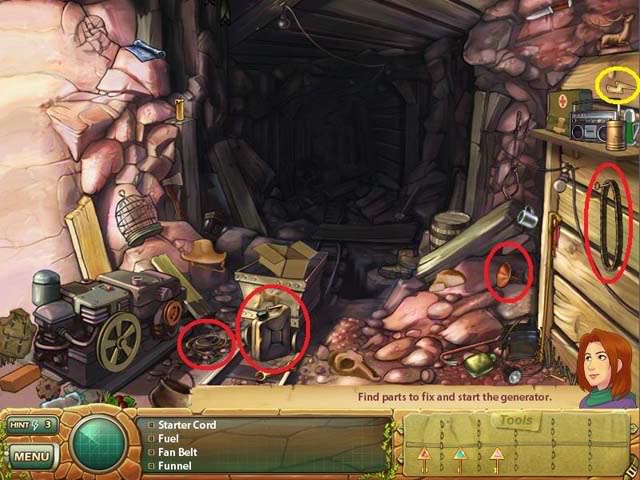
- Put the fan belt on the generator. Next, put the funnel on the opening on top. Use the fuel on the funnel. Finally, put the starter cord on the generator.
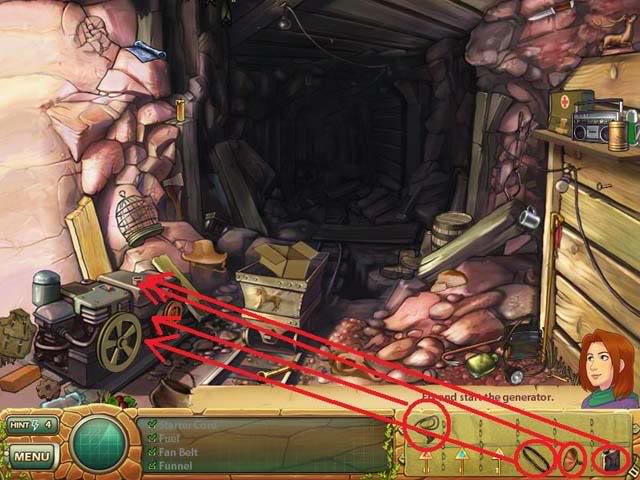
Mine Entrance
Find all the items on the list.
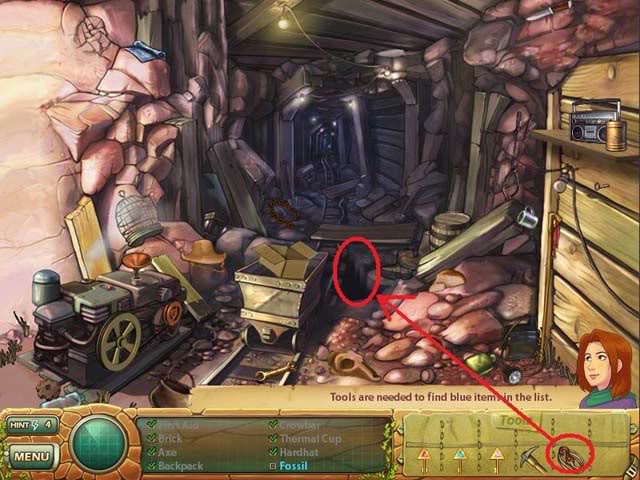
Tools to find: Miner’s Pick, Rope Coil
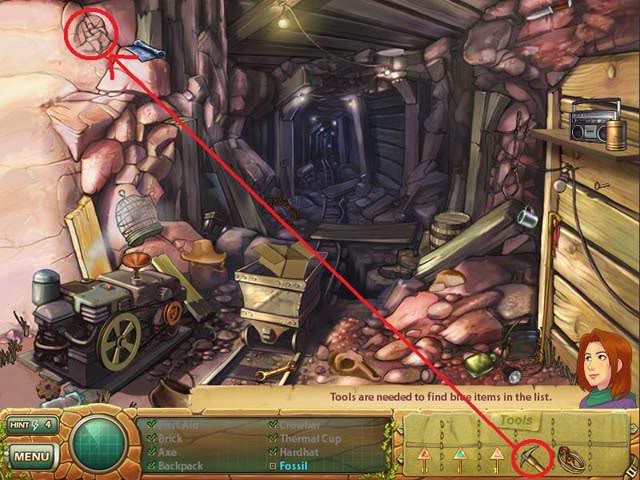
Hidden Item: Fossil
- Use the miner’s pick on the crumbling wall.
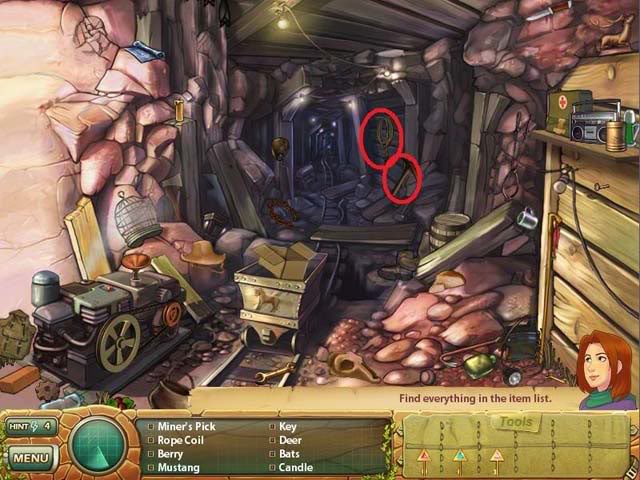
Secret Item: Golden Branch
- Use the rope coil on the hole in the ground.
Mine
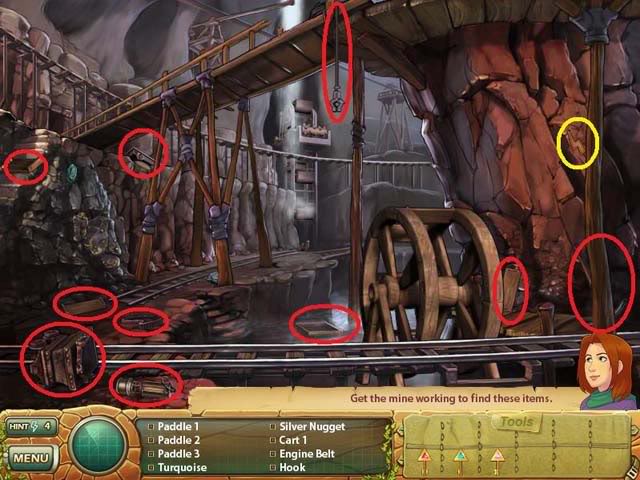
Find all the items on the list.
Tools to find: Paddle x3, Cart x2, Engine Belt, Hook, Mining Lamp, Sifter, Miner’s Pick
- Note: You won’t be able to carry all of these tools at once. There will be one left over. When you use a tool to clear up space in your inventory, you can pick up the last one.
Getting the mine working
- Use the engine belt on the machine at the back of the mine.
- Place Cart 2 on the track underneath the machine.
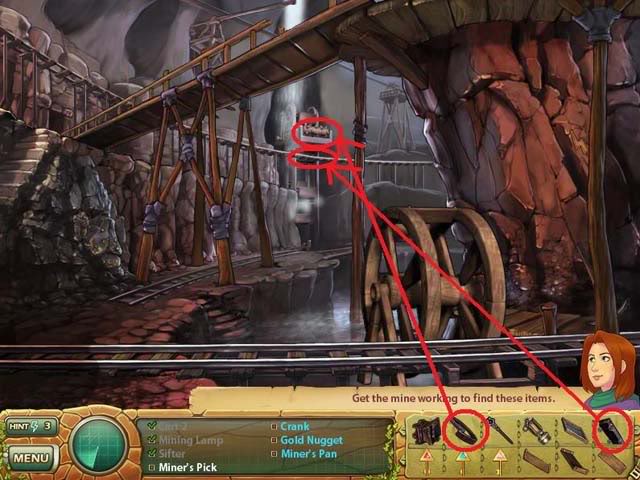
- Use the hook on the crane.
- Place Cart 1 at the edge of the track on the floor.
- Put the three paddles on the mill wheel.
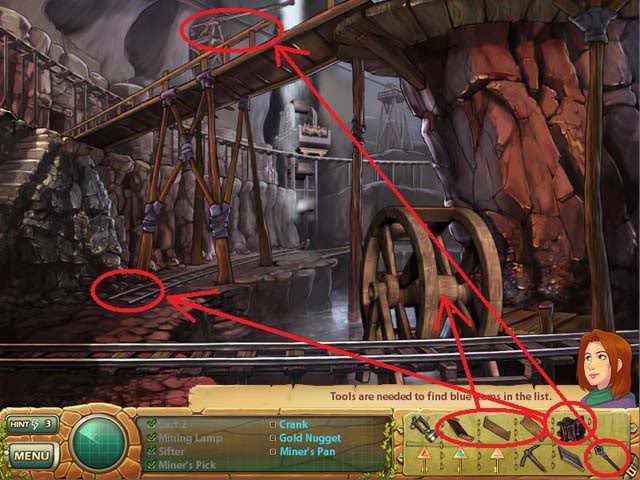
- Place the sifter in the tray.
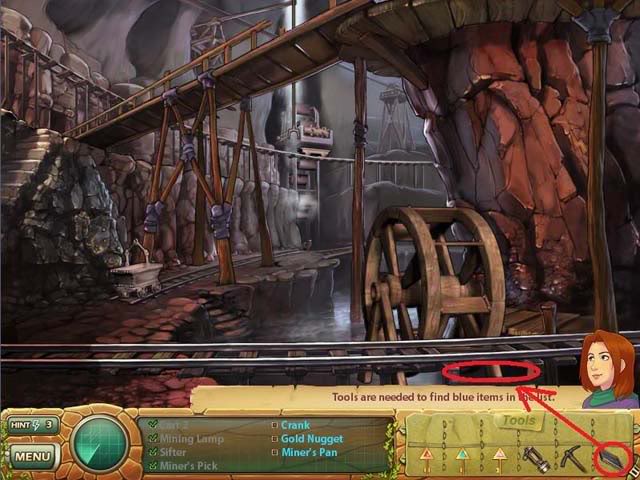
Hidden Items: Crank, Gold Nugget, Miner’s Pan
- Use the lamp in the lower left corner of the mine to reveal the crank.
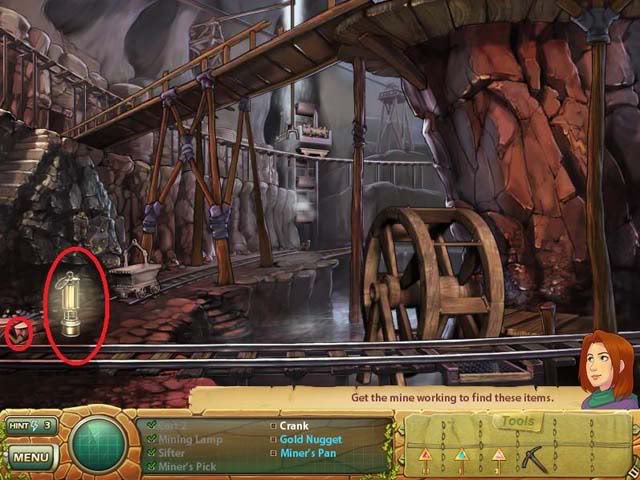
- Put the crank back onto the mill.
- Use the miner’s pick on the wall underneath the cart.
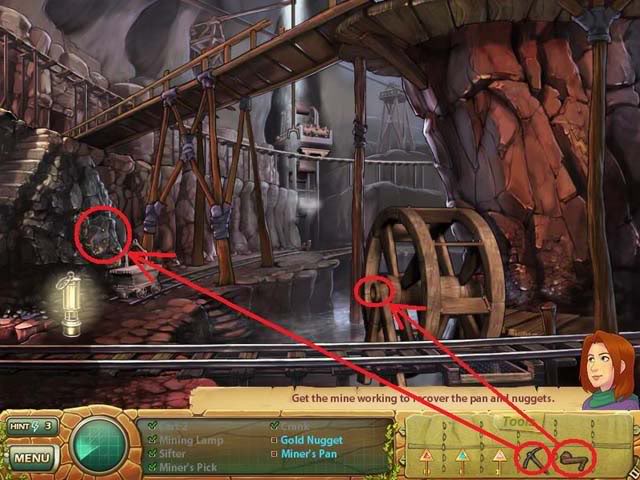
- After a small animation, a cart full of coal will arrive in front of the water mill. Turn the mill crank to sift the rocks, and you’ll be left with the gold nugget to take.
- Click on the cart to send it back to its starting position.
- Now, use the miner’s pick on the same spot in the wall a second time. Watch the cart collect the rocks and sift them. Click on the rock pile a second time to get the miner’s pan.
- Click on the stairs leading down into the water (the cursor will turn green) to investigate.
Mini-Game: Panning for Gold
- Use the Miner’s Pan on the water and it will bring up a pan of dirt. Click on the pan, and while holding the mouse button down, move the mouse from side to side to shake the pan. The first time you’ll turn up the gold dust. Repeat the process to find the golden branch.
Exit the mine through the door on the upper left of the screen.
Black Kettle Hideout
Find all the items on the list.
Tools to find: Pipe Part x3, Firewood x3, Rope, Knife
Special Items: Paper
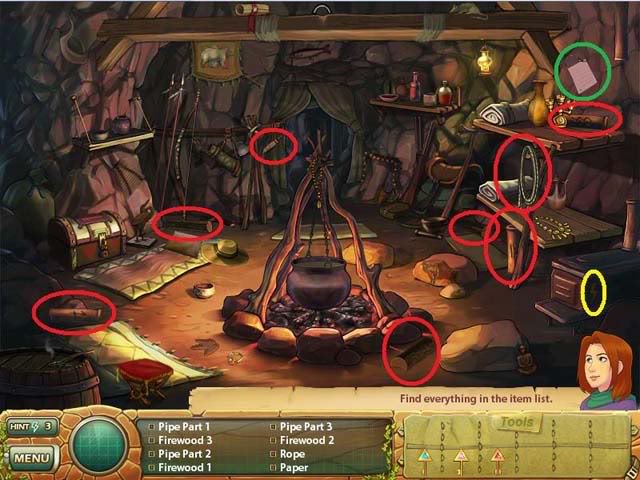
Hidden Items: Mason Icons, Bellows, Golden Branch, Sagittarius, Aquarius, Libra
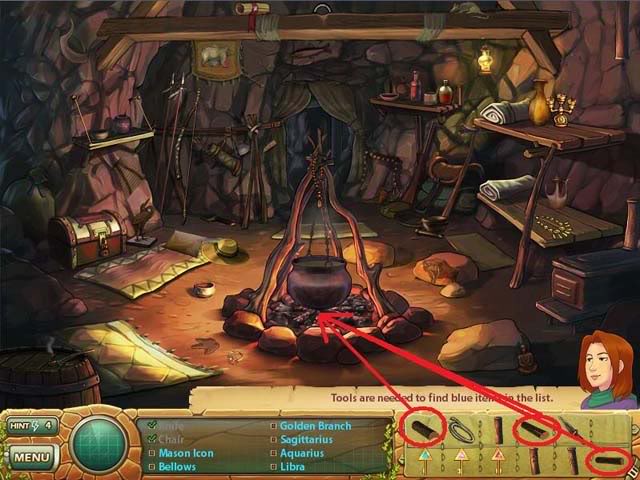
- Place the three pieces of firewood onto the fireplace.
- Use the knife on the sack on the left to get the bellows.
- Use the bellows on the fireplace. As the cauldron heats up, three zodiac symbols will appear on it. Click on them to receive Sagittarius, Aquarius and Libra.
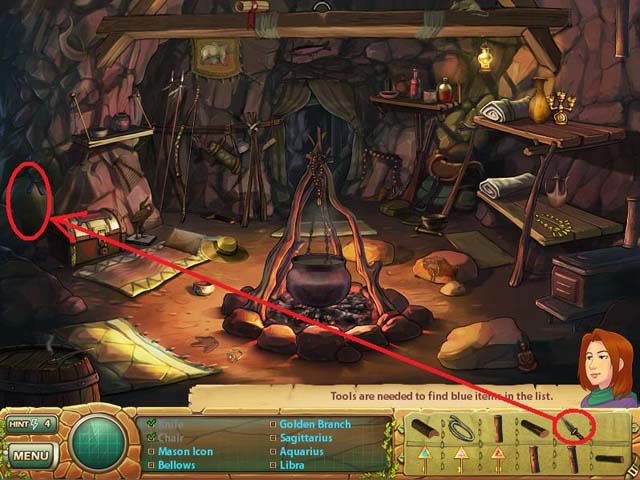
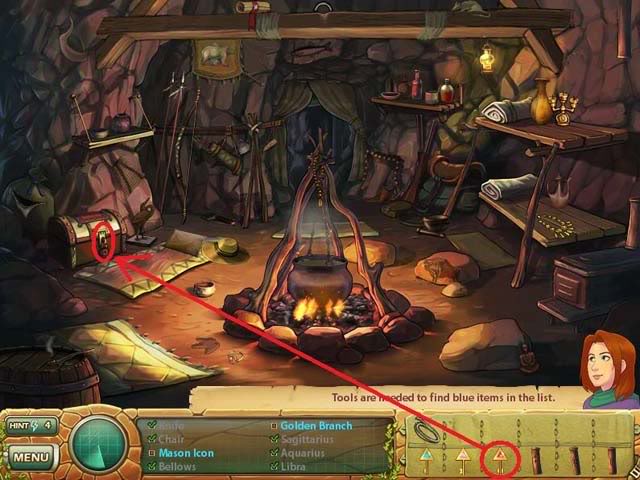
- Use the red key on the chest to open it. Take the golden key and the mason symbol (it looks like a piece of paper) inside.
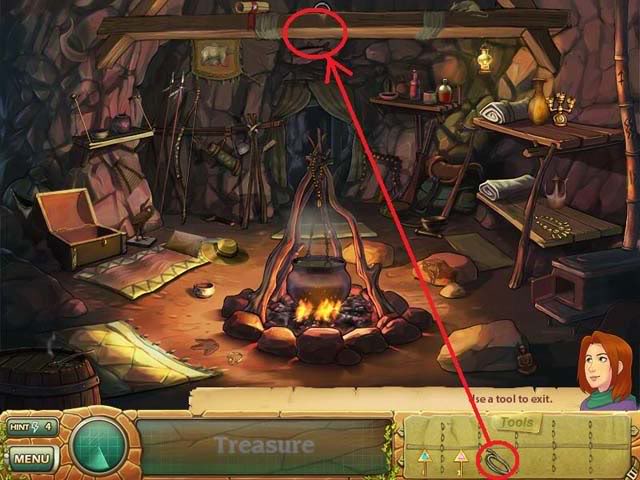
Secret Item: Treasure
- Fit the three pipe pieces onto the incomplete pipe on the right side of the screen.
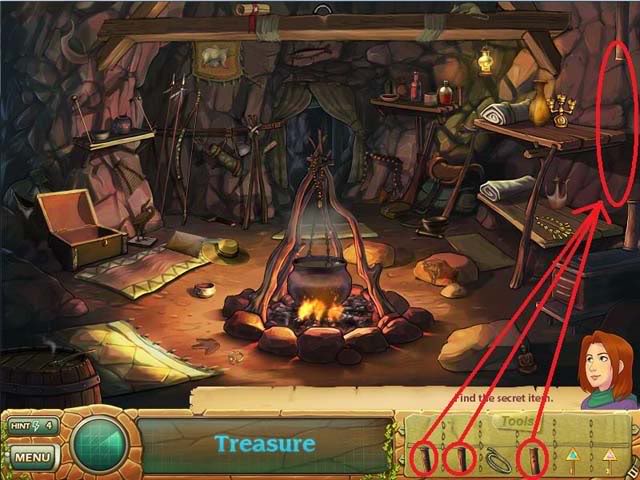
- To exit, use the rope on the beam above the cauldron. Once the rope is looped around, click on the rope to raise the cauldron.
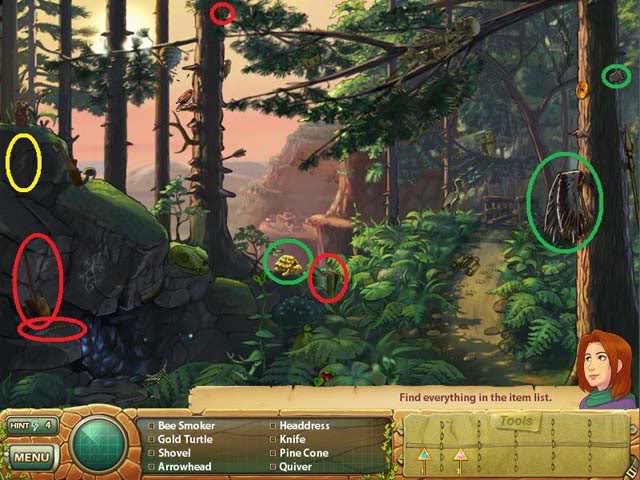
Forest Path
Find all the items on the list.
Tools to find: Shovel, Bee Smoker, Knife, Pine Cone
Museum items: Gold Turtle, Headdress, Arrowhead
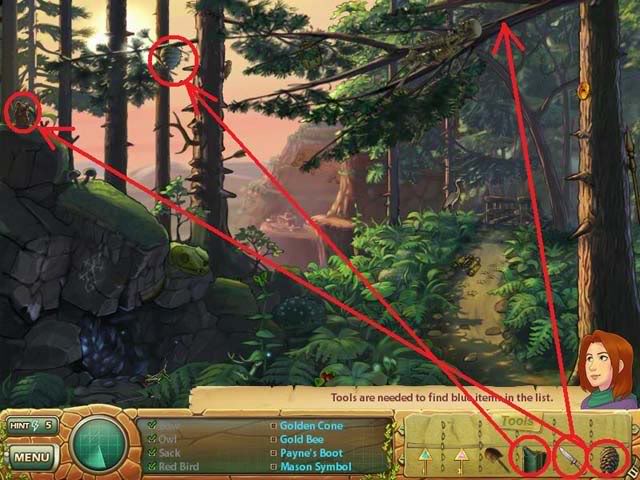
Hidden Items: Golden Cone, Gold Bee, Payne’s Boot, Mason Symbol
- Give the pine to the squirrel. It will run up the tree and drop the golden cone for you to take.
- Use the knife on the tree branch. Pick up Payne’s Boot after it falls. You can also take the Mason Symbol that appears on the large tree trunk to the right.
- Use the bee smoker on the bee hive to get the gold bee.
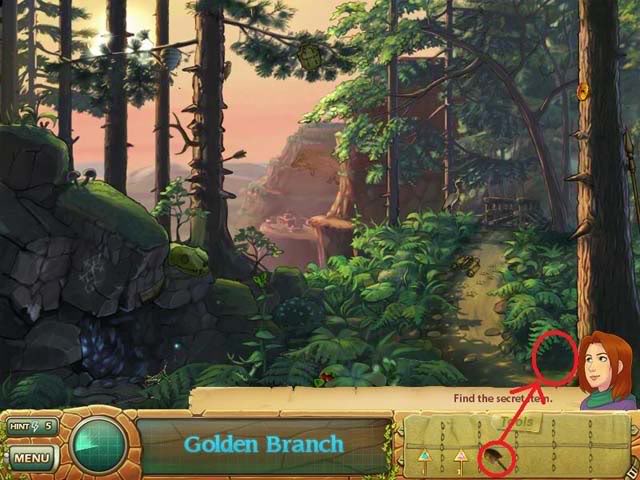
Secret Item: Golden Branch
- Use the shovel on the spot under the bush at the beginning of the path to uncover a chest. Use the pink key on the chest.
Old Western Fort
- After a brief cutscene, you’ll be able to use the keycard you receive on the door to unlock the gate.
Find all the items on the list.
Tools to find: Cross and Crown, Ramrod, Cannonball, Shovel, Lanyard Fuse, Spare Wheel
Museum Items: Custer
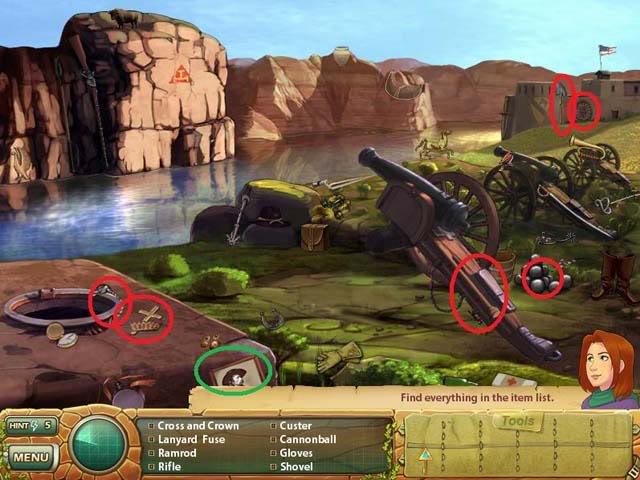
Assemble the Canon
- Click these items on the large cannon in the following order: Spare Wheel, Lanyard Fuse, Cannon Ball, Ramrod.
- Click on the canon to aim it. (You’re aiming for the red symbol on the far cliff.) Click the fuse to fire the cannon. If you hit the red symbol, four gold treasures will spill out, as well as a cross and crown mold.
- Secret Item: Tree Trunk
- Use the cross and crown symbol from your inventory on the cross and crown mold.
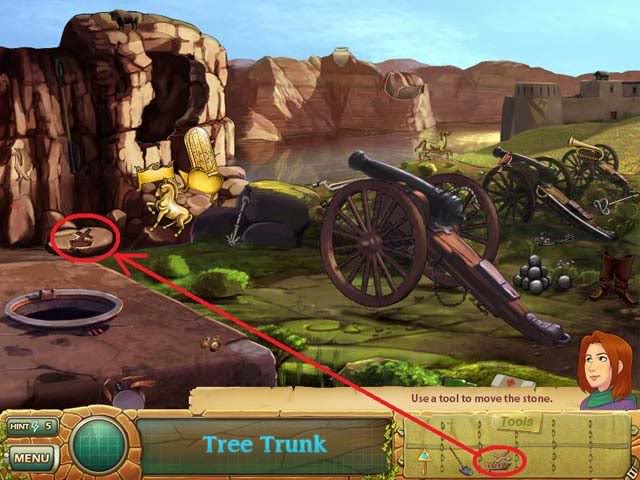
- The mold will slide out of the way. Use the shovel on the dirt underneath to dig up a chest. Use your remaining key on the chest to take the tree trunk.
Assembling the Vial of Stability
- This is a straightforward puzzle. Simply fit the golden tree pieces onto the outline to fill it in. No rotating necessary.
- The finished tree will look like the screenshot below:
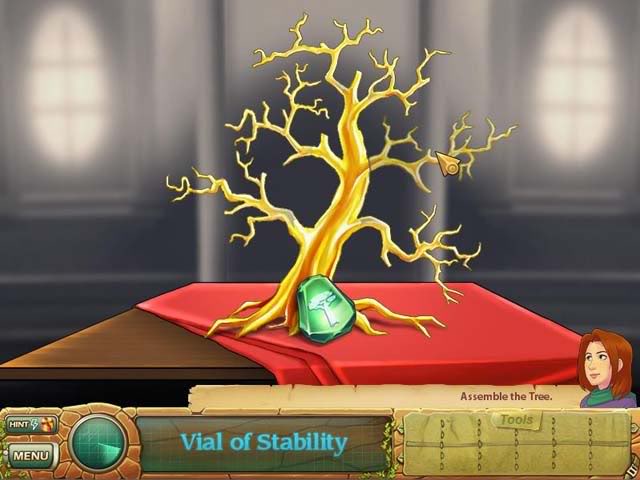
- Click on the green gem to take the vial of stability.
STAGE 5: THE RACE FOR ZOE’S LOVE
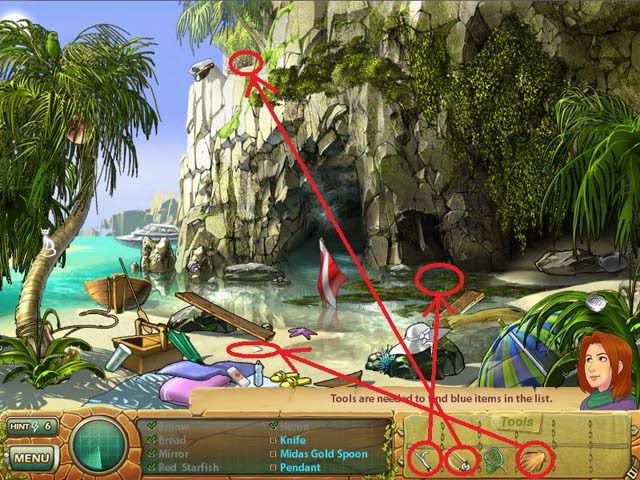
Beach Cove
Find all the items on the list.
Tools to find: Pick, Fishing Rod, Dip Net, Shell
Museum Items: Golden Nest
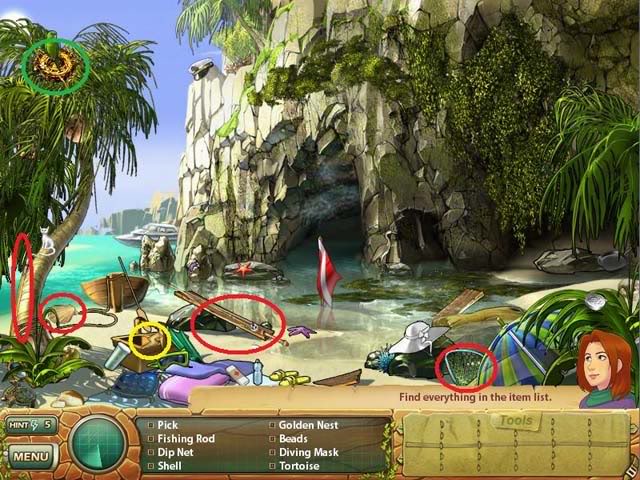
Hidden Items: Knife, Midas Gold Spoon, Pendant
- Use the hook on the seaweedy area to get the pendant.
- Use the fishing rod on the nest on the cliff to get the Midas Gold Spoon.
- Use the shell on the blade tip buried in the sand to get the knife.
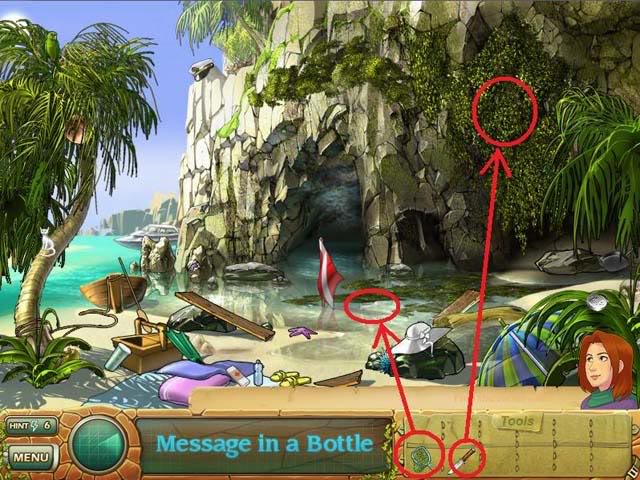
Secret Item: Message in a Bottle
- Use the dip net in the water near the seaweed to get the message in a bottle.
- After you’ve read the message, use the knife on the vines growing on the cliff to reveal the exit.
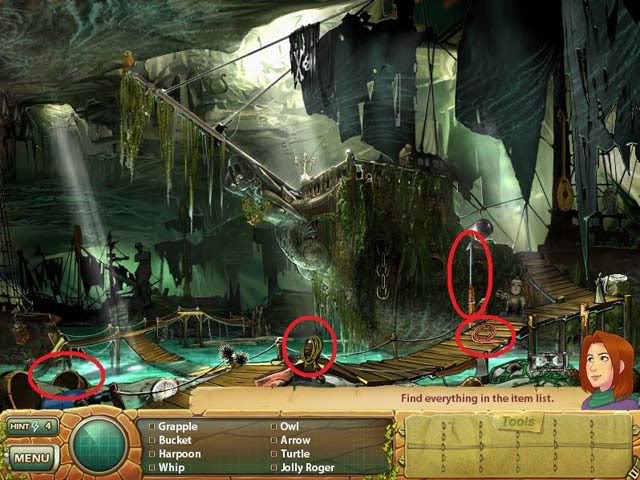
Pirate’s Hideout
Find all the items on the list.
Tools to find: Grapple, Whip, Harpoon, Bucket
Hidden Items: Anchor, Tooth Necklace, Medallion, Glass Eye
- Use the bucket on the water near the bridge to get the glass eye.
- Use the harpoon on the moldy sail to get the tooth necklace.
- Use the grapple on the anchor sticking out of the water in the lower left of the screen to pull it out all the way.
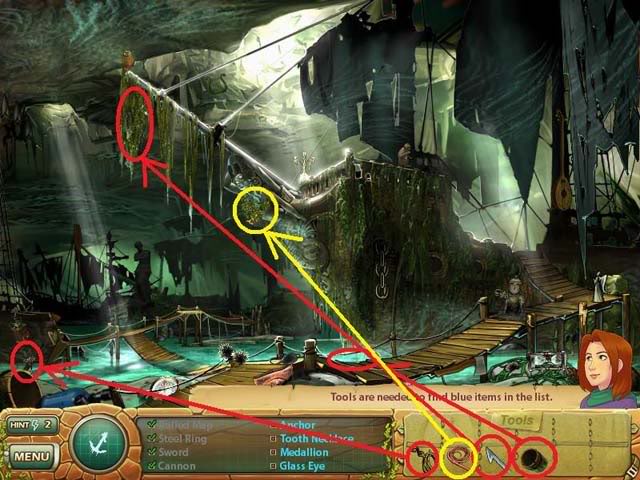
Secret Item: Golden Links
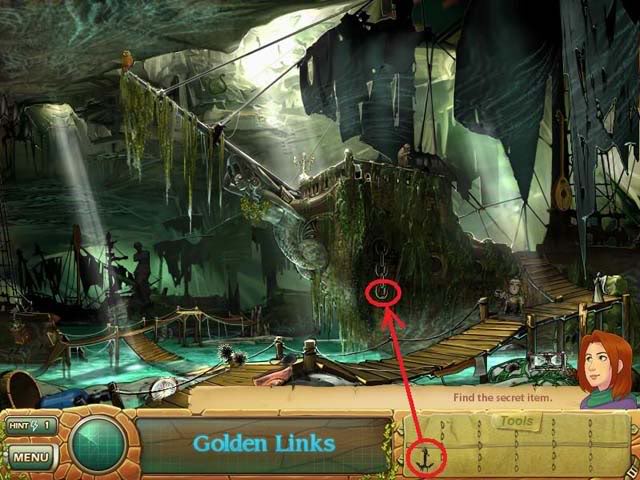
Use the anchor on the chain.
Pirate Ship
Find all the items on the list.
Tools to find: Powder, Dagger, Hammer, Pistol, Hook
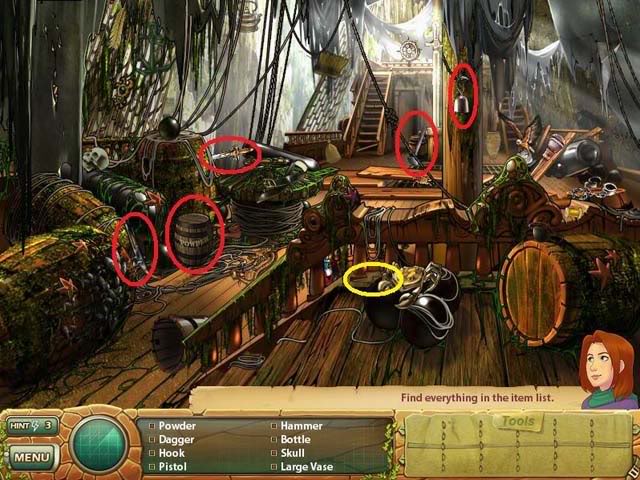
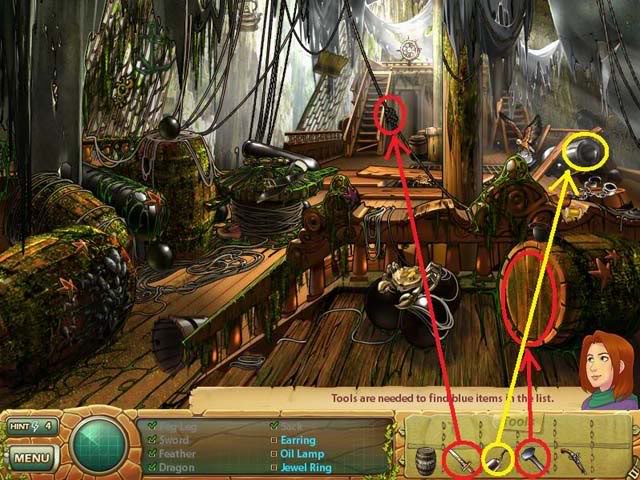
Hidden Items: Earring, Oil Lamp, Jewel Ring
- Use the hammer on the barrel to get the jewel ring.
- Use the dagger on the rope knot to get the oil lamp.
- Use the hook on the cannon to get the earring.
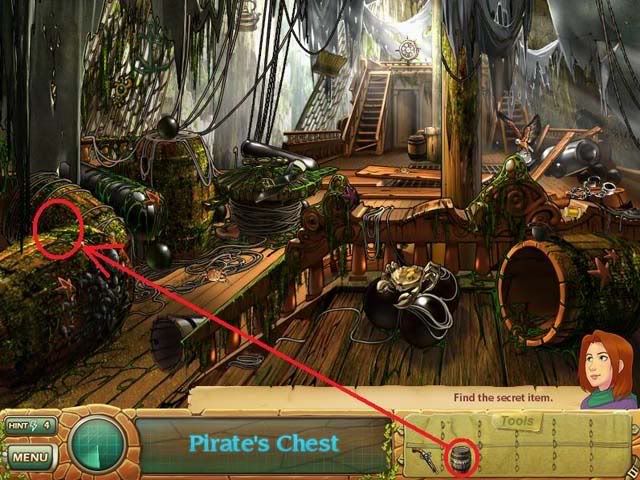
Secret Item: Pirate’s Chest
- Place the powder on top of the large barrel on the left, then use the pistol on the powder to blow the barrel apart. The chest is inside.
Captain’s Cabin
Find all the items in the list.
Tools to find: Sword, Key
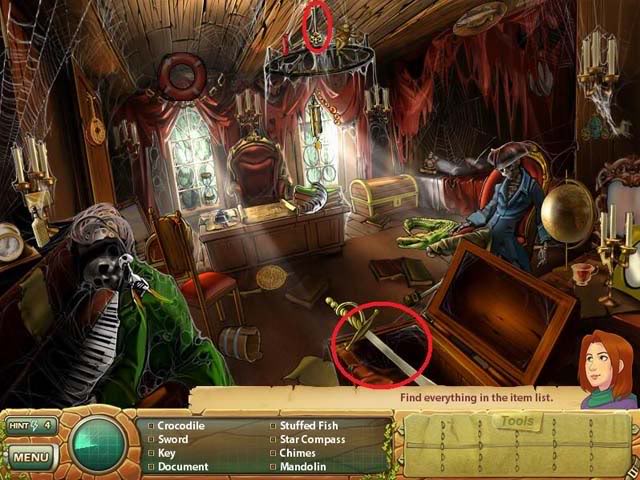
Hidden Item: Pirate Shirt
- Use the sword on the curtain on the right.
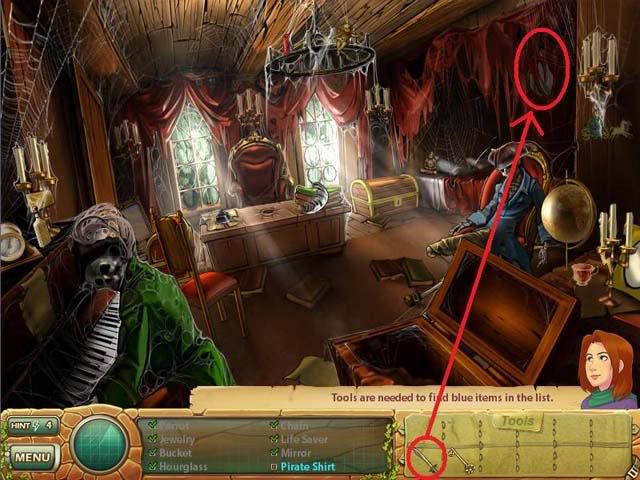
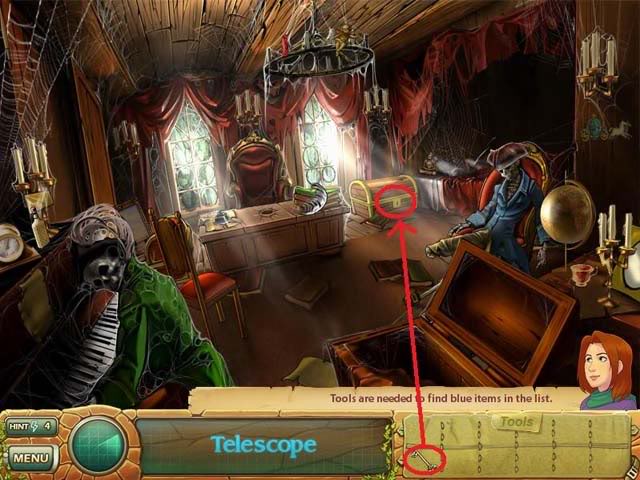
Secret Item: Telescope
- Use the key on the treasure chest and take the telescope inside.
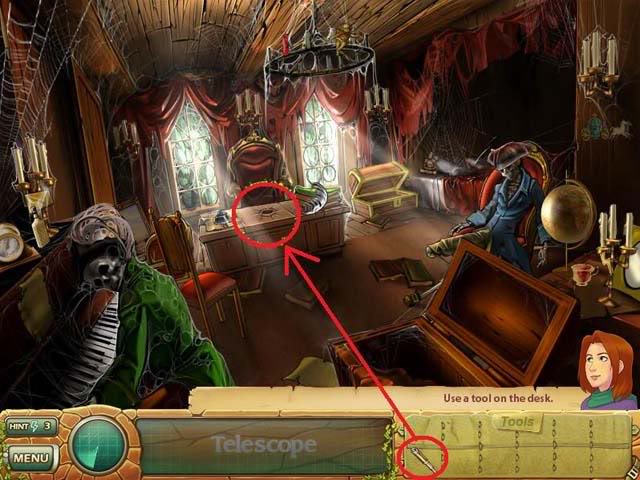
Find the secret exit: Use the telescope on the hole on the desk.
Treasure Room
Find all the items in the list.
Tools to find: Silver Coin x2, Goblet, Mirror, Hammer
Museum items: Golden Egg, Jeweled Beetle
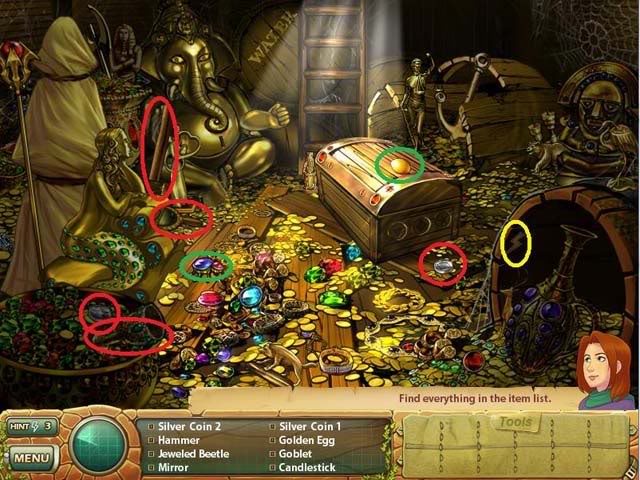
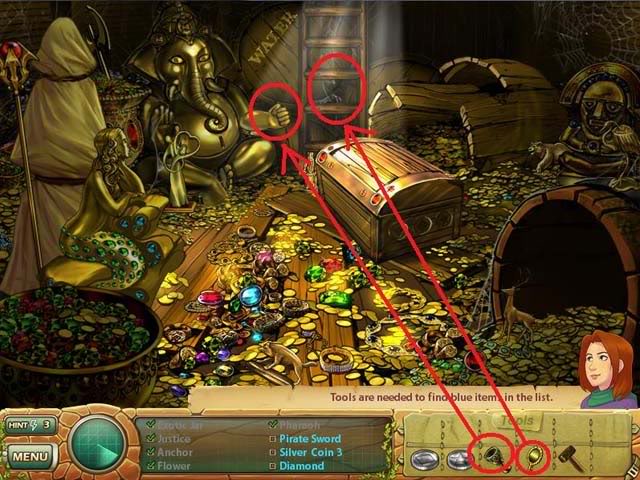
Hidden Items: Pirate Sword, Silver Coin 3, Diamond
- Use the mirror on the beam of light to reveal the location of the pirate sword.
- Place the goblet in the hand of the big golden elephant. Use the hammer on the goblet. The third silver coin will roll onto the ground.
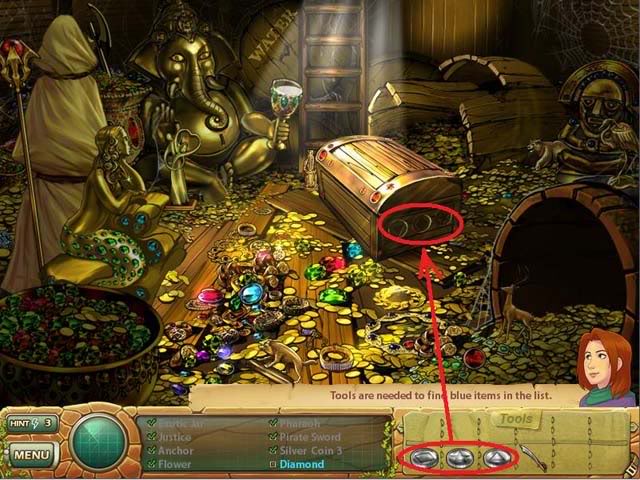
- Place the three silver coins in the slots on the treasure chest. (Be sure to match up the symbols, triangle to triangle, square to square, and star to star.) The diamond is inside the chest.
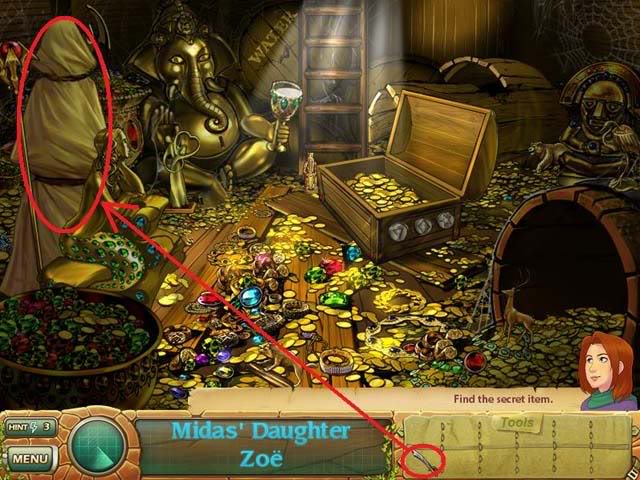
Secret Item: Midas’ Daughter Zoe
- Use the sword on the covered up statue.
STAGE 6: MUSIC IN THE AIR
Courtyard
Find all the items on the list.
Tools to find: Felt Boot, Empty Glass, Cane
Museum items: Crown
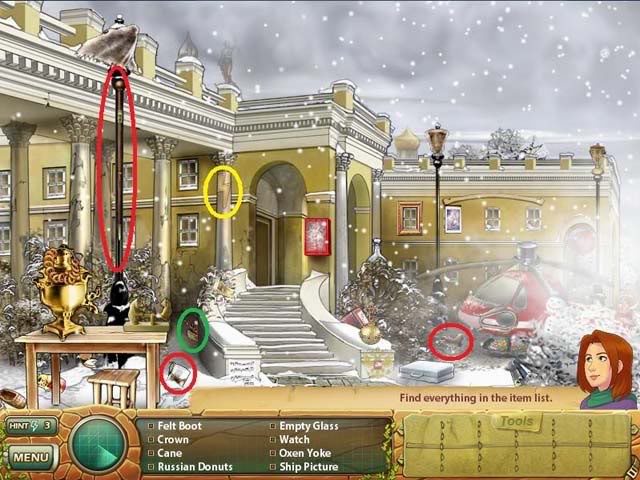
Hidden Items: Hot Water, Hook, Ladder
- Place the empty glass on the table, the use the felt boot on the golden jug to fill the glass with hot water. Click on the glass to return it to your inventory.
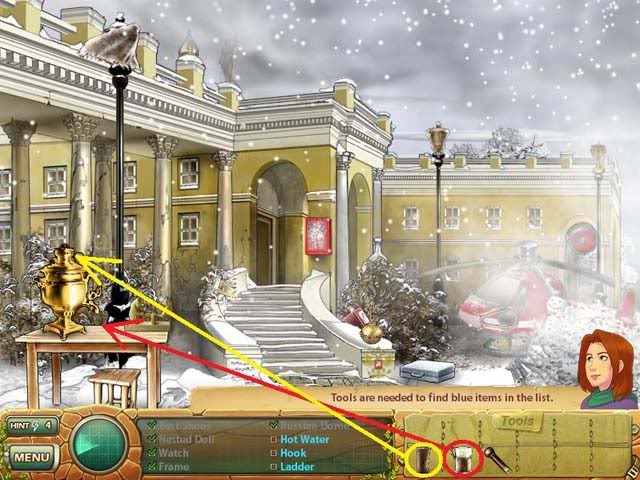
- Use the hot water on the emergency box to get the hook.
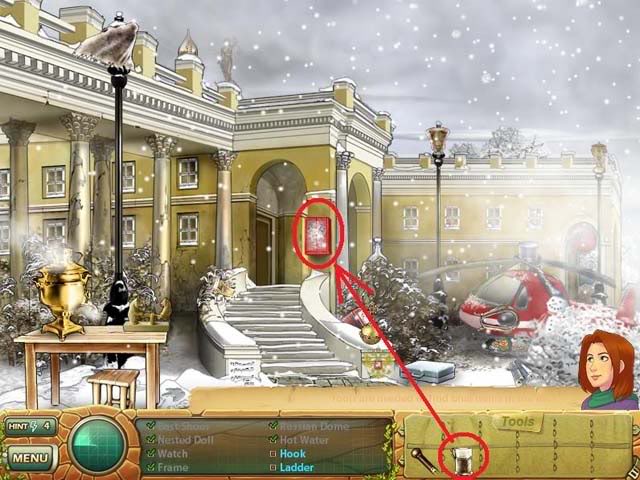
- Use the hook in the upper left corner to get the ladder.
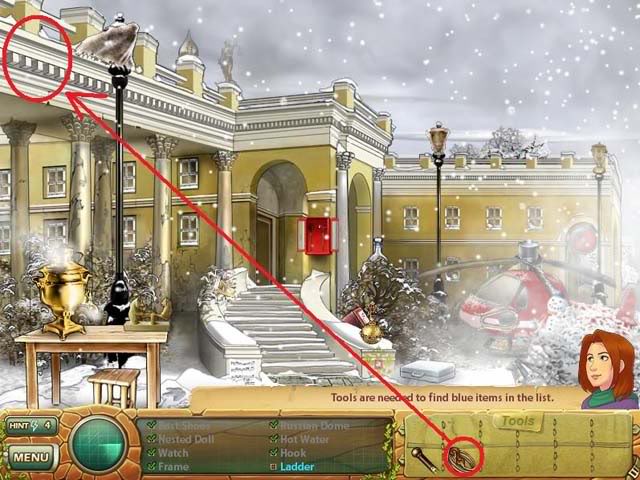
Secret Item: Painting
- Use the cane on the briefcase in front of the helicopter
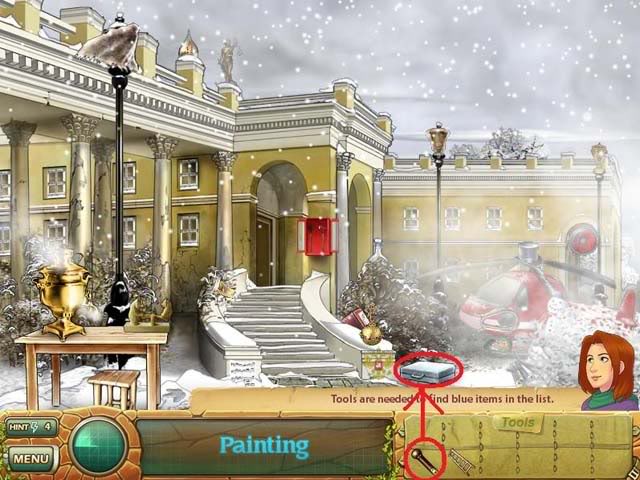
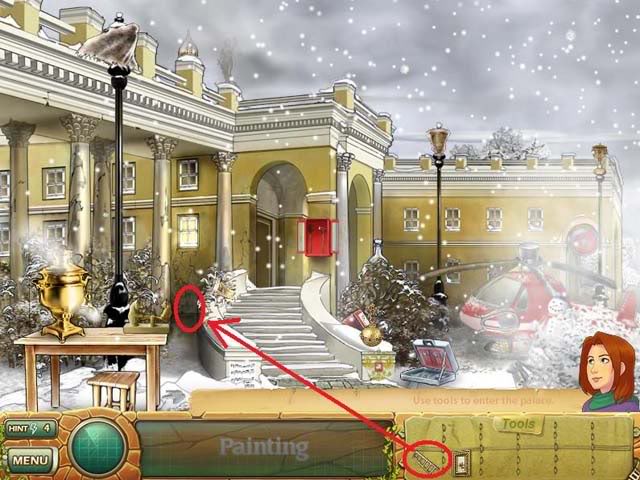
- Use the ladder under the lit window to gain entrance into the palace.
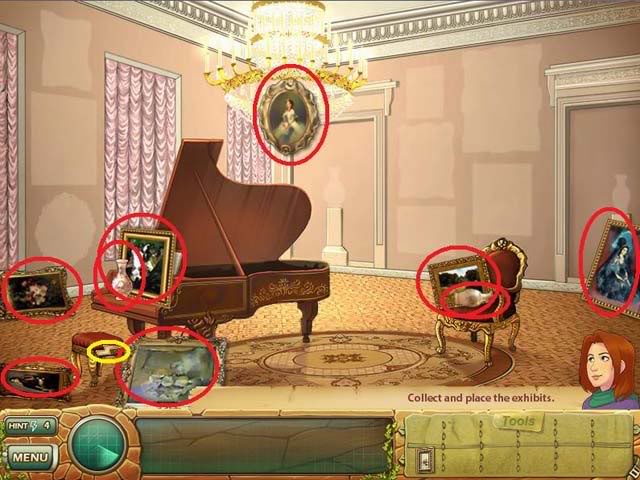
Collect and place the exhibits
Start by picking up the 9 paintings and 2 vases.
Next, place them back on the walls in the right places.
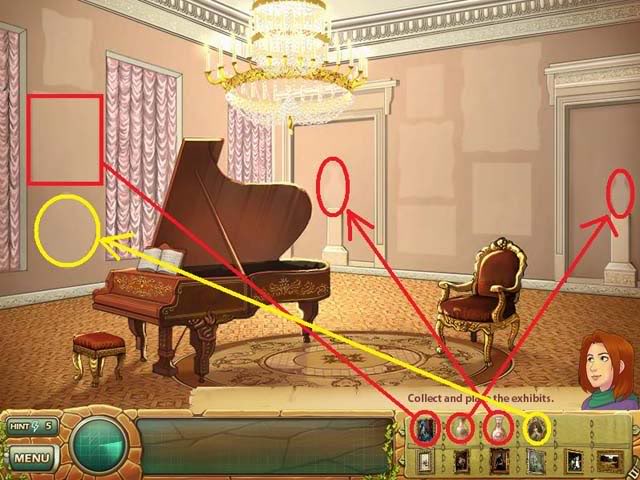
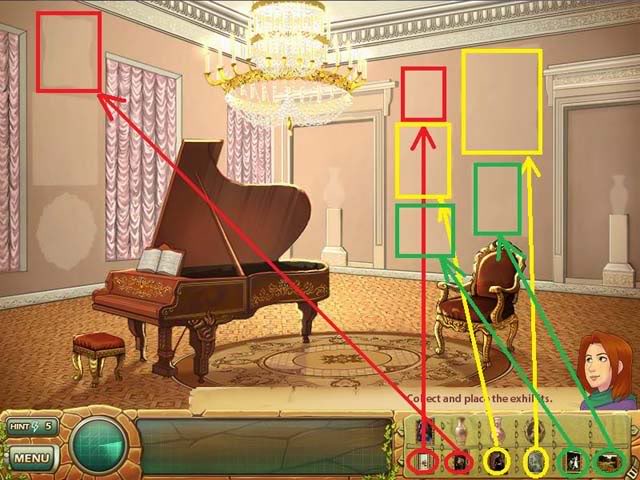
Click on the stairs to descend into the secret office.
Secret Office
Find all the items on the list.
Tools to find: Acid, Medal
Museum Items: Faberge Egg 1, Scepter
Special Items: Grey-Haired Man (removing this painting reveals a safe underneath.)
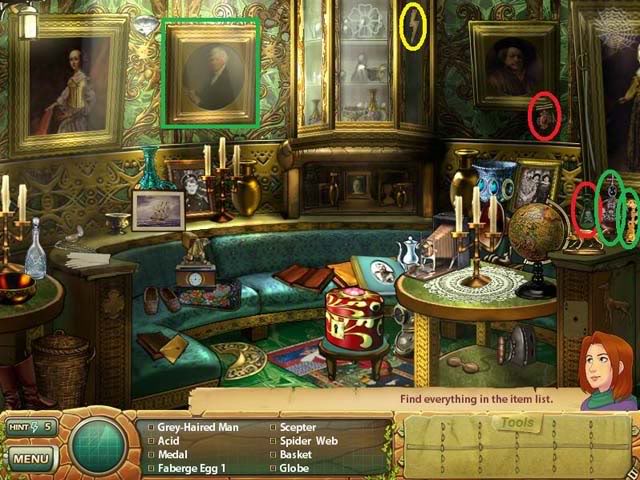
Hidden Items:
Faberge Egg 2, Faberge Egg 3
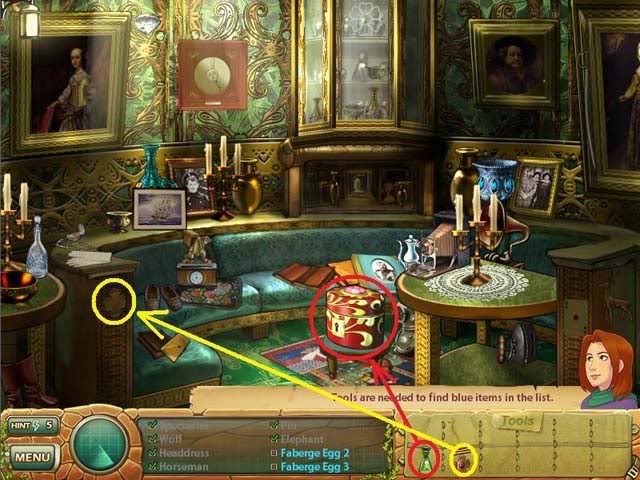
- Use the acid on the locked red box to get Faberge Egg 2.
- Place the medal in the indentation in the wood to get Faberge Egg 3.
- Secret Item: Gold Canary Eggs
- Click on the safe on the wall to play a mini-game.
Mini-Game – Safe
- Pressing the red button in the middle of the lock causes the key to swivel down. Your goal is to rearrange the five colored pieces (key teeth) so that the key fits into the lock.
- Arrange the teeth from top to bottom: pink, blue, yellow, green, red. Then press the red center button.
- Take the three golden canary eggs.
Irish Village
Find all the items in the list.
Tools to find: Cleaning Rag, Can Opener, Matches
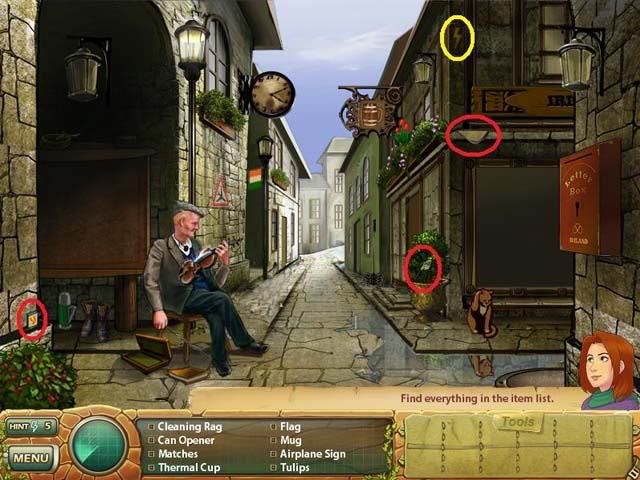
- Hidden Items: Milk, Flour, Honey, Map, Eggs, Cheese, Sardine, Key
- Use the cleaning rag on the dirty shop window to get the milk, flour, honey, eggs and cheese.
- Use the matches on the lamp to reveal the map.
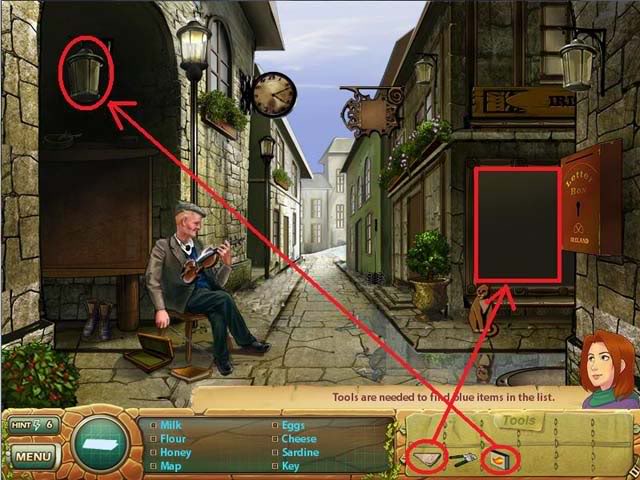
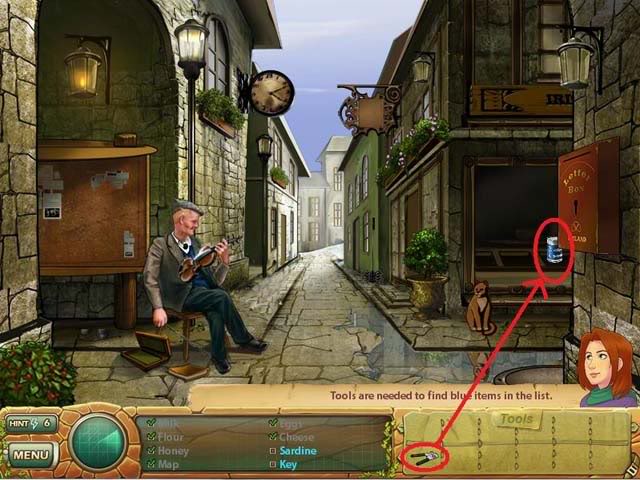
- Use the can opener on the tin in the window to get the sardine.
- Give the sardine to the cat in front of the window. When it walks away, take the key that it was sitting on.
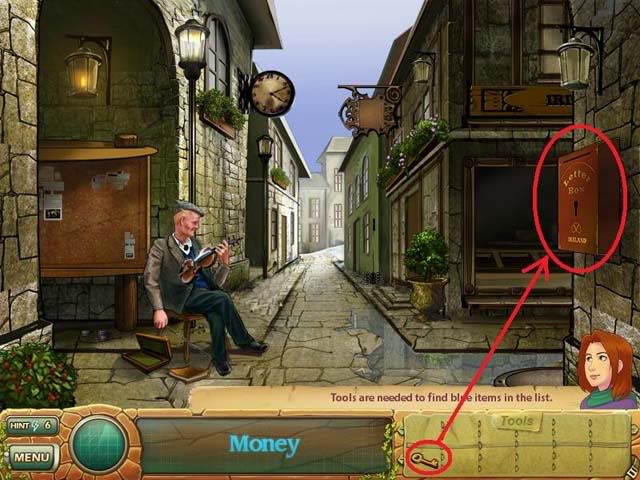
Secret Item: Money
- Use the key on the red letter box.
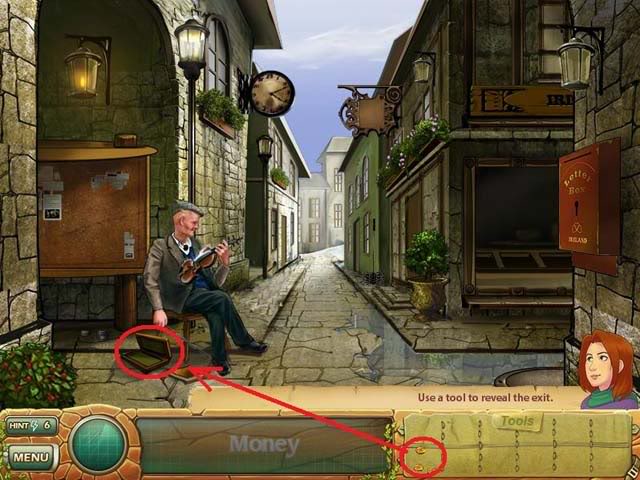
Find the exit:
- Put the money into the busker’s case.
Countryside
Find all the items in the list.
Tools to find: Pick Axe, Sword, Candy
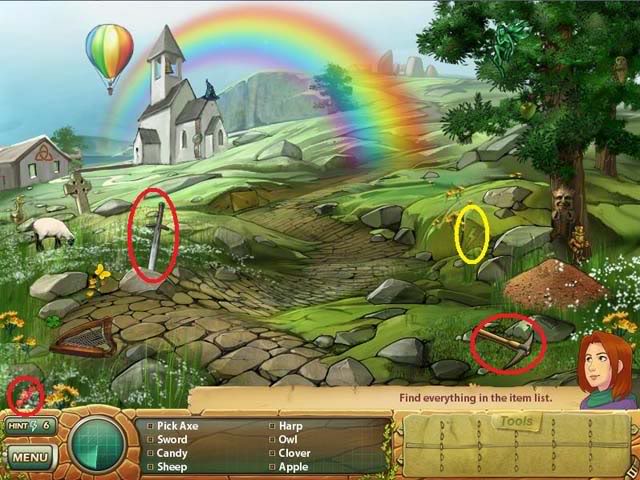
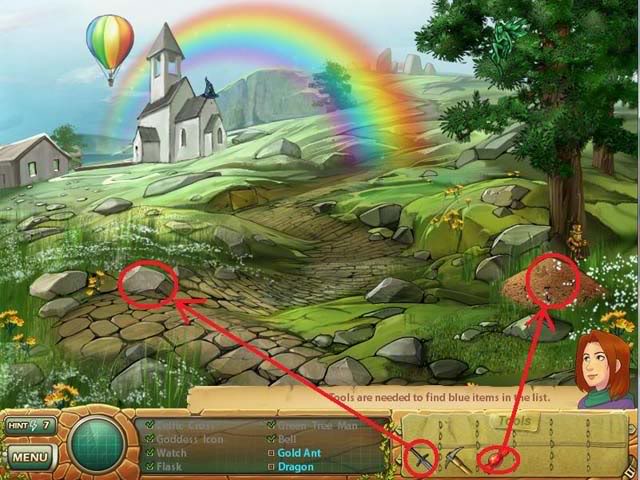
Hidden Items: Golden Ant, Dragon
- Use the candy on the ant hill. Take the golden ant when it comes out.
- Use the sword on the suspicious “flaming rock” to get the dragon.
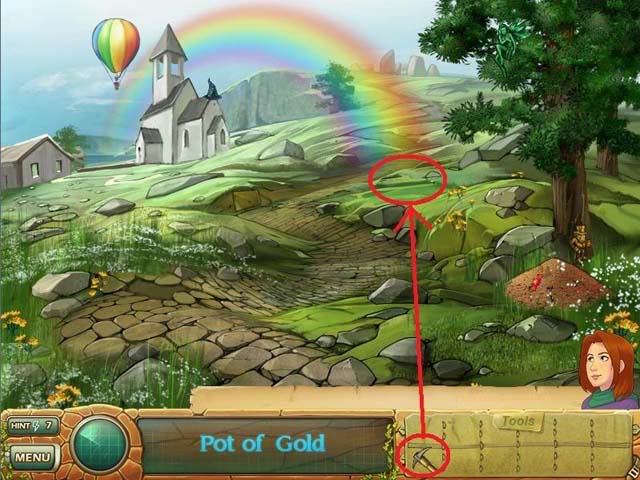
Secret Item: Pot of Gold
- Use the pick axe to dig – where else? – at the end of the rainbow.
Crom Cruach henge
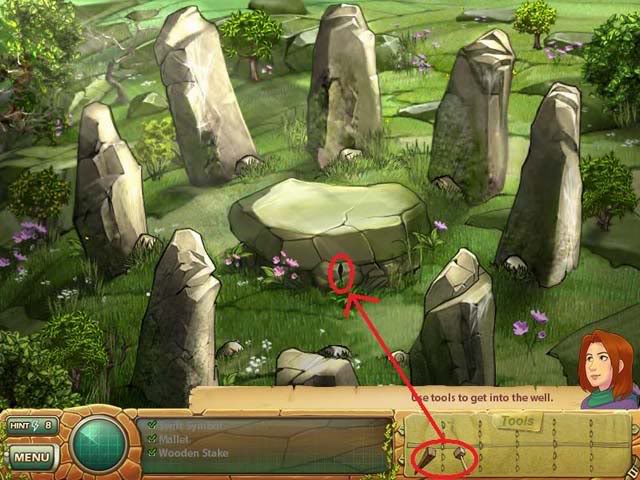
Tools to find: Swift Symbol, Mallet, Wooden Stake
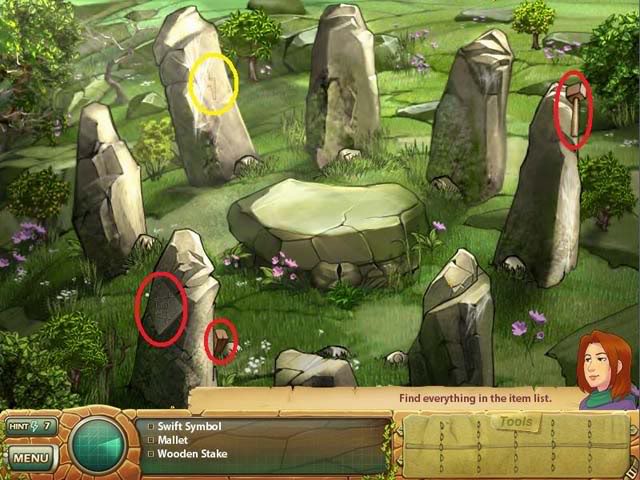
- Use tools to get into the well.
- Use the wooden stake on the crack at the bottom of the stone slab, then use the mallet on the stake.
Remove the Boards
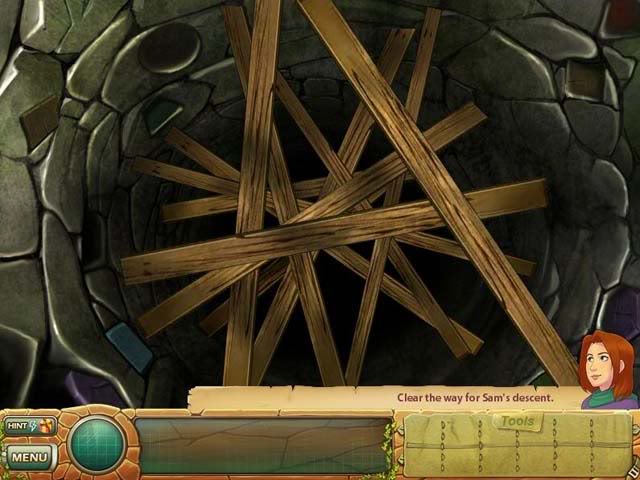
Remove the wooden boards blocking access to the well. Simply click on the boards one by one to remove them, making sure you always click on the topmost board – the one that doesn’t have any boards on top of it.
Mini-Game: Match the Tiles
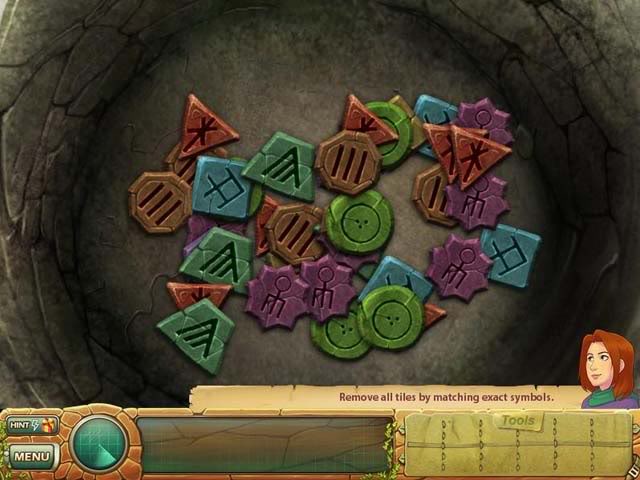
This is another pretty straightforward challenge. The key is to click on pairs of matching tiles to remove them. Like mah jong (aka Shanghai), you can only remove a tile if no other tile is on top of it. Start by removing tiles that are on top of other tiles, and work your way down.
Crom Cruach henge – click on the stones
- Click on the stones in the correct sequence that corresponds to the pattern you found in the previous puzzle.
- The screenshot below tells you what order to push the stone symbols in – the numbers are color-coded with the order of the stones, and you can also follow the number sequence, clicking the stones in order starting from 1 to 8.
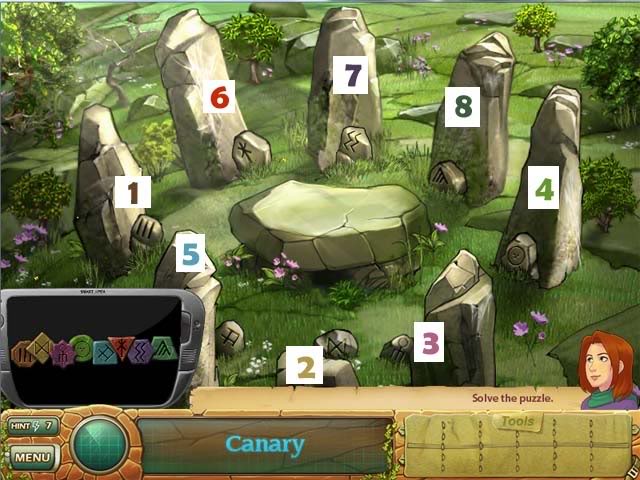
- Take the canary that appears on the stone slab.
Irish Village – Nighttime
Find all the items in the scene.
Tools to find: Iron
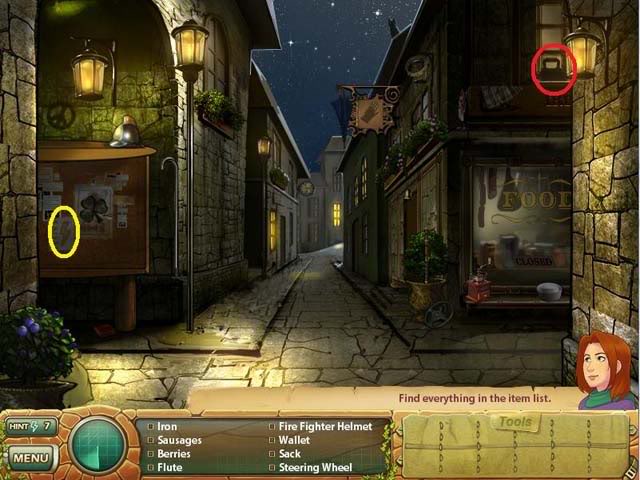
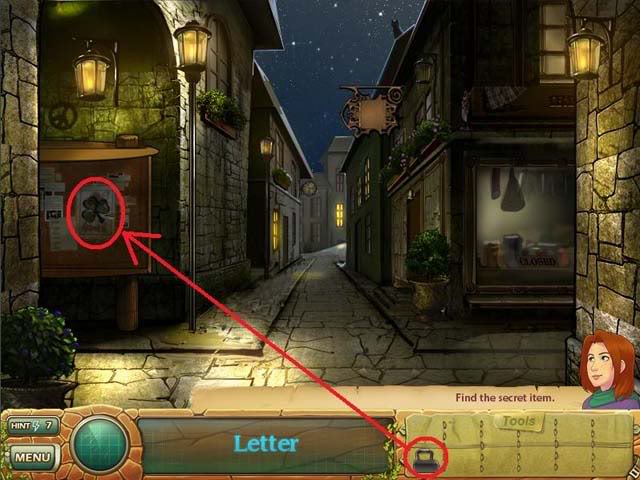
Secret Item: Letter
- Use the iron on the shamrock poster.
STAGE 7: FINDING LOYALTY
In front of the Castle
Find all the items in the list.
Tools to find: Lilacs, Tattered Flag
Museum Items: Gong
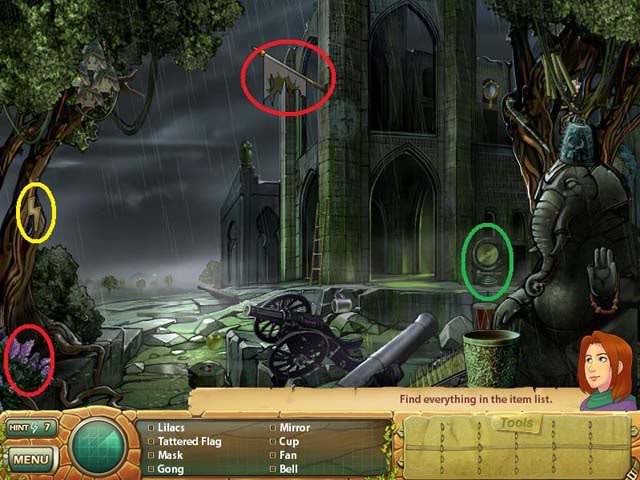
Hidden Items: Mallet, incense
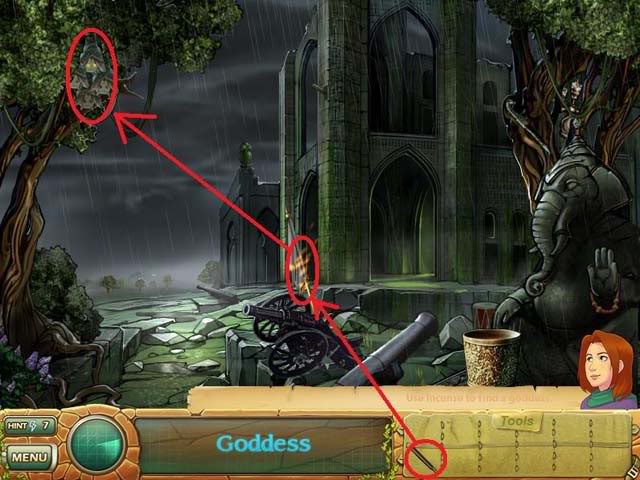
- Use the tattered flag on the cannon to get the mallet.
- Put the lilacs in the bucket, then use the mallet on the bucket to get incense.
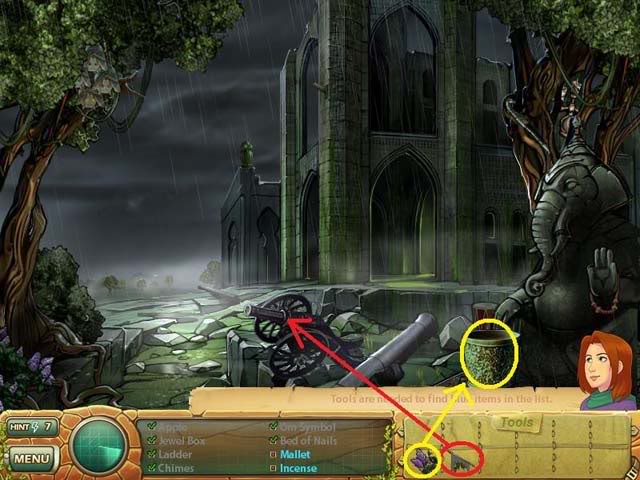
Secret Item: Goddess
- Use the incense stick on the burning flag to light the incense, then use the lit incense on the bats in the tree to make them fly away and reveal the statue.
Castle Courtyard
Find all the items on the list.
Museum Items: Medal, Musket
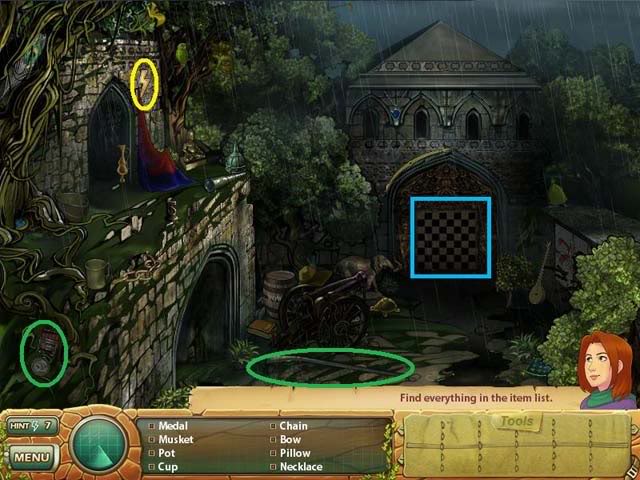
- Click on the chess board (noted in blue in the screenshot) to zoom in on a puzzle.
Mini-Game: Chess Board
- This is a match-3 game. Match three or more of the same chess piece to clear them from the board. When pieces are cleared, the chess board pattern disappears to reveal an image beneath. Make enough matches to completely reveal the picture.
Clear a path for the queen:
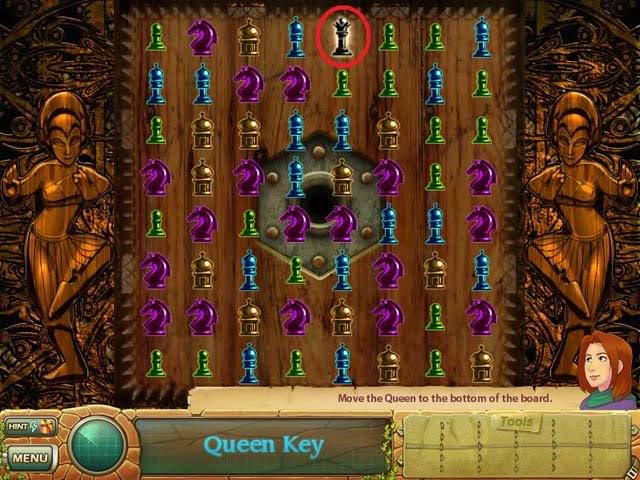
- After you reveal the image underneath the chess board, the queen playing piece appears at the top. Your goal now is to move her down to the bottom of the board. You can’t make a match with the queen, but making matches underneath her causes her to fall. Keep matching until she falls to the very bottom.
- After you’ve got the Queen, use the playing piece in the hole in the center of the door to unlock it.
Laboratory
Find all the items on the list.
Tools to find: Yellow Flask, Burner
Museum Items: Shiva
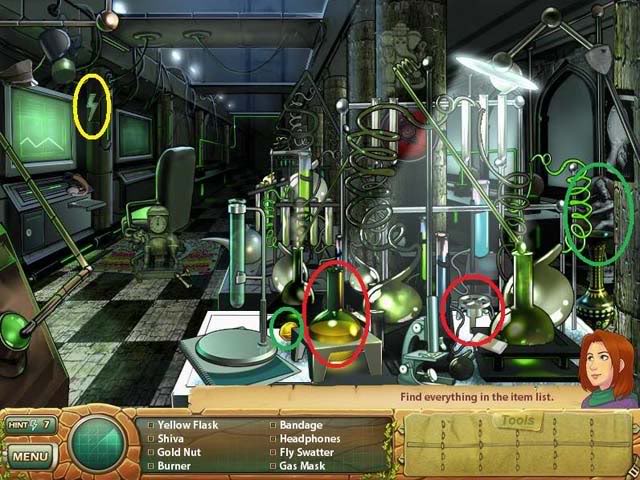
Hidden Items: Gold Dates, Acid, CD
- Use the burner on the test tube stand to create the acid (take the green test tube after it’s been heated up).
- Use the yellow flask on the floor to get the gold dates.
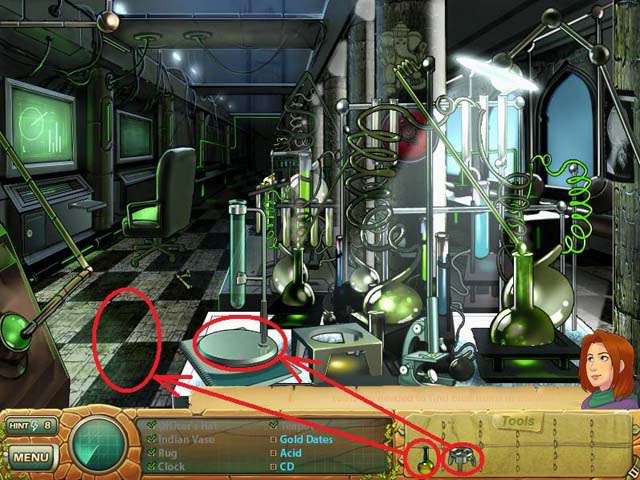
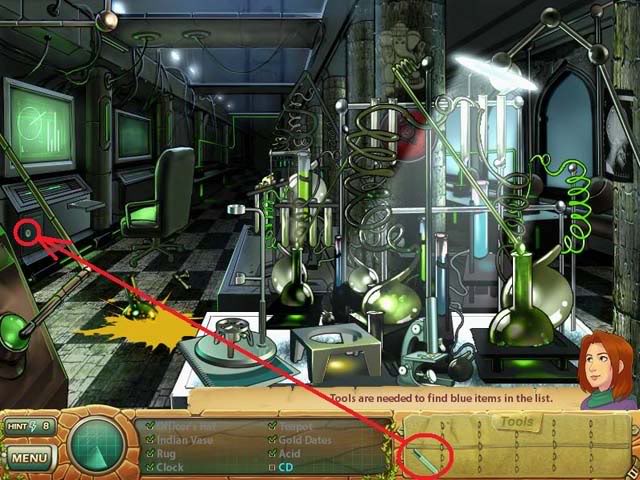
- Use the acid on the safe lock to get the CD.
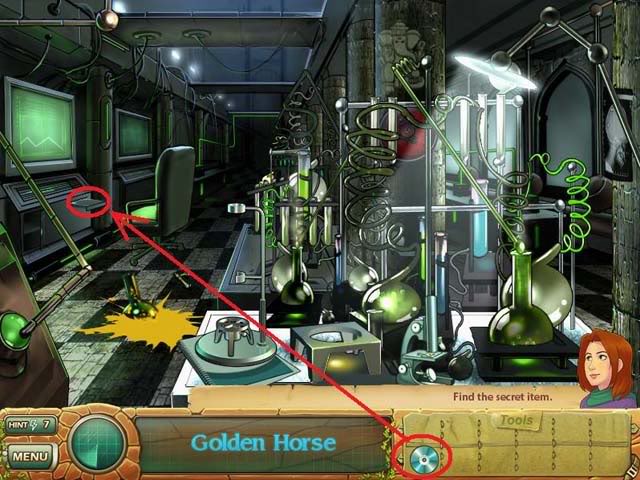
Secret Item: Golden Horse
- Put the CD into the CD tray to get the golden horse.
Thailand
Find all the items on the list.
Tools to find: Ares, Leo, Taurus, Chain Glove, Trap, Aquarius, Virgo, Machete, Capricorn
Note: The goat (Capricorn) will appear after you find the other zodiac symbols.
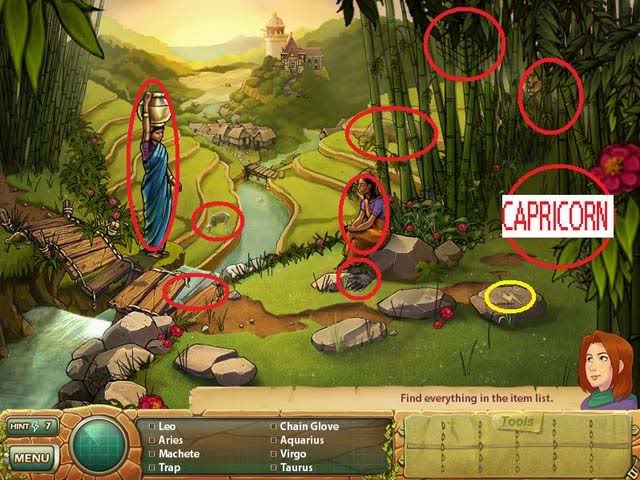
Hidden Items: Cancer, Scorpio, Harpoon
- Use the machete on the reeds to the left, and pick up the harpoon that falls onto the bridge.
- Use the trap at the top of the river to get Cancer (the crab).
- Use the chain glove on the rock to get Scorpio (the scorpion).
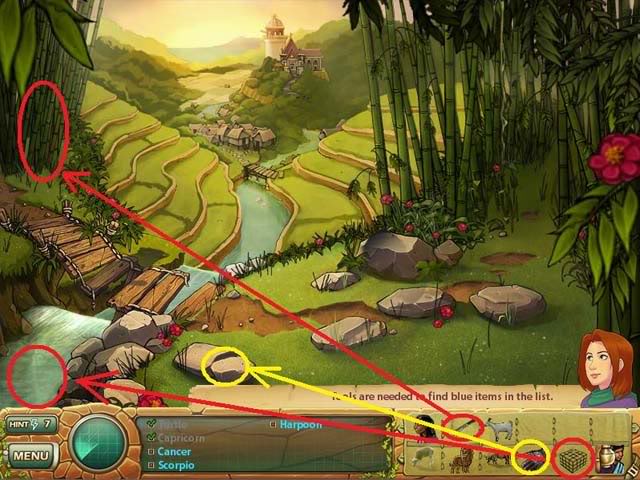
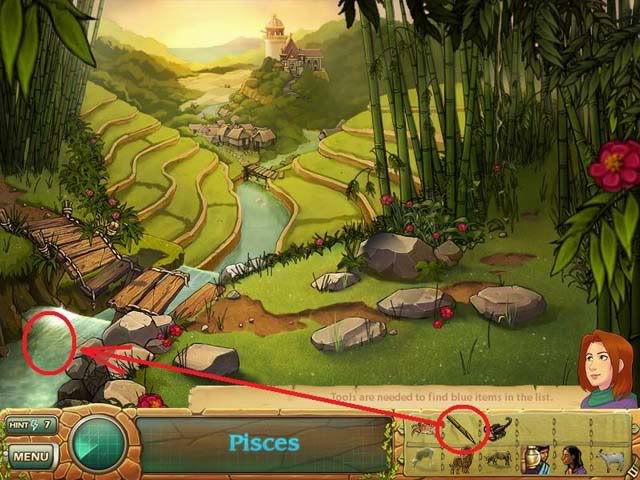
Secret Item: Pisces
- Use the bamboo at the mouth of the river (bottom left corner) to spear a fish, then click on it to pick it up.
Obsevatory
Find all the items on the list
Tools to find: Viewfinder x2, Gemini, Lever, Tapes
Museum Items: Sun Dial
Special Item: Swift Symbol
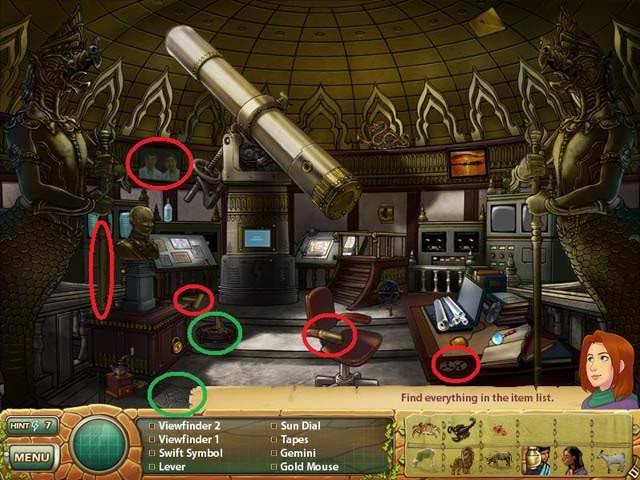
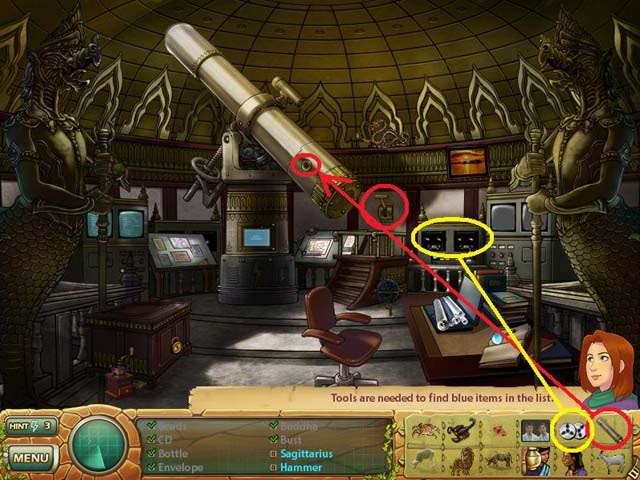
NOTE: There are a lot of items to pick up here, and you’re going to find that your inventory gets full. When this is the case, you can make room by using the lever and viewfinder as shown in the screenshot below:
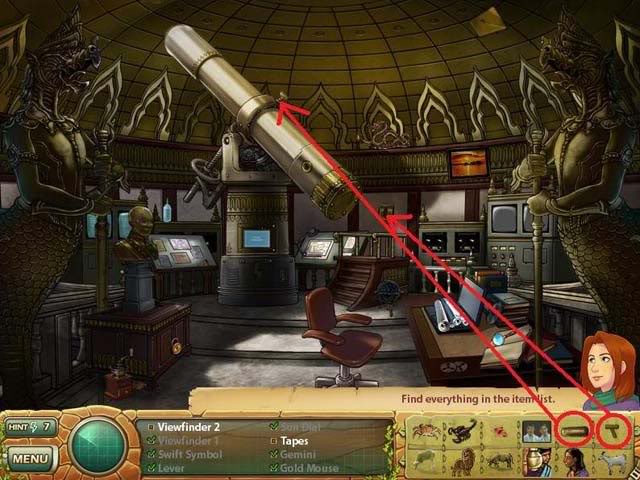
Hidden Items: Sagittarius, Hammer
- Use the tapes on the tape machine. The screens to the right will turn on and show an image of a bow and arrow. Click on this to get Sagittarius.
- While you’re at it, fit the second piece of the viewfinder onto the telescope as shown in the screenshot below.
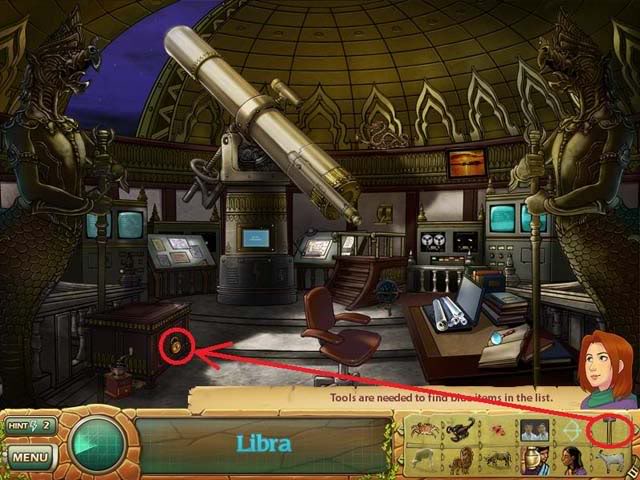
- Click the lever on the wall to open the observatory ceiling. The hammer is on the ledge.
- Use the hammer on the locked chest and take the scales inside.
- Click on the telescope lens to start the constellations mini-game.
Mini-Game: Constellations
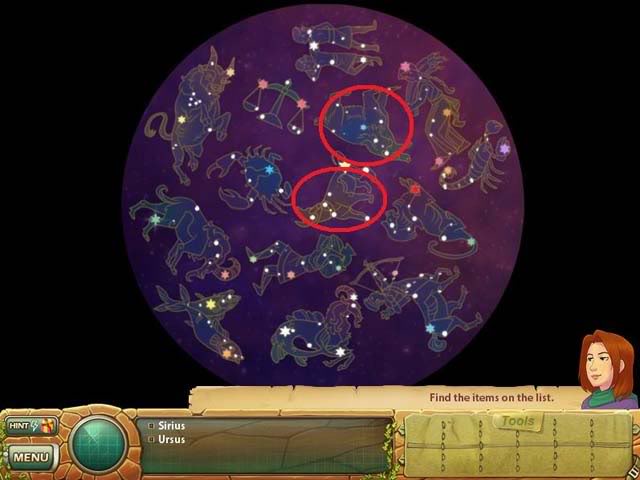
- Your goal is to arrange each of the 12 zodiac signs in the sky to match up with their constellations. Use the large colored stars as a guideline when matching. Don’t forget that you can rotate the constellations by clicking and holding the green arrow, then dragging your mouse to the left or right.
- See the screenshot below for what the constellations look like when placed. After you’ve finished, the Sirius and Ursus constellations will appear. Click on them.
Mini-Game: Keyboard #1
- Click on the monitor underneath the telescope to start this mini-game.
- Select the Sirius constellation from your inventory and click it onto the keyboard. The keys 5,6,7,9, T, O, B will be highlighted.
- Click on the keys in the following order: 7, B, 6, T, 5, 0, 9. When you’ve done it correctly, each key will turn green.
- When it’s finished you’ll exit back out to the observatory.
Mini-Game: Keyboard #2
- Next, click on the panel underneath the glowing monitors on the right side of the screen for another mini-game.
- Click the remaining constellation in your inventory, Ursus, onto the keyboard. The keys 3,7,R,T,U and F will be highlighted.
- Click on the keys in the following order: F, U, 7, 3, R, T
Click on the exit.
Geber’s Lab
Find all the items on the list.
Tools to find: Red Eyedropper, Blue Eyedropper, Spoon, Forceps
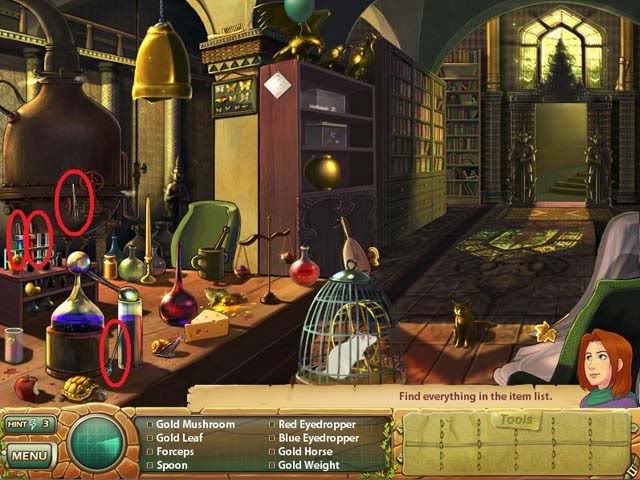
Hidden items: Red Powder, Gold Apple, Gold Bug, Feather, Gold Fish, Gold Cheese
- Hint: The Red Eyedropper turns object to gold; the Blue Eyedropper turns them from gold back to normal.
- Use the spoon on the small red jar in the lower left to get the red powder.
- Use the forceps on the same red jar to get the gold bug.
- Use the red eye dropper on the apple in the lower left to get the gold apple.
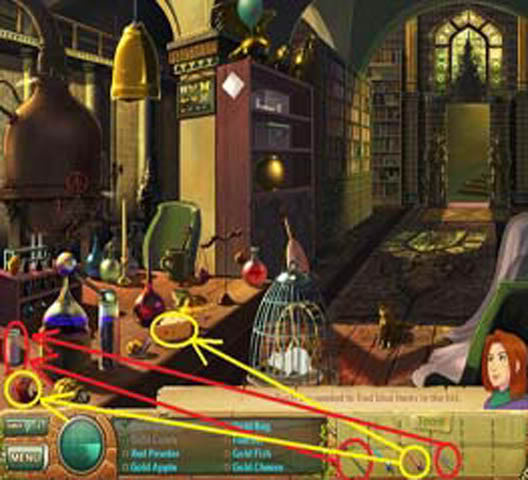
- Use the blue eyedropper on the gold fishbowl to turn it back to normal. Click on the gold fish swimming inside.
- Use the blue eyedropper on the golden bird on the shelf (the middle one of three), then grab the feather it drops as it flies away.
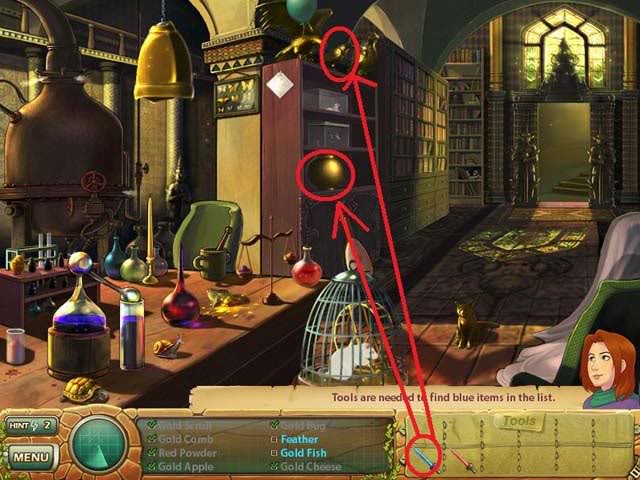
Secret Item: Vial of Truth
- Use the red eyedropper on the bookshelves to cause some books to fall.
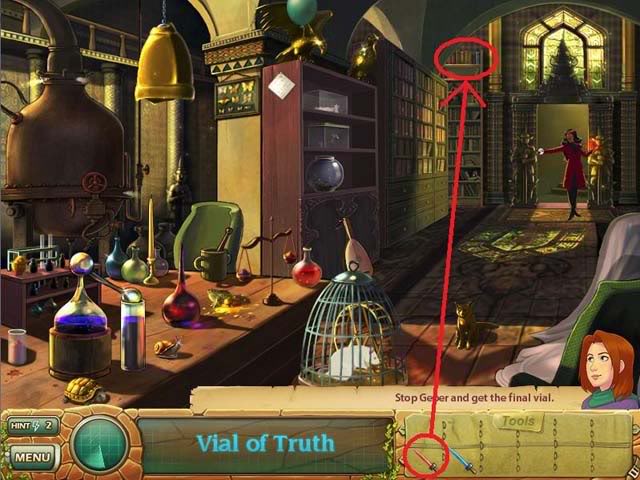
- In the next scene, use the blue eyedropper on the golden blanket hanging on the cage above the table.
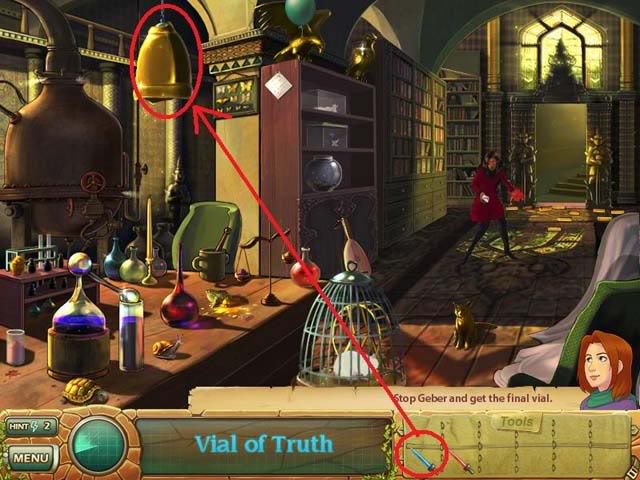
- Next, use the red eyedropper on the balloon along the ceiling.
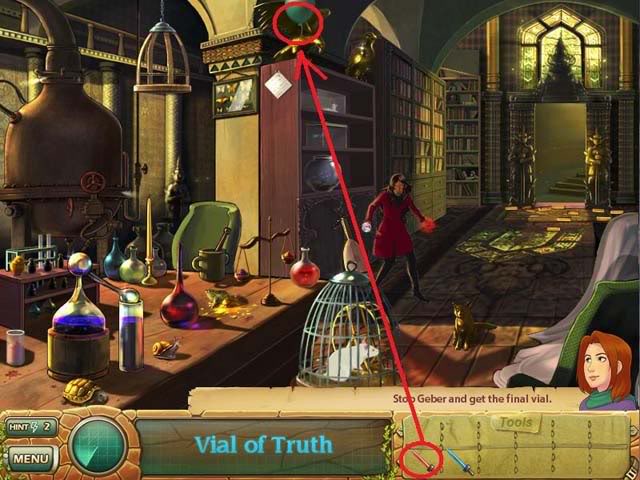
- Next, use the blue eyedropper on the golden cat in front of the woman.
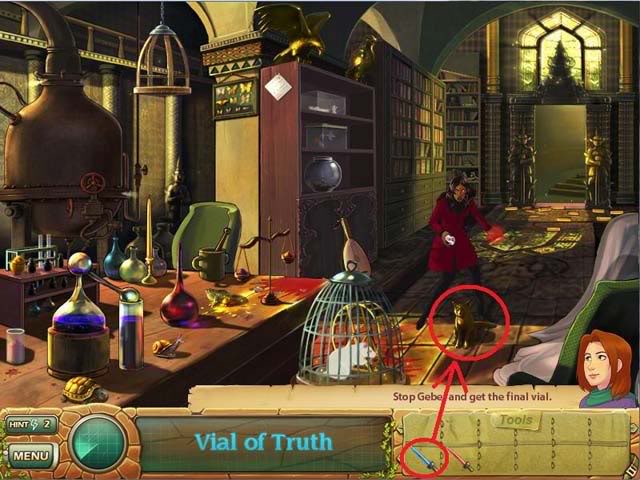
- Take the Vial of Truth from her hand.
Watch the final cutscene. Congratulations, you’ve just finished the game!
“;
More articles...
Monopoly GO! Free Rolls – Links For Free Dice
By Glen Fox
Wondering how to get Monopoly GO! free rolls? Well, you’ve come to the right place. In this guide, we provide you with a bunch of tips and tricks to get some free rolls for the hit new mobile game. We’ll …Best Roblox Horror Games to Play Right Now – Updated Weekly
By Adele Wilson
Our Best Roblox Horror Games guide features the scariest and most creative experiences to play right now on the platform!The BEST Roblox Games of The Week – Games You Need To Play!
By Sho Roberts
Our feature shares our pick for the Best Roblox Games of the week! With our feature, we guarantee you'll find something new to play!Type Soul Clan Rarity Guide – All Legendary And Common Clans Listed!
By Nathan Ball
Wondering what your odds of rolling a particular Clan are? Wonder no more, with my handy Type Soul Clan Rarity guide.


