![All VV Ultimatum Titles [How to Get]](/wp-content/uploads/2026/06/vv-ultimatum-titles.jpg "All VV Ultimatum Titles [How to Get]")
All VV Ultimatum Titles [How to Get]
Do titles provide buffs?


Welcome to the Samantha Swift and the Fountains of Fate walkthrough on Gamezebo. Samantha Swift and the Fountains of Fate is an Interactive/Hidden Object game played on PC, created by Mumbo Jumbo and available at Mumbo Jumbo or BigFish Games. This walkthrough includes tips and tricks, helpful hints, and a strategy guide for how to complete Samantha Swift and the Fountains of Fate.
Welcome to the Samantha Swift and the Fountains of Fate walkthrough on Gamezebo. Samantha Swift and the Fountains of Fate is an Interactive/Hidden Object game played on PC, created by Mumbo Jumbo and available at Mumbo Jumbo or BigFish Games. This walkthrough includes tips and tricks, helpful hints, and a strategy guide for how to complete Samantha Swift and the Fountains of Fate.
Strategy Guide Note: In this guide, I have only highlighted Green Items, Blue Items, Inventory Items Secret Items, Lightning Bolts and Swifts.
Watch the opening movie.
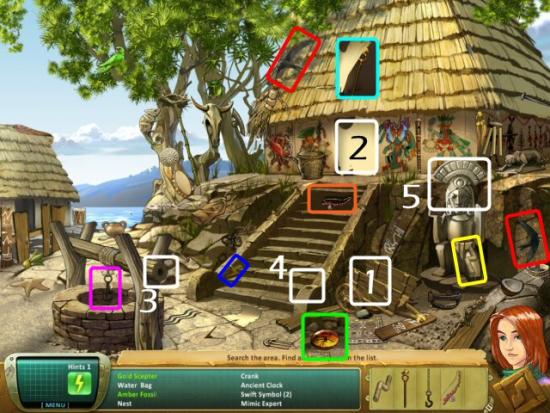
Stilt House
Find all items in the lists, the Lightning Bolt (blue) and 2 Swifts (red). Green Item: Amber Fossil; Blue Item: Hook; Inventory Items: Crank and Golden Scepter; Secret Item: Coral Necklace. Click on the Wagon (1) to find the Amber Fossil (green). Click on the Doorway (2) and collect the Golden Scepter (cyan). Use the Crank (yellow) on the Well (3), click on it and collect the Hook (magenta). Use the Golden Scepter on the Stair Post (4), use the Hook on the Scepter, click on the Crank (3) and collect the Coral Necklace (orange). Use the Coral Necklace on the Idol (5) and click on the Exit.

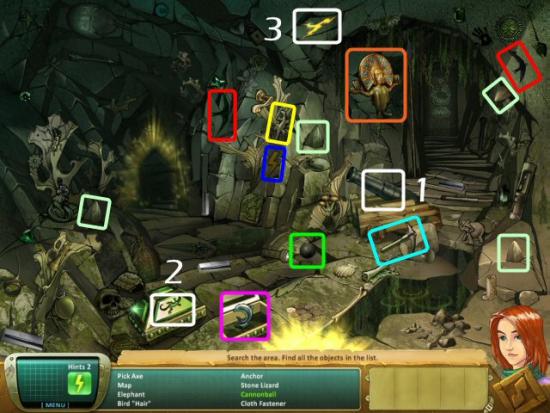
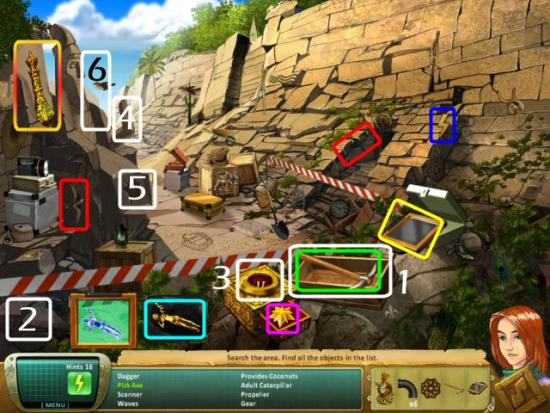
Cave Entrance
Find all items in the lists, the Lightning Bolt (blue) and 2 Swifts (red). Green Item: Cannonball; Blue Item: Silver Dolphin; Inventory Items: Stone Lizard and Pickaxe; Secret Item: Gold Inca Idol. Click on the Cannon (1) to find the Cannonball (green). Use the Stone Lizard (yellow) on the Chest (2) and collect the Silver Dolphin (magenta). Use the Pickaxe (cyan) on the Ceiling Crack (3) and collect the Gold Inca Idol (orange). Note the 4 Teeth (light green); you will need to return for these (you can’t get them now) after entering the next scene. Exit through the Arch at the back of the Cave Entrance.
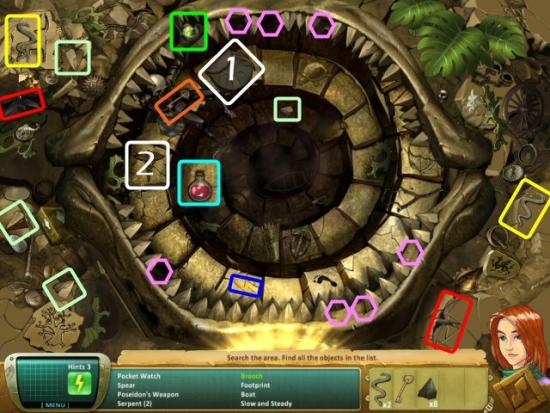
Pit
Find all items in the lists, the Lightning Bolt (blue) and 2 Swifts (red). Green Item: Brooch; Blue Item: Healing Potion; Inventory Items: 2 Serpents; Secret Item: Key. Click on the Pouch (1) to find the Brooch (green). Use the 2 Serpents (yellow) on the Caduceus (2) and collect the Healing Potion (cyan). Collect the Key (orange), 4 Teeth (light green), return to the previous scene and collect those 4 Teeth (light green, in the previous screenshot), return here and use the 8 Teeth in the 8 Gaps (pink). You’ll be returned to the Cave Entrance; exit through the Doorway on the right.
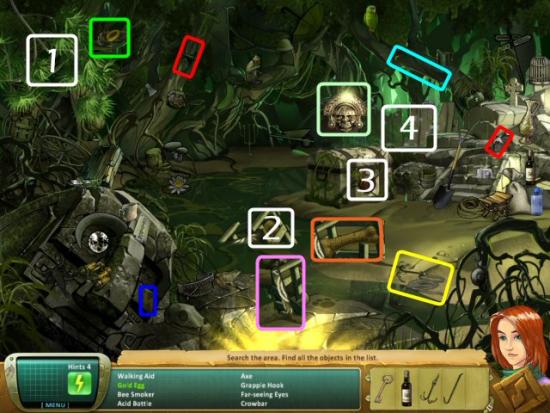
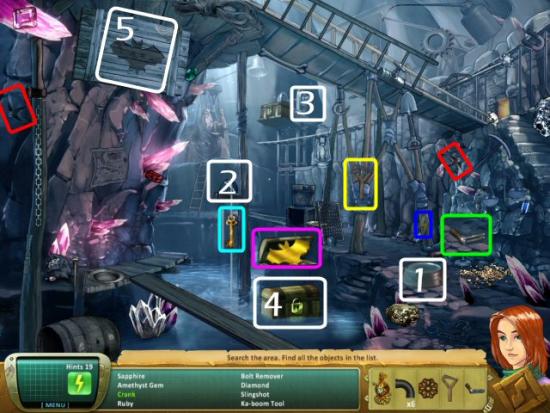
Underground River
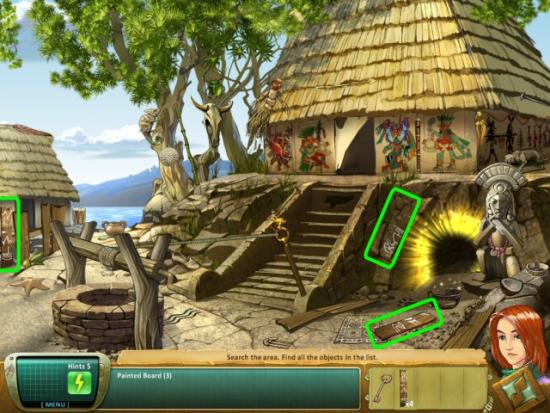
Find all items in the lists, the Lightning Bolt (blue) and 2 Swifts (red). Green Item: Gold Egg; Blue Items: Dinosaur Femur and Inca Mask; Inventory Items: Grappling Hook, Acid Bottle, Crowbar; Secret Item: Painted Board. Click on the Branches (1) to find the Gold Egg (green). Use the Grappling Hook (yellow) on the Crate (2), use the Crowbar (cyan) on the Crate and collect the Dinosaur Femur (orange). Use the Acid Bottle on the Lock (3) and collect the Inca Mask (light green) and collect the Painted Board (pink). Click back 3 times to return to the Stilt House, collect the Painted Boards then return here and click on the Fence (4).
Stilt House
Collect the 3 Painted Boards (yellow), return to the Underground River and click on the Fence.
Underground River
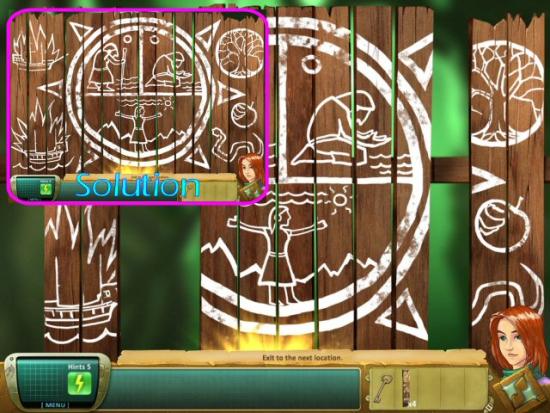
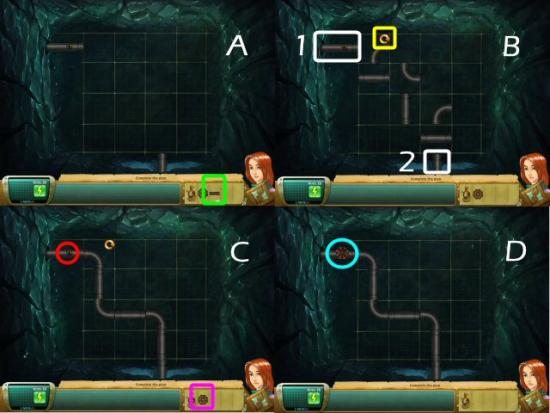
Fence Puzzle: Use the 4 Painted Boards in the spaces. Click on a Board then click on another to exchange places. Once a Board is in the correct position, it will lock into place. If you like, you can wait to add the Painted Boards until after you’ve placed the rest of the Boards.
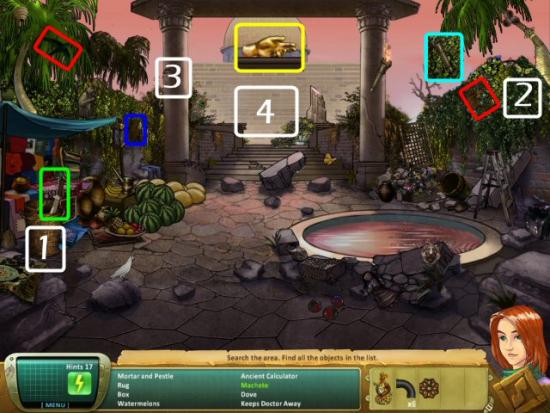
Swamp
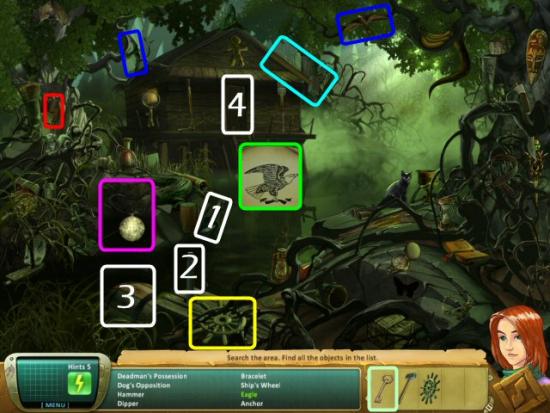
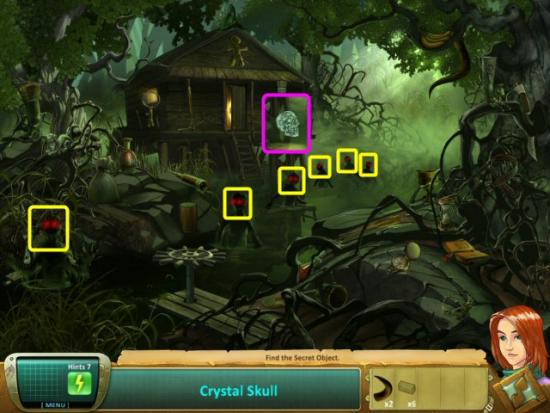
Find all items in the lists, the Lightning Bolt (blue) and 2 Swifts (red). Green Item: Eagle; Blue Item: Medallion; Inventory Items: Hammer and Ship’s Wheel; Secret Item: Crystal Skull. Click on the Bottle (1) to find the Eagle (green). Use the Ship’s Wheel (yellow) on the Post (2), use the Hammer (cyan) on the Barrel (3) and collect the Medallion (cyan). Use the Key (light green) on the Door (4). The Crystal Skull won’t appear until you finish in the House and return here.
House
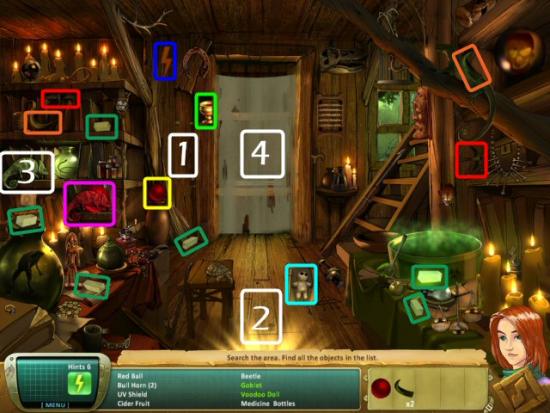
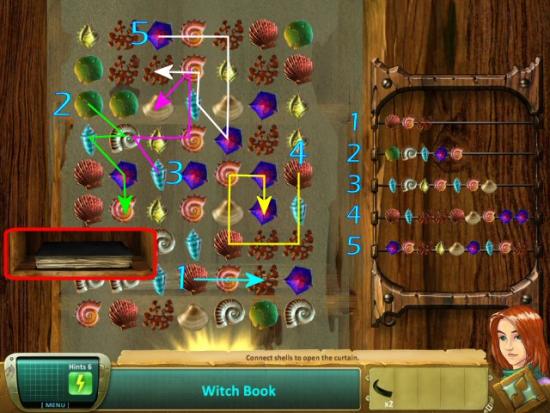
Find all items in the lists, the Lightning Bolt (blue) and 2 Swifts (red). Green Items: Goblet and Voodoo Doll; Blue Item: Red Chameleon; Inventory Items: Red Ball, 2 Bull Horns; Secret Item: Witch’s Book. Click on the Wall (1) and collect the Goblet (green). Click on the Floor Board (2) and collect the Voodoo Doll (cyan). Use the Red Ball (yellow) on the Chameleon (3) and collect the Red Chameleon (magenta). Collect the 2 Bull’s Horns and click on the Curtain (4). Note the 6 Salt Crystals (dark green); you’ll collect these after you complete the Witch’s Shell Puzzle.
Witch’s Shell Puzzle: Find the Shells, shown on the right, by clicking on the first and dragging to the last. The order of the puzzles will NOT necessarily be in a straight horizontal, vertical or diagonal line. You will complete 5 strings of Shells. There are several solutions for each string of Shells; see the following screenshot for my solutions. When you’ve finished, collect the Witch’s Book (red) and return to the House. Collect the 6 Salt Crystals and return outside to the Swamp.
Swamp
Use the 6 Salt Crystals on each of the 6 Swamp Zombies (yellow) and collect the Crystal Skull (magenta). Exit to the right, in the back.
Shipwreck
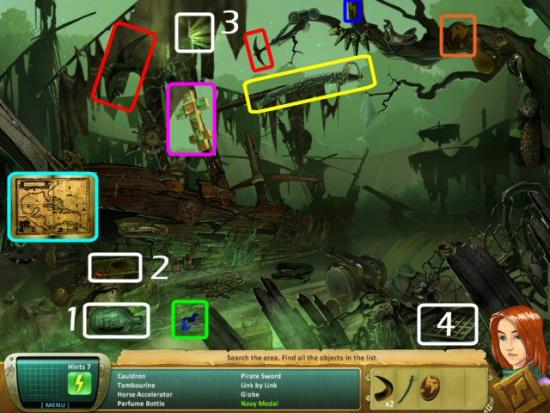
Find all items in the lists, the Lightning Bolt (blue) and 2 Swifts (red). Green Item: Navy Medal; Blue Item: Old Map; Inventory Items: Pirate Sword and Globe; Secret Item: Emerald Cross. Click on the Bottle (1) to find the Navy Medal (green). Use the Globe (orange) on the Book (2) and collect the Old Map (cyan). Use the Pirate Sword (yellow) on the Sail (3) and collect the Emerald Cross (magenta). Click on the Grating (4) and exit the scene.
Dungeon
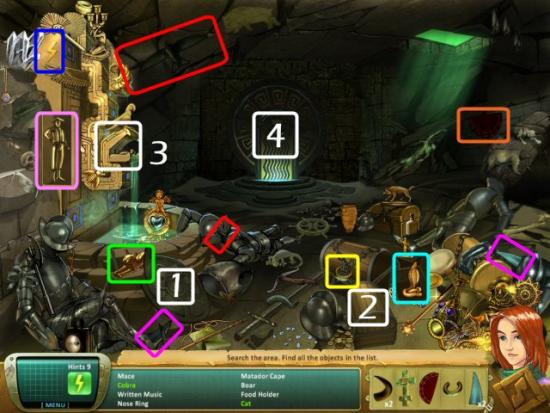
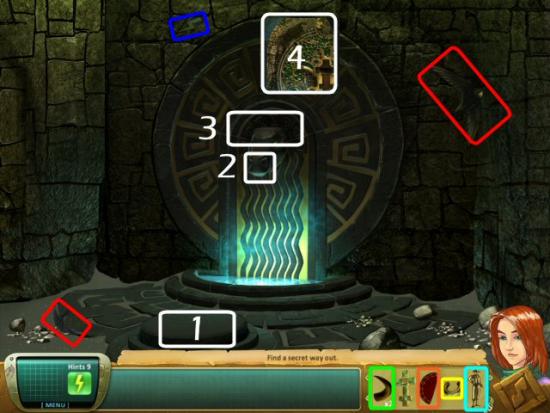
Find all items in the lists, the Lightning Bolt (blue) and 2 Swifts (red). Green Items: Cat and Cobra; Inventory Items: Nose Ring, Matador Cape and 2 Diamond Fangs; Secret Item: Matador. Click on the Shield (1) to collect the Cat (green). Click on the Chest (2) to collect the Cobra (cyan). Use the 2 Diamond Fangs (magenta) on the Serpent (3), and collect the Matador (pink). Click on the Bull (4).
Bull
Collect the Lightning Bolt (blue) and 2 Swifts (red). Secret Item: Cortez Emerald of Judgment. Use the Matador (cyan) on the Dais (1) and use the Cape (orange) on the Matador. Use the Nose Ring (yellow) on the Bull’s Nose (2), the 2 Bull’s Horns (green) on his Head (3) and click on the Room (4).
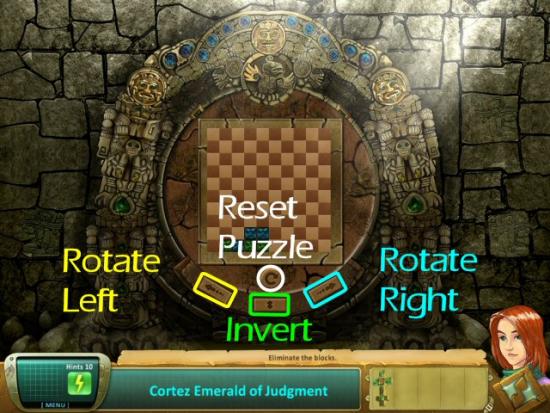
Board Puzzle: The object is to group the colors together, by rotating the board, to remove them. Look at the following screenshot for an explanation of the buttons. This puzzle isn’t timed nor are you limited by how many moves you can make. Once you complete the puzzle, use the Emerald Cross in the center slot, click on the cover to remove it and click to exit.
Click on the following for a video solution.
Mesopotamian Marshlands
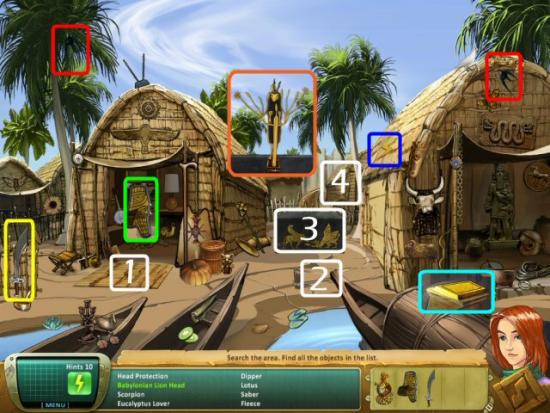
Find all items in the lists, the Lightning Bolt (blue) and 2 Swifts (red). Green Item: Babylonian Lion Head; Blue Item: Gold Ark; Inventory Item: Saber; Secret Item: Sumerian Goat. Click on the Mat (1) to find the Babylonian Lion Head (green). Use the Saber (yellow) on the Rope (2) and collect the Gold Ark (cyan). Use the Babylonian Lion Head on the Chest (3) and collect the Sumerian Goat (orange). Exit to the Desert (4).
Desert
Find all items in the lists, the Lightning Bolt (blue) and 2 Swifts (red). Green Items: Golden Adam and Shovel; Secret Item: Gold Heart. Click on the Tent Flap (1) and collect the Golden Adam (green). Click on the Tree (2) and collect the Shovel (cyan). Use the Shovel on the Ground (3) and collect the Gold Heart (magenta). Exit to the Garrison (4).

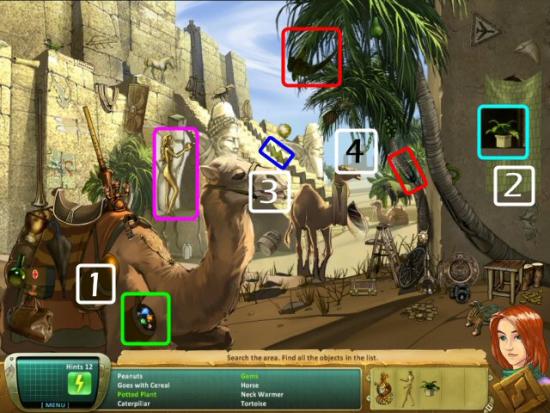
Garrison
Find all items in the lists, the Lightning Bolt (blue) and 2 Swifts (red). Green Items: Gems and Potted Plant; Secret Item: Golden Eve. Click on the Saddle Bag (1) and collect the Gems (green). Click on the Curtain (2) and collect the Potted Plant (cyan). Use the Potted Plant on the Camel (3) and collect the Golden Eve (magenta). Exit to the City (4).
City
Find all items in the lists, the Lightning Bolt (blue) and 2 Swifts (red). Blue Items: Keys and Apple; Inventory Item: Curved Wire; Secret Item: Golden Serpent. Use the Curved Wire (yellow) on the Grate (1) and collect the Keys (cyan). Use the Keys on the Truck (2) and collect the Apple (green). Use the Golden Adam and Golden Eve on the Fountain (3) and collect the Golden Serpent (magenta). Exit to the Factory (4).
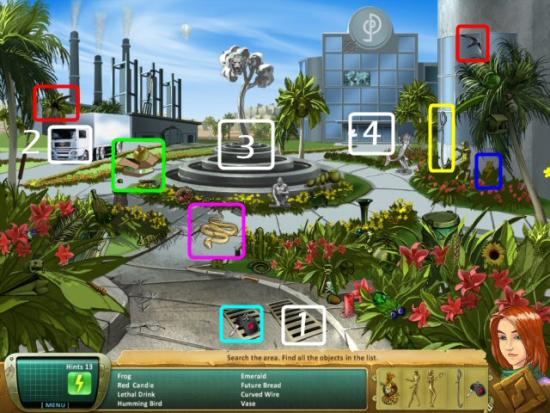
Factory
Find all items in the lists, the Lightning Bolt (blue) and 2 Swifts (red). Green Item: Lever; Blue Item: Pyramid Watcher; Inventory Items: 2 Neon Bulbs; Secret Item: Canopic Jar. Click on the Toolbox (1) and collect the Lever (green). Use the 2 Neon Bulbs (yellow) in the Empty Sockets (2) and collect the Pyramid Watcher (cyan). Use the Lever on the Conveyer (3), click on the Box (4) and collect the Canopic Jar (magenta). Click on the Boxes (5).
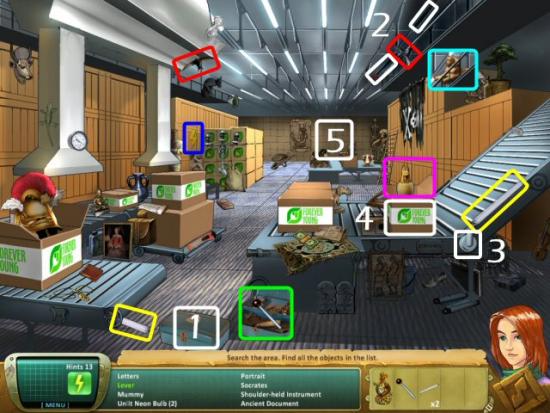
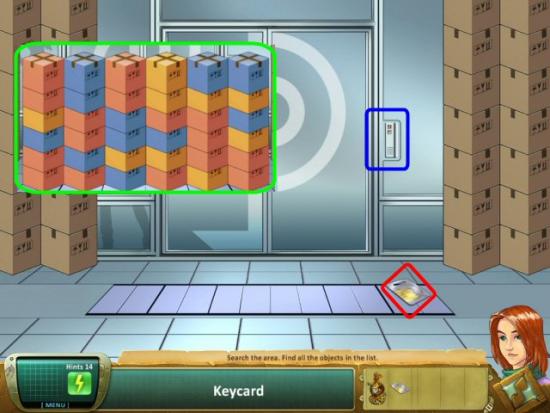
Boxes Puzzle: Remove adjacent boxes of the same color in groups of 2 or more. If you’re left with 1 box, the puzzle will reset. There is no strategy or a single solution; the puzzle is different each time. Collect the Key Card (red) and use it on the Electronic Lock (blue). Enter the Conference Room.
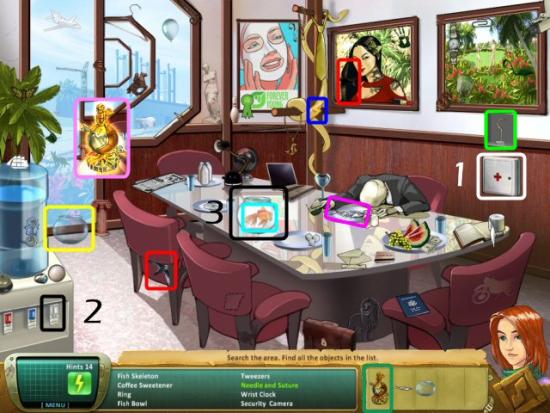
Conference Room
Find all items in the lists, the Lightning Bolt (blue) and 2 Swifts (red). Green Item: Needle and Suture; Blue Item: Goldfish; Inventory Item: Fish Skeleton and Fishbowl; Secret Item: Waters of Eden. Click on the First Aid Kit (1) and collect the Needle and Suture (green). Use the Fishbowl (yellow) on the Water Fountain (2), use the Fish Skeleton (magenta) on the Fishbowl (3) and collect the Goldfish (cyan). Use the Empty Cupid (dark green) on the Water Fountain and collect the Waters of Eden (pink).
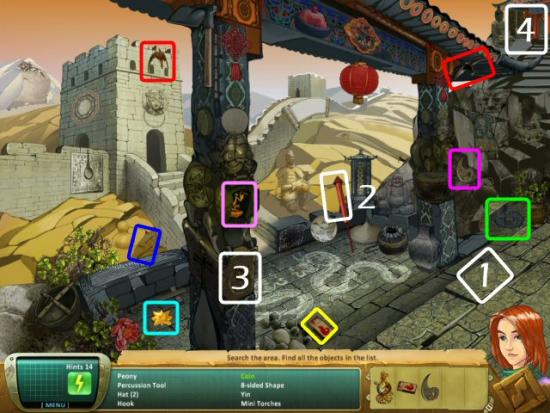
Great Wall
Find all items in the lists, the Lightning Bolt (blue) and 2 Swifts (red). Green Item: Coin; Blue Item: Star; Inventory Items: Matches and Yin Symbol; Secret Item: Golden Mantis. Click on the Stone (1) and collect the Coin (green). Use the Matches (yellow) on the Rocket (2) and collect the Star (cyan). Use the Yin Symbol (magenta) on the Yin Yang Medallion (3) and collect the Golden Mantis (pink). Exit to the Temple (4).
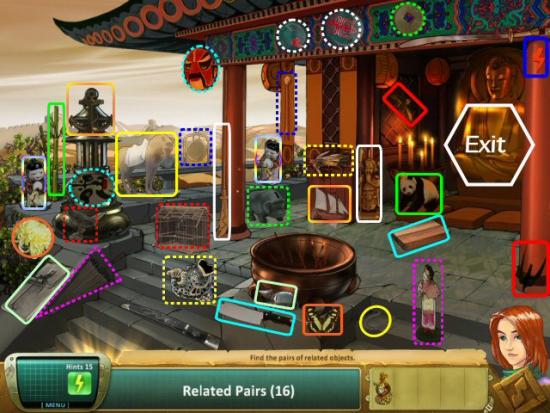
Temple
Find 16 related pairs, the Lightning Bolt (blue) and 2 Swifts (red). Exit to the Serpent Bridge.
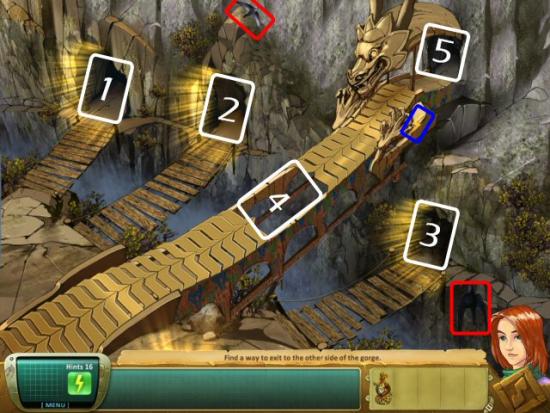
Serpent Bridge
Collect the Lightning Bolt (blue), 2 Swifts (red) and complete Chambers 1, 2 and 3, in any order, and then return here to repair the Bridge (4) and cross the gorge to the Dragon Chamber (5).
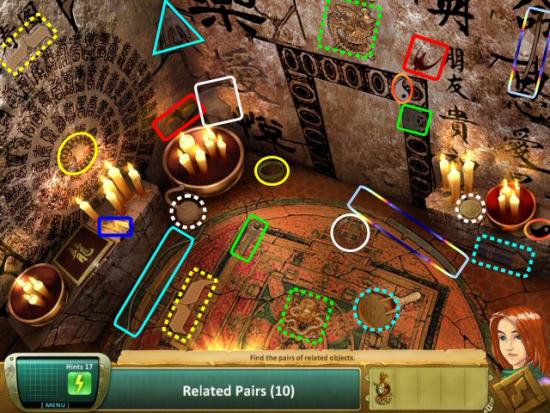
Chamber 1
Find 10 related pairs, the Lightning Bolt (blue) and 2 Swifts (red) Inventory Items: 2 Serpent Bridge Plans (dotted yellow).
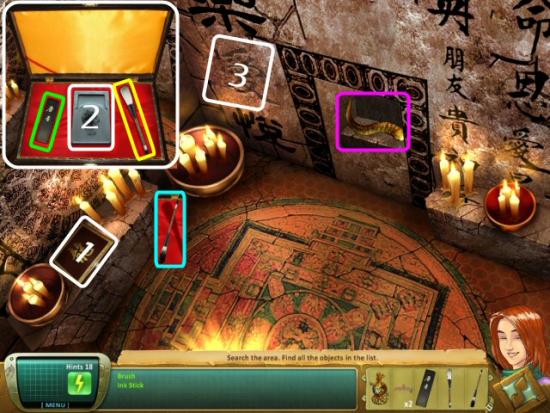
Green Items: Brush and Ink Stick; Blue Item: Painted Brush; Secret Item: Dragon Horn. Click on the Calligraphy Set (1), collect the Brush (green) and Ink Stick (yellow) and use them on the Mixing Stone (2). Collect the Painted Brush (cyan), use it on the Wall Tile (3) and collect the Dragon Horn (magenta). Exit to the Serpent Bridge then enter Chamber 2.
Chamber 2
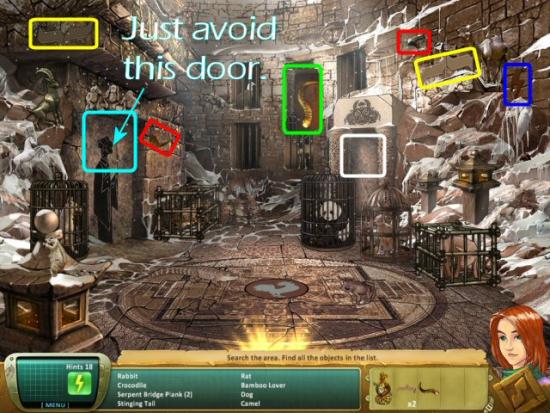
Find all items in the lists, the Lightning Bolt (blue) and 2 Swifts (red). Inventory Items: 2 Serpent Bridge Planks (yellow); Secret Item: Dragon Horn. Click on the Door (white) to collect the Dragon Horn (green). If you click on the Door (cyan) at the left, and go through, you’ll end up hanging off the side of a cliff. Click through to return to the chamber…or avoid it altogether by not clicking on it. Exit to the Serpent Bridge then enter Chamber 3.
Chamber 3
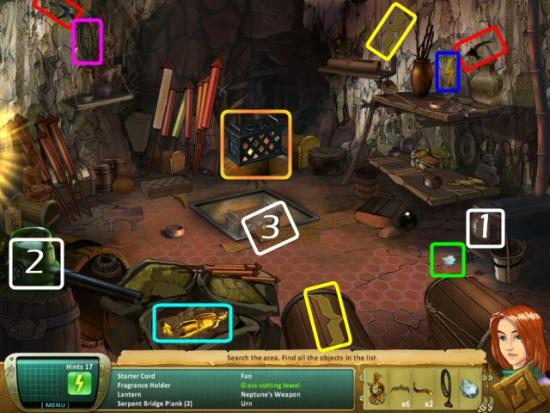
Find all items in the lists, the Lightning Bolt (blue) and 2 Swifts (red). Green Item: Glass Cutting Jewel; Blue Item: Gold Statuette; Inventory Items: 2 Serpent Bridge Planks (yellow) and a Starter Cord; Secret Item: Eternal Fire. Click on the Oven Door (1) and collect the Glass Cutting Jewel (green). Use the Starter Cord (magenta) on the Leaf Blower (2) and collect the Gold Statuette (cyan). Click on the Carpet (3), use the Glass Cutting Jewel on the Glass (4) and collect the Eternal Fire (orange). Exit to the Serpent Bridge.
Serpent Bridge
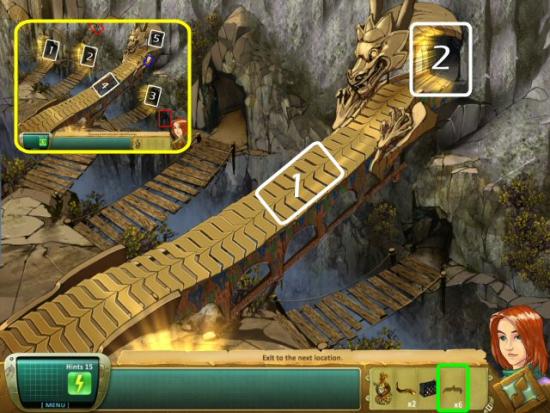
Use the 6 Serpent Bridge Planks (green) to replace the Missing Section (1) and Exit to the Cave (2).
Cave
Find all items in the lists, the Lightning Bolt (blue) and 2 Swifts (red). Green Items: Pearl Bracelet and Gold Ball; Secret Item: Shangri-La Immortality Water. Click on the Fish (1) and collect the Pearl Bracelet (cyan). Click on the Parasol (2) and collect the Gold Ball (green). Click on the Pool (3) for the Chinese Characters Puzzle.
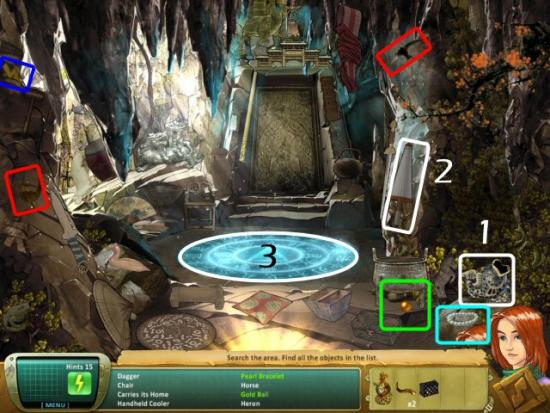
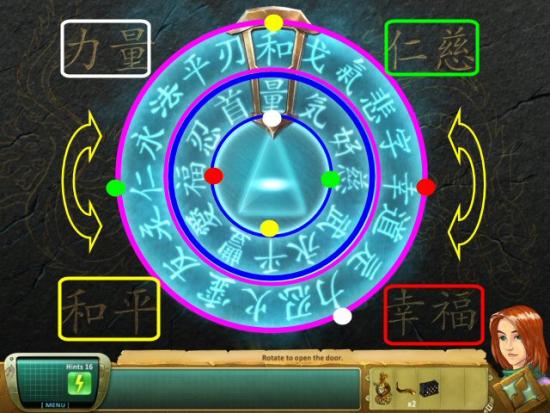
Chinese Characters Puzzle: Rotate the inner (magenta) and outer (blue) rings, by clicking and dragging them around (in either direction), to match each of the 4 Chinese Phrases. When correct, the phrases will light up. You may do them in any order you like. This is a simple and direct puzzle; no strategy is needed.
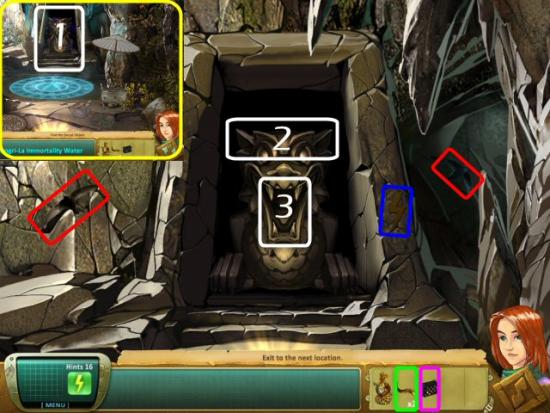
Dragon Statue: Click on the Dragon Statue (1) and collect the Lightning Bolt (blue), 2 Swifts (red). Use the Dragon Horns (green) on his Head (2) and the Eternal Fire (magenta) on his Mouth (3).
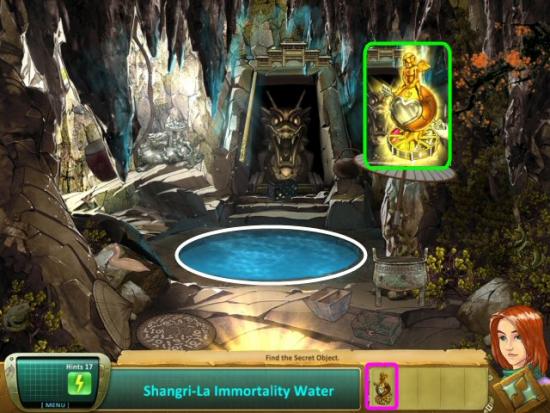
Shangri-La Immortality Water: Use the Empty Cupid (magenta) on the Pool (white) and collect the filled container (green).
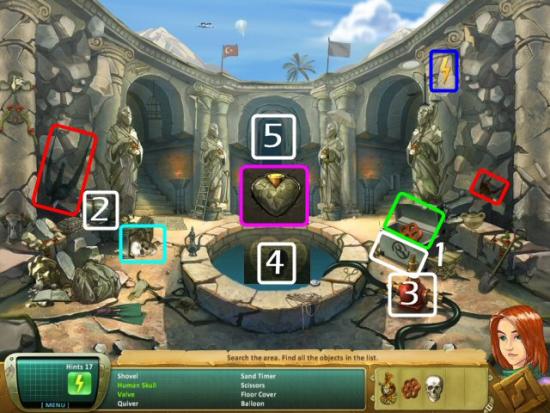
King Midas’ Palace Courtyard
Find all items in the lists, the Lightning Bolt (blue) and 2 Swifts (red). Green Items: Human Skull and Valve; Secret Item: Stone Heart. Click on the Toolbox (1) and collect the Valve (green). Click on the Helmet (2) and collect the Human Skull (cyan). Use the Valve on the Pump (3), use the Human Skull on the Indentation (4) and collect the Stone Heart (magenta). Exit to the Palace (5).
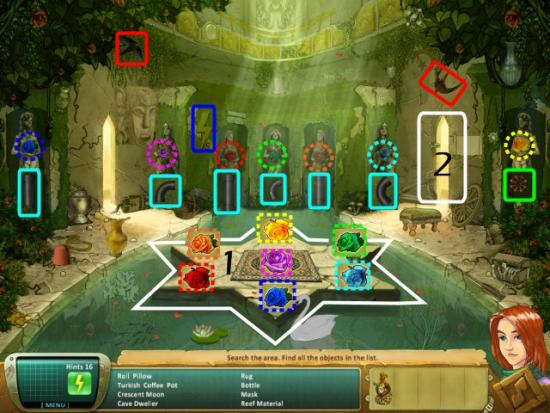
Palace
Find all items in the lists, the Lightning Bolt (blue) and 2 Swifts (red). Blue Items: Valve and 6 Pipes; Inventory Items: 7 Roses (Green, Orange, Yellow, Red, Blue, Purple and Light Blue. Use each Rose on its matching colored Jewel on the Dais (1) in the middle of the Pool. Collect the 6 Pipes (cyan) and the Valve (green) and exit to the Treasure Room (2).
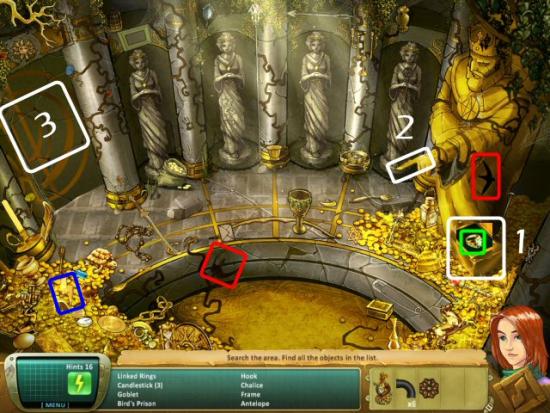
Treasure Room
Find all items in the lists, the Lightning Bolt (blue) and 2 Swifts (red). Green Item: Ring. Click on the Chest (1), collect the Ring (green) and use it on the statue’s Finger (2). Exit the room (3).
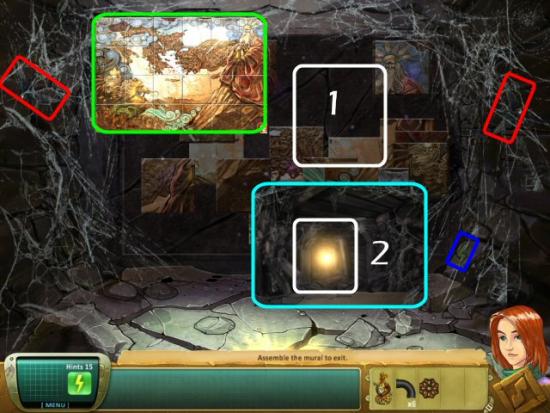
Mural Puzzle: Collect the Lightning Bolt (blue), 2 Swifts (red) and then click on the puzzle (1). Click on each piece, move it to the correct location and then click to place it. Once it’s placed correctly, you can’t move it again. When it’s complete, exit to the Outside (2).
Outside the Palace
Find all items in the lists, the Lightning Bolt (blue) and 2 Swifts (red). Green Item: Pickaxe; Blue Items: Gold Dancer and Gold Star; Inventory Item: Scanner; Secret Item: Genie Bottle. Click on the Crate (1) and collect the Pickaxe (green). Use the Scanner (yellow) and the Pickaxe, in that order, on the Rocks (2) and collect the Gold Dancer (cyan). Use the Gold Dancer on the Gold Box (3) and collect the Gold Star (pink). Click on the Statue’s Hand (4), use the Gold Star, collect the Genie Bottle (orange) and exit to Jerusalem (5).
Jerusalem
Find all items in the lists, the Lightning Bolt (blue) and 2 Swifts (red). Green Item: Machete; Blue Item: Unlit Torch; Secret Item: Golden Hand. Click on the Basket (1) and collect the Machete (green). Use the Machete on the Vines (2) and collect the Unlit Torch (cyan). Use the Unlit Torch on the Pillar (3), click on it and collect the Golden Hand (yellow). Click on the Wall (4).
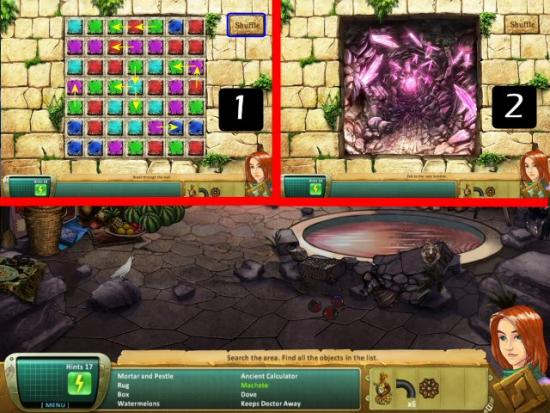
Wall Puzzle: This is a straightforward Match-3 game. Click on a square, then click on an adjacent square to move it so 3, or more, squares of the same color line up and you break through a portion of the wall. Continue playing until you’ve broken through the entire wall. If you find yourself without 3 squares to match up, click on the Shuffle Button (blue) to rearrange the squares. The following screenshot shows several “first moves” (yellow) you can make. Complete the puzzle (1) and then exit to the Mines (2).
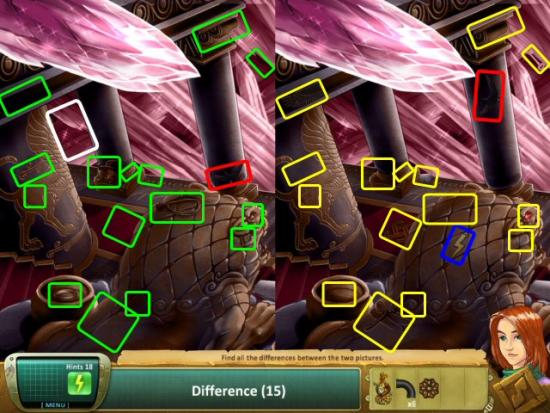
King Solomon’s Mines
Find the Differences Minigame: Find the Lightning Bolt (blue), 2 Swifts (red) and the 15 Differences. Exit to the Dock (white). Note: You should have now found 60 Swifts and unlocked Unlimited Hidden Object Mode.
Dock
Find all items in the lists, the Lightning Bolt (blue) and 2 Swifts (red). Green Item: Crank; Blue Item: Key; Inventory Item: Slingshot; Secret Item: Golden Bat. Click on the Washtub (1) and collect the Crank (green). Use the Slingshot (yellow) on the Rock (2) and collect the Key (cyan). Use the Crank on the Winch (3), use the Key on the Chest (4) and collect the Golden Bat (magenta). Use the Golden Bat on the Sign (5).
Pipes Puzzle: A. Use the 6 Pipes (green) in the puzzle grid. B. Rotate them as needed by clicking on the circular arrow (yellow) so they make a continuous connection from the Inlet Pipe (1) to the Outlet Pipe (2). Once you’ve placed a Pipe, you can click on it and move it to another square in the grid. You may also return it to your inventory by clicking on it then right clicking anywhere in the scene. C. Once all the Pipes are placed correctly use the Valve (magenta) on the Valve Stem (red). D. Click on the Valve (cyan).
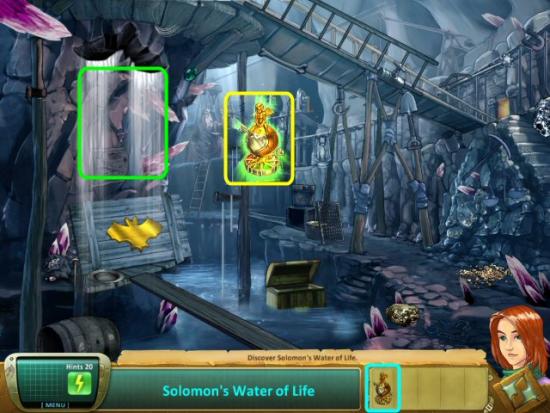
Use the Empty Cupid (cyan) on Solomon’s Water of Life (green) and collect the filled Cupid (yellow).
Hopi Village
Find all items in the lists, the Lightning Bolt (blue) and 2 Swifts (red). Green Item: Hopi Shield; Blue Item: Flute; Inventory Item: Dagger; Secret Item: Kokopelli Flute Player. Click on the Rug (1) and collect the Hopi Shield (green). Use the Dagger (yellow) on the Pipe (2) and collect the Flute (cyan). Use the Flute in the Wall (3) and collect the Kokopelli Flute Player (magenta). The exits lead to the Ghost Town (4), Waterfall (5) and Forest Path (6). You can choose any location to start with, but you may have to return later to finish other areas. Exit to the Ghost Town.

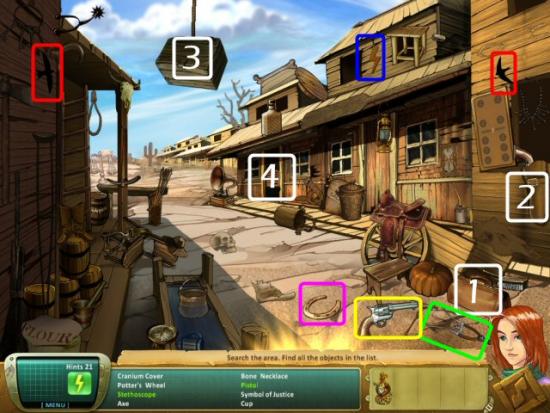
Ghost Town
Find all items in the lists, the Lightning Bolt (blue) and 2 Swifts (red). Green Items: Pistol and Stethoscope; Secret Item: Golden Horseshoe. Click on the Doctor’s Bag (1) and collect the Stethoscope (green). Click on the Holster (2) and collect the Pistol (yellow). Use the Pistol on the Box (3), collect the Golden Horseshoe (magenta) and exit to the Saloon (4).
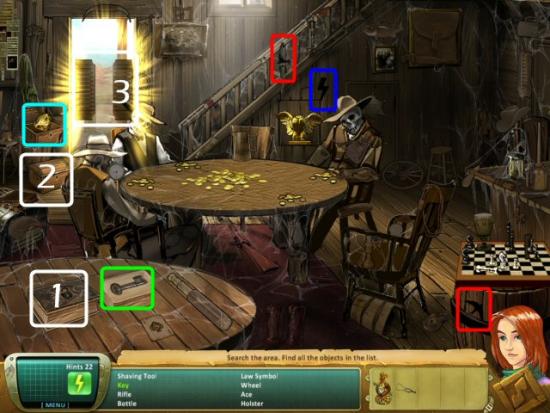
Saloon
Find all items in the lists, the Lightning Bolt (blue) and 2 Swifts (red). Green Item: Key; Blue Item: Gold Nugget; Secret Item: Silver Coins. Click on the Book (1) and collect the Key (green). Use the Key on the Chest (2) and collect the Gold Nugget (cyan). You can’t do any more, yet, so exit to the Town (3), return to the Hopi Village and continue to the Forest Path.
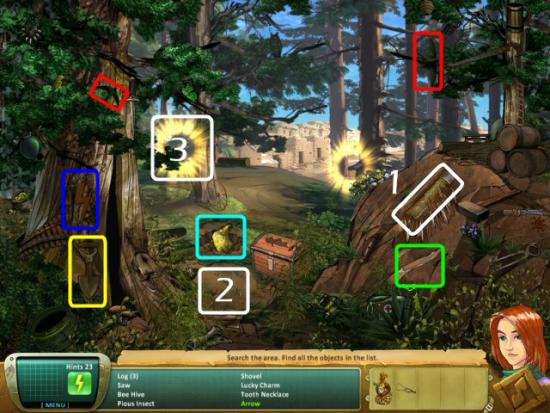
The Forest Path
Find all items in the lists, the Lightning Bolt (blue) and 2 Swifts (red). Green Item: Arrow; Blue Item: Eagle Head; Inventory Item: Shovel; Secret Item: Hopi Tablet. Click on the Quiver (1) and collect the Arrow (green). Use the Shovel (yellow) on the Tracks (2) and collect the Eagle Head (cyan). You can’t do any more, yet, so exit to the Forest (3).
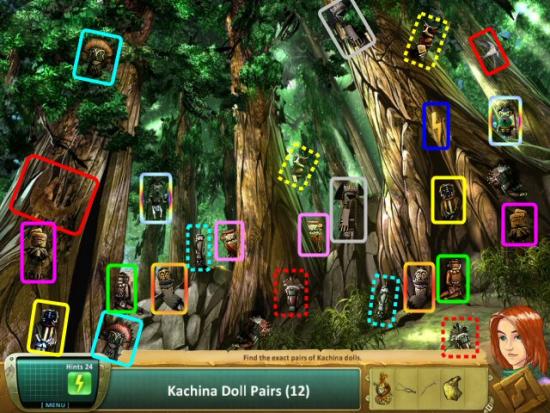
The Forest
Find 12 pairs of Kachina Dolls, the Lightning Bolt (blue) and 2 Swifts (red). Return to the Ghost Town Saloon.
Saloon
Use the Eagle Head (cyan) on the Statue (1), use the Stethoscope (green) on the Safe (2) and collect the Silver Coins (magenta). Click on the Table (3).
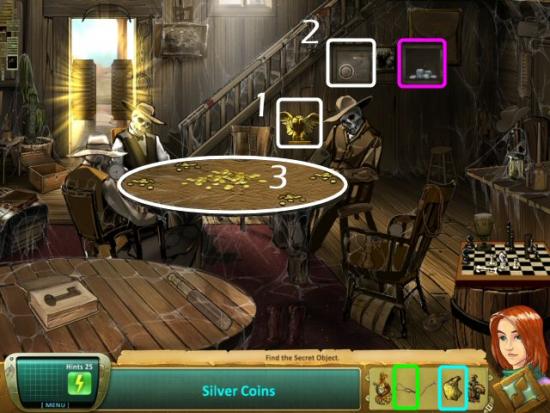
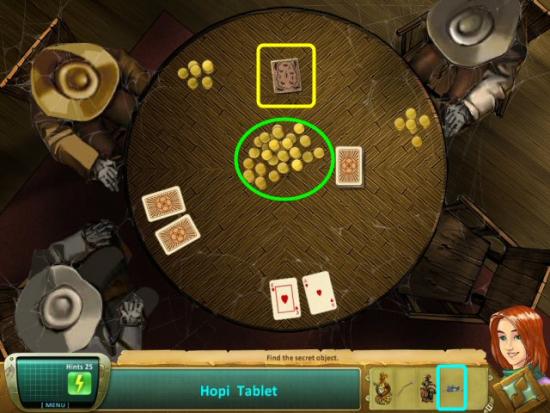
Poker Table
Use the Silver Coins (cyan) on the Pot (green) and collect the Hopi Tablet (magenta). Return to the Hopi Village and continue to the Waterfall.
Waterfall
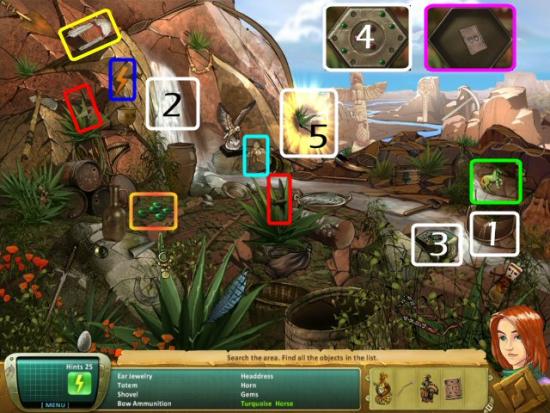
Find all items in the lists, the Lightning Bolt (blue) and 2 Swifts (red). Green Item: Turquoise Horse; Blue Item: Warrior Statue; Inventory Items: Headdress and Gems; Secret Item: Hopi Tablet. Click on the Saddle (1) and collect the Turquoise Horse (green). Use the Headdress (yellow) on the Face (2) and collect the Warrior Statue (cyan). Click on the Jewelry Box (3), use the Gems (orange) on top (4) and collect the Hopi Tablet (magenta). Exit to the Hopi Village (5) and return to the Forest Path.
Forest Path
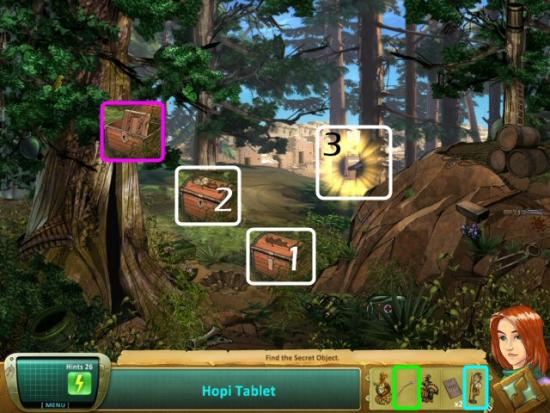
Use the Warrior Statue (cyan) on the Chest (1). Use the Arrow (green) on the Lock (2) and collect the Hopi Tablet (magenta). Exit to the Hopi Village (3).
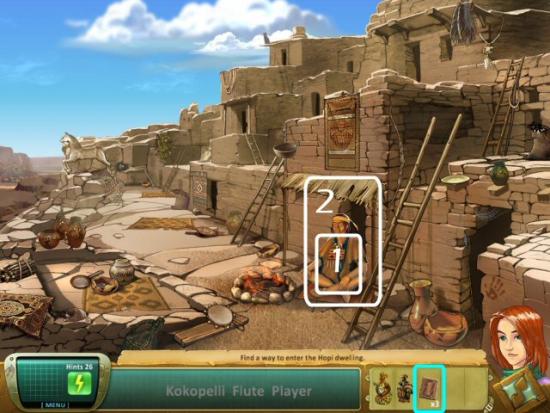
Hopi Village
Use each of the 3 Hopi Tablets (cyan) on the Shaman (1) and enter the House (2).
House
Find the Lightning Bolt (blue), 2 Swifts (red) and click on the Dream Catcher (cyan).
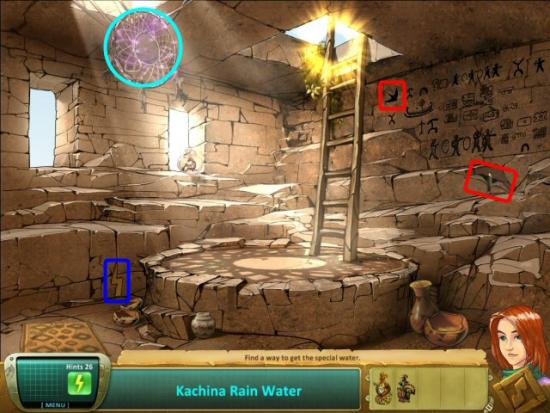
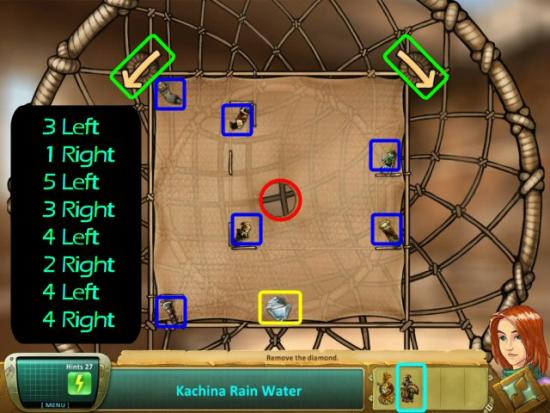
Dream Catcher Puzzle: Use the Set of Kachina Dolls (cyan) on the center of the Dream Catcher. The object of this game is to rotate the board, using the left and right Arrows (green), so that the Diamond (yellow) collects all the Kachina Dolls (blue) and then falls through the hole in the middle (red). There are many solutions; the ones I used are shown in the following screenshot.
Click on the following for a video solution.
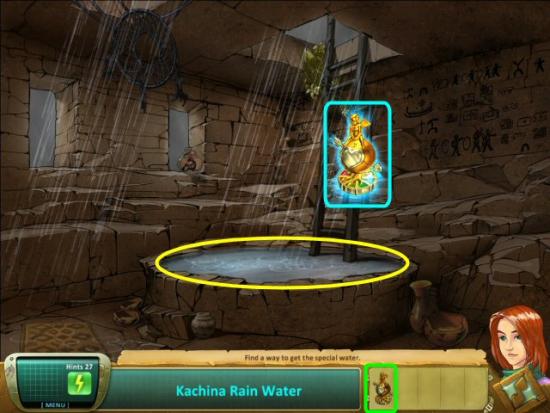
Use the Empty Cupid (green) on the Pool (yellow) and collect the Kachina Rain Water (cyan).
The Beach
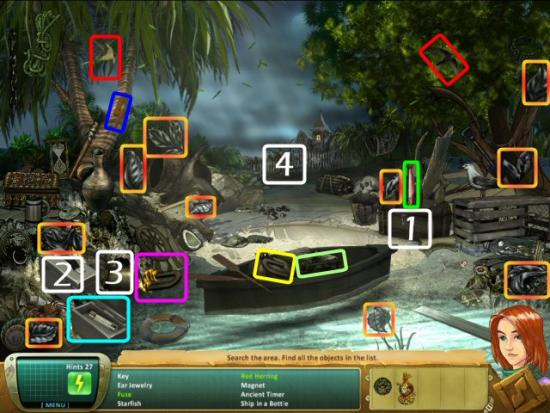
Find all items in the lists, the Lightning Bolt (blue) and 2 Swifts (red). Green Items: Fuse and Red Herring; Inventory Items: Magnet, Key and 10 Metal Leaves; Secret Item: 6 Coins. Click on the Chest (1) and collect the Red Herring (green). Click on the Toolbox (2) and collect the Fuse (cyan). Collect 10 Metal Leaves (orange) and the Key (light green). Use the Magnet (yellow) on the Pipe (3) and collect 6 Coins (magenta). Exit to the Gate (4).
The Gate
Collect the Lightning Bolt (blue) and 2 Swifts (red). Use the Metal Leaves (orange) on the Gate (1) and use the Key (light green) in the Lock (2). Note that the choice of Leaves you pick from your Inventory is random; its shape will highlight once you’re over the correct spot.
Yard
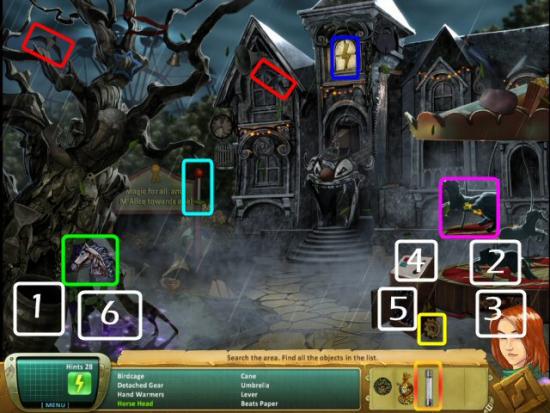
Find all items in the lists, the Lightning Bolt (blue) and 2 Swifts (red). Green Item: Horse Head; Inventory Items: Gear and Lever; Secret Item: Emerald Cross. Click on the Barrel (1) and collect the Horse Head (green). Use the Horse Head on the Carousel (2), use the Gear (yellow) on the Mechanism (3), use the Lever (cyan) on the Control Panel (4), use the Fuse (orange) on the Fuse Box (5) and collect the Emerald Cross (magenta). Click on the Base of the Tree (6).
Tree
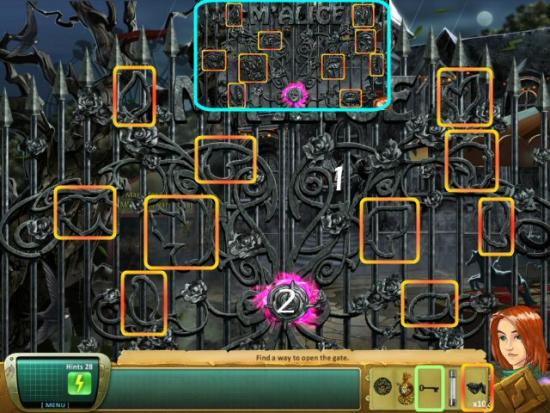
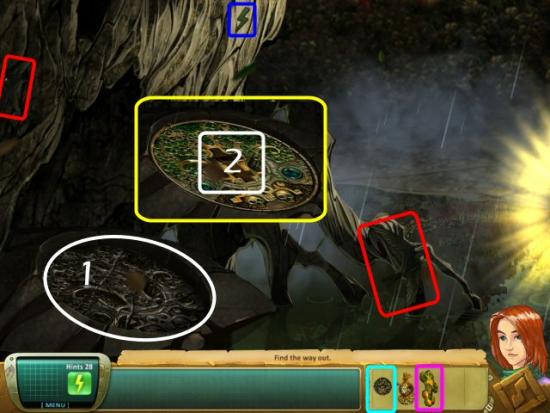
Find the Lightning Bolt (blue) and 2 Swifts (red). Use the Emerald of Cortez (cyan) at the Base of the Tree (1), use the Emerald Cross (magenta) in the Slot (2) and exit to the Courtyard.
Courtyard
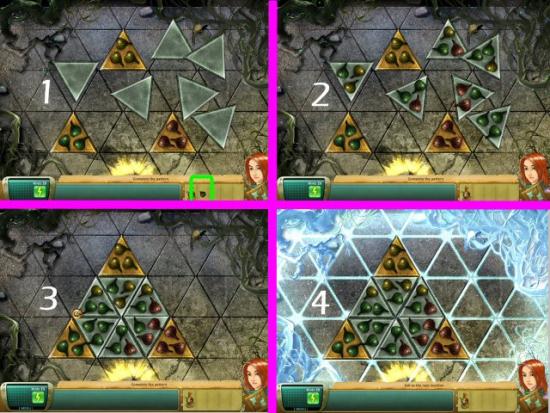
Find 18 Figs (green), the Lightning Bolt (blue) and 2 Swifts (red). Click on the Doors (white).
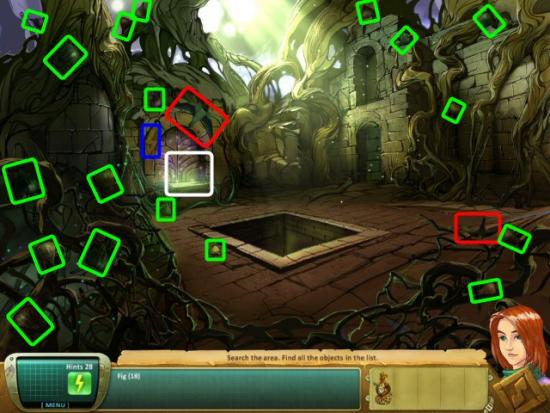
Fig Puzzle: 1. Use the Figs (green) on the board. 2. Click and drag the triangles into place to form one large triangle. 3. Click on any corner to rotate each piece into position. 4. Completed puzzle. The colors of the Figs must match the ones adjacent to them, on all 3 sides.
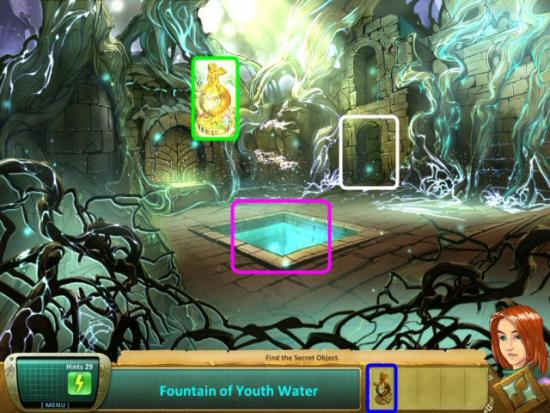
Use the Empty Cupid (blue) on the Pool (magenta), collect the Fountain of Youth Water (green) and exit into the House (white).
House
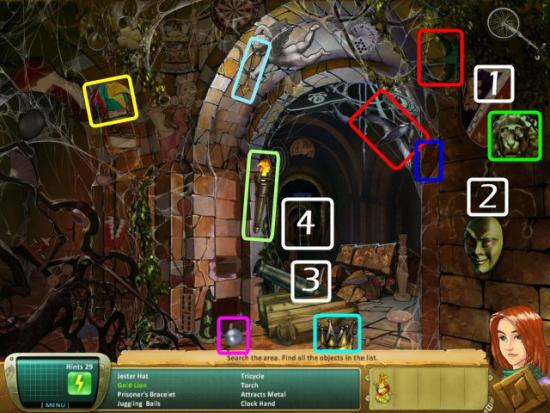
Find all items in the lists, the Lightning Bolt (blue) and 2 Swifts (red). Green Item: Gold Lion; Blue Item: Crown; Inventory Items: Jester’s Hat, Torch and Clock Hand; Secret Item: Crystal Ball. Click on the Shield (1) and collect the Gold Lion (green). Collect the Clock Hand (light blue). Use the Jester’s Hat (yellow) on the Mask (2) and collect the Crown (cyan). Use the Torch (light green) on the Cannon (3) and collect the Crystal Ball (magenta). Exit out the Door (4).
Clown Door
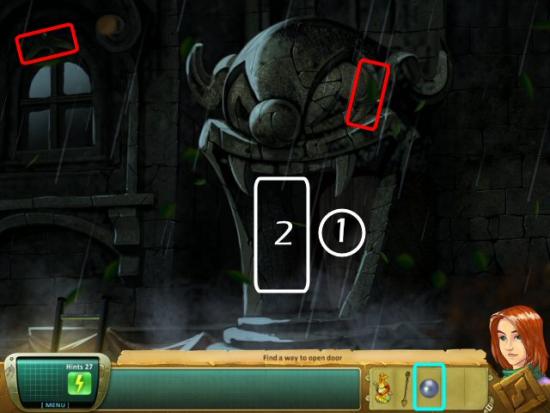
Find the 2 Swifts (red), use the Crystal Ball (cyan) on the Door (1) and enter the Labyrinth (2). There doesn’t appear to be a Lightning Bolt (believe me, I searched) in this location.
Labyrinth
Move through the Labyrinth to the end. If you are stuck, click on the circular button (cyan) to take you back to the beginning. Each time you see a playing card in the distance, move directly towards it until you can’t go any further. In all cases, save one, there is only one direction to turn.
Magic Room
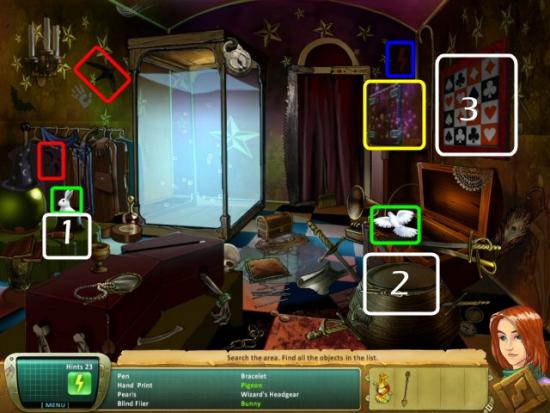
Find all items in the lists, the Lightning Bolt (blue) and 2 Swifts (red). Green Items: Pigeon and Bunny; Secret Item: Key. Click on the Top Hat (1) and collect the Bunny (green). Click on the Barrel (2) and collect the Pigeon (cyan). Click on the Wall Hanging (3) and click on the Safe (yellow).
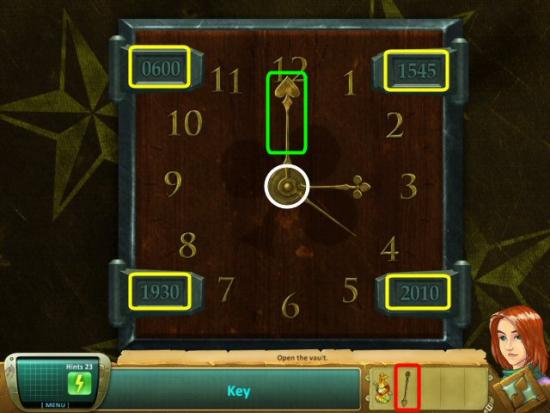
Clock Safe Puzzle: Use the Clock Hand (red) on the Clock (white). You need to set the time, 4 times, according to those shown in each corner (yellow). In order to convert the Military/European time shown, just subtract 12:00 from all times after 12:59 pm (59 minutes after 12:00 noon). To change the time, move the Minute Hand (green) in either direction; clockwise or counter-clockwise.
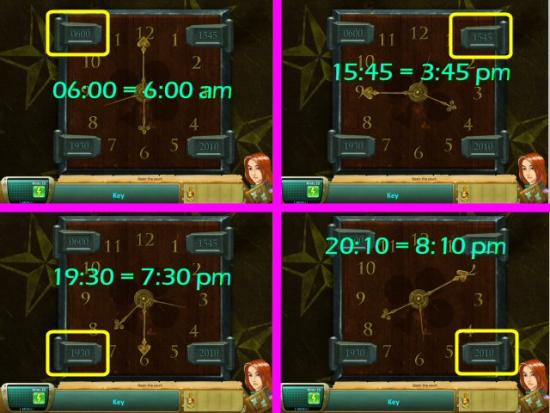
Clock Safe Puzzle Solutions
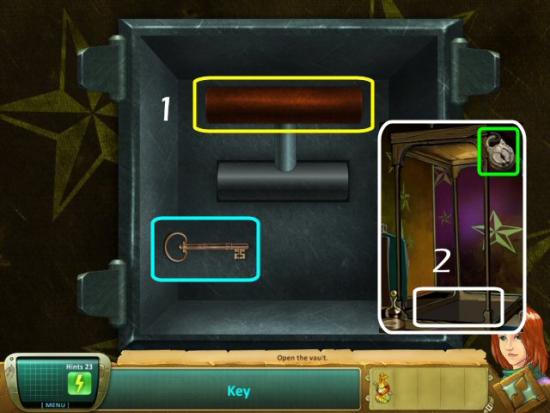
Click the Handle (1), collect the Key (cyan), use the Key on the Lock (green) and exit through the bottom of the Water Tank (2).
Find the Lightning Bolt (blue) and 2 Swifts (red). Use the Fountain of Youth Water (green) on the Green Crystals (magenta). Watch the ending movie and credits.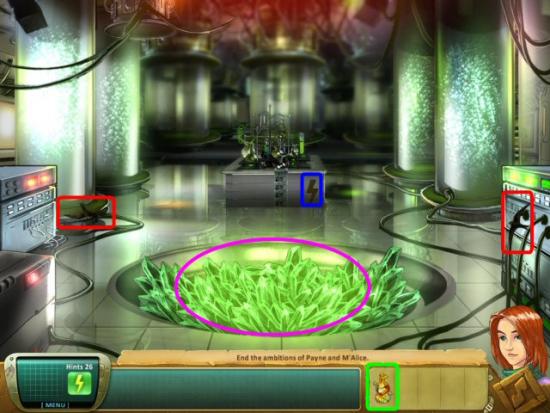
Congratulations! You’ve completed Samantha Swift and the Fountains of Fate. You can now play Unlimited Hidden Object Mode and replay the game to collect any Trophies you missed.
