![All VV Ultimatum Titles [How to Get]](/wp-content/uploads/2026/06/vv-ultimatum-titles.jpg "All VV Ultimatum Titles [How to Get]")
All VV Ultimatum Titles [How to Get]
Do titles provide buffs?


Welcome to the walkthrough for Royal Trouble on Gamezebo. Royal Trouble is a point and click adventure game for the PC created by Orchid Games. This walkthrough includes tips and tricks, helpful hints, and a strategy guide to complete Royal Trouble.
Welcome to the walkthrough for Royal Trouble on Gamezebo. Royal Trouble is a point and click adventure game for the PC created by Orchid Games. This walkthrough includes tips and tricks, helpful hints, and a strategy guide to complete Royal Trouble.
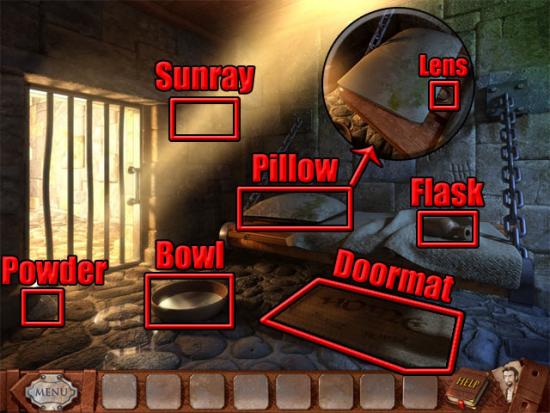
The game starts in the cell playing as Prince Nathaniel. Take the powder and the empty flask on the bed. Select the doormat and the piece of cord will be added to the inventory. Examine the pillow and take the dirty lens in the close-up view. Use the lens on the bowl of water to clean it. Combine the gunpowder with the empty flask in the inventory to make the flask with gunpowder. Combine the flask with gunpowder with the cord in the inventory to make the bomb. Use the bomb on the closed door and then use the lens on the sunray to blast open the door. Open the door and go through it.

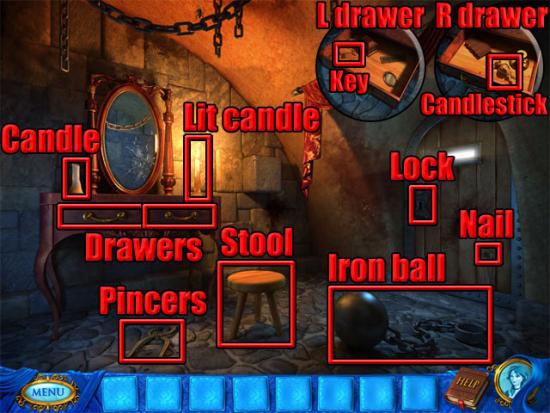
The game now switches to Princess Loreen in her cell. Take the candle and the pincers. Open the left drawer and take the small key in the close-up view. Open the right drawer and take the candlestick in the close-up view. Use the pincers on the nail in the door to remove it. Use the candle on the burning candle to light it. Select the stool to move it closer to the door. Combine the candle with the candle holder in the inventory and then use the lit candle on the stool. Use the nail on the door lock:
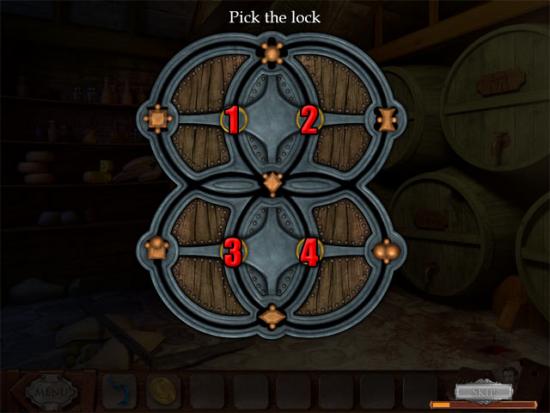
In the Pick the Lock mini-game, press the right rotation button twice and the left rotation button to move the pieces to the correct positions:

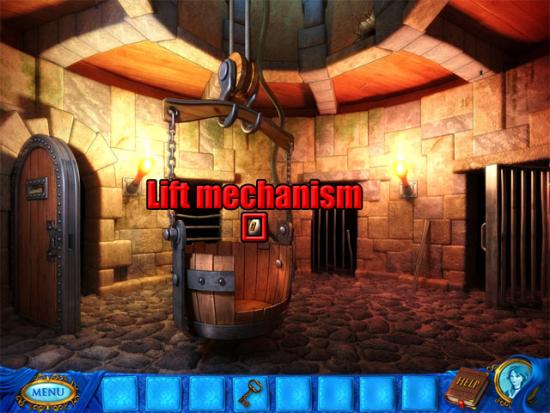
Go through the door and use the small key on the left mechanism:
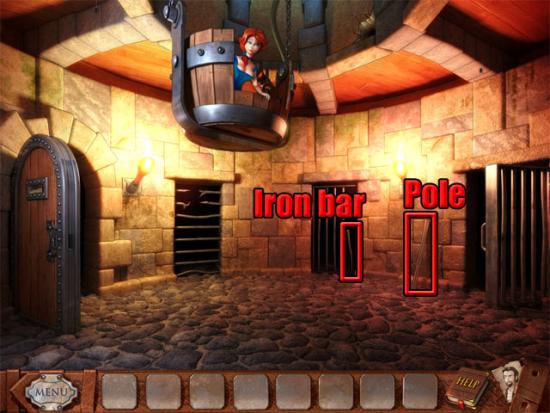
Take the iron bar and the pole:
Go through the left doorway to enter Loreen’s cell. Use the pole on the curtain and take the piece of metal that drops to the floor. Use the iron bar on the stone:
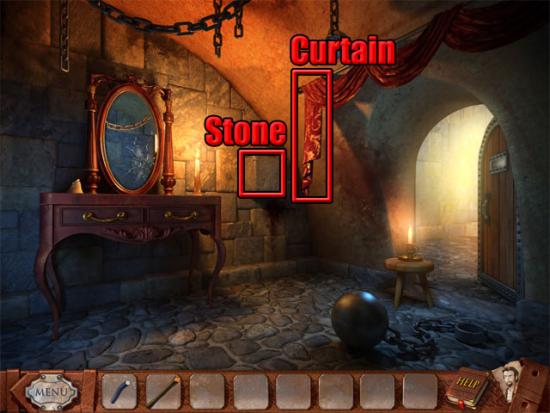
Take the signet ring that was revealed behind the stone. Exit the cell and use the curtain on the sharp iron bars to make a line. Combine the line with the bent bar in the inventory to make a grappling hook. Use the grappling hook on the crack at the right side of the lift:
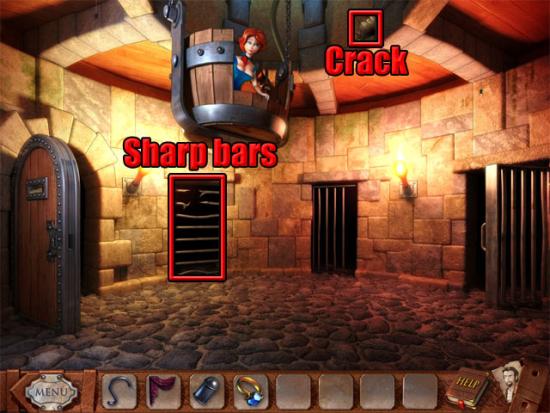
Climb up the rope to meet the prisoner. Give the ring to the prisoner to play the peg solitaire game:
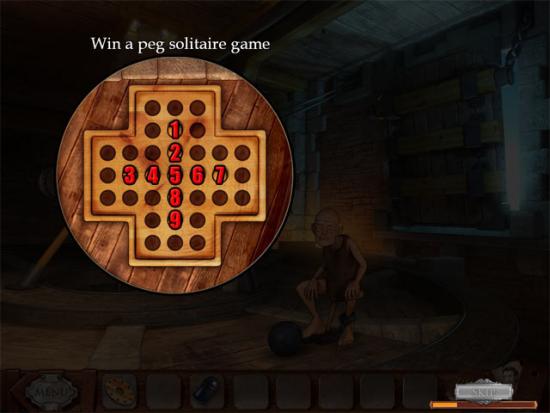
The mini-game can be completed in eight movements:
Peg 2: Up 2
Peg 8: Up 2
Peg 7: Left 2
Peg 5: Up 2
Peg 3: Right 2
Peg 2: Down 2
Peg 2: Down 2
Peg 2: Down 2
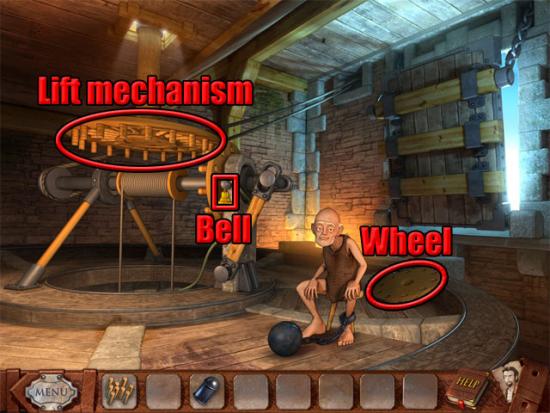
After completing the mini-game, the prisoner will give the nine wooden pegs to Nathaniel. Take the wooden wheel. Combine the wooden pegs and the metal peg with the wooden wheel in the inventory to make the cogwheel. Use the cogwheel on the lift mechanism. Select the bell:
Select the door to exit the castle. Take the crowbar. Select the crane lift to untie the lines. Open the left box and the right box. Use the crowbar on the barrel to make the loose planks:

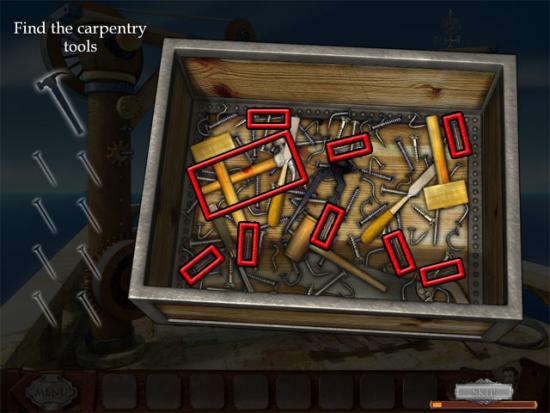
Examine the left box and find the carpentry tools:
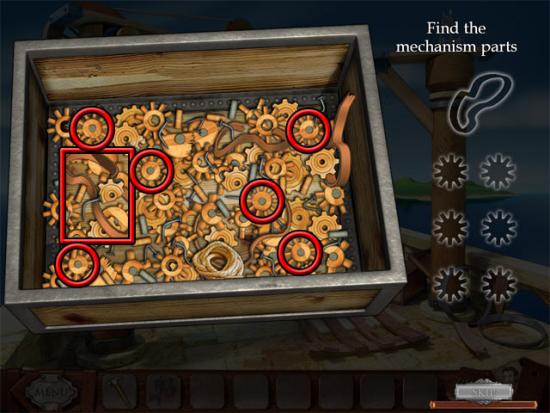
Examine the right box and find the mechanism parts:
Use the nails on the loose planks and then use the hammer on the loose planks with nails eight times to make the platform. Take the platform and use it on the lines above the hole. Use the gears and the drive belt on the crane mechanism to complete the lift. Select the lift to switch to Loreen in the tunnel.
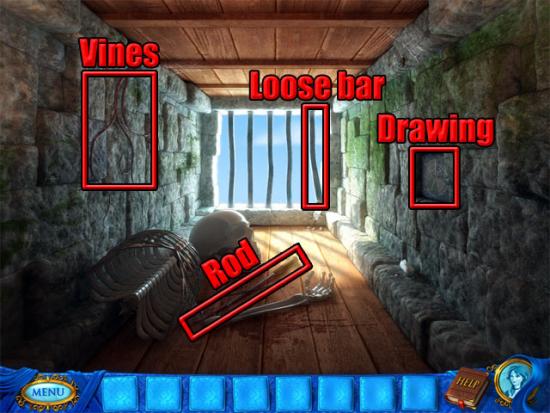
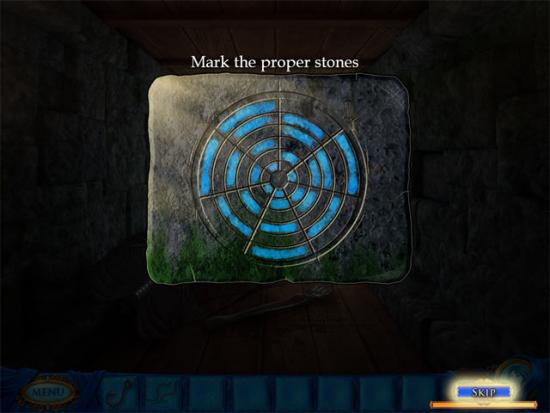
Take the hook from the fishing rod, the roots and the loose iron bar. Examine the drawing on the wall:
Select the correct stones on the bottom section of the disc to complete the mini-game:
Take the knife from the wall and take the stone with a hole on the floor. Combine the iron bar with the stone with a hole in the inventory to make the nearly a hammer item. Combine the nearly a hammer item with the roots in the inventory to make the hammer. Use the hammer on the iron bars three times to remove them all. Go through the exit to arrive on the beach near the ship. Take a pebble, the bamboo stick and the plank on the beach. Use the knife on the vines. Combine the vines, the bamboo stick and the fishing hook in the inventory to make the fishing rod. Throw the pebble at the parrot then use the fishing rod on the plank in the water to take it:
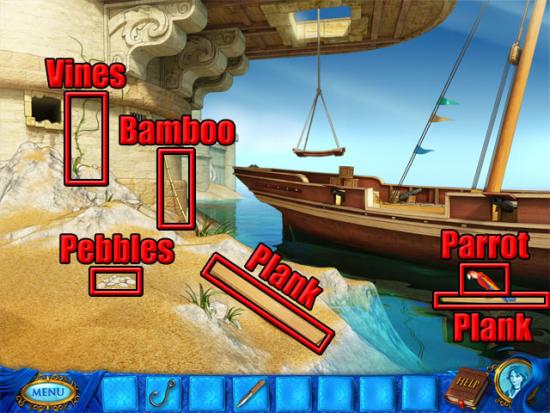
Use both planks on ship and then climb across the gangplank to board the ship.
Take the corkscrew and the iron coin on the floor:
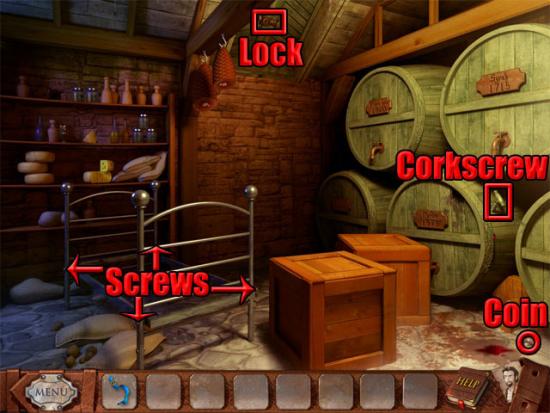
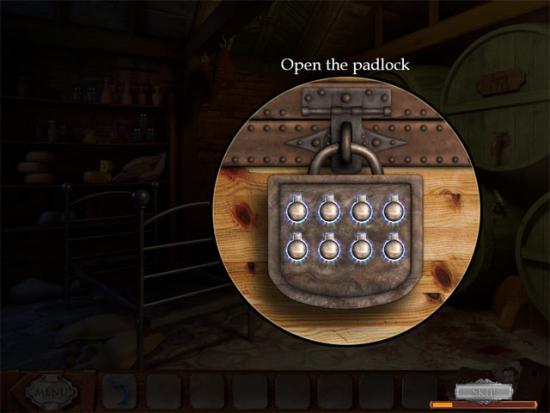
Move the two boxes and examine the closed chest that is revealed. Open the padlock by moving the parts of the lock until they all point upwards:
The mini-game changes each time that it is played so it is not possible to give an exact solution. Take the golden coin from the opened chest after completing the mini-game. Examine the four screws on the bed frame and use the iron coin on each screw in the close-up views. Take both of the bed parts and combine them in the inventory to put together the bed frames. Combine the screws with the bed frames in the inventory to make the ladder. Move the boxes near to the wall and then use the ladder on the boxes. Use the corkscrew on the door lock to play the lock mini-game:
Complete the mini-game by pressing the buttons in the following order:
Button 2: Press once
Button 1: Press once
Button 2: Press twice
Button 3: Press once
Button 4: Press twice
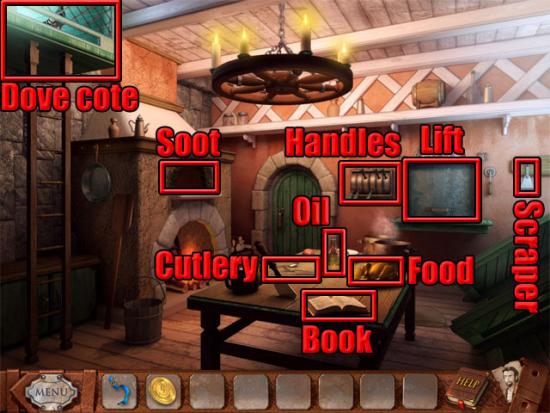
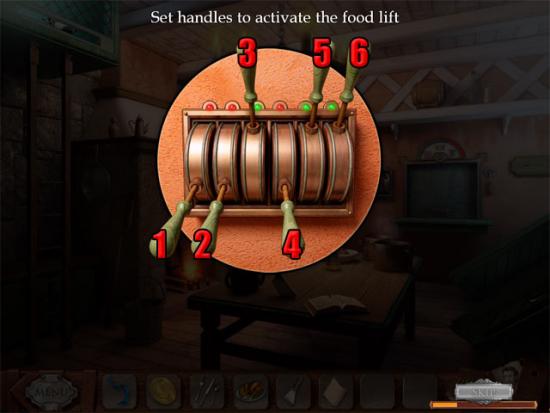
After completing the mini-game, go through the trap door to enter the kitchen. Take the cutlery, food and scraper. Select the cook book three times to take the piece of paper. Examine the handles:
Complete the mini-game by moving handles 1, 5 and 6:
Examine the food lift and use the cutlery on the door. Select the handle to send the food up to Loreen’s room. Take the letter from Loreen that is sent back down in the lift. Use the food on the lift and select the handle again. Take the plate of crumbs that is sent back down. Also send up the gold coin and Loreen’s necklace in the lift in the same way. Take the next letter that is sent back down and then exit the close-up view of the lift.
Use the plate of crumbs on the dove cote and take the feather that drops to the floor. Use the scraper on the soot above the fireplace. Use the soot on the bottle of oil on the table and then use the feather on the ink in the bottle. Combine the feather with the paper in the inventory to write a letter to Loreen. Examine the food lift again. Use the letter on the food lift and then pull the handle to send the letter up to Loreen. Take the letter and the vase full of water that is sent back down. Use the vase full of water on the fireplace and then go through fireplace to escape from the kitchen.
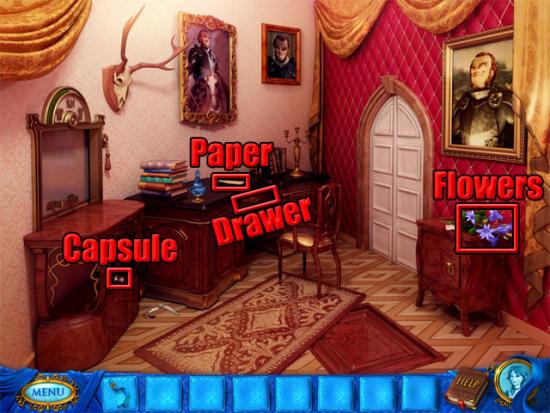
Take the small capsule, the piece of paper and the flowers:
Knock on the door three times and give the necklace to the guard. Exit the room to go upstairs to the terrace. Talk to the guard and the key will be added to the inventory. Return to the cell and use the key on the drawer. Put all of the pieces back together on the outline:

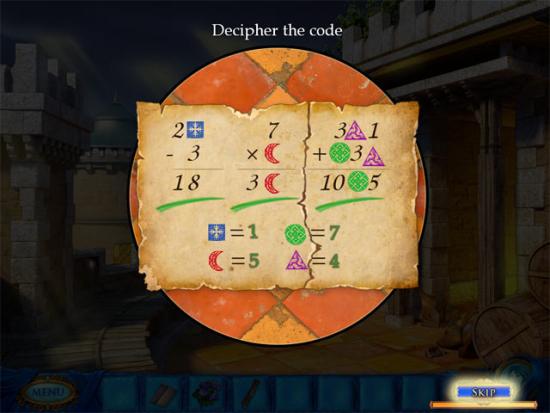
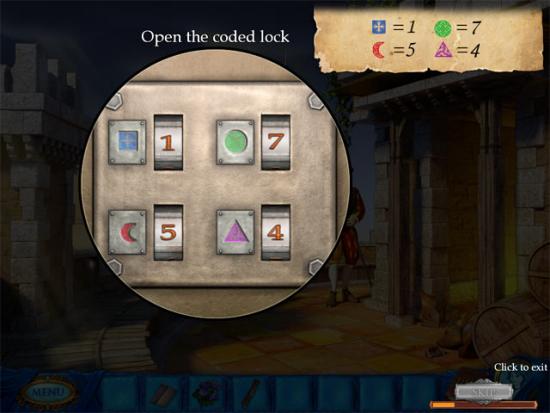
Return to the terrace and give the incomplete code card to the guard. Click on the glowing question marks to enter a number for each symbol. Enter the correct numbers to complete the mini-game:
Select the scraps of metal to take the old jagged blade. Examine the dove cote:
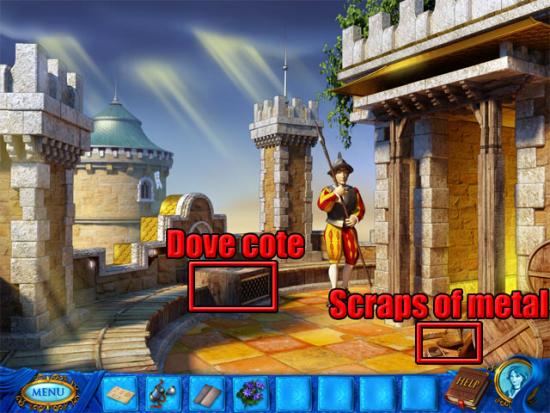
Enter the correct numbers for the symbols on the dove cote:
Examine the dove cote and take the pigeon and the feather. Return to the cell and use the feather on the ink bottle on the desk:

Combine the feather with ink on the paper in the inventory to write the letter to Nathaniel. Combine the letter with the empty capsule capsule in the inventory to make the capsule with letter. Combine the capsule with letter on the pigeon in the inventory to make the pigeon with capsule. Return to the terrace and use the pigeon with capsule on the sky to send the pigeon.
Select the pigeon and it will fly away. Take the pole:

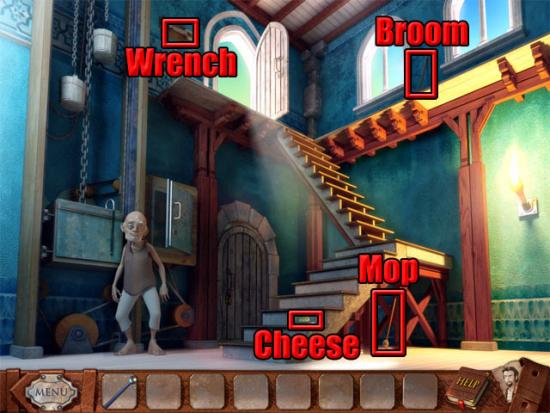
Go through the doorway to talk to the prisoner again. Take the cheese, mop, broom and wrench:
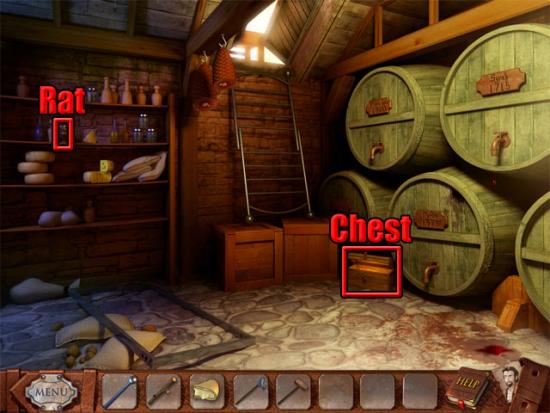
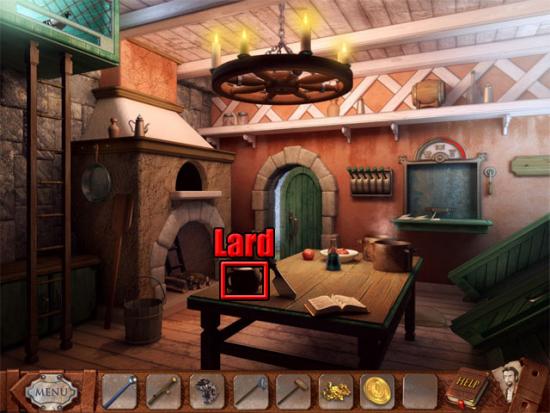
Return to the terrace and examine the dovecote. Use the wrench on the screw in the close-up view and then take the thick stick and the key. Go through the doorway and use the key on the door lock. Enter the kitchen and move right to the cellar. Use the cheese on the rat to take the rat. Select the chest to take the gold and the gold coin:
Return to the prisoner and give him the rat to receive a part of the mechanism. Give the gold coin to the prisoner to play a more complicated version of the peg solitaire game than was played earlier on in the game. This version of the game uses 32 pegs and the aim as before is to leave only one peg remaining on the board. Click outside the mini-game circle while playing the game and it will count as a fail. Fail the peg solitaire game three times in a row and an easier version of the game will be played where the game will be completed if eight or less pegs are left on the board at the end. After completing the mini-game, return to the kitchen and use the part of the mechanism on the pot of lard:
Return to the prisoner and give the lubricated part of the mechanism to the prisoner to receive the cane. Return to the kitchen and examine the food lift. Use the gold on the food lift and then select the handle to send it to Loreen. Return to the terrace and use the flag pole, stick, cane, mop and broom on the five holes in the wall. Select the window to climb up to it.
Examine the food lift and take the gold from it. Use the old jagged blade on the trophy twice to take the two antlers:
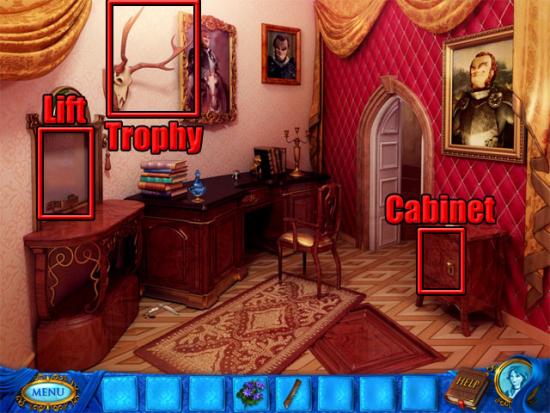
Exit the room and give the gold to the guard to receive the rope ladder. Use the antlers on the holes:
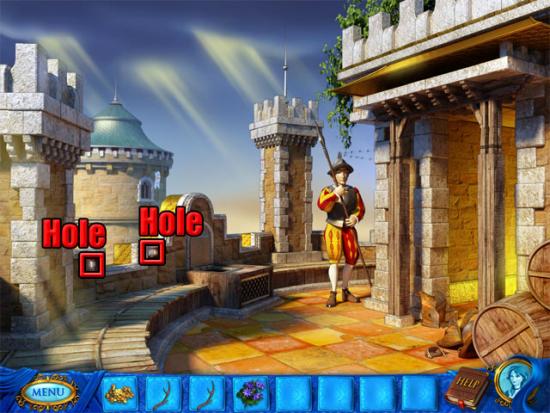
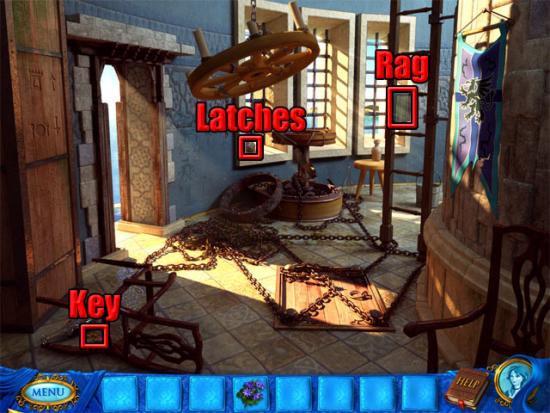
Use the rope ladder on the antlers and then climb down the rope ladder to the bridge. Go through the doorway and take the decorated key, metal latches and rag:
Climb up the ladder and use the decorated key on the cabinet. Examine the cabinet and take the feather, sharpening stone, luxury paper and dagger. Exit the view of the cabinet and use the goose feather on the ink bottle. Combine the goose feather with the luxury paper in the inventory to write a letter to Nathaniel. Examine the food lift. Use the letter in the food lift and then pull the handle to send the letter to Nathaniel. Exit the view of the food lift.
As Nathaniel, examine the lift and take the letter from Loreen. Take the salt, wine glass and wooden splinter. Select the curtain tie and then take it from the floor. Use the wine glass on the barrel:
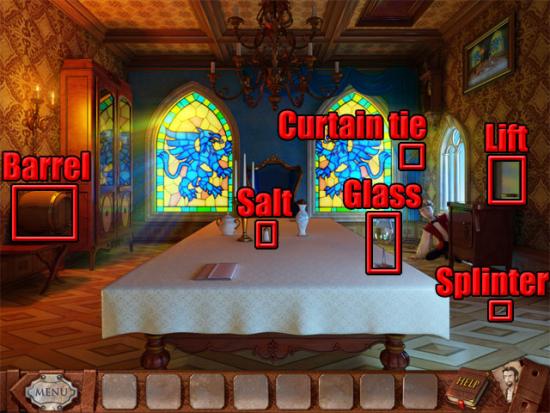
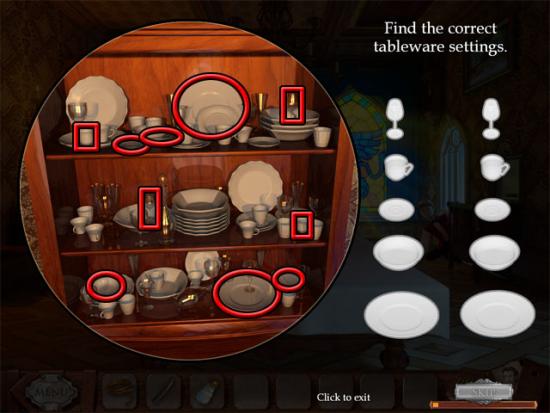
Give the glass of wine to the waiter to receive the keys. Use the keys on the cupboard at the left side of the room. Examine the shelves in the cupboard and find the correct tableware settings:
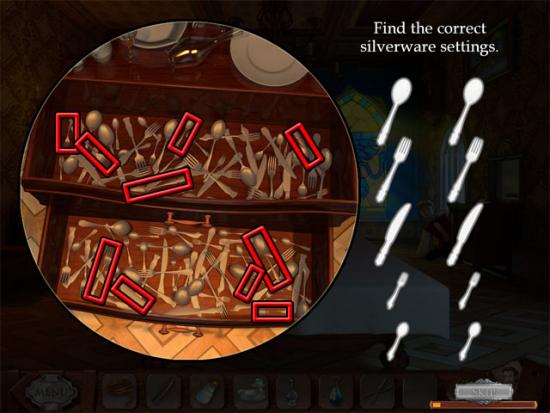
Select the drawers in the cupboard and find the correct silverware settings:
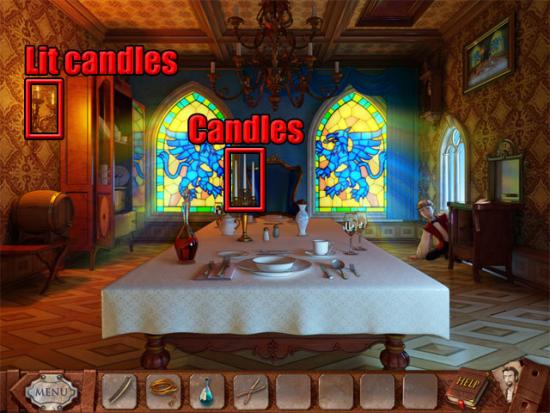
Use the keys on the cupboard at the right side of the room. Examine the cupboard and take the carafe, bottle of cleaning liquid and blunt shears. Exit the close-up view and use the empty carafe on the barrel of wine. Use the tableware, silverware and carafe full of wine on the table. Some of the wine will spill on the table, so use the salt on the wine to remove it. Use the wooden splinter on the lit candles and then use the lit splinter on the candles on the table:
Examine the lift. Put the cleaning liquid in the food lift and then pull the lever to the cleaning liquid to Loreen.
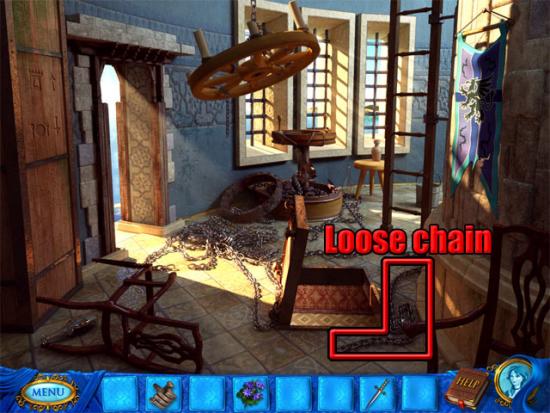
As Loreen, examine the food lift and take the cleaning liquid. Enter the guard room and combine the cleaning liquid with the rag in the inventory. Use the cleaning rag on the dirty chain. Clean all areas of the chain in the close-up view to find the weak points.
As Nathaniel, examine the food lift and use the blunt shears on it. Pull the handle to send the blunt shears to Loreen.
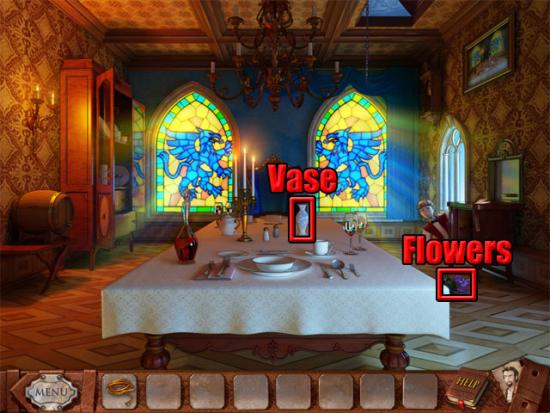
As Loreen, examine the food lift and take the blunt shears. Combine the shears with the sharpening stone in the inventory to make the sharp shears. Enter the guard room and use the sharp shears on the clean chain three times to break the chain. Open the trapdoor and Nathaniel will ask for flowers. Select the loose chain to lower it through the trapdoor and then use the flowers on the trapdoor to give them to Nathaniel.
As Nathaniel, take the flowers and use them on the vase:
Take the metal latches. Use the dagger on the rotating wheel to take it:

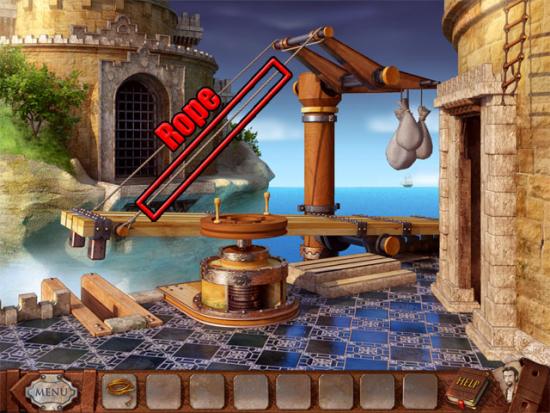
Go through the doorway to the bridge. Use the rotating wheel on the pivot and use the two metal latches on the broken mechanism:
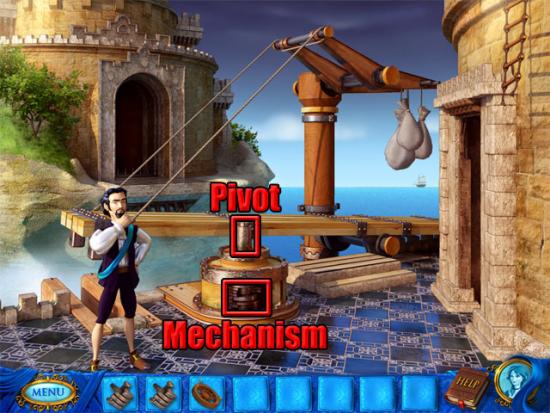
Align the latches so that they fit the slots in the mechanism. The two parts of the mechanism must be solved separately. Start by moving the bottom latch in one of the sections to the correct position. Once this has been done, it will not need to be touched again. Next move the latch above to the correct position, and so on to the top. The latches are in a different position each time the game is played so it is not possible to give an exact solution.
After completing the mini-game, talk to Nathaniel to lower the bridge. Select the gate to cross the bridge.
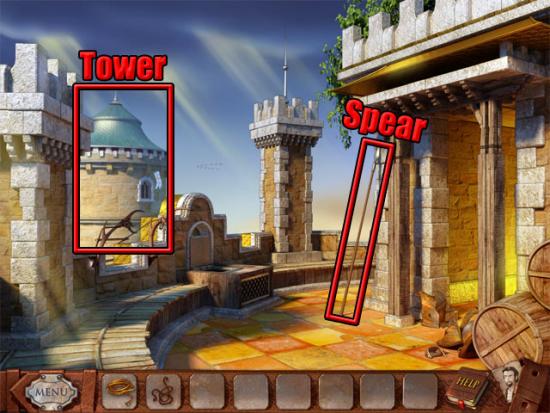
Select the rotating wheel to turn the bridge. Take the rope from the bridge:
Go through the doorway, climb up the tower to the cell and then go through the doorway to the terrace. Take the spear that the guard leaves behind. Combine the bridge rope with the curtain tie back in the inventory and then use the lasso on the tower:
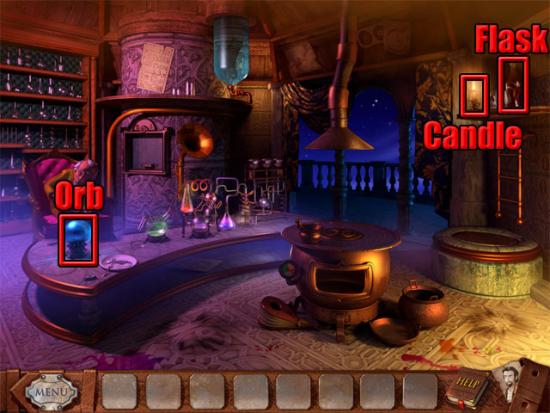
Select the tower to enter it. Take the flask with tummy tonic and give it to the alchemist. Take the candle. Examine the scrying orb on the desk:
Take the torch and use it on the three unlit torches. Take the rope. Take the stone and use it on the handrail three times to break it:
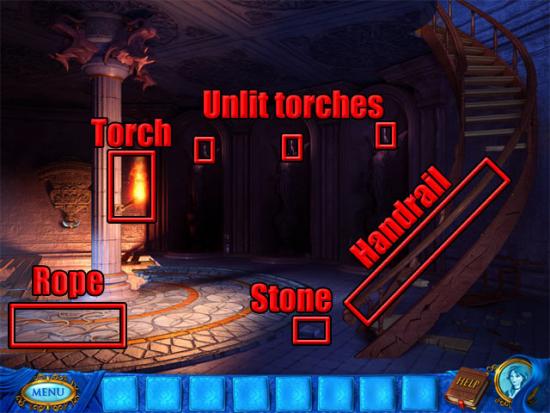
Take three banisters from the piles of trash below the statues and use them on the broken handrail. Use the torch with the torch holder on the pillar. Use the pieces of rope on the broken handrail. Take the makeshift ladder and use it on the hole in the stairs. Take the torch from torch holder and go upstairs to upper room. Use the torch on the torch holder. Select the spider web at the left side of the room and take the chain that is revealed. Use the chain on the mirror:

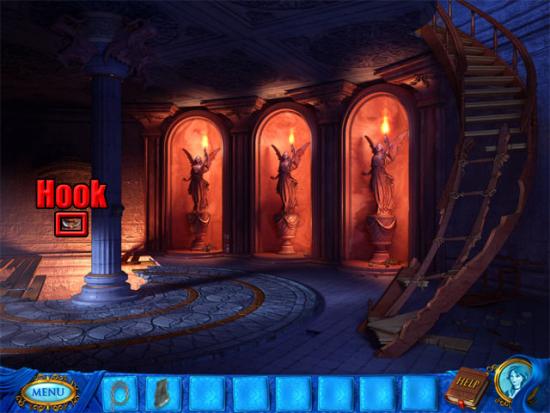
Take the piece of mirror. Go downstairs. Use the chain on the steel hook:
Take the stairs remains and the ladder. Remove the spider webs on the left chair and at the right side of the door and then take the key and the crystal. Take the handkerchief on the right chair:
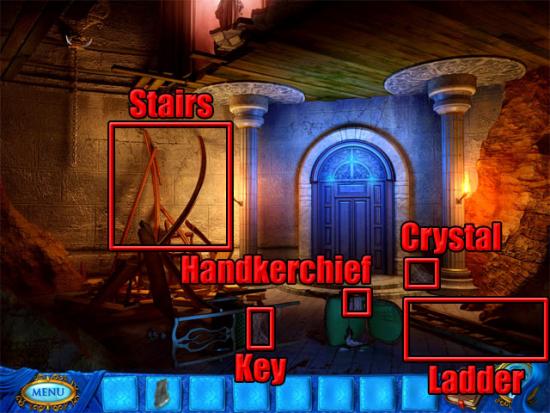
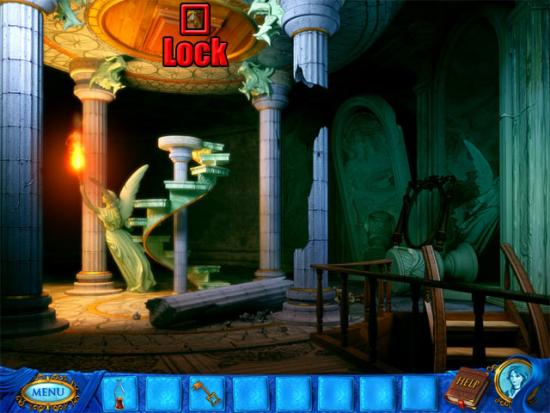
Combine the handkerchief with the dirty mirror in the inventory to make the clean mirror. Examine the door and use the mirror on the signs. Use the crystal on the slot and then press the symbols in the correct order:

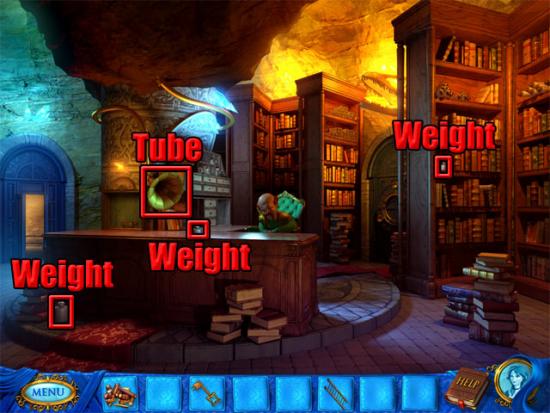
Go through the door to enter the library. Select the tube to talk to Nathaniel. Take the three weights:
Talk to the librarian.
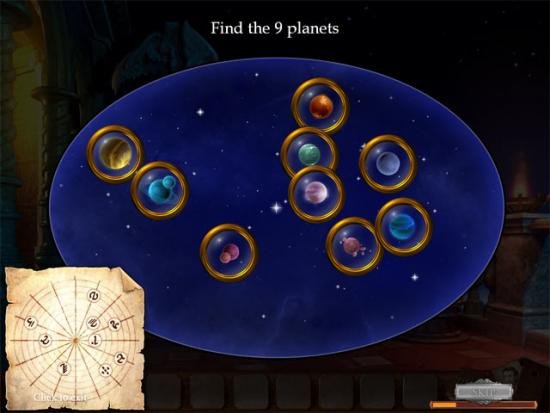
Enter the terrace and use the lens on the telescope. Move the lens around the stars and select the nine planets:
Return to the alchemist’s room and examine the lift. Use the planets configuration on the lift and then pull the handle to send it to Loreen. Exit the close-up view of the lift.
Examine the lift and take the planet configuration. Examine the closed door and rotate the discs until the symbols are in the correct order and positions:

Enter the storeroom and find the three laboratory jars:
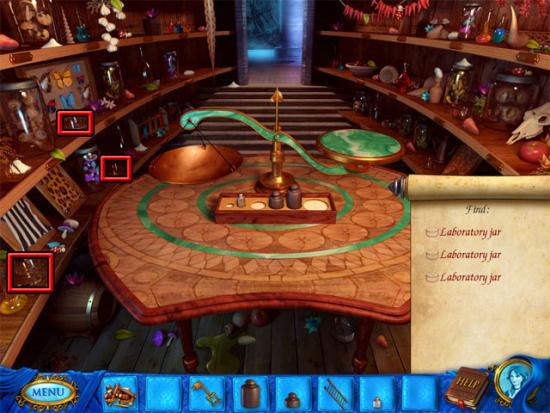
Find the ingredients:
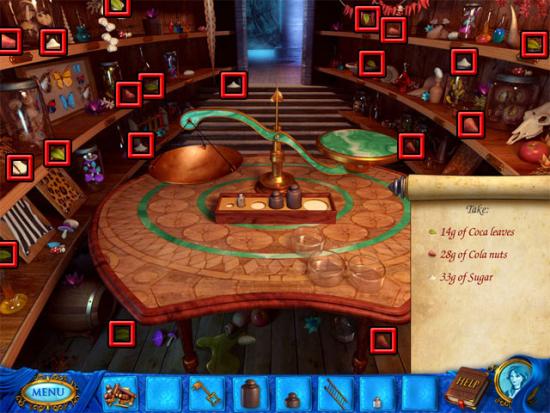
Use the the three weights on the box below the scales. Weigh the coca leaves correctly by adding the 1g, 3g and 10g weights and then adding seven coca leaves. Take the coca leaves from the scale. Weigh the cola nuts correctly by adding the 3g, 5g and 20g weights and then adding four cola nuts. Take the cola nuts from the scale. Weigh the sugar correctly by adding the 1g, 2g, 10g and 20g weights and then adding four three piles of sugar. Take the sugar from the scale. Return to the library and examine the lift. Use the wood logs on the lift and pull the handle to send them to Nathaniel. Use the Tummy Tonic recipe and ingredients on the lift and pull the handle to send it to Nathaniel. Exit the view of the lift.
Examine the lift and take the wood logs, Tummy Tonic recipe and ingredients. Select the cabinet above the alchemist to take a flask. Use the flask on the water container to fill it with water. Examine the stove:
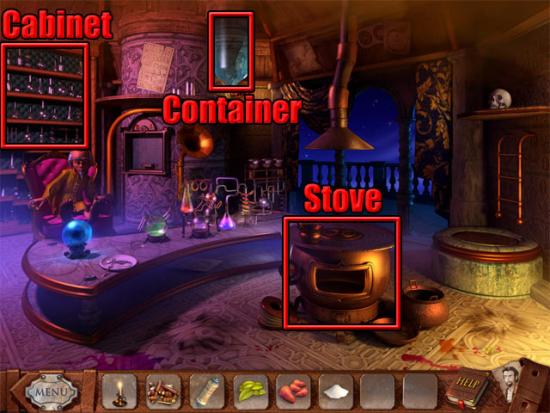
Use the wood logs and the lit candle on the fireplace. Select the copper pan to place it above the stove. Use the cola nuts on the copper pan and then keep clicking the bellows until the thermometer needle moves to red. Keep the needle in the red section for 15 seconds to roast the cola nuts. Take the cola nuts from the pan. Use the coca leaves on the mortar to grind them. Select the cauldron to place it on top of the stoves. Use the roasted cola nuts, ground coca leaves, sugar and water on the cauldron. Use the bellows and keep the thermometer needle in the yellow for 25 seconds. Use the empty flask on the cauldron to boil the essence. Use the empty flask on the cauldron to take the Tummy Tonic essence.
Give the Tummy Tonic recipe to the alchemist and he will tell Nathaniel to dilute the essence. Take a flask from the cabinet and use it on the water container to play the water measurement mini-game. The aim is to switch water between the containers so that one of the containers has four litres of water in it. After completing the mini-game, combine the water with the Tummy Tonic essence and then give the diluted Tummy Tonic essence to the alchemist. Examine the lift. Use the Tummy Tonic on the lift and then pull the handle to send it to Loreen. Exit the close-up view of the lift.
Examine the lift and take the Tummy Tonic. Give the Tummy Tonic to the librarian to cure him. Go through the left doorway to the staircase and use the ladder on the upper floor. Move up twice and use half of the Tummy Tonic on the rusty lock:
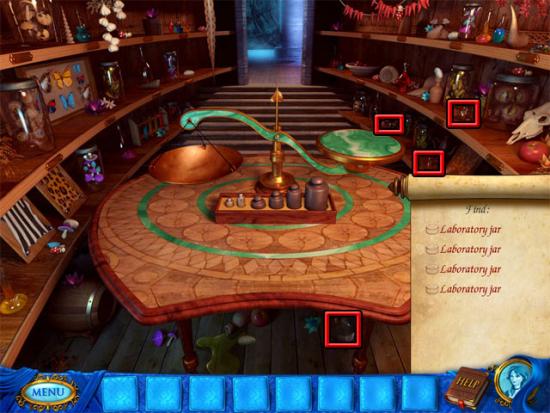
Use the key on the lock to open the trapdoor. Return to the library and talk to the librarian to receive a potion recipe. Enter the storeroom and find the four laboratory jars:
Weigh the black lotus correctly by adding the 2g, 3g, 5g, 10g and 20g weights and then adding four lotus flowers. Take the lotus flowers from the scale. Weigh the bluebells correctly by adding the 1g, 3g, and 20g weights and then adding three bluebells. Take the bluebells from the scale. Weigh the cocoons correctly by adding the 1g, 3g, 5g, 10g and 20g weights and then adding the three cocoons. Take the cocoons from the scale. Weigh the toadstools correctly by adding the 5g and 10g weights and then adding the five toadstools. Take the toadstools from the scale. Exit the storeroom and the library. Go upstairs twice and give the potion recipe and ingredients to the alchemist.
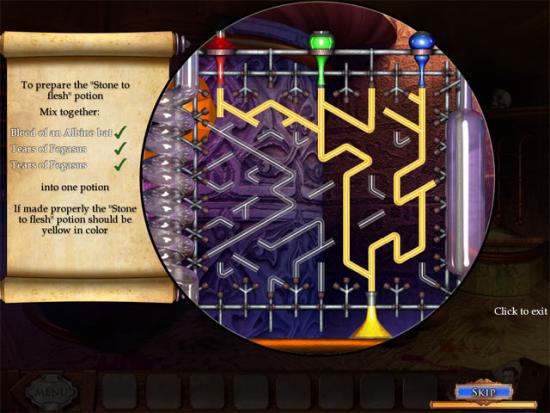
Take an empty flask from the cabinet and use it on the water container to fill it. Examine the stove. Select the copper pan to place it above the stove. Use the silkworm cocoons on the copper pan and then keep clicking the bellows until the thermometer needle moves to red. Keep the needle in the red section for 15 seconds to roast the silkworm cocoons. Take the silkworm cocoons from the pan. Use the lotus petals on the mortar to grind them. Select the cauldron to place it on top of the stoves. Use the roasted silkworm cocoons, ground lotus petals, toadstools and bluebell petals and flask with water on the cauldron. Use the bellows and keep the thermometer needle in the yellow for 25 seconds. Use the empty flask on the cauldron to boil the essence. Use the empty flask on the cauldron to take the freshly made essence. Give the freshly made essence to the alchemist. Use the freshly made essence on the laboratory equipment and prepare the Stone to Flesh potion by connecting the tubes:
Go outside to the terrace and use the mixture on the stone gryphon to complete the game.
