- Wondering how to get Monopoly GO! free rolls? Well, you’ve come to the right place. In this guide, we provide you with a bunch of tips and tricks to get some free rolls for the hit new mobile game. We’ll …
Best Roblox Horror Games to Play Right Now – Updated Weekly
By Adele Wilson
Our Best Roblox Horror Games guide features the scariest and most creative experiences to play right now on the platform!The BEST Roblox Games of The Week – Games You Need To Play!
By Sho Roberts
Our feature shares our pick for the Best Roblox Games of the week! With our feature, we guarantee you'll find something new to play!All Grades in Type Soul – Each Race Explained
By Adele Wilson
Our All Grades in Type Soul guide lists every grade in the game for all races, including how to increase your grade quickly!
Royal Detective: Lord of Statues Walkthrough
Welcome to the Royal Detective: Lord of Statues Collector’s Edition walkthrough on Gamezebo. Royal Detective: Lord of Statues is a hidden object adventure game created by Elephant Games. This walkthrough includes tips and tricks, helpful hints, and a strategy guide on how to complete Royal Detective: Lord of Statues.
Game Introduction – Royal Detective: Lord of Statues
Welcome to the Royal Detective: Lord of Statues Collector’s Edition walkthrough on Gamezebo. Royal Detective: Lord of Statues is a hidden object adventure game created by Elephant Games. This walkthrough includes tips and tricks, helpful hints, and a strategy guide on how to complete Royal Detective: Lord of Statues.
General Tips
- When starting a new game, you can choose between three difficulty levels: Casual, Advanced, and Hardcore Mode. Casual mode: This mode is for new or casual players who want a relaxed game-play session. All the significant game locations are marked with sparkles, and the Hint quickly recharges. Advanced Mode: This mode is for advanced players who want to overcome obstacles without extra help. The Hint takes longer to recharge, and there are no sparkle indicators. Hardcore Mode: This mode is for those who are eager to play the game with no help at all. There is no Hint feature, no mini-game skip function, and no sparkle indicators.
- Hints take on the form of Rupert: a small statue who can be found in the lower right corner of the screen. Click on him when he’s present to receive a Hint as to what you should do. He will help you find objects and proceed further in the game. Hints are unlimited, but will require time to recharge.
- Puzzles can be skipped, however you will have to wait a certain amount of time until you can skip it (unless you’re playing Hardcore Mode).
- The Map is located in the lower left corner of the screen. Use this to keep track of where you’ve been and where you should go next.
- Also located in the lower left corner of the screen is the Menu button. Use this to toggle options or return to the main menu at any point during the game.
- Inventory Items are shown at the bottom of the screen. They are identified with CAPS in the guide below.
- Within hidden object areas, you will find items listed in blue. These items require an additional action of some sort before they can be collected. These are outlined in blue in the guide below.
- Scattered throughout the game are Miniature Figurines. These will be circled in yellow in the guide below. There are 26 in total.
Chapter 1: The Optics Workshop
Stone Bridge
- Click on Rupert, who’s waving at you, to talk with him. He will accompany you as your Hint function.
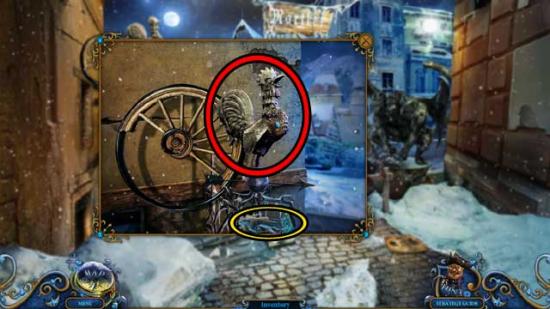
- Examine the weather vane on the upper left. Click on the ROOSTER to add him to your inventory and the Miniature 1/26.

- Take a closer look at the gap on the left to peer down below. Use the ROOSTER on the chest below to retrieve it.
- Click on the hidden object area that appears over the broken chest.
- Find the objects listed at the bottom of the screen; their locations are shown below. Items listed in blue require an additional action.
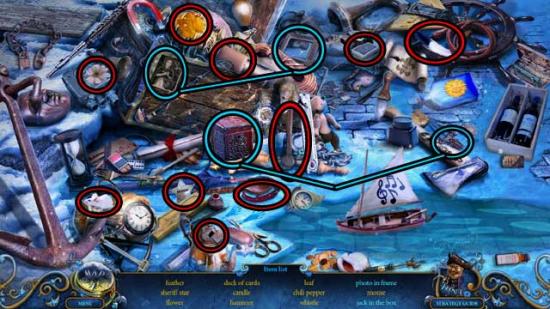
- Upon completing the area, the SHERIFF STAR will be added to your inventory.
- Take a closer look at the book lying on the ground. Click on the APPLE PART (1) to add it to your inventory.
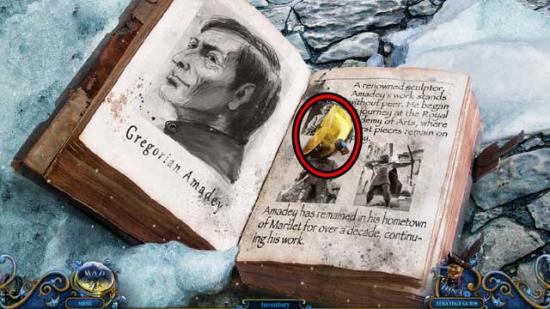
- Examine the gate barring your way ahead. Use the SHERIFF STAR on the slot in the gate, then click on it to open it.
- Once the gate has lifted, proceed forward to the next area.
Square
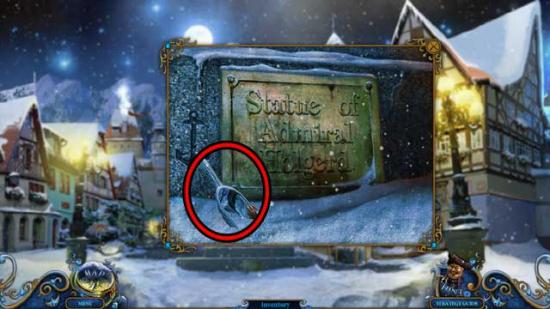
- Take a closer look at the base of the statue ahead. Click on the SCOOP to add it to your inventory.
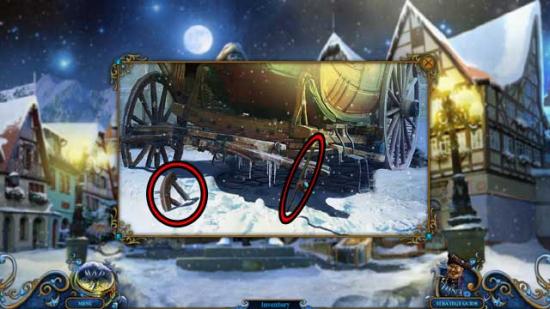
- Examine the carriage in the distance off the left side of the statue. Click on the CANE and the WHEEL PART (1) to add them to your inventory.
- Back in the main area, proceed right to the Store Entrance.
Store Entrance
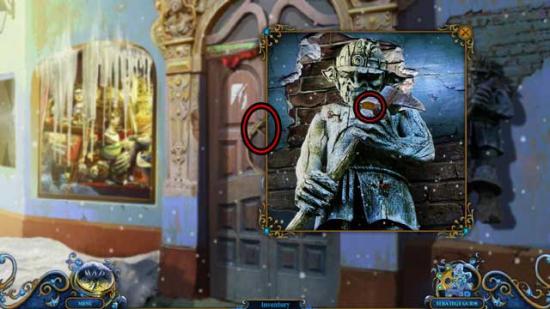
- Click on the WHEEL PART (2) hanging on the door to add it to your inventory. Next, examine the statue hanging on the wall on the right. Click on the GOLDEN COIN to add it to your inventory.
- Take a closer look at the window display on the left. Use the CANE to knock down all the icicles, then click on the hidden object area that appears.
- Find the objects listed at the bottom of the screen; their locations are shown below. Items listed in blue require an additional action.
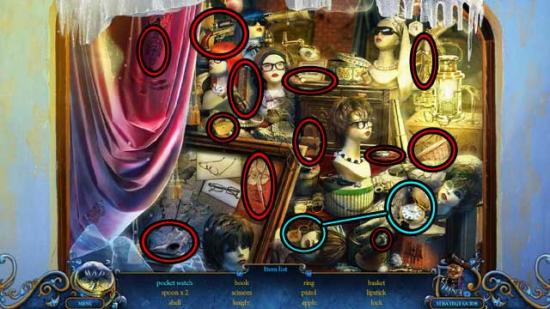
- Upon completing the area, the APPLE PART (2) will be added to your inventory.
- Return to the Stone Bridge.
Stone Bridge
- Examine the incomplete wheel on the upper left. Use the WHEEL PARTS (x2) to complete the WHEEL and add it to your inventory.
- Go back to the Square.
Square
- A cutscene will occur upon entering the Square.
- Examine the carriage in the distance again. Use the WHEEL on the carriage to repair it, then back in the main area, click on it to move it out of the way.
- Proceed forward through the revealed archway to the next area.
Mansion Gates
- Take a closer look at the wheel propped up against the wall on the left. Click on the APPLE PART (3) to add it to your inventory.
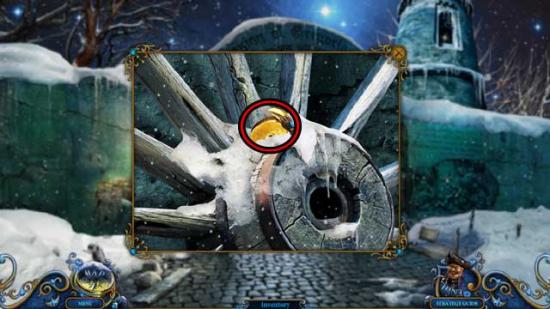
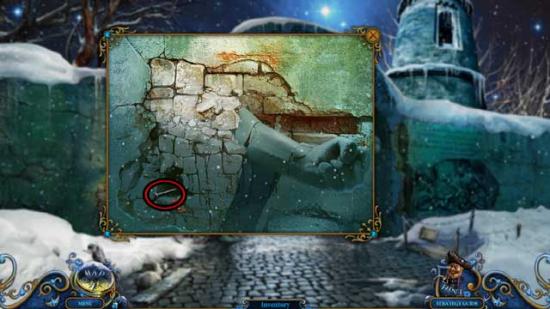
- Examine the broken portion of wall on the left. Click on the NAIL to add it to your inventory.
- Take a closer look at the chained area on the right. Click on the LION TILE (1) to add it to your inventory.
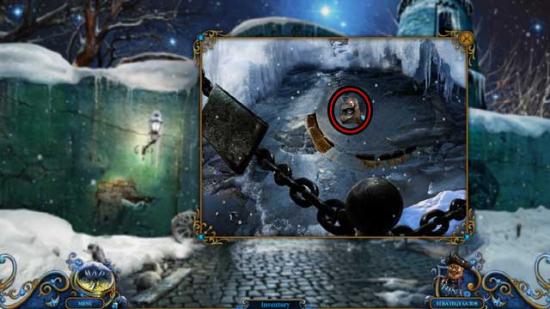
- Read the inscription in the wall on the right, then return to the Square.
Square
- Speak with the new statue, the Archer, then examine the base.
- Take a closer look at the pedestal between the statue base and the Store Entrance. Use the APPLE PARTS (x3) on the pedestal to trigger a puzzle.
- The golden apple is broken into pieces. Rotate the rings of the target so that the parts of the apple are aligned in the center. The solution is shown below.
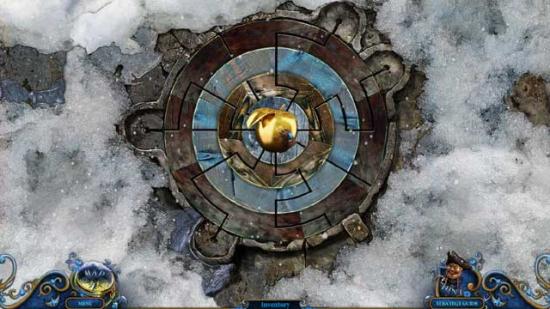
- Upon completing the puzzle, click on the TARGET to add it to your inventory.
- Go right to the Store Entrance.
Store Entrance
- Take a closer look at the front door. Place the TARGET in the circular slot, then exit back to the Square.
Square
- The Archer will shoot open the doors to the store. Return to the Store Entrance.
Store Entrance
- Enter through the open door to the Optics Workshop.
Optics Workshop
- Examine the grey box on the far end of the right table. Click on the Miniature 2/26 to collect it.
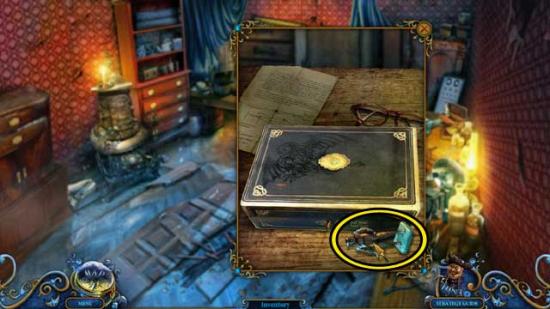
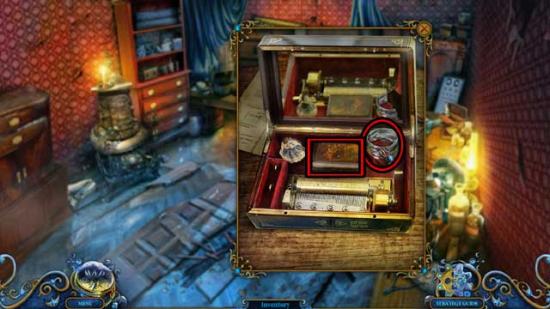
- Use the NAIL to pry the broken key from the box lock, then use the GOLDEN COIN on the slot to open the box. Click on the JAM and the VAMPIRE MAGNET within the box inside to add them to your inventory.
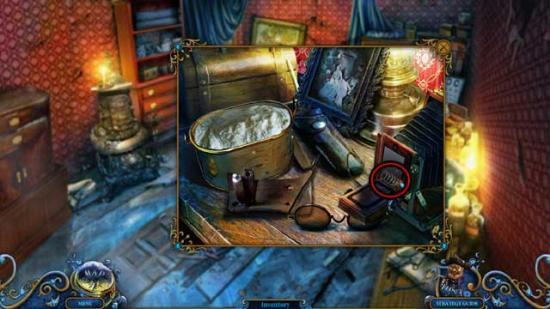
- Take a closer look at the camera on the table on the right. Click on the camera lens to open it, then click on the photo inside for a cutscene. Once finished, click on the SPRING to add it to your inventory.
- Take a closer look at the framed map hanging on the back wall. Use the VAMPIRE MAGNET on the map to trigger a puzzle.
- Set the mythical creatures into the right habitats. The solution is shown below.
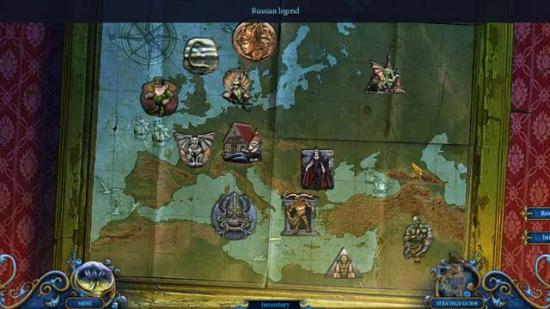
- Upon completing the puzzle, click on the MAGNIFYING GLASS to add it to your inventory.
- Exit to the Square.
Square
- Take a closer look at the circular stone on the left, beneath the arrow sign with the cake. Use the JAM on the close-up to trigger a puzzle.
- Paint the cake so the neighbor pieces have different jam on them. Click on the jam and then click on the cake piece to paint it. A possible solution is shown below.
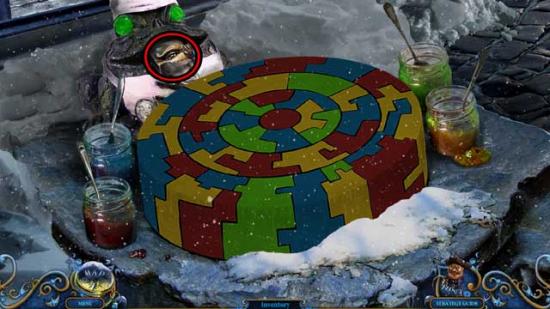
- Upon completing the puzzle, click on the LION TILE (2) to add it to your inventory.
- Enter the Optics Workshop.
Optics Workshop
- Examine the metal stove on the left. Use the LION TILES (x2) on the empty grooves, then once complete, click on the hatch to open it. Click on the Miniature 3/26 and the HOOK WITH CHAIN to collect them.
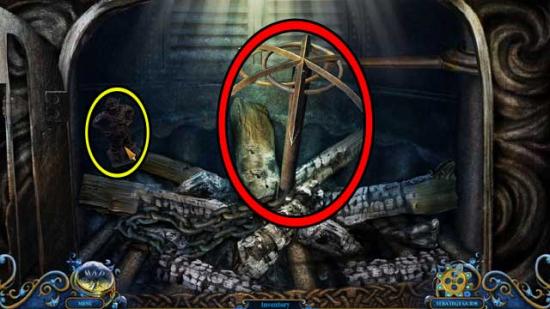
- Use the MAGNIFYING GLASS on the circular stand to light a fire, then use the SCOOP to obtain the EMBERS and add them to your inventory.
- Make your way back to the Mansion Gates.
Chapter 2: The Mansion
Mansion Gates
- Examine the chained area on the right. Use the EMBERS to melt the ice, then click on the WRENCH to add it to your inventory.
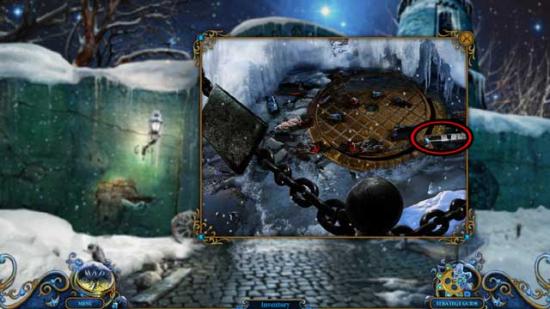
- Upon removing the Wrench, a hidden object area will appear.
- Find the objects listed at the bottom of the screen; their locations are shown below. Items listed in blue require an additional action.
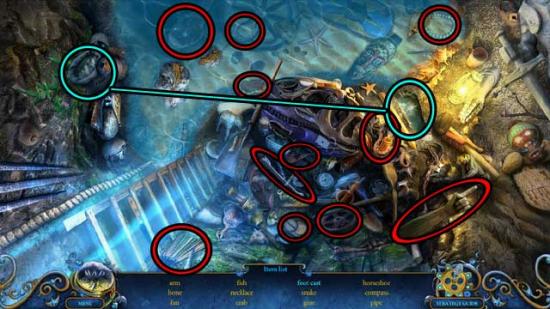
- Upon completing the area, the FOSSIL will be added to your inventory.
- Use the HOOK WITH CHAIN on the window in the tower on the upper right, then take a closer look inside. Click on the Miniature 4/26 and the TELESCOPE to collect them, then give the FOSSIL to the stone wolf to move it aside and obtain the FLAIL.
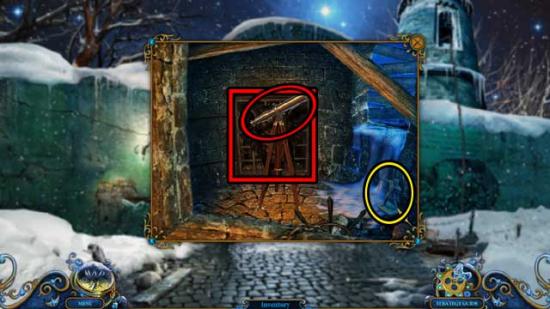
- Return to the Stone Bridge.
Stone Bridge
- Take a closer look at the dark statue on the right. Use the FLAIL on the statue to trigger a cutscene.
- After the cutscene, examine the pedestal on which the statue was sitting. Click on ATLAS’S HEAD to add it to your inventory.
- Go back to the Square.
Square
- Use the TELESCOPE on the window in the tall house on the left to set it up, then click on the telescope for a closer view. Click on the Miniature 5/26 and use the ROOSTER to obtain the SMITH’S TONGS.
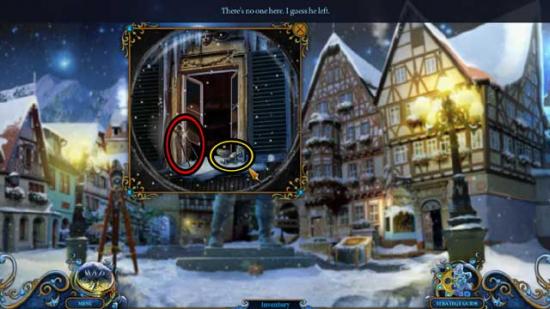
- After the cutscene, take a closer look at the top of the telescope and click on the SMITH’S TONGS and the ROOSTER to add them to your inventory from here.
- Go right to the Store Entrance.
Store Entrance
- Take a closer look at the statue on the right. Use the SMITH’S TONGS to pull out the nails, then click on the MINER to add him to your inventory.
- Return to the Mansion Gates.
Mansion Gates
- Examine the broken portion of wall on the left. Use the MINER on the wall section, then examine it again and click on ATLAS’S HAND to add it to your inventory.
- Take a closer look at the statue missing limbs on the right side of the portcullis Use ATLAS’S HAND and ATLAS’S HEAD on the statue to restore it, then click on the front of the portcullis to trigger a cutscene.
- Once the cutscene is finished, click on the lion knocker to open the portcullis
- Proceed forward to the Garden.
Garden
- Click on the little girl, then watch the cutscene that ensues.
- Examine the fallen basket on the left. Click on the Miniature 6/26, the BAKING FORM, and the FLOWERS 1/2 to collect them.
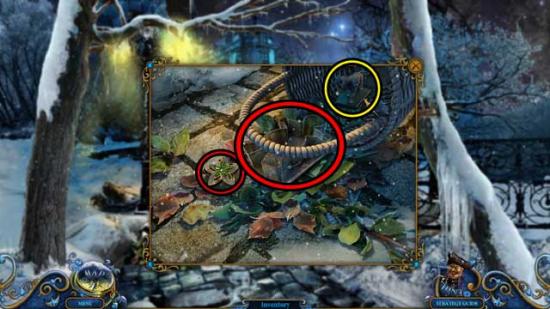
- Take a closer look at the bucket beneath the sign on the right. Click on the Miniature 7/26 and the HANDLE to collect them.
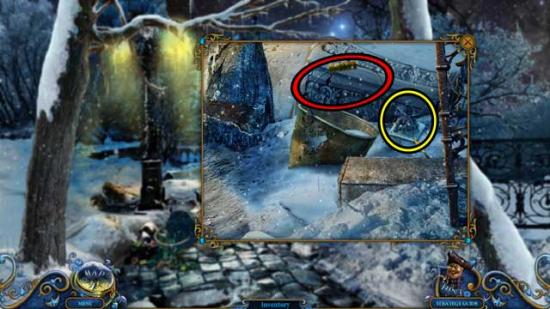
- Back in the main area, click on the Miniature 8/26 to collect it.
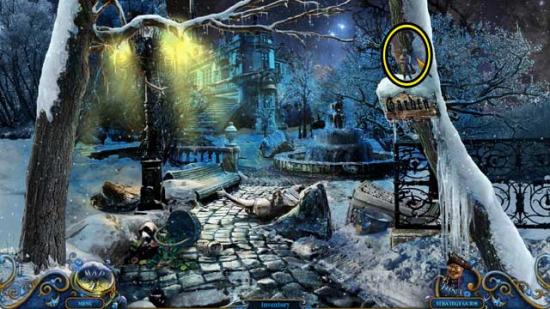
- Examine the fountain ahead, then once the ice has fallen, click on it again for a closer view to trigger a puzzle.
- Click on the jar to stop the water and see the mermaid’s reflection. Place the flowers correctly according to the colored rocks in the reflection. The solution is shown below.
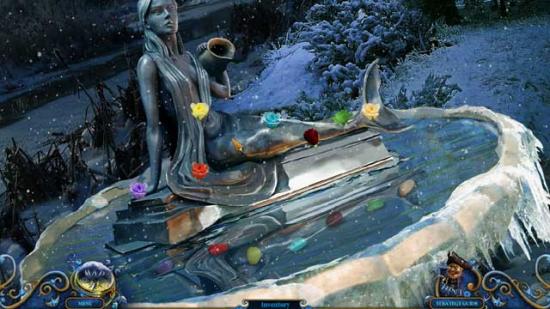
- Upon completing the puzzle, a hidden object area will appear over the fountain.
- Find the objects listed at the bottom of the screen; their locations are shown below. Items listed in blue require an additional action.
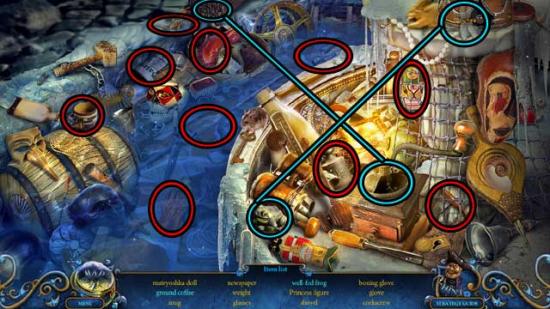
- Upon completing the area, the PRINCESS FIGURE (1) will be added to your inventory.
- Proceed forward to the next area.
Mansion Entrance
- Click on the Miniature 9/26 to collect it.
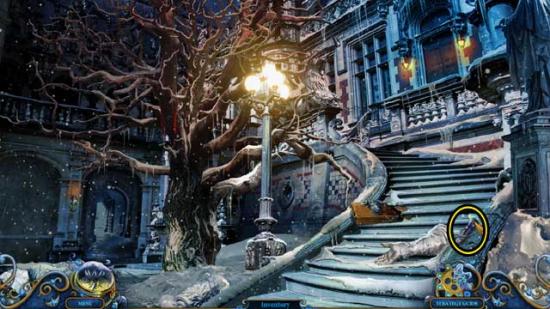
- Take a closer look at the box lying on the steps. Click on the Miniature 10/26 to collect it, then click on the stone step to remove it and collect the CREST PART (1) beneath.
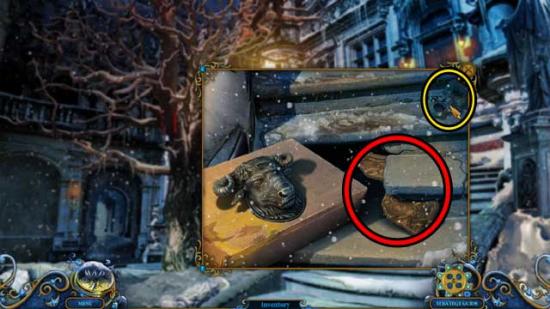
- Proceed through the archway to the left of the tree to the next area.
Tower Entrance
- Take a closer look at the basket on the ground. Click on the Miniature 11/26 and the GINGER inside to collect them.
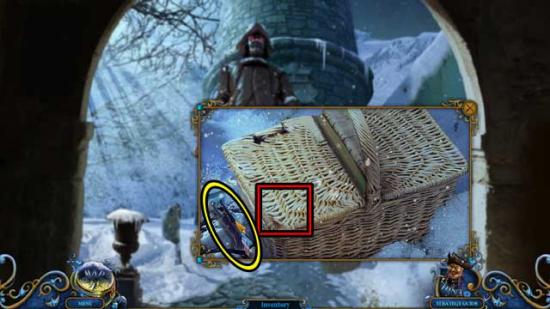
- Take a closer look at the post towards the left. Click on the CREST PART (2) to collect it.
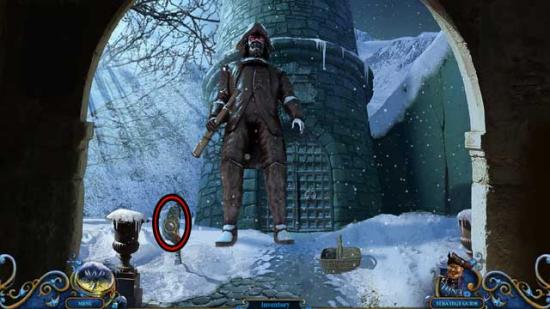
- Make your way back to the Optics Workshop.
Optics Workshop
- Examine the camera on the table on the right. Use the HANDLE on the CAN OF FLOUR, then click on it to add it to your inventory.
- Return to the Mansion Entrance.
Mansion Entrance
- Proceed through the door at the top of the steps to the Mansion Hall.
Mansion Hall
- Enter through the white doors on the lower right.
Dining Room
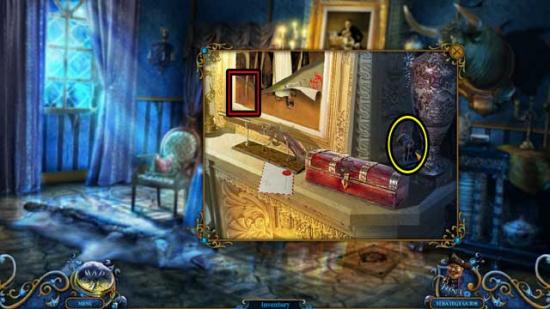
- Take a closer look at the mantlepiece. Click on the Miniature 12/26 to collect it, then click on the letter to trigger a cutscene. Once it’s done, examine the mantlepiece against and click on the painting tear to tear it down further. Note the clue and click on the PRINCESS FIGURE (2) to add it to your inventory.
- Take a closer look at the chair on the left side of the table. Use the ROOSTER to startle the chicken, then click on the EGG to add it to your inventory. (Don’t forget to recollect the ROOSTER as well).
- Examine the table. Click on the Miniature 13/26 and the GLUE to collect them.
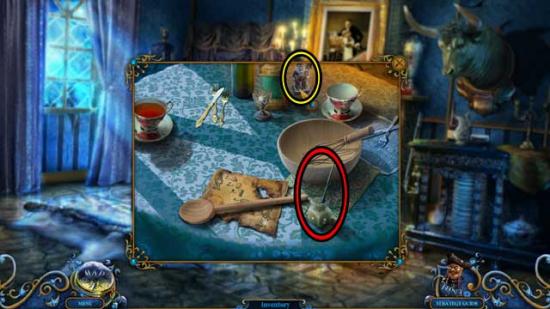
- Next, place the CAN OF FLOUR on the table on the left, the EGG on the stand, and the GINGER on the table as well. Use the wooden spoon to add the flour to the bowl, then add the egg and the ginger. Click on the whisk to mix them all together, then click on the DOUGH to add it to your inventory.
- Return to the Mansion Hall.
Mansion Hall
- Proceed to the domed area up the steps towards the right.
Princess Statue
- Click on the sheet to remove it, then take a closer look at the statue. Click on the PRINCESS FIGURE (3) and the FLOWERS 2/2 to add them to your inventory.
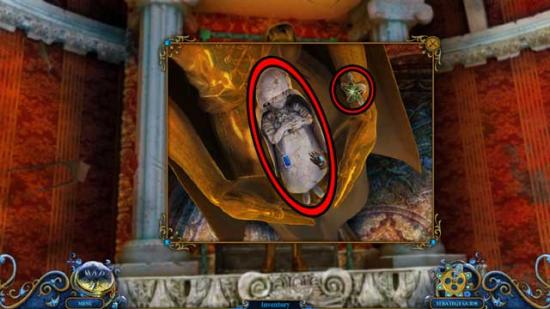
- Make your way back to the Store Entrance.
Store Entrance
- Take a closer look above the door. Use the WRENCH to loosen the bolts, then click on the red RAG to add it to your inventory.
- Enter the Optics Workshop.
Optics Workshop
- Examine the oven on the left. Use the BAKING FORM on the oven, then place the DOUGH inside the baking form. Click on the resulting GINGERBREAD once it’s ready to add it to your inventory.
- Return to the Mansion Hall.
Mansion Hall
- Take a closer look at the dog. Give the GINGERBREAD to the dog, then enter through the white door behind it to the next area.
Maid’s Room
- Examine the sewing machine on the left. Click on the NEEDLE AND THREAD to add it to your inventory.
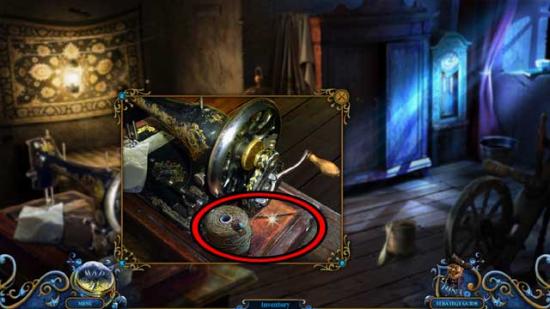
- Take a closer look under the bed. Click on the SHOVEL to add it to your inventory, then exit for now.
- Examine the top of the bed. Click on the crystal ball for a short cutscene, during which it will break. Click on the GOLDEN ANGEL to add it to your inventory.
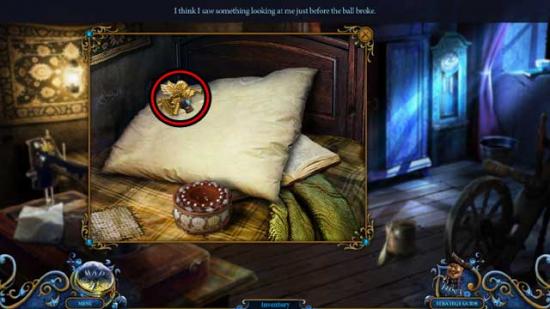
- Read the book under the pillow for another cutscene.
- Back in the main portion of the room, examine the bird cage. Click on the cage door to open it, then click on the HORSE’S LEG inside to add it to your inventory.
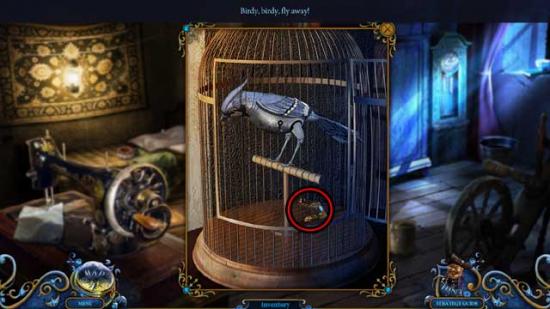
- Click on the wardrobe to open it, revealing a hidden object area.
- Find the objects listed at the bottom of the screen; their locations are shown below. Items listed in blue require an additional action.
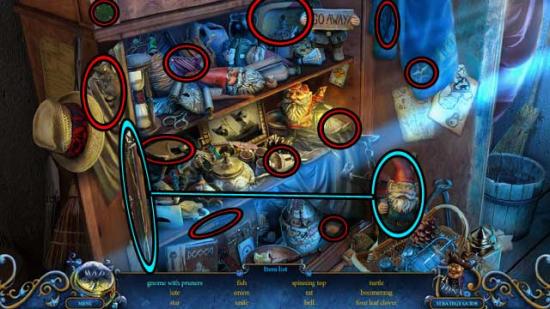
- Upon completing the area, the GNOME will be added to your inventory.
- Backtrack to the Optics Workshop.
Chapter 3: The Tower
Optics Workshop
- Examine the chair for a closer view. Use the RAG on the chair, then the NEEDLE AND THREAD to repair it. Click on the repaired CHAIR to add it to your inventory.
- Make your way back to the Dining Room.
Dining Room
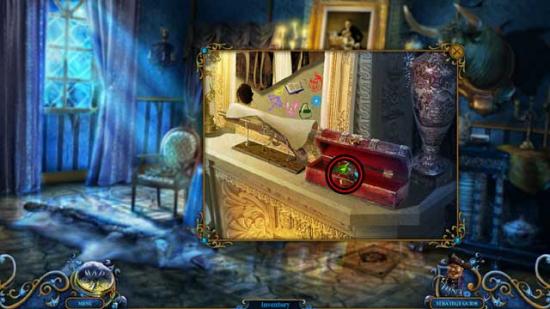
- Take a closer look at the box on the mantlepiece. Use the GOLDEN ANGEL on the groove to open the box, then click on the EMERALD inside to add it to your inventory.
- Back in the main portion of the room, use the CHAIR on the switch on the floor to the right of the table. This will reveal a hidden object area.
- Find the objects listed at the bottom of the screen; their locations are shown below. Items listed in blue require an additional action.
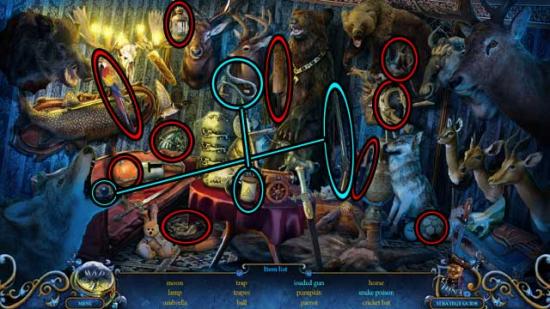
- Upon completing the area, the HORSE HEAD will be added to your inventory.
- Go out to the Mansion Hall.
Mansion Hall
- Take a closer look at the white doors at the far end of the hall. Use the CREST PARTS (x2) on the groove in the door to open it, then proceed inside.
Amadey’s Workshop
- Examine the small series of stands connected together on the floor straight ahead. Use the PRINCESS FIGURES (x3) on the stands to trigger a puzzle.
- Click two figures to swap them. Place each figure on the correct pedestal. The solution is shown below.
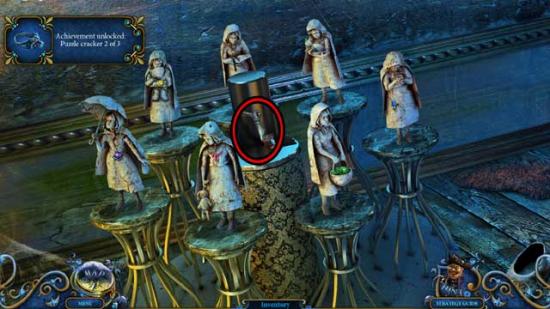
- Upon completing the puzzle, click on the KNIGHT’S HAND to add it to your inventory.
- Go back to the Mansion Entrance.
Mansion Entrance
- Take a closer look at the tree on the left. Use the GNOME on the tree to trim it. Examine the tree again and use the ROOSTER to knock down the ladder. Click on the GNOME to add it back to your inventory, then take a closer look within the tree to trigger a puzzle.
- The eggs are broken. Restore them. Click on an egg piece, move it to the base, and click again to release. Not all pieces will be used. The solution is shown below.
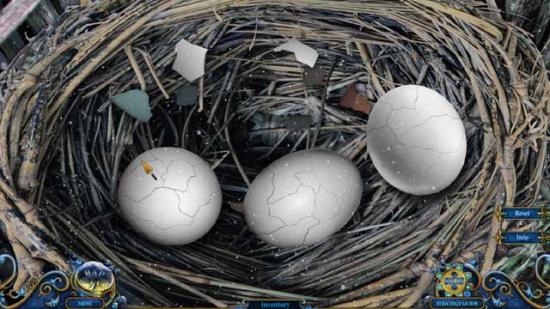
- Upon completing the puzzle, the FEATHER will appear and be added to your inventory.
- Return to Amadey’s Workshop.
Amadey’s Workshop
- Examine the lock over the cabinet in the back corner. Use the HORSE HEAD, the KNIGHT’S HAND, the FEATHER, and the HORSE’S LEG on the lock figure to restore it, then take a closer look inside. Click on the large GOLDEN ARROWS on the left to add them to your inventory.
- Make your way back to the Square.
Square
- Give the GOLDEN ARROWS to the Archer statue, then make your way back to the Tower Entrance.
Tower Entrance
- After watching the cutscene, click on the large SPYGLASS that was dropped by the red-eyed statue and add it to your inventory.
- Take a closer look at the front doors of the Tower. Note the items you’re missing, then click on the SIGNALMAN to add him to your inventory.
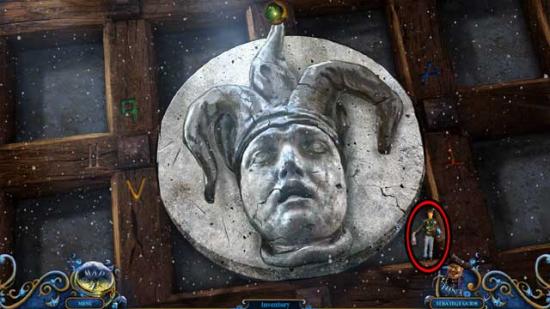
- Return to Amadey’s Workshop.
Amadey’s Workshop
- Examine the small railroad model on the back wall. Use the SIGNALMAN on the small silver stand on the left, then click on the KEY to add it to your inventory.
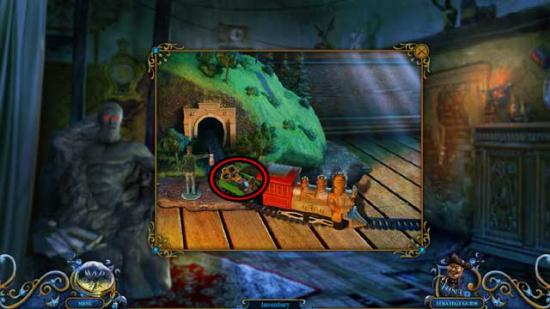
- Use the MINOR on the exposed brick wall on the right. However, his pickaxe isn’t enough. Give him the SPYGLASS to break down the wall.
- Click on the hidden object area that appears.
- Find the objects listed at the bottom of the screen; their locations are shown below. Items listed in blue require an additional action.
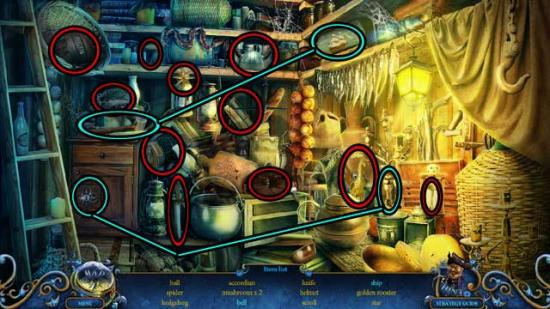
- Upon completing the area, the BELL (1) will be added to your inventory.
- Return to the Maid’s Room.
Maid’s Room
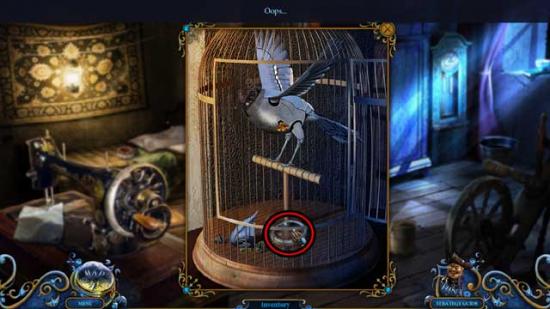
- Examine the bird cage for a closer view. Use the KEY on the bird, then click on it to activate it. Collect the resulting BRONZE RING to add it to your inventory.
- Go back to the Mansion Entrance.
Mansion Entrance
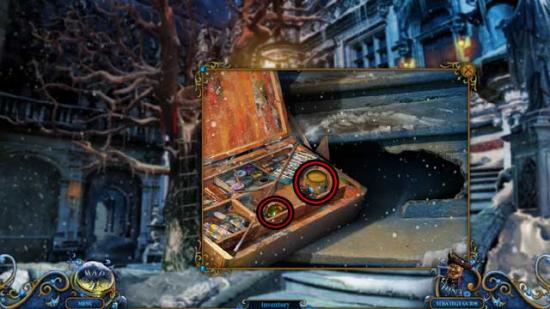
- Take a closer look at the box lying on the steps. Use the BRONZE RING on the ox face to open the box, then click on the PAINT and the BELL (2) inside to add them to your inventory.
- Return to the Tower Entrance.
Tower Entrance
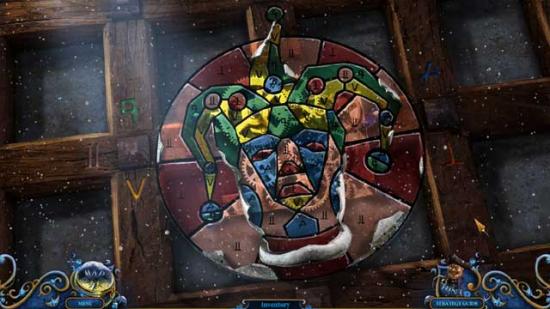
- Take a closer look at the front doors of the Tower again. Use the BELLS (x2) on the stone jester to trigger a puzzle.
- The jester is the wrong color. Click on a glass piece to change its color. The solution is shown below.
- Upon completing the puzzle, the doors will open. Proceed inside.
Tower Inside
- Click anywhere to trigger a brief cutscene. Once it’s finished, click on the Miniature 14/26 to collect it.
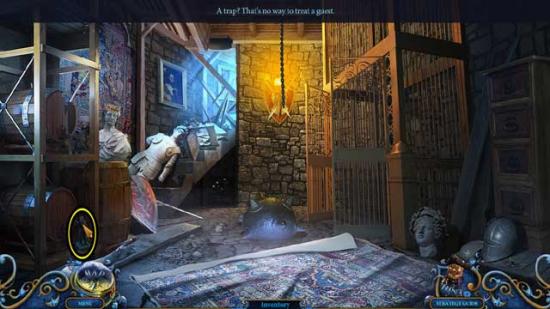
- Examine the bust statue on the left for a closer view. Click on the RUBY in the crown to add it to your inventory.
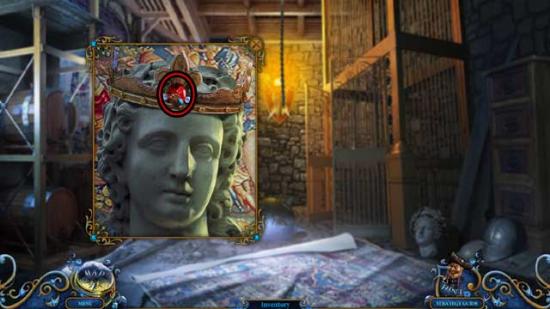
- Return to the Mansion Hall.
Mansion Hall
- Take a closer look at the suit of armor bordering the staircase. Use the RUBY and the EMERALD on the slots in the gauntlets to trigger a puzzle.
- Click on the rings to rotate them. Click on the buttons to swap jewels. Place the jewels on the correct rings. Note that there’s a certain number of gems of each color. The solution is shown below.
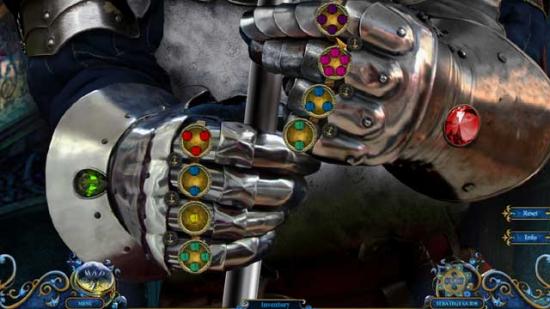
- Upon completing the puzzle, the HALBERD will be added to your inventory.
- Backtrack to the Tower Inside.
Tower Inside
- Take a closer look at the spiked ball in the hole in the floor. Use the HALBERD to prop it up out of the hole, revealing a hidden object area inside.
- Find the objects listed at the bottom of the screen; their locations are shown below. Items listed in blue require an additional action.
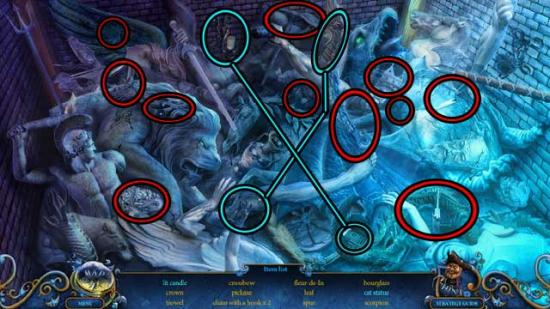
- Upon completing the area, the CANDLE will be added to your inventory.
- Examine the dark area underneath the stairs. Use the CANDLE on the peg on the wall to light the area, then click on the Miniature 15/26 and the CRANK HANDLE to collect them.
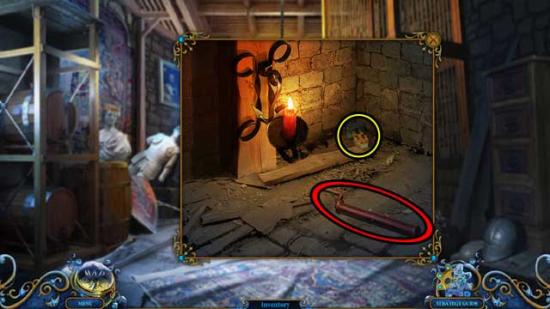
- Back in the main area, take a closer look at the inside of the gated area on the right. Use the CRANK HANDLE on the mechanism, then use the MINER to power it, thus activating the elevator and taking you up to the next level.
Chapter 4: The Gallery of Statues
Tower Chamber
- Click anywhere to view a cutscene.
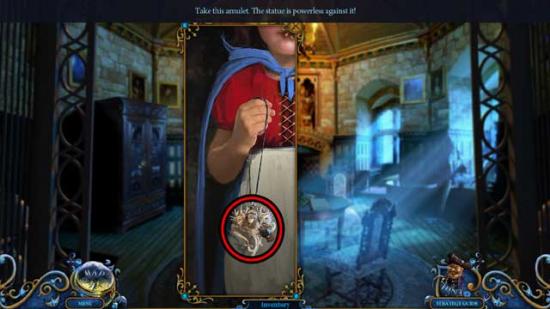
- Click on Princess to speak with her, then click on the AMULET she gives you to add it to your inventory.
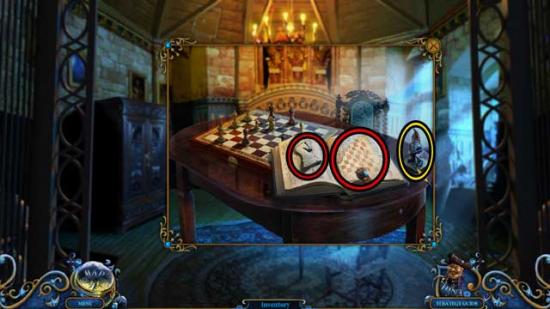
- Take a closer look at the table in the center of the room. Click on the book to open it, then click on the Miniature 16/26, the CHESS DIAGRAM, and the CHESS PIECE 1/2 to collect them.
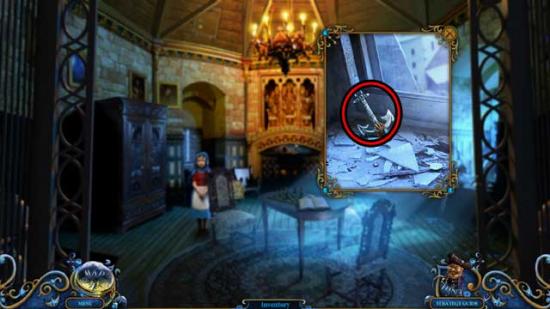
- Examine the first window on the right. Click on the LITTLE ANCHOR to add it to your inventory.
- Take a closer look at the hatch in the upper left corner of the ceiling. Use the ROOSTER to open it and knock the ladder down.
- Return to the Square.
Square
- Examine the base of the pedestal. Use the SMALL ANCHOR on the groove on the left to fill it, then click on the CHESS PIECE 2/2 that appears to add it to your inventory.
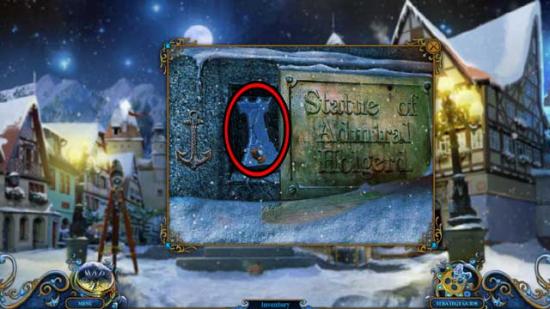
- Make your way back to the Mansion Hall.
Mansion Hall
- Take a closer look at the chessboard pattern on the floor at the base of the staircase. Use the CHESS DIAGRAM and the CHESS PIECES on the board, then take a closer look at the diagram to see where the Chess Pieces should go. The solution is shown below.
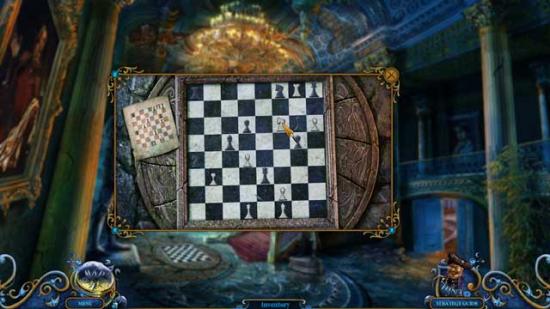
- Proceed down through the secret passage that appears to the Stairs.
Stairs
- Click on the Miniature 17/26 and the GNOME WITH SAW to collect them.
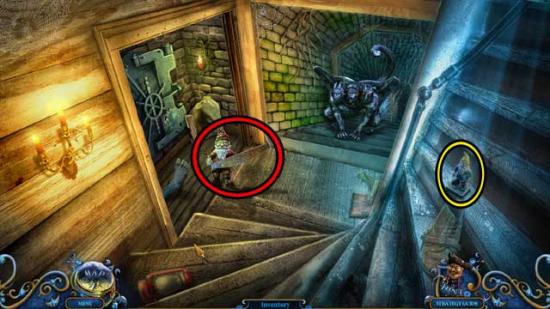
- Examine the safe door on the left to trigger a puzzle.
- Click the circle to rotate it. Restore the picture to open the safe door. The solution is shown below.
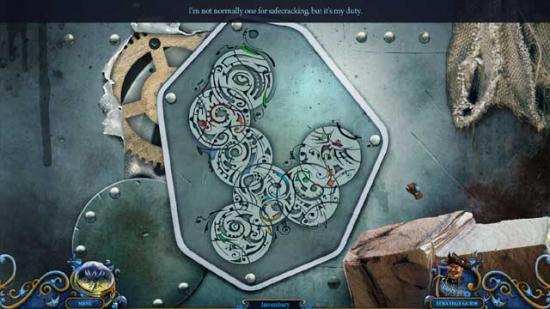
- Upon completing the puzzle, click on the hidden object area that appears.
- Find the objects listed at the bottom of the screen; their locations are shown below. Items listed in blue require an additional action.
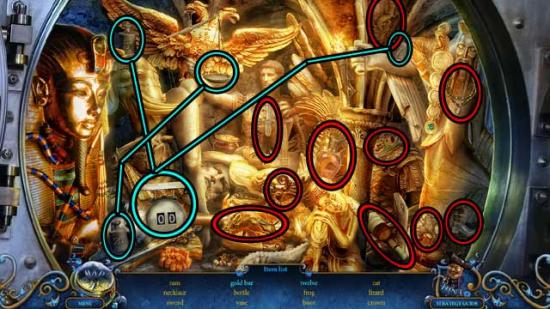
- Upon completing the area, the BAR OF GOLD will be added to your inventory.
- Take a closer look at the chimera. Use the AMULET on it to put it to sleep, then proceed down to the next area.
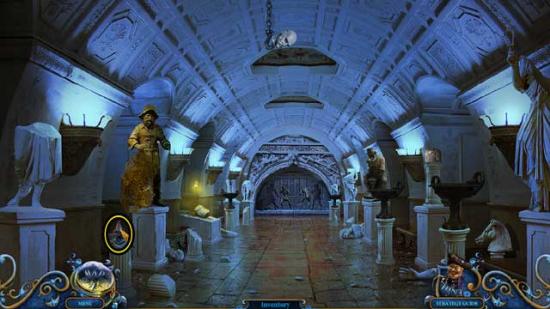
Gallery of Statues
- Click on the Miniature 18/26 to collect it.
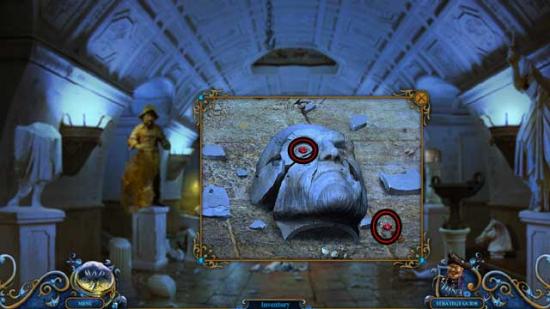
- Take a closer look at the head on the hook near the ceiling. Use the ROOSTER to knock it down, then take a closer look at it on the floor. Click on the RED EYES (x2) to add them to your inventory.
- Make your way back to the Tower Entrance.
Tower Entrance
- Examine the fallen tree on the left. Use the GNOME WITH SAW and the GNOME on the tree- together they will create a path for you. Once finished, click on the GNOMES (x2) to add them back to your inventory.
- Proceed forward to the next area.
Backyard
- Take a closer look at the gnome with the gold cap on the right ahead. Use the SHOVEL on the stick handle.
- Place the GNOMES (x2) from your inventory into the circle.
- Examine the river bank on the right. Click on the FISH MOLD to add it to your inventory.
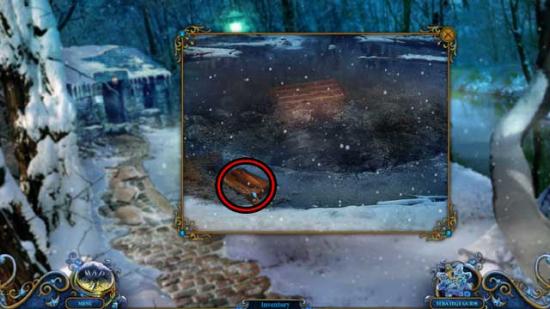
- Back in the main view, go forward to the next area.
Backyard House
- Click on the Miniature 19/26, the HORSESHOE, and the WOODEN HANDS 1/2 to collect them.
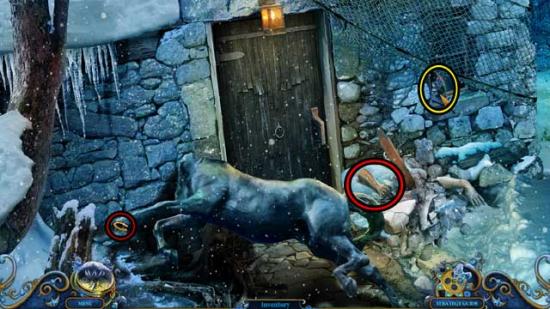
- Return to the Optics Workshop.
Optics Workshop
- Examine the stove on the left. Use the FISH MOLD on the embers, then use the BAR OF GOLD on the mold. Click on the resulting GOLDEN CARP to add it to your inventory.
- Return to the Gallery of Statues.
Gallery of Statues
- Examine the Fisherman statue on the left. Place the GOLDEN CARP in his empty hand, then click on the GOLDEN NET to add it to your inventory.
- Return to the Backyard.
Backyard
- Examine the riverbank on the right again. Use the GOLDEN NET on the water, then use the MINER to retrieve the chest.
- Take a closer look at the chest. Click on the SHELL to add it to your inventory.
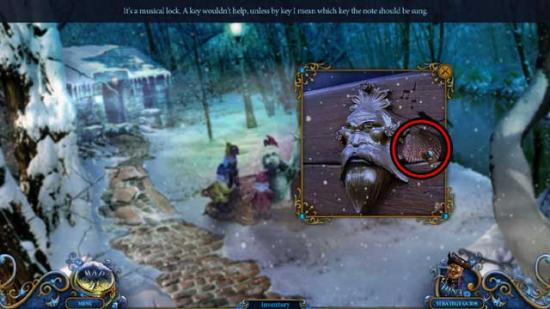
- Make your way back to the Maid’s Room.
Maid’s Room
- Take a closer look at the top of the bed. Use the SHELL on the round box to open it, then click on the BIRD’S HEAD inside to add it to your inventory.
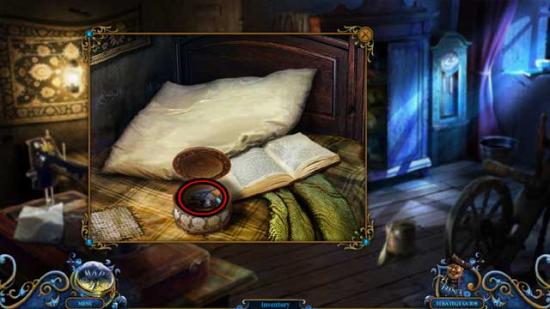
- Examine the bird cage for a closer view. Use the BIRD’S HEAD on the mechanical bird body, then click to obtain the MECHANICAL BIRD.
- Return to the Backyard.
Backyard
- Examine the chest near the riverbank. Use the MECHANICAL BIRD on the chest to open it, then click on the hidden object area that appears.
- Find the objects listed at the bottom of the screen; their locations are shown below. Items listed in blue require an additional action.
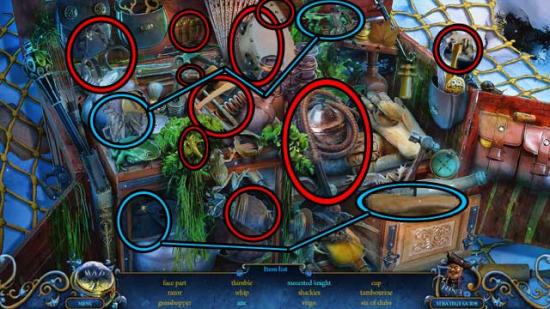
- Upon completing the area, the CENTAUR FACE PART 1/2 will be added to your inventory.
- Return to Amadey’s Workshop.
Amadey’s Workshop
- Take a closer look inside the large cabinet in the corner. Use the HORSESHOE on the groove in the back to open a secret compartment, then click on the CENTAUR FACE PART 2/2 inside to collect it.
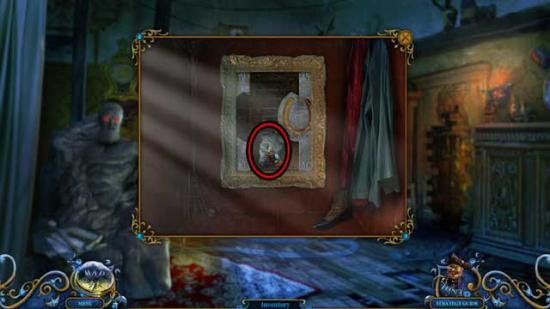
- Return to the Gallery of Statues.
Gallery of Statues
- Examine the pedestal with the torso piece on the left. Use the CENTAUR FACE PART on the ring to trigger a puzzle.
- Assemble the statue. Rotate it to the appropriate angle and then place the pieces at the correct angles. Click on the arrows to rotate left and right. The solution is shown below.
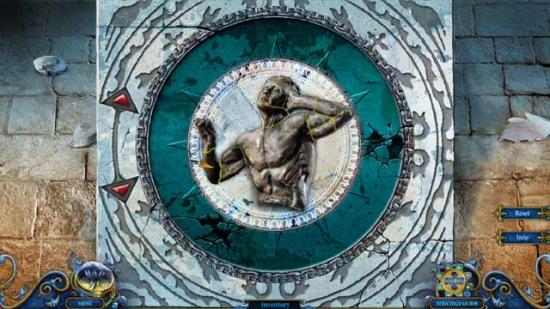
- Upon completing the puzzle, click on the CENTAUR TORSO to add it to your inventory.
- Return to the Backyard House.
Chapter 5: The Backyard House
Backyard House
- Use the CENTAUR TORSO on the horse body, then click on the completed CENTAUR to add it to your inventory.
- Click on the front door to open it- you will acquire the DOOR HANDLE.
- Speak with the door, then go back to the Gallery of Statues.
Gallery of Statues
- Proceed forward to Amadey’s Secret Room.
Amadey’s Secret Room
- Use the CENTAUR on the slot in the wall on the left. Click on the square window slot that appears on the right for a short cutscene.
- After the cutscene, the FAUN WITH BAGPIPES will be added to your inventory.
- Go to the Maid’s Room.
Maid’s Room
- Take a closer look at the container sitting on the floor. Use the DOOR HANDLE to open the lid, then click on the PALETTE KNIFE inside to add it to your inventory.
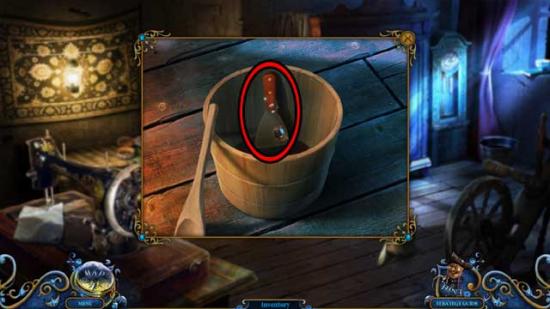
- Return to the Backyard House.
Backyard House
- Use the PALETTE KNIFE, followed by the PAINT on the door. Click on the HINGE that appears to add it to your inventory.
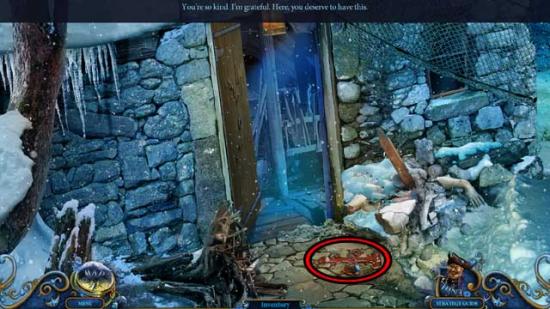
- Enter the house.
Backyard House Entrance
- Click on the Miniature 20/26 and the MAGIC BROOM to collect them.
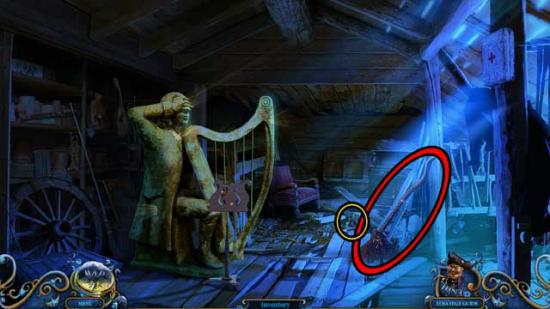
- Return to the Maid’s Room.
Maid’s Room
- Examine the area underneath the bed. Use the MAGIC BROOM to pull out the pieces of wood from under the bed, then use the GLUE to repair the WOODEN HANDS 2/2 and add it to your inventory.
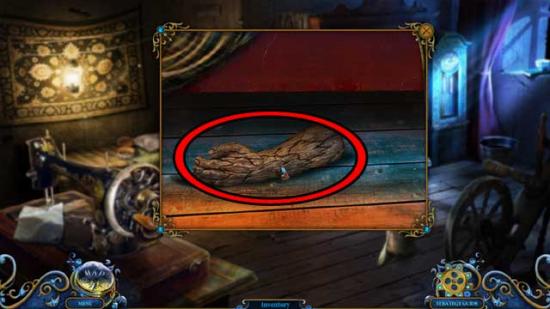
- Return to the Gallery of Statues.
Gallery of Statues
- Examine the sculptor statue on the right. Use the WOODEN HANDS on the statue, then click on the FAUN WITH DRUM to add it to your inventory.
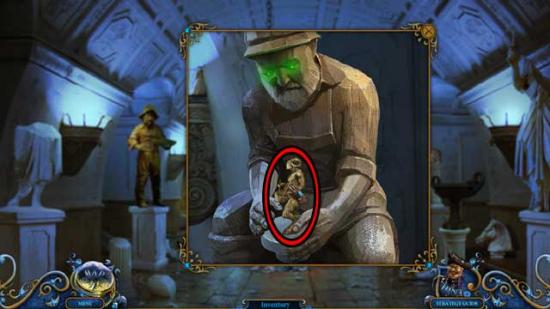
- Make your way back to the Tower Chamber.
Tower Chamber
- Take a closer look at the hatch in the ceiling on the upper left you opened earlier using the ROOSTER. Use the MAGIC BROOM to clear our the cobwebs, then use the ROOSTER to clear out the bats, revealing a hidden object area.
- Find the objects listed at the bottom of the screen; their locations are shown below. Items listed in blue require an additional action.
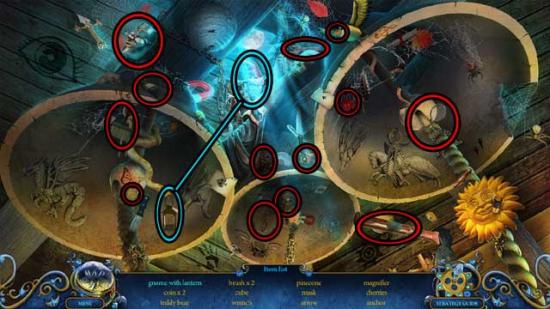
- Upon completing the area, the CHIEF GNOME will be added to your inventory.
- Return to the Backyard.
Backyard
- Use the CHIEF GNOME to complete the circle of gnomes, then watch as they dig out Snow White.
- Once done, take a closer look at Snow White. Use the FLOWERS to restore the missing ones on her crown, then click on the LITTLE HARP to add it to your inventory.
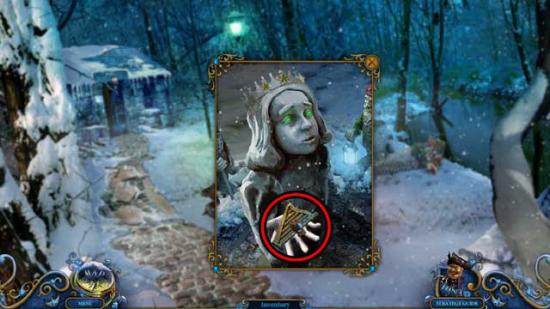
- Return to the Tower Chamber.
Tower Chamber
- Examine the wardrobe on the left. Use the LITTLE HARP, the FAUN WITH DRUM, and the FAUN WITH BAGPIPES on the appropriate slots to open it.
- Take a closer look inside the wardrobe. Click on the DISK inside to add it to your inventory.
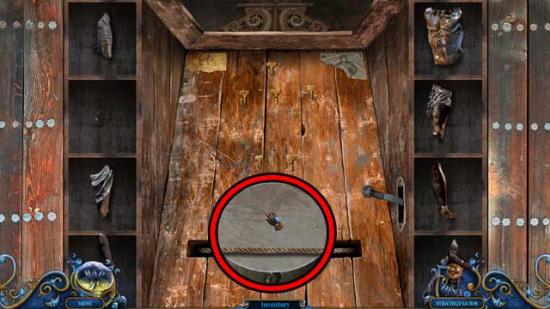
- Go back to the Gallery of Statues.
Gallery of Statues
- Take a closer look at the stone cylinder on top of the pillar on the right. Use the DISK to trigger a puzzle.
- Click the disks to rotate them till they line up and form an image. The solution is shown below.
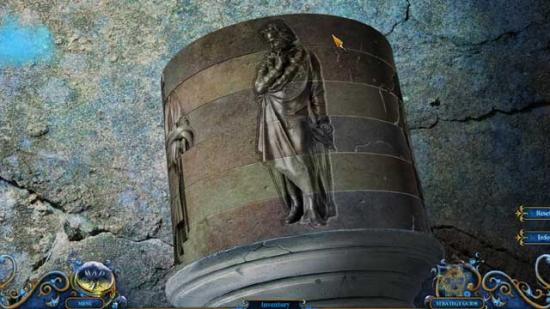
- Upon completing the puzzle, click on the hidden object area that appears.
- Find the objects listed at the bottom of the screen; their locations are shown below. Items listed in blue require an additional action.
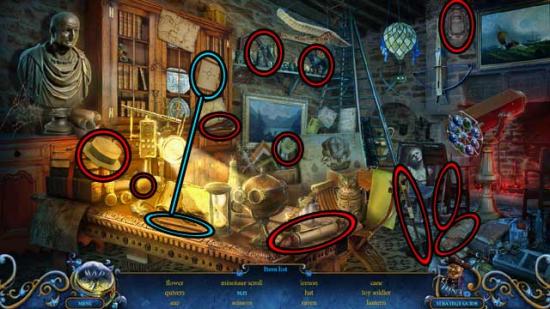
- Upon completing the area, the MINOTAUR SCHEME will be added to your inventory.
- Proceed to the Dining Room.
Dining Room
- Take a closer look at the ox head on the wall on the upper right. Use the RED EYES on the sockets, then click on the MINOTAUR HEAD to add it to your inventory.
- Go to the Tower Chamber.
Tower Chamber
- Examine the wardrobe on the left again. Use the MINOTAUR SCHEME on the torn paper on the upper left, then use the MINOTAUR HEAD on the empty shelf on the left to trigger a puzzle.
- Assemble the statue as it is shown in the drawing. Click on the lever to slide the boxes. The solution is shown below.
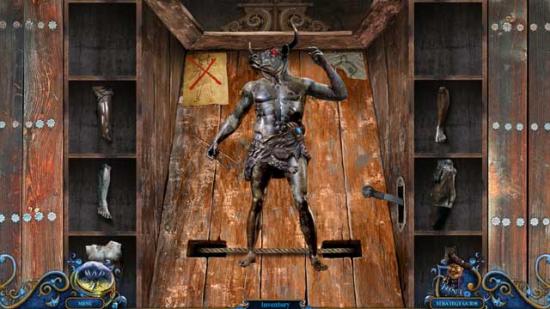
- Upon completing the puzzle, click on the MINOTAUR to add it to your inventory.
- Return to Amadey’s Secret Room.
Amadey’s Secret Room
- Use the MINOTAUR on the slot on the right to open the door, then click anywhere to trigger a cutscene.
- Go back out to the Gallery of Statues.
Gallery of Statues
- After another cutscene, examine the snowy area of the floor on the right. Click on the ICE HEAD to add it to your inventory.
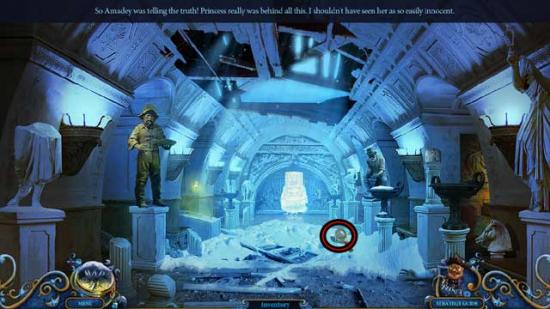
- Proceed forward, back to Amadey’s Secret Room.
Amadey’s Secret Room
- Click on the Miniature 21/26 and the HERO’S DIAGRAM to collect them.
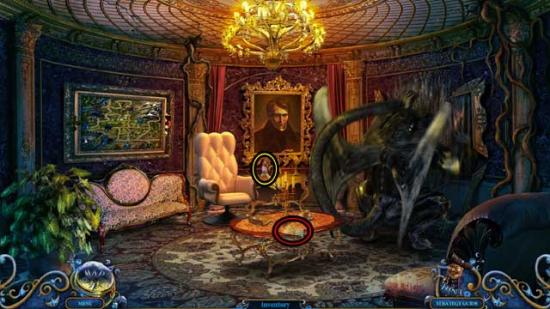
- Return to the Optics Workshop.
Chapter 6: The Wagon
Optics Workshop
- Speak with the Archer statue and note what he has to say.
- Click on the hidden object area behind the Archer.
- Find the objects listed at the bottom of the screen; their locations are shown below. Items listed in blue require an additional action.
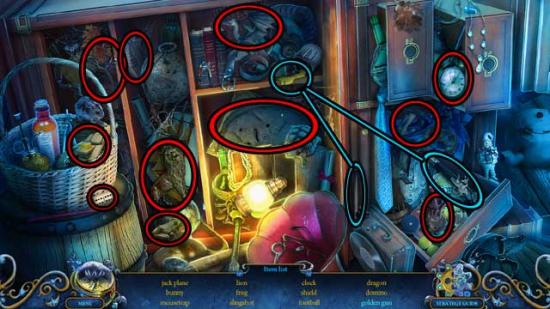
- Upon completing the area, the HERO’S SHIELD will be added to your inventory.
- Take a closer look at the stove on the left. Use the ICE HEAD on the embers to melt it, then click on the HERO’S HEAD to add it to your inventory.
- Take a closer look at the Archer’s left foot. Click on the NOTES 1/4 to add them to your inventory.
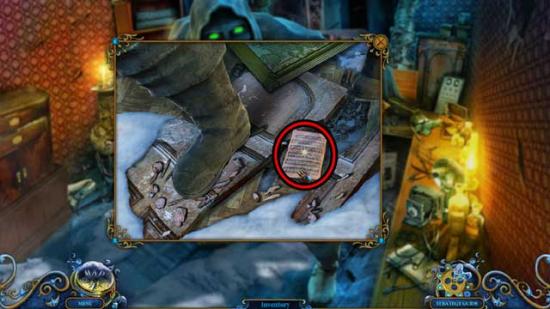
- Make your way to the Garden.
Garden
- Go forward to the Wagon.
Wagon
- Click anywhere to trigger a cutscene.
- Once finished, zoom in on each of the cages to collect the PENDANT PARTS (x4) and don’t forget to collect the Miniature 22/26 as well.
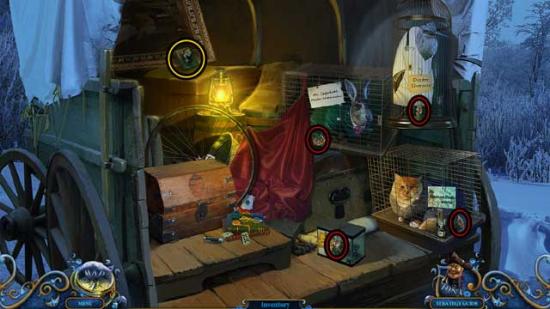
- Click on the chest towards the left for a closer view. Use the PENDANT PARTS (x4) on the indentation to open the chest, revealing a puzzle.
- The triangles change color when you click on them. Make all of the triangles blue. The best strategy is to start from a corner and work your way towards the middle. If you click on a triangle wrong, you can always click to change it back or click the ones around it to fix it. The solution is shown below.
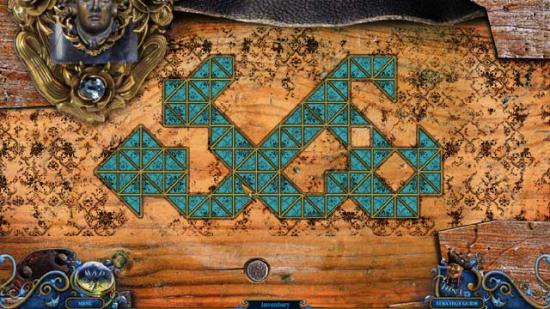
- Upon completing the puzzle, a hidden object area will appear.
- Find the objects listed at the bottom of the screen; their locations are shown below. Items listed in blue require an additional action.
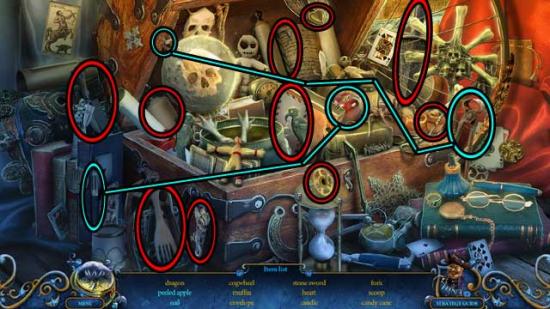
- Upon completing the area, the HERO’S SWORD will be added to your inventory.
- Make your way back to the Tower Chamber.
Tower Chamber
- Examine the wardrobe on the left again. Use the HERO’S DIAGRAM on the torn paper on the upper right and the HERO’S HEAD on the empty shelf on the left to trigger a puzzle.
- Assemble the statue as it is shown in the drawing. Click on the lever to slide the boxes. The solution is shown below.
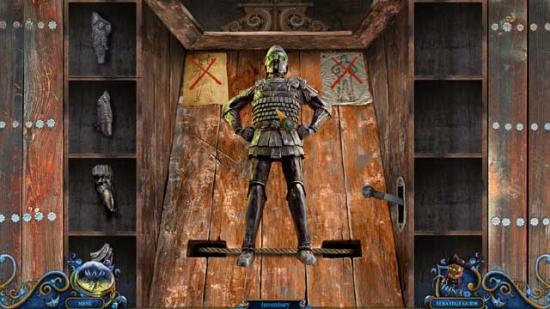
- Upon completing the puzzle, use the HERO’S SHIELD and the HERO’S SWORD on the completed statue, then click on the HERO to add him to your inventory.
- Return to Amadey’s Secret Room.
Amadey’s Secret Room
- Use the HERO on the chimera on the right to trigger a cutscene. Once finished, examine the ruin on the floor. Click on the RED EYES 8/12 to add them to your inventory.
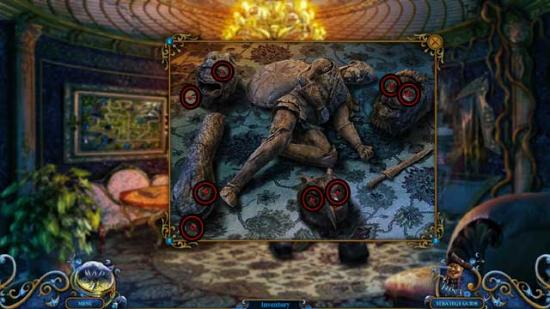
- Proceed forward through the hole in the wall on the right to the Chapel.
Chapel
- Take a closer look at the bow statue towards the left. Click on the Miniature 23/26 and the NOTES 2/4 to collect them.
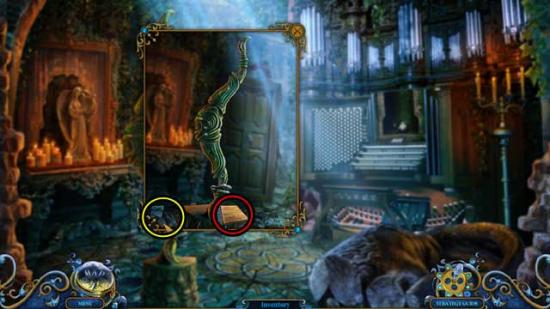
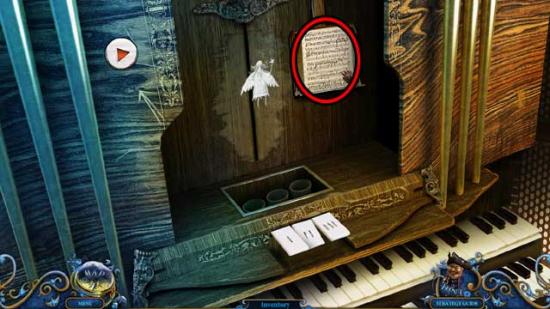
- Take a closer look at the organ on the right to trigger a puzzle.
- Help the angel fly away. Click the keys to change the height of the angel’s flight. Click the Play button on the upper left when ready. The sequence is as follows (numbered 1-3 in correspondence with the marks on the keys): 2, 1, 3, 2, 1, 2, 1, 1, 3, 2, 3, 1, 2, 1, 2. Upon completing the puzzle, click on the NOTES 3/4 to collect them.
- Return to the Mansion Hall.
Mansion Hall
- Watch the cutscene, then use the ROOSTER on the Angel statue to distract it.
- Proceed up the steps to the Princess Statue.
Princess Statue
- Click on the NOTES 4/4 to add them to your inventory.
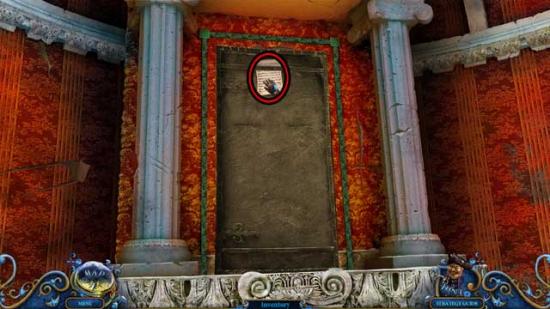
- Return to the Backyard House Entrance.
Backyard House Entrance
- Take a closer look at the music stand. Use the NOTES on the stand to trigger a hidden object area.
- Find the objects listed at the bottom of the screen; their locations are shown below. Items listed in blue require an additional action.
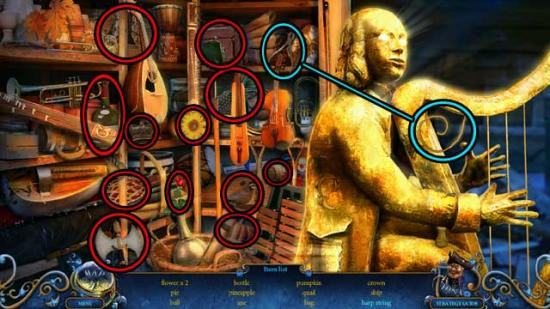
- Upon completing the area, the HARP STRING will be added to your inventory.
- Return to the Chapel.
Chapel
- Examine the bow statue. Use the HARP STRING on the bow statue, then click on the BOW to add it to your inventory.
- Return to the Optics Workshop.
Optics Workshop
- Give the BOW to the Archer, then watch the cutscene that follows.
- Go outside to the Square.
Square
- Take a closer look at the stone head on the ground towards the right, near the pedestal. Click on the RED EYES 10/12 and the METAL WING to add them to your inventory.
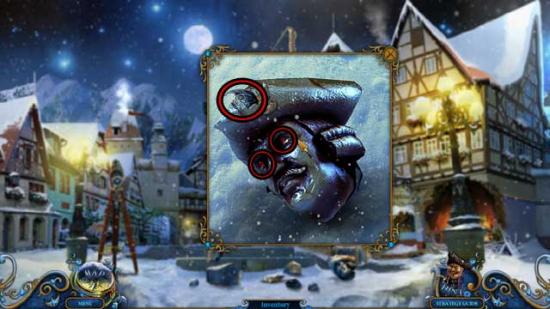
- Make your way back to the Tower Chamber.
Chapter 7: Princess
Tower Chamber
- Examine the mantlepiece. Use the SPRING and the METAL WING on the beast on the left, then watch what happens. Click on the SILVER KNIGHT to add it to your inventory.
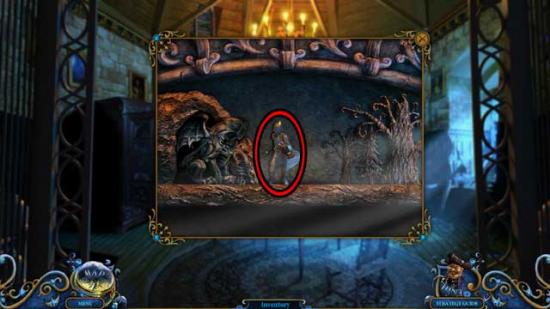
- Go to Amadey’s Secret Room.
Amadey’s Secret Room
- Take a closer look at the painting on the left. Use the SILVER KNIGHT on the frame to trigger a puzzle.
- Create a legendary hero’s story. Click the arrow buttons to move the hero. Conquer the heart of the princess and kill the dragon. Note that you can have only one item at a time. Follow these steps, referring to the screenshot below, to solve the puzzle:
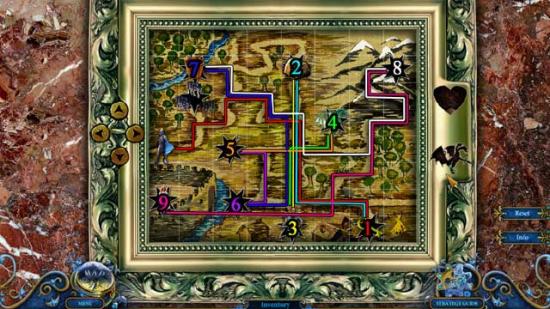
- Retrieve the Key
- Use the Key to open the Chest, obtain the Gold
- Give the Gold to the old man, obtain the Sword
- Use the Sword to slay the dragon
- Pick up the Lever
- Use the Lever to lower the drawbridge to the castle
- Retrieve the bucket of Water
- Use the Water on the bud so it blooms into the Flower (obtain it)
- Give the Flower to the Princess
- Upon completing the puzzle, click on the hidden object area that appears.
- Find the objects listed at the bottom of the screen; their locations are shown below. Items listed in blue require an additional action.
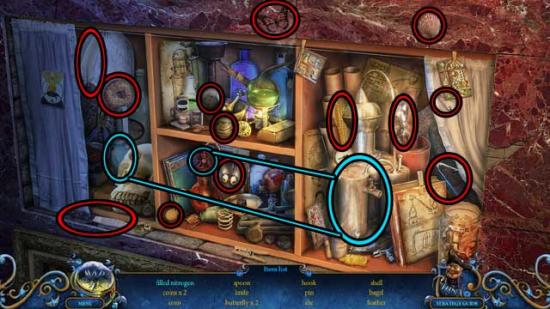
- Upon completing the area, the NITROGEN will be added to your inventory.
- Return to the Mansion Hall.
Mansion Hall
- Use the NITROGEN on the Angel statue.
- Take a closer look at the base of the steps where the Rooster is sitting. Click on the RED EYES 12/12 to add them to your inventory.
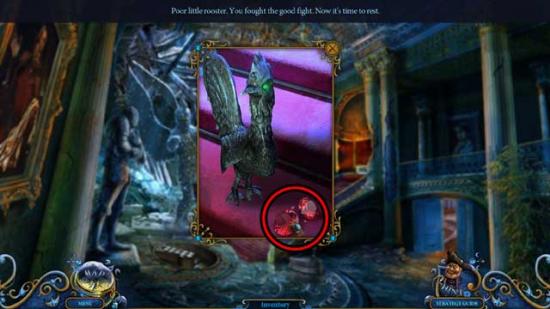
- Proceed up to the Princess Statue.
Princess Statue
- Use the HINGE on the upper left portion of the door, then take a closer look at the eyes that appear. Use the RED EYES on the slots in the eyes to complete the door, then proceed through to the Attic.
Attic
- A cutscene will trigger when you enter the room.
- Click on the Miniature 24/26 and the MAGIC POWDER to collect them.
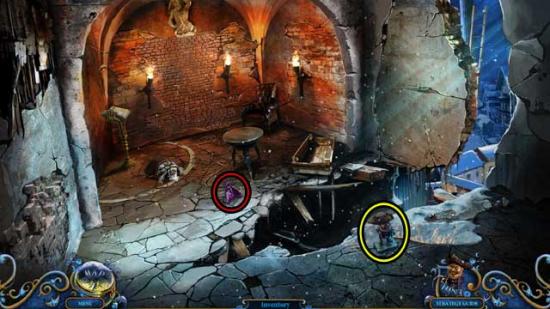
- Examine the book on the stand in the left corner. Use the MAGIC POWDER on the book.
- Take a closer look at Amadey. Click on the COINS 1/5 and the CAGE KEY to add them to your inventory.
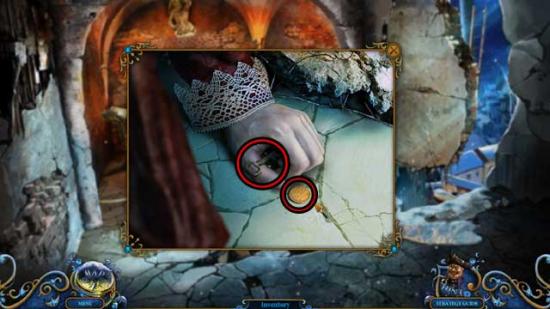
- Make your way back to the Wagon.
Wagon
- Zoom into each of the animal cages and use the CAGE KEY to unlock them. Click on the TOAD, the CAT, the BUNNY, and the HERON to add them to your inventory.
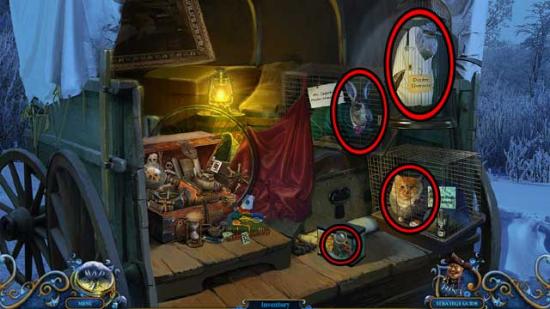
- Return to the Attic.
Attic
- Place the TOAD, the CAT, the BUNNY, and the HERON on the white circle in the corner of the room around the book stand. Next, take a closer look at the book stand and use the MAGIC POWDER on the book to restore each to their original forms.
- Take a closer look at each of the unconscious figures. Click the COIN each has- you’ll end up with a total of COINS 5/5. You will also collect the HANDCUFFS.
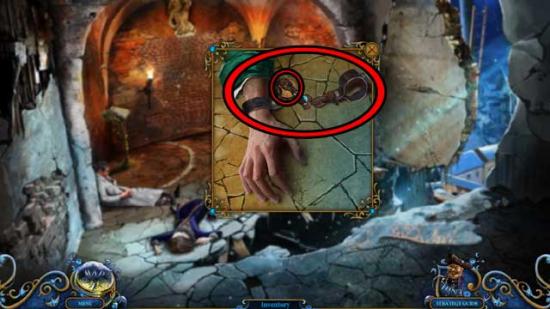
- Examine the brick wall at the far end of the room. Use the MINER on the wall to try and knock it down, but to no avail.
- Take a closer look at the Leprechaun that appears on the right. Give him the COINS. This will trigger a hidden object area to appear.
- Find the objects listed at the bottom of the screen; their locations are shown below. Items listed in blue require an additional action.
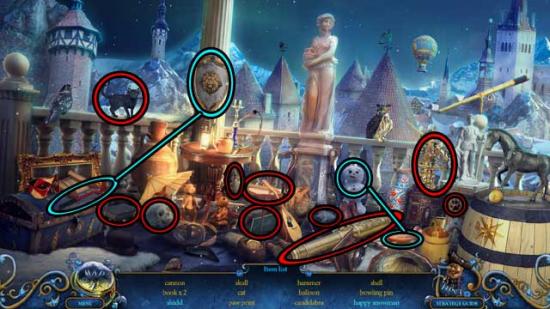
- Upon completing the area, the CANNON will be added to your inventory.
- Give the CANNON to the MINER and watch the cutscene that follows.
- Proceed through the hole in the wall to the final area.
Princess’ Secret Room
- Click on the Miniatures 25/26 and 26/26 to collect them and complete the Avid Collector achievement.
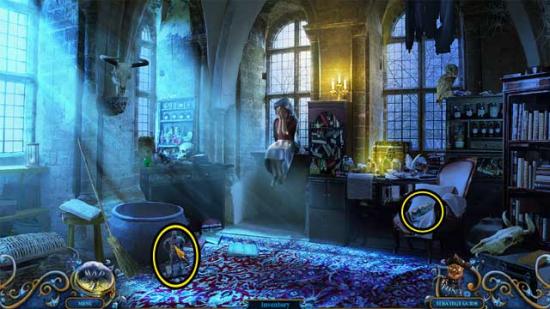
- Talk with Princess. After hearing her story, choose to either give her the MAGIC BROOM or use the HANDCUFFS on her. Your decision will alter the ending.
Congratulations! You’ve completed Royal Detective: Lord of Statues! You can now access the Extra Game Play via the Bonus section of the Main Menu.
Bonus Chapter
Attic
- Click on Rupert to collect him again (and thus find out what’s going on and re-enable the Hint).
- The MINER and the ROOSTER will automatically appear in your inventory.
- Enter Princess’ Secret Room.
Princess’ Secret Room
- Click on the hidden object area over the desk on the left.
- Find the objects listed at the bottom of the screen; their locations are shown below. Items listed in blue require an additional action.
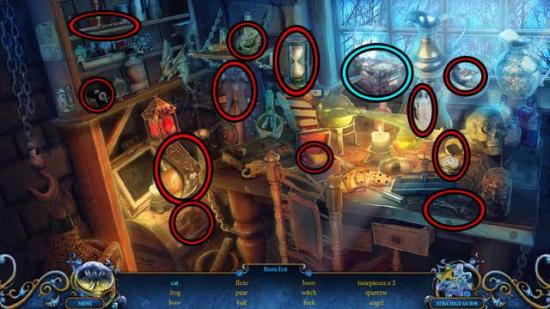
- Upon completing the area, the FLUTE PART 1/2 will be added to your inventory.
- After a brief cutscene, examine the desk on the right. Click on the COLORED ROCKS 1/3 to add them to your inventory.
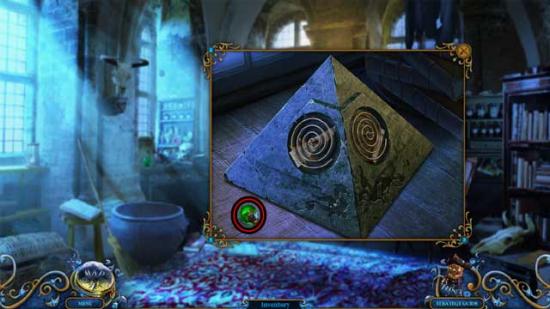
- Go back to the Attic.
Attic
- Some of the beams will come down. Proceed across the beam on the right and down into the Narrow Street below.
Narrow Street
- Take a closer look at the window on the right. Click to open it, then click on the COLORED ROCKS 2/3 to add it to your inventory.
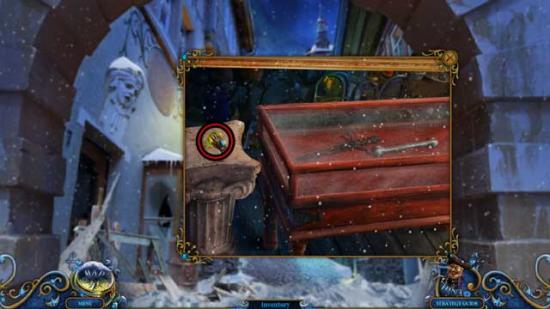
- Back in the main area, use the MINER on the rubble blocking the path ahead to clear it, then proceed forward to the next area.
Field
- Click anywhere to trigger a cutscene.
- For now, proceed forward to the upper left, to the Ruins.
Ruins
- Take a closer look at the stone henge on the upper left. Use the ROOSTER to retrieve the COLORED ROCKS 3/3 and add them to your inventory.
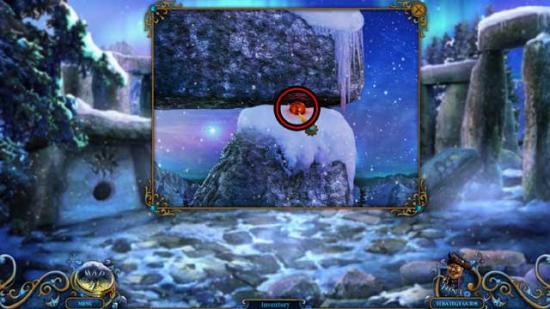
- Examine the upright stone towards the left with the markings on the front. Use the COLORED ROCKS on the stone to trigger a puzzle.
- Click on a rock to drop it into the chute. If the rock is the same color as the hole it falls into, the diamond on the left will rise. Lift the diamond all the way up to take it. A good trick to use is to look at the way the chutes are positioned: the wheel will always turn the opposite way of where the chutes are located. So, if a wheel has chute slots positioned left and up, it will rotate right, and vice verse: if they’re positioned right and up, it’ll rotate left. Solutions are randomized. Upon completing the puzzle, the DIAMOND will be added to your inventory.
- Return to the Narrow Street.
Narrow Street
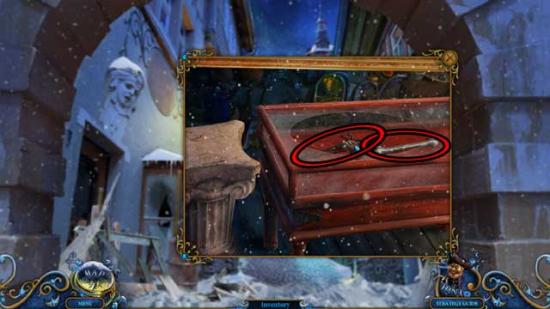
- Examine the window on the right again. Use the DIAMOND to cut open the glass case, then click on the RUSTY DAGGER and the SILVER BONE inside.
- Go back to the Field.
Field
- Take a closer look at the windmill on the right. Use the RUSTY DAGGER on the grinding wheel on the left to sharpen it, then click on the SHARP DAGGER to add it to your inventory.
- Proceed to the Ruins.
Ruins
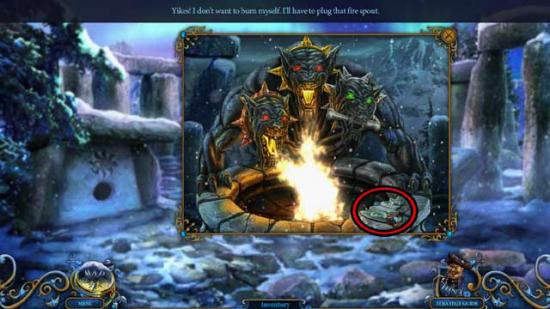
- Take a closer look at the fire-breathing statue ahead. Use the SILVER BONE on the head with the silver collar, then click on the PART OF TITAN RING 1/2 to add it to your inventory.
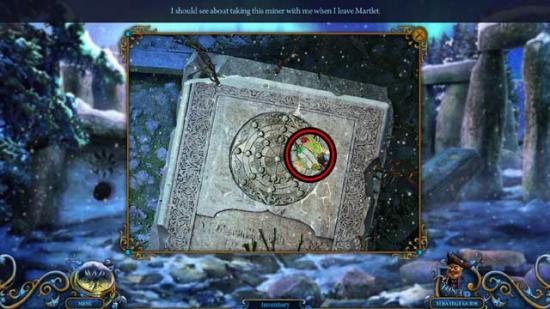
- Back in the main area, examine the stone coffin on the right. Use the SHARP DAGGER to remove the vines, then click on the CHAIN to add it to your inventory. Next, use the MINER on the coffin to retrieve the PART OF TITAN RING 2/2.
- Go back to the Field.
Field
- Take a closer look at the giant stone hand. Use the PART OF TITAN RING on the ring to trigger a puzzle.
- Click on a diamond to move it. It will move if there is an empty spot nearby. Move all of the green diamonds onto the green ring, all the reds ones onto the red ring, and all the yellow ones onto the yellow ring. A good strategy is to move a yellow one into the center ring, then work on moving all the green ones into the green ring, followed by the red, followed by the yellow into their respective rings. The solution is shown below.
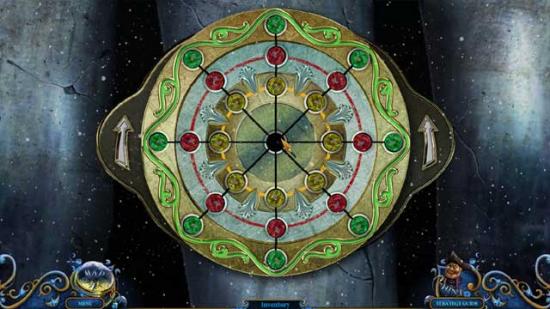
- Upon completing the puzzle, the RING SEAL will be added to your inventory.
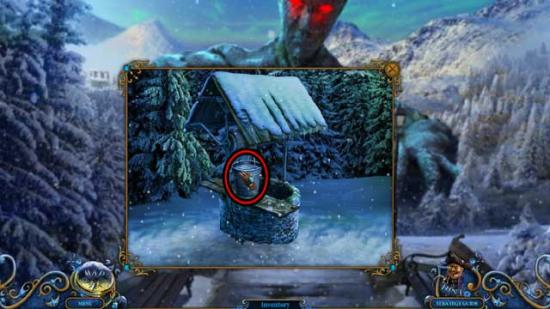
- Examine the well on the left. Use the CHAIN on the well to lower the bucket, then click on the lever to bring it back up. Click on the BUCKET WITH WATER to add it to your inventory.
- Return to the Narrow Street.
Narrow Street
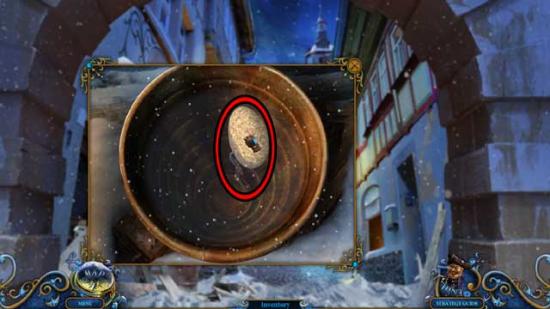
- Examine the metal barrel on the left. Use the BUCKET WITH WATER on the interior of the barrel, then click on the RUSTY KEY to add it to your inventory.
- Go back to the Field.
Field
- Take a closer look at the windmill on the right. Use the RUSTY KEY on the lock on the door to open it, then click on the hidden object area that appears.
- Find the objects listed at the bottom of the screen; their locations are shown below. Items listed in blue require an additional action.
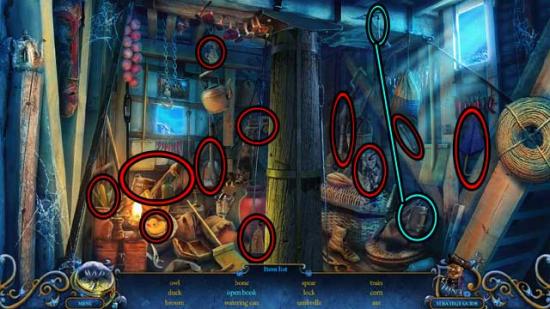
- Upon completing the area, the BRONZE BONE will be added to your inventory.
- Proceed to the Ruins via the space under the stone giant’s arm.
Ruins
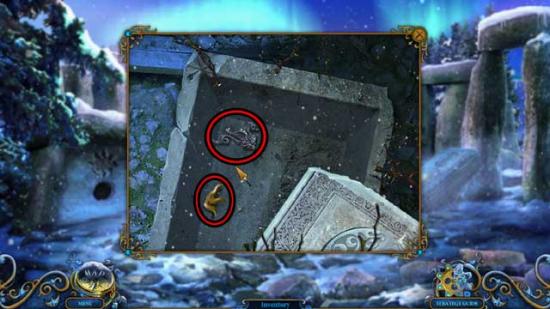
- Take a closer look at the coffin on the right. Use the RING SEAL to open the coffin, then click on the DRAGON and the STAR 1/2 inside to add them to your inventory.
- Examine the fire-breathing statue again. Use the BRONZE BONE on the head with the bronze collar.
- Make your way back to Princess’ Secret Room.
Princess’ Secret Room
- Examine the desk on the right. Use the DRAGON on the indentation on the left side of the pyramid to open it, then click on the PIECE OF PAPER and the STAR 2/2 to add them to your inventory.
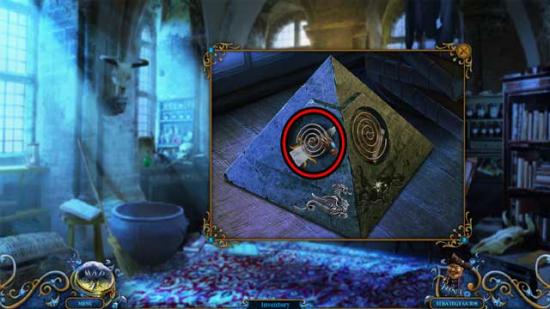
- Return to the Ruins.
Ruins
- Take a closer look at the stone structure on the left. Use the STAR on the groove to fill it, then click on the hidden object area that appears.
- Find the objects listed at the bottom of the screen; their locations are shown below.
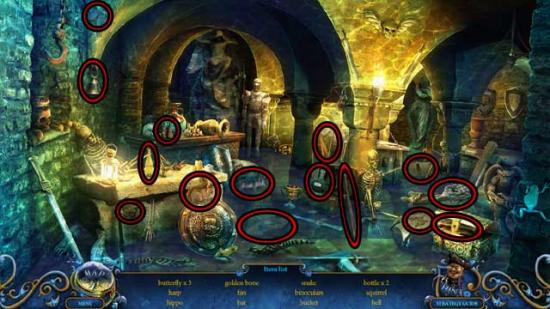
- Upon completing the area, the GOLDEN BONE will be added to your inventory.
- Examine the fire-breathing statue once again. Use the GOLDEN BONE on the head with the golden collar, then click on the DRAGON to add it to your inventory.
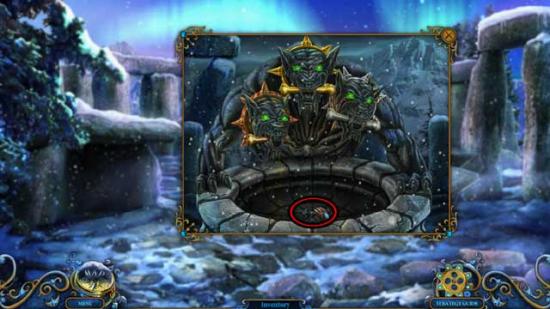
- Backtrack to Princess’ Secret Room.
Princess’ Secret Room
- Examine the desk on the right. Use the DRAGON on the remaining groove, then click on the FLUTE PART 2/2 to add it to your inventory.
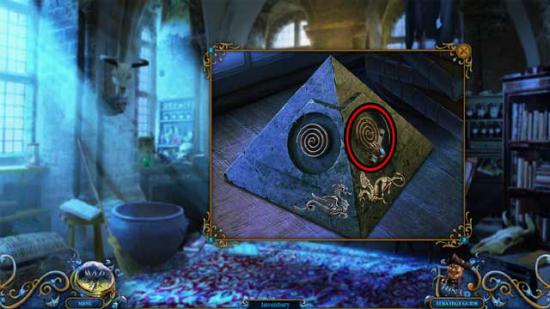
- Return to the Field.
Field
- After the cutscene, use the FLUTE on the statue. In the close-up, use the PIECE OF PAPER on the upper left corner to trigger a puzzle.
- Crack the code to plate the right melody. There are pictures on the top left of the page, each one associated with one of the flute holes. Click on the flute holes in the right order. The solution is as follows:
- Skull= Grim Reaper, Cauldron= Witch, Moon= Wolf
- Fish Net= Spider Web, Wings= Dragon, Jaws= Wolf, Scythe= Grim Reaper
- Spider= Spider Web, Flame= Dragon, Broom= Witch, Skeleton Hand= Grim Reaper, Bat= Witch
- Cat= Witch, Forest= Wolf, Chest= Dragon, Fish= Dragon, Mushrooms= Witch, Butterfly= Spider Web
- Upon completing the puzzle, watch the cutscene that follows.
Congratulations! You’ve completed the Bonus Game Play of Royal Detective: Lord of Statues Collector’s Edition!
More articles...
Monopoly GO! Free Rolls – Links For Free Dice
By Glen Fox
Wondering how to get Monopoly GO! free rolls? Well, you’ve come to the right place. In this guide, we provide you with a bunch of tips and tricks to get some free rolls for the hit new mobile game. We’ll …Best Roblox Horror Games to Play Right Now – Updated Weekly
By Adele Wilson
Our Best Roblox Horror Games guide features the scariest and most creative experiences to play right now on the platform!The BEST Roblox Games of The Week – Games You Need To Play!
By Sho Roberts
Our feature shares our pick for the Best Roblox Games of the week! With our feature, we guarantee you'll find something new to play!All Grades in Type Soul – Each Race Explained
By Adele Wilson
Our All Grades in Type Soul guide lists every grade in the game for all races, including how to increase your grade quickly!


