![Digimon UP Tier List [Supports, Buddies, and Partners]](/wp-content/uploads/2026/07/digimon-up-tier-list.jpg "Digimon UP Tier List [Supports, Buddies, and Partners]")
Digimon UP Tier List [Supports, Buddies, and Partners]
These Digimon will get you UP the leaderboard.


![Haze Seas Boss Drops [Chances, Locations, and How to Spawn]](/wp-content/uploads/2026/07/haze-seas-boss-drops.jpg "Haze Seas Boss Drops [Chances, Locations, and How to Spawn]")

Welcome to the walkthrough for Robin’s Quest: A Legend is Born on Gamezebo. Robin’s Quest: A Legend is Born is a hidden object game for the PC created by Gogii Games. This walkthrough includes tips and tricks, helpful hints, and a strategy guide to complete Robin’s Quest: A Legend is Born.
Welcome to the walkthrough for Robin’s Quest: A Legend is Born on Gamezebo. Robin’s Quest: A Legend is Born is a hidden object game for the PC created by Gogii Games. This walkthrough includes tips and tricks, helpful hints, and a strategy guide to complete Robin’s Quest: A Legend is Born.
Main Scenes
Hidden Object Scenes
Mini-Games
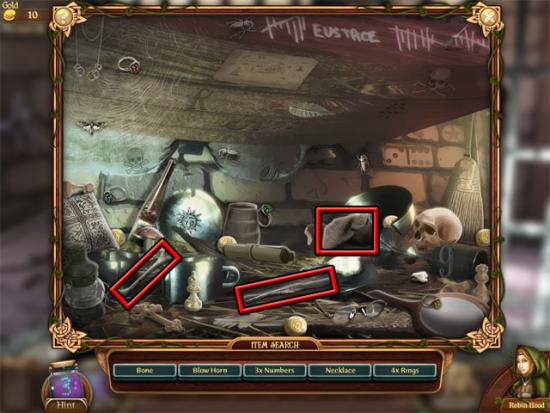
The game starts in the jail cell. Select the sparkling chest on the floor to open it. Select the chest again and the hint jar will be added to the bar at the bottom of the screen. Examine the bed to enter a hidden object scene. Find the following objects:

Find the remaining objects on the list and the bone, knife and cloth will be added to the inventory. Use the bone on the cane and then use the cane on the guard to take the keys. Use the keys on the keyhole to enter a close-up view. Use the keys on the keyhole again to see three keys. Select the key shown below:
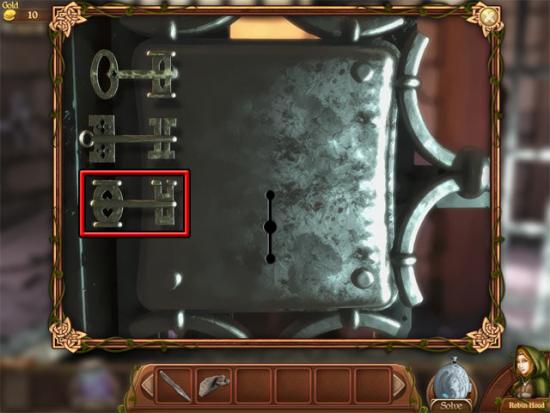
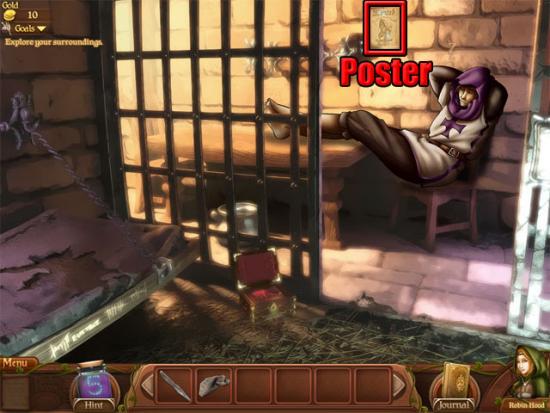
Click to rotate the key and then select the keyhole to unlock the door. Take the wanted poster on the wall:
Select the sparkling area to move to the castle hallway. Use the knife on the sparkling area on the pillar and a rock will be added to the inventory. Use the rock on one of the windows above the guards and they will leave the room. Go through the doorway to exit the castle. Talk to the boy and select the top reply line when he offers to teach Robin how to shoot the bow and arrow. The arrow ability can now be selected to hit targets that are out of reach. The following hotspots are available in this area:
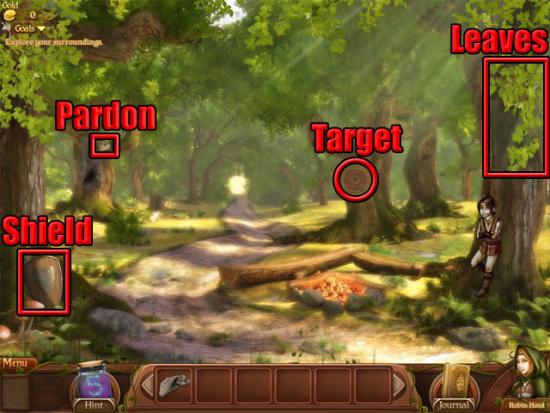
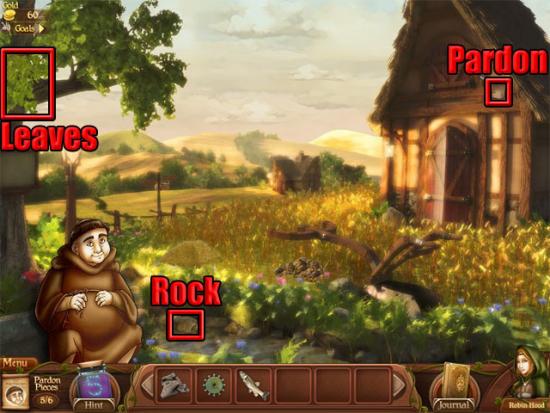
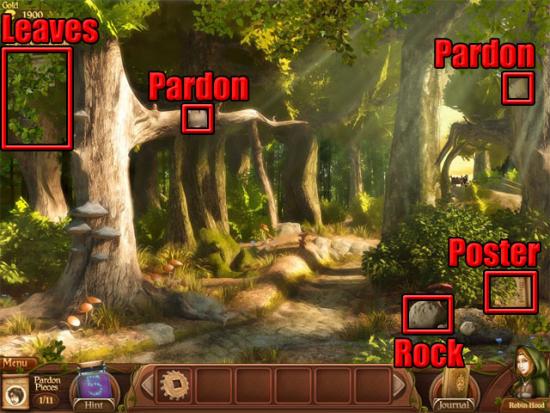
Select the shield and take the ten gold pieces. Select the target on the tree and then choose the arrow ability from the circle that appears to enter archery mode. Move the cursor over the target and click to shoot an arrow. Select the sparkling area on the tree to take a part of Friar Tuck’s pardon. Select the leaves at the right side of the area and take the wanted poster that is revealed. Move forward to the gypsy cart. The following hotspots are available:
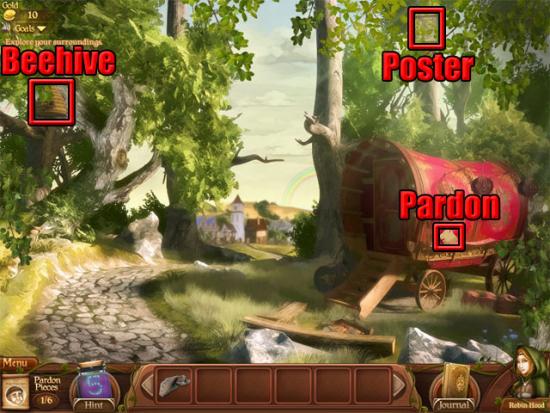
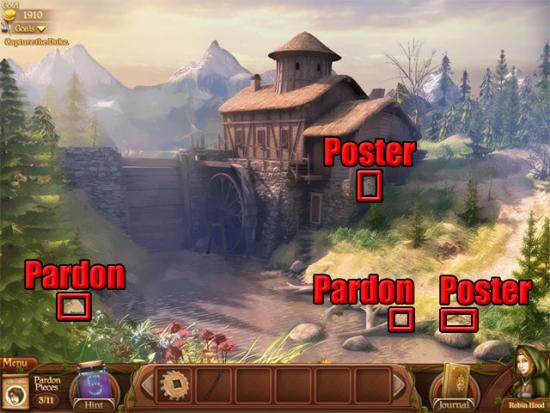
Shoot an arrow at the beehive and take the ten gold coins that drop out. Take the wanted poster and Friar Tuck’s pardon. Enter the gypsy cart and talk to the gypsy to learn about the locket and the jar of fireflies. Move forward to the town center. The following hotspots are available:
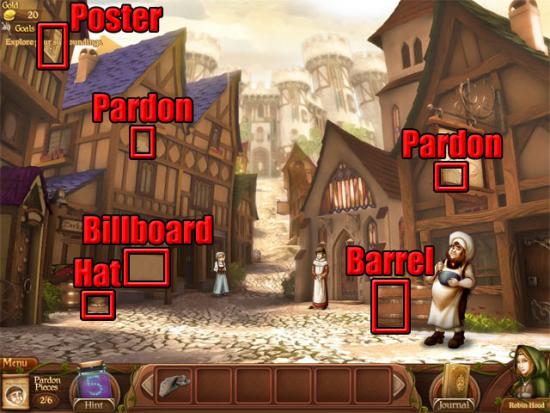
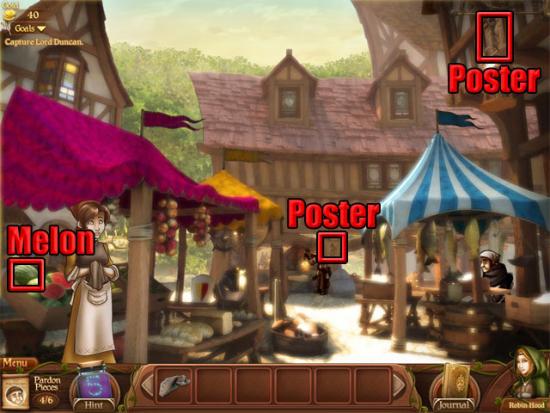
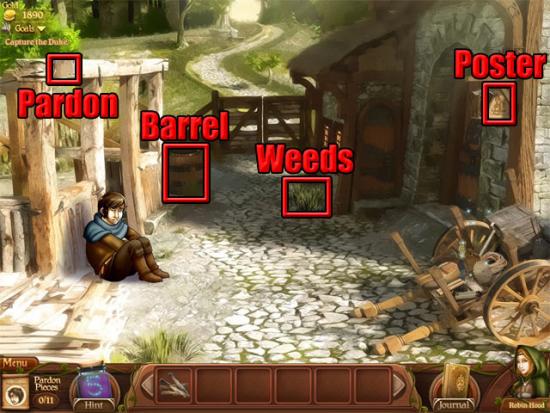
Take the wanted poster and two pieces of Friar Tuck’s pardon. Move the hat and take the ten gold pieces. Move the barrel and take the ten gold pieces. Examine the billboard and take the wanted poster. Talk to the baker and agree to help him. Move left to the market and take the two wanted posters. Move the melon and take the ten gold pieces:
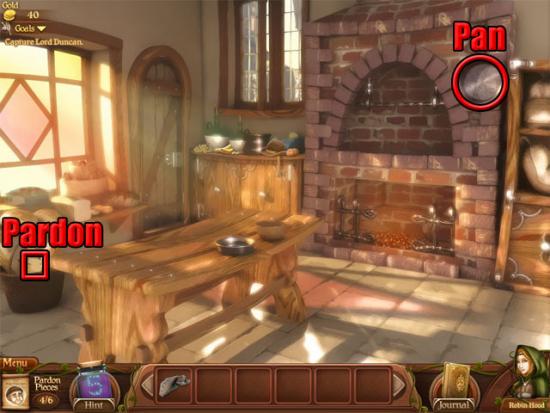
Move back to the town center and right into the bakery. Take the pardon. Move the frying pan and take the ten gold pieces:
Go through the doorway to the back alley to hear the guards talking about pies. Move back to the bakery and examine the cabinet to enter a hidden object scene. Find the following objects:
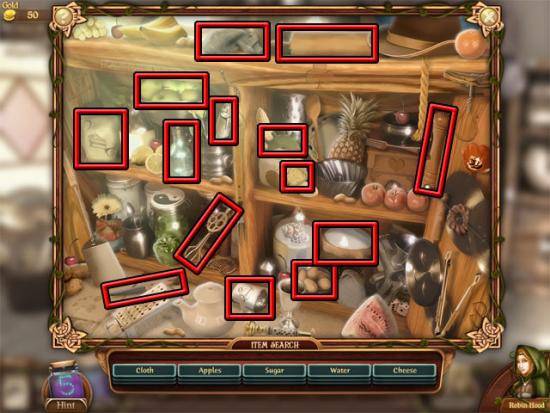
Find the remaining objects on the list and the pie ingredients, cloth, small gear and cloth will be added to the inventory. Examine the table and use the pie ingredients on the metal bowl to play a mini-game where the aim is to click the corresponding ingredient on the table when it passes over the cutting board. There are four rounds to complete:
Round 1: Eggs, whisk, flour, water, rolling pin.
Round 2: Apples, knife, apples, apples, apples, knife.
Round 3: Cinnamon, sugar, cinnamon.
Round 4: Eggs, whisk, flour, water, rolling pin, knife, sugar.
After the puzzle has been solved, the raw pie will be added to the inventory. Use the raw pie on the shelf above the fireplace. Move left to the back alley. Take the poster. Select the plant and take the ten gold pieces:
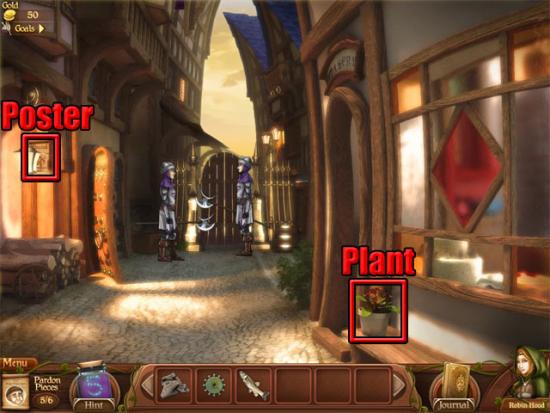
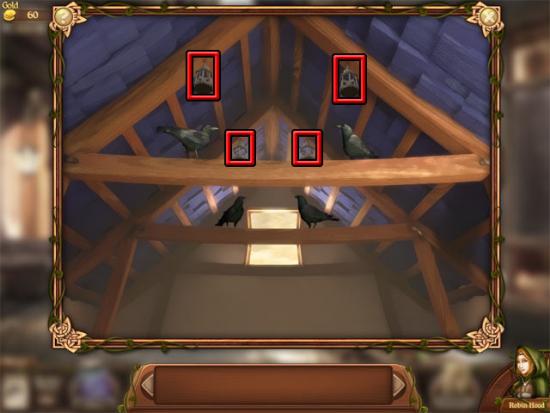
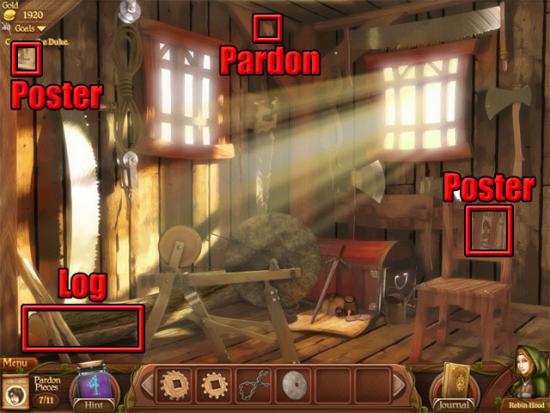
Examine the left door to meet George Woodsmith. Ask him for wood and he will say that he wants you to get rid of the crows in his workshop. Select the four lanterns:
Take the fire logs outside the workshop door. Return to the bakery and use the fire logs on the fireplace to cook the pie. Take the pie. Open the window and use the cooked pie on the window ledge. Go through the left door to the back alley to see that the guards are attracted to the smell of the pie. Move forward to the fields. Select the leaves and take the wanted poster. Move the rock and take the ten gold pieces. Take the last part of Friar Tuck’s pardon:
Talk to Friar Tuck and he will ask if you have found his pardon. Use the pardon on Friar Tuck and he will be added to the band of merry men. The persuade ability will now become available.
Enter the barn and take the wanted poster:
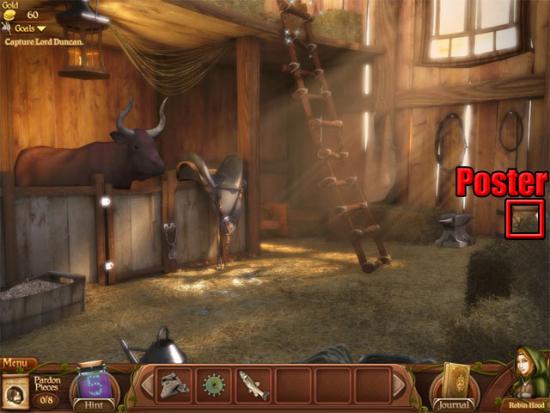
Examine the sparkling area at the top of the ladder to enter a hidden object scene. Find the objects shown below:
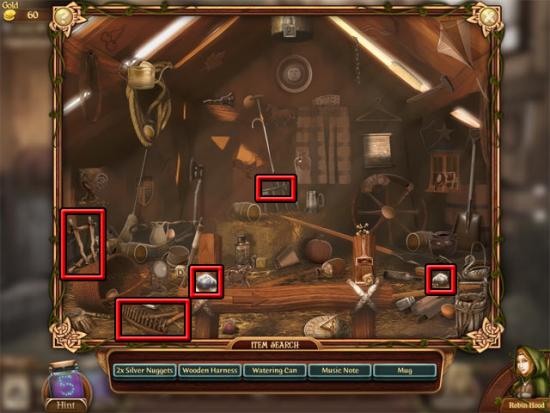
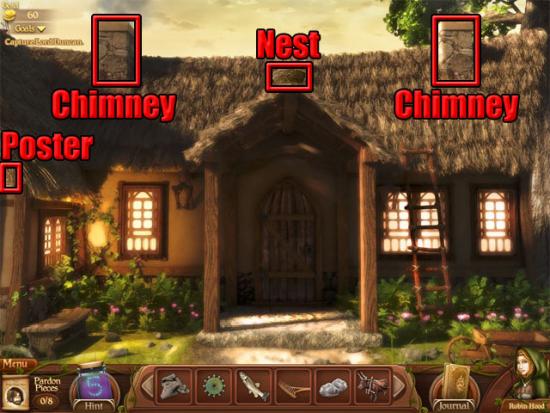
Find the remaining objects on the list and the harness, key, rake and two pieces of silver will be added to the inventory. Take the ladder. Use the key on the lock on the gate to open it. Use the harness on the ox and then select the ox to add it to the inventory. Exit the barn. Move forward to Lord Duncan’s house. Use the ladder on the roof. Shoot an arrow at the nest and take the ten gold pieces. Take the wanted poster and then use a cloth on each chimney:
Select Lord Duncan to talk to him. Return to the town market and examine the blacksmith. Use the silver on the oven, use the tongs on the silver and then use the silver on the anvil:

Take the rod from the anvil. Return to the fields and use the ox on the plough to reveal the chest. Examine the chest and use the two rods on it. Slide the rods to the following positions:
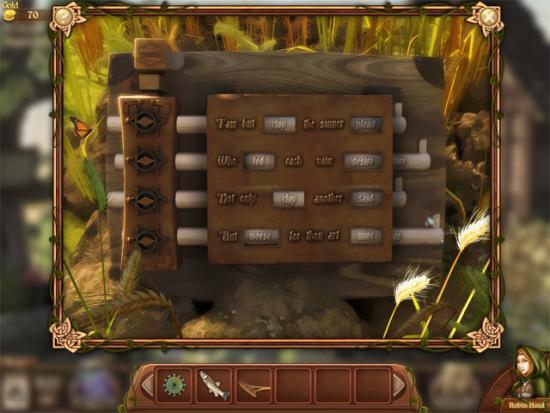
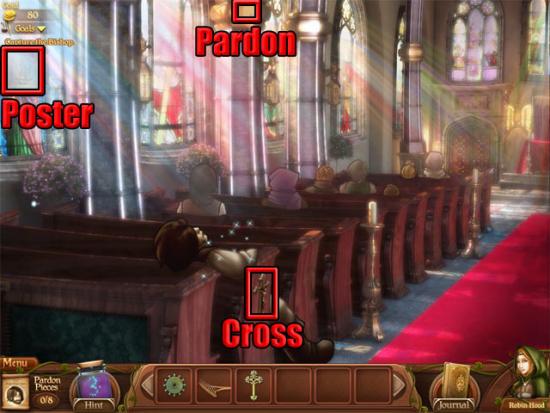
Take the cross and the baker’s gold from the chest. Return to the town center and give the baker’s gold to the baker. Select Father Peter outside the church and use the persuade ability on him. Agree to help fight the wrong-doing and the church door will open. Enter the church. Select the cross and take the ten gold pieces. Take the poster and Little John’s pardon:
Examine the sleeping man to enter a hidden object scene. Find the following objects:
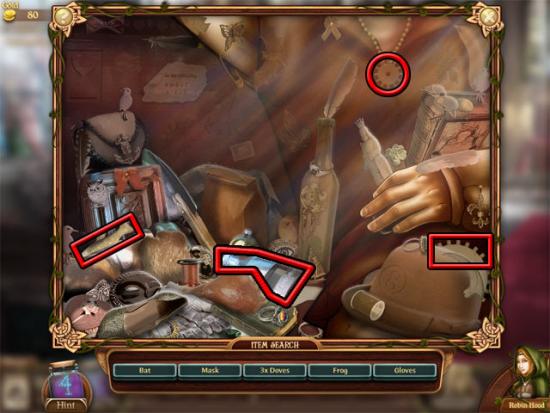
Find the remaining objects on the list and the empty flask, fish, small gear and large gear will be added to the inventory. Move toward to the church altar. The following hotspots are available:
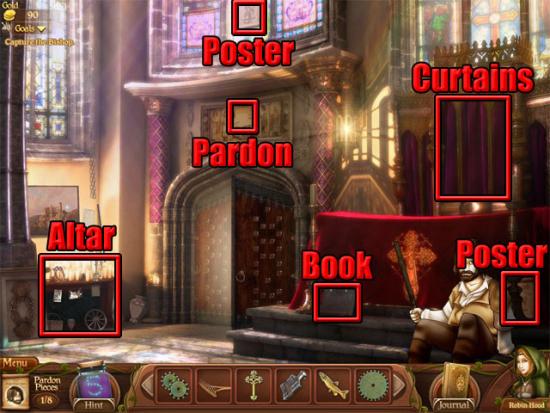
Take the two posters and the pardon. Move the book and take the ten gold pieces. Select the altar to enter a hidden object scene. Find the following objects:
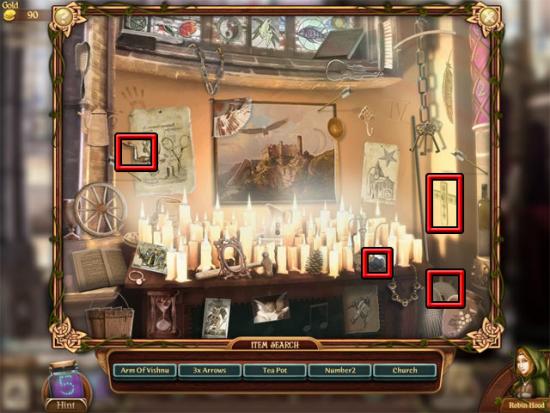
Find the remaining objects on the list and the cross, arms of Vishnu, small gear and ore will be added to the inventory. Select the curtains to play the colored discs mini-game. Rotate the discs to create the pattern shown below:
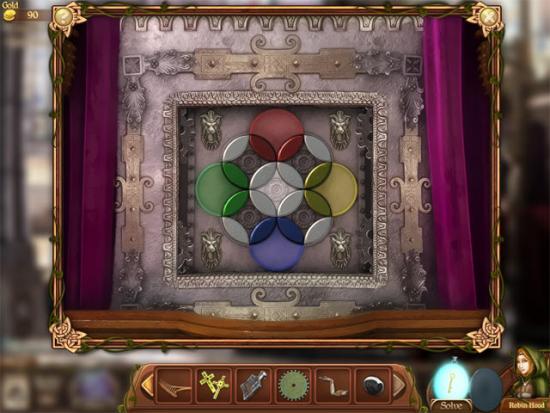
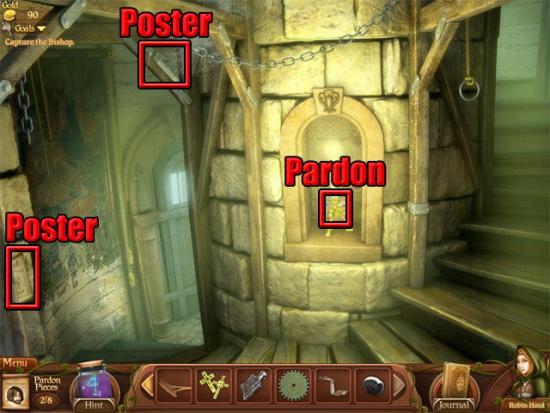
Take the cross after the mini-game has been completed. Enter the church staircase. Take the two wanted posters and Little John’s pardon:
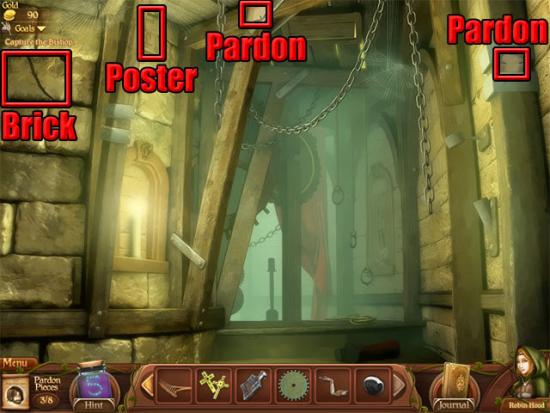
Return to the town market and examine the fish trader. Use both fish on the left scale to take the knife. Return to the church staircase and select the tapestry on the left wall to reveal a brick. Examine the brick and then in the close-up view use the knife on the brick to remove it. Take the cross to unlock the fire arrow ability. Go upstairs to the bell tower hatch. Take the wanted poster and the two pieces of Little John’s pardon. Select the brick and take the ten gold pieces:
Move back to the church staircase. Examine the door at the bottom of the stairs and use the four crosses on the slots. Select each cross in any order and the door will open. Enter the church basement. Take the two pieces of Little John’s pardon and the two wanted posters. Shoot an arrow at the light and take the ten gold pieces that fall out:
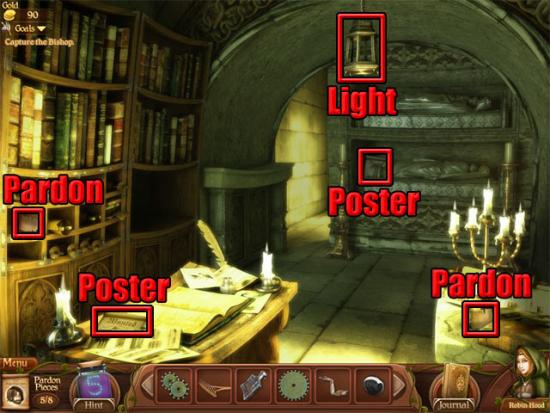
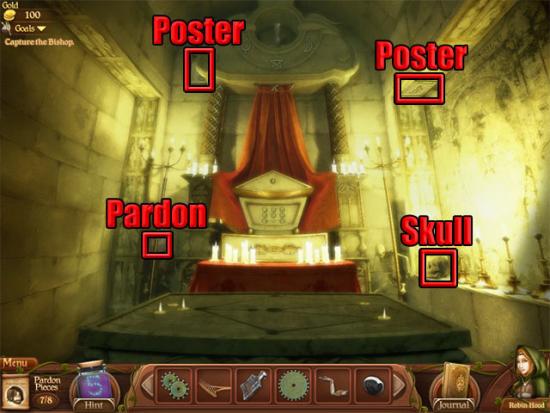
Move forward to the basement altar and take the last piece of Little John’s pardon and the two wanted posters. Select the skull and take the ten gold pieces:
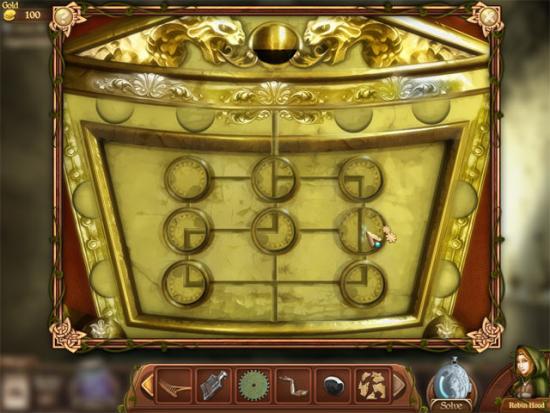
Examine the symbols at the top of the altar. Examine the altar to play a mini-game where the aim is to arrange the discs so that the path has no dead ends:
Flammable oil will start pouring down from the top of the altar. Use the empty flask on the oil. Examine the altar to enter a hidden object scene. Find the following objects:
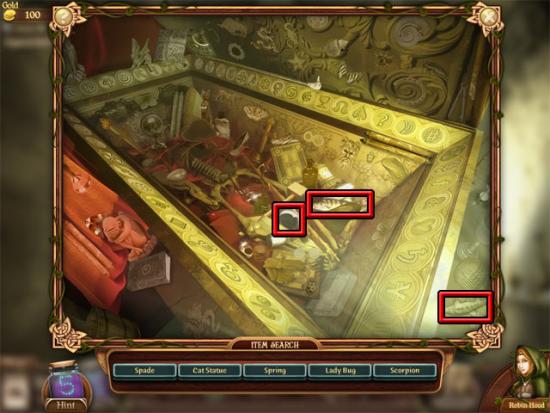
Find the remaining objects on the list and the two fish and the ore will be added to the inventory. Return to the church altar and give the Little John pardon to Little John. The strength ability will now become available.
Return to the town market and talk to the concerned lady. Agree to help her stop the illegal smuggling. Examine the fish trader and trade the two fish for the net. Examine the blacksmith. Use the ore on the oven, the tongs on the silver and the silver on the anvil to make the shovel. Take the shovel. Return to the town center.
If you feel like playing the archery competition at this point, examine the billboard, examine the poster and then select Enter Now. The competitions are optional mini-games and as such do not have to be completed. The aim in the archery competition is to hit as many bullseyes as possible, with a bonus given if all ten bullseyes are hit. The prize money in this first tournament is 100 gold pieces for first prize, with an additional 100 gold pieces if all ten bullseyes are hit. Select Accept Results when you are happy with the final score.
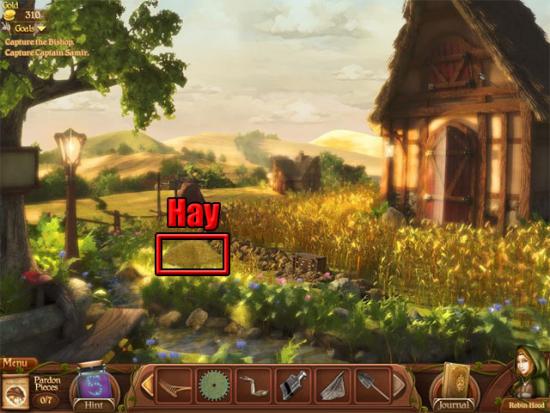
Return to the fields and use the fire arrow on the hay to take the ten gold pieces:
Enter the barn and use the strength ability on the anvil:
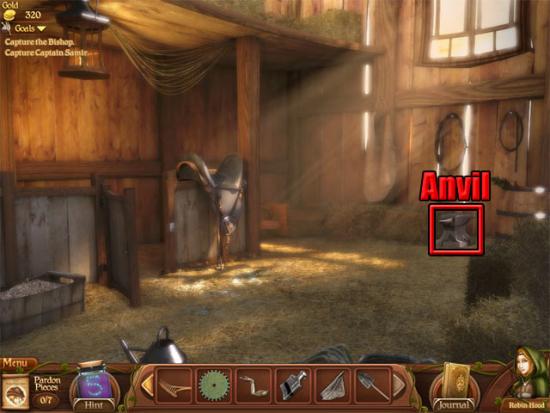
Take the ten gold pieces. Return to the town market and then move forward to the road to the docks. The following hotspots are available:
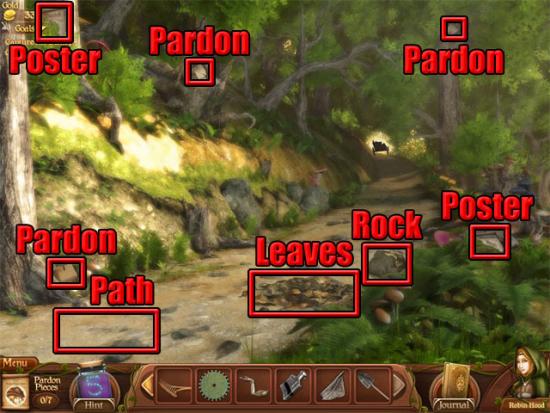
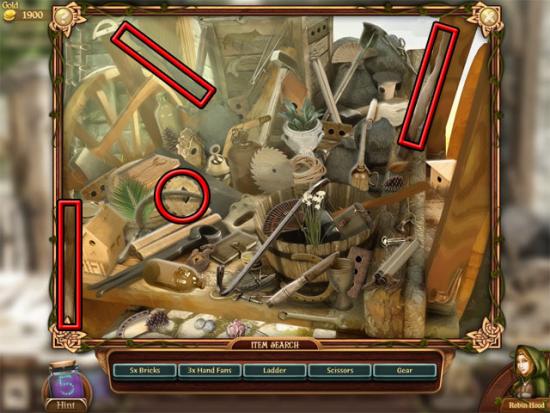
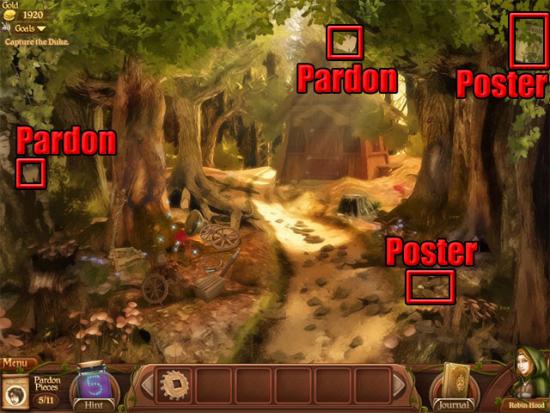
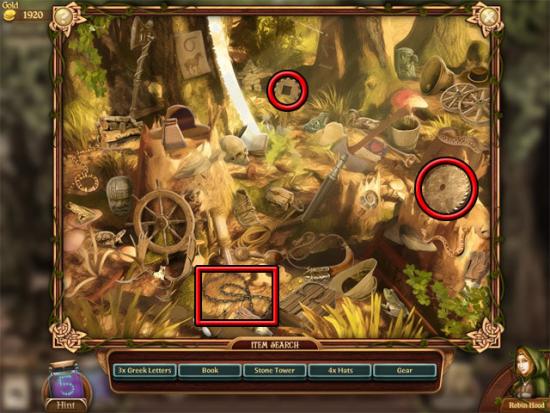
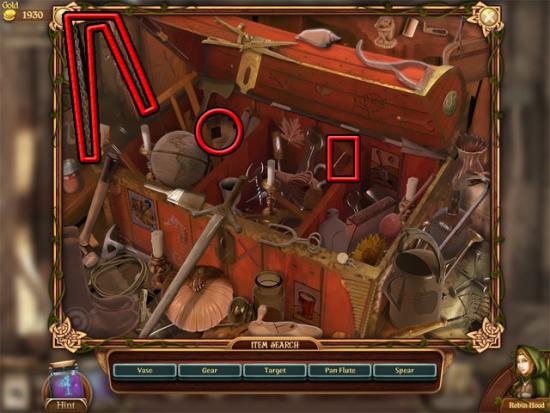
Take the three pieces of Alan-a-Dale’s pardon and the two wanted posters. Move the rock and take the ten gold pieces. Use the shovel on the path at the left side of the area. Use the net on the hole and then use the rake on the leaves to complete the trap. Examine the cart to enter a hidden object scene. Find the following objects:
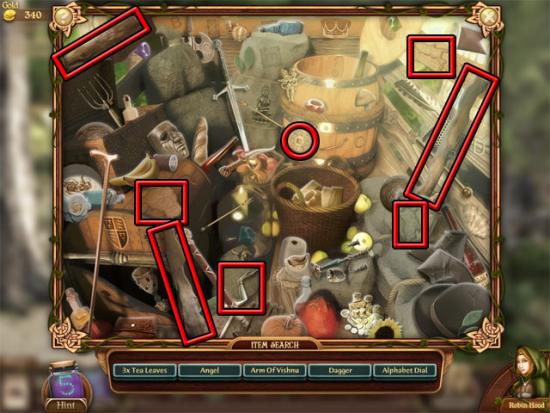
Find the remaining objects and the three planks, three countries, alphabet dials and the arm of Vishnu will be added to the inventory. Move forward to the docks. Take the two pieces of pardon and the two wanted posters. Use the strength ability on the barrel and take the ten gold pieces:
Return to the church bell tower hatch. Use the flask with oil on the hatch and then shoot a fire arrow at it to open the hatch. Move up to the bell tower. Take the two pardons and the wanted poster:
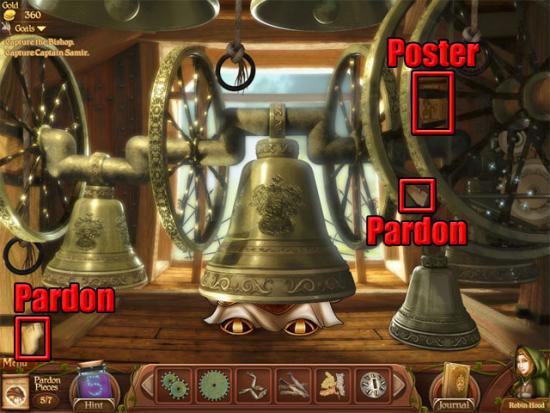
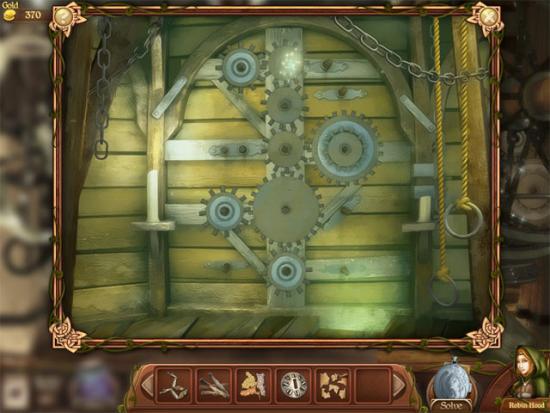
Use the strength ability on the right bell and take the ten gold pieces. Examine sparkling area and use the gears on the pegs so that all of the gears spin:
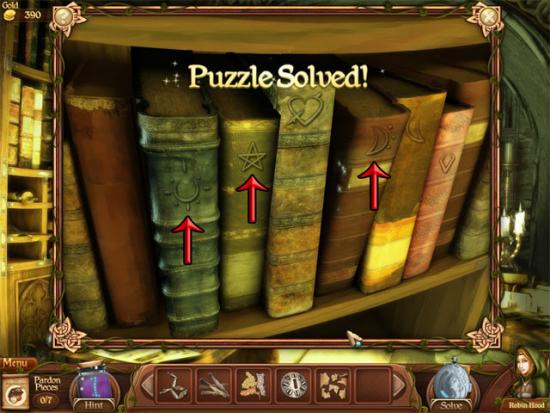
Pull the ring above the middle bell and select the bishop to receive the book. Return to the basement and examine the bottom-right bookshelf. Use the book on the shelf and then select the correct books to move forward:
Take the priest’s gold from the shelves. Return to the town center and give the priest’s gold to the priest. Two more archery competitions are available on the billboard at this point. The amateur competition and the free-for-all. Complete the amateur competition and the pro competition will become available. The free-for-all competition can be played at any time for extra money. When you are ready to continue, return to the docks and talk to Alan-a-Dale. Give the pardon to Alan-a-Dale and the music ability will become available.
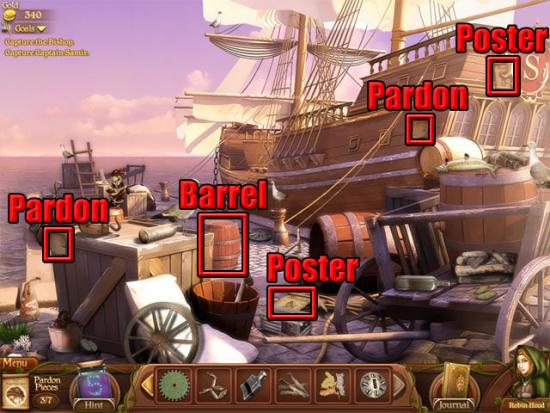
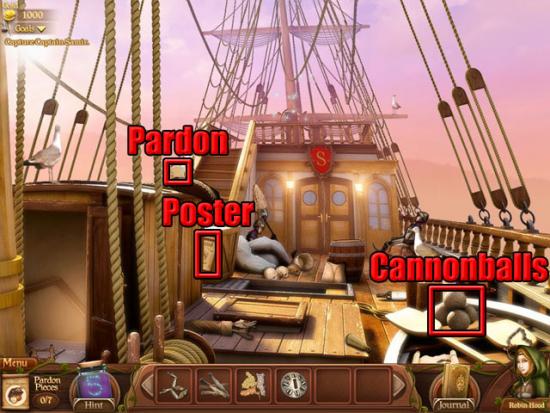
Move forward to the ship’s deck and use the music ability on the guards to put them to sleep. Take the wanted poster and the pardon. Use the strength ability on the cannonballs and take the ten gold pieces:
Examine the area at the top of the stairs to enter a hidden object scene. Find the following objects:
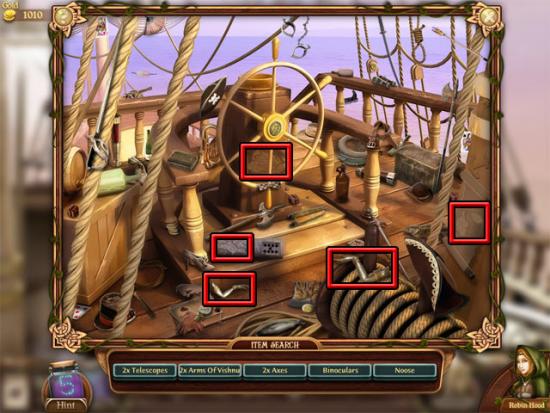
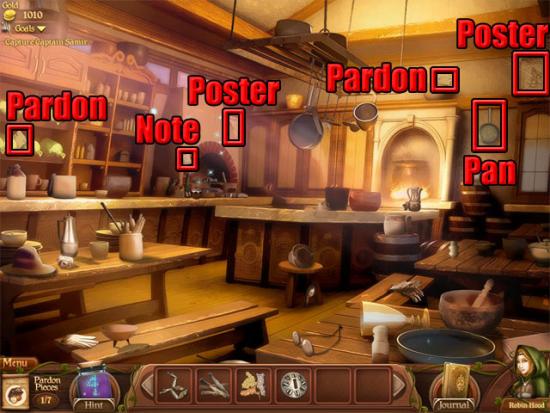
Find the remaining objects on the list and the three countries and the two arms of Vishnu will be added to the inventory. Enter the ship’s galley. Take the two pardons and the two posters. Select the note at the left side of the fireplace to update the journal. Move the frying pan and take the ten gold pieces:
Examine the fireplace to enter a hidden object scene. Find the following objects:
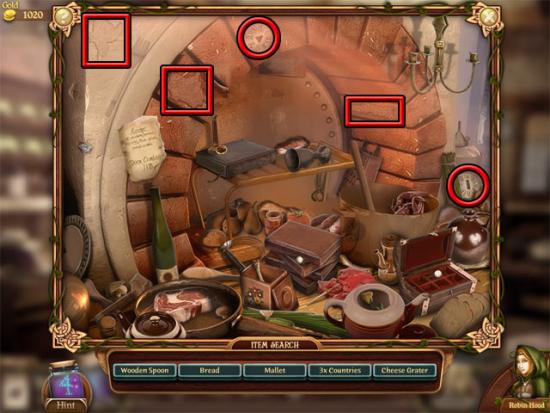
Find the remaining objects on the list and the three countries and the two alphabet dials will be added to the inventory. Move back to the ship’s deck. Examine the door and use the three alphabet dials on the lock. Move the dials to the positions shown below and then pull the lever to complete the mini-game:

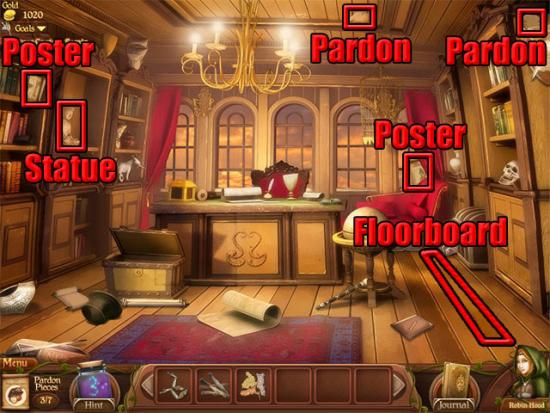
Move forward to the captain’s quarters. Take the two wanted posters and the two pardons. Use the strength ability on the floorboard and take the ten gold pieces. Examine the statue on the shelf:
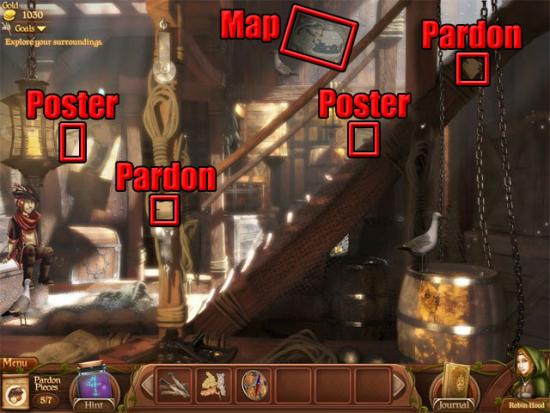
Use the four arms on the statue and then move all of the arms in any order to see the captain. Talk to the captain to receive the compass. Return to the ship’s deck and move down to enter the cargo hold. Take the two pardons and the two posters. Use the fire arrow on the map on the wall and take the ten gold pieces:
Talk to Will Scarlett and then give him the pardon to receive the sneak ability. The stealth ability will now become available.
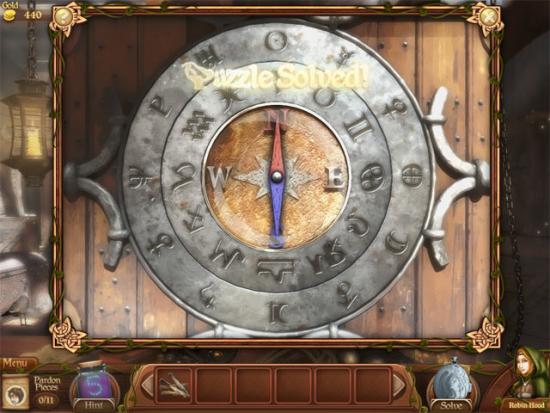
Examine the chest and use the compass on the middle of the lock. Move the dials so that the compass faces north:
Examine the chest to enter a hidden object scene. Find the following objects:
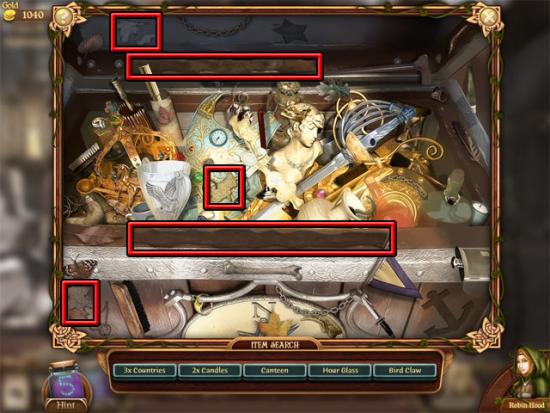
Find the remaining objects on the list and the three countries and two planks will be added to the inventory. Return to the captain’s quarters and examine the globe. Use the twelve countries on the globe and they will be placed around the edges of the window. Put the 12 countries in the correct places on the globe:

Take the vendor’s gold from the globe. Return to the town market and give the vendor’s gold to Mrs. Goods. Move back to the town center, where the archer’s cup can now be played by examining the billboard. Complete this and the Royal Cup will become available. When you are ready to move on, talk to Mrs. Marley at the right side of the billboard and agree to help her. Enter the Marley house. Take the pardon and the poster. Select the barrel and take the poster. Shoot a fire arrow at the weeds and take the ten gold pieces:
Examine the cart and find the following objects:
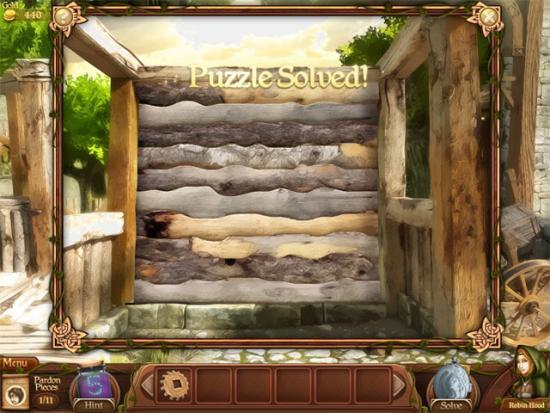
Find the remaining objects on the list and the gear and three planks will be added to the inventory. Examine the shed and use the eight planks on it. Put the planks on the wall in the correct order:
Move forward to the sawmill road. Take the poster and the two pardons. Move the leaves and take the poster. Use the strength ability on the rock and take the ten gold pieces:
Use the strength ability on the tree and Little John will climb it. Use the sneak ability on the bush and Will Scarlett will sneak behind it. While Little John is talking to the peddler, use the sneak ability on the peddler to take the pike. Move forward to the sawmill. Take the two pardons and the two posters:
Examine the water wheel and use the pike on the log to make the waterwheel start spinning. Use the strength ability on the log in the river and take the ten gold pieces. Move forward to the logging road. Take the poster and the two pardons. Select the leaves and take the poster:
Examine the sparkling area to enter a hidden object scene. Find the following objects:
Find the remaining objects on the list and the gear, chain and dull saw will be added to the inventory. Enter the logging shed and take the two posters and the pardon. Use the strength ability on the log and take the ten gold pieces:
Open the chest and then examine the chest to enter a hidden object scene. Find the following objects:
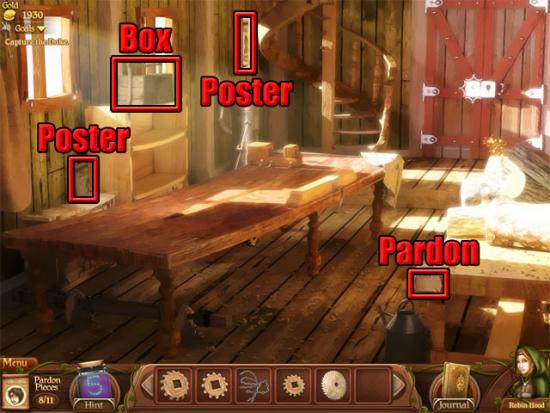
Find the remaining objects on the list and the crank, chain and gear will be added to the inventory. Examine the grinding wheel. In the close-up view, use the crank on the left wheel to start spinning the saw. Use the dull saw on the grinding wheel to make the sharp saw. Move back twice to the sawmill and go through the doorway to enter the sawmill floor. Take the two posters and the pardon. Open the box and take the ten gold pieces:
Examine the door to play the sliding block mini-game. Follow the instructions below the image to complete the mini-game:
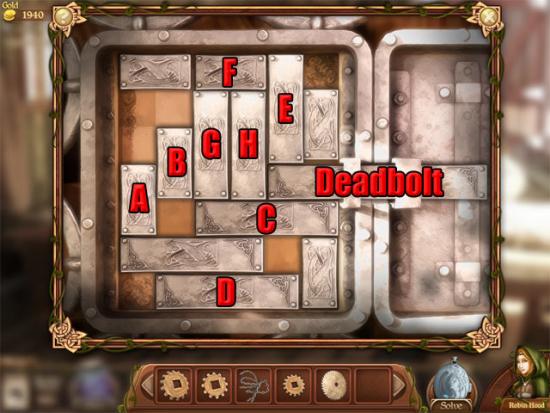
A: Up 2
B: Up 1
C: Left 2
D: Left 1
Deadbolt: Right 1
E: Down 4
F: Right 2
G: Up 1
H: Up 1
Deadbolt: Left 5
Move forward to the logging lake and take the two posters and the pardon. Shoot fire arrows at the six logs around the perimeter of the lake to trap the duke:
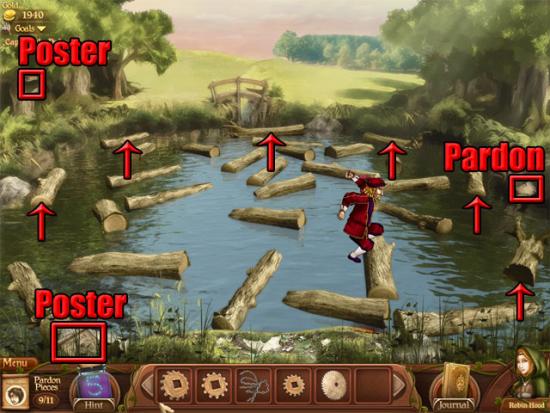
Talk to the duke to receive the log. Move back to the sawmill floor and examine the table. Use the gears, chains and sharp saw on the table to complete the table saw. Use the log on the saw and then take the five pieces of wood. Examine the stairs and use the five pieces of wood on the slots to repair the stairs. Climb up to the sawmill tower. Shoot an arrow at the painting and take the ten gold pieces. Take the poster and the final pardon:
Examine the cabinet and flip the switches so that they all fit into the grooves. One way of completing this mini-game is shown below:
Take the wife’s gold. Return to the town center and give the wife’s gold to Mrs. Marley. The final archery competition can now be accessed from the billboard, with a first place prize of 500 gold pieces. Talk to Maid Marion at the left side of the area and she will be added to the group. The charm ability will now become available. Move forward to the castle drawbridge. Take the two posters. Move the stone and take the ten gold pieces:
[robin_61]
Select the guards and use the charm ability to lower the drawbridge. Shoot a fire arrow at the cart and the guards will run away. Move forward to the castle courtyard. Take the wanted poster. Move the grass and take the wanted poster that is revealed. Shoot a fire arrow at the second flag from the left and take the ten gold pieces:
[robin_62]
Examine the fountain to enter a hidden object scene. Find the golden disc:
[robin_63]
Find the remaining objects on the list and the golden discs will be added to the inventory. Go through the left door to enter the castle jail. Take the two posters. Move the shield and take the ten gold pieces:
[robin_64]
Use the music ability, the sneak ability and then the strength ability on the sheriff. Examine the key panel and remove the keys based on the sheriff’s instructions until the correct key is found. Use the key on the cell door to rescue Thomas Hood.
Exit the jail and enter the castle entrance hall. Take the two posters. Shoot an arrow at the vase and take the golden disc. Shoot a fire arrow at the picture above the door and take the golden disc.
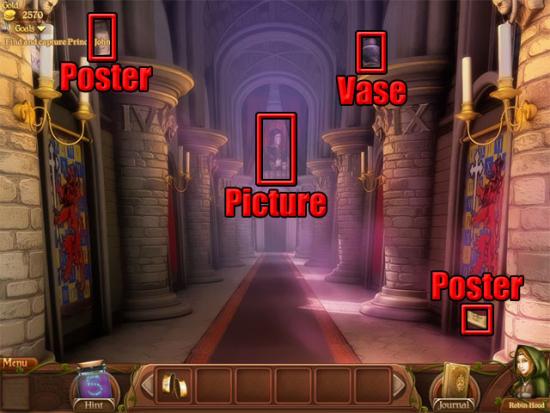
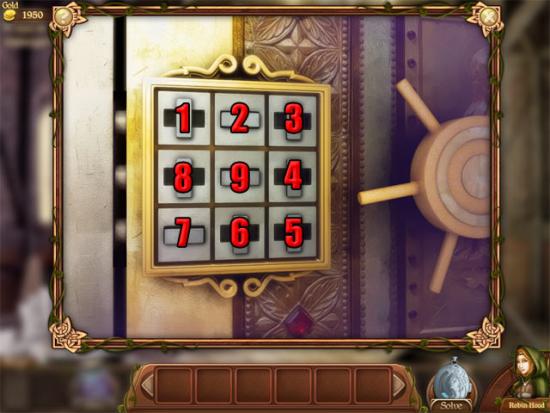
Examine either tapestry and select the correct buttons to complete the puzzle:
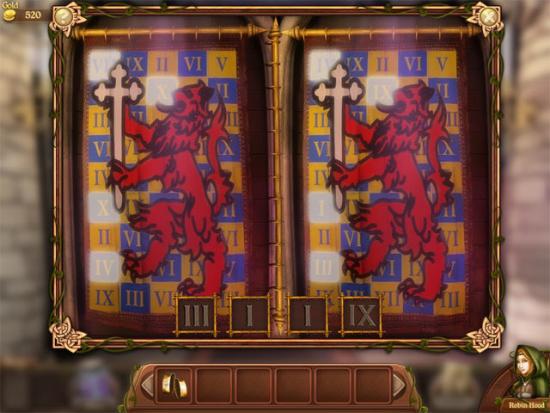
The aim now is to select the same numbers on the pillar that were shown on the tapestry. Select the numbers in the following order:
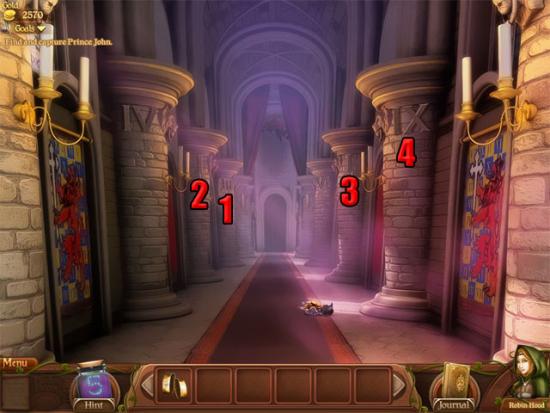
Move forward to the throne room and take the two posters. Shoot an arrow at the light and take the ten gold pieces:

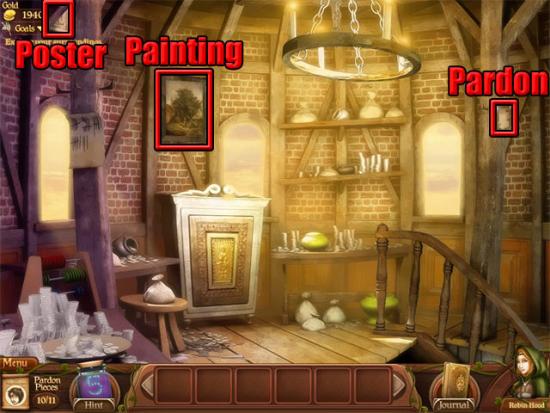
Go through the right door to enter the castle hall. Take the two posters. Use the strength ability on the plant pot and take the ten gold pieces. Use the fire arrow ability on the candle and take the ten gold pieces:
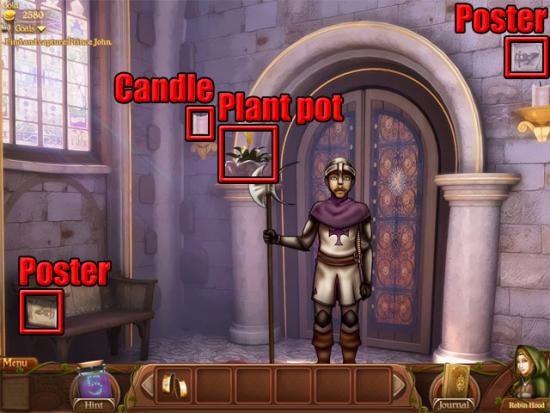
Use the charm ability on the guard and he will leave. Enter the king’s bedroom. Take the two posters. Move the cushion and take the ten gold pieces. Shoot a fire arrow at the painting and take the ten gold pieces. Examine the crest to see that the crest is a key and a lion:
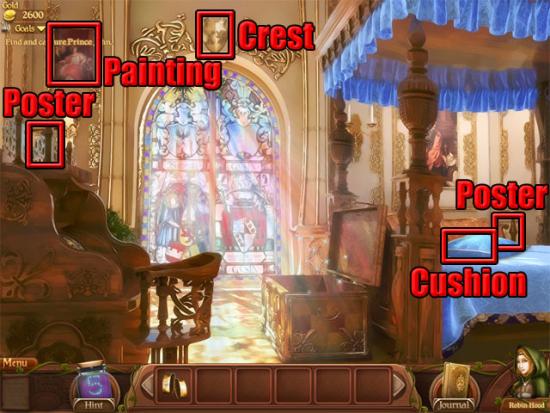
Examine the chest to enter a hidden object scene. Find the golden disc:
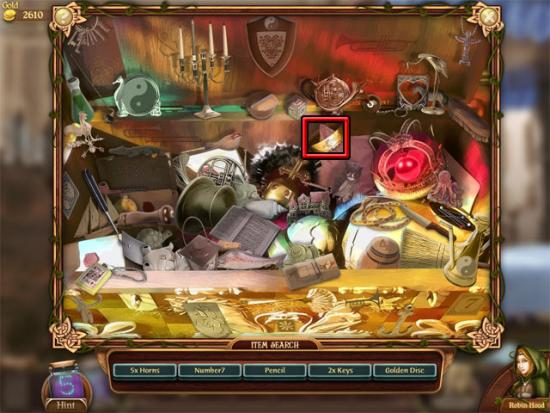
Find the remaining objects on the list and the golden disc will be added to the inventory. Examine the desk and use the four golden discs on it. Rotate the discs to the positions shown below:
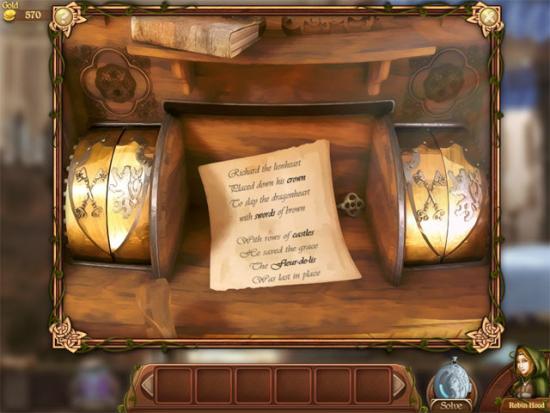
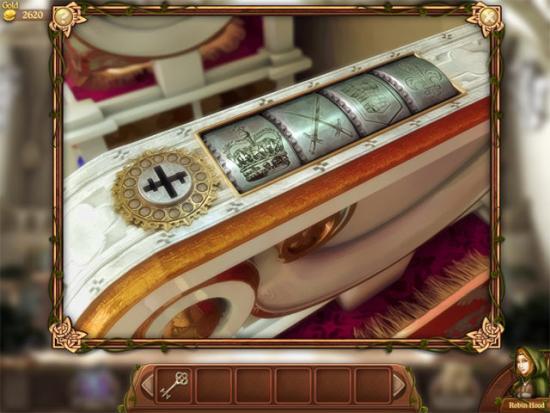
Take the throne key from the desk and a note will be added to the journal. Return to the throne room and examine the throne at the top of the stairs. Move the dials to the following positions:
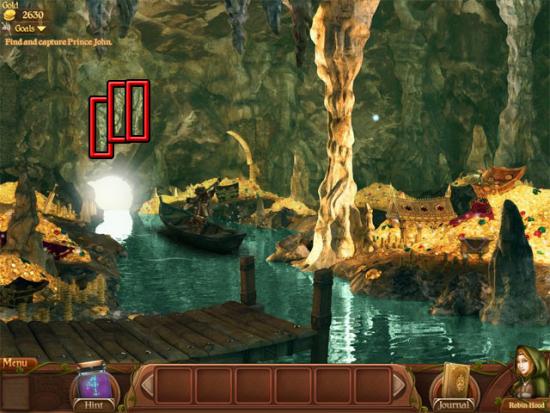
Use the throne key in the keyhole and then select the key to open the door to the treasure cave. Move forward to the treasure cave. Shoot arrows at the hanging rocks above the exit to capture Prince John and complete the game: