- Wondering how to get Monopoly GO! free rolls? Well, you’ve come to the right place. In this guide, we provide you with a bunch of tips and tricks to get some free rolls for the hit new mobile game. We’ll …
Best Roblox Horror Games to Play Right Now – Updated Weekly
By Adele Wilson
Our Best Roblox Horror Games guide features the scariest and most creative experiences to play right now on the platform!The BEST Roblox Games of The Week – Games You Need To Play!
By Sho Roberts
Our feature shares our pick for the Best Roblox Games of the week! With our feature, we guarantee you'll find something new to play!Anime Fantasy Codes – Free Gems and Tokens
By Adele Wilson
Our Anime Fantasy Codes guide has a list of codes that offer up a variety of rewards, such as gems, tokens, and lots more!
Robin Hood Walkthrough
Welcome to the Robin Hood walkthrough on Gamezebo. Robin Hood is a hidden object Game played on the PC created by Daedalic Entertainment and Prime Games. This walkthrough includes tips and tricks, helpful hints, and a strategy guide on how to complete Robin Hood.
Robin Hood – Game Introduction
Welcome to the Robin Hood walkthrough on Gamezebo. Robin Hood is a hidden object Game played on the PC created by Daedalic Entertainment and Prime Games. This walkthrough includes tips and tricks, helpful hints, and a strategy guide on how to complete Robin Hood.
General Description and Navigation
This is a hidden object game that requires visiting several locations, using inventory items to advance play and solving mini games related to a scene.
- There is no timer and no score is kept.
- Rewards in the form of gold and jewels are available for solving mini games. No tally of how much is accumulated is kept, however. It is given away to the poor during the game.
Beginning Play:
- Profiles – Create new, edit existing, or delete player profiles. Change profiles by clicking the listed profile and the “OK” button. The highlighted profile with a leaf next to it is the current profile.
- Options – Change music volume and sound effects or mute them entirely. You may also select or deselect full screen play.
Navigation:

- Menu – Resume paused play, change play options or exit to main menu.
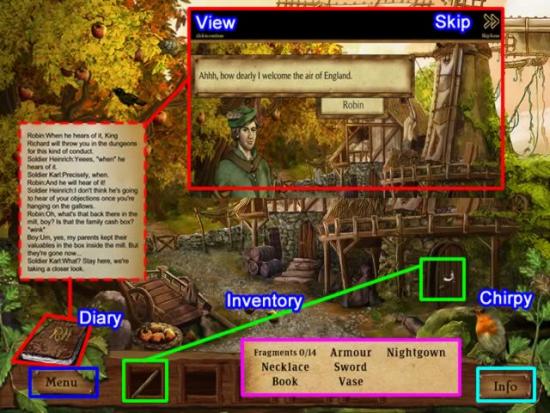
- Diary – All scenes contain conversations between characters. Click to view the back and forth chat between the characters or click the double arrows to skip. The diary is a transcript of each conversation. Previous conversations can also be reviewed.
- Inventory – Items collected from a scene needing to be utilized are stored in inventory. Click the item and drag it to the circling arrow on the screen location.
- Item list – Objects hidden in a scene are listed. Each object is crossed off as it is collected.
- Info – Click to see the goal for the scene.
- Help – The small bird, Chirpy, can be clicked to help locate items in a scene. He falls asleep when used but is rested quickly to help again.
Walkthrough
Hidden object items may differ from this guide’s screenshots and your list. Only inventory items are highlighted in a scene.
A brief conversation between Robin and Marion sets the background for game play. If you would prefer to read the entire conversation at once, click the double arrows to skip the scene then open the Diary for a transcript..
Chapter 1: Back in England
Chirpy will provide a tutorial prior to play beginning.
Find the items listed in the scene.
Game: Restore the Crest.
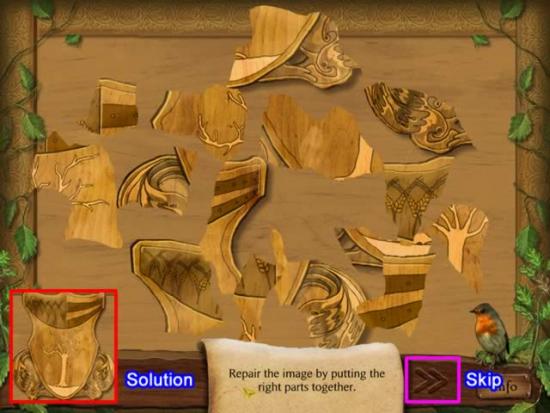
This is a jig-saw type puzzle.
- Work from the outside in and match the patterns.
- Pieces will snap together when they are correctly aligned.
- The solution is shown in the inset in the above screenshot.
This puzzle may be skipped by clicking the double arrows. Loot for correctly solving the puzzle will be forfeited if skipped.
Game: Spot the Differences.
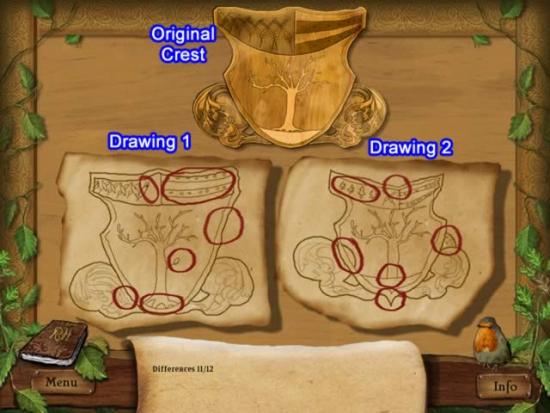
- Compare each drawing to the original crest.
- Click the differences.
- This puzzle cannot be skipped.
Game: Find the Heraldic Symbol.
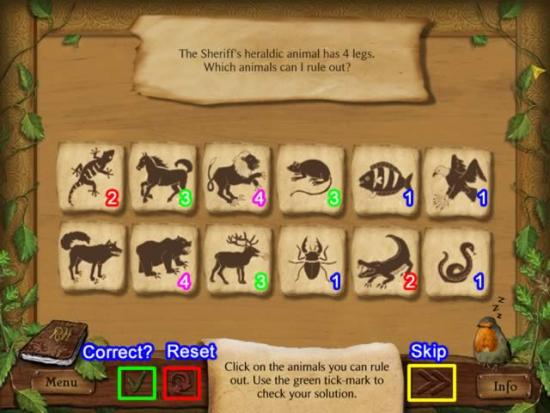
Use the clues to eliminate the incorrect heraldic symbols.
- Click the symbols that match the clue.
- Click the green tick-mark to see if you are correct.
- The message “Something’s wrong..” will appear if any of your selections are incorrect. You will not be told which are correct.
- If you make a mistake or want to change your answer, click the red reset arrows to start over.
- Correctly identifying the symbols for a clue provides another clue. The process repeats itself until all possible symbols have been eliminated.
SOLUTION:
Clue 1: It has four legs.
- Click the fish, eagle, spider and snake.
- Click the green checkmark to eliminate them.
Clue 2: It’s not a reptile.
- Click the newt and crocodile.
- Click the green tick-mark to eliminate them.
Clue 3: It’s not a hunter.
- Click the horse, rat and elk.
- Click the green tick-mark to eliminate them.
Clue 4: It has a long tail and is not a predatory cat.
- Click the lion and bear.
- Click the green tick-mark to eliminate them.
Result: the heraldic symbol is the wolf.
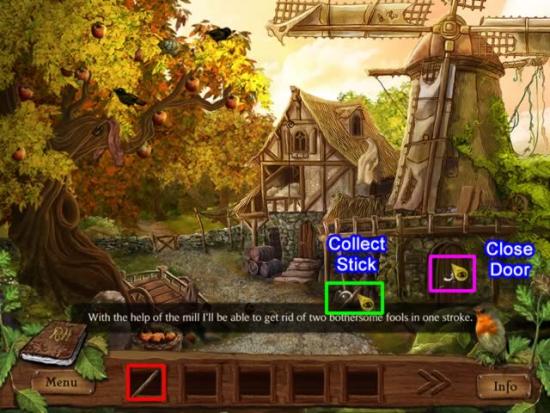
At the mill scene, a clue appears indicating a way is needed to lock the two soldiers inside the mill.
- Mouse over the stick. The cursor turns into an eye and a swirl glows around the stick.
- Click to place the stick in inventory.
- The door to the mill now has the glowing swirl. Mouse over the door. The cursor turn into an eye.
- Click to close the door.
- Click the stick in inventory, then click the door to bar it.
Game: Get to Nottingham.
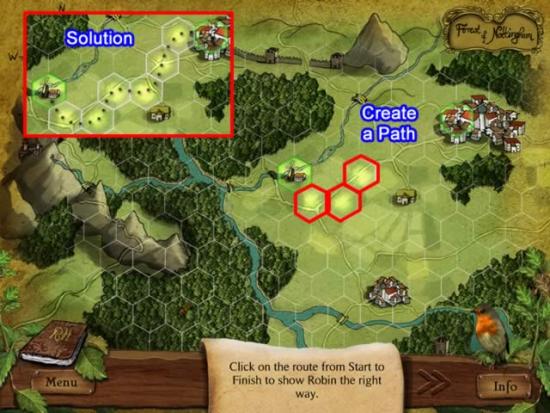
Beginning at the mill, click the polygon sequence that will lead to Nottingham.
- Place the cursor on a polygon. The cursor turns into an eye.
- Click correctly and the polygon lights up.
- Click incorrectly and your progress disappears and you must try again.
The solution is shown in the inset above.
Game: Number of Sheep.
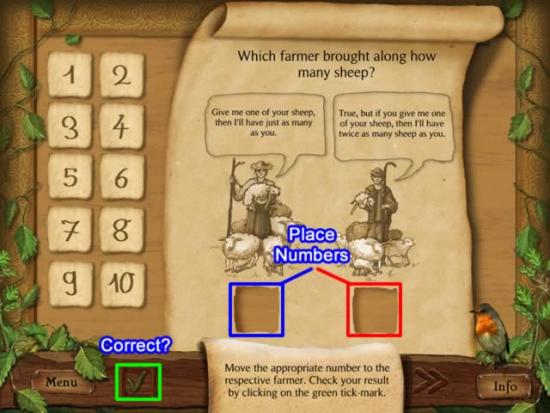
Drag two numbers from the column and place one in each empty square. Click the tick-mark to see if your answer is correct.
The first shepherd provides the clue: “Give me one of your sheep, then I’ll have just as many as you.”
- The only way this could be true is if the second shepherd has two more sheep than the first shepherd.
The second shepherd provides the clue: “…if you give me one of your sheep then I’ll have twice as many sheep as you”.
- Only if both shepherds have an even number of sheep after giving a sheep to shepherd two, will this be true.
SOLUTION:
- The initial number of sheep each shepherd has must be an odd number.
- Shepherd two must have two more sheep initially than shepherd one.
Possible combinations:
- 1 and 3. After giving 1 sheep from shepherd two to shepherd one, both now have 2 sheep. Clue 1 is correct. Clue two fails, however, because by giving his only sheep to shepherd two, shepherd one has 0 and shepherd two has 4.
- 3 and 5. The first clue works, but the second fails as shepherd one ends up with 2 sheep and shepherd two has 6. Two is not half of six.
- 5 and 7 is the only possible combination for both clues to be true. Both would have 6 sheep if shepherd two gave one of his sheep to shepherd one. If shepherd one gave one of this sheep to shepherd two, shepherd one would have 4 and shepherd two would have 8. Four is half of eight.
Drag the number 5 to the box for the first shepherd and 7 to the box for the second shepherd.
Click the green tick-mark to complete the game.
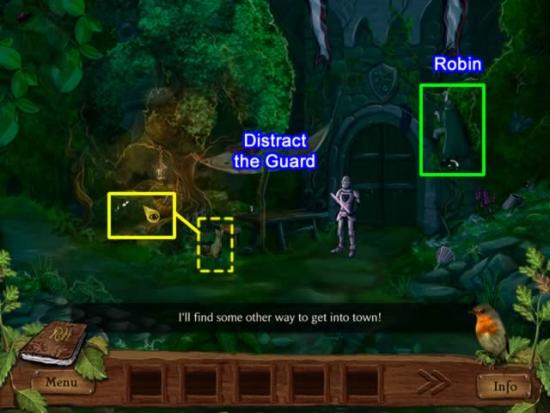
To allow Robin to gain entrance into Nottingham, the guard must be distracted.
- Place the cursor over the bush with the glowing circle. The cursor turns into an eye.
- Click. A cute woodland creature comes out of the bush and poses in front of the guard.
- While the guard is looking away, click on the swirling circle on the wall to the right of the gate.
- Click. Robin appears and climbs the wall.
Game: Slider Puzzle.
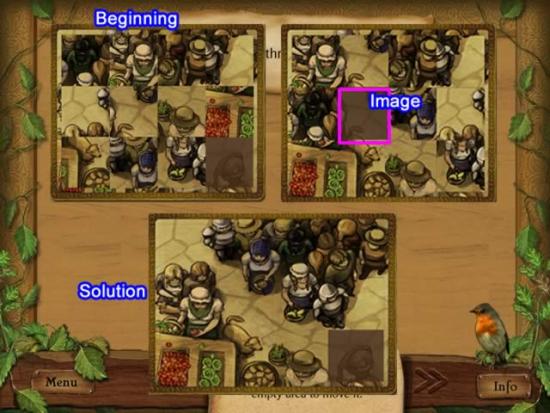
Use the empty square to help rearrange tile pieces.
Slide a tile to reveal the image of the tile that should be in that space.
Work row-by-row and exchange tiles so the finished puzzle resembles the solution shown above.
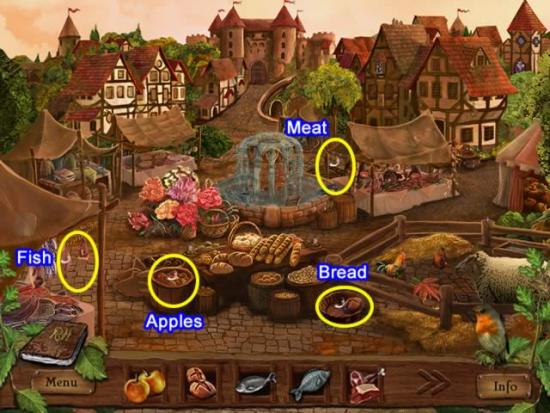
Collect the items listed for inventory.
- Place the inventory items as shown above.
Proceed to the gate area and collect the marbles and marble bag.
Collect the wood from the stream area.
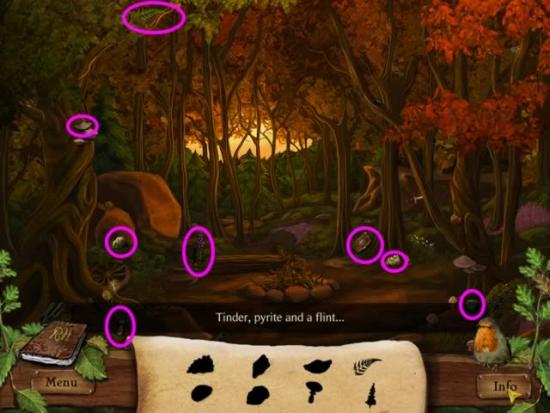
Locate the tinder, pyrite and flint in the above scene based on the silhouettes.
Game: Find the Flint.
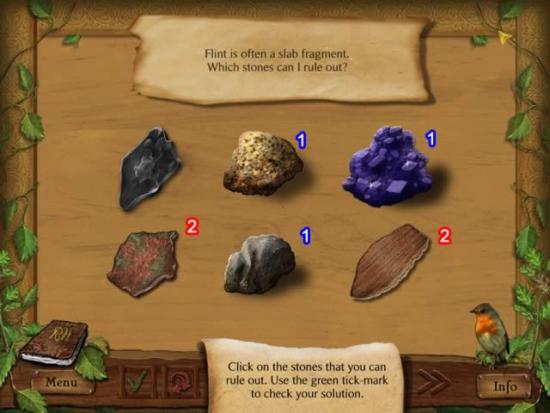
Use the clues to eliminate the incorrect rocks.
- Click the rocks that match the clue.
- Click the green tick-mark to see if you are correct.
- The message “Something’s wrong..” will appear if any of your selections are incorrect. You will not be told which are correct.
- If you make a mistake or want to change your answer, click the red reset circle to start over.
- Correctly eliminating the rocks based on a clue provides another clue. The process repeats itself until all possible rocks have been eliminated.
SOLUTION:
Clue 1: It is often a slab fragment.
- Eliminate the three rocks with a number 1 beside them.
Clue 2: Flint is black.
- Eliminate the two rocks with a number 2 beside them.
Game: Find the Pyrite.
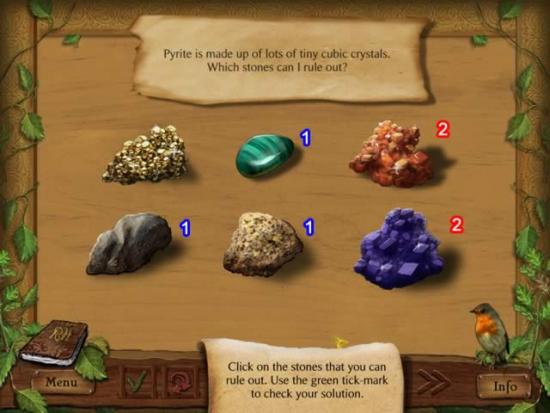
Use the same process of elimination as above to find the pyrite.
SOLUTION:
Clue 1: It is made up of lots of tiny cubic crystals.
- Eliminate the three rocks with a number 1 beside them.
Clue 2: It is also called “fool’s gold”.
- Eliminate the two rocks with a number 2 beside them.
Game: Solve the Image.
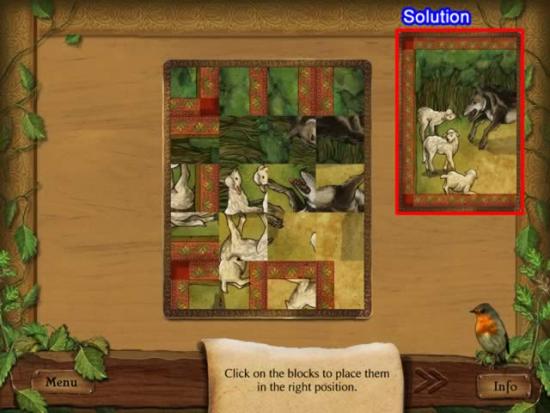
Click each tile to rotate it into the correct position.
- Rotate the outside border pieces first.
- Work inward from there, matching pattern to pattern.
The solution is shown in the inset above.
Game: Finish the Image.
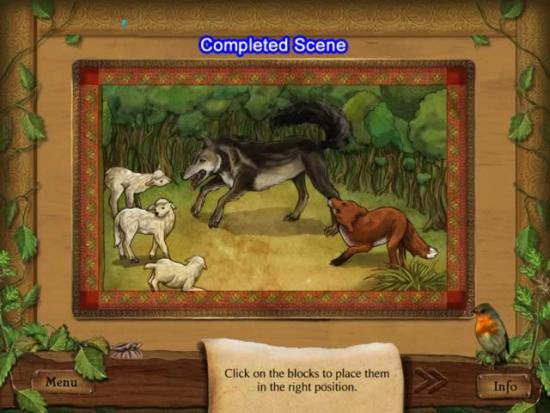
Use the same method described above to complete the picture.
The solution is shown above.
Game: Place the Camp.
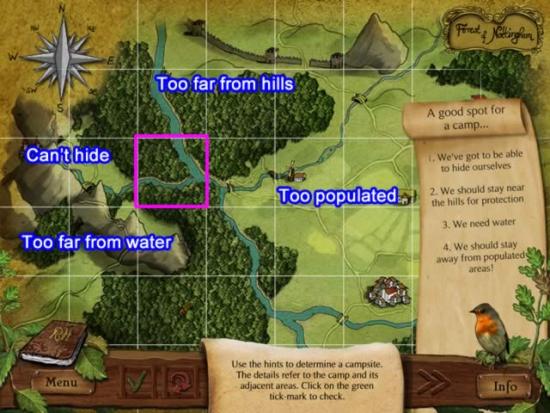
Use the specifications to determine the best place for Robin and his men to set up camp.
- Click a square to select it as a possible site.
- Click the green tick-mark to see if this is a good location. If it isn’t a good location you won’t be told why, just refer to the specifications again and it may be apparent.
- Some of the reasons for not selecting an area are show above. The highlighted pink square is the best place.
Once selected, the scene will switch to the campsite. Locate the objects indicated.
Chapter 2: A Rebel and his Men
Game: Find Followers.
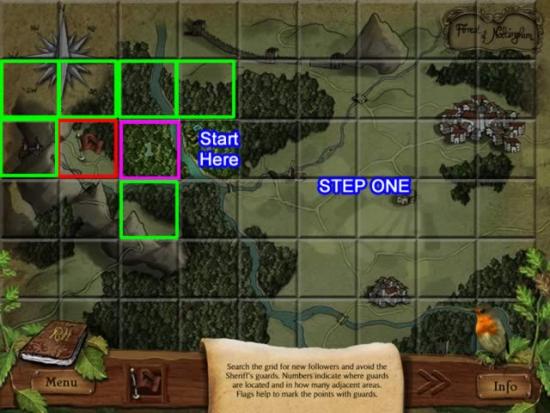
Recruit followers without encountering the sheriff’s men.
- Begin at the established camp location. You know there are followers and no sheriff’s men there.
- Click the square. A number one appears indicating the sheriff’s men border this location on one side.
- Click the square to the left. A message appears saying you’ve run into the sheriff’s men. Click a red flag from the menu bar and click this square.
- Click the squares closest to the first square with the number one in it. Since you have now found the only square that can contain a flag, there can be no other flags around it (highlighted in green in the above screenshot).
- Continue clicking squares around the initial flag.
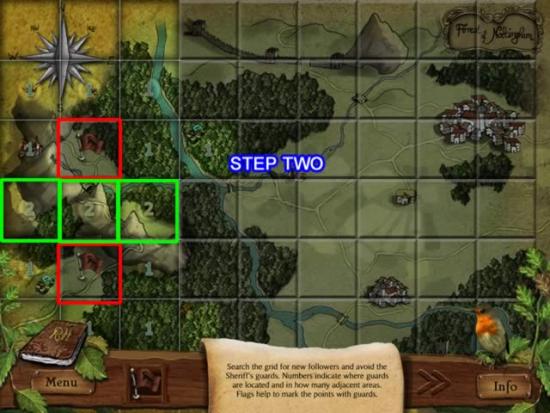
- The number two means there are two flags at any one corner.
- Cautiously click to uncover where the second flag is located (highlighted in green).
- There is only one place where a second flag can go between the three green highlighted squares. Place a flag there.
- Continue locating the recruits and flagging where the sheriff’s men are located.
- Clicking a location containing sheriff’s men will reset the game. It will leave your current flags on the board, but you must click to highlight the squares again.
- To remove a flag from a square, click it again.
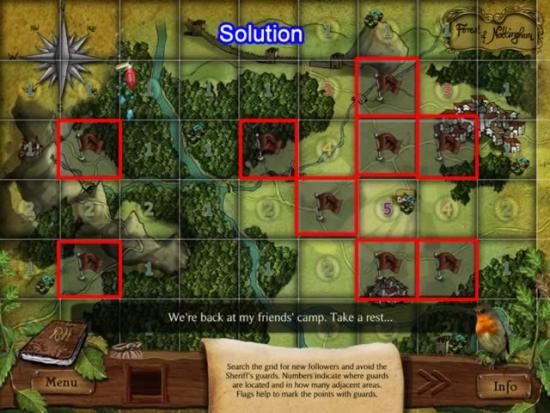
The completed puzzle is shown above.
Game: Sequence Pairs.
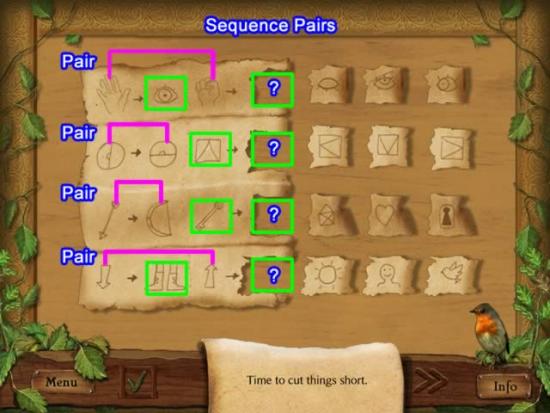
Find the missing symbol to complete the sequence.
- Study the matching pairs in each sequence to find their relationships.
- Once identified, select the symbol from among the three to the left that would form a sequence pair with the symbol highlighted in green above.
- Click the symbol and place it at the end of the sequence strip.
- Click the green tick-mark to see if your logic holds.
SOLUTION:
Sequence 1:
- Sequence pair of open hand then closed hand.
- Open eye paired with closed eye.
Sequence 2:
- Sequence pair of circles with line and dot moving clock-wise at a 90 degree angle.
- Triangle pointing to the 12 o’clock position. A 90 degree rotation would show the next triangle at the 3:00 o’clock position.
Sequence 3:
- Sequence pair of like objects, bow and arrow.
- A key corresponds with a lock.
Sequence 4:
- Sequence pair of up arrow, down arrow.
- Boots at the bottom, head at the top.
Find the objects listed at the camp.
Game: Make an Arrow.
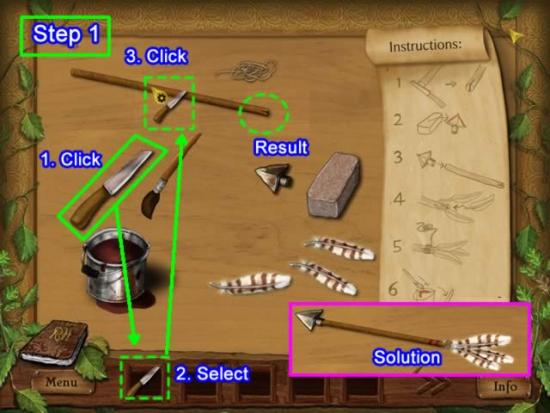
Follow the instructions on the right to create an arrow.
Step 1 is illustrated above:
- Click the knife. It will go to inventory.
- Select the knife from inventory by clicking it.
- Drag the knife to the stick and click to create the slit in the stick. The knife will go back to its position on the table.
Step 2 – Sharpen the arrow head.
- Click the brick to send it to inventory.
- Click the brick and drag it to the arrow head. Click.
- The arrow head is now sharp.
Step 3 – Place the arrow head.
- Click the arrow head to send it to inventory.
- Select the arrow head and drag it to the stick.
- It attaches itself to the end opposite of the slit.
Step 4 – Place the feathers.
- Click each of the three feathers to send them to inventory.
- Place each feather at the end of the stick.
Step 5 – Bind the feathers.
- Click the string to send it to inventory.
- Drag the string to the feathers at the end of the stick.
- Click to tie the feathers onto the end of the stick.
Step 6 – Paint the arrow.
- Click the paint brush to send it to inventory.
- Drag the brush from inventory to the can of red paint.
- The brush with red paint is now in inventory.
- Drag the brush to the arrow twice to make two red circles.
The arrow is complete.
Game: Logic Puzzle
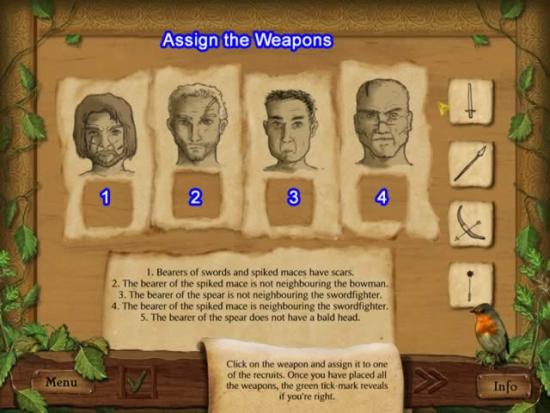
Use the clues to figure out which man is assigned which weapon. Here is one way to interpret the clues:
- Clue 1: The third man is not assigned the spiked mace or sword. He must be assigned either the bow or spear.
- Clue 5: The spear is not assigned to the fourth man. He can only have the sword, spiked mace or bow.
- Clue 4: Since the third man does not have the sword, the fourth man, his neighbor, does not have the spiked mace. The fourth man can only have the sword or bow.
- Clue 2: Only the first and second man can have the spiked mace so neither of them can have bows.
- Clue 4: The sword and spiked mace can only be assigned to the first and second man. This leaves only the bow for the forth man and the spear for the third man.
- Clue 3: The third man has the spear so the sword must belong to the first man, leaving the spiked mace for the second man.
SOLUTION:
- Man 1 – Sword
- Man 2 – Spiked mace.
- Man 3 – Spear
- Man 4 – Bow.
Return to the camp and find the items listed to make a disguise.
Game: Memory match.
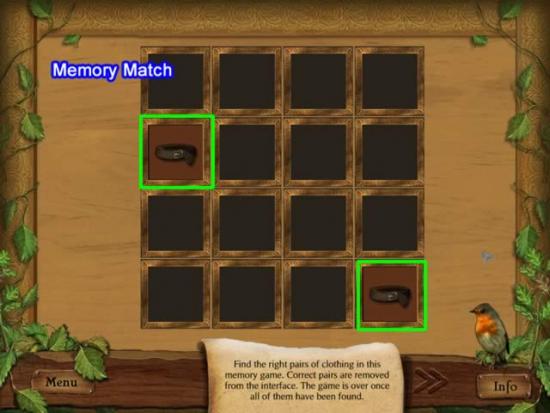
Find two tiles containing matching pieces of clothing to remove the tiles.
The game is complete when all tiles are removed.
Game: Fit the Disguise.
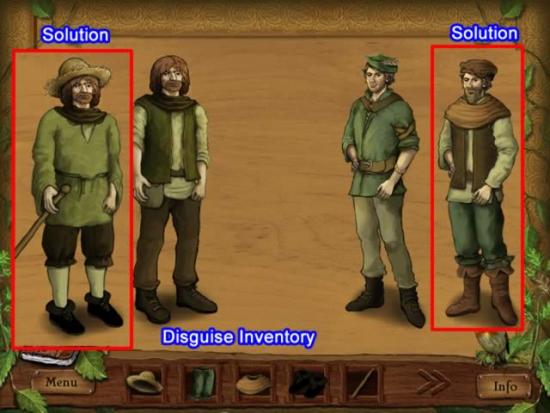
Select disguise pieces from inventory and place the object on each man.
The final disguises are show above.
Game: Spot the differences.
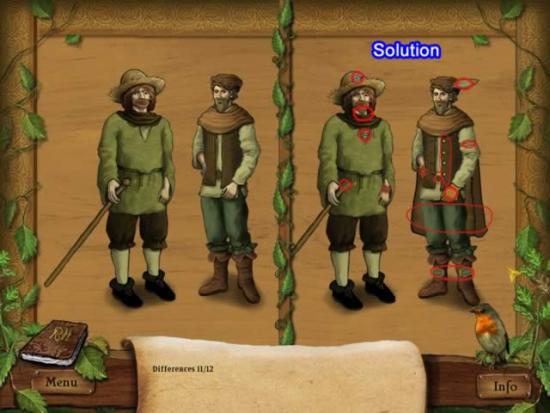
Compare the image on the left to the one on the right.
Mark the differences on the image on the right.
The solution is shown above.
Game: Find the Path.
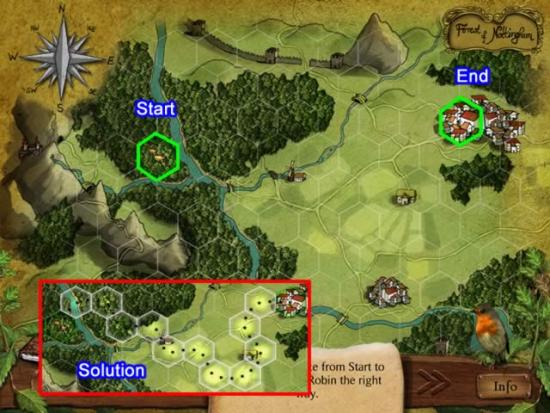
The path from Robin’s camp to Nottingham is initially shown to you.
Recreate the path by clicking on the correct polygon sequence from start to finish.
Clicking incorrectly will cause the game to restart.
The solution is shown in the inset.
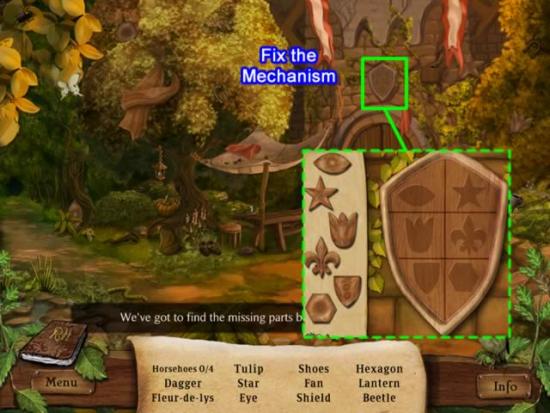
Collect the objects indicated on the list.
Place the symbols in the correct order on the shield.
Game: Repeat the Pattern.
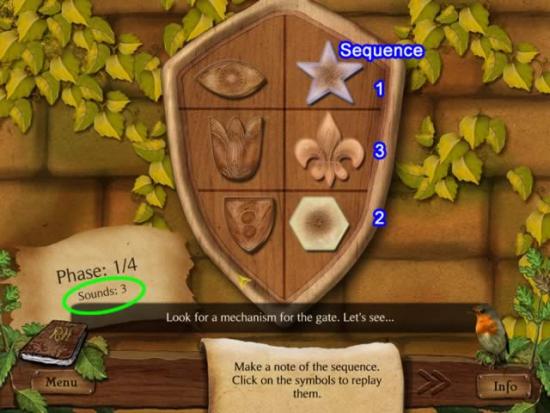
Repeat the sequence of glowing symbols and sounds.
There are four phases and the number of symbols to repeat increases.
Incorrectly following the sequence will cause the game to reset for that phase. The pattern will not change. The sequence for the first phase is shown above.
SOLUTION:
- Phase 1: Star, Hexagon, Fleur-de-lis.
- Phase 2: Eye, Fleur-de-lis, Tulip, Shield.
- Phase 3: Tulip, Star, Hexagon, Eye, Shield, Eye.
- Phase 4: Fleur-de-lis, Eye, Hexagon, Star, Tulip, Shield, Eye, Tulip.
Game: Spot the Differences.
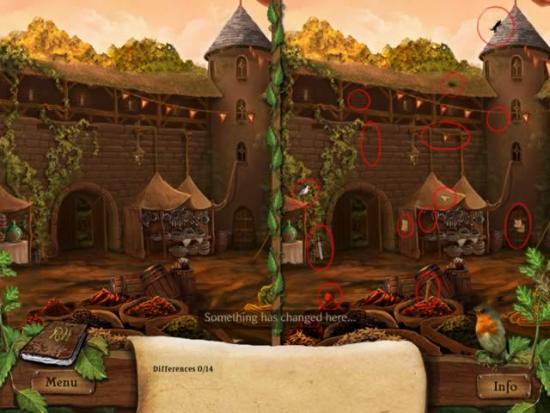
Compare the scene on the left with the one on the right.
Click on the area on the right-hand scene where you spot a difference.
The solution is shown above.
Visit Maid Marion at Mass and help her collect her 20 coins.
Collect the 12 pieces of parchment from the market square.
Game: Reassemble the Proclamation.
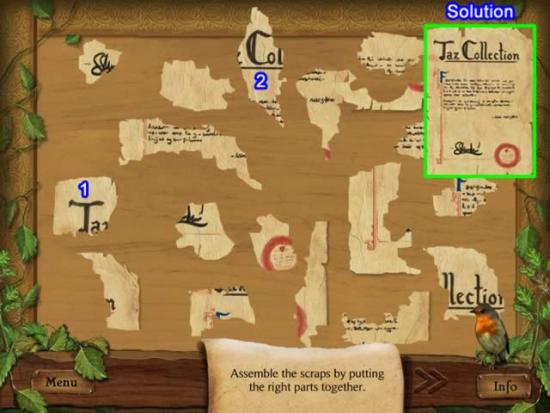
Work from the top and left side to reassemble the proclamation.
The first two pieces are indicated above.
Continue matching patterns. The pieces will snap together if they are correct.
Robin and company waylay the tax collectors. Pick up the indicated items not broken in the melee.
Game: Food Sudoku.
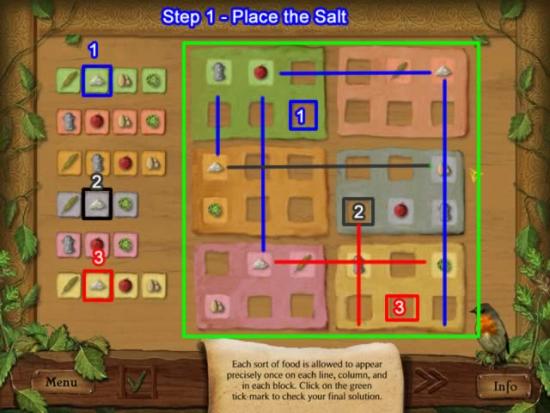
The six grids above combine to form a set of rows and columns (outlined in green).
Each food item can appear in only one row and column within the set.
Place the colored item in the same colored grid.
The screenshot above shows how to place the three salt items in their correct slot.
The colored lines relate to the corresponding boxed and numbered squares of salt.
Green salt:
- There is already salt in the first row and column of the orange grid. Eliminate the second row and first column in the green grid.
- There is salt in the first row and second column of the bright pink grid. Eliminate that position in the green grid.
- There is salt in the first row and third column of the soft pink grid. Eliminate that position in the green grid.
- SOLUTION: The only square available for the salt in the green grid is in the second row and third column.
Gray salt:
- There is already salt in the first row and column of the orange grid. This eliminates both empty boxes in the gray grid.
- SOLUTION: The only open slot is the first column and second row.
Yellow salt:
- The salt in the first row of the pink grid eliminates the only open slot in that row of the yellow grid.
- There is salt in the first row and second column of the pink grid. This eliminates the third column of the yellow grid.
- There is salt (placed in the step above) in the first column and second row of the gray grid. This eliminates this same position in the yellow grid.
- SOLUTION: The only square available for the salt in the yellow grid is in the second row and second column.
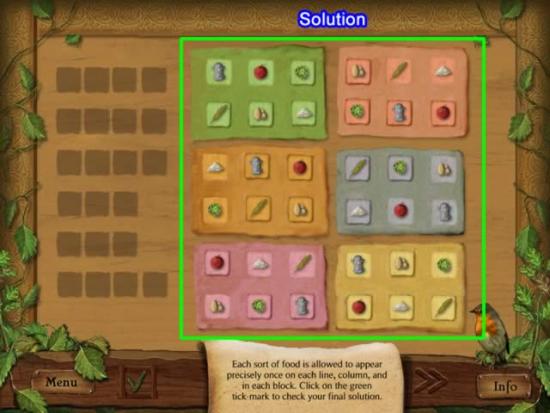
Continue working through the grids with the remaining food items.
Click the green tick-mark when you are finished to check your solution.
The solution is shown below:
Chapter 3: A Secret Message
Find the 12 branches at the campsite.
Game: Spot the Difference.
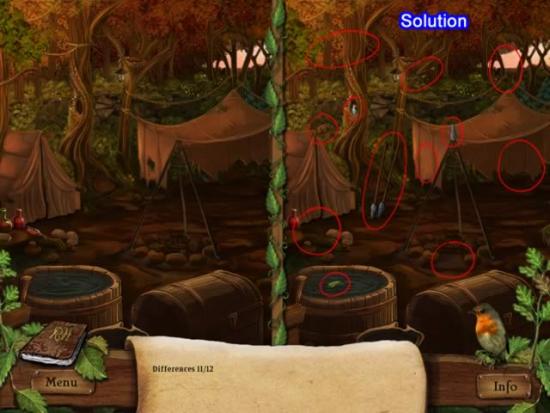
Compare the scene on the left with the one on the right.
Click on the area on the right-hand scene where you spot a difference.
The solution is shown above.
Find the items for the letter at the campsite.
Game: Complete the Seal.
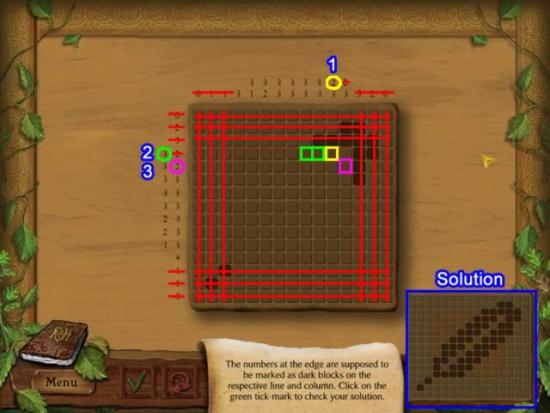
The numbers on the outside of the grid indicate how many squares in that column or row are to be darkened.
In the above screenshot, the red lines indicate rows and columns that have been completed.
The red lines through the numbers at the edge show those have already been darkened.
To solve the puzzle, begin at the top right and work across and down.
The numbers highlighted in blue show where to start.
- The first number (1) has a two below it. Looking down that column shows that only one square has been darkened. Click the yellow square shown on the grid to darken it and complete the required two darkened squares.
- The second number has a three next to it. Continue from the yellow square and darken two more across to get the three in a row.
- The third number indicates that two squares need to be darkened. One already is and the squares behind it are already complete so click the square highlighted in pink to get two in a row.
Continue working following the pattern demonstrated above. The inset shows the solution.
Game: Seal the Letter.
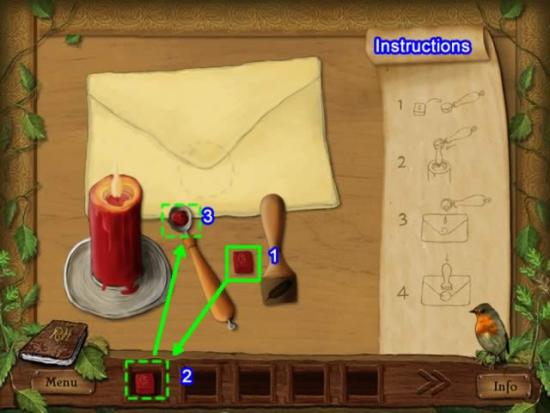
Follow the instructions on the right to seal the letter.
The first step is illustrated above:
- Click the sealing wax. It goes to inventory.
- Drag the wax from inventory to the melting spoon.
Continue as follows:
- Click the spoon to sent it to inventory
- Drag the spoon to the candle flame to melt it.
- The melted wax and spoon go to inventory.
- Drag the spoon to the circle outlined on the letter.
- Pour the wax on the envelope.
- Click the seal. It goes to inventory.
- Drag the seal from inventory to the letter.
- Click to press the seal in the soft wax.
The puzzle is complete.
Collect the letters and mail sack the carrier dropped.
Game: Reassemble the Letter.
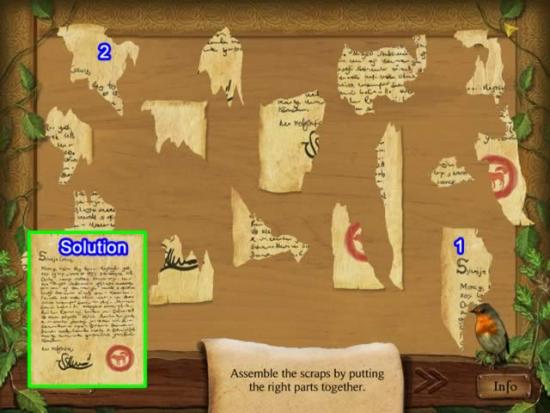
Work from the top and left side to reassemble the letter.
The first two pieces are indicated above.
Continue matching patterns. The pieces will snap together if they are correct.
Game: Creating a Seal.
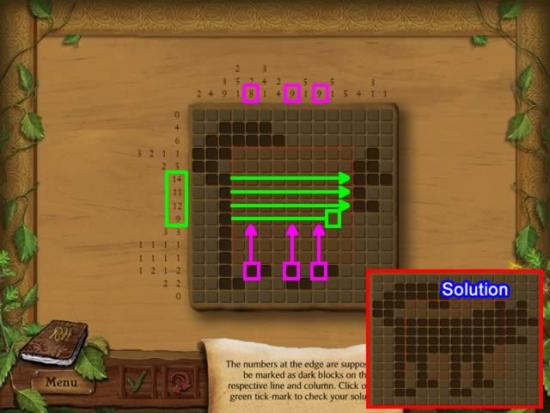
Work this puzzle similarly to the first one. The exception is that there are large numbers that fill a row.
- Start with the large numbers in the middle and darken the squares between the start and end squares.
- The numbers highlighted in pink show their starting location at the bottom. Count up from there and darken the appropriate number of squares.
- Continue working the grid from top and bottom and left and right.
- The solution is shown in the inset.
Game: Seal the Letter.
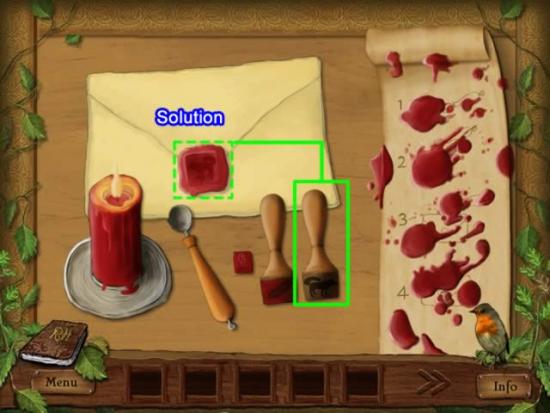
Seal this letter using the same steps as described in the first letter.
Use the wolf seal instead of the feather.
Chapter 4: The Tournament
Game: Logic Puzzle
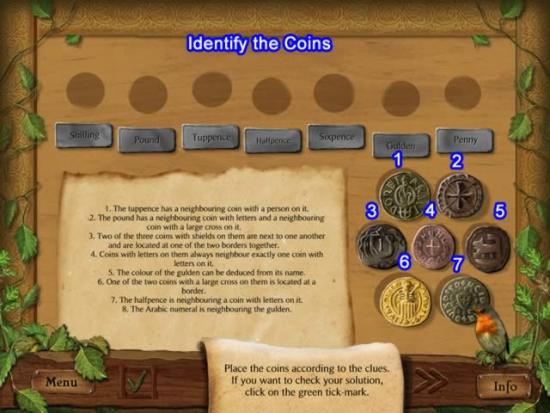
Use the clues to correctly place the coins with their name.
These clues are more ambiguous than the first logic puzzle. Two different set of coin placements will fit all the clues. Here is the way to interpret the clues to correctly solve the puzzle:
- CLUE 5: Coin 6 is the only gold coin. It is the Guilden.
- CLUE 1: Only coin 1 has a person on it. Coin 1 is either the Pound or Halfpence.
- CLUE 3: Coins with shields: 1, 3, 6, 7. Coin 6 is already placed. Coin 1 must be the Pound.
- CLUE 7: Coin 3 is either the Sixpence or Penny.
- CLUE 2, 3, 4 (this is where I disagree with the solution, but here is the right way to interpret these clues): Letter to letter, shield on an end: Coin 7 is the Shilling. Cross on the end, letter to letter means Coin 4 is the Penny and based on Clue 7, Coin 3 is the sixpence.
- CLUE 2: Coin 4 is the Tuppence.
- The remaining coin, Coin 5, has to be the Halfpence even though that means the number on the Sixpence is to be considered a letter (CLUE 7).
Game: Coin Values.
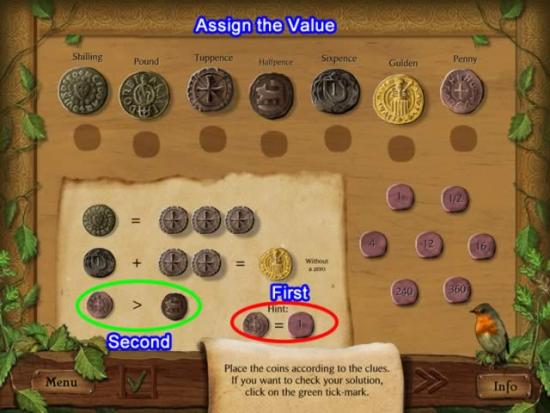
Assign the coins a value from the pink numbers available.
SOLUTION:
- The first one is given to you: a Penny = 1. Click and drag the 1 to the slot below the Penny.
- The second one is the equation at the bottom. A penny is greater than a halfpenny. Click and drag the 1/2 marker to the Halfpenny slot.
- The next equation can be solved by seeing which markers multiplied by three equal another number in the set. Tuppences = 4 and a Shilling = 12.
- By process of elimination, the Sixpence = 16. Sixteen plus eight equals 24. A Guilden (without a zero) is the 240 marker.
- SOLUTION: Shilling = 12; Pound = 360; Tuppence = 4; Halfpence = 1/2; Sixpence = 16; Guilden = 240; Penny = 1.
Return to the camp and collect Robin’s bow and arrows so he can practice.
Game: Shoot the Animals.
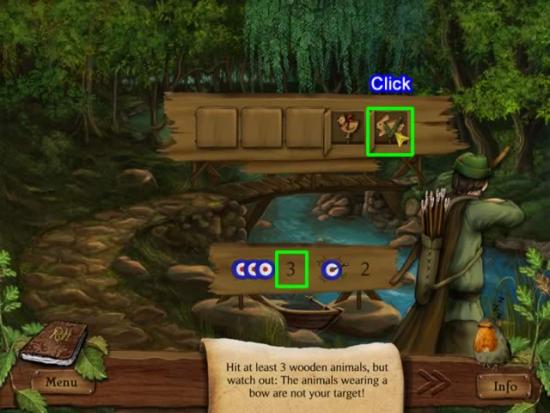
Click the animal without the red bow around its neck when the doors open.
The doors open and close quickly so you must be fast on the mouse.
The game is repeated with the goal of the number of animals to hit increasing. Failure to attain the goal restarts the game with the goal set at a lower number.
This game can be skipped by clicking the double arrows on the bottom panel.
Collect the items needed for disguises as the camp.
Game: Item Match
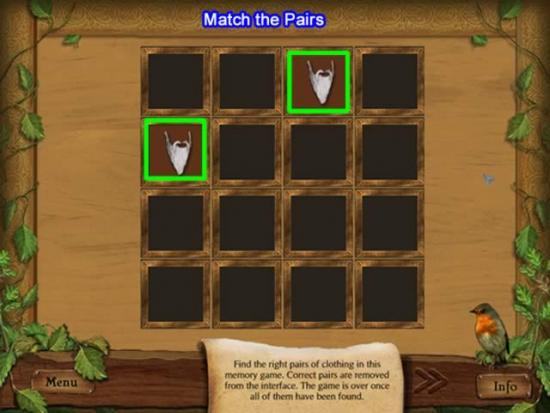
Match the two disguise parts and clear the board to continue.
Game: Place the Disguise.
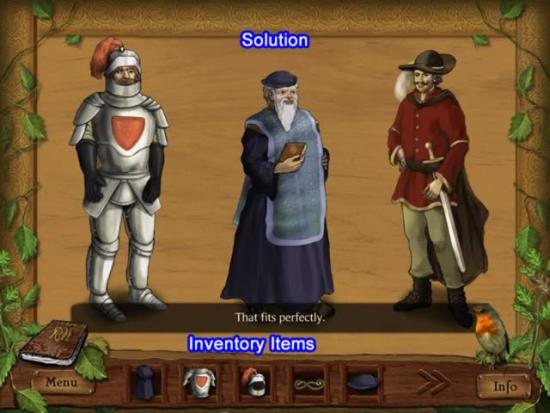
Take the disguise items from inventory and place them on the correct character.
The solution is shown above.
Game: Spot the Difference.
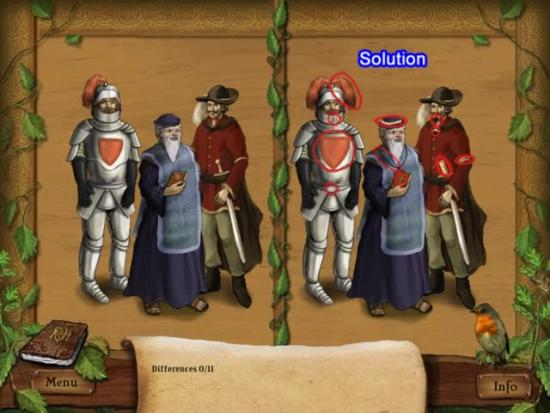
Compare the image on the left to the one on the right.
Mark the differences on the image on the right.
Game: Trace the Path.
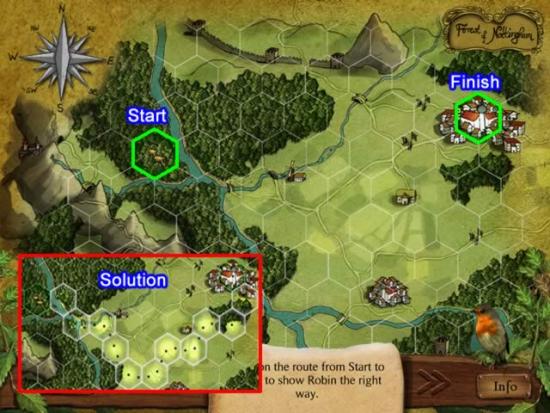
The path from Robin’s camp to Nottingham is initially shown to you.
Recreate the path by clicking on the correct polygon sequence from start to finish.
Clicking incorrectly will restart the game.
The solution is shown in the inset.
Collect the pieces of parchment to enter the tournament.
Collect the 12 wooden animals on the tournament grounds.
Game: Shoot the Animals.
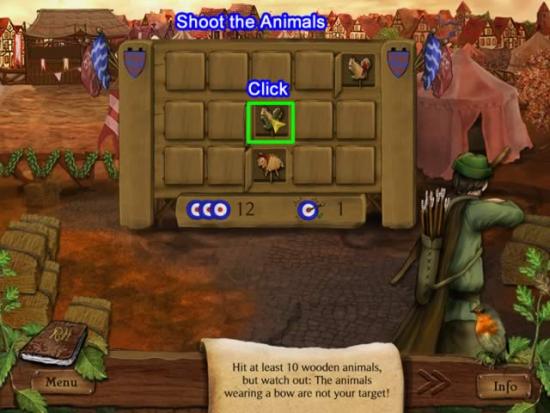
This game is similar to the previous correct-click game except now there are three options instead of two.
Chapter 5: Fighting the Sheriff
Find the items to help Robin escape from the dungeon.
Game: Match the Keys.
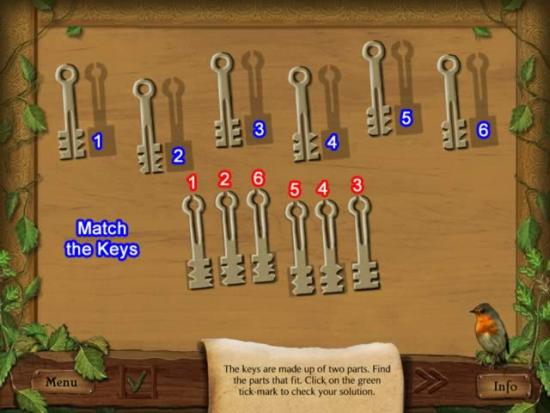
Find the keys in the lower row that most closely match those in the upper row.
When you find a match. click the key in the lower row and place it in the shaded area next to the key in the upper row.
Not all keys match exactly on both sides.
Click the green tick-mark when you think you have the correct solution.
SOLUTION:
- The numbers outlined in red correspond to the key position (blue) in the row above.
Game: Find the Correct Key.
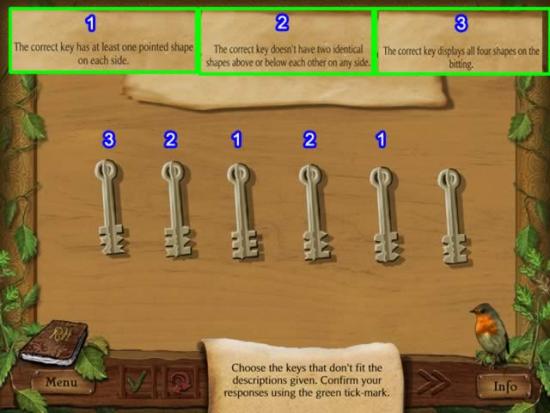
Eliminate the keys based on the clues given.
The clues are outlined in green above and their corresponding number above a key indicates the keys to remove for that clue.
After three clues, only one key remains.
Find the guards in both courtyards to escape.
Game: Trace the Path
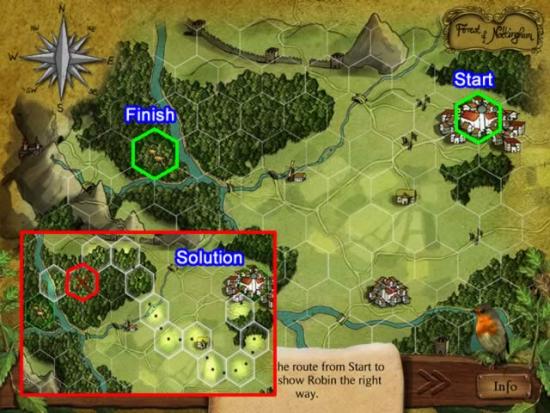
The path from Nottingham to Robin’s camp is initially shown to you.
Recreate the path by clicking on the correct polygon sequence from start to finish.
An incorrect click will restart the game.
The solution is shown in the inset. Note that Robin and Little John stop short of reaching the camp (indicated by a red X in the solution).
Game: Spot the Difference
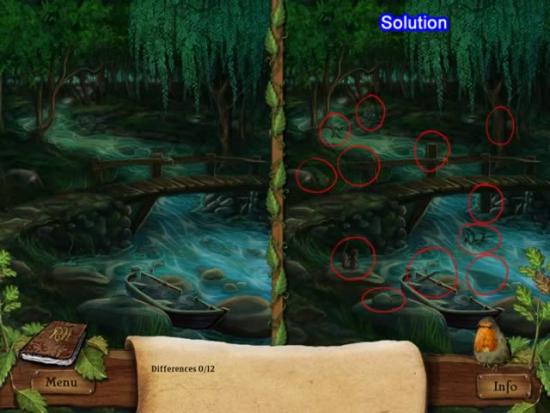
Compare the scene on the left with the one on the right.
Click on the area on the right-hand scene where you spot a difference.
The solution is shown above.
Game: Trace the Path.
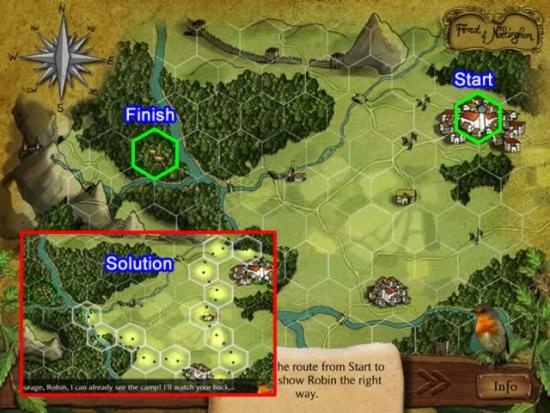
Because of the trouble they encountered, Robin and Little John try a different path to the camp.
The path from Nottingham to Robin’s camp is initially shown to you.
Recreate the path by clicking on the correct polygon sequence from start to finish.
Clicking incorrectly will cause the game to restart.
The solution is shown in the inset.
Collect the clothes for two more disguises from the camp.
Game: Match the Disguise.
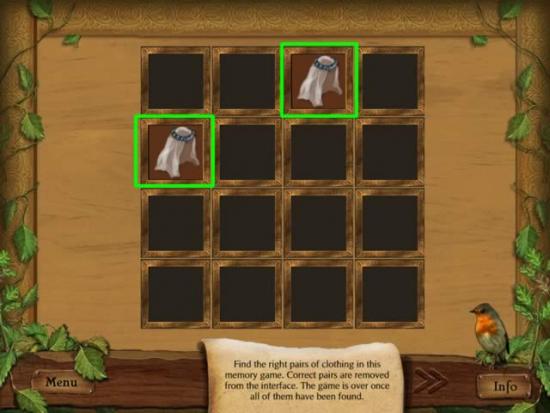
Match the two disguise parts and clear the board to continue.
Game: Place the Disguise.
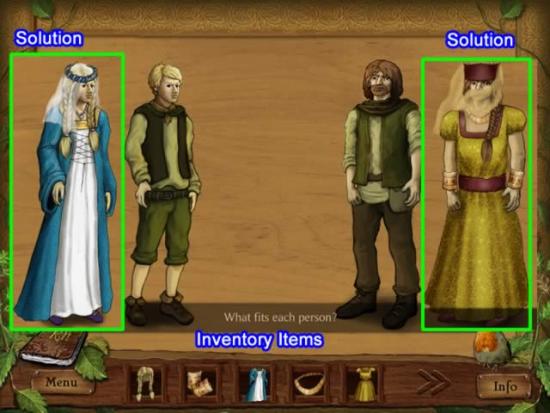
Take the disguise items from inventory and place them on the correct character.
The solution is shown above.
Game: Spot the Difference.
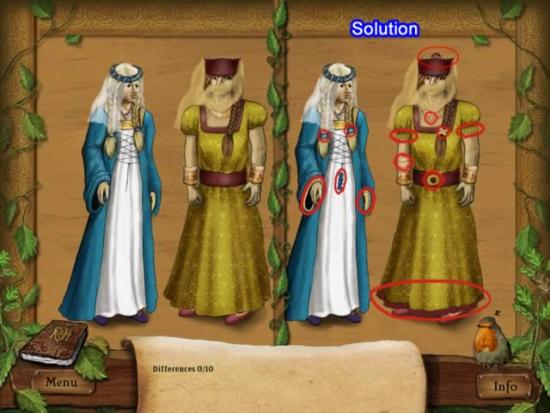
Compare the image on the left to the one on the right.
Mark the differences on the one on the right.
Game: The Plan Drawing.
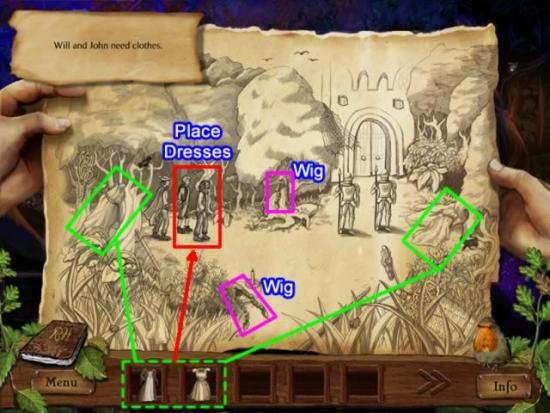
Work through the plan for entering the grounds.
- Click both dresses. They go to inventory.
- Drag a dress from inventory and click on Will.
- Repeat for Little John.
- Do the same thing for the wigs.
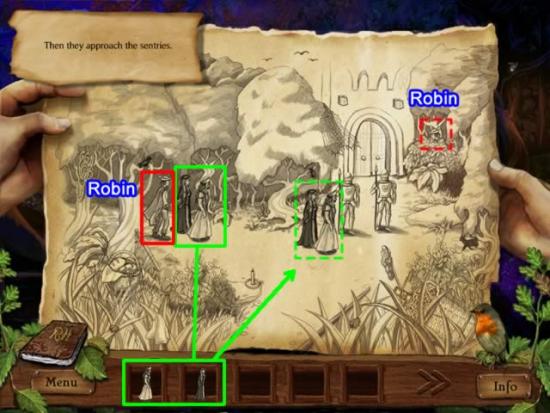
Reposition the characters.
- Click Will. He will go to inventory
- Repeat for Little John.
- Drag Will from inventory and place him in front of the guards.
- Repeat for Little John.
- Click Robin. He goes to inventory.
- Drag Robin from inventory and place him behind the guards.
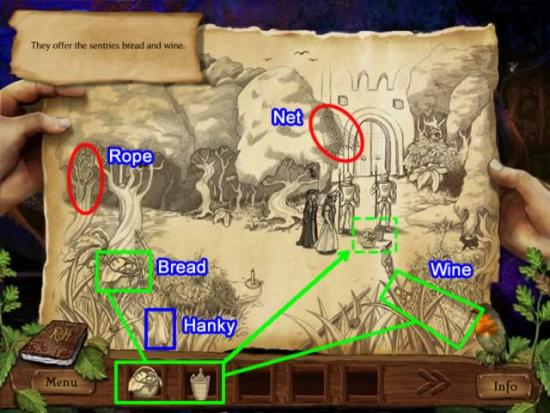
Distract the guards.
- Collect the bread and wine for inventory.
- Drag them individually from inventory and place them in front of the guards.
- Click the net and rope for Robin’s use. They go to inventory.
- Get the hanky. It goes to inventory
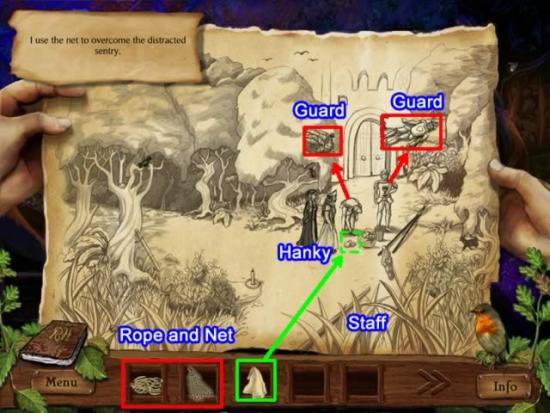
Overcome the guards.
- Drag the hanky from inventory and drop it at the foot of the first guard. He bends to pick it up.
- Drag the net from inventory. Place it on the guard. The rope also disappears from inventory and the first guard is now bundled in the net.
- Click the staff. It goes to inventory.
- Give the staff to Little John. He takes care of the other guard.
Collect the necessary items from camp to implement this plan.
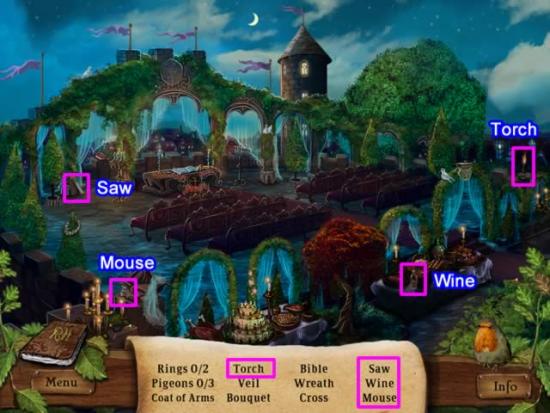
Collect the items on the list. The SAW, WINE, MOUSE, and TORCH go to inventory.
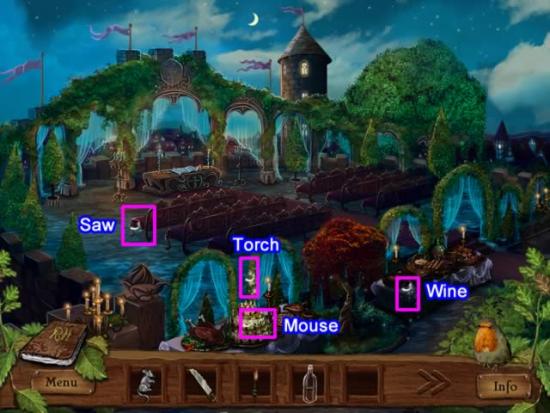
Create mischief.
- Use the SAW on the bench leg so the witness can’t sit down.
- Let the MOUSE loose on the cake.
- Set fire to the arch with the TORCH.
- Spill the WINE on the tablecloth.
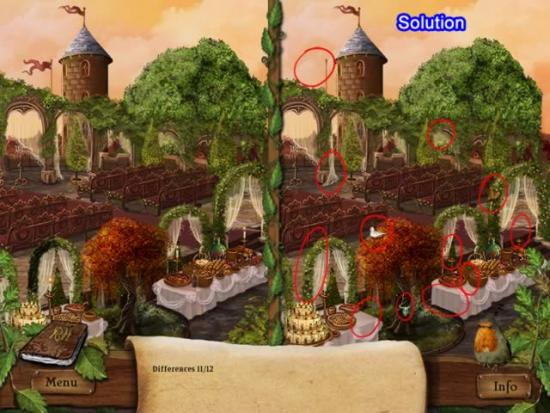
Game: Spot the Differences.
Compare the image on the left to the one on the right.
Mark the differences on the one on the right.
Robin and Marion are reunited.
Congratulations! You have completed Robin Hood.
More articles...
Monopoly GO! Free Rolls – Links For Free Dice
By Glen Fox
Wondering how to get Monopoly GO! free rolls? Well, you’ve come to the right place. In this guide, we provide you with a bunch of tips and tricks to get some free rolls for the hit new mobile game. We’ll …Best Roblox Horror Games to Play Right Now – Updated Weekly
By Adele Wilson
Our Best Roblox Horror Games guide features the scariest and most creative experiences to play right now on the platform!The BEST Roblox Games of The Week – Games You Need To Play!
By Sho Roberts
Our feature shares our pick for the Best Roblox Games of the week! With our feature, we guarantee you'll find something new to play!Anime Fantasy Codes – Free Gems and Tokens
By Adele Wilson
Our Anime Fantasy Codes guide has a list of codes that offer up a variety of rewards, such as gems, tokens, and lots more!


