
Best Horror Games On Itch.io – July 2026
Across a bounty of subgenres.
Grow A Garden 2 Base Price List
What's the most valuable crop?![Evomon Types Guide [Strengths, Weaknesses, Resistance]](/wp-content/uploads/2026/06/evomon-types.jpg "Evomon Types Guide [Strengths, Weaknesses, Resistance]")
Evomon Types Guide [Strengths, Weaknesses, Resistance]
Your companion guide during battles.
![[Roblox] Evomon Shiny Hunting Guide – Including Prismatic and Pris Shinies!](/wp-content/uploads/2026/06/evomon-shiny-hunting-guide.jpg "[Roblox] Evomon Shiny Hunting Guide – Including Prismatic and Pris Shinies!")
Rite of Passage: The Perfect Show Walkthrough
Welcome to the Rite of Passage: The Perfect Show walkthrough on Gamezebo. Rite of Passage: The Perfect Show is a hidden object/adventure game created by Mad Head Games. This walkthrough includes tips and tricks, helpful hints and a strategy guide on how to complete Rite of Passage: The Perfect Show.


- Prefer Gamezebo on Google

Game Introduction – Rite of Passage: The Perfect Show
Welcome to the Rite of Passage: The Perfect Show walkthrough on Gamezebo. Rite of Passage: The Perfect Show is a hidden object/adventure game created by Mad Head Games. This walkthrough includes tips and tricks, helpful hints and a strategy guide on how to complete Rite of Passage: The Perfect Show.
General Tips
This hidden object game requires visiting several locations and using inventory items to advance play.
- Play is mostly linear although there are some options for the order in which to explore locations.
- Select Options on the main menu to adjust the Music, Ambient Sound, Voice and SFX Volume. You may also toggle Hardware Cursor and Full Screen selections.
- Begin play by selecting a playing mode that suits your style of play: Casual or Expert. The mode cannot be changed during game play. Create a new profile and begin the game again to change the play mode.
- Use the following tools to interact with the game:

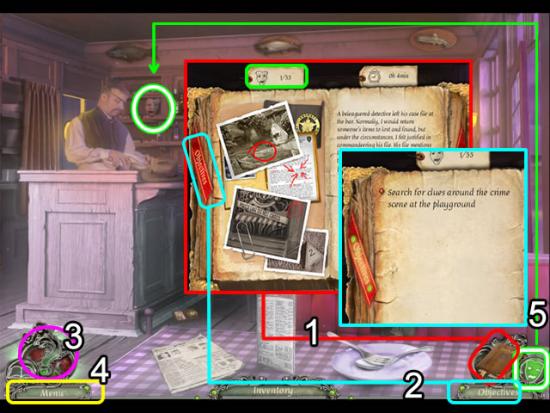
- A Journal (1) is kept to record story information, objectives and tips for solving puzzles. The journal glows when new information is added.
- Directly access the Objectives in the journal by pressing the Objectives tab (2).
- Hints (3) may be used to direct play or reveal the location of an item in a hidden object scene. It changes to a Skip button for puzzles.
- Select the Menu tab (4) to change Options during game play and to exit to the main menu.
- Hidden object scenes contain items listed in yellow lettering. These items require opening or moving objects to find them. Items listed in blue lettering require an extra step to complete them.
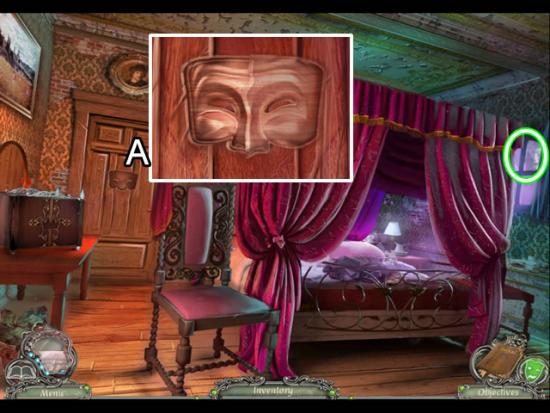
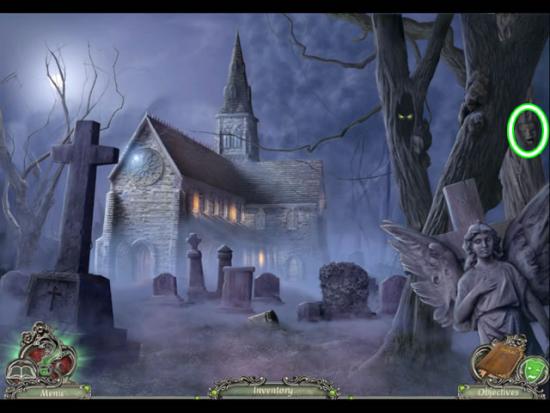
- There are 55 Masks hidden in the scenes and bonus play in the collector’s edition. A green mask (5) indicates a mask is hidden in the current scene. A gray mask icon means the mask has ready been found or there is no mask in a new scene.
- Extras bonus content in the Collector’s Edition includes Music, Concept Art, Wallpapers, Screensaver and Bonus Gameplay. These items may be accessed after completing the main game.
- Always move the cursor around a scene. Watch the cursor to see if it changes into a hand (pick up an item), gears (interact with the scene) or magnifying glass (zoom in on an area).
Walkthrough Tips
- This guide is based on the Collector’s Edition of the game. Some scenes and content are not available in the standard edition.
- The point of a hidden object game is to find the objects in a scene. For this reason, only inventory items are highlighted.
- CAPITALIZED inventory items are meant to make it easier to find where this guide may differ from your own play. Inventory items are highlighted in blue with a white border in the screenshots.
- If you don’t have an item referenced in this guide, click and hold the “Ctrl” key and then press the “F” key. This opens a Find area in your web browser. Type in the name of the object as it appears in this guide to find where else that it is referenced.
- Hidden masks are circled in white with a green border.
- To minimize back and forth moves, most available inventory items in a scene are picked up when first encountered.
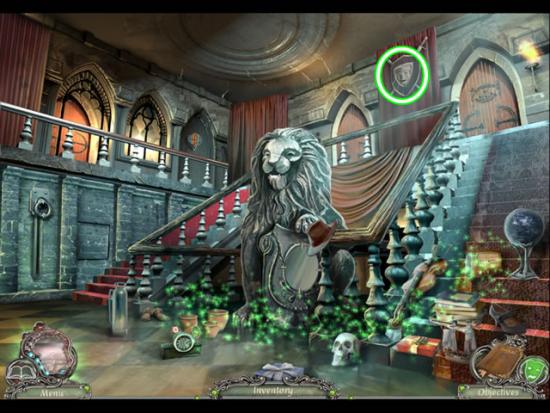
Chapter 1: The Crime Scene
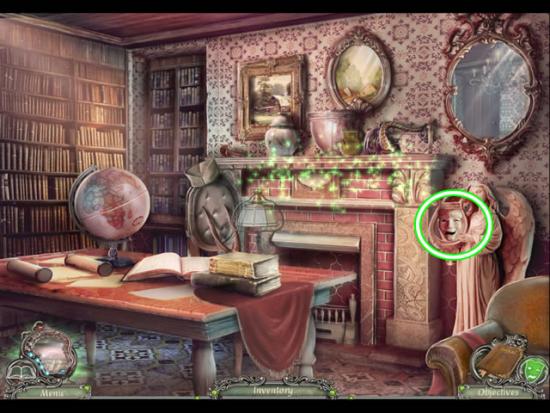
Cafe
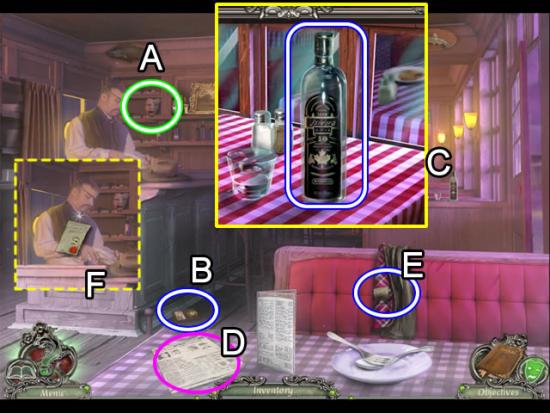
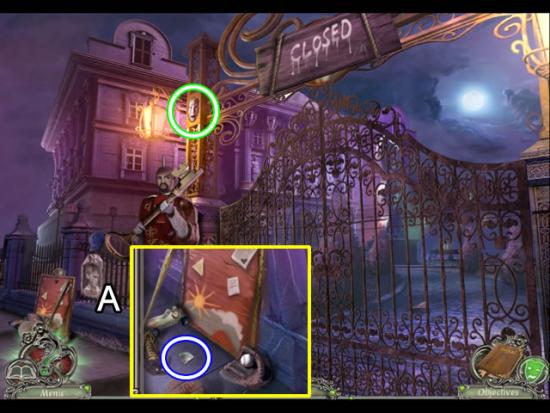
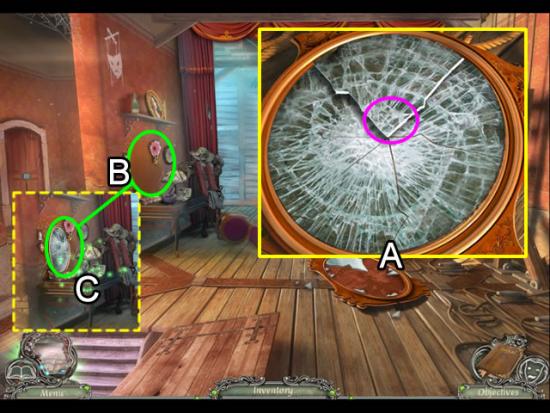
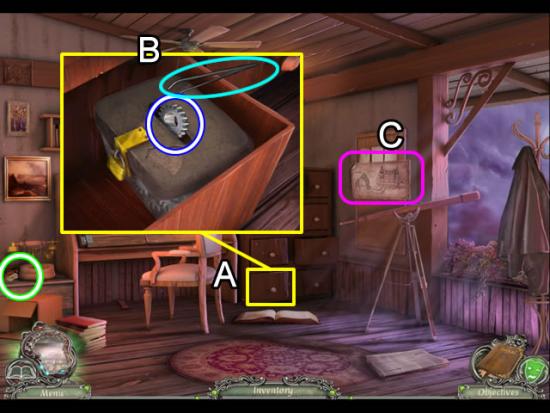
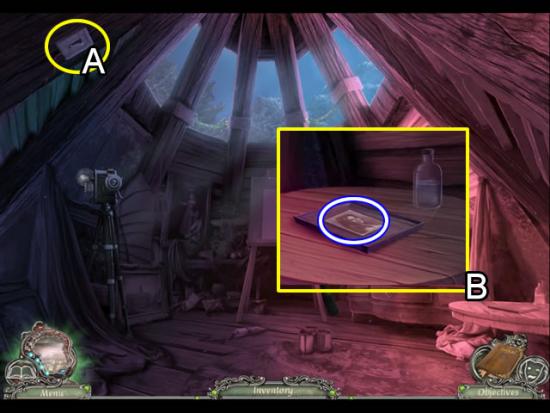
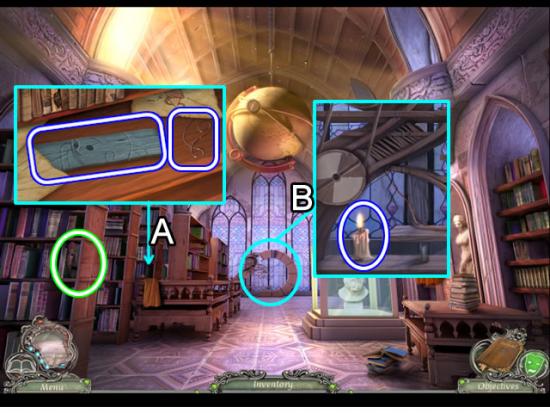
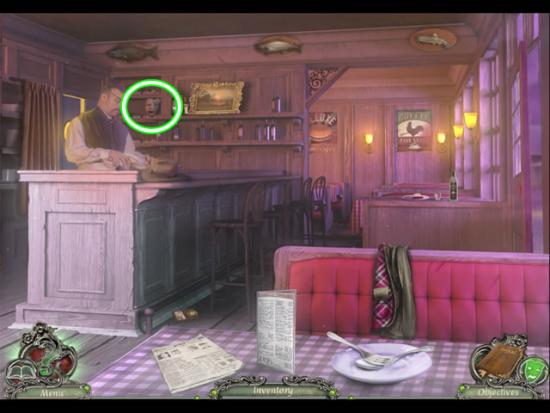
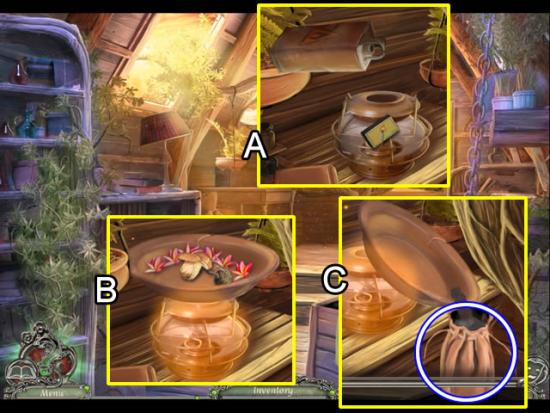
- Collect the first Mask (1/55) from the shelf on the back wall (A).
- Pick up the BADGE the detective dropped (B).
- Zoom in on the back table (C); take the EMPTY BOTTLE.
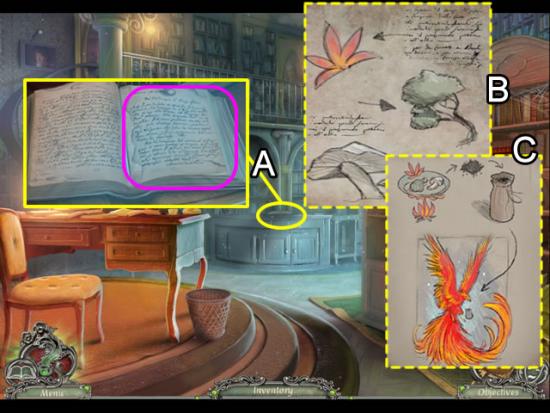
- Read the paper on the table (D) to add journal information.
- Retrieve the MYSTERIOUS NOTE from the jacket pocket (E).
- Give the MYSTERIOUS NOTE to the bartender (F).
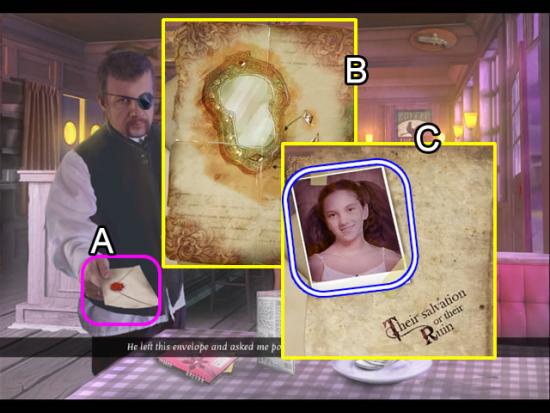
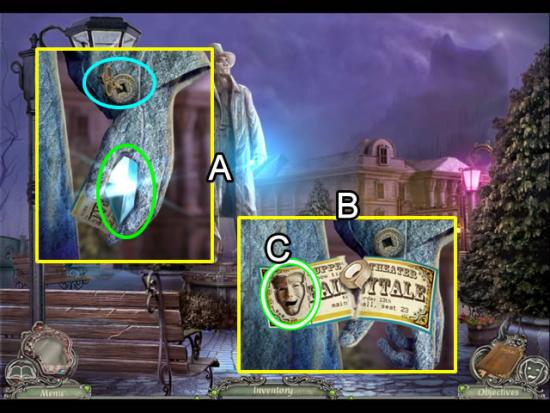
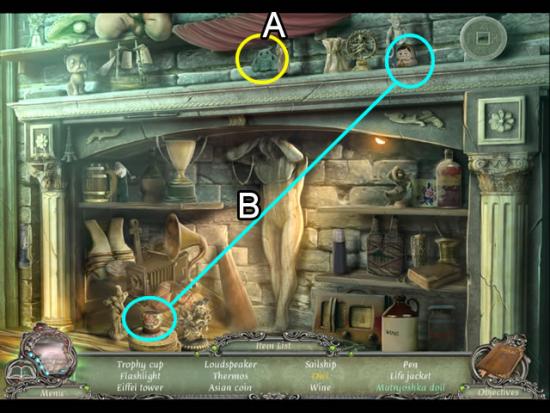
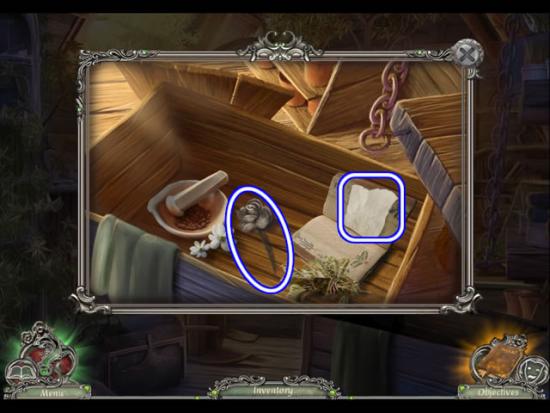
- Take the envelope from the bartender (A).
- Break the seal and open the document inside (B) for journal information.
- Turn the page over (C); take the CHILD’S PHOTO (1/4) and add the information to the journal.
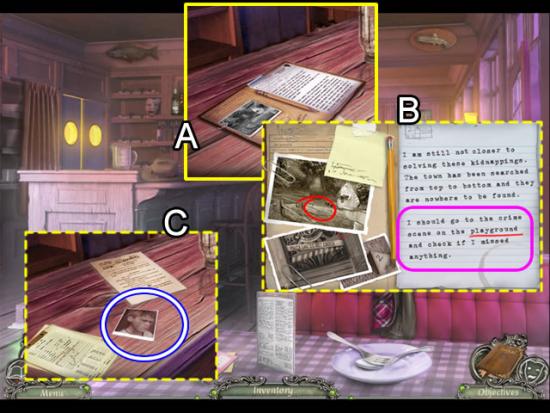
- Inspect the bar where the detective was sitting (A).
- Look closer at the detective’s notes (B) for journal information and an objective (pink).
- Move the papers on the counter (C); take the CHILD’S PHOTO (2/4).
- Exit the cafe.

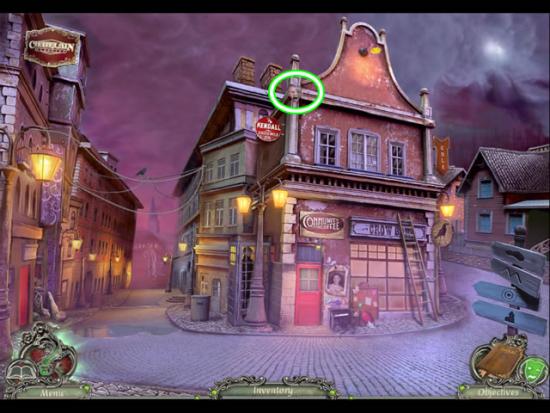
Street
- Click each direction arrow on the signpost (A) to see the locations available for the left and right side streets.
- Zoom in on the door (B).
- Remove the poster (C) for the journal; note the metal plate it was covering.
- Move the toys (D); take the DUCT TAPE.
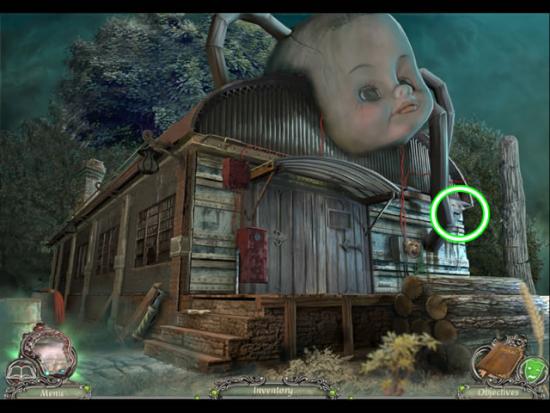
- Take Mask (2/55) from the left column on the building.
- Attempt to take the left street. Take the right street.
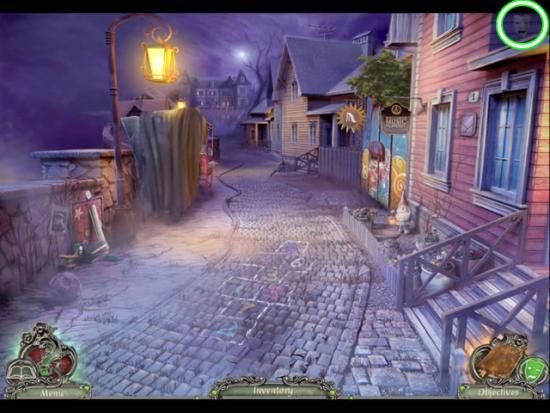
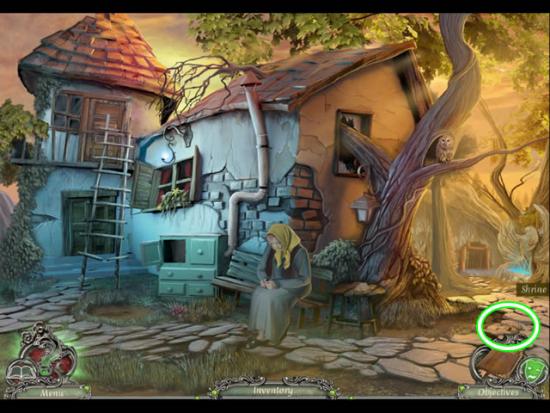
Havenhills
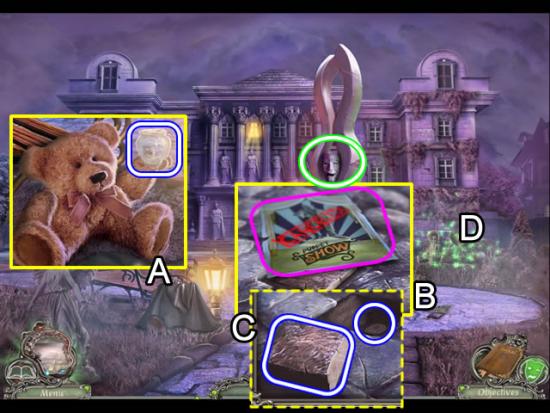
- Speak to the worried mother.
- Pick up the Mask on the side of the house (3/55).
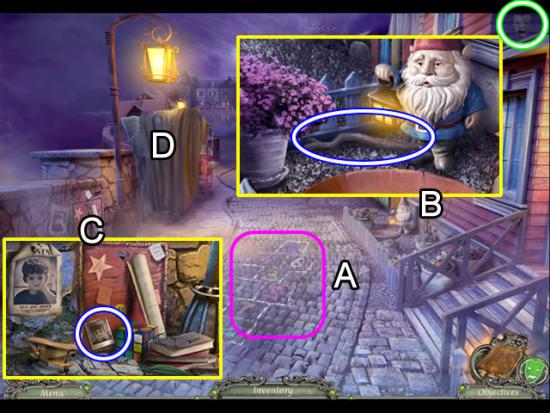
- Look closer at the hopscotch layout on the street (A) to record journal information for later reference.
- Zoom in on the flowerbed (B); take the BRANCH.
- Examine the shrine (C); move the books to find the CHILD’S PHOTO (3/4).
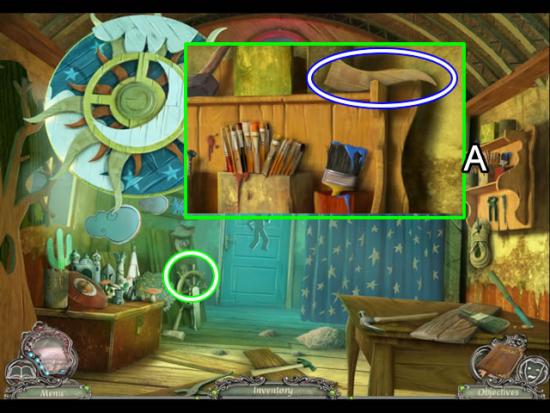
- Move the cloth (D) to open a hidden object scene.
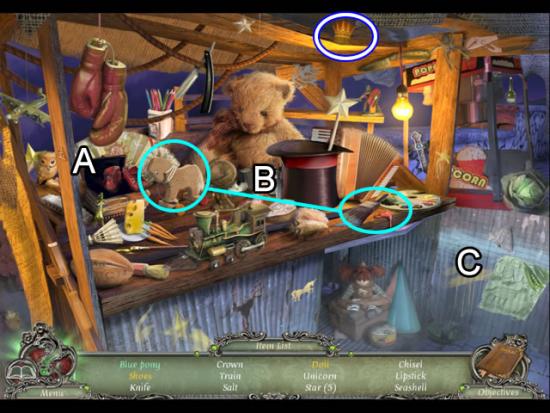
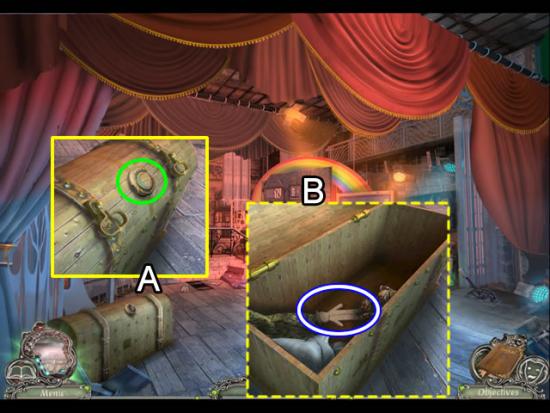
- Open the chest to find the Shoes.
- Use the paintbrush to paint a Blue Pony (B).
- Open the metal door (C) to find the Doll.
- Find the rest of the listed objects.
- The CROWN goes to inventory.
- Go forward to the lake.
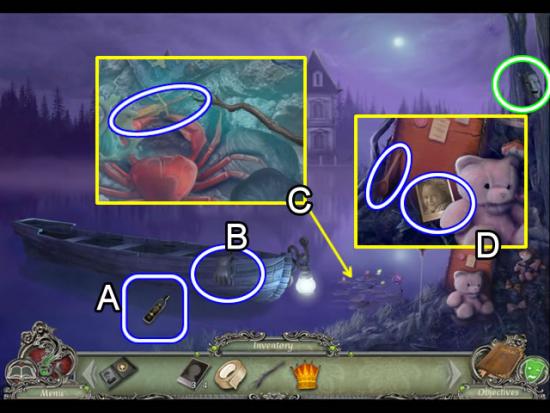
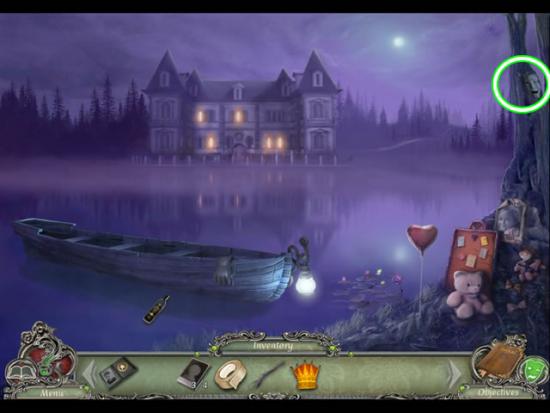
Lake
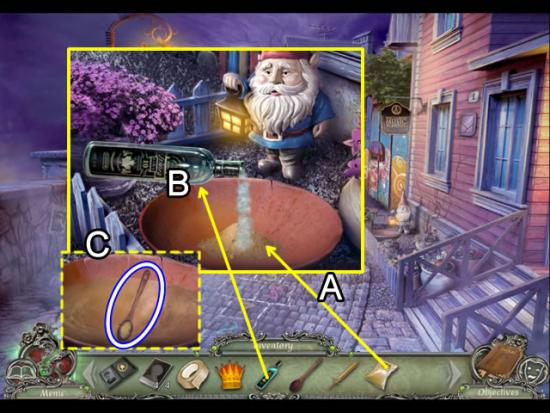
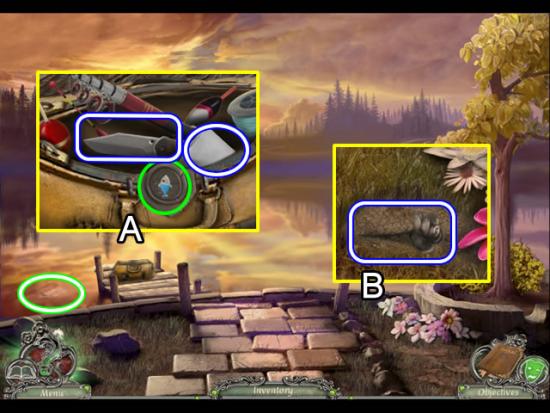
- Dip the EMPTY BOTTLE into the water (A); receive a BOTTLE WITH WATER.
- Take the RUBBERS GLOVES hanging on the boat (B).
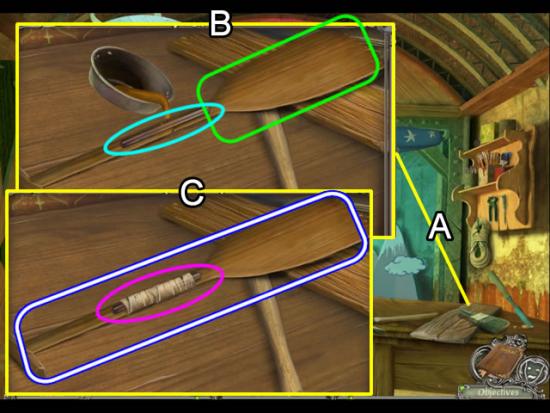
- Zoom in on the lily pads (C). Move the pads aside. Use the BRANCH to get the SWORD.
- Look closer at the shrine (D). Move the bear and take the CHILD’S PHOTO (4/4). Pick up the WOODEN SPOON leaning against the board.
- Get the Mask (4/55) in the tree.
- Go back twice to the street.
Street
- If you have not already done so, attempt to go down the left street to the town square.
- Use the RUBBER GLOVES to remove the downed wires and restore power.
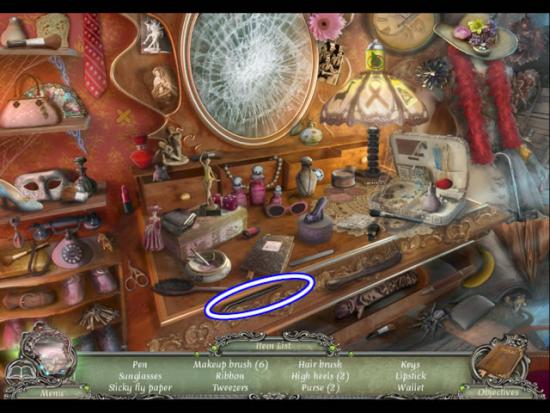
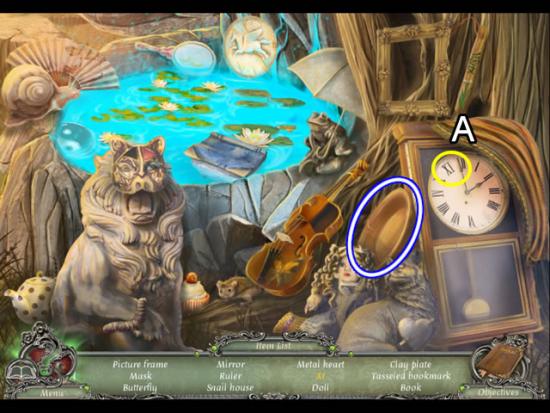
- Play the hidden object scene.
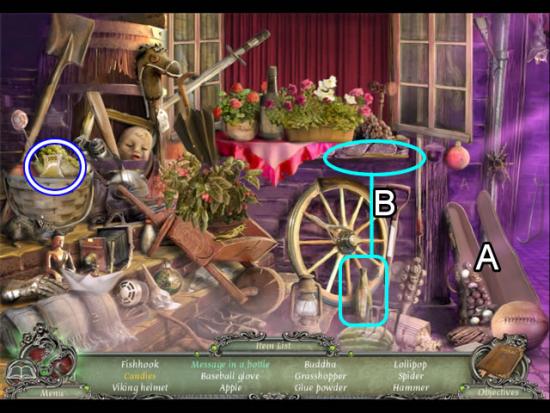
- Open the violin case (A) to find the Candies.
- Use the tweezers to extract the Message in a Bottle (B).
- Find the rest of the listed objects.
- The GLUE POWDER goes to inventory.
Havenhills
- Zoom in again on the flowerbed.
- Pour the GLUE POWDER into the empty bowl (A).
- Add the contents of the BOTTLE WITH WATER (B).
- Stir the mixture with the WOODEN SPOON (C). A GLUE ON SPOON item automatically returns to inventory.
- Return to the street. Go left to the town square.
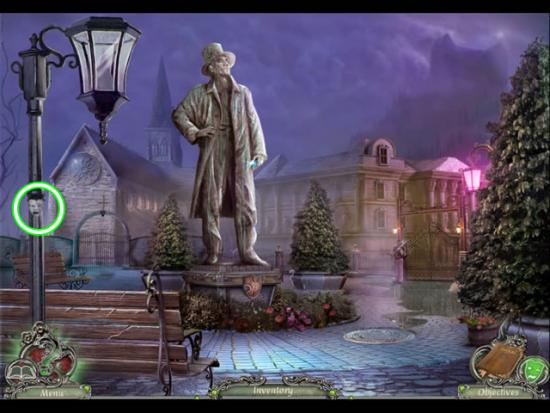
Town Square
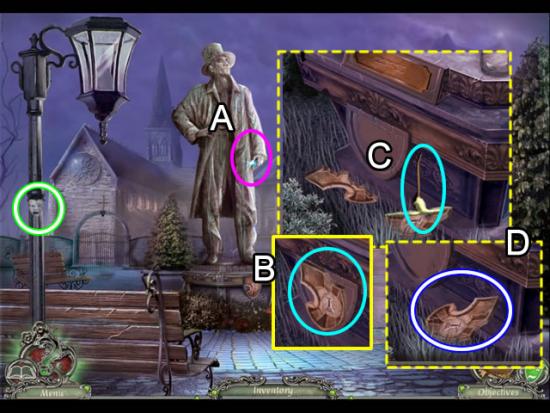
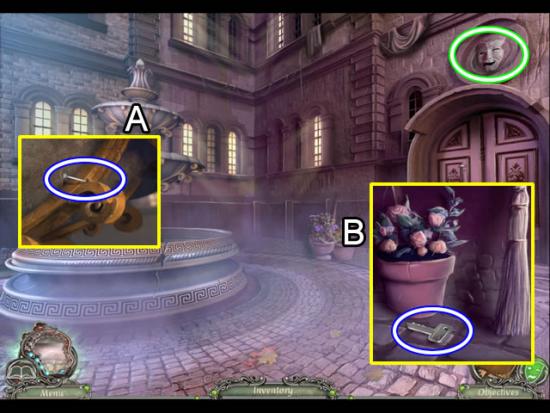
- Attempt to take the gem from the statue’s hand (A).
- Examine the base of the statue (B); pry out the shield (aqua).
- Apply the GLUE ON SPOON to the broken half (C). Click the other half to combine the two pieces.
- Take the mended SHIELD.
- Collect the Mask (5/55) from the lamppost.
Havenhills
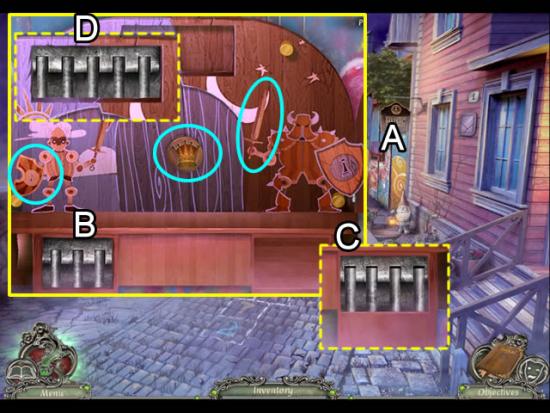
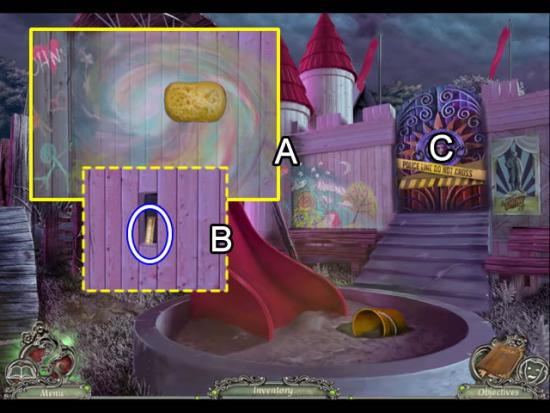
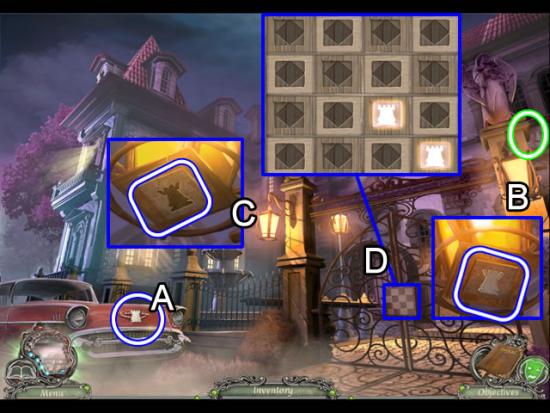
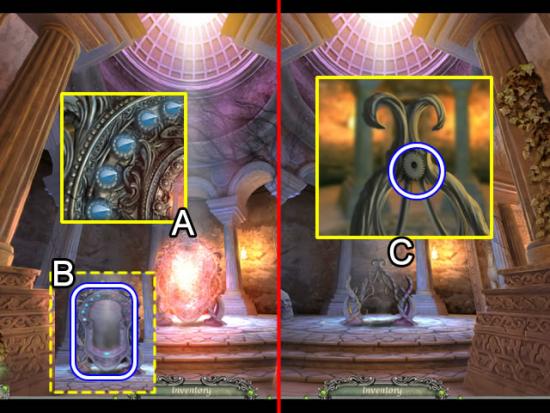
- Zoom in on the gate to the playground (A).
- Open the side flaps and lift the grate in the middle to gain access to the lock mechanism.
- Place the SHIELD, CROWN and SWORD in the dashed outlines on the stage (aqua) to open the gate puzzle.
- The goal is to find the right combination to in which to depress the bars in the insets so all remain down. Solving the first (B) opens the second (C). Solving the second opens the third (D).
- The order is random.
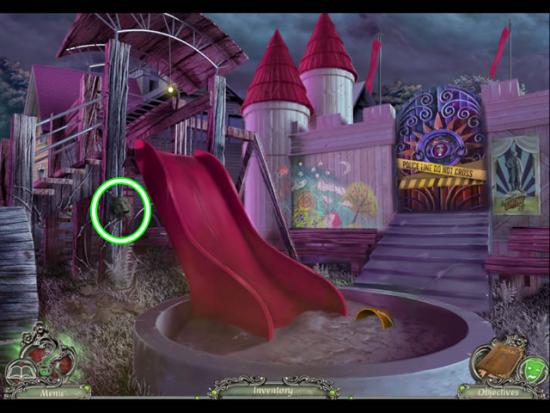
Playground
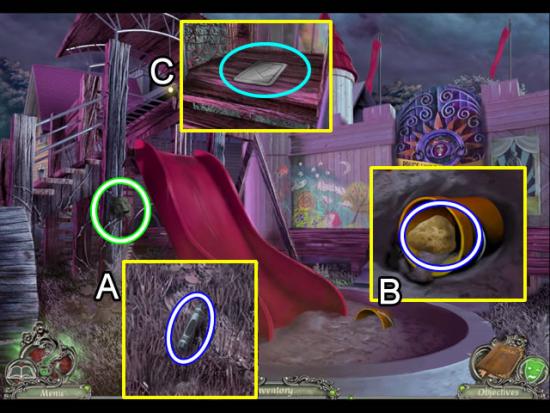
- Move the pile of leaves (A) aside to uncover a CRAYON.
- Use the bucket to find a DRY SPONGE in the sand (B).
- Look at the top of the stairs (C) at the metal plate design. Note its location for later use.
- Collect the Mask (6/55) from the post next to the slide.
- Exit the playground.
Lake
- Dip the DRY SPONGE in the water at the edge of the lake.
- Receive a WET SPONGE.
- Return to the playground.
Playground
- Examine the drawing on the fence (A).
- Use the WET SPONGE to remove the drawings and uncover a compartment in the fence.
- Open the compartment; take the PUNCH CARD (1/4).
- Remove the crime scene tape (C) from the gate. Enter the grounds of the play castle.

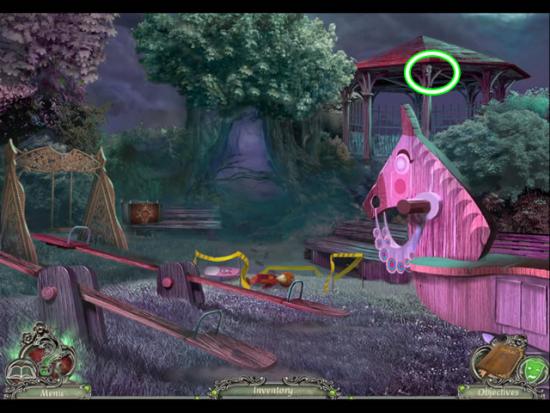
Play Castle
- Look closer at the crime scene area (A). Read the note (green) and take the TWIN DOLL.
- Get the Mask (7/55) from the top of the gazebo.
- Follow the path (B) to havengrove.
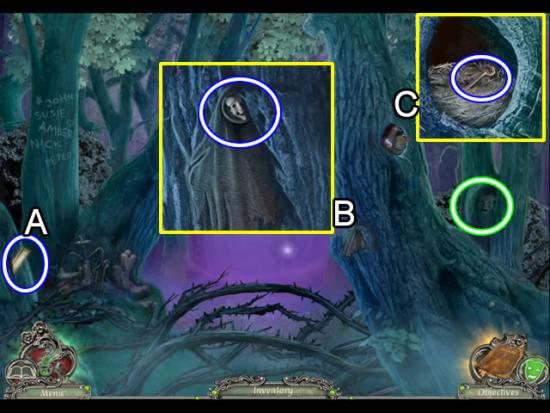
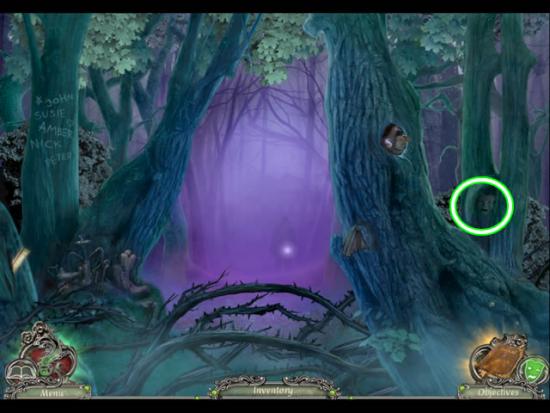
Havengrove
- Pick up the PUNCH CARD (2/4) from the tree (A).
- Take the CLUE from the slit in the tree (B).
- Look closer at the nest after the birds take flight (C). Move the contents around to uncover the CEMETERY KEY.
- Take the Mask (8/55) from the trunk on the tree on the right.
- Exit the playground and return to the street.
Street
- Play the hidden object scene.
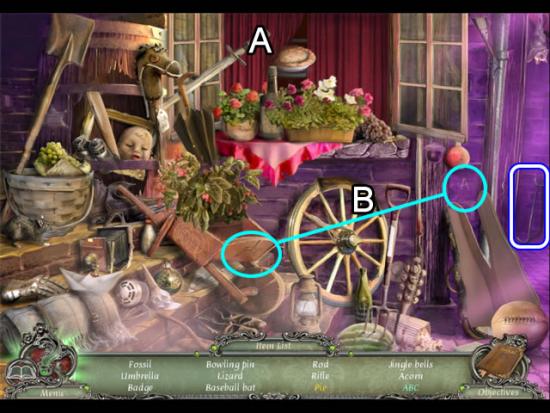
- Pull the curtain aside (A) to find the Pie.
- Drag the letter “A” to the end of the wheelbarrow (B) to complete the ABC letter combination.
- Find the rest of the listed objects.
- The ROD goes to inventory.
- Continue to the town square.
Town Square
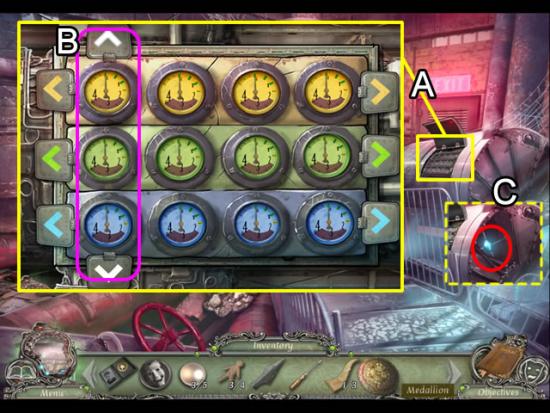
- Use the ROD to open the manhole cover.
- Peer into the hole to open a puzzle.
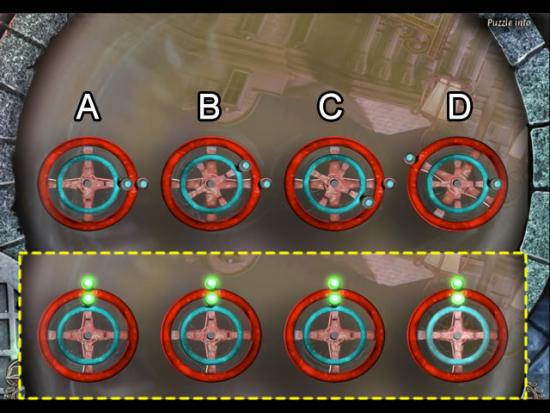
- The goal is to align the lights on the four valve wheels as shown in the dashed inset.
- Clicking a red wheel rotates both the red and blue wheels 1/4 of a turn clockwise for that valve. The blue wheels turn independently of the red wheels. All wheels, with the exception of valve (D), affect the movement of the valve to its right by 1/16 of a counter clockwise turn. In other words, clicking a wheel three times will turn it 3/4 around the dial and its neighbor will move 1/4 in the opposite direction. Red wheels affect only the neighboring red wheel and the blue wheels affect only the neighboring blue wheel.
- The best strategy is to solve from left to right. Use the relationship between two valves to align the lights on a neighboring wheel to a quarter settings (Imagine a clock at 12:00, 3:00, 6:00 and 9:00). Wheels aligned within the 1/16th angle will never line up on top.
- There is no reset button for this puzzle and exiting the puzzle does not reset it. Solve the puzzle by manipulating pairs until the first valve wheel is at 3:00 and the neighbor is at 9:00. Click the first valve three times to get it to the 12:00 position. Do this for both the red and blue wheels. Once (A) is solved, work with (B) and (C). Follow the same procedure to solve for (B) and get (C) in position to work with (D). Once the lights on (D) are on quarter points, solve for (C). Valve (D) can be solved separately.
- Solving the puzzle drains the water in the square.
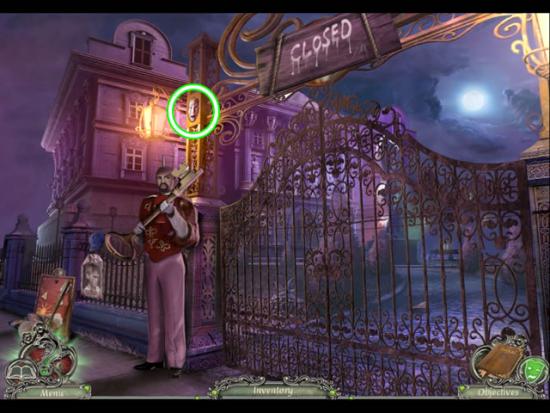
- Approach the intricate gate on the right.
Intricate Gate
- Collect the Mask (9/55) from the gatepost above the guard.
- Look closer at the shrine (A). Move the objects away at the base of the board; take the MEDALLION QUARTER (1/4).
- Back out of the scene.
- Look at the gate on the left.
Cemetery Gate
- Insert the CEMETERY KEY in the lock to open the gate.
Chapter 2: The Church and Amber’s Home

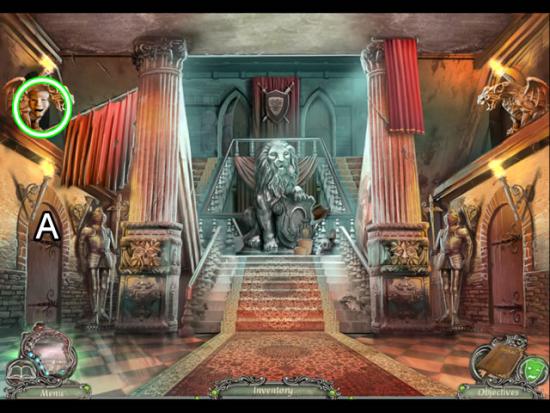
Cemetery
- Collect the Mask (10/55) from the tree.
- Pick up the SOLDIER’S HAT (A).
- Zoom in on the ivy-covered headstone (B); remove the ivy and uncover the PUNCH CARD (3/4). Pry out the MEDALLION QUARTER (2/4) from the smaller marker.
- Enter the church (C).
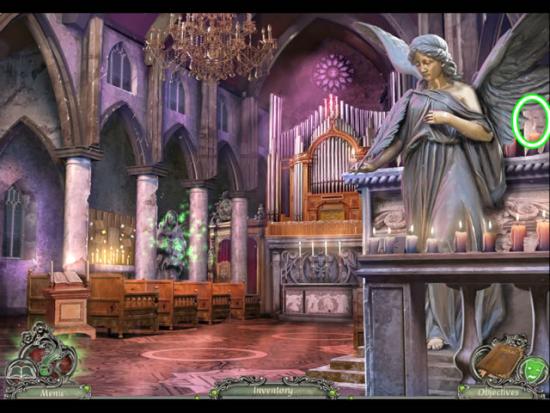
Church
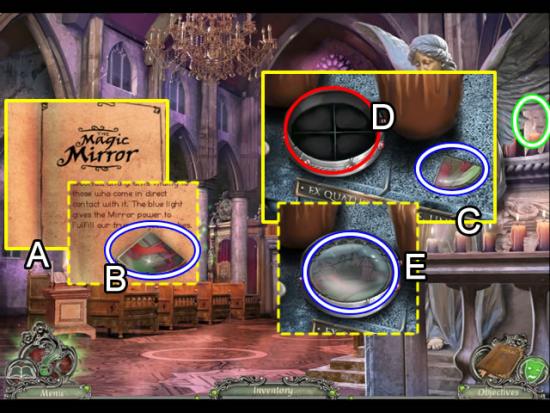
- Zoom in on the bookstand (A). Read the information about the “Magic Mirror”; take the MEDALLION QUARTER (3/4) from one of the pages (B).
- Inspect the candles (C). Pick up the MEDALLION QUARTER (4/4). Place the four MEDALLION QUARTERS in the slots in the container (D). Retrieve a whole MEDALLION (E).
- Find the Mask (11/55) under the angel’s wing.
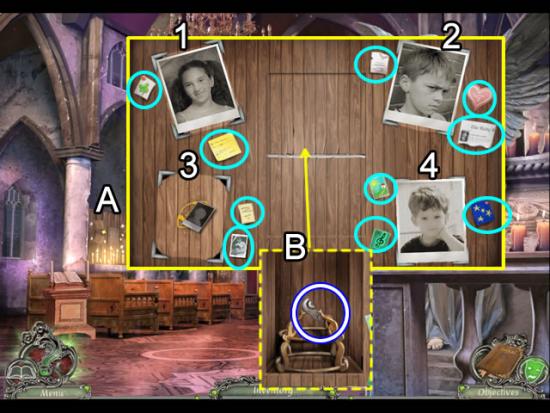
- Look closer at the missing children board (A).
- Insert the CHILD’S PHOTOS (4/4) in the slots on the board to open a puzzle.
- The goal is to match the photos with the information (aqua).
- Swap any two photos to get the correct positions.
- Correctly solving the puzzle opens the center compartment (B); take the AMULET (1/2) from the compartment.
- Solution. Melissa (1), Ben (2), David (3) and Amber (4).
- Play the hidden object scene.
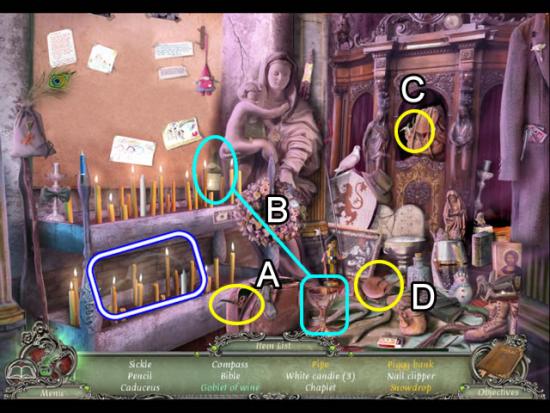
- Open the satchel (A) to find the Pipe.
- Pour the bottle of wine into the goblet (B); take the Goblet of Wine.
- Draw back the curtain (C); pluck the Snowdrop flower from the backpack.
- Open the bag to spread its contents on the floor (D). Get the Piggybank.
- Find the rest of the listed objects.
- The SICKLE goes to inventory.
- Return to the playground. Go forward to the play castle.
Play Castle
- Look closer at the case on the bench (A). Insert the MEDALLION in the slot to open a puzzle.
- The goal is to complete two rounds of place-the-object.
- Move the cursor around the scene until it turns into a hand. Pick up the object and examine the scene to find the likely place.
- Solution – Round One. Refer to inset (B) above. Place the man on the shadow (aqua). Put the stone in the empty spot in the circle (pink). Put the top of the tree on the empty tree (orange). Place the boat in the lake (white).
- Solution – Round Two. Refer to inset (C) above. Put the sun icon on the gate (white). Put the top on the castle tower (orange). Put the bucket in the sandbox (pink). Use the board to close the gap in the tower (aqua).
- Take the BLUE GEM that appears in the stage compartment (D).
- Follow the path at the back to the thorny bush.
Havengrove
- Use the SICKLE to remove the thorny bush (A).
- Pick up the CROWBAR on the path (B).
- Play the hidden object scene near the tree (C).

- Place the crown on the head of the doll (A); take the King.
- Open the box (B) to find the Diamond.
- Click the boot (C) to encourage the Hamster to come out.
- Find the rest of the listed objects.
- The cheese goes to inventory as a CHEESE TOY.
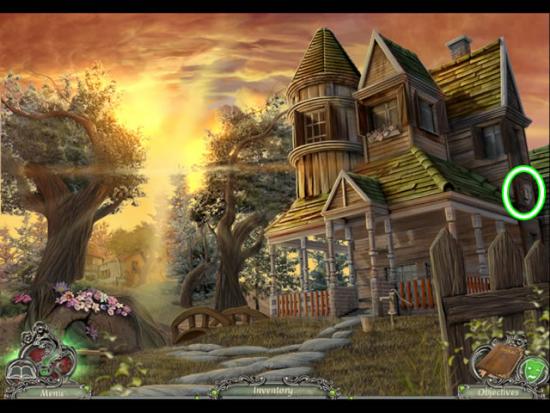
- Go forward to Amber’s house.
Amber’s House
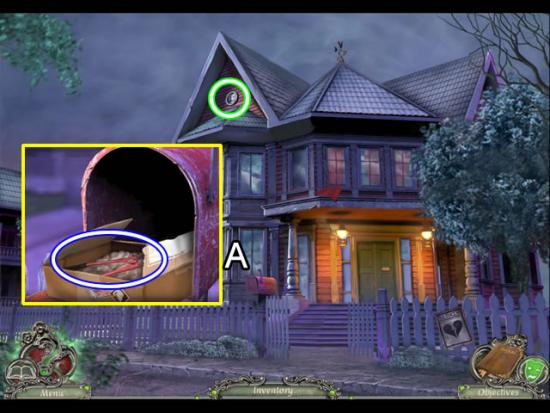
- Collect the Mask (12/55) from the eaves of the house.
- Look inside the mailbox (A). Open the package and take the CHAIN CUTTER.
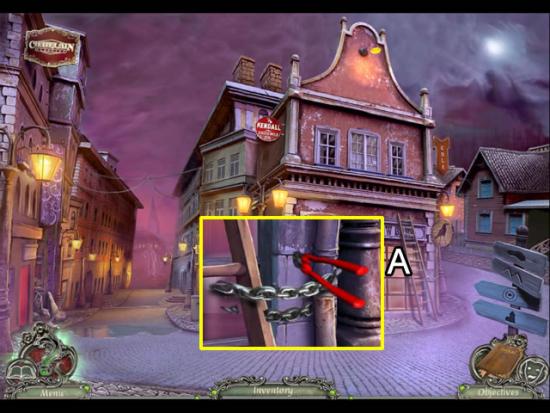
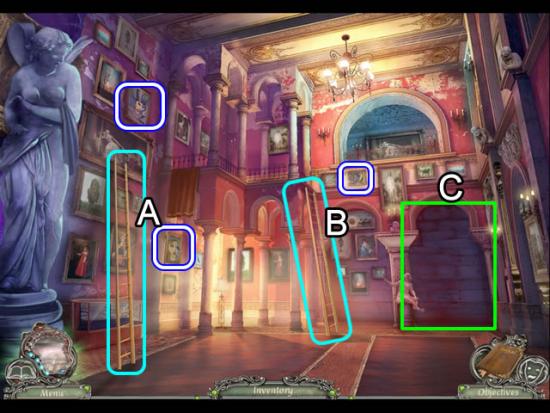
Street
- Zoom in on the ladder (A).
- Use the CHAIN CUTTER to free the LADDER.
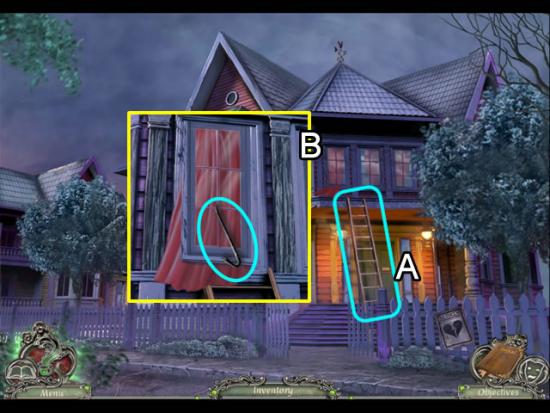
Amber’s House
- Place the LADDER against the side of the house (A).
- Use the CROWBAR to pry to the window loose.
- Open the window and enter Amber’s room.
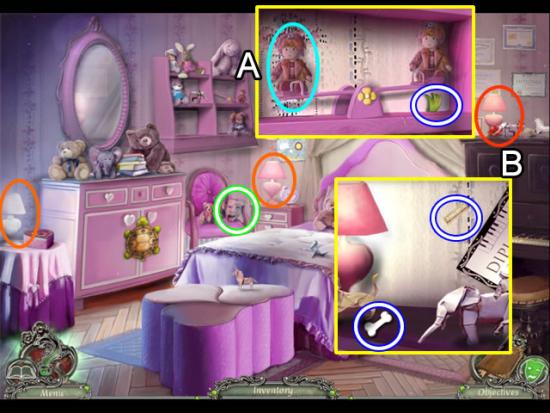
Amber’s Room
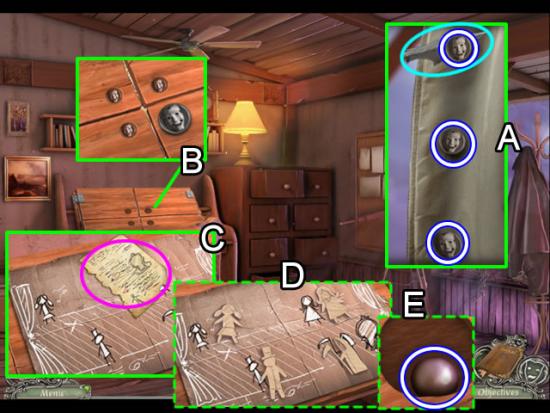
- Turn on the three lamps (orange).
- Take the Mask (13/55) on the chair.
- Look at the toys on the shelf (A). Place the TWIN DOLL on the empty teeter-totter seat (aqua); take the GRASS TOY.
- Examine the contents on the top of the piano (B). Look behind the diploma to find the PUNCH CARD (4/4). Move the origami toys to get the BONE TOY.
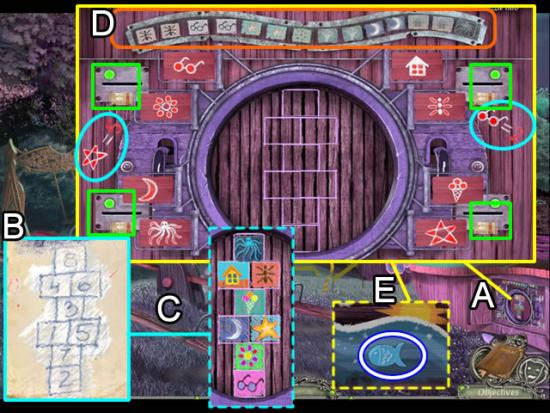
Play Castle
- Open the compartment doors in the side of the wooden horse (A).
- Insert the four PUNCH CARDS in the slots (green) to open a puzzle.
- Flip back through the pages of the journal to the entry for the hopscotch game (B) on the sidewalk in front of the music school in Havenhills. Note the position of the numbers.
- Refer to the clues on the board: Star = 5 and Glasses = 2. This refers to the number of red marks on the symbols. The star has five red points and the glasses have two red lenses. Look at the other symbols on the board and count the how much red is on each symbol: the ice cream cone has three red scoops; the bug has six red legs, etc.
- Once the symbols and numbers are figured out, drag each symbol from the board and place it on the hopscotch board where the number represented by the symbol matches the number on the hopscotch diagram from the journal (C).
- Finally, click the symbols in the order and number of times as shown on the strip above the puzzle (D). Click the bug twice, the glasses twice, the star twice, the flower once, etc.
- Completing the puzzle opens the center circle. Take the FISH TOY from the open compartment (E).
Amber’s Room
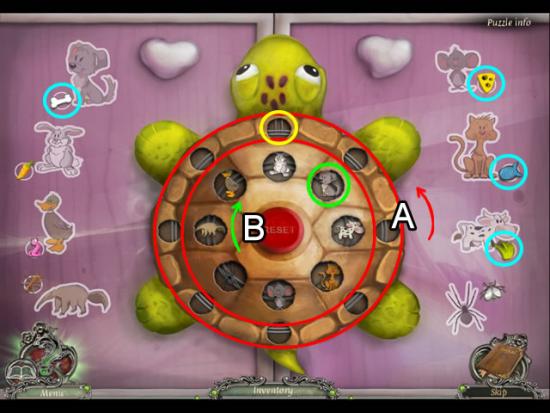
- Zoom in on the turtle dresser doors.
- Add the BONE, CHEESE, FISH and GRASS TOYS (aqua) to the circles with their corresponding animal to open a puzzle.
- The goal is to transfer the food from the board to the turtle so the food aligns with the correct animals in the center of the turtle.
- Click a food icon on the board to open the turtle’s mouth and add it to the turtle. The food will land in the top circle (yellow). At the same time the outer ring with the holes (A) rotates counter clockwise and the inner ring with the animals rotates clockwise. Begin adding the food based on the position of the animal in the green circle (the dog). Next add food for the animal to the right of the dog. Continue adding food for the animal to the right of the current animal until all the food has been added.
- Solution. Add the food in this order: bone, grass, fish, cheese, fly, ant, worm and carrot.
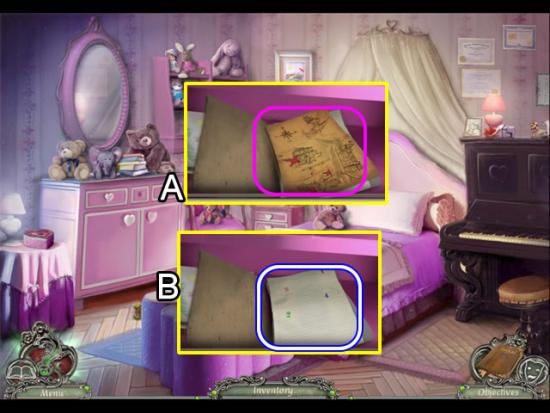
- Open the book on origami on the cabinet shelf (A). Pick up and examine the map. Each “X” marks a location where a metal plate is located. The map is added to the journal.
- Take the BLANK PAPER that was under the map.
Play Castle
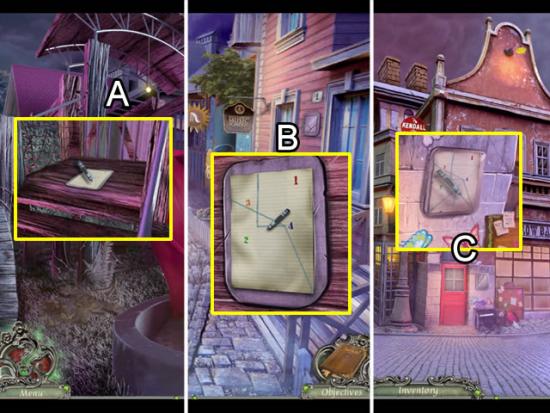
- Zoom in metal plate located on the top of the slide.
- Put the BLANK PAPER on the plate. Use the CRAYON to trace the lines (A).
- Receive a piece of PAPER for inventory.
Havenhills
- Repeat the process with the plate on the side of the building (B).
Street
- Finish the process with the plate next to the red door (C).
- The completed PAPER opens a puzzle.
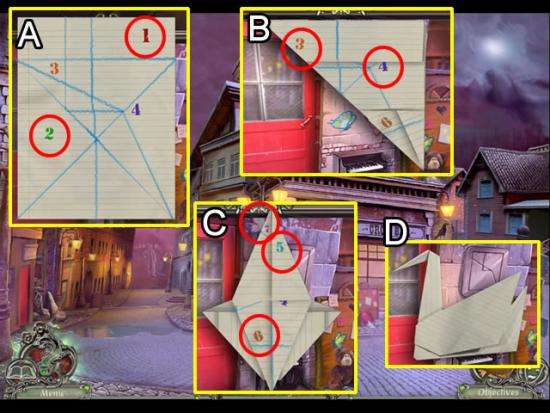
- The goal is to fold the paper in the correct order to create an origami swan.
- Be sure and click directly on the numbers.
- Click the numbers “1” and “2” as shown in inset (A). The result is shown in inset (B).
- Click the numbers “3” and “4”. The result is shown in inset (C).
- Click “5”, “6” and the “7” at the very top.
- Take the ORIGAMI SWAN (D).
Amber’s Room
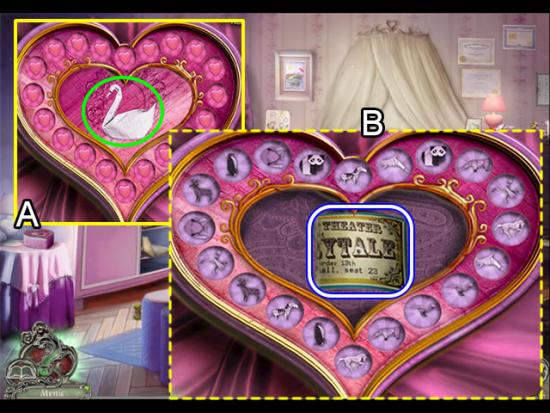
- Inspect the heart-shaped box on the table (A).
- Insert the ORIGAMI SWAN in the center to open a puzzle.
- The goal is to find the matching pair of creatures hidden behind the hearts. An incorrect match shifts the hearts one position. Finding a match stops the shift.
- The location of the creatures is shown above (B). Take the TORN THEATER TICKET.
Havenhills
- Speak to Ben’s mother.
- Play the hidden object scene.
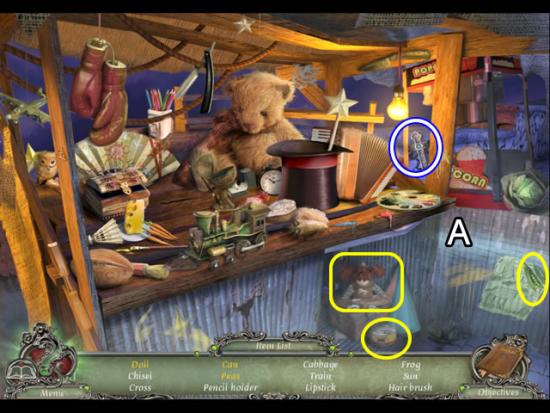
- Open the tin door (A) to find the Doll, Can and Peas.
- Find the rest of the listed objects.
- The CROSS goes to inventory.

Cemetery
- Put the CROSS in the inset at the base of the grave marker (aqua) to reveal a lock mechanism.
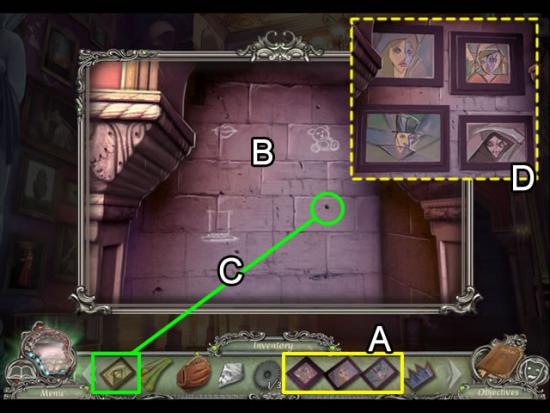
- Look closer at the mechanism to open a puzzle.
- The goal is to find four faces by flipping and rotating the image segments.
- The image on each of the four segments (labeled A – D above) can be changed by clicking it. Use the four buttons (1 – 4 above) to rotate the images.
- Button 1 rotates A and C.
- Button 2 rotates B and D.
- Button 3 rotates A and B.
- Button 4 rotates C and D.
- Correctly solving a face changes it to shades of green.
- Tip. If only one segment of a face cannot be matched, try solving a different image.
- Take the AMULET (2/2) from the open compartment.

Church
- Zoom in on the altar.
- Insert the two AMULET pieces in the inset (aqua). Click each wing that appears on either side of the amulet to open the compartment.
- Put the BLUE JEWEL in the open slot (green) to equalize the energy in the blazing mirror (B). Remove the mirror. Take the sealed envelope from the compartment.
- Open the envelope and read the letter (C); take the SQUARE KEY.
Town Square
- Examine the hand on the statue (A).
- Insert the SQUARE KEY in the keyhole above the wrist; attempt to remove the jewel.
- After the cutscene, remove the TORN THEATER TICKET from the hand. It doesn’t go to inventory, but stays next to the hand.
- Add the TORN THEATER TICKET from inventory to the ticket from the hand. Mend the THEATER TICKET with the DUCT TAPE.
- Approach the intricate gate.
Intricate Gate
- Put the SOLDIER’S HAT on the guard (A).
- Zoom in on his chest (B). Insert the THEATER TICKET in the slot to open the gates.
- Pick up the MIRROR SHARD (1/5) from inside the gate.
Chapter 3: The Theater Yard and Basement
Theater Yard
- Collect the Mask (14/55) from the statue.
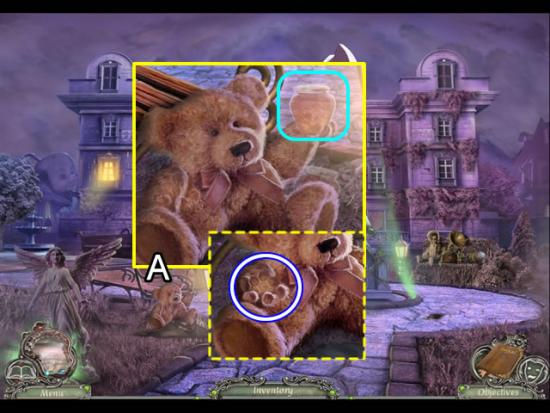
- Remove the cloth (A) covering the bear; take the HONEY JAR.
- Examine the area to the right of the fountain (B). Pick up the poster.
- Use the CROWBAR to remove the loose BRICK. Take the TOKEN (1/3) from the hole (C).
- Play the hidden object scene.
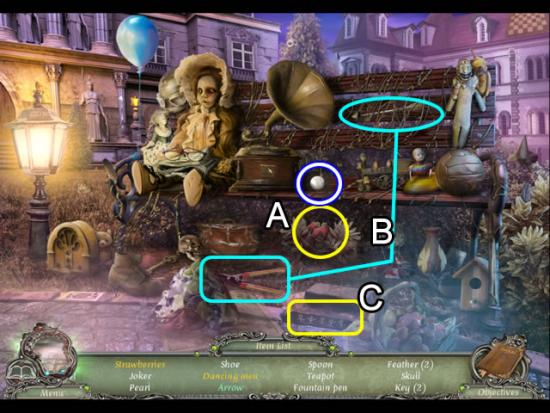
- Move the leaves to find the Strawberries.
- Snip the vines with the clippers (B) and take the Arrow.
- Remove the brick to find the Dancing Men.
- Find the rest of the listed objects.
- Receive the PEARL (1/5).
- Go to the left.
Backyard
- Collect the Mask (15/55) from the top of the second column.
- Peer into the fountain (A). Pick up the drawing.
- Use the BRICK to loosen the pipe. Move the SHARP PIPE back and forth until it comes free.
- Continue up the path.
Workshop
- Collect the Mask (16/55) on the right side of the shop.
- Examine the stairs (A). Pick up the origami horse; unfold it to read a note.
- Take the BEE SMOKER.
Backyard
- Use the BEE SMOKER to calm the bees (A).
- Use the SHARP PIPE as a spout to fill the HONEY JAR (B). Take the FULL HONEY JAR.
Theater Yard
- Give the bear (A) the FULL HONEY JAR.
- Take the offered METAL HONEYCOMB.
Workshop
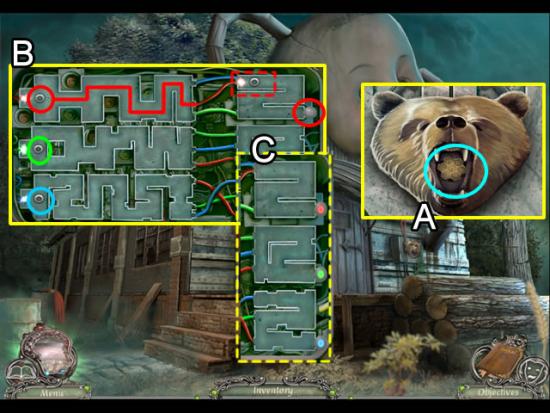
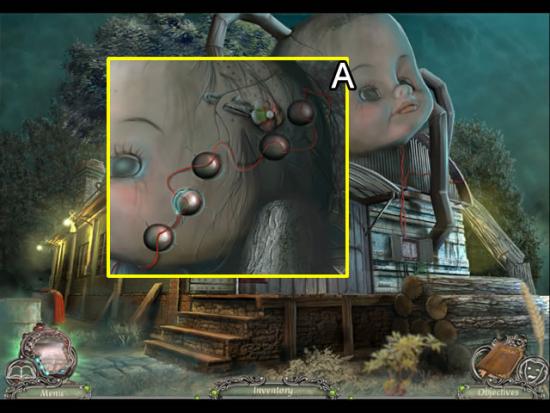
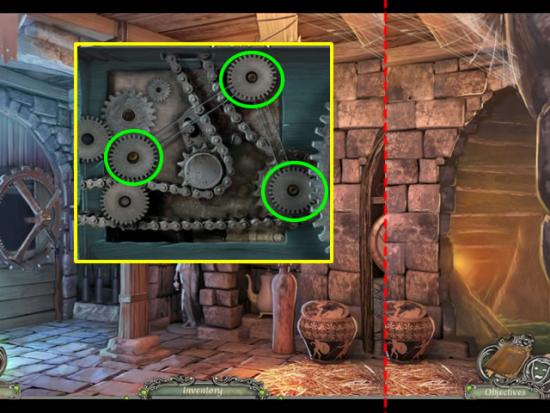
- Zoom in on the bear head (A). Click to open its mouth; insert the METAL HONEYCOMB to open the panel and start a puzzle (B).
- The goal is to guide the three energy currents through mazes and colored wires to the lights at the end.
- Use the small disk to pull the energy spark. Connect to the second maze via the corresponding colored wire (see the red path above). Guide the spark through the second maze to light up the bulb (C) for all three lights.
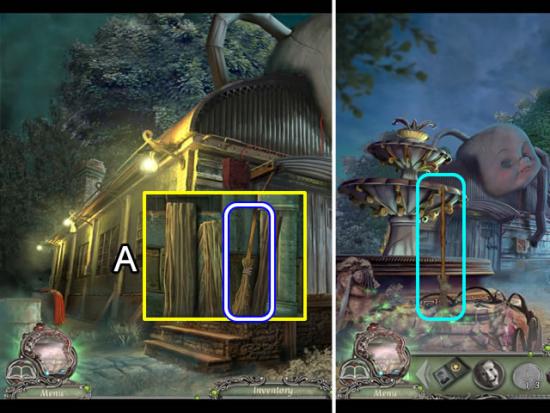
- Look at the boards leaning against the side of the shop (A); move them to find a BROOM.
Backyard
- Use the BROOM to sweep the dust off the small playground in front of the fountain.
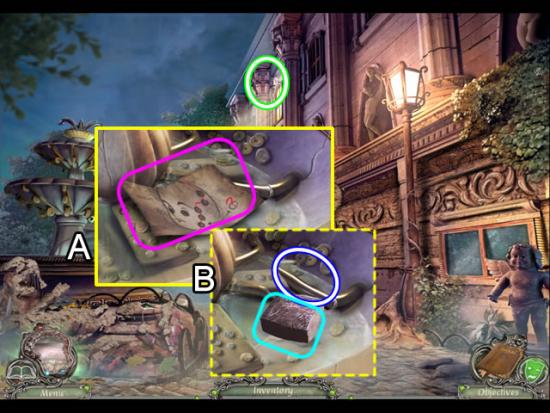
- Play the hidden object scene.
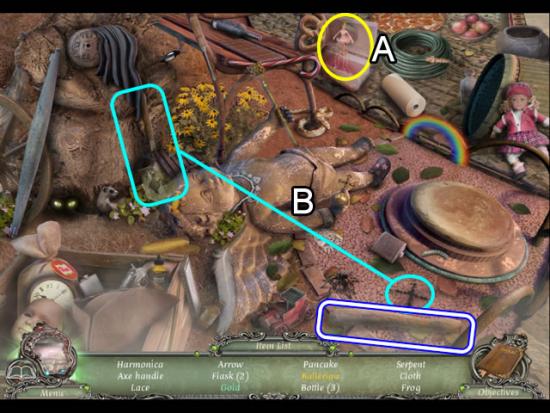
- Open the box (A) to find the Ballerina.
- Use the shovel to dig at the “X” (B) and find the Gold.
- Find the rest of the listed objects.
- The AXE HANDLE goes to inventory.
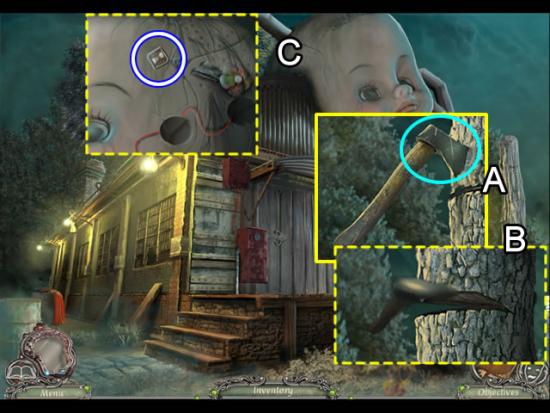
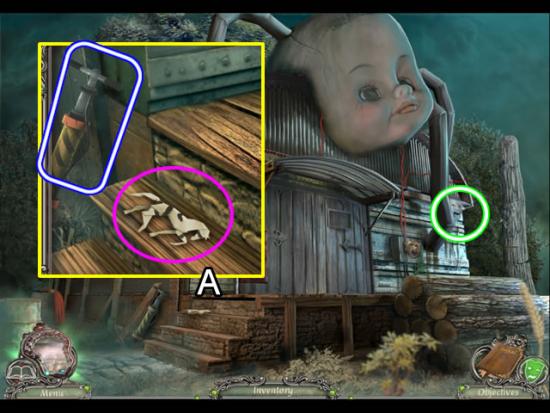
Workshop
- Look at the dead tree (A). Attach the AXE HANDLE to the axe head.
- Use the AXE to cut through the top of the tree. The tree lands on the roof.
- Examine the big doll head (C); take the MEDALLION.

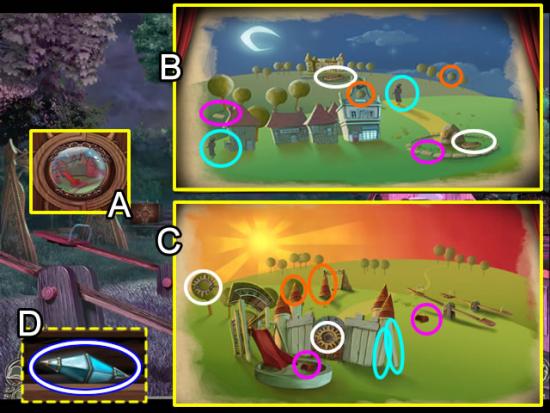
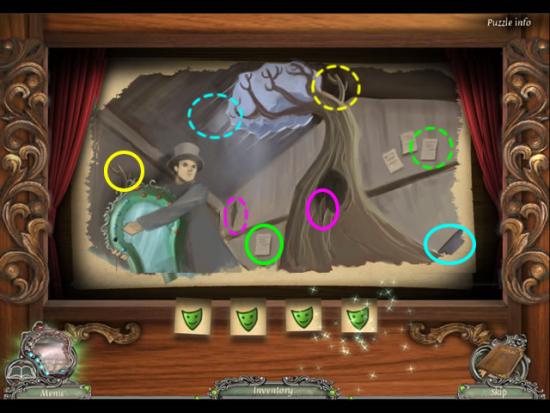
Theater Yard
- Insert the MEDALLION in the inset at the base of the statue (A) to open two place-the-object puzzles.
- The solutions are shown above (B) and (C). The solid colors show the pieces to pick up. The same colored dashed outlines indicate their placement.
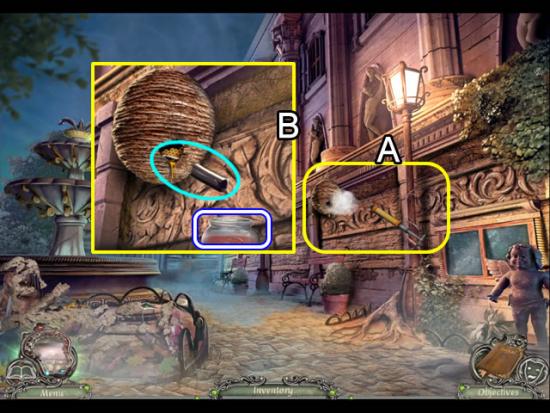
- Take the PEARL (2/5) and WIRE HOOK from the stage (D).
Backyard
- Use the WIRE HOOK to slip the latch on the basement window by the small angel.
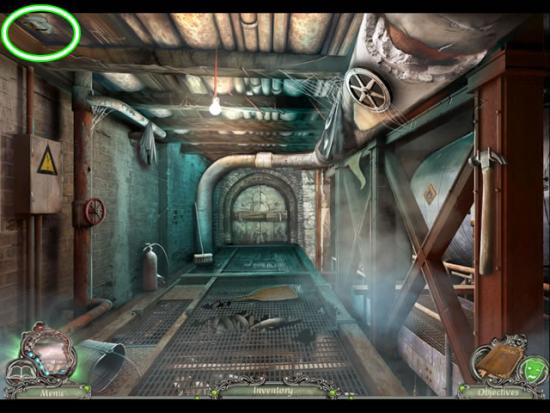
Theater Basement
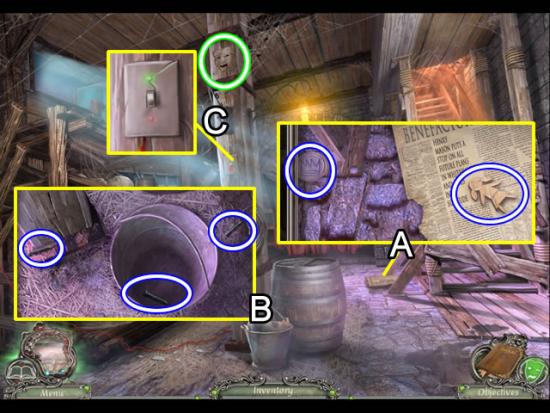
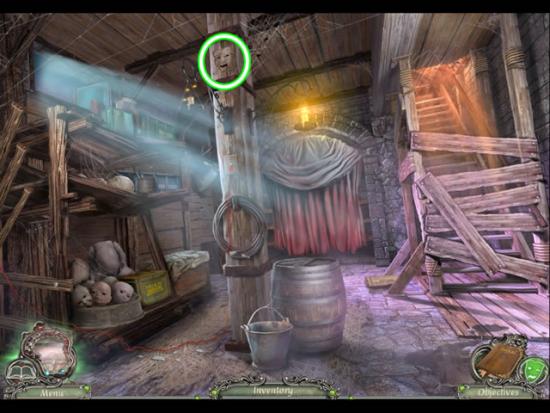
- Collect the Mask (17/55) on the beam.
- Read the papers on the floor (A). Take the CARDBOARD FIGURINE (1/4) hidden between the papers. Pick up the TOKEN (3/3).
- Examine the bucket (B). Pick up each NAIL (3/3).
- Flip the switch (C) to drop the slats.
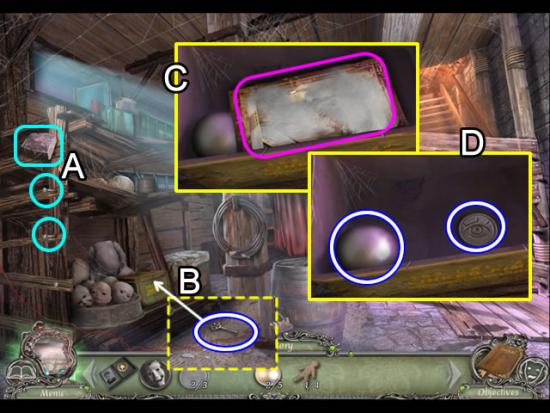
- Put the three NAILS in the top three slats (A); pound them in with the BRICK.
- Pick up the BOX KEY that is jarred loose (B); use it to open the green box on the lower shelf.
- Peer into the box (C). Dust off the old photograph for the journal.
- Take the PEARL (3/5) and TOKEN (3/3) from the bottom of the box.

Backyard
- Look into the fountain (A); examine the rectangular stone. Put the three TOKENS in the empty slots.
- Note the three colored drops of water on the stone (B). Trace the cracks from the drops back to the slots. Swap the colored TOKENS around until they are in the slot that leads to the same colored drop.
- Matching the tokens and drops opens a puzzle.
- The goal is to find the tokens with the same pattern (not the same color) as those in the stone. Clicking an incorrect token discards any collected correct picks for that token and shifts the tokens in the fountain. Each token in the stone has four matching tokens.
- Solution.
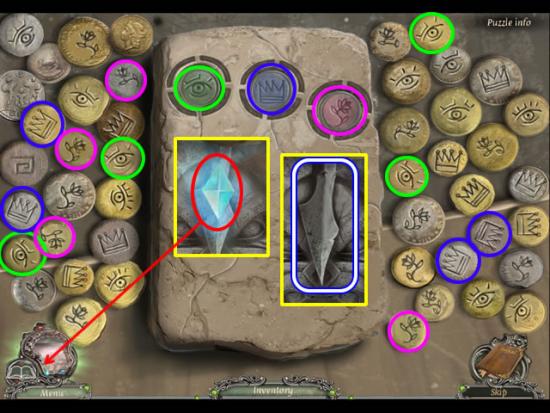
- Click the flashing tokens on the stone to open the compartment.
- The blue jewel is added to the mirror frame (red). Take the SHARP STONE.
- Play the triggered hidden object scene.
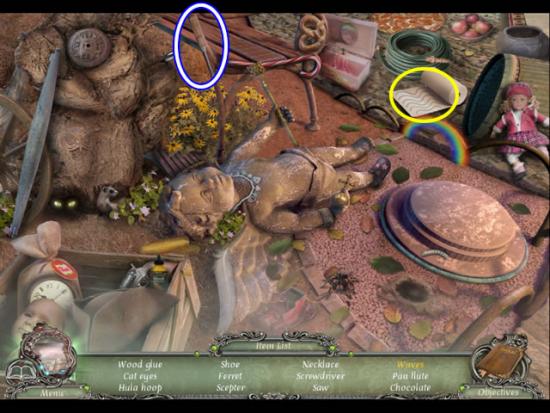
- Unroll the paper towels to find the Waves (yellow).
- Find the rest of the listed objects.
- The SCREWDRIVER goes to inventory.
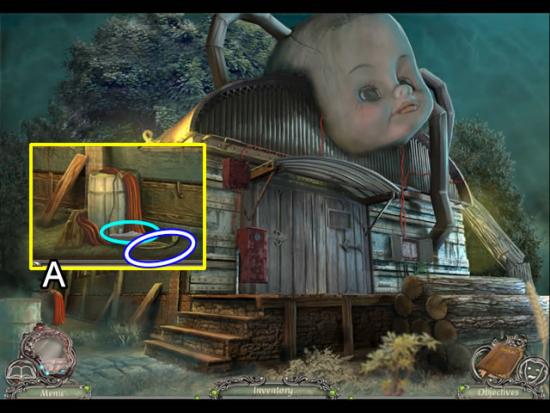
Workshop
- Look closer at the barrel with the red cloth on it (A).
- Use the SHARP STONE to cut off a length of CURTAIN ROPE.
Theater Basement
- Use the CURTAIN ROPE to pull back the red curtains on the back wall.
- Play the hidden object scene.
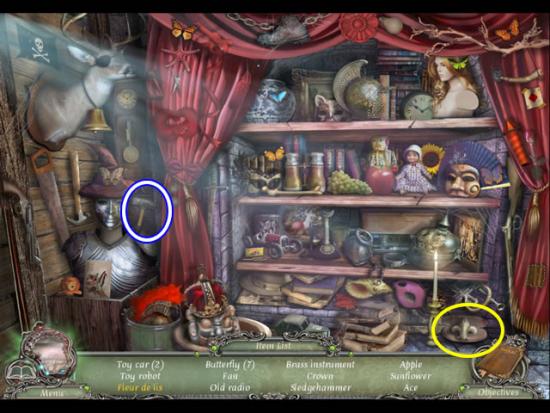
- Open the case to find the Fleur-de-lis (yellow).
- Find the rest of the listed objects.
- The SLEDGEHAMMER goes to inventory.
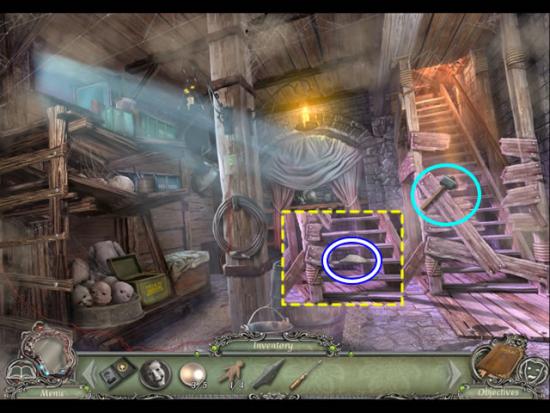
- Smash through the boards blocking the stairs with the SLEDGEHAMMER.
- Pick up the MIRROR SHARD on the steps (2/5).
Chapter 4: Theater Stage Area
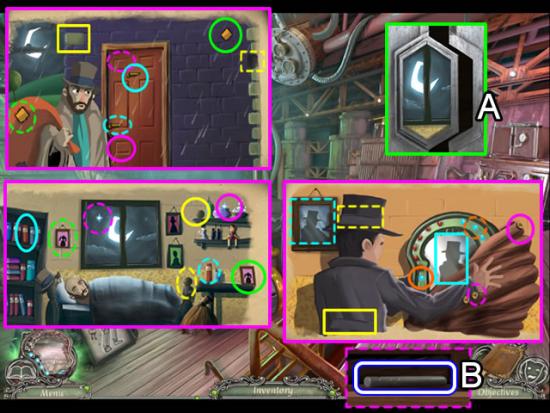
Backstage
- Collect the Mask (18/55) from the cobwebs at the top left.
- Pick up the MIRROR SHARD (3/5) on the floor.
- Examine the bottom of the curtain raising mechanism (A). Swap the mixed-up numbers below the ropes until they are in the 1-2-3-4 sequence; remove the numbers to uncover the letters R-O-P-E under them and a CARDBOARD FIGURE (2/4).
- Look at the top of the mechanism (B). Rearrange these letters to spell R-O-P-E and open the curtain.
- Go to the storage area to the left of the open curtains.
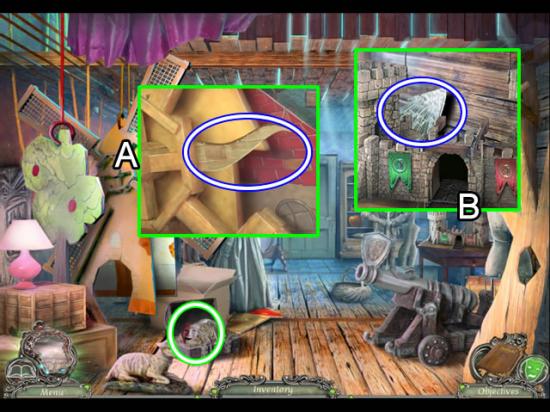
Storage
- Collect the Mask (19/55) from the open case above the lamb.
- Inspect the windmill (A); take the SUN RAY (1/3).
- Look closer at the miniature castle (B); pick up the MIRROR SHARD (4/5).
- Back out of the area and go right.
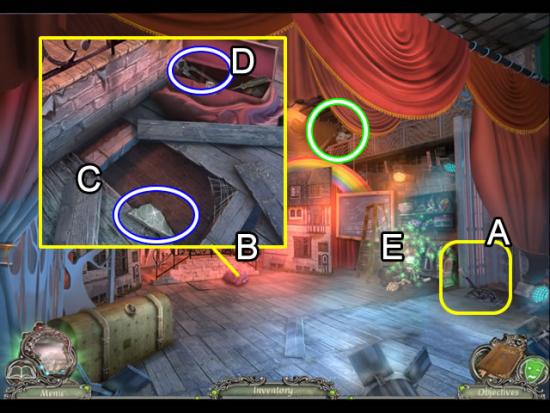
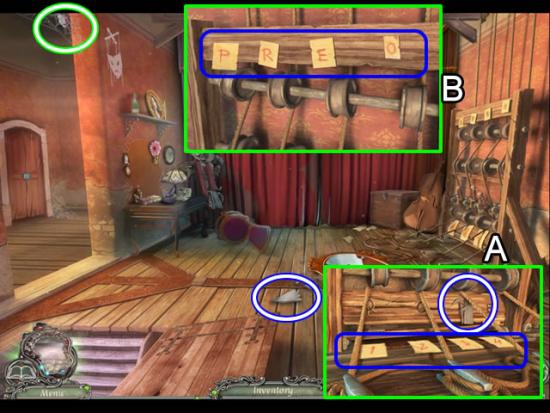
Stage
- Pull the lever (A) to turn on the lights.
- Pick up the Mask (20/55) from the area above the rainbow.
- Zoom in on the front of the stage (B). Remove the boards (C) and take the MIRROR SHARD (5/5). Remove the cloth from the toolbox, open it (D) and get the NAIL PULLER.
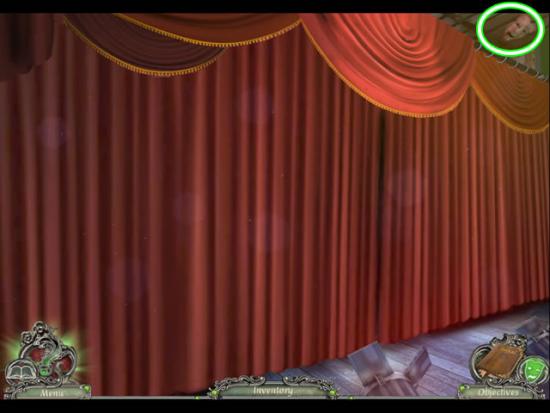
- Play the hidden object scene (E).
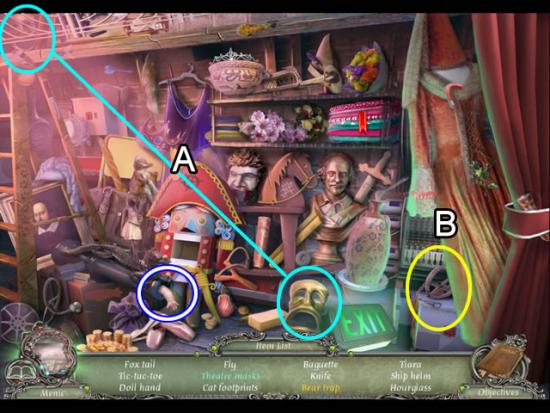
- Put the Theater Masks together (A).
- Pull back the curtain (B) to uncover the Bear Trap.
- Find the rest of the listed objects.
- The DOLL HAND goes to inventory.
Backstage
- Zoom in on the mirror frame (A). Place the MIRROR SHARDS (5/5) in the frame to open a puzzle.
- Place each shard in the frame based on its shape. Pick up a piece and place it in the frame. Move the cursor close the center of a shard (pink) to change the cursor to a rotate circle. Click to rotate and then pick up and place the shard again. Repeat the process until the correct position is located. Correctly placed pieces lock into position. Take the MAKE-UP MIRROR.
- Place the MAKE-UP MIRROR on the wall (B) to trigger a hidden object scene on the table (C).
- Find the listed objects.
- The TWEEZERS go to inventory.
- Go down the stairs to the basement.
Theater Basement
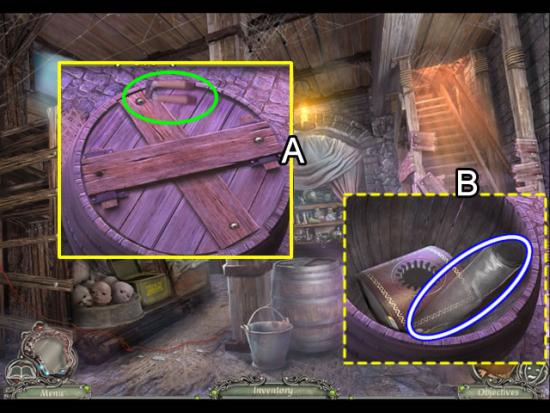
- Look at the top of the barrel. Use the NAIL PULLERS (green) to nip the tops off of the four nails (A). Remove the two boards and take off the lid.
- Take the TRANSPARENT MUSIC SHEET (B). Note the box with the gear-shaped lid.
Stage
- Zoom in on the set with the house and rainbow.
- Place the TRANSPARENT MUSIC SHEET on the green board to open a puzzle.
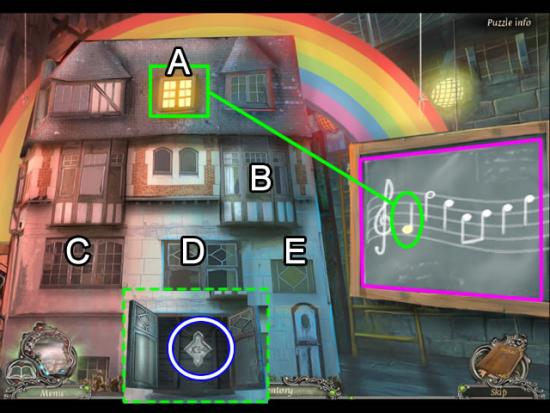
- The goal is to find the window sequence that when clicked, corresponds to the music notes.
- A correct window turns a note yellow. Selecting an incorrect window resets the notes.
- Solution. Click the lettered windows in this order: A-E-D-B-C-D-E.
- Take the MANAGER’S KEY from the open window.
- Go back once and then left to the storage area.
Storage
- Zoom in on the door at the back of the room.
- Insert the MANAGER’S KEY in the inset. Press the symbol key down and then pull the handle to open the door.
Manager’s Office
- Collect the Mask (21/55) next to the telephone.
- Open the bottom cabinet drawer (A).
- Use the TWEEZERS to extract the GEAR from the locked box (B).
- Examine the bulletin board (C) and take the drawing of the secret tunnel for the diary.
Theater Basement
- Look inside the barrel again.
- Put the GEAR in the box and click to open the lid. Take the LOCK PICK
Backstage
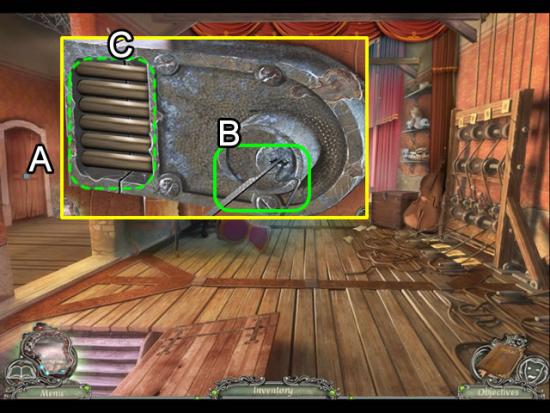
- Zoom in on the door on the left (A).
- Insert the LOCK PICK in the key slot (B) to open a puzzle.
- The goal is to retract all of the bars (C) simultaneously.
- Selecting a correct bar retracts it. Selecting an incorrect bar resets all of the bars. The solution to the puzzle is random.
Boiler Room
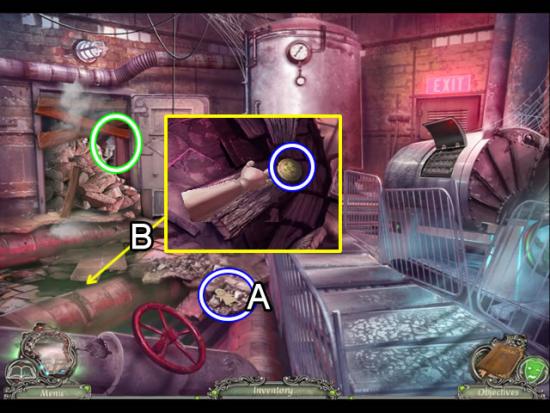
- Collect the Mask (22/55) from the debris in the door.
- Pick up the CARDBOARD FIGURE (3/4) from the floor (A).
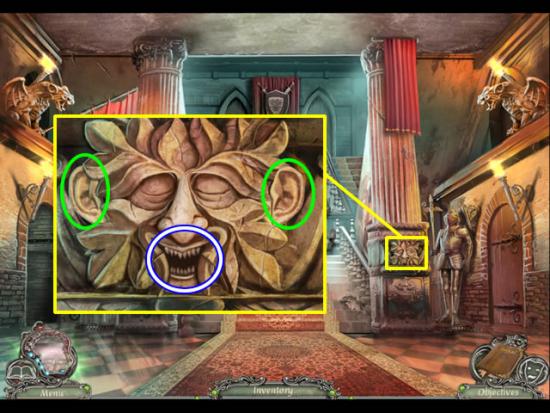
- Zoom in on the hole in the floor (B). Use the DOLL HAND to retrieve the MEDALLION.
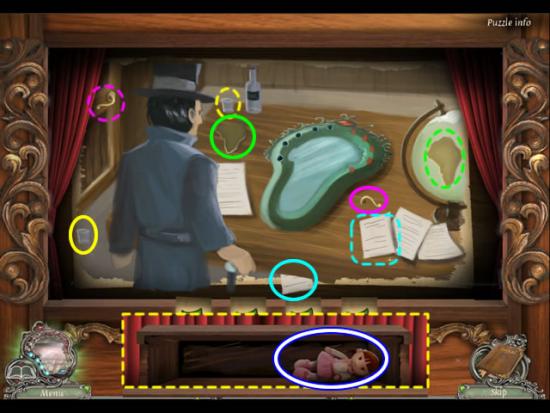
- Look closer at the bottom of the door (A). Continue to click on each metal panel until the stage opens on two place-the-object puzzles.
- The solutions are shown above (B) and (C). The solid colors show the pieces to pick up. The same colored dashed outlines indicate their placement.
- Take the PEARL (4/5) from the bottom of the stage (D).
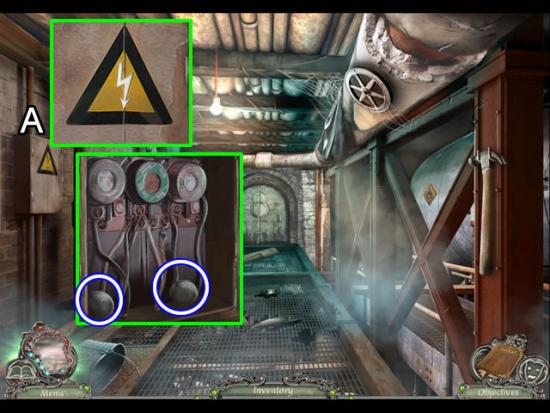
- Examine the machine (A). Use the SCREWDRIVER to remove the grating and open a puzzle.
- The goal is to use the up and down arrows (B) and the left and right arrows in each row to place the colored gauges in the same row as the colored arrow (see above for the solution).
- The beginning position is random.
- Completing the puzzle opens a compartment (C). Zoom in and take the blue jewel (red) for the mirror.
Stage
- Insert the MEDALLION in the trunk (A) lock (green). Press to open the top.
- Move the contents to find the CARDBOARD FIGURE (4/4) in the trunk (B).
Backstage
- Play the hidden object scene on the make-up table.
- Find the listed objects.
- The HERBICIDE goes to inventory.
- Go left to the storage area and enter the manager’s office.
Manager’s Office
- Examine the coat (A). Use the SHARP STONE (aqua) to remove the three BUTTONS. The buttons combine with the CLUE button in inventory to form a BUTTON item.
- Insert the four BUTTONS in the slots in the desk (B). Open each door panel.
- Take the page for the journal (C). Place the CARDBOARD FIGURES (4/4) on the drawing.
- Swap the CARDBOARD FIGURES on the drawing until they match the white stick figures (D).
- Take the PEARL (5/5) from the desk opening.
- Exit the theater
Chapter 5: The Workshop
Workshop
- Zoom in on the doll head (A).
- Put the PEARLS (5/5) in the empty slots. Swap them until the lines on the pearls match the wiring as shown above.
Doll Manufacturing Room
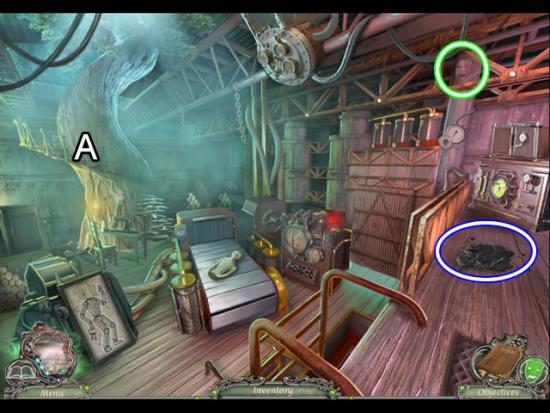
- Collect the Mask (23/55) from the scaffolding.
- Pick up the CHARCOAL.
- Zoom in on the tree of puppets (A).
Tree of Puppets
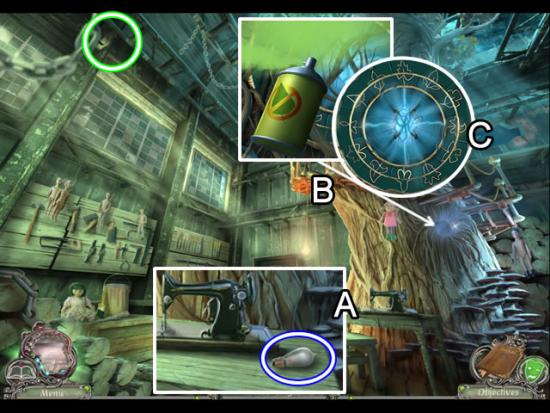
- Collect the Mask (24/55) from the rafters by the chain.
- Take the FLASH BULB from the sewing machine table (A).
- Peer into the tree hollow (B). Use the HERBICIDE to clear vines and open a puzzle.
- The goal is to swap the tops of the leaves so they match the bottom ring (C). A correctly matched pair light up. Receive the blue jewel for the mirror for solving the puzzle.
- Go through the door at the back of the room.
Scenography Workshop
- Play the hidden object scene.
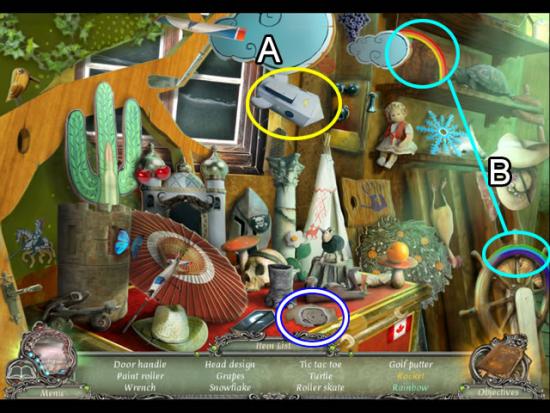
- Move the cloud (A) to find the Rocket.
- Attach the bottom part to the Rainbow (B).
- Find the rest of the listed objects.
- The HEAD DESIGN goes to inventory.
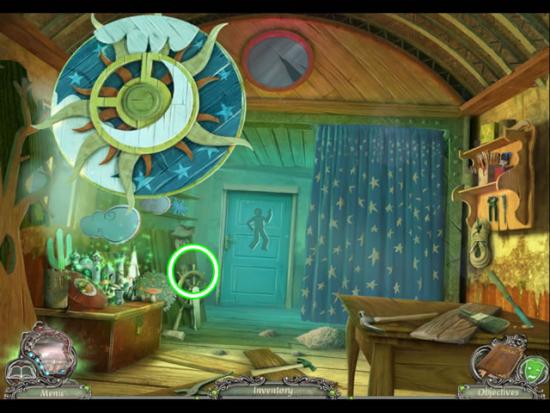
- Collect the Mask (25/55) from behind the ship’s helm.
- Look closer at the paint shelf (A). Take the SUN RAY (2/3).
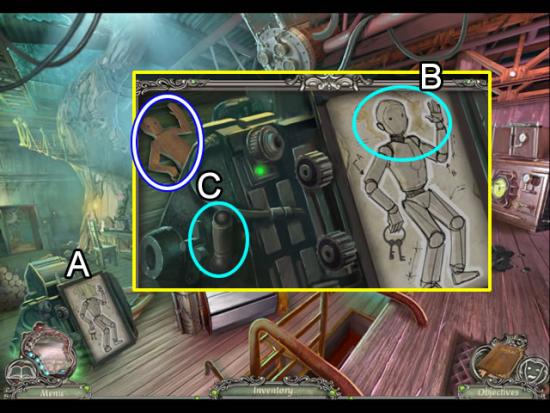
Doll Manufacturing Room
- Zoom in on the machine board (A).
- Put the HEAD DESIGN on the torn design sheet (B).
- Pull the lever (C) to start the scanner; take the DOLL DESIGN.
Scenography Workshop
- Insert the DOLL DESIGN in the same-shaped outline on the rear door.
- Enter the Atelier.
Atelier
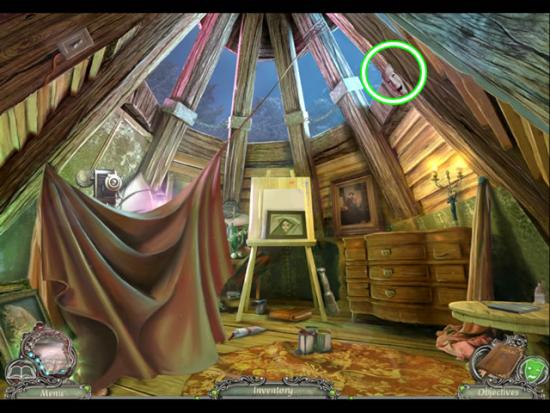
- Collect the Mask (26/55) from the beam by the right window.
- Examine the easel (A). Take the PAINTING OF GRIM REAPER and the PHOTO PAPER that is under the painting.
- Pick up the PESTLE and the book (B) for journal information.
- Remove the drape (C) to find a hidden object scene.
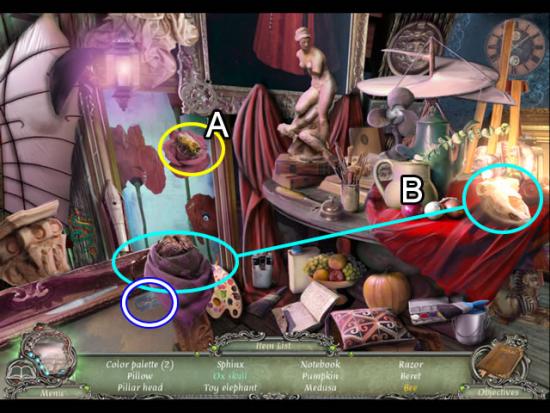
- Open the flower to find the Bee (A).
- Put the horns on the Ox Skull (B).
- Find the rest of the listed objects.
- The RAZOR goes to inventory.
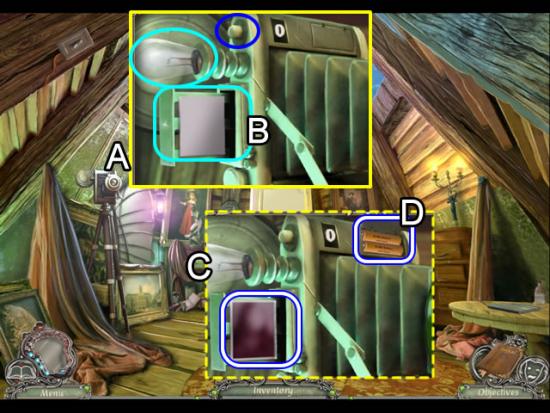
- Zoom in on the camera (A).
- Insert the FLASHBULB in the socket. Open the compartment on the side (B); add the PHOTO PAPER and close the compartment. Press the button (blue).
- Zoom back in on the camera. Open the compartment (C); take the UNDEVELOPED PHOTO. Open the battery compartment (D); take the BATTERY PACK.
- Flip the light switch (A) to change the lighting.
- Look at the table (B). Put the UNDEVELOPED PHOTO in the developing tray; take the PHOTO OF ME.
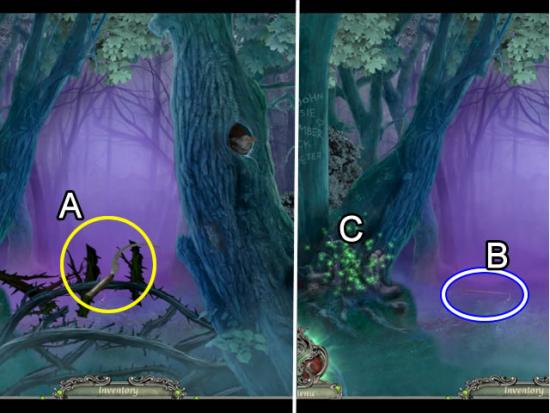
Tree of Puppets
- Examine the crack in the tree bark.
- Use the RAZOR to scrape off the three drops of RESIN.
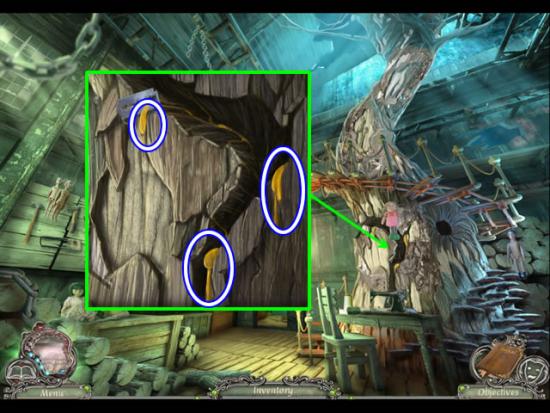
- Zoom in on the worktable (A).
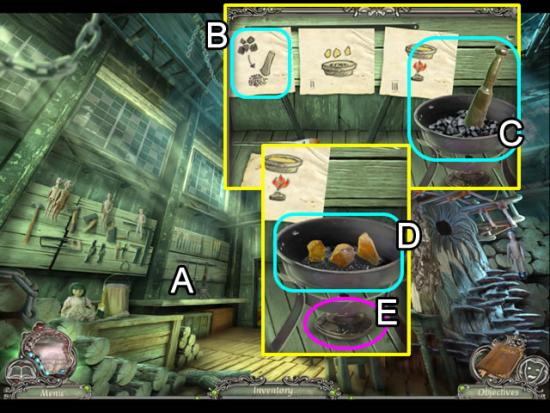
- Follow the directions (B) to make the RESIN GLUE: Put the CHARCOAL in the bowl and grind it with the PESTLE (C).
- Add the RESIN (3/3) (D) and click the burner (E) to light it and create the glue.
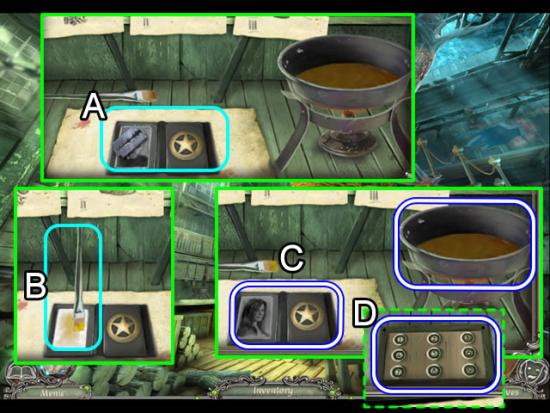
- Put the BADGE on the paper (A); use the RAZOR to remove the existing picture.
- Dip the brush in the resin glue; apply the glue to the empty photo place on the badge (B).
- Place the PHOTO OF ME on the badge. Take the new BADGE and the container of RESIN GLUE.
- Move the paper; take the KEYBOARD that was under it (D).
Doll Manufacturing Room
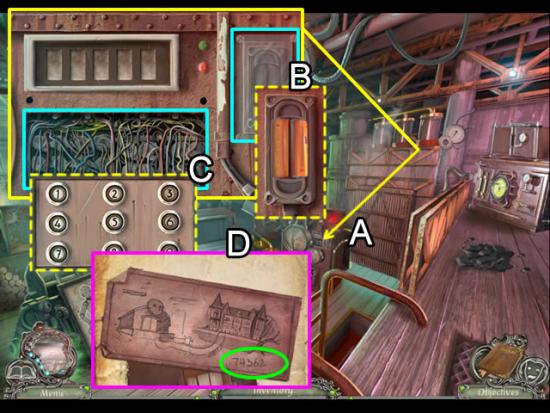
- Look at the control panel on the machine in front of the metal doors (A).
- Use the SCREWDRIVER access the battery compartment (B). Remove the cover and insert the BATTERY PACK.
- Place the KEYPAD on the wires (C) and open a puzzle.
- Flip back through the journal pages to the document taken from the bulletin board in the manager’s office (D) about the underground passage. Key in the numbers 7-4-3-6-2 that were noted on the drawing to open the doors.
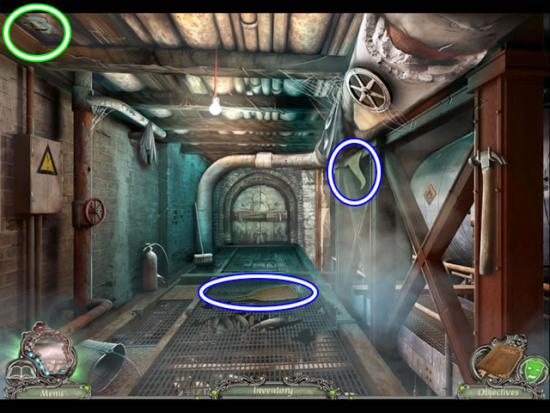
Passage
- Collect the Mask (27/55) on the roof.
- Pick up the BROKEN OAR from the floor and the SUN RAY (3/3) from the beam below the pipe.
Scenography Workshop
- Play the hidden object scene.
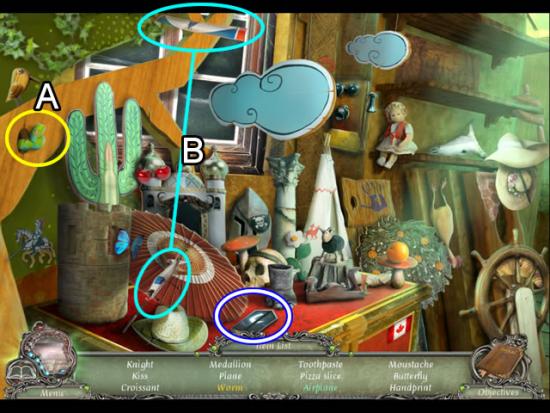
- Click the bird to encourage the Worm to come out (A).
- Attach the wings to the Airplane (B).
- Find the rest of the listed objects.
- The Medallion goes to inventory as THE TALE OF A REWARD.
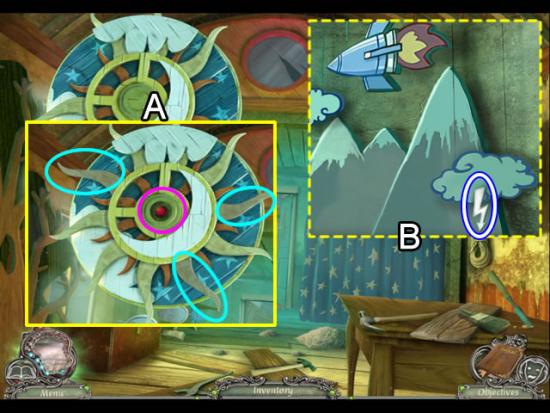
- Look closer at the wooden sun (A). Attach each SUN RAY (3/3) to open the center. Press the red button to raise the curtain (B).
- Examine the set that was hidden by the curtain (B). Take the LIGHTENING bolt.
Doll Manufacturing Room
- Zoom in on the machine with the gauges (A). Insert THE TALE OF A REWARD in the slot to open the metal doors and start three place-the-object puzzles.
- The solutions are shown above. The solid colors show the pieces to pick up. The same colored dashed outlines indicate their placement.
- Take the METAL BAR from the stage compartment (B).
Passage
- Look at the electrical box (A). Put the LIGHTENING bolt in the inset to open the box.
- Take the MARBLES (2/4) from the box.
Atelier
- Play the hidden object scene.
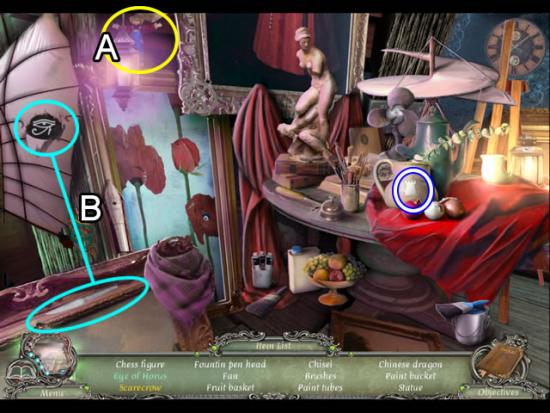
- Move the cloth (A) to find the Scarecrow.
- Use the knife to cut the light reflector and uncover the Eye of Horus (B).
- Find the rest of the listed objects.
- The CHESS FIGURE (1/2) goes to inventory.
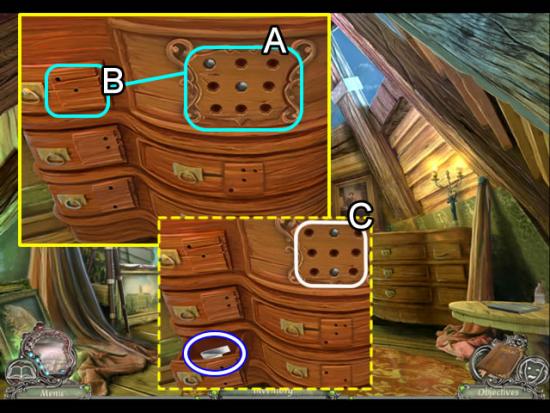
- Zoom in on the dresser.
- Place the two MARBLES in the center panel (A) to open a puzzle.
- Move the marbles to match the patterns on the three drawers with the two holes on them (B) to open them.
- Opening the bottom drawer (C) reveals some GAUZE.
Scenography Workshop
- Zoom in on the worktable (A).
- Place the BROKEN OAR on the table (B) next to the broken oar handle. Put the METAL ROD on top of the two pieces (aqua). Pour the RESIN GLUE over the rod and oar parts.
- Wrap the GAUZE (pink) around the oar and rod (C). Take the repaired OAR.
- Exit the workshop. Return to the town square and then go right to reach the lake.
Lake
- Put the OAR in the boat.
- Paddle across the lake to the mansion.
Chapter 6: The Mansion Entries, Basement and Library
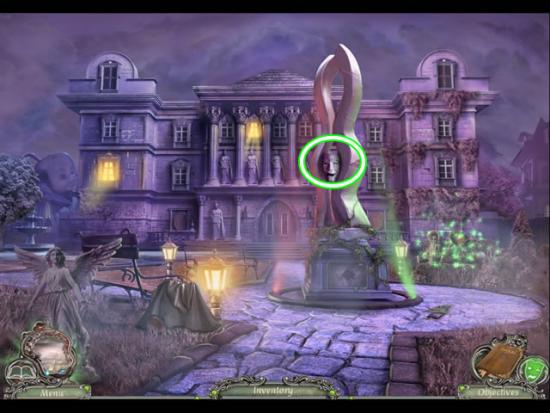
Mansion
- Collect the Mask (28/55) on the mansion by the right gate statue.
- Pick up the CHESS FIGURE (2/2) from the car (A).
- Examine the base of the right gate lamp (B). Insert a CHESS FIGURE in the inset; take the CHESS FIELD (1/2).
- Examine the base of the left gate lamp (C). Insert a CHESS FIGURE in the inset; take the CHESS FIELD (2/2).
- Zoom in on the gate lock (D). Place the CHESS FIELD (2/2) pieces in the empty slots to open a puzzle.
- The goal is to match all of the chess pieces.
- Match according to color and piece: white rook and white rook as shown above. Incorrect matches scroll the rows down. Find all of the matches to open the gates.
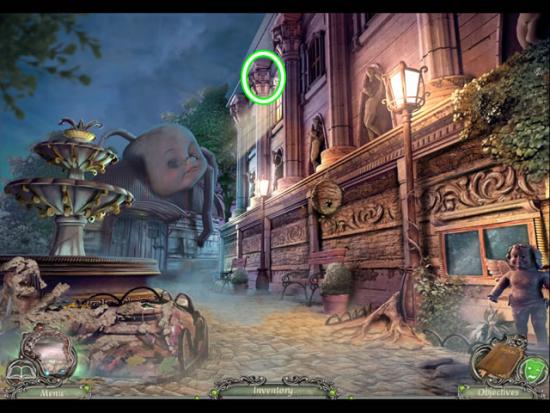
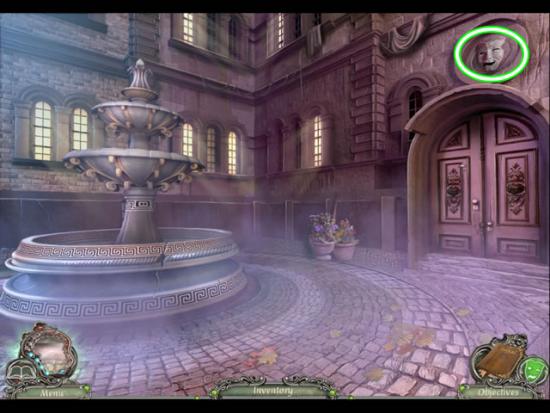
Mansion Entrance
- Collect the Mask (29/55) from above the door.
- Look at the top of the fountain (A); remove the loose BOLT.
- Move the planters (B); take the CAR KEY.
- Go back through the gates.
Mansion
- Look closer at the car.
- Insert the CAR KEY in the door lock.
- Open the bag on the car seat; take the KNOCKER.
- Return to the mansion entrance.

Mansion Entrance
- Zoom in on the doors (A). Attach the KNOCKER (green) and secure it with the BOLT (aqua).
- Present the BADGE to the woman (B) to gain entrance.
Foyer
- Speak to the housekeeper.
- Collect the Mask (30/55) from the left gargoyle.
- Open the door on the left (A).

Basement Stairs
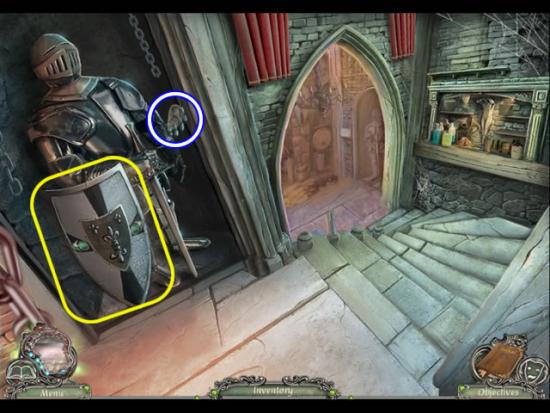
- Collect the Mask (31/55) from between the feet of the suit of armor.
- Take the STONE ROD (A).
- Play the hidden object scene (B).
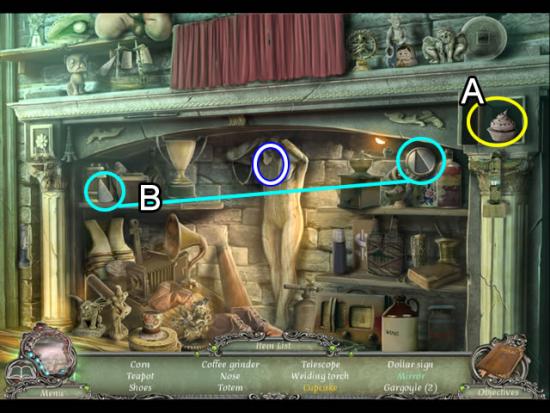
- Open the compartment (A) to find the Cupcake.
- Put the shard in the Mirror (B).
- Find the rest of the listed objects.
- The NOSE goes to inventory.
- Continue down the stairs.
Mansion Basement
- Collect the Mask (32/55) from to nook above the statue.
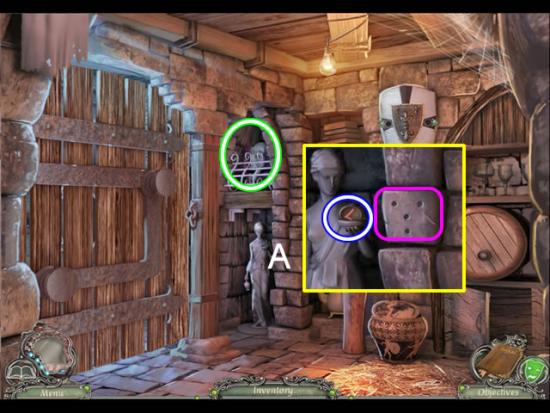
- Examine the statue (A). Take the LETTER (1/5). Click the pattern on the brick (pink) to add a puzzle clue to the journal.

- Pry the door open with the STONE ROD (green).
- Grab the EAR (1/2) from the shelf in the next room.
Foyer
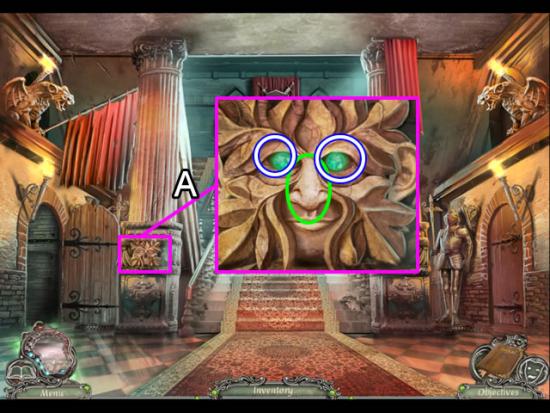
- Zoom in on the base of the left column (A).
- Attach the NOSE; take each EMERALD EYE (2/2).
Mansion Basement
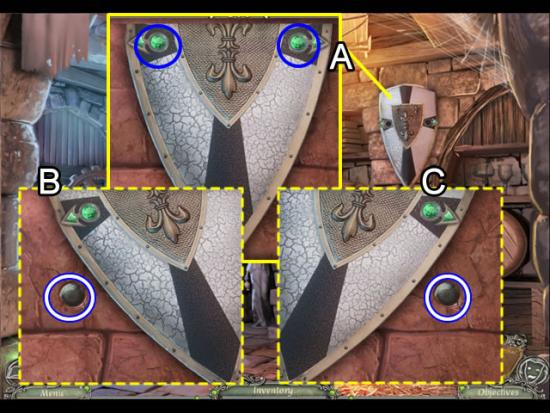
- Look closer at the shield (A).
- Insert an EMERALD EYE (2/2) in each slot (blue).
- Move the shield to the right (B); take the MARBLE (1/2).
- Move the shield to the left (C); take the MARBLE (2/2).
- Take the KNIGHT’S SHIELD from the wall.
Basement Stairs
- Put the KNIGHT’S SHIELD on the suit of armor (yellow).
- Take the proffered EAR (2/2).
Foyer
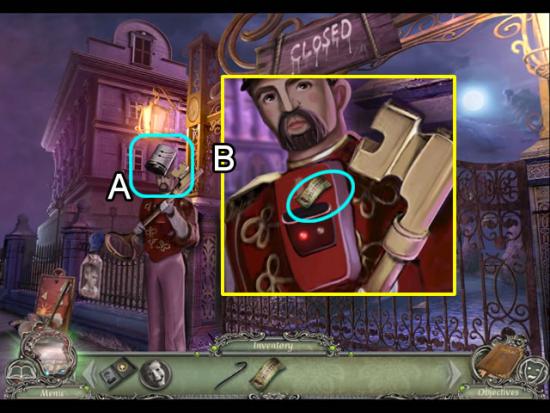
- Show the BADGE to Henry Mason.
Mansion
- Paddle back across the lake.
- Return to the town square, go through the intricate gate, head to the left to the workshop, enter and go all of the way through to the atelier.
Atelier
- Look again at the dresser.
- Review the journal (A) and note the pattern from the brick at the mansion.
- Insert the new MARBLES (2/2) in the center panel. Rearrange all four MARBLES until they match the pattern from the brick.
- Take the MASK from the drawer.
- Return to the doll manufacturing room; enter the passage.
Passage
- Zoom in on the far door.
- Put the MASK in the slot in the door (pink). Press twice to open the door to the secret passage.
Tunnel
- Collect the Mask (33/55) on the lower right wall.
- Pick up the TANGRAM PIECES (10/10) highlighted in blue.
- Zoom in on the door at the top of the steps (white).
- Insert the TANGRAM PIECES (10/10) in the door to open a puzzle.
- The goal is to fit the pieces together to form the picture. The pieces do not rotate.
- Solution:
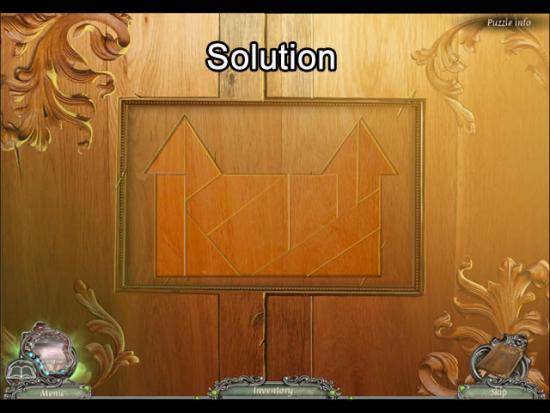
- Enter mansion basement.
- Go up the stairs to the foyer.
Foyer
- Examine the base of the right column.
- Attach the EARS (2/2) and take the STONE TEETH.
- Go up the stairs.
Upstairs
- Play the hidden object scene.
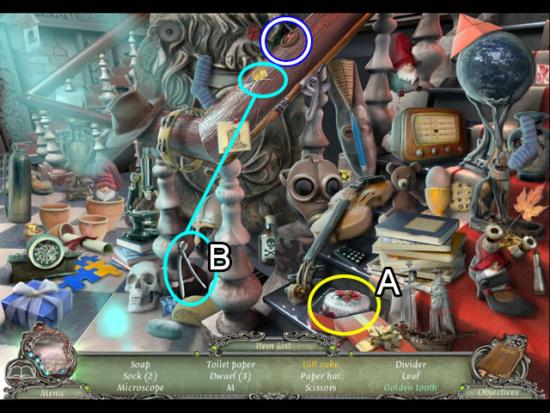
- Remove the lid on the box (A) to find the Gift Cake.
- Use the pliers (B) to pull the Golden Tooth out of the bannister.
- Find the rest of the listed objects.
- The “M” goes to inventory as a LETTER (2/5).
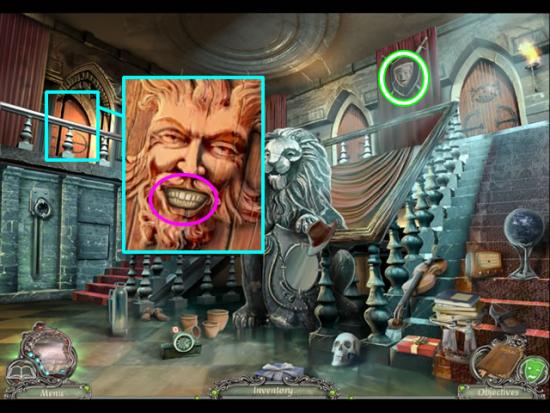
- Collect the Mask (34/55) from the shield.
- Look at the first door on the left (aqua).
- Insert the STONE TEETH to open the library door.
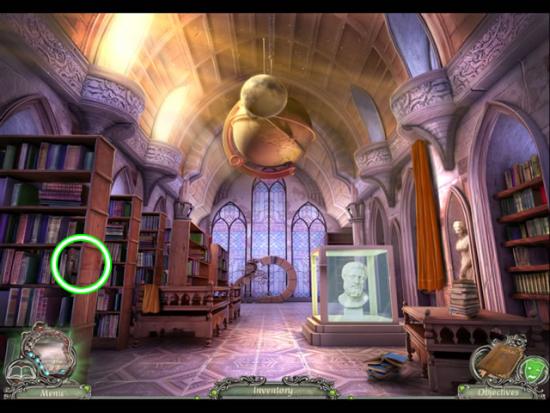
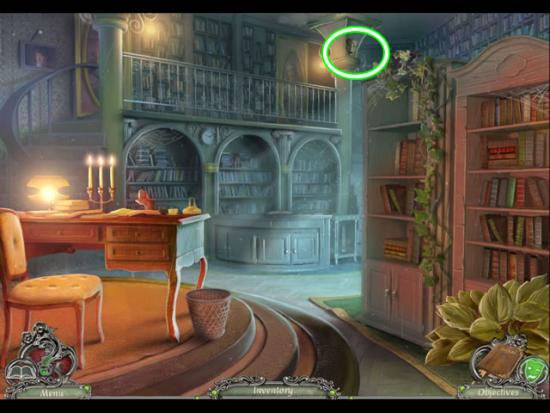
Library
- Collect the Mask (35/55) from the first bookshelf.
- Look at the desk (A). Move the papers to receive journal information and uncover a CARVED BOARD and STRING.
- Examine the mirror machine (B). Take the CANDLE.
- Exit the library.
Basement Stairs
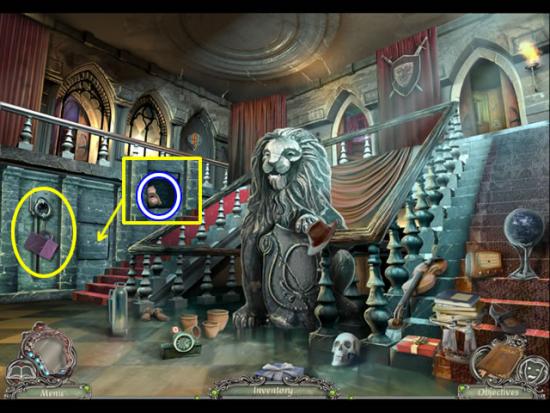
- Play the hidden object scene.
- Lift the curtain (A) to find the Owl.
- Put the head on the base (B) of the Matryoshka Doll.
- Find the rest of the listed objects.
- Receive a LETTER (3/5) for inventory.
Mansion Basement
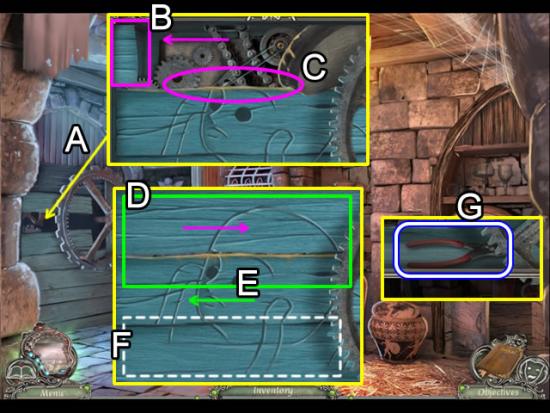
- Zoom in on the mechanism (A). Insert the CARVED BOARD in the empty slot.
- Move the top board to the left (B); pour the RESIN GLUE along the top of the middle board (C).
- Pull the top board to the right (D) to seal the top and middle boards together. Push the two sealed boards to the left (E).
- Pour the RESIN GLUE on the bottom board (F). Pull the two top boards back to seal all three boards.
- Push the three sealed boards to the left. Pick up the PLIERS from the compartment (G).
Upstairs
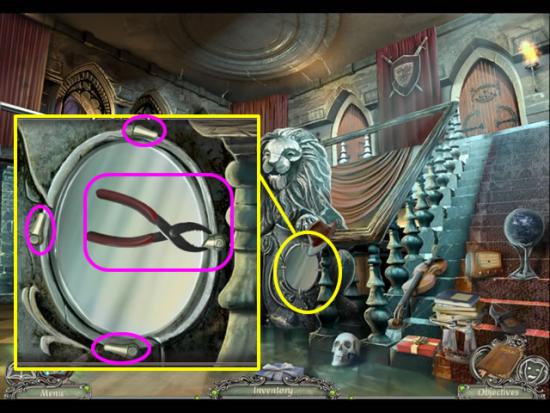
- Look closer at the mirror (yellow).
- Turn the three latches (pink). Use the PLIERS to turn the broken latch.
- Take the SMALL MIRROR.
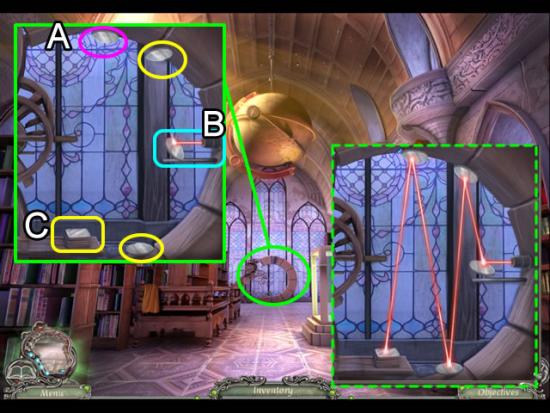
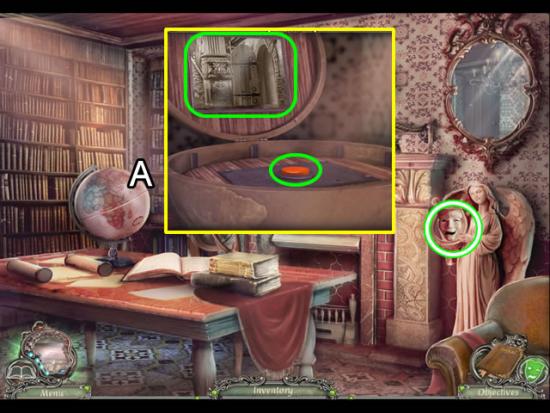
Library
- Zoom in on the mirror mechanism again.
- Put the SMALL MIRROR on the empty peg (A).
- Adjust all of the mirrors so the beam (B) is reflected onto the flat mirror (C) to start the mechanism.
- The solution is shown in the dashed inset.
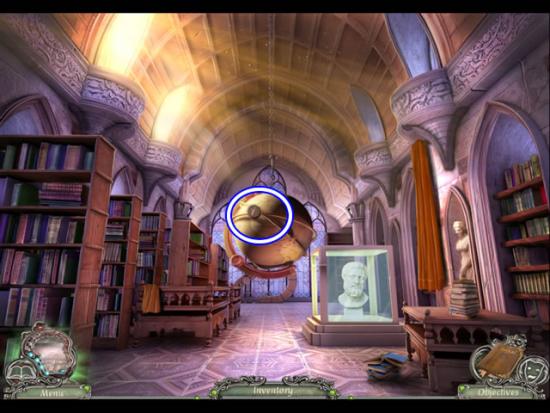
- Zoom in on the lowered globe and take the LETTER (4/5).
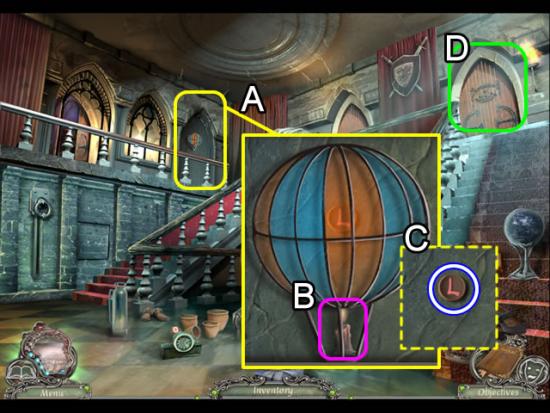
Upstairs
- Look at the last archway on the left (A).
- Place the CANDLE in the base of the hot air balloon (B) to make it rise.
- Take the LETTER (5/5) the balloon was hiding (C).
- Examine the door on the far right (D).
- Place the LETTERS (5/5) in the slots on the door to open a puzzle.
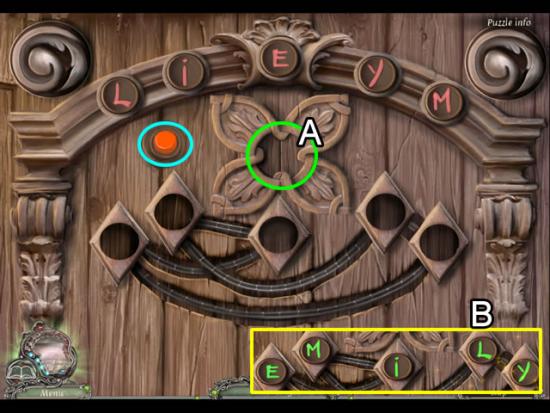
- The goal is to put the five LETTERS into the slot at the top of the tracks (A) in the correct order so they end up spelling E-M-I-L-Y (B).
- Each time a letter is added it pushes the one(s) before it one space further along the tracks. Follow the tracks to figure out the ending order. Press the reset button (aqua) as needed.
- Solution. Add the letters in this order: I-E-Y-L-M.
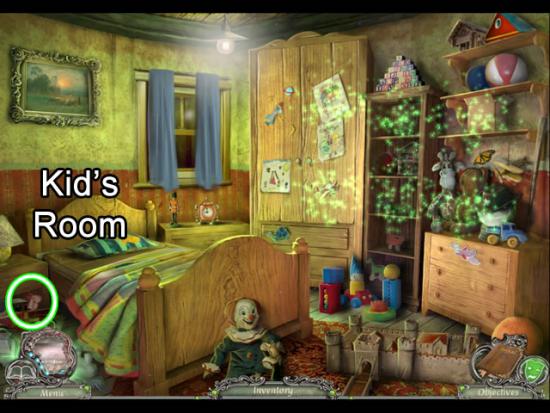
Chapter 7: The Bedrooms, Gallery and Secret Rooms

Kid’s Room
- Play the hidden object scene.
- Open the closet door (A) to locate the Lemon.
- Attach both Puzzle Pieces (B).
- Find the rest of the listed objects.
- Receive the HALF OF THE MASK (1/2) for inventory.
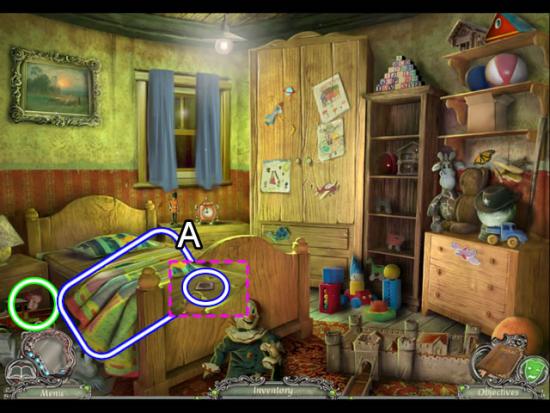
- Collect the Mask (36/55) from the nightstand on the left.
- Take the BLANKET off the bed (A); pick up the uncovered SQUARE (dashed pink).
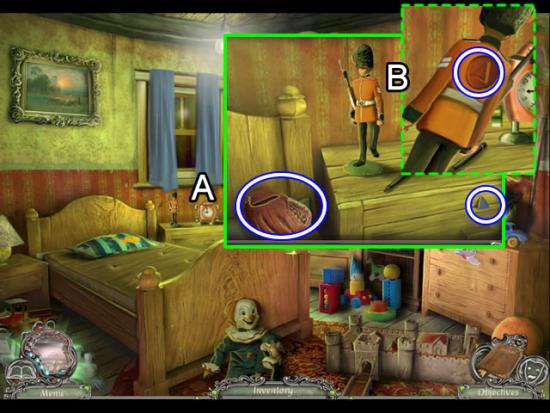
- Look at the nightstand on the right (A).
- Take the BASEBALL GLOVE and TRIANGLE.
- Examine the soldier (B). Read the writing on the front for journal information. Take the CIRCLE from the back of the soldier.
Library
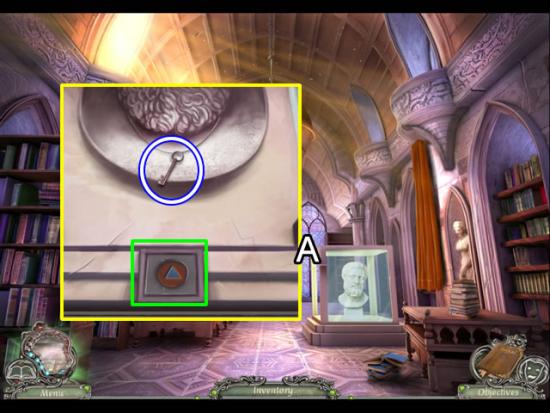
- Zoom in on the glass case (A).
- Put the SQUARE, CIRCLE and TRIANGLE in the tray (green) to open the case.
- Take the BEDROOM KEY.
Upstairs
- Look at the door next to the kid’s room.
- Use the BEDROOM KEY to unlock the door; pull the handle to enter.

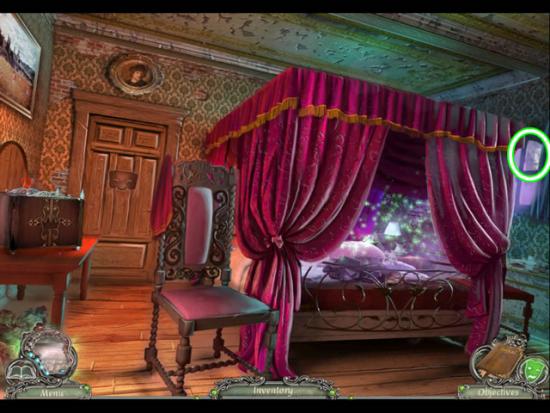
Bedroom
- Mate the Japanese Slippers (A).
- Move the hat (B) to find the White Glove.
- Find the rest of the listed objects.
- The WEIGHT goes to inventory.
Upstairs
- Attach the STRING to the hook on the wall. Tie the WEIGHT to the end of the string to open the compartment.
- Take the HALF OF THE MASK (2/2) from the compartment.
Bedroom
- Collect the Mask (37/55) from the window.
- Insert both HALF OF THE MASK pieces in the inset in the door (A).

Work Cabinet
- Play the hidden object scene.
- Complete the Egyptian Medallion (aqua).
- Find the rest of the listed objects.
- The DIAMOND goes to inventory.
- Collect the Mask (38/55) from the lyre the statue is holding.
- Open the top of the globe (A).
- Press the button twice to open the door in the image.
Upstairs
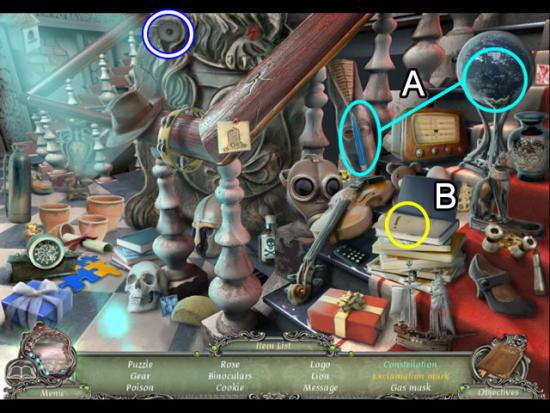
- Play the hidden object scene.
- Use the pencil to draw the Constellation on the globe (A).
- Open the book cover (B) to find the Exclamation Mark.
- Find the rest of the listed objects.
- The GEAR (1/3) goes to inventory.
Foyer
- The door on the right is now open.
- Enter the gallery.
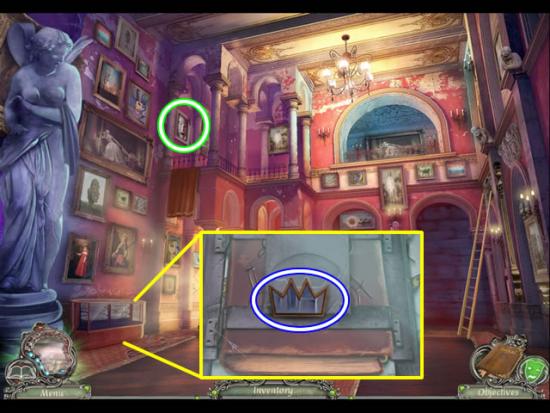
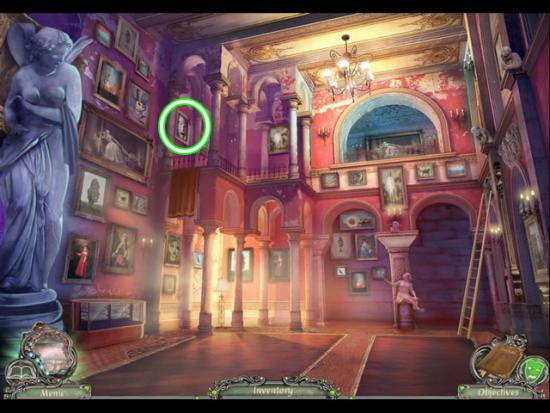
Gallery
- Collect the Mask (39/55) from the frame in the corner.
- Zoom in on the glass case. Pick up the MEDALLION.
- Lean the ladder against the left wall (A); take the PAINTING OF HENRY MASON and the PAINTING OF HENRY’S WIFE.
- Lean the ladder against the middle wall (B); take the PAINTING OF HENRY’S DAUGHTER.
- Zoom in on the alcove (C).
- Match the three paintings of HENRY MASON and his WIFE and DAUGHTER from inventory (A) to the icons on the wall (B).
- Add the PAINTING OF GRIM REAPER to the empty slot (C).
- The correct positioning is shown (D).
Hall of Secrets
- Collect the Mask (40/55) from the second column.
- Look closer at the spider web (A); take the WINDING KEY.
- Examine the panel on the right wall (B); pick up the METAL BUTTERFLY PART (1/2).
- Go back upstairs to the bedroom.
Bedroom
- Zoom in on the chest (A); insert the MEDALLION to open “Act V – A Tale of Power”.
- Play the first scene of the find-and-place puzzle.
- The solution shown above. The solid colors show the pieces to pick up. The same colored dashed outlines indicate their placement.
- Solving scene one opens scene two.
- Find and place the objects in scene two.
- The solution is shown above.
- Solving this scene opens scene three.
- Find and place the objects in scene three to complete the puzzle.
- Take the PLUSH DOLL from the front of the curtains.
- Go next door to the kid’s room.
Kid’s Room
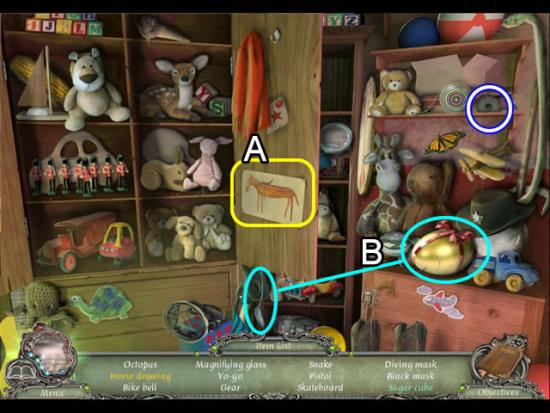
- Play the hidden object scene.
- Open the cabinet doors (A) to find the Horse Drawing.
- Use the spoon to crack the egg (B) and take the Sugar Cube.
- Find the rest of the listed objects.
- The GEAR (2/3) goes to inventory.
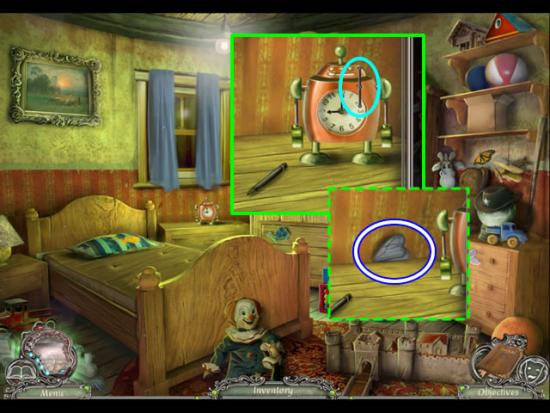
- Look at the robot clock on the nightstand.
- Insert the WINDING KEY (aqua) to move the clock; take the METAL BUTTERFLY PART (2/2).
- Go downstairs to the gallery.
Gallery
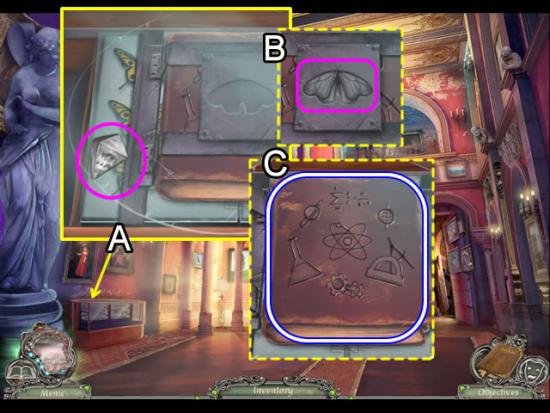
- Zoom in on the display case (A): use the DIAMOND to cut a hole in the glass.
- Insert the two METAL BUTTERFLY PARTS in the lock (B).
- Take the SCIENCE BOOK (C) and uncover a match-the-butterflies puzzle.
- Solution:
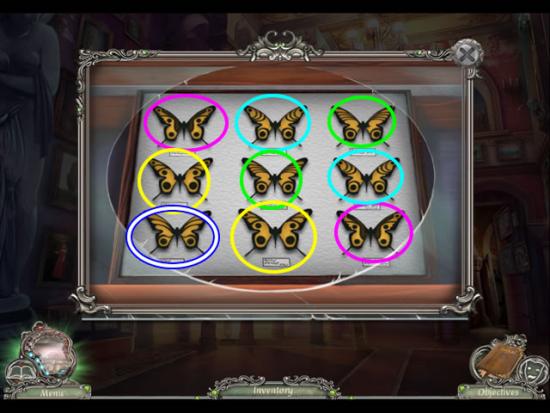
- Remove the matching pairs of butterflies until only one remains.
- Take the BUTTERFLY.
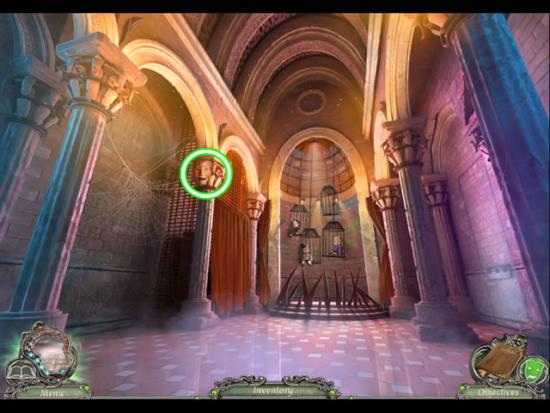
- Go forward to the hall of secrets.
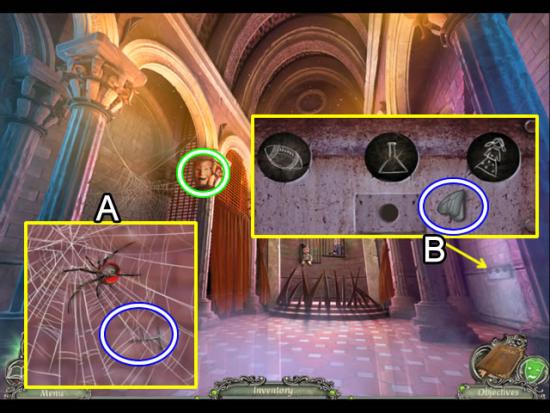
Hall of Secrets
- Look closer at the cobweb (A). Put the BUTTERFLY on the web to distract the spider. Take the MECHANISM BUTTON.
- Zoom in on the mechanism (B). Insert and press the MECHANISM BUTTON to gain entrance to the cages.
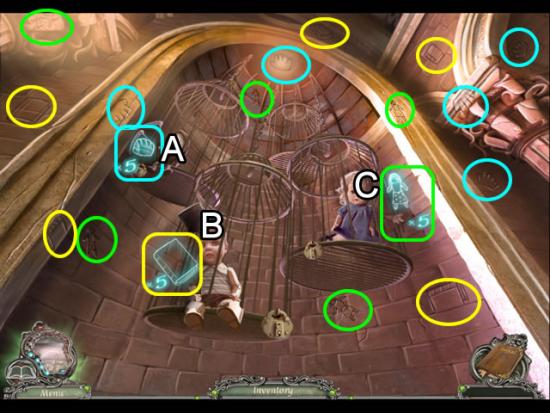
- Give the caged puppets the BASEBALL GLOVE (A), SCIENCE BOOK (B) and PLUSH DOLL (C) to open a puzzle.
- Find five each of the baseball gloves (aqua), books (yellow) and dolls (C) on the surrounding walls and ceiling.
- Note the symbols each puppet displays (A).
- Return to the mechanism on the wall (B). Click through the images until the order and symbol match what the puppets displayed.
- Enter the mirror room.
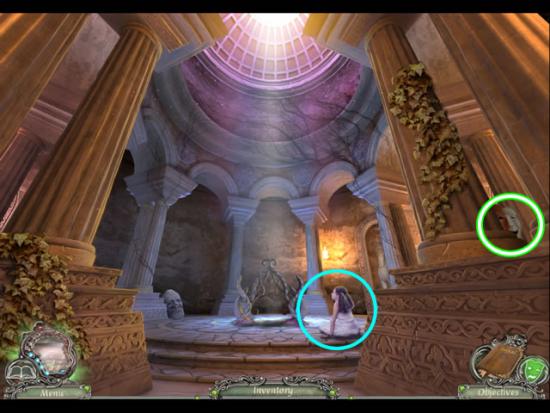
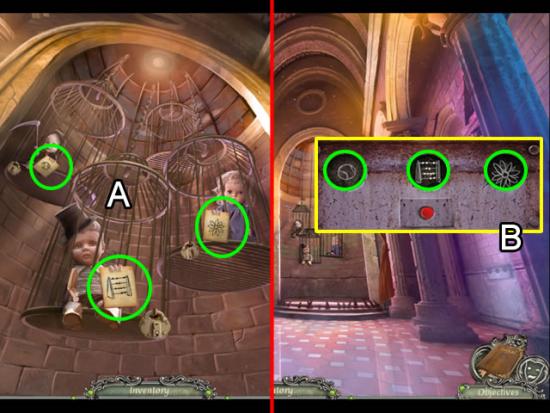
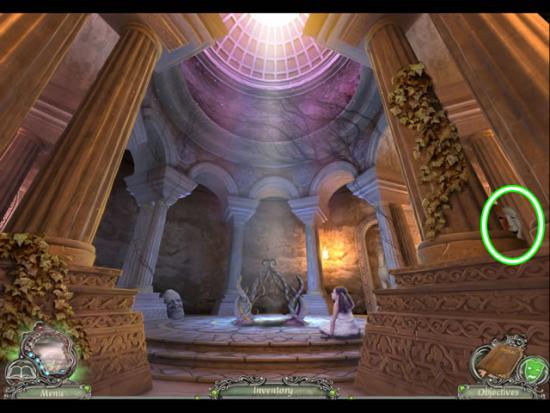
Mirror Room
- Collect the Mask (41/55) to the right of the column.
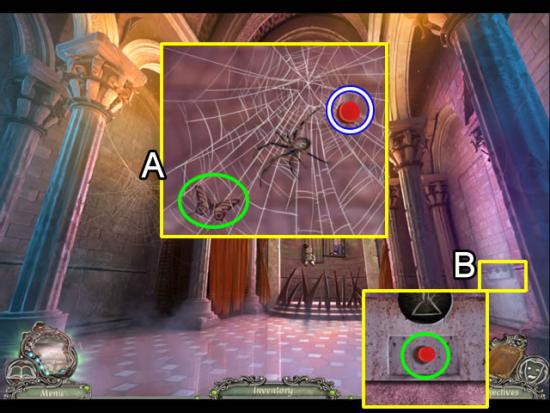
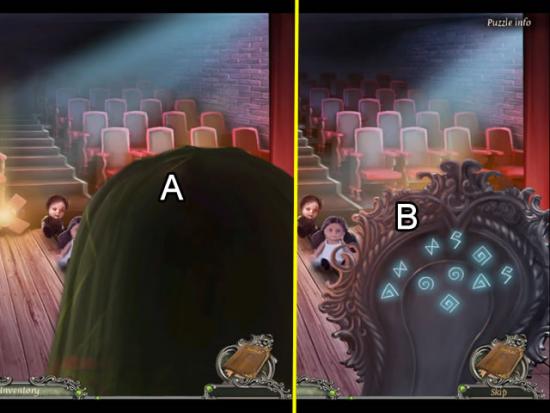
- Speak to the girl to trigger a cutscene and a puzzle.
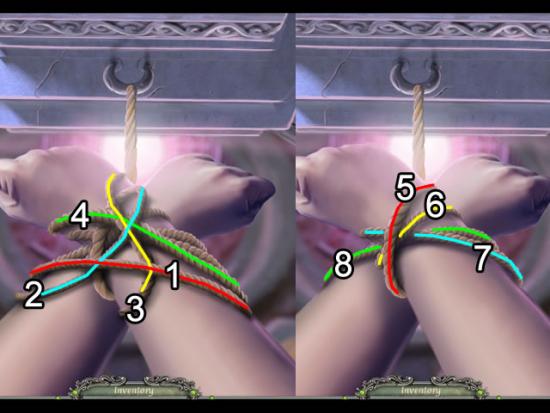
- The goal of the puzzle is to remove the upper-most rope.
- The above screenshots shows the order.
- Note: The green mask icon indicating there is a mask in this scene is incorrect.
- Examine the glowing mirror to obtain a new objective.
- Return to the upstairs bedroom and enter the work cabinet.
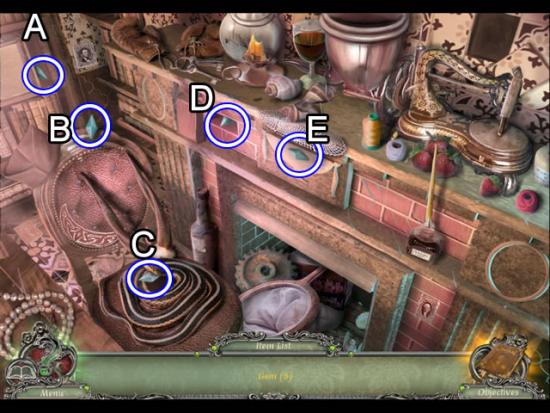
Work Cabinet
- Play the hidden object scene to collect the BLUE JEWELS (5/5).
- Remove the books (A), move the cap (B), lift the snake’s head (C), remove the brick (D) and lift the doily (E) to uncover the jewels.
- Return to the mirror room.
Mirror Room
- Insert the BLUE JEWELS (5/5) in the slots on the mirror (A).
- Pick up the stabilized MIRROR (B).
- Look closer at the mirror stand (C). Take the GEAR (3/3).
Hall of Secrets
- Speak to the man sitting on the steps.
- Receive a new objective.
- Exit to the foyer and go left to the mansion basement.
Mansion Basement
- Zoom in on the mechanism.
- Place the three GEARS on the empty pegs to open the tunnel passageway.
- Exit the workshop. Enter the theater basement and go up and to the right to the stage.

Stage
- Collect the last Mask (42/55) available in the main game.
- Draw back the curtain and place the MIRROR against the tree (A). Cover the mirror with the BLANKET.
- Remove the blanket (A) when the curtain opens.
- Play three rounds of match-the-symbol (B).
- View the final cutscenes to see how the story ends.
Congratulations! You have completed playing the main game of Rite of Passage: The Perfect Show. The bonus content for the Collector’s Edition is now available by looking into the chest on the main menu.
Hidden Mask Locations
Cafe
Street
Havenhills
Lake
Town Square
Playground
Play Castle
Havengrove
Town Square – Intricate Gate
Cemetery
Church
Theater Courtyard
Backyard
Workshop
Theater Basement
Scenography Workshop
Atelier
Passage

Mansion
Mansion Entrance

Mansion Foyer

Basement Stairs
Mansion Basement
Tunnel
Upstairs
Library
Kid’s Room
Bedroom
Work Cabinet
Gallery
Hall of Secrets
Mirror Room
Stage
Masks 43-55 are found only in the Collector’s Edition Bonus game.
Street
Havenhills
Lake
Henry’s House
Grandma’s House
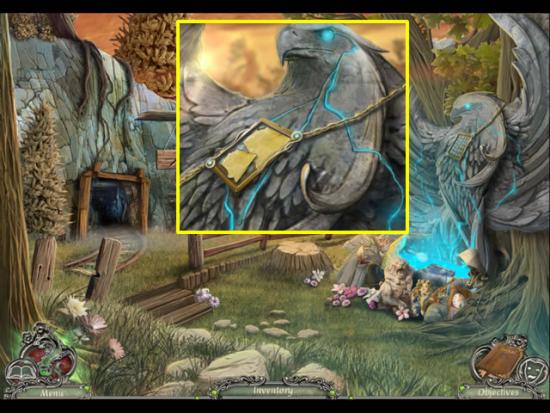
The Shrine
Mine Entrance
Library
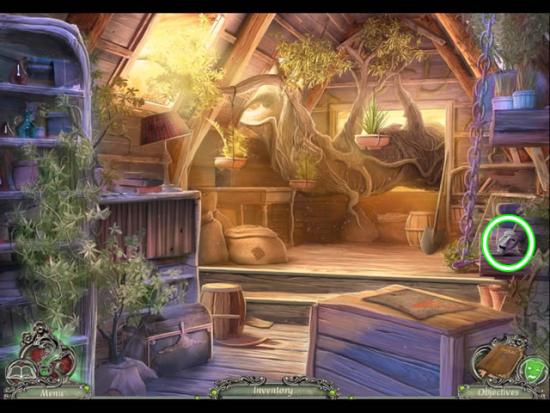
Attic
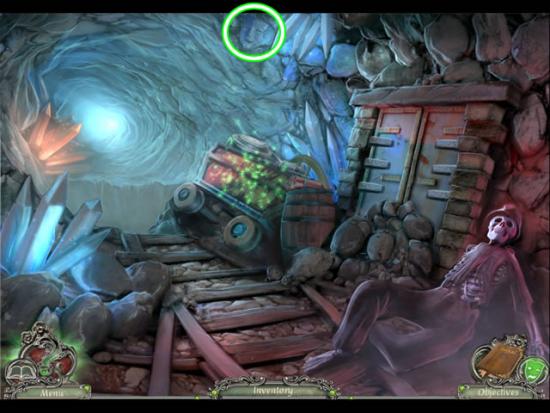
Mine Interior

Chamber
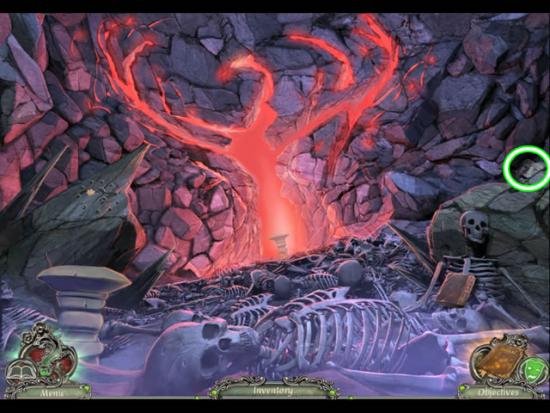
Red Phoenix Shrine
Emily’s Bedroom
Collector’s Edition Bonus Play
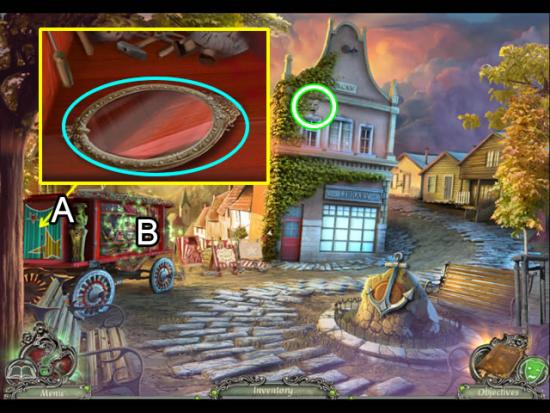
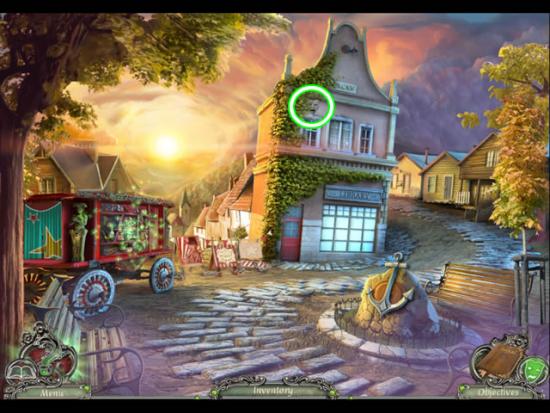
Street
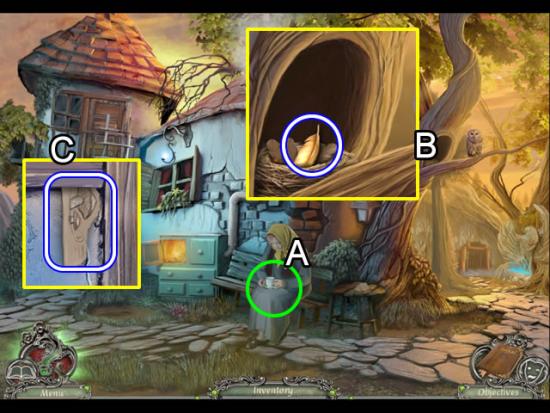
- Collect the Mask (43/55) from the ivy on the second story of the library.
- Open the curtain on the back of the wagon (A). Pick up the mirror (aqua) for story information.
- Play the hidden object scene (B).
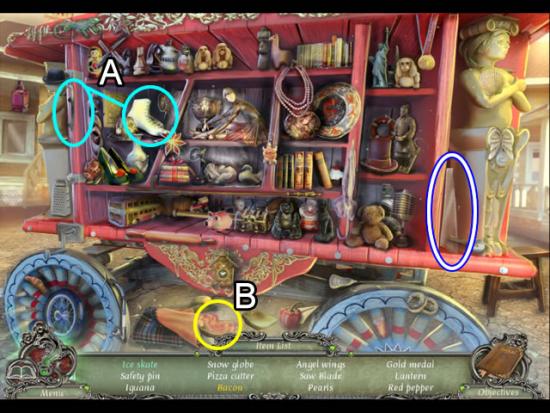
- Attach the blade to the Ice Skate (A).
- Remove the bread (B) to find the Bacon.
- Find the rest of the listed objects.
- The SAW BLADE goes to inventory.
- Go right.
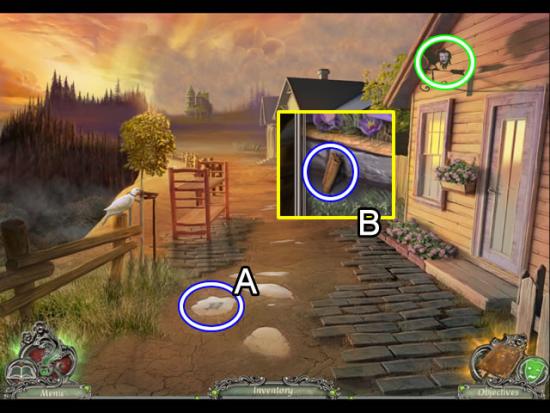
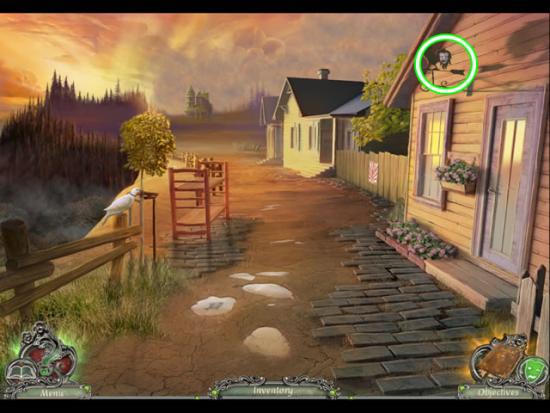
Havenhills
- Read the note the dove delivers.
- Collect the Mask (44/55) from the ornament on the building.
- Pick up the METAL FISH on the stone (A).
- Look closer at the flowerbed (B); take the CINNAMON.
- Continue up the path to the lake.
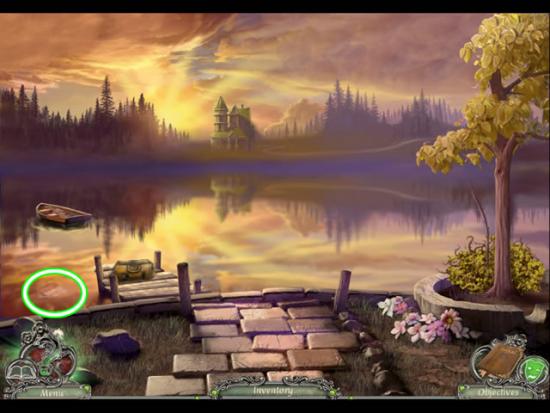
Lake
- Collect the Mask (45/55) from the water.
- Examine the bag (A). Insert the METAL FISH in the inset and turn it to open the bag. Take the KNIFE and HANDKERCHIEF.
- Look closer at the flowers (B); take the METAL ROSE (1/3).
Havenhills
- Use the KNIFE to loosen the poster on the fence. Remove the poster and the fence boards under it.
- Play the hidden object scene.
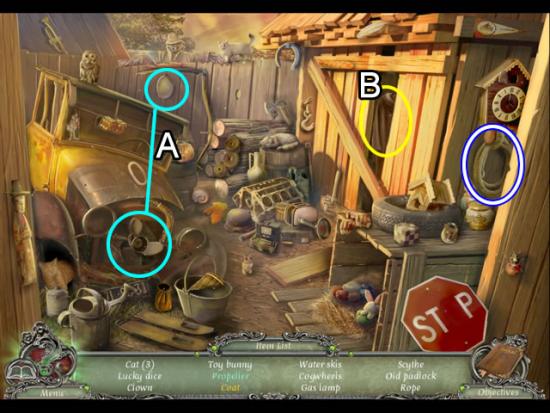
- Attach the missing blade to the Propeller (A).
- Remove the board to find the Coat (B).
- Find the rest of the listed objects.
- The ROPE goes to inventory.
Street
- Zoom in on the anchor on the rock.
- Use the HANDKERCHIEF to take the CHOCOLATE.
- Pick up the MATCHES on the bench.
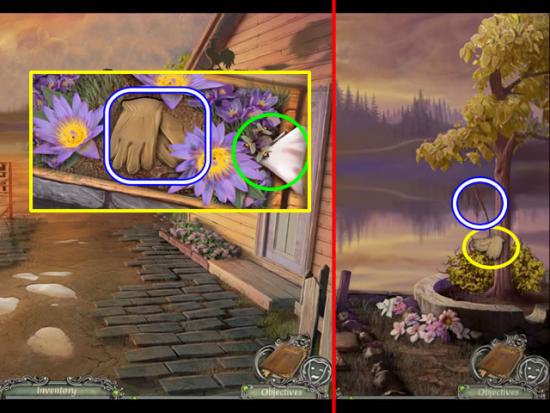
Havenhills
- Look at the flowerbed again.
- Use the CHOCOLATE to distract the bees. Move the flowers and take the GARDEN GLOVE.
Lake
- Take the THORNY BRANCH with the GARDEN GLOVES.

Street
- Look at the poster boards (A). Use the THORNY BRANCH to pull the SAW HANDGRIP to within reach.
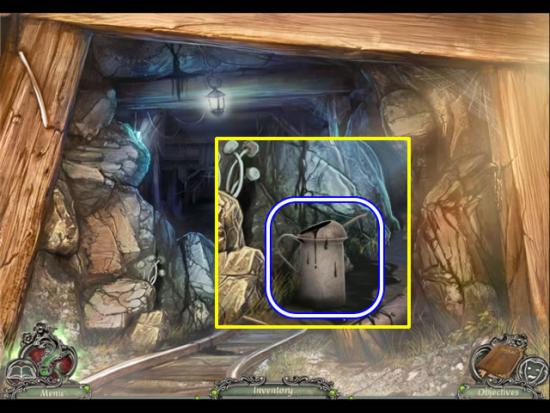
- Zoom in on the back of the wagon.
- Place the SAW HANDGRIP and SAW BLADE on the work area to combine them into a SAW.
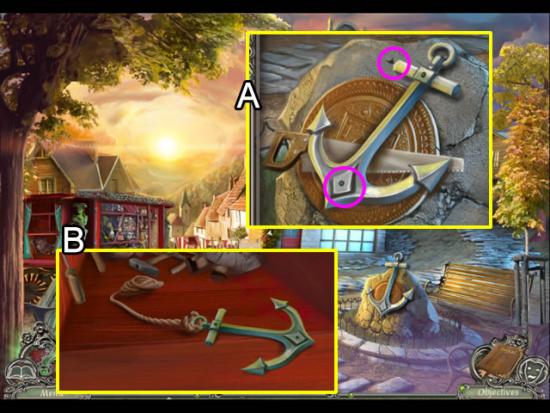
- Look again at the anchor on the rock.
- SAW through the top and bottom bolts (pink) to free the ANCHOR from the rock.
- Use the work area in the back of the wagon yet again (B). Put the ROPE and ANCHOR on the surface to combine them into a GRAPPLING HOOK.
Lake
- Throw the GRAPPLING HOOK into the boat and reel it in.
- Paddle the boat across the lake.
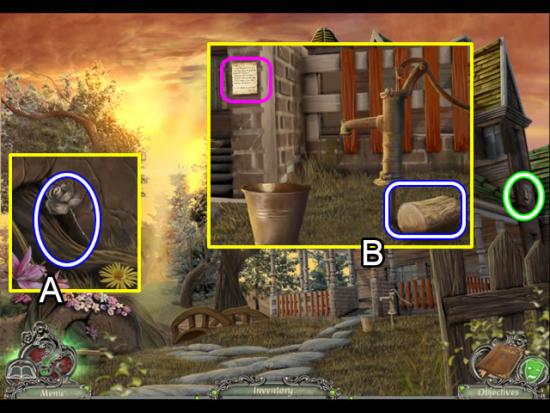
Henry’s House
- Collect the Mask (46/55) on the side of the house.
- Look at the base of the tree (A); pick up the METAL ROSE (2/3)
- Zoom in on the pump (B). Pick up the LOG. Take the note (pink) for story information and a new objective.
- Cross the bridge and head to grandma’s house.
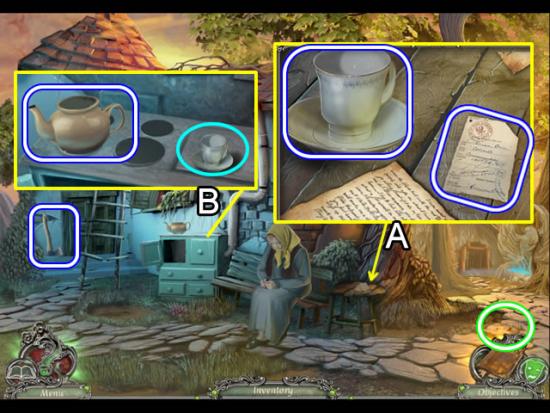
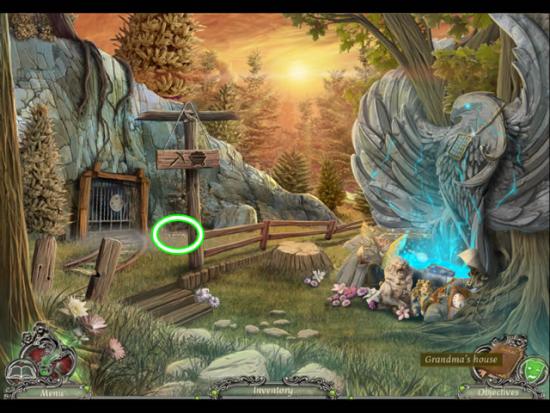
Grandma’s House
- Speak with Grandma and receive a new objective.
- Collect the Mask (47/55) embedded in the stone to the right of the tree.
- Look at the side table (A). Move the papers to find the LIBRARY CARD. Take the TEA CUP.
- Examine the stove (B). Put the TEA CUP on the stove and take the EMPTY TEAPOT.
- Pick up the AXE leaning against the building.
- Take the right path to the shrine.
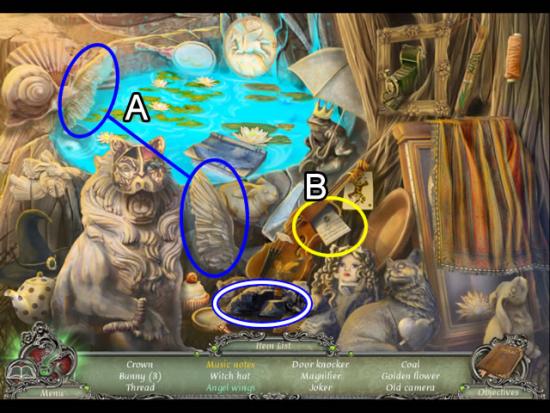
Shrine
- Play the hidden object scene.
- Attach the Angel Wings (A).
- Open the compartment in the violin to find the Music Notes (B).
- Find the rest of the listed objects.
- Receive the COAL for inventory.
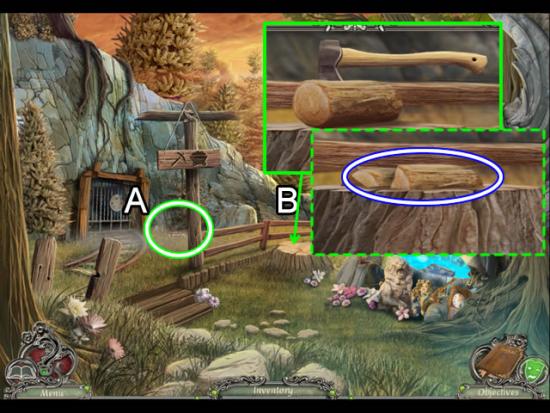
- Look closely at the ground below the shrub at the base of the rock (A) to find the Mask (48/55).
- Put the LOG on the stump (B). Chop the WOOD PIECES with the AXE.
- Return to Henry’s house. Cross the lake.
Havenhills
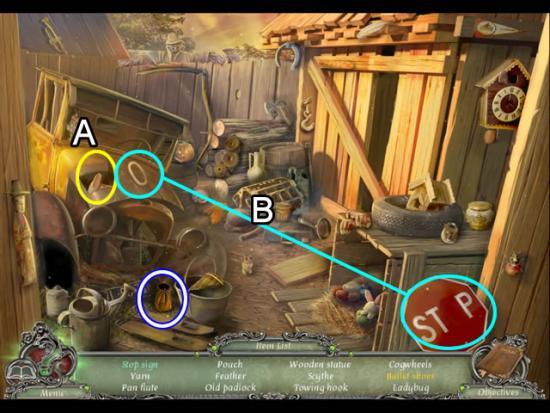
- Play the hidden object scene.
- Open the compartment in the car hood (A) to find the Ballet Shoes.
- Add the “O” to repair the Stop Sign (B).
- Find the rest of the listed objects.
- Receive the POUCH for inventory.
Street
- Zoom in on the red door to the library.
- Insert the LIBRARY CARD in the card reader to open the door.
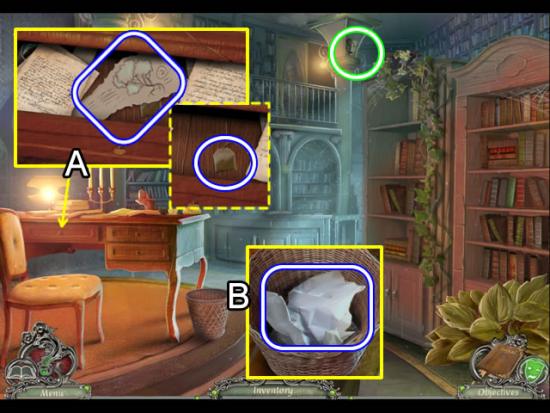
Library
- Collect the Mask (49/55) from the top of the column.
- Open the center desk drawer (A). Move the papers to uncover the PAGE PIECE (1/3). Take the TEA BAG that was under the page piece.
- Look in the wastebasket (B). Pick up the WRINKLED PAPER.
- Go back across the lake to Henry’s house.
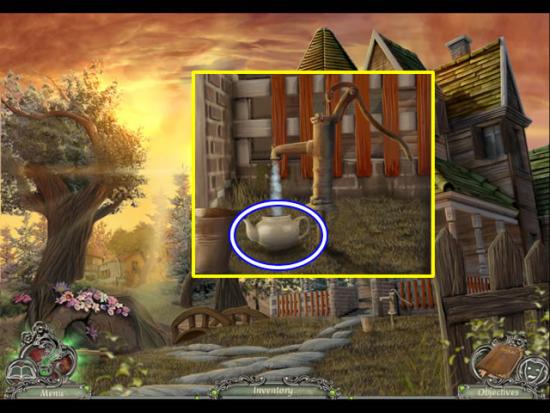
Henry’s House
- Zoom in on the pump.
- Put the EMPTY TEAPOT below the spout. Pump the handle. Take the FULL TEAPOT of water.
Grandma’s House
- Zoom in on the stove.

- Put the COAL, WRINKLED PAPER and WOOD PIECES in the stove (A). Light the fire with the MATCHES.
- Put the FULL TEAPOT on the burner (B). Add the CINNAMON and the TEABAG to the steaming pot.
- Pour the contents of the TEAPOT into the TEA CUP. Take the CUP OF TEA.
- Give Grandma the CUP OF TEA.
- Look into the tree hollow (B); take the GOLDEN FEATHER.
- Look closer at the attic door (C). Pick up the PAGE PIECE (2/3).
- Go back across the lake to the street in front of the library.
Street
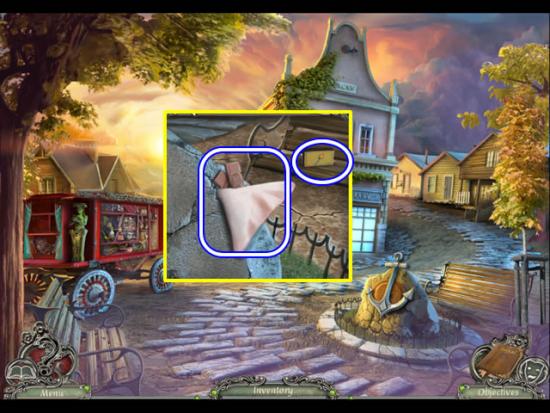
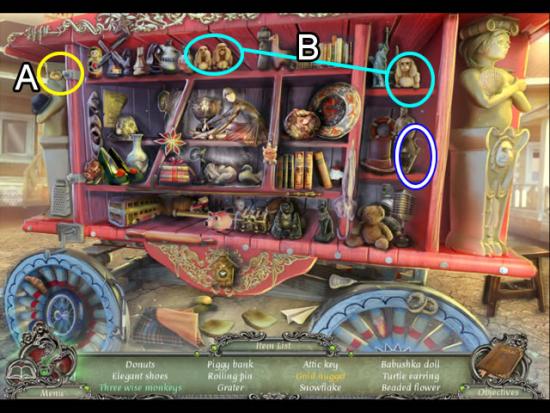
- Play the hidden object scene.
- Move the hat (A) to find the Gold Nugget.
- Add the monkey to the other two (B). Take the Three Wise Monkeys.
- Find the rest of the listed objects.
- The ATTIC KEY goes to inventory.
- Enter the library.
Library
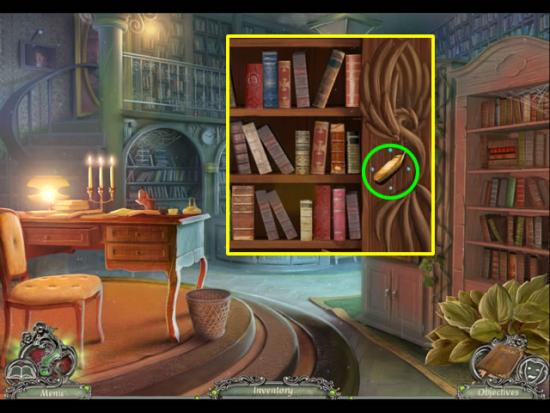
- Examine the bookcase on the right.
- Insert the GOLDEN FEATHER in the inset to open a puzzle.
- The goal is to remove the matching pairs of books.
- There are 15 pairs of books to find. Examine the books in the center shelves and find their mates on the outside shelves. Selecting the book on the center shelf will automatically remove the pair. Selecting an incorrect book will add back a pair.
- Big hint: Unless the game developer issues a new release, the key books have their tops cut off and are easy to spot. Trying to find their match is harder as there is no top to compare.
- Solution:
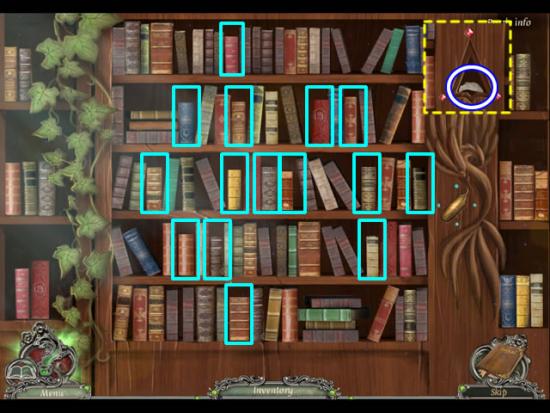
- Take the PAPER PIECE (3/3) from the nook that opens.
- Examine the open book on the desk (A).
- Attach the PAPER PIECES (3/3) to the torn page. Take the repaired page.
- Look at the ingredients (B) and directions (C) on the reverse side for making Phoenix Dust.
- Begin collecting the ingredients at the lake.
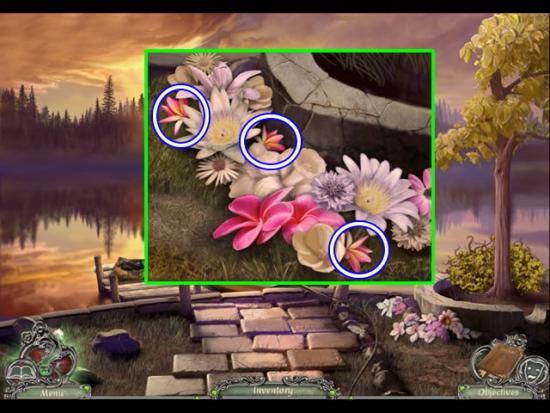
Lake
- Look at the flowerbed by the tree.
- Pick the FLAME LILY (3/6) flowers.
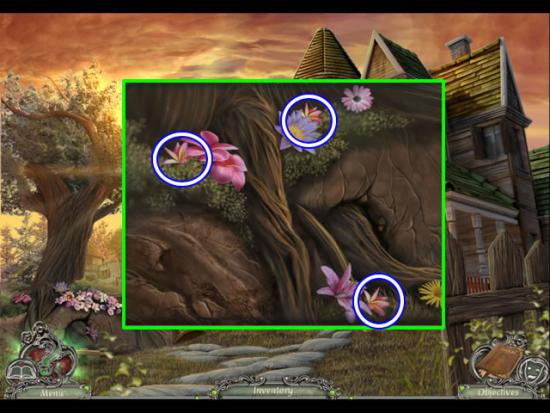
Henry’s House
- Zoom in on the flowers
- Pick the remaining FLAME LILY (6/6) flowers.
Grandma’s House
- Climb the ladder to the attic.
- Use the ATTIC KEY in the lock to open the door.
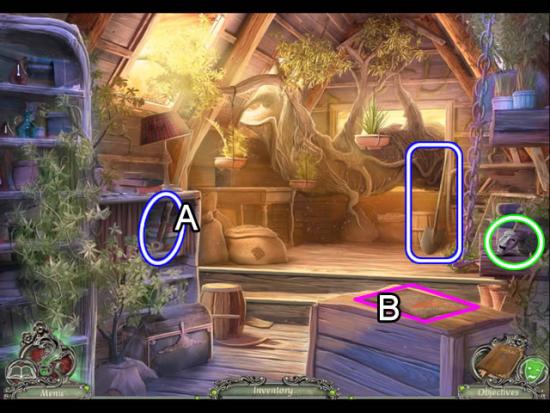
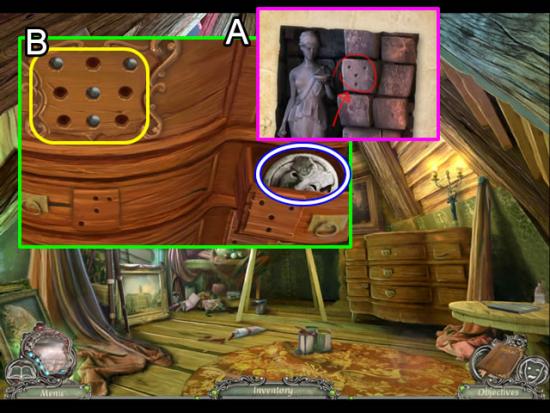
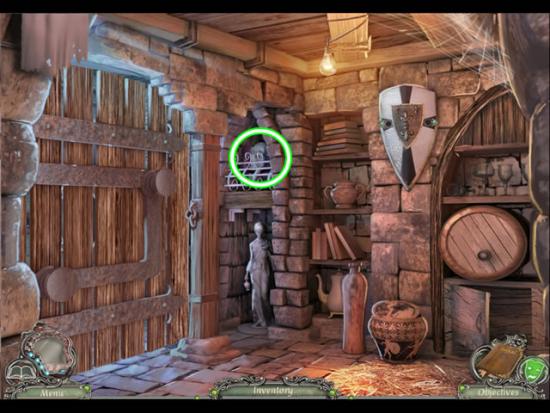
Attic
- Collect the Mask (50/55) from the right shelf.
- Move the curtain on the box (A). Take the LEVER.
- Pick up the SHOVEL leaning against the back wall.
- Examine the paper on the crate (B) for information about using the Phoenix Dust.
- Take the top off of the crate and look inside.
- Remove the green cloth.
- Open the book; take the SCRAP OF PAPER (1/2)
- Pick up the METAL ROSE (3/3).
- Exit the attic. Take the path on the right to the shrine.
Shrine
- Play the hidden object scene.
- Move the cloth covering the clock (A). Take the “XI” on the clock face.
- Find the rest of the listed objects.
- The CLAY PLATE goes to inventory.
- Look at the stump again. Use the SHOVEL to dig up the SMOKE-SHRUB ROOTS.
- Go forward to the mine entrance.
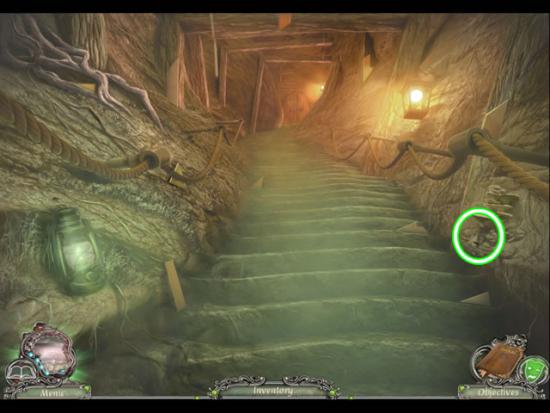
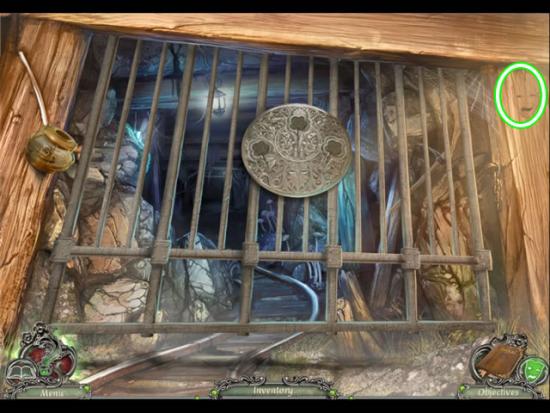
Mine Entrance
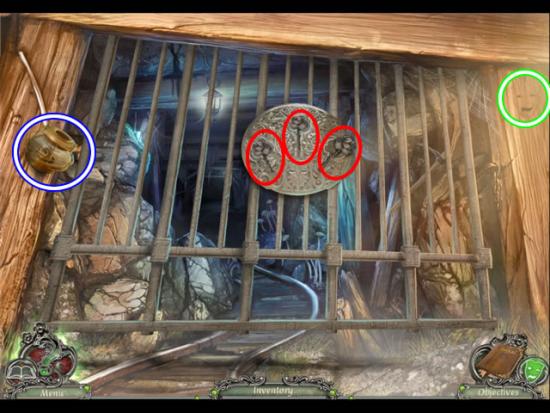
- Collect the Mask (51/55) from the right side.
- Take the GAS LAMP.
- Insert the each METAL ROSE (3/3) in the insets in the center circle to open the grate.
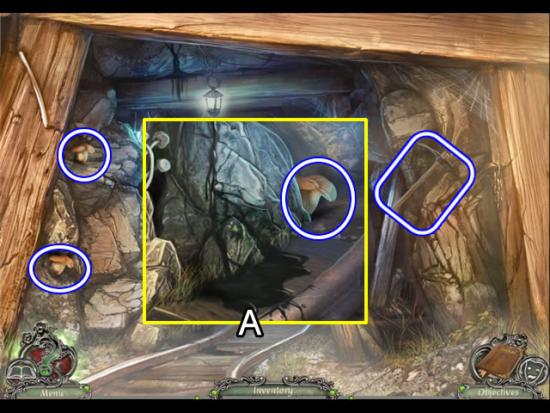
- Pick the MUSHROOMS (2/3) from the rocks on the left.
- Look at the oil puddle (A). Pick the MUSHROOMS (3/3).
- Take the PICKAX embedded in the rocks on the right.
- Return to Granny’s attic.
Attic
- Place the GAS LAMP on the worktable (A). Pour the can of fuel from the table into the lamp. Use the MATCHES to light it.
- Put the CLAY PLATE on top of the lamp (B). Add the FLAME LILY (6/6), SMOKE-SHRUB ROOTS and MUSHROOMS (3/3).
- Put the POUCH in the ashes to pour the ASHES into the pouch (C).
- Pick up the SCRAP OF PAPER (2/2) that fell on the floor.
- Exit the attic.
Shrine
- Zoom in on the blue phoenix.
- Put the SCRAP OF PAPER (2/2) pieces in the plate around its neck.
- Take the MINE MAP.
- Go forward and enter the mine.
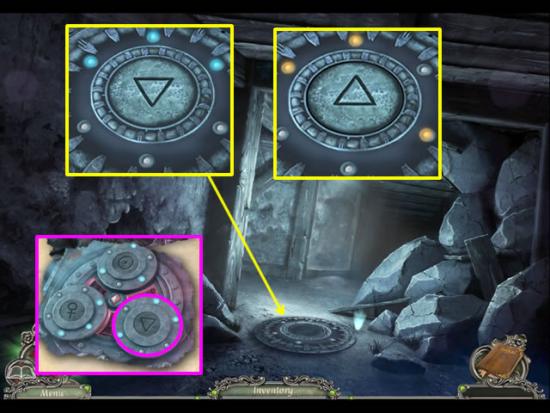
- Put the MINE MAP of the ground to activate a puzzle.
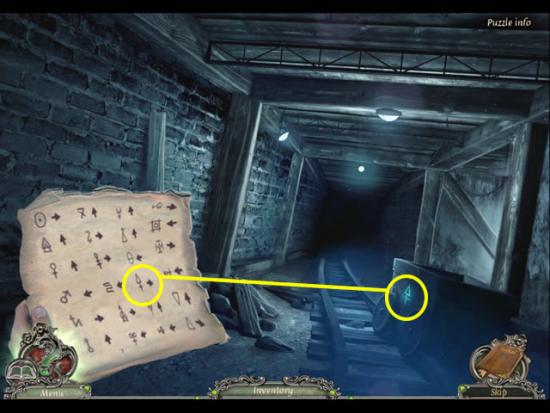
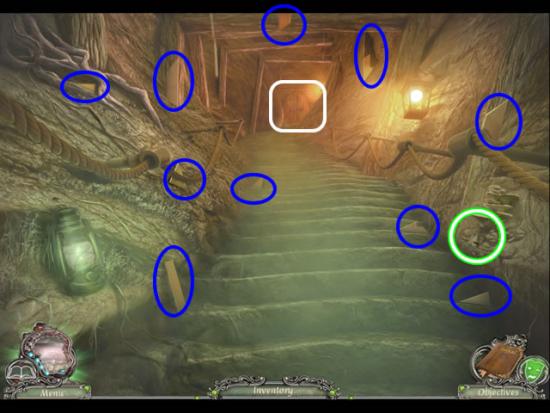
Mine
- The goal is to match the blue symbols to the MINE MAP to negotiate the passages.
- The first sign is on the coal cart (yellow). Compare the symbol to map and go the direction indicated by an arrow on the map (right).
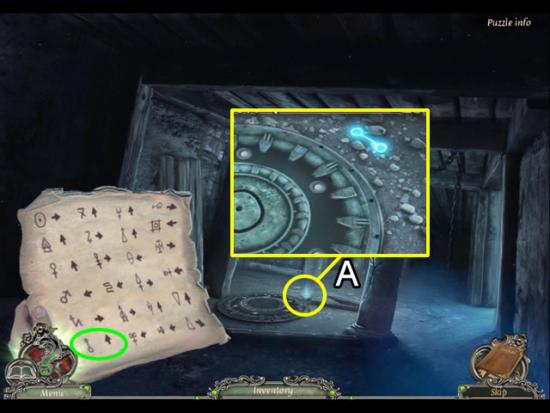
- Look around at this location for a symbol. See a faint blue glow on the ground (A).
- Look closer to find the symbol.
- Go forward.
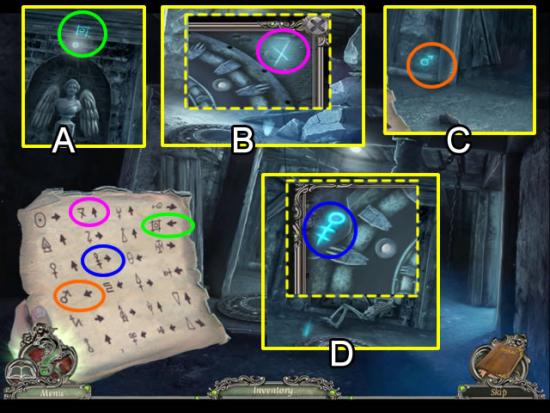
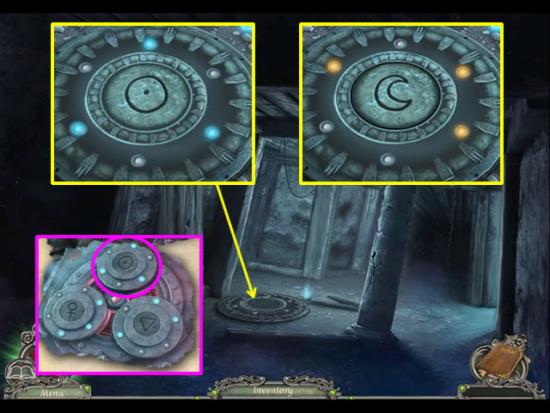
- Look above the angel in the alcove (A). The symbol (green) says to go left.
- At the rock pile (B), the symbol (pink) says to go forward.
- The symbol (orange) at the crossroads (C) translates to left.
- At the skeleton location (D), the symbol (blue) indicates right.
- Arrive at the rock pile with the overturned cart (the chamber entrance).
- Play the hidden object scene.
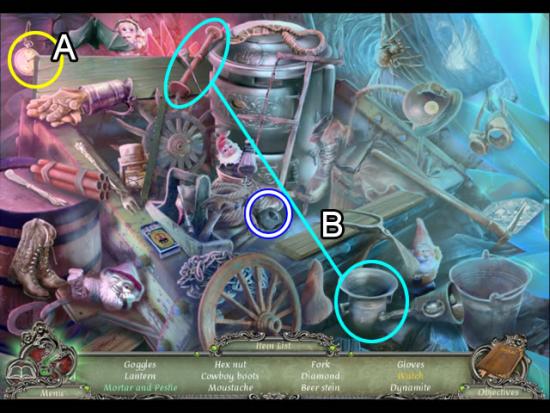
Chamber Entrance
- Move the coat (A) to find the Watch.
- Put Pestle with the Mortar (B).
- Find the rest of the listed objects.
- The HEX NUT goes to inventory.
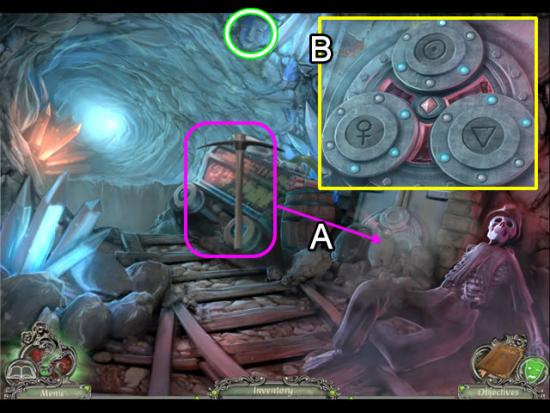
- Collect the Mask (52/55) from the top of the tunnel.
- Use the PICKAX to remove the rocks (A).
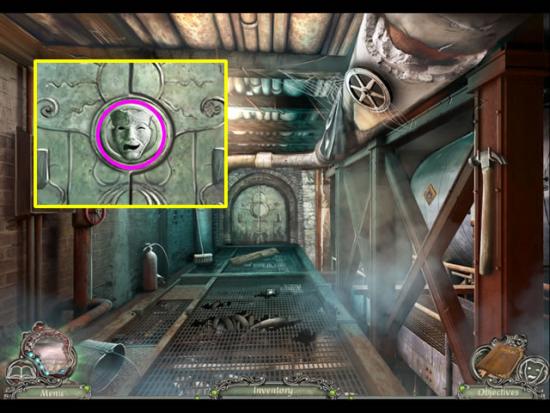
- Look closer at the door mechanism (B) and open a puzzle.
- Click one of the plates to add the patterns and symbols to the journal.
- The goal is to go back to the plates in the tunnels and enter the codes shown in blue lights in the plates.
- Go down once.
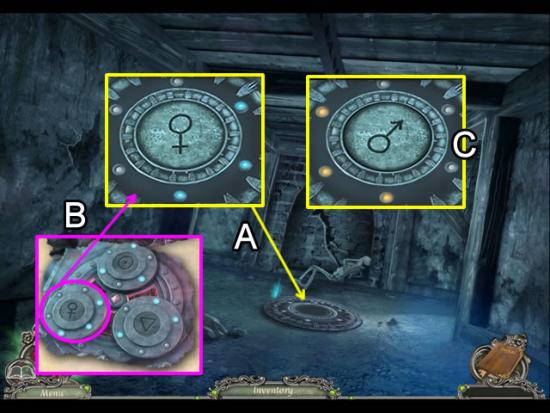
- Zoom in on the plate (A).
- Refer to the journal notation (B). Replicate the light pattern for that symbol by clicking the three lights.
- Correctly matching the pattern changes the plate symbol (C) and light pattern and color. Make a note of the symbol and pattern.
- Go down once.
- Repeat the process with the symbols and lights for this plate.
- Go down once.
- Repeat the process with the symbols and lights for this last plate.
- Go forward twice and either right or left to return to the chamber entrance.
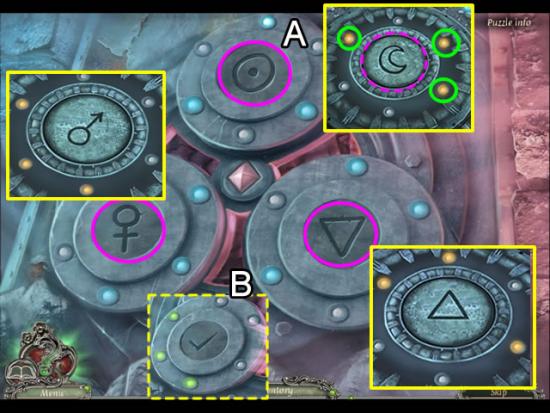
Chamber Entrance
- Zoom in on the door lock mechanism.
- Flip the symbol (A) for the first plate to the new symbol. The lights go off. Input the new pattern of yellow lights.
- When the new symbol and pattern are correct, the light pattern changes, switches to green and a check appear in the symbol circle (B).
- Repeat the process for the other two plates.
- When all plates have a check and green lights the door opens.
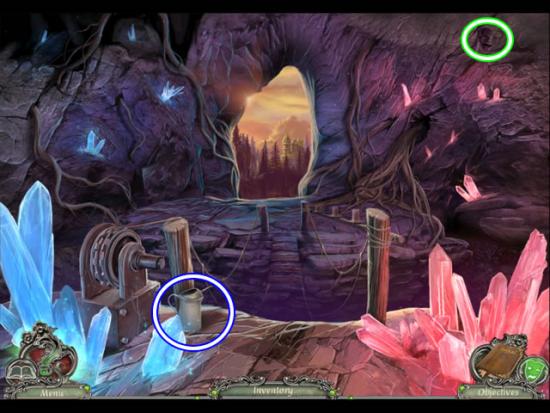
Chamber
- Collect the Mask (53/55) from the upper right wall.
- Take the EMPTY OIL CAN.
- Exit the chamber.
- Go down once to get to the mine entrance.
Mine Entrance
- Zoom in on the oil puddle.
- Put the EMPTY OIL CAN under the seepage.
- Take the full OIL CAN.
- Go forward once to return to the chamber entrance.
Chamber Entrance
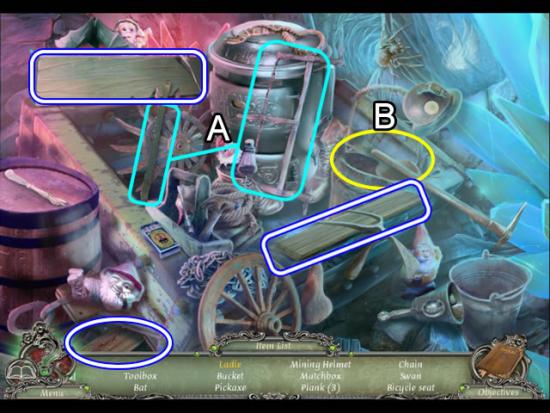
- Play the hidden object scene.
- Attach the blade to the Saw (A).
- Move the cloth and take the Ladle.
- Find the rest of the listed objects.
- The three PLANKS go to inventory.
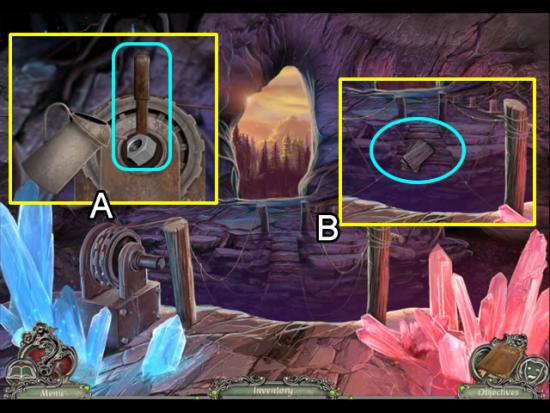
Chamber
- Look at the winch (A). Attach the LEVER and secure it with the HEX NUT. Use the OIL CAN on the assembly. Pull the lever to tighten the rope bridge.
- Fill the gaps on the bridge with the PLANKS (B).
- Cross the bridge.

Red Phoenix Shrine
- Collect the Mask (54/55) from the rocks on the right.
- Pick up the old diary (pink). Read the entries; take the PHOENIX MEDALLION from the second page.
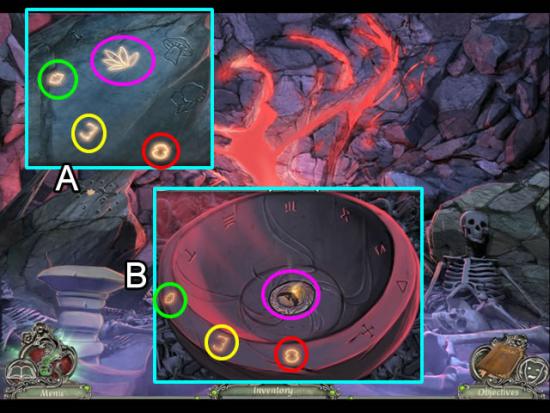
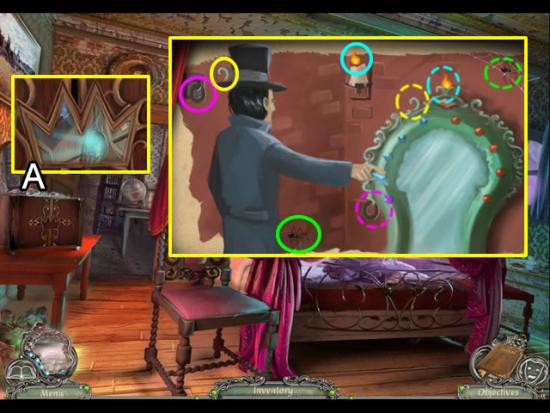
- Zoom in on the black rock (A).
- Press the flame lily icon (pink). A symbol lights up (green). Press it to light up the next symbol in the sequence (yellow). Press this symbol to light up the last symbol (red).
- Go to the pedestal (A).
- Press the same symbols on the basin to open the center slot (pink). Insert the PHOENIX MEDALLION and turn it to light up a portion.
- A new pedestal appears. Take the PHOENIX MEDALLION.
- Return to the rock. Repeat the above process for the mushrooms icon.
- A third pedestal emerges.
- Return to the rock. Repeat the above process for the smoke-shrubs roots.
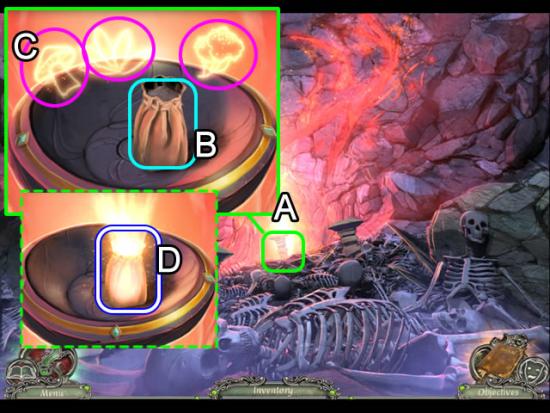
- Look at the glowing pedestal (A).
- Put the ASHES pouch in the center (B). Click each of the icons (C) to send their powers to the ashes.
- Take the PHOENIX DUST (D).
- Go through the crevice in the back wall to enter Emily’s bedroom.
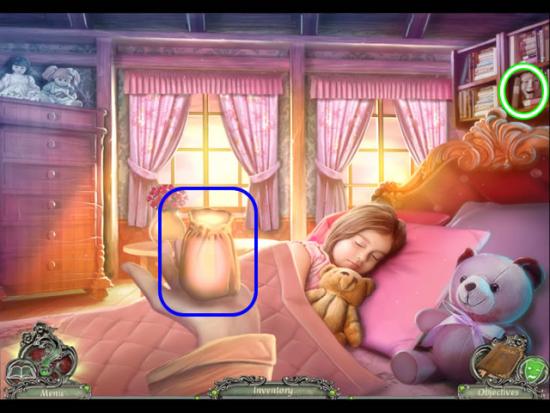
Emily’s Bedroom
- Collect the last Mask (55/55) from the bookshelf on the right.
- Sprinkle the PHOENIX DUST on Emily
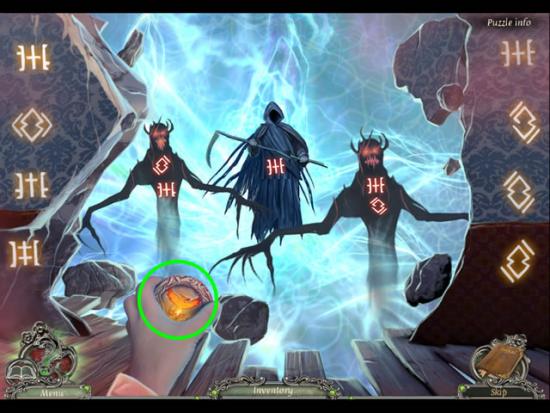
- Put the PHOENIX MEDALLION on the grim reaper that appears.
- This activates several rounds of a match-the-symbol puzzle with the reaper and its minions.
- Complete the puzzle to save Emily.
Congratulations! You have completed the bonus game included in Rite of Passage: The Perfect Show Collector’s Edition. A winner is you!

More articles...
-
Best Horror Games On Itch.io – July 2026
Across a bounty of subgenres. -
Grow A Garden 2 Base Price List
What's the most valuable crop? -
Evomon Types Guide [Strengths, Weaknesses, Resistance]
Your companion guide during battles.