![Digimon UP Tier List [Supports, Buddies, and Partners]](/wp-content/uploads/2026/07/digimon-up-tier-list.jpg "Digimon UP Tier List [Supports, Buddies, and Partners]")
Digimon UP Tier List [Supports, Buddies, and Partners]
These Digimon will get you UP the leaderboard.


![Haze Seas Boss Drops [Chances, Locations, and How to Spawn]](/wp-content/uploads/2026/07/haze-seas-boss-drops.jpg "Haze Seas Boss Drops [Chances, Locations, and How to Spawn]")

Welcome to Gamezebo’s official walkthrough for Riddle of the Sphinx, released originally in 2000 and rereleased by iWin in 2009. This guide contains spoilers. When consulting guides for adventure games, you should only look at the section you need help with so that you don’t spoil future in-game events for yourself. You have been forewarned. GENERAL TIPS When you click on an item, you can either use it immediately or store it for later. To store an item, right-click while holding it to br…
a:1:i:0;a:2:s:13:”section_title”;s:25:”Riddle of the Sphinx Tips”;s:12:”section_body”;s:53872:”Welcome to Gamezebo’s official walkthrough for Riddle of the Sphinx, released originally in 2000 and rereleased by iWin in 2009.
This guide contains spoilers. When consulting guides for adventure games, you should only look at the section you need help with so that you don’t spoil future in-game events for yourself. You have been forewarned.
GENERAL TIPS
WALKTHROUGH
You can jump to any word in the walkthrough by pressing the "Ctrl" and "F" keys at the same time and typing in the word you want to search for. For example, if you’re wondering what you need to do with the shovel, type Ctrl+F, then "shovel" to search the document for that word.
Items are indicated by ALL CAPS.
1. Gil’s Camp
Make your way toward Gil’s tent, the one in the very back of the camp. Move toward the table and focus in on the tape player. Press the Stop/Eject button (second from the right) to open the tape deck. Pick up the CASSETTE TAPE, put it in the player, and press Play (the green button) to listen to Gil’s message for you.
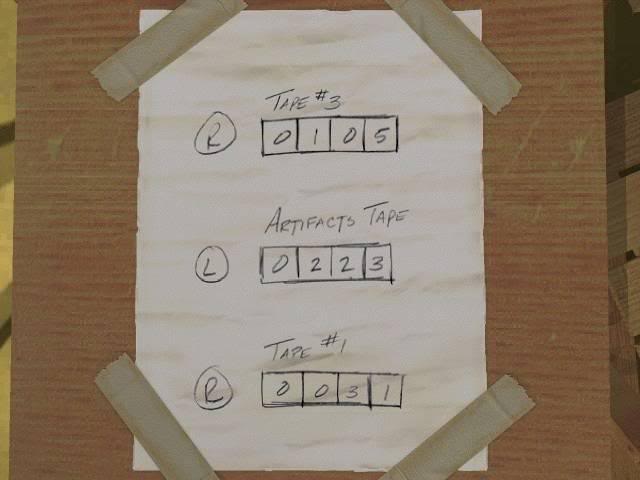
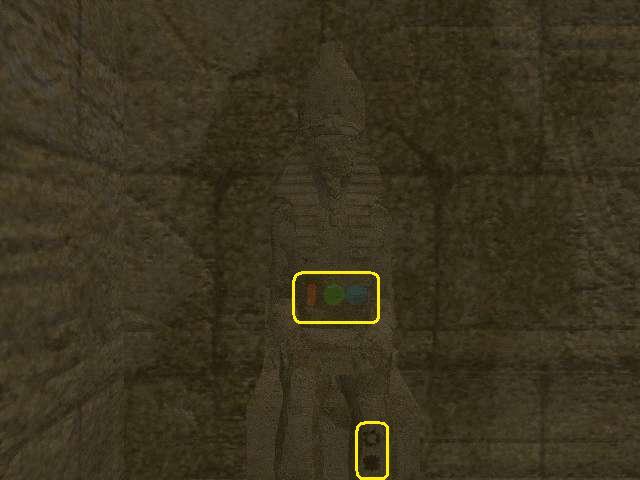
Look at the three drawers on the left side of the desk. Above them is a slat that can be pulled out. A note is taped to it with three numbers on it, reading as follows:

(Fig. 1-1: The first clue to learning the combination.)
Write this clue down, then move away from the desk and to the right. In the first corner you come to, you will see a box marked “Food & Supplies”. Grab the piece of trash in the left corner of the box. It is the cardboard backing to a package that contained a combination lock, and it has already been opened. Click and hold the mouse, then move it left or right to turn the package over and look at the backside. You can read instructions here on how to use the lock.

(Fig. 1-2: Instructions for opening the combination lock.)
Move right until you see a cot with a box on it. (We’ll come back to the workbench in a second.) Some of Gil’s personal effects—his passport, his wallet, and his watch (which is broken)—are in this box. Open up the wallet. To pull a card out and look at it, click and hold the mouse, then pull it up. Behind the blue card is a scrap of paper with more numbers on it. Write these down as well. They are another clue to getting inside Gil’s treasure chest.
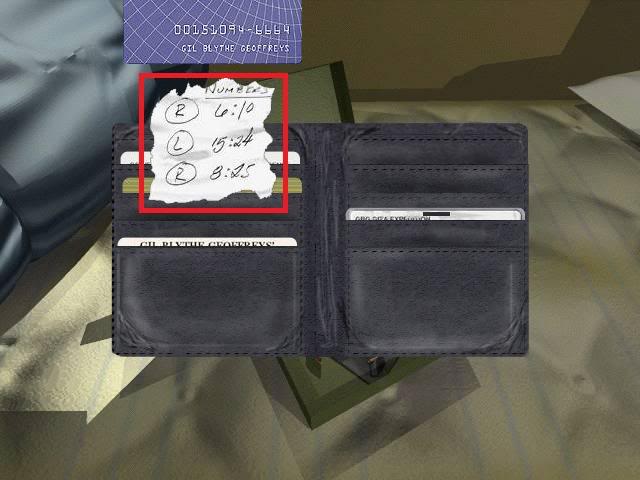
(Fig. 1-3: The second clue to learning the combination.)
Another item of interest you will want to remember is Gil’s campus ID number, 1007-72-33-1334. Write that down as well; you will need it later.
Turn now to the nightstand next to the cot. The only item you can use here is the book of matches. You can’t take the whole pack with you, and you can’t put a match in your inventory, so you have to light a match now and move quickly in order to use it.
Take one MATCH. Light it by clicking and holding the left mouse button, then dragging it across the gray strip at the top of the matchbook. With the lit match, move back and left until you reach the workbench you passed earlier. Turn on the gas under the pot, then light the burner with the lit MATCH. Inside the pot, the congealed mass will melt away to reveal the DESK KEY. Turn off the stove, grab the DESK KEY, and take it back to the desk where you listened to Gil’s message.
The DESK KEY opens all four drawers. Retrieve TAPE #3 and the ARTIFACTS TAPE from the top left drawer, and TAPE #1 from the bottom left drawer. Listen to each one in the order given in the first clue (see the first screenshot in this walkthrough). You can fast-forward or rewind the tape deck to get directly to the point in each tape, also written in the first clue, where the hint is revealed.
TAPE #3 states that the first number of the combination is in Numbers (as in, the book of the Bible). It is the day number, the number of doves, and the number of pigeons, all added together.
The ARTIFACTS TAPE tells you to add the number of young bulls to five (5), then subtract the number of male goats to get the second number to the combination. This information is also found in Numbers.
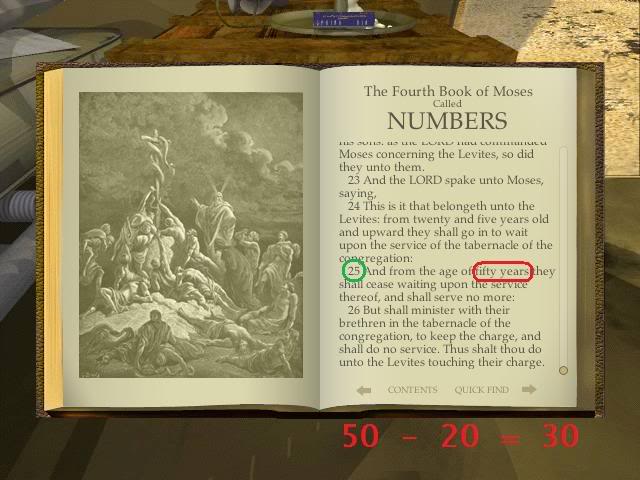
TAPE #1 reveals that the third number in the combination is the number of years in a certain verse of Numbers minus 30.
With this information at hand, you can now consult the Bible in Gil’s nightstand. Return to the nightstand and move the cursor to the crate containing the books so that the cursor points down. When you click, you will get in closer. Take the Bible and open it to Numbers. Now, if you wrote down the numbers from the scrap of paper behind the blue card in Gil’s wallet, you will know exactly where to look. The Bible has a handy quick-find option so you can go directly to the book and chapters Gil referenced, but you will have to scroll to the verses using the bar to the right.
From the scrap of paper, you know that the first clue is in Numbers chapter 6, verse 10, and is the sum of the day, the number of doves, and the number of pigeons. 8 + 2 + 2 = 12.
For the second clue, go to chapter 15, verse 24. Add the number of bulls to 5, then subtract the number of goats. 5 + 1 – 1 = 5.
Finally, turn to chapter 8, verse 25. The third number is the number of years referenced in that verse minus 30. 50 – 30 = 20.
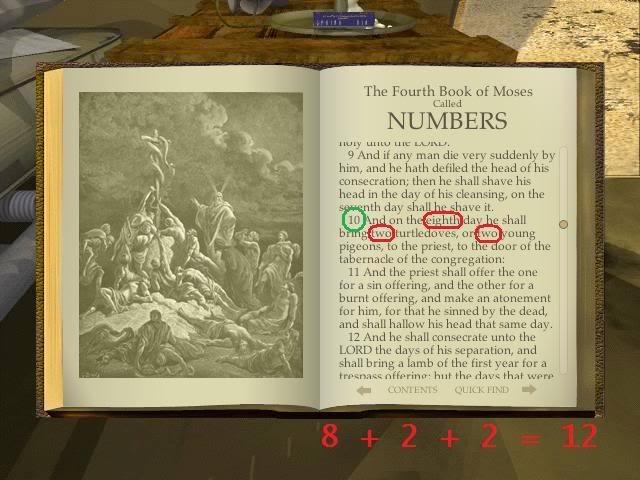
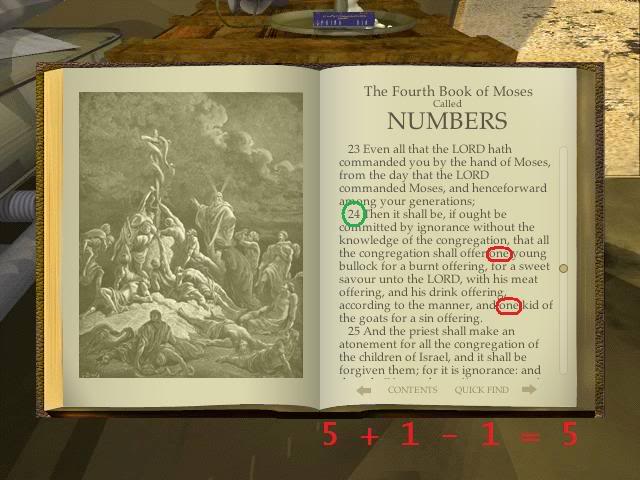
(Figs. 1-4 through 1-6: Doing the math.)
Therefore the combination to the chest is 12, 5, 20. Go to the chest and turn the lock according to the instructions on the back (see Figure 1-2 above). Once you have made the proper turns, the lock will open automatically. If it doesn’t open, turn the lock at least one full revolution to tumble it, then start at zero and try again.
When the lock opens, undo the latches and then click the lid to open it. Open the blue book to find a SCROLL in the hollowed-out pages. Add it to your inventory, along with the SCROLL TRANSLATION TAPE off to the side. Return to the tape deck.
Listen to Gil’s message about the SCROLL. You can view the SCROLL while the tape plays if you would like to follow along. Take the SCROLL with you in your backpack, but not the tape. The SCROLL will prove helpful as a reference tool later. Exit Gil’s tent.
As you leave, head to the right and move along the scaffolding to the Sphinx. There is a piece of information there that you will need in the next area. Move ahead on the scaffolding to the bottom of the stairs, then turn left and go toward the scaffolding on the right side of the Sphinx. As you approach the scaffolding, you will see a construction date on one of the planks. Write this number down and save it for later.
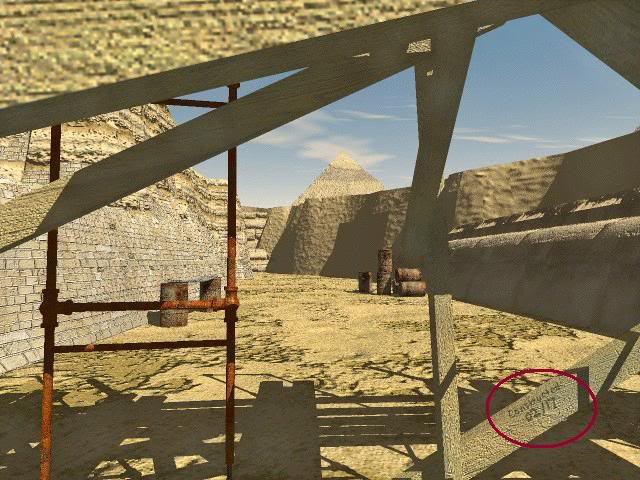
(Fig. 1-7: Construction date of the scaffold.)
Now go back to the base camp and enter the helicopter to fly over to Cheops’ pyramid.
2. Cheops’ Pyramid
Look left to the tent and go toward it. Grab the GAS CAN and add it to your backpack. Come back a little and go right toward the wheelbarrow. Make your way up between the yellow fences to the pyramid entrance.
Inside the pyramid, it is dark. The game won’t let you go past a certain point without the lights on, so before you go in, move to the generator to the right. Pour the gasoline from the GAS CAN in at the top. Once it finishes, press the green Start button to fire it up.
Enter the pyramid and move forward. There’s a dead end up ahead, but another path leads up. Go through the tunnel to another fork in the path. At this new area, look around to find a grate. It should be below you and to the right. Open the grate, then go one screen deeper into it to find a note taped to the wall. It’s from Gil, and it contains the code for getting into Gatenbrink’s door. This code is constructed from information you have (hopefully) already written down.
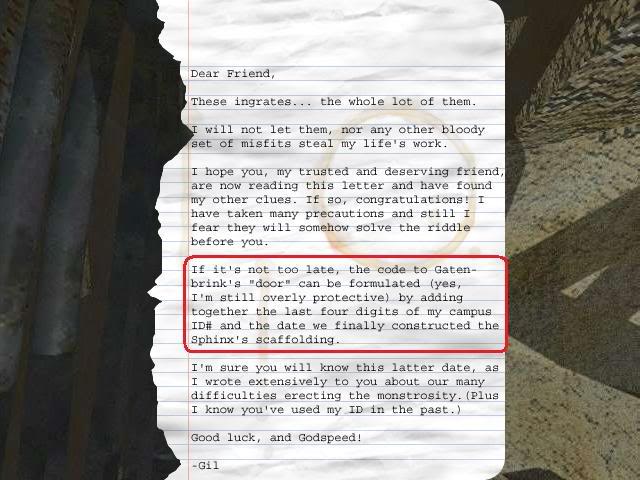
(Fig. 2-1: Gil’s note.)
There are now two shafts you can travel through: a lower and an upper one. Go through the lower one to reach a room full of video equipment.
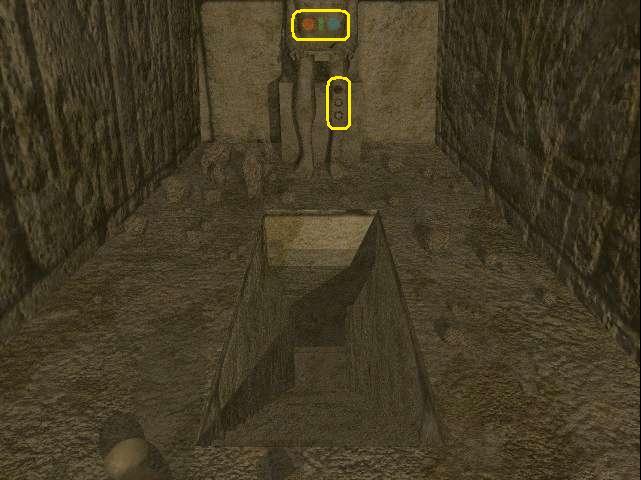
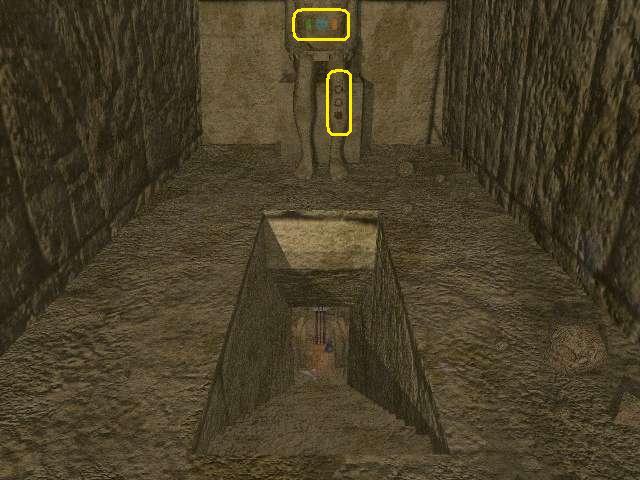
The Gatenbrinks door is in the small tunnel next to the table. You will need the ROBOT in this room to travel through that narrow passage. Grab the ROBOT from off its stand and take it over to the shaft. When you click on the hole, you will place the ROBOT inside. Turn to the table and turn on the video monitor with the power button on the top left-hand side.
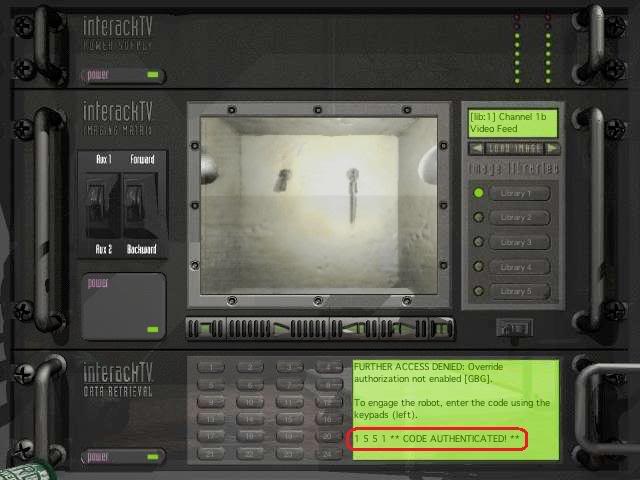
Turn on Library 1 to see through the ROBOT’s video feed. When you turn on the bottom switch for data retrieval, you can read through the various pages to learn about the excavation project. Data entry #2 will show you how to control the ROBOT. Move him forward by holding up the second switch on the middle panel. You will go forward until you hit a snag. Hold the first switch down (Aux. 2) to get over the hump.
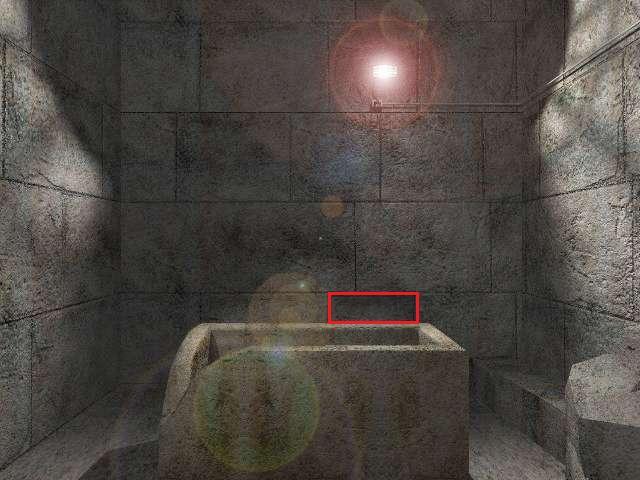
Continue forward until you reach a door at around signal strength 74.0. Access is denied and a code is required. Recall from Gil’s note (Figure 2-1) that you must add the last four digits of his campus ID and the construction date of the scaffold at the Sphinx to get the code. 1334 + 217 = 1551. When keyed in, the robot will push the door in, revealing a passage behind you.
(Figs. 2-2, 2-3: Ta-da!)
From here you can go no further. Return to the previous room and this time take the upper path.
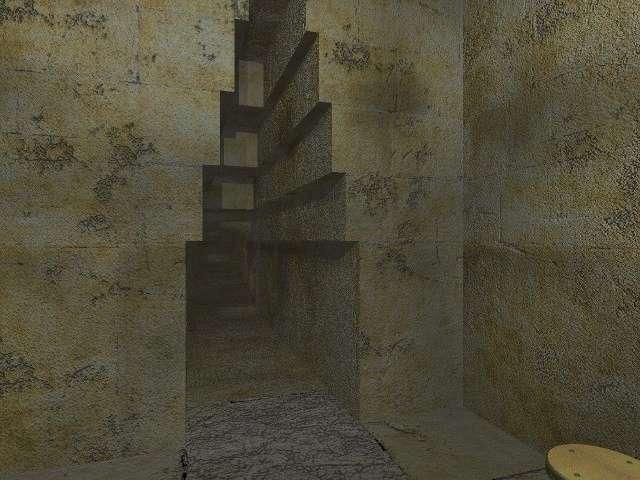
You should reach a room with an empty crypt. Facing the crypt, there is a block in the wall set a little deeper than the others. Move toward it and push on it to reveal a tunnel.
(Fig. 2-4: Move toward the block indicated and push on it to reveal a tunnel.)
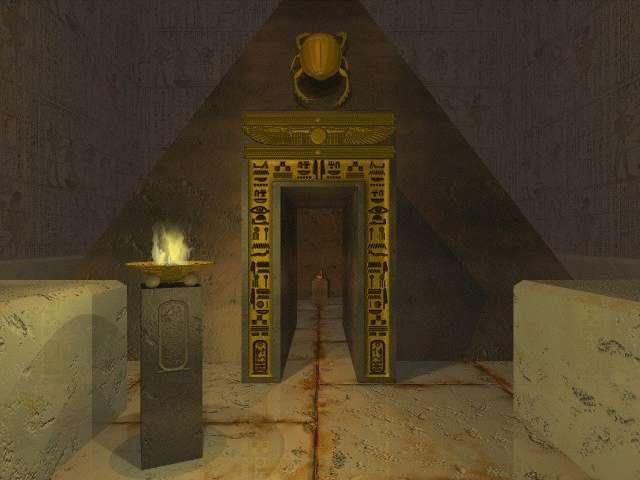
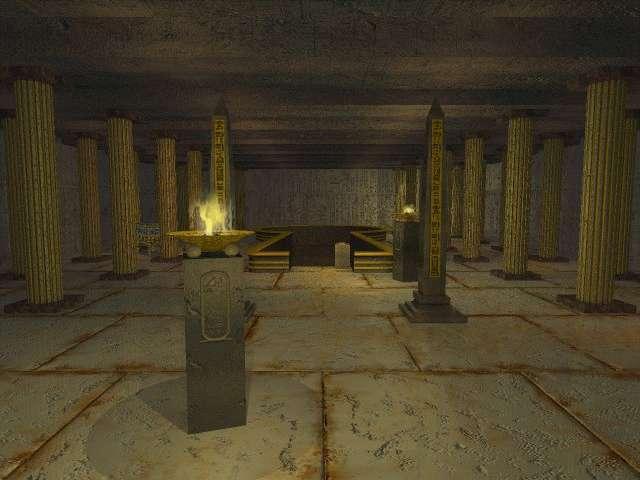
At the end of the new tunnel is a room full of golden objects. Underneath the pharaoh’s crypt is another tunnel. When you reach the other side of this tunnel, you will be facing a cobra statue.
From here there are six rooms to explore. Head left and enter the first one, which has a picture of a throne over the door.
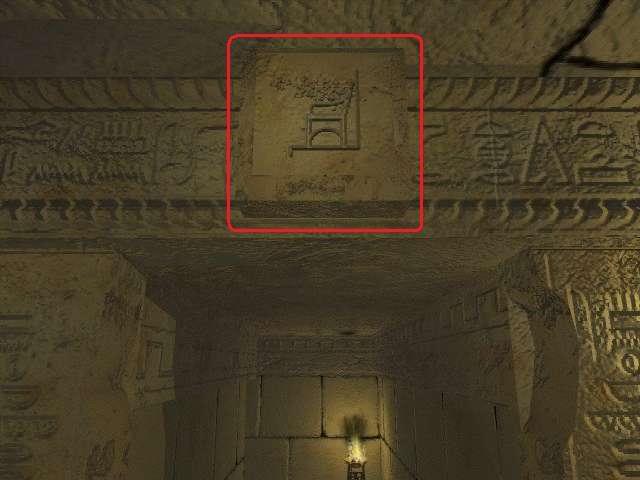
(Fig. 2-5: The symbol at the top of a door will help you make sure you’re going in the right room.)
Go through the passageway and look for a round container. Open it and take out the HERALDIC KEY, a four-pronged object with a curved top.
There is another room off to the side with a golden throne and an obsidian statue in the corner. Sit on the throne to move the statue, revealing a passage to yet another side room. On the floor in the middle of this room is the ROYAL SCOPE. Add it to your inventory.
Leave the throne chamber from the original door and go right to the knife chamber. Again, the symbol at the top will help you identify it.
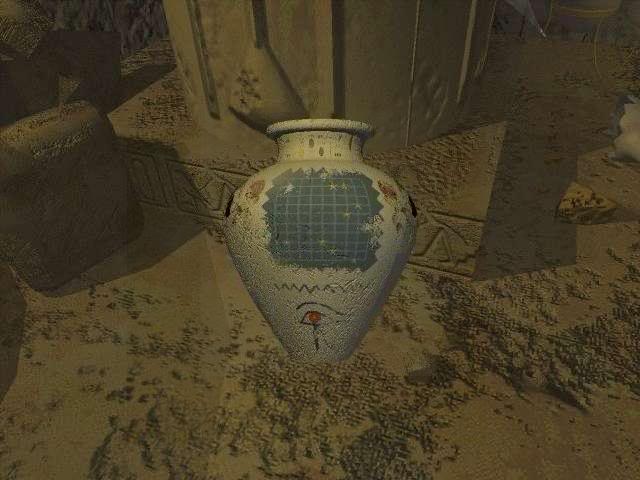
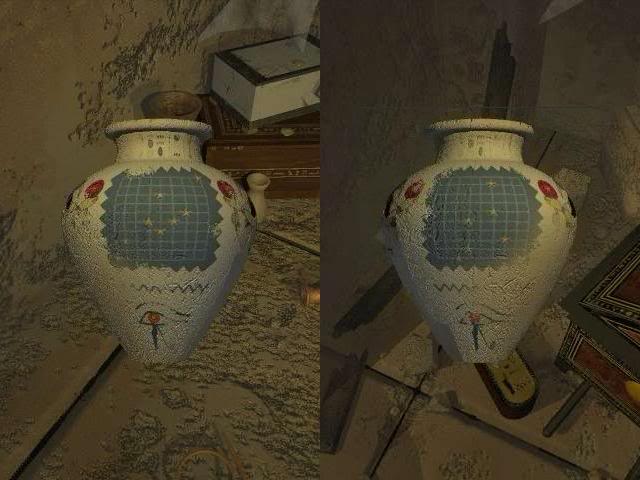
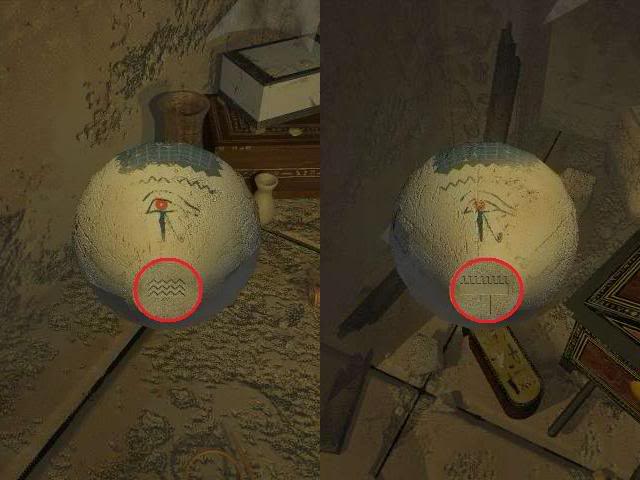
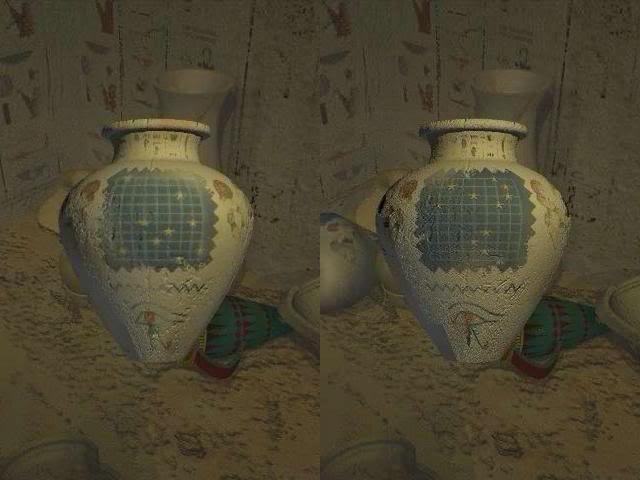
Ahead of you will be a small set of stairs. To the right on the floor is a box containing a knife and a scroll. Add the YACHT SCROLL to your backpack. You will also need to grab some WOODEN ARROWS from the nearby pot for later. Go up the steps in the center of the room and get the GOLD DAGGER out of the box there. You may also want to examine the jar with the star map on it, as some of those symbols will gain greater significance later.
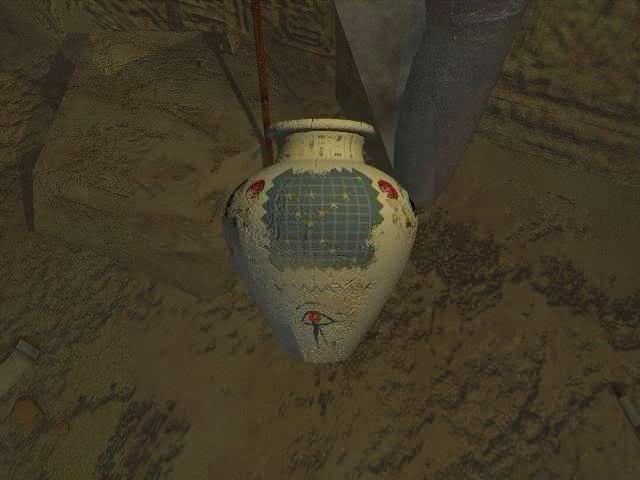
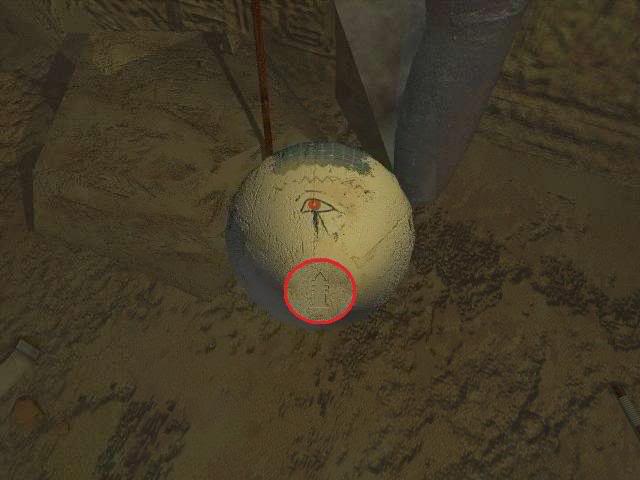
(Figs. 2-6, 2-7: The star map jar. Note the map on the front and the symbol on the bottom.)
Leave the knife room and go right to the hat room. Straight ahead inside is a statue of a person playing the flute. Turn right and look on the floor to find the FLAUTIST SCROLL and the ROYAL TRUMPET. Over to the left is another star map jar, with a different map and symbol.
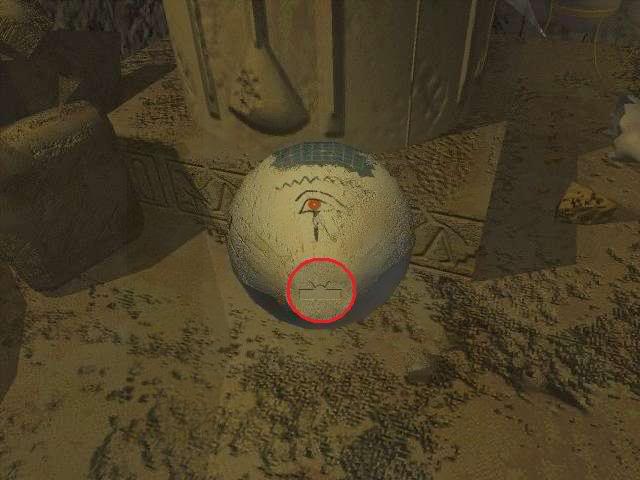
(Figs. 2-8, 2-9: Another jar with a star map on it.)
Check the game board near the star jar as well. Open the drawer on the side to find a key. Put the FLAX WICK KEY in your backpack.
Look again around the room for a red vase sitting in a corner. Next to it is a pot containing another scroll. Add this THRONE SCROLL to your inventory as well.
Now go around to the back of the flute-playing statue. On its back is a plug that’s out of place. Click on it to put it back in its slot, then go around and stand in front of the pedestal in front of the flute player. Place the ROYAL TRUMPET on it, then click it again to play it. A panel across from it will shatter, allowing you access to a side room. When you have done this, put the ROYAL TRUMPET back in your backpack.
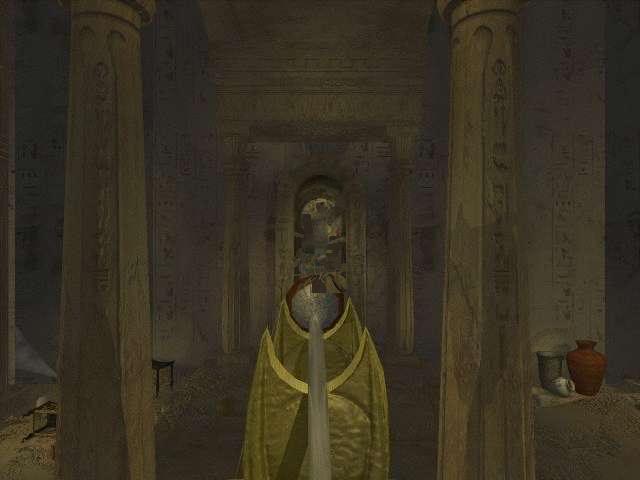
(Fig. 2-10: Play the trumpet on the stand to smash the wall in front of it.)
There are actually two panels to smash here, so once you’ve done one, turn to the other side, face the other one, and smash it as well. Through one of the smashed panels, you will see baskets with cobras sticking out. You cannot advance through this room if the cobras are out. You need to go to the other panel, which has a bag hanging behind it.
If you read the FLAUTIST SCROLL, you will see that you need to squeeze this bag eight times. Do this and the statue will play a song that will keep the cobras at bay. Go into their domain and walk along the curving path of stone steps to a tablet against the wall. Take HATHOR’S TABLET and add it to your inventory.
Leave and continue in the direction you’ve been going. Skip the first door you come to, which is sealed, and go on to the next, which leads to the arrow chamber.
There are six columns in here, all with doors tied shut. Cut the cords with the GOLD DAGGER, then search all three alcoves. You’ll find two more star map jars and a REED LEAF KEY.
(Figs. 2-11, 2-12: Two more star map jars.)
Once you’ve scoped out the room, check the doors on the columns until one of them opens. When one does, you’ll see a rope. Climb it and cross the bone bridge to find a pot of fire, some WOODEN ARROWS strewn about, and a mounted crossbow. One arrow is already lit up in the fire pot for you. Take it and put it on the bow string.
You are aiming for the Anubis statues on each side of the ladder. Drag the turntable using the control below the bow and turn it to the left or right. From the center, you’ll want to turn it twice in each direction. When you burn off the cords binding the wrists of one Anubis statue, take the other arrow on the ground, run it through the fire to ignite it, and shoot it at the other one.
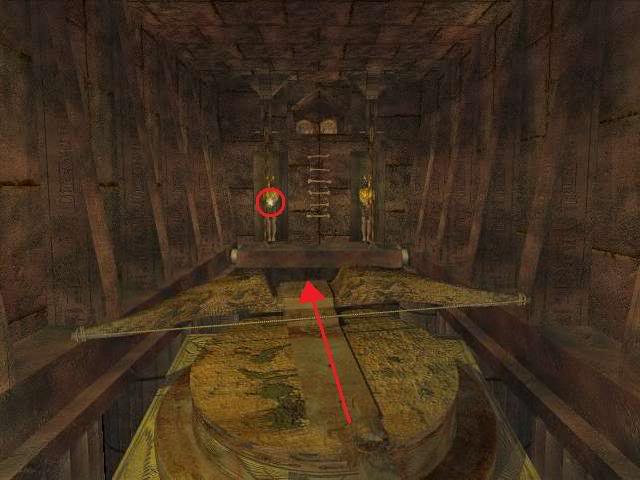
(Fig. 2-13: Note the angle and the burning wrists on the statue.)
When both statues are unbound, a platform will roll out that you can walk across to get to the bone ladder ahead. At the top of the Anubis ladder are two of ANUBIS’ TABLETS. One will kill you if you touch it; the other is safe. The one on the left is the one you want to take.
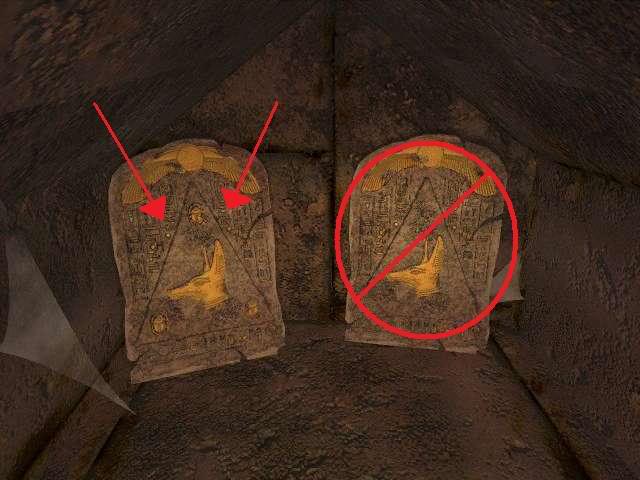
(Fig. 2-14: Left good, right bad.)
On your way back, note the alcove in the pedestal on which the crossbow is mounted. Take the ARCHWAY SCROLL inside.
Leave the arrow room and continue right once more to the boat chamber. Look for a red box with a round top and two items inside, the SACRED AMULET and the CHARMER SCROLL. Perusing the CHARMER SCROLL will show you how to use the SACRED AMULET, which you need to know for later. There is also a tall dark box in another corner that contains the PILLAR KEY, which you should also collect for later. There is nothing to be done with the model boat displayed in the center of the room; however, do make a note of the
Head from here to the jar room. At the end of the room is a table. Pull the gold lid off the red jar to find the AHNK [sic] KEY. There are also two more jars with star maps and odd symbols.
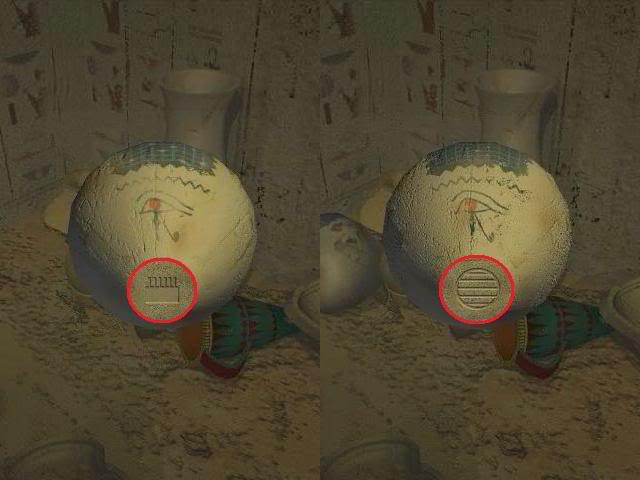
(Figs. 2-15, 2-16: More star map jars.)
Go now to the only room you haven’t been to: the one with the sealed door and the shining symbol at the top. Touch the panel to rotate it and get through. You will go up several flights of stairs in here. Along the way you will pass a star-shaped lever. Right now it is missing a vital piece and does not work. We will return to it later.
At the top of the stairs, you’ll see a grid on the wall, much like the ones you’ve seen on the star maps on the clay jars. To the right is a pot containing several star-shaped pieces with symbols like the ones you’ve seen on the bottoms of the jars. One of these is the correct star map, and when the pieces with the correct symbol on them are arranged the same way as in the corresponding star map, the grid will open and give you an item.
The correct star map to follow is the one on the left side of Figure 2-15. Arrange them as shown in Figure 2-17 below, using only the pieces with the symbol on the left side of Figure 2-16 (the rectangle with six poles sticking out of the top).
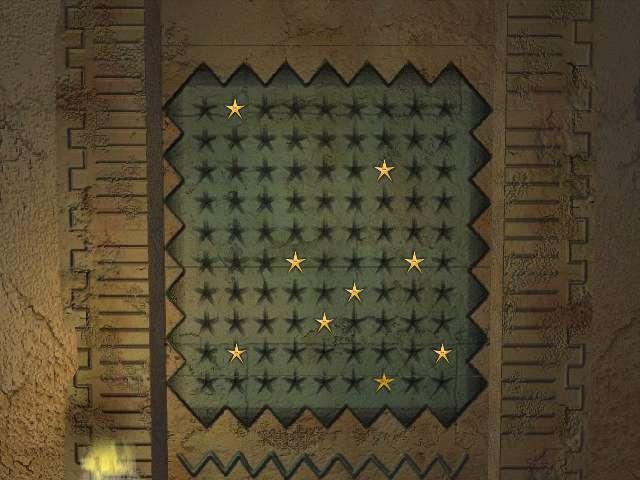
(Fig. 2-17: The correct star map configuration.)
Upon solving the configuration, the STAR SCEPTER will fall into the hands of the statue on the left and a stairway will reveal itself. For now you can’t do anything in the new upstairs room. Pick up the STAR SCEPTER and take it back to the star-shaped lever from earlier. Insert it into the hole below the lever, then turn the lever. It will turn into a sun shape. The room upstairs is now lit up and you are able to explore it.
Explore the room to find two tablets in the corner. Again, one will kill you upon touching it, and the other is safe to touch. This time, you have a pretty good idea of which one not to touch – there’s a skeleton with his arm draped around the bad one. Take the one he’s not touching and add THOTH’S TABLET to your backpack.
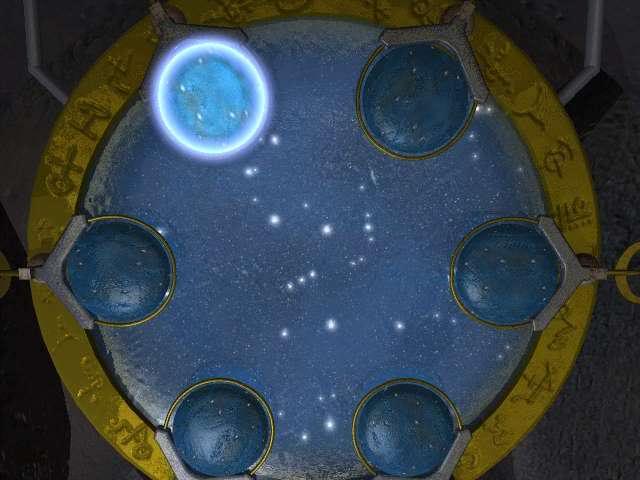
Click the lever at the top of the steps (you may have to do it twice) to move the stairs that led up here. This will reveal a stairway you can go down in order to collect the ASTRO SCROLL. Reading it will show you to use the ROYAL SCOPE to see constellations out the windows of this room. If you look outside now though, you won’t see anything. You have to take a nap on the bed and make it nighttime.
Once night falls, use the ROYAL SCOPE and each window and map out the constellations for future reference. To see a constellation, place the ROYAL SCOPE on the stand in front of a window, then move toward the lens until you see the stars.
When you leave this room through the rotating door, you will see a passageway open ahead of you. Go in real quick to find a model ship like the one in the boat chamber, except much larger. You cannot do anything with this, but you should check out each of the crocodile statues in here. Go up to each one so that its head is onscreen and run your cursor over the eyes. When you do this, they will glow a certain color. Make a note of the color that each pair of eyes turns and how all these statues are arranged. This information will come in handy somewhere down the line.

(Figs. 2-18, 2-19: The crocodile statues in the chamber across from the sealed star room. Inspect each set of eyes and note what color each one turns.)
Go to sleep and make it daytime again, then return all the way to the video equipment room.
Enter the tunnel where the wall receded when the ROBOT pushed in the door. There is a small tunnel to the right that you can go into, which can be very hard to find because all the walls are gray and kind of blend in with each other. Here’s a picture showing you where to click:
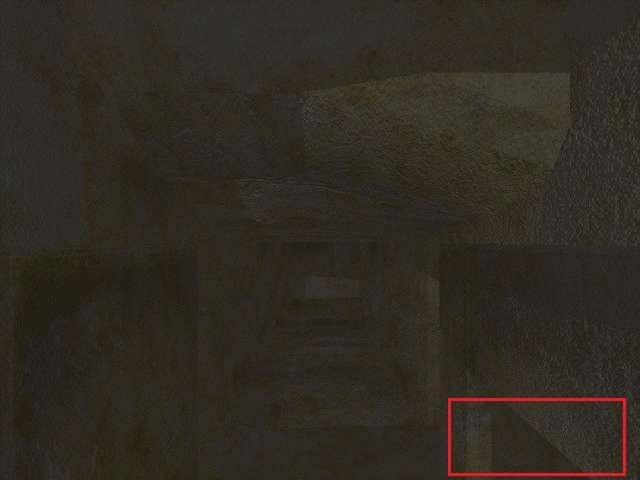
(Fig. 2-20: Kind of tricky, no?)
Once in this tunnel, take the first branch off to the right. Move forward and pass the first sitting statue and go ahead to a pair of sitting statues, then into the door across from them. Go down the winding stairs into a room with a giant golden snake wrapped around a pillar. Go around the snake column to find a room with a golden scarab beetle above the door and a harp-shaped switch inside. Turn the harp switch once.
(Fig. 2-21: The room with the harp switch.)
You can now climb the golden snake to the top. You’ll find a room with five harp statues. Each of these is missing a key. Get a closer look at the base of the harp and look through your inventory to determine which harp is missing which key. From the leftmost statue going clockwise, use the REED LEAF KEY, then the PILLAR KEY, then the FLAX WICK KEY, then the AHNK KEY, and finally the HERALDIC KEY.
With these in place, you can now obtain the GOLD HARP KEY in the scarab beetle room. Turn it again. When you turn it, it will pop out of its base and you can grab it off the ground.
Go back to the pair of sitting statues, then back some more to the single sitting statue. Click on it to push it aside and reveal a passageway. Travel down it until you reach a huge room with a giant boat. On the way down the stairs in that room, look in the pot halfway down and grab the STAIRS ROD.
In this room are four different bolts you need to collect. Go around to the back of the boat and into the dead-end hallway behind it. You’ll see a vase in the corner; click it to tip it and break it, revealing the VASE BOLT. Pay attention here to the carving on the wall as well. You will see some of the stones on the arch in the picture pressed in. Make a note of these, since you will need to use this information in conjunction with another item in this room.
(Fig. 2-22: The carving by the Vase Bolt. Note the pressed-in stones.)
Between the back two columns on the right side of the boat is a red basket (you will have to approach the column to see it). Inside that is the PYRAMID BOLT.
Just before the archway with the crocodile statue at the end is a vase. Check it and grab the CROSS BOLT out of it, then board the ship and look right. Open the storage cabinet and get the SUN BOLT out of the box in the middle.
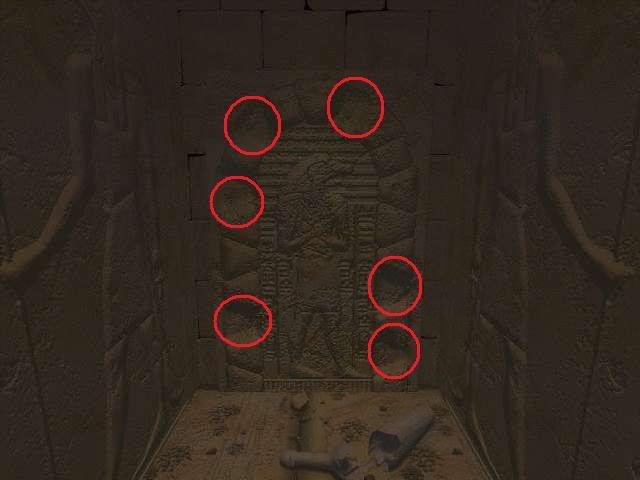
Go to the crocodile statue near where you got the CROSS BOLT. Face the archway and take out the ARCHWAY SCROLL. You will see a series of tallies written on the various stones of the arch. Focus only on the stones that were pressed in on the wall art you saw back where you got the VASE BOLT. Those stones, as indicated on the ARCHWAY SCROLL, are Nos. 2, 4, 7, 9, 13, and 17.
(Fig. 2-23: Touch the marked stones in the order indicated in the picture.)
When you press the stones in the right order, the platform on which the crocodile god statue sits will rotate. Step on the empty platform when it comes around to be taken to a corridor with a green glow. Follow the crocodile over to the edge of the water. When you reach the edge, some crocs will swim up, allowing you to use them as stepping stones. Go across them and over to the tablets. Once again, one is the wrong tablet and will kill you if you take it, so save before choosing one. The correct SOBEK’S TABLET is the one on the right. Leave the way you came. You do not have to press the stone sequence again.
By now you have probably noticed some columns in this room with some rotating dials at the top. If you took notes earlier in the room with the crocodile statues that had color-changing eyes, you will know what to do here. The YACHT SCROLL will show you how to organize these colored dials. The faces in the circles at the top of the scroll represent the statues to the left of the boat, and the ones at the bottom indicate the ones to the right of the boat. Also, the left side of the scroll represents the front of the boat. A blank circle means that that column does not have to be adjusted.
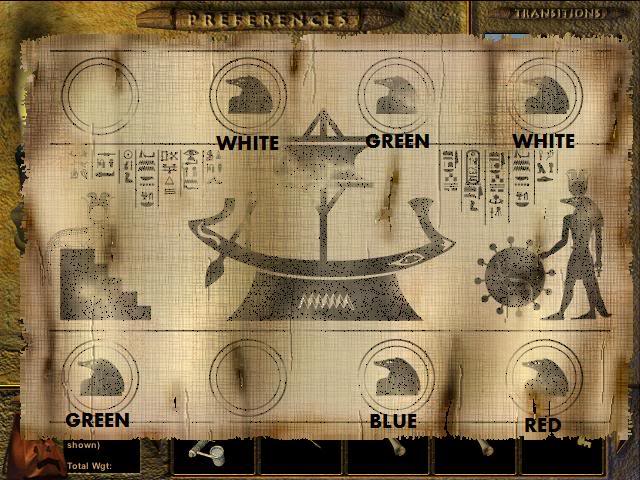
(Fig. 2-24: Remember the colors of the crocodile statues’ eyes and adjust the columns as shown.)
Climb each column and turn it to the proper color. Use the YACHT SCROLL and your notes on the colors of the statues’ eyes to guide you. When you have done this, go to the wheel at the top of the room in the back. You can pull on it, but it won’t do anything. It is missing a piece just to the right of the wheel. Slip the VASE BOLT in and then turn it.
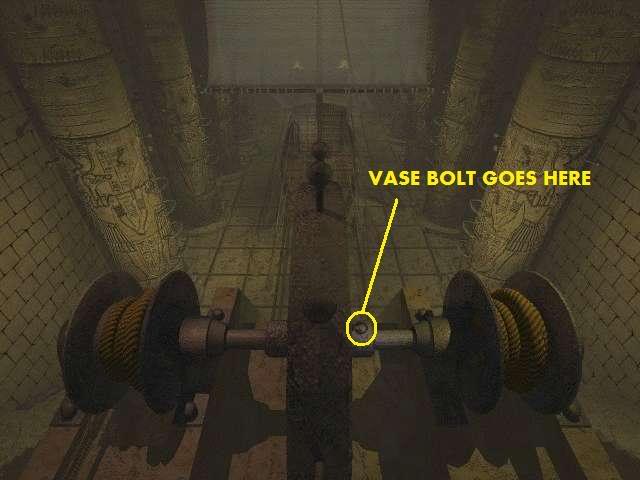
(Fig. 2-25: Where to put the Vase Bolt.)
If the columns are set correctly and the VASE BOLT is in place, the yacht will move. Go downstairs to the front of the boat and enter the tunnel the relocated boat has revealed.
Dive into the water until you see a wide-open area with a rock in front of you. Go up to the surface at that point. You can go left or right from here. Left is a dead end, so go down the path to the right. Around a bend, you’ll run into a path that forks in three directions. Go to the right until you reach a bank that you can climb onto. There will be a red boulder up here.
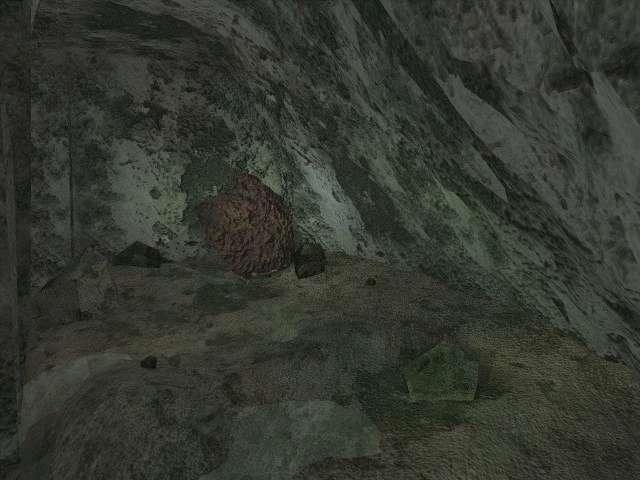
(Fig. 2-26: Where you should end up.)
Approach the red boulder and enter the triangular door behind it. Swim through the water to a ladder that will take you outside. Here, you will find a PICK AXE and a briefcase. Inside the briefcase you’ll find four pages written by one of Gil’s colleagues containing hints for using the SACRED AMULET to get past a cobra guarding a certain passageway. We will return to that passageway soon, but first there’s another tablet you need to get. Yet again, one will kill you and the other won’t, and again there is a skeleton to help you figure out which one’s the wrong one. But where’s the right one? You’ll have to do some climbing to find it. Look for the wall with grooves in it and move the cursor to the top of the screen to go up.
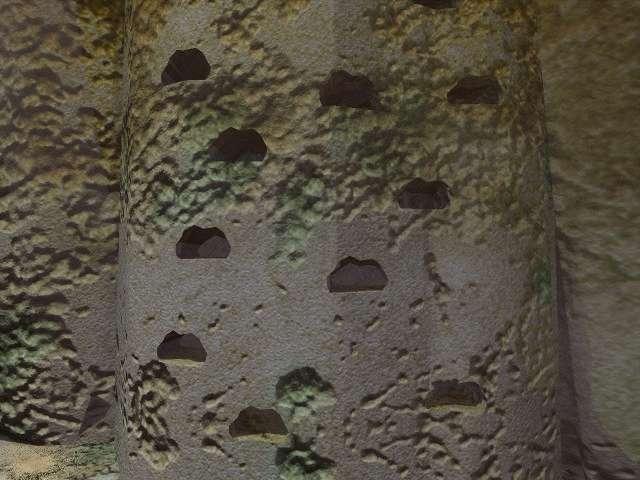
(Fig. 2-27: The wall you’re looking for.)
At the top is HORUS’ TABLET. Grab it and sock it away in your backpack, then descend and return to the fork in the river, this time taking the path to the left. You should come to a wall with hieroglyphics and a small hole on it. This is the very same one described in the note you just read. Save before going through it, because it is possible to die here.
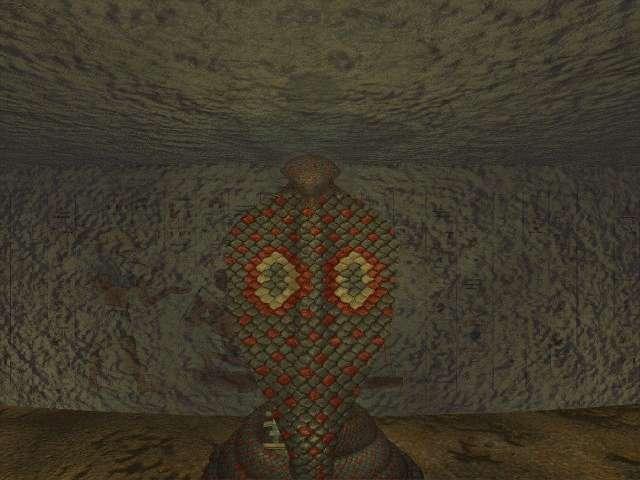
At this wall, use the PICK AXE to hack the rest of it away. After you use it twice, a cobra will pop up. As you have read on the CHARMER SCROLL and Gil’s colleague’s field notes, the SACRED AMULET will make it back down. Click the SACRED AMULET on the cobra to make it go away. You must be very quick about this, as the cobra wastes no time in striking at you. You will not have to deal with the cobra again as long as you are in the room, but bear in mind that you leave and come back, you will have to use the SACRED AMULET again.
Go all the way up to the colored cobra statue and turn around. On your bottom left you should see a tablet. Click on it to find two of them. The one on the left is the safe one this time. Put TAUERT’S TABLET in your pack. Leave this room and go back to the fork, turning left down the center path. Swim down this pathway until you are out in the light of day, then go all the way to the edge of the pool and exit at left.
Turn back toward the door and walk by the poolside to the corner, where you should find a statue. Note the colorations on its stomach and leg; these are things you will need to know later.
(Fig. 2-28: The aforementioned statue.)
Turn around and head through the main door. To your left you’ll see four statues sitting. Make your way to the right around the lake to reach them. Halfway around, you’ll be able to turn left at a palm tree to see some stepping stones leading toward an arch on a small island. Go out this way and explore this area until you find three discs on a stone. When you touch them, they will each reveal a color before quickly shutting. The left one reveals blue, the middle one shows yellow, and red lies underneath the one on the right. Make a note of this color sequence before moving onward.
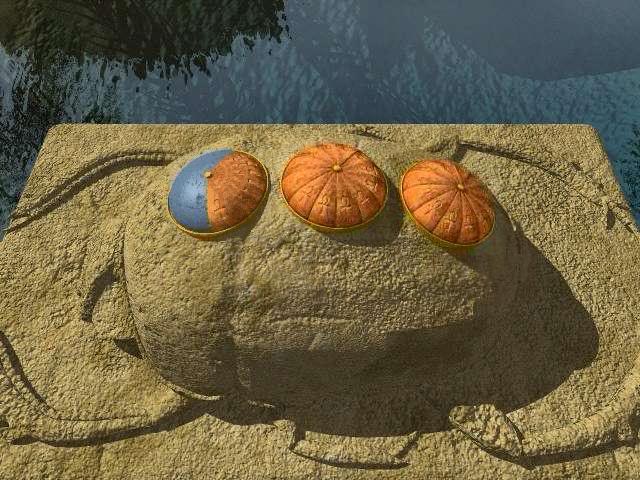
(Fig. 2-29: The aforementioned discs on the stone. Note how I have touched the left one and revealed a color hidden beneath it.)
Continue to make your way to the four statues. Shortly after leaving the island, you will see a giant rock casting a large shadow. Search near the shadow to find a spherical SCARAB WEIGHT in the sand.
Upon reaching the statues, look around the far side of the fallen head. If you look in its ear, you’ll find another SCARAB WEIGHT stored there. Put in your backpack.
Go back until you see a ramp. It will lead to a door situated between two of the statues. Go in and move RA’S SCROLL out of the sand and into your inventory.
From the door that led to RA’S SCROLL, go left, but stay at the base of the statues. You should find a staircase between two of them. Go up it as far as you can, then climb the statue using the footholds provided. Climb up as far as you can to the very top (you will hear wind rushing). At the very top, you will be able to look down and find some symbols on the statue’s head, which you need to again record for later.
(Fig. 2-30: The symbols in the statue’s head.)
Go down and all the way around the lake past the door that brought you out here. You will soon find a shining gold pyramid. Go up to the foot of the ramp at the front, then turn around and move forward a screen. You should see a shining light toward the left. Approach and look down and you’ll find the final SCARAB WEIGHT that you need to pick up.
Go back to the pool that brought you here. Where before you went to the right and looked at the statue (from Figure 2-28), this time go left. You will find a hallway leading up some stairs to a bridge located outside. Go up two more flights of stairs, then at the top, turn around and note the colorations on this statue, similar to the Figure 2-28 statue.
(Fig. 2-31: The second statue so far to show such a pattern.)
Turn back around and move ahead until you find a third statue, across from some stairs leading down. Again, note its color pattern.
(Fig. 2-32: The third statue with the current color pattern.)
Down the stairs, you’ll encounter a puzzle requiring the three SCARAB WEIGHTS you found. Place one on each of the three free hooks before you. They will balance out the weight, allowing you to turn the three dials. You must now recall the colored patterns on the three statues you observed. Together, the color patterns and the filled-in dots show where each particular pattern goes. Combine the two patterns on the machine in the following configuration:
(Fig. 2-33: How the Scarab Weight machine should look upon completion.)
Go out to the nearby outdoor walkway where you can see the golden disk hanging out of the corner of your eye. When you are at exactly this screen:

(Fig. 2-34: This is where you have to be to turn and complete the next step.)
turn right, go up to the balcony, and look down into the pool, where you will see some symbols:
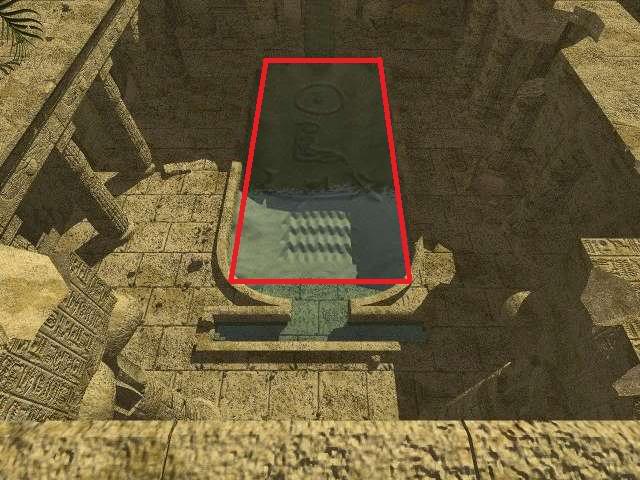
(Fig. 2-35: Activating the Scarab Weight machine allows you to see these symbols.)
Having taken note of these symbols, go back to the shiny pyramid where you found the third SCARAB WEIGHT.
Enter the symbols in the order in which you viewed them from top to bottom to open the front door. Random symbols will appear in each spot; keep moving the cursor over the spots until you get the ones you want. The door will open when the correct sequence is given.
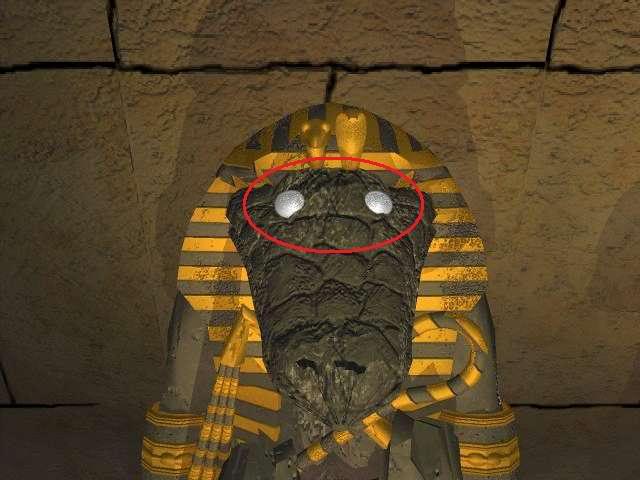
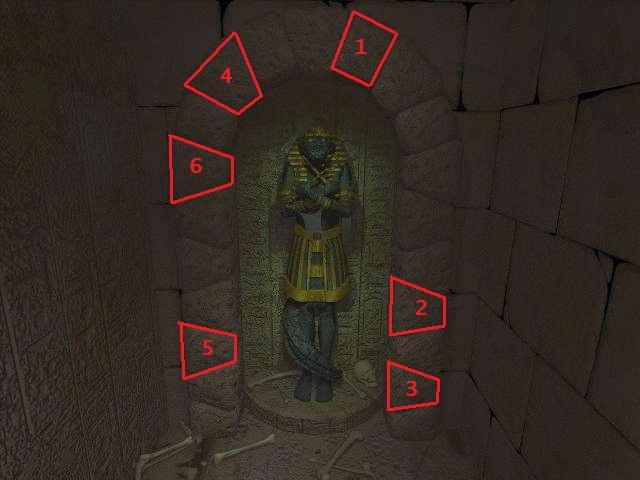
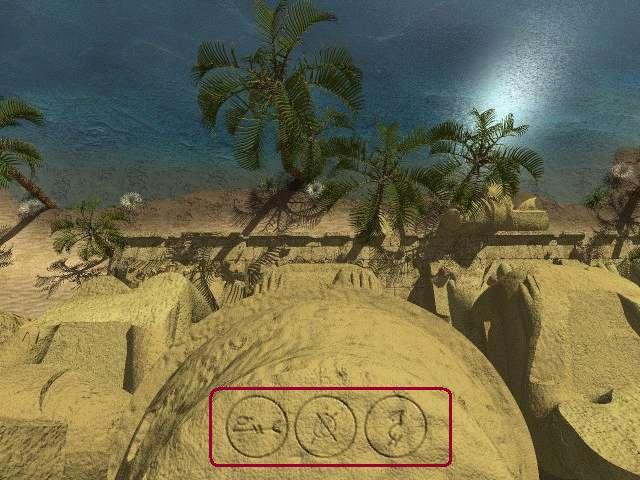
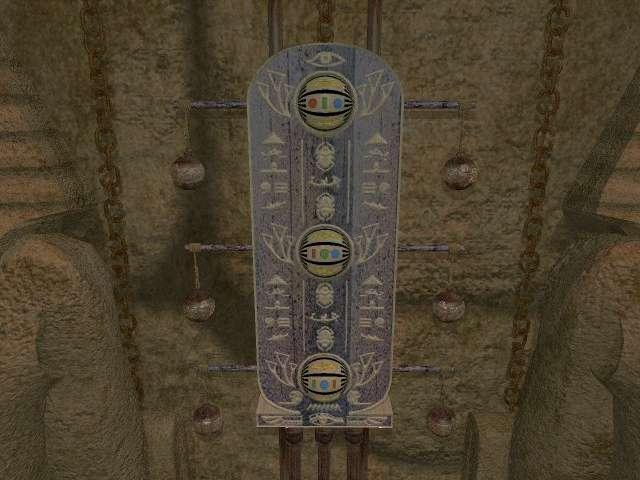
Before entering, walk around the base of the pyramid until you find footholds like the ones at the four sitting statues. If you go around to the left from the first entrance, you will see a cobra on a blue sphere at the top of the first set of footholds. Climb up as high as you can, so that the cobra is in the dead center of the screen, then move the cursor to the bottom until you see the long finger pointing down. Click to position yourself in front of the golden glyph wheel, which must be adjusted.
Turn the wheel under the blue sphere to the fish, the gold sphere to the turtle, and the red sphere to the stork. At this point, the music will go ambient and you can enter the pyramid and use the tablet holders. You should by now have six tablets, each of which goes in a corresponding holder. Additionally, each time you put a tablet in the correct holder, a scroll will pop out from the compartment above it. Starting from the left and going clockwise, place the tablets and take the scrolls in this order:
With these six scrolls in hand, return to the boat room, go up the stairs, and crawl back through the passageway that was hidden behind the first sitting statue. Turn left and go into the room that you came into when you took the first branching path from the tunnel in the video equipment room. If you look to your right, you should see a door with a picture of a circular maze above it.

(Fig. 2-36: What you should be looking at based on where I’ve led you so far.)
Go in this room and take the LEVER HANDLE out of the statue’s right hand. Turn around and place it in the slot by the door. When you pull on the LEVER HANDLE, the door will rise, and you will have little time to escape. (You may want to save before attempting this, reloading as needed.)
Get out, then go back down the hall past the pair of sitting statues. Of the two rotating mazes you find here, the one on the left should now be open. Go in and get the COBRA WHEEL from off the center pedestal. As you turn to leave, make a note of the drawing on the stone in the upper left corner:
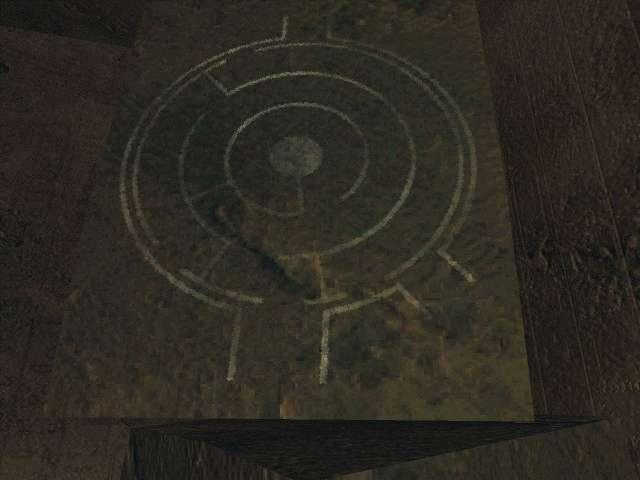
(Fig. 2-37: A diagram of a small circular maze.)
Place the COBRA WHEEL on the pink/yellow block back in the main hallway, then click on it to turn the maze in front of you. You must explore the maze in two different configurations to find all the items within:
Walk into the maze after turning the COBRA WHEEL three times. You should eventually find a small tunnel that you have to crawl through. In the room you reach is the SACRED CULL. There is also a skeleton huddled in the corner in this room with a scroll in its hands. Take the FLUME SCROLL and leave the maze, then turn the wheel one more time to get a configuration where you just walk around one linear path without any forks. You will enter the following room:
(Fig. 2-38: Where you’re supposed to go after getting the Sacred Cull and Flume Scroll.)
Move straight forward and you’ll notice a pedestal you’ve seen before. As you may recall, the GOLD HARP KEY goes on here. Place it here now to make two statues guarding a basin rise out of the ground. Turn around, go back toward the door that led you into this room, and turn left at the door. You should move around to two very large statues with a container underneath the thing they’re carrying. Pulling on the lever at the bottom makes sand drop into the container.
Place the SACRED CULL over the container and pull the lever to fill it with sand.
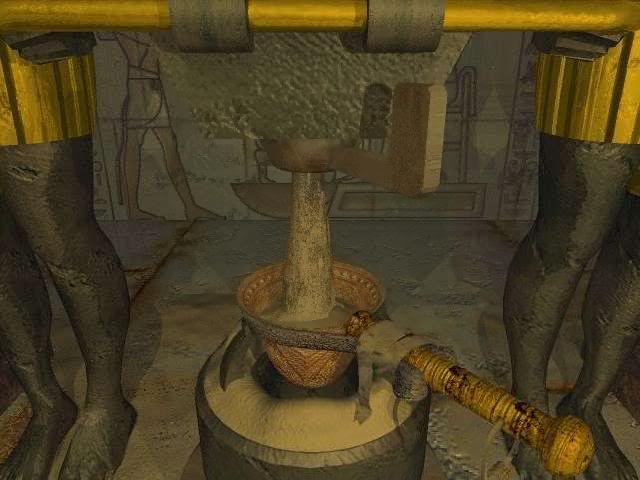
(Fig. 2-39: Filling the Sacred Cull with sand.)
Take the sand-filled SACRED CULL down to the basin revealed by the GOLD HARP KEY and pour it in. It takes an excruciating six trips to fill the basin with enough sand to activate it by weight.
When you have filled it enough, you will automatically sit in the chair beyond the basin as the whole mechanism moves downward. When you’ve reached your destination, dismount, move forward, and rotate the panel ahead of you.
Approach the cobra statue with the grate on its back and look left. There is a maze ahead of you that is very difficult to navigate. However, there are a couple of easy reference points to help you keep your bearings.
Save at the cobra statue so that you can start over if you get too irrevocably lost.
(Fig. 2-40: A good place to save before entering Anubis’ labyrinth.)
You will know you are on the right track when you hear water flowing. Move toward the sound and soon you will reach a room with a large round pool and six Anubis statues.
Push back each Anubis statue by clicking on it. Look at the disk hidden underneath each statue and record how many dots are in the red space next to each symbol. You will notice that all of them have a different amount of dots in the red space, ranging from zero to five.
Leave the pool room and go left to find six tubes positioned on the wall. Upon closer inspection, you will see that each tube has a symbol atop it that corresponds to the one you saw beneath the Anubis statues.

(Fig. 2-41: The water raising/lowering system. Note the symbols atop each tube.)
Match the levels according the symbols they were next to, using the top lever to raise a tube’s level and the bottom one to lower it. The same number of balls must be in the red space that you saw on each diagram (e.g. there can only be one ball in the red space on the far left tube).
Once those are set, go back in and pull on each of the disks located beneath the Anubis statues. When all six disks are pulled up, the water will drain from the pool and you can climb down the ladder located at the curving horns on the far end.
Down in the drained pool are six grates, each with a disk above them that can be manipulated. Turn each disk to open the grates. Through each tunnel you will find a key in a chest that corresponds to one of the scrolls you got in the golden pyramid back at the beach (STONEHENGE KEY, BERMUDA KEY, GIZA KEY, ATLANTIAN KEY, MAYAN KEY, and EASTER ISLAND KEY).
Once you have all six keys, go through the round tunnel whose entrance is bordered with stones to get back to the beginning of the Anubis maze. You’ll come out through the grate that was in the cobra statue there. Go back to the sand-filled basin and click on it to dump it out, leading you back up to the rotating maze.
You have now done everything there is to do in Cheops’ pyramid. Leave the place entirely, get in the helicopter, and head back to the Sphinx site.
3. The Sphinx
After landing, go to the Sphinx site, down the steps to the ground, and left to the scaffolding where you found the construction date. As you get on the right side of the Sphinx, you should see a door to your left.
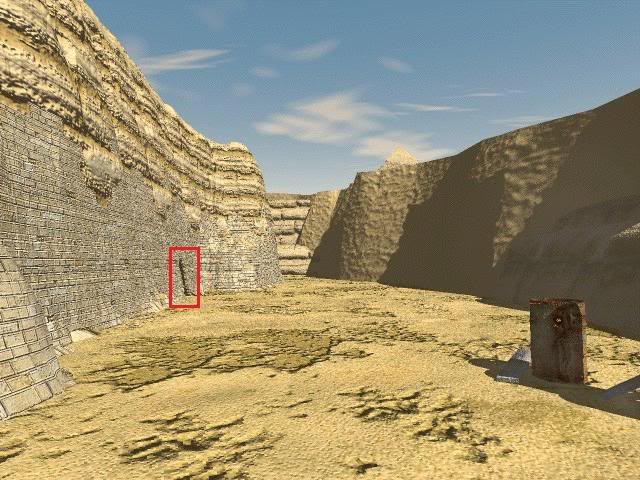
(Fig. 3-1: The door leading inside the Sphinx is located here.)
Go in the door and through the tunnel to the circular obstacle. Get as close as you can so you can place the six keys inside. Starting from the top left and going clockwise, insert the keys in this order:
When you enter, you will be presented with a series of constellations. Save at this point, because choosing the wrong constellation will get you killed!
Moving your cursor over each selection will allow you to see them in greater detail. Look for Orion the hunter, displayed below:
(Fig. 3-2: Orion, the winning constellation.)
After choosing Orion, move toward the Ark of the Covenant and click on it to hear one final monologue from your old friend Gil. Sounds like he’s been up to some crazy stuff!
When he is finished talking, open the Ark and reach for the light inside.
Congratulations! Although the story goes in the next installment, entitled The Omega Stone, your adventure ends here for now.
“;
