- Wondering how to get Monopoly GO! free rolls? Well, you’ve come to the right place. In this guide, we provide you with a bunch of tips and tricks to get some free rolls for the hit new mobile game. We’ll …
Best Roblox Horror Games to Play Right Now – Updated Weekly
By Adele Wilson
Our Best Roblox Horror Games guide features the scariest and most creative experiences to play right now on the platform!The BEST Roblox Games of The Week – Games You Need To Play!
By Sho Roberts
Our feature shares our pick for the Best Roblox Games of the week! With our feature, we guarantee you'll find something new to play!Type Soul Clan Rarity Guide – All Legendary And Common Clans Listed!
By Nathan Ball
Wondering what your odds of rolling a particular Clan are? Wonder no more, with my handy Type Soul Clan Rarity guide.
Rhianna Ford & The Da Vinci Letter Walkthrough
Rhianna Ford and the Da Vinci LetterGeneral Tips There is no timer and no score kept There are no limits to the number of Hints and they recharge quickly Puzzles can be skipped without penalty. The option to skip bar fills quickly. When you have completed the game, clicking "Play" again will allow you to select various locations and find every hidden object.Using the tools: Menu Tab – Click to save and to exit to the main menu, change options or get general game help. Map Icon – Shows…
a:1:i:0;a:2:s:13:”section_title”;s:50:”Rhianna Ford & The Da Vinci Letter Walkthrough”;s:12:”section_body”;s:56579:”
Rhianna Ford and the Da Vinci Letter
General Tips
- There is no timer and no score kept
- There are no limits to the number of Hints and they recharge quickly
- Puzzles can be skipped without penalty. The option to skip bar fills quickly.
- When you have completed the game, clicking "Play" again will allow you to select various locations and find every hidden object.

Using the tools:
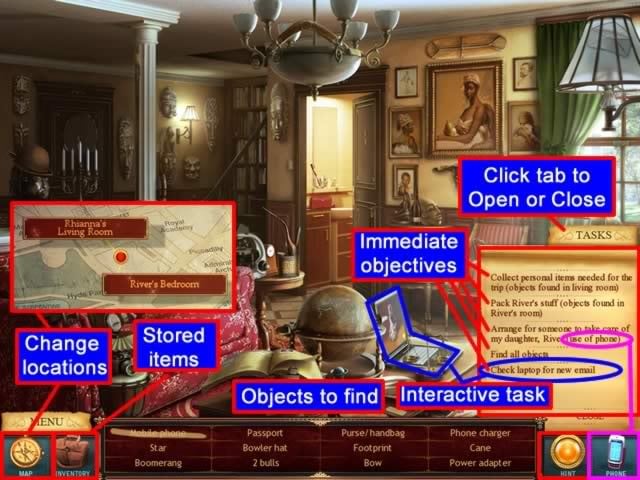
- Menu Tab – Click to save and to exit to the main menu, change options or get general game help.
- Map Icon – Shows currently available locations to explore. Use it to switch locations.
- Inventory Icon –. Shows the list of available objects needed to interact with the scene or complete a puzzle.
- Objects List – Items from the object list will either be crossed off as they are found or go to inventory for later use.
Items that are listed in grey indicate you must do something before they can be found.
- Task Tab – Click the tab to open or close the list. It is a guide for completing the current locations. Items don’t necessarily have to be completed in the same order as on the list. Items are crossed off as they are completed.
- Hint – A circle will appear around a random item on the object list.
Interactive items from the task list will sparkle and the cursor will turn into a magnifying glass when placed on the object.
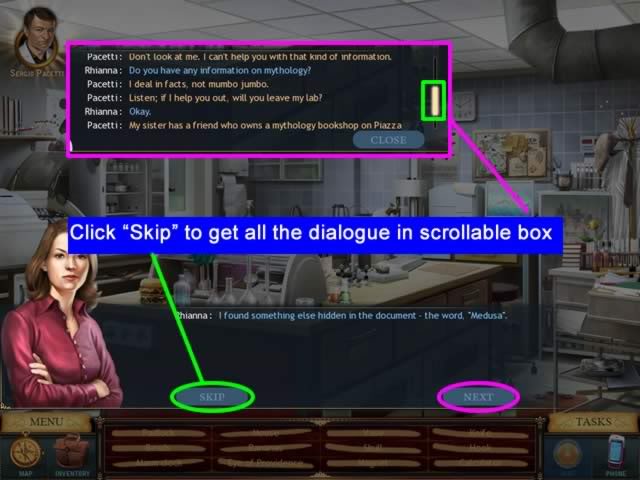
To skip sometimes lengthy conversations between the characters, click the "Skip" button to get all the dialogue at once in a scrollable box.
Walkthrough
Chapter 1
There is a brief tutorial at the beginning to familiarize you with play.
Location: Rhianna’s Living Room
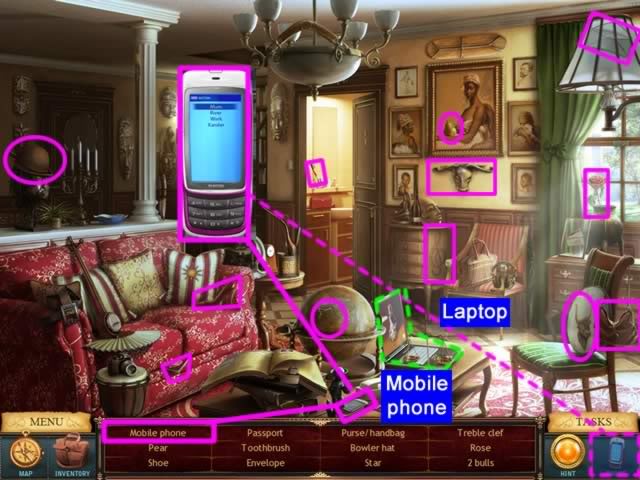
The first item on the object list is the Mobile Phone. Click on it and the phone will pop up on the screen. You are told to call Mum.
Click on the word Mum (listed in red) and you’re told the number is no longer in service and to locate the new number in River’s bedroom.
The Phone icon now is available. It will flash when you have incoming calls.
Update Mum’s phone number is added to the Tasks.
Check laptop for new mail is also on the Task list. The laptop (outlined in green) is glowing.
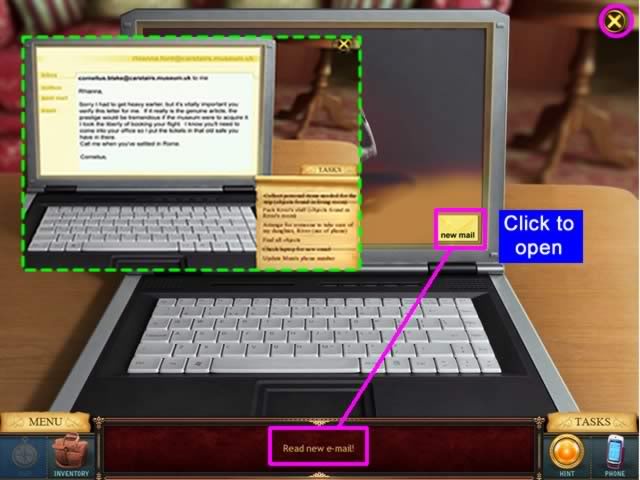
Click on the laptop to open it.
Read new e-mail appears in the object list window.
Click on the yellow "new mail" icon on the screen.
The new message appears on the screen. Note that certain items have been crossed off the Task list indicating that they have been completed.
Close the laptop by clicking the "x" in the upper corner of the screen.
After all items have been collected and the e-mail read, the "Location Complete" message appears.
Click on the message and the map will appear showing the next location needing to be accessed.
Location: River’s Bedroom
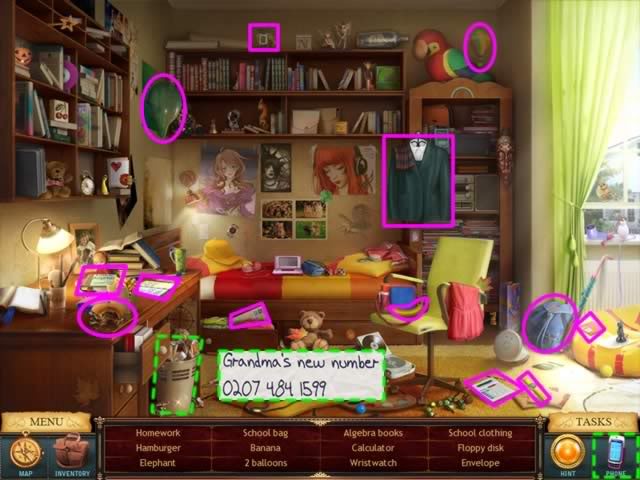
Collect all the objects on the list.
The trash can is glowing. Click on it and the new telephone number appears.
Click the phone icon to make the call and complete this location.
The map appears showing the next location.
Location: Rhianna’s Office at the Museum
A new set of tasks appears on the Task List
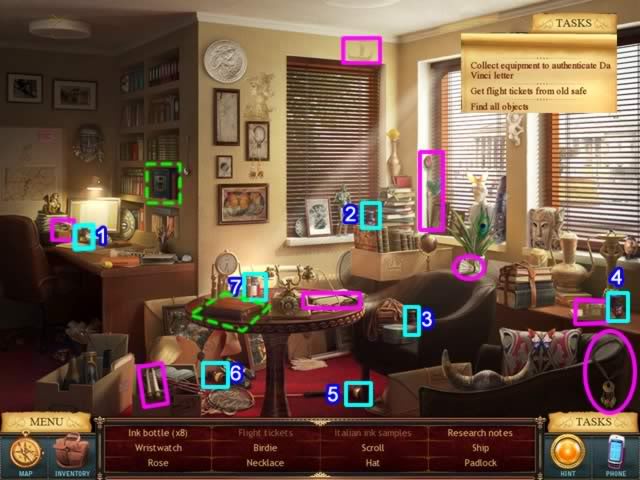
Two of the objects on the list are darkened indicating that they cannot yet be found.
Only 7 of the listed 8 bottles of ink to find are in current scene. The location of the 7 bottles are outlined and numbered above.
When clicked on, each bottle of ink goes into the Inventory satchel.
Two interactive locations need to be inspected.
First click on the safe in the bookshelf
Puzzle: Safe Combination
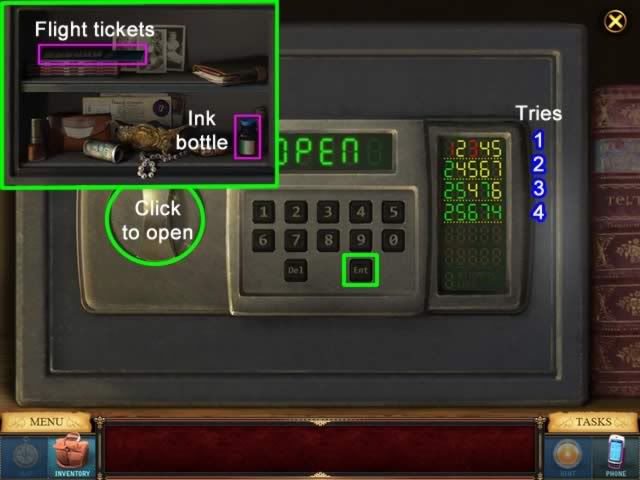
Goal: Find the correct combination of numbers to open the safe within six attempts.
Try 1: Enter the numbers 1 – 5 and press "Ent"
- Red – The number is not part of the sequence (1 and 3 above)
- Yellow – The number is part of the sequence but is not in the correct position (2,4 and 5)
- Green – The number is in the correct position
Try 2: Enter 2, 4, and 5 first since these are part of the combination and each will be in a new location. Click on 6 and 7 to see if they are part of the combination. Click "Ent"
- The number 2 is shown in green indicating it is the first number. The numbers 4, 5, 6, 7 are also correct but not in the right position.
Try 3: Enter 2. Reverse the order of the next two numbers (5, 4) and the last two numbers (7, 6).
- All are in the correct position except 4 and 6.
Try 4: Reversing the positions of the two incorrect numbers, enter 2, 5, 6, 7, and 4.
Your combination will probably be different than what is shown. The combination will change each time you play the game. It will also change if you fail to find the correct sequence within six tries.
Click on the safe knob to open it
Retrieve the flight tickets and the 8th bottle of ink.
A message appears that this close-up is complete. Click the message to return to the office.
Puzzle: Ink Samples
Click on the glowing lab kit on the table to open the puzzle.
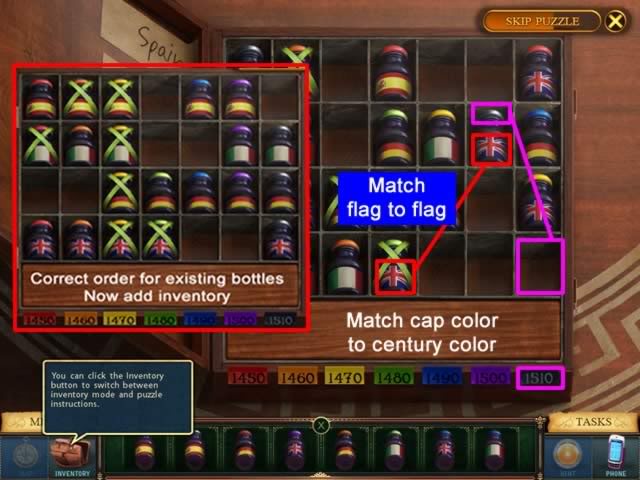
Goal: Arrange all the ink samples by country and century.
Click on the Inventory satchel to switch between the puzzle instructions and inventory items.
Match the color of the lid to the color tab color of the century. The only exception is 1510 where you match the silver top to the silver ink on the black tab.
The bottles with ribbons on them show what the country flag looks like. These bottles are correctly placed for country and century and cannot be moved.
Arrange the current bottles concentrating on one country at a time.
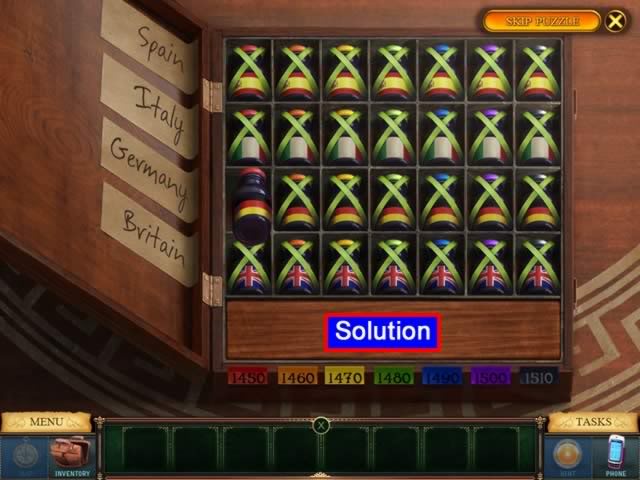
Add the bottles from inventory to complete the puzzle.
Location: Rhianna’s Living Room
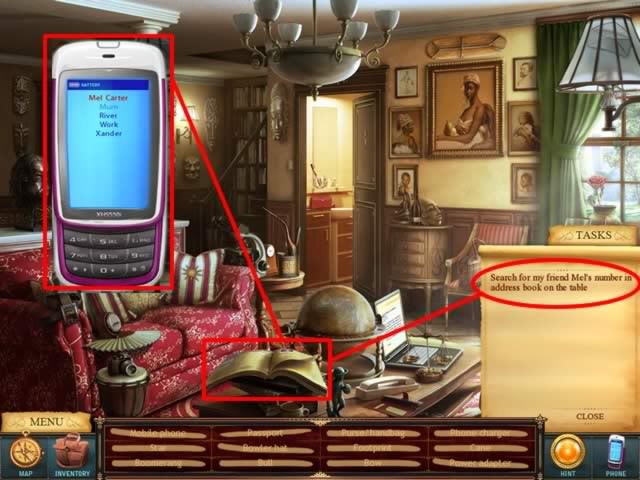
To complete the chapter, click on the address book and call Mel Carter to make hotel arrangements in Rome.
Chapter 2
Location: Hotel Lobby
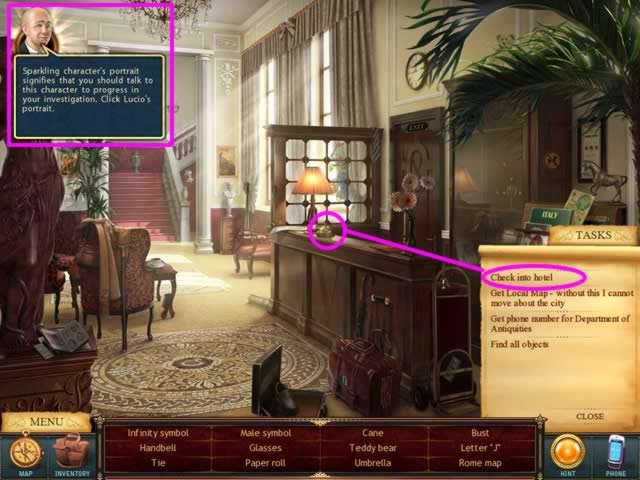
Click the glowing service bell to check into the hotel. When characters need to interact with you their likeness will appear in the upper left corner. Click to hear or read the dialogue.
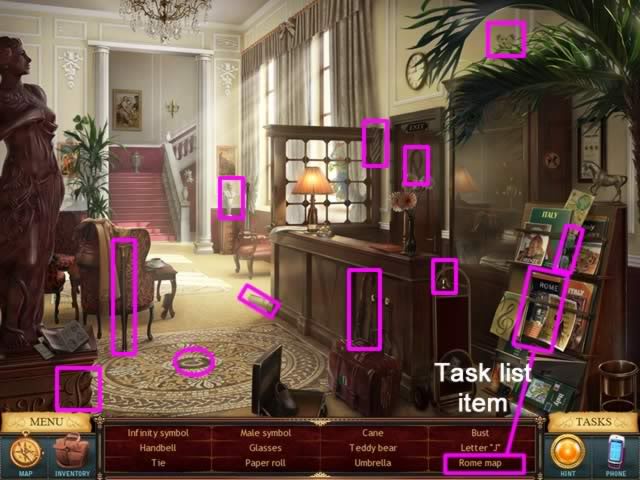
Find all of the listed objects. One item, a map of Rome, will be used to change locations when using the Map tab.
Location: Rhianna’s Hotel Room
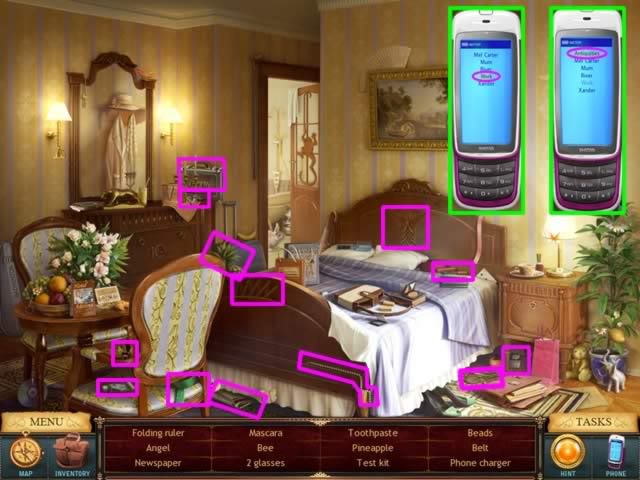
Collect the listed objects.
Call Work to get the number of the Antiquities Department.
Call Antiquities to make an appointment.
Location: Department of Antiquities
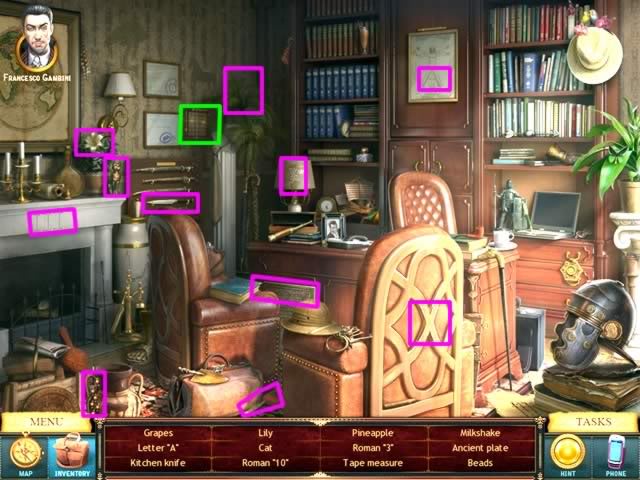
Collect the listed objects.
Click on the glowing wall safe to open the puzzle
Puzzle: Open Safe
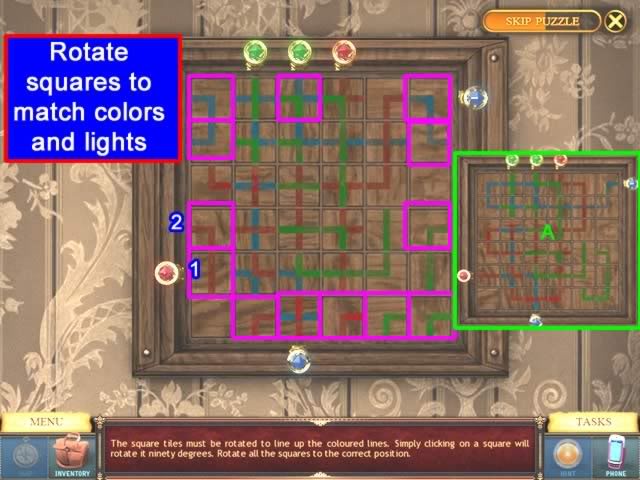
Goals: Match the colored lines on the tiles to the same colored lights (red to red, green to green, and blue to blue) and complete the pattern so all colored lines connect to their corresponding color. The light will come on when a circuit (i.e. all tile colors match) is complete.
Clicking a tile will rotate it 90 degrees.
It is easiest to work from the outside in.
Using the puzzle shown above as an example, start with the red light and line (1). Click the tile to rotate it so the red line touches the red light.
All lined tiles are part of a circuit so no part can be touching the wall (2). This will cause an incomplete circuit.
Rotate and build a colored line pattern based on these repositioned outside tiles (Inset A).
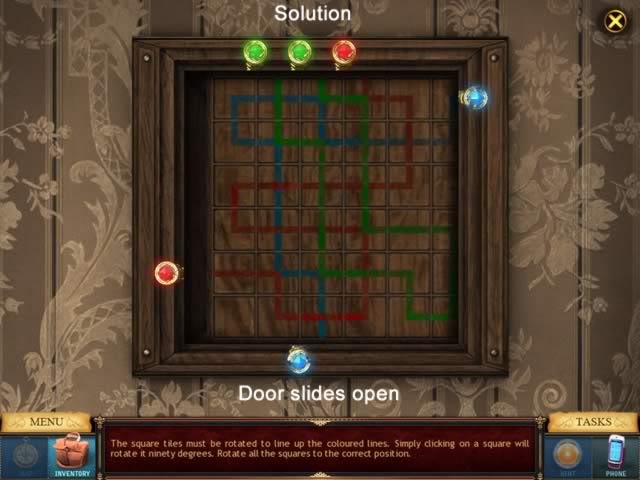
Working your way inward, continue to rotate tiles to match the colored lines.
Your solution should look similar to the above.
When all lights are lit, the door will open.
Take the piece of candy to complete this chapter
Chapter 3
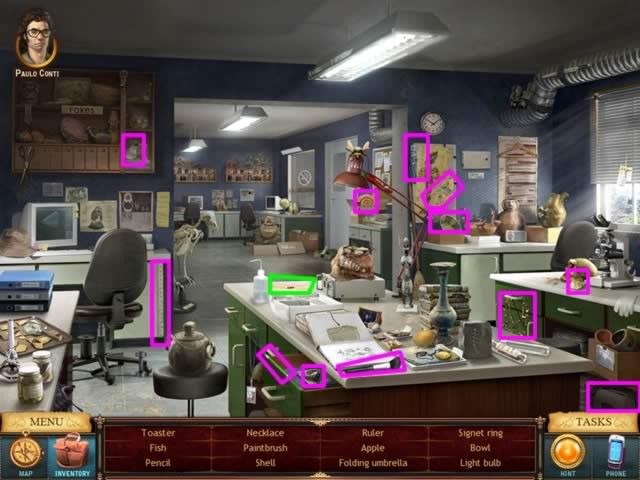
Collect all the items. The glowing letter on the counter indicates it is now ready to be authenticated.
Puzzle: Authenticate the Letter
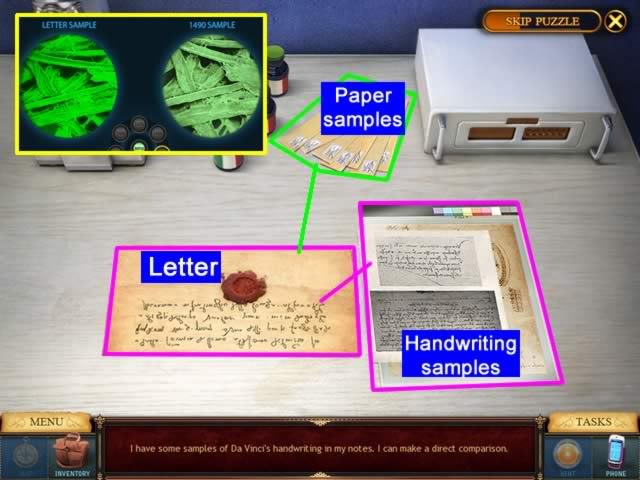
Goal: Authenticate the letter through various tests.
Compare the handwriting samples by dragging them to the letter. They appear to match,
Compare the paper samples.
- Place the samples on the letter to view them under the ultraviolet light
- Click on the century button to switch samples. When the samples are closes, click "Match" to see if you are correct. The year 1490 is the closest match.
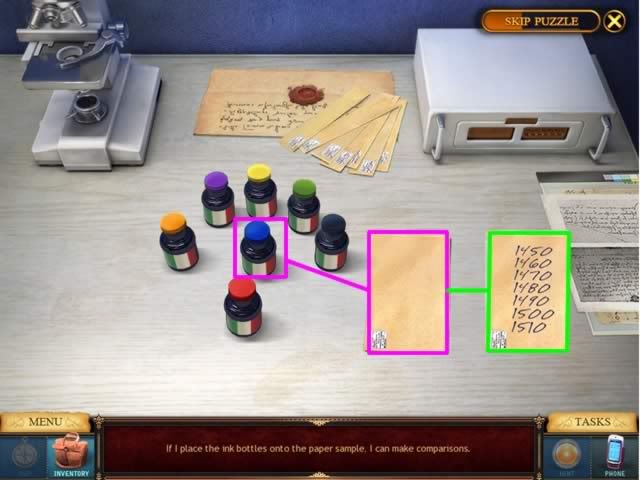
To compare the ink, first drag any ink bottle onto the test paper.
The centuries will appear.
To view under the ultra-violet light, drag the century’s list onto the letter.
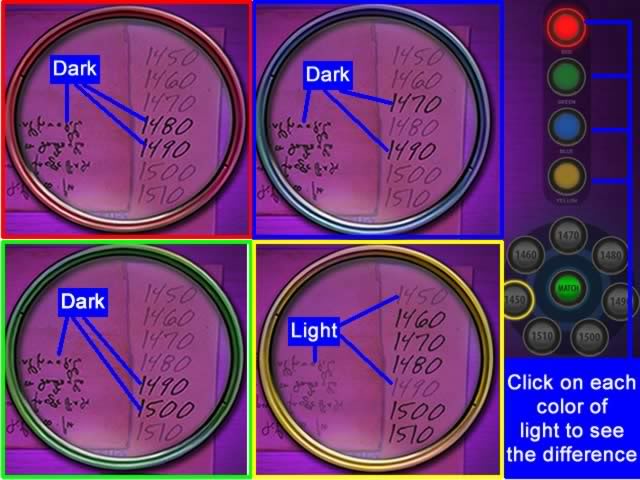
Goal: Find the year where the ink on the letter reacts the same way as the century ink swatch.
Change the filter color and see how each reacts.
In the above screen illustration, the color of the magnification ring indicates which filter color is being used. The puzzle always begins with the year 1450 under the red light. Look for similarities.
- The text is dark and so are the years 1480 and 1490
Click on green filter.
- The text is dark and so are the years 1490 and 1500
Click on the blue filter.
- The text is dark and so are the years 1470 and 1490.
Click on the yellow filter.
- The text is light and so are the years 1450 and 1490.
The only century that reacts consistently with the text is 1490.
Solution: Click on the year 1490 and go through each color filter. The reaction of the ink and the letter are the same under each filter. Click "Match" to solve the puzzle.
Task: Search for Clues
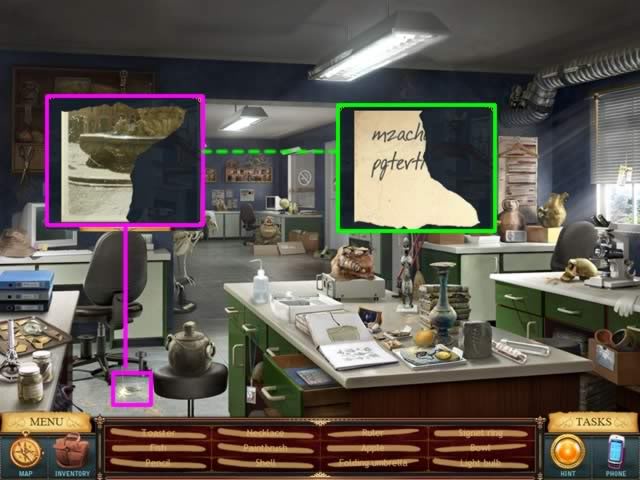
Click the glowing piece of paper on the floor.
View the postcard fragment. Click Close
View the hand writing fragment. Click Close
Location: Cleaner’s Closet
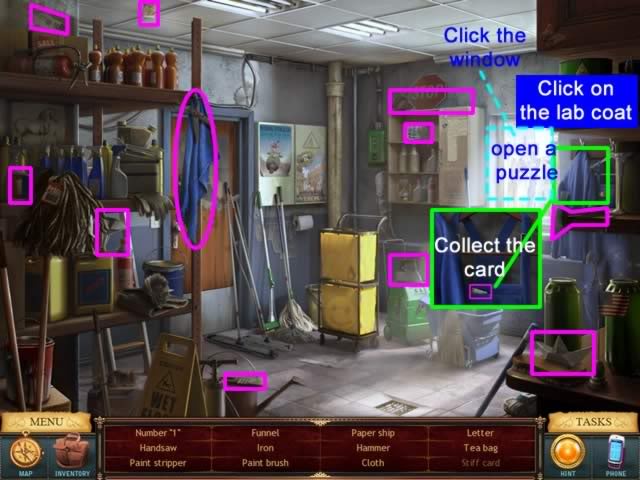
All objects can be found in the current scene except the "stiff card".
The paint thinner, paint brush and cloth go to inventory.
Click on the glowing clothing on the back right wall.
Collect the "stiff card".
Click the window to open a puzzle.
Puzzle: Open the Window
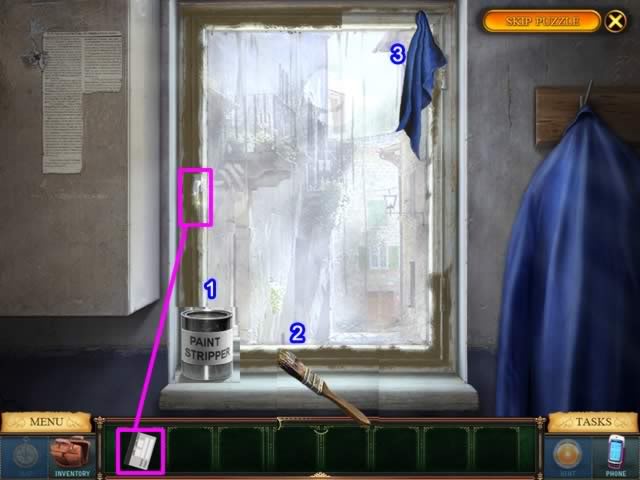
Goal: Open the painted-shut window to escape.
From inventory:
- Place the Paint Thinner on the window ledge
- Select the Paint Brush and click on the paint thinner. The can disappears.
- Use the brush to paint along the outside of the window to remove the old paint.
- When complete, the window is outlined in green and the brush disappears.
- Use the cloth to remove the old paint from around the window.
- Click on the latch. The window still won’t open.
- Place the stiff card from inventory next to the latch. It will spring the mechanism holding the window shut.
Escape through the window.
Location: Hotel
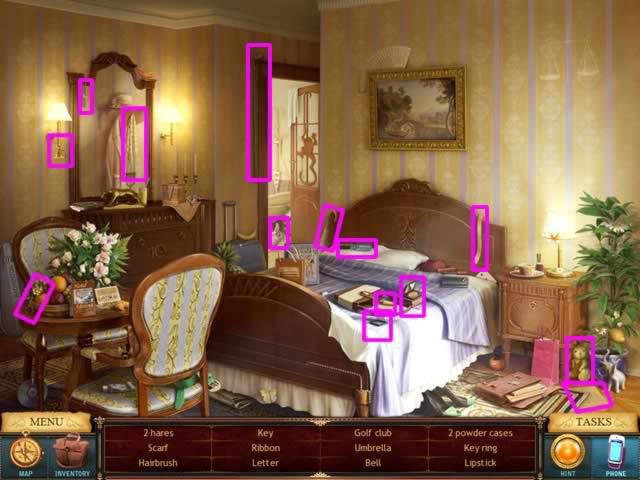
Find all the objects indicated. Use phone for a conversation with work.
This completes the chapter.
Chapter 4
Location: Department of Antiquities – Hallway
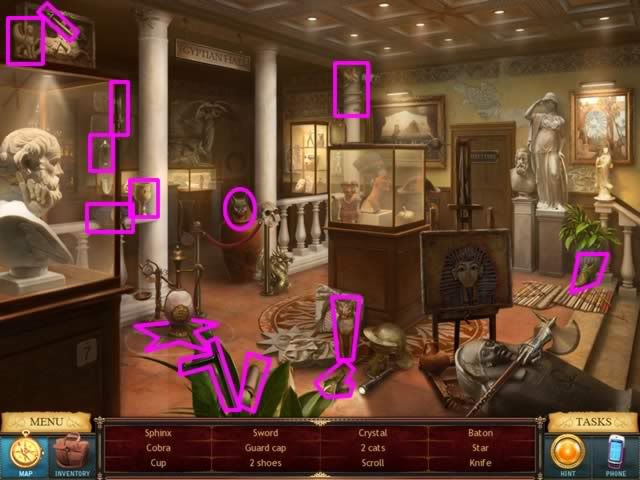
Find all the items listed.
Location: Security Office
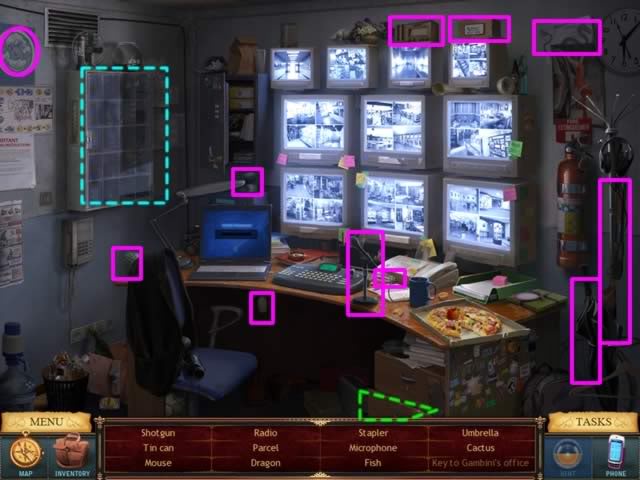
Find all the objects. Click on the glowing bottom desk drawer for the office key.
Puzzle: Find the Keys
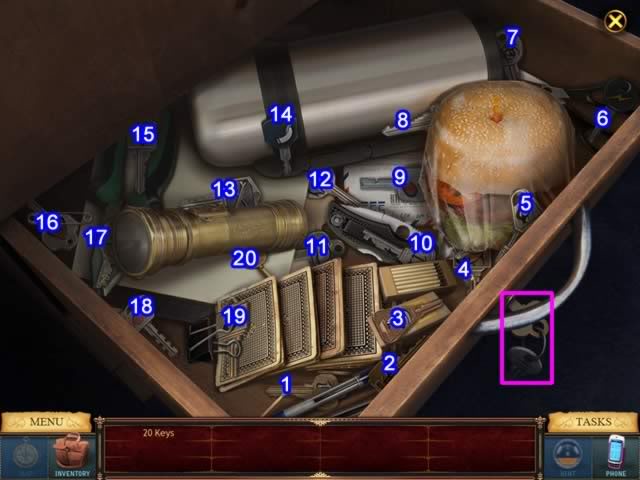
Locate all 20 keys as indicated above.
Take the desk key set (outlined in pink) and use it to open the cabinet on the left wall of the office (outlined in aqua in the office screen shot)
Puzzle: Place the Keys
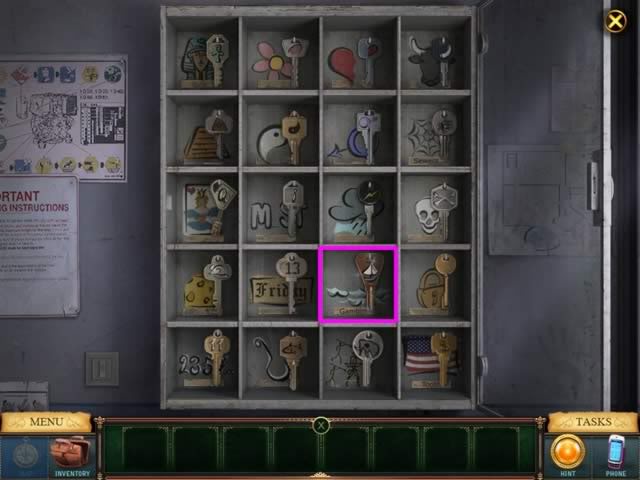
Goal: Using the clue on the key head and the illustration in each box, hang each key on the hook in the proper box.
Solution: Beginning from the top left:
- Sphinx – Ankh
- Flower – Petal
- Bull – Horn
- Pyramid – Eye
- Ying – Yang
- Male – Female
- Web – Spider
- Woman – Ring
- M_st – i
- Storm – Lightning
- Skull – Bones
- Cheese – Mouse
- Friday – 13
- Waves – Ship
- Lock – Key
- 2, 3, 5, 7… – 11
- Hook – Worm
- Hunters – Mastodon
- Flag – $
Select the Waves/Ship key labeled "Gambini" to complete the puzzle.
Return to the hallway with the key and place it on Gambini’s door to enter his office
Location: Gambini’s Office
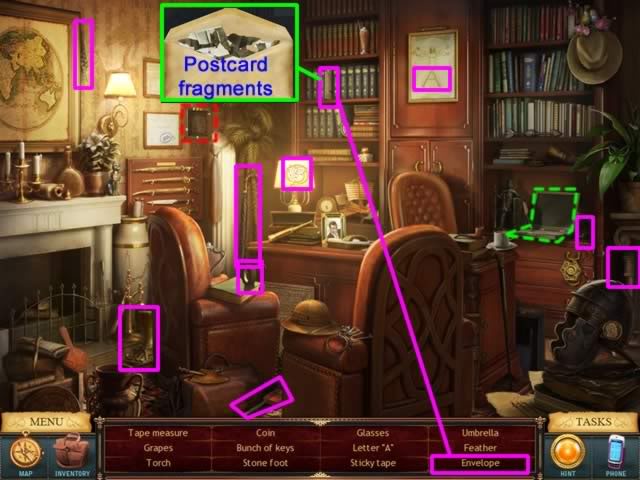
Find the items indicated. When clicking on the "Envelope", the fragments of the postcard are found.
Call River to help get the password to the computer.
Click on the wall safe you opened earlier (outlined in red). The piece of paper on the bottom of the safe with the word "Caruso" goes to inventory. Exit from the safe.
Return to the laptop.
Open inventory. Drag the card containing "Caruso" to the "password" space on the laptop screen. This was the correct password.
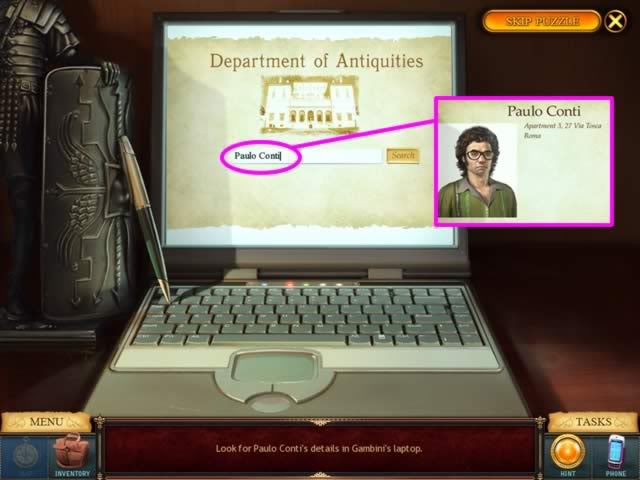
Type "Paulo Conti" in the search screen and click "Search". You obtain Conti’s address.
Exit the computer to return to the office.
The desk is glowing. Click it to open the puzzle.
Puzzle: Assemble the Post Card
Goal: Put the pieces of the post card together to find a clue.
- Take the pieces from inventory and place them around the exiting starting pieces.
- Click the pieces to rotate them to get them in the correct position.
- The pieces will lock into place when placed correctly.
- After completing the puzzle, drag the "sticky tape" to the post card to hold the pieced in place.
- Click to turn the card over and see the writing on the back.
The completed post card will go into inventory.
Exit the puzzle to complete this chapter
Chapter 5
Location: Plaza in front of the Pantheon
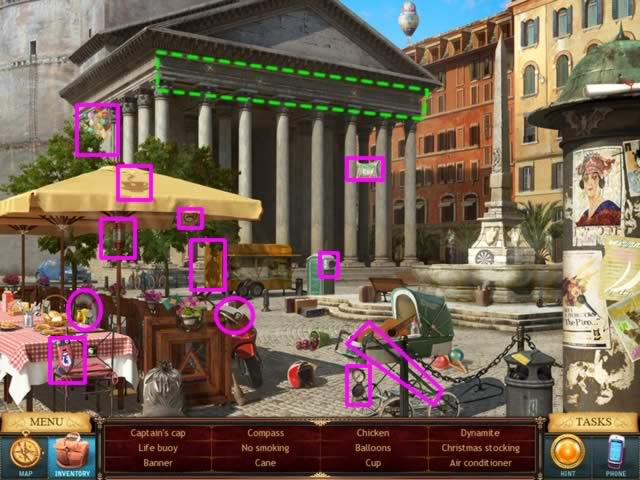
Find the object indicated.
Click on the glowing area on the Pantheon.
Puzzle: Decode the Message
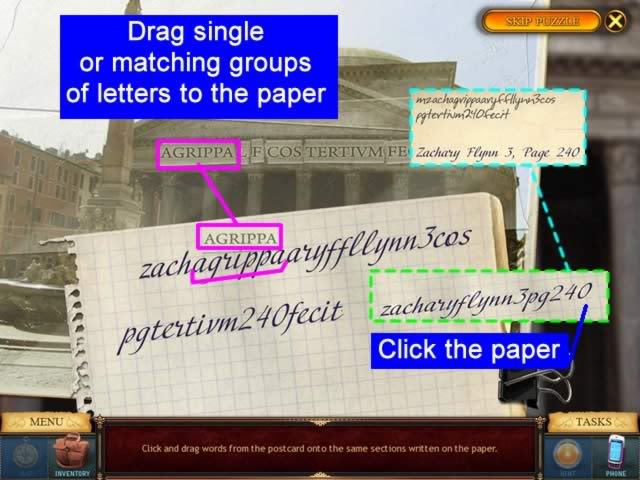
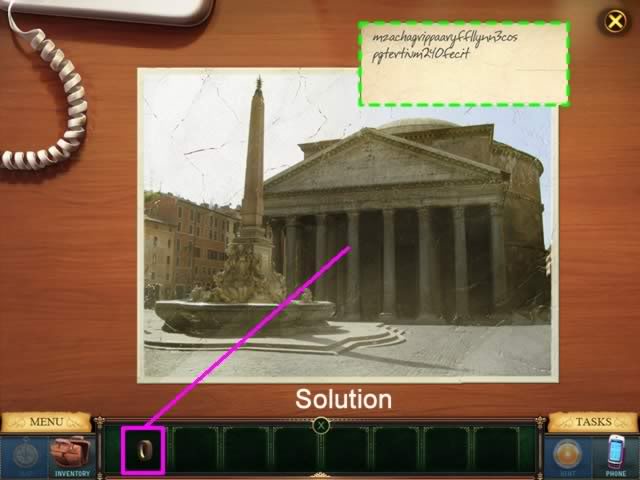
- Click and drag a single letter or matching groups of letters from the Pantheon to the paper.
- The text on the paper will disappear until all that remains is a single line of letters and numbers (highlighted in green above.)
- Click the text. The clue is revealed.
Location: Conti’s Apartment, Exterior and Kiosk
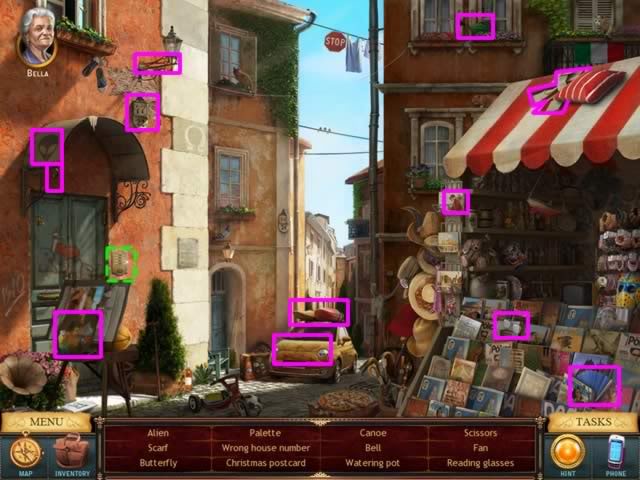
Find the objects.
Return the reading glasses to Bella, the Kiosk owner.
Click the glowing call box on the building for a close up.
Click the button to Conti’s apartment. There is no answer.
Exit the close up and speak to Bella again.
Location: The Park
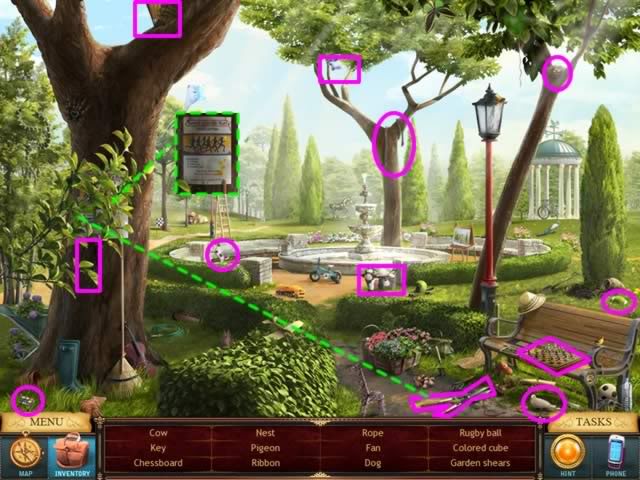
Collect all the objects.
The gardening shears will go to inventory.
Use the shears to cut the branches obscuring the poster
Click the poster to get Conti’s telephone number, call him and leave a message.
Location: Hotel Lobby
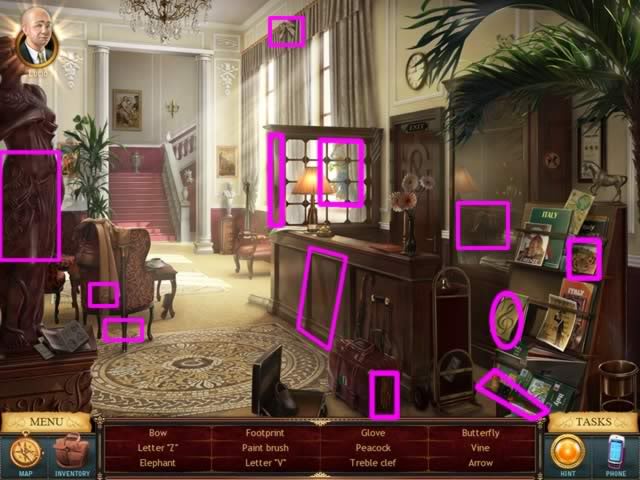
Find the items indicated.
Have a conversation with Lucio to find the next location
Location: Library of Antiquarian Books, Lobby
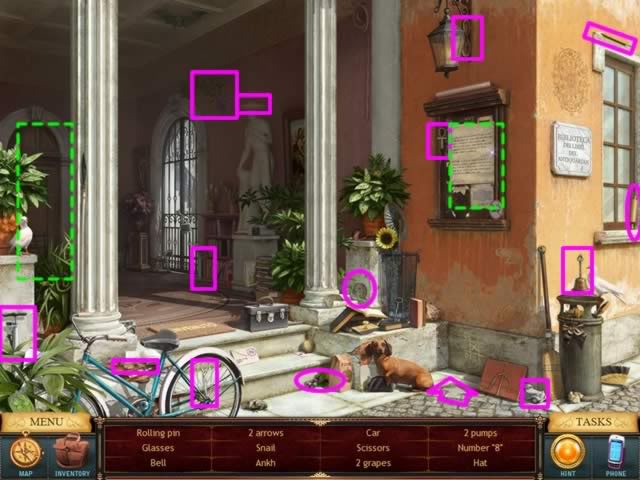
Collect all the objects.
Click on the glowing notice board to read the rules for library access.
Click on the door at the back of the scene
Call Mel Carter
Chapter 6
Location: Mel’s Apartment
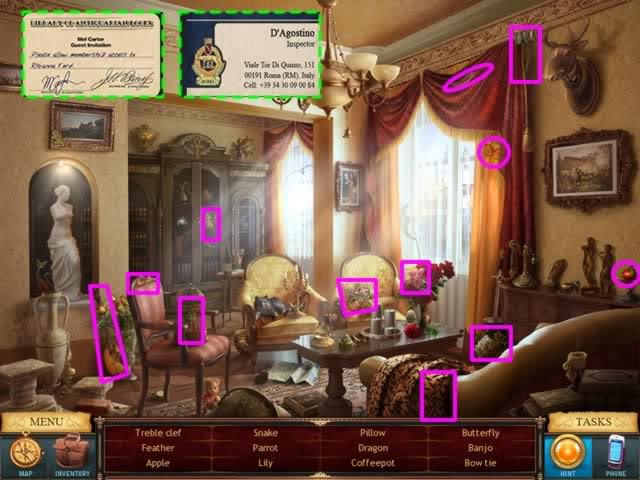
Find the objects indicated.
Receive a Guest Invitation card to use the library from Mel.
Meet the police inspector. Get his card.
Location: Library of Antiquarian Books, Lobby
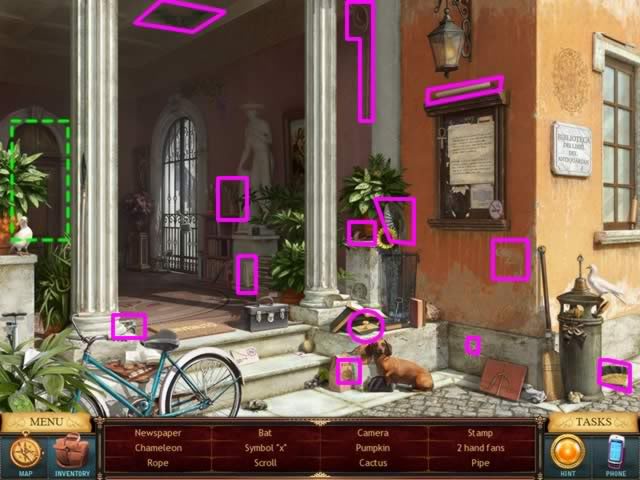
Find the objects.
Gain access to the library
Location: Library of Antiquarian Books, Interior
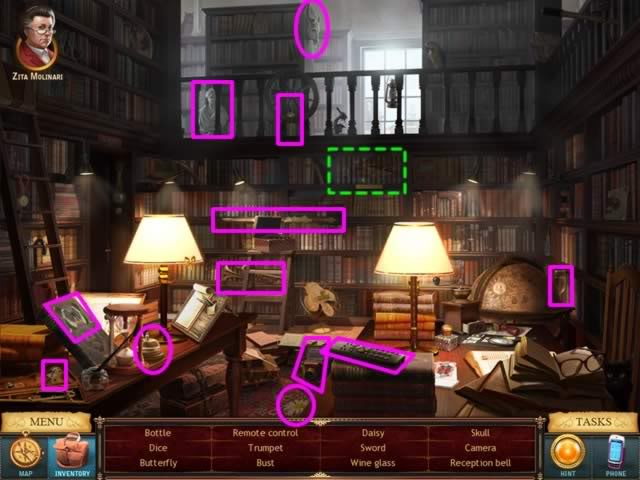
Collect the listed objects then click on the glowing set of book on the back wall to open a puzzle.
Puzzle: Arrange Books
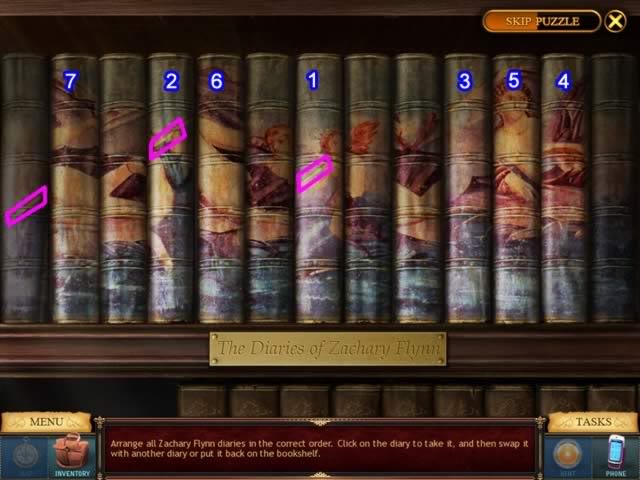
Goal: Arrange the books so the spines represent a picture.
- Begin at the left. Note that there is what looks like a pole on this book. The book toward the middle of the shelf (labeled 1) also has a pole, but positioned a little higher.
- Move this book so it is the first book in the sequence.
- The book marked (2) also has a pole in a higher position and part of a face that would match. Place this book next to the first.
- Continue to search for pattern similarities to complete the puzzle.
- The numbers on the spines above indicate which position they occupy on the shelf.
Only seven moves were needed to complete this puzzle, yours may be different.
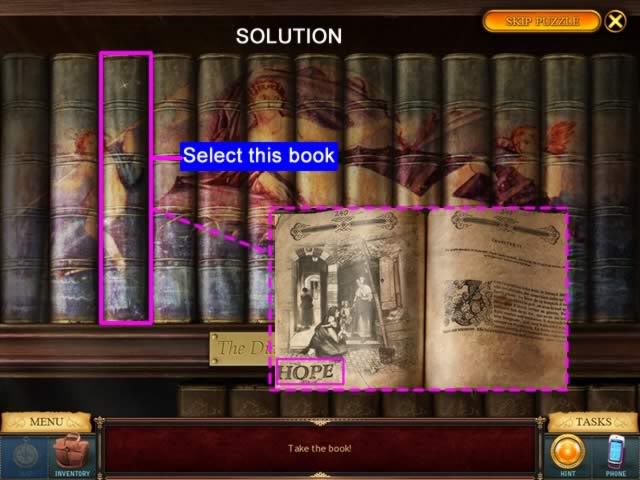
The third book is glowing. Click to open it.
The word "Hope" is glowing. Click it to close the puzzle and return to the library.
Receive a copy of a document Xander was looking at a year earlier.
Chapter 7
Location: Police Headquarters
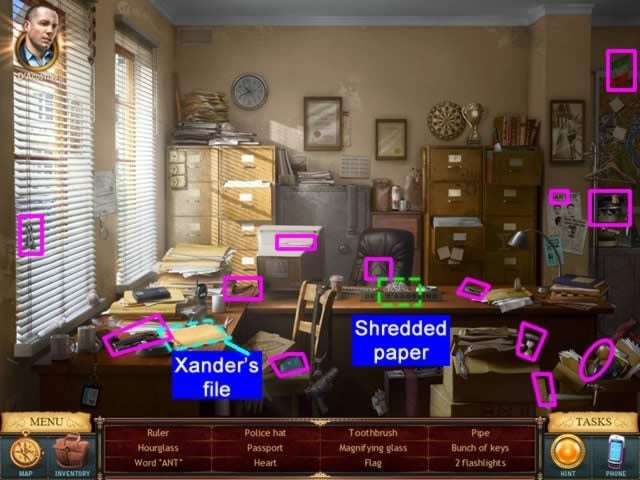
Find the objects listed.
Discuss the document obtained from the library with the detective. When he leaves the room, click on the glowing pieces of shredded paper on the desk.
Puzzle: Reconstruct the Paper Strips
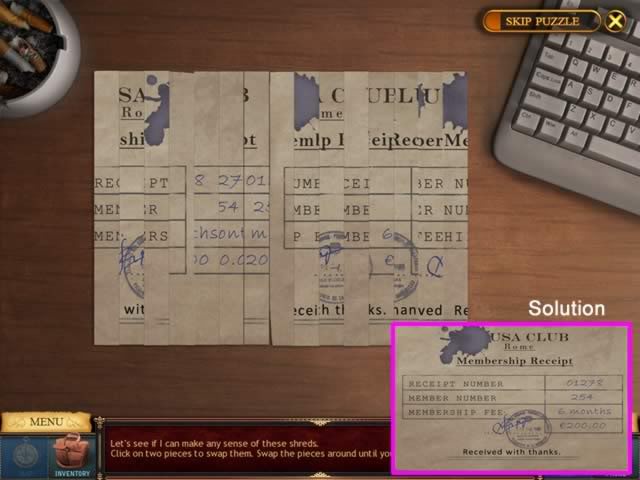
To solve the puzzle, concentrate on the stamp or the ink blot at the top of the page as they are the easiest to figure out. When a strip is correctly placed it will lock into place. The correct solution is shown above.
Exit the puzzle and return to the police office. A file with Xander’s name on it is glowing on the front left desk. Click on it to review the police notes on Xander.
Location: Hotel Room
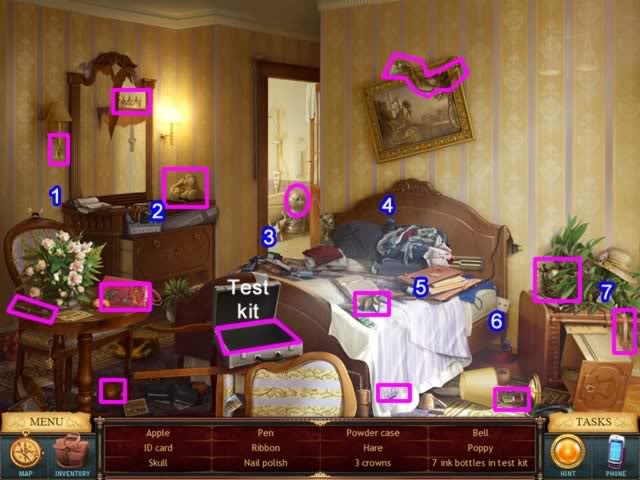
Find the items indicated. Drag the seven bottles of ink (labeled above) to the test kit.
Click the test kit to complete the scene.
Location: Police Lab
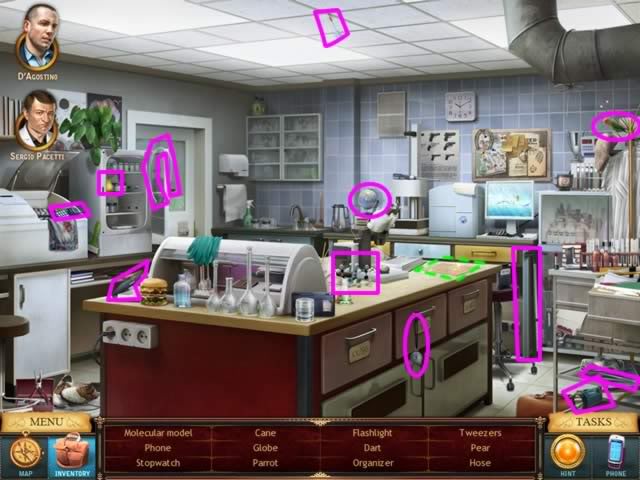
Find the objects indicated. Click on the glowing document to begin the comparison.
Task: Compare Police and Library Documents
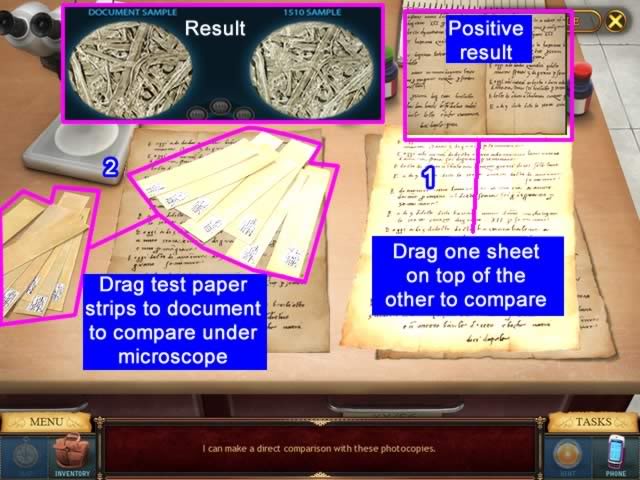
Goal: See if the two documents match.
First drag one sheet of paper onto the other to see if the handwriting matches.
Second, drag the test strips of paper onto the document to date the paper under the microscope.
The best match is 1510.
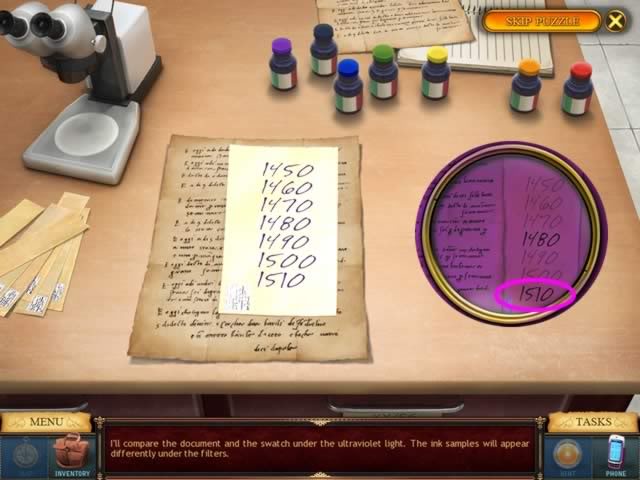
The last test is for the ink and paper.
Drag an ink bottle onto the test strip.
Place the test strip on top of the document and view through the filters under the ultra-violet light.
The most consistent match says both the ink and paper are from 1510.
Puzzle: Find the Matching Words
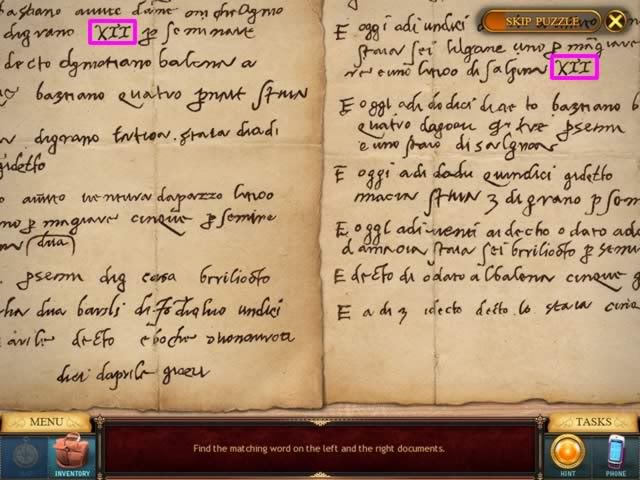
Goal: Find a matching sequence of words on both the left and right documents.
There is only one sequence found on both documents.
Click on both sequences outlined above for a comparison.
They are an exact match.
Chapter 8
Location: Hotel Room
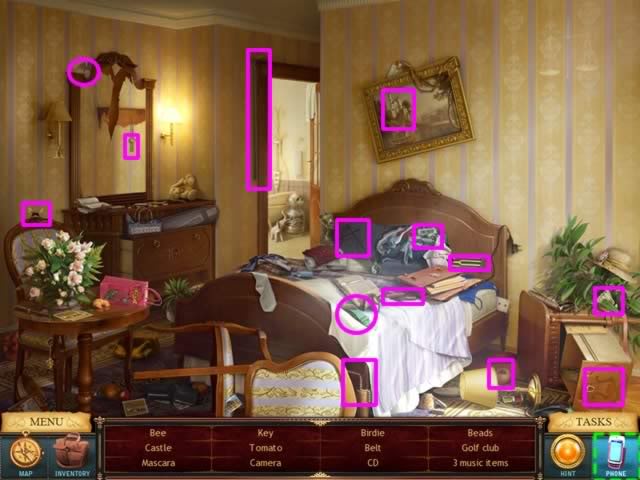
Find all the objects at this location.
Use the mobile phone to make some calls
Location: Mel’s Apartment
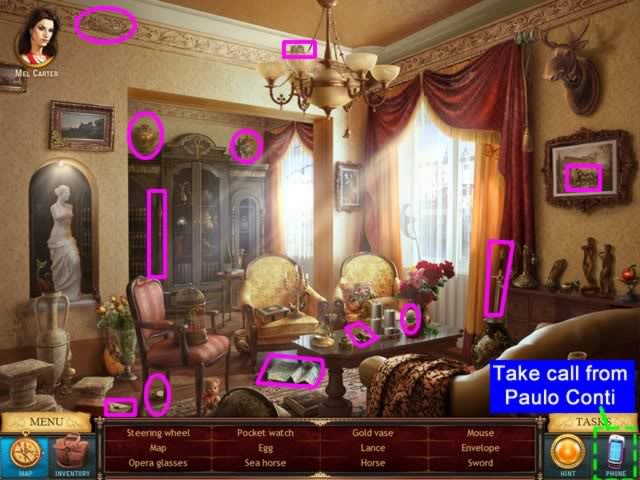
Find the objects listed. Take a call from Conti.
Location: Conti’s Apartment, Exterior and Kiosk
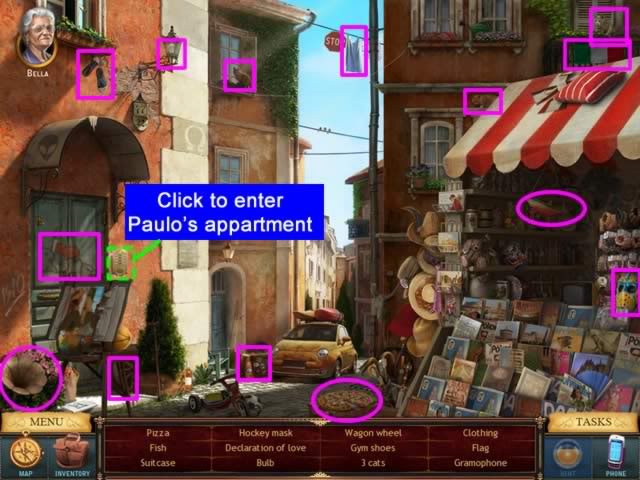
Find all the objects then click on door call box to gain entrance to Paulo’s apartment.
Location: Paulo Conti’s Apartment
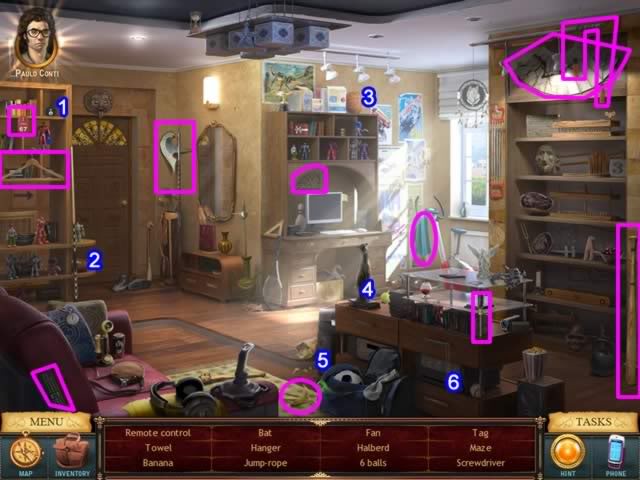
Find all the objects in the scene. Talk to Paulo
Location: Park
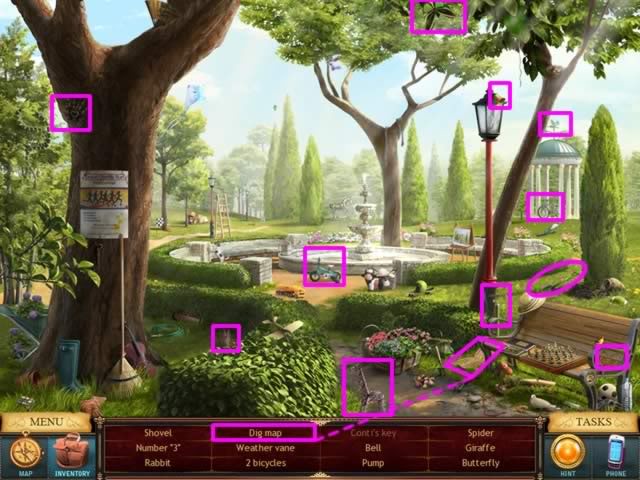
Find the objects indicated. The "Dig Map" will show the places to dig for the key parts.
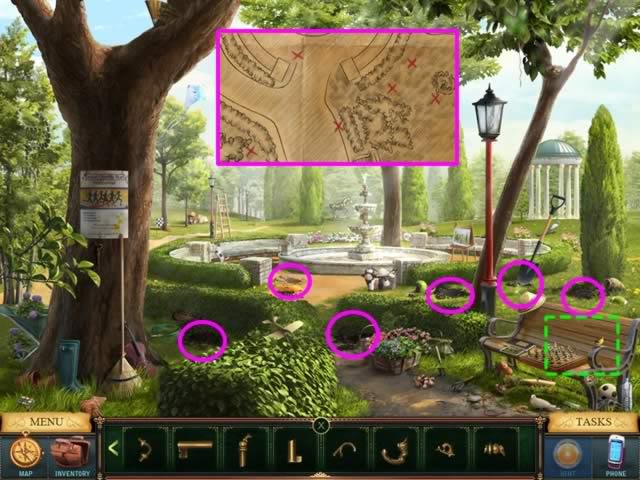
Use the shovel from inventory to dig up the pieces of keys at the spots shown on the map.
Click the glowing bench to open the puzzle to reassemble the key parts.
Puzzle: Assemble 4 Keys
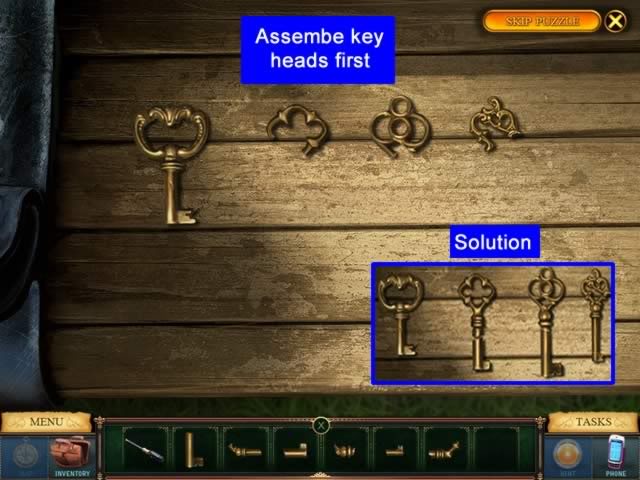
Goal: Assemble four keys from the parts in inventory.
Left-click to select a piece.
Right-click to rotate it.
Assemble the key heads first as they are the easiest to identify.
The solution is shown above.
Location: Conti’s Apartment, Living Room
Task: Get into locked bedroom
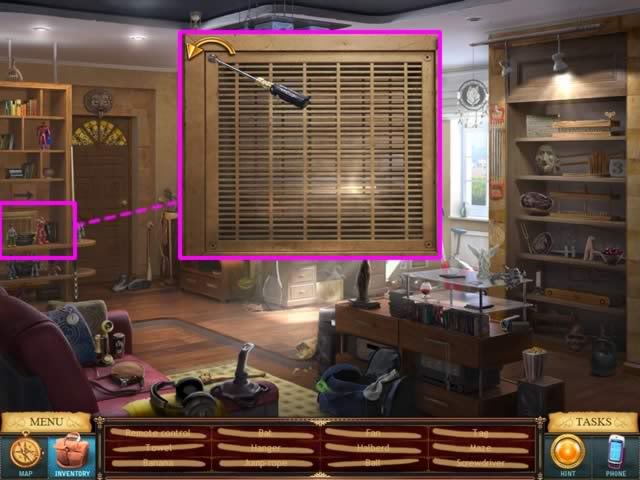
Click on the glowing grate on the back wall.
Select the screwdriver from inventory.
Place the screwdriver over each screw and rotate it in a clock-wise motion several times to unscrew the four screws. The screws will drop off the vent when you have unscrewed them.
Location: Conti’s Bedroom
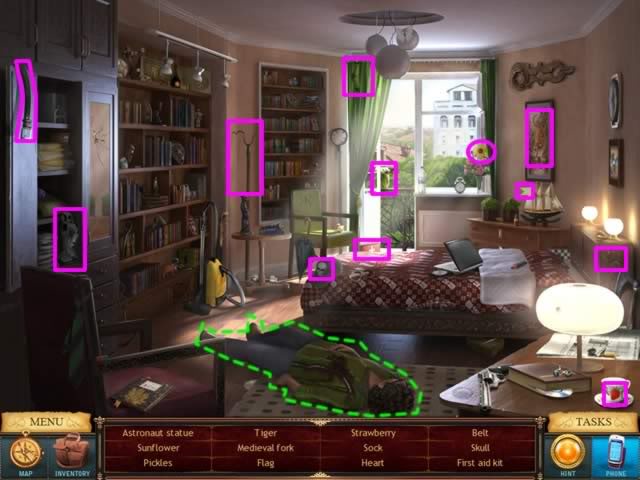
Locate the objects listed. Click on Paulo to perform emergency first aid
Puzzle: Revive Paulo
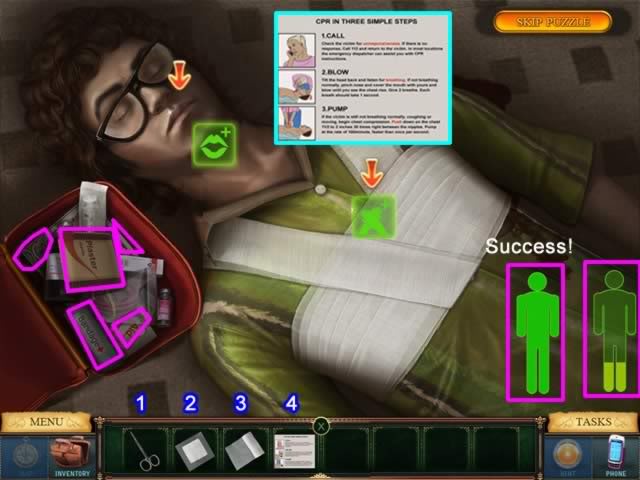
Goal: Keep Paulo alive until help arrives.
Get the items listed from the bag. They will go into Inventory:
- Dressing
- Surgical tape
- Scissors
- CPR card
- Emergency card
Call the emergency number.
1) Use the scissors to cut open the shirt
2) Place the dressing on the wound
3) Apply the surgical tape
4) Perform CPR. Alternate between:
- Blowing into the mouth by clicking when the mouth icon turns green
- Compressing the chest when the compress icon turns green.
- Watch the life-level of the man icon. If it gets too low, you need to start again.
Chapter 9
Location: Police Lab
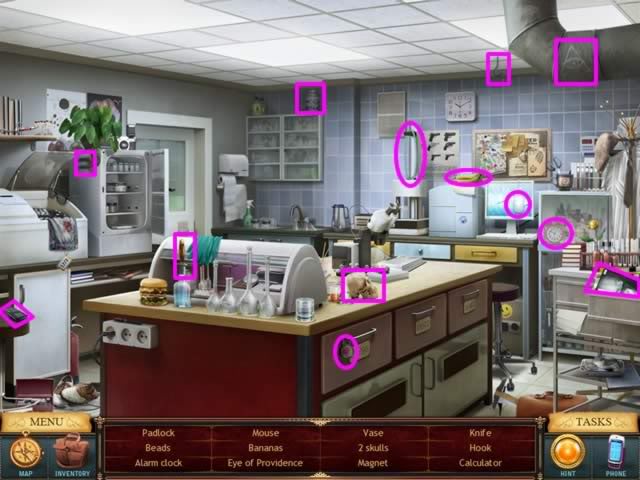
Find the objects listed.
Puzzle: Find the Letters
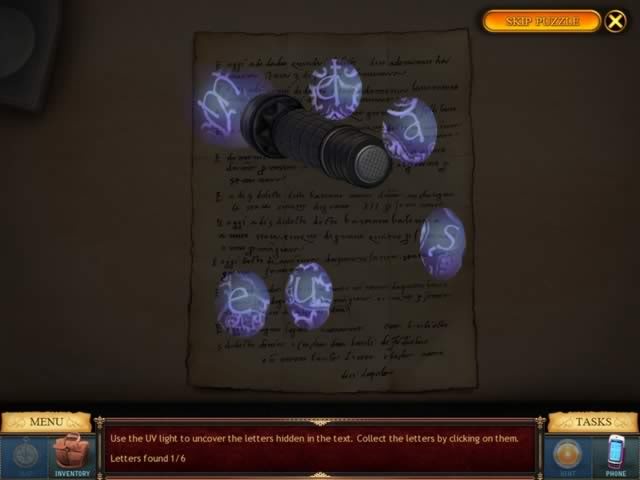
Goal: Use the UV flashlight to find the letters hidden in the document
Puzzle: Finds the Clue
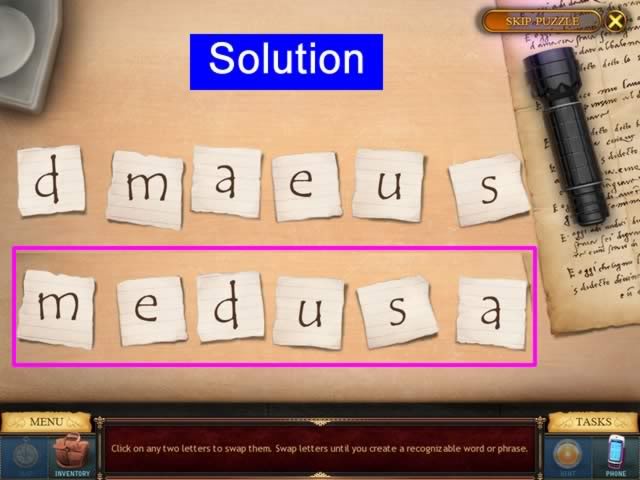
Goal: Figure out the word Xander hid by rearranging the letters into a meaningful word.
Location: Mythology Bookshop
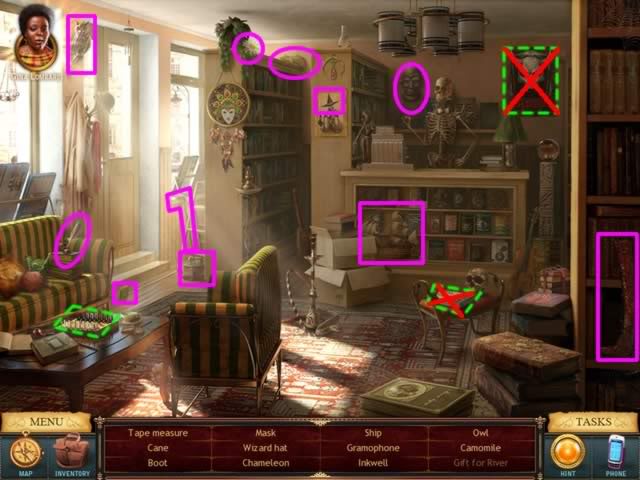
Find the objects listed.
Find a gift for River. Three areas light up
- Click the poster on the back wall. It’s too scary.
- Click the book on the stand. It’s too young for her
- Click the chess set. It’s just right
Location: Police Station
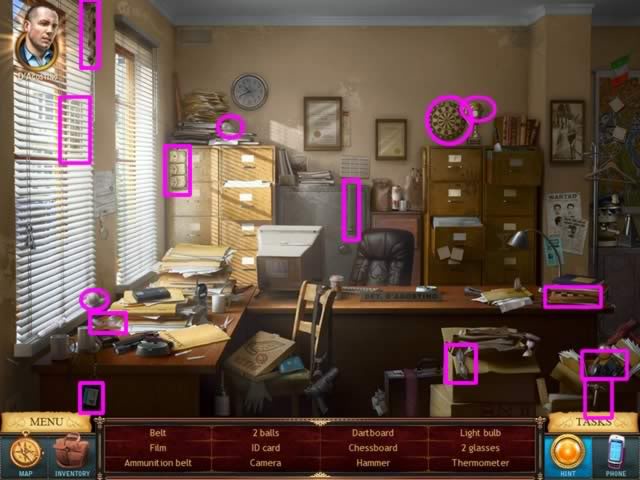
Find the objects indicated. Have a conversation with the detective.
Location: The Medusa, Club Entrance
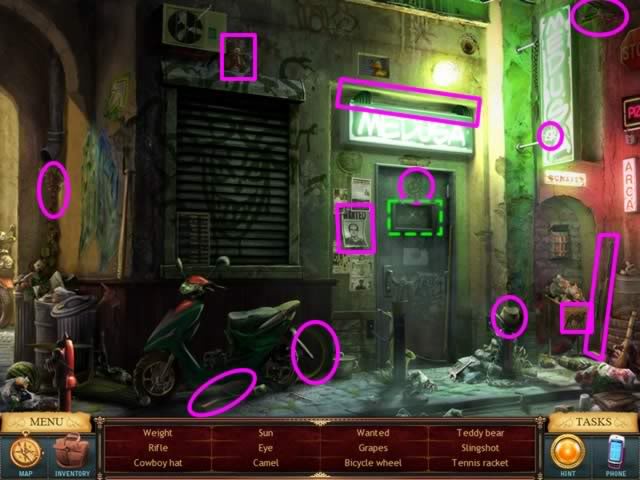
Find all the items listed. Attempt to gain entrance by knocking on the panel in the door.
Location: The Medusa, Club Alley
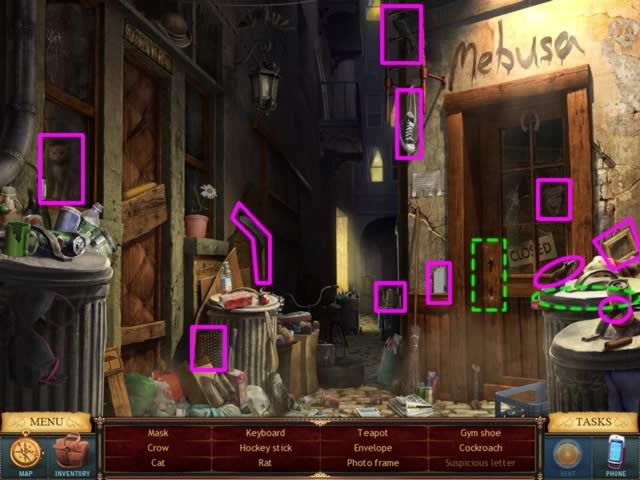
Find all the objects listed.
Click on the glowing door area. You cannot get in.
Click on the glowing garbage can lid for a close up.
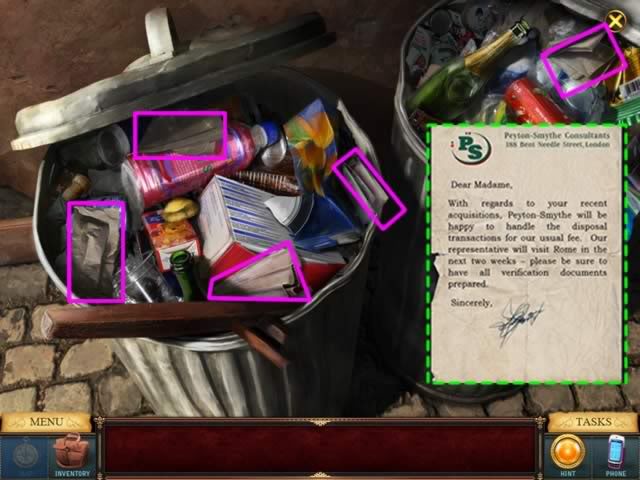
Check the five glowing pieces of paper. Find the document.
Chapter 10
Location: Hotel Lobby
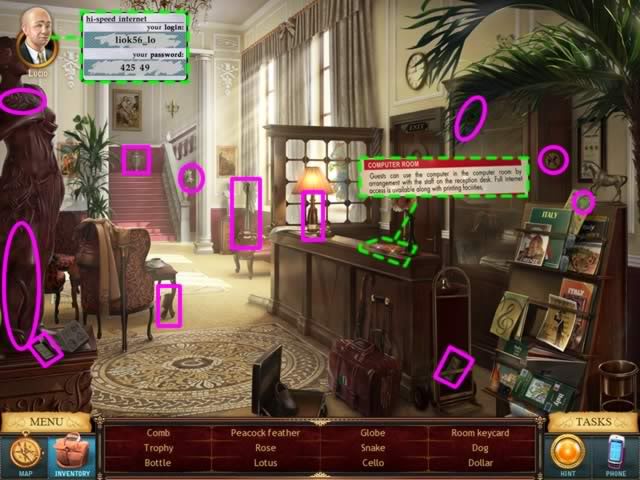
Find all the items listed.
Check the glowing guest services book on the front desk to find out about Internet access.
Get the login and password from Lucio.
Location: Hotel Computer Room
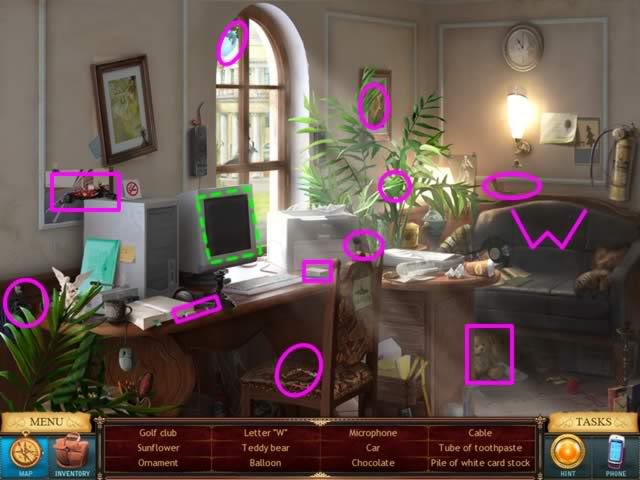
Find all the objects listed. Click on the computer screen to access it.
Puzzle: Access Internet Information
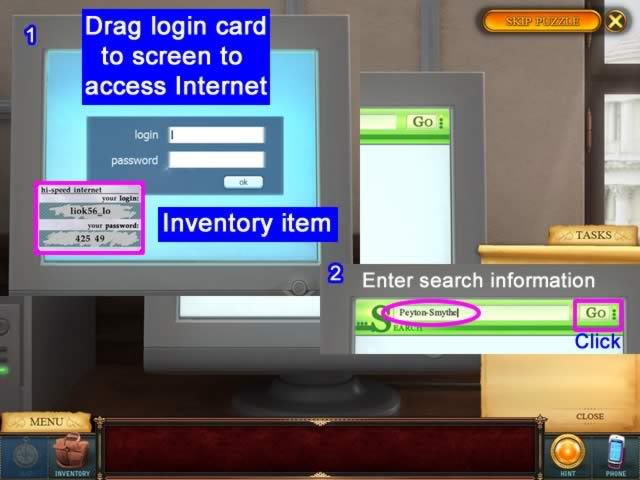
Goal: Find what information is available about the company Peyton-Smythe on the Internet
- Login to Internet with login and password provided.
- Use search engine to find Peyton-Smythe
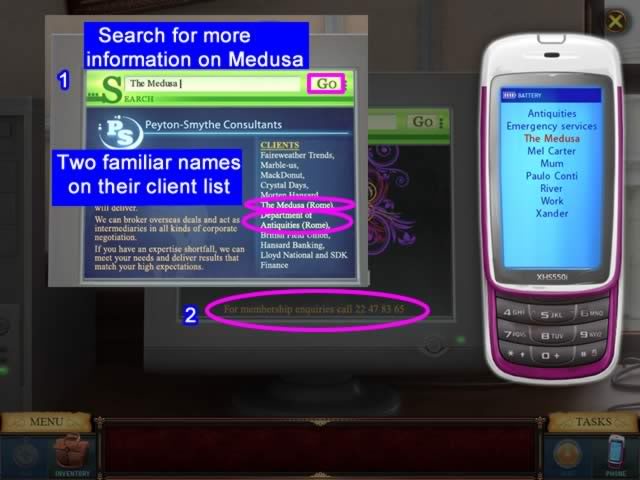
The client list for Peyton-Smythe shows both The Medusa and the Department of Antiquities
- Search for more information on The Medusa
- Call the number listed for membership
Task: Create a Business Card
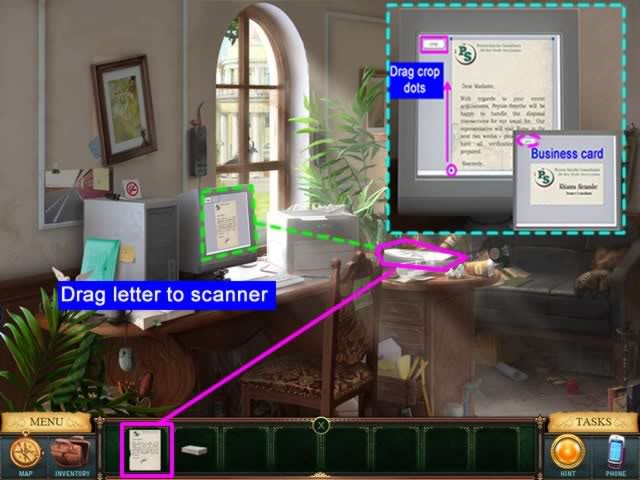
Drag the Peyton-Smythe letter to the glowing scanner to the right of the computer.
The document will be automatically scanned into the computer.
Click on the computer screen to see the scanned document.
Crop the document to get a business sized card by dragging the crop dot up to above the writing.
The business card with the name will be generated on the screen.
Click the "Print" button on the screen.
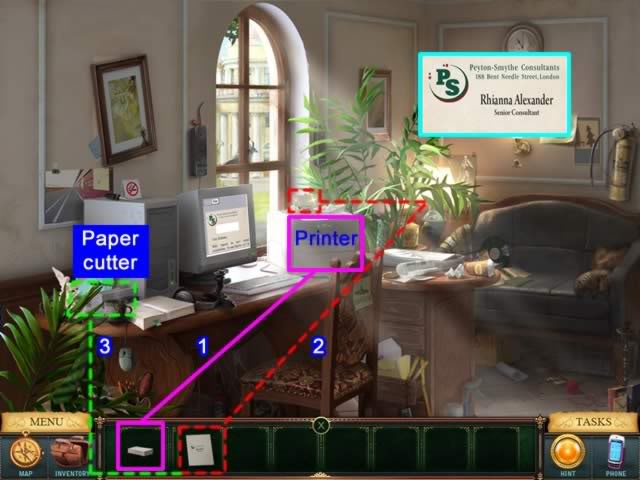
Drag the paper stock from Inventory to the printer.
The printed card will emerge from the top of the printer. It will go to inventory
Drag the card to the paper cutter to trim it to the correct size.
Location: The Medusa, Club Entrance
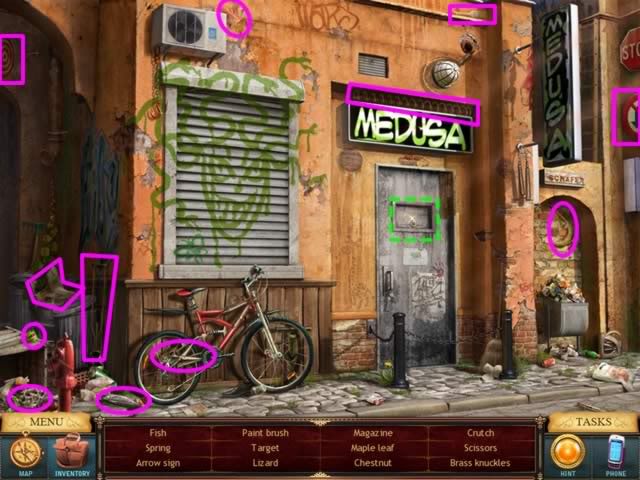
Find all the objects listed then click on the glowing door panel
Location: The Medusa, Club Waiting Room
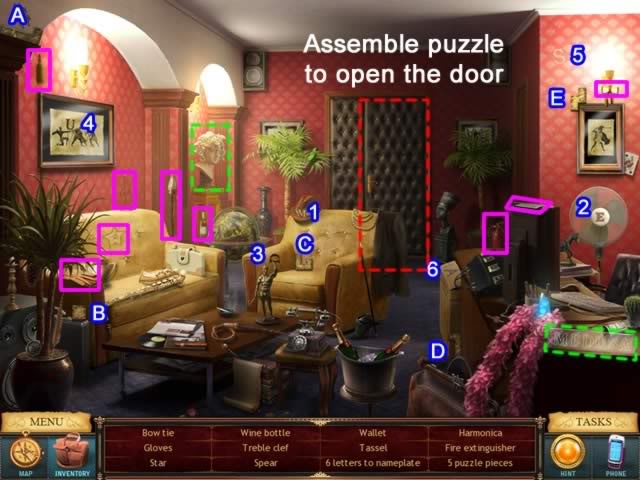
Find all the objects listed.
Drag the six letters (numbered 1-6 above) onto the name plate outlined in green
Click on the five puzzle pieces (A – E).
The head (outlined in green will glow). Click to access the puzzle that will open the door at the back of the room
Puzzle: Door Lock
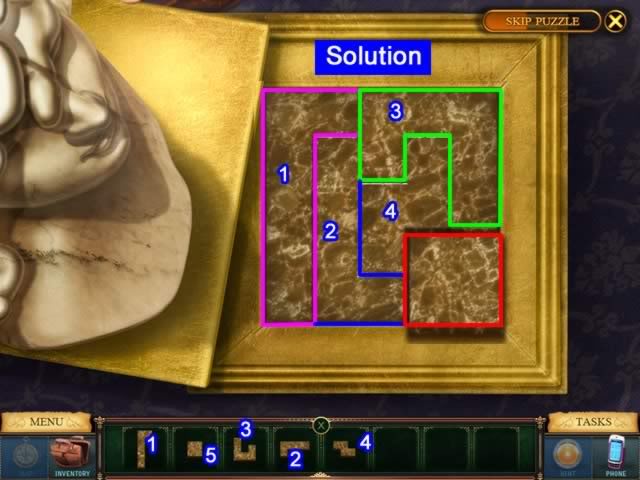
Goal: Fit the puzzle pieces into the square.
Right-click to rotate a piece. A correctly positioned piece will lock into place.
Location: The Medusa, Club Office
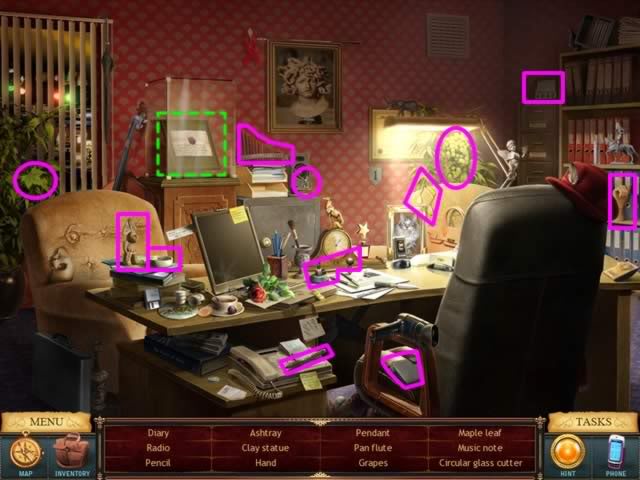
Find all the objects listed.
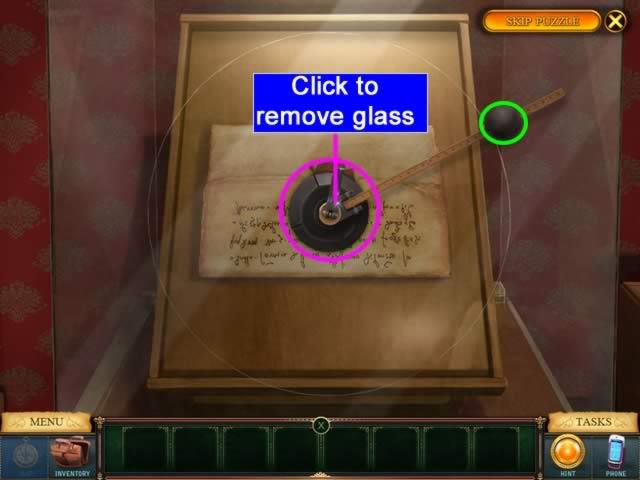
Place the glass cutter from Inventory on the center of the case.
Rotate the ball in a circular motion until you can see the etching on the glass.
To remove the glass circle and get the letter, click on the glowing center of the cutter. The glass will fall away.
Chapter 11
Location: The Medusa, Club Cellar
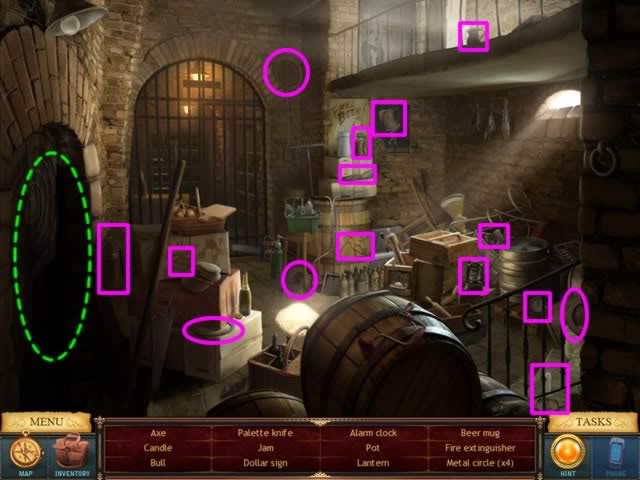
Find the items indicated.
Puzzle: Door Lock
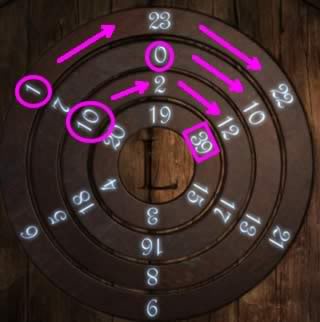
Goal: Have each column sum to 50 by rotating the 4 circles. There are many ways to figure this puzzle out, here is one:
- Find the largest number. It is on the smallest circle: 39
- 50 – 39 = 11. The 11 must be spread over the other three circles. This eliminates many numbers
- On the outside circle only 1 and 9 can combine with numbers on the inner two circles to sum to 11
- The possible combinations are (1, 8, 2, 39); (9, 0, 2, 39) or (1, 0 10, 39)
- Only this last combination will result in all the other numbers also summing to 50.
Location: Old Tunnels
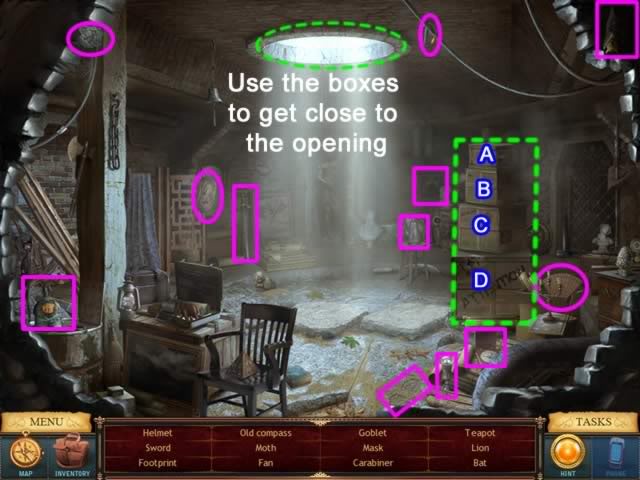
Find the items indicated.
Attempt to get cell phone coverage by using the three pads to rearrange the boxes so they stack up close to the opening.
Puzzle: Move the Boxes
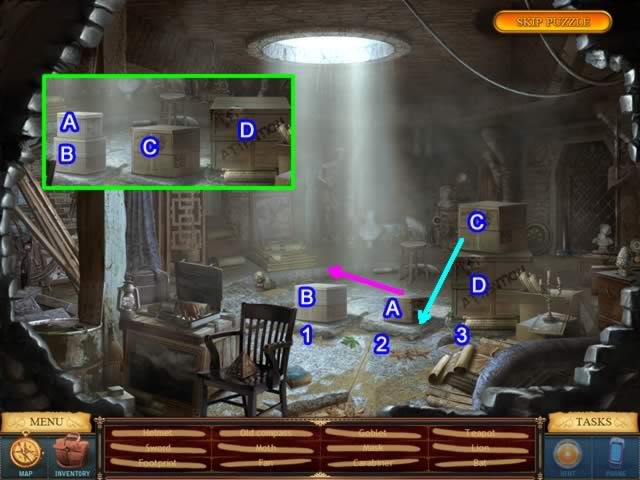
- Move box A to pad 2
- Move box B to pad 1
- Move box A on top of box B on pad 1
- Move box C to pad 2
See the inset above for the rearranged boxes
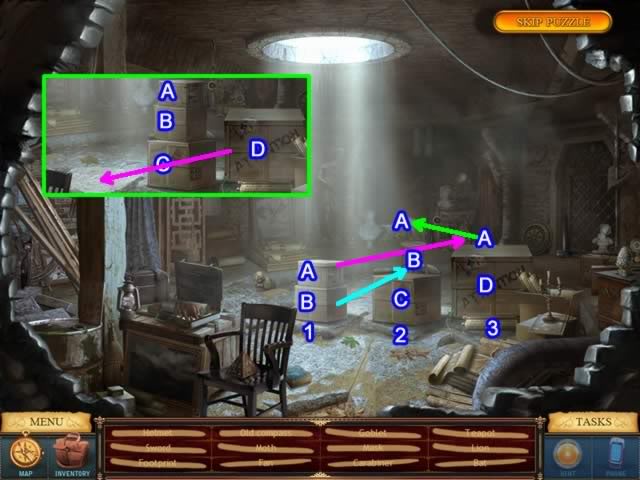
- Move box A to box D
- Move box B to box C
- Move box A from box D to the top of box B on pad 2
- Move box D from pad 3 to pad 1
See the inset above for the rearranged boxes
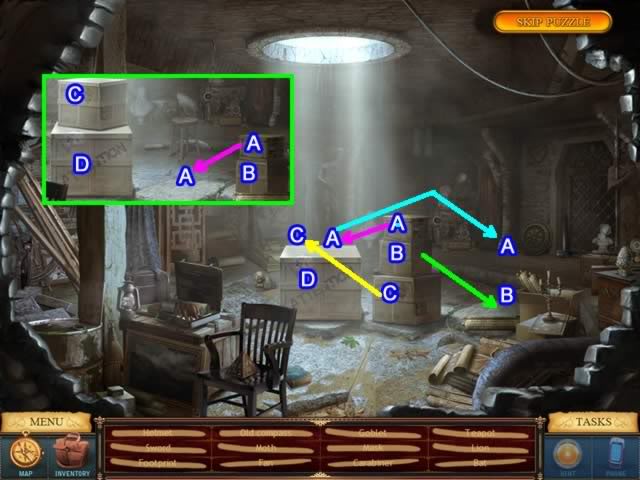
- Move box A from the top of box B on pad 2 to the top of box D on pad 1
- Move box B from the top of box C on pad 2 to the empty pad 3
- Move box A from the top of box D to the top of box B on pad 3
- Move box C from pad 2 to the top of box D on pad 1
- Move box A from the top of box B to the empty pad 2
See the inset above for the rearranged boxes.
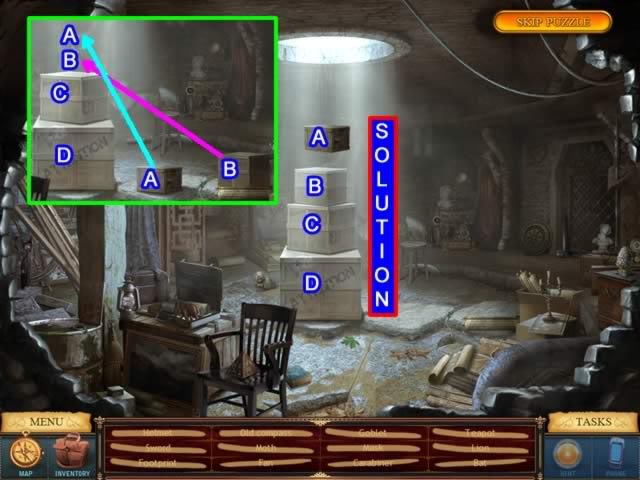
- Move box B from pad 3 to the top of box C on pad 1
- Move box A from pad 2 to the top of box B on pad 1
Climb atop the boxes and call emergency services to get rescued.
Location: Police Lab
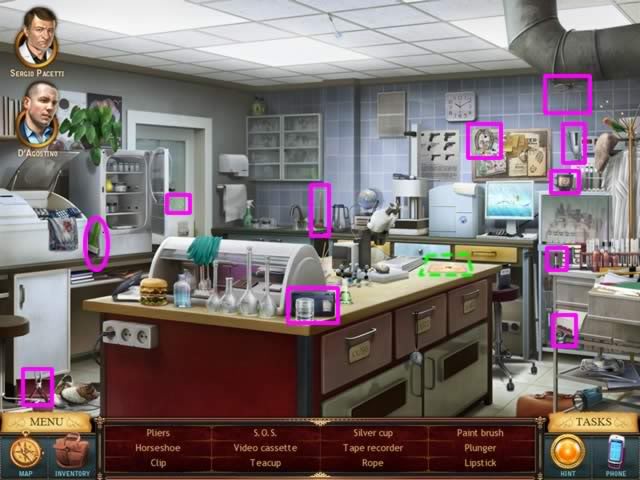
Find all the objects listed then click on the glowing letter on the counter top.
Puzzle: Find Hidden Clue
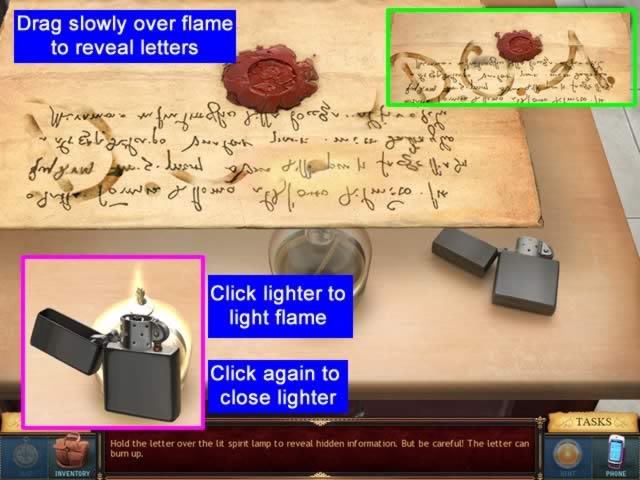
Goal: Use the spirit lamp to find the hidden clue.
- Drag the lighter to the lamp and click to get the flame on the lighter.
- Click the lighter again and the flame will go out and the lighter return to the table.
- Click on the letter and move it back and forth slowly over the flame. When a dark brown outline appears, concentrate in this area to reveal the detail.
- Do not hold the letter too long in one place or it will burn.
Solution: The letters D.O.A. are revealed.
Chapter 12
Location: Department of Antiquities: Gambini’s Office
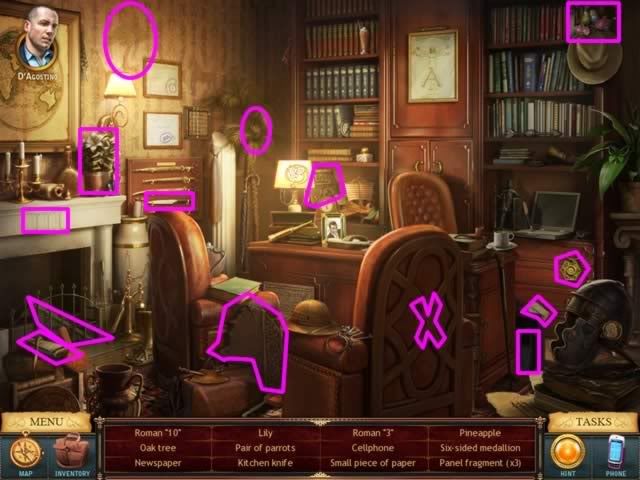
Find the items indicated. The "Small piece of paper" object contained the computer password "Michelangelo"
Location: Department of Antiquities: Security Office
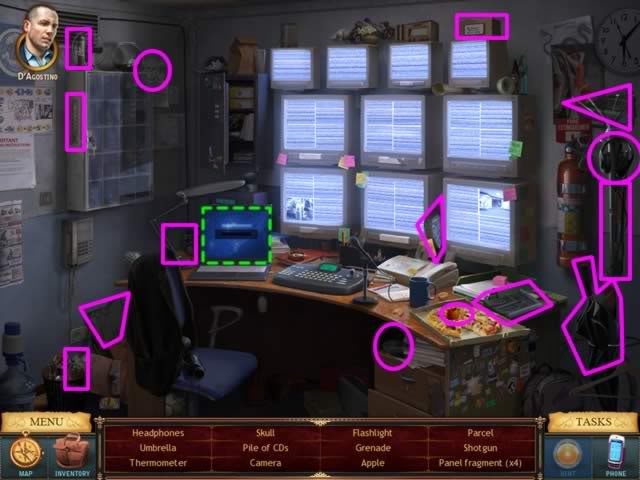
Find all the objects indicated.
Click on the glowing computer screen to open a puzzle
Puzzle: Match the Pairs
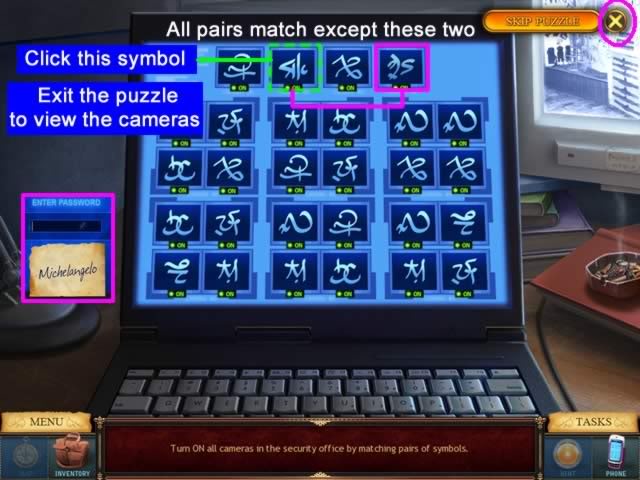
Goal: Match the pairs of symbols to turn the camera monitors on.
Drag the password to the computer screen to gain access.
Match the symbols.
Two pairs do not match so not all cameras can be on at the same time.
Click the symbol outlined in green to get the feed for the camera the symbol represents.
Exit the puzzle to view the security cameras.
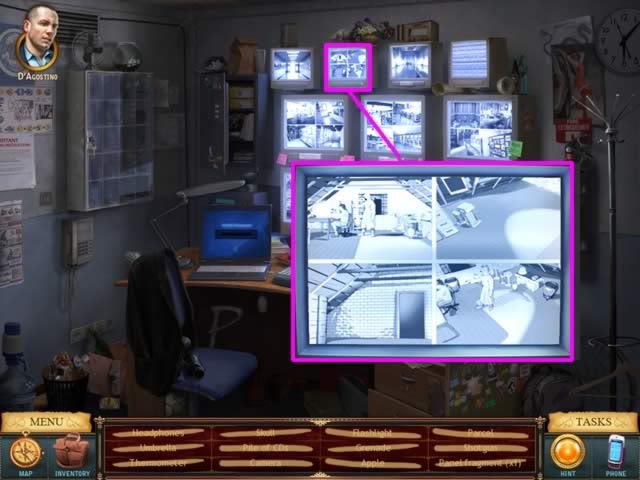
View the close up of the glowing camera to see what is occurring in the attic.
Location: Department of Antiquities: The Hallway
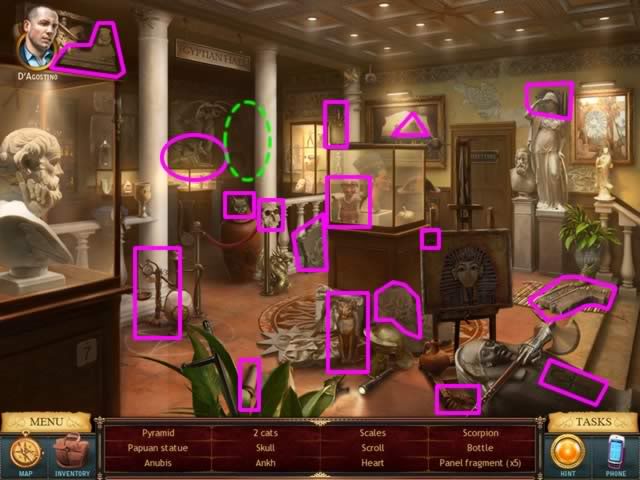
Find the objects indicated. Click on the glowing area in the back of the room to access the attic
Puzzle: Assemble the Fragments
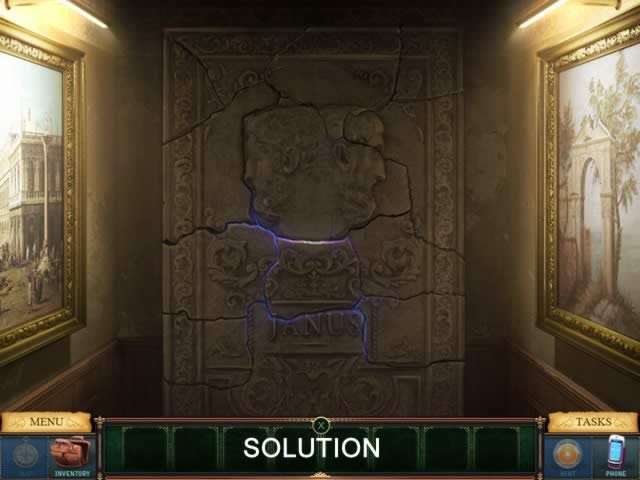
Goal: Using the pieces from inventory, assemble the tablet.
- Right-click to rotate pieces
- Work from the bottom up matching patterns.
- A piece will lock into place only when it adjoins a piece already placed.
When completed, the tablet will crack open to allow access to the attic to conclude the game.
Watch the cut shot at the end to see how everything is resolved.
Congratulations! You have completed the game.
“;
More articles...
Monopoly GO! Free Rolls – Links For Free Dice
By Glen Fox
Wondering how to get Monopoly GO! free rolls? Well, you’ve come to the right place. In this guide, we provide you with a bunch of tips and tricks to get some free rolls for the hit new mobile game. We’ll …Best Roblox Horror Games to Play Right Now – Updated Weekly
By Adele Wilson
Our Best Roblox Horror Games guide features the scariest and most creative experiences to play right now on the platform!The BEST Roblox Games of The Week – Games You Need To Play!
By Sho Roberts
Our feature shares our pick for the Best Roblox Games of the week! With our feature, we guarantee you'll find something new to play!Type Soul Clan Rarity Guide – All Legendary And Common Clans Listed!
By Nathan Ball
Wondering what your odds of rolling a particular Clan are? Wonder no more, with my handy Type Soul Clan Rarity guide.


