
Best Horror Games On Itch.io – July 2026
Across a bounty of subgenres.
Grow A Garden 2 Base Price List
What's the most valuable crop?![Evomon Best Starter [Leafbun, Blazpup, or Bubble?]](/wp-content/uploads/2026/06/evomon-best-starter.jpg "Evomon Best Starter [Leafbun, Blazpup, or Bubble?]")
Evomon Best Starter [Leafbun, Blazpup, or Bubble?]
Grass-type, Fire-type, or Water-type?
![[Roblox] Evomon Shiny Hunting Guide – Including Prismatic and Pris Shinies!](/wp-content/uploads/2026/06/evomon-shiny-hunting-guide.jpg "[Roblox] Evomon Shiny Hunting Guide – Including Prismatic and Pris Shinies!")
Resonance Walkthrough
Welcome to the Resonance walkthrough on Gamezebo. Resonance is a point-and-click adventure game played on created by Xii Games and published by Wadjet Eye Games. This walkthrough includes tips and tricks, helpful hints, and a strategy guide on how to complete Resonance.


- Prefer Gamezebo on Google

Game Introduction – Resonance
Welcome to the Resonance walkthrough on Gamezebo. Resonance is a point-and-click adventure game played on created by Xii Games and published by Wadjet Eye Games. This walkthrough includes tips and tricks, helpful hints, and a strategy guide on how to complete Resonance.
General Tips
- Basic gameplay for this game is pretty standard for a point-and-click adventure, but with some creative additions
- Interactive areas and items are indicated with pop-up messages
- Left click on an object to interact with it or pick it up
- Right click on an object to get more information
- The menu bar pops down when you move your cursor to the top left of the screen. The menu bar consists of the following sections:
- Main Menu: The main menu can be accessed by clicking the red power icon on the menu bar. Go to the main menu to save and load games, change the volume, view your achievements or toggle “bloopers” (outtakes of voiceovers you can play)
- Character Selection: Move your cursor to the right side of the menu bar to reveal a panel with icons for all available characters you can play with. The character you’re currently playing with is indicated with a yellow dot. To change characters simply click on the desired character’s icon
- INV: Your inventory. This is where items you pick up are stored. To use an item you need to click and drag it to the desired location. Sometimes you need to combine two items in the inventory before you can use them in the scene. Right click an item to get more information on it. Each character has their own inventory, but many items can be swapped around by simply dragging them onto another character
- LTM: Long term memory. Important scenes are automatically stored in your LTM. Some scenes are specific, individual memories for one character, others are memories that are shared by all. Click on a memory to watch the scene again or to get additional information. LTM entries can be used in conversation (see below) and are often essential for continuation of the game
- STM: Short term memory. The STM is character-specific. You can store “memories” of objects or people in your STM to use in conversation later on. All interactive objects and areas can be stored in the STM. When you click on something in a scene and hold down your mouse button, the STM will automatically scroll down and you can drag the object to one of the slots. There are about ten STM slots per character, but you can overwrite items when necessary
- Dialog is not only excellent, but also very important in this game. To get ahead in the game you often have to talk to the right people about the right things. In most conversations it’s safe to just go through all the options. However, there are a couple of conversations with “deal breaker” options that immediately end the conversation. In these instances you will need to replay the conversation and try different options
- To initiate a conversation simply click on a character or drag and drop an item onto the character to discuss that item. You can drag and drop items directly from the scene, or from your LTM, STM or inventory. You can use the STM to store items you want to talk about to someone who is not in the current scene
- Quite often you will see a black “drop box” at the top of the dialog box. You can put items from your STM, LTM or inventory in this box to talk about them. Just click on an item to make it appear in the box, or manually drag and drop it into the box
- Hints: Whenever you’re stuck, click on one of the four main characters to initiate a conversation and ask them if they have any thoughts on the situation. Hints can be very vague but should be just enough to point you in the right direction. Have all your main characters talk to each other for different perspectives on the situation
- Strategy: Try everything! Talk to people about everything in the room or even things you’ve seen in other locations. Try inventory items on each other and on interactive places in the scene. If one character can’t do it, maybe someone else can. Be creative, think big! This game isn’t easy, but ultimately it is all quite logical (albeit in retrospect)
- Note: This walkthrough is still missing information on the “Blackmailer”, “Hippocrates” and “Map Master” achievements (see “Achievements” below). The walkthrough also only contains 335/340 points. If you know how to get these achievements or find the last five points, please leave a message on the forum and I will have the walkthrough updated.
Meet the Gang
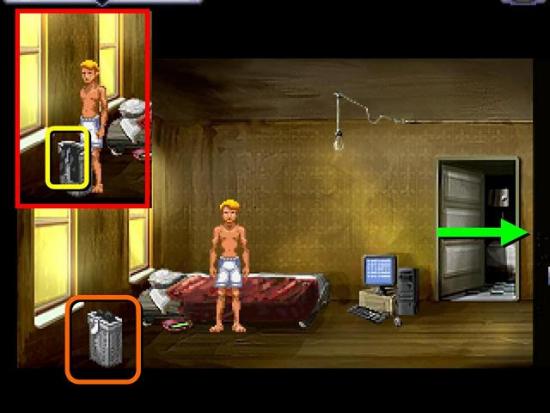
Ed’s Apartment
- You can skip the opening news stories by hitting Esc

- Click on the hamper
- Click on the pants and find Ed’s cell (+5)
- If you right click on the phone in the inventory you get another point (+1)
- Go right into the next room
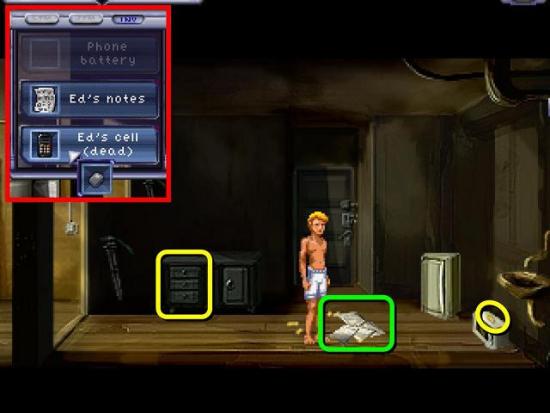
- Click on the papers on the floor to find Ed’s notes (+2)
- Pick up the key on top of the microwave
- Open your inventory and drag and drop the key onto the drawers
- Open the drawers and find a phone battery
- Open your inventory and drag the phone battery onto Ed’s cell (+1)
- Left click on Ed’s cell in the inventory
- Choose “use the phone’s address book” (+2)
- Choose “check the caller ID” (+2)
- Call Dr. Morales
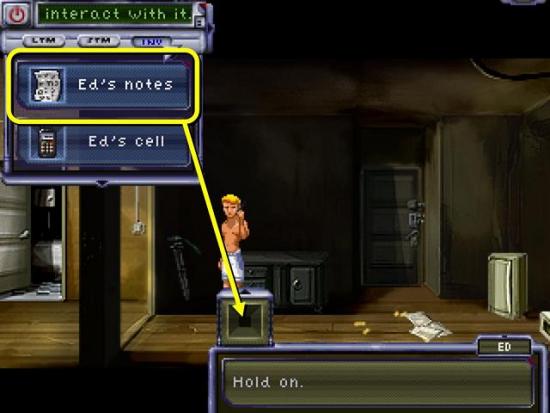
- When Dr. Morales asks for the notes, click on Ed’s notes in the inventory (+5)
- You will come to a screen with four clocks. Click on the clocks to play the following scenes. The scenes can be played in random order
6:55 – Ed
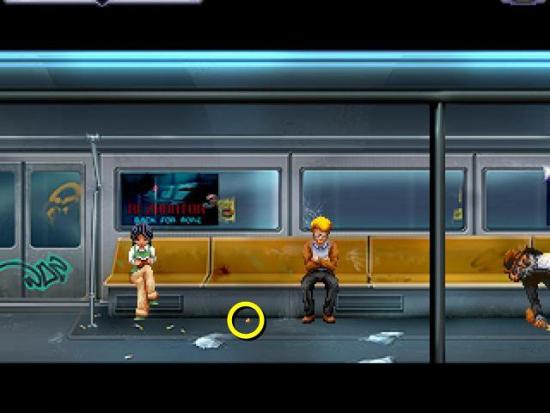
- Pick up the coin (+2)
- Talk to Anna (go through all dialog options for the “That” Guy achievement)
- Use the coin from the inventory on Anna (+3)
- You can also talk to Anna about her Lucky Coin (LTM)
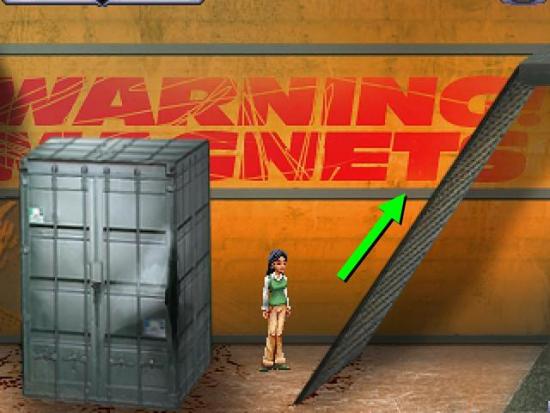
- End the conversation
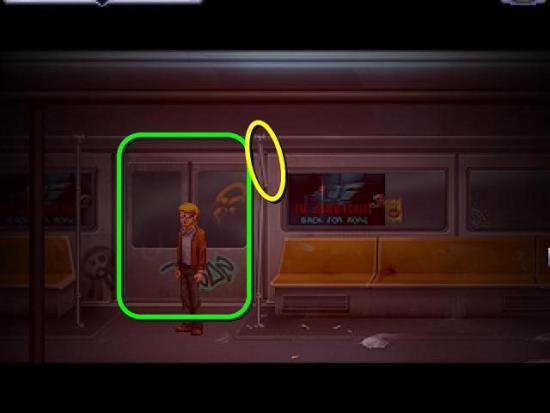
- When the lights are off, click on the subway doors to prise them open
- Pull down the loose bar to get a pipe (+2)
- Use the pipe on the subway doors (+1)
- Step out into the darkness
6:27 – Anna
- To get the Quick Escape achievement, see the achievements section below
- Lock the door to buy some time (+2).
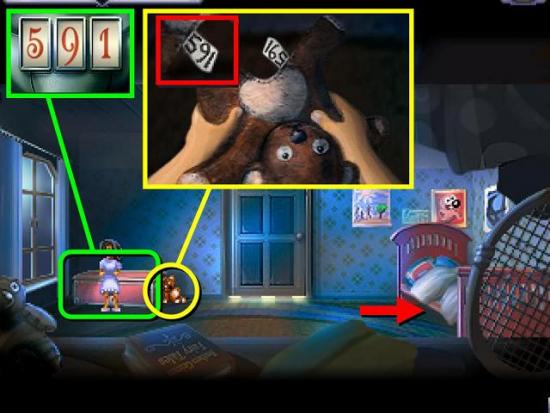
- Pick up Señor Bear
- Watch the LTM about the bear (+1)
- Right click on Señor Bear in the inventory
- He has a code on the tag on his leg. However, note that the bear is upside down, so the code is too. This makes the code 591 (+2)
- Zoom in on the chest and enter 591
- Click “open the chest” (+2)
- Find Anna’s treasure
- Watch the memory with Uncle Javi – you won’t be able to use the treasure unless you do (+1)
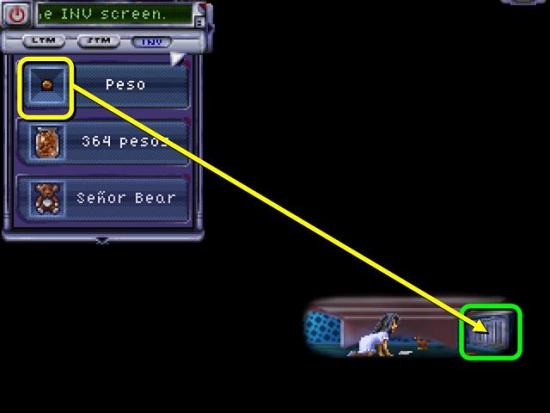
- Hide under the bed
- Click on the treasure in the inventory and get a peso
- Use the peso on the vent cover
7:30 – Ray
- Go into your inventory and check Ray’s smartphone
- Click on notes and go through both “goals 1” and “Antevorta”
- Important to remember is that the secretary leaves at 7:30 and you are looking for information on A. Batra
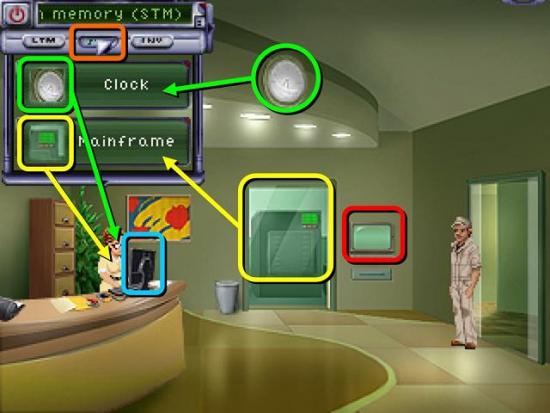
- First talk to Emma about the mainframe, either by clicking and dragging the mainframe directly onto her, or by putting it in your STM first and then selecting it once you’re in conversation with her
- Now you can talk to her and ask her what she’s doing
- Talk to her about the clock on the wall as above
- Once Emma is gone, check the computer
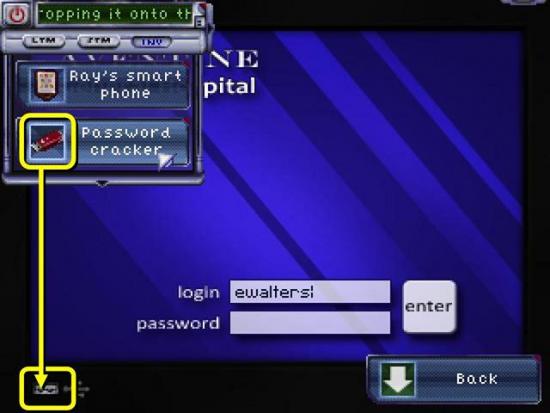
- Select Ray’s password cracker from the inventory and put it in the USB port at the bottom of the screen
- The password cracker will get Emma’s password (+3), which in Emma’s case is always “password”. If you need to find it again later it will be stored in the notes on Ray’s phone. However, the first time you use it, it will be entered automatically
- Click enter
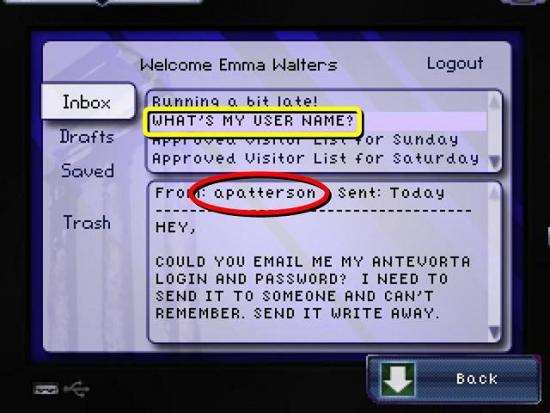
- In the inbox, read the email entitled “what’s my username?” Note the email alias of the sender at the top of the email. This is a random name, but in my example it was apatterson
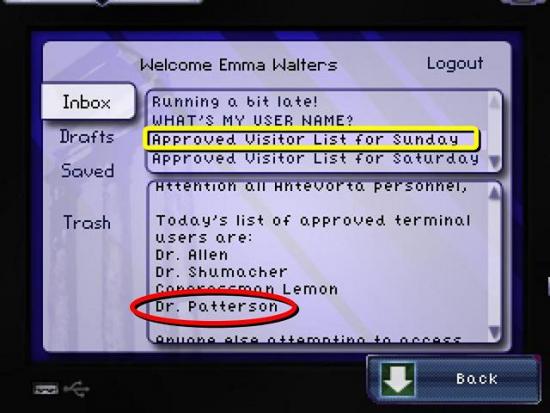
- Check the approved visitor list for Sunday to find out Emma isn’t approved, but Emma’s boss (e.g. Dr. Patterson) is
- Go to drafts and read the email “Dear idiot”
- Scroll down the email to find out that usernames for the Antevorta system are made up of the first three letters of someone’s first name and the first three letters of someone’s last name, and that the password can be reset in the system – so you need to find out Dr. Patterson’s first name
- Send the draft email for an extra point and the Just Because achievement (+1)
- Read all the other emails for fun, including the ones in the saved box
- Log out
- Now type the email alias for Emma’s boss (e.g. apatterson) in the login box and use the password cracker again to get his password. This password is random
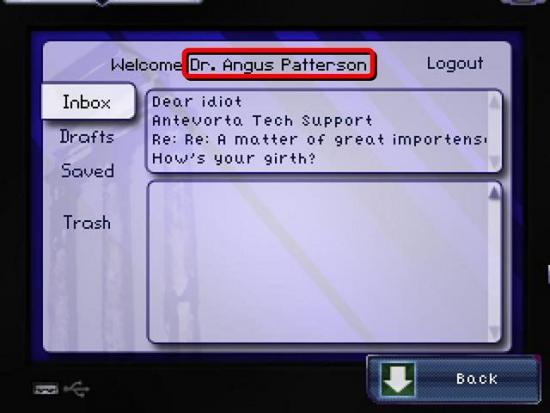
- Read the boss’s full name at the top of the screen (e.g. Angus Patterson)
- Exit the computer
- Go to the terminal on the wall
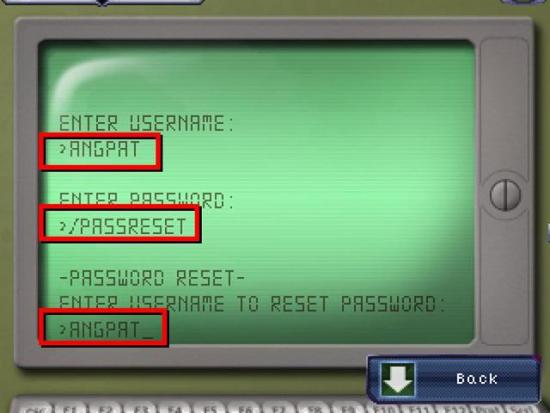
- Enter the username you gathered from the first three letters of the boss’s first name and the first three letters from his last name (e.g. Angus Patterson is ANGPAT)
- You don’t know the password, so enter something random and be told you need to enter /HELP to find the available commands
- Enter /PASSRESET
- Then enter the username again (+3)
- Exit the terminal and go back to the computer
- Log in with the boss’s details again (if you forgot the password, it’s in the notes on Ray’s phone, at the bottom of “antevorta”)
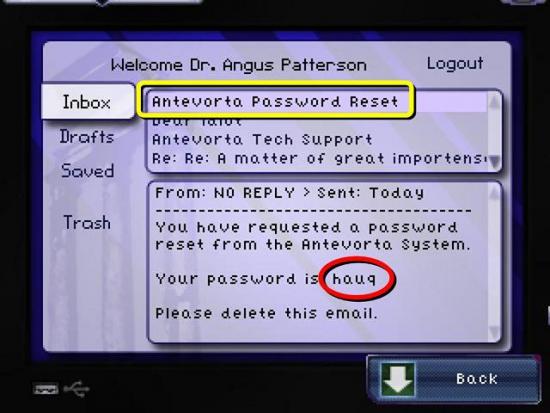
- Check the new email for the password, which is another random one. In my case was “hauq”
- Before you go back to the terminal, search the room
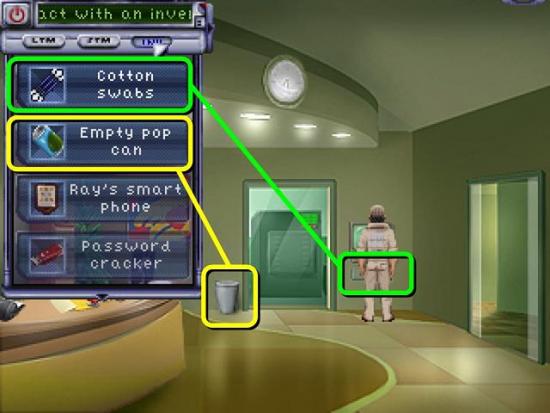
- Find an empty pop can in the trash can
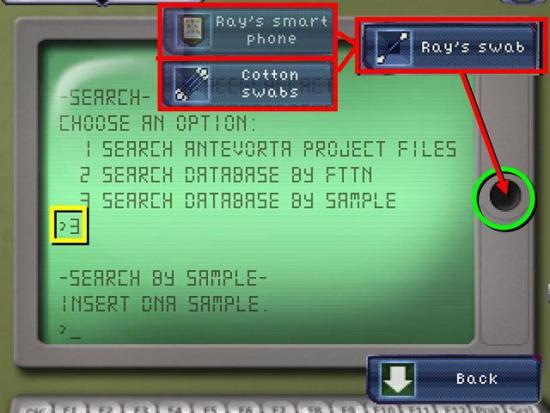
- Find cotton swabs (+1) in the drawer below the terminal

- Access the terminal again and enter the username (e.g. ANGPAT) and password (e.g. HAUQ)
- In your inventory, use the cotton swabs on the empty pop can
- Put the can swab in the hole that opens
- Type /HELP followed by /SEARCH
- Choose option 1
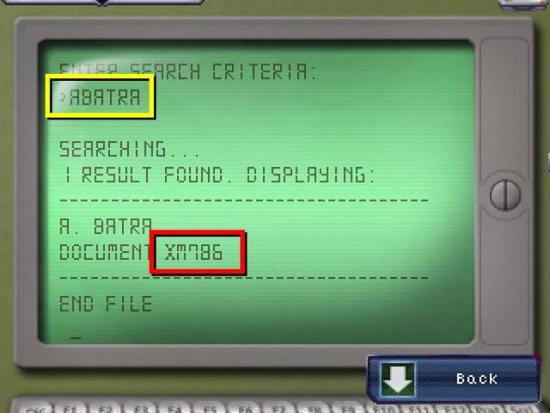
- Search for A BATRA (+2)
- Take note of the document code (in my case XM786)
- Type /SEARCH again and choose option 3
- Put the can swab back in the hole
- Type /SEARCH and choose option 3 again
- In the inventory, use a cotton swab on Ray’s phone
- Eenter Ray’s swab (+3)
- Exit the terminal

- Right click on the drawers of the filing cabinet on the left to find out which drawer contains the file for A. Batra (e.g. file XM786 is in drawer 4)
- Open the respective drawer and type in the file code (+6)
7:05 Detective Bennet
- Watch the scene and listen to some great examples of Wadjet Eye’s excellent trademark voiceovers
- Walk to the left
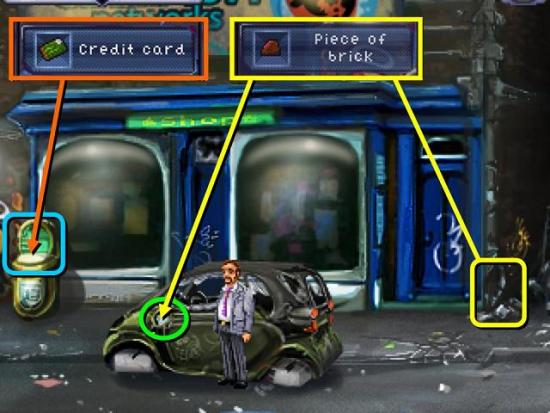
- Inspect the crumbled bricks and take a piece of brick
- Walk further left and use the piece of brick on the wing mirror of the stripped car
- Pick up the car mirror (+2)
- Click on Bennet’s wallet to get his badge and a credit card (+2)
- Use the credit card on the newspaper vendor to get a newspaper (+1)
- You can go into the alley next to the vending machine and inspect it, but there’s nothing there (other than a hint for what to do next)
- Don’t go into the post office or you die

- In your inventory, use the piece of brick on the car mirror to get a shard of mirror
- Put the shard of mirror inside the newspaper (+3)
- Sit down on the bench
- Take out the newspaper with mirror
Juno Labs
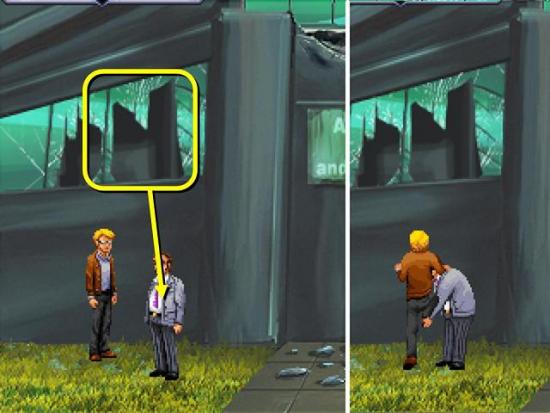
- Talk to Saul the janitor. If you let him talk without interruption you will get the Good Listener achievement
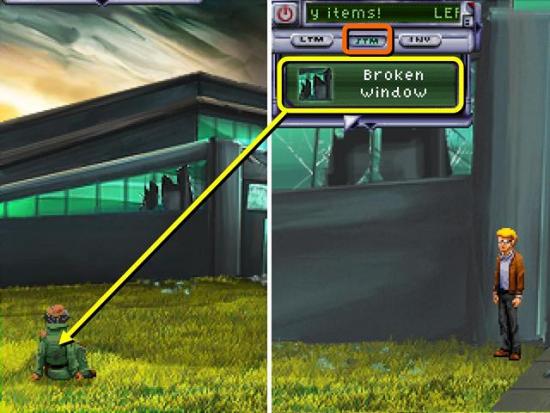
- Walk to the building
- Put the broken window in your STM
- Go back to Saul and talk to him about the broken window
- Talk to Detective Bennet (+2)
- You can now swap between playing with Ed or Detective Bennet at the top of the page
- Click on Detective Bennet and ask him to follow you
- Walk to the building
- Have Ed talk to Bennet about the slab blocking the door
- While Bennet is trying to move the slab, click on the slab again – together they can shift it (+3)
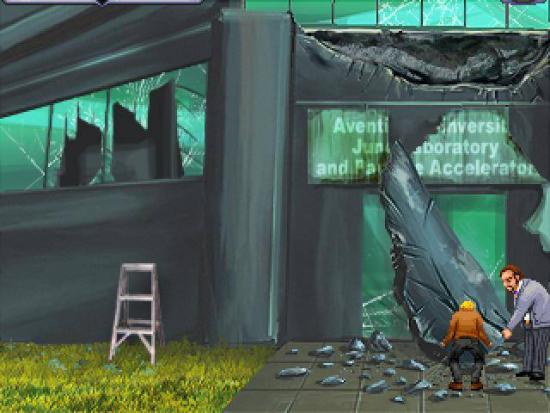
- Unfortunately, you can’t enter through the main doors so you have to go through the window
- Talk to Detective Bennet about the broken window so he will give you a leg up (+1)
- Pull down the sign on the left to get the No Smoking achievement
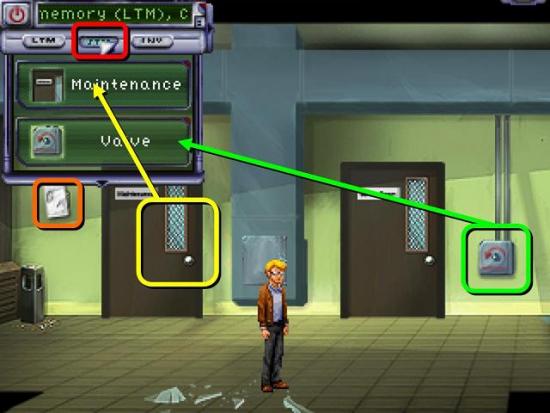
- Put the maintenance door and the valve in your STM
- Exit the building
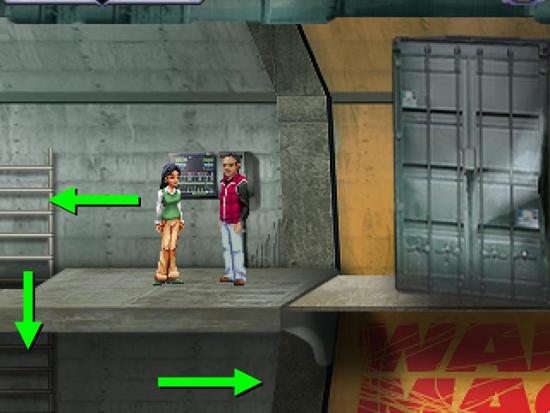
- Talk to Saul about the valve
- Talk to Saul about the maintenance door (+2)
- Saul will give you his keys
- Go back to the building and ask Bennet to give you a leg up again
- Open the maintenance door with Saul’s keys (+2)
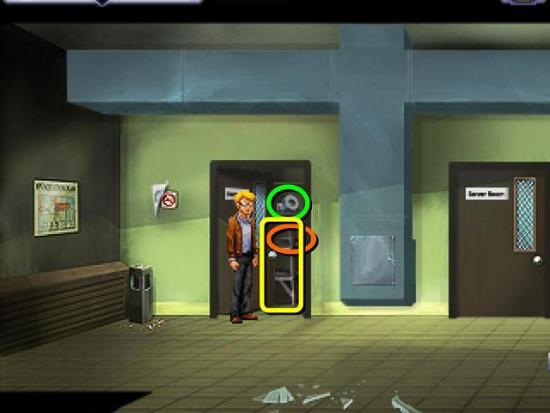
- Take the duct tape, screwdriver and step ladder (take the ladder last or you’ll have to make an extra trip) (+1)
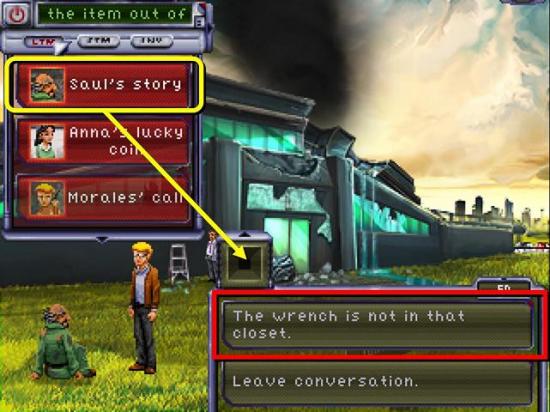
- Once the maintenance closet is empty, go back to Saul and talk to him
- Tell him there was no wrench in the closet (this only comes up after you talked to him about the valve)
- Then remind him of the story about the window he told (select from LTM)
- He will give you his monkey wrench (+3)
- Go back to the building
- Ask Bennet to follow you and go up the ladder
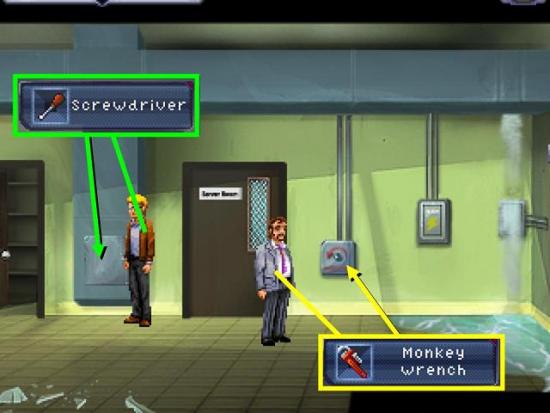
- Give Bennet the wrench (alternatively, you can have Bennet talk to Saul and have him get the wrench himself)
- Use the screwdriver to open the ventilation access (green)
- Have Ed climb up the ventilation access and to the leaky pipe on the right
- Switch to Bennet
- When Ed is in the ventilation shaft, use the monkey wrench on the valve (yellow)
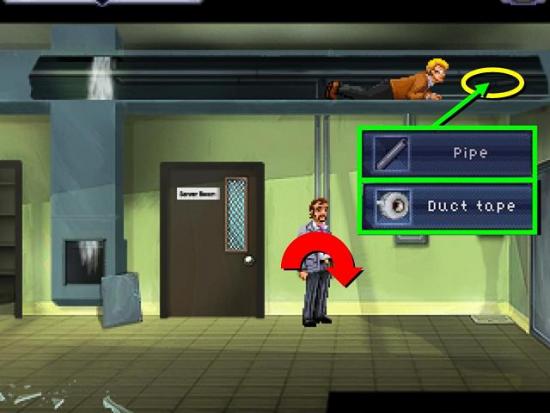
- Turn to the right (+2)
- Switch back to Ed
- Remove the rusty pipe
- Put the pipe from the subway in the gap (+1)
- Fix in place with the duct tape (+1)
- Switch to Bennet
- Use the monkey wrench on the valve again and turn to the left (+3)
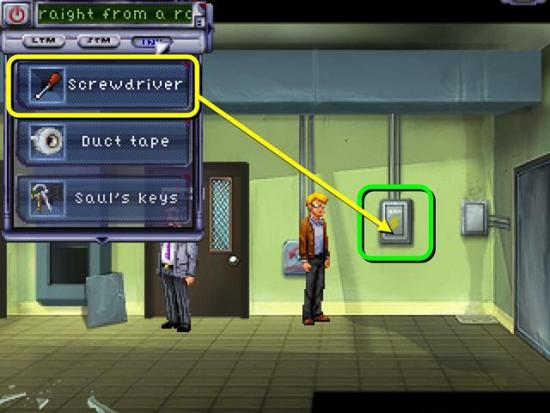
- Switch to Ed
- Use the screwdriver on the fuse box
- Click on the fuse box to open
- Now you can either try and go through the metal doors or past the concrete slab through the front door
- To go through the metal doors inside, have Ed go to the control panel by the door
- Use the screw driver to remove the screws
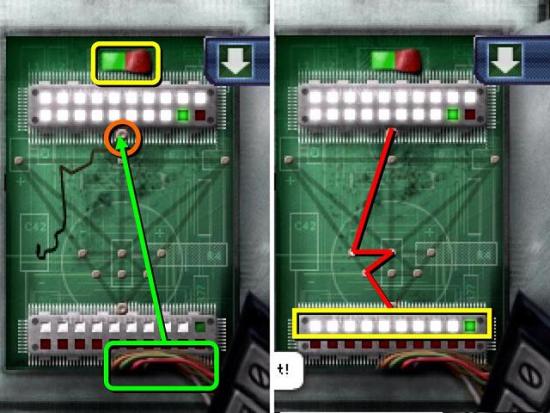
- Flick the switch at the top to turn off the power
- Remove the burned wire
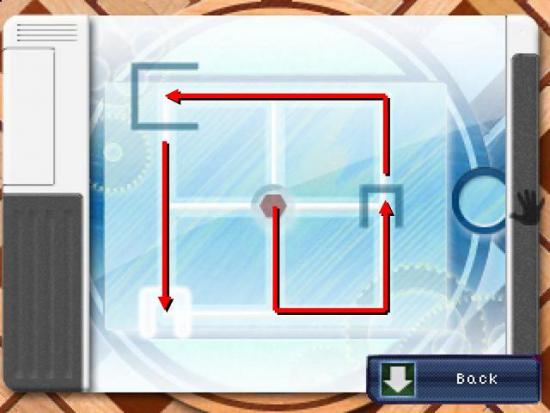
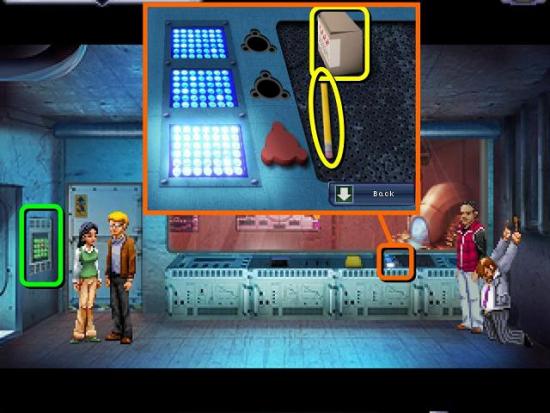
- Right click on the various parts of the mechanism to get information on what to do. Switch off the power with the switch at the top. Then click on the loose wires at the bottom and then click on the primary pin at the top. Then drag the wire around the pins to the terminal pin at the bottom. You will need to hook the wire around the pins to keep them in place. When the wire is in place, turn on the power. The lights at the top of the strip turn on one by one until it reaches 19. Each pin takes a set number of lights to power up and glow. Any power not absorbed this way will turn on the lights below. So if there are 19 pins above and 10 below, you need to select pins whose total adds to 9 (19-10=9).
- Have both Ed and Bennet go into the lobby of the lab either through the metal door you just opened, or the main door outside
- Go into Morales’ Lab
- Ask Bennet to lift the metal beam
- When he is lifting it, have Ed pick up the book (+3)
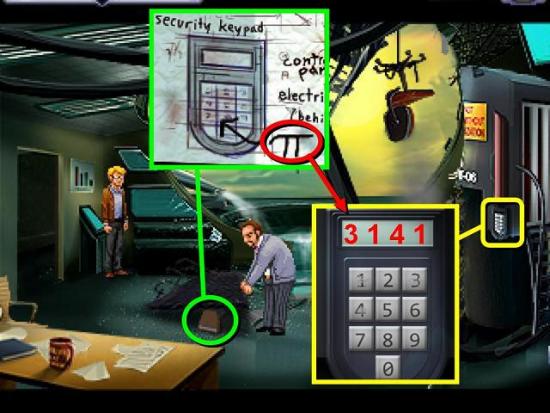
- Click on Morales’ journal in the inventory
- Take the loose paper that is sticking out (+1)
- Back out and right click on the paper in your inventory
- See that the code for the keypad is pi
- Go to the keypad and enter 3141 (as pi is 3.141 etc) (+5)
Anna’s Dreams
- When Ed shows Anna the journal, right click on her hospital ID badge in the inventory
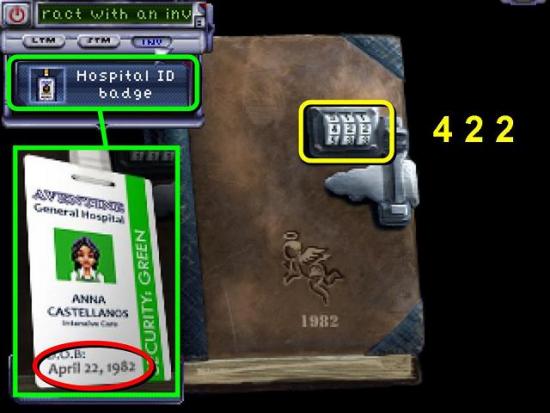
- Note that her date of birth is 22 April 1984
- Enter 422 into the lock and click to open (+3)
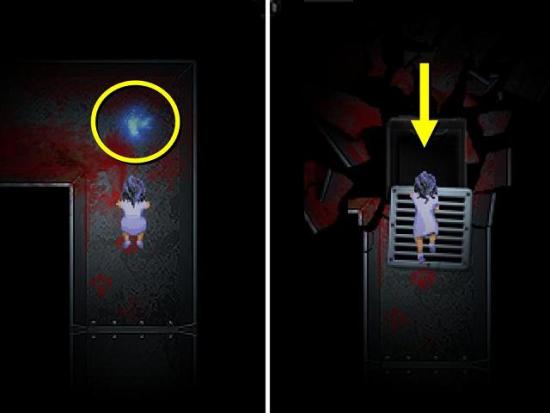
- Baby Anna is in a dream maze. There are three levels of this maze, and each level has a memory, indicated with blue swirls. Although you can exit the dream at several points, keep dreaming until you’ve found all three memories to get the points and the Dream Master achievement.
To go to the next level you need to fall down another ventilation grid. If you go to another level before you found the memory on the previous one, go through the grid on level 3 and you’ll end up on the level you missed.
(Hansel and Gretel +2; go to level 2 +3; Where is mama? +3; go to level 3 +4; Papa +4) - When you have all three memories, go through another grid to wake up in Anna’s apartment (+5)
- In the apartment Anna will have a memory about a cipher (+5). You can use this cipher to decode the journal for the Decoder Ring achievement and more points. However, this is not required to complete the game. In any case, you don’t have time to do it now as you have to run!

- Click on the bookcase and push it to the right to block the door (+2)
- Exit through the window
- Go down the left fire escape ladder
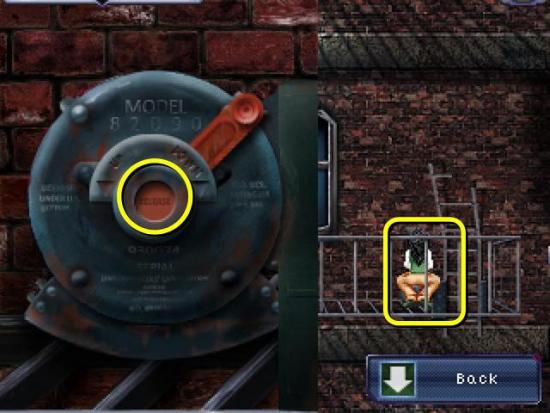
- Zoom in on the mechanism
- Click the release button in the middle to get the handle (+2)
- Go back up the ladder, past the window and up the next ladder
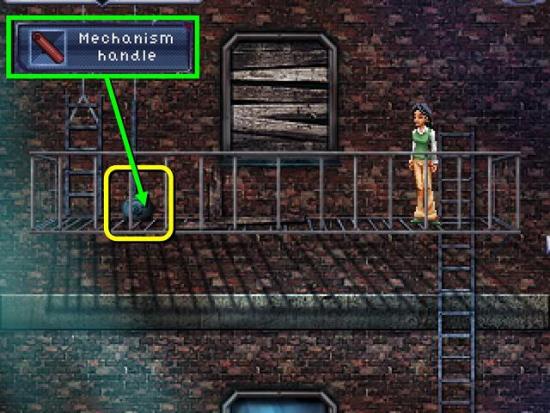
- Put the handle on the mechanism (+2)
- Turn counter clockwise until the ladder is fully up
- Go up the ladder (+3)

- Take the broken glass from the broken window in the door (+2)
- Use the glass on the rope of the ladder
- Click on the piece of glass and find the part of the rope where you can cut (there is a specific place where the glass will sink slightly into the rope). Now cut furiously until the rope is severed. The best way is to use short, quick strokes. You only get a very short time to do this. You can skip this part if you want, but then you won’t get the Cut the Rope achievement or points (+3)
Getting the Financial Statements
- In the conversation between Ed, Anna and Bennet, you get a point for asking about Morales’ research (+1)
- When Bennet is talking to Ray, tell him he looks familiar, then talk to him about the LTM of Ed and Anna at the hospital (+1)
- You now have control over all four characters (+10)
- 156 points
Ray
- Switch over to Ray, leave the baseball fields and go to National Credit Systems. You can take the fellow gang with you, but Ozzy won’t talk to you if Detective Bennet is there
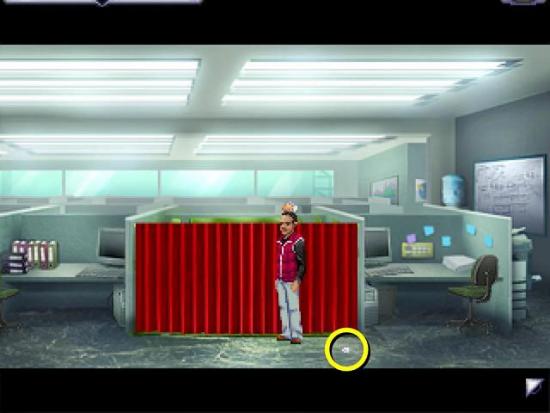
- Click on the red curtain
- Talk to Ozzy about the financial statements (LTM)
- Ozzy wants Morales’ FTTN and $10,000 (+1)
- Pick up the empty pill bottle
- Right click on the pill bottle to find out it’s an illegal prescription for comfocil
- Exit and go back to the baseball fields
- Give the cotton swabs to Anna
Anna
- Switch to Anna
- Ask Ray to come with you (you don’t need to, but it saves you an extra step later)
- Go to the hospital and go in
- Go to the ICU on level 2
- Walk to the left until you see the autopharm and several patient rooms
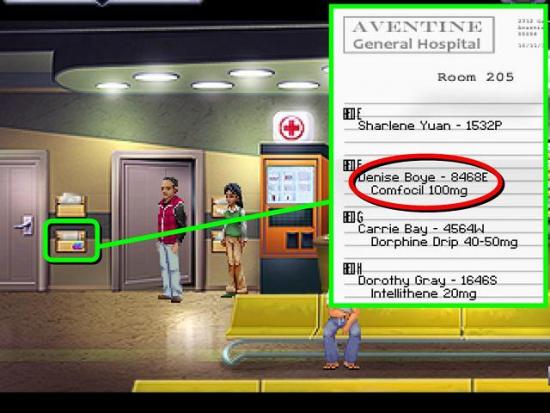
- Right click on the bottom left patient folder to you find a patient who needs comfocil
- Write down her patient ID: 8468E
- Access the autopharm
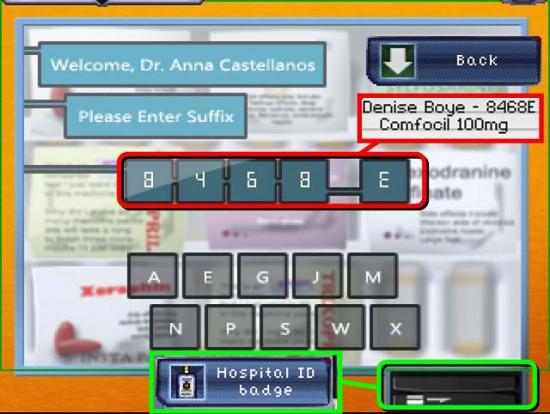
- Swipe your hospital ID card (+1)
- Enter 8468E
- Confirm and take the prescription meds (+2)
- Go back to the elevator. Make sure that Anna has the cotton swabs
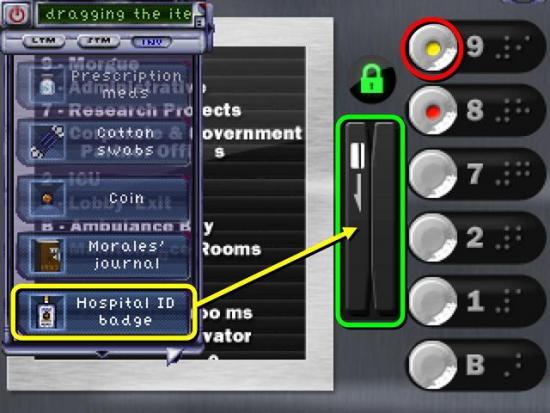
- Use the hospital ID badge on the card holder (+1)
- Go to the morgue on level 9 (Ray won’t come with you) (+2)
- Pick up Morales’ death certificate and the ultra sonograph
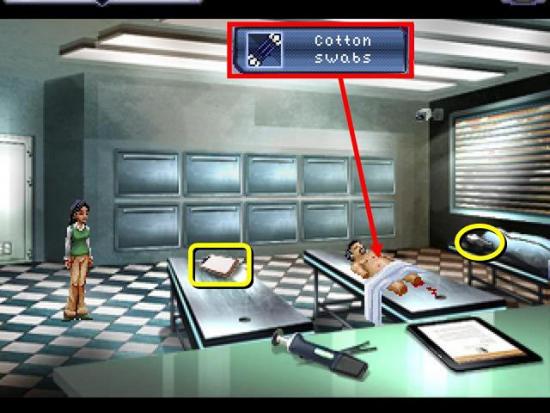
- Talk to Morales’ body (+3)
- Use a cotton swab on Morales’ body
- Exit and go to level 7
- Give Morales’ swab to Ray
Ray
- Talk to Emma and ask her about the morning shift. If you sent her angry email earlier, she will tell you about her date (+2)
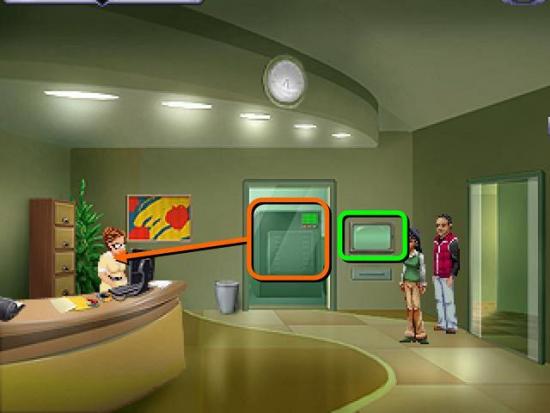
- Talk to Emma about the mainfame. She will allow you to use the terminal again
- Access the terminal – you’re still logged in
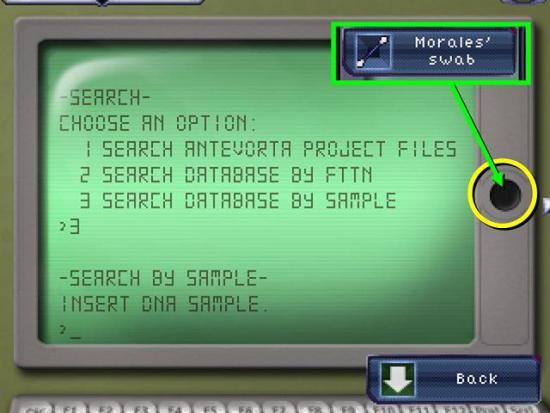
- Type /SEARCH and enter search option 3
- Put Morales’ swab in the hole. You find his FTTN
- Ray will get a new email when you exit the terminal
- Ask Anna to follow you
- Exit and go to level 1
- Exit and go to National Credit Systems
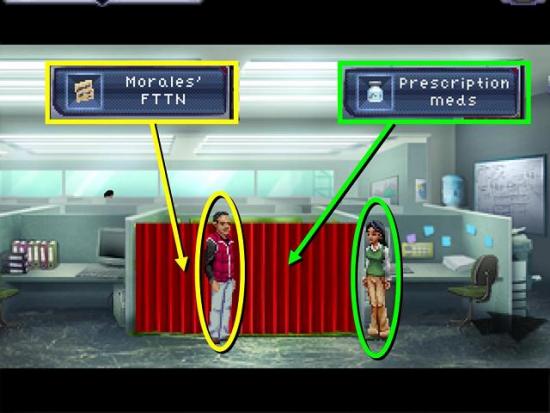
- Talk to Ozzy behind the red curtain
- Give him Morales’ FTTN (+2)
Anna
- Give Ozzy the prescription meds (+3)
- Ozzy will give you Morales’ credit report
- Right click on Morales’ credit report to find out he paid a lot of money to Tortoise Security
- You will get a new location on your map
Getting the Blueprints
Bennet
- Go to the police administration
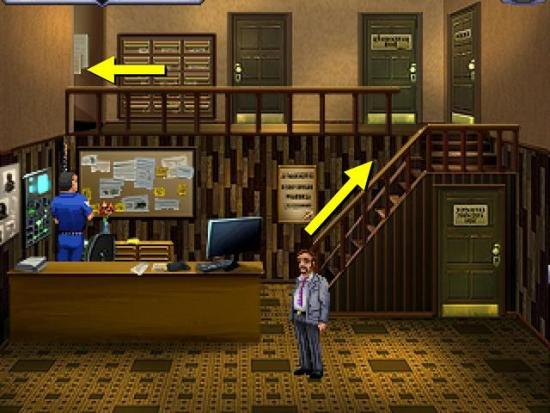
- Go upstairs and left
- Talk to Officer Johnsen
- When he asks, click on the archives terminal on the left
- Click again to scan your fingerprint
- Nothing happens (+1)
- Right clicking on the certificate on the wall will also get you the location for Tortoise Security on your map, if you don’t already have it
- Put the archive in your STM
Anyone
- You can do the following steps with anyone you like, but getting Bennet to do them saves you a few extra steps. Whoever you’re playing with, they will need to get the ultra sonograph and Morales’ financial records from Anna and have the archives in their STM. If you want to do this with anyone other than Bennet, read below to find out how to get them into the archives to get the STM entry
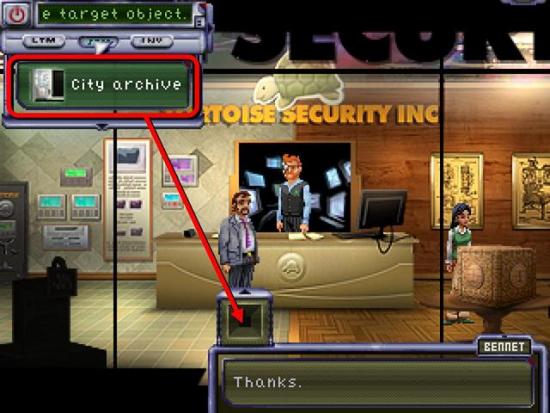
- Go to Tortoise Security
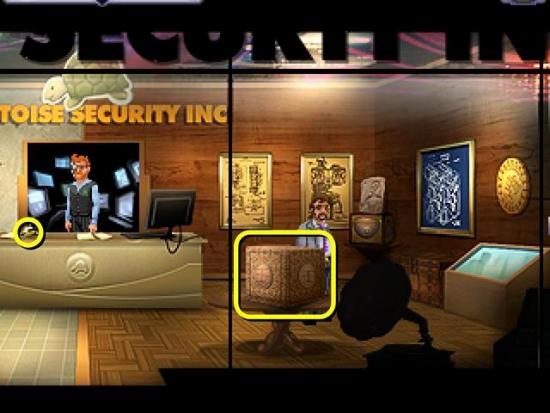
- Either ring the bell on the counter or touch any display item for Mr. Tortoise to come out
- Talk to him about everything
- After the conversation, put the ultra sonograph on the puzzle box (+3)
- Solve all four sides of the puzzle by moving the red dot inside the small box to the white gate (+5)
- Blue Side
- Green Side
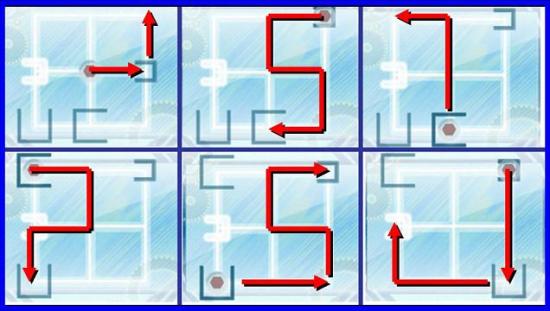
- Yellow Side

- Red Side
- Whoever solved the puzzle box can now talk to Tortoise about the archives (STM) (+5)
- Tortoise will give you the master keycard. Listen carefully to his explanation
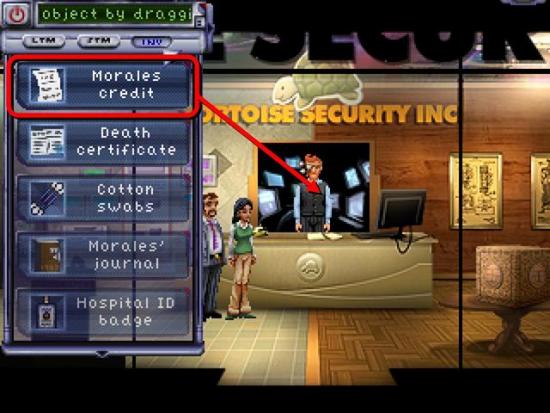
- Talk to tortoise about Morales’ credit records (Anna likely has the credit records so either give this to Bennet or have her talk to Tortoise) (+3)
- You need to get him copies of Morales’ will and death certificate
Bennet
- The following sequence is a three person job. Get Bennet, Ray and either Ed or Anna to the police administration
- Give the master keycard to Ray

- Go up the stairs
- Tell Officer Berry that you’re taking Ray to be interrogated
- When Ray is in the interrogation room, exit left
- Put the copy room in your STM
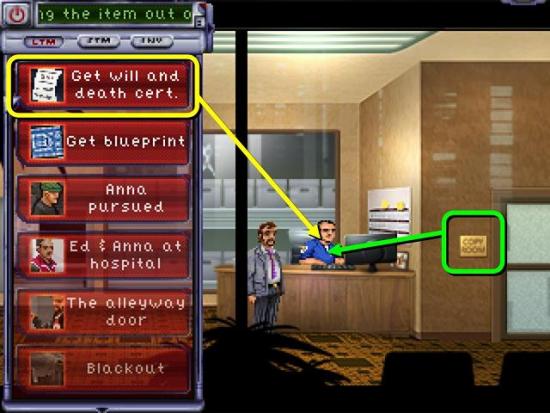
- Talk to Johnsen about the LTM of getting the will and death certificate
- Johnsen can pull up the will for you no problem
- Go to the archive, scan your fingerprint and take the will (+2)
- Now talk to Johnsen about the copy room, either from your STM or drag the copy room directly to him (+2)
- When he is distracted, switch to Anna or Ed, who are waiting with Officer Berry downstairs
Anna or Ed
- Talk to Officer Berry about the security panel (+2)
- When he is distracted, switch to Ray
Ray
- While Ed or Anna is talking to Berry, exit left to the archives (+2)
- Alternatively, you can skip distracting Berry and wait with Ray until Berry answers the phone. However, this takes longer and you will miss some points
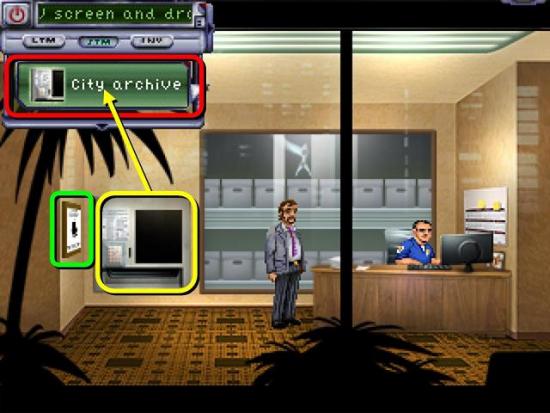
- Access Johnsen’s computer
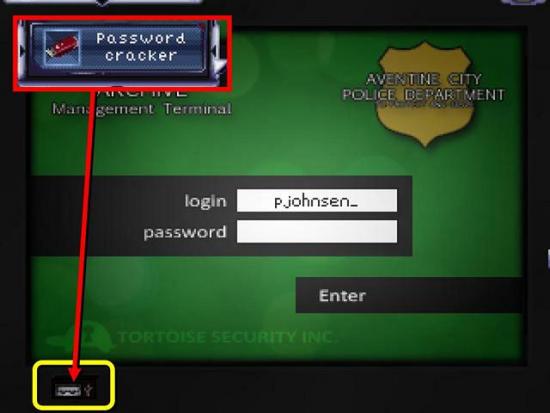
- Open the USB port at the bottom and use the password cracker (+1)
- Go to “recent documents”
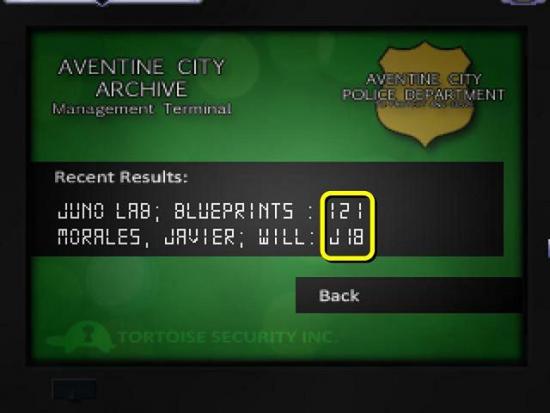
- Note the codes for both the will and the blueprints, which are different in each game. In my game they were I21 for the blueprints and J18 for the will, so I will use those as an example
- Exit the computer
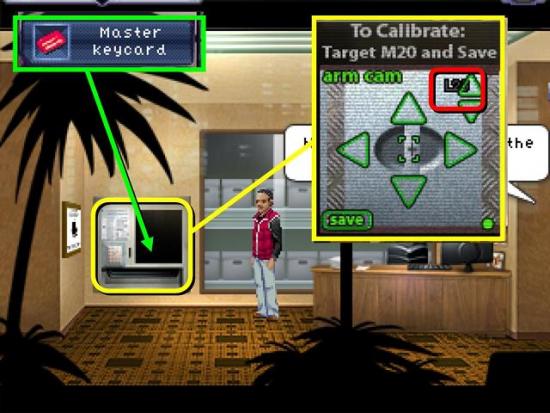
- Use the master keycard on the archives
- Select “retrieval arm manual alignment”
- The calibration instructions say you need to use the arrows to find file M20 and then save to correctly calibrate the system. However, we want to calibrate the system so that it will think it is getting the will (e.g. file J18) but in reality it is getting the blueprints (e.g. file I21). Thus, we need to calibrate the system to the folder that is as far away from M20 as the blueprint is from the will. In this example we need to go one letter down (J to I) and three numbers up (18 to 21), meaning we need to calibrate the system to L23. So move the crosshairs to L23, make sure they are centered correctly and hit save
- Exit the archives and exit right to be taken back to the interrogation room
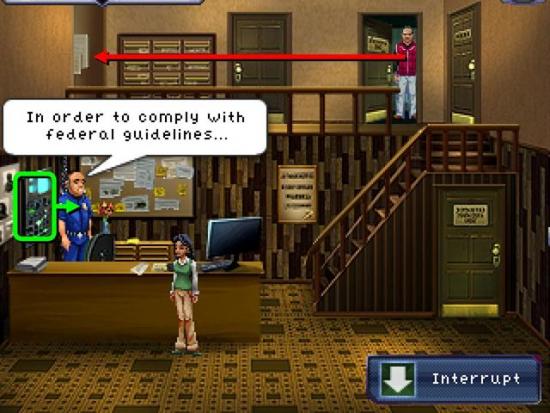
Bennet
- After Ray has recalibrated the archives, switch to Bennet
- Interrupt the conversation about the photocopier (you’ve just got to love the Wadjet Eye voiceover scripts!)
- Talk to Johnsen again about the will and death certificate to request a second copy of the will (LTM)
- Access the archives, scan your finger and take the blueprints (+4). If you succeed after only having had to calibrate the archives once you will get the Archive Master achievement
Exit and go downstairs
The Supercollider
- Give the will to Anna
Anna
- Go to Tortoise Security

- Ring the bell
- Give the death certificate and the will to Tortoise
- You will get a security cam picture of the person who stole his records on Morales’ vault (+5)
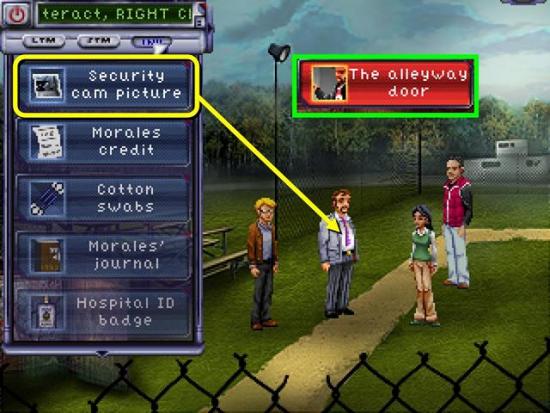
- Show the security cam picture to Bennet
- During the conversation, select the LTM of the alleyway door
Bennet
- Bennet and Anna will be taken back to the alley where Bennet’s story started (+1)
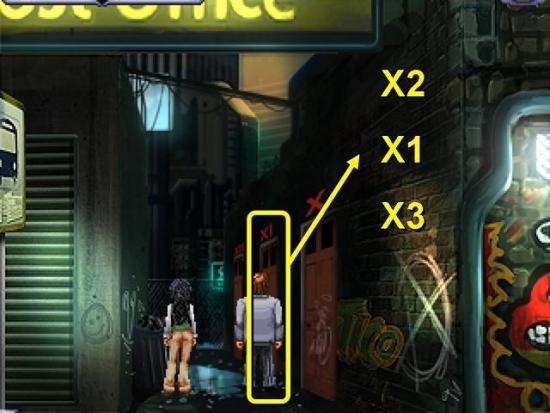
- Refer to the LTM of the alleyway door again to remember the correct door and the knocking pattern
- Click on the middle door
- Knock twice, once and three times, then stop knocking
- The Japanese lady inside will give Bennet a paper swan (+2)
- You’re taken back to the baseball fields
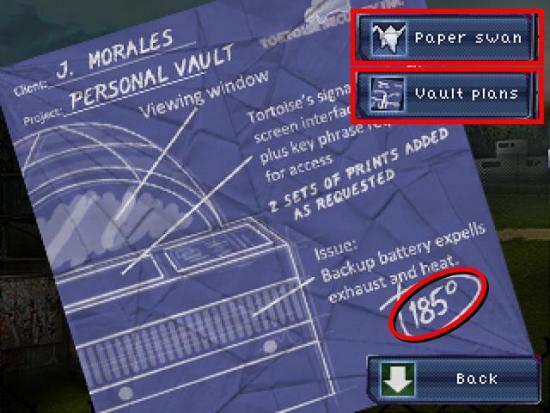
- Click on the paper swan to unfold it. It’s the plan for Morales’ vault
- Click on the vault plans to see the backup battery expels heat at 185 degrees
Ed
- We still have to visit Uncle Angelo’s grave, so let’s do that now
- Talk to Anna about the LTM of Angelo’s Grave to be taken straight there (+3)
- After the scenes at the grave, go to the Juno Laboratory and go into Morales’ lab
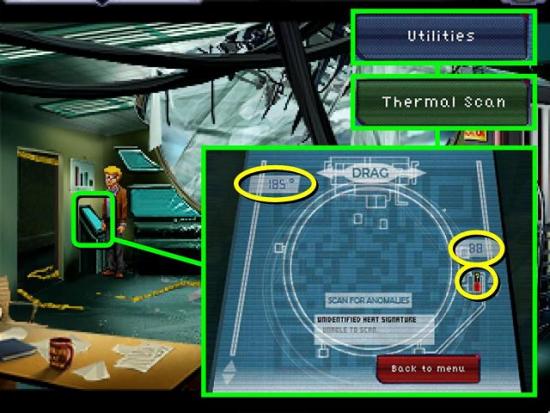
- Access the terminal by the door
- Select “utilities” followed by “thermal scan”
- Set the left slider to 185 degrees and click “scan for anomalies”
- Use the right slider to go to a different floor and scan again. Keep doing this until you find a scan with a red ? on it (B8)
- Click on the ?
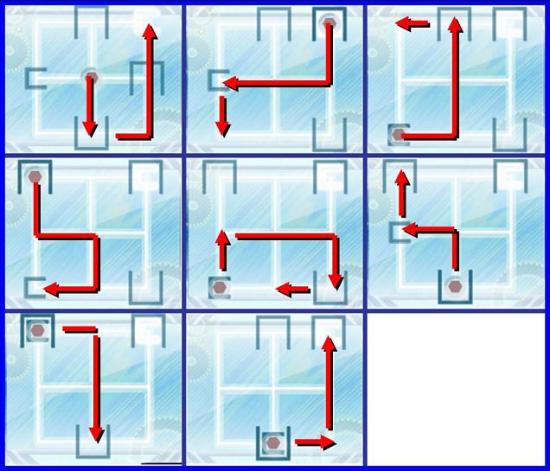
The Supercollider Puzzle
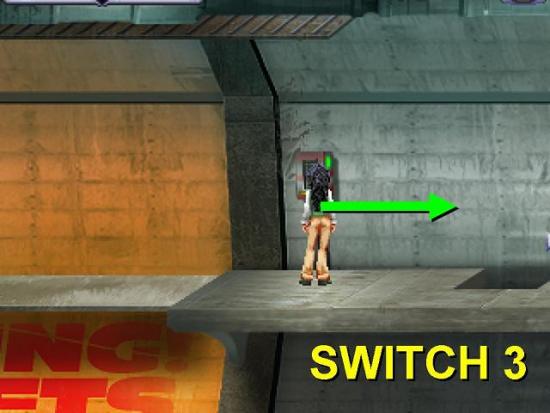
- Anna and Ray aren’t carrying anything made of metal so they can walk under the supercollider magnets when they’re on. Ed and Bennet can help with the switches but can’t be under the colliders when they’re on. Everywhere it says Anna you can also use Ray, and vice versa. Everywhere it says Ed you can also use Bennet, and vice versa. In this walkthrough I will put Bennet on switch 1, Ray on switch 2 and Anna on switch 3
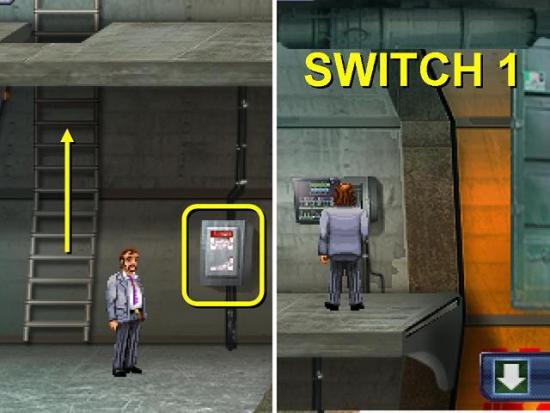
- Bennet: Walk to the right, open the fuse box and switch it on
- Bennet: Go up the ladder and pull down the lever on the switch, which I’ll call switch 1 (+1)
- Anna and Ray: Walk to the right until you come to a second ladder
- Ray: Climb up the ladder and activate switch 2 (+1)

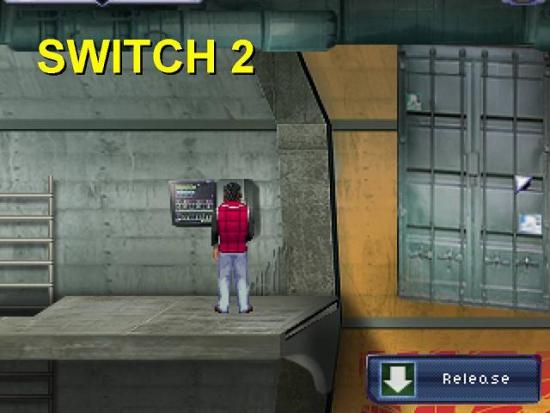
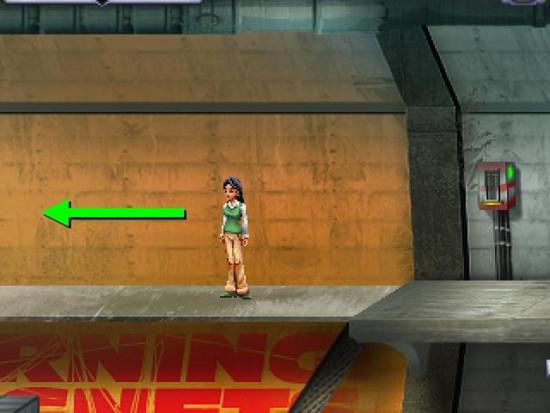
- Anna: Walk to the door at the end, open the fuse box and switch it on
- Anna: Now walk Anna back to the middle of the second magnet. She should be under the letter N on the wall. There is also a gray mark on the wall in the spot where she should stand (it’s behind Anna in the screen shot so you can’t see it).
- Ray: Release switch 2. The crate should fall to the left of Anna and the broken walkway to her right. Put Anna in the wrong spot and she dies
- Bennet: Release switch 1. All crates should be on the ground
- Anna: Walk up the broken walkway to the last platform
- Ray: Activate switch 2 so the crate and the walkway go up again
- Anna: Activate switch 3 (+1). The first walkway goes over the first crate, the second walkway goes under the second crate
- Now it is important to get Anna out of the way. If Ray releases switch 2 while Anna is by switch 3, the broken walkway will fall on her head. So walk her a few paces to the right
- Ray: Release switch 2
- The first crate should now be on the ground under the walkway, while the second crate should be on top of the second walkway, with both switch 1 and switch 2 released
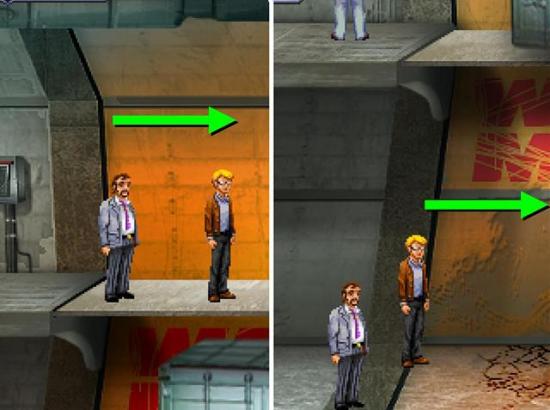
- Ed and Bennet: Walk across the first walkway to where Ray is, go down the ladder and walk to the door at the end
- Ray: Activate switch 2
- Bennet or Ed: Switch off the fuse box by the door (lever up)
- Ray: Release switch 2 (crate is now on the ground)
- Bennet or Ed: Activate fuse box by the door (lever down)
- Anna: Walk across walkway to Ray
- Bennet or Ed: Turn off fuse box by the door (lever up)
- Ray: Activate switch 2
- Bennet or Ed: Activate fuse box by the door (lever down)
- Ray: Release switch 2 (the crate is now on the walkway)
- Anna and Ray: Go down the ladder and walk to the door
- Exit (+3)
Your Uncle Holds the Key
- Watch the scene for three more points (+3)
- If you haven’t done so already, this would be a good time to decode the journal. This isn’t required to complete the game, but it will give you an additional 10 points and the Decoder Ring achievement (+10). See the Achievements section below for information
- The journal tells you that the second set of fingerprints programmed into the vault is Anna’s. No real surprise there
Ed
- The default for this section is Ed, but you could use Anna too
- Click on the door controls (+1)
- There is a fuse panel beside Ray. Zoom in on it
- Pick up the small box and the pencil
- Don’t yet take out the fuse already in place
- Click on the small box in your inventory to find a second fuse
- You need to find a third fuse
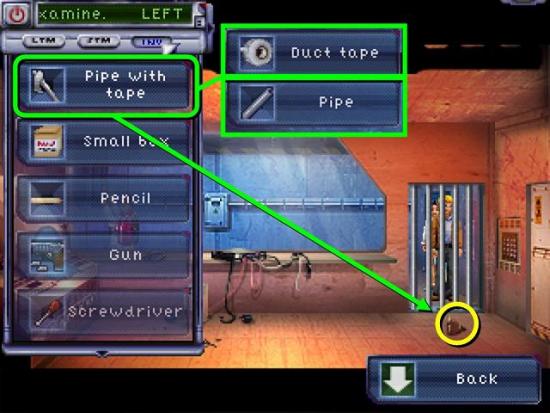
- Ray now has the metal pipe that Ed found on the subway. Give it back to Ed
- Put the duct tape on the pipe in the inventory (+1)
- Either find the third fuse from this side of the bars, or click on the bars to look through and find it from the other side (as in the image). Either way, get the fuse with the pipe with tape (+1)
- Right click the two fuses in your inventory and note their numbers
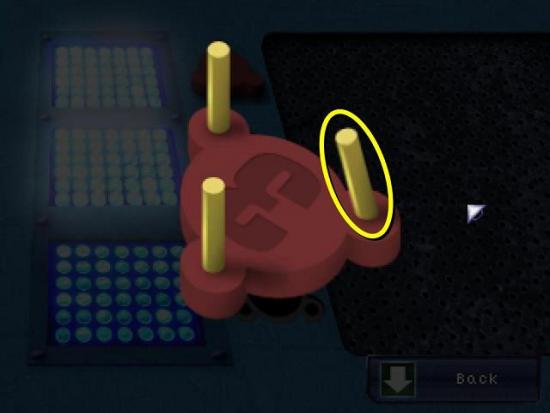
- Bend the bent pin back on fuse 3 (+1)
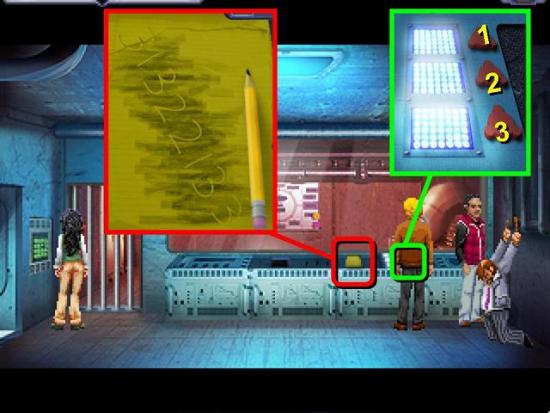
- Access the fuse panel again
- Put the fuses in the slots in an order you can easily remember, for example 1, 2, 3 from top to bottom (you can take out the third fuse and check its number if necessary) (+1)
- Click on the pad of paper
- Use the pencil on the pad of paper to find an eight digit number – 3132 2133 (+1)
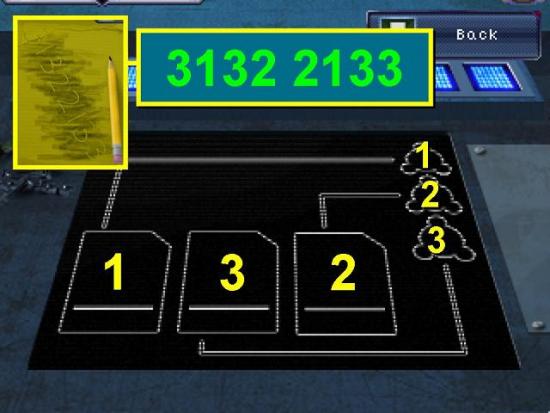
- Access the small code panel. Remember which way you placed your fuses and follow the lines to the touch pads. If you put them in 1, 2, 3 from top to bottom, the touch pads are numbered 1, 3, 2 from left to right. Enter 3132 2133 (+2)
Anna
- Talk to Ed (+5)
- Access the vault computer
- Touch to start
- You don’t know the key phrase!
- Click on the stairs by Baby Anna and watch the scenes. In particular, pay attention to the last scene as it contains an important clue (hint: Dante is not Anna’s father)
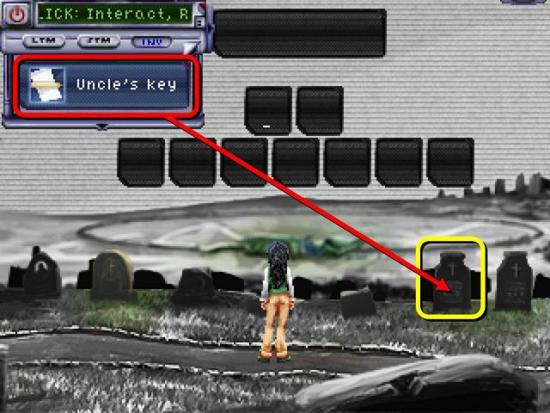
- In the graveyard, put the note with Uncle’s key on father’s grave
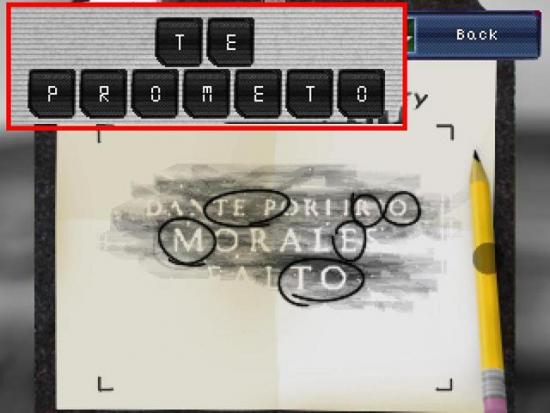
- Use the pencil to find the circled letters (if you do this with Angelo’s grave you’ll find that there are no letters in the circles)
- When you have the code, exit the gravestone
- Enter TE PROMETO
- Back at the computer, hit OK (+3)
- Watch the video
- Choose either option – it doesn’t matter (+3)
Ray
- Any of the dialog options will get you where you need to go. However, if you want the Close to Heart achievement, do the following:
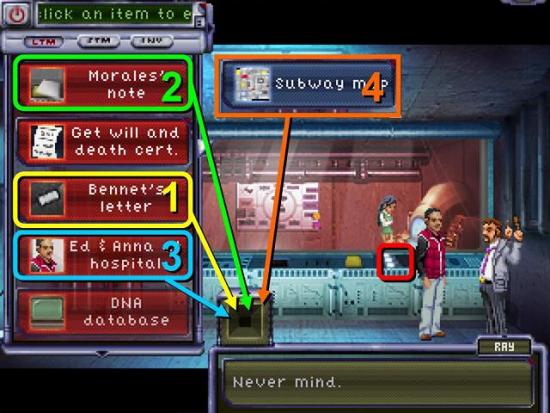
- Choose “What do you want with the Resonance research?”
- Choose “Explain the note”
- Enter the LTM of Bennet’s letter (+5)
- Enter the LTM of Morales’ note
- Enter the LTM of Ed and Anna at the hospital
- Enter the subway map from the inventory (+3)
- Yes, that did just happen
- As soon as Bennet says “Ray, close the door,” click on the fuse panel
Ray and Bennet
Edgetown
- Go through all dialog options
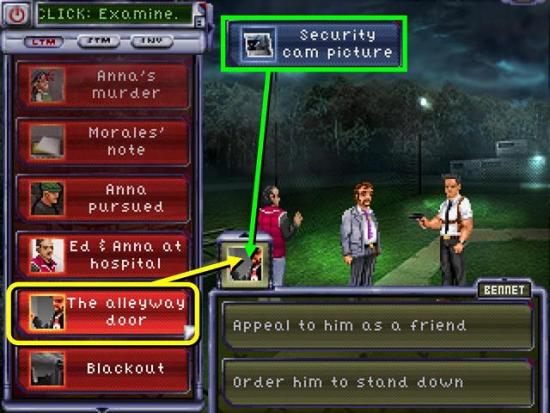
- When you run out of options, talk about the LTM of the alleyway door (+3)
- Then talk about the security cam picture (+2)
- From here on, Ray and Bennet will do everything together. You can switch characters but not go anywhere with just one of them
- Go to Edgetown
- Go into the alleyway
- Try the knocking pattern as it was before, but that doesn’t work anymore
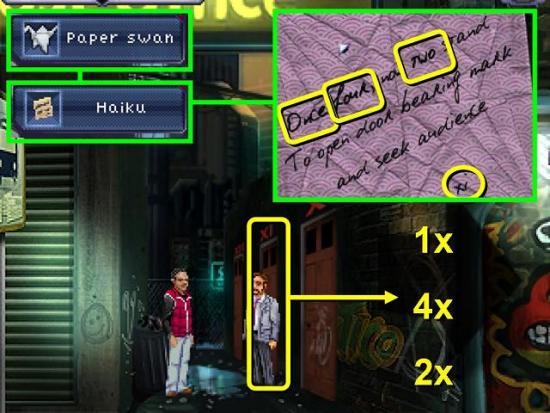
- Click on the paper swan in Bennet’s inventory
- Right click on the Haiku. It says “Once four, now two stand”
- Knock once, four times and twice on door XI (+2)
- You can go through all dialog options with either character. There are only two options where they differ, which are:
- After Amul introduces himself, switch to Ray and choose to talk about A. Batra. Enter his smartphone from your inventory (+3)
- Have Bennet choose to arrest them. Then show the security cam picture (+3)
- When you ask how to stop Ed, Amul will tell you the resonance devices were placed 4 km from the lab. Remember this
- At the end of the scene Ray will be given a drafting compass

- Back in the alley, switch to Ray and put the drafting compass on the subway map
- Click on the scale bar at the top and move the pencil to the 4 km mark
- Go back to the map and put the needle of the compass on the lab (+3)
- You can now travel to Ed’s apartment
Ed’s Apartment
- Click on the cabinet door and select “take all” to get your stuff back
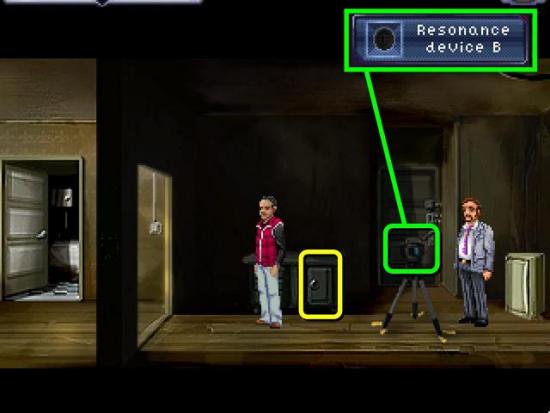
- Click on the “camera” on the tripod. Bennet will take it (+3)
- Switch to Bennet
- Click on resonance device B in the inventory
- Check text messages (+3)
- Switch to Ray
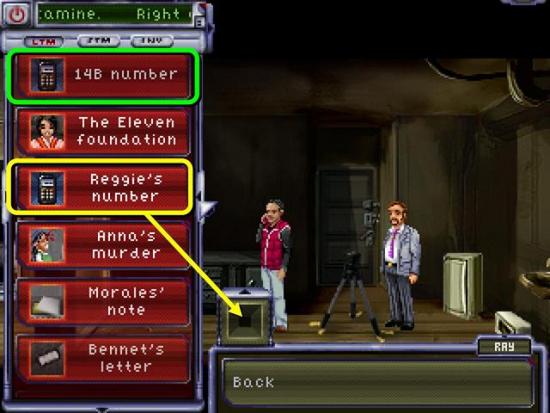
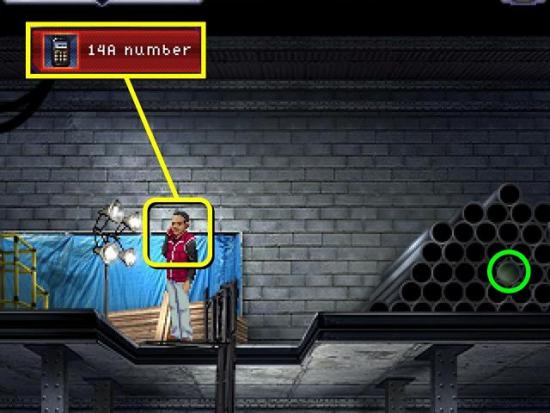
- Use the smart phone to call Reggie by selecting the LTM of Reggie’s number
- Ask him about either 14A or 14B (+1)
- You can now go back to the police administration
Police Administration
- Go to the police administration (+1)
- Go upstairs and left toward the archive

- Use Bennet’s credit card on the tech room door (+1)
- Go in
- Right click on the electronic lock to find out what its code is (random)
- Go back downstairs and access Officer Berry’s cool control panel

- Click on “manage” in the bottom left corner
- Type in the code you just found and click on the padlock (+3)
- Go back to the tech room and click on the lock to open the door
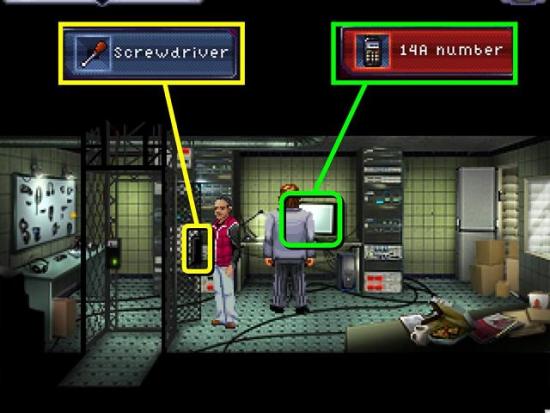
- Click on the terminal screen (+1)
- Trace 14A (+1)
- You now have a new location on your map
- Switch to Ray and use the screwdriver on the magnet on the open door to take the magnet (+1)
Warehouse
- Go to the warehouse
- Ray will get new mail
- Right click on the sticky note – the key is in Todd’s locker
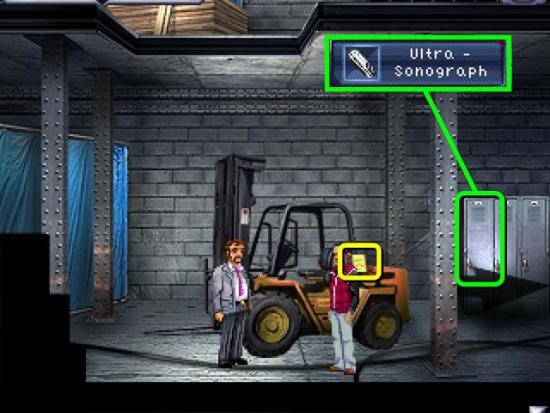
- Have Ray put the ultra sonograph on the locker on the left (+1)

- Put the small magnet on the locker
- Find the key and maneuver it to the ventilation grid at the top by first moving it up to take it out of the coat pocket, then down to get it out of the coat, then up past the locker handle. It’s quite tricky to get past the handle as there is limited space, but try to move the key to the left side of the magnet and in a vertical position. Then move it up and out of the slot at the top (+5)
- Use the forklift key on the forklift (+1)
- Position Ray on the forks of the forklift
- Switch to Bennet and access the forklift
- Move the green lever to the green slot, then push the red lever up until Ray can go no further
- Move the green lever to the blue slot, then push the red lever up until Ray is at the top
- Switch to Ray
- Call 14A (+1)
- Find resonance device A in the pipe that lights up when you call (+3). This is random, so it’ll likely be a different pipe than shown in the image above. Also, you won’t be able to find it until you’ve made the call
- Put Ray back on the forklift, switch to Bennet and reverse the procedure (pushing the red lever down)
- Switch back to Ray and click on resonance device A to find another cell phone
- Check text messages (+2)
Finding Ed
Police Administration
- Go back to the tech room at the police administration
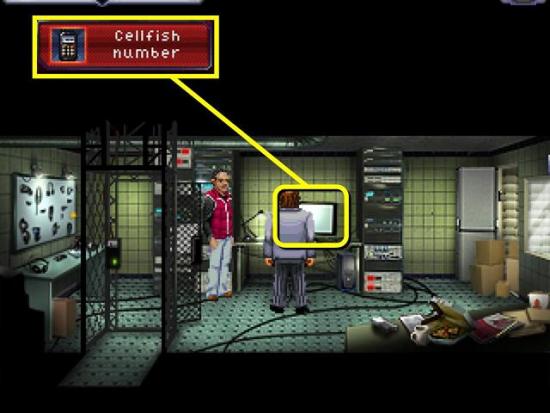
- Access the terminal and trace the Cellfish number
- Get some basic interrogation advice (“What do I say?” option)
- Choose “I’m calling him right now”
- You now need to push Ed’s buttons just right until he starts talking long enough for Bennet to trace his number. Whatever you do, do not threaten his life or tell him you’re on his tail. You may be able to choose other options than the ones I did, but the following sequence works:
- 1. Be aggressive
- 2. Tell him he betrayed you
- 3. Threaten to write about him
- 4. Ed should say “I’m not a bad guy”. When he does, change to “go interrogative”
- 5. Ask why he did it
- 6. Ed will mention Amul and Reno. So ask about them
- Ed will now start talking and Bennet will trace his number
- When Ray is talking to Bennet, talk about the DNA database (LTM) (+2)
Hospital
- Go into the hospital and to level 7
- Have Ray talk to Emma about the mainframe or the LTM of the DNA database (they have the same result) (+3)
- Go to the basement
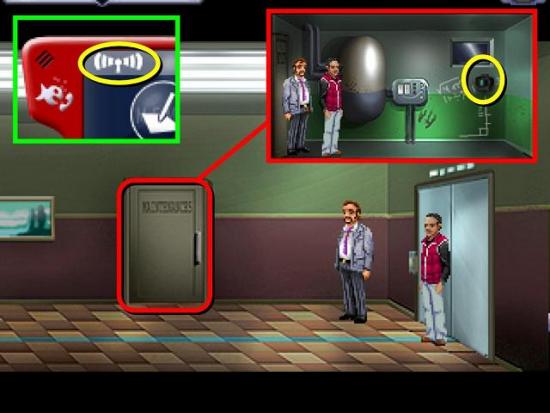
- The resonance device is behind one of the maintenance doors, but the location is random. If you just start kicking in doors at random, you will eventually be caught by security. Have Ray stand in front of each of the doors in turn and then check his smartphone. By one of the doors he will get a full signal – that’s the door you want to kick in (+1)
- When you find the device, take it (+1)
- Exit the hospital
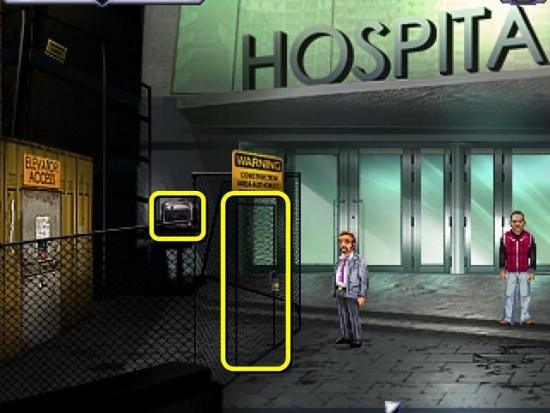
- Open the wire gate
- Watch the TV (+2)
- You can now choose between two endings, each of which gives a different achievement
“The New World Order” Ending
- You need to maneuver Ed so he is exactly in between the two resonance devices – one of which is held by Ray, the other is on the railing by the door
- You only have about six turns to do this before the devices go off
- You can choose the “look around” option or switch between Ray and Bennet at any time without using up a turn. Only asking Ed a question counts as a turn
- You can ask any question you like, including from your LTM. But whatever you do, do not challenge Ed to shoot you, because he will
- You will get two points after Ed activates the devices (+2)

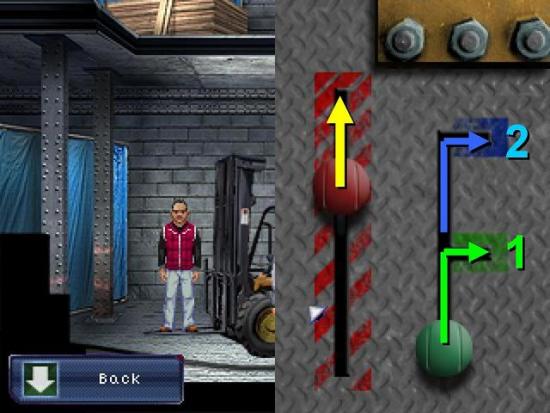
- To get Ed in the right position, have Ray as a question and then take one step back
- Then switch to Bennet and have him take three steps forward so Ed is standing on the metal bar between the yellow and white plates, as in the image above
- After three steps forward Ed will threaten to shoot you if you take another one, and this is not an empty threat! So three steps and no more, then keep him talking until the devices go off
- When Ray and Bennet are in the baseball fields you can choose to publish or delete Ray’s story. It doesn’t matter which you choose; you will only get different newspaper headlines during the credits
“Lesser of Two Evils” Ending
- For this ending you need to get Ray convinced that Ed is doing the right thing. Again, you only have a limited number of question to achieve this before the devices go off
- To get this ending, have Ray do the talking and choose the following options:
- 1. Then educate me about Antevorta
- 2. You’re a sociopath
- 3. How do we stop them?
- 4. Choose “show him the device in your pocket”, but don’t actually select the device from your inventory
- 5. When the only dialog option is “No. I won’t betray Bennet” select the LTM of the news report
- For each ending you will get an additional 20 points
Achievements
There are 38 achievements you can collect throughout the game. However, it is impossible to get all achievements in one game, so you will have to play multiple times.
If you go back to a saved game you will go back to the achievements you had at that point in the game, so you will lose any achievements you gained after that. This also means you will need to play the entire game twice to get both endings – you can’t just go back to the autosave and then play the alternative ending.
When you start a new game, the game will remember the achievements you had at the moment you quit the last game you played. So make sure the last game you played was at your most advanced point in the game before you start a new one and not an earlier save.
- That Went Well – Talk to Anna on the subway
- Mirror Master – Look into the alleyway with the mirror in the newspaper
- Gotta Hide – Escape the nightmare
- Get the Scoop – Figure out what Antevorta is for
- Just Because – Send Emma’s draft email to her boss
- “That” Guy – Go through all dialog options before giving Anna back her lucky coin on the subway
- Duo – Control two characters
- Teamwork – Solve the water leak problem in the lab with Ed and Bennet
- Savior – Get Dr. Morales out of the simulator
- Cut the Rope – Don’t skip the rope cutting puzzle on the rooftop
- Good Listener – Listen to Saul’s whole story without interrupting him
- No Smoking – Find the no smoking sign in the lab
- Wired – Repair the lab door circuit
- Angel – Open Morales’ journal without damaging it, using Anna’s date of birth
- Dream Master – Find all memories in Anna’s dream
- Quartet – Control four characters
- Blueprint Snatcher – Get the blueprints from the archives
- See the Wizard – Find Morales’ financial information
- Magnetic Personality – Get everyone through the supercollider
- Access Granted – Get access to the inner vault
- I Promise You – Find the key phrase to the vault computer
- Safecracker – Crack Tortoise’s safe
- Blackmailer – Blackmail Tortoise into helping you
- Archive Master – Get the blueprints out of the archives on your first try, meaning you can only calibrate the archive once
- Hippocrates – Keep Anna’s professional integrity in tact
- Close to Heart – Find out Detective Bennet’s secret by choosing the correct dialog options in the scene after Ed shoots Anna
- Finding North – Use the compass to find a new location on the map
- Key Nabber – Get the key out of the locker without opening it
- Phone Tracer – Keep Ed talking long enough to trace his Cellfish number
- Map Master – Find a new location on the map without using any fancy technology
- Lesser of Two Evils – Side with Ed at the top of the crane to stop the Eleven Foundation
- The New World Order – Kill Ed at the top of the crane
- Independent – Play the entire game without asking a character for tips
- Listen to Us – Play the entire game with commentary mode running. As soon as you get access to the menu bar at the top, go to the main menu and select “show bloopers”. At various places in the game you will see green buttons with a B on it. Click on these buttons to get outtakes from the voice actors
- High Score – Get the full score of 340
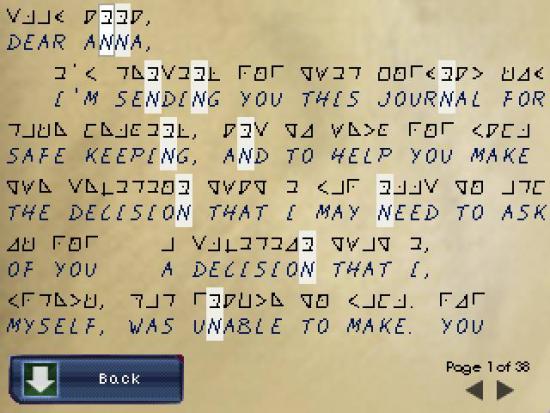
- Decoder Ring – Decode Morales’ journal. Watch Anna’s memory of the “cypher” (sic) for a clue on how to solve the code, then select the journal from her inventory. Click on any symbol to highlight it and all symbols like it and enter the letter you think it is, based on the cipher and letter patterns. The complete cipher is shown in the image below. Note that there are two symbols each for A, E, O and T. Do the whole journal. Don’t worry, 38 pages may seem a lot, but after you’ve done the first two pages only a few letters will be left to fill in

- Safe Seer – Open the safe without using the sonograph. You won’t get the three points for the sonograph
- Quick Escape – Escape baby Anna’s nightmare without locking the door. To get this achievement you will miss out on the points you get for locking the door and finding the code on Señor Bear.
Immediately open the chest with code 591. Don’t make any mistakes when entering the code. In particular, click the down arrow only once for 9 and the up arrow once for 1. As soon as you have the treasure, hide under the bed. Anna should be under the bed when she says “Wait, I didn’t lock the door,” or you won’t make it.
Under the bed, quickly watch the memory of Uncle Javi. At this point the monster will open the door and enter the room. Click on the treasure in your inventory to get the peso, then use the peso on the air vent before the monster looks under the bed.

More articles...
-
Best Horror Games On Itch.io – July 2026
Across a bounty of subgenres. -
Grow A Garden 2 Base Price List
What's the most valuable crop? -
Evomon Best Starter [Leafbun, Blazpup, or Bubble?]
Grass-type, Fire-type, or Water-type?