![Digimon UP Tier List [Supports, Buddies, and Partners]](/wp-content/uploads/2026/07/digimon-up-tier-list.jpg "Digimon UP Tier List [Supports, Buddies, and Partners]")
Digimon UP Tier List [Supports, Buddies, and Partners]
These Digimon will get you UP the leaderboard.


![Haze Seas Boss Drops [Chances, Locations, and How to Spawn]](/wp-content/uploads/2026/07/haze-seas-boss-drops.jpg "Haze Seas Boss Drops [Chances, Locations, and How to Spawn]")

Welcome to Gamezebo's strategy guide for REO Speedwagon: Find Your Own Way Home.In Find Your Own Way Home, you play as entertainment news reporter Ruby Easton. For several weeks now, Ruby has been on assignment with the infamous rock band REO Speedwagon and the night for the band's new album release party has finally arrived. But nothing is ever straightforward as Ruby soon finds out. She stumbles across numerous problems as she prepares for the big event and then to top it all off, K…
a:1:i:0;a:2:s:13:”section_title”;s:50:”REO Speedwagon: Find Your Own Way Home Walkthrough”;s:12:”section_body”;s:49042:”Welcome to Gamezebo’s strategy guide for REO Speedwagon: Find Your Own Way Home.

In Find Your Own Way Home, you play as entertainment news reporter Ruby Easton. For several weeks now, Ruby has been on assignment with the infamous rock band REO Speedwagon and the night for the band’s new album release party has finally arrived. But nothing is ever straightforward as Ruby soon finds out. She stumbles across numerous problems as she prepares for the big event and then to top it all off, Kevin Cronin, the band’s lead vocalist goes missing. It is now up to you to use your hidden object and puzzling solving skills to find Kevin and save the big release party from becoming a bust.
TIPS & TRICKS
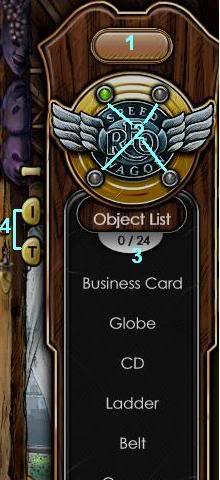
1. This houses the countdown timer if you’re playing the game in timed mode.
2. Click here to use one of your four powers which can help your solve your current puzzle or task:
3. This section helps keep track of how many objects are hidden on a level as well as how many you have uncovered so far.
4. The ‘I’ and ‘T’ buttons represent your Inventory and Tasks lists.
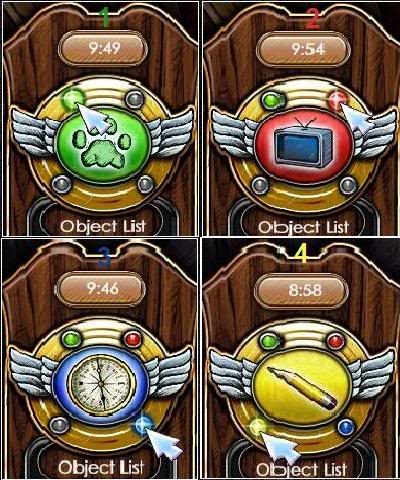
1. ‘Hint Power’: highlights the topmost hidden object on the list.
2. ‘Power Monitor’ (good for 10 seconds): shows what the topmost object on the list looks like.
3. ‘Compass’ (also only good for 10 seconds): changes the cursor to a compass needle, which points you to and only will turn green when you’ve found the nearest object.
4. ‘Ruby’s Pencil’: crosses out items on your list so that you don’t have to find them.
As you would guess, the following walkthrough contains spoilers…
WALKTHROUGH GUIDE
CHAPTER 1: STRANGE MESSAGES
Level 1 (Ruby)
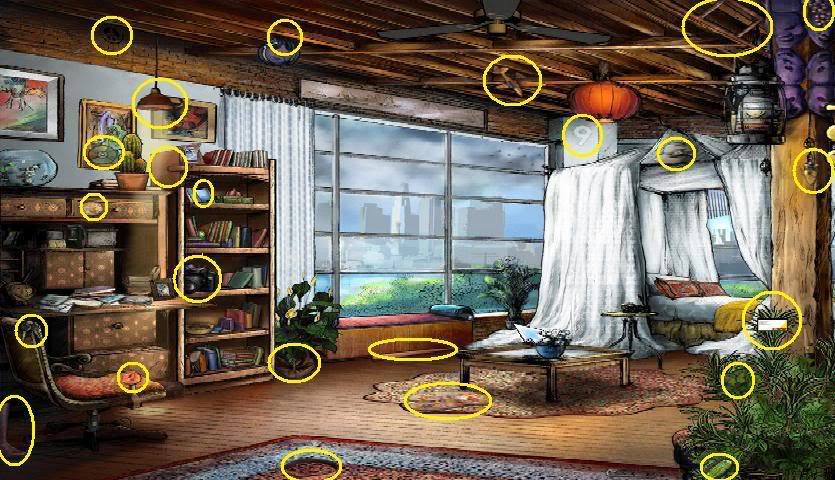
Find the 24 items hidden throughout Ruby’s bedroom.
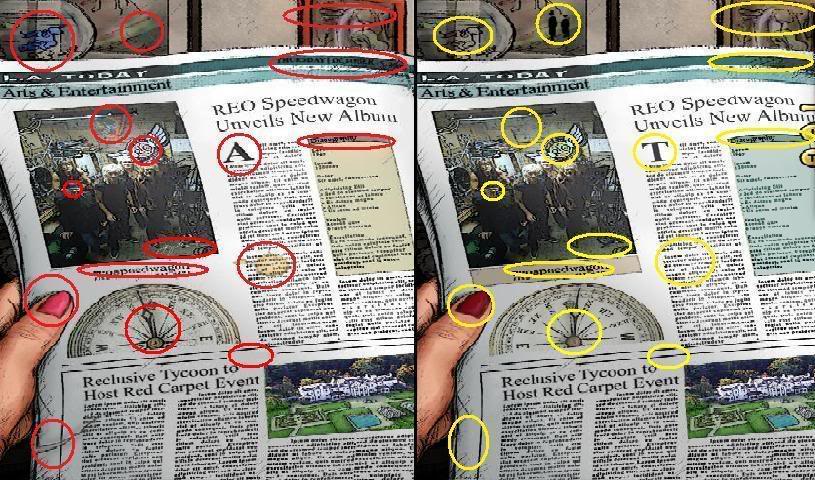
LEVEL 2A (Party Tonight)
Find the 16 differences between the two photos.
LEVEL 2B (Looks Like Rain)
Complete the following tasks to complete the level:
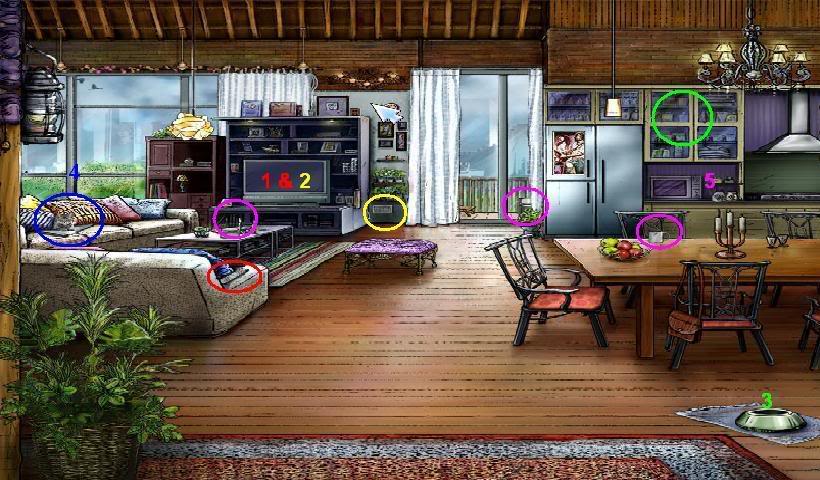
1. Find the remote to turn the TV on.
2. Look to the side where the electrical outlet is. Plug the TV back in and then try the TV again.
3. Take the cat food from the cabinet and refill Dennis’s food bowl to get him off of your laptop.
4. Now that Dennis is gone, take your laptop.
5. Find the coffee maker, coffeepot (jar) and a coffee mug and set them in their assigned places.
LEVEL 3A (Inspiration)
Using the dates that are either time-stamped, written, or featured in the snapshots, place all 15 pictures in chronological order (see below).

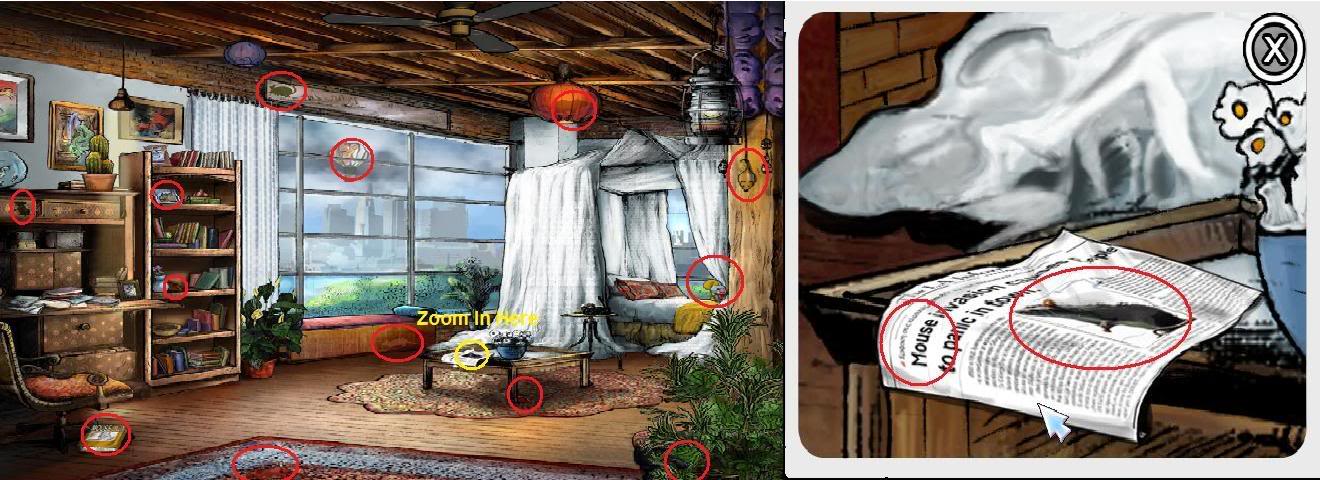
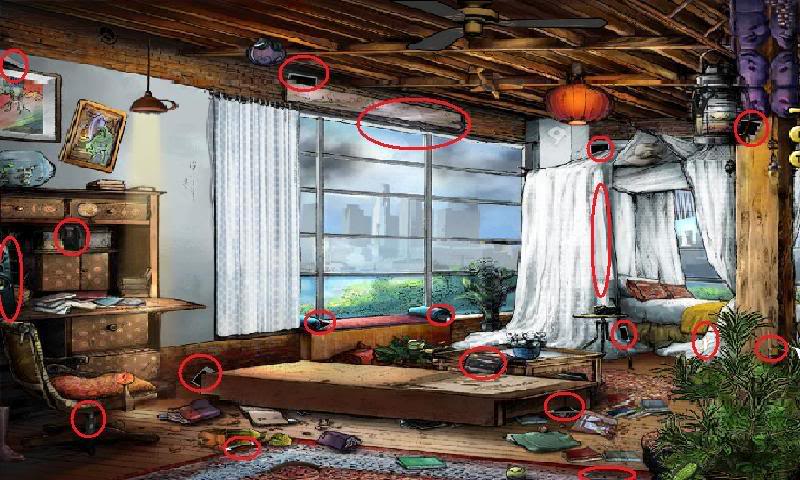
LEVEL 3B (Eek!)
Find all 15 ‘mice’ hidden throughout the bedroom.
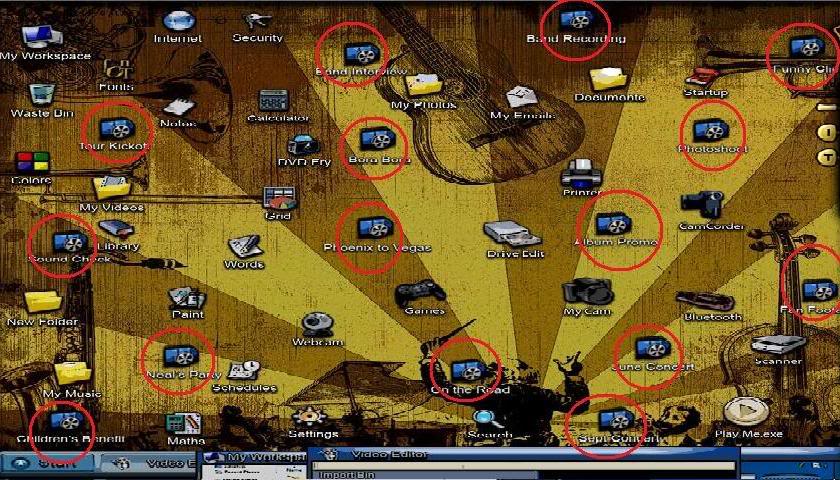
LEVEL 4A (Tour Footage)
Find the 15 pieces of footage in the correct order listed.
*NOTE*: To see all of the desktop icons on Ruby’s laptop, you’ll need to drag the opened windows out of the way to the bottom of the screen (see below).
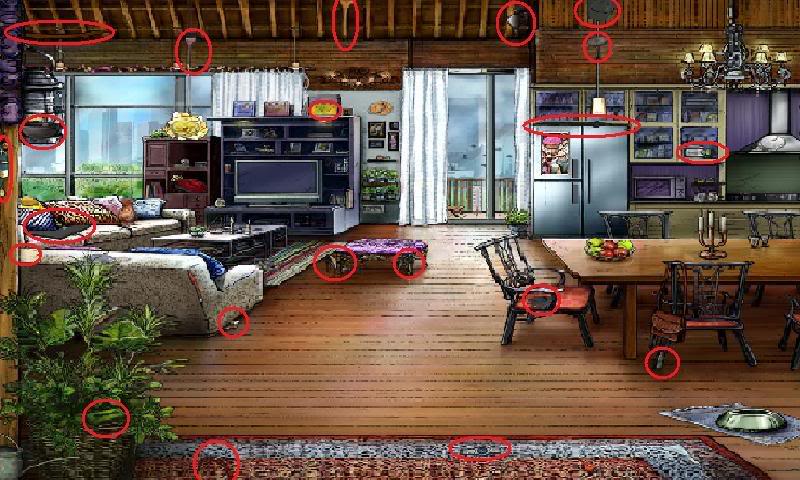
LEVEL 4B (Jam In The Kitchen)
Find 20 objects throughout the apartment that either make music or sound. And no, the television does NOT count.
LEVEL 4C (Bumbling Biff)
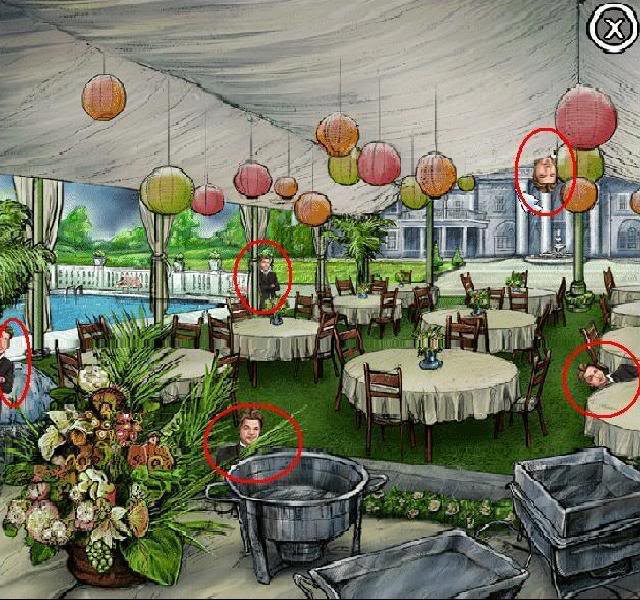
Find Biff, Ruby’s problematic co-worker, who is hidden 25 times throughout 5 different locations:
LEVEL 5A (Day Dreaming)
Take pictures in the scene below so that it matches the photos in your object list. The picture below shows where you should aim or move your camera to take the needed shots.
*NOTE*: You’ll know when you have the subject framed just right in your camera view because your shot turns white.
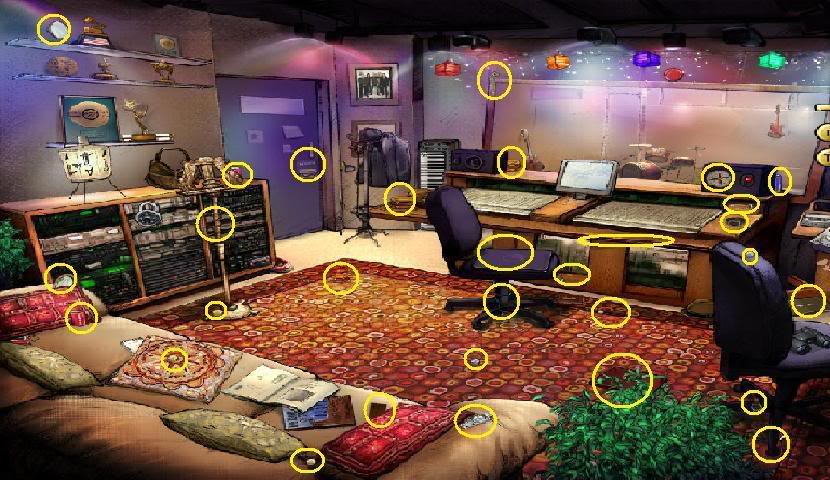
LEVEL 5B (Back To Work)
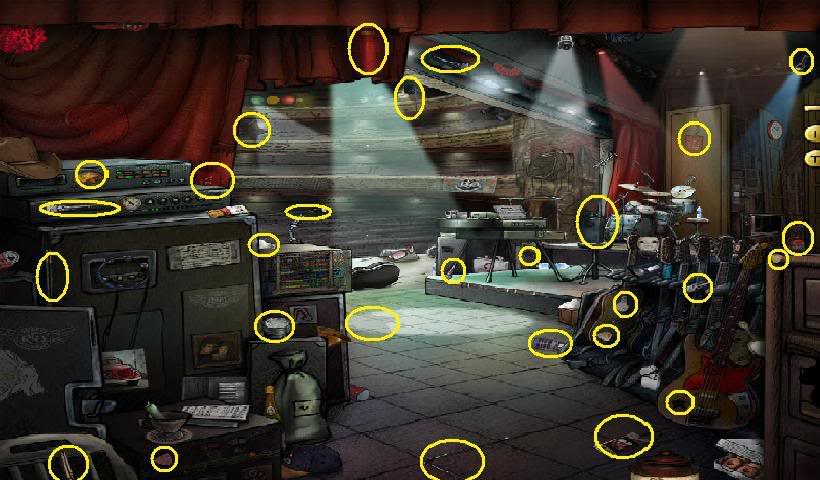
Find all 30 items from your object list that are scattered throughout the recording studio.
LEVEL 6A (Bryan’s Challenge)
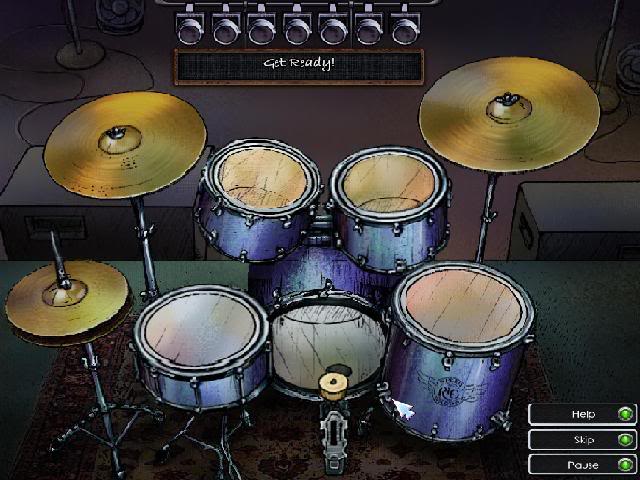
The first of the game’s several mini-games. Repeat the music sequences played by clicking on the drums in the correct order.
*NOTE*: The drumming sequences are always at random and if you reset this challenge or choose to play it again in the future, the drums and the order they’re played in will be switched. If memory games aren’t your forte, it’s best to write down the sequences as they are played and then mimic them.
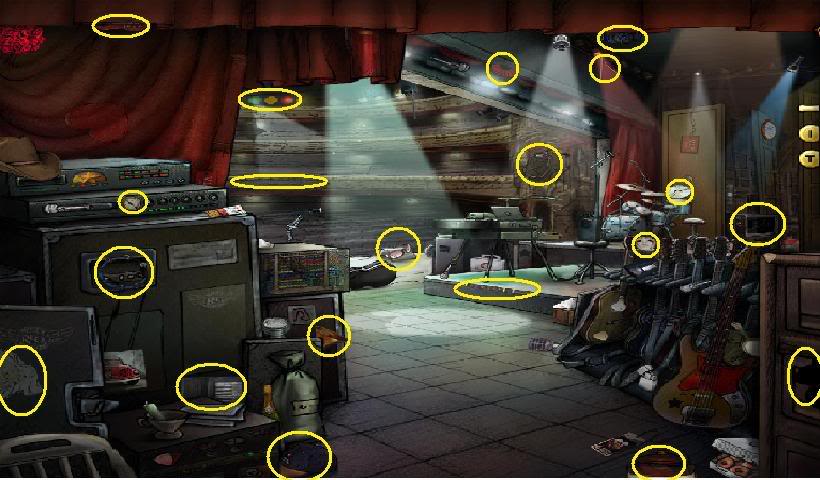
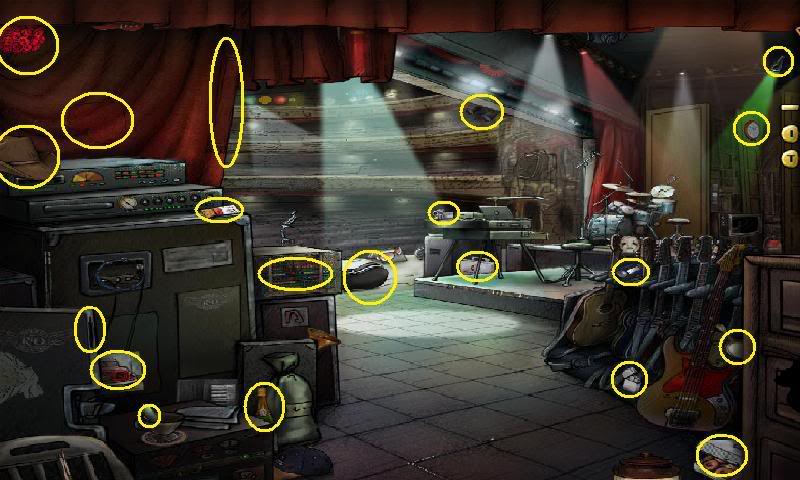
LEVEL 6B (Onstage)
1. Flip the switch (see below) to make your scavenger hunt a lot easier.

2. Find the 20 items hidden throughout backstage:
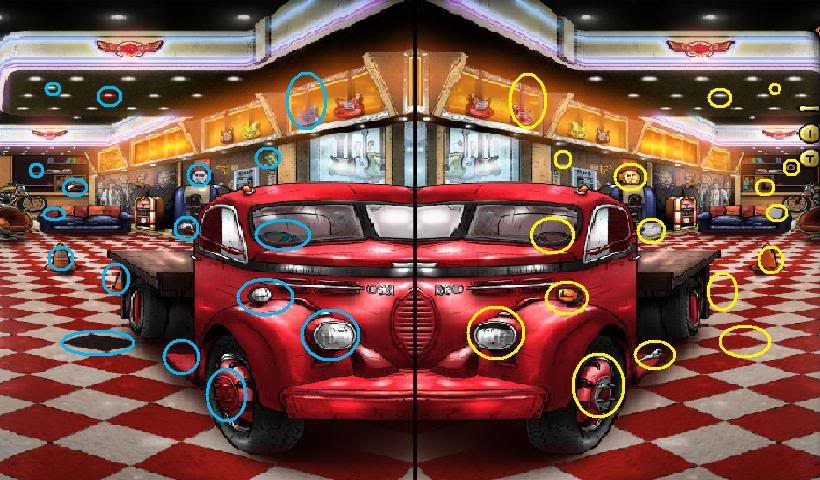
LEVEL 7A (Speedwagon)
Another ‘find the differences’ puzzle. Find the 17 differences between the two photos:
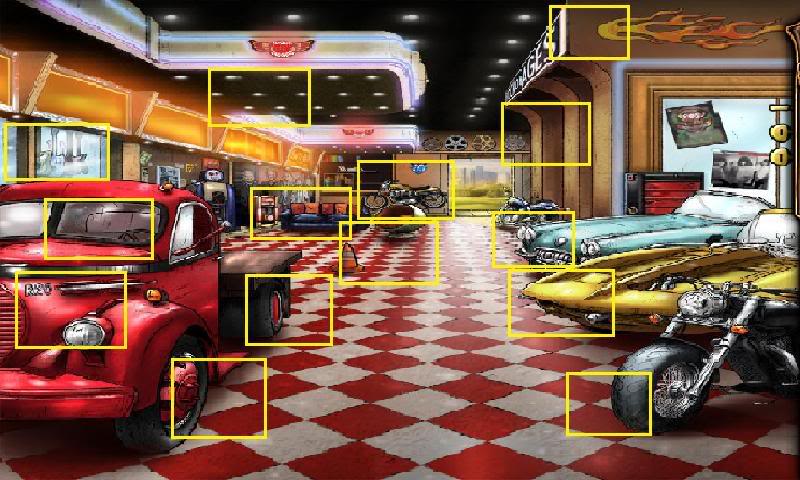
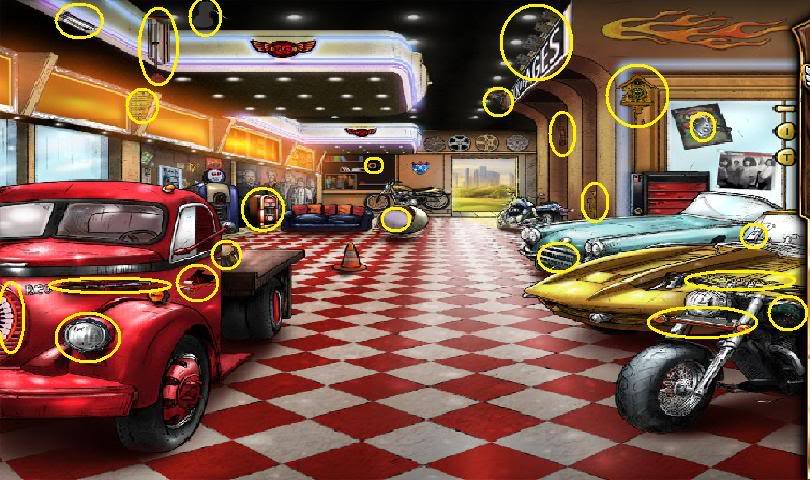
LEVEL 7B (Dave’s Garage)
Complete the following tasks to complete the puzzle:
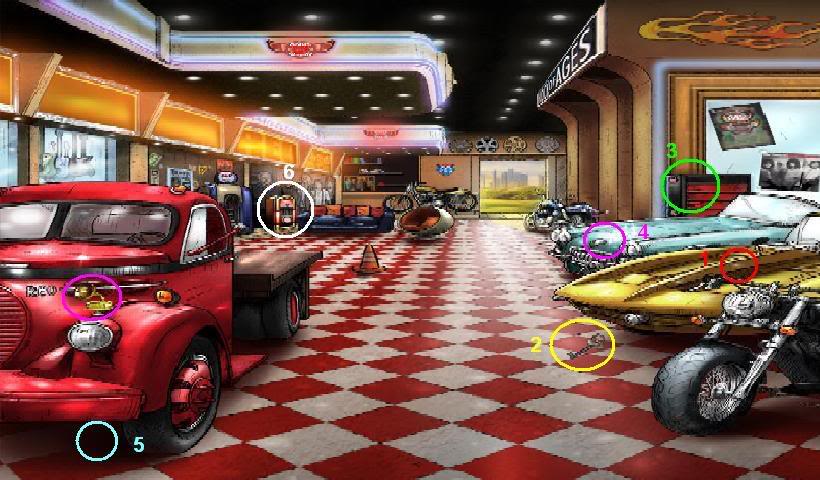
1. Try to start up the yellow corvette.
2. Grab the key from off the floor just in front of the corvette.
3. Unlock the cabinet and take the wrench from inside.
4. Grab the golden hood ornament from the hood of the red truck and attach it to the back of the blue car. Tighten the hood ornament with the wrench you just found.
5. Grab the key from inside the hood of the blue car and start up the yellow corvette. A coin will now ‘magically’ appear under the red truck.
6. Take the coin and place it into the jukebox.
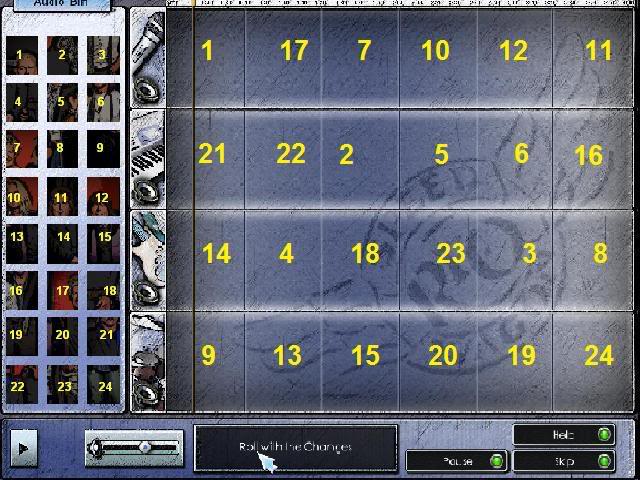
LEVEL 7C (Roll With The Changes)
Place the pictures on the left in the right order so that they combine to make a large portrait of REO Speedwagon:
LEVEL 8A (Playing A Round)
Another photo shoot puzzle. Take pictures in the scene below so that it matches the photos in your object list.
LEVEL 8B (Check 1,2,3)
Find the 28 objects hidden onscreen.
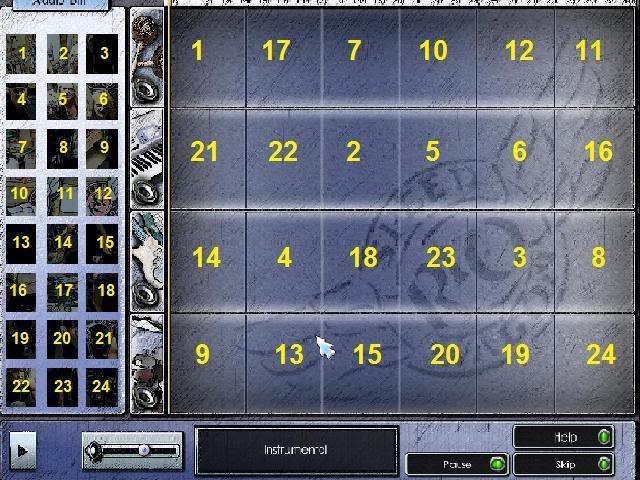
LEVEL 9A (Studio Mix)
Yet another hidden object puzzle, but this time around, there’s a twist. All of the names of the objects on the list are either blurred or mirror imaged (written in reverse).
1. Take the mirror to be able to read the items that are ‘mirror imaged’ on the list.
2. Take the binoculars to read the blurred items on the list.
3. Find the remaining 19 objects to complete the sublevel.
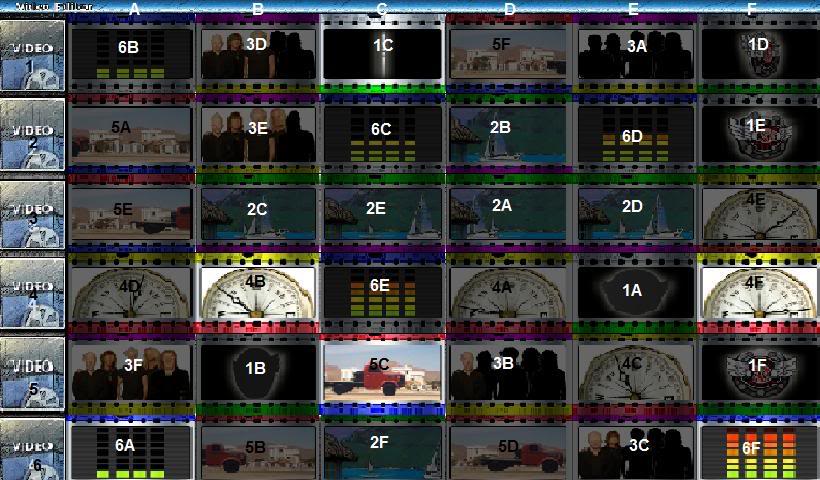
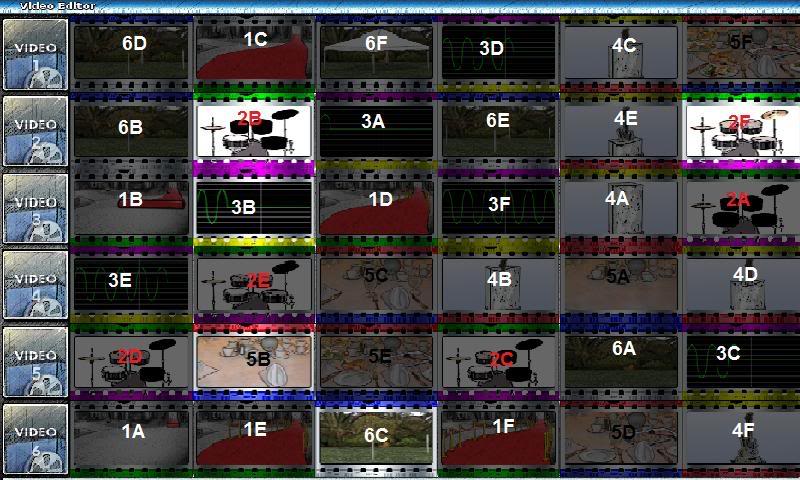
LEVEL 9B (Final Cut)
Based on content, place the clips for each video together so that they are in the right order.
*NOTE*: The video clips will become brighter when they are placed in the right order and each video (1-6) has 6 video clips (A-F)
LEVEL 10A (Out The Door)
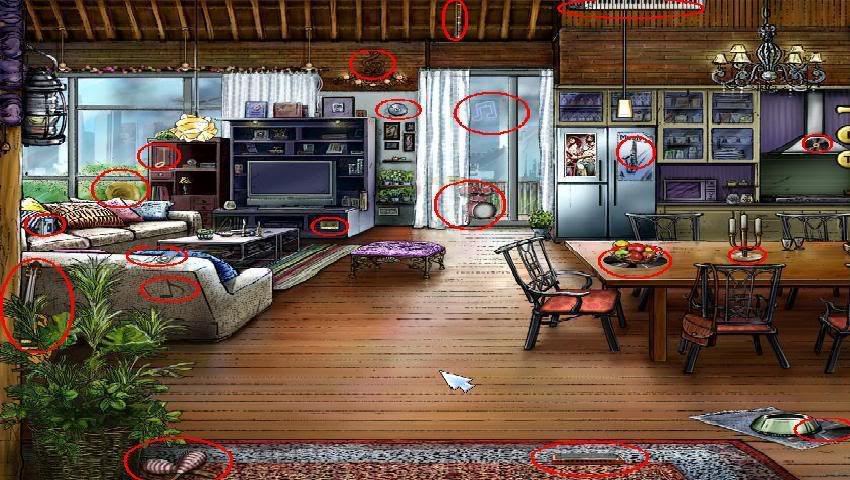
Find the 20 objects hidden throughout Ruby’s apartment.

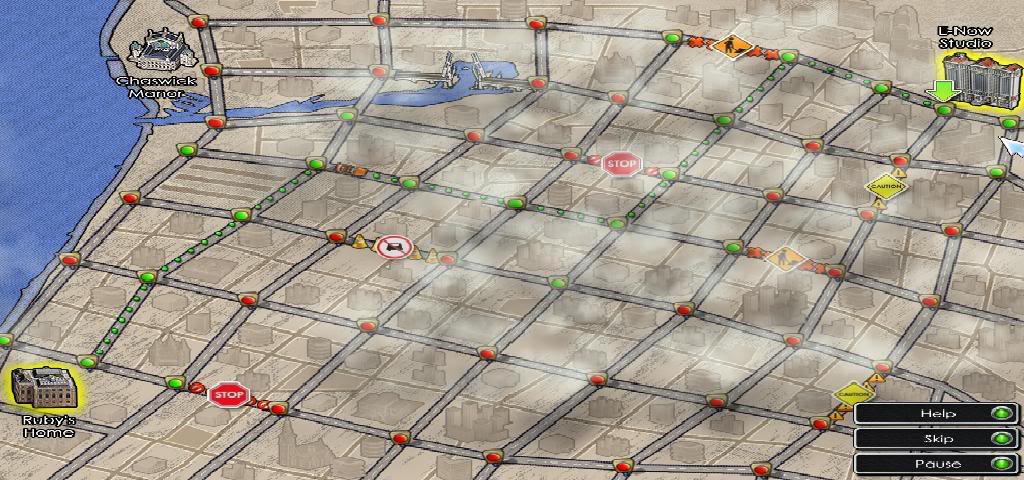
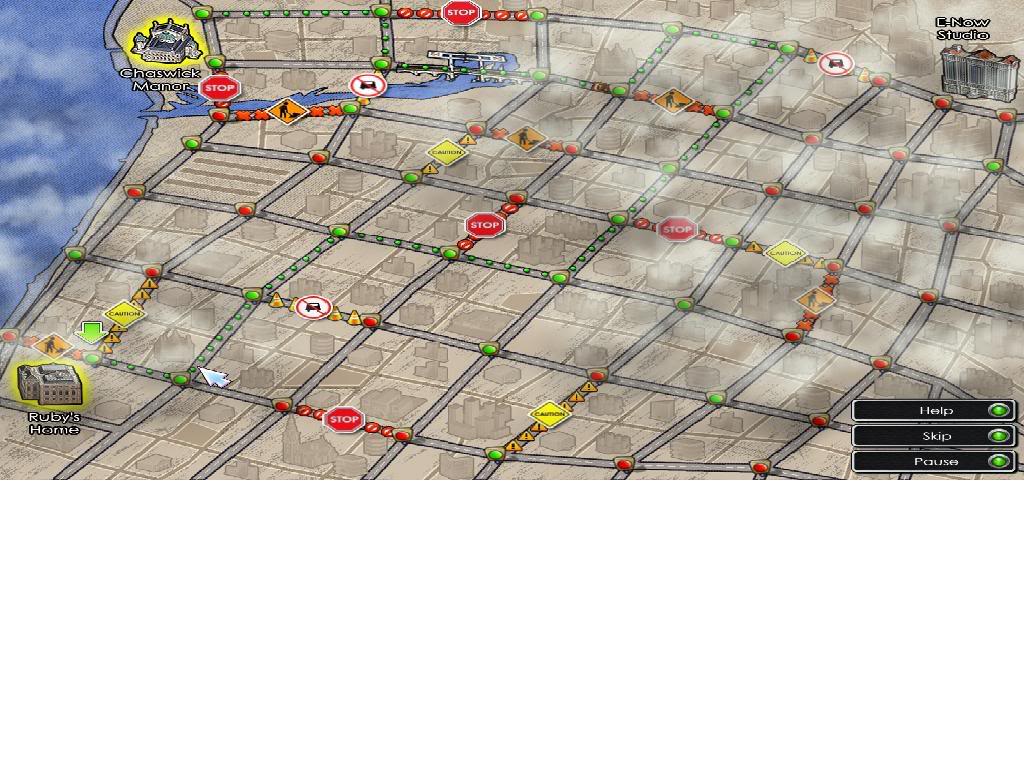
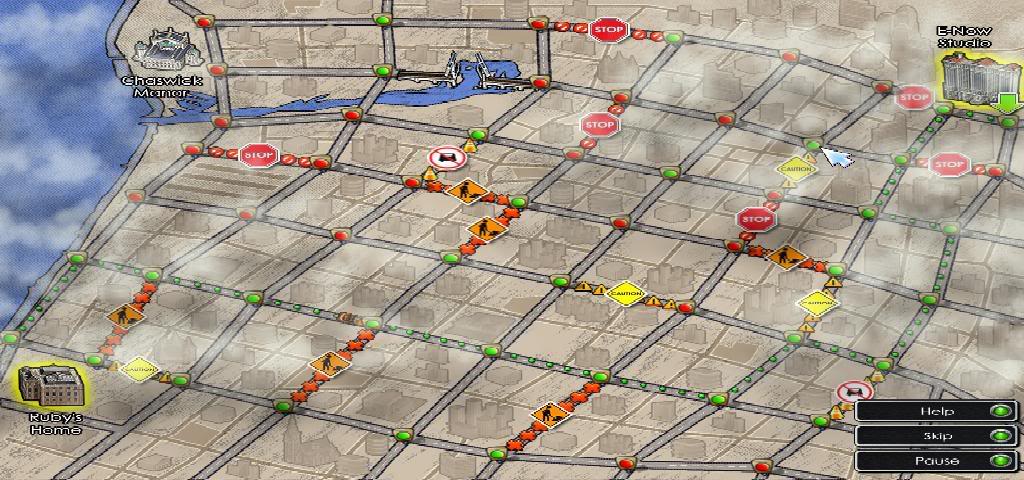
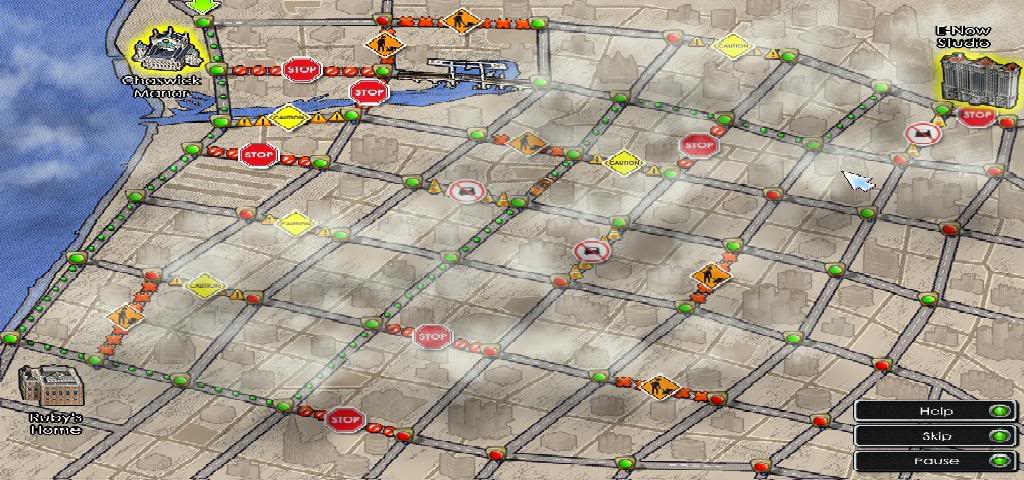
LEVEL 10B (Rush Hour)
Navigate the busy streets of Los Angeles, and help Ruby find her way from her apartment loft to her office (ENow Studio). Turn red lights into green lights and avoid any road blocks. There are several different ways to approach this kind of puzzle as long as you keep in mind that with each light that you change, the lights adjacent to them will be affected as well. Pictured below for instance is one route used to get to the studio:
CHAPTER 2: WHERE’S KEVIN?
Level 11
Complete the following tasks to complete the level:
1. Grab Ruby’s keyboard and access any damage Biff may have given it.
2. Find the four missing keys from the keyboard.
3. Lay the keyboard on top of the news desk and then reassemble it.
4. Now for some payback. Grab the pepper spray from off the floor here and head into the dressing room area.
5. Take the label off of Biff’s breath spray. Set the pepper spray on the stand and then affix the breath spray label onto the pepper spray.
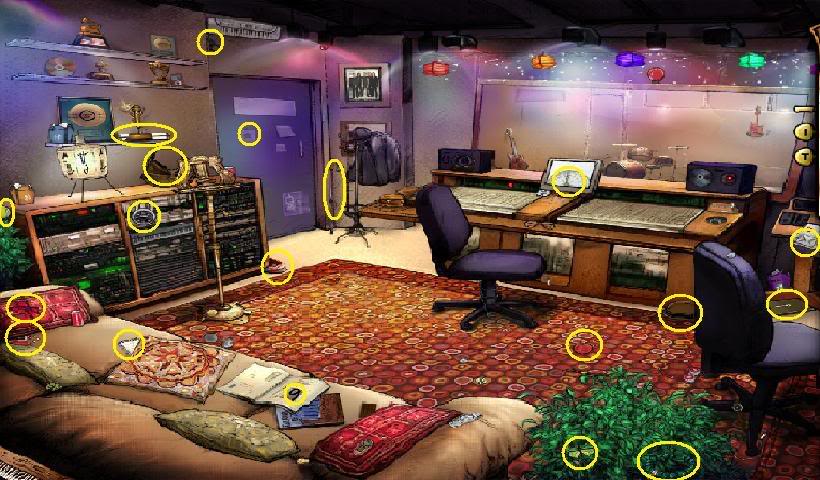
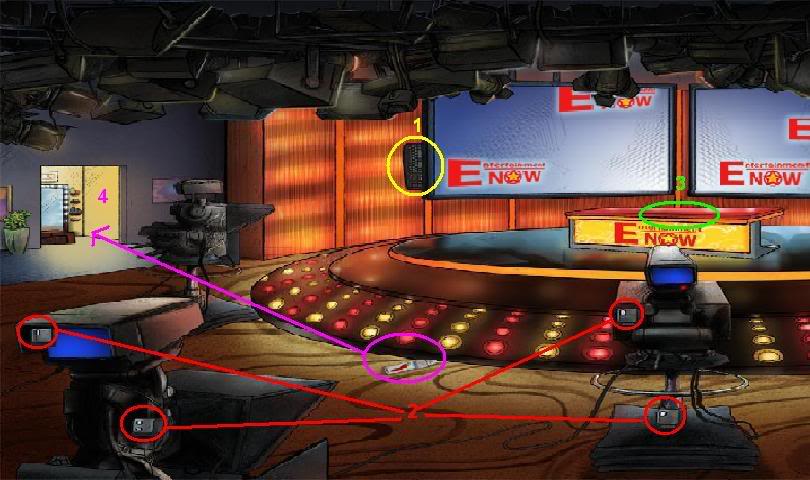
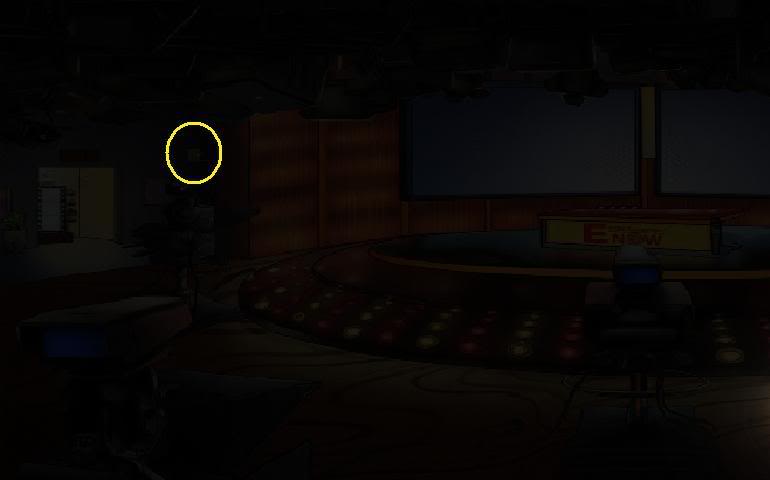
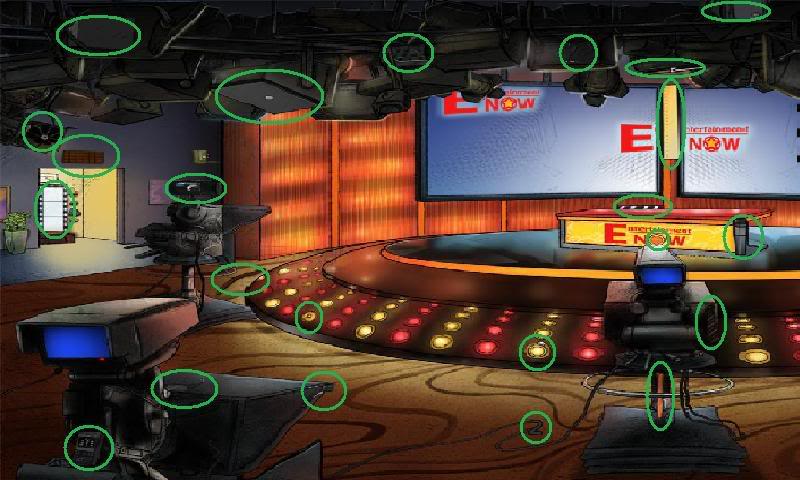
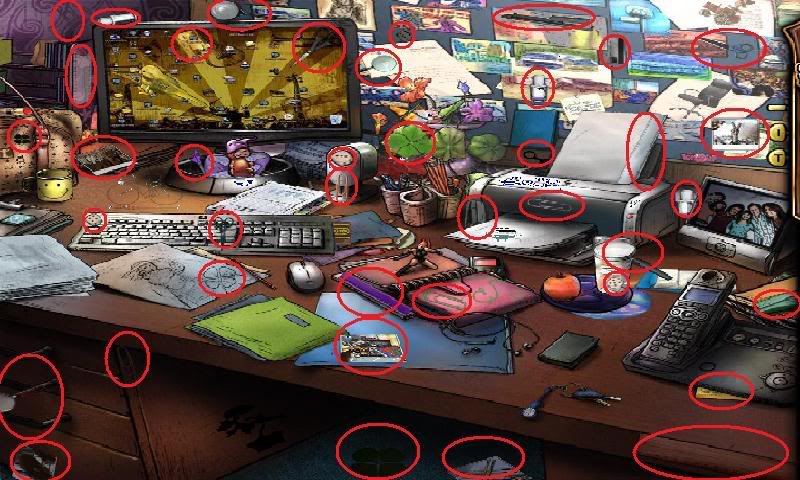
LEVEL 12A (Entertainment Now)
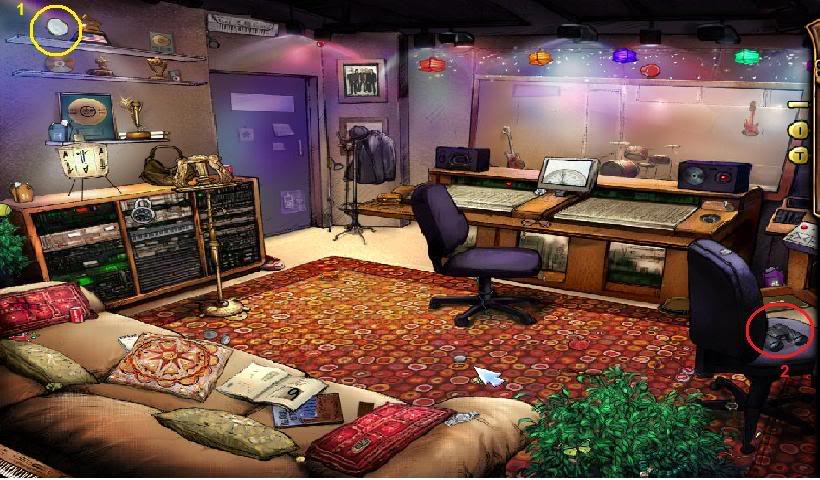
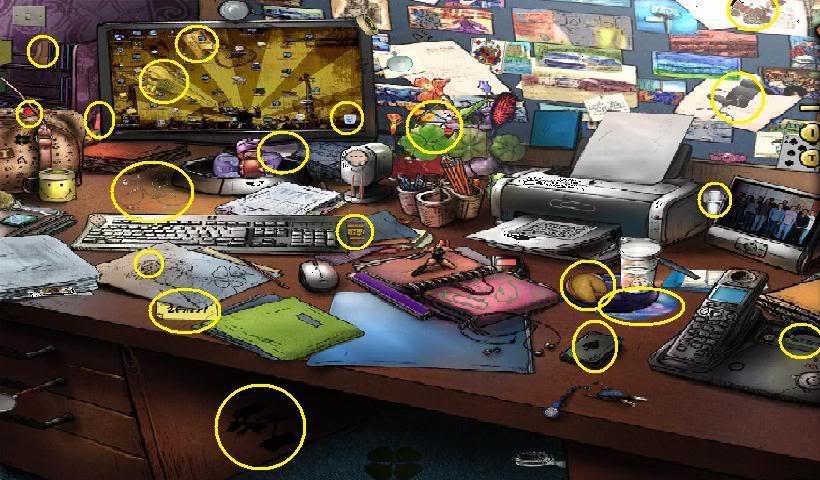
1. Turn the light on in Ruby’s office.
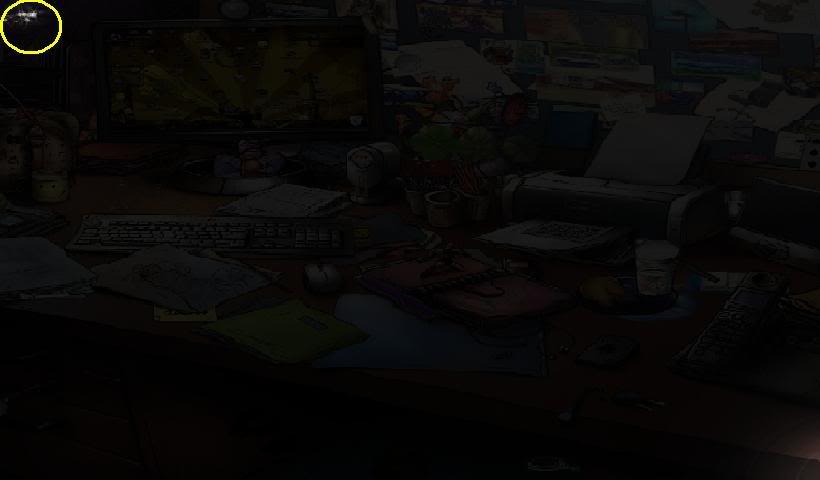
2. Find the 20 objects scattered throughout Ruby’s workspace.
LEVEL 12B (Take Five)

In this mini-game, simply pop the colored bubbles when they are floating over the bucket of the matching color. The goal is to fill all 4 buckets to the top. Careful though, because if you pop a bubble whose color is different than the bucket it’s over, or if you take too long to fill up a bucket, it’ll slowly deplete.
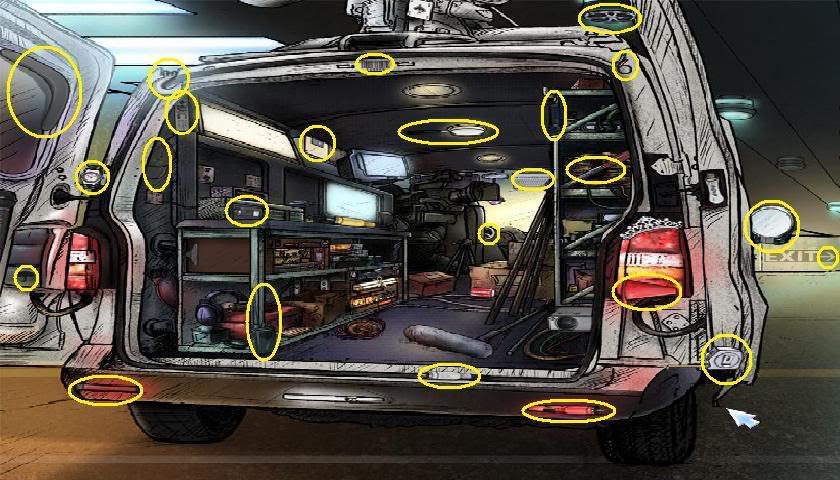
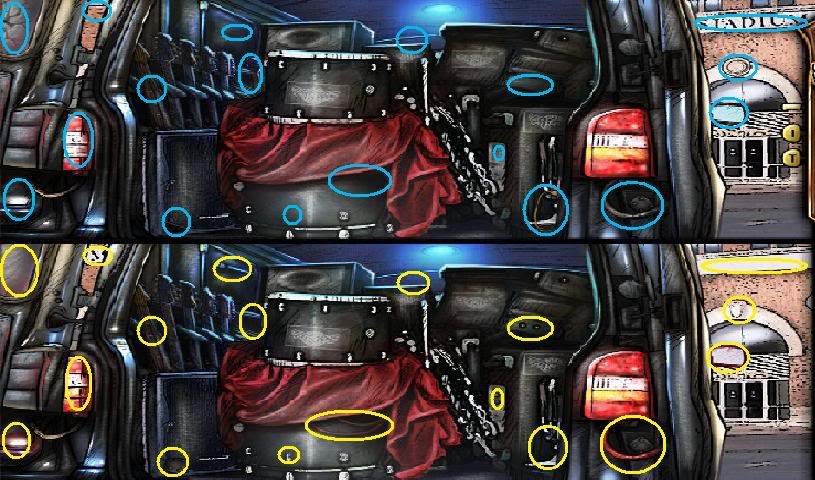
LEVEL 13A (Not Again!)
Find the 24 objects hidden both in and outside of the news truck.
LEVEL 13B (Run Away Baby)
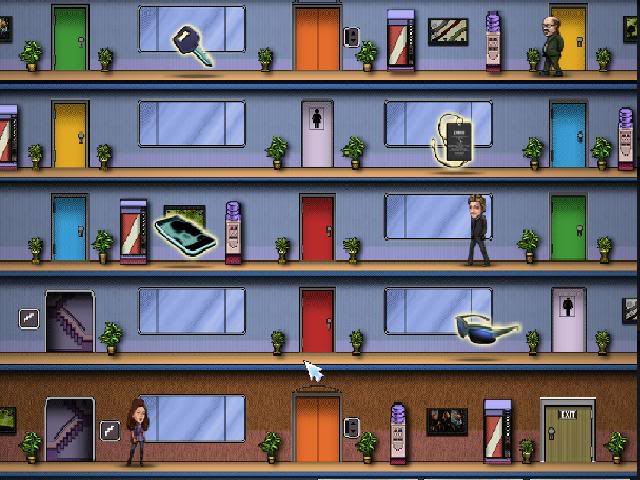
In this new mini-game, you have to collect all of the highlighted onscreen objects and make your way back outside without getting caught by either Biff or Ruby’s boss, Marvin. Use the stairs, elevators and door to move throughout the building, and if things are getting dangerous, duck into the ladies’ room for cover!
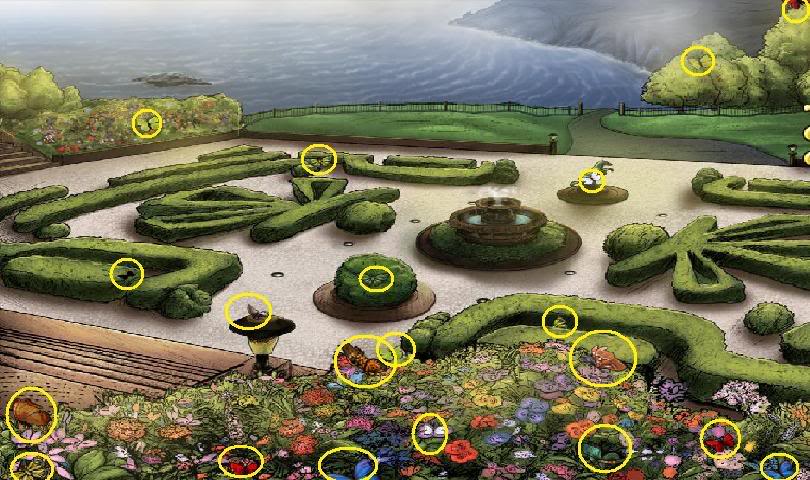
LEVEL 14A (Butterflies)
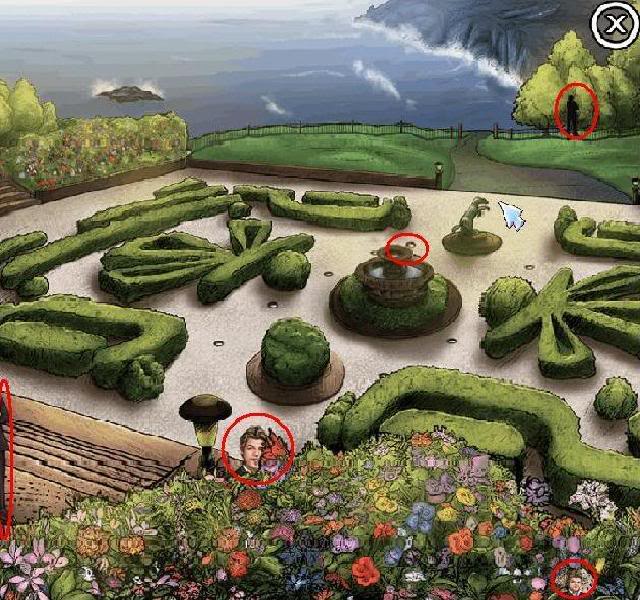
As the level’s name implies, you must find butterflies hidden throughout the garden – 20 of them to be exact:
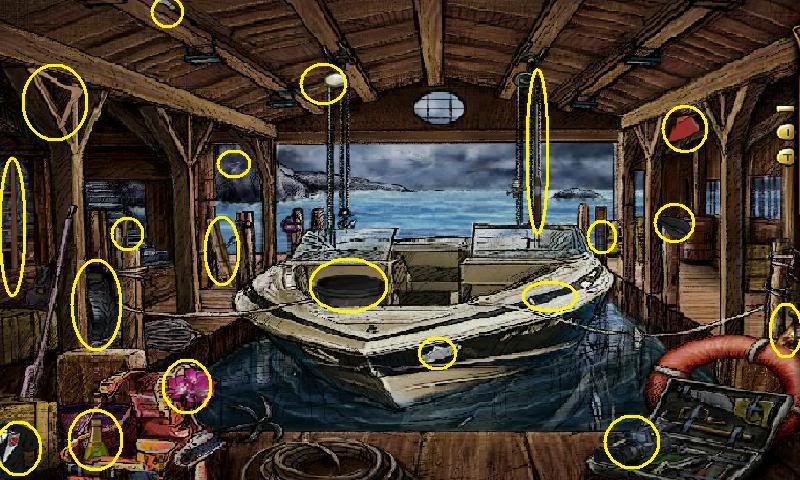
LEVEL 14B (Handsome Stranger)
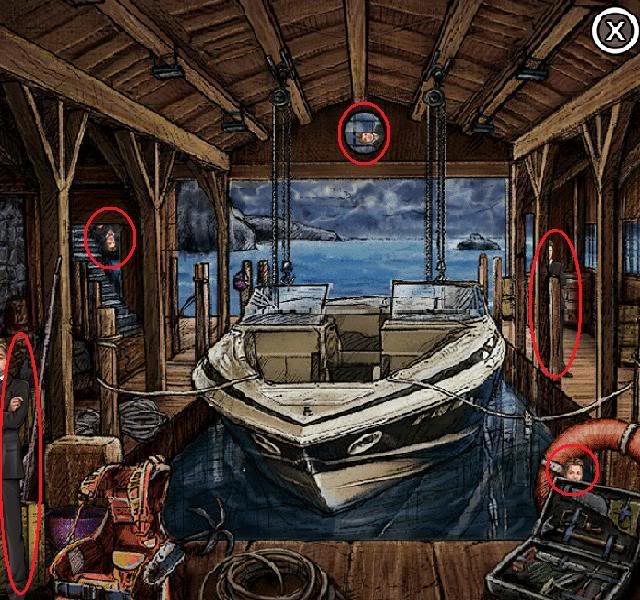
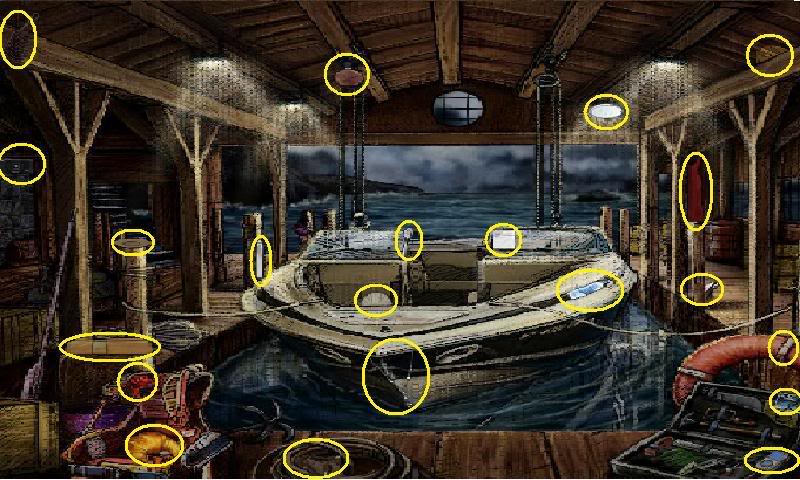
Find the 20 objects from the list hidden throughout the boathouse.
LEVEL 14C (Wheels And Strings)
Yet another photo shoot puzzle. Snap the same shots as depicted in your object list.
LEVEL 15A (All Geared Up)
Yet another ‘find the differences’ puzzle. This time, there are 18 differences between the two photos.
LEVEL 15B (Bit By Bit)
Another ‘audio edit’ puzzle. Place the pictures on the left in the right order so that they combine to make a large portrait of REO Speedwagon:
LEVEL 15C (Neal Plugging In)
Yet another hidden object puzzle – with a twist. As you did before, make haste finding the mirror and the binoculars so that you can clearly see the blurred or mirror imaged names of the remaining 18 objects on your list.
LEVEL 16A (Prelude)
Find 27 objects throughout the recording studio that either make music or sound.

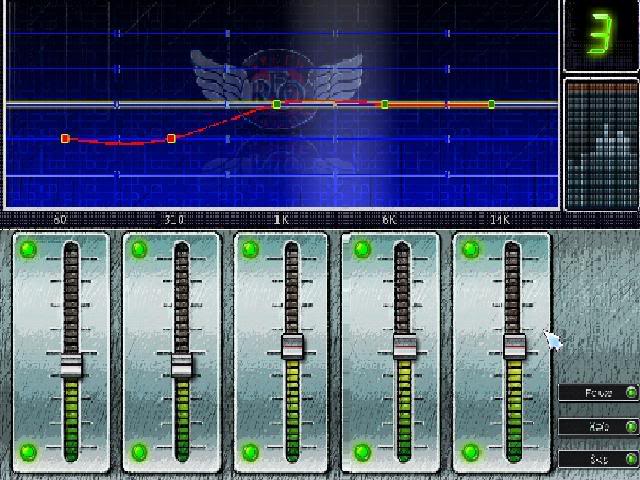
LEVEL 16B (Wires Crossed)
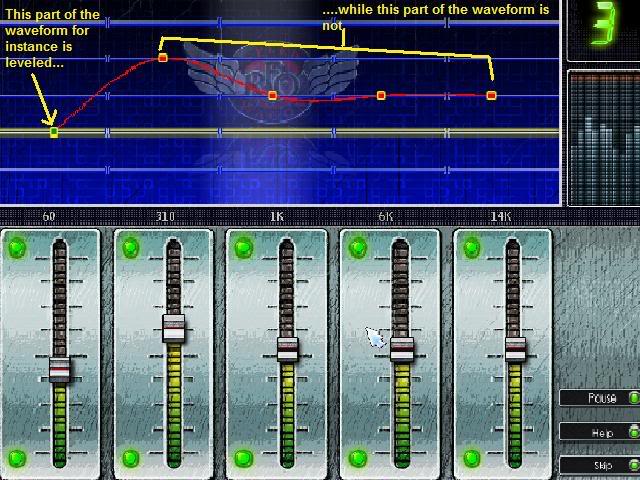
In this mini-game, you’ll have to move the sliders so that each waveform is balanced along the highlighted level. You will have to play around with the settings a few times because when you move one slider for one part of the waveform, other parts of the waveform will sometimes move up and or down. Balance all three waveforms that appear to complete the puzzle.
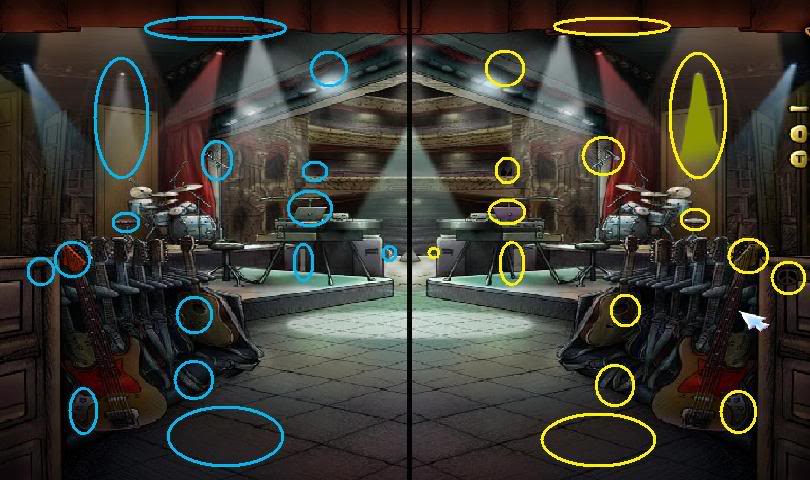
LEVEL 16C (In The Wings)
Find the 15 differences between the two scenes.
LEVEL 17A (Tune Up)
Another sublevel whose title hints at what has to be accomplished. Find 23 objects that make either music or sound.
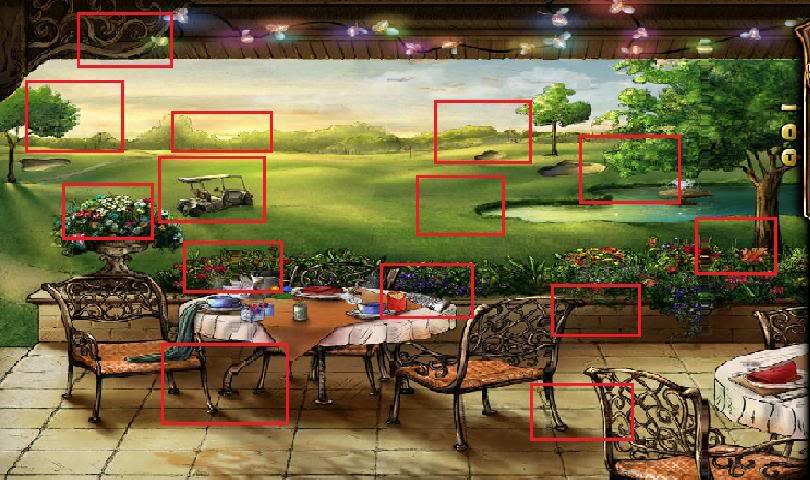
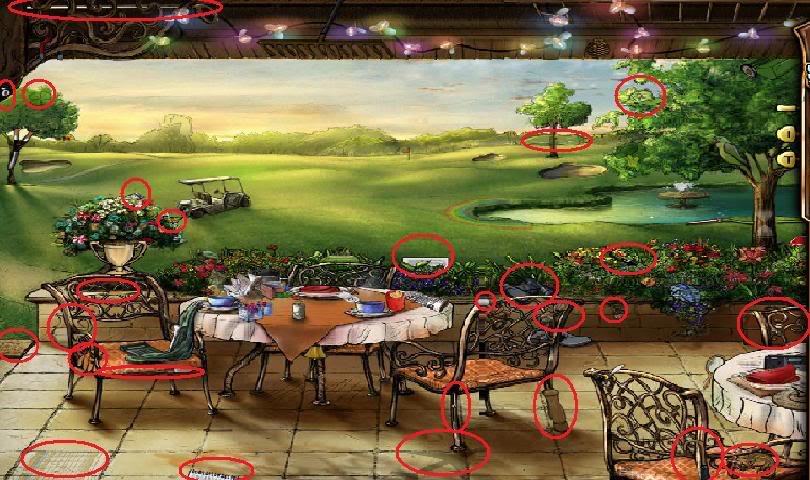
LEVEL 17B (Bruce’s Tee Time)
Find the 26 objects scattered all over the golf course.
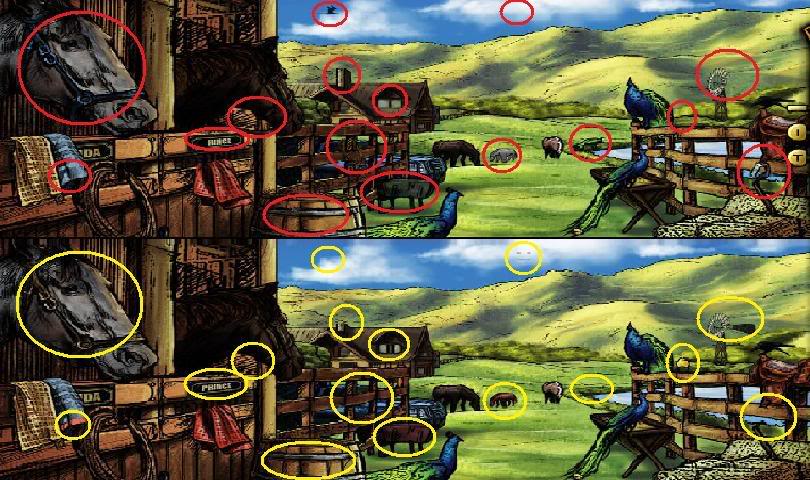
LEVEL 17C (Horse Of A Different Color)
Find the 16 differences between the two photos:
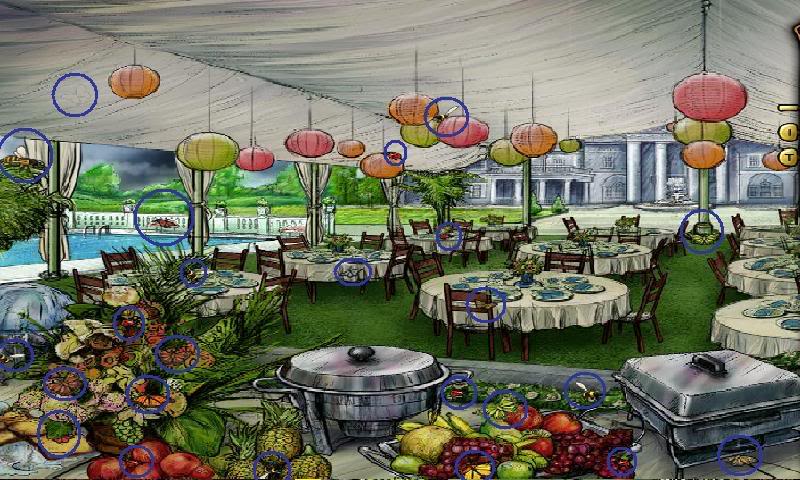
LEVEL 18A (Birds And Bees)
The banquet tents are literally crawling with all sorts of insects. Find all 24 to complete the sublevel.
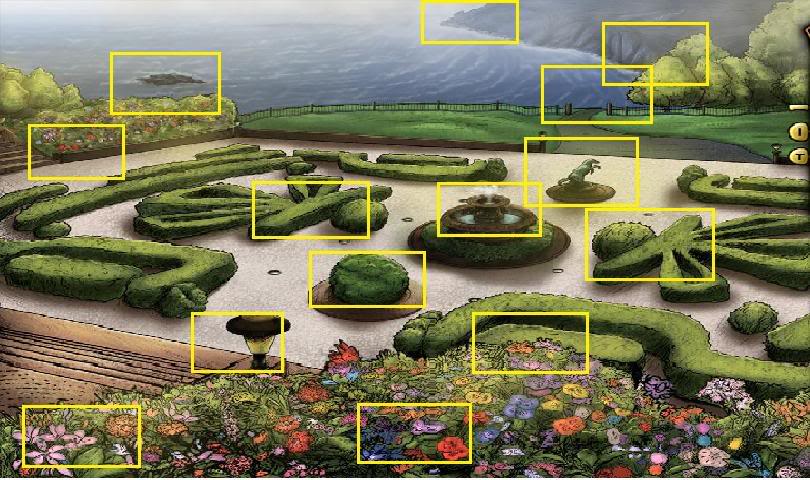
LEVEL 18B (Blooming Ruby)
Take various shots of Chaswick Manor’s garden to complete this level.
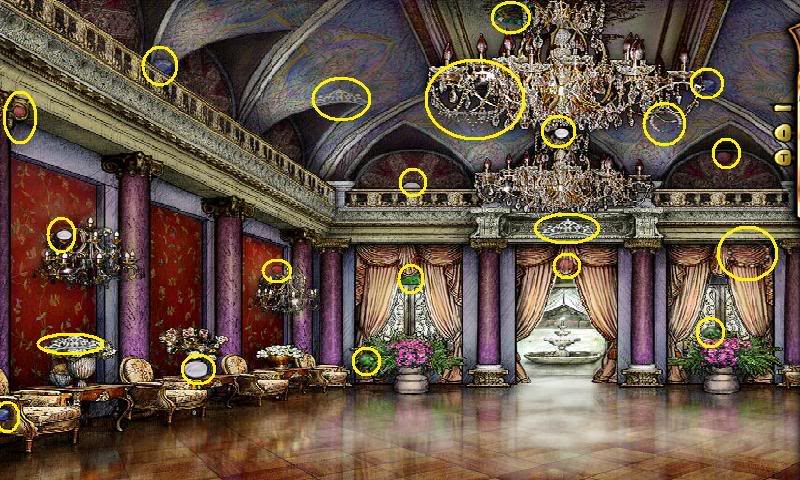
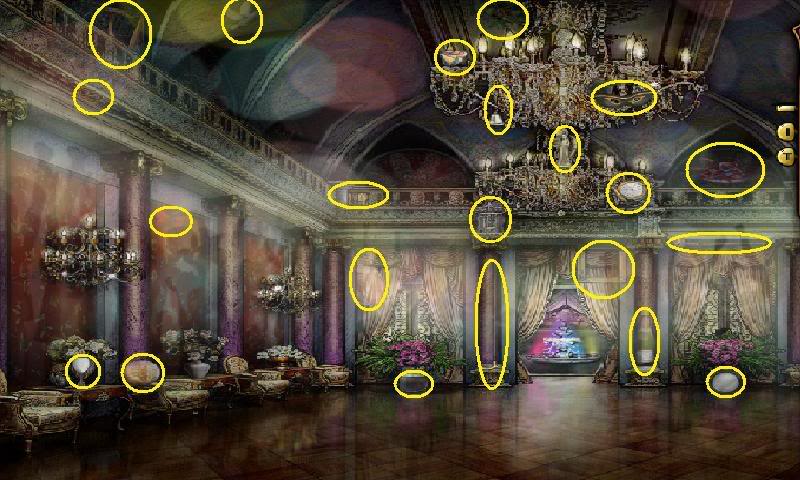
LEVEL 19A (Family Jewels)
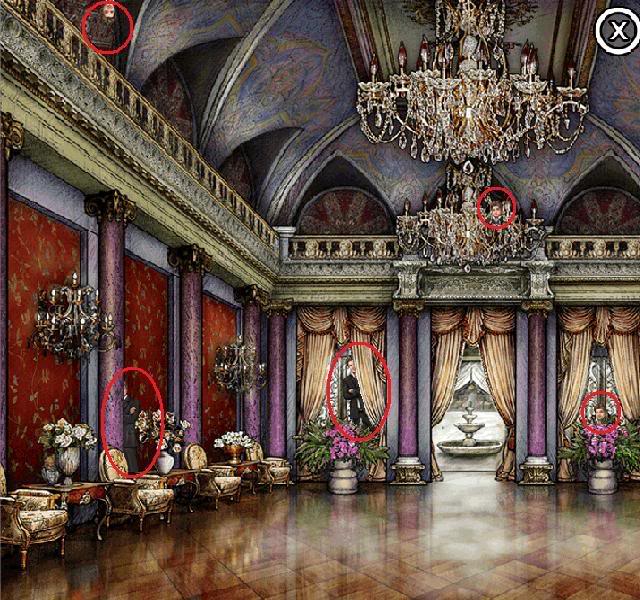
Ruby’s clumsiness has caused 21 pieces of jewelry to go flying every which way. Find them all throughout the ballroom.
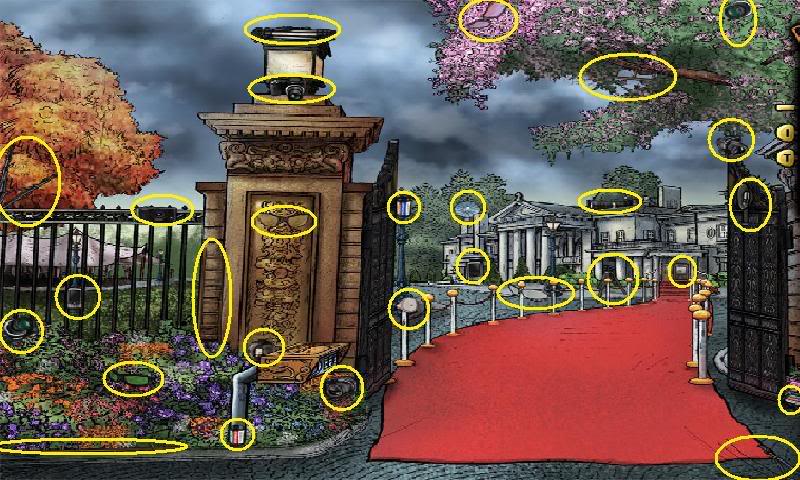
LEVEL 19B (Paparazzi)
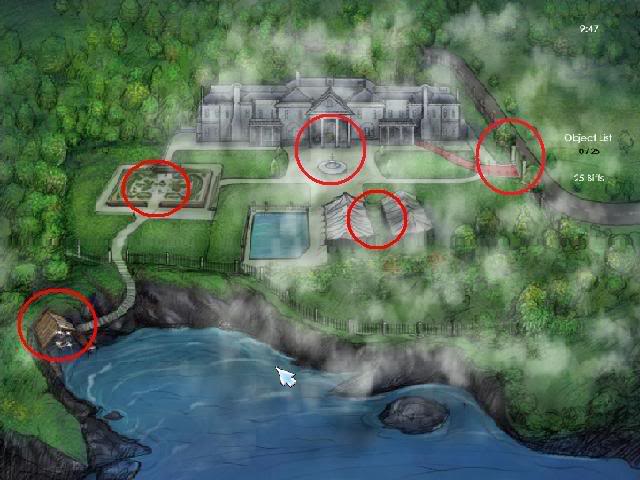
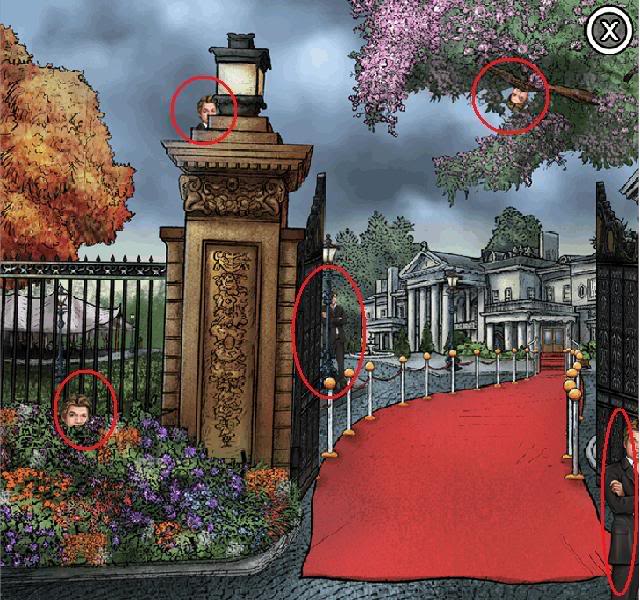
Find the 28 objects hidden all around the front gate of Chaswick Manor.
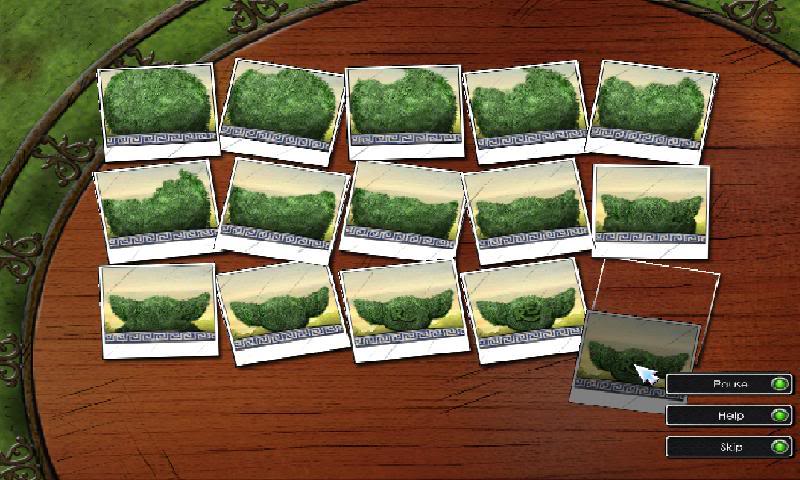
LEVEL 19C (REO In The Garden)
Place Ruby’s snapshots in chronological order, started with the photo of an untouched hedgerow to the photo of REO Speedwagon’s logo pruned from the hedge.
LEVEL 20A (Party Prep)
Once again, based on the content, place the clips for each video together so that they are in the right order. The clips will become brighter when placed in the right spot and there are 6 clips for each video.
LEVEL 20B (Trapped!)
Help Ruby get outside of Chaswick Manor:
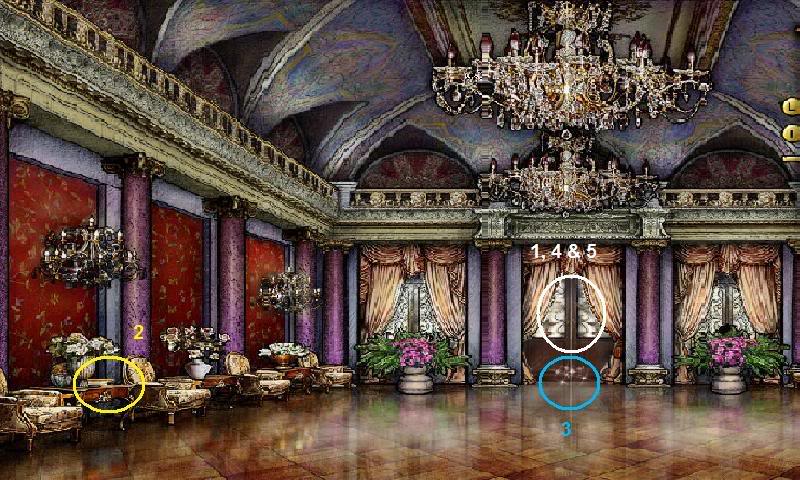
1. Examine the locked door. You’ll learn you need something to catch the key someone carelessly (and in your case luckily) left in the lock on the opposite side of the door.
2. Head over to this table and pick up the newspaper and the silver chopstick.
3. Head back to the door. Slide the newspaper under the door…
4. …and use the chopstick on the keyhole.
5. Grab the key that fell down onto the newspaper and make your escape!
LEVEL 20C (Dark Skies)
Help Ruby make her way from Chaswick Manor and back to her apartment. As you did before, change the red lights into green lights and avoid any road blockages to get Ruby through.
CHAPTER 3: WHO’S MIRANDA?
LEVEL 21 (Pawprints)
Find the 19 objects buried and scattered throughout the mess Dennis created in Ruby’s bedroom.
LEVEL 22A (Looking For Answers)
Find the 21 objects hidden throughout Ruby’s apartment.
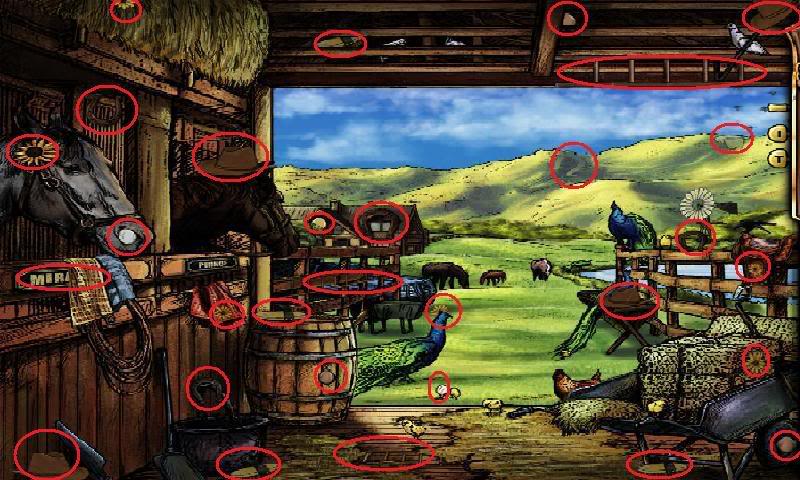
LEVEL 22B (Needle In A Haystack)
Find the 30 objects on the list (including the mysterious Miranda) that are scattered throughout the ranch.
LEVEL 23A (Hole In One)
Since the ranch lead was a dead end, check out your footage of the golf course. And while you’re at it, find the 25 objects on your list (well, 23 after you’ve found the mirror and binoculars).

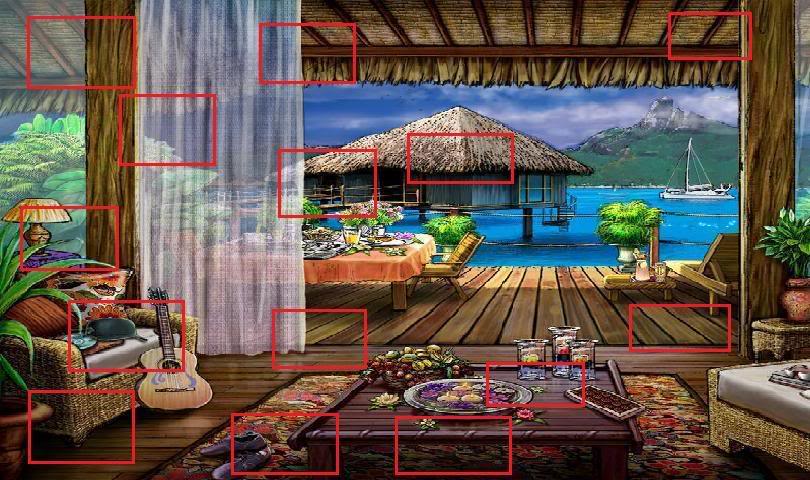
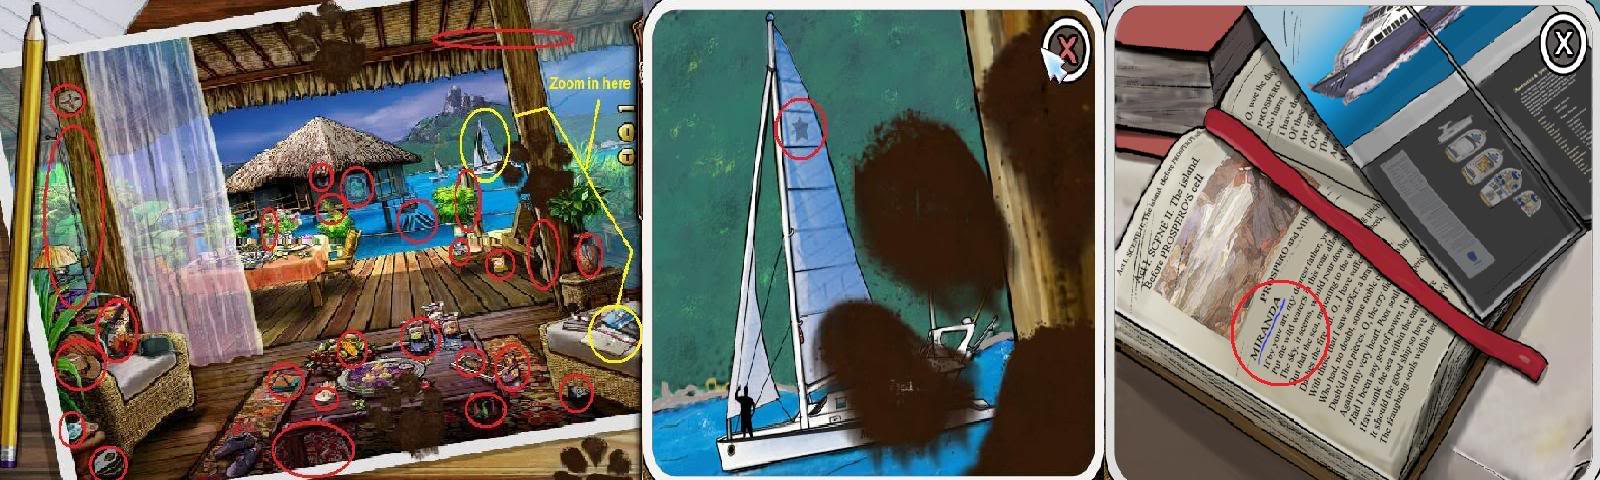
LEVEL 23B (Bora Bora)
Find the 28 objects hidden throughout the snapshot of Bora Bora.
LEVEL 23C (In Too Deep)
Once again, you must help Ruby make her way to ENow Studio. Change the necessary red lights to green lights and avoid any roadblocks.
LEVEL 24A (Locked!)
Complete the following tasks to unlock the E Now news truck:
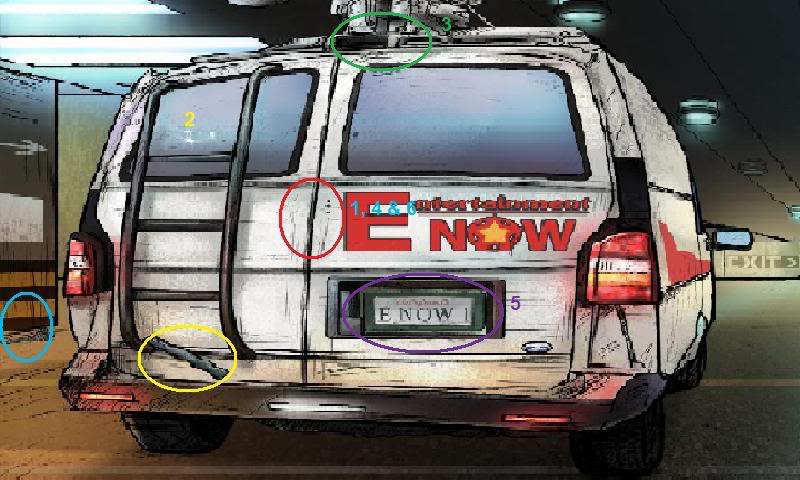
1. Examine the area where the door handle should be.
2. Grab the rung that fell off of the ladder and then reattach it to the top of the ladder.
3. Examine the top of the news truck to find a screwdriver. Take it, you must.
4. Take the handle from off the ground and reattach it to the door.
5. Now for some screws. Examine the license plate and use the screwdriver to loosen the screws here.
6. Use the screws you just acquired on the door handle.
LEVEL 24B (Lost In The Shuffle)
1. Flip on the light switch to the stage set.
2. Search for the 23 objects hidden onscreen.
LEVEL 24C (Mixed Messages)
You’re presented with another mixer board mini-game. As you did before, you’ll have to move the sliders so that each waveform is balanced along the highlighted level. Don’t forget that sometimes when you move one slider for one part of the waveform, other parts of the waveform will move up and or down.
LEVEL 25A (Sabotage)
Find the 40 objects from your list scattered all throughout Ruby’s workspace. Then pray that Biff gets his just desserts real soon.
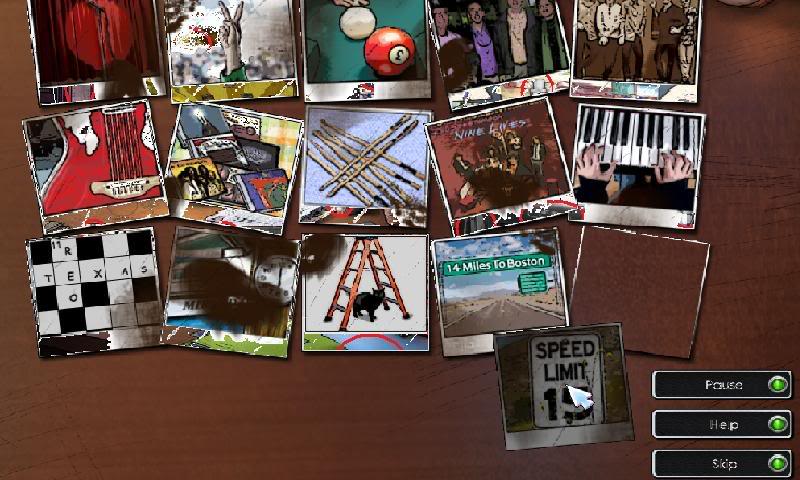
LEVEL 25B (Putting It All Together)
Another ‘place the photos in order’ puzzle. This time, place the pictures in order based on the number of subjects featured in them or simply of the number itself (ie: the photo of the guy with two fingers up in the air would go into position # 2 while the picture mentioning 14 miles would go into position 14).
LEVEL 26A (Revelation)
Get to work cleaning those photos Dennis messed up to get a hint on finding Kevin:
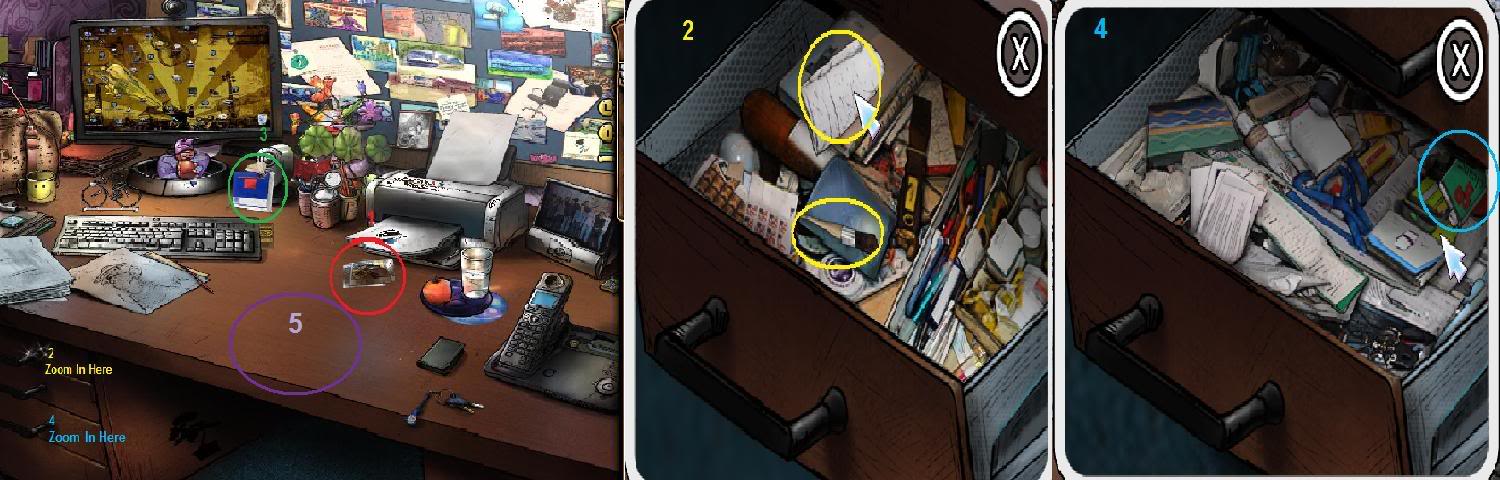
1. Grab the photos from off the desk.
2. Open up the top desk drawer and take out the towel and the fine brush.
3. Take the paper napkin.
4. Open up the third desk drawer and take out the photo cleaner.
5. Spread the towel out on the desk here. After laying out the photos, use the brush, then the napkin if any smudges remain to remove the dirt. Only use the photo cleaner for any really stubborn stains.
LEVEL 26B (Ruby To The Rescue)
Quickly get Ruby back to Chaswick Manor. It’ll be hard since the weather has caused many obstructions on the road, but it can be done. Just put into play the same tactics from the previous driving mini-games/puzzles and you’ll be there in no time.
LEVEL 27A (Lighting Up The Sky)
You are now playing the game from Kevin Cronin’s point of view. On the good ship Miranda, search for 17 emergency flares.
LEVEL 27B (Dangerous Combination)
Now that you’re back to Ruby’s point of view, help her get into Chaswick Manor to alert the others about Kevin:
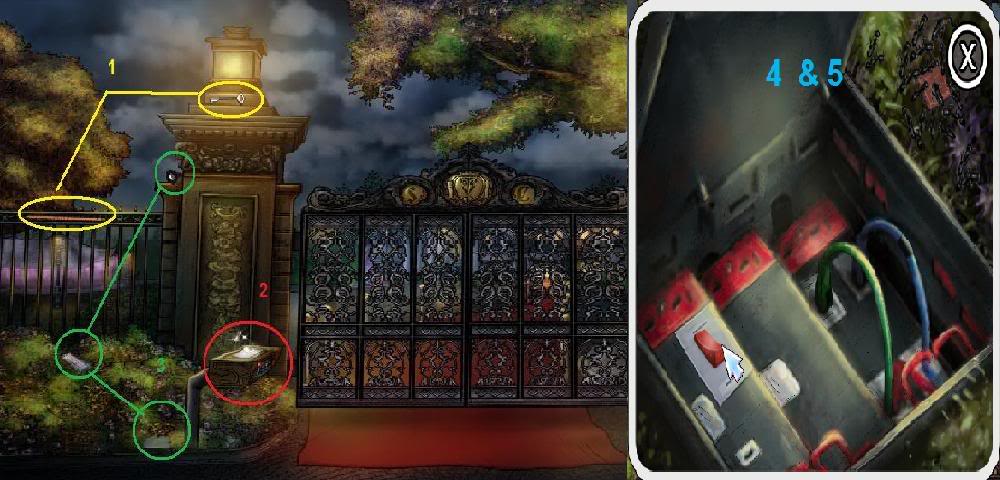
1. Take the pencil and the key from here.
2. After zooming in, use the pencil on the notepad here to get the security code.
3. Grab the chocolate bar and the electrical tape and then examine the locked box here.
4. Unlock the box, and then use the chocolate bar to coax the ants away.
5. Tape the cut wire and then flip the red switch.
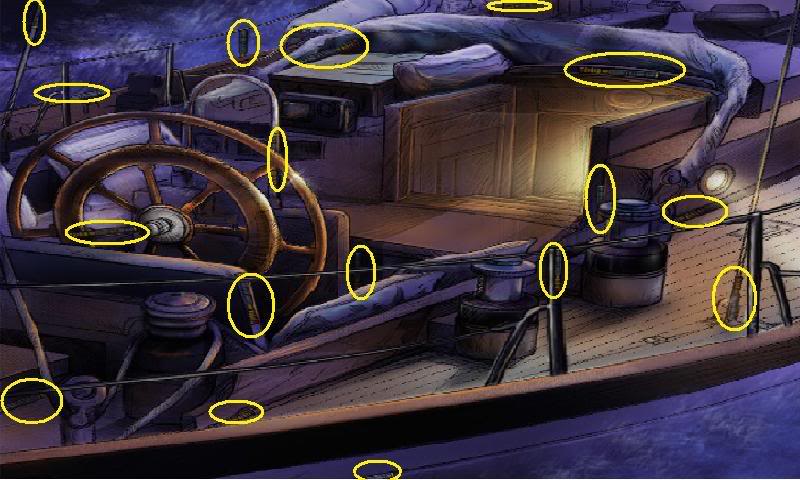
LEVEL 28A (Let My Love Find You)
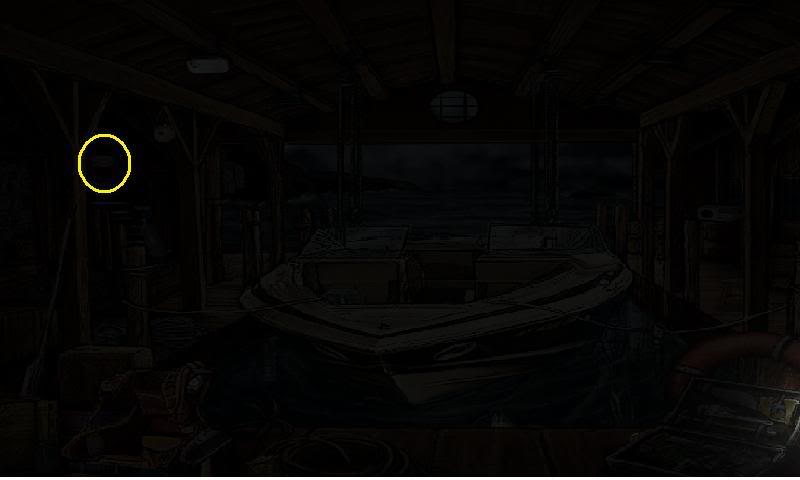
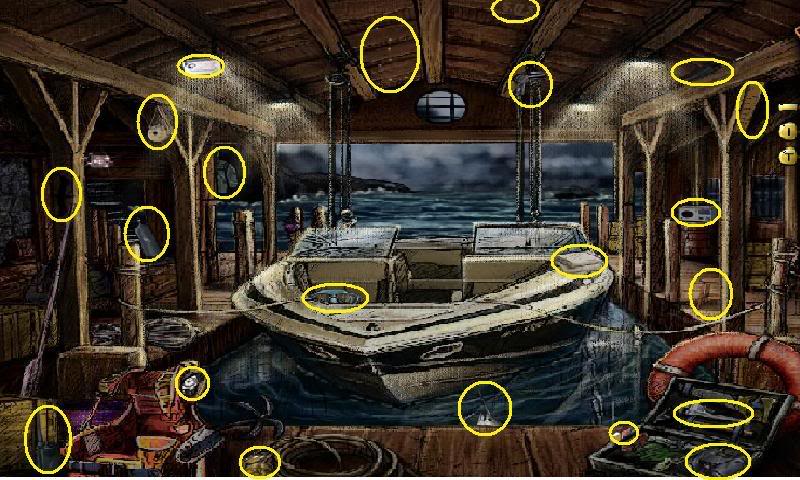
Turn the lights on in the boathouse. Then look for all 21 objects on your list.
LEVEL 28B (Twisted And Turned)

In this mini-game, you must steer Ruby, Chaz and the other band members of REO Speedwagon safely through the turbulent waters. Make sure to avoid any whirlpools, choppy water, buoys and sharp rocks as you navigate your way to Kevin, unless you’ll looking to total your rescue vessel.
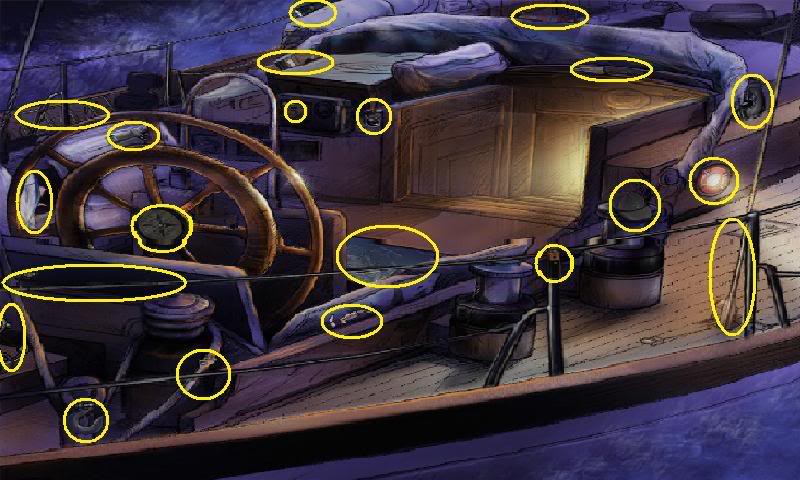
LEVEL 29A (The Brotherhood)
Onboard the Miranda, search for the 21 objects hidden onscreen.
LEVEL 29B (Riding Out The Storm)
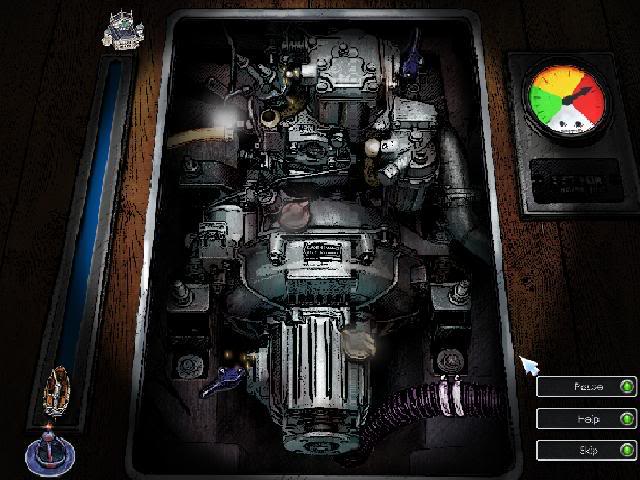
In this mini-game, you must steer the Miranda back to the Chaswick Manor. But there’s a slight problem. OK, a big problem. You must also simultaneously fix any loose pieces of the engine, nor can the engine stay overheated (in the red) for more than 5 seconds.
LEVEL 30A (Find Your Own Way Home)
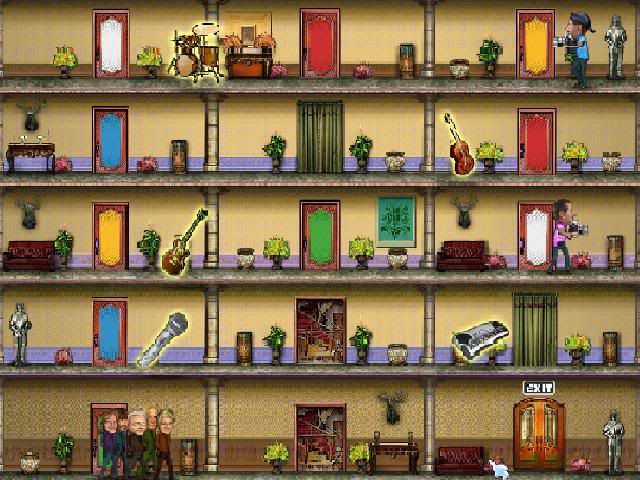
Just great. Just when the band makes it back to Chaswick Manor, the place just so happens to be crawling with paparazzi. You’ll have to help Kevin and the others collect their instruments and make it back down to the exit without being spotted. Just as you have done once before, use the stairs and doors to move throughout the building, and if the paparazzi seem to be closing in on you, duck behind some curtains for cover!
LEVEL 30B (Soaked To The Bone)
Find 21 objects hidden throughout the boathouse.
LEVEL 30C (Live From The Red Carpet)
Find 26 objects that either make music or sound.

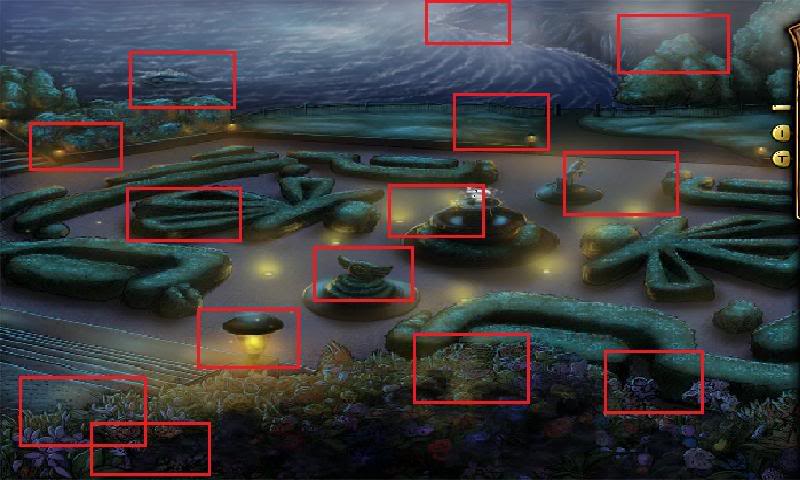
LEVEL 31A (By The Light Of The Moon)
Another photo shoot level. Take 14 snapshots of the garden at night.
LEVEL 31B (Everything You Feel)
Find the 24 objects from your list all throughout and around the banquet tent.

LEVEL 31C (Smilin’ In The End)
You’re almost there! Find 22 objects hidden in the ballroom.
Watch the final cutscene and congratulate yourself on finally Finding Your Own Way Home!
“;
