- Wondering how to get Monopoly GO! free rolls? Well, you’ve come to the right place. In this guide, we provide you with a bunch of tips and tricks to get some free rolls for the hit new mobile game. We’ll …
Best Roblox Horror Games to Play Right Now – Updated Weekly
By Adele Wilson
Our Best Roblox Horror Games guide features the scariest and most creative experiences to play right now on the platform!The BEST Roblox Games of The Week – Games You Need To Play!
By Sho Roberts
Our feature shares our pick for the Best Roblox Games of the week! With our feature, we guarantee you'll find something new to play!All Grades in Type Soul – Each Race Explained
By Adele Wilson
Our All Grades in Type Soul guide lists every grade in the game for all races, including how to increase your grade quickly!
Redemption Cemetery: Salvation of the Lost Walkthrough
Welcome to the Redemption Cemetery: Salvation of the Lost walkthrough on Gamezebo. Redemption Cemetery: Salvation of the Lost is an adventure game with puzzles and hidden object scenes. This walkthrough includes tips and tricks, helpful hints and a strategy guide on how to complete the game.
Game Introduction – Redemption Cemetery: Salvation of the Lost
Welcome to the Redemption Cemetery: Salvation of the Lost walkthrough on Gamezebo. Redemption Cemetery: Salvation of the Lost is an adventure game with puzzles and hidden object scenes. This walkthrough includes tips and tricks, helpful hints and a strategy guide on how to complete the game.
General Tips
Difficulty Modes
- There are three difficulty modes: Casual, Advanced and Soul Saver.
- You can switch between modes at any point during the game by going to Options under Menu.
- Casual: hint and skip buttons recharge faster and active areas are indicated with sparkles.
- Advanced: hint and skip buttons recharge more slowly and active areas are not indicated.
- Soul Saver: hint and skip buttons recharge very slowly, active areas are not indicated and black bar tips are disabled.
Cursors
- A skeleton hand icon indicates objects that can be picked up to go into your inventory.
- A magnifying glass icon shows active areas that can be inspected more closely or that require some kind of interaction. If you’re playing in Casual or Advanced mode, clicking on interactive areas with a magnifying glass will give you a black bar hint.
- The arrow cursor changes shape in places where you can move to another area.
- A raven head indicates items that your raven helper needs to get for you.
Journal, Inventory and Map
- You can access the journal by clicking on the notebook in the bottom right corner of the screen.
- The journal only keeps track of the storyline, and is not used to store codes or hints.
- The inventory is shown at the bottom of the screen.
- Items in the inventory marked with a green + need to be combined with another inventory item. The second item may be in a different section of the inventory. In that case, just pick up one of the items, and then click on the arrow buttons to scroll through the inventory, while holding the item.
- The map can be accessed in the bottom left of the screen.
- This map is interactive, meaning you can use it to quickly jump to different locations.
- Locations marked with a red ! currently have actions you can complete.
The Raven
- Early on in the game, Hina will give you a raven helper.
- The raven can help you retrieve items you can’t reach on your own.
- The raven can use four different magical powers, which will be accumulated throughout the game.
- The Power of Air allows the raven to retrieve items high up or far away.
- The Power of Earth allows the raven to retrieve items buried or hidden.
- The Power of Water allows the raven to retrieve items that are submerged.
- The Power of Fire allows the raven to retrieve items from hot or burning places.
- Whenever the raven is needed to retrieve an item, your cursor will change into a raven head.
- Simply click on the item to summon the raven. You will then be asked to select which power you want to use.
- Before you can use any of the powers, you need to charge them with a mini-game. Each time you use a power, you lose 20% of its power. If you run out, you have to play the mini-game again to recharge.
Hidden Object Scenes
- There are a few different types of Hidden Object Scene (HOS) in this walkthrough.
- The standard HOS shows a list of items to find in white, and some items that require an additional action before you can take them in red.
- The interactive HOS show the outlines and names of a few items to find. These items will then need to be used in the scene to reveal more items.
Collector’s Edition
- The Collector’s Edition contains a variety of bonus materials, which include the following:
- Puppy medals can be collected throughout the game. Collect enough medals to unlock new mini-games that can be accessed by clicking on Puppy’s Room on the main menu.
- Trophies can be collected by finding medals and playing the games in the Puppy’s Room.
- Go to Extras on the main menu to play the bonus chapter, replay HOS and mini-games, view concept art, wallpapers, play music etc.
Chapter 1: The Cemetery

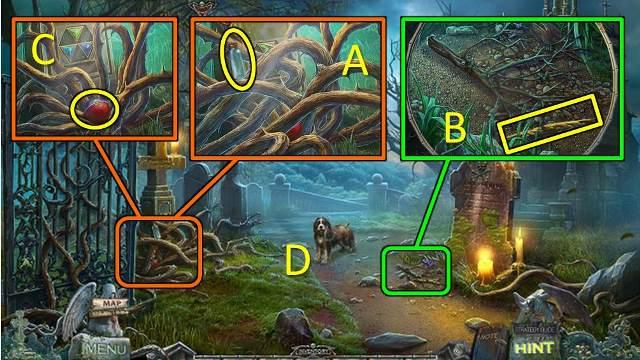
- Zoom into the weeds on the left and take the BOTTLE (A).
- Zoom into the sticks in front of the gravestone and pick up the BRANCH WITH WAX (B); use the BOTTLE to catch the WOOD BORERS.
- Go back to the weeds and release the WOOD BORERS; you can now pick up the BALL (C).
- Throw the BALL at the dog (D).
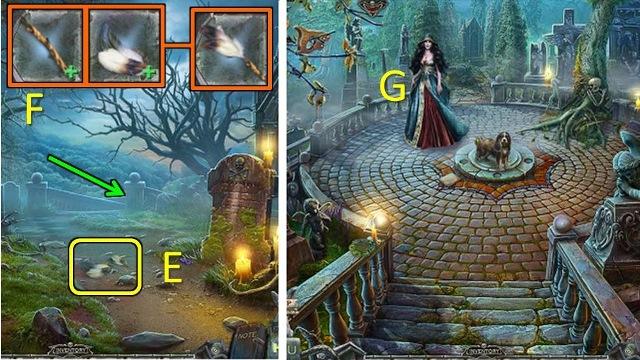
- Pick up the FEATHERS.
- You can combine the FEATHERS with the BRANCH WITH WAX in your inventory to get a DUSTER (F) (From here on combined inventory items are no longer shown in the images).
- Go down the steps to an area marked as Hina.
- Talk to Hina (G); she gives you the raven.
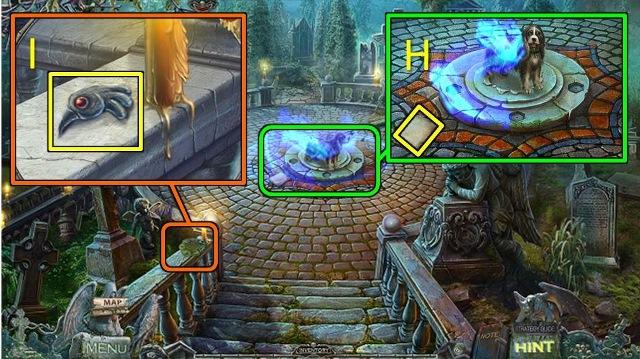
- Zoom into the dog and pick up the paper (H). It shows the four Powers for your raven.
- Zoom into the stone wall on the left and if you’re playing the Collector’s Edition you can pick up a medal for your puppy.
- Under the medal is a CROW HEAD (I).
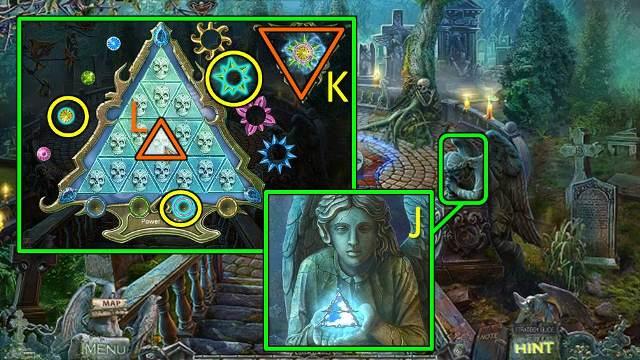
- Inspect the head of the statue on the right (J).
- The statue will give you the Power of Air for your raven.
- Click on the Power of Air to get a puzzle to charge it.
- Each triangle represents a combination of three colored shapes. Find the triangle that represents the shapes and colors shown in the example on the right (K) and click to remove that triangle (L). Continue until all triangles are gone.
- Your raven is now charged.
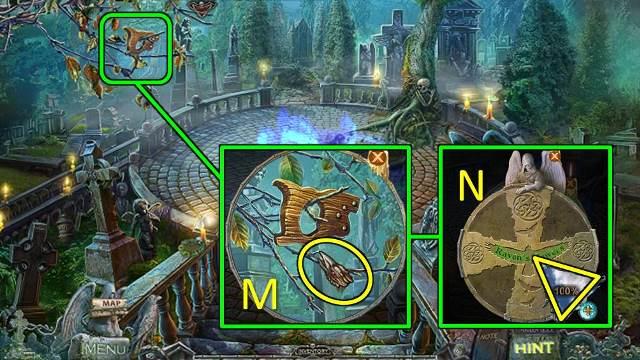
- Zoom into the tree branches on the left and use the raven on it (M), then select the charged Power of Air (N) to release the raven on the item.
- A SAW HANDLE will be added to your inventory.
- Go forward to the Passage.
- Talk to the ghost (O).
- Zoom into the plants on the right; move the grass aside and pick up the NECKLACE (P).
- Zoom into the mausoleum and pick up the medal for your puppy.
- Knock over the candle (Q) and take the CROW’S WING that’s under the moss (R).
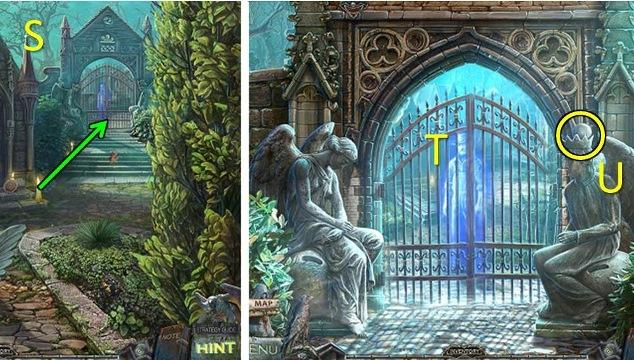
- Move on to the gate the ghost went through (S).
- Talk to the ghost again (T).
- Pick up the ORB (U).
- Back out two screens.
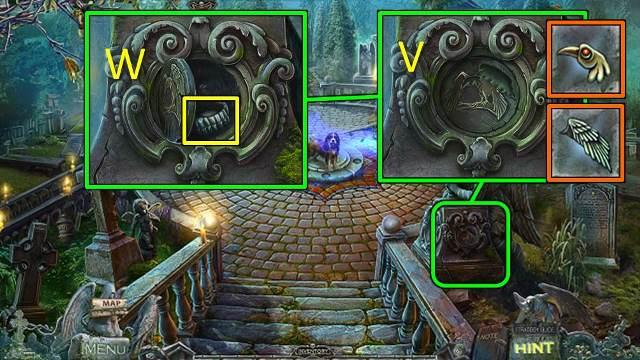
- Zoom in on the statue’s pedestal.
- Put the CROW HEAD and CROW’S WING on the relief (V) and take the LOWER JAW (W).
- Go left. This area is called the Witch.
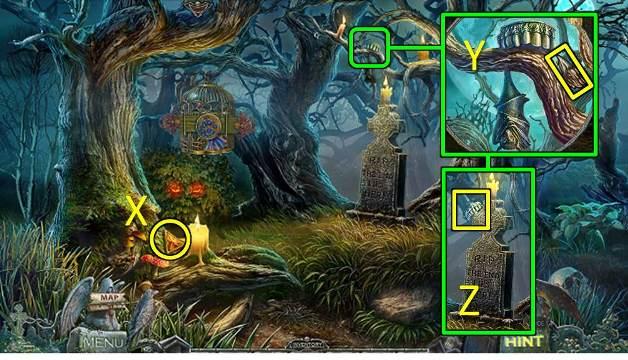
- Pick up the CRYSTAL (X).
- Zoom into the tree branches above the gravestone (Y).
- Select the Power of Air for your raven.
- Pick up the UPPER JAW from the gravestone (Z).
- In your inventory, combine the UPPER JAW with the LOWER JAW to get a JAW.
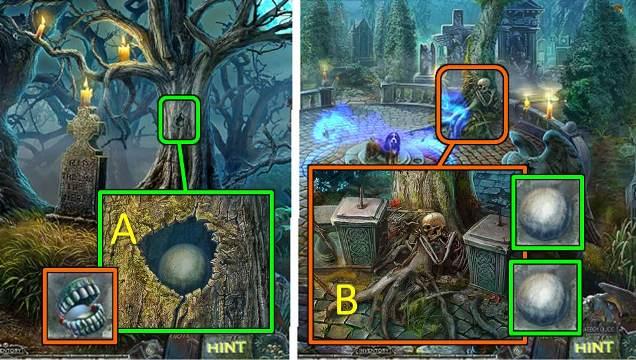
- Zoom into the tree.
- Wait until the snake has gone and use the JAW to make the hole bigger (A).
- Take the second ORB.
- Go back to the dog.
- Zoom into the skeleton in the back.
- Place the two ORBS on the spikes (B).
- Go right through the new passage to an area called the Worker.
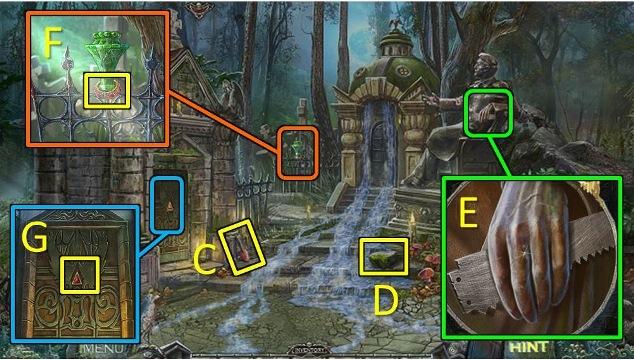
- Pick up the SHOVEL (C) and the STONE (D).
- Zoom into the statue’s hand and take the SAW BLADE (E).
- Combine the SAW BLADE with the SAW HANDLE to get a SAW.
- Zoom into the fence.
- Use the STONE to break the glass and take the BRACELET (F).
- Zoom into the crypt door and take the CRYSTAL (G).
- Go back to the Passage.
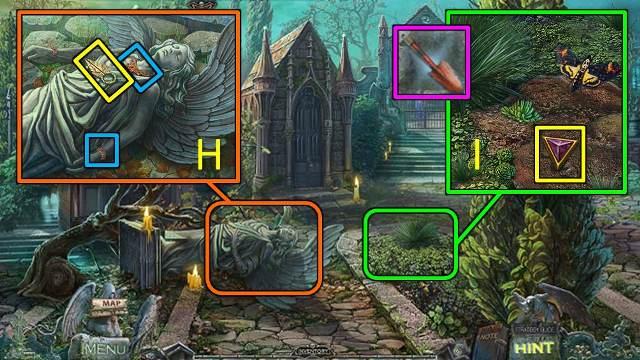
- Zoom into the fallen statue and put the NECKLACE around her neck and the BRACELET around her arm (H, blue).
- Pick up the CRYPT KEY (H, yellow).
- Zoom into the plants and move the moth.
- Use the SHOVEL to dig up another CRYSTAL (I).
- Go all the way back to the first screen (called Metro on your map).
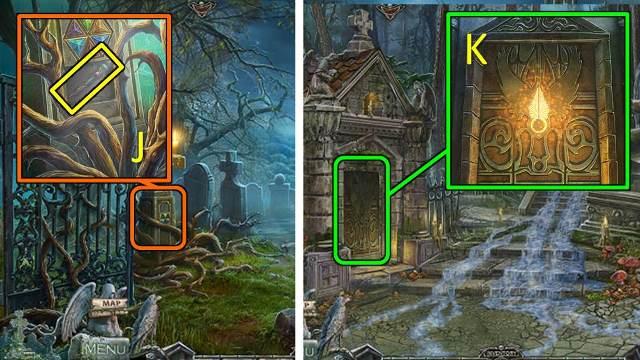
- Zoom into the weeds and place the three CRYSTALS on the lock.
- Take the SCEPTER (J).
- Go back to the Worker.
- Zoom into the crypt door and open it with the CRYPT KEY (K).
- Go into the crypt.
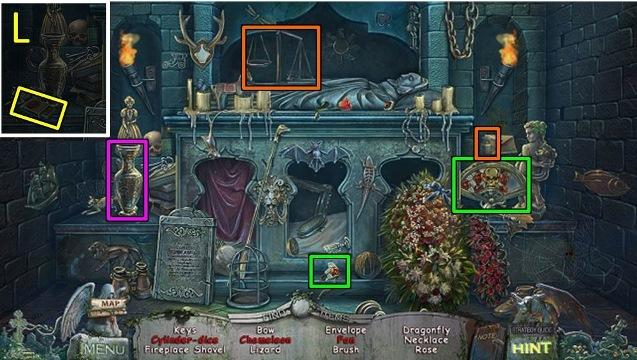
- Pick up the matches (L) and light the torches to trigger a HOS.
- Put the weight on the scales to find the chameleon (orange); break the vase to get the cylinder-dice (pink); put the two pieces of the fan together (green).
- The CYLINDER-DICE will be added to your inventory.
- Go back to the Witch area.
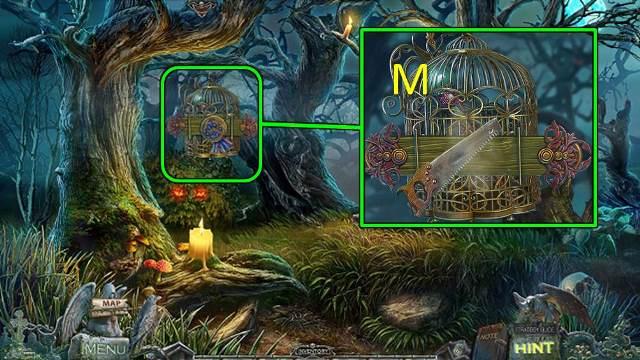
- Zoom into the birdcage and pick up another medal for your puppy.
- Use the SAW to remove the plank (M).
- Zoom into the lock and put the CYLINDER-DICE on it to trigger a mini-game.
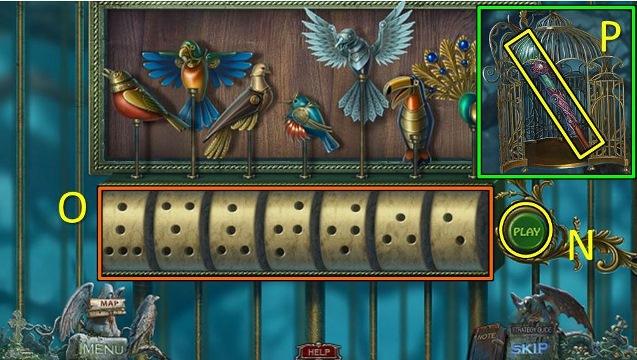
- Click the Play button (N) to hear the melody and see which of the birds are moving. Change the wheels below the birds that are not moving and click Play again. Continue until you’ve found the correct code to make all birds move (O).
- Take the SCEPTER inside the cage (P).
- Go back to the Passage and on to the gate.
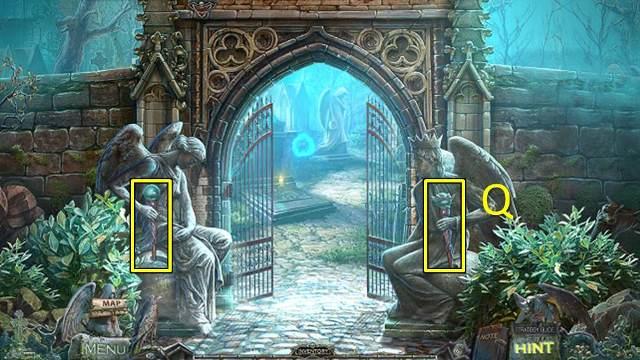
- Give a SCEPTER to each of the statues (Q).
- Go through the gate
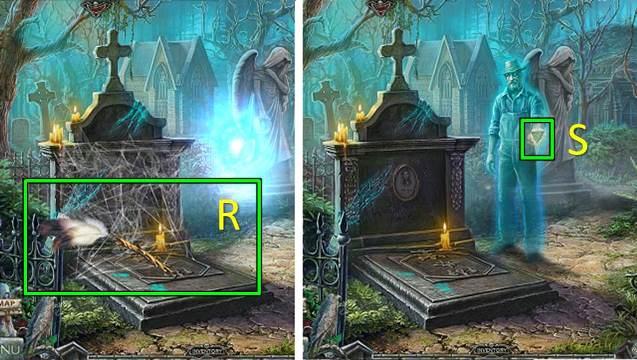
- Clean the grave with your DUSTER (R).
- Talk to the ghost again. His name is Jeeves. He will give you the Power of Earth (S).
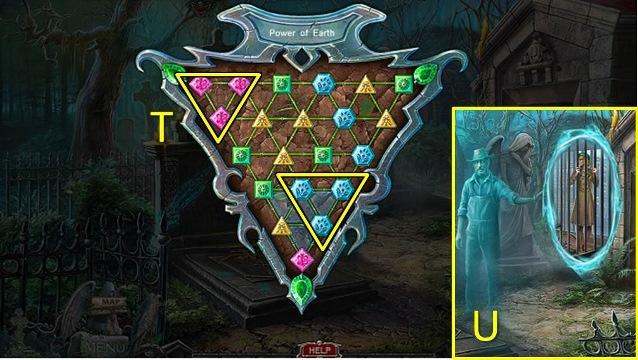
- To charge the Power of Earth you need to remove all triangles. A triangle will be removed if all three corners show the same symbol. You can click on a triangle to rotate it (T).
- Once the Power of Earth is charged, Jeeves will open a portal for you (U). Go through it.
Chapter 2: The Zoo
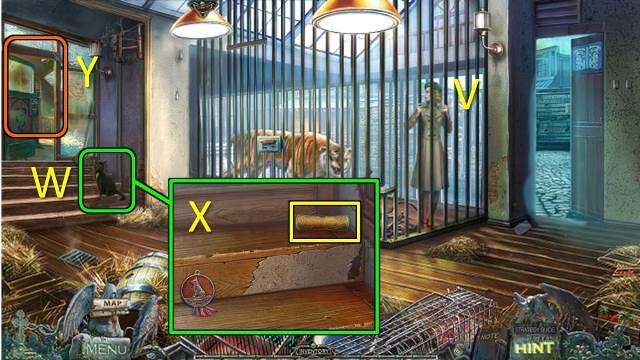
- Talk to the journalist (V).
- Click on the cat to scare it away (W).
- Zoom in on the steps where the cat was sitting.
- Pick up the DRILL HANDLE and another medal (X).
- Attempt to go through the door on the left (Y).
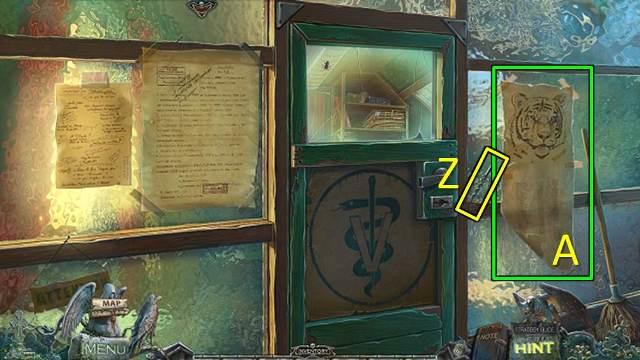
- Pick up the DRILL BIT (Z) and read the poster about the tiger (A).
- Combine the DRILL HANDLE with the DRILL BIT to get… a CORKSCREW.
- Go back to the tiger room and exit right to the PASSAGE.
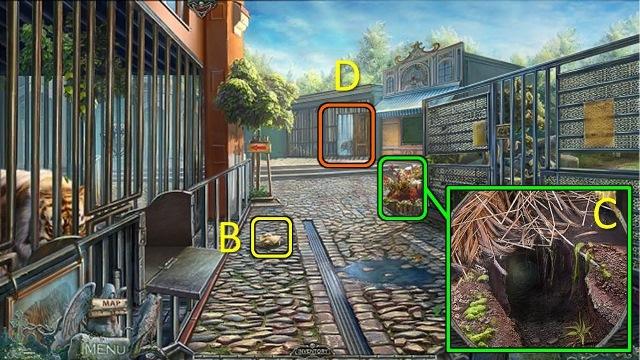
- Pick up the note about the penguins (B).
- Zoom into the flower bed and take the medal.
- Use the Power of Earth to retrieve the AQUARIUM TOKEN (C).
- Inspect the wolf cage in the back (D) (you need to do this to trigger the next cut scene).
- Back out from the wolf cage to the Passage and go left to the Square.
- Look through the binoculars and take the GAME TOKEN (E).
- Inspect the bear statue and use the Power of Air to retrieve a PIECE OF ICE (1/4) (F).
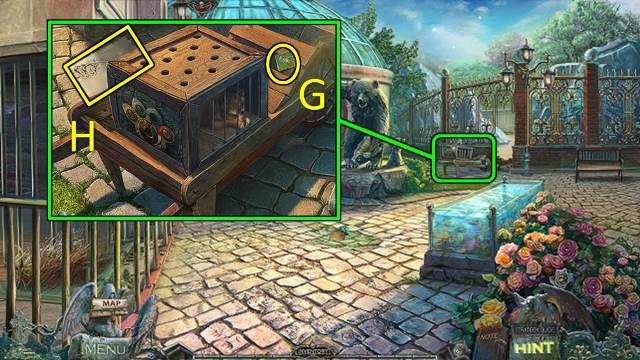
- Inspect the wolf cub cage and take the puppy medal, ZEBRA MOSAIC PIECE (G) and the note about gorillas (H) (note that this is only available if you’ve been inside the wolf cage).
- Return to the Passage.
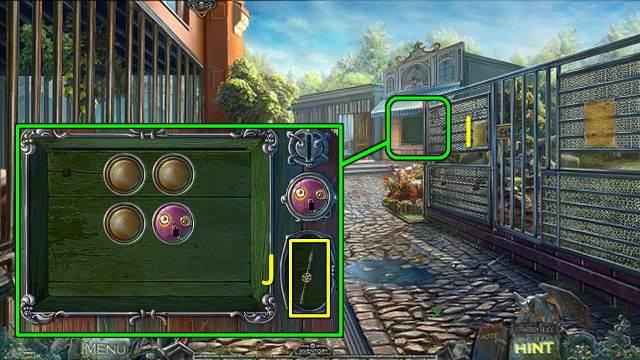
- Zoom into the blinded house in the back (I).
- Use the GAME TOKEN to start a mini-game.
- You will be shown a group of symbols. Remember the location of the symbol that matches the example on the right, and follow that symbol with your eyes when the tokens are scrambled. When the movement stops, click on the correct token to find the symbol. If you make a mistake, you will have to replay the previous level.
- Take the TOY FISHING ROD (J).
- Go to the Passage.
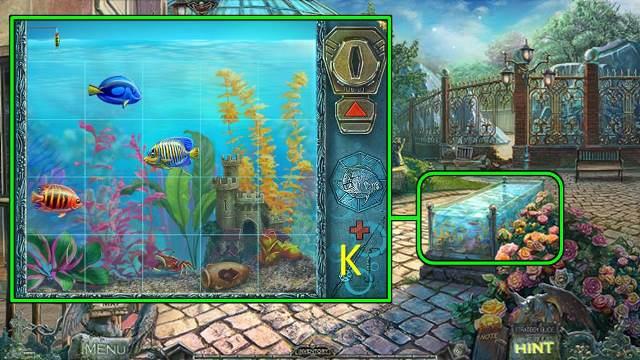
- Inspect the aquarium and put the AQUARIUM TOKEN and TOY FISHING ROD on it to trigger a mini-game (K).
- Catch the fish at the top of the aquarium. Each time you click, the fish will move to a different location. You need to try to anticipate where the fish will move in your next click.
- You get a FISH.
- Go into the Lobby.
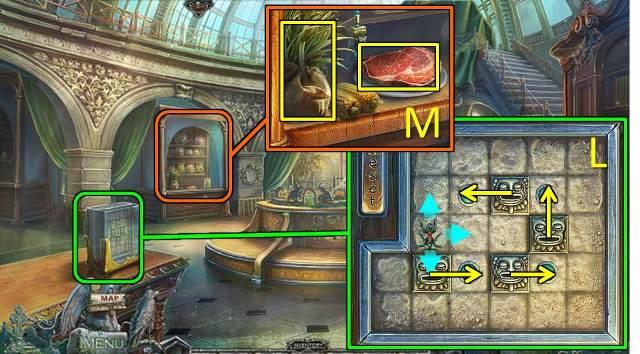
- Zoom into the glass box on the left for another mini-game.
- You need to use the ant to move the tiles to the green buttons.
- Push the left tile to the left, and then move the ant to the square above that tile so you can move the tile down (L).
- Then move the top tile left, the right tile up, and the two bottom tiles right.
- Take the PIECE OF ICE (2/4).
- Inspect the display cabinet and take the MEAT and the GRASS (M).
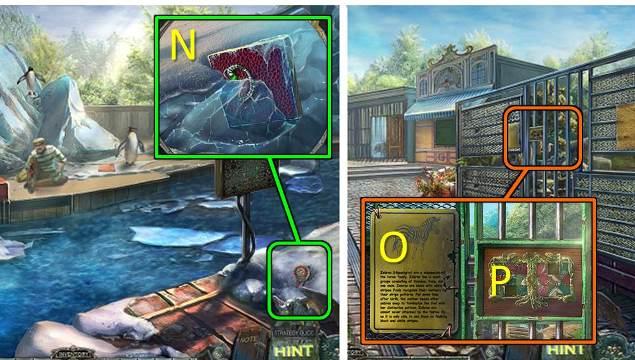
- Go back out to the square and go right to the Penguin Cage.
- Inspect the snow on the right and take the medal.
- Use the Power of Earth to get another ZEBRA MOSAIC PIECE (N).
- Go back to the Passage.
- Go to the zebra enclosure on the right.
- Read the note (O) and zoom into the lock (P).
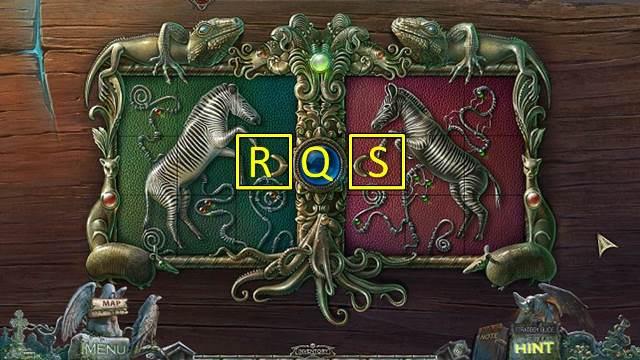
- Place the two ZEBRA MOSAIC PIECES on the lock to trigger a mini-game.
- Restore the two mozaics by selecting two tiles to swap them. Click the blue button (Q) to swap the two tiles on either side of it (R and S).
- Go into the Zebra Cage.
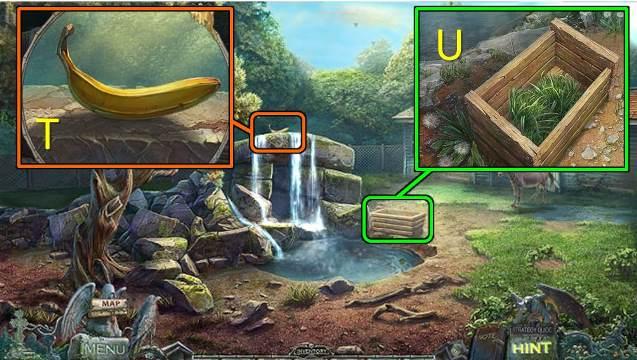
- Zoom into the banana on top of the waterfall and use the Power of Air to retrieve the BANANA (T).
- Zoom into the feeder and take the medal.
- Put the GRASS in the feeder (U).
- Go into the zebra’s house for a HOS.
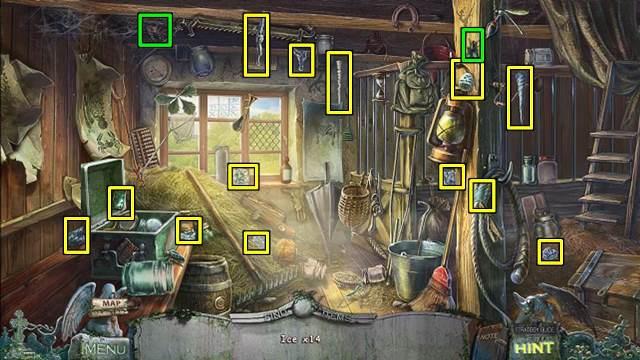
- Find 14 pieces of ice. One is inside the chest. Feed the fly to the spider (green) to get another one.
- You get a PIECE OF ICE (3/4).
- Go to the Passage.
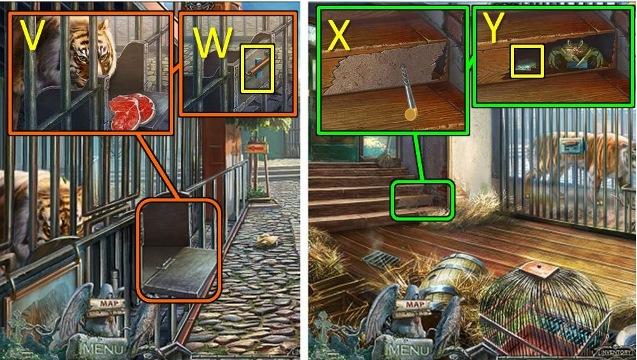
- Zoom into the feeding hatch and give the MEAT to the tiger (V).
- Close the hatch and take the SOFT PLASTIC (W).
- Go to the tiger room.
- Zoom into the wooden steps and remove the board with the CORKSCREW (X).
- Give the SOFT PLASTIC to the crab and take the PIECE OF ICE (4/4) (Y).
- Go to the Penguin Cage.
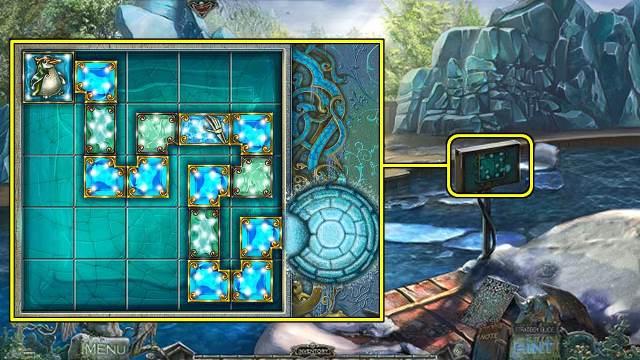
- Remove the panel from the box on the right and zoom into the box.
- Put the PIECES OF ICE (4/4) on the box to trigger a mini-game.
- Create a path for the penguin to its cage. Blue pieces can be moved, green pieces can only be rotated.
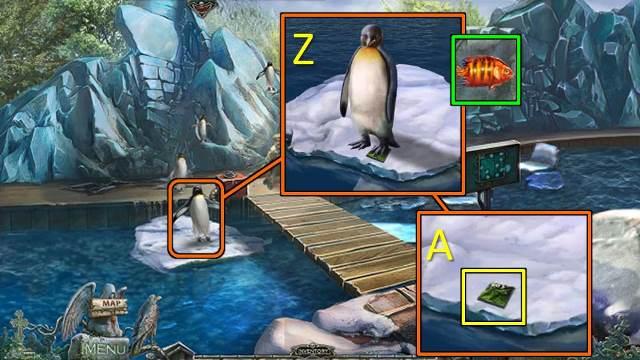
- Zoom into the penguin on the ice and give him the FISH (Z).
- Zoom into the ice again and take the ANIMAL TILE (A).
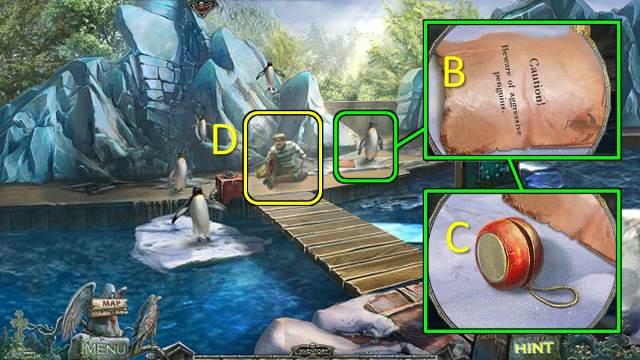
- Zoom into the penguin on the right and move the note (B).
- Pick up the YO-YO (C).
- Talk to the thief (D).
- Go to the Lobby.
- Zoom into the monkey and feed him the banana (not shown in image).
- Play the interactive HOS at the top of the stairs.
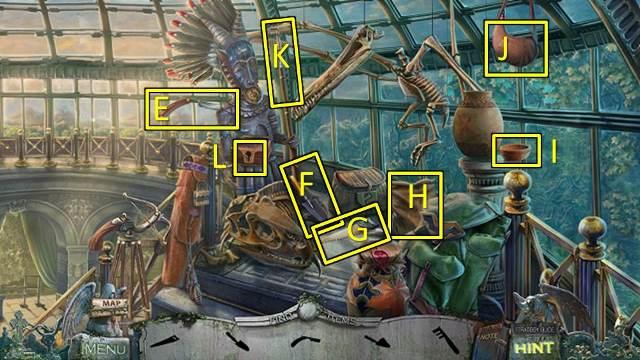
- Pick up the RAZOR (E), SHOVEL (F) and HACKSAW (G).
- Use the SHOVEL on the bag of gypsum (H) to get a SHOVEL WITH GYPSUM.
- Use the SHOVEL WITH GYPSUM on the bowl (I).
- Cut the water bladder (J) with the RAZOR to obtain a BOWL WITH GYPSUM.
- Use the HACKSAW on the spear (K) to get a SPEARHEAD.
- Use the SPEARHEAD to pick the lock (L).
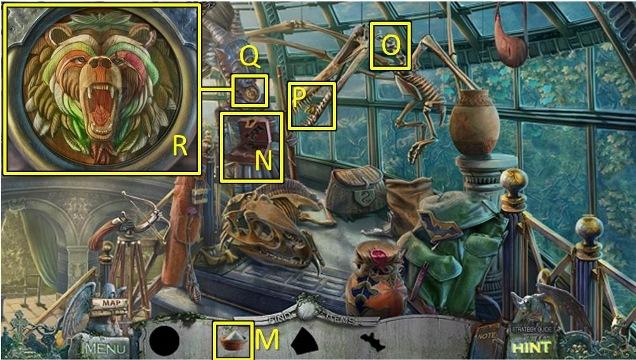
- Put the BOWL WITH GYPSUM (M) on the mold (N)and when the box opens again, take the BONE.
- Put the BONE on the skeleton (O).
- Take the GAME PART (P).
- Zoom into the game (Q) and put the GAME PART on it.
- Restore the image by swapping the tiles around (R).
- Take the WOLF MEDALLION.
- Go back to the square
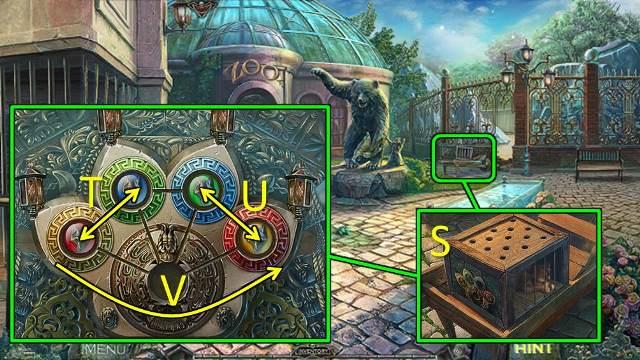
- Zoom into the wolf cub cage.
- Zoom into the lock and trigger the mini-game with the WOLF MEDALLION (S).
- Move the medallions around until they’re in the slots with matching color. One solution is to swap the blue and red medallions around (T), then swap the yellow and green medallions around (U), and then moving all four medallions counter clockwise until they’re in the correct place (V).
- Take the WOLF CUB.
- Go to the Wolf Cage.
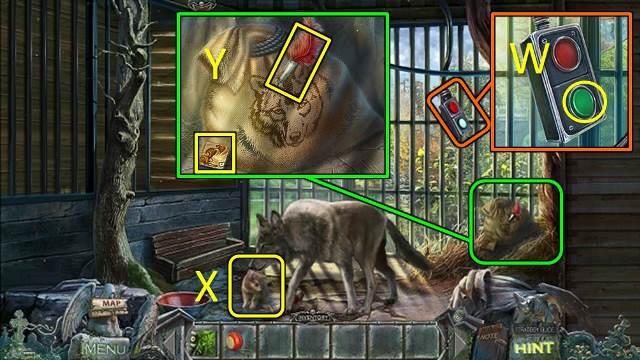
- Zoom into the cage mechanism and push the green button to open the cage (W).
- Give the WOLF CUB to the wolf (X).
- Zoom into the bag and take the ANIMAL TILE and DART (Y).
- Go to the Zebra Cage and play the new HOS.
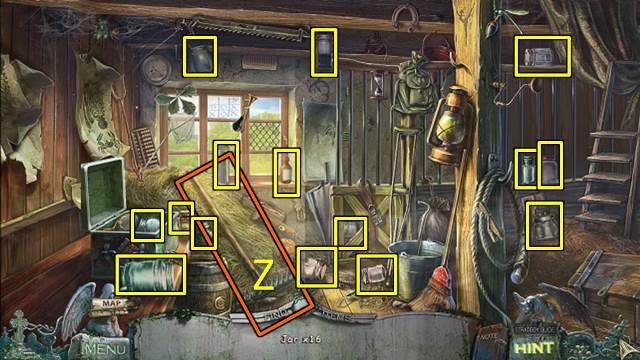
- This time you need to find 16 jars. There is one in the chest and one behind the cage door. Use the rake (Z) to find the one in the hay.
- You get HYDROGEN PEROXIDE.
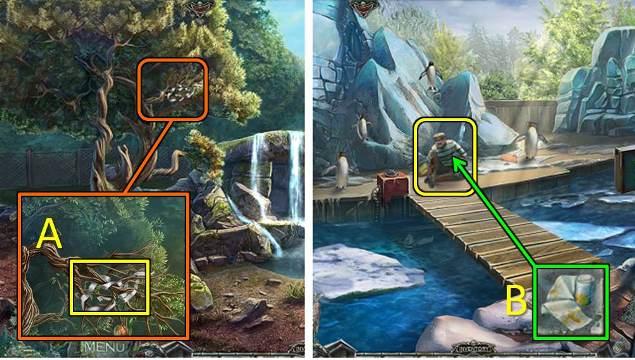
- Zoom into the tree branches and pull the branches close with the YO-YO (A).
- Take the BANDAGE.
- Combine the HYDROGEN PEROXIDE with the BANDAGE to get an ANTIBACTERIAL BANDAGE.
- Go to the Penguin Cage and give the ANTIBACTERIAL BANDAGE to the thief (B).
- KEYS will be added to your inventory.
- Go to the Tiger Room.
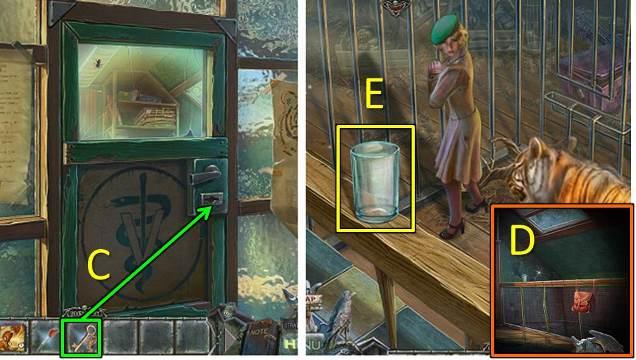
- Go to the door on the left and open it with the KEYS (C).
- Go through the door.
- Look over the railing (D).
- Take the GLASS (E).
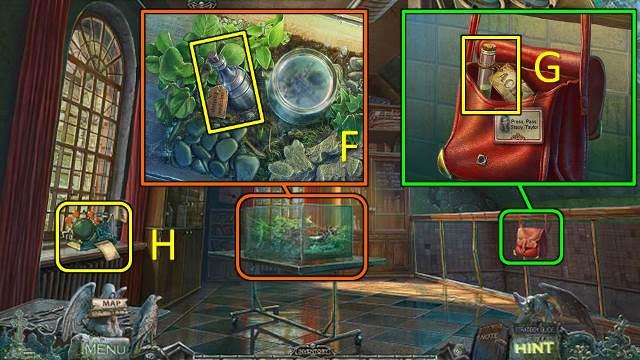
- Return to the Veterinary Room.
- Inspect the tarantula cage.
- Put the GLASS over the tarantula and take the SLEEPING MEDICINE (F).
- Inspect the bag on the right, open it and take the ACID (G).
- Click on the device on the left (H).
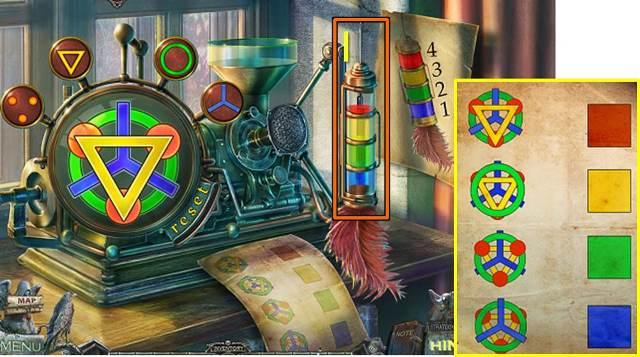
- Put the DART and SLEEPING MEDICINE on it to trigger a mini-game.
- You need to fill the syringe with the colors in the order as shown on the example. Each color can be made by adding a specific combination of the four symbols to the machine. If you make a mistake, click the reset button. You will only have to redo the layer you did wrong. Add the symbols in the following order:
- 1 Blue: blue, green, red, yellow.
- 2 Green: red, green, blue, yellow.
- 3 Yellow: green, yellow, red, blue.
- 4 Red: yellow, blue, red, green.
- Take the TRANQUILIZER DART (I).
- Go to the Lobby and play the new HOS.
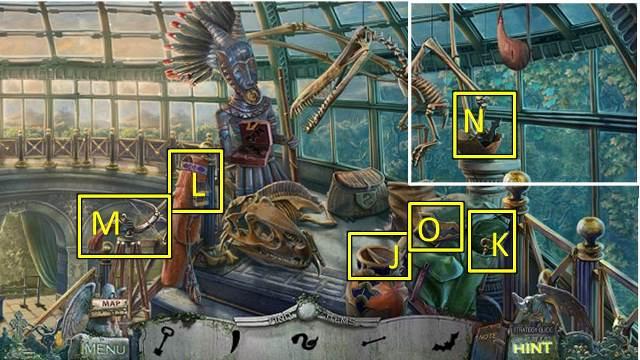
- Open the jar to take the FANG (J).
- Open the bag pocket to take the KEY (K).
- Open the lock (L) with the KEY and take an ARROW from the quiver.
- Put the ARROW on the crossbow (M) and shoot it.
- Take the BAT (N).
- Put the BAT on the bat lock (O).
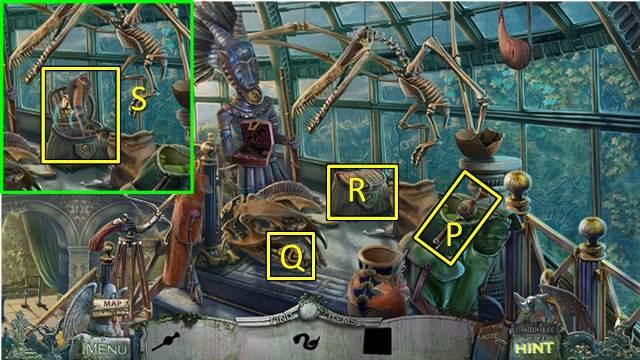
- Take the FLUTE (P).
- Put the FANG on the skull and take the GOLD SNAKE (Q).
- Unlock the snake basket with the GOLD SNAKE (R).
- Use the FLUTE to charm the snake (S) and take the ANIMAL TILE.
- Zoom into the puzzle in the middle of the room and trigger the mini-game by putting your three ANIMAL TILES on the puzzle.
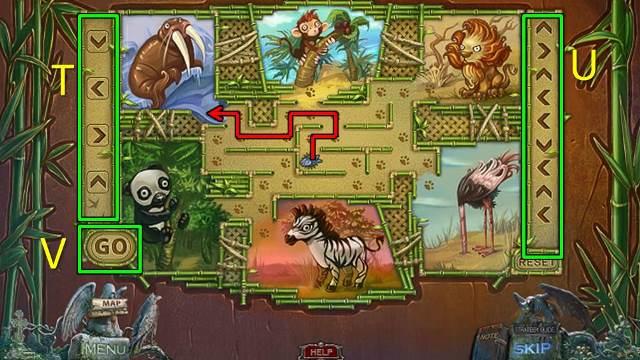
- First recreate the images of the animals by swapping the tiles around.
- Once the images have been restored, you need to send food to each of the animals in turn. Select the arrow buttons on the left (T) in a sequence that will move the correct food to the correct animal. For each animal you can only use a maximum of 10 steps. If you think you have the correct sequence (U), click Go (V) and watch the food move.
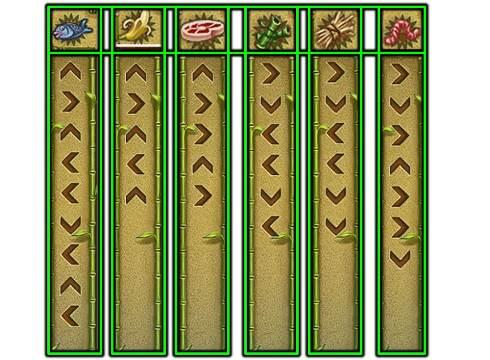
- Solutions for all animals are shown above.
- Take the GUN.
- Combine the GUN with the TRANQUILIZER DART to make a TRANQUILIZER GUN.
- Go to the Veterinary Room.
- Look over the railing and shoot the tiger with the TRANQUILIZER GUN (W).
- Go to the Tiger Room.
- Zoom into the lock and melt it with the ACID (X).
- Go back through the portal.
- Pick up the DOG CRYSTAL and read the newspaper.
Chapter 3: The Hydroelectric Plant
- Go back to the dog
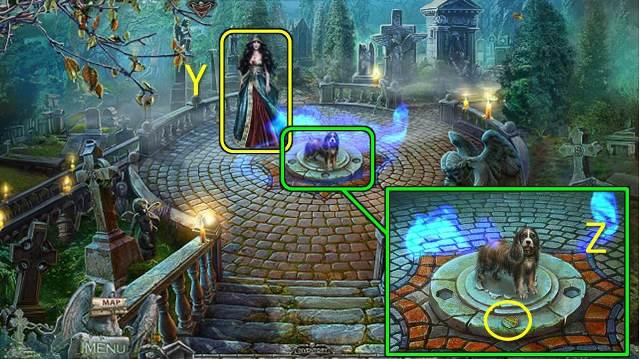
- Talk to Hina (Y).
- Zoom into the dog and put the DOG CRYSTAL down (Z).
- Go to the area marked as Worker.
- Talk to the ghost. His name is Mr. Stein and will give you the Power of Water.
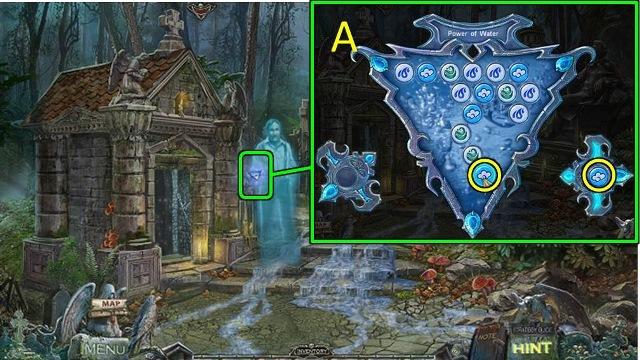
- To charge the Power of Water you need to shoot the symbols from the two canons at matching symbols in the field. You can simply shoot by clicking on the symbol you want to hit.
- Play the new HOS in the crypt.
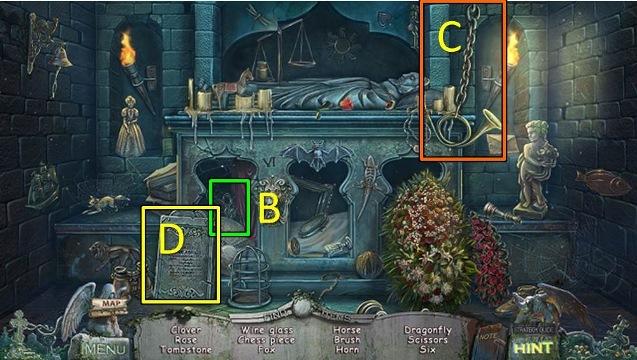
- The scissors are behind the curtain (B); pull the chain to find the horn (C).
- A TOMBSTONE (D) will be added to your inventory.
- Give the TOMBSTONE to Mr. Stein.
- Go through the portal.
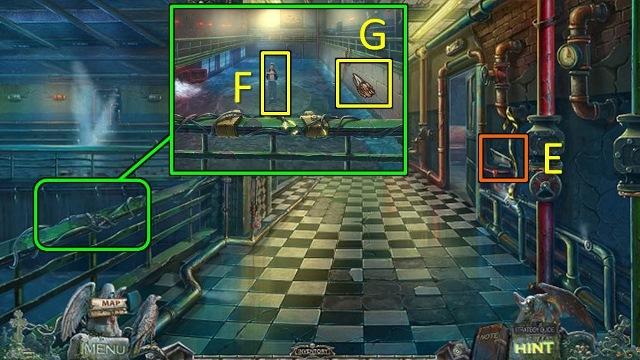
- Pick up PART OF THE DAM (E).
- Look over the railing and talk to the man (F).
- Use the Power of Water on the water to retrieve a NUTCRACKER (G).
- Go into the Restroom on the right.
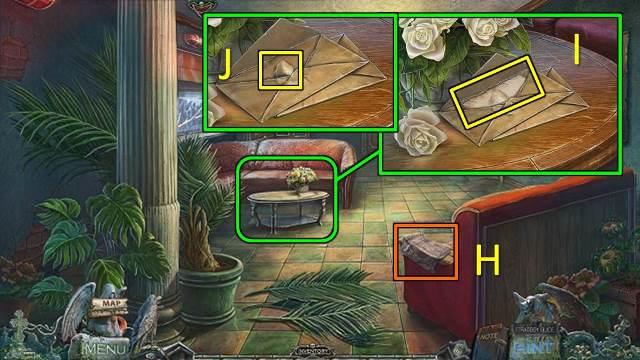
- Read the newspaper on the couch (H).
- Inspect the coffee table.
- Open the envelope and take the SHEET OF PAPER (I) and the CHIP WITH THE IMAGE OF A CAR (1/3) (J).
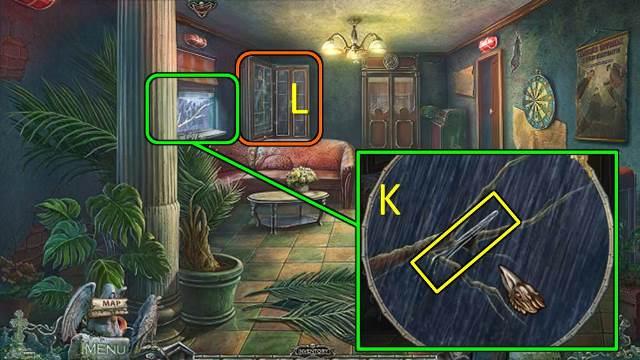
- Look through the window and use the Power of Air to retrieve the TWEEZERS (K).
- You will need to recharge the Power of Air if you want to use it again later.
- Inspect the cabinet (L) for a HOS.
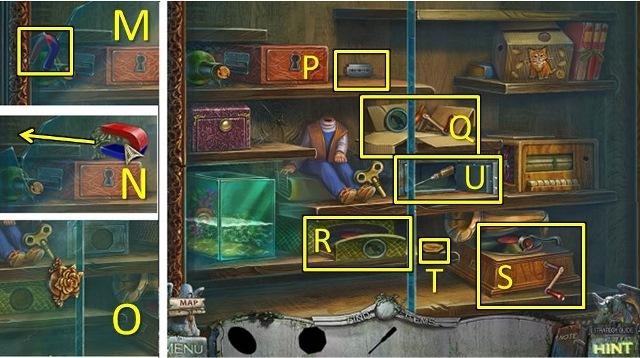
- Please note that the screenshot above shows all actions completed – this is not how it will look on your screen!
- Pick up the magnet (M) and use it on the handle.
- Carefully move the handle around the shelves to the hole in the glass (N).
- Use the HANDLE on the hole (O).
- You can now move the glass doors back and forth to access the various components.
- Pick up the BLADE (P).
- Use the BLADE on the paper box (Q) and take the HANDLE and the RAVEN.
- Open the green box with the RAVEN and take the RECORD (R).
- Put the RECORD and the HANDLE on the gramophone (S).
- Turn the handle and pick up the MEDALLION (T).
- Open the metal box with the MEDALLION and take the SCREWDRIVER (U), which will go into your inventory.
- Go right into the Canteen.
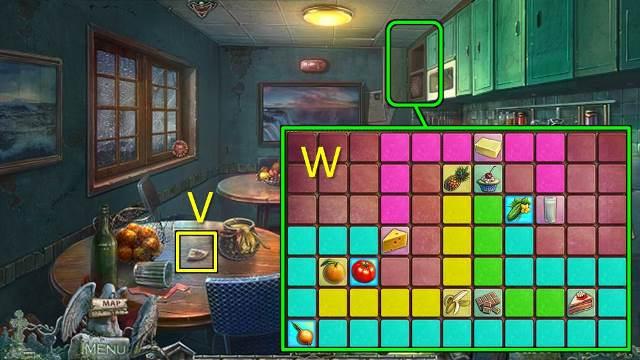
- Take the CHIP WITH THE IMAGE OF A CAR (2/3) (V) from the table.
- Zoom into the upper cabinet for a mini-game.
- Connect all items in the same food group without the paths crossing (W).
- Take the PENKNIFE.
- Zoom into the lower cabinet.
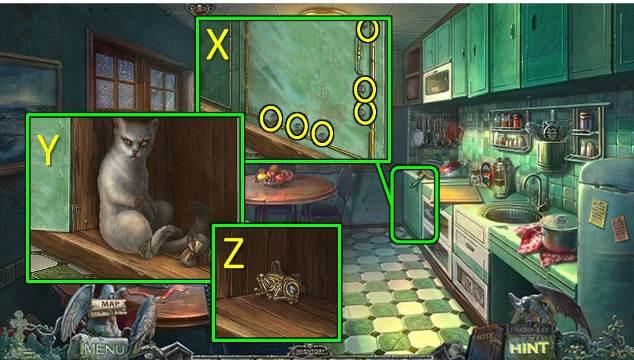
- Use the SCREWDRIVER to move each screw individually (X).
- Open the cabinet.
- Use the PENKNIFE to release the cat (Y).
- Go into the cabinet again and take the TOAD (Z).
- Go to the Restroom.
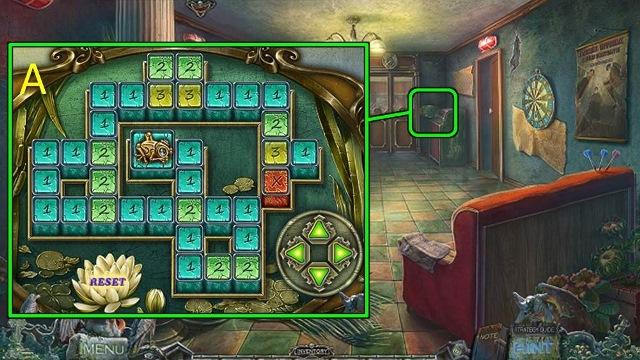
- Zoom into the elevator mechanism and use the TOAD to trigger a mini-game (A).
- Use the up (U), right (R), down (D) and left (L) arrows to move the toad to the end of the board. Each square needs to be crossed the number of times shown on the square. One possible solution is: R, 4xD, 2xR, L, R, 2xU, 7xL, 2xU, 2xR, 2xD, 4xU, 2xR, U, R, D, L, U, R, D, L, 4xR, 2xD, R, L, U, 2xD.
- Go into the elevator.
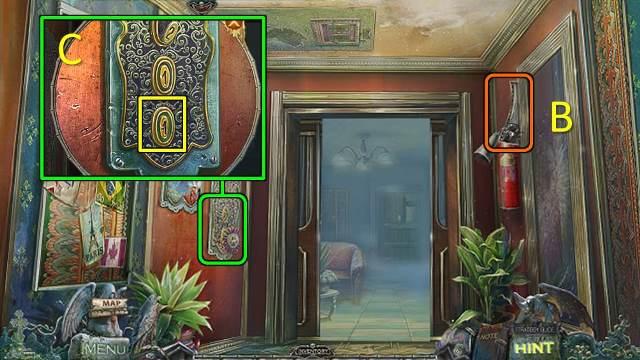
- Read the poster (B).
- Zoom into the control panel and take the medal.
- Click on the bottom button (C).
- Exit the elevator to go into the Dressing Room.
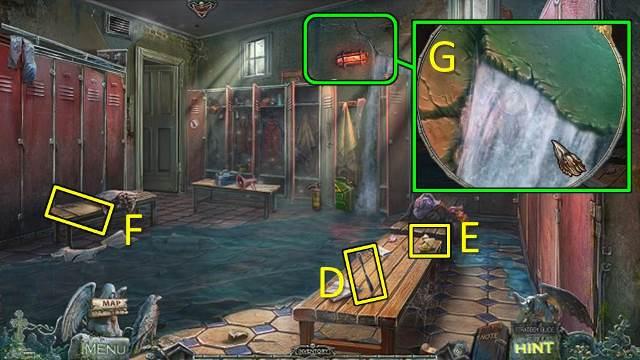
- Pick up the SYMBOL OF A KNIFE (D).
- Read the two notes (E and F).
- Inspect the crack in the wall.
- Use the Power of Water to retrieve the BUNNY (G).
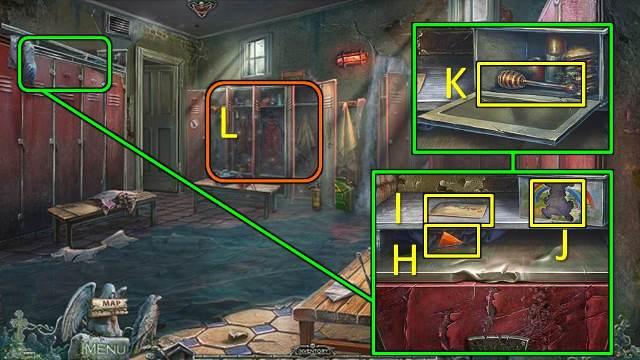
- Inspect the top of the lockers on the left.
- Take the CONTROL PANEL ELEMENT (1/4) (H) and read the note (I).
- Put the BUNNY on the lunch box (J).
- Take the HONEY DIPPER (K).
- Play the HOS (L).
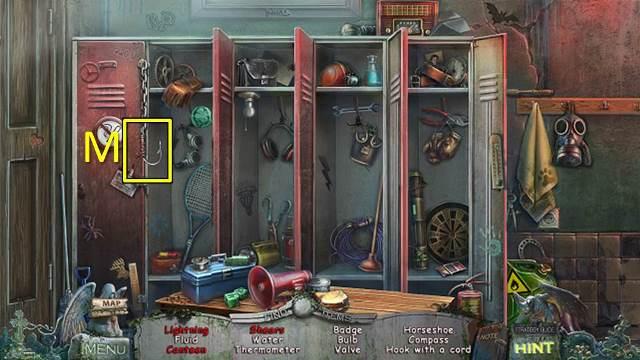
- Items shown in red are hidden behind the clothes in the lockers. You can move clothing from one locker to another to find the hidden items underneath. The screenshot shows the lockers without the clothes.
- A ROPE WITH A HOOK (M) will be added to your inventory.
- Go left into the Control Room.
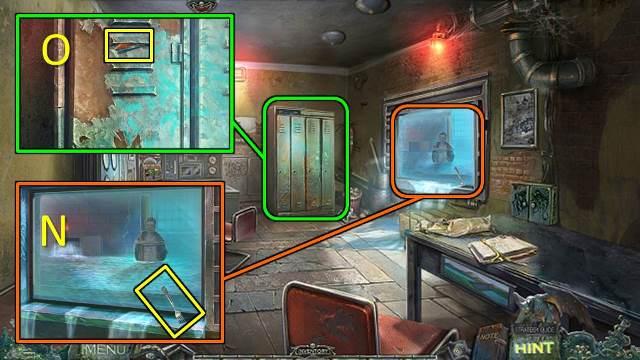
- Inspect the window and take the SYMBOL OF A FORK (N).
- Combine the SYMBOL OF A FORK with the SYMBOL OF A KNIFE to get a FORK AND KNIFE.
- Inspect the lockers and use the TWEEZERS to take the CONTROL PANEL ELEMENT (2/4) (O).
- Go back to the Elevator and use the middle button to go back to the ground floor.
- Go to the Canteen.
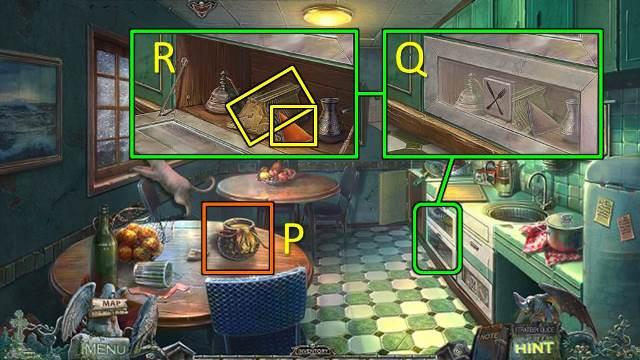
- Use the HONEY DIPPER on the jar of honey to get a HONEY DIPPER WITH HONEY (P).
- Zoom in on the cabinet and open it with the FORK AND KNIFE (Q).
- Take the CONTROL PANEL ELEMENT (3/4) and another PART OF A DAM (R).
- Combine the two PARTS OF A DAM to get a DAM.
- Take the Elevator down and go to the Control Room.
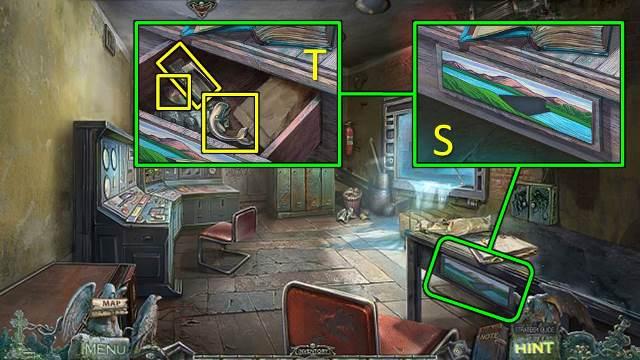
- Zoom into the desk drawer and put the DAM on the mosaic (S).
- Take the WINDOW HANDLE, WHALE and CHIP WITH THE IMAGE OF A CAR (3/3) (T).
- Go to the Parapet.
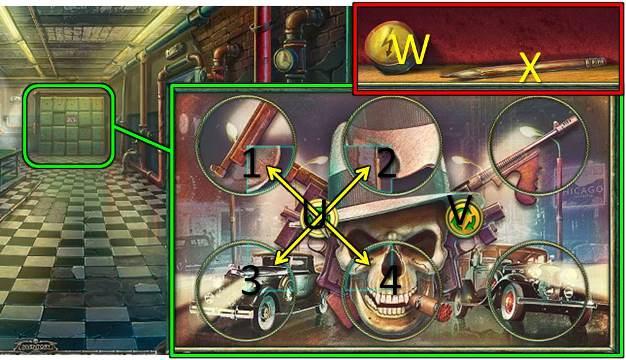
- Zoom into the lockers in the back and put the CHIP WITH THE IMAGE OF A CAR (3/3) on it to trigger a mini-game.
- Click on the circles to rotate them. You can move tiles between circles by clicking on one of the green arrow buttons (U and V) and selecting two of the four tiles surrounding the button to swap them. You can swap horizontally, vertically and diagonally.
- Take the CONTROL PANEL ELEMENT (W) and the PENCIL (X).
- Combine the PENCIL and SHEET OF PAPER to get a PENCIL AND SHEET OF PAPER.
- Take the Elevator down to the Dressing Room.
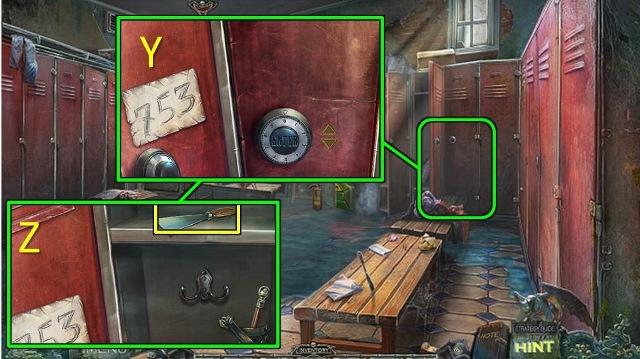
- Zoom into the locker.
- Use the PENCIL AND SHEET OF PAPER on the numbers on the left door to get the code (Y).
- Use the up arrow three times to get to the 7 and click enter.
- Use the up arrow twice to get to the 5 and click enter.
- Use the up arrow twice to get to the 3 and click enter.
- Take the SCRAPER (Z).
- Go into the Elevator.
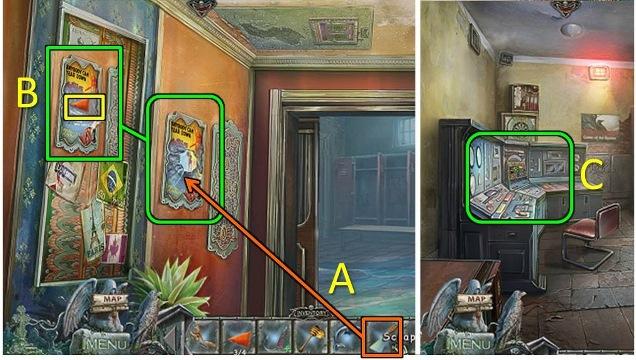
- Use the SCRAPER on the poster (A).
- Take the CONTROL PANEL ELEMENT (4/4) (B).
- Go to the Control Room.
- Access the control panel (C).
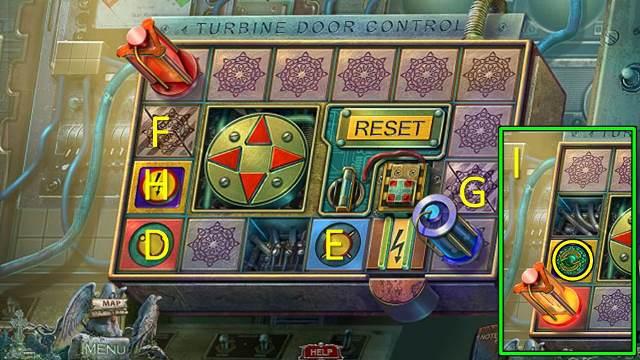
- Put the CONTROL PANEL ELEMENTS (4/4) and the separate CONTROL PANEL ELEMENT on the control panel.
- Use the arrow keys to move the lamps to the squares with matching color (D and E). The arrow keys control the direction of the red lamp, but both lamps move simultaneously but in the opposite direction. The two broken tiles (F and G) will disappear and block the way when moved. When the red lamp passes the button with the lightning bolt (H), the path for the blue button to its spot will open.
- Solution: 5xR, D, U, 5xL, D x 2, 2xR, D.
- Take the ROTATION KNOB (I).
- Go to the Elevator.
- Zoom into the ceiling hatch and activate a mini-game with the ROTATION KNOB.
- You need to move the colored gems on the inside next to the gems on the outside of the same color. Use knobs J and L to rotate the two panels, and knob K to swap tiles 2 and 4.
- From the default position, click on the knobs and tiles in the following order (note that this puzzle cannot be reset): J, Lx3, 2, K, L, K, Lx3, 4, K, Jx2, K, 5, 6, K, Lx2, 2, K, Lx2, K, 5, 3, K, Lx2, 1, 4, K, 2, 3, K, 5, 6, K, 2, J, K, 5, J, K, Lx3, K, Jx2, K, J, 1, K, L, K, 2, Jx2, Lx3.
- Take the SCISSORS (M).
- Go back into the Dressing Room and play the new HOS as before.
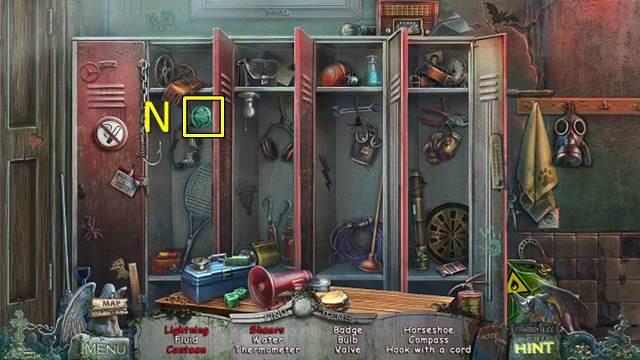
- A GREEN BALL will be added to your inventory (N).
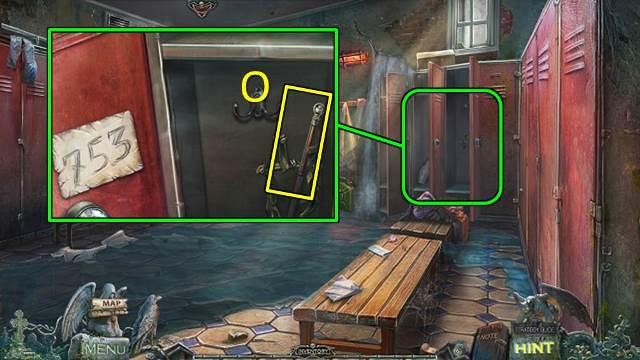
- Access the locker you opened earlier and use the SCISSORS to remove the straps.
- Take the CANE (O).
- Combine the CANE with the HOOK WITH ROPE to get a LONG HOOK.
- Go to the Rest room (you can now use your map without having to go to the elevator).
- Play the new HOS in the cabinet (again, the image is a compilation of all actions, so your screen will not look like this).
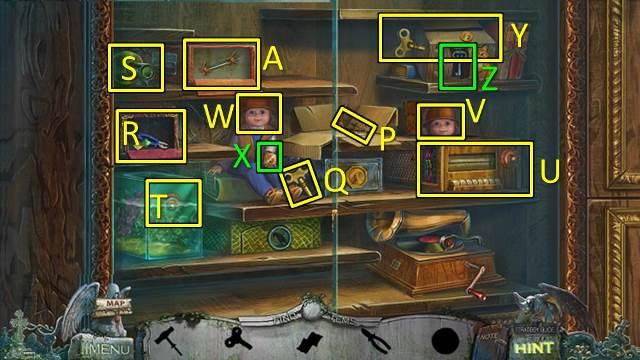
- Take the CORKSCREW (P) and the KEY (Q).
- Open the purple box and take the TAPE and the NIPPERS (R).
- Use the CORKSCREW to open the bottle (S).
- You can now take the KNOB from the fish tank (T).
- Put the TAPE on the wires and the KNOB on the radio (U).
- First turn the knob on the radio, then play the radio three more times by pushing down three of the tabs.
- Take the HEAD (V) and put it on the doll (W).
- Take the COIN (X).
- Put the COIN and the KEY on the box at the top (Y).
- Turn the key.
- Take the second KEY (Z).
- Open the red box (A) with the KEY.
- Use the NIPPERS to take the GLASS CUTTER, which will be added to your inventory.
- Go back to the Canteen.
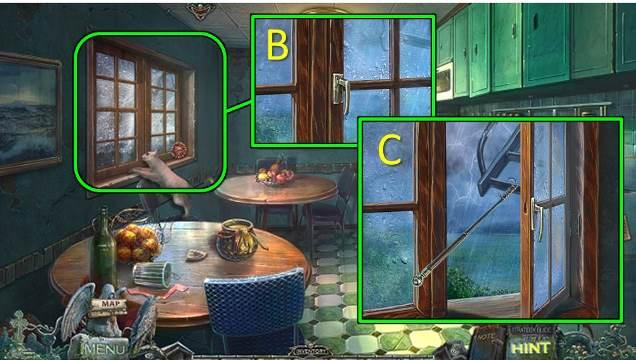
- Zoom into the window and take the puppy medal.
- Put the WINDOW HANDLE on the window and open the window (B).
- Use the LONG HOOK to grab the fire escape (C).
- Exit through the window to go to Reception.
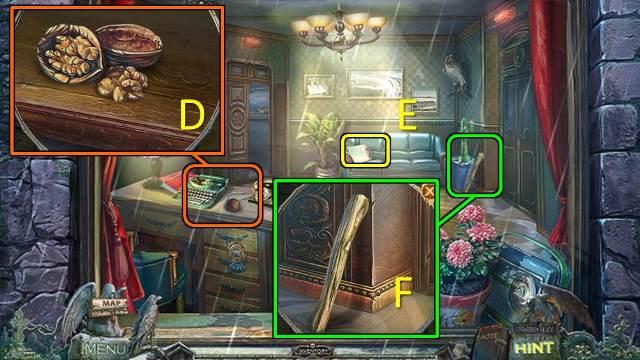
- Inspect the desk.
- Use the NUTCRACKER to crack the nut, and pick up the NUT (D).
- Look at the record on the couch (E).
- Inspect the cactus and pick up the AXE HANDLE (F).
- Go through the doors on the left to the Director’s Office.
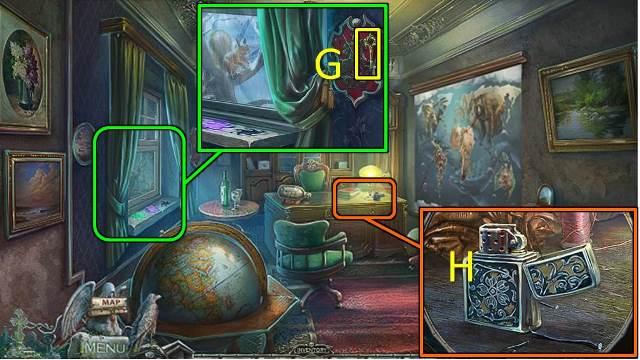
- Inspect the window and take the KEY (G).
- Inspect the desk and take the LIGHTER (H).
- Walk down to Reception.
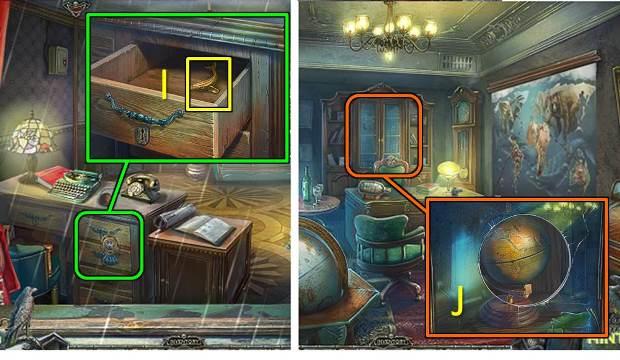
- Inspect the desk drawer and take the puppy medal.
- Open the drawer with the KEY and take the WHALE (I).
- Go to the Director’s Office.
- Zoom into the glass cabinet and cut a hole with the GLASS CUTTER (J).
- Access the globe and put the two WHALES on it to trigger a mini-game.
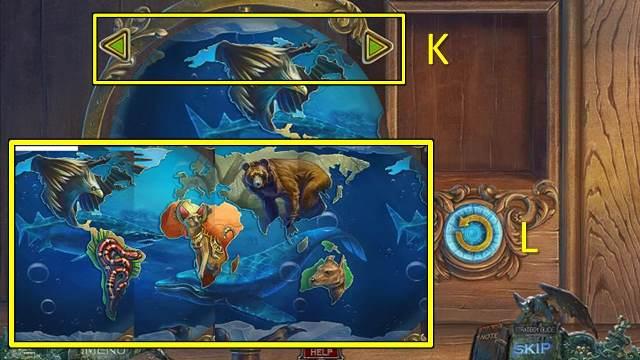
- Complete the globe jigsaw. Use the arrows (K) to turn the globe. Move a piece to the blue button (L) and click on it to rotate.
- Go into the Secret Passage.
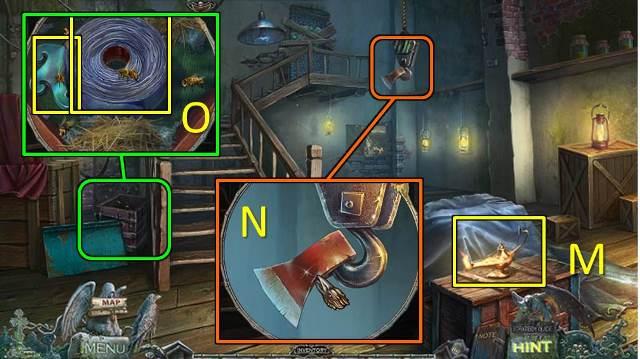
- Take the puppy medal.
- Use the LIGHTER to light the lamp (M).
- Zoom into the hook and use the Power of Air to retrieve the AXE BLADE (N).
- Combine the AXE BLADE and the AXE HANDLE to get an AXE.
- Inspect the crate on the left.
- Use the DIPPER WITH HONEY to remove the bees (O).
- Take the INSULATING TAPE and WATER SYMBOL.
- Walk down to the Director’s Office.
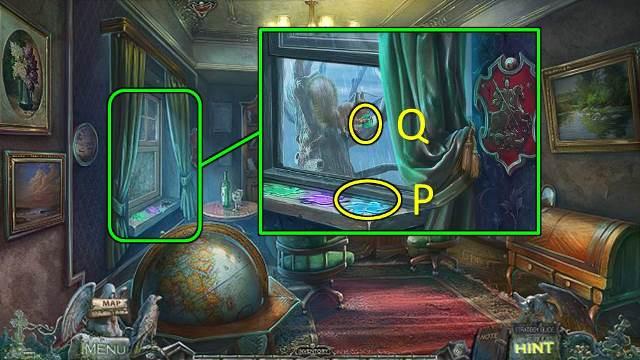
- Go to the window.
- Put the WATER SYMBOL on the window sill (P).
- Give the NUT to the squirrel.
- Take the GREEN BALL from the squirrel (Q).
- Move forward to the Secret Passage.
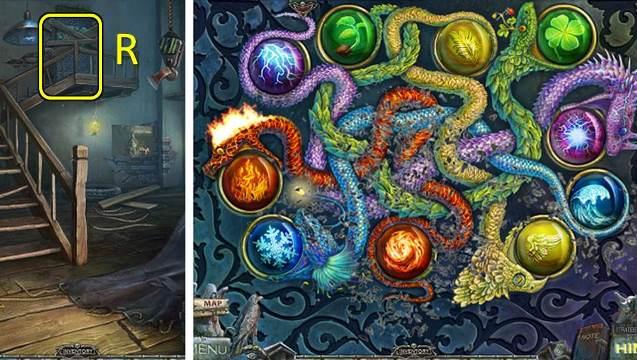
- Use the AXE on the door at the top of the stairs (R).
- Zoom into the lock and put the two GREEN BALLS on it to trigger a mini-game.
- Move the orbs around so that each snake has an orb with symbols matching its element in its mouth and tail.
- Go forward to the Storage room.
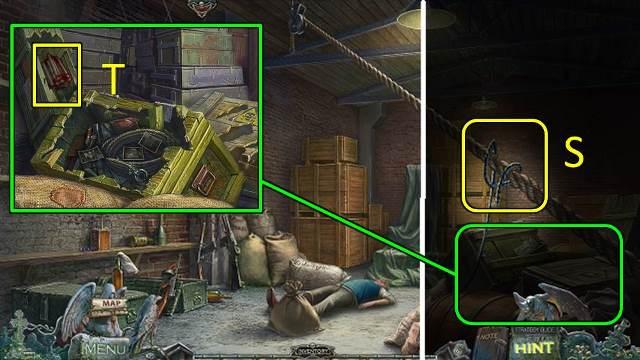
- Light the fuse on the right with the LIGHTER (S).
- Zoom into the boxes and destroy all three with your AXE.
- Take the ROPE LADDER (T).
- Go all the way back to the parapet.
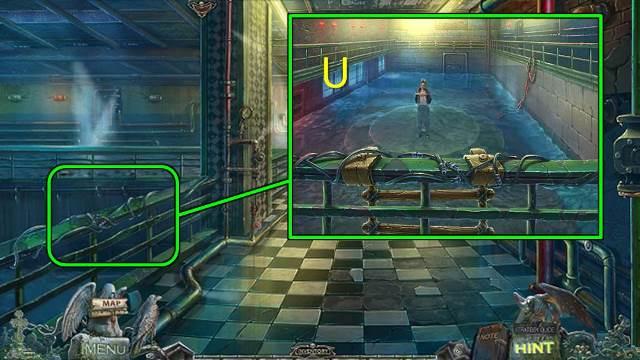
- Zoom into the barrier.
- Fix the broken wires with the INSULATING TAPE and put the ROPE LADDER down (U).
- Go down the ladder into the TURBINE ROOM.
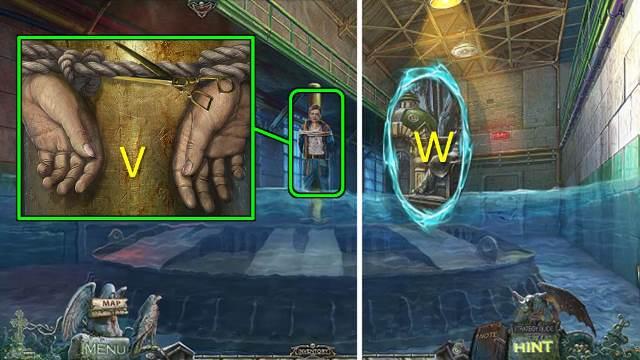
- Zoom into the worker and cut his ropes with the SCISSORS.
- Talk to the worker.
- Go through the portal.
Chapter 4: The Middle Ages
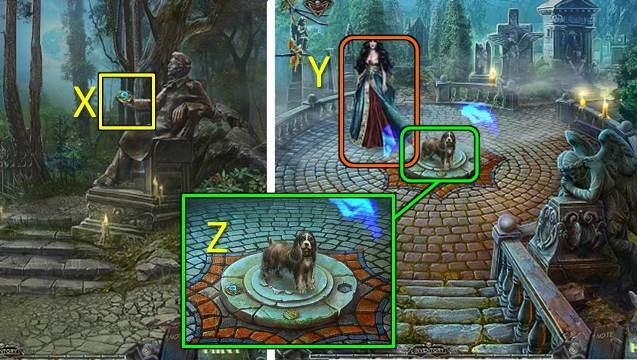
- Take the DOG CRYSTAL from the worker (X).
- Go back to the dog and talk to Hina (Y).
- Zoom into the dog and put the DOG CRYSTAL down (Z).
- Go left to the area called Witch.
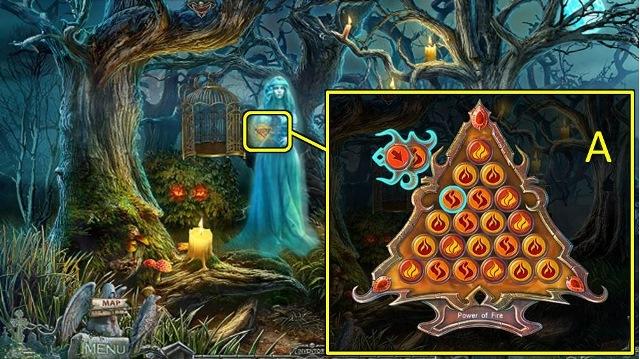
- Talk to the Ghost. Her name is Lady Hanson.
- Take the Power of Fire and play the mini-game to charge it (A).
- Shoot the symbols into the triangle to make rows (not clusters) of three matching symbols. Continue until you’ve cleared the triangle entirely.
- Go to the Journalist area.
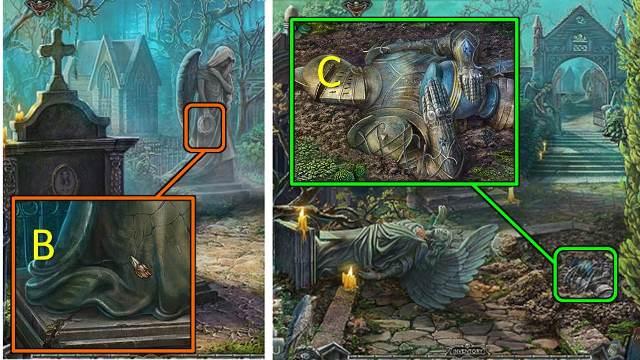
- Zoom into the statue and use the Power of Earth to retrieve WIRE CUTTERS (B).
- Go to the Passage.
- Zoom into the flowerbed and use the WIRE CUTTERS to remove the wires from the statue.
- Move both the statue’s hands and take the ASHES (C).
- Return to the Witch
- Give her the ASHES.
- Go through the portal.
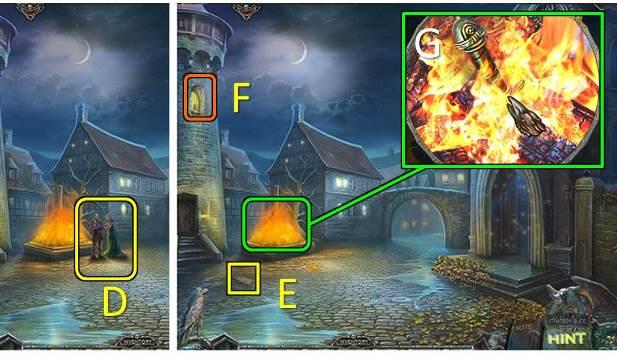
- Talk to the people (D).
- Pick up the note (E).
- Zoom into the tower (F) window for another puppy medal.
- Zoom into the fire and use the Power of Fire to retrieve a BLUNT KNIFE (G).
- Play the HOS in the church.
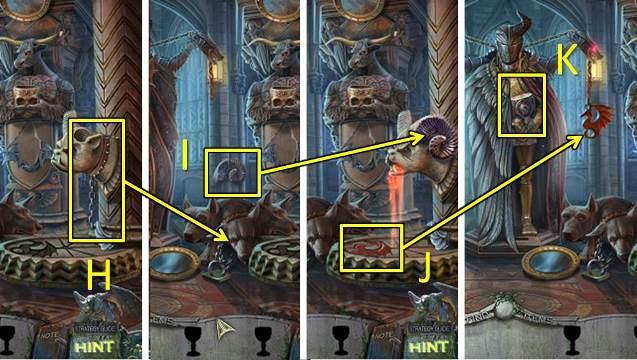
- Take the COLLAR and put the COLLAR on the dog’s middle head (H).
- Take the HORN and put the HORN on the gargoyle (I).
- Close the gargoyle’s mouth.
- Pick up the DRAGON and put the DRAGON on the chain (J).
- Take the CUP (K).
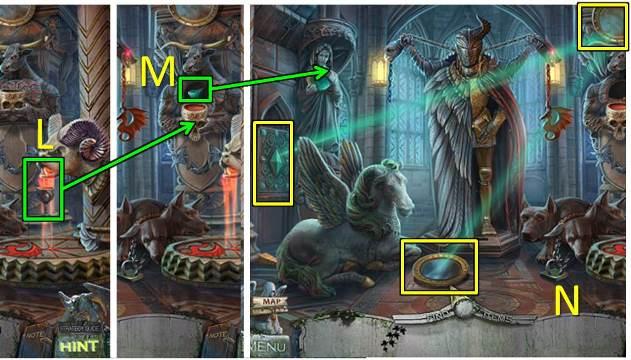
- Open the gargoyle’s mouth again and put the CUP under it to get a CUP WITH LAVA (L).
- Put the CUP WITH LAVA on the skull; take the GEM and put the GEM on the broken glass sphere (M).
- Pull the mirror at the top down and move the mirror on the bottom until the light shines on the wall (N).
- Take the IVY.
- Move forward to the Street.
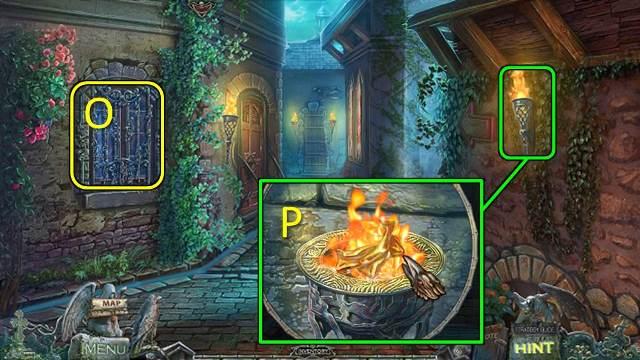
- Look through the window (O).
- Zoom into the torch and use the Power of Fire to retrieve a PIECE OF THE ROSE (P).
- Go right to the Alley.
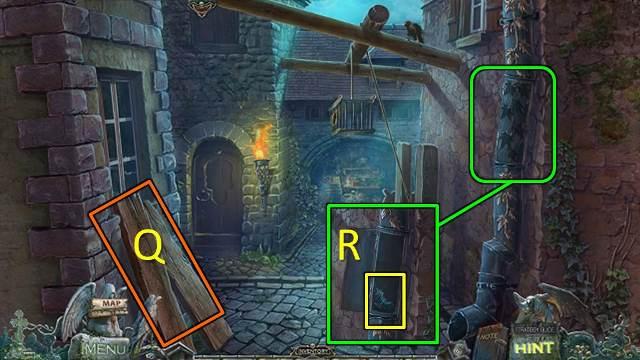
- Pick up the PLANKS (Q).
- Put the IVY on the drainpipe and take the BAT (R).
- Play the HOS in the back.
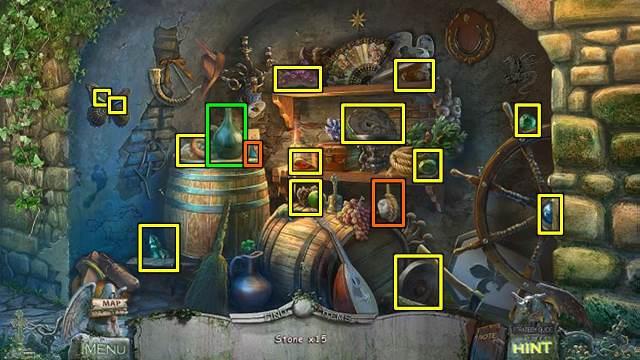
- You need to find 15 stones. Cut the rope with the glass shard (orange); turn the ship’s wheel; remove the green bottle (green).
- A WHETSTONE will be added to your inventory.
- Combine the WHETSTONE with the BLUNT KNIFE to get a KNIFE.
- Return to the Square.
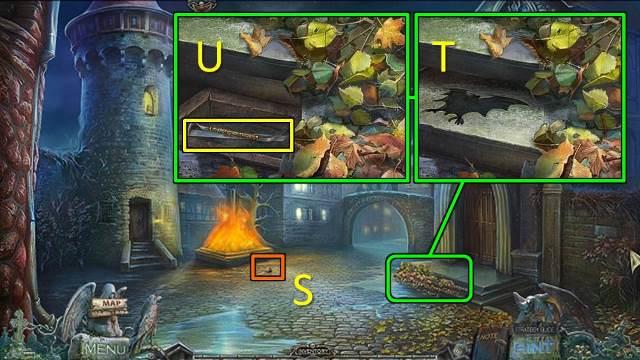
- Pick up the second PIECE OF THE ROSE (S).
- Combine the two PIECES OF THE ROSE to get a ROSE.
- Zoom into the church steps and put the BAT on the step (T).
- Take the CROWBAR and the PICTURE PIECE (U).
- Go to the Alley.
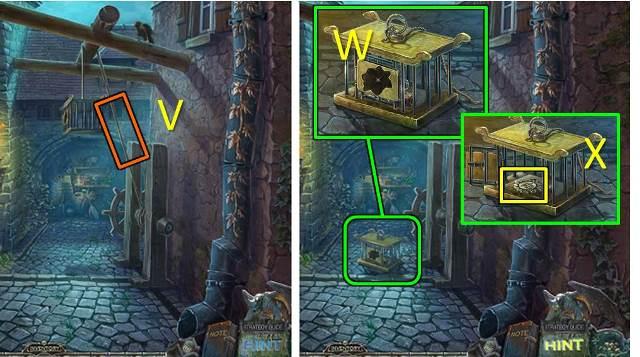
- Use the KNIFE to cut through the rope (V).
- Zoom into the cage and open it with the ROSE (W).
- Take the SUN (X).
- Go to the Street.
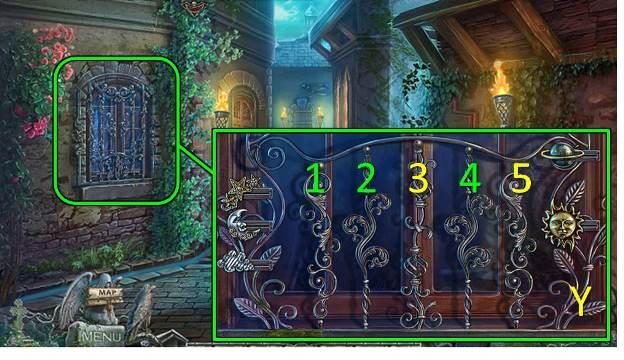
- Zoom into the window and put the SUN on the bars to trigger a mini-game (Y).
- You need to remove all bars, but some bars affect others. From the starting position, only click bars 1, 2 and 4.
- Go through the window into Fiona’s House.
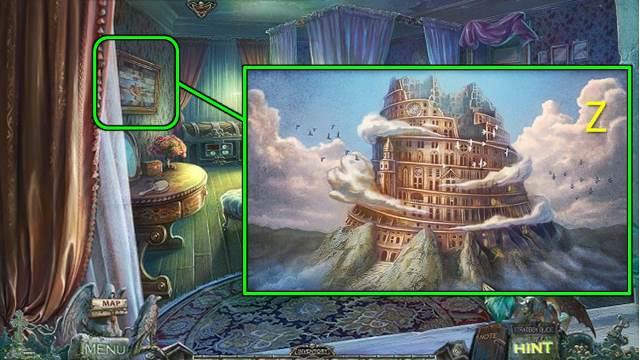
- Zoom into the painting and put the PICTURE PIECE on it to trigger a mini-game (Z).
- Restore the picture by swapping strips around. Drag the strips left or right to align the pieces.
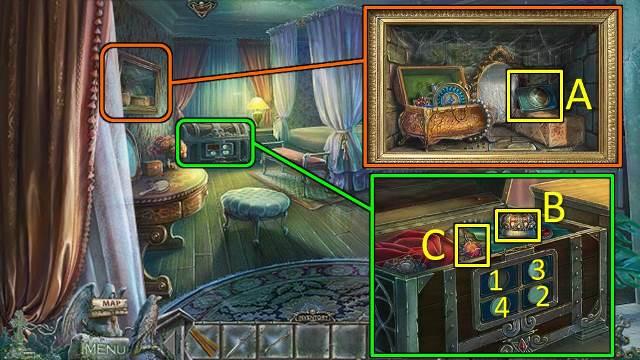
- Zoom into the safe and take the puppy medal and the MOON (A).
- Zoom into the locked chest and put the MOON on it.
- Click the moon buttons in the order shown in the screenshot.
- Take the crown MEDALLION (B) and the other medallion (C).
- Note: if you take the medallion before the crown you will need to go back and get the crown once you’re out of prison.
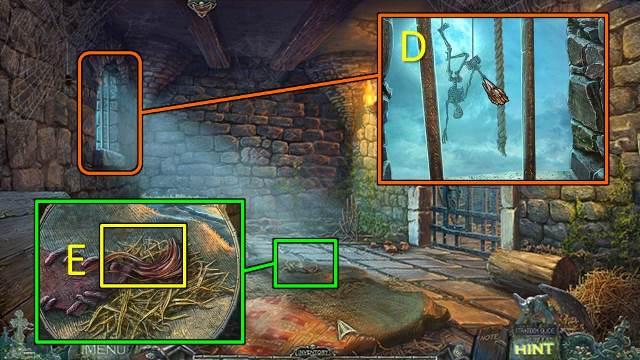
- Look through the window and pull the rope.
- Use the Power of Air to retrieve the HAMMER (D).
- Move the corner of the mattress and zoom into it.
- Pick up the HAIR (E).
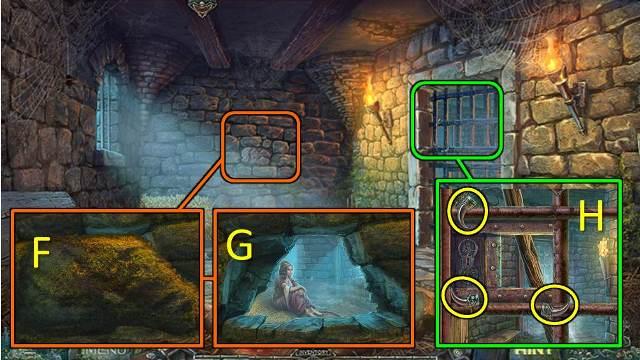
- Zoom into the wall (F).
- Remove the stone with the CROWBAR.
- Talk to Fiona (G).
- A HAIRPIN will be added to your inventory.
- Look through the door and take the CLAWS (H).
- Return to the cell.
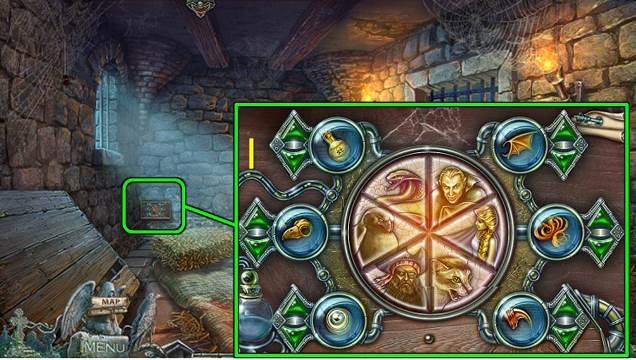
- Move the bale of straw and zoom into the puzzle.
- Put the CLAWS and HAIR on the puzzle to trigger a mini-game (I).
- First move the outer images to match them with the character they belong to.
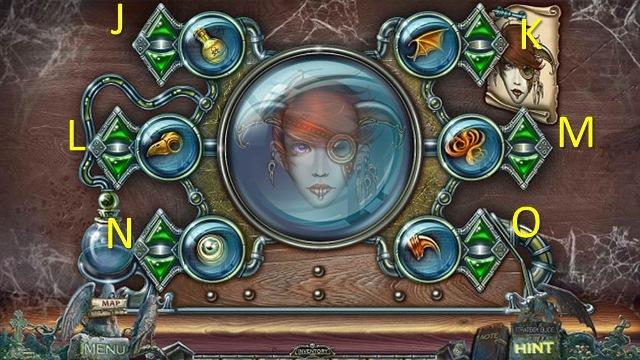
- For the second step, use the green arrows to scroll through the features until you’ve recreated the image on the right.
- Using only the up arrows, click the arrows in the following order: Jx3, Kx1, Lx1, Mx3, Nx3, Ox2.
- Take the SLEEPING POTION.
- Look through the door.
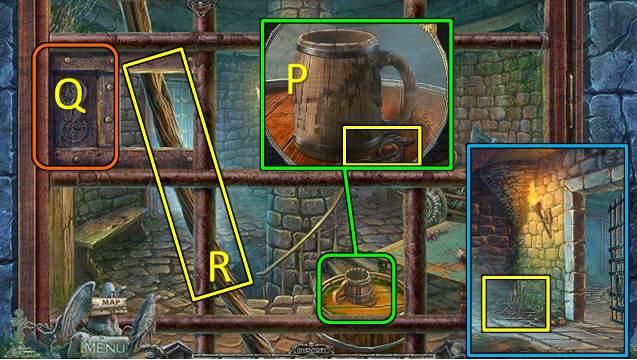
- Zoom into the mug.
- Put the SLEEPING POTION in the mug.
- Zoom into the barrel again and take the BIRD (P).
- Open the lock with the HAIRPIN (Q).
- Take the STICK (R).
- Go back to the cell.
- Put the STICK with the other sticks (S).
- A BROOM will be added to your inventory.
- Go into the Guard room and exit to the Square.
- Play the new HOS.
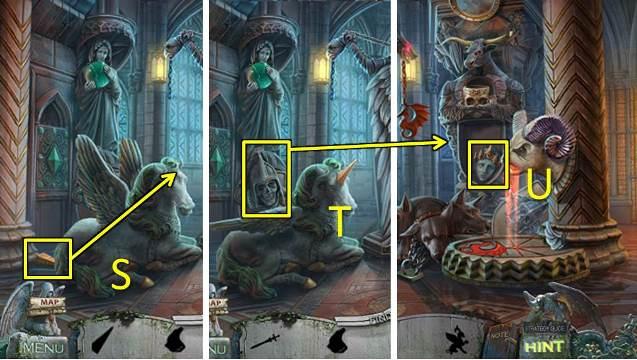
- Pick up the HORN and put it on the unicorn (S).
- Take the SKULL and put it on the shield (T).
- Take the HEAD (U).
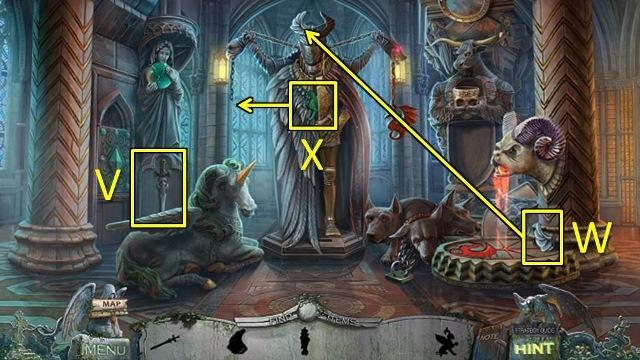
- Put the HEAD on the other shield and take the SWORD (V).
- Take the WING and put it on the helmet (W).
- Take the GRIFFIN and hang it from the chain (X).
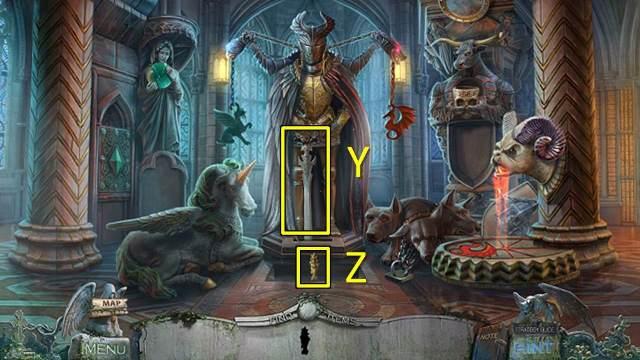
- Give the SWORD to the statue (Y).
- Take the DOLL (Z).
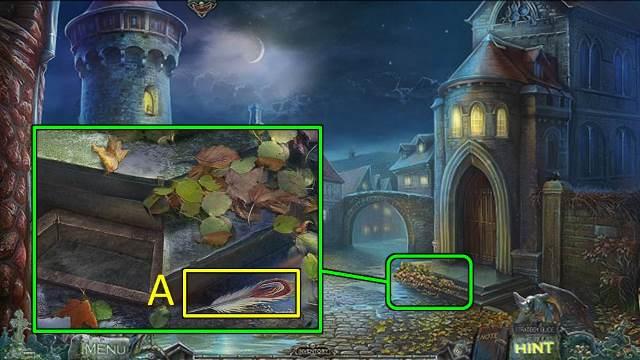
- Zoom into the church steps and use the BROOM three times.
- Pick up the PEN.
- Go to Fiona’s House and take the crown MEDALLION from the chest, if you didn’t do so before.
- Go to the Alley and play the new HOS.
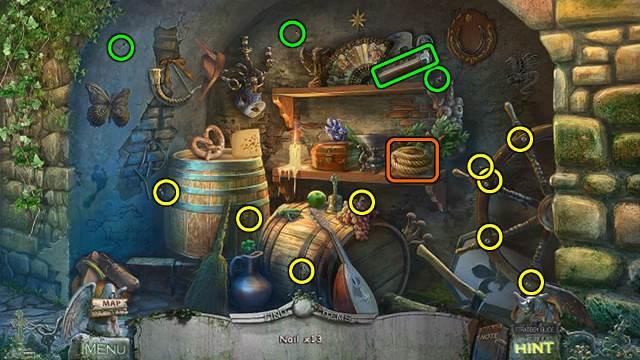
- You need to find 13 nails. One nail is under the rope (orange). Use the hammer to take two nails from the wall and one from the top shelf (green).
- NAILS will be added to your inventory.
- Combine the HAMMER and NAILS to get a HAMMER AND NAILS.
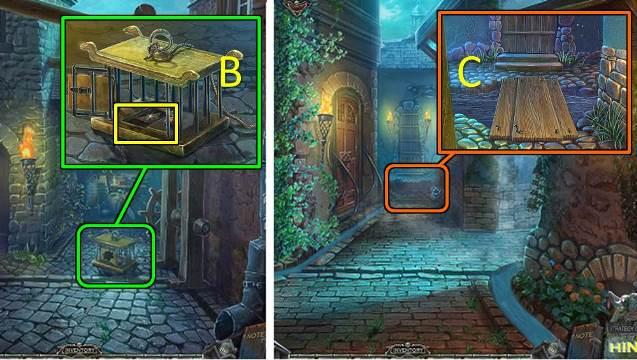
- Zoom into the cage.
- Put the BIRD in the cage and take the ALL-SEEING EYE (B).
- Go to the Street.
- Zoom into the water and take the puppy medal.
- Put the PLANKS over the water and fix them into place with the HAMMER AND NAILS (C).
- Exit the zoom, open the door and go forward to Hanson’s.
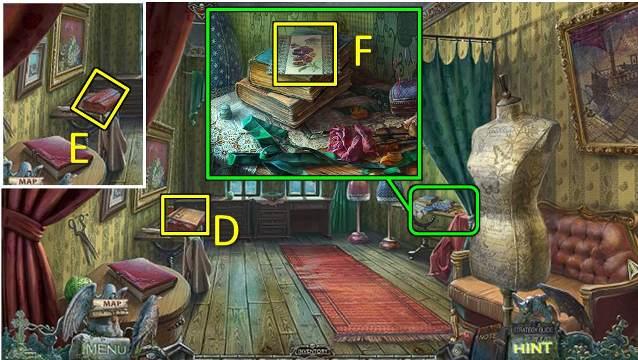
- Pick up the note about Shakespeare (D).
- Use the KNIFE to cut a RAG from the bolt of fabric (E).
- Zoom into the side table and take the puppy medal.
- Move the top two books to read another note (F).
- Go back to the Street.
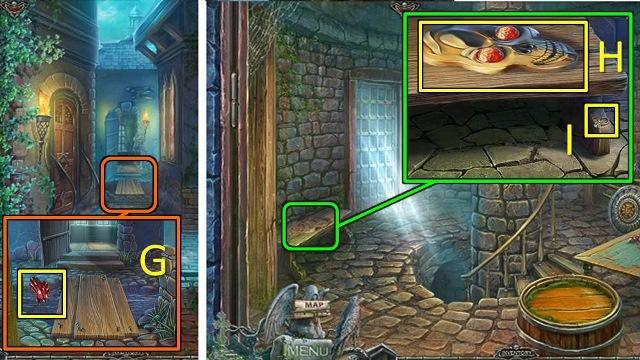
- Zoom into the puddle and dip the RAG in the water to get a WET RAG (G).
- Go to the Guard room.
- Zoom into the bench and clean it with the WET RAG.
- Pick up the SKULL (H) and the RING (I).
- Combine the RING with the MEDALLION to get a CROWN.
- Go to the Alley
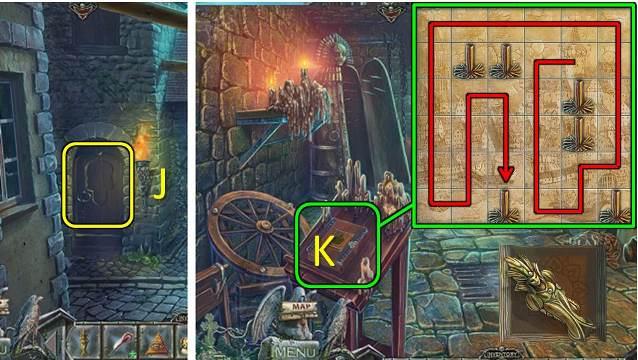
- Put the SKULL on the door (J).
- Go through the door into the Chamber.
- Zoom into the book and put the CROWN on it for a mini-game (K).
- Click on any tile to start the game, then use the arrows to make the witch fly over all the tiles.
- Take the second DOLL (L).
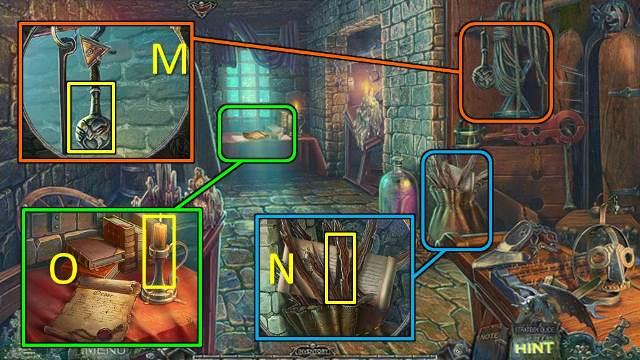
- Zoom into the torture instruments, put the ALL-SEEING EYE on it and take the MACE (M).
- Zoom into the bag of wood, take the KINDLING and read the note (N).
- Zoom into the table in the back and put the KINDLING in the flame to get HOT KINDLING (O).
- Go to Hanson’s.
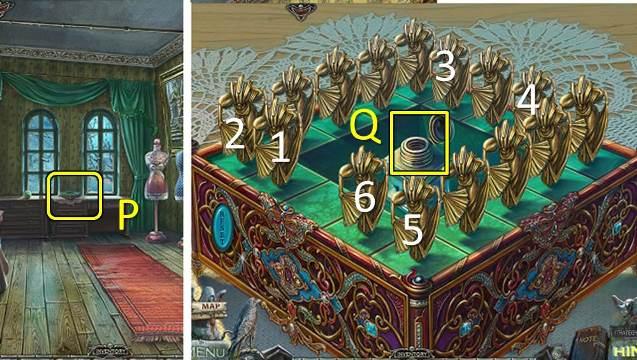
- Zoom into the table in the back (P) and trigger the mini-game with the two DOLLS.
- Click on the dolls in the order shown in the screenshot to make them all curtsey.
- Take the INK (Q).
- Combine the INK with the PEN to get a PEN AND INK.
- Go to the Chamber.
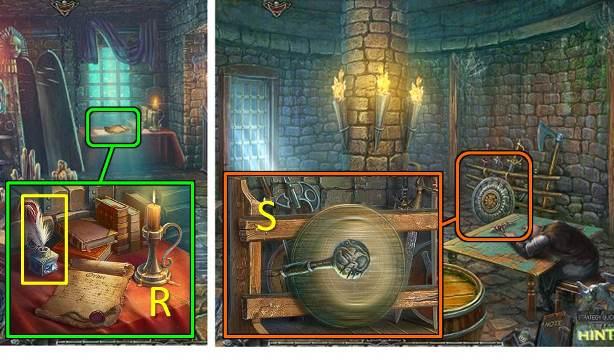
- Zoom into the table in the back.
- Put the PEN AND INK on the table and click on the pen to sign the RELEASE ORDER (R).
- Go to the Guard room.
- Zoom into the weapon rack and use the MACE on the shield to wake the guard (S).
- Talk to the guard and give him the RELEASE ORDER.
- The KEY TO FIONA’S cell is added to your inventory.
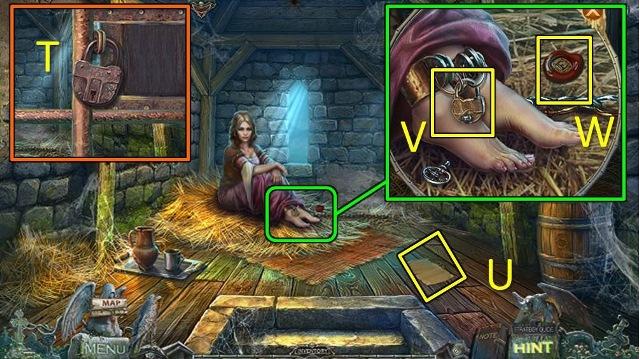
- Go to Fiona’s cell and open the lock with the KEY TO FIONA’S CELL (T).
- Pick up the note (U).
- Zoom into Fiona’s feet and open the lock with the KEY TO FIONA’S CELL (V).
- Pick up the SEALING WAX (W) and combine it with the HOT KINDLING to get MELTED WAX.
- Put the MELTED WAX on the lock on Fiona’s feet and turn the key.
- Talk to Fiona and walk down.
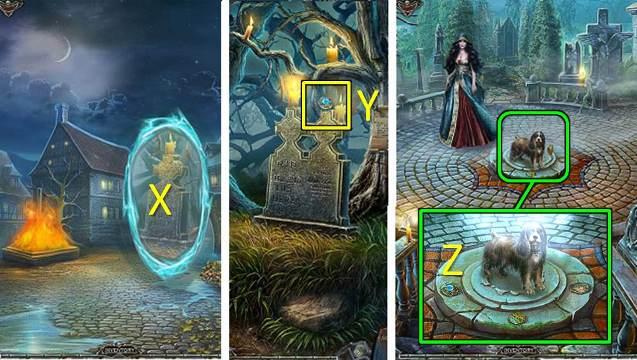
- Go through the portal (X).
- Pick up the DOG CRYSTAL (Y).
- Go to the dog.
- Zoom into the dog and put the DOG CRYSTAL down (Z).
- Talk to Hina.
- Go through the portal.
Bonus Chapter (Collector’s Edition Only)
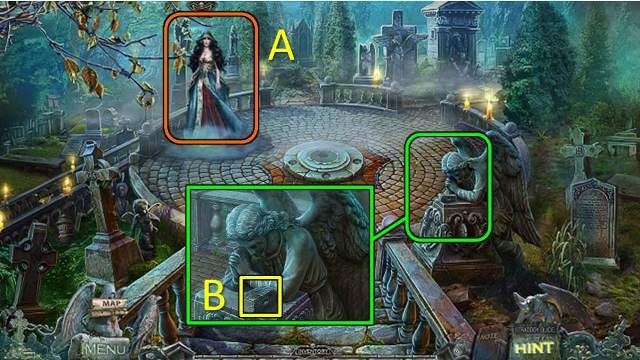
- Talk to Hina (A).
- Inspect the statue on the right and take the HAMMER HEAD (B).
- Go forward.
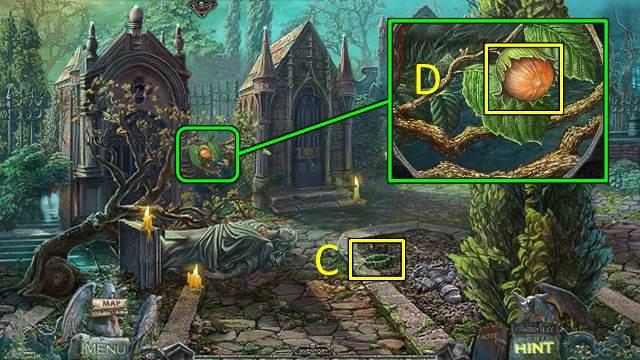
- Take the COLLAR (C).
- Zoom into the tree and take the NUT (D).
- Go forward.
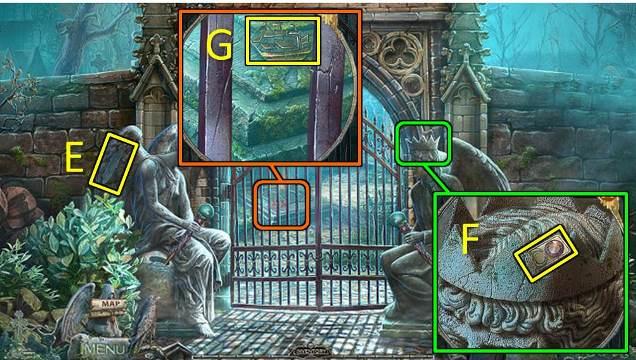
- Take the ANGEL FEATHER (1/4) (E).
- Zoom into the right statue and take the CHIP (1/3) (F).
- Look through the gate and use the Power of Air to retrieve the SHIP SYMBOL (G).
- Walk down twice.
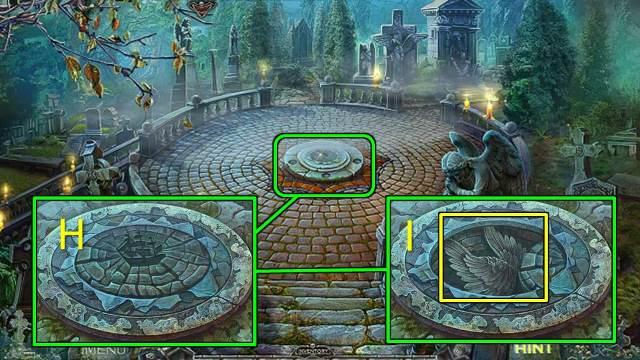
- Zoom into the ground in the center.
- Put the SHIP SYMBOL on the ground (H).
- Take the ANGEL WINGS (I).
- Go left.
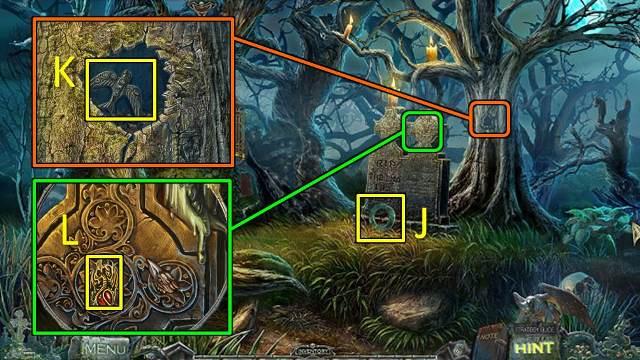
- Take the PART OF A GATE LOCK (J).
- Zoom into the hollow tree.
- Take PART OF THE BIRD LOCK (K).
- Zoom into the tombstone and use the Power of Earth to retrieve a PART OF A GATE LOCK (1/2) (L).
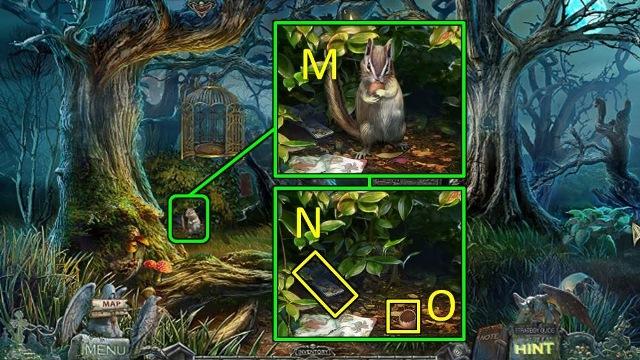
- Zoom into the squirrel and give him the NUT (M).
- When the squirrel is gone, take the CHIP (2/3) (N) and the NUTSHELL (O).
- Play the HOS.
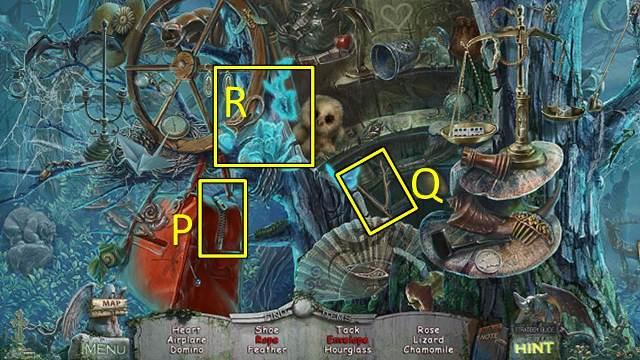
- The envelope is inside the bag (P); use the stick (Q) to remove the butterflies (R) so you can take the rope.
- You receive a LONG ROPE.
- Walk down once and go right.
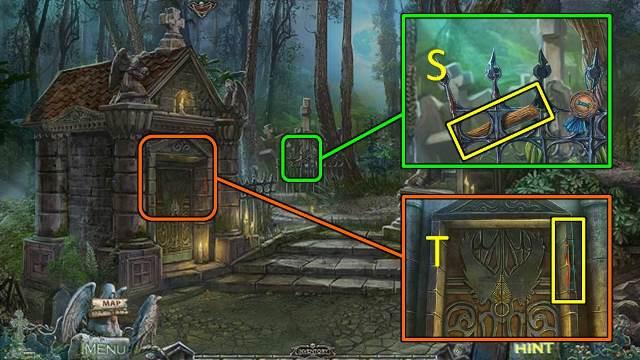
- Zoom into the fence.
- Take the puppy medal and the WOODEN HANDLE (S).
- Combine the WOODEN HANDLE with the HAMMER HEAD to get a HAMMER.
- Zoom into the crypt door and take the MAGIC RIBBON (T).
- Go to the Passage.
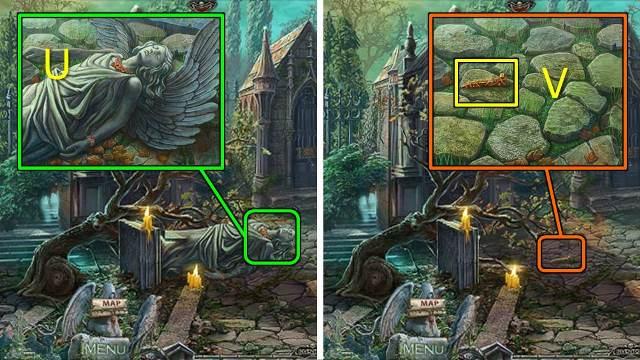
- Zoom into the statue and give her her ANGEL WINGS (U).
- Zoom into the ground and take the CHISEL (V).
- Walk down.
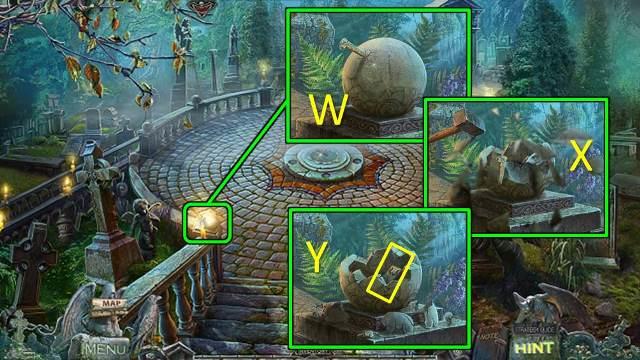
- Zoom into the stone wall.
- Put the CHISEL on the stone (W) and use the HAMMER to break it (X).
- Take the CHIP (3/3) (Y).
- Go forward.
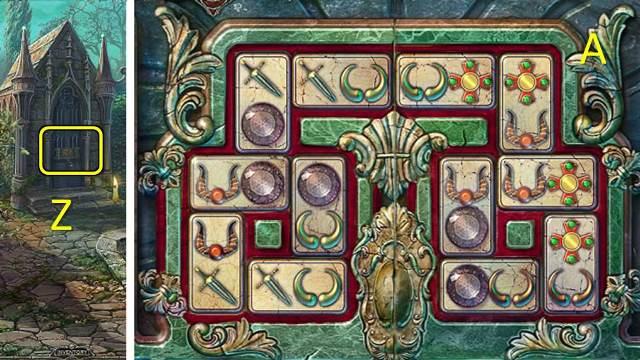
- Zoom into the crypt (Z) and put the CHIPS (3/3) on the door to trigger a mini-game (A).
- This game is like dominoes: you need to place all the tiles into the slot so that the images on adjacent tiles match.
- Go into the crypt to the Underground Cave.
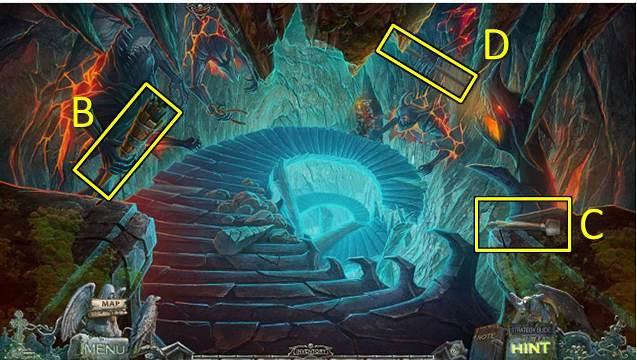
- Take the EXTINGUISHED TORCH (B) and the SCRAPER (C).
- Use the Power of Air to retrieve the STICK (D).
- Combine the STICK with the MAGIC RIBBON to get a RIBBON ON A STICK.
- Play the HOS.
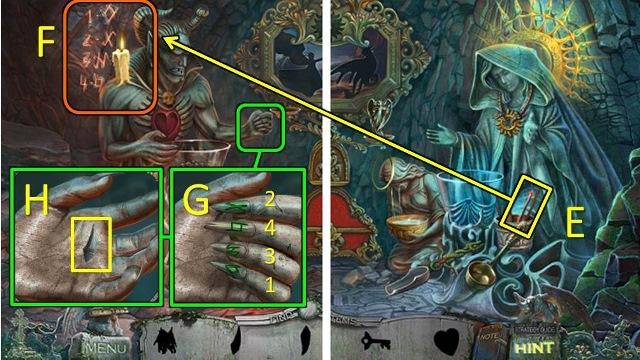
- Pick up the burning ember (E).
- Use the burning ember to light the candle (F).
- Zoom into the demon’s hand and click on the fingers in the order revealed by the candle (G).
- Take the stone tooth (H).
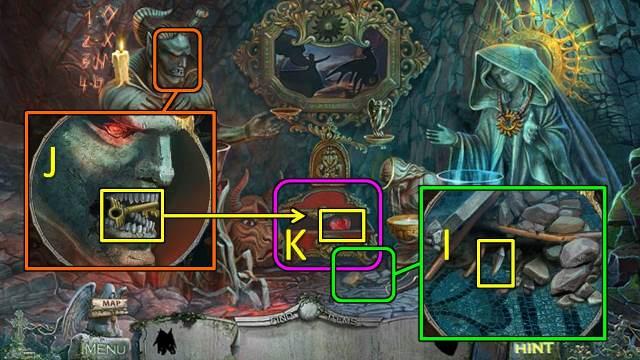
- Zoom into the rubble on the floor.
- Move the stones until you find the second stone tooth (I).
- Zoom into the demon’s head and put the two stone teeth in his mouth.
- Take the metal key (J).
- Use the metal key to open the red chest.
- Take the heart (K).
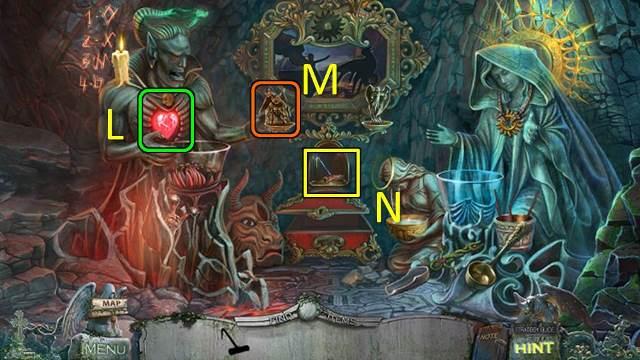
- Put the heart on the demon’s chest (L).
- Take the metal demon figurine and put it on the scales (M).
- Take the HOOK (N).
- Combine the HOOK with the LONG ROPE to get a new HOOK.
- Go to the Worker area.
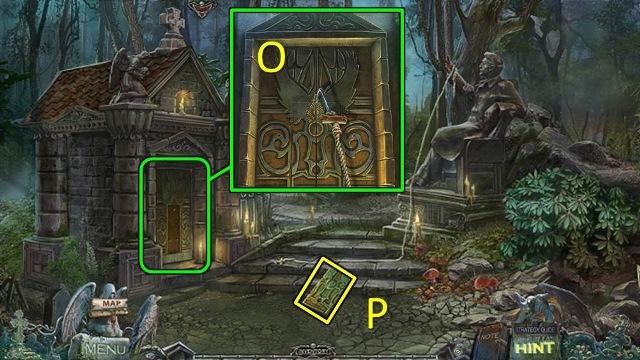
- Zoom into the crypt and put the HOOK (with the rope attached) on the door (O).
- Click on the rope to attach it to the statue.
- Click on the statue’s hand to pull the rope.
- Take the TOMB PLATE (P).
- Go to the Underground Cave.
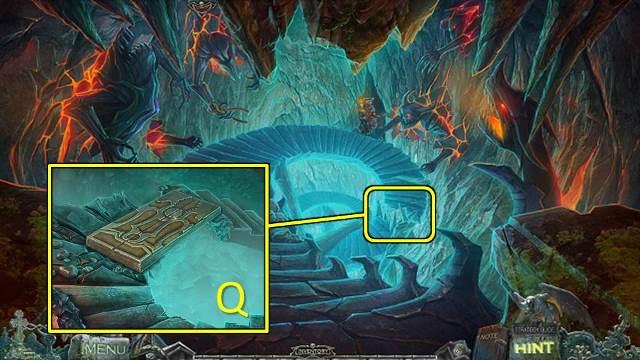
- Zoom into the hole in the staircase and put the TOMB PLATE down (Q).
- Go down the stairs into the THICKET.
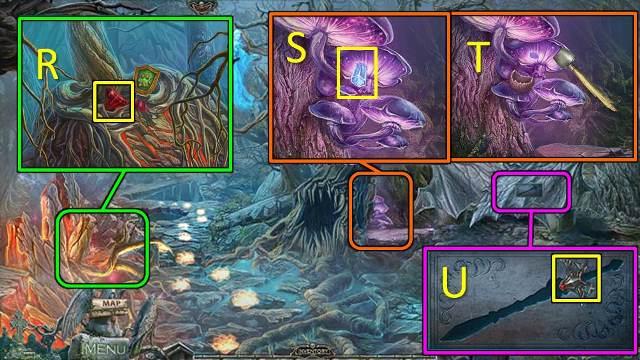
- Zoom into the branches.
- Move the branches aside and take the puppy medal and the RUBY EYE (R).
- Zoom into the purple mushrooms and take the DIAMOND TOOTH (S).
- Put the NUTSHELL under the mushrooms and use the SCRAPER to collect MUSHROOM DUST (T).
- Zoom into the barrier on the right and take the SWORD HILT (U).
- Move forward to the Castle Gate.
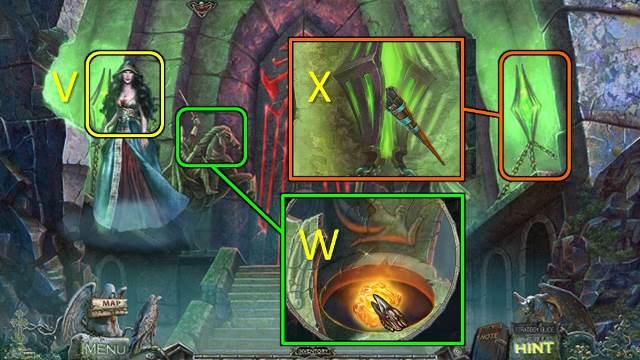
- Talk to Hina (V).
- Zoom into the left knight and use the Power of Fire to retrieve the FIREBALL (W).
- Zoom into the green flame and light the EXTINGUISHED TORCH to get a BURNING TORCH (X).
- Walk down.
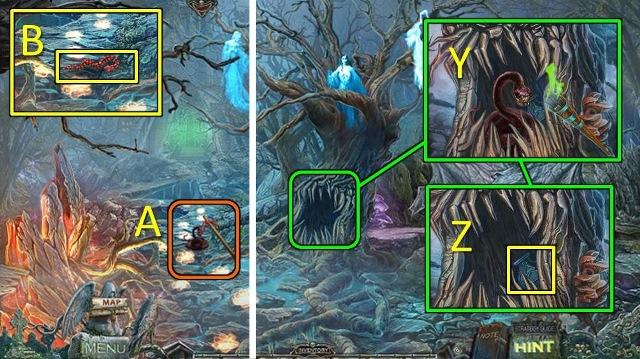
- Zoom into the hollow tree.
- Use the BURNING TORCH to scare away the snake (Y).
- Take the JAR (1/2) (Z).
- Back at the Thicket, use the RIBBON ON A STICK on the snake (A) to turn it into a SNAKE SIGN (B).
- Go to the Castle Gate.
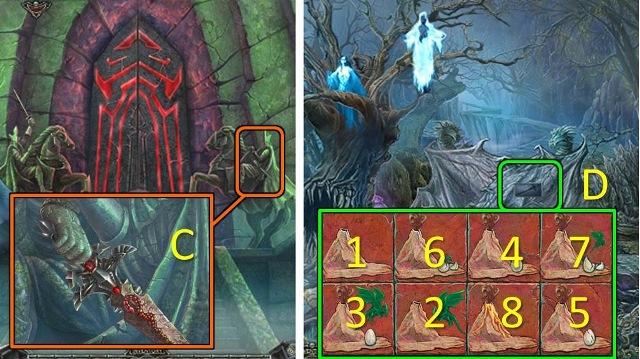
- Zoom into the right knight and put the SWORD HILT and SNAKE SIGN on his sword (C).
- Pick up the SWORD.
- Walk down.
- Zoom into the barrier on the right.
- Put the SWORD in the indentation for a mini-game (D).
- Click on the tiles in the correct order to tell the story of the dragon egg. The order is shown in the screenshot.
- Walk right to the Lake.
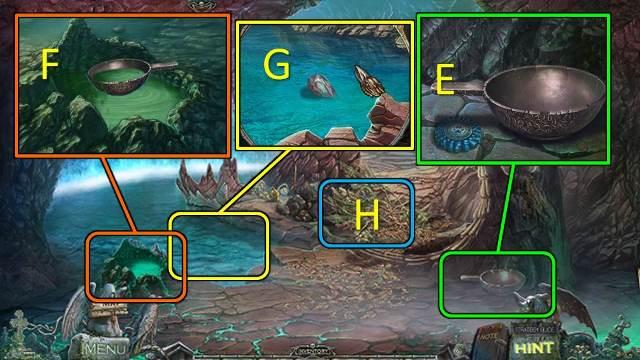
- Zoom into the bowl and pick up the puppy medal and the BOWL (E).
- Zoom into the small crater and use the BOWL on it to get a BOWL OF WATER (F).
- Zoom into the lake and use the Power of Water to retrieve another RUBY EYE (G).
- Remove the branches (H).
- Play the HOS.
- Move the floating moss to find the queen (I); use the hammer (J) on the skull (K) to find the feather.
- You receive an ANGEL FEATHER (2/4).
- Go forward to the Crypt.
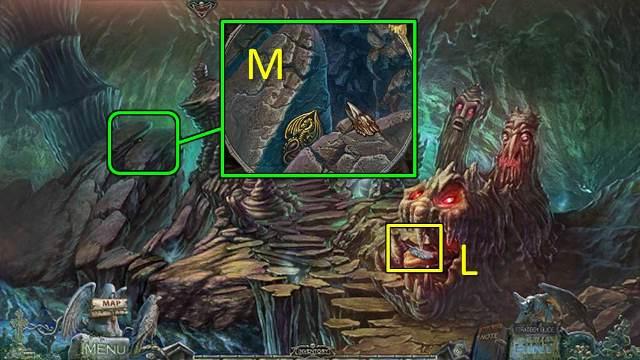
- Take the ANGEL FEATHER (3/4) (L).
- Zoom into the rocks on the left and use the Power of Earth to retrieve the second PART OF A GATE LOCK (2/2) (M).
- Go to the Underground Cave.
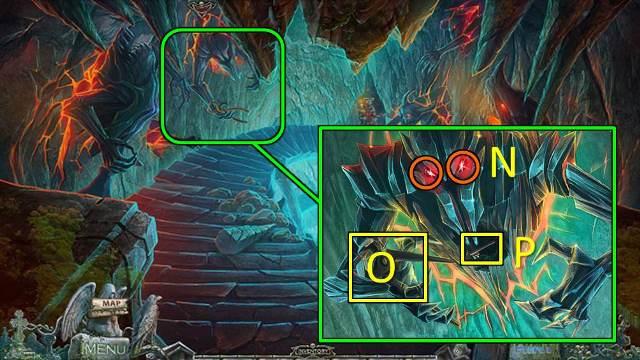
- Zoom into the second demon from the left and give him the two RUBY EYES (N).
- Take the TONGS (O) and the PART OF THE BIRD KEY (P).
- Combine the two PARTS OF THE BIRD KEY to get the BIRD KEY.
- Play the new HOS.
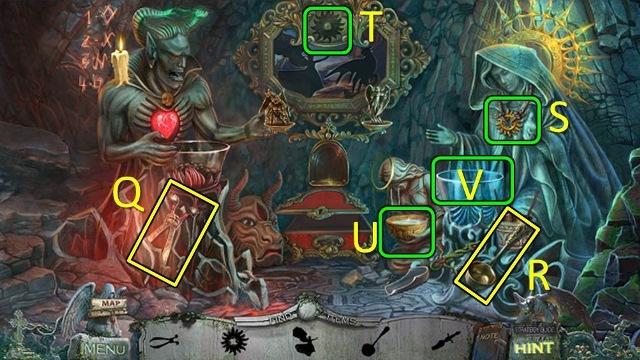
- Pick up the scissors (Q) and the empty ladle (R).
- Use the scissors to get the sun-shaped amulet (S).
- Put the sun-shaped amulet on the picture frame (T).
- Use the ladle on the bowl of liquid (U) to get a ladle with liquid.
- Put the ladle with liquid on the glass bowl (V).
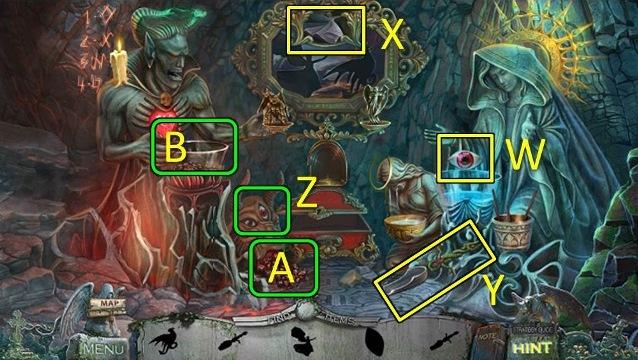
- Take the stone eye (W).
- Take the miniature angel (X).
- Pick up the metal shovel (Y).
- Put the stone eye on the beast’s head (Z).
- Use the metal shovel on the coal to get the shovel with coal (A).
- Put the shovel with coal in the bowl on the left (B).
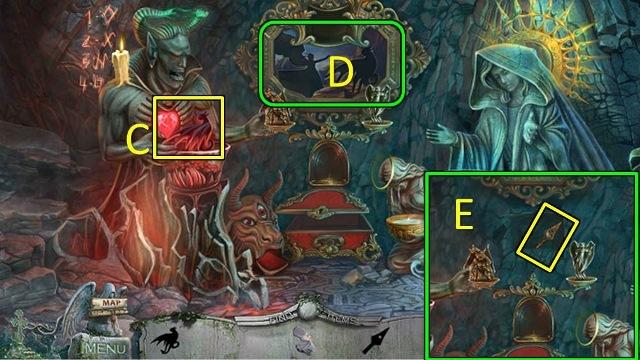
- Take the miniature demon (C).
- Put the miniature demon and miniature angel on the picture (D).
- Take the BLUNT SPEARHEAD (E).
- Go all the way back to the Witch area.
- Play the new HOS.
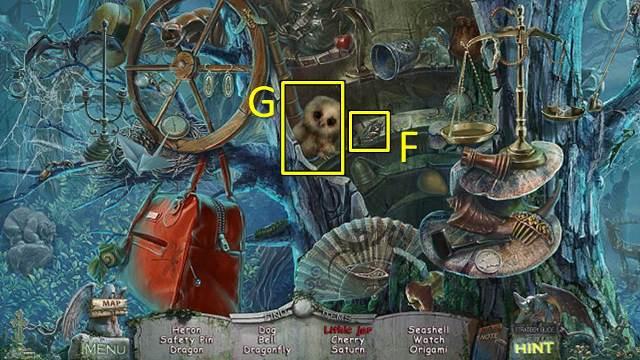
- Give the bug (F) to the owl chick to find the lithic jar (G).
- You receive a JAR (2/2).
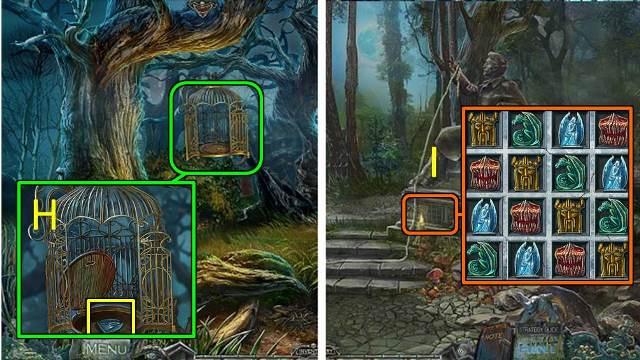
- Zoom into the birdcage.
- Unlock the base with the BIRD KEY.
- Take the ANGEL STATUETTE (H).
- Go to the Worker area.
- Zoom into the statue base and put the ANGEL STATUETTE on it to trigger a mini-game (I).
- You need to move the symbols around so that each row and each column only contains one of each symbol. The easiest way to do this is to go in diagonals.
- Take the note and the STAFF SOLAR DISC.
- Go to the Castle Gate
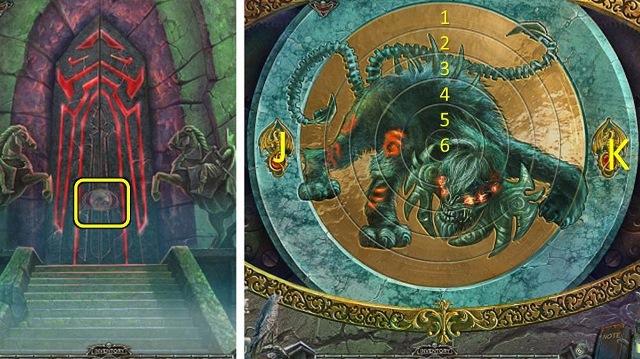
- Zoom into the door.
- Put the separate PART OF A GATE LOCK and the two other PARTS OF A GATE LOCK (2/2) on the lock to trigger a mini-game.
- Select a ring and use the buttons to turn them into place. Sometimes rings affect other rings. The quickest solution from the default position is:
- Ring 1, Kx2; ring 3, Jx4; ring 2, Kx3; ring 4, Kx1; ring 5, Kx1; center circle, Kx1
- Walk forward.
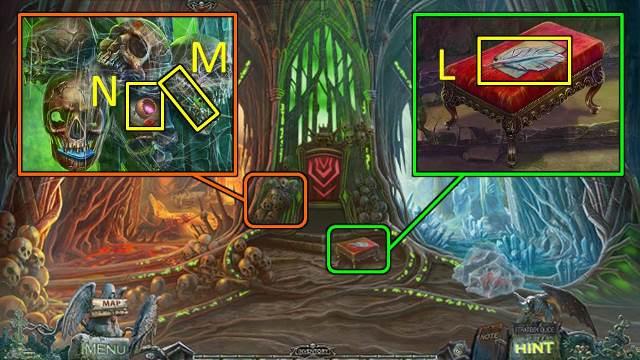
- Zoom into the stool and take the ANGEL FEATHER (4/4) (L) and the note.
- Zoom into the skulls.
- Take the BRUSH (M) and put the MUSHROOM POWDER in the hole in the middle skull (N).
- Dip the BRUSH into the mushroom powder to draw the symbol.
- You receive a DIAMOND TOOTH.
- Walk left and play the HOS.
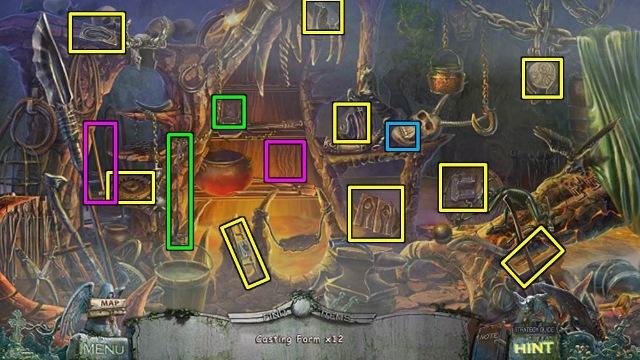
- Use the fire poker on the form on the shelf (green) and use the hammer on the back wall (pink). One casting form is inside the skull’s mouth (blue).
- You receive HALF OF THE CASTING FORM.
- Walk down and right to the Ice Cave.
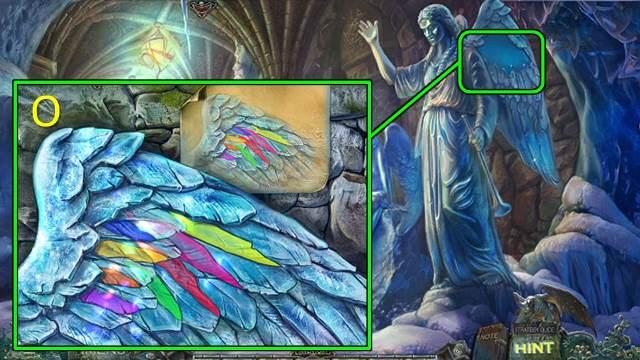
- Zoom into the angel on the right and give her the ANGEL FEATHERS (4/4) to trigger a mini-game.
- Put the feathers on the wing in the pattern shown on the example. You know if a feather is in the right place if the colors appear (O).
- Take the STAFF WINGS.
- Go to the Crypt.
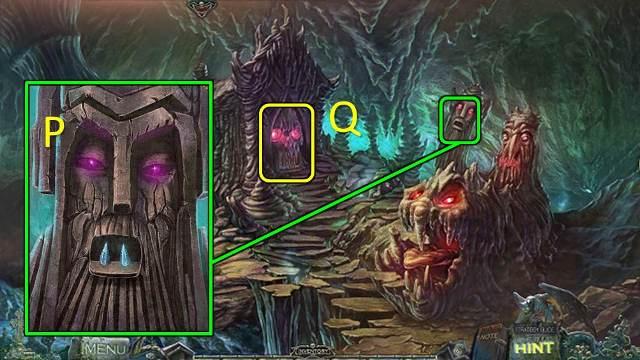
- Zoom into the stone face in the back and give him the DIAMOND TOOTH (x2) (P).
- Use the BLUNT SPEARHEAD on the teeth to get a SHARP SPEARHEAD.
- Zoom into the cave in the back (Q).
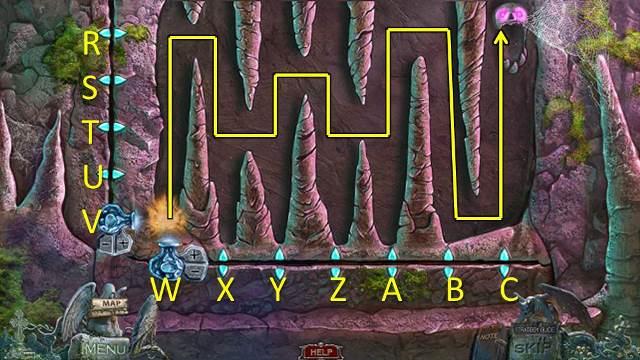
- Put the JAR (2/2) and the FIREBALL on it to trigger a mini game.
- Use the two jars to blow the fireball through the maze. You can move the jars up and down or left and right. Use the + and – keys to increase or decrease the air flow. In the instructions below, for example, S +1 means, click on S and then on the + button of the bottle on S once:
- W +4; R +1; X -2; T +1; Y +1; S +1; Z -1; T +1; A +2; R +1; B -4; V +1; C +4
- Take the MAGIC CAGE.
- Go to the Throne Hall.
- Zoom into the stool and use the SHARP SPEARHEAD to cut the fabric.
- Take the TOKEN (D).
- Put the MAGIC CAGE on the dog in the ice (E).
- Go to the Lake and play the new HOS.
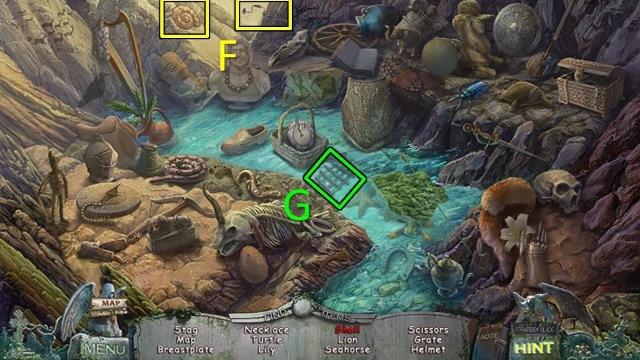
- Use the drill to get the shell (F).
- You receive a GRATE (G).
- Go to the Lava.
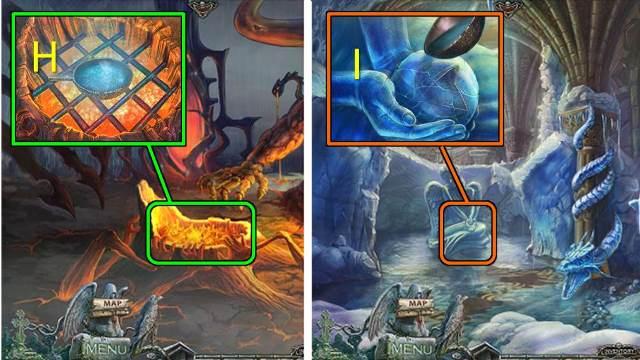
- Zoom into the crater on the left and put the GRATE over it.
- Put the BOWL OF WATER on the grate and take the BOWL OF HOT WATER (H).
- Go to the Ice Cave.
- Zoom into the statue in the back.
- Pour the BOWL OF HOT WATER over her hands (I) and take the FUNNEL.
- Go back to the Lava and play the new HOS.
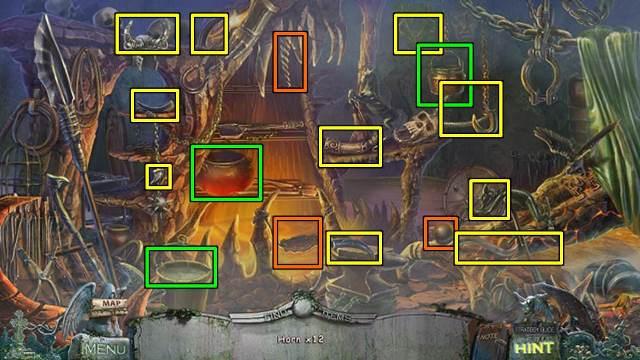
- Put the cannonball on the slingshot (orange); take the kettle and put it into the bucket of water, then put it on the cauldron (green).
- You receive a HORN.
- Go to the Ice Cave.
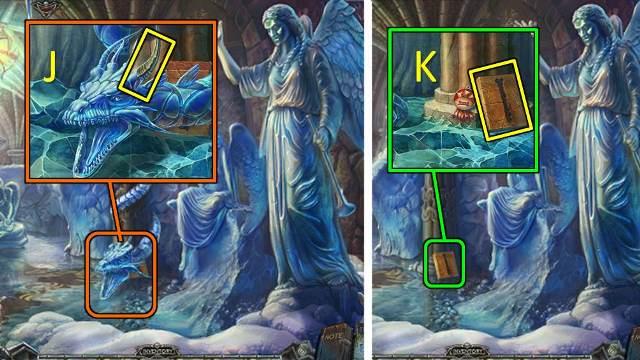
- Zoom into the dragon and give him the HORN (J).
- Zoom into the floor where the dragon was and take the puppy medal and the second HALF OF THE CASTING FORM (K).
- Combine the two HALVES OF THE CASTING FORM to get a CASTING FORM.
- Go to the Lava.
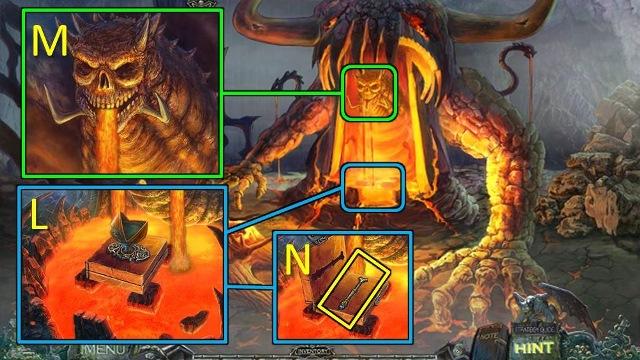
- Zoom into the center lava pit.
- Put the CASTING FORM down and put the FUNNEL in it (L).
- Zoom into the lava gargoyle and close its mouth (M).
- Zoom into the lava pit again and use the TONGS on the mold.
- Take the PART OF THE MAGIC STAFF (N).
- In your inventory, combine the PART OF THE MAGIC STAFF with the STAFF SOLAR DISC, then combine the new PART OF THE MAGIC STAFF with the STAFF WINGS.
- You receive a MAGIC STAFF.
- Walk down twice
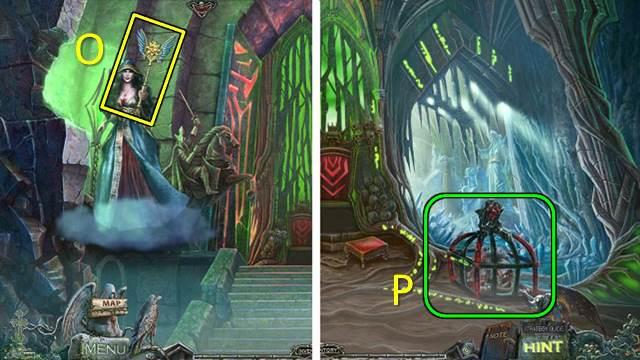
- Give the MAGIC STAFF to Hina.
- Take the MAGIC STAFF from Hina again (O).
- Walk forward.
- Use the MAGIC STAFF on the cage (P).
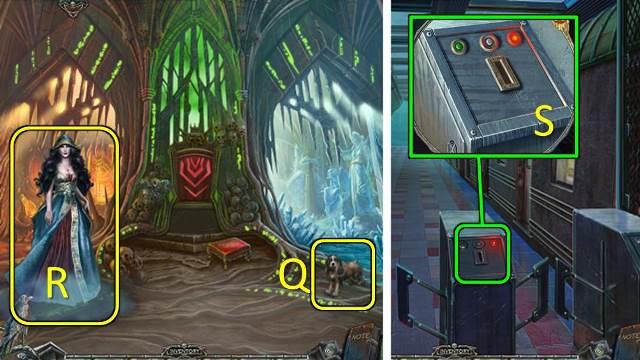
- Put the COLLAR on the dog (Q).
- Talk to Hina (R).
- Go through the portal.
- Zoom into the barrier and put the TOKEN in the slot (S).
Congratulations!
You have completed Gamezebo’s walkthrough for Redemption Cemetery: Salvation of the Lost. You should be all set on your way to play your best game! Be sure to check back often for game updates, staff and user reviews, user tips, forums comments and much more here at Gamezebo!
More articles...
Monopoly GO! Free Rolls – Links For Free Dice
By Glen Fox
Wondering how to get Monopoly GO! free rolls? Well, you’ve come to the right place. In this guide, we provide you with a bunch of tips and tricks to get some free rolls for the hit new mobile game. We’ll …Best Roblox Horror Games to Play Right Now – Updated Weekly
By Adele Wilson
Our Best Roblox Horror Games guide features the scariest and most creative experiences to play right now on the platform!The BEST Roblox Games of The Week – Games You Need To Play!
By Sho Roberts
Our feature shares our pick for the Best Roblox Games of the week! With our feature, we guarantee you'll find something new to play!All Grades in Type Soul – Each Race Explained
By Adele Wilson
Our All Grades in Type Soul guide lists every grade in the game for all races, including how to increase your grade quickly!


