
Best Horror Games On Itch.io – July 2026
Across a bounty of subgenres.![Haze Seas Accessories Tier List [Best Accessories to Equip]](/wp-content/uploads/2026/07/haze-seas-accessories-tier-list.jpg "Haze Seas Accessories Tier List [Best Accessories to Equip]")
Haze Seas Accessories Tier List [Best Accessories to Equip]
The accessories with the best stat buffs in Haze Seas.
![[Roblox] Evomon Shiny Hunting Guide – Including Prismatic and Pris Shinies!](/wp-content/uploads/2026/06/evomon-shiny-hunting-guide.jpg "[Roblox] Evomon Shiny Hunting Guide – Including Prismatic and Pris Shinies!")

Redemption Cemetery: Grave Testimony Walkthrough
Welcome to the Redemption Cemetery: Grave Testimony walkthrough on Gamezebo. Redemption Cemetery: Grave Testimony is a hidden object adventure game created by ERS Game Studios. After finding yourself stranded on a mysterious graveyard isle, interact with the living and the dead as you attempt to escape and uncover the mysteries that surround you. Gamezebo’s walkthrough will provide you with detailed images, tips, information, and hints on how to play your best game.


- Prefer Gamezebo on Google

Game Introduction – Redemption Cemetery: Grave Testimony
Welcome to the Redemption Cemetery: Grave Testimony walkthrough on Gamezebo. Redemption Cemetery: Grave Testimony is a hidden object adventure game created by ERS Game Studios. After finding yourself stranded on a mysterious graveyard isle, interact with the living and the dead as you attempt to escape and uncover the mysteries that surround you. Gamezebo’s walkthrough will provide you with detailed images, tips, information, and hints on how to play your best game.
General Tips
Difficulty
- When starting a new game, you can choose between one of three difficulty levels: Regular, Hard, and Expert.
- Regular Mode features skip and hint buttons recharging quickly, and active zones being highlighted with sparkles.
- Hard Mode features skip and hint buttons taking longer to recharge, and active zones are not highlighted.
- Expert Mode features skip and hint buttons recharging very slowly, and active zones are not highlighted. Black-bar tips are also disabled.
Hidden Object Scenes
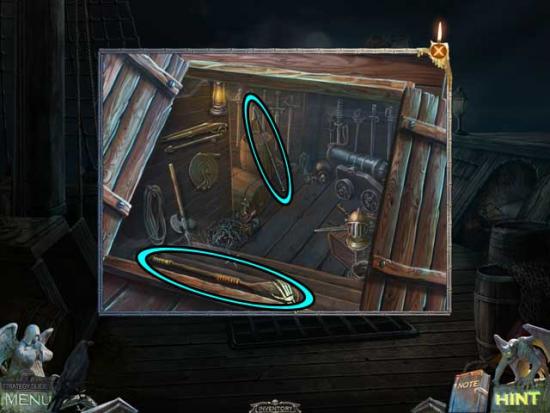
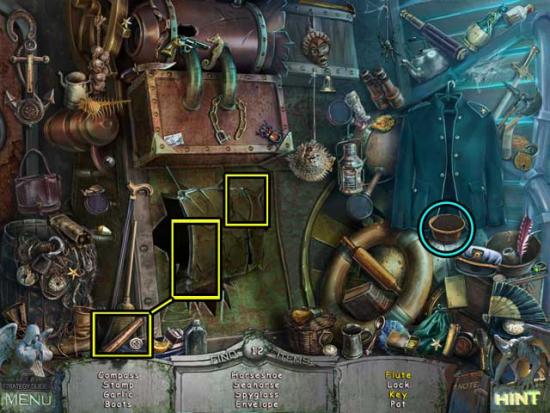
- There are two types of Hidden Object Scenes (HOS) in the game. There are scenes in which you must find items listed at the bottom of the screen, and then there are scenes in which you must find objects outlined at the bottom of the screen. The latter of these two will require you to interact with different areas before you can uncover more objects.
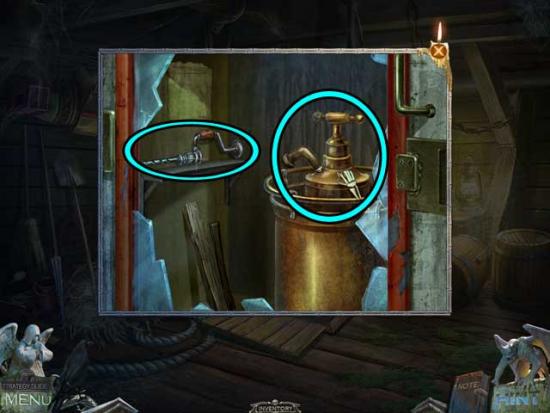
- In the case of the first type of HOS, normal items (listed in white) are randomized. Therefore, only Inventory Items (circled in blue) and Interactive Items/Areas (outlined in yellow) will be shown.
- Inventory Items will be identified with CAPS in the guide below.
- Interactive Items/Areas can mean one of a few things. Sometimes you will need to combine items, or use an item on another to cross them off the list. Other times, you will simply need to reveal their location, i.e. by opening a cabinet, to reveal where they are.
General Layout
- The Menu button can be found in the lower left corner of the screen. Click on this to pause your game, access options, or visit the Main Menu at any time.
- The Diary, or “Notes” can be found in the lower right corner of the screen. This will keep track of important clues or story details you find throughout the game. If you can’t remember a puzzle clue or important detail, you may want to check here. Notes and Newspaper scraps you find throughout the game will also be stored here.
- The Hint Button is located in the lower right corner of the screen. It is marked by a gargoyle and says “Hint”.
- Your Inventory Bar is located at the bottom of the screen. Simple toggle over the bottom of the screen to bring it up. There are arrows on either side for when you have more items than can be displayed at one time.
- The Crow is located next to the Menu button on the lower left, once you receive it. The Crow will be turned to stone when it cannot be used. You will need to find Crow Runes in order to activate the Crow again. The Crow can be used to retrieve or perform actions on objects at a distance.
- Sometimes you will need to combine Inventory Items in order to create new, more useful items. If an item can be combined, a small green “+” will appear in the lower right corner of the item slot. Simple drag it over to another item to combine them. If successful, you will create a new item. If the item you need to combine with is out of sight on the Inventory bar, simple move the half you want to combine over the corresponding directional arrow to toggle to the other half.
Cursors
- The default cursor is an angled arrow. This will change into a couple different things depending on the situation.
- The cursor will change into a magnifying glass when you can zoom in on an area for a closer view.
- The cursor will change into a skeleton’s hand when you can pick up an Inventory Item.
- The cursor will change into a boarder arrow when you can move to another location.
- When using the Crow, the cursor will change to a crow’s head.
Hint and Skip Buttons
- The Hint Button is in the same location, the lower right corner, no matter if you’re in main gameplay or a puzzle. Once fully charged, the word “Hint” will illuminate. You can use this for general pointers, or to find a specific object. Hints are unlimited, though they require a certain amount of time to recharge depending on the difficulty mode.
- The Skip button appears during puzzles. If you become frustrated on a puzzle and would rather skip it, this button will become usable after a certain amount of time has passed.
Collector’s Edition
- This walkthrough covers the Collector’s Edition content of Redemption Cemetery: Grave Testimony.
- Once you’ve completed the main adventure, the Extra Gameplay will become available. You can access this by visiting the Main Menu and selecting “Extras”, then choose “Extra Gameplay”.
- Additional Collector’s Edition features include a screensaver, concept art, music, and wallpapers.
Chapter 1: Skull Hill
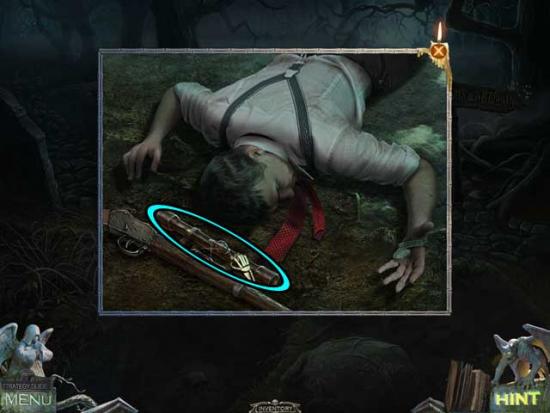
Open Grave
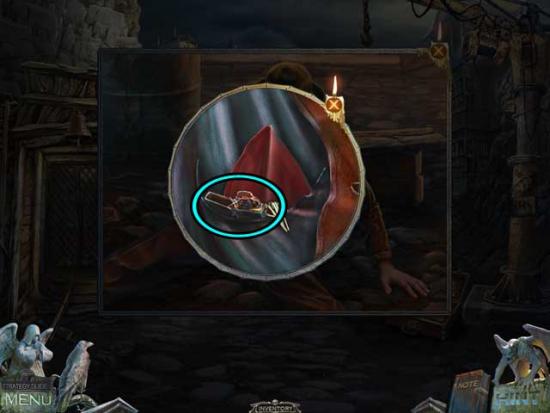
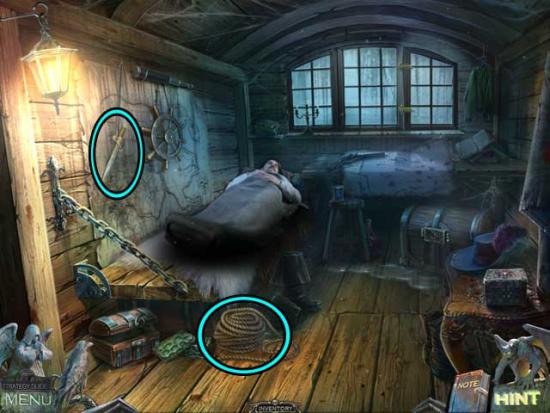
- Examine the body of the man lying on the ground.
- Click on the OPTICAL SIGHT to add it to your inventory.

- Take note of the locket half in the man’s hand.
- Back in the main area, proceed left to the Dock.
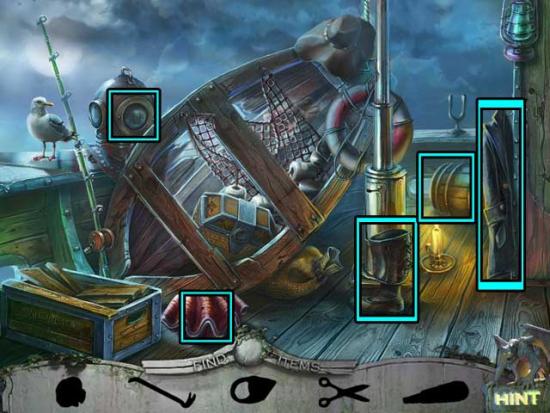
Dock
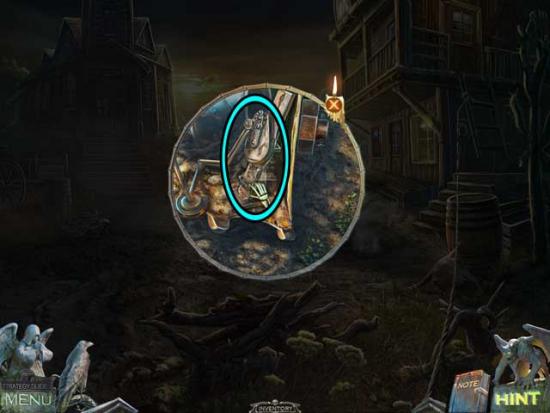
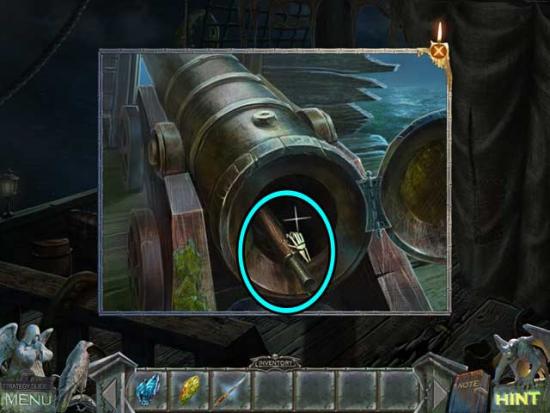
- Use the OPTICAL SIGHT to look at the gangster in the boat.
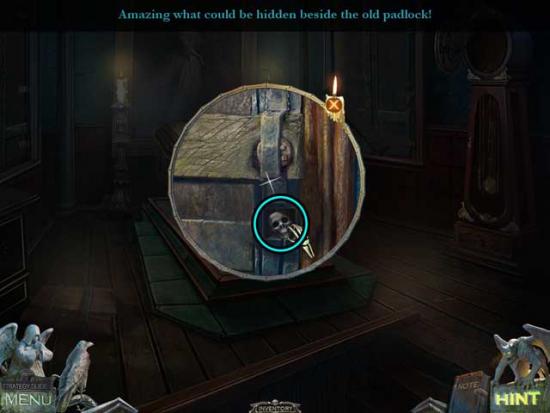
- Take a closer look at the item on the first dock post. Click on the SKULL PIECE to add it to your inventory.
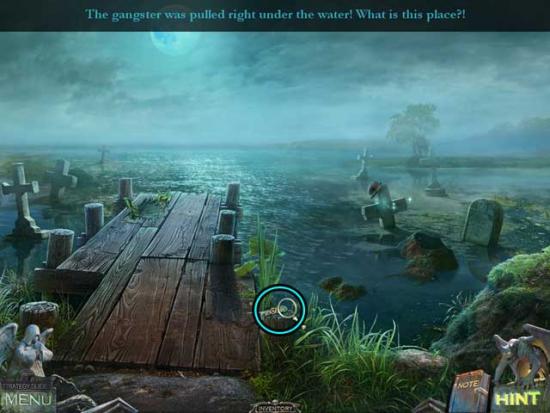
- Return to the Open Grave.
Open Grave
- Go right to the Lake of Death.
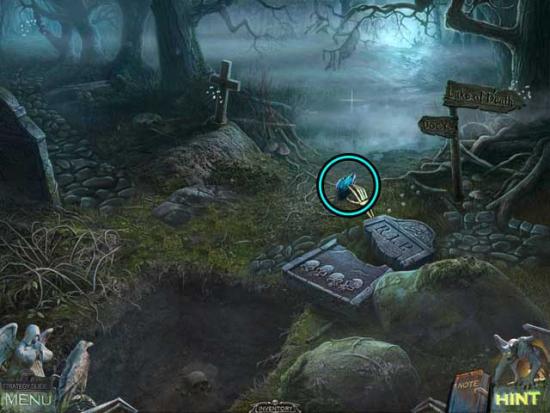
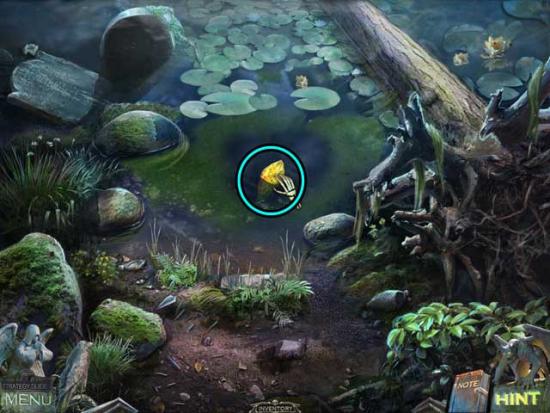
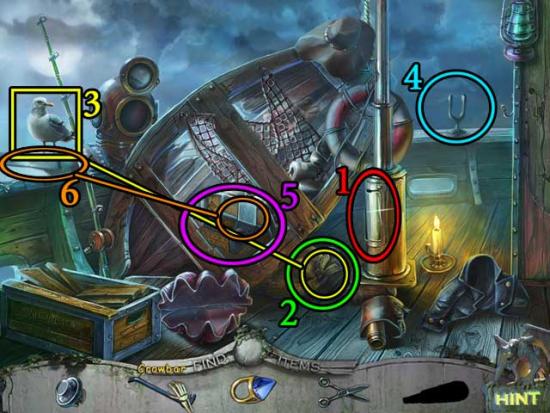
Lake of Death
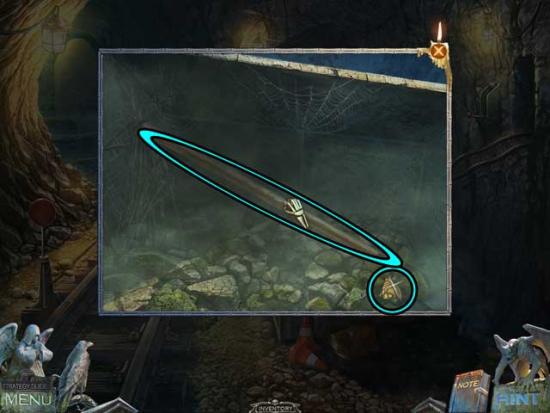
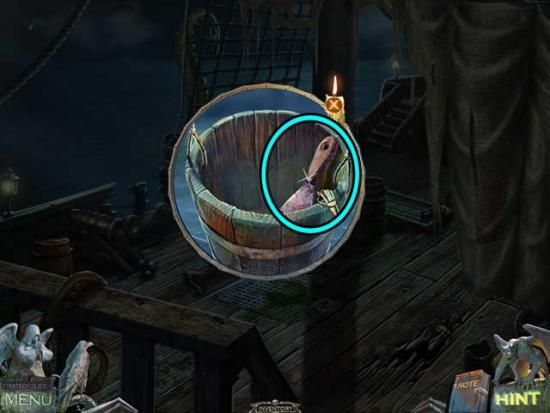
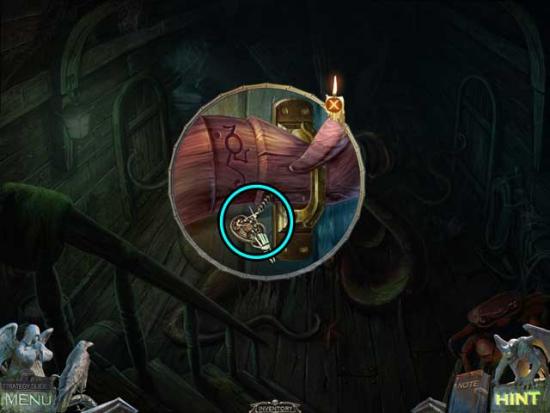
- Take a closer look at the lantern hanging from the branch towards the right. Use the SKULL PIECE on the lock to open it.
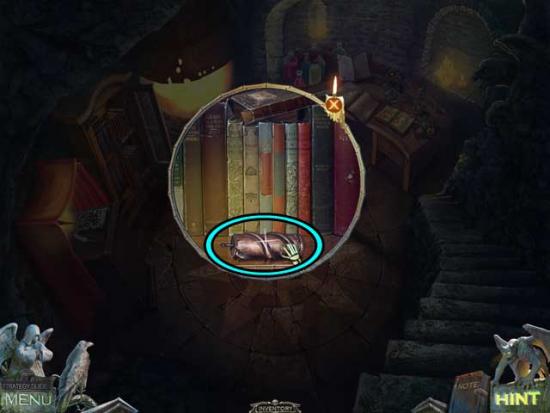
- Click on the EMPTY LOCKET HALF and the CANDLE inside to add them to your inventory.
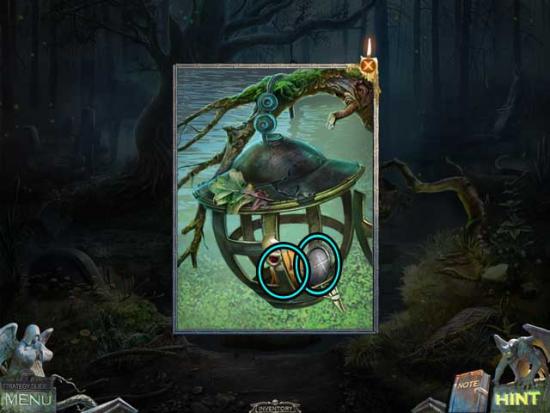
- Go back to the Dock.
Dock
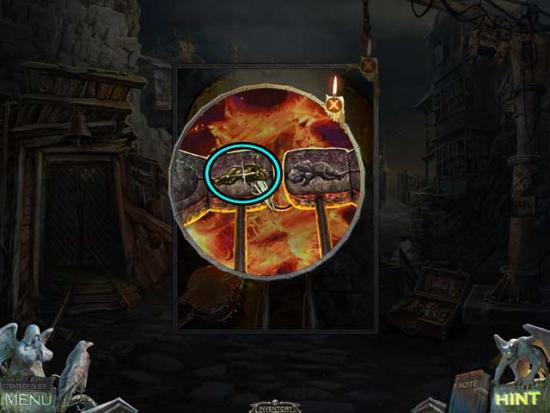
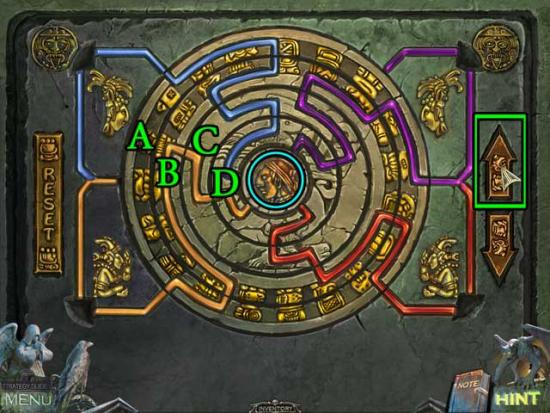
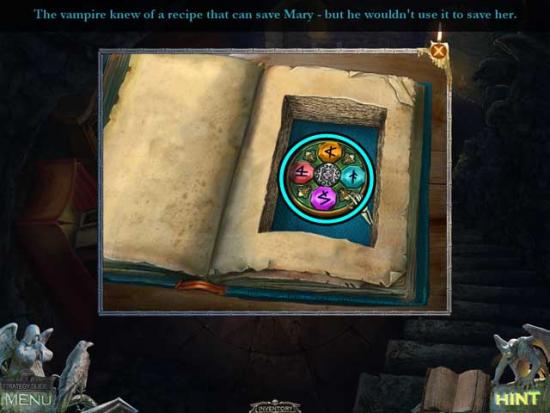
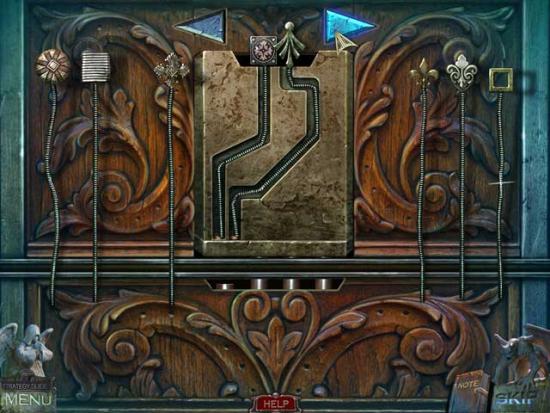
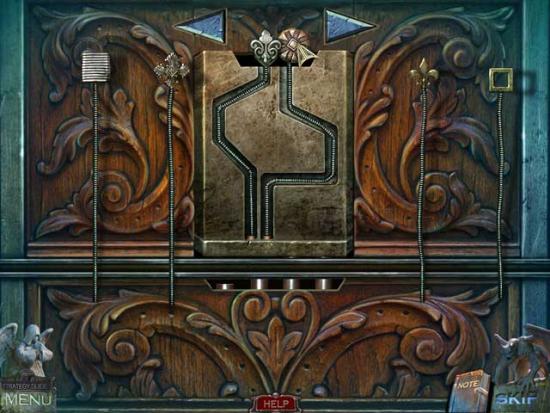
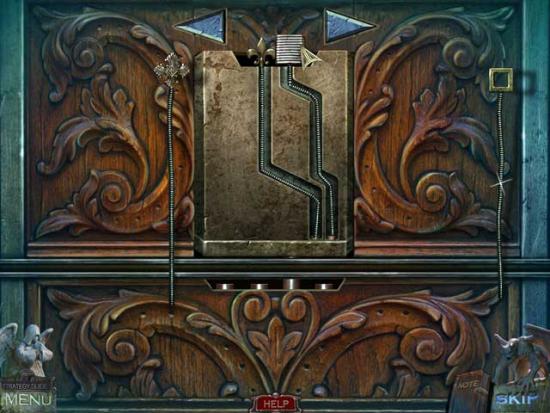
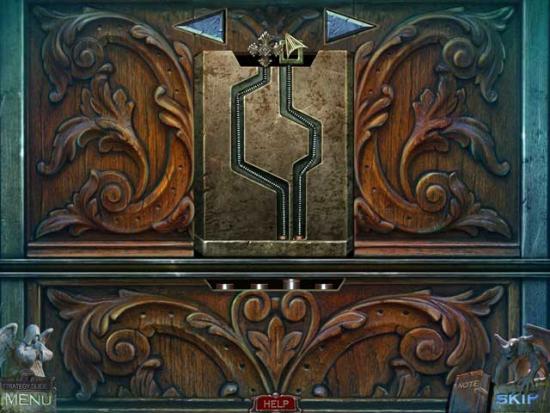
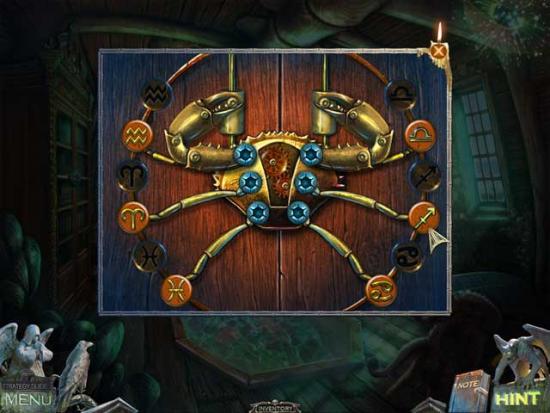
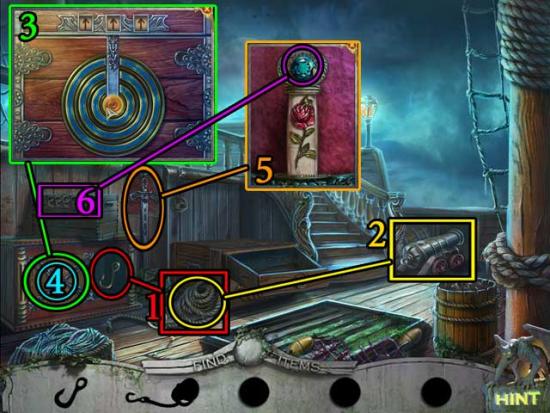
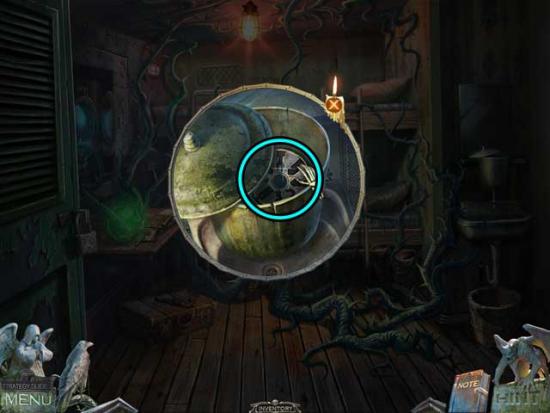
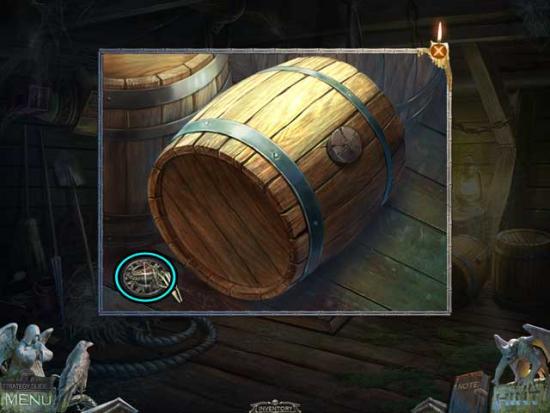
- Take a closer look at the small square hole in the upper left portion of the dock. Use the CANDLE on the empty pedestal or skull to trigger a puzzle.
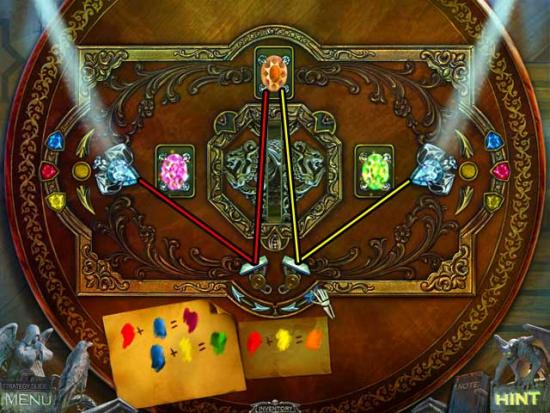
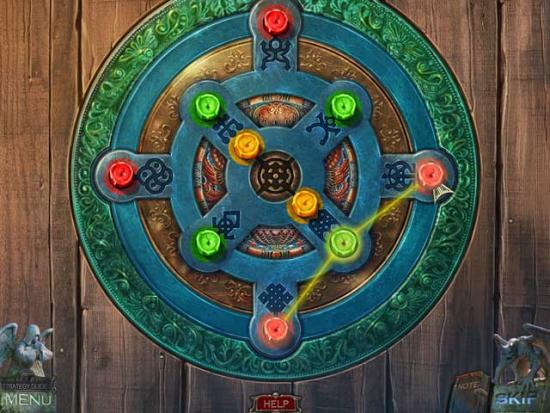
- Place the candles on the arms with the symbols in matching colors. Click and drag a candle to move it. Use the skull in the center as an extra stand. Referring to the screenshot below as reference, make the following moves: D to F, E to D, B to E, A to B, C to A, D to C, E to D, B to E, A to B, and D to A.

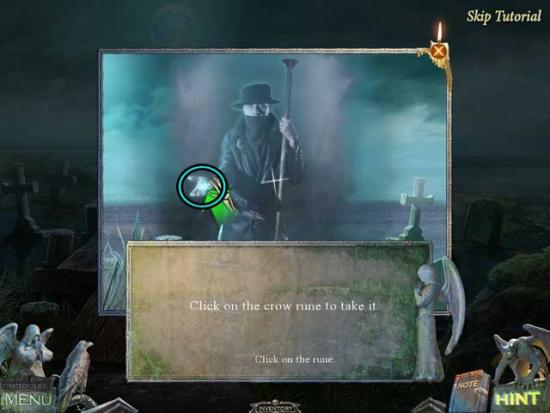
- Upon completing the puzzle, a mysterious man will arrive in a boat.
- Speak with the man, he will give you the Crow, which will appear in the bottom left corner of your screen.
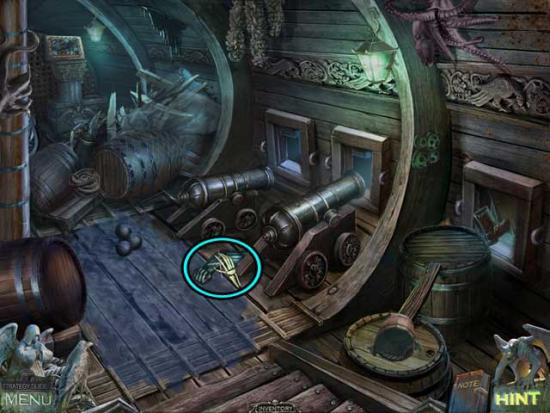
- Click on the CROW RUNE he offers you to collect it. This will enable you to use the Crow.
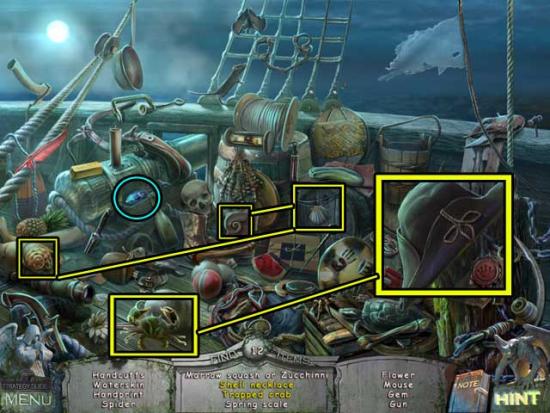
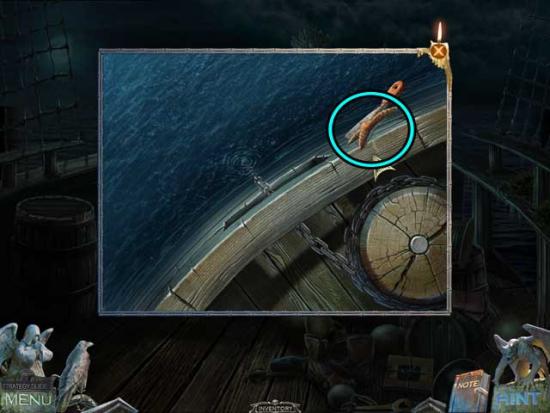
- Use the Crow to retrieve the Hat from the gravestone in the water.
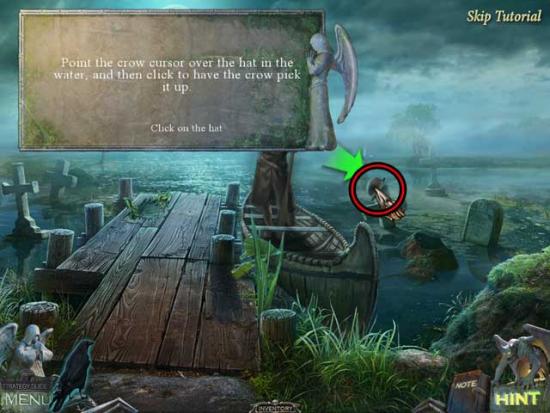
- Take a closer look at the Hat once it’s dropped on the dock. Click on the PHOTO inside to add it to your inventory.
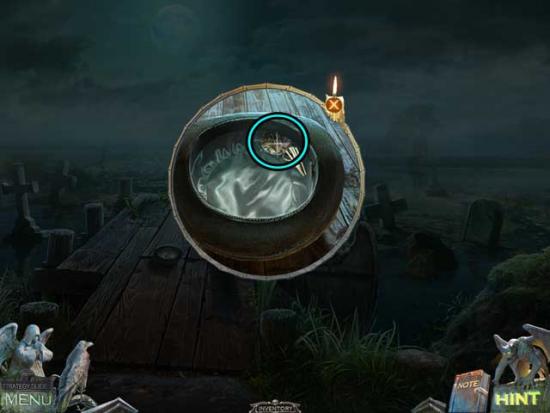
- In your inventory, combined the PHOTO with the EMPTY LOCKET HALF to obtain the LOCKET HALF.
- Return to the Open Grave.
Open Grave
- Examine the hand of the man’s body lying on the ground, then take another closer look to view the locket half within. Use the LOCKET HALF to restore it.
- Speak with the ghost of the man that appears. He will open a portal for you to a new area.
- Proceed through the portal to the next area.
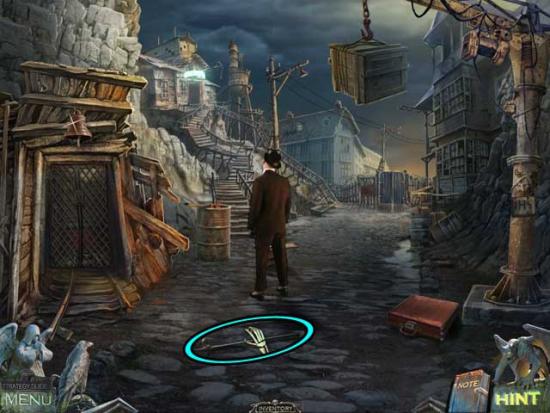
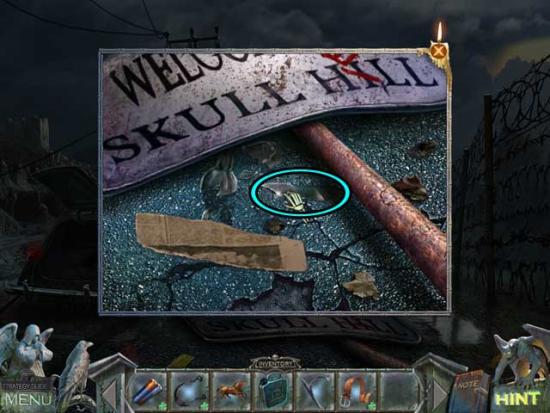
Skull Hill
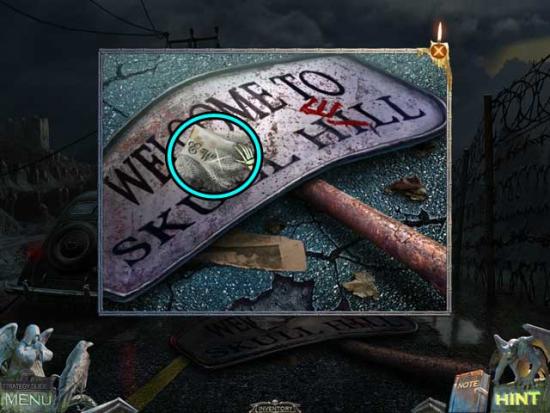
- Examine the road sign lying in the street. Click on the HANDKERCHIEF to add it to your inventory.
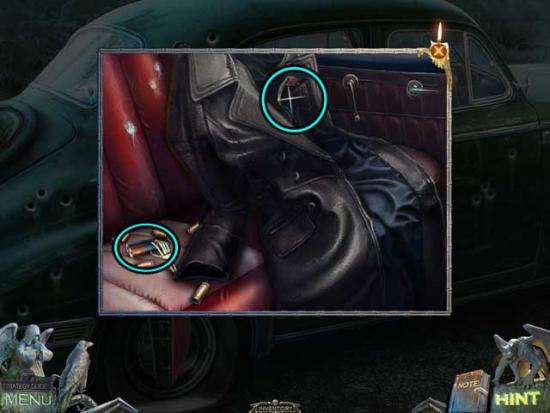
- Take a closer look at the car on the left. Click on the rear door to open it, then take a closer look inside. Click on the BATTERIES and the ELASTIC BAND to add them to your inventory.
- Examine the floor of the back seat. Click on the mud mat to lift it, revealing a locket beneath.
- Set the puzzle pieces by changing their places to make a picture. The solution is shown below.
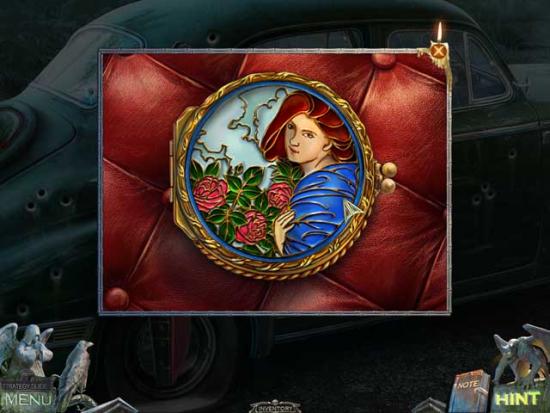
- Upon completing the puzzle, click on the TRUNK KEY revealed inside the locket to add it to your inventory.
- Now, open the front door of the car. Click on the Newspaper in the front seat to add it to your Notes.
- Take a closer look inside the front portion of the car, specifically the rear-view mirror. Use the HANDKERCHIEF to clean the mirror, revealing the code “347”.
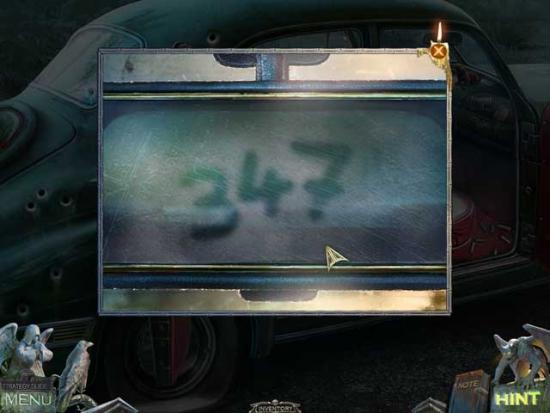
- Exit back to the main view from the road, then take a closer look at the trunk of the car. Use the TRUNK KEY on the lock to open it.
- Click on the HORSES STATUETTE and the FUEL CANISTER to collect them.
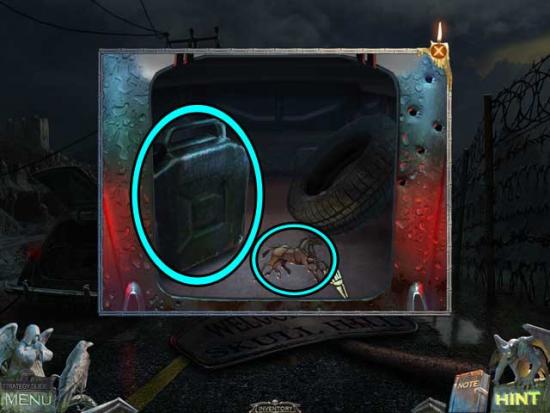
- Proceed forward down the road to the next area.
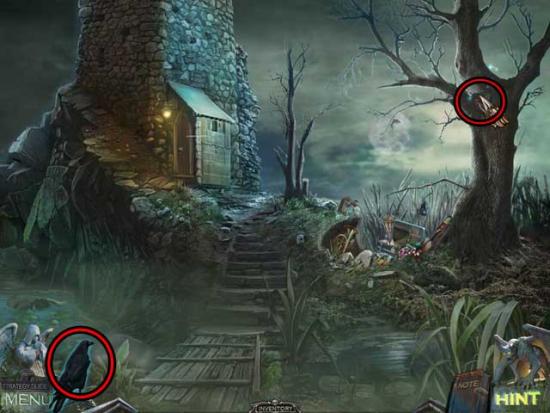
Mine Entrance
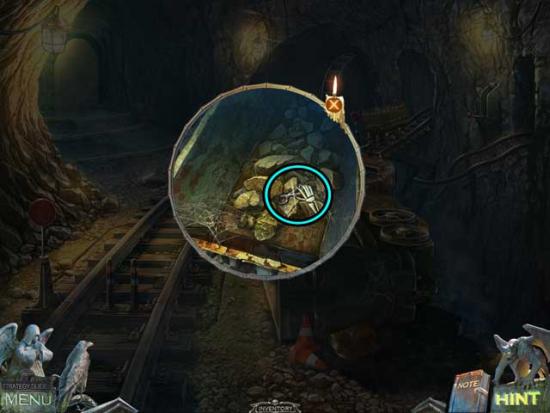
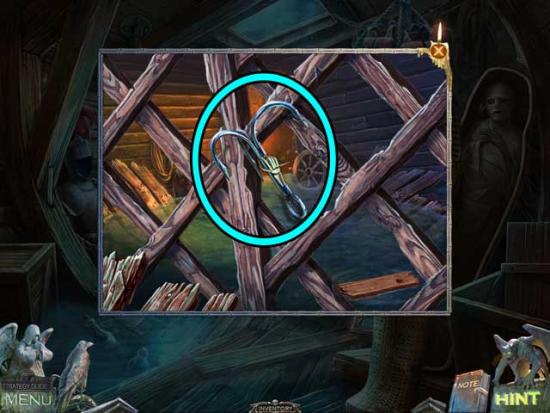
- Click on the HOOK lying on the ground to add it to your inventory.
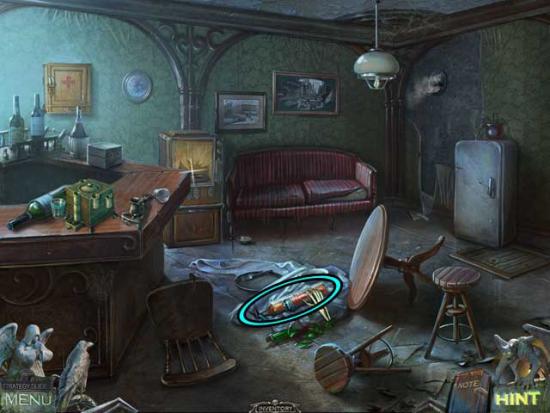
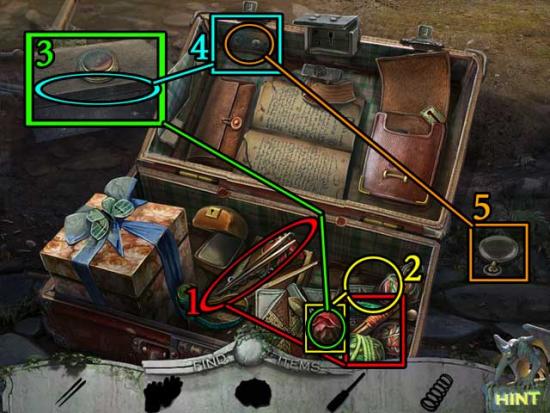
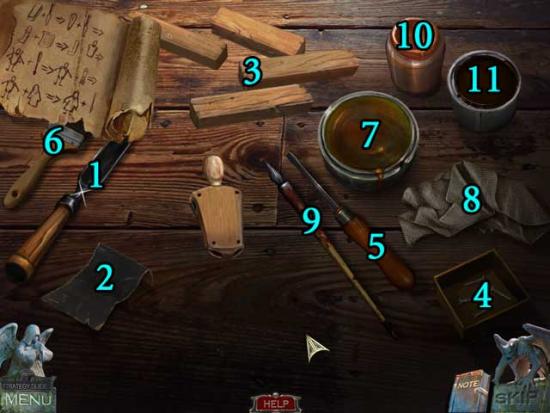
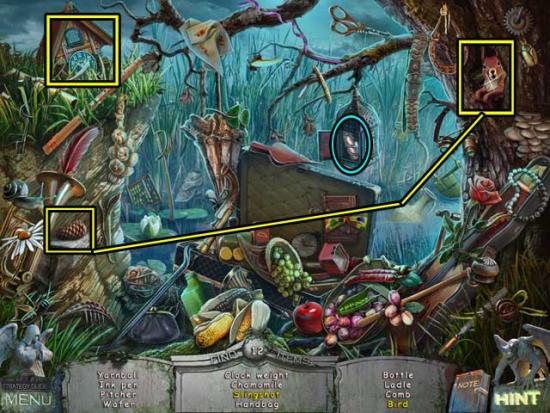
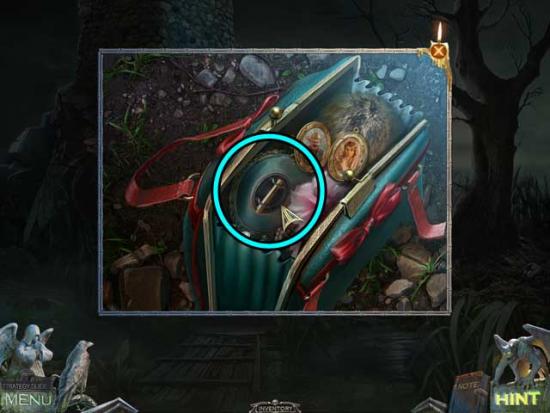
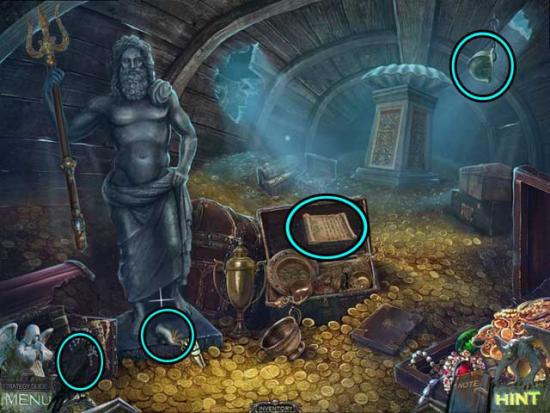
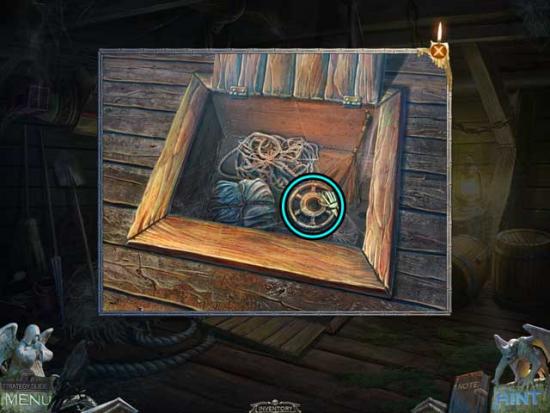
- Examine the suitcase lying on the ground towards the right. Input the code “347” to open it, revealing a hidden object area.
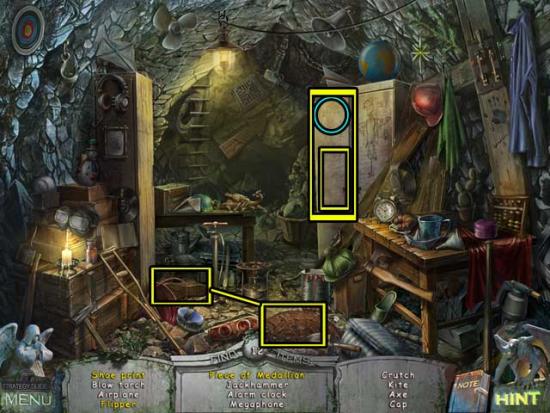
- Search the scene for silhouetted objects on the list, then use them to recover the rest of the items. The sequence is shown and outlined below.
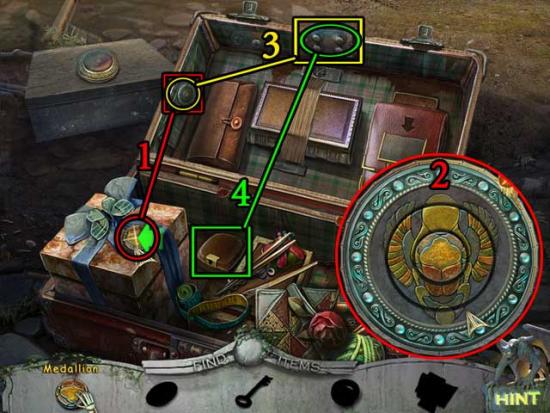
- 1) Click on the Medallion to collect it, then use it on the center slot of the lock to trigger a puzzle.
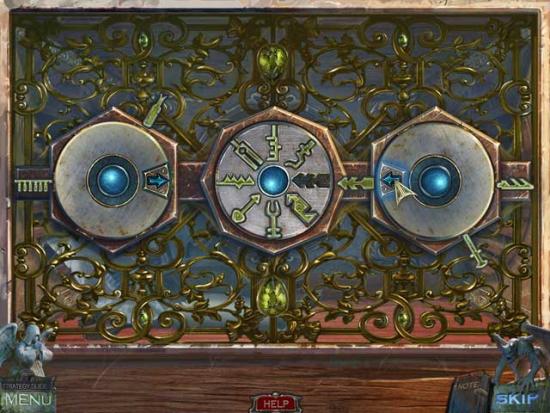
- 2) Rotate the rings to open the lock. The solution is as shown.
- 3) Click on the Powder Compact to collect it, then use it on the lock buttons at the top of the suitcase to reveal the combination. Click the top two buttons.
- 4) Click on the Key to collect it, then use it to open the locked box.
- 5) Click on the Signet Ring to collect it, then use it to open the round lock near the top of the suitcase.
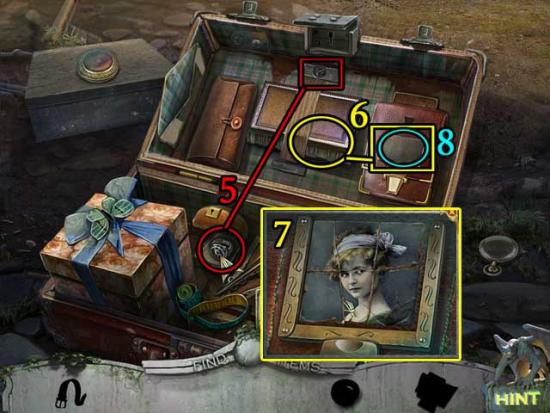
- 6) Click on the Photos to collect them, then use them on the square frame on the satchel to trigger a puzzle.
- 7) Put the pieces of the picture back together. The solution is as shown.
- 8) Click on the BELT inside the satchel to add it to your inventory.
- Go back to Skull Hill.
Skull Hill
- Take a closer look at the sign fallen in the road again. Use the HOOK to move it, then click on the GLASS SHARD to collect it.
- Combine the GLASS SHARD and the BELT to obtain the GLASS KNIFE.
- Examine the car on the left again and take a closer look at the front seat area. Next, examine the glove compartment on the right.
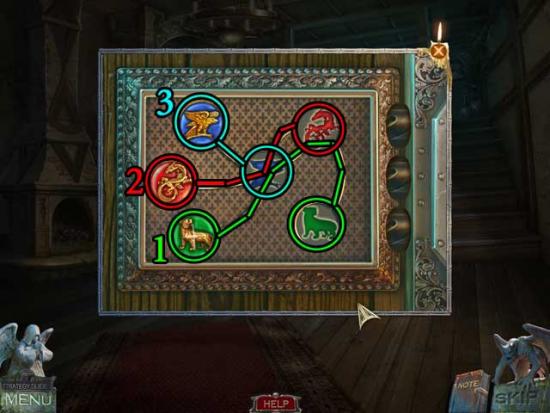
- Use the GLASS KNIFE to cut the stitching, revealing a puzzle panel beneath. Place the HORSES STATUETTE in front of the carriage on the right to trigger a puzzle.
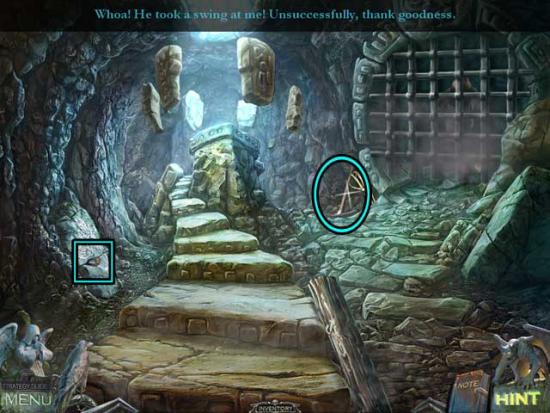
- Repel the gunmen’s attack by clicking on the characters in the correct order. Each character can deactivate only one gunman. Click on the characters in the order shown in the screenshot below to solve the puzzle.
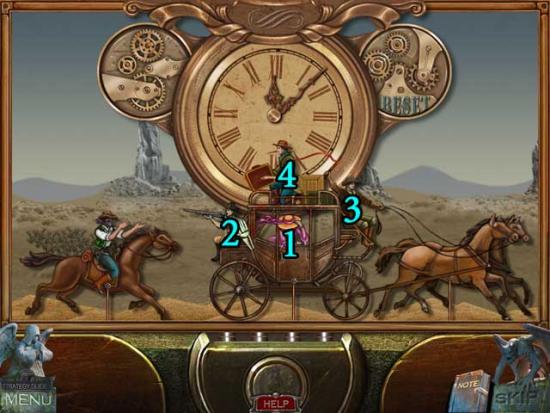
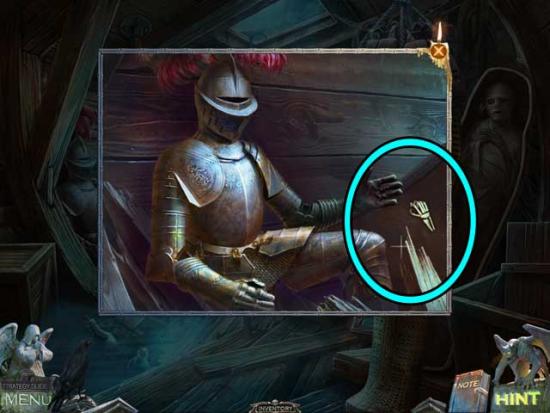
- Upon completing the puzzle, click on the FORKED STICK in the glove compartment to collect it.
- In your inventory, combine the FORKED STICK and the ELASTIC BAND to obtain the SLINGSHOT.
- Return to the Mine Entrance.
Mine Entrance
- Use the SLINGSHOT on the bell hanging above the Mine Entrance on the left to distract the gangster.

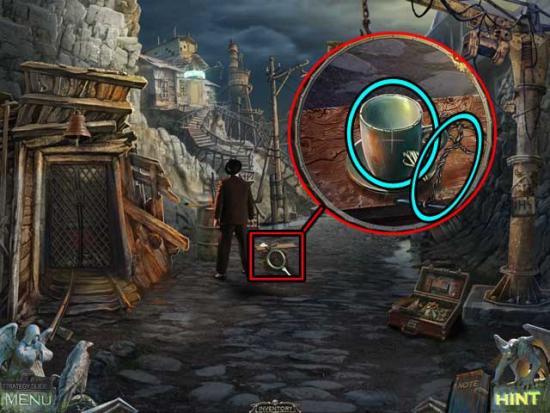
- Once the gangster is distracted, examine the makeshift table to his right. Click on the CUP and the GARROTE to add them to your inventory.
- Proceed forward to the next area.
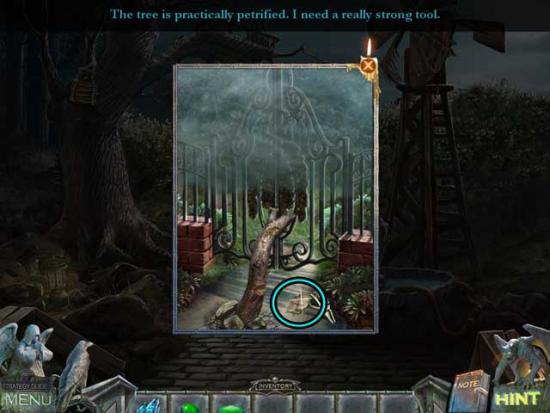
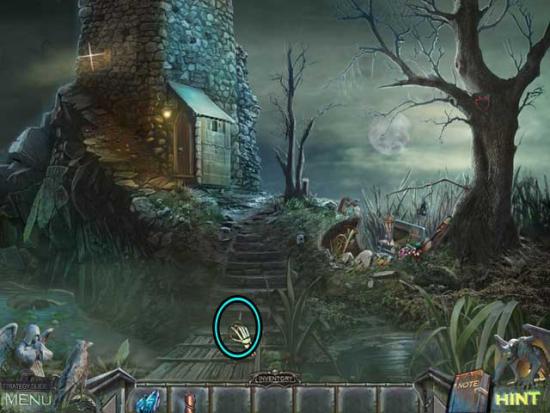
Gate
- Examine the makeshift ladder to the right of the Gate. Use the GARROTE to repair the bottom step.
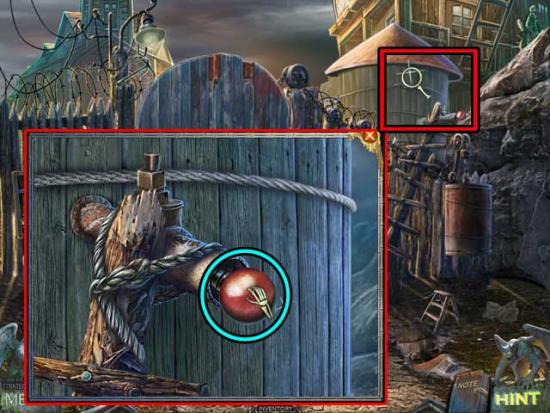
- Take a closer look at the water tower on the other side of the fence. Click on the LEVER to add it to your inventory.
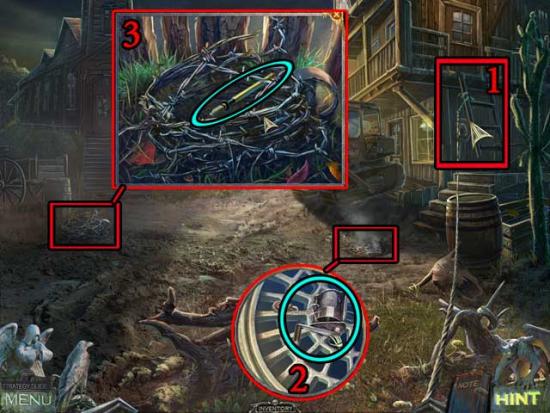
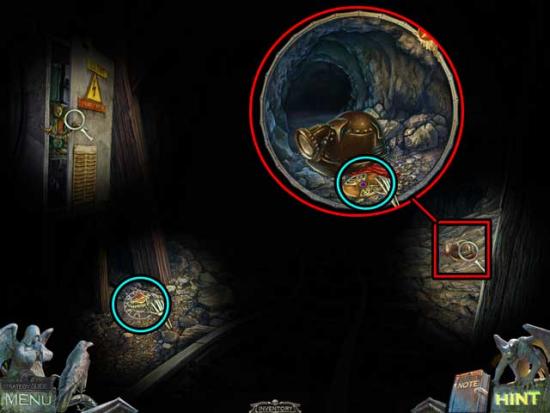
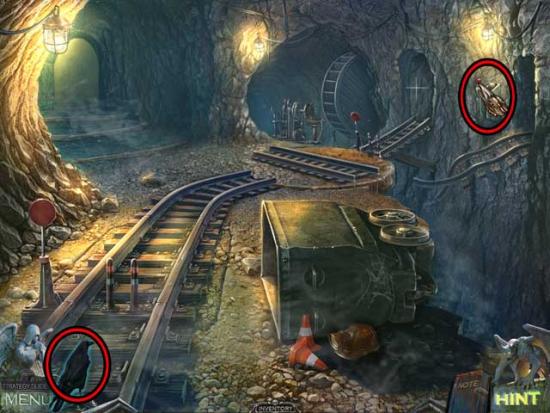
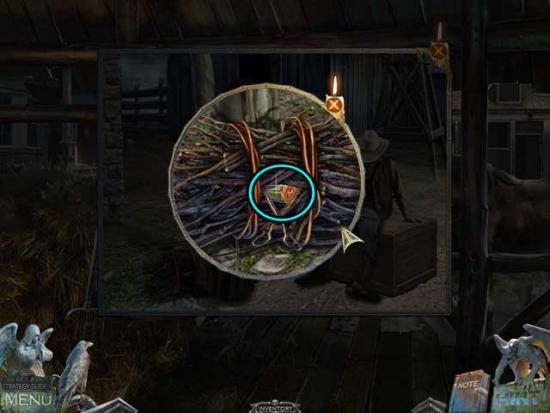
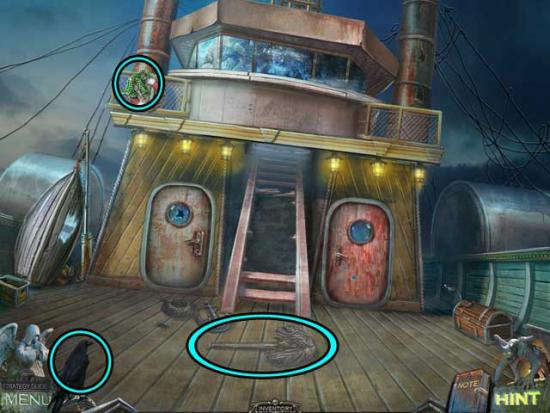
- Back in the main area, examine the bucket on the left, beneath the bulletin board. Click on the leaves to clear them away, then click on the CROW RUNE to collect it (1).
- Use the Crow to obtain the GRAPPLE and add it to your inventory (2).
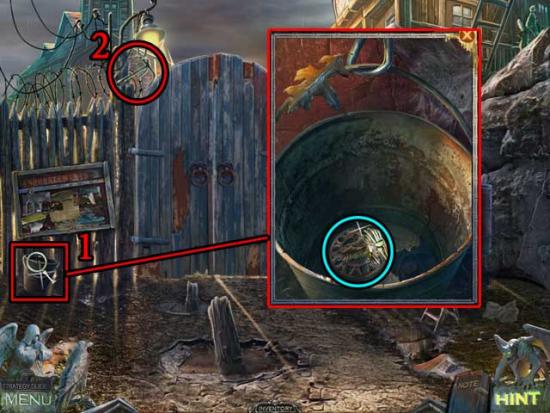
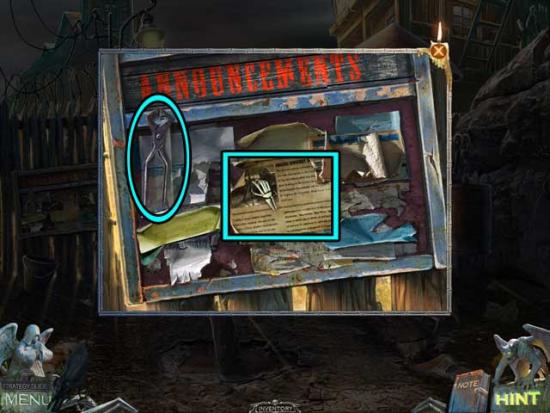
- Take a closer look at the bulletin board on the left. Click on the news scrap in the middle to add it to your Notes, then click on the PLIERS to add them to your inventory.
- Go back to the Mine Entrance.
Mine Entrance
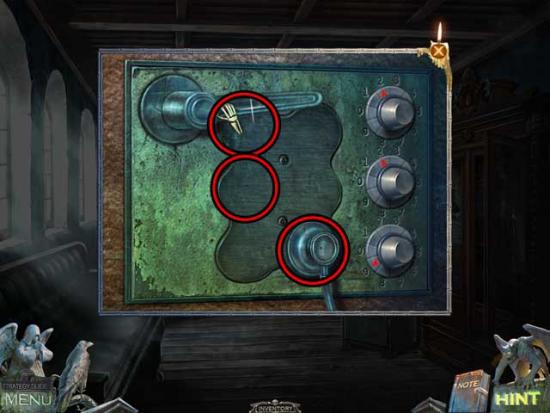
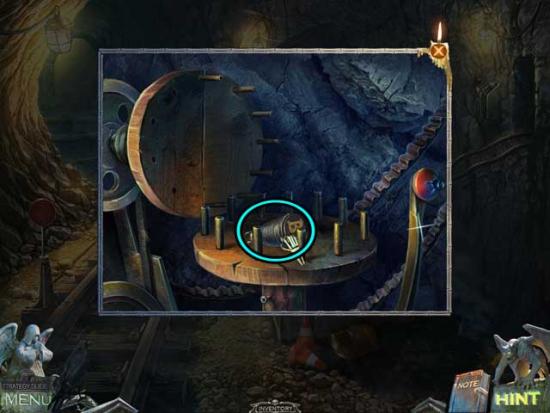
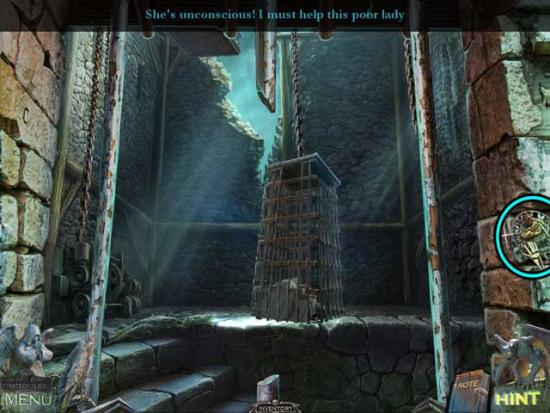
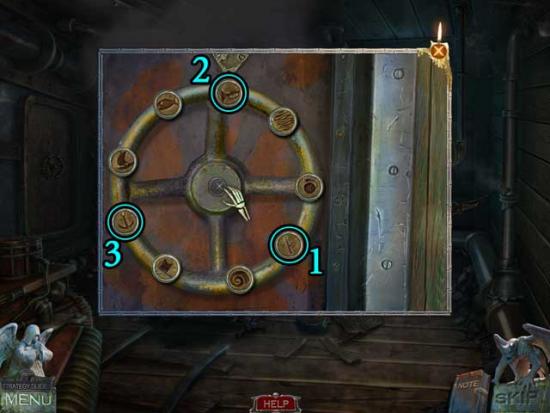
- Examine the pole of the crane on the right. Use the LEVER on the panel close-up to trigger a puzzle.
- Click and drag the levers so that their positions match the example. Moving a lever will affect the others. Move the levers according to the numbers to the positions shown in the screenshot below to solve the puzzle.
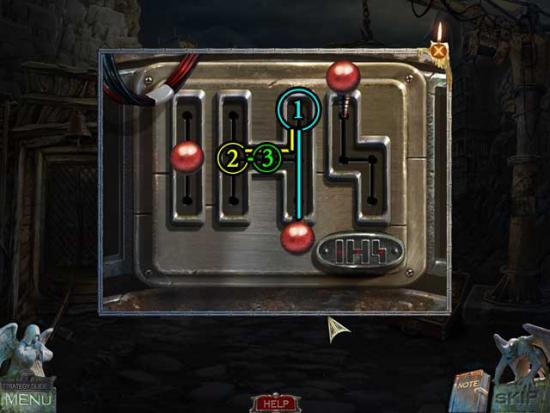
- Upon completing the puzzle, the crane will lower the suspended crate.
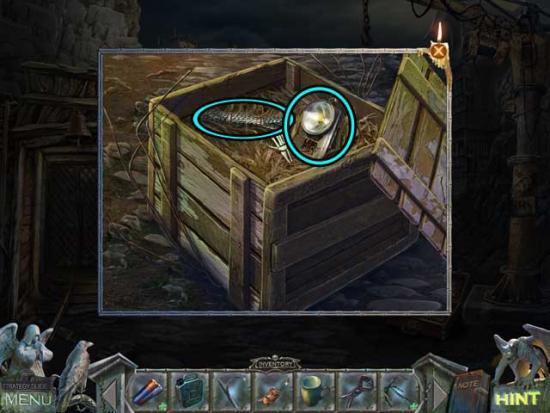
- Examine the now-accessible crate. Use the PLIERS to cut the wire surrounding the box, then click on the ROPE and the FLASHLIGHT WITHOUT BATTERIES inside to collect them.
- In your inventory, combine the BATTERIES and the FLASHLIGHT WITHOUT BATTERIES to obtain the FLASHLIGHT WITH BATTERIES.
- In your inventory, combine the ROPE and the GRAPPLE to obtain the GRAPPLING HOOK.
- Return to the Gate.
Gate
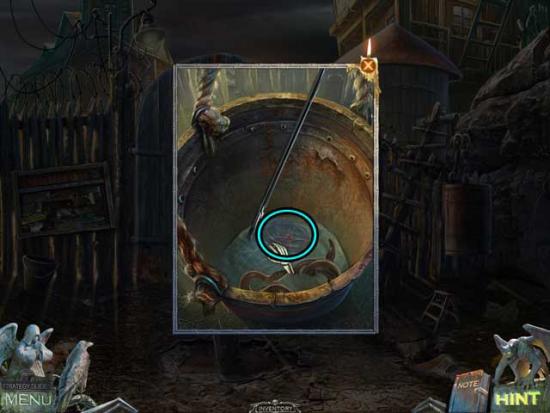
- Examine the red steel drum hanging from the fence on the right. Use the FLASHLIGHT WITH BATTERIES on the inside of the drum to illuminate it.
- Once illuminated, use the HOOK to retrieve the VALVE and add it to your inventory.
- Examine the water tower on the other side of the fence on the right again. Use the VALVE on the on the top of the spigot, then click on it to restore the flow of water.
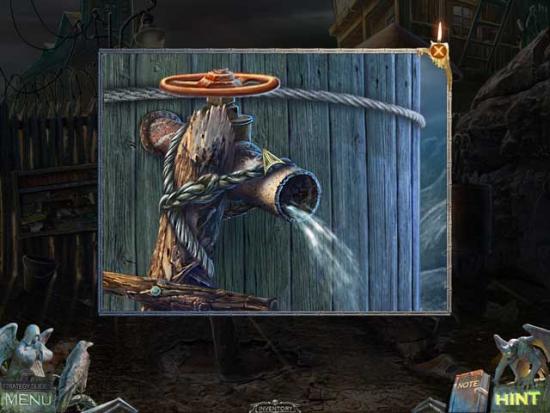
- Upon filling the water, the steel drum will trigger a mechanism that opens the Gate.
- Proceed through to the next area.
Chapter 2: The Mining Town
Town Clearing
- Take a closer look at the Miner. He’s trying to destroy the bulldozer and will vanish soon after.
- Use the GRAPPLING HOOK to lower the ladder leading up to the second floor of the building (1).
- Take a closer look at the sewer grate. Click on the WINCH to collect it (2).
- Examine the pile of barbed wire. Use the PLIERS to cut it, then click on the GLASS CUTTER to add it to your inventory (3).
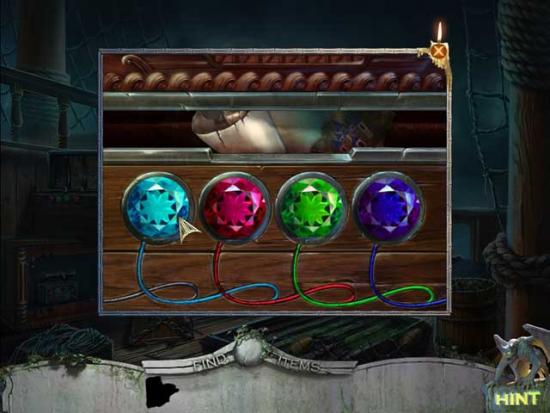
- Examine the bulldozer for a closer view.
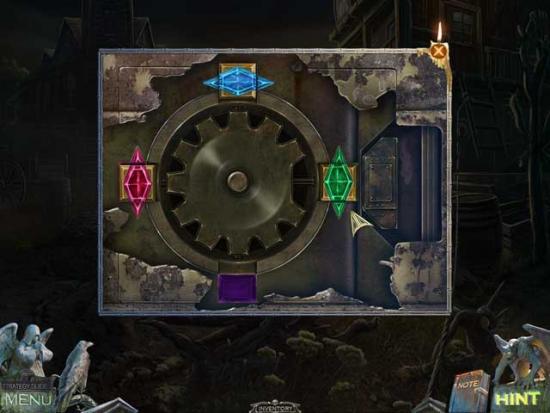
- Put the three gems into the appropriate colored slots to open the lock. Click on the gear to rotate it, and click on the gems to move them in and out of the empty space in the gear. Follow this process when doing the puzzle: 1) Click on the gear so that the slot in it is lined up with a gem. 2) Click on a gem to slide it into the slot in the gear. 3) Click on the gear to rotate it to the slot you want to place the gem, and click on the gem to slide it into that slot. Repeat for each gem. The solution is shown below.
- There’s nothing to do within the bulldozer at this moment, so leave it for now.
- Examine the door on the upper level of the building on the right. Take a closer look, then use the GLASS CUTTER on the bottom corner of the window to remove the glass. Click on the latch to open the door and proceed inside.
Office
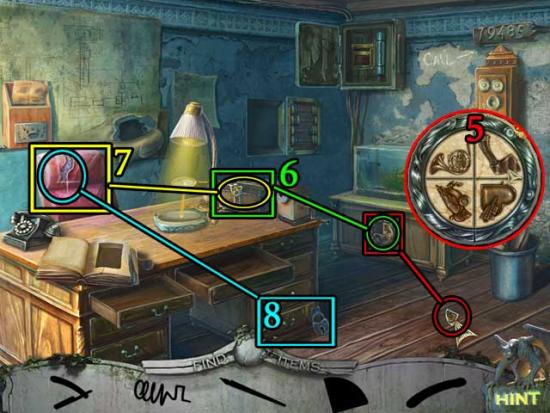
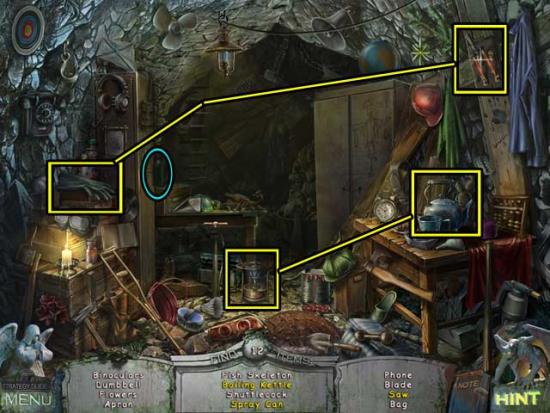
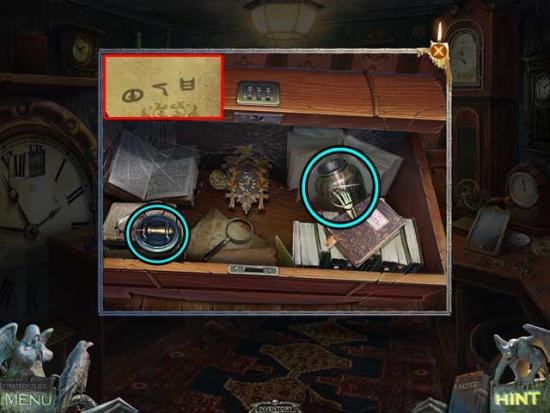
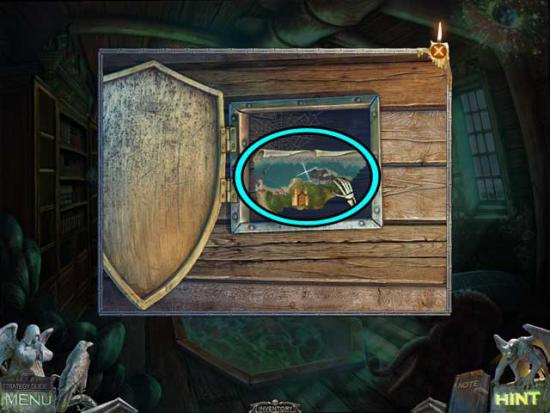
- Click on the hidden object area over the desk at the back of the room.
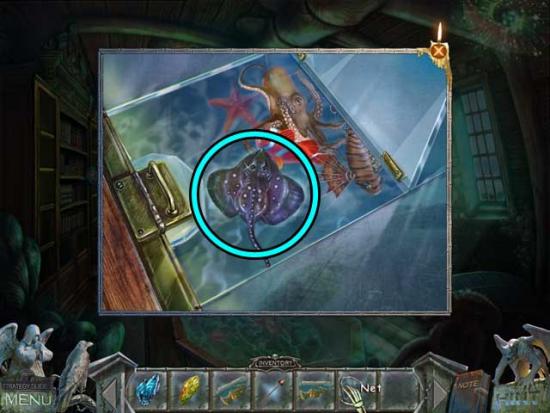
- Search the scene for silhouetted objects on the list, then use them to recover the rest of the items. The sequence is shown and outlined below.

- 1) Click on the Steak to collect it, then use it on the fish inside the aquarium.
- 2) Click on the Right Medallion Half to collect it.
- 3) Click on the paper to reveal a hidden compartment and collect the Left Medallion Half.
- 4) Use the Right Medallion Half and the Left Medallion Half on the slot at the top of the book to open it.
- 5) Click on the Ruler to collect it.
- 6) Click on the Code Message to collect it.
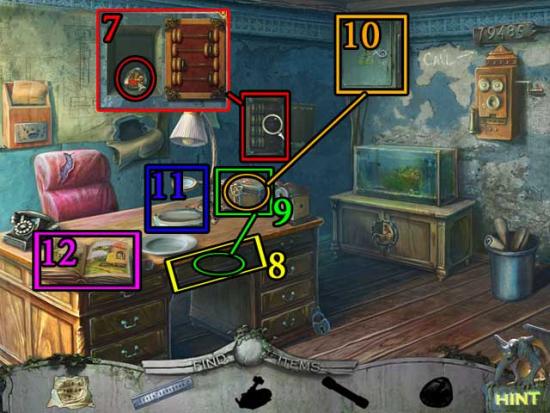
- 7) Take a closer look at the abacus and arrange the beads as shown on the diagram. Once finished, collect the Resin Lump.
- 8) Use the Ruler to pry open the drawer.
- 9) Click on the Gnome to collect it, then use it on the top of the box on the desk.
- 10) Collect the Fuse inside the box, then open the fuse box and place the Fuse inside.
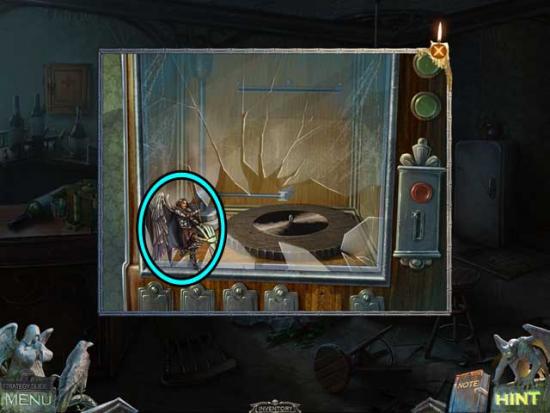
- 11) Electricity is restored. Use the Resin Lump on the lamp to obtain the Knight.
- 12) Take a closer look at the book and use the Knight on the empty slot.
- Place the objects within the book in their correct locations, shown below.

- Upon placing all the objects, click on the ANGEL revealed in a hollow of the book to add it to your inventory.
- Click on the Newspaper lying on the couch on the left to collect it.
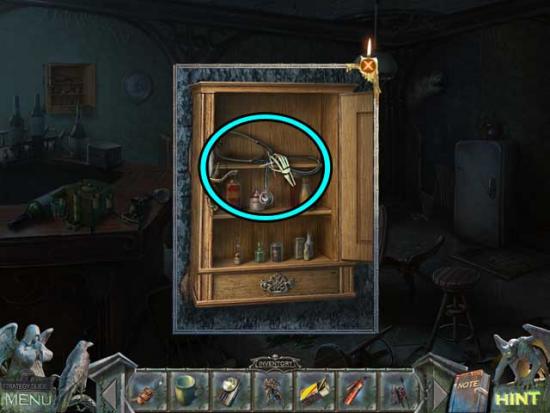
- Click on the right door of the cabinet on the right to open it, then take a closer look inside. Click on the MATCHES to add them to your inventory.
- Take a closer look at the hook connected to the ceiling. Use the WINCH on the hook, then click on the lever to let out the line.
- Exit the close-up and take a closer look at the grey safe lying on the floor. Click on the hook to latch it onto the handle.
- Examine the winch again. Click on the lever to draw the line back in, lifting the safe.
- Examine the safe, which is now standing upright. Click on the INSULATING TAPE to add it to your inventory.

- Go outside.
Town Clearing
- Take a closer look at the bulldozer. Inside, examine the exposed part of the console. Use the INSULATING TAPE to secure the loose red and blue wires.
- Once fixed, click on the rightmost lever to activate the bulldozer.
- The bulldozer will move out of the way, allowing you access to the lower portion of the building.
- Enter the lower portion of the building.
Bar
- Click on the FIRE EXTINGUISHER to add it to your inventory.
- Examine the vent in the upper right corner of the room and click on the Article to read it.
- Take a closer look at the broken jukebox on the far end of the room. Click on the ANGEL (2) to add it to your inventory.
- Examine the medical cabinet on the upper left portion of the back wall. Use the GLASS KNIFE to cut the rope holding it shut.
- Click to open the cabinet, then click on the STETHOSCOPE inside to collect it.
- Make your way back to the Office.
Office
- Take a closer look at the upright safe again. Use the STETHOSCOPE on the safe to trigger a puzzle.
- Use the stethoscope to listen to each dial and open the safe. Click and drag the stethoscope to a dial, and then click the dial to listen for the correct number. The locations where you should place the stethoscope, in addition to the correct dial locations, are shown below.
- Upon completing the puzzle, take a closer look inside the safe and add the SLEEPING PILLS to your inventory.
- Exit back outside.
Town Clearing
- Use the FIRE EXTINGUISHER on the bulldozer to put out the flame.
- Take a closer look at the lowered scoop of the bulldozer. Click on the JACK inside to add it to your inventory.
- Enter the Bar.
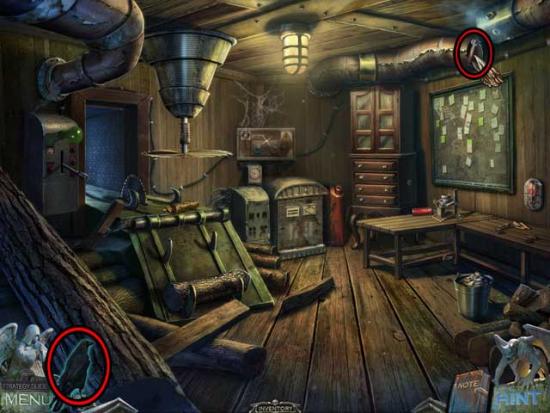
Bar
- Take a closer look at the refrigerator on the right. Use the JACK underneath the refrigerator, then click on the handle to remove it.
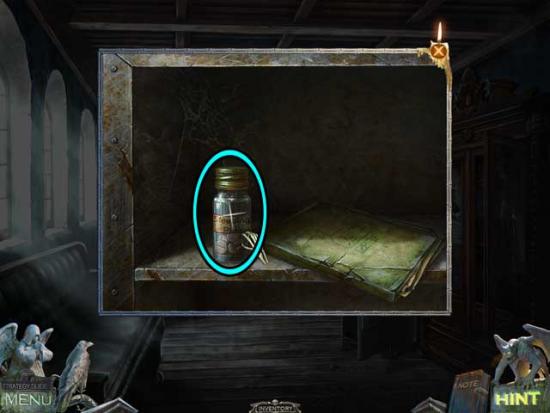
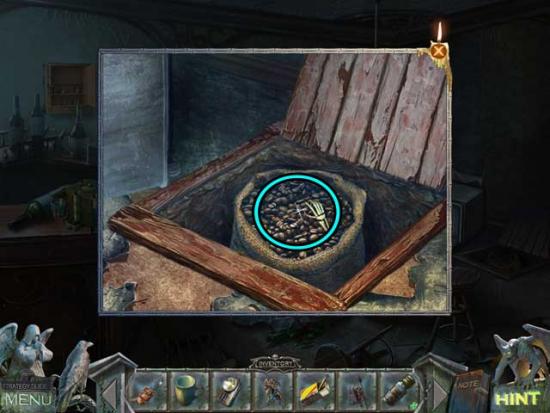
- Click on the wooden hatch in the floor to open it, revealing a sack inside. Use the GLASS KNIFE to cut the rope holding it shut.
- Click on the COFFEE BEANS inside the sack to add them to your inventory.
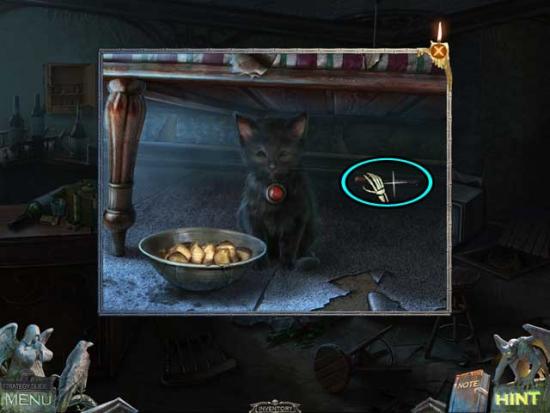
- Examine the open fridge lying on its side on the floor to enter a puzzle.
- Move the cat food can to the correct slot by shifting the other objects on the shelf. Click and drag an object to move it into an empty slot. The solution sequence is outlined in the screenshot below.

- Upon completing the puzzle, the CAT FOOD CAN will be added to your inventory.
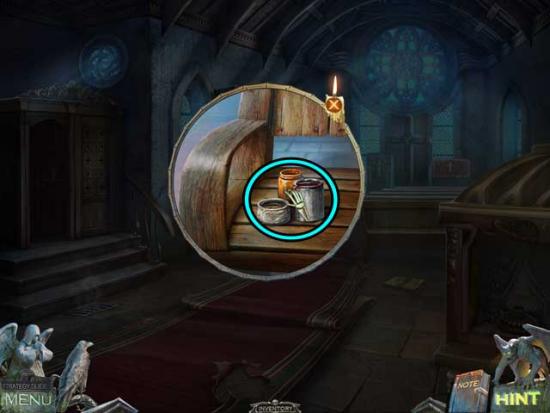
- Examine the coffee maker on the bar on the left. Place the COFFEE BEANS, the MATCHES, and the CUP on the surface to trigger a puzzle.
- Make the necessary preparations, and brew a cup of coffee. Using the screenshot below as reference, the solution is as follows:
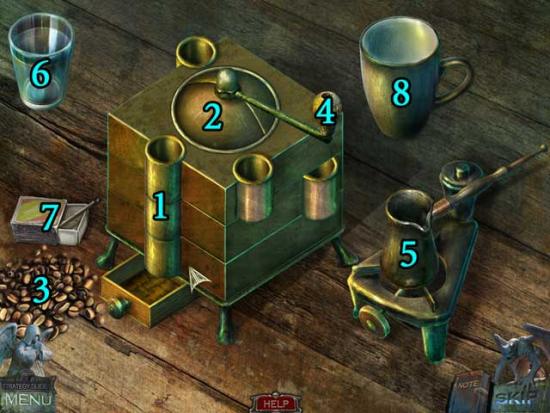
- 1) Click on the rotating sections on the side of the grinder until it is aligned as shown.
- 2) Click on the top portion of the grinder to open it.
- 3) Add the coffee beans to the inside of the grinder and shut the hatch.
- 4) Click on the lever to grind the coffee beans.
- 5) Place the coffee from the bottom drawer into the container on the right.
- 6) Pour the water into the same container on the right.
- 7) Use the matches to light the fire beneath the container on the right.
- 8) Pour the resulting cooked coffee into the mug.
- Upon completing the puzzle, click on the CUP OF COFFEE to add it to your inventory.
- In your inventory, combine the SLEEPING PILLS and the CUP OF COFFEE to obtain the COFFEE WITH SLEEPING PILLS.
- Make your way back to the Mine Entrance.
Mine Entrance
- Examine the small makeshift table to the right of the gangster. Place the COFFEE WITH SLEEPING PILLS on the saucer and watch what happens.
- Once the gangster is asleep, take a closer look at him, specifically his inner coat pocket. Click on the LIGHTER to add it to your inventory.
- Take a closer look at the steel drum with the fire inside next to the gangster. Click on the FUNNEL to add it to your inventory.

- Note the forging tongs and exit for now.
- Proceed up the staircase towards the background, to the workshop with the blue neon light at the top.
Workshop
- Upon entering, click on the FORGE BELLOWS lying on the ground to collect them.
- Click on the Article hanging on the bulletin board on the right to read it.
- Examine the generator at the back of the room with the red tank next to it. Click on the tank cap to remove it.
- Use the FUNNEL, followed by the FUEL CANISTER on the red tank. Click on the COIN that appears to collect it.
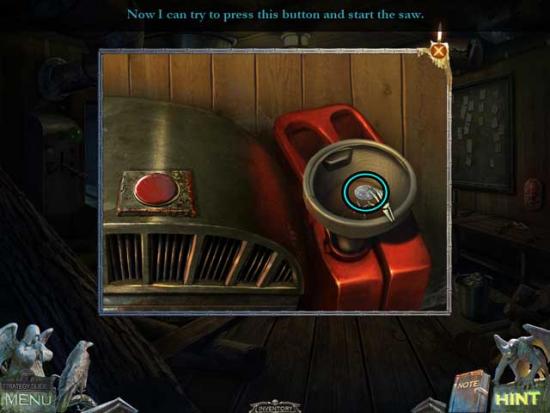
- Click on the red button to the left of the tank, on the generator, to activate it.
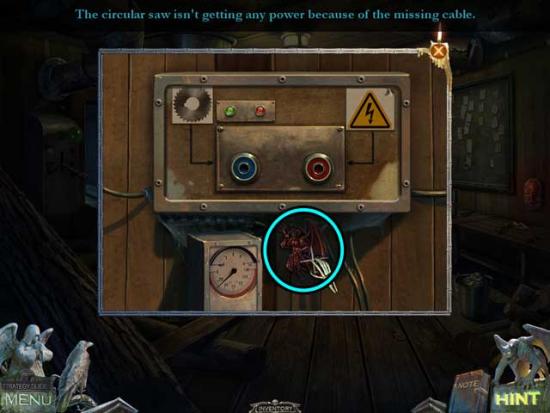
- Examine the power box above the generator on the back wall. Click on the DEMON to add it to your inventory.
- Exit the Workshop.
Mine Entrance
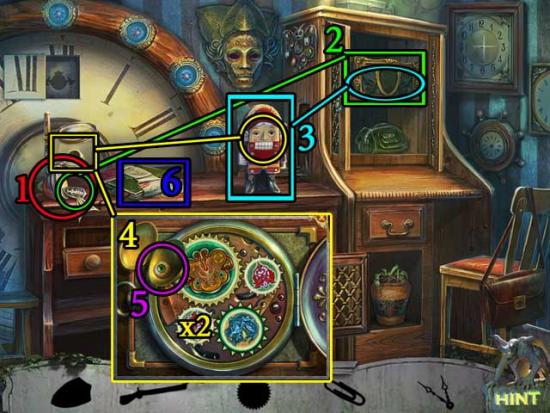
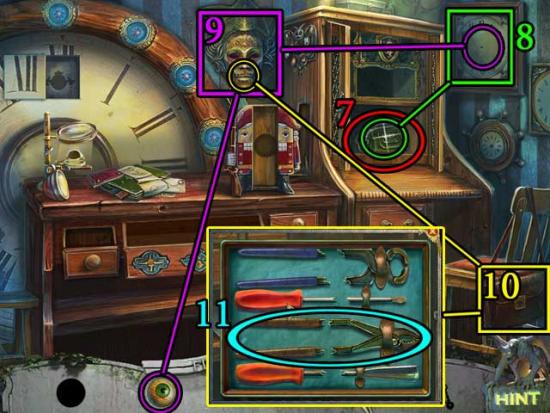
- Click on the hidden object area that has reappeared over the suitcase.
- Search the scene for silhouetted objects on the list, then use them to recover the rest of the items. The sequence is shown and outlined below.
- 1) Click on the Knitting Needles, then use them on the thread to create the Gloves.
- 2) Click on the Gloves, then use them on the Rose to handle it.
- 3) Use the Rose on the box to open it, revealing the Screwdriver inside.
- 4) Use the Screwdriver on the small plate to remove it, revealing the Spring.
- 5) Use the Spring on the watch to repair it, revealing the Hairpin.
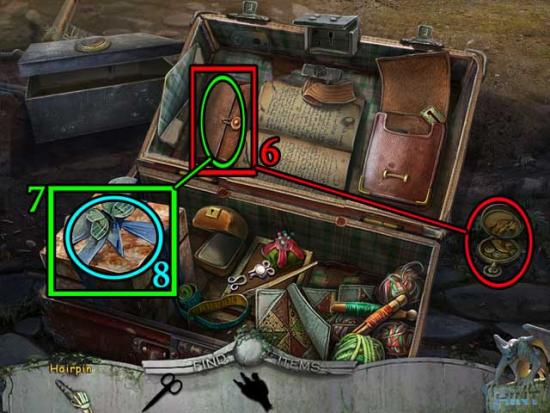
- 6) Use the Hairpin on the leather case to open it, revealing the Scissors.
- 7) Use the Scissors on the ribbon to open the gift box.
- 8) Collect the final item.
- Upon completing the area, the TIN SOLDIERS will be added to your inventory.
- Take a closer look at the steel drum with the fire. Place the TIN SOLDIERS into the forging tongs/mold.
- Next, use the FORGE BELLOWS on the bottom of the drum to heat the flame.
- Examine the tongs and mold again, clicking to separate them. Click on the ANGEL (cherub) inside to add it to your inventory.
- Return to the Office.
Office
- Click on the hidden object area at the back of the room.
- Search the scene for silhouetted objects on the list, then use them to recover the rest of the items. The sequence is shown and outlined below.
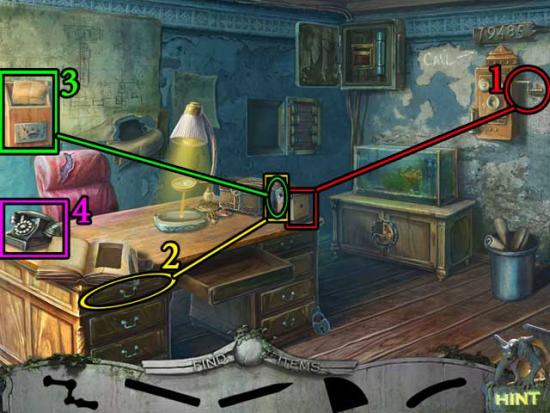
- 1) Click on the Handle and use it on the sharpener.
- 2) Click on the drawer to open it and collect the Pencil, then use it on the sharpener.
- 3) Use the Sharpened Pencil on the paper within the box to reveal an important clue.
- 4) Click on the phone for a closer view. Dial the numbers in the following order: 7, 9, 4, 8, 5.
- 5) Click on the Piece of Lock that appears and use it on the lock to restore it. Arrange the pieces as shown to open it.
- 6) Click on the Razor Handle, then use it on the blade within the box to obtain the Razor.
- 7) Use the Razor on the chair to reveal the Broken Spring.
- 8) Use the Broken Spring to open the locked drawer and collect the final item inside.
- Upon completing the area, the BRUSH will be added to your inventory.
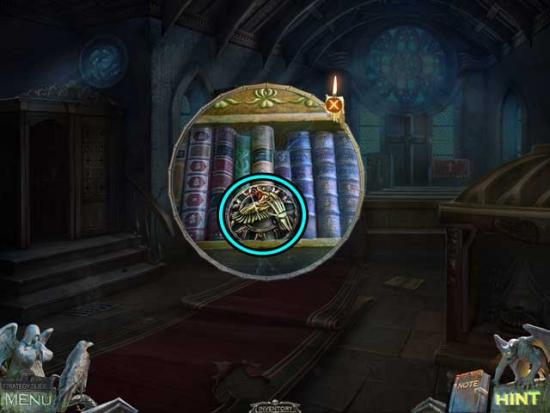
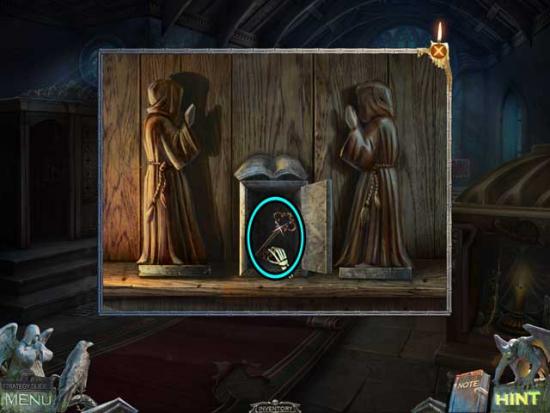
- Examine the broken window of the cabinet on the right. Use the ANGEL (cherub) on the empty pillar slot on the box inside to trigger a puzzle.
- Match the instruments to their musicians, and then repeat their melodies. Click and drag the correct instrument to a musician, and then click the music notes on the keyboard below. The correct musician-to-instrument arrangement is shown below.
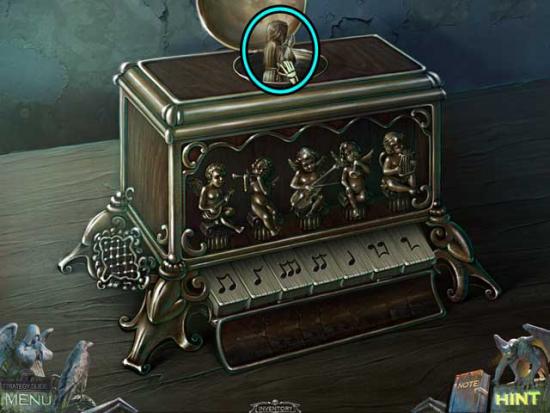
- Upon completing the puzzle, click on the MONK to add it to your inventory.
- Exit to the Town Clearing.
Town Clearing
- Examine the door of the chapel in the upper left corner.
- Place the DEMON and the ANGELS (x2) in the empty slots on the door to trigger a puzzle.
- Find a way to make all of the angels raise their wings. Click an angel to lift its wings and attack different demons. But be careful! The demons will retaliate. The sequence is random, but the final solution as it should look is shown below.
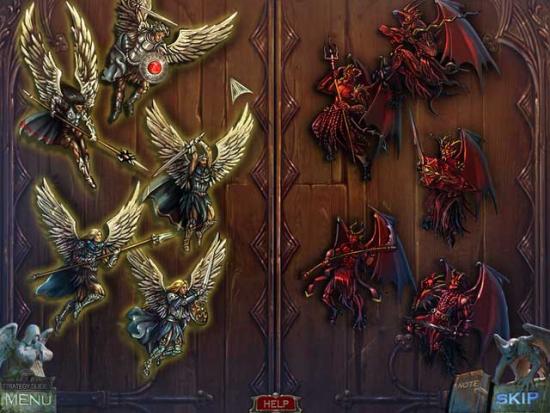
- Upon completing the puzzle, the doors will open.
- Enter the Chapel.
Chapter 3: The Chapel
Chapel
- Click on the red curtain on the right to move it aside, revealing and altar beneath. There’s nothing you can do here just yet, however.
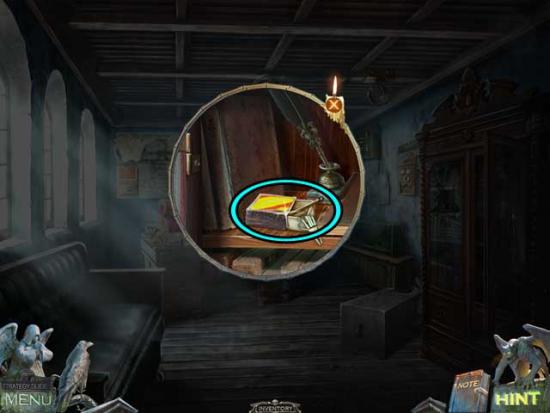
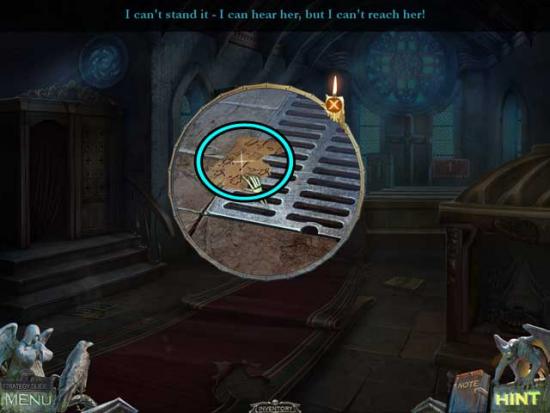
- Examine the book lying on the floor behind the right section of church pews to read the entry within.
- Take a closer look at the grate on the floor, beneath the steps on the left. Click on the DESIGN PIECE to add it to your inventory.
- Click on the curtain over the confession box doorway on the left to move it aside, though leave this area for now.
- Examine the rear left church pew with the hat hanging off the end. Click on the PAINTS to add them to your inventory.
- Examine the bookshelf on the left side of the chapel. Click on the CROW RUNE to collect it.
- Exit the Chapel for now and return to the Workshop.
Workshop
- Use the Crow to retrieve the CAN OPENER from the vent and add it to your inventory (it will fall to the floor, where you must pick it up).
- In your inventory, combine the CAN OPENER with the CAT FOOD CAN to obtain the OPENED CAT FOOD CAN.
- Return to the Bar.
Bar
- Take a closer look under the red couch. Use the OPENED CAT FOOD CAN on the dish, then click on the CHISEL that’s revealed to add it to your inventory.
- Back in the main area, take a closer look at the jukebox next to the couch. Use the COIN on the slot to have the machine grab a record, then click on the DESIGN PIECE (2) that’s revealed to collect it.
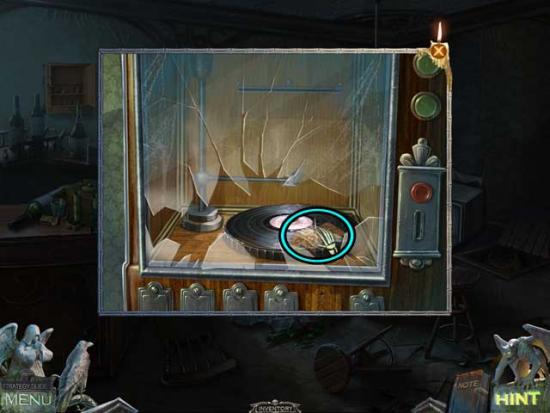
- In your inventory, combine the DESIGN PIECES (x2) with each other to obtain the DESIGN.
- Return to the Chapel.
Chapel
- Take a closer look at the front of the Chapel where the large cross is. Use the CHISEL to remove the candle WAX and add it to your inventory.
- Make your way back to the Workshop.
Workshop
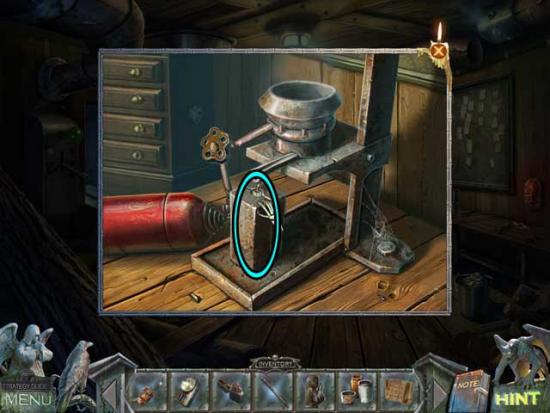
- Examine the portion of the work table on the right that’s sticking out towards the middle of the room. Place the WAX inside the hollow in the device, then click on the gold-colored valve to turn on the gas. Use the LIGHTER to ignite it (surrounding the wax).
- Click on the CANDLE to add it to your inventory.
- Backtrack to the Chapel.
Chapel
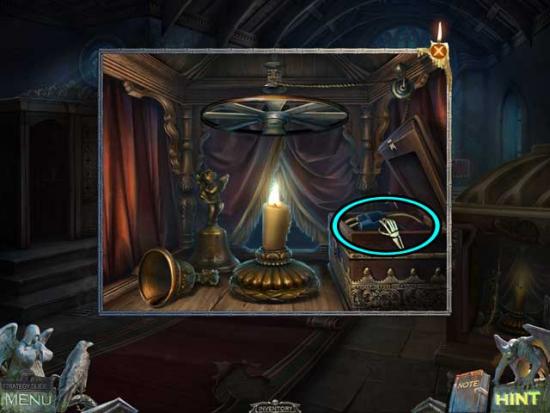
- Examine the altar on the lower right. Place the CANDLE in the holder, then use the LIGHTER to light it. Click on the CABLE that’s revealed to add it to your inventory.
- Make your way back to the Workshop.
Workshop
- Take a closer look at the power box on the back wall, above the generator. Use the CABLE on the red and blue sockets to restore power.
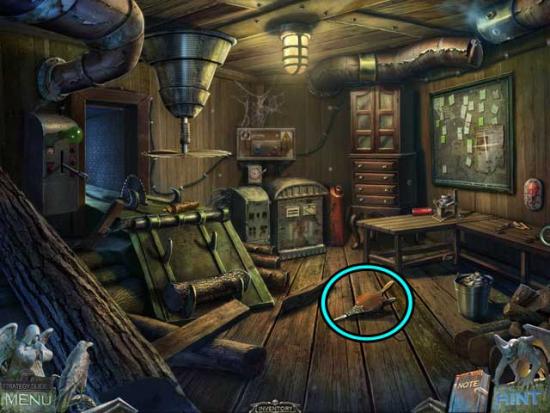
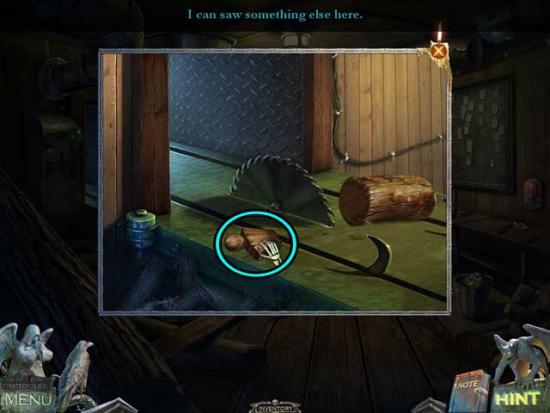
- Back in the main area, click on the lever to the left of the circular saw (below the green light bulb) to turn it on.
- Click on the large SAW BLADE that just misses you to add it to your inventory.
- Take a closer look at the circular saw table. Click on the piece of wood to saw it, then click on the WOODEN STATUETTE to add it to your inventory.
- Examine the work bench on the right. Place the WOODEN STATUETTE, the DESIGN, the PAINTS, and the BRUSH on the table to trigger a puzzle.
- Create a monk statuette in the correct sequence. Click and drag the tools and supplies according to the instructions. The numbered reference to the correct sequence solution is shown below.
- 1) Click on the carving tool and use it on the wooden blocks at the top of the table.
- 2) Use the sandpaper on the wooden pieces at the top of the table.
- 3) Use the wooden limbs on the body in the center of the table.
- 4) Pick up the screws and place them one-by-one in the holes in the body.
- 5) Use the screwdriver to secure each of the four screws.
- 6) Pick up the large brush.
- 7) Dip the brush in the stain and use it to coat the figure.
- 8) Use the cloth on the figure to give it clothing.
- 9) Pick up the small brush.
- 10) Dip the small brush in the orange paint and use it to paint the figure’s face.
- 11) Dip the small brush in the black paint and use it to paint the figure’s robe.
- Upon completing the sequence, click on the MONK (2) to add it to your inventory.
- Return to the Chapel.
Chapel
- Examine the open door of the confession booth on the left. Place the MONKS (x2) on the stands on either side of the middle statuette, then click on the KEY that appears to add it to your inventory.
- Make your way to the Mine Entrance.
Mine Entrance
- Take a closer look at the Mine Entrance on the left. Use the KEY on the lock to open the gates, then proceed inside.
Chapter 4: The Mine
Elevator
- Examine the floor control console on the left. Click any of the buttons.
- The gear on the right will break. Use the SAW BLADE to replace the broken gear on the right.
- Examine the control console again. Select “B3”.
- Once you arrive, exit the Elevator.
Shaft B3
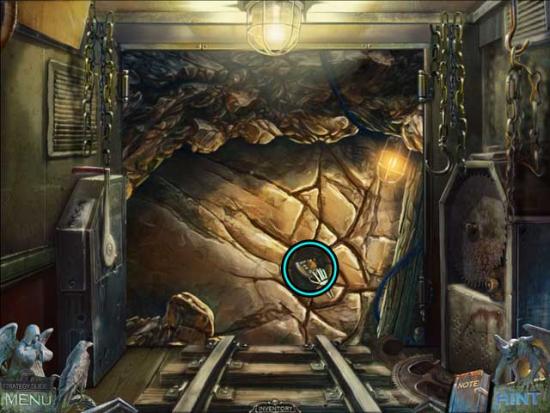
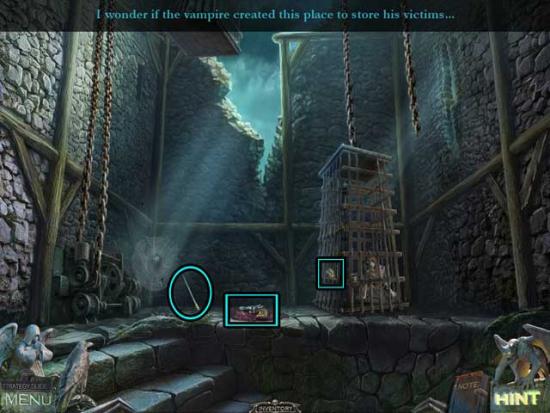
- Use the FLASHLIGHT WITH BATTERIES on the area to be able to see.
- Click on the CROW RUNE to collect it, then examine the miner’s helmet on the right. Click to move it and obtain the CENTRAL PANEL ELEMENT. Next, examine the panel on the wall on the right.
- Use the GLASS KNIFE to cut the rope holding the panel shut.
- Take a closer look at the panel and place the CENTRAL PANEL ELEMENT into the center slot to trigger a puzzle.
- Light up the terminals by placing puzzle segments into circles with outlines of matching colors. Click the centers of the circles to rotate them. Click the green buttons between circles to move segments to the two open spaces in the center circle. The solution is shown below.
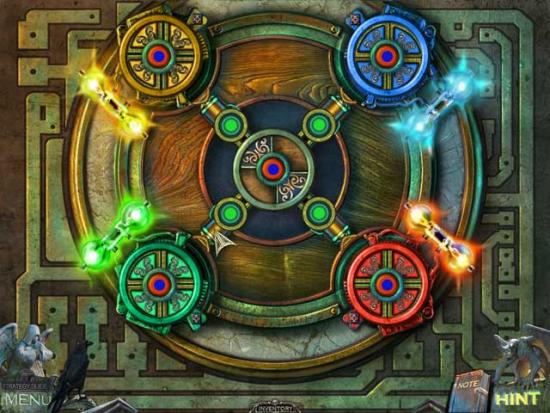
- Upon completing the puzzle, light will be restored to the shaft.
- Proceed forward to the next area.
Chasm
- Take a closer look at the mechanism at the far end of the chasm area. Click on the ELEVATOR BUTTON to add it to your inventory.
- Back in the main area, use the Crow on the lever on the wall between the two arches on the right. This will cause a mine cart to appear on the far track.
- Examine the mine cart that appeared. Click on the CELL KEY inside to add it to your inventory.
- Return to the Elevator.
Elevator
- Examine the floor control panel on the left. Use the ELEVATOR BUTTON on the top empty slot to restore it.
- Click the new button “B1”.
Shaft B1
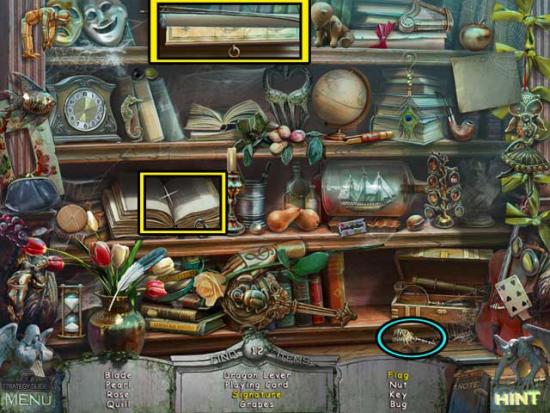
- Take a closer look at the lock on the door. Use the CELL KEY to open it, revealing a hidden object area.
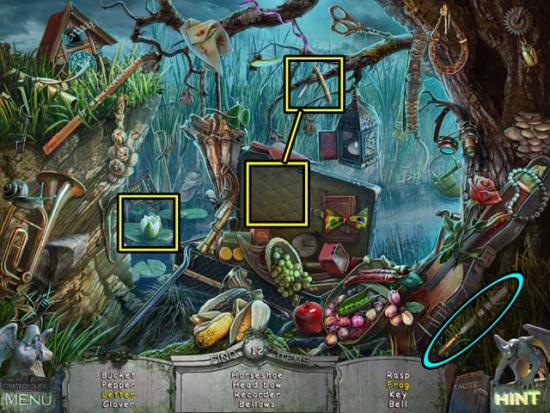
- Find the objects listed at the bottom of the screen. Objects listed in white are randomized. Additional-action items are outlined in yellow, and the Inventory Item is circled in blue.
- Upon completing the area, the INSECT SPRAY will be added to your inventory.
- Return to the Chasm.
Chasm
- Examine the toppled mine cart immediately in front of you. Use the INSECT SCRAY to get rid of the spiders.
- Click on the STICK and the AMULET PIECE to add them to your inventory.
- Backtrack to the Workshop.
Workshop
- Examine the circular table saw towards the left. Use the STICK on the saw to cut it into segments, then click on the STICK PIECES to add them to your inventory.
- Return to the Chasm.
Chasm
- Take a closer look at the mechanism at the far end of the Chasm again. Use the STICK PIECES on the empty slots in the mechanism to restore it, then click on the red lever on the right.
- The door on the left will open. Proceed inside.
Burial Site
- Look at the Miner on the right. He will cause the portcullis to fall, blocking your path to him.
- Click on the PICKAX to add it to your inventory, then examine the slab with the white markings on the left. Click on the ELEVATOR BUTTON to add it to your inventory.
- Return to the Elevator.
Elevator
- Examine the floor control panel on the left. Place the ELEVATOR BUTTON into the remaining empty slot to restore it, then select “B2”.
- The Elevator will malfunction, taking you up to Shaft B1.
Shaft B1
- Click on the hidden object area.
- Find the objects listed at the bottom of the screen. Objects listed in white are randomized. Additional-action items are outlined in yellow, and the Inventory Item is circled in blue.
- Upon completing the area, the AMULET PIECE (2) will be added to your inventory.
Elevator
- Back in the Elevator, select “B2” again from the floor control panel on the left.
Shaft B2
- Click on the Scroll on the lower left to read it.
- Use the PICKAX on the wall of rock ahead to break off a section, revealing the AMULET PIECE (3). Click on it to add it to your inventory.
- Make your way back to the Burial Site.
Burial Site
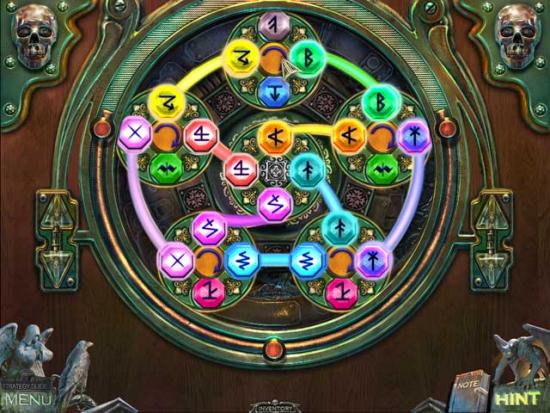
- Examine the altar ahead. Use the AMULET PIECES (x3) on the empty slots in the corners of the slab to restore them and trigger a puzzle.
- Put together four pieces of the amulet by rotating the circles and making a route for each piece. Click a circle to select it, and then click the arrow buttons to rotate it. Rotating a segment may affect other segments. Using the screenshot below as reference, click on the “up” arrow on the right only the number of times stated, selecting the ring as stated and shown.
- Solution: Ax2, Cx6, Bx3, Dx1.
- Upon restoring the amulet, watch the cutscene that follows. You will find yourself back in the Cemetery.
Chapter 5: The Small Town
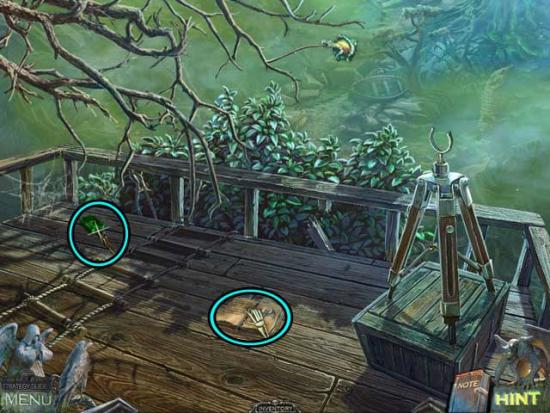
Open Grave
- Speak with the ghost. When his body disappears, click on the SOUL STONE to add it to your inventory.
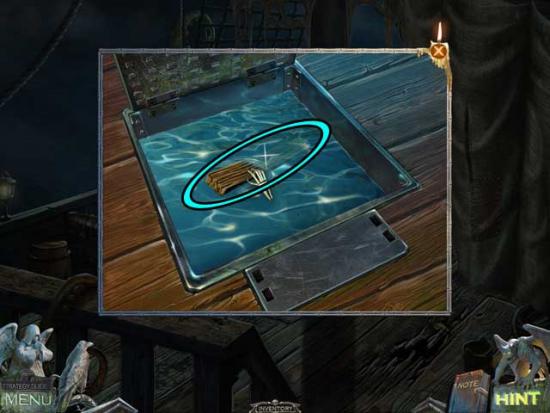
- Take a closer look at the water ahead. You will enter a puzzle.
- Arrange the board fragments to restore the bridge. Click two fragments to swap their positions and match the shapes of the breaks. The solution is shown below.
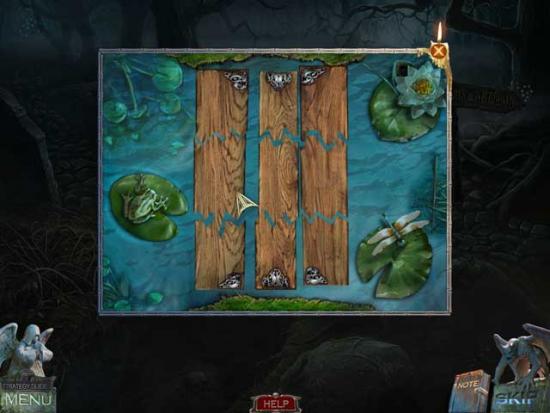
- Upon completing the puzzle, you will be able to proceed further.
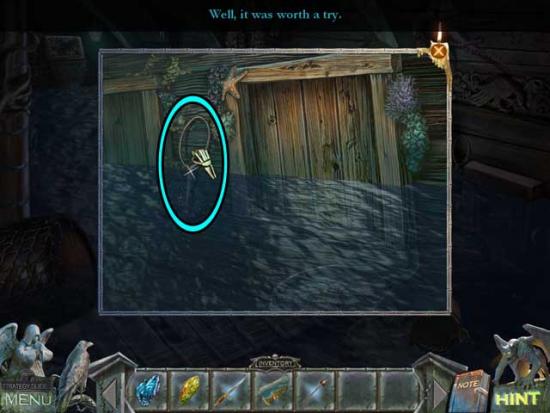
Swamp Edge
- Take a closer look at the water and speak with the ghost that appears.
- After speaking with the ghost, enter the portal that appears on the upper left.
Stable
- Click on the box up in the rafters on the upper left to knock it down.
- After knocking down the box, click on the HAND DRILL that appears to add it to your inventory.
- Take a closer look at the man and the woman ahead. Speak with both of them and click on the Note on the side of the box on which the man is sitting.
- Back in the main view, proceed forward to the next area.
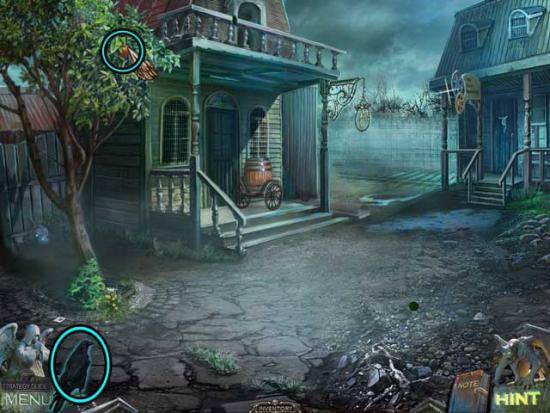
Porch Area
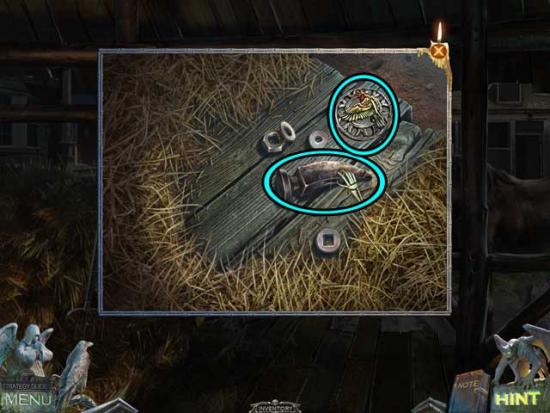
- Take a closer look at the porch of the house on the left. Use the HAND DRILL on the barrel to drain its contents, then click on it to roll it aside.
- Click on the PITCHFORK to add it to your inventory.

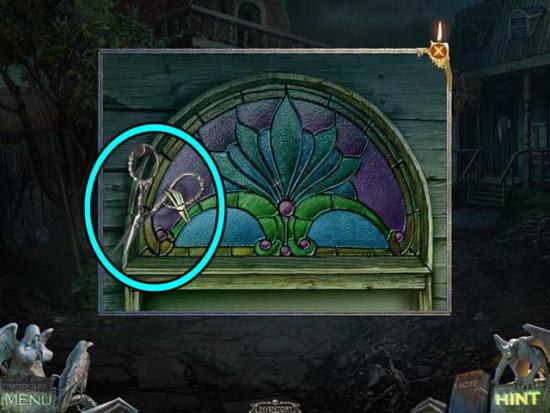
- Examine the stained glass window above the door on the left. Click on the SCISSORS to add them to your inventory.
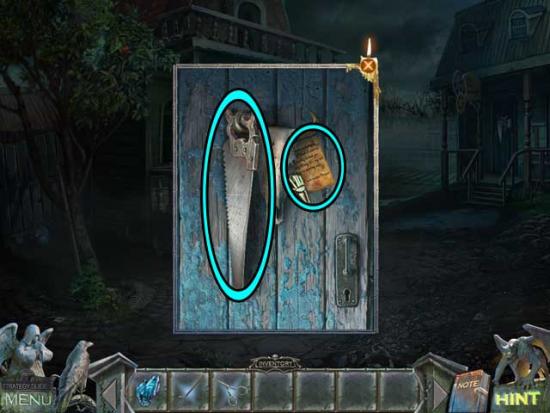
- Examine the door of the house on the right. Click on the Note and the SAW to collect them.
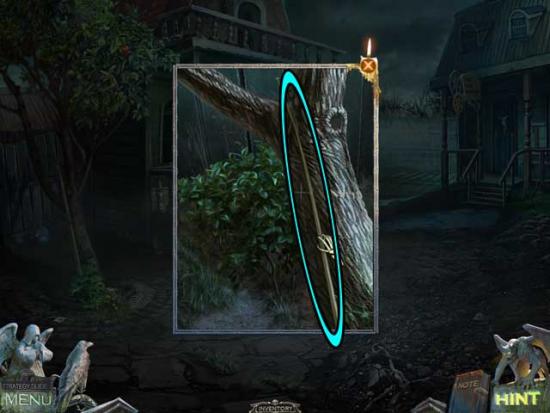
- Take a closer look at the tree on the left. Use the SCISSORS to cut the rope, then click on the FISHING ROD to add it to your inventory.
- Go back to the Stable.
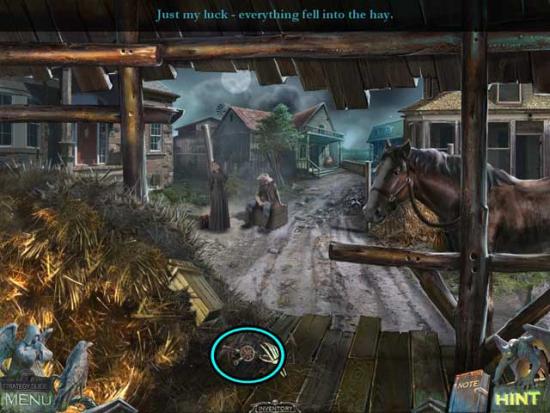
Stable
- Use the PITCHFORK on the hay at the bottom of the stack, to the right of the box that fell down from the rafters.
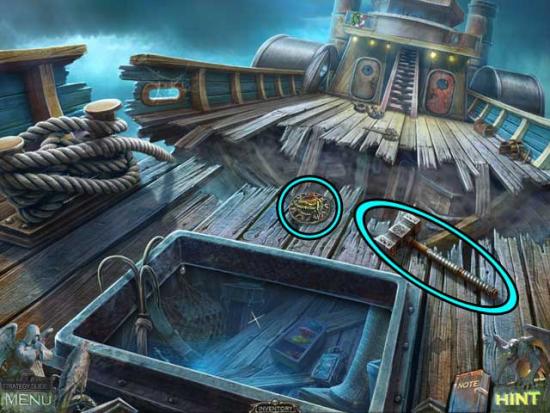
- Take a closer look. Click on the IRON HAMMER and the CROW RUNE to collect them.
- Use the SAW on the handle of the Pitchfork in the hay, then click on the resulting HAMMER HANDLE to add it to your inventory.
- In your inventory, combine the HAMMER HANDLE and the IRON HAMMER to obtain the HAMMER.
- Go forward to the Porch Area.
Porch Area
- Use the Crow to retrieve the APPLE from the tree.
- Go back to the Stable.
Stable
- Give the APPLE to the horse.
- Take a closer look at the bag hanging around the horse’s neck. Click on the FISHING TACKLE inside to collect it.
- In your inventory, combine the FISHING TACKLE and the FISHING ROD to obtain the ROD.
- Go forward to the Porch Area.
Porch Area
- Take a closer look at the stained glass window above the door on the left. Use the HAMMER to break the glass.
- Next, take a closer look inside via the broken window. Use the ROD to retrieve the KEY and add it to your inventory.

Back in the main area, examine the door of the house on the left. Use the KEY on the lock to open it, then proceed inside.
Chapter 6: The Judge’s House
Foyer
- Click on the far rug to reveal a hatch in the floor.
- Examine the fireplace on the left. Click on the Manuscript in the lower right corner to add it to your Notes.
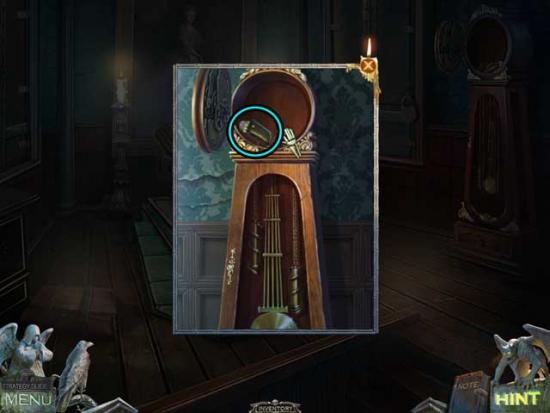
- Examine the standing clock in the upper left corner of the upper level. Click on the GLOBE KEY to add it to your inventory.

- Take a closer look at the doors on the upper level. Use the SAW to cut through the door bolt, then proceed inside.
Library
- Take a closer look at the large globe on the left. Use the GLOBE KEY to open it.
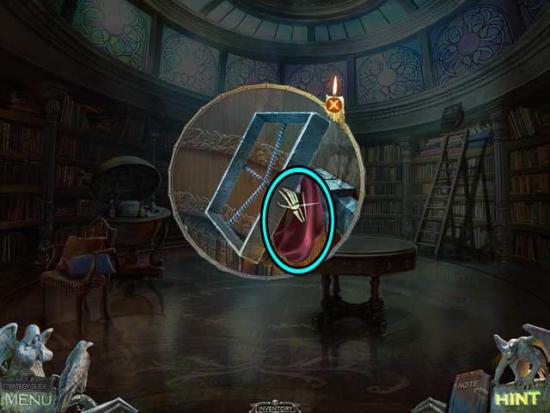
- Next, examine the first bookcase to the left of the center shelf. Click on the Letter to read it, then click on the black books with the red bookmarks.
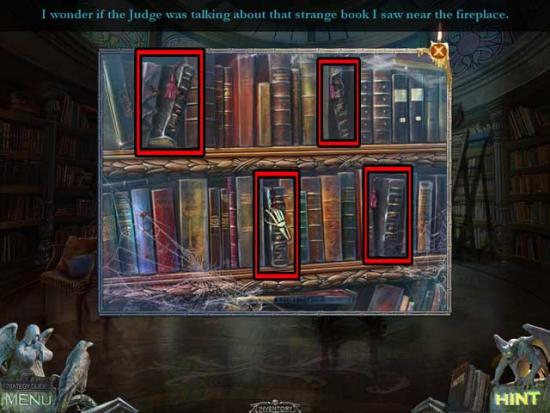
- Upon clicking all the books, a secret entrance will be revealed, also revealing a hidden object area.
- Find the objects listed at the bottom of the screen. Objects listed in white are randomized. Additional-action items are outlined in yellow, and the Inventory Item is circled in blue.
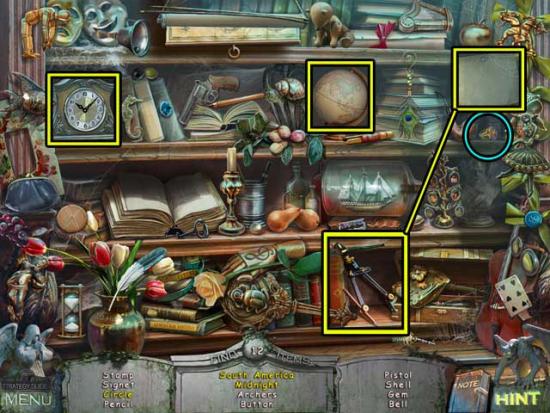
- Upon completing the area, the SIGNET RING will be added to your inventory.
- Examine the bottom portion of the ladder on the right. Click on the COAL TONGS to add them to your inventory.
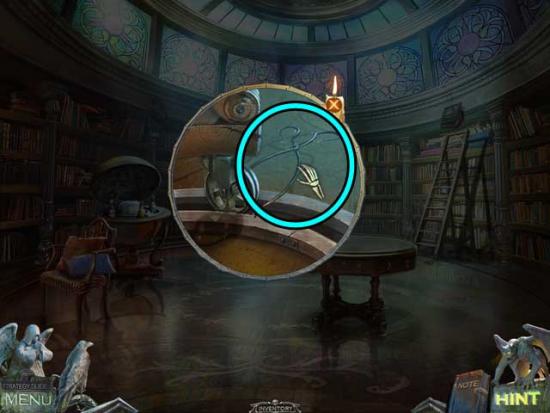
- Next, examine the top portion of the ladder on the right. Click on the SHAWL to add it to your inventory.
- Exit to the Foyer.
Foyer
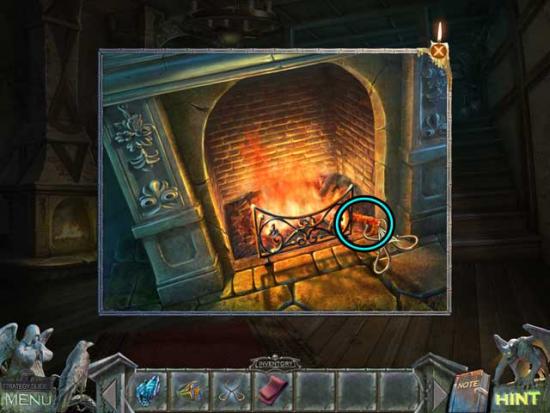
- Examine the fireplace on the left. Use the COAL TONGS on the COAL to collect it.
- Go back to the Library.
Library
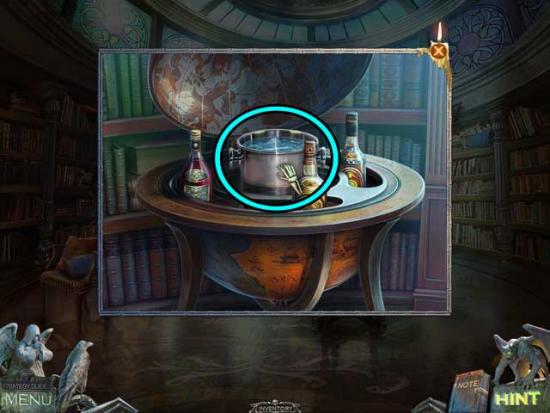
- Take a closer look at the globe on the left again. Use the COAL on the bucket of ice to melt it, then click on the BUCKET OF WATER to add it to your inventory.
- Go back to the Foyer.
Foyer
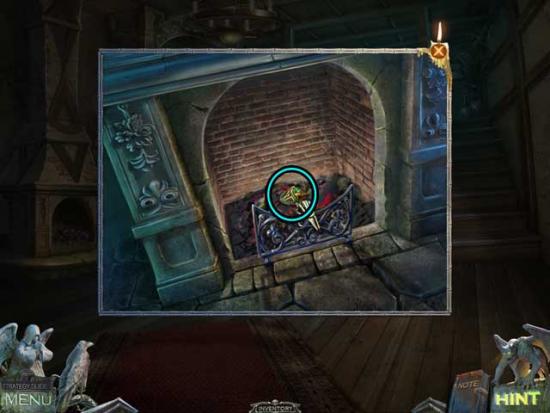
- Examine the fireplace on the left again. Use the BUCKET OF WATER to extinguish the fire, then click on the SIGNET RING (2) to add it to your inventory.
- Make your way back to the Stable.
Stable
- Take a closer look at the man and the woman again, this time taking an additional closer look at the bundle of sticks behind the woman.
- Use the COAL TONGS to retrieve the SIGNET RING (3) and add it to your inventory.
- Return to the Foyer.
Foyer
- Examine the doors on the lower level, beneath the stairs, ahead. Use the SIGNET RINGS (x3) on the panel to trigger a puzzle.
- Put the rings on their imprints. Click a ring to highlight it, and then click the available location where you want to move it. Move the rings according to the numbers and locations shown below to solve the puzzle.
- Upon completing the puzzle, the doors will open. Proceed through to the next area.
Backyard
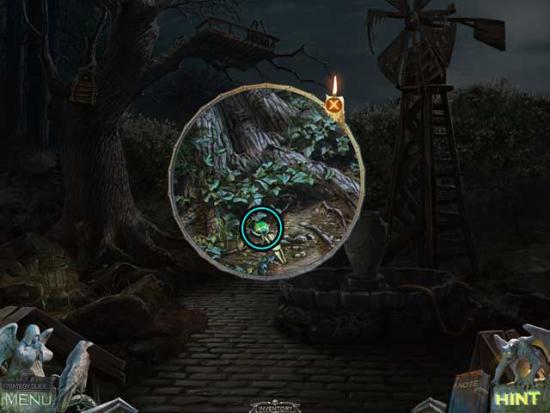
- Examine the base of the tree on the left. Click on the AMULET to add it to your inventory.
- Examine the upper portion of the windmill on the right. Use the SHAWL on the bare framework to restore the blades.
- Click on the GEM EYE that is thrown from the fountain to collect it.
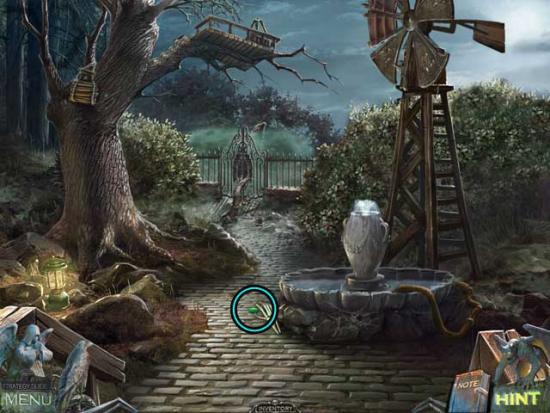
- Take a closer look at the gate ahead in the distance. Click on the GUIDE HALF to add it to your inventory.
- Go back to the Foyer.
Foyer
- Examine the statue on the upper left. Place the AMULET and the GEM EYE in their correct slots, then click on the AX to add it to your inventory.
- Go back out to the Backyard.
Backyard
- Take a closer look at the gate in the distance. Use the AX on the branch propped up against the gate to remove it.
- Click on the WORKSHOP KEY to add it to your inventory.
- Make your way back to the Porch Area.
Porch Area
- Examine the door on the right. Use the WORKSHOP KEY to open the door, then proceed inside.
Clock Workshop
- Click on the hidden object area on the left.
- Search the scene for silhouetted objects on the list, then use them to recover the rest of the items. The sequence is shown and outlined below.
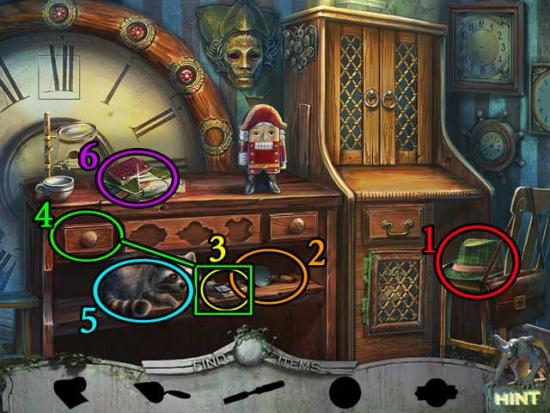
- 1) Click on the hat to move it, then collect the Chisel.
- 2) Click on the Trowel to collect it.
- 3) Click on the trap on the Racoon’s paw to remove it.
- 4) Open the drawer, then use the Bandage inside on the Racoon’s paw.
- 5) Click on the Oiler and the Drawer Symbol to collect them.
- 6) Click on the stack of books for a closer view, then click on the top book to move it. Note the code beneath.
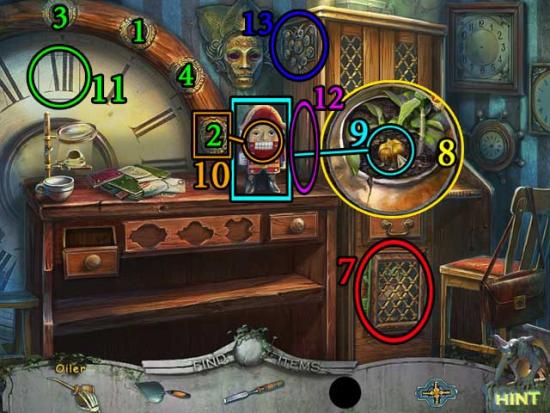
- 7) Use the Oiler on the cabinet to open it.
- 8) Click on the potted plant for a closer view. Use the Trowel to reveal the Golden Nut.
- 9) Use the Golden Nut on the nutcracker to reveal the Clock Button.
- 10) Use the Clock Button on the empty slot in the large clock frame.
- 11) Press the buttons in the correct order as shown, then collect the Drawer Symbol (2).
- 12) Use the Chisel on the loose board and collect the Owl Coin.
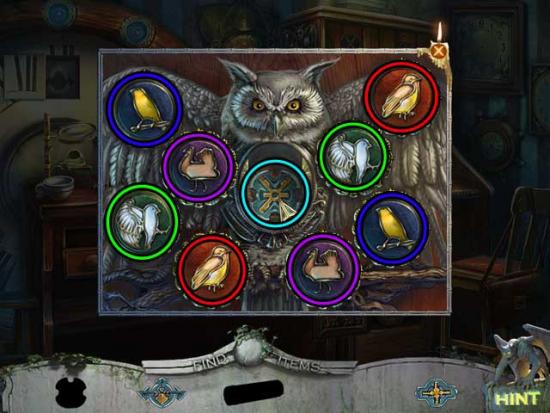
- 13) Use the Owl Coin on the owl panel to trigger a puzzle.
- Click on coins to flip them, matching identical birds. The matches are shown below. Upon completing the puzzle, collect the Drawer Symbol (3).
- Use the Drawer Symbols (x3) on the drawer with the three grooves ahead, then collect the final item inside.
- Upon completing the area, the INCOMPLETE TELESCOPE will be added to your inventory.
- Take a closer look at the table on the right. Click on the CROW RUNE to collect it.

- Make your way back to the Backyard.
Backyard
- Use the Crow to knock the rope ladder down from the tree on the left.
- Take a closer look at the platform up in the tree. Collect the Text and the LEVER.
- Make your way back to the Clock Workshop.
Clock Workshop
- Examine the clock with the missing face hanging near the ceiling. Use the LEVER on the clock to trigger a puzzle.
- Put the levers into the correct positions to open the leaves one at a time. Click and drag the levers left and right to change their positions. The solution in the order and locations to which you should move the levers is shown below.

- Upon completing the puzzle, click on the GEM EYE to add it to your inventory.
- Make your way back to the Foyer.
Foyer
- Examine the statue on the upper left again. Place the GEM EYE in the remaining empty eye socket to restore it.
- The statue will move, revealing a new door. Proceed through to the next area.
Coffin
- Click on the GUIDE HALF on the floor, and in the Coffin, the Note and the EYEPIECE to collect them.
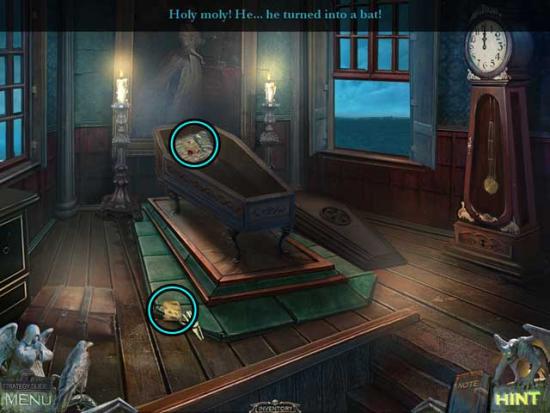
- In your inventory, combine the EYEPIECE and the INCOMPLETE TELESCOPE to obtain the TELESCOPE.
- In your inventory, combine the GUIDE HALF (x2) with each other to obtain the UNMARKED GUIDE.
- Return to the Backyard.
Backyard
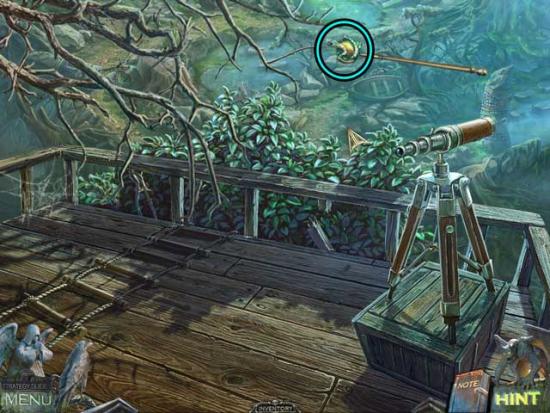
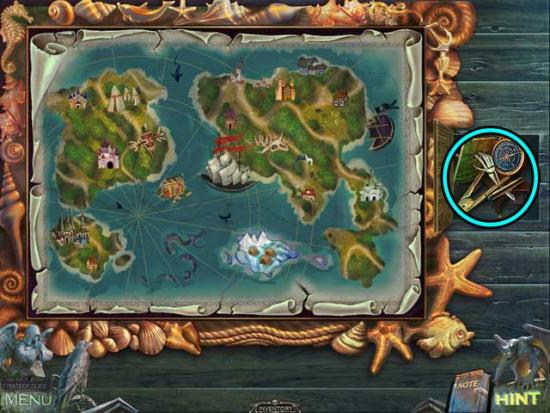
- Take a closer look at the platform up in the tree again. Use the TELESCOPE on the stand on the right, then click for a closer view.
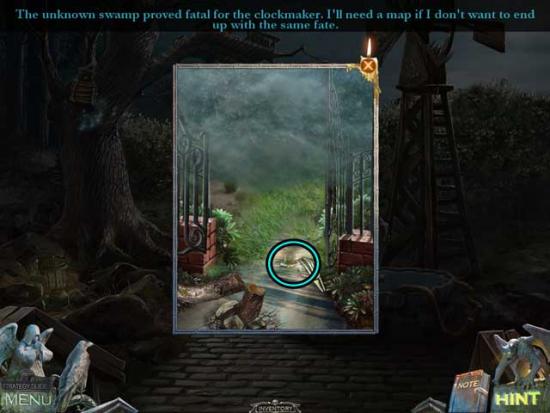
- In the close-up, use the UNMARKED GUIDE to trigger a puzzle.
- Find the guides for the map using the telescope. Once you find one, click on it to cross it from the list. The locations of all the landmarks are shown below.
- Upon completing the puzzle, click on the SWAMP GUIDE to add it to your inventory.
- Go back down to the main area of the Backyard.
- Take a closer look at the open gate ahead. Use the SWAMP GUIDE on the open gate to be able to gain access to the Swamp.
Proceed forward to the next area.
Chapter 7: The Swamp
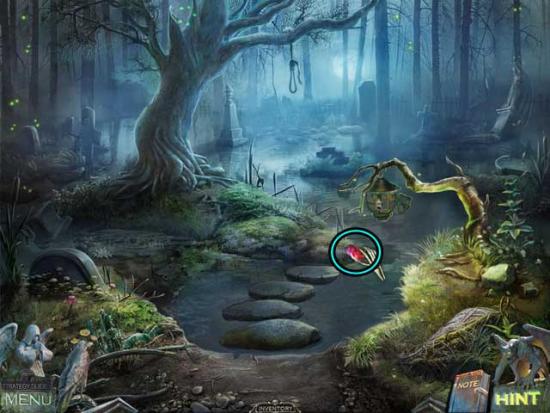
Swamp
- Click on the hidden object area beneath the tree.
- Find the objects listed at the bottom of the screen. Objects listed in white are randomized. Additional-action items are outlined in yellow, and the Inventory Item is circled in blue.
- Upon completing the area, the CLOCK WEIGHT will be added to your inventory.
- Click on the FORK to add it to your inventory.
- Take a closer look at the tower window up the path. Watch the cutscene, then click on the CROW RUNE to collect it.
- Back in the main area, use the Crow to knock the purse out of the tree.
- Examine the purse that falls to the ground. Click to open it, then collect the Note inside. It has an important clue on it.
- Return to the Clock Workshop.
Clock Workshop
- Click on the hidden object area on the left.
- Search the scene for silhouetted objects on the list, then use them to recover the rest of the items. The sequence is shown and outlined below.
- 1) Click on the cup to knock it over.
- 2) Collect the Shield and use it on the frame.
- 3) Collect the Toy Gun and use it on the nutcracker.
- 4) Collect the Gear and use it on the watch. Click on the bottom left gear twice to open the secret compartment.
- 5) Collect the Mask Eye.
- 6) Take a closer look at the stack of books and collect the red Clip.
- 7) Use the Clip on the green bag to open it.
- 8) Collect the Clock Hands and use them on the blank-face clock.
- 9) Collect the Mask Eye and use both Mask Eyes (x2) on the mask.
- 10) Collect the Spade Symbol and use it on the satchel. Match the handles to their instruments as shown in the screenshot above.
- 11) Click on second tool from the bottom to collect it.
- Upon completing the area, the PLIERS will be added to your inventory.
- Take a closer look at the chest on the floor at the back of the room. Click on the segments to rotate them so they display the proper combination. The three-symbol solution is shown in your Notes (as well as in the screenshot below).
- Once the chest is open, click on the URN and the SUCTION CUP to collect them.
- Take a closer look at the mirror on the table on the right. Use the PLIERS on each of the flaps holding the mirror in place to lift them, then click on the SQUARE MIRROR to add it to your inventory.
- Make your way back to the Swamp.
Swamp
- Examine the purse on the ground beneath the tree on the far right. Use the SUCTION CUP on the MIRROR inside the purse to add it to your inventory.
- Backtrack to the Library.
Library
- Click on the hidden object area.
- Find the objects listed at the bottom of the screen. Objects listed in white are randomized. Additional-action items are outlined in yellow, and the Inventory Item is circled in blue.
- Upon completing the area, the DRAGON LEVER will be added to your inventory.
- Examine the area at the top of the ladder. When on the right, use the SQUARE MIRROR on the slot. When the ladder’s on the left, use the MIRROR on the round slot.
- Examine the book that appears on the table once the mirrors are restored to enter a puzzle.
- Use crystals and mirrors to direct beams onto three gems in order to illuminate them with a beam of their color. Click the arrows by the crystals and the mirrors to rotate each. Click the (smaller) colored gems (red, blue, yellow) to project a light beam from the crystal. The solutions are shown below.
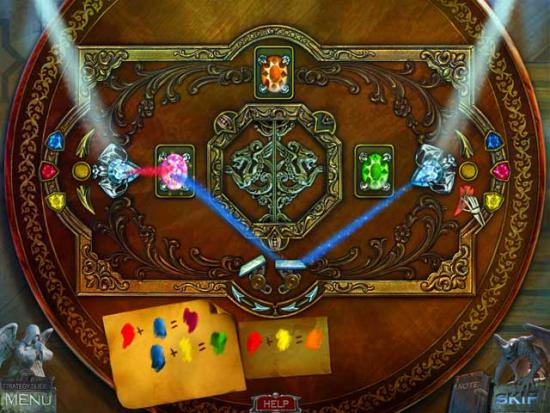
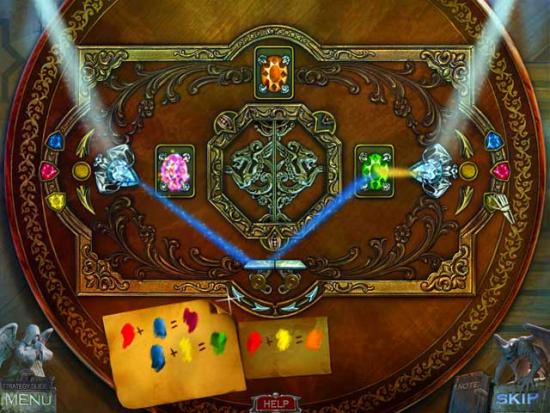
- Upon completing the puzzle, click on the TOWER KEY to add it to your inventory.
- Make your way back to the Swamp.
Swamp
- Click on the hidden object area beneath the tree.
- Find the objects listed at the bottom of the screen. Objects listed in white are randomized. Additional-action items are outlined in yellow, and the Inventory Item is circled in blue.
- Upon completing the area, the FILE will be added to your inventory.
- Examine the door attached to the Tower. Use the TOWER KEY on the slot in the door to open it, then proceed inside.
Chapter 8: The Tower
Tower
- Click on the STICK, the BULLET, and the DRAGON LEVER (2) in their respective locations shown below to add them to your inventory.
- Make your way back to the Foyer.
Foyer
- Examine the panel on the left, between the fireplace and the previous location of the statue, by the left staircase. Use the DRAGON LEVERS (x2) on the panel to trigger a puzzle.
- Each lever should be in the correct position. The solution is shown below.
- Upon arranging the levers correctly, the round hatch on the floor will open, revealing a puzzle.
- Place the candles in the matching colored symbols. Click a candle to swap its position with another candle. Only three adjoining candles may be exchanged. The solution is shown below.
- Upon completing the puzzle, proceed down through the hatch to the next area.
Secret Chamber
- Click on the large cabinet towards the left to open it, then take a closer look inside. Click on the CLOCK WEIGHT (2) to add it to your inventory.
- Return to the Coffin.
Coffin
- Take a closer look at the clock on the right. Use the CLOCK WEIGHTS (x2) on the chains within the clock, then click on the SET OF PICKLOCKS that’s revealed to collect them.
- Examine the shut window on the right. Use the FILE on the lock to remove it, then click on the SKULL KNOB to add it to your inventory.
- The window is now open.
- Return to the Secret Chamber.
Secret Chamber
- Take a closer look at the book stand on the left. Use the SKULL KNOB on the empty slot in the book to restore it.
- Click on the Page within to add it to your Notes, then click on the CENTRAL CIRCLE to collect it.
- Go back to the Coffin.
Coffin
- Examine the top of the Coffin. Use the CENTRAL CIRCLE on the empty slot in the middle to trigger a puzzle.
- Rearrange the gems so that their symbols match each other on the connecting lines. Click the center button to rotate individual circles, and click the arrows on the sides to rotate all of the circles. The center circle will not move. The solution is shown below.
- Upon completing the puzzle, the Coffin will open. Watch the brief cutscene, then take a closer look inside.
- Use the URN on the ashes within the Coffin to obtain the VAMPIRE ASHES.
- Go to the Backyard.
Backyard
- Take a closer look at the platform up in the tree.
- In your inventory, combine the FORK and the STICK to obtain the TONGS.
- Use the TONGS to retrieve the FLASK from the branches above and add it to your inventory.
- Return to the Secret Chamber.
Secret Chamber
- Take a closer look at the desk near the top of the screen. Place the FLASK, the VAMPIRE ASHES, and the BULLET on the table to trigger a puzzle.
- Follow the directions as shown in the book to create a cure. The numbered solution is outlined and shown below.
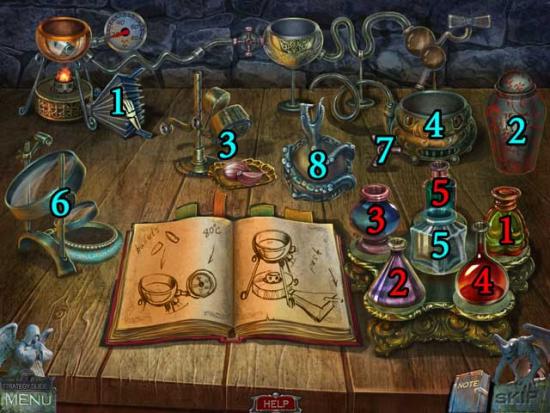
- 1) Click on the bellows until the gauge above is on “80” to melt the bullets.
- 2) Use the vampire ashes on the goblet at the top of the screen to which the melted bullets was transferred.
- 3) Place the garlic within the masher.
- 4) Use the mashed garlic on the bowl into which the liquid has drained.
- 5) Pour the surrounding flasks (correctly numbered in red above) into the middle flask in the correct order, then pour the contents of the middle flask into the bowl.
- 6) Take a closer look at the microscope on the left. Match the pairs until only one is remaining, then click on it to complete the puzzle. Add the red extract at the bottom of the microscope to the bowl.
- 7) Click the valve on the side of the bowl to drain the contents into the vial.
- 8) Click on the completed POTION to add it to your inventory.
- Return to the Tower.
Tower
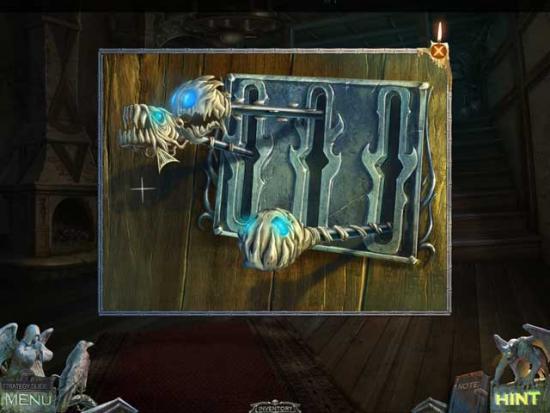
- Take a closer look at the cage in which the woman is being kept. Use the SET OF PICKLOCKS on the cage to trigger a puzzle.
- Put the picklocks into the slots according to the next symbol on the panel. Going in the right direction from the start, the solutions are as shown below.
- Upon completing the puzzle, the cage will open. Click on the paper scrap that appears on the floor to read it.
- Give the POTION to the woman to heal her.
- Watch the cutscene that follows. You will be transported back to the Swamp Edge afterward.
Chapter 9: The Ship
Swamp Edge
- Speak with the ghost in the water. Once he disappears, click on the SOUL STONE (2) to collect it.
- Make your way back and right to the Lake of Death.
Lake of Death
- Speak with the ghost that appears here. He will open a portal to a new area.
- Proceed through the portal to the next area.
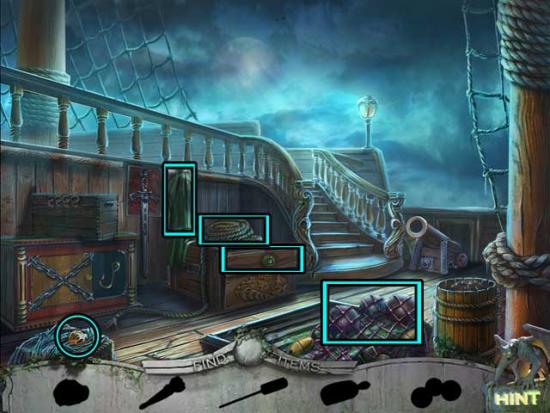
Deck
- Take a closer look at the grate in the Deck. Click on the COIN to add it to your inventory.
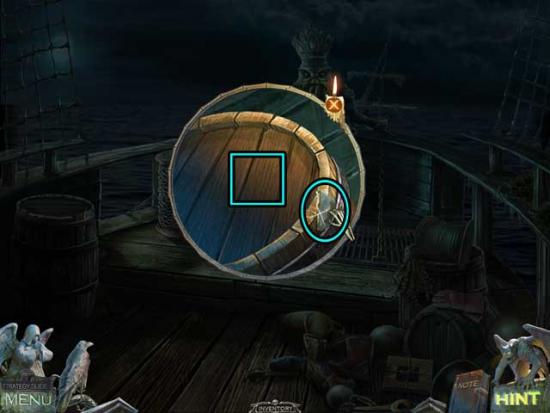
- Examine the wooden hatch doors on the left. Click on the WEDGE to collect it.
- Take a closer look at the wrapped-up object near the railing on the far edge. Click on the COIN (2) to collect it.
- Notice the barrel rolling back and forth on the right. Use the WEDGE to stop it rolling
- After a brief cutscene, click on the door on the right to open it and proceed inside.
Cabin
- Click and ROPE and the DIRK to add them to your inventory.
- Speak with the sick man in the bed.
- Next, examine the window. Use the COINS (x2) on the latches to hold them into place.
- Take a closer look outside the now-open window to trigger a puzzle.
- To retrieve the buoy with the medicine, untangle the ropes so that none are crossing. Make sure the anchors are each connected to a platform, with the one with the most ropes being in the middle. The solution is shown below.
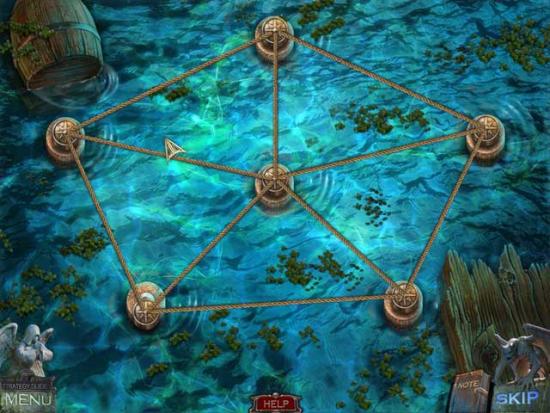
- Upon completing the puzzle, click on the MEDICINE inside the buoy that appears to collect it.
- Take a closer look at the sick man on the bed. Give him the MEDICINE. You will get the CHEST KEY in return.
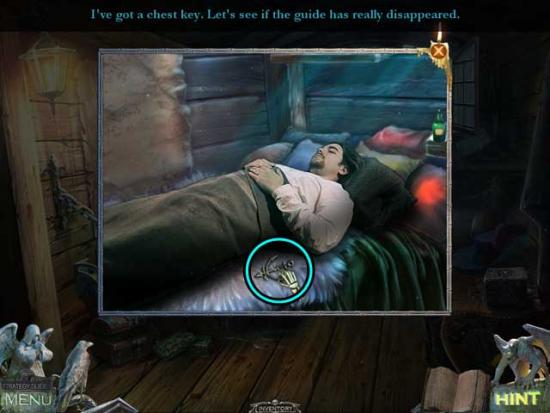
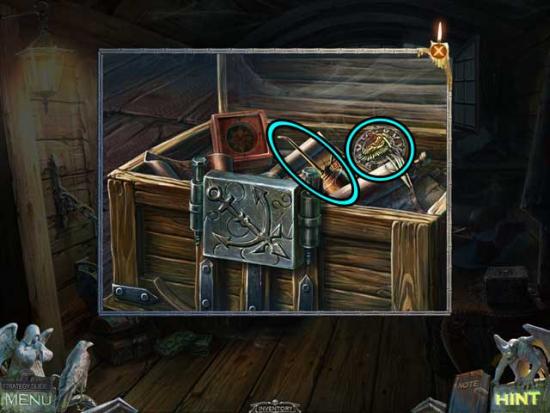
- Take a closer look at the chest towards the right. Use the CHEST KEY on the lock to open it.
- Click on the CROW RUNE and the OIL CAN to add them to your inventory.
- Return to the Deck.
Deck
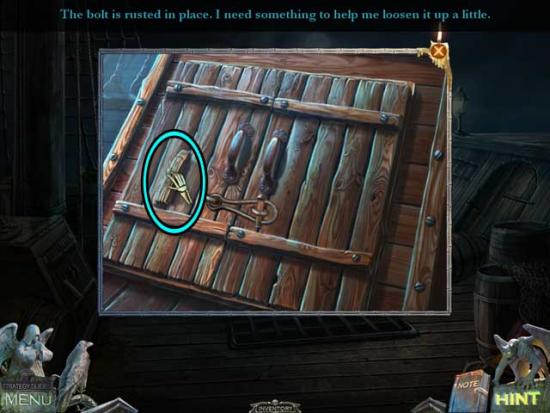
- Examine the hatch doors on the left again. Use the OIL CAN to remove the rust, then click on the doors to open them.
- Click on the OAR and the HARPOON to add them to your inventory.
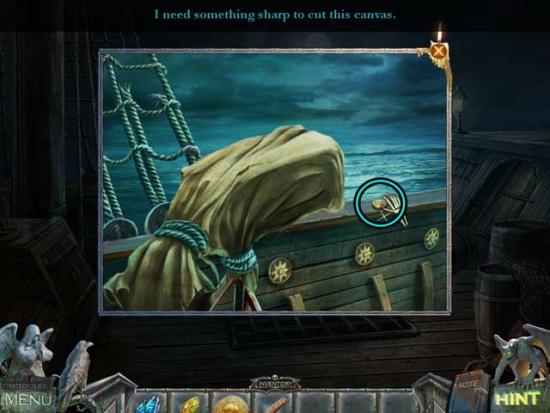
- Take a closer look at the wrapped-up object near the edge railing again. Use the DIRK to remove the ropes, revealing a spear gun beneath.
- In your inventory, combine the HARPOON and the ROPE to obtain the HARPOON WITH ROPE.
- Use the HARPOON WITH ROPE on the spear gun to bring the boat closer, then use the OAR on the boat. You will be transported to the other ship.
Boat
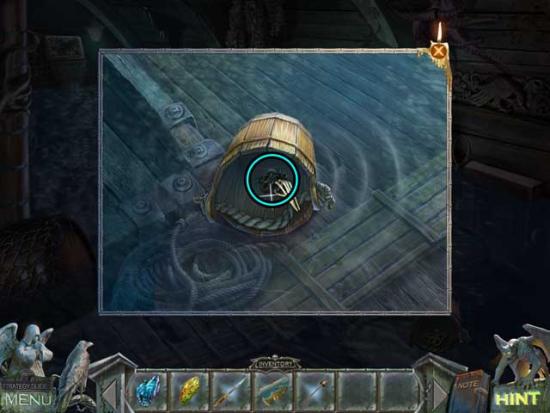
- Use the Crow to retrieve the rope, allowing you access to the deck of the other ship.
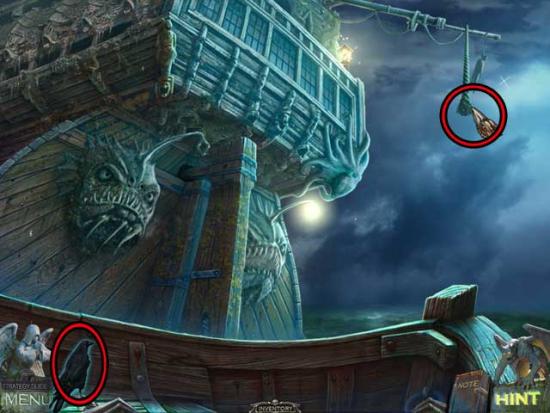
- Proceed up the rope to the next area.
Ship Rear
- Take a closer look at the gold fish statue on the left. Use the DIRK to remove the seaweed from the top of its head.
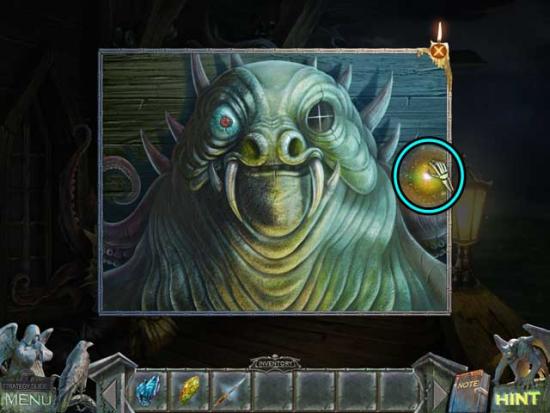
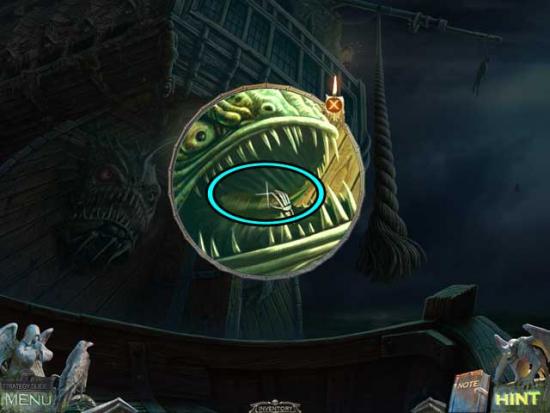
- Examine the monster above the doorway. Click on the ANGLERFISH LIGHT to add it to your inventory.
- Go back down to the Boat.
Boat
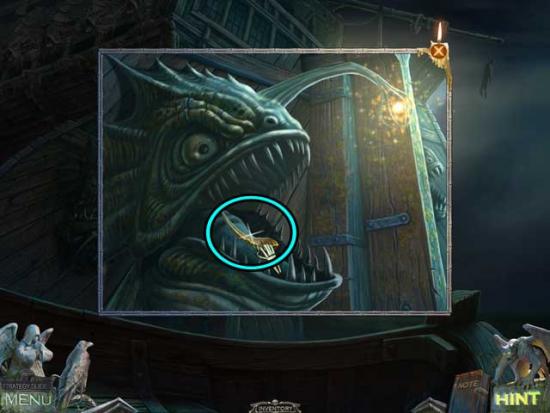
- Take a closer look at the anglerfish statue on the left. Use the ANGLERFISH LIGHT on the statue, then click on the HORN in its mouth to collect it.
- Take a closer look at the anglerfish statue on the right. Click on the HORN (2) to collect it.
- Go back up to the Ship Rear.
Ship Rear
- Examine the gold fish on either side of the door. Use the HORNS (x2) on their respective statues to replace them, opening the way to the door.
- Proceed inside.
Captain’s Quarters
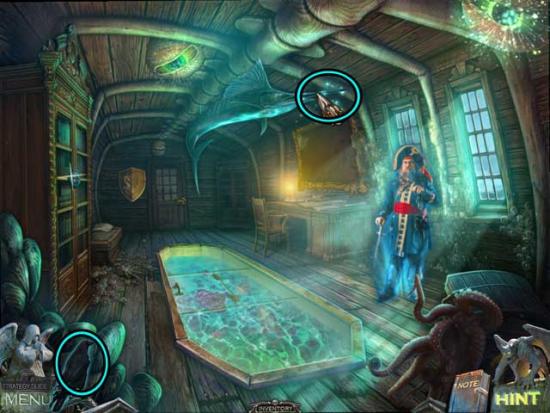
- Speak with the ghost.
- Take a closer look at the glass tank on the floor. Click on the BEHEMOTH EYE to collect it.

- Examine the gold shield on the back wall at the far end of the room. Click on the CROW RUNE to collect it.
- Back in the main area, use the Crow to knock down the FISH NOSE, then pick it up to add it to your inventory.
- Go back outside.
Ship Rear
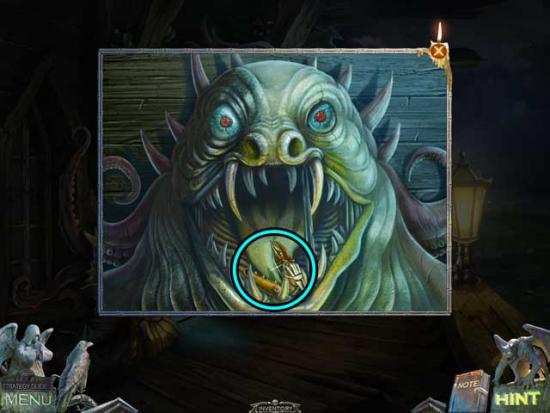
- Take a closer look at the monster above the door. Use the BEHEMOTH EYE on the empty socket. Then once restored and the monster’s mouth is open (you may need to click it first), place the FISH NOSE inside the mouth to hold it open, then click on the CRAB CLAW to add it to your inventory.
- Enter the Captain’s Quarters.
Captain’s Quarters
- Take a closer look at the door at the far end of the room. Use the CRAB CLAW on the crab mechanism to trigger a puzzle.
- Arrange the crab’s legs to match the symbols above each leg. Click two legs to swap their positions. The solution is shown below.
- Enter through the door to the next area.
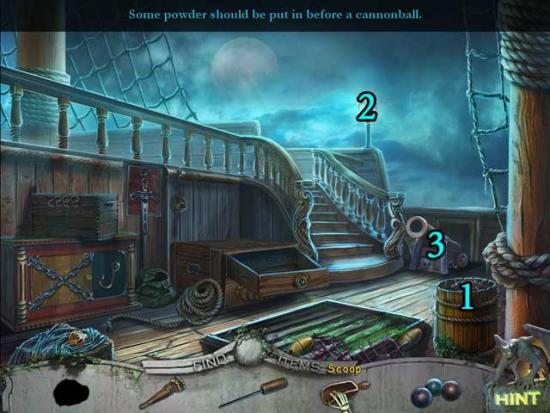
Ship Deck
- Examine the cannon on the left. Click on the rear hatch to open it, then click on the RAMROD inside to collect it.
- Examine the bucket hanging from the rope. Click on the SCRAPER inside to collect it.
- Proceed up the steps on the far end of the deck to the next area.
Bow
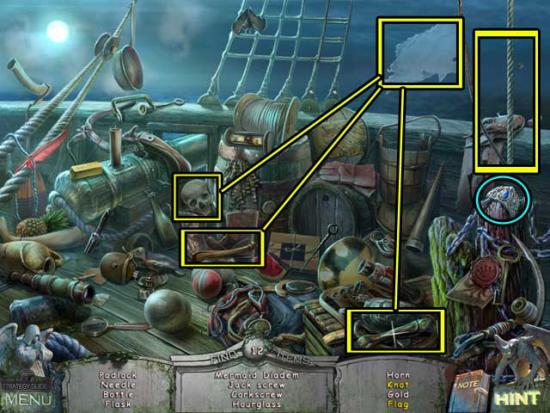
- Click on the hidden object area on the lower right.
- Find the objects listed at the bottom of the screen. Objects listed in white are randomized. Additional-action items are outlined in yellow, and the Inventory Item is circled in blue.
- Upon completing the area, the GEM will be added to your inventory.
- Take a closer look at the chains on the left. Click on the Book on top of the barrel to collect it, then use the SCRAPER to obtain the STARFISH.
- Examine the barrel on the left. Click on the MAP to add it to your inventory. Then, use the DIRK to pry the top open and collect the RING inside.
- Go back to the Captain’s Quarters.
Captain’s Quarters
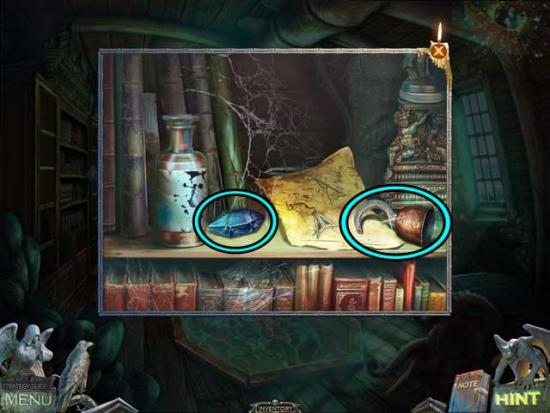
- Examine the bookcase on the left. Use the STARFISH on the lock to open it, then click on the GEM (2) and the PIRATE HOOK inside to collect them.
- In your inventory, combine the RAMROD with the PIRATE HOOK to obtain the RAMROD WITH HOOK.
- Examine the glass aquarium on the floor. Use the RING to cut the glass open, then exit for now.
- Proceed to the Bow.
Bow
- Examine the statue on the Bow. Use the GEMS (x2) on the slots in the crown to restore them. This will trigger the statue to open the nearby grate.
- Proceed down through the open hatch to the next area.
Below Deck
- Use the RAMROD WITH HOOK on the bucket floating on the water towards the right to bring it closer. Click on the HATCH KEY inside to collect it.
- Return to the Ship Deck.
Ship Deck
- Take a closer look at the hatch grate. Use the HATCH KEY on the lock to open it, then click on the BOARD inside to collect it.
- Go back down Below Deck.
Below Deck
- Use the BOARD between the two barrels underwater on the right, then take a closer look at the far right side of the ship.
- Click on the NET to add it to your inventory.
- Take a closer look at the barrel with the netting over it floating on the left. Use the DIRK to remove the FISHNET, then click on the CANNONBALL as well to add them to your inventory.
- Go back to the Ship Deck.
Ship Deck
- Take a closer look at the suspended bucket on the left again. Place the CANNONBALL inside the bucket to weigh it down. This will cause the sail on the right to move, revealing a hidden object area.
- Search the scene for silhouetted objects on the list, then use them to recover the rest of the items. The sequence is shown and outlined below.
- Click on the Torch, the Cannon Balls, the Scoop, the Ramrod, and the Stone to collect them.
- 1) Use the Scoop on the barrel to obtain the Powder.
- 2) Take a closer look at the lamp. Use the Stone to break it, then use the Torch on it to obtain the Lit Torch.
- 3) Use the Powder, the Ramrod, the Cannon Balls, and the Lit Torch on the cannon in that order.
- When you assume control of the cannon, aim for the small platform with the “+” carving underneath. This will cause the mast to fall. Examine the open box that falls with the mast and collect the final item inside.
- Upon completing the area, the SEA HORSE will be added to your inventory.
- Enter the Captain’s Quarters.
Captain’s Quarters
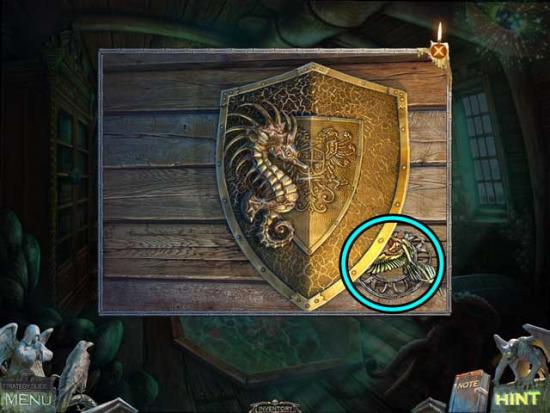
- Take a closer look at the gold shield to the left of the door at the far end of the room. Use the SEA HORSE on the right half to restore it, then click on the MAP (2) inside to collect it.
- In your inventory, combine the FISHNET and the NET to obtain the improved NET.
- Take a closer look at the aquarium. Use the NET to retrieve the ELECTRIC RAY and add it to your inventory.
- Go back out to the Ship Deck.
Ship Deck
- Examine the pump to the left of the mast. Place the ELETRIC RAY inside the bowl of water. The pump will start working again, draining the water inside the nearby hatch.
- Proceed through the open hatch down into the Hold.
Chapter 10: Redemption
Hold
- Click on the BOOT on the immediate left to add it to your inventory.
- Examine the barrel the octopus is holding. Click on the MAP (3) to collect it.
- Examine the door on the right. Click on the CORKSCREW to collect it.
- Make your way back Below Deck via the Bow.
Below Deck
- Take a closer look at the hatch underwater on the right. Use the BOOT to wedge it open, draining the water out of the area.
- Click on the STATUE HAND that appears to add it to your inventory.
- Examine the pedestal at the very back of the area, in the upper left corner of the screen.
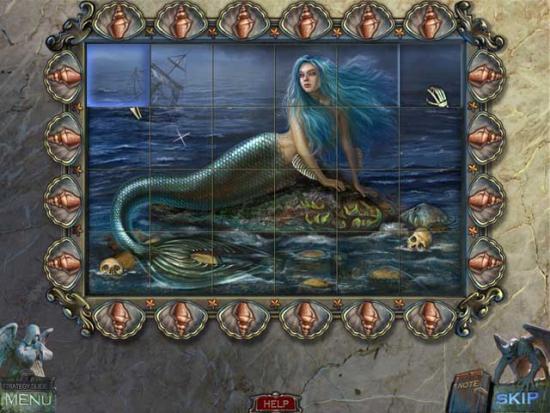
- Complete the puzzle to create a picture of a mermaid. Click two puzzle pieces to swap their positions. The solution is shown below.
- Once the puzzle is complete, return to the Bow.
Bow
- Click on the hidden object area on the lower right.
- Find the objects listed at the bottom of the screen. Objects listed in white are randomized. Additional-action items are outlined in yellow, and the Inventory Item is circled in blue.
- Upon completing the area, the DIADEM will be added to your inventory.
- Back in the main area again, examine the statue on the Bow. Use the STATUE HAND on the left side of the creature to restore it. This will cause the anchor to rise.
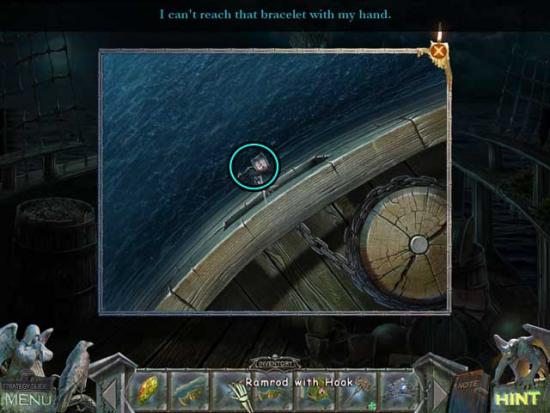
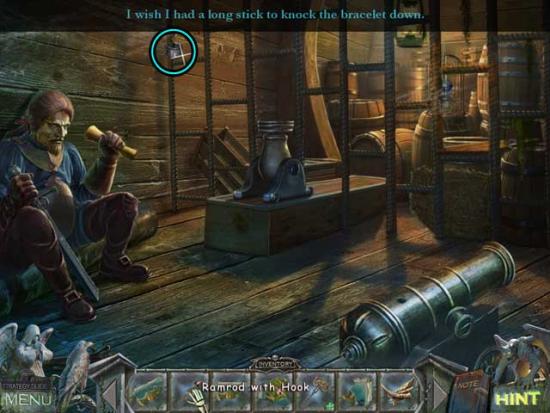
- Take a closer look at the anchor. Use the RAMROD WITH HOOK on it to retrieve the BRACELET.
- Go back Below Deck.
Below Deck
- Examine the pedestal with the mermaid painting in the upper left corner again. Give the DIADEM to the mermaid and she will reward you with MAP (4).

- Make your way back over and down to the Hold.
Hold
- Take a closer look at the door on the left. Use the BRACELET on the indentation in the tentacle to restore it. This will cause the door to open.
- Proceed through the door to the next area.
Cell
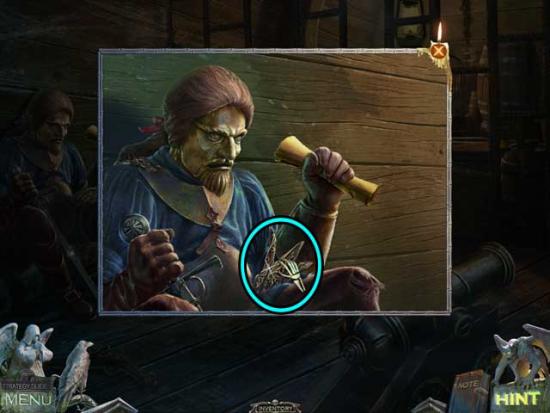
- Examine the statue on the left. Click on the TRIDENT TINES to collect them.
- Back in the main area, use the RAMROD WITH HOOK to retrieve the BRACELET and add it to your inventory.
- Go back out to the Hold.
Hold
- Take a closer look at the barrel the octopus is holding. Use the BRACELET on the indentation in that tentacle.
- The octopus will throw the barrel down in front of it, breaking it. Take a closer look at the wrecked barrel.
- Click on the Note, the CROW RUNE, and the CORKED ACID to collect them.

- Return to the Cell.
Cell
- Take a closer look at the rusted bars towards the right. Use the CORKED ACID on the bars to melt them away, then take a closer look at the cage on the other side.
- Note the stuffed bird, then click on the BRACELET to add it to your inventory.

- Go back out to the Hold.
Hold
- Examine the door on the right again. Use the BRACELET on the indentation in the tentacle to restore it, opening the door.
- Proceed through to the next area.
Treasury
- Examine the trident the statue is holding. Use the TRIDENT TINES on the close-up, then place them back into their proper locations as shown below.
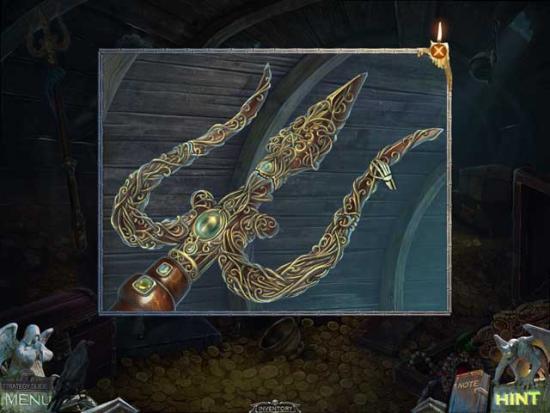
- Upon completing the trident, click on the PARROT HEAD that appears to collect it. Also click on the Scroll and use the Crow to obtain the HELMET suspended on the upper right.
- Go back to the Cell.
Cell
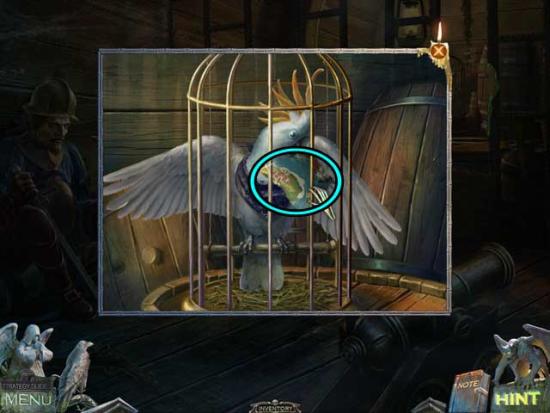
- Take a closer look at the statue on the left. Place the HELMET on the statue’s head, then click on the MERMAID FIGURINE to add it to your inventory. Note the clue about the stuffed bird, too.
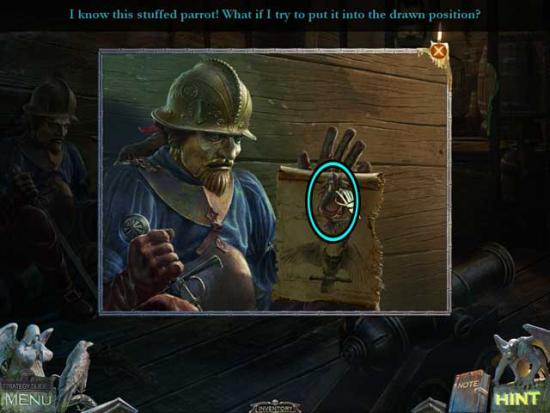
- Examine the stuffed parrot inside the cage within the cell. Use the PARROT HEAD on it, then adjust the right wing to lower it according to the clue on the scroll. Click on the MAP (5) revealed to collect it.
- Return to the Treasury.
Treasury
- Examine the clam on top of the pedestal at the far end of the hold. Use the MERMAID FIGURINE on the empty slot on the left to trigger a puzzle.
- Interchange neighboring pearls to put them into the shells matching their colors and symbols. A good strategy is to start with the pearls in the bottom corners and work you way up from bottom to top. The solution is shown below.
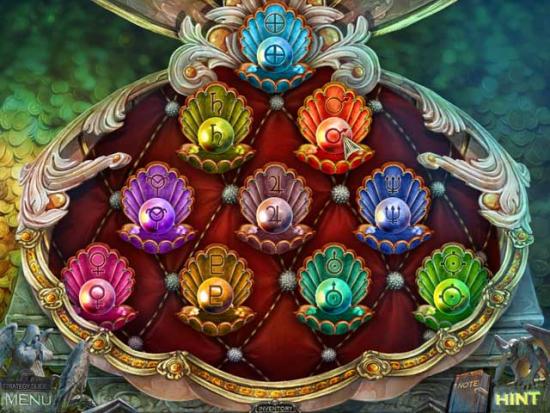
- Upon completing the puzzle, click on the MAP (6) that appears in the middle shell to collect it.
- Go back to the Ship Deck.
Ship Deck
- Click on the hidden object area.
- Search the scene for silhouetted objects on the list, then use them to recover the rest of the items. The sequence is shown and outlined below.
- 1) Use the Hook on the rope to obtain the Rope with Hook.
- 2) Attach the Rope with Hook to the cannon on the right and the chained box on the left, then click on the cannon to push it overboard, opening the chained box.
- 3) Examine the box inside. Click on the rune dials to arrange them in such a way that it will open. The solution is shown above.
- 4) Click on the Violet Gem, Red Gem, and Green Gem inside to collect them.
- 5) Take a closer look at the sword. Click on the panels on the hilt so that they form a complete picture of a rose (shown above), then click on the Blue Gem to collect it.
- 6) Use the Violet Gem, Red Gem, Green Gem, and Blue Gem on the slots in the box on the left.
- Arrange the gems so that they match the pattern below them. The solution is shown below.
- Click on the MAP (7) inside the chest to collect it.
- Go to the Captain’s Quarters.
Captain’s Quarters
- Speak with the ghost.
- Examine the large frame on the wall on the right. Use the MAP (x7) on the frame to trigger a puzzle.
- Put the map pieces back together. Right-click to rotate the pieces. Correctly placed pieces will drop automatically. The solution is shown below.
- Upon completing the puzzle, click on the GUIDES to add them to your inventory.
- Speak with the ghost one last time, then return to the Cabin of the first ship.
Cabin
- Take a closer look at the chest on the right. Place the GUIDES inside the compass box within the chest to restore them to their rightful location.
- Speak with the man in the bed. He will give you the HOLD KEY.

- Go out to the Deck.
Deck
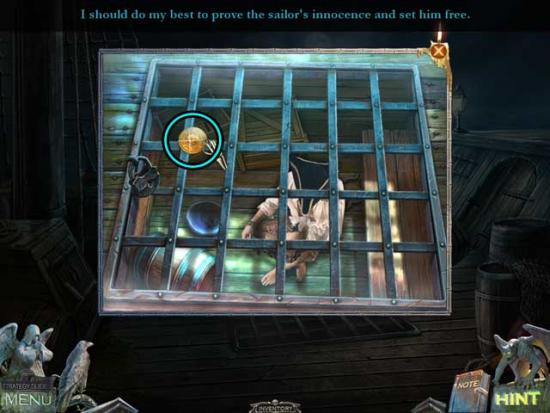
- Examine the grate. Use the HOLD KEY on the lock to open it, then click on the grate to free the prisoner.
- After a cutscene, you will find yourself back at the Lake of Death.
Lake of Death
- Click on the SOUL STONE (3) that appears to add it to your inventory.
- Make your way to the Dock.
Dock
- Take a closer look at the ferryman. Give him the SOUL STONES (x3), then watch the cutscene that follows.
Congratulations! You’ve completed the main adventure, but your journey isn’t over yet! You can now access the Bonus Content, including additional gameplay, via the Extras portion of the Main Menu
Bonus Chapter
Dingy
- Speak with the ferryman. He will give you the SOUL STONES.
- Enter the shipwreck.
Hold
- Examine the box on the floor next to the lantern and the sarcophagus. Place the SOUL STONES within the grooves in the box to open it, then take a closer look at the mask inside.
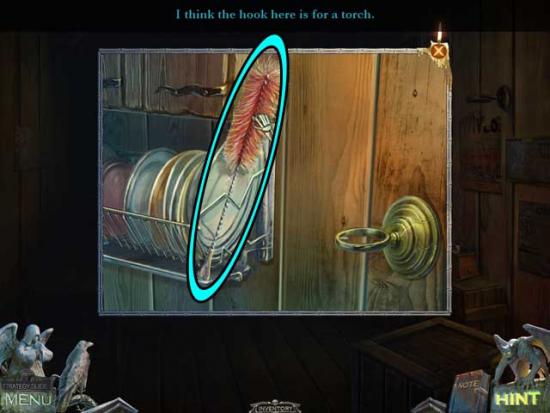
- Arrange the feather so that the color halves facing each other match all the way around the mask. Click two feathers to swap their positions. The solution is shown below.
- Upon completing the puzzle, the fog will disappear.
- Click on the sarcophagus on the right to open it, then click on the BANDAGE attached to the mummy to add it to your inventory.
- Examine the small gold and red coffin. Click on the Note inside to read it.
- Take a closer look at the suit of armor on the left. Click on the Certificate it’s holding to examine it.
- Take a closer look at the wooden grating at the back of the room. Click on the HOOK to collect it.
- In your inventory, combine the BANDAGE and the HOOK to obtain the GRAPPLING HOOK.
- Use the GRAPPLING HOOK on the opening at the top of the Hold, then proceed up to the next area.
Hold Entrance
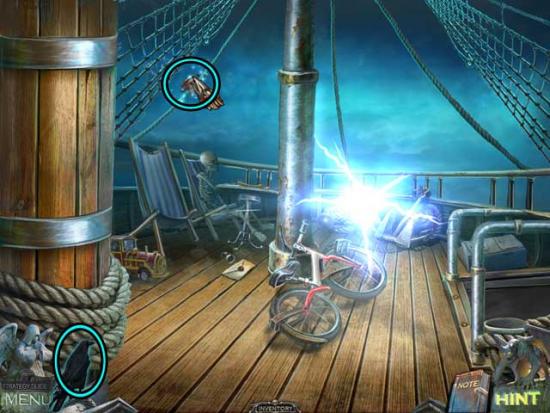
- Click on the CROW RUNE and the HAMMER to collect them.
- Go back down into the Hold.
Hold
- Take a closer look at the suit of armor on the left. Use the HAMMER on the helmet, then click on the SHIELD to add it to your inventory.
- Go back up to the Hold Entrance.
Hold Entrance
- Use the SHIELD on the gap in the deck, then proceed across to the next area.
Deck
- Use the Crow to retrieve the SCARF, then collect it and the MOP on the deck.
- Click on the door on the left to open it, then proceed inside.
Passenger Cabin
- Take a closer look at the container above the sink on the right. Click on the top to open it, then click on the CENTRAL CLIP inside to collect it.
- Go back out to the Deck.
Deck
- Examine the chest on the right. Use the SCARF on the SICKLE stuck in the top of the chest to add it to your inventory.
- In your inventory, combine the MOP and the SICKLE to obtain the MOP WITH SICKLE.
- Take a closer look at the boat that’s hooked up on the left. Use the MOP WITH SICKLE on the rope holding the hook to cut it.
- Click on the hidden object area that appears.
- Search the scene for silhouetted objects on the list, then use them to recover the rest of the items. The sequence is shown and outlined below.
- Click on the Ring, the Scissors, the Security Lock, the Crowbar, and the Broken Telescope to collect them.
- 1) Use the Crowbar to open the panel, then use the Ring on the glasses to obtain the Lens.
- 2) Use the Scissors on the sack to cut it open.
- 3) Collect the Bread, then give it to the seagull.
- 4) Place the Broken Telescope on the stand, then use the Lens on it to restore it. Note the number “42” that appears.
- 5) Use the Security Lock on the chest, armed with the code to open it.
- 6) Collect the Handle and use it on the saw blade.
- Upon completing the area, the SAW will be added to your inventory.
- Enter the Passenger Cabin again.
Passenger Cabin
- Use the MOP WITH SICKLE on the suitcase on the lower left to bring it closer.
- Click on the UMBRELLA on top of the suitcase to add it to your inventory.
- Go back down to the Hold.
Hold
- Use the MOP WITH SICKLE on the bundle hanging behind the sarcophagus, then click on the LIFE JACKETS to add them to your inventory.
- Take a closer look at the wooden grating at the back of the Hold. Use the SAW to saw it away.
- Use the LIFE JACKETS on the water with the hands to create a safe passage to the other side.
- Proceed across to the next area.
Engine Room
- Take a closer look at the skeleton in the hammock. Click on the Page within the notebook to collect it.
- Examine the door on the left. Click on the correct symbols (as shown/numbered below) to open it.
- Proceed through the door to the next area.
Storage Room
- Take a closer look at the barrels on the right. Click on the CROW RUNE to collect it.
- Examine the hatch on the floor. Click on the rope, and it will break off, adding the BROKEN ROPE to your inventory.
- Use the UMBRELLA to hook the latch, then click on the HANDLE inside to add it to your inventory.
- Examine the panel on the vent on the upper left. Use the CENTRAL CLIP on the center groove to trigger a puzzle.
- Put the keys from the side clips in their places in the central clip. Not all keys will be used. Click on the blue buttons in the center of the dials to rotate them. When a key from a side wheel matches a groove in the center, click on the arrow to insert it. The solution (which keys will and won’t be used) is shown below.
- Upon completing the puzzle, click on the Photo and the WRENCH to collect them.
- Go to the Engine Room.
Engine Room
- Examine the pipe on the far right. Use the HANDLE on the top of the pipe in the close-up, then click on it to shut off the steam.
- Click on the hidden object area that appears in the corner.
- Find the objects listed at the bottom of the screen. Objects listed in white are randomized. Additional-action items are outlined in yellow, and the Inventory Item is circled in blue.
- Upon completing the area, the POT will be added to your inventory.
- In your inventory, combine the POT with the BROKEN ROPE to obtain the POT WITH ROPE.
- Go back to the Storage Room.
Storage Room
- Use the POT WITH ROPE on the hook hanging from the ceiling. Click on it repeatedly to break the glass of the nearby emergency equipment box.
- Take a closer look at the broken glass. Click on the FIRE PUMP and the HAND DRILL to add them to your inventory.
- Examine the barrels on the right. Use the HAND DRILL on the cork in the barrel to remove it, revealing caterpillars inside.
- Make your way back to the Deck.
Deck
- Take a closer look at the door on the right. Use the HAND DRILL to remove the handle, then proceed inside.
Doctor’s Quarters
- Examine the fallen table in the middle of the room. Use the SAW on the propped up table leg to saw it off, then click on the TABLETOP to add it to your inventory.
- Exit to the Deck.
Deck
- Use the TABLETOP on the gap in the stairs ahead, then proceed up to the next area.
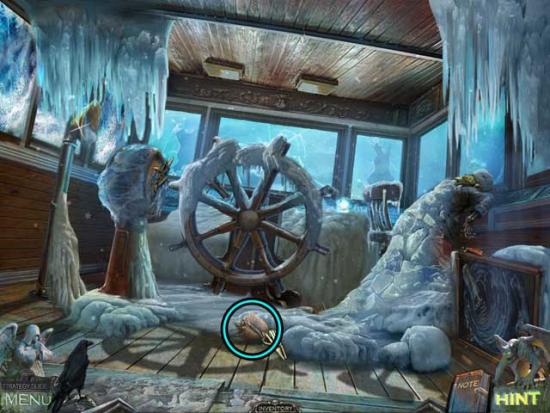
Wheelhouse
- Click on the SHELL lying on the floor to add it to your inventory.
- Next, take a closer look at the case on the right. Click on the VALVE to collect it, then use the WRENCH on the bolt to retrieve the HOSE as well.
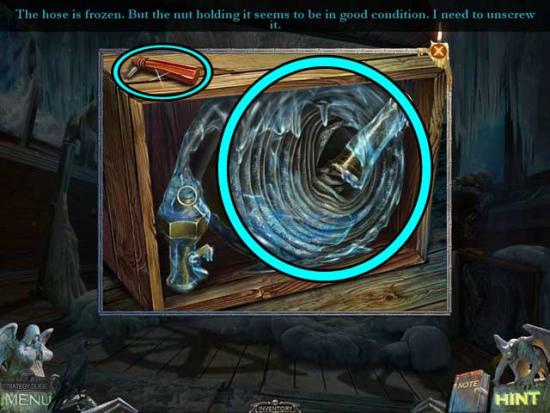
- In your inventory, combine the FIRE PUMP and the HOSE to obtain the EXTINGUISHER.
- Return to the Doctor’s Quarters.
Doctor’s Quarters
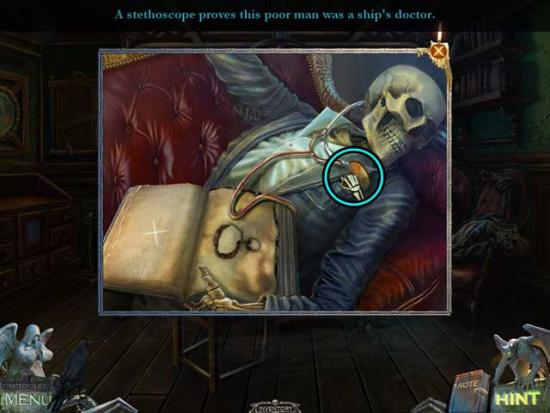
- Use the EXTINGUISHER on the fire in the area to extinguish it.
- Take a closer look at the skeleton on the couch on the right. Click on the STETHOSCOPE to add it to your inventory.
- Examine the window at the back of the room. Click on the FIRE SYMBOL to add it to your inventory.
- Next, use the SAW on the window frame to remove it, then proceed through to the next area.
Bow
- Use the Crow to retrieve the TRI-KEY and add it to your inventory.
- Take a closer look at the table at which the skeleton is sitting on the left. Click on the Document to read it.
- Make your way back to the Deck.
Deck
- Examine the chest on the right. Use the TRI-KEY on the lock to open it, then click on the RAILS PART to add it to your inventory.
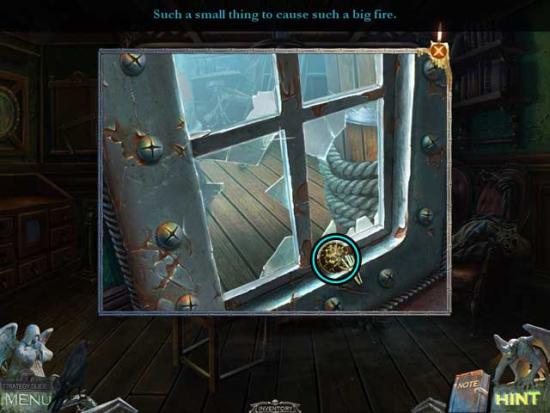
- Still in the close-up, click on the can of engine oil to open it. Dip the SCARF in the oil to obtain the OILED SCARF.
- Return to the Engine Room.
Engine Room
- Examine the circular puzzle on the floor. Use the RAILS PART on the device to trigger a puzzle.
- Put both balls into the central hole in order to repair the wheel bearing. To reach the solution, click on the arrows in the order as follows (shown below): Bx3, Ax6, Ax4, Bx2, Ax6.
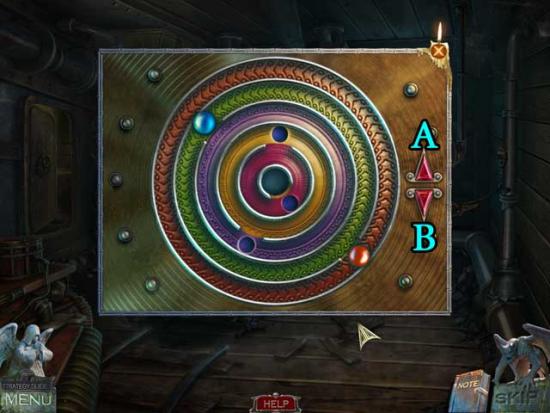
- Upon completing the puzzle, click on the WHEEL to add it to your inventory.
- Take a closer look at the broken cart. Use the WHEEL on the cart to restore it, rolling the cart out of the way. Click on the SECTION OF RAILS beneath to add it to your inventory.
- Return to the Bow.
Bow
- Examine the stairwell going down on the right. Use the SECTION OF RAILS on the ruined steps to gain access to the lower area.
- Proceed down to the next area.
Galley
- Take a closer look at the lit section of wall on the right. Click on the BRUSH to add it to your inventory.
- Make your way back to the Wheelhouse.
Wheelhouse
- Examine the open pipe on the left. Use the BRUSH on the item inside to knock it down inside.
- Make your way down to the Engine Room.
Engine Room
- Click on the hidden object area in the corner.
- Find the objects listed at the bottom of the screen. Objects listed in white are randomized. Additional-action items are outlined in yellow, and the Inventory Item is circled in blue.
- Upon completing the area, the ROLLING PIN will be added to your inventory.
- Take a closer look at the skeleton in the hammock. Click on the FLINT in the pipe to add it to your inventory.
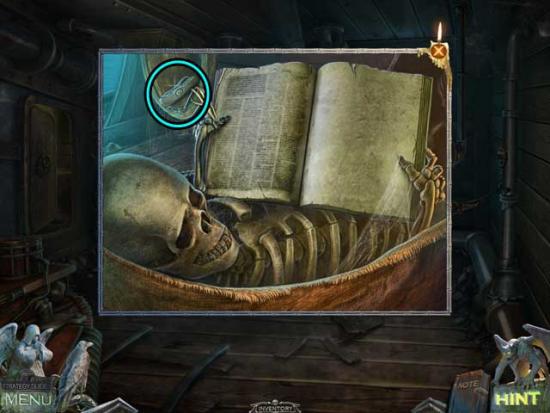
- In your inventory, combine the ROLLING PIN with the OILED SCARF to obtain the TORCH.
- Go to the Galley.
Galley
- Examine the lit wall on the right. Use the TORCH on the holder on the wall, then use the FLINT on it to light it.
- Examine the sink in the rear left corner. Use the VALVE on the spigot.
- Next, use the POT on the sink, then click on the valve to fill it with water. Click on the WATER POT to add it to your inventory.
- Take a closer look at the stove in the rear right corner of the room. Click on the oven door to open it.
- Click on the FILE to add it to your inventory.
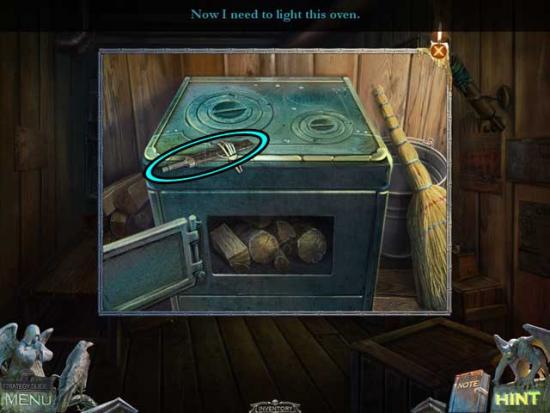
- Next, use the FLINT on the wood inside the stove to light it, then place the WATER POT on the stove.
- Make your way back to the Deck.
Deck
- Click on the hidden object area on the left.
- Search the scene for silhouetted objects on the list, then use them to recover the rest of the items. The sequence is shown and outlined below.
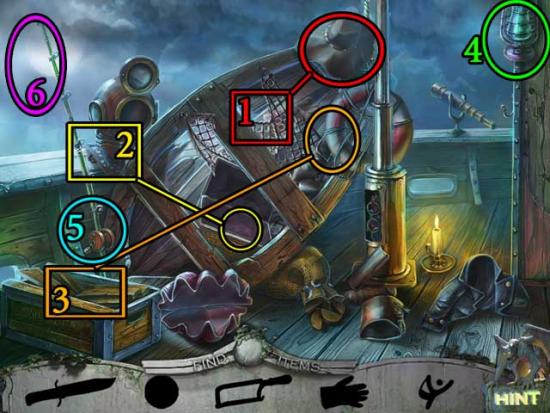
- 1) Click on the Knife and use it on the net to retrieve the Glove.
- 2) Collect the Ball from the chest and use it on the slingshot under the helmet to get the Loaded Slingshot.
- 3) Collect the Saw and use it on the boards to obtain the Fishing Line.
- 4) Use the Loaded Slingshot on the lantern, then collect the Hook inside.
- 5) Use the Fishing Line and the Hook on the fishing pole.
- 6) Use the Glove to collect the LOBSTER and add it to your inventory.
- Back in the main area, take a closer look at the anchor and chain on the deck. Use the FILE on the first link attached to the anchor, then click on the ANCHOR to add it to your inventory.
- Make your way back to the Galley.
Galley
- Examine the sack by the wall on the right. Use the LOBSTER to cut it open, then click on the CROW RUNE inside to collect it.
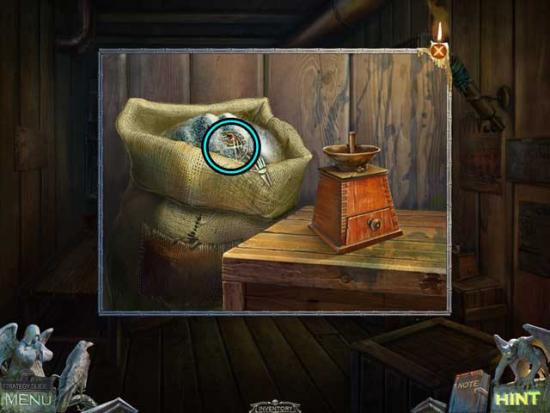
- Next,use the SHELL to collect the SALT in the sack and add it to your inventory.
- Take a closer look at the stove in the far corner. Use the SALT on the pot to obtain the BOILING WATER.
- Make your way to the Wheelhouse.
Wheelhouse
- Use the BOILING WATER on the ice and snow in the area to melt it.
- Take a closer look at the skeleton on the right. Click on the PUZZLE PART and the Note to collect them.
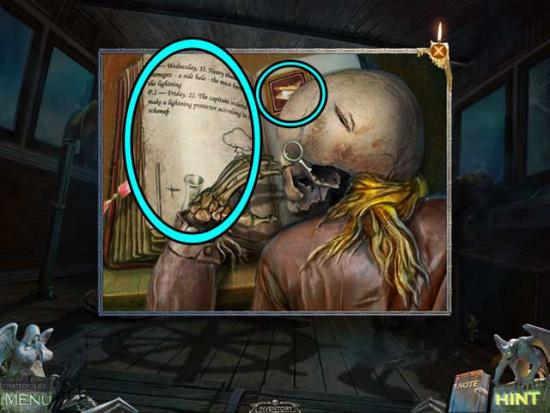
- Examine the control console at the back of the room between the skeleton and the wheel. Click on the WATER SYMBOL to add it to your inventory.
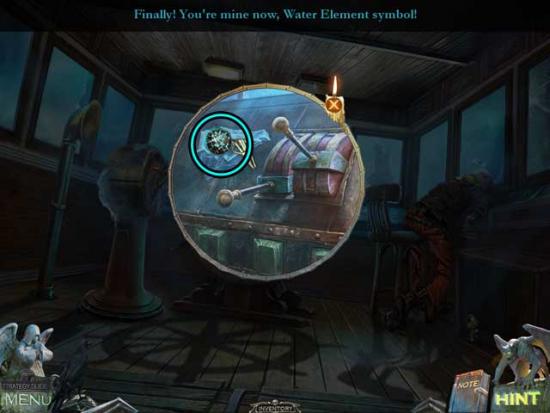
- Take a closer look at the speed control on the left. Click on the Note and the CORKSCREW to collect them.
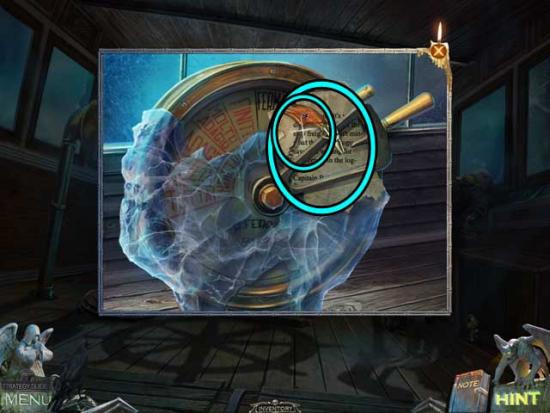
- Proceed to the Galley.
Galley
- Take a closer look at the door on the right side of the room. Use the PUZZLE PART on the door to trigger a puzzle.
- Arrange the images so that the dishes in the center are surrounded by the correct components. Click two components to swap their positions. The solution is shown below.
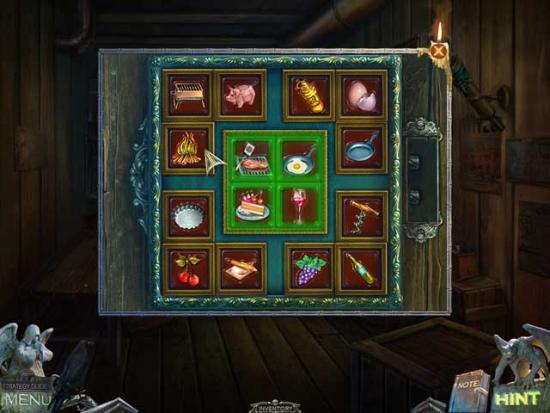
- Upon completing the puzzle, the door will open. Proceed through to the next area.
Pub
- Use the Crow to open the sack stuck in the rafters in the upper right corner.
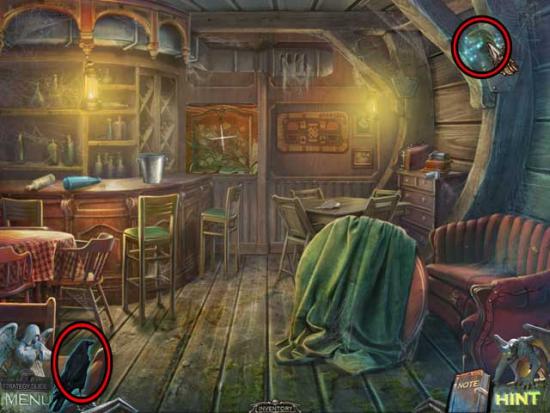
- Take a closer look at the couch on the right. Click on the COFFEE to add it to your inventory.
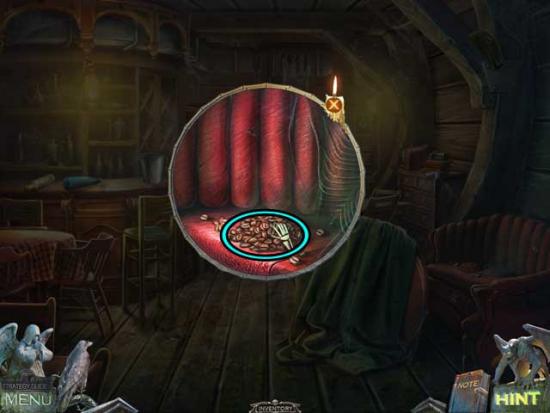
- Examine the dumbwaiter on the back wall. Click on the panel to open it, then place the ANCHOR on the hook.
- A hidden object area will appear.
- Search the scene for silhouetted objects on the list, then use them to recover the rest of the items. The sequence is shown and outlined below.
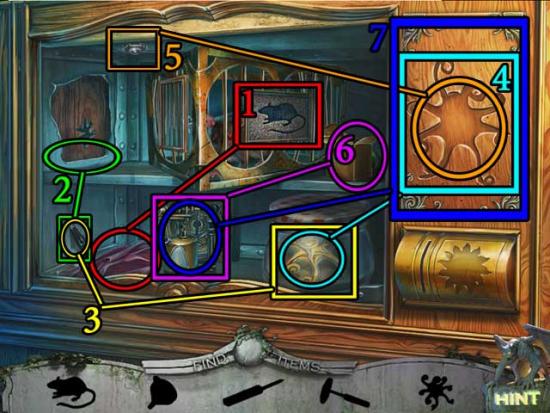
- 1) Click on the Rat Symbol and use it on the side of the cage to trigger a puzzle. Use the arrows to move the rat to the end of the labyrinth. The solution is shown below.
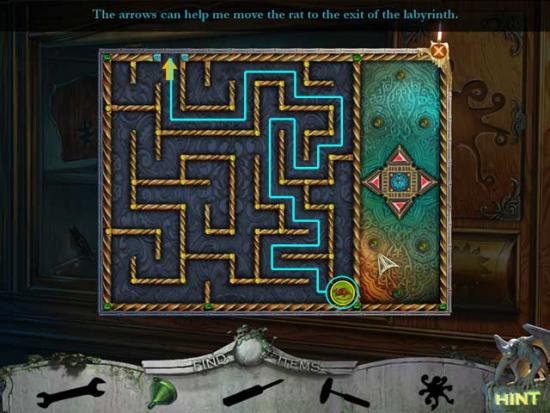
- 2) Click on the Hammer Handle to collect it, then combine it with the top.
- 3) Use the Hammer on the glass jar to break it.
- 4) Use the Octopus Symbol on the indentation in the cabinet in the upper right corner to open it.
- 5) Collect the Wrench and use it on the bolt to loosen it and obtain the Fuel.
- 6) Collect the Funnel, then use the Funnel and the Fuel on the Blowtorch.
- 7) Use the Blowtorch on the ice in the cabinet to melt it. Click on the final item inside.
- Upon completing the area, the CAN OPENER will be added to your inventory.
- Examine the bar counter. Click on the blue CLOSED BOTTLE to collect it.
- In your inventory, combine the CLOSED BOTTLE and the CORKSCREW to obtain the OPEN BOTTLE.
- Take a closer look at the counter again. Use the STETHOSCOPE on the bucket with the ice and champagne to strain it, then click on the SNAKE KEY to add it to your inventory.
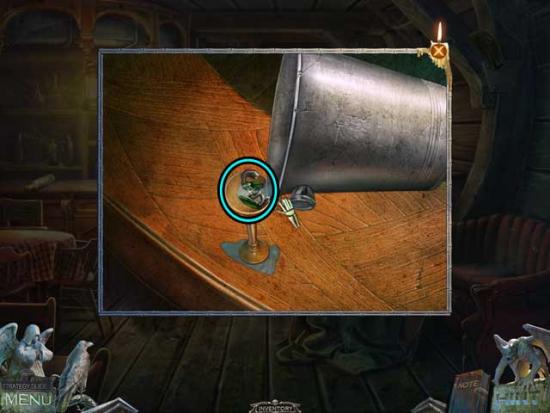
- Make your way back to the Doctor’s Quarters.
Doctor’s Quarters
- Take a closer look at the bag on the floor on the left. Use the SNAKE KEY on the lock to open it, then click on the BANDAGE inside to collect it.

- Proceed to the Engine Room.
Engine Room
- Examine the base of the vertical pipe on the right. Use the CAN OPENER on the pipe to open it, adding the TUBE to your inventory.
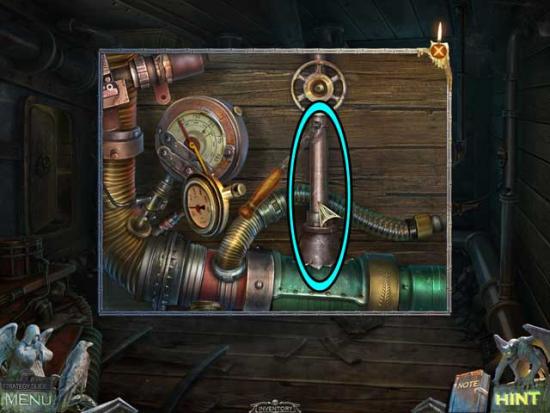
- Make your way to the Bow.
Bow
- Take a closer look at the bike lying on the deck. Use the FILE on the inner wheel to obtain the SPOKES and add them to your inventory.
- Examine the table at which the skeleton is sitting on the left. Place the OPEN BOTTLE, the BANDAGE, and the SPOKES on the table.
- Use the Bandage on the Spokes, then place the Spokes inside the Open Bottle. Click on the LIGHTNING ROD to add it to your inventory.
- Back in the main area, use the LIGHTNING ROD on the lightning.
- Examine the far end of the Bow. Click on the rope to remove it, collecting the AIR SYMBOL beneath.
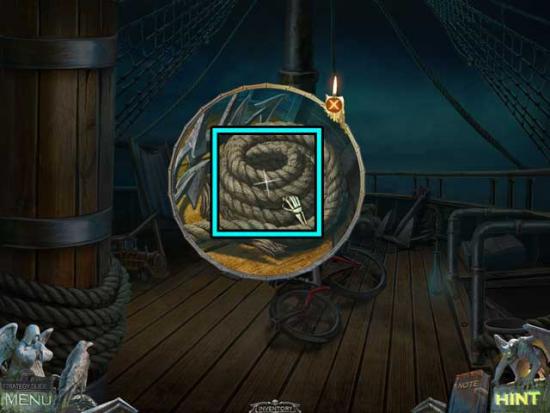
- Go back down to the Pub.
Pub
- Examine the dumbwaiter for another hidden object area.
- Search the scene for silhouetted objects on the list, then use them to recover the rest of the items. The sequence is shown and outlined below.
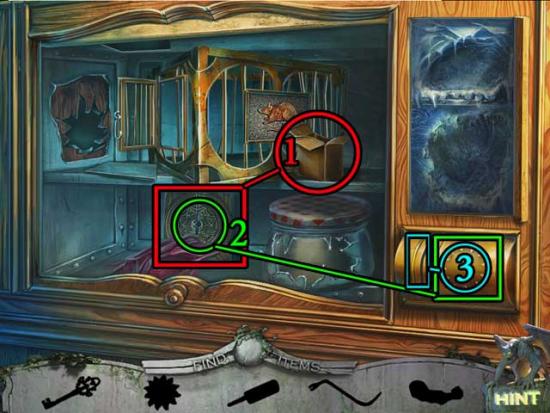
- 1) Collect the Key, then use it on the lock.
- 2) Collect the Sun Symbol, then use it on the groove on the right.
- 3) Collect the Lever and use it on the slot next to where you collected it. Click on it.

- 4) Collect the Crowbar and use it to pry open the dragon’s jaws.
- 5) Collect the Knight’s Arm and use it on the knight.
- 6) Collect the Broken Sword and use it on the sharpening wheel.
- 7) Collect the Sharpened Sword and use it on the doll on the left.
- 8) Collect the Glasses and use them on the plush on the top shelf.
- 9) Collect the Gem and use it on the puzzle on the lower left.
- Place the gems in their proper locations according to their colors. Click a gem to move it to the empty slot connected to it. Click on the gems in the following order to reach the solution: Blue, Red, Orange, Blue, Red, Yellow, Purple, Green, Red, Yellow, Purple, Yellow. The solution is shown below.
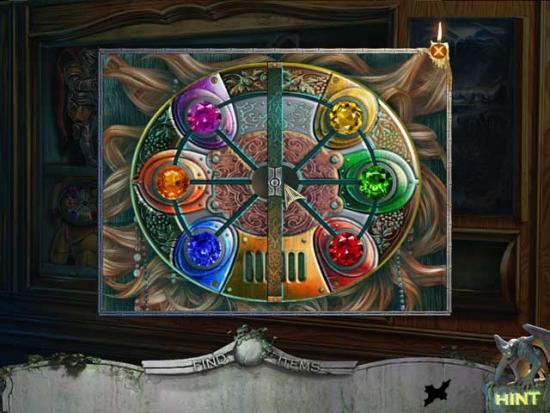
- Upon completing the puzzle and the hidden object area, click on the BAG KEY to collect it.
- Back in the main area, examine the dresser in the rear right corner. Use the TUBE on the phonograph to restore it, play it, then click on the HANDLE to add it to your inventory.
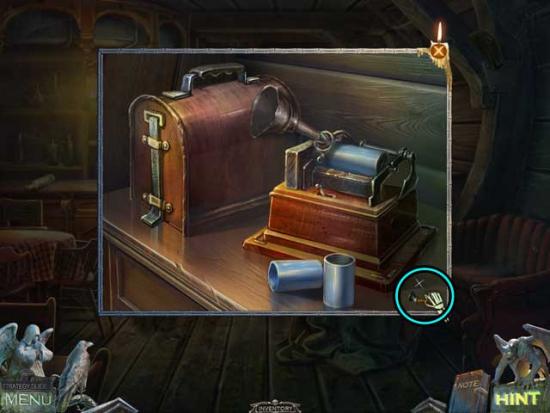
- Exit to the Galley.
Galley
- Take a closer look at the crates on the right. Use the HANDLE and the COFFEE on the coffee grinder, then click on the bottom drawer to open it and collect the GROUND COFFEE.
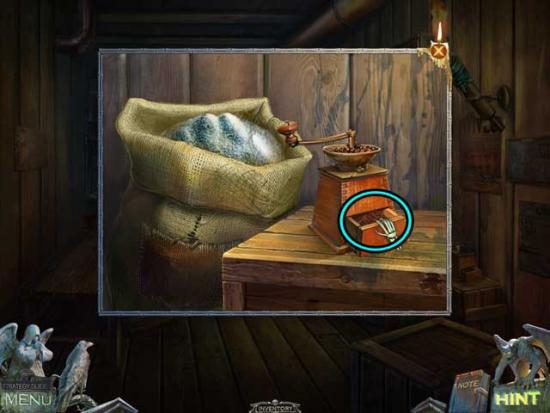
- Go to the Doctor’s Quarters.
Doctor’s Quarters
- Examine the skeleton on the right. Use the GROUND COFFEE on the blank page to reveal wording beneath. Click on the Page to collect it.
- Go to the Passenger Cabin.
Passenger Cabin
- Take a closer look at the suitcase on the floor. Use the BAG KEY on the lock on the right to open the suitcase, then click on the GLUCOSE inside to add it to your inventory.
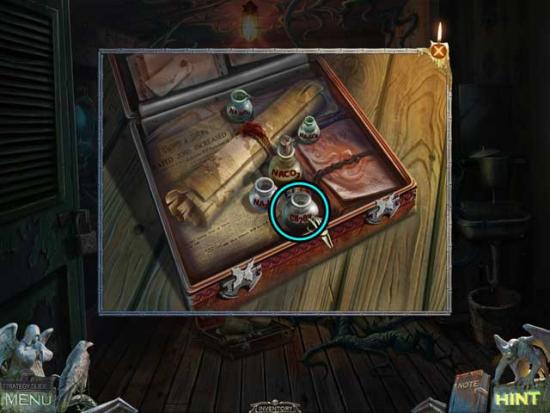
- Make your way to the Storage Room.
Storage Room
- Examine the barrels on the right. Use the GLUCOSE on the hole in the barrel. You will obtain the VIAL WITH CATERPILLARS.
- Go back to the Passenger Cabin.
Passenger Cabin
- Use the VIAL WITH CATERPILLARS on the vines throughout the room to get rid of them.
- Click on the Page within the passenger’s journal to read it.
- Take a closer look at the table on the left. Click on the Scroll to read it, then click on the EARTH SYMBOL to add it to your inventory.
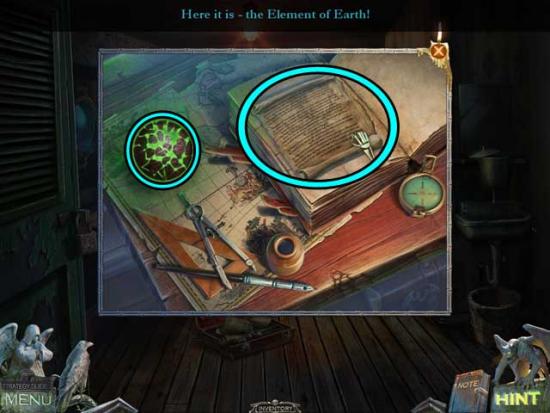
- Return to the Hold.
Hold
- Take a closer look at the small gold and red coffin on the pedestal, then take a closer look inside. Use the FIRE SYMBOL, the WATER SYMBOL, the AIR SYMBOL, and the EARTH SYMBOL on the statue to trigger a puzzle.
- Arrange the stones from the statue’s eyes matching the color of symbols on its foreheads. Click on an eye to select it, then move it to one of the two slots in the statue’s crown. Rotate the faces with the arrow buttons, then place the correct eye colors into the eye sockets that correspond with the symbol color on that face. The solutions are shown below.
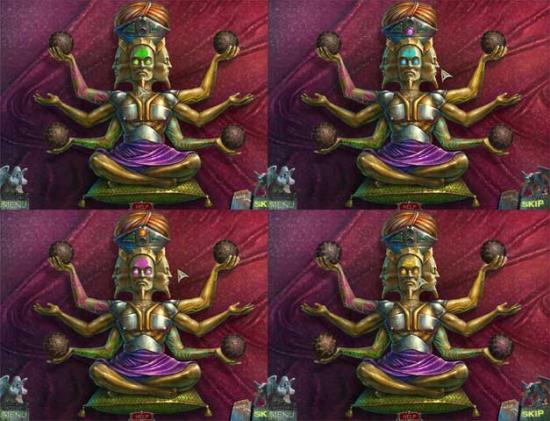
- Next, put the element symbols in the statue’s hands according to the corresponding color and design. Move the symbols over one hand at a time, clockwise or counter-clockwise doesn’t matter, until they all line up. The completed solution is shown below.
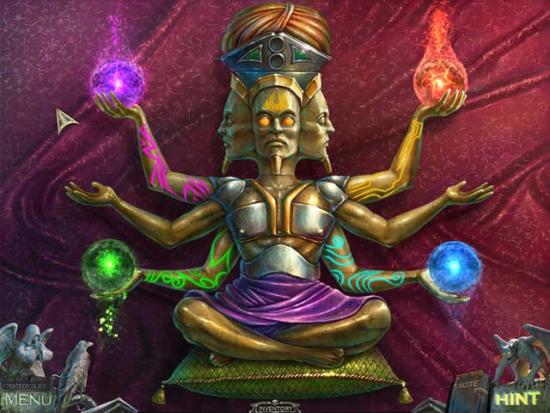
- Upon completing the puzzle, click on the CASKET to add it to your inventory.
- Go outside to the Dingy.
Dingy
- Give the CASKET to the ferryman, then watch the cutscene that follows.
Congratulations!
You have completed Gamezebo’s walkthrough for Redemption Cemetery: Grave Testimony. Be sure to check back often for game updates, staff and user reviews, user tips, forums comments and
much more here at Gamezebo!

More articles...
-
Best Horror Games On Itch.io – July 2026
Across a bounty of subgenres. -
Haze Seas Accessories Tier List [Best Accessories to Equip]
The accessories with the best stat buffs in Haze Seas.