- Wondering how to get Monopoly GO! free rolls? Well, you’ve come to the right place. In this guide, we provide you with a bunch of tips and tricks to get some free rolls for the hit new mobile game. We’ll …
Best Roblox Horror Games to Play Right Now – Updated Weekly
By Adele Wilson
Our Best Roblox Horror Games guide features the scariest and most creative experiences to play right now on the platform!The BEST Roblox Games of The Week – Games You Need To Play!
By Sho Roberts
Our feature shares our pick for the Best Roblox Games of the week! With our feature, we guarantee you'll find something new to play!All Grades in Type Soul – Each Race Explained
By Adele Wilson
Our All Grades in Type Soul guide lists every grade in the game for all races, including how to increase your grade quickly!
Redemption Cemetery: Children’s Plight Walkthrough
Welcome to the Redemption Cemetery – Children’s Plight Collector’s Edition walkthrough on Gamezebo. Redemption Cemetery – Children’s Plight Collector’s Edition is a Hidden Object Game played on the PC created by ERS Game Studios. This walkthrough includes tips and tricks, helpful hints and a strategy guide on how to complete Redemption Cemetery – Children’s Plight Collector’s Edition.
Redemption Cemetery: Children’s Plight – Game Introduction
Welcome to theRedemption Cemetery – Children’s Plight Collector’s Editionwalkthrough on Gamezebo.Redemption Cemetery – Children’s Plight Collector’s Editionis a Hidden Object Game played on the PC created by ERS Game Studios. This walkthrough includes tips and tricks, helpful hints and a strategy guide on how to completeRedemption Cemetery – Children’s Plight Collector’s Edition.
General Tips
This hidden object game requires visiting several locations and using inventory items to advance play.
- Play is mostly linear although there are some options for the order in which to explore locations.
- CAPITALIZED inventory items are meant to make it easier to find where this guide may deviate from your own play.
- Always move the cursor around a scene. Watch the cursor to see if it changes into a hand or magnifying glass.
Main Menu:
- Play – Begin or resume a game. The first time you play you must select a difficulty level:
- Regular – Hint and Skip buttons recharge faster. Hidden object areas are illuminated.
- Expert – Hint and Skip buttons take longer to recharge. Most helpful aids are unavailable.
- Options – Change music and sound effects volume. You may select or deselect full screen and a custom cursor.
- Exit – Quit the game.
- Extras – Bonus play is available after completing the game. Music, concept art, wallpapers, screensavers are available after completing the bonus chapter.
- Profiles – Click the “Click Here to Change Player” link to create, delete or switch player profiles.
Screen Navigation:
- Strategy Guide – In-game play guide.
- Menu – Change your options, resume the game, view the Help menu or return to the main menu.
- Inventory/Item List – A scrollable list of icons showing available items or a list of hidden items to be collected.
- Notes – Clicking an object can add clues or information. The diary glows when new information is added.
- Hint/Skip Bar – Clicking will show a random item from an itemized list. Hints are not limited and the bar refills quickly. The bar turns into a Skip bar for puzzles.
Symbol Meanings:
- Magnifying Glass – Zoom in on interactive area.
- Hand – Interact with an object: pick up an item, open a door or move an object.
- Sparkles – Hidden object areas.
Walkthrough Tips
A short clip explains the background and introduces the story line for play.
If you are not familiar with hidden object games, click “Yes” when asked if you would like a tutorial. This will show you how to interact with objects and characters.
The objects for hidden object scenes are randomly generated. That is why only inventory items are shown. They are highlighted in white with a blue border. Objects listed in blue indicate either an extra step is needed to find or create the object. Move your cursor around until the cursor turns into a hand or magnifying glass to find the blue objects.
With the exception of a hidden object area, most inventory items are not collected from a scene until they are needed.
Assumptions:
- You know to click through the conversations with characters.
- After you have gone back and forth between locations more than once, you don’t need to be told how many times to go up or down.
- Just as in the movies, you will always enter a darkened door, window or portal.
Chapter 1: The Grounds and Cemetery

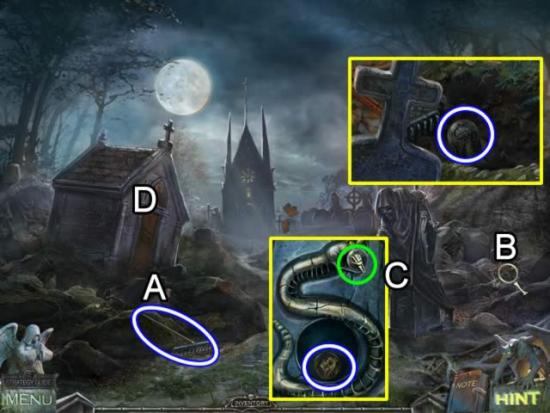
- Pick up the RAKE (A).
- Zoom in on the pile of leaves (B). Use the RAKE to uncover a SPHERE.
- Inspect the base of the statue (C). Place the SPHERE in the snake’s mouth. Take the PUZZLE PIECE.
- Click the door (D) to open an interactive area.
- Place the PUZZLE PIECE in the empty slot to start a puzzle.
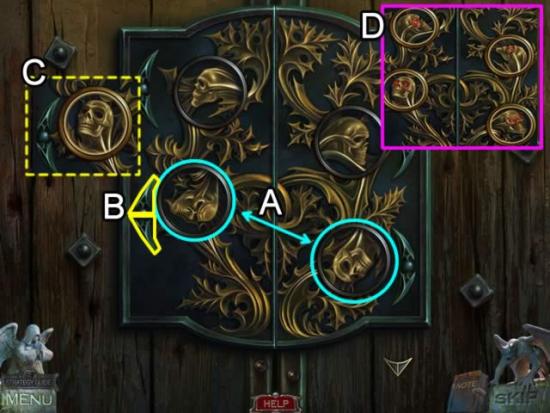
- The goal is to place the skulls in the correct location and position to open the door.
- Begin by studying the pattern on the door and the pattern surrounding each skull. Select two skulls to swap their locations (A). Use the arrows beside the slot (B) to rotate and align the skull and door patterns. A correctly aligned skull locks into place and is highlighted (C).
- The eyes of the skulls turn red when all are correctly aligned (D).
- The door opens to a hidden object scene.
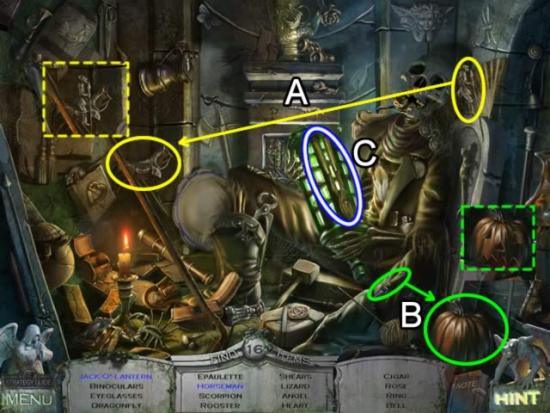
- Drag the man to the horse (A) to form a Horseman (dashed yellow). Click the Horseman to eliminate the object.
- Drag the knife to the pumpkin (B). The knife automatically cuts the pumpkin. Collect the resulting Jack O’ Lantern (dashed green).
- Collect the rest of the listed items. The SHEARS (C) are added to inventory.
- Continue up the road to the church entrance.
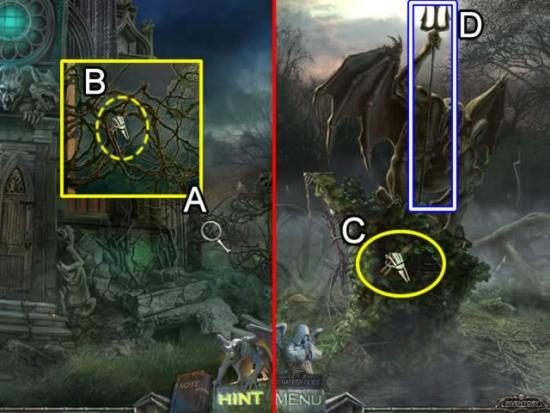
- Look at the brambles on the right side of the church (A). Use the SHEARS to remove them (B) and enter the statue area.
- Use the SHEARS to remove the ivy from the statue on the left (C). Take the TRIDENT (D) and return to the front of the church.
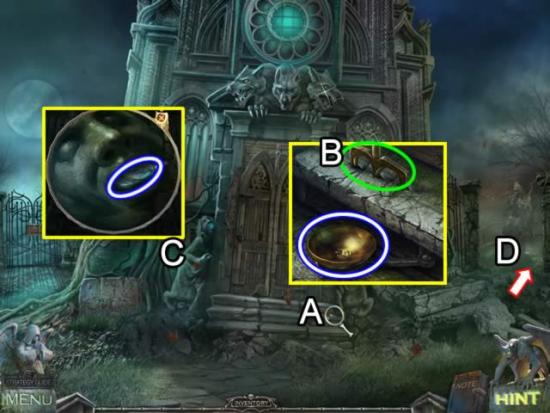
- Zoom in on the steps (A).
- Insert the tines of the TRIDENT in the three slots (B). Take the BOWL.
- Inspect the figure to the left of the doors (C). Take the EMPTY BOTTLE from its mouth.
- Return to the statue area (D).
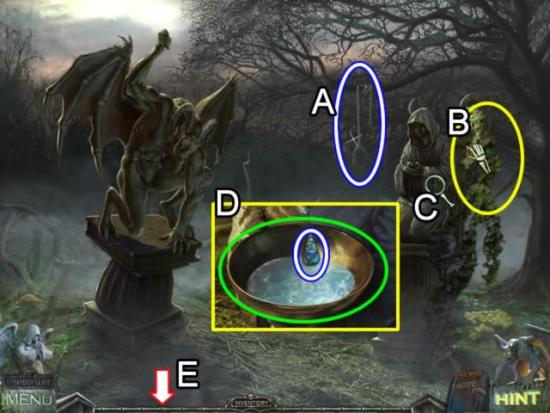
- Take the NOOSE from the tree (A).
- Use the SHEARS to remove the ivy from the statue (B).
- Zoom in on the hands (C).
- Put the BOWL in the hands (D). Wait for the bowl to fill with angel tears. Place the EMPTY BOTTLE in the bowl to fill it with TEARS OF CERBERUS.
- Return to the church entrance (E).
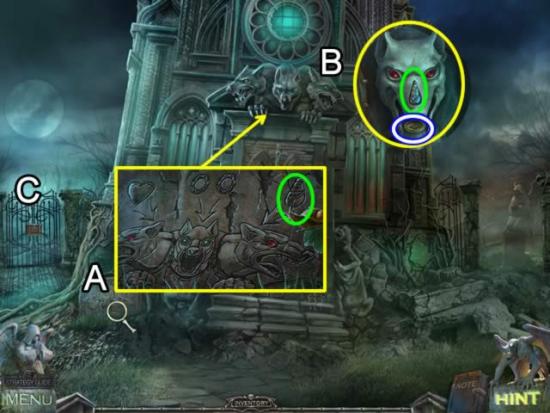
- Look at the stone to the left of the steps (A). It is a key for the three heads of Cerberus. Note the head on the right has a shape similar to the bottle.
- Examine the third head above the door (B).
- Insert the TEARS OF CERBERUS in the grove on the nose. Take the PUZZLE PIECE.
- Zoom in on the gate on the left (C).
- Insert the PUZZLE PIECE in the empty slot to open a puzzle.
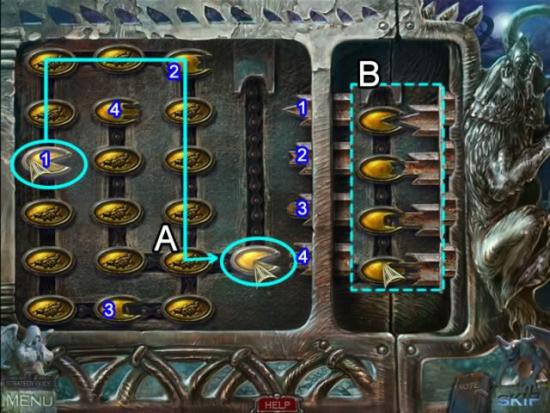
- The goal is to align the disk shapes to fit the lock tumblers.
- The numbers on the disk shapes in the above screenshot correspond to the numbers on the tumblers. Click a shape and drag it around the chains until it is at the intersection to the tumblers (A). Drag the shape forward to position it on the tumbler chain. The first move is shown above.
- Repeat the sequence for each shape. View the video for the complete solution.
- Enter the gate to the cemetery.
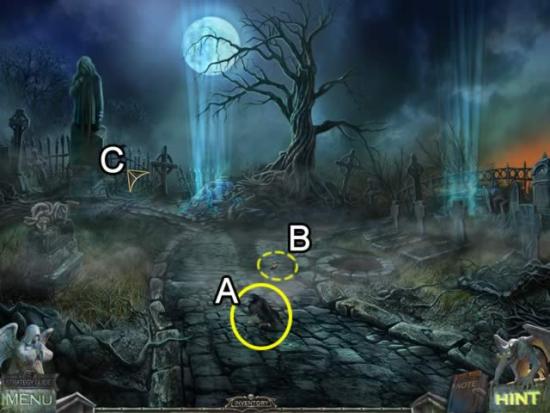
- Click the crow (A). Pick up the HYDRA HEAD it dropped (B).
- Follow the path to the left grave marker (C).
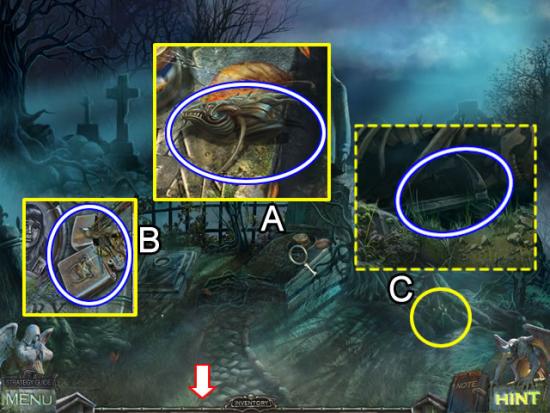
- Access the main grave marker (A). Take the HYDRA HEAD.
- Inspect Mary’s headstone (B). Take the LIGHTER.
- Zoom in on the tree root sparkles on the right (C). Remove the dirt pile. Take the WARHAMMER.
- Exit the grave area.
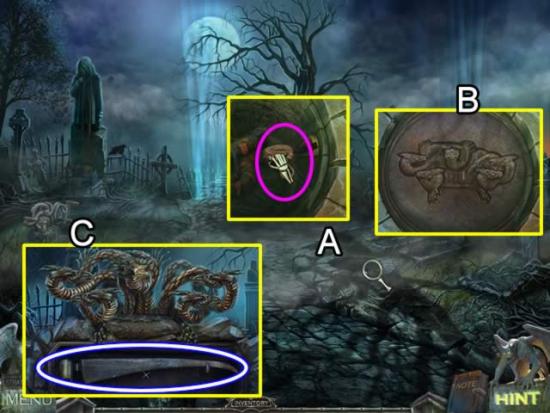
- Look closer at the open pit on the side of the path (A). Place the NOOSE on the lever to close the cover (B). Note the position of the heads on the cover.
- Zoom in on the sculpture on the left (C).
- Place the HYDRA HEADS atop the two necks without heads. Click each head until they match the well cover (middle head center, upper heads facing inward and lower heads facing outward). Take the SCYTHE BLADE.
- Return to the front of the church and watch the cutscene.
- Go down to the gate area.
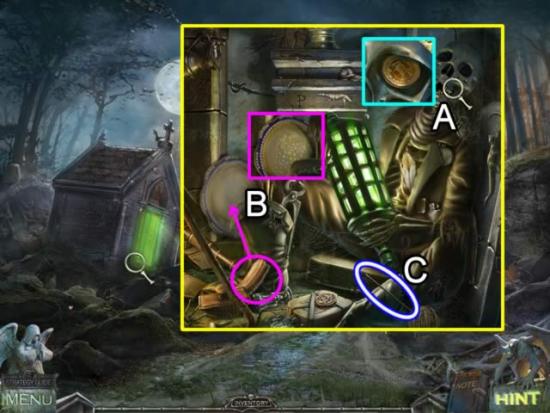
- Play the hidden object scene in the stone building.
- Blue listed items:
- Zoom in on the skull (A). Take the Coin from the eye socket.
- Drag the brush to the plate (B). The Grapes are revealed.
- The Knitting NEEDLE (C) is added to inventory.
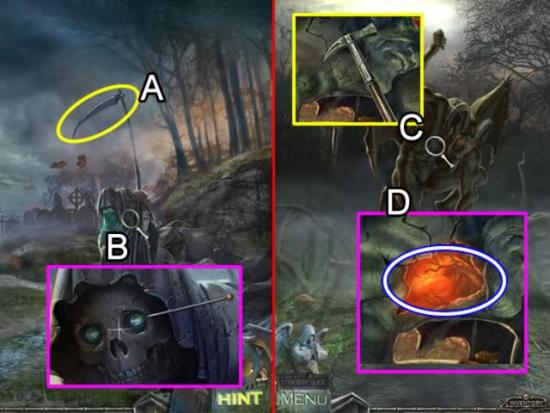
- Place the SCYTHE BLADE on death’s staff (A).
- Zoom in on the eyes (B). Use the NEEDLE to pry out the gems in the eye sockets to get the EYES OF CERBERUS.
- Return to the front of the church.
- Go right into the statue area.
- Inspect the chest area of the first statue (C). Use the WARHAMMER to crack open the chest. Take the HEART OF CERBERUS (D).
- Return to the church entrance.
Chapter 2: The Church
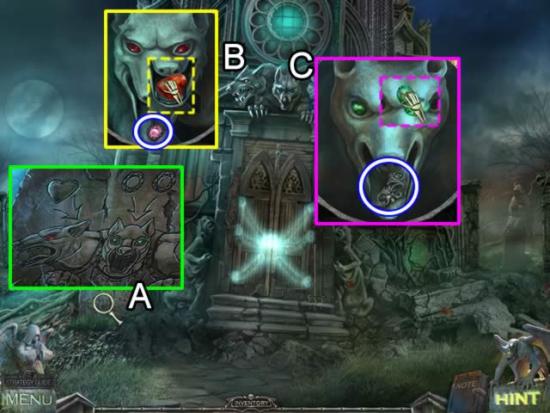
- Zoom in on the stone to the left of the steps (A). It shows what objects go to the remaining two heads.
- Click the first head (B). Place the HEART OF CERBERUS in its mouth. Receive a GEM.
- Click the center head (C). Insert the EYES OF CERBERUS in the eye sockets. Receive an AMULET FRAGMENT.
- Inspect the door lock to open a puzzle.
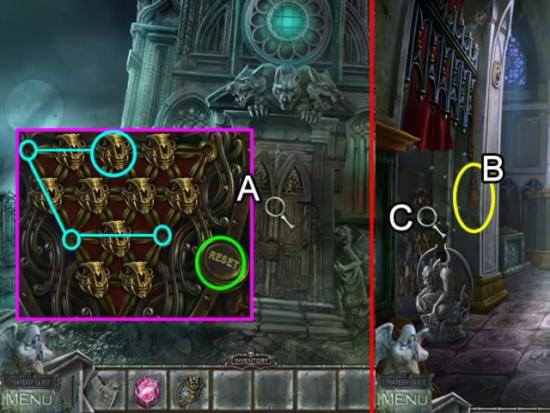
- The goal is to jump the skulls over each other to eliminate all but one. The first three moves are shown above (A). View the video to see the entire solution.
- Enter the church.
- Pull the cord on the left (B) to raise the curtain.
- Play the hidden object scene (C).
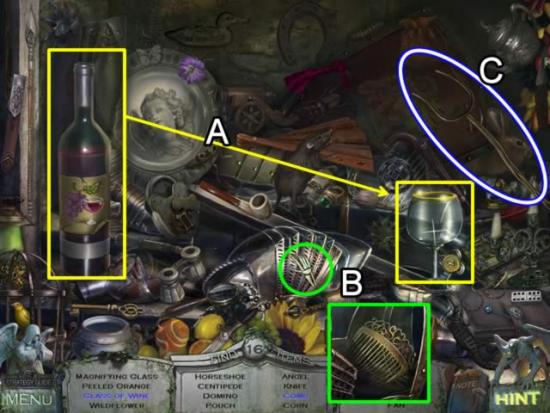
- Drag the bottle of wine to the glass (A) to get a Glass of Wine.
- Open the fan fold (B). Look inside to find the Comb.
- Find the rest of the listed items. The FORK (C) is added to inventory.
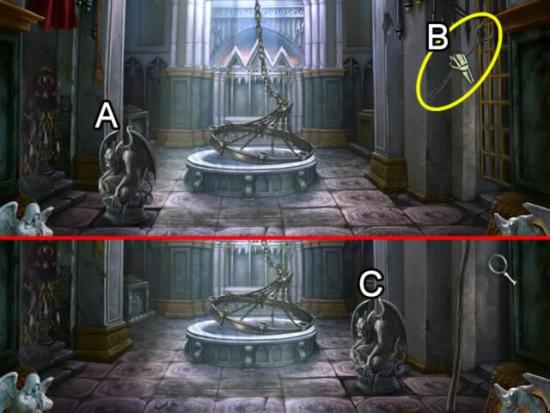
- Click the demon statue (A) to move it over one square and raise the first lattice.
- Put the FORK under the lattice to secure it (B).
- Click the statue again (C) to move it over and raise the second lattice.
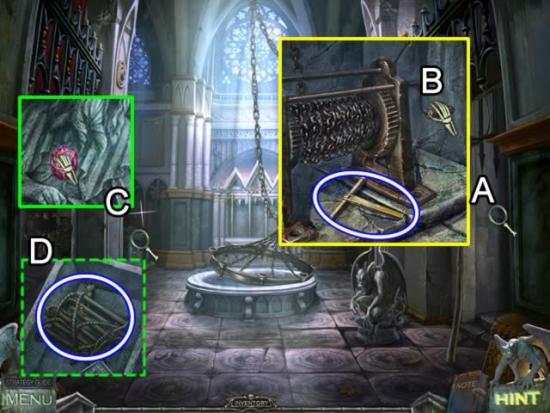
- Inspect the alcove (A). Pick up the KEY. Click the handle on the winch (B) to raise the fallen chandelier.
- Look closer at the sarcophagus on the left (C).
- Place the GEM in the outline. Take the ROPE LADDER (D).
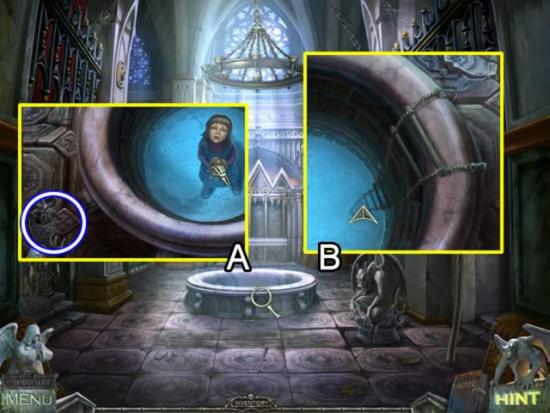
- Zoom in on the floor font (A). Click Mary and pick up the AMULET FRAGMENT.
- Put the ROPE LADDER on the side of the font (B) and climb down.
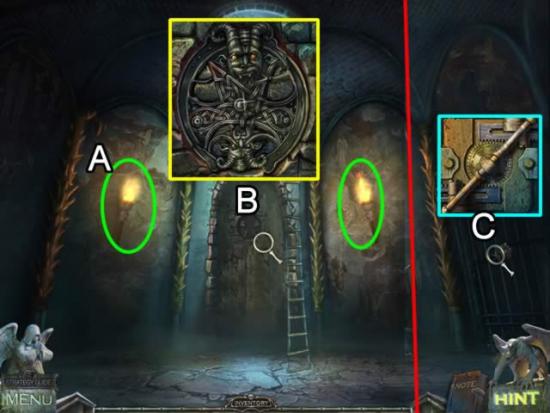
- Place the LIGHTER on the torch on the left (A). Click to light it. Repeat the process with the torch on the right.
- Inspect the door (B).
- Place both AMULET FRAGMENTS in the groove.
- Look at the door on the right (C). Place the KEY in the center to open the door.
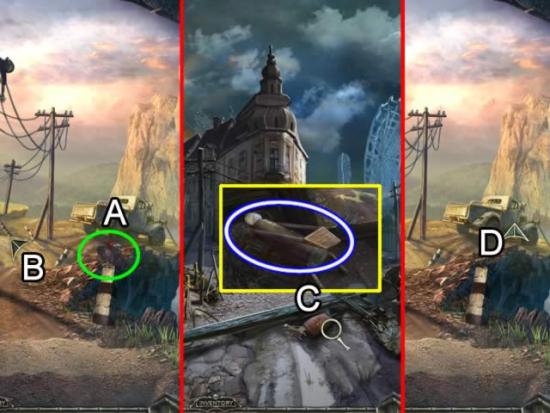
- Click the crow (A) at the tunnel exit.
- Follow the road to the left (B) and enter the town.
- Click anywhere in the scene to topple the power pole.
- Zoom in on the power box (C). Take the PUMP.
- Click down to return to the tunnel exit.
- Head right (D) toward the truck.
Chapter 3: The Tow Truck Area
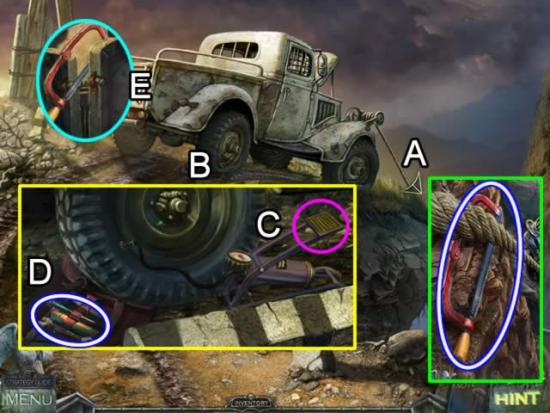
- Go to the front of the tow truck (A). Find Mary. Take the HACKSAW.
- Click down to return to the truck.
- Examine the flat tire (B).
- Place the PUMP on the tire. Click the pedal (C) to inflate the tire. Take the SCREWDRIVER and WRENCH from the tool set (D).
- Inspect the latch on the tailgate (E). Use the HACKSAW to gain access to the bed of the truck.
- Play the hidden object scene in the truck bed.
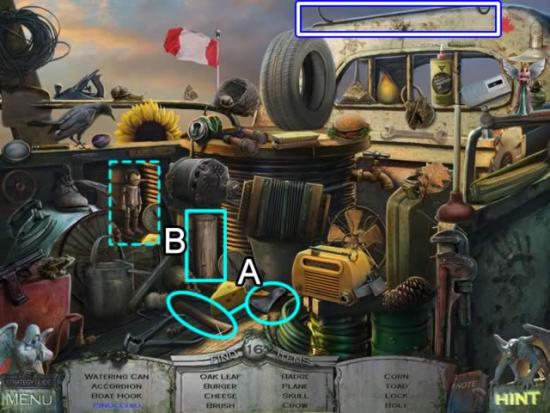
- Drag the axe head to the handle (A) to form an axe. Put the axe on the piece of wood (B) to carve Pinocchio.
- Find the rest of the objects. The Boat Hook goes into inventory as a GAFF HOOK.
- Return to the tunnel exit.
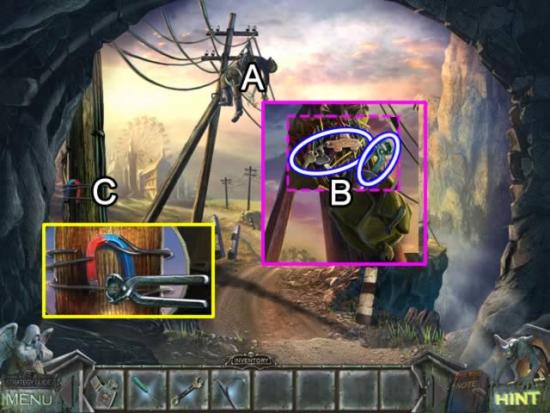
- Zoom in on the lineman (A). Use the GAFF HOOK to pull down the bag.
- Look in the bag (B) and take the KEY and PINCERS.
- Inspect the pole (C).
- Use the Pincer to remove the wire. Take the MAGNET.
- Return to the truck.
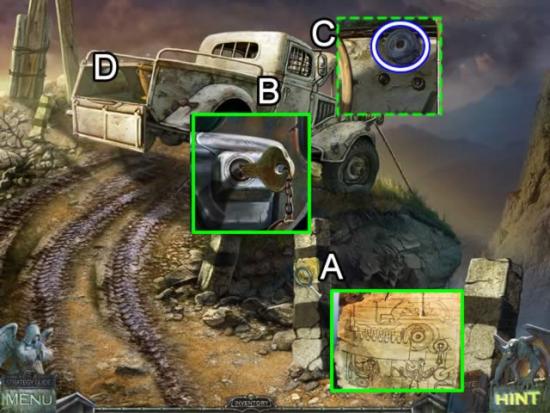
- Examine the paper on the post (A). The drawing is added to Notes.
- Zoom in on the door handle (B). Click the cover on the lock to expose the keyhole. Place the KEY in the slot. Click to open the door.
- View the interior of the truck (C). Take the ELECTRICAL TAPE.
- Play the hidden object scene in the truck bed (D).
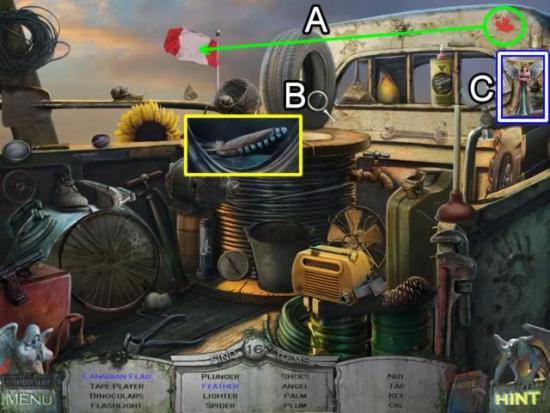
- Drag the maple leaf to the center of the flag to form the Canadian Flag.
- Examine the tire (B). Take the Feather.
- Collect the remaining objects. The ANGEL is added to inventory.
- Click down to leave the truck area. Go left to the town.
Chapter 4: The Town
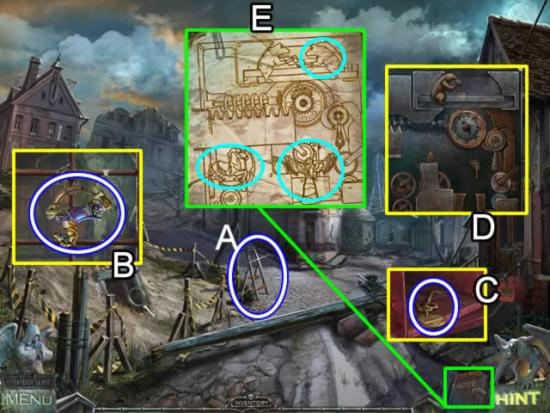
- Zoom in on the fuse box on the downed power pole (A). Use the SCREWDRIVER to remove the four screws. Click to remove the cover. Zoom in to open a puzzle (B).
- The goal is to place the fuses in the plugs so no lines overlap. A solid blue line indicates no overlapping lines. One solution is shown above (C). Exit the puzzle and the enter it again. Pull the handle (D) to shut off the power.
- Play the hidden object scene in front of the building (E).

- Drag the fly swatter to the fly (A). Pick up the Dead Fly.
- Place the cherry on the cupcake (B). Pick up the Cherry Cupcake.
- Find the listed objects. The BEAR is added to inventory.
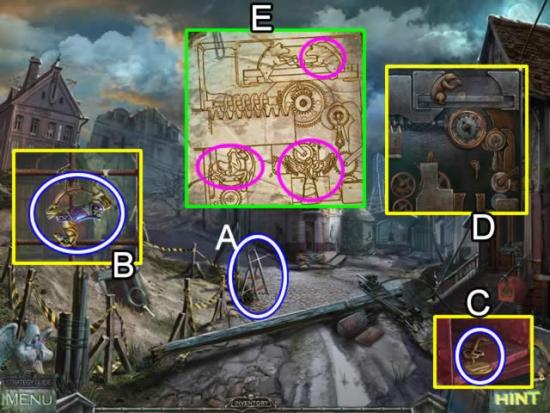
- Take the LADDER (A).
- Examine the shaft entrance (B). Pick up the HORSE.
- Open the mailbox (C). Take the suitcase KEY.
- Look at the door lock (D). Review the drawing in Notes for the correct placement of the BEAR, HORSE and ANGEL.
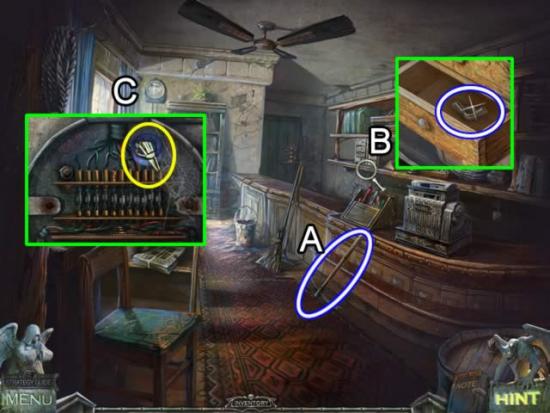
- Take the PICKAX (A).
- Inspect the small chest (B). Take the WING NUT.
- Look at the fuse box (C). Use the WRENCH to remove the four bolts on the cover. Use the ELECTRICAL TAPE to fix the short and restore the power.
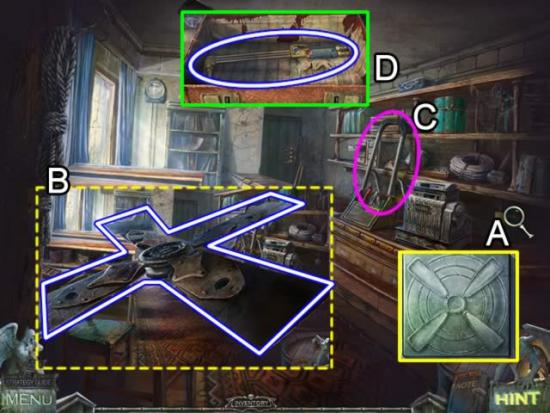
- Zoom in on the fan switch (A). Click to start the fan. Take the FAN BLADE (B).
- Place the LADDER against the shelves (C).
- Examine the suitcase on the top shelf (D). Use the suitcase KEY to unlock the latches. Take the EMPTY GAS TORCH.
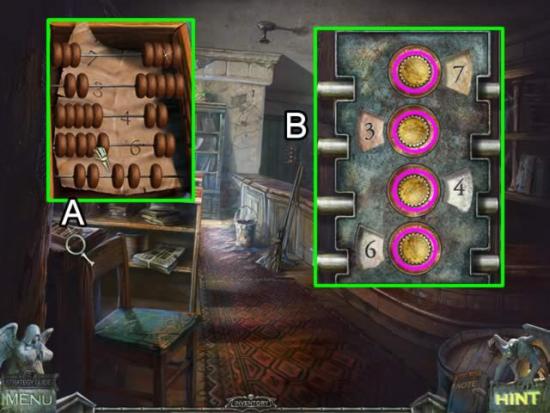
- Inspect the abacus (A). Move the beads aside to reveal the set of numbers on the sheet of paper (7, 3, 4, 6).
- Zoom in on the lock on the back door (B). Click the dials (pink) to rotate the numbers until they match the code found in the abacus.
- Click the open door to start a puzzle.
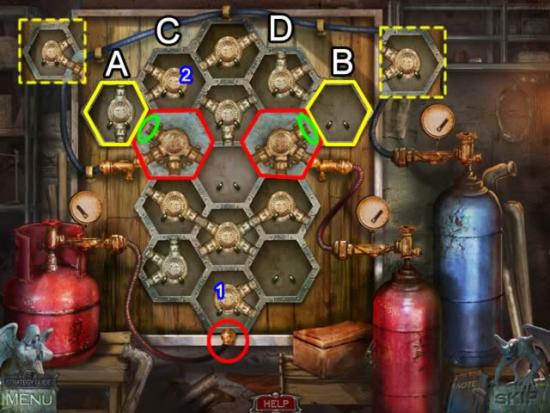
- The goal of the puzzle is to swap the pipe pieces to connect all three gas cylinders without a break. All pieces are used.
- The two pieces highlighted in red cannot be moved. Use these as a starting point to solve the puzzle.
- A good strategy is to look at the pieces with the fewest possibilities. The hexagons (A) and (B) can only have a connection from the red hex box to the adjoining hex box. These must be “V” shaped pieces. There are only two pieces that will work. Place piece (1) in hex box (A) and piece (2) in box (B). The dashed inset shows the result.
- Continue to solve this upper connection. There is only one piece each that works for hex boxes (C) and (D). This solves the remaining box between (C) and (D).
- See the next screenshot for the entire solution.
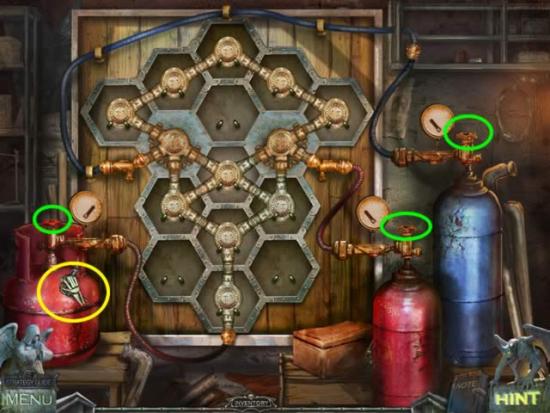
- Click each valve (green) to stop the leaks.
- Place the EMPTY GAS TORCH (yellow) on the tank on the left.
- Accept the FUELED GAS TORCH for inventory.
- Exit the building.
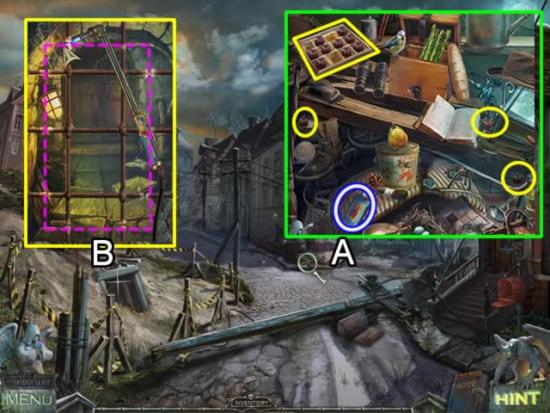
- Play the hidden object scene outside of the building (A). Drag the three pieces of candy to the box (yellow). Take the Candy Box. The LIGHTER FLUID is added to inventory.
- Examine the shaft opening (B).
- Use the FUELED GAS TORCH on the white marks on the grill to cut away a portion (dashed pink).
- Enter the room.
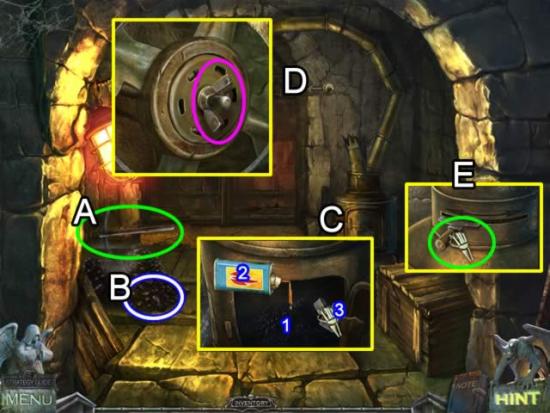
- Use the PICKAX to break up the chunk of coal (A). Scoop up a handful (B) for inventory.
- Zoom in on the stove (C). Open the door. Place the COAL (1) in the stove. Pour the LIGHTER FLUID (2) over the coal. Use the LIGHTER (3) to start a fire.
- Access the rod by the door (D). Put the FAN BLADE on the end of the rod. Secure it with the WING NUT.
- Access the stove again (E). Move the damper handle to the right so the smoke will power the fan and open the door.
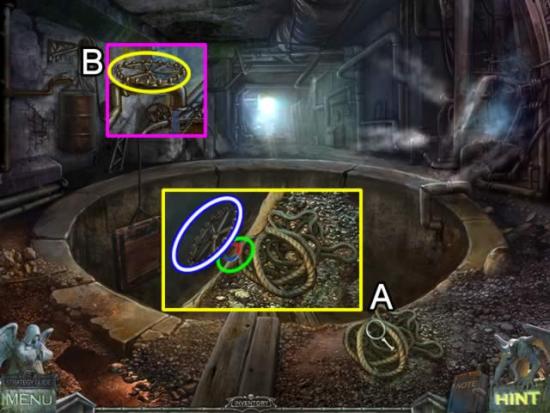
- Inspect the rope (A). Place the MAGNET on the end of the rope and lower it into the pit to retrieve the VALVE.
- Zoom in on the barrel (B). Place the VALVE on the spigot. Click the valve to start the water flowing and fill the tank.
- Use the GAFF HOOK to retrieve the raft. Take the NAIL PULLER.
- Return to the entry room.
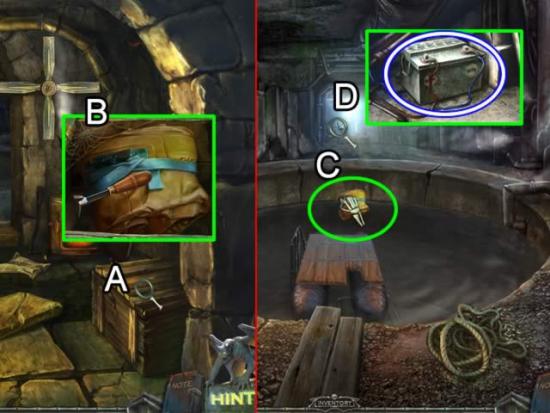
- Zoom in on the crate (A). Use the NAIL PULLER to remove the nails from the cover. Take the RAFT from the crate (B).
- Return to the vat room.
- Place the RAFT in the water to span the gap (C).
- Zoom in on the light on the far side (D). Click the battery to remove the cables. Click once more to add the BATTERY to inventory.
- Exit and return to the truck.
Chapter 5: Returning to the Cemetery
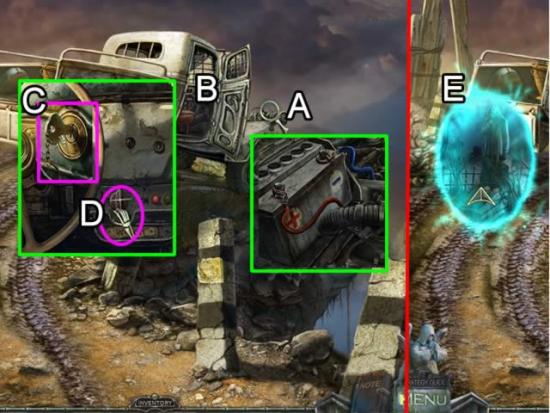
- Zoom in on the hood of the truck (A). Place the BATTERY in the slot. Click the red and blue cables to attach them.
- Enter the truck cab (B). Insert the KEY in the ignition (C). Click to start the truck. Flip the winch switch (D) to pull up the car.
- Speak to Mary.
- Enter the portal (E) to return to the cemetery.
- Take the AMULET from Mary’s mother and speak to Mary.
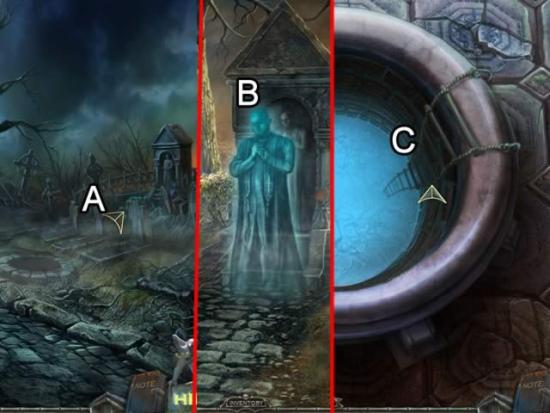
- Click down to leave Mary with her mother.
- Go right to the grave marker that just rose up (A).
- Speak to the priest to learn about Andrew (B).
- Return to the church. Go down the font to the warlock’s lair (C).
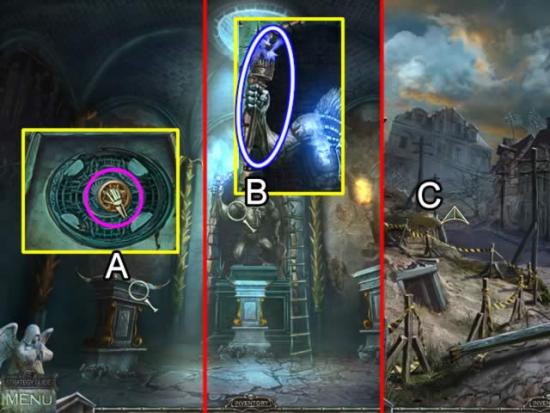
- Examine the first pedestal on the left (A). Place the AMULET in the center.
- Zoom in on the statue (B). Take the TORCH.
- Go through the tunnel and return to the town.
- Go up the street on the left (C).
Chapter 6: Finding Andrew
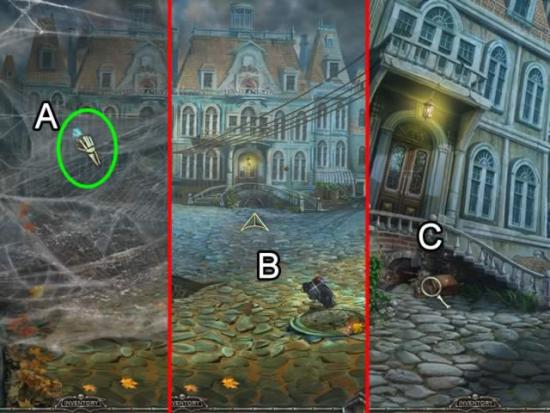
- Use the TORCH to destroy the spider web (A).
- Click the crow (B). Go toward the mansion.
- Play the hidden object scene (C).
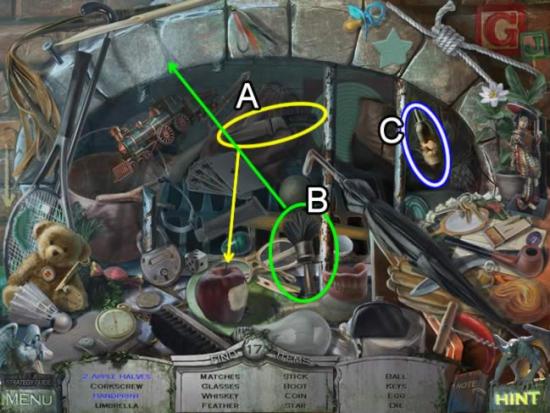
- Drag the knife to the apple (A). Pick up the two Apple Halves.
- Use the brush on the bricks (B) to uncover the Handprint.
- Collect the items listed. The WHISKEY (C) is added to inventory.
- Return to the intersection.
- Go down through the hole in the street to the underground garage.
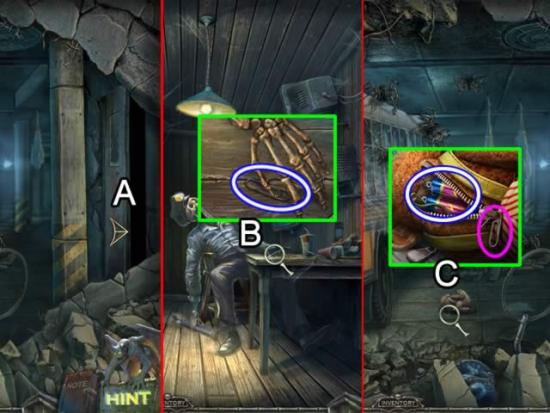
- Go through the door on the right (A) to the security room.
- Zoom in on the guard’s hand (B). Take the CLIP.
- Return to the garage.
- Click the cymbal playing monkey to knock it over.
- Zoom in on the monkey (C). Click the zipper tab. It falls off. Put the CLIP on the zipper. Take the BATTERIES hidden in the chimp.
- Return to the security room.
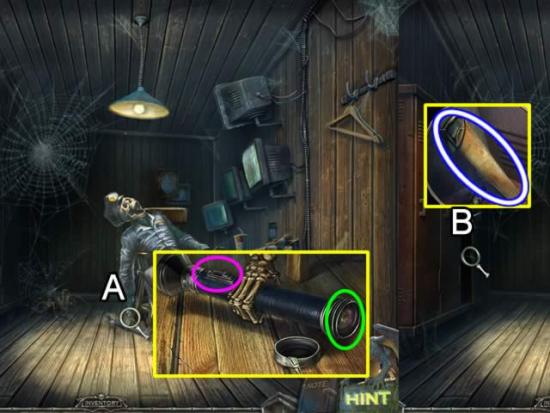
- Zoom in on the guard’s left hand (A).
- Remove the cap from the flashlight. Insert the BATTERIES (green). Replace the cap. Click the switch (pink). The light destroys to the spider and web.
- Open the closet door (B) and take the SAW.
- Return to the street.
Chapter 7: The Saloon and Toy Store
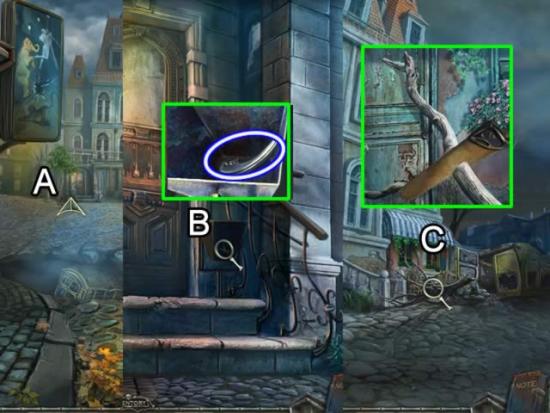
- Go toward the door on the left side of the mansion (A).
- Zoom in on the drop box (B). Take the FRIDGE HANDLE.
- Return to the street. Approach the mansion again.
- Zoom in on the right side (C). Use the SAW to remove the tree in front of the door.
- Enter the room.
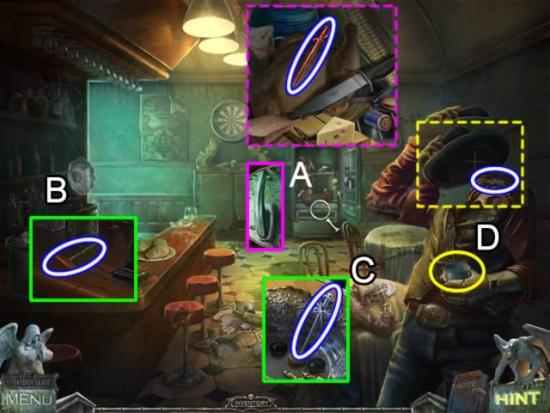
- Zoom in on the refrigerator (A). Insert the FRIDGE HANDLE to open the door.
- Play the hidden object scene. Collect the RED SWORD for inventory.
- Inspect the gramophone (B). Take the CORKSCREW.
- Look at the hand on the table (C). Take the BLUE SWORD.
- Pour the WHISKEY into the cup (D). When the robot cowboy lifts his hat (dashed yellow), zoom in and take the CLOUD on his head.
- Exit the room.
- Return to the door on the far left.
- Zoom in on the lock to open a puzzle.
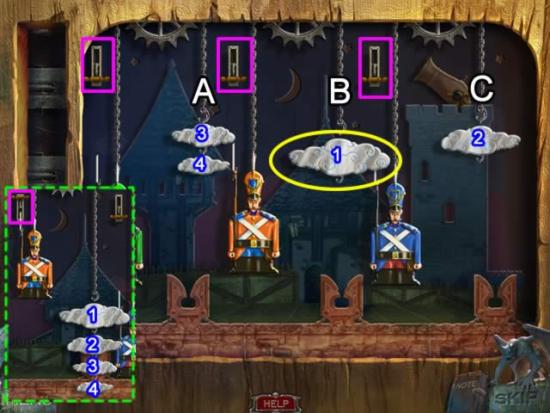
- Place the CLOUD on the empty hook (yellow).
- The goal is to place all the clouds on the hooks in ascending order to raise the bayonets and trip to switches above the soldiers.
- Solve the orange soldier first. Hook cloud (2) to cloud (1) on chain (B). Attach cloud (4) to chain (C). Hook cloud (3) to the bottom of cloud (2) on chain (B). Hook cloud (4) to the bottom of cloud (3) on chain (B). The solution is shown in the dashed insert.
- Use the three chains to switch the clouds into the 1-4 sequence for the other two soldiers. Watch the video for the entire solution.
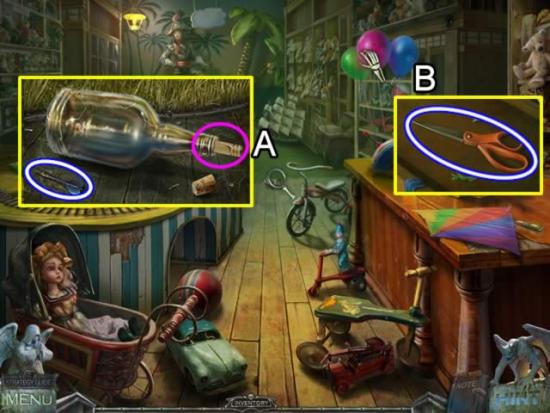
- Zoom in on the bottle on the floor (A). Use the CORKSCREW to uncork it. Click the paper (pink) to review the instructions for the dartboard. The information is saved in Notes. Pick up the BLUE DART.
- Pop the balloons (B). Inspect the shelves. Take the SCISSORS.
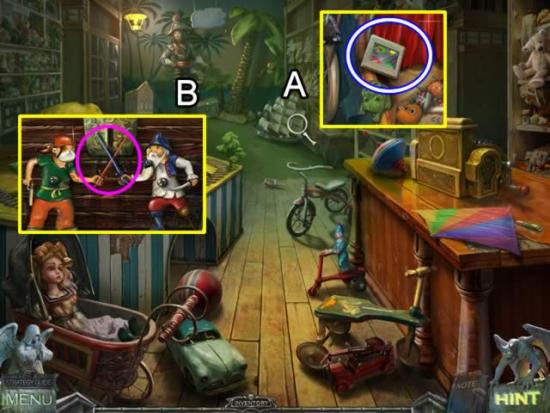
- Play the hidden object scene in the toy pile (A). The SLIDE is added to inventory.
- Inspect the chest (B). Place the RED SWORD and BLUE SWORD in the pirate’s hands to open the chest.
- Zoom in to open a puzzle.
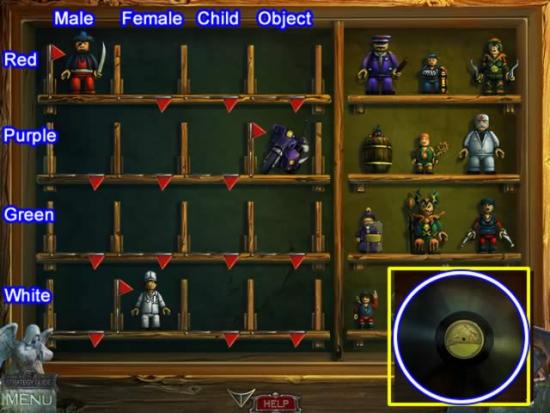
- The goal is to place the objects on the right into their correct slot on the left by row and column.
- The above screenshot shows the alignment for the rows and columns. Correctly placing an item raises the red flag.
- Complete the puzzle and take the RECORD.
- Exit the toy store. Approach the building again.
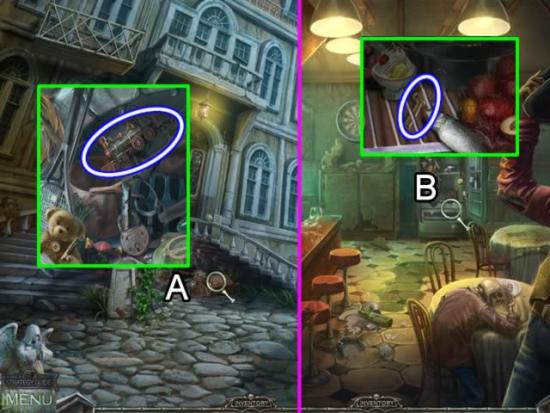
- Play the hidden object scene in front (A). Find all of the objects and receive a LOCOMOTIVE.
- Enter the saloon on the right.
- Play the hidden object scene in the refrigerator (B). Find all of the objects and receive a TRAIN KEY.
- Return to the toy store.
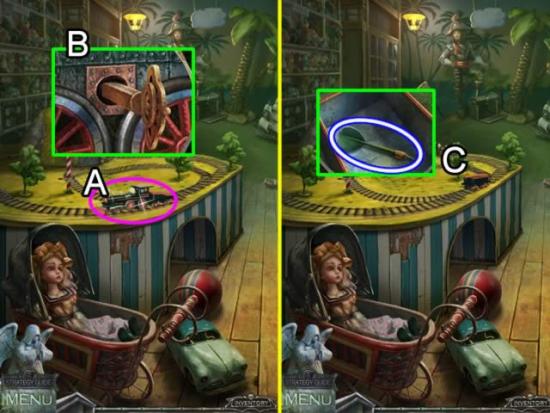
- Place the LOCOMOTIVE on the train tracks (A).
- Zoom in and insert the TRAIN KEY (B). Click the key to start the train.
- Look inside the box car (C). Take the GREEN DART.
- Return to the saloon.
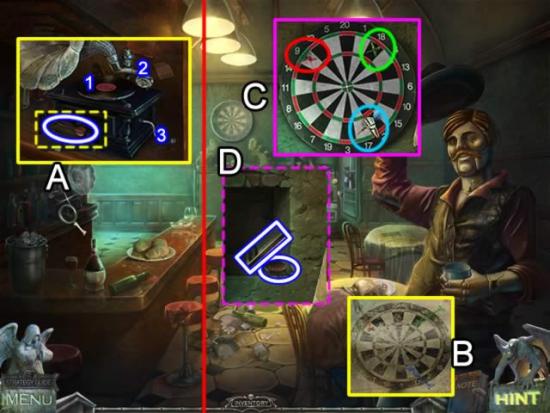
- Inspect the gramophone (A).
- Place the RECORD on the turntable (1). Put the needle on the record (2) and crank the handle (3) to play the record. Take the RED DART from the compartment.
- Review the instructions for the dartboard stored in Notes (B).
- Zoom in on the dartboard (C). Place the darts in the board based on color and number (red – 9; green – 18; blue – 17).
- Examine the contents of the hidden compartment. Take the COIN and MAGNETIC CARD.
- Exit the saloon.
- Look at the lock on the front door of the main part of the building. Slide the MAGNETIC CARD through the slot to open the door.
Chapter 8: The Main Building
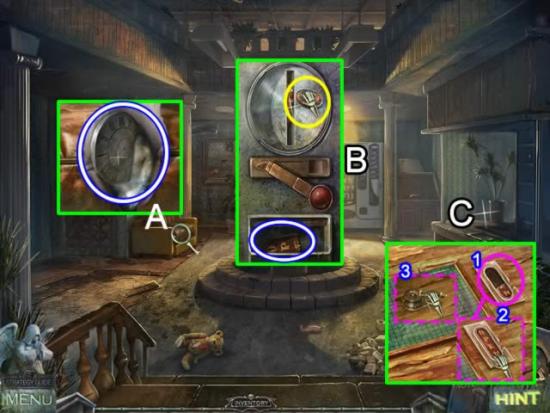
- Examine the couch (A). Use the SCISSORS to cut the thread. Take the CLOCK FACE.
- Zoom in on the vending machine (B). Insert the COIN in the slot (yellow). Take the HALF TOKEN that falls into the change tray.
- Look at the reception desk (C). Remove the magazines. Place the HALF TOKEN in the slot (1). Click the repaired button (2) to open the cover. Click the lever (3) to open the stairway entrance.
- Go up the stairs on the left.
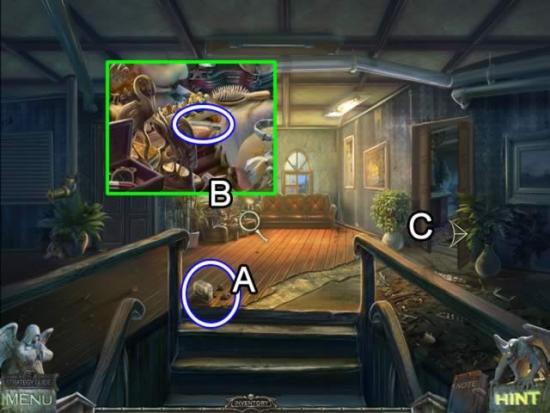
- Pick up the BOX WITH PUZZLES at the top of the stairs (A).
- Play the hidden object scene on the couch (B). Collect all of the items. The FUSE is added to inventory.
- Enter the doors on the right (C).
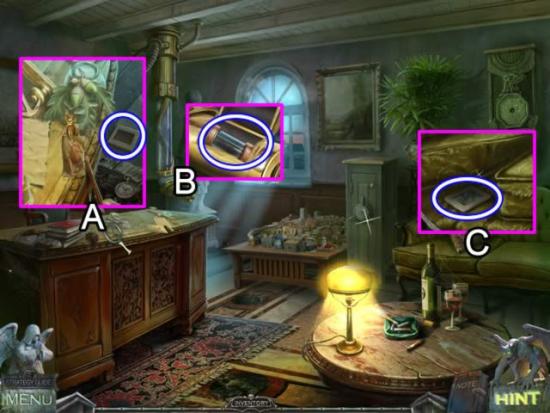
- Play the hidden object scene on the desk (A). Collect all of the items. The SLIDE is added to inventory.
- Inspect the mail tube (B) Take the CANISTER.
- Look under the cushion of the sofa (C). Take the slide.
- Return to the hallway.
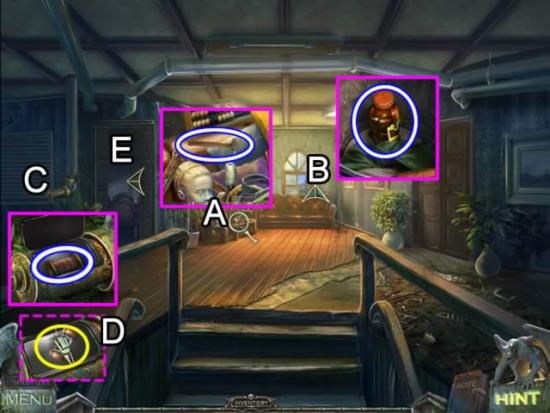
- Play the hidden object scene on the couch (A). Find all the items. The HAMMER is added to inventory.
- Go out the window (B). Zoom in on the bucket. Take the SOLVENT.
- Examine the pneumatic tube (C). Take the BOBBIN. Place the CANISTER in the tube (D).
- Enter the doors on the left (E).
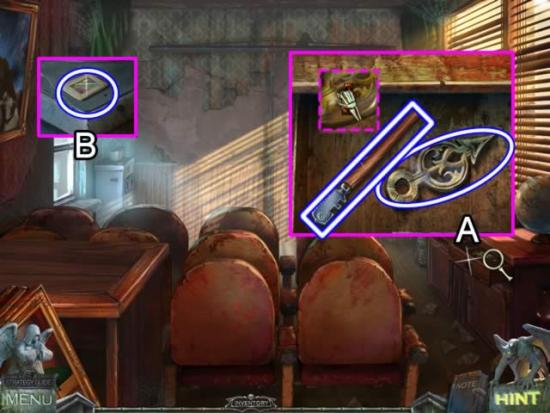
- Open the cabinet drawer on the right (A) and examine the contents. Use the SOLVENT (dashed pink) to remove the grime from the CLOCK HAND. Pick up the GLASS CUTTER as well.
- Look at the cabinet in the corner (B). Take the SLIDE.
- Return to the office.
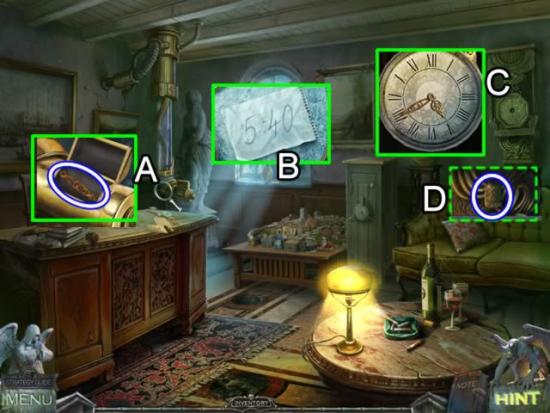
- Open the tube (A). Take the CLOCK HAND.
- Inspect the piece of paper on the window sill (B). Note the time: 5:40.
- Zoom in on the clock (C). Insert the CLOCK FACE and both CLOCK HANDS. Drag the hands until they read 5:40. Take the WEIGHT (D) from the bottom of the clock.
- Return to the lobby.
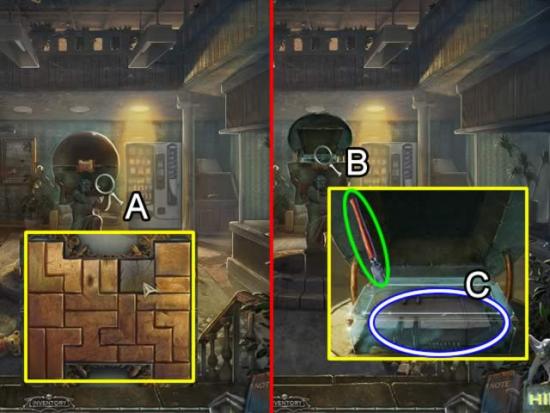
- Zoom in on the Atlas statue (A). Place the BOX WITH PUZZLES in the empty grid to open a puzzle.
- The goal is to place the pieces so all fit with no spaces or shape overlap. Build around the three fixed pieces. The placement does not appear to be based on color or scratch pattern in the shapes. One solution is shown in the inset above.
- Inspect the open globe (B). Use the GLASS CUTTER to open a hole. Take the PROJECTOR.
- Return to the second floor. Enter the room on the left.
- Put the WEIGHT on the screen cord (A).
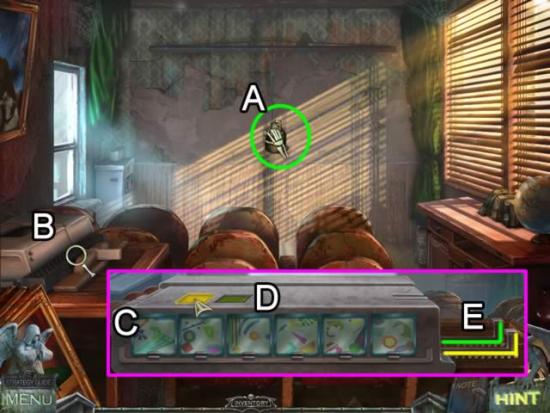
- Place the PROJECTOR on the table (B). Zoom in to open an interactive window.
- Place the six SLIDES in the slots along the side of the projector (C). Use the yellow and green buttons on the top of the projector (D) to open and close their similarly colored slide trays (E).
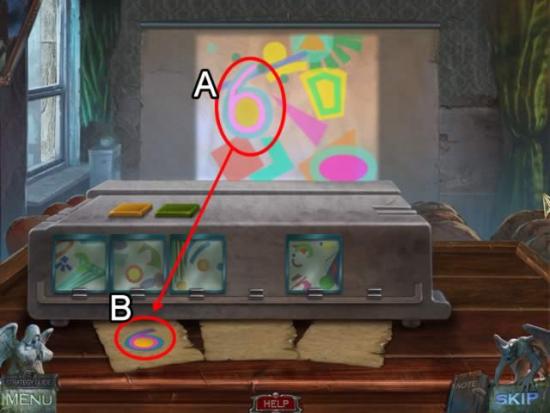
- The goal is to find the two slides that when overlaid, form a number (A). The number flashes on the screen then prints on the paper below the projector (B).
- The first number found does not mean it will print on the first piece of paper. There is a three number sequence to find but they can be found in any order.
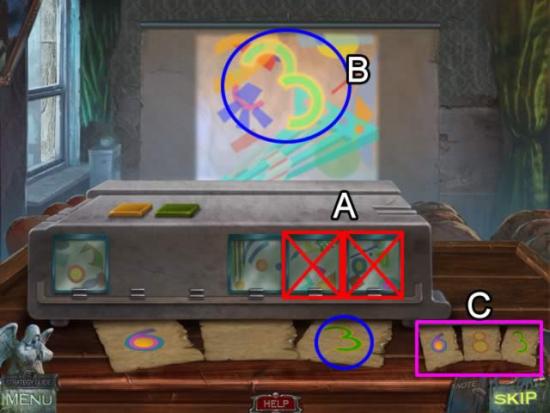
- Once the first number has been found, rearrange the slides on the side of the projector so the last two slots are open.
- Remove the two slides that formed the first number and place them in the last two slots (A). No slides are used more than once so these slides can be eliminated when trying two find the next two numbers. Reordering narrows the process for finding the second number (B). The last number will be the two remaining slides. The sequence is 6-8-3 (C).
- Return to the office.
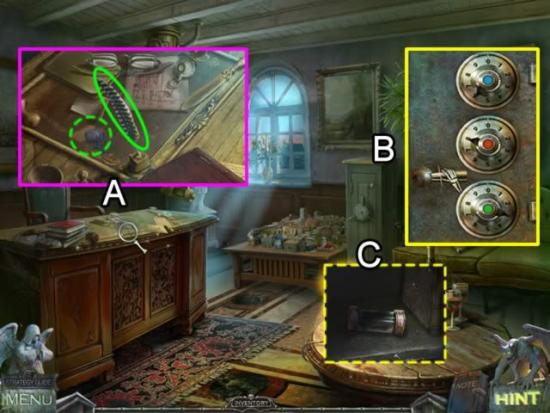
- Play the hidden object scene on the desk (A). Drag the quill to the desk to get the Blot. Receive a FUSE for finding all of the objects.
- Examine the safe (B).
- Click the dials until the arrows match the number sequence order from the slide projector (6-8-3). Click the lever to open the safe. Take the FUSE.
- Exit the building. Return to the toy store.
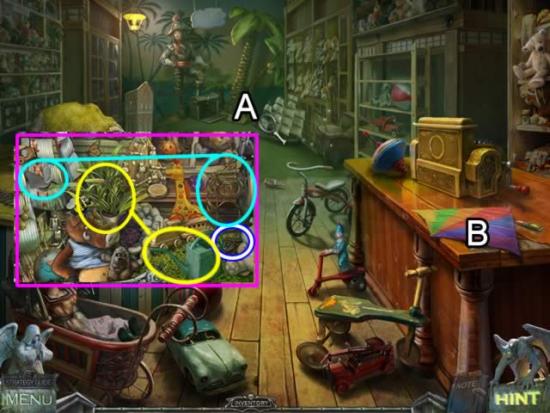
- Play the hidden object scene in the back of the store (A).
- Drag the bird to the cage (aqua) and close the cage door to get a Bird in Cage.
- Pick up the watering can (yellow) and place it over the plant to get a Flower.
- The NAILS are added to inventory
- Zoom in on the kite on the desk (B) to open a puzzle.
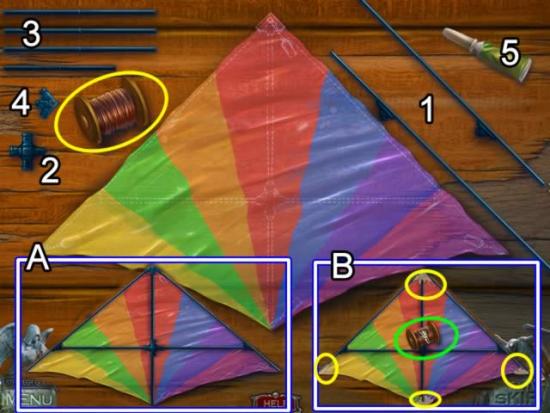
- Place the BOBBIN (yellow) on the work surface.
- The goal is to construct the kite. Left click to pick up a piece and right click to rotate it.
- Begin with the frame (A). Start with the two long pieces (1). Make sure the tabs on both pieces are toward the bottom part of the kite. Add the center piece (2). Attach the four smaller struts (3). Add the top part (4) to connect the two long pieces.
- Complete the kite (B) by applying the glue (5) to each of the four corners (yellow). Place the bobbin in the middle of the kite.
- Take the completed KITE.
- Return to the main building. Go to the second floor and out the window to the platform.
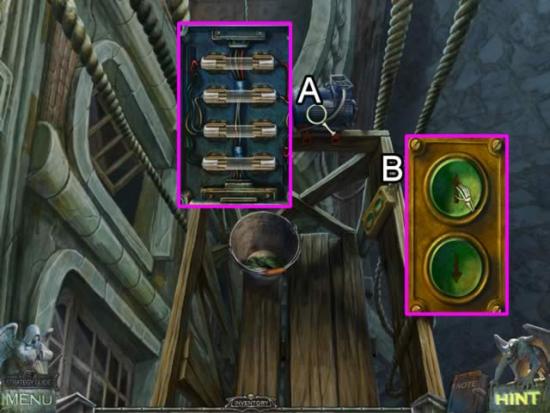
- Access the power box (A). Insert the FUSES.
- Zoom in on the control box (B). Press the up arrow.
- Enter the window to the clock tower.
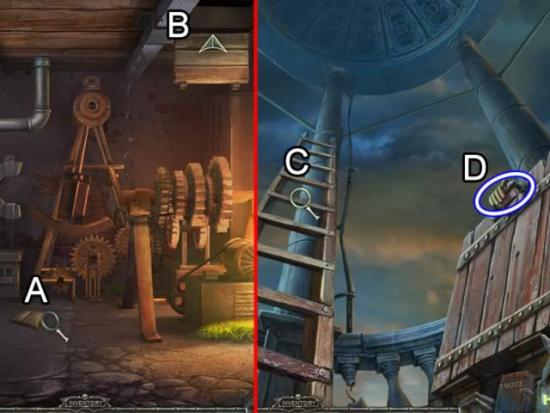
- Look at the book (A).
- Climb through the hatch (B) to the roof.
- Inspect the ladder (C). Take the GLOVE (D).
- Return to the clock tower. Ride the platform down to the second floor.
- Exit the building.
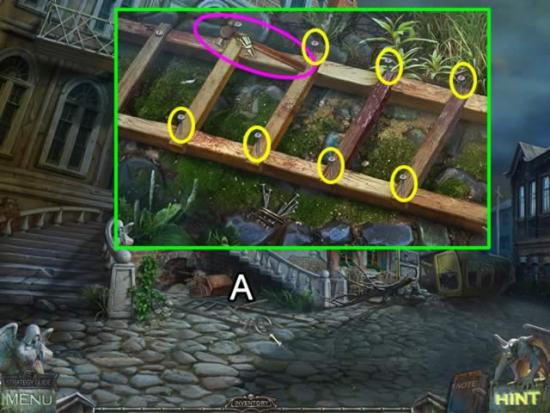
- Look at the broken ladder on the ground (A).
- Place the HAMMER and NAILS on the ground to start the puzzle.
- Place the rungs back in the grooves. Put two nails on each rung (yellow). Put the hammer over each nail and click three times to drive the nails in. Pick up the repaired LADDER.
- Return to the roof.
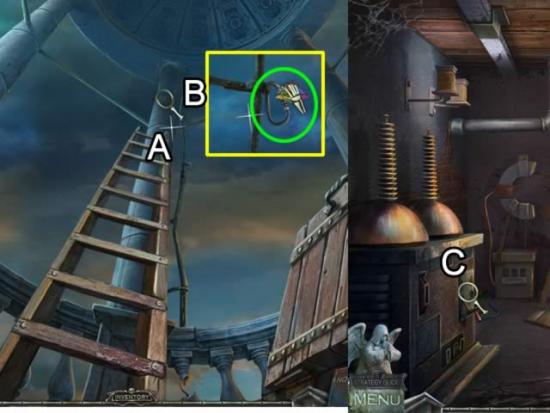
- Position the LADDER on the column (A).
- Zoom in on the wire along the top (B). Attach the KITE to the carabiner. Watch the electricity flow.
- Return to the clock tower room.
- Look at the power control (C). Flip the switch. Note that the clock hands moved.
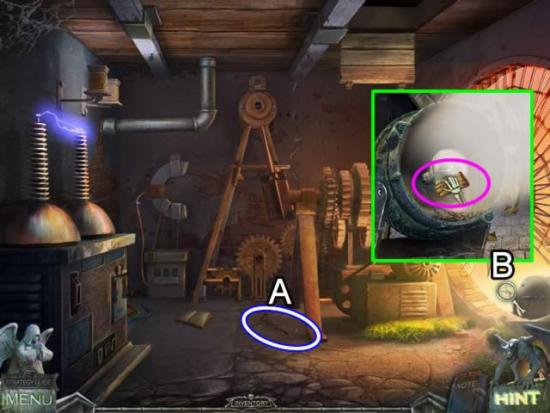
- Pick up the SEWER HOOK (A).
- Look closer at the spotlight (B). Click once to remove the cover. Use the GLOVE to remove the SPOTLIGHT BULB.
- Exit the building. Return to the damage in the road.
Chapter 9: Returning to the Cemetery
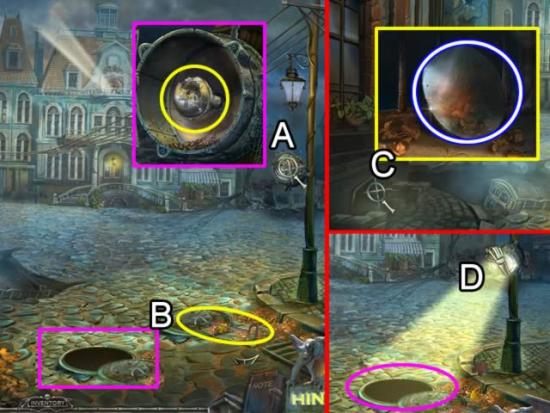
- Inspect the spotlight on the street lamp (A). Remove the cover. Exchange the burned out bulb for the new SPOTLIGHT BULB.
- Use the SEWER HOOK to open the access cover (B).
- Reposition the spotlight so it is shining on the alcove on the sidewalk (C). Look inside and take the MIRROR.
- Reposition the spotlight again so it is shining into the sewer access (D).
- Go through the hole to the underground garage.
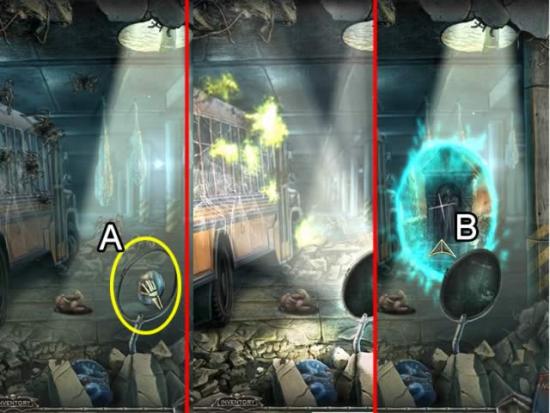
- Place the MIRROR in the frame of the broken road sign (A). Watch the spiders explode.
- Take the portal to the cemetery (B).
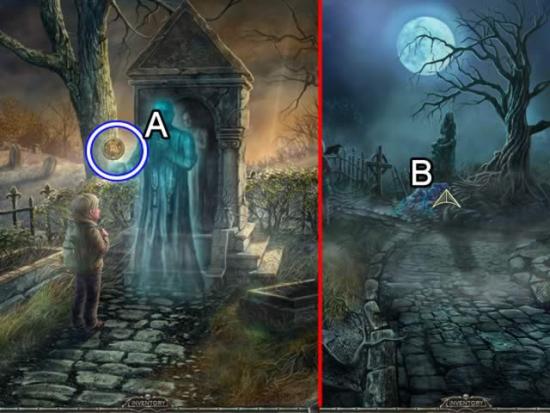
- Take the AMULET (A). Have a final talk with the boy. Exit the area.
- Go toward the new marker (B) to learn about the next child.
- Return to the church. Go down the floor font to the warlock’s lair.
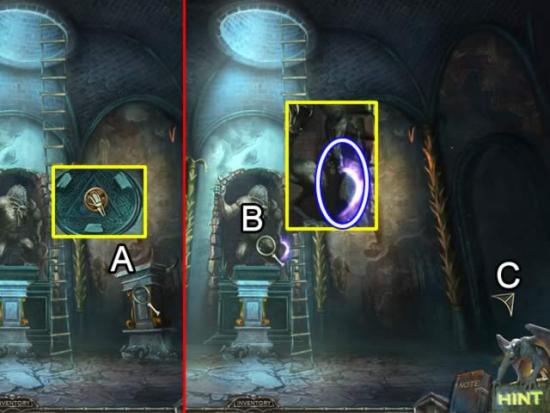
- Zoom in on the pedestal on the far right (A). Place the AMULET in the center.
- Inspect the demon statue (B). Take the SICKLE.
- Go through the tunnel (C).
- Enter the town. Take the road to the right toward the Ferris wheel.
Chapter 10: The Amusement Park Grounds
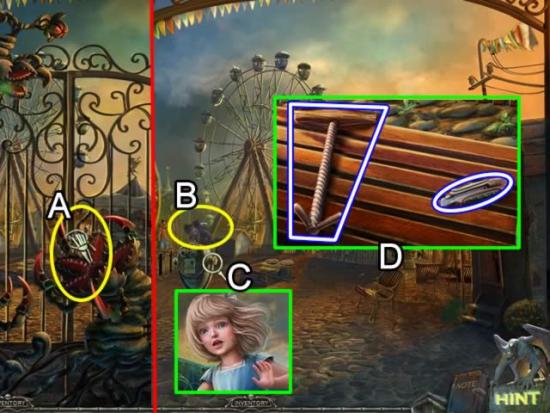
- Use the SICKLE on the gate to dissolve the plants (A).
- Click the crow (B) and look through the viewfinder to see Nancy.
- Take the HOOK KEY and KNIFE from the bench (D).
- Go forward.
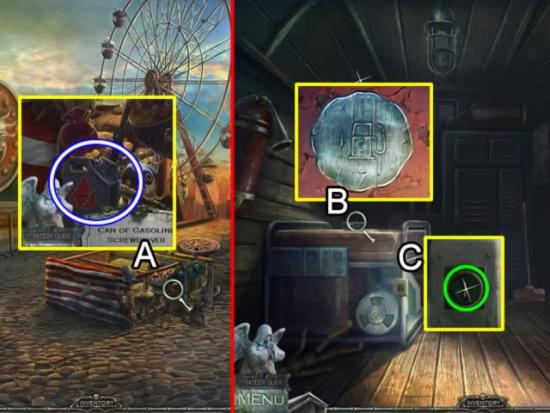
- Play the hidden object scene on the fallen cart (A). Find the items listed. Collect a CANISTER OF GASOLINE.
- Return to the park entrance.
- Enter the building on the right.
- Zoom in on the top of the generator (B). Remove the cap. Fill it from the CANISTER OF GASOLINE. Click the button on the side (C) to restore the lights.
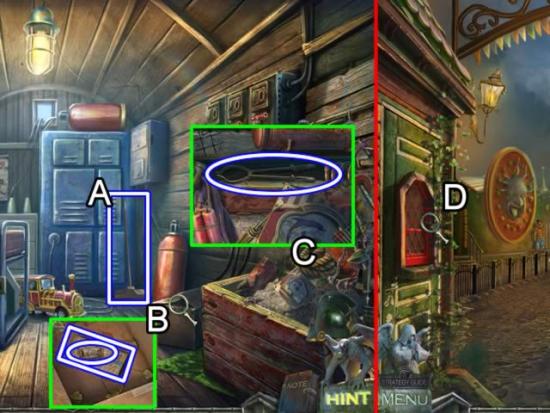
- Take the MOP (A).
- Zoom in on the box (B). Use the KNIFE to cut the strapping tape. Get the NEEDLE AND THREAD and the stack of TICKETS.
- Play the hidden object scene on the right (C). Find all of the objects to receive FORCEPS.
- Exit the building.
- Inspect the ticket booth (D).
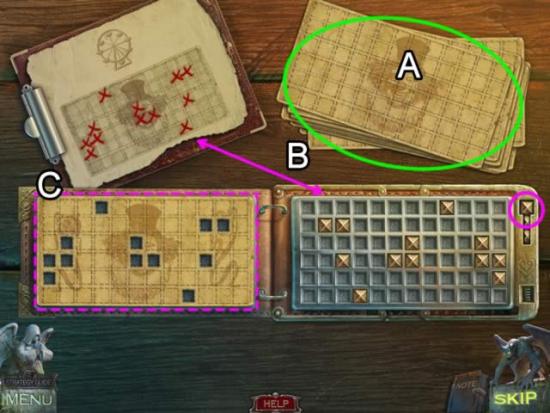
- Place the TICKETS (A) on the surface to start the puzzle.
- The goal is to insert the gold plugs into the grid to replicate the x’s in the pattern ticket (B).
- Place the plugs in a mirror image of the pattern to solve the puzzle. Tickets that slide away are incorrect. Receive the FERRIS WHEEL CARD (C).
- Go toward the amusement ride entrance area.
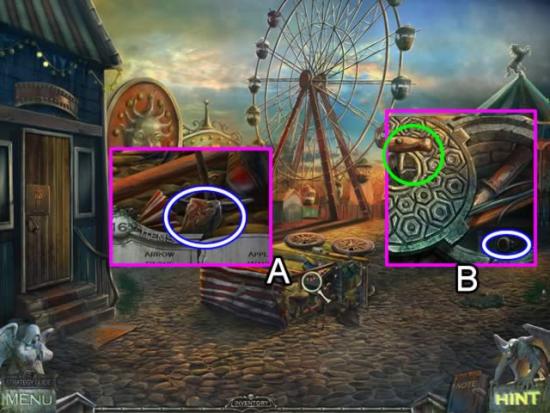
- Play the hidden object scene on the overturned cart (A). Find all of the objects to receive a STONE.
- Inspect the manhole cover (B). Use the HOOK KEY to remove the cover. Use the FORCEPS to retrieve the FERRIS WHEEL FUSE.
- Return to the electrical shack.
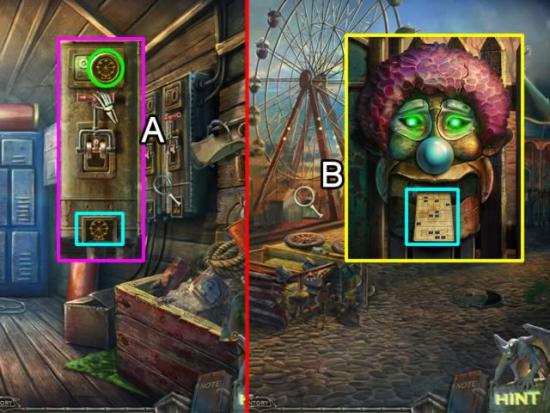
- Look at the fuse boxes on the wall (A). Identify the Ferris wheel box by the icon on the bottom (aqua). Insert the FERRIS WHEEL FUSE in the slot (green). Pull the switch.
- Return to the amusement ride entrance area.
- Zoom in on the entrance to the Ferris wheel (B).
- Insert the FERRIS WHEEL CARD in the slot.
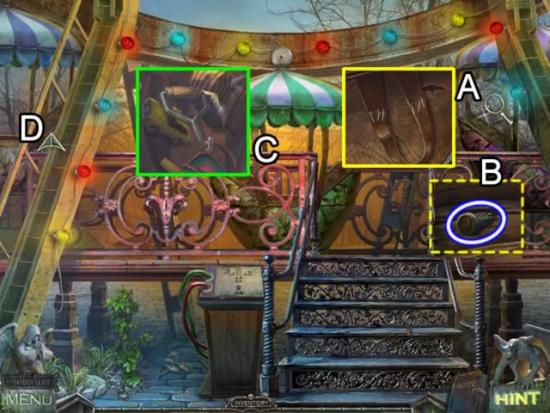
- Inspect the seat on the right (A). Pull the handle to raise the seat. Use the NEEDLE AND THREAD to repair the torn handle. Pull again to lift the seat. Take the ARCADE FUSE (B).
- Play the hidden object scene on the center seat (C). Find all of the items. Collect the HOOK for inventory.
- Climb the stairs on the left (D).
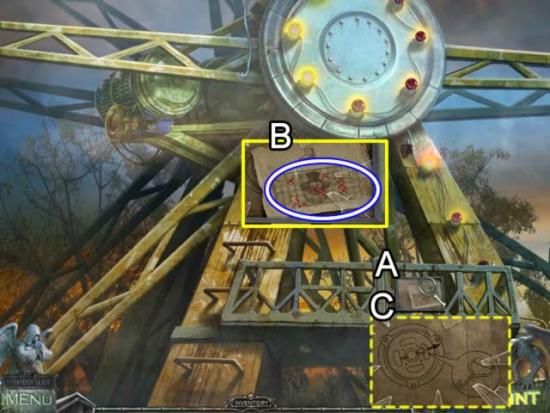
- Look closer at the sign hanging from the structure (A).
- Use the STONE to smash the glass (B). Take the ARCADE PATTERN. Note the instructions that were hidden beneath the pattern (C). This information is save in the Notes section and will be used later.
- Return to the electrical shack.
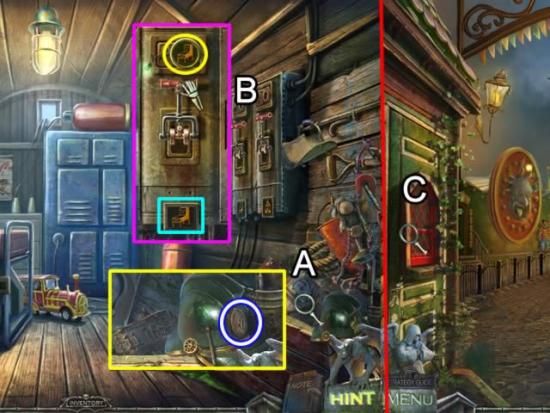
- Play the hidden object scene on the right (A). Find all of the objects. Retain the COIN in inventory.
- Examine the fuse boxes (B). Insert the ARCADE FUSE in the slot in the center fuse box. Pull the handle.
- Return to the ticket booth window (C).
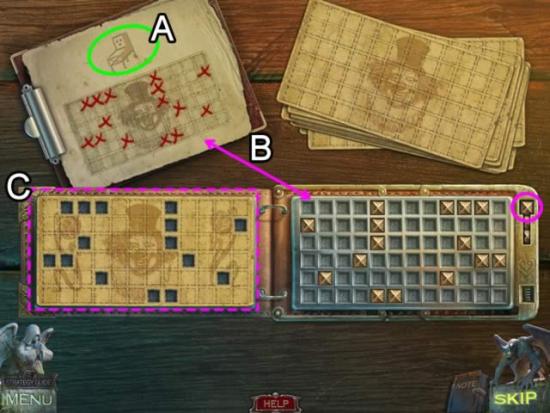
- Place the ARCADE PATTERN on the clipboard (A) to start the puzzle.
- Reproduce the “x” pattern with the gold plugs in mirror image the same as the Ferris wheel puzzle.
- Receive the ARCADE CARD (C).
- Return to the amusement ride entrance area.
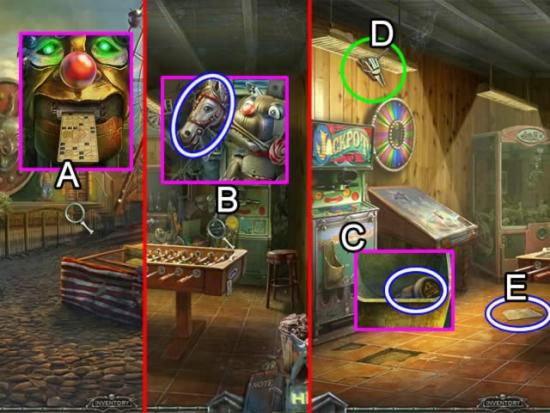
- Insert the ARCADE CARD in the ticket slot (A).
- Play the hidden object scene at the back of the arcade (B). Collect all of the objects. Retain the HORSE HEAD for inventory.
- Inspect the Jackpot machine (C). Take the CAROUSEL FUSE.
- Use the MOP to knock down the piece of paper on the light (D). It floats to the floor. Pick up the CAROUSEL PATTERN (E).
- Return to the electrical shack.
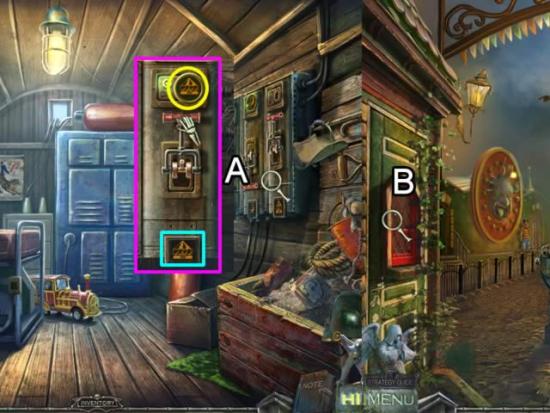
- Examine the fuse boxes (A). Place the CAROUSEL FUSE in the remaining fuse box. Pull the switch.
- Return to the ticket booth window.
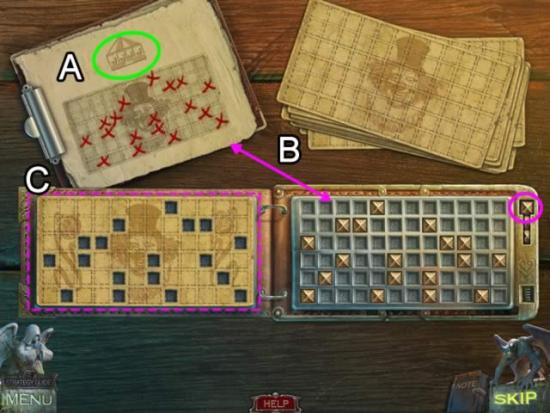
- Place the CAROUSEL PATTERN on the clipboard (A) to start the puzzle.
- Reproduce the “x” pattern with the gold plugs in mirror image the same as the previous puzzles.
- Receive the CAROUSEL CARD (C).
- Return to the amusement ride entrance area.
Chaper 11: The Carousel and Arcade
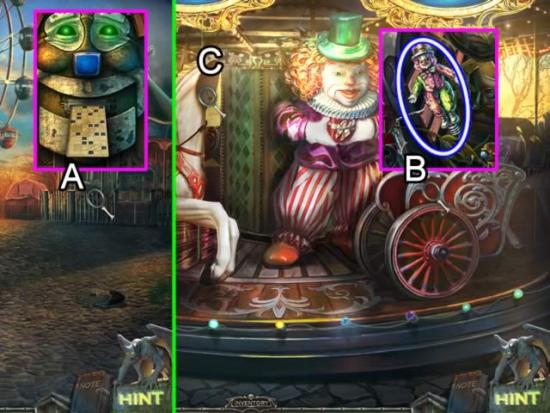
- Insert the CAROUSEL CARD into the ticket taking machine (A).
- Play the hidden object scene on the right (B). Collect all of the objects. Retain the CLOWN for inventory.
- Zoom in on the missing horse head (C) to open an interactive area.
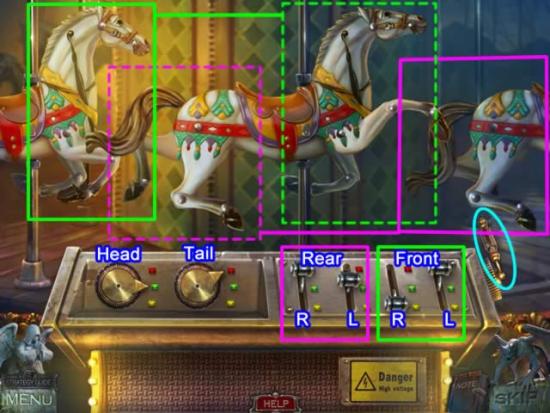
- Place the missing HORSE HEAD on the center horse to begin a puzzle.
- The goal is to use the knobs and levers to move the center horse’s head, tail and legs to match the position of the portion of the two horses shown to either side of it.
- The knobs control the head and tail. The first two levers move the right and left rear legs. The last two levers move the front right and left legs. Click the bar on the right (aqua) to see the result of positioning.
- SPOILER ALERT. The solution is as follows: head – red, tail – green, both rear legs – red, both front legs – yellow.
- Correctly solving the puzzle causes the clown to drop its package. Zoom in and take the GOLDEN TOKEN.
- Return to the arcade.
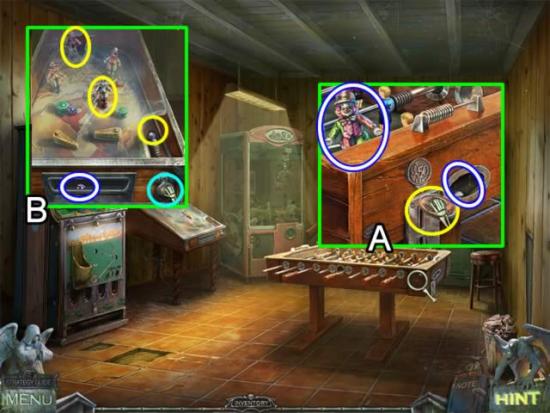
- Zoom in on the foosball table (A). Pick up the CLOWN. Insert the COIN in the slot (yellow). Retrieve the BALL that drops out.
- Go to the pinball machine (B). Place the two CLOWNS in the empty spots on the board. Put the BALL in the spring slot. Click the knob (aqua) to shoot the ball. The VIOLET BUTTON falls into the bottom tray.
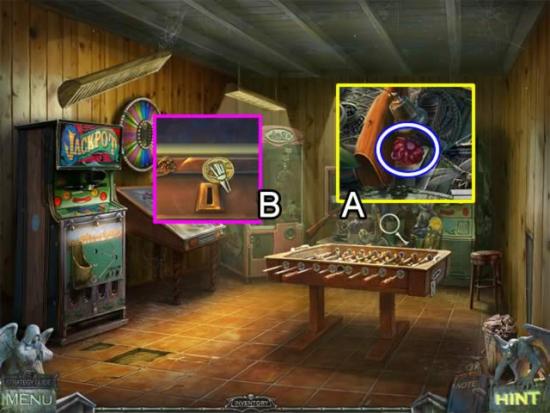
- Play the hidden object scene at the back (A). Collect all of the items. Retain the RED BUTTON for inventory.
- Zoom in on the pick-a-toy game (B). Insert the GOLDEN TOKEN to start the game.
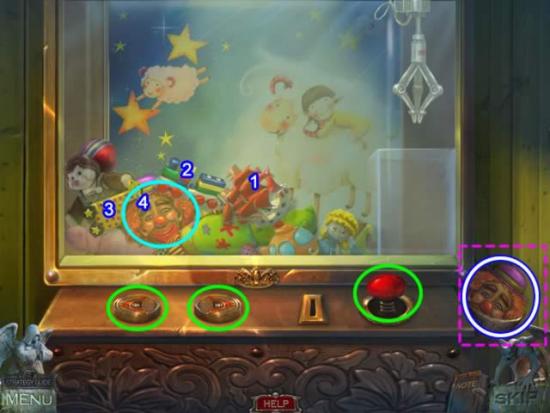
- Use the two directional arrows to position the claw and the red plunger to pick up and remove a toy.
- The goal is to retrieve the clown’s head. To do this, first move the boat (1), then the train (2) and then the giraffe (3). Now the way is clear to access the head.
- Take the CLOWN HEAD from the reward box.
- Exit the arcade. Go to the building on the left.
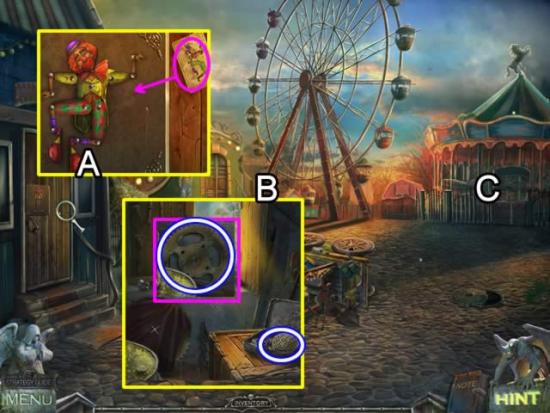
- Look at the door (A). Place the CLOWN HEAD atop the body. Click each piece of the body until it matches the card next to the door. See the inset for the solution.
- Once inside the parts shed (B), take the CHAIN from the box. Click the cloth to reveal the GEAR.
- Return to the carousel (C).
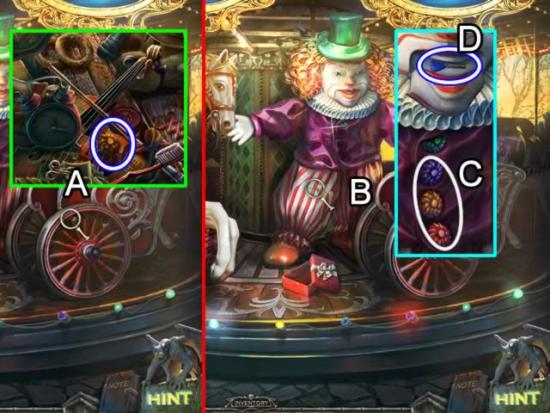
- Play the hidden object scene on the right (A). Collect all of the items. The Button is added to inventory as an ORANGE BUTTON.
- Inspect the clown (B). Insert the VIOLET, ORANGE and RED BUTTONS on its jacket (C). Take the BLUE KEY from the mouth (D).
- Return to the Ferris wheel. Climb the ladder to the next level.
Chapter 12: The Ferris Wheel
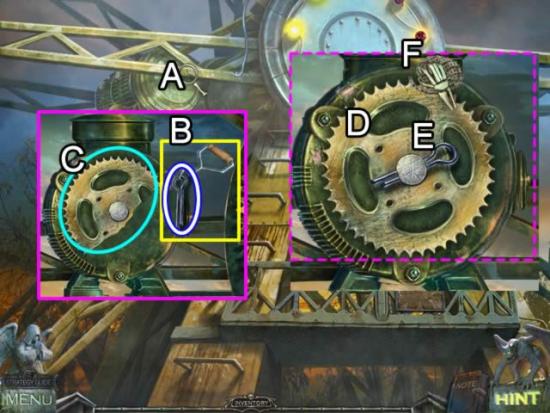
- Zoom in on the gear mechanism (A).
- Click the broken chain to remove it. Use the HOOK to extract the LINCHPIN (B). Click the broken gear to remove it (C).
- Place the new GEAR on the mechanism (C). Secure it with the LINCHPIN (E). Add the CHAIN (F) to complete fixing the mechanism.
- Return to the Ferris wheel loading area.
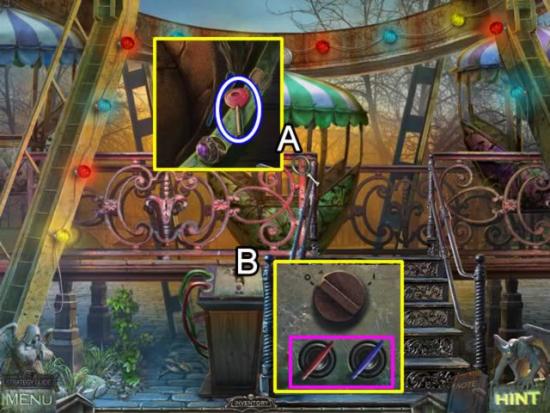
- Play the hidden object scene (A). Collect all of the objects. Retain the RED KEY for inventory.
- Zoom in on the control panel (B). Insert the RED and BLUE KEYS in the slots. Click each to turn them and open a puzzle.
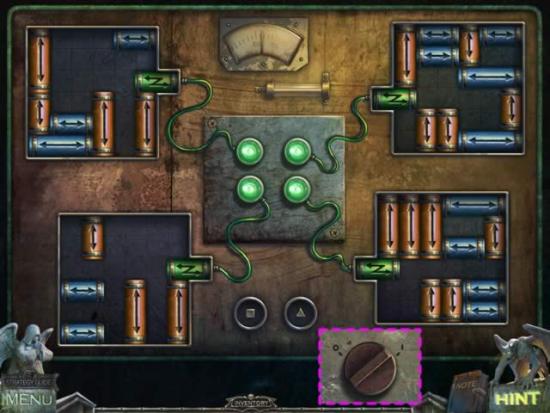
- The goal is to slide the four green batteries to the green wires and light up the lamps. One solution is shown above.
- Click the dial (dashed pink) to run the carousel.
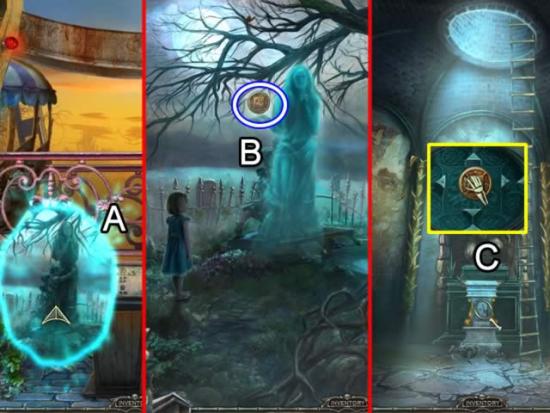
- Speak with the child and then return to the cemetery (A).
- Take the last AMULET (B).
- Return to the church. Go down to the warlock’s lair.
- Access the remaining pedestal (C). Place the AMULET in the center.
- Watch the final cutscene.
Congratulations! You have finished playing Redemption Cemetery: Children’s Plight Collector’s Edition.
Bonus play is now available from the main menu.
Collector’s Edition Bonus Chapter
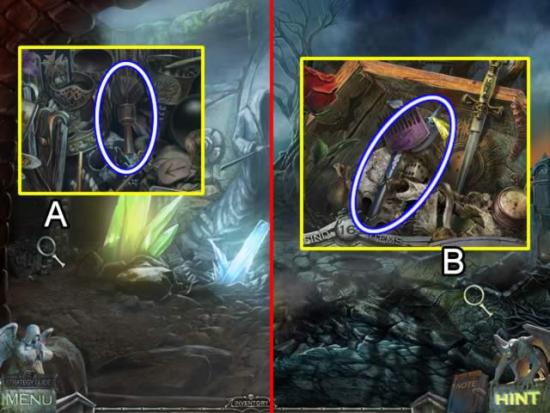
- To begin play, click Extras on the main menu and then click Play.
- Watch the opening cutscene to find out the goal for this bonus play.
- Go left.
- Play the hidden object scene (A). Find all of the objects to collect the BRUSH for inventory.
- Go to the cemetery.
- Click anywhere to start the scene.
- Play the hidden object scene on the right (B). Remove the coffin lid to get the AXE for inventory.
- Go straight up the path to the middle grave marker.
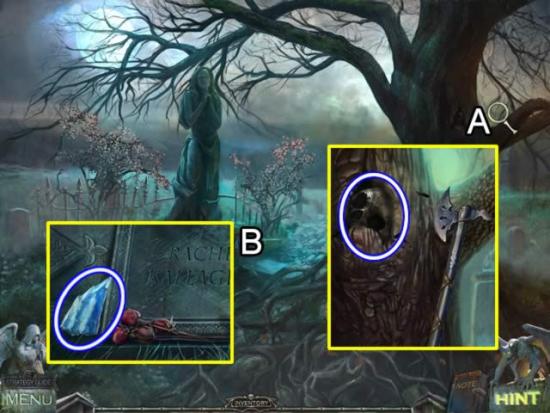
- Inspect the tree branch (A). Use the AXE to uncover the overgrown SKULL.
- Zoom in on the base of the grave marker (B). Take the BLUE CRYSTAL.
- Exit the scene.
- Go to the grave marker on the left.
- Take the SHOVEL HANDLE from the grave.
- Exit the scene.
- Go to the grave marker on the right.
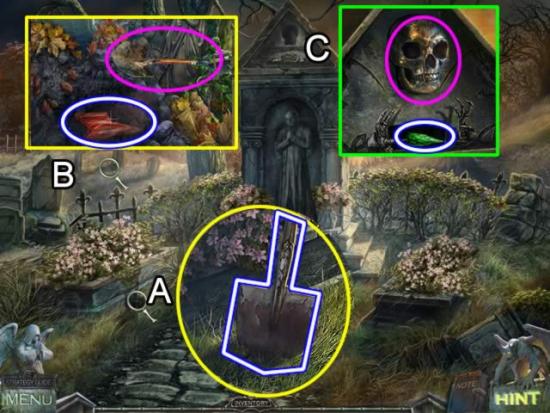
- Look closer at the shovel head (A). Insert the SHOVEL HANDLE. Take the SHOVEL.
- Zoom in on the far cluster of graves (B). Use the SHOVEL to dig up the RED CRYSTAL.
- Inspect the apex of the grave marker (C). Place the SKULL in the outline. Take the GREEN CRYSTAL.
- Exit the scene.
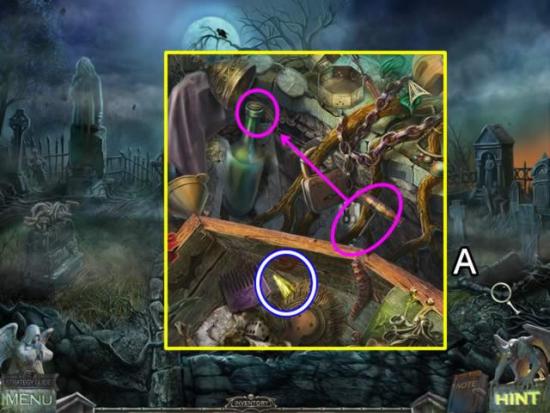
- Play the hidden object scene on the right (A). Drag the corkscrew to the bottle to get the Cork. The YELLOW CRYSTAL is added to inventory.
- Return to the statue of death. Go left.
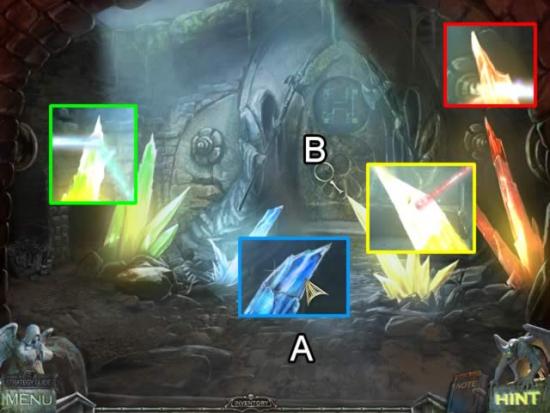
- Zoom in on the tip of each crystal (A). Place the RED, YELLOW, BLUE and GREEN CRYSTAL tips on their similarly colored crystal.
- Inspect the door to open a slider puzzle.
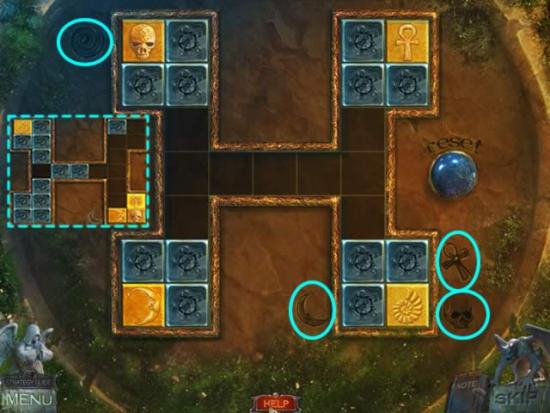
- The goal is to slide the pieces so the four gold tiles are next to their matching symbol on the board.
- It is easiest to place the spiral in the upper right corner and then the skull in the lower left. Once these two are in place, work on getting the moon into position. Do the ankh last. See the dashed inset for the solution.
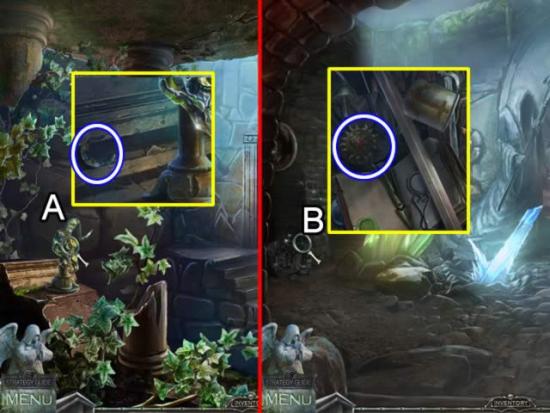
- Inspect the statue on the left (A). Use the BRUSH to remove the cobwebs covering the MOON.
- Return to the crystal room.
- Play the hidden object scene on the left (B). Find all of the objects. The SUN is retained for inventory.
- Return to the cemetery.
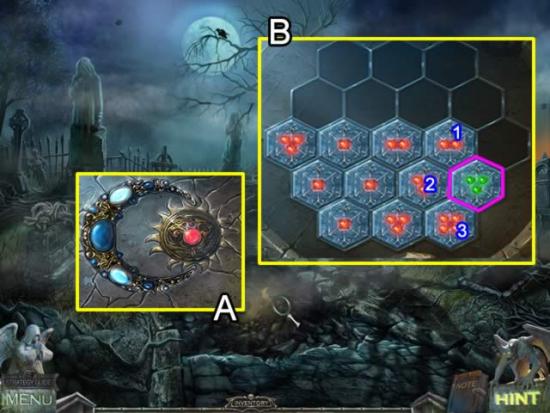
- Zoom in on the hole in the path (A). Place the SUN and the MOON in their outlines to open a puzzle (B).
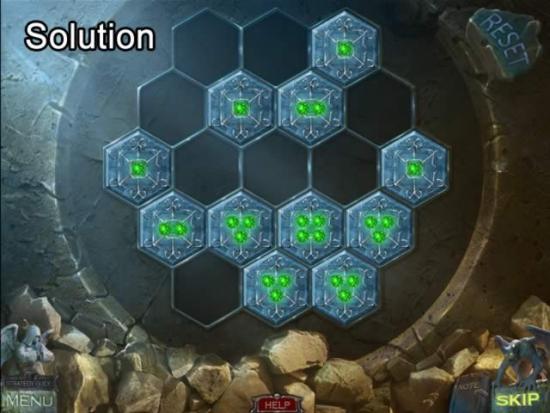
- The goal is to swap the hexagon pieces so the number surrounding each piece is equal to the number of lights in the center. The lights on a correctly positioned piece turn green. Note the hex tile in the above screenshot outlined in pink. Its three lights are green and there are three pieces surrounding it.
- See the next screenshot for one solution.
- Enter the tunnel.
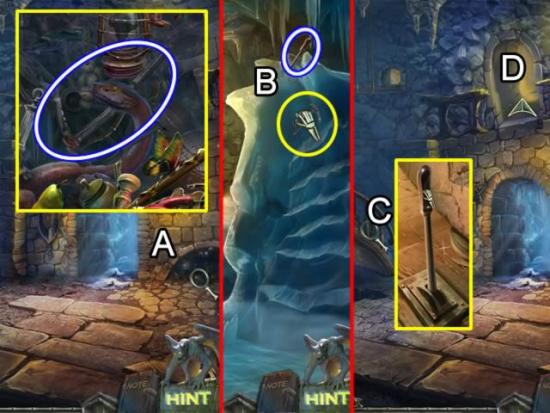
- Play the hidden object scene on the right (A). Find all of the objects. Retain the ICE AXE for inventory.
- Go through the door with the blue light.
- Use the ICE AXE to carve out steps in the ice. Retrieve the LEVER.
- Return to the cave.
- Zoom in on the staircase (C). Insert the LEVER in the slot. Pull the lever to move the stairs. Enter the door at the top (D).
- Zoom in on the sand in the middle of the room. Use the SHOVEL to get a SHOVEL of SAND.
- Return to the cave.
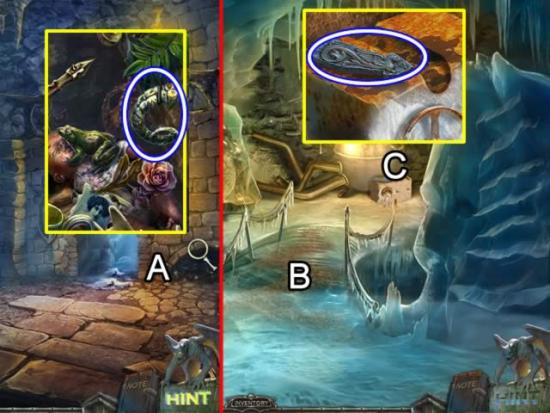
- Play the hidden object scene on the right (A). Find all of the objects. Retain the HORN for inventory.
- Enter the ice cave.
- Place the SHOVEL of SAND on the icy walkway (B). Zoom in on the block (C) and take the ARROW.
- Return to the fire room.
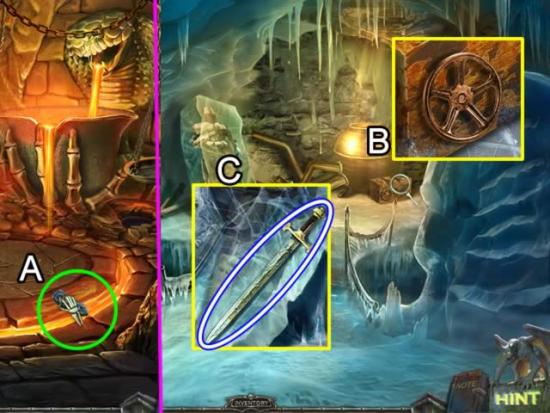
- Place the ARROW in the inset on the right side of the ring (A). Molten material pours through to the pot in the ice room.
- Return to the ice room.
- Turn the valve attached the pot (B) to release steam on the icy knight.
- Take the SWORD from the partially melted figure (C).
- Return to the crystal cave and enter the Templar burial vault.
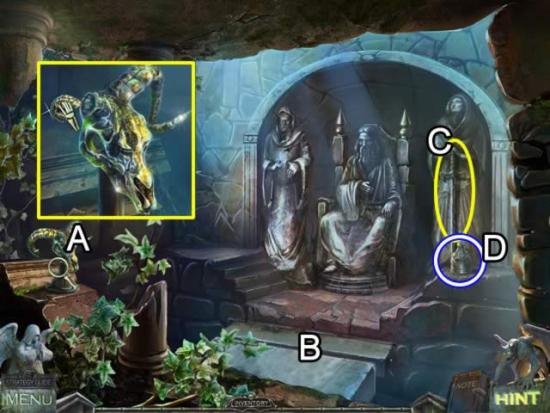
- Place the HORN in the slot on the statue (A). Click both horns to move stones over the chasm (B).
- Put the SWORD on the figure on the right (C). Pick up the WEIGHT that fell down (D).
- Return to the fire room.
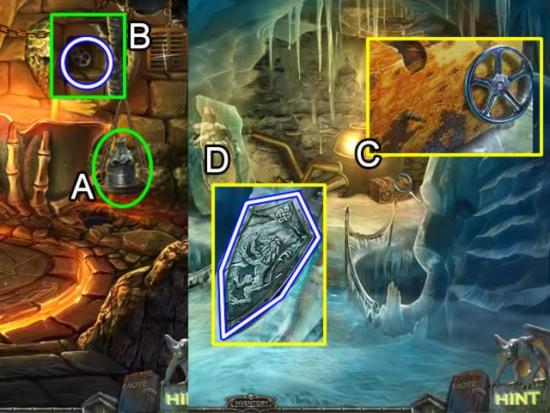
- Place the weight in the scale (A) to lift the vent on the wall (B). Take the RIGHT VALVE.
- Return to the ice room.
- Place the RIGHT VALVE on the block (C). Click it to release more steam.
- Pick up the SHIELD (D).
- Return to the Templar burial vault.
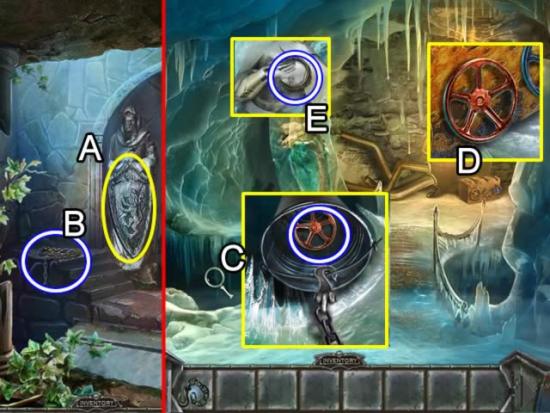
- Place the SHIELD on the figure on the left (A). Take the CHAIN (B).
- Return to the ice room.
- Zoom in on the hole on the left (C). Use the CHAIN to raise the bucket. Take the RED VALVE.
- Place the RED VALVE in the center of the block. Click to release more steam.
- Take the CROWN from the melting knight (E).
- Return to the Templar burial vault.
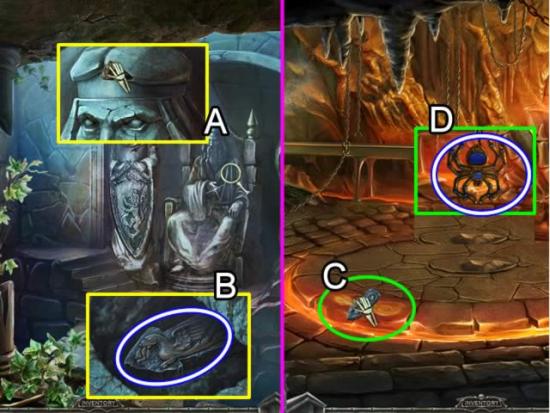
- Place the CROWN on the head of the middle figure (A). Take the ARROW from the base of the statue (B).
- Return to the fire room.
- Put the ARROW in the groove on the left side of the circle (C). Get the SPIDER that drops down (D).
- Return to the cave floor.
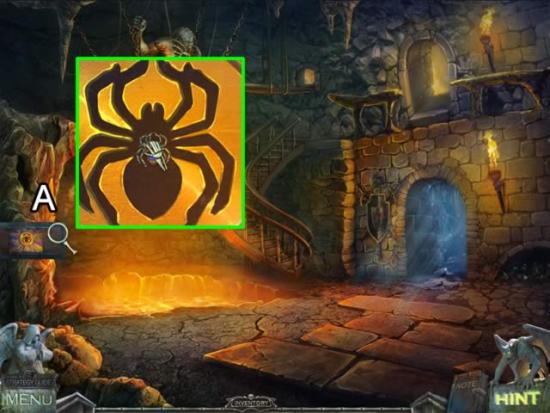
- Zoom in on the box on the left (A). Insert the SPIDER in the silhouette to start a puzzle.
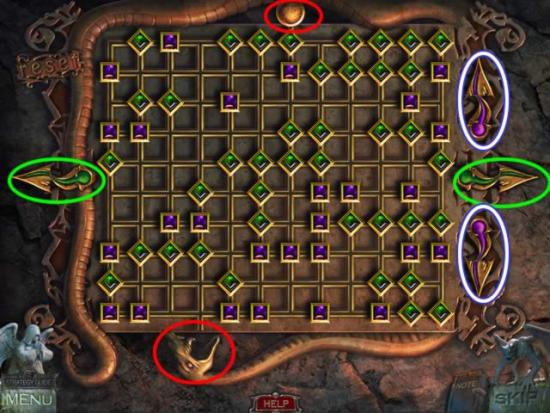
- The goal is to move the ball from the top of the board into the snake’s mouth.
- The arrows with green inlay move the green gems left or right. The arrows with purple inlay move the purple gems up and down.
- The ball won’t move if a gem of another color is blocking it. Try to clear paths to drop the ball. View the video to see how to manipulate the gems. The solution shown isn’t necessarily the most efficient way through the maze.
- View the final cutscene to complete the bonus play.
Congratulations! You have finished the bonus play for Redemption Cemetery: Children’s Plight Collector’s Edition.
Other bonus material is now available from the Extras tab on the main menu
More articles...
Monopoly GO! Free Rolls – Links For Free Dice
By Glen Fox
Wondering how to get Monopoly GO! free rolls? Well, you’ve come to the right place. In this guide, we provide you with a bunch of tips and tricks to get some free rolls for the hit new mobile game. We’ll …Best Roblox Horror Games to Play Right Now – Updated Weekly
By Adele Wilson
Our Best Roblox Horror Games guide features the scariest and most creative experiences to play right now on the platform!The BEST Roblox Games of The Week – Games You Need To Play!
By Sho Roberts
Our feature shares our pick for the Best Roblox Games of the week! With our feature, we guarantee you'll find something new to play!All Grades in Type Soul – Each Race Explained
By Adele Wilson
Our All Grades in Type Soul guide lists every grade in the game for all races, including how to increase your grade quickly!


