![Digimon UP Tier List [Supports, Buddies, and Partners]](/wp-content/uploads/2026/07/digimon-up-tier-list.jpg "Digimon UP Tier List [Supports, Buddies, and Partners]")
Digimon UP Tier List [Supports, Buddies, and Partners]
These Digimon will get you UP the leaderboard.


![Haze Seas Boss Drops [Chances, Locations, and How to Spawn]](/wp-content/uploads/2026/07/haze-seas-boss-drops.jpg "Haze Seas Boss Drops [Chances, Locations, and How to Spawn]")

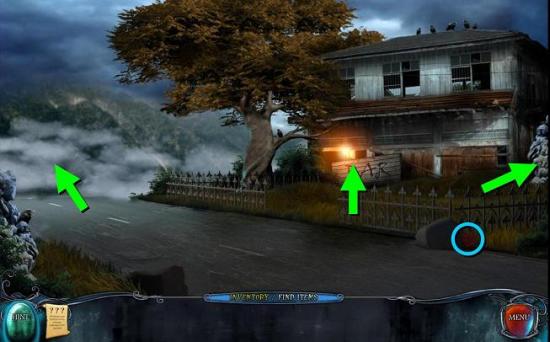
Welcome to the Red Crow Mysteries: Legion walkthrough on Gamezebo. Red Crow Mysteries: Legion is an Adventure game played on Mac, PC or iPad, created by Cateia Games. This walkthrough includes tips and tricks, helpful hints, and a strategy guide on how to complete Red Crow Mysteries: Legion.
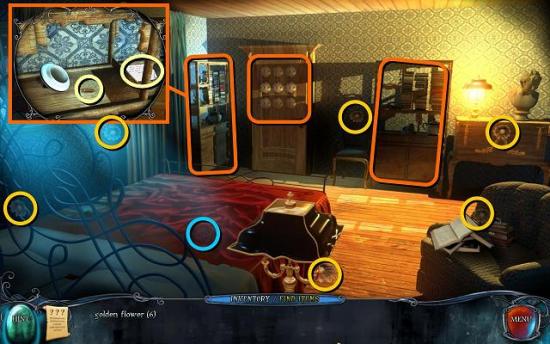
Welcome to the Red Crow Mysteries: Legion walkthrough on Gamezebo. Red Crow Mysteries: Legion is an Adventure game played on Mac, PC or iPad, created by Cateia Games. This walkthrough includes tips and tricks, helpful hints, and a strategy guide on how to complete Red Crow Mysteries: Legion.
This game can be played in three difficulty modes:
Quite usefully, you can decide to change difficulty modes at any point during the game by going to the Settings menu. In the Settings menu you can also individually change hint and skip recharge times and toggle the Find Items panel and Sparkle Hints on or off.
The cursor is normally arrow-shaped, but changes into the following symbols when you hit an interactive area:
In the bottom left of the screen is the Hint button. Unfortunately, it doesn’t do much other than indicate items in the current window that can be interacted with. So, if you need to unlock a door, but the key is not on the current screen, all the hint button will do is highlight the door that you need to unlock.
This game doesn’t have a journal to keep track of your progress or any clues you may have found. However, in the bottom left of the screen, next to the Hint button there is a list of your current tasks.
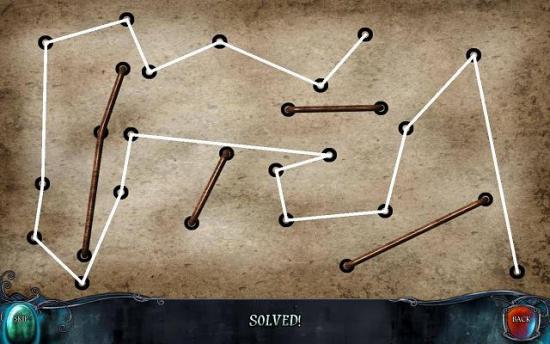
Puzzles can be skipped once the Skip button has charged, but most puzzles cannot be reset. Even if you exit the puzzle and return to it later, it will be as you left it the first time. So, in this walkthrough puzzle solutions are given that only work from the start of the puzzle. If you already made changes to the puzzle and then get stuck, the walkthrough instructions won’t be of any help – sorry!
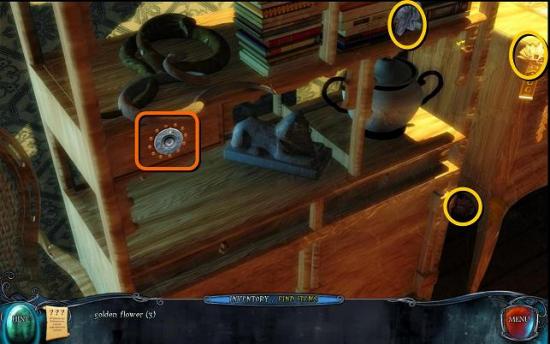
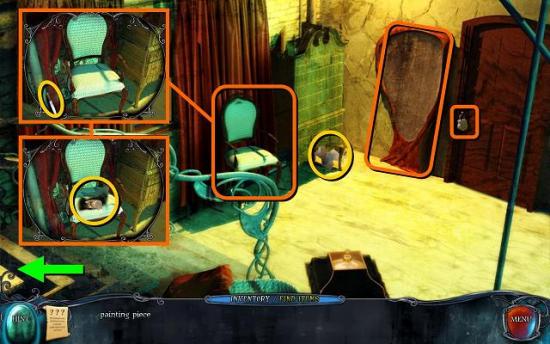
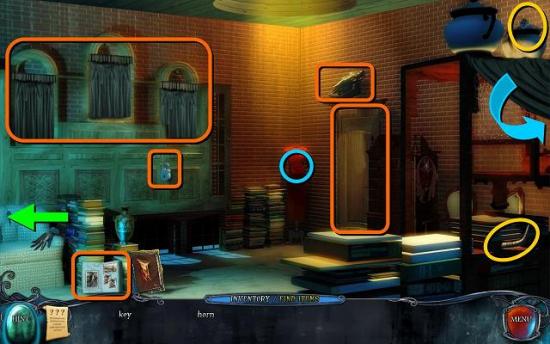
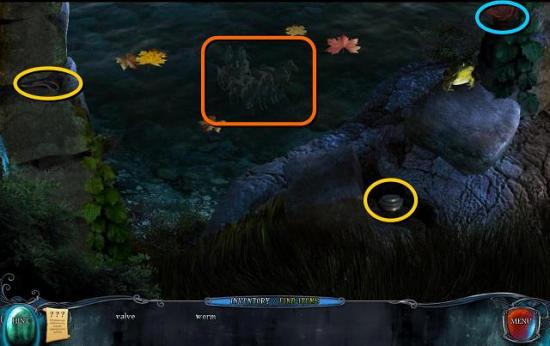
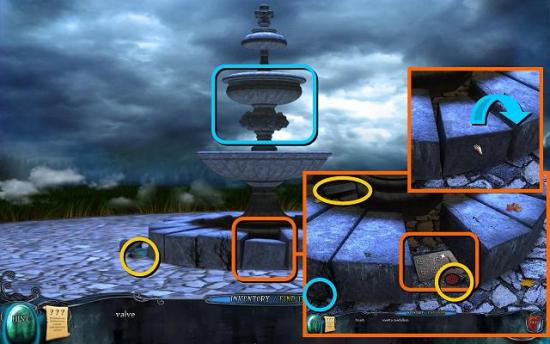
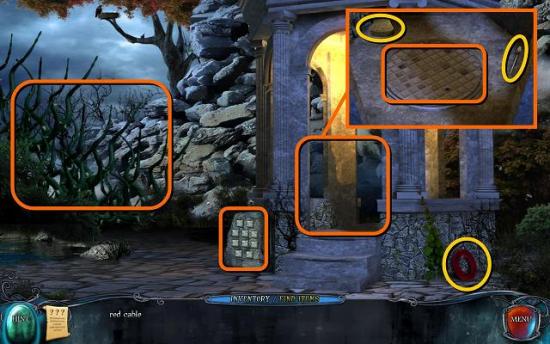
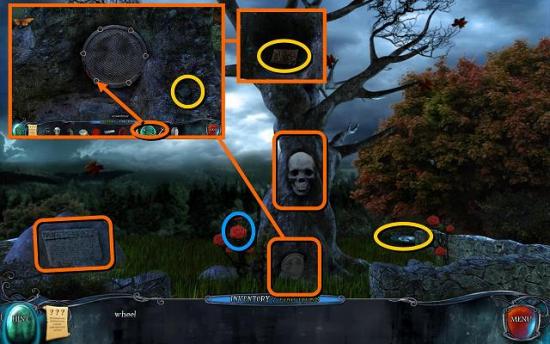
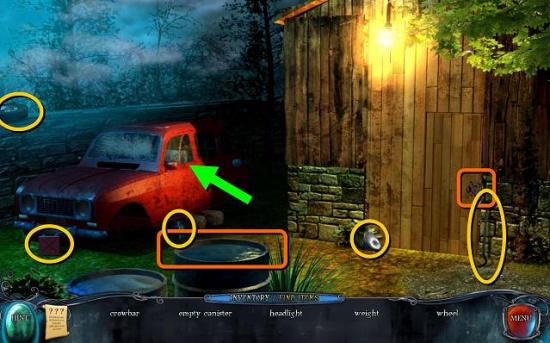
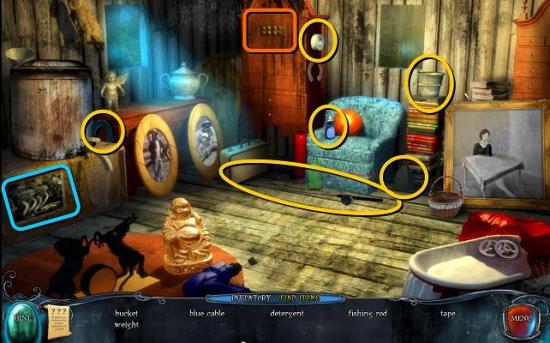
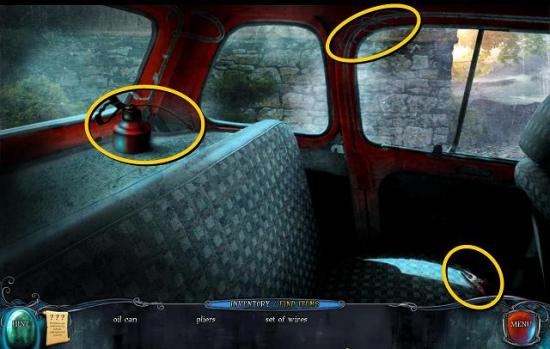
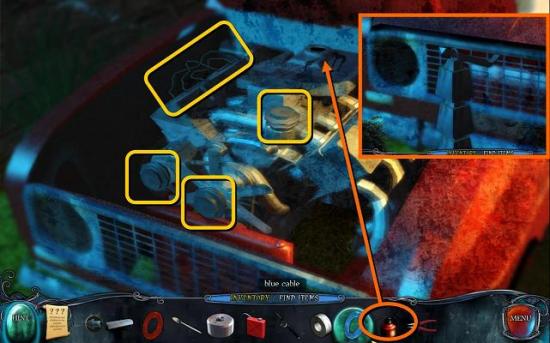
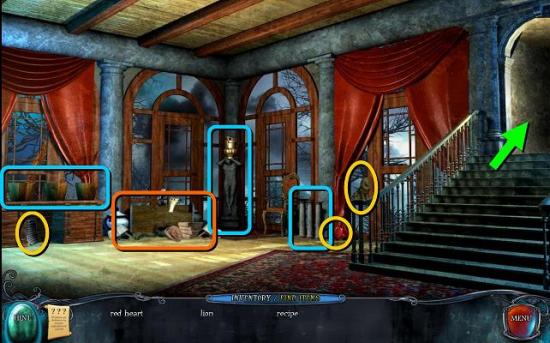
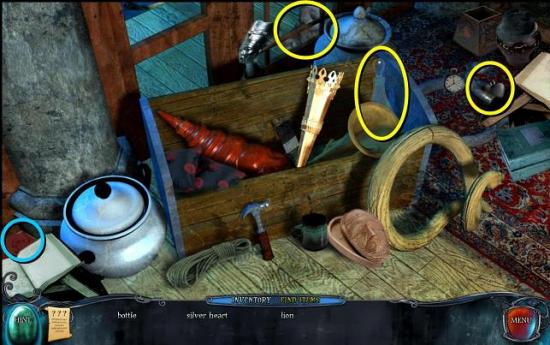
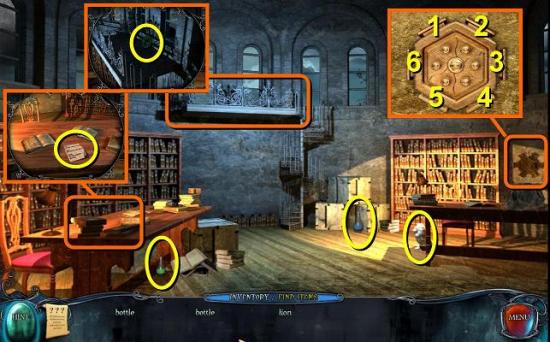
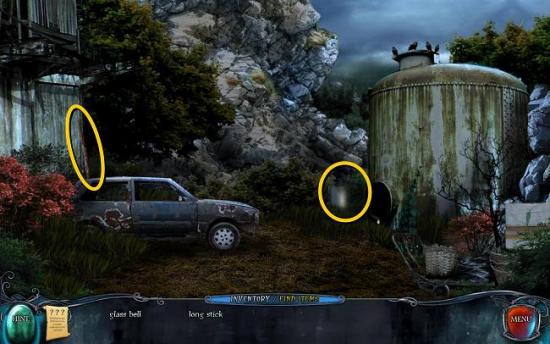
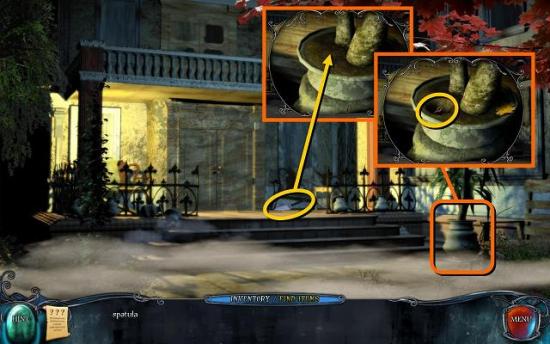
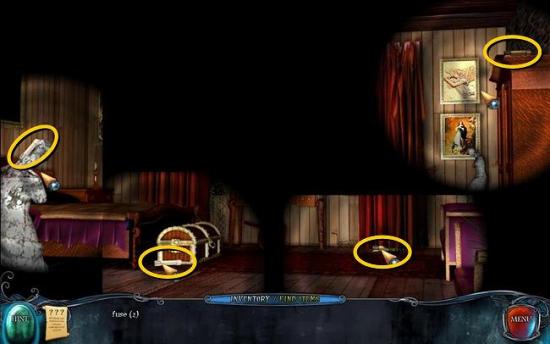
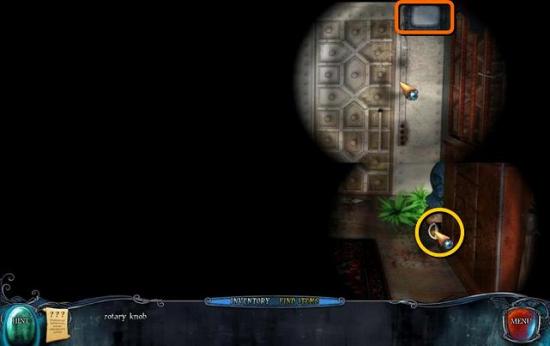
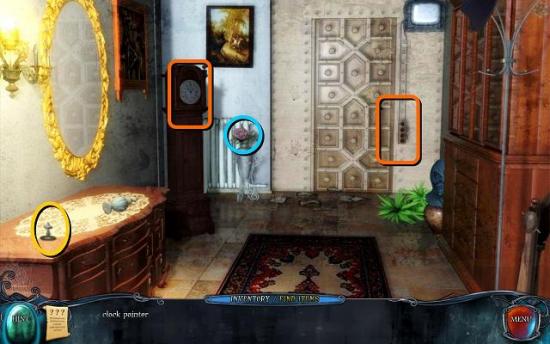
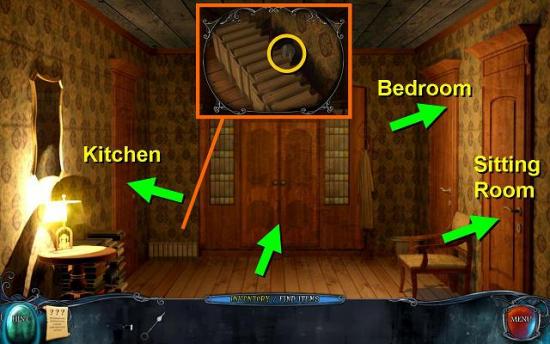
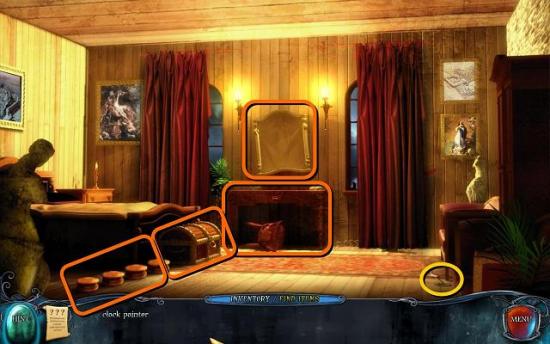
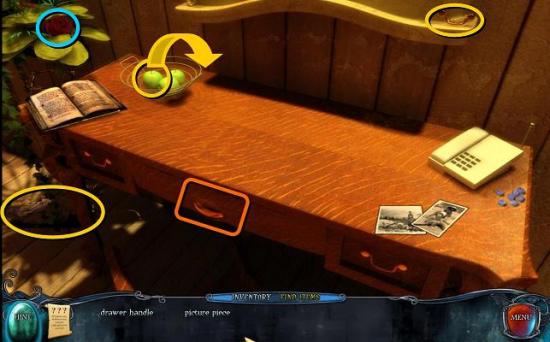
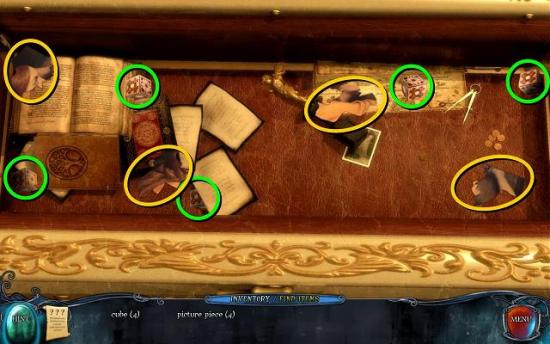
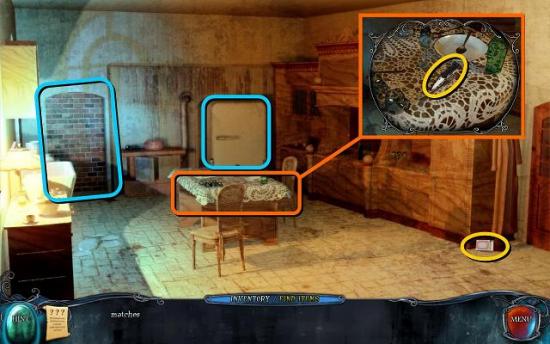
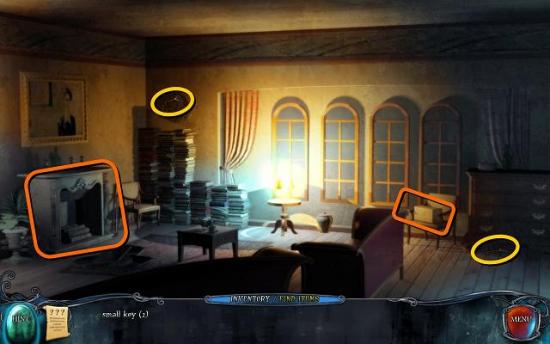
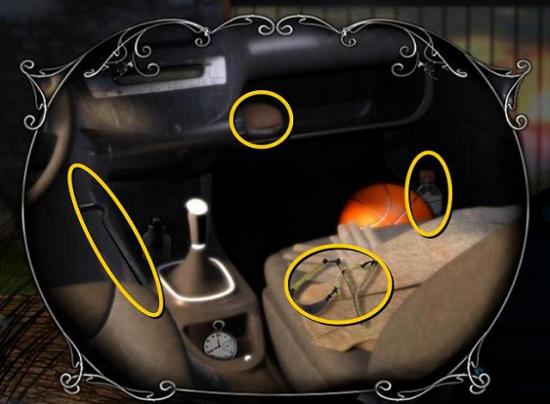
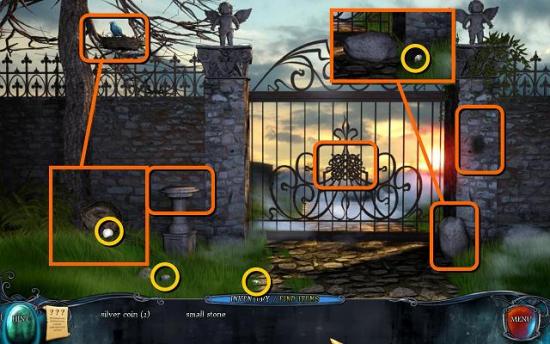
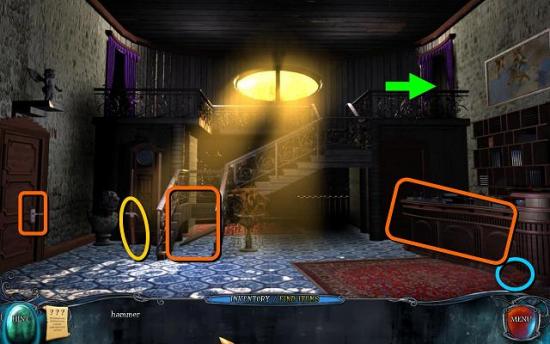
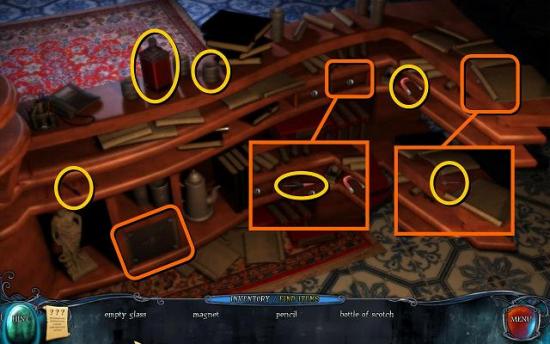
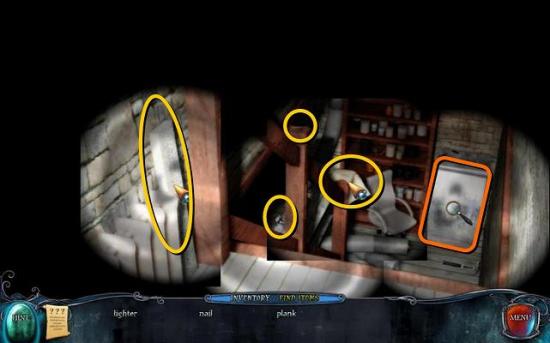
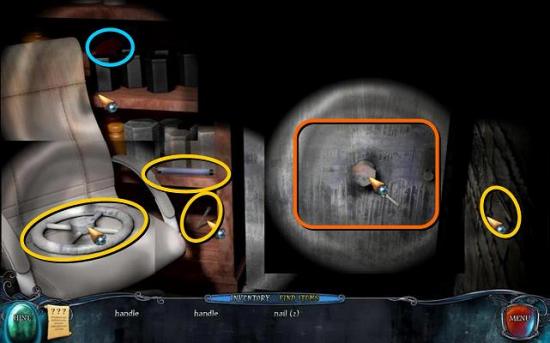
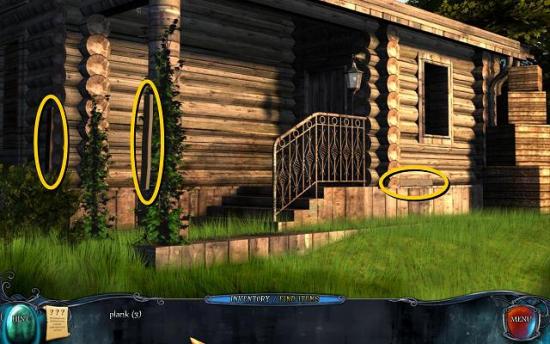
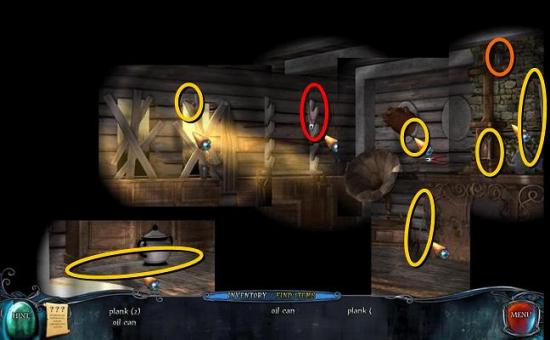
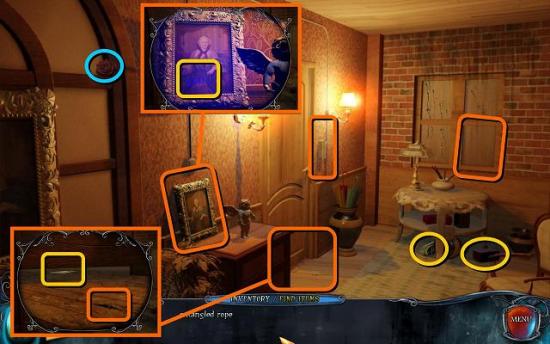
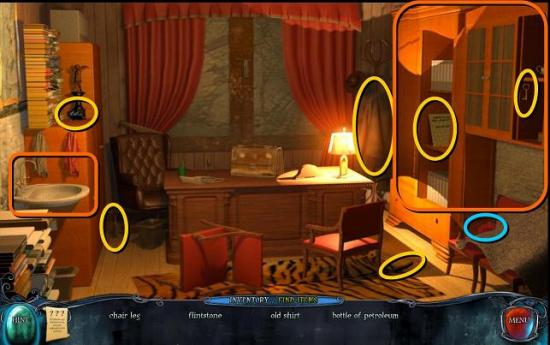
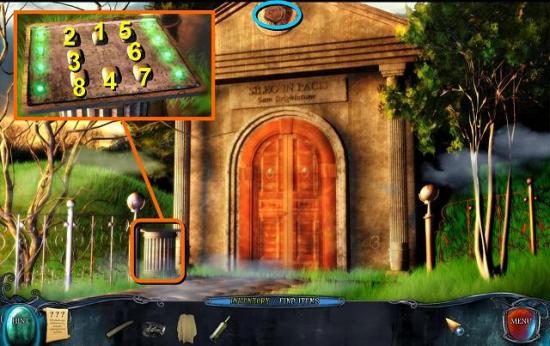
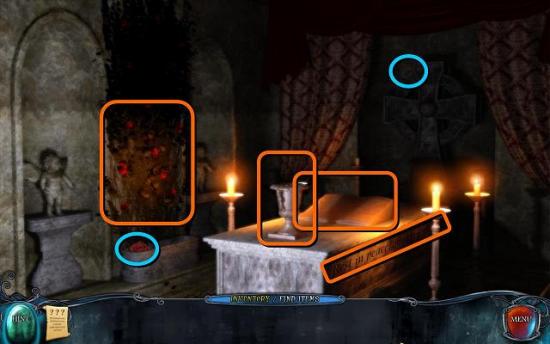
Screen shots will be provided for each new area you get to. Objects that can be picked up to go into your inventory will be circled in yellow. Areas that can be interacted with on the first visit to a new scene will be outlined in orange. Areas that can be interacted with later, once you have found new objects or information, will be outlined in blue.
Bedroom

Hallway
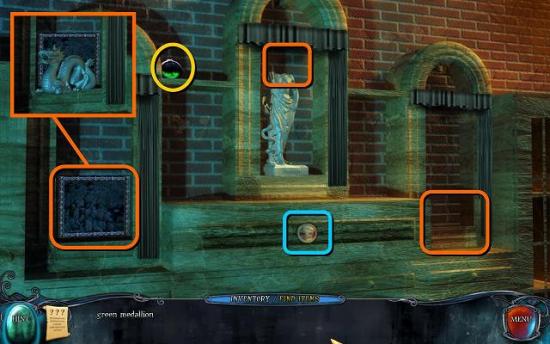
Statue Room

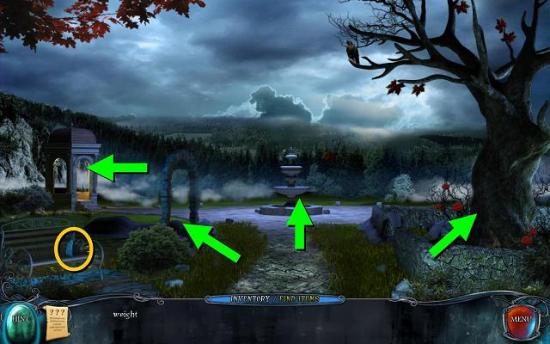
Garden
Gazebo

The Skull Tree
Garage
The Car

The Attic
The Bar

Aunt Mildred’s House
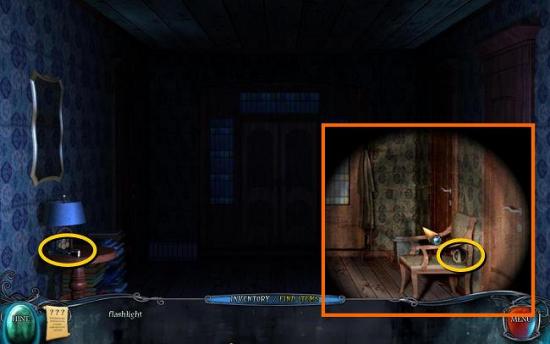
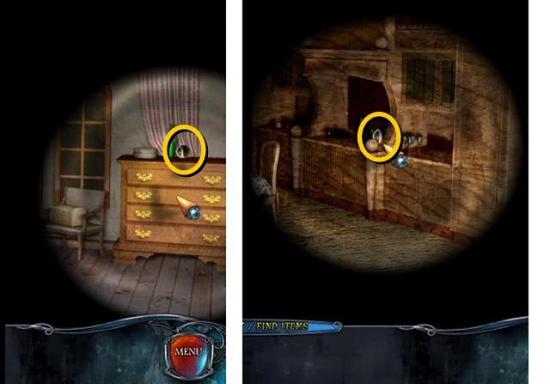
Bedroom
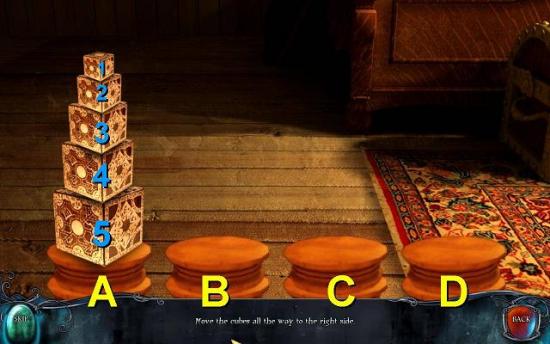
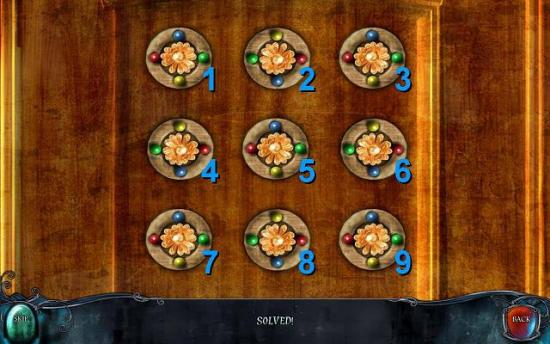
1. Move cube 1 to B, 2 to C and 3 to D
2. Move cube 1 on top of 2
3. Move cube 4 to B and put cube 3 on top of it
4. Move cube 5 to D
5. Move cube 3 from B to A,
6. Move cube 4 from B to D, and cube 3 from A to D
7. Move cube 1 from C to B
8. Move cube 2 from C to D, and cube 1 from B to D
Sitting Room

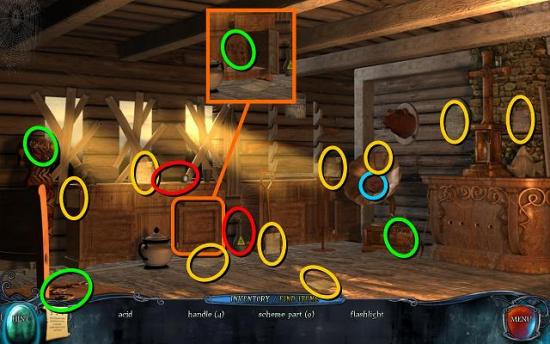
Kitchen
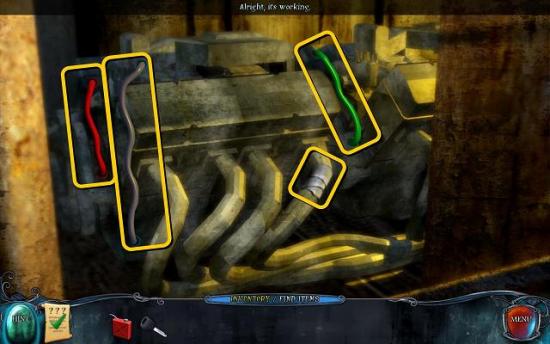
Basement


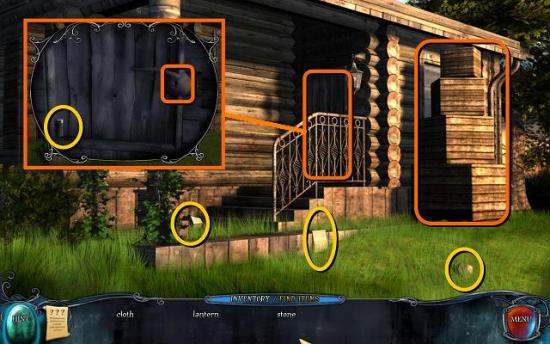
The Shed
1. Move 1 to A and 2 to C
2. Move 1 to C (on top of 2)
3. Move 3 to A
4. Move 1 from C back to B
5. Move 2 from C to A (on top of 3)
6. Move 1 from B to A (on top of 2)
7. Move 4 to C
8. Move 1 from A to C (on top of 4)
9. Move 2 from A to B (on top of 5) and move 1 from C to B (on top of 2)
10. Move 3 from A to C (on top of 4)
11. Move 1 from B to A
12. Move 2 from B to C (on top of 3)
13. Move 1 from A to C (on top of 2)
14. Move 5 to A
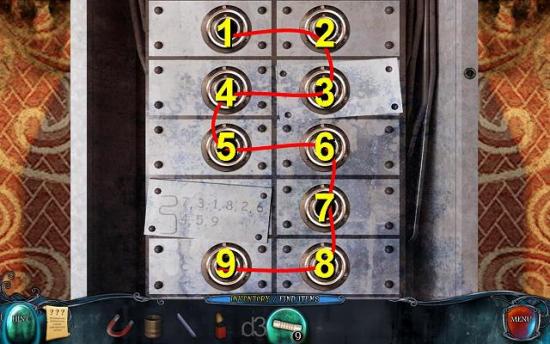
The Hallway and Basement
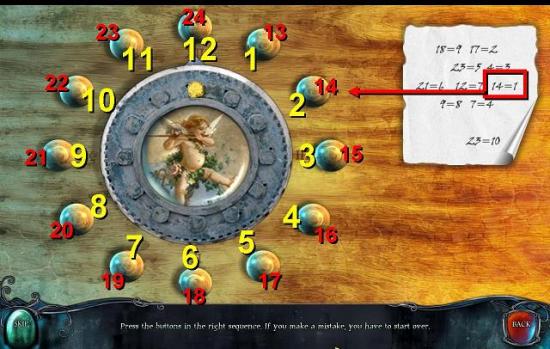
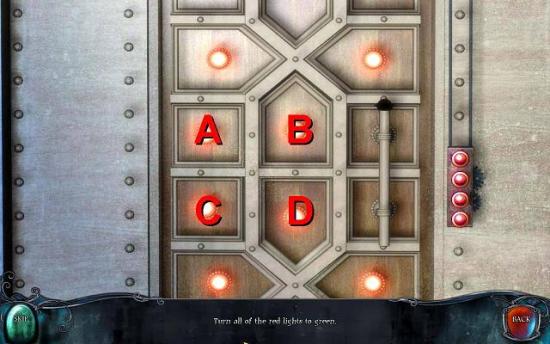
1. 2 red in, turn right
2. 1 red out, turn left
3. 1 red in, turn right
4. 1 red out, turn left
5. 1 red out, 2 blue in, turn right
6. 1 blue out, 1 red in, turn left
7. 1 red out, 1 blue in, turn right
8. 2 blue out, 1 red in, turn left
9. 1 red in, turn right
10. 1 red out, turn left
11. 1 red in, turn right
12. 2 red out
Upstairs
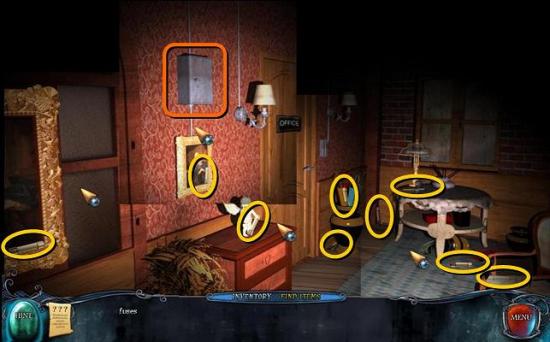
The Office
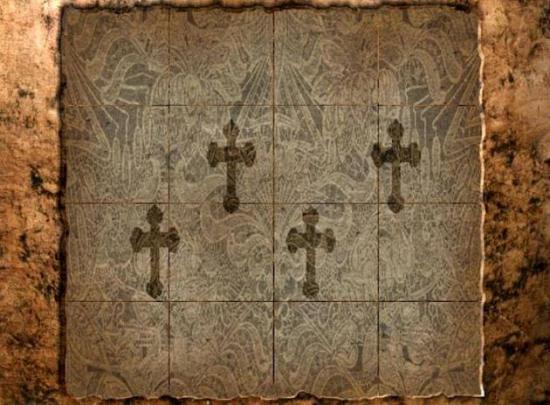
The Tomb
1. 1 white left
2. jump 1 yellow, move next yellow right
3. jump first 2 white, move third white left
4. jump all 3 yellows to the right
5. move first white and jump other 2 whites left
6. move 1 yellow, jump 1 yellow right
7. move 1 white left
Full List of Roses
1. Ch 1: Bedroom, on the bed
2. Ch 1: Statue room, on the mannequin
3. Ch 1: Rose bush by skull tree
4. Ch 1: By the pond in the garden
5. Ch 1: By the fountain in the garden
6. Ch 1: In the tree with the crow
7. Ch 1: In the crate with objects in the attic
8. Ch 2: On the road outside the bar
9. Ch 2: In the bar under the record player
10. Ch 2: In the vase by the clock
11. Ch 2: In the plant beside the desk in the bedroom
12. Ch 2: By the fire place in the sitting room
13. Ch 2: By the red chair in the basement
14. Ch 3: In the gramophone in the cabin
15. Ch 3: In the hallway by the reception desk
16. Ch 3: On the shelf in the dark basement
17. Ch 3: Upstairs, after you’ve switched on the light
18. Ch 3: On the chair in the office upstairs
19. Ch 3: On the front façade of the tomb
20. Ch 3: Inside the tomb, by the roses
21. Ch 3: Inside the tomb, behind the cross on the wall
