Ranch Rush 2 Walkthrough

Welcome the Ranch Rush 2 walkthrough on Gamezebo. Ranch Rush 2 is a time management and strategy game created by FreshGames. This walkthrough includes tips and tricks, helpful hints, and a strategy guide on how to complete Ranch Rush 2.

By
Share this
  • Share this on Facebook
  • Share this on Twitter

Ranch Rush 2 – Introduction

Welcome the Ranch Rush 2 walkthrough on Gamezebo. Ranch Rush 2 is a time management and strategy game created by FreshGames. This walkthrough includes tips and tricks, helpful hints, and a strategy guide on how to complete Ranch Rush 2.

The farm that Sara built in Ranch Rush 1 has become so big and popular that Sara has been swamped in paperwork and never has time to leave her office and actually enjoy the farm anymore. Jim suggests a vacation on a tropical island, to get away from it all. But you know Sara! She can’t help herself and buys a plot of land on the island to start a new tropical farm! Help Sara and her pet monkey Coco build a new farm and fill the orders of her demanding customers.

General Strategy

Like with many farming games, you need to plant and harvest crops to order. As the game progresses, you will also need to buy and feed farm animals to produce things like milk and wool, and operate machines to bake pies and make juice etc.

You will start in casual mode, which gives you plenty of time to fill all your orders. Halfway through the game, expert and free play modes are unlocked. Expert mode is much harder – the orders are much bigger and you get less time to complete them. The same strategies apply as for casual mode. Free play is a continuous game during which you keep getting new orders as you complete them.

At the start of each day you will get a list of items that you will need to produce before the timer for that day runs out. Unlike some other time management games, you will not get several time levels to get silver or gold stars, but just one time – if you don’t complete within that time, you will have to restart the day. However, when you replay a day you will start out with your farm as you left it after your failed attempt.

You will get a warning when you have 2 minutes left and another when you have 1 minute left, and you will hear a ticking sound counting down the last 30 seconds of the day.

The more time you have left, the more money and bonus coins you will receive. Money is needed to buy new materials. Coins are required to win trophies and achievements, and you can buy décor upgrades for your farm with them.

You can plan as many moves as you like in advance. Right click on your mouse to cancel all planned moves. This may come in handy if you spot a good moment to collect milk or eggs, for example. Note that if you make a mistake, for example, Sara is carrying a crate of produce that you’ve forgotten to use before moving on to another task, Sara will follow all your clicks without being able to execute the task until she can offload the crate.

You can pause the game by hitting the move, buy, or sell buttons at the bottom right of your window. This will allow you to take stock of the situation and figure out what needs to be done next without any time passing.

During the day, first work on the things that take the longest to produce. For example, for a gift basket you first need to feed the peacock and harvest its feathers, and you need to bake fruit rolls to go in the basket. Then make sure all your machines are working at full capacity and your animals are all fed so they produce their materials. Only when everything is whirring, start harvesting your simple crops, starting with the ones that grow the slowest.

The trick to this game is planning ahead. Before you start your day, have a good look at the list for tomorrow. Then when you’re nearly finished with your orders for today, leave one order open, for example just 1 wildflower, and get ready for the next day’s orders. Get your machines to produce as many products as they can for tomorrow’s, and make sure that their storage trays are also filled up. Similarly, pre-produce as many animal materials as possible and make sure your animals are fully fed. Then when your timer nearly runs out, fill your final order.

On Fridays, produce as many as possible of your most expensive products for market day the next day.

Planting and Harvesting

To plant crops, buy patches of soil and bags of seeds. Click on the bag of seeds and then on an empty patch to plant the crops. Initially, Sara will only be able to carry one seed at a time, so you have to click on the bag and then on the soil for each crop you want to plant. However, on the Friday of week 5 you will be able to buy a seed bag upgrade, meaning that Sara will be able to carry 3 seeds of the same type at once. Click on the bag 3 times and then on 3 patches of soil to plant 3 crops.

Sometimes your crops will need watering, which is indicated with a blue water drop symbol. Click on the well and then on the crop to water it. Do this fast, as crops will die when they’re not watered. Crops will flash red when they’re close to dying. Sara can only water one plant at once. On the Wednesday of week 6 you will be able to buy the sprinkler upgrade. Plants immediately surrounding a sprinkler will never need to be watered manually.

Your crops can also get infested with insects, which will kill them if you don’t spray the insects. Click on the can of bug spray and then on the plant. On the Monday of week 8 you will be able to buy the pest sprinkler upgrade, meaning all your sprinklers will water and spray insects at the same time.

When crops are fully grown, click on the stack of crates and then on the plant to harvest it. Then click on the barn to drop off your produce. Each time you bring your produce to the barn, it will be deducted from your to do list at the top of the screen. At first, Sara will be able to carry 3 items at one time. Later on in the game you will be able to buy a crates upgrade, after which Sara will be able to carry 5 items.

Re-plant crops as soon as you can after a crop has died or has been depleted.

Animal Care

Animals need to be fed to produce their materials. Goats will feed themselves by going to the wildflower fields, but the other animals need to be fed manually. The monkeys will wander into your banana fields and eat your bananas if you don’t feed them by the tree.

In general, animals will tell you how much food they require for their next production. However, their food trays can hold 3 lots of food at once, and it’s generally a good idea to just keep feeding them 3 lots of food at a time. This way, they will often produce their next lot of materials without you having to feed them again. The only exception is the peacocks, as they require different foods each time and you can’t anticipate what they want next. So just feed them to order.

Each animal can hold 3 lots of their materials in their pens before you have to collect them and bring them to the barn. Only goats can only hold one lot of milk. It is therefore a good idea to place storage trays near the goats, so they can keep producing milk without you having to bring any to the barn. When the pens are full, they will not produce any more until you bring the materials to the barn.

Llamas need to be clipped and peacocks need to be plucked before they will go on producing their next materials.

Machines

At various stages in the game you will need to buy machines to produce a yet greater variety of products. Some machines, like the juicer, only need one type of raw material, others need a combination of materials to produce their items. Each machine will have storage trays that can hold three of each raw material. They are also able to hold 3 lots of finished product. Machines will stop producing when their product tray is full.

Sometimes machines break down and need to be fixed. To do this, click on the toolbox and then on the machine.

Organizing your farm

When organizing your farm, try and make the routes Sara has to walk as short as possible by placing related items close together. For example, place your crates, well and insect spray close to your crops. Place animals near the crops on which they are fed and the machines near the crops or other raw products they require.

If you have groups of machines at some distance from each other, make sure a tool kit is near each group.

Also note that Sara can walk through crop fields, but has to walk around animals and machines, so make sure she can get to items easily. Don’t place animals or machines too close to the shore, or she will have to walk around them to collect the crabs. Also pay attention that your bridges aren’t blocked.

You can reorganize your farm at any point during the game, even halfway through a day if you like. I am constantly reorganizing in between levels to get the fastest possible layout for that level.

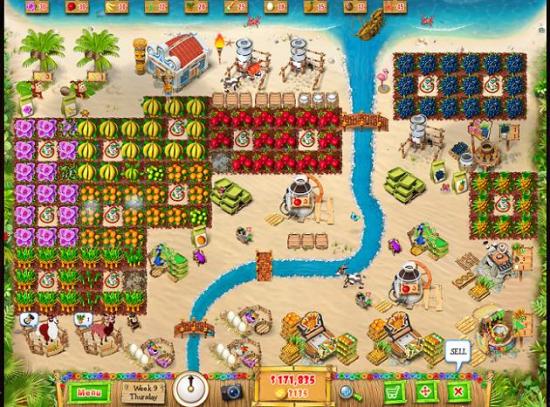
There are many ways in which you can organize your farm – find something that works well for you. An example of a final farm layout is shown in the image below.

Ranch Rush 2

Island Market and Fishing

Saturdays are market days, in which you get a set amount of time to earn as much money as possible. It pays to make sure your farm is well stocked on expensive products on Fridays before your timer runs out. That way, you can instantly start selling expensive products on market day. You will receive 15 coins for each $250 earned at the market.

Sundays are fishing days. To catch fish, click your mouse to lower your lure. When it hits a fish, it will come up automatically. You can also click your mouse again to manually reel in your lure. When you’ve caught a fish, make sure it lands in your boat to get the coin rewards.

When you’ve caught certain numbers of fish, you will get a bigger lure that you can use to catch bigger fish. Each time you get a new lure, a treasure will appear on the seabed, which you can catch in the same way as your fish and which will give you extra coins. When your lure hits a fish that is too big for it, you will lose your lure and wait a few seconds before you get a new one.

There are other perils, too. Swordfish will cut your line when they cross it and you will have to wait for a new lure. Stingrays will give you an electric shock for a few seconds.

Trophies and Achievements

There are 19 trophies you can win, and there’s a long list of achievements in your to do list, all of which are self explanatory. It isn’t possible to get all trophies and achievements during one game, but they will keep adding up when you start a new farm as the same user.

Walkthrough – Abbreviations

WF – wildflowers
Bn – bananas
Cc – coconuts
PG – pomegranates
Cr – crabs
M – milk
J – juice
Sc – sugarcane
W – wool
O – oranges
FR – fruit roll
AB – acai berries
IC – ice creams
E – eggs
P – pineapple
CP – coconut pie
PF – peacock feather
GB – gift basket

Week 1

Monday

  • Learn to plant and harvest.
  • 4 WF

Tuesday

  • Learn to buy and move.
  • 4WF / 2Bn

Wednesday

  • 7WF / 4Bn
  • I had 6 patches of wildflowers and 6 of bananas at this point. Place the bananas close to the coconut tree.

Thursday

  • 10WF / 4B / 1Cc
  • Feed the monkey bananas to get it to collect coconuts for you. It will usually tell you how many bananas it needs to harvest the next coconut, but I generally feed the monkey 3 bananas each time, as this means the monkey may go on to collect another coconut before you have to feed it again. Click on the tree once for each banana. Three coconuts can be stored by the tree.

Friday

  • 10WF / 6Bn / 2Cc
  • I had 8 patches of wildflowers and bananas and 1 coconut palm at this point
  • If you have time left before the level ends, stock up on coconuts for the Island Market on Saturday, as they are your highest selling item. Also leave 3 bananas by the tree so Coco will get one or two more coconuts during market day without Sara having to feed him.

Week 2

Monday

  • 10WF / 4PG / 6Bn / 2Cc
  • Plant 6 pomegranate crops at the start of the day.

Tuesday

  • 8WF / 6PG / 3Cc / 10Cr
  • Move crops or items one square away from the shore so Sara doesn’t have to walk around them to get the crabs.
  • You can collect 3 crabs in one run.

Wednesday

  • 10WF / 8PG / 10Bn / 12Cr
  • If you have time left at the end of the level, stock up on coconuts for the next day.

Thursday

  • 12WF / 12 PG / 1M / 10Bn / 4Cc
  • Buy a goat and place it far away from your wildflowers.
  • The goat will feed on the wildflowers and then return to the pen for milking. Three milkings will produce one container of milk
  • Collect the milk once the container is full. The goat will come running back to its pen and headbutt you if you’re not out of there in time, so only try and take the milk when the goat is far away.

Friday

  • 12PG / 2M / 10Bn / 3Cc / 8Cr
  • Buy insect spray.
  • If you have time, stock up on coconuts and milk for the Island Market.

Week 3

Monday

  • 12WF / 2M / 10Bn / 2J / 3Cc
  • Buy a juicer and a repair kit. Place juicer close to pomegranate fields.
  • First focus on getting the juice and coconuts. Only start harvesting wildflowers and bananas when juicer and monkey are at work.
  • Leave one order open and stock up on juice and coconuts for Tuesday.

Tuesday

  • 8PG / 3M / 3J / 4Cc / 14Cr
  • Buy second goat.
  • First get juicer working and feed monkey.
  • Leave one order open and stock up on juice for Wednesday.

Wednesday

  • 8WF / 8PG / 3M / 8Bn / 4J / 5Sc
  • Buy approx. 8 patches of sugarcane and plant them.
  • Get juicer working before harvesting pomegranates, bananas and wildflowers (in that order).
  • Leave one order open and stock up on coconuts for Thursday.

Thursday

  • 15WF / 15PG / 15Bn / 8Sc / 5Cc / 10Cr
  • Buy Speedy Gloves upgrade – this allows Sara to plant and harvest faster.
  • Feed monkeys, then harvest sugarcane, pomegranates, bananas, crabs and wildflowers.
  • Leave one order open and stock up on juice, milk and coconuts for Friday.

Friday

  • 8PG / 4M / 10Bn / 6J / 12Sc / 5Cc
  • Get juicer working, make sure milk containers are empty and feed monkeys.
  • Harvest sugarcane, pomegranates and bananas.
  • Get ready for market day: stock up on juice and bananas. Also make sure the juicer has 3 crates of pomegranates in storage and Coco has 3 bananas. Also buy a storage tray to store any surplus milk.

On market day, first sell your stored juices and coconuts, and any milk you may have stored. Then focus on harvesting the sugarcanes, making sure to collect any additional juice, milk and coconuts as they come available.

Free Play Mode will be unlocked after Saturday’s fishing game.

Week 4

Monday

  • 12 PG / 4M / 18 Bn / 6J / 2W / 4Cc
  • Buy a llama and a pair of clippers. Place them close to your sugarcane field.
  • Start juicer and feed monkeys.
  • Feed llama with 3 sugarcanes.
  • To harvest llama wool, first click on the clippers and then on the llama. You can stack 3 bales of wool by each llama. To collect them, click on the bales of wool once for each bale.
  • Harvest pomegranates and bananas when animals are fed and juicer is working.
  • Stock up on wool, milk and coconuts for Tuesday

Tuesday

  • 18PG / 4M / 12Sc / 4W / 5Cc
  • Buy second storage tray.
  • If you have the money, buy a second llama, though you can complete this level with one.
  • Feed monkeys and llamas, then harvest other crops.
  • Stock up on juice for Wednesday.

Wednesday

  • 15WF / 3M / 18Bn / 6J / 15Sc
  • Buy 4 more patches of each produce.
  • If your farm gets too big for your screen, scroll out with your mouse wheel or the zoom button at the bottom of the screen.
  • First get the juicer up and running, then focus on harvesting.
  • Stock up on juice, wool and coconuts for Thursday.

Thursday

  • 10WF / 6J / 5W / 5O / 5Cc / 8Cr
  • Buy and plant about 8 patches of oranges.
  • Feed monkeys and llamas and get juicer running before harvesting crabs and flowers.
  • Stock up on juice, wool and coconuts for Friday

Friday

  • 6PG / 6J / 6Sc / 5W / 😯 / 4Cc / 6Cr
  • Feed animals and get juicer started before harvesting other crops.
  • As always, get ready for market day by stocking up your machine and making sure your animals are fully fed.

Week 5

Monday

  • 15WF / 4M / 5J / 3W / 3FR / 5Sc / 10Cr
  • Buy fruit roll machine and place near sugarcane and orange fields. Reorganize your farm if you need to; it really pays to have oranges and sugarcanes close together.
  • To make a fruit roll, the machine uses 2 oranges and 1 sugarcane. However, it holds only 3 of each in the storage trays, so the oranges will need to be restocked after one roll is produced. I usually get 3 crates to harvest 2 oranges and 1 sugarcane and dropping them off at the machine. You can then instantly get another lot of 2 oranges and 1 sugarcane to put on the storage tray while the machine is working.
  • Stock up on wool, fruit rolls and coconuts for Tuesday (and milk if you can).

Tuesday

  • 12 PG / 5M / 10Bn / 10Sc / 6W / 5FR / 6Cc
  • Buy the Speedy Shoes upgrade to make Sara walk faster.
  • If you don’t already have a second llama, get one now.
  • First get the fruit roll machine working and feed your llamas and monkey. The fruit roll machine needs to be restocked often, so keep paying attention to it.
  • Stock up on juice and milk for Wednesday.

Wednesday

  • 18WF / 6M / 12Bn / 8J / 12O / 6Cr
  • The bridge upgrade has become available. Don’t buy a bridge until you need to expand your farm to the other side as crabs will start arriving on the other side as soon as you have a bridge, which is a longer run for Sara. You can buy more than one bridge.
  • This level is mainly about harvesting, so get your juicer running and just click like crazy to harvest.
  • Stock up on wool, coconuts and fruit rolls for Thursday.

Thursday

  • 20PG / 10Bn / 7W / 6FR / 5AB / 8Cc / 16Cr
  • Buy and plant about 8 patches of acai berries – perhaps on the other side of the stream. A good tip is to buy another stack of crates to place on the other side of the stream.
  • Get your fruit roll machine working and feed your monkeys and llamas. Then harvest.
  • Stock up on juice, milk, wool and fruit rolls for Friday.

Friday

  • 8WF / 6M / 9J / 12Sc / 6W / 😯 / 6FR / 6AB
  • Buy the seed bag upgrade – this means that Sara can carry 3 seeds of the same type at once. When planting 3 of the same crop, click the seed bag 3 times and then click on 3 empty patches.
  • As usual, get stocked up as much as you can for market day. Focus on expensive products like fruit rolls, milk and juice first.

Expert mode is unlocked after the fishing game on Sunday.

Week 6

Monday

  • 18WF / 18 PG / 6M / 18Bn / 18Sc / 12O / 5FR / 12AB
  • Many of your crops are destroyed at the start of the game. Start by replanting everything. This is also a good chance for you to get your two speed bonus trophies. Plant the slowest growing crops, such as oranges and sugarcane, first.
  • Then get your fruit roll machine working and start harvesting.
  • Stock up on juice, wool and Cc for Tuesday.

Tuesday

  • 8PG / 8J / 10Sc / 8W / 😯 / 3IC / 7Cc / 12Cr
  • Buy an ice cream maker. To make ice creams you need 1 milk and 2 acai berries, so place the machine near the berries. If this is far away from your other machines, also get another repair kit.
  • Get the ice cream and juice machines working and feed your llamas and monkeys. Then harvest.
  • Stock up on fruit rolls, coconuts, ice creams and milk for Wednesday.

Wednesday

  • 18PG / 3M / 18Bn / 7W / 7FR / 4IC / 8Cc
  • You get the sprinkler upgrade! This means you no longer manually have to water plants. Take this time to reorganize your farm. Sprinklers can reach one row of crops on each side, so plant your crops in little squares with a sprinkler in the middle. If you have enough money to buy enough sprinklers for each plant you can go on and sell your well to make more room.
  • Work on getting your fruit rolls and ice creams first before harvesting.
  • Stock up on fruit rolls, ice cream, juice and milk for Thursday.

Thursday

  • 4M / 9J / 10Sc / 12O / 8FR / 10AB / 5IC / 3E
  • Buy a duck. Ducks eat wildflowers, so if possible, place them you’re your wildflower fields. As with the other animals, the ducks’ food trays can hold 3 wildflowers at once.
  • Ducks will produce eggs, and they can store 3 eggs at a time in their nests. You can only collect eggs when the duck is eating. If you try and get eggs when the duck is hatching them, you will be pecked.
  • Buy a second monkey/palm.
  • Friday is a big day, so stock up as much as you can on juice, milk, ice cream, wool, eggs and coconuts.

Friday

  • 20WF / 6M / 9J / 9W / 6IC / 4E / 16Cc
  • You know the drill by now: get your machines working and your animals fed. In particular, keep an eye on the ice cream machine as it will run out of berries very fast.
  • Stock up as much as you can of expensive products such as ice creams, juice, fruit rolls, wool, milk and eggs for market day. Also make sure all machines are fully stocked and animals fed so they can keep producing during market day.

Week 7

Monday

  • 25PG / 9M / 25Bn / 12J / 25Sc / 5Fr / 20AB / 8Cc
  • Buy a second juicer and reorganize so both juicers are near the pomegranate field.
  • Buy another block of acai berries and a sprinkler.
  • Stock up on wool, ice cream, coconuts and eggs for Tuesday.

Tuesday

  • 20WF / 20Bn / 9W / 18O / 6IC / 6E / 6P / 10Cc / 15Cr
  • Buy and plant a block of pineapples around a sprinkler.
  • Buy another goat and more storage trays if necessary.
  • Stock up on just about everything for Wednesday, as it will be a full on production day! Get ice creams, fruit rolls, juice, coconuts, wool, milk and eggs.

Wednesday

  • 4M / 12J / 9W / 6FR / 6IC / 8E / 8P / 6Cc
  • Follow the usual strategy of first making sure your slowest working machines are stocked and keep your animals fed.
  • Stock up on juice, fruit rolls, ice creams and coconuts for Thursday.

Thursday

  • 20WF / 9J / 10Sc / 5FR / 8IC / 3CP / 10P / 4Cc / 12Cr
  • Buy a pie maker. Pies are made of 1 egg, 1 coconut and 1 sugarcane and will hold 3 of each in storage. I usually place my pie machine near the ducks.
  • Buy a second duck.
  • Stock up on milk, eggs, juice, wool and pies for Friday. Also make sure you have coconuts and eggs to make more pies.

Friday

  • 10M / 10Bn / 10J / 10W / 20O / 20AB / 6E / 5CP / 10P
  • Plant another block of oranges around a sprinkler.
  • Get prepared for market day. Make sure you have pies, ice creams and fruit rolls, and as many other products as you can manage. Stock up your machines.

Week 8

Monday

  • 20 WF / 6M / 10J / 22Sc / 15AB / 6IC / 5E / 5CP / 12P / 7Cc
  • Buy the pest sprinkler upgrade – all your sprinklers will spray insect repellent as well as water. You only have to buy this upgrade once for all your sprinklers.
  • Stock up on juice, wool, fruit rolls and eggs for Tuesday.

Tuesday

  • 18PG / 20Bn / 3PF / 10J / 9W / 18O / 7FR / 5E / 18Cr
  • Buy a peacock and a plucking glove. Peacocks eat different things each time, so feed them to order. To harvest feathers, pick up the gloves and click on the peacock.
  • Stock up on wool, peacock feathers, coconut pies and coconuts for Wednesday. Also make sure you have extra eggs and coconuts to make more pies.

Wednesday

  • 22PG / 5M / 4PF / 20Sc / 9W / 22 AB / 4E / 7CP / 12P / 5Cc
  • Stock up on juice, milk, feathers and ice cream for Thursday. Get a few fruit rolls if you can.

Thursday

  • 18WF / 18PG / 6M / 18Bn / 12J / 18O / 8IC / 2GB / 15Cr
  • Buy the gift basket maker. Each gift basket contains 1 fruit roll, 1 peacock feather and a pineapple.
  • Focus on making your ice creams and juice first. Then get the ingredients for the gift baskets. Then harvest your simple crops.
  • Friday is a big day, so stock up on ice creams, coconut pies, wool, juice, fruit rolls and eggs. Also make sure you have milk, eggs and coconuts to make more ice creams and pies.

Friday

  • 5M / 8J / 8W / 4FR / 8AB / 8IC / 5E / 8CP / 3G
  • No specific instructions for today. Just work hard on those pies and ice creams and get prepped for market day.