
Best Horror Games On Itch.io – July 2026
Across a bounty of subgenres.![Haze Seas Accessories Tier List [Best Accessories to Equip]](/wp-content/uploads/2026/07/haze-seas-accessories-tier-list.jpg "Haze Seas Accessories Tier List [Best Accessories to Equip]")
Haze Seas Accessories Tier List [Best Accessories to Equip]
The accessories with the best stat buffs in Haze Seas.
![[Roblox] Evomon Shiny Hunting Guide – Including Prismatic and Pris Shinies!](/wp-content/uploads/2026/06/evomon-shiny-hunting-guide.jpg "[Roblox] Evomon Shiny Hunting Guide – Including Prismatic and Pris Shinies!")

PuppetShow: Lost Town Walkthrough
Welcome to the PuppetShow: Lost Town walkthrough on Gamezebo, written by Lynne Basinet. PuppetShow: Lost Town is an interactive, adventure, hidden object game played on PC, created by ERS Game Studios. This walkthrough includes tips and tricks, helpful hints, and a strategy guide for how to complete PuppetShow: Lost Town.


- Prefer Gamezebo on Google

PuppetShow: Lost Town – Game Introduction
Welcome to the PuppetShow: Lost Town walkthrough on Gamezebo, written by Lynne Basinet. PuppetShow: Lost Town is an interactive, adventure, hidden object game played on PC, created by ERS Game Studios. This walkthrough includes tips and tricks, helpful hints, and a strategy guide for how to complete PuppetShow: Lost Town.
Copyright Information
This walkthrough was created by Lynne Basinet, for gamezebo.com, and is protected under US and International Copyright laws. Any unauthorized use, including re-publication, in whole or in part, without permission, is strictly prohibited.
General Information
- Main Menu
- Options: Adjust the Music and Sound volumes and turn Full Screen and Custom Cursors on and off.
- Profiles: Create up to 10 profiles, with a maximum of 9 characters (letters and numbers, only).
- Credits: View information about the development team.
- More Info: Access the Strategy Guide, Forums (at BigFish Games) and download pages (at BigFish Games) for Mystery of Joyville and Souls of the Innocent.
- Extras: Locked until the Main Game is completed.
- Game Screens
- Menu: Located at the lower right, click to access Continue, Options, Help and Exit (to the Main Menu). You can also press the Esc key on your keyboard to bring it up. Press again to dismiss it.
- Strategy Guide: Located at the lower right, just below the Menu button.
- Hint Button: Located at the lower left, in Search Scenes. When it becomes available, click on it to highlight a random item from the list.
- Tools (Inventory): Located at the lower left, click to access items you’ve collected and use them on interactive items/areas in the current scene.
- Cursors
- Magnifying Glass: means you can zoom into a close-up of an area or get a description of an item.
- Grabbing Hand: means you can manipulate an object or pick up an item.
- Spinning Globe: means you can navigate to a new area
- Gameplay
- After a few moments, you can skip cutscenes/movies by clicking on the button at the lower right.
- Advance dialog by clicking. You can advance it as quickly as you can click.
- You’ll be given the opportunity to use a Tutorial when you first begin play. Click on Yes or No.
- Gameplay consists of eliminating items from search lists in Object Searches, collecting Tools during object searches and in close-up areas, completing Interactive Tasks, solving Puzzles and completing Minigames and Navigating to different areas to progress.
- Object Searches many contain interactive items. Those items will be shown in Magenta, in the list. Click on them to activate a task or open/uncover something.
- Special Features
- See Extras under Main Menu section
- 2 modes of play. Regular and Expert. Regular Mode, the Hint and Skip buttons take less time to charge and areas/items of interest will be highlighted. In Expert Mode, the Hint and Skip buttons take longer to charge and areas/items of interest won’t be highlighted.
Gameplay and Guide Tips
- This guide assumes you’ve read the General Information, used the in-game Tutorial and/or Help features or otherwise familiarized yourself with the gameplay.
- The Hint button recharges in 60 seconds in Regular Mode and 90 seconds in Expert Mode. The Skip Button charges in 120 seconds in Regular Mode and 180 seconds in Expert Mode.
- The game is fairly non-linear, although some areas aren’t available until after you complete other tasks. You may complete some areas and tasks in any order you choose.
- Close-up (zoomed in) areas may need to be manually closed by clicking on the OK button. If you won’t need to access an area again, it will generally close automatically. This won’t be mentioned in the body of the walkthrough.
- Many items/areas/characters can be clicked on; however, they may not be necessary to progress in the game. This walkthrough won’t mention them unless they’re necessary for game progression. DO click on them so you have a better gaming and more immersive story experience. Occasionally, an item won’t be active until later in the game, or after you complete a task. Those items will be mentioned only when they become usable.
- The item lists in Object Searches are random, so only the Tool (Inventory Item) and possible Interactive Items will be indicated. All Object Search areas will be highlighted with sparkles when they become active regardless, which game mode you choose. The only areas that won’t be highlighted, in Expert Mode, are interactive characters, areas and items.
- Interactive Items, in Object Searches, need to be clicked on twice to eliminate them from the list. Click on an item to activate, open or move it and then click on the list item to eliminate it. In some cases, you may need to close something you’ve opened to find other items in the list.
- Click on the Tools button to access inventory items. In this walkthrough, when you’re told to use a particular Inventory Item, it is assumed you’ll know to open the Tools to access what you need. It will close automatically after you pick up a Tool. If there are more than 5 items in your inventory, use the arrows to scroll through them until you locate what you need. Hover your mouse cursor over and item for a description.
- In this walkthrough, solutions for Puzzles and Minigames will be shown in either an image or video (only if the solution steps are very long). Puzzles and Minigames with random solutions will show strategies or steps for solving them. If there are repeating Minigames, you’ll be referred to the first instance for instructions.
- You may exit all Object Searches, Puzzles and Minigames by moving your cursor near the bottom of the screen and clicking (click back) if you’d like to wait and complete them later.
- Note that the chapters in this walkthrough are arbitrary and were chosen by me where I thought there were logical breaks. My chapters and headings will not coincide with those in the game’s Strategy Guide. I completed my walkthrough independent of the Strategy Guide, so the order of tasks is also different, in many areas.
- In this walkthrough, Tools (Inventory Items) will be indicated in green, Interactive Items/Active Areas in yellow, and Entrances/Exits in blue. Additional/Alternate colors, numbers, arrows and/or letters will be used where necessary and for clarification.
Walkthrough
Create your profile, adjust your preferences in Options, click on Play, choose your game Mode and begin your adventure.
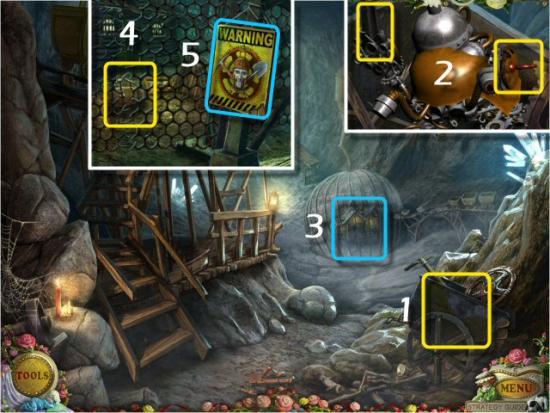
1 – The Cave
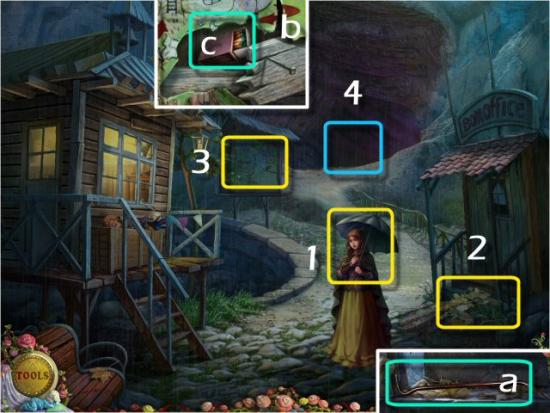
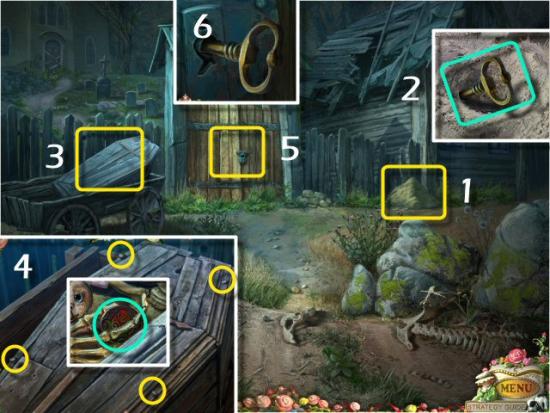
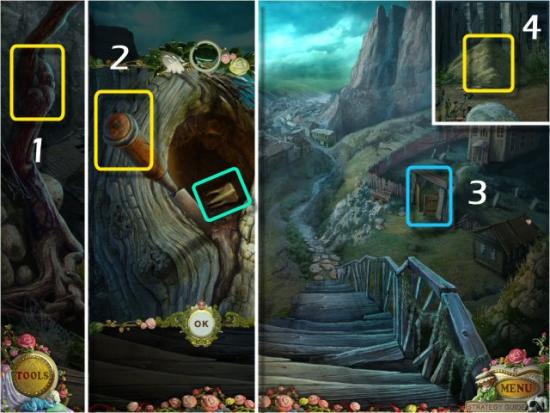
Click on Suzy’s Mother (1), click on the Pile of Leaves (2), collect the Crowbar (a) and then click on the Leaves 3 times, to uncover the Pick Axe Head. Click on the Notice Board (3), click on the Map (lower right), use the Crowbar on the Nail (b), collect the Matches (c) and then continue to the Cave Bridge (4).

Click on the Sign (1) and click on all 4 Latches (2). Observe the Animal Symbols (Crab, Snake and Eagle) and then continue into the Cave (3).
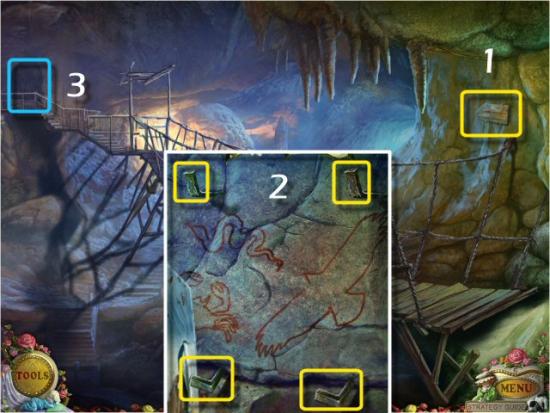
Click on the Lantern (1), open the Cover (2), use the Matches on the Wick (3) and then click on the Wall (4).
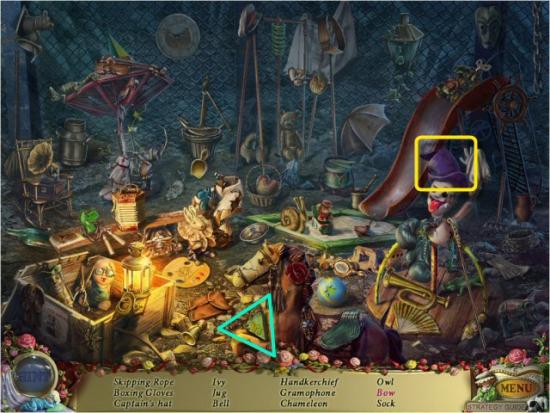
Click on the Stones with the 3 Animal Symbols (1), in any order, collect the Pick Axe Handle (2) and then return Outside (click back twice). Click on the Box Office Steps (3), use the Pick Axe Handle on the Pick Axe Head, collect the Pick Axe (4) and then click on the Toy Box (5) on the Porch.
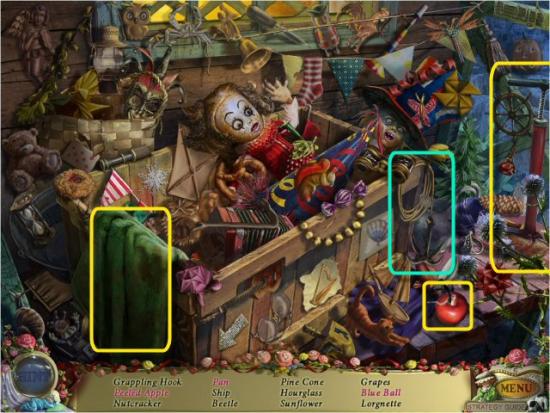
Find all the items in the list. Interactive Items: click green cloth to reveal Pan, click hand pump to inflate Blue Ball, click peeler for Peeled Apple. Tool: Grappling Hook
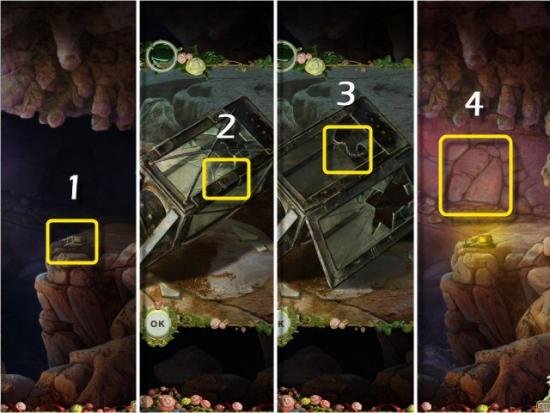
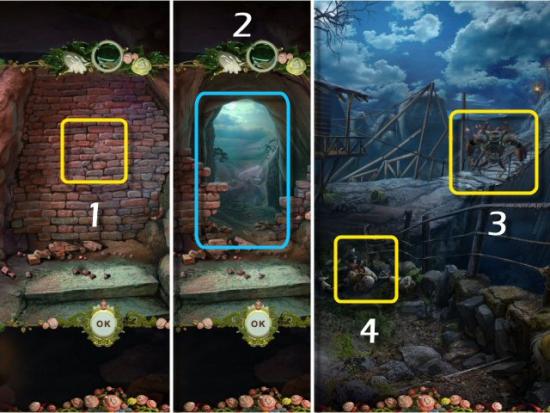
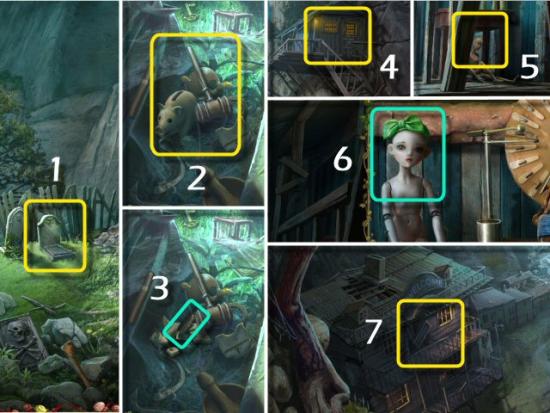
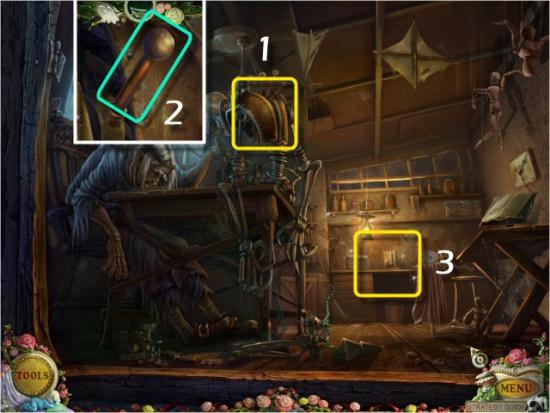
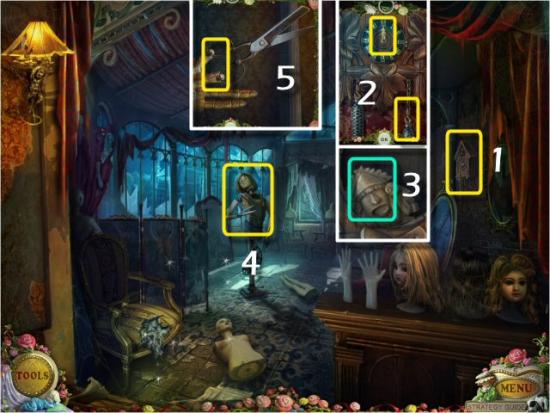
When complete, return to the Brick Wall. Use the Pick Axe on the Wall (1 – click 3 times) and then continue through the Hole (2). Click on the Monster Puppet (3) and then click on the Broken Puppet (4).
2 – The Bridge to Town
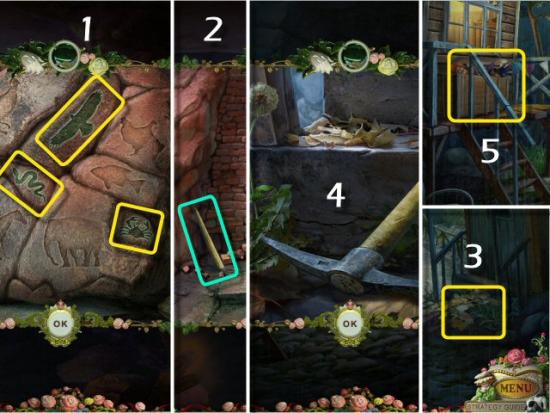
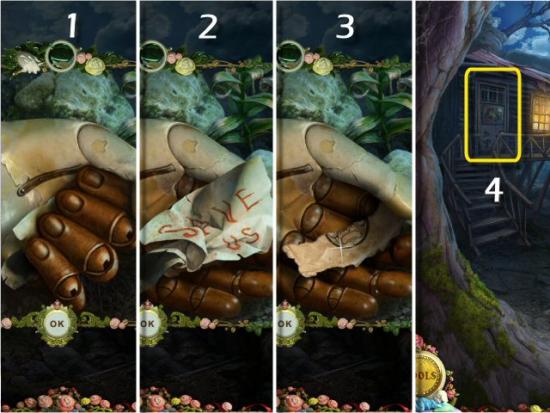
Click on the Hand (1), click on the Note (2), collect the Scrap of Paper (3) and then click on the Door (4) to the house.
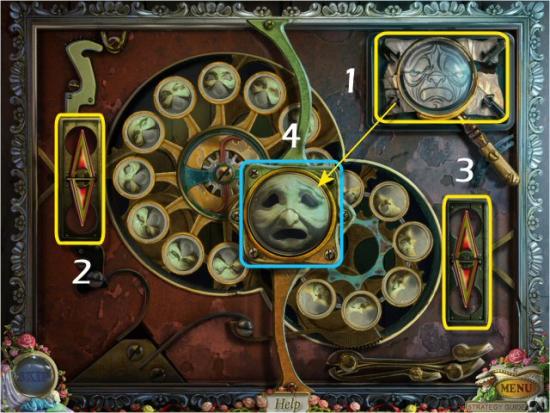
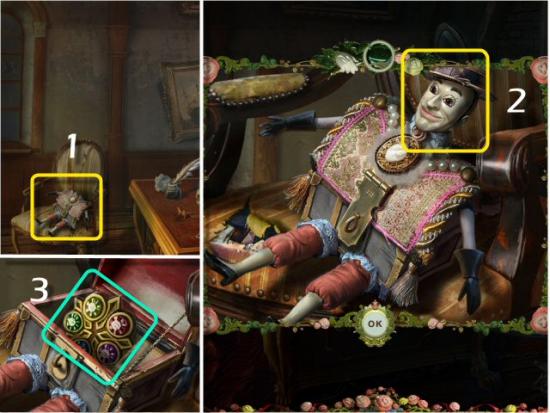
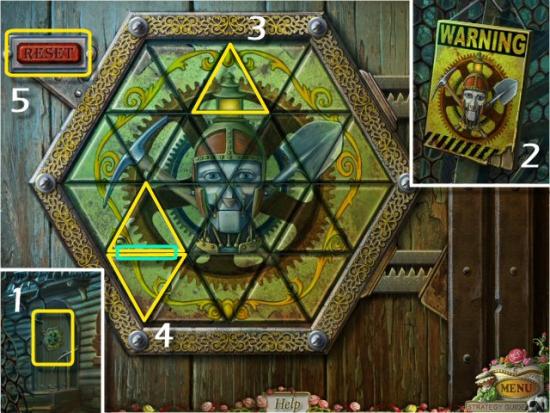
Use the Scrap of Paper on the Torn Diagram (1). The object is to use the Left and Right Arrows (2 and 3), to change the expression of the mouth and eyes (4) to match that on the Diagram. Click the Up arrows to rotate the images counter-clockwise and the Down arrows to rotate them clockwise. A few clicks are all it takes to get the correct combination. Note that the solution is always the same, but the initial configuration is random each time you play. Refer to the screenshot for the correct configuration.
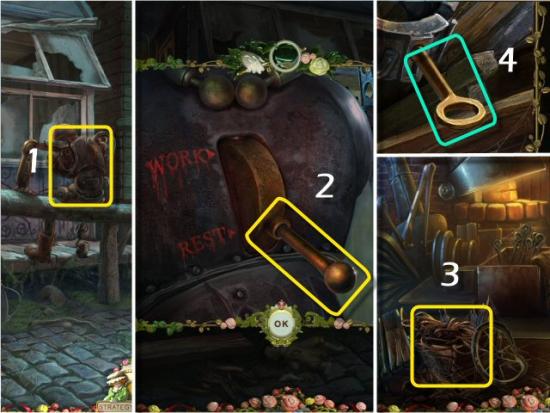
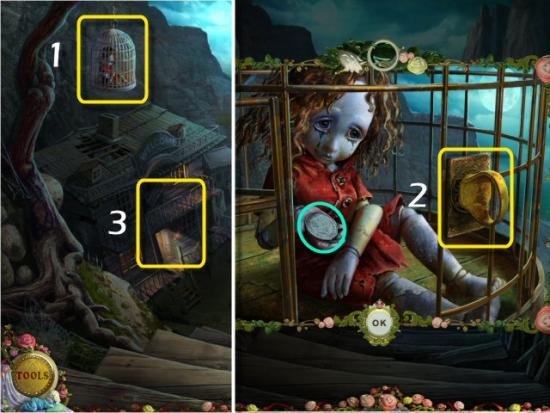
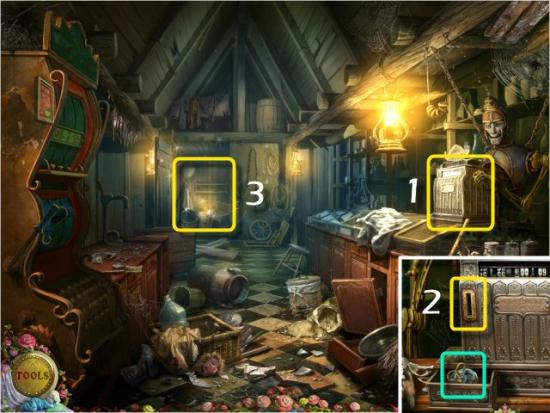
Enter the Open Door, click on the Cannon (1) and use the Grappling Hook on the Cannon (2) and then the Matches on the Wick (3), in that order. Click the Winch (4), click on the Diary (5) and collect the Flower Disc (6 – 1 of 3). Click on the Curtain (7) and then click on the Barrel (8).
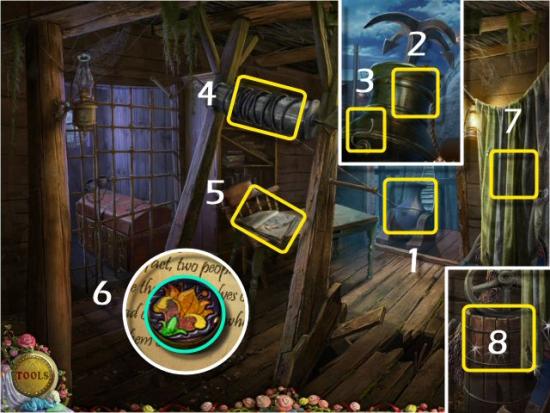
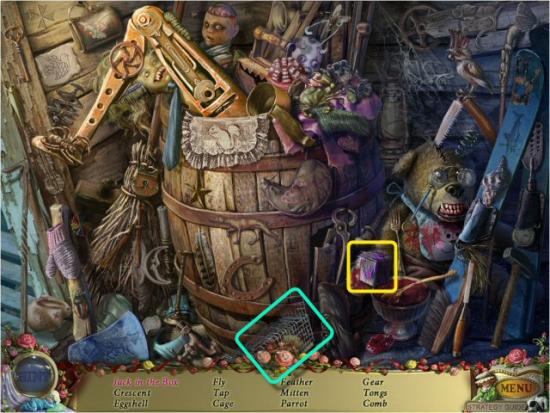
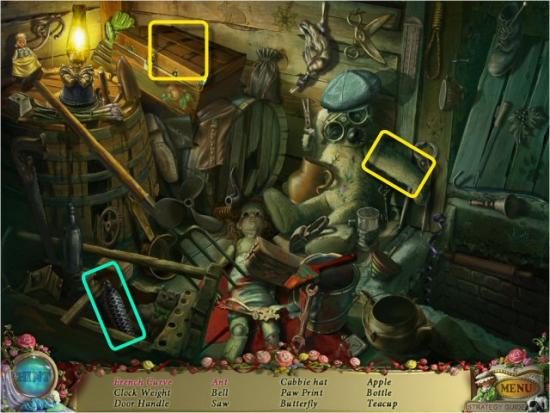
Find all the items in the list. Interactive Item: Jack in the Box. Tool: Cage.
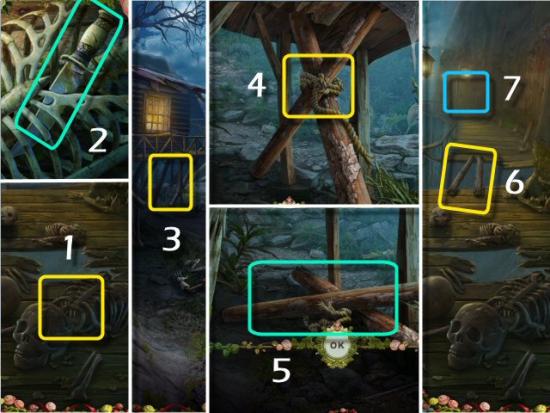
Exit the house (click back) and then cross the Bridge (click forward). Click on the Skeleton (1), collect the Knife (2) and return to the House (click back). Click on the Porch Supports (3), use the Knife on the Rope (4 – click twice), collect the Wooden Beams (5) and return to the Bridge (click forward). Use the Wooden Beams on the Hole (6) and then continue down the Path to Town (7 – click forward twice).
3 – The Center of Town
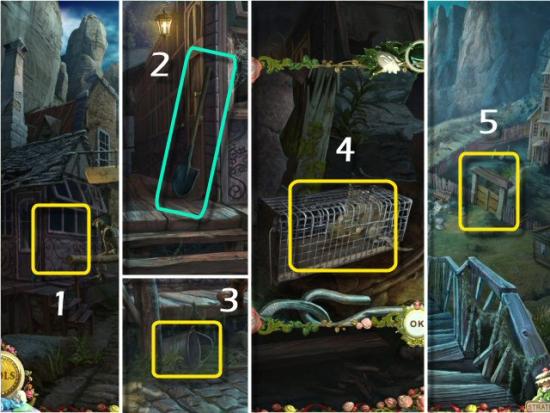
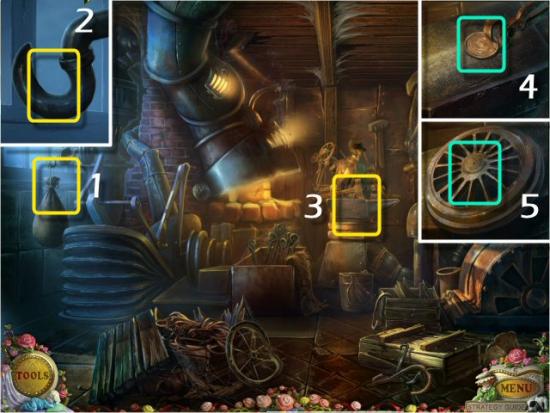
Click on the Blacksmith’s House (1), collect the Shovel (2) and click on the Bucket (3). Use the Cage on the Mouse (4 – you’ll automatically add the Mouse to inventory), return to the Outskirts of Town (click back twice) and click on the Churchyard Gate (5).
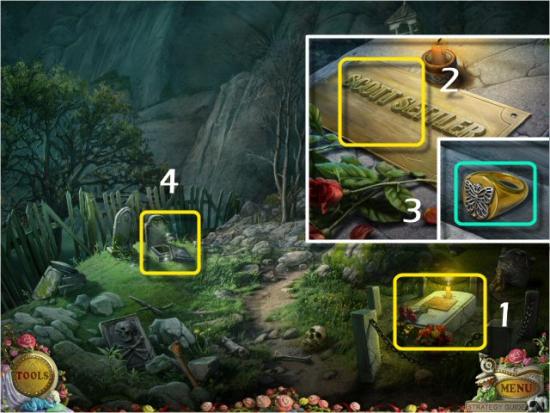
Click on the Pile of Dirt (1), use the Shovel (click twice) and collect the Cemetery Key (2). Click on the Coffin (3), use the Crowbar on each of the 4 Nails (4) and collect the Flower Disc (#2 of 3). Click on the Gate (5), use the Key in the Lock (6), click on the Key and then enter the Cemetery.
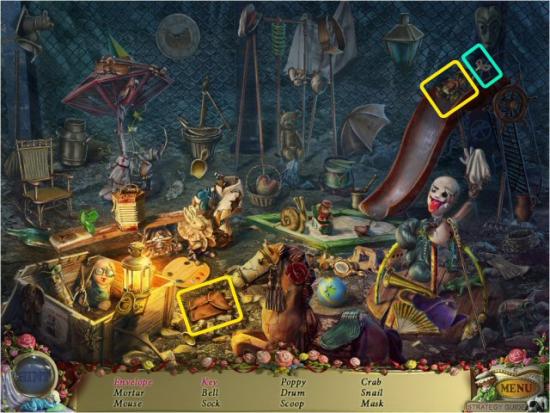
Click on the Grave (1 – click twice) and find all the items in the list. Interactive Item: Mallet breaks Piggy Bank to reveal Coin (2). Tool: Copper Coin (3). Return to the Town (click back twice and then forward once) and click on the Puppet Master’s House (4). Click on the Table (5), collect the Puppet (6), return to the Outskirts of Town (click back twice) and click on the Saloon (7).
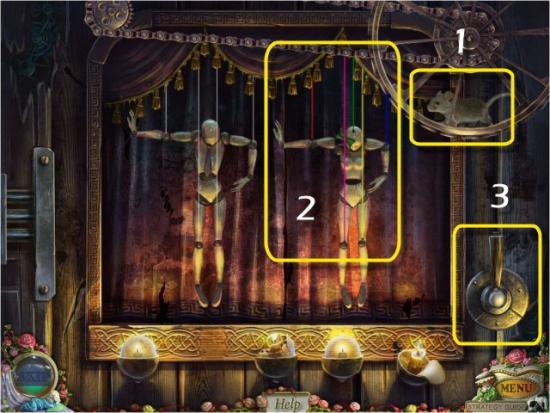
Use the Mouse on the Wheel (1) and the Puppet on the Dangling Strings (2 – in either order). The object is to rearrange the strings, on the Right Puppet, and click on the Lever (3), so that both Puppets move alike. Click on a colored string and then click on another to switch their places. Once the strings are in their correct positions, click on the Lever. Note that the solution and initial configuration is always the same, each time you play. Refer to the screenshot for the correct configuration. The quickest solution is to click on the following strings:
- Red then Green
- Magenta then Blue
- Green then Blue
- Yellow then Blue
- The correct order is Red, Magenta, Green, Yellow and Blue.
Enter the open Door of the Saloon, click on the Letter (1), click on the Seal (2) and then click on the Bar (3). Find all the items in the list. Interactive Item: click Hat (4) to release Moth (5). Tool: Fishing Hook (6). Return to the Town (click back once and then forward once). Click on the Broken Steps (7), use the Hook on the Hole (8), collect the Flower Disc (#3 of 3) and then click on the Door to the General Store (9).
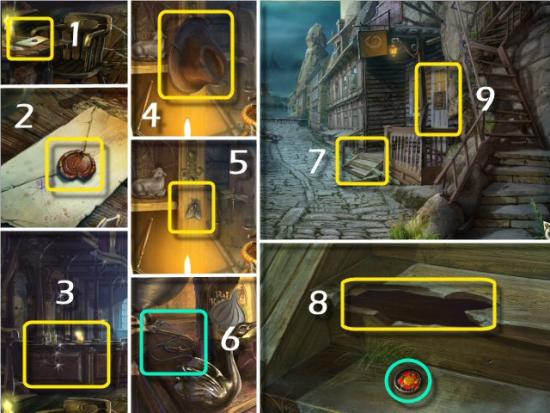
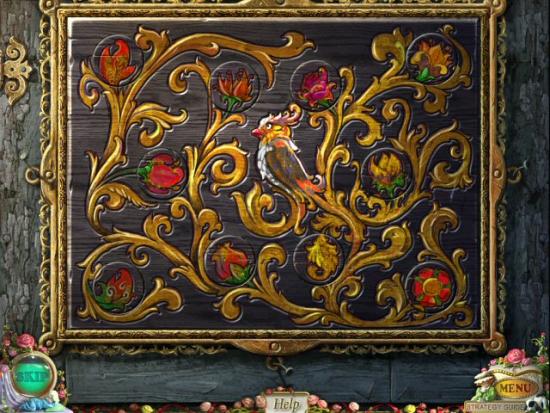
Use all 3 Flower Discs in the empty slots (click anywhere; they’ll automatically be placed). The object is to switch the positions of the Flower Discs so that the picture is complete and all elements are lined up. Click on one disc and then another to switch their places. Note that the solution is always the same, but the initial configuration is random each time you play. Refer to the screenshot for the correct configuration.
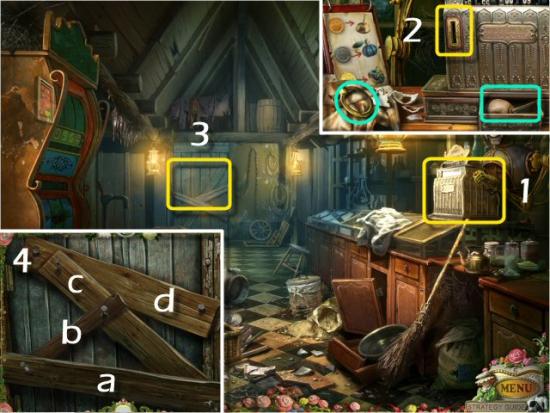
Enter the General Store and click on the Cash Register (1), collect the Well Handle Ring, use the Coin in the Slot (2) and collect the Oil Can (3). Click on the Door (4), use the Crowbar on the Boards (5 – click on the boards in the order shown: a, b, c and d) and then click on the Open Cupboard.
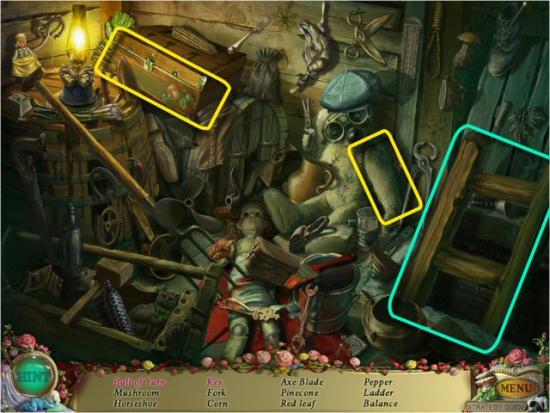
Find all the items in the list. Interactive Items: click on the Suitcase to collect the Ball of Yarn, click on the Teddy Bear’s Arm to collect the Key. Tool: Ladder.
4 – The North End of Town
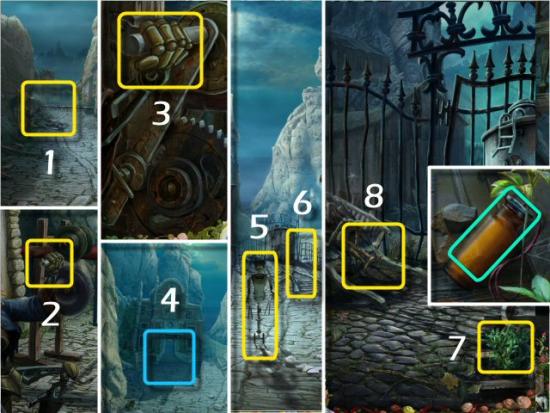
Return to the Street (click back) and click on the Gate (1). Click on the Guard Puppet’s Hand (2) and use the Oil Can on the Handle (3). Continue through the Gate to the North End of Town (4), click on the Barber Puppet (5) and then click on the Tank at the Gate (6). Click on the Weeds (7), collect the Battery and then click on the Debris (8).
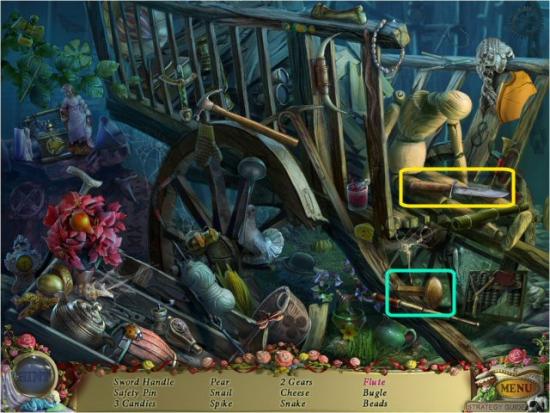
Find all the items in the list. Interactive Item: click on the Knife to create the Flute. Tool: Spike.
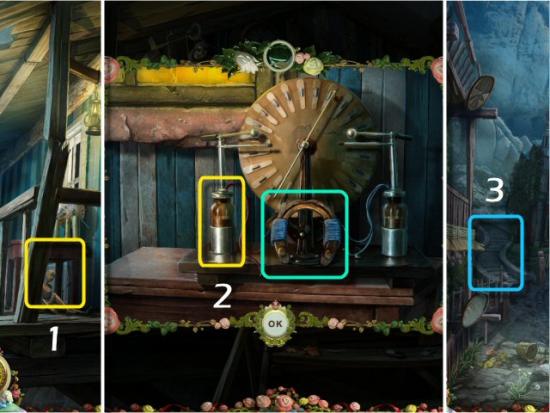
Return to the Puppet Master’s House (click back twice and then at the upper right) and click on the Table (1). Use the Battery in the Device (2) and collect the Magnet. Return to the North End of Town (click back once and then forward once) and then click on the Stairs to the Well (3).
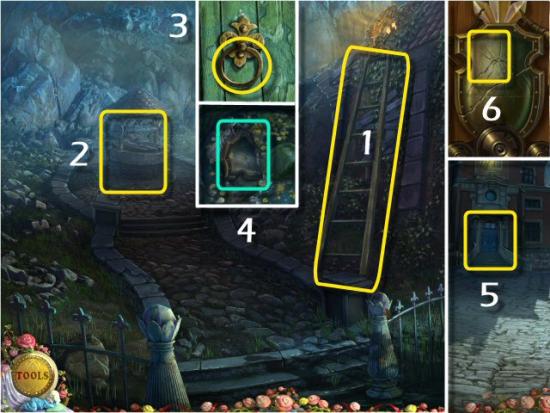
Use the Ladder on the House (1), click on the Well (2) and use the Well Ring Handle on the Door (3). Click on the Door, use the Magnet to collect the Coat of Arms Piece (4) and return to the Street (click back). Click on the Mansion (5), use the Coat of Arms Piece on the Broken Shield (6) and then enter the Open Door of the Mansion.
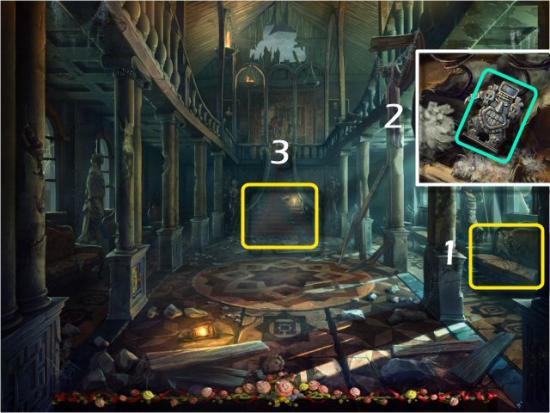
Click on the Sofa (1), click on the Torn Seat Cushion (click twice), collect the Statue (2) and then click on the Stairs (3 – click twice).
Find all the items in the list. Interactive Items: click on the Chest to reveal the Ship Wheel, click on the Green Bag to reveal the Letters. Tool: Letters.

Return to the Cemetery (click back three times, click right into the Churchyard and then forward into the Cemetery) and click on the Tomb (1). Use the Letters on the Nameplate (2), click to open it, collect the Butterfly Ring (3) and then click on the Open Grave (4).
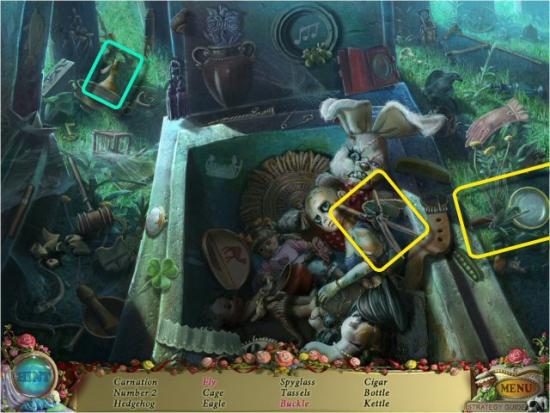
Find all the items in the list. Interactive Items: click the Magnifying Glass to reveal the Fly, click on the Garden Shears to release the Buckle. Tool: Weed Killer (“Bottle”).
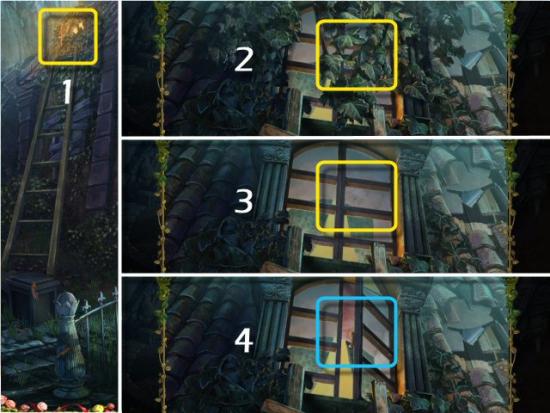
Return to the Well (click forward twice and then left on the Stairs to the Well) and click on the Roof (1). Use the Weed Killer on the Poison Ivy (2) and then click on the Window (3 – click twice).
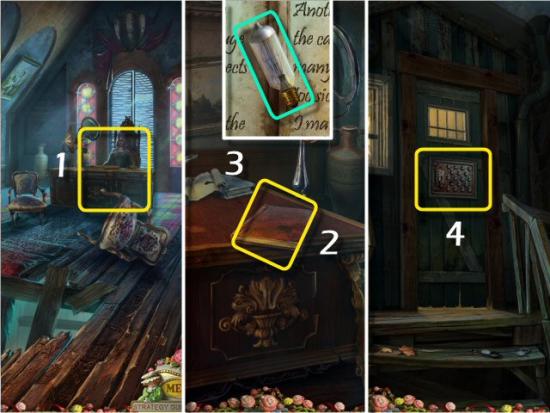
Click on the Desk (1), click on the Book (2 – click twice) and collect the Bulb (3). Return to the Puppet Master’s House (click back three times and then at the upper right) and click on the Door (4).
5 – The Center of Town
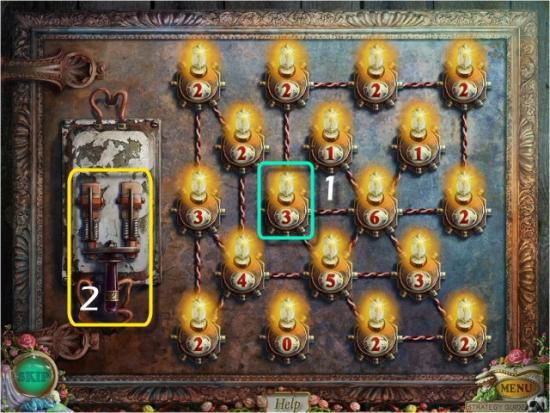
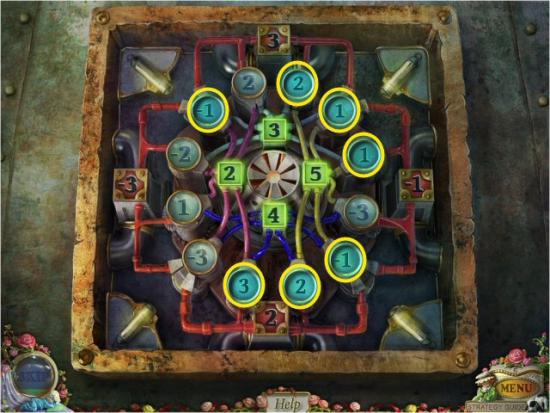
Use the Bulb in the Empty Socket (1). The object is to light all the Bulbs with only the number of connections shown on each one. Move your cursor between the connections, for each Bulb, and then click to place a wire; click again to remove it. You can test your connections by clicking on the Lever (2). If your solution isn’t correct, click on the Lever again to turn off the Bulbs. Note that the solution and initial configuration are always the same, each time you play. Refer to the screenshot for the correct configuration.
Enter the Open Door of the Puppet Master’s House, click on the Puppet (1), collect the Lever (2) and then click on the Desk (3).
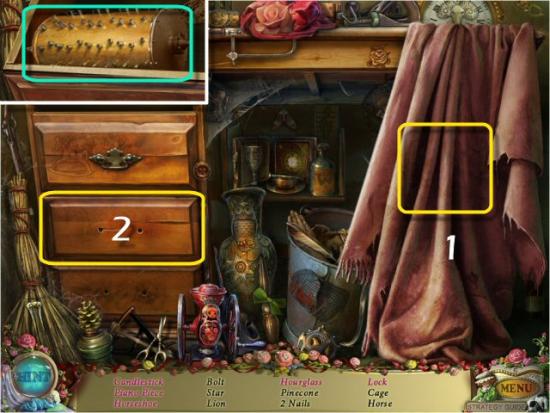
Find all the items in the list. Interactive Items: click on the Pink Blanket (1) to reveal the Candlestick, Horseshoe, Hourglass, Lock, Lady, Spool, Spoon, Handset, Question Mark and number 7 (note that your item list will not contain all these items). Tool: Piano Piece – click on the third Drawer (2) to open it and reveal the Player Piano Roller.
Return to the Blacksmith’s House (click back twice and then left on the House) and click on the Puppet (1). Use the Lever on his Back, click on the Lever (2) and then enter the Open Door. Click on the Debris (3), collect the Handcuff Key (4) and then return to the Outskirts of Town (click back three times).
6 – The Outskirts of Town
Click on the Cage (1) and use the Butterfly Ring in the Lock (2). Click on the Ring, collect the Silver Coin and then click on the Saloon (3).
Click on the Piano Player Puppet (1), click on the Piano Roll Holder (2) and use the Piano Piece. Click on the Dancer (3 – the one closest to the Piano), collect the Heart (4), return to the Bar area (click back) and then click on the Bar (5).
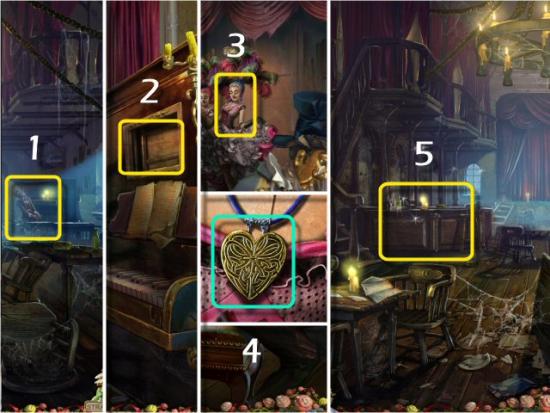
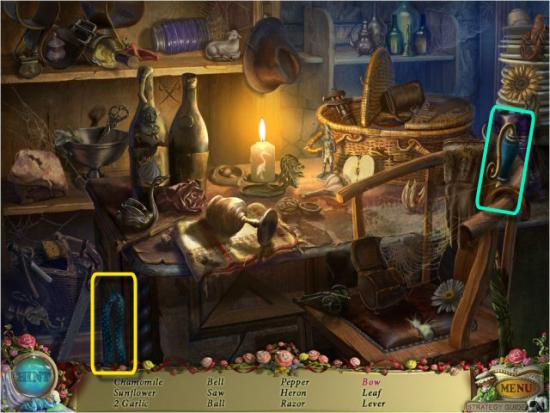
Find all the items in the list. Interactive Item: click on the Ribbon to create the Bow. Tool: Lever.
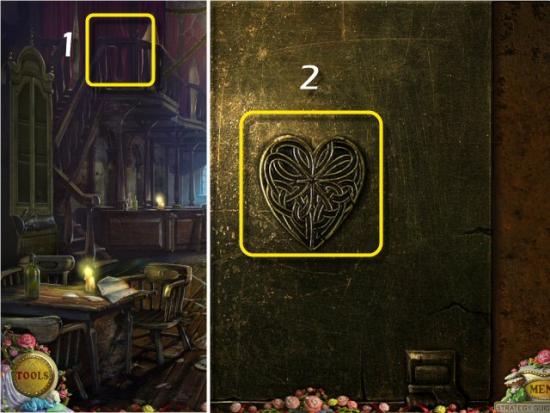
Click on the Curtains (1 – click twice) at the top of the Stairs and then use the Heart in the Empty Space (2).
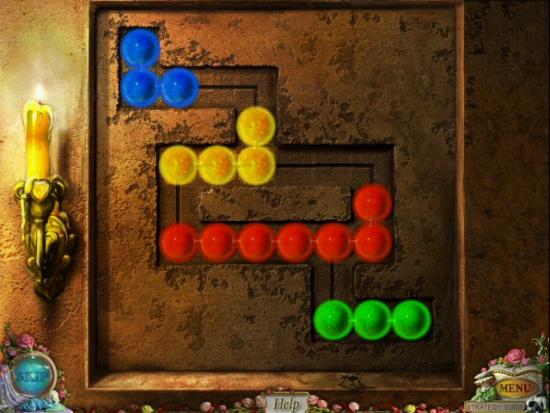
The object is to move the Strings of Colored Balls into their matching colored spaces. Click and drag the leading ball in the string to move it. Note that the solution and initial configuration are always the same, each time you play; however, you’ll need to make a number of incremental moves in order to get them all into the correct spaces.
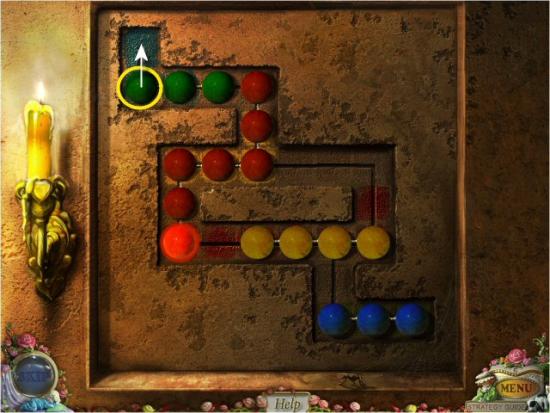
The steps to solving this puzzle are shown below. Note that it is assumed you know to click on the first colored ball, at the leading edge of the string, in the direction you need to move it. Read the chart from top to bottom, and left to right, in columns, beginning on the left side. L = Left, R = Right, U = Up and D = Down.
Color | Direction | Spaces | Color | Direction | Spaces | Color | Direction | Spaces |
Green | U | 1 | Yellow | L,D,R | 5 | Red | L,D | 5 |
Red | R | 1 | Red | R,D,L | 10 | Green | R | 2 |
Yellow | U,L | 4 | Blue | D,R | 4 | Red | R | 2 |
Blue | U,R | 3 | Green | R,D,L,D | 7 | Red | U,L | 3 |
Red | R | 2 | Blue | L,U,L,U | 7 | Green | L | 3 |
Yellow | L,U,L | 4 | Green | R,U,L | 4 | Yellow | U,R,U,L | 6 |
Blue | U,L | 4 | Red | U,L,D,R | 11 | Green | R,D,R | 6 |
Red | R,D,R | 5 | Green | D | 1 | Red | D,R | 6 |
Yellow | L,D,R | 5 | Red | R,U | 3 | Yellow | L | 3 |
Blue | L,U,L | 4 | Green | L,D | 3 | Red | U | 1 |
Yellow | R,D | 7 | Red | U,L | 4 | Yellow | D | 1 |
Red | L,U,R | 7 | Green | D,R | 4 | Yellow | U | 1 |
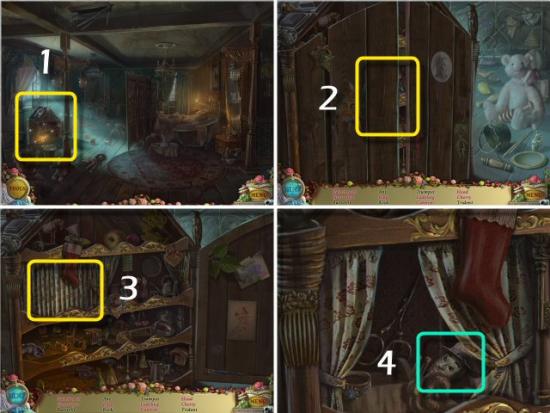
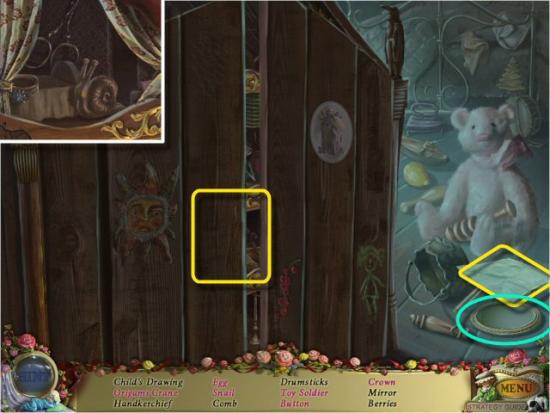
Click on the Open Door, click on the Dollhouse (1) and find all the items in the list. Interactive Items: click on the Cupboard Door (2) to reveal the Turtle, Crown, Leaves, Cherry, Button, Horseshoe, Egg, Key, Bird House, 2 Ships, Teacup, Parasol, Cannon, Ladybug, Kangaroo, Pineapple, Paintbrush, Eye and Toy Soldier (note that your item list will not contain all these items). Once you’ve opened the Cupboard Door, click on the Curtain (3) to reveal the Ring and Head (4). Tool: Puppet Head (“Head”). A good strategy would be to find all the items outside of the Cupboard, before you open the door.
Return to the General Store (click back twice, forward once and then right at the bottom right). Click on the Cash Register (1), use the Silver Coin in the Slot (2), collect the Pesticide and then click on the Slot Machine (3).
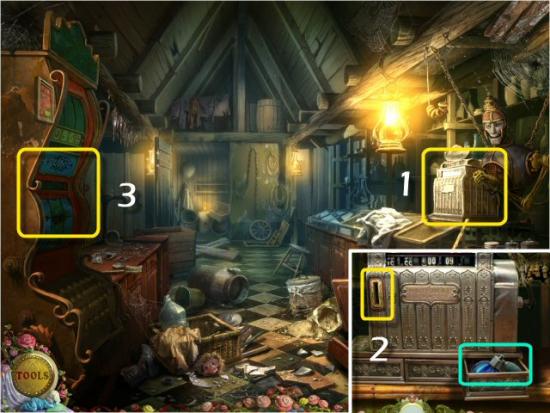
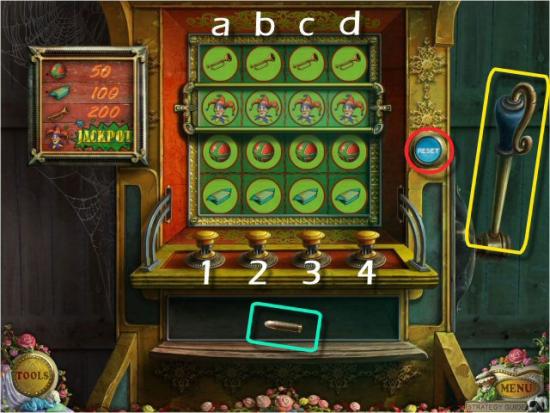
Use the Lever in the Empty Slot and then click on it. The object is to move the Columns to make 4 Rows of Jack Pots (all the symbols are the same, across a row). Click the 4 Buttons (1, 2, 3 and 4), in the correct order, to get all 4 Jack Pots. Each time you click a Button it moves one or more Columns down. You can click on the Reset Button (red) to start over.
Button 1 moves Column “a” down 1 and Column “c” down 2. Button 2 moves Column “a” and “b” down 1 and Column “d” down 2. Button 3 moves Columns “c” and “d” down 1. Button 4 moves Column “b” down 2 and Column “d” down 1. Click on the following Buttons for the quickest solution: 1, 4, 3, 3, 1 and 1. Collect the Bullet.
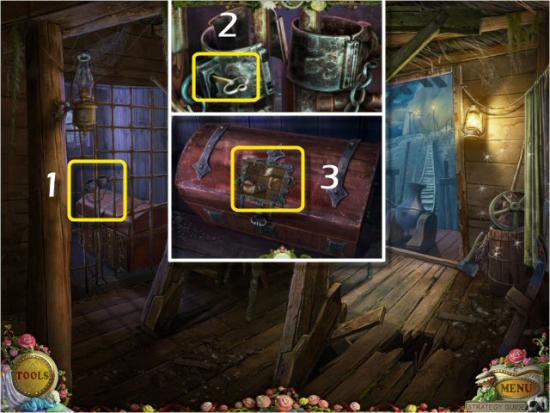
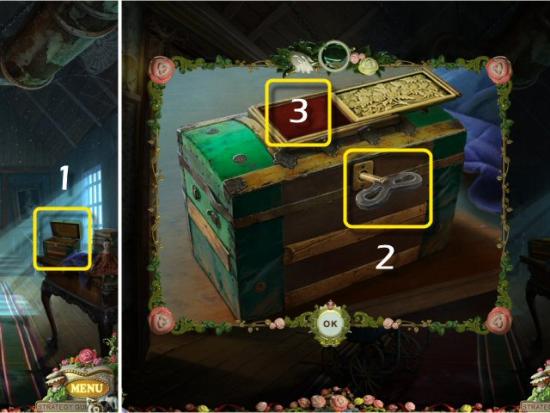
Return to the House where you first exited the Cave (click back four times and then enter the House, on the left), click on the Cell (1) and use the Handcuff Key in the Handcuffs (2). Click on the Open Cell Door and then click on the Chest (3).
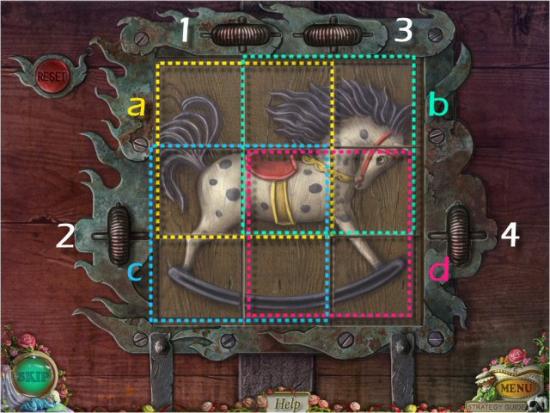
The object is to unscramble the picture of the Rocking Horse. Click on the Buttons at the top and sides to rotate a group of 4 Tiles, clockwise. Once a Tile is in the correct position it will lock into place and only the remaining Tiles in that group will move. Button 1 moves Group “a,” Button 2 moves Group “c,” Button 3 moves Group “b” and Button 4 moves Group “d.” The quickest solution is to click on the following Buttons: 1, 3, 3, 2, 2, 2, 4, 2, 4, 2, 1, 1, 2, 1, 1 and 1.
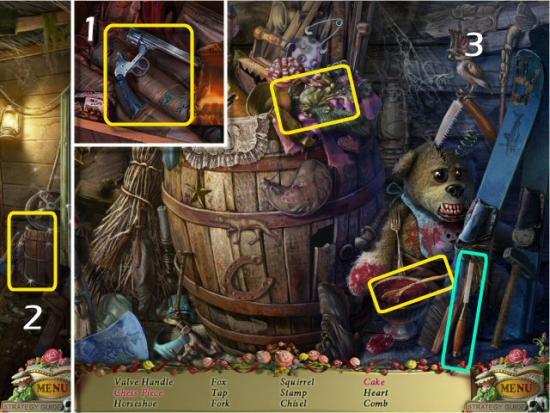
Use the Bullet on the Unloaded Revolver (1 – you’ll automatically receive the Revolver), click on the Barrel (2) and find the items in the list (3). Interactive Items: click the Spoon to reveal the Chess Piece, click the Crab to reveal the Cake. Tool: Chisel
Return to Felicia’s Office (click back once, forward four times, left at the Stairs and then click on the Roof) and click on the Chair (1). Use the Puppet Head on the Puppet Box (2) and collect the Pendant (3).
Return to the Upstairs Room at the Saloon (click back four times, left into the Saloon and left into the Upstairs Room) and click on the Dollhouse. Find all the items in the list. Inventory Item: click on the Paper to create the Origami Crane, click on the Cupboard Door to reveal the Snail (you may need to click on the Curtain inside, also). Note that some things may repeat from the previous item list for this location. Tool: Mirror.
Click on the Vanity (1), use the Pesticide on the Bugs (2), use the Pendant in the Empty Space (3) and collect the Lens (4).

7 – The Mine
Return to Felicia’s Office (click back twice, forward twice, left at the Stairs and then click on the Roof) and click on the Lens Apparatus (1). Use the Lens on the Lens Holder and the Matches on the Lamp (2 – in that order) and then return to the Street (click back twice).

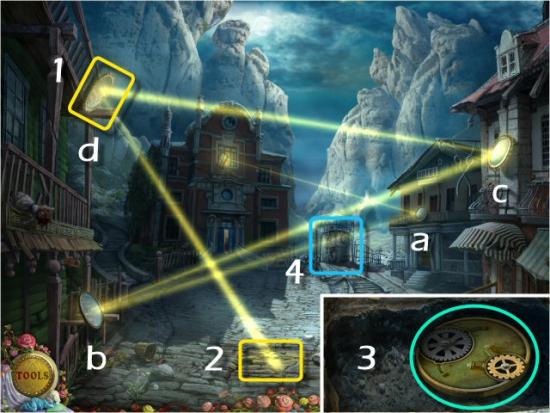
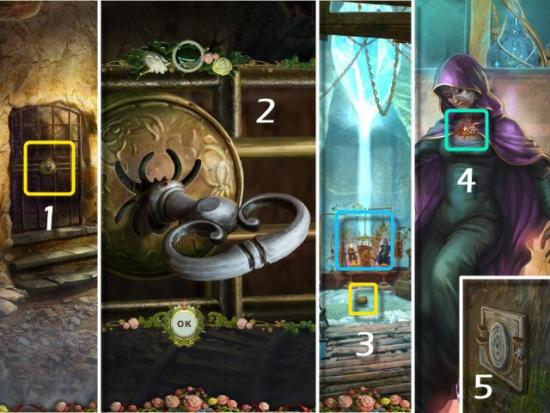
Use the Mirror in the Broken Frame (1) and then click on each Mirror to reveal a Spot on the Cobblestones (2). Note that you only need to click on each Mirror once. The quickest solution is to click on “a,” “b,” “c” and then “d.” Click on the Cobblestones, click on the Paver, collect the Gears (3) and then click on the Tracks to the Tank (4).
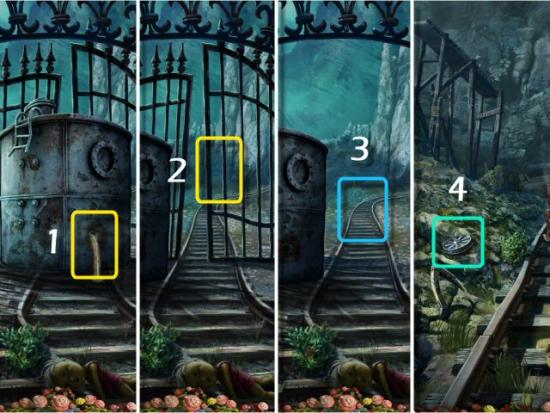
Use the Revolver on the Tank (1), click on the Tank to move it, click on the Gate (2), continue down the Tracks and then collect the Puppet Wheel (4).
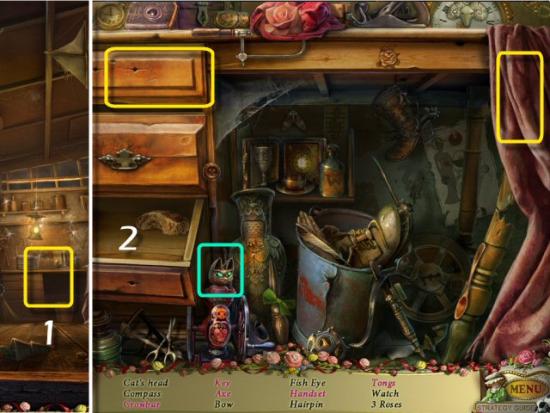
Return to the Puppet Master’s House (click back three times, click on the House at the upper right and enter the House). Click on the Desk (1) and find all the items in the list (2). Interactive Items: click on the Pink Blanket to reveal the Coffee Pot, Crowbar, Key and Axe. Click on the Top Drawer to reveal the Tongs. Note that some things may repeat from the previous item list for this location. Tool: Cat Head.
Click on the Animal Puppet (1), use the Puppet Wheel on the Base (2) and the Cat Head on Top (3 – in either order) and then return to the Tracks to the Mine (click back twice, forward once, right at the Tank and then through the Gate).
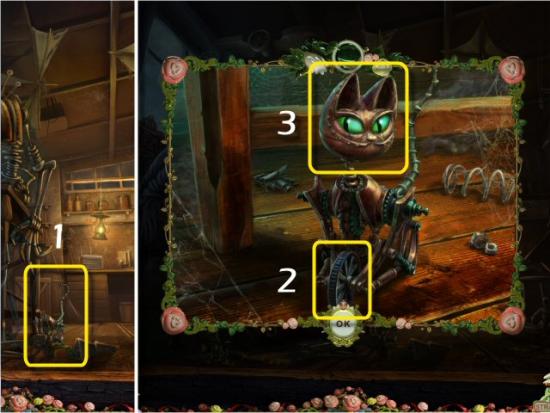
Use the Cat Puppet on the Dog Puppet (1), click on the Dog House (2), collect the Wrench (3) and then click on the Doors to the Mine (4).
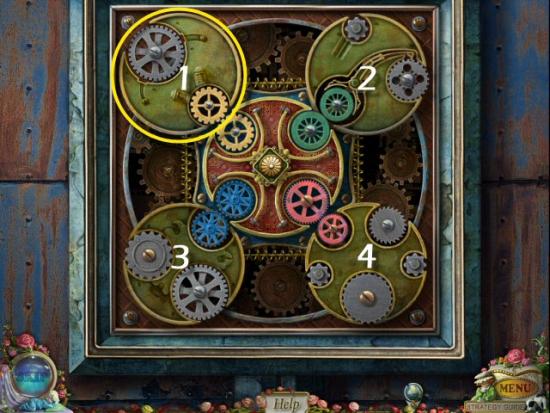
Use the Gears in the Empty Space. The object is to rotate the Gears in the Corners (1, 2, 3 and 4) so that they match up to the Gears in the Center. You can click or right click to rotate them in each direction. The Yellow Gear (1) also moves the Center and the Green Gear, the Green Gear (2) also moves the Center and the Pink Gear the Blue Gear (3) also moves the Center and the Yellow Gear and the Pink Gear (4) also moves the Center and the Blue Gear. The solution and initial configuration are always the same. The solution steps are:
- Right click the Blue Gear (3) once
- Right click the Pink Gear (4) four times
- Click the Yellow Gear (1) twice
- Click the Green Gear (2) twice
- Click the Blue Gear (3) four times
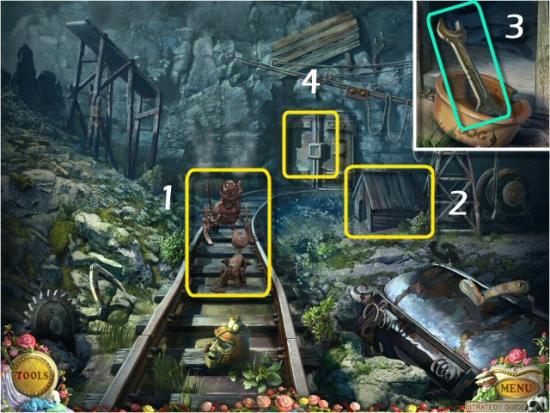
Enter the Mine, click on the Pipe (1) and use the Wrench on the 3 Bolts (2). Click on the Right Shed (3), collect the Fuel Can (4) and then click on the Left Shed (5).
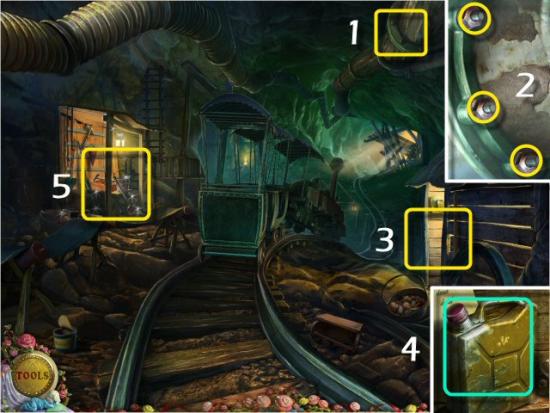
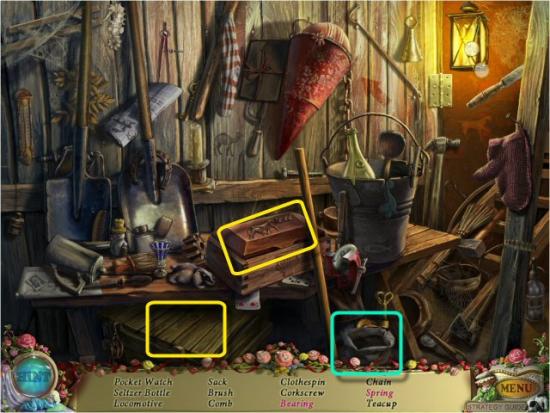
Find all the items in the list. Interactive Items: click on the Chest to reveal the Bearing, click on the Crate to reveal the Spring. Tool: Empty Sack (“Sack”).
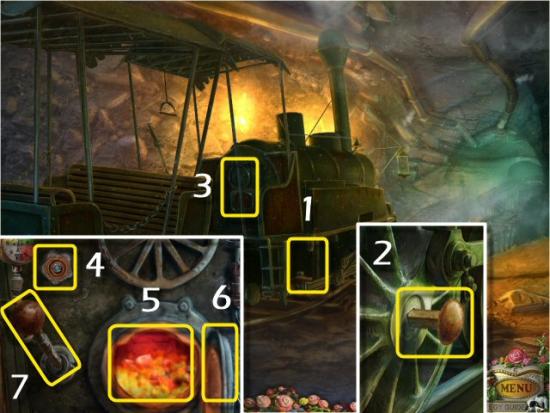
Click on the Train (1) and collect the Broken Wheel (2). Click on the Signal (3), use the Oil Can on the Rust (4), click on the Switch (5) and then click on the Train Car (6).
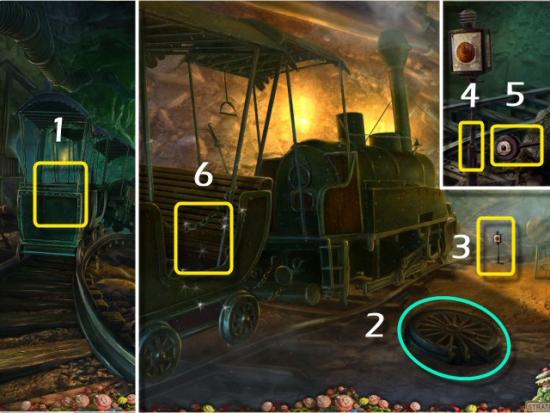
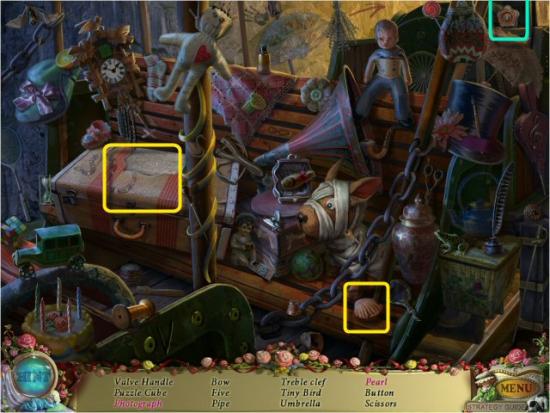
Find all the items in the list. Interactive Items: click on the Suitcase to reveal the Photograph, click on the Clam to reveal the Pearl. Tool: Valve.
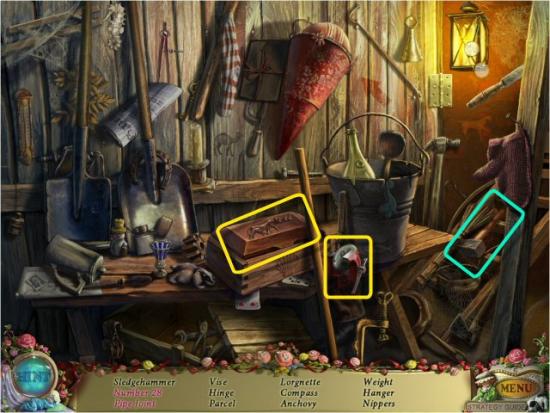
Return to the front of the Mine (click back once) and click on the Left Shed again. Find all the items in the list. Interactive Items: click on the Chest (if it’s not open) to reveal the Pipe Joint, click on the Vise to release the Number 28. Tool: Sledge Hammer.
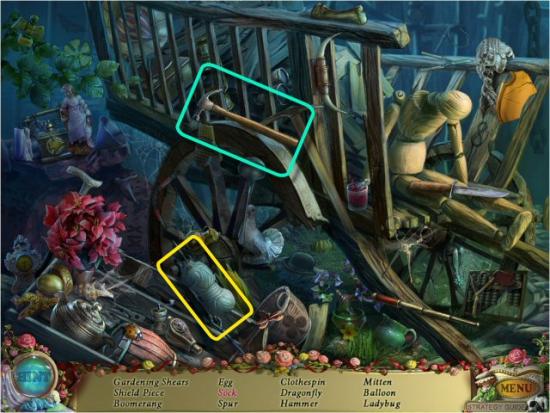
Return to the Gate (click back twice) and click on the Debris. Find all the items in the list. Interactive Item: click on the Yarn to create the Sock. Tool: Hammer
Return to the Outskirts of Town (click back three times), click on the Tree (1), use the Chisel (2), use the Hammer on the Chisel (click twice) and collect the Golden Tooth. Return to the Churchyard (3), click on the Sand (4) and use the Empty Sack on the Sand to receive the Bag of Sand.
Return to the Blacksmith’s Shop (click back once, forward once, left and then enter), click on the Bellows Mechanism (1) and use the Bag of Sand on the Hook (2). Click on the Anvil (3), use the Golden Tooth, click on it again and collect the Golden Coin (4). Repeat with the Broken Wheel and collect the Train Wheel (5).
Return to the General Store (click back twice and the right to enter) and click on the Cash Register (1). Use the Golden Coin in the Slot (2), collect the Winding Gear (3) and then click on the Cupboard (4).
Find all the items in the list. Interactive Items: open the Chest to reveal the French Curve, lower the Teddy Bear’s Arm to reveal the Ant (it may already be showing). Tool: Clock Weight
Return to the Train Engine in the Mine (click back once, forward once, right at the Gate to the Mine and then forward twice) and click on the Axle (1). Use the Train Wheel and then the Spike (in that order), use the Sledge Hammer on the Spike (2 – click twice) and then click on the Engine Compartment (3). Use the Valve on the Stem (4) and then use the Fuel and the Matches on the Coals (5 – in that order). Click on the Furnace Cover (6), the Valve and the Lever (7 – in that order) and then click forward through the new opening in the Mine.
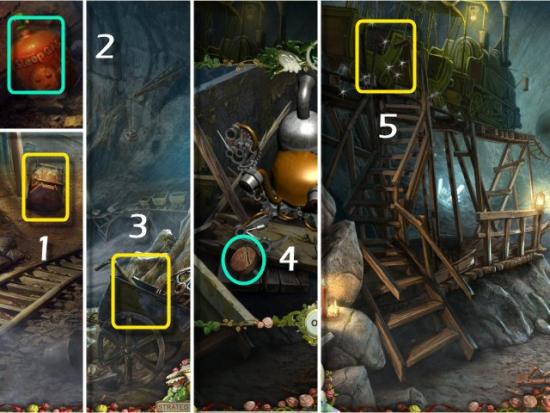
Click on the Mine Cart (1), collect the Sleep Gas (2) and continue forward (3). Click on the second Mine Cart (4), collect the Button (5) and then click on the Elevated Train (6).
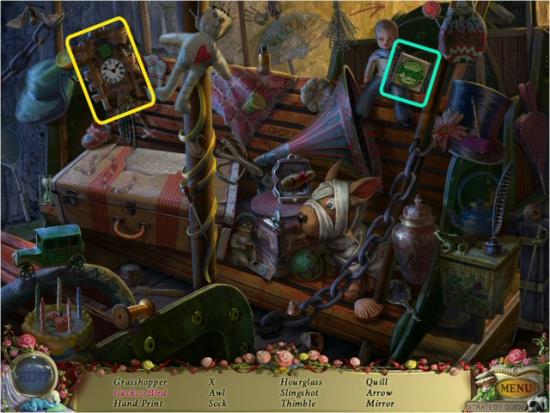
Find all the items in the list. Interactive Item: click on the Clock to reveal the Cuckoo Bird. Tool: Grasshopper.
8 – The North End of Town
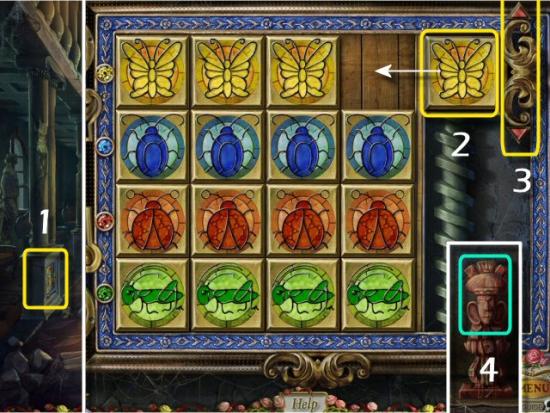
Return to the North End of Town (click back 5 times), enter the Mansion, click on the Column (1) and use the Grasshopper on the Board (click anywhere). The object is to line up all the Symbols, in each row, according to the color of the Gem on the left side of each row. Click on a Tile to move it to the open space. Use the Holder (2), to move a Tile off the Board and use the Arrows (3) to move the Holder, up and down, between rows. The initial configuration is random, but the solution is always the same. When complete, collect the Wooden Statue (4).
Click on the Stairs (1) and find all the items in the list (2). Interactive Items: click on the Dish Towel to create the Dragon on the window, click on the Chest to reveal the Plane. Tool: Triangle. When complete, return outside (click back once) and click on the Barber Shop Door (3).

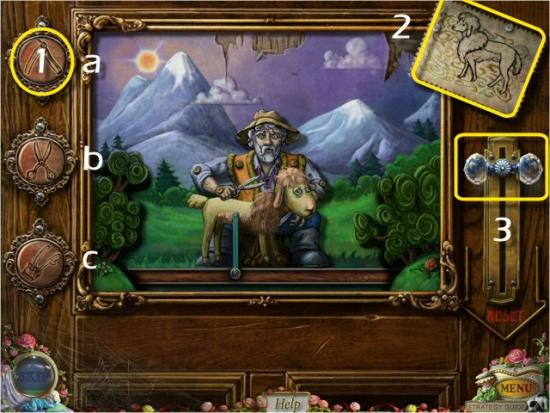
Use the Razor Button in the Empty Space (1). The object is to have the Farmer cut the Sheep’s Wool so that it looks like the image of the Poodle (2). Click on the Buttons, in the correct order, to complete the task. Click on the Handle (3) to reset the puzzle. The initial configuration and solution are always the same. The only correct solution is to click on the following Buttons: a, b, c and then a.
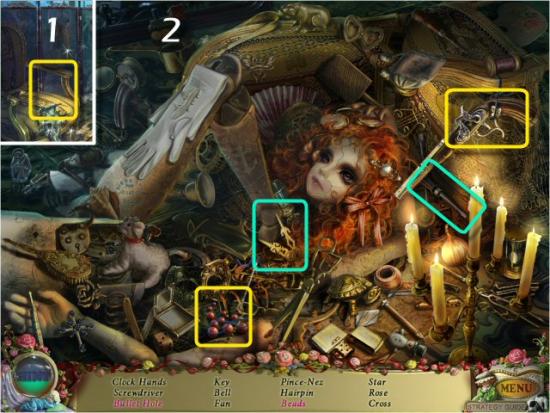
Enter the Barber Shop and click on the Chair (1 – you’ll need to do this 2 times in a row). Find all the items in the lists (2). Interactive Items: click on the Revolver to create the Bullet Hole (on the left side of the scene), click on the Loose Beads to create the Beads. Tools: Screw Driver and Clock Hands.
Click on the Cuckoo Clock (1), use the Clock Hands and Clock Weight (2 – in either order) and collect the Ivory Statue (3). Click on the Barber Puppet (4), use the Screwdriver (5) and you automatically collect the Scissors.
9 – The Mine
Return to the Elevated Train in the Mine (click back once and forward 5 times) and click on the Mine Cart (1). Use the Winding Gear and Scissors on the Puppet (2 – in either order), continue forward (3), click on the Fence and then click on the Playground (4 – click in the same place, twice). Note the Sign on the Pole (5).
Find all the items in the list. Interactive Items: click the Hat to reveal Bow. Tool: Triangle.
Click on the House (1) and use the 2 Triangles on the Board (click anywhere). The object is to rearrange the Tiles to form the correct image. The image will be the same as the Sign on the Pole (2), outside the Fence. Click in the center of a Tile (3) to rotate it and click in between 2 Tiles (4) to switch their places. You can also right click to rotate them in the opposite direction. Click on the Reset Button (5) to start over. The solution is always the same; however, the starting configuration is random each time you play. A good strategy would be to place all the Tiles for the center first, and then work on the perimeter.
When complete, enter the House then immediately exit (click back) and click on the Playground again. Find all the items in the list. Interactive Items: click on the Pouch to reveal the Envelope, click on the Toy Car to release the Key. Tool: Key (the Key will be at the bottom of the Slide).
Return to the House and click on the Box (1). Use the Key in the Lock (2) and then click on the Top (3).
The object is to move all the Keys to the right column, keeping them in the same order, from top to bottom, as they began. Click on a Key and then click the same shaped Lock in the column where you want it to move. Note that the Keys exit and enter columns from the bottom and can’t pass beyond any Keys that are below or above it, in the same column. Click on the Reset Button (blue) to start over. The quickest solution is as follows (The Letter refers to the Row and the Number to the Column you need to move the Key from and then to. Read the chart from left, to right by rows):
D1 to D3 | C1 to C2 | D3 to D2 | B1 to B3 | D2 to D3 |
C2 to C1 | D3 to D1 | B3 to B2 | D1 to D3 | C1 to C2 |
D3 to D2 | A1 to A3 | D2 to D3 | C2 to C1 | D3 to D1 |
B1 to B3 | D1 to D2 | C2 to C3 | D2 to D3 |

Return to the first Mine Cart (click back 3 times), click on the Door (1), use the Key in the Lock (2) and then enter the Chamber. Use the Sleep Gas (3 – click anywhere), continue forward and then collect Felicia’s Brooch (4). Return to the Pathway to Town (the broken bridge with all the Skeletons – click back 9 times) and click on the Plaque (5).
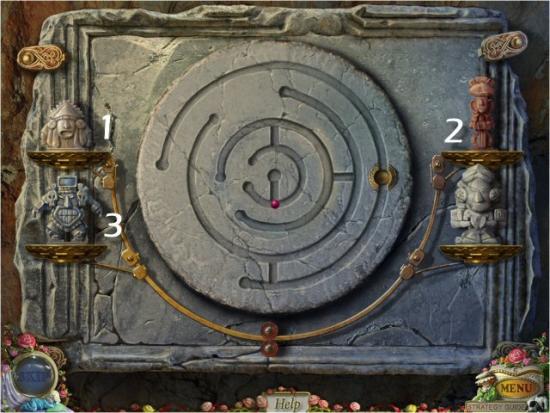
Use the Statues on the Scale. The object is to move the Marble from the center of the Maze to the Brass Cup. Click on a Statue and then click on another to switch their places and rotate the Marble Maze. The Statues are all of different weights and the Maze will rotate clockwise or counter-clockwise depending on which Statues you place where. The solution is always the same IF the Statues are placed on the same Scale Bases, each time. For my solution, I placed the Ivory Statue (1) at the top left, the Metal Statue (2) at the bottom left and the Wooden Statue (3) at the top right.
Placing the Statues in these positions makes the first correct rotation of the Maze. The quickest solution is as follows (note that if you placed your Statues other than shown in the image, this solution will not work for you):
- Switch the Metal (2) and Wooden (3) Statues
- Switch the Ivory (1) and Metal (3) Statues
- Switch the Wooden (2) and Ivory (3) Statues
Continue up the Steps (1), use Felicia’s Brooch on the Monster Puppet and then click on its Chest (2).
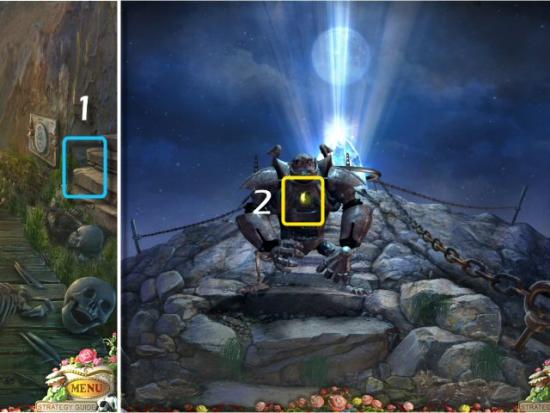
The object is to light the Green Buttons, and avoid lighting the Red Buttons, by pressing the correct Blue Buttons. The correct Blue Buttons will total the number on the Green Buttons. This puzzle is always the same.
Collect the Crystal (1) and then return to the Chamber in the Mine (click back once, forward 7 times and enter on the left). Click the Platform (2), click on the Mechanism (3) and use the Crystal in the Holder (4).
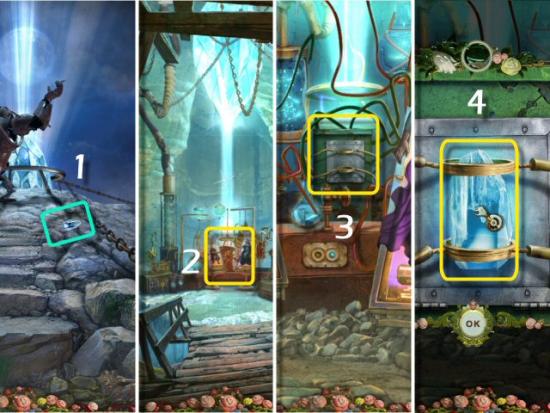
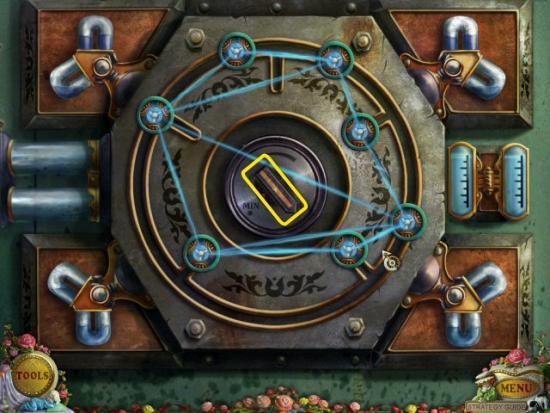
The object is to uncross all the Energy Currents. Click on a Fuse (1) and then drag it to a new position. Drag it into one of the slots (2) so you can move the other Fuses. There isn’t one exact solution where everything must be in a certain place. As long as the Currents don’t cross each other, it’s solved. When complete, click and drag the Pointer, counter-clockwise, to the “Min” marking on the Dial.
Watch the ending movie and credits. Congratulations! You’ve completed the PuppetShow: Lost Town.

More articles...
-
Best Horror Games On Itch.io – July 2026
Across a bounty of subgenres. -
Haze Seas Accessories Tier List [Best Accessories to Equip]
The accessories with the best stat buffs in Haze Seas.