
Best Horror Games On Itch.io – July 2026
Across a bounty of subgenres.![Haze Seas Accessories Tier List [Best Accessories to Equip]](/wp-content/uploads/2026/07/haze-seas-accessories-tier-list.jpg "Haze Seas Accessories Tier List [Best Accessories to Equip]")
Haze Seas Accessories Tier List [Best Accessories to Equip]
The accessories with the best stat buffs in Haze Seas.
![[Roblox] Evomon Shiny Hunting Guide – Including Prismatic and Pris Shinies!](/wp-content/uploads/2026/06/evomon-shiny-hunting-guide.jpg "[Roblox] Evomon Shiny Hunting Guide – Including Prismatic and Pris Shinies!")

PuppetShow: Destiny Undone Walkthrough
PuppetShow: Destiny Undone is an interactive hidden object puzzle game created by ERS Game Studio. You will move from location to location solving hidden object hunts, mini-puzzles and picking up items to use in order to proceed in the game. Gamezebo’s strategy guide will provide you with detailed images, tips, information, and hints on how to play your best game.


- Prefer Gamezebo on Google

Game Introduction – PuppetShow: Destiny Undone
PuppetShow: Destiny Undone is an interactive hidden object puzzle game created by ERS Game Studio. You will move from location to location solving hidden object hunts, mini-puzzles and picking up items to use in order to proceed in the game. Gamezebo’s strategy guide will provide you with detailed images, tips, information, and hints on how to play your best game.
General Tips
- This walkthrough is meant to be used as a guide to assist in solving mini-puzzles and acquiring all items in order to complete the game. You may explore locations in the order you wish, this walkthrough is written to take the most direct route to the game’s finish.
- Inventory objects will be written in CAPITALS and highlighted in yellow in the screenshots. The walkthrough will state, “Use the inventory item on the blah blah,” because it assumes you have the item. If you don’t have the item, on your keyboard, press CTRL+F (at the same time). In the text box, type the name of the item you are looking for and press ENTER. This will scan this page for the appearance of that word.
- Often you need to perform an action (i.e., place or collect an inventory item) in order for the game to progress. Before assuming the game has a glitch, go through your inventory and see if you can place any of your items anywhere or look for an item to pick up, switch to flip, etc.
- The Menu button at the bottom right of the screen gives access to the options screen and can bring you back to the main menu.
- Items collected throughout the game go into your inventory, located at the bottom-left of your screen. To keep the inventory displayed, click the lock icon.
- Closing a window – To close the zoom-in windows, click the X at the top right corner. Tip: If you can zoom in on the area again, you likely haven’t found everything you needed to find.
- Character puppets – There are ten character puppets to collect throughout the game. Some are available in the Bonus Chapter so it is safe to assume character puppets can only be collected in the Collector’s Edition.
Difficulty modes
- There are three difficulty modes.
- Casual mode has faster filling Hint and Skip meters and sparkles indicate all active areas. A tutorial is available. The sparkles are very faint.
- Hard mode has slower filling Hint and Skip meters and there are no sparkles to indicate active areas.
- Advanced mode has no Hint or Skip meter and there are no sparkles to indicate active areas.
- You can change the difficulty setting during the game from the Options menu.
Cursors
- The default cursor looks like an arrow with a globe.
- A magnifying glass indicates you can inspect the area more closely or interact with the area (i.e., use an inventory item).
- A grabbing hand indicates you can pick up an item to add to your inventory.
- A spinning globe indicates you can move in that direction.
- Move your cursor over every aspect of a scene and watch for it to change, it’s the only way to find everything, especially if playing in Hard and Advanced mode.
Hidden objects scenes (HOS)
- Some hidden object scenes provide a list of items to find. These items are different each game so only the inventory item will be indicated by a yellow highlight in the screenshots.
- Items written in black are available immediately.
- Items written in orange require an extra action to be found. These items will be indicated by white highlights in the screenshots.
- Some hidden object scenes provide silhouettes of items to find. When you find an item, you will need to use it within the scene in order to uncover other items.
Helper puppet
- Use the helper puppet to get into areas you can’t reach.
- The helper puppet will move and wiggle about when it can be used in a location.
- Throughout the game, you will find hat patterns for the puppet. Click on the puppet house (found in the Tools fan) and click on a mannequin head to make the hat.
- There are twelve hat patterns found in the regular game and four in the bonus chapter.
- Instructions for the hat patterns can be found at the bottom of this walkthrough.
Journal and Map
- Your journal is located at the bottom right of the screen.
- The journal records your progress and contains clues to solve puzzles. The journal will open and close when new clues have been added.
- Items collected that are added to your journal will be highlighted in white in the screenshots.
- The map is located at the bottom right of your screen. Your current location is indicated by a your puppet helper. Objectives are indicated by an exclamation point.
- You can use the map to jump from location to location.
Hint and Skip
- The Hint and Skips options are available in all game modes.
- The Hint button is located at the bottom right of the screen. After using a hint, the meter will recharge.
- Hints used in hidden object scenes will point out an item to find.
- Hints used during the adventure mode will point out what to focus on in the scene or will highlight in which direction to go.
- Skip allows you to skip mini-puzzles.
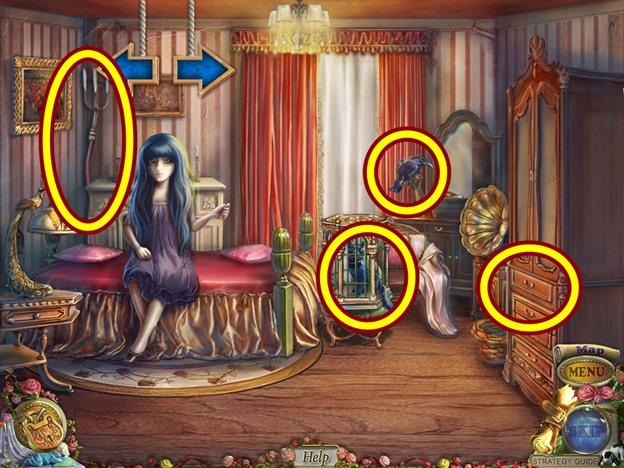
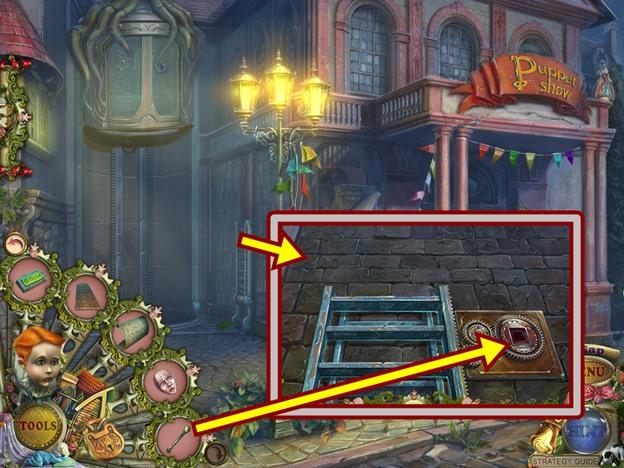
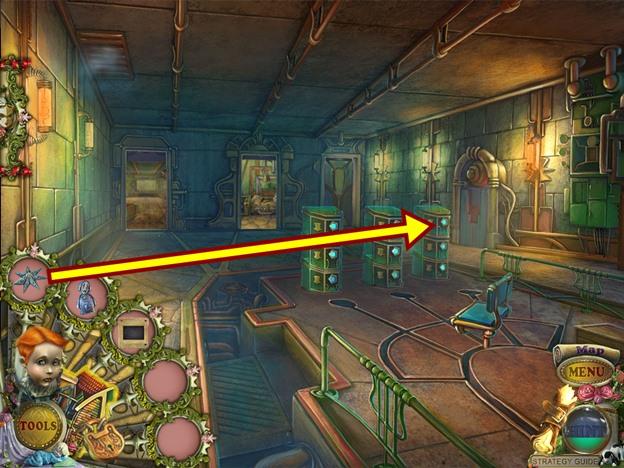
Chapter 1 – The Master’s House
- From the main screen, click Play, then choose your difficulty. Watch the cutscene.

- Talk to Felicia. Click through the dialogue.
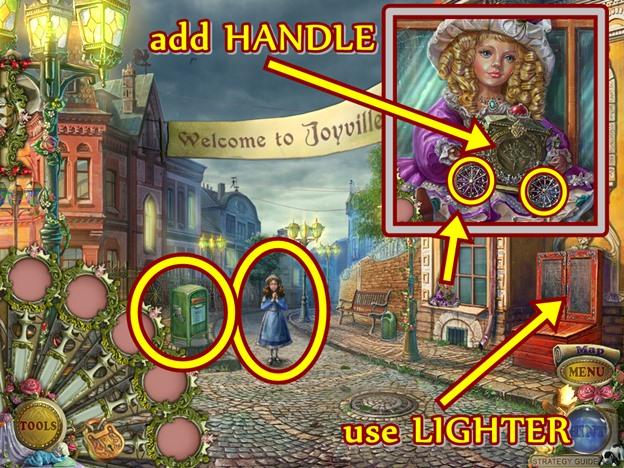
- Click on the newspaper box.
- Open the door and take out the newspaper.
- Read the article, then take the HANDLE. Click anywhere outside the window to close it.
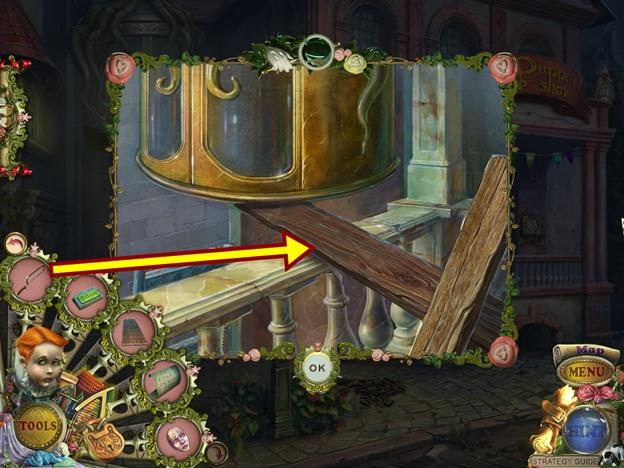
- Click on the doll on the windowsill.
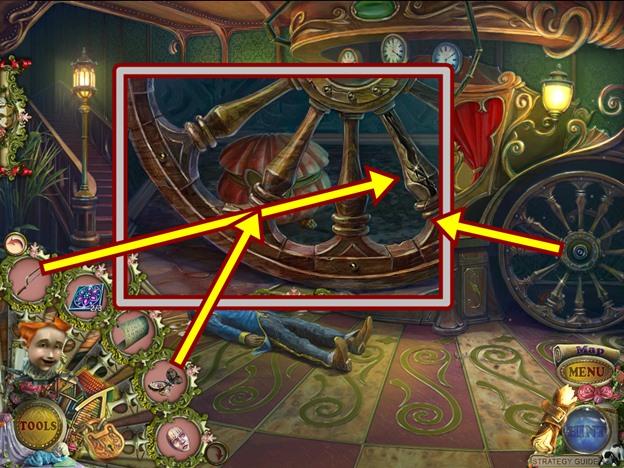
- Click on the two carriage wheels, then add the HANDLE.
- Take the LIGHTER that appears.
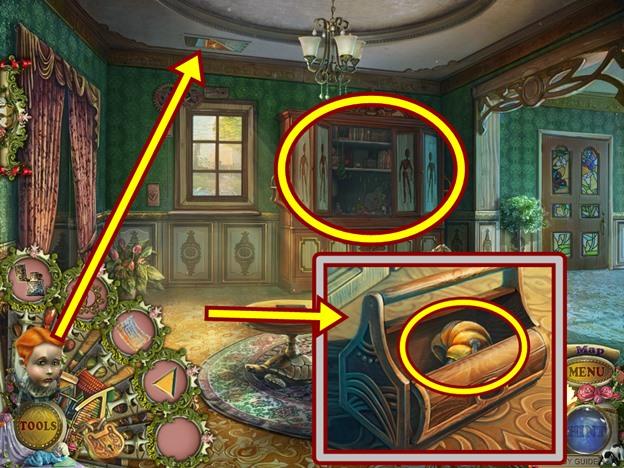
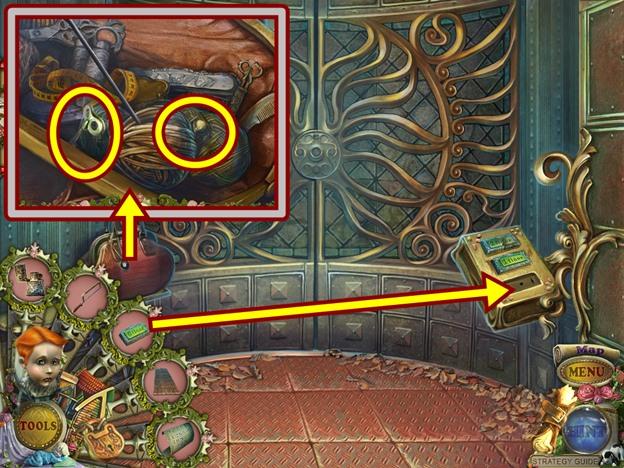
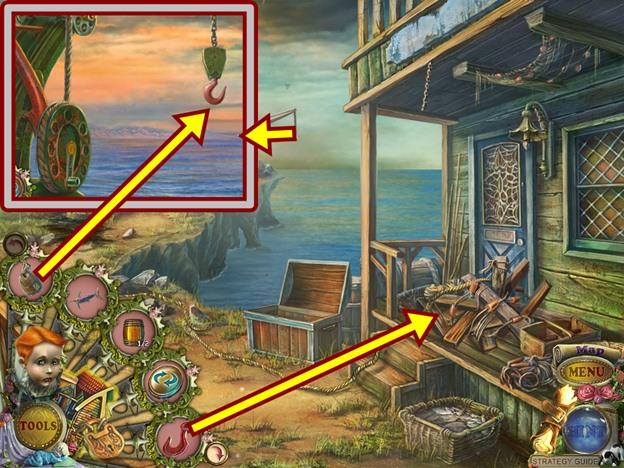
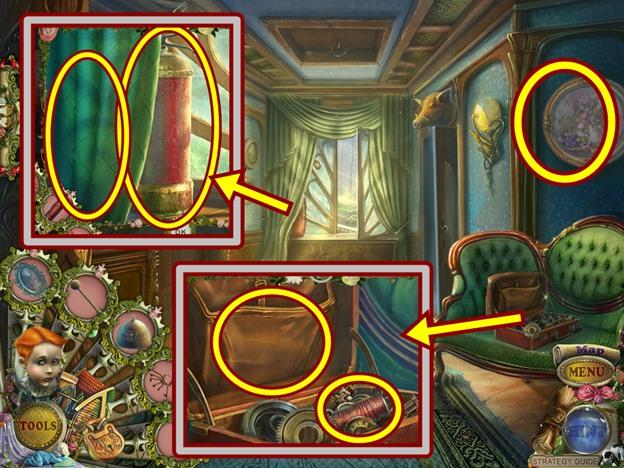
- Click on the red chest beside the window.
- Use the LIGHTER to burn the rope to open the cabinet.
- Take the HOOK.
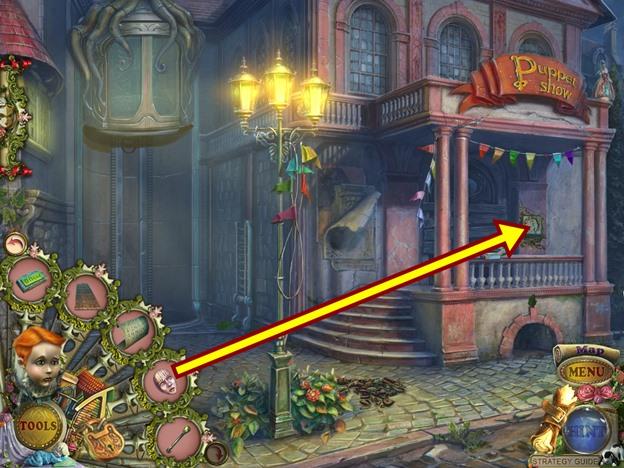
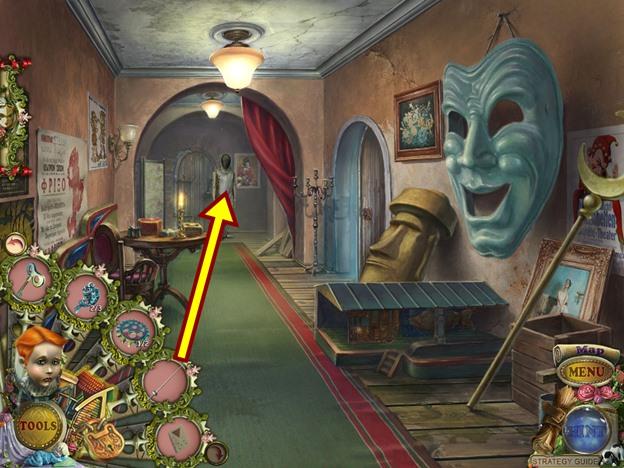
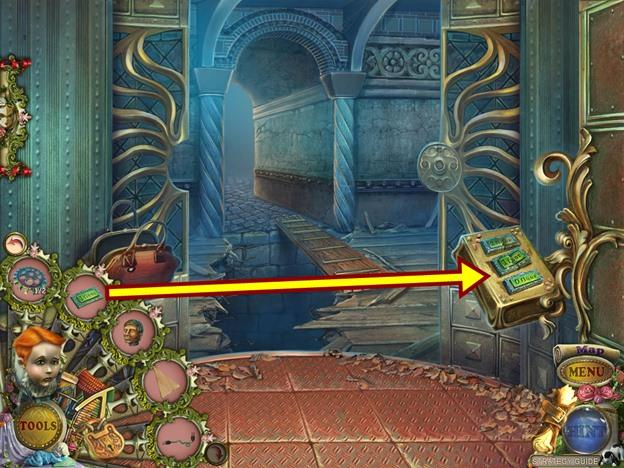
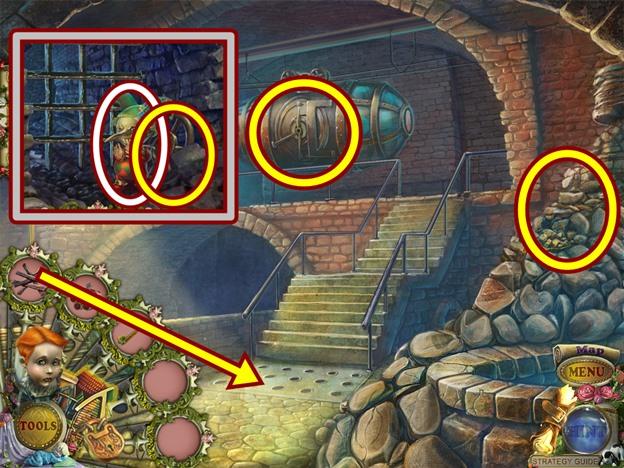
- Move up the street.
- Talk to the paper boy. Click through the dialogue.
- Move down.
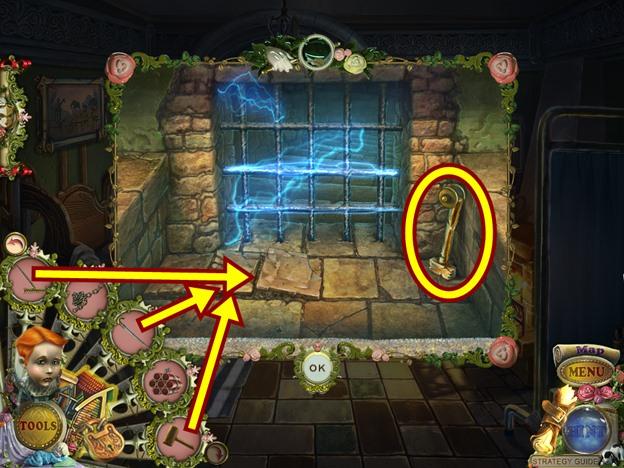
- Click on the manhole cover.
- Use the HOOK to get the HANDLE.
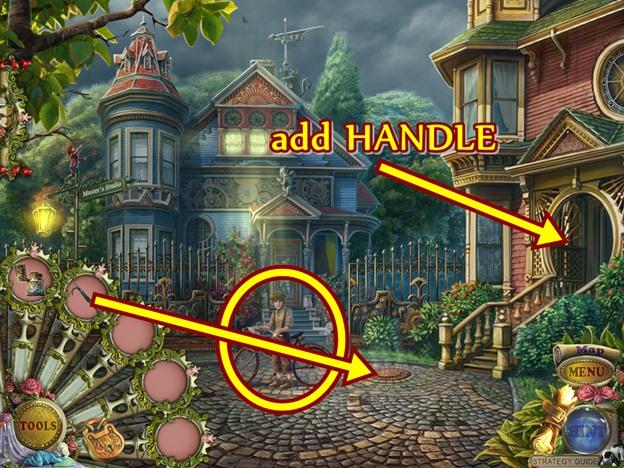
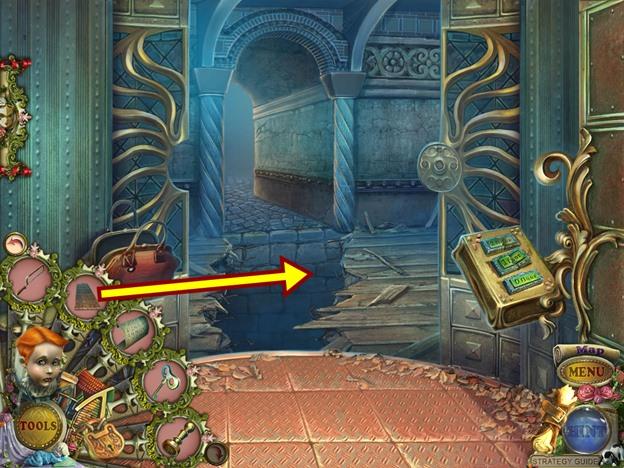
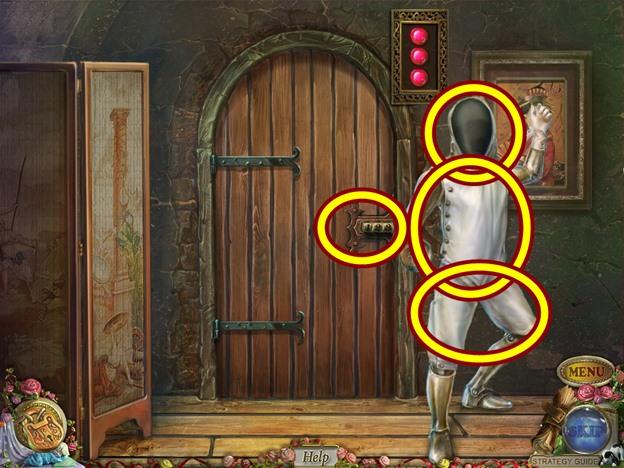
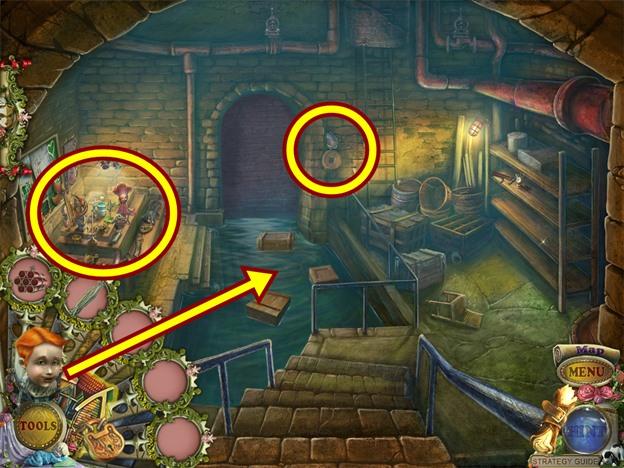
- Click on the door on the house on the right.
- Add the HANDLE, then turn it.
- Enter the Master’s house.
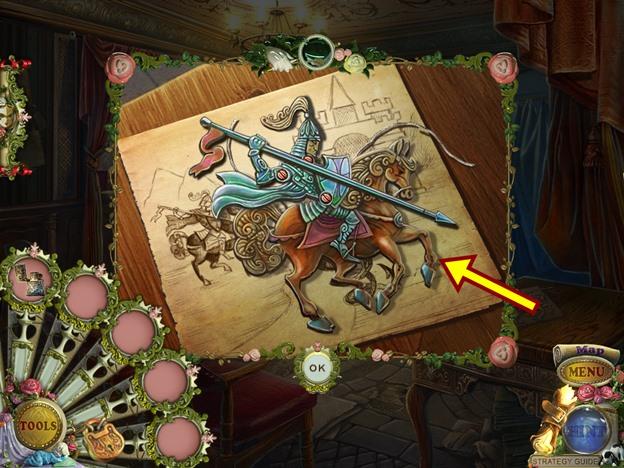
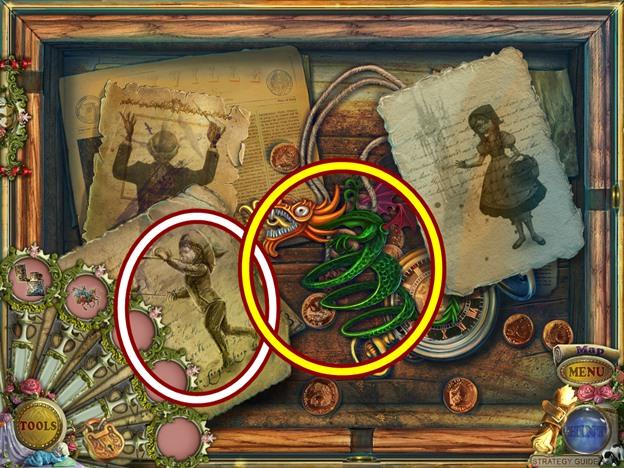
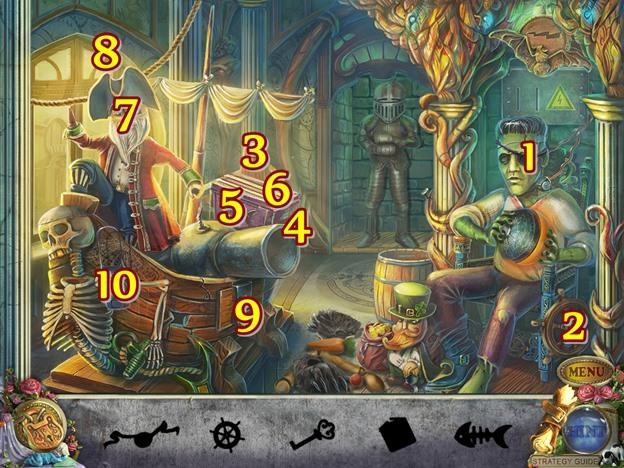
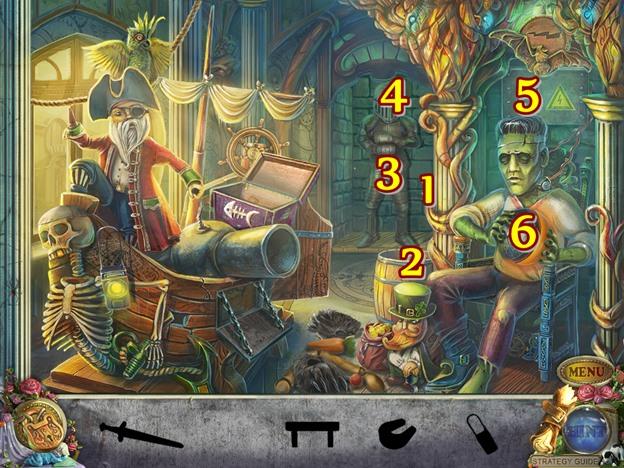
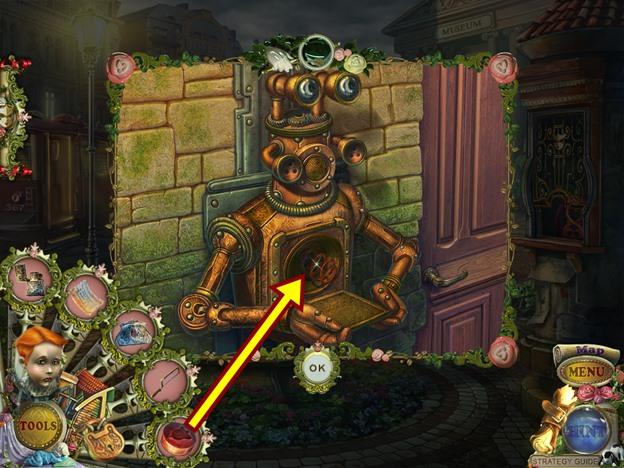
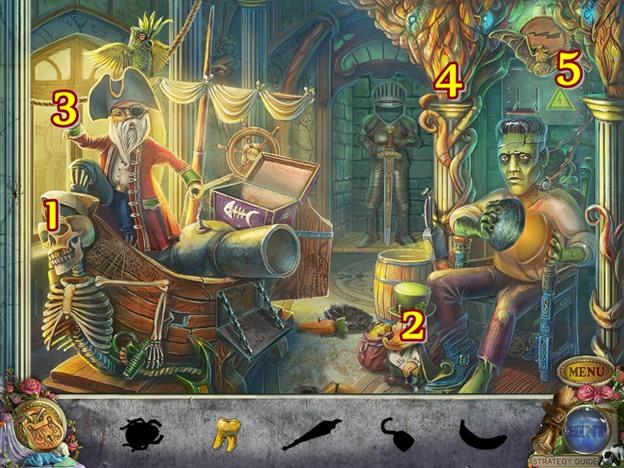
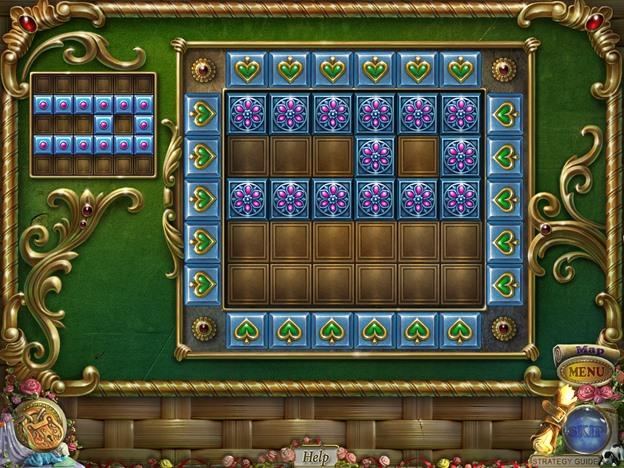
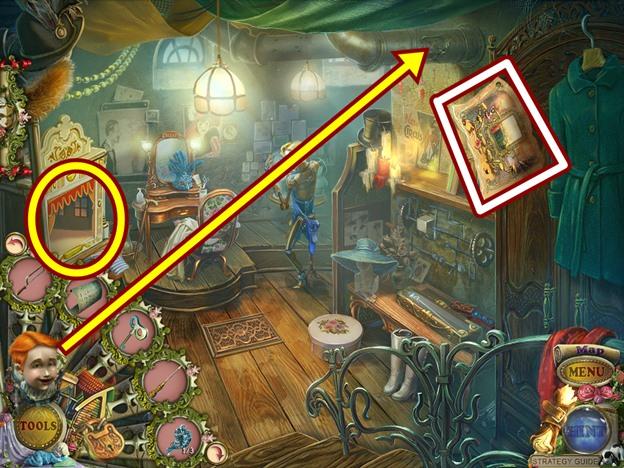
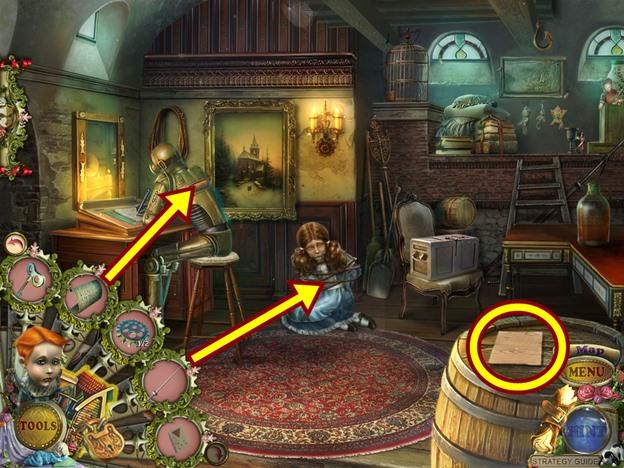
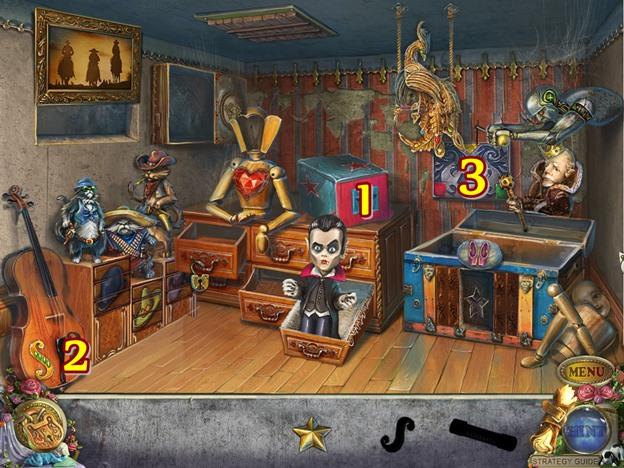
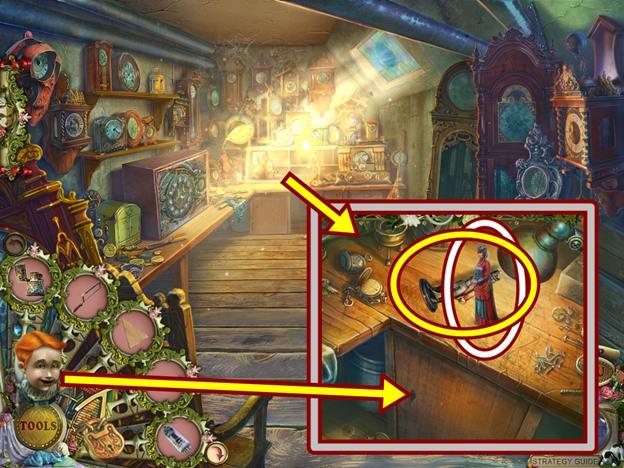
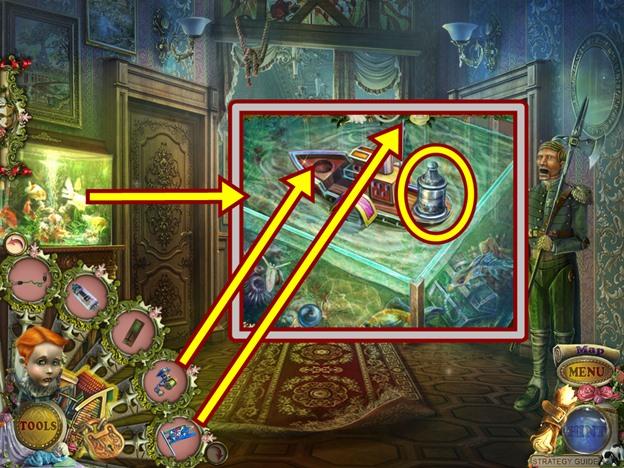
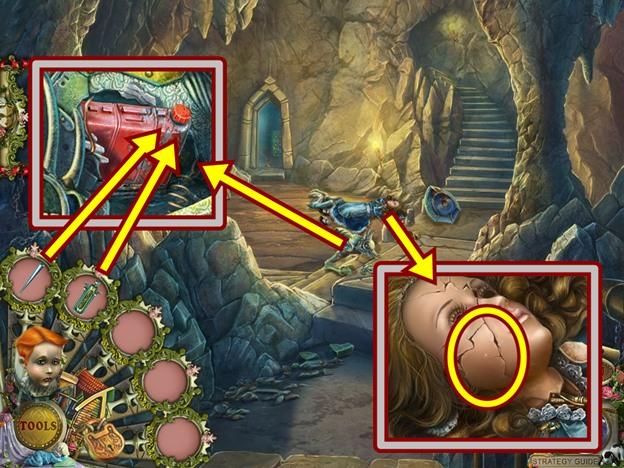
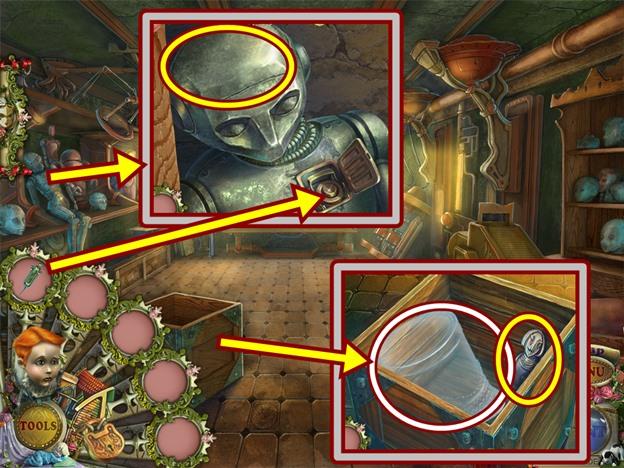
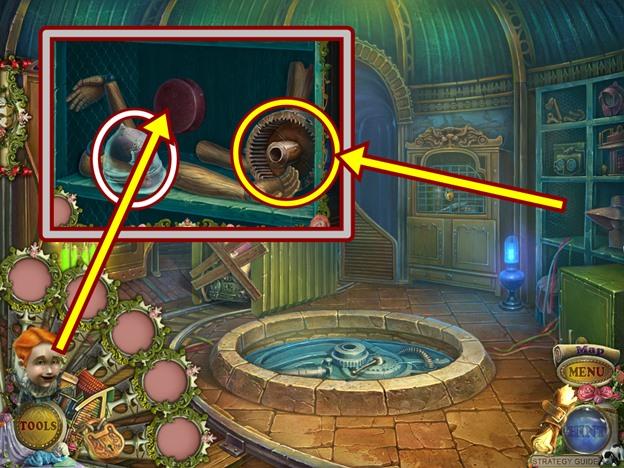
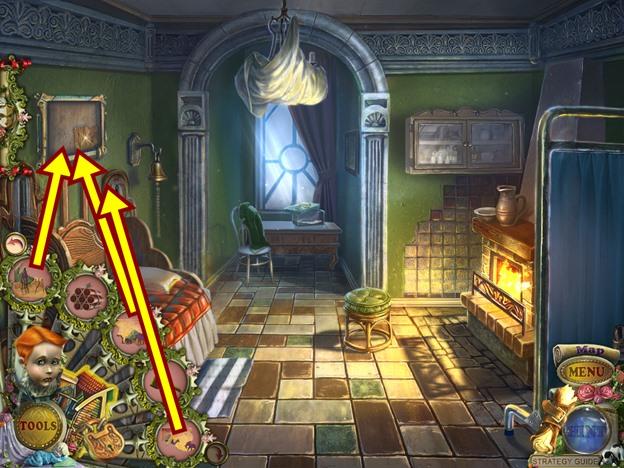
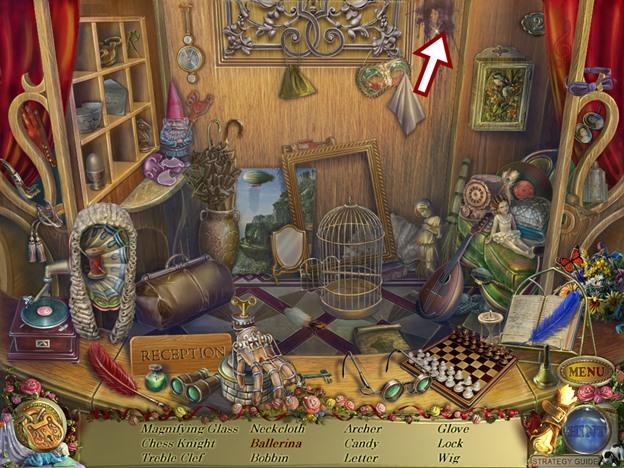
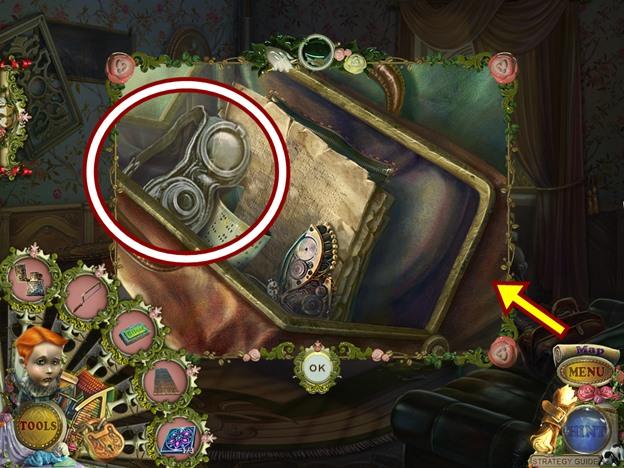
- Click on the table on the right.
- Put the knight back together again by matching up the screws. Start with the torso, then add the shield, arm and head. When you are finished, take the KNIGHT. The completed image is shown in the screenshot above.
- Click on the windowsill to confront the mechanical puppet.
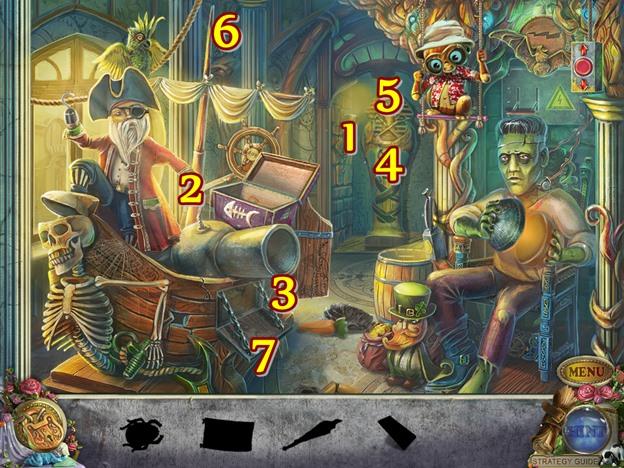
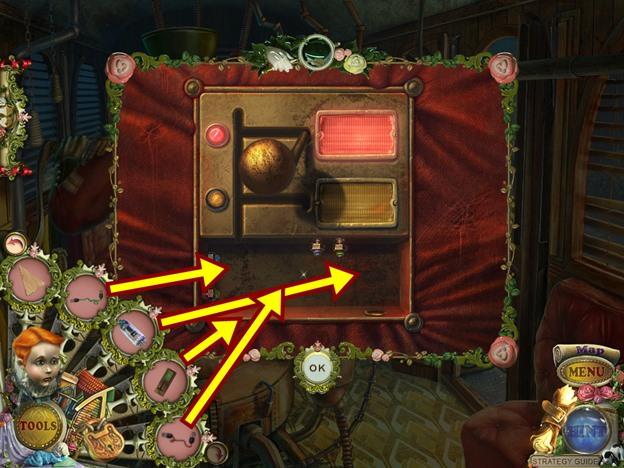
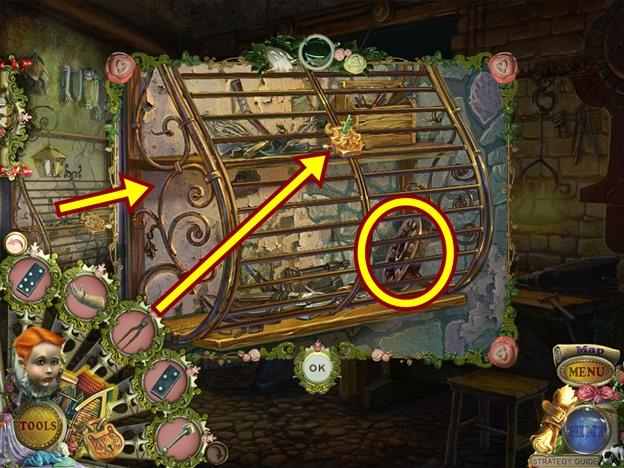
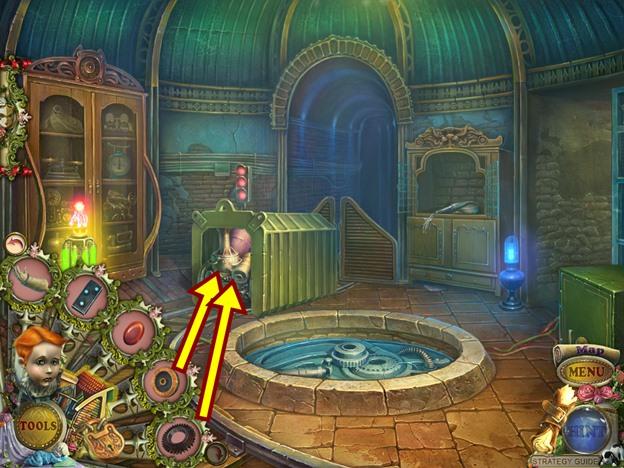
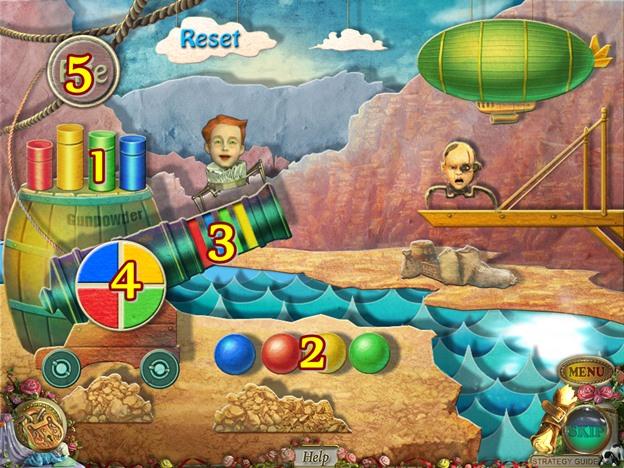
- Click on the box on the floor.
- A mini-puzzle starts.
- Use the levers to move the trains so each train is on its matching coloured track. Solving this puzzle depends on timing. There will be times when you’ll have two trains on one track. Ensure they do not crash or you’ll have to start over.
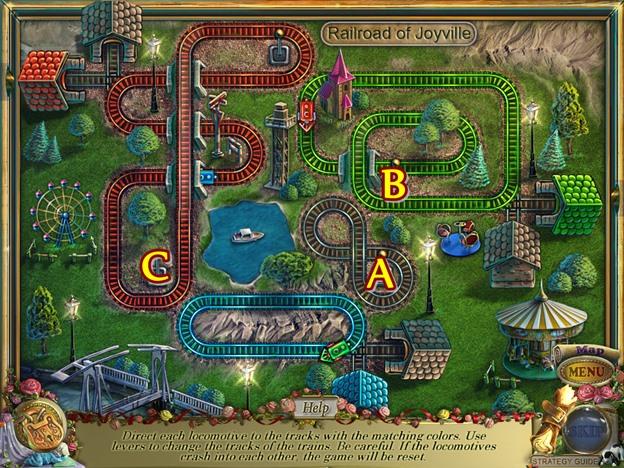
- Start by clicking the lever labelled A in the screenshot above to move the green train to the yellow track.
- Now click the lever labelled B to move the green train to the green track, ensuring it will not collide with the red train.
- Click the lever labelled A to move the red train to the blue track.
- Click the lever labelled C to swap the red and blue trains.
- Wait for each train to pull into its station.
- Once the puzzle is completed, its panel will open.
- Take note of the picture of the boy holding a pinwheel and a bugle.
- Move the papers, then take the DRAGON.
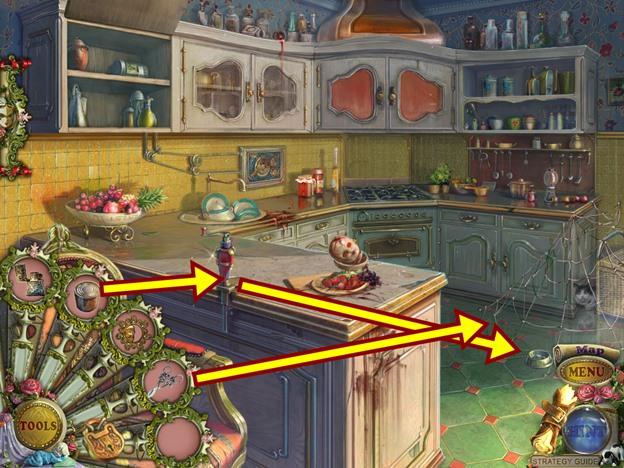
- Open the curtain and enter the kitchen.
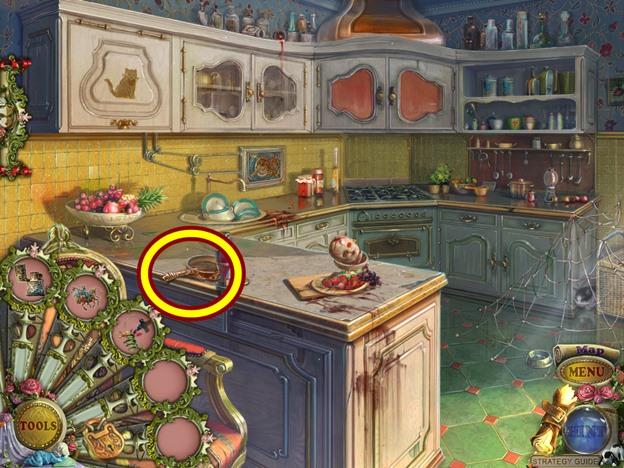
- Click on the counter with the can opener.
- Take the FRYING PAN. Click anywhere outside the window to close it.
- Move down.
- Click on the window sill.
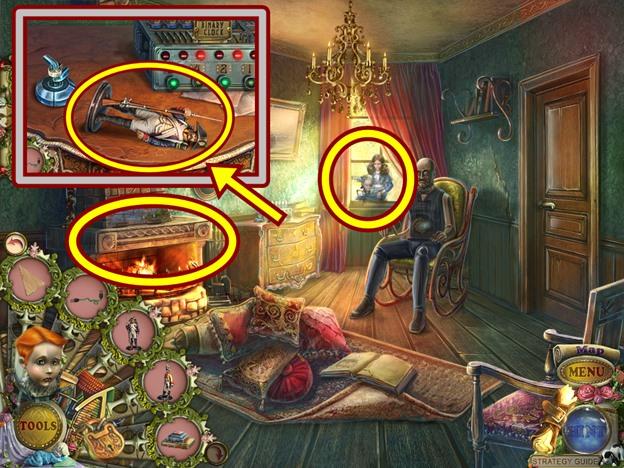
- Hit the mechanical puppet with the FRYING PAN.
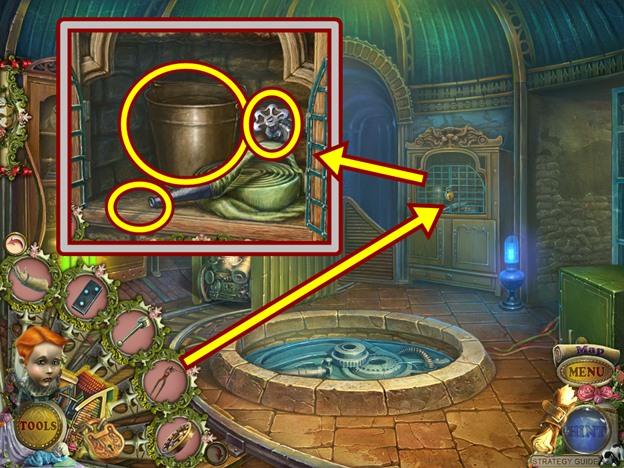
- After the puppet falls out the window, take the OILCAN.
- Return to the kitchen.
- Click on the panel over the sink.
- Use the OILCAN on the gears, then turn the handle.
- Click on the now open cupboard.
- Take the ANGEL and CAN.
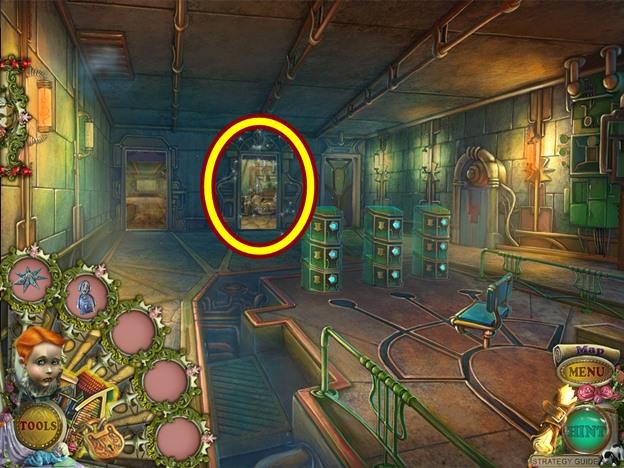
- Move down.
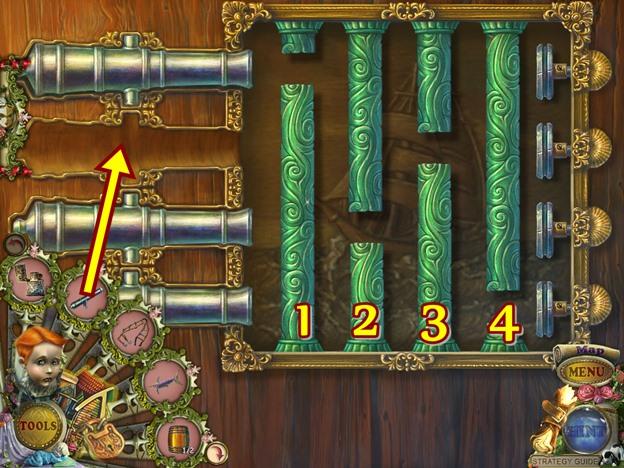
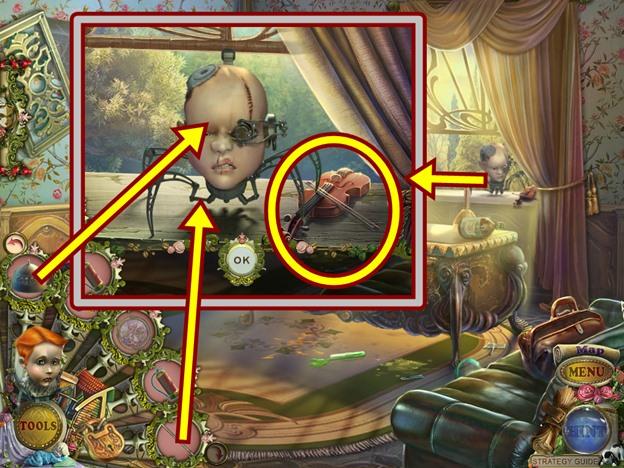
- Click on the puppet theatre.
- Add the KNIGHT to the strings on the far left, add the DRAGON to the strings in the centre and add the ANGEL to the strings on the far right.
- After the animation, take the SUN that appears. When the panel opens, take the SCISSORS.
- Return to the kitchen.
- Click on the can opener.
- Add the CAN to the base, then turn the handle.
- Lift the lid, then take the OPENED CAN.
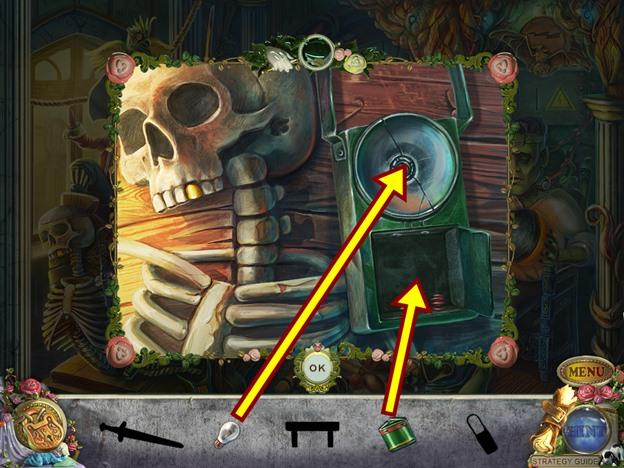
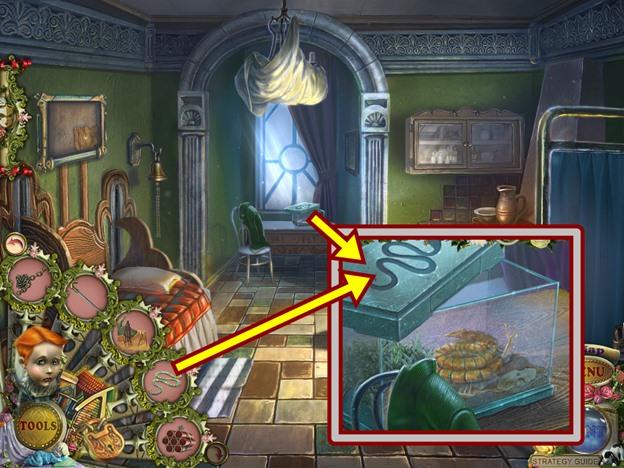
- Click on the trapped cat.
- Cut the net with the SCISSORS.
- Pour the OPENED CAN into the empty bowl to coax the cat out.
- Take the CAT.
- Move down two scenes.
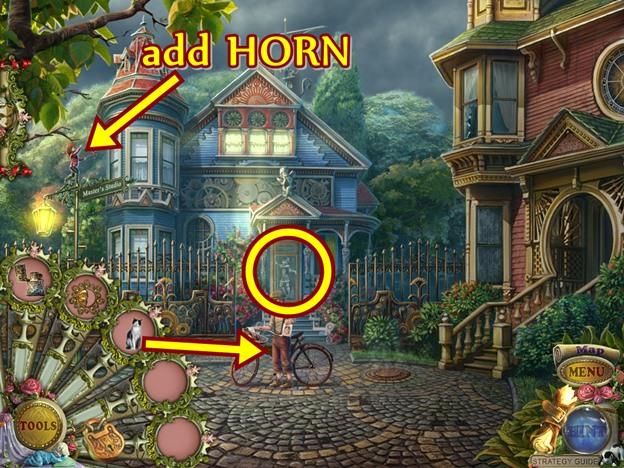
- Click on the paper boy and give him the CAT. Click through the dialogue.
- Take the HORN he offers.
- Watch the cutscene.
- Click on the street sign.
- Put the HORN on the boy statuette.
- When the street sign opens, take the KEY.
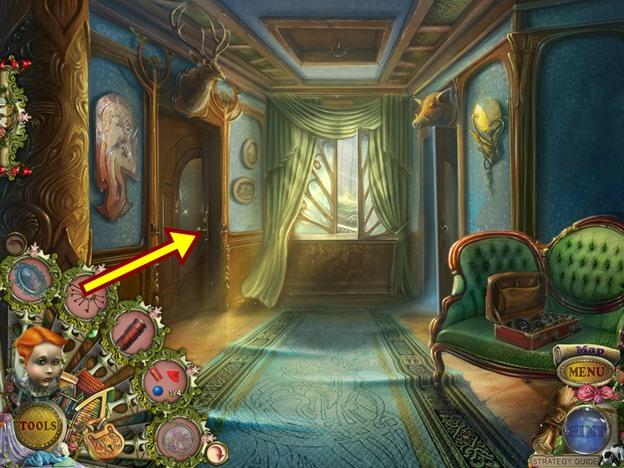
- Click on the house in the centre.
- Insert the KEY, then turn it two times.
- Enter the house.
- Click through the dialogue.
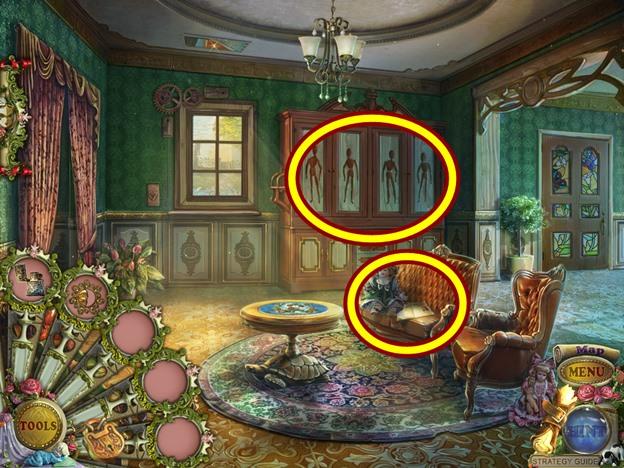
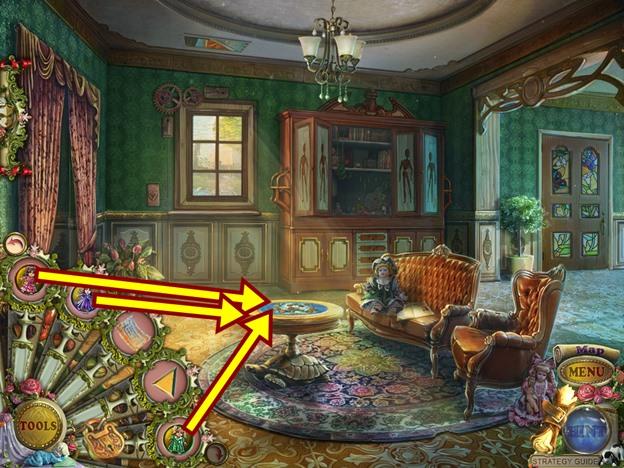
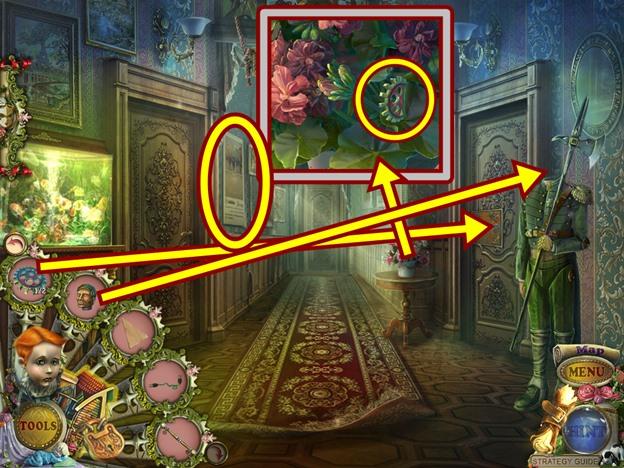
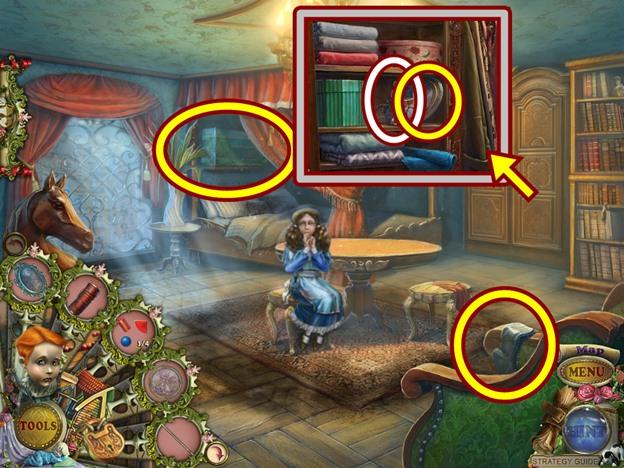
- Click on the sofa.
- Click on the etching to add it to your journal as it will be used later to solve a puzzle.
- Take the RED DOLL.
- Read the newspaper article. Click anywhere outside the window to close it.
- Open the cabinet.
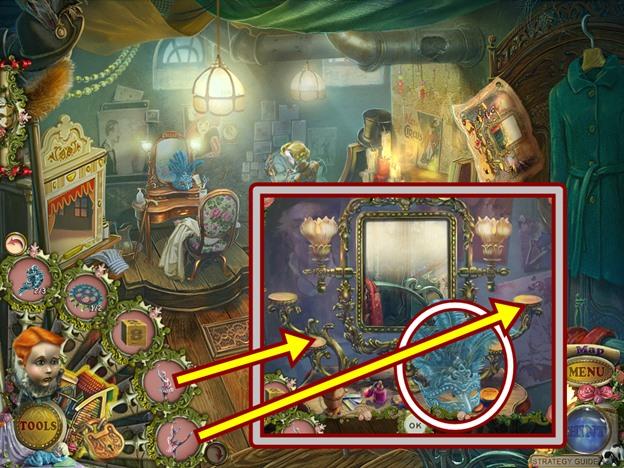
- Click on the cabinet to start a hidden object hunt.
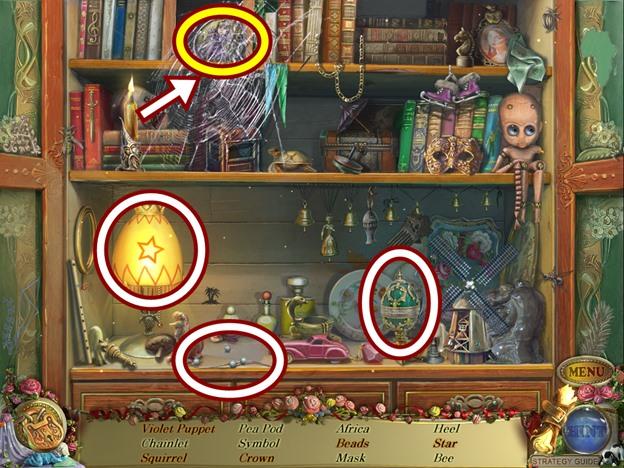
- Find all the objects. Turn on the lamp to reveal more items. Click three times on the beaded bracelet to get the beads. Use the candle to burn the web to reveal more items. Open the egg to reveal the squirrel.
- A VIOLET DOLL is added to your inventory.
- Go through the door on the right.
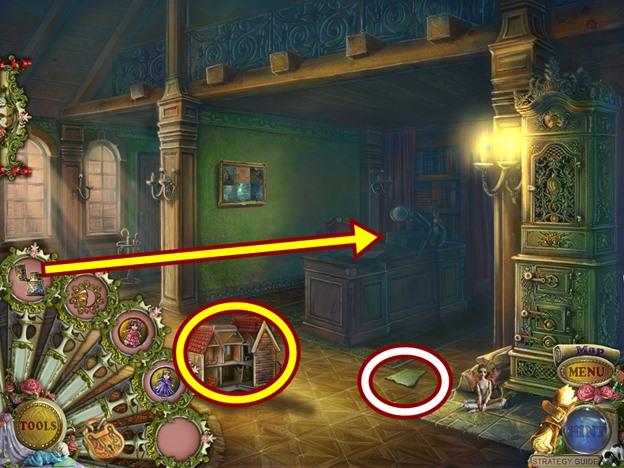
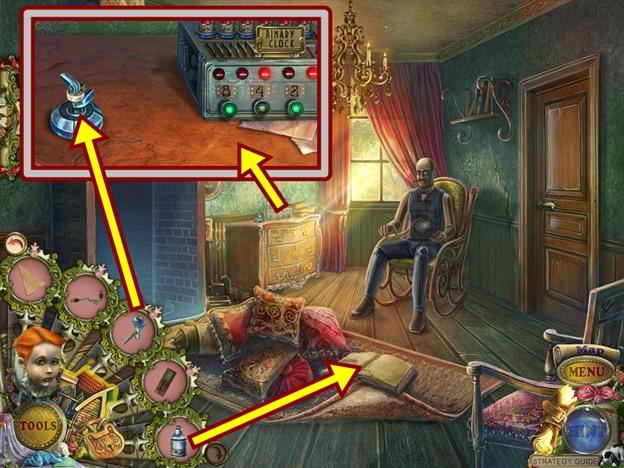
- Pick up the paper from the floor. Watch the cutscene.
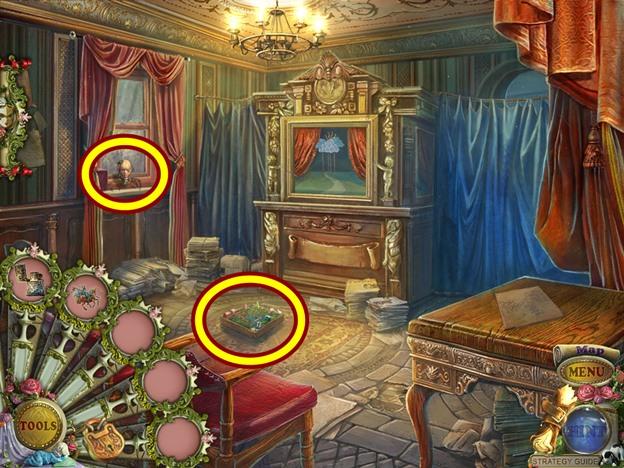
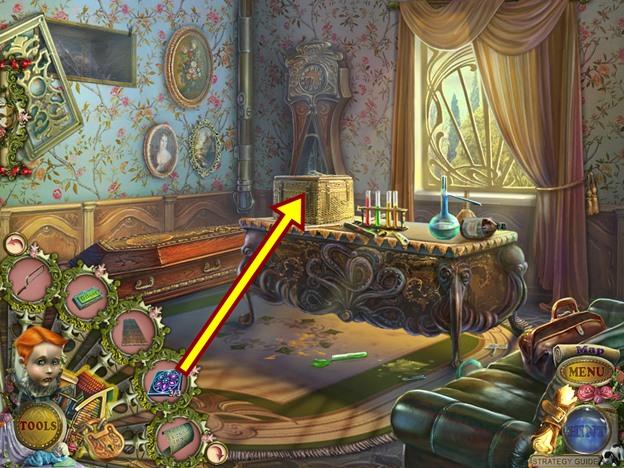
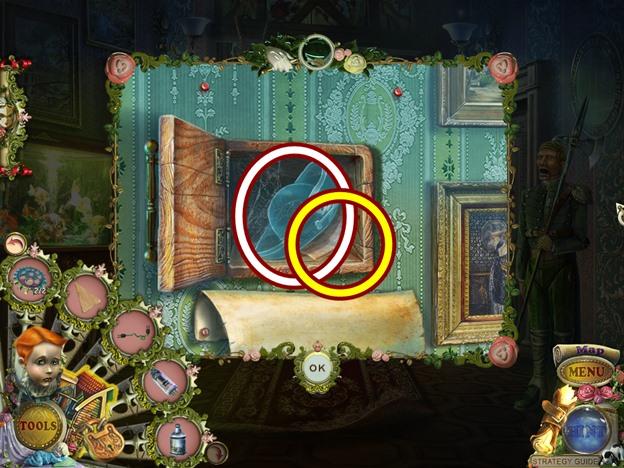
- Click on the desk.
- Light the candle with the LIGHTER.
- Open the drawer and take the HOTEL RECEIPT and BUTTON.
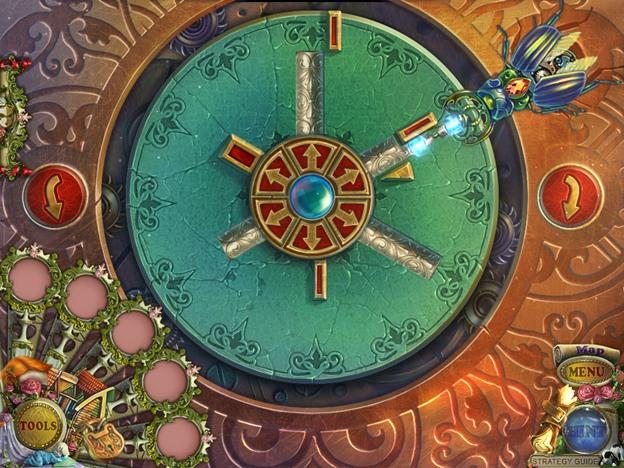
- Click on the doll house.
- A mini-puzzle starts.
- Dress the two dolls. When a doll is fully dressed, it will glow. Use the arrows to switch the dolls.
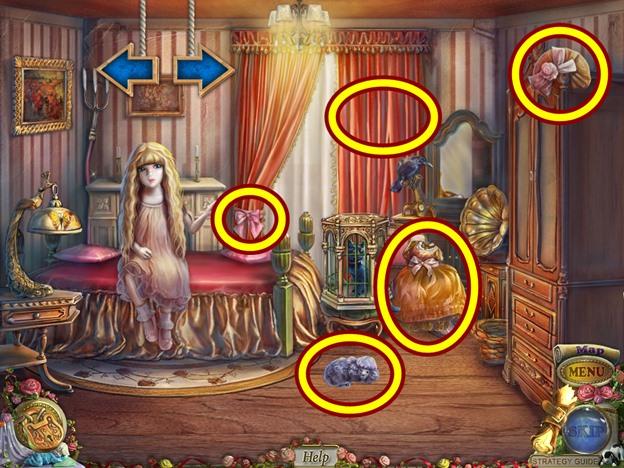
- When you are finished, take the GREEN DOLL.
- Move down.
- Click on the table.
- Add the RED DOLL, GREEN DOLL and VIOLET DOLL.
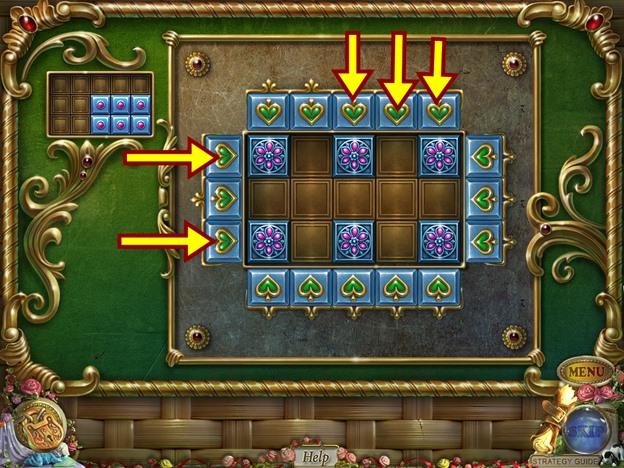
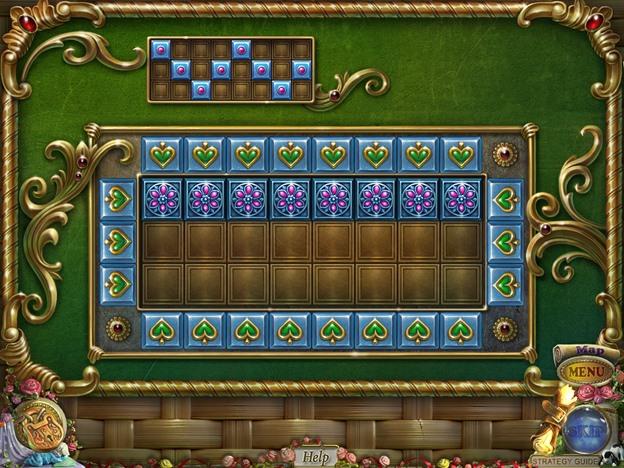
- A mini-puzzle starts.
- Move the dolls to their matching coloured slot on the right. Dolls can only be moved to their matching coloured slot. A doll cannot jump over another doll. When you click on a doll, its available slots light up. Click on a lit up slot and the doll will move to it.
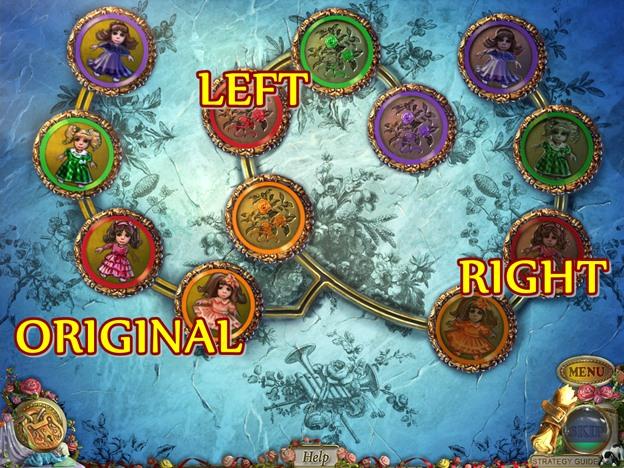
- Using the screenshot above as a guide, there are three positions, original, left and right.
- Begin by moving the orange doll to the left orange slot.
- Move the red doll to the right red slot.
- Move the orange doll to the right orange slot.
- Move the green doll to the green left slot.
- Move the orange doll to the original orange slot.
- Move the red doll to the left red slot.
- Move the orange doll to the left orange slot.
- Move the violet doll to the right violet slot.
- Move the orange doll to the right orange slot.
- Move the red doll to the original red slot.
- Move the orange doll to the original orange slot.
- Move the green doll to the right green slot.
- Move the orange doll to the left orange slot.
- Move the red doll to the right red slot.
- Move the orange doll to the right orange slot.
- Take the instructions.
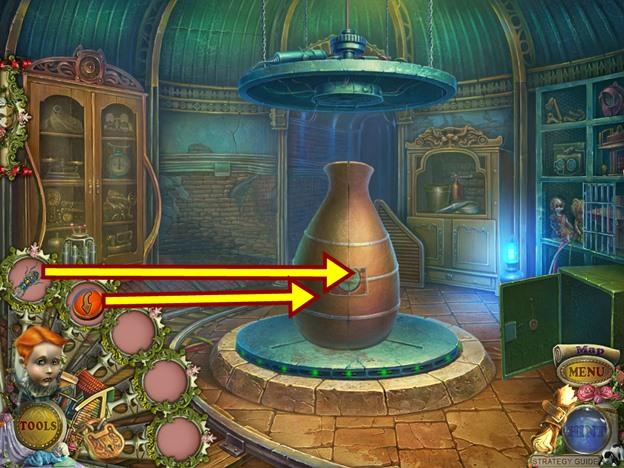
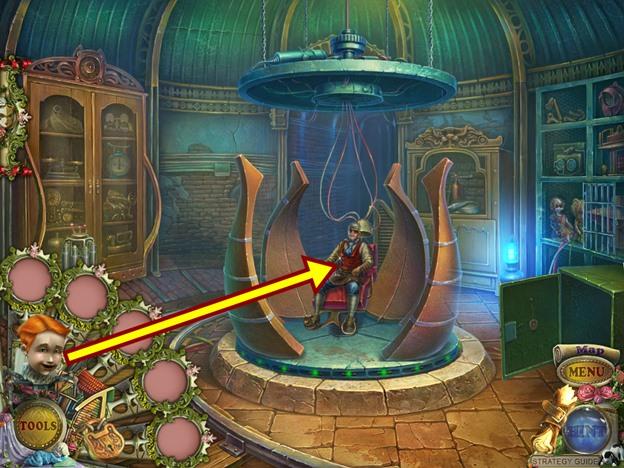
- Flip the red power switch.
- You now have a helper puppet. Name it.
- Click on the vent on the ceiling.
- Use the helper puppet to get into the vent.
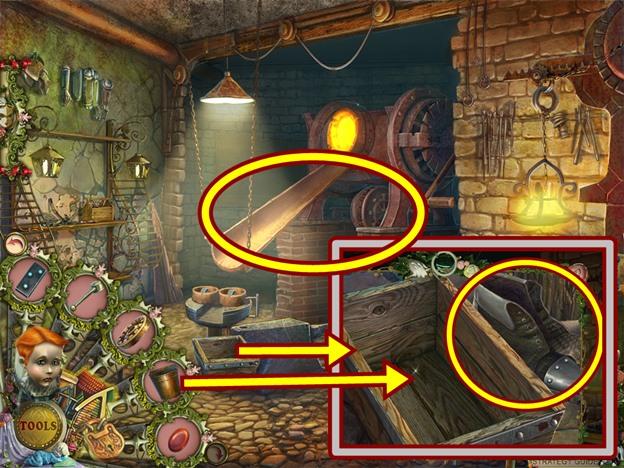
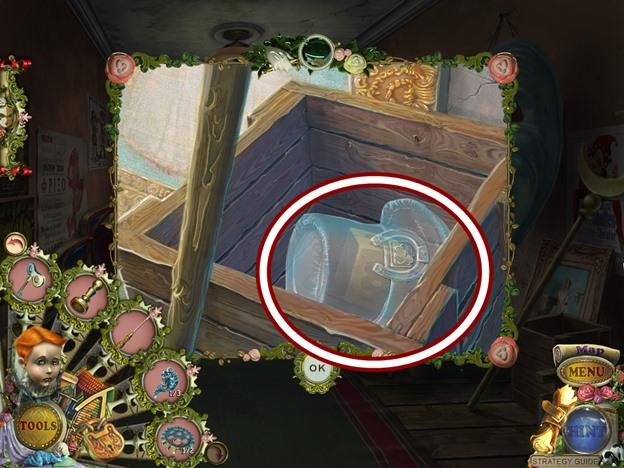
- Click on the toolbox that falls.
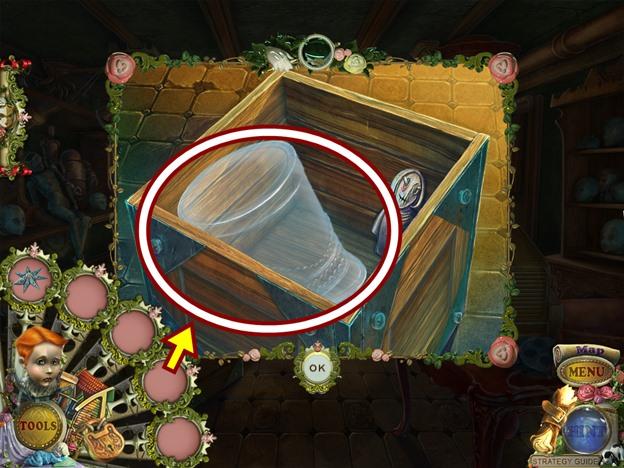
- Open the toolbox and take the HANDLE PART.
- Click on the cabinet to start a hidden object hunt.
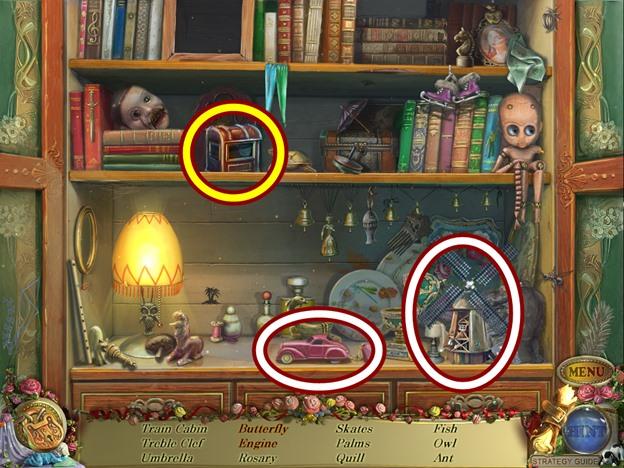
- Find all the objects. Lift the windmill and move the car to reveal more items.
- A TRAIN PART is added to your inventory.
- Go through the doorway on the left.

- Watch the cutscene.
- Click on the panel in front of the carousel.
- Add the BUTTON, then press it.
- Open the saddlebag and take the PICTURE PIECE.
- Click on the track high up on the wall.
- Use the helper puppet to get the TRAIN PART.
- Move down and go through the door on the right.
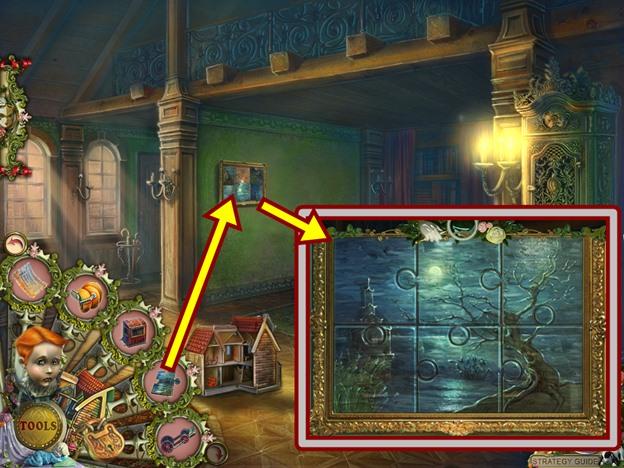
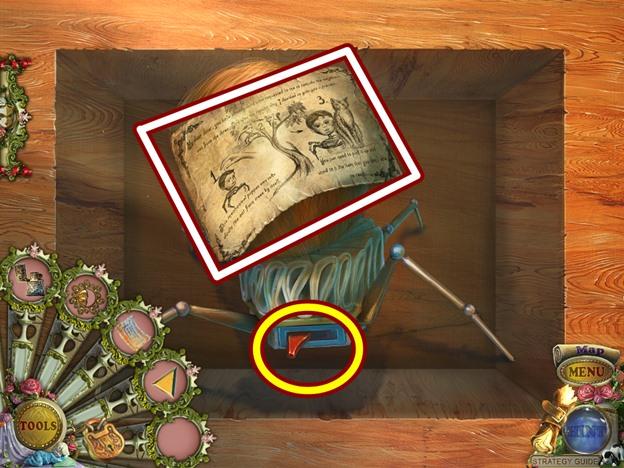
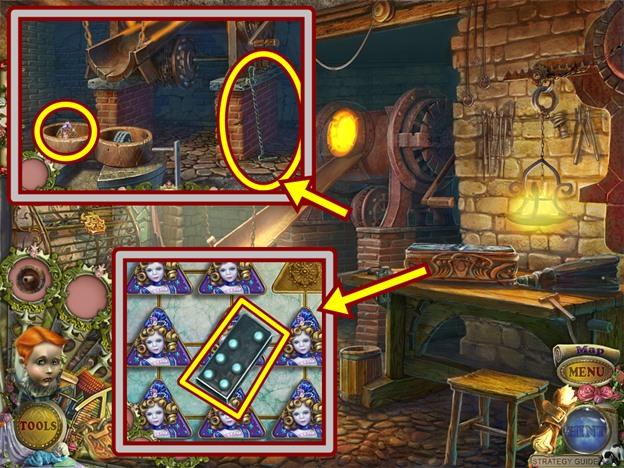
- Click on the painting on the wall.
- Add the PICTURE PIECE.
- Rearrange the pieces like a jigsaw puzzle to recreate the image. When a piece is in its correct position, it locks into place. Click on a piece to select it, then click on the position you wish to place it. The completed image is in the screenshot above.
- When you are finished, the painting lifts to reveal a hidden cache. Take the PURSE and HANDLE PART.
- Move down and go through the doorway on the right.
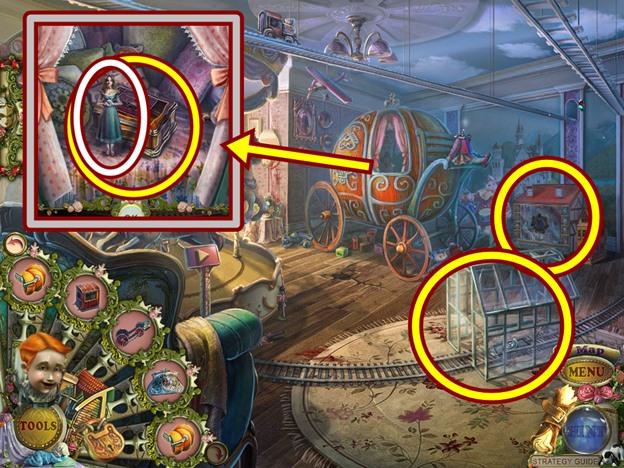
- Click on the carriage.
- Add the two HANDLE PARTS, then pull the handle.
- Take the CHARACTER PUPPET.
- Open the chest, then click on it.
- Add the two TRAIN PARTS, then take the TRAIN.
- Click on the glass house.
- Put the TRAIN on the track. When it pulls the trolley out, take the MOON.
- Click on the house.
- Add the SUN and the MOON.
- A mini-puzzle starts.
- Recreate the scene using the objects on the left and right. Items have to be placed in a particular order in order to advance the scene.
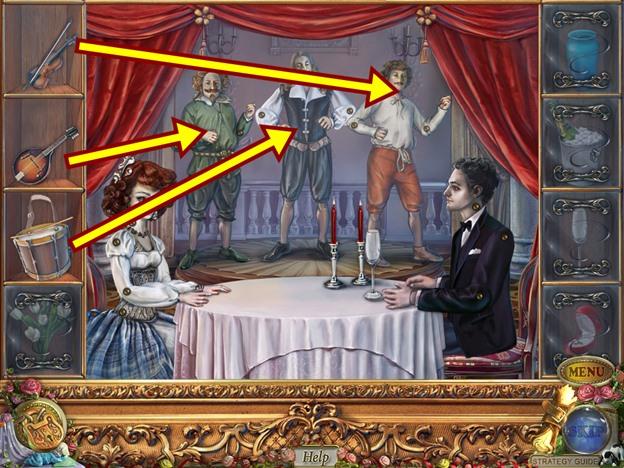
- First give the instruments to the musicians.
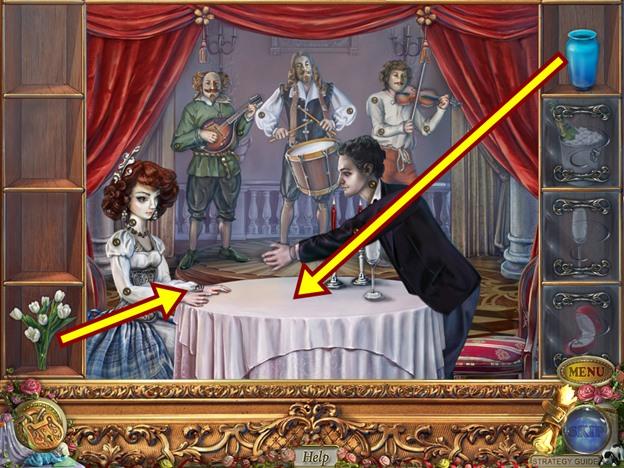
- Put the tulips in the woman’s hands, then put the vase on the table.
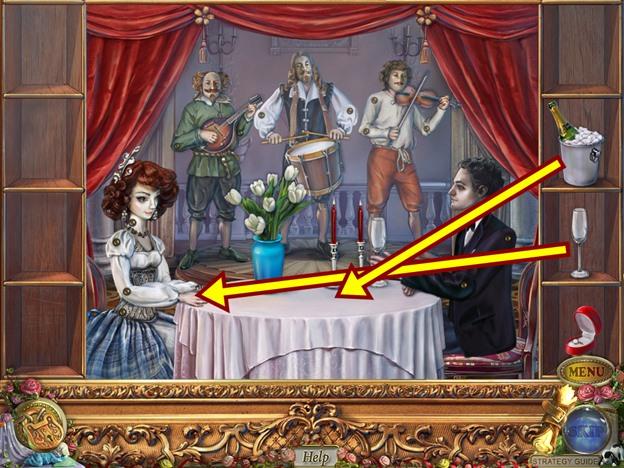
- Put the glass in the woman’s hand, then put the champagne bucket on the table.
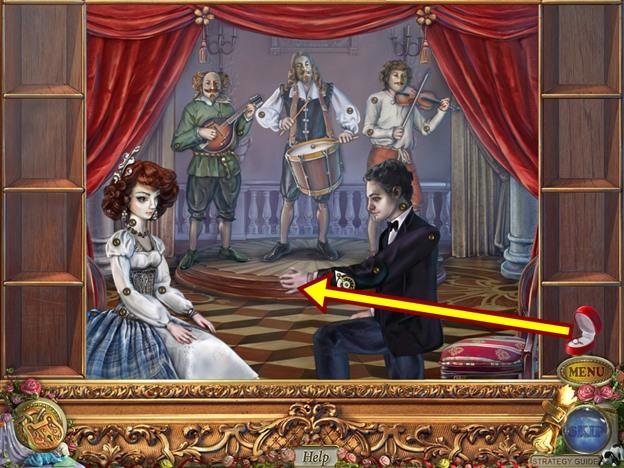
- Put the ring in the man’s hands.
- When the scene is over, take the RING that appears.
- Move down.
- Click on the panel beside the window.
- Click on the panel, then add the RING.
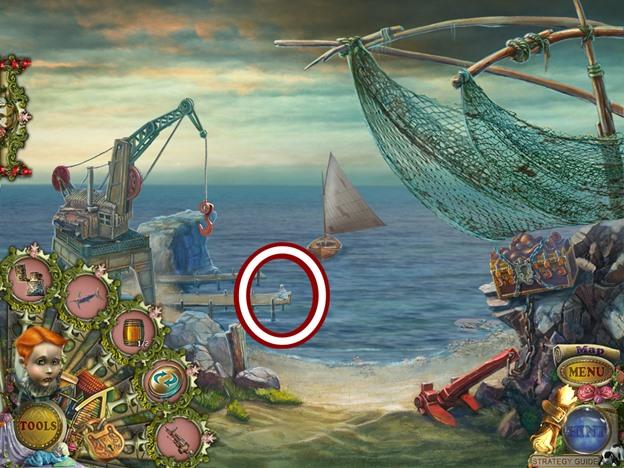
- Climb through the window.
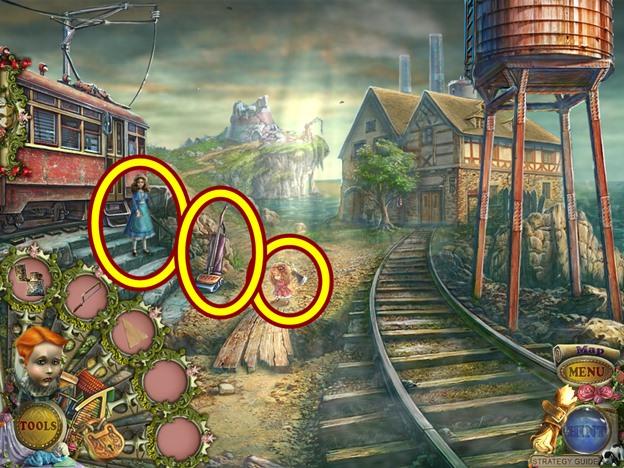
Chapter 2 – The Tram Depot
- Click on the carriage. Click through the dialogue.
- Take the LADDER.
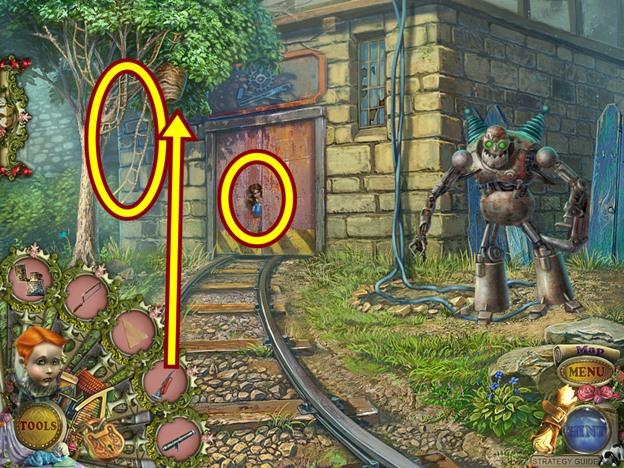
- Click on the base of the tree.
- Use the puppet helper to get the NUT.
- Click on the little tree house.
- Give the NUT to the mechanical squirrel, then take the KEY.
- Click on the newspaper.
- Open it and read the article. Move down to close the article.
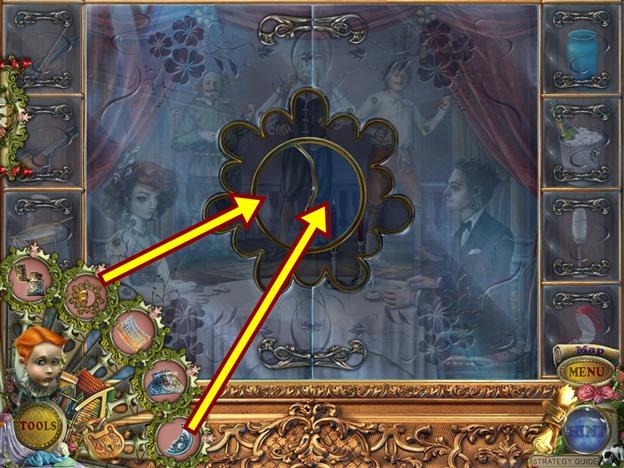
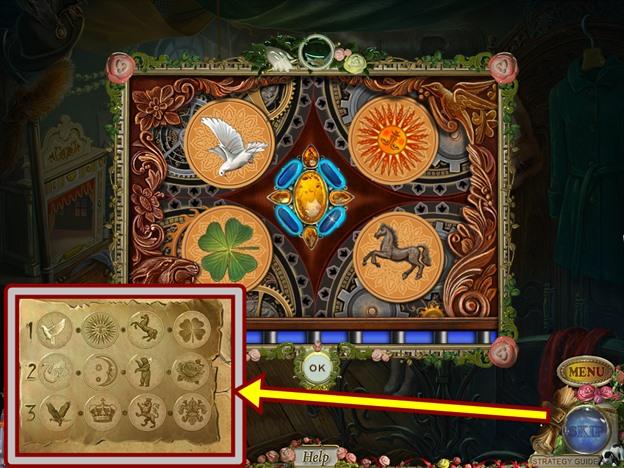
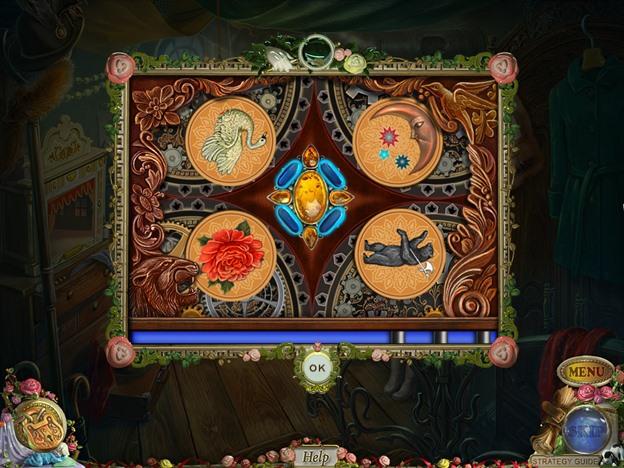
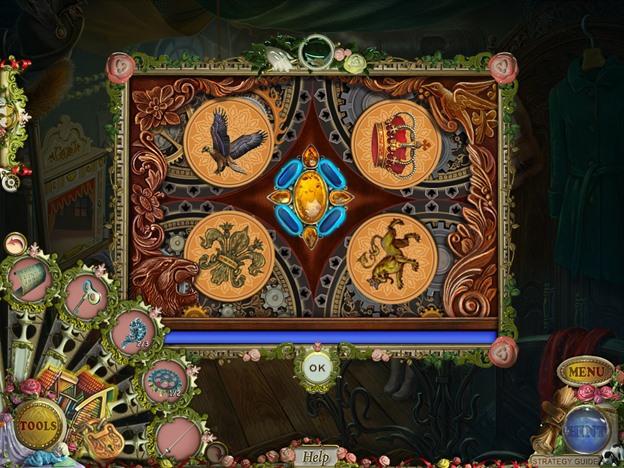
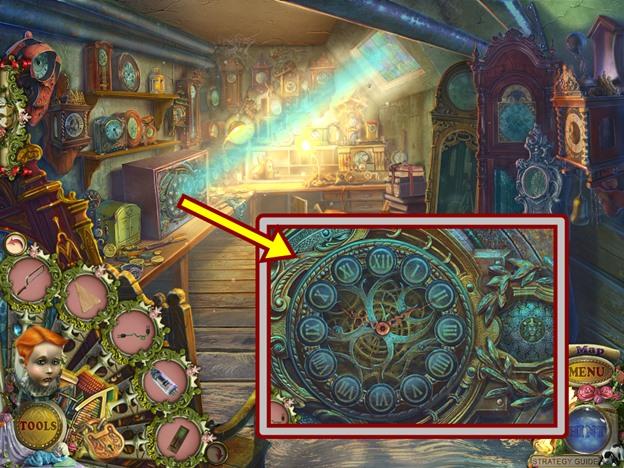
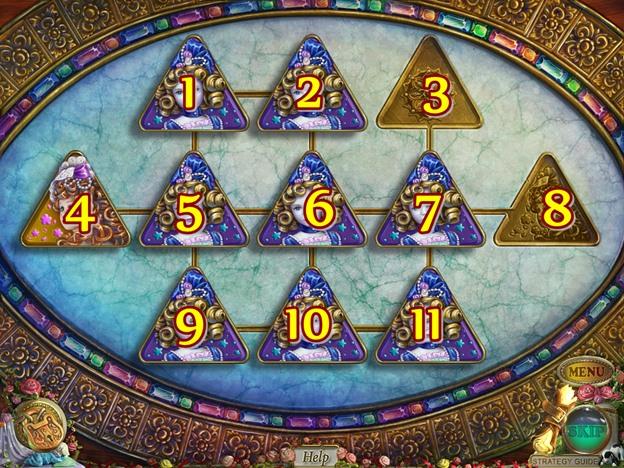
- Click on the plaque on the back wall.
- Rearrange the hands to match the image you saw earlier (found in your journal).
- Solution:

- Take the GREEN TRAM
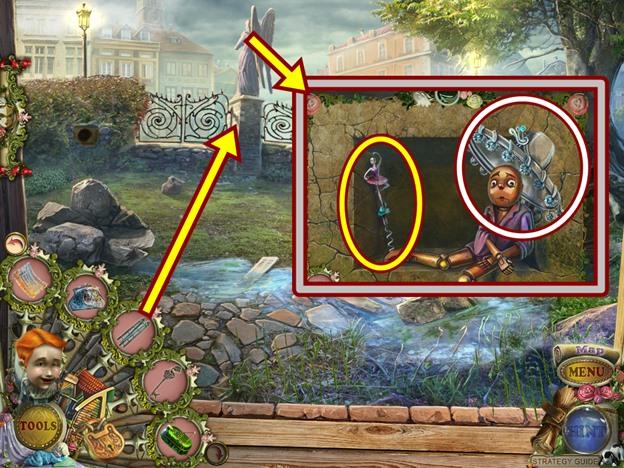
- Click on the angel statue.
- Place the LADDER against the statue.
- Click on the head.
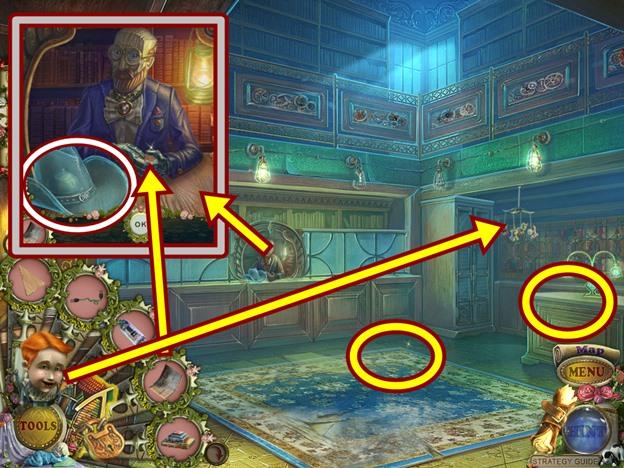
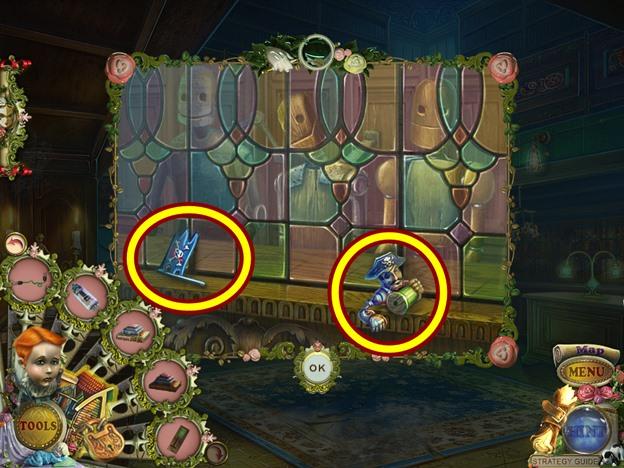
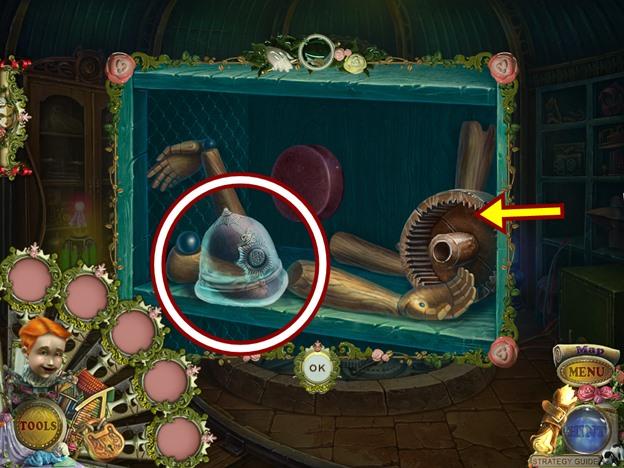
- Take the CORKSCREW and the sombrero HAT PATTERN.
- To make the hat, click on the puppet house and select the mannequin with the hat to make it. Instructions to make the hats can be found at the end of this walkthrough.
- Click on the gate.
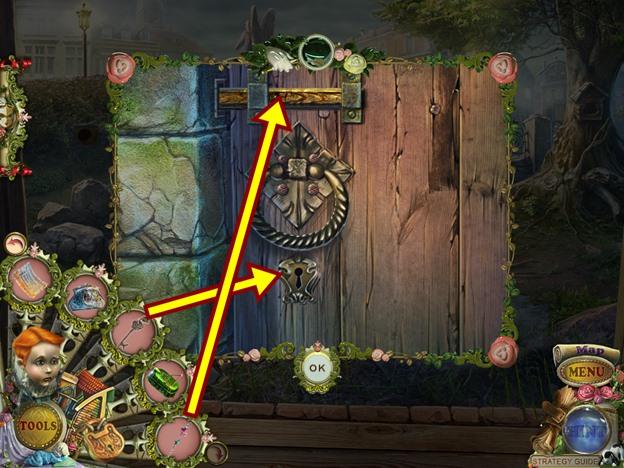
- Put the CORKSCREW on the wooden board and insert the KEY in the keyhole.
- Pull the handle.
- Go through the doorway.
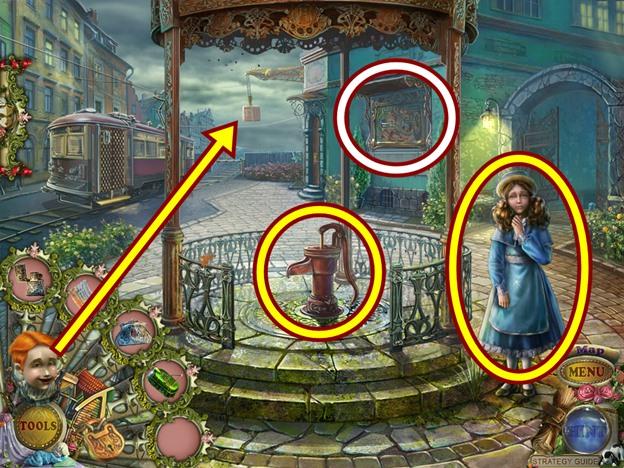
- Talk to Felicia. Click through the dialogue.
- Click on the wall map. Click anywhere outside the window to close it.
- Click on the hanging crate.
- Use the puppet helper to knock down the crate.
- Click on the fallen crate and take the VIOLET TRAM.
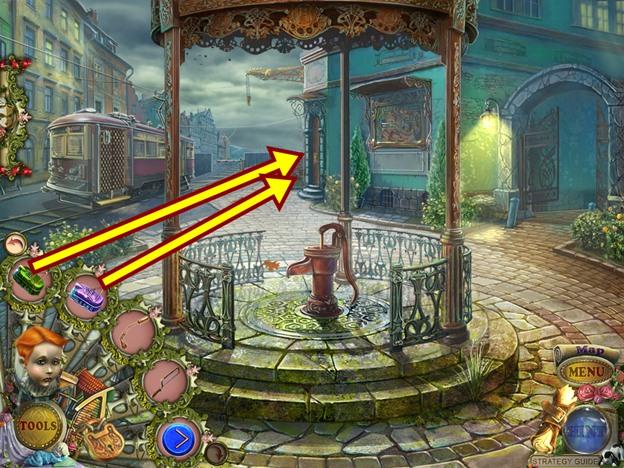
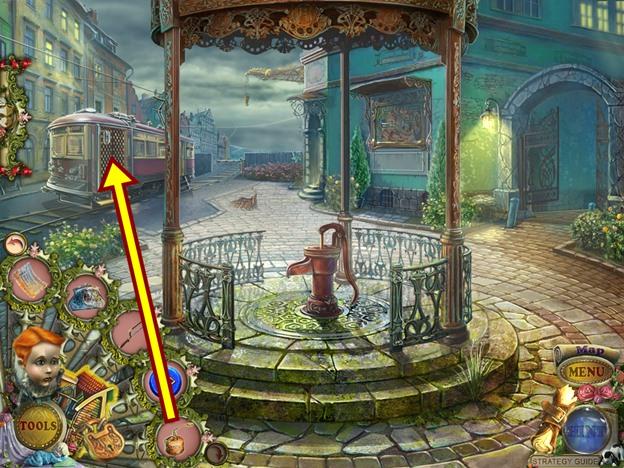
- Click on the pump where the dog is.
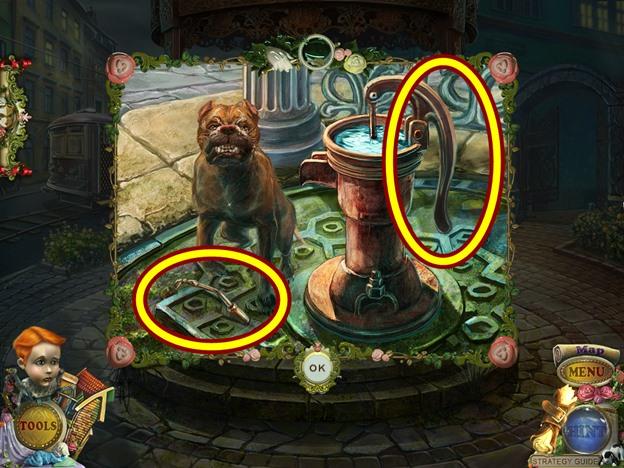
- Pump the lever to chase away the dog.
- Take the GAS BURNER PART.
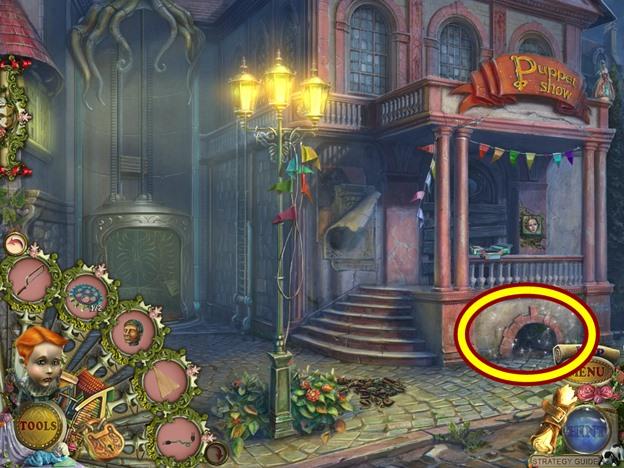
- Go through the archway on the right.
- Click on the toolbox on the porch.
- Take the SAW.
- Click on the grate below the porch.
- Use the puppet helper to slip through the grate and pull the lever.
- When the grate opens, click on the area.

- Find the items based on the silhouettes at the bottom of the screen.
- Take the key (1) and broom (2).
- Use the key in the padlock (3).
- When the drawer opens, take the crown.
- Put the crown on the king (4), then take the heart.
- Put the heart on the wooden doll (5).
- When the head opens, take the ballet slipper.
- Put the ballet slipper on the chest (6), then take the fiddlestick.
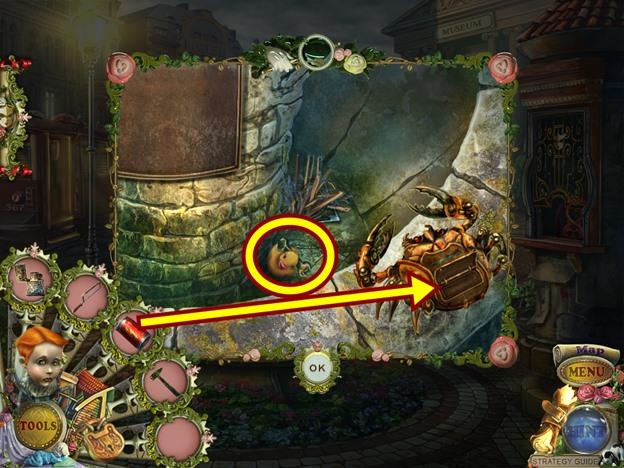
- Put the fiddlestick on the cello (7). This moves the golden bird (8).
- Take the crab from the golden bird (8).
- Put the crab in the inset (9), then take the cat.
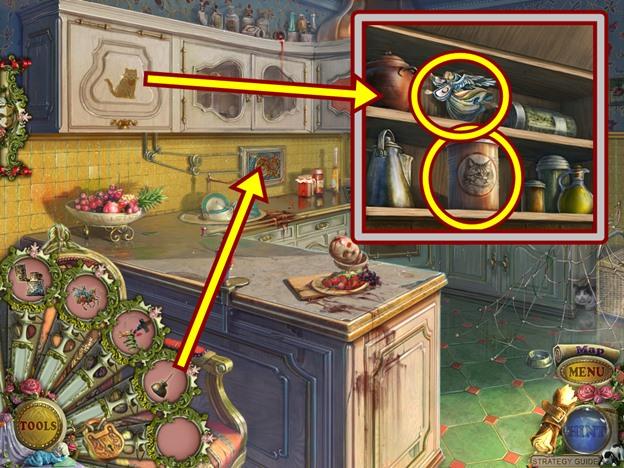
- Click on the painting.
- Use the broom to brush away the cobwebs.
- Place the cat on the shelf.
- Rearrange the cats so they are in the same position as shown in the painting (use the hats as a guide).
- Once the cats are in the correct position, the shelf panel will open revealing a mini-puzzle. Rearrange the panels so under each cat is its matching and completed hat. To move a hat piece, click on a piece and note the pieces that light up. Click on a lit piece to move that hat piece to that panel. Start by completing a hat on the left or right side, then do the rest.
- Solution:
- When you are finished, the painting opens. Take the JUGGLING BALL.
- Click on the juggling clown.
- Give the clown the JUGGLING BALL to get the BUTTON.
- Move down.
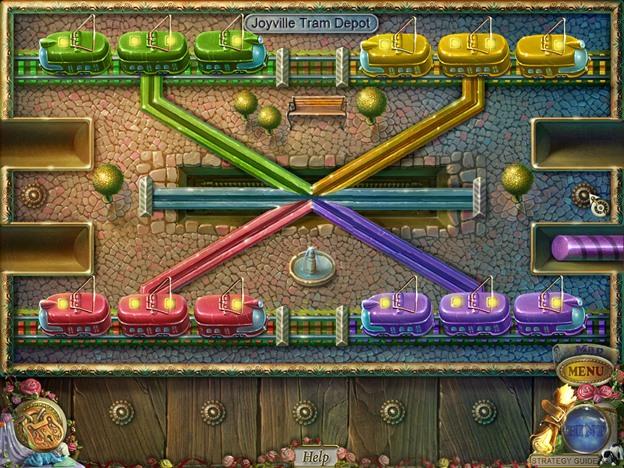
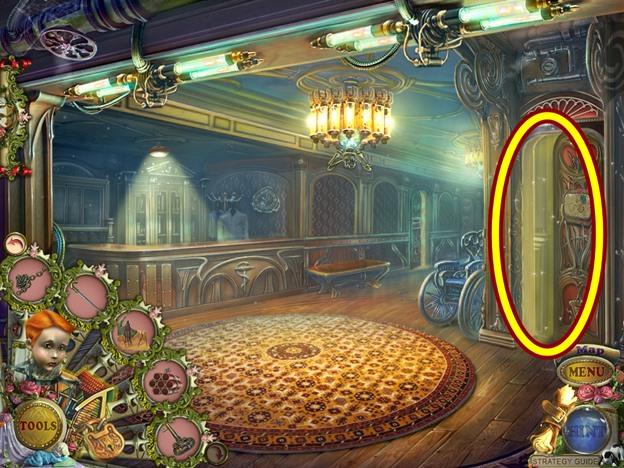
- Click on the tram station door.
- Add the GREEN TRAM and VIOLET TRAM.
- A mini-puzzle starts.
- Rearrange the tram parts so the colour of the tram matches the colour of the tracks. As well, ensure the train pieces are in order, with a front, middle and back.
- Use the two middle pieces of track to help in moving the tram parts around. To move a tram part, click on it and click on an arrow to move it in that direction. Choose a colour to start with and work at getting all the tram parts onto their proper track. Proceed until all the tram parts are on their proper track. Then use the middle track parts to help rearrange the tram parts so there’s a front, middle and back tram part.
- Solution:
- Enter the tram station.
- Click on the machine.
- Use the helper puppet to get the GAS BURNER PART.
- Click on the table.
- Take the CHARACTER PUPPET and the fool’s HAT PATTERN.
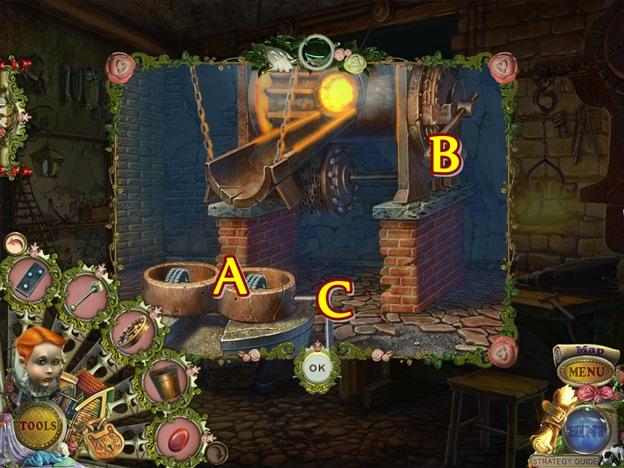
- Put the two GAS BURNER PARTS on the gas burner.
- Take the completed GAS BURNER.
- Move down.
- Click on the tram.
- Use the GAS BURNER on the grate, then push it open and enter the tram.
- Watch the cutscene.
- Take the BUTTON.
- Move down and enter the tram station.
- Click on the fence.
- Use the GAS BURNER to melt the chain.
- Click on the inset.
- Add the two BUTTONS.
- A mini-puzzle starts.
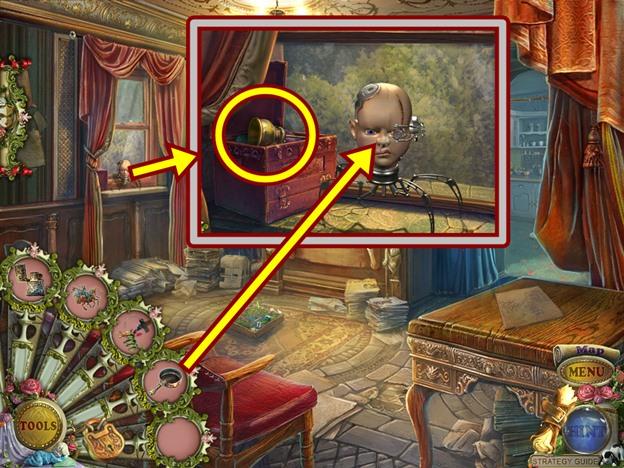
- Restore the puppet’s head. Use the directional buttons to move the claw back and forth. Use the down button to drop the claw so it can either pick up an item or place it on the base.
- First use the claw to pick up the bottom half of the head, then place it on the base. Then get the top half of the head and place it on the bottom half of the head. Now get the hat and put it on the head. The claw will pick up the head and drop it into a slot.
- When you are finished, pick up the HEAD.
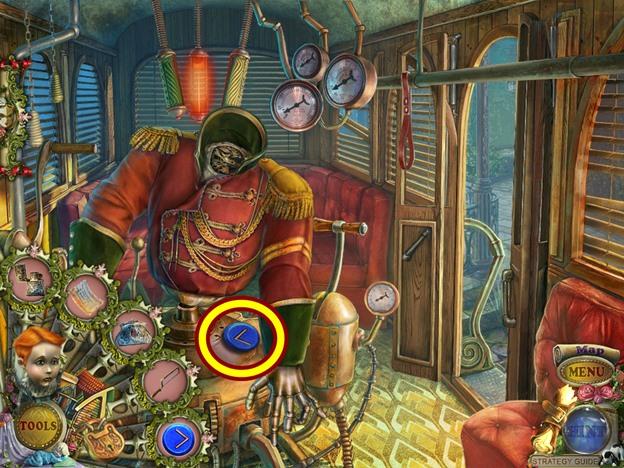
- Return to the tram.

- Put the HEAD on the puppet.
- When the conductor turns around, click on the panel on its back.
- Click on the lever to start the tram.
- Exit the tram.
Chapter 3 – The Hotel
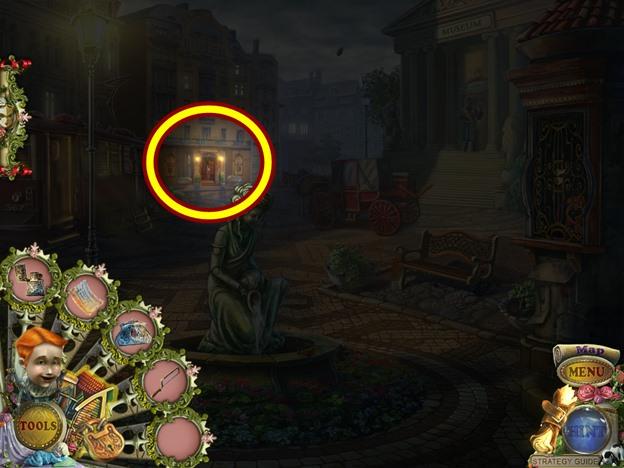
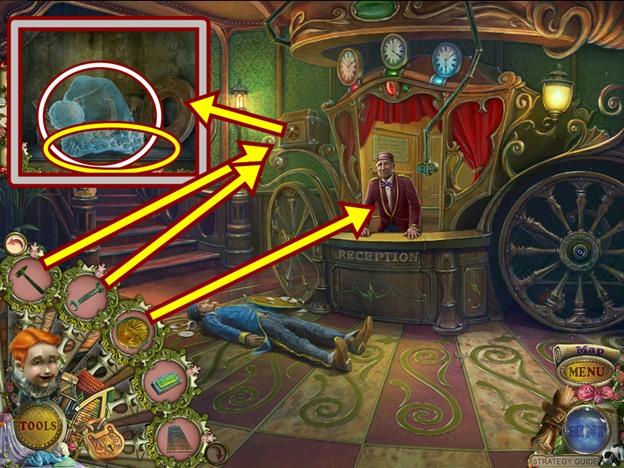
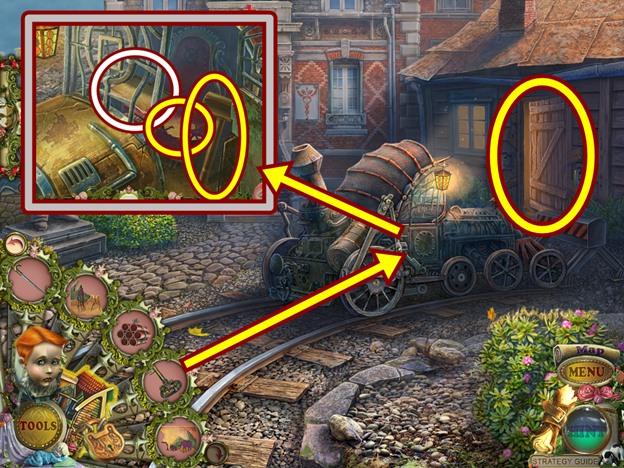
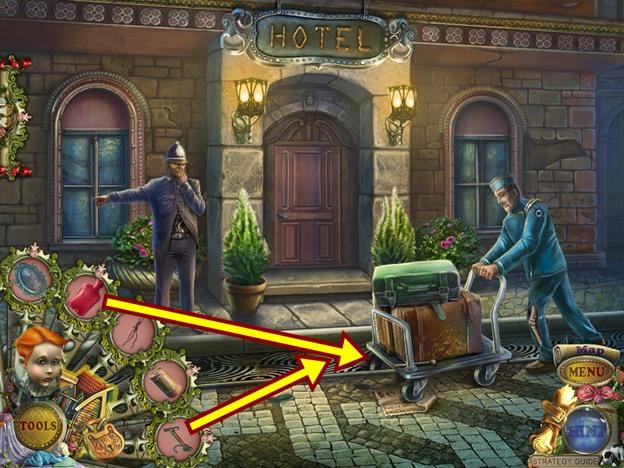
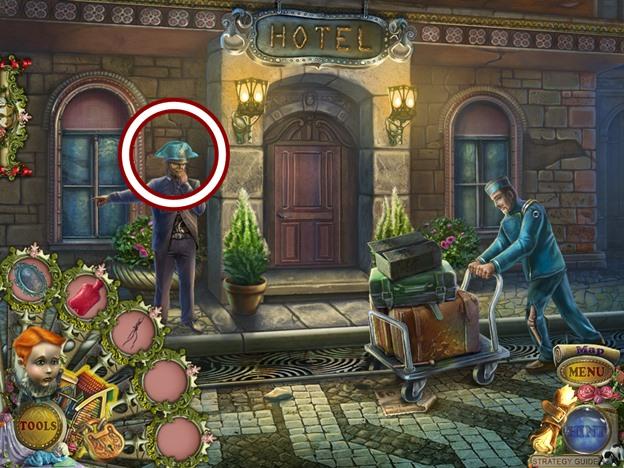
- Click on the hotel door and watch the cutscene.
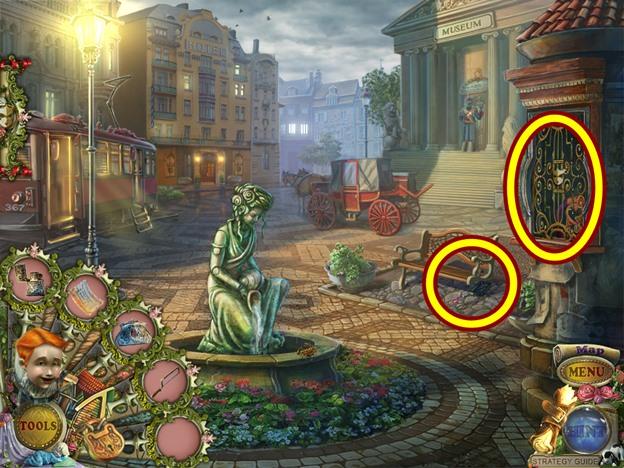
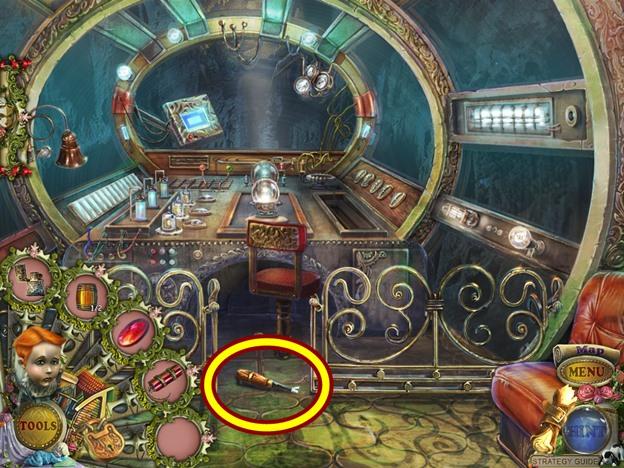
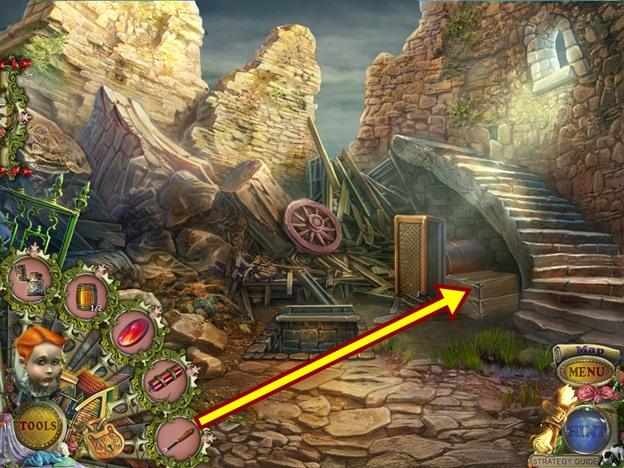
- Click on the bench and take the JACK SCREW.
- Click on the ticket booth.
- Use the JACK SCREW to lift the grate.
- Use the LIGHTER to light the lantern.
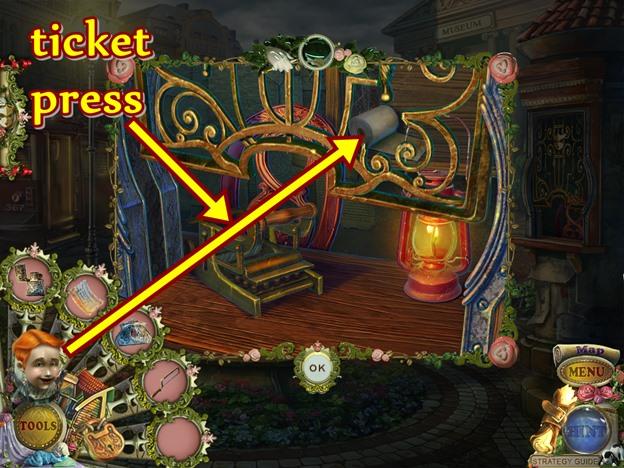
- Use the puppet helper to get the ticket roll.
- Take the TICKET ROLL, then place it in the ticket press.
- Take the TICKET.
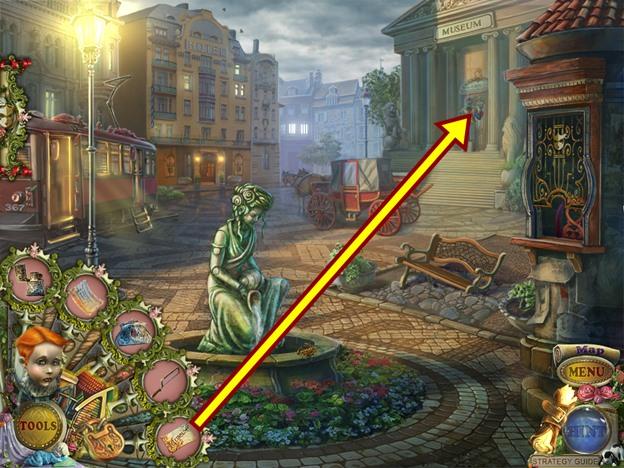
- Click on the museum door.
- Put the TICKET in the puppet’s mouth.
- Click on the door.
- Find the objects based on the silhouettes at the bottom of the screen.
- Take the bandage (1) and helm (2).
- Put the helm on the boat (3), then turn it.
- Take the fish skeleton (4).
- Put the fish skeleton (5) in the inset, then take the bulb (6) that appears.
- Put the bandage on the pirate (7), then take the key that appears (8).
- Use the key on the padlock (9), then take the battery.
- Click on the lantern (10).
- Take the lantern.
- Put the lantern on the beam (1), then look in the barrel (2).
- Take the sword.
- Put the sword on the knight (3), then take the lever that appears from its helmet (4).
- Put the lever in the inset (5), then pull it.
- Take the MAGNET (6).
- Click on the carriage.
- Use the MAGNET on the key.
- Take the KEY.
- Open the carriage door with the KEY.
- After the dog escapes, click on the carriage again.
- Take the BELL BUTTON.
- Click on the hotel door.
- Insert the BELL BUTTON, then press the button.
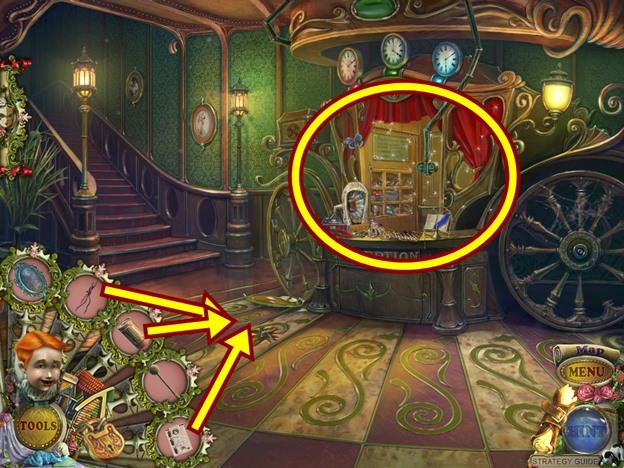
- Go through the door.
- Click on the concierge.
- Give him the HOTEL RECEIPT.
- Click through the dialogue. Move down.
- Click on the bellman.
- Lift the chest flap and take the BATTERY.
- Go up the stairs.
- Click on the door on the left.
- Click through the dialogue.
- Give Gabriella her PURSE.
- Click through the dialogue.
- Take the drawing she offers.
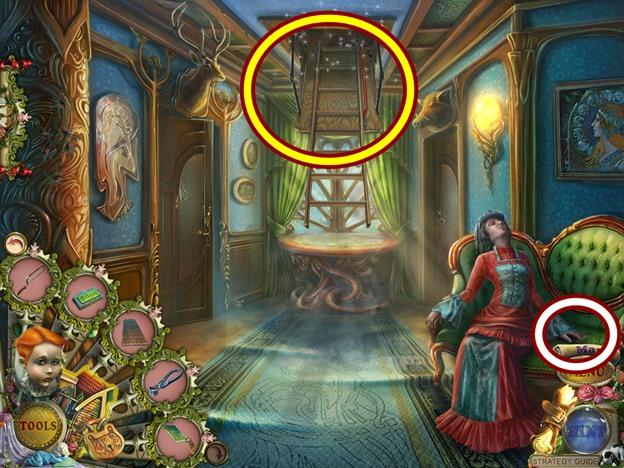
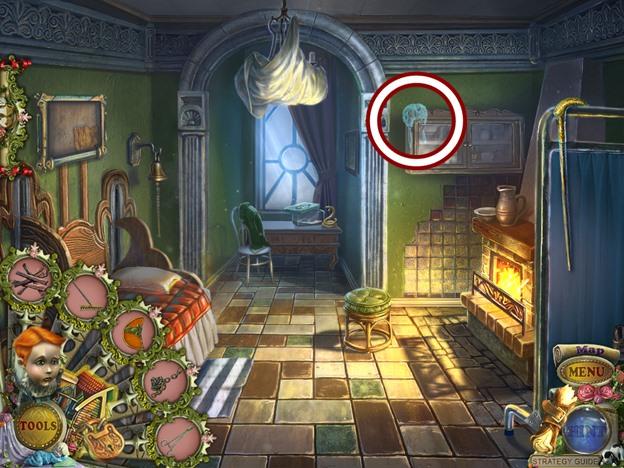
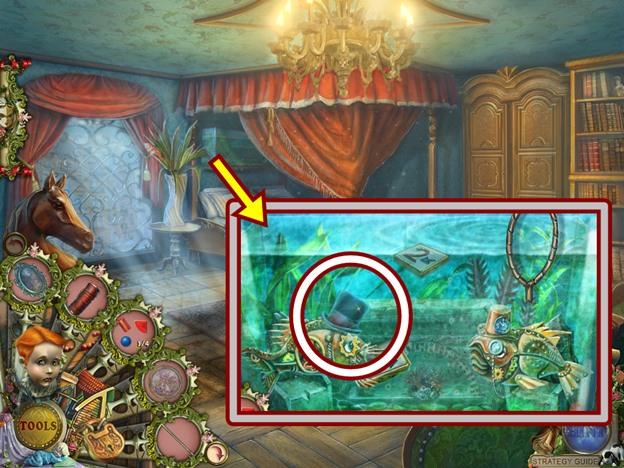
- Click on the ceiling hatch.
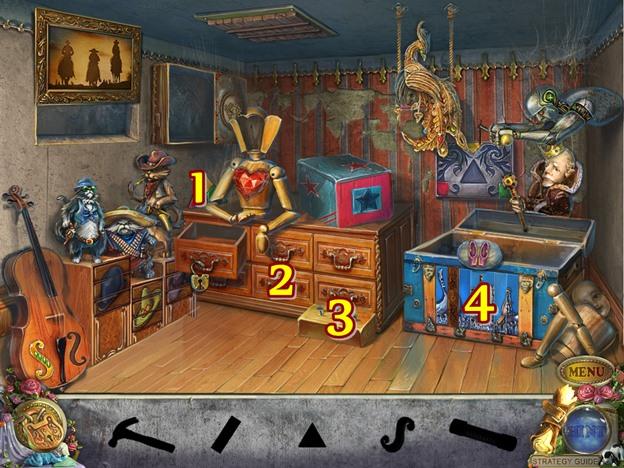
- Use the helper puppet to pull down the hatch.
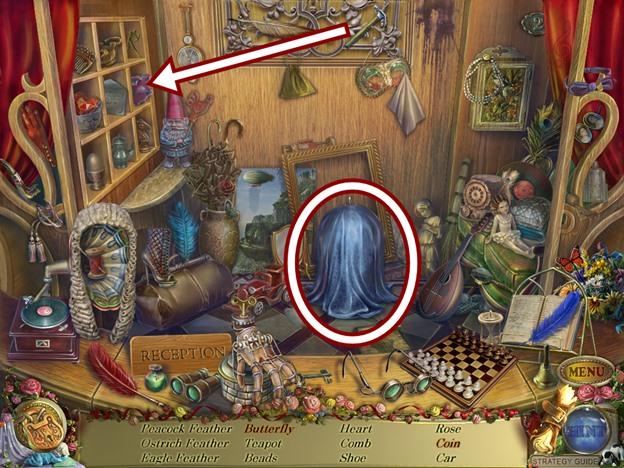
- Click on the opened hatch to start a hidden object hunt.
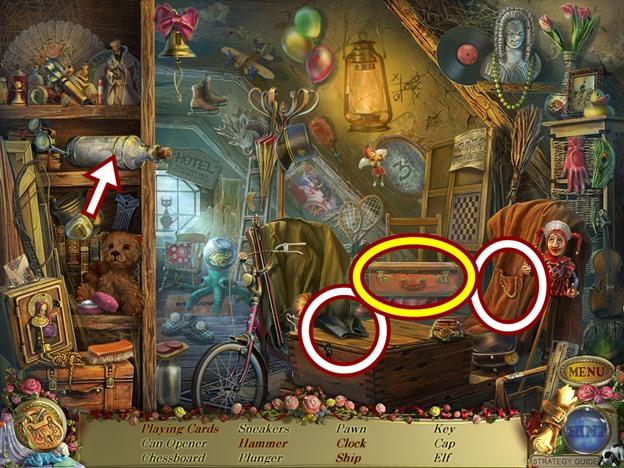
- Find all the objects. Lift the sleeve to reveal the playing cards. Use the stone to break the bottle to reveal the ship. Open the suitcase to reveal the hammer. Reach into the pocket of the jacket to reveal the clock.
- A HAMMER is added to your inventory.
- Move down two scenes.
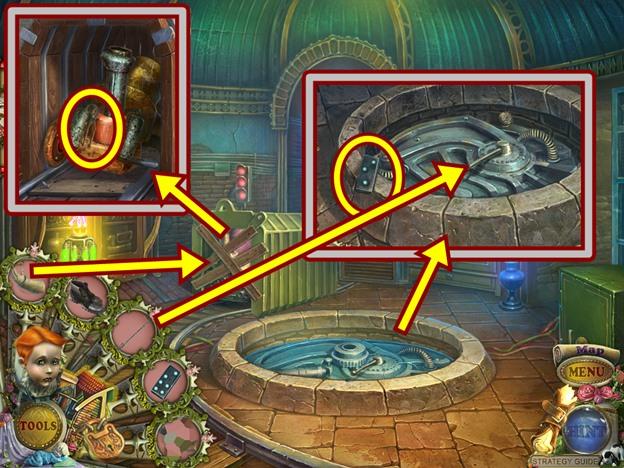
- Click on the fountain.
- Put the BATTERY in the crab.
- When the fountain fills with water, take the WRENCH.
- Get on the tram.
- Click on the panel on the conductor’s back and click on the lever.
- When the tram stops, get off.
- Go through the archway on the right.
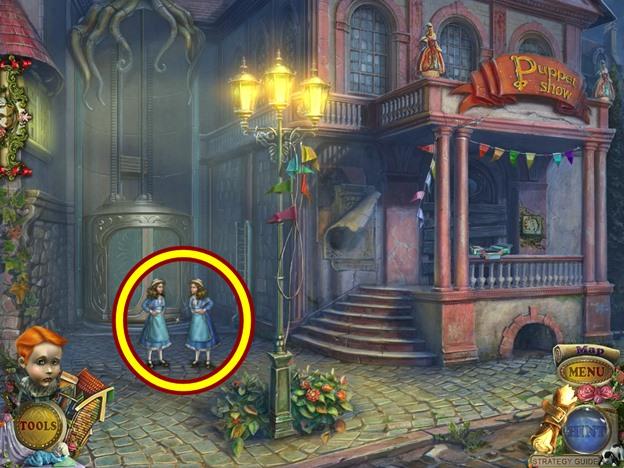
- Click on the two Felicias. Watch the cutscene.
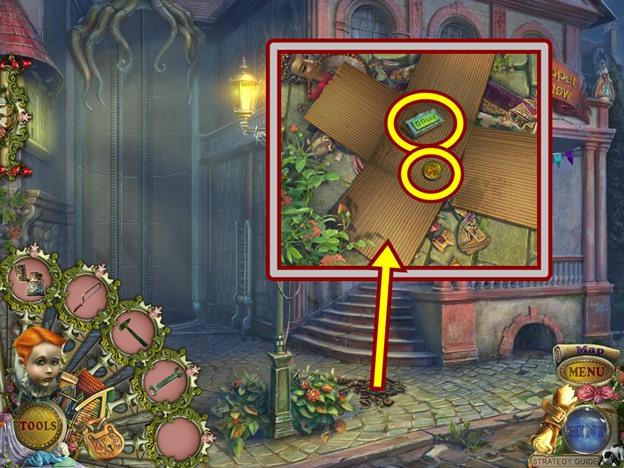
- Click on the broken statuette on the ground.
- Open the box and take the COIN and the ELEVATOR BUTTON.
- Move down and get on the tram.
- Click on the panel on the conductor’s back and click on the lever.
- When the tram stops, get off.

- Click on the museum door.
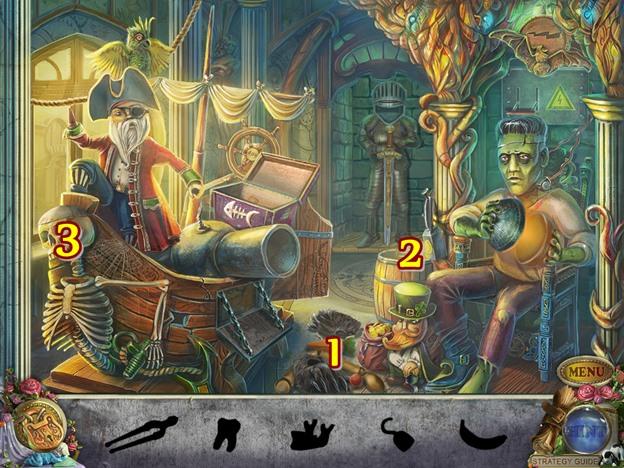
- Find the objects based on the silhouettes at the bottom of the screen.
- Move the items on the floor (1) to get the jaw.
- Click on the barrel (2). Move the items and take the tongs.
- Click on the skull (3).

- Add the jaw.
- Use the tongs to take the gold tooth.
- Take the banana from the skull’s head (1).
- Give the tooth to the leprechaun (2) to get the hook.
- Put the hook on the pirate’s hand (3) to lower the monkey (4).
- Give the banana to the monkey to lower the red button (5).
- Take the torch (1).
- Put the torch in the pirate’s hand (2).
- After the cannon fires, take the scarab (3).
- Put the scarab on the sarcophagus (4).
- Take the flag that appears (5).
- Put the flag on the flagpole (6).
- Take the trap that appears (7).
- A WOODEN BRIDGE is added to your inventory.
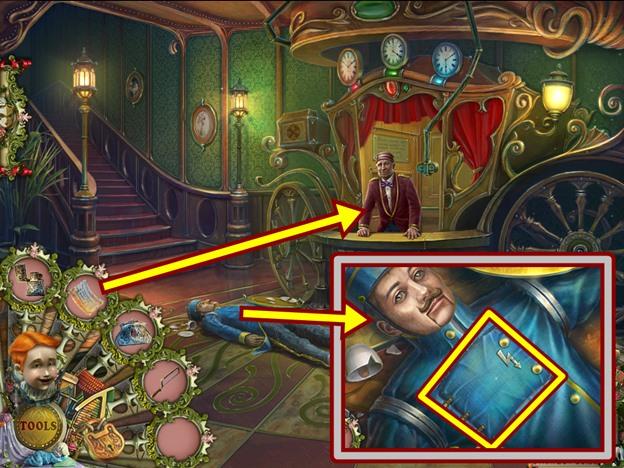
- Enter the hotel.
- Click on the concierge.
- Click through the dialogue.
- Give the COIN to the concierge.
- Click through the dialogue.
- He gives you the PUNCH CARD KEY.
- Click on the safe.
- Add the HAMMER and WRENCH.
- Take the Santa HAT PATTERN and the BOLT CUTTERS.
- Go up the stairs.
- Click on the Gabriella’s left hand.
- Pick up the note and read it. Click anywhere outside the window to close it.
- Click on the ceiling hatch to start a hidden object hunt.
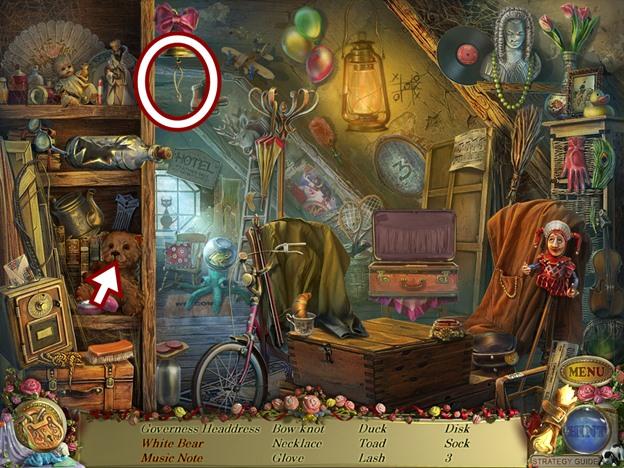
- Find all the objects. Use the powder on the stuffed bear to get the white bear. Pull the bell cord to get the music note.
- A CHIP (1/3) is added to your inventory (it is not found in the scene).
- Click on the door on the right.
- Insert the PUNCH CARD KEY in the mouth, then pull the handle.
- Use the BOLT CUTTERS to cut the door chain.
- Enter the room.
- Watch the cutscene.
- Click on the grate.
- Use the BOLT CUTTERS to remove the grate.
- Use the LIGHTER to burn away the cobwebs.
- Click on the medical bag on the couch.
- Open the bag.
- Take the COMPUTER PAPER, BUTTERFLY and engineering goggles HAT PATTERN.
- Click on the coffin.
- Remove the lid.

- Take the CHIP (2/3).
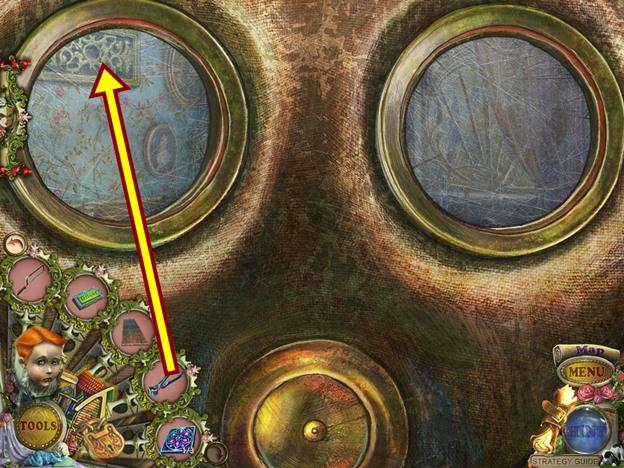
- Use the SAW on the head, then take the MASK.
- Move down two scenes to the hotel lobby.
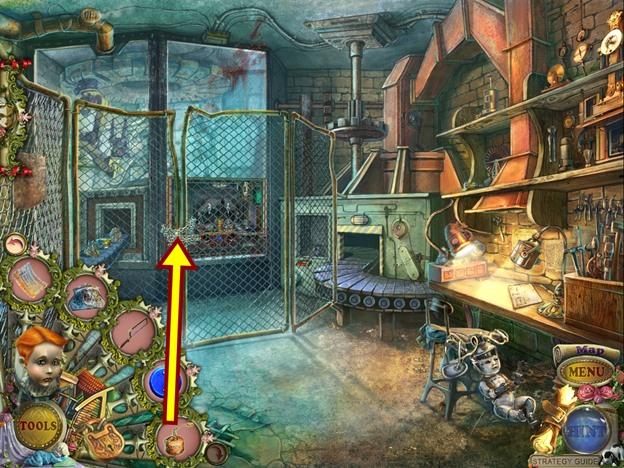
- Click on the large right wheel.
- Use the SAW to remove the broken spoken.
- Use the puppet helper to move the chest.
- Insert the BUTTERFLY into the inset.
- Open the chest and take the CHIP (3/3).
- Go up the stairs and into the room on the right.
- Click on the wicker box on the desk.
- Add the three CHIPS.
- A mini-puzzle starts.
- Use the arrows to move the chips so they match the pattern on the left.
- To solve the first puzzle, move all the chips all the way to the right, then move them down.
- To solve the second puzzle, move all the chips so they are all in the top row. Once all the chips are in the top row, use the down arrows to move the chips to their proper position.
- To solve the third puzzle, move the chips so there’s a chip in every slot in the top row. Once this is done, move the other chips into the middle row, being mindful of positioning the two chips that will be between the two rows. Once they are positioned, move each column down one position.
- A LEVER is added to your inventory.
- Move down three positions and enter the tram. Click on the panel and click on the lever.
- Exit the tram and go through the archway on the right.
Chapter 3 – 0 Floor
- Click on the ladder.
- Add the LEVER, then pull it to raise the ladder.
- Click on the top of the ladder.
- Use the SAW to cut the board.
- Click on the panel beside the door.
- Add the MASK, then press it to lower the elevator.
- Get on the elevator.
- Click on the bag.
- Open the bag and take the KEY.
- Move the ball of yarn and take the STAMP.
- Click on the elevator panel.
- Add the ELEVATOR BUTTON, then press 0 Floor.
- Watch the cutscene.
- Put the WOODEN BRIDGE across the gap.
- Move forward.

- Watch the cutscene.
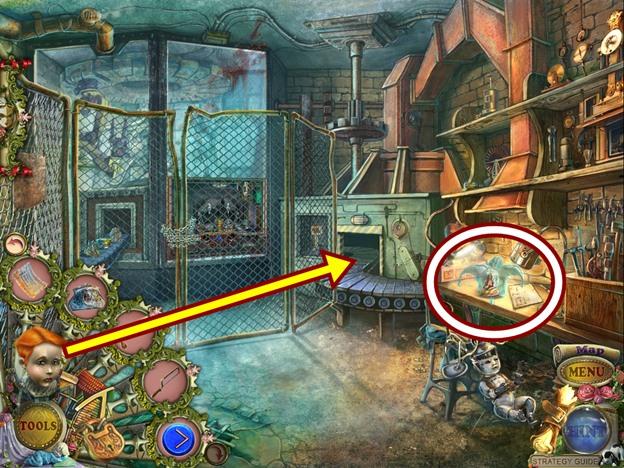
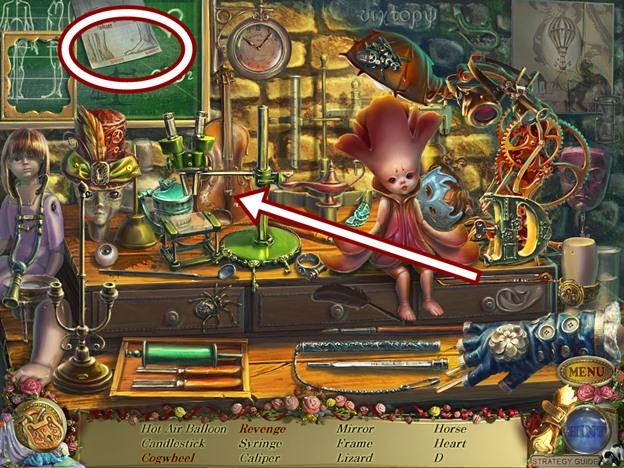
- Click on the table.
- Take the SCREWDRIVER.
- Lift the lid of the fancy chest and take the FISH (1/3).
- Open the wooden box.
- Take the diagram (added to your journal as you’ll need it for a later puzzle).
- Take the GEAR (1/2).
- Click on the wooden crate.
- Take the Leprechaun HAT PATTERN and the CUBE.
- Click on the street scene to start a hidden object hunt.
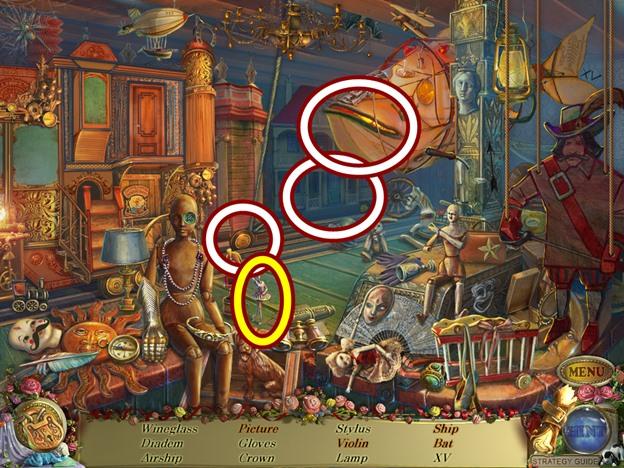
- Find all the objects. Open the inflatable fish’s mouth and take the ship. Move the wheel to knock down the chandelier to reveal the bat. Click on the house and take the violin and the picture. If you are asked to find a lamp, it is the lantern and not the table lamp.
- A BALLERINA FIGURINE is added to your inventory.
- Click on the door on the right.
- Add the STAMP to the inset, then go through the door.
- Click on the diagram. Click anywhere outside the window to close it.
- Click on the pipe.
- Use the puppet helper to reach the pipe.
- Take the FISH (2/3).
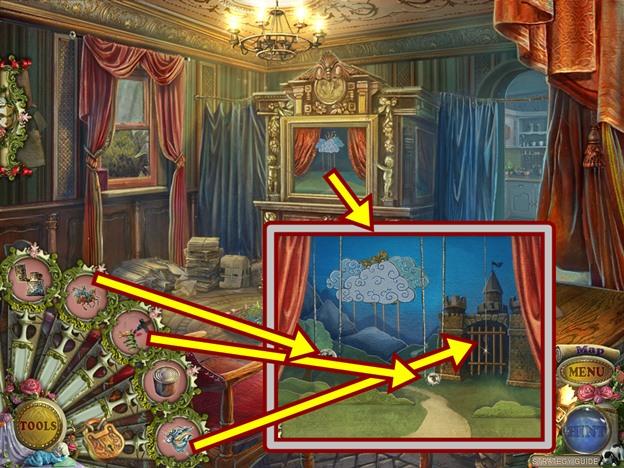
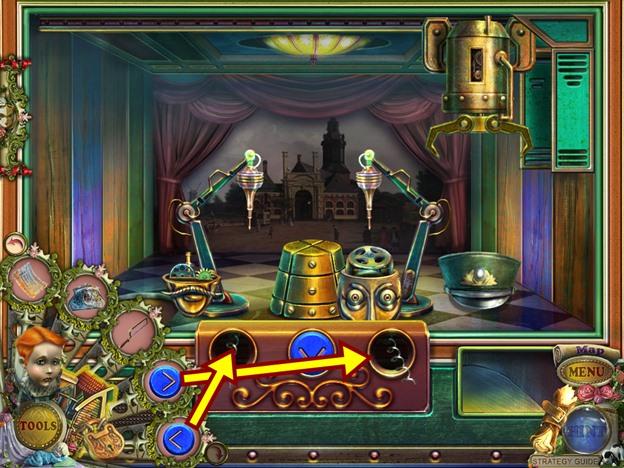
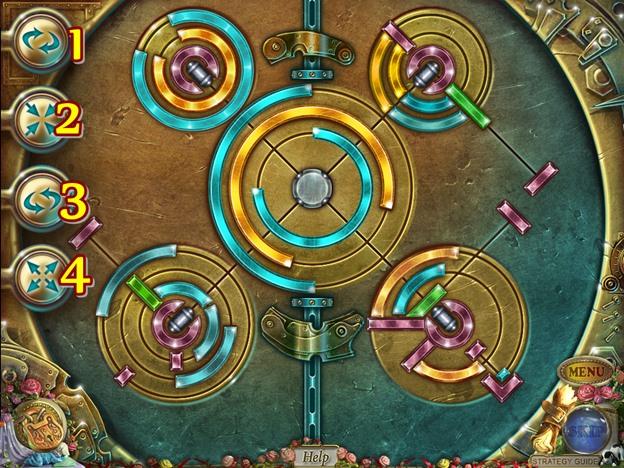
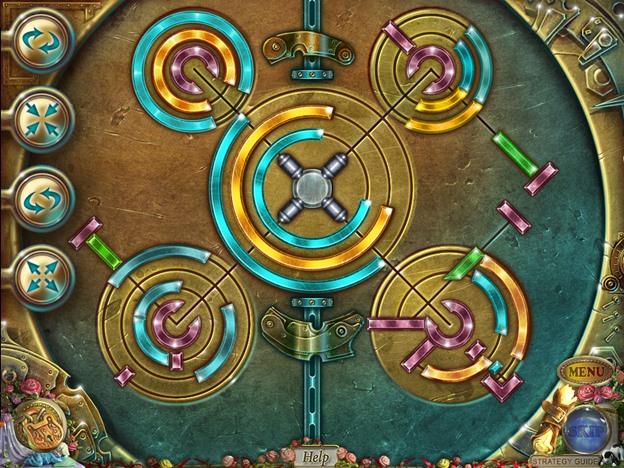
- Click on the puppet theatre.
- A mini-puzzle starts.
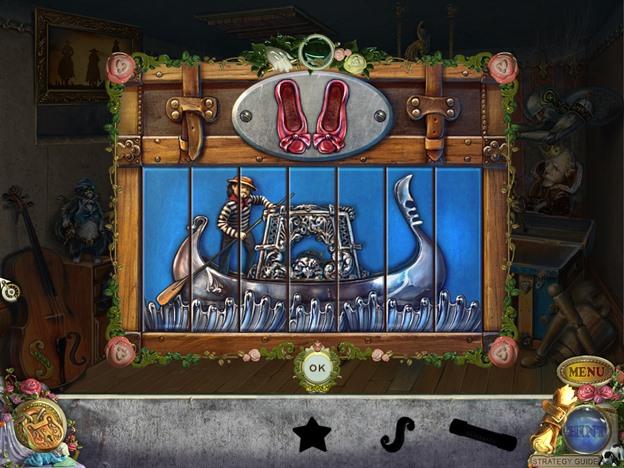
- Arrange the puppets to match the image on the hanging banner. You can only move the arms holding swords and the heads. When the puppets are in the correct position, it will move to the next slot and you must complete the image again.
- Solutions:
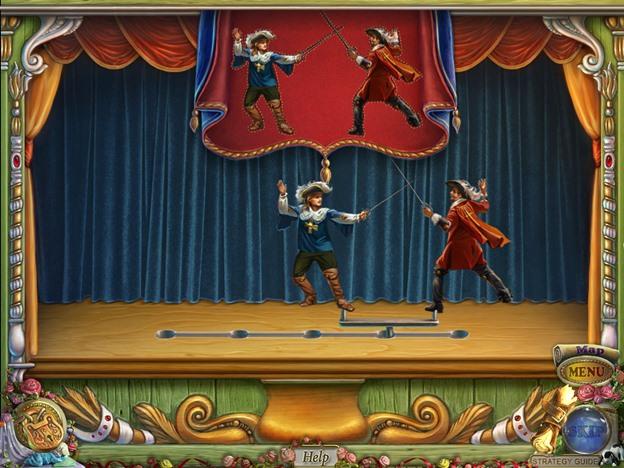
- I was not able to get a screenshot of the final pose as the puppets began moving immediately.
- Take the BALLERINA FIGURINE that appears.
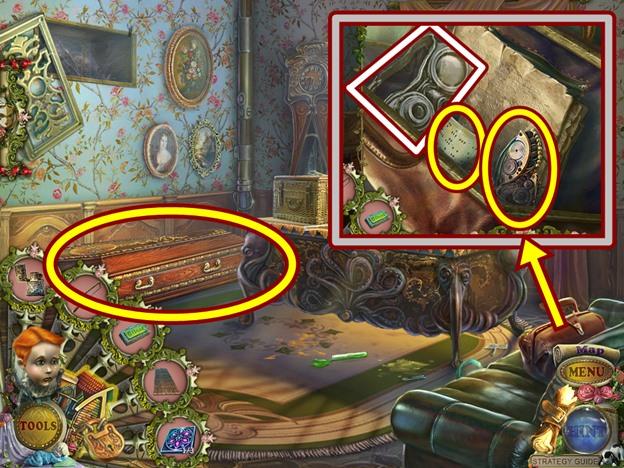
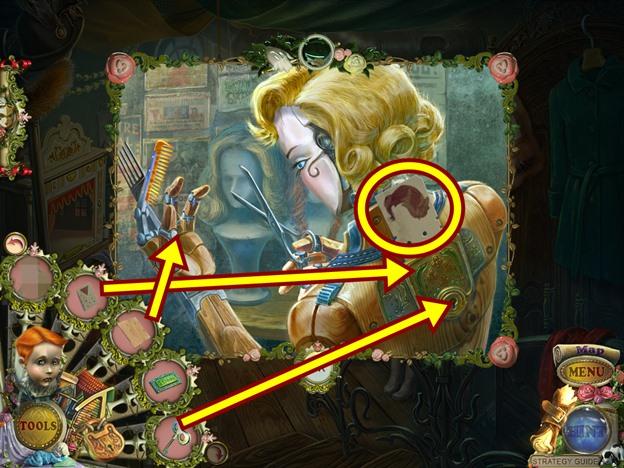
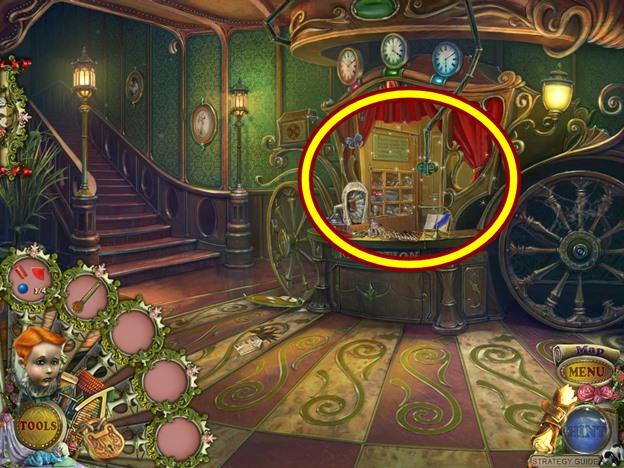
- Click on the dressing table.
- Take the masquerade HAT PATTERN.
- Put the BALLERINA FIGURINES on the pedestals.
- When the mirror flips over, take the CUBE.
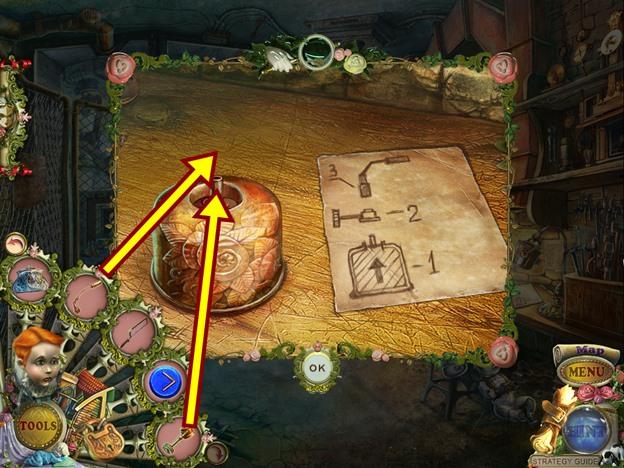
- Click on the table on the right.

- Add the two CUBES, then pull the red lever.
- Note the combination 057.
- Use the SCREWDRIVER on the glass display to open it.
- Take the SWORD.
- Open the hatch on the floor, then click on it.
- A mini-puzzle starts.
- Rotate the discs so the symbols match the diagram you found in the hallway (which can now be found in your journal). To rotate a disc, click on the blue gem beside it.
- Solutions:
- When you are finished, move the items out of the way and take the CARD.
- Move down.
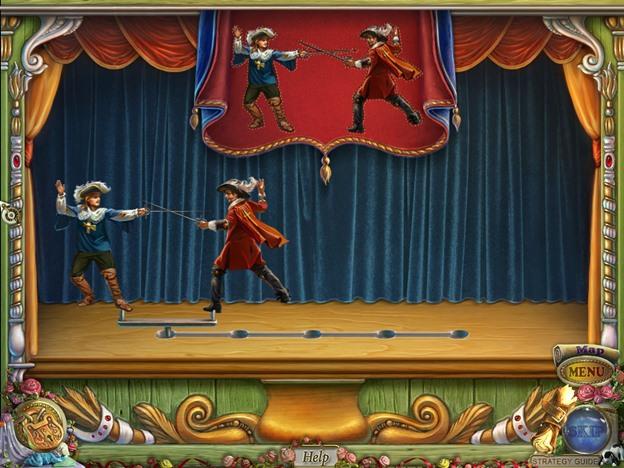
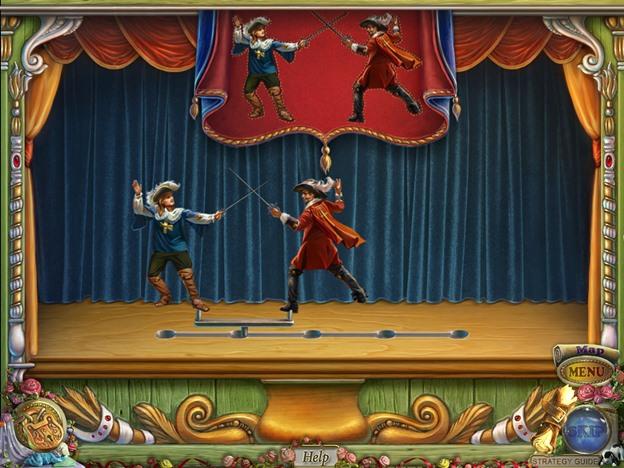
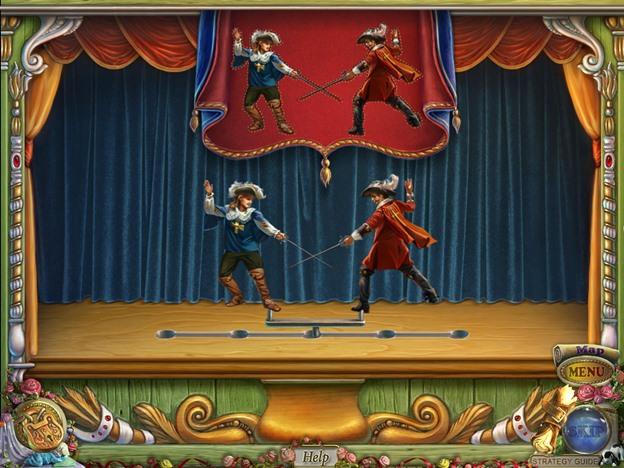
- Click on the fencer puppet.
- Use the SWORD on the fencer.
- A mini-puzzle starts.
- Stab the fencer three times. Click on either the head, torso or legs of the fencer to strike. You will either be blocked or you connect. If you connect, one of the red lights will turn green. There are many possible solutions for this puzzle. One solution is to strike the legs, causing the fencer to block, then strike the head. Do this two more times.
- When you’ve defeated the fencer, click on the door.
- Adjust the combination on the door to 057.
- Go through the door.
- Take the PIECE OF PLYWOOD.
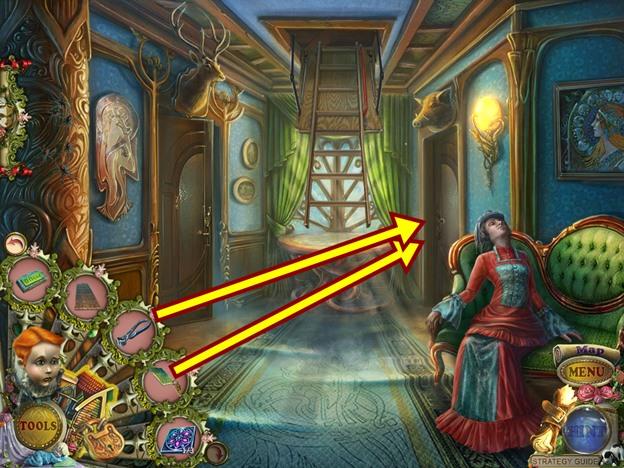
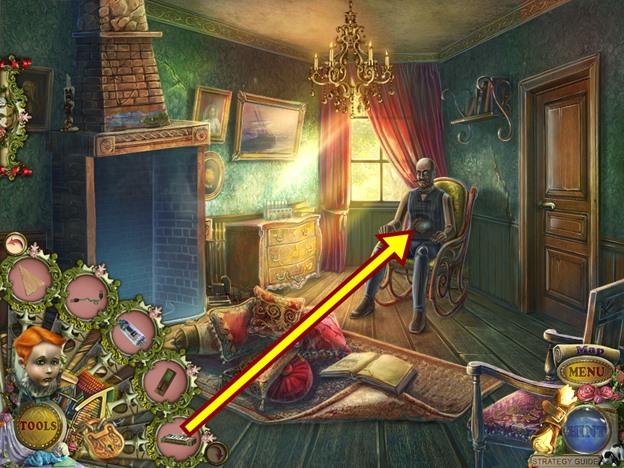
- Click on the Felicia.
- Use the SWORD to cut the ropes.
- Click through the dialogue. Move down.
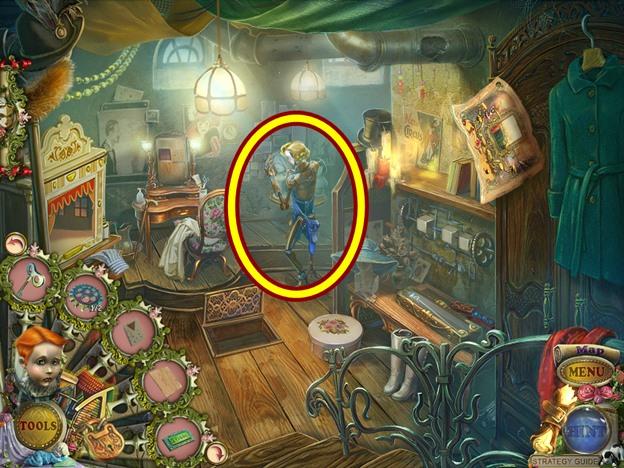
- Click on the mechanical puppet.
- Put the COMPUTER PAPER in its back.
- Wait for the puppet to finish writing, then take the note. Click anywhere outside the window to close it.
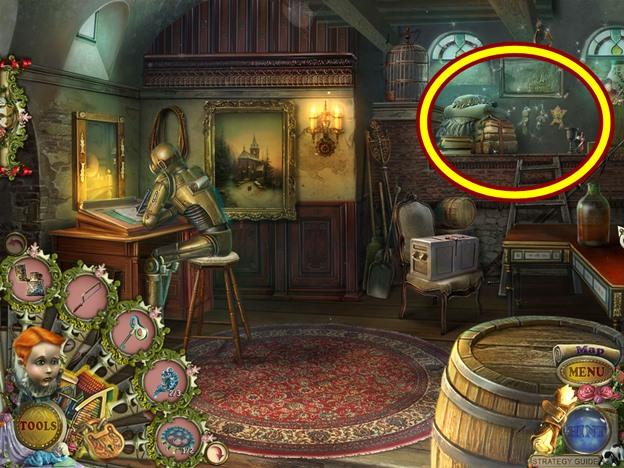
- Click on the ledge on the right to start a hidden object hunt.
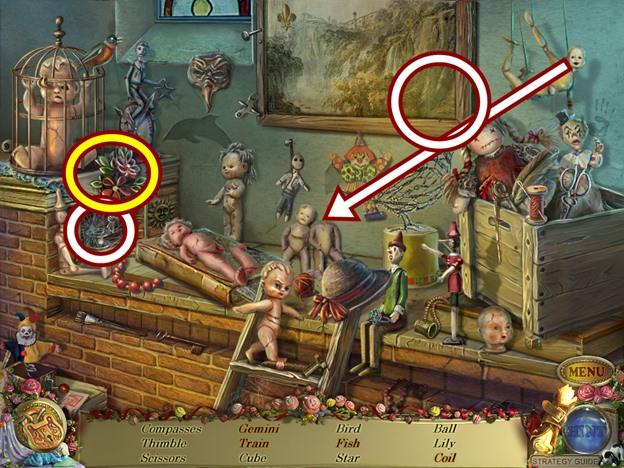
- Find all the objects. Tear the bottom right corner of the painting to reveal the train. Put the doll head on the doll twins to get the Gemini. Move the flowers to reveal the fish. Brush away the cobwebs to reveal the coil.
- A FISH (3/3) is added to your inventory.
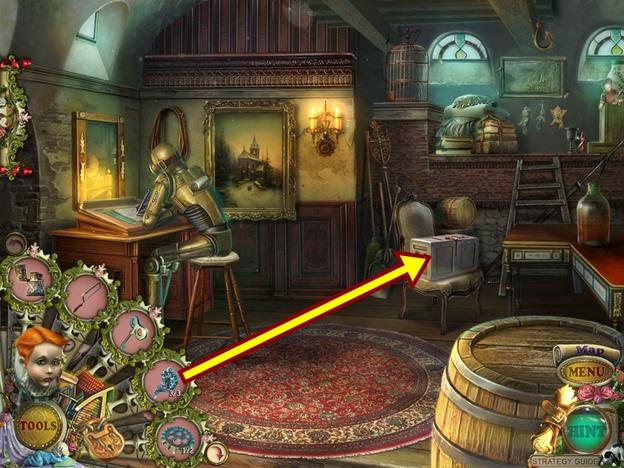
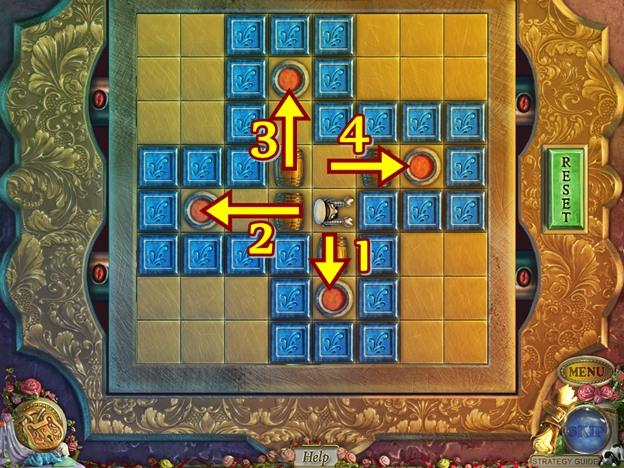
- Click on the box on the chair.
- Add the three FISH.
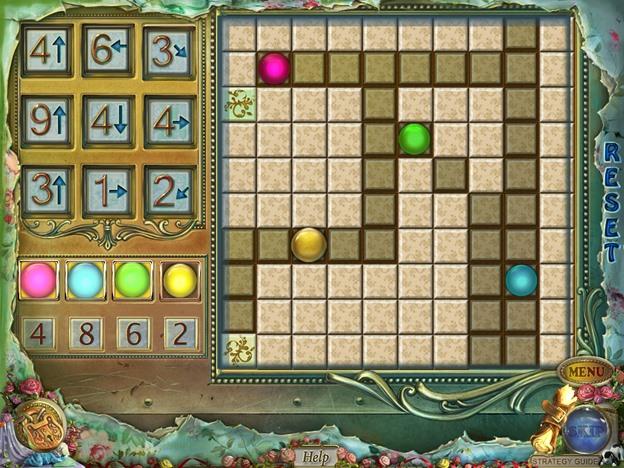
- A mini-puzzle starts.
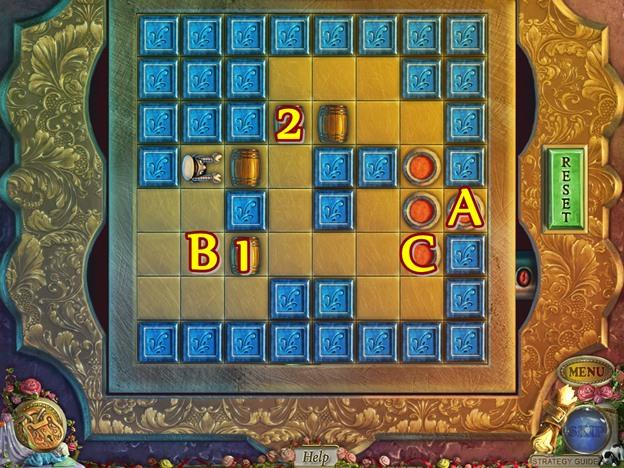
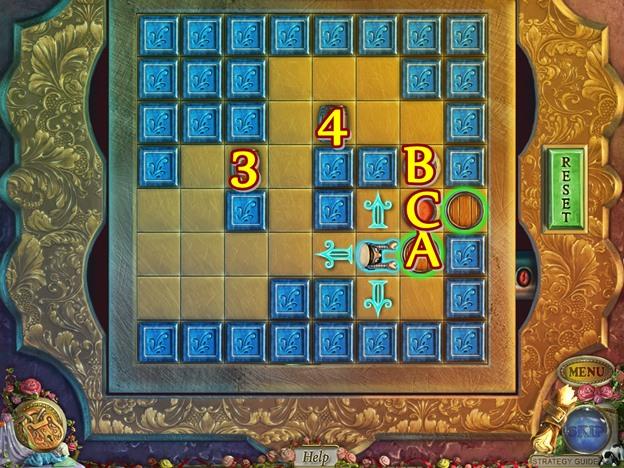
- Remove all the frogs so only the red frog remains. A frog can only jump over another frog into an empty position. Click on a frog and then click on a directional arrow to move it.
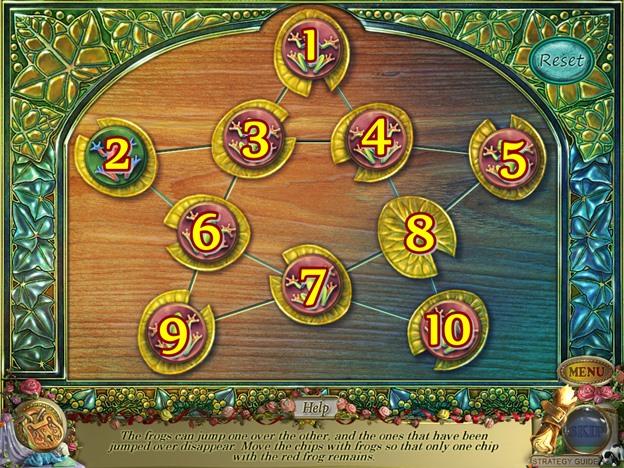
- Click the Reset button. Using the screenshot above as a guide, move the frogs in the following order:
- 9->8, 2->7, 4->2, 10->4, 5->3, 2->4, 1->8, 7->5.
- Take the ELEVATOR BUTTON.
- Move down.
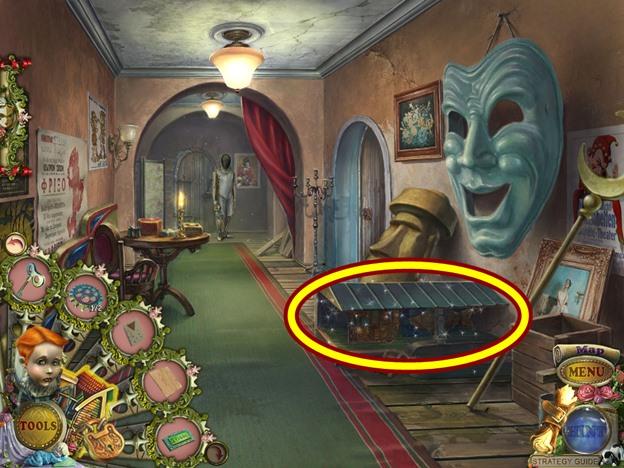
- Click on the street scene to start a hidden object hunt.
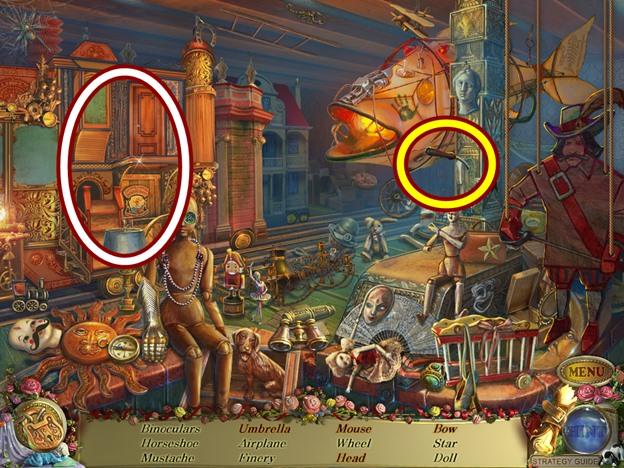
- Find all the objects. Move the train prop to reveal the umbrella and bow. Pull the lever to lift the paper doll to reveal the mouse and head. If you are asked to find “finery,” it is the necklace on the wooden doll.
- A GUARD HEAD is added to your inventory.
- Go through the door on the right.
- Click on the mechanical puppet.
- Remove the card and add the CARD from your inventory.
- Insert the KEY into the keyhole.
- Put the PIECE OF PLYWOOD in the puppet’s hand.
- Turn the key.
- Once the puppet is done cutting, take the TRIANGLE.
- Take the WIRE from the puppet’s hand.
- Move down two scenes to the elevator.
- Click on the elevator panel.
- Remove the broken 1 Floor button and replace it with the ELEVATOR BUTTON.
- Press the 1 Floor button.
- When the elevator stops, move down.
- Click on the grate below the porch.
- Find the objects based on the silhouettes at the bottom of the screen.
- Take the triangle (1).
- Open the drawer (2) and take the hammer.
- Use the hammer to remove the nailed down board (3).
- When the drawer opens, take the puzzle from the vampire puppet.
- Click on the chest (4).
- Add the puzzle to trigger a mini-puzzle.
- Swap adjacent pieces to recreate the image.
- Take the star that appears.
- Put the star in the slot (1) to open the box, then take the cello accessory that appears.
- Put the cello accessory on the cello (2).
- Take the fuse that appears.
- Add the triangle to the inset (3).
- When the panel opens, add the fuse.
- A HANDLE is added to your inventory.
- Climb the ladder that appears.
Chapter 4 – Puppet Show
- Click on the flowerpot.
- Take the GEAR (2/2).
- Click on the headless puppet.
- Add the GUARD HEAD.
- Take the PANEL LAMP from its mouth.
- Click on the left hallway wall.
- Remove the paper poster.
- Take the pirate HAT PATTERN and the LIBRARY CARD.
- Click on the door on the right.
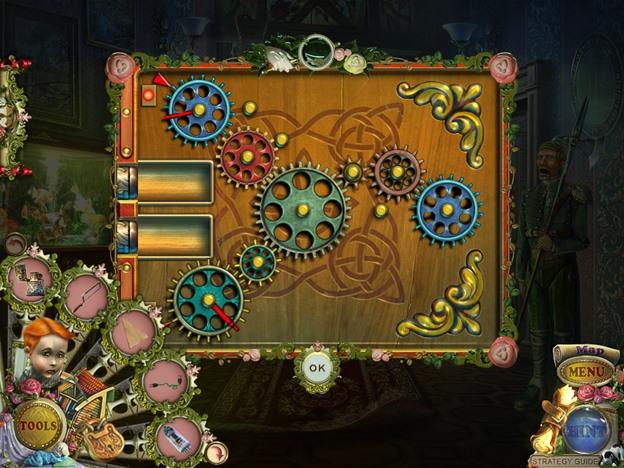
- Add the two GEARS.
- A mini-puzzle starts.
- Connect the gears to make them rotate. When the gears are correctly placed, the lock pins will move at the same time and the door will open. Incorrectly placed gears will rotate but the lock pins won’t move at the same time to unlock the door.
- Solution:
- Enter the room on the right.
- Click on the table against the back wall.
- Take the CHARACTER PUPPET and the SOLDIER.
- Use the helper puppet to open the cupboard.
- Take the BOOKS.
- Move down and enter the door on the left.
- Watch the cutscene.
- Click on the mechanical Felicia.
- Click through the dialogue.
- Click on the dresser.
- Take the SOLDIER. Click anywhere outside the window to close it.
- Click on the fireplace mantle.

- Add the two SOLDIERS (use the small soldiers as a guide).
- Go through the new entrance.
- Click on the librarian.
- Take the cowboy HAT PATTERN.
- Give the librarian the LIBRARY CARD.
- Take the BOOKS.
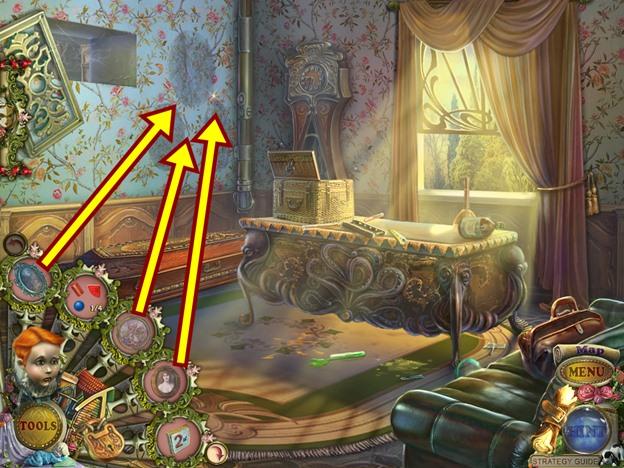
- Click on the corner of the carpet.
- Lift the carpet.
- Take the CONTROL PANEL PART.
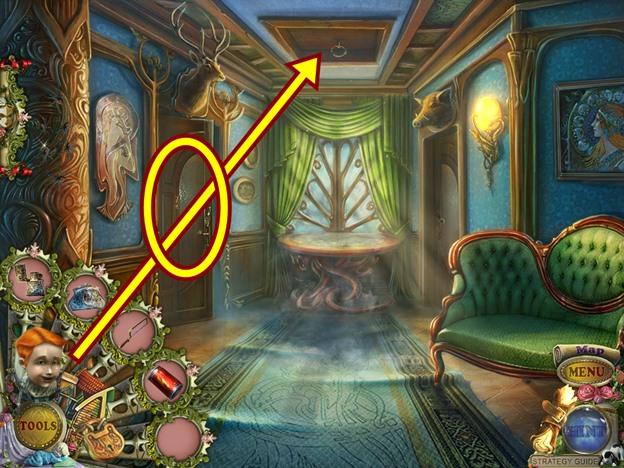
- Click on the mobile hanging from the ceiling.
- Use the helper puppet to climb up the mobile.
- Click on the table on the right.
- Take the PIRATE and the FLAG. Click anywhere outside the window to close it.
- Move down two scenes.
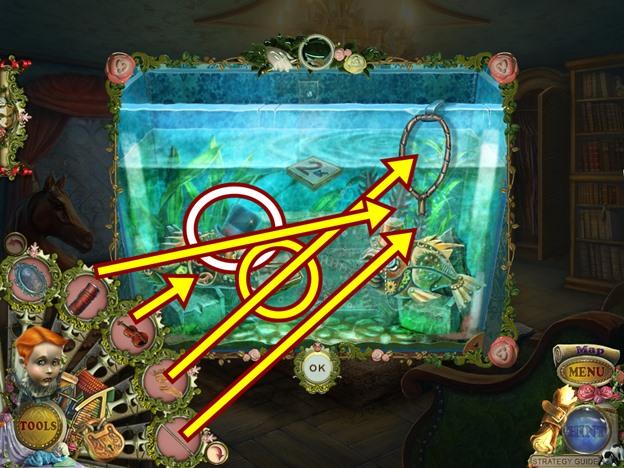
- Click on the aquarium.
- Take the LIQUID.
- Put the PIRATE and the FLAG on the boat.
- Take the GLASS CUTTER PART.
- Go back into the room on the left.
- Click on the book on the floor.
- Put the LIQUID beside the book.
- Remove the lid from the jar of liquid, then pick up the liquid and pour it on the book.
- Take note of the numbers 10:10. click anywhere outside the window to close it.
- Click on the dresser.
- Put the GLASS CUTTER PART on the other glass cutter part.
- Take the GLASS CUTTER. Click anywhere outside the window to close it.
- Go back through the fireplace to the library.
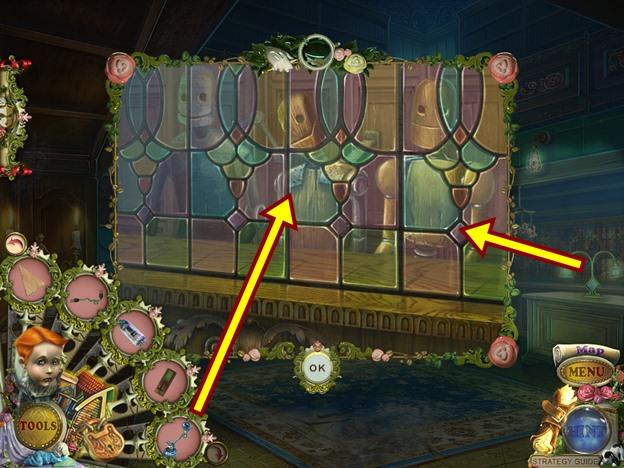
- Click on the stained glass.
- Put the GLASS CUTTER on the glass, then take the STAINED-GLASS PIECE.
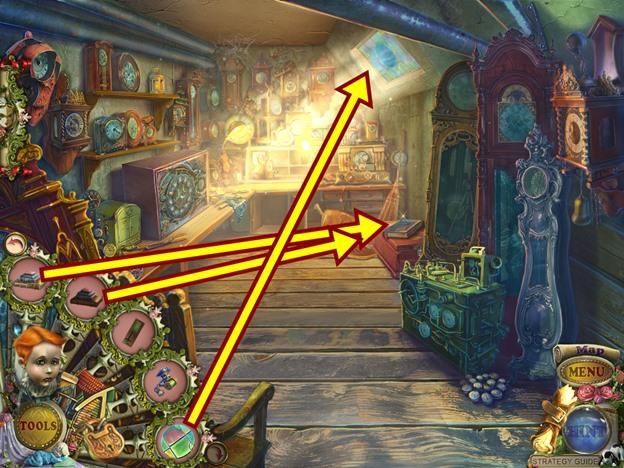
- Move down two scenes, then go through the door on the right.
- Click on the trunk.
- Add the two BOOKS.
- Click on the stained glass.
- Add the STAINED-GLASS PIECE.
- Click on the clock the light is shining on.
- Set the time to 10:10.
- Take the PIANO.
- Move down and enter the door on the left.
- Click on the puppet.
- Put the PIANO in its hands.
- A mini-puzzle starts.
- Repeat the sequence that is played. If necessary, press Repeat to see the sequence again.
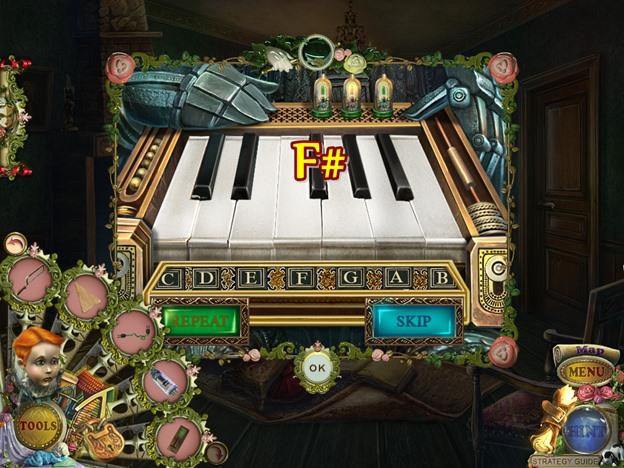
- The keys are labelled.
- To solve the puzzle, press the keys in the following sequence:
- G-A-F#-G-E
- E-G-F#-G-E
- G-A-F#-G-E-F#-D-D-G.
- Click on the door to start a hidden object hunt.
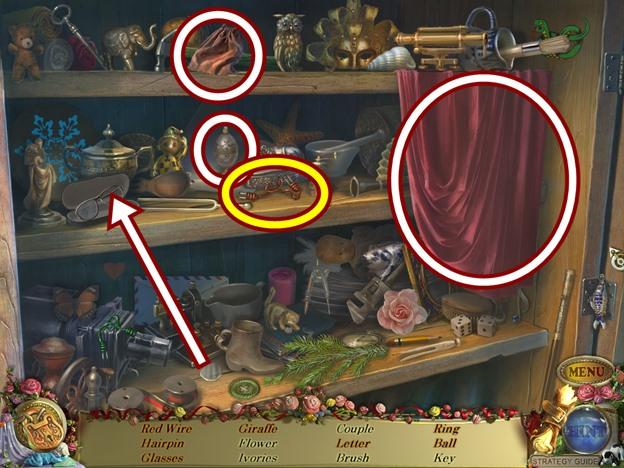
- Find all the objects. Move the red curtain to reveal more items. Open the egg to take the ring. Open the pouch to take the hairpin. Put the lens back on the glasses, then take them. If you are asked to find a brush, it’s the paintbrush, not the scrub brush.
- A WIRE is added to your inventory.
- Move down four scenes, then get on the tram.
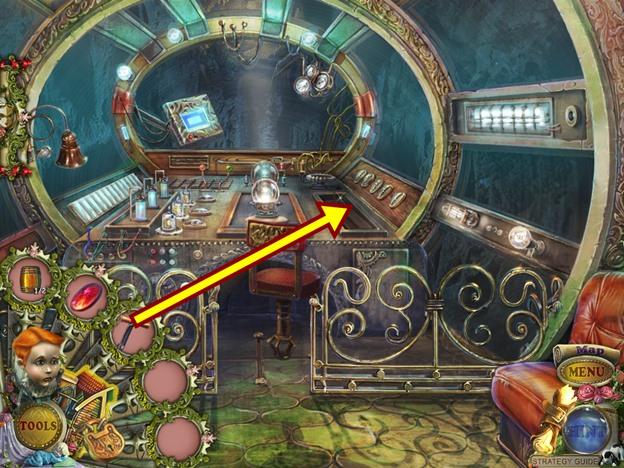
- Click on the control panel on the conductor’s back.
- Add the two WIRES, then PANEL LAMP, then add the CONTROL PANEL PART.
- Click on the lever.
- Exit the tram.
Chapter 5 – Workshop
- Watch the cutscene.
- Click on the Felicia.
- Click through the dialogue.
- Click on the vacuum.
- Take the VACUUM CLEANER.
- Click on the tiny puppet.
- Click on the puppet to make it chop the wood.
- Once the wood has been chopped, take the CANNON.
- Move towards the house.
- Click on the door.
- Click through the dialogue.
- Click on the tree.
- Use the VACUUM CLEANER to get rid of the wasps.
- Take the ROPE LADDER.
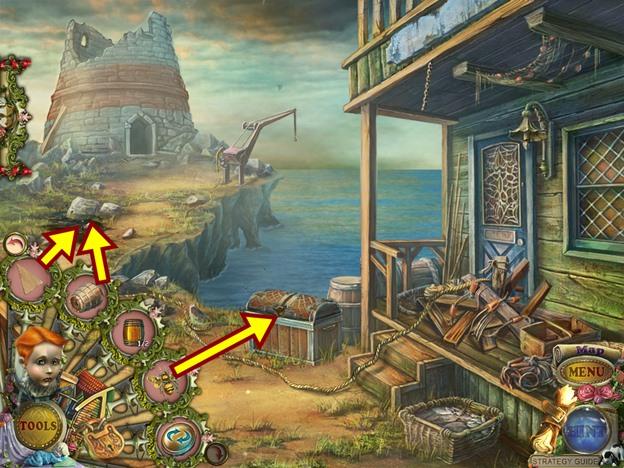
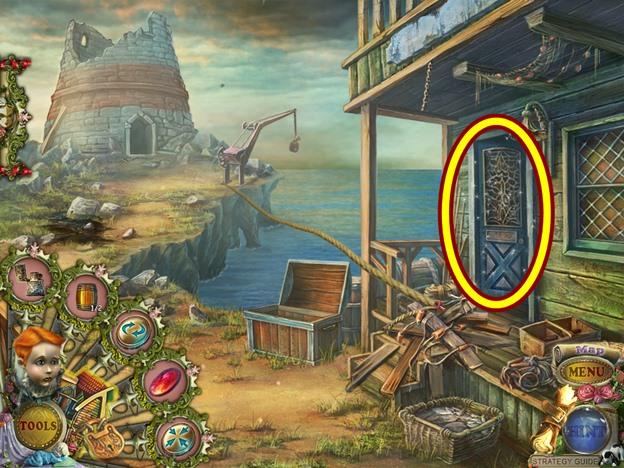
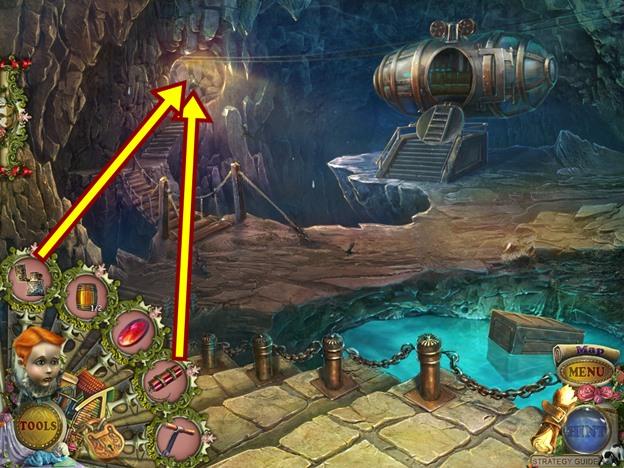
- Move down, then go towards the lighthouse (path on the left).
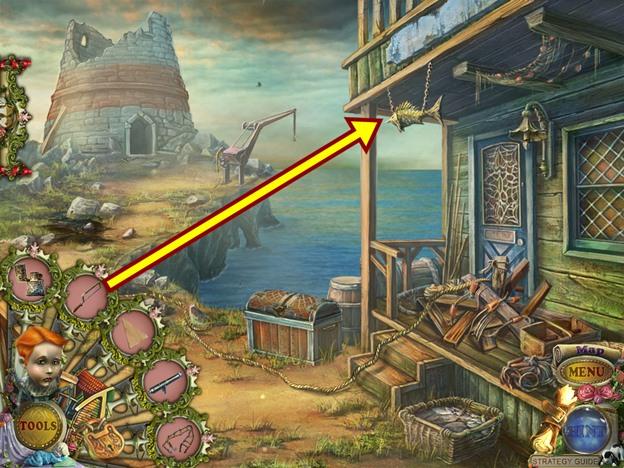
- Click on the swordfish.
- Use the SAW to cut the chains.
- Take the FISH KEY from where it fell.
- Move forward.
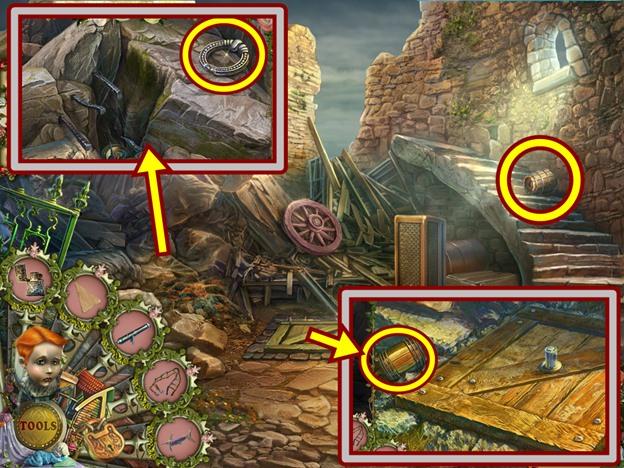
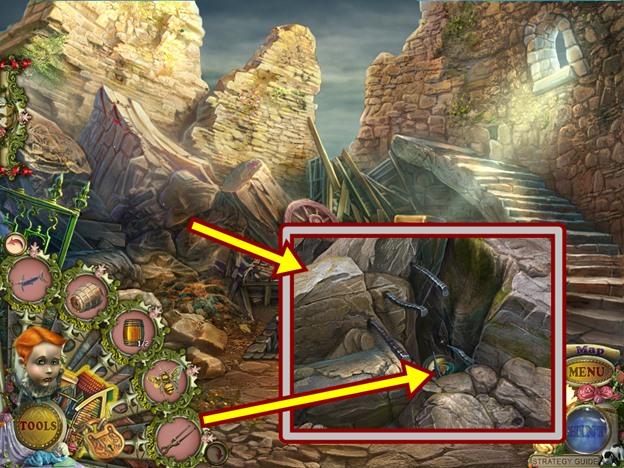
- Take the LEAKY BUCKET.
- Click on the rocks at the left.
- Click on the rocks again.
- Take the HANDLE. Click anywhere outside the window to close it.
- Click on the hatch.
- Take the BARREL (1/2).
- Put the HANDLE on the hatch, then lift it and go down the stairs.
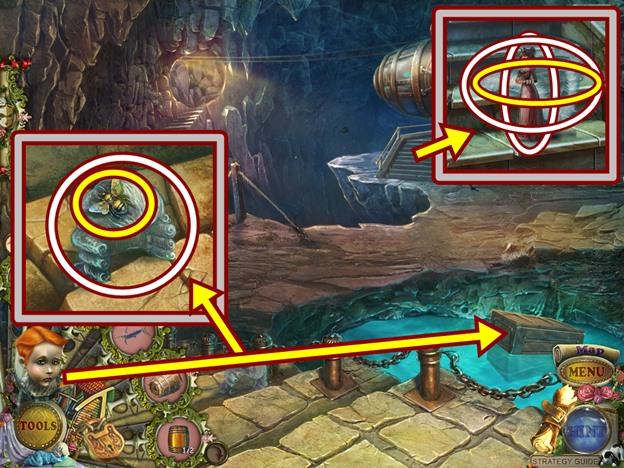
- Click on the floating chest.
- Use the helper puppet on the chest.
- Click on the stuff the helper puppet got from the chest.
- Take the FLY and the man’s wig HAT PATTERN.
- Click on the stairs.
- Take the CHARACTER PUPPET, the tricorn HAT PATTERN and PLIERS.
- Move down.
- Click on the rocks on the left.
- Use the PLIERS to get the BUTTON.
- Move down.
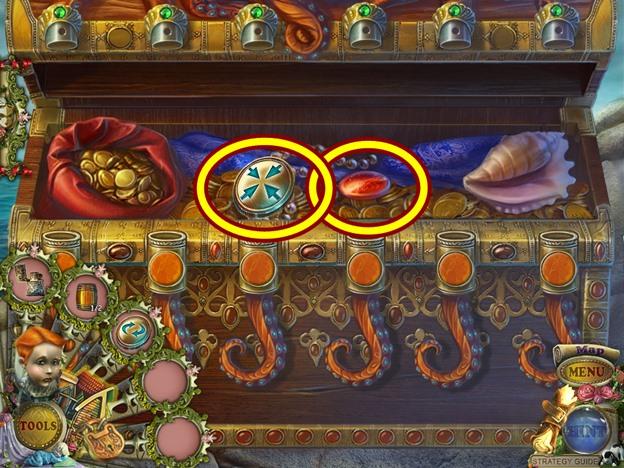
- Click on the tar puddle.
- Add the LEAKY BUCKET, then the TRIANGLE.
- Take the BUCKET.
- Click on the chest.
- Add the FLY.
- Look in the chest.
- Add the CANNON to the inset.
- A mini-puzzle starts.
- Adjust the rods to make a path so the cannons can fire and hit their target. Click on a rod and click the arrows to move the rod. Each rod controls itself and another rod.
- From the starting position, move the 2nd rod all the way up, then move the 4th rod all the way up, then move the 1st rod all the way up, then move the 2nd rod all the way up. The top cannon can fire.
- With all the rods positioned so the opening is at the very top, shoot the second cannon by:
- Rod 1 one position down, rod 2 one position down, rod 4 one position down, rod 2 one position up, rod 1 one position down, then rod 2 one position down. The second cannon can fire.
- To shoot the third cannon:
- Rod 2 one position down, rod 3 one position up, rod 1 one position down and rod 2 one position down. The third cannon can fire.
- To shoot the fourth cannon:
- Rod 1 one position down, rod 2 two positions down, rod 4 one position down, rod 1 one position down and rod 2 one position down. The fourth cannon can fire.
- A HARPOON GUN is added to your inventory.
- Move down.
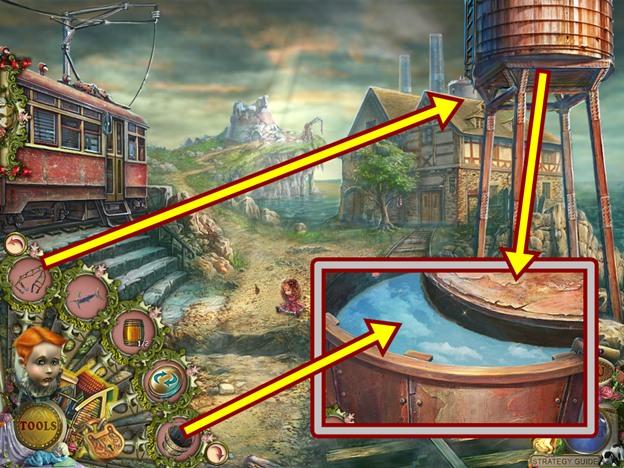
- Click on the water tower.
- Add the ROPE LADDER.
- Click on the ladder.
- Watch the cutscene.
- Remove the lid.
- Put the BUCKET in the water to get the BUCKET WITH WATER.
- Move towards the house.
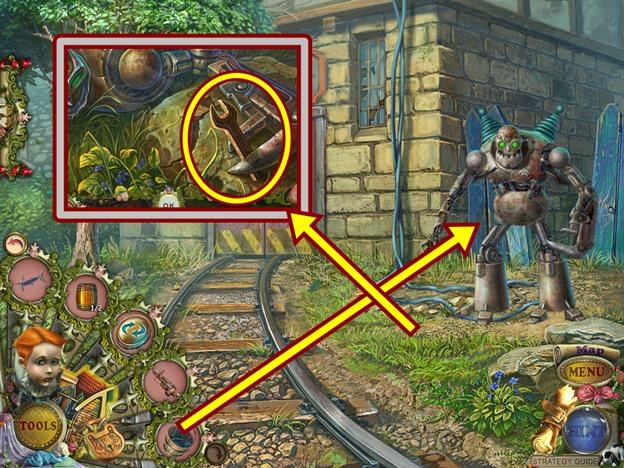
- Pour the BUCKET WITH WATER on the robot.
- After it falls, click on the robot.
- Take the WRENCH.
- Move forward through the fence opening.
- Click on the dock.
- Take the war bonnet HAT PATTERN and HARPOON.
- Click on the crane’s hook.
- Use the WRENCH to take the HOOK.
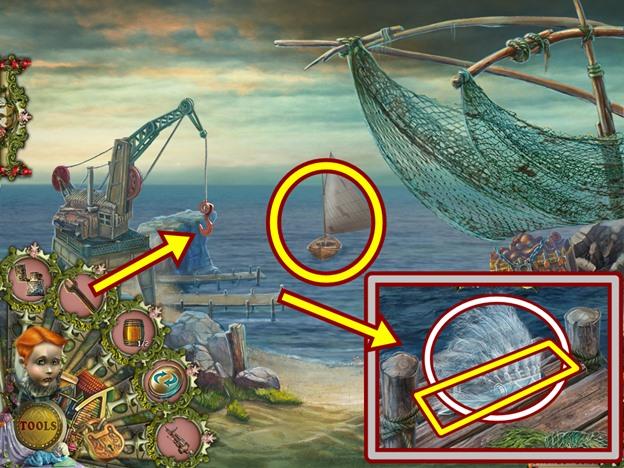
- Click on the sailboat.
- Put the HARPOON GUN on the beach, then add the HARPOON.
- Pull the trigger.
- When the boat is pulled closer, click on the boat and take the BAG.
- Move down two scenes, then take the left path towards the lighthouse.
- Click on the door.
- Add the HOOK, then click on the rope to attach it to the hook. Click anywhere outside the window to close it.
- Click on the crane.
- Put the BAG on the hook, then turn the crank.
- The doorway is now clear.
- Click on the door to start a hidden object hunt.
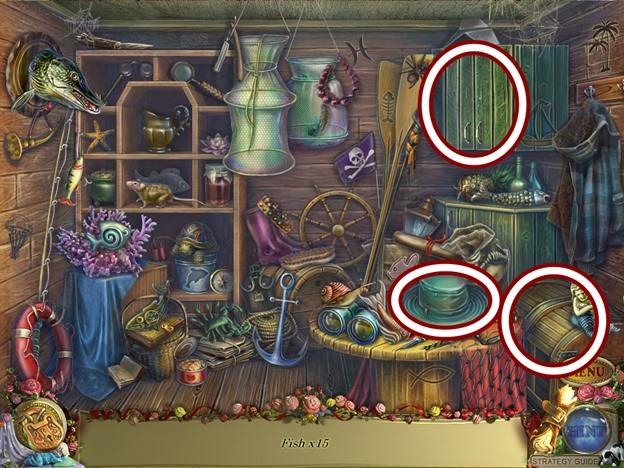
- Find all the objects. Find 15 fish. Open the cupboard to reveal a fish. Lift the hat to reveal a fish. After you take the fish on the chest, open the chest to find another fish.
- An OCTOPUS is added to your inventory.
- Move down, then go towards the house and go through the fence opening.
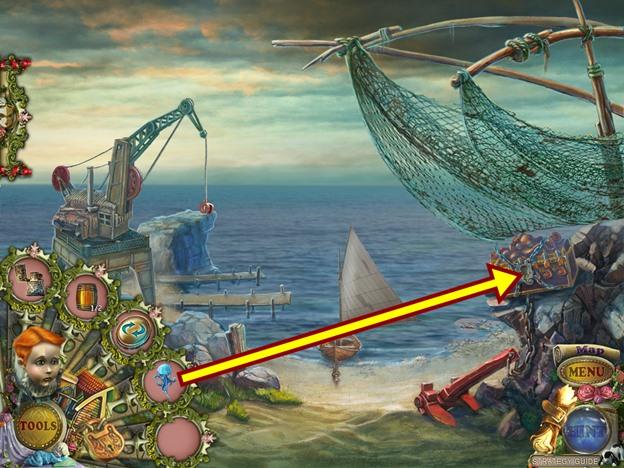
- Click on the chest.
- Insert the OCTOPUS into the opening.
- Look in the chest.
- A mini-puzzle starts.
- Press the buttons in a particular order to open the chest. Pressing a button affects itself and others. There are many possible solutions to this puzzle.
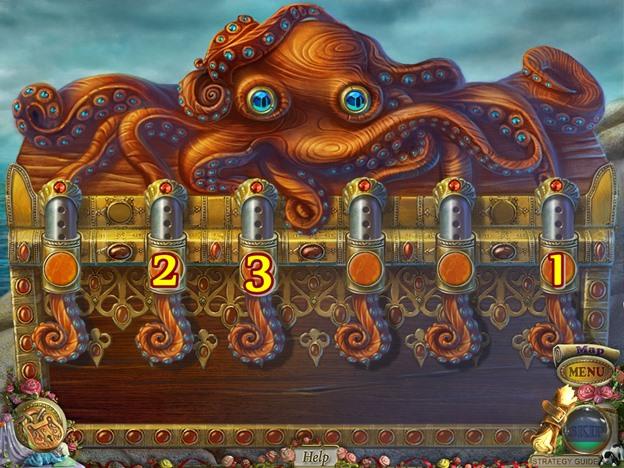
- Using the screenshot above as a guide, press the buttons in the order shown (for this solution to work, all the locks must be closed).
- Take the JEWEL and the BUTTON.
- Move down two scenes, then take the left path.
- Click on the door to start a hidden object hunt.
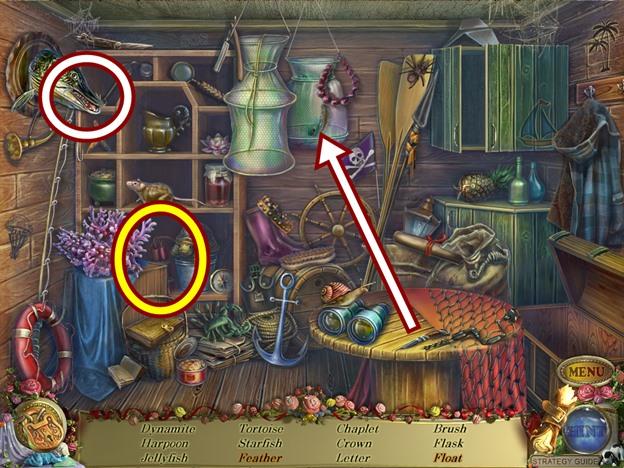
- Find all the objects. Use the knife on the hanging mesh bag to get the feather. Open the crocodile’s mouth to get the float.
- DYNAMITE is added to your inventory.
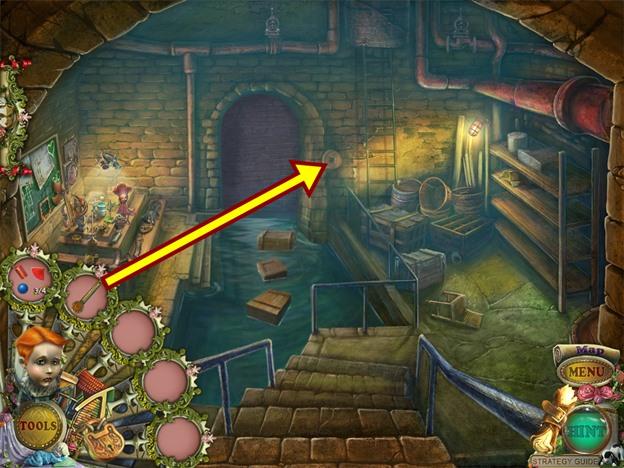
- Move forward and go down the hatch.
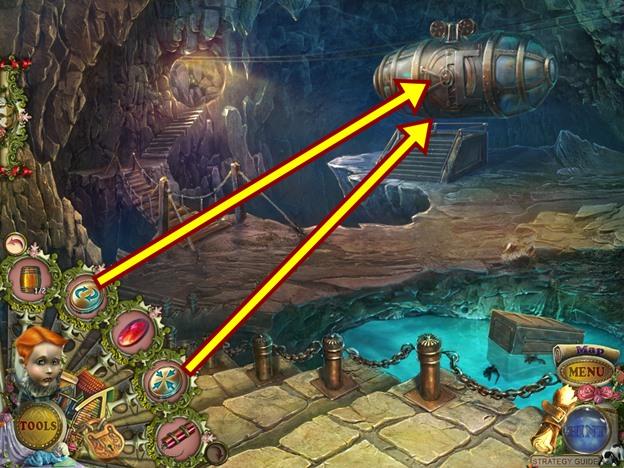
- Click on the transportation mechanism.
- Add the two BUTTONS.
- A mini-puzzle starts.
- Use the buttons on the left to move the blocking pieces in order to clear a path for the grey handles to make their way into the centre disc. There are two rotating buttons, one moves clockwise (1), one moves counter-clockwise (3). The other two buttons move the blocking pieces either in (2) or out (3).
- There are many possible ways to solve this puzzle.
- Top left: Click and hold the rotating button (either one) until eventually the blocking pieces are positioned so the grey handle can move towards the centre disc.
- Top right: Use the out button to move the long green blocking piece out of the disc. Use the counter-clockwise button to move the blue blocking pieces all the way counter-clockwise. Then use the clockwise button to move the blue and yellow pieces out of the way of the grey handle.
- Bottom left: Move the green blocking piece out of the disc, then use the rotating buttons to make enough of a path for the grey handle to move to the centre disc.
- Bottom right: Get the green blocking piece out of the way so you can move the blue and yellow blocking pieces behind the grey handle. Move the green blocking piece back into the disc, placing it so the long yellow piece can move behind the grey handle and so the blue piece can’t block the grey handle’s path. Once the long yellow piece is behind the grey handle, move the green blocking piece so the grey handle can move to the centre.
- With all four grey handles now waiting to get inside the centre disc, the easiest and laziest way to finish this puzzle is press and hold either of the rotating buttons and stop when there’s a path for the grey handle to move all the way into the centre disc. Once there’s a path available, press the in button to move the grey handle inwards.
- The screenshot above shows the solved puzzle. Take note of the position of all the blocking pieces.
- Enter the transportation mechanism.
- Take the NAIL DRAWER.
- Move left and move down.
- Click on the wooden crate.
- Pull the nails using the NAIL DRAWER.
- Take the LEVER.
- Go down the hatch.
- Click on the rocks on the left.
- Add the DYNAMITE, then light it with the LIGHTER.
- Get on the transportation mechanism.
- Put the LEVER on the panel, then pull the lever.
Chapter 6 – Catacombs
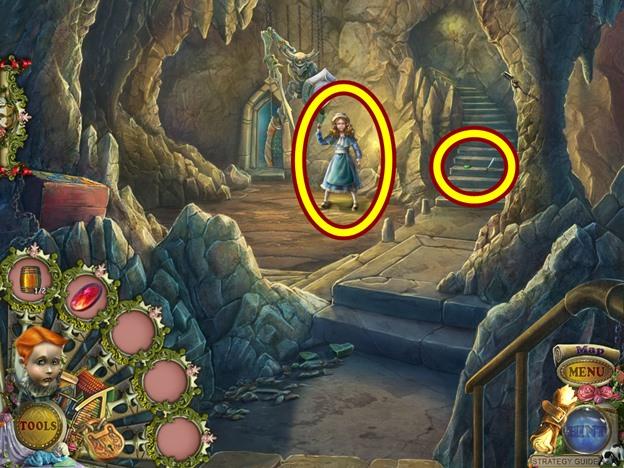
- Click on Felicia.
- Click through the dialogue.
- Click on the stairs.
- Take the JEWEL and the SYRINGE PART.
- Move up the stairs.
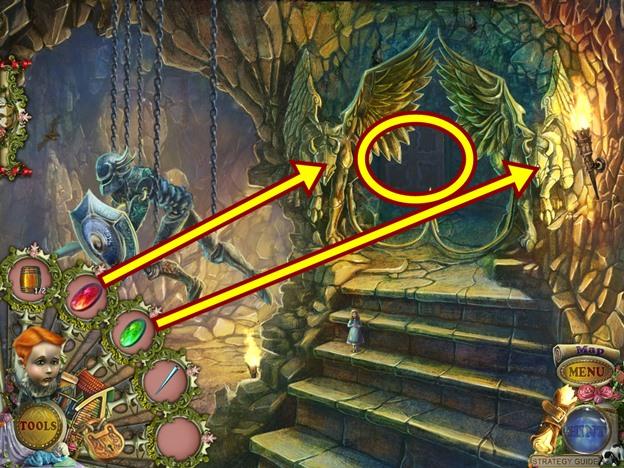
- Click on the statues at the top of the stairs.
- Put the red JEWEL on the left statue and the green JEWEL on the right statue.
- Click on the door to start a hidden object hunt.
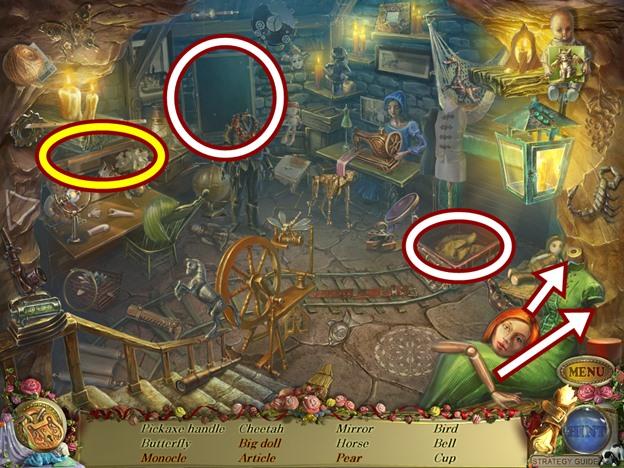
- Find all the objects. Put the doll head and left arm on the doll to take the big doll. Move the chalkboard to get the pear and the article (the word “the”). Remove the cloth from the trolley to take the monocle.
- A HANDLE is added to your inventory.
- Move down.
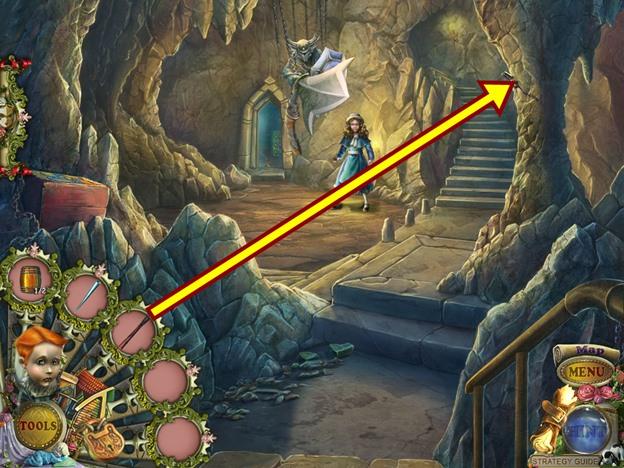
- Click on the right wall.
- Add the HANDLE and take the PICKAXE.
- Go up the stairs.
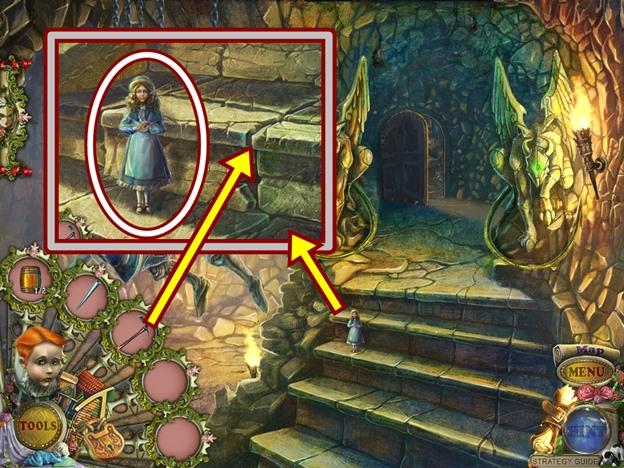
- Click on the stairs.
- Take the CHARACTER PUPPET.
- Use the PICKAXE on the stair, then take the BARREL (2/2).
- Move down.
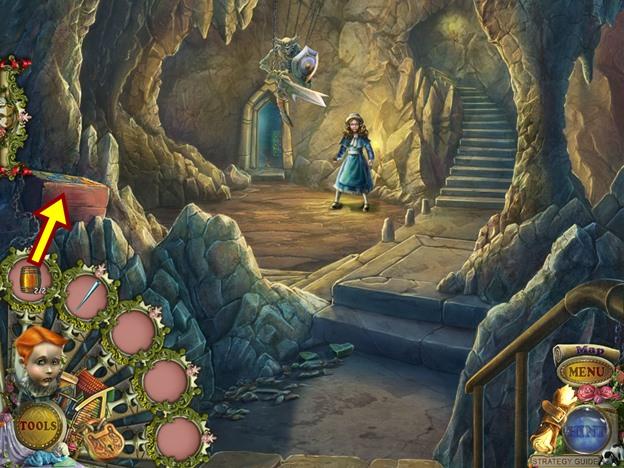
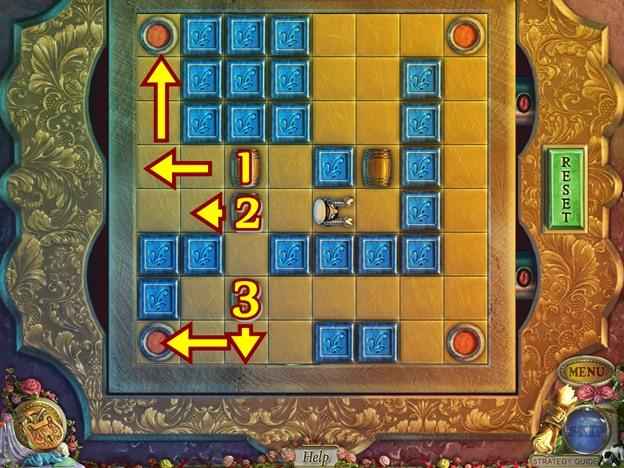
- Click on the wooden chest on the left.
- Add the two BARRELS.
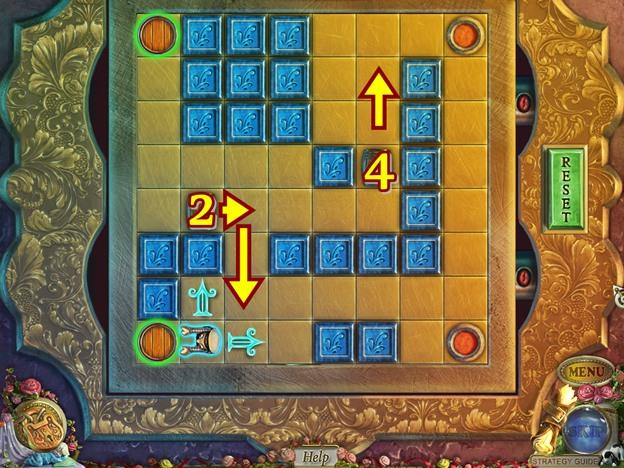
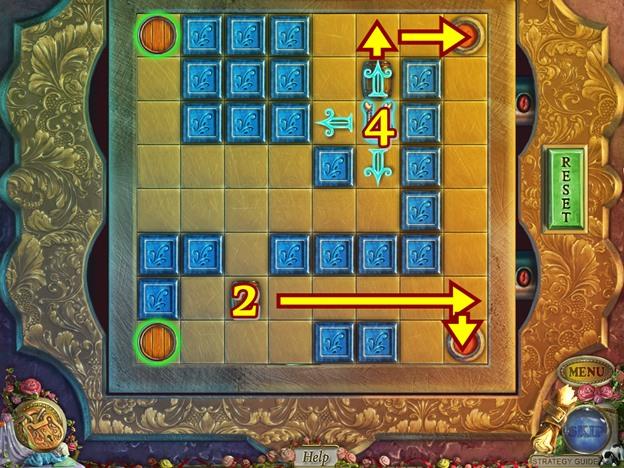
- A mini-puzzle starts.
- Use the seaman to move the barrels onto the red spaces. Click on the seaman and click on an arrow to move it one space in that direction. Press the Reset button if you get stuck.
- You must solve this puzzle four times.
- To solve the first level, move the barrels in order according to the screenshot above.
- To solve the second level, move the barrels in order according to the screenshot above.
- To solve the third level, move barrel 1 all the way left, then move around it and push it all the way to the top left red space.
- Move to the right of barrel 2 and movie it one space to the left.
- Move down and move barrel 3 all the way down, then move to its right and move it all the way left to the bottom left space.
- Move up and move barrel 2 one space to the right, then move it two spaces down. Go around and move barrel 4 two spaces up.
- Move back down to barrel 2 and move it all the way right, then go around and push it down into the bottom right red space. Now go up and move barrel 4 up and into the top right red space.
- To solve the fourth level, move barrel 1 all the way right, then up one space and into the far right red space (A). Move up and move barrel 2 three spaces down, then go around and move it two spaces to the left (B), then go around and move it all the way right to space C.
- Go around and push barrel 3 to the right, then go around and push it all the way down, then move around the board and move it all the way right to space A.
- Now go up and move barrel 4 left and all the way down, then go around to the bottom of the red spots and push the barrel on space A two spaces up to space B, then move back down and move the barrel on space A to space C.
- Move barrel 4 two spaces left so you can go around it, then go around it and move the barrel all the way right to the space A.
- When you are finished, take the BOTTLE OF ACID.
- Go up the stairs.
- Click on the chains holding up the puppet.
- Pour the BOTTLE OF ACID on the chains.
- Click on the door to start a hidden object hunt.
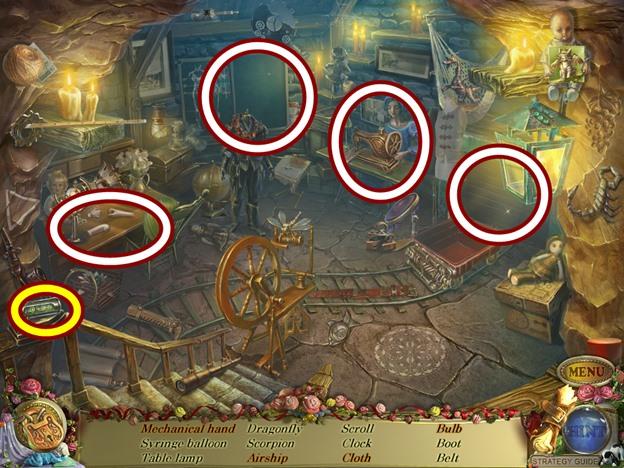
- Find all the objects. Move the wooden panel, then move the trolley to get the bulb. Move the chalkboard to get the airship. Click on the sewing puppet to get the cloth. Put the arm together to make the mechanical hand.
- A SYRINGE PART is added to your inventory.
- Move down.
- Click on the broken puppet.
- Remove the cap from the fuel tank, then add the two SYRINGE PARTS.
- Take the syringe to get FUEL.
- Click on the Felicia puppet.
- Click on its face and take the RED BUTTON.
- Move forward.
- Click on the centre door.
- Take the FIVE-POINTED STAR.
- Click on the centre console and add the FIVE-POINTED STAR.
- Click on the centre door to start a hidden object hunt.
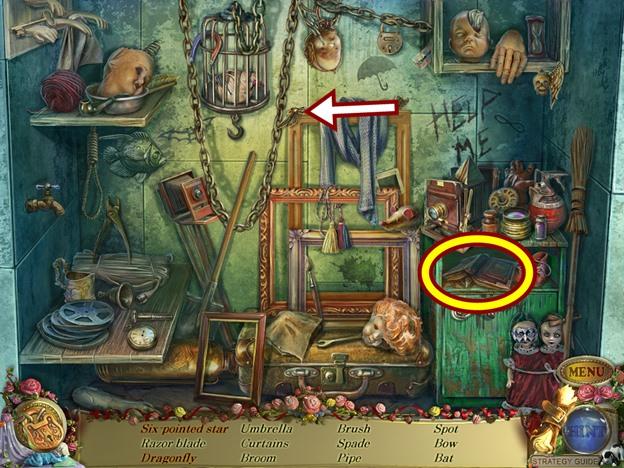
- Find all the objects. Lift the book to get the six-pointed star. Put the dragonfly back together. If you are asked to find curtains, you need to find the curtain tassels.
- A SIX-POINTED STAR is added to your inventory.
- Click on the left console and add the SIX-POINTED STAR.
- Go through the door on the left.
- Click on the puppet on the left.
- Remove the cap and add the FUEL.
- Take the SEVEN-POINTED STAR from its head.
- Click on the chest.
- Take the parade HAT PATTERN and the KEY.
- Move down.
- Click on the centre door to start a hidden object hunt.
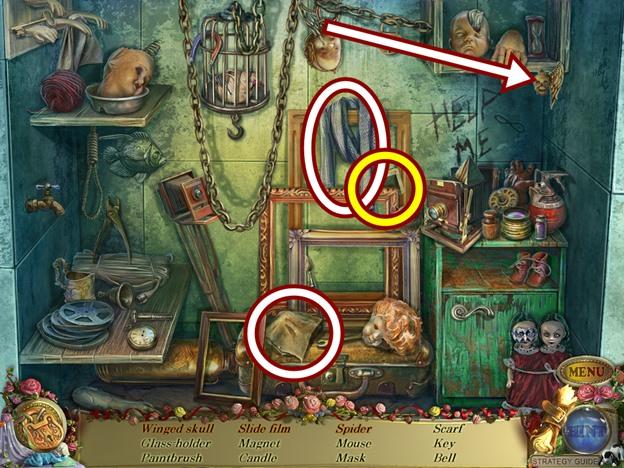
- Find all the objects. Reattach the winged skull. Lift the cloth and take the spider. Take the scarf so you can then take the slide film.
- A SLIDE FILM is added to your inventory.
- Go through the door on the left.
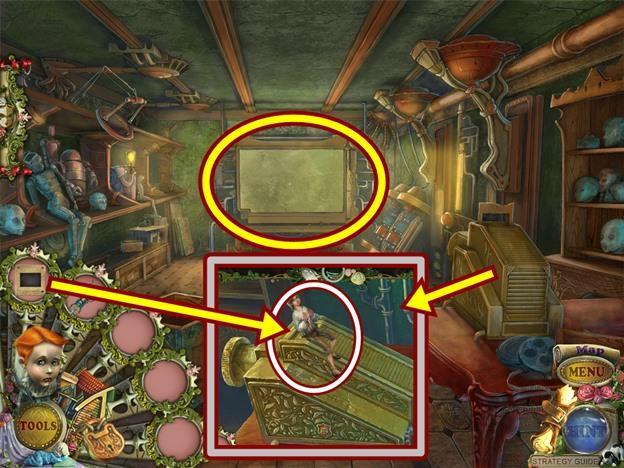
- Click on the projector.
- Take the CHARACTER PUPPET.
- Insert the MAGIC SLIDE into the projector.
- Click on the screen and note the combination.
- Move down.
- Click on the console on the far right.
- Add the SEVEN-POINTED STAR.
- Go through the door on the far right.
- Click on the cage on the right.
- Add the KEY to the inset.
- Take the BEETLE.
- Click on the safe.
- Click on the dial. If you haven’t put the slide film into the projector, you will not be able to open the safe.
- When the safe opens, take the CHARACTER PUPPET and the LEVER.
- Click on the tubes on the left.
- Insert the LEVER, then pull it.
- Click on the contraption that appears in the centre of the room.
- Insert the BEETLE and the RED BUTTON.
- A mini-puzzle starts.
- Connect the two blue crystals, the one the beetle is holding and one at the end of a metal rod. Use the outer rotating arrows to move the disc clockwise or counter-clockwise. The arrows on the disc move the metal rods.
- There are many possible solutions to this puzzle, as well there is no reset button so a step-by-step instruction is not possible.
- To solve this puzzle, focus on moving the disc counter-clockwise, adjusting the metal rods as you go.
- Solution:
- When the contraption opens, click on the Master.
- Use the helper puppet to free the Master.
- Watch the cutscene.
The end!
If you are playing the Collector’s Edition, you may now play the Bonus Chapter.
From the main menu, click Extras, then click Play. Select your difficulty setting.
Bonus Chapter
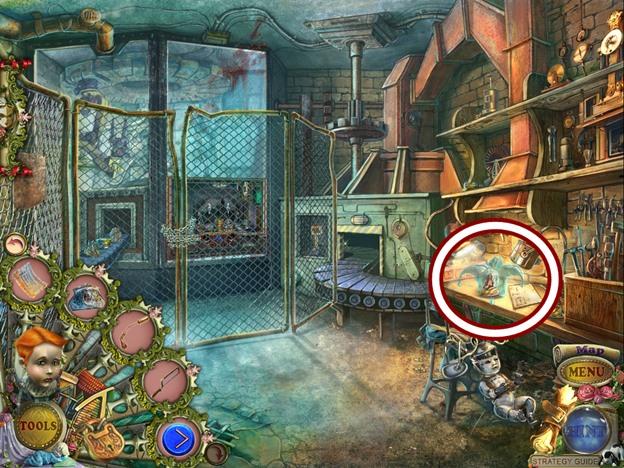
- Watch the cutscene.
- Click on the shelves on the right.
- Take the Bobby’s HAT PATTERN.
- Use the helper puppet to push the red button and knock out the CASTING MOLD.
- Move through the new doorway to the right.
- Click on the mold machine.
- Take the CHEST PART and the FIREPLACE POKER. Click anywhere outside the window to close it.
- Click on the chest on the table.
- Take the DOMINO.
- Add the CHEST PART.
- A mini-puzzle starts.
- Move the doll piece from the far left space to the far right space. You can only move a piece into an empty slot along the track. When you click and drag a piece into a slot, all the pieces in that line will follow.
- Using the screenshot above as a guide, from the beginning position, move the pieces in the following order:
- 7->8, 7->3, 10->11, 5->9, 2->1, 6->2, 9->10, 5->9, 5->4, 2->1, 6->2, 11->10, 7->8, 7->11, 5->4, 7->3 and 7->8.
- Take the STONE HAND.
- Move down.
- Click on the boarded up tunnel.
- Remove the planks using the STONE HAND (three clicks).
- Take the PLIERS. Click anywhere outside the window to close it.
- Click on the base on the floor.
- Take the DOMINO.
- Use the FIREPLACE POKER to hook and take the LEVER.
- Go through the doorway on the right.
- Click on the locked cage.
- Use the PLIERS on the lock to get the PLIERS WITH A KEY.
- Take the CASTING MOLD.
- Move down.
- Click on the armoire on the right.
- Use the PLIERS WITH A KEY to unlock the lock.
- Take the BUCKET OF WATER.
- Turn the tap, then take the RED LENS that came out of the hose’s nozzle.
- Go through the doorway on the right.
- Click on the chest on the floor.
- Take the HEAVY BOOT.
- Fill the chest with the BUCKET OF WATER. Click anywhere outside the window to close it.
- Click on the mold machine.
- Add the two CASTING MOLDS (A), then turn the top lever (B).
- Put the LEVER into the lower lever (C), then turn it.
- Click on the chest on the floor.
- Use the FIREPLACE POKER to get the WHEEL and the GEAR.
- Move down.
- Click on the train.
- Add the WHEEL and the GEAR.
- Move forward along the tracks.
- Watch the cutscene.
- Click on the boarded up door.
- Use the STONE HAND to remove the planks (three clicks).
- Use the HEAVY BOOT to break the metal brackets.
- Take the CLOCK HAND and the JOINT.
- Pick up SOME PLANKS. Click anywhere outside the window to close it.
- Click on the train.
- Take the YELLOW LENS from the lantern. Click anywhere outside the window to close it.
- Click on the statue.
- Take the GREEN LENS form the statue’s head.
- Add the JOINT to the broken arm, then add the STONE HAND.
- Take the MEDIC LOCK PART.

- Click on the asylum steps.
- Take the RAKE.
- Put the CLOCK KEY on the clock.
- Enter the asylum.
- Click on the chandelier.
- Use the helper puppet to climb up the chandelier and get the CHAIN.
- Click on the counter.
- Take the BOTTLE OF ALCOHOL. Click anywhere outside the window to close it.
- Click on the coat rack.
- Take the MEDICAL CLIP. Click anywhere outside the window to close it.
- Click on the door on the right.
- Add the GREEN LENS, RED LENS and YELLOW LENS.
- Click on the door to start a hidden object hunt.

- Find all the objects. Use the brush to shoo the spider to get the web.
- A STENCIL is added to your inventory.

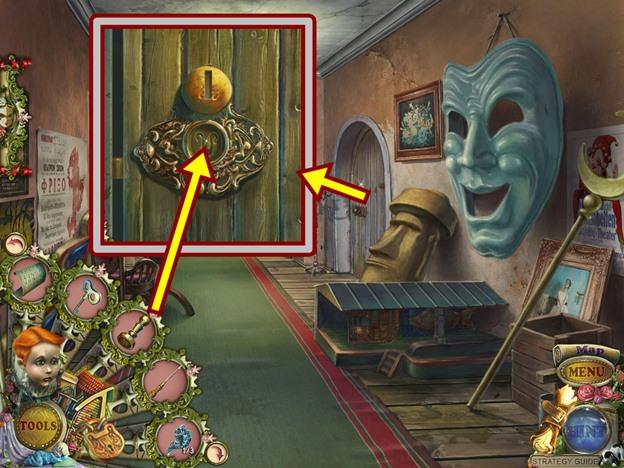
- Click on the door at the far left end of the hall.
- Add the two DOMINOS and the STENCIL.
- A mini-puzzle starts.
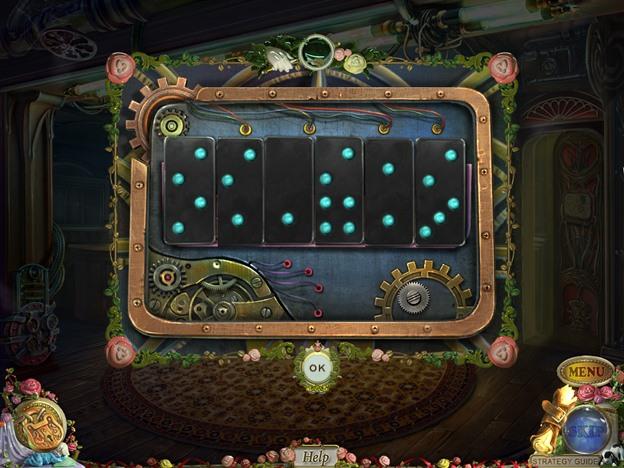
- Rearrange the dominos so each domino’s dots totals the number written below. Click on two dominos to swap their positions.
- Solution:
- Enter the room.
- Click on the fireplace.
- Add the BOTTLE OF ALCOHOL.
- Take the woman’s wig HAT PATTERN and the CANE.
- Click on the painting on the wall.
- Take the CHEST PART. Click anywhere outside the window to close it.
- Click on the desk.
- Use the MEDICAL CLIP to put the snake in the tank.
- Take the PIN and the PAINTING FRAGMENT. Click anywhere outside the window to close it.
- Move down.
- Click on the coat rack.
- Use the PIN on the zipper, then take the MEDIC LOCK PART.
- Click on the counter.
- Add the two MEDIC LOCK PARTS.
- Take the CHEST PART and GOLDEN SNAKE.
- Go through the door on the left.
- Click on the desk.
- Put the GOLDEN SNAKE in the inset on the tank lid, then take the SPARE KEY.
- Move down.
- Click on the door to start a hidden object hunt.

- Find all the objects. Put the receiver to complete the telephone.
- A PAINTING FRAGMENT is added to your inventory.
- Move down.
- Click on the train.
- Put the SPARE KEY in the lock, then open the door.
- Take the MALLET and PAINTING FRAGMENT.
- Open the folder and read the note. Click anywhere outside the window to close it.
- Click on the door, then click on it again.
- Add the two CHEST PARTS.
- A mini-puzzle starts.
- Make a fossil by combining elements. Hover your cursor over each element to see what the disc represents. Use the two top pink buttons to rotate the left and right set of discs. Use the lower pink buttons to combine elements. Press the Reset button if you need to restart.
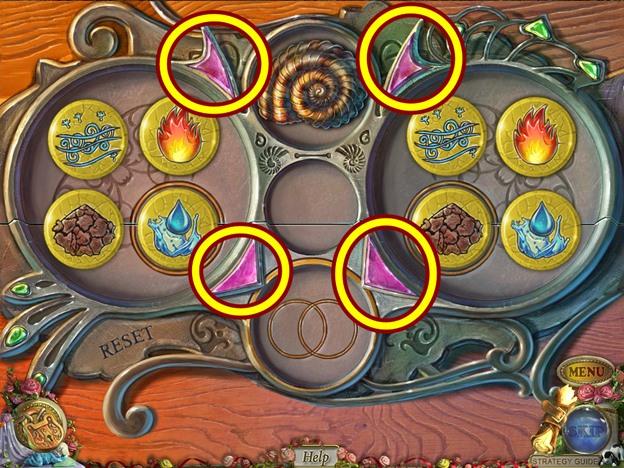
- Start by combining:
- Water (left) and earth (right) = dirt (right).
- Fire (left) and air (right) = energy (left).
- Air (left) and water (right) = cloud (right).
- Earth (left) and fire (right) = stone (left).
- Then combine:
- Stone (left) and cloud (right) = sand (right).
- Energy (left) and dirt (right) = DNA (left).
- Then combine:
- DNA (left) and sand (right) to make the fossil.
- When the chest opens, take the DYNAMITE.
- Enter the asylum and go into the door on the left.
- Click on the painting.
- Add the three PAINTING FRAGMENTS.
- When the bed rises, look under it.
- Take the MECHANISM PART.
- Use the RAKE to move the stones.
- Put the CANE into the ground, then hit it three times with the MALLET to secure it.
- Add the CHAIN.
- Move forward.
- Click on the ground at the bottom of the stairs.
- Place SOME PLANKS over the grates.
- Look over the edge.
- Take the CHARACTER PUPPET and the MECHANISM PART.
- Click on the right rock wall.
- Move the rocks and take the FUSE.
- Move the rocks some more and take the MECHANISM PART.
- Click on the transportation contraption.
- Add the three MECHANISM PARTS (first the part that looks like a wheel, then lever, then the screw).
- Turn the wheel.
- Board the transportation mechanism.
- Watch the cutscene.
- Click on the panel on the wall.
- Take the PAINTING. Click anywhere outside the window to close it.
- Click on the chests floating in the water.
- Send the helper puppet down to the chests.
- Click on the table to start a hidden object hunt.
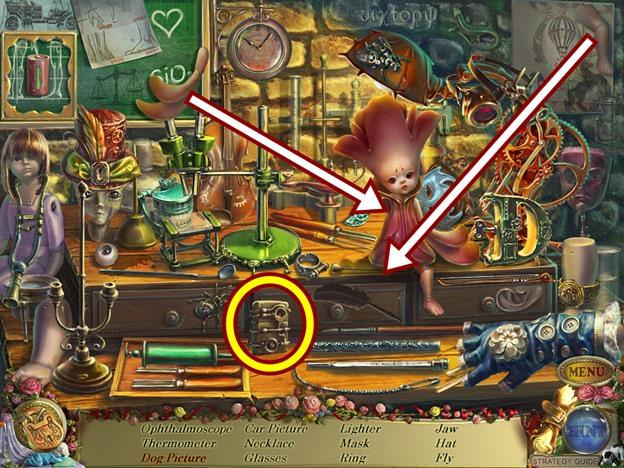
- Find all the objects. Put the fins and leg on the puppet, then put the battery in it to get the dog picture.
- A LIGHTER is added to your inventory.

- Click on the top of the ladder.
- Add the DYNAMITE, then the FUSE, then light it with the LIGHTER.
- Climb the ladder.
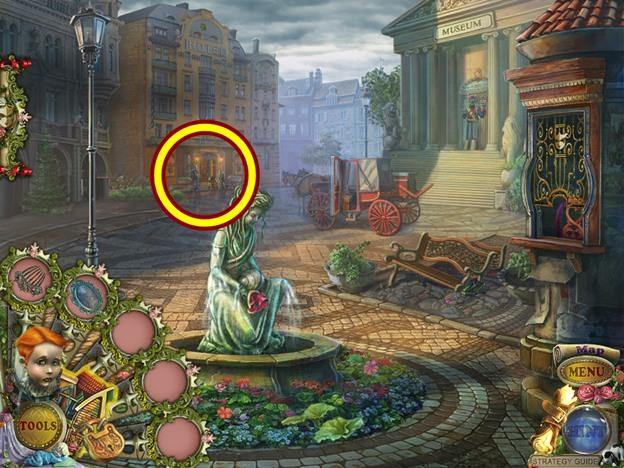
- Click on the hotel door.
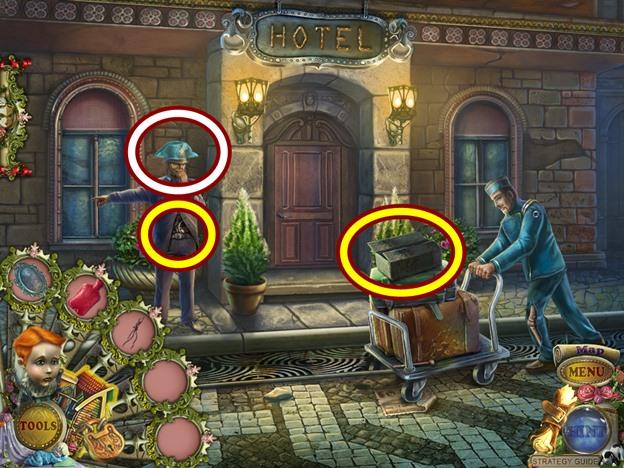
- Take the BOX.
- Take the Napoleon HAT PATTERN from atop the police puppet’s head.
- Click on the police puppet’s torso and take the BATTERY.
- Move down two scenes.

- Click on the bookshelf.
- Put the BOX over the eye.
- Take the COMB and the PUMP.
- Climb the ladder.
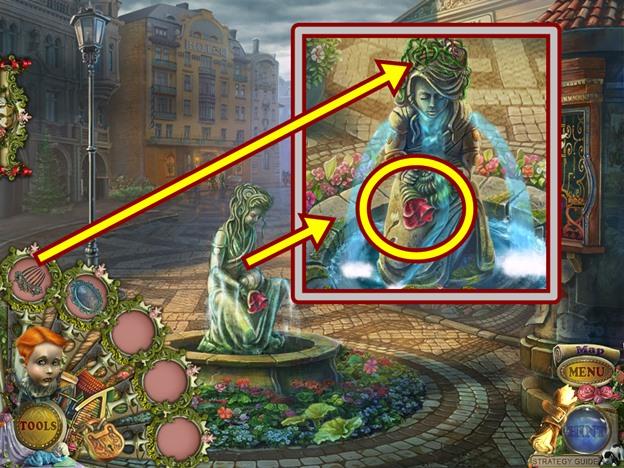
- Click on the fountain.
- Take the HOT WATER BOTTLE.
- Use the COMB on the statue’s head, then take the WIRE.
- Click on the hotel door.
- Put the HOT WATTER BOTTLE below the cart, then add the PUMP.
- When the cart leaves, take the TUTORIAL and the DRUMSTICK.
- Enter the hotel.
- Click on the floor.
- Put the TUTORIAL on the floor, then put the BATTERY and WIRE on it.
- Take the LOCKPICKS.
- Click on the front desk to start a hidden object hunt.
- Find all the objects. Use the hammer to break the piggybank and take the coin. Lift the cover off the birdcage, then take the butterfly when it lands.
- A METAL CAP is added to your inventory.
- Go up the stairs.
- Take the PAINTING from off the wall.
- Click on the sofa.
- Take the FASTENING THREAD.
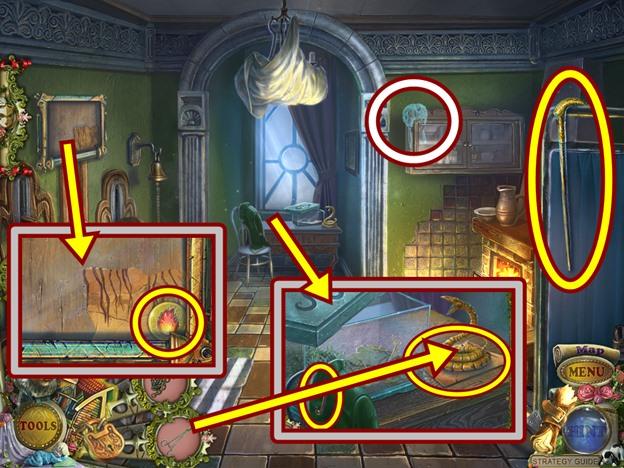
- Pull down the flap and take the CANNON PART (1/4).
- Click on the window.
- Take the FIRE EXTINGUISHER.
- Open the curtain and take the HANDLE.
- Go through the door on the right.
- Click on the windowsill.
- Put the METAL CUP on the mechanical puppet, then hit it with the DRUMSTICK.
- Take the MINIATURE VIOLIN.
- Move down.
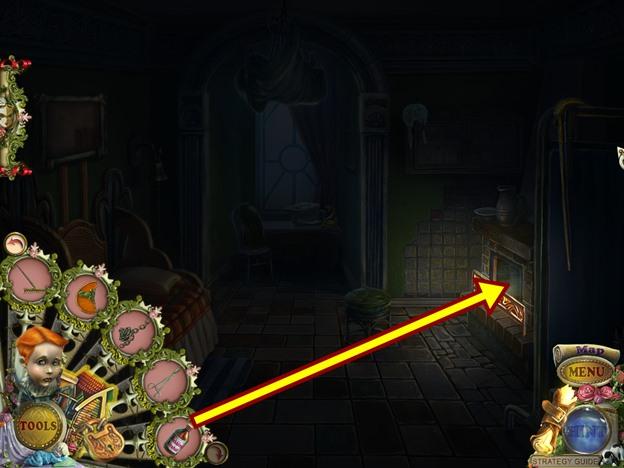
- Click on the door on the left.
- Unlock the door with the LOCKPICKS.
- Go through the doorway.
- Use the FIRE EXTINGUISHER to put out the fire.
- Click on the Felicia puppet.
- Click through the dialogue.
- She gives you a CLOSET KEY.
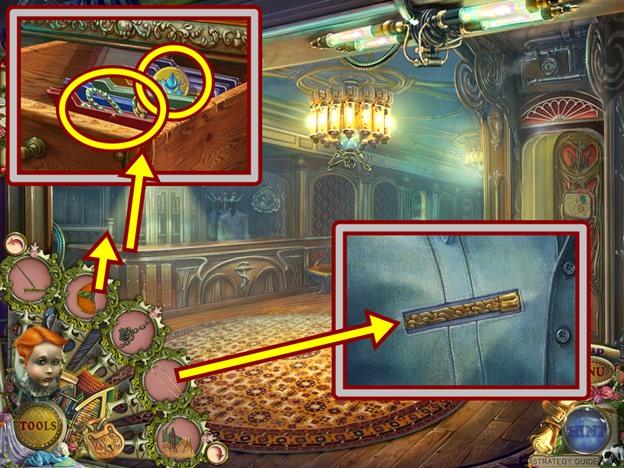
- Take the STOCKING from off the chair.
- Click on the closet door, then open it with the CLOSET KEY.
- Take the CHARACTER PUPPET and the PICTURE.
- Click on the aquarium behind the bed.
- Take the Lincoln cylinder HAT PATTERN.
- Put the HANDLE on the net, then add the STOCKING, then secure it with the FASTENING THREAD.
- Use the net to get the BUTTON.
- Give the MINIATURE VIOLIN to the sad fish, then take the BUTTON that floats to the top.
- Move down, then go through the door on the right.
- Click on the wall.
- Add the two PAINTINGS and the PICTURE.
- Click on the panel that appears.
- Add the two BUTTONS.
- A mini-puzzle starts.
- Press the numbered directional buttons to reveal the coloured marbles on the board. Press some buttons to see what they reveal and to get a feel for the puzzle. Press Reset to start new. Only buttons lit in green can be pressed.
- To solve the first part of the puzzle, press the numbered buttons in the follow order:
- 3 up, 4 right, 3 diagonally down, 4 down, 1 right, 9 up, 2 diagonally down, 6 left.
- Once you have revealed all four marbles, click on each the amount of times shown at the bottom left of the puzzle.
- When you are finished, take the journal entry and the HANDLE KEY.
- Move down two scenes.
- Click on the front desk to start a hidden object hunt.
- Find all the objects. Use the rag to clean the stain to reveal the ballerina.
- A CANNON PART (2/4) is added to your inventory.
- Move down two scenes.

- Click on the table on the left to start a hidden object hunt.
- Find all the objects. Move the paper to uncover revenge. Put the bow on the violin to get the cogwheel.
- A CANNON PART (3/4) is added to your inventory.
- Click on the panel on the wall.
- Add the HANDLE KEY.
- Move forward.
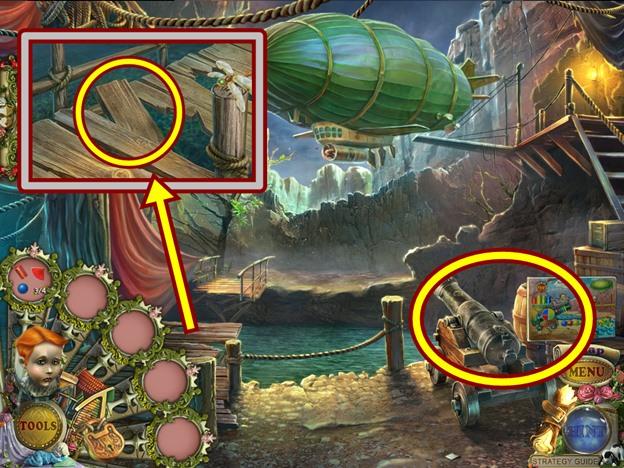
- Click on the broken dock.
- Click on a board, then take the CANNON PART (4/4).
- Click on the cannon.
- Add the four CANNON PARTS.
- A mini-puzzle starts.
- Use the cannon to shoot the targets.
- First you must pack the cannon with gunpowder (1), then add its same coloured cannonball (2). Press the same colour on the cannon (3) so the helper puppet can pack the cannon. Aim the cannon by pressing its same coloured pie piece (4), then press Fire (5). Use trial and error to determine the order of colours.
- To solve the puzzle, first shoot blue, then yellow, then red, then green.
- Watch the cutscene.
- The last CHARACTER PUPPET is dropped and automatically added to the puppet theatre.
The end!
Hat Patterns and locations
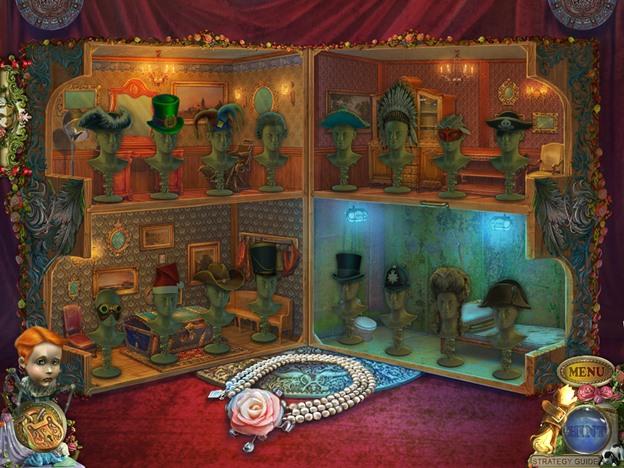
- There are twelve hat patterns in the regular game and four found in the bonus chapter.
- Go to the puppet’s house to access the hat patterns.
- Click on a mannequin head to select a pattern to make.
- There are four types of puzzles used:
- 3D puzzle: Put the hat together in a 3D puzzle. Pick up a piece and hover it over the hat base. If you see an area light up, that is where you can place the piece. Use the rotational arrow (top left) to rotate the hat. Put all the pieces together. Once you are finished putting the hat together, you have to place the accessories. The accessories sometime go on in a particular order. Follow the prompts. When you are finished, you can take the hat.
- Construct: Similar to the 3D puzzle except you don’t have to turn the hat. Put all the pieces together, then add the accessories. When you are finished, you can take the hat.
- Cut: You have to cut the pattern. Pick up the knife (top left) and hover it over the dots on the fabric. When you notice a dot light up, click on it. Then move the knife to another dot, if it lights up, click on it. The knife will always move in a clockwise direction. When you are finished painting, the paintbrush will automatically be put down. Add the accessories. When you are finished, you can take the hat.
- Paint: Your cursor will automatically hold a paintbrush. Dip the brush into a paint colour and touch the area of the hat to colour it, using the finished picture as a guide. You can only add the correct colour so if a colour is not taking, choose another colour (helpful when there are similar colours). When you are finished painting, the paintbrush will automatically be put down. Add the accessories. When you are finished, you can take the hat.
- Tips:
- You can only put pieces in their correct position. Pick up a piece and hover it over the hat. If it lights up, you can place it.
- If you can’t find the accessories, hover your cursor over the area and look for the grabbing hand.
- Locations in order of being found:
- Sombrero – backyard of Master’s house
- Fool – tram station
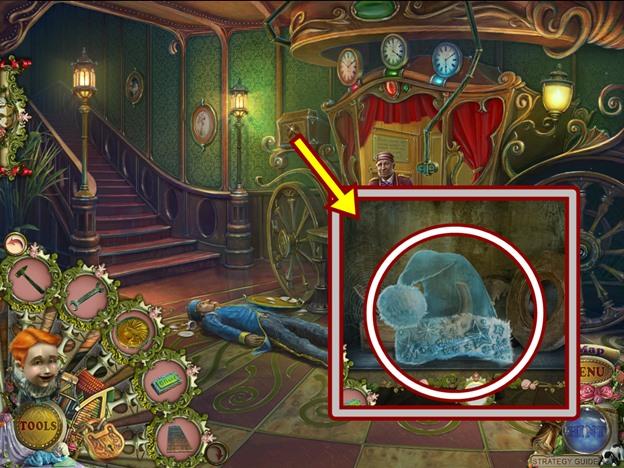
- Santa – hotel lobby
- Engineering goggles – office on second floor of the hotel
- Leprechaun – top floor of the theatre
- Masquerade – dressing room of theatre
- Pirate – wall safe in the Master’s house

- Cowboy – library

- Man’s wig and the Tricorn hat – catacomb entrance
- War bonnet – beach
- Parade – left mechanical room in the catacombs
- Bobby – mechanical room (first room in the Bonus Chapter)
- Woman’s wig – room with the fireplace in the asylum
- Napoleon – outside the hotel
- Lincoln cylinder – in the aquarium in the hotel room
Congratulations! You have completed Gamezebo’s walkthrough for PuppetShow: Destiny Undone. Be sure to check back often for game updates, staff and user reviews, user tips, forums comments and much more here at Gamezebo!

More articles...
-
Best Horror Games On Itch.io – July 2026
Across a bounty of subgenres. -
Haze Seas Accessories Tier List [Best Accessories to Equip]
The accessories with the best stat buffs in Haze Seas.