- Wondering how to get Monopoly GO! free rolls? Well, you’ve come to the right place. In this guide, we provide you with a bunch of tips and tricks to get some free rolls for the hit new mobile game. We’ll …
Best Roblox Horror Games to Play Right Now – Updated Weekly
By Adele Wilson
Our Best Roblox Horror Games guide features the scariest and most creative experiences to play right now on the platform!The BEST Roblox Games of The Week – Games You Need To Play!
By Sho Roberts
Our feature shares our pick for the Best Roblox Games of the week! With our feature, we guarantee you'll find something new to play!All Grades in Type Soul – Each Race Explained
By Adele Wilson
Our All Grades in Type Soul guide lists every grade in the game for all races, including how to increase your grade quickly!
Princess Isabella: Return of the Curse Walkthrough
Welcome to the Princess Isabella: Return of the Curse Collector’s Edition walkthrough on Gamezebo. Princess Isabella: Return of the Curse is a hidden object adventure game played on the PC created by Gogii Games. This walkthrough includes tips and tricks, helpful hints, exclusive Collector’s Edition content, and a strategy guide for how to complete Princess Isabella: Return of the Curse Collector’s Edition.
Princess Isabella: Return of the Curse – Game Introduction
Welcome to the Princess Isabella: Return of the Curse Collector’s Edition walkthrough on Gamezebo. Princess Isabella: Return of the Curse is a hidden object adventure game played on the PC created by Gogii Games. This walkthrough includes tips and tricks, helpful hints, exclusive Collector’s Edition content, and a strategy guide for how to complete Princess Isabella: Return of the Curse Collector’s Edition.
General Tips
- From the beginning of the game, you can choose between two modes: Normal or Advanced. Normal Mode is geared towards players seeking a more casual and entertaining experience, while Advanced Mode is geared towards players looking for a more challenging experience.
- From the Options menu, you may choose screen ratio, sound ratio, and very importantly: you can choose to adjust the game for slower computers if yours is having trouble running it smoothly.
- From the Extras menu, you can access bonus Collector’s Edition content.
- Throughout the game, accomplishing various tasks will unlock additional Collector’s Edition bonus content. Completing the main quest adventure will reward you with an entire bonus adventure.
- Once you’ve unlocked the Bonus Adventure, you can either choose to start it immediately from the end of the normal game, or access it again anytime via the Extras menu.
- Tasks you should be trying to currently accomplish are shown throughout the game via the Tasks window in the bottom left corner of the screen.
- Clicking on the Journal in the bottom right corner of the screen will recap important game and storyline events as you go. It also includes a map.
- Use the Menu button at the bottom right corner of the screen to access the Options or Main Menu at any time during gameplay.
- To the left of the Tasks menu in the bottom left corner of the screen is a Crystal symbol, with a color and number beneath it. This refers to who you’re currently trying to free, what color the Gems are you need to find, and how many you currently have.
- Everytime you find a new inventory item, it will be added to the bar at the bottom of the screen. The newest or most recently updated inventory items will always appear furthest on the right.
- Throughout the game you will have help from a companion: the Fairy, the Dragon, or both. Each possesses unique Abilities you can unlock and use to progress further in the game. These helpers also harbor the location of the Hint button. Hints are unlimited, but will require time to recharge after use. When you have both helpers, you can use two Hints back-to-back.
- When playing a puzzle, the Hint button will become the Skip button. After a certain amount of time has passed, you may choose to skip a puzzle. All puzzles may eventually be skipped.
- Throughout the guide below, KEY ITEMS are capitalized and outlined in red. Normal or randomized items or locations are outlined in blue. Circular outlines refer to an object directly out in the open, while a square outline requires you to zoom in or perform an action to acquire the item in question.
- It should be noted that while this game is linear, you can complete many tasks and objectives, as well as acquire various items, in very different orders. The strategy guide below outlines one of the easier and more linear routes in regards to gameplay.
- Due to the fact you can do things in this game in very different orders, make sure to use the “Ctrl+F” command if you need help finding a specific item in the guide below, i.e. “GREEN GEM”. Items in a series are numbered throughout the guide to help you keep track, i.e. “GREEN GEM 4/8”.
- This particular strategy guide is tailored towards the Collector’s Edition of the game. As such, the Collector’s Edition bonus adventure content can be found and is featured exclusively in Chapter 6.
Chapter 1: The Butler
Nursery
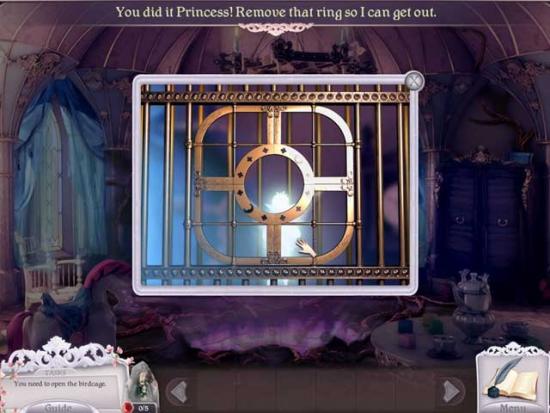
- Click on the bird cage that the fairy is trapped inside on the left side of the screen.
- Click on the sides of the door panels to flip them so that they form a ring. The solution is shown below:

- Upon assembling the door panels correctly, click on the RING KEY in the center to add it to your inventory, simultaneously freeing the fairy.
- Examine the chest below the bird cage.
- Use the RING KEY on the groove in the top of the chest, then rotate the ring so that it matches the symbols on the chest. The solution is shown below.
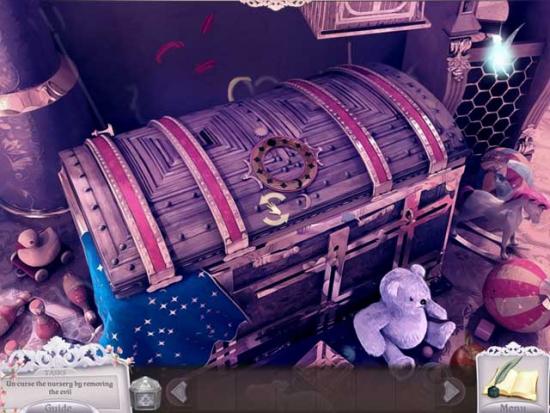
- Remove all the evil objects in the general vicinity: their locations are shown below.
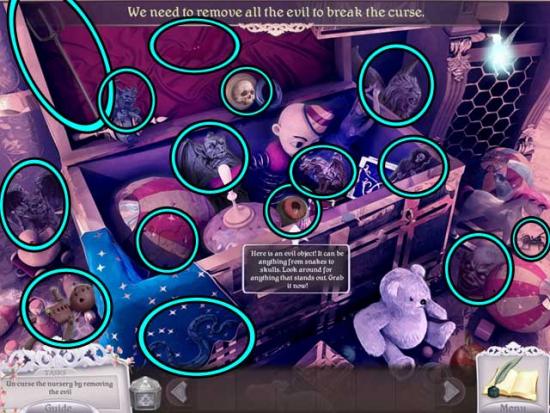
- Once you’ve removed all the evil objects, the curse will be broken. Pick up the TRANSFORMATION POTION that appears on the floor in the middle of the room to add it to your inventory.
- Take a closer look at the Closet on the right.
- Open the Closet doors, then find the 10 DRESSES scattered throughout the area. Their locations are shown below.
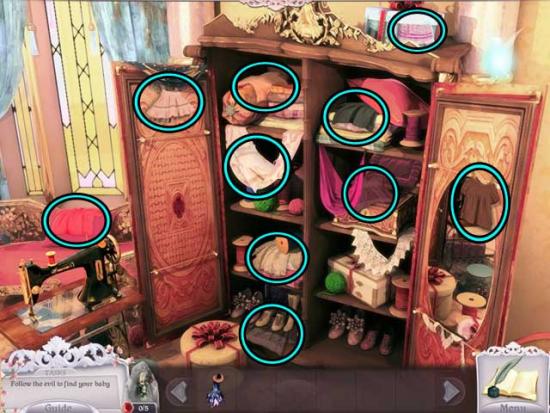
- Once you’ve found all the DRESSES, take a closer look at the Sewing Machine to the left of the Closet.
- Use the DRESSES on the Sewing Machine to acquire the DRESS ROPE, which will be added to your inventory.
- Use the DRESS ROPE on the Chandelier on the ceiling, then use the TRANSFORMATION POTION on the DRESS ROPE to enlarge it. You can now gain access into the next room.
Bedroom
- Take a closer look at the Mirror on the left. Click on the MIRROR to add it to your inventory.
- Examine the purple drape in the upper right corner of the bed. Use the MIRROR in this area, however it cannot reflect the beam of light when it’s so dirty.
- Proceed down into the next area.
Baths
- Pick up the RED GEM 1/5 on the right to add it to your inventory, then examine the Towel on the left.
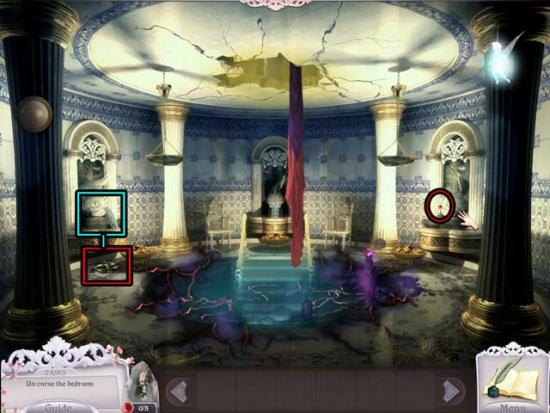
- Pick up the TOWEL to add it to your inventory, then examine the Fountain on the left. Use the TOWEL on the Fountain to acquire the WET TOWEL for your inventory.
- Go back up to the Bedroom.
Bedroom
- Examine the MIRROR (now on the right).
- Use the WET TOWEL to clean the dirty Mirror.
- Once the Mirror and room are restored, click on the TRANSFORMATION POTION that appears to add it to your inventory.
- Examine the bed. Click on the covers to remove them, revealing a hidden object area.
- Find the objects listed at the bottom of the screen. Some objects may be randomized. The Key Item is circled in red.
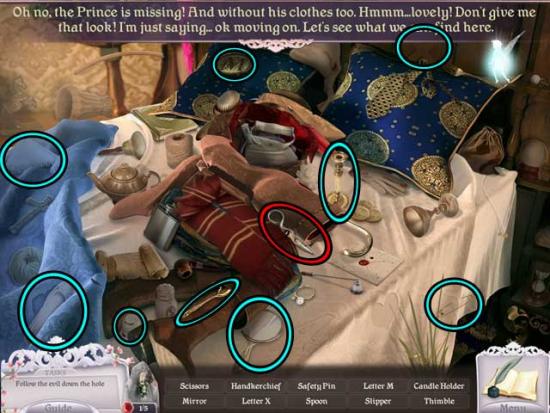
- Upon completing the hidden object area, the SCISSORS will be added to your inventory.
- Use the SCISSORS on the CURTAIN within the large door-window at the back of the room to add it to your inventory.
- Return to the Baths.
Baths
- Use the CURTAIN on the Dress Rope to extend it, then continue down the hole.
Catacombs
- Examine the ground area on the left side of the pillar (it should be surrounded by butterflies).
- Find all the evil to remove the curse on the water. Their locations are shown below.
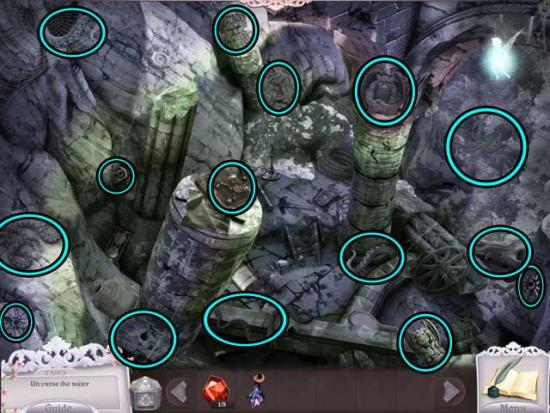
- Pick up Bella’s Rattle that appears on the right side of the screen: it will reveal the RED GEM 2/5. Click on it to add it to your inventory.
- Examine the Paw in the far background in the left portion of the screen. Click on the EGG to add it to your inventory.
- Examine the water where you previously removed all the evil to enter a hidden object area.
- Find the objects listed at the bottom of the screen. Some objects may be randomized. The Key Item(s) is circled in red.
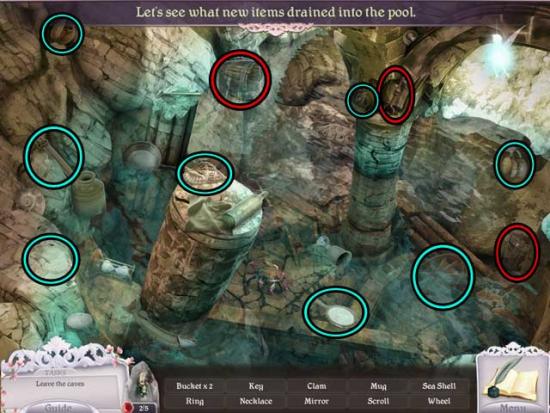
- Upon completing the hidden object area, the DRAWER KEY and the SMALL BUCKET (1/5 and 2/5) will be added to your inventory.
- Return to the Bedroom via the exit in the upper left corner of the screen.
Bedroom
- Examine the desk on the left.
- Use the DRAWER KEY to open the Desk, then collect the DIAMOND inside.
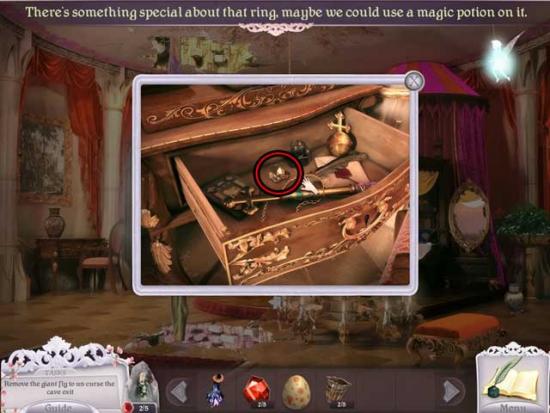
- Collecting the DIAMOND will unlock a new Fairy Ability: Diamond. You can now smash things apart when needed!
- Use the Diamond Ability on the two Vases in the room (locations shown below) to shatter them, revealing the RED GEM 3/5 and the LEAF 1/5 to be added to your inventory.
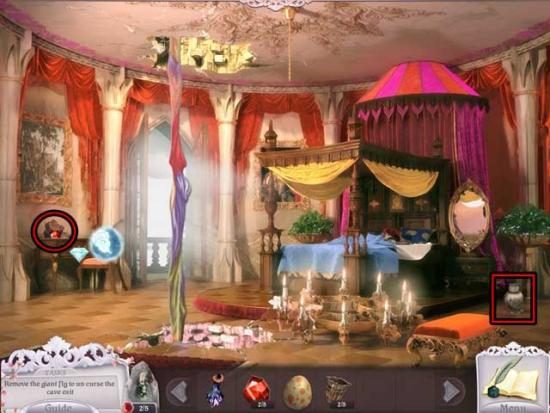
- Proceed down to the Baths.
Baths
- Use the Diamond Ability on the bubble at the top of the pillar on the left to break it open, revealing the BAMBOO 1/3. Click on it to add it to your inventory.
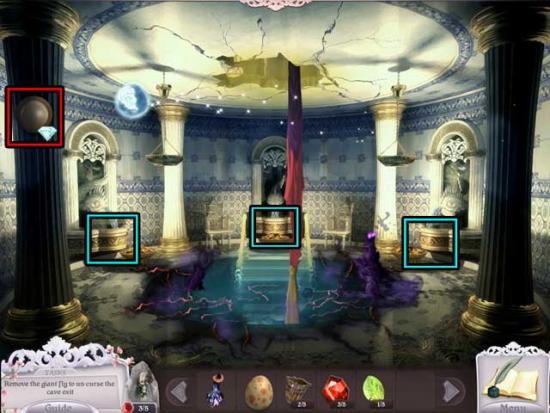
- Use the Diamond Ability on the basins of each of the Fountains in the room to break them open, pouring water out of them and freeing the room from the curse.
- Pick up the TRANSFORMATION POTION that appears in the middle of the room to add it to your inventory.
- Continue back down to the Catacombs.
Catacombs
- Use the Diamond Ability on the crack/dragon design on the boulder on the left. Collect the LEAF 2/5 inside to add it to your inventory.
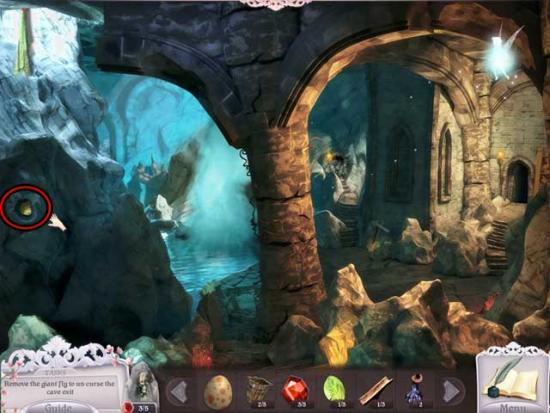
- Proceed through the doorway on the far right.
Portcullis
- Use the Diamond Ability on the Gear on the floor on the right to break it open, revealing the LEAF 3/5. Use the same ability on the Pillar on the right to break a segment open, revealing the RED GEM 4/5. Click on them to add them to your inventory.
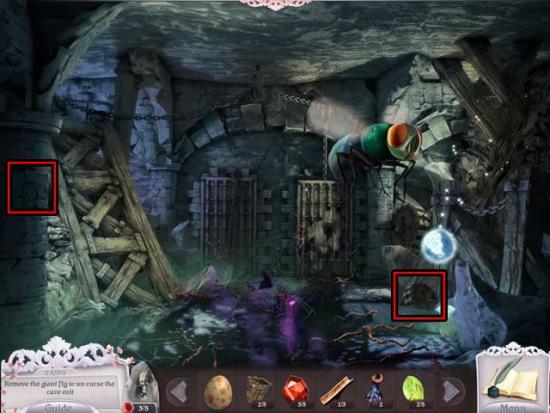
- You’ll need to find a way to get rid of the Giant Fly before you can proceed further in this area.
- Return to the Baths.
Baths
- Examine the Fountain on the left: inside is a Tadpole.
- Use a TRANSFORMATION POTION on the Tadpole to acquire the FROG. Click on it to add it to your inventory.
- Return to the Portcullis.
Portcullis
- Use the FROG in the room with the Fly, then use another TRANSFORMATION POTION on the FROG, which will then eat the Fly, ridding the room of evil.
- Pick up the TRANSFORMATION POTION and the CHAIN lying on the floor to add them to your inventory.
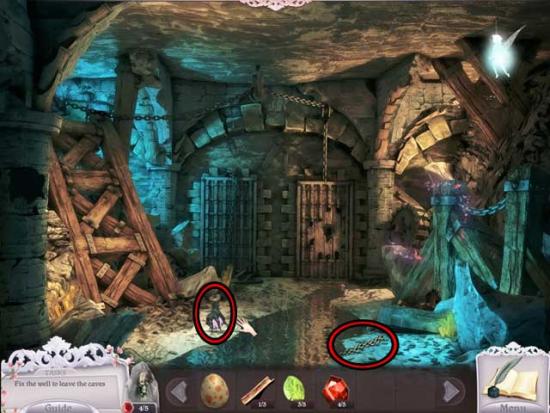
- Click on the area on the right with the butterflies to enter a hidden object area.
- Find the objects listed at the bottom of the screen. Some objects may be randomized. The Key Item(s) is circled in red.
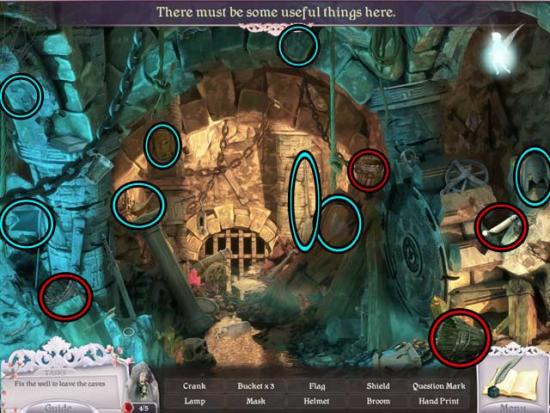
- Upon completing the hidden object area, the CRANK and the SMALL BUCKET (3/5 – 5/5) will be added to your inventory.
- Return to the Catacombs, then enter the other passage (near the middle of the screen).
Well
- Examine the slack chain near the top of the screen, to the right of the Well. Use the CHAIN on the end of the chain here to repair it.
- Next, take a closer look at the Well.
- Use the SMALL BUCKET 1/5 – 4/5 on the rope, then use the remaining SMALL BUCKET on the bit of chain hanging down from the top and to the right. Use the CRANK on the Well, then use a TRANSFORMATION POTION on the Bucket hanging from the chain.
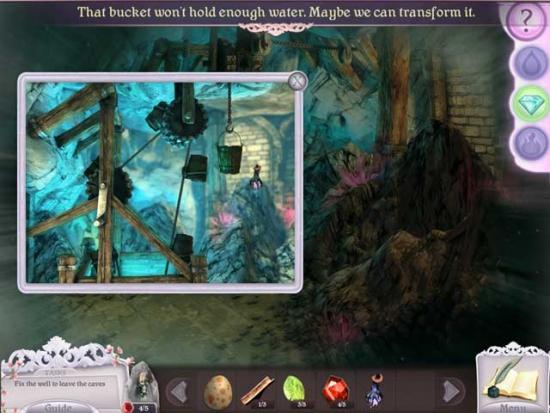
- Once this is done, the door in the neighboring room should open (if not, click on the Crank to start the sequence of events).
- Return to the Portcullis.
Portcullis
- Enter through the now-open door into the next area.
Witch’s Tree
- Examine the crystal stone on the right: it’s the Butler. Use the RED GEMS from your inventory on the slots in the stone. You’ll need one more before you can free him.
- Continue down the road to the Clearing.
Clearing
- Take a closer look at the Lumberjack to trigger a hidden object area.
- Find the objects listed at the bottom of the screen. Some objects may be randomized. The Key Item(s) is circled in red.
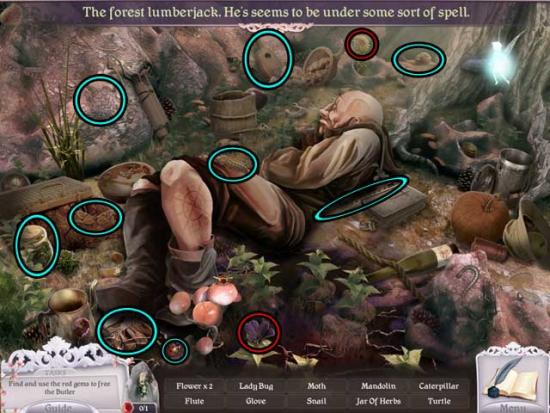
- Upon completing the hidden object area, the VIOLET and the SUNFLOWER will be added to your inventory.
- Use the Diamond Ability on the Beehive in the upper left corner of the screen to break it open and retrieve the BAMBOO 2/3. Use the ability on the boards in the lower left corner of the screen to reveal the MIRROR SHARD. Use the ability on the rock in the lower right corner of the screen to reveal the final RED GEM.
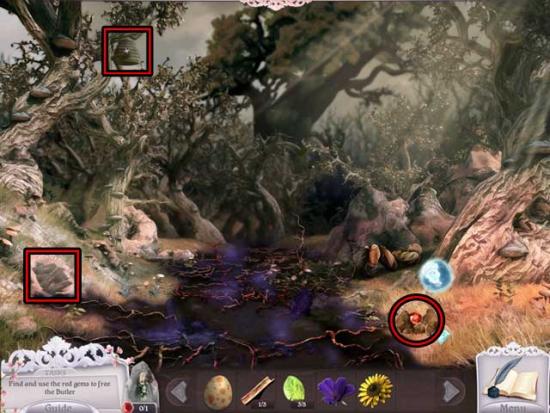
- Upon retrieving the final RED GEM, return to the Witch’s Tree.
Witch’s Tree
- Examine the Butler’s crystal on the right. Use the final RED GEM on the grooves on the front to trigger a puzzle.
- Click on the arrows surrounding the slots to arrange the red gems. The goal is to move all the red gems into the glowing red slots. The solution is shown below.
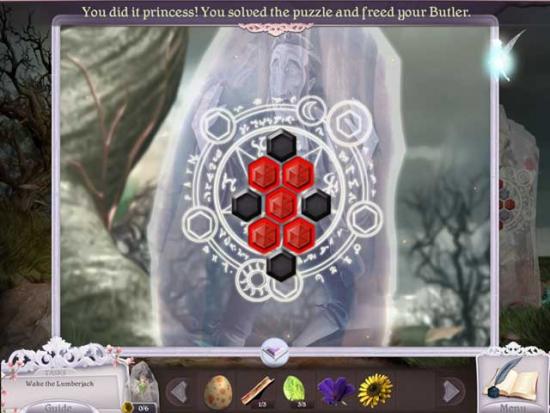
- The Butler is now free! He will give you the ROSE as thanks.
Chapter 2: The Fairy Queen
Witch’s Tree
- Return to the Clearing.
Clearing
- Take a closer look at the Lumberjack again. This time, use the VIOLET, SUNFLOWER, and ROSE from your inventory on the slots on the right side of the screen.
- Use the flowers to color the tattoo on the Lumberjack’s leg, without the same color touching itself anywhere on the tattoo. A possible solution is shown below.
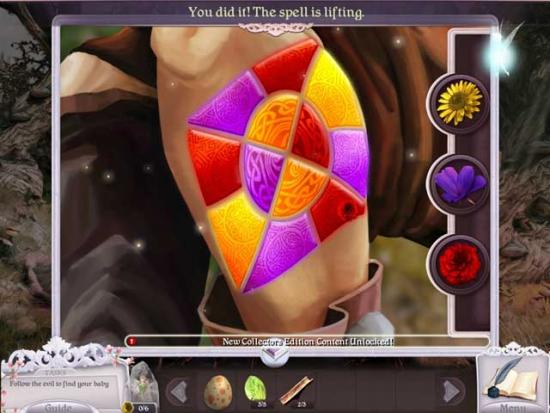
- Upon lifting the curse off the Lumberjack, he’ll reward you with the SEED PACKET.
- Pick up the TRANSFORMATION POTION that appears on the ground to add it to your inventory.
- Click on the area where the Lumberjack was previously sleeping to enter a hidden object area.
- Find the objects listed at the bottom of the screen. Some objects may be randomized. The Key Item(s) is circled in red.
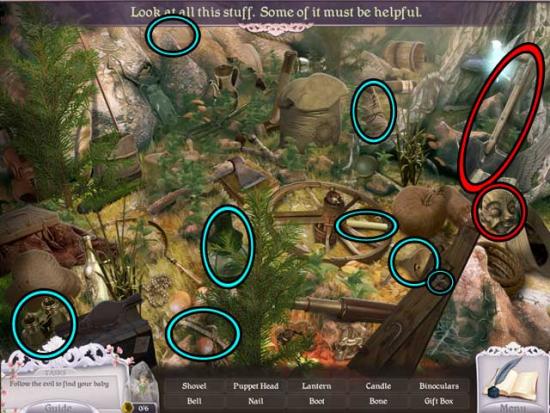
- Upon completing the hidden object area, the SHOVEL and the PUPPET PART 1/15 will be added to your inventory.
- Continue forward into the next area.
Fairy Village
- Use the Diamond Ability on the two areas shown in the screenshot below to obtain the MIRROR SHARD (2) and the BAMBOO (3/3) for your inventory.
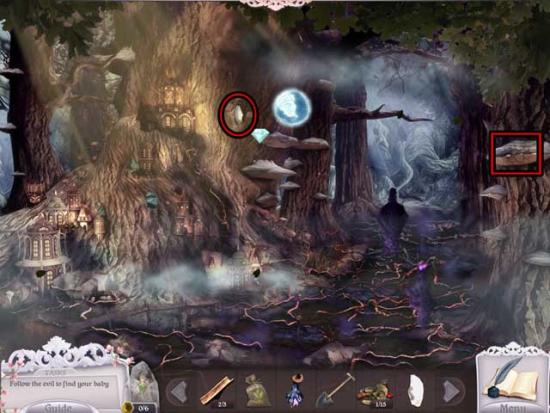
- Enter the Fairy Village.
Fairy Village (Inside)
- The Mother Tree’s life force is dying. You’ll need to activate the four waterfalls in this area to restore it.
- Examine the sparkling area in the lower left first.
- Slide the blocks to release the door locks and let forth the water. The solution to the puzzle is shown below:
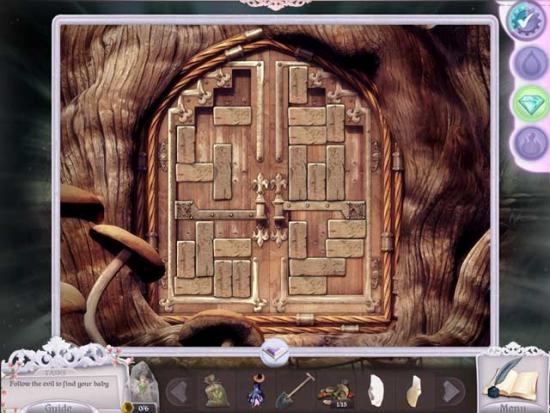
- Now that that’s done, examine the area in the upper right portion of the screen (the third area if counting from left to right).
- Use the BAMBOO 3/3 from your inventory on the wooden cradle slots. Click on the pieces of Bamboo you’ve placed to rotate them in such a way that the water flows into the leaf at the bottom of the screen. The solution is shown below.
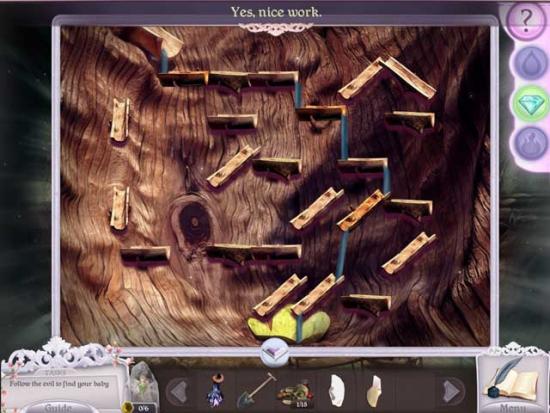
- Examine the other area on the right.
- Place the two MIRROR SHARDS from your inventory into the correct broken mirrors to repair them. It should look like this:
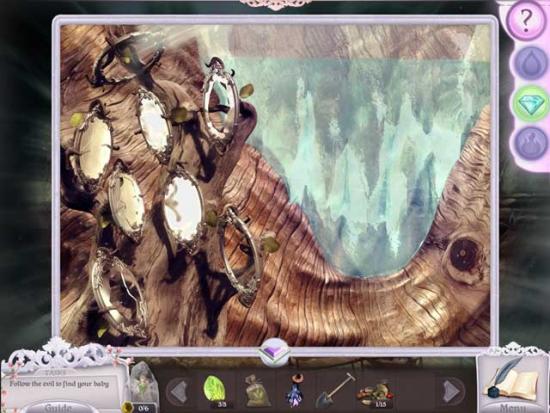
- There’s nothing left to do here for now, so exit the Fairy Village and continue forward into the next area.
Tree Crossing
- Use the Diamond Ability to break open the jar on the right and the crate on the left, revealing the LEAF 4/5 and the MIRROR SHARD to be added to your inventory.
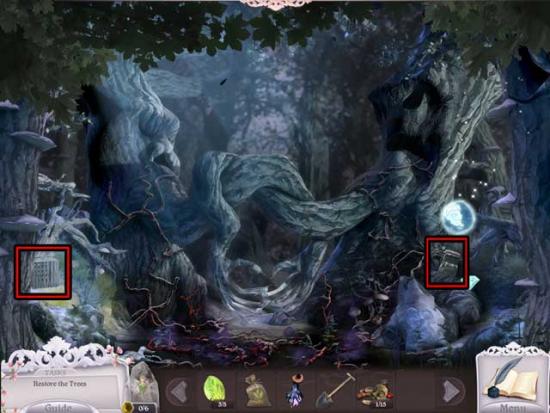
- Take a closer look at the area between the bottom of the trees, in the middle of the screen.
- Use the SHOVEL to dig up the dirt, then use the SEED PACKET on the hole. Finally, use a TRANSFORMATION POTION on the packet to purge the evil from the area and make the trees happy again.
- Click on Bella’s Item that appears at the bottom of the screen. It will turn into the YELLOW GEM 1/6. Click on it to add it to your inventory.
- Continue forward into the next area.
Town Crossroads
- Use the Diamond Ability on the cracked Tree, Bottle, and Birdhouse in the area (locations shown below) to reveal the LEAF 5/5, the LILY, and the MIRROR SHARD (2).
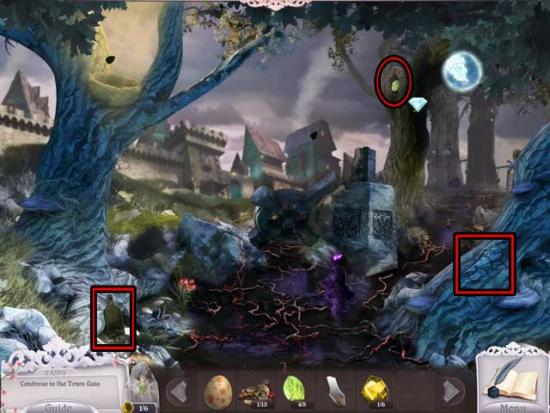
- Examine the Bird’s Nest in the upper left corner of the screen.
- Use the EGG on the Bird’s Nest. There’s nothing more you can do at the moment, so leave it there for now.
- Continue towards the Town Gate in the background.
Town Gate
- Use the Diamond Ability on the wall and the sword (shown below) to reveal the PUPPET PART 2/15 and the PINK DAISY, to be added to your inventory.
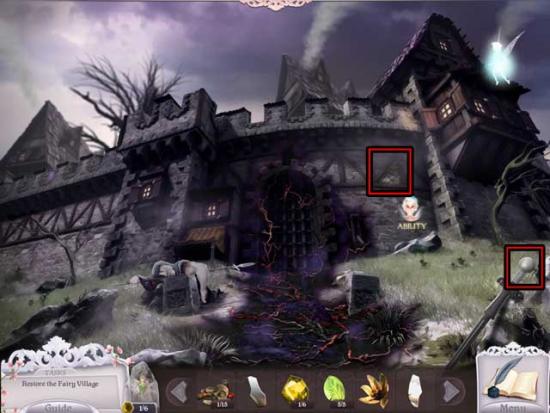
- Examine the Guard sleeping nearby. Go ahead and place the LILY and the PINK DAISY in their correct slots. Just one more to find!
- For now, return to the Fairy Village (Inside).
Fairy Village (Inside)
- Examine the sparkling area in the upper left portion of the screen (towards the center).
- Use the LEAVES (LEAF x5) on the Windmill to repair it, causing the water to flow again.
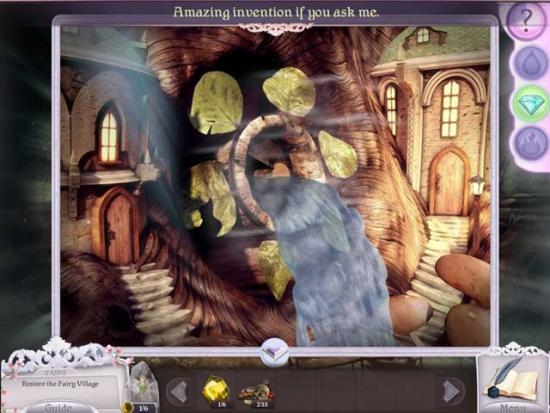
- Go ahead and examine the last area left again, placing the MIRROR SHARDS from your inventory into their correct Mirrors. There should now only be two left to repair. Refer to the screenshot below to see how it should look at this point.
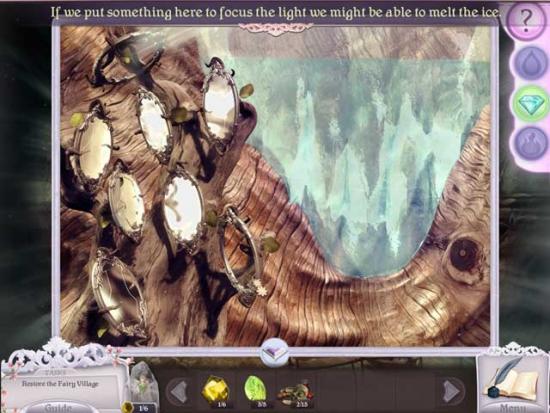
- Exit for now and return to the Town Crossroads, then continue up the path to the right.
Skull Road
- Examine the gate blocking the path at the far end of the road.
- Rotate the skulls so that 3 in a row diagonally are lined up, facing forward. The correct color order of skulls that can be lined up is Red, then Blue, then Green, then Yellow. Each time you line up a diagonal row facing forward, the skulls will disappear so you can line up the next colored row. An example is shown below:
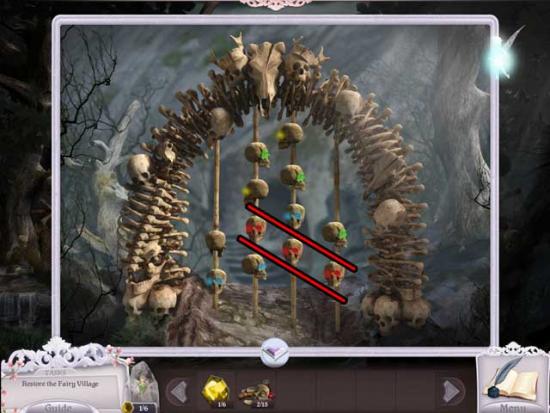
- Upon completing the puzzle, the barricade will disappear. Continue forward to the next area.
Troll’s Bridge
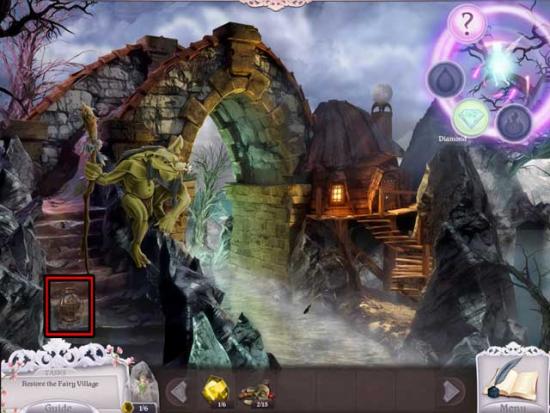
- Talk to the Troll: he demands payment if you’re to pass, but you don’t have what it takes just yet.
- Use the Diamond Ability on the lantern on the left to break it open, revealing the WHITE DAISY to be added to your inventory.
- Return to the Town Gate.
Town Gate
- Examine the sleeping Guard, then use the final flower (WHITE DAISY) on its proper slot.
- Use the flowers to dye the various parts of the tattoo in such a way that a color never touches itself. A possible solution is shown below.
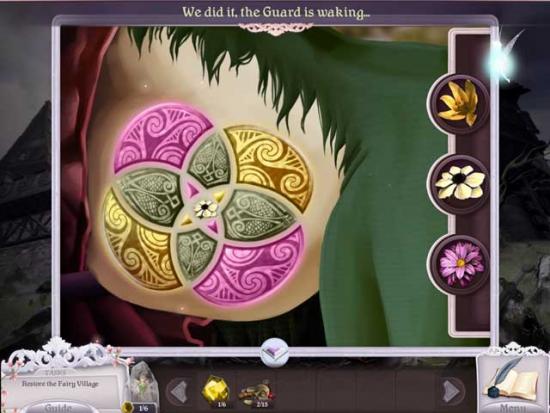
- Rescuing the Guard will purge the area of evil and reward you with the LENSES (two separate “LENS”).
- Click on Bella’s Shoes that appear. They’ll turn into the YELLOW GEM 2/6. Click on it to add it to your inventory.
- Return to the Fairy Village (Inside).
Fairy Village (Inside)
- Now we can finally fix all the Mirrors in the final area. Click on it for a closer view.
- Use the LENSES from your inventory on the remaining empty Mirror frames to complete them. The ice will melt, triggering the final waterfall.
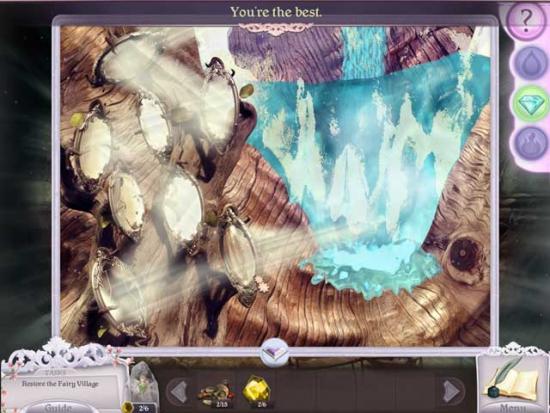
- The Mother Tree’s life force is now restored. After talking with the Fairy King, click on the crystal heart that appears to obtain the Fairy Ability: Water! You will also obtain the GOLD RING for your inventory.
- Exit to the Fairy Village (Outside).
Fairy Village
- Click on the TRANSFORMATION POTION and the YELLOW GEM 3/6 that appears to add them to your inventory.
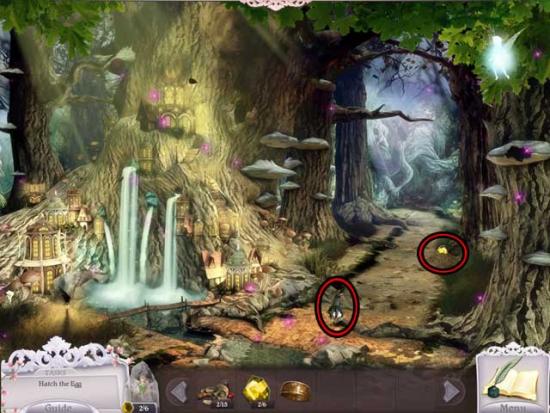
- Continue forward to the Town Crossroads.
Town Crossroads
- Examine the Bird’s Nest where you placed the Egg earlier.
- Use the TRANSFORMATION POTION on the Egg to hatch it, revealing a baby Dragon.
- Feed the red Dragon Berries in the lower left-center portion of the screen to the Dragon. The Dragon now knows Dragon Ability: Lift! At this point, the Fairy will leave (for a while) and the Dragon will become your new companion.
- Use the Lift Ability on the toppled upper portion of the Cross in the middle of the screen to restore the statue, purging the area of evil.
- Click on the YELLOW GEM 4/6 that appears to add it to your inventory.
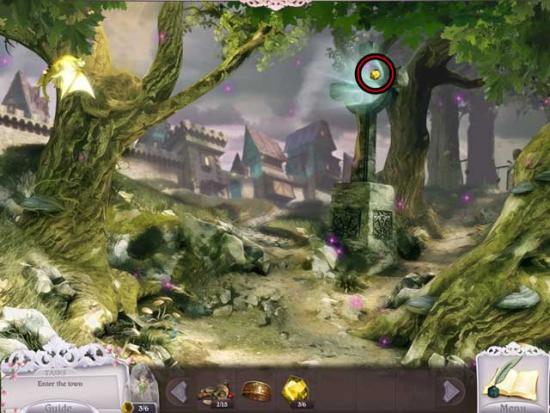
- Go up the road to the Skull Road.
Skull Road
- Use the Lift Ability on the Skull at the bottom of the screen to reveal the PUPPET PART 3/15. Click on it to add it to your inventory.
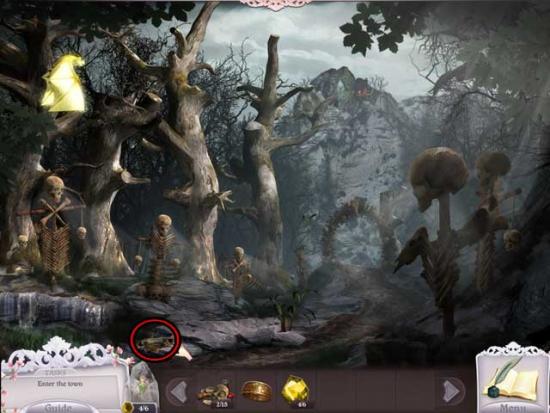
- Return to the Town Gate.
Town Gate
- Proceed forward via the top of the wall (you’ll switch to Dragon view).
Town (Aerial)
- Examine the Chimney in the lower right corner of the screen to enter a hidden object area.
- Find the objects listed at the bottom of the screen. Some objects may be randomized. The Key Item(s) is circled in red.
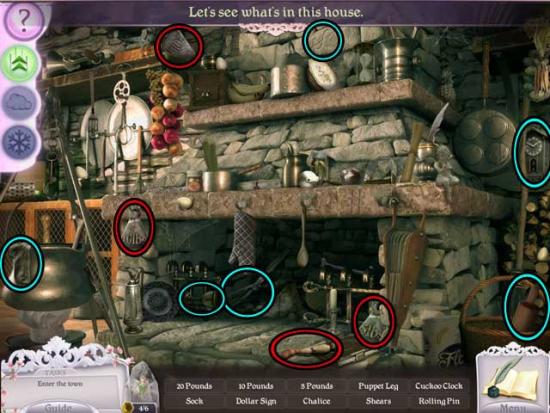
- Upon completing the hidden object area, the 20 POUNDS, 10 POUNDS, 5 POUNDS, and PUPPET PART 4/15 will be added to your inventory.
- Once you’re done with the hidden object area and are back over the Town, examine the Gate House on the left.
- Place the Weights (20LBS, 10LBS, 5LBS) from your inventory onto the correct hooks to open the Town Gate. Once finished, click the Lever on the mini-screen on the right to open the Gate. The solution is shown below.
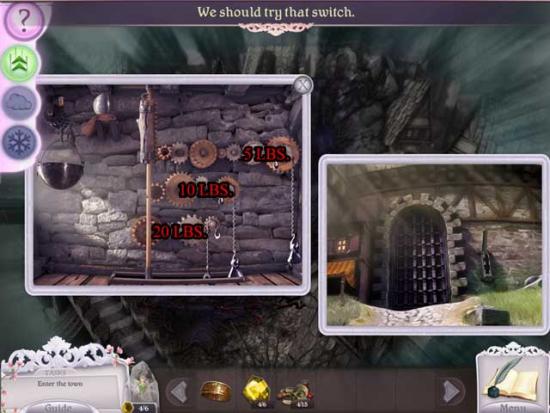
- Return to the Town Gate, then enter through the Gate to the Town Square.
Town Square
- Use the Lift Ability on the Barrel on the left to break it open, revealing the YELLOW GEM 5/6. Click on it to add it to your inventory.
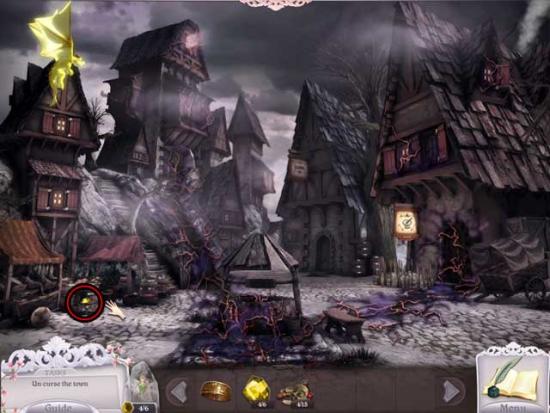
- Proceed down the Well.
Well
- Use the Lift Ability on the wooden board blocking the door to remove it, releasing the water.
- Return to the Town Square, now purged of evil.
Town Square
- Pick up the HEART KEY and the TRANSFORMATION POTION that appear to add them to your inventory.
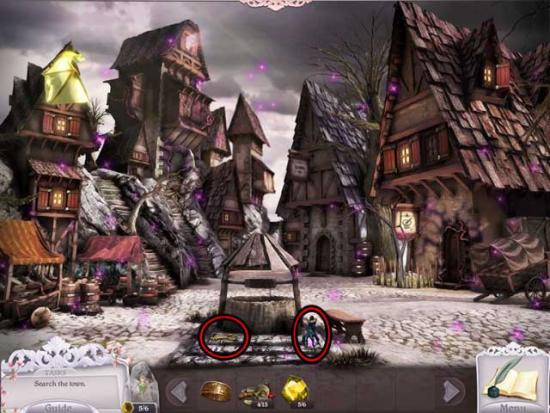
- Enter the building on the right.
Apothecary
- Use the Lift Ability on the bottle on the far left side of the screen to break it open, revealing the PUPPET PART 5/15. Click on it to add it to your inventory.
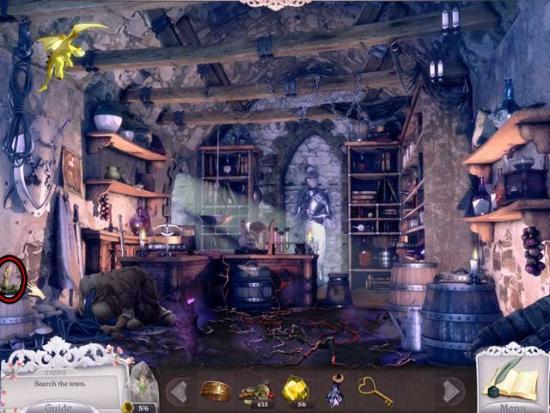
- Continue (to the left via the back of the room) to the Storage Room.
Storage Room
- Use the Lift Ability on the Bucket on the lower right and the Cabinet on the left to open them, revealing the PUPPET PART 6/15 and the YELLOW GEM 6/6. Click on them to add them to your inventory.
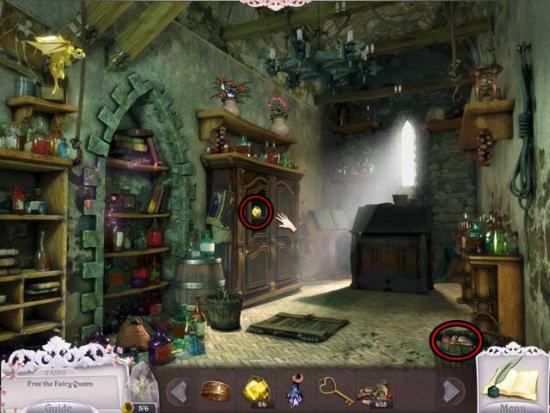
- When given the option to return immediately to the Witch’s Tree, select Yes.
Witch’s Tree
- Examine the foremost crystal containing the Fairy Queen.
- Use the six YELLOW GEMS from your inventory on the empty slots to trigger a puzzle.
- Click on the arrows surrounding the slots to arrange the yellow gems. The goal is to move all the yellow gems into the glowing yellow slots. The solution is shown below.
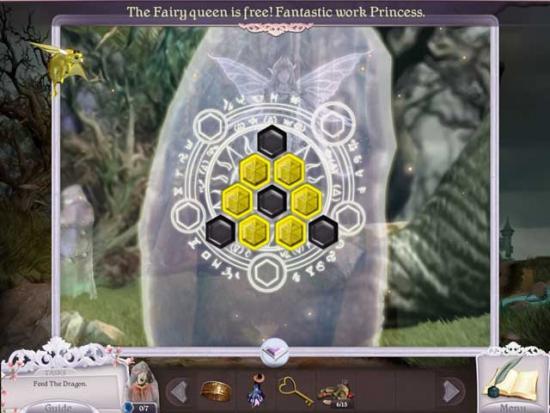
- The Fairy Queen is now free! She will give you the JAR as thanks.
Chapter 3: The Town Mayor
Witch’s Tree
- Select the option to return to the Storage Room.
Storage Room
- Examine the shelves in the stone alcove on the left to enter a hidden object area.
- Find the objects listed at the bottom of the screen. Some objects may be randomized. The Key Item(s) is circled in red.
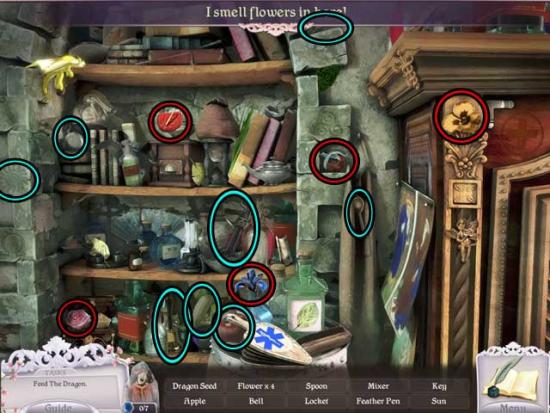
- Upon completing the hidden object area, the FLOWERS (x4 separate) and the DRAGON SEED will be added to your inventory.
- Return to the main Apothecary area.
Apothecary
- Take a closer look at the sleeping Chemist.
- Use the FLOWERS x3 (every flower except the Rose) on their correct slots, then use the flowers to color the various parts of the tattoo in such a way that a color never comes in direct contact with itself. A possible solution is shown below.
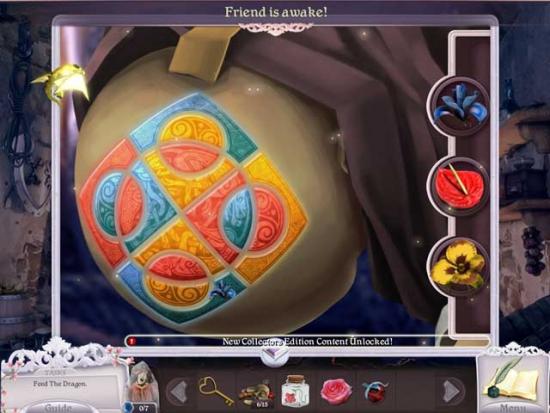
- Upon waking him, the Chemist will reward you with the RECIPE BOOK.
- Pick up the TRANSFORMATION POTION that appears on the floor.
- Use the Lift Ability on the vase on the right to break it open, revealing the BLUE GEM 1/7. Click on it to add it to your inventory.
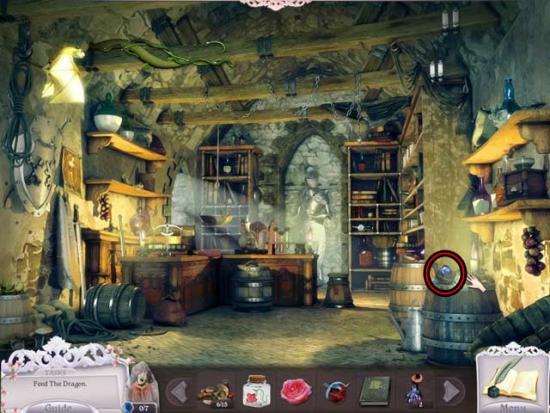
- Return to the Storage Room.
Storage Room
- Examine the large Stand at the back of the room for a closer look.
- Use the RECIPE BOOK on the Stand and the DRAGON SEED on the Pot above it. Click on the book pages until you find the page entitled “Fire Pepper”, then exit the close-up.
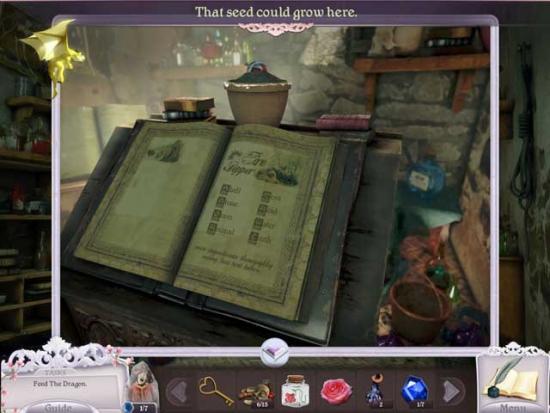
- Click on the hidden object area that reappears over the shelves on the left.
- Find the objects listed at the bottom of the screen. Some objects may be randomized. The Key Item(s) is circled in red.
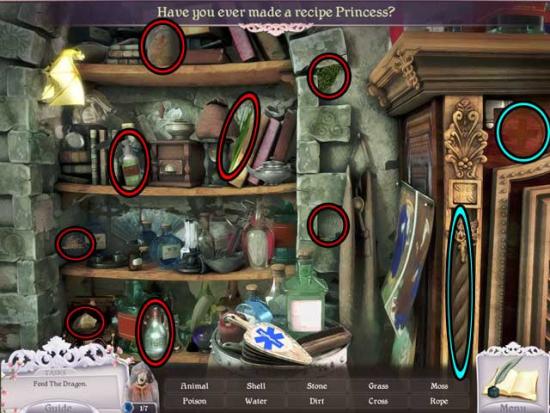
- Upon completing the hidden object area, the INGREDIENTS 8/8 will be added to your inventory.
- Return to the Apothecary.
Apothecary
- Examine the chemistry set in the middle-rear of the room for a closer view.
- Use the INGREDIENTS 8/8 on the chemistry set, then follow the directions on the chalk board. It’s easy to get a little confused, so here’s the best way to do it (refer to the screenshot as reference for rows):
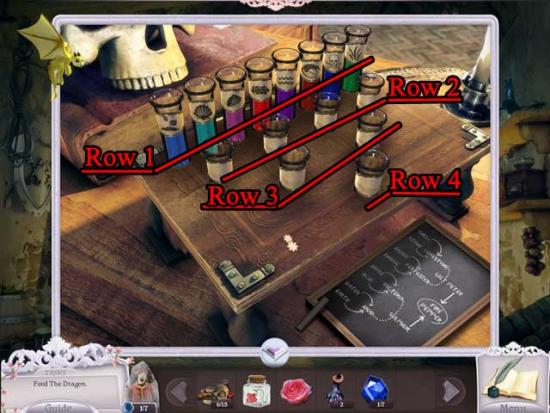
-1st Row: Click on the Shell (aqua/light blue) and the Stone (light purple) to obtain the Limestone (pale green) in the 2nd row.
-1st Row: Click on the Grass (green) and the Animal (dark red) to obtain the Fertilizer in the 2nd row.
-2nd Row: Click on the Limestone and the Fertilizer to obtain the Salt Peter in the 3rd row.
-1st Row: Click on the Moss (red) and the Acid (royal blue) to obtain the Bacteria in the 2nd row.
-1st Row: Click on the Water (purple) and the Earth (blue) to obtain the Mud.
-2nd Row: Click on the Bacteria and the Mud to obtain the Sulphur in the 3rd row.
-3rd Row: Click the Salt Peter and the Sulphur to obtain the FIRE PEPPER.
- Click on the FIRE PEPPER to add it to your inventory.
- Before leaving, return to the Storage Room.
Storage Room
- Examine the Stand at the back of the room again.
- Use a TRANSFORMATION POTION on the Dragon Seed.
- Click on the Dragon Berries and feed it to the Dragon. You will unlock the Dragon Ability: Smoke!
- Use the Smoke Ability on the bee on top of the cabinet, revealing the BLUE GEM 2/7. Click on it to add it to your inventory.
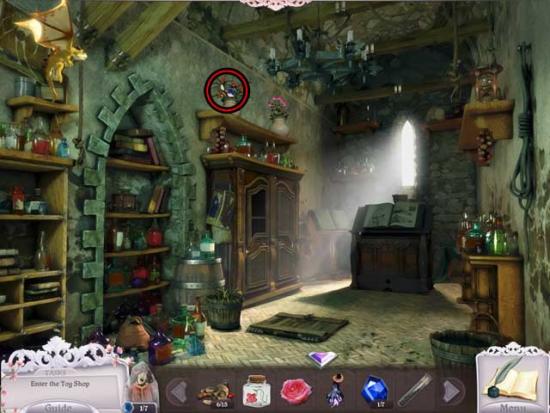
- Exit back to the Town Square.
Town Square
- Proceed up the steps to the darkened house on the left.
Toy Shop Entrance
- Use the Lift Ability on the barrel on the right to recover the PUPPET PART 7/15, then use it on the Ball and Chain to move the Toy Maker’s hands together.
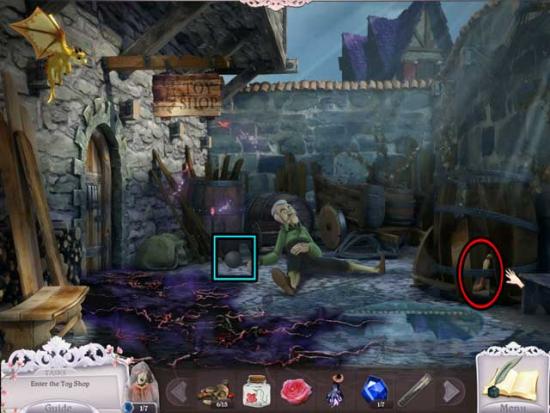
- Examine the Toy Maker’s hands: he’s got a tattoo you’ll need to color. Place the FLOWER (rose) in its slot before exiting the close-up.
- Examine the sparkling barrel near the shop entrance to enter a hidden object area.
- Find the objects listed at the bottom of the screen. Some objects may be randomized. The Key Item(s) is circled in red.
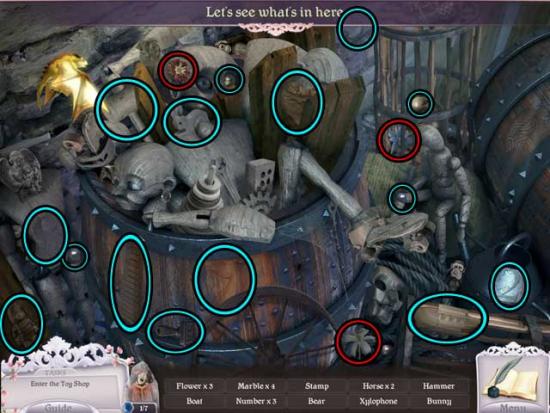
- Upon completing the hidden object area, the FLOWERS (x3 separate) will be added to your inventory.
- Examine the Toy Maker’s hands.
- Use the 3 FLOWERS from your inventory on their correct slots. Then, use the Flowers to color the various parts of the tattoo without having a color touch itself. A possible solution is shown below.
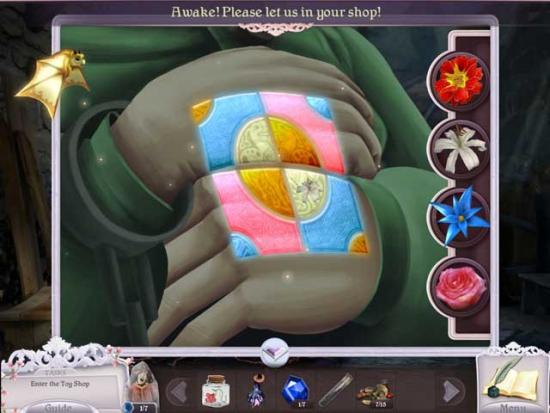
- Upon waking the Toy Maker, he’ll reward you with the PAINT OUTLINES 2/2.
- Pick up the TRANSFORMATION POTION that appears on the ground to add it to your inventory.
- Click on Bella’s Bear on the left. It will turn into the BLUE GEM 3/7. Click on it to add it to your inventory.
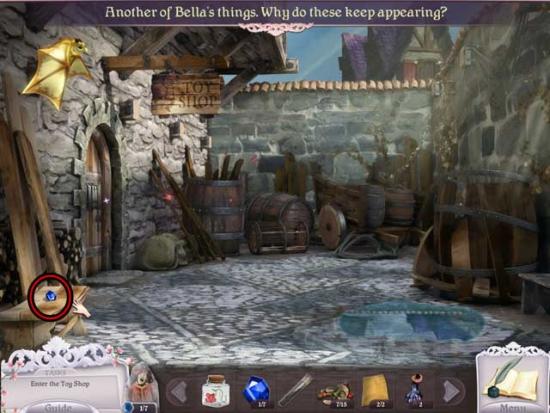
- Click on the barrel to play the re-activated hidden object area.
- Find the objects listed at the bottom of the screen. Some objects may be randomized. The Key Item(s) is circled in red.
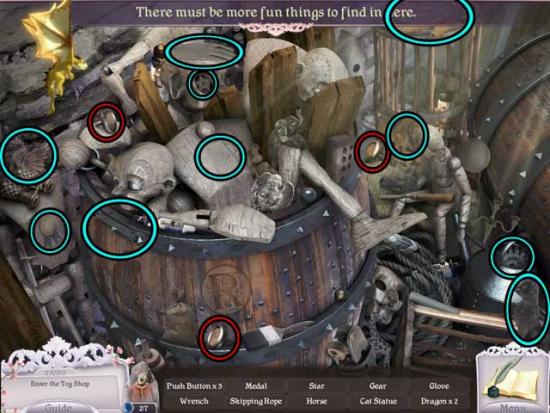
- Upon completing the hidden object area, the PUSH BUTTON 3/3 will be added to your inventory.
- Examine the door of the Toy Shop.
- Click on the various panels at the top of the puppet to move its limbs into the correct positions. Once done, use the HEART KEY on the lock in the middle of the puppet to open the door. The correct solution is shown below.
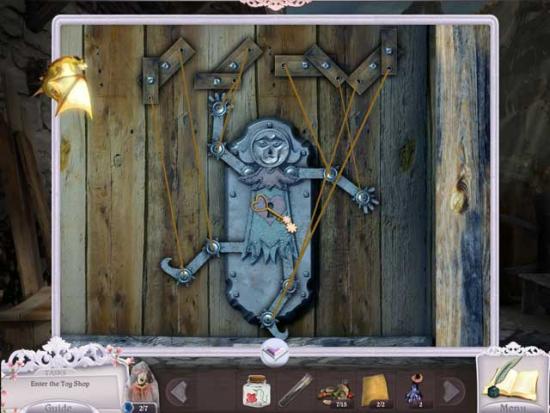
- Enter the Toy Shop.
Toy Shop 1F
- Use the Lift Ability on the Shield on the wall on the left to remove it, revealing the PUPPET PART 8/15. Click on it to add it to your inventory.
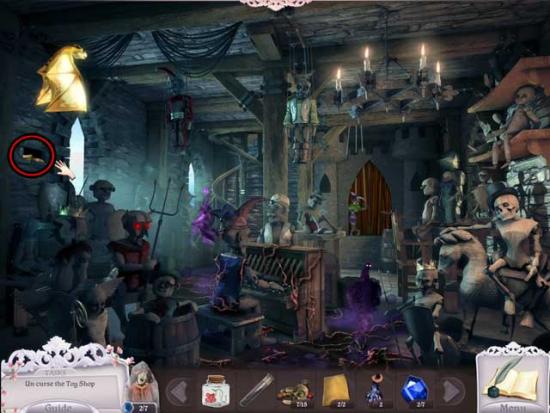
- Proceed up the spiral stairs to the second floor.
Toy Shop 2F
- Use the Smoke Ability on the Giant Bee to knock it out.
- Use the Lift Ability on the Lantern sitting on the table and the cracked panel in the floor to reveal the BLUE GEM 4/7 and the PUPPET PART 9/15.
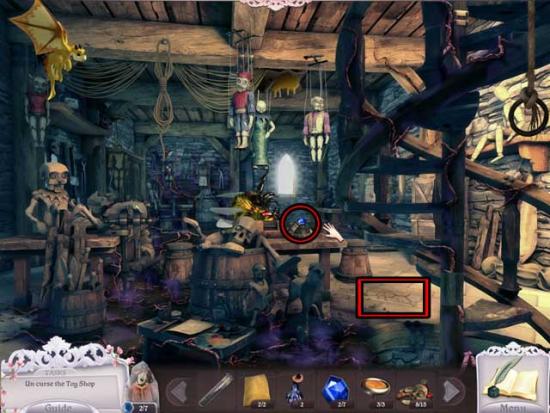
- Use a TRANSFORMATION POTION on the knocked out Giant Bee to turn it small, causing it to fly away and purge the room of evil.
- Pick up the new TRANSFORMATION POTION that appears on the floor on the left to add it to your inventory.
- Examine the small table near the bottom of the screen.
- Use the PAINT OUTLINES on the table.
- Use the paintbrush to paint the first picture of the scissors Grey. It should look like this when finished:
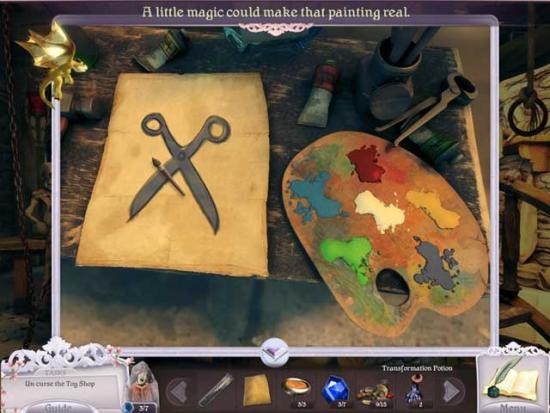
- Use a TRANSFORMATION POTION on the finished painting to turn it into the TOY SCISSORS, then click on them to add them to your inventory.
- Examine the table again, this time placing the remaining PAINT OUTLINE on it.
- Use the brush to paint the heart Red. It should look like this when finished:
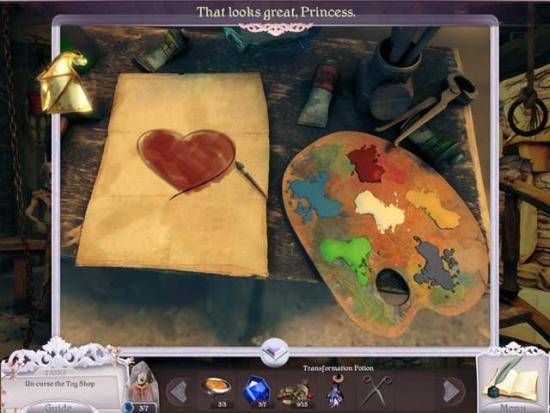
- Use the remaining TRANSFORMATION POTION on the painting to turn it into the METAL HEART. Click on it to add it to your inventory.
- Notice the honey dripping from the ceiling between the hanging puppets. Use the JAR from your inventory on it to obtain the JAR OF HONEY.
- For now, continue up the spiral stairs.
Toy Shop 3F
- Examine the Crib in the middle of the room.
- Click on the blanket to remove it, then click on the Evil Objects to remove them until they’re all gone. Their locations are shown below.
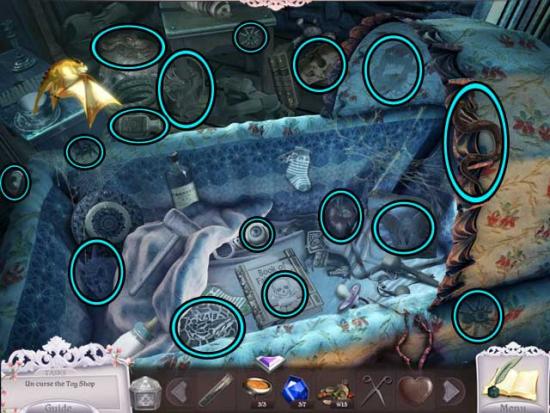
- Having found all the Evil Objects, the evil will be purged from the room.
- Pick up the TRANSFORMATION POTION and the BLUE GEM 5/7 lying on the floor to add them to your inventory.
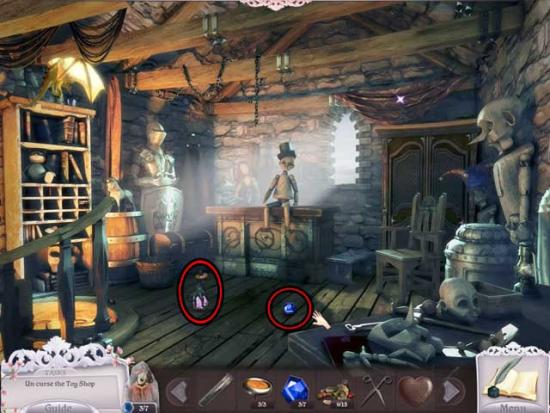
- Examine the puppet hanging on the wall on the right.
- Click the buttons at the top of the puppet to select a color. The idea is to turn the whole board one color (starting from the heart in the upper left corner) in 25 turns. An example from most of the way through the puzzle is shown below.
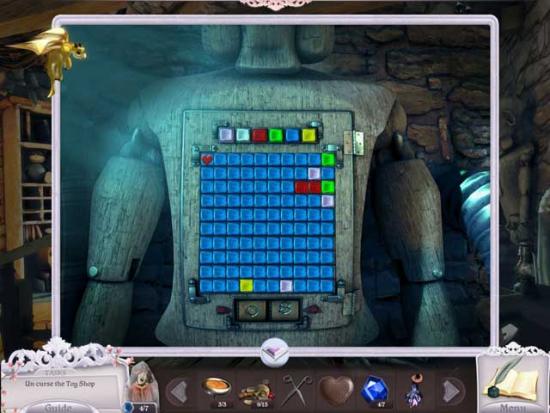
- Upon completing the puzzle, click on the WOODEN HEART inside the open puppet to add it to your inventory.
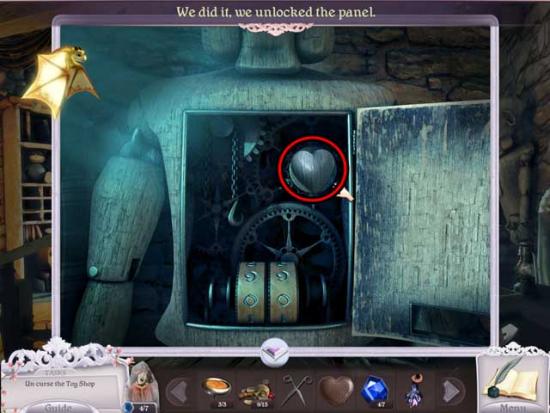
- Before leaving, use the Lift Ability on the curtain in the upper right corner of the screen and the cracked floorboard at the bottom to obtain the PUPPET PART 10/15 and PUPPET PART 11/15.
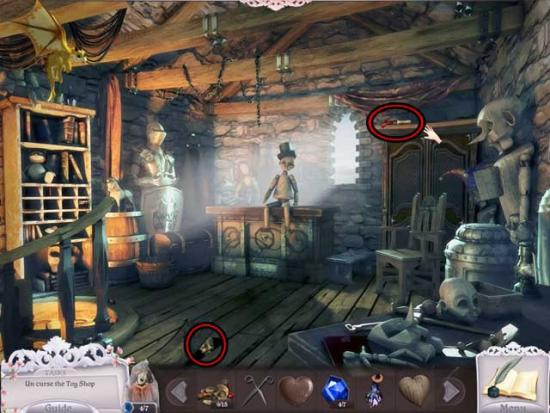
- The area is now complete, so go back down to the 1st floor.
Toy Shop 1F
- Use the TOY SCISSORS on the Demon Puppet dancing on the other end of the room to cut the strings and purge the room of evil.
- Pick up the TRANSFORMATION POTION that appears on the floor, then use the Smoke Ability on the bee on the right to remove it and reveal the BLUE GEM 6/7. Click on it to add it to your inventory.
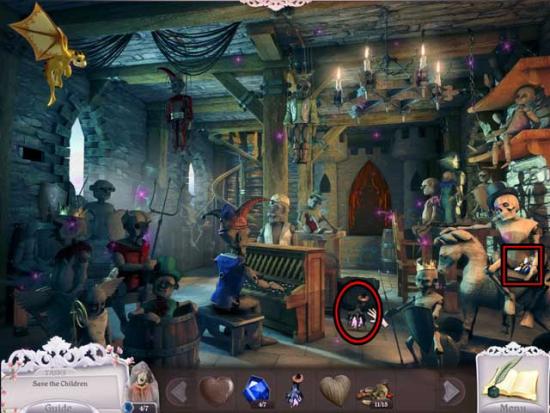
- Examine the puppet at the piano in the middle of the room.
- Use the PUSH BUTTONS 3/3 on the missing holes in the piano. A secret compartment will open, revealing the GOLD RING (2). Click on it to add it to your inventory.
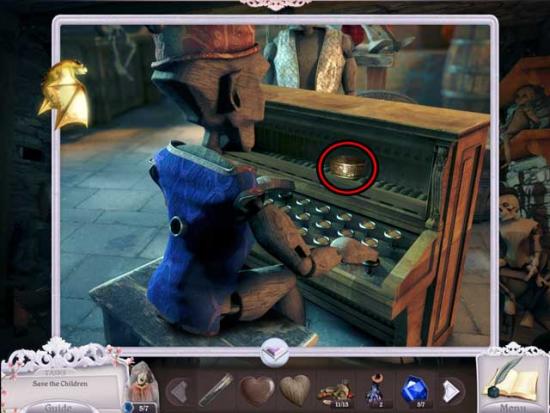
- Now’s a good time to clear a bit of inventory space, so go back up to the 2nd floor.
Toy Shop 2F
- Examine the back wall for a closer view.
- Place the PUPPET PARTS 11/15 on the screen: they will appear at the top of the screen for assembly. (Please note! Despite having placed the pieces on the wall, the guide will continue to refer to the following parts as 12/15 – 15/15 etc.)
- Place the METAL HEART on the middle body and the WOODEN HEART on the body on the right.
- For now, feel free to assemble the puppet parts with their correct bodies. There’s still 4 pieces to be found, though.
- Time for some backtracking! Return to the Troll’s Bridge.
Troll’s Bridge
- Use the JAR OF HONEY on the Troll to get rid of him. You can now access the rest of the area.
- Use the Lift Ability on the orb on top of the house to break it open, revealing the PUPPET PART 12/15.
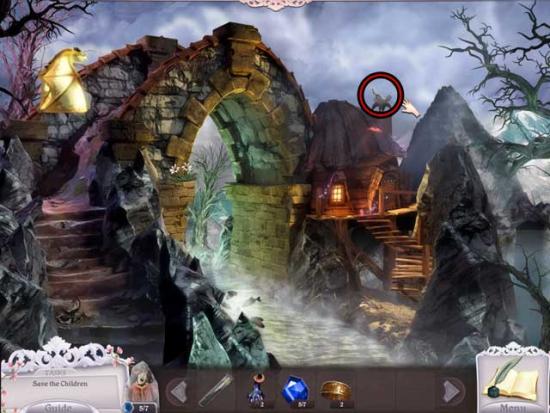
- Take a closer look at the house to enter a hidden object area.
- Find the objects listed at the bottom of the screen. Some objects may be randomized. You can open the chest at the back of the room to reveal more items. The Key Item(s) is circled in red.
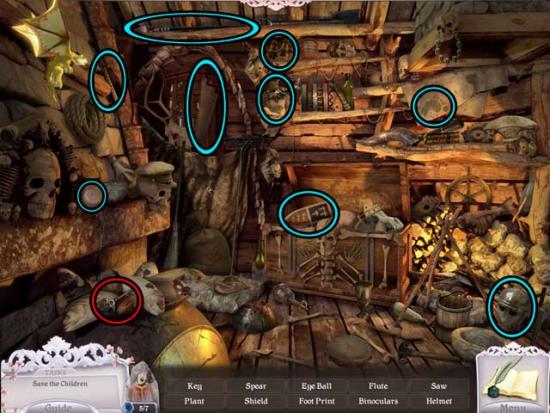
- Upon completing the area, the WINDUP KEY will be added to your inventory.
- Return to the 1st floor of the Toy Shop.
Toy Shop 1F
- Take a closer look at the puppet at the piano again.
- Use the WINDUP KEY on the puppet, then use a TRANSFORMATION POTION on the Key to make it fit. The puppet will now play music.
- Go back to the Troll’s Bridge, and continue up the path to the next area.
Rapunzel’s Tower
- Use the FIRE PEPPER on the hair swirling around the Tower, but you’re not ready to ignite it just yet.
- Continue forward to the next area.
Dwarves’ Home
- Use the Lift Ability on the Axe stuck in the Tree on top of the hill to remove it, purging the area of evil.
- Click on the TRANSFORMATION POTION that appears to add it to your inventory.
- Examine the gardening area on the right to enter a hidden object area.
- Find the objects listed at the bottom of the screen. Some objects may be randomized. The Key Item(s) is circled in red.
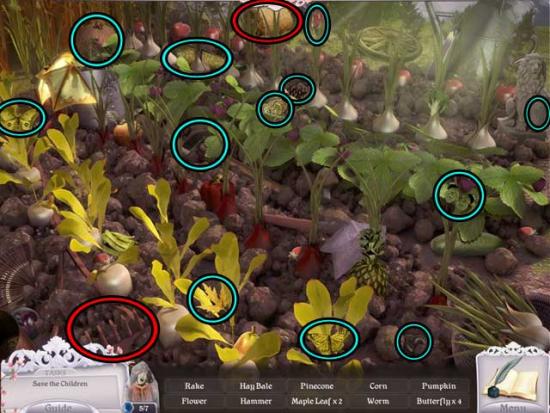
- Upon completing the hidden object area, the HAY and the RAKE will be added to your inventory.
- Take a closer look at the cart filled with fireworks to enter another hidden object area.
- Find the objects listed at the bottom of the screen. Some objects may be randomized. The Key Item(s) is circled in red.
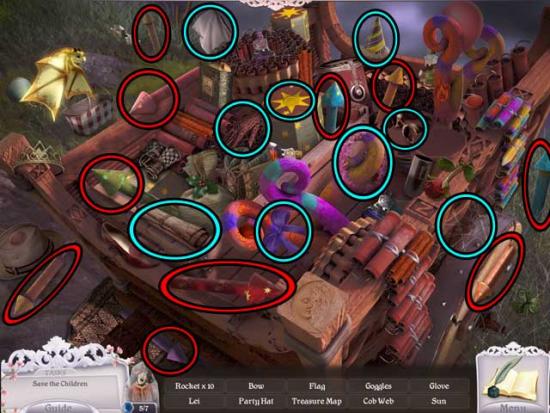
- Upon completing the area, the FIREWORKS will be added to your inventory.
- Return to Rapunzel’s Tower.
Rapunzel’s Tower
- Use the FIREWORKS on the Hair covered in Fire Pepper to burn it away, purging the area of evil.
- Pick up the TRANSFORMATION POTION that appears on the ground to add it to your inventory.
- Examine the Well on the right to enter a hidden object area.
- Find the objects listed at the bottom of the screen. Some objects may be randomized. The Key Item(s) is circled in red.
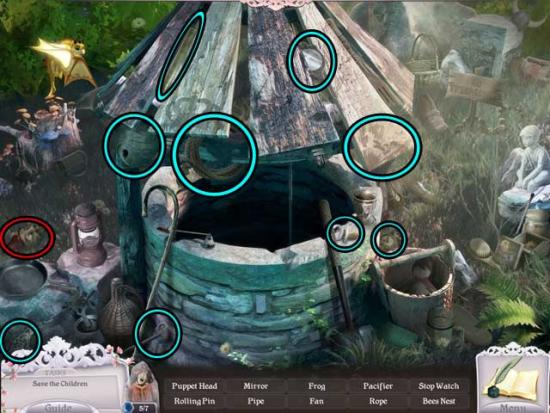
- Upon completing the hidden object area, the PUPPET PART 13/15 will be added to your inventory.
- Enter Rapunzel’s Tower.
Inside Rapunzel’s Tower
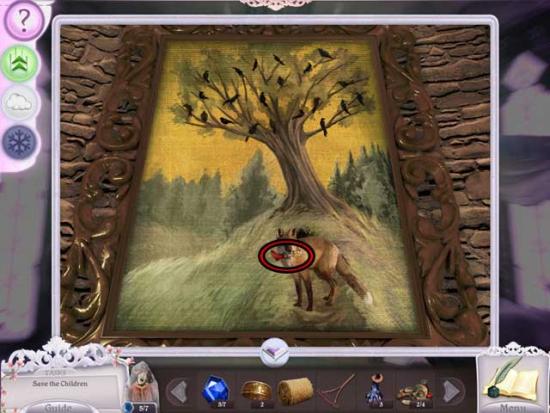
- Examine the painting of the Fox on the right. Use the Smoke Ability to lure it from its den. Click on the PUPPET PART 14/15 in its mouth to add it to your inventory.
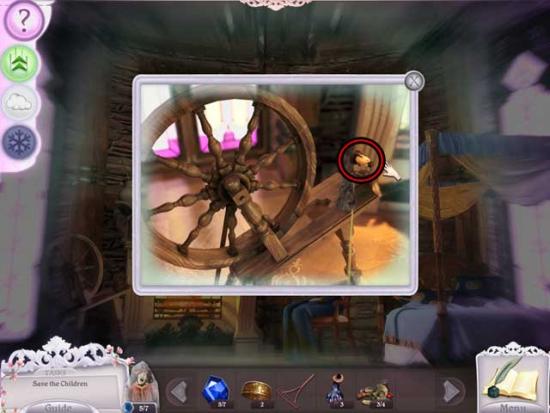
- Examine the Loom in the lower left corner. Use the HAY on the Loom to create the GOLD STRING. Click on it to add it to your inventory.
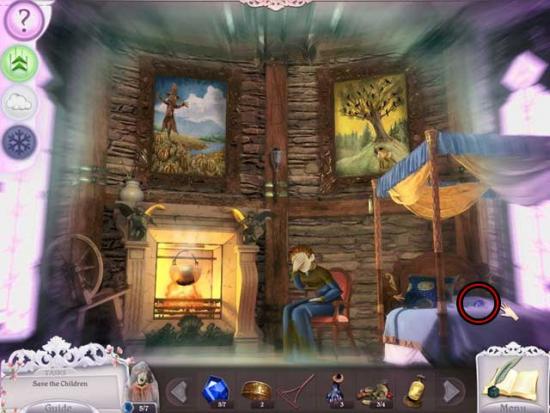
- Use the Lift Ability on the pillows on Rapunzel’s bed, revealing the BLUE GEM 7/7. Click on it to add it to your inventory.
- When given the option to warp straight to the Witch’s Tree, select Yes.
Witch’s Tree
- Examine the middlemost crystal of the three remaining.
- Use the 7 BLUE GEMS on the empty slots in the crystal to trigger a puzzle.
- Click on the arrows surrounding the slots to arrange the blue gems. The goal is to move all the blue gems into the glowing blue slots. The solution is shown below.
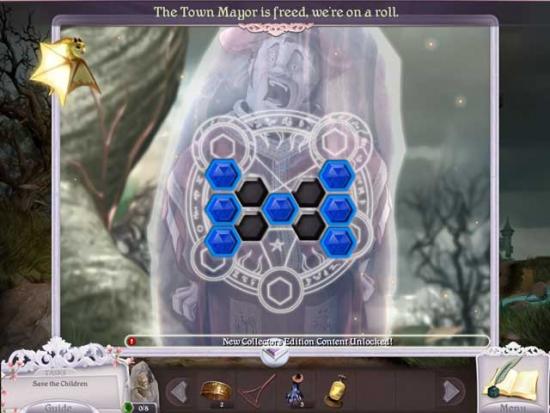
- The Town Mayor is now free! He will give you the WIG as thanks.
Chapter 4: The Dwarf Chief
Witch’s Tree
- It’s important to note that the Fairy is now by your side again.
- Make your way back to the Storage Room of the Apothecary.
Storage Room
- Use the Water Ability on the plant on the floor on the left to reveal the GREEN GEM 1/8. Click on it to add it to your inventory.
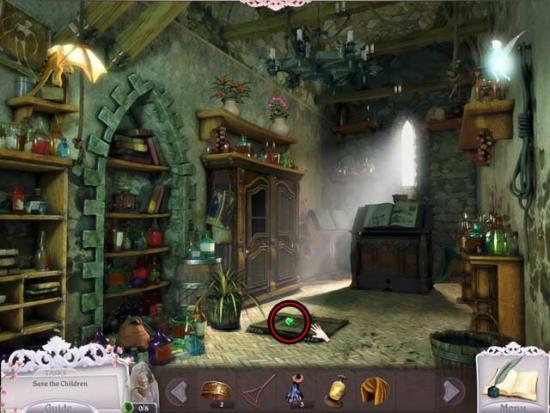
- Continue to the Apothecary.
Apothecary
- Use the Water Ability on the vine growing in the rafters to reveal the GREEN GEM 2/8. Click on it to add it to your inventory.
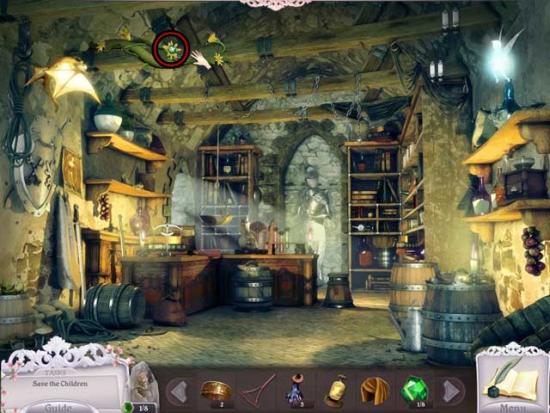
- Continue to the Town Square.
Town Square
- Use the Water Ability on the tree in front of the Apothecary to reveal the GREEN GEM 3/8. Click on it to add it to your inventory.
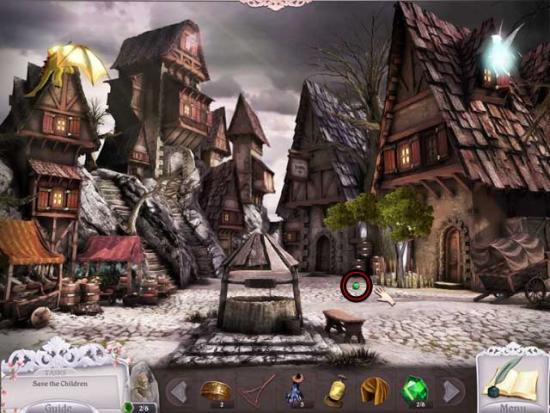
- Continue back to the Skull Road.
Skull Road
- Use the Water Ability on the plant in the middle of the road to reveal the GREEN GEM 4/8. Click on it to add it to your inventory.
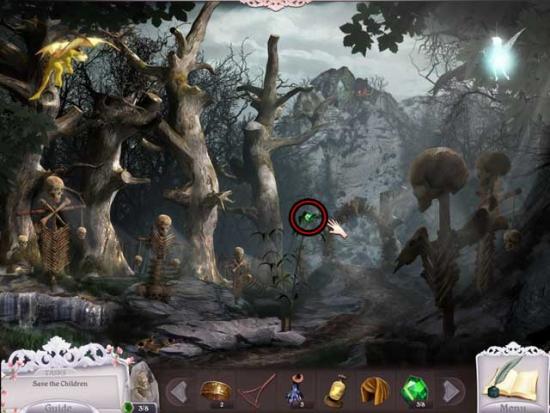
- Continue forward to the Troll’s Bridge.
Troll’s Bridge
- Use the Water Ability on the flowers growing at the foot of the bridge to reveal the GREEN GEM 5/8. Click on it to add it to your inventory.
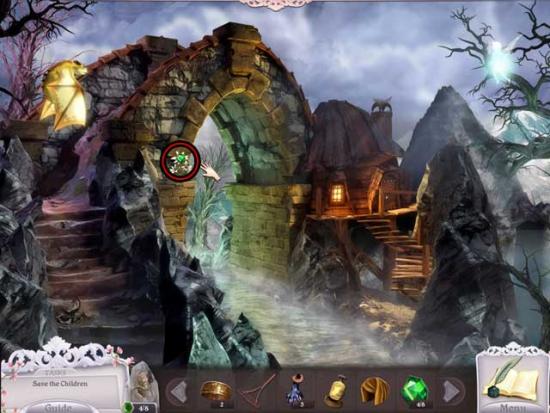
- Continue towards Rapunzel’s Tower.
Rapunzel’s Tower
- Use the Water Ability on the small fire in the lower left corner of the screen to reveal the GREEN GEM 6/8. Click on it to add it to your inventory.
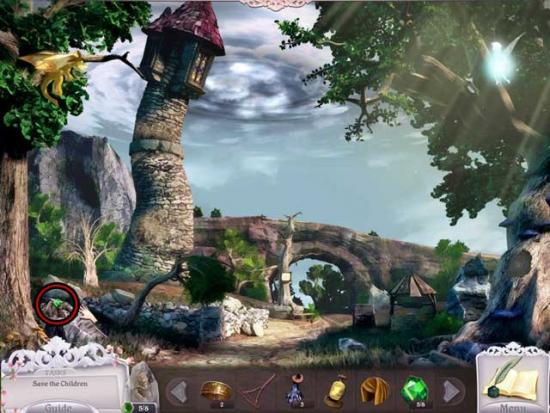
- Enter Rapunzel’s Tower.
Inside Rapunzel’s Tower
- Examine the painting of the scarecrow on the left. Use the Water Ability on the dried-up riverbed to replenish it, revealing the PUPPET PART 15/15. Click on it to add it to your inventory.
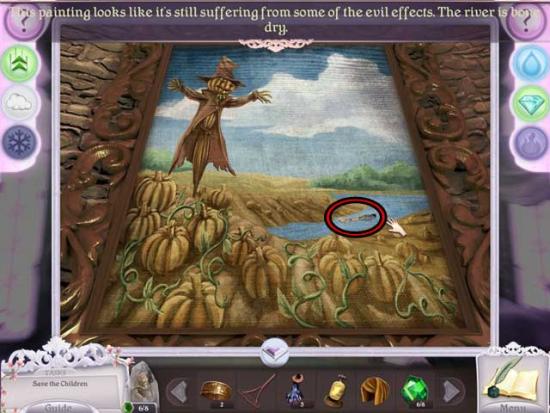
- Use the Water Ability on the plant on top of the fireplace to reveal the GREEN GEM 7/8. Click on it to add it to your inventory.
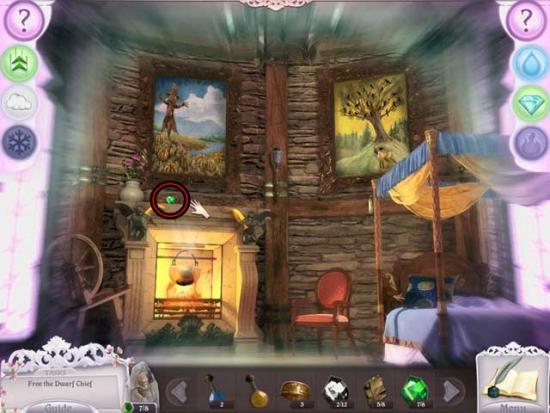
- Use the WIG on Rapunzel, then use a TRANSFORMATION POTION on the Wig to make it grow. Rapunzel will reward you with the FABRIC HEART.
- Now it’s finally time to finish those puppets! Return to the 2nd floor of the Toy Shop.
Toy Shop 2F
- Click on the back wall of the shop to take a closer look at the puppet assembly area.
- Use the FABRIC HEART on the puppet on the left, then use the PUPPET PART 15/15 (or any remaining if you did this earlier) and assemble each of the puppets. The completed solutions are shown below.
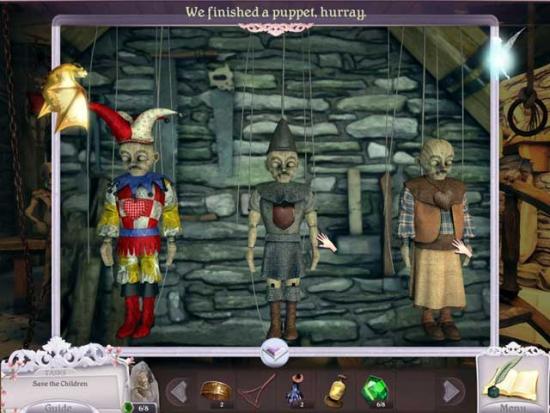
- Click on each of the 3 CHILD PUPPETS to add them to your inventory, then go back down to the 1st floor.
Toy Shop 1F
- Examine the stage and curtain at the back of the room.
- Use the 3 CHILD PUPPETS on the stage. Coupled with the music from the puppet at the piano earlier, they will dance and turn back into children!
- As reward for your help, the Toy Maker will reward you with the DOOR HANDLE.
- Continue back to the Dwarves’ Home.
Dwarves’ Home
- Use the Diamond Ability on the windows outside the home to reveal the SCHEMATIC PIECE 1/8 and the GREEN GEM 8/8.
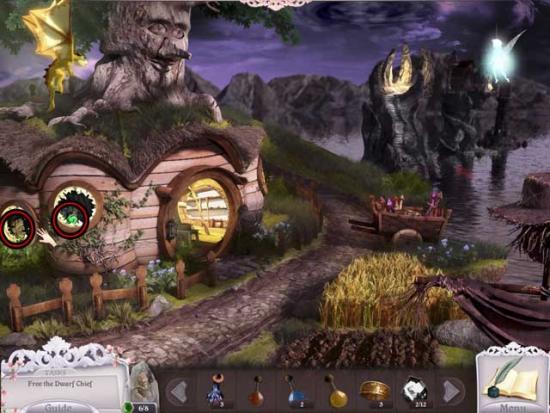
- Once you’ve collected the final GREEN GEM, select “Yes” when asked to warp to the Witch’s Tree.
Witch’s Tree
- Take a closer look at the crystal on the left.
- Use the 8 GREEN GEMS on the empty slots to trigger a puzzle.
- Click on the arrows surrounding the slots to arrange the green gems. The goal is to move all the green gems into the glowing green slots. The solution is shown below.
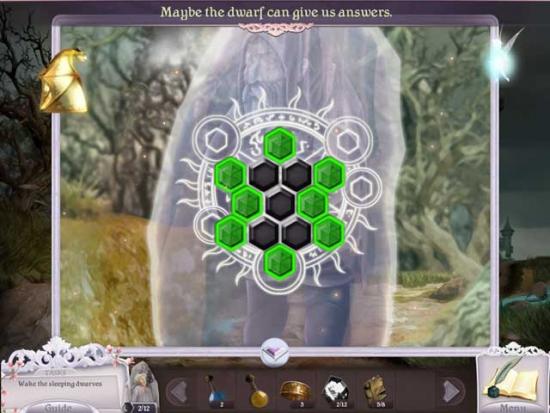
- The Dwarf Chief is now free! He will give you the COAL as thanks.
Chapter 5: The Prince
Witch’s Tree
- From here, return to the Dwarves’ Home.
Dwarves’ Home
- Examine the front door for a closer view.
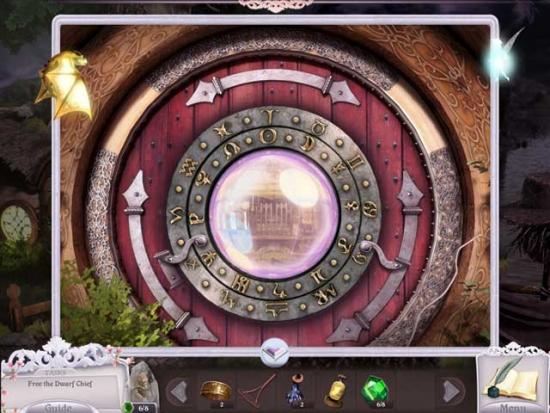
- Use the DOOR HANDLE on the right side of the door, then rotate the rings so that both lenses are fully open. The solution is shown below.
- Enter the house.
Entryway
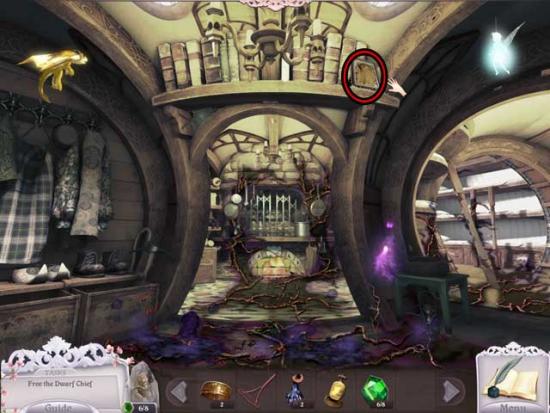
- Use the Diamond Ability on the picture frame in the upper right corner of the screen to break it, revealing the SCHEMATIC PIECE 2/8. Click on it to add it to your inventory.
- Continue to the right.
Sleeping Quarters
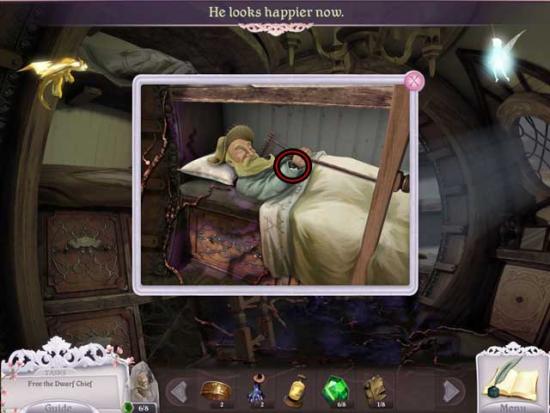
- Take a closer look at the Gardener, sleeping on the lower bunk on the right. Use the RAKE on the Gardener, then pick up the BLACK GEM 1/12 that appears and add it to your inventory.
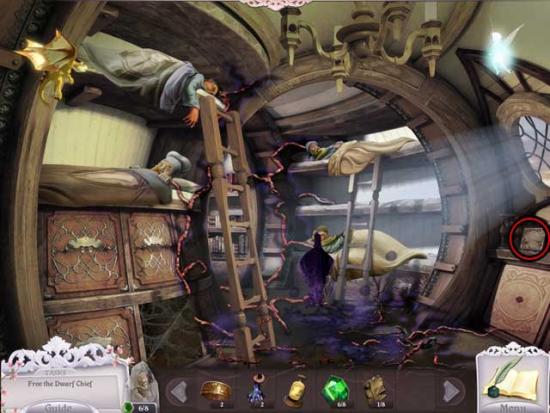
- Use the Diamond Ability to break the glass on the picture frame on the right. Click on the SCHEMATIC PIECE 3/8 to add it to your inventory.
- Continue forward through the passage into the next area.
Library
- Use the Diamond Ability on the window on the left to reveal the SCHEMATIC PIECE 4/8. Click on it to add it to your inventory.
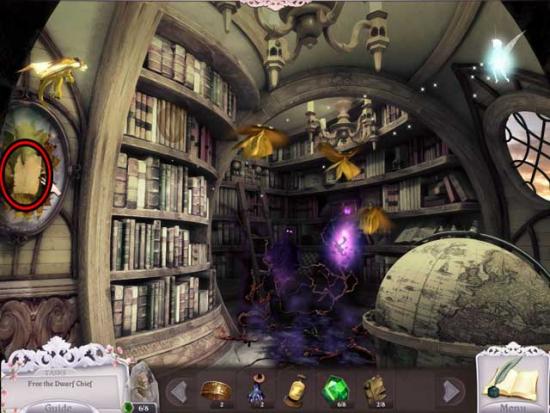
- You can’t progress further here for now, so return to the Entryway and proceed forward into the Kitchen.
Kitchen
- Take a closer look at the Cheese on the table on the right. Click on the small piece of CHEESE to add it to your inventory.
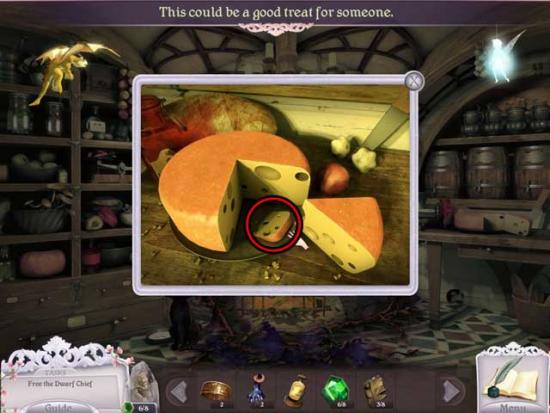
- Take a closer look at the hole in the wall underneath the table with the Cheese. Use the CHEESE on the floor in front of the Mouse to lure the Mouse out, distracting the Cat.
- Use the Diamond Ability on the picture frame on the left above the oven to break it, revealing the SCHEMATIC PIECE 5/8. Click on it to add it to your inventory.
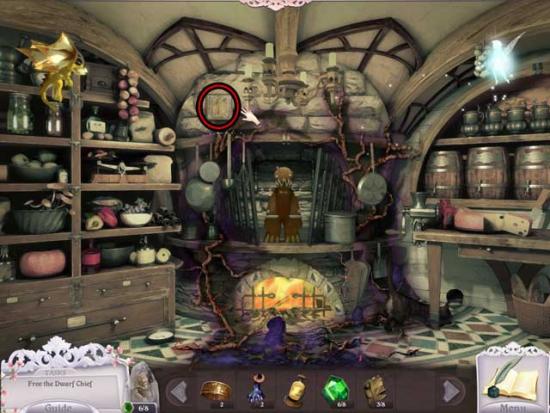
- Examine the Milk Dish no longer guarded by the Cat in the lower left corner.
- Use a TRANSFORMATION POTION on the milk dish to turn it into the MILK JUG, then click on it to add it to your inventory.
- Use the MILK JUG on the Gingerbread Man to purge the evil from the room.
- Pick up the TRANSFORMATION POTION that appears on the floor to add it to your inventory.
- Examine the pantry on the left to enter a hidden object area.
- Find the objects listed at the bottom of the screen. Some objects may be randomized. The Key Item(s) is circled in red.
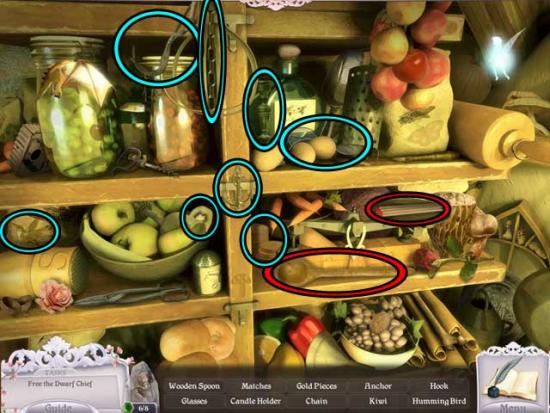
- Upon completing the hidden object area, the WOODEN SPOON and the MATCH will be added to your inventory.
- Return to the Entryway.
Entryway
- The evil of this room is purged now, too. Pick up the TRANSFORMATION POTION on the floor to add it to your inventory.
- Examine the drawers on the left to enter a hidden object area.
- Find the objects listed at the bottom of the screen. Some objects may be randomized. The Key Item(s) is circled in red.
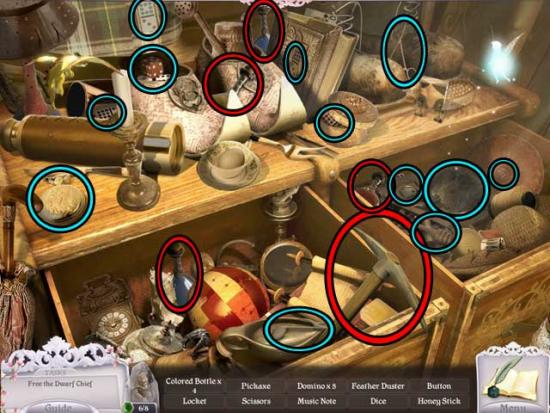
- Upon completing the hidden object area, the PICK AXE, RED VIAL, BLUE VIAL x2, and the YELLOW VIAL will be added to your inventory.
- Use the Lift Ability on the upturned corner of the carpet at the bottom of the screen. Click for a closer look.
- Move the black corner tiles in the center of the puzzle into their appropriate corners. The solution is shown below.
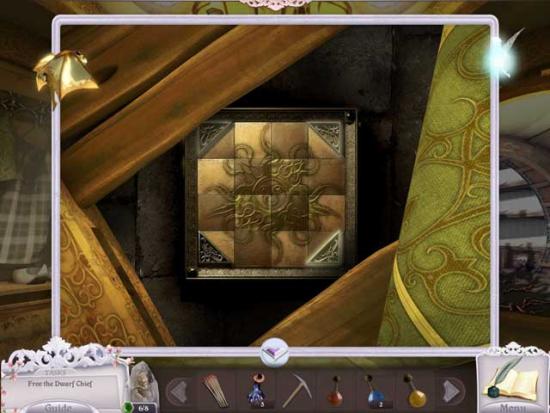
- Once completed, click on the GOLD RING (3) that appears inside to add it to your inventory.
- Return to the Sleeping Quarters.
Sleeping Quarters
- Take a closer look at the Miner sleeping on the top left bunk. Use the PICK AXE on him to reveal the BLACK GEM 2/12. Click on it to add it to your inventory.
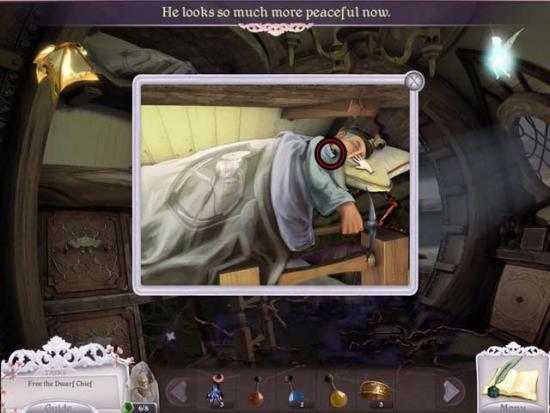
- There are two Dwarves remaining, but we’ll come back to them shortly. For now, return to the Kitchen. (Note: You may continue to use items on the Dwarves, you do not have to follow this sequence of events).
Kitchen
- Examine the Oven for a closer view.
- Use the COAL on the oven to heat it, then click on it to obtain the Fairy Ability: Fire!
- Use the Fire Ability on the Candle on the right side of the Oven to melt it, revealing the BLACK GEM 3/12. Click on it to add it to your inventory.
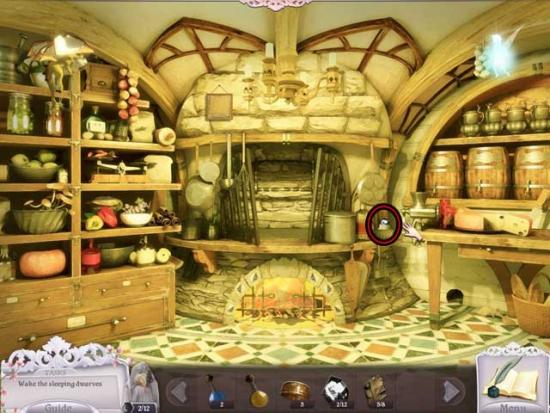
- Proceed back to the Entryway.
Entryway
- Use the Fire Ability on the cobweb in the upper left corner of the doorway to reveal the BLACK GEM 4/12. Click on it to add it to your inventory.
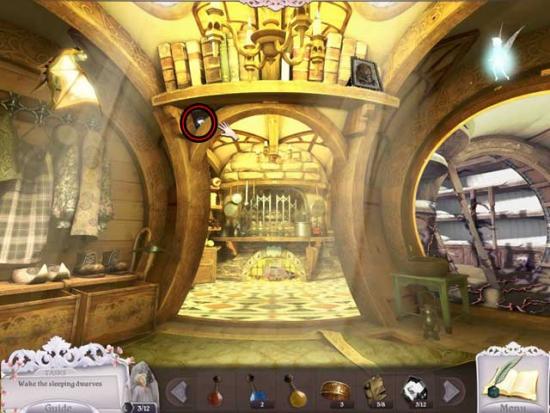
- Continue into the Sleeping Quarters.
Sleeping Quarters
- Use the Fire Ability on the cobweb in the lower left to burn it away, revealing the SCHEMATIC PIECE 6/8. Click on it to add it to your inventory.
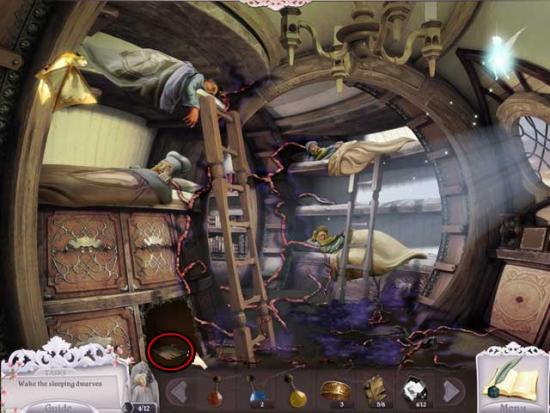
- Take a closer look at the Chef sleeping on the lower left bunk. Use the WOODEN SPOON on him to reveal the BLACK GEM 5/12. Click on it to add it to your inventory.
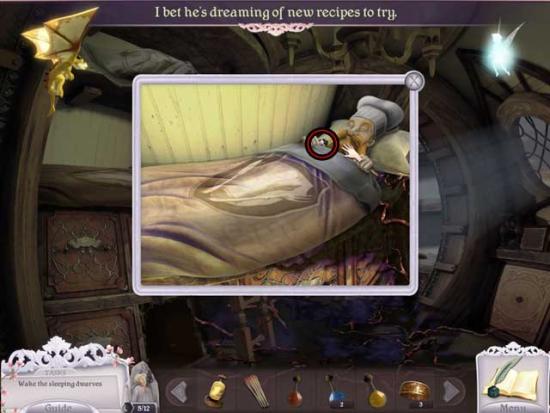
- Take a closer look at the Soldier sleeping on the top right bunk. Use the MATCH on him to reveal the BLACK GEM 6/12. Click on it to add it to your inventory.
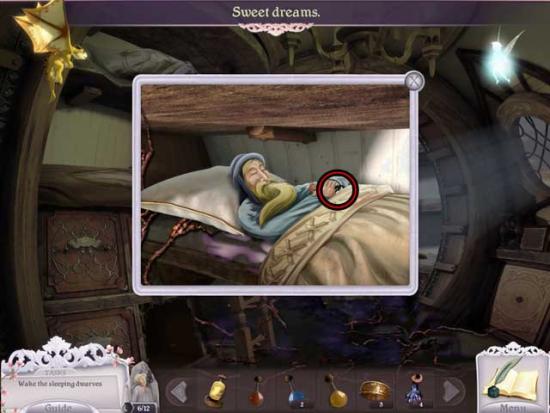
- Now that all the Dwarves are sleeping peacefully, the room has been cleansed of evil. Pick up the TRANSFORMATION POTION that appears to add it to your inventory.
- Continue forward to the Library.
Library
- Use the Fire Ability on the Flying Books to destroy them and purge the room of evil.
- Pick up the TRANSFORMATION POTION and the BOOK lying on the floor to add them to your inventory.
- Use the Fire Ability on the books with the fire logo on the left to burn them away, then use the Diamond Ability on the cracked portion at the top of the arch. This will reveal the BLACK GEM 7/12 and the SCHEMATIC PIECE 7/8 to be added to your inventory.
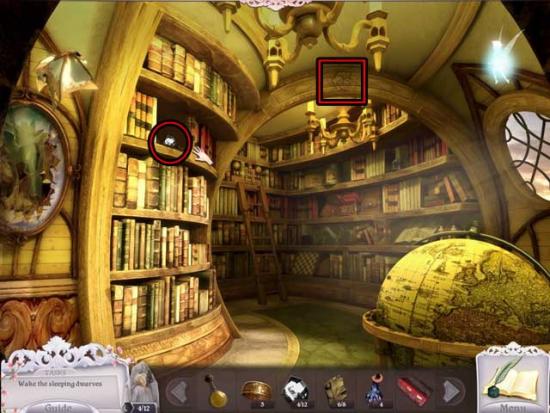
- Examine the middle shelf on the right.
- Push the buttons on the side of the box to move the Leaf to an adjacent color. The goal is to slide the Leaf into the slot in the center of the box. The solution is as follows (push the buttons in the following order): Red, Green, Blue, Red, Green, and Violet. Please note though, there are multiple ways of reaching the solution.
- Upon completing the puzzle, the box will open revealing the CASTING STONE. Click on it to add it to your inventory.
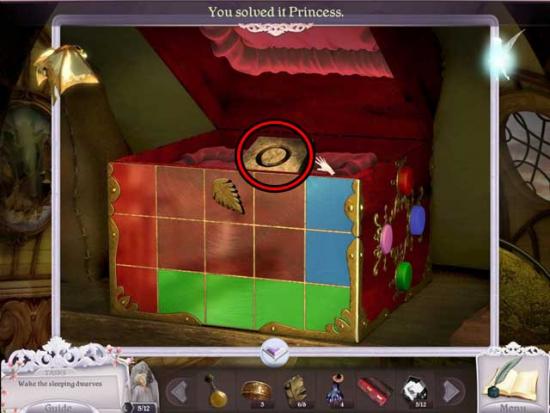
- Examine the shelves at the top of the ladder at the far end of the passageway.
- Use the BOOK on the puzzle to activate it. Arrange the Books in the correct order: the solution is shown below.
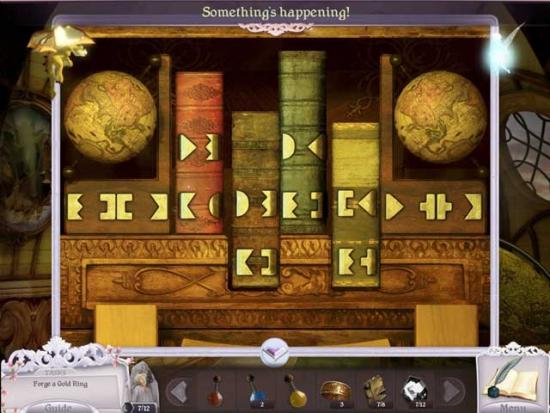
- Enter through the secret doorway that appears.
Hidden Workshop
- Use the Diamond Ability to break the picture frame in the upper right corner near the ceiling. Click on the SCHEMATIC PIECE 8/8 inside to add it to your inventory.
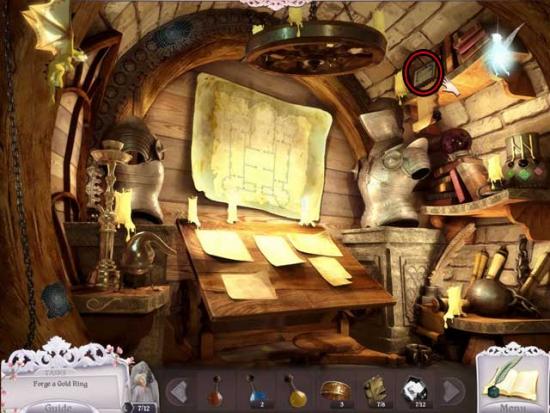
- Examine the middle shelf on the far right for a closer view.
- Use the colored vials from your inventory (RED VIAL, BLUE VIAL x2, YELLOW VIAL) on the shelf to place them there, then use them on the correct openings in the jar to achieve the mixed colors shown at the bottom. The solution is as follows and is shown below:
-Red Vial: right opening
-Blue Vial: middle opening
-Yellow Vial: left opening
-Blue Vial: left opening
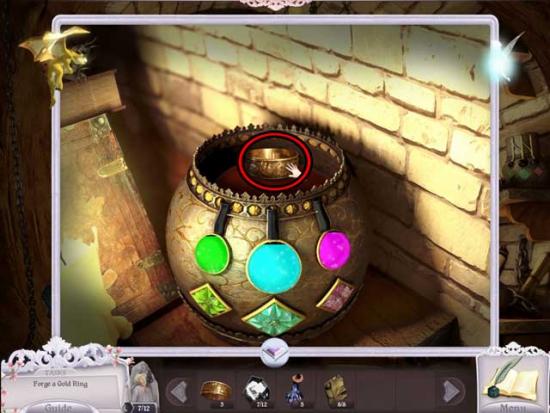
- Upon completing the puzzle, click on the GOLD RING (4) to add it to your inventory.
- Use the Fire Ability on the cobweb-covered holes at the top and left of the room to reveal the CASTING STONE (2) and the BLACK GEM 8/12. Click on them to add them to your inventory.
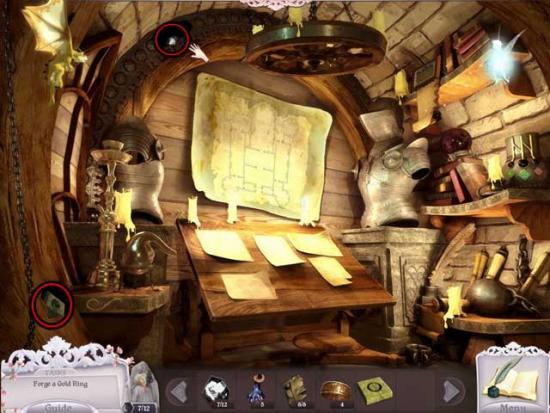
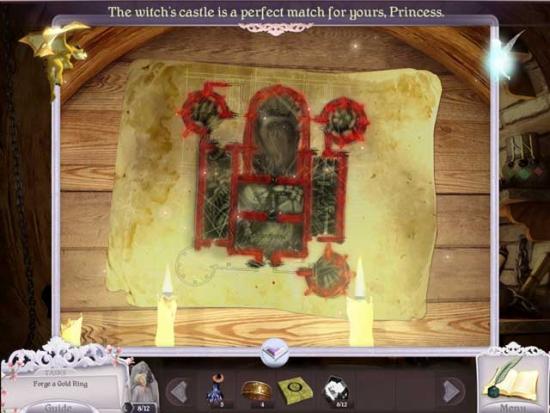
- Examine the floor plans on the wall.
- Use the 8 SCHEMATIC PIECES on the floor plans, then arrange the pieces into their correct locations. The solution is shown below.
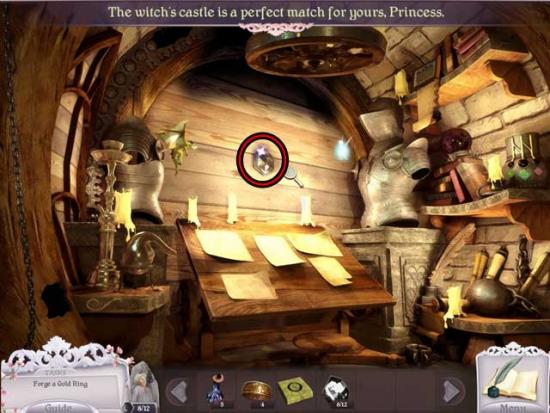
- Examine the Gem revealed in the wall. Use the Lift Ability to remove it and acquire the BLACK GEM 9/12 to be added to your inventory.
- Return to the Kitchen.
Kitchen
- Take a closer look at the Oven.
- Use the GOLD STRING on the pot to melt it, then use the 2 CASTING STONES on the bottom of the oven to begin the forging. Once the top Casting Stone is removed, click on the GOLD RING (5) to add it to your inventory.
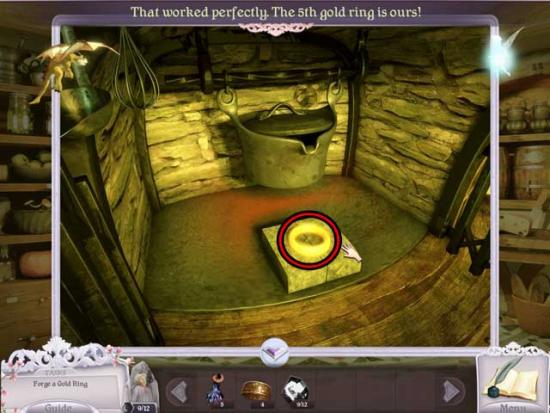
- Exit the house to the outside area of the Dwarves’ Home.
Dwarves’ Home
- Use the Fire Ability on the Scarecrow’s hat on the far right to burn it open, revealing the BLACK GEM 10/12. Click on it to add it to your inventory.
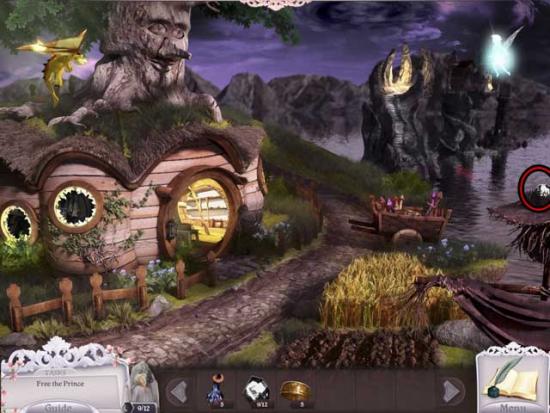
- Continue back towards Rapunzel’s Tower.
Rapunzel’s Tower
- Use the Fire Ability on the cobweb-covered hole in the tree on the right to reveal the BLACK GEM 11/12. Click on it to add it to your inventory.
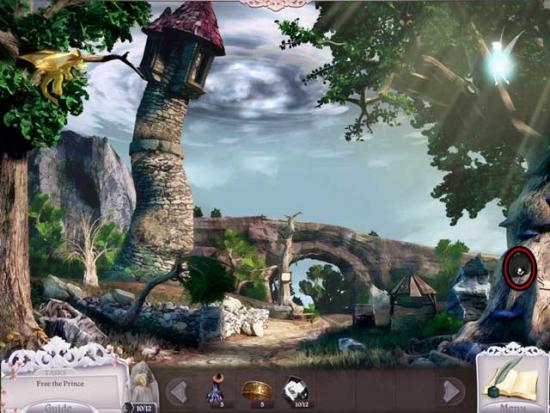
- Enter Rapunzel’s Tower.
Inside Rapunzel’s Tower
- Use the Fire Ability on the torch in the center of the wall to reveal a hidden alcove containing the BLACK GEM 12/12. Click on it to add it to your inventory.
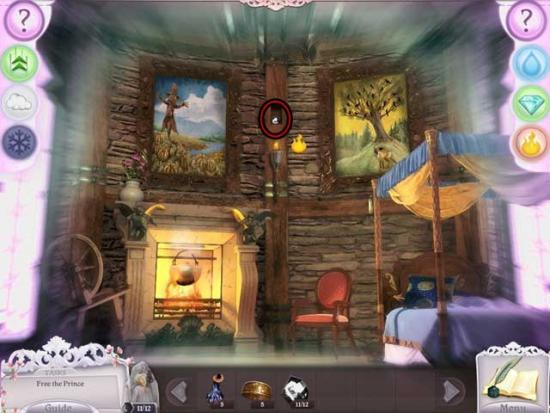
- You’ve now acquired all the Black Gems! When prompted on whether or not you’d like to return immediately to the Witch’s Tree, select Yes.
Witch’s Tree
- Examine the last remaining crystal on the right.
- Use the 12 BLACK GEMS on the empty slots in the crystal to trigger a puzzle.
- Click on the arrows surrounding the slots to arrange the black gems. The goal is to move all the black gems into the glowing blue slots. The solution is shown below.
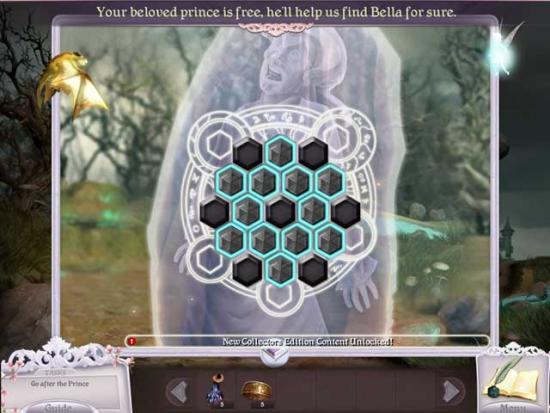
- The Prince is now free!
- Click on the Portal that appears where the Witch’s Tree once stood to enter.
Witch’s Claw
- Take a closer look at the top of the path.
- Use the 5 GOLD RINGS on the finger-like stones, then use a TRANSFORMATION POTION on each of them.
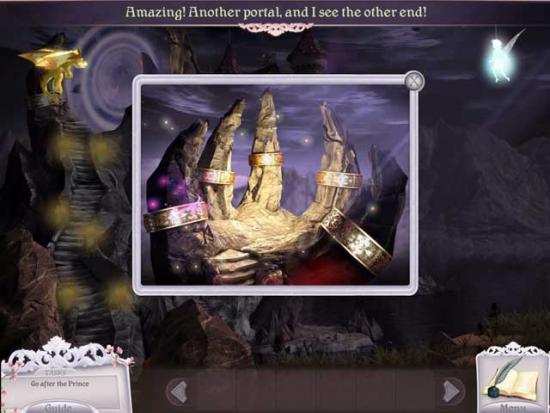
- Enter through the Portal that appears.
Congratulations! You’ve completed the main quest of Princess Isabella: Return of the Curse! If you own the Collector’s Edition of the game, the Bonus Content can now be accessed.
Chapter 6: The Witch’s Lair (Collector’s Edition Content)
If you own the Collector’s Edition of the game, you may choose to access this content either immediately once you’ve finished the main story, or at any time via the Extras portion of the Main Menu by clicking “Bonus Content”.
Outside the Tower
- Click on the outer wall of the Tower at the top of the stairs for a closer view.
- You’ll encounter a puzzle. Raise the number of blocks indicated by the numbers on the edges of each row and column. The solution to the puzzle is shown below:
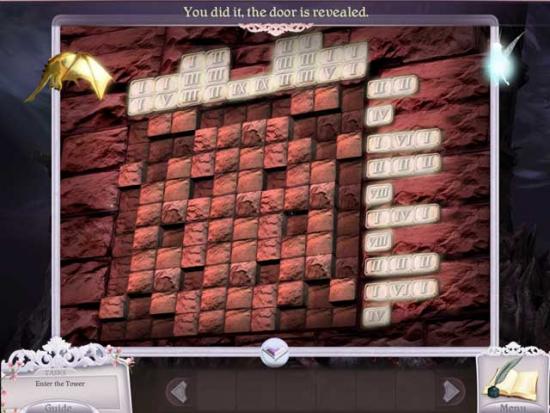
- Enter through the door into the Tower.
Tower of Trophies
- Continue up the steps to Painting #3 and enter.
Gingerbread Woods
- Take a closer look at the front door.
- Use the green candy ribbon (by holding down the mouse button and moving the mouse where you’d like the ribbon to go) to connect a continuous line between the candy circles. The solution is shown below:
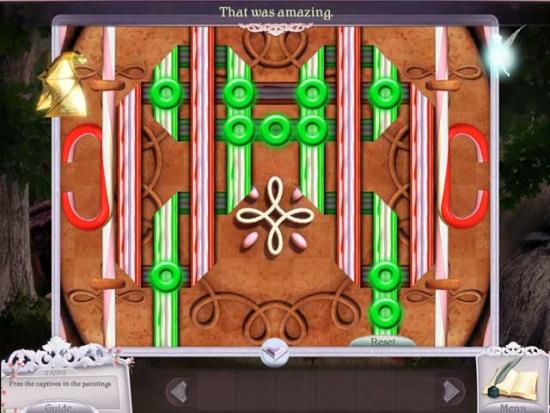
- Upon completing the puzzle, the door of the house will open. Proceed inside.
Gingerbread House
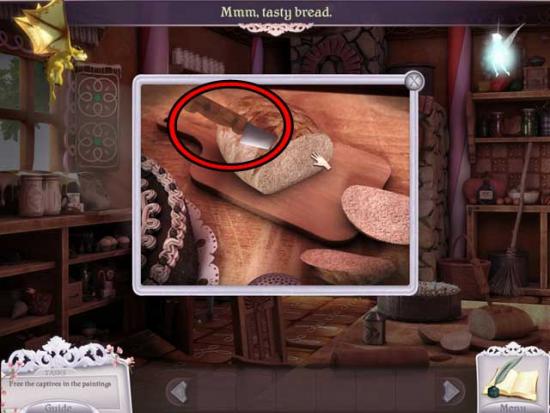
- Take a closer look at the loaf of bread on the right. Click on the KNIFE to add it to your inventory.
- Click on the cabinet on the left to enter a hidden object area.
- Find the objects listed at the bottom of the screen. Some objects may be randomized. The Key Item(s) is circled in red.
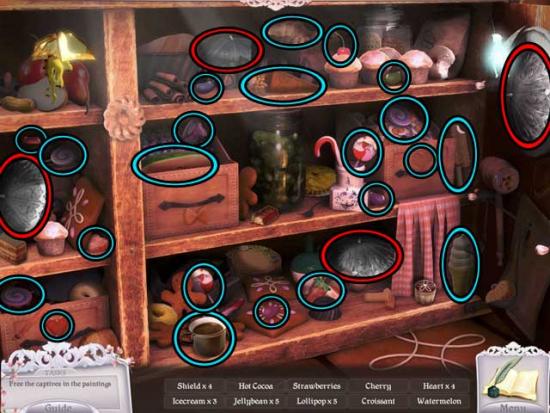
- Upon completing the hidden object area, the SHIELD (x4) will be added to your inventory.
- Return to the main Tower area.
Tower of Trophies
- Go down the steps to Painting #2 and enter.
Ship
- Take a closer look at the Mermaid caught in the net on the left.
- Use the KNIFE to cut the Mermaid free. She will reward you with the FISH OIL.
- Return to the Tower.
Tower of Trophies
- Go down the steps to Painting #1 and enter.
Forest
- Use the FISH OIL on the chords binding the Leprechaun to free him and obtain the STRINGS.
- Return to the Tower.
Tower of Trophies
- Go up the steps to Painting #2 and enter.
Ship
- Take a closer look at the Harp on the far end of the deck.
- Use the STRINGS on the Harp to trigger a puzzle. Click on the correct strings in the order shown on the Harp until you’ve played the song that puts the Sirens to sleep.
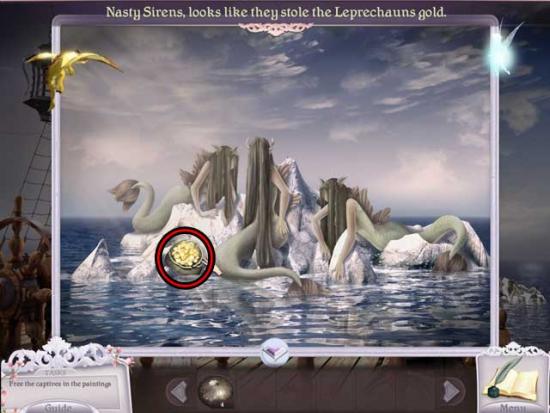
- Once successful, take a closer look at the rock with the Sirens on the right. Click on the POT OF GOLD to add it to your inventory.
- Exit to the Tower.
Tower of Trophies
- Go down the steps to Painting #1 and enter.
Forest
- Take a closer look at the Stump in the middle of the screen.
- Use the POT OF GOLD on the Stump to trigger a Rainbow.
- Return to the Tower.
Tower of Trophies
- Go up the steps to Painting #4. The ice blocking the painting has now melted, so proceed inside.
Ice Palace Entrance
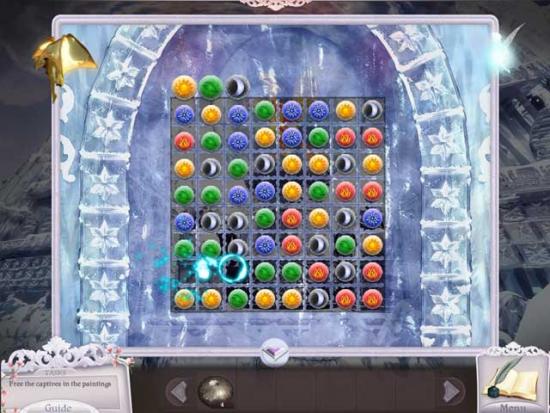
- Take a closer look at the front Gate, and you’ll find a Match-3 puzzle. Make matches of 3 by swapping neighboring symbols. Each time you make a match, the tile behind it will break. The goal is to clear all the background tiles.
- Once completed, proceed through the Gate.
Ice Palace
- Examine each of the four statues positioned around the Phoenix. Use the SHIELD (x4) on each of the statues so that they’re each holding one, then rotate the statue so that it’s facing the Phoenix. The best way to do this is by clicking the top half so it faces in the right direction first, then the middle section to correct the position of the legs. An example of what the final solution should look like (the same for all four) is shown below:
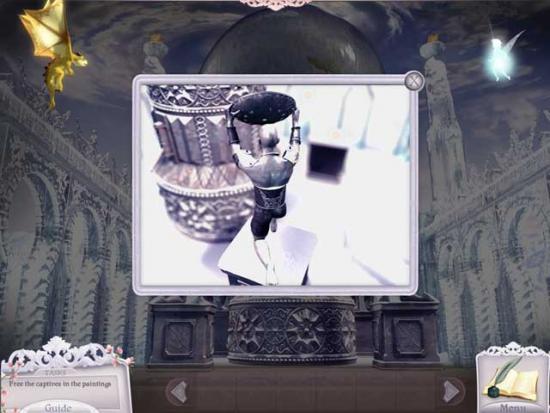
- The Phoenix is now free! Exit the Painting to the Tower.
Tower of Trophies
- Notice the flood of water that flows out of the painting.
- Go down the steps to Painting #3 and enter.
Gingerbread House
- Click on the Pot for a closer view, then click on the YOUNG CENTAUR to save it from the Pot and add it to your inventory.
- Exit to the Tower.
Tower of Trophies
- Continue up to the top of the steps.
- Use the YOUNG CENTAUR on the Centaur guard. As thanks for saving his child, you will be rewarded with the TRIDENT.
- Proceed back down the steps to Painting #2 and enter.
Ship
- Take a closer look at the figure on the front of the ship.
- Use the TRIDENT on the large male figure, then collect the UNICORN GEM to be added to your inventory.
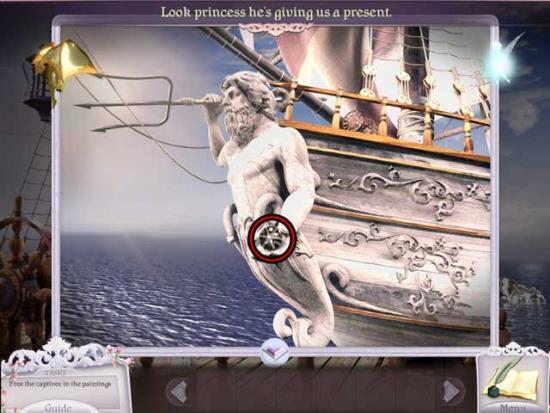
- Return to the Tower.
Tower of Trophies
- Go up to the top of the steps where the Centaur was previously, then continue through the open doorway.
Unicorn Pedestal
- Take a closer look at the Unicorn in the middle of the screen.
- Use the UNICORN GEM on the missing center groove to trigger a puzzle.
- Click the various tiles to move them around the puzzle until the design is complete. The solution is shown below.
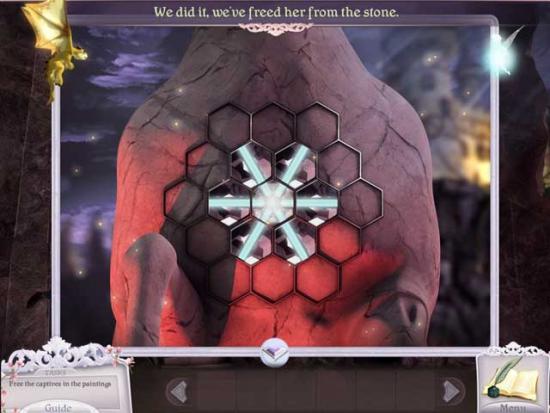
- Click on the freed Unicorn.
Castle Entrance
- Take a closer look at the large Eye in the front door.
- Move the tiles within the pupil around until all the outermost tiles contain all three colors. The solution is shown below.
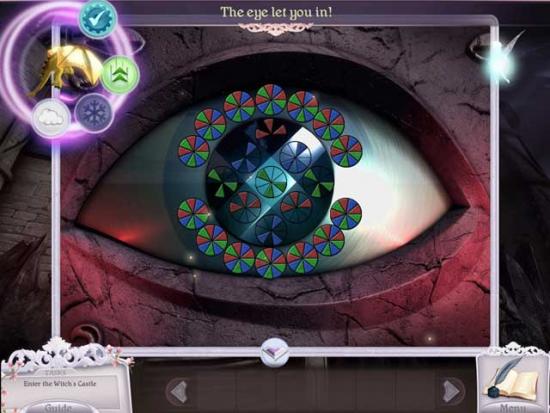
- Enter through the door and into the next area.
Castle Courtyard
- Take a closer look at the sparkling area on the right between the two statues to enter a hidden object area.
- Find the objects listed at the bottom of the screen. Some objects may be randomized. The Key Item(s) is circled in red. This particular one is tricky because the objects will be continually switched out. You’ll have to keep a sharp eye and a fast finger out in order to get all the items on the list! The key is to be patient and focus on no more than a couple items at a time. An example of this particular area is shown below.
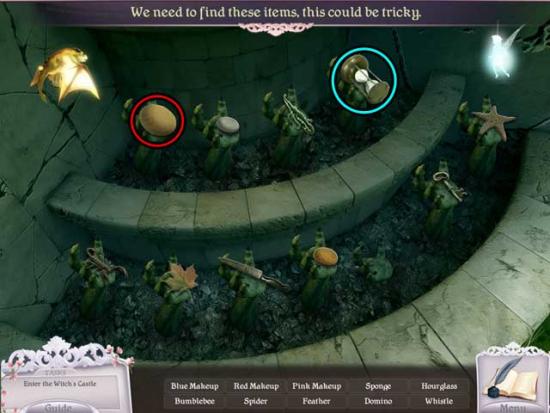
- Upon completing the hidden object area, the BLUE MAKEUP, SPONGE, RED MAKEUP, and PINK MAKEUP will be added to your inventory.
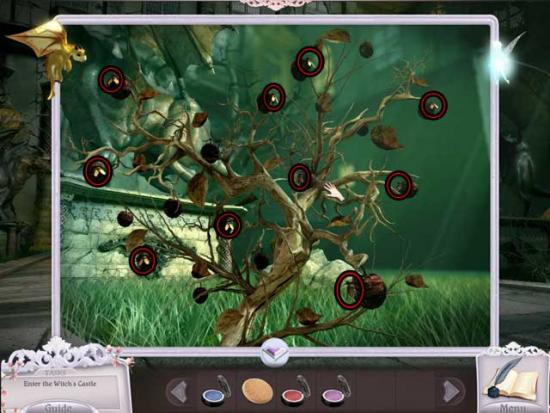
- Take a closer look at the small dead bush next to the gargoyle that’s farthest away on the right.
- Collect the FLY (x10) to be added to your inventory. Their locations are shown below.
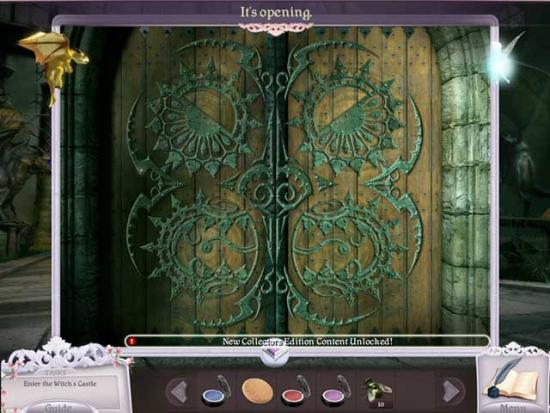
- Examine the Gate at the far end of the room.
- Rotate the dials on the door until each one is in its correct position. The solution is shown below.
- Enter through the Gate and into the next room.
Grand Hall
- Take a closer look at the Painting on the left at the top of the stairs. Click on the SCARECROW to add it to your inventory.
- Take a closer look at the Painting on the right at the top of the stairs. Use the SCARECROW on the Painting to scare off the Crows, leaving behind the CROW FEATHER. Click on it to add it to your inventory.
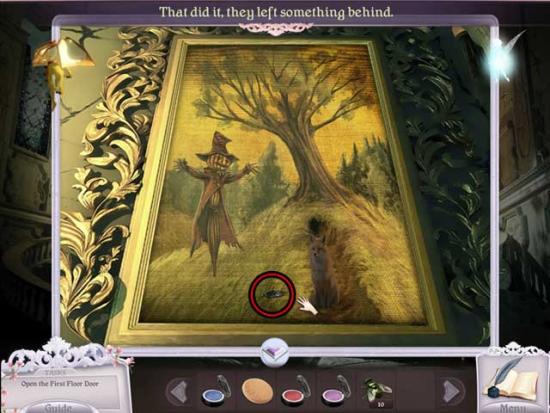
- Exit the Painting, and notice the Crows flying everywhere.
- Click on the Painting on the left again. Click on the GREEN CRYSTAL BALL the Crows have revealed to add it to your inventory.
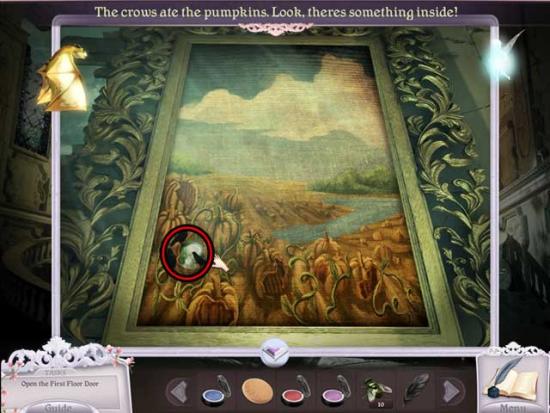
- Return to the Courtyard.
Castle Courtyard
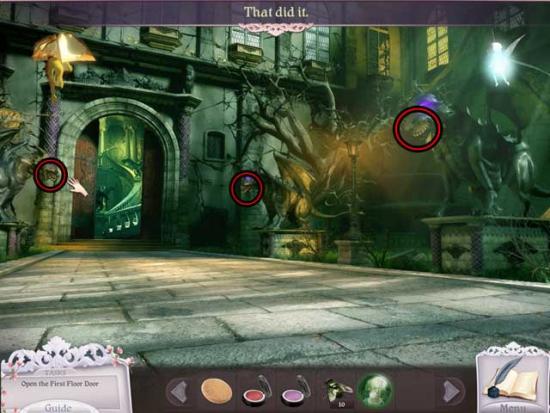
- Use the CROW FEATHER on each of the Gargoyles to make them smile, each revealing a Gear. Click on the BIG GEAR (x2) and the MIDDLE GEAR to add them to your inventory.
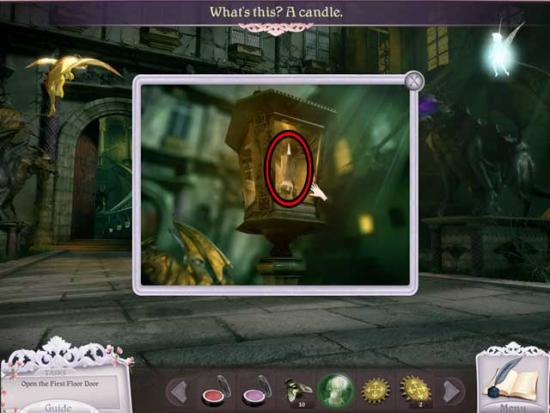
- Take a closer look at the Lamppost on the right. Click on the CANDLE to add it to your inventory.
- Return to the Grand Hall.
Grand Hall
- Use the Lift Ability to lift the Chandelier on the ground out of the way, then look at the door that was behind it.
- Use the BIG GEAR (x2) and the MIDDLE GEAR on the door to unlock it. You will need to alternate one BIG GEAR and the MIDDLE GEAR once to open both locks. The solution is shown below.
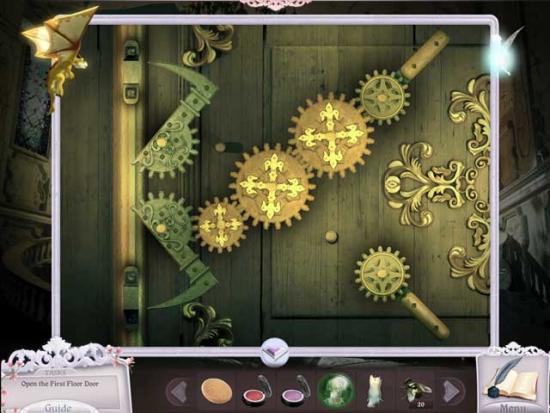
- Enter through the door into the next area.
Portrait Room
- Take a closer look at the green painting on the left. Use the GREEN CRYSTAL BALL on the painting.
- Click on the STAINED GLASS BERRIES that appear to add them to your inventory, then continue through the Portal in the painting into the next area.
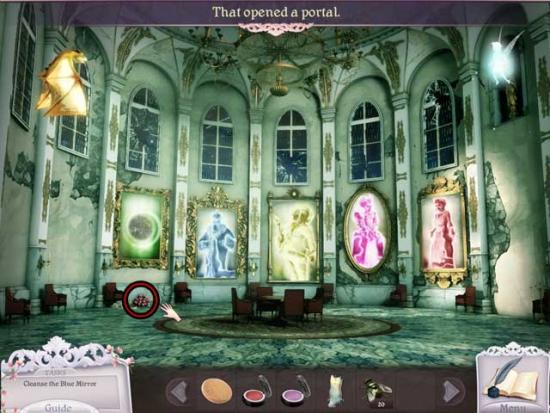
Greenhouse
- Use a FLY on each of the Venus Flytraps to distract them.
- Click on the red Dragon Berries in the background and feed them to the Dragon. You will acquire a new Dragon Ability: Freeze!
- While the Venus Flytraps are eating, use the Freeze Ability on each of them to freeze them solid. Next, use the Diamond Ability to crush them (while they’re frozen).
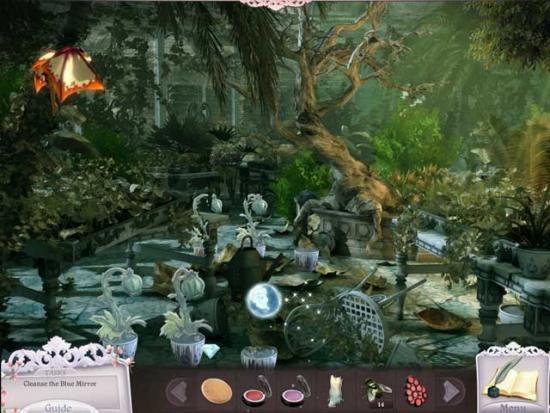
- Once all the Flytraps have been defeated, the Greenhouse will melt away, revealing the BLUE CRYSTAL BALL. Click on it to add it to your inventory.
- Return to the Portrait Room.
Portrait Room
- Take a closer look at the blue painting on the left. Use the BLUE CRYSTAL BALL on the painting.
- Click on the STAINED GLASS DRAGON that appears to add it to your inventory, then continue through the Portal in the painting into the next area.
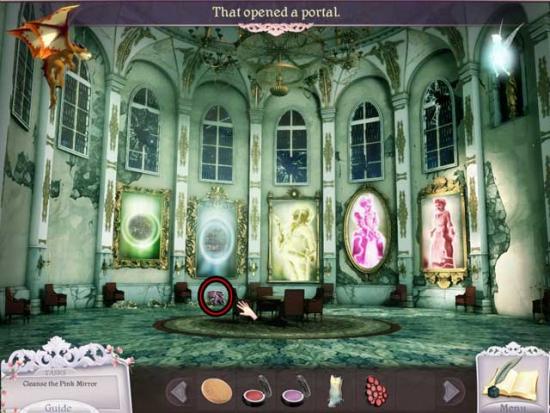
Observatory
- Take a closer look at the base of the Telescope. Click the three rings on the left to adjust the image on the right until it’s clear. The solution for the position of the rings is shown below.
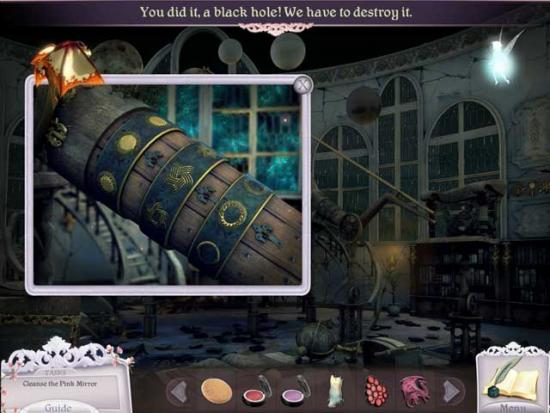
- Examine the upper portion of the Telescope for a closer view. Reverse the lenses so that the light is focused-down properly. The solution is shown below.
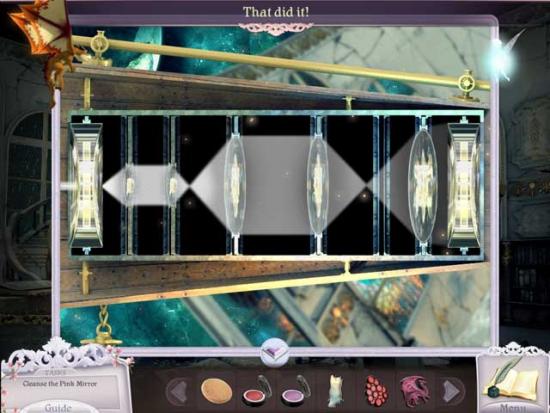
- Examine the area above the shelves on the right. Use the CANDLE on this area to amplify the Telescope light and destroy the Black Hole.
- Once you’ve destroyed the Black Hole, the Observatory will melt away, revealing the PINK CRYSTAL BALL. Click on it to add it to your inventory.
- Return to the Portrait Room.
Portrait Room
- Take a closer look at the pink painting on the right. Use the PINK CRYSTAL BALL on the painting.
- Click on the STAINED GLASS KNIGHT that appears to add it to your inventory, then continue through the Portal in the painting into the next area.
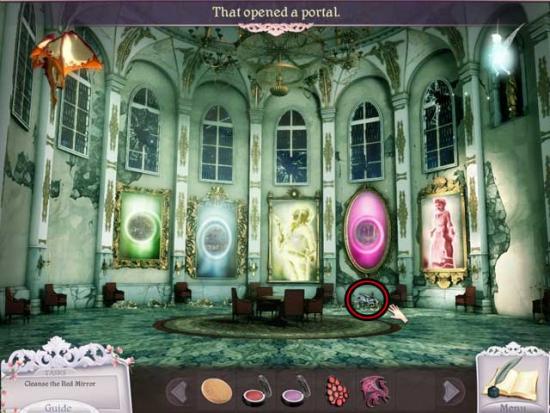
Dressing Room
- Take a closer look at the little girl in the chair, beneath the mirror at the far end of the room.
- The goal of this is to have the Doll match her reflection. Use the SPONGE on the Doll to clean her face, then apply the appropriate makeup on the appropriate areas. The BLUE MAKEUP should go above her eyes, the RED MAKEUP should go on her cheeks, and the PINK MAKEUP should go on her lips. The solution is shown below.
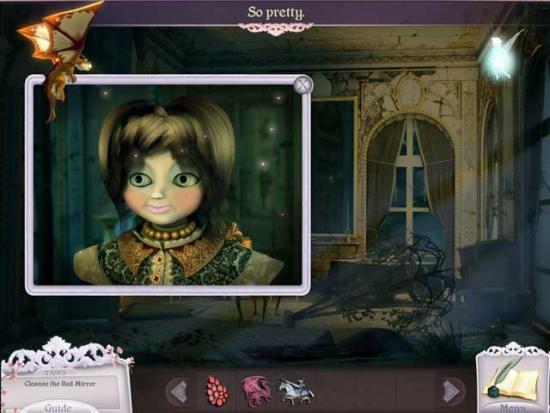
- Once you’ve completed the Doll, the Dressing Room will melt away, revealing the RED CRYSTAL BALL. Click on it to add it to your inventory.
- Return to the Portrait Room.
Portrait Room
- Take a closer look at the red painting on the right. Use the RED CRYSTAL BALL on the painting.
- Click on the STAINED GLASS SMOKE that appears to add it to your inventory, then continue through the Portal in the painting into the next area.
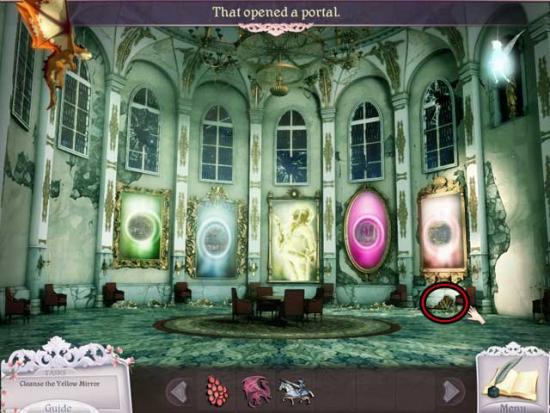
Bedroom
- Click on the chair with the doll to enter a hidden object area.
- Find the objects listed at the bottom of the screen. Some objects may be randomized. The Key Item(s) is circled in red.
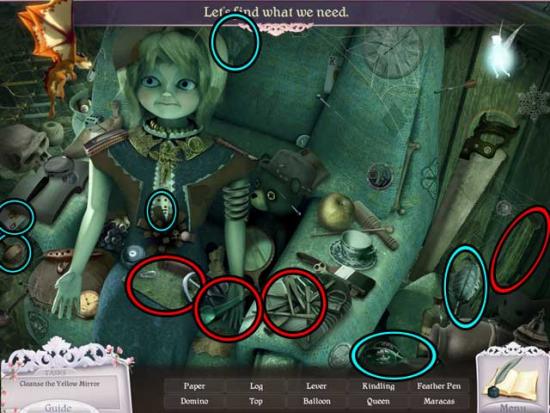
- Upon completing the hidden object area, the PAPER, KINDLING, LOG, and LEVER will be added to your inventory.
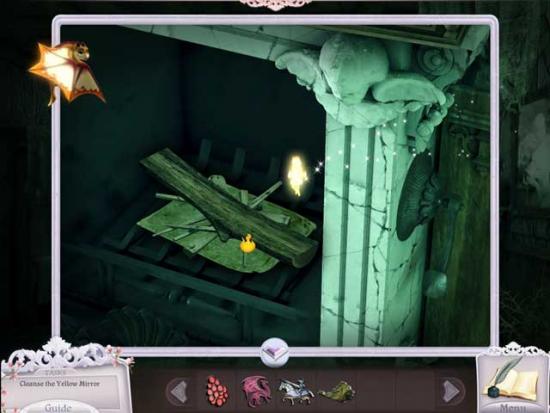
- Take a closer look at the Fireplace on the right.
- Place the PAPER, KINDLING, and LOG into the Fireplace (in that order), then place the LEVER on the outer right side. Click on it to open the chimney, then use the Fire Ability on the items within the Fireplace to light a successful fire.
- Take a closer look at the picture frame hanging/window on the right wall, towards the far end of the room.
- Use the Lift Ability on the wooden boards to remove them and open the window.
- Upon scaring away the Monsters, the Bedroom will melt away, revealing the YELLOW CRYSTAL BALL. Click on it to add it to your inventory.
- Return to the Portrait Room.
Portrait Room
- Take a closer look at the yellow painting in the middle. Use the YELLOW CRYSTAL BALL on the painting.
- Click on the STAINED GLASS SUN that appears to add it to your inventory, then enter through the Portal and into the next area.
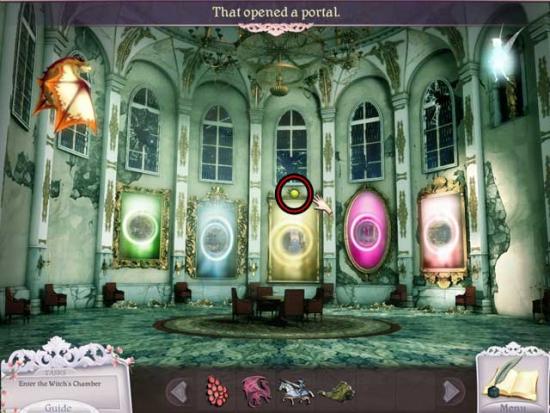
Nursery
- Click on the Mirror at the far end of the room for a closer look.
- Use the Freeze Ability on the Mirror to reveal a set of notes.
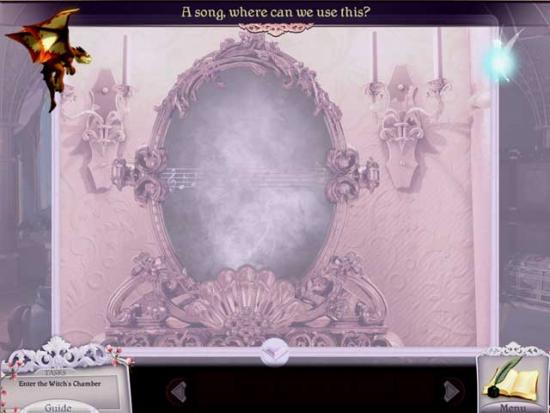
- Take a closer look at the Crib in the center of the room.
- Adjust the knobs on the music box so that the evil song notes are changed to the good song notes. The knob positions and solution are shown below.
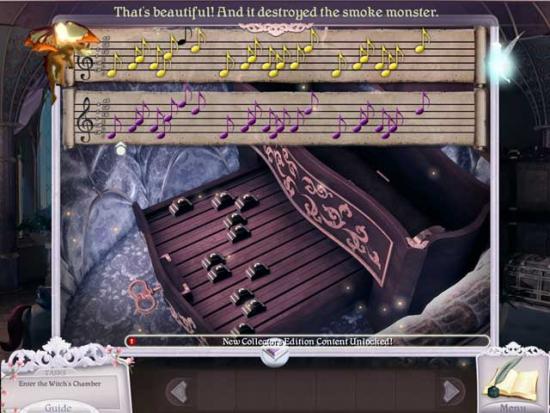
- Once you’ve adjusted the song, the Nursery will melt away, revealing the CRYSTAL BALL. Click on it to add it to your inventory, then return to the Portrait Room.
Portrait Room
- Now return to the Grand Hall.
Grand Hall
- Take a closer look at the picture at the top-center of the stairs.
- Use the Stained Glass items on the picture in the following order: 1)STAINED GLASS SUN, 2)STAINED GLASS BERRIES, 3)STAINED GLASS DRAGON, 4)STAINED GLASS KNIGHT, 5)STAINED GLASS SMOKE.
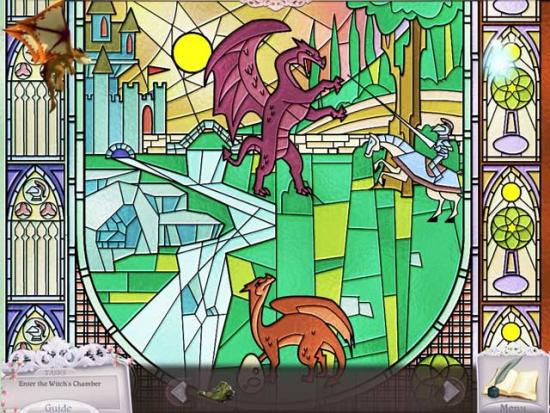
- Upon completing the story told via the picture, proceed through the newly opened door into the next room.
Throne Room
- Take a closer look at the Throne in the center of the room.
- Use the CRYSTAL BALL on the Throne, then click on it to activate it.
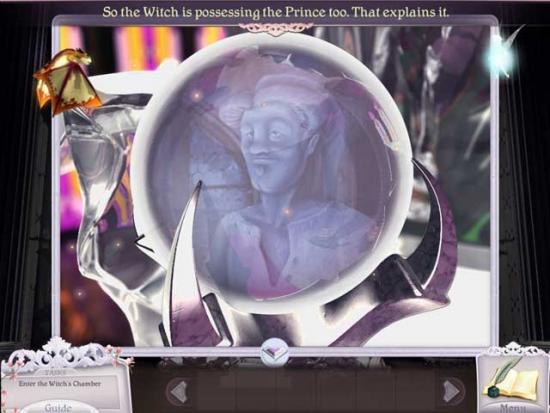
- Proceed up the steps that appear into the next area.
Battle
- Find objects listed at the bottom of the screen before the Witch has a chance to harm you. Everytime you complete a set of items, you’ll take away some of her health. Objects may be randomized. An example of the final list of objects you’ll need to find in order to defeat the Witch is shown below.
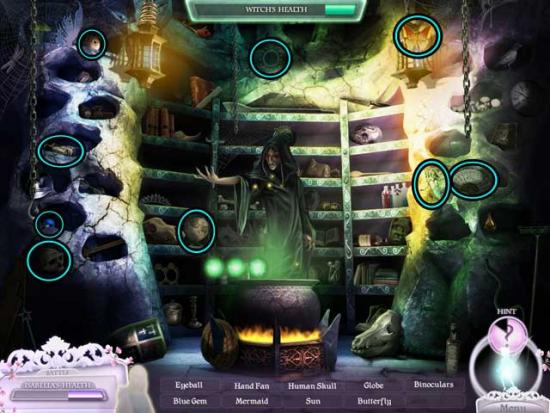
Congratulations! You’ve completed Princess Isabella: Return of the Curse Collector’s Edition!
More articles...
Monopoly GO! Free Rolls – Links For Free Dice
By Glen Fox
Wondering how to get Monopoly GO! free rolls? Well, you’ve come to the right place. In this guide, we provide you with a bunch of tips and tricks to get some free rolls for the hit new mobile game. We’ll …Best Roblox Horror Games to Play Right Now – Updated Weekly
By Adele Wilson
Our Best Roblox Horror Games guide features the scariest and most creative experiences to play right now on the platform!The BEST Roblox Games of The Week – Games You Need To Play!
By Sho Roberts
Our feature shares our pick for the Best Roblox Games of the week! With our feature, we guarantee you'll find something new to play!All Grades in Type Soul – Each Race Explained
By Adele Wilson
Our All Grades in Type Soul guide lists every grade in the game for all races, including how to increase your grade quickly!


