
Best Horror Games On Itch.io – July 2026
Across a bounty of subgenres.
Grow A Garden 2 Base Price List
What's the most valuable crop?![Evomon Best Starter [Leafbun, Blazpup, or Bubble?]](/wp-content/uploads/2026/06/evomon-best-starter.jpg "Evomon Best Starter [Leafbun, Blazpup, or Bubble?]")
Evomon Best Starter [Leafbun, Blazpup, or Bubble?]
Grass-type, Fire-type, or Water-type?
![[Roblox] Evomon Shiny Hunting Guide – Including Prismatic and Pris Shinies!](/wp-content/uploads/2026/06/evomon-shiny-hunting-guide.jpg "[Roblox] Evomon Shiny Hunting Guide – Including Prismatic and Pris Shinies!")
Princess Isabella: A Witch’s Curse Walkthrough
Welcome to our walkthrough for Princess Isabella: A Witch's Curse. TABLE OF CONTENTSOverview and General TipsPortrait 1Portrait 2Portrait 3Portrait 4Portrait 5Portrait 6Portrait 7 OVERVIEW AND GENERAL TIPS Main Screen Menu Click here to change your Options (such as adjusting music and sound effects, or toggling from full screen or windowed mode), or to Exit the game (your game will automatically be saved). Mirror Pieces Collected This number shows how many mirror pieces you'…


- Prefer Gamezebo on Google

a:1:i:0;a:2:s:13:”section_title”;s:46:”Princess Isabella: A Witch’s Curse Walkthrough”;s:12:”section_body”;s:74976:”
Welcome to our walkthrough for Princess Isabella: A Witch’s Curse.
TABLE OF CONTENTS
Overview and General Tips
Portrait 1
Portrait 2
Portrait 3
Portrait 4
Portrait 5
Portrait 6
Portrait 7
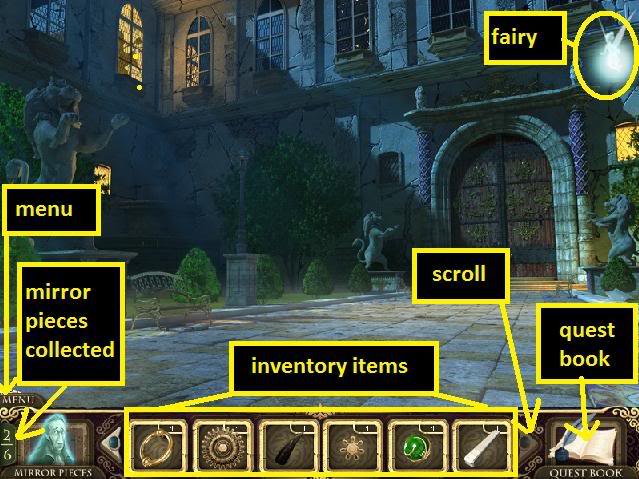
Main Screen

Menu
Click here to change your Options (such as adjusting music and sound effects, or toggling from full screen or windowed mode), or to Exit the game (your game will automatically be saved).
Mirror Pieces Collected
This number shows how many mirror pieces you’ve collected towards the current portrait, and how many you still need to collect.
Inventory Items
Sometimes you’ll pick up items on your quest that will need to be used to solve puzzles. They are displayed here. If you collect more items than can be displayed on the screen, you can scroll through them by clicking the arrow keys on either side.
Fairy
Click on the fairy in the upper right corner to use hints and access special abilities. (These abilities are explained in more detail in the section below.)
Quest Book
Click here to access your journal, see how many mirror pieces you’ve collected, and look at your map.
QUEST BOOK
The Quest Book is divided into three sections.
Journal
Any important information you come across in your quest will be recorded here. Check this section at any time to review the data.
Mirrors
In this section you’ll see how many mirror pieces you’ve collected for each of the seven portraits.
Map
- The map will be filled in as you visit more rooms on the first and second floors of the castle.
- A green circle will appear in the room if you’ve cleared it, meaning there are no more puzzles to solve here.
- You can fast-travel to any room in the castle that you’ve already visited by clicking directly on that room on the map. This is much faster than actually walking.
HINTS AND FAIRY ABILITIES
- Click on the fairy in the upper right corner to access the fairy’s abilities. She will gradually learn more throughout the game that can be used in certain situations.
- If you hover the cursor over something and it changes to "Ability," it means you have to use one of the fairy’s powers here. It’s up to you to figure out which one.
- To use an ability, select it from the menu. The cursor should change to reflect what ability you’ve selected (such as a flame). Then, click on the item you want to use the ability on.
HINT (green)
- If you’re stuck and don’t know what to do next in a room, use a Hint. The fairy will float to an area of interest that you should investigate. In hidden object scenes, using Hint will reveal the location of an item on the list.
- The hint button needs to recharge for a few seconds before you can use it again.
- If you’re in a puzzle or mini-game, "Hint" changes to "Solve." You an use Solve to skip the puzzle.
ROCK (grey)
Use this ability to smash breakable objects, like vases and bottles.
FLAME (orange)
Use this ability to light things on fire. Some enemies dislike the heat and can be defeated by it.
WIND (blue)
Use the wind ability to blow away dust and other objects.
WATER (turquoise)
Use the water ability on special plants to water them. You never know what you’ll find when they grow.
WALKTHROUGH
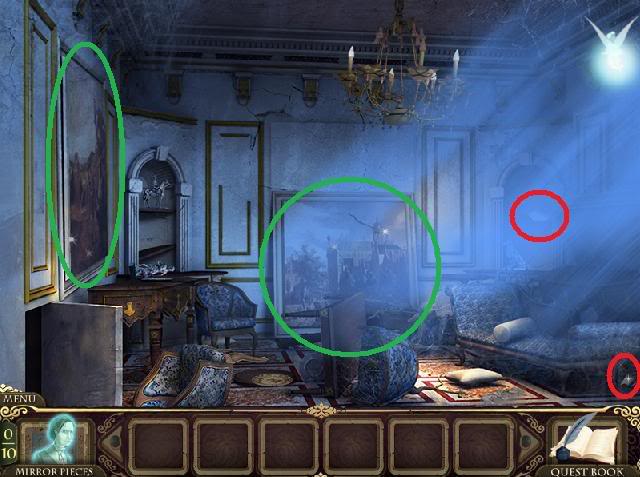
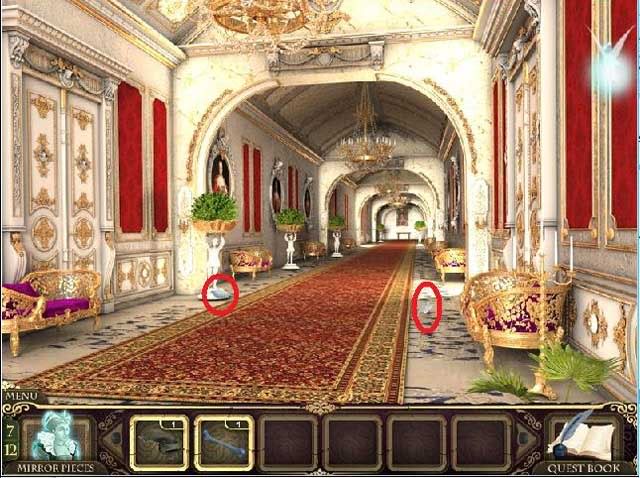
Courtyard – Main Floor
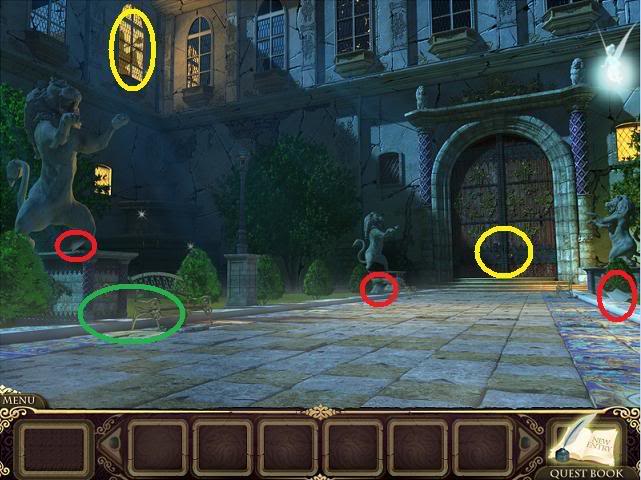
- Examine the window, door handle
- Pick up the three mirror shards here (circled in red)
- Click on the base of the larger of the two lion statues to zoom in on a hidden object game.
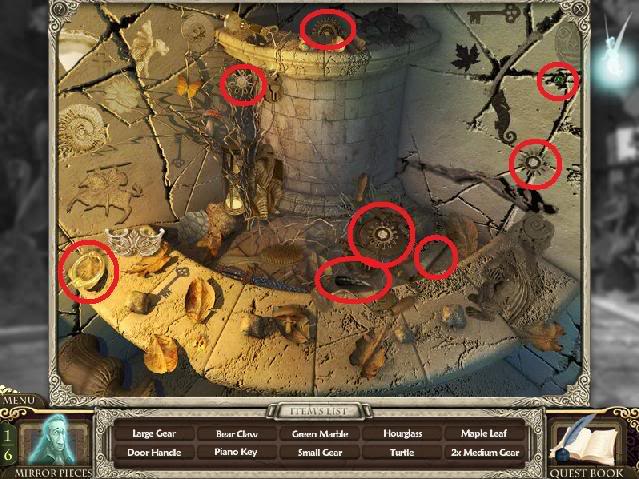
- The following inventory items are circled in the screenshot: Large Gear, Medium Gear (x2), Small Gear, Bear Claw, Green Marble, Piano Key
- Additional items you need to find are random, and will be different for each playthrough.
- Return to the Courtyard screen, and click on the door. Use the door handle from your inventory on the
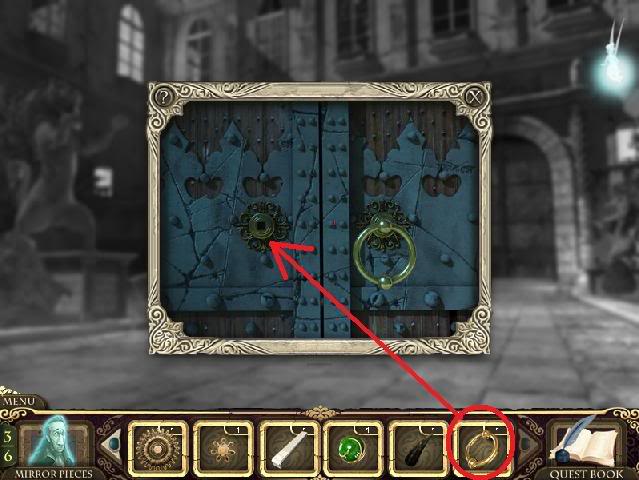
- AREA CLEAR.
- Click on the open door to enter the Grand Hall
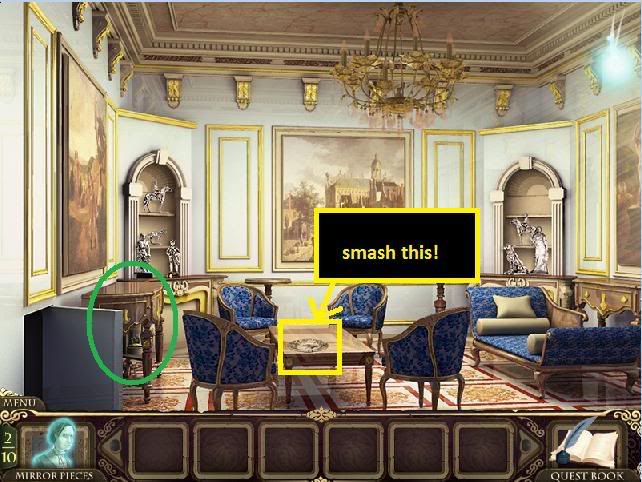
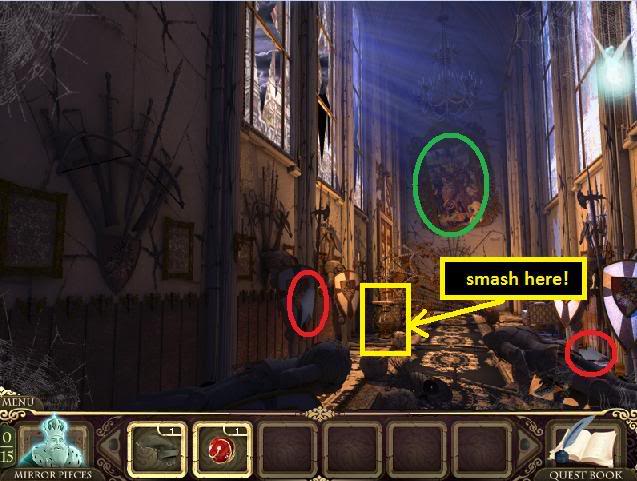
Grand Hall – Main Floor – Cursed
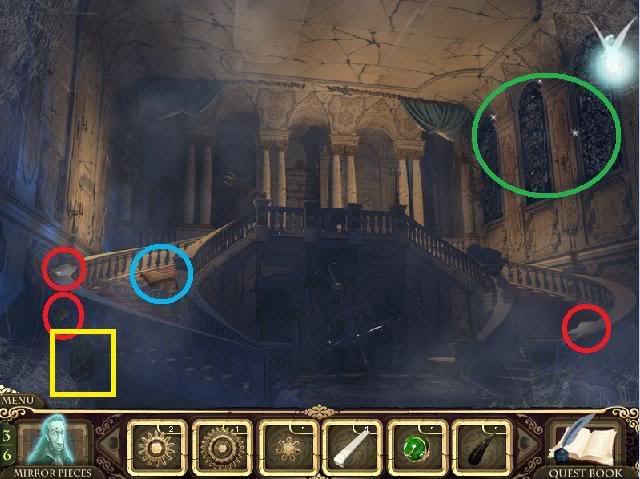
- Pick up the mirror shard (circled in red), and the journal note (circled in blue).
- Take note of the jug in the lower left corner. Your fairy doesn’t have the ability to break this yet, but she will learn how to do so later on, so you’ll have to revisit this scene later.
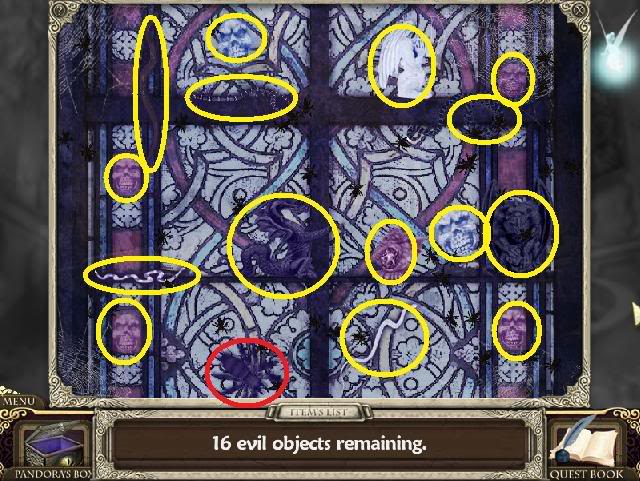
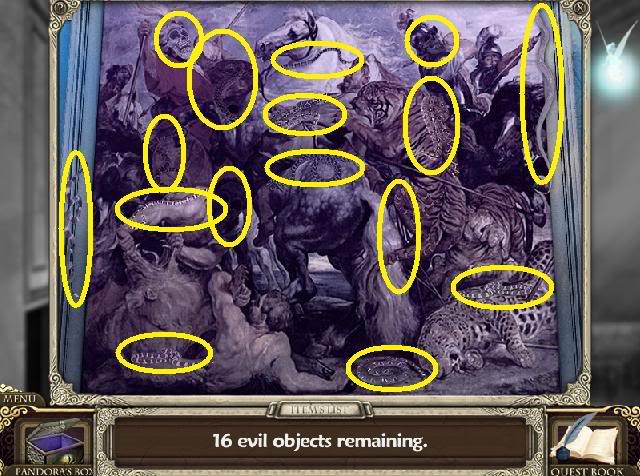
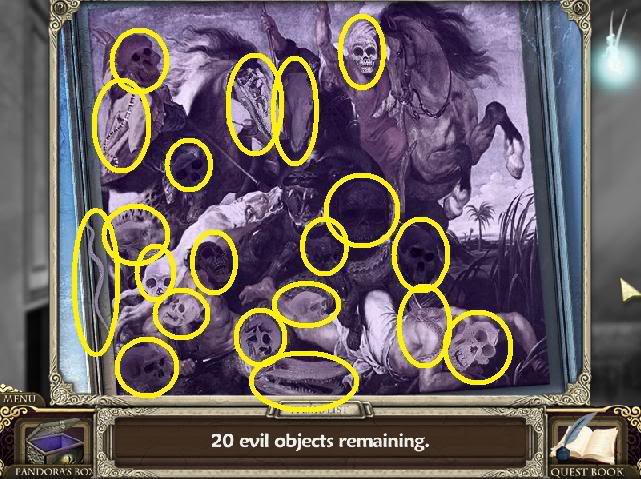
- Click on each of the three stained glass window in the upper right to launch a mini-game. Click on all the "evil objects" to remove them (see screenshots below):
Stained Glass Window 1 (left)
- Note: the large spider (circled in red) moves around, so it could be in a different place than shown in the screenshot.
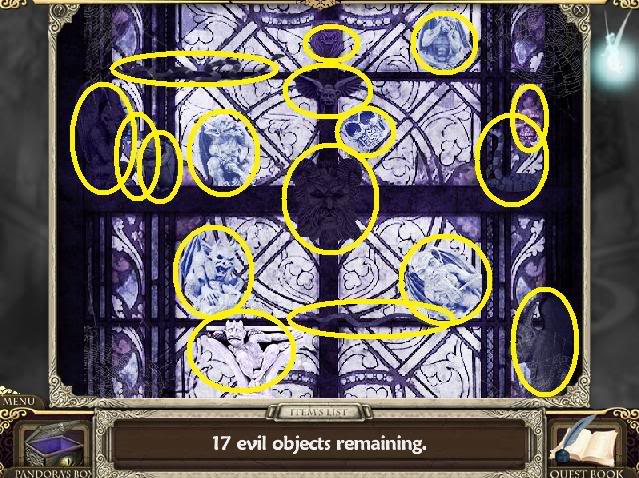
Stained Glass Window 2 (middle)
Stained Glass Window 3 (right)
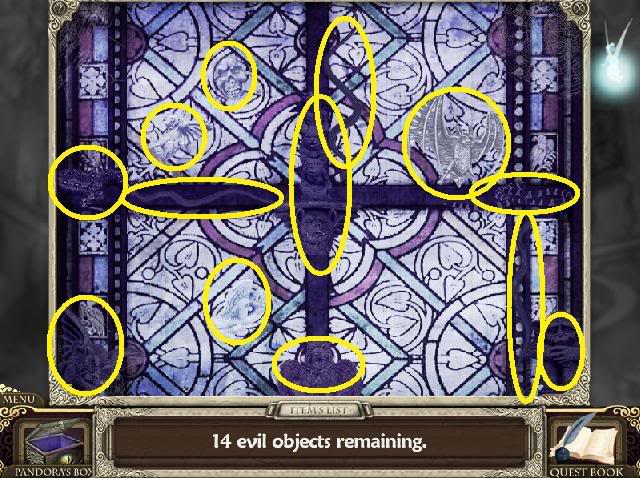
- After you’ve cleared the three stained glass windows, the curse will life on the grand hall. Click the door to zoom in on a puzzle.
Grand Hall – Main Floor – Uncursed
- Now you can examine the painting at the top of the left staircase.
Painting
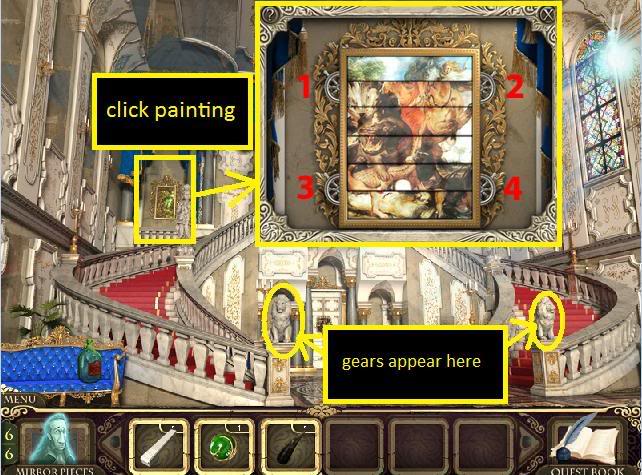
- Rotate the sections of the painting so that only the "good" side is showing.
- Click the upper right gear (marked #2 in the screenshot), and the lower left gear (marked #3 in the screenshot) to solve the puzzle.
Gears Puzzle
- After you get the last two gears, click on the door.
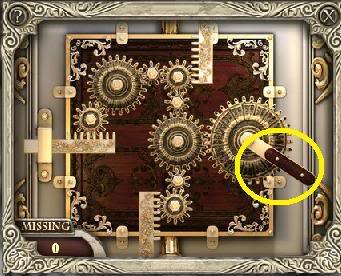
- You must place the seven gears in your inventory to connect all of the gears and activate the door mechanism.
- When finished, click the brown handle on the right to open the door.
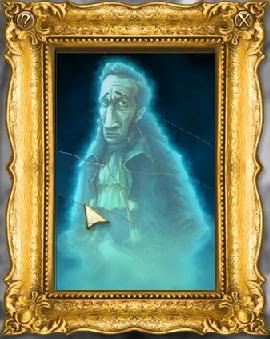
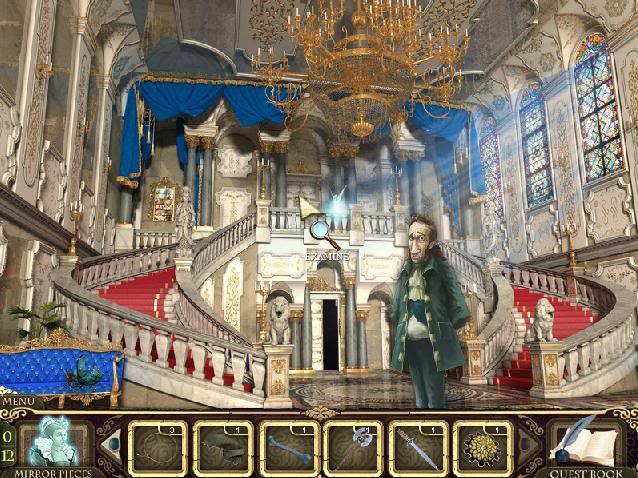
Hall of Reflection – Main Floor
- Upon entering the Hall of Reflection, you learn that the witch has captured everyone in the castle, and you must free them by finding all of the mirror pieces to put their reflections back together.
- Examine the left-most frame. If you’ve found all the mirror pieces, you will be able to piece them back together.
- (If you haven’t found all the mirror shards, revisit the Grand Hall and Courtyard, and consult our screenshots to find the shards.)
- Left-click on a piece to grab it, right-click to rotate it if needed, then left-click again to drop it in the correct place.
- The servant opens the door for you, and says he’ll be in the Entrance Hall if you need him again.
- Exit through the left hallway.
Hallway – Main Floor (#1)
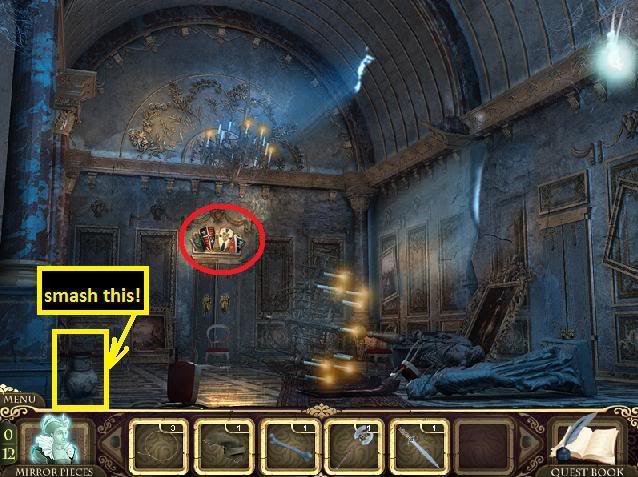
- Click on the bottle, and the fairy will learn the "Rock" ability, which allows her to smash vases and other breakable containers. Let’s try it out on the vase nearby. Move your mouse cursor onto the fairy, then select "Rock" from her abilities menu. Next, click on the vase. Smash! Pick up the model of MERCURY contained inside.
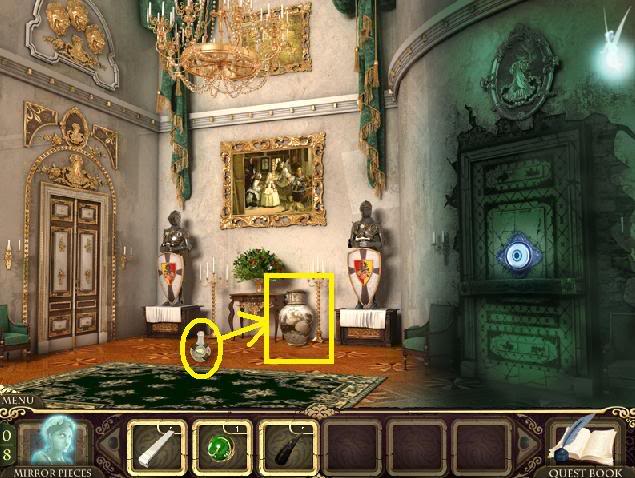
- Before we do anything else here, remember that other vase back in the Grand Hall? Let’s go see what’s inside that one.
- Go south to the Hall of Reflection, then South again back to the Grand Hall.
- Use the Rock ability to smash the vase that’s sitting on the blue couch in the lower left corner of the screen. You receive a Gun Stock.
- Head back to the Hallway. There’s nothing else you can do here for now, so take the door on the left to the Piano Lounge.
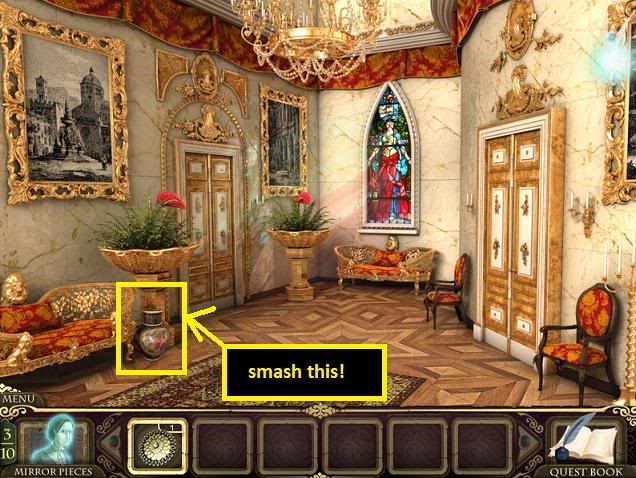
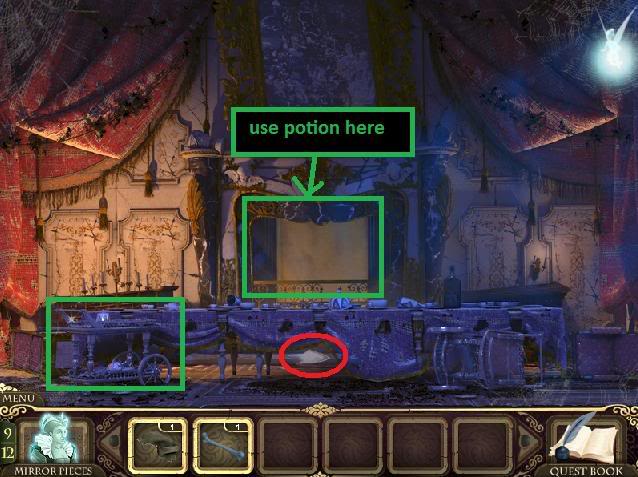
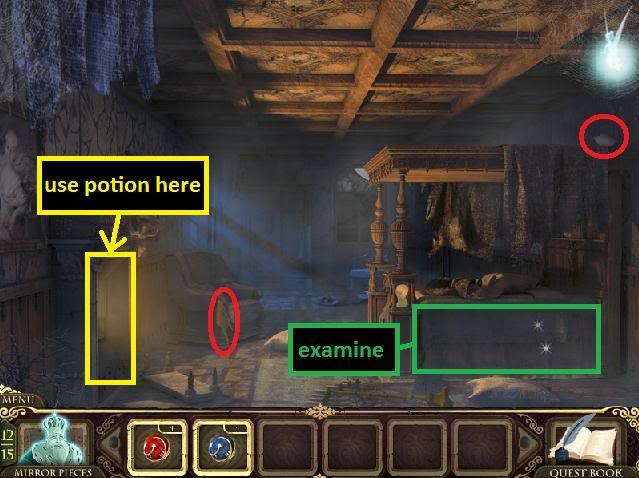
Piano Lounge – Cursed
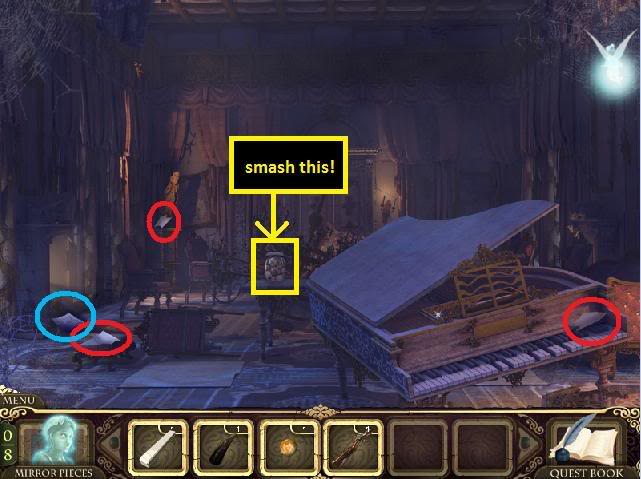
- There are three mirror shards here (circled in red), and one journal note (circled in blue).
- Smash the vase to receive a model of Venus.
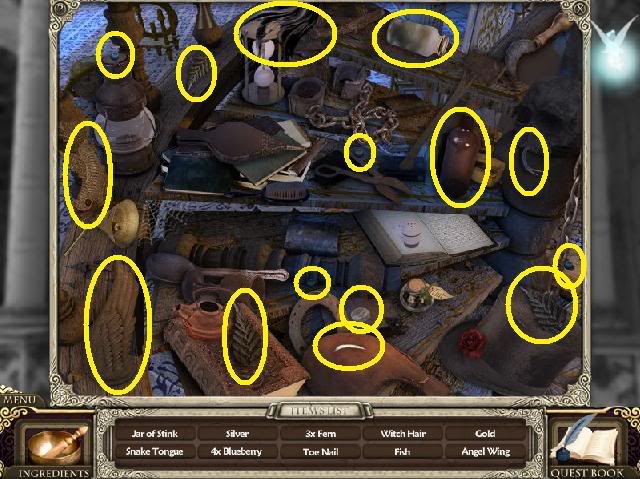
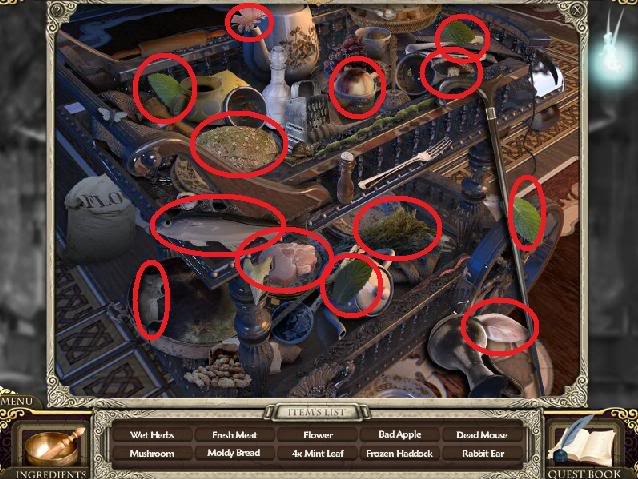
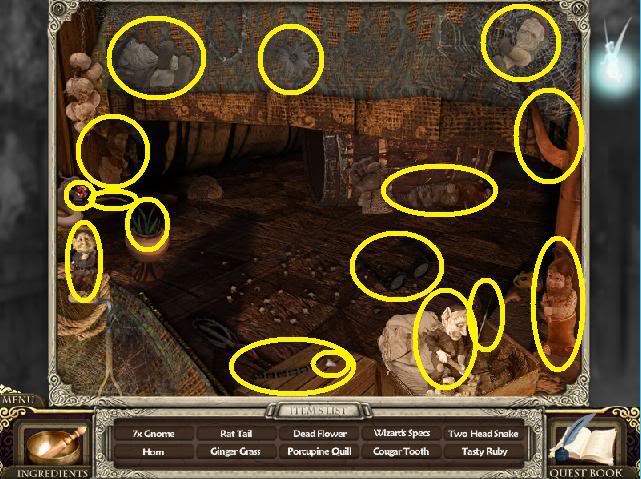
- Examine the piano for a hidden object search close-up, and find the following objects:
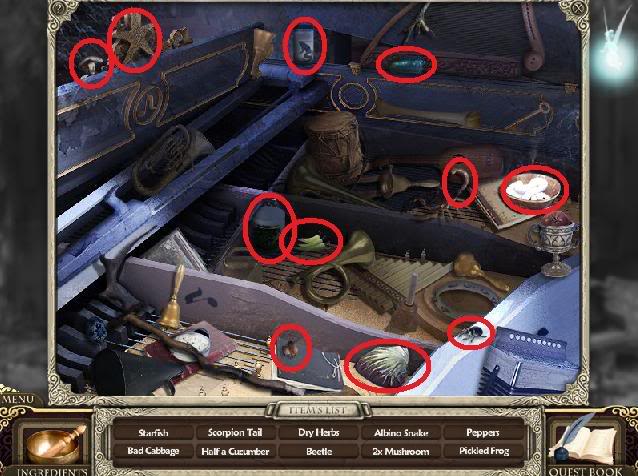
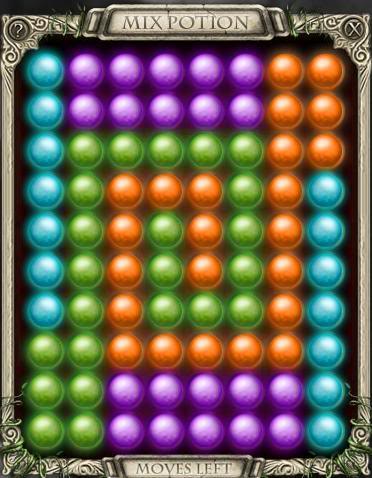
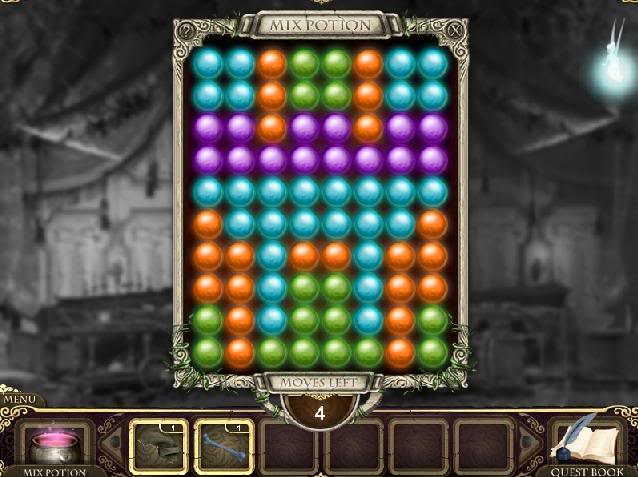
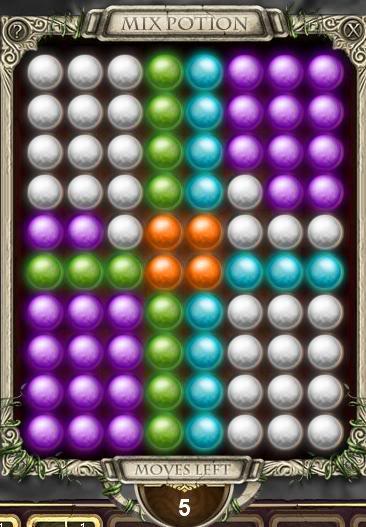
- Next, you’ll have to mix the potion ingredients in the least possible moves.
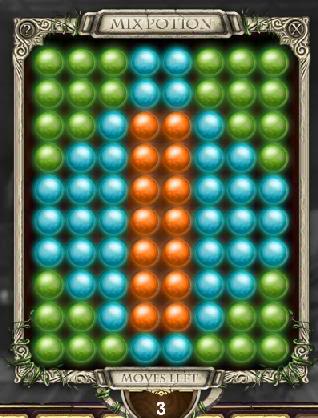
- Click the red section first, then the blue, then the green.
- You’ll receive a Potion in your inventory.
- Click on the fireplace along the left-side wall, and use the Potion on it.
- Click on the doors on the far wall of the piano lounge to enter a second hallway.
Hallway – Main Floor (#2)
- There are a couple of things to break here. Use the fairy’s Rock ability on the vase and plate. You’ll receive another Piano Key, and a mirror shard.
- AREA CLEAR.
- Take the left door to the Hunting Gallery.
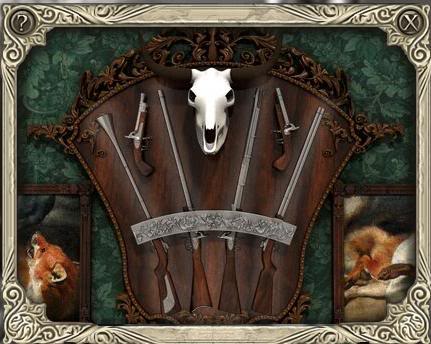
Hunting Gallery – Main Floor
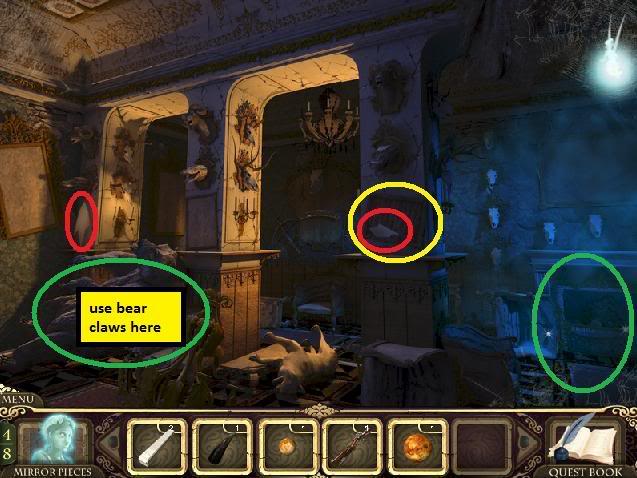
- There are two mirror shards here (circled in red).
- Click on the picture on the right-most of the three columns. It’s a musical score. Click on the score and you’ll learn your first song: "The Bear Score."
- Notice the stuffed bear in the lower left corner. This is where you’ll eventually put all the bear claws you find. You don’t have all of them yet, though.
- Examine the fireplace in the lower right of this room to zoom in for a hidden object search.
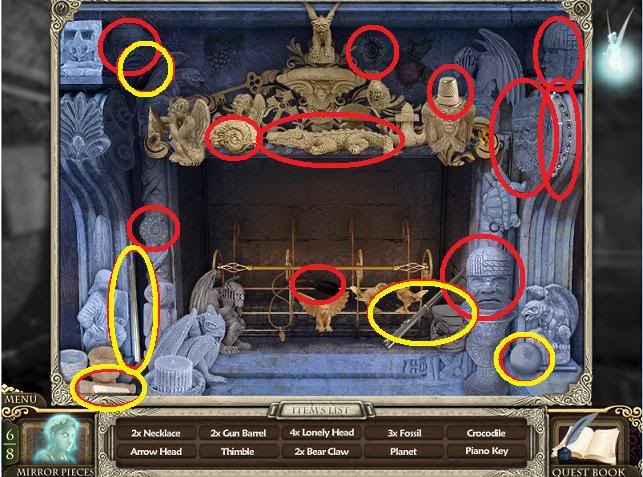
- Find the Bear Claw, Piano Key, Planet, and two Gun Barrels and they’ll be added to your inventory. These are circled in yellow in the screenshot. The rest of the items are random. (Some of the items you might have to find are circled in red.)
- There’s nothing else you can do here right now, so head out to the Hallway, and this time take the right door to the Observatory.
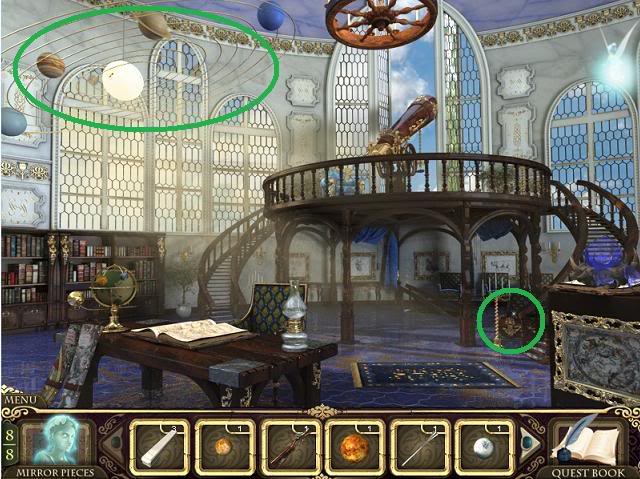
Observatory
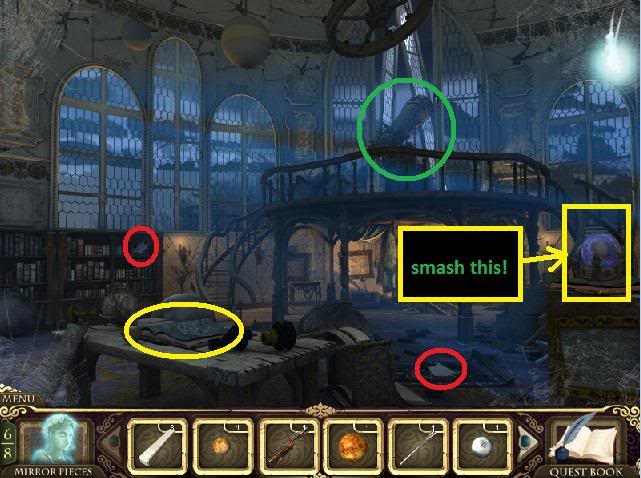
- There are two mirror pieces here (circled in red).
- Pick up the Constellation Book on the large wooden table.
- Use the fairy’s Rock ability on the vase to get the planet Mars.
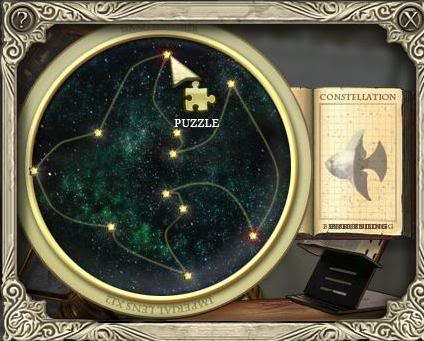
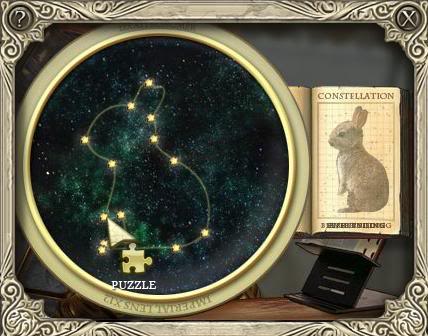
- Zoom in on the telescope. Place the Book of Constellations on the empty pedestal besides the telescope view of space.
- The shape of a fish will appear. You must drag the glowing red planets on the left to move the lines so that they resemble the shape of the fish in the book. Only the red planets can be moved. When you’ve dropped a planet in the right place, the planet’s color will change to yellow and you’ll no longer be able to move it.
- The fish should look something like this:
- Do the same for the rest of the constellations:

- This will lift the curse on the room!
Observatory – Uncursed
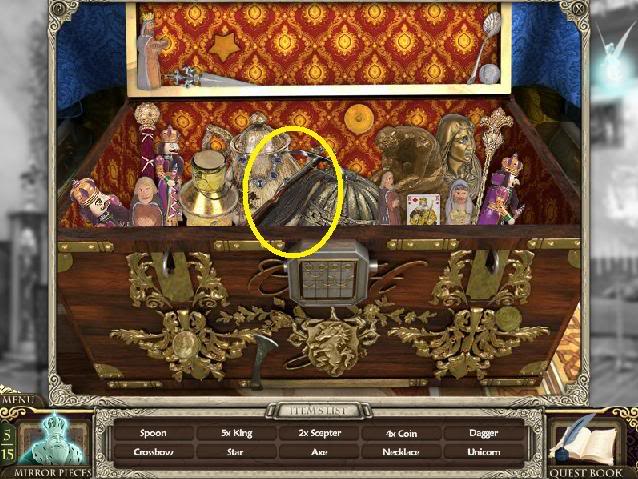
- Examine the chest at the bottom of the staircase.
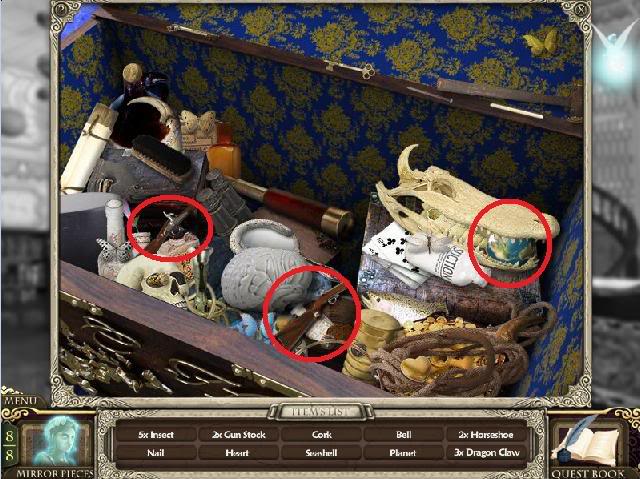
- Pick up the two Gun Stocks, and the planet (circled in red). The rest of the items are random.
- Next, click on the solar system model in the upper left corner.
- Put the five planets for your inventory (Mercury, Earth, Venus, Pluto and Mars) back onto the model.
- Take the Bear Claw that appears.
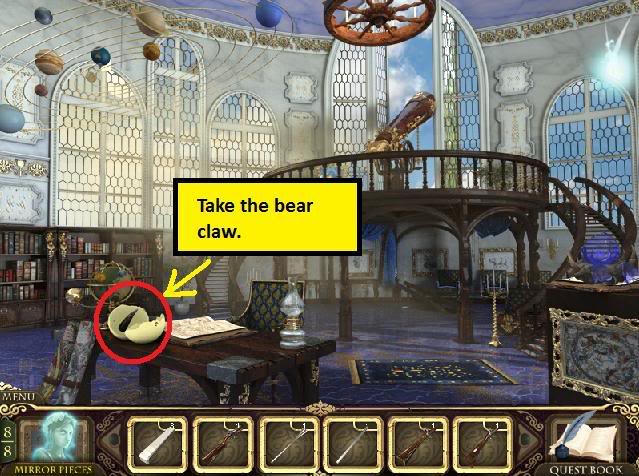
- AREA CLEAR.
- Go back to the Piano Lounge.
Piano Lounge
- Click on the piano, and use the three Piano keys from your inventory to replace the three missing keys.
- The music you found appears on the stand above the keyboard.
- Click the keys in the following order to play the song:
- F, E, F, E, F, D, E, F, G, F, G
- Take the Bear Claw that appears from the compartment that opens in the piano.
- AREA CLEAR.
Hall of Reflections
- If you haven’t done so already, return to the Hall of Reflections and put the second mirror back together. The maid gives you more information about the strange witch, and gives you a third Gun Stock.
- Return to the Hunting Gallery.
Hunting Gallery
- Click on the stuffed bear in the lower left corner, and use the five bear claws. The curse has now been lifted!
- Click on the gun rack to zoom in. Place the three Gun Stocks and three Gun Barrels from your inventory back onto the gun rack as shown:
- A secret passage opens in the fireplace leading into the Tea Room.
AREA CLEAR.
Tea Room – Main Floor
- There are two mirror shards here (circled in red).
- Zoom in on the two painting and find all the evil objects.
Left Painting
Right Painting
- The curse is now lifted!
Tea Room – Uncursed
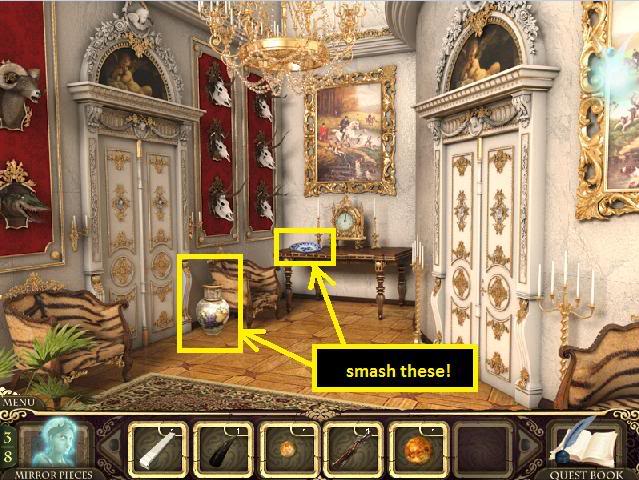
- Investigate the side table on the left to zoom in for a hidden object search.

- Find the Calendar Gear and Gramophone Turntable (circled in red). The rest of the items to find are random – some of the items you might need to find are circled in yellow.)
- Use fairy’s Rock ability on the plate to get a mirror shard.
- There’s nothing else you can do here for now, so take the hallway to the right.
Hallway – Main Floor (#3)
- Use the fairy’s Rock ability on the vase to get a mirror shard.
- AREA CLEAR.
- Take the left door into the Grand Library.
Grand Library
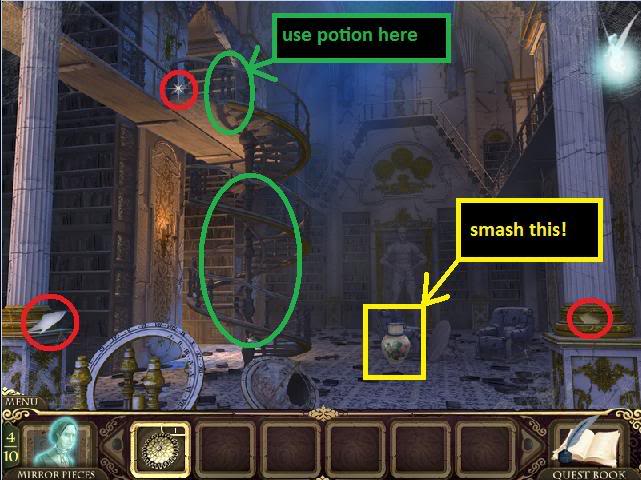
- There are three mirror shards here (circled in red).
- Use the fairy’s Rock ability to break the vase. She’ll learn the Flame ability, which can set things on fire.
- Click the staircase to zoom in.
- Collect all the ingredients needed to make the potion.

- Click the balls in the following order: orange, purple, green, blue.
- Examine the fire at the top of the staircase, and use the potion on it to put it out. This will end the curse!
- There’s nothing more you can do in the library for now, so return to the Hallway and go right to the Crown Jewels.
Crown Jewels – Main Floor
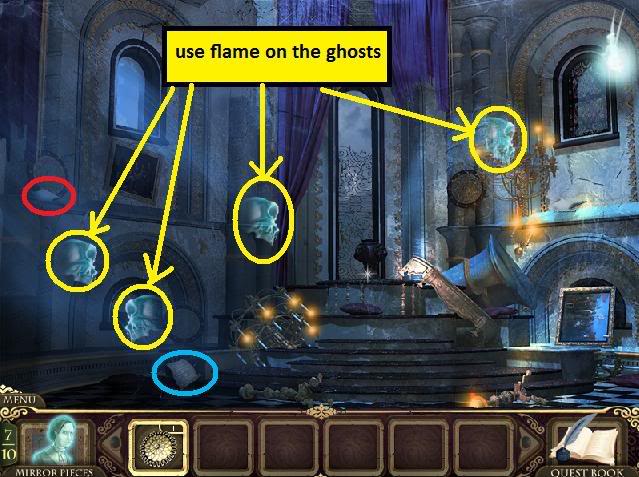
- There are two mirror shards (circled in red), and a journal note (circled in blue).
- There are four ghosts flying around. Use fairy’s Flame ability and click on each of the ghosts to get rid of them. This will lift the curse.
Crown Jewels – Uncursed
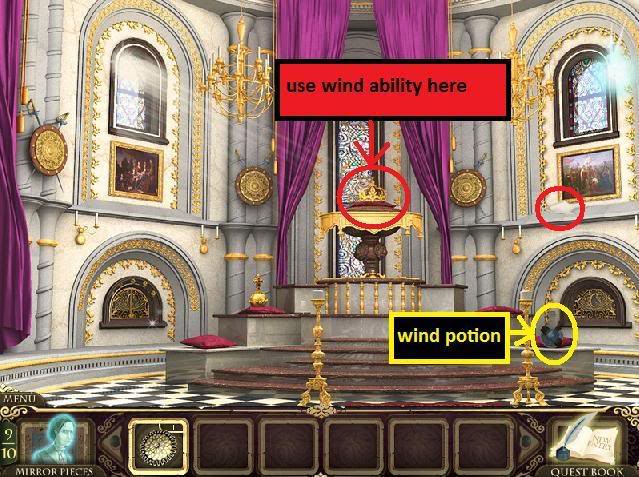
- There’s a mirror shard here (circled in red).
- Pick up the bottle in the lower right part of the scene. The fairy will learn the Wind ability, which lets her blow away dust and other objects.
- Zoom in on the crown on the pedestal, and use the Wind ability on it.
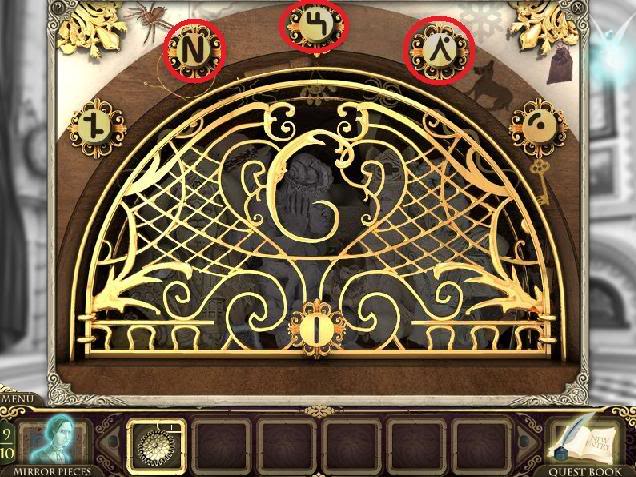
- Study the symbols on the crown, then zoom out.
- Zoom in on the fireplace, and click the three symbols on the crown:
- Next, find the following objects: Gramophone Needle, Gramophone Horn, Piano String (circled in red). Other items you might need to find are circled in yellow.
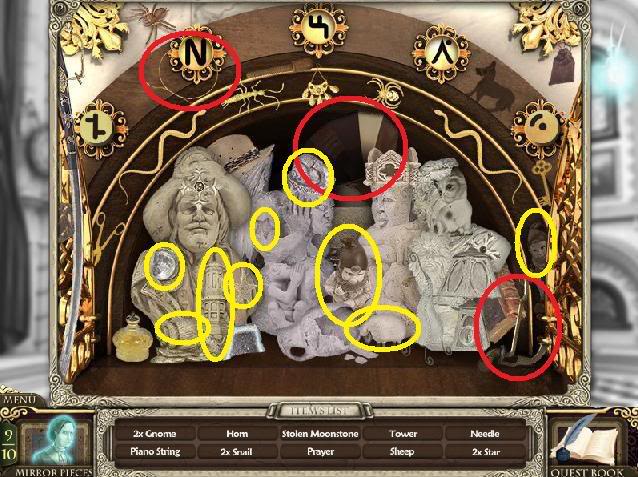
- AREA CLEAR.
Hall of Reflection
- Now that you have all 10 mirror shards, go to the hall of reflection and restore the third painting – the Nanny.
- Return to the Grand Library.
Grand Library
- Click on the statue and answer its questions.
- Question 1: What large bird hangs over the hunters fireplace? Answer: PEACOCK.
- Question 2: How many lions can you see guarding the entrance to the castle? Answer: FIVE.
- Question 3: What planet is fifth from the sun? Answer: JUPITER.
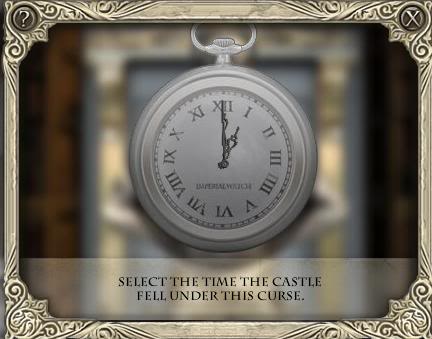
- Question 4: Select the time the castle fell under this curse. Answer: Move the clock cursors so the clock says 1 p.m.
- Once you’ve answered the questions correctly, a door into the Kitchen will open.
Kitchen
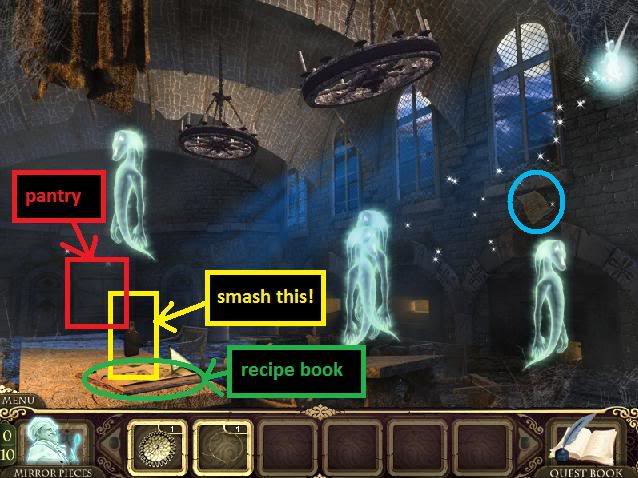
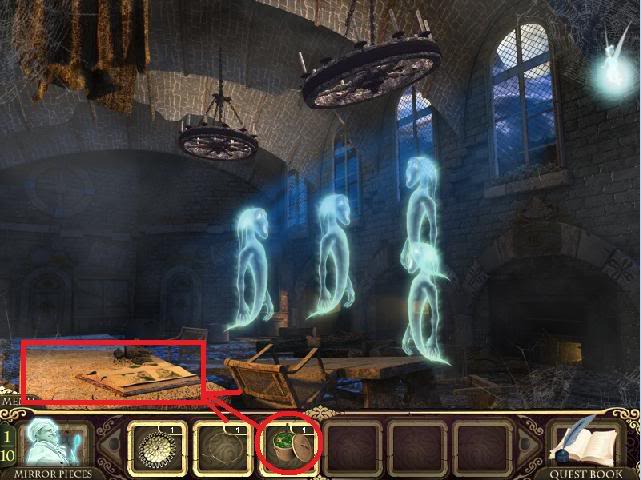
- There’s a journal notebook page here (circled in blue).
- Use the Rock ability on the glass to get a mirror shard.
- Click on the recipe book on the table and turn the pages until you see the recipe for GHOSTLY GRUEL. Click on that page to rip it out.
- Next, click on the pantry. Drag the recipe page onto the pantry and the list of ingredients you need to find will appear.
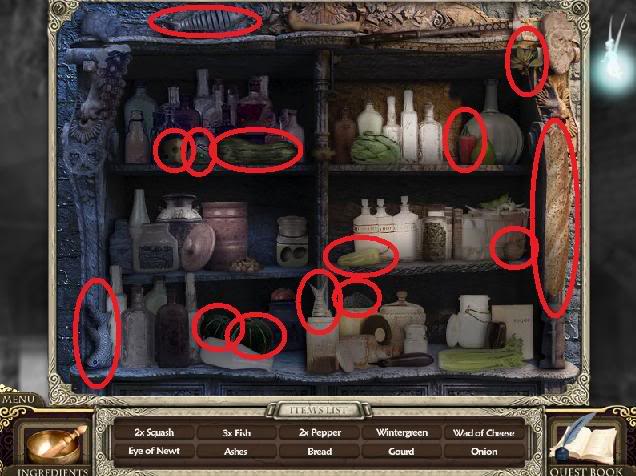
- Complete the puzzle below to finish the recipe.
- Click the balls in the following order: Green, orange, purple, blue.
- Put the ghostly gruel on the table:
- The curse will be lifted.
Kitchen – Uncursed
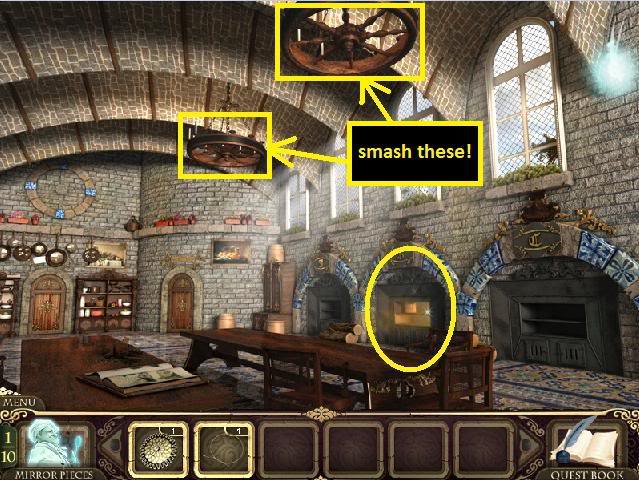
- Use fairy’s Rock ability on the two chandeliers. Two mirror shards will fall onto the table.
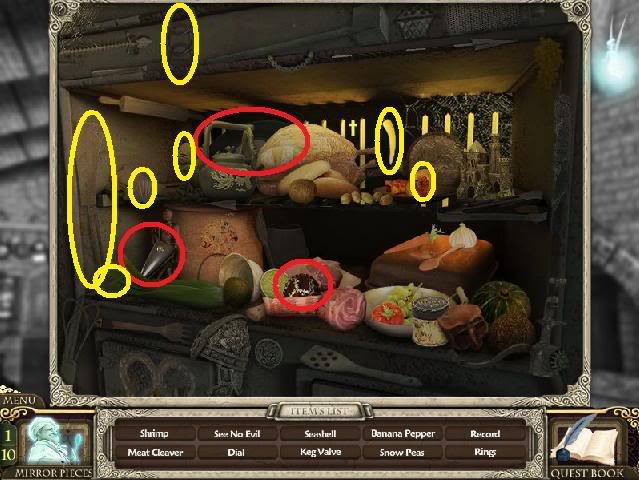
- Click on the kitchen shelf to zoom in on a hidden object search.
- Find the Triangle Dial, Grammophone Record, and Keg Valve (circled in red). Other objects you might have to find are circled in yellow.
- AREA CLEAR.
- Go to the cellar.
Cellar
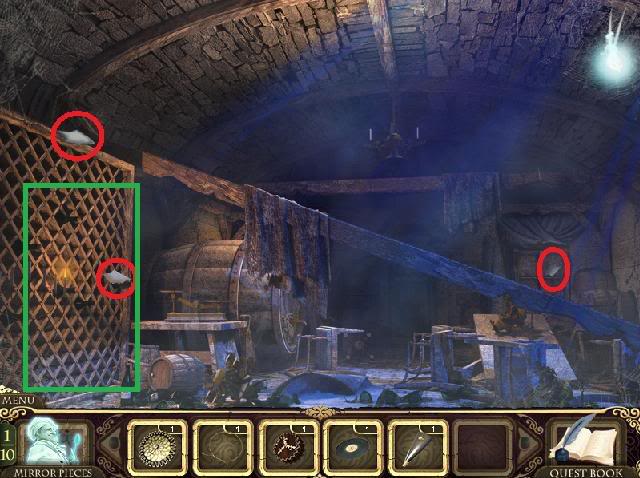
- There are three mirror shards here (circled in red).
- Click on the wine rack on the left to zoom in on a mini-game.
- The goal is to figure out which bottle is heaviest by weighing them on the scale. You get two weighings, then you’ll be asked to choose the heaviest bottle. If you get it wrong, the bottles will be reset and you’ll have to try again.
- Start by placing two bottles on the scale. If they are equal in weight, neither of them is the evil bottle. If one is heavier, that is the evil bottle.
- If you’ve found the heavy bottle, place two more bottles on the scale to get to the question part. Select the evil bottle.
- If the first two bottles are equal in weight, place two different bottles on the scale. If one is heavier, that one is the evil bottle. If both are equal in weight again, the last remaining bottle must be the evil one. When asked which is the evil bottle, select the bottle that you haven’t placed on the scale yet.
- Solving this puzzle will break the curse.
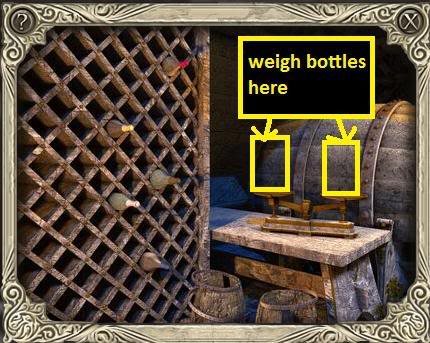
Cellar – Uncursed
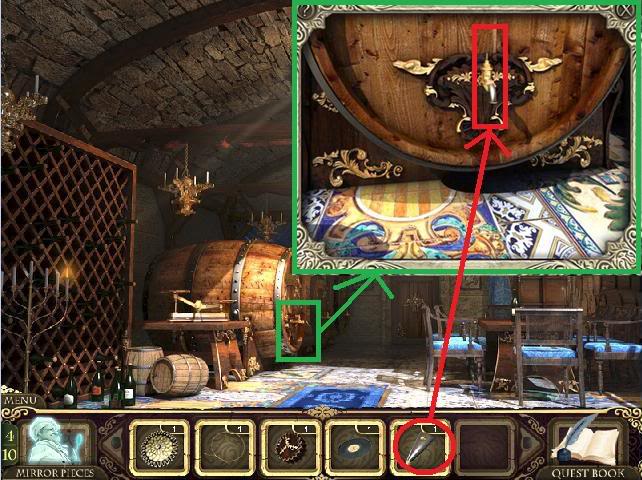
- Click on the large wine kegs near the door.
- Use the Keg Valve on the keg spout. Take the Cleaning Rag that appears on the floor.
- Exit back out to the Kitchen, and go to the Green House.
Green House – Main Floor
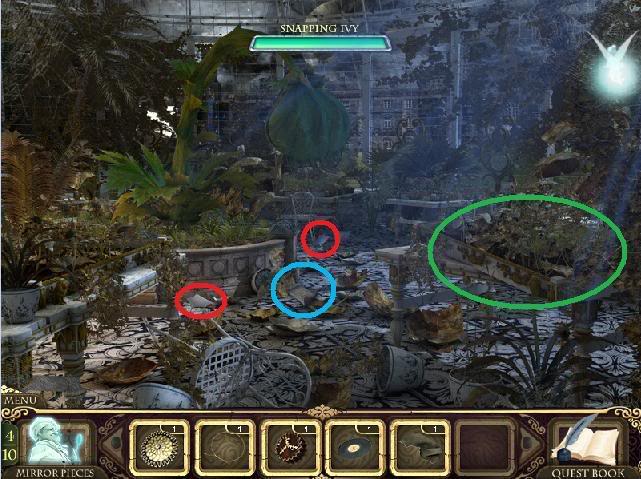
- There are two mirror shards here (circled in red), and one journal note (circled in blue).
- Click on the plant box.
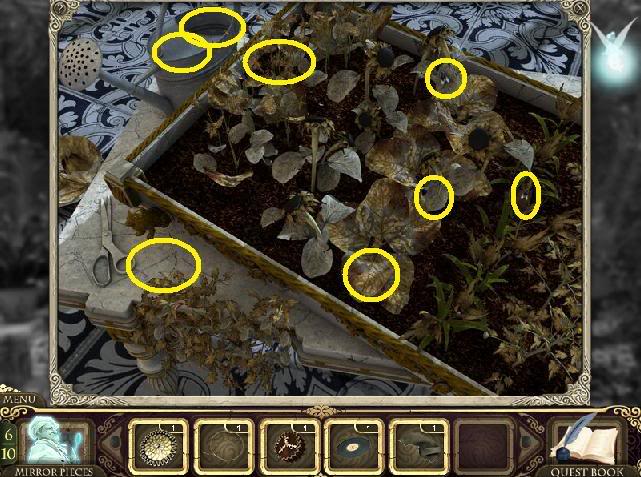
- Flies appear in different places in the box. I’ve circled in yellow common places where you might see flies appear. You can collect up to 10 flies, but you’ll only need 3 to defeat the Snapping Ivy plant.
- Defeating the Snapping Ivy
- Use one of the flies on the Ivy. When it snaps at it, select fairy’s Flame ability and click on the plant. You’ll see part of its life bar disappear. Do this twice more to defeat the plant.
Green House – Uncursed

- Click on the blue potion and fairy will learn the Water spell. Water can be used to water plants.
- Water the four plants as shown in the screenshot above.
- Each plant will open to reveal a goodie inside it. Take the two mirror shards, Bone, and Triangle Dial from the center of each plant.
- AREA CLEAR.
Tea Room
- Return to the Tea Room and zoom in on the gramophone stand.
- Use the Gramophone Turntable, Gramophone Horn, and Gramophone Needle on the stand.
- Return to the tea room, and put the Gramophone Record onto the Gramophone. You’ll learn the "Record" song.
- AREA CLEAR.
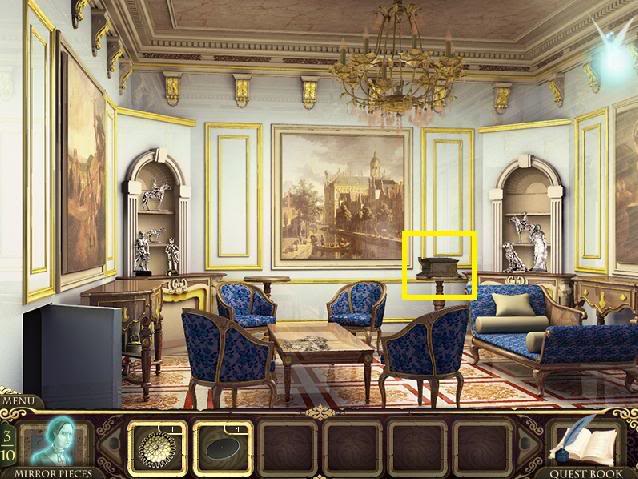
Grand Library
- Go to the grand library and click on the globe in the lower left of the screen.
- It’s another music puzzle. This time, you have to slide each dial to the correct letter to correspond with the notes on the music.
- Slide the dials so they correspond with the following letters (from left to right): F, E, D, F, A, G, A, B.
- Note: The third note, "D," is actually the lower "D" that isn’t actually marked – not the higher D.
- Next, slide the dial along the bottom from right to left to finish the puzzle.
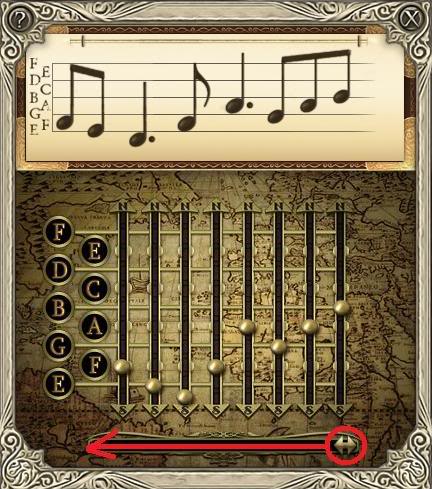
- Pick up the Axe that appears inside the globe.
- AREA CLEAR.
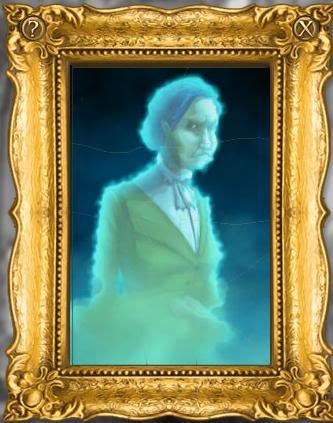
Room of Reflection
- Go to the Room of Reflection and put together the fourth portrait: the Cook.
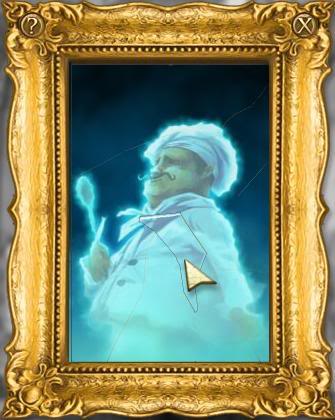
- The cook gives you Knobs for the door in the cellar.
- Return to the cellar.
Cellar
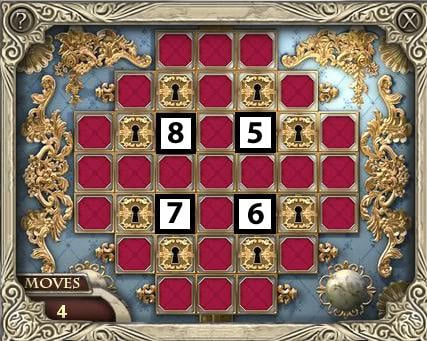
- Zoom in on the door, and replace the three door knobs ("triangle dials").
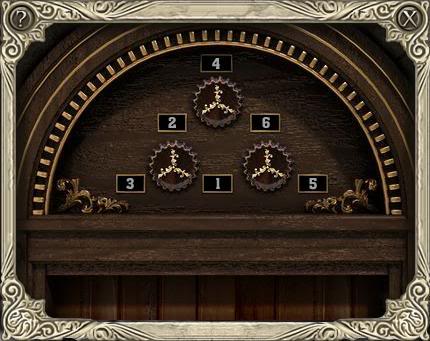
- The goal of this puzzle is to arrange the numbers for 1 to 6 in a pyramid.
Solution:
- Click the right knob once.
- Click the left knob once.
- Click the top knob twice.
- Click the left knob twice.
AREA CLEAR.
Head through the door into the Stables.
Stables – Main Floor
- There are four mirror shards here (circled in red).
- Zoom in on the stable.
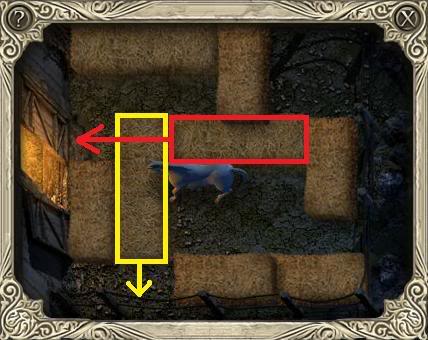
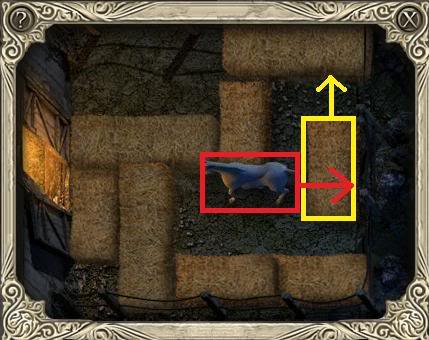
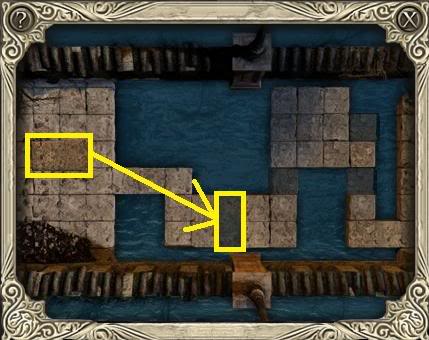
- White horse puzzle:
- You must slide the bales of hay to clear a path for the white horse to get back into the stable.
- Step 1 – Slide the horse forward as far as it can go. Slide the small bale of hay on the right up behind the horse. Slide the two bales along the bottom to the right:

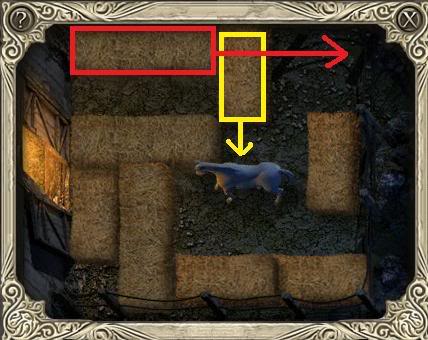
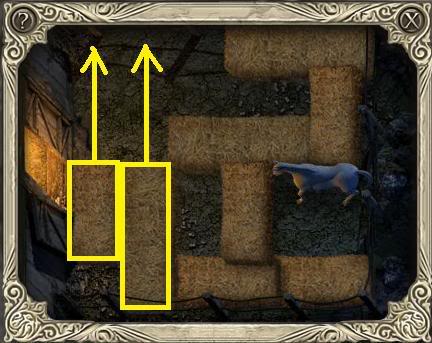
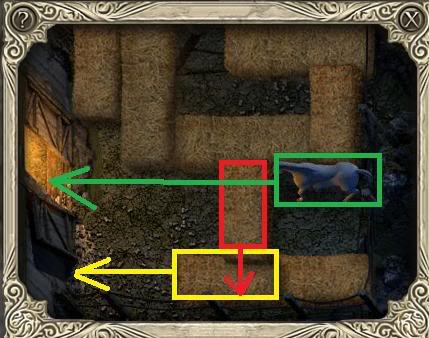
Follow the rest of the diagrams below to complete the puzzle:

Stables – Uncursed
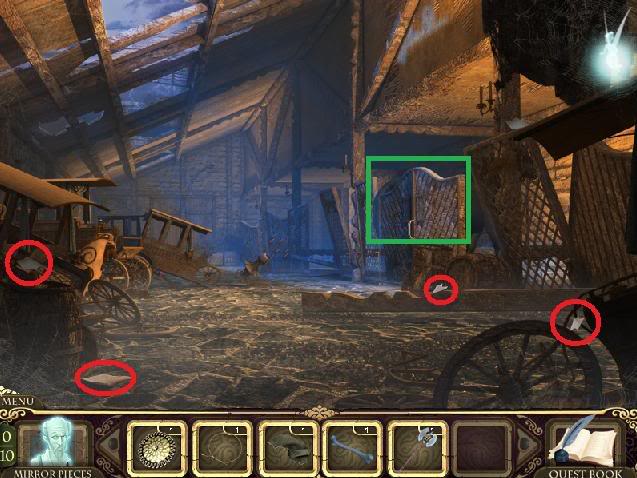
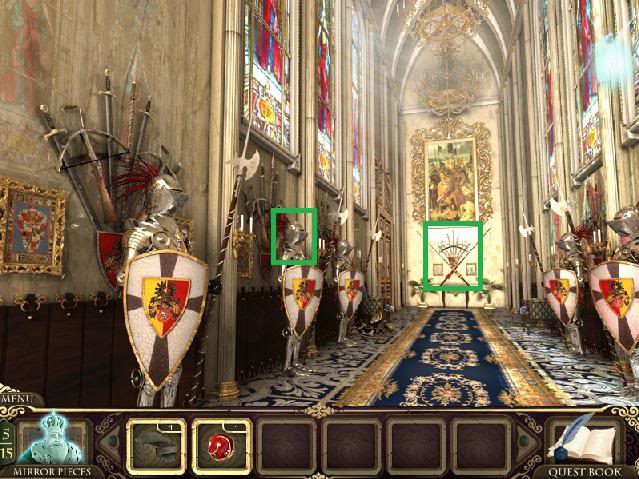
- Pick up the journal note in the lower left of the screen, next to the barrel.
- Examine the carriage on the left side of the screen to zoom in on a hidden object search.
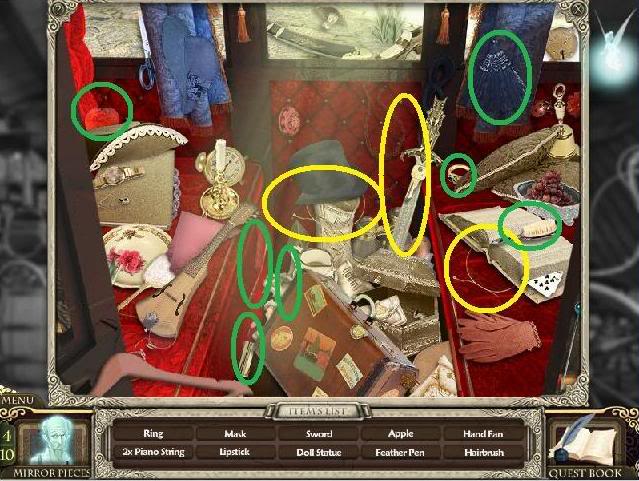
- Find the Sword and two Piano Strings (circled in yellow). The rest of the items you might need to find are circled in green.
- AREA CLEAR.
- Continue to the Garden Walkway
Garden Walkway – Main Floor
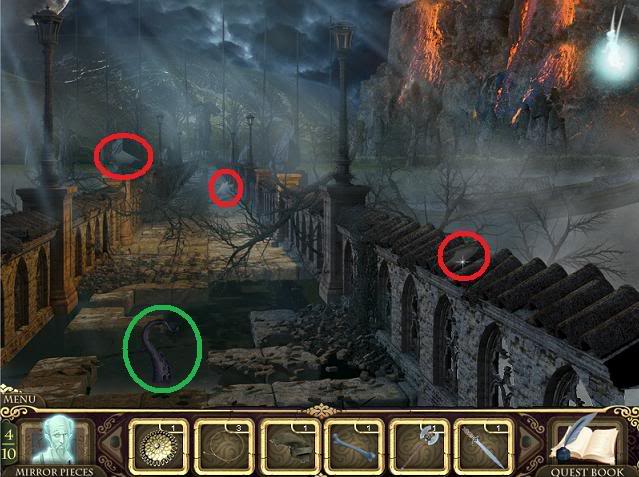
- There are three mirror shards here (circled in red).
- Click on the tentacle to zoom in.
- Click on the stone slab on the left and four yellow cursors will appear. Click the cursors to make the brick roll in that direction.
- The goal is to roll the brick into each of the holes along the pathway.
Gap 1:
- Click the cursors in the following order to make the brick roll into the first gap: Down, right, right, right, down, right, right.
Gap 2:
- Roll the second brick in the following order: Right, right, up, left, down, down, right, right, right, down, right, right, right, right, up.
Gap 3:
- Roll the third brick in the following order: Up, right, right, down, left, down, right, right, right, down, right, right, right, right, up, up, up, right, down, right.
Gap 4:
- Up, right, right, down, left, down, right, right, right, down, right, right, right, right, up, up, right, right, right, down.
Thus completes the puzzle. Cross the bridge to the Garden Fountain.
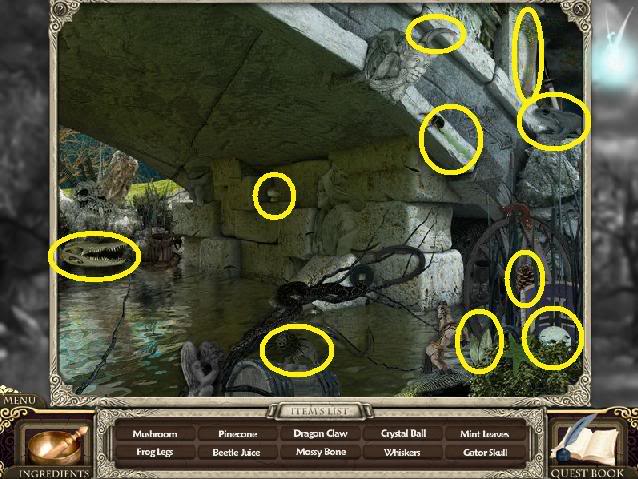
Garden Fountain – Main Floor
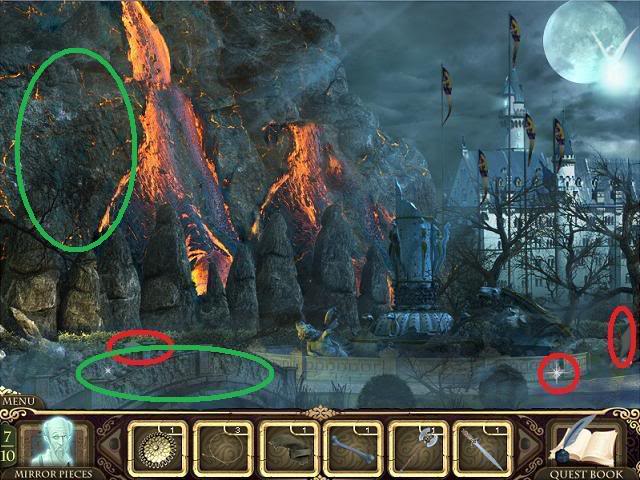
- There are three mirror shards here (circled in red).
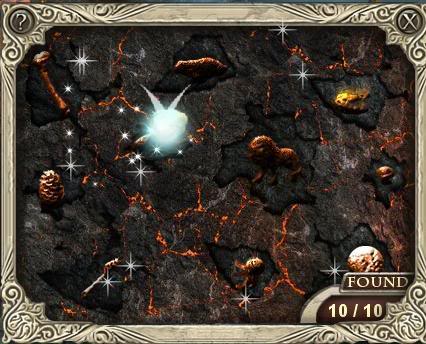
- Start by examining the rock wall.
- Use the Rock ability to smash through the rock and reveal 10 items.
- Next, examine the bridge to search for hidden objects.
- Mix the ingredients in the least possible moves
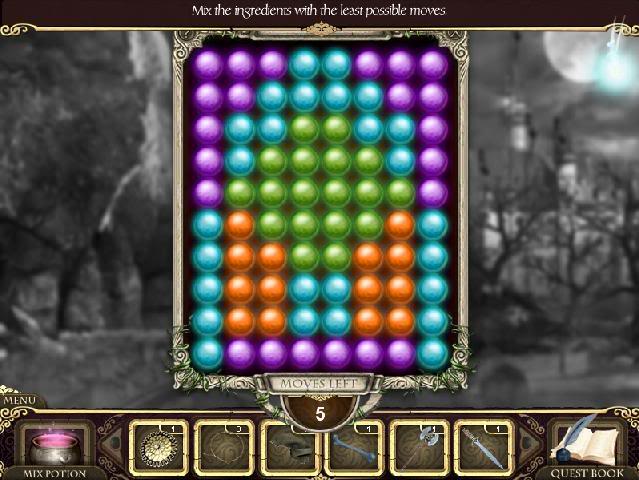
- Touch the colors in the following order: Green, orange, orange, blue, purple.
- Use the potion on the lava on the side of the mountain. This will break the curse.
Garden Fountain – Uncursed
- It’s time to get the fountain working again. Click the bottom part of the fountain.
- The goal in this pipe mini-game is to connect the pipes so water can flow from all four sides.
- Rotate the pipes so they look like the screenshot below:
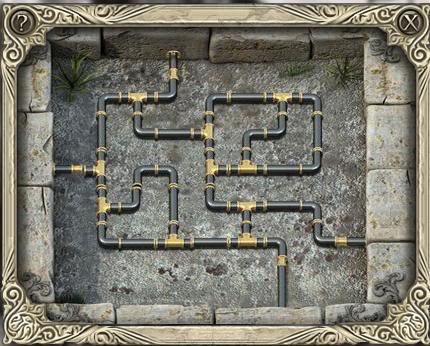
- Pick up the Calendar Piece that appears at the top of the fountain
- AREA CLEAR.
Return to the Hall of Reflection and put together the Gardener’s portrait.
Great Hall
- Return to the Grand Hall, and investigate the center wall above the staircase.
- Place the two calendar dials from your inventory, and turn them so the numbers read 11 and 18.
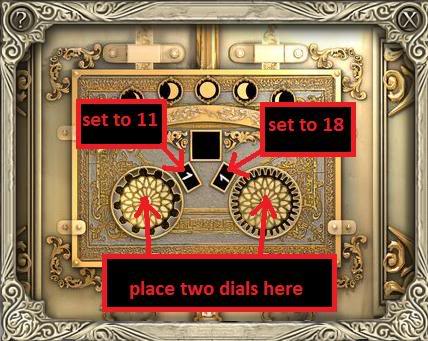
- AREA CLEAR.
- Go through the new door to the second floor East Art Gallery, pass through it into the Dance Hall, then to the Balcony.
Balcony – Second Floor
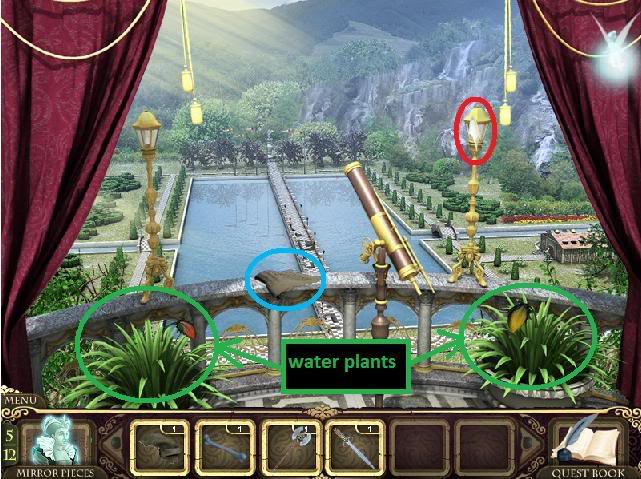
- Pick up the mirror shard (circled in red), and journal note (circled in blue).
- Use the Water ability to water the two plants in the lower right and left corners of the balcony. Take the Mirror Shard and Berry that appear in the center of each plant.
- Click on the telescope to zoom in on the birds on the lawn. Use the Berry on the birds.
- The birds teach you a new song, the "Waltz" score.
- AREA CLEAR.
- Return to the Dance Hall.
Dance Hall – Second Floor
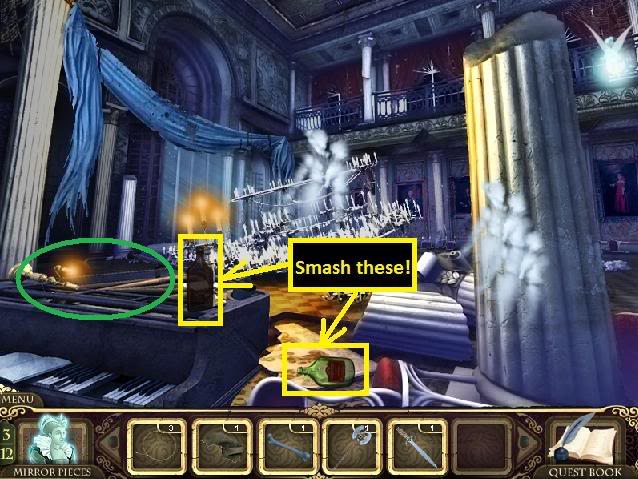
- Use the Rock ability on the two bottles to get two mirror shards.
- Click on the top of the piano, and use the three Piano Strings from your inventory to fix the piano.
- Click on the piano to play your new song for the ghosts.
- Cick on the piano keys in the following order:
- E, G, D, E, A (the higher A, not left-most bottom one), D, E, F, E, D, high C, E.
- This will break the curse in the dance hall.
Dance Hall – Uncursed
- Click on the piano again to look under it.
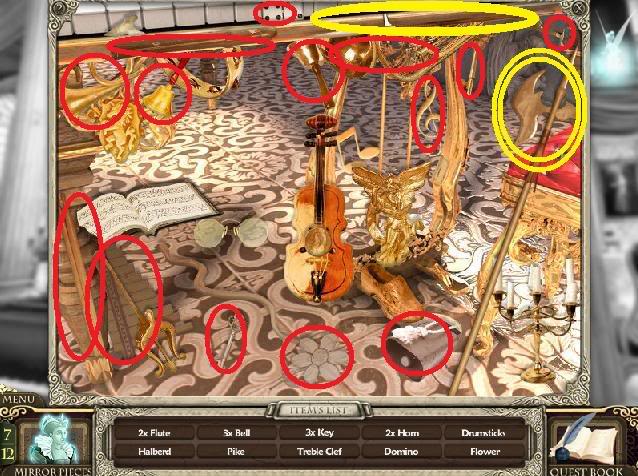
- Collect the Halberd and Pike (circled in yellow). Some of the other items you may need to find are circled in red.
- AREA CLEAR.
- Go back to the East Art Gallery and go through to the West Art Gallery.
West Art Gallery – Second Floor
- There are two mirror shards here (circled in red).
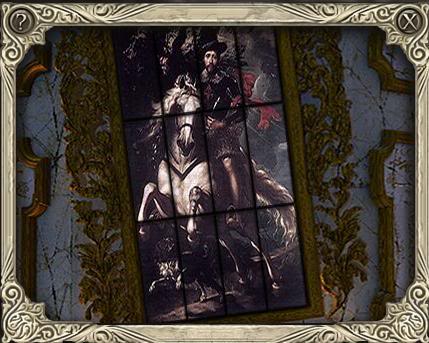
- Examine the four paintings here that show the kings with their weapons.
- Go back to the East Art Gallery.
East Art Gallery – Second Floor
- Use the Rock power on the vase in the lower left corner to get a mirror shard.
- Investigate the coats of arms above the door.
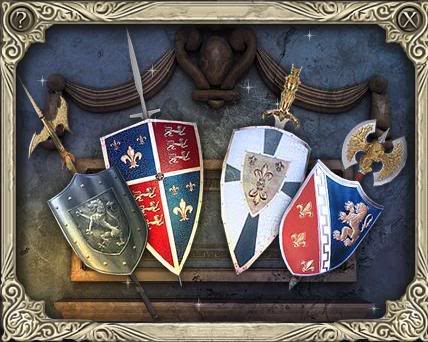
- Place the four weapons in your inventory onto the correct shield. Use the four paintings in the West Art Gallery as a guide.
- This clears the curse in both the East and West Art Galleries.
- Go to the West Art Gallery.
West Art Gallery – Uncursed
- Examine the horse statue in the lower right corner.
- Click on two blocks to swap them so that all the numbers on all four sides of each square are touching the same number on a different square.
- The solution looks like this:
- AREA CLEAR.
- Go through the newly unlocked door to the second floor hallway.
Hallway – Second Floor
- There are two mirror shards here (circled in red).
- Take the left door to the Dining Room.
Dining Room – Second Floor
- There is a mirror shard here (circled in red).
- Examine the card in the lower left of the screen for a hidden object search.
- Mix the ingredients in the least possible moves.
- Click the colors in the following order: Purple, blue, orange, green
- Use the potion on the fireplace to end the curse in the dining room.
Dining Room – Uncursed
- There is a vase sitting on the right side of the long table. Use the Rock ability to smash it and get a mirror shard.
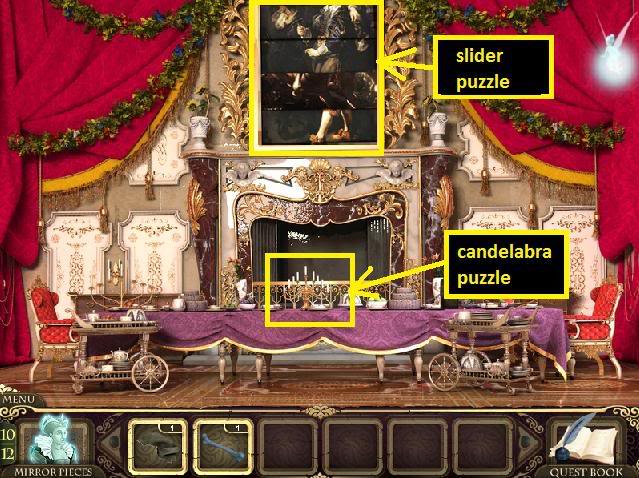
- Click on the candelabra in the center of the room.
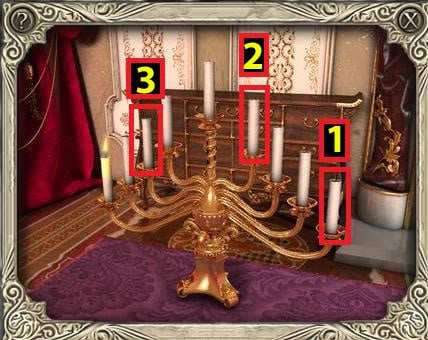
- Refer to the screenshot above, and click the candles in the order 1, 2, 3 as they’re labelled.
- Pick up the Red Marble.
- Next, examine the painting above the fireplace.
- Painting
- Rotate the sections of the painting so that only the "good" side is showing.
- Click the gears in the following order: upper left, lower left, lower right, top right, top left.
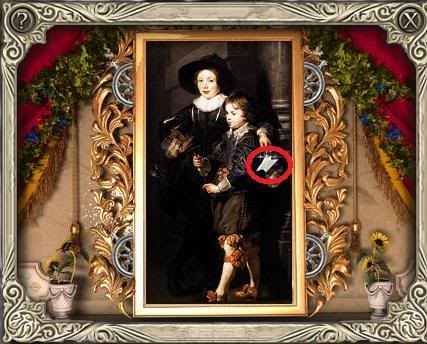
- Take the mirror shard that appears after you solve the puzzle.
- AREA CLEAR.
- By now you should have found all 12 mirror shards. Return to the Hall fo Reflection to put together the sixth portrait.
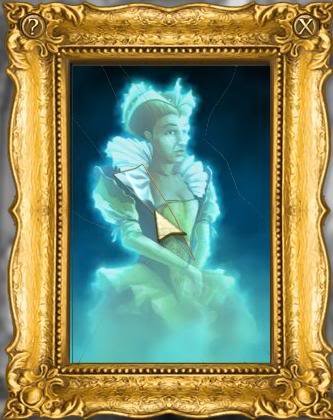
- After you free your mother, she gives you a dog’s Ball.
- Return to the East Art Gallery.
- Click on the closed door to zoom in on the doorknockers shaped like dog’s heads. Place the Ball from your inventory on the right dog, and the Bone on the left dog.
- AREA CLEAR.
- Go through the door into a new hallway (Hallway – Second Floor) and then go left into the Armored Hallway.
Armored Hallway – Second Floor
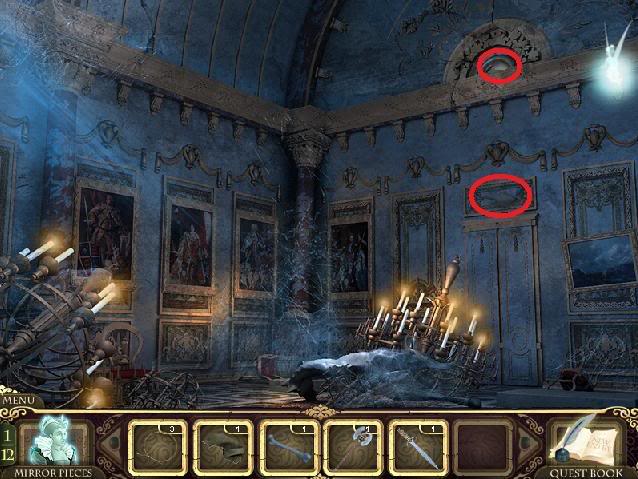
- There are two mirror shards here (circled in red).
- Use the Rock ability on the vase near the door to get another mirror shard.
- Go through the door at the end of the hall to enter the Royal Bedroom.
Royal Bedroom – Second Floor
- There are two mirror shards here (circled in red).
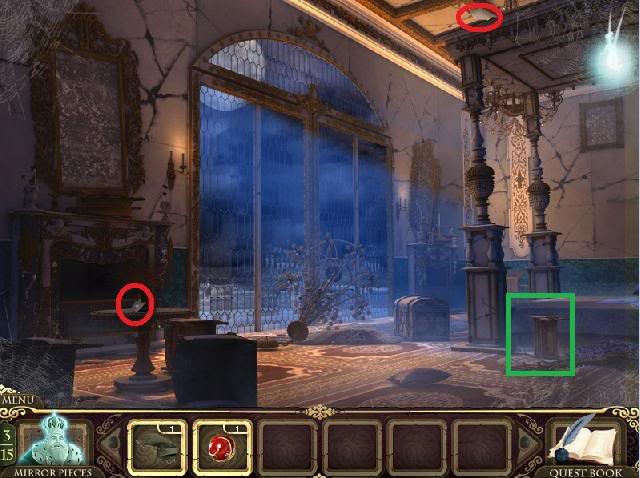
- Zoom in on the area underneath the bed in the lower right corner.
- Select the Rock ability and smash all the bugs.
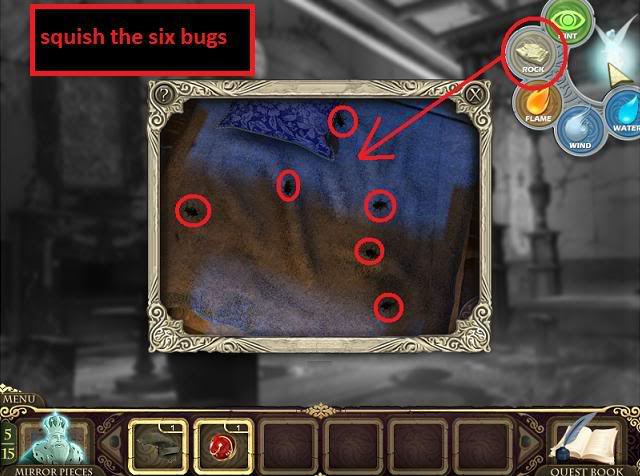
- The curse will be lifted.
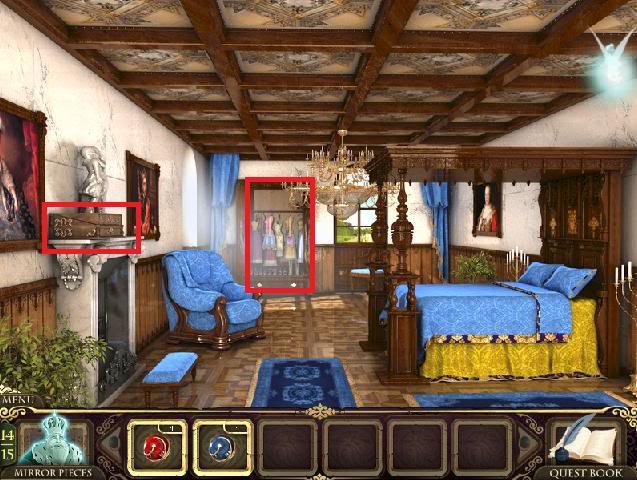
Royal Bedroom – Uncursed
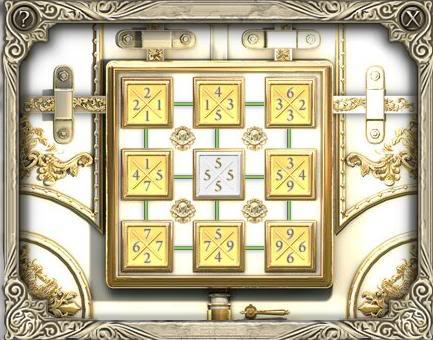
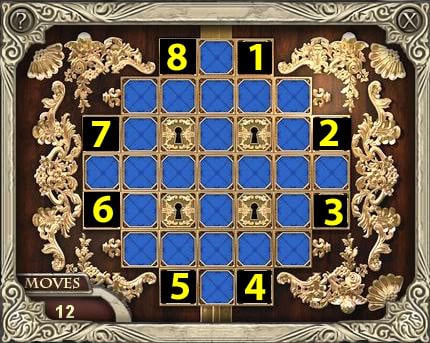
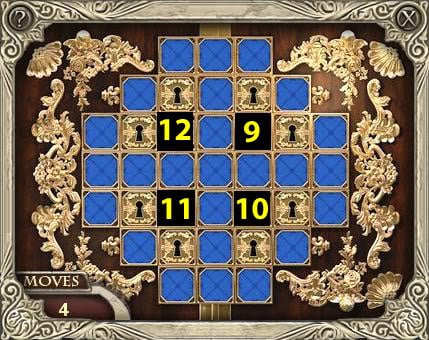
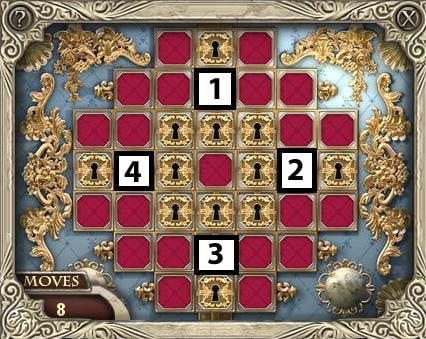
- Examine the chest at the foot of the bed.
- Examine the numbered screenshot below, and turn the following tiles:
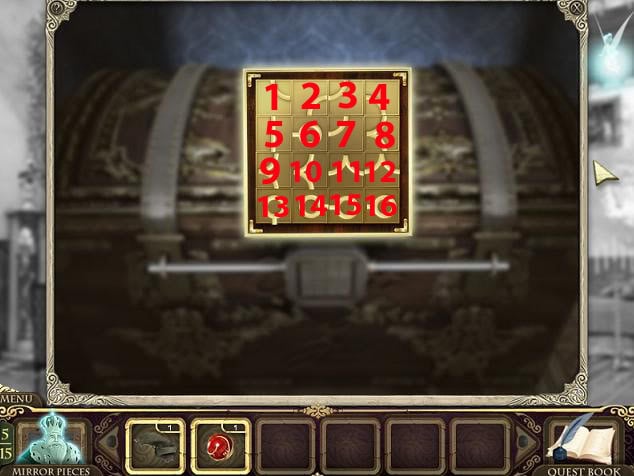
- Click #1 once
- Click #2 once
- Click #3 twice
- Click #6 once
- Click #7 once
- Click #9 twice
- Click #10 three times
- Click #11 twice
- Click #12 three times
- Click #13 twice
- Click #14 three times
- Click #15 once
- Click #16 once
In the open chest, pick up the Crossbow (circled in yellow).
- AREA CLEAR.
- Go back to the Armored Hallway.
Armored Hallway
- Zoom in on the portrait at the end of the hall, and use the Crossbow on the painting. The crossbow ill now be armed. Click on each of the ghosts to shoot them.
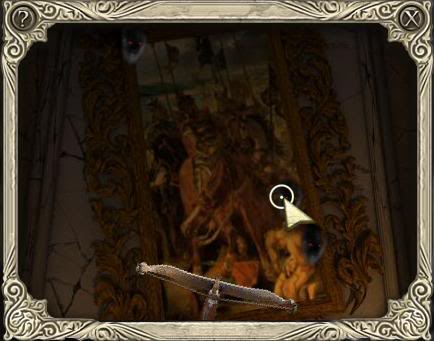
- This will lift the curse.
Armored Hallway – Uncursed
- Examine the end of the hallway to zoom in on a hidden object search.
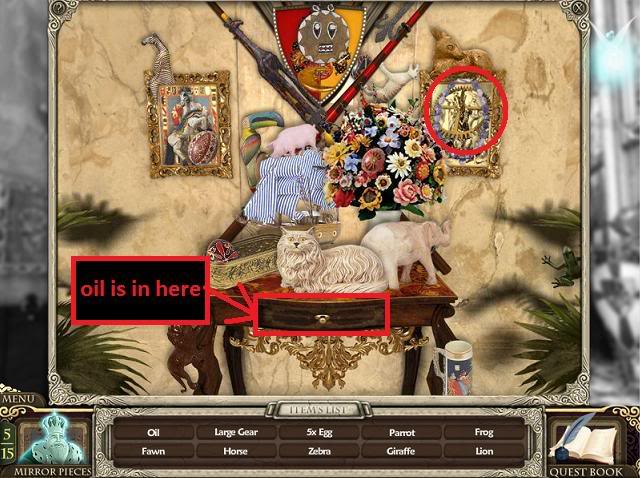
- Collect the Oil (which is inside the drawer of the table), and the Large Gear. The rest of the items are randomized.
- Next, click on the helmet of the middle suit of armor on the left.
- Use the Oil on the helmet. When it opens, take the Clock Face.
- AREA CLEAR.
- Go back to the first hallway (it will be the only Second Floor area on your map still marked with an "X." Now that it’s not longer cursed, you can go through the door into the Powder Room.
Powder Room
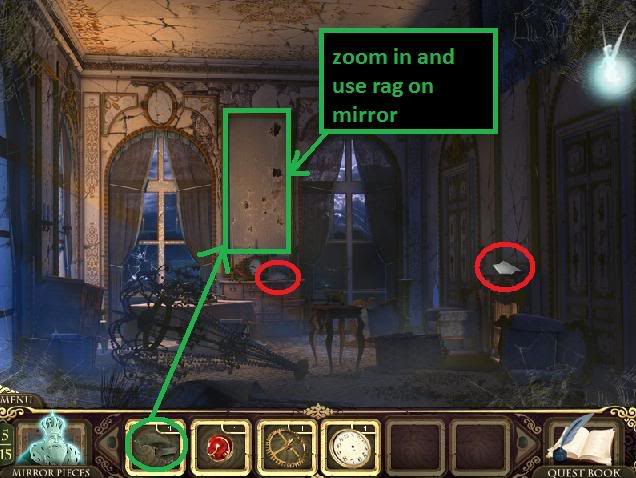
- There are two mirror shards here (circled in red).
- Zoom in on the dusty mirror, and use the Rag from your inventory to wipe it clean. Doing so will lift the curse.
Powder Room – Uncursed
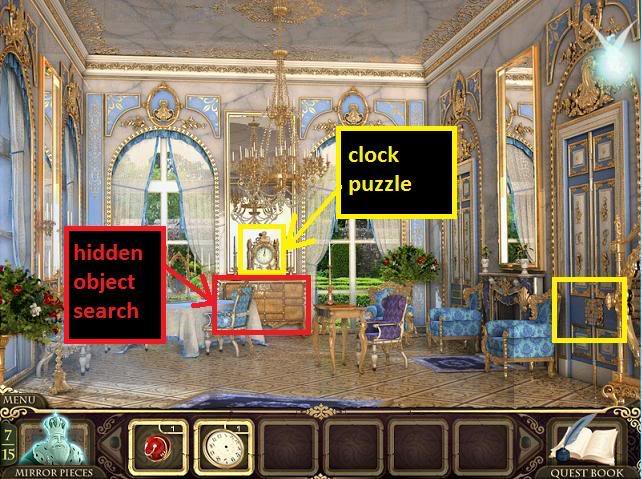
- Examine the desk in the middle of the room to zoom in for a hidden object search. NOTE: There are two hotspots very close together here. Clicking higher will cause you to zoom in on the clock, which is a different puzzle.
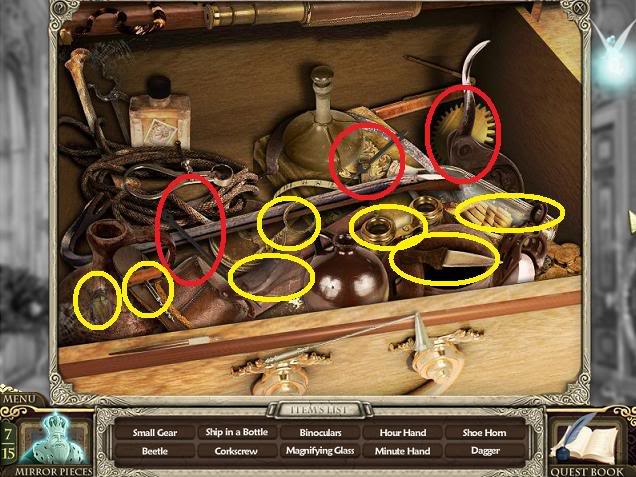
- Take the Small Gear, Large Clock Hand, and Small Clock Hand (circled in red). Some of the other items you may need to find are circled in yellow.
- Next, zoom in on the clock above the dresser.
- Use the two clock gears on the clock, then the clock face, then the two clock hands. Pick up the Blue Key that appears.
- Go back to the Dining Room, then take the right exit to a new Hallway.
Hallway
- Examine the door.
- Use the Blue Key from your inventory and click on the locks so that all the blue squares get turned up.
- Click on the lock in the following order:
- AREA CLEAR.
- Go through the door into the study.
Study
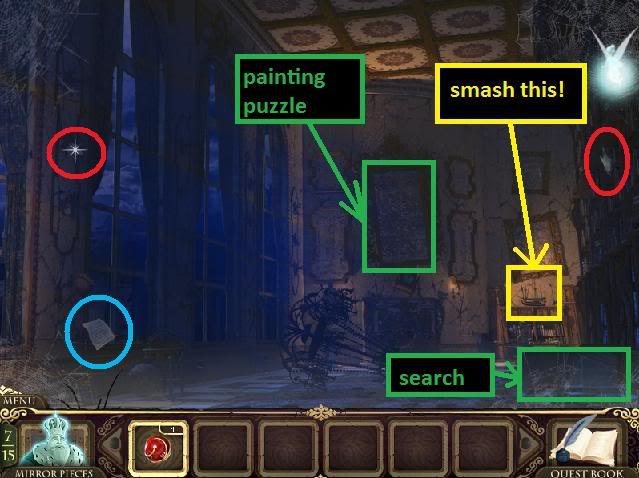
- There are two mirror shards here (circled in red), and one journal note (circled in blue).
- Use the Rock ability on the ship to get another mirror shard.
- Examine the lower right corner of the scene to zoom in on a hidden object search.
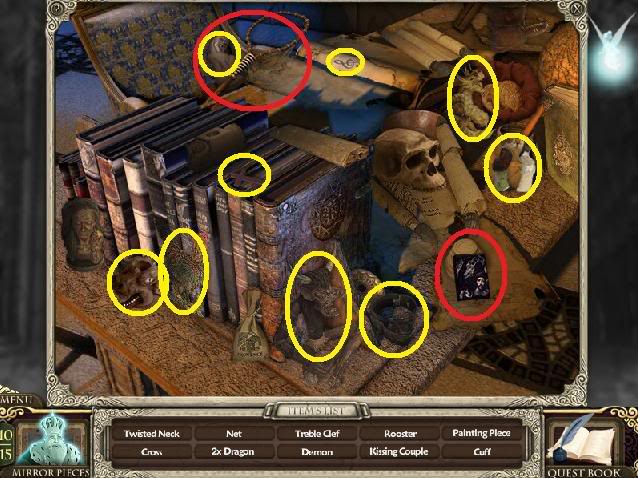
- Find the Net and Painting Piece (circled in red). Additional items that you may need to find are circled in yellow.
- Examine the painting on the back wall.
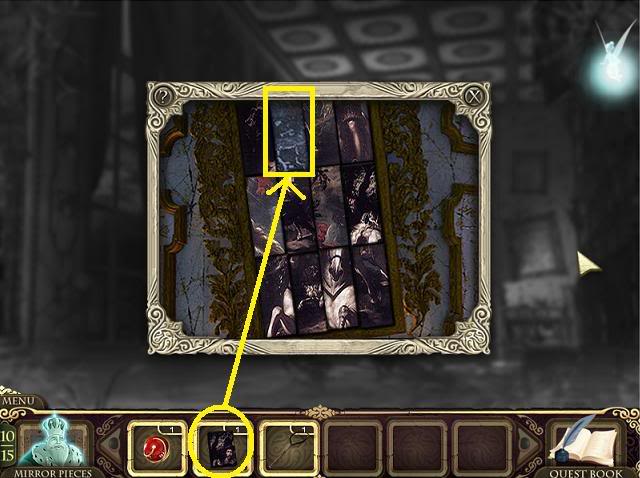
- Place the Painting Tile from your inventory on the spot on the painting that’s missing a piece.
- Swap tiles to unscramble the painting. This is what it should look like:
- This will uncurse the room.
Study – Uncursed
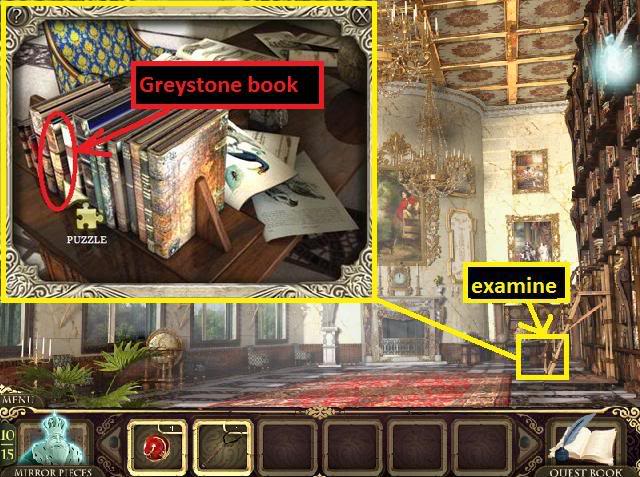
- Examine the shelf near the ladder in the lower right of the screen, and select the book with the gold cover. Read about Greystone Castle, paying attention to the fact that it’s located on the border of Spain and Portugal.
- Next, examine the globe in the lower left area of the scene.
- Rotate the globe so that the pointer is resting on the border of Portugal and Spain. Pick up the Red Key that appears.
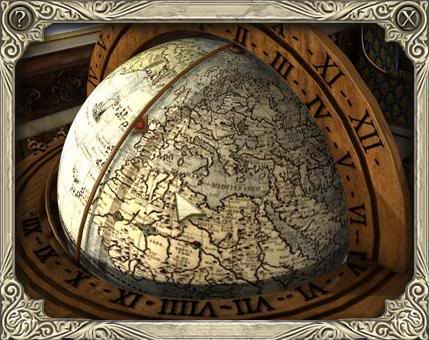
- AREA CLEAR.
Powder Room
- Once you have the Red Key from the Study, return to the Powder Room and examine the larger of the two doors.
- It’s another lock puzzle. This time, use the Red Key and click on the locks until all the squares are red.
- Click the locks in the following order:
- AREA CLEAR.
- Go through the door into the Dressing Room.
Dressing Room – Second Floor
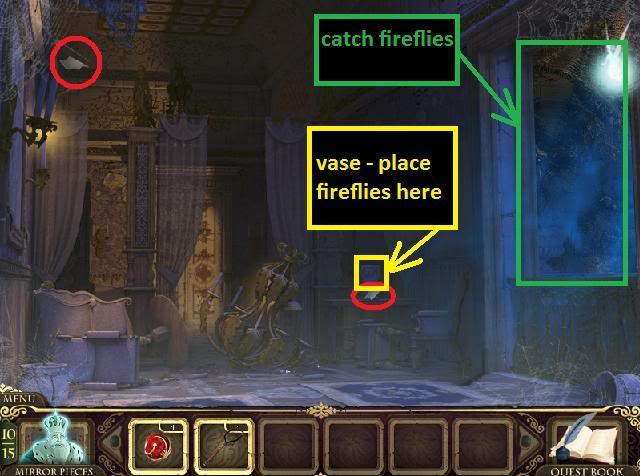
- There are two mirror shards here (highlighted in red).
- Zoom in on the window, and use the Fly Net to catch all the fireflies.
- Move the net swiftly from left to right to catch the flies. (You don’t have to hold down any mouse buttons.)
- Next, examine the vase and use the Net with Fireflies on it. Then select the fairy’s Flame ability and use it on the vase.
- This will break the curse.
Dressing Room – Uncursed
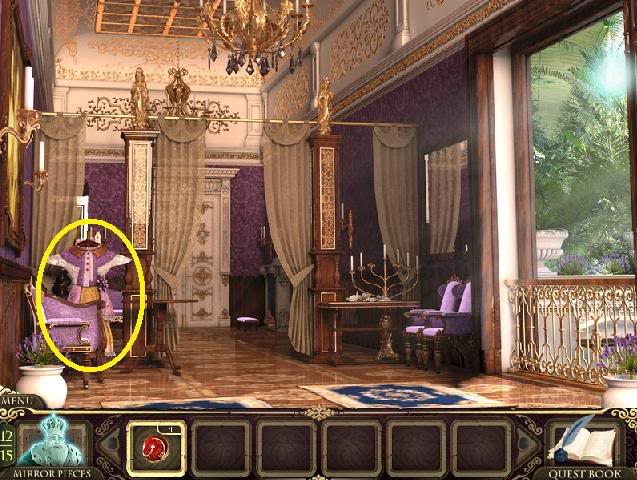
- Examine the purple dress.
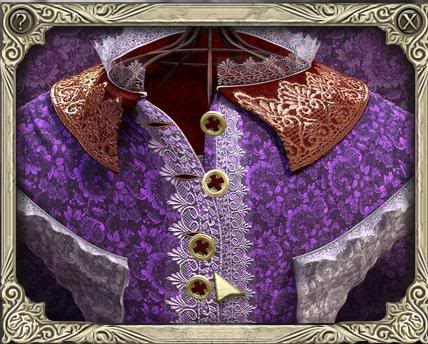
- The goal is to unbutton the dress. Slide each button down all the way, then back up through the button hole. The button should pass under the fabric and undo the fabric. Repeat this for the other three buttons.
- Take the Blue Marble.
- AREA CLEAR.
- Continue through the door to Your Bedroom.
Your Bedroom
- There are two mirror shards here (circled in red).
- Examine under the bed for a hidden object search.
- Find the items to make the potion:
- Mix the potion in the least possible moves
- Click the colors in the following order: orange, green, blue, white, purple
- Next, zoom in on the fireplace and use the potion on it. The curse will be lifted.
Your Bedroom – Uncursed
- Investigate the wardrobe at the back of the room to zoom in for a hidden object search.
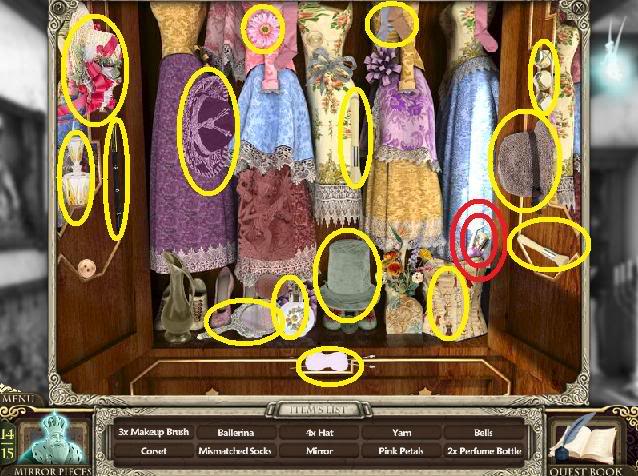
- Find the Ballerina (circled in red). Other items that you might have to find are circled in yellow.
- Next, take a closer look at the box on the mantle.
- Click on the box to open it.
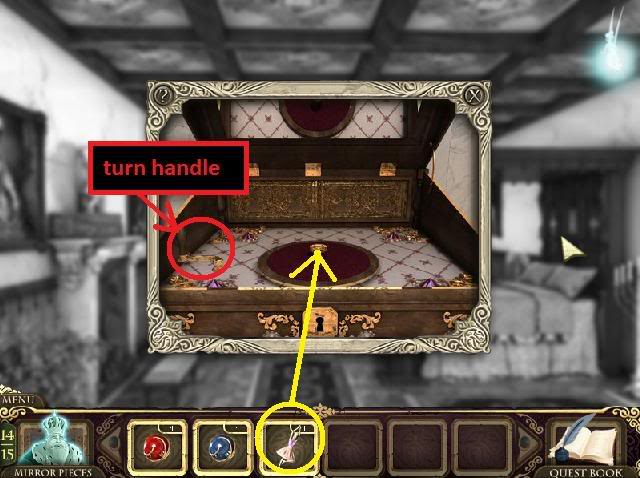
- Place the Ballerina from your inventory on the circle. Click and hold the crank on the left and turn it by dragging the mouse. Release the crank, and the music box should start to play. Collect the final mirror shard that appears.
- AREA CLEAR.
- Return to the Hall of Reflection and put together the king’s portrait.
- Head back to the last room you haven’t cleared yet, the first floor Hallway.
Hallway – First Floor
- It’s time to investigate the creepy door. Click on the eye to zoom in on a mini-game.
- This is an arcade game similar to Zuma or Luxor. The center of the eye can shoot marbles at the line of colored marbles rotating around it. Your goal is to make all the marbles disappear by matching three or more.
- Place the Green Marble from your inventory in the green hole on the left. The eye can now shoot green marbles. Shoot the line of marbles, aiming for the green ones. Any clusters of three or more marbles will disappear. Shoot the marbles until no green ones remain.
- Do the same for the other three colors: Red, Blue and Yellow.
- AREA CLEAR.
- Go through the door into the Witch’s Lair.
Witch’s Lair

- In this final hidden object search, you’ll duel with the witch to see who can find the objects on their list first. Your list of objects to find is on the lower part of the screen.
- Each time you clear a group of items, you’ll deplete some of the witch’s life meter, but if she finds her list of items first, your life will go down.
- Don’t panic – if you lose all your life, you’ll get to try again.
- Click on the green eye in the lower right corner to use a hint. The hint will take a few seconds to recharge. Since there’s no penalty for using hints, I recommend using a hint as soon as the meter recharges.
- The list of items to find is random. The screenshot above shows the items I had to find in my playthrough.
Congratulations, you’ve completed Princess Isabella: A Witch’s Curse. Enjoy the final cutscene.
“;

More articles...
-
Best Horror Games On Itch.io – July 2026
Across a bounty of subgenres. -
Grow A Garden 2 Base Price List
What's the most valuable crop? -
Evomon Best Starter [Leafbun, Blazpup, or Bubble?]
Grass-type, Fire-type, or Water-type?