
Best Horror Games On Itch.io – July 2026
Across a bounty of subgenres.![Haze Seas Accessories Tier List [Best Accessories to Equip]](/wp-content/uploads/2026/07/haze-seas-accessories-tier-list.jpg "Haze Seas Accessories Tier List [Best Accessories to Equip]")
Haze Seas Accessories Tier List [Best Accessories to Equip]
The accessories with the best stat buffs in Haze Seas.
![[Roblox] Evomon Shiny Hunting Guide – Including Prismatic and Pris Shinies!](/wp-content/uploads/2026/06/evomon-shiny-hunting-guide.jpg "[Roblox] Evomon Shiny Hunting Guide – Including Prismatic and Pris Shinies!")

Penny Dreadfuls: Sweeney Todd Walkthrough
Welcome to Gamezebo's strategy guide for Penny Dreadfuls: Sweeney Todd. General Tips There are no trophies awarded in this game however at the end of each chapter, an investigation report is filed. It grades you on search accuracy (how many times you clicked wrongly), puzzles solved (instead of skipping them), hints used and time taken. The game is dark. Adjust your monitor's brightness or lower the lights around you to better see the screen, especially for the hidden objec…


- Prefer Gamezebo on Google

a:1:i:0;a:2:s:13:”section_title”;s:41:”Penny Dreadfuls: Sweeney Todd Walkthrough”;s:12:”section_body”;s:95682:”Welcome to Gamezebo’s strategy guide for Penny Dreadfuls: Sweeney Todd.
General Tips
- There are no trophies awarded in this game however at the end of each chapter, an investigation report is filed. It grades you on search accuracy (how many times you clicked wrongly), puzzles solved (instead of skipping them), hints used and time taken.
- The game is dark. Adjust your monitor’s brightness or lower the lights around you to better see the screen, especially for the hidden object elements.
- You don’t need to pay attention to the story but it does give you an idea of the point.
- The nature of this story is somewhat gruesome. There are some hidden object scenes that are a little disturbing.
- This game stays true to its time in history so some hidden object items are tricky (i.e., a cudgel).
- You can move back and forth to locations as long as they are available on the map. This walkthrough is written to finish the game in the shortest amount of time.
Main Menu

- Play – This starts the game. When you play for the first time, you will have to enter a name and choose the play mode:
- Casual Mode:
- 1. No penalties for miss-clicks;
- 2. Active areas are sparkly;
- 3. Faster hint recharge.
- Challenge Mode:
- 1. Penalties for miss-clicks;
- 2. Active areas less sparkly;
- 3. Slower hint recharge.
- Tip: You cannot change the difficulty level once you begin.
- Options – Allows you to adjust the volume for the voices, music, ambience and sound effects. As well, you can adjust the display for the game.
- Extras – Available once you’ve completed the game. You can replay puzzles and hidden object areas, listen to the soundtrack and watch the intro videos.
- Exit – Allows you to quit the game. Returning to the game will bring you back where you left off.
- Change Player – Allows you to change the player or add or delete a player.
Game Play
There are six chapters in this game. The chapters get longer as the game progresses.
Each chapter begins with a long introduction. They can be skipped. You then get the case notes from the Inspector and a list of items to find as evidence.
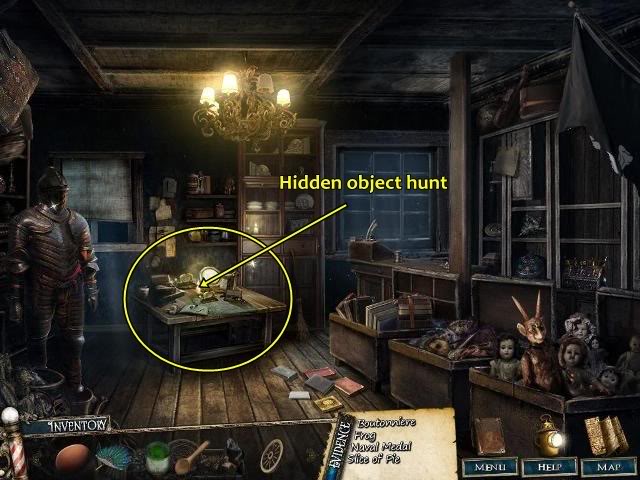
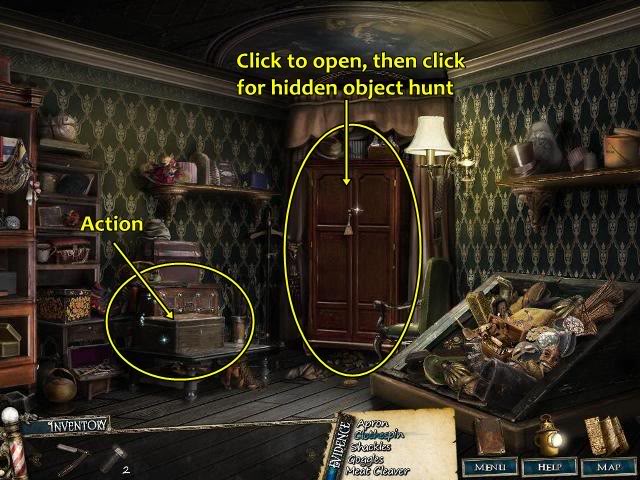
You move from location to location. Each location has several areas where you will solve puzzles, perform actions and clear hidden object zones.

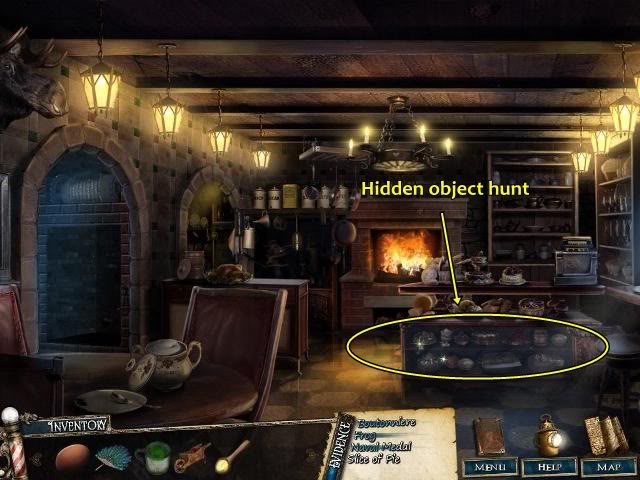
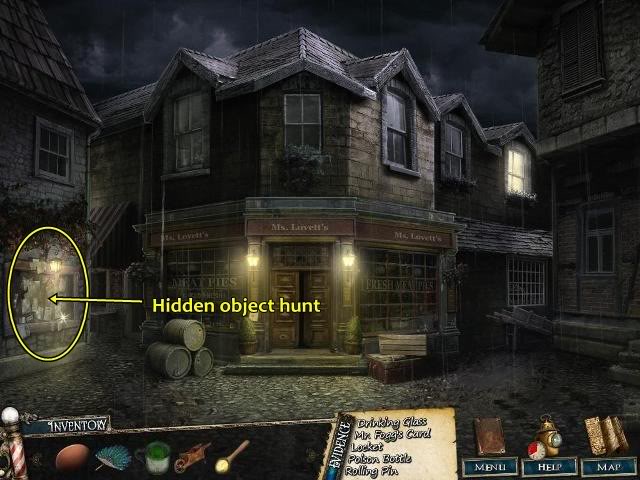
Hidden object hunts – You are given a list of objects to find. Once you’ve found them all, you are given either an item to add to your inventory or an item from the evidence list.
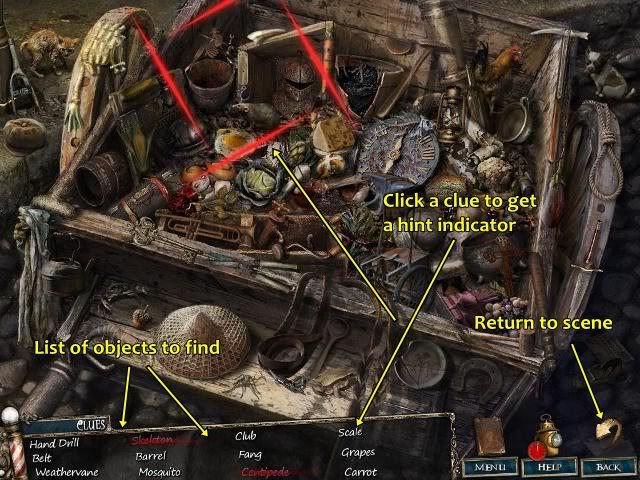
- Leaving a hidden object zone and returning does not reset it, the objects you have already found are remembered.
- The list of objects is different every time you play the game.
- If you are stuck, click an object in the Clues section and red lines will appear around the object.
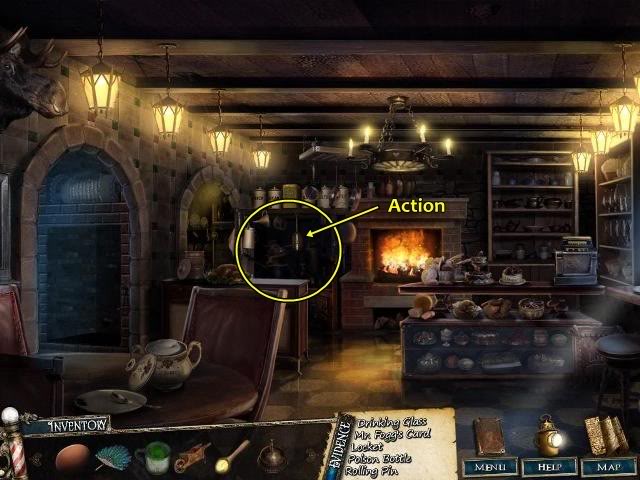
- Performing actions – When you click on an active area (it sparkles), a zoomed-in area appears. You either have to perform an action or use an item from your inventory.
Tip: Click on one of these areas and the written text on the screen may give you an idea of what you need to do.
Tip: Click on an Inventory item and then click inside the zoomed in area to perform the action. If nothing happens, it’s the wrong item. Keep trying with all your Inventory items. If you don’t have the right item at the time, you will eventually find it while advancing through the game.
- Puzzles – You sometimes have to solve a puzzle in order to advance the game. After about 10 seconds, you can skip the puzzle.
- There is no reset button. To reset a puzzle, leave the area and then return.
- When investigating a scene, watch for sparkling areas. In casual mode, all active areas sparkle. In challenging mode, the active areas will be less sparkly. Your cursor changes when hovering over an active area (see below).
The bottom of your screen displays:
- Inventory list – These are items you find throughout the game. They are needed to perform actions.
- An item found in Chapter 1 will not necessarily be used in that chapter.
- Evidence list – These are the items you must find in each chapter during your investigation.
- Menu – Allows you to exit to the main screen. It can also be used to pause the game (although there is technically no timer, your play time is considered in your investigation report).
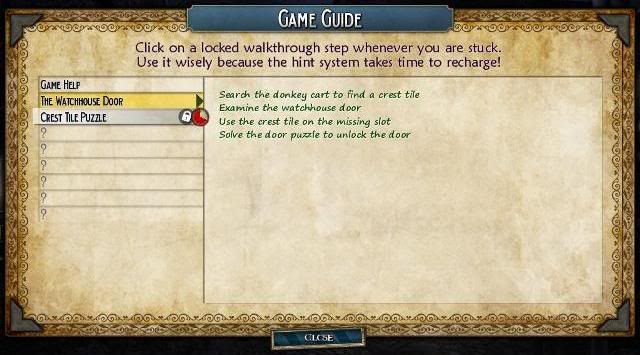
- Help – In a scene, clicking Help lets you ask for the next set of steps. Be careful using this because you may only need help for one element but you’ll see the next few steps afterwards.
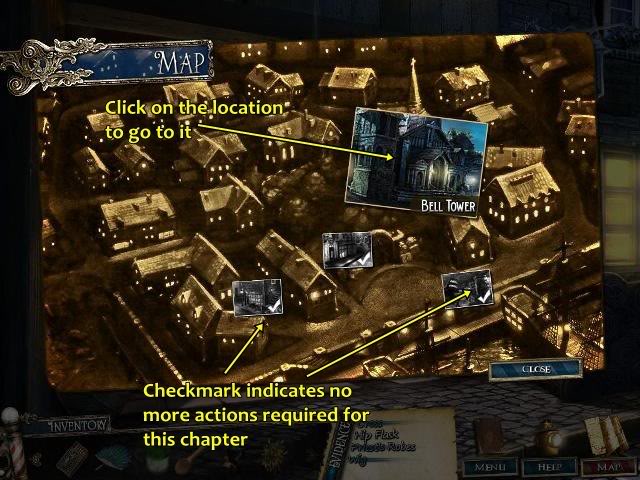
Map – You move from location to location using a map. If there is nothing left to discover in a location, its picture will be black and white with a checkmark.
Tip: To determine whether or not you are done in a location, open the map and hover over another picture. If the location where you are is still in colour, there are more things to find.
The cursor will change when it’s over an active area.
- A magnifying glass will tell you to investigate.

- Moving gears indicate an action needs to be performed (either by using an item from your inventory or by clicking on it).

- A grabbing hand means you can take the item.

- A finger pointing indicates a direction you can move in.

- You will return to areas so don’t be alarmed if you don’t have the right tool to perform an action in an active area.
Walkthrough
Throughout the walkthrough, screenshots will be provided to help you find the active areas and to solve puzzles. Active areas will be circled.
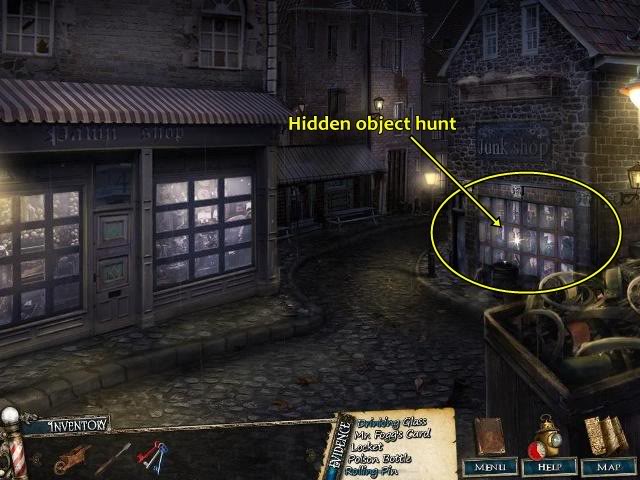
Solutions cannot be given for hidden object hunts as the list is different every time you play.
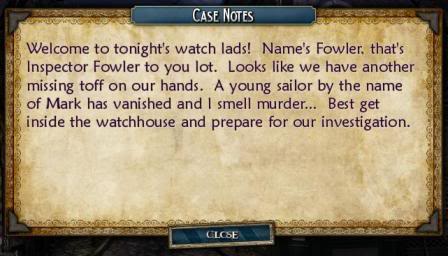
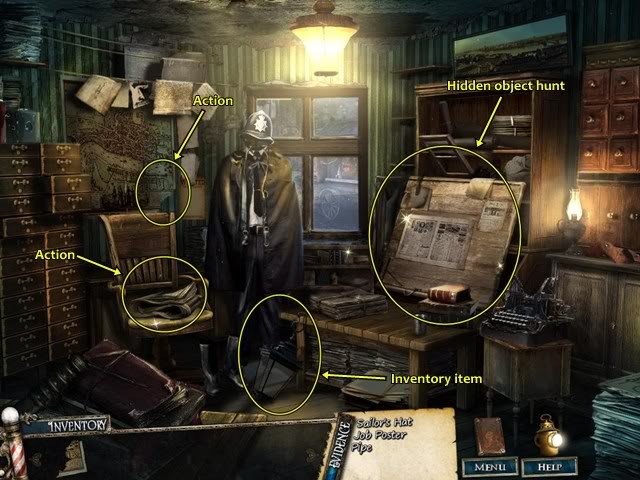
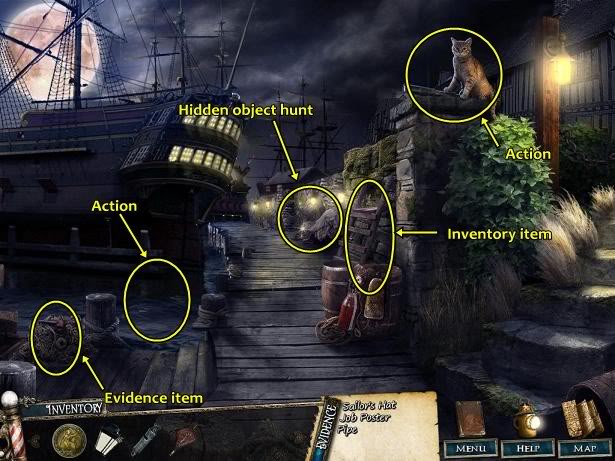
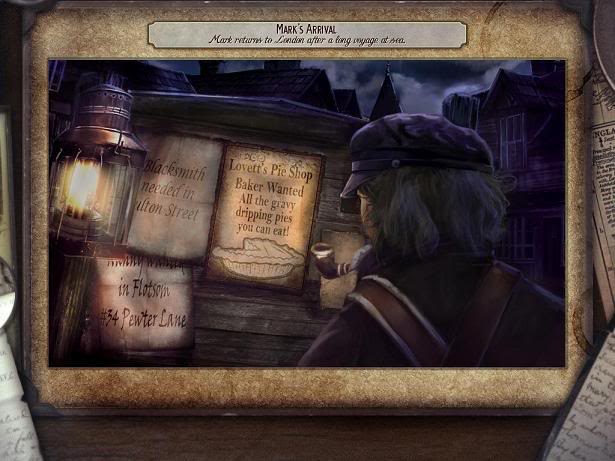
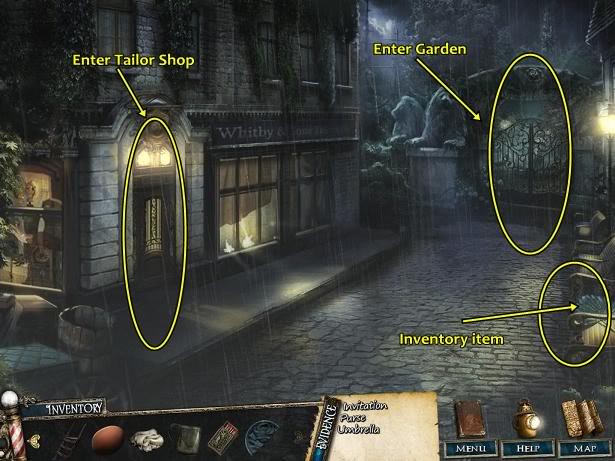
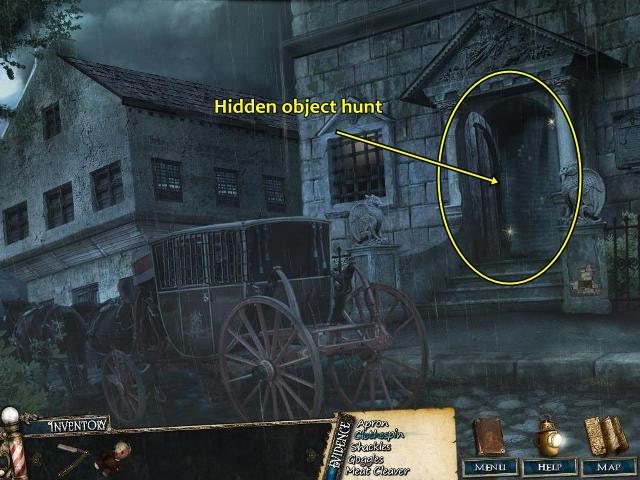
Chapter 1 Watch Lane
After watching the chapter’s intro (or you can skip it), you find yourself on Watch Lane. A sailor is missing and you have to find him.
Through your investigation in this chapter, you must find three inventory items: A sailor’s hat, job poster, and pipe.
Click Close to close the Case Notes.
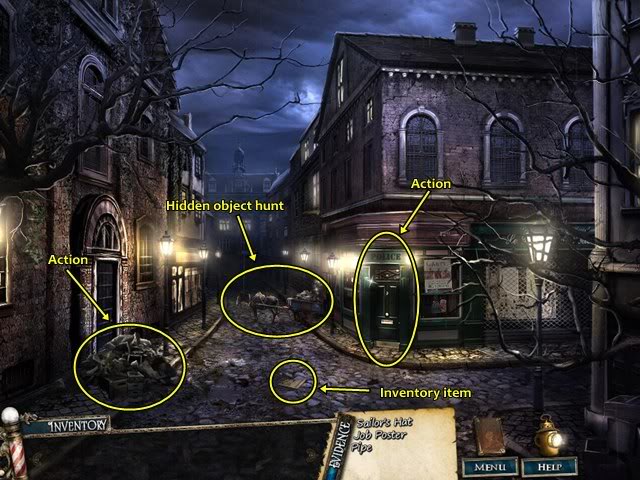
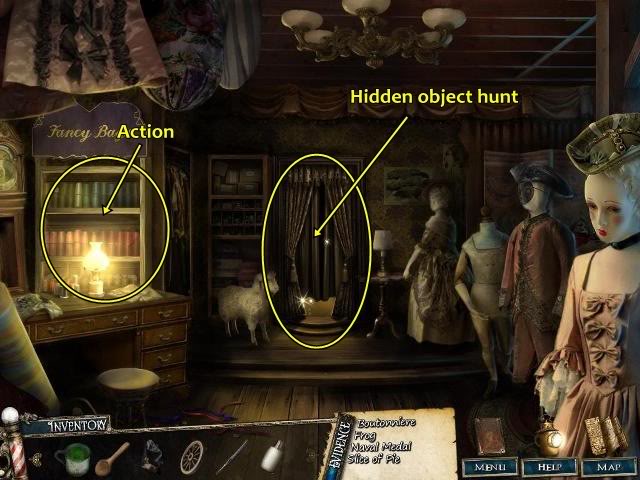
There are four active areas in this scene.
Click the Map Piece to take the Inventory item.
Clicking on the rubbish pile (action item on the left) requires an action. You’ll come back to it later in the game.
Click on the horse carriage to look for hidden objects:
- You receive a Crest Tile as an Inventory item.
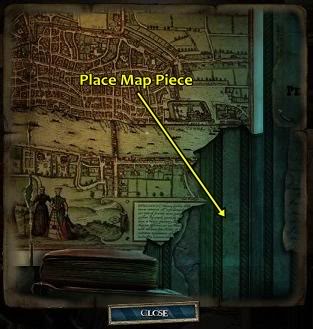
Click on the Watch House door.
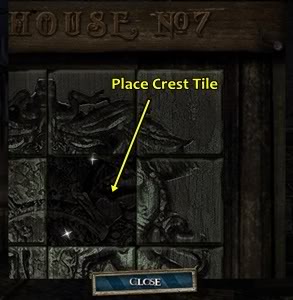
From the Inventory list, click the Crest Tile and place it in the opening.
You have to complete a puzzle:
- Click a tile to rotate it clockwise (right-clicking rotates it counter-clockwise).
- Click to rotate the tiles until they form a picture or a crest.
- Start with the outer corners, then do the sides, then the interior.
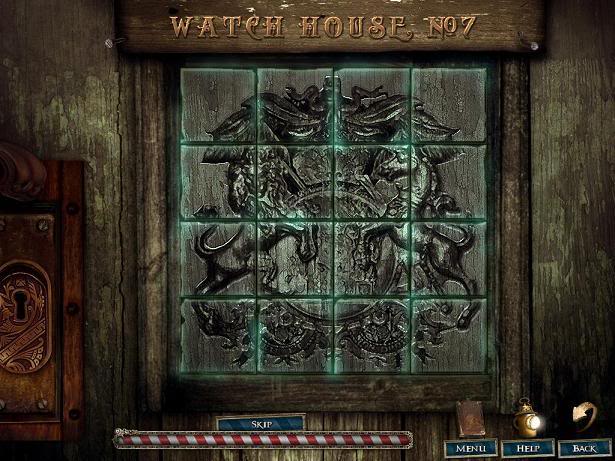
You can now enter the Watch House.
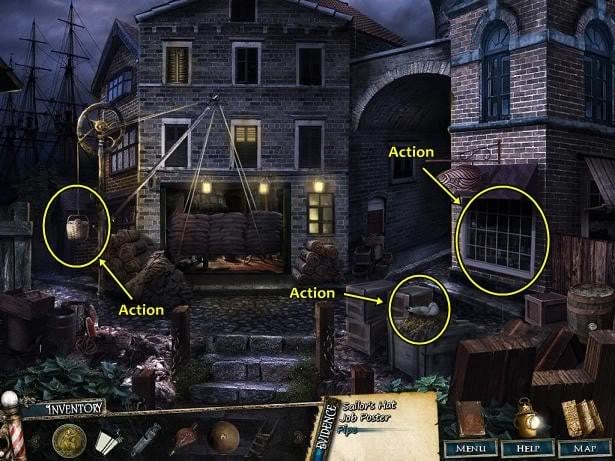
Watch House
There are four active areas in this scene.
- Click the Lantern to take the Inventory item.
- Click on the map (action item, upper left).
You now have access to the Map, allowing you to move from location to location.
- Click the Newspaper (action item on chair).
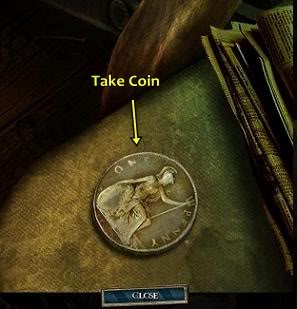
- Click the Coin to take the Inventory item.
- Click the desk to look for hidden objects.
- You receive a Whistle as an Inventory item.
Exit the Watch House (place your cursor towards the bottom of the scene and notice it changes and is pointing downwards).

Watch Lane
- The horse carriage is sparkling. Click on it to look for hidden objects.
- You receive a Fire Bellows as an Inventory item.
Click the Map icon (bottom right of your screen).
- The map opens and your location is highlighted. Move your mouse to the other location, Lime Wharf.
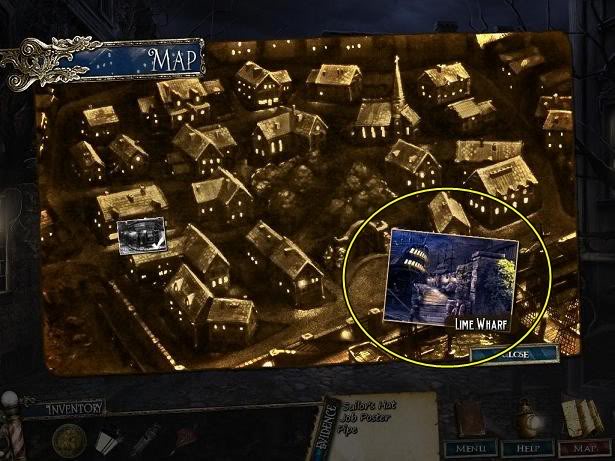
- Notice Watch Lane is now black and white with a checkmark. This means there is nothing left to find on Watch Lane for this chapter.
- Tip: Use the map to determine if you still have more to do in a location.
Click Lime Wharf.
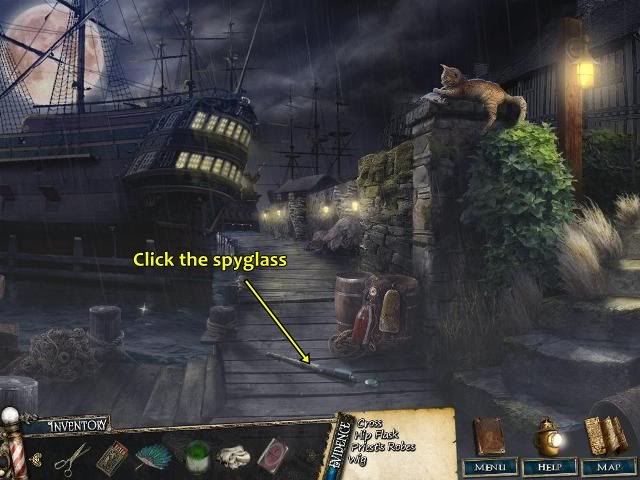
Lime Wharf
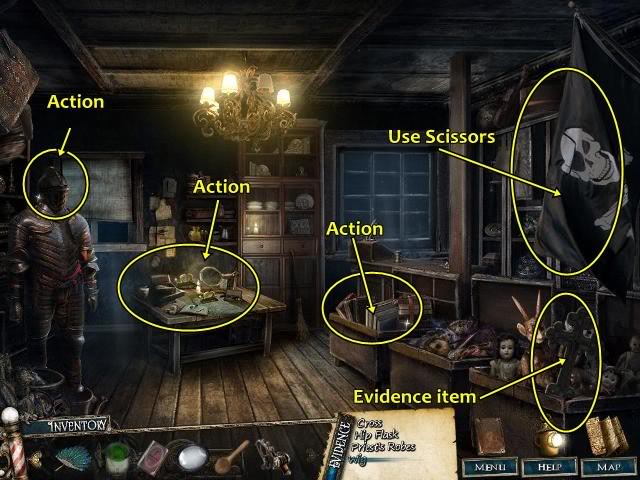
There are five active areas in this scene.
- Click on the pile of nets (lower right) to take a Pipe. This is an Evidence item.
- Click on the active area in the water.
- You don’t yet have the proper Inventory item to perform this action. Click Close.
- Click the fishing nets (middle of the screen) to look for hidden objects.
- You receive a Cannon Ball as an Inventory item.
- Click the Ladder to take the Inventory item.
- Click the cat. She has a spyglass but won’t let go. You don’t yet have the proper inventory item to distract it.
Head up the stairs (right of your screen).
There are three active areas in this scene.
Click the bird.
- It is on something so you need to scare it away.
- Click the Whistle from your Inventory items and use it on the bird.
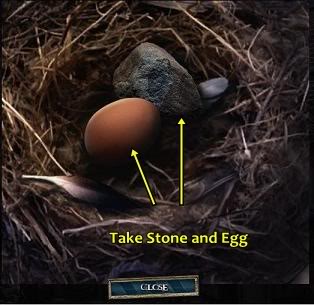
- Click the empty nest.
- Click the Egg and Stone to take the Inventory items.
Click the window.
- There is a job poster on the other side of the glass.
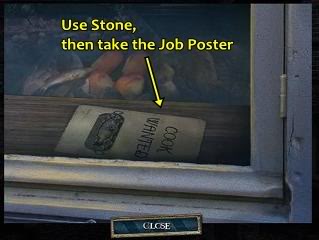
- Click the Stone from your Inventory items and use it on the glass.
- Click the Job Poster to take the Evidence item.
The basket (left hand side of screen) is attached to a rope and pulley.
- Click the basket.
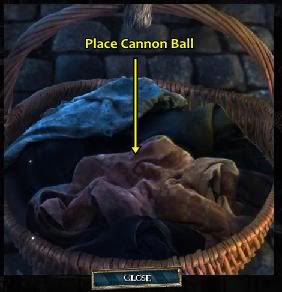
- Click the Cannon Ball from your Inventory items and use it on the basket.
This reveals a new area.
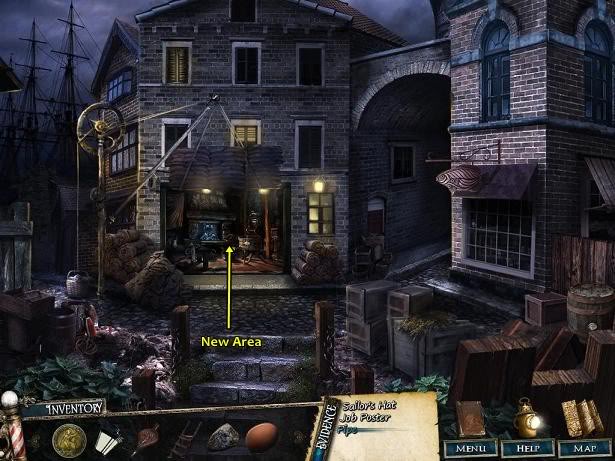
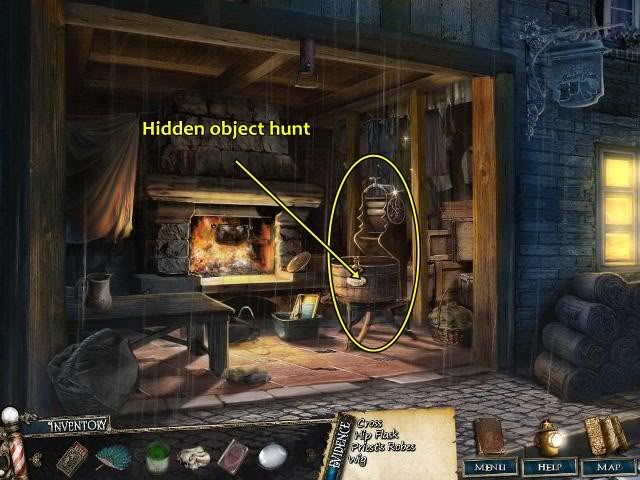
Enter the room.
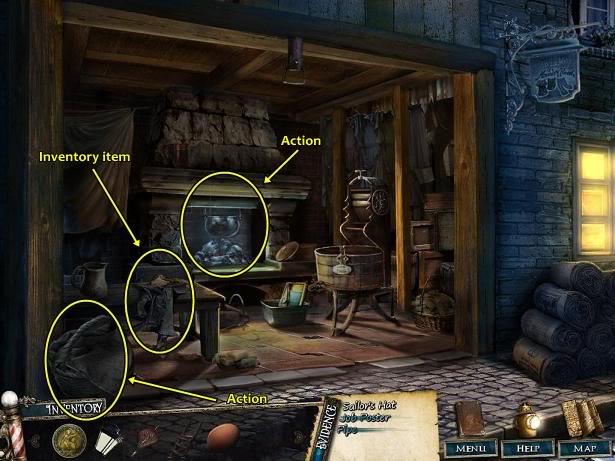
There are three active areas in this scene.
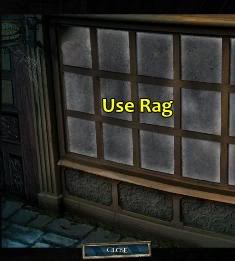
- Click the Rag on the table to take the Inventory item.
- Click the basket.
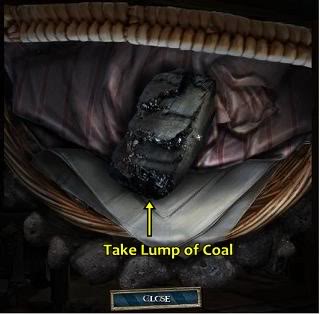
- Click the Lump of Coal to take the Inventory item.
- Click the cauldron.
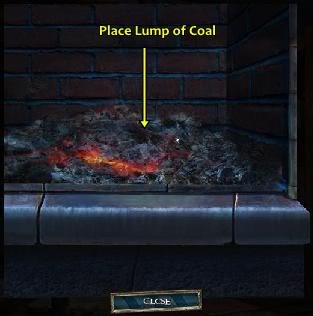
- The fire is low. Click the Lump of Coal from your Inventory items and use it on the fire.
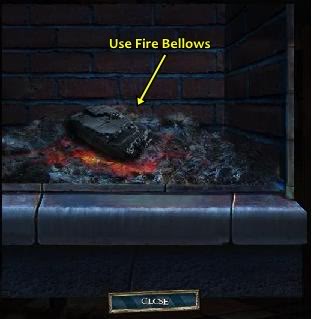
- Click the Fire Bellows from your Inventory items and use it on the coal.
The room is now lit up and the washing machine is sparkling.
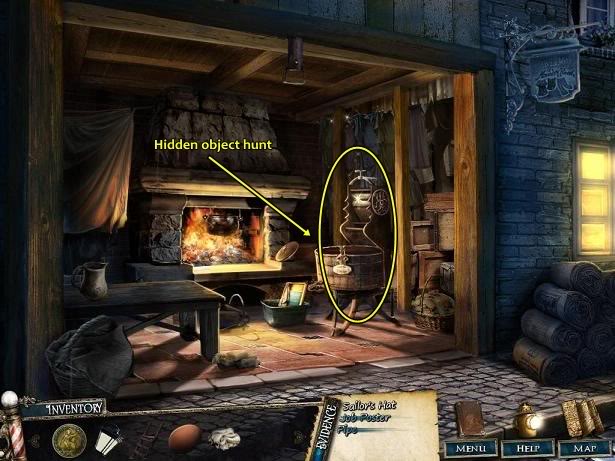
- Click the washing machine to look for hidden objects.
- You receive a Sailor’s Hat as an Evidence item.
The chapter is complete.
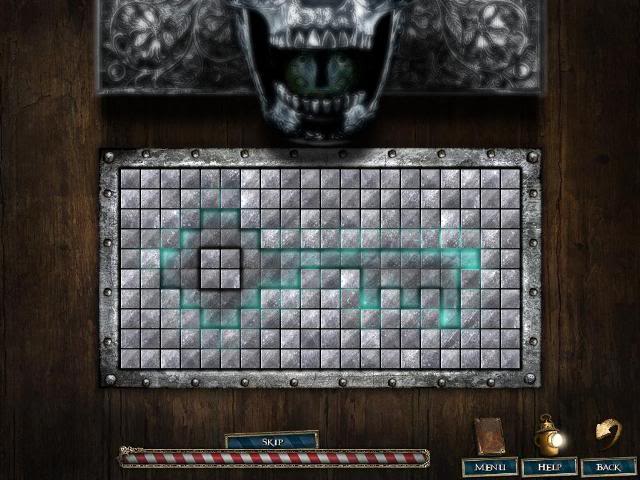
- Solve the puzzle. Rearrange the torn photo pieces.
- Tip: Start with the corners, then do the sides, then the interior.
Chapter 2 Lime Wharf
After watching the chapter’s intro (or you can skip it), you find yourself where you left off. You must find Johanna, the missing sailor’s fiancée.
Through your investigation in this chapter, you must find three inventory items:
- An invitation;
- A purse; and
- An umbrella.
Click Close to close the case notes.
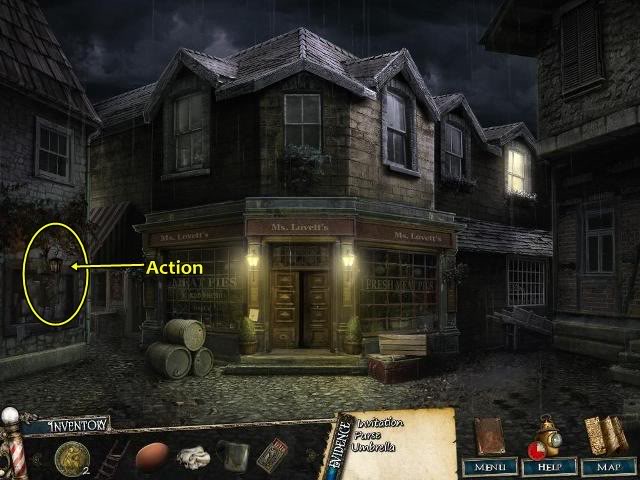
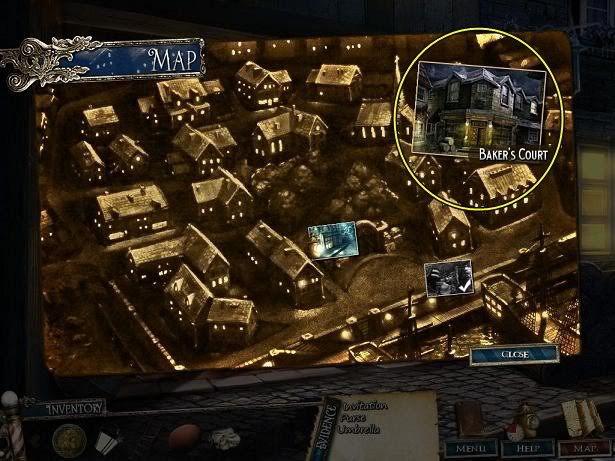
Click Baker’s Court.
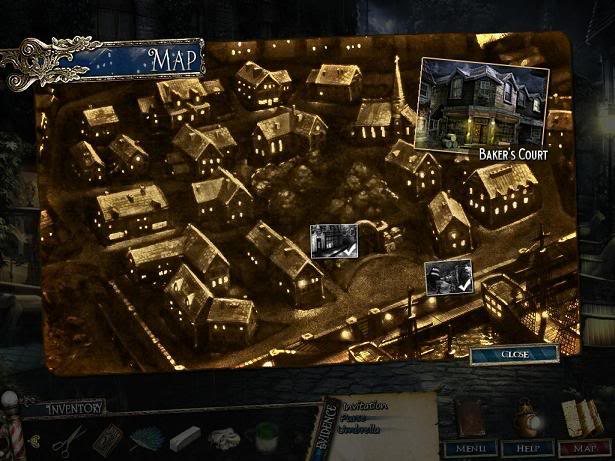
Baker’s Court
There are three active areas in this scene.
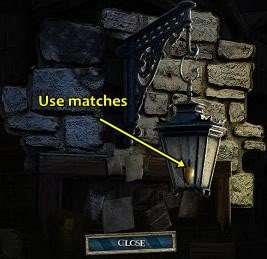
Click the wall (left-hand side of screen).
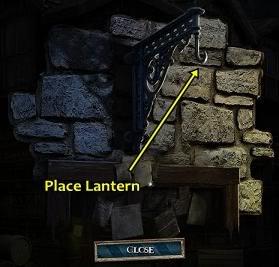
- It’s too dark to see. Click the Lantern from your Inventory items and use it on the wall.
- It will still be too dark, and you have to find something to light the lantern.
- Click Close, then the puddle.
- It’s an indentation of keys. You don’t have the necessary Inventory item to perform this action.
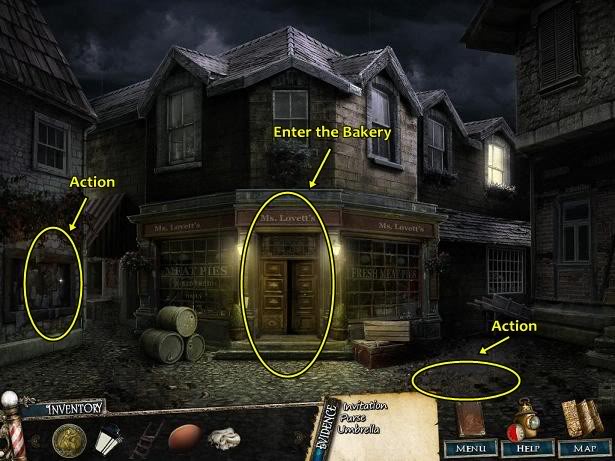
- Click Close, and enter the bakery.
Bakery
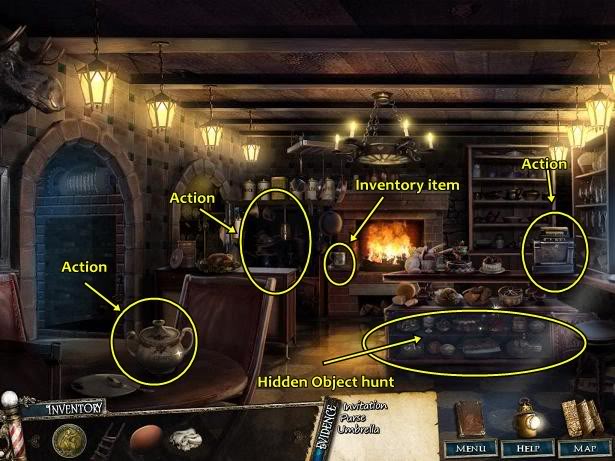
There are five active areas in this scene.
- Click the Empty Mug beside the fire to take the Inventory item.
- Click the sugar bowl.
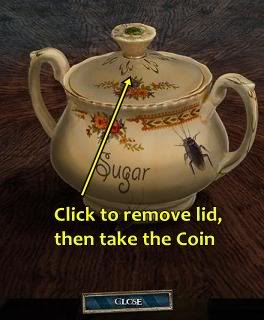
- Click the sugar bowl’s cover.
- Click the Coin to take the Inventory item.
- Click the shelf in the back (left-hand, beside fire).
- You need a bell to ring. You don’t have the necessary Inventory item to perform this action.
- Click Close.
- Click the cash register.
- The surface requires polishing and the Rag will not do. You don’t have the necessary Inventory item to perform this action.
- Click Close.
- Click the glass case to look for hidden objects.
- You receive Matches as an Inventory item.
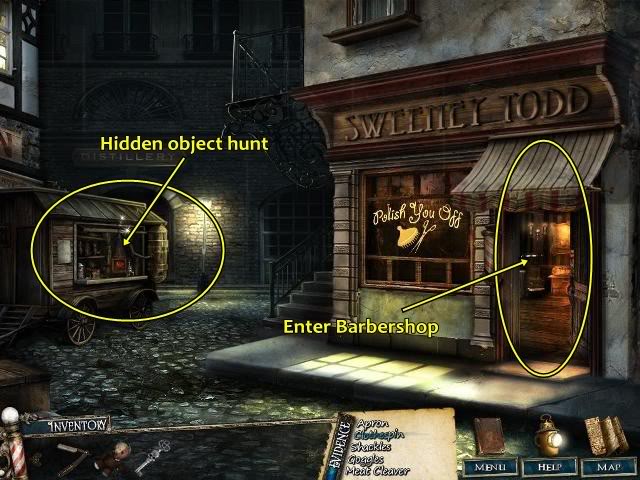
Exit the bakery.
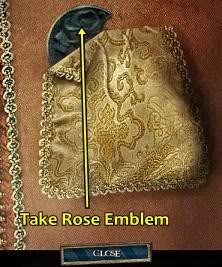
Click the lantern.
- Click the Matches from your Inventory items and use it on the lantern.
- Click the lantern to look for hidden objects.
- You receive a Rose Emblem Piece as an Inventory item.
Click the map.
Click Piccadilly Square.
Piccadilly Square
There are three active areas in this scene.
- Click the Fan on the bench to take the Inventory item.
Enter the tailor shop.
Tailor Shop
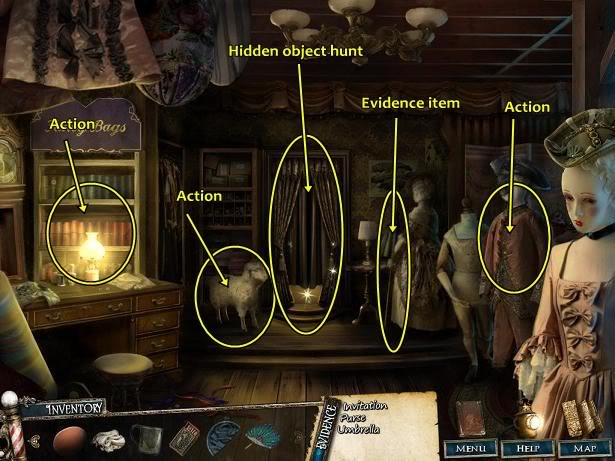
There are five active areas in this scene.
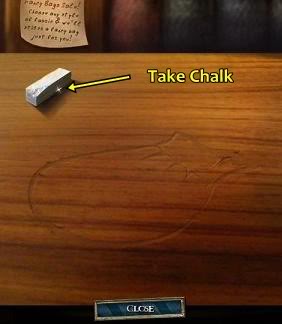
- Click the desk.
- Click the Chalk to take the Inventory item.
- Another action is required however you don’t have the necessary Inventory item.
- Click Close.
- Click the sheep.
- You don’t have the necessary Inventory item to perform this action.
- Click Close.
- Click the curtained area to look for hidden objects.
- You receive Scissors as an Inventory item.
- Click the Umbrella to take the Evidence item.
- Click the mask wearing mannequin.
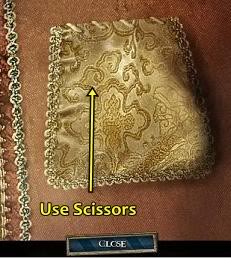
- Click the Scissors from your Inventory items and use it on the pocket.
- Click the Rose Emblem Piece to take the Inventory item.
- Tip: The Scissors do not work on the sheep.
Exit the tailor shop.
Go up through the gate to the garden.
Garden
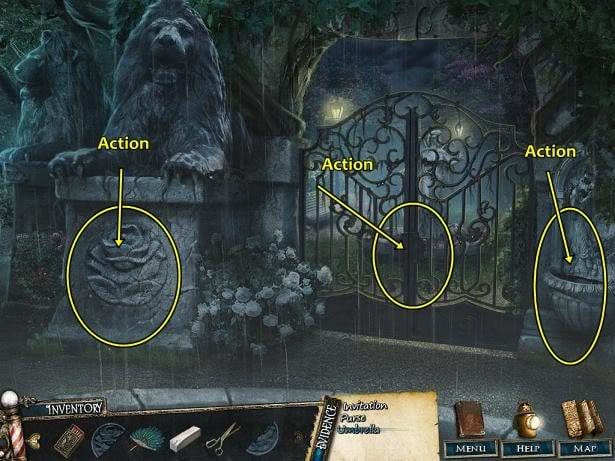
There are three active areas in this scene.
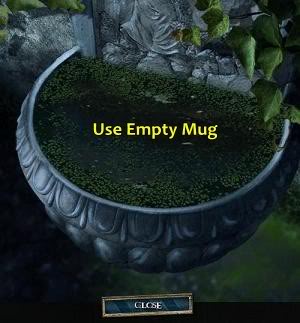
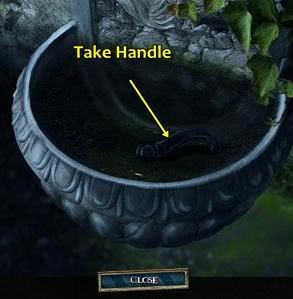
- Click the fountain.
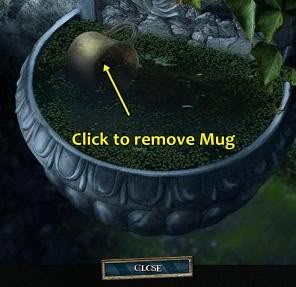
- Click the Empty Mug from your Inventory items and use it on the fountain.
- Click the Mug to take the Inventory item.
- Click the Handle to take the Inventory item.
- Click the stone under the lion.
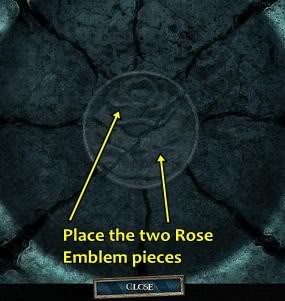
- Click the two Rose Emblem Pieces from your Inventory items and use it on the imprint.
A puzzle has to be completed.
- The "petals" need to be rotated so there is one in each slot.
- Rotate the pieces to move them to their correct position.
- Solution: Line all the petals up so they are pointing northeast.
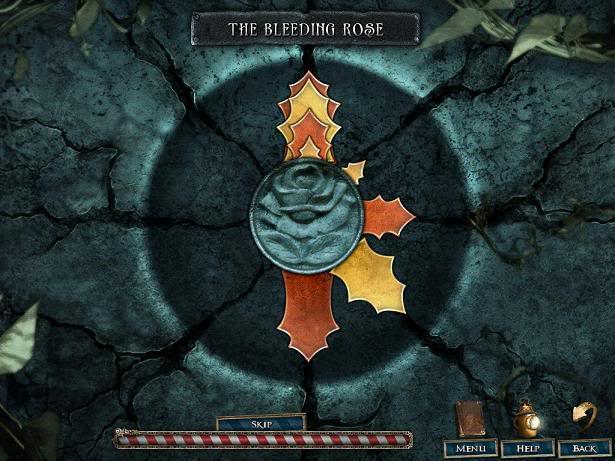
- The petals come in four sizes. Move the second smallest piece on spot clockwise.
- Move the second biggest petals clockwise to the next available slot.
- Move the smallest petals two spots counter-clockwise.
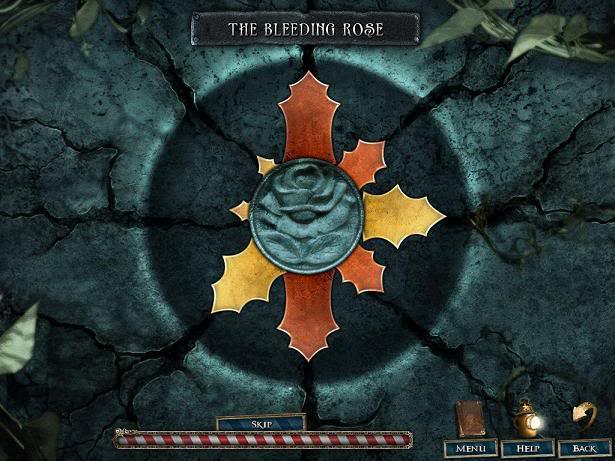
- The rose emblem stone has moved. Click the Purse to take the Evidence item.
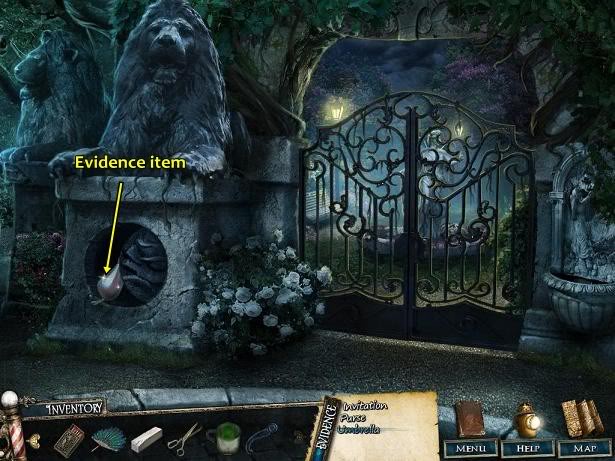
- Click the gate.
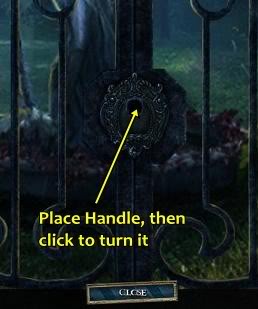
- Click the Handle from your Inventory items and use it on the lock.
- Click the handle to open it.
- Click the statue to look for hidden objects.
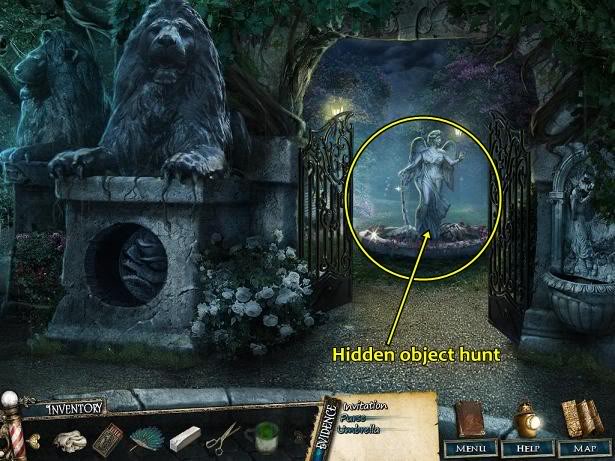
- You receive a Penny as an Inventory item.
Click Baker’s Court on the map.
Baker’s Court
Enter the bakery.
Bakery
- Click the cash register.
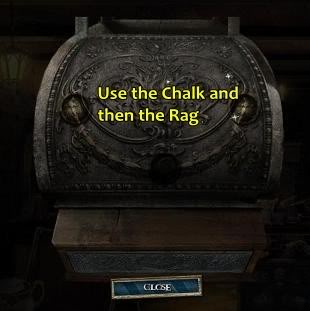
- Click the Chalk from your Inventory items and use it on the cash register.
- Click the Rag from your Inventory items and use it on the chalky cash register.
- Click the Pennies from your Inventory items and place them in the open slots.

A puzzle has to be completed.
- Click and drag a numbered button to reveal a shape.
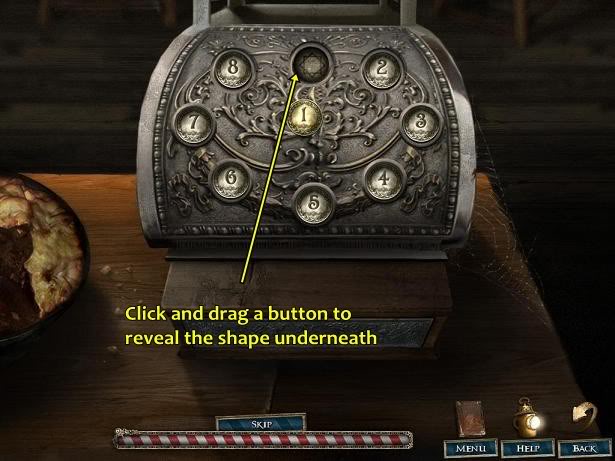
- Switch the buttons to put the appropriate number on the appropriate shape.
- Take note of all the shapes. Any ideas?
- Each shape represents a number.
- Still stuck? Count the sides or corners or points of the shapes.
Solution:
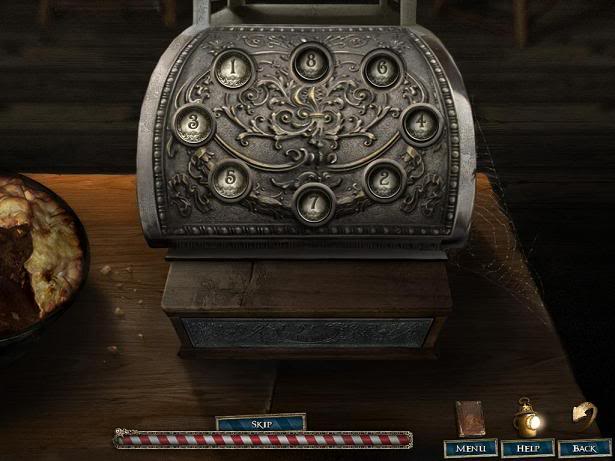
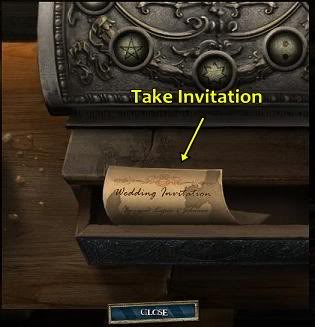
- Click the cash register again. The door is open. Click the Invitation to take the Evidence item.
The chapter is complete.
- Solve the puzzle. Rearrange the torn photo pieces.
- Tip: Start with the corners, then do the sides, then the interior.
Chapter 3 Baker’s Court
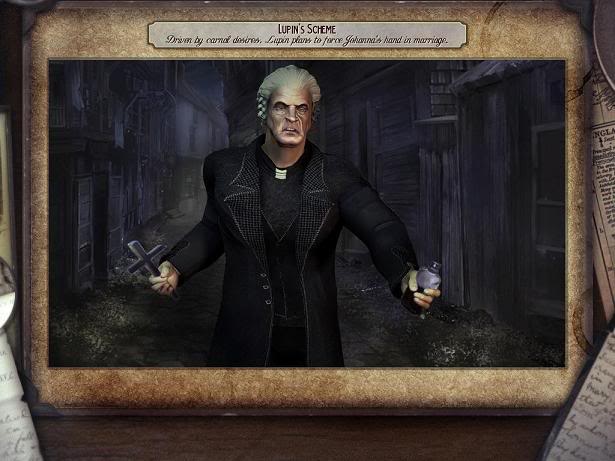
After watching the chapter’s intro (or you can skip it), you find yourself where you left off. You must find Reverend Lupin.
Through your investigation in this chapter, you must find four inventory items:
- A cross;
- A hip flask;
- A priest’s robes; and
- A wig.
Click Close to close the case notes.
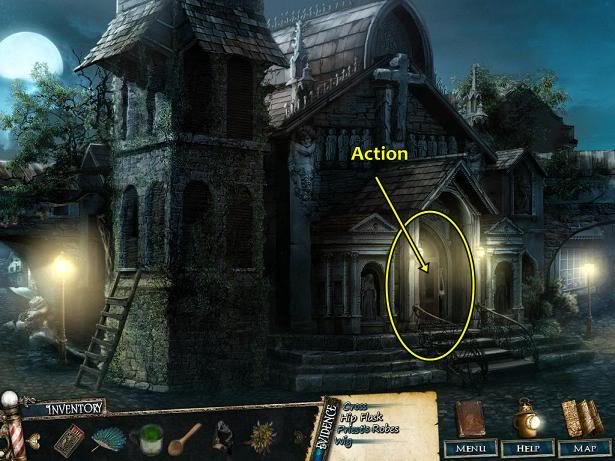
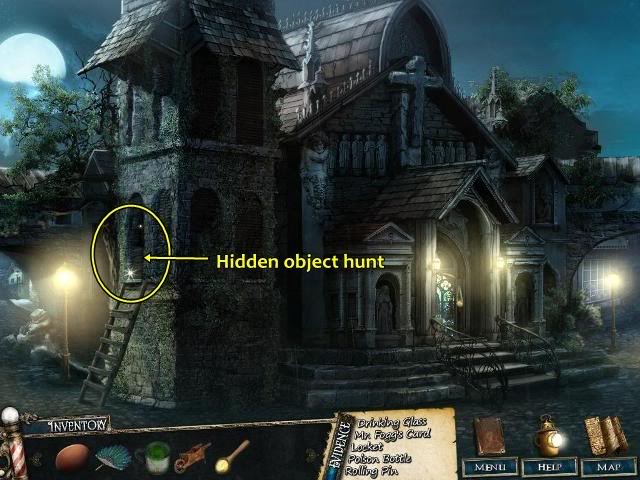
Click Bell Tower on the map. Bell Tower
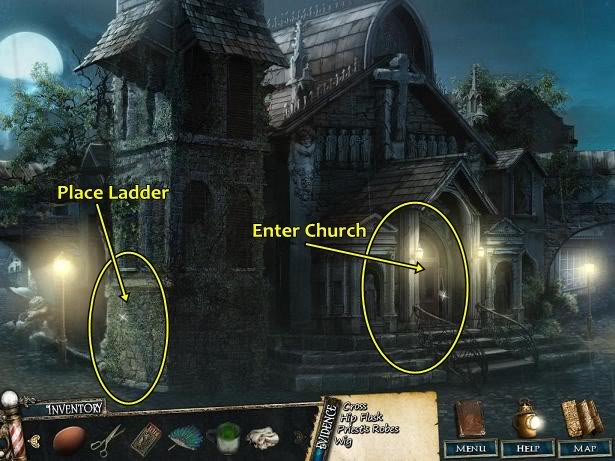
There are two active areas in this scene.
- Click on the side of the church. It’s too high to climb.
- Click the Ladder from your Inventory items and use it on the side of the church.
- Click the ladder.
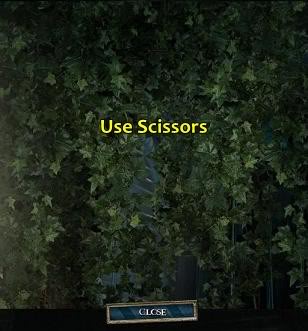
- The ivy is in the way. Click the Scissors from your Inventory items and use it on the ivy.
- Click the window above the ladder to look for hidden objects.
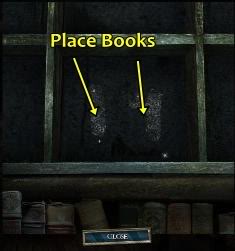
- You receive a Book as an Inventory item.
- Click the door. Read the sign. You don’t have the necessary Inventory item to perform this action.
Click Piccadilly Square. Piccadilly Square
Go up through the gate.
Garden
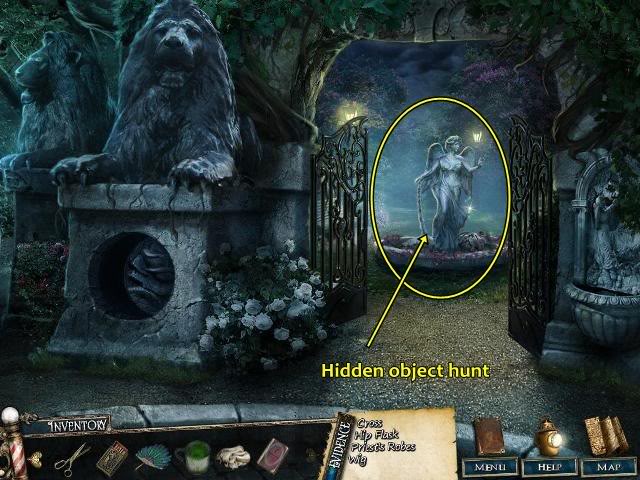
- Click the statue to look for hidden objects.
- You receive a Fish as an Inventory item.
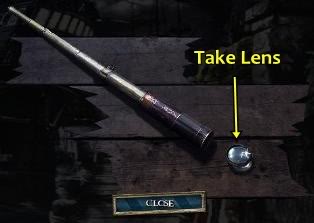
Click Lime Wharf on the map. Lime Wharf
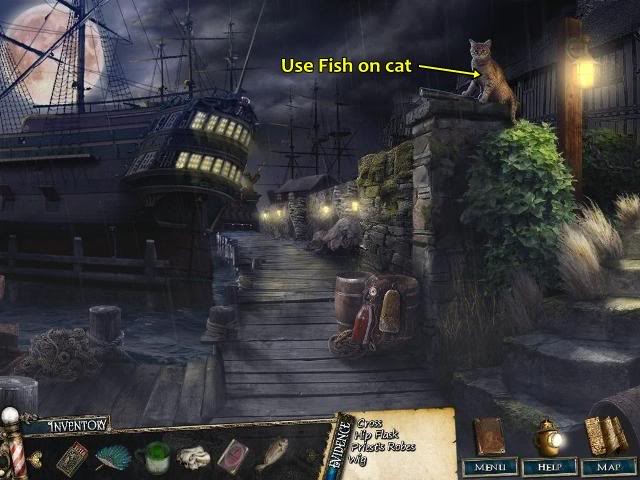
- Click the Fish from your Inventory items and use it on the cat.
- The cat drops the spy glass.
- Click the Lens to take the Inventory item.
Go right, up the stairs.
Then go forward into the lit area.
- Click the washing machine to look for hidden objects.
- You receive a Wig as an Evidence item.
Click Junk Street on the map.
Junk Street
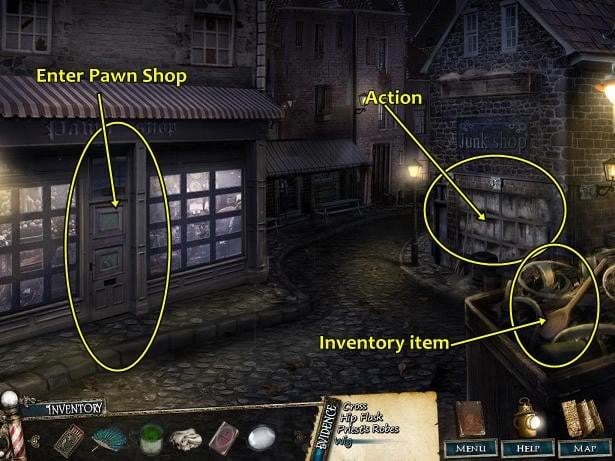
- There are three active areas in this scene.
- From the garbage bin in the bottom right-hand corner of the screen, click the Scoop to take the Inventory item.
- Click on the window of the junk shop.
- It’s filthy. Click the Rag from your Inventory items and use it on the dirty window.
- Now that the window is clean, click on it to look for hidden objects.
- You receive a Fishing Rod as an Inventory item.
Enter the pawn shop
Pawn Shop
There are five active areas in this scene.
- From the bin in the bottom right-hand corner of the screen, click the Cross to take the Inventory item.
- Click the Scissors from your Inventory items and use them on the Jolly Roger flag. The cut piece is added to your Inventory items.
- Click the suit of armour. You don’t have the necessary Inventory item to perform this action. Click Close.
- Click on the desk.
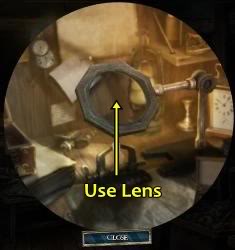
- Click the Lens from your Inventory items and use it on the lamp.
- Click the desk to look for hidden objects.
- You receive a Book as an Inventory item.
- Click the pile of books. Something is missing.
- Click the Books from your Inventory items and place them on the shelf.
- You have to complete a puzzle.
- Each book has a number from 1-5 on it. There are two of each number.
- Each row of shelves must equal 15.
- Each column of shelves must equal 10.
- Notice that two shelves have a number in them? Only one book with that number can be on that shelf.
- Still stuck? 1+2+3+4+5=15. One of each book goes in each row.
Solution:
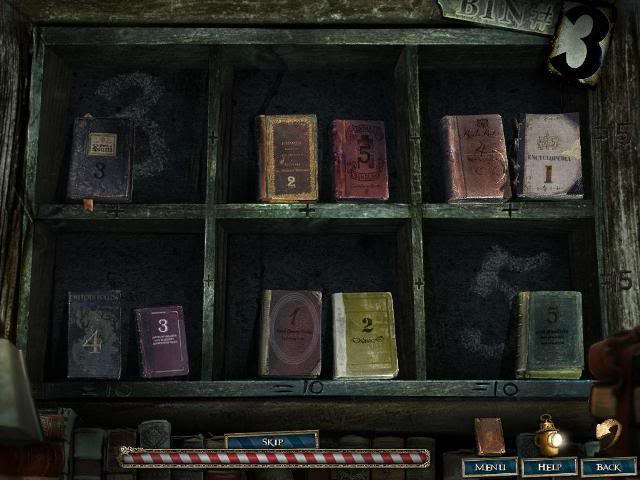
Some books fell on the floor.
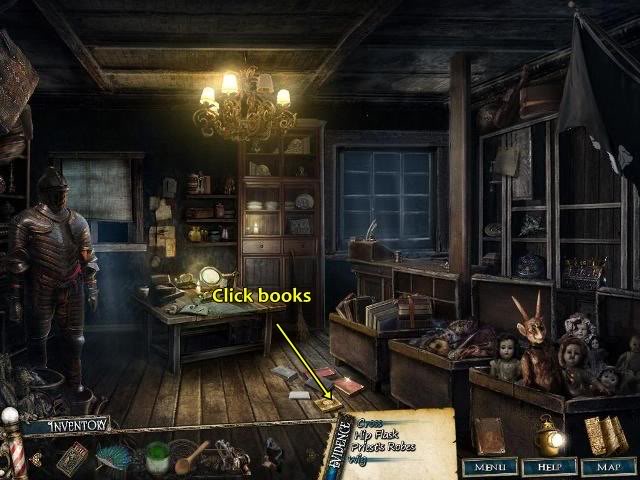
Click the books.

- Click to open the book.
- Click the Incense to take the Inventory item.
Click the map icon.
Click Lime Wharf.
Lime Wharf

Click the active area in the water.
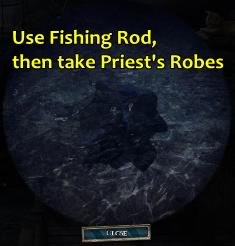
- Click the Fishing Rod from your Inventory items and use it in the water.
- Click the Priest’s Robes to take the Evidence items.
Click the map icon.
Click Bell Tower.
Bell Tower
Click the door.
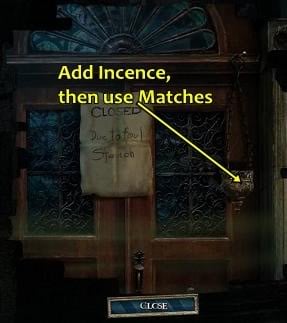
- Click the Incense from your Inventory items and put it in the burner.
- Click the Matches from your Inventory items and use them on the incense.
- Click the door.
Enter the church.
Inside the church
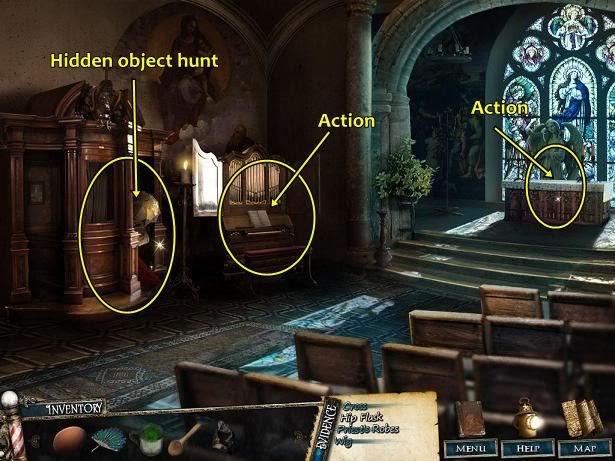
- There are three active areas in this scene.
- Click the confessional to look for hidden objects.
- You receive Organ Keys as an Inventory item.
- Click on the organ.
- Click the Organ Keys from your Inventory items and place them on the organ. ST-3-bt-inside-organ-with keys
- Click the newly placed organ keys to reveal a candle.
- Click the Candle to take the Inventory item.
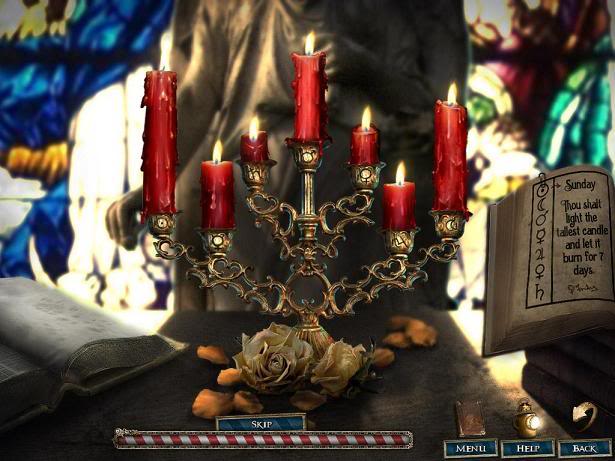
- Click the altar.
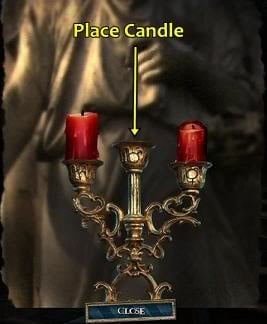
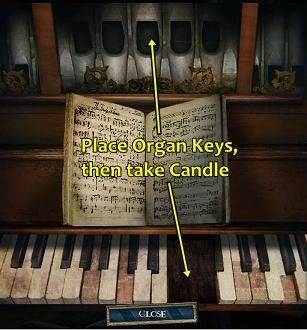
- Click the Candle from your Inventory items and place it on the candelabra.
- You have to complete a puzzle.
- Read the clue on the right-hand side.
- The symbols represent the days of the week, starting with Sunday.
- Place the candles in the appropriate holder, placing the tallest candle in the Sunday holder.
Solution: Place the candles in descending order of height, starting with Sunday and the shortest candle ends up in the Saturday holder.
Tip: Wednesday and Friday’s symbols look very similar. If you thought you solved the puzzle but didn’t, switch their candles.
Click on the opening below the altar.
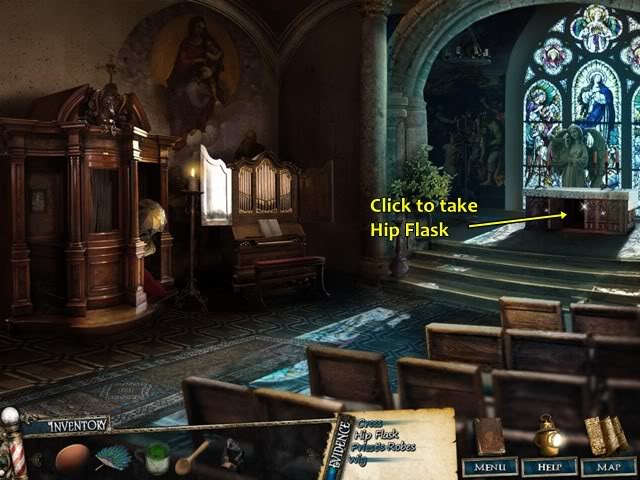
- Click the Flask to take the Evidence item.
The chapter is complete.
- Solve the puzzle. Rearrange the torn photo pieces.
- Tip: Start with the corners, then do the sides, then the interior.
Chapter 4 Bell Tower
After watching the chapter’s intro (or you can skip it), you find yourself where you left off. You must find a young boy who works at the barbershop.
Through your investigation in this chapter, you must find four inventory items:
- A boutonniere;
- A frog;
- A naval medal; and
- A slice of pie.
Click Close to close the case notes.
Click the map icon.
Click Junk Street.
Junk Street
Enter the pawn shop.
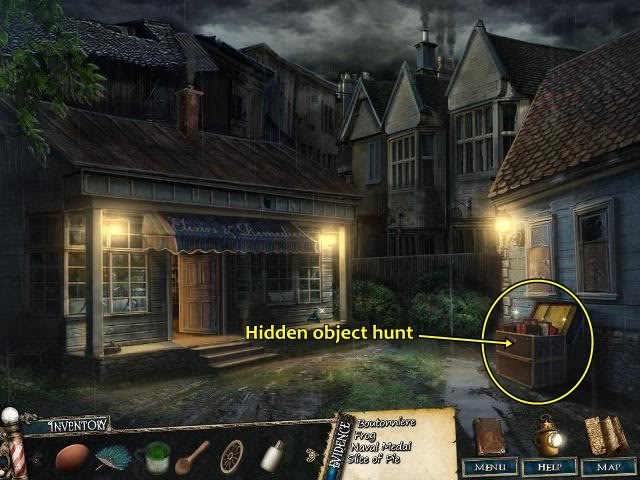
- Click the desk to look for hidden objects.
- You receive a Lockpick as an Inventory item.
Click the map icon.
Click Fleet Street.
Fleet Street
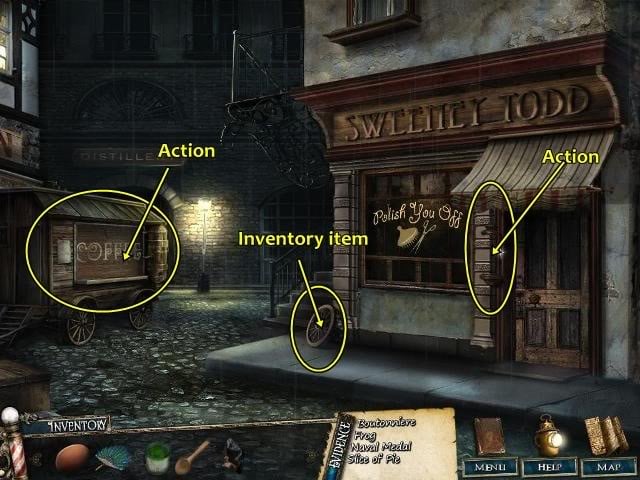
There are three active areas in this scene.
- Click the Wheel to take the Inventory item.
- Click the coffee cart.
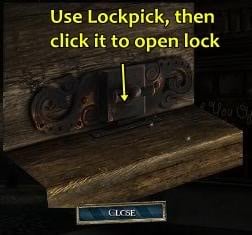
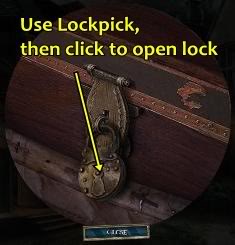
- Click the Lockpick from your Inventory items and use it on the lock.
- Click the lockpick to open the lock.
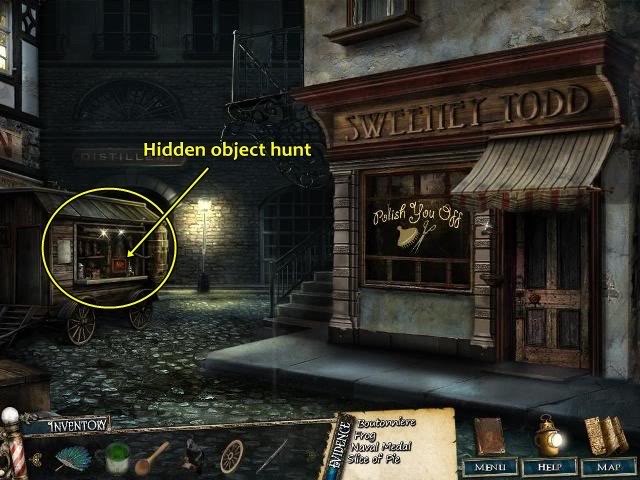
- Click the coffee cart to look for hidden objects.
- You receive Milk as an Inventory item.
Click the map icon.
Click Piccadilly Square.
Piccadilly Square
Enter the tailor shop.
- Click the curtain to look for hidden objects.
- You receive a Needle and Thread as an Inventory item.
- Click the table (left-hand side of screen).
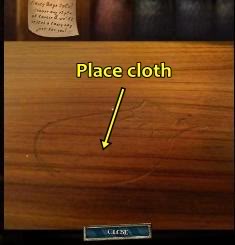
Click the Piece of Cloth (from the Jolly Roger flag) from your Inventory items and place it on the table.
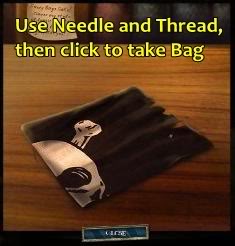
- Click the Needle and Thread from your Inventory items and use it on the cloth.
- Click the Bag to take the Inventory item.
Click the map icon.
Click Reagent Row.
Reagent Row
- There are four active areas in this scene.
- Click the Crutch to take the Inventory item.
- Click the mouse hole. You don’t have the necessary Inventory item to perform this action. Click Close.
- Click on the suitcase.
- Click the Lockpick from your Inventory items and use it on the lock. ST94
- Click the lockpick to open the lock.
- Click the suitcase to look for hidden objects.
You receive Peanuts as an Inventory item.
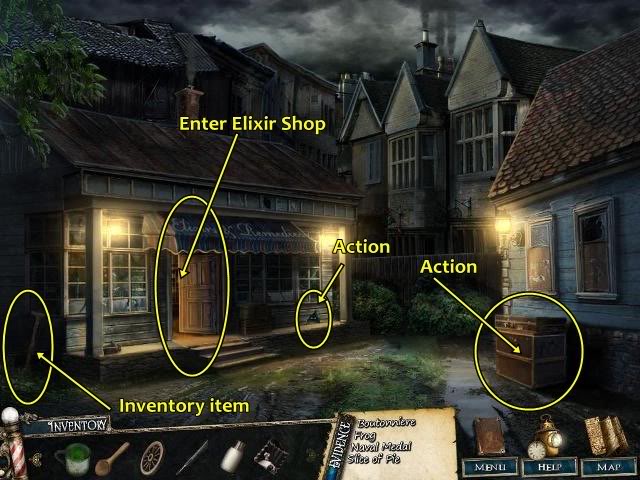
Enter the elixir shop.
Elixir shop
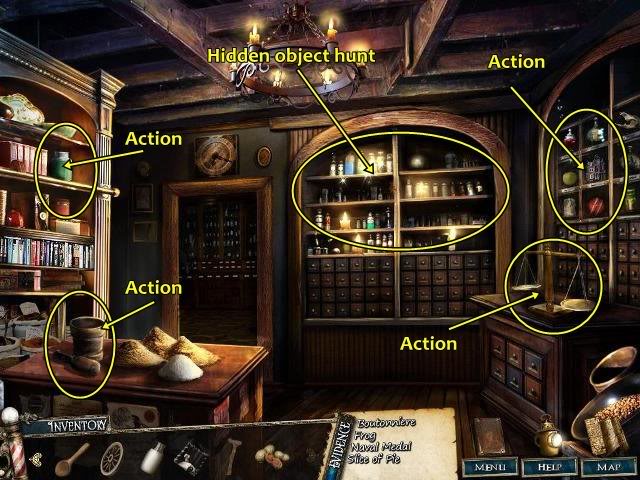
There are five active areas in this scene.
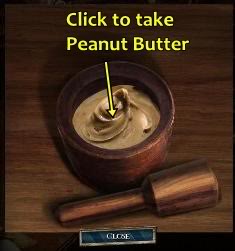
Click the mortar and pestle on the table.
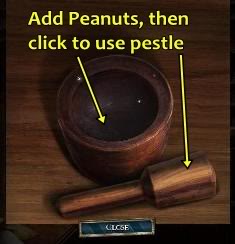
Click the Peanuts from your Inventory items and put them in the mortar (the bowl).
Click the pestle (bat) and use it on the peanuts to make peanut butter.

Click to remove the pestle, then click the Peanut Butter to take the Inventory item.
- Click the jar of acid on top of the bookshelf.
- You don’t have the necessary Inventory item to perform this action. Click Close.
- Click the shelf to look for hidden objects.
- You receive a Skull as an Inventory item.
- Click the shelf above the scale. You have to complete a puzzle.
- You have to put the appropriate object on the appropriate shelf.
- There are 12 shelves, 11 have a word at the bottom.
- Look closely at the words. You are only seeing part of the word, in some cases, you can make out the blurred portion, i.e., ladyfinger.
- Now examine the objects on the shelves. Notice one is a finger? This belongs on the "ladyfinger" shelf.
- Place the rest of the objects on the shelf to form words.
Solution:
Click that area of the shelf again.
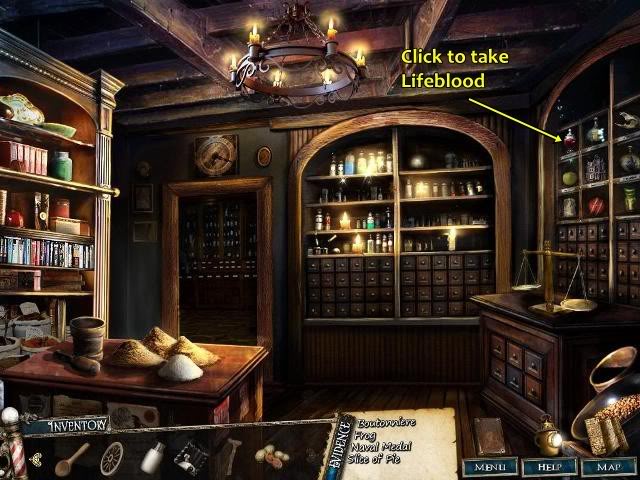
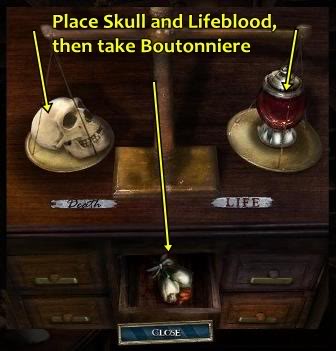
- Click the Lifeblood to take the Inventory item.
- Click the scales.
- Click the Skull from your Inventory items and place it on the balance representing Death and click the Lifeblood and place it on the balance representing Life.
- A drawer opens. Click the Boutonniere to take the Evidence item.
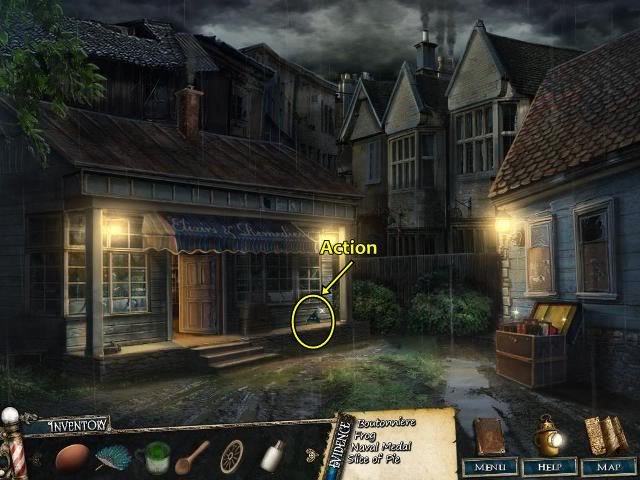
Click the map icon, then click Guttersnipe Alley.
Guttersnipe Alley
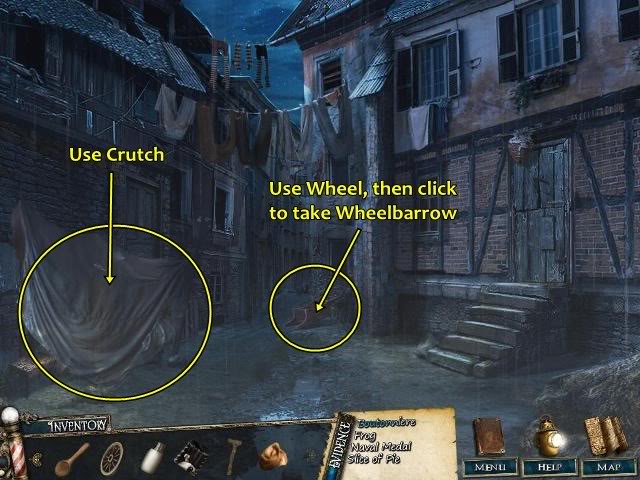
There are three active areas in this scene.
- Click the Wheel from your Inventory items and use it on the wheelbarrow. Then click the Wheelbarrow to take the Inventory item.
- Click on the tent. It has fallen over. Click the Crutch from your Inventory items and use it on the tent.
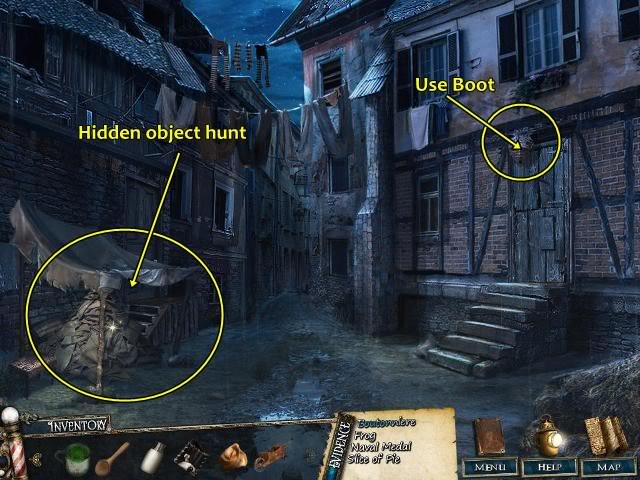
- Click the tent to look for hidden objects.
- You receive a Boot as an Inventory item.
- Click the door. There is a wasps’ nest blocking the door.
- Click the Boot from your Inventory items and use it on the nest.

- Click the Bag from your Inventory items and use it on the wasps’ nest.
- Click on the door to go inside.
Slum House
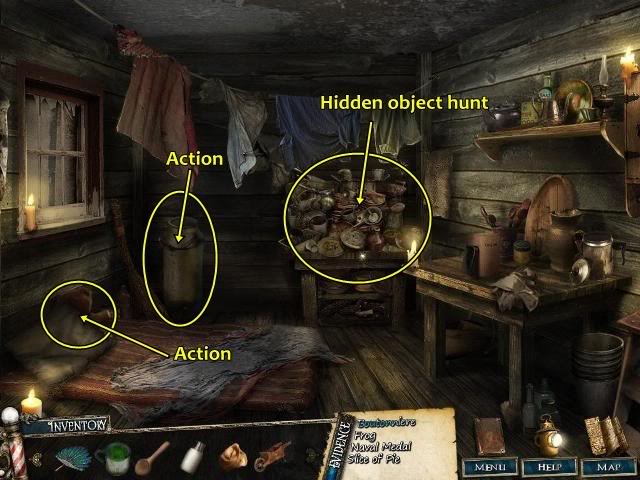
- There are three active areas in this scene.
- Click the pillow.
- You don’t have the necessary Inventory item to perform this action.
- Click Close.
- Click the barrel.
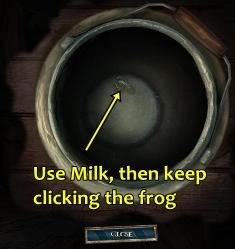
Click the Milk from your Inventory items and use it on the barrel. Click the frog several times until it’s gone.
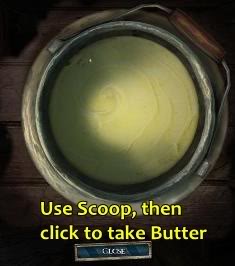
- Click the Scoop from your Inventory items and use it on the butter.
- Click the Scoop with Butter to take the Inventory item.
- Click the pots and pans to look for hidden objects.
- You receive a Mousetrap as an Inventory item.
Click the map icon.
Click Reagent Row.
Reagent Row
- Click the mouse hole.
- Click the Mousetrap from your Inventory items and place it in front of the hole.
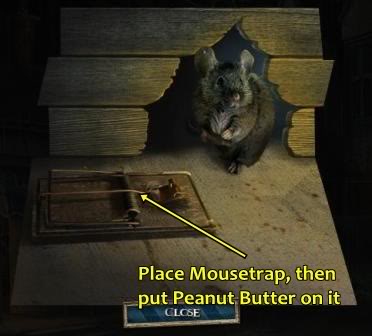
Click the Peanut Butter from your Inventory items and place it on the mousetrap.
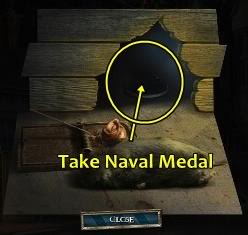
- Click the Naval Medal to take the Evidence item.
Click the map icon.
Click Baker’s Court.
Baker’s Court
Enter the bakery.
Bakery
- Click the glass case to look for hidden objects.
- Click the Slice of Pie to take the Evidence item.
The chapter is complete.
Solve the puzzle. Rearrange the torn photo pieces.
Tip: Start with the corners, then do the sides, then the interior.
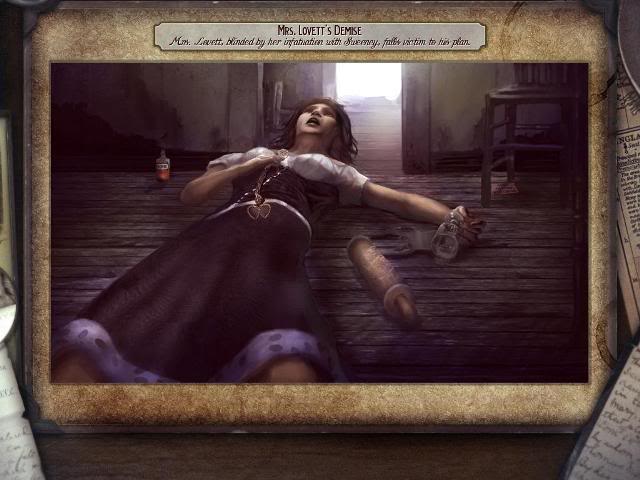
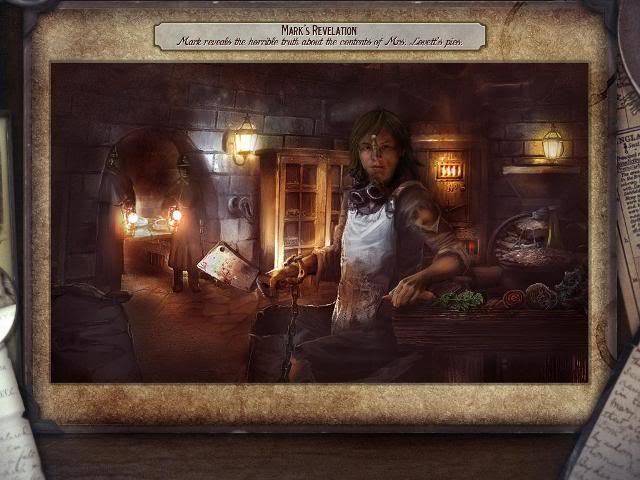
Chapter 5 Baker’s Court
After watching the chapter’s intro (or you can skip it), you find yourself where you left off. You must find Mrs. Lovett, the pie maker.
Through your investigation in this chapter, you must find five inventory items: A drinking glass, Mr. Fogg’s card, a locket, poison bottle, and rolling pin.
Click Close to close the case notes.
Bakery
Exit the bakery.
- Click the wall to look for hidden objects.
- You receive a Service Bell as an Inventory item.
Enter the bakery.
Bakery
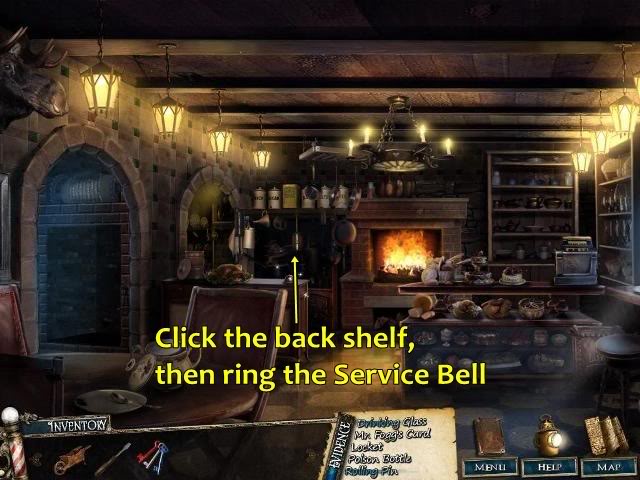
Click the back shelf. Click the Service Bell from your Inventory items and place it on the table.
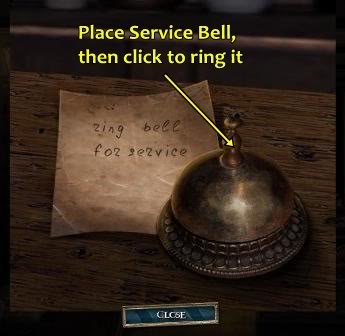
Click on the bell. A dumbwaiter appears; click on him, but you won’t have the necessary Inventory item to perform this action, so click Close.
Click the map icon, then click on the Bell Tower.
Bell Tower
Click the ladder to look for hidden objects, and you will receive a Door Knocker as an Inventory item. Then click Mr. Fogg’s Asylum on the map icon.
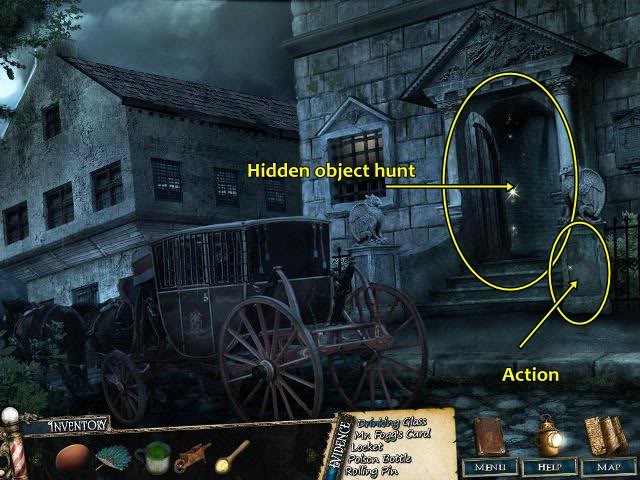
Mr. Fogg’s Asylum
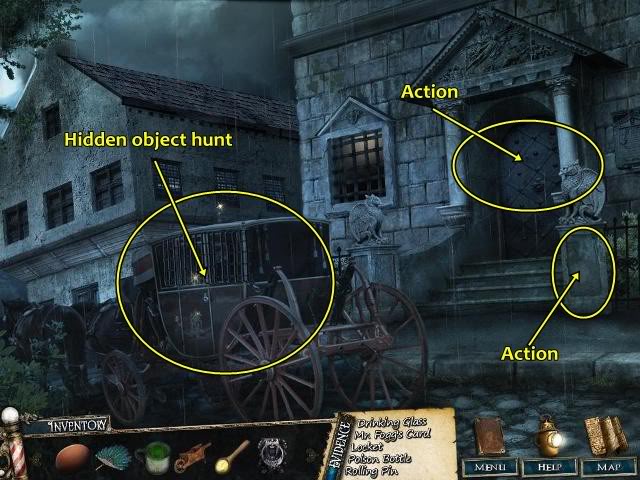
- There are three active areas in this scene.
- Click the carriage to look for hidden objects.
- You receive a Driving Glass as an Evidence item.
- Click the stone under the small statue.
- You don’t have the necessary Inventory item to perform this action.
- Click Close.
- Click the door.
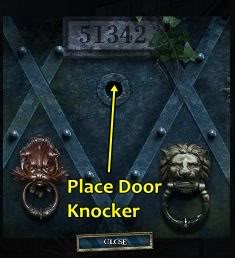
- Click the Door Knocker from your Inventory items and use it on the door.
- You have to complete a puzzle.
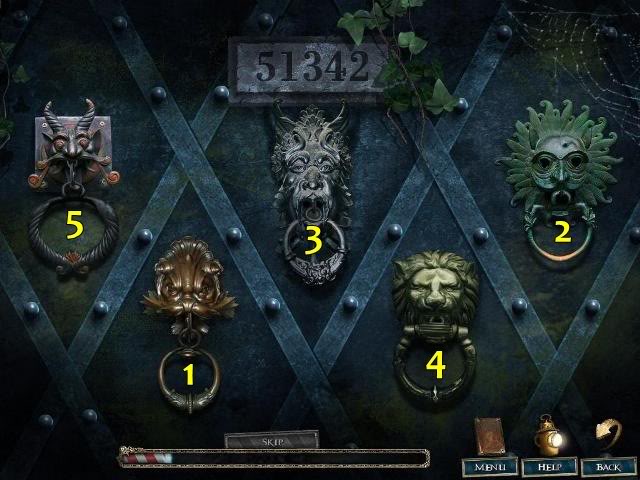
- The number 51342 is at the top of the puzzle.
- The door knockers have to be clicked in a specific sequence that has something to do with 51342.
- The game’s help guide says the first knocker is the last to be pulled.
- The door knockers are not numbered 1-2-3-4-5.
- Still stuck? The door knockers are numbered 5-1-3-4-2. Pull the appropriate knocker in order of 1-2-3-4-5.
- Click the door to look for hidden objects.
- You receive a Screwdriver as an Inventory item.
- You are back on the street.
- Click the stone under the small statue.
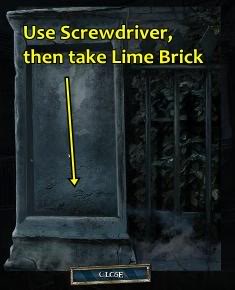
Click the Screwdriver from your Inventory items and use it on the stone, then click the Lime Brick to take the Inventory item. Afterwards, click Reagent Row on the map.
Reagent Row
Enter the elixir shop.
Elixir Shop
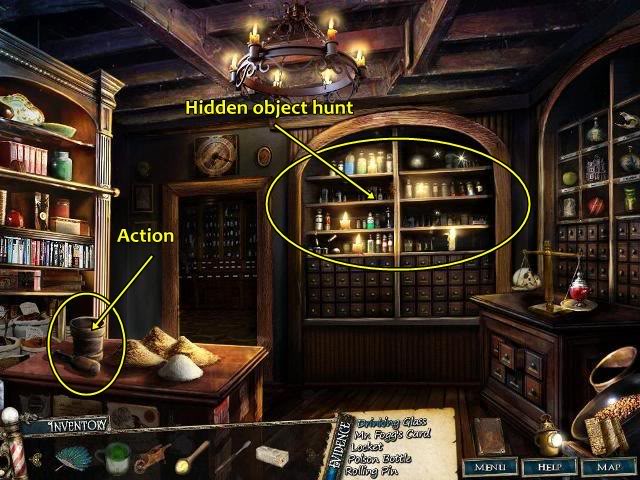
- There are three active areas in this scene.
- Click the shelf to look for hidden objects.
- You receive a Rolling Pin as an Evidence item.
- Click the mortar and pestle on the table.
- Click the Lime Brick from your Inventory items and put it in the mortar (the bowl).
- Click the pestle (bat) and use it on the lime brick to crush it.
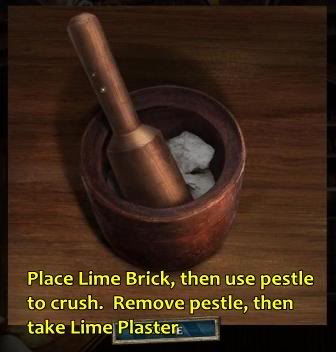
Click to remove the pestle, then click the Lime Plaster to take the Inventory item. However, you still don’t have the necessary Inventory item to perform an action on the acid jar, so click Close, then click Lime Wharf on the map.
Lime Wharf
Click the pile of nets to look for hidden objects, then click on the Mystery Meat to take the Inventory item. After, click Baker’s Court on the map.
BAKER’S COURT
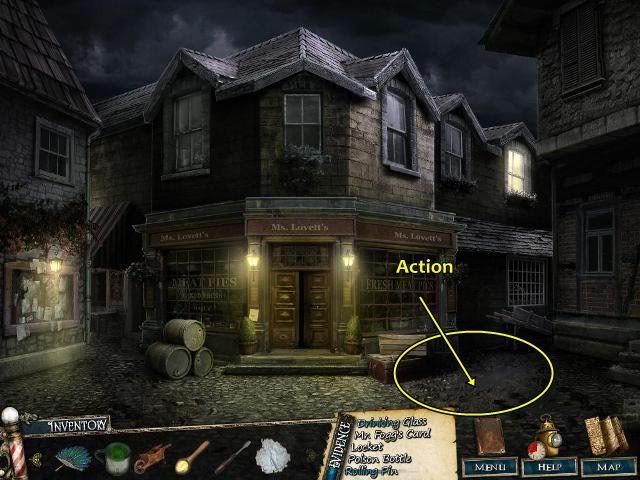
Click the puddle.
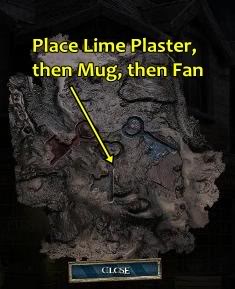
- Click the Lime Plaster from your Inventory items and use it on the imprint.
- Click the Mug of Water from your Inventory items and use it on the plaster imprint.
- Click the Fan from your Inventory items to dry the plaster.
- Click the Barbershop Keys to take the Inventory items.
- Enter the bakery.
Bakery
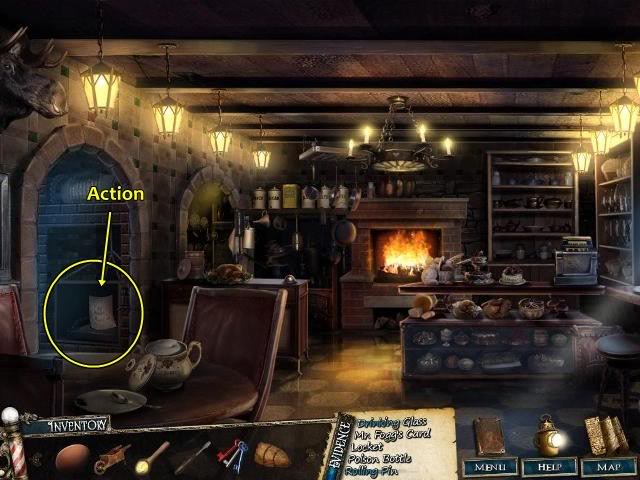
Click the dumbwaiter.
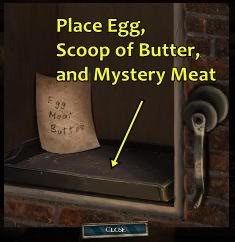
From your Inventory items, click to add the:
- Egg;
- Butter; and
- Mystery Meat.
ST-5-bc-bakery-dumbwaiter-note-egg-meat-butter
Click the lever.
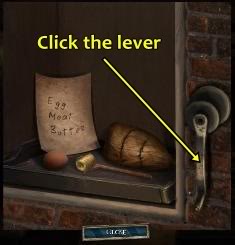
The dumbwaiter has lowered. Click the back shelf.
Click on the bell to ring it. The dumbwaiter will come back with a pie, which you click on, but you won’t have the necessary Inventory item to do that, so click Close.
Click Junk Street on the map.
JUNK STREET
Click the Junk Shop to look for hidden objects, and you will receive a Barbershop Pole as an Inventory item. Click Fleet Street on the map.
Fleet Street
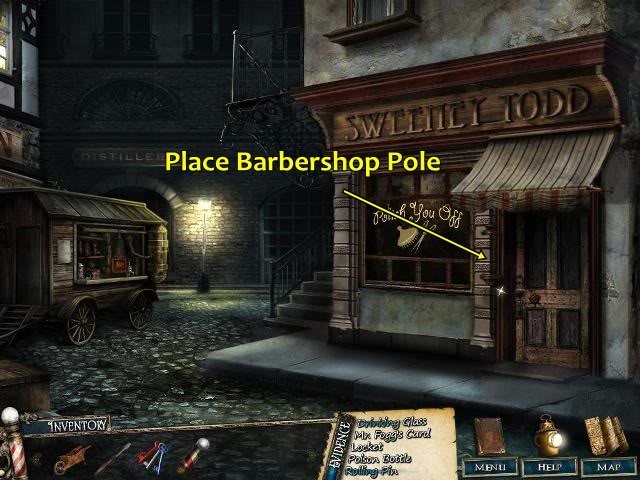
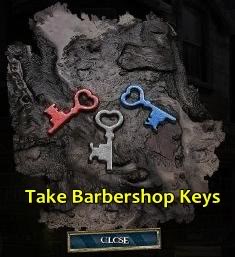
Click the Barbershop Pole from your Inventory items and use it on the door, then click the door.

Click the Barbershop Keys from your Inventory items and use them on the locks.
You now have to complete a puzzle.
Note the three colours of the barber pole are the same three colours as the locks.
The barbershop pole’s colours are each associated with a number:
- Red is II (2)
- White is I (1)
- Blue is III (3)
Solution: In the order they appear in the barbershop pole, click the keys the same number of times:
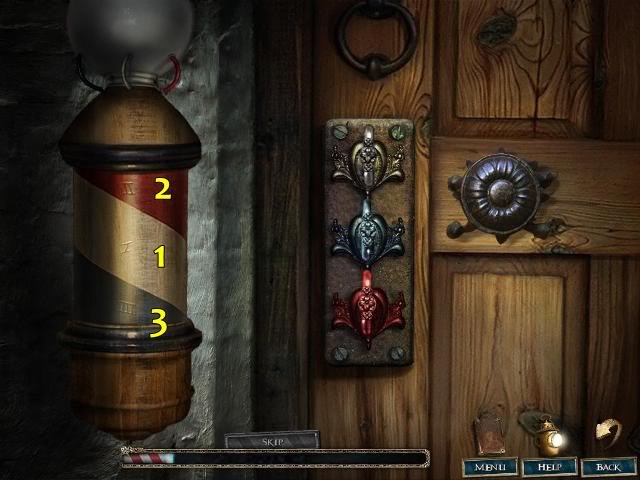
- Click the red key twice, the white key once and the blue key three times.
- Click the door knob.
- Enter the barbershop
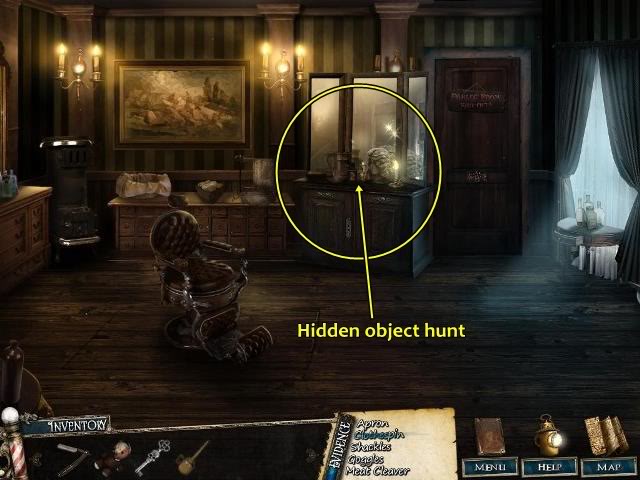
Barbershop
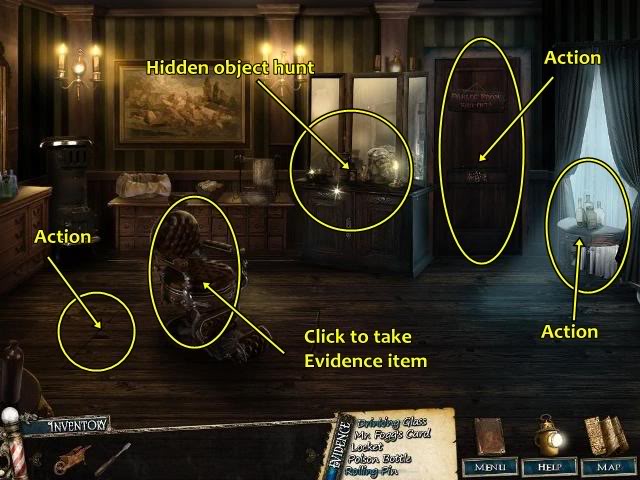
- There are five active areas in this scene.
- Click the hole in the floorboard.
- You don’t have the necessary Inventory item to perform this action.
- Click Close.
- Click the barber’s chair.
- Click Mr. Fogg’s Card to take the Evidence item.
- Click the bottles (left-hand side of screen).
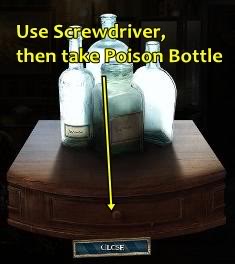
- Click the Screwdriver from your Inventory items and use it on the locked drawer.
- Click the Poison Bottle to take the Evidence item.
- Click the dresser to look for hidden objects.
- You receive a Razor as an Inventory item.
- Click Baker’s Court on the map.
Baker’s Court
Enter the bakery.
Bakery
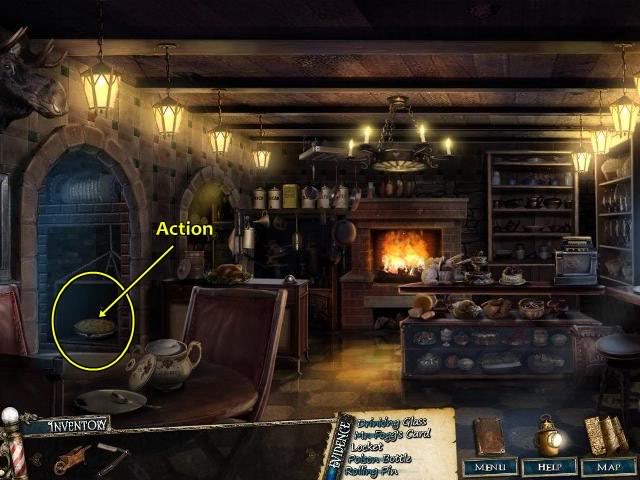
Click the pie.
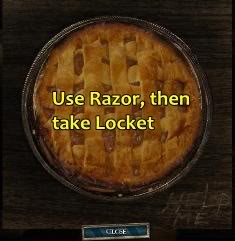
Click the Razor from your Inventory items and use it on the pie, then click the Locket to take the Evidence item.
The chapter is complete.
Solve the puzzle. Rearrange the torn photo pieces.
Tip: Start with the corners, then do the sides, then the interior.
Chapter 6 Baker’s Court
After watching the chapter’s intro (or you can skip it), you find yourself where you left off. You must find Sweeney Todd.
Through your investigation in this chapter, you must find five inventory items:
- An apron;
- A clothespin;
- Shackles;
- Goggles; and
- A meat cleaver.
Click Close to close the case notes, then click Piccadilly Square on the map.
Piccadilly Square
Enter the tailor shop.
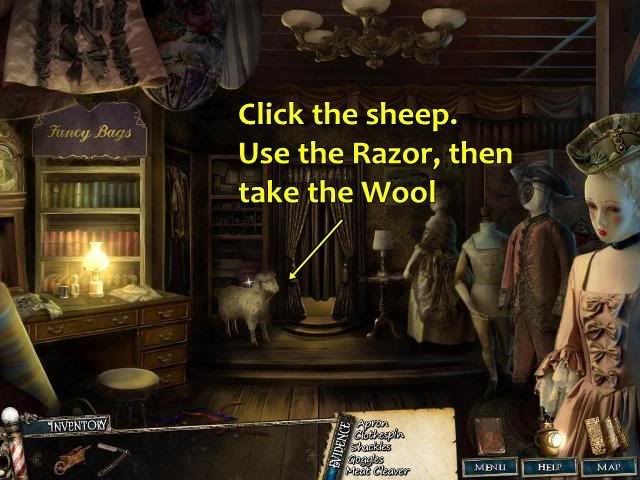
Tailor Shop
- Click the sheep.
- Click the Razor from your Inventory items and use it on the sheep.
- Click the Wool to take the Inventory item.
Click the map icon.
Click Guttersnipe Alley.
Guttersnipe Alley
Enter the slum house.
Slum House
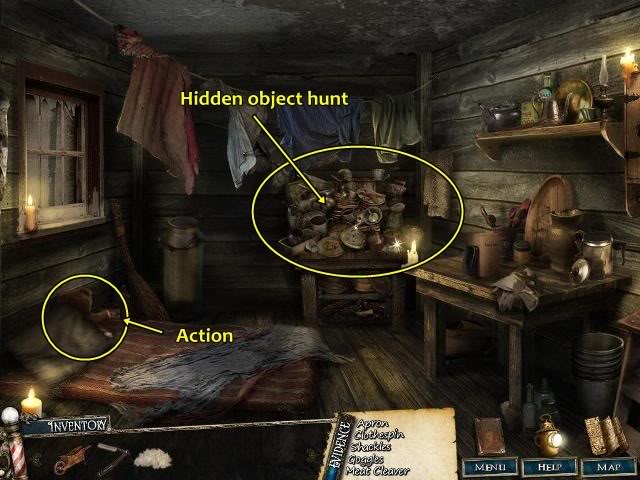
- Click the pots and pans to look for hidden objects.
- You receive a Clothespin as an Evidence item.
- Click the pillow.
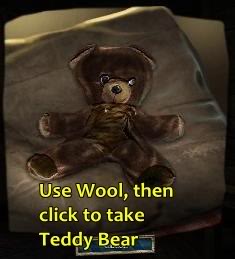
- Click the Wool from your Inventory items and use it on the teddy bear.
- Click the Teddy Bear to take the Inventory item.
- Click Mr. Fogg’s Asylum on the map.
Mr. Fogg’s Asylum
Click the door to look for hidden objects, and you will receive a Skull Key as an Inventory item. Click Fleet Street on the map.
Fleet Street
- Click the coffee cart to look for hidden objects.
- You receive an Oil Can as an Inventory item.
- Enter the barbershop.
Barbershop
Click the dresser to look for hidden objects, where you will receive a Shaving Brush as an Inventory item. Click Junk Street on the map.
Enter the pawn shop.
Pawn Shop
Click the Oil Can from your Inventory and use it on the two screws in the helmet topping the suit of armour.
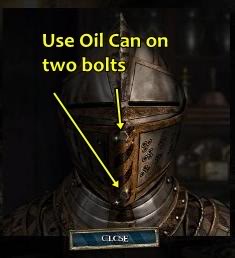
Click to remove the two screws, then click on the helmet again.
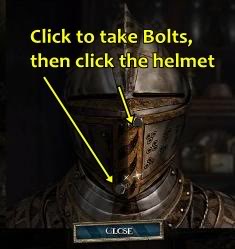
Click the two eyes (Marbles) to put them in your Inventory.
Click Reagent Row on the map. Enter the elixir shop.
Elixir Shop
Click the acid on the shelf.
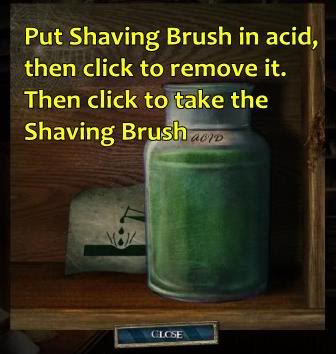
- Click the Shaving Brush from your Inventory items and use it on the acid jar.
- Click the brush to remove it.
- Click the Acidic Brush to take the Inventory item.
Click Fleet Street on the map. Enter the barbershop
Barbershop
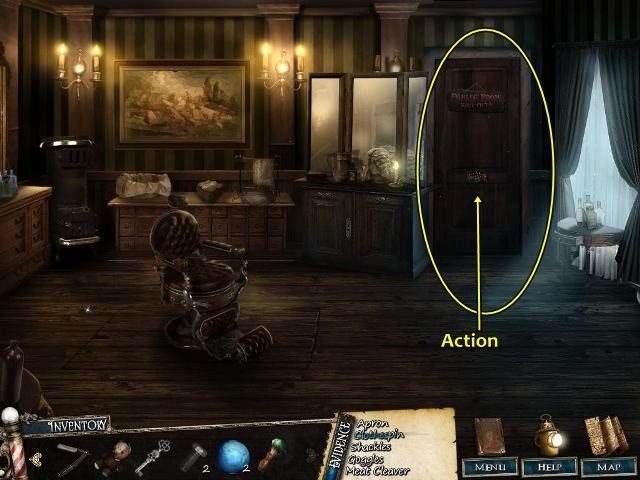
- Click the door.
- Click the Acidic Brush from your Inventory items and use it on the skull lock.
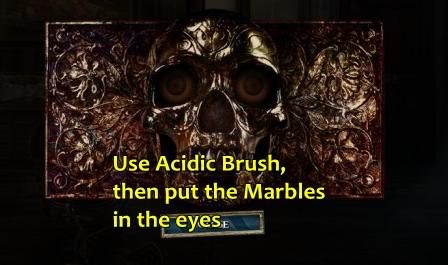
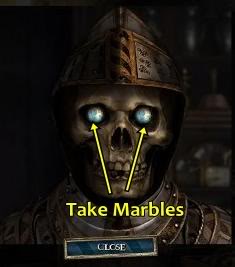
- Click the two Marbles from your Inventory items and place them in the eye sockets.
- Click the Skull Key from your Inventory items and use it on the mouth.
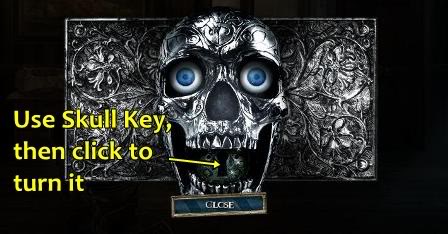
- Click on the key to turn it.
- You have to complete a puzzle.
- Click around. If you click around enough, you’ll notice a different sound (i.e, more of a clanking sound.)
- Start from the top left-hand corner and start clicking on the squares until you hear a clanking sound.
Solution:
The door opens.

- Click the Teddy Bear from your Inventory items and use it on the trap.
- Go up the stairs.
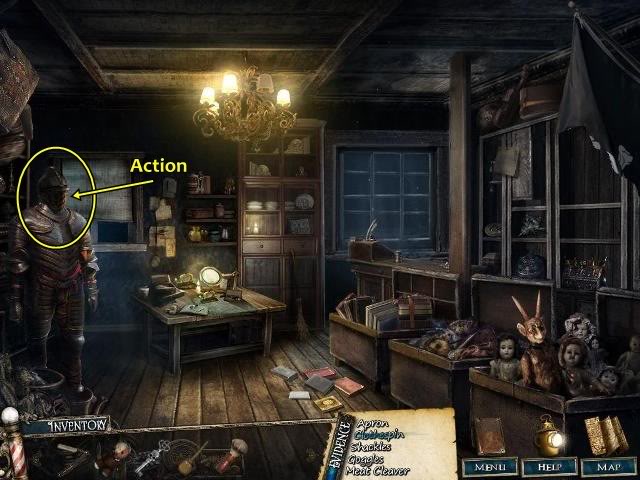
Parlour Room
- There are two active areas in this scene.
- Click the wardrobe to open it.
- Click the wardrobe again to look for hidden objects.
- You receive a Walking Cane as an Inventory item.
Click the suitcases. You have to complete a puzzle.
- You have to put the coloured ball in its same coloured slot (i.e., green ball in green slot, etc.)
- Move the tiles up and down or side to side to allow a path for the balls.
- Only the square tile in the middle doesn’t move.
- Start by moving the green ball out of the way and getting the red ball into its slot. Then move the tiles up into that corner to free up space.
Solution:
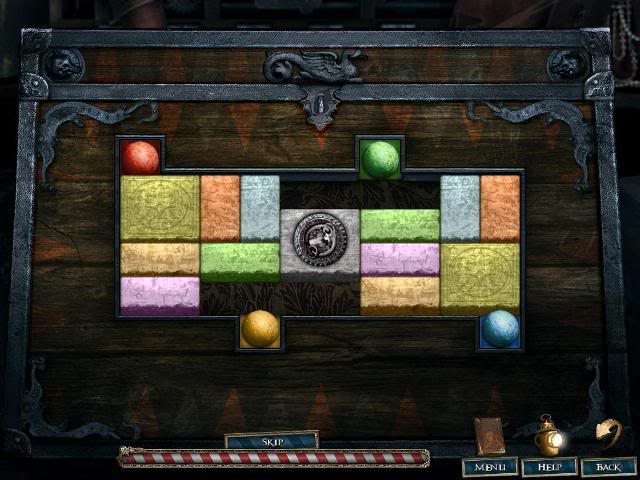
- Click the suitcases to look for hidden objects.
- You receive a Sewer Key as an Inventory item.
- Exit the parlour room.
Barbershop
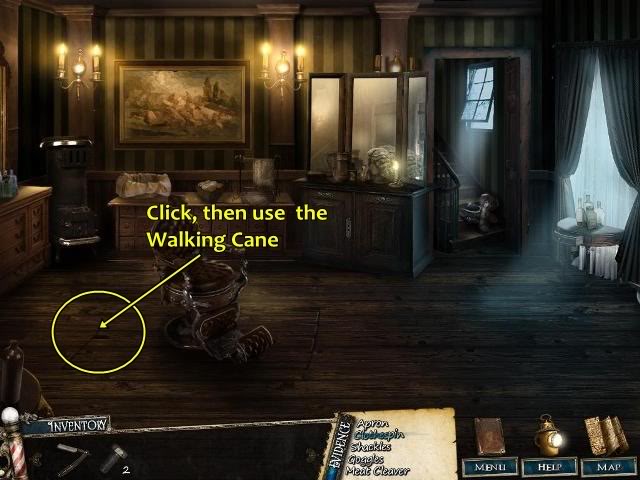
- Click the floorboard.
- Click the Walking Cane from your Inventory items and use it on the floorboard. ST-6-fs-barber-floorboard-cane
- Click the cane to move it.
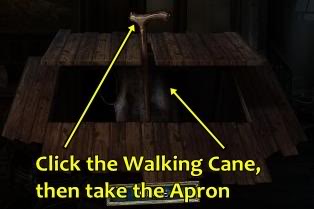
Click the Apron to take the Evidence item. Click Watch Lane on the map.
Watch Lane
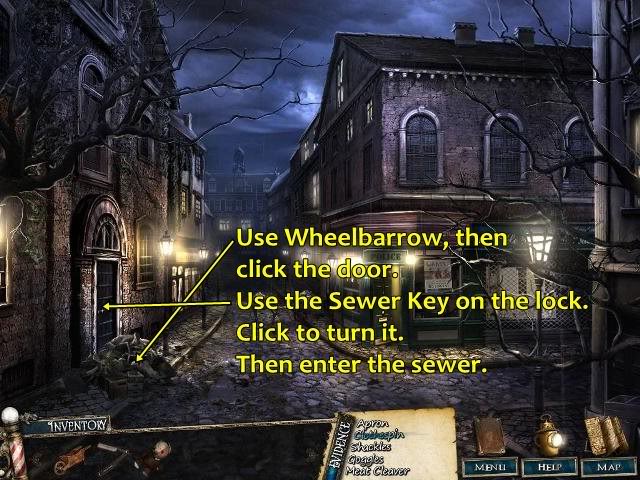
- Click the Wheelbarrow from your Inventory items and use it on the rubbish pile.
- Click the door.
- Click the Sewer Key from your Inventory items and use it on the lock.
- Click on the key to unlock the door.
- Enter the sewer.
Sewer
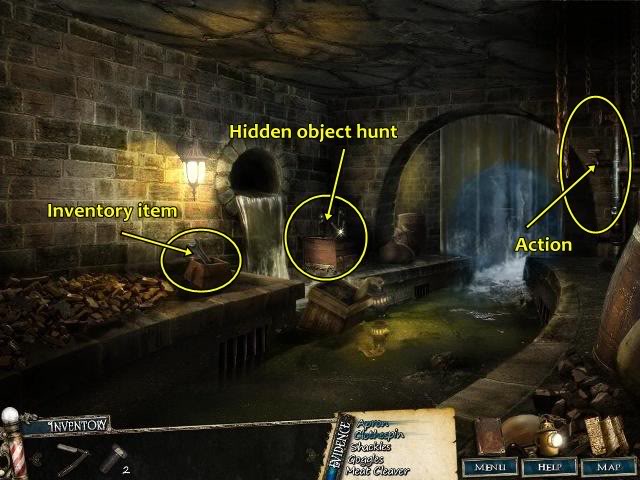
There are three active areas in this scene.
- Click the Wrench in the box to take the Inventory item.
- Click the box to look for hidden objects.
- You receive a Valve as an Inventory item.
Click the pipes.
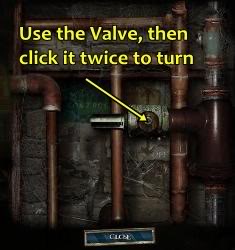
Click the Valve from your Inventory items and use it on the pipes, then click the valve twice to turn off the water.
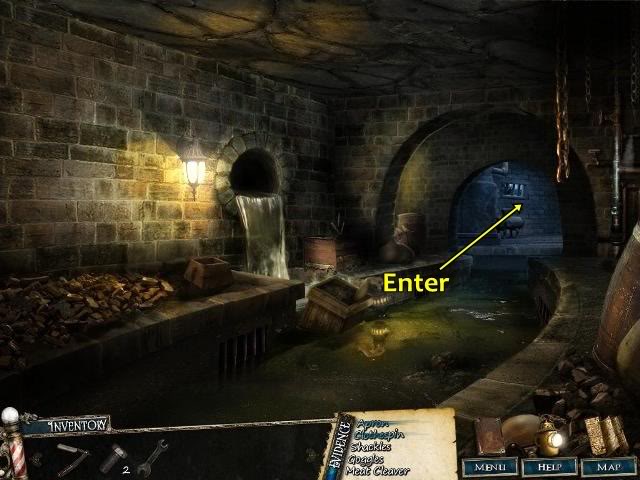
Enter the next area.
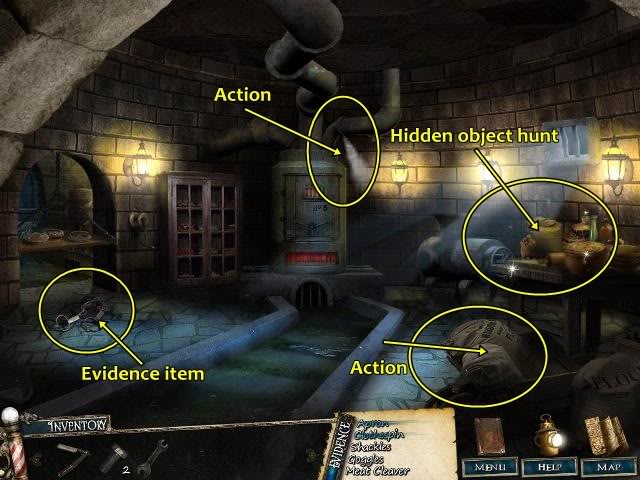
There are four active areas in this scene.
- Click the Shackles to take the Evidence item.
- Click the table to look for hidden objects.
- You receive Gloves as an Inventory item.
- Click the sack of flour.
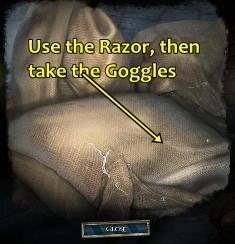
- Click the Razor from your Inventory items and use it on the sack.
- Click the Goggles to take the Evidence item.
- Click the steam.
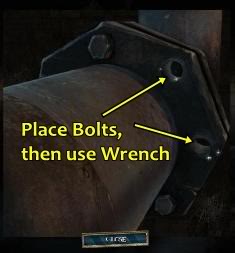
- Click the two Bolts from your Inventory items and place them in the holes.
- Click the Wrench from your Inventory items and use it on the bolts.
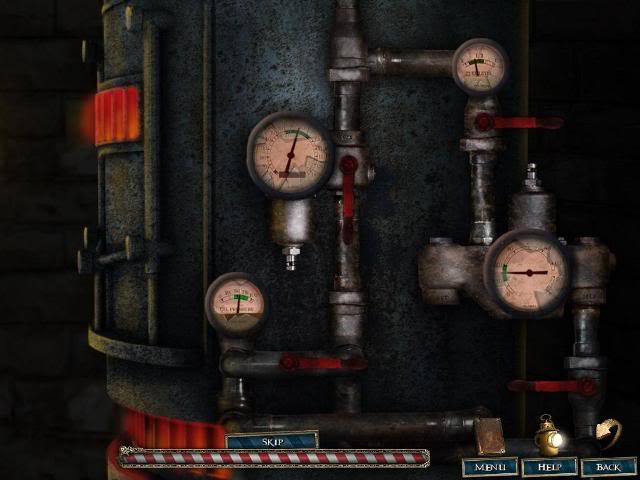
- You have to complete a puzzle.
- Click each valve when the hand is in the green zone.
After you successfully stop a hand in the green zone, the other hands start moving faster and faster.
Start with the metres with the smaller green zones.
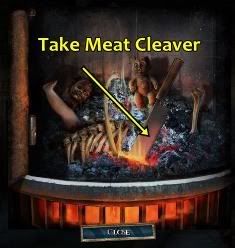
Click the heater.
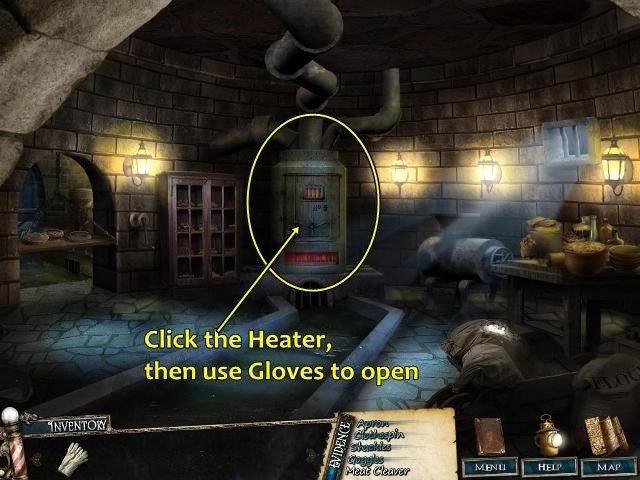
Click the Gloves from your Inventory items and use it on the heater.
Click the Meat Cleaver to take the Evidence item.
The chapter is complete.
Solve the puzzle. Rearrange the torn photo pieces.
Tip: Start with the corners, then do the sides, then the interior.
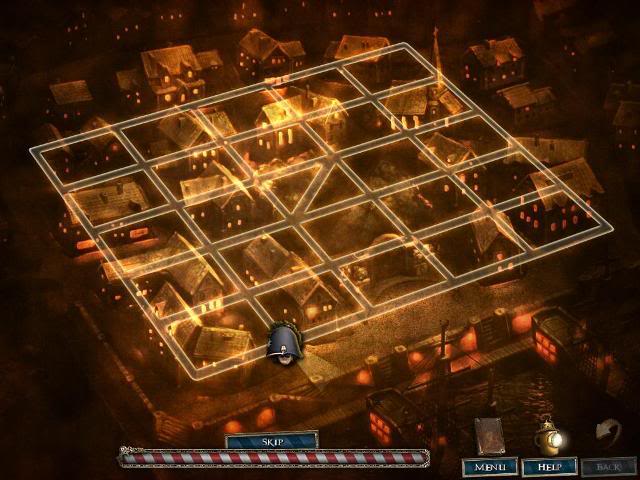
Final puzzle
Trap Sweeney.
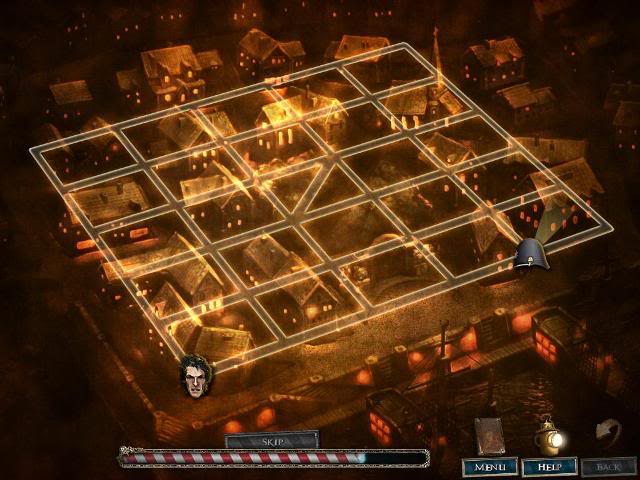
- You have to land on Sweeney.
- You can only move one spot at a time.
- Each time you move, Sweeney moves.
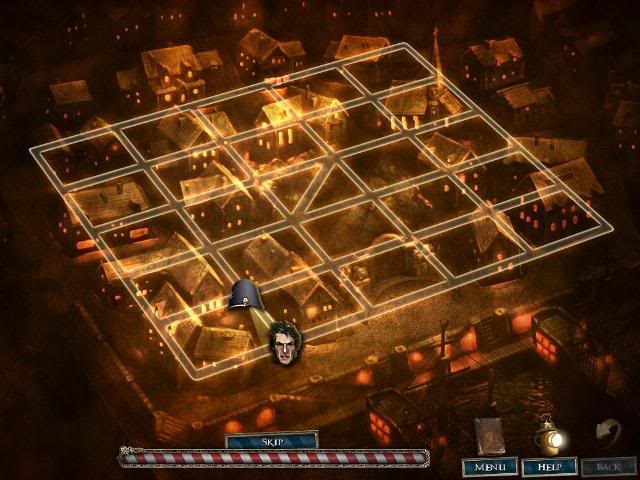
Just keep moving towards him and try to back him into a corner.
“;

More articles...
-
Best Horror Games On Itch.io – July 2026
Across a bounty of subgenres. -
Haze Seas Accessories Tier List [Best Accessories to Equip]
The accessories with the best stat buffs in Haze Seas.