- Wondering how to get Monopoly GO! free rolls? Well, you’ve come to the right place. In this guide, we provide you with a bunch of tips and tricks to get some free rolls for the hit new mobile game. We’ll …
Best Roblox Horror Games to Play Right Now – Updated Weekly
By Adele Wilson
Our Best Roblox Horror Games guide features the scariest and most creative experiences to play right now on the platform!The BEST Roblox Games of The Week – Games You Need To Play!
By Sho Roberts
Our feature shares our pick for the Best Roblox Games of the week! With our feature, we guarantee you'll find something new to play!All Grades in Type Soul – Each Race Explained
By Adele Wilson
Our All Grades in Type Soul guide lists every grade in the game for all races, including how to increase your grade quickly!
Pathfinders: Lost at Sea Walkthrough
Welcome to the Pathfinders: Lost at Sea walkthrough on Gamezebo. Pathfinders: Lost at Sea is a hidden object game created by ERS G-Studio. This walkthrough includes tips and tricks, helpful hints, and a strategy guide to how to complete Pathfinders: Lost at Sea.
General Tips
Welcome to the Pathfinders: Lost at Sea walkthrough on Gamezebo. Pathfinders: Lost at Sea is a hidden object game created by ERS G-Studio. This walkthrough includes tips and tricks, helpful hints, and a strategy guide to how to complete Pathfinders: Lost at Sea.
- Due to the fact that there are no clear-cut chapters in this title, the guide will be organized according to finding the Coins the professor leaves behind.
- Objects listed on the item list in this game are randomized, with the exception of a few. All key items will be circled in this guide: the rest will be left out.
- Key items will be circled in red, zoom-in locations will be circled in green, and interactive items will be circled in blue for this guide. Coins will be circled in yellow.
- You may switch between the inventory items and the items list by using the arrows on the cell phone screen, located in the upper left.
- Hints are unlimited, however after using a hint, you will have to wait for it to recharge.
- Puzzles may be skipped after an alotted amount of time has passed.
- When an open hand icon appears instead of your cursor, you may use an inventory item in this area.
- Some objects may be moved to reveal other objects: this is not the case for every scene, though.
- Click the “Note” book in the bottom left corner of the screen to review the story thus-far.
Click the Help button to view your current objective.
Walkthrough- The 1st Coin
Ship Cabin
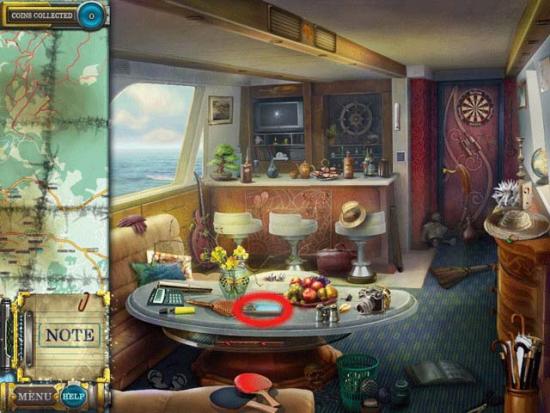
- Pick up the Cell Phone lying in front of you on the table: this will contain the list of items you will need to find.

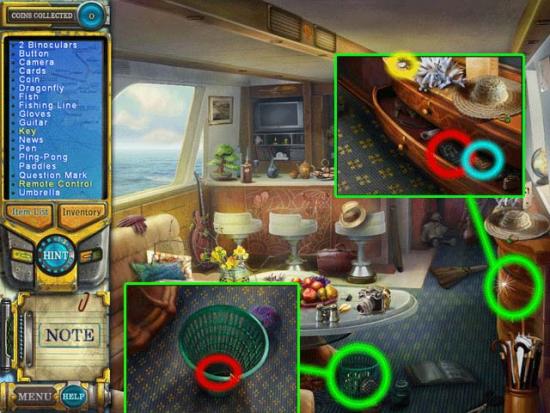
- Click on the trash basket circled in green below to enter a close-up: click on the Key to add it to your inventory.
- Use the Key on the dresser drawer circled in green to enter another close-up: in here you’ll find the Remote Control, Cards, and the Coin. Click on the Coin to cross it from your list. Click on the Remote Control to add it to your inventory. Click on the Cards to enter a mini-game.
Matching Cards Mini-game
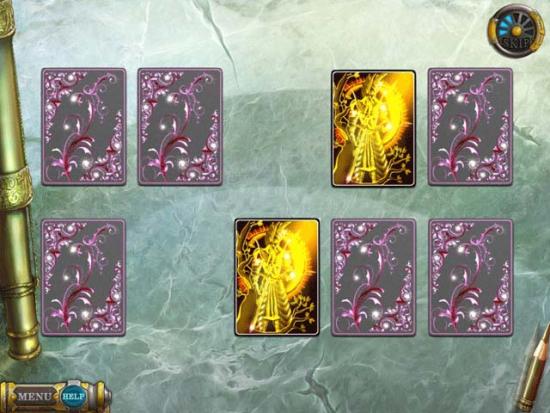
- Click to reveal cards and match up the pairs. If you guess incorrectly, the cards will switch places. An example of a matching pair is shown below:
The 2nd Coin
Ship Deck
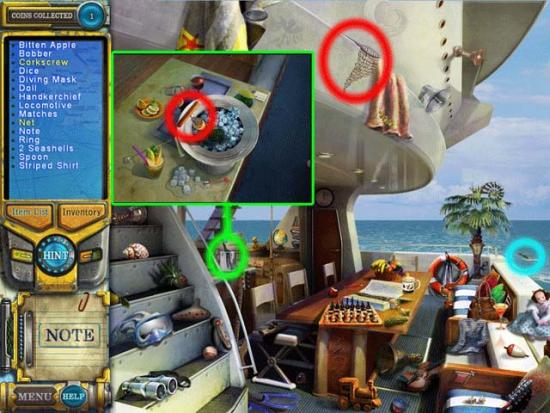
- Click on the Net circled in red to add it to your inventory.
- Click on the wine chiller circled in green to enter a close-up: click on the Corkscrew to add it to your inventory.
- Use the Net on the Bottle circled in blue to fish it from the sea: use the Corkscrew on the cork to open it and collect the Note inside.
Note Assembly Mini-game
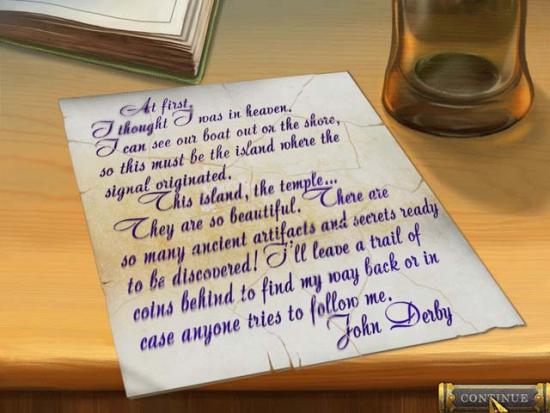
- Assemble the note by clicking on the pieces and dragging them into the appropriate place within the outline. Right-click to rotate the pieces. The solution looks like this:
Ship Lounge
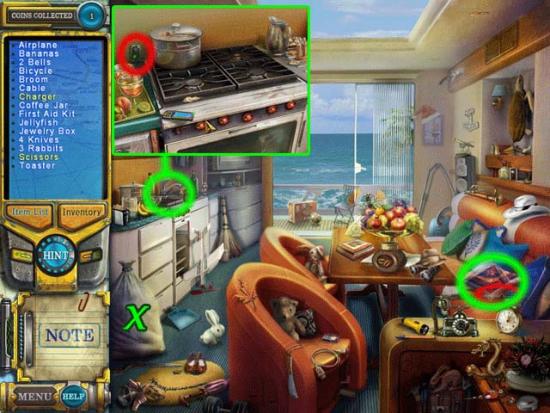
- Click on the pillow circled in green to move it and reveal the Scissors circled in red, resting underneath. Click the Scissors to add them to your inventory.
- Use the Scissors on the sack, marked with a large green “X”, to reveal the Charger. Click on it to add it to your inventory.
- Use the Charger on the plug in the sink zoom-in area. Once your phone is charged, click it to pick it up again.
Shipwreck
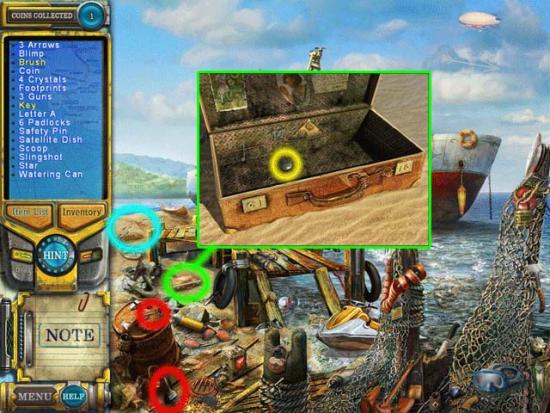
- Pick up the Key and the Brush circled in red.
- Click on the suitcase circled in green. Use the Key on the lock to open it. Use the Brush on the sand inside to reveal the Coin.
- Click on the footprints circled in blue to enter a mini-game.
Footprint Differences Mini-game
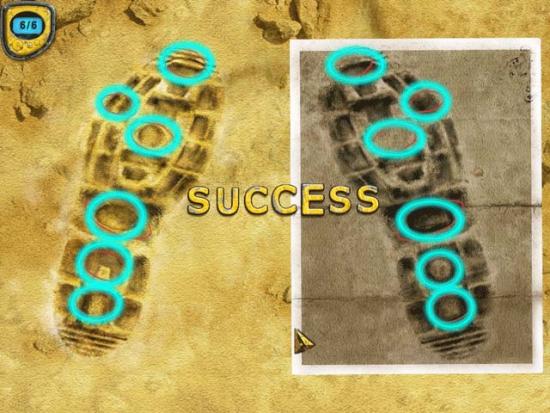
- Find 6 differences between the footprints by clicking the areas that don’t match. The differences are shown below:
The 3rd Coin
Inside the Shipwreck
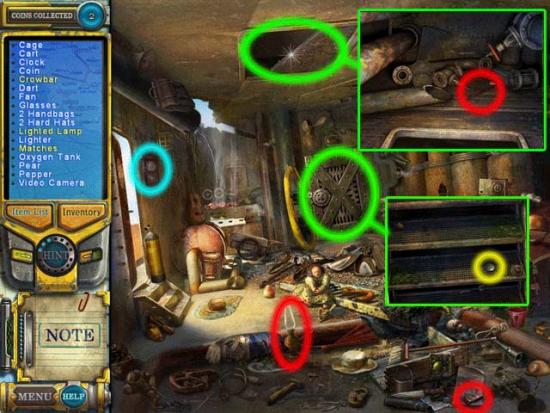
- Pick up the Matches and use them on the Lamp to get the Lighted Lamp, both circled in red. Use it on the open attic to find the Crowbar.
- Use the Crowbar on the door to open it. Inside is the Coin.
- Click on the Clock to enter a mini-game.
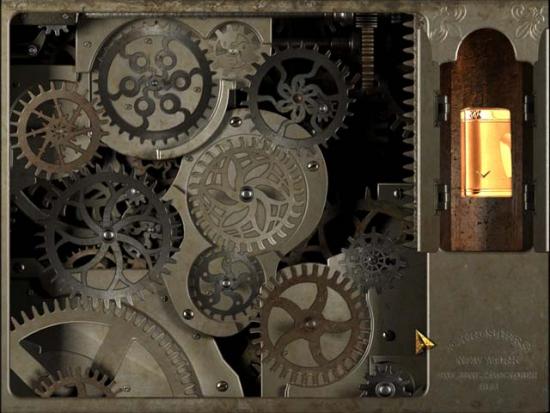
Clock Gears Mini-game
- Place the gears in the correct location. Start at the bottom left corner. If the gear is moving, then you’re on the right track! The solution is shown below. After completing the puzzle, you’ll find the Professor’s Lighter.
The 4th Coin
Village Entrance
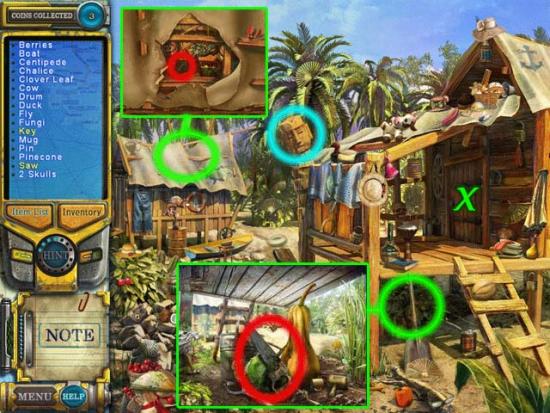
- Click on the area beneath the first hut to enter a close-up. Click on the Saw to add it to your inventory.
- Use the Saw on the Statue Head circled in blue. This will open a hole in the far roof.
- Click on the hole in the roof for a close-up, and pick up the Key.
- Use the Key on the door of the first hut marked with a green “X”.
Inside the Hut
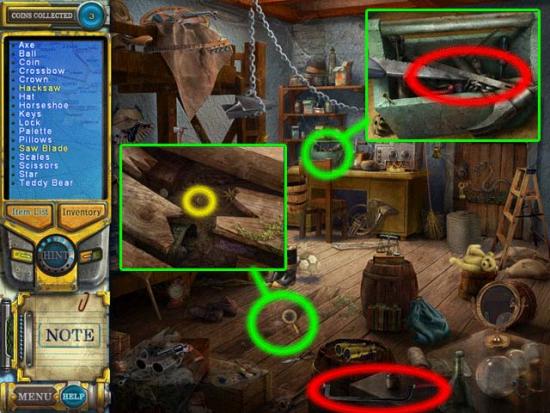
- Click on the Toolbox for a close-up, and add the Saw Blade to your inventory.
- Use the Saw Blade on the Hacksaw, circled in red. Use the Hacksaw on the chain to drop the anvil and create a hole in the floor.
- Click on the broken floor for a closer view, and add the Coin to your list.
The 5th Coin
Cave Entrance
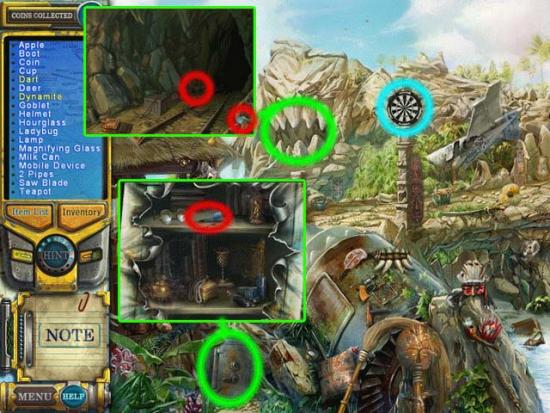
- Click on the cave in the distance for a close-up. Try to click on the mobile device, and a lizard will run off with it. Click on the Dynamite to add it to your inventory.
- Use the Dynamite on the safe to open it. Click on it for a close-up.
- Collect the Dart from inside the safe.
- Use the Dart on the dartboard circled in blue, and then click on it to enter a mini-game.
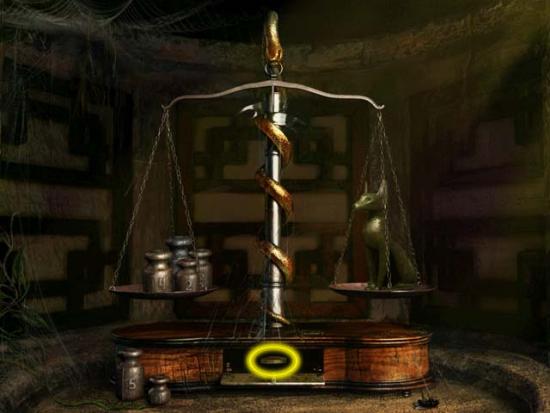
Balancing Scales Mini-game
- Balance the scale by using the weights. Upon completing the puzzle, you’ll be rewarded with the Coin. The solution is shown below:
The 6th Coin
Veranda
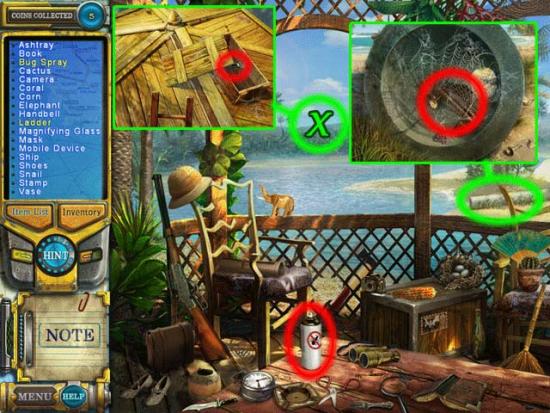
- Click on the Bug Spray on the table to add it to your inventory.
- Click on the tube for a close-up. Use the Bug Spray on the spider to get rid of it. Pick up the Ladder inside to add it to your inventory.
- Use the Ladder on the area marked with a large green “X”.
- Climb the ladder, then open the box at the top to collect the Mobile Device.
Airplane Hangar
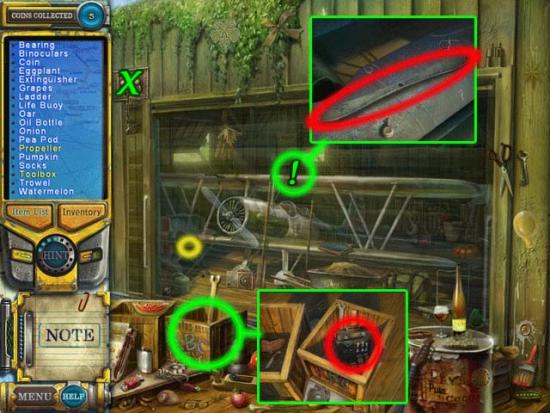
- Click on the crate in front of the hangar. Pick up the Tools to add them to your inventory.
- Use the Tools on the area marked with a green “X” to fix the lever, and open the hangar.
- Click on the area marked with a green “!” to enter another close-up. Pick up the Propeller to add it to your inventory.
- Use the Propeller on the front of the biplane to reveal the location of the Coin.
The 7th Coin
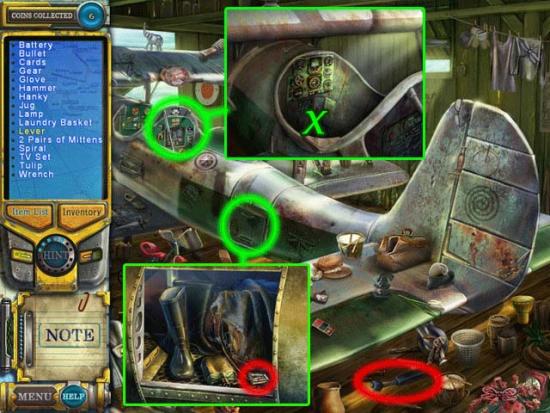
Inside the Hangar
- Pick up the Lever lying on the floor to add it to your inventory.
- Click on the cockpit for a closer view, then attach the Lever in the location of the green “X” and click on it.
- Click on the compartment towards the back of the plane once it opens, and pick up the Battery inside.
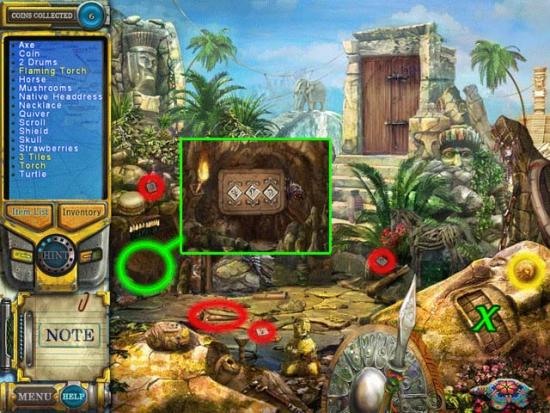
Tiki Ruins
- Collect the Coin circled in yellow in the tiki statue’s eye.
- Pick up the 3 Tiles circled in red.
- Click on the teeth of the tiki, marked with a green “X” to enter a mini-game. You’ll need to click on the various teeth until they all disappear: the puzzle solution is randomized. Once you complete the mini-game, fire will spew from the mouth.
- Pick up the Torch and use it on the fire-spewing mouth to light it.
- Click on the cave circled in green for a close-up.
- Use the Lit Torch inside the cave, then use the 3 Tiles on the indentations. Arrange them so they match the pattern below (also viewable on the rock around the tiles), then click the head-lever on the side.
The 8th Coin
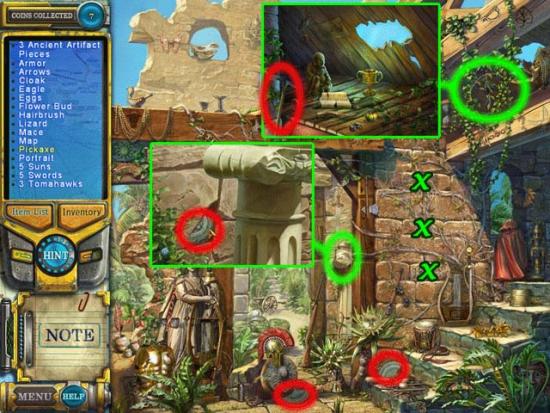
Ancient Ruins
- Pick up the two Artifacts circled in red.
- Click on the loose stones on the right wall to create a ladder: their locations are marked with green “X”s.
- Explore the newly accessible area above the steps, circled in green. In the close-up, click the Pickaxe to add it to your inventory.
- Click on the green-circled area near the pillar for a close-up. Use the Pickaxe on the loose stone to reveal another Artifact.
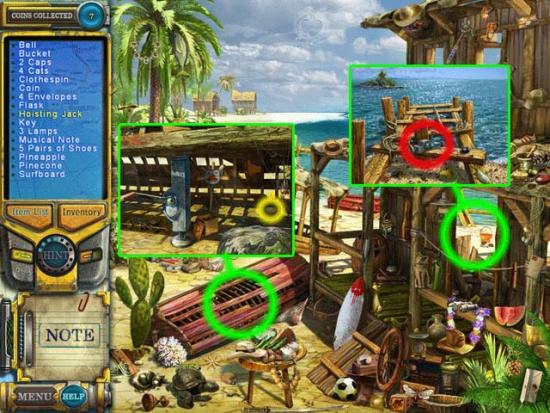
Beach Shack
- Click on the close-up area inside the shack doorway for a close-up, then click the Hoisting Jack to add it to your inventory.
- Use the Hoisting Jack on the overturned boat to lift it and reveal another close-up area. Click on it to enter the close-up and collect the Coin.
The 9th Coin
Beach Ruins
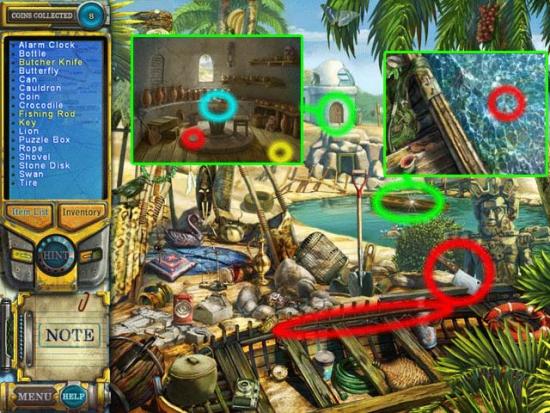
- Pick up the Butcher Knife and the Fishing Rod circled in red.
- Click on the boat in the background for a closer view. In the close-up, use the Fishing Rod in the water to pick up the Key.
- Use the Key on the door in the distance to enter another close-up. Use the Butcher Knife on the window boards to destroy them and let in the light.
- Pick up the Coin and the Artifact lying on the floor.
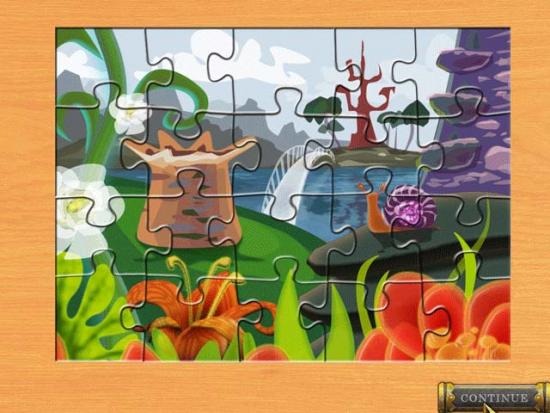
- Click on the Puzzle Box on the table to enter a mini-game.
Jigsaw Mini-game
- Complete the picture puzzle by fitting the pieces together within the frame. Right-click to rotate the pieces. The solution is shown below:
The 10th Coin
Docks
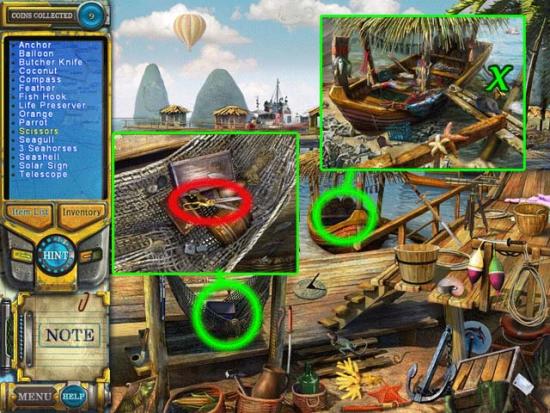
- Click on the hammock for a close-up. In the close-up, click on the Scissors to add them to your inventory.
- Click on the boat ahead of you for another close-up. In the close-up, use the Scissors on the rope on the right marked by a green “X” to cut it free.
Tugboat
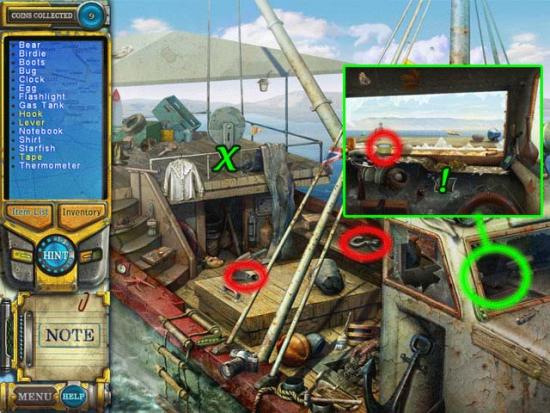
- Pick up the Hook and Lever circled in red.
- Use the Hook on the pulley, marked with a green “X”.
- Click on the cockpit of the boat for a close-up. Pick up the Tape circled in red.
- Use the Lever on the area marked with a green “!”, then use the Tape on the same area. Click the wires to fully repair the lever, then click the Lever to activate the pulley.
- Take a close look at the newly opened cargo are in the middle of the ship to find a survivor.
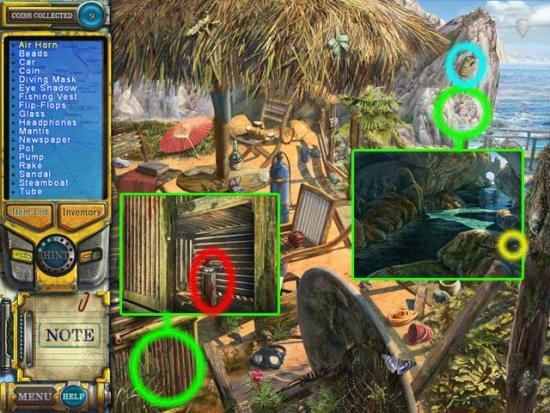
Seaside Grass Hut
- Click on the cabinet on the bottom left for a close-up. In the close-up, pick up the Air Horn to add it to your inventory.
- Click on the close-up area on the cliffs for a closer view. Use the Air Horn on the snake, then pick up the Coin.
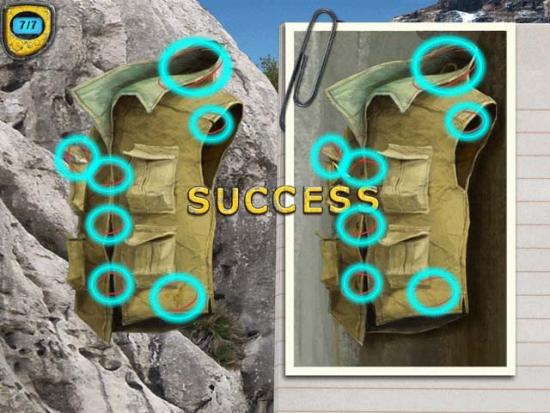
- Click on the Vest circled in blue to enter a mini-game.
Vest Differences Mini-game
- Find the 7 differences between the two fishing vests by clicking the areas that don’t match.
The 11th Coin
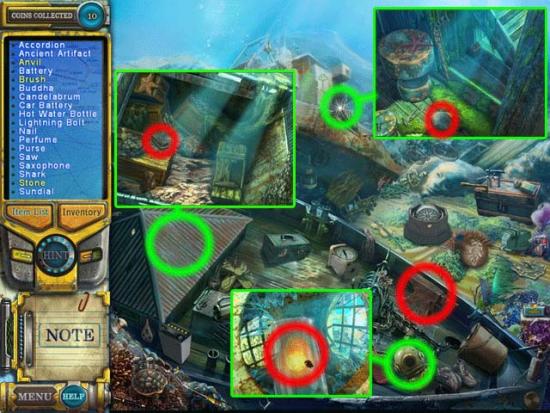
Underwater Wreck
- Pick up the Anvil circled in red. Use the Anvil on the green area on the left below to activate another close-up area. In that area, pick up the Brush.
- Click on the close-up area on the ship in the background. In the close-up, click on the Stone to add it to your inventory.
- Click on the Helmet to enter a close-up. Use the Brush to clear away the seaweed, then use the Stone to break open the glass and collect the Ancient Artifact.
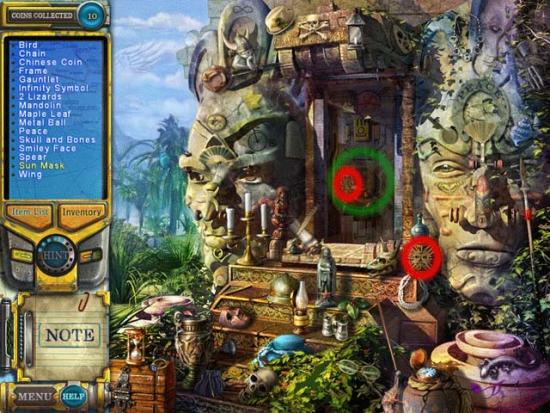
Temple Entrance
- Click on the Sun Mask circled in red to add it to your inventory.
- Click on the door to enter a mini-game: repeat the light sequence of the symbols to unlock the door. Sequences are randomized. Once you complete it, the door will open.
- Use the Sun Mask on the artifact inside, then click on it for a closer view. Place the Artifact from your inventory into the box to complete the area.
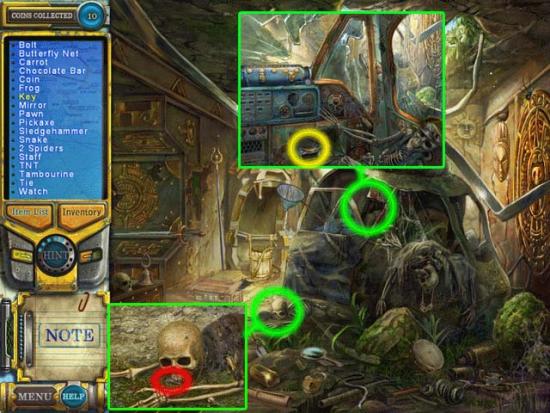
Helicopter Crash Site
- Click on the skeleton at the bottom of the helicopter to enter a close-up area. Click on the Key to add it to your inventory.
- Click on the helicopter cockpit to enter a close-up. Use the Key on the glove compartment to open it and collect the Coin.
The 12th Coin
Well Plaza
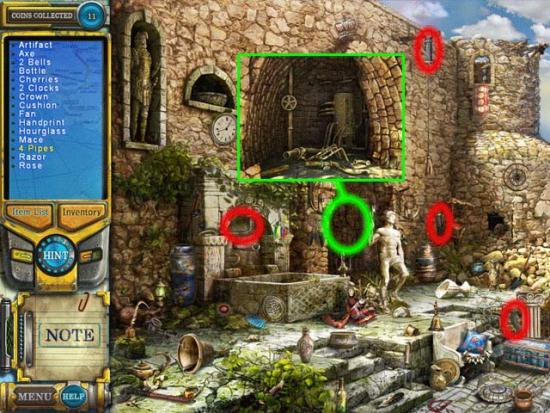
- Pick up the 4 Pipe Pieces scattered throughout the area (circled in red). You may have to click on the large objects nearby to move them out of the way to collect the pipes.
- Click on the stone doorway for a closer view.
- Use the 4 Pipes on the water mechanism to enter a puzzle.
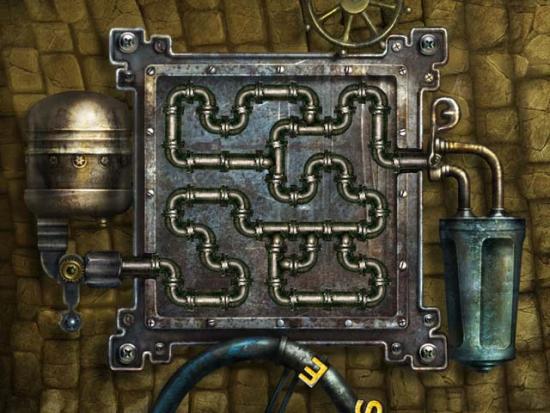
Water Pipe Mini-game
- Click on the pipe pieces to rotate them. Use all pieces to connect the pipes and complete the loop. The solution is shown below:
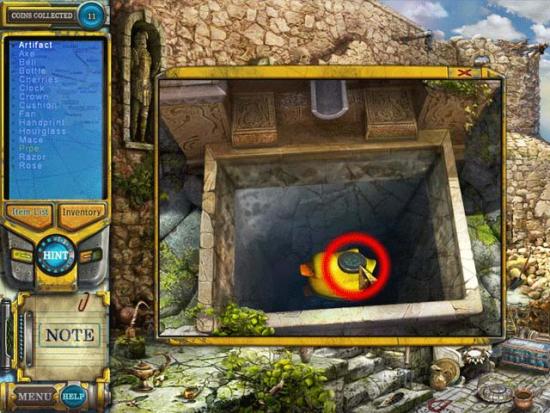
- After completing the mini-game, click on the well for a close-up and pick up the Artifact resting on the rubber duck’s back.
Cliff Fountain
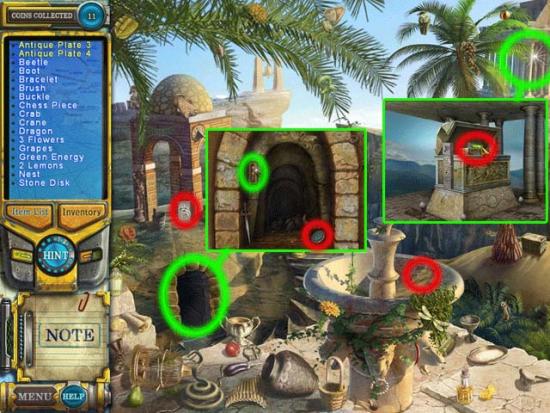
- Click on the dark doorway on the left to enter a close-up area. Click the lever to activate the fountain, and pick up the Artifact circled in red.
- Pick up the Antique tiles circled in red, then click on the close-up area in the distance.
- Use the Tiles on the coffin to open it and reveal the Green Energy. Click it to add it to your inventory.
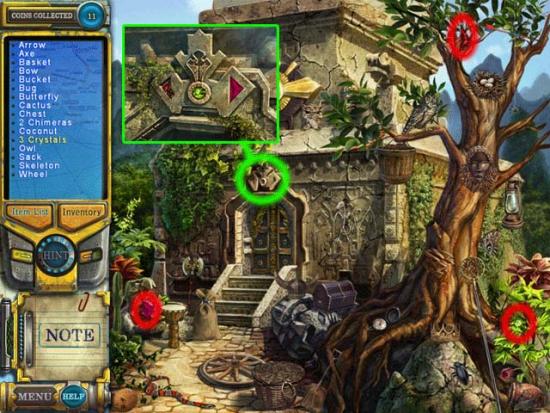
Sun Temple Entrance
- Pick up the 3 Crystals scattered throughout the area.
- Click on the top of the doorway for a close-up. Place the crystals within the indentations to open the door.
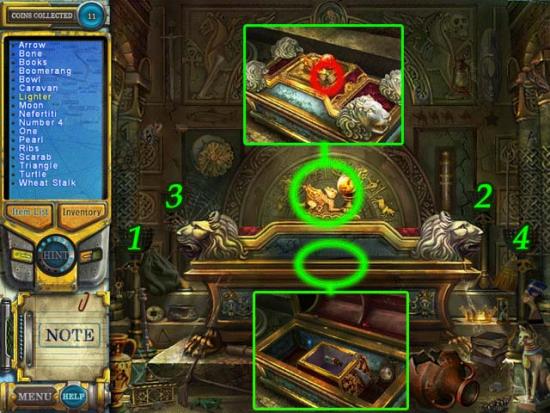
Sun Sarcophagus
- Click on the top of the sarcophagus for a closer view. Click the Lighter to add it to your inventory.
- Use the Lighter to light the torches in the order shown in the picture below. This will open the sarcophagus. Click on the inside for a closer view.
- Inside the sarcophagus, use the Green Energy on the open box inside.
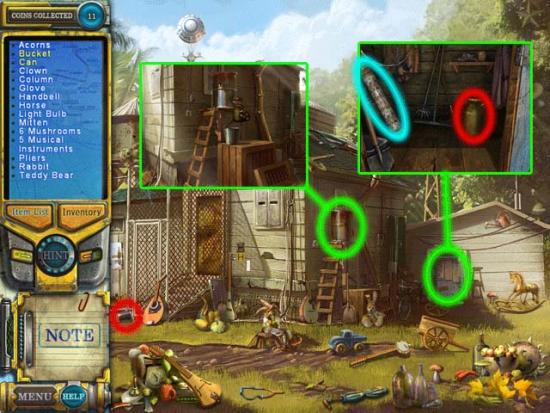
Private House
- Pick up the Bucket circled in red, then click on the shed for a closer view. Click on the Can to add it to your inventory.
- Click on the water dispenser on top of the ladder outside the house for a closer view. Use the Can and the Bucket to drain the water, then click on the water dispenser to knock it over. You’ll need to do this to get to the next area.
- Go back to the shed and click on the Pillar to enter a puzzle.
Pillar Mini-game
- Click and drag the strips until the original picture is restored. The solution is shown below:

Inside the House
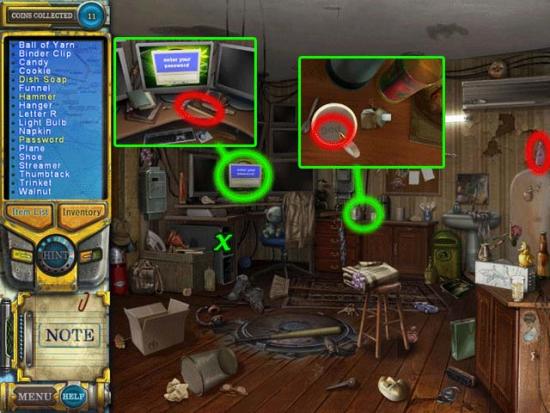
- Click on the Dish Soap to add it to your inventory.
- Click on the tea cup for a close-up. Use the Dish Soap on the tea cup to reveal the word “god” at the bottom. Click the word to add it to your inventory.
- Click on the computer for a closer view. Pick up the Hammer to add it to your inventory. Use the password “god” on the computer to log in. Look at the upper monitors.
- Use the Hammer on the main computer 3 times to destroy it. The main computer is marked with a green “X”.
Bunker
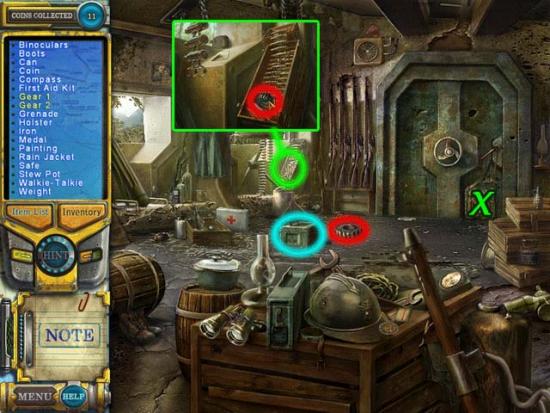
- Collect the two Gears hidden here: one is in plain site and the other is nestled among a close-up of the bullets.
- Click the bag sitting in front of the door to enter a close-up. Continue to click this area to move the bag, remove the panel, and then place the Gears in the empty space.
- Click the safe in the middle of the room to enter a puzzle.
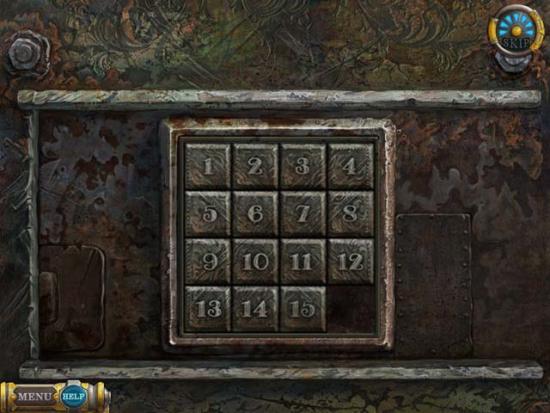
Safe Mini-game
- Slide the 15 pieces into numerical order with the empty space after the 15 block. You will be rewarded with a long-awaited Coin upon completion. The solution is shown below:
Note: This Coin does not count towards your Coin total.
Basement
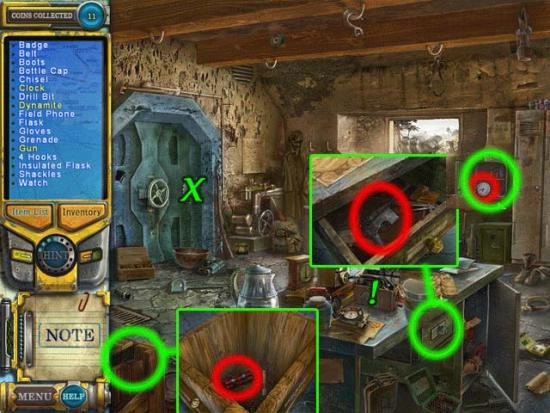
- Click the wooden crate on the lower left to remove the lid and have a closer view. Click the Dynamite to add it to your inventory.
- Click the desk drawer to open it, then have a closer look. Pick up the Gun inside the drawer to add it to your inventory.
- Use the Gun on the first aid kit to open it, then collect the Clock inside.
- Use the Dynamite and the Clock on the door in the area marked with a green “X”.
- Lastly, pick up the Field Phone marked with a “!”.
Battering Ruins
- Click the loose stone marked with a green “X” to remove it and click for a close-up. Pick up the Rope Coil and add it to your inventory.
- Click on the statue’s mouth for a closer view. Collect the Wheel inside.
- Click on the opposite statue’s mouth for a closer view. Collect the Coin inside.
- Use the Rope Coil and the Wheel on the battering ram, then once completed, click the ram to smash through the wall.
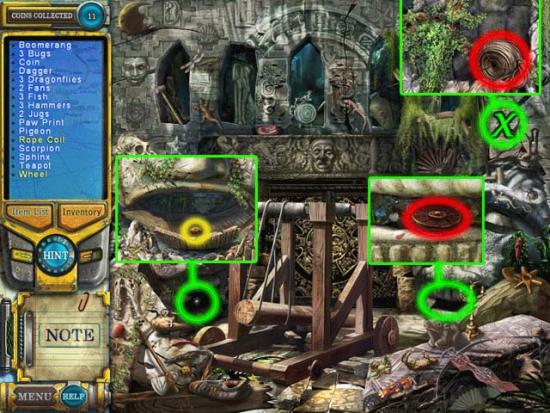
The Last Coin
The Cave
- Pick up the Crystal and the Mirror circled in red.
- Click on the area circled in green for a closer view. Click the Air and Water Artifacts to add them to your inventory.
- Place the Mirror in the area marked with a green “X”, then click on the gate for a closer view.
- Use the Crystal on the gate to open it.
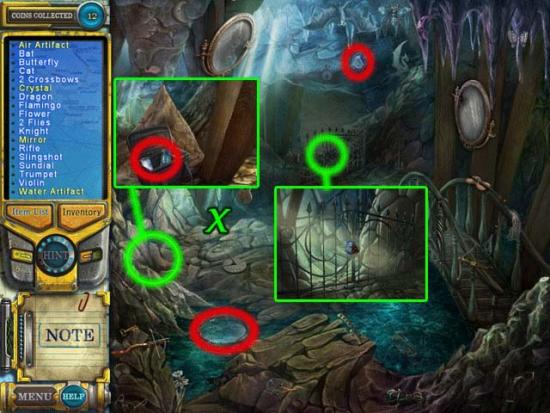
Air Temple
- Click on the red drape in the top right corner of the screen to move it and reveal the Sword. Click it to add it to your inventory.
- Use the Sword on the red lantern to cut it open and reveal the Puzzle Box. You will then start a mini-game.
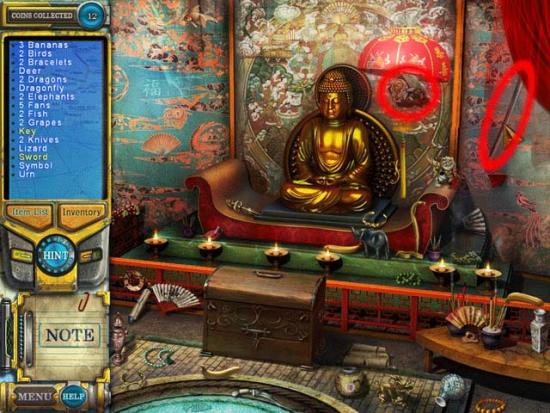
Dragon Tile Mini-game
- Rotate the rings to restore the image and open the box, working from the inside out. The solution is as follows. Upon completing the puzzle, the Key will be added to your inventory.
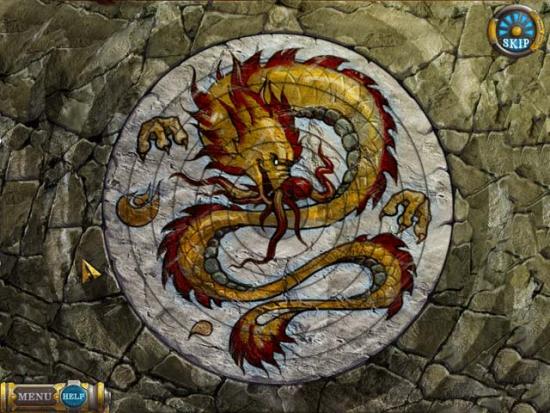
- Use the Key on the chest in front of the Buddha to open it. Use the Air Artifact on the indentation inside the chest to complete the area.
Water Temple Entrance
- Pick up the Axe lying on the ground to add it to your inventory.
- Use the Axe on the shield circled in green to destroy part of it. Click on the Coin revealed to collect it.
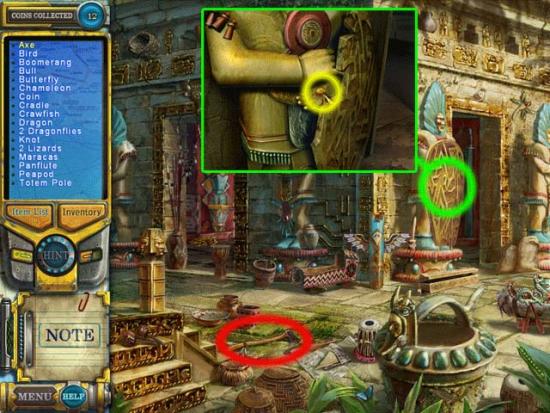
The Finale
The Water Temple
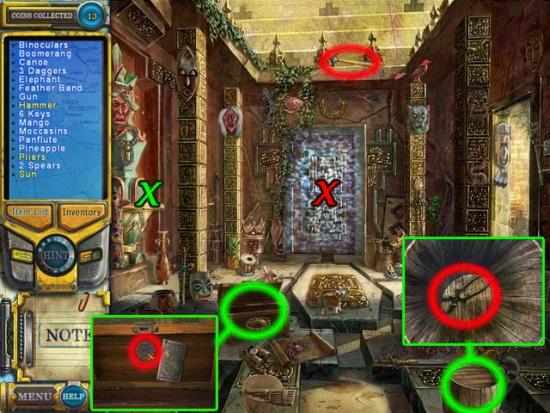
- Pick up the Hammer to add it to your inventory.
- Use the Hammer on the barrel at the bottom right to open it. Click on it and collect the Pliers inside.
- Click on the chest on the floor for a closer view. Use the Pliers on the metal plate to move it and reveal the Sun. Click it to add it to your inventory.
- Use the Water Artifact from your inventory on the area marked with a green “X”.
- Once the force field over the door disappears, use the Sun on the middle of it to enter a mini-game (marked with a red “X”).
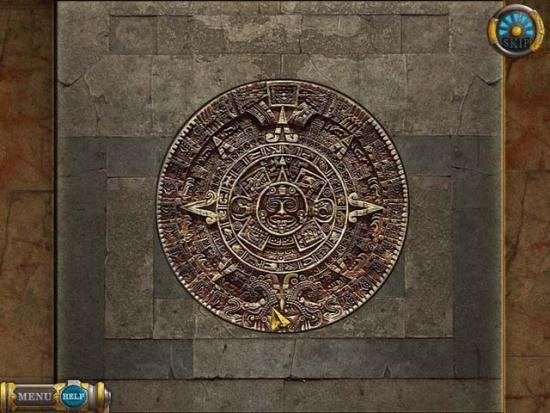
Sun Lock Mini-game
- Complete the sun lock puzzle by fitting the pieces into their correct places. The solution is shown below:
The Portal Chamber
- Click on the right side of the stone slab for a close-up view of some puzzle pieces. Click the “?” puzzle pieces to initiate the next sequence of events.
- After the brief dialogue, click on the door circled in green to enter a close-up. Pick up the Scroll lying on the floor to add it to your inventory.
- Use the Scroll on the Tablet with the “?”s to initiate a mini-game.
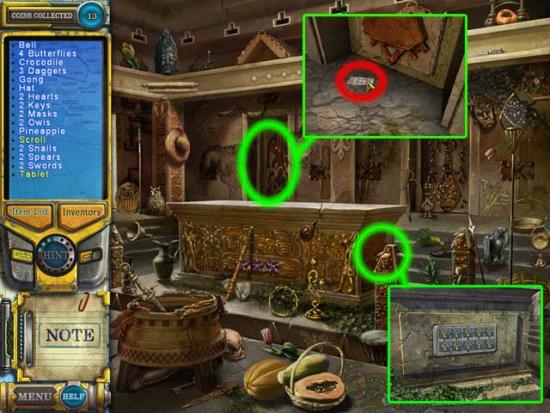
Mini-game Part 1- Matching
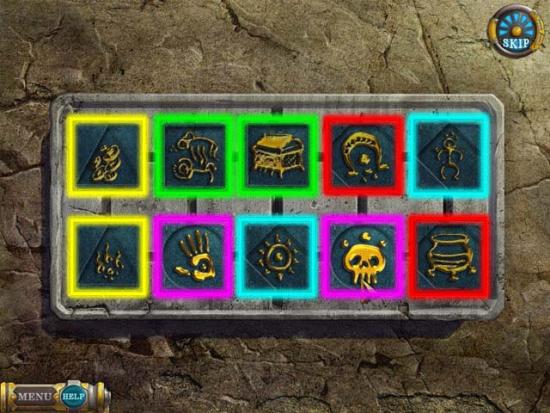
- Click on the stones to match pairs. If you click on a stone that doesn’t match the first stone, the ancient mechanism will shuffle the stones. Pairs are not identical. The pairs have been outlined in different colors below to show what matches what (the solution):
Mini-game Part 2- Organizing
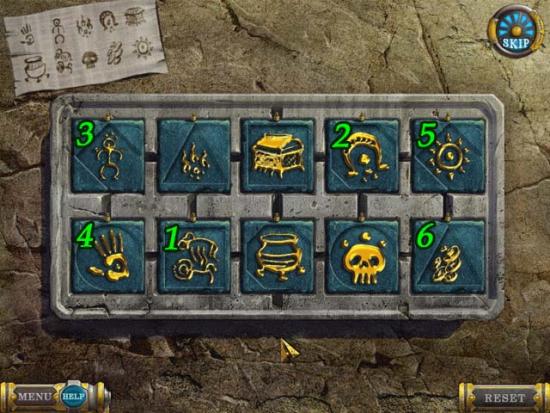
- To create the combination shown on the paper (scroll), you need to change the position of the tiles in 3 steps. You may reset the puzzle or skip at anytime. The tiles are numbered according to how you should press them to solve the puzzle:
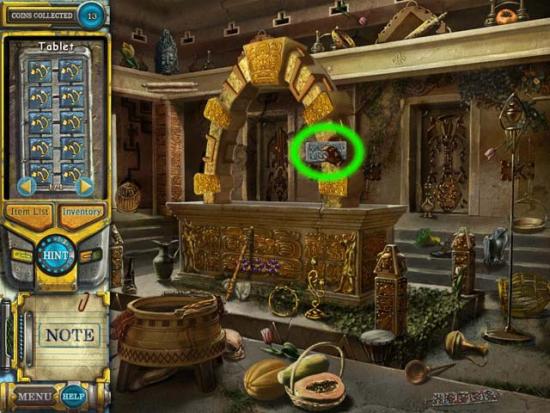
- Place the Tablet from your inventory in the slot circled below:
Congratulations, you’ve completed the game!
More articles...
Monopoly GO! Free Rolls – Links For Free Dice
By Glen Fox
Wondering how to get Monopoly GO! free rolls? Well, you’ve come to the right place. In this guide, we provide you with a bunch of tips and tricks to get some free rolls for the hit new mobile game. We’ll …Best Roblox Horror Games to Play Right Now – Updated Weekly
By Adele Wilson
Our Best Roblox Horror Games guide features the scariest and most creative experiences to play right now on the platform!The BEST Roblox Games of The Week – Games You Need To Play!
By Sho Roberts
Our feature shares our pick for the Best Roblox Games of the week! With our feature, we guarantee you'll find something new to play!All Grades in Type Soul – Each Race Explained
By Adele Wilson
Our All Grades in Type Soul guide lists every grade in the game for all races, including how to increase your grade quickly!


