![Hololive Dreams Tier List [Best Cards]](/wp-content/uploads/2026/07/hololive-dreams-tier-list.jpg "Hololive Dreams Tier List [Best Cards]")
Hololive Dreams Tier List [Best Cards]
The best cards for the best performances.


![Iron Soul Dungeon Weapon Tier List [Best Weapons]](/wp-content/uploads/2026/07/iron-soul-dungeon-weapon-tier-list.jpg "Iron Soul Dungeon Weapon Tier List [Best Weapons]")

Welcome to Gamezebo's walkthrough for Paradise.WALKTHROUGH The Madargane Harem: As the game opens, you'll see a boat coasting down the river. You'll overhear a conversation between King Rodon and a mercenary. The king is eagerly awaiting the arrival of his daughter, who he hadn't seen since she was six. Times are a bit troubling, it seems, and while precautions were made after the rebels took over the airport, we soon see an airplane carrying the king's daughter be…
a:1:i:0;a:2:s:13:”section_title”;s:20:”Paradise Walkthrough”;s:12:”section_body”;s:64037:”Welcome to Gamezebo’s walkthrough for Paradise.
WALKTHROUGH
The Madargane Harem:
As the game opens, you’ll see a boat coasting down the river. You’ll overhear a conversation between King Rodon and a mercenary. The king is eagerly awaiting the arrival of his daughter, who he hadn’t seen since she was six. Times are a bit troubling, it seems, and while precautions were made after the rebels took over the airport, we soon see an airplane carrying the king’s daughter being shot down before the game abruptly shifts control over to the protagonist of the game.
You’ll find that you’re in a control of a woman who is standing inside a small room. First thing you’ll want to do is investigate your surroundings. Start with looking at the objects on the table and read the letter you find there that’s enclosed in the envelope.
The letter is from an infirmary that explains that your character was found at the edge of a desert near death from dehydration and suffering from amnesia, so they sent her to where she is now in order for her to recover from her ordeal.
After you’re done reading the letter, look out the window next to you and you’ll see a woman wave back. The woman will enter the building and head up to your character’s room to talk.
When she first enters the room, she snaps a picture of your as-of-yet unnamed character with a camera before handing it to her along with a bag containing some other objects. She then introduces herself as Aicha, a servant working in the palace. When your character says that she can’t remember her name, Aicha says that everyone has a name, and suggests calling your character Ann Smith, after the name that was found on the book that Aicha returned.
You can access Ann’s inventory by right clicking anywhere on the screen, so after Aicha has finished talking, let’s do that to see what exactly was returned to Ann. It looks like Ann has received some undeveloped film, a university card, a camera, a silk scarf, a map, and a book entitled "The Lost Paradise of Maurania" by Ann Smith.
Click on the magnifying glass at the top of the inventory screen and use it to take a closer look at the book. You can use the arrow buttons at the lower right corner of the screen to flip through the pages as the book talks about the different animal and plant life that Ann Smith encountered while in Maurania.
After you’ve finished looking, talk to Aicha again to listen to her pine for Ann’s scarf. Ann seems like a generous woman, if you ask me, so give Aicha the silk scarf and because of Ann’s kind gesture, Aicha says that she and her brother Moktar would be more than willing to help Ann with whatever she needs.
As you talk to Aicha about all the available topics, you’ll learn that Ann is being kept in the Prince of Madargane’s harem. Ann won’t be able to see the Prince at this time because he is currently ill with butterfly fever and he’ll only allow his favorite to see and take care of him until he’s feeling better. Ann’s only other hope at escaping is to talk to Madame Souafi, who is the strict governess of the harem. Before Ann heads out into the hallway, check your inventory to see that she was given a key by Aicha.
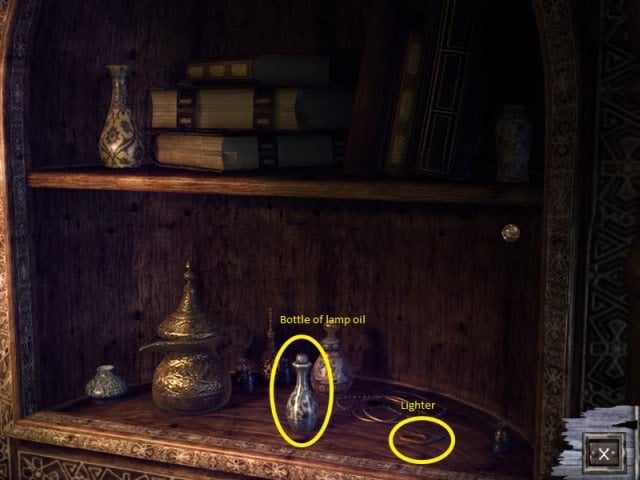
After you leave the room, you’ll see a display case. Examine it more closely and retrieve the lamp oil and lighter from the bottom shelf.

If you walk south, Ann will be near the entrance to the prince’s bedroom, which is currently guarded by bald-headed man. When you try to talk to him, you’ll realize that he’s mute, so he can’t say anything even if he wanted to. Ann won’t be able to enter at this time, so we will have to try taking another approach.
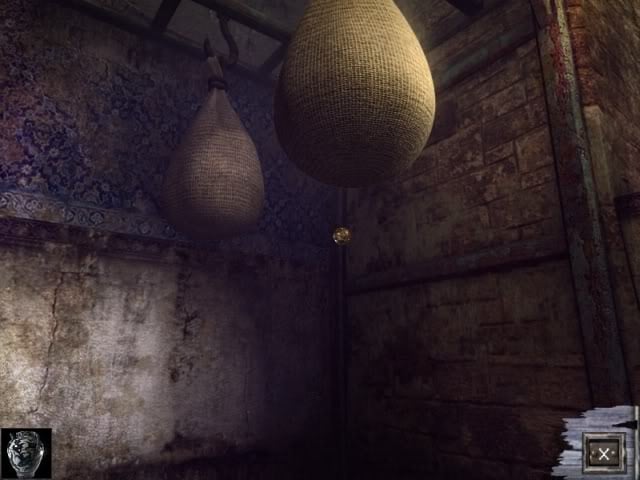
The door to the north of Ann’s room is locked, and it’s rather dark. You’ll see a lamp hanging next to the door. Use the lighter to light it, and then you can use the key to unlock the door and head out into the courtyard.
Follow the balcony around to the other side and walk down the stairs. You’ll see a rather large woman sitting here. Talk to her to be introduced to Madame Souafi, the governess Aicha told Ann about earlier. Exhaust all available conversation options to learn more about where Ann is being kept. She’ll also learn about the gardener Mustapha as well as the guard Kadher (the bald man standing outside the prince’s room).
When you’re finished, head south past a couple of pairs of concubines, none of whom want to talk to Ann, and head out the door to the right of the second pair. Head past the fountain and out into the garden. You’ll see a man tending to it at the opposite end of the area, and upon talking to him you’ll learn that he is Mustapha. Talk to him about everything before heading up the stairs to the north.
You’ll find the princess sitting here. She is awfully conceited, don’t you think? I suppose that’s what happens when you’re considered to be the prince’s favorite. Talk to her about all available topics and eventually she’ll get up and leave to sit in the aviary.
Head back inside the harem and talk to Aicha and she’ll agree to help Ann become the prince’s next favorite when you’re finished. Note that if Aicha becomes upset with Ann for asking too many questions, wait a moment and try again.
In order to get Ann’s plan under way, first she’ll need to talk to the princess some more. The aviary can be found by heading through the archway to the left of where Madame Souafi was seated. Walk around the cage to the north to find the princess and talk to her. At first she’ll refuse to talk, but as soon as Ann turns around, she’ll change her mind. She’s got a craving for some honey sweetcakes, but she needs Ann to help her get them.
When Ann first entered the aviary, you may have noticed a scale to her right. This will come into play in just a moment. Head back upstairs to the balcony to find Madame Souafi watching over everything that’s going on. Talk to her about the scales to learn that they’re actually dainty-scales, which help to moderate the prince’s wives’ appetites to keep them from becoming too fat.
It sounds like Ann’s going to have to tinker with the scales a little bit. Walk back downstairs and walk over to the first pair of concubines. You’ll see a small empty jar sitting on the ground near their feet. Pick it up and then walk back to the previous screen. Fill the jar with some pool water and then return to the dainty-scales. Behind the actual scale are a couple of counter-weights. Use the full jar on the first bag and it’ll lower due to the added weight. The cage will then raise up to allow access to the light sweetcakes.
Give the light sweetcakes to the princess and she’ll want more because the first ones weren’t filling enough. Fill the jar with more water, and this time use the water on the second bag to even them out. The cage will raise once again so Ann can access the normal sweetcakes, which she should take and give to the princess. The princess still wants more, so return to the scale and instead of putting water on the bags, grab the hook above them to release the catch and reset the counterweights. The cage will fall back to the floor, and this time, have Ann climb on top of the cage and take the heavy sweetcakes.
Return to the princess with the heavy sweetcakes and she’ll tell Ann that because she ate so much, she feels bloated and now she wants Ann to prepare her steam bath. Ask Madame Souafi for more info on the actual steam bath, and then talk to the princess to find out how she likes her baths. She’ll give you a medallion that’ll allow the steam bath to let out the appropriate amount of steam for her.
Head over to the boiler room, which is behind where Madame Souafi is sitting and to the left. Check out the panel to the right.
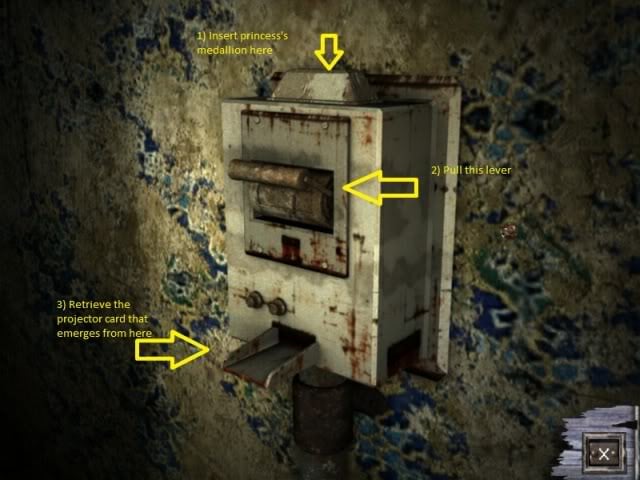
Insert the medallion that Ann received from the princess in the slot at the top. Pull the lever and out pops out a projector card from the slot at the bottom. Take it and then leave the close-up view.
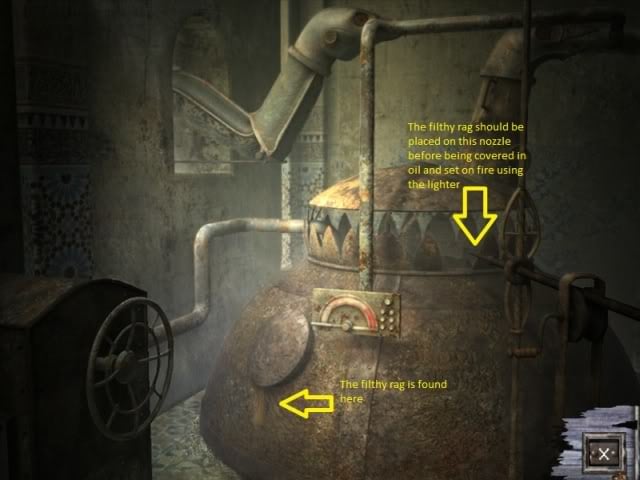
Examine the boiler and take the dirty rag from the lid near the bottom of the tank and then place it on the nozzle to the right. Cover it in oil from the flask and use the lighter on it to get the boiler lighted.
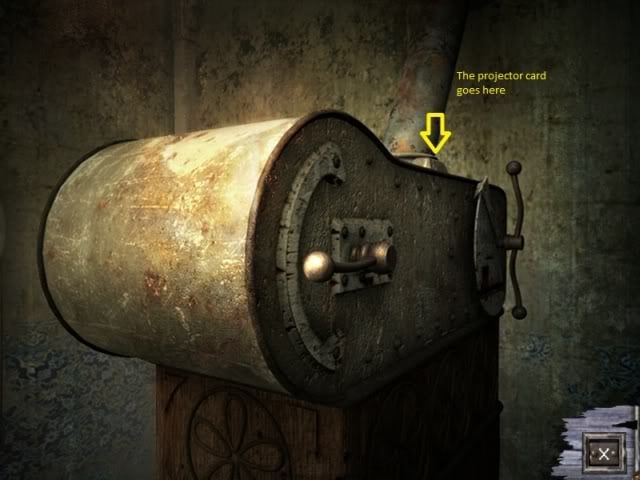
Exit the boiler room and enter the room on the opposite end. Walk up the small set of stairs and use the projector card in the small slot towards the top of the machine. Pull on the lever to see a beam of light come out of the machine and illuminate the wall across from you.
Examine the wall to get a close-up view of it. You’ll see the light shining on two cogs, both of which have holes in them. Below them are a couple of wheels that can be turned that control the cogs. The left wheel controls the inner cog while the right controls the one on the outside. What you’ll need to do is turn each wheel until the holes in the cog are lined up with the beams of light. When you’re successful, you’ll see the princess get up from her seat in the aviary and head into the bathing area.
While she’s taking her precious steam bath, head upstairs and climb into the large basket sitting in the hallway. You’ll see Madame Souafi unlock the princess’s room to check and make sure everything is okay. Make note of the combination (or you can just look at the following screenshot).
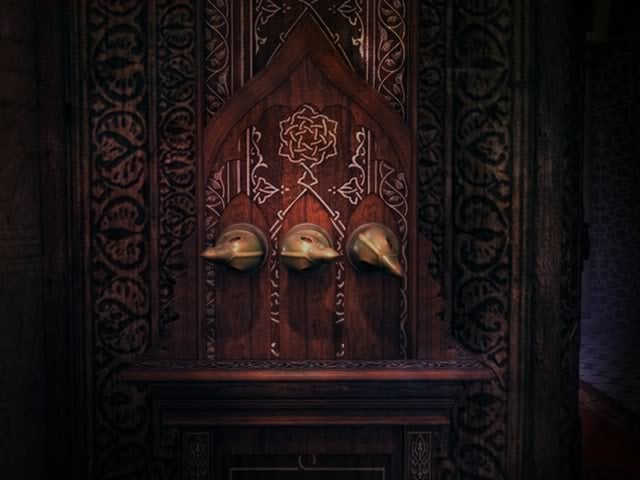
After Souafi leaves, take a look at the lock and adjust the birds’ heads until they match the picture above in order to unlock the door to the princess’s room. The first bird’s head should be adjusted until its beak faces to the left, the second bird’s beak should face to the right, while the third should face to the lower right.
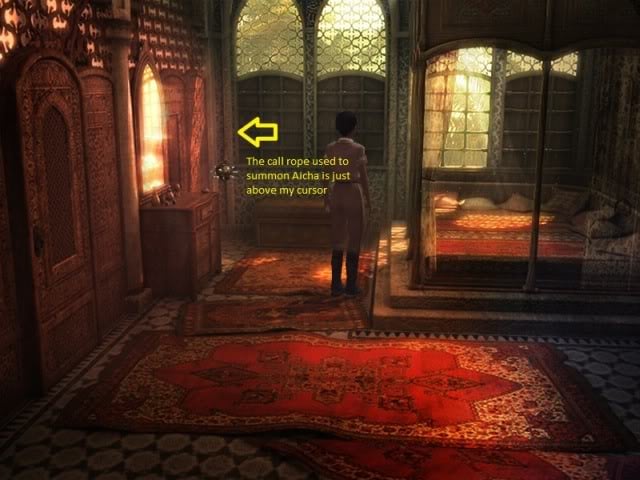
Once Ann is inside the princess’s room, pull on the call rope near the window to summon Aicha and she’ll retrieve the favorite’s robe. The rope can be a bit hard to see, so use the next screenshot in case you’re having trouble seeing it.
Once you’re in Aicha’s room, talk to her to learn that even though Ann now has the robe, she still needs the princess’s perfume. It turns out that while Kadher has a hard time seeing, he has the nose of a hunting dog and he’ll able to figure out that Ann isn’t the favorite unless she goes in smelling like the favorite.
Talk to Madame Souafi about the perfume to learn that it is made from a special flower that grows in the garden and it’s usually the Prince himself that makes it using the tools found in his workshop.
The Prince’s workshop can be found by heading out to the garden and heading up the stairs and following the path south of where you originally met the princess. Once you’re inside the workshop, read the book on the nearby table to learn how the perfume is actually made. Ann will need a Madargandier flower, which only blooms at night, a couple of blue almonds, and some Barbary water. The water is found inside the workshop, and it’s being contained in a beaker that is found on the table to the far right of the room.
After you’ve obtained the water, go to the right of the stairway to find a telescope. Look through it to see an almond fruit growing on a tree outside before leaving the workshop.
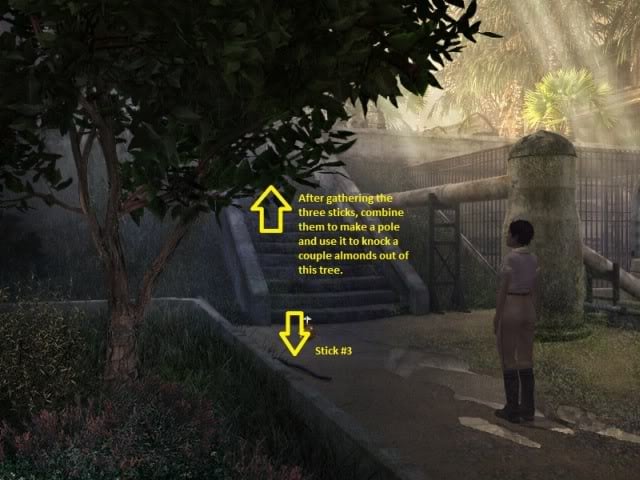
In order to reach the almonds, you’ll need to get a pole. Gather up three sticks that are around the garden and combine them to create a makeshift pole. The screenshot below will illustrate the locations of each stick.
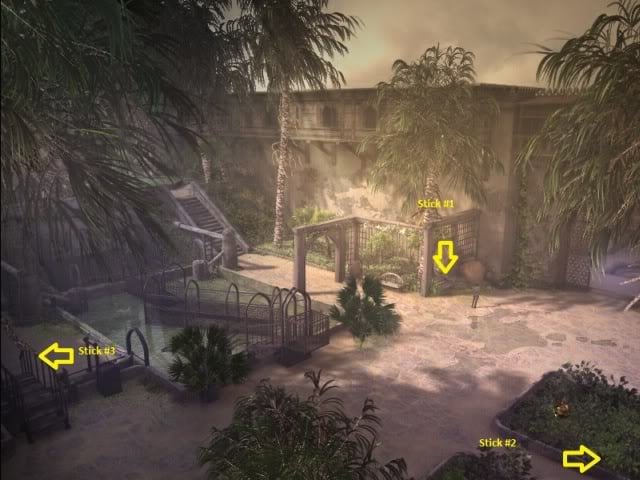
In order to combine the sticks together, go into your inventory and drag each stick on top of another one until the pole is made. Use the pole on the tree above where you found the third stick to knock a couple of almonds out of the tree. Pick them both up from the ground and now we’ll have to figure out some way to get the flower.
As you were looking for the third stick, you may have heard some growling while in the area. If you look in the area behind the almond tree, you’ll see a leopard sleeping in a cage. When you look at the leopard more closely, Aicha will come out and warn Ann away from it.
Go back inside the harem and talk to Aicha, who is cleaning the floors near where Madame Souafi usually sits. Ask her about the leopard, but she doesn’t know much about it. Ask Madame Souafi about it and you’ll learn that the Prince lets it out at night so it can ward off any prowlers.
Head up to Kadher’s post and as you walk across the balcony towards the Prince’s room, you’ll see a Madargandier flower start to bloom, suggesting that it is almost nightfall. After seeing the flower, return to Ann’s room and go to sleep on her bed.
The Night of the Leopard:
As Ann slumbers away, you’ll be put in control of the leopard that was previously being kept in the cage. You control the leopard by pointing the arrow in the direction you want it to go while holding down the left mouse button. The closer the cursor is to the leopard, the easier it will be to control it.
Due to the technical limitations of my current computer, I was unable to play through this section of the game due to the poor FPS. I hope that when I get a better computer, I’ll be able to go through this section more in-depth with the next version of the guide. You can play through it if you wish, just don’t expect any assistance from me at this time. The goal is to get one of the Madargandier flowers from where they grow so that Ann can get to it when she wakes up.
You can press the ESC key at any time to skip through this part of the game.
The Madargane Harem:
When Ann awakes, head out to the garden and pick up the flower near the bench where you picked up the first stick. You should now have all the ingredients needed to make the perfume, so return to the Prince’s workshop.
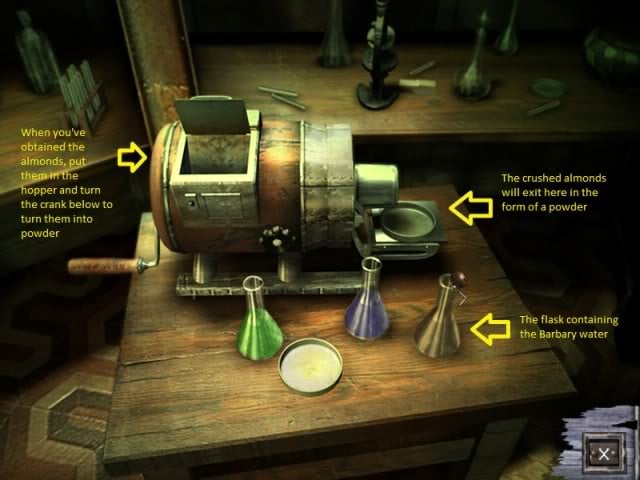
On the table where you picked up the Barbary water, there is also a grinder. Put the two almonds into the hopper and turn the crank to turn them into a powder.
Afterwards, walk over to the still on the other table. Drop the water, almond powder, and the flower into the funnel at the top left and use the lighter to light the burner underneath it. The perfume will be distilled into a beaker on the right side, which you should then take with you.
With the perfume in your possession, head back to the fountain near the entrance to the harem to find Aicha. Talk to her and you’ll return to Ann’s room as Aicha turns Ann into the new favorite. Proceed to the Prince’s room and Kadher will move out of the way as Ann approaches him.
Walk down the stairs to enter the Prince’s room and talk to him at the far right side of the area. He’ll quickly figure out that Ann isn’t his favorite, but you’ll soon learn that he is not her enemy either. Talk to him about everything and he’ll eventually tell Ann a story about a little girl named Ann Smith (not the one that’s talking to him now) and a leopard. The Prince wants Ann to return the leopard to the desert, and he’ll allow her to leave the harem to get the supplies she needs to make the journey.
After you’re done listening to him, you can head back upstairs to automatically find yourself back in Ann’s room with her normal clothes on. To reach the town of Madargane, head back out to the garden and when you reach the fountain, take a right instead of a left to find a door that’ll lead out into the town.
Madargane:
Wow, this place looks like a bomb was dropped on it. I suppose that’s what happens when people mass evacuate a city. Head to the right until the screen begins to scroll and you see a small shop in the background. Ann comments that the shop sells everything, but that’s not what we’re here for. Walk to the right until you find something covered up with a mat. Upon closer inspection and removal of the mat, you’ll be looking through the back window of a broken down truck.
Leave the view and head right from the buildings and exit into the next screen. Along the way, you’ll be interrupted by a cutscene involving a rebel colonel and one of his flunkies. The flunky lets the colonel know that some of his cohorts shot down a plane carrying King Rodon’s daughter (Ann), but the problem is she is still alive and she’s looking to get the black leopard. The colonel decides to keep Ann from reaching her father by any means necessary.
When Ann enters the next area, she will be stopped by a rug merchant. She shrugs him off, letting him continue on his way. Head through the archway and stop to check out the door on your right to learn that it’s locked. We’ll back for it later. Continue on your way and head south when you reach the next screen. You’ll notice that the rug merchant has somehow managed to sneak past you and is now standing near the path.
Head towards the far right until you see a couple of fuel pumps and enter the garage. Talk to the mechanic to be introduced to Hassan. He’s willing to fix the truck, but it needs new tires, a battery, and a fan for the engine. After you’re finished talking to him, walk to the right to find the airplane that Ann was riding in. You’ll find a hand pump lying on the ground near the hydraulic lift, so pick it up as you’ll need it later. Look in the airplane and Ann will have a flash of memory at the point where the plane was shot down and crashed. Take the battery, the spring coming out of the back of the seat as well as the burned document from the dashboard before leaving the close-up view.
Read the document and then talk to Hassan about the airplane before leaving the garage. Head back to the fork where the rug merchant is located and this time head north to enter the market square. As Ann enters the square, she’ll come across a couple of men with their dog. The dog will begin to bark at Ann, and one of the men will push her out of the way as a couple of gazeline riders head out of the village on their gazelines.
Near the village exit, you’ll find a guard. Talk to him to find out that in order to leave the village, she needs a valid pass with her photo and the Prince’s signature. Continue out of the village and head down to the docks. You’ll find Aicha’s brother, Moktar standing here. Check out the tires hanging off the side of the dock to learn that Ann is too weak to carry them herself. Talk to Moktar about everything and when you ask him to lend a hand, he’ll agree to carry the tires back to Hassan’s garage.
Return to the village and head back to where Ann first encountered the rug merchant. There is a path that runs to the right of the archway, follow it to find Moktar sitting outside a café as well as some other shops. Enter the one with the beaded window to find a hair salon.
Upon entering, you may be distracted by the noisy fan. Take a look at it and then talk to the hairdresser. He’ll agree to let you have the fan if Ann can fix his manual one. Look at the pedal near the chair and press on it to have the pedal lift up. Place the spring underneath the pedal to fix the fan and now the hairdresser will let you take his noisy fan. Turn it off before removing the cover and taking the fan blade.
As soon as you leave, you’ll be interrupted by another cutscene that shows Hassan having been murdered in his garage by an unknown assailant. If you didn’t talk to Moktar about everything at the docks, you can talk to him as he’s sitting outside the café. After you’re done, enter the café and Ann will get the sneaking suspicion that she’s not wanted there. Ignore the two men, but take the newspaper sitting on the block near the lower right edge of the screen. Read the newspaper and then head into the back to find the proprietor of the establishment. Talk to him to learn that he is the brother-in-law of the resident photographer, and he’ll agree to let Ann have the key to his place so she can develop her film.
After getting what you went in for, return to the photographer’s place and use the key to unlock his door. Flip the switch down to the middle position to turn on the light in the darkroom.
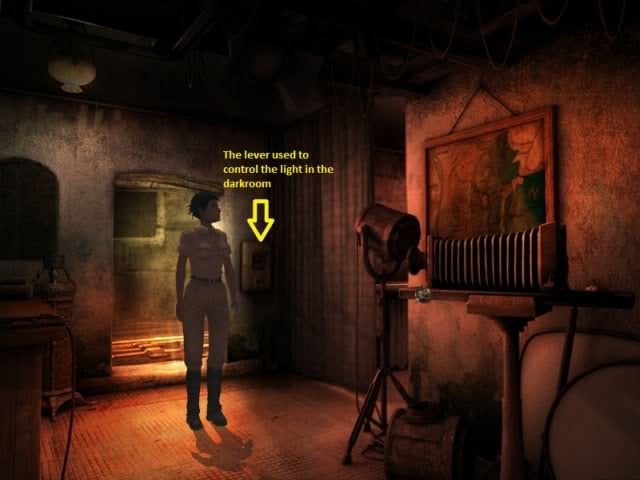
Enter the darkroom and near Ann is a set of drawers. The top drawer contains a book explaining the proper procedure on developing film. The machine sitting on the table is the actual film developing machine. Flip the lever in the previous room to its bottom position before placing the undeveloped film in the spool on the film developing machine.
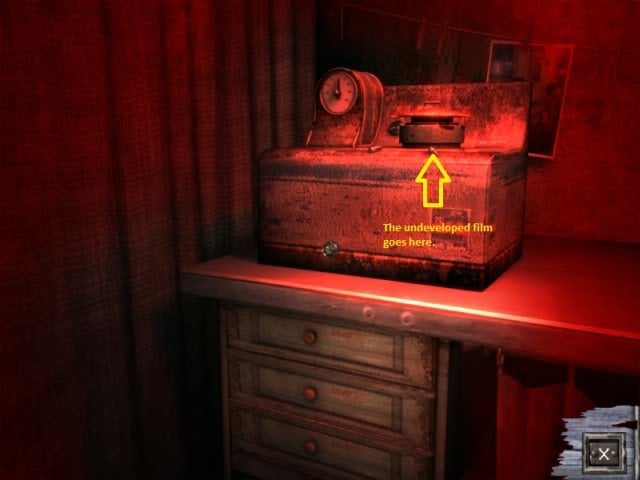
As soon as Ann does this, the rug merchant will walk in and turn on the light in the darkroom in an attempt to sabotage the film. Ann runs out to yell at him, except he has already left the room. Use the film developing machine again and turn the timer to the left of the film spool to develop it. Take the developed film over to the enlarger.
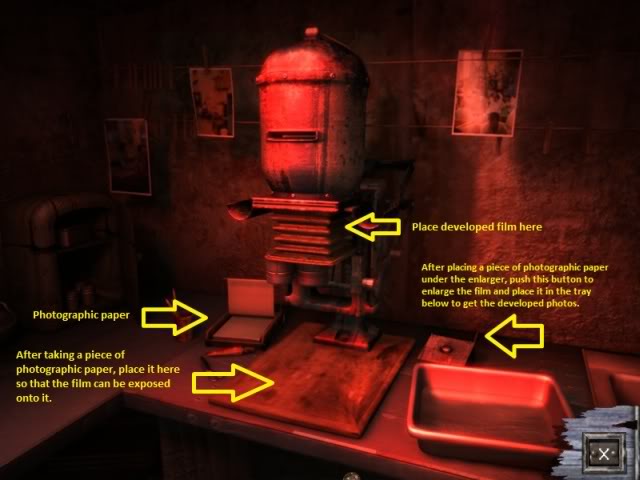
Place the film in the center plate on the enlarger. Take a piece of photographic paper sitting to the left of the enlarger and place it on the bottom plate. Push the button to the right to enlarge the film and then put it in the tray below the button to get the enlarged photos. Go into the inventory and combine the photos with the pass to put Ann’s photo on the pass. All you need now is the Prince’s signature.
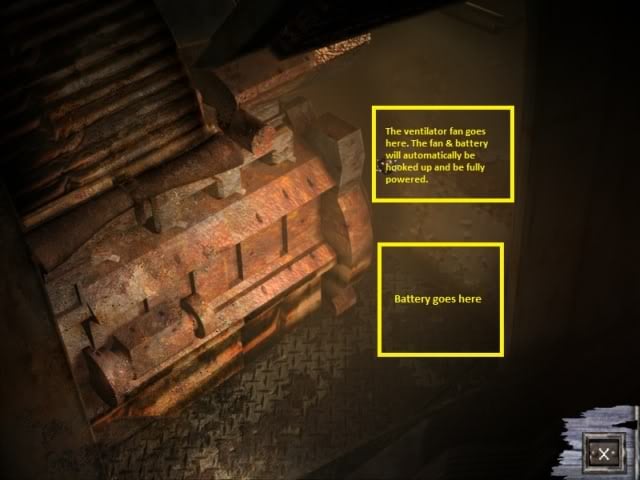
Return to Hassan’s garage and Ann will stumble upon his bloodied corpse. I guess she’ll have to fix the truck herself, but at least the tires were already put on. Look at the open engine compartment and place the battery and ventilator fan inside of it. They’ll automatically be hooked up once they’re in position.
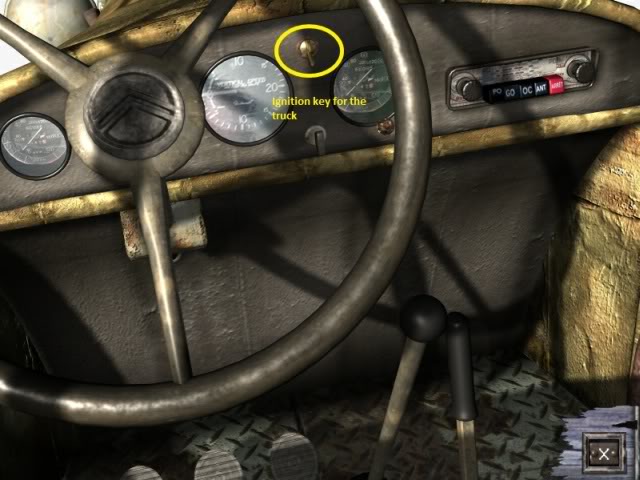
Use the rope on the truck’s winch and Ann will tie the rope to something sturdy to pull the truck down after she takes a look at the truck’s interior and turns it on.
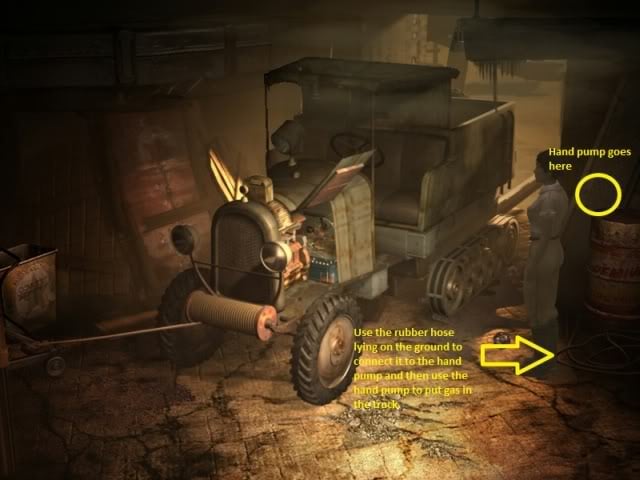
The truck still needs gas in order for it to be fully operational. Use the hand pump on the barrel of gas near the truck and then use the rubber hose lying on the ground next to it to hook it up to the pump. Use the hose again to connect it to the truck and then use the pump so that the truck will be filled with gas.
Climb in the truck and Ann will drive it back to the harem and park it inside the garden. Go to the Prince’s room and talk to him to obtain a key so that Ann can free the leopard from its cage. Return to the garden and talk to Mustapha. Walk over to the wheel near him and turn it twice until you see some water flowing through the lock and some fish swimming in through it. Head up to the stairs and walk over to the large cage in the middle. Enter the turnstile near it and use the key to turn it. Follow the path to find a control panel and a lever that controls the water pool below. Pull the large lever to drain the water and now you’ll have to use the control panel to straighten the bridge so that the leopard can follow it into the back of Ann’s truck.
You’ll see several notches surrounding the lever. Number them from left to right and move the lever to the sixth position. Pull the small lever to the right down to bring the bridge up and facing to the right. Center it by putting the large lever in the third position and pull the small lever again. The leopard will follow the bridge down and enter the back of Ann’s truck once you’ve done it successfully.
Talk to the Prince again to say goodbye and he’ll sign Ann’s pass before she leaves. Hop in the truck and Ann will set off to the Molgrave Desert. However, before she gets too far, she’s startled by a couple of stray gazelines and drives off the edge of a cliff.
The Molgrave Desert Crash Site:
Ann seems to emerge from the crash relatively unscathed, but the leopard seems to have gone missing. Pick up a piece of glass from the ground behind Ann and then head south from the crash site.
You’ll find that your path is blocked off by several large vines. Use the glass shard to cut through them and continue on your way. You’ll find a couple of large branches that are wide and seemingly strong enough to support Ann. Walk down the lower branch and the end of it will snap off.
Follow the upper branch and tug on the vine, only to have Ann be bit by a snake…it’s non-poisonous, of course, otherwise this would be a rather short game. 😛 The vine will fall down so Ann can return to the lower branch and use the vine to climb down to the jungle floor.
Follow the path until Ann encounters several palmettes. A palmette falcon will soon arrive to try to prey on them, sending them burrowing back into the ground. You have no other choice than to cross the open palmette-infested sand, but there’s a trick to it. Whenever the palmette falcon flies overhead, you’ll see the palmettes in its flight path burrow into the ground. As soon as they do, run across the sand until you reach the other side.
If Ann fails at any time, she’ll be attacked by the palmettes and be forced to retreat to the nearest safe spot. Continue to wait for the falcon to fly overhead and run when your path is clear of palmettes until you reach the other side.
Kick the log twice to knock it down into the ground below, and continue on your way to find another palmette-infested area. Use the same strategy as last time until you make it across.
The next area is a little simpler. There are several sand lilies growing in the ground, but some of them aren’t entirely stable. Have Ann hop onto the first stable sand lily and work your way to the other side from there. If at any time Ann steps onto an unstable lily, it’ll sink into the ground and Ann will jump back to the last stable one she was standing on. Some of the lilies she will have to jump on will be small, but most of them will be the more abundant large ones.
Once you’ve made it across, keep on going until you run across a man in safari gear checking out a dead gazeline. Introduce Ann to Major "Goodmorning" and he’ll tell her that he’s investigating a crime. Apparently the leopard’s been through here and it killed the gazeline while hunting for food. Talk to him further to learn about gazelines, the Molgrave, polopolo bats, and even the leopard itself.
When you’re done talking to him, head south until you see the leopard moving in the background. Examine the broken fencing to knock off a couple of posts and then pick them up from the ground. Enter the base of the tree to the right and Ann will be forced to exit after startling some polopolo bats.
Re-enter the tree and place the branches on the ground. Light them on fire to smoke out the bats and Ann will be allowed to climb up the tree after the smoke has cleared out to uncover the Molgrave village.
The Molgrave Village:
At the top, walk to the left and pick up the large pole lying on the ground behind the pots. Jump across the gap in the walkway and check out the rope to the left. Go into your inventory and combine the glass shard with the pole to make a spear and then use the spear on the rope to cut it and lower the walkway to the next hut.
The next hut is blocked off by a small stump. Climb on it only to have it roll out from under Ann’s feet and sending her crashing back down to the walkway. Look at the mound on the side of the hut and use the spear in four different spots to create footholds for Ann to climb. She’ll automatically climb up once the footholds are made. As you attempt to follow the path to the next screen, the part Ann is standing on will give way and send her down to the floor below.
Once Ann recovers, enter the hut to the right to meet the matriarch of the Molgrave tribe. She’ll tell Ann through her interpreter that because the leopard attacked her son, she sent hunters to kill the leopard. Ann will only have a day to find it before the hunters do and after Ann is finished talking, the venom from the snake bite that Ann received earlier will cause her to faint.
When Ann wakes up, she’ll find herself inside the priest-doctor’s hut. He says that the bite she received from the viperon isn’t poisonous, but it does have some interesting effects. As you talk to the doctor, Ann will learn more about who she is. It is revealed to her that she is King Rodon’s daughter because she the mark of the leopard claw on her shoulder. She’ll do best to keep it hidden, otherwise she could be killed because of it.
After you’re finished talking to the doctor, leave his hut and head back to where Ann originally fell down. Take the path to the right of the matriarch’s hut and then follow it left until you see a man standing outside of another hut. He doesn’t speak English, so don’t bother trying to talk to him. Instead, take the plant that’s growing across from him.
Head back to the right until you see a ladder towards the right of the screen. Follow the path right past the ladder until you see the trunk of a large tree. Go right from there until you can see several large jugs hanging off the side of the railing. Pull one up and take some of the polopolo fat from it.
Return to the tree and this time take the top walkway leading from the left side of the tree until you come across a gazeline corral. Head through the corral to the other side and climb up the ladder in the next screen. As soon as Ann reaches the top, you’ll overhear a news report on the radio stating that Madargane has fallen to the rebels and that the Prince and his retinue have been killed.
Talk to the boy standing nearby and he’ll explain how to catch the leopard. It has something to do with using a falcon to catch polopolo bats as they’re driven off and using them as bait and that in order to scare the bats into flying away, you have to use a drum.
Return to the gazeline corral after talking to the boy and follow the path south. You’ll find an angler sitting in the far corner of the area. He is trying to catch sand dabs. He doesn’t speak English either, but his seat is available for Ann to sit in.
To operate the fishing rod, you have to use one of the colored baits to attract the sand dabs. If the bait you use doesn’t seem to be working, you can switch it out for a different colored bait. The wheels to the left and right of the seat allow Ann to turn and move her rod. When a sand dab is close enough to the bait, use the reel to bring it in. It’s mostly trial and error, but you’ll see a short cutscene of Ann reeling in the sand dab when you are successful.
Once you’ve obtained the sand dab, enter the angler’s hut behind you to find the Major in the hut along with the angler. Talk to the Major and then give the sand dab to the angler. The Major will tell Ann that it takes a while to properly cure the skin, although the alternative solution involves Ann giving the angler a couple of plants along with some polopolo fat. It’s a bit crude, but Ann is in a hurry so that will have to do for now.
You should have already grabbed one of the plants that you need. The other is found outside of a hut in one of the upper levels. You’ll have to head back the way you came, past the gazeline corral, until you reach the ladder that sits towards the middle of the screen.
Once there, climb the ladder to the upper level and then follow the path northwest. Follow the next path to the left until you reach the hut with a pot sitting outside and a plant growing near the door. Take the plant and return to the angler. Give the plants to the angler and talk to the Major again to learn that the angler still needs the polopolo fat. Give the fat to him and the angler will set off on curing the skin. Leave the hut and then re-enter to find the cured skin stretched out on the right side of the room. Take it because now we’re going to use it to fix the drum.
If you haven’t come across it yet, backtrack a little ways until you see a large tree in the background. Follow the path around to the right of it and you’ll see a walkway that goes around the tree. Climb up the ladder to find the broken drum. Put the cured skin on it to fix it, but we still can’t do anything with it just yet.
Return to the Molgrave prince, the boy who explained how to capture the leopard. Inform him that the drum has been fixed, and he’ll tell Ann that she has to beat the drum to scare the polopolo bats out of the tree and when they have taken flight, he’ll send out the falcon to kill one and bring it back for Ann to use.
Head back to the drum and use the mallets to start beating on it and watch as the polopolo bats evacuate the tree en masse. The prince will send out his falcon and it’ll be successful in catching one. Return to the prince again to claim your prize.
We’re almost ready to bait the trap, but there’s one last thing that we have to do. Return to the ladder that led up to the upper level of the village and climb up. Head south from the hut to the next screen. Enter the hut on the right and pick up the hook and several nuts near Ann’s feet. With those now in your possession, go back to the previous screen and take the right path at the fork.
Go past the woman standing outside the first hut and look at the sign outside the second. It shows you how to make a bungee strap, and the length of strap needed is largely dependent upon the person’s weight. After you’re done looking, head inside the hut.

As soon as Ann steps inside, she’ll comment that the machine in the room looks like a measuring contraption, which is precisely what it is. Step on the scale near Ann’s feet to learn that she weighs 2 ½ nuts. Walk over to the nut splitter to the right of the scale and place a nut in the holder. Pull the lever to drain the nut and it’ll be tossed over to the scale when it’s done. Repeat the process one more time and on the third nut, click near the center of the nut to set the cleaver so that when you pull the lever, the machine tosses half a nut over to the scale.
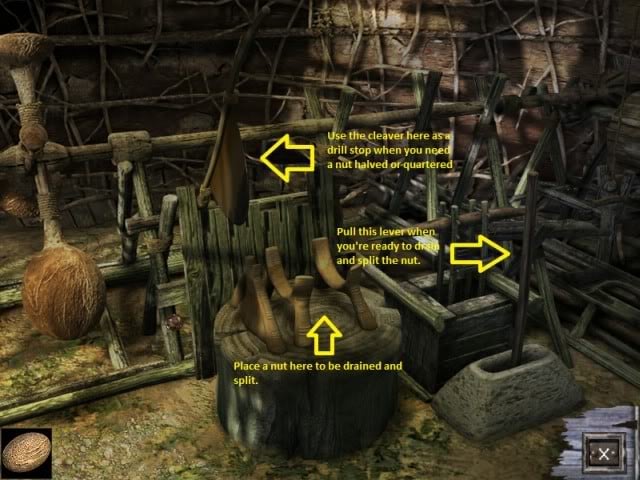
If you’ve done this correctly, the machine will create a bungee cord when you walk over to the next machine and pull the lever. Take the cord once it’s finished and leave the hut as now we’re ready to bait the trap for the leopard.
Return to the angler’s hut and instead of going inside, go back to the chair where you had to fish for the sand dabs. Climb down the ladder next to the chair to find the leopard trap. When Ann steps down from the bottom rung from the ladder, the hook will fall out of her pocket and drop to the ground below. The only way to get it back is to use the bungee cord on the plank Ann is standing on. A cutscene will play to show Ann bungee jumping to retrieve the hook.
Walk over to the trap in the center of the area and place the hook on the line and bait it using the polopolo bat. Pull the lever to open the trap floor and then pick up the branches near the ladder and Ann will automatically use them to cover up the hole.
As you climb up the ladder, night falls and Ann will sleep on the platform above as the gameplay switches back to the leopard.
The Night of the Leopard, Part 2:
I had to skip this sequence as well because while I tried to play through it this time, I reached a point where the leopard refused to move no matter what I did. I hope to cover it in a future version of the guide when I have a better PC that can better handle the demands of the game.
The Molgrave Village:
Just before Ann awakes, you’ll see that the leopard has found the trap and has fallen for the bait. Return to the matriarch’s hut to find the priest-doctor standing outside. It is revealed that a couple of guys looking for Ann has murdered the Major as they tried to get him to tell them where Ann was hiding. The Molgrave villagers murdered the men after they found out what happened and just before Ann leaves, the priest-doctor will begin to tell a story about King Rodon. When the story concludes, Ann will have reached her next destination.
The Ferry:
Read the report that the priest-doctor gave to Ann that Ann is someone with the initials M.R. followed by a physical description of her. Head down to the bridge to find a sinking ferry. To make the ferry level again, go to the broken down truck near the gazeline and take one of the jerry cans. Walk down to the dock to the right of the path leading to the ferry. Use the jerry can on the sinking corner of the ferry to raise it up a little bit and you’ll have to do this two more times with the other jerry cans until the ferry is no longer sinking.
Return to the gazeline and click on it to have Ann get it moving onto the ferry. Follow it onto the boat and click on it again to get the ferry underway. Part way through the trip, one of the support posts will break and cause the ferry to capsize, drowning the gazeline. Ann will wash up on the shore near the entrance to the Zamarat Mines with the leopard nowhere to be found.
The Zamarat Mines:
Follow the road north from the dock and continue right at the fork. Head down into the shanty town and proceed through it until you see a man standing on a deck to the left. Go up the stairs running up the right side of the building where the man is located and then enter the door to the right. Walk into the office using the door and talk to the man to be introduced to John Harambee, the director of the mining operations in the area.
After Ann is done talking to the director, leave the room and you’ll see a scene where he reports that the king’s daughter, Malkia Rodon-Crown has arrived. He will hold her captive until the man he is talking to arrives on the scene to collect her. Head out the same way you came in to see a trio of miners, one of whom appears to be injured. He rambles on about a beast, a level 1095, and someone named Dada.
Talk to Harambee about the injured miner and after the conversation, he’ll lock Ann inside his office. In order to escape, check out the shelves to the left of the door and take the knobs, the miner’s clothes, as well as the rods. In case you haven’t noticed, you may see a bug scurry across the floor and disappear into a crack in the floor.
When you inspect the floor where the bug disappeared, Ann will note that it’s not entirely solid. Combine one of the knobs with the new rod to create a miner’s stick. Use the stick to pry loose the floorboards to see that the hole opens up into the mine shaft.
Change into the miner’s clothes by using them on the screen located on the other side of the office. Use the rhino’s head near the door and Ann will climb up into the ceiling. Harambee will come back to check on Ann, only to guess that she disappeared into the mine shaft. Once he leaves, come down from the ceiling and leave the office.
Backtrack all the way to the entrance of the mine, where you saw the two men talking. You’ll encounter Harambee along the way, but don’t worry, he won’t even bother to give Ann a second glance. You will also witness a status report between the rebel colonel and his flunky before you’re able to head left at the fork to find an open mine shaft. Use the panel near the bottom left corner of the elevator to head down into the shaft.
The Zaramat Mine Shaft:
Go left once you step off and enter the office. Talk to the man to be introduced to William Désiré Mititti, or Bill for short. You can learn more about the mines, Engineer Dada, as well as the emeralds they were mining before leaving the office.
Head north into the shaft and pick up the large rope on the ground. Continue on to uncover an elephant that’s chained to a post. Go back and talk to Bill about it to learn that it’s old and is currently waiting to be hoisted back up to the surface. Bill will leave the office and Ann will change back into her regular clothes. Inspect the open drawer on the desk and remove the wrench and wedges before Bill returns.
Go back and free the elephant using the wrench on the post and it’ll saunter through the shaft until it reaches the elevator. Follow it back and then climb up on top of the elevator by first getting a close-up view of the ceiling and then opening up the hatch. Use the wedges on the metal beams to keep the elevator from going all the way back up the shaft. Open the hatch on the elevator roof to climb back down and then use the elevator button to uncover the hidden floor.
Connect the hooked rope to the ring on the floor covering and the elephant will drag the covering away. Climb down into the lower floor and check out the yellow control panel. Flip the little switch near the bottom and to the left of the large lever to the right once and then flip the large lever down to access the hidden level 1095.
Follow the path down and talk to Engineer Dada sitting atop her throne. She’s lost it, and she considers herself to be the Queen of Hell. She never wants to return to the surface and when the conversation ends, she has her guards throw Ann down into a pit and knocking her unconscious in the process.
The Night of the Leopard, Part 3:
I skipped this section because of the same problem I had in part 2.
The Emerald Pit of Level 1095:
The leopard will arrive on the scene and wake Ann up, startling her in the process. Walk down to the next screen and pick up the broken lantern from the ground near the back wall. Go to the right and look at the rope holding the elevator up. Cover it in the oil from the broken lantern and then burn it using the lighter to free the elevator.
Get into the elevator and head up to the next floor. Take some emeralds from the bucket nearby and take the fuse wire that’s lying on the ground to the left. Go up to the top floor and pick up the drill. Ann will use it to bore a hole in the wall containing the emeralds. If you gaze skyward, you’ll see a bat hanging upside down from the ceiling above the elevator. Chuck some emeralds at it three different times until it lands on the crate hanging nearby.
The leopard will sense that it’s lunch time and it will lunge and eat the bat. As it lands, the crate the bat was perched on will come crashing down and expose the dynamite that was contained inside. Ride the elevator all the way back down and pick up a stick of dynamite.
Go back up and put the dynamite in the hole that Ann drilled and connect the fuse wire to it. Head back down and connect the end of the fuse wire lying near the leopard to the base of the detonator in the screen where you picked up the broken lantern. Push the plunger down to blow a hole in the wall, and sending the water from the river rushing in to flood the mine.
You’ll find Ann and the leopard back on level 975. Go back to Bill’s office and attempt to persuade him to leave, but to no avail. Head right past the elevator to find the elephant waiting to be hoisted up. Climb onto the elephant and everyone will be lifted up to the surface.
Talk to the man sitting near the elevator shaft and he will reveal to Ann her real identity. She is Malkia Rodon-Crown, the daughter of King Rodon. He doesn’t like the king very much, and Ann (Malkia) will have a hard time believing what he has to say about her father.
Follow the road back out to the entrance of the mine until you see a cutscene with Ann and the leopard riding the elephant and getting the hell out of Dodge. The leopard will jump off the elephant just before Ann is captured by rebels.
The Rebel Camp Site:
Ann will be caged with seemingly no way to get out. You’ll notice that the cage is swinging and if you move your cursor to the left or right of the cage, it’ll change to one with an arrow. As the cage swings in the direction of the arrow, hold the mouse button down to get Ann to shift her weight and get the cage swinging faster. You’ll have to constantly change direction to get the cage swinging out far enough and when you do, grab a stick from the tree to the right and once she has the stick, start swinging the cage to the left until she can use the stick on the beehive.
Once Ann knocks down the hive, the bees begin to swarm the guard and she will be freed. The guards will take her to see the colonel and you’ll be introduced to Conrad Siri. Talk to him and he’ll reveal some more about Ann’s past. She’s apparently a part of the ongoing revolution, even if she doesn’t remember anything about it. Her new goal is to get on board the Black Vault, Rodon’s ship, and stop the drums because the rebels are superstitious and they won’t approach the boat while the drums are still going.
After the conversation, Siri will give Ann a walkie-talkie and some emeralds. Before leaving, read the documents on his desk and then leave his tent. Follow the path leading northwest that’s to the right of Siri’s tent and take some thorns from the bush nearby.
Head back the way you came and this time exit to the lower right to find the soldiers’ camp. Talk to the soldier nearby to learn a little more about the Black Vault and the revolution. Return once again to Siri’s tent but this time head due north. Pick up the cattails near the riverbank and then head to the right to find the area where Ann was initially being held captive.
Talk to the soldier until he agrees to let Ann talk to the prisoner hanging in the second cage. Introduce yourself to Wamganga, who happens to be one of the Buluus, and also happened to serve Rodon as his doctor. Talk to him about everything and then head right until you come across the Black Vault.
You will have to find a way to get onboard, but you’ll notice that you’re prevented from doing so because there’s a snake wrapped around the anchor chain. Go back and ask Wamganga for assistance, and he’ll tell Ann to bring him some bramble thorns and some reeds. You already have them in your inventory if you’ve been following the guide up to this point, so give them both to Wamganga and he’ll put them to good use by eliminating the guard standing nearby.
Walk over to the guard’s chair and pick up the knife lying on the ground near it. Use the knife to cut the rope holding Wamganga’s cage, which is tied to the tree near the right of the screen.
Now that Wamganga is free, he’ll take care of the snake for you. Follow him over to the ship and climb aboard.
The Black Vault:
Ann has to scale the side of the ship using the rivets. From her current location, you can get onto the deck of the ship by sidling to the right, then climbing up once, moving to the right again, climbing up twice, to the left twice (Ann should be blocking the porthole at this point) and climbing up one more time.
When you’ve made it up to the deck, take the distress flare from the cabinet that’s attached to the building nearest Ann. Turn around and go left to see shots being fired from the cannon. It looks like there are several monkeys inside the cannon house, so you’ll have to use the smoke grenade to smoke them out. Once they’re gone, hop inside the cannon.
To aim the cannon, the large wheel moves it left and right while the smaller one aims it up and down. Aim the cannon as far left as it can go and then level it at the ventilation duct. Pull the left lever down and then push the button near the green light to fire the cannon and blow up the ventilation duct.
Leave the cannon house and go back to where Ann originally climbed on board. Go to the right and climb up the ladder. Jump down the hole where the ventilation duct used to be to enter the ship’s interior.
There’s an elevator across from where Ann is standing. Push the down button next to it to call the elevator and ride it down. Head down and go through the open doorway to the right to find the boiler room. Proceed south into the room and follow the walkway all the way around and through the door to the right of the leopard-head furnace. Go straight through the next corridor and pick up the gas can to the left of the door. Follow the hallway down to the end and you’ll have looped back to the room with the coal.
We’ll have to get the furnace going so that we can get the water drained from the ship. The first step is to operate the small yellow panel near the pile of coal.
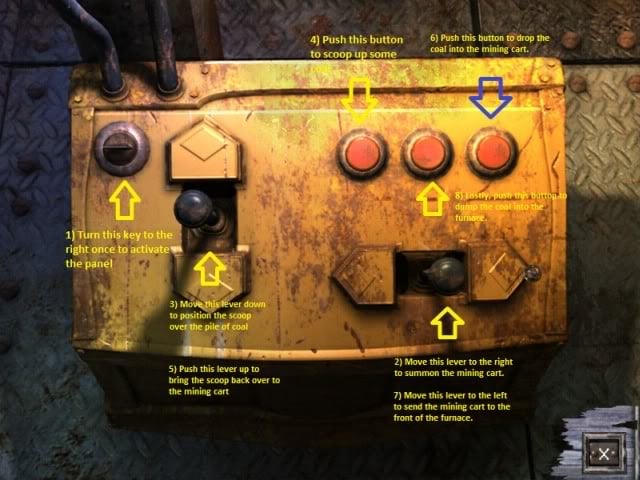
1) Turn the key in the upper left to the right once to activate the panel.
2) Push the horizontal lever to the right once to summon the mining cart.
3) Move the vertical lever down to position the scoop over the pile of coal.
4) Push the first red button to scoop up some coal.
5) Move the vertical lever up to position the scoop over the cart.
6) Push the third red button to drop the coal into the cart.
7) Move the horizontal lever to the left to send the cart to the front of the furnace.
8) Push the middle red button to dump the coal into the furnace.
Once the coal is in the furnace, walk over to the front of it and a little leopard lighter will pop up from the middle of the track. Pour the gas into the lighter and light his torch using Ann’s lighter. Push the right button on its back to extend its right arm forward and then push the left to watch the leopard lighter blow the flames into the furnace to light it.
Now that the furnace has been lit, we can now drain the water from the floor below. Go over to the yellow control panel on the opposite end of the room. Push the first button at the top right to start the pump and then move the lever to drain the water. Climb down the ladder nearby and head left from there. Go through the doorway and ride the elevator up to the next floor. You will notice that Wamganga is standing nearby.
NOTE: Just a word of warning, I experienced several glitches going through this area. There wasn’t anything that prevented me from playing through the game, but rather they were simply nuisances.
When you reach the next floor, go to the right and follow the path north, only to see that it’s blocked off by a trio of monkeys. Head back to the previous hallway and you’ll see that there’s a valve on the wall. Turn it to set off the fire sprinklers and it’ll scare the monkeys away. Turn it again to turn them off and then head back to the area they were blocking.
Head the door to the left to enter a ritual room. You may experience a glitch here with Wamganga’s voice saying something about the circle of candles in the room, but there’s nothing you can do about it until later. Grab the chalk lying on the floor near the candles closest to the door.
When you leave the room and head south, you’ll notice a giant snake blocking the path. Head back the way you came and ride the elevator back down. Talk to Wamganga and while he’ll agree to help with the leopard, he wants Ann to retrieve a statue from a room that he is unable to enter due to his beliefs.
Enter the room to the left of where Wamganga is standing and talk to the man standing in front of Rodon’s statue. His name is Gretzelburg and he is Rodon’s banker. Talk to him about everything and when you attempt to touch the statue, Gretzelburg will prevent Ann from doing so. Go over to the table near the entrance to the room and look at the note to find a phone number. Upon leaving the view, Siri will contact Ann via walkie talkie. Ann wants Siri to call the phone and pretend to be a banker and tell Gretzelburg that the transfer went through.
Once Gretzelburg speaks with Siri, he’ll leave the room. While he is gone, use the knife on the medallion that’s in Rodon’s statue’s left hand to obtain it and then go up to the door on the other side of the room. Insert the medallion into the depression on the door to unlock it and go inside.
Take the four voodoo dolls as well as the treasury bonds from the shelf across from Ann and you’ll also notice a fifth voodoo doll with a safe for a body. After you’re finished, Gretzelburg will return and block Ann’s escape. Use the lighter on the voodoo doll with the safe for a body and it’ll burn Gretzelburg, scaring him off.
Before leaving, go to the left side of the room and take the African mask from the lower left corner of the shelf. Return to Wamganga and ask him to help with the snake and then give him the voodoo doll that has the white eyebrows.
Ride the elevator back up and return to the ritual room with the leopard to see Wamganga here waiting for Ann.
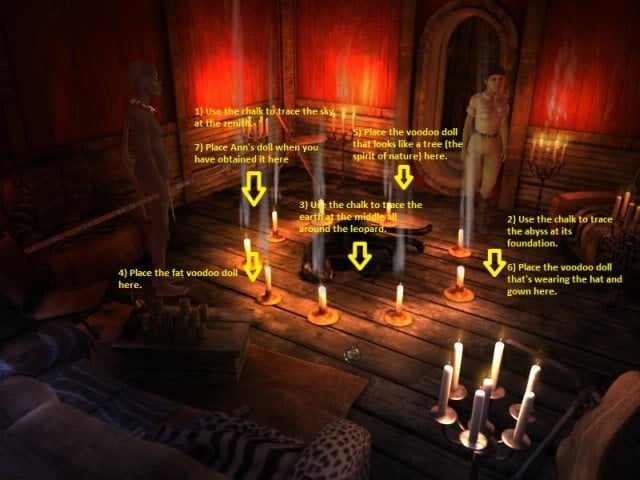
Wamganga will first instruct Ann to trace the sky at its zenith. Imagine the candles to be like a clock, and consider the candle near Ann to be at the 12 o’clock position. Use the chalk to draw a sun at the 9 o’clock position.
Wamganga will next instruct Ann to trace the abyss at its foundation. Use the chalk on the 3 o’clock position to draw a half-moon. The next step will be to draw the earth at its middle around the leopard. There’s a spot near the leopard’s head that you can click on to draw the circle.
Ann will now have to place the voodoo dolls in their correct spots. The doll that resembles a tree will be placed at the 12 o’clock position. The one wearing the hat and gown will be placed on the half-moon while the fat one will be placed at the 6 o’clock position. There’s still one more doll needed and it can be found inside of Ann’s room.
To find Ann’s room, return to the elevator. Rather than going back down, there is a door to the other side of it that Ann can go through. The cursor needed to get Ann to move there is to the bottom right of the screen.
Open the door to the left and Ann will remember that the room used to be her childhood room and it seems like Rodon left it the way it was before she disappeared. Open the chest at the foot of the bed and remove Ann’s doll from it. Go back to the ritual room and place it on the sun. The gods won’t help the leopard for free, so apparently you need to give them a bit of money. Place the treasury bonds on the leopard and Wamganga will then go out and get rid of the large snake.
Talk to him to learn that he’ll now need some morphine, dressing, and disinfectant. To get them involves going to the ship’s infirmary, which involves heading out to the hallway that was previously guarded by the snake. From there, go through the door to the right and then to the left. Head down the hallway and enter the room to the left to find the infirmary.
Take the card sitting atop some clothes and watch as a monkey makes off with it. Open the medicine box underneath the closet and remove the contents. While it’ll appear that you only grabbed one item, all three will appear in your inventory. Return to Wamganga and give them the first aid supplies. While he is at work healing the leopard, we’ll have to work on getting back the card the monkey stole.
Leave the ritual room and return to the hallway outside the infirmary. There is a door to the right part way down the corridor. Enter it to find a trio of monkeys fascinated by the TV. Ignore them for now and go into the next room to find a camera. Use the African mask on it and Ann will sit in the chair and don the mask, which serves to frighten the monkeys away. However, one of them will stay behind.
Give the emerald to the monkey and it’ll return the key. Leave the room and head down the hallway and exit to the right. If you go right once more, you’ll find more monkeys that look half-starved. Go back one screen and enter the doorway that’s to the left to find the ship’s galley. Walk over to the stove and use the can opener to open the can sitting near it. Pour the can’s contents into the pan and light the stove using the lighter.
The monkeys will come in and chow down. Go back to the hall that they were blocking off and go right into the room where you see a locked door and a couple of cabinets. Open the left cabinet to find an espionage report as well as a note on the inside of the door that has the number 2577 written on it.
Walk over to the door and use the keypad on the wall to the right of it. Punch in 2577 and then swipe the special key through the reader below it to open the door. You’ll find yourself inside the ship’s war room. Look at the map on the table and then pick up the envelope lying underneath it.
Climb down the ladder nearby to finally learn the source of the drumming. There’s bait spinning around the frogboxers, and as the bait gets closer to them, they punch it so that it hits the drum. Use the control panel and flip the lever to turn off the machine spinning the bait and then climb up the ladder.
Go to the bottom left and climb up the ladder to enter the wheel house. You’ll find the captain that you’ve seen in the previous cutscenes talking to King Rodon. Introduce yourself to Willy Vandenard, the captain of the ship. Once he cuts you off, talk to him again about the rest of the subjects and then proceed to leave the room. Before you do, you’ll hear a gunshot and Ann will turn around to see that Vandenard has committed suicide, and she’ll pick up his gun and the key to Rodon’s room.
Go back to the royal apartments and use the key on the door south from Ann’s room to unlock the door to the king’s room. You’ll watch as Ann and the king are reunited, although they’re not the best of circumstances. Watch the ending sequence and you’ll have beaten the game.
“;
